product & assembly guide manual electric combo
TRANSCRIPT

SleepSafeBed.com | 866.852.23373629 Reed Creek Drive | Bassett, VA 24055 | FDA Registered
Manual Electric ComboManual Electric ComboManual Electric ComboPRODUCT & ASSEMBLY GUIDE
SleepSafe (Low Bed)
SleepSafe II (Medium Bed)
SleepSafer (Tall Bed) Dual View
SleepSafer with Extension Dual View with Topper
F O U N D A T I O N
ELECTRIC ARTICULATION HI-LO FIXED MANUAL
The Manual Electric Combo foundation elevates the head and knee sections of the bed, electrically with a corded remote. The Hi-Lo feature uses a manual crank to raise and lower the foundation.

Table of Contents
MANUAL ELECTRIC COMBO
ToolsNeeded
forAssembly
1. Pre-Assembly Information
2. Component Chart #1
3. Component Chart #2
4. Assembly Guide: SleepSafe Low Bed
5. SleepSafe II Medium Bed
6. Assembly Guide: SleepSafer Tall Bed
7. SleepSafer Tall Bed Dual View
8. Assembly Guide: SleepSafer Tall Bed
9. with Extension / Top
10. Safety Rail Adjustment Instructions
11. Padding Information
12. Mattress Information
13. Final Installation Checklist
14. Operator’s Guide
15. Maintenance / Popular FAQ’s
16. Warranty Information
17. DME Provider / Technical Support
18. Serial Number
Allen and Torx Wrenches(Supplied)
Flat and Phillips HeadScrewdrivers
3/8” Open or ClosedEnd Wrench
Two People for Assembly
This guide is available as a PDF. Contact Customer Service at 866.852.2337 for more information.

Note! Read Before Assembly
• KEEP THIS PRODUCT & ASSEMBLY GUIDE. IT CONTAINS THE SERIAL NUMBER-------------------------------------
• CAREFULLY REMOVE AND LAY OUT ALL COMPONENTS. FAMILIARIZE YOURSELF WITH INSTRUCTIONS TO FACILITATE THE ASSEMBLY OF YOUR BED.-------------------------------------
• CHECK COMPONENTS AND CONTENTS OF ENCLOSED HARDWARE BAG WITH THE HARDWARE LIST ON FOLLOWING PAGES.-------------------------------------
• KEEP THE FOUR CARDBOARD STANDS FOR ASSEMBLY AND POSSIBLE FUTURE USE.-------------------------------------DUE TO THE PRESENCE OF SMALL PARTS DURING ASSEMBLY, KEEP OUT OF REACH OF CHILDREN.-------------------------------------
• IMPORTANT: FOLLOW THE INSTRUCTIONSIN THE SPECIFIED ORDER TO ENSURE THE BED IS PROPERLY ASSEMBLED.-------------------------------------
• COMPLETE ASSEMBLY. ENSURE EACH COMPONENT IS INSTALLED. DO NOT OMIT ANY COMPONENT FROM INSTALLATION.-------------------------------------
• NEVER USE THIS BED IF THERE ARE ANY MISSING FASTENERS, LOOSE JOINTS, BROKEN PARTS, TORN MESH, OR PADDING INADEQUACIES. CONTACT SLEEPSAFE BEDS AT 866.852.2337 FOR ASSISTANCE.
SleepSafeBed.com | 866.852.23373629 Reed Creek Drive | Bassett, VA 24055 | FDA Registered
• NEVER SUBSTITUTE OR ALTER PARTS, THE PRODUCT INCLUDING SIDE RAILS, MUST BE FULLY INSTALLED PRIOR TO USE.-------------------------------------
• IF BED IS PADDED, CHECK THAT ALLPADDING IS FIRMLY ATTACHED.-------------------------------------
• DO NOT USE POWER TOOLS DURING ASSEMBLY OR DISASSEMBLY-------------------------------------
• WARNING STRANGULATION HAZARD:STRINGS CAN CAUSE STRANGULATION! NEVER PLACE BED NEAR WINDOW WHERE CORDS FROM BLINDS OR DRAPES MAY STRANGLE A CHILD. -------------------------------------
• KEEP REMOTE CONTROL CORD AWAY FROM BED WHILE MOVING THE SAFETY RAIL UP OR DOWN TO PREVENT PINCHING OF THE CORD. -------------------------------------
• KEEP REMOTE CONTROL CORD AWAY FROM BED’S INTERIOR TO PREVENT ENTANGLEMENT AND STRANGULATION-------------------------------------
• AN UNINTERUPTED POWER SUPPLY (UPS)UNIT IS RECOMMENDED FOR MISSION CRITICAL CONTROL OF BED FOR USER-------------------------------------
• DO NOT SUBSTITUTE MATTRESS. IT IS SPECIFICALLY DESIGNED AND FITTED FOR A SLEEPSAFE® BED AND ITS USER.
1

MANUAL ELECTRIC COMBO
SleepSafeBed.com1-866-852-23373629 Reed Creek Dr. | Bassett, VA 24055
2
IncludedComponents
forAssembly
CardboardSpacer 4 4 4 4 4 4 4 4
90 mmAllen Bolt 8 12 16 28 28 12 28 28
3/4”Hex Bolt 8 8 8 8 8 8 8 8
Barrel Nut(If the bed is unpadded)
8 12 16 28 40 12 28 40
40 mmAllen Bolt
T-12F-18 Q-18
T-12F-18 Q-18
Allen / TorxWrench Set(Various sizes)
1 1 1 1 1 1 1 1
SquareBit Driver 1 1 1 1 1 1 1 1
Casters(Attached) 4 4 4 4 4 4 4 4
ExtensionSafety Latch & 2 Screws
1 1 2 2
SLEE
PSAF
ER (w
/Ext.
& To
p)
SLEE
PSAF
ER (D
ual V
iew)
SLEE
PSAF
E (Lo
w Bed
)SL
EEPS
AFE I
I (Med
ium B
ed)
SLEE
PSAF
ER (T
all B
ed)
SLEE
PSAF
ER (w
/Exte
nsio
n)
SSR (D
ual V
iew w
/Ext.
& To
p)
SSR
(Dua
l View
w/E
xtens
ion)
3
SSR (D
ual V
iew w
/Ext.
& To
p)
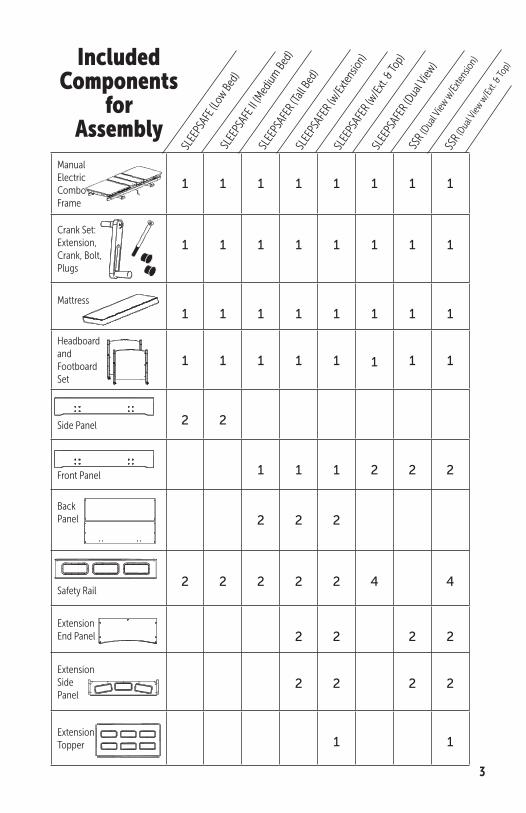
Manual Electric Combo Frame
1 1 1 1 1 1 1 1
Crank Set:Extension,Crank, Bolt,Plugs
1 1 1 1 1 1 1 1
Mattress1 1 1 1 1 1 1 1
HeadboardandFootboardSet
1 1 1 1 1 1 1 1
Side Panel 2 2
Front Panel 1 1 1 2 2 2
BackPanel 2 2 2
Safety Rail2 2 2 2 2 4 4
ExtensionEnd Panel 2 2 2 2
ExtensionSide Panel
2 2 2 2
ExtensionTopper 1 1
SLEE
PSAF
ER (w
/Ext.
& To
p)
SLEE
PSAF
ER (D
ual V
iew)
SLEE
PSAF
E (Lo
w Bed
)SL
EEPS
AFE I
I (Med
ium B
ed)
SLEE
PSAF
ER (T
all B
ed)
SLEE
PSAF
ER (w
/Exte
nsio
n)
SSR (D
ual V
iew w
/Ext.
& To
p)
SSR
(Dua
l View
w/E
xtens
ion)Included
Componentsfor
Assembly

Assembly Guide SleepSafe (Low Bed)
SleepSafe II (Medium Bed)
After unpacking bed and checking the contents
Set ManualElectric ComboFoundation on 4 providedcardboard spacers.
Insert Barrel Bolts into Side Panels. (Note: Barrel Bolts are pre-inserted on padded beds)
Align and push in Barrel Nutas shown. Use flatheadscrewdriver forassistance.
Attach Side Panels to foundation.(Use 3/8” wrench to install eight 3/4” Hex Bolts insidethe panel)
SleepSafe Bed (Low Bed) Side Panels use 8 Barrel BoltsSleepSafe II (Medium Bed) Side Panels use 12 Barrel Bolts
When placing spacers beneath foundation, allow room for both side panels to be attached.
Use 4 Hex Bolts inside each panel.
4
IMPORTANT!First choose depth for mattress to
floor height. High setting adds height.
MANUAL ELECTRIC COMBO
SleepSafeBed.com1-866-852-23373629 Reed Creek Dr. | Bassett, VA 24055
HEAD
FOOT
IMPORTANT!CHECK THE BED ORDER FOR THEDESIRED LOCATION OF THE CRANK. In this diagram, the front crank has been mounted to the left of the head. The front crank position may have been mounted to the right of the head.
Reference Only.
Crank installedin later step.

�
�
�
AttachHeadboard and Footboardsto Side Panels.(Use 4mm Allen Wrench to fasten 90mm Allen Bolts to Side Panels)
Once headboard and footboards are attached, remove cardboard spacers. Save for future use.
Casters are pre-installed
Prepare Safety Rail Hinge Pins for Installation.
Factory preset has hinge pins that may be extended. These pins need to be adjusted evenly on both sides to fit properly when inserted into the posts.
NOTE: Full instructions for safety rail adjustment are found on page 10.
SleepSafe Bed (Low Bed) uses (8) 90mm BoltsSleepSafe II (Medium Bed) uses (12) 90mm Bolts
InstallCrank Handle,Safety Rails, and Mattress.Insert the safety rail hinge pins into both posts when safety rail is in the down position.
CLOCKWISE INCREASES play.COUNTER-CLOCKWISEDECREASES play.
Strike
Hinge Pin
5
Once installed, use both hands to pivot the safety rail up to attach it securely to the posts.
Same rail installationfor both sides of the bed.
Fasten Crank.Install plug inunused opening.

Use 4 Hex Bolts inside each panel.
IMPORTANT!First choose depth for mattress to
floor height. High setting adds height.
Assembly Guide SleepSafer (Tall Bed)
SleepSafer (Dual View)
After unpacking bed and checking the contents
Insert Barrel Bolts into Back and Front Panels.(Note: Barrel Bolts are pre-inserted inpadded beds)
Align and push inBarrel Nut as shown. Use flatheadscrewdriver for assistance..
Attach Panels to foundation.(Use 3/8” wrench to install eight 3/4” Hex Bolts insidethe panel))
SleepSafer Bed (Tall Bed) Back Panels uses 10 Barrel BoltsSleepSafer Bed (Tall Bed) Front Panel use 6 Barrel Bolts* Dual View Option uses 2 Front panels only. No Back Panels.
BAC K PA N E L*
BAC K PA N E L*
F R O N T PA N E L
6 MANUAL ELECTRIC COMBO
SleepSafeBed.com1-866-852-23373629 Reed Creek Dr. | Bassett, VA 24055
Set ManualElectric ComboFoundation on 4 providedcardboard spacers.
When placing spacers beneath foundation, allow room for both side panels to be attached.
HEAD
FOOT
IMPORTANT!CHECK THE BED ORDER FOR THEDESIRED LOCATION OF THE CRANK. In this diagram, the front crank has been mounted to the left of the head. The front crank position may have been mounted to the right of the head.
Reference Only.
Crank installedin later step.

�
�
Prepare Safety Rail Hinge Pins for Installation.
Factory preset has hinge pins that may be extended. These pins need to be adjusted evenly on both sides to fit properly when inserted into the posts.
NOTE: Full instructions for safety rail adjustment are found on page 10.
CLOCKWISE INCREASES play.COUNTER-CLOCKWISEDECREASES play.
InstallCrank Handle,Safety Rails, and Mattress.Insert the safety rail hinge pins into both posts when safety rail is in the down position.
Strike
Hing Pin
Install Four Rails for DUAL VIEW option.
7
�
Attach Headboard and Footboardsto Panels.Fasten (6) 90mm Allen Bolts to each panelwith 4mm Allen Wrench.
Once headboard and footboards are attached, remove cardboard spacers.
Casters are pre-installed
IMPORTANT: When installing the Back Panel the Barrel Bolts need to be away from the frameor, in other words, toward the wall.
InstallBack Panel.Set in place with alignment pins, then fasten with (2) 90mm Allen Bolts to each post.NOTE: This step notnecessary forDual View option
ALIGNMENTPINS
�
Fasten Crank.Install plug inunused opening.
Once installed, use both hand-sto pivot the safety rail up to attach it securely to the posts.

Attach Extension Ends to Side Rails. Flip Assembly Over.Illustration shows assembly upside down.Flip unit over when assembly completed.
Assembly Guide SleepSafer (Tall Bed) Open & Closed Extensions
After unpacking bed and checking the contents
Set ExtensionSide Rails Upside Downand on their Legs.Assemble this with two people, otherwise one person can assemble one panel at a time after the the rest of the bed is assembled.
If Applicable,Attach theTop to the Extension.Use 4mm Allen Wrench to attach Extension Top with (12) 40mm Allen Bolts.
Before flipping over use 4mm Allen Wrench to fasten (8) 90mm bolts, 2 per post, on each side of the
Legs are upside down.
8 MANUAL ELECTRIC COMBO
SleepSafeBed.com1-866-852-23373629 Reed Creek Dr. | Bassett, VA 24055

�
�
A Loosen top bolts on all 4 bed posts. This allows play in the frame to fit the Extension.
B Set the Extension on top of bed posts. Extension posts should align with the bed posts.
C Fasten Extension to the Bed. Fasten (1) 90mm Allen Bolt into each post to attach Extension. Tighten all bolts.
9
â
C
B
A
This SleepSafer® Tall Bed Extension installation step is based on ordering it with the SleepSafer®Tall Bed. Retrofitting this Extension requires additional instruction.
InstallSafety Latch to Extension. Align safety latch to threaded inserts located in the predrilled holes in the Extension.Use Phillips head screwdriver to mount the latch to the Extension.
The latch will catch and secure the top safety rail when raised into position. Use thumb to push latch up to release the rail.
IMPORTANT: Be sure to support safety rail
with both hands while moving the rail into their secure positions.
IMPORTANT: Bottom Safety Rail pivots down.
Use both hands to carefully operate.

Up and Down Safety Rail Adjustment
�
Side by Side Safety Rail Adjustment
Does the Safety Rail need adjustment?For proper operation the pin should be centered in the strike.If not centered, follow the following steps to center the pin in the strike.
PIN
PULLLEVER
STRIKE
Additional Tools Needed:Hammer or Mallet
Portable Electric Drill
Remove Strike from Bed Post.Use Drill with Torx bit to remove screws from the Strike. Gently tap the strike out of the bed post with hammer or mallet to access
POST
Adjust Set Screw.Use Torx 10 wrench to adjust set screw. Keep in mind which direction that you need to adjust the pin. If the pin needs to be raised, turn the set screw clockwise. If the pin needs to be lowered, turn the set counter-clockwise.
To RAISE pin, turnClockwiseTo LOWER pin, turnCounterclockwise
Reinsert Strike into Bed Post.Check to see if the Pins are centered properly within the Strikes.
Use Portable Drill with Torx bit to remove screws holding Strike to bed post,
Does the Safety Rail need adjustment?When up and secure, check the spacing between the end of the safety rail and the headboard and footboard legs. They should be spaced evenly.
Remove Safety Rail and adjust the play.If spacing is not even, or there istoo much side-to-side play in the rail,turn the black hex bolt using the ¼” Allen Wrench provided .
This spacing should be even on both sides.
To INCREASE play turn bolt CLOCKWISE
To DECREASE play turn bolt COUNTERCLOCKWISE
10 MANUAL ELECTRIC COMBO
SleepSafeBed.com1-866-852-23373629 Reed Creek Dr. | Bassett, VA 24055

SleepSafe Bed Padding Information
11
Materials:• 70 Denier Nylon Fabric Cover with a Fluid Resistant Healthcare Coating• 3/4” High Density Foam Padding
Padding Features:The safety rail pads extend up and over the rails and attach to the outside of the safety rails. The headboard and footboard pads extend to the top and to the edges of the legs of headboard and footboard.• Anti-Static• Bacteria Resistant• Malodor Protection• Fluid Resistant• Fungal Resistant• Flame Retardant• Tear Resistant
Padding Attachment:• Industrial strength Velcro is used to secure the padding to inside panels and safety rails.
Padding Maintenance• For cleaning, use warm water and a mild cleanser. If the padding is over the windows, it can be removed and cleaned. If the padding is around the windows, please do not remove. It is best to clean this padding in its place.
Important Note:Padding is installed at the factory and will cover ALL 4 sides. Padding only 1 or 2 sides is NOT an option. Padding removal will cause a gap between the mattress and the bed’s interior.
VELCRO®
AROUND
OVER
Screen Mesh Windows offer better ventilation.
Padding for a SleepSafer Tall Bed with an Extension Top works around the sceen mesh windows for better ventilation.

SleepSafe Bed Mattress Information
SleepSafe Bed® – Our Memory Foam Mattress with Gel TechnologySleepSafe® Bed mattress support surfaces provides optimized pressure redistribution, rapid heat dissipation, and increases in breathability compared to standard foam.• Reduced incidence of pressureulcers by channeling heat away from the body much faster than standard foam, virtually ridding perspiration moisture.• Superior pressure redistribution achieved by providing more support and less cradling at higher levels of compression, distributing pressure over a larger surface area and eliminating static fatigue.
How Does It Work?The technology works by allowing air to pass through open cells, channeling it away from the body instead of trapping it within the closed cells of traditional memory foam. The infusion of gel poly-mers throughout the foam contributes both cooling properties and the virtual elimination of static fatigue. As a result of the marriage between open cell foam and gel infusion, the mattress holds its shape better, redistributes pressure over a larger surface area, and successfully wicks heat away from the body, leaving patients cool, dry, and comfortable.
Specialized Matttress Cover
Certified Memory Foam Infused with Gel Polymers
Foam products meet the following criteria:• Low Emissions (VOC’s) • Performance – Tested• BPA Phthalate – Free • Made without Ozone Depleters• CFC – Free • Mercury, Lead and Heavy Metal Free• BHT – Free • Made without Formaldehyde• PBDE – Free • Methylene Chloride – Free• Emissions – Tested • Environmentally Innovative• Content – Tested • Material Certification
Other notes about the foam in mattresses:• Foam products use a blend of natural oil-based and conventional polyols.• Benefits farmers looking for a new market for crops .• Polyol is made partially from plant-based renewable oils such as soy bean and castor beans.
12 MANUAL ELECTRIC COMBO
SleepSafeBed.com1-866-852-23373629 Reed Creek Dr. | Bassett, VA 24055

Final Bed Installation Checklist
�
�
Check all bolts to see that they are tight.Be sure all fasteners that hold the components are hand tightened with wrenchs.
Check Safety Rails to be sure they operate and latch properly.Safety Rails should pivot correctly, align properly and securely latch into the gate located on the bed posts.
Latch Lever
Latch Pin
Allen and Torx Wrenchs are included with the bed delivery.
Check fit between headboard, footboard, bed sides and mattress. The mattress should always fit snugly against the sides. If not, contact the DME or Customer Service at SleepSafe Beds.
Check Bed Operation with the Remote.The Manual Electric Combo should move about 70° for the head and about 35° for the knee. The HiLo range is 10” up and down with the Manual Crank.
For Extensions, check operation of Safety Latch holding the top Safety Rail.Top Safety Rail should set in place when lifted up and into place on the Extension.
13
Latch Gate
Mattress should fit ¼” or lesson all sides.
Head should move up to 70°
Knee should move up to 35°
Foundation should move up and down 10” with
Manual Crank
This latch should be properly
mounted to the Extension to
ensure top Safety Rail is securely held in place.
Thumb operated
latch.
Top Safety Rail

Operator’s Guide: Manual Electric Combo
Handling, operating and securing the Safety Rails.Safety Rails on the SleepSafe (Low Bed), SleepSafe II (Medium Bed) and SleepSafer (Tall Bed) are removable. Removing the Top Rail first on the Tall bed is recommended.The top Safety Rail on the SleepSafer with the Extension is not removable. The Top Rail attaches to the Extension.
It is always recommended to handle the Safety Rails gently and firmly with both hands. Be sure both sides of the Safety Rail are securely attached to the post before leaving the bed alone.
14
REMOVE Safety Rails from their down position. Gently lift the rail UP and OUT.To ATTACH, place IN both strikes and let the rail DOWN.
IMPORTANT: USE BOTH HANDS WHEN OPERATING SAFETY RAILS.
IMPORTANT: Be sure BOTH sides of the rails are secured to the posts.
How the Casters Work.The casters are pre-installed at the factory in the bottom of the headboard and footboard legs. It is recommended that the casters are locked when the bed is in use to add to the bed’s stability.
The casters are locked when the tab is in the down position. Unlocked when the tab is up.
MANUAL ELECTRIC COMBO
SleepSafeBed.com1-866-852-23373629 Reed Creek Dr. | Bassett, VA 24055
Operating the Manual Electric Combo Foundation This foundation uses a cordedremote to control 3 functions:1) Chair Function: Both Head & Foot2) Controls head elevation to 70°3) Controls knee elevation to 35°4) Manual Crank controls mattress height
REMOTE LOCK OUT Procedure:Press and HOLD BOTH DOWN BUTTONS on HEAD and FOOT articulation functions for about 5 seconds. The LIGHT on the REMOTE will FLASH when it is locked. To UNLOCK, repeat his procedure.
�Up:Crank ClockwiseDown:Crank Counterclockwise
LOCKED UNLOCKED

Frequently Asked Questions
Annual Maintenance Checklist
15
How do I get replacement parts? What should I do if I have a repair problem?Please call your local dealer that helped you purchase the bed. They should be able to help with any problem you may have. If your original dealer cannot help you with replacement parts or repair, please contact us directly so we may assist you at 866-852-2337.
Is there a battery backup system for beds using electricy in case of a power failure?Yes. Battery backup systems (UPS) are available from retailers such as Staples or Office Depot. We recommend that you purchase a UPS battery back up unit such as APC’s ES 750. This unit will give enough power to operate the bed for a limited time. This unit has 6 battery powered outlets to provide power for other devices as well.
My child’s medical needs have changed. Can I change the foundation?Yes. Most SleepSafe® Bed foundations can be converted to another bed. We will be glad to assist you. Give us a call, toll-free, at 866-852-2337 for more information about SleepSafe® Bed conversions. To convert any SleepSafe Bed foundation, you will need to purchase a Conversion Kit from SleepSafe® Beds. Insurance may or may not cover the additional cost of the conversion kit. It may be necessary to submit another letter of medical necessity justifying the change. You will need to make the purchase through your local DME provider of SleepSafe® Beds.
Can I buy just a mattress?Yes, as a replacement for a SleepSafe® Bed mattress. We do not recommend using a SleepSafe® Bed mattress for another bed type. Our mattresses are designed and custom sized to fit inside a SleepSafe® Bed and may not be appropriate for other beds. Safety is our number one priority and our mattresses are designed to fit snugly within the wooden bed frame to reduce the chance of burrowing or entrapment.
How do I clean my SleepSafe® Bed?All surfaces of a SleepSafe® Bed can be cleaned with water and mild detergent using a soft cloth. Please avoid any abrasives and solvents.
Tighten all bolts on panels and posts.Use provided Torx and Allen Wrenches to hand tighten. Avoid power tools.
Lubricate working components beneath the bed.Lubricate the pins, actuators and hinges.
Clean Padding and Check Velcro® if bed is padded.Use a mild detergent to gently clean surfaces, avoid abrasive cleaning
pads or sponges. Check to see that Velcro® is attached properly.

Bed/Mattress Warranty Information
Full One-Year SleepSafe® Bed WarrantyThe SleepSafe® Bed is warranted against defects in workmanship or materials for a period of one year from the date of purchase. Sleep Safe Beds, LLC will repair or replace any defective part at no cost to the purchaser if the shipping of the part is within the continental United States.
Limited Five Year SleepSafe® Bed WarrantyDuring the second through fifth years from the date of purchase, SleepSafe Beds, LLC will replace any part found to be defective. Purchaser shall pay all service and shipping costs related to the replacement of the defective part.
Terms and Conditions for SleepSafe® Bed WarrantyA SleepSafe® Bed is expressly prescribed for a single user. This warranty will cover the bed for this user only. Warranty coverage beyond this use is handled on a case by case basis. This war-ranty applies to normal use and does not cover any damage caused by excessive wear, abuse, misuse, mishandling or modification of the product.
SleepSafe® Bed Mattress Warranty InformationAll SleepSafe® Bed models are shipped with a CertiPUR-US® memory foam mattress with gel infused technology. This support surface provides optimized pressure redistribution rapid heat dissipation and increases in breathablity compared to standard foam. Memory foam infused with gel polymers is designed for patient comfort as well as clinical superiority. Benefits include: reduced incidence of pressure ulcers by channeling heat away from the body significantly faster than standard foam, virtually eliminating perspiration moisture. The mattresses are water resistant, but are not waterproof.
Full One-Year Warranty for SleepSafe® Bed MattressFull one year warranty from date of purchase. SleepSafe® Beds, LLC will replace the mattress due to a defect in the materials and workmanship of the mattress, at no cost to the purchaser.
Limited Five Year Warranty for SleepSafe® Bed MattressDuring the second to fifth year, SleepSafe® Beds, LLC will replace the mattress due to a defect in the materials or workmanship of the mattress, with the shipping costs to be paid by purchaser.
Terms and Conditions for SleepSafe® Bed Mattress WarrantyAny breakdowns or deterioration of the product caused by factors other than a defect in the materials and workmanship of the mattress, such as repeated exposures to bodily fluids by incontinence, are not covered by this warranty.
16 MANUAL ELECTRIC COMBO
SleepSafeBed.com1-866-852-23373629 Reed Creek Dr. | Bassett, VA 24055

Durable Medical Equipment Provider
Customer Service & Technical Support
SleepSafe Bed SupportHours: 8 AM to 5 PM / M-F / EST
Toll Free: 866.852.2337
Local: 276.627.0088
Fax: 276.627.0234
Web: SleepSafeBed.com
In case of an EMERGENCY after hours, please call 866-852-2337 for instructions on how to access the on-call help desk.
Bed Serial # ___________________________________
Installation Date ___________________________________
DME Provider ___________________________________
DME Contact ___________________________________
DME Address ____________________________________
DME Phone ____________________________________
DME Email ____________________________________
Installed by ____________________________________
DME Provider Support
DME: ________________________
Conact: ______________________
Phone: _______________________
Email: ________________________
Web: _________________________
17

SleepSafeBed.com | 866.852.23373629 Reed Creek Drive | Bassett, VA 24055 | FDA Registered
WI-820.120-5 Manual Electric Combo [5] Rev. 01