producing the school census spring 2014...
TRANSCRIPT
applicable to 7.154 onwards
Producing the School Census Spring 2014 Return English Primary and Middle deemed Primary Schools
Capita SIMS, Franklin Court, Priory Business Park, Cardington, Bedfordshire MK44 3JZ Tel: 01234 838080 Fax: 01234 832036 Email: [email protected] Web: www.capita-cs.co.uk
Revision History
Version Change Description Date
7.154 - 1.0 Initial release. 20/11/2013
7.154 - 2.0 Amendment to the introduction of the Updating Hours for Early Years Children section on page 15.
09/12/2013
© Capita Business Services Ltd 2013. All rights reserved. No part of this publication may be reproduced, photocopied, stored on a retrieval
system, translated or transmitted without the express written consent of the publisher. Microsoft® and Windows® are either registered trademarks or trademarks of Microsoft
Corporation in the United States and/or other countries.
Capita Doc Ref: SCSpr14_PRI/HBK/091213/AW
Providing Feedback on Documentation
We always welcome comments and feedback on the quality of our documentation including online help files and handbooks. If you have any comments, feedback or
suggestions regarding the module help file, this handbook (PDF file) or any other aspect of our documentation, please email:
Please ensure that you include the module name, version and aspect of documentation on which you are commenting.
C|Contents 01| Introduction .................................................................. 1
Overview ........................................................................................ 1 How has the School Census Return Changed?................................. 1 Steps to Producing the School Census Return ................................. 3 Where to Find More Information ..................................................... 4
02| Preparing for the School Census Spring 2014 Return .... 5 Setting Permissions ........................................................................ 5
Where to find More Information about Permissions ................ 6 What Version of SIMS is Required? ................................................. 6 Preparing Data for the School Census Return ................................. 6
School Level ............................................................................ 6 Pupil Level .............................................................................. 7
03| Producing the School Census Spring 2014 Return ......... 9 Creating a New School Census Return ............................................ 9 Configuring the Census Folder ...................................................... 10 Specifying the Security Message for Reports ................................ 11 Editing Census Details .................................................................. 12
Calculating All Details ........................................................... 12 Editing School Information ........................................................... 13 Updating Hours for Early Years Children ....................................... 15
Adding/Editing Hours at Setting or Funded Hours ................ 16 Identifying which Pupils have no Hours Recorded ................ 18
Updating Class Types .................................................................... 18 Resetting All Class Types ...................................................... 21 Identifying which Pupils have no Class Type Specified ......... 21
Updating Pupils with Top-Up Funding ........................................... 21 Updating Pupils Adopted from Care .............................................. 24 Editing Classes Information .......................................................... 26
Adding Classes ...................................................................... 28 Deleting Classes .................................................................... 28 Recalculating the Classes Information .................................. 28 Saving Edited Data ................................................................ 28
Editing Pupil Reconciliation .......................................................... 28 Entering Attendance Information ................................................. 29
Attendance/Lesson Monitor Users ........................................ 30 Attendance/Lesson Monitor Not in Use ................................. 31
Entering General Information ....................................................... 32
Entering Admission Appeals Totals ............................................... 32 Entering Infant Appeals Totals ..................................................... 33
04| Completing the School Census Spring 2014 Return ..... 35 Creating and Validating a School Census Return ........................... 35
Resolving Validation Errors and Checking Queries ................ 37 Producing Detail Reports .............................................................. 40
Generating Detail Reports ..................................................... 43 Printing a Report from your Web Browser .................................... 44 Transferring Report Data to a Spreadsheet ................................... 45 Deleting Temporary Web Browser Files ........................................ 45
Deleting the cache in Windows Internet Explorer 8 and 9 .... 45 Deleting the cache in Windows Internet Explorer 7 .............. 45
Producing the Summary Report .................................................... 46 Generating the Summary Report ........................................... 46
Editing an Unauthorised Return .................................................... 47 Authorising the Return ................................................................. 48
Post Authorisation Reports ................................................... 50 Submitting the Return .................................................................. 50 Retrieving Authorised Census Return Files ................................... 50 Copying a Return .......................................................................... 51 Deleting an Unauthorised Return .................................................. 52
Index ............................................................................... 53
01| Introduction
Producing the School Census Spring 2014 Return 1
01|Introduction Overview ......................................................................................... 1 How has the School Census Return Changed?.................................. 1 Where to Find More Information ...................................................... 2 Steps to Producing the School Census Return .................................. 3
Overview This handbook provides the information needed by Primary/Middle deemed Primary schools in England to complete the School Census Spring 2014 Return, which takes place on Thursday 16 January 2014. The School Census Spring 2014 Return is required to be completed by maintained Nursery schools, Primary schools, Middle schools, Secondary schools, All-Through schools, Special schools, Pupil Referral Units (PRUs), City Technology Colleges (CTCs) and Academies (including free schools) in England. Non-maintained Special schools are also required to submit the return. Currently, there are three School Census returns each year (i.e. Spring, Summer and Autumn), which collect detailed information about school characteristics and pupil details, e.g. pupil address, free school meals, exclusions, etc. Different data is collected depending on which return is being prepared and your school phase. A list of items collected from Primary/Middle deemed Primary schools in England for the School Census Spring 2014 Return is available in a later section of this handbook.
NOTE: The contents of the graphics (dates, names, panel numbers, etc.) are examples only of what you might expect to see when using SIMS to produce the School Census Return.
More Information: Preparing Data for the School Census Return on page 6
How has the School Census Return Changed? Changes to the School Census Spring Return include the following:
School Census Spring 2014 Return Key Dates Routines | Statutory Returns | School Census Census Date: 16/01/2014 Age at date: 31/08/2013
01| Introduction
2 Producing the School Census Spring 2014 Return
Pupil Referral Units For the first time, Pupil Referral Units (PRUs) are required to complete the
termly School Census return. This replaces the annual Pupil Referral Unit Census previously completed by PRUs.
PRUs are required to provide attendance data for four year olds for the first time.
Additional Resources:
Producing the School Census Spring 2014 Return (English Pupil Referral Units) handbook
All-Through Schools The School Census Spring 2014 Return provides the facility for All-through schools to run and submit a return that accurately reflects their School Phase (All Through) and the required data for their pupils (aged under 7 through to those aged over 14). Previously, all-through schools ran the School Census as a Secondary school.
Additional Resources:
Producing the School Census Spring 2014 Return (English All-Through schools) handbook
Selected Period on Census Day A new panel (Selected Period on Census Day) has been provided to enable schools that have a timetable to select the name of the applicable period on census day. The selected period on census day is based on the last digit of the DfE establishment number and is the period on census day (as defined by the DfE) when your school should run the return.
Top-Up Funding Information Top-up funding is supplied to schools in most cases by the Local Authority, to meet the additional costs of support for high needs pupils. A new panel (Top-up Funding) has been added to the School Census 2014 Return to enable schools to record the on-roll pupils for whom a school is receiving top-up funding on census day.
More Information: Updating Pupils with Top-Up Funding on page 21 Top-up Funding Report on page 42
Adopted from Care Information A new panel (Adopted from Care) has been added to the School Census 2014 Return to enable schools to record which pupils were looked after immediately before adoption.
More Information: Updating Pupils Adopted from Care on page 24 Adopted from Care Report on page 42

01| Introduction
Producing the School Census Spring 2014 Return 3
Steps to Producing the School Census Return The process of producing the School Census can be separated into a number of steps, some of which might need to be repeated in order to eliminate validation errors and queries.
01| Introduction
4 Producing the School Census Spring 2014 Return
Where to Find More Information In addition to this handbook, a preparation guide that outlines how to prepare your data for the School Census, together with an Errors and Resolutions document that provides suggestions on how to resolve any validation errors or queries, are being prepared. These guides, together with any other useful information, can be found on our SupportNet website (http://support.capitaes.co.uk) soon after the release of the School Census by entering CENSUS14 in the Site Search field on the SupportNet Home page and clicking the Go button. A wide range of documentation is available from within SIMS via the Documentation Centre. This documentation includes handbooks, tutorials, quick reference sheets, etc. and can be accessed by clicking the Documentation button on the SIMS Home Page. Once open, click the Handbooks button, select the required category then select the required handbook from the Handbooks page. References to any other documents mentioned in this handbook can be accessed from the Documentation Centre unless otherwise specified.
Online help can be accessed by pressing F1 or clicking the applicable Help button.
02| Preparing for the School Census Spring 2014 Return
Producing the School Census Spring 2014 Return 5
02|Preparing for the School Census Spring 2014 Return Setting Permissions ......................................................................... 5 What Version of SIMS is Required? .................................................. 6 Preparing Data for the School Census Return .................................. 6
Setting Permissions The following permissions are applicable to users who deal with returns.
Producing the Return To produce the return, you must be a member of the Returns Manager user group in System Manager.
Editing and Preparing Data Users who edit and prepare data must have permissions to access other areas of SIMS, e.g. pupil details, school details, etc. These users must be a member of any of the following user groups in System Manager:
Administration Assistant Admissions Officer School Administrator.
Importing Revised Files The Import Fileset functionality enables updates to the Validation Errors Summary and the Summary report (derived from files supplied by the Statutory Body), and detail reports (provided by SIMS), to be imported into SIMS between SIMS releases. To use the Import Fileset functionality (via Tools | Setups | Import | Fileset), you must be a member of any of the following user groups in System Manager:
Personnel Officer Returns Manager System Manager.
For more information about the Import Fileset functionality, please refer to the applicable preparation guide, available on our SupportNet website (http://support.capitaes.co.uk).
02| Preparing for the School Census Spring 2014 Return
6 Producing the School Census Spring 2014 Return
Where to find More Information about Permissions Please see your System Administrator/Manager if you are not sure whether you have the required permissions. For more information, please refer to the Managing SIMS Users, Groups and Databases handbook. For a list of the permissions available for each release, please refer to the appropriate permissions spreadsheet, which can be found on our SupportNet website (http://support.capitaes.co.uk) by entering PERMLIST in the Site Search field on the SupportNet Home page then clicking the Go button.
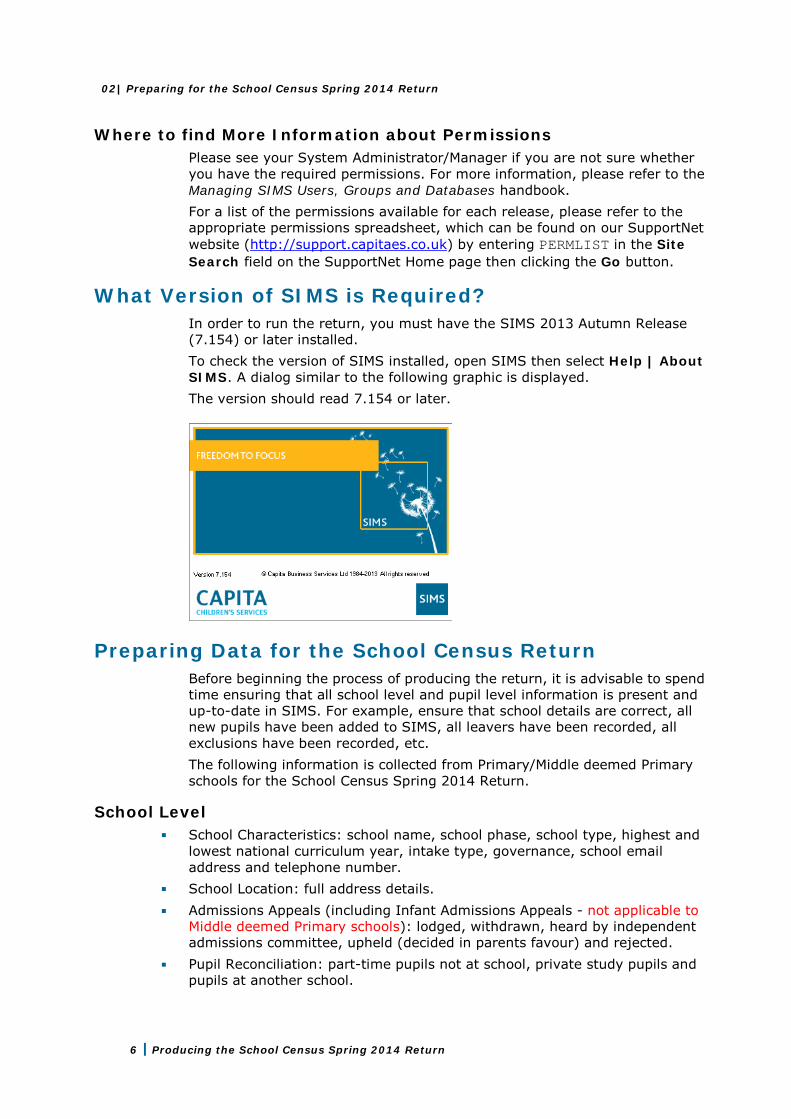
What Version of SIMS is Required? In order to run the return, you must have the SIMS 2013 Autumn Release (7.154) or later installed. To check the version of SIMS installed, open SIMS then select Help | About SIMS. A dialog similar to the following graphic is displayed. The version should read 7.154 or later.
Preparing Data for the School Census Return Before beginning the process of producing the return, it is advisable to spend time ensuring that all school level and pupil level information is present and up-to-date in SIMS. For example, ensure that school details are correct, all new pupils have been added to SIMS, all leavers have been recorded, all exclusions have been recorded, etc. The following information is collected from Primary/Middle deemed Primary schools for the School Census Spring 2014 Return.
School Level School Characteristics: school name, school phase, school type, highest and
lowest national curriculum year, intake type, governance, school email address and telephone number.
School Location: full address details. Admissions Appeals (including Infant Admissions Appeals - not applicable to
Middle deemed Primary schools): lodged, withdrawn, heard by independent admissions committee, upheld (decided in parents favour) and rejected.
Pupil Reconciliation: part-time pupils not at school, private study pupils and pupils at another school.
02| Preparing for the School Census Spring 2014 Return
Producing the School Census Spring 2014 Return 7
Class Information: class name, number of teachers in class, number of adult non teachers in class, class year group, number of pupils from the host school in the class and number of pupils from other schools in the class. Class type and class Key Stage and class activity (not applicable to Middle deemed Primary schools).
Miscellaneous: free school meals taken.
Pupil Level Pupil Identifiers: UPN, former UPN, surname, forename, middle names, former
surname, preferred surname, date of birth and gender. Pupil Characteristics: ethnicity, free school meal start date, end date and UK
country in which the eligibility applies, language, service children in education indicator, funded hours, hours at setting, top-up funding indicator and adopted from care. Youth Support Services Agreement (YSSA) indicator (applicable to Middle deemed Primary only).
Pupil Status: enrolment status, date of entry, date of leaving, part-time indicator, boarder indicator and actual National Curriculum year group. Class type (not applicable to Middle deemed Primary schools).
Special Educational Needs: SEN provision, SEN type ranking, SEN type for each SEN need, member of SEN unit (sometimes called special class) indicator and member of resourced provision indicator.
Termly Exclusion Information (01/04/2013 to 31/08/2013): exclusion category, exclusion reason, in care indicator, SEN provision, exclusion start date and exclusion actual number of sessions.
Pupil Home Address Information: pupil's home address details. Termly Attendance Information (start of the Autumn term (01/09/2013) to
31/12/2013): possible sessions, sessions missed due to authorised absence, sessions missed due to unauthorised absence, attendance codes (reason for absence) and number of sessions missed. For more information and step by step instructions on the preparations that need to be carried out before the census return is produced, please refer to the Preparing for the School Census Spring 2014 guide applicable to the phase of your school. The preparation guide, together with other useful documentation, will be available on the SupportNet website (http://support.capitaes.co.uk), as soon as possible after product release. To access these documents, enter CENSUS14 in the Site Search field on the Home page then click the Go button.

02| Preparing for the School Census Spring 2014 Return
8 Producing the School Census Spring 2014 Return

03| Producing the School Census Spring 2014 Return
Producing the School Census Spring 2014 Return 9
03|Producing the School Census Spring 2014 Return Creating a New School Census Return ............................................. 9 Configuring the Census Folder ....................................................... 10 Specifying the Security Message for Reports ................................. 11 Editing Census Details ................................................................... 12 Editing School Information ............................................................ 13 Updating Hours for Early Years Children ........................................ 15 Updating Class Types ..................................................................... 18 Updating Pupils with Top-Up Funding ............................................ 21 Updating Pupils Adopted from Care ............................................... 24 Editing Classes Information ........................................................... 26 Editing Pupil Reconciliation ........................................................... 28 Entering Attendance Information .................................................. 29 Entering General Information ........................................................ 32 Entering Admission Appeals Totals ................................................ 32 Entering Infant Appeals Totals ...................................................... 33
Creating a New School Census Return Before creating a new School Census return, ensure that all pupil and school information is present and up-to-date in SIMS. The School Census Spring 2014 Return collects data for:
all pupils on the register on census day (16/01/2014). any additional pupils not on-roll on census day who:
were subject to any type of exclusion from 01/04/2013 to 31/08/2013 inclusive.
attended school from the start of the 2013 Autumn term to 31/12/2013 inclusive.
The Census Folder and Security message for Reports must be specified before clicking the New button to create a new return. It is possible to create more than one return. This enables you to carry out dry runs so that you can check what data needs to be added or updated. Any unwanted returns can be deleted (providing they have not been authorised).

03| Producing the School Census Spring 2014 Return
10 Producing the School Census Spring 2014 Return
1. Select Routines | Statutory Returns | School Census to load the School Census validation and reporting files.
NOTE: The first time that the Routines | Statutory Returns | School Census menu route is selected during each SIMS session, there is a delay while the School Census files are loaded.
When the files are loaded, the Census Return for Spring Term browser is displayed. The Fileset ID is displayed in the browser header for information only.
By default, the Term field displays the appropriate term for the selected return, in this instance Spring.
2. Ensure that the Census Folder is configured correctly and that the required Security message for Reports is specified, as described in the following sections.
Configuring the Census Folder Before creating a return, the folder in which the return file will be saved must be specified.
IMPORTANT NOTE: Due to the sensitive nature of some of the data stored in SIMS, careful consideration should be given when specifying the location of any folder into which you save sensitive data, e.g. census returns, imported and exported CTFs, etc. You should be mindful of your school’s responsibilities with respect to information security. Consider which users have access to the chosen folder, especially if the folder is shared on a server. The DfE recommends ISO27001 as the standard for information security (http://www.itgovernance.co.uk/iso27001.aspx). If you are in any doubt, you should consult with your IT Security Officer before proceeding.
03| Producing the School Census Spring 2014 Return
Producing the School Census Spring 2014 Return 11
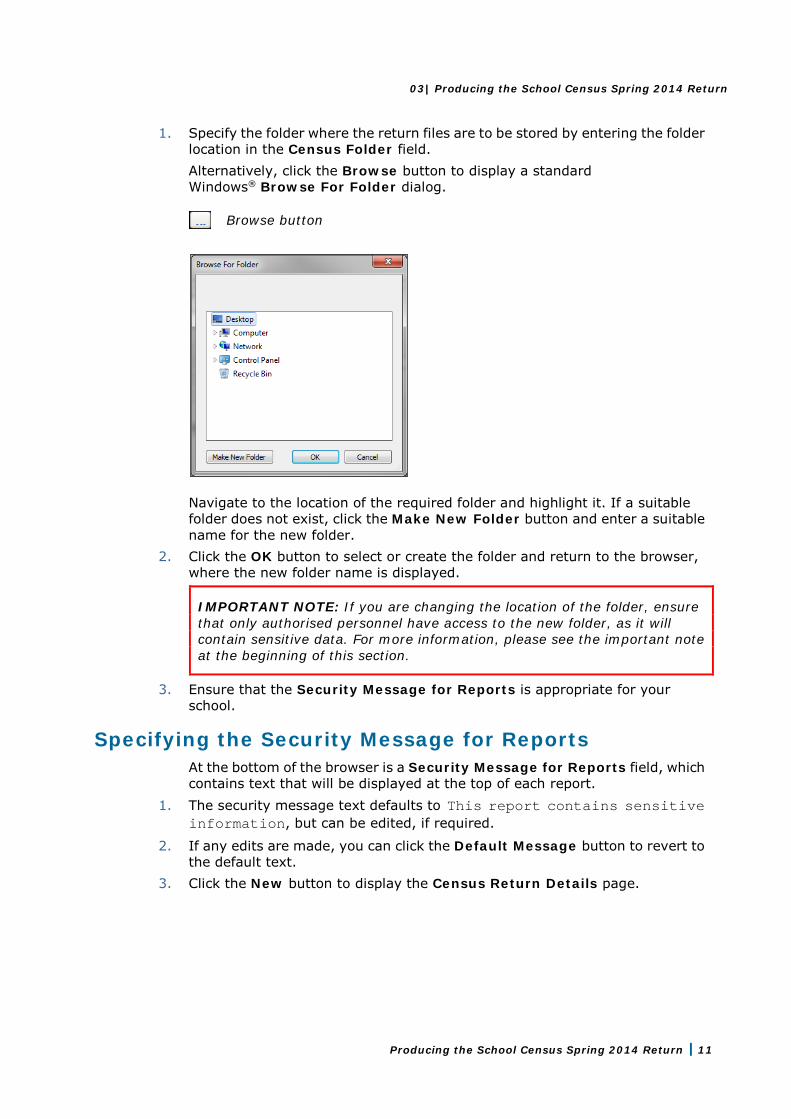
1. Specify the folder where the return files are to be stored by entering the folder location in the Census Folder field. Alternatively, click the Browse button to display a standard Windows® Browse For Folder dialog.
Browse button
Navigate to the location of the required folder and highlight it. If a suitable folder does not exist, click the Make New Folder button and enter a suitable name for the new folder.
2. Click the OK button to select or create the folder and return to the browser, where the new folder name is displayed.
IMPORTANT NOTE: If you are changing the location of the folder, ensure that only authorised personnel have access to the new folder, as it will contain sensitive data. For more information, please see the important note at the beginning of this section.
3. Ensure that the Security Message for Reports is appropriate for your school.
Specifying the Security Message for Reports At the bottom of the browser is a Security Message for Reports field, which contains text that will be displayed at the top of each report.
1. The security message text defaults to This report contains sensitive information, but can be edited, if required.
2. If any edits are made, you can click the Default Message button to revert to the default text.
3. Click the New button to display the Census Return Details page.
03| Producing the School Census Spring 2014 Return
12 Producing the School Census Spring 2014 Return
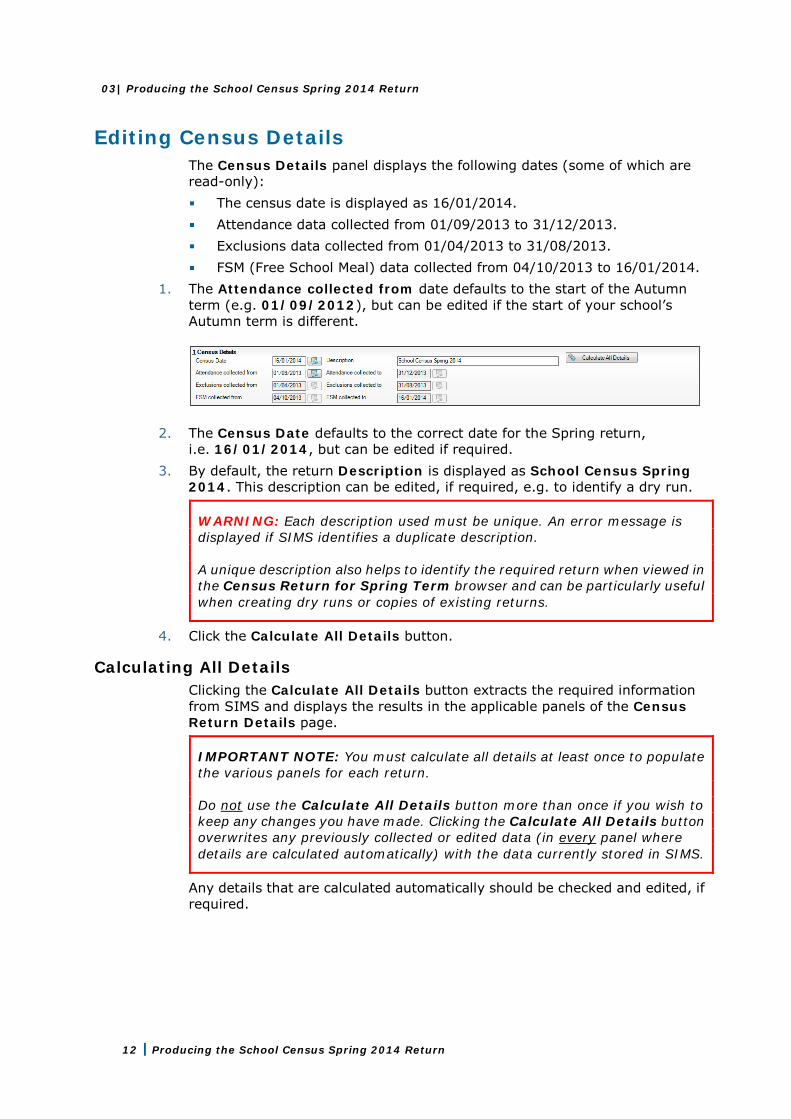
Editing Census Details The Census Details panel displays the following dates (some of which are read-only):
The census date is displayed as 16/01/2014. Attendance data collected from 01/09/2013 to 31/12/2013. Exclusions data collected from 01/04/2013 to 31/08/2013. FSM (Free School Meal) data collected from 04/10/2013 to 16/01/2014.
1. The Attendance collected from date defaults to the start of the Autumn term (e.g. 01/09/2012), but can be edited if the start of your school’s Autumn term is different.
2. The Census Date defaults to the correct date for the Spring return, i.e. 16/01/2014, but can be edited if required.
3. By default, the return Description is displayed as School Census Spring 2014. This description can be edited, if required, e.g. to identify a dry run.
WARNING: Each description used must be unique. An error message is displayed if SIMS identifies a duplicate description. A unique description also helps to identify the required return when viewed in the Census Return for Spring Term browser and can be particularly useful when creating dry runs or copies of existing returns.
4. Click the Calculate All Details button.
Calculating All Details Clicking the Calculate All Details button extracts the required information from SIMS and displays the results in the applicable panels of the Census Return Details page.
IMPORTANT NOTE: You must calculate all details at least once to populate the various panels for each return. Do not use the Calculate All Details button more than once if you wish to keep any changes you have made. Clicking the Calculate All Details button overwrites any previously collected or edited data (in every panel where details are calculated automatically) with the data currently stored in SIMS.
Any details that are calculated automatically should be checked and edited, if required.

03| Producing the School Census Spring 2014 Return
Producing the School Census Spring 2014 Return 13
1. Click the Calculate All Details button. A message advises that any existing data currently shown on the Census Return Details page will be overwritten.
2. Click the Yes button to calculate all details. At this point there may be a short delay, depending on the number of pupils in the school. Progress is reported in the status bar at the bottom of the screen. When complete, the applicable panels on the Census Return Details page are populated with the data extracted from SIMS.
3. The return can be saved at any point by clicking the Save button.
Editing School Information The School Information panel displays details that have previously been recorded on the School Details page in SIMS (Focus | Pupil | Pupil Details). The information displayed may vary depending on your school and the details entered, e.g. Academy specific information. The details displayed are read-only but can be amended if necessary via the School Detail button.
03| Producing the School Census Spring 2014 Return
14 Producing the School Census Spring 2014 Return
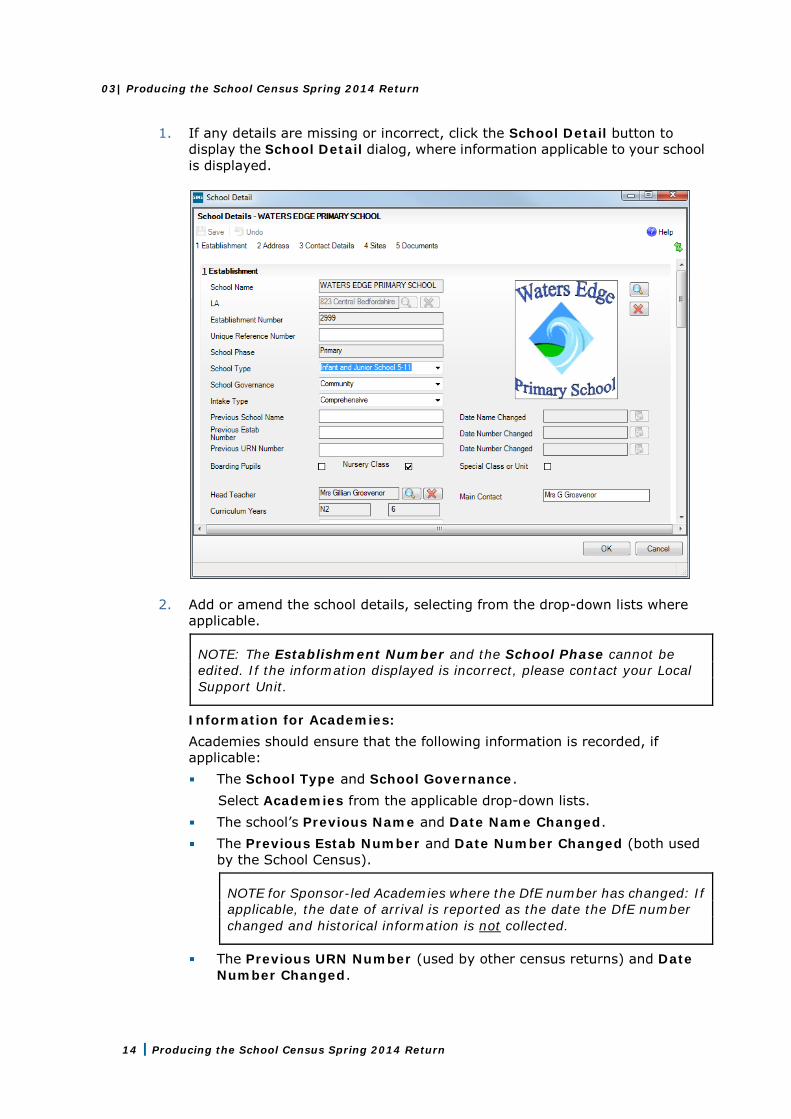
1. If any details are missing or incorrect, click the School Detail button to display the School Detail dialog, where information applicable to your school is displayed.
2. Add or amend the school details, selecting from the drop-down lists where applicable.
NOTE: The Establishment Number and the School Phase cannot be edited. If the information displayed is incorrect, please contact your Local Support Unit.
Information for Academies: Academies should ensure that the following information is recorded, if applicable:
The School Type and School Governance. Select Academies from the applicable drop-down lists.
The school’s Previous Name and Date Name Changed. The Previous Estab Number and Date Number Changed (both used
by the School Census).
NOTE for Sponsor-led Academies where the DfE number has changed: If applicable, the date of arrival is reported as the date the DfE number changed and historical information is not collected.
The Previous URN Number (used by other census returns) and Date Number Changed.
03| Producing the School Census Spring 2014 Return
Producing the School Census Spring 2014 Return 15
3. Click the Save button then click the OK button to return to the Census Return Details page, where the updated details are displayed.
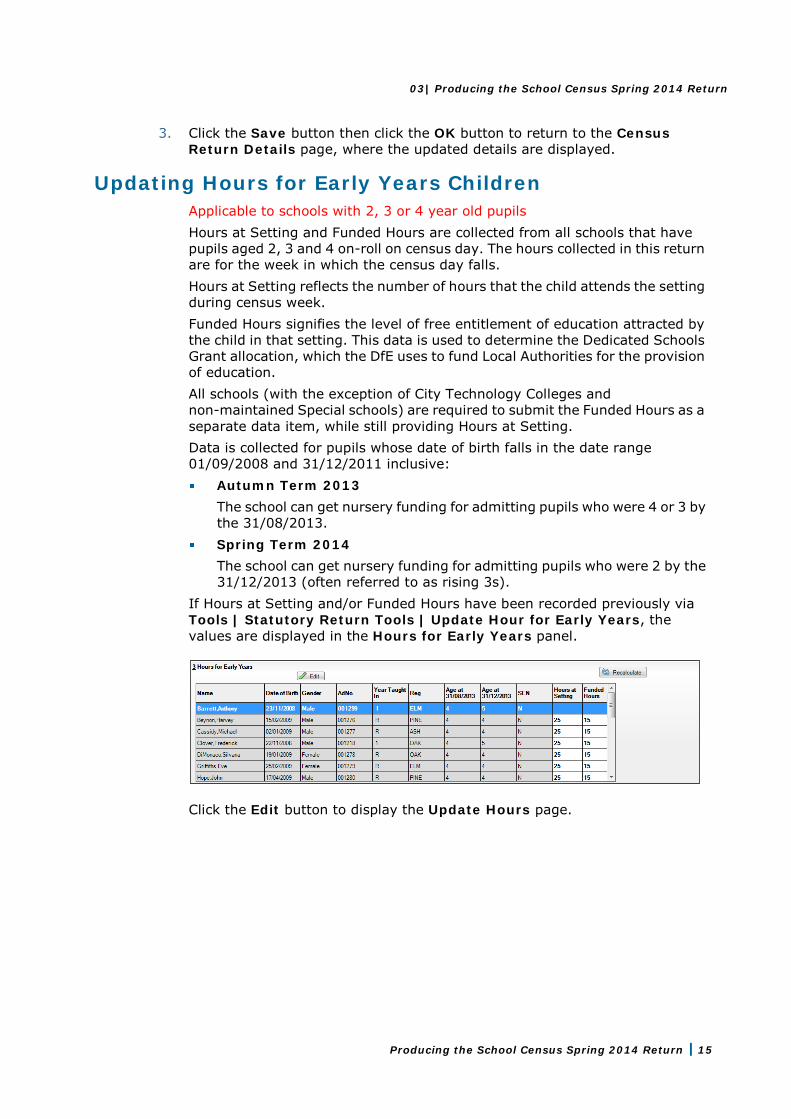
Updating Hours for Early Years Children Applicable to schools with 2, 3 or 4 year old pupils Hours at Setting and Funded Hours are collected from all schools that have pupils aged 2, 3 and 4 on-roll on census day. The hours collected in this return are for the week in which the census day falls. Hours at Setting reflects the number of hours that the child attends the setting during census week. Funded Hours signifies the level of free entitlement of education attracted by the child in that setting. This data is used to determine the Dedicated Schools Grant allocation, which the DfE uses to fund Local Authorities for the provision of education. All schools (with the exception of City Technology Colleges and non-maintained Special schools) are required to submit the Funded Hours as a separate data item, while still providing Hours at Setting. Data is collected for pupils whose date of birth falls in the date range 01/09/2008 and 31/12/2011 inclusive:
Autumn Term 2013 The school can get nursery funding for admitting pupils who were 4 or 3 by the 31/08/2013.
Spring Term 2014 The school can get nursery funding for admitting pupils who were 2 by the 31/12/2013 (often referred to as rising 3s).
If Hours at Setting and/or Funded Hours have been recorded previously via Tools | Statutory Return Tools | Update Hour for Early Years, the values are displayed in the Hours for Early Years panel.
Click the Edit button to display the Update Hours page.
03| Producing the School Census Spring 2014 Return
16 Producing the School Census Spring 2014 Return
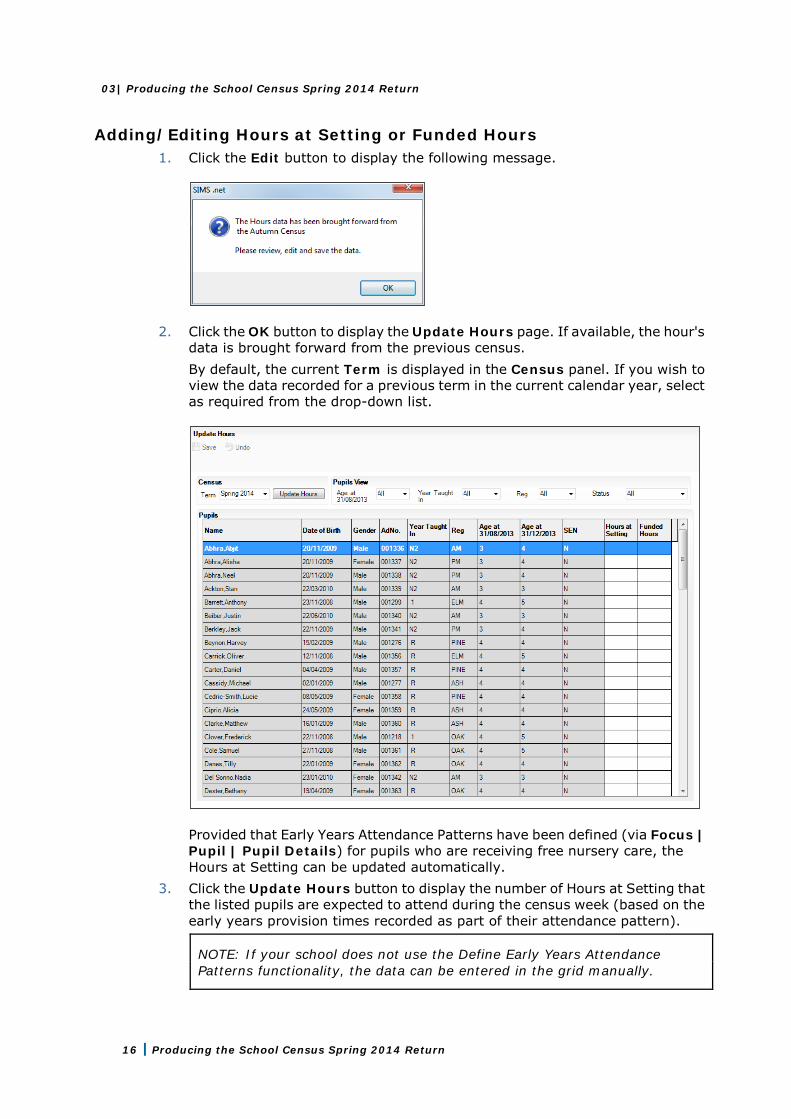
Adding/Editing Hours at Setting or Funded Hours 1. Click the Edit button to display the following message.
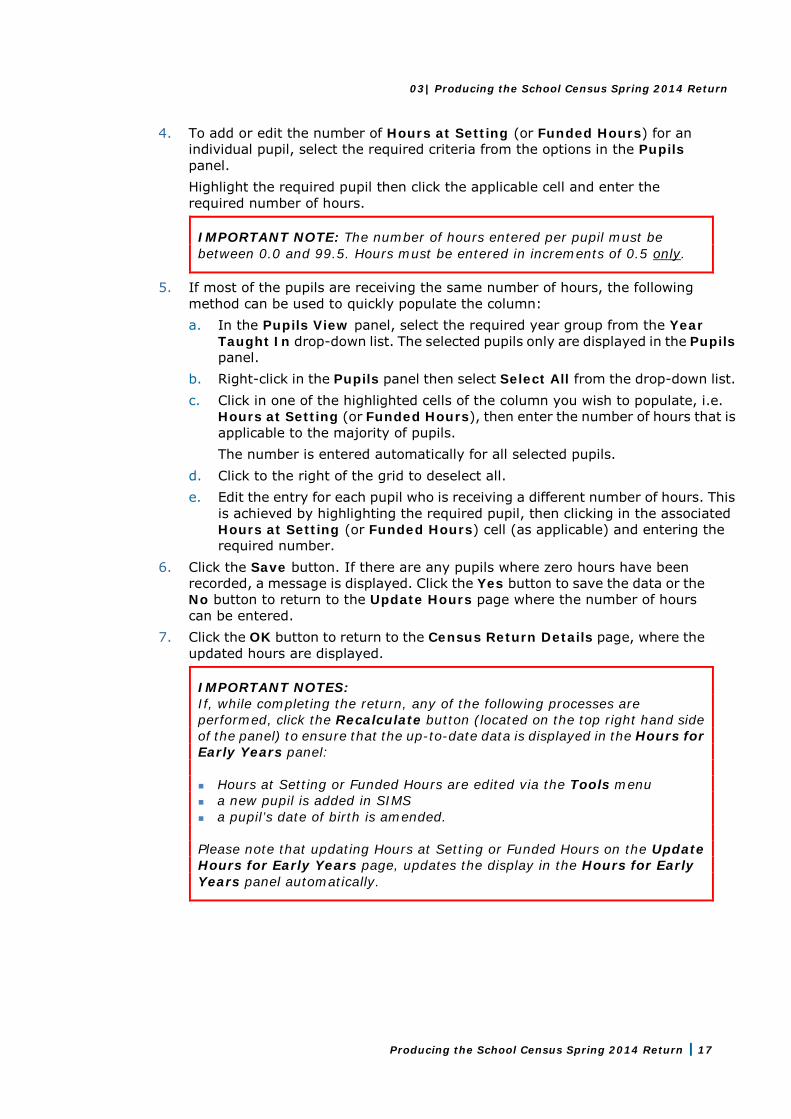
2. Click the OK button to display the Update Hours page. If available, the hour's data is brought forward from the previous census. By default, the current Term is displayed in the Census panel. If you wish to view the data recorded for a previous term in the current calendar year, select as required from the drop-down list.
Provided that Early Years Attendance Patterns have been defined (via Focus | Pupil | Pupil Details) for pupils who are receiving free nursery care, the Hours at Setting can be updated automatically.
3. Click the Update Hours button to display the number of Hours at Setting that the listed pupils are expected to attend during the census week (based on the early years provision times recorded as part of their attendance pattern).
NOTE: If your school does not use the Define Early Years Attendance Patterns functionality, the data can be entered in the grid manually.
03| Producing the School Census Spring 2014 Return
Producing the School Census Spring 2014 Return 17
4. To add or edit the number of Hours at Setting (or Funded Hours) for an individual pupil, select the required criteria from the options in the Pupils panel. Highlight the required pupil then click the applicable cell and enter the required number of hours.
IMPORTANT NOTE: The number of hours entered per pupil must be between 0.0 and 99.5. Hours must be entered in increments of 0.5 only.
5. If most of the pupils are receiving the same number of hours, the following method can be used to quickly populate the column: a. In the Pupils View panel, select the required year group from the Year
Taught In drop-down list. The selected pupils only are displayed in the Pupils panel.
b. Right-click in the Pupils panel then select Select All from the drop-down list. c. Click in one of the highlighted cells of the column you wish to populate, i.e.
Hours at Setting (or Funded Hours), then enter the number of hours that is applicable to the majority of pupils. The number is entered automatically for all selected pupils.
d. Click to the right of the grid to deselect all. e. Edit the entry for each pupil who is receiving a different number of hours. This
is achieved by highlighting the required pupil, then clicking in the associated Hours at Setting (or Funded Hours) cell (as applicable) and entering the required number.
6. Click the Save button. If there are any pupils where zero hours have been recorded, a message is displayed. Click the Yes button to save the data or the No button to return to the Update Hours page where the number of hours can be entered.
7. Click the OK button to return to the Census Return Details page, where the updated hours are displayed.
IMPORTANT NOTES: If, while completing the return, any of the following processes are performed, click the Recalculate button (located on the top right hand side of the panel) to ensure that the up-to-date data is displayed in the Hours for Early Years panel: Hours at Setting or Funded Hours are edited via the Tools menu a new pupil is added in SIMS a pupil’s date of birth is amended. Please note that updating Hours at Setting or Funded Hours on the Update Hours for Early Years page, updates the display in the Hours for Early Years panel automatically.
03| Producing the School Census Spring 2014 Return
18 Producing the School Census Spring 2014 Return
Identifying which Pupils have no Hours Recorded 1. On the Census Return Details page, click the Edit button (located in the
Hours for Early Years panel) to display the Update Hours for Early Years page.
2. In the Pupils View panel, ensure that the required Age at date, Year Taught In and Reg group are selected then select No Hours at Setting (or No Funded Hours) from the Status drop-down list. Only pupils who do not have an entry for Hours at Setting (or Funded Hours) are displayed.
3. Enter the required values for these pupils as previously described. 4. Click the Save button.
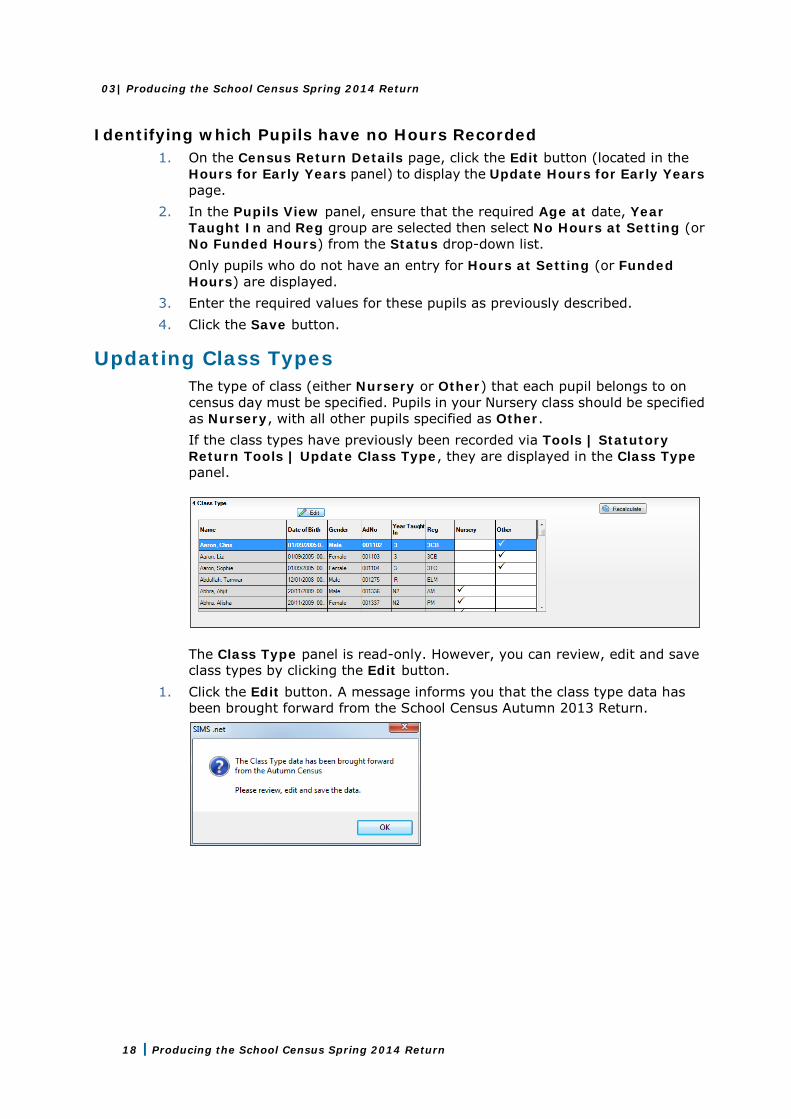
Updating Class Types The type of class (either Nursery or Other) that each pupil belongs to on census day must be specified. Pupils in your Nursery class should be specified as Nursery, with all other pupils specified as Other. If the class types have previously been recorded via Tools | Statutory Return Tools | Update Class Type, they are displayed in the Class Type panel.
The Class Type panel is read-only. However, you can review, edit and save class types by clicking the Edit button.
1. Click the Edit button. A message informs you that the class type data has been brought forward from the School Census Autumn 2013 Return.
03| Producing the School Census Spring 2014 Return
Producing the School Census Spring 2014 Return 19
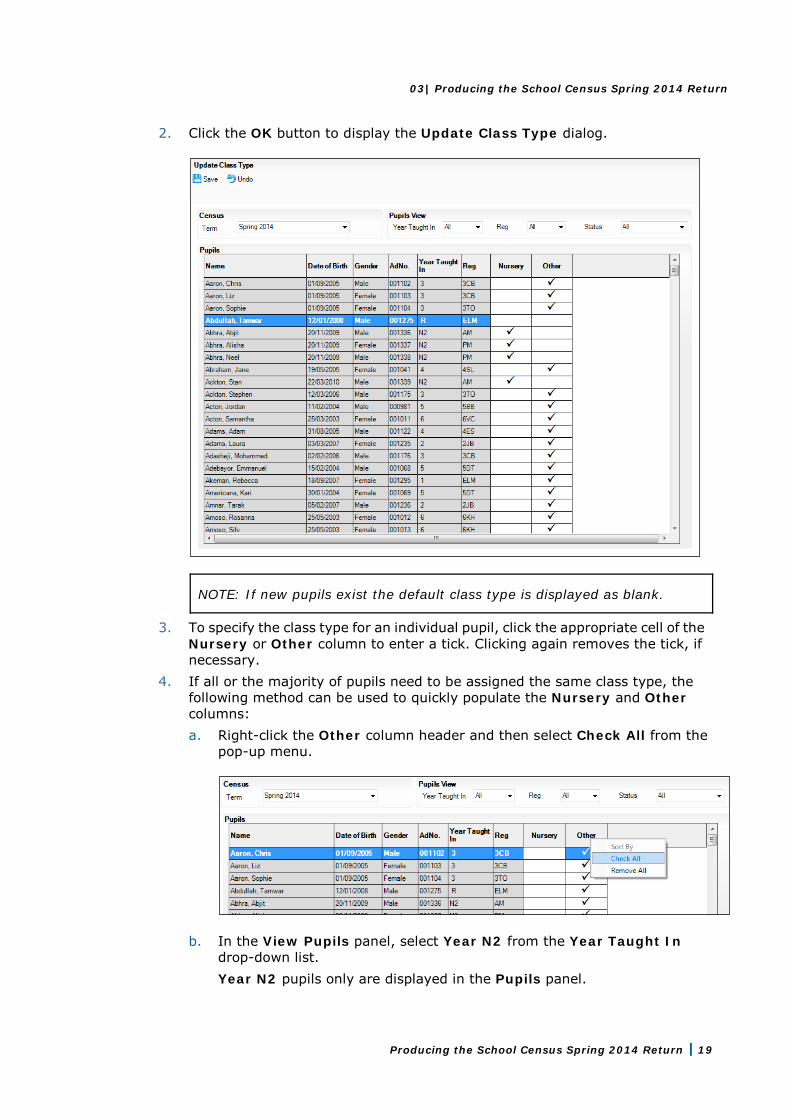
2. Click the OK button to display the Update Class Type dialog.
NOTE: If new pupils exist the default class type is displayed as blank.
3. To specify the class type for an individual pupil, click the appropriate cell of the Nursery or Other column to enter a tick. Clicking again removes the tick, if necessary.
4. If all or the majority of pupils need to be assigned the same class type, the following method can be used to quickly populate the Nursery and Other columns: a. Right-click the Other column header and then select Check All from the
pop-up menu.
b. In the View Pupils panel, select Year N2 from the Year Taught In drop-down list. Year N2 pupils only are displayed in the Pupils panel.

03| Producing the School Census Spring 2014 Return
20 Producing the School Census Spring 2014 Return
c. Right-click the Nursery column header then select Check All from the pop-up menu.
d. Repeat steps b and c for any additional Nursery classes. e. To ensure that your selection is correct, select All from the Year Taught In
drop-down list.
5. Click the Save button. 6. If a message is displayed advising you that some pupils have not been
assigned a class type, click the No button then ensure that a class type is allocated to every pupil before saving again.
IMPORTANT NOTE: Not assigning a class type to every pupil will result in a validation failure when the School Census file is created.
03| Producing the School Census Spring 2014 Return
Producing the School Census Spring 2014 Return 21
7. Click the OK button to return to the Census Return Details page, where the updated class types are displayed in the Class Type panel.
Additional Resources:
Preparing for the School Census Spring 2014 Return handbook
Resetting All Class Types To reset all class types, right-click the Nursery (or Other) column header then select Remove All from the pop-up list. The Nursery (or Other) column is cleared of all ticks. Re-enter the correct class types as previously described.
Identifying which Pupils have no Class Type Specified To ensure that all pupils are assigned to a class type, select No Class Type from the Status drop-down list in the Pupils View panel. Any pupils without a Class Type are displayed in the Pupils panel.
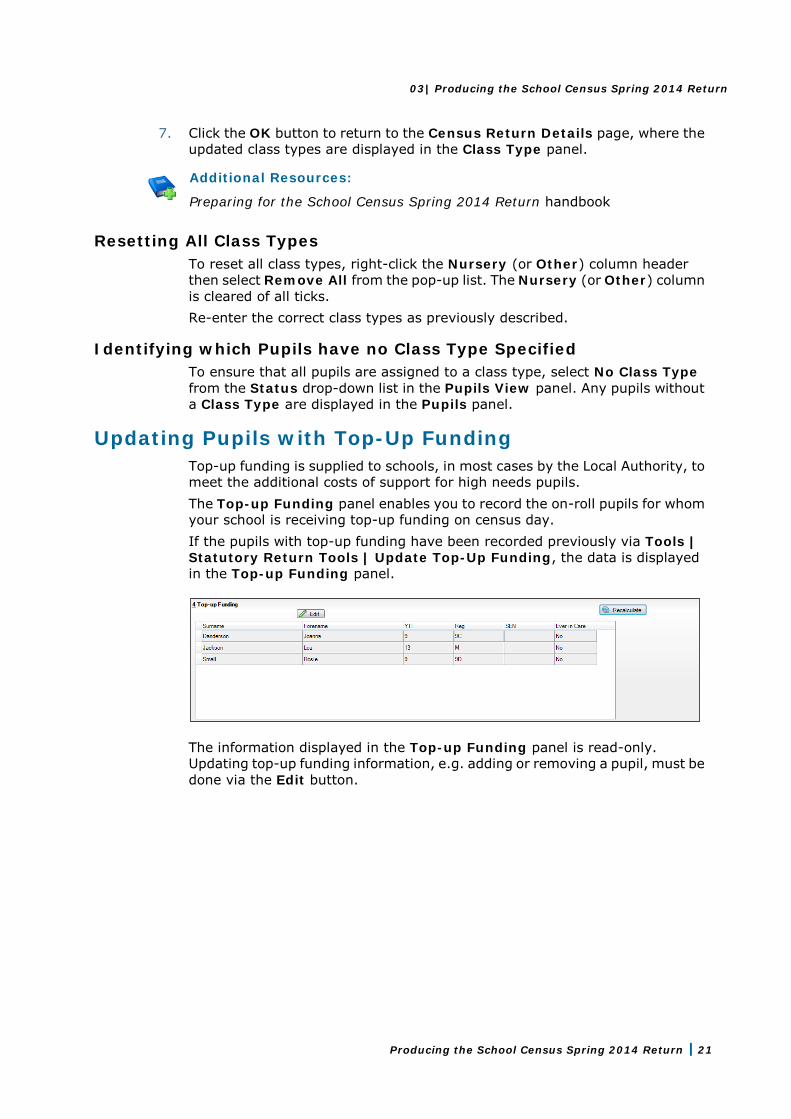
Updating Pupils with Top-Up Funding Top-up funding is supplied to schools, in most cases by the Local Authority, to meet the additional costs of support for high needs pupils. The Top-up Funding panel enables you to record the on-roll pupils for whom your school is receiving top-up funding on census day. If the pupils with top-up funding have been recorded previously via Tools | Statutory Return Tools | Update Top-Up Funding, the data is displayed in the Top-up Funding panel.
The information displayed in the Top-up Funding panel is read-only. Updating top-up funding information, e.g. adding or removing a pupil, must be done via the Edit button.
03| Producing the School Census Spring 2014 Return
22 Producing the School Census Spring 2014 Return
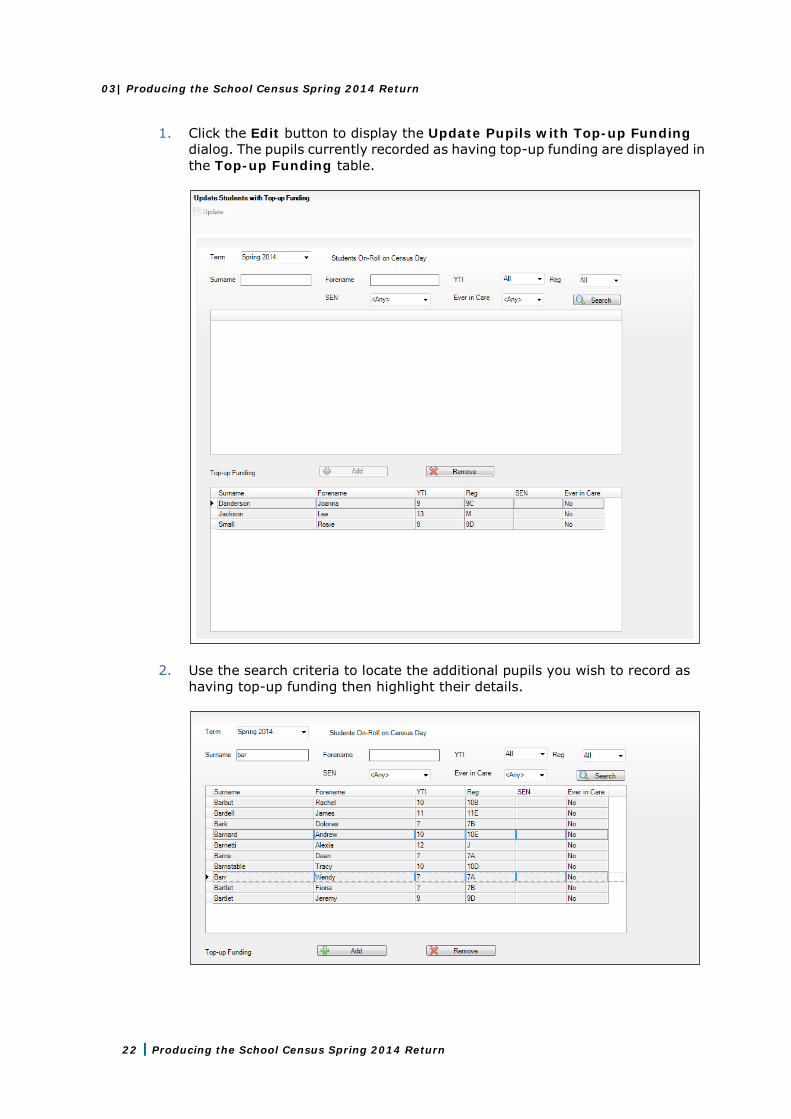
1. Click the Edit button to display the Update Pupils with Top-up Funding dialog. The pupils currently recorded as having top-up funding are displayed in the Top-up Funding table.
2. Use the search criteria to locate the additional pupils you wish to record as having top-up funding then highlight their details.
03| Producing the School Census Spring 2014 Return
Producing the School Census Spring 2014 Return 23
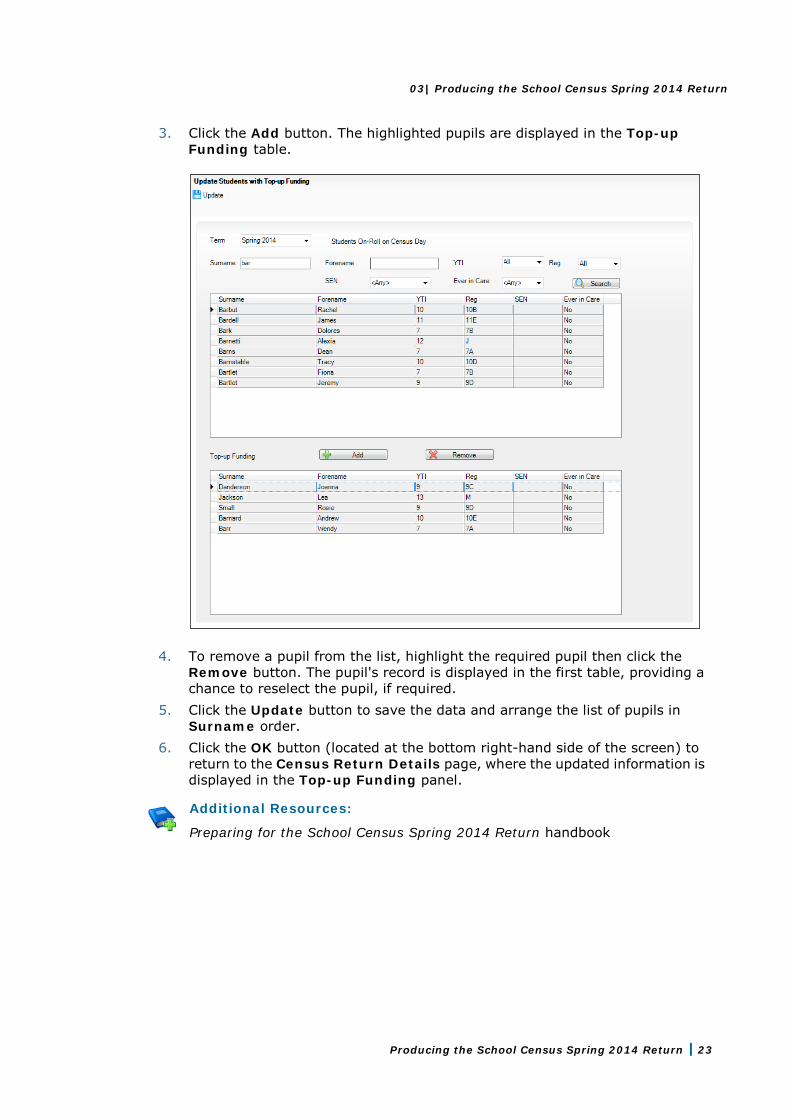
3. Click the Add button. The highlighted pupils are displayed in the Top-up Funding table.
4. To remove a pupil from the list, highlight the required pupil then click the Remove button. The pupil's record is displayed in the first table, providing a chance to reselect the pupil, if required.
5. Click the Update button to save the data and arrange the list of pupils in Surname order.
6. Click the OK button (located at the bottom right-hand side of the screen) to return to the Census Return Details page, where the updated information is displayed in the Top-up Funding panel.
Additional Resources:
Preparing for the School Census Spring 2014 Return handbook
03| Producing the School Census Spring 2014 Return
24 Producing the School Census Spring 2014 Return
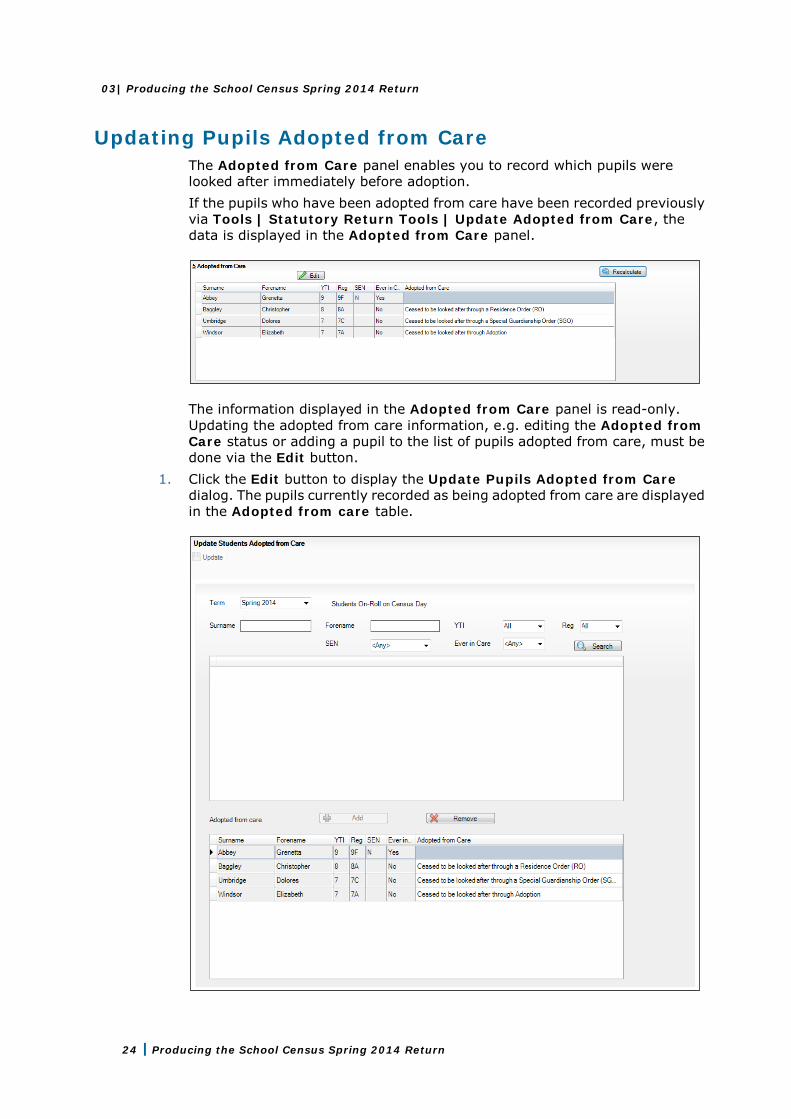
Updating Pupils Adopted from Care The Adopted from Care panel enables you to record which pupils were looked after immediately before adoption. If the pupils who have been adopted from care have been recorded previously via Tools | Statutory Return Tools | Update Adopted from Care, the data is displayed in the Adopted from Care panel.
The information displayed in the Adopted from Care panel is read-only. Updating the adopted from care information, e.g. editing the Adopted from Care status or adding a pupil to the list of pupils adopted from care, must be done via the Edit button.
1. Click the Edit button to display the Update Pupils Adopted from Care dialog. The pupils currently recorded as being adopted from care are displayed in the Adopted from care table.

03| Producing the School Census Spring 2014 Return
Producing the School Census Spring 2014 Return 25
2. Use the search criteria to locate the additional pupils you wish to record as being adopted from care then highlight their details.
3. Click the Add button. The highlighted pupils are displayed in the Adopted from care table.
03| Producing the School Census Spring 2014 Return
26 Producing the School Census Spring 2014 Return
4. Ensure that the correct adopted from care status is displayed for all the pupils by clicking the Adopted from Care cell then selecting the applicable status from the drop-down list:
Ceased to be looked after through Adoption Ceased to be looked after through a Special Guardianship Order
(SGO) Ceased to be looked after through a Residence Order (RO).
5. To remove a pupil from the list, highlight the required pupil then click the Remove button. The pupil's record is displayed in the first table, providing a chance to reselect the pupil, if required.
6. Click the Update button to save the data and arrange the list of pupils in Surname order.
7. Click the OK button (located at the bottom right hand-side of the screen) to return to the Census Return Details page, where the updated information is displayed in the Adopted from Care panel.
Additional Resources:
Preparing for the School Census Spring 2014 Return handbook
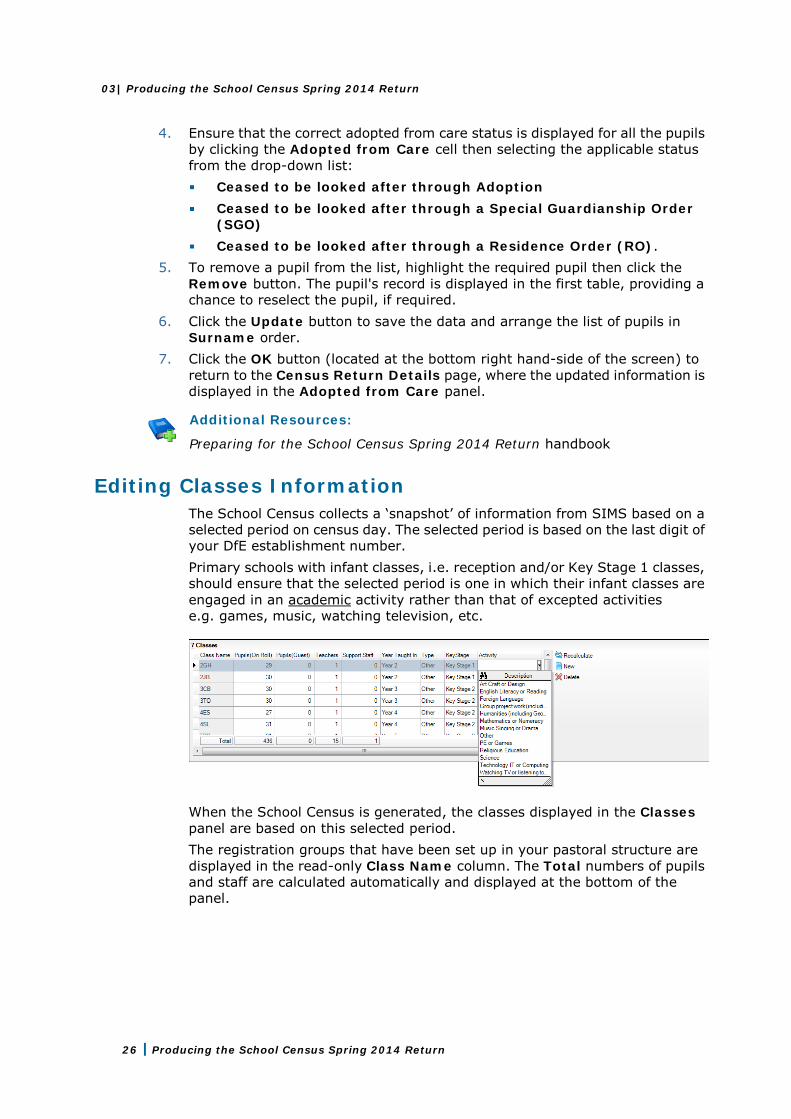
Editing Classes Information The School Census collects a ‘snapshot’ of information from SIMS based on a selected period on census day. The selected period is based on the last digit of your DfE establishment number. Primary schools with infant classes, i.e. reception and/or Key Stage 1 classes, should ensure that the selected period is one in which their infant classes are engaged in an academic activity rather than that of excepted activities e.g. games, music, watching television, etc.
When the School Census is generated, the classes displayed in the Classes panel are based on this selected period. The registration groups that have been set up in your pastoral structure are displayed in the read-only Class Name column. The Total numbers of pupils and staff are calculated automatically and displayed at the bottom of the panel.
03| Producing the School Census Spring 2014 Return
Producing the School Census Spring 2014 Return 27
Check and, if necessary, edit the information. Pupils (On Roll)
The number of pupils in the class at the selected period is displayed. The entries in this column can be edited if required. Ensure that:
any pupils temporarily absent on the census day are included. any part-time pupils not scheduled to be in school at the selected
period are excluded. These pupils should be counted in the Pupil Reconciliation panel instead (please see Editing Pupil Reconciliation on page 28).
Pupils (Guest) This column displays any guest pupils who are normally in the class at the selected period. Ensure that any guest pupils have an Enrolment Status of Guest pupil in the Pupil Details panel (Focus | Pupils | Pupil Details).
Teachers Include all qualified and unqualified teachers taking the class at the selected period. Exclude teachers who are:
wholly or mainly providing support to individual pupils. on Planning, Preparation and Assessment (PPA) time.
Support Staff Include teaching assistants, special needs support staff, support staff for minority ethnic pupils and other education support staff in the class at the selected period. Exclude non-teaching staff wholly or mainly providing support to individual pupils.
Year Actual This column shows the curriculum year group of each class displayed. To edit the year group, click in the cell and select from the drop-down list. Select Mixed Year if a class contains pupils from more than one National Curriculum year.
NOTE: This does not include classes containing any pupils who have been held back, or advanced a year and are of a different chronological age to the rest of the class.
Type This column displays the class type. To edit the class type, click in the cell then select either Other or Nursery (as appropriate) from the drop-down list.
Key Stage This column displays the key stage of each class. This can be amended by clicking in the cell and selecting the required Key Stage from the drop-down list.
NOTE: A Mixed Key Stage class is a class containing pupils from different key stages, e.g. Year 2 (Key Stage 1) and Year 3 (Key Stage 2), and not a class containing a child of a different age because they have been held back or advanced a year.
03| Producing the School Census Spring 2014 Return
28 Producing the School Census Spring 2014 Return
Activity This column provides the ability to select the activity that the class was engaged in at the selected period. This is achieved by clicking in the required cell then selecting the applicable activity from the drop-down list. Other should not be selected unless none of the activities listed are appropriate.
Adding Classes It may be necessary to add an additional class if, for example, some pupils are receiving additional teaching support. This is achieved by clicking the New button then entering the applicable class information in the additional row, which is displayed at the bottom of the table.
NOTE: Remember to reduce the number of pupils in the main class.
Ensure that you click the Save button to save the data and refresh the display.
Deleting Classes In some circumstances, classes may need to be deleted, e.g. if they do not normally take place at the selected period. This is achieved by highlighting the class then clicking the Delete button.
NOTE: If you delete a class that contains pupils, you must recalculate again to ensure that pupil numbers are correct.
Recalculating the Classes Information The data in the Classes panel can be replaced with the original data from the database by clicking the appropriate Recalculate button.
IMPORTANT NOTE: Clicking the Recalculate button overwrites any edited data with the original data stored in SIMS. Do not use the Recalculate button if you wish to keep any changes you have made.
Saving Edited Data If you edit any pupil details displayed in the Classes panel, ensure that you click the Save button to save the data and refresh the display in the Pupil Reconciliation panel.
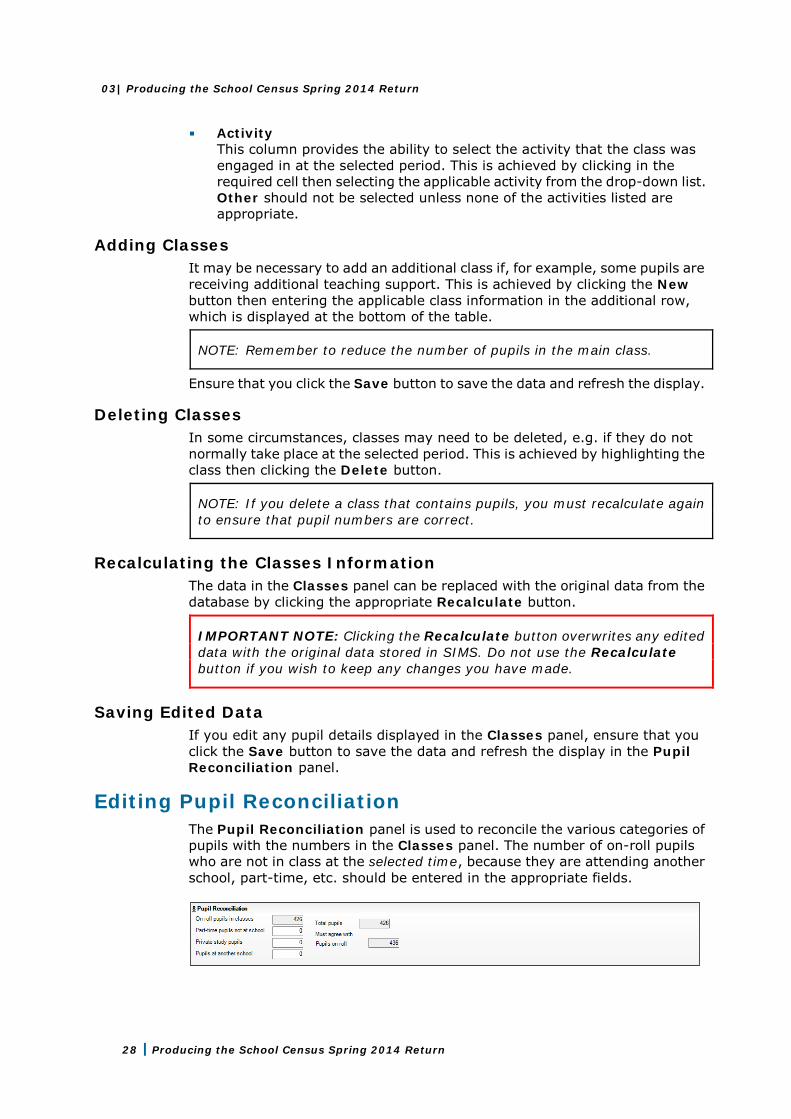
Editing Pupil Reconciliation The Pupil Reconciliation panel is used to reconcile the various categories of pupils with the numbers in the Classes panel. The number of on-roll pupils who are not in class at the selected time, because they are attending another school, part-time, etc. should be entered in the appropriate fields.
03| Producing the School Census Spring 2014 Return
Producing the School Census Spring 2014 Return 29
For example: In the previous example, there are 436 Pupils On Roll but only 426 On Roll Pupils in classes. The difference must be accounted for. This could be the number of Nursery children not in school at the selected time. In which case, 10 should be entered in the Part-time pupils not at school field.
1. If applicable, enter the number of Part-time pupils not at school, the number of Private study pupils and the number of Pupils at another school.
2. Check the values in the Total pupils and Pupils On Roll fields. The two values must be the same. The value in the Total pupils field is calculated automatically and equals the sum of the following:
On Roll Pupils in classes Part-time pupils not at school Private study pupils Pupils at another school.
3. Amend the values in the editable fields, if required.
Entering Attendance Information Termly attendance data (including attendance codes and the number of sessions missed) should be provided for non-boarder pupils aged 4 to 15 inclusive on 31/08/2013 who were on-roll for at least one session during the period from the start of the 2013 Autumn term to 31/12/2013. Initially the Attendance panel is blank. However, after clicking the Calculate All Details button (located in the Census Details panel) the display changes.
IMPORTANT NOTE: Clicking the Calculate All Details button overwrites any edited data in every panel with the original data stored in SIMS. Do not use this button if you wish to keep any changes you have made.
The information displayed in the Attendance panel (after the Calculate All Details button is clicked) is dependent on which of the following is applicable:
Attendance is in use, the attendance codes being used are DfE compliant and there are either:
no missing marks or
missing marks. Attendance is in use and the attendance codes being used are DfE
non-compliant. Attendance is not in use.
03| Producing the School Census Spring 2014 Return
30 Producing the School Census Spring 2014 Return
Attendance/Lesson Monitor Users
IMPORTANT NOTE: If Attendance is in use, ensure that all missing marks and unexplained absences for the previous term have been dealt with before commencing the Census return.
TIP: After the Create and Validate process is run, the Attendance detail report can be used to assist with the checking of the attendance data. Select Attendance Report from the Detail Report drop-down list.
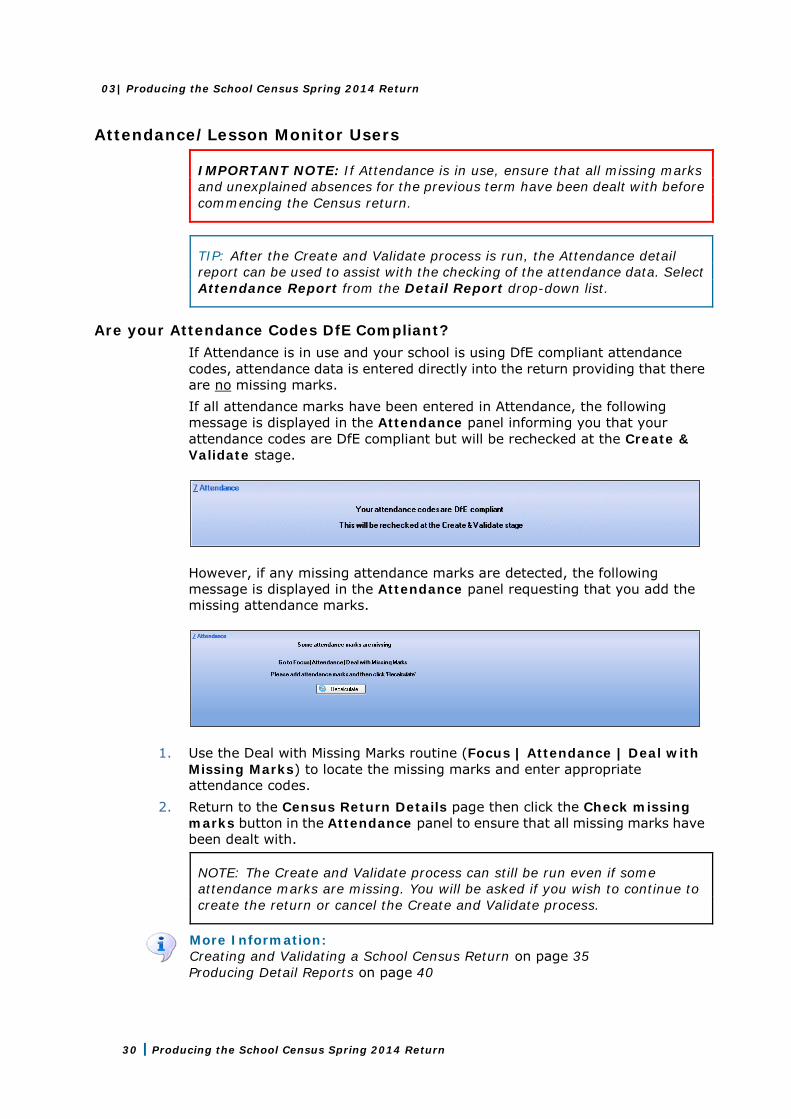
Are your Attendance Codes DfE Compliant? If Attendance is in use and your school is using DfE compliant attendance codes, attendance data is entered directly into the return providing that there are no missing marks. If all attendance marks have been entered in Attendance, the following message is displayed in the Attendance panel informing you that your attendance codes are DfE compliant but will be rechecked at the Create & Validate stage.
However, if any missing attendance marks are detected, the following message is displayed in the Attendance panel requesting that you add the missing attendance marks.
1. Use the Deal with Missing Marks routine (Focus | Attendance | Deal with Missing Marks) to locate the missing marks and enter appropriate attendance codes.
2. Return to the Census Return Details page then click the Check missing marks button in the Attendance panel to ensure that all missing marks have been dealt with.
NOTE: The Create and Validate process can still be run even if some attendance marks are missing. You will be asked if you wish to continue to create the return or cancel the Create and Validate process.
More Information: Creating and Validating a School Census Return on page 35 Producing Detail Reports on page 40
03| Producing the School Census Spring 2014 Return
Producing the School Census Spring 2014 Return 31
Are your Attendance Codes DfE Non-Compliant? If Attendance is in use but one or more incorrect attendance codes have been detected, e.g. the Z or @ code is in use, a message is displayed in the Attendance panel to inform you that your attendance codes are not DfE compliant.
1. Non-compliant codes must be dealt with. Please contact your Local Support Unit for assistance.
2. Click the Check attendance codes button to check that DfE attendance codes are now in use. If the attendance codes are now DfE compliant, a message informs you that the codes will be rechecked at the Create & Validate stage.
3. Click the OK button to continue.
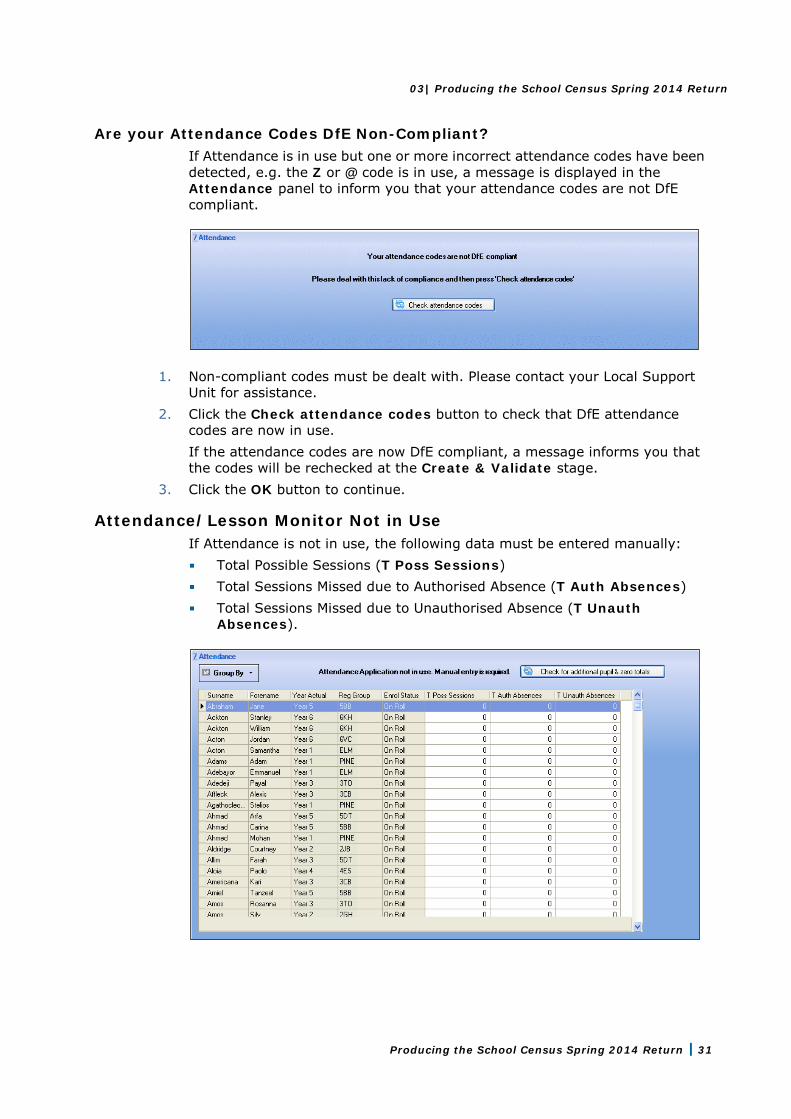
Attendance/Lesson Monitor Not in Use If Attendance is not in use, the following data must be entered manually:
Total Possible Sessions (T Poss Sessions) Total Sessions Missed due to Authorised Absence (T Auth Absences) Total Sessions Missed due to Unauthorised Absence (T Unauth
Absences).
03| Producing the School Census Spring 2014 Return
32 Producing the School Census Spring 2014 Return
1. To filter the display of pupils in the Attendance panel, select Year Group, Registration Group or Enrolment Status from the Group By drop-down list. Alternatively, select Group by None to display a list of all pupils.
2. To sort the displayed data by surname, forename, year group, registration group or enrolment status, click the appropriate column heading.
3. For each pupil, enter the correct attendance numbers in the T Poss Sessions, T Auth Absences and T Unauth Absences columns.
4. To clear the attendance information and check for additional pupils, click the Check for additional students & zero totals button.
WARNING: If the Check for additional students & zero totals button is clicked, any attendance data entered manually is lost.
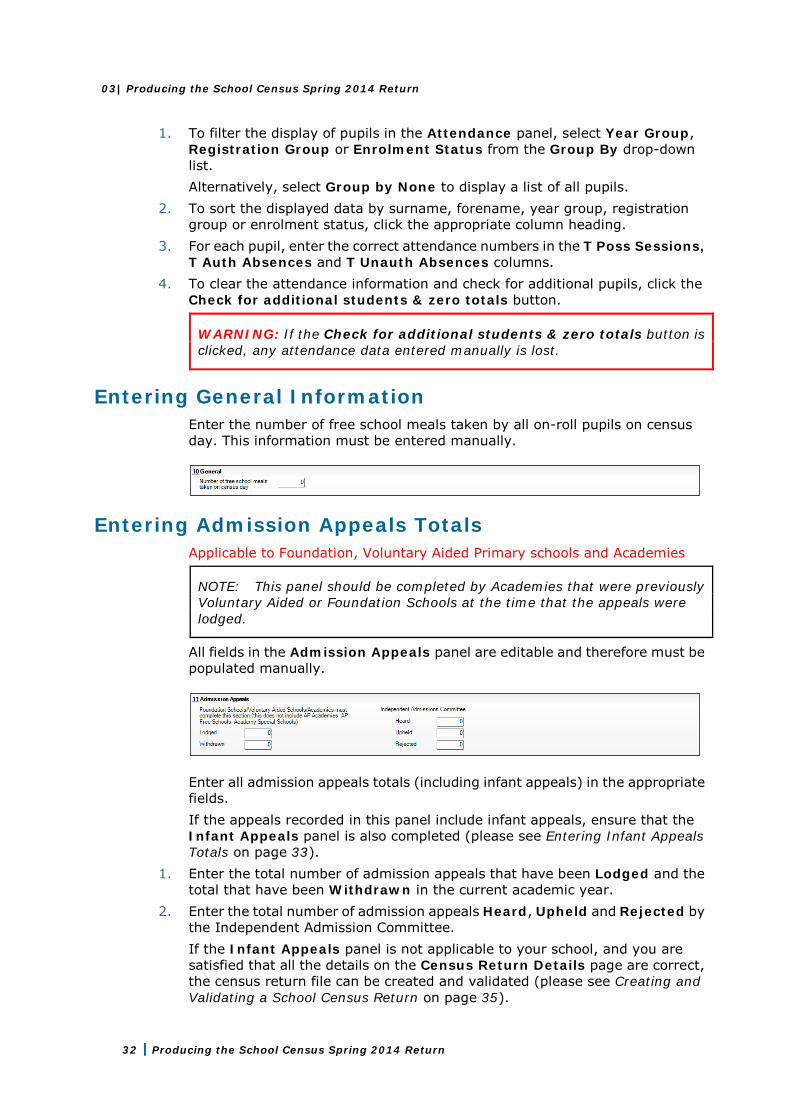
Entering General Information Enter the number of free school meals taken by all on-roll pupils on census day. This information must be entered manually.
Entering Admission Appeals Totals Applicable to Foundation, Voluntary Aided Primary schools and Academies
NOTE: This panel should be completed by Academies that were previously Voluntary Aided or Foundation Schools at the time that the appeals were lodged.
All fields in the Admission Appeals panel are editable and therefore must be populated manually.
Enter all admission appeals totals (including infant appeals) in the appropriate fields. If the appeals recorded in this panel include infant appeals, ensure that the Infant Appeals panel is also completed (please see Entering Infant Appeals Totals on page 33).
1. Enter the total number of admission appeals that have been Lodged and the total that have been Withdrawn in the current academic year.
2. Enter the total number of admission appeals Heard, Upheld and Rejected by the Independent Admission Committee. If the Infant Appeals panel is not applicable to your school, and you are satisfied that all the details on the Census Return Details page are correct, the census return file can be created and validated (please see Creating and Validating a School Census Return on page 35).
03| Producing the School Census Spring 2014 Return
Producing the School Census Spring 2014 Return 33
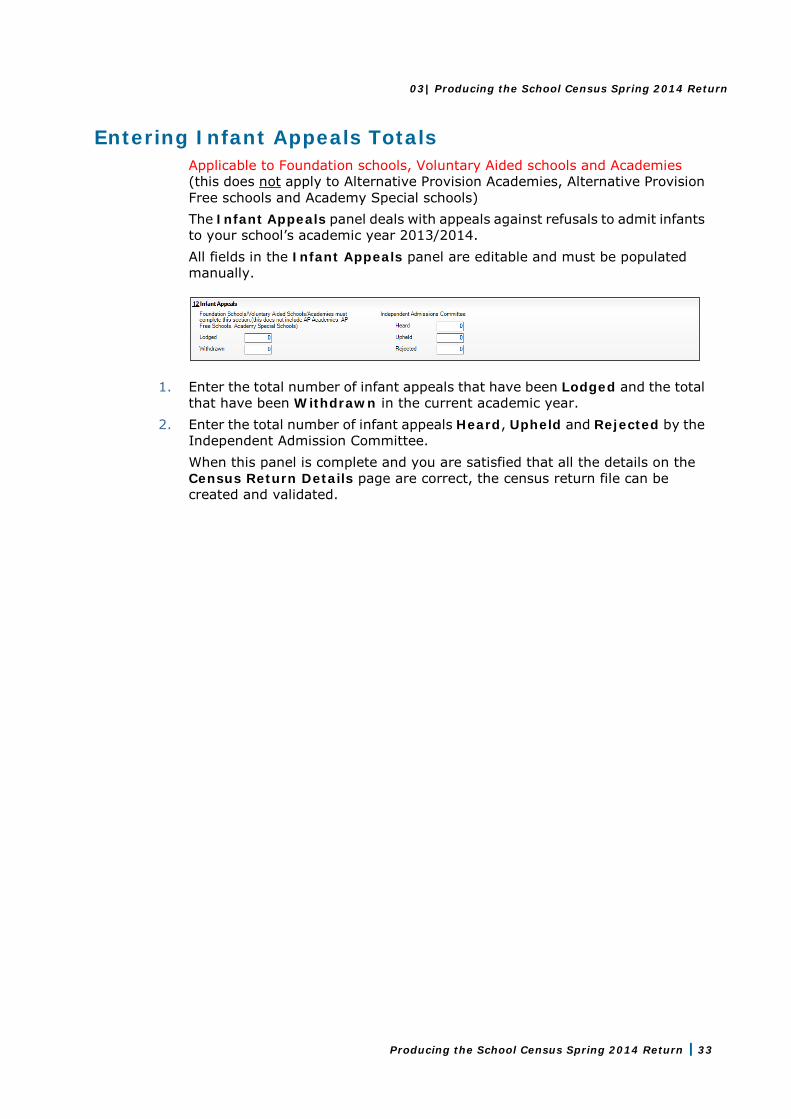
Entering Infant Appeals Totals Applicable to Foundation schools, Voluntary Aided schools and Academies (this does not apply to Alternative Provision Academies, Alternative Provision Free schools and Academy Special schools) The Infant Appeals panel deals with appeals against refusals to admit infants to your school’s academic year 2013/2014. All fields in the Infant Appeals panel are editable and must be populated manually.
1. Enter the total number of infant appeals that have been Lodged and the total that have been Withdrawn in the current academic year.
2. Enter the total number of infant appeals Heard, Upheld and Rejected by the Independent Admission Committee. When this panel is complete and you are satisfied that all the details on the Census Return Details page are correct, the census return file can be created and validated.
03| Producing the School Census Spring 2014 Return
34 Producing the School Census Spring 2014 Return
04| Completing the School Census Spring 2014 Return
Producing the School Census Spring 2014 Return 35
04|Completing the School Census Spring 2014 Return Creating and Validating a School Census Return ............................ 35 Producing Detail Reports ............................................................... 40 Printing a Report from your Web Browser ..................................... 44 Transferring Report Data to a Spreadsheet .................................... 45 Deleting Temporary Web Browser Files ......................................... 45 Producing the Summary Report ..................................................... 46 Editing an Unauthorised Return ..................................................... 47 Authorising the Return .................................................................. 48 Submitting the Return ................................................................... 50 Retrieving Authorised Census Return Files .................................... 50 Copying a Return ........................................................................... 51 Deleting an Unauthorised Return ................................................... 52
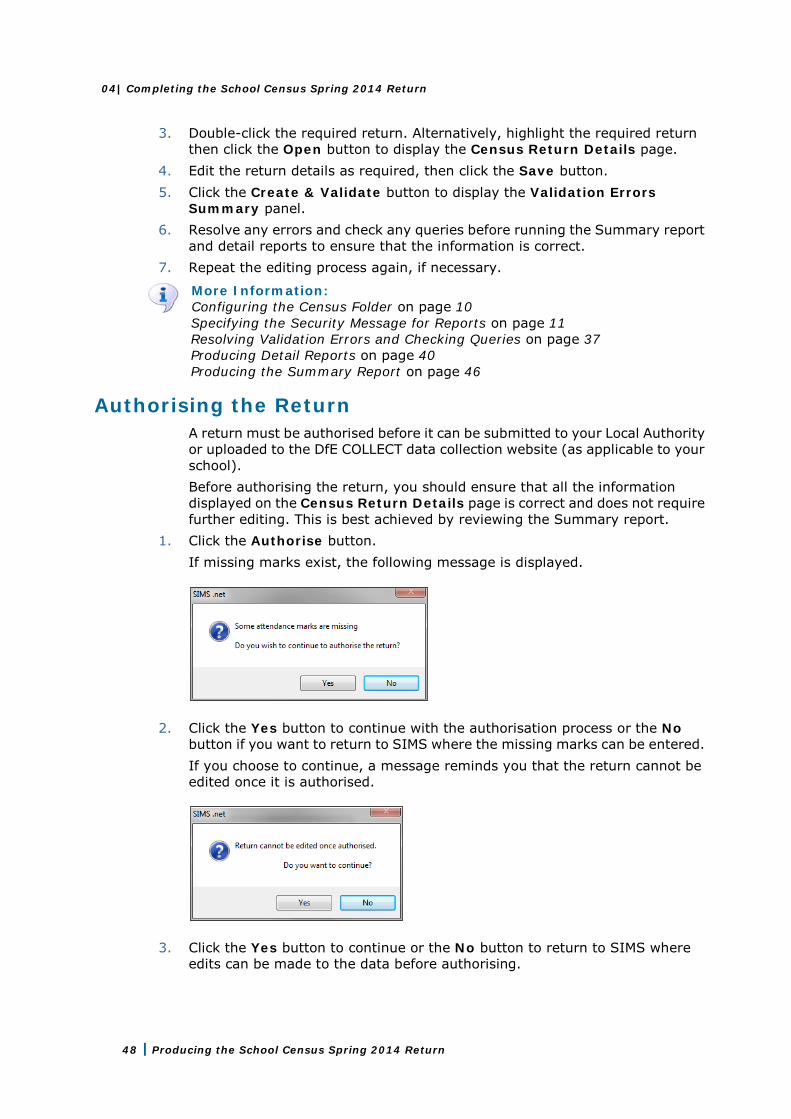
Creating and Validating a School Census Return A return must be created, validated and authorised before it can be sent to your Local Authority or uploaded to the DfE COLLECT data collection website (as applicable to your school). Validating the return creates an unauthorised return file, which is then run against a set of DfE rules. When the validation is complete, a list of errors and queries is displayed. An error is caused by either missing or inaccurate data, whilst a query highlights data which is unusual or not as expected, e.g. there are no pupils with special educational needs.
1. Select Routines | Statutory Returns | School Census to display the Census Return browser.
2. Click the Search button to display a list of returns. 3. Double-click the required return to display the Census Return Details page. 4. Click the Create & Validate button to begin the process. There may be a
short delay, depending on the number of pupils at your school.
04| Completing the School Census Spring 2014 Return
36 Producing the School Census Spring 2014 Return
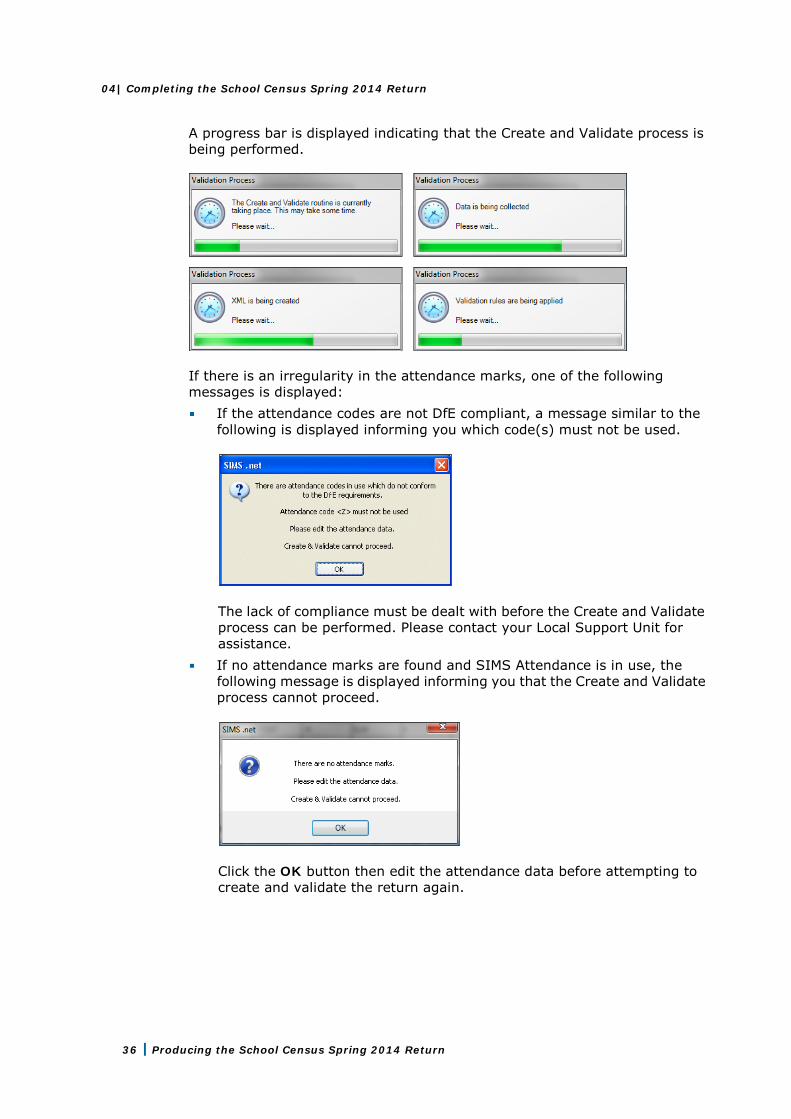
A progress bar is displayed indicating that the Create and Validate process is being performed.
If there is an irregularity in the attendance marks, one of the following messages is displayed:
If the attendance codes are not DfE compliant, a message similar to the following is displayed informing you which code(s) must not be used.
The lack of compliance must be dealt with before the Create and Validate process can be performed. Please contact your Local Support Unit for assistance.
If no attendance marks are found and SIMS Attendance is in use, the following message is displayed informing you that the Create and Validate process cannot proceed.
Click the OK button then edit the attendance data before attempting to create and validate the return again.
04| Completing the School Census Spring 2014 Return
Producing the School Census Spring 2014 Return 37
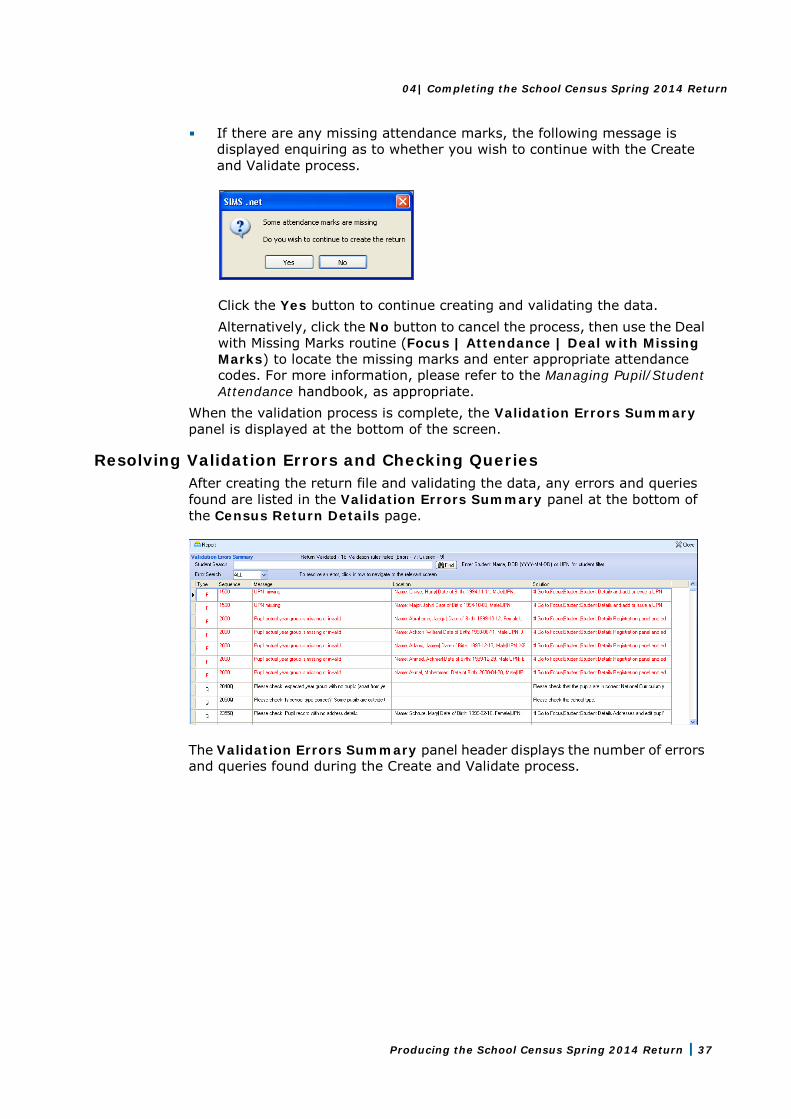
If there are any missing attendance marks, the following message is displayed enquiring as to whether you wish to continue with the Create and Validate process.
Click the Yes button to continue creating and validating the data. Alternatively, click the No button to cancel the process, then use the Deal with Missing Marks routine (Focus | Attendance | Deal with Missing Marks) to locate the missing marks and enter appropriate attendance codes. For more information, please refer to the Managing Pupil/Student Attendance handbook, as appropriate.
When the validation process is complete, the Validation Errors Summary panel is displayed at the bottom of the screen.
Resolving Validation Errors and Checking Queries After creating the return file and validating the data, any errors and queries found are listed in the Validation Errors Summary panel at the bottom of the Census Return Details page.
The Validation Errors Summary panel header displays the number of errors and queries found during the Create and Validate process.

04| Completing the School Census Spring 2014 Return
38 Producing the School Census Spring 2014 Return
Details about the errors and queries that have been found are displayed in the following columns.
Column Description
Type Displays the type of validation rule:
Failure (F displayed in red) indicates an error, which must be corrected.
Query (Q displayed in black) indicates that there are unusual data conditions. These should be considered and corrected, if necessary.
Sequence Shows the error or query number.
Message Displays the text of the error or query message.
Location Lists the specific record containing the error or query.
Solution Provides a suggestion on how the error can be corrected or the query checked. Many solutions have a hyperlink (indicated by a #) to the appropriate area of SIMS.
To assist in the resolution of any errors and queries: When the mouse pointer is hovered over an error or query row, it changes
to a hand if a hyperlink is available to the area of SIMS where the issue can be checked.
NOTE: A hyperlink is also indicated by a hash symbol (#) preceding the Solution text.
Click the appropriate hyperlink to display the specific SIMS area where the record(s) can be checked or corrected.
When the mouse pointer is hovered over a Message, Location or Solution cell, hover help displays the entire content of that cell.
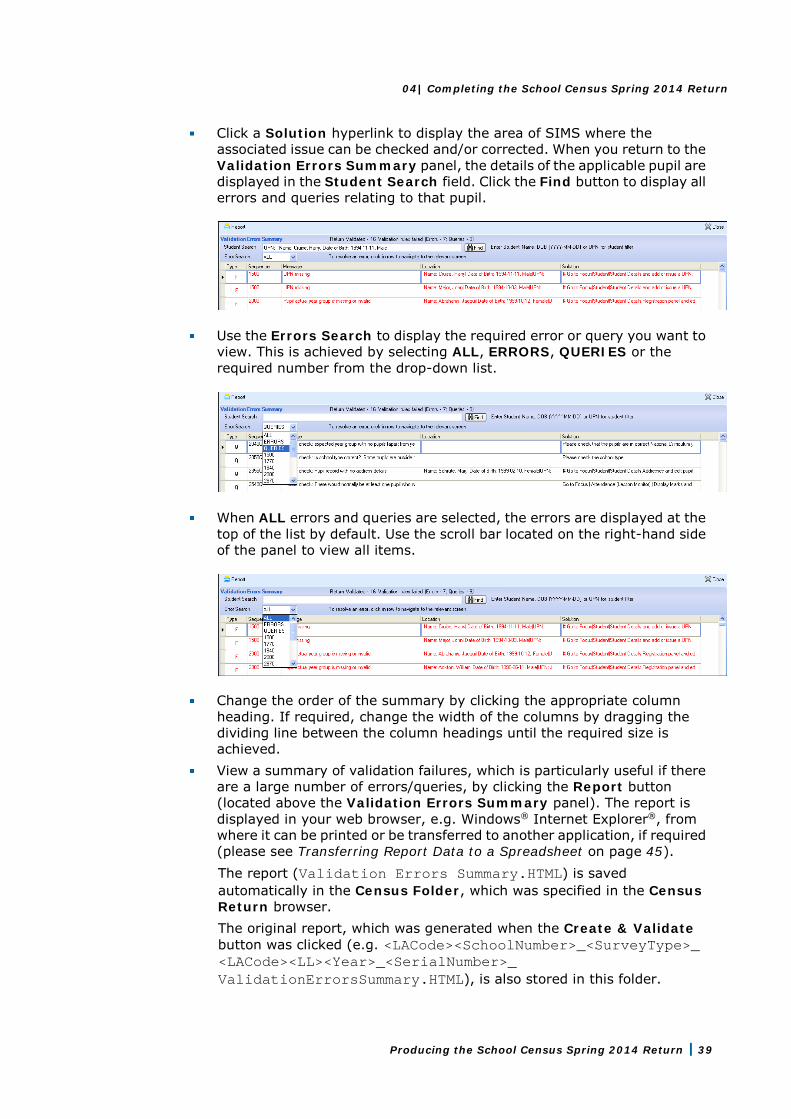
The Student Search functionality can be used to display all errors and queries relating to a particular pupil. Enter all or part of a UPN, pupil's surname or date of birth in the Student Search field then select the required record from the Student Search drop-down list and click the Find button.
04| Completing the School Census Spring 2014 Return
Producing the School Census Spring 2014 Return 39
Click a Solution hyperlink to display the area of SIMS where the associated issue can be checked and/or corrected. When you return to the Validation Errors Summary panel, the details of the applicable pupil are displayed in the Student Search field. Click the Find button to display all errors and queries relating to that pupil.
Use the Errors Search to display the required error or query you want to view. This is achieved by selecting ALL, ERRORS, QUERIES or the required number from the drop-down list.
When ALL errors and queries are selected, the errors are displayed at the top of the list by default. Use the scroll bar located on the right-hand side of the panel to view all items.
Change the order of the summary by clicking the appropriate column heading. If required, change the width of the columns by dragging the dividing line between the column headings until the required size is achieved.
View a summary of validation failures, which is particularly useful if there are a large number of errors/queries, by clicking the Report button (located above the Validation Errors Summary panel). The report is displayed in your web browser, e.g. Windows® Internet Explorer®, from where it can be printed or be transferred to another application, if required (please see Transferring Report Data to a Spreadsheet on page 45). The report (Validation Errors Summary.HTML) is saved automatically in the Census Folder, which was specified in the Census Return browser. The original report, which was generated when the Create & Validate button was clicked (e.g. <LACode><SchoolNumber>_<SurveyType>_ <LACode><LL><Year>_<SerialNumber>_ ValidationErrorsSummary.HTML), is also stored in this folder.
04| Completing the School Census Spring 2014 Return
40 Producing the School Census Spring 2014 Return
For guidance on navigating to files on your local workstation when you are working in a Hosted environment, please contact your System Manager or Local Support Unit.
Resolve as many errors and check as many queries as possible then revalidate the return details. Continue to resolve failures and revalidate the return as many times as necessary.
NOTE: All errors must be resolved and all queries must be investigated.
If at any point you wish to hide the list of error and queries, click the Close button located at the top right-hand side of the Validation Errors Summary panel. The list is displayed again when the Create and Validate process is run. Many of the errors generated can be fixed quickly using bulk update functionality (via Routines | Pupil | Bulk Update). For more information, please refer to the Managing Pupil/Students handbook. In addition to the Validation Errors Summary, an Errors and Resolutions document containing a list of all errors/queries that can be generated is being produced. Explanations and information on how to resolve the errors or whether the queries can be ignored are also included. The document can help to identify the order in which errors should be corrected. For example, if a UPN is missing, several UPN related errors might be generated. Therefore, adding missing UPNs can remove several errors. The Validation Errors and Resolutions document will be posted to the SupportNet website (http://support.capitaes.co.uk) as soon as it is complete.
More Information: Transferring Report Data to a Spreadsheet on page 45
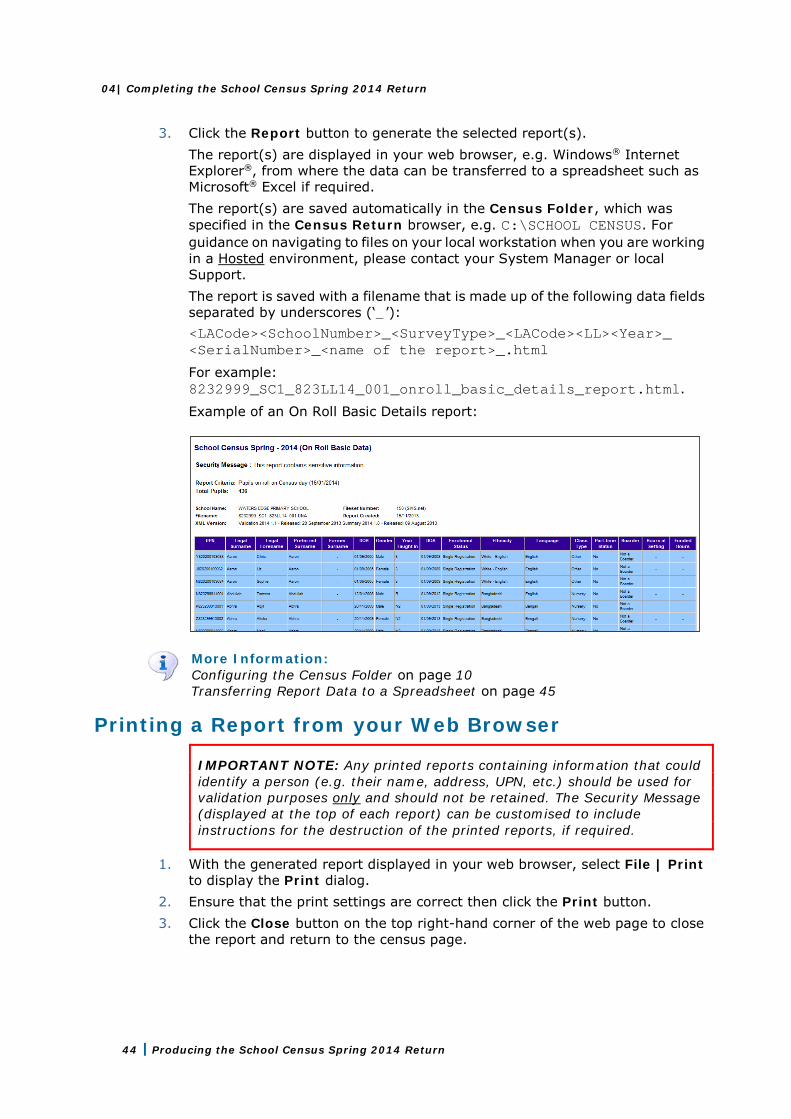
Producing Detail Reports Detail Reports can be used to check the data stored in SIMS that has been used to create the return. The reports can be produced as soon as the return has been validated. Each detail report header displays the Security Message that was defined in the Census Return browser, the Report Criteria and the Total Pupils that are listed in the report. Also shown at the top of the report is the School Name, the Fileset Number, the Filename, the Report Created date, and the XML Version. The following reports are currently available:
On Roll Basic Details Report Report Criteria: Pupils on-roll on census day. This report provides basic information about the pupils, e.g. UPN, full name, date of birth, gender, year taught in, date of admission, enrolment status, ethnicity, language, class type, part-time status, boarder status, hours at setting and funded hours.
04| Completing the School Census Spring 2014 Return
Producing the School Census Spring 2014 Return 41
Leavers Basic Details Report Report Criteria: Report Criteria: Pupils not on-roll on census day:
Leavers with attendance 1 term ago (01/08/2013 - 31/12/2013). Leavers with exclusions 2 terms ago (01/04/2013 - 31/08/2013).
This report provides basic information about leavers, e.g. UPN, former UPN, full name, date of birth, gender, date of admission, date of leaving, ethnicity, language, part-time status, boarder status, attendance and exclusions.
Exclusions Report Report Criteria: Pupils with exclusions two terms ago, i.e. 01/04/2013 to 31/08/2013 (on-roll and leavers but not exclusions with appeal result of Reinstated or Not in the best interests of the child). This report provides details relating to pupils who have been excluded from school: UPN, legal surname, legal forename, date of birth, gender, date of admission, exclusion category, reason for exclusion, exclusion start date, number of sessions excluded from, in care status, SEN provision and on-roll status.
Attendance Report Report Criteria: Pupils with attendance one term ago (on-roll and leavers aged 4 to 15 at 31/ 08/2012 but not boarders). This report provides each pupil's basic attendance information for the Autumn term: UPN, legal surname, legal forename, date of birth, gender, the year taught in, the number of possible sessions, the number of sessions absent and their on-roll status. The number of each attendance code (divided into authorised and unauthorised sections) is displayed and the total of each code is shown at the end of each column. An indication of whether attendance is not required is also shown. A list of the attendance codes and there descriptions are displayed at the bottom of the report.
Absentees Report Report Criteria: Pupils who are missing 22 or more sessions and therefore may be at risk of becoming persistent absentees, including those who are already persistent absentees with 46 or more sessions absent (non-boarders, on-roll and leavers aged 5 -15 on 31 August). Also, pupils who have missed 14 sessions and whose absence may need to be tracked. This report provides information regarding the number of sessions possible and the number of sessions that the pupil was absent from (authorised plus unauthorised). Also, displayed is the pupil's UPN, legal surname, legal forename, date of birth, gender, year taught in, on-roll status and enrolment status.
04| Completing the School Census Spring 2014 Return
42 Producing the School Census Spring 2014 Return
SEN Report Report Criteria: Pupils with SEN Provision/Status = A (School Action or Early Years Action), P (School Action Plus or Early Years Action Plus) and S (Statement). This report provides a list of pupils who have special educational needs. Displayed are their UPN, name, date of birth, gender, year taught in, SEN Provision, SEN type ranking, SEN type, member of SEN unit indicator, member of resourced provision indicator and on-roll status.
Address Details Report Report Criteria: Pupils on-roll on census day. This report provides a list of pupil addresses, together with their UPN, Former UPN (if applicable) and full name. The report also includes the administrative area/county if recorded in SIMS.
Free School Meal Eligibility Report Report Criteria: On-roll pupils on census day who are eligible for Free School Meals on or after 04/10/2013 and up to and including census day (16/01/2014). This report provides information about pupils who are eligible for free school meal. The report displays the pupil's UPN, legal surname, legal forename, date of birth, gender, year taught in and on-roll status. Also shown are their free school meal eligibility start date, end date and the UK country in which the eligibility applies.
Top-up Funding Report Report Criteria: On-roll pupils who have been awarded Top-up Funding as at census day. The following information is displayed on the report: UPN, legal surname, legal forename, date of birth, gender, year actual and SEN provision status.
Adopted from Care Report Report Criteria: On-roll pupils who have been adopted from care as at census day. The report displays the following information about pupils who have been adopted from care: UPN, legal surname, legal forename, date of birth, gender, year actual, SEN provision and adopted from care status, e.g. ceased to be looked after through a residence order (RO).
Class Report Report Criteria: Classes at the selected period on census day. This report provides class information, i.e. the class name, number of pupils in class (on-roll and guests), number of staff (teachers and support staff), year taught in, class type, key stage and activity. Displayed at the bottom of this report is the pupil reconciliation data:
part-time pupils not at school private study pupils pupils at another school total pupils not in class at selected period.
04| Completing the School Census Spring 2014 Return
Producing the School Census Spring 2014 Return 43
General Report Report Criteria: Free school meals taken on census day and admissions appeals during the 2011/2012 academic year. Where applicable, this report provides information about:
free school meals taken on census day. all appeals against a refusal to admit a pupil to the School,
where the request was for a place during the 2012/2013 academic year admission appeals for Infant classes.
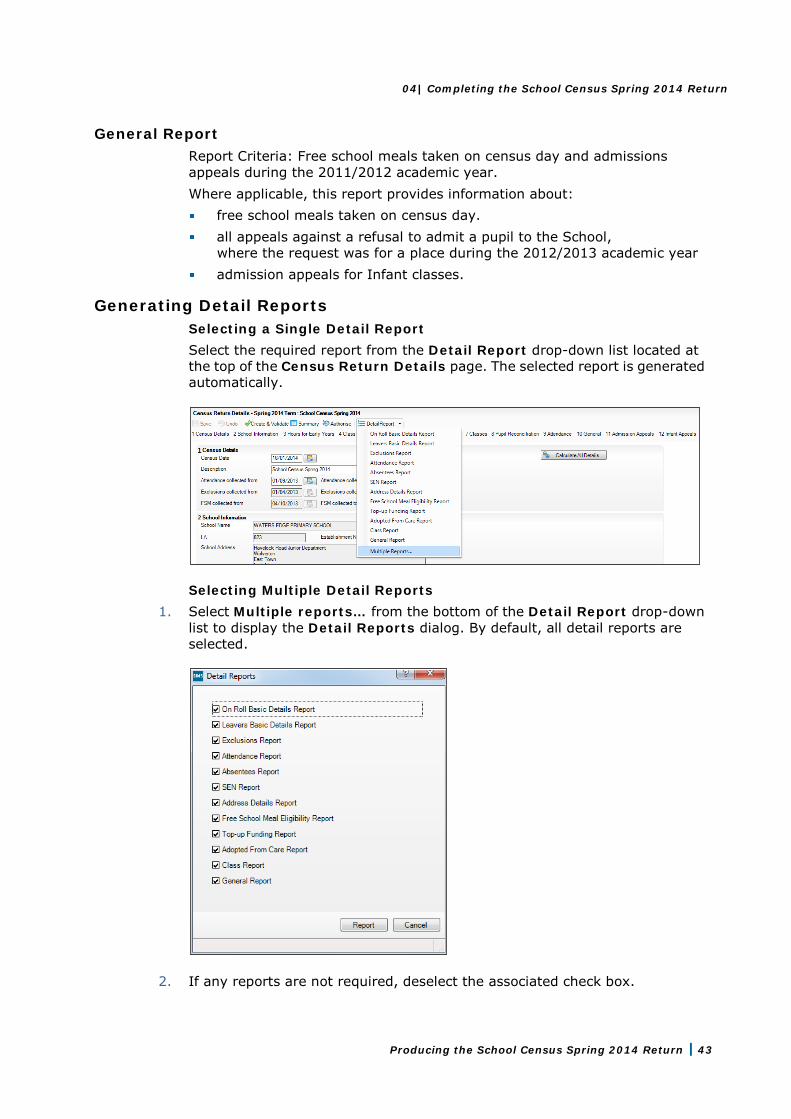
Generating Detail Reports Selecting a Single Detail Report Select the required report from the Detail Report drop-down list located at the top of the Census Return Details page. The selected report is generated automatically.
Selecting Multiple Detail Reports 1. Select Multiple reports… from the bottom of the Detail Report drop-down
list to display the Detail Reports dialog. By default, all detail reports are selected.
2. If any reports are not required, deselect the associated check box.
04| Completing the School Census Spring 2014 Return
44 Producing the School Census Spring 2014 Return
3. Click the Report button to generate the selected report(s). The report(s) are displayed in your web browser, e.g. Windows® Internet Explorer®, from where the data can be transferred to a spreadsheet such as Microsoft® Excel if required. The report(s) are saved automatically in the Census Folder, which was specified in the Census Return browser, e.g. C:\SCHOOL CENSUS. For guidance on navigating to files on your local workstation when you are working in a Hosted environment, please contact your System Manager or local Support. The report is saved with a filename that is made up of the following data fields separated by underscores (‘_’): <LACode><SchoolNumber>_<SurveyType>_<LACode><LL><Year>_ <SerialNumber>_<name of the report>_.html
For example: 8232999_SC1_823LL14_001_onroll_basic_details_report.html.
Example of an On Roll Basic Details report:
More Information: Configuring the Census Folder on page 10 Transferring Report Data to a Spreadsheet on page 45
Printing a Report from your Web Browser
IMPORTANT NOTE: Any printed reports containing information that could identify a person (e.g. their name, address, UPN, etc.) should be used for validation purposes only and should not be retained. The Security Message (displayed at the top of each report) can be customised to include instructions for the destruction of the printed reports, if required.
1. With the generated report displayed in your web browser, select File | Print to display the Print dialog.
2. Ensure that the print settings are correct then click the Print button. 3. Click the Close button on the top right-hand corner of the web page to close
the report and return to the census page.
04| Completing the School Census Spring 2014 Return
Producing the School Census Spring 2014 Return 45
Transferring Report Data to a Spreadsheet Transferring a report to a spreadsheet application enables the data to be sorted, the column order to be changed, etc. In your web browser, right-click the report then select the required option, e.g. Export to Microsoft Excel, from the drop-down list. The spreadsheet contains the same level of sensitive information as the original HTML report from which it was transferred therefore, it is important that the file is saved to a folder with the same level of security.
Deleting Temporary Web Browser Files It is recommended that, after viewing statutory returns reports, you delete any temporary web browser files to ensure that any cached data (i.e. data stored on the PC itself, which enables high-speed access to previously viewed data) is removed. This prevents the information, e.g. copies of web pages that are stored in the local cache for faster viewing, remaining on the hard disk of the PC in the temporary directory, where they are unsecure because they can still be accessed.
Deleting the cache in Windows Internet Explorer 8 and 9 1. Click the Tools button located on the far right-hand side of the toolbar. 2. Select Internet options from the drop-down list to display the Internet
Options dialog. 3. Select the General tab. 4. In the Browsing history section, click the Delete... button to display the
Delete Browsing History dialog. 5. Ensure that the Temporary Internet Files check box is selected then click
the Delete button. All temporary files (including any Statutory Returns reports files) that the browser has cached are deleted.
6. Click the OK button.
Deleting the cache in Windows Internet Explorer 7 1. Click the Tools button located on the far right-hand side of the toolbar. 2. Select Delete Browsing History… from the drop-down list to display the
Delete Browsing History dialog. 3. Click the Temporary Internet Files Delete files… button to display the
following message: Are you sure you want to delete all temporary Internet Explorer Files?
4. Click the Yes button to delete all the files held in the local cache on the PC. If a different web browser is in use, please refer to the help file available with that software package.
04| Completing the School Census Spring 2014 Return
46 Producing the School Census Spring 2014 Return
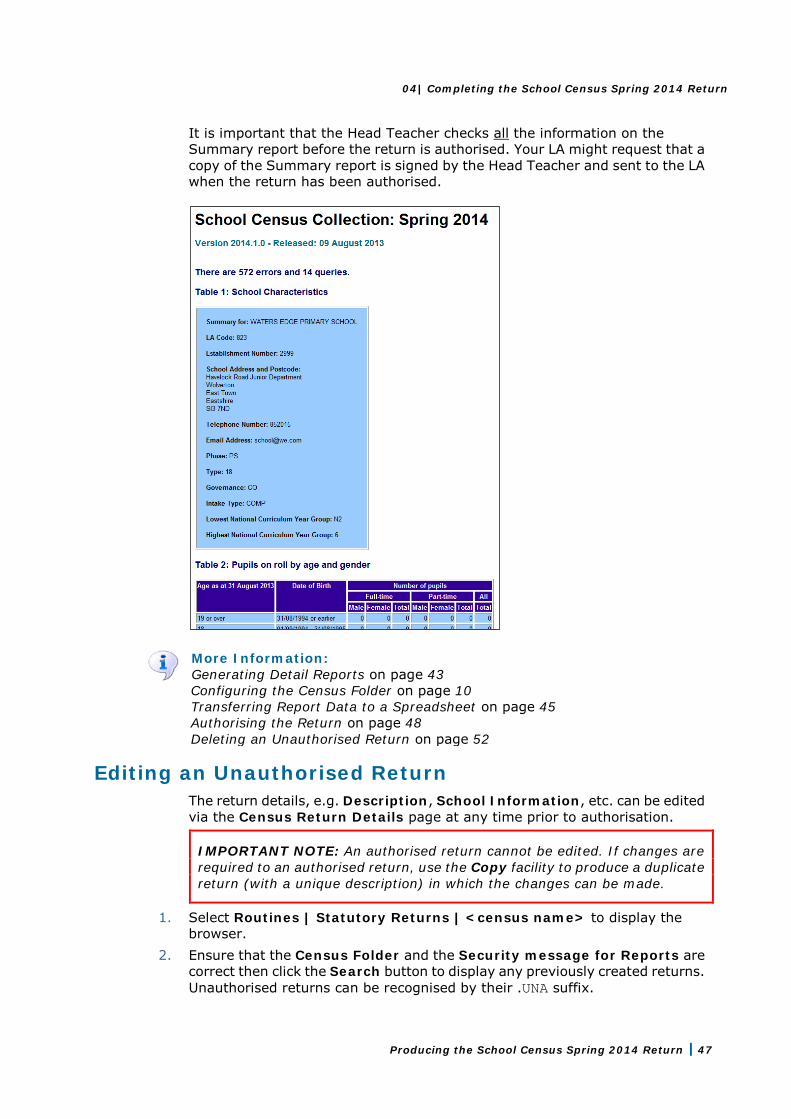
Producing the Summary Report The Summary report enables the accuracy and completeness of the return to be assessed by the school staff involved in preparing the return. It can also be used to assist the Head Teacher in the checking of data before authorising the return.
NOTE: When the return is authorised, the Summary report is automatically generated and displayed in your web browser, e.g. Windows® Internet Explorer.
Generating the Summary Report Click the Summary button located at the top of the Census Return Details page. The report is automatically displayed in your web browser, e.g. Windows® Internet Explorer®, but can be transferred to a spreadsheet such as Microsoft® Excel if required. The report is saved automatically in the Census Folder, which was specified in the Census Return browser, e.g. C:\SCHOOL CENSUS. For guidance on navigating to files on your local workstation when you are working in a Hosted environment, please contact your System Manager or Local Support Unit. The report is saved with a filename that is made up of the following data fields separated by underscores (‘_’): <LACode><SchoolNumber>_<SurveyType>_<LACode><LL><Year>_ <SerialNumber>_<name of the report>_.html
For example: 8232999_SC1_823LL14_001_Summary_Report.html.
04| Completing the School Census Spring 2014 Return
Producing the School Census Spring 2014 Return 47
It is important that the Head Teacher checks all the information on the Summary report before the return is authorised. Your LA might request that a copy of the Summary report is signed by the Head Teacher and sent to the LA when the return has been authorised.
More Information: Generating Detail Reports on page 43 Configuring the Census Folder on page 10 Transferring Report Data to a Spreadsheet on page 45 Authorising the Return on page 48 Deleting an Unauthorised Return on page 52
Editing an Unauthorised Return The return details, e.g. Description, School Information, etc. can be edited via the Census Return Details page at any time prior to authorisation.
IMPORTANT NOTE: An authorised return cannot be edited. If changes are required to an authorised return, use the Copy facility to produce a duplicate return (with a unique description) in which the changes can be made.
1. Select Routines | Statutory Returns | <census name> to display the browser.
2. Ensure that the Census Folder and the Security message for Reports are correct then click the Search button to display any previously created returns. Unauthorised returns can be recognised by their .UNA suffix.
04| Completing the School Census Spring 2014 Return
48 Producing the School Census Spring 2014 Return
3. Double-click the required return. Alternatively, highlight the required return then click the Open button to display the Census Return Details page.
4. Edit the return details as required, then click the Save button. 5. Click the Create & Validate button to display the Validation Errors
Summary panel. 6. Resolve any errors and check any queries before running the Summary report
and detail reports to ensure that the information is correct. 7. Repeat the editing process again, if necessary.
More Information: Configuring the Census Folder on page 10 Specifying the Security Message for Reports on page 11 Resolving Validation Errors and Checking Queries on page 37 Producing Detail Reports on page 40 Producing the Summary Report on page 46
Authorising the Return A return must be authorised before it can be submitted to your Local Authority or uploaded to the DfE COLLECT data collection website (as applicable to your school). Before authorising the return, you should ensure that all the information displayed on the Census Return Details page is correct and does not require further editing. This is best achieved by reviewing the Summary report.
1. Click the Authorise button. If missing marks exist, the following message is displayed.
2. Click the Yes button to continue with the authorisation process or the No button if you want to return to SIMS where the missing marks can be entered. If you choose to continue, a message reminds you that the return cannot be edited once it is authorised.
3. Click the Yes button to continue or the No button to return to SIMS where edits can be made to the data before authorising.
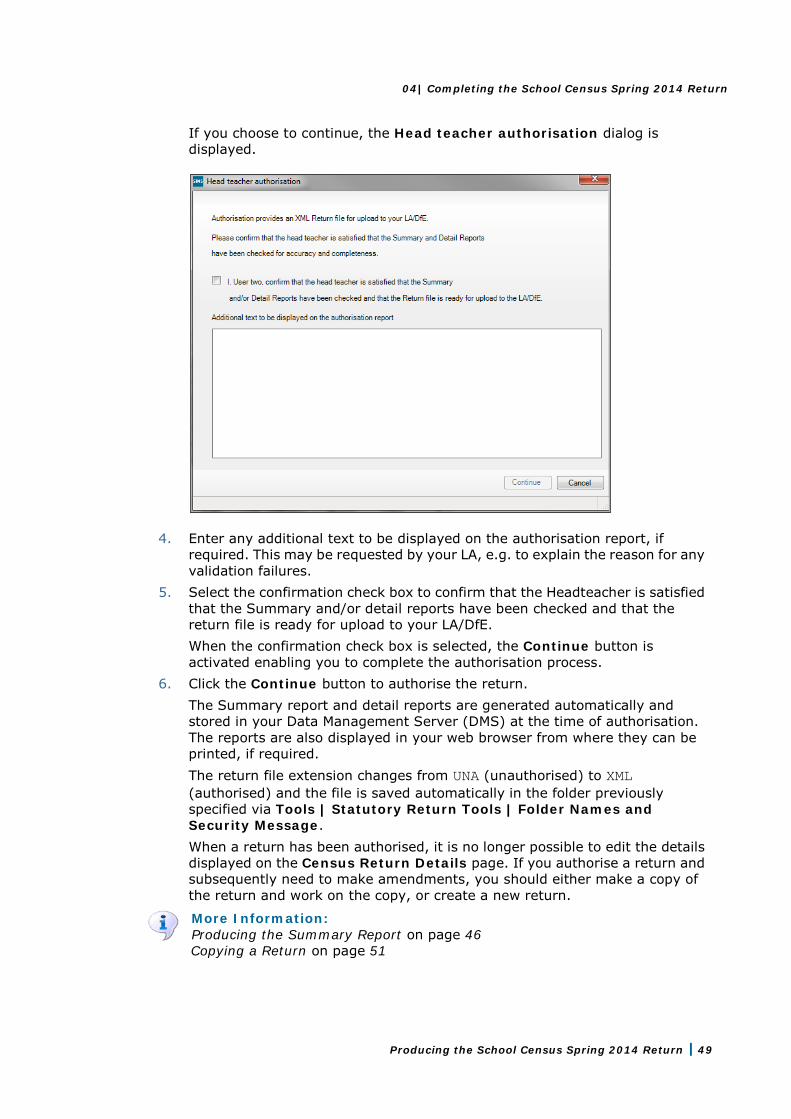
04| Completing the School Census Spring 2014 Return
Producing the School Census Spring 2014 Return 49
If you choose to continue, the Head teacher authorisation dialog is displayed.
4. Enter any additional text to be displayed on the authorisation report, if required. This may be requested by your LA, e.g. to explain the reason for any validation failures.
5. Select the confirmation check box to confirm that the Headteacher is satisfied that the Summary and/or detail reports have been checked and that the return file is ready for upload to your LA/DfE. When the confirmation check box is selected, the Continue button is activated enabling you to complete the authorisation process.
6. Click the Continue button to authorise the return. The Summary report and detail reports are generated automatically and stored in your Data Management Server (DMS) at the time of authorisation. The reports are also displayed in your web browser from where they can be printed, if required. The return file extension changes from UNA (unauthorised) to XML (authorised) and the file is saved automatically in the folder previously specified via Tools | Statutory Return Tools | Folder Names and Security Message. When a return has been authorised, it is no longer possible to edit the details displayed on the Census Return Details page. If you authorise a return and subsequently need to make amendments, you should either make a copy of the return and work on the copy, or create a new return.
More Information: Producing the Summary Report on page 46 Copying a Return on page 51
04| Completing the School Census Spring 2014 Return
50 Producing the School Census Spring 2014 Return
Post Authorisation Reports The Validation Errors Summary report, the Summary report and the Authorisation report are automatically generated and displayed in your web browser at the point of authorisation. The file extension of the authorised return file changes from .UNA (unauthorised) to .XML (authorised) and is saved together with all detail reports in the folder previously specified in the Census Return browser. All reports can be viewed via Tools | Statutory Return Tools | Retrieve Authorised Census Return Files. This routine also provides the opportunity to download the files to a different folder.
IMPORTANT NOTE: Ensure that authorised personnel only have access to the download folder because the retrieved files contain sensitive information.
More Information: Retrieving Authorised Census Return Files on page 50
Submitting the Return
WARNING: The School Census Autumn 2013 Return must be completed and accepted by the authorising body before upgrading to the SIMS Autumn 2013 Release (7.154). The functionality that enabled the 2013 School Census returns to be created is removed when the SIMS 2013 Autumn Release (7.154) is applied.
When the return has been completed and the Summary report has been signed by the Head Teacher (if requested to do so by your LA), the .XML file can be uploaded to the DfE COLLECT data collection website or sent to your LA, depending on the instructions you have been given. The authorised return file is located in the folder previously specified in the return browser. For guidance on navigating to files on your local workstation when you are working in a Hosted environment, please contact your System Manager or Local Support Unit.
IMPORTANT NOTE: An authorised file cannot be edited. If you need to make changes to an authorised file, you must make a copy of the original file, rename it and work on the copy.
Retrieving Authorised Census Return Files Authorised returns are stored in your Document Management Server (DMS). The Returns Manager can download and run the reports associated with previous authorised returns enabling the data for the current return to be compared with that submitted previously.
1. Select Tools | Statutory Returns Tools | Retrieve Authorised Census Return Files to display the Retrieve Authorised Return Files for <census name> page.
04| Completing the School Census Spring 2014 Return
Producing the School Census Spring 2014 Return 51
2. Select the type of census required from the Return Type drop-down list to display a list of previous returns that match the selected criteria.
3. By default, the files Download to the folder specified in the census browser. To specify a different folder: a. Click the Select a Folder button (...) to display a standard Windows® Browse
For Folder dialog. b. Navigate to the location of the required folder then highlight it. If a suitable
folder does not exist, click the Make New Folder button then enter a suitable name for the new folder.
IMPORTANT NOTE: Ensure that authorised personnel only have access to the download folder because the retrieved files contain sensitive information.
For guidance on navigating to files on your local workstation when you are working in a Hosted environment, please contact your System Manager or local Support.
c. Click the OK button to select or create the folder then return to the Retrieve Authorised Return Files for <census name> page where the chosen folder name is displayed in the Download to field.
4. Highlight the return you wish to retrieve then click the Retrieve Files button. The authorised return file (i.e. the XML file) and all reports associated with the selected return are downloaded from your DMS to the specified folder. The folder and its contents are then displayed automatically, enabling you to open the required files in your web browser.
5. The contents of the specified folder can be viewed again by clicking the Folder button adjacent to the Download to field.
Copying a Return An unauthorised return can be copied and saved as a new return. This enables a ‘snapshot’ of a return to be taken at any time providing a backup of any manual changes that have been made to the return, for example before recalculating details. This functionality can also be used to make a copy of an authorised return if the LA or DfE requires it to be resubmitted. The necessary corrections can then be made to the data. The copied return must be saved, created, validated and authorised before resubmitting.
NOTE: Ensure that the return you wish to replicate is not open at the time of copying.
1. Select Routines | Statutory Returns | <name of census> to display the census browser.
2. Click the Search button to ensure that the list of returns is displayed. 3. Highlight the file you wish to copy then click the Copy button.
A message requests confirmation that you wish to make a copy of the selected return.
04| Completing the School Census Spring 2014 Return
52 Producing the School Census Spring 2014 Return
4. Click the Yes button to make the copy, which is then displayed in the browser as: Copy of <description of selected file>.
5. To rename the copied return, highlight it then click the Open button to display the Return Details page.
6. In the Census Details panel, edit the Description then click the Save button.
IMPORTANT NOTE: The new Description must be unique for this return. SIMS will not save the data if a duplicate return description is found.
Deleting an Unauthorised Return During the return process, a number of copies of the return may be created, e.g. to track progress. When the return has been authorised successfully, it is advisable to delete any versions of the return that are no longer required. This keeps the number of files in the storage folder and listed in the browser to a minimum, therefore removing confusion and lessening the risk of selecting the wrong return. The delete routine can be used to remove unwanted returns at any time prior to the relevant return being authorised.
IMPORTANT NOTES: When a return file is deleted, any associated files, e.g. Validation Errors Summary, detail reports, etc. that have been produced are also deleted. The return files that have already been authorised cannot be deleted.
1. Select Routines | Statutory Returns | <Return name> to display the browser.
2. Click the Search button to ensure that the list of return files is displayed. 3. Highlight the return file to be deleted then click the Delete button. A message
prompts for confirmation that the selected return should be deleted. 4. Click the Yes button to permanently delete the selected return file and all
associated report files. The deleted return file is removed from the browser and the storage folder, along with any associated reports.
I| Index
Producing the School Census Spring 2014 Return 53
Index A access rights ......................................... 5 adopted from care ............................... 24 authorising ......................................... 48
retrieving previous authorised census returns ......................................... 50
school census ................................... 48
C calculating all details ............................ 12 class types
updating .......................................... 18 configuring
school census defaults ....................... 10 copying
school census return ......................... 51
D data collected
school level ........................................ 6 pupil level ....................................... 7
default folder defining ........................................... 11
deleting school census return ......................... 52 temporary web browser files .............. 45
detail reports producing ........................................ 40 transferring to a spreadsheet ............. 45
E editing
an unauthorised return ...................... 47 errors and queries (validation)
resolving ......................................... 37
F funded hours
no hours recorded ............................. 18
updating ....................................... 2, 15
H hours at setting
no hours recorded ............................. 18 updating ....................................... 2, 15
P permissions .......................................... 5 preparation
minimum version of SIMS .................... 6 permissions........................................ 5
previous authorised census returns ........ 50 printing
reports ....................................... 44, 50 validation errors summary ................. 37
pupil reconciliation ............................... 28
Q queries and errors (validation)
resolving ......................................... 37
R reconciliation
pupil reconciliation ............................ 28 reporting
deleting temporary web browser files .. 45 producing detail reports ..................... 40
generating detail reports ................. 43 reports
absentees report ......................... 41 address details report .................. 42 adopted from care report ............. 42 attendance report........................ 41 free school meal eligibility report ... 42 general report ............................. 43 leavers basic details report ........... 41 on-roll basic details report ............ 40 top-up funding report .................. 42
specifying security message ............... 11 resolving
errors and queries ............................ 37 retrieving
authorised census return files ............. 50
I| Index
54 Producing the School Census Spring 2014 Return
S school census return
authorising ...................................... 48 configuring the storage folder ............. 10 copying ........................................... 51 deleting ........................................... 52
security deleting temporary files ..................... 45 specifying security message ............... 11
SIMS version required to create return .......... 6
steps to producing the return flowchart ........................................... 3
submitting the return ........................... 50 summary report
printing ........................................... 44 producing ........................................ 46
T temporary web browser files
deleting ........................................... 45 top-up funding .................................... 21 transferring
report data to a spreadsheet .............. 45
U unauthorised return
copying ........................................... 51 deleting ........................................... 52 editing ............................................. 47
updating adopted from care ............................ 24 class types ....................................... 18 hours for early years children .......... 2, 15 top-up funding ................................. 21
V validation failures
resolving ......................................... 37