procedures - fema - emergency management institute …training.fema.gov/devres/docs/lcms...
TRANSCRIPT

Learning Content Management System (LCMS) ProceduresLast Updated: 4/3/18
ContentsProcedures..................................................................................................................................................3
Course Structure/Hierarchy.....................................................................................................................3
Developing Course Structure/Hierarchy (IS and ILT)............................................................................3
Create a Single Screen/PPT Slide (IS and ILT).......................................................................................4
Add Instructor Guide Specific Content(R)............................................................................................5
Mark Content for Appropriate Output (IS and ILT)..............................................................................6
Add Textual Content to Your Discussion Point (IS and ILT)......................................................................6
Add a Description Element to Your Screen/PPT Slide..........................................................................6
Add a Bulleted List to a Discussion Point (IS and ILT)...........................................................................6
Adding Media..........................................................................................................................................7
Importing Media into the LCMS (IS and ILT)........................................................................................7
Add Images to a Page (Discussion Point).............................................................................................8
Add Audio to a Screen (IS)...................................................................................................................9
Add a Video to Your Screen/Slide (IS and ILT).....................................................................................9
Adding PDFs or Other Documents to a Course (ILT)..........................................................................11
Creating Links........................................................................................................................................12
Create Pop-Up Content (IS)...............................................................................................................12
Add a Link to an Element (IS or ILT)...................................................................................................12
Create a Printable Summary (IS)........................................................................................................13
Assessments..........................................................................................................................................14
Text Area (IS).....................................................................................................................................14
Matching Assessment Element (IS or ILT)..........................................................................................15
Multiple Choice Multiple Answer (MCMA) Assessment Element (IS or ILT)......................................16
Multiple Choice Single Answer (MCSA) Assessment Element (IS or ILT)............................................17
Ordering Assessment Element (IS or ILT)...........................................................................................17
True/False Assessment Question (IS or ILT).......................................................................................18
1
Self-Assessment Page (IS)..................................................................................................................19
Activity Page (IS)................................................................................................................................19
Reusing Content....................................................................................................................................20
Searching – Finding Content to Reuse...............................................................................................20
Paste..................................................................................................................................................20
Paste as Link......................................................................................................................................21
Positioning Elements within a Page (Discussion Point)..........................................................................21
Using Layouts (IS)...............................................................................................................................21
Positioning Media and PPT Layout (IS and ILT)..................................................................................22
Special Screens......................................................................................................................................22
Course Overview (IS).........................................................................................................................22
Lesson Overview (IS)..........................................................................................................................23
Screen Features, Navigating Using Your Keyboard, Receiving Credit (IS)..........................................23
Lesson Summary (IS)..........................................................................................................................24
Exam Page (IS)...................................................................................................................................24
Appendix A: Alt Text..................................................................................................................................25
Independent Study Image:....................................................................................................................25
Instructor Led Image:............................................................................................................................25
SendMeSummary Function...................................................................................................................25
Media Element – Source View...............................................................................................................25
2

ProceduresProcedures for adding various types of content can be found below. All Procedures include information regarding whether it can be applied to Independent Study (IS) or Instructor Led Training (ILT) within the course title. For instance, if a procedure’s title includes “(IS or ILT)” it applies to either Independent Study or Instructor Led courses.
Some of the procedures include information about EMI Specific Requirements; however, please review the “EMI LCMS Developer Requirements” document found here: http://training.fema.gov/devres/lcmssupport.aspx for a complete list of requirements.
Course Structure/HierarchyDeveloping Course Structure/Hierarchy (IS and ILT)
1. Begin in the Web Authoring tool2. Drag a Course Object from the Objects Palette to the Center Pane3. In the far right pane, change to General view4. Add a label (Course code + Course Name) to your new course and then click Save in the upper
left corner 5. Drag a Module from the Objects Palette to the Center Pane (underneath of your new course).*6. With your new module selected, follow similar procedures to steps 3 & 4, again giving the
module the same label as the course. 7. Drag and drop a Unit underneath your new module.**8. Change the label of the unit to reflect the lesson (Lesson # + Lesson Name)9. Drag a lesson underneath of your unit. Give the lesson the same name as the unit.10. Add page level objects as necessary. The Discussion Point object can be used for every page
required in the lesson. 11. Add any number of elements under each discussion point. The elements include textual, rich
media, and assessment objects. This is where the actual content is. See specific guidelines for using different elements.
Example Structure
o Look at IS-1110 and L0205 in the LCMS as examples of the proper structures or see screenshots below.
3

IS Example: Instructor Led Example:
Additional Information
* - If a course does not need to be broken up into modules, simply create a single module under the course level using the above naming conventions. Everything else in the course will go underneath of this single module.
** - Each lesson should be created at the unit level and then directly under it at the lesson level as well. The unit and lesson will have the same name/label. Example: if there are 3 lessons in your course, you would create 3 units with a single lesson under each.
Create a Single Screen/PPT Slide (IS and ILT)Each screen in and Independent Study course or PPT slide in an instructor led course can be represented in the LCMS by a single Discussion Point. In addition to the slide content, instructor led courses may also contain an Instructor Note or a Student Note. These notes would be included under the same Discussion Point as the slide contents.
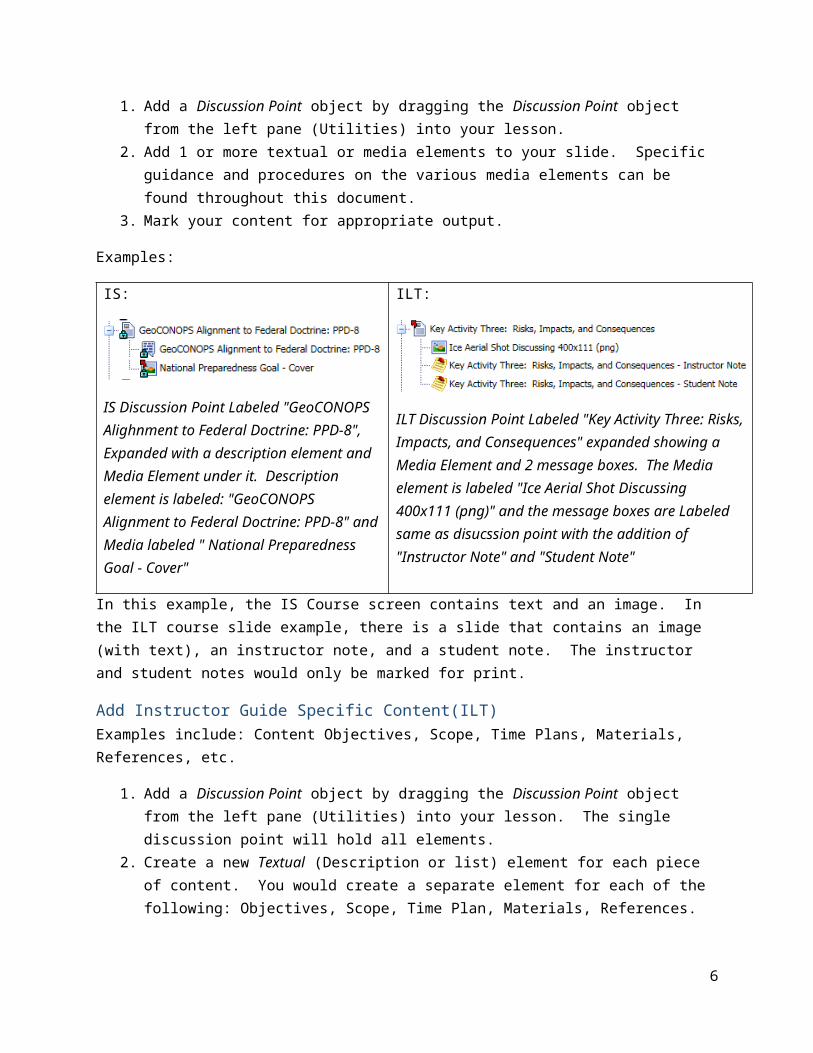
1. Add a Discussion Point object by dragging the Discussion Point object from the left pane (Utilities) into your lesson.
2. Add 1 or more textual or media elements to your slide. Specific guidance and procedures on the various media elements can be found throughout this document.
3. Mark your content for appropriate output.
Examples:
4

IS:
IS Discussion Point Labeled "GeoCONOPS Alighnment to Federal Doctrine: PPD-8", Expanded with a description element and Media Element under it. Description element is labeled: "GeoCONOPS Alignment to Federal Doctrine: PPD-8" and Media labeled " National Preparedness Goal - Cover"
ILT:
ILT Discussion Point Labeled "Key Activity Three: Risks, Impacts, and Consequences" expanded showing a Media Element and 2 message boxes. The Media element is labeled "Ice Aerial Shot Discussing 400x111 (png)" and the message boxes are Labeled same as disucssion point with the addition of "Instructor Note" and "Student Note"
In this example, the IS Course screen contains text and an image. In the ILT course slide example, there is a slide that contains an image (with text), an instructor note, and a student note. The instructor and student notes would only be marked for print.
Add Instructor Guide Specific Content(ILT)Examples include: Content Objectives, Scope, Time Plans, Materials, References, etc.
1. Add a Discussion Point object by dragging the Discussion Point object from the left pane (Utilities) into your lesson. The single discussion point will hold all elements.
2. Create a new Textual (Description or list) element for each piece of content. You would create a separate element for each of the following: Objectives, Scope, Time Plan, Materials, References. Add each to the Discussion Point and label each element appropriately.
3. Specify Output for Print only, IG, and possibly SM. See “Mark Content for Appropriate Output” section of this document for additional information.
4. Add your text to each element via the Design tab or Source tab. See the “Add Textual Content to Your Discussion Point” section of this document for additional information.
You may repeat similar steps for each unit/lesson. Consider the way that these are written and ways that you may be able to re-use them in other sections of the course.
Example structure:
5
Structure Image full text: ILT Example of an expanded lesson. The lesson label is "E0210 Unit 1: Introduction to Recovery Concepts". A single discussion point labeled: "E0210 Objectives and Scope" is expanded with Textual elements labeled “L0205 Unit 1 Objectives,” E0210 Unit 1 Scope,” “E0210 Time Plan,” “E0210 Unit 1 Materials and Equipment,” “L0205 Unit 1 Audiovisuals,” “E0210 References”
Mark Content for Appropriate Output (IS and ILT)Content can be marked for Print (IG and SM), PPT, or Web output at the Element level (below discussion point). Each element must be marked individually.
1. Select your element in the center (Structure) pane2. Change the right-hand (Details Top) pane to the General tab. 3. Modify the Output by selecting or deselecting them (green means selected)
4. Expand the Print Output under the Metadata area and mark appropriately for Instructor Guide
and Student Manual 5. Click Save at the top left side of the screen.
Add Textual Content to Your Discussion Point (IS and ILT)Add a Description Element to Your Screen/PPT SlideThis assumes a discussion point has already been created.
1. In the left hand (Utilities) pane, change to Objects Palette if it is not already selected.2. Expand the Textual section of the Objects Palette
3. Drag a Description element from the textual section of the left pane and drop it in the discussion point.
4. Change the label appropriately under the General tab in the right (Details Top) pane.5. Click the save button in the upper left corner.
6. Click on General in the right pane (Details Top) and change that to Design tab.7. Add a title and text (format appropriately) using this Design pane.8. Click the save button in the upper left corner.
Add a Bulleted List to a Discussion Point (IS and ILT)This assumes a discussion point has already been created.
1. Expand the Textual section of the Objects Palette
2. Drag a List element from the textual section of the left pane and drop it in the discussion point.
6

3. Select the list element that was created in step 2, change the 3rd (rightmost) pane to General
4. Change the label appropriately.5. Click the save button in the upper left corner.
6. Change from General to Source in the rightmost pane. 7. Optional: Add a title and text8. Choose the Type of list (Blank, Bullets, Letters, Numbers)9. For each bulleted list item, add text.
10. If you need to add another Item click the Add icon: and then repeat step 9.11. Optional: Add Text to the Bottom Text area if you would like additional text to be displayed
under the list.12. Click the save button in the upper left corner.
Additional Information:
Switch between List elements using the previous and next buttons Add sub-lists by using html code in a single list element:
Delete a list element by clicking the Delete Icon You May also choose to use the Design view to modify a list. Similar options can be found by
right clicking a list element in the Design view. You may create lists within a Description element instead of a List element if you choose to do
so. Simply use one of the list options in the Design tab of the Description element: or add the html in the Source tab.
Adding MediaImporting Media into the LCMS (IS and ILT)Media includes Images (png, jpg, gif), Videos (mp4), Closed Captioning (vtt or srt), and additional documents (pdf, doc, docx, xls, xlsx).
1. In the left-hand (Utilities) pane change to Media Search2. Click Create New Media Object from the bottom left under Media Tasks
7

3. Click browse and locate the media file on your local computer4. Click Next5. The following fields must be filled out:
a. Label – The label is the name that will be displayed when someone searches for this in the LCMS. The label must contain a short description, the image size in pixels (width by height), and the file extension. See example:
b. Alt Text – Complete alt text required. If words are within the image, all words must be included in the alt text. There is a 250 character limit.
c. Category - Always choose “EMI Media Category”d. Description – Use something similar to the alt text. The system only allows about 3 lines
of text thoughe. Search Keys – separate by commas. These are additional ways to find the image in the
system6. Click Next7. Click Finish
Add Images to a Page (Discussion Point)This assumes a discussion point has already been created.
1. In the leftmost pane (Utilities), expand the Rich Media section
2. Drag and drop the Media element from this section to your Discussion Point.3. Select/highlight the media element. 4. With General opened in the 3rd (Details Top) pane, change the label of the new media element.
5. Change from General to Source in the rightmost pane. 6. Click the magnifying glass next to the Media label.
7. If the image is already in the system, continue onto step 8. If it is not yet in the system, follow the “Importing Media into the LCMS” procedures found within this document.
8. Search for the media by entering key words or part of the label in the upper left corner of the dialog box and then click on the magnifying glass.
9. Select the appropriate image from the results by clicking on it and then choosing OK at the bottom right of the dialog.
10. Click the save icon in the upper left corner.
8

Add Audio to a Screen (IS)This assumes a discussion point has already been created. Please note, you should only use mp3 files.
1. In the leftmost pane (Utilities), expand the Rich Media section
2. Drag and drop the Media element from this section to your Discussion Point.3. Select/highlight the media element. 4. With General opened in the 3rd (Details Top) pane, change the label of the new media element.
5. Change from General to Source in the rightmost pane. 6. Click the magnifying glass next to the Media label.
7. If the mp3 is already in the system, continue onto step 8. If it is not yet in the system, follow the “Importing Media into the LCMS” procedures found within this document.
8. Search for the mp3 by entering key words or part of the label in the upper left corner of the dialog box and then click on the magnifying glass.
9. Select the appropriate audio from the results by clicking on it and then choosing OK at the bottom right of the dialog.
10. Click on the parameters icon, which is found right next to the media label.11. Change the player attribute to “HTML5”. Click OK.12. Click the save icon in the upper left corner.
Add a Video to Your Screen/Slide (IS and ILT)Independent Study – Video Procedures (IS)MP4 is the required video type. An additional closed captioning file (srt or vtt format) is also required and must correspond to the video. These files should be created outside of the system and then imported in. See section 9.1 of the Requirements Documentation.
1. Import the mp4 and closed captioning files into the LCMS by following the “Importing Media into the LCMS” procedures found in this document. Note: You will complete this once for the mp4 and a second time for the closed captioning file. Name the CC file similarly to the mp4, indicating that it is closed captioning.
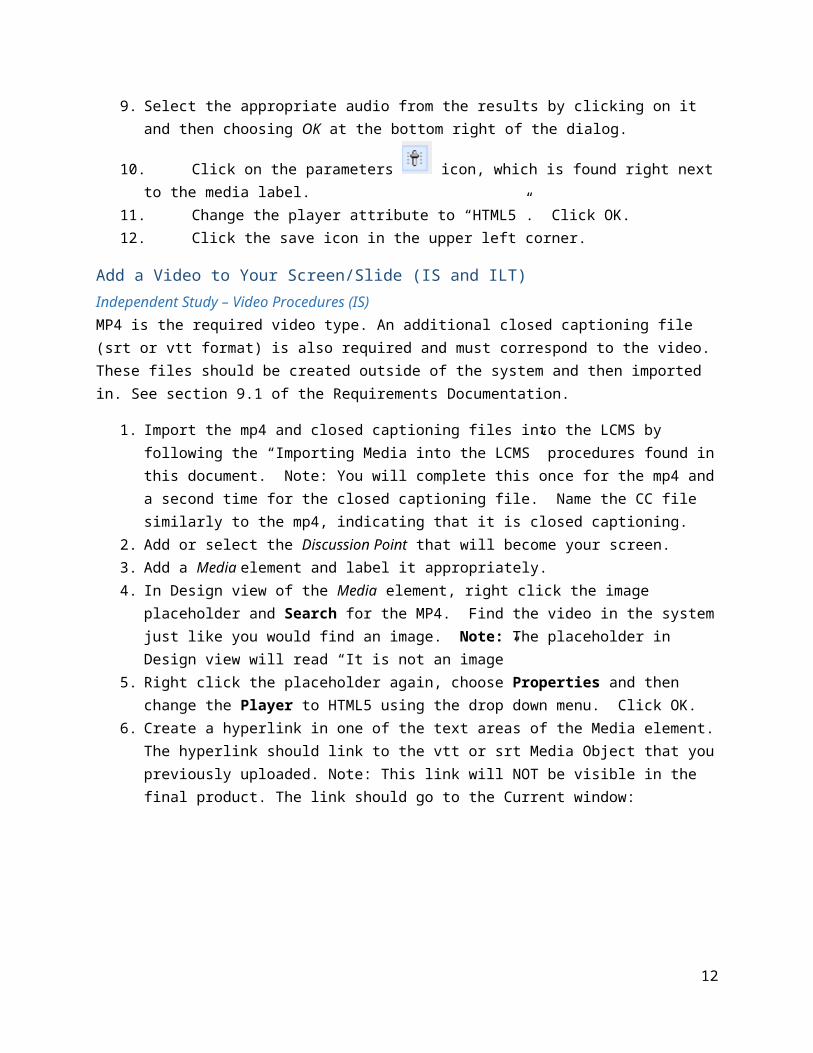
2. Add or select the Discussion Point that will become your screen.3. Add a Media element and label it appropriately.4. In Design view of the Media element, right click the image placeholder and Search for the MP4.
Find the video in the system just like you would find an image. Note: The placeholder in Design view will read “It is not an image”
5. Right click the placeholder again, choose Properties and then change the Player to HTML5 using the drop down menu. Click OK.
9

6. Create a hyperlink in one of the text areas of the Media element. The hyperlink should link to the vtt or srt Media Object that you previously uploaded. Note: This link will NOT be visible in the final product. The link should go to the Current window:
Caption: Link - Webpage Dialog box – Protocol “http”. Label: “Captions” Type: “Media Object,” Window: “Current,” Target: “Craig Fugate - Fraud Abuse Intro CC (vtt)” OK and Cancel Buttons available.
7. Add a pop-up link to the transcript. You can use the procedures found in this document titled: “Add a Link to an Element (IS or ILT)” .
Independent Study – Flash Video Procedures (IS)*Note: these procedures only may be used when migrating existing flash videos into the LCMS. All new videos must be in MP4 format.
1. Import the swf into the LCMS by following the “Importing Media into the LCMS” procedures found in this document.
2. Follow the “Adding Images to a Page (Discussion Point) procedures found in this document, but search for and add your swf media instead.
3. Copy and Paste as link the element labeled: “Flash Controls (Main Control) – Use this!” into the same discussion point that contains the Media Element. Please note, you may get these
10

controls from the “IS-Reusable Content” course under the “Flash Controls” Unit:
Instructor Led Course - Video Procedures (ILT)MP4 is the required video type. Closed Captioning must be embedded into the video. The video should be created outside of the system and then imported in.
1. Import the mp4 and closed captioning files into the LCMS by following the “Importing Media into the LCMS” procedures found in this document.
2. Follow the “Adding Images to a Page (Discussion Point) procedures found in this document, but add your video instead.
Adding PDFs or Other Documents to a Course (ILT)Occasionally, you may want to add supportive documents (PDFs, Word Docs, Excel Spreadsheets, etc.) to a course for various reasons. In order to have these documents exported out with the final project (final course materials), follow the directions below.
1. Import the document into the LCMS by following the procedures: “Importing Media into the LCMS (IS and ILT)”. Once your file is imported into the system you will create a link to it:
2. Add a description element to your course. The description element will contain a link to the document/file. Depending on the flow of the course, you may want to add all course references to a single description element in the beginning of the course (creating a references section).
3. Select the description element in the center pane.4. Change the rightmost pane to Design view. 5. Add text: Type the title of the PDF or document that you will be linking to.6. Using your cursor, select the text that you added above.
7. Click the hyperlink icon 8. In the link dialog box, change Type to the Media Object that you will be linking to.
9. Click on the browse for media object Icon
11
10. Type the name of the PDF or document that you have previously imported into the system.11. Select the correct element from the list of results. Note: you may need to right click, choose
properties, to ensure that you are choosing the right document.12. Select OK again.
Following the steps above will do 2 things. In the final exported Word Document (IG or SM), there will be an embedded link to the document. Also, the final export will include the document that you added in the zipped materials.
Replacing Existing MediaMedia (including documents, Images, Videos, Audio, etc.) is added to the LCMS as a Media Object. When media is first uploaded to the system, this becomes the base media object. In order to add the Media Object to a course, you must place it in a container Media Element. Note, these are 2 separate things. The container (Element) holds the media (Object). If you ever need to change media (system-wide), you must change the base Media Object. In doing so any Media Elements that refer to it will automatically be changed.
1. Determine the name of the Media Object (base Object). If you already know this, proceed to step 2. If you are unsure follow the steps below:
a. Find a media element (from within a course) that references it.b. Go to the Source view of the media elementc. Under the media selection, copy the Label text.
2. In the left hand Pane switch to “Media Search”3. Paste in the Label. You may want to add quotes around it (“). Search.4. When the results appear, right click the Media Object that was found, choose Properties5. Switch from General view to Files6. Click the gear icon at the top/right and choose Add File7. Browse the Computer, upload the new file8. Click OK
By performing the steps above, you will replace and remove the existing media with the new uploaded media. This will replace it anytime it is referenced and ensure that the old media has been removed from the system.
Creating LinksCreate Pop-Up Content (IS)Add content that isn’t shown within the normal course path and is only available when something is clicked.
1. If you do not already have a hidden lesson in your course, follow A-C. Otherwise, skip to step 2a. Create a new Unit – Label it with something like: “IS-XXXX Hidden Content”b. Create a new lesson under your unit. Label the new Lesson “IS-XXXX Hidden Content” or
something similar.
12

c. Follow these steps for both the unit and the lessoni. Right click on the lesson in the center pane.
ii. Click Moreiii. Click Hide
2. Add a discussion point and any number of elements below that discussion point into your hidden lesson. Add labels and actual content to each element. *
3. Go to or create a new element within the normal flow of the course and then follow the “Add a Link to an Element” procedures found in this document.
* - You may link to objects at various different levels including lesson, discussion point, or even element level. Change Type based upon the material that should be displayed.
Add a Link to an Element (IS or ILT)Links can be added to several different types of elements including lists or descriptions. The procedures are similar for both. The example below specifically describes adding a link to a Description element:
1. Select the description element or any element you want to add a link to in the center pane.2. Change the rightmost pane to Design view. 3. Highlight the text that will become the link.
4. Click the hyperlink icon 5. For an internal link (to page in course) follow these procedures:
a. In the link dialog box, change Type to the Type of Object/Element that you will be linking to. You can link to entire lessons; however the most common is either Discussion Point or Element
b. Change Window to “New.”
c. Click the icon next to the Window dropdown and change the window size to 800x600 or something else if required. Click OK.
d. Click on the browse for object Icon e. Type the name of the discussion point, element, or lesson that you would like to link to.
Click the search (magnifying icon) button.f. Select the correct element from the list of results. Note: you may need to right click,
choose properties, and then change to preview to ensure that you have selected the correct element.
g. Select OK again.6. For an external link (example http://www.google.com) follow these procedures:
a. Type the link in the Target field (without http or https).b. Change Window to “New” if it should be opened in a new window
13

c. Click the icon next to the Window dropdown and change the window size to 800x600 or something else if required. Click OK.
d. Click OK.
Note: There is no need to add any information about leaving FEMA. The template will take care of this automatically when it is exported.
Create a Printable Summary (IS)This assumes that you have already created all content for individual pages. Also, keep in mind that not everything will be included in the printable version and in some cases alternative content will be included (ex: videos replaced by transcripts).
1. If you do not already have a lesson that is holding your hidden content, create one underneath of the current unit and name it “Hidden Pages.”
2. Add a new Discussion Point to the newly created “Hidden Pages” lesson. Label the discussion point something like “IS-XXXX Lesson 1 Printable”
3. Open your current course structure and current lesson. Copy (right click, copy) each element level item that should be included in the printable version.
4. Select the discussion point created in step 2. Right click it, paste as link.* 5. Repeat steps 3 and 4 for every element that belongs in the printable version. Note: you may
need to copy transcripts and other elements that are found in hidden pages. You would copy the transcript instead of the videos. Only include media necessary for course content (Example: Organizational charts, etc.). Do not include media added for decorative purposes.
6. Once the printable lesson is complete, you can create a link using the “Add a Link to an Element” procedures.
Follow similar procedures to create a Printable version of the Entire course. In that case, you may multi-select elements found in each printable lesson and copy/paste as link into your full course printable Discussion Point.
* - Use the paste as link feature as much as possible instead of the paste feature because if the content ever changes it will only need to be changed in one place (it will automatically be changed in the other places).
AssessmentsAll assessment procedures assume that you have already created a single Discussion Point that will hold your assessment element.
Note: Some assessment elements are available in both IS and instructor led courses; however, they may display differently. Users will not be able to select (by clicking) the correct answer choice in the Word version. It will only be the question/answers in textual format.
14

Text Area (IS)
1. Insert the “FreeForm” element from the “Survey” section of the Object Palette into the course.2. Go to the “Design View” and add the slide Title to the Title field and Question to the Text Field3. Save4. Add an element to the hidden section (with the correct answer/suggested response)5. Add a Description element directly below the FreeForm element6. In design view of the description element, create a hyperlink to the suggested response created
in step 4. For more information about adding a link, see the procedures in this document titled: “Add a Link to an Element”
Matching Assessment Element (IS or ILT)
Perform the following steps to create a Matching Assessment element. Matching elements can be used for Do/Don’t style questions or Multiple True/False on the same screen.
7. Create a new Matching element by dragging and dropping from the Object Palette or by using the right-select menu in the Objects view.
8. In the General view, enter a label in the Label field. After you save the content, this label displays in the course treeview.
9. In the General view, change the Rendering to Dropdown List:
10. In the Source view, enter a title for the element in the Title field, and enter an introduction in the Text field.
11. Select a Shuffle option as follows: o Not Shuffled if you do not want answers to ever be shuffledo Shuffle All Answers if you would like answers to be randomly shuffled each time that the
question is takeno Shuffle Distractors Only if you would like incorrect answers to be randomly shuffled each
time that the question is taken12. Select the number of times that a learner can attempt to answer this question from the Number of
Tries drop-down list.
13. Enter question level remediation by clicking the remediation icon . This information will be displayed after the student gets the question correct or fails to within the allowed number of tries.
14. If you would like to display an image, enter the image label in the Label field of the Media frame, or search for the media object. To display the image as a link, select the Display as Link check box and enter a label in the Link Text field.
15. Enter a question, word, or phrase in the Text field of the Item frame. You can use a Media Object as a question by entering a valid media label in the Media field, or browse for the Media Object.
16. Enter the answer in the Text field of the Answer frame. You can use a Media Object as an answer by entering a valid media label in the Media field, or browse for the Media Object.
15

17. To add a question and answer, select the corresponding Add button and repeat Steps 9 and
10. To delete the current question or answer, select the corresponding Delete button . 18. To specify the correct answer choices: Select an item from the Item drop-down list in the Match
frame and select its correct answer from the Answer drop-down list. To add a match, select the Add button and repeat Step 12. To delete the current match, select the Delete button. You would add matches for every item/answer choice combo.
Note: To view all items and matches at the same time, select the Summary button . You can add, edit, and delete items and matches in this view.
19. Save your work.
Example: GUID# 00B7205241531FD2BEF31301000101F0
Multiple Choice Multiple Answer (MCMA) Assessment Element (IS or ILT)
Perform the following steps to create a Multiple Choice - Multiple Answer Assessment element.
1. Create a new Multiple Choice-Multiple Answer element by dragging and dropping from the Object Palette or by using the right-select menu in your course treeview.
2. In the General view, enter a label in the Label field. After you save the content, this label displays in the course treeview.
3. In the Source view, enter a title for the element in the Title field, and enter an introduction in the Text field.
4. Select a Shuffle option as follows: o Not Shuffled if you do not want answers to ever be shuffledo Shuffle All Answers if you would like answers to be randomly shuffled each time that the
question is takeno Shuffle Distractors Only if you would like incorrect answers to be randomly shuffled each
time that the question is taken5. Select the number of times that a learner can attempt to answer this question from the Number of
Tries drop-down list.
6. Enter question level remediation by clicking the remediation icon . This information will be displayed after the student gets the question correct or fails to within the allowed number of tries.
7. If you would like to display an image, enter the image label in the Label field of the Media frame, or search for the media object. To display the image as a link, select the Display as Link check box and enter a label in the Link Text field.
8. Enter an answer in the Answer field of the Answer frame. You can also use a Media Object as an answer by entering a valid media label in the Media field, or search for the media object.
9. Select the Correct check box if this answer is correct. (Multiple correct answers may be selected)10. To add an answer, select the Add button and repeat Steps 8 and 9. To delete the current answer,
select the Delete button.
16

Note: To view all answers at the same time, select the Summary button. You can add, edit, and delete answers in this view.
11. Save your work.
Multiple Choice Single Answer (MCSA) Assessment Element (IS or ILT)
Perform the following steps to create a Multiple Choice - Single Answer Assessment element.
1. Create a new Multiple Choice-Single Answer element by dragging and dropping from the Object Palette or by using the right-select menu in your course treeview.
2. In the General view, type a label in the Label field. After you save the content, this label displays in the course treeview.
3. In the Source view, enter a title for the element in the Title field, and enter an introduction in the Text field.
4. Select a Shuffle option as follows: o Not Shuffled if you do not want answers to ever be shuffledo Shuffle All Answers if you would like answers to be randomly shuffled each time that the
question is takeno Shuffle Distractors Only if you would like incorrect answers to be randomly shuffled each
time that the question is taken5. Select the number of times that a learner can attempt to answer this question from the Number of
Tries drop-down list.
6. Enter question level remediation by clicking the remediation icon . This information will be displayed after the student gets the question correct or fails to within the allowed number of tries.
7. If you would like to display an image, enter the image label in the Label field of the Media frame, or search for the media object. To display the image as a link, select the Display as Link check box and enter a label in the Link Text field.
8. Enter an answer in the Answer field of the Answer frame. You can also use a Media Object as an answer by entering a valid media label in the Media field, or search for the media object.
9. Select the Correct check box if this answer is correct. For this Assessment element, you can select this check box only for one answer.
10. To add an answer, select the Add button and repeat steps 8 and 9. To delete the current answer, select the Delete button.
Note: To view all answers at the same time, select the Summary button. You can add, edit, and delete answers in this view.
11. Save your work.
Ordering Assessment Element (IS or ILT)
Perform the following steps to create an Ordering Assessment element.
1. Create a new Ordering element by dragging and dropping from the Object Palette or using the right-select menu in your course treeview.
17

2. In the General view, type a label in the Label field. After you save the content, this label displays in the Development TreeView.
3. In the Source view, enter a title for the element in the Title field, and enter an introduction in the Text field.
4. Select a Shuffle option as follows: o Not Shuffled if you do not want answers to ever be shuffledo Shuffle All Answers if you would like answers to be randomly shuffled each time that the
question is takeno Shuffle Distractors Only if you would like incorrect answers to be randomly shuffled each
time that the question is taken5. Select the number of times that a learner can attempt to answer this question from the Number of
Tries drop-down list.
6. Enter question level remediation by clicking the remediation icon . This information will be displayed after the student gets the question correct or fails to within the allowed number of tries.
7. If you would like to display an image, enter the image label in the Label field of the Media frame, or search for the media object. To display the image as a link, select the Display as Link check box and enter a label in the Link Text field.
8. Enter an answer in the Answer field of the Answer frame. You can also use a Media Object as an answer by entering a valid media label in the Media field, or search for the media object.
9. To add an answer, select the Add button and repeat step 8. To delete the current answer, select the Delete button. The order that the answers are loaded will be the correct order. You may choose to Show All Answers with the Summary Icon. Within this section, you can change the order by changing the numbers in the order fields.
True/False Assessment Question (IS or ILT)
Perform the following steps to create a TrueFalse Assessment element.
1. Create a new TrueFalse element by dragging and dropping from the Object Palette or using the right-select menu in your course treeview. Select the General view and continue with the steps below:
2. In the General view, enter a label in the Label field. After you save the content, this label displays in the course treeview.
3. In the Source view, enter a title for the element in the Title field, and enter the question in the Text field.
4. Select the number of times that a learner can attempt to answer this question from the Number of Tries drop-down list.
5. Enter question level remediation by clicking the remediation icon . This information will be displayed after the student gets the question correct or fails to within the allowed number of tries.
6. If you would like to use an answer other than True, enter the answer in the Answer field of the Answer frame. You can also use a Media Object as an answer by entering a valid media label in the Media field, or search for the Media Object.
7. Select the Next button. If you would like to use an answer other than False for answer 2, enter the answer in the Answer field. You can also use a Media Object as an answer by entering a valid media label in the Media field, or search for the Media Object.
18

8. Mark the Correct answer with the checkbox.
Note: To view all answers at once, select the Summary button. You can add, edit, and delete answers in this view.
9. Save your work.
Self-Assessment Page (IS)Self-Assessment pages are those that allow the learner to evaluate themselves on a specific topic. ***Recent Update: Please note, previously self-assessments were created by using custom HTML; however, self-assessments should now be created with a description element or a table element. They will NOT be interactive. Instead they will serve as thought-experiments. Use the steps below if you are using a Table element to create your self-assessment.
1. Create a Discussion Point in the Lesson and label it appropriately and uniquely.2. Add a Table element into the Discussion Point, labeling the table appropriately.3. Go to Design view of the table element.
a. Add the Title of the slide in the title fieldb. Add the question/instructions into the first Text field. Please note, you may need to
consider the wording of the question:i. If you are revising or developing a course: Word the question appropriately for a
thought experiment. For example: “Instructions: Based on what you have learned about formal and informal partnerships, consider whether the following partnerships are FORMAL or INFORMAL. “
ii. If you are migrating an existing course, use the existing question base (no need to rewrite). For example if the course you are migrating says: “Instructions: Based on what you have learned about formal and informal partnerships, indicate whether the following partnerships are FORMAL or INFORMAL. When you are done, select Submit.” Then use that.
Activity Page (IS)Activity pages are those that are used to evaluate your knowledge based on checking of knowledge points covered in a lesson. In order to create an Activity page for the LCMS custom HTML and JavaScript had to be developed. Below are the steps for adding an Activity page to your course.
1. Create a Discussion Point in the Lesson where you would like to add an Activity page.2. Locate the IS-Reusable Content course in the Objects pane of the LCMS.3. Under Activity locate the Activity Check List Extended object.4. Copy the Activity Check List Extended object.5. Paste As Link the Activity Check List Extended object into the Discussion Point object you
created in step 1.6. Navigate back to the IS-Reusable Content course locate and Copy the Activity Check List Array
Extended object.
19

7. Paste the Activity Check List Array Extended object into the Discussion Point object you created in step 1.
8. Select the Activity Check List Array Extended object.9. Select Source from the Preview Pane menu.10. Copy all of the text from the Head section.11. Open Notepad (or your favorite text editor) and paste the text into a new document.12. Locate the lines of text that begin with “listArray.push”. These represent the table entries with
the check boxes and the resulting list based on responses.a. Add responses as necessary by replacing the text between listArray.push(" and
") on each line.b. Lines can be added or removed as necessaryc. Do not leave any “empty” lines.
13. Select all of the text in the document and Copy.14. Open the Web Authoring tool in the LCMS and navigate to the Activity Check List Array Extended
object you created in your Discussion Point object.15. In the Head section of the Activity Check List Array Extended object Select All and Paste
the text from the document you just Copied.16. Save your work.
Reusing ContentContent can and should be used at various levels. Always develop content with reuse in mind. Think about creating descriptions and/or information that may be able to be reused in other courses. Create the base text as a single element (reusable) and then you can create an additional element to get more specific (if necessary).
Searching – Finding Content to Reuse1. In the left hand (Utilities) pane, select Content Search from the dropdown. 2. Type in part of the label or keywords. Note: You may wish to use quotes to search for phrases
or content that contains numerical values.3. After finding an object, you can Right Click it to:
a. Find - (within the hierarchy/structure pane)b. Copy – to be pasted or pasted as link laterc. Properties – to view various tabs and/or make changes. It is possible to preview in here
as well.
PastePasting will create a separate 2nd version of an object. If you paste an object and make a change to it, the original will not be modified.
1. Find an object or element that you would like to paste2. Right click – copy3. Find the location that you would like to paste it4. Right click Paste
20

Paste as LinkPasting as link will add another element into your course structure. If either the original or the new version are modified, both will change. An object can potentially be linked in hundreds of locations. If it is changed once all locations will change.
When copying/pasting as link at a higher level (Example Lesson level), all objects and elements underneath will also be linked. If any of those are changed, they will be changed in all places.
1. Find an object or element that you would like to Paste as Link2. Right click – copy3. Find the location that you would like to paste it4. Right click Paste as Link
Positioning Elements within a Page (Discussion Point)Using Layouts (IS)This assumes multiple elements have been added to a discussion point. Before you begin, determine the type of layout that you want. You may want a single column, 2 columns (with varying widths), or something else.
1. In the leftmost pane, change the pane to Layouts 2. Drag and drop the appropriate layout from this pane to your Discussion Point in the center pane.3. Reposition elements within your discussion point appropriately by changing their order. Most 2
column layouts will float the 1st element left, 2nd element right, 3rd element left, 4th right, and so on.
Example: Using a 2 column layout.
In this example, the Left column will have the Objectives followed by the Clock media element. The right hand column would have the Navigation media element followed by the Print media element. If you ever need to add multiple elements on 1 side, but not the other, make use of the Empty Spot content – copy and paste as link into your discussion point. This will serve as a place holder. For instance, if I only wanted the Objectives in the left of this example, I would replace the clock with the Empty Spot.
Note: These layouts only work in IS courses.
Positioning Media and PPT Layout (IS and ILT)You may add text to a media element and position the image/text appropriately. In IS courses, this should only be used when the media/image conveys meaning relative to the content itself (for example
21

a chart). Since PPTs files cannot use the LCMS’s build in layout capabilities, this method is OK to use for any slide that it needs.
1. Create a new media element and add an image to it using the “Add Images to a Page” procedure found in this document.
2. Open to Source view and Modify the following:a. Alignment under Media – This is the alignment of the image itselfb. Text Area 1 – Add Text and possibly a title. Basic HTML may be usedc. Position under Text Area 1 – this is the alignment of the text in relation to the image.
d. Save the Media Element.e. You may wish to look at it in Design or Preview mode.
Special ScreensUse the IS-987 Sample Course as an Example of what each of these pages should look like in the LCMS.
Course Overview (IS)1. Add a single Discussion Point labeling it something like: “IS-XXXX Course Overview” 2. Insert a single List element that contains an intro sentence and the list of objectives3. Insert a Media element for an image of a bulleted list of the Lessons4. Add/Reuse a clock icon showing the time to complete the lesson. Use the Content Search to see
if there is a clock icon that already meets your needs by searching for “Clock 1 hour” or something like that. Be sure to use one that mentions course time, not lesson time.
5. Perform a Content Search to find the “Empty Space” and paste as link under the clock. This will be a blank space in the right hand side and is necessary when using the layout.
22

6. Add a Media element with the Print Icon and text next to it that contains a link to the Printable version of the entire course. You may wish to copy/paste a version from another course and simply modify the link to point to your course’s printable version.
7. Apply the layout titled: “2 Column (2/3rds) and (1/3rd)”
Lesson Overview (IS)1. Add a single Discussion Point labeling it something like: “IS-XXXX Lesson 1 Overview” 2. Insert a single List element that contains an intro sentence and the list of lesson objectives3. Insert a Media element for an image of a bulleted list of the Lessons (showing current lesson)4. Add/Reuse a clock icon showing the time to complete the lesson. Use the Content Search to see
if there is a clock icon that already meets your needs by searching for “Clock 1 hour” or something like that. Be sure to use one that mentions lesson time, not course time.
5. Perform a Content Search to find the “Empty Space” and paste as link under the clock. This will be a blank space in the right hand side and is necessary when using the layout.
6. Add a Media element with the Print Icon and text next to it that contains a link to the Printable version of this lesson. You may wish to copy/paste a version from another course and simply modify the link to point to your lesson’s printable version.
7. Apply the layout titled: “2 Column (2/3rds) and (1/3rd)”
Screen Features, Navigating Using Your Keyboard, Receiving Credit (IS)1. Search for the 3 Discussion Points Labeled:
a. “Screen Features”b. “Navigating Using Your Keyboard”c. “Receiving Credit”
2. For each, Copy and Paste as Link into your first lesson.
Lesson Summary (IS)1. Insert a single Discussion Point at the end of the Lesson 2. Insert a List element that contains some text and the list of objectives completed.
23

3. Insert a Media element that is an image of the Lesson List indicating that this lesson is now complete.
4. Copy/Paste as Link the Print Icon (with link to printable lesson) from the Lesson Overview Discussion point into this one.
Exam Page (IS)1. Perform a Content Search for this exact phrase: "Exam Page (IS-987) [Offical Template]" –
keeping the quotes around it.2. Right click the Object that is found and choose Copy3. Right click the last Discussion Point in your course and choose Paste – DO NOT PASTE AS LINK4. Change the name/label of the Discussion Point and element below it.5. Open Source or Design view of the element and add your course code in place of the current
number that is there, but leave the rest of the text . Follow the guidelines below:
a. If your course contains a letter enter it without the dot like this: “230d”b. If your course contains a yearly version, enter it with the dot: “18.16”c. Do not include “IS-“
24

Appendix A: Alt TextIndependent Study Image:Independent Study Course Structure - showing IS-1110 at course level labeled: “IS-1110 Writing Commercial Exposures-Copy”, single module labeled: “IS-1110 Writing Commercial Exposures”, 4 units Labeled: “Lesson 1: Course Introduction,” “Lesson 2: Identifying Commercial Exposures,” “Lesson 3: Eligibility, Coverage, and Loss Settlement,” “Lesson 4: Special Considerations.” There are single lessons under each unit with the same names as the parent units. The Lesson 4 lesson is expanded with the following discussion points: “Hidden Lesson 4: Special Considerations,” “Lesson 4 Objectives,” “Non-Condominium Flood Insurance,” “Tenant’s Coverage,” “Other Insurance and Excess Flood,” “Lesson 4 Knowledge Check 1,” “Course Summary,” “Completing this Course.” “Lesson 4 Objectives” is expanded showing “Lesson 4 Objectives,” “IS-1110 Lesson 3 Complete Lesson List 202x283 (png),” “Clock 10 minutes Lesson,” “Empty Spot,” and “Print Lesson.”
Instructor Led Image:Resident course hierarchy – Course labeled “L0205: Recovery from Disaster: The Local Government Rule-Copy.” A single module under the course with the same label. Seven Units under the module with the following labels: “Unit 1: Introduction to Recovery Concepts,” “Unit 2: Recovery Pre-Disaster Planning Guidance for Local Governments,” “Unit 3: Leading and Managing Recovery,” “Unit 4: Stakeholder Engagement and Information Management,” “Unit 5: Local Capabilities and Challenges,” “Unit 6: Joplin, Missouri Case Study,” “Unit 7: Course Conclusion.” There is a single lesson under each unit. The Lessons have the same names as the parent units. Lesson/Unit 7 Expanded showing several discussion points. Discussion points are labeled: “Unit 7: Course Conclusion,” “Course Summary and Final Comments,” “Course Examination,” “Final Course Evaluation,” and “Conclusion L205.” The Discussion point labeled "Unit 7: Course Conclusion" is expanded with a single list element labeled the same.
SendMeSummary FunctionHTML – Head Text Area: “function SendMeSummary() { vwidth = 740; vheight = 560; sWidth = screen.width; tWidth = (sWidth/2); hWidth = (vwidth/2); uWidth = (tWidth-hWidth); //Change the number 00B7205241531FD57DDD130B00010FAE 2 lines below this. If (typeof(newContent) != ‘undefined’) { NewContent ‘00B7205241531FD57DDD130B00010FAE(highlighted)’, ‘1’
Media Element – Source ViewSource view of Media Element with Text Area 1 Highlighted – Title “Key Activity: Five: Leadership” Text – empty. Media Section: Label: “Community Meeting and Downtown 200x242,” Alt Text: “Open community meeting and a picture of a downtown,” Caption – empty, Alignment: “Left” (highlighted), Display as Thumbnail – unchecked, Caption – empty, Thumbnail – empty, Thumbnail alt text- empty. Text Area 1 of 1 Section: Add, Paste, Delete, Previous, Next, and Summary Icons. Title – empty, Text (highlighted): “<p><em>Timeline: 3-9 Months</em></p><ol><li>Leadership
25

Position</li><li>Organizational Strucfture</li><li>Sector-Specific Coordinators</li></ol>,” Position: “Right,” Alignment Section: Vertical: “Top,” Horizontal: “Left”
26