pro tools isis guide -...
TRANSCRIPT
Pro Tools ISIS Guide® ®
Version 10.1

Legal NoticesThis guide is copyrighted ©2011 by Avid Technology, Inc., (hereafter “Avid”), with all rights reserved. Under copyright laws, this guide may not be duplicated in whole or in part without the written consent of Avid.
003, 96 I/O, 96i I/O, 192 Digital I/O, 192 I/O, 888|24 I/O, 882|20 I/O, 1622 I/O, 24-Bit ADAT Bridge I/O, AudioSuite, Avid, Avid DNA, Avid Mojo, Avid Unity, Avid Unity ISIS, Avid Xpress, AVoption, Axiom, Beat Detective, Bomb Factory, Bruno, C|24, Command|8, Control|24, D-Command, D-Control, D-Fi, D-fx, D-Show, D-Verb, DAE, Digi 002, DigiBase, DigiDelivery, Digidesign, Digidesign Audio Engine, Digidesign Intelligent Noise Reduction, Digidesign TDM Bus, DigiDrive, DigiRack, DigiTest, DigiTranslator, DINR, DV Toolkit, EditPack, Eleven, EUCON, HD Core, HD Process, HDX, Hybrid, Impact, Interplay, LoFi, M-Audio, MachineControl, Maxim, Mbox, MediaComposer, MIDI I/O, MIX, MultiShell, Nitris, OMF, OMF Interchange, PRE, ProControl, Pro Tools M-Powered, Pro Tools, Pro Tools|HD, Pro Tools LE, QuickPunch, Recti-Fi, Reel Tape, Reso, Reverb One, ReVibe, RTAS, Sibelius, Smack!, SoundReplacer, Sound Designer II, Strike, Structure, SYNC HD, SYNC I/O, Synchronic, TL Aggro, TL AutoPan, TL Drum Rehab, TL Everyphase, TL Fauxlder, TL In Tune, TL MasterMeter, TL Metro, TL Space, TL Utilities, Transfuser, Trillium Lane Labs, Vari-Fi, Velvet, X-Form, and XMON are trademarks or registered trademarks of Avid Technology, Inc. Xpand! is Registered in the U.S. Patent and Trademark Office. All other trademarks are the property of their respective owners.
Product features, specifications, system requirements, and availability are subject to change without notice.
Guide Part Number 9329-65200-00 REV A 11/11
Documentation FeedbackAt Avid, we are always looking for ways to improve our documentation. If you have comments, corrections, or suggestions regarding our documentation, email us at [email protected].
Chapter 1. Introduction . . . . . . . . . . . . . . . . . . . . . . . . . . . . . . . . . . . . . . . . . . . . . . . . . . . . . . . . . 1
Avid ISIS Capabilities. . . . . . . . . . . . . . . . . . . . . . . . . . . . . . . . . . . . . . . . . . . . . . . . . . . . . . 1
Avid Interplay. . . . . . . . . . . . . . . . . . . . . . . . . . . . . . . . . . . . . . . . . . . . . . . . . . . . . . . . . . . . 1
Overview of an ISIS System . . . . . . . . . . . . . . . . . . . . . . . . . . . . . . . . . . . . . . . . . . . . . . . . . 2
AAF, OMF, and MXF Basics. . . . . . . . . . . . . . . . . . . . . . . . . . . . . . . . . . . . . . . . . . . . . . . . . 2
Embedded Media and Linked Media . . . . . . . . . . . . . . . . . . . . . . . . . . . . . . . . . . . . . . . . . . . 5
Frame-Rate Accurate Video Editing and Sample-Rate Accurate Audio Editing . . . . . . . . . . . . 6
System Requirements . . . . . . . . . . . . . . . . . . . . . . . . . . . . . . . . . . . . . . . . . . . . . . . . . . . . . 7
About Avid ISIS Guides . . . . . . . . . . . . . . . . . . . . . . . . . . . . . . . . . . . . . . . . . . . . . . . . . . . . 7
Support for Avid ISIS . . . . . . . . . . . . . . . . . . . . . . . . . . . . . . . . . . . . . . . . . . . . . . . . . . . . . . 8
Conventions Used in This Guide. . . . . . . . . . . . . . . . . . . . . . . . . . . . . . . . . . . . . . . . . . . . . . 8
About www.avid.com . . . . . . . . . . . . . . . . . . . . . . . . . . . . . . . . . . . . . . . . . . . . . . . . . . . . . . 9
Chapter 2. Configuring a Workstation as an ISIS Client. . . . . . . . . . . . . . . . . . . . . . . . . . . . . . 11
Installation Overview . . . . . . . . . . . . . . . . . . . . . . . . . . . . . . . . . . . . . . . . . . . . . . . . . . . . . 11
Workstation Configuration Requirements . . . . . . . . . . . . . . . . . . . . . . . . . . . . . . . . . . . . . . 11
Installing Pro Tools . . . . . . . . . . . . . . . . . . . . . . . . . . . . . . . . . . . . . . . . . . . . . . . . . . . . . . 11
Avid ISIS Client and Zone Descriptions . . . . . . . . . . . . . . . . . . . . . . . . . . . . . . . . . . . . . . . . 12
Mac ISIS Connection . . . . . . . . . . . . . . . . . . . . . . . . . . . . . . . . . . . . . . . . . . . . . . . . . . . . . 12
Installing the ISIS Client Hardware on a Windows CPU . . . . . . . . . . . . . . . . . . . . . . . . . . . . 12
Configuring Windows 7 Network Profiles . . . . . . . . . . . . . . . . . . . . . . . . . . . . . . . . . . . . . . . 15
Client Software Installation . . . . . . . . . . . . . . . . . . . . . . . . . . . . . . . . . . . . . . . . . . . . . . . . . 16
Chapter 3. Using a Client in an ISIS System . . . . . . . . . . . . . . . . . . . . . . . . . . . . . . . . . . . . . . . 17
About Avid ISIS Client Manager . . . . . . . . . . . . . . . . . . . . . . . . . . . . . . . . . . . . . . . . . . . . . 17
Connecting to the Avid ISIS System . . . . . . . . . . . . . . . . . . . . . . . . . . . . . . . . . . . . . . . . . . 17
Mounting and Unmounting Workspaces . . . . . . . . . . . . . . . . . . . . . . . . . . . . . . . . . . . . . . . 19
Using the Workspace Display . . . . . . . . . . . . . . . . . . . . . . . . . . . . . . . . . . . . . . . . . . . . . . . 22
Testing Your Avid ISIS Connection . . . . . . . . . . . . . . . . . . . . . . . . . . . . . . . . . . . . . . . . . . . 24
Setting Bandwidth Reservations . . . . . . . . . . . . . . . . . . . . . . . . . . . . . . . . . . . . . . . . . . . . . 27
Contents
Contents iii
iv
Performing Administrative Tasks . . . . . . . . . . . . . . . . . . . . . . . . . . . . . . . . . . . . . . . . . . . . 28
Configuring Pro Tools Session Settings for a New Session . . . . . . . . . . . . . . . . . . . . . . . . . 29
Performance Characteristics . . . . . . . . . . . . . . . . . . . . . . . . . . . . . . . . . . . . . . . . . . . . . . . 30
Sharing Files . . . . . . . . . . . . . . . . . . . . . . . . . . . . . . . . . . . . . . . . . . . . . . . . . . . . . . . . . . 31
Destructive Editing . . . . . . . . . . . . . . . . . . . . . . . . . . . . . . . . . . . . . . . . . . . . . . . . . . . . . . 32
Chapter 4. Avid ISIS Workflows for Pro Tools . . . . . . . . . . . . . . . . . . . . . . . . . . . . . . . . . . . . . 33
Exporting Audio and Video from Media Composer . . . . . . . . . . . . . . . . . . . . . . . . . . . . . . . 33
Importing Audio and Video into Pro Tools. . . . . . . . . . . . . . . . . . . . . . . . . . . . . . . . . . . . . . 38
Editing Audio in Pro Tools . . . . . . . . . . . . . . . . . . . . . . . . . . . . . . . . . . . . . . . . . . . . . . . . . 41
Exporting Audio from Pro Tools for Avid Editing Applications. . . . . . . . . . . . . . . . . . . . . . . . 42
Importing Pro Tools Audio Files Back into the Avid Video Editing Application . . . . . . . . . . . . 44
Pro Tools ISIS Guide
Chapter 1: Introduction
This guide explains how to connect and config-ure a Mac- or Windows-based system with Pro Tools® HD software as an ISIS® client within an Avid ISIS 7000 or 5000 system.
This guide also covers how to exchange audio and video media sequences between Pro Tools and Avid video application clients (such as Media Composer and Symphony) attached to an ISIS system.
This guide is written for ISIS administrators, Pro Tools users, and Avid users.
Systems running non-HD Pro Tools software can also act as ISIS clients, but media streaming is not supported in this configuration.
Avid ISIS CapabilitiesAvid ISIS 7000 and 5000 are Ethernet-based shared storage systems that lets users of Pro Tools and Avid video editing applications share the same media as follows:
• Stream audio and video media in real time.
• Configure multiple streaming users on the same ISIS system.
• Share AAF and OMF sequences, and OMF and MXF audio and video media.
• Share AAF sequences and MXF media, using the Avid Interplay asset management system (Avid Interplay system required).
Avid InterplayAvid Interplay with the Pro Tools Avid Interplay option lets users of Pro Tools and Avid video ap-plications work within the same asset manage-ment system.
For more information, refer to the Pro Tools Avid Interplay Guide.
Chapter 1: Introduction 1
2
Overview of an ISIS SystemThis guide describes how to configure and work with a Pro Tools client within an Avid ISIS sys-tem. The ISIS installations addressed in this guide typically comprise the following compo-nents:
ISIS System Entire set of components within an individual ISIS installation.
ISS/Ethernet Switch Each ISIS crate has two built-in Ethernet connections known as ISS switches. You can also add external switches that connect to the built-in switches.
System Director One or more servers (including a backup server) that functions as the heart of the ISIS file system, by maintaining location in-formation for media stored on drives.
ISIS Crate Chassis that contains the drives that store the actual data.
Avid Interplay Transcode and/or Avid DMS ProEncode (Optional) Engine that distributes processor-intensive tasks to network servers in order to allow ISIS clients to proceed without interruption.
Avid Interplay Access/Assist (Optional) Media asset management client application that en-ables facility-wide searching, sorting, catalog-ing, management, and retrieval of media.
Avid Interplay Engine (Optional) Server that manages the metadata stored on the System Di-rector server.
Clients One or more Avid or Pro Tools worksta-tions configured to be able to exchange data with other clients attached to the ISIS system.
For more information on the architecture and administration of ISIS systems, see the applicable Avid ISIS guides.
Pro Tools ISIS Guide
AAF, OMF, and MXF BasicsAAF and OMF files are mechanisms for storing and retrieving media data and metadata so that projects can be freely exchanged between differ-ent applications and platforms (such as between Pro Tools and Avid video editing applications).
Media data and metadata enable an application that receives AAF and OMF sequence files to automatically and quickly reassemble the com-position. A simple metaphor for this approach is that media data files are the pieces of a puzzle and metadata is the set of instructions for assembling the puzzle.
In the simplest case, only an AAF or OMF sequence is exchanged. If this sequence points to existing media files, the size of the sequence file is relatively small and the export/import process is relatively fast.
AAF and OMF sequences can also have media data embedded in them. This creates a single, larger file that is slower to export and import, but which may be easier to manage than thou-sands of files stored on different volumes.
Pro Tools supports AAF and OMF sequences that contain embedded audio media.
Pro Tools does not support AAF or OMF sequences containing embedded video media, except if you are importing such sequences into a video satellite track. In such cases, video meta-data is imported into the track.
For the purposes of this user guide, AAF sequences are emphasized and referenced over the older OMF sequence standard.
MXFMXF is a media file format. There are MXF video files and MXF audio files, but there are no “MXF sequences.” An AAF sequence may refer to or in-clude MXF media files, but OMF sequences can-not refer to or include MXF files.
Avid Video Editing Application Support for MXF Media
Media Composer® supports MXF media as fol-lows:
• Create MXF media when capturing, transcoding, rendering, or using other methods to create media.
• Import of MXF media files created in other Avid video editing applications
• Export of MXF audio and video files
Pro Tools Support for MXF Media
Pro Tools supports MXF media as follows:
• Import of MXF video and audio media
• Export of MXF audio media
Pro Tools cannot export Avid video files of any type.
Video files digitized in Pro Tools are technically of the MXF format, but are intended only for use in Pro Tools and are not tested for compatibility with other applications.
AAFAAF sequences are Avid video editing applica-tions’ best way to exchange projects and main-tain valuable metadata. An AAF sequence can refer to OMF and/or MXF media files, or have OMF and MXF media files embedded within them. There is no such thing as an AAF audio or video media file.
Avid Video Editing Application Support for AAF Sequences
Media Composer supports AAF sequences as follows:
• Import and export of AAF sequences with embedded video files (MXF or OMF) and/or audio files (MXF, WAV, or AIFF)
• Import and export of AAF sequences that refer to external (linked) video files (MXF or OMF) and/or audio files (MXF, WAV, or AIFF)
Pro Tools Support for AAF Sequences
Pro Tools supports AAF sequences as follows:
• Import and export of AAF sequences that con-tain embedded or refer to external (linked) MXF, WAV, or AIFF audio files
• Import of AAF sequences that refer to external (linked) MXF or OMF video files
• Video satellite systems only: Import of AAF sequences containing embedded video to a satellite track, in which case Pro Tools im-ports only the metadata (cuts and external clip names) and not the video
Pro Tools does not export video files, tracks or metadata as part of AAF sequences.
Chapter 1: Introduction 3
4
OMFOMF is both a media file and sequence format. OMF media files can be audio or video.
Avid Video Editing Application Support for OMF Media and Sequences
Media Composer supports OMF media and se-quences as follows:
• Import and export of OMF sequences with embedded OMF video files and WAV or AIFF audio files
• Import and export of OMF sequences that refer to external (linked) OMF video files and WAV or AIFF audio files
Pro Tools Support for OMF Media and Sequences
Pro Tools supports OMF media and sequences as follows:
• Import of OMF video files created by Media Composer or other Avid video edit-ing applications
• Export of OMF audio files
• Import and playback of OMF sequences that refer to external (linked) audio files or contain embedded audio files
• Import and playback of OMF sequences that refer to external (linked) OMF video files
• Export of OMF sequences that refer to ex-ternal (linked) audio files or contain em-bedded audio files
• Pro Tools does not export video files, tracks or metadata as part of OMF sequences
Pro Tools ISIS Guide
Embedded Media
Exporting to OMF or AAF with embedded media results in one large OMF or AAF file containing both the metadata and all associated media files. However, it is important to note that file size is limited to 2 GB when exporting to OMF.
Pro Tools can output AAFs larger than 2 GB. In Media Composer, the AAF Edit Protocol setting must be checked during ex-port to allow AAF files larger than 2 GB.
Media Data (Media Files)Media data represents raw audio or video mate-rial and is stored in individual media files. Every time you record a piece of video or audio mate-rial into an application, you are creating a media file containing media data. Audio media data is stored as samples (such as 44,100 or 48,000 sam-ples per second of recording) while video media is typically stored as frames (24, 25, or 30 frames per second of recording).
The size of each media file depends on how much audio or video material it contains. For example, if you record ten minutes of continu-ous video material at a high resolution, you might end up with a video media file that is 1.8 GB in size, whereas a one minute recording at the same resolution might result in a 180 MB file. Media files tend to be large, since high qual-ity audio and video signals are data intensive. Video data generally requires considerably more storage than audio data.
MXF Media Data Locations On the volumes you have designated for media storage, Media Composer stores all MXF media:
• When stored locally, MXF media is placed in the Avid MediaFiles/MXF/1 folder. Media Composer can also read MXF media located at Avid MediaFiles/MXF/2, Avid MediaFiles/MXF/3, and so on.
• When stored in a shared environment, MXF media is placed in a folder called Avid MediaFiles/MXF/client.1 (where client represents the name of the client com-puter).
This guide refers to the root folder name (Avid MediaFiles) whenever referencing this folder.
OMF Media Data Locations On the volumes you have designated, Media Composer stores all OMF media in the OMFI MediaFiles folder.
MetadataMetadata is used to describe:
• Information about each media file. This may include sample rate, bit depth, external names, the name of the videotape from which the media file was captured, and even timecode values that specify where a file was used in a Pro Tools session.
• Information about Pro Tools sessions or other sequences, including what files are used, where they appear in a Timeline, and automation.
• For AAF or OMF sequences, metadata also includes information about unrendered AudioSuite effects (such as real-time EQ) on Avid workstations. Pro Tools skips un-rendered effects on import. Rendered ef-fects are media files, that can be imported or skipped on import into Pro Tools.
• For AAF or OMF sequences, information about automation (clip-based gain or vol-ume automation data).
Embedded Media and Linked MediaThere are two ways to handle media files when exporting AAF or OMF files:
• Embedded media (in which the media files are embedded in an AAF or OMF sequence)
• Linked media (in which media files are ref-erenced by an AAF or OMF sequence)
Pro Tools lets you import AAF or OMF se-quences containing embedded audio files. You can also import AAF or OMF sequences contain-ing embedded video files, but only if you are im-porting them to a video satellite track. In such a case, only the video metadata is imported.
Chapter 1: Introduction 5

6
Frame-Rate Accurate Video Editing and Sample-Rate Accurate Audio EditingAvid video editing applications edit with frame accuracy. This means that in a 30-fps project, you can edit at 30 different locations for every one second of video. Pro Tools edits with sample rate accuracy. In a 48-kHz session, there are po-tentially 48,000 locations to edit for every sec-ond of audio.
When Pro Tools exports an AAF composition destined for an Avid video editing application, it must ensure that the audio files line up on frame boundaries. To do this, it might have to split an existing audio clip into three separate clips. For
Pro Tools ISIS Guide
example, the following illustration shows a 5-frame video clip and a corresponding audio clip. In Pro Tools, the audio clips might not line up on video frame boundaries.
In order to export frame accurate audio clips, Pro Tools splits the audio media on frame boundaries and fills any gaps with silence. The following illustration shows the resulting audio clips that are exported to Avid.
When you use Export Selected Tracks as OMF/AFF to export tracks from Pro Tools with Enforce Avid Compatibility enabled, a number of additional media files labeled Sample Accu-rate Edit appear in the Avid bins. These are the additional media files that Pro Tools creates to ensure that the Avid editing application receives frame-accurate audio. You also see the sample-accurate edit media files if you zoom in on the imported audio in the Timeline.
Figure 1. Original audio clip
One Pro Tools audio clip
5 frame video clip
The original audio clip does not line up on video frame boundaries
Figure 2. Exported audio clip
Three exported audio clips
5 frame video clip
Exported audio clips line up on video frame boundaries
New audio clip with padded silence
New audio clip with padded silence
System RequirementsUsing Pro Tools within an ISIS system requires the following:
ISIS 7000
• Windows 7
• Mac OS X
• Pro Tools HD software
• An available expansion slot for a Gigabit Ethernet (Gig-E) based host bus adapter (HBA), and Gig-E Ethernet-based connec-tivity to the Avid ISIS server
• ISIS client installation software
ISIS 5000
• Windows 7
• Mac OS X
• Pro Tools HD software
• An available expansion slot for a Gigabit Ethernet (Gig-E) based host bus adapter (HBA), and Gig-E Ethernet-based connec-tivity to the Avid ISIS server
• ISIS client installation software
Some configurations can use a computer’s built-in Ethernet port. For more information, see “Avid ISIS 7000 Requirements with Pro Tools” in the Pro Tools Knowledge Base. You can reach the Knowledge Base by clicking Help > Pro Tools Knowledge Base in Pro Tools, or at www.avid.com/support.
Some configurations can use a computer’s built-in Ethernet port. For more information, see “Avid ISIS 5000 Requirements with Pro Tools” in the Pro Tools Knowledge Base. You can reach the Knowledge Base by clicking Help > Pro Tools Knowledge Base in Pro Tools, or at www.avid.com/support.
Compatibility Information
Avid can only assure compatibility and provide support for hardware and software it has tested and approved.
For complete system requirements, configura-tion details, and a list of qualified computers, operating systems, hard drives, and third-party devices, visit:
www.avid.com/compatibility
About Avid ISIS GuidesPDF versions of Avid Read Mes are installed au-tomatically with Avid ISIS software. Also, searchable online help files containing the same information are accessible from the Help menus in the Interplay Access and Interplay Adminis-trator applications.
You can use any of the following guides as sup-plementary information for this guide:
• The Avid ISIS 7000 System Setup Guide and Avid ISIS 5000 System Setup Guide describe how to connect cables between components that create a basic system and then how to connect more than one basic system together to create a larger, redundant system.
• The Avid ISIS 7000 Client Manager User’s Guide and Avid ISIS 5000 Client Manager User’s Guide provide information for the setup and installation of the ISIS Client Manager software and related hardware components.
• The Avid Site Preparation Guide contains in-formation that helps you prepare your site for installing ISIS system hardware.
Chapter 1: Introduction 7
8
• The Avid ISIS 7000 Administration Guide and Avid ISIS 5000 Administration Guide are in-tended for system administrators responsible for the setup and day-to-day management of an Avid ISIS media network, as well as for us-ers who need to access workspaces on the net-work.
These guides and other ISIS guides are available on the Avid ISIS Online Library DVD and on the Avid Knowledge Base. You can reach the Knowl-edge Base by clicking Help > Pro Tools Knowl-
edge Base in Pro Tools, or at www.avid.com/support. To view or print PDF guides, you can use Adobe Reader.
About the Pro Tools Avid Interplay GuideThe Pro Tools Avid Interplay Guide describes how to set up Pro Tools as a client within an Avid Interplay system, as well as use Pro Tools and Interplay to exchange sequences between Avid and Pro Tools users.
Support for Avid ISISFor support on Avid ISIS, visit Avid’s Knowl-edge Base. You can reach the Knowledge Base by clicking Help > Pro Tools Knowledge Base in Pro Tools, or at www.avid.com/support. Online services are available 24 hours per day, 7 days per week.
Search this online Knowledge Base to find an-swers, to view error messages, to access trouble-shooting tips, to download updates, and to read or join online message-board discussions.
For support on Pro Tools HD, see “About www.avid.com” on page 9.
Pro Tools ISIS Guide
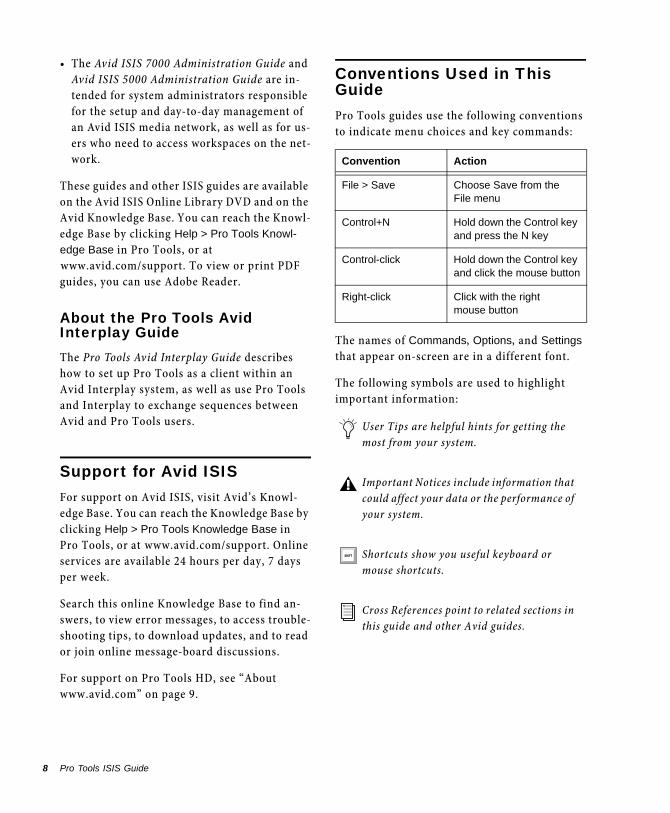
Conventions Used in This GuidePro Tools guides use the following conventions to indicate menu choices and key commands::
The names of Commands, Options, and Settings that appear on-screen are in a different font.
The following symbols are used to highlight important information:
Convention Action
File > Save Choose Save from the File menu
Control+N Hold down the Control key and press the N key
Control-click Hold down the Control key and click the mouse button
Right-click Click with the right mouse button
User Tips are helpful hints for getting the most from your system.
Important Notices include information that could affect your data or the performance of your system.
Shortcuts show you useful keyboard or mouse shortcuts.
Cross References point to related sections in this guide and other Avid guides.
About www.avid.comThe Avid website (www.avid.com) is your best online source for information to help you get the most out of your Pro Tools system. The follow-ing are just a few of the services and features available.
Product Registration Register your purchase online.
Support and Downloads Contact Avid Customer Success (technical support); download software updates and the latest online manuals; browse the Compatibility documents for system re-quirements; search the online Knowledge Base or join the worldwide Pro Tools community on the User Conference.
Training and Education Study on your own using courses available online or find out how you can learn in a classroom setting at a certified Pro Tools training center.
Products and Developers Learn about Avid products; download demo software or learn about our Development Partners and their plug-ins, applications, and hardware.
News and Events Get the latest news from Avid or sign up for a product demo.
Chapter 1: Introduction 9

10
Pro Tools ISIS Guide
Chapter 2: Configuring a Workstation as an ISIS Client
This chapter describes how to install and config-ure an individual Pro Tools workstation as a client of an Avid ISIS system.
Installation OverviewInstalling the hardware and software involves the following process:
1 Make sure the Pro Tools software is installed on the workstation.
2 If your computer requires an added Ethernet card, install the ISIS client hardware.
3 Do one of the following:
• If using ISIS 7000, install the ISIS client software for Zone 1 or Zone 2 clients.
– or –
• If using ISIS 5000, install the ISIS client software for Zone 1, Zone 2, Zone 3, or Zone 4 clients.
Workstation Configuration RequirementsBefore configuring a workstation as a client of an ISIS system, obtain from your ISIS adminis-trator (and make a note of) the following infor-mation for the ISIS system to which you are con-necting your clients:
• IP address
• Subnet Mask
• Default Gateway
Installing Pro ToolsIf you are configuring a Pro Tools workstation as an ISIS client, ensure that Pro Tools hardware and software are properly installed. For detailed information, see the Pro Tools Installation Guide.
Chapter 2: Configuring a Workstation as an ISIS Client 11
12
Avid ISIS Client and Zone DescriptionsAll clients in the system are classified by zones, depending on how they connect to the network. The following list defines the clients in each net-work layer by its zone classification:
Zone 1 Client Connected to ISIS VLANs via an ISS 1 Gb port (direct connection)
Zone 2 Client Connected to ISIS VLANs via a 1 Gb port on an Avid qualified layer-3 switch (non-routed)
Zone 3 Client (ISIS 5000 only) Connected to an Avid qualified Layer-3 Switch (Router) with known QoS (normally 1Gbps)
Zone 4 Client (ISIS 5000 only) Connected to a non-Avid qualified switch with unknown QoS
Mac ISIS ConnectionAvid ISIS supports Mac clients on the media net-work with Zone 1 through Zone 4 connections. You can use any of the onboard Ethernet ports on the Mac system to connect to the media net-work.
Some firewall settings on Mac clients prevent you from connecting to the Avid ISIS environ-ment when enabled. You might receive an error message informing you that no System Direc-tors were found and that the problem might be the firewall settings. If you encounter problems, contact your network admin.
Clients can run in any lower-numbered zone. For example, a Zone 2 client can also run as a Zone 1 client.
Pro Tools ISIS Guide
Installing the ISIS Client Hardware on a Windows CPUOn some Windows CPUs, an Ethernet card is re-quired for connection to Avid ISIS. For more in-formation, see Avid ISIS 7000 Requirements with Pro Tools or Avid ISIS 5000 Requirements with Pro Tools at the Avid Knowledge Base. You can reach the Knowledge Base by clicking Help > Pro
Tools Knowledge Base in Pro Tools, or at www.avid.com/support.
To install the Intel PRO/1000 MT or Intel PRO/1000 PT card:
1 Insert the Intel PRO/1000 MT or PRO/1000 PT card into your workstation and connect it to an ISS switch.
2 Install the Intel PRO/1000 MT or PRO/1000 PT driver.
Inserting the Intel PRO/1000 MT or PRO/1000 PT Ethernet Card into a WorkstationThe Avid ISIS client hardware consists of one Ethernet cable (rated CAT 5e or higher) and a single qualified Ethernet HBA (Host Bus Adapter), such as the Gig-E Intel PRO/1000 MT or PRO/1000 PT. You must purchase Ethernet cables separately.
To insert the HBA Ethernet card into a Pro Tools workstation:
1 Shut down and power off your computer and expansion chassis (if one is present).
2 Open your computer according to the instruc-tions included with it.
For a complete list of qualified host bus adapters, consult Avid support.
3 Release any static electricity by touching the power supply, or another grounded item.
4 Remove the Ethernet card from the antistatic bag, being careful to handle it only by the edges.
Determine the correct card slot order: See Avid ISIS 7000 Requirements with Pro Tools or Avid ISIS 5000 Requirements with Pro Tools at the Avid Knowledge Base. You can reach the Knowl-edge Base by clicking Help > Pro Tools Knowl-
edge Base in Pro Tools, or at www.avid.com/support.
5 Line up the Ethernet card with the installation slot, and slide the card into place gently so the PCIe connector is aligned with the correct PCIe slot.
6 Press down firmly on the card with even pres-sure. The connector should click into place in the PCIe slot.
7 To attach the card bracket to the computer mounting bracket, fasten the card in place using a screw or latch down the securing bracket if one is built in.
To connect an installed Intel PRO/1000 PT or PRO/1000 PF card to the ISS (ISIS switch):
1 Plug one end of an Ethernet cable into the Intel PRO/1000 PT or PRO/1000 PF card’s Ethernet port.
2 Connect the other end of the Ethernet cable to the ISS (ISIS Switch).
Installing the Intel PRO/1000 MT or PRO/1000 PT DriverOnce the Intel Ethernet card is physically in-stalled in your computer, you must install the appropriate driver.
For more information, see the Avid ISIS Client Setup and Installation Guide.
If your system has a DVD drive, you can install it directly from the Avid ISIS DVD. If you do not have a DVD drive, you need to use another means (such as a network connection) to trans-fer the necessary driver from the Avid ISIS DVD to your system.
To install the Intel Ethernet card driver:
1 If you did not restart the system after install-ing Intel PRO/1000 MT or PRO/1000 PT Ether-net card, do so now.
After you restart your system, the following message appears: “Looking for the Intel PRO/1000 MT (or PT) driver.”
2 Cancel the message.
3 Insert the DVD into the DVD drive.
4 On the DVD, navigate to the following folder: Tools_and_Thirdparty_Software/Drivers_and_Firmware.
5 In the Drivers_and_Firmware folder, copy the Intel_MT_Server_NIC or Intel_PT_Server_NIC folder to the desktop of your system.
6 Navigate to the Intel_MT_Server_NIC or Intel_PT_Server_NIC folder on your desktop, and go to Driver/Intel NIC 10.0 Avid.
7 Double click the Auto-run.exe file.
An Installer window opens.
8 Click Install Drivers.
9 A message window appears stating that the drivers and other files that are needed are being installed. This may take some time to complete. When the message window closes, the installa-tion is complete.
10 Set the IP address of the board to allow you to communicate with the Avid ISIS system.
Chapter 2: Configuring a Workstation as an ISIS Client 13
14
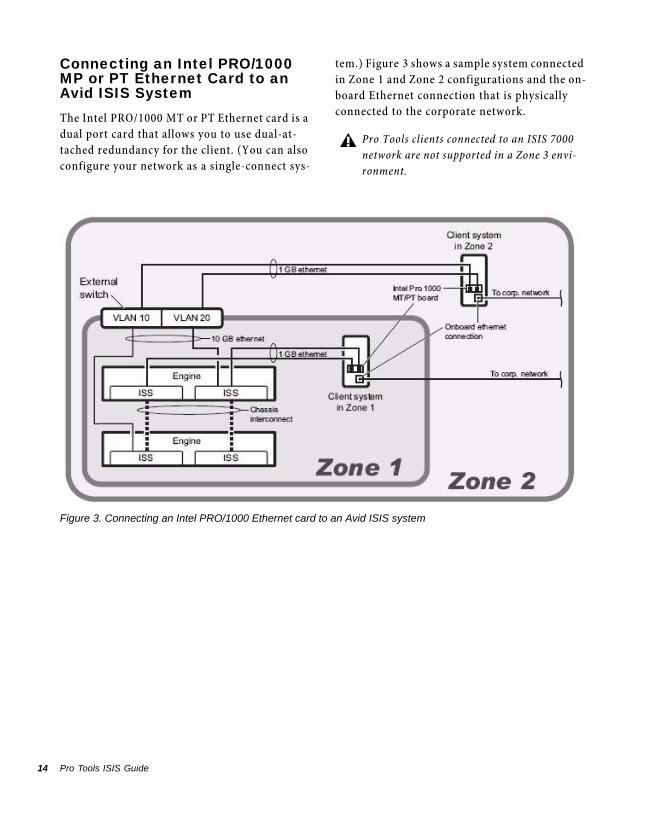
Connecting an Intel PRO/1000 MP or PT Ethernet Card to an Avid ISIS SystemThe Intel PRO/1000 MT or PT Ethernet card is a dual port card that allows you to use dual-at-tached redundancy for the client. (You can also configure your network as a single-connect sys-
Pro Tools ISIS Guide
tem.) Figure 3 shows a sample system connected in Zone 1 and Zone 2 configurations and the on-board Ethernet connection that is physically connected to the corporate network.
Pro Tools clients connected to an ISIS 7000 network are not supported in a Zone 3 envi-ronment.
Figure 3. Connecting an Intel PRO/1000 Ethernet card to an Avid ISIS system
Configuring Windows 7 Network Profiles(Windows 7 Only)
Network profiles are used by Windows 7 to dis-tinguish between Public, Private, and Domain network connections. Because each network profile uses its own security settings, you must configure the Client Manager settings so that the appropriate ports are opened for each appli-cable network profile on your system.
To configure the Client Manager settings for Windows 7 network profiles:
1 Verify which network connection profile(s) are used to connect to your ISIS system by doing the following:
• Click Start > Network. The Network window opens.
– or –
• Click Network and Sharing Center. The Net-work and Sharing Center window opens.
The Network and Sharing Center window lists the network connections present on your system and which network profile has been applied to them.
Once you have determined which network pro-file has been applied to the connection(s) to your ISIS system, you can go to the next step.
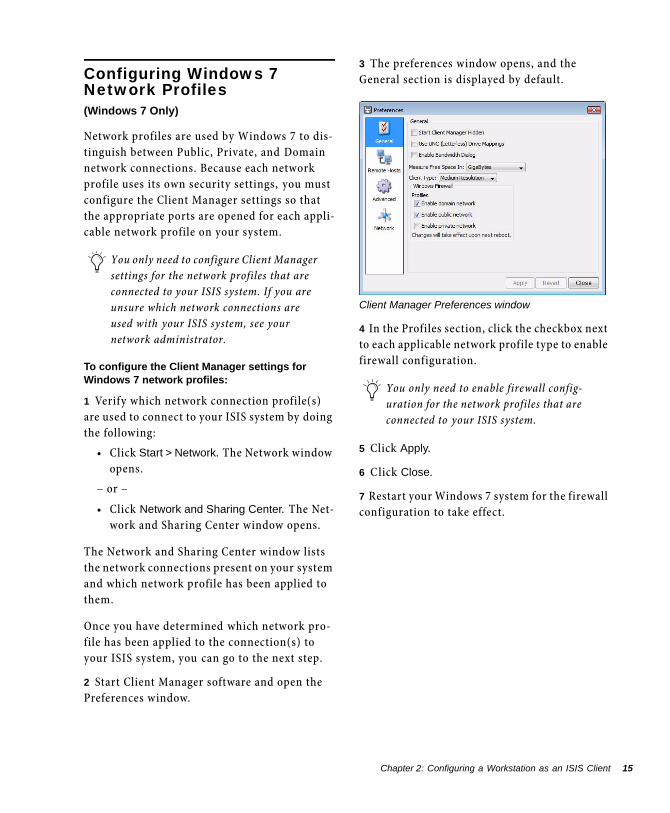
2 Start Client Manager software and open the Preferences window.
You only need to configure Client Manager settings for the network profiles that are connected to your ISIS system. If you are unsure which network connections are used with your ISIS system, see your network administrator.
3 The preferences window opens, and the General section is displayed by default.
4 In the Profiles section, click the checkbox next to each applicable network profile type to enable firewall configuration.
5 Click Apply.
6 C lick Close.
7 Restart your Windows 7 system for the firewall configuration to take effect.
Client Manager Preferences window
You only need to enable firewall config-uration for the network profiles that are connected to your ISIS system.
Chapter 2: Configuring a Workstation as an ISIS Client 15
16
Client Software InstallationWhen working with an Avid ISIS system, it’s necessary to have the correct ISIS client soft-ware installed on your Pro Tools system. For information on installing, uninstalling, and upgrading ISIS client software, see the Avid ISIS 7000 Client Guide or the Avid ISIS 5000 Client Guide.
Additional Installation DetailsThe following sections contain additional infor-mation about installing the client software on your system.
Client Licensing
Any client that connects to an Avid ISIS 7000 or 5000 system must be included in the System Di-rector dongle count for your media network. There is no need to order special licenses for each client. If you are not certain about your li-cense status, see your Avid ISIS administrator.
Saving User Client Manager Settings
The Avid ISIS installer DVD includes a utility that saves your Avid ISIS Preferences settings when upgrading from an earlier version or when reinstalling your client application. This utility is run on the Avid ISIS clients and saves the set-tings file on the client’s C:\ drive in the location used by Client Manager software. Depending on the version of your Avid ISIS application, you might have to run this utility to save your client preferences when upgrading software. See the Avid ISIS 7000 ReadMe or Avid ISIS 5000 Re-adMe for information on which software ver-sions require you to run the utility.
Pro Tools ISIS Guide
If you have preferences set (such as Client Type set to High Resolution or a Remote Host setting) and you want them to be automatically pre-served in the upgrade, then you must run this utility prior to upgrading to the latest version. If you do not run the utility, you must manually reenter any preference settings after the update completes.
To run the utility:
1 Insert the Avid ISIS installer DVD in the Avid ISIS client’s DVD drive and double-click SaveI-SISPreferences.exe located in the following loca-tion.
DVD drive:\AvidISISClient
You can also copy this utility to the client and run it from there (for example from the desk-top). If your client’s computer uses a 64-bit op-erating system, use the utility in the following location:
DVD drive:\AvidISISClient64 folder.
2 After the utility is finished, close all open ap-plications.
3 Uninstall the previous version of the Avid ISIS software.
4 Install the new Avid ISIS software as described the Avid ISIS 7000 Setup Guide or Avid ISIS 5000 Setup Guide.
Your new Preferences settings are set as they were in the previous version.
Chapter 3: Using a Client in an ISIS System
This chapter includes setup instructions and configuration parameters for each workstation you add as an ISIS client.
About Avid ISIS Client ManagerAvid ISIS Client Manager allows your client to connect to the Avid ISIS system. Once installed, the Client Manager runs in the background so you can mount and access your workspaces at any time, as well as manage your workspaces and bandwidth reservations.
Client Manager displays an icon in the Windows Taskbar. When logged in, the Client Manager displays all available System Directors and all available workspaces.
The Client Manager allows users with the neces-sary account privileges to resize workspaces, to protect and unprotect workspaces, and to spec-ify client bandwidth reservations, if any.
Connecting to the Avid ISIS SystemThe Client Manager automatically checks for all System Directors available in the Avid ISIS sys-tem. You can use the Client Manager to connect to the network and optionally reconnect auto-matically when you reboot your system.
Opening the Client Manager
To connect to the Avid ISIS network via the Client Manager:
1 On Windows, do one of the following:
• If the Client Manager icon is not available in the Windows taskbar, select Start > All
Programs > AvidISIS > ClientManager.
• Click the Client Manager icon in the Win-dows taskbar.
• Right-click the Client Manager icon and select ISIS Client Manager.
2 On Mac, do one of the following:
• Double-click the Client Manager alias icon on the desktop, or double-click the Client Manager alias icon in the dock.
– or –
• If the Client Manager alias icon is not avail-able, select Go > Applications, and then dou-ble-click the AvidISIS folder. In this folder, double-click the ClientManager file.
: Using a Client in an ISIS System 17
18
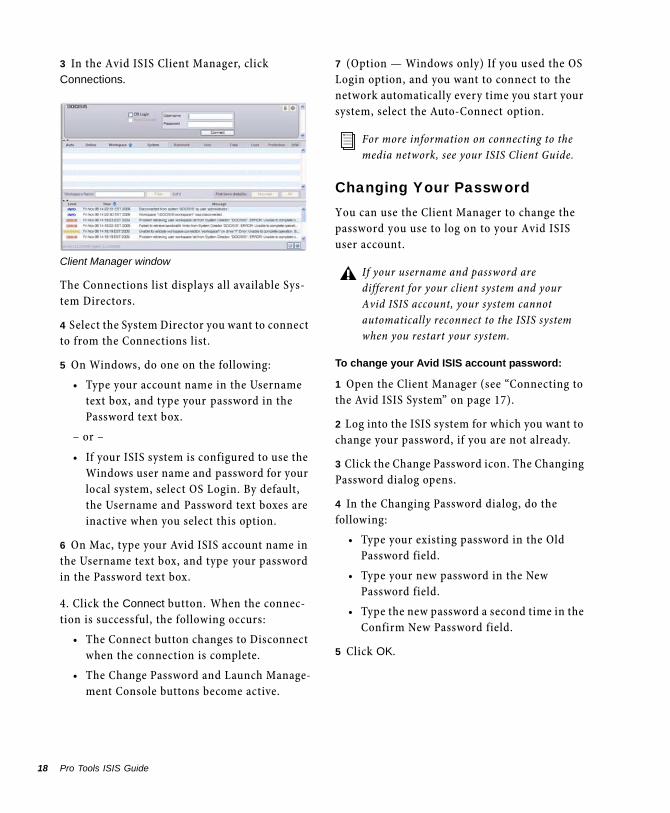
3 In the Avid ISIS Client Manager, click Connections.
The Connections list displays all available Sys-tem Directors.
4 Select the System Director you want to connect to from the Connections list.
5 On Windows, do one on the following:
• Type your account name in the Username text box, and type your password in the Password text box.
– or –
• If your ISIS system is configured to use the Windows user name and password for your local system, select OS Login. By default, the Username and Password text boxes are inactive when you select this option.
6 On Mac, type your Avid ISIS account name in the Username text box, and type your password in the Password text box.
4. Click the Connect button. When the connec-tion is successful, the following occurs:
• The Connect button changes to Disconnect when the connection is complete.
• The Change Password and Launch Manage-ment Console buttons become active.
Client Manager window
Pro Tools ISIS Guide
7 (Option — Windows only) If you used the OS Login option, and you want to connect to the network automatically every time you start your system, select the Auto-Connect option.
Changing Your PasswordYou can use the Client Manager to change the password you use to log on to your Avid ISIS user account.
To change your Avid ISIS account password:
1 Open the Client Manager (see “Connecting to the Avid ISIS System” on page 17).
2 Log into the ISIS system for which you want to change your password, if you are not already.
3 Click the Change Password icon. The Changing Password dialog opens.
4 In the Changing Password dialog, do the following:
• Type your existing password in the Old Password field.
• Type your new password in the New Password field.
• Type the new password a second time in the Confirm New Password field.
5 Click OK.
For more information on connecting to the media network, see your ISIS Client Guide.
If your username and password are different for your client system and your Avid ISIS account, your system cannot automatically reconnect to the ISIS system when you restart your system.
Accessing Client Manager HelpThe Client Manager Help provides background information for tasks, windows, and dialogs. The Help system is HTML-based and operates in your default Web browser.
To open the Client Manager help:
In the Menu panel, click Help.
Mounting and Unmounting WorkspacesYour Avid ISIS user account must have access to at least one workspace. For information on workspace access, see your Avid ISIS Adminis-tration Guide.
When you have one or more workspaces mounted and the connection to the System Di-rector is subsequently lost, a message in the taskbar (for Windows systems) or the dock (for Mac systems) indicates the workspace is un-available.
The Client Manager then automatically attempts to reestablish the connection with the System Director. When the connection is successfully reestablished, a message in the taskbar or dock informs you of the connection state.
For information on opening the Client Manager, see “Connecting to the Avid ISIS System” on page 17.
To mount an Avid ISIS workspace on your system:
1 Open the Client Manager. The Workspaces list opens. The Online field displays a green ball for workspaces that are already mounted. You can filter the Workspaces list by Workspace name.
2 Do one of the following:
• Click (mount) in the Online column for the selected workspace.
• Click to select a workspace, then Right-click, and select Mount.
• (Option) Right-click, and select “Mount to drive” from the menu.
The Client Manager mounts the selected work-space on your client and the Online icon for the mounted workspace changes to green. The Workspaces list displays the drive the work-space is mounted to. If you use letterless drive mappings, the Workspaces list displays “UNC path” next to the Online icon.
3 (Option) If you want the selected workspace remounted the next time you log in, do one of the following:
• Click (enable) in the Auto column for the mounted workspace.
– or –
• Right-click, and select Enable auto mount.
The next time you log in to your client system, the Client Manager automatically mounts the selected workspace.
Selecting this option will override the cur-rent drive mapping option settings for the selected workspace. For more information on drive letter assignments, see “Configur-ing Workspace Drive Letter Assignments” on page 21.
: Using a Client in an ISIS System 19
20
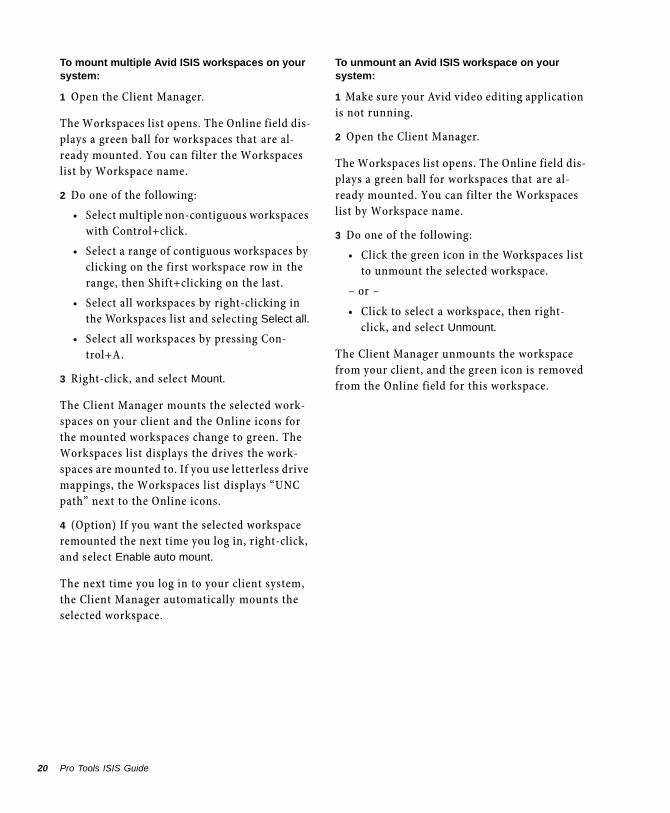
To mount multiple Avid ISIS workspaces on your system:
1 Open the Client Manager.
The Workspaces list opens. The Online field dis-plays a green ball for workspaces that are al-ready mounted. You can filter the Workspaces list by Workspace name.
2 Do one of the following:
• Select multiple non-contiguous workspaces with Control+click.
• Select a range of contiguous workspaces by clicking on the first workspace row in the range, then Shift+clicking on the last.
• Select all workspaces by right-clicking in the Workspaces list and selecting Select all.
• Select all workspaces by pressing Con-trol+A.
3 Right-click, and select Mount.
The Client Manager mounts the selected work-spaces on your client and the Online icons for the mounted workspaces change to green. The Workspaces list displays the drives the work-spaces are mounted to. If you use letterless drive mappings, the Workspaces list displays “UNC path” next to the Online icons.
4 (Option) If you want the selected workspace remounted the next time you log in, right-click, and select Enable auto mount.
The next time you log in to your client system, the Client Manager automatically mounts the selected workspace.
Pro Tools ISIS Guide
To unmount an Avid ISIS workspace on your system:
1 Make sure your Avid video editing application is not running.
2 Open the Client Manager.
The Workspaces list opens. The Online field dis-plays a green ball for workspaces that are al-ready mounted. You can filter the Workspaces list by Workspace name.
3 Do one of the following:
• Click the green icon in the Workspaces list to unmount the selected workspace.
– or –
• Click to select a workspace, then right-click, and select Unmount.
The Client Manager unmounts the workspace from your client, and the green icon is removed from the Online field for this workspace.
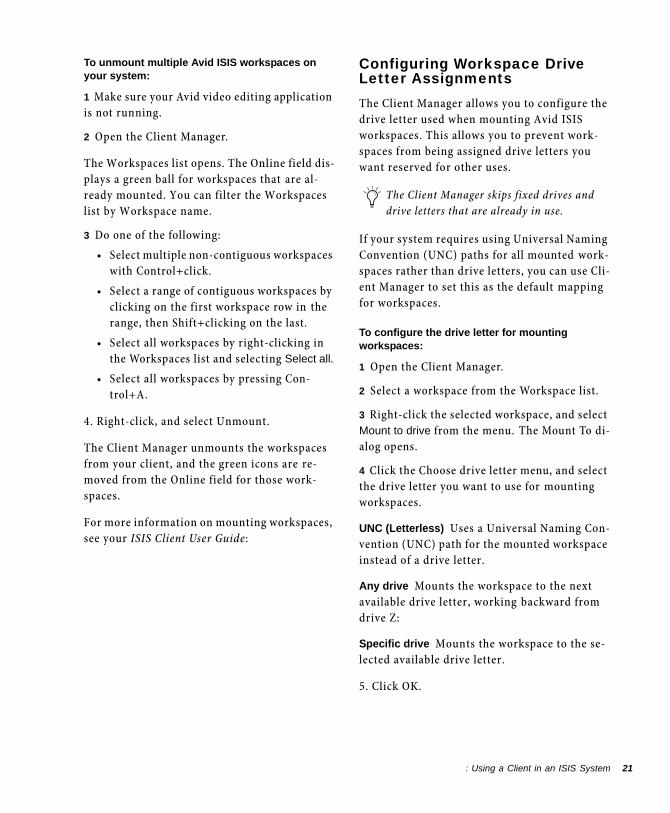
To unmount multiple Avid ISIS workspaces on your system:
1 Make sure your Avid video editing application is not running.
2 Open the Client Manager.
The Workspaces list opens. The Online field dis-plays a green ball for workspaces that are al-ready mounted. You can filter the Workspaces list by Workspace name.
3 Do one of the following:
• Select multiple non-contiguous workspaces with Control+click.
• Select a range of contiguous workspaces by clicking on the first workspace row in the range, then Shift+clicking on the last.
• Select all workspaces by right-clicking in the Workspaces list and selecting Select all.
• Select all workspaces by pressing Con-trol+A.
4. Right-click, and select Unmount.
The Client Manager unmounts the workspaces from your client, and the green icons are re-moved from the Online field for those work-spaces.
For more information on mounting workspaces, see your ISIS Client User Guide:
Configuring Workspace Drive Letter AssignmentsThe Client Manager allows you to configure the drive letter used when mounting Avid ISIS workspaces. This allows you to prevent work-spaces from being assigned drive letters you want reserved for other uses.
If your system requires using Universal Naming Convention (UNC) paths for all mounted work-spaces rather than drive letters, you can use Cli-ent Manager to set this as the default mapping for workspaces.
To configure the drive letter for mounting workspaces:
1 Open the Client Manager.
2 Select a workspace from the Workspace list.
3 Right-click the selected workspace, and select Mount to drive from the menu. The Mount To di-alog opens.
4 Click the Choose drive letter menu, and select the drive letter you want to use for mounting workspaces.
UNC (Letterless) Uses a Universal Naming Con-vention (UNC) path for the mounted workspace instead of a drive letter.
Any drive Mounts the workspace to the next available drive letter, working backward from drive Z:
Specific drive Mounts the workspace to the se-lected available drive letter.
5. Click OK.
The Client Manager skips fixed drives and drive letters that are already in use.
: Using a Client in an ISIS System 21
22
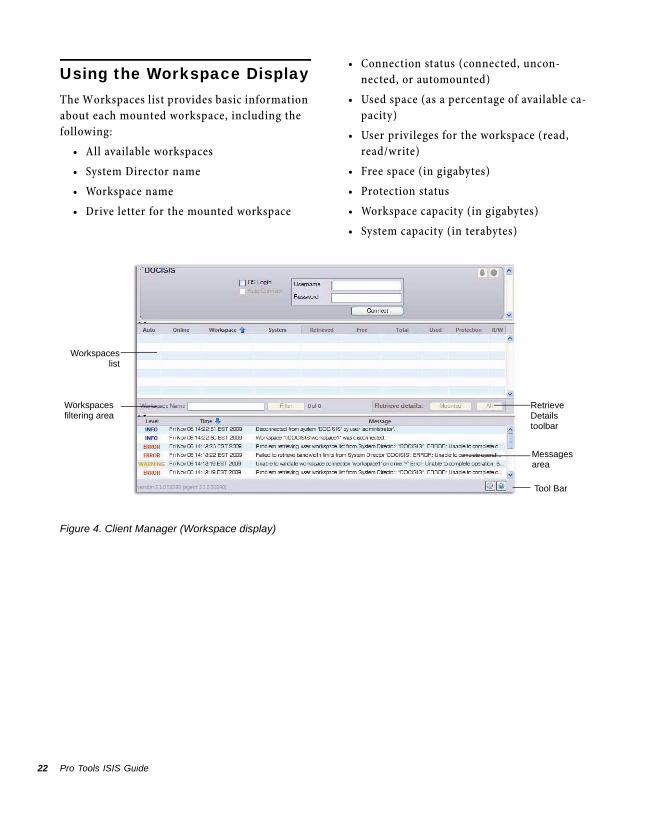
Using the Workspace DisplayThe Workspaces list provides basic information about each mounted workspace, including the following:
• All available workspaces
• System Director name
• Workspace name
• Drive letter for the mounted workspace
Pro Tools ISIS Guide
• Connection status (connected, uncon-nected, or automounted)
• Used space (as a percentage of available ca-pacity)
• User privileges for the workspace (read, read/write)
• Free space (in gigabytes)
• Protection status
• Workspace capacity (in gigabytes)
• System capacity (in terabytes)
Figure 4. Client Manager (Workspace display)
Workspaceslist
Workspaces filtering area
Tool Bar
RetrieveDetailstoolbar
Messagesarea
Retrieving Workspace DetailsWhen you connect to an ISIS system, only the workspace names are displayed; you need to re-trieve additional workspace details manually. You do not have to mount a workspace to re-trieve its details.
To retrieve details for one or more selected workspaces:
1 Do one of the following:
• Select a single workspace by clicking on a workspace row.
• Select multiple non-contiguous workspaces with Control+click.
• Select a range of contiguous workspaces by clicking on the first workspace row in the range, then Shift+clicking on the last.
2 Right-click in the Workspace list, and select Retrieve details. Additional details are retrieved for the selected workspaces.
To retrieve details for all mounted workspaces, do one of the following:
In the Retrieve Details area, click Mounted.
– or –
Right-click in the Workspace list, and select Retrieve mounted details.
Additional details are retrieved for all mounted workspaces.
To retrieve details for all workspaces, do one of the following:
In the Retrieve Details area, click All.
– or –
Right-click in the Workspace list, and select Retrieve all details.
Additional details are retrieved for all work-spaces.
Sorting the DisplayIf the Workspaces list contains a large number of workspaces, you might want to sort the items in the list.
To sort the Workspaces list:
1 Click on a field heading that you want to sort. A blue arrow appears next to the field heading.
2 Click the field heading again to reverse the sort order.
Filtering the DisplayIf the Workspaces list contains a large number of workspaces, you might want to filter the items in the list.
To filter the Workspaces list:
1 Type part or all of a workspace name in the Workspace Name field.
2 Click the Filter button.
The Workspaces list updates to display the workspace names that match the text entered.
To display all Workspaces:
Delete the text in the Workspace Name field.
The Workspaces list updates to display all avail-able Workspaces.
After you clear the Workspace name filter, you have to manually retrieve details from the selected workspaces.
: Using a Client in an ISIS System 23
24
Configuring Workspace Drive Letter AssignmentsThe Client Manager allows you to configure the drive letter used when mounting Avid ISIS workspaces. This allows you to prevent work-spaces from being assigned drive letters you want reserved for other uses.
If your system requires using Universal Naming Convention (UNC) paths for all mounted work-spaces rather than drive letters, you can use Cli-ent Manager to set this as the default mapping for workspaces.
To configure the drive letter for mounting workspaces:
1 Open the Client Manager (see “Connecting to the Avid ISIS System” on page 17).
2 In the Menu panel, click Workspaces.
3 Click the Fast menu, and select Mount To.
4 In the Mount To dialog, click the Choose drive letter menu, and select the drive letter you want to use for mounting workspaces.
5 Click OK.
The Client Manager skips fixed drives and drive letters that are already in use.
Pro Tools ISIS Guide
Testing Your Avid ISIS Connection(Windows Systems Only)
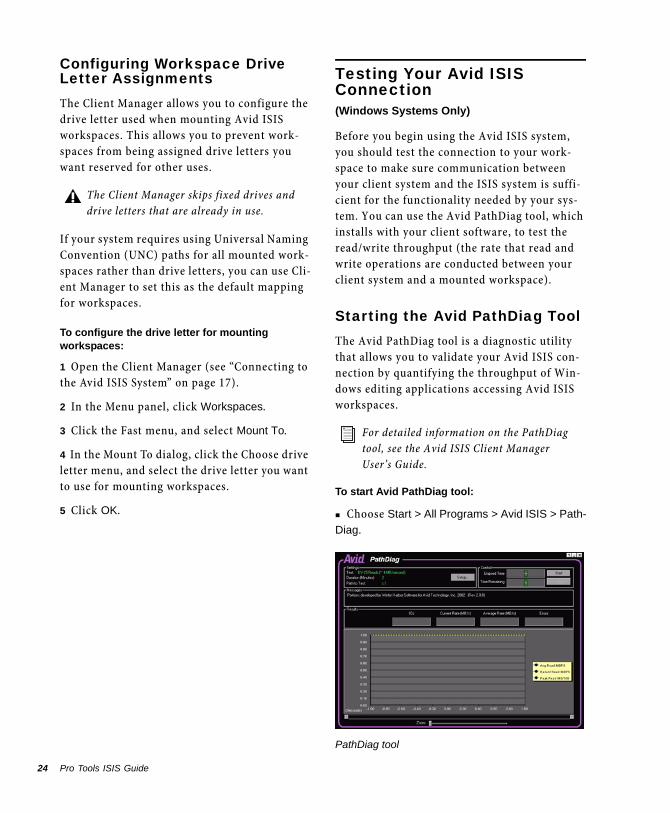
Before you begin using the Avid ISIS system, you should test the connection to your work-space to make sure communication between your client system and the ISIS system is suffi-cient for the functionality needed by your sys-tem. You can use the Avid PathDiag tool, which installs with your client software, to test the read/write throughput (the rate that read and write operations are conducted between your client system and a mounted workspace).
Starting the Avid PathDiag ToolThe Avid PathDiag tool is a diagnostic utility that allows you to validate your Avid ISIS con-nection by quantifying the throughput of Win-dows editing applications accessing Avid ISIS workspaces.
To start Avid PathDiag tool:
Choose Start > All Programs > Avid ISIS > Path-
Diag.
For detailed information on the PathDiag tool, see the Avid ISIS Client Manager User’s Guide.
PathDiag tool
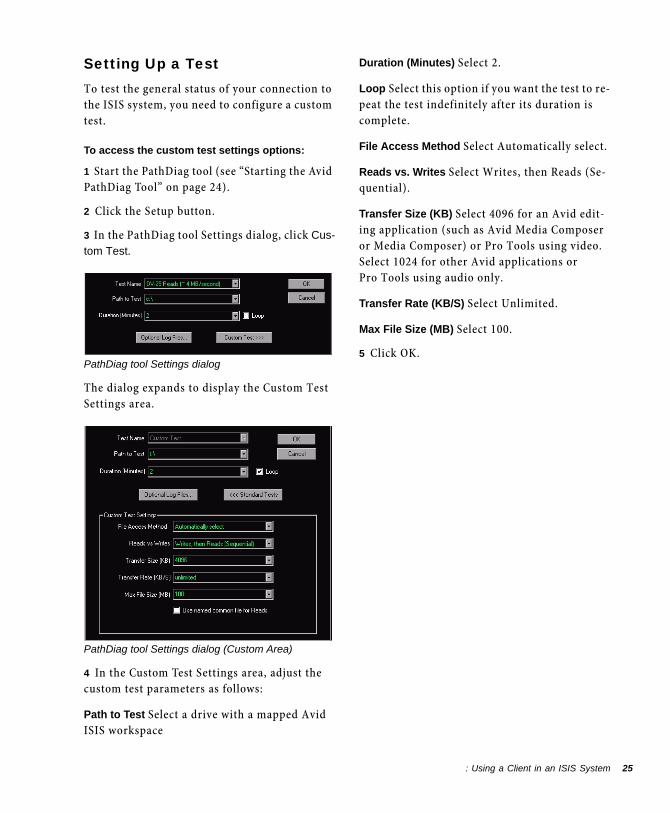
Setting Up a TestTo test the general status of your connection to the ISIS system, you need to configure a custom test.
To access the custom test settings options:
1 Start the PathDiag tool (see “Starting the Avid PathDiag Tool” on page 24).
2 Click the Setup button.
3 In the PathDiag tool Settings dialog, click Cus-
tom Test.
The dialog expands to display the Custom Test Settings area.
4 In the Custom Test Settings area, adjust the custom test parameters as follows:
Path to Test Select a drive with a mapped Avid ISIS workspace
PathDiag tool Settings dialog
PathDiag tool Settings dialog (Custom Area)
Duration (Minutes) Select 2.
Loop Select this option if you want the test to re-peat the test indefinitely after its duration is complete.
File Access Method Select Automatically select.
Reads vs. Writes Select Writes, then Reads (Se-quential).
Transfer Size (KB) Select 4096 for an Avid edit-ing application (such as Avid Media Composer or Media Composer) or Pro Tools using video. Select 1024 for other Avid applications or Pro Tools using audio only.
Transfer Rate (KB/S) Select Unlimited.
Max File Size (MB) Select 100.
5 Click OK.
: Using a Client in an ISIS System 25
26
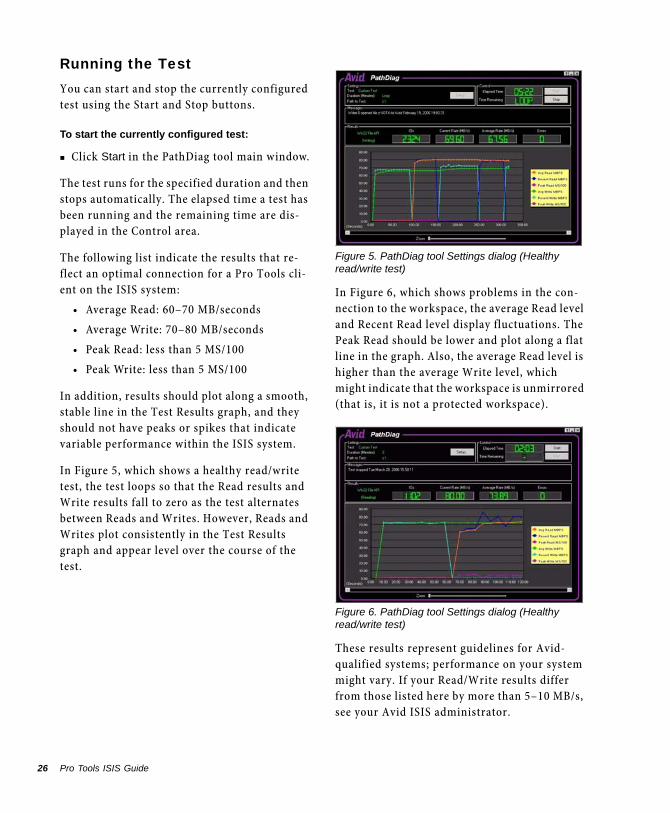
Running the TestYou can start and stop the currently configured test using the Start and Stop buttons.
To start the currently configured test:
Click Start in the PathDiag tool main window.
The test runs for the specified duration and then stops automatically. The elapsed time a test has been running and the remaining time are dis-played in the Control area.
The following list indicate the results that re-flect an optimal connection for a Pro Tools cli-ent on the ISIS system:
• Average Read: 60–70 MB/seconds
• Average Write: 70–80 MB/seconds
• Peak Read: less than 5 MS/100
• Peak Write: less than 5 MS/100
In addition, results should plot along a smooth, stable line in the Test Results graph, and they should not have peaks or spikes that indicate variable performance within the ISIS system.
In Figure 5, which shows a healthy read/write test, the test loops so that the Read results and Write results fall to zero as the test alternates between Reads and Writes. However, Reads and Writes plot consistently in the Test Results graph and appear level over the course of the test.
Pro Tools ISIS Guide
In Figure 6, which shows problems in the con-nection to the workspace, the average Read level and Recent Read level display fluctuations. The Peak Read should be lower and plot along a flat line in the graph. Also, the average Read level is higher than the average Write level, which might indicate that the workspace is unmirrored (that is, it is not a protected workspace).
These results represent guidelines for Avid-qualified systems; performance on your system might vary. If your Read/Write results differ from those listed here by more than 5–10 MB/s, see your Avid ISIS administrator.
Figure 5. PathDiag tool Settings dialog (Healthy read/write test)
Figure 6. PathDiag tool Settings dialog (Healthy read/write test)
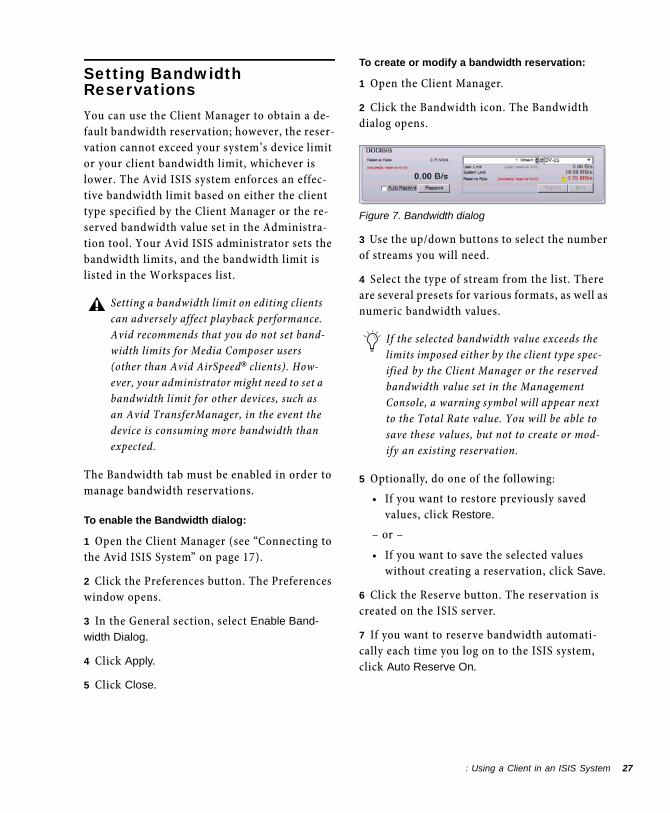
Setting Bandwidth ReservationsYou can use the Client Manager to obtain a de-fault bandwidth reservation; however, the reser-vation cannot exceed your system’s device limit or your client bandwidth limit, whichever is lower. The Avid ISIS system enforces an effec-tive bandwidth limit based on either the client type specified by the Client Manager or the re-served bandwidth value set in the Administra-tion tool. Your Avid ISIS administrator sets the bandwidth limits, and the bandwidth limit is listed in the Workspaces list.
The Bandwidth tab must be enabled in order to manage bandwidth reservations.
To enable the Bandwidth dialog:
1 Open the Client Manager (see “Connecting to the Avid ISIS System” on page 17).
2 Click the Preferences button. The Preferences window opens.
3 In the General section, select Enable Band-
width Dialog.
4 Click Apply.
5 Click Close.
Setting a bandwidth limit on editing clients can adversely affect playback performance. Avid recommends that you do not set band-width limits for Media Composer users (other than Avid AirSpeed® clients). How-ever, your administrator might need to set a bandwidth limit for other devices, such as an Avid TransferManager, in the event the device is consuming more bandwidth than expected.
To create or modify a bandwidth reservation:
1 Open the Client Manager.
2 Click the Bandwidth icon. The Bandwidth dialog opens.
3 Use the up/down buttons to select the number of streams you will need.
4 Select the type of stream from the list. There are several presets for various formats, as well as numeric bandwidth values.
5 Optionally, do one of the following:
• If you want to restore previously saved values, click Restore.
– or –
• If you want to save the selected values without creating a reservation, click Save.
6 Click the Reserve button. The reservation is created on the ISIS server.
7 If you want to reserve bandwidth automati-cally each time you log on to the ISIS system, click Auto Reserve On.
Figure 7. Bandwidth dialog
If the selected bandwidth value exceeds the limits imposed either by the client type spec-ified by the Client Manager or the reserved bandwidth value set in the Management Console, a warning symbol will appear next to the Total Rate value. You will be able to save these values, but not to create or mod-ify an existing reservation.
: Using a Client in an ISIS System 27
28
Performing Administrative TasksYou can use the Preferences dialog and the Mes-sages dialog to manage the following adminis-trative tasks:
• Set display properties
• Clear cached information
• View, save, and clear logged error messages
Setting Display Properties in the Client ManagerDisplay properties in the Client Manager control how the application displays information on your local system.
To set Client Manager display properties:
1 Open the Client Manager (see “Connecting to the Avid ISIS System” on page 17).
2 Click Preferences.
3 In the Preferences dialog, click General.
4 In the General area, select the appropriate op-tions:
Start Client Manager Hidden Select this option to allow the Client Manager to run hidden and ac-cessible from the Client Manager icon in the Taskbar. Deselect this option to open the Client Manager each time you start your system.
Use UNC (Letterless) Drive Mappings Select this option to use UNC paths to map workspaces in-stead of drive letters.
Enable Bandwidth Dialog Select this option to enable the “Display Bandwidth in Bits Per Sec-ond” option as well as the bandwidth displays in Client Manager tool.
Pro Tools does not support UNC paths for access to media files.
Pro Tools ISIS Guide
Display Bandwidth in Bits Per Second Select this option to display bandwidth in bits per second. Deselect this option to display bandwidth in bytes per second.
Measure Free Space In You can choose to dis-play the amount of available space in your work-space either in gigabytes (GB) or in the total length of stored media (hours:minutes:seconds) at a selected resolution.
5 Click Apply and close the application.
Clearing Cached DataThe Client Manager maintains information on site settings in cache files, and the tool appends data each time you open the Client Manager. You can clear the cached information—for ex-ample, to remove settings for users no longer working on a specific system—by deleting the cache files.
To clear cached data:
1 Open the Client Manager (see “Connecting to the Avid ISIS System” on page 17).
2 Click Preferences.
3 In the Preferences dialog, click Advanced.
4 Do one of the following:
• Click the Clear button for each cache file you want to clear.
– or –
• Click the Clear All button to clear all cached data.
5 Click Apply and close the application.
Using Logs and MessagesThe Client Manager keeps an log of events, in-formation, and error messages. You can view the current log in the Messages dialog. You can also save a copy of the log, and you can clear the log maintained for the current work session.
To view Client Manager event logs:
Open the Client Manager (see “Connecting to the Avid ISIS System” on page 17).
The Messages area is the bottom section of the Client Manager window. You can sort the Mes-sages list by clicking the Level, Time, or Message field heading and clicking on the blue arrow to sort in ascending or descending order.
To save a copy of the event log:
1 Right-click in the list, and select Export. The Export dialog opens.
2 Navigate to the folder where you want to save your log.
3 Type a name for the log in the File Name text box.
4 Click Save.
The Client Manager saves the event messages as a log file (filename.log).
To clear all event logs:
Click the Fast menu, and select Clear.
The Client Manager clears all logs when you exit the application.
Configuring Pro Tools Session Settings for a New SessionThe following describes the recommended ses-sion settings for creating a new Pro Tools ses-sion when working in an ISIS system.
To create a new Pro Tools session for Avid ISIS:
1 In Pro Tools, choose File > New Session.
2 In the New Session dialog, select an Audio File Type for the session that is compatible across all workstations.
3 Select a Sample Rate for the session that is compatible across all workstations.
4 Select a Bit Depth for the session that is com-patible across all workstations.
5 Click OK.
6 Name the session and save it to an Avid ISIS workspace.
Audio File Type
Pro Tools supports AIFF and BWF (.WAV) au-dio files natively. The BWF sub-formats RF64 and WAVE Extended are also supported.
Avid video editing applications do not support RF64 audio files. Standard.WAV format is recommended when working in a shared media environment with video.
All Sound Designer II files must be converted to a Windows-compatible format for use in an ISIS system.
: Using a Client in an ISIS System 29
30
For the best media compatibility between Pro Tools workstations and Avid workstations, you should choose to work with Broadcast WAV media files. Make sure the Audio File Type pop-up menu in the New Session dialog is set to WAV when you are creating a new session.
Sample Rate
Pro Tools HD supports sample rates up to 192 kHz, but other Pro Tools and Avid worksta-tions only support lower sample rates. There-fore, when working on an Avid ISIS network, it is vital to use sample rates for shared media that are supported on all workstations.
It is preferable for all participants in the system to agree on a standard, universal sample rate for the sake of compatibility and to avoid media conversion. Many facilities choose 48 kHz, which is the industry standard for post produc-tion and broadcast applications.
Bit Depth
It is preferable for all participants in the system to agree on a standard, universal bit depth for the sake of compatibility and to avoid media conversion. Many facilities standardize on 24-bit audio, which offers higher audio quality than 16-bit, and is more universally supported than 32-bit floating point audio.
The WAV file format is required when working with audio files containing field recorder metadata.
For the most current compatibility informa-tion on supported Pro Tools systems and Avid ISIS, visit www.avid.com.
Pro Tools ISIS Guide
Performance CharacteristicsYou should experience no functional difference between working with Pro Tools attached to an ISIS system or working with Pro Tools attached to local storage. However, due to the architec-tural differences between ISIS and local storage, some subtle differences may be noticeable.
Disk Cache Performance Enhancements
Pro Tools HD software version 10 provides a RAM-based Disk Cache system. With it, audio is loaded into RAM for instant playback, increas-ing performance significantly, especially with networked storage (such as an ISIS system).
Allocating a generous amount of RAM to Disk Cache allows for higher track counts over ISIS, closer to standard Pro Tools system maximums.
When playing back large or complex sessions (especially from networked storage), perfor-mance is significantly improved by caching all audio in the timeline to RAM, so it can be useful to know how much of the audio has been cached.
To check Disk Cache status:
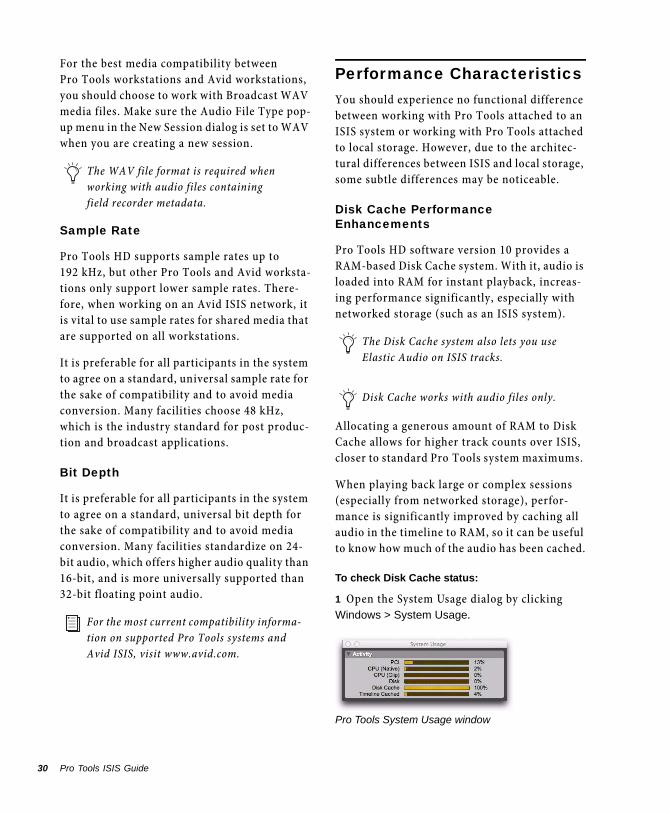
1 Open the System Usage dialog by clicking Windows > System Usage.
The Disk Cache system also lets you use Elastic Audio on ISIS tracks.
Disk Cache works with audio files only.
Pro Tools System Usage window
2 The Timeline Cached gauge displays the per-centage of audio in the timeline that has been cached to RAM. If the Timeline Cached gauge is at 100%, all audio in the Pro Tools timeline has been cached to RAM.
For more information on Disk Cache and how to configure it, see the Pro Tools Reference Guide.
Opening FilesPro Tools periodically opens and closes files (for example, to buffer them for playback). When us-ing ISIS storage, the file open process is some-what slower than with local storage. This is most noticeable when first opening an existing ses-sion. Pro Tools software version 10 and higher calculates fades in real time, rather than pre-rendering them. This speeds up the file open process significantly.
The amount of audio that can be cached to RAM is dependent on the amount of RAM allocated to Disk Cache in the Playback Engine dialog in Pro Tools. In cases where the total size of all audio on the timeline exceeds the amount of allocated RAM, the Timeline Cached gauge will not reach 100%.
Sharing Files
Sharing Session FilesTo avoid machine conflicts among multiple us-ers and avoid general performance problems, no two Pro Tools clients should open the same ses-sion at the same time. Only one Pro Tools client should have a particular session open at any given time.
Sharing Video FilesPro Tools clients with Avid video peripherals (such as Avid Mojo, Avid Mojo SDI, and AVop-tion|V10) can share JFIF and MXF video files with other ISIS clients. Pro Tools cannot de-structively modify video files.
Sharing Audio FilesPro Tools clients can share audio files in an al-location group with other ISIS clients. When working with shared audio files, it is recom-mended that you use the Duplicate command to make a copies before applying any destructive edits.
: Using a Client in an ISIS System 31
32
Destructive EditingThe following Pro Tools features can destruc-tively modify audio files:
• Pencil Tool
• AudioSuite in Overwrite Files mode
• Destructive Record
• Compact Selected
• DestructivePunch Record
• DigiBase metadata entry/editing
When working with shared audio files, it is rec-ommended that you use the Duplicate command to substitute copies before applying any de-structive edits. This avoids the problem of mod-ifying a file referenced by another session.
To substitute a copy of a shared file:
1 In Pro Tools, select the clip you want to copy in the Edit window.
2 Choose Edit > Duplicate.
Rendering an AudioSuite effect in Overwrite Files mode will destructively modify the af-fected clips, however, fades and metadata are preserved.
Pro Tools ISIS Guide
MXF and OMF Files
Pro Tools treats all MXF and OMF media that are both created by Avid and stored on shared storage as read-only. Consequently, destructive editing tools cannot be used to modify MXF and OMF media files. However, you can delete or overwrite MXF and OMF files.
Because Pro Tools creates both MXF/OMF and non-MXF/OMF media files, these destructive editing tools can be used on non-MXF/OMF me-dia created by Pro Tools. When you are working in an ISIS system, you should always create a copy of an audio file before applying a destruc-tive change.
Use the Duplicate or Consolidate commands in Pro Tools to make non-OMF or non-MXF copies of audio files for destructive editing.
Chapter 4: Avid ISIS Workflows for Pro Tools
This chapter covers workflows for using an Avid editing application (such as Media Composer) and Pro Tools to exchange AAF sequences using ISIS shared storage, as follows:
• Exporting audio and video from Media Composer and other Avid video edit-ing applications
• Importing audio and video into Pro Tools
• Exporting audio from Pro Tools for Avid video editing applications
• Importing audio into an Avid video editing application from Pro Tools
• Synchronizing audio with an Avid sequence
Exporting Audio and Video from Media ComposerTo export sequences from Avid video editing ap-plications for import into Pro Tools, you can choose from the following methods:
• Using the Send To templates to export an AAF or OMF sequence
• Manually exporting an AAF or OMF sequence
• Checking a sequence into Avid Interplay for Pro Tools (Avid Interplay system required)
For more information on exporting Avid sequences, see the documentation that came with your Avid editing application.
For information on working with Interplay, see the Pro Tools Avid Interplay Guide.
Chapter 4: Avid ISIS Workflows for Pro Tools 33
34
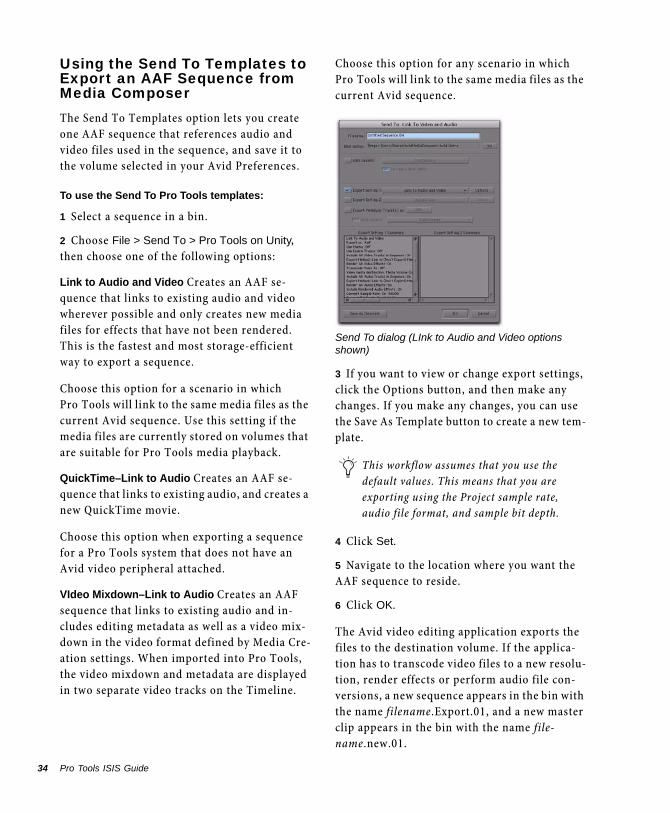
Using the Send To Templates to Export an AAF Sequence from Media ComposerThe Send To Templates option lets you create one AAF sequence that references audio and video files used in the sequence, and save it to the volume selected in your Avid Preferences.
To use the Send To Pro Tools templates:
1 Select a sequence in a bin.
2 Choose File > Send To > Pro Tools on Unity, then choose one of the following options:
Link to Audio and Video Creates an AAF se-quence that links to existing audio and video wherever possible and only creates new media files for effects that have not been rendered. This is the fastest and most storage-efficient way to export a sequence.
Choose this option for a scenario in which Pro Tools will link to the same media files as the current Avid sequence. Use this setting if the media files are currently stored on volumes that are suitable for Pro Tools media playback.
QuickTime–Link to Audio Creates an AAF se-quence that links to existing audio, and creates a new QuickTime movie.
Choose this option when exporting a sequence for a Pro Tools system that does not have an Avid video peripheral attached.
VIdeo Mixdown–Link to Audio Creates an AAF sequence that links to existing audio and in-cludes editing metadata as well as a video mix-down in the video format defined by Media Cre-ation settings. When imported into Pro Tools, the video mixdown and metadata are displayed in two separate video tracks on the Timeline.
Pro Tools ISIS Guide
Choose this option for any scenario in which Pro Tools will link to the same media files as the current Avid sequence.
3 If you want to view or change export settings, click the Options button, and then make any changes. If you make any changes, you can use the Save As Template button to create a new tem-plate.
4 Click Set.
5 Navigate to the location where you want the AAF sequence to reside.
6 Click OK.
The Avid video editing application exports the files to the destination volume. If the applica-tion has to transcode video files to a new resolu-tion, render effects or perform audio file con-versions, a new sequence appears in the bin with the name filename.Export.01, and a new master clip appears in the bin with the name file-name.new.01.
Send To dialog (LInk to Audio and Video options shown)
This workflow assumes that you use the default values. This means that you are exporting using the Project sample rate, audio file format, and sample bit depth.

Manually Exporting an AAF Sequence from Media ComposerManually exporting an AAF sequence from an Avid editing application involves more steps than using the Send To templates, but it pro-vides more flexibility.
Once all effects have been rendered, export the sequence as an AAF sequence.
To manually export an AAF sequence:
1 Select the sequence in the bin.
2 Select File > Export.
3 Type a name and select a location for the ex-ported sequence.
4 Select Export to Pro Tools from the Export Set-tings menu at the bottom of the Export As dia-log.
5 Click the Options button to open the Export to Pro Tools Settings dialog. Verify the settings:
• For Export As, select AAF.
• Select the Include All Video Tracks in Se-
quence option. When the sequence is im-ported into Pro Tools. All of the video tracks will be “flattened” so that the im-ported sequence shows only a single video stream.
You will need to render all video effects before manually exporting the sequence.
6 In the Video/Data Details tab, select one of the following from the Export Method pop-up menu:
Link to (Don’t Export) Media The Pro Tools ses-sion will link to the same video files as the cur-rent Avid sequence. Use this setting if the video files are currently stored on a volume suitable for Pro Tools video playback.
Copy All Media New complete video files will be created on the designated volume.
Consolidate Media Similar to Copy All Media, but only the parts of the video clips which are actually used in the Timeline are copied. Use this setting to copy the video files to a volume suitable for Pro Tools video playback.
Export Settings – Export To Pro Tools dialog, Video/Data Details tab
Chapter 4: Avid ISIS Workflows for Pro Tools 35
36
Video Mixdown The exported AAF sequence will reference a video mixdown. This setting lets you have a choice of whether to export the video mixdown alone or the video mixdown along with additional video track edits. The choice depends largely on the version of Pro Tools to which you are exporting. Pro Tools 7.2 and higher can show the video mixdown alongside video edits; in this case, you should select both the video mixdown and the video edits. For versions of Pro Tools prior to 7.2, you should export the video mixdown by itself.
The following settings may also appear under the Video Details tab, depending on the selected export method:
Media Destinations Choose where to store cop-ied video files.
Handle Length Extends the beginning and end of the consolidated file by the specified number of frames. This lets you trim edits later, though the sequence would need to be re-edited in the Avid video editing application.
Render Video Effects Always select Render Video Effects. If you already manually rendered effects, selecting this option will not create new files. It is highly recommended that all effects be rendered manually before exporting the se-quence.
Transcode Video To Use this only if you need to change the video resolution. Pro Tools supports most SD resolutions supported by Avid, and even supports mixed resolutions in the Pro Tools Timeline, so in most cases there is no
Pro Tools ISIS Guide
need to spend extra time transcoding the video. However, if you have video of a resolution which is not currently supported by Pro Tools, use this setting to transcode it to a supported resolution.
While new video files are typically stored in the OMFI MediaFiles folder (for OMF media) or the Avid MediaFiles folder (for MXF media), some workflows let you choose a different target des-tination for video in the Media Destination sec-tion of the Video Details tab, as follows:
Media Drive This option exports media to the OMFI MediaFiles folder or Avid MediaFiles folder on a connected storage drive. Select the Use Media Creation Settings option to use the default settings, or deselect that option to choose a media drive from the pop-up menu.
Folder This option exports video media to a spe-cific folder. Select the Use Same Folder as AAF File option to export the video media into the same folder you designated for exporting the AAF sequence, or deselect this option to select a specific folder location for the media.
If your Pro Tools system is running on a slower computer, you may be able to reduce some of the CPU load in Pro Tools by transcoding the video to 1:1 on export. 1:1 video is uncompressed, and consequently it does not need to be decompressed before playing back. However, 1:1 video requires significant amounts of storage space.
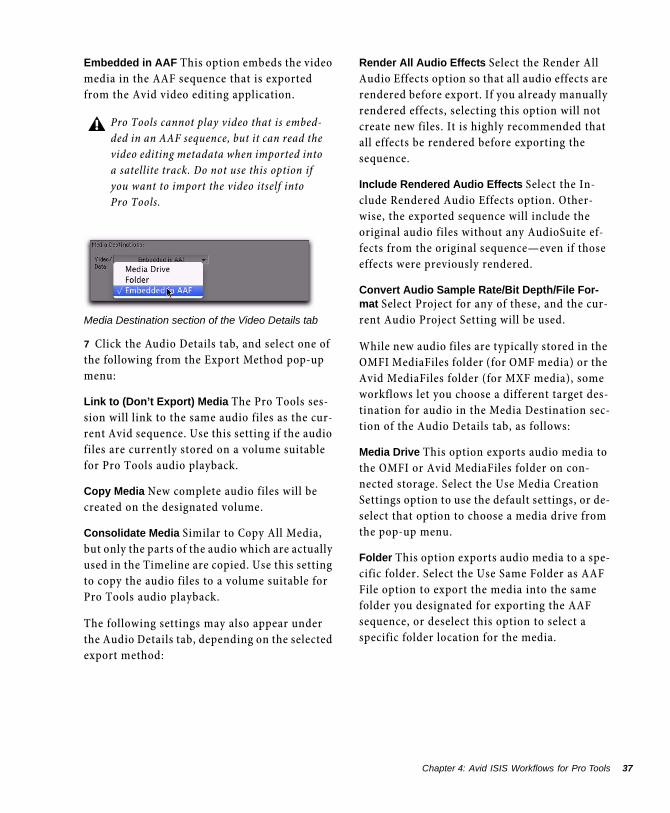
Embedded in AAF This option embeds the video media in the AAF sequence that is exported from the Avid video editing application.
7 Click the Audio Details tab, and select one of the following from the Export Method pop-up menu:
Link to (Don’t Export) Media The Pro Tools ses-sion will link to the same audio files as the cur-rent Avid sequence. Use this setting if the audio files are currently stored on a volume suitable for Pro Tools audio playback.
Copy Media New complete audio files will be created on the designated volume.
Consolidate Media Similar to Copy All Media, but only the parts of the audio which are actually used in the Timeline are copied. Use this setting to copy the audio files to a volume suitable for Pro Tools audio playback.
The following settings may also appear under the Audio Details tab, depending on the selected export method:
Pro Tools cannot play video that is embed-ded in an AAF sequence, but it can read the video editing metadata when imported into a satellite track. Do not use this option if you want to import the video itself into Pro Tools.
Media Destination section of the Video Details tab
Render All Audio Effects Select the Render All Audio Effects option so that all audio effects are rendered before export. If you already manually rendered effects, selecting this option will not create new files. It is highly recommended that all effects be rendered before exporting the sequence.
Include Rendered Audio Effects Select the In-clude Rendered Audio Effects option. Other-wise, the exported sequence will include the original audio files without any AudioSuite ef-fects from the original sequence—even if those effects were previously rendered.
Convert Audio Sample Rate/Bit Depth/File For-mat Select Project for any of these, and the cur-rent Audio Project Setting will be used.
While new audio files are typically stored in the OMFI MediaFiles folder (for OMF media) or the Avid MediaFiles folder (for MXF media), some workflows let you choose a different target des-tination for audio in the Media Destination sec-tion of the Audio Details tab, as follows:
Media Drive This option exports audio media to the OMFI or Avid MediaFiles folder on con-nected storage. Select the Use Media Creation Settings option to use the default settings, or de-select that option to choose a media drive from the pop-up menu.
Folder This option exports audio media to a spe-cific folder. Select the Use Same Folder as AAF File option to export the media into the same folder you designated for exporting the AAF sequence, or deselect this option to select a specific folder location for the media.
Chapter 4: Avid ISIS Workflows for Pro Tools 37
38
Embedded in AAF This option embeds the audio media in the AAF sequence that is exported from the Avid video editing application. Unlike embedded video, Pro Tools can import and play audio which is embedded in an AAF sequence. Embedding audio within the AAF sequence makes file management much simpler because there is only one file to move—the sequence.
8 Click Save or Save As in the Export Settings dialog:
• Click Save to use the specified settings whenever Export to Pro Tools is selected from the Export Settings menu. These set-tings will also be used when choosing any of the options located at File > Send To > Pro Tools to Unity.
• Click Save As to save these settings as a pre-set with a different name. These settings can then be recalled in the Export dialog. If you click Save As instead of Save, the Export to Pro Tools settings will not be changed.
9 Click Save in the Export As dialog. (The Ex-port Settings cannot be saved until you have se-lected a target drive for both audio and video.)
When the export is complete, you are ready to import the file into Pro Tools.
Pro Tools cannot play video that is embed-ded in an AAF sequence, but it can read the video editing metadata when imported into a satellite track. Do not use this option if you want to import the video itself into Pro Tools.
For more information on opening and importing AAF sequences in Pro Tools, see “Importing Audio and Video into Pro Tools” on page 38. For more infor-mation on the Import Session dialog, see the Pro Tools Reference Guide.
Pro Tools ISIS Guide
Checking In Sequences to Interplay for Pro Tools ClientsThe Avid Interplay media management system can be used in tandem with an ISIS network to manage media sharing between Pro Tools and Avid video editing application clients. For more information on checking in sequences to Interplay for Pro Tools users, see the Pro Tools Avid Interplay Guide.
Importing Audio and Video into Pro ToolsTo import sequences exported from Avid video editing applications into Pro Tools, you can choose from the following methods:
• Importing an AAF or OMF sequence as a Pro Tools session
• Importing an AAF or OMF sequence into an existing Pro Tools session
• Importing a video mixdown into Pro Tools
• Importing an AAF or OMF sequence into Pro Tools from Interplay (Pro Tools Avid Interplay Option and an Avid Interplay system required)
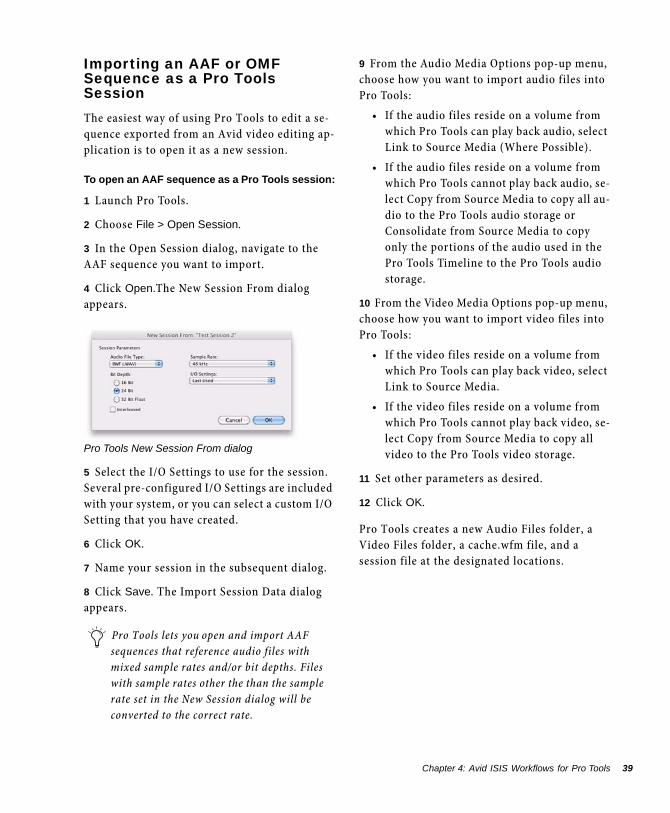
Importing an AAF or OMF Sequence as a Pro Tools SessionThe easiest way of using Pro Tools to edit a se-quence exported from an Avid video editing ap-plication is to open it as a new session.
To open an AAF sequence as a Pro Tools session:
1 Launch Pro Tools.
2 Choose File > Open Session.
3 In the Open Session dialog, navigate to the AAF sequence you want to import.
4 Click Open.The New Session From dialog appears.
5 Select the I/O Settings to use for the session. Several pre-configured I/O Settings are included with your system, or you can select a custom I/O Setting that you have created.
6 Click OK.
7 Name your session in the subsequent dialog.
8 Click Save. The Import Session Data dialog appears.
Pro Tools New Session From dialog
Pro Tools lets you open and import AAF sequences that reference audio files with mixed sample rates and/or bit depths. Files with sample rates other the than the sample rate set in the New Session dialog will be converted to the correct rate.
9 From the Audio Media Options pop-up menu, choose how you want to import audio files into Pro Tools:
• If the audio files reside on a volume from which Pro Tools can play back audio, select Link to Source Media (Where Possible).
• If the audio files reside on a volume from which Pro Tools cannot play back audio, se-lect Copy from Source Media to copy all au-dio to the Pro Tools audio storage or Consolidate from Source Media to copy only the portions of the audio used in the Pro Tools Timeline to the Pro Tools audio storage.
10 From the Video Media Options pop-up menu, choose how you want to import video files into Pro Tools:
• If the video files reside on a volume from which Pro Tools can play back video, select Link to Source Media.
• If the video files reside on a volume from which Pro Tools cannot play back video, se-lect Copy from Source Media to copy all video to the Pro Tools video storage.
11 Set other parameters as desired.
12 Click OK.
Pro Tools creates a new Audio Files folder, a Video Files folder, a cache.wfm file, and a session file at the designated locations.
Chapter 4: Avid ISIS Workflows for Pro Tools 39
40
Importing an AAF Sequence into an Existing SessionYou can import an AAF sequence containing au-dio and video media into an existing Pro Tools session.
To open and import audio and/or video tracks from an AAF sequence:
1 Open an existing Pro Tools session.
2 Choose File > Import > Session Data, and choose the AAF sequence that you wish to import.
Any video imported into Pro Tools must be the same frame rate as video already placed in the Timeline.
Pro Tools cannot play video that is embed-ded in an AAF sequence, but it can read the video editing metadata when imported into a satellite track. Do not use this option if you want to import the video itself into Pro Tools.
You can also open an AAF sequence by drag-ging it from any location on your computer or the DigiBase browser to the Pro Tools Timeline.
Pro Tools ISIS Guide
3 From the Audio Media Options pop-up menu, choose how you want to import audio files into Pro Tools:
• If the audio files reside on a volume from which Pro Tools can play back audio, select Link to Source Media (Where Possible).
• If the audio files reside on a volume from which Pro Tools cannot play back audio, se-lect Copy from Source Media to copy all au-dio to the Pro Tools audio storage or Consolidate from Source Media to copy only the audio used in the session to the Pro Tools audio storage.
4 From the Video Media Options pop-up menu, choose how you want to import video files into Pro Tools:
• If the video files reside on a volume from which Pro Tools can play back video, select Link to Source Media.
• If the video files reside on a volume from which Pro Tools cannot play back video, se-lect Copy from Source Media to copy all video to the Pro Tools video storage.
5 In the Import Session Data dialog, deselect any source tracks that you do not want to be im-ported. (If you are importing Session Data from AAF sequences, all tracks are selected by de-fault. If you are importing tracks from a Pro Tools session, no tracks are selected by default.)
6 Click OK.
If there are any errors or clip name trunca-tions, a dialog will appear asking you if you want a detailed report of the changes. Click Yes and choose where you want to save the log.
7 If your audio or video source media is on a vol-ume that is not suitable for playback (shown as a Transfer volume in the Workspace browser) or if your ISIS workspace privileges are read-only, Pro Tools displays a dialog that guides you to copy the media to a volume designated for Play-back or Record. (Click Yes.)
Pro Tools imports the audio and video media to the Timeline. Audio tracks with mixed sample rates and/or bit depth are automatically con-verted to the same sample rate and bit depth as the session.
Now you are ready to edit the audio files in Pro Tools.
Drive Selection When Importing Session Data
When using the Import Session Data dialog to import audio files with Copy or Consolidate Source selected in the Audio Media Options pop-up menu, all new audio files are stored on the volumes designated for their respective tar-get tracks in the Disk Allocation dialog.
Selecting a Networked Workspace When Importing Session Data
When using the Import Session Data dialog to import audio files with Copy or Consolidate Source selected in the Audio Media Options pop-up menu, all new audio files are stored on the volumes designated for their respective tar-get tracks in the Disk Allocation dialog.
When importing video files (such as from a CD), the video files are copied by default to the same volume that holds the session file. To have the files copied to another volume, open the Work-space browser, and select T in the volume desig-nation column for all volumes except the volume where you want the video to be stored. To ensure that the files are not copied to the root level of
the volume, create a folder with the session name on the desired network workspace, then create a folder within that session folder named Video Files.
Importing Sequences into Pro Tools from InterplayThe Avid Interplay media management system can be used in tandem with an ISIS network to manage media sharing between Pro Tools and Avid video editing application clients. For more information on importing a sequence into Pro Tools from Interplay, see the Pro Tools Avid Interplay Guide.
Editing Audio in Pro ToolsAudio files created in the Avid video editing ap-plication are either OMF or MXF files, which Pro Tools cannot edit destructively.
When you use Pro Tools to perform a destruc-tive edit (such as using the Pencil tool to edit a waveform), it creates a new copy of the file and leaves the original untouched.
See the Pro Tools Reference Guide for detailed information on editing audio files in Pro Tools.
Chapter 4: Avid ISIS Workflows for Pro Tools 41
42
Exporting Audio from Pro Tools for Avid Editing ApplicationsIn Pro Tools, you can export audio tracks for use in the Avid video editing application using any of the following commands:
• Exporting selected tracks as an AAF sequence
• Bouncing to disk
• Exporting selected clips as files
• Exporting edited audio tracks to Interplay from Pro Tools (Avid Interplay system re-quired)
For other export methods, see the Pro Tools Ref-erence Guide.
Exporting Tracks as AAF SequencesUse Export Selected Tracks as OMF/AAF to ex-port individual tracks or an entire Pro Tools session in AAF format.
Tracks are exported in their entirety and time selections are ignored.
Volume and pan automation is not retained on export if Quantize Edits to Frame Bound-aries is enabled (Avid Compatibility Mode).
The Movie track cannot be exported to AAF or OMF from Pro Tools.
Pro Tools ISIS Guide
To export selected audio tracks from Pro Tools as an AAF sequence:
1 In Pro Tools, select the tracks you want to ex-port in the Pro Tools session by Shift-clicking the names of each track.
2 Choose File > Export > Selected Tracks as
OMF/AAF.
3 Under OMF/AAF Options, choose AAF (or OMF) from the Export As pop-up menu.
4 Select Enforce Avid Compatibility.
Enforce Avid Compatibility creates frame-accu-rate edits, wraps the files as OMFI (unless you choose MXF), and limits the sample rate options to 44.1 or 48 kHz. Dithering without noise shap-ing will be applied to files being exported from 24-bit to 16-bit.
5 Ensure that the Target Project Timecode For-mat pop-up menu displays the correct frame rate for the Avid project.
6 Click OK.
7 In the Publishing Options dialog, type the Pro Tools Comment and Sequence Name.
An OMF sequence cannot reference MXF media files. In the Export Selected Tracks as OMF/AAF dialog, MXF is only available when AAF is selected in the Export As pop-up menu.
Pro Tools Publishing Options dialog
8 Click OK.
Pro Tools will create a sequence with the name you supply. (The Pro Tools comment appears in the Avid bin in a Pro Tools Comment column.)
9 In the Name the AAF/OMF File to Export dia-log, navigate to a folder where you can easily lo-cate the Pro Tools composition when it is time to import it into the Avid video editing application.
10 Click Save.
11 In the Please Choose a Folder for Converted Audio Files dialog, do one of the following:
• If you are exporting to the same storage that the Avid video editing application will be accessing, navigate to the OMFI Media-Files folder (AIFF or WAV files) or the Avid MediaFiles folder (MXF files).
– or –
• If you are exporting to a location that is not directly accessible to the Avid video editing application, navigate to a location where you can easily find the audio files when you need to copy them over to the Avid computer.
12 Click Use Current Folder (Windows) or Choose (Mac).
Pro Tools exports the following files:
• The AAF sequence is saved to the folder you designated.
• If you exported audio files directly to the Avid video editing application’s video stor-age, related media is saved to the appropri-ate volume and folder (OMFI MediaFiles or Avid MediaFiles) accessible to the applica-tion.
Do not save the sequence to either the OMFI Media Files folder or the Avid Media Files folder.
13 Do one of the following:
• If you are using the Avid video editing ap-plication on the same computer as Pro Tools and are ready to use it to import the files you just exported from the Avid video editing application, exit Pro Tools.
• If you were unable to save the audio portion of the AAF sequence directly to storage that is accessible from the Avid video editing application, copy the audio files from their saved location to the OMFI MediaFiles folder (for AIFF or WAV media) or Avid MediaFiles folder (for MXF media) on a drive connected to your Avid system.
Exporting Audio Files Using Bounce to DiskUse the Bounce to Disk command to create pre-mixed files of the current Pro Tools session. This does not export all of the individual files on the Timeline, but it does guarantee that the mix you hear in the Avid video editing application will be identical to the mix you hear in Pro Tools, including all panning, effects and au-tomation.
To export audio files using Bounce to Disk:
1 In Pro Tools, finalize the mix.
2 Select the time range of the session that you want to export. (All audible tracks in that time range will be included in the bounce, whether they are selected or not.)
3 Choose File > Bounce to > Disk.
Chapter 4: Avid ISIS Workflows for Pro Tools 43
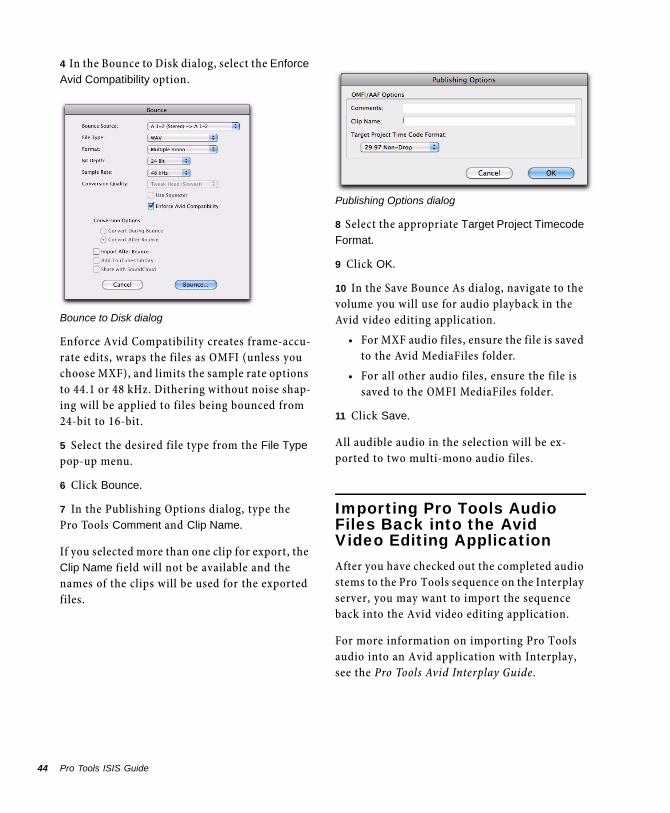
44
4 In the Bounce to Disk dialog, select the Enforce
Avid Compatibility option.
Enforce Avid Compatibility creates frame-accu-rate edits, wraps the files as OMFI (unless you choose MXF), and limits the sample rate options to 44.1 or 48 kHz. Dithering without noise shap-ing will be applied to files being bounced from 24-bit to 16-bit.
5 Select the desired file type from the File Type pop-up menu.
6 Click Bounce.
7 In the Publishing Options dialog, type the Pro Tools Comment and Clip Name.
If you selected more than one clip for export, the Clip Name field will not be available and the names of the clips will be used for the exported files.
Bounce to Disk dialog
Pro Tools ISIS Guide
8 Select the appropriate Target Project Timecode
Format.
9 Click OK.
10 In the Save Bounce As dialog, navigate to the volume you will use for audio playback in the Avid video editing application.
• For MXF audio files, ensure the file is saved to the Avid MediaFiles folder.
• For all other audio files, ensure the file is saved to the OMFI MediaFiles folder.
11 Click Save.
All audible audio in the selection will be ex-ported to two multi-mono audio files.
Importing Pro Tools Audio Files Back into the Avid Video Editing ApplicationAfter you have checked out the completed audio stems to the Pro Tools sequence on the Interplay server, you may want to import the sequence back into the Avid video editing application.
For more information on importing Pro Tools audio into an Avid application with Interplay, see the Pro Tools Avid Interplay Guide.
Publishing Options dialog
AAAF sequences
exporting from Avid (manually)from Media Composer 35
exporting from Avid (via Send to Templates)from Media Composer 34
exporting from Pro Toolsfrom audio tracks 42
importingas a new session 39into an existing session 40
Pro Tools support for 3about this guide 1accuracy
frame rate 6sample rate 6
Adobe Reader 8AIFF audio files 29audience of this guide 1audio file type 29audio files
compatibility between Pro Tools and Avid 29editing in Pro Tools 41exporting with Bounce to Disk 43importing into Avid from Interplay 44sharing 31
audio stemsimporting into Avid from Interplay 44
audio streaming 1Avid
customer success 9Avid DMS ProEncode 2Avid Interplay Access 2Avid Interplay Assist 2Avid Interplay Engine 2Avid Interplay Transcode 2Avid ISIS Administration Guide 8Avid ISIS Client Manager (see Client Manager)Avid ISIS Client Manager User’s Guide 7Avid ISIS System Setup Guide 7
Avid MediaFiles folderlocation of 5
Avid PathDiag tool (see PathDiag tool)Avid Site Preparation Guide 7Avid video editing applications
AAF support for 3and frame-rate accuracy 6OMF support for 4
Bbandwidth
reserving 27Bounce to Disk
exporting audio tracks with 43Bounce to Disk dialog 44BWF (.WAV) audio files 29
Ccache files
clearing from Client Manager 28capabilities
of ISIS 1changing
password 18Client Manager
bandwidth reservation 27changing your password 18clearing cache files 28configuring drive letter assignments 24connecting to an ISIS system 17definition of 17display properties 28, 29Help system 19logging 28messages 28opening 17preferences 28, 29
Index
Index 45
46
clientschanging your Client Manager password 18configuring with ISIS system 2ISIS installation software 7opening Client Manager 17system requirements 7
compatibilitybetween Pro Tools and Avid video editing
applications 29configuring
drive letters 24Zone 1 clients 14Zone 2 clients 14
crate, ISIS 2
Ddefinition
Avid DMS ProEncode 2Client Manager 17Ethernet switch 2Interplay Access 2Interplay Assist 2Interplay Engine 2Interplay Transcode 2ISIS clients 2ISIS crate 2ISIS system 2ISS 2media data 5metadata 5OMF media and sequences 4System Director 2
destructive editing 32Diagnostic tools
Avid PathDiag tool 24diagrams
Intel PRO/1000 MT or PT Ethernet HBA to ISIS 14
Disk Cache 30documentation 7drive selection, when importing session data 41drivers
installing for Intel PRO/1000 MT or PT HBA 13
Eembedded media
definition of 4vs. linked media 5
Ethernet HBA 12
Pro Tools ISIS Guide
Ethernet switch 2Export Settings dialog 35Exported Selected Tracks as OMF/AAF 42exporting
AAF sequences from Avid (manually)from Media Composer 35
AAF sequences from Avid (Send To Templates)
from Media Composer 34AAF sequences from Pro Tools
from audio tracks 42audio tracks in Pro Tools
as an AAF sequence 42using Bounce to Disk 43
external media (see linked media)
Fframe-rate accuracy (Avid video editing
applications) 6
Gguide conventions 8guides
audience of this guide 1Avid ISIS guides 7
HHelp system
Client Manager 19
Iimporting
AAF sequencesas a new Pro Tools session 39into an existing Pro Tools session 40into Avid from Interplay 44
audio and videoas a new Pro Tools session 39into an existing Pro Tools session 40into Avid from Interplay 44
installingIntel PRO/1000 MT or PT Ethernet card driver
13Intel PRO/1000 MT or PT Ethernet card
connecting to an Avid ISIS system 14installing driver for 13
Interplaydocumentation 8importing
audio stems into Avid video editing appli-cation from 44
ISIS capabilities 1Interplay Access 2Interplay Assist 2Interplay Engine 2Interplay Transcode 2ISIS
additional documentation 7and Avid Interplay 1and media streaming 1client installation software 7clients 2crate 2diagrams
Intel Ethernet card connections 14installation overview 11number of configurable users 1opening Client Manager 17system 2system requirements for clients 7testing 24
ISSdefinition 2
Lletterless drive mapping 24linked media
vs. embedded media 5locations
of MXF media 5of OMF media 5
MMac OS X
system requirements 7manually exporting sequences
from Media Composer 35media
Avid default locations for 5media compatibility
between Pro Tools and Avid video editing applications 30
Media Composeexporting AAF sequences
manually 35
Media Composerexporting AAF sequences
via Send To Templates 34Media Composer clients
and ISIS capabilities 1configuring with ISIS system 2installing the Intel Ethernet card on 12number of configurable users 1system requirements 7
media datadefinition of 5
media files 5and metadata 5
metadatadefinition of 5
MXF mediaediting 32folder locations 5
NNew 39
OOMF media
Avid video editing application support for 4definition of 4editing 32folder locations 5Pro Tools support for 4
OMF sequences (see AAF sequences)OMFI MediaFiles folder
location of 5overview
documentation 1guide 1installing ISIS client hardware and software 11ISIS system 2
Ppassword
changing 18PathDiag tool
custom tests 25definition 24
PDF documentation 7performance characteristics, with ISIS 30Please Choose a Folder for Converted Audio Files
dialog 43
Index 47

48
preferencesClient Manager 28
Pro ToolsAAF support for 3and sample-rate accuracy 6editing audio files 41exporting audio tracks
as AAF sequences 42using Bounce to Disk 43
importingAAF sequence as a new session 39AAF sequence into an existing session 40
ISIS capabilities 1New Session dialog 39OMF support for 4system requirements 7
Pro Tools clientsconfiguring with ISIS system 2installing the Intel Ethernet card on 12number of configurable users 1sharing files 31
Publishing Options dialog 42, 44
Rreal time audio or video streaming 1
Ssample rates 30
for use with Pro Tools and Avid video editing applications together 30
sample-rate accuracy 6Send To dialog 34Send To Templates
in Media Composer 34sequences
exporting from Avid (manually)from Media Composer 35
exporting from Avid (via Send To Templates)from Media Composer 34
session datadrive selection 41selecting a networked workspace when
importing 41sessions
importing AAF sequenceas a new session 39into an existing session 40
sharing session files 31sharing
Pro Tools ISIS Guide
audio files 31session files 31video files 31
Sound Designer II files 29support
AAF sequences 3MXF media 3OMF sequences and media 4
supported audio file types 29supported bit-depths 30supported sample rates 30System Director
connecting to using Client Manager 17definition of 2
system requirements 7
Ttechnical support 9testing
ISIS connection 24timecode
and metadata 5
UUNC paths (Client Manager) 24Universal Naming Convention (see UNC paths)users
possible number with ISIS 1
Vvideo files
sharing 31video satellite system
and support for embedded video AAF 3video streaming 1
WWindows 7
system requirements 7workspaces
configuring drive letter assignments 24letterless drive mapping 24selecting when importing session data 41UNC paths 24

Avid2001 Junipero Serra Boulevard Daly City, CA 94014-3886 USA
Technical Support (USA)Visit the Online Support Center at www.avid.com/support
Product InformationFor company and product information, visit us on the web at www.avid.com