pro project management with sharepoint 2010 || managing requirements
TRANSCRIPT

C H A P T E R 4
■ ■ ■
45
Managing Requirements
In this chapter you’ll enhance the Requirements list that you created in Chapter 2. First, you’ll implement a way to score each requirement. This will provide a quantitative approach for determining which requirements should be implemented first. Then you’ll add a feature to specify dependencies since some requirements will rely on other related requirements. With these enhancements you’ll be able to more easily plan the project and decide which requirements are in scope.
Analyzing Requirements As you start gathering requirements, you could have hundreds, even thousands of them. So how do you decide which to work on first?
Prioritizing Requirements You should devise a mechanism for scoring each requirement based on a set of factors that fit your environment. A factor is an estimate of the impact that implementing this requirement would have. Some examples are:
• Improved customer service
• Time/money saved
• Increased market share These factors can be either positive or negative. A factor such as time/money saved is a positive one;
the more time saved, the better. You can also use negative factors such as required development or risk. Requirements that take more effort to implement would lower their overall score. This approach allows you to identify the low-hanging fruit; the items that have a big impact with relatively little effort.
The first step in this process is to decide on what factors work for you. When evaluating a requirement, what things about it would increase (or decrease) its importance? Ultimately, these should measure how implementing this requirement will help your organization fulfill its mission statement or operational objectives. Each factor should be assigned a relative weight, as some will have a bigger impact than others. I recommend using scale from –10 to 10 and assign the negative factors a negative

CHAPTER 4 ■ MANAGING REQUIREMENTS
46
weight. The most important positive factor should be given a 10 and all other factors should then be assigned a weight based on their relative importance.
■Tip If you use a scale with positive numbers only, such as 1 to 10, when computing an overall score, you’ll need to remember to subtract the score for negative factors instead of adding them. Using negative numbers for the relative weight may seem a bit confusing, but it simplifies the subsequent computation.
The next step is to score each requirement against these factors. Use a score of 1 to 10. Again, assign a 10 to the highest requirement and then score the remaining ones relative to that one. This can be difficult to do because you may not have all the requirements identified yet. You may want to define scale to use for each factor. For example, for the development-required factor, you can specify the score to use for each predefined range of person-days to implement. For other factors this may be less quantitative, but it is a good idea to define some type of criteria so the scoring is consistent for all requirements.
There are some requirements that are, well, required. These are essential, non-negotiable requirements. These could be legal or operational constraints that are imposed on the project. Or they could be requirements that are so important that it would be pointless to implement the project without them. For these requirements, instead of scoring them, you’ll just need to identify them as required.
Requirement Dependencies Requirements should be detailed and specific. They may start out rather general, but as the process evolves they will be broken down into smaller, more specific requirements. At that level, requirements tend to be interrelated. For example, one requirement may be to collect sales tax and another to report the sales tax collected on the income report. In order to report on sales tax, the system must first collect it. In this case, the second requirement is dependent on the first.
When planning your project, you’ll need to keep in mind how these requirements are related. A high-priority requirement may be dependent on a low-priority requirement. If the first is added to the project, the second must be also, even if it otherwise would fall below the cutoff line.
Another thing to be aware of is how breaking a requirement into smaller pieces can affect their individual scores. Take the sales tax scenario as an example. Collecting the tax may take a lot of effort and have little benefit, while the report may be easy and have more visibility. In this case, the first may get a low score and the second a much higher score. To compensate for this, you may want to score these together as a single requirement and give both the same score.
Adding Factors You will need to add some columns to the Requirements list where you can score each of the factors. In the instructions that follow, I will use generic names like Factor1. You can do the same, but you will eventually need to decide on what factors you’ll want to use and name these columns accordingly.
CHAPTER 4 ■ MANAGING REQUIREMENTS
47
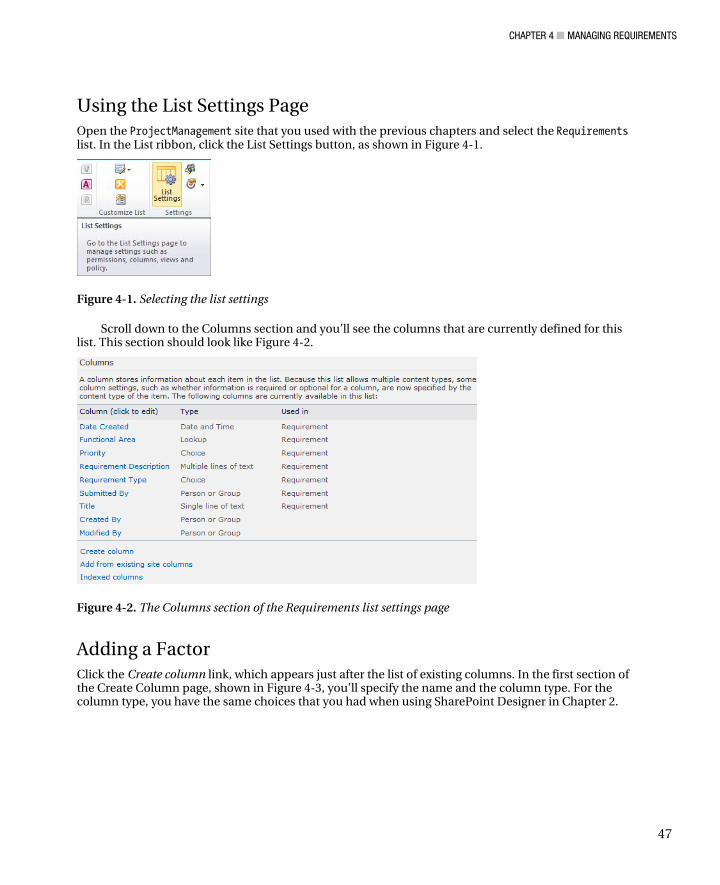
Using the List Settings Page Open the ProjectManagement site that you used with the previous chapters and select the Requirements list. In the List ribbon, click the List Settings button, as shown in Figure 4-1.
Figure 4-1. Selecting the list settings
Scroll down to the Columns section and you’ll see the columns that are currently defined for this list. This section should look like Figure 4-2.
Figure 4-2. The Columns section of the Requirements list settings page
Adding a Factor Click the Create column link, which appears just after the list of existing columns. In the first section of the Create Column page, shown in Figure 4-3, you’ll specify the name and the column type. For the column type, you have the same choices that you had when using SharePoint Designer in Chapter 2.
CHAPTER 4 ■ MANAGING REQUIREMENTS
48
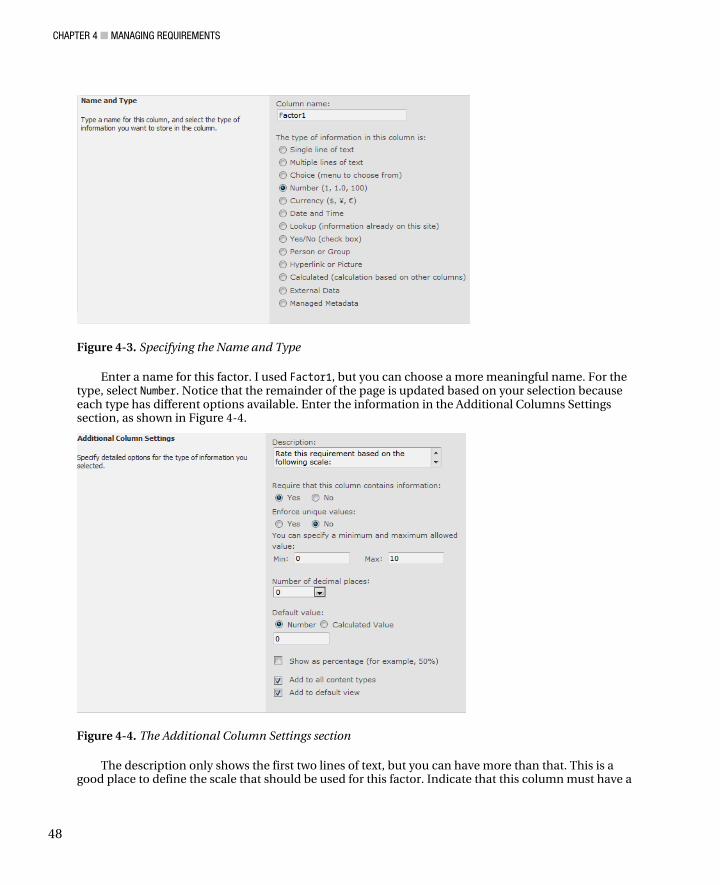
Figure 4-3. Specifying the Name and Type
Enter a name for this factor. I used Factor1, but you can choose a more meaningful name. For the type, select Number. Notice that the remainder of the page is updated based on your selection because each type has different options available. Enter the information in the Additional Columns Settings section, as shown in Figure 4-4.
Figure 4-4. The Additional Column Settings section
The description only shows the first two lines of text, but you can have more than that. This is a good place to define the scale that should be used for this factor. Indicate that this column must have a

CHAPTER 4 ■ MANAGING REQUIREMENTS
49
value and specify the default value of 0. You can define the minimum and maximum values allowed for this column. Also, you should specify the number of decimal places to be zero since you’re only working with whole numbers. If you click the “Add to all content types” check box, this column will also be added to the Requirement content type as well as the Requirements list. Click the OK button to add this column.
Adding Additional Factors The List Settings page should be displayed, which will now include the new column. The columns are listed in alphabetical order, so the new column may not be at the end of the list. Repeat the following steps to add as many factors as you want:
1. Click the Create column link.
2. On the Create Column page, enter the name of the factor.
3. Specify the type as Number.
4. Enter a description for this factor (include scale information).
5. Require a value and set the default to 0.
6. Specify the minimum and maximum allowed values to 0 and 10, respectively.
7. Specify the number of decimal places as 0. When you’re done, the Column section of the List Settings page should look like Figure 4-5.
Figure 4-5. The updated column list

CHAPTER 4 ■ MANAGING REQUIREMENTS
50
Scoring a Requirement Now that the factors have been added to the list, edit one of the existing requirements and specify the score for each factor. For each factor there should be a field that looks like Figure 4-6.
Figure 4-6. Entering a factor score
The description that you entered for this factor is displayed below the text box. You can place text here that will help the user enter consistent and accurate scores. The asterisk next to the factor name indicates that this is a required field.
■Note For new requirements, the score for each factor should default to 0. However, the default value logic is only applied when the item is first created. Since this is an existing record, the factors are all blank, and the edit form should require you to enter a value for each before you can save the record.
After entering a score for each factor, the requirement should look like Figure 4-7.
Figure 4-7. A newly scored requirement
Calculating the Overall Score Now that you have scored the requirements using the defined factors, it would be very useful to compute an overall score based on relative weight of each of the factors. To do that, you’ll use a calculated column.
The overall score is computed by multiplying the score for that factor by the relative weight assigned to the factor. These products are then summed to arrive at the overall score. The relative weights are fixed; they are the same for all requirements. The actual scores can be different for each requirement. For example, assume Factor1 has a relative weight of 10, Factor2 has a relative weight of 5, and Factor3 has a weight of –7. In this case Factor1 is twice as important as Factor2. Factor3 is somewhere between these but has a negative value because the higher the score, the less desirable this requirement is.
In this scenario, the overall score is computed by adding the score for Factor1 × 10, plus the score for Factor2 × 5, plus the score for Factor3 × –7.

CHAPTER 4 ■ MANAGING REQUIREMENTS
51
Adding a Calculated Column The value of a Calculated column is determined by a formula that you specify. This formula can include other columns in the list, as well as many built-in functions.
From the List ribbon, click the List Setting button. In the List Settings page, click the Create column link just like you did to add the factors. For the column name, enter Overall Score and select the Calculated column type. Enter the formula as follows:
=([Factor1]*5)+([Factor2]*7)+([Factor3]*10)+([Factor4]*-4)+([Factor5]*2)
This formula simply multiplies each factor score by the relative weight determined for that factor and then adds up the products. You may have different column names. Instead of these generic names, use the correct column names from your Requirements list. Also, the weights I used are just random numbers; you will need to use the weighted values that you determined for each factor.
■Tip To add a column to the formula, you can select the column from the list box to the right of the formula and click the Add to formula link. When a column is used in a formula and the name contains spaces, it must be enclosed by square brackets (i.e., []).
Change the data type returned to Number and set the number of decimal places to 0. The completed form should look like Figure 4-8.
Figure 4-8. Entering a Calculated column definition

CHAPTER 4 ■ MANAGING REQUIREMENTS
52
Click the Save button to add this column. Select the Requirements list and you should now see the Overall Score column in the view.
■Tip For more information about formulas in a Calculated column, go to http://msdn.microsoft.com/en-us/library/bb862071.aspx. This page provides lots of examples of formulas that perform string manipulation, mathematical and statistical functions, date comparisons and formatting, and conditional logic.
Modifying the View The Overall Score should have been added to the default view. Now that you have this column, you probably don’t need the individual factor scores in the view. From the List ribbon, click the Modify View button, as shown in Figure 4-9.
Figure 4-9. Clicking the Modify View button
On the Edit View page, unselect the factor columns (Factor1, Factor2, etc., or whatever you named your columns). Make sure you leave Overall Score checked. Click the OK button to save your changes. The Requirements list should now look like Figure 4-10.
Figure 4-10. The default view with the overall score
The view form still shows the individual factor scores, as demonstrated in Figure 4-11.

CHAPTER 4 ■ MANAGING REQUIREMENTS
53
Figure 4-11. The View form showing all factor scores
Supporting Non-Negotiable Requirements Before you finish up this feature, you’ll add a flag to indicate that this is a required (or non-negotiable) requirement.
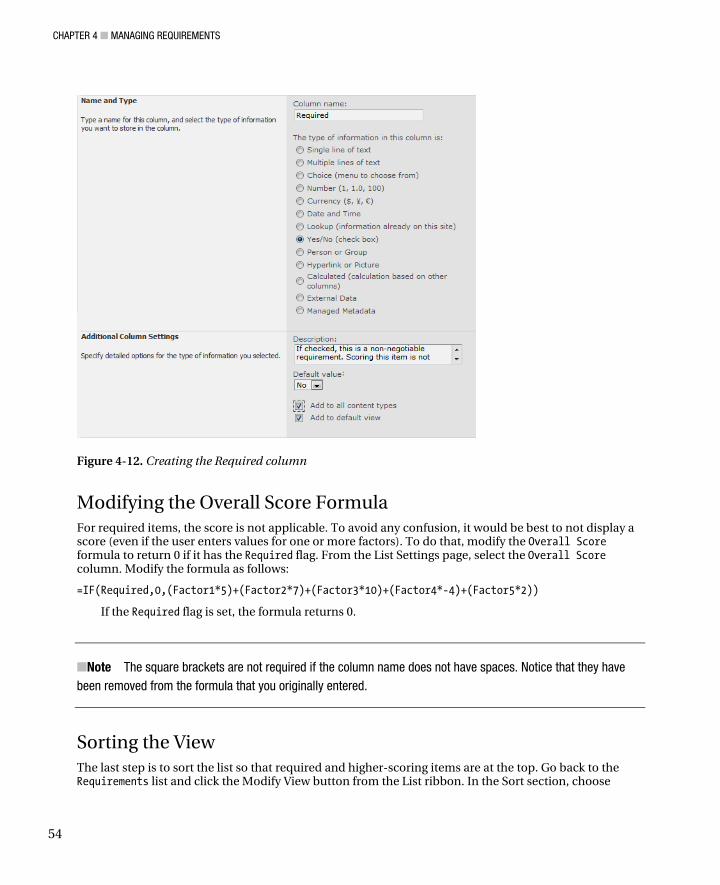
Adding the Required Flag Go to the List Settings page and click the Create column link. On the Create Column page, enter the name as Required and choose the Yes/No column type. Select the default value of No because, hopefully, most of your requirements will not fall into this category. The completed form should look like Figure 4-12.
CHAPTER 4 ■ MANAGING REQUIREMENTS
54
Figure 4-12. Creating the Required column
Modifying the Overall Score Formula For required items, the score is not applicable. To avoid any confusion, it would be best to not display a score (even if the user enters values for one or more factors). To do that, modify the Overall Score formula to return 0 if it has the Required flag. From the List Settings page, select the Overall Score column. Modify the formula as follows:
=IF(Required,0,(Factor1*5)+(Factor2*7)+(Factor3*10)+(Factor4*-4)+(Factor5*2))
If the Required flag is set, the formula returns 0.
■Note The square brackets are not required if the column name does not have spaces. Notice that they have been removed from the formula that you originally entered.
Sorting the View The last step is to sort the list so that required and higher-scoring items are at the top. Go back to the Requirements list and click the Modify View button from the List ribbon. In the Sort section, choose

CHAPTER 4 ■ MANAGING REQUIREMENTS
55
Required as the first sort column and select the “Show items in descending order” option. Then choose Overall Score as the second sort column, and also use the descending-order option for this column. The completed section should look like Figure 4-13.
Figure 4-13. Specifying the sort criteria
The default view should now sort the requirements, putting the required items first and then sorting the remaining items based on their overall score. The view should look like Figure 4-14.
Figure 4-14. The sorted view
Supporting Dependencies The next feature that you’ll implement is to provide the ability to define dependencies between individual requirements.
Adding a Lookup Column You’ll now enhance the Requirements list to allow you to specify dependencies. You’ll do this using a multivalued Lookup column. From the List Settings page, click the Create column link. On the Create Column page, enter the name as Dependencies and select the Lookup column type.
In the Additional Column Settings section, select the Requirements list from the “Get information from” drop-down box. Select Title as the column to be used, which should be the default value. Check the “Allow multiple values” check box. This will allow a requirement to define multiple dependencies. The completed form should look like Figure 4-15.

CHAPTER 4 ■ MANAGING REQUIREMENTS
56
Figure 4-15. Specifying the additional column settings
Click the Save button to create the new column.
Adding a Dependency Go to the Requirements list, select one of the items, and edit it. The edit form should include the Dependencies column, as shown in Figure 4-16.
Figure 4-16. Editing the dependencies
CHAPTER 4 ■ MANAGING REQUIREMENTS
57
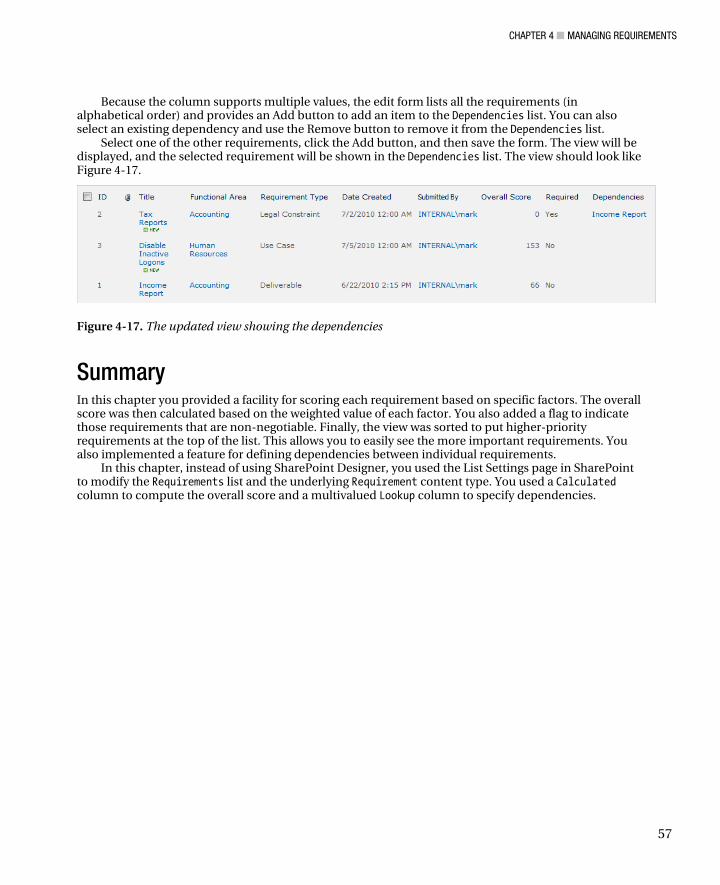
Because the column supports multiple values, the edit form lists all the requirements (in alphabetical order) and provides an Add button to add an item to the Dependencies list. You can also select an existing dependency and use the Remove button to remove it from the Dependencies list.
Select one of the other requirements, click the Add button, and then save the form. The view will be displayed, and the selected requirement will be shown in the Dependencies list. The view should look like Figure 4-17.
Figure 4-17. The updated view showing the dependencies
Summary In this chapter you provided a facility for scoring each requirement based on specific factors. The overall score was then calculated based on the weighted value of each factor. You also added a flag to indicate those requirements that are non-negotiable. Finally, the view was sorted to put higher-priority requirements at the top of the list. This allows you to easily see the more important requirements. You also implemented a feature for defining dependencies between individual requirements.
In this chapter, instead of using SharePoint Designer, you used the List Settings page in SharePoint to modify the Requirements list and the underlying Requirement content type. You used a Calculated column to compute the overall score and a multivalued Lookup column to specify dependencies.