pro internal routing tool - jagwire.com · routing hydraulic hose ║ fÜhren des...
TRANSCRIPT

Pro Internal Routing Tool
1 3 4
5
2
1
INTRODUCTIONThank you for purchasing the Jagwire Pro Internal Routing Tool. This tool can be used to guide inner cables, housing, hydraulic hose and Shimano® E-Tube wires through internally routed aluminum, carbon fiber or titanium bicycle frames.
EINFÜHRUNGVielen Dank, dass Sie sich für das Jagwire Pro Internal Routing Tool entschieden haben. Dieses Tool kann zur Führung innen liegender Kabel, Zughüllen, Hydraulikschläuche und Shimano® E-Tubekabel durch intern geführte Fahrradrahmen aus Aluminium, Carbonfaser oder Titan verwendet werden.
INTRODUCCIÓNGracias por adquirir la herramienta de enrutamiento interno Jagwire Pro. Esta herramienta puede usarse para la guía de cables internos, el alojamiento, la manguera hidráulica y los cables del E-Tube de Shimano® a través de los marcos de bicicleta de enrutamiento interno de aluminio, fibra de carbono o titanio.
INTRODUCTIONNous vous remercions d’avoir acheté l’outil de câblage intérieur pro Jagwire. Cet outil peut être utilisé pour ache-miner les câbles internes, les gaines, les tuyaux hydrauliques et les câbles E-TUBE Shimano® dans les cadres de vélos à câblage intérieur en aluminium, en fibre de carbone ou en titane.
引言感謝你購買JAGWIRE專業內走線工具組,此工具主要使用在引導內線,外殼,油管與Shimano電子變速線組穿組於內走線鋁車架,碳籤維車架或鈦車架上。
EN Open it by unthreading its lid counterclock-wise. Inside, you will find a flexible wire (F), hydraulic hose fitting (G), and E-Tube fitting (H).
DE Öffnen Sie den Behälter, indem Sie den Deckel linksherum aufdrehen. Innen finden Sie ein flexibles Kabel (F), ein Hydraulikschlauch-(G) und ein E-Tubepassstück (H).
ES Ábralo desenroscando su tapa en sentido contrario a las agujas del reloj. Dentro, encontrará un cable flexible (F), un conector de manguera hidráulica (G), y un conector de E-Tube (H).
FR Ouvrez-le en dévissant son couvercle dans le sens inverse des aiguilles d’une montre. À l’inté-rieur se trouvent un câble flexible (F), un raccord de tuyau hydraulique (G) et un raccord E-Tube (H).
CH 逆時針轉開圓管端蓋,內有軟線(F),油管接頭(G)與電子線接頭(H)
EN Begin by sliding the E-Tube fitting (H) over the end of the inner cable, with the narrow end first.
DE Beginnen Sie, indem Sie das E-Tubepass-stück (H) mit der schmalen Seite führend über das Ende des inneren Seils schieben.
ES Comience colocando el conector de E-Tube en el extremo del cable interno,comenzando por el extremo estrecho.
FR Commencez en faisant coulisser le raccord E-Tube (H), le bout étroit en premier, sur l’extrémi-té du câble intérieur.
CH 一開始將內線穿入電子線接頭(H),從較小一邊穿入。
EN Insert the end of the inner cable into the threaded end of the flexible wire (F).
DE Führen Sie das Ende des inneren Seils in das Gewindeende des flexiblen Kabels (F) ein.
ES Coloque el extremo del cable interno en el extremo roscado del cable flexible (F).
FR Introduisez l’extrémité du câble intérieur dans l’extrémité filetée du câble flexible (F).
CH 將內線穿入有牙端的軟線(F)
EN Thread the E-Tube fitting (H) onto the flexible wire (F). This will hold the flexible wire in place and allow the magnetic end to help guide the cable through the frame.
DE Schieben Sie das E-Tubepasstück (H) auf das flexible Kabel (F). Dadurch wird das flexible Kabel in Position gehalten und dem magnetischen Ende ermöglicht das Seil durch den Rahmen zu ziehen.
ES Enrosque el conector de E-Tube (H) en el cable flexible (F). Esto mantendrá el cable flexible en su posición y permitirá que el extremo magnético guíe el cable a través del cuadro.
FR Vissez le raccord E-Tube (H) sur le câble flexible (F) pour maintenir le câble flexible en place et permettre à l’extrémité magnétique d’aider au guidage du câble dans le cadre.
CH 將電子接頭(H)對鎖入軟線(F)。此將軟線固定位後磁鐵頭可以協助引導內線穿入車架。
EN Insert the inner cable into the frame, leading with the magnetic end of the flexible wire (F).
DE Führen Sie das innere Seil geführt vom magneti-schen Ende des flexiblen Kabels (F) in den Rahmen ein.
ES Coloque el cable interno en el cuadro, comen-zando por el extremo magnético del cable flexible (F).
FR Introduisez l’extrémité du câbles intérieur dans le cadre avec l’extrémité magnétique du câble flexible (F) en premier.
CH 將內線穿入車架,此時有磁性的軟線接頭(F)作為引導功能
EN Then, remove the storage container (E).
DE Dann entfernen Sie den Aufbewahrungsbehälter (E).
ES Después, retire el depósito de almacenamiento (E).
FR Retirez ensuite le conteneur de rangement (E).
CH 然後將儲存圓管(E)取出
ROUTING STEEL INNER CABLE ║ FÜHRUNG DES INNEREN STAHLSEILS ║ CABLE INTERNO DE ACERO DE ENRUTAMIENTO ║ CHEMINEMENT D’UN CÂBLE INTÉRIEUR EN ACIER ║ 內線穿組說明
BASIC OPERATION ║ GRUNDLEGENDE FUNKTIONSWEISE ║ FUNCIONAMIENTO BÁSICO ║ FONCTIONNEMENT DE BASE ║ 基本操作
2 3 4
EN The Jagwire Pro Internal Cable/Housing Tool uses two powerful magnets to guide control lines though an internally routed frame.
The main magnet (A) can be used to pull magnetic items through a frame tube. By holding the main magnet (A) against the outside of the frame wall, its magnetic field will draw the object towards it.
DE Das Tool verwendet zwei leistungsstarke Magneten, um Steuerleitungen durch einen intern geführten Rahmen zu leiten.
Der Hauptmagnet (A) kann genutzt werden, um ma-gnetische Teile durch einen Rohrrahmen zu ziehen. Durch Halten des Hauptmagneten (A) gegen die Rahmenaußenseite wird der Gegenstand von dem Magnetfeld in die Richtung des Hauptmagneten gezogen.
ES La herramienta de cable/alojamiento interno Jagwire Pro utiliza dos potentes imanes para guiar las líneas de control a través de un cuadro de enrutamien-to interno.
El imán principal (A) puede usarse para empujar elementos magnéticos a través de un tubo del cuadro. A través de la sujeción del imán principal (A) hacia la parte exterior del cuadro, su campo magnético atraerá los objetos hacia él.
FR L’outil professionnel pour câbles/gaines intérieurs Jagwire utilise deux aimants puissants pour faciliter le contrôle des câbles et gaines dans un cadre à câblage intérieur.
L’aimant principal (A) peut être utilisé pour tirer les éléments magnétiques dans un tube du cadre. En tenant l’aimant principal (A) contre l’extérieur de la paroi du cadre, son champ magnétique attirera l’objet vers lui.
CH JAGWIRE專業內走線組工具利用二個強力磁鐵導引線組通過車架內部。主磁鐵(A)用來吸附磁性物件通過車架內管。經由主磁鐵(A)依附在車架外壁吸引物件
EN This tool also contains attachments to aid in the routing of inner cables, hydraulic hose, and Shimano® E-Tube wires.
To access these fittings, first remove the cap (D) by turning it counterclockwise and pulling it off the main tool body.
DE Dieses Tool enthält auch Vorrichtungen zur Erleichterung der Führung von innen liegenden Kabeln, Hydraulikschläuchen und Shimano® E-Tubekabeln.
Um auf diese Passstücke zuzugreifen, entfernen Sie zuerst den Deckel (D), indem Sie diesen gegen den Uhrzeigersinn drehen und vom Haupt-werkzeugkörper wegziehen.
ES Esta herramienta también contiene accesorios que ayudan en el enrutamiento de los cables internos, la manguera hidráulica y los cables E-Tube de Shimano®.
Para acceder a los conectores, primero retire la tapa (D) girándola en sentido contrario a las agujas del reloj y retirándola de la parte principal de la herramienta.
FR Cet outil contient aussi des accessoires facilitant le cheminement des câbles, tuyaux hy-drauliques et câbles E-Tube Shimano® intérieurs.
Ces accessoires sont accessibles en retirant d'abord le capuchon (D), en le tournant dans le sens inverse des aiguilles d'une montre et en le sortant du corps de l'outil principal.
CH 這工具內含有內線,油管與Shimano電子變速線走線輔助裝罝。要使用這些輔助工具時,首先逆時鐘方向轉開並拉開側蓋(D)
EN The flexible magnet (B) is used to retrieve magnetic items from within the frame. It is extended using the slider and can be inserted directly into the frame. Once inside, it will attach to the object and allow for easy removal. The LED flashlight (C) can be activated using the toggle switch on the slider.
DE Der flexible Magnet (B) wird genutzt, um magnetische Teile aus dem Rahmen zu bergen. Er wird mit Hilfe des Schiebereglers verlängert und kann direkt in den Rahmen eingeführt werden. Innerhalb des Rahmens wird er sich an den Gegenstand anhängen und einfaches Entnehmen ermöglichen. Die LED-Stablampe (C) kann mit dem Kippschalter am Schieberegler aktiviert werden.
ES El imán flexible (B) sirve para recuperar ar-tículos magnéticos dentro del marco. Se extiende usando el dispositivo deslizante y puede introdu-cirse directamente en el cuadro. Una vez dentro, se adhiere al objeto y permite una fácil extracción. La linterna de LED (C) puede ser activada usando el conmutador del dispositivo deslizante.
FR L’aimant flexible (B) permet de retirer les éléments magnétiques de l’intérieur du cadre. Il se déploie à l’aide du coulisseau et il peut être introduit directement dans le cadre. Une fois à l’intérieur, il s’attache sur l’objet et permet un retrait facile. La lampe de poche à DEL (C) peut être allumée à l’aide de l’interrupteur à bascule qui se trouve sur le coulisseau.
CH 磁頭軟管(B)主要伸入車架內吸引磁鐵件。此軟管為滑動式設計可直接伸入車架內吸附物件並移動物件。LED照明燈(C)可經由滑蓋上開關打開
PARTS INCLUDED ║ MITGELIEFERTE TEILE ║ PARTES INCLUIDAS ║ PIÈCES INCLUSES ║ 零件示意
B E F A
DHG
CE-Tube FittingHydraulic
Hose Fitting
Flexible Wire
Removable Cap
Storage Container
LED Flashlight
Flexible Magnet Main Magnet磁頭軟管
LED照明燈
儲存圓管
油管接頭 電子線接頭
軟線接頭 主磁鐵
可拆側蓋
ROUTING HYDRAULIC HOSE ║ FÜHREN DES HYDRAULIKSCHLAUCHS ║ MANGUERA HIDRÁULICA DE ENRUTAMIENTO ║ CHEMINEMENT D’UN TUYAU HYDRAULIQUE ║ 油管穿組說明
5
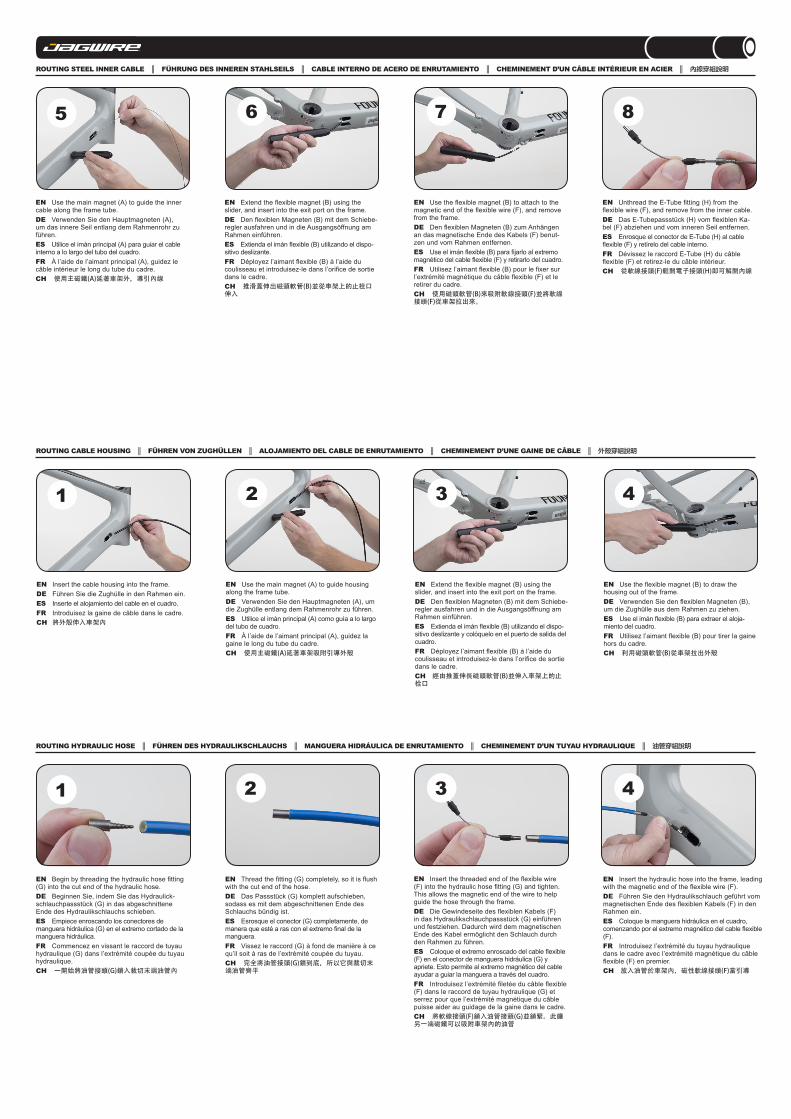
EN Use the main magnet (A) to guide the inner cable along the frame tube.
DE Verwenden Sie den Hauptmagneten (A), um das innere Seil entlang dem Rahmenrohr zu führen.
ES Utilice el imán principal (A) para guiar el cable interno a lo largo del tubo del cuadro.
FR À l’aide de l’aimant principal (A), guidez le câble intérieur le long du tube du cadre.
CH 使用主磁鐵(A)延著車架外,導引內線
EN Extend the flexible magnet (B) using the slider, and insert into the exit port on the frame.
DE Den flexiblen Magneten (B) mit dem Schiebe-regler ausfahren und in die Ausgangsöffnung am Rahmen einführen.
ES Extienda el imán flexible (B) utilizando el dispo-sitivo deslizante.
FR Déployez l’aimant flexible (B) à l’aide du coulisseau et introduisez-le dans l’orifice de sortie dans le cadre.
CH 推滑蓋伸出磁頭軟管(B)並從車架上的止栓口伸入
EN Use the flexible magnet (B) to attach to the magnetic end of the flexible wire (F), and remove from the frame.
DE Den flexiblen Magneten (B) zum Anhängen an das magnetische Ende des Kabels (F) benut-zen und vom Rahmen entfernen.
ES Use el imán flexible (B) para fijarlo al extremo magnético del cable flexible (F) y retirarlo del cuadro.
FR Utilisez l’aimant flexible (B) pour le fixer sur l’extrémité magnétique du câble flexible (F) et le retirer du cadre.
CH 使用磁頭軟管(B)來吸附軟線接頭(F)並將軟線接頭(F)從車架拉出來。
EN Unthread the E-Tube fitting (H) from the flexible wire (F), and remove from the inner cable.
DE Das E-Tubepassstück (H) vom flexiblen Ka-bel (F) abziehen und vom inneren Seil entfernen.
ES Enrosque el conector de E-Tube (H) al cable flexible (F) y retírelo del cable interno.
FR Dévissez le raccord E-Tube (H) du câble flexible (F) et retirez-le du câble intérieur.
CH 從軟線接頭(F)鬆開電子接頭(H)即可解開內線
6 7 8
ROUTING STEEL INNER CABLE ║ FÜHRUNG DES INNEREN STAHLSEILS ║ CABLE INTERNO DE ACERO DE ENRUTAMIENTO ║ CHEMINEMENT D’UN CÂBLE INTÉRIEUR EN ACIER ║ 內線穿組說明
1
EN Insert the cable housing into the frame.
DE Führen Sie die Zughülle in den Rahmen ein.
ES Inserte el alojamiento del cable en el cuadro.
FR Introduisez la gaine de câble dans le cadre.
CH 將外殼伸入車架內
EN Use the main magnet (A) to guide housing along the frame tube.
DE Verwenden Sie den Hauptmagneten (A), um die Zughülle entlang dem Rahmenrohr zu führen.
ES Utilice el imán principal (A) como guía a lo largo del tubo de cuadro.
FR À l’aide de l’aimant principal (A), guidez la gaine le long du tube du cadre.
CH 使用主磁鐵(A)延著車架吸附引導外殼
EN Extend the flexible magnet (B) using the slider, and insert into the exit port on the frame.
DE Den flexiblen Magneten (B) mit dem Schiebe-regler ausfahren und in die Ausgangsöffnung am Rahmen einführen.
ES Extienda el imán flexible (B) utilizando el dispo-sitivo deslizante y colóquelo en el puerto de salida del cuadro.
FR Déployez l’aimant flexible (B) à l’aide du coulisseau et introduisez-le dans l’orifice de sortie dans le cadre.
CH 經由推蓋伸長磁頭軟管(B)並伸入車架上的止栓口
EN Use the flexible magnet (B) to draw the housing out of the frame.
DE Verwenden Sie den flexiblen Magneten (B), um die Zughülle aus dem Rahmen zu ziehen.
ES Use el imán flexible (B) para extraer el aloja-miento del cuadro.
FR Utilisez l’aimant flexible (B) pour tirer la gaine hors du cadre.
CH 利用磁頭軟管(B)從車架拉出外殼
ROUTING CABLE HOUSING ║ FÜHREN VON ZUGHÜLLEN ║ ALOJAMIENTO DEL CABLE DE ENRUTAMIENTO ║ CHEMINEMENT D’UNE GAINE DE CÂBLE ║ 外殼穿組說明
2 3 4
1
EN Begin by threading the hydraulic hose fitting (G) into the cut end of the hydraulic hose.
DE Beginnen Sie, indem Sie das Hydraulick-schlauchpassstück (G) in das abgeschnittene Ende des Hydraulikschlauchs schieben.
ES Empiece enroscando los conectores de manguera hidráulica (G) en el extremo cortado de la manguera hidráulica.
FR Commencez en vissant le raccord de tuyau hydraulique (G) dans l’extrémité coupée du tuyau hydraulique.
CH 一開始將油管接頭(G)鎖入裁切末端油管內
EN Thread the fitting (G) completely, so it is flush with the cut end of the hose.
DE Das Passstück (G) komplett aufschieben, sodass es mit dem abgeschnittenen Ende des Schlauchs bündig ist.
ES Esrosque el conector (G) completamente, de manera que esté a ras con el extremo final de la manguera.
FR Vissez le raccord (G) à fond de manière à ce qu’il soit à ras de l’extrémité coupée du tuyau.
CH 完全將油管接頭(G)鎖到底,所以它與裁切末端油管齊平
EN Insert the threaded end of the flexible wire (F) into the hydraulic hose fitting (G) and tighten. This allows the magnetic end of the wire to help guide the hose through the frame.
DE Die Gewindeseite des flexiblen Kabels (F) in das Hydraulikschlauchpassstück (G) einführen und festziehen. Dadurch wird dem magnetischen Ende des Kabel ermöglicht den Schlauch durch den Rahmen zu führen.
ES Coloque el extremo enroscado del cable flexible (F) en el conector de manguera hidráulica (G) y apriete. Esto permite al extremo magnético del cable ayudar a guiar la manguera a través del cuadro.
FR Introduisez l’extrémité filetée du câble flexible (F) dans le raccord de tuyau hydraulique (G) et serrez pour que l’extrémité magnétique du câble puisse aider au guidage de la gaine dans le cadre.
CH 將軟線接頭(F)鎖入油管接頭(G)並鎖緊。此讓另一端磁鐵可以吸附車架內的油管
EN Insert the hydraulic hose into the frame, leading with the magnetic end of the flexible wire (F).
DE Führen Sie den Hydraulikschlauch geführt vom magnetischen Ende des flexiblen Kabels (F) in den Rahmen ein.
ES Coloque la manguera hidráulica en el cuadro, comenzando por el extremo magnético del cable flexible (F).
FR Introduisez l’extrémité du tuyau hydraulique dans le cadre avec l’extrémité magnétique du câble flexible (F) en premier.
CH 放入油管於車架內,磁性軟線接頭(F)當引導
2 3 4
ROUTING SHIMANO® E-TUBE WIRE ║ FÜHREN DES SHIMANO® E-TUBEKABELS ║ CABLE DE ENRUTAMIENTO DE E-TUBE DE SHIMANO® ║ CHEMINEMENT D’UN CÂBLE E-TUBE SHIMANO® ║ SHIMANO®電子線組穿組說明
1
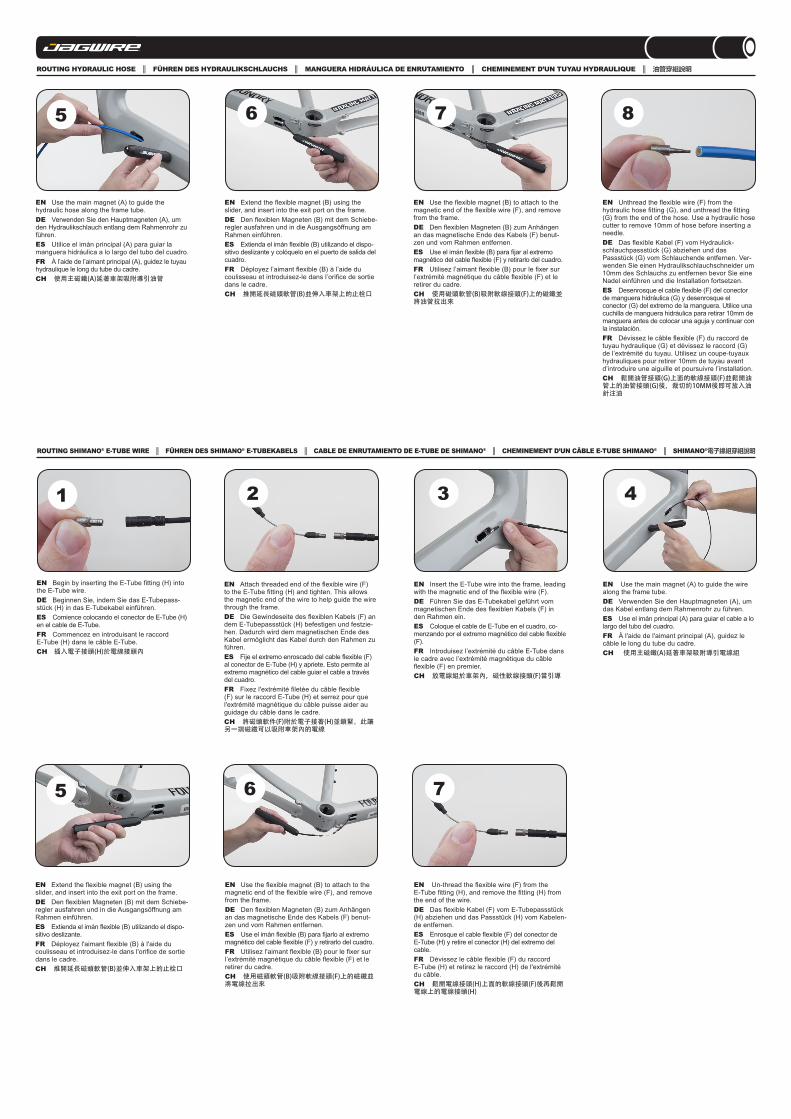
EN Begin by inserting the E-Tube fitting (H) into the E-Tube wire.
DE Beginnen Sie, indem Sie das E-Tubepass-stück (H) in das E-Tubekabel einführen.
ES Comience colocando el conector de E-Tube (H) en el cable de E-Tube.
FR Commencez en introduisant le raccord E-Tube (H) dans le câble E-Tube.
CH 插入電子接頭(H)於電線接頭內
EN Attach threaded end of the flexible wire (F) to the E-Tube fitting (H) and tighten. This allows the magnetic end of the wire to help guide the wire through the frame.
DE Die Gewindeseite des flexiblen Kabels (F) an dem E-Tubepassstück (H) befestigen und festzie-hen. Dadurch wird dem magnetischen Ende des Kabel ermöglicht das Kabel durch den Rahmen zu führen.
ES Fije el extremo enroscado del cable flexible (F) al conector de E-Tube (H) y apriete. Esto permite al extremo magnético del cable guiar el cable a través del cuadro.
FR Fixez l'extrémité filetée du câble flexible (F) sur le raccord E-Tube (H) et serrez pour que l'extrémité magnétique du câble puisse aider au guidage du câble dans le cadre.
CH 將磁頭軟件(F)附於電子接著(H)並鎖緊。此讓另一端磁鐵可以吸附車架內的電線
EN Insert the E-Tube wire into the frame, leading with the magnetic end of the flexible wire (F).
DE Führen Sie das E-Tubekabel geführt vom magnetischen Ende des flexiblen Kabels (F) in den Rahmen ein.
ES Coloque el cable de E-Tube en el cuadro, co-menzando por el extremo magnético del cable flexible (F).
FR Introduisez l’extrémité du câble E-Tube dans le cadre avec l’extrémité magnétique du câble flexible (F) en premier.
CH 放電線組於車架內,磁性軟線接頭(F)當引導
EN Use the main magnet (A) to guide the wire along the frame tube.
DE Verwenden Sie den Hauptmagneten (A), um das Kabel entlang dem Rahmenrohr zu führen.
ES Use el imán principal (A) para guiar el cable a lo largo del tubo del cuadro.
FR À l'aide de l'aimant principal (A), guidez le câble le long du tube du cadre.
CH 使用主磁鐵(A)延著車架吸附導引電線組
2 3 4
ROUTING HYDRAULIC HOSE ║ FÜHREN DES HYDRAULIKSCHLAUCHS ║ MANGUERA HIDRÁULICA DE ENRUTAMIENTO ║ CHEMINEMENT D’UN TUYAU HYDRAULIQUE ║ 油管穿組說明
5
EN Use the main magnet (A) to guide the hydraulic hose along the frame tube.
DE Verwenden Sie den Hauptmagneten (A), um den Hydraulikschlauch entlang dem Rahmenrohr zu führen.
ES Utilice el imán principal (A) para guiar la manguera hidráulica a lo largo del tubo del cuadro.
FR À l’aide de l’aimant principal (A), guidez le tuyau hydraulique le long du tube du cadre.
CH 使用主磁鐵(A)延著車架吸附導引油管
EN Extend the flexible magnet (B) using the slider, and insert into the exit port on the frame.
DE Den flexiblen Magneten (B) mit dem Schiebe-regler ausfahren und in die Ausgangsöffnung am Rahmen einführen.
ES Extienda el imán flexible (B) utilizando el dispo-sitivo deslizante y colóquelo en el puerto de salida del cuadro.
FR Déployez l’aimant flexible (B) à l’aide du coulisseau et introduisez-le dans l’orifice de sortie dans le cadre.
CH 推開延長磁頭軟管(B)並伸入車架上的止栓口
EN Use the flexible magnet (B) to attach to the magnetic end of the flexible wire (F), and remove from the frame.
DE Den flexiblen Magneten (B) zum Anhängen an das magnetische Ende des Kabels (F) benut-zen und vom Rahmen entfernen.
ES Use el imán flexible (B) para fijar al extremo magnético del cable flexible (F) y retirarlo del cuadro.
FR Utilisez l’aimant flexible (B) pour le fixer sur l’extrémité magnétique du câble flexible (F) et le retirer du cadre.
CH 使用磁頭軟管(B)吸附軟線接頭(F)上的磁鐵並將油管拉出來
EN Unthread the flexible wire (F) from the hydraulic hose fitting (G), and unthread the fitting (G) from the end of the hose. Use a hydraulic hose cutter to remove 10mm of hose before inserting a needle.
DE Das flexible Kabel (F) vom Hydraulick-schlauchpassstück (G) abziehen und das Passstück (G) vom Schlauchende entfernen. Ver-wenden Sie einen Hydraulikschlauchschneider um 10mm des Schlauchs zu entfernen bevor Sie eine Nadel einführen und die Installation fortsetzen.
ES Desenrosque el cable flexible (F) del conector de manguera hidráulica (G) y desenrosque el conector (G) del extremo de la manguera. Utilice una cuchilla de manguera hidráulica para retirar 10mm de manguera antes de colocar una aguja y continuar con la instalación.
FR Dévissez le câble flexible (F) du raccord de tuyau hydraulique (G) et dévissez le raccord (G) de l’extrémité du tuyau. Utilisez un coupe-tuyaux hydrauliques pour retirer 10mm de tuyau avant d’introduire une aiguille et poursuivre l’installation.
CH 鬆開油管接頭(G)上面的軟線接頭(F)並鬆開油管上的油管接頭(G)後,裁切約10MM後即可放入油針注油
6 7 8
5
EN Extend the flexible magnet (B) using the slider, and insert into the exit port on the frame.
DE Den flexiblen Magneten (B) mit dem Schiebe-regler ausfahren und in die Ausgangsöffnung am Rahmen einführen.
ES Extienda el imán flexible (B) utilizando el dispo-sitivo deslizante.
FR Déployez l'aimant flexible (B) à l'aide du coulisseau et introduisez-le dans l'orifice de sortie dans le cadre.
CH 推開延長磁頭軟管(B)並伸入車架上的止栓口
EN Use the flexible magnet (B) to attach to the magnetic end of the flexible wire (F), and remove from the frame.
DE Den flexiblen Magneten (B) zum Anhängen an das magnetische Ende des Kabels (F) benut-zen und vom Rahmen entfernen.
ES Use el imán flexible (B) para fijarlo al extremo magnético del cable flexible (F) y retirarlo del cuadro.
FR Utilisez l'aimant flexible (B) pour le fixer sur l’extrémité magnétique du câble flexible (F) et le retirer du cadre.
CH 使用磁頭軟管(B)吸附軟線接頭(F)上的磁鐵並將電線拉出來
EN Un-thread the flexible wire (F) from the E-Tube fitting (H), and remove the fitting (H) from the end of the wire.
DE Das flexible Kabel (F) vom E-Tubepassstück (H) abziehen und das Passstück (H) vom Kabelen-de entfernen.
ES Enrosque el cable flexible (F) del conector de E-Tube (H) y retire el conector (H) del extremo del cable.
FR Dévissez le câble flexible (F) du raccord E-Tube (H) et retirez le raccord (H) de l'extrémité du câble.
CH 鬆開電線接頭(H)上面的軟線接頭(F)後再鬆開電線上的電線接頭(H)
6 7

Product Safety and InstallationWARNING: Many bicycle service and repair tasks require special knowledge and tools. In order to help minimize the chances of an accident and possible injury, it is critical that you have any installation, repair or maintenance performed by a professional bicycle mechanic or dealer. Do not begin any adjustments or service on your bicycle yourself until you have learned from your mechanic or dealer how to properly complete them. Improper adjustment or service may result in damage to the bicycle or an accident, which can cause serious injury or death.Before installing any component or accessory make sure that it is compatible with your bicycle by checking with your dealer.WARNING:1. Riding with improperly adjusted brakes, worn brake pads, worn control cables or housings is dangerous and can result in serious injury or death.2. Applying brakes too hard or too suddenly can lock up a wheel, which could cause you to lose control and fall. Sudden or excessive application of the front brake may pitch the rider over the handlebars, which may result in serious injury or death.3. Disc brakes can get extremely hot with extended use. Be careful not to touch a disc brake until it has had plenty of time to cool.4. See the brake manufacturer’s instructions for operation and care of your brakes. If you do not have the manufactur-er’s instructions, see your dealer or contact the brake manufacturer.Important: If your control system wires begin to fray, your housing end caps show any signs of damage or your housing is kinked, replace them with new products.WARNING: Jagwire cables, housings and brake pads are not intended for use on any motorized bicycle or vehicle. Any such use could result in a serious personal injury.
Produktsicherheit und InstallationACHTUNG: Bei vielen Fahrradreparaturen und –wartungsaufgaben sind spezielle Kenntnisse und Werkzeuge notwen-dig. Um Unfallgefahren und mögliche Verletzungen soweit wie möglich auszuschließen, ist es entscheidend, dass alle Installations-, Reparatur- und Wartungsarbeiten von einem Fachmann durchgeführt werden. Nehmen Sie Einstellungs- oder Wartungsarbeiten an Ihrem Fahrrad erst dann in Angriff, nachdem Ihr Mechaniker oder Händler Ihnen gezeigt hat, wie diese ordnungsgemäß auszuführen sind. Fehler bei Einstellungs- oder Wartungsarbeiten können zu Beschädigung des Fahrrads oder zu Unfällen mit möglicherweise schweren Verletzungen oder gar Todesfolge führen.Bevor Sie Komponenten oder Zubehörteile installieren, vergewissern Sie sich bitte bei Ihrem Händler, dass diese mit Ihrem Fahrrad kompatibel sind.ACHTUNG:1. Das Fahren mit unsachgemäß eingestellten Bremsen, abgenutzten Bremsbelägen, abgenutzten Steuerkabeln oder -gehäusen ist gefährlich und kann zu schweren Verletzungen oder Tod führen.2. Wenn Sie die Bremsen zu stark oder zu plötzlich betätigen, kann ein Reifen blockieren, was zu Kontrollverlust und Stürzen führen kann. Bei einer plötzlichen oder zu starken Betätigung der Vorderbremse kann der Fahrer mit möglicher Verletzungs- oder Todesfolge über den Lenker katapultiert werden.3. Scheibenbremsen werden bei längerer Benutzung extrem heiß. Bitte Vorsicht! Scheibenbremsen erst anfassen, nachdem sie viel Zeit hatten, um abzukühlen.4. Bitte konsultieren Sie die Herstelleranleitungen zu Betrieb und Pflege Ihrer Bremsen. Wenn Sie die Herstelleranleitun-gen nicht verfügbar haben, wenden Sie sich an Ihren Händler oder direkt an den Bremsenhersteller.Wichtig: Wenn Ihre Steuersystemdrähte anfangen, Abnutzungserscheinungen zu zeigen, die Gehäuseendkappen Zeichen von Beschädigung aufweisen oder wenn das Gehäuse Dellen usw. hat, sollten diese Teile mit neuen Produkten ersetzt werden.ACHTUNG: Kabel, Gehäuse und Bremsbeläge von Jagwire sind nicht für Mopeds oder Kraftfahrzeuge geeignet. Jeder solche Gebrauch könnte zu schweren Personenschäden führen.Beschränkte Garantie: Chia Cherne/Jagwire gewährleistet, dass Produkte für einen Zeitraum von 2 Jahren nach dem Neuerwerb frei von Material- oder Verarbeitungsfehlern sind. Diese Garantie bezieht sich nur auf den ursprünglichen Inhaber und ist nicht übertragbar. Garantieansprüche müssen durch den Einzelhändler, bei dem das Fahrrad oder das Jagwire-Produkt gekauft wurde, geltend gemacht werden. Ein originaler Kaufnachweis ist erforderlich. Das vollständige Gewährleistungsdokument kann bei jagwire.com eingesehen werden.
Seguridad e instalación del productoADVERTENCIA: Muchas tareas de mantenimiento y reparación de bicicleta necesitan de conocimientos y herramientas especiales. Como forma de minimizar las probabilidades de un posible accidente o lesión, es imprescindible que cualquier instalación, reparación o mantenimiento sea realizado por un mecánico o vendedor de bicicletas. No realice ningún ajuste o mantenimiento a su bicicleta hasta que haya consultado con su mecánico o vendedor cómo hacerlo apropiadamente. Un ajuste o mantenimiento inadecuado puede resultar en un daño para su bicicleta o en un accidente, que puede causar una herida grave o la muerte.Antes de instalar cualquier componente o accesorio, asegúrese que éste sea compatible con su bicicleta consultando previamente con su vendedor.ADVERTENCIA:1. Montar en bicicleta con frenos incorrectamente ajustados, con pastillas de freno gastadas, cables controladores o cubiertas de cable gastados es peligroso y puede causar una herida grave o la muerte.2. Apretar los frenos demasiado fuerte o demasiado rápido puede trabar una rueda, lo que puede ocasionar que pierda el control y se caiga. Un repentino o excesivo uso del freno puede catapultar al ciclista por sobre el manillar, lo que puede causar una herida grave o la muerte.3. Los frenos de disco pueden calentarse excesivamente con el uso continuo. Asegúrese de no tocar los frenos de disco hasta que hayan tenido tiempo suficiente de enfriarse.4. Lea las instrucciones del fabricante de los frenos para conocer la operación y mantenimiento de los mismos. Si no posee las instrucciones del fabricante, vea a su vendedor o contacte con el fabricante de los frenos.
Importante: Si los cables de control se han desgastado, si las tapas de las cubiertas del cable muestran algún signo de daño o si la cubierta del cable está hecha un rizo, reemplácelos por productos nuevos.ADVERTENCIA: Los cables, cubiertas de cables y pastillas de freno marca Jagwire no están diseñadas para su uso en ninguna bicicleta o vehículo con motor. Cualquier utilización de ese tipo puede resultar en una herida grave.Garantía limitada: Chia Cherner/Jagwire garantiza que sus productos estén libres de defectos en sus materiales o manufactura por un período de dos años luego de la compra original. Esta garantía es válida únicamente para el dueño original y no es transferible. Cualquier reclamo bajo esta garantía debe hacerse a través del vendedor donde la bicicleta o producto Jagwire haya sido comprado. Es imprescindible contar con el comprobante original. Para ver la garantía completa, por favor visite jagwire.com.
Consignes de sécurité et d’installation du produitAVERTISSEMENT : De nombreuses tâches de réparation et d’entretien de bicyclettes demandent des connaissances et des outils particuliers. Afin de réduire au minimum les risques d’accident et de blessure éventuelle, il est très important que vous laissiez tout travail d’installation, de réparation ou d’entretien à un mécanicien spécialisé dans la bicyclette ou à un marchand. Avant d’effectuer un réglage ou un entretien sur votre vélo, demandez conseil à votre mécanicien ou à votre marchand sur la meilleure façon de mener à bien ces tâches. Un mauvais réglage ou un mauvais entretien peuvent endommager votre vélo ou occasionner un accident, avec l’éventualité d’une blessure grave ou mortelle.Avant d’installer tout élément ou accessoire, assurez-vous qu’il est bien compatible avec votre bicyclette en demandant à votre marchand.AVERTISSEMENT :1. Faire du vélo avec des freins mal ajustés, des patins de freins, des câbles de commande ou des gaines usés est dangereux et peut occasionner des blessures graves ou mortelles.2. Forcer sur les freins ou les utiliser trop subitement peut entraîner le blocage d’une roue, ce qui pourrait vous faire perdre l’équilibre et provoquer une chute. Le freinage soudain ou l’utilisation excessive du frein avant peuvent projeter le cycliste par-dessus le guidon, pouvant occasionner des blessures graves ou mortelles.3. Les freins à disques peuvent devenir extrêmement chauds lors d’un usage prolongé. Veillez à ne pas toucher les freins à disques tant qu’ils n’ont pas eu suffisamment de temps pour refroidir.4. Consultez les instructions du fabricant des freins concernant l’utilisation et l’entretien de ceux-ci. Si vous ne dispo-sez pas du manuel d’instructions du fabricant, consultez votre marchand ou le fabricant des freins.Important : Si les câbles du système de commande commencent à s’effilocher, si vous remarquez que les capuchons d’extrémité de votre gaine sont endommagés ou que votre gaine est déformée, remplacez-les par des produits neufs.AVERTISSEMENT : Les câbles, gaines et patins de freins Jagwire ne sont pas conçus pour être utilisés sur une bicy-clette à moteur ou tout autre engin motorisé. Une telle utilisation pourrait occasionner de graves blessures.Garantie limitée : Chia Cherne/Jagwire garantit que ses produits ne comportent aucun défaut matériel ou de fabrication pour une période de deux ans à compter de la date d’achat originale. Cette garantie ne s’applique qu’au premier propriétaire et n’est pas transférable. Toute réclamation dans le cadre de cette garantie doit être effectuée par l’inter-médiaire du distributeur auprès duquel la bicyclette ou le produit Jagwire ont été achetés. La preuve d’achat originale est requise. Pour consulter la politique en matière de garantie dans son intégralité, veuillez vous rendre sur le site jagwire.com.
產品安全與安裝 警告: 由於各式車款其結構及配件的不同,安裝和維修時皆須專門技術及維修工具。為降低事故與意外發生機率,Jagwire 建議您將各種安裝、維修和保養工作交由專業的車店或經銷點來進行維修及保養。在未向專業技師或經銷商學習正確維修方法前,切勿擅自隨意對自行車進行任何調整或保養的動作。不當的調整或保養,都可能引起自行車的損壞或事故的發生,甚至導致嚴重傷亡事故發生。請切實在自行車安裝零配件前,先向車店技師或零售車店商,進行確認該零配件是否適用於您的自行車上。警告:1. 不當的煞車調整將會造成煞車皮磨損、煞車線或外管損耗,進而造成危險和嚴重傷亡。2. 剎車太過用力或剎車過急,將會造成輪胎鎖死進而導致車輛失控或摔倒的情況發生。建議您在緊急剎車時,請勿使用前剎車,避免突然發生產生危險,導致騎乘者可能撞到把手,嚴重時將導致重傷或死亡的情況發生。3. 長時間使用碟剎後卡鉗部位溫度將會升高,故在碟剎盤冷卻之前,請勿用手直接觸碰。4. 建議您,進行剎車操作與保養前,請先參閱剎車製造商所提供之原廠說明書。如無原廠說明書,請洽詢您的經銷商或聯繫剎車製造商索取。重要:當您發現端套已有磨損或外管有扭曲現象時,便顯示您的自行車操控系統已開始有磨損的現象,請即刻更換新的產品,以確保自身安全。警告:Jagwire 煞車線、外管和煞車皮不可使用在電動腳踏車或汽機車上,如因不當使用將會導致個人嚴重的傷亡。保固期限:自購買日算起,佳承精工 / JAGWIRE 對於材質及成品的保固期間為兩年,此權利僅對原始購買者享有並不得轉讓。在期限內若需更換產品,需提供原始購買憑證,此權利將賦予 Jagwire 授權之正式經銷商。 如需得了解更完整的保固資訊,請上Jagwire網站查詢。
产品安全与安装警告:许多自行车保养和维修工作都需要具有专门的知识,并配备相应的工具。为降低事故和伤害发生几率,最好将各种安装、维修或维护工作交由专业自行车技师或经销商处理,这点尤为重要。除非已从技师或经销商处学会正确维修的方法,否则切勿擅自对自行车进行任何调节或保养。不当的调节或保养很可能会引起自行车损坏或事故发生,进而导致重伤甚至死亡。安装任何组件或配件之前,请先向您的经销商确认该组件或附件是否同您的自行车配套。警告:1. 自行车刹车调节不当、刹车片磨损、刹车线或护套磨损会对骑乘者造成危险,并可能导致重伤或死亡。2. 刹车太用力或刹车过急会将车轮锁定,从而导致车辆失控或摔倒。使用前刹车突然刹车或刹车过死,骑乘者可能会撞在前把手上,而导致重伤或死亡。3. 长时使用盘式刹车会使其变得过热。盘式刹车冷却之前,请勿与之接触。4. 请参阅刹车制造商说明书来进行刹车操作和保养。如无制造商说明书,请咨询您的经销商或联系刹车制造商。重要提示:当自行车刹车线开始磨损、护套端盖显示任何的破损或护套发生扭结迹象时,请及时更换新配件。警告:Jagwire 刹车线、护套和刹车片不得应用于任何机动自行车或汽车。否则很可能导致重大人身伤害。有限保修:自购买之日起,Chia Cherne/Jagwire(佳承精工/Jagwire)对材料或工艺缺陷的保修时间为 2 年。此保修仅适用于原车主,不得转让。此保修声明须由自行车或 Jagwire 产品经销处的零售商所提供。需要原始的购买凭证。如需了解完整的保修政策,请访问 jagwire.com。
WWW.JAGWIRE.COM
For installation assistance contact your local bike shop or email us at: [email protected]
BATTERY REPLACEMENT ║ BATTERIEWECHSEL ║ SUSTITUCIÓN DE LA BATERÍA ║ REMPLACEMENT DES PILES ║ 電池更換
EN Remove the cap (D) by turning it counter-clockwise and pulling it off the main tool body.
DE Entfernen Sie den Deckel (D), indem Sie diesen gegen den Uhrzeigersinn drehen und vom Hauptwerkzeugkörper wegziehen.
ES Quite la tapa (D) girándola en sentido contrario a las agujas del reloj y retírela de la parte principal de la herramienta.
FR Retirez le capuchon (D) en le tournant dans le sens inverse des aiguilles d'une montre et en le sortant du corps de l'outil principal.
CH 逆時針拔開可拆側蓋(D)脫離工具主體
1
EN Replace the battery cover and slide the flash-light back into main body. Replace the removable cap (D).
DE Setzen Sie die Batteriefachabdeckung wieder auf und schieben die Stablampe ins Hauptgehäu-se zurück. Den abnehmbaren Deckel (D) wieder aufsetzen.
ES Sustituya la cubierta de la batería y coloque la linterna de nuevo en la parte principal. Sustituya la tapa extraíble (D).
FR Remettez le couvercle des piles en place et faites coulissez la lampe dans le corps de l'outil principal. Remettez le capuchon amovible (D) en place.
CH 蓋上電池蓋並將LED燈座推定位後蓋上可拆側蓋(D)
5
EN Pull the slider back so that the flashlight body is accessible. Note: you do not need to completely remove the flashlight from the main tool body.
DE Ziehen Sie den Schieberegler zurück, damit das Lampengehäuse zugänglich ist. Hinweis: Die Stablampe muss nicht vollständig vom Hauptwerk-zeugkörper entfernt werden.
ES Empuje el dispositivo deslizante hacia atrás para que el cuerpo de la linterna esté accesible. Observación: No necesita retirar completamente la linterna de la parte principal de la herramienta.
FR Tirez the coulisseau vers l'arrière afin de pouvoir accéder au corps de la lampe. Remarque : Il n’est pas nécessaire d’enlever complètement la lampe du corps de l'outil principal.
CH 將推蓋往後拉讓LED燈座退出一些。注意:不必將LED燈座拉出來
2EN Remove the battery cover from the rear of the flashlight.
DE Entfernen Sie die Batteriefachabdeckung von der Stablampenrückseite.
ES Retire la cubierta de la batería de la parte trasera de la linterna.
FR Retirez le couvercle des piles situé à l'arrière de la lampe.
CH 將LED燈座上的電池蓋打開
3EN Remove the batteries, and replace with two new 392/384 (LR41, GP192) batteries.
DE Tauschen Sie die Batterien gegen zwei neue Batterien vom Typ 392/384 (LR41, GP192) aus.
ES Retire las baterías y sustitúyalas por dos nuevas baterías 392/384 (LR41, GP192).
FR Retirez les piles et remplacez-les avec deux piles 392/384 (LR41, GP192) neuves.
CH 將電池取出並更換二顆新的392/384 (LR41, GP192) 電池
4
©2016 Chia Cherne Industry CO., LTD.Released January