prism medical the sling · pdf fileintroduction prism medical ltd (pml) is the parent company...
TRANSCRIPT
Prism Medical
The Sling Guide

Table of Contents
Frequently Asked Questions ......................................................................................................................... 5
Anatomy of a Sling ........................................................................................................................................ 8
Manufacturing and Testing Procedures ........................................................................................................ 9
Sling Care and Laundering .......................................................................................................................... 10
Sling Integrity Inspection ............................................................................................................................ 11
Risk Assessment .......................................................................................................................................... 14
Sling Fabrics................................................................................................................................................. 16
Universal Slings ........................................................................................................................................... 19
HAMMOCK SLING ....................................................................................................................................... 27
DELUXE SUPPORT SLING ............................................................................................................................. 34
COMFORT RECLINE ..................................................................................................................................... 40
HYGIENE SLING and DUAL ACCESS SLING ................................................................................................... 45
Positioning Sling .......................................................................................................................................... 49
BAND SLING ................................................................................................................................................ 53
TRI-TURNER SLINGS .................................................................................................................................... 56
STANDING AND WALKING SLINGS .............................................................................................................. 58
Sit to Stand Slings ........................................................................................................................................ 63
Ordering Guidelines .................................................................................................................................... 64
Alternate Sling Application Tips and Tricks ................................................................................................. 65
Sling Sizing Guidelines ................................................................................................................................. 66
BC SLINGS .................................................................................................................................................... 67
Prism Medical’s Custom Sling Program ...................................................................................................... 70
Sling Warranty Information ........................................................................................................................ 71
Introduction
Prism Medical Ltd (PML) is the parent company of Waverley Glen Systems (WGS), with headquarters based in
Toronto, ON and St. Louis, MO. As a North American (US Made products) manufacturer, Prism Medical is well
positioned to offer the best products and support to all of its customers, and to provide unparalleled support and
after-sales service.
Prism Medical Ltd is a leader in modern lift, positioning and transfer solutions, and is recognized as a pioneer in the
development of modern ceiling lift technology. Prism Medical lifts are currently used in hundreds of facilities
(acute care, long-term care, assisted living and homecare) in North America with over 50,000 ceiling lift systems in
use.
Prism Medical recognizes that one of the biggest challenges facing healthcare facilities is the prevention of
musculoskeletal injuries related to patient lifting, transferring and repositioning as “lifting patients is the leading
cause of work-related injury for nursing personnel” (Colling et al., 2004). As a strong supporter of the “minimal lift”
standard, Prism Medical is dedicated to lowering costs associated with healthcare worker and client injuries and
providing solutions to meet facility's needs.
Equipment has been identified in the Moving and Handling literature as a critical component of effective Safe
Patient Handling Programs, along with the following components:
Equipment
Policy and Procedures
Training and Education
Assessment and Review
Compliance Evaluation, Audit and Monitoring
Equipment solutions may include one of more of the following items:
Friction Reducing Devices
Gait/Transfer Belts
Swivel Discs/Cushions
Ceiling Lifts
Floor Based Lifts
Slings
Lateral Transfer Products
Bathing Assistive Devices and Lifts
Chair Repositioning Devices
Selection of equipment is based on a needs assessment. The results of this assessment will yield different results
dependent on the facility; however, some form of lifting equipment to address the needs of partial and non-weight
bearing clients will likely be included in the final equipment list. Almost every Safe Patient Handling Program
includes the implementation of lifting equipment and slings.
Prism Medical believes that with any lift system the sling is a very important component to the system, as it is the
only link between the client and the lifting device. Appropriate sling selection and application is integral in ensuring
the safety of the interaction between the client and the lifting device.
Prism Medical is pleased to offer the Sling Guide to assist in the selection, application, assessment and care of all
Prism Medical slings.
Frequently Asked Questions Prism Medical receives a significant number of inquiries about the use of slings. The following information is
provided as a general guideline, addressing some of the more frequently asked questions. It is important that an
assessment occurs to ensure that this General Information is applicable to your situation. If after review you have
any questions about the application of any of the recommendations/information contained herein please contact
your local Prism Medical/Waverley Glen sales representative, dealer or Prism Medical directly.
It is important to consult a health care professional who will perform an individualized, client-based assessment to
determine the product and technique most applicable for each client and their unique situation. Whenever
using/applying any Safe Patient Handling product, it is important that the user is well trained in the proper use and
practices proper body mechanics to increase the safety of the task.
Q: How many users/caregivers are required to safely apply or use Prism Medical products?
A: Many of the Prism Medical products are designed to be used by a single caregiver or by clients themselves. For
example, Prism Medical has installed ceiling lifts in home-care settings that allow the client to lift/transfer him or
herself without the need for additional assistance. From sling application to ceiling lift use, the client is able to
independently lift/transfer him or herself.
Not all techniques for product use will be easily achieved by a single care provider. Many organizations have
established policies requiring two caregivers to be present at all times when mechanical lifts are used. This
common practice affords facilities an additional mechanism to address risk. A risk assessment should occur in each
situation to determine if two caregivers are essential to reduce risk for completing a lift or transfer.
Q: Can slings be left “under clients”?
A: Slings used for “standard” transfer (i.e., bed to chair, chair to bed), are designed to be applied before the
transfer and removed following the transfer, and it is best practice to remove slings after usage. It is known
however that sling removal is not always practiced.
Often caregivers/clients report that the sling is left in position after the transfer because it is too difficult or time
consuming to remove and/or reapply. These challenges are often due to incorrect positioning of the sling. Please
refer to Sling Application section under each sling style for tips on how to apply/remove a sling safely and
efficiently.
Sometimes the decision is made to leave the sling in place after the transfer due to specific variables or clinical
requirements that make removal of the sling difficult, even when applied and removed as outlined in this Guide.
This should only be done after thoroughly assessing the specific situation, including the risks to the client’s skin
integrity. The decision to leave a sling in place should be supported and the rationale should be well documented.
If a decision is made to leave the sling in place, then ‘Spacer Fabric’ sling should be used. Please refer to Sling
Fabrics for more detailed information.
In deciding between removing the sling and leaving the sling in place, consider the following:
Skin Integrity: the client should be assessed for any signs of skin irritation, either pre-existing or
occurring as a result of the sling being left in position. Recognize that redness will be the first sign
of skin irritation. If redness is noted or the client complains of discomfort, the sling should not be
left in place.
Sling Position: It is important to ensure that the sling is properly positioned prior to each and
every use. If the sling is left in place after a transfer it may shift with client movement before it is
to be used again. The caregiver must check that the sling is properly positioned before using it to
lift the client again. Please refer to the individual sling styles for proper application techniques.
Q: Should lift systems be used to “transfer” or “transport” clients?
A: Mechanical lifts should be used to transfer clients. When using a mobile floor lift, clients should be moved over
the shortest possible distance. Prism Medical recommends that the transport of clients in slings and mechanical
lifts be limited. However, it is the responsibility of each facility to establish policies, procedures and protocols
related to lift use. Keep in mind that there are products that are specifically designed to transport clients.
Q: What is the life span of a sling?
A: There are a number of factors that influence the life span of a sling. These factors are so varied that it is
recommended that the condition and integrity of a sling be visually inspected prior to each and every use.
Additionally, monthly inspections should be conducted and documented in a standardized manner.
Note: Please refer to the Sling Integrity Inspection section of the Sling Guide for additional information and a
sample inspection checklist.
Q: What sling fabric should I use for transferring clients into and out of the bathtub?
A: The decision to use one sling fabric over another should be based on client comfort and skin integrity.
Prism Medical recommends that if a particular sling fabric is chosen to meet the client’s skin integrity needs, the
same sling fabric can be used for all tasks, including bathing. There are two exceptions to this rule:
(1) Slip fit material should not be used for bathing. Slip fit material is not permeable to air or water. If used
for bathing, water will pool inside the sling which will increase the risk of the task by (a) altering the fit of
the sling to the client, and (b) creating a slipping hazard if the water should spill onto the floor.
(2) Mesh should never be used for bathing as the open weave creates multiple pressure points on the client’s
skin. When the client’s skin is wet, as in bathing, the risk of injury to the skin is increased. Applying
unnecessary pressure to wet skin increases the risk of injury further and is uncomfortable for the client.
All other sling fabrics can be used for bathing.
Q: Can a Hygiene Sling or Dual Access Sling be used for a bed to chair and/or chair to bed transfer?
A: Prism Medical recommends that the Hygiene Sling be limited to toileting/peri-care. Due to the design of the
Hygiene Sling there is greater risk to the client when compared to a standard transfer sling (Universal, Hammock,
Deluxe Support, Comfort Recline). If a client meets the criteria for the use of a Hygiene Sling, its use should be
limited to toileting/peri-care only and a sling design that affords more body coverage should be used when
performing a standard bed-chair or chair-bed transfer.
NOTE: It is important to recognize that the material contained herein is meant to provide general
recommendations only. This material is not meant to replace an assessment by a qualified health care
professional. Additionally, the use of a sling and lift system does not automatically guarantee that safe client
transfers will occur. The Clinical Team involved in the care of the client using any assistive device is responsible for
determining appropriate client handling protocol and product recommendations. Prism Medical strongly
recommends that a health care professional perform a Moving and Handling Assessment and recommend the
sling and transfer method best suited to each client.
Due to the fact that Prism Medical is not involved with the care of each and every client that uses Prism Medical
products, Prism Medical accepts no responsibility regarding how a facility or individual applies or uses a safe
patient handling device, accessory, technique or recommendation.
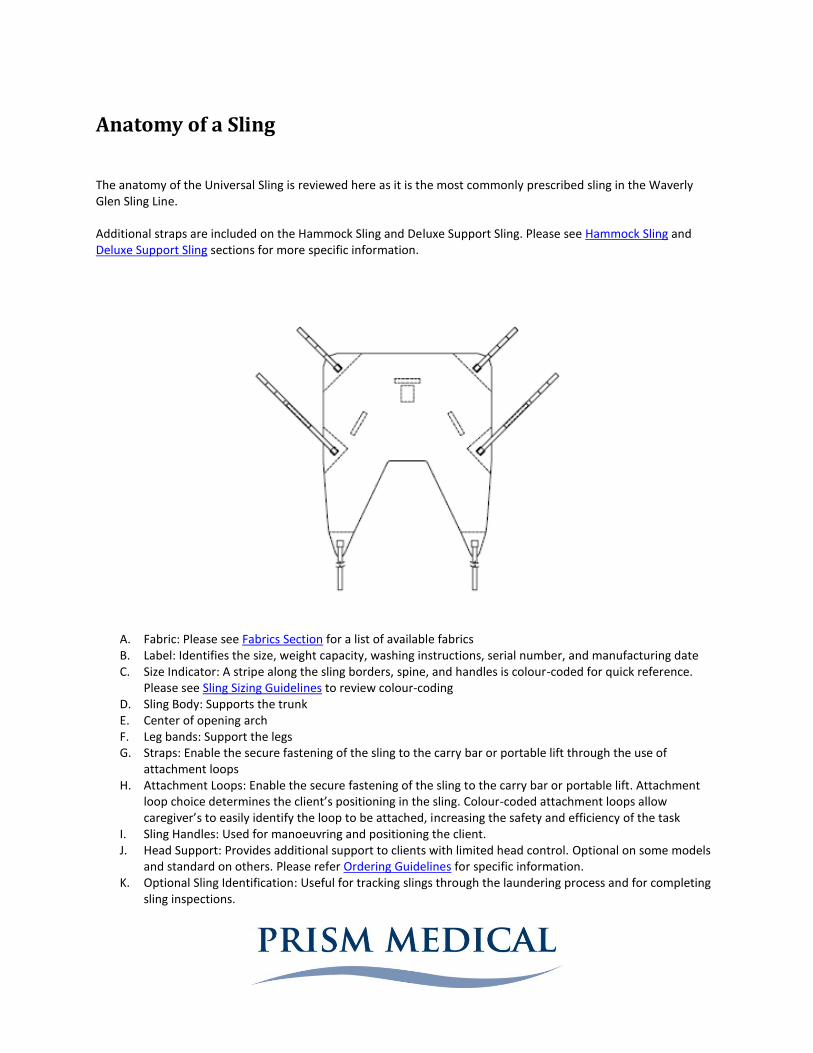
Anatomy of a Sling The anatomy of the Universal Sling is reviewed here as it is the most commonly prescribed sling in the Waverly Glen Sling Line. Additional straps are included on the Hammock Sling and Deluxe Support Sling. Please see Hammock Sling and Deluxe Support Sling sections for more specific information.
A. Fabric: Please see Fabrics Section for a list of available fabrics B. Label: Identifies the size, weight capacity, washing instructions, serial number, and manufacturing date C. Size Indicator: A stripe along the sling borders, spine, and handles is colour-coded for quick reference.
Please see Sling Sizing Guidelines to review colour-coding D. Sling Body: Supports the trunk E. Center of opening arch F. Leg bands: Support the legs G. Straps: Enable the secure fastening of the sling to the carry bar or portable lift through the use of
attachment loops H. Attachment Loops: Enable the secure fastening of the sling to the carry bar or portable lift. Attachment
loop choice determines the client’s positioning in the sling. Colour-coded attachment loops allow caregiver’s to easily identify the loop to be attached, increasing the safety and efficiency of the task
I. Sling Handles: Used for manoeuvring and positioning the client. J. Head Support: Provides additional support to clients with limited head control. Optional on some models
and standard on others. Please refer Ordering Guidelines for specific information. K. Optional Sling Identification: Useful for tracking slings through the laundering process and for completing
sling inspections.

Manufacturing and Testing Procedures Prism Medical slings have been recognized by many health professionals world-wide as the gold standard for sling
design, construction, and performance.
Prism Medical prides itself on manufacturing our slings to the highest standards in the industry. All of our slings are
manufactured according to recognized guidelines and are tested accordingly.
Prism Medical uses the testing protocol established by ISO10535 “Hoists for the Transfer of Disabled Persons –
Requirements and Test Methods”. This standard is used in our sling design and in establishing the testing criteria
for our slings.
All Prism Medical slings are tested to 1.5 times the maximum load for 20 minutes.
New designs go through our washing testing at Exova Labs (formerly Bodycote).
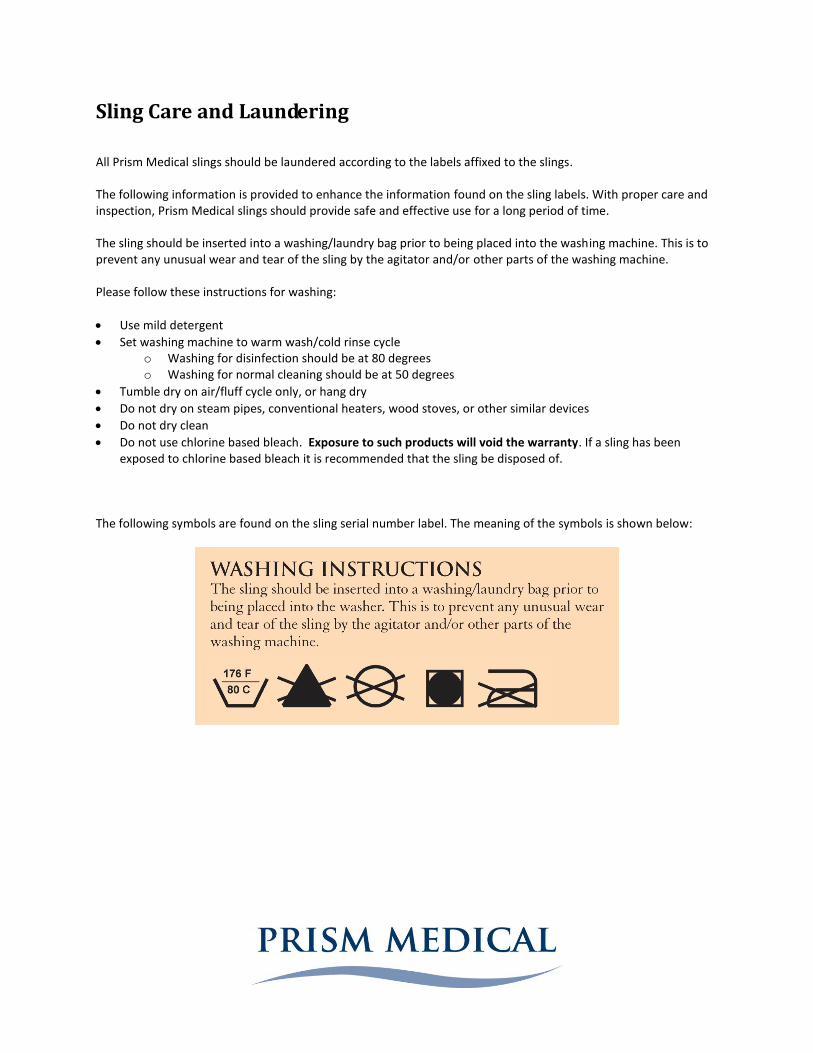
Sling Care and Laundering
All Prism Medical slings should be laundered according to the labels affixed to the slings. The following information is provided to enhance the information found on the sling labels. With proper care and inspection, Prism Medical slings should provide safe and effective use for a long period of time. The sling should be inserted into a washing/laundry bag prior to being placed into the washing machine. This is to prevent any unusual wear and tear of the sling by the agitator and/or other parts of the washing machine. Please follow these instructions for washing:
Use mild detergent
Set washing machine to warm wash/cold rinse cycle o Washing for disinfection should be at 80 degrees o Washing for normal cleaning should be at 50 degrees
Tumble dry on air/fluff cycle only, or hang dry
Do not dry on steam pipes, conventional heaters, wood stoves, or other similar devices
Do not dry clean
Do not use chlorine based bleach. Exposure to such products will void the warranty. If a sling has been exposed to chlorine based bleach it is recommended that the sling be disposed of.
The following symbols are found on the sling serial number label. The meaning of the symbols is shown below:

Sling Integrity Inspection
There are a number of factors that influence the life span of a sling. These factors are so varied that it is recommended that the condition and integrity of a sling be visually inspected prior to each and every use. Additionally, monthly inspections should be conducted and documented in a standardized manner. Possible factors affecting the condition and lifespan of a sling include:
Client Weight
Frequency of Use
Frequency of Laundering
Washing and Drying Method
Washing and Drying Temperature
Detergent used
Disinfectant used
Misuse
The above list outlines some of the potential factors that may affect the integrity of a sling. Unfortunately, there is
no method currently available to effectively test/measure the strength of a sling that will not damage the sling in
the testing process.
Rest assured Prism Medical manufactures all of our sling models to the highest quality standards.
It is only through a standardized process of sling inspections that a facility will be able to determine the need to
discontinue the use of a sling.
The Pre-use inspection is simple and quick. The purpose of the pre-use inspection is to ensure that here are no
obvious signs of wear and tear, such as loose threads/seams, rips/tears, or fraying.
The Monthly inspection is more involved. The purpose of the monthly inspection also to ensure the integrity of
the sling but this inspection should involve a more thorough assessment including looking at and physically testing
all aspects of the sling. The monthly inspection should follow a standardized protocol, outlined by the
organization/facility, and should be documented.
Below is a sample checklist that can be used for this monthly inspection.
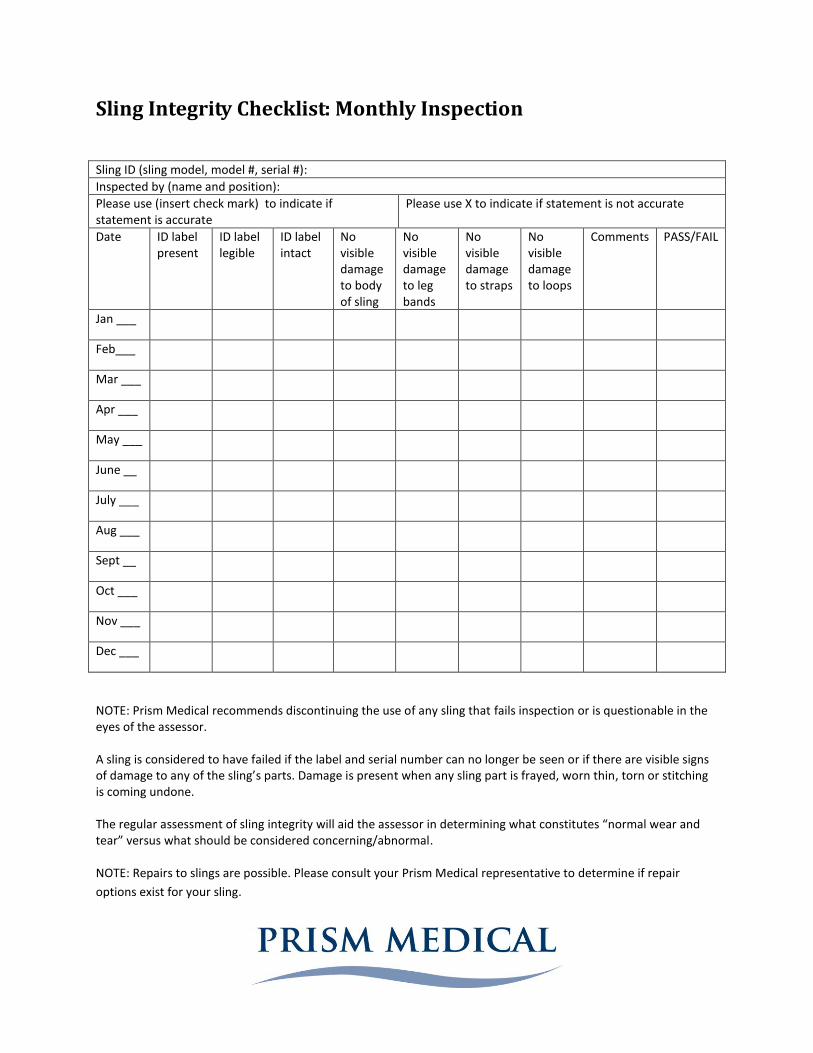
Sling Integrity Checklist: Monthly Inspection
Sling ID (sling model, model #, serial #):
Inspected by (name and position):
Please use (insert check mark) to indicate if statement is accurate
Please use X to indicate if statement is not accurate
Date ID label present
ID label legible
ID label intact
No visible damage to body of sling
No visible damage to leg bands
No visible damage to straps
No visible damage to loops
Comments PASS/FAIL
Jan ___
Feb___
Mar ___
Apr ___
May ___
June __
July ___
Aug ___
Sept __
Oct ___
Nov ___
Dec ___
NOTE: Prism Medical recommends discontinuing the use of any sling that fails inspection or is questionable in the eyes of the assessor. A sling is considered to have failed if the label and serial number can no longer be seen or if there are visible signs of damage to any of the sling’s parts. Damage is present when any sling part is frayed, worn thin, torn or stitching is coming undone. The regular assessment of sling integrity will aid the assessor in determining what constitutes “normal wear and tear” versus what should be considered concerning/abnormal. NOTE: Repairs to slings are possible. Please consult your Prism Medical representative to determine if repair
options exist for your sling.
Sling Compatibility
The Prism Medical Sling Range is compatible with all Prism Medical/Waverley Glen lifts, including ceiling and floor based lifts. Prism Medical Slings are also compatible with most other manufacturer’s lifts that accommodate loop style attachment. Most manufacturers recommend the use of their own slings with their lifts. While this does reduce the risk of non-compatibility is also reduces the flexibility afforded to health care professionals in making recommendations to meet the needs of their clients.
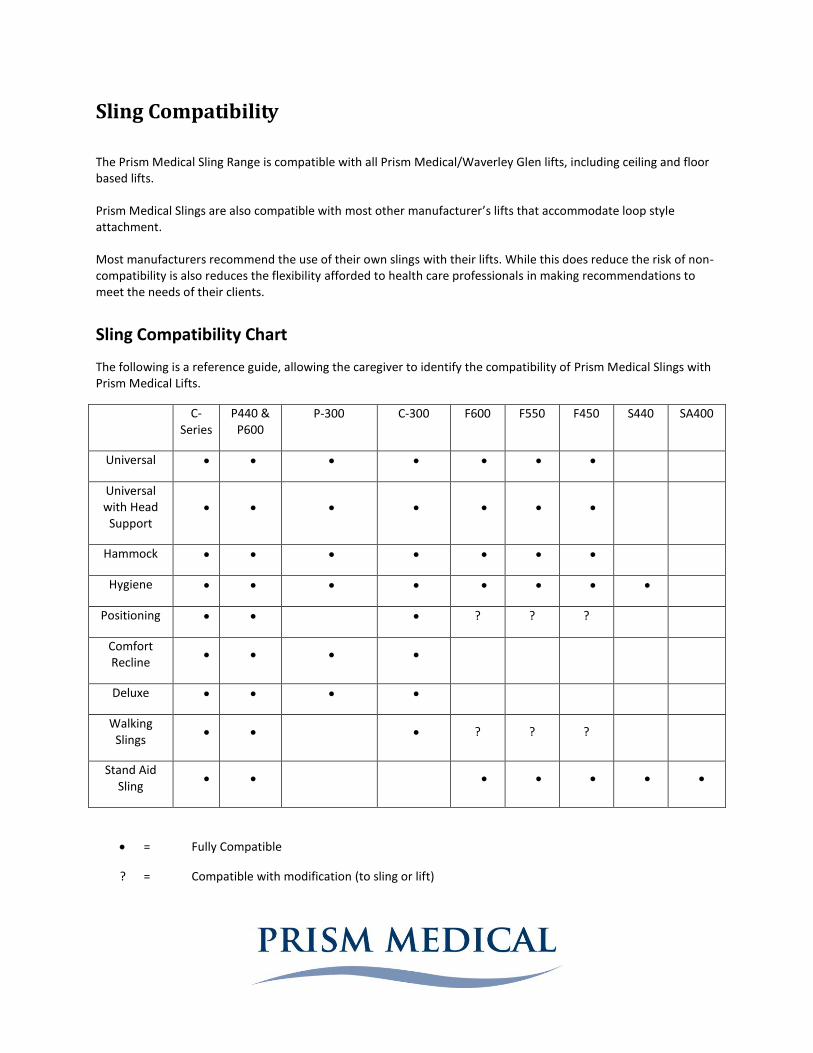
Sling Compatibility Chart
The following is a reference guide, allowing the caregiver to identify the compatibility of Prism Medical Slings with Prism Medical Lifts.
C-Series
P440 & P600
P-300 C-300 F600 F550 F450 S440 SA400
Universal
Universal with Head
Support
Hammock
Hygiene
Positioning ? ? ?
Comfort Recline
Deluxe
Walking Slings
? ? ?
Stand Aid Sling
= Fully Compatible
? = Compatible with modification (to sling or lift)
Risk Assessment The following information is provided as a guideline only. A thorough assessment should be conducted by a qualified health professional. This assessment should include assessment of the physical and cognitive needs of the client as well as the needs demanded by the context.
Risk Assessment: Assessment of the Client
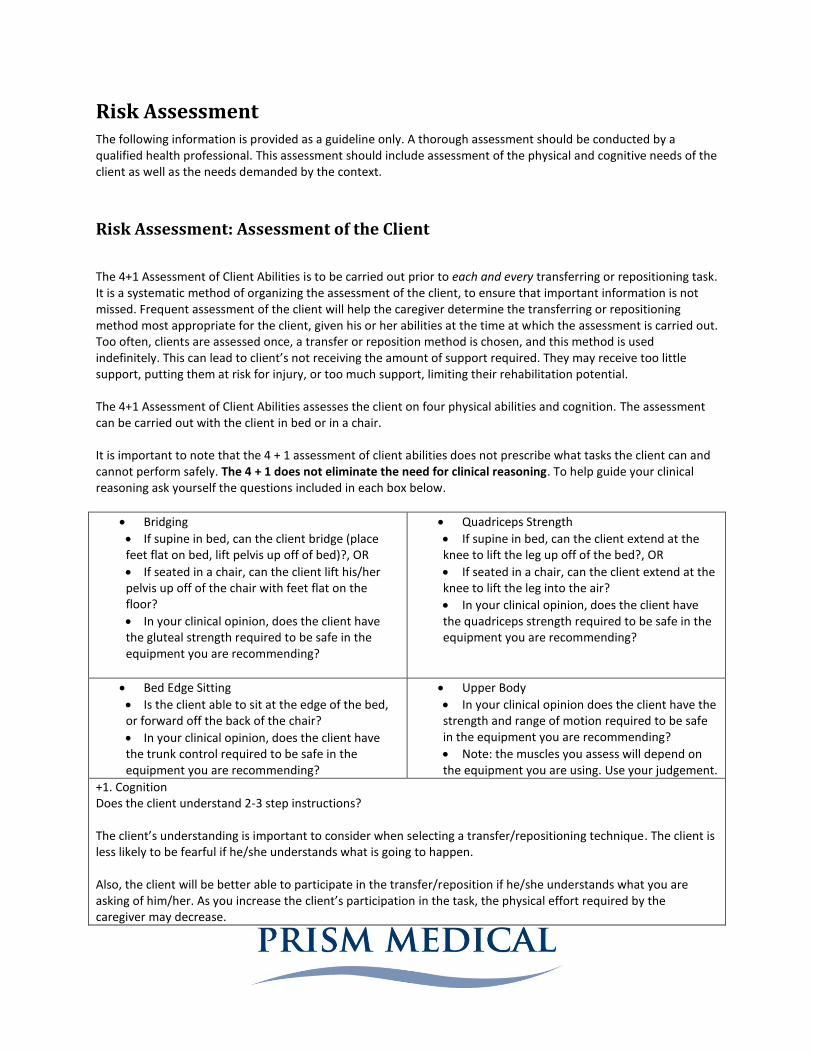
The 4+1 Assessment of Client Abilities is to be carried out prior to each and every transferring or repositioning task. It is a systematic method of organizing the assessment of the client, to ensure that important information is not missed. Frequent assessment of the client will help the caregiver determine the transferring or repositioning method most appropriate for the client, given his or her abilities at the time at which the assessment is carried out. Too often, clients are assessed once, a transfer or reposition method is chosen, and this method is used indefinitely. This can lead to client’s not receiving the amount of support required. They may receive too little support, putting them at risk for injury, or too much support, limiting their rehabilitation potential. The 4+1 Assessment of Client Abilities assesses the client on four physical abilities and cognition. The assessment can be carried out with the client in bed or in a chair. It is important to note that the 4 + 1 assessment of client abilities does not prescribe what tasks the client can and cannot perform safely. The 4 + 1 does not eliminate the need for clinical reasoning. To help guide your clinical reasoning ask yourself the questions included in each box below.
Bridging
If supine in bed, can the client bridge (place feet flat on bed, lift pelvis up off of bed)?, OR
If seated in a chair, can the client lift his/her pelvis up off of the chair with feet flat on the floor?
In your clinical opinion, does the client have the gluteal strength required to be safe in the equipment you are recommending?
Quadriceps Strength
If supine in bed, can the client extend at the knee to lift the leg up off of the bed?, OR
If seated in a chair, can the client extend at the knee to lift the leg into the air?
In your clinical opinion, does the client have the quadriceps strength required to be safe in the equipment you are recommending?
Bed Edge Sitting
Is the client able to sit at the edge of the bed, or forward off the back of the chair?
In your clinical opinion, does the client have the trunk control required to be safe in the equipment you are recommending?
Upper Body
In your clinical opinion does the client have the strength and range of motion required to be safe in the equipment you are recommending?
Note: the muscles you assess will depend on the equipment you are using. Use your judgement.
+1. Cognition Does the client understand 2-3 step instructions? The client’s understanding is important to consider when selecting a transfer/repositioning technique. The client is less likely to be fearful if he/she understands what is going to happen. Also, the client will be better able to participate in the transfer/reposition if he/she understands what you are asking of him/her. As you increase the client’s participation in the task, the physical effort required by the caregiver may decrease.
Risk Assessment: Assessment of the Context
In addition to the 4+1 Assessment of Client Abilities described above it is important that the caregiver assess other factors that may impact the safety and success of the task to be carried out. During the assessment, consideration should be given to the client’s safety and comfort, the caregiver’s safety, the task being performed, and the environment in which the sling/lift is being used. A common assessment tool that can be used is the LITE Risk Assessment:
L – Load – Consider the size, weight, and shape of the person to be lifted as well as their needs and abilities
I – Individual – Consider the competency and abilities of the person (i.e., the caregiver) who will be carrying out the task T – Task – The task refers to the transferring or repositioning task to take place. Consider the risks/hazards associated with the transfer to be performed. Consider how often the task will be performed, at what times, and in what locations. Additionally, ensure that the equipment being used is appropriate for the task and is in safe working order.
E – Environment- – Consider the situation and surroundings in which the lift/sling will be used Use of the LITE Risk Assessment helps the assessor ensure that all important aspects of the situation are considered. It is a systematic method of thinking through scenarios, to ensure that important information is not missed. If risks are identified steps must be taken to reduce these risks. For example, if the client lacks hip extension and trunk control and the only sling available is a Hygiene Sling, the risk to the client is very high. Steps must be taken to lower this risk to an acceptable level. In this example, an alternate sling with the appropriate amount of support must be used to lower the risk to the client.
Sling Fabrics
Prism Medical offers a variety of sling fabrics to meet client needs. Please refer to ‘Ordering Guidelines’ accompanying each sling model to view the available fabrics. Please refer to the information below in determining the appropriate sling fabric for the client. If you are unsure of the appropriate sling fabric to meet client needs, do not hesitate to contact your Prism Medical representative or a member of our clinical team. Polyester:
Close-knit polyester fabric
General purpose sling fabric
Can be considered when skin integrity is not impaired
Can be used for bathing as is water permeable Slip Fit:
Nylon rip-stop fabric, sometimes referred to as parachute fabric/silk
Designed to be easily fitted and removed
Ideal for use in tight fitting chairs (i.e., custom seating)
Not to be used for bathing as it is not water permeable and will retain water around the client when lifted Poly-Slip:
Combination of close-knit Polyester and Slip Fit fabrics
The body of the sling is Polyester
Outer side of leg bands is Slip Fit material to allow for easy fitting and removal
Can be used for bathing as body of sling is water permeable Spacer Fabric:
Knitted polyester fabric manufactured with an internal air gap
Fabric is similar to wheelchair cushion cover fabric
Slight stretch in all directions to allow the fabric to mould to the client’s body
Can be used for bathing as is water permeable
Can be left in place (behind/under the client) after the transfer as Spacer Fabric has shown potential as a pressure redistributing fabric. Sling should only be left in place if assessed to be safe by a trained professional.
Nylon Mesh:
Open-weave fabric
Not to be used for bathing due to large number of pressure points which create the potential for impaired skin integrity
Described by some users as uncomfortable on bare skin Quilted
Quilting to leg bands of mesh slings
Increase comfort
Reduce the incidence of leg straps bunching under legs, creating discomfort and a risk to skin integrity
Padded
Padded polyester leg bands
Increase comfort
Reduce incidence of fabric bunching under legs, creating discomfort and a risk to skin integrity Client-Specific (Disposable)
manufactured from a white non-woven polypropylene
strength is derived through a spun bond method of layering the fibres and the sewing patterns
liquids will bead up on the surface and will either run off or can be easily patted dry with a cloth
should not be washed as this defeats one of the primary benefits of the sling which is to help control cross contamination
material is the same type as used for the manufacture of surgical drape systems and disposable gowns used by most hospitals
Sling Models The following section reviews each of the sling models currently available from Prism Medical. The following information is provided for each model:
Description
Picture
Technical Drawing
Weight Capacity
Available Options
Appropriate Uses
Sizing/Fit
Application Instructions
Specialty Applications if any
Universal Slings
Description
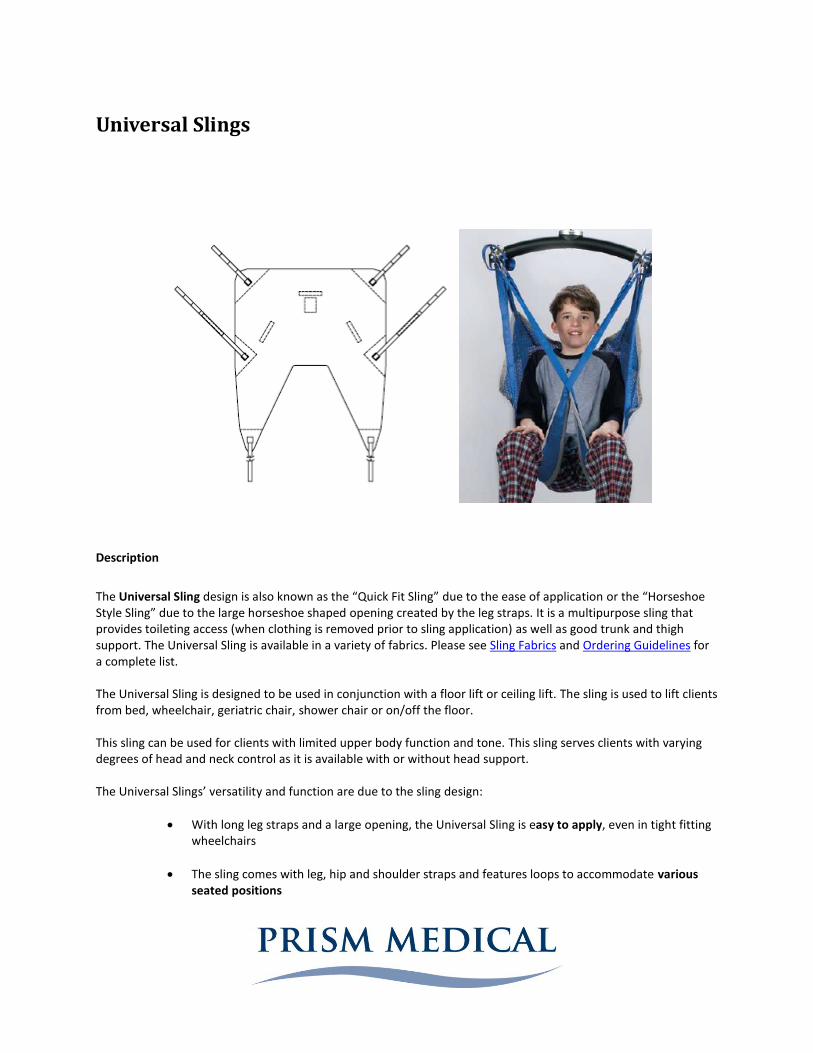
The Universal Sling design is also known as the “Quick Fit Sling” due to the ease of application or the “Horseshoe Style Sling” due to the large horseshoe shaped opening created by the leg straps. It is a multipurpose sling that provides toileting access (when clothing is removed prior to sling application) as well as good trunk and thigh support. The Universal Sling is available in a variety of fabrics. Please see Sling Fabrics and Ordering Guidelines for a complete list. The Universal Sling is designed to be used in conjunction with a floor lift or ceiling lift. The sling is used to lift clients from bed, wheelchair, geriatric chair, shower chair or on/off the floor. This sling can be used for clients with limited upper body function and tone. This sling serves clients with varying degrees of head and neck control as it is available with or without head support. The Universal Slings’ versatility and function are due to the sling design:
With long leg straps and a large opening, the Universal Sling is easy to apply, even in tight fitting wheelchairs
The sling comes with leg, hip and shoulder straps and features loops to accommodate various seated positions
When short shoulder straps and long leg straps are selected the Universal Sling enables the client to be positioned in an upright seated position (close to 90 degrees with a well fitted/sized sling)
The Universal Sling is designed with lateral straps in the hip area. These straps differentiate the Waverley Glen Universal Sling from other “Horseshoe style” slings. The lateral straps serve two purposes:
o The lateral straps help redistribute load from the inside of the thigh (typical of most Universal designs) , to the outside of the thigh thus increasing comfort
o The client’s hips can be pulled into external rotation by leg straps, leading to discomfort and a risk of injury. The addition of lateral straps helps return the hips to a neutral position increasing comfort and decreasing the risk of injury.
Lateral support is afforded by the wide sling body
If head support is required it is sewn on as an additional piece, allowing independent head control and support.
Weight Capacity The Universal Sling is rated to 1000lbs Safe Working Load in mesh, quilted and polyester fabrics and 440lbs in Slipfit and Spacer fabrics. Available Options Fabrics: Universal Slings are available in a variety of sling fabrics. Sling fabric is chosen based on comfort and skin integrity.
Nylon Mesh
Quilted: The leg bands are quilted. The sling body is mesh.
Padded
Polyester
Slip Fit: nylon rip-stop (parachute style)
Poly/slip: a combination of Polyester and Slip Fit
Spacer Fabric: a three dimensional fabric with an internal air gap
Client Specific (disposable) Head Support: Universal Slings are available with or without head support. Clinical Applications Appropriate for a client who:
Requires head support (optional head support is available)
Requires lateral support
Needs or wants to sit at 90o hip flexion (Chair Position)
Has intact lower limbs or who has unilateral below the knee amputation A different sling design will better meet the needs of a client who:
Has unilateral above-knee amputation
Has bilateral lower limb amputation
Has extreme fixed kyphosis
Has “hip precautions” (especially hip Internal or external rotation) Sling Sizing Guidelines Sizes: Universal Slings are available in the following sizes:
Junior
Small
Medium
Large
X-Large
XX-Large
Custom Please refer to the Sling Sizing Chart for the appropriate sling size for your client. Sizing is based on weight and height, however other factors should also be considered to ensure the best size is chosen for clients fit. Determining Universal Sling Fit:
Two points on the sling serve as landmarks in determining proper fit: (1) the center of the opening arch, and (2)
the top border for slings without head support (or shoulder strap when using with head support). To find the
center of the opening arch, locate the ‘center tab’ on the bottom border of the sling body. To find the top border
of the sling without head support draw an imaginary line from the shoulder strap to the midpoint of the top border
of the sling.
Determining appropriate sling length:
The center of the opening arch should be in line with the client’s tailbone (coccyx). The top border of the sling
should fall between the client’s shoulder, and the bottom of the ear.
Determining appropriate sling width:
When the center of the sling body is in line with the client’s spine, the sling should extend to the anterior crease of
the shoulder (where the deltoid muscle and chest meet). When the client is in the sling, you should not be able to
have both sides of the sling meet to fully encircle the client. This would signal that the sling is too big. However
you should be able to come across the front of the client slightly, otherwise the sling will be too small.
Determining appropriate leg band length:
The leg bands should be assessed to determine if there is an appropriate amount of material available to ensure
client comfort. There should be 3-4” of band exposed from under the leg when the leg bands are applied. If it is
noted that the straps or webbing of the sling contacts the skin, the sling is considered too small and should be
exchanged for a larger sized sling.
A sling that is too small with be uncomfortable for the client and may increase the chance of skin irritation. A sling
that is too large will prevent the client from being positioned into an upright/chair-type position may increase the
difficulty of positioning a client into a chair, and may increase the risk of injury to the client (i.e., fall out of sling).
Universal Sling Application
When the client is lying down:
1. Assist the client to roll onto his or her side – have him or her help as much as possible.
2. Position the sling underneath the client:
a. Lay the sling on the bed
b. Fold the sling in half lengthwise with the tag on the outside
c. Place the folded edge 2 inches away from the client and tuck the top layer under the client’s back
d. Bottom edge should be at the tailbone and top edge at the shoulders
e. Ask the client to roll onto his or her back
f. Walk around to the other side of the bed
g. Ask the client to roll away from you just enough that you can pull the tucked flap flat onto the bed
h. Ask the client to roll onto his or her back
3. Tuck the leg bands under and between the upper thighs and cross the straps. This is the most common leg band configuration. Please see Leg Band Application for alternate configurations.
4. Attach the loops on the straps to the carry bar on the lift
a. Make sure you use the same colour loops on both sides of the sling (i.e., if you use blue on the left leg
strap, use blue on the right leg strap)
b. Remember: Short loops for Shoulders, and Long loops for Legs if you want the client to be lifted in an
upright seated position
When the client is sitting in a chair/wheelchair:
1. Ask the client to lean forward. If the client cannot do this by him/herself, gently bring him/her forward using the
sling behind the shoulders to assist you. Place yourself in front of the client, or slightly to the side.
2. Apply the sling:
a. Tuck the sling down behind the client’s back with the tag on the outside
b. The bottom edge should fall just below the tailbone
c. Let the rest of the sling slide down between the client’s back and the chair back
3. Tuck the leg bands under the client’s legs in one of the configurations outlined above
4. Bring the top of the sling in line with the client’s shoulders
5. Attach the loops on the straps to the carry bar on the lift
a. Make sure you use the same colour loops on both sides of the sling
b. Remember: Short loops for Shoulders, and Long loops for Legs if you want the client to be lifted in an
upright seated position
Important note: Once you have reached the point at which there is tension on the straps but the client has not
yet been lifted off of the surface, STOP THE LIFT. Make sure all straps are securely fastened to the carry bar and
that the sling has not shifted position on the client’s body (i.e., it is not slipping up the client’s back and there
are no folds or wrinkles in the sling fabric). If you notice anything of concern, stop the lift, and reassess the
situation.

Leg Band Application There are three typical leg band configurations; Divided Leg "Closed/Crossover" - Provides optimum comfort and security. The most commonly used (default) attachment option and is recommended. The “crossover” configuration can be achieved in two ways:
(a) One leg strap is threaded through the small opening in the opposite leg strap. This will decrease the size of the opening minimally and will ensure the legs do not splay. (b) One leg band is crossed over the opposite leg band. This will provide more support than option (a) by decreasing the size of the opening even more. This will also bring the legs closer together than option (a).
Divided Leg "Open" - Provides increased access for personal hygiene. Use extreme caution with this leg band configuration as external hip rotation may be increased and the opening is larger, increasing the risk to the client. Closed Leg – The client’s legs are held together tightly before passing leg straps under them for maximum dignity. The leg bands and straps are crossed under individual's thighs. This leg band configuration provides the smallest opening under the client. This leg band configuration may be suitable for clients with limited ability to externally rotate hips (i.e., those with lower extremity contractures, increased tone).
Sling removal Best practice is to remove the sling after the transfer has occurred and to re-insert the sling prior to the client being transferred again. Encouraging client participation, where possible, can increase the time efficiency of the task.
Efforts should be made to reduce the potential of friction occurring between the sling and skin.
The following steps are used for removal of the universal, hammock and deluxe support slings.
When the client is lying down:
1. Remove the leg bands from the client’s legs
a. Assist the client to bend his or her knee to facilitate leg band removal
2. Assist the client to roll onto his or her side – have him or her help as much as possible.
3. Tuck the sling under the client’s back, pushing down into mattress to reduce friction between the sling and the
client’s skin
4. Ask the client to roll onto his or her back
5. Walk around to the other side of the bed
6. Ask the client to roll away from you just enough that you can pull the tucked sling out from under the client
7. Ask the client to roll onto his or her back
When the client is sitting in a chair/wheelchair:
1. Remove the leg bands from the client’s legs
a. Ask the client to lift his or her leg to facilitate leg band removal.

b. If the client is unable to do this independent, assist the client to lift his or her leg, using good body mechanics.
c. If only partial leg elevation can be achieved, friction can be reduced by folding the leg strap under the leg band and peeling the leg band back on itself. Removing the leg band in this manner causes the friction to occur between the two pieces of material rather than between the material and the client’s leg.
2. Remove the sling body from behind the client
a. Ask the client to lean forward and remove the sling from behind the client b. If the client is unable to do this independently, assist the client to lean forward, using good body
mechanics. Remove the sling from behind the client
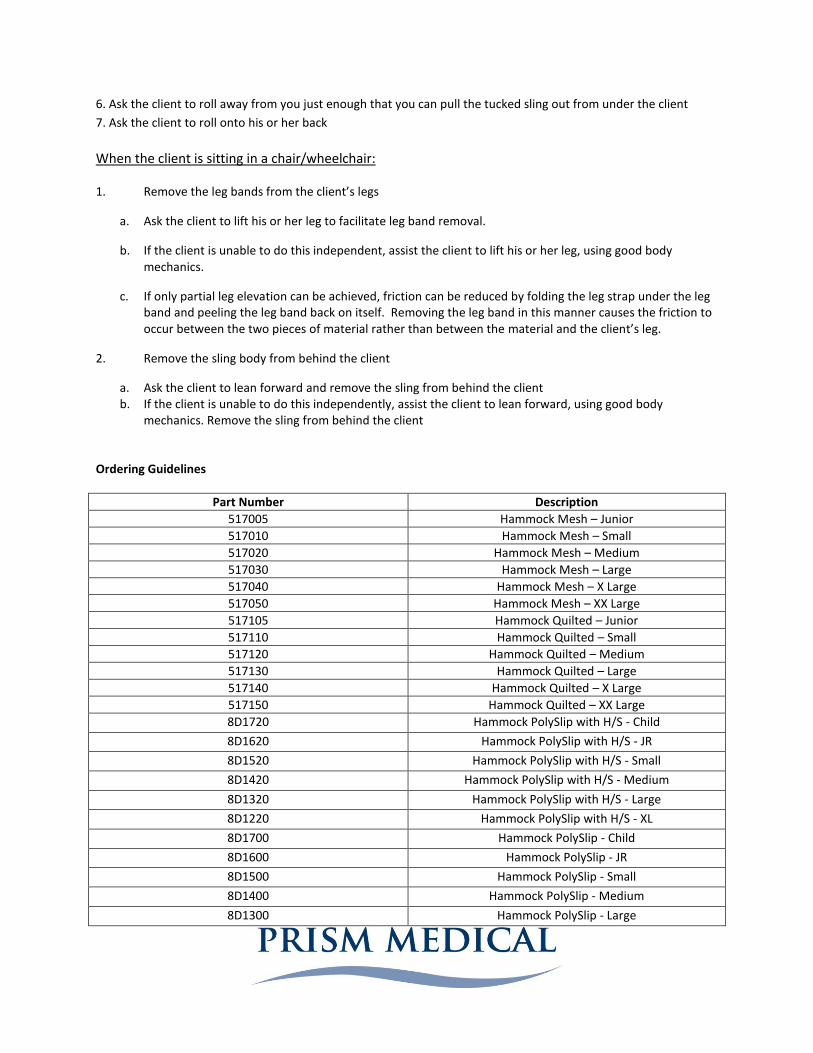
Ordering Guidelines
Part Number Description
517205 Universal Mesh – Junior
517210 Universal Mesh – Small
517220 Universal Mesh – Medium
517230 Universal Mesh – Large
517240 Universal Mesh – X Large
517250 Universal Mesh – XX Large
517305 Universal Quilted – Junior
517310 Universal Quilted – Small
517320 Universal Quilted – Medium
517330 Universal Quilted – Large
517340 Universal Quilted – X Large
517350 Universal Quilted – XX Large
527305 Universal Padded – Junior
527310 Universal Padded – Small
527320 Universal Padded – Medium
527330 Universal Padded – Large
527340 Universal Padded – X Large
527350 Universal Padded – XX Large
517405 Universal Mesh with Head Support – Junior
517410 Universal Mesh with Head Support – Small
517420 Universal Mesh with Head Support – Medium
517430 Universal Mesh with Head Support – Large
517440 Universal Mesh with Head Support – X-Large
517450 Universal Mesh with Head Support – XXLarge
517505 Universal Quilted with Head Support – Junior
517510 Universal Quilted with Head Support - Small
517520 Universal Quilted with Head Support – Medium
517530 Universal Quilted with Head Support – Large
517540 Universal Quilted with Head Support – X Large
517550 Universal Quilted with Head Support – XX Large
527505 Universal Padded with Head Support – Junior
527510 Universal Padded with Head Support – Small
527520 Universal Padded with Head Support – Medium
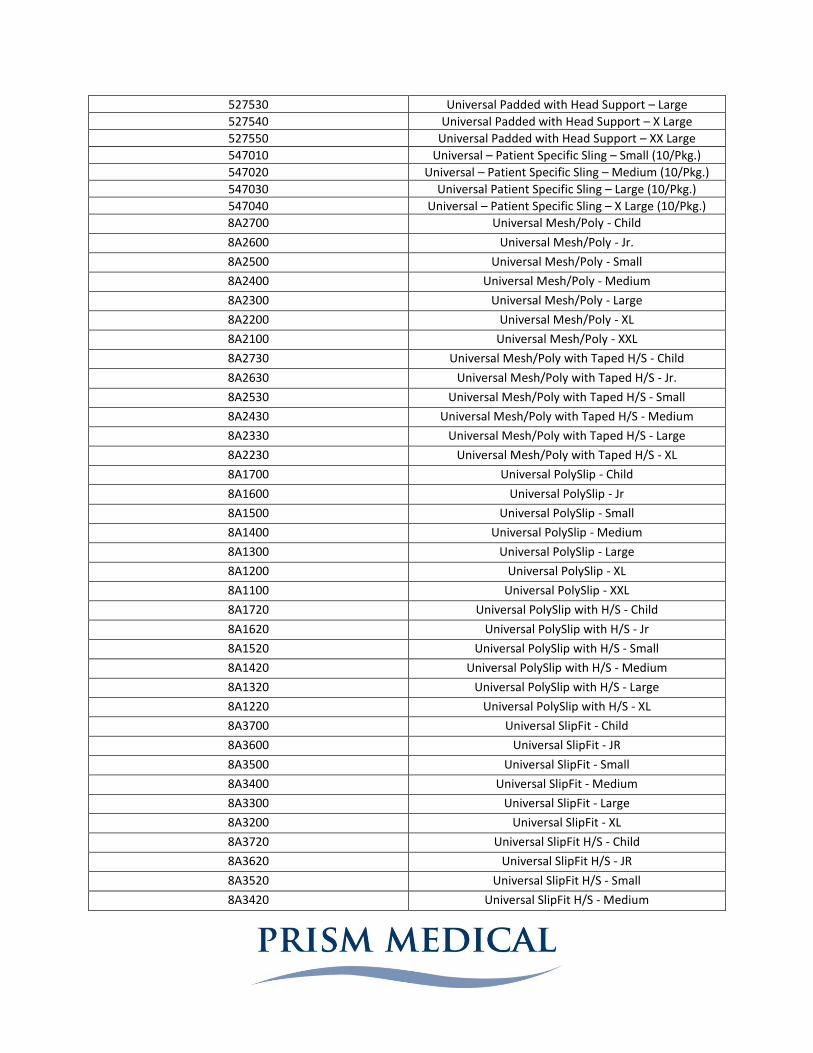
527530 Universal Padded with Head Support – Large
527540 Universal Padded with Head Support – X Large
527550 Universal Padded with Head Support – XX Large
547010 Universal – Patient Specific Sling – Small (10/Pkg.)
547020 Universal – Patient Specific Sling – Medium (10/Pkg.)
547030 Universal Patient Specific Sling – Large (10/Pkg.)
547040 Universal – Patient Specific Sling – X Large (10/Pkg.)
8A2700 Universal Mesh/Poly - Child
8A2600 Universal Mesh/Poly - Jr.
8A2500 Universal Mesh/Poly - Small
8A2400 Universal Mesh/Poly - Medium
8A2300 Universal Mesh/Poly - Large
8A2200 Universal Mesh/Poly - XL
8A2100 Universal Mesh/Poly - XXL
8A2730 Universal Mesh/Poly with Taped H/S - Child
8A2630 Universal Mesh/Poly with Taped H/S - Jr.
8A2530 Universal Mesh/Poly with Taped H/S - Small
8A2430 Universal Mesh/Poly with Taped H/S - Medium
8A2330 Universal Mesh/Poly with Taped H/S - Large
8A2230 Universal Mesh/Poly with Taped H/S - XL
8A1700 Universal PolySlip - Child
8A1600 Universal PolySlip - Jr
8A1500 Universal PolySlip - Small
8A1400 Universal PolySlip - Medium
8A1300 Universal PolySlip - Large
8A1200 Universal PolySlip - XL
8A1100 Universal PolySlip - XXL
8A1720 Universal PolySlip with H/S - Child
8A1620 Universal PolySlip with H/S - Jr
8A1520 Universal PolySlip with H/S - Small
8A1420 Universal PolySlip with H/S - Medium
8A1320 Universal PolySlip with H/S - Large
8A1220 Universal PolySlip with H/S - XL
8A3700 Universal SlipFit - Child
8A3600 Universal SlipFit - JR
8A3500 Universal SlipFit - Small
8A3400 Universal SlipFit - Medium
8A3300 Universal SlipFit - Large
8A3200 Universal SlipFit - XL
8A3720 Universal SlipFit H/S - Child
8A3620 Universal SlipFit H/S - JR
8A3520 Universal SlipFit H/S - Small
8A3420 Universal SlipFit H/S - Medium
8A3320 Universal SlipFit H/S - Large
8A3220 Universal SlipFit H/S - XL
8A4700 Universal Spacer - Child
8A4600 Universal Spacer - JR
8A4500 Universal Spacer - Small
8A4400 Universal Spacer - Medium
8A4300 Universal Spacer - Large
8A4200 Universal Spacer - XL
8A4730 Universal Spacer with Taped H/S - Child
8A4630 Universal Spacer with Taped H/S - JR
8A4530 Universal Spacer with Taped H/S - Small
8A4430 Universal Spacer with Taped H/S - Medium
8A4330 Universal Spacer with Taped H/S - Large
HAMMOCK SLING
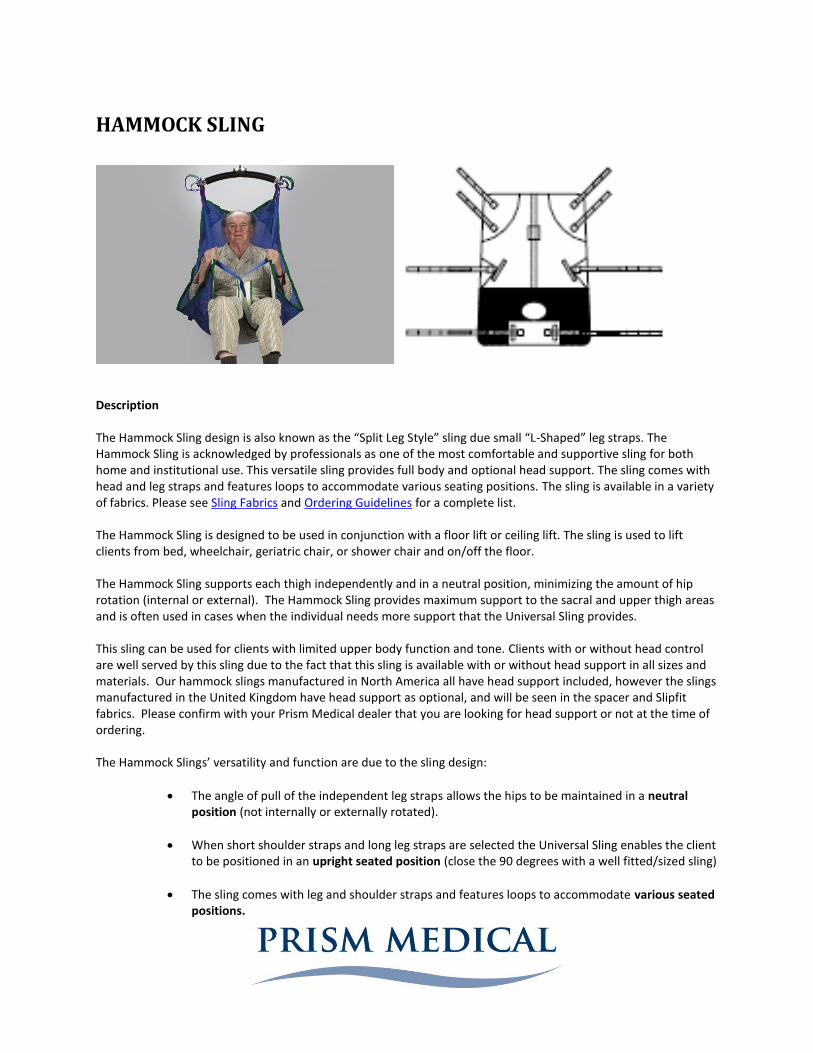
Description The Hammock Sling design is also known as the “Split Leg Style” sling due small “L-Shaped” leg straps. The Hammock Sling is acknowledged by professionals as one of the most comfortable and supportive sling for both home and institutional use. This versatile sling provides full body and optional head support. The sling comes with head and leg straps and features loops to accommodate various seating positions. The sling is available in a variety of fabrics. Please see Sling Fabrics and Ordering Guidelines for a complete list. The Hammock Sling is designed to be used in conjunction with a floor lift or ceiling lift. The sling is used to lift clients from bed, wheelchair, geriatric chair, or shower chair and on/off the floor. The Hammock Sling supports each thigh independently and in a neutral position, minimizing the amount of hip rotation (internal or external). The Hammock Sling provides maximum support to the sacral and upper thigh areas and is often used in cases when the individual needs more support that the Universal Sling provides. This sling can be used for clients with limited upper body function and tone. Clients with or without head control are well served by this sling due to the fact that this sling is available with or without head support in all sizes and materials. Our hammock slings manufactured in North America all have head support included, however the slings manufactured in the United Kingdom have head support as optional, and will be seen in the spacer and Slipfit fabrics. Please confirm with your Prism Medical dealer that you are looking for head support or not at the time of ordering. The Hammock Slings’ versatility and function are due to the sling design:
The angle of pull of the independent leg straps allows the hips to be maintained in a neutral position (not internally or externally rotated).
When short shoulder straps and long leg straps are selected the Universal Sling enables the client to be positioned in an upright seated position (close the 90 degrees with a well fitted/sized sling)
The sling comes with leg and shoulder straps and features loops to accommodate various seated positions.

The Hammock Sling is appropriate for client’s with unilateral above the knee amputation or bilateral amputation if applied in the closed leg format
The Hammock Sling is designed with less lateral support than the Universal Sling. Users can order lateral hip straps to be sewn on at the time of manufacturing. These lateral hip straps will provide additional support that may be required to meet individual client needs.
Weight Capacity The Hammock Sling is rated to 600lbs in mesh fabric, 800 lbs in polyester fabric, and 440 lbs in Slipfit and Spacer fabrics. This is true of all sizes.
Sling Options Fabrics: Hammock Slings are available in a variety of sling fabrics. Sling fabric is chosen based on comfort and skin integrity.
Nylon Mesh
Quilted: The leg bands are quilted. The sling body is mesh.
Padded
Polyester
Slip Fit: nylon rip-stop (parachute style)
Poly/slip: a combination of polyester and slip fit
Spacer Fabric: a three dimensional fabric with an internal air gap
Patient Specific (disposable) Head Support: Head support is incorporated into the design of the sling.
NOTE: The “shoulder straps” are positioned higher on the Hammock Sling, as compared to the Universal Sling. Thus, the “shoulder straps” control the shoulder and head position for clients using the Hammock Sling.
Clinical Applications: Appropriate for a client who:
Due to a progressive condition may require head support at a later date
Requires hips to be supported in a “neutral” position (not internally or externally rotated)
Has unilateral above-the-knee OR bilateral lower limb amputations (special application is required)
Has a kyphotic Posture
Require more support due to high or low tone during the transfer A different sling type will best meet the needs of a client who:
Requires a sling with independent head control
Require a easy to apply and remove transfer solution
Requires a sling for toileting and pericare

Sling Sizing Guidelines Sizes: Hammock Slings are available in a variety of sizes.
Junior
Small
Medium
Large
X-Large
XX-Large
Custom Please refer to the Sling Sizing Chart for the appropriate sling size for your client: Determining Hammock Sling Fit:
Hammock Slings are designed with the head support integrated into the body of the sling. As a result the sling is
sized slightly differently.
Two points on the sling serve as landmarks in determining proper fit: (1) the center of opening arch. To find the
center of the opening arch, locate the ‘center tab’ on the bottom border of the sling body. Landmark (2) is the
point at which the shoulder strap attaches to the sling body.
Determining appropriate sling length:
The center of the opening arch should be in line with the client’s tailbone (coccyx). The point at which the shoulder
strap attaches to the sling body should fall between the client’s shoulder (deltoid), and the top of the ear. The
Head Support will extend up beyond this point.
Determining appropriate sling width:
When the center of the sling body is in line with the client’s spine, the sling should extend to the anterior crease of
the shoulder (where the deltoid muscle and chest meet). The Hammock Sling typically has a narrower fit than the
Universal Sling and may not extend all the way to the anterior shoulder crease. When the client is in the sling, you
should not be able to have both sides of the sling meet to fully encircle the client. This would signal that the sling
is too big. However you should be able to come across the front of the client slightly, otherwise the sling will be
too small.
If it is noted that the straps or webbing of the sling contacts the skin, the sling is considered too small and should
be exchanged for a larger sized sling.
A sling that is too small with be uncomfortable for the client and may increase the chance of skin irritation. A sling
that is too large will prevent the client from being positioned into an upright/chair-type position, may increase the
difficulty of positioning a client into a chair, and may increase the risk of injury to the client (i.e., fall out of sling).
Hammock Sling Application Instructions
When the client is lying down:
1. Assist the client to roll onto his or her side – have him or her help as much as possible.
2. Position the sling underneath the client:
a. Lay the sling on the bed
b. Fold the sling in half lengthwise with the tag on the outside
c. Place the folded edge 2 inches away from the client’s spine and tuck the top layer under the client’s
back
d. Bottom edge should be at the tailbone and shoulder strap should be in line with the client’s shoulder
(the top edge will extend up and beyond the client’s shoulder due to integrated head support)
e. Ask the client to roll onto his or her back
f. Walk around to the other side of the bed
g. Ask the client to roll away from you just enough that you can pull the tucked flap flat onto the bed
h. Ask the client to roll onto his or her back
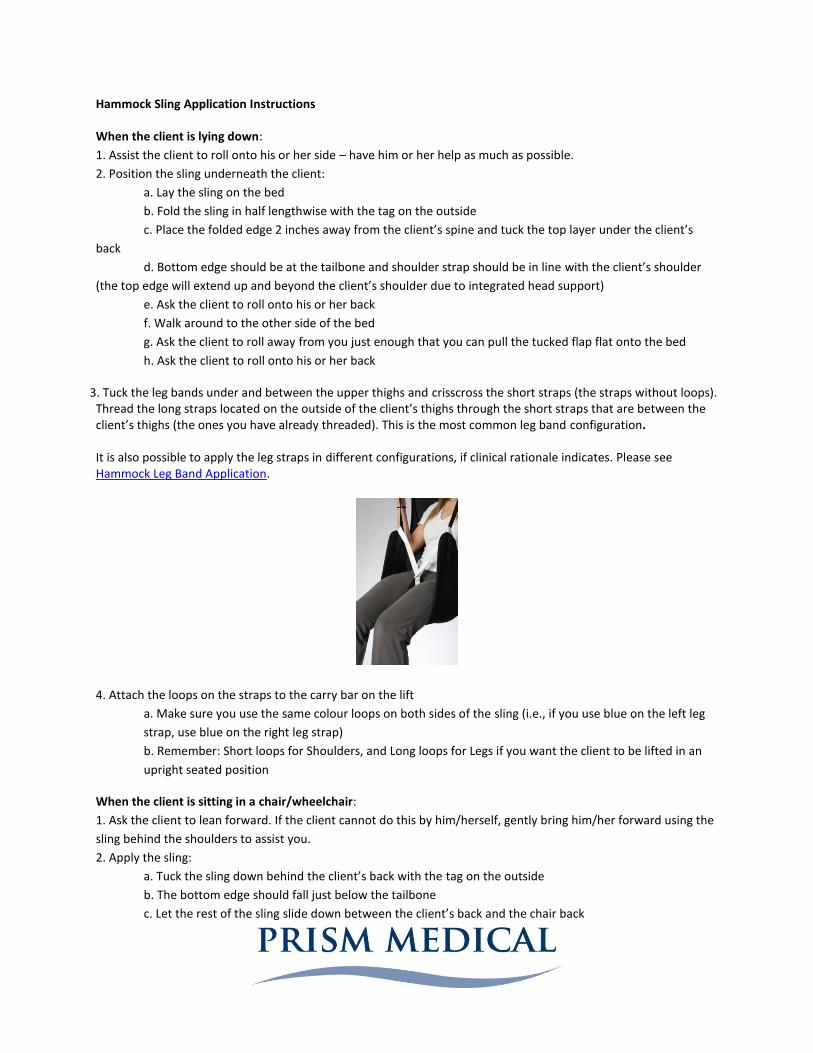
3. Tuck the leg bands under and between the upper thighs and crisscross the short straps (the straps without loops). Thread the long straps located on the outside of the client’s thighs through the short straps that are between the client’s thighs (the ones you have already threaded). This is the most common leg band configuration. It is also possible to apply the leg straps in different configurations, if clinical rationale indicates. Please see Hammock Leg Band Application.
4. Attach the loops on the straps to the carry bar on the lift
a. Make sure you use the same colour loops on both sides of the sling (i.e., if you use blue on the left leg
strap, use blue on the right leg strap)
b. Remember: Short loops for Shoulders, and Long loops for Legs if you want the client to be lifted in an
upright seated position
When the client is sitting in a chair/wheelchair:
1. Ask the client to lean forward. If the client cannot do this by him/herself, gently bring him/her forward using the
sling behind the shoulders to assist you.
2. Apply the sling:
a. Tuck the sling down behind the client’s back with the tag on the outside
b. The bottom edge should fall just below the tailbone
c. Let the rest of the sling slide down between the client’s back and the chair back
3. Tuck the leg bands under the client’s legs in one of the configurations outlined above
4. Bring the shoulder strap in line with the client’s shoulders
5. Attach the loops on the straps to the carry bar on the lift
a. Make sure you use the same colour loops on both sides of the sling
b. Remember: Short loops for Shoulders, and Long loops for Legs if you want the client to be lifted in an
upright seated position
Important note: Once you have reached the point at which there is tension on the straps but the client has not
yet been lifted off of the surface, STOP THE LIFT. Make sure all straps are securely fastened to the carry bar and
that the sling has not shifted position on the client’s body (i.e., it is not slipping up the client’s back and there no
folds or wrinkles in the sling fabric). If you notice anything of concern, stop the lift, and reassess the situation.
Hammock Leg Band Application There are three typical leg band configurations; Divided Leg "Closed/Crossover" - Provides optimum comfort and security. The most commonly used (default) attachment option and is recommended. The “crossover” is achieved by threading one short midline strap through the other short midline strap. These straps are designed to create a connection between the two leg bands and are not designed to attach to the lift or portable motor. Next, thread the leg straps through the midline straps. Divided Leg "Open" - Provides increased access for personal hygiene. Use extreme caution with this leg band configuration as external hip rotation may be increased and the opening is larger, increasing the risk to the client. Closed Leg – Maximum dignity is provided because the client’s legs are held tightly together when lifted. This leg band configuration is achieved by threading each leg band and strap under both of the client’s thighs. Each long leg strap is then threaded through the short strap closest to it. This creates a “bucket” effect and provides the smallest opening under the client. This leg band configuration may be suitable for clients with limited ability to externally rotate hips (i.e., those with lower extremity contractures, increased tone).
Sling removal Best practice is to remove the sling after the transfer has occurred and to re-insert the sling prior to the client being transferred again. In practice, this is not always happening. Caregivers often report that the sling removal process is time consuming. Encouraging client participation can increase the time efficiency of the task.
Efforts should be made to reduce the potential of friction occurring between the sling and skin.
The following steps are used for removal of the universal, hammock, and deluxe support slings.
When the client is lying down: 1. Remove the leg bands from the client’s legs
b. Assist the client to bend his or her knee to facilitate leg band removal
2. Assist the client to roll onto his or her side – have him or her help as much as possible.
3. Tuck the sling under the client’s back, pushing down into mattress to reduce friction between the sling and the
client’s skin
4. Ask the client to roll onto his or her back
5. Walk around to the other side of the bed
6. Ask the client to roll away from you just enough that you can pull the tucked sling out from under the client
7. Ask the client to roll onto his or her back
When the client is sitting in a chair/wheelchair:
1. Remove the leg bands from the client’s legs
a. Ask the client to lift his or her leg to facilitate leg band removal.
b. If the client is unable to do this independent, assist the client to lift his or her leg, using good body mechanics.
c. If only partial leg elevation can be achieved, friction can be reduced by folding the leg strap under the leg band and peeling the leg band back on itself. Removing the leg band in this manner causes the friction to occur between the two pieces of material rather than between the material and the client’s leg.
2. Remove the sling body from behind the client
a. Ask the client to lean forward and remove the sling from behind the client b. If the client is unable to do this independently, assist the client to lean forward, using good body
mechanics. Remove the sling from behind the client
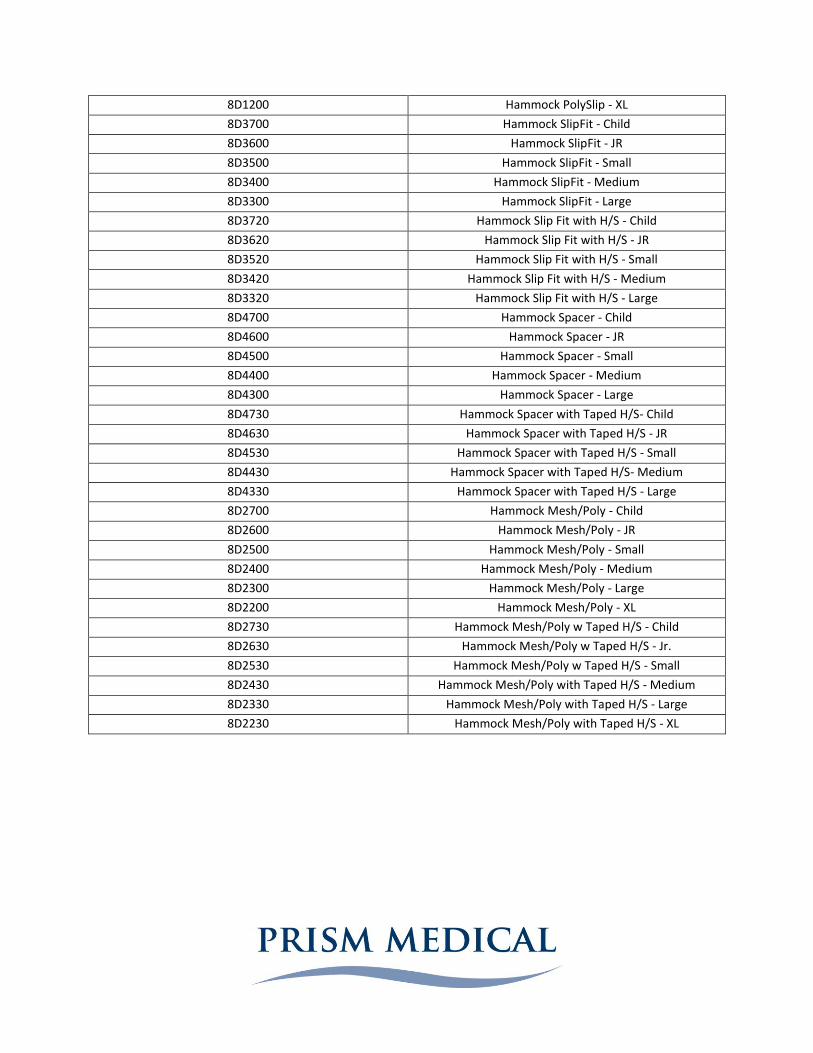
Ordering Guidelines
Part Number Description
517005 Hammock Mesh – Junior
517010 Hammock Mesh – Small
517020 Hammock Mesh – Medium
517030 Hammock Mesh – Large
517040 Hammock Mesh – X Large
517050 Hammock Mesh – XX Large
517105 Hammock Quilted – Junior
517110 Hammock Quilted – Small
517120 Hammock Quilted – Medium
517130 Hammock Quilted – Large
517140 Hammock Quilted – X Large
517150 Hammock Quilted – XX Large
8D1720 Hammock PolySlip with H/S - Child
8D1620 Hammock PolySlip with H/S - JR
8D1520 Hammock PolySlip with H/S - Small
8D1420 Hammock PolySlip with H/S - Medium
8D1320 Hammock PolySlip with H/S - Large
8D1220 Hammock PolySlip with H/S - XL
8D1700 Hammock PolySlip - Child
8D1600 Hammock PolySlip - JR
8D1500 Hammock PolySlip - Small
8D1400 Hammock PolySlip - Medium
8D1300 Hammock PolySlip - Large
8D1200 Hammock PolySlip - XL
8D3700 Hammock SlipFit - Child
8D3600 Hammock SlipFit - JR
8D3500 Hammock SlipFit - Small
8D3400 Hammock SlipFit - Medium
8D3300 Hammock SlipFit - Large
8D3720 Hammock Slip Fit with H/S - Child
8D3620 Hammock Slip Fit with H/S - JR
8D3520 Hammock Slip Fit with H/S - Small
8D3420 Hammock Slip Fit with H/S - Medium
8D3320 Hammock Slip Fit with H/S - Large
8D4700 Hammock Spacer - Child
8D4600 Hammock Spacer - JR
8D4500 Hammock Spacer - Small
8D4400 Hammock Spacer - Medium
8D4300 Hammock Spacer - Large
8D4730 Hammock Spacer with Taped H/S- Child
8D4630 Hammock Spacer with Taped H/S - JR
8D4530 Hammock Spacer with Taped H/S - Small
8D4430 Hammock Spacer with Taped H/S- Medium
8D4330 Hammock Spacer with Taped H/S - Large
8D2700 Hammock Mesh/Poly - Child
8D2600 Hammock Mesh/Poly - JR
8D2500 Hammock Mesh/Poly - Small
8D2400 Hammock Mesh/Poly - Medium
8D2300 Hammock Mesh/Poly - Large
8D2200 Hammock Mesh/Poly - XL
8D2730 Hammock Mesh/Poly w Taped H/S - Child
8D2630 Hammock Mesh/Poly w Taped H/S - Jr.
8D2530 Hammock Mesh/Poly w Taped H/S - Small
8D2430 Hammock Mesh/Poly with Taped H/S - Medium
8D2330 Hammock Mesh/Poly with Taped H/S - Large
8D2230 Hammock Mesh/Poly with Taped H/S - XL
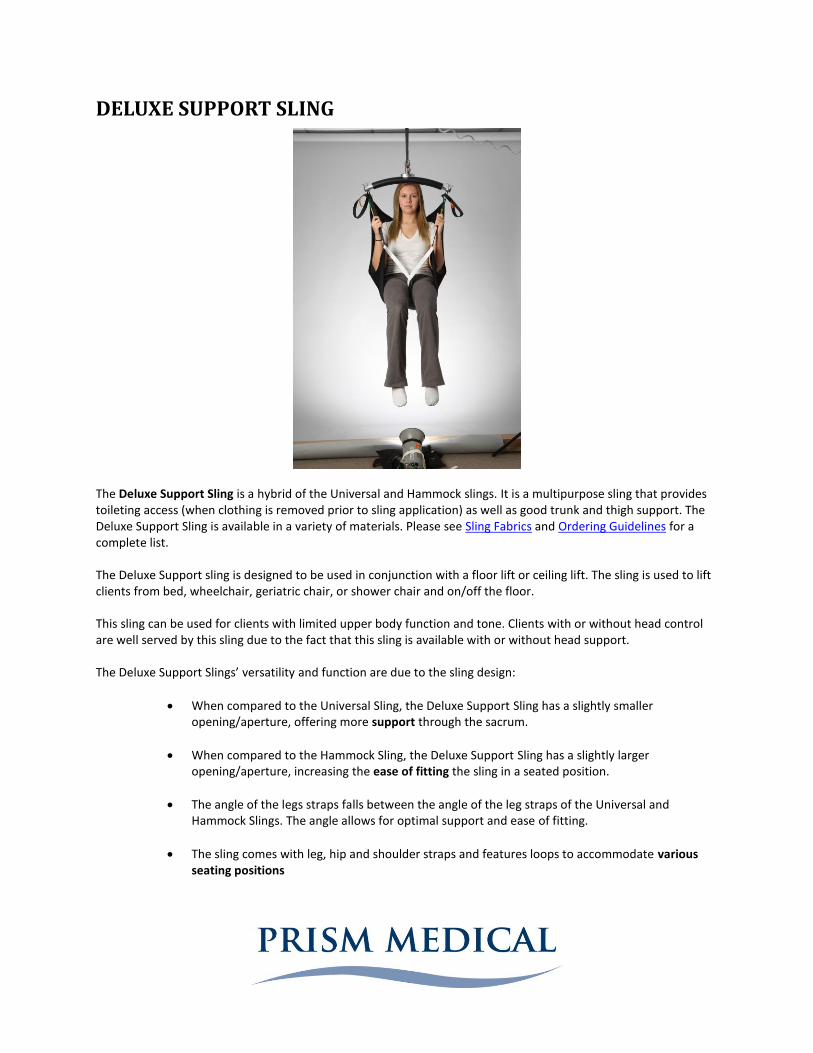
DELUXE SUPPORT SLING
The Deluxe Support Sling is a hybrid of the Universal and Hammock slings. It is a multipurpose sling that provides toileting access (when clothing is removed prior to sling application) as well as good trunk and thigh support. The Deluxe Support Sling is available in a variety of materials. Please see Sling Fabrics and Ordering Guidelines for a complete list. The Deluxe Support sling is designed to be used in conjunction with a floor lift or ceiling lift. The sling is used to lift clients from bed, wheelchair, geriatric chair, or shower chair and on/off the floor. This sling can be used for clients with limited upper body function and tone. Clients with or without head control are well served by this sling due to the fact that this sling is available with or without head support. The Deluxe Support Slings’ versatility and function are due to the sling design:
When compared to the Universal Sling, the Deluxe Support Sling has a slightly smaller opening/aperture, offering more support through the sacrum.
When compared to the Hammock Sling, the Deluxe Support Sling has a slightly larger opening/aperture, increasing the ease of fitting the sling in a seated position.
The angle of the legs straps falls between the angle of the leg straps of the Universal and Hammock Slings. The angle allows for optimal support and ease of fitting.
The sling comes with leg, hip and shoulder straps and features loops to accommodate various seating positions

When short shoulder straps and long leg straps are selected the Deluxe Support Sling enables the client to be positioned in an upright seated position (close the 90 degrees with a well fitted/sized sling)
If head support is required it is sewn on as an additional piece, allowing independent head control and support.
Weight capacity: The Deluxe Support Sling is tested to 625lbs for the Polyslip and mesh fabrics and 400lbs for the Slipfit and Spacer fabrics. Available options: Fabrics: The Deluxe Support Sling is available in a variety of fabrics. Sling fabric is chosen based on comfort and skin integrity.
Polyester
Spacer Fabric
Nylon Mesh with padded leg bands Head Support: Deluxe Support Slings are available with or without head support Clinical Applications: Appropriate for a client who:
Requires more support through the lower body than is afforded by the Universal Sling
Requires a sling that is easier to apply in a seated position than the Hammock Sling

Requires head support (optional head support is available)
Needs or wants to sit at 90o hip flexion (Chair Position)
Has both legs or who has unilateral below the knee amputation A different sling design will better meet the needs of a client who:
Has unilateral above-knee amputation
Has bilateral lower limb amputation
Has extreme fixed kyphosis
Has “hip precautions” (especially hip Internal or external rotation) Sling Sizing Guidelines Sizes: Deluxe Support Slings are available in the following sizes:
Child
Junior
Small
Medium
Large
X-Large
XX-Large
Custom Please refer to the Sling Sizing Chart for the appropriate sling size for your client.
Determining Deluxe Support Sling Fit:
Two points on the sling serve as landmarks in determining proper fit: (1) the center of the opening arch, and (2)
the top border for slings without head support. To find the center of the opening arch, locate the ‘center tab’ on
the bottom border of the sling body. To find the top border of the sling without head support draw an imaginary
line from the shoulder strap to the midpoint of the top border of the sling.
Determining appropriate sling length:
The center of the opening arch should be in line with the client’s tailbone (coccyx). The top border of the sling
should fall between the client’s shoulder (deltoid), and the top of the ear.
Determining appropriate sling width:
When the center of the sling body is in line with the client’s spine, the sling should extend to the anterior crease of
the shoulder (where the deltoid muscle and chest meet). The Hammock Sling typically has a narrower fit than the
Universal Sling and may not extend all the way to the anterior shoulder crease. When the client is in the sling, you
should not be able to have both sides of the sling meet to fully encircle the client. This would signal that the sling
is too big. However you should be able to come across the front of the client slightly, otherwise the sling will be
too small.

Determining appropriate leg band length:
The leg bands should be assessed to determine if there is an appropriate amount of material available to ensure
client comfort. Typically, there should be 3-4” of band exposed from under the leg when the leg bands are applied.
If it is noted that the straps or webbing of the sling contacts the skin, the sling is considered too small and should
be exchanged for a larger sized sling.
A sling that is too small will be uncomfortable for the client and may increase the chance of skin irritation. A sling
that is too large will prevent the client from being positioned into an upright/chair-type position, may increase the
difficulty of positioning a client into a chair, and may increase the risk of injury to the client (i.e., fall out of sling).
Deluxe Support Sling Application Instructions:
When the client is lying down:
1. Assist the client to roll onto his or her side – have him or her help as much as possible.
2. Position the sling underneath the client:
a. Lay the sling on the bed
b. Fold the sling in half lengthwise with the tag on the outside
c. Place the folded edge 2 inches away from the client’s spine and tuck the top layer under the client’s
back
d. Bottom edge should be at the tailbone and shoulder strap should be in line with the client’s shoulder
e. Ask the client to roll onto his or her back
f. Walk around to the other side of the bed
g. Ask the client to roll away from you just enough that you can pull the tucked flap flat onto the bed
h. Ask the client to roll onto his or her back
3. Tuck the leg bands under and between the upper thighs and crisscross the short straps (the straps without loops). Thread the long straps located on the outside of the client’s thighs through the short straps that are between the client’s thighs (the ones you have already threaded). This is the most common leg band configuration.
It is also possible to apply the leg straps in a different configuration, if clinical rationale indicates. Please see Deluxe Support Sling Leg Band Application.
4. Attach the loops on the straps to the carry bar on the lift
a. Make sure you use the same colour loops on both sides of the sling (i.e., if you use blue on the left leg
strap, use blue on the right leg strap)
b. Remember: Short loops for Shoulders, and Long loops for Legs if you want the client to be lifted in an
upright seated position
When the client is sitting in a chair/wheelchair:
1. Ask the client to lean forward. If the client cannot do this by him/herself, gently bring him/her forward using the
sling behind the shoulders to assist you.
2. Apply the sling:
a. Tuck the sling down behind the client’s back with the tag on the outside
b. The bottom edge should fall just below the tailbone
c. Let the rest of the sling slide down between the client’s back and the chair back
3. Tuck the leg bands under the client’s legs in one of the configurations outlined above
4. Bring the shoulder strap in line with the client’s shoulders
5. Attach the loops on the straps to the carry bar on the lift
a. Make sure you use the same colour loops on both sides of the sling
b. Remember: Short loops for Shoulders, and Long loops for Legs if you want the client to be lifted in an
upright seated position
Important note: Once you have reached the point at which there is tension on the straps but the client has not
yet been lifted off of the surface, STOP THE LIFT. Make sure all straps are securely fastened to the carry bar and
that the sling has not shifted position on the client’s body (i.e., it is not slipping up the client’s back and there no
folds or wrinkles in the sling fabric). If you notice anything of concern, stop the lift, and reassess the situation.
Deluxe Support Sling Band Application There are two typical leg band configurations; Divided Leg "Closed/Crossover" - Provides optimum comfort and security. The most commonly used (default) attachment option and is recommended. The “crossover” is achieved by threading one short midline strap through the other short midline strap. These straps are designed to create a connection between the two leg bands and are not designed to attach to the lift or portable motor. Next, thread the leg straps through the midline straps. Divided Leg "Open" - Provides increased access for personal hygiene. Use extreme caution with this leg band configuration as external hip rotation may be increased and the opening is larger, increasing the risk to the client.
Sling removal Best practice is to remove the sling after the transfer has occurred and to re-insert the sling prior to the client being transferred again. In practice, this is not always happening. Caregivers often report that the sling removal process is time consuming. Encouraging client participation can increase the time efficiency of the task.
Efforts should be made to reduce the potential of friction occurring between the sling and skin.
The following steps are used for removal of the universal, hammock, and deluxe support slings.
When the client is lying down:
1. Remove the leg bands from the client’s legs
Assist the client to bend his or her knee to facilitate leg band removal
2. Assist the client to roll onto his or her side – have him or her help as much as possible.
3. Tuck the sling under the client’s back, pushing down into mattress to reduce friction between the sling and the
client’s skin
4. Ask the client to roll onto his or her back
5. Walk around to the other side of the bed
6. Ask the client to roll away from you just enough that you can pull the tucked sling out from under the client
7. Ask the client to roll onto his or her back
When the client is sitting in a chair/wheelchair:
1. Remove the leg bands from the client’s legs
a. Ask the client to lift his or her leg to facilitate leg band removal.
b. If the client is unable to do this independent, assist the client to lift his or her leg, using good body mechanics.
c. If only partial leg elevation can be achieved, friction can be reduced by folding the leg strap under the leg band and peeling the leg band back on itself. Removing the leg band in this manner causes the friction to occur between the two pieces of material rather than between the material and the client’s leg.
2. Remove the sling body from behind the client
a. Ask the client to lean forward and remove the sling from behind the client b. If the client is unable to do this independently, assist the client to lean forward, using good body
mechanics. Remove the sling from behind the client Ordering Guidelines
8H1700 Deluxe Support PolySlip Sling - Child
8H1600 Deluxe Support PolySlip Sling - JR
8H1500 Deluxe Support PolySlip Sling - Small
8H1400 Deluxe Support PolySlip Sling - Medium
8H1300 Deluxe Support PolySlip Sling - Large
8H1200 Deluxe Support PolySlip Sling - XL
8H2700 Deluxe Support Mesh/Poly - Child
8H2600 Deluxe Support Mesh/Poly - JR
8H2500 Deluxe Support Mesh/Poly - Small
8H2400 Deluxe Support Mesh/Poly - Medium
8H2300 Deluxe Support Mesh/Poly - Large
8H2200 Deluxe Support Mesh/Poly - XL
8H4700 Deluxe Support Spacer - Child
8H4600 Deluxe Support Spacer - JR
8H4500 Deluxe Support Spacer - Small
8H4400 Deluxe Support Spacer - Medium
8H4300 Deluxe Support Spacer - Large
8H4200 Deluxe Support Spacer - XL
COMFORT RECLINE
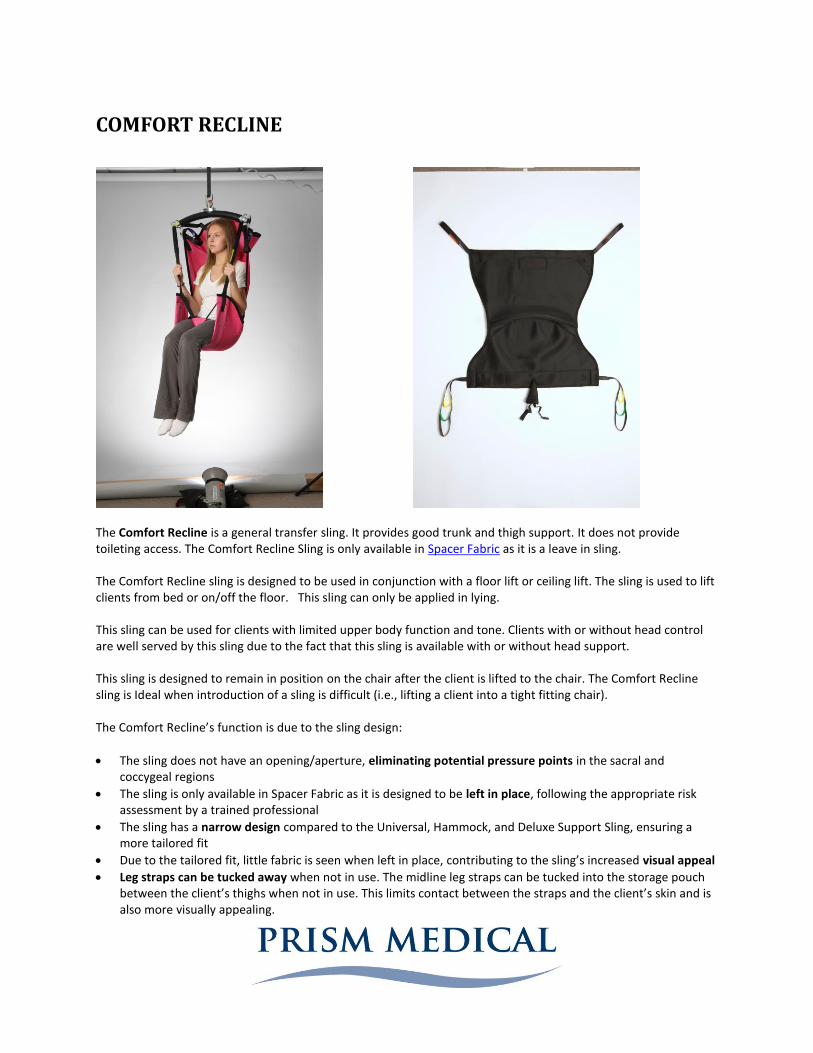
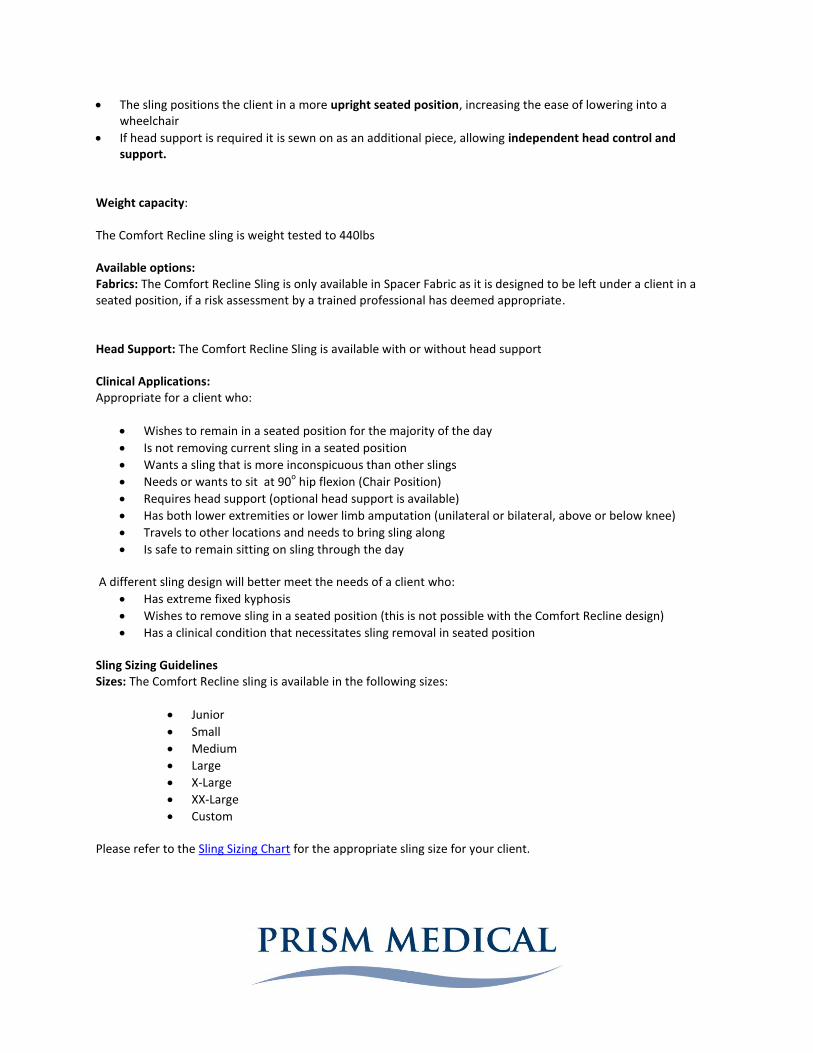
The Comfort Recline is a general transfer sling. It provides good trunk and thigh support. It does not provide toileting access. The Comfort Recline Sling is only available in Spacer Fabric as it is a leave in sling. The Comfort Recline sling is designed to be used in conjunction with a floor lift or ceiling lift. The sling is used to lift clients from bed or on/off the floor. This sling can only be applied in lying. This sling can be used for clients with limited upper body function and tone. Clients with or without head control are well served by this sling due to the fact that this sling is available with or without head support. This sling is designed to remain in position on the chair after the client is lifted to the chair. The Comfort Recline sling is Ideal when introduction of a sling is difficult (i.e., lifting a client into a tight fitting chair). The Comfort Recline’s function is due to the sling design:
The sling does not have an opening/aperture, eliminating potential pressure points in the sacral and coccygeal regions
The sling is only available in Spacer Fabric as it is designed to be left in place, following the appropriate risk assessment by a trained professional
The sling has a narrow design compared to the Universal, Hammock, and Deluxe Support Sling, ensuring a more tailored fit
Due to the tailored fit, little fabric is seen when left in place, contributing to the sling’s increased visual appeal
Leg straps can be tucked away when not in use. The midline leg straps can be tucked into the storage pouch between the client’s thighs when not in use. This limits contact between the straps and the client’s skin and is also more visually appealing.
The sling positions the client in a more upright seated position, increasing the ease of lowering into a wheelchair
If head support is required it is sewn on as an additional piece, allowing independent head control and support.
Weight capacity: The Comfort Recline sling is weight tested to 440lbs Available options: Fabrics: The Comfort Recline Sling is only available in Spacer Fabric as it is designed to be left under a client in a seated position, if a risk assessment by a trained professional has deemed appropriate. Head Support: The Comfort Recline Sling is available with or without head support Clinical Applications: Appropriate for a client who:
Wishes to remain in a seated position for the majority of the day
Is not removing current sling in a seated position
Wants a sling that is more inconspicuous than other slings
Needs or wants to sit at 90o hip flexion (Chair Position)
Requires head support (optional head support is available)
Has both lower extremities or lower limb amputation (unilateral or bilateral, above or below knee)
Travels to other locations and needs to bring sling along
Is safe to remain sitting on sling through the day
A different sling design will better meet the needs of a client who:
Has extreme fixed kyphosis
Wishes to remove sling in a seated position (this is not possible with the Comfort Recline design)
Has a clinical condition that necessitates sling removal in seated position Sling Sizing Guidelines Sizes: The Comfort Recline sling is available in the following sizes:
Junior
Small
Medium
Large
X-Large
XX-Large
Custom Please refer to the Sling Sizing Chart for the appropriate sling size for your client.
Determining Comfort Recline Sling Fit:
Three points on the sling serve as landmarks in determining proper fit: (1) the darting in the hip region, (2) the
bottom border of the sling, and (3) the top border for slings without head support. The darting in the hip region
should line up with the client’s hips when he/she is in a side lying position with the hips and knees flexed. To find
the top border of the sling without head support draw an imaginary line between the shoulder straps.
Determining appropriate sling length:
With the client in side lying with hips and knees flexed, drape the sling over the client with the label facing out. The
darting should be in line with the client’s hips. With the darting in position, the bottom border of the sling should
fall low enough to provide support to the gluteal region and the thighs. If the bottom border does not extend far
enough, it can create added pressure to the thighs. If the bottom border extends too far, it can create added
pressure behind the knees.
With the darting in position, the top border should fall between the client’s shoulder (deltoid), and the top of the
ear. If the top border does not extend high enough, it can create added pressure to the upper back.
Determining appropriate sling width:
The Comfort Recline has a narrower fit than the Universal Sling. When the center of the sling body is in line with
the client’s spine, the sling should extend anywhere from between the lateral aspect of the shoulder and the
anterior crease of the shoulder (where the deltoid muscle and chest meet). When the client is in the sling, you
should not be able to have both sides of the sling meet to fully encircle the client. This would signal that the sling
is too big. However you should be able to come across the front of the client slightly, otherwise the sling will be
too small.
Determining appropriate leg band length:
The Comfort Recline does not have leg bands. It does have midline leg straps extending from a storage pouch
between the thighs. The leg straps are threaded through the midline leg straps prior to lifting to ensure
appropriate sling fit. Neither set of straps should come in contact with the client’s skin.
Comfort Recline Sling Application Instructions:
When the client is lying down:
1. Assist the client to roll onto his or her side with hips and knees flexed– have him or her help as much as possible.
2. Position the sling underneath the client:
a. Lay the sling on the bed
b. Fold the sling in half lengthwise with the tag on the outside
c. Place the folded edge 2 inches away from the client’s spine and tuck the top layer under the client’s
back
d. Line the darting in the hip region up with the client’s flexed hip
e. Bottom edge should support the client’s gluteal region and thighs, and the top edge should be in line
with the client’s shoulder
e. Ask the client to roll onto his or her back
f. Walk around to the other side of the bed
g. Ask the client to roll away from you just enough that you can pull the tucked flap flat onto the bed
h. Ask the client to roll onto his or her back
Note: Alternatively, you can drape the sling over the client while the client is in a side-lying position with
the hips and knees flexed. Tuck the edge closest to the bed under the client by pushing down into the
mattress. Have the client roll onto his/her back. Walk around to the other side of the bed and ask client to
roll away from you just enough that you can pull the tucked flap onto the bed. Ask the client to roll onto
his/her back. Some caregivers find land marking is easier using this method with this sling design.
3. Locate the storage pouch between the client’s thighs. This storage pouch (made of Spacer Fabric) houses the midline leg straps. Thread the leg straps through the midline leg straps.
4. Attach the loops on the straps to the carry bar on the lift
a. Make sure you use the same colour loops on both sides of the sling (i.e., if you use blue on the left leg
strap, use blue on the right leg strap)
b. Remember: Short loops for Shoulders, and Long loops for Legs if you want the client to be lifted in an
upright seated position. The Comfort Recline Sling maintains the client is a more upright position than
other slings.
The Comfort Recline Sling is not design to be applied when the client is sitting in a chair/wheelchair.
Important note: Once you have reached the point at which there is tension on the straps but the client has not
yet been lifted off of the surface, STOP THE LIFT. Make sure all straps are securely fastened to the carry bar and
that the sling has not shifted position on the client’s body (i.e., it is not slipping up the client’s back and there no
folds or wrinkles in the sling fabric). If you notice anything of concern, stop the lift, and reassess the situation.
Sling removal The Comfort Recline can only be removed when the client is supine due to the sling design. When the client is lying down:
1. Remove the leg straps from the client’s legs and insert the straps into the storage pouch.
2. Assist the client to roll onto his or her side – have him or her help as much as possible.
3. Tuck the sling under the client’s back, pushing down into mattress to reduce friction between the sling and the
client’s skin
4. Ask the client to roll onto his or her back
5. Walk around to the other side of the bed
6. Ask the client to roll away from you just enough that you can pull the tucked sling out from under the client
7. Ask the client to roll onto his or her back
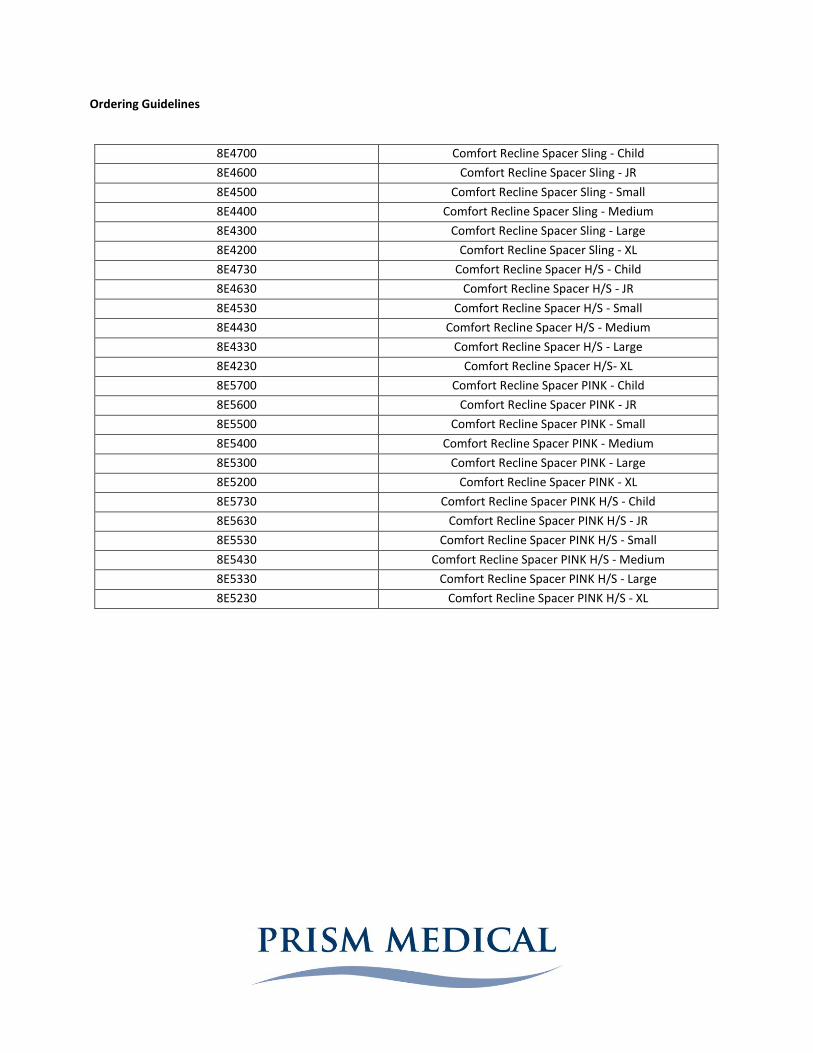
Ordering Guidelines
8E4700 Comfort Recline Spacer Sling - Child
8E4600 Comfort Recline Spacer Sling - JR
8E4500 Comfort Recline Spacer Sling - Small
8E4400 Comfort Recline Spacer Sling - Medium
8E4300 Comfort Recline Spacer Sling - Large
8E4200 Comfort Recline Spacer Sling - XL
8E4730 Comfort Recline Spacer H/S - Child
8E4630 Comfort Recline Spacer H/S - JR
8E4530 Comfort Recline Spacer H/S - Small
8E4430 Comfort Recline Spacer H/S - Medium
8E4330 Comfort Recline Spacer H/S - Large
8E4230 Comfort Recline Spacer H/S- XL
8E5700 Comfort Recline Spacer PINK - Child
8E5600 Comfort Recline Spacer PINK - JR
8E5500 Comfort Recline Spacer PINK - Small
8E5400 Comfort Recline Spacer PINK - Medium
8E5300 Comfort Recline Spacer PINK - Large
8E5200 Comfort Recline Spacer PINK - XL
8E5730 Comfort Recline Spacer PINK H/S - Child
8E5630 Comfort Recline Spacer PINK H/S - JR
8E5530 Comfort Recline Spacer PINK H/S - Small
8E5430 Comfort Recline Spacer PINK H/S - Medium
8E5330 Comfort Recline Spacer PINK H/S - Large
8E5230 Comfort Recline Spacer PINK H/S - XL

HYGIENE SLING and DUAL ACCESS SLING
Description The Hygiene and/or Dual Access slings are specifically designed for toileting and hygiene functions. The Hygiene Sling features quilted material and comes with leg and shoulder straps with loops, allowing for a variety of seated positions. A wide strap across the chest, available with a Velcro or Buckle closure, provides additional upper body support. The Dual Access sling also has an internal non slip fabric and optional side straps to increase support when the client is in the sling. Due to its design, the Hygiene and Dual Access Slings allows the user to remove clothing while the client is supported in the sling. This can make toileting less time consuming as it allows for a direct transfer between a bed, wheelchair, or chair to a toilet or commode. The Hygiene and Dual Access Slings provide reduced body coverage relative to the Universal or Hammock Slings which increases its’ versatility as outlined above. As the versatility of these slings increase compared the Universal or Hammock Sling so does the risk. The client must undergo a thorough assessment by a qualified health professional prior to prescription of the Hygiene Sling. The assessment must reveal that the client:
Has adequate trunk control and does not require more trunk support than the Hygiene Sling provides
Has head and neck control and does not require head support
Has good muscular endurance (especially hip extension)
Understands the function of the hygiene sling and is comfortable with its use
Is Cooperative
Is Predictable
NOTE: The use of the Hygiene and Dual Access Slings are sometimes the source of controversy, due to its application with a unique set of clients. Prism Medical recognizes the importance to continue to toilet/commode clients as long as possible; however, this practice needs to be assessed to be safe. It is important that each client be assessed by a health professional before the use of the Hygiene and/or Dual Access Sling. Even if it is determined that the Hygiene or Dual Access Sling are appropriate for a client for toileting, it is recommended that a Universal or Hammock Sling be used for non-hygiene transfers. The Hygiene and Dual Access Slings are used in conjunction with a floor lift or ceiling lift. Weight Capacity The Hygiene Sling is rated to 1000lbs and the Dual Access sling is rated to 625lbs safe Working Load. This is true of all sizes and fabric combinations. Sling Options Fabrics: The Hygiene Sling is available in Quilted material only. Hygiene Slings have the option of a Velcro or Buckle closure for the chest belt. Head Support: Due to the design the standard Hygiene Sling does not incorporate any head or trunk support, unless under specific custom ordering. Clinical Applications: Appropriate for a client who:
Can demonstrate some level of hip extension / gluteal strength
Has some basic core strength and head control
Needs to complete a toileting or peri-care activity A different sling type will best meet the needs of a client who:
Wishes to perform transfers other than from a bed, or chair to a toilet or commode
Lacks adequate trunk control
Requires head and neck support
Lacks the cognition required to be safe in this sling
Has unilateral above-knee amputation, or Bilateral lower limb amputations
NOTE: Clients with unilateral below the knee amputations should be assessed on a case-by-case basis Sling Sizing Guidelines Sizes: Hygiene Slings are available in a variety of sizes.
Junior
Small
Medium
Large
X-Large
XX-Large
Custom Please refer to the Sling Sizing Chart for the appropriate sling size for your client:
NOTE: The Hygiene Sling and Dual Access Sling typically fits larger than the Universal/Hammock Slings therefore appropriate assessment should be completed.
Determining Hygiene and Dual Access Sling Fit:
The sling must be sized appropriately to ensure that the sling does not shift up and into the client’s axilla where it can exert pressure, creating discomfort and increasing the risk of injury to anatomical structures. The bottom edge of the waist belt should be positioned at the top of the hips (level with the iliac crest). The waist belt should be snug.
Hygiene and Dual Access Sling Application The Hygiene and Dual Access Slings will always be applied while the client is in a seated position.
The client who has been assessed to be safe in the Hygiene Sling has adequate trunk control and endurance and
will be able to maintain a seated position while the sling is applied. If the client does not have the strength and/or
endurance to maintain a seated position for sling application they should not be lifted in the Hygiene Sling.
There are two options for seated application:
(1) the client is seated at the edge of the bed, in a wheelchair, or in a chair,
(2) the client is in long sitting in a profiling/hospital bed with the head of the bed elevated.
1. Ask the client to lean forward.
2. Apply the sling:
a. Tuck the sling down behind the client’s back with the tag on the outside
b. The bottom edge should fall at the top of the hips (iliac crest)
c. Fold the waist straps across the client’s abdomen
d. Fasten the Velcro or buckle closure. Adjust as necessary to ensure a snug fit.
NOTE: The waist strap is intended for the security of the person and to keep the sling in place. It is in not
intended to be weight bearing.
3. Tuck the leg bands under and between the upper thighs and crisscross the straps in the following configuration:
Divided Leg "Closed/Crossover" - Provides optimum comfort and security. The most commonly used (default) attachment option and is recommended. The “crossover” configuration can be achieved in two ways:
(a) One leg strap is threaded through the small opening in the opposite leg strap. This will decrease the size of the opening minimally and will ensure the legs do not splay.

(b) One leg band is crossed over the opposite leg band. This will provide more support than option (a) by decreasing the size of the opening even more. This will also bring the legs closer together than option (a).
4. Attach the loops on the straps to the carry bar on the lift
a. Make sure you use the same colour loops on both sides of the sling (i.e., if you use blue on the left leg
strap, use blue on the right leg strap)
b. Remember: Short loops for Shoulders, and Long loops for Legs if you want the client to be lifted in an
upright seated position
Important note: Once you have reached the point at which there is tension on the straps but the client has not
yet been lifted off of the surface, STOP THE LIFT. Make sure all straps are securely fastened to the carry bar and
that the sling has not shifted position on the client’s body (i.e., it is not slipping up the client’s back and into the
axilla and there no folds or wrinkles in the sling fabric). If you notice anything of concern, stop the lift, and
reassess the situation.
Ordering Guidelines
Part Number Description
517606 Hygiene Sling Quilted – Junior (Velcro)
517611 Hygiene Sling Quilted – Small (Velcro)
507621 Hygiene Sling Quilted – Medium (Velcro)
507631 Hygiene Sling Quilted – Large (Velcro)
517641 Hygiene Sling Quilted – X Large (Velcro)
517651 Hygiene Sling Quilted – XX Large (Velcro)
517605 Hygiene Sling Quilted – Junior (Buckle)
517610 Hygiene Sling Quilted – Small (Buckle)
517620 Hygiene Sling Quilted – Medium (Buckle)
517630 Hygiene Sling Quilted – Large (Buckle)
517640 Hygiene Sling Quilted – X Large (Buckle)
517650 Hygiene Sling Quilted – XX Large (Buckle)
8B0700 Dual Access Poly - Child
8B0600 Dual Access Poly - Jr
8B0500 Dual Access Poly - Small
8B0400 Dual Access Poly - Medium
8B0300 Dual Access Poly - Large
8B0200 Dual Access Poly - XL
8C0700 Dual Access Side Retention Straps - Child
8C0600 Dual Access Side Retention Straps - JR
8C0500 Dual Access Side Retention Straps - Small
8C0400 Dual Access Side Retention Straps - Medium
8C0300 Dual Access Side Retention Straps - Large
8C0200 Dual Access Side Retention Straps - XL
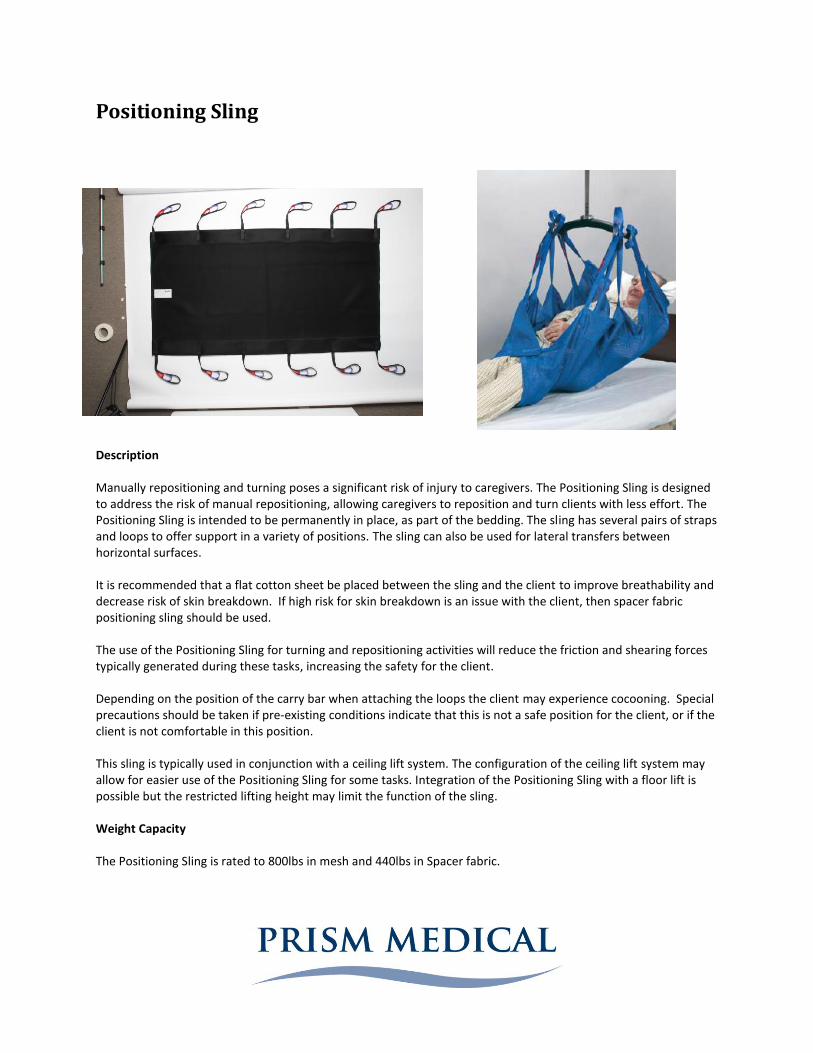
Positioning Sling
Description Manually repositioning and turning poses a significant risk of injury to caregivers. The Positioning Sling is designed to address the risk of manual repositioning, allowing caregivers to reposition and turn clients with less effort. The Positioning Sling is intended to be permanently in place, as part of the bedding. The sling has several pairs of straps and loops to offer support in a variety of positions. The sling can also be used for lateral transfers between horizontal surfaces. It is recommended that a flat cotton sheet be placed between the sling and the client to improve breathability and decrease risk of skin breakdown. If high risk for skin breakdown is an issue with the client, then spacer fabric positioning sling should be used. The use of the Positioning Sling for turning and repositioning activities will reduce the friction and shearing forces typically generated during these tasks, increasing the safety for the client. Depending on the position of the carry bar when attaching the loops the client may experience cocooning. Special precautions should be taken if pre-existing conditions indicate that this is not a safe position for the client, or if the client is not comfortable in this position. This sling is typically used in conjunction with a ceiling lift system. The configuration of the ceiling lift system may allow for easier use of the Positioning Sling for some tasks. Integration of the Positioning Sling with a floor lift is possible but the restricted lifting height may limit the function of the sling. Weight Capacity The Positioning Sling is rated to 800lbs in mesh and 440lbs in Spacer fabric.
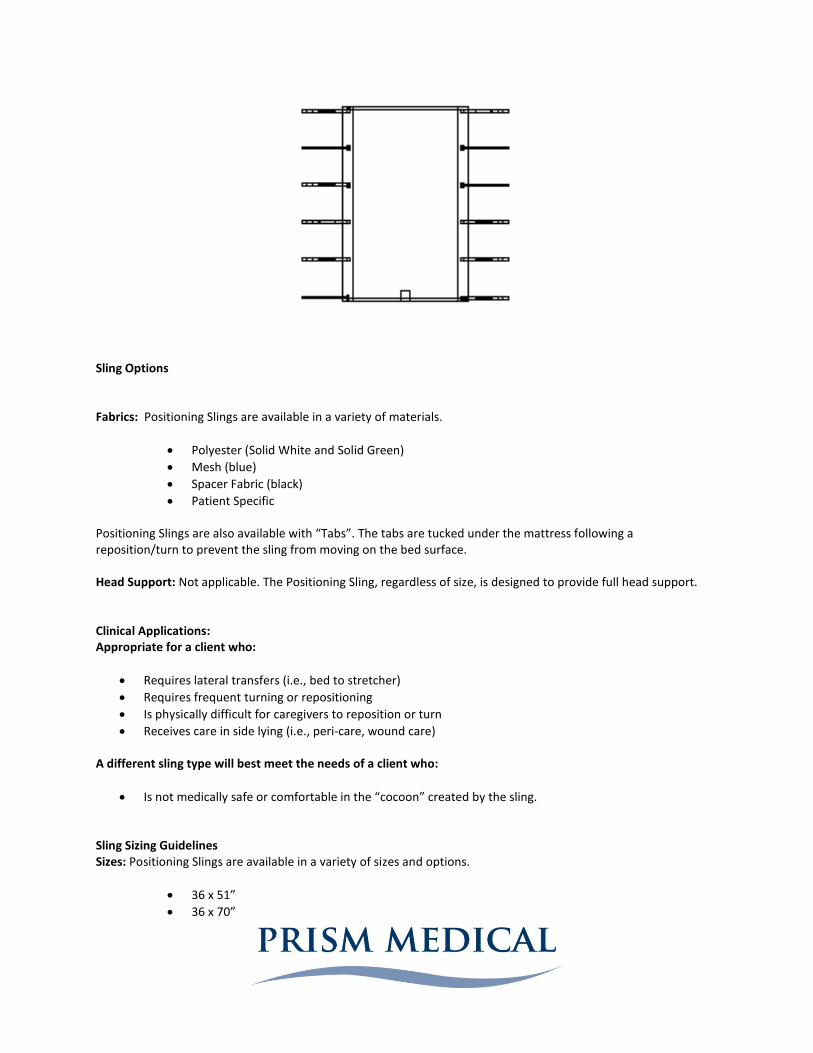
Sling Options Fabrics: Positioning Slings are available in a variety of materials.
Polyester (Solid White and Solid Green)
Mesh (blue)
Spacer Fabric (black)
Patient Specific Positioning Slings are also available with “Tabs”. The tabs are tucked under the mattress following a reposition/turn to prevent the sling from moving on the bed surface. Head Support: Not applicable. The Positioning Sling, regardless of size, is designed to provide full head support. Clinical Applications: Appropriate for a client who:
Requires lateral transfers (i.e., bed to stretcher)
Requires frequent turning or repositioning
Is physically difficult for caregivers to reposition or turn
Receives care in side lying (i.e., peri-care, wound care) A different sling type will best meet the needs of a client who:
Is not medically safe or comfortable in the “cocoon” created by the sling. Sling Sizing Guidelines Sizes: Positioning Slings are available in a variety of sizes and options.
36 x 51”
36 x 70”
42 x 78” (Most Common)
56 x 78”
Custom Determining Positioning Sling Fit: Sizing should be assessed to ensure that straps are not too short, creating difficulty in accessing the straps or loops. Once applied to the carry bar, straps should not come into contact with the skin. The sling should be positioned high on the bed to ensure that support is provided to the head. Custom slings are available. Positioning Sling Application Instructions
Before the client is transferred to the bed:
1. Place the Positioning Sling on the bed with the tag facing out and the top border in line with the top of the bed
2. Ensure there are no wrinkles in the Positioning Sling
3. Transfer the client to the bed using a sling and lift. The appropriate sling model will be determined through
assessment. Once on the bed, remove the secondary sling from underneath the client, leaving the positioning sling
in place. Use an appropriate number of caregivers to remove the sling with the goal of increasing client comfort
and minimizing the physical exertion required of the caregivers.
4. Attach the loops on the straps to the carry bar.
The straps at, and just distal to the heaviest points of the body must be attached to the carry bar. The following straps will always be applied:
Head support straps
Shoulder straps
Hip straps
Thigh straps
Knee/calf straps
On longer Positioning Slings the foot straps/bottom straps are often not attached, as doing so will cause the sling to “bunch-up” under the client’s knees.
a. To maintain the client level while lifting (i.e., to transfer to another surface) make sure you use the
same colour loops on both sides of the sling (i.e., if you use red on the left, use red on the right)
b. To roll the client to the side you will attach the straps on one side of the client only. The straps on the
side of the bed you are rolling the client toward will not be attached to the carry bar. Make sure the
bed rail is up on the side you are rolling the client toward. If bedrails are not available, position a
caregiver on the side you are rolling the client toward to ensure client safety.
d. Raise the carry bar
a. Lift the client off of the bed if transferring to another surface
b. Raise the carry bar as much as is needed to turn the client on his/her side
i. If the client is to be left positioned on his/her side (i.e., for pressure relief): place
bolsters or pillows behind the client to help maintain the client in the desired position.
ii. If the client is to receive care on his/her side (i.e., bathing, wound care):
1. Assist the client to maintain the side-lying position that has been achieved
using the carry bar. More than one caregiver may be needed for this task.
2. Lower the carry bar to allow slack on the straps. Remove the loops from the
carry bar. Place the sling back down on the bed to allow access to the client’s
back.
3. Provide care as needed.
Important note: Once you have reached the point at which there is tension on the straps but the client has not
yet been lifted off of the surface, STOP THE LIFT. Make sure all straps are securely fastened to the carry bar and
that the sling has not shifted position on the client’s body (i.e., it is not slipping up the client’s back and there no
folds or wrinkles in the sling fabric). If you notice anything of concern, stop the lift, and reassess the situation.
Should the Positioning Sling become soiled and require removal and replacement, the client should be transferred from the bed using a traditional sling or another Positioning Sling.
Ordering Guidelines
Part Number Description
507800 Position – White (36” x 51”)
507802 Position – Green (36” x 51”)
507803 Position – White (42” x 78”) – Tabs
507804 Position – Green (42” x 78”) – Tabs
507805 Position – White (36” x 70”)
507807 Position – Green (36” x 70”)
507808 Position – White (42” x 78”)
507809 Position – Green (42” x 78”)
507810 Position – Blue Mesh (36” x 70”)
507811 Position – Blue Mesh (42” x 78”)
507814 Position – Blue (56” x 78”)
507815 Position – Green (56” x 78”)
547811 Positioning Patient Specific Sling – 10 per Package
9Y4900 Positioning Sling Spacer Fabric (42x78)
9Y4901 Positioning sling Spacer Fabric with Elastic (42x78)
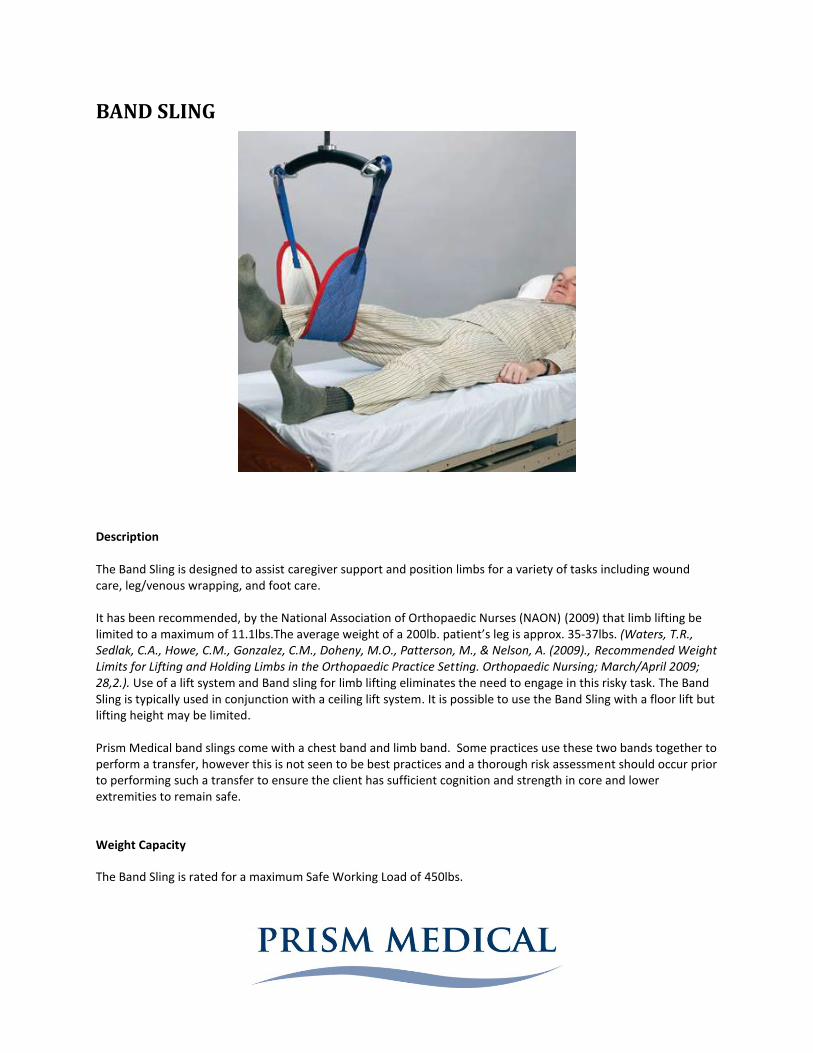
BAND SLING
Description The Band Sling is designed to assist caregiver support and position limbs for a variety of tasks including wound care, leg/venous wrapping, and foot care. It has been recommended, by the National Association of Orthopaedic Nurses (NAON) (2009) that limb lifting be limited to a maximum of 11.1lbs.The average weight of a 200lb. patient’s leg is approx. 35-37lbs. (Waters, T.R., Sedlak, C.A., Howe, C.M., Gonzalez, C.M., Doheny, M.O., Patterson, M., & Nelson, A. (2009)., Recommended Weight Limits for Lifting and Holding Limbs in the Orthopaedic Practice Setting. Orthopaedic Nursing; March/April 2009; 28,2.). Use of a lift system and Band sling for limb lifting eliminates the need to engage in this risky task. The Band Sling is typically used in conjunction with a ceiling lift system. It is possible to use the Band Sling with a floor lift but lifting height may be limited. Prism Medical band slings come with a chest band and limb band. Some practices use these two bands together to perform a transfer, however this is not seen to be best practices and a thorough risk assessment should occur prior to performing such a transfer to ensure the client has sufficient cognition and strength in core and lower extremities to remain safe.
Weight Capacity
The Band Sling is rated for a maximum Safe Working Load of 450lbs.
Sling Options
Fabrics:
The Band Sling is available in two fabrics:
1. Quilted
2. Disposable – Patient Specific
Clinical Applications:
Appropriate for a client who:
Requires limb holding or positioning for:
o Wound care to lower legs/ankles/feet o Venous wrapping o Foot care
The Band Sling may not be an appropriate solution for a client who:
Has impaired skin integrity to the limb requiring lifting (additional precautions should be taken)
Is unpredictable, has cognitive impairment, or has lower limb amputation
Lacks the range of motion in the joints of the lifted limb (i.e., lack ankle, knee, hip flexion)
Determining Band Sling Fit: Sizes:
The Band Sling is available in a variety of sizes. Band Slings are sold in a package of two different sized
sling.
Size
Length Width Length Width
Junior 22 9 25 9
Small 25 9 28 9
Medium 28 9 31 9
Large 31 9 34 9
X Large 34 9 37 9
XX Large 37 9 40 9
Chest Band Leg Band
Slings should be assessed to ensure that straps are not too short, creating difficulty in accessing the straps or loops. Once applied to the carry bar, straps should never come into contact with the skin. Band Sling Application:
1. Fold the Band Sling in half lengthwise to prevent the strap from contacting the skin when the sling is threaded under the leg.
2. Thread the sling under the limb at the natural hollow behind the knee or ankle. This will reduce the risk of skin irritation during application and reduce the physical exertion required of the caregiver.
3. Once threaded, move the Band Sling away from the natural hollow and under the portion of the limb to be supported.
a. Push The Band Sling down into the mattress before moving it to create a gap between the sling and the client’s limb.
b. Position the sling. i. Avoid positioning the sling under the knee joint, ankle joint, or over any areas of skin
irritation. ii. For larger limbs it may be necessary to use two Band slings to distribute the pressure
over a larger surface area and increase client comfort.
4. Unfold the sling under the limb by peeling the sling under itself. The sling should now be flat on the bed. 5. Attach the sling to the carry bar, ensuring there are no wrinkles or folds in the sling. 6. Raise the carry bar to support the limb for care. Do not position the limb off of the bed for extended
periods of time as this can create unnecessary pressure under the limb and can create discomfort. Ordering Guidelines:
Part Number Description
507710 Band Sling Quilted – Small
507720 Band Sling Quilted – Medium
507730 Band Sling Quilted – Large
507740 Band Sling Quilted – X Large
507750 Band Sling Quilted – XX Large
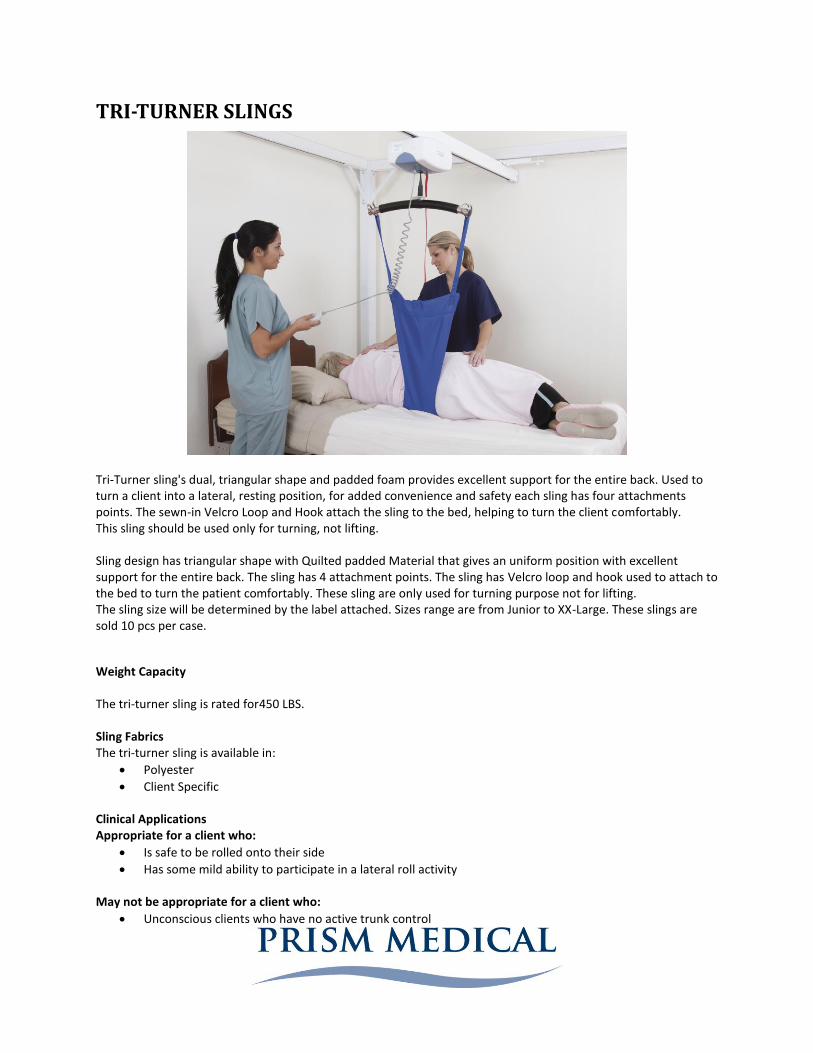
TRI-TURNER SLINGS
Tri-Turner sling's dual, triangular shape and padded foam provides excellent support for the entire back. Used to turn a client into a lateral, resting position, for added convenience and safety each sling has four attachments points. The sewn-in Velcro Loop and Hook attach the sling to the bed, helping to turn the client comfortably. This sling should be used only for turning, not lifting. Sling design has triangular shape with Quilted padded Material that gives an uniform position with excellent support for the entire back. The sling has 4 attachment points. The sling has Velcro loop and hook used to attach to the bed to turn the patient comfortably. These sling are only used for turning purpose not for lifting. The sling size will be determined by the label attached. Sizes range are from Junior to XX-Large. These slings are sold 10 pcs per case.
Weight Capacity The tri-turner sling is rated for450 LBS. Sling Fabrics The tri-turner sling is available in:
Polyester
Client Specific Clinical Applications Appropriate for a client who:
Is safe to be rolled onto their side
Has some mild ability to participate in a lateral roll activity May not be appropriate for a client who:
Unconscious clients who have no active trunk control
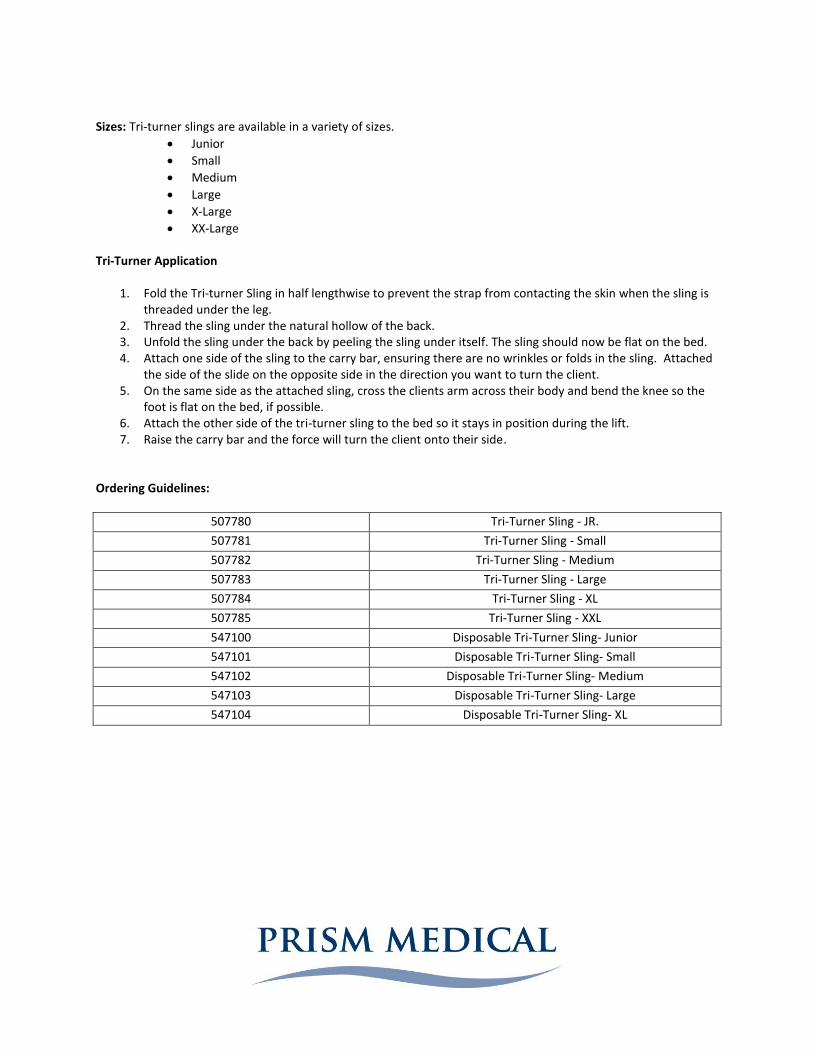
Sizes: Tri-turner slings are available in a variety of sizes.
Junior
Small
Medium
Large
X-Large
XX-Large Tri-Turner Application
1. Fold the Tri-turner Sling in half lengthwise to prevent the strap from contacting the skin when the sling is threaded under the leg.
2. Thread the sling under the natural hollow of the back. 3. Unfold the sling under the back by peeling the sling under itself. The sling should now be flat on the bed. 4. Attach one side of the sling to the carry bar, ensuring there are no wrinkles or folds in the sling. Attached
the side of the slide on the opposite side in the direction you want to turn the client. 5. On the same side as the attached sling, cross the clients arm across their body and bend the knee so the
foot is flat on the bed, if possible. 6. Attach the other side of the tri-turner sling to the bed so it stays in position during the lift. 7. Raise the carry bar and the force will turn the client onto their side.
Ordering Guidelines:
507780 Tri-Turner Sling - JR.
507781 Tri-Turner Sling - Small
507782 Tri-Turner Sling - Medium
507783 Tri-Turner Sling - Large
507784 Tri-Turner Sling - XL
507785 Tri-Turner Sling - XXL
547100 Disposable Tri-Turner Sling- Junior
547101 Disposable Tri-Turner Sling- Small
547102 Disposable Tri-Turner Sling- Medium
547103 Disposable Tri-Turner Sling- Large
547104 Disposable Tri-Turner Sling- XL
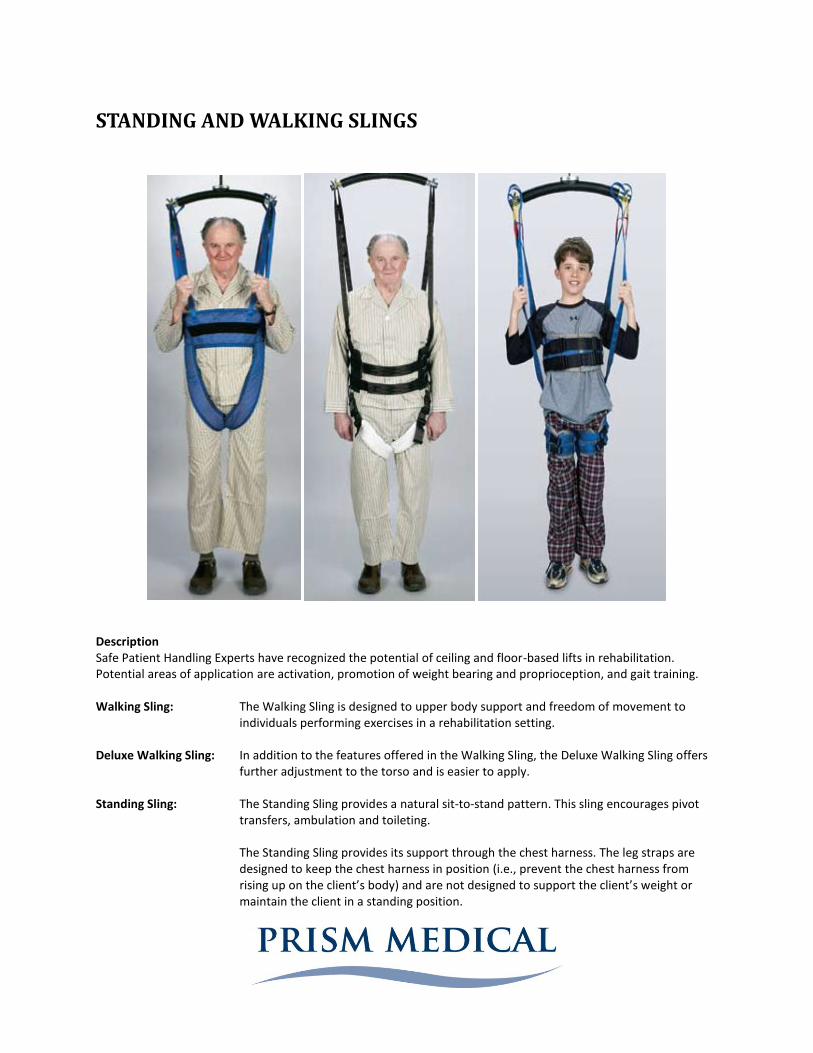
STANDING AND WALKING SLINGS
Description Safe Patient Handling Experts have recognized the potential of ceiling and floor-based lifts in rehabilitation. Potential areas of application are activation, promotion of weight bearing and proprioception, and gait training. Walking Sling: The Walking Sling is designed to upper body support and freedom of movement to
individuals performing exercises in a rehabilitation setting. Deluxe Walking Sling: In addition to the features offered in the Walking Sling, the Deluxe Walking Sling offers
further adjustment to the torso and is easier to apply. Standing Sling: The Standing Sling provides a natural sit-to-stand pattern. This sling encourages pivot
transfers, ambulation and toileting.
The Standing Sling provides its support through the chest harness. The leg straps are designed to keep the chest harness in position (i.e., prevent the chest harness from rising up on the client’s body) and are not designed to support the client’s weight or maintain the client in a standing position.
Rehab Walking Sling: The Rehab Walking Sling was designed in conjunction with Spaulding Rehabilitation Hospital Boston. The Rehab Walking Sling provides an adjustable, contoured, non-slip chest harness in a variety of sizes. The leg straps are removable, adjustable and available in a variety of lengths.
The Rehab Walking sling can be customized for a perfect fit. Weight Capacity The Walking and Standing Slings vary in their rated Safe Working Loads: Walking Sling = 600lbs. (272 kg.) Deluxe Walking Sling = 450lbs. (204 kg.) Standing Sling = 600lbs. (272 kg.)
Rehab Walking Sling = 600lbs. (272 kg.) Custom Bariatric versions are available in each sling model.
Sling Options Fabrics: All slings are manufactured in a variety of fabrics including:
- Padded - Non-Slip Chest Harnesses - Sheep Skin - Polyester Webbing/Straps
Clinical Application: Appropriate for a client who:
Is able to transition from sit to stand with some assistance
Is weight bearing
Has the endurance required of the task
Has an understanding of the purpose of the sling
Is cooperative
Wishes to engage in rehabilitation including: o gait training o Sensori-motor training o activation training o pivot transfer in a controlled environment
A different sling type will better meet the needs of a client who:
Has impaired trunk control
Has impaired head control
Is non-weight bearing
Lacks the endurance required to complete the task
Has impaired cognition
Is uncooperative
Is assessed by a trained professional to be unsafe in a standing/walking sling
Sling Sizing Guidelines: Walking Sling: The Walking Sling is available in a single, universal sized sling with limited adjustability
Deluxe Walking Sling: The Deluxe Walking Sling is available in a single, universal sized sling with limited adjustability
Standing Sling:
Sizing is based on torso length and chest circumference. The Standing Sling is available in the following sizes:
Junior Small Medium Large X Large XX Large
Rehab Walking Sling: Sizing is based on torso length, chest circumference, and leg circumference. The following sizes are available:
Chest harnesses: Medium and Large Leg straps: four available lengths Determining Standing/Walking Sling Fit: The most cautious way to determine fit of the Standing/Walking Sling you are considering is to consult your vendor representative. Application Please refer to the individual Sling Application Instructions for each sling model.

Deluxe Walking AND Rehab Walking Sling Instructions
1. With the individual seated in the wheelchair or chair, position the back support of the sling on the patient’s back. The back support of the sling should be placed under the arms of the patient. Loop the chest straps through the two D-rings and secure using the Velcro strips located on the chest straps.
2. The leg strap should be fitted by slipping the sheep skin padded portion around the patient’s thigh. Adjust the sheep skin material around the thigh as required. The leg strap should be secured with the buckle. Repeat procedure for the other leg in the same manner.
3. The straps can be attached to the carry bar. We recommend the first loop be used as an initial starting point. The straps should bear the same weight distribution.
4. Raise the carry bar such that the straps begin to tighten. At this point, check to ensure that the straps are connected to the carry bar prior to proceeding. Continue lifting the patient. During the lift if the sling feels uncomfortable, the patient should be lowered and the straps and/or leg pieces repositioned.
5. In order to attain the best vertical positioning, the leg pieces on the back of the patient may need to be re-positioned (slide inward). During the lift the patient should have access to parallel bars (or similar
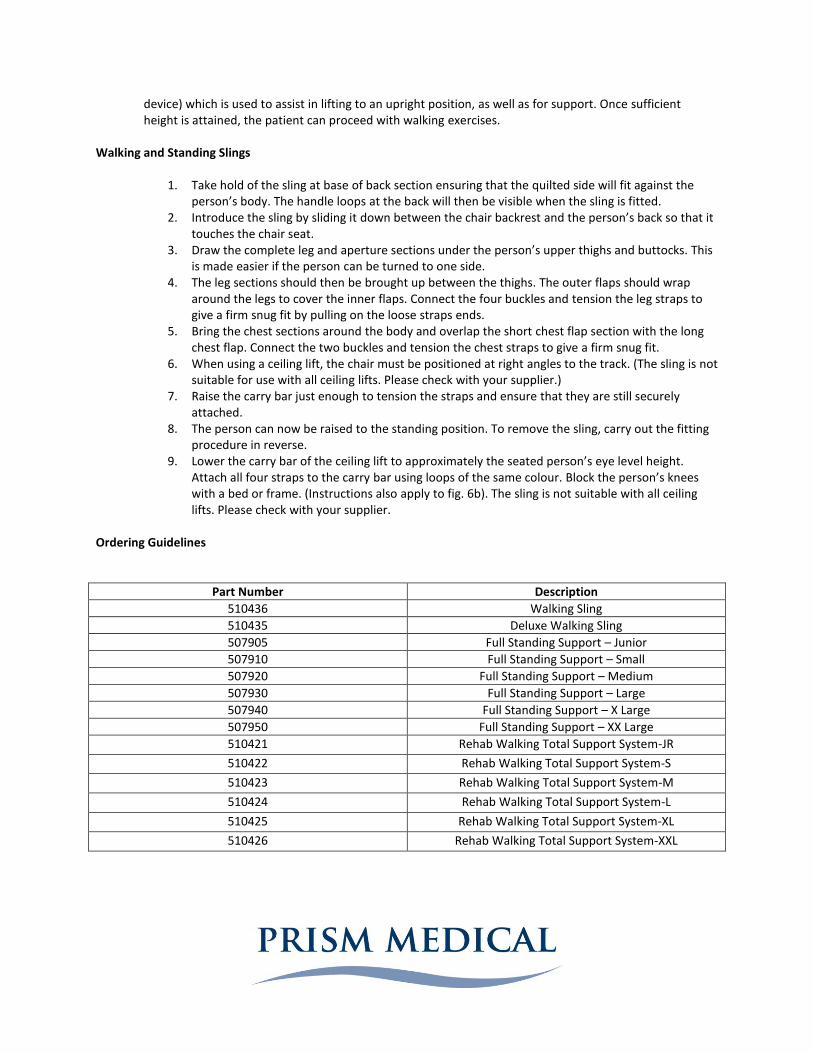
device) which is used to assist in lifting to an upright position, as well as for support. Once sufficient height is attained, the patient can proceed with walking exercises.
Walking and Standing Slings
1. Take hold of the sling at base of back section ensuring that the quilted side will fit against the
person’s body. The handle loops at the back will then be visible when the sling is fitted. 2. Introduce the sling by sliding it down between the chair backrest and the person’s back so that it
touches the chair seat. 3. Draw the complete leg and aperture sections under the person’s upper thighs and buttocks. This
is made easier if the person can be turned to one side. 4. The leg sections should then be brought up between the thighs. The outer flaps should wrap
around the legs to cover the inner flaps. Connect the four buckles and tension the leg straps to give a firm snug fit by pulling on the loose straps ends.
5. Bring the chest sections around the body and overlap the short chest flap section with the long chest flap. Connect the two buckles and tension the chest straps to give a firm snug fit.
6. When using a ceiling lift, the chair must be positioned at right angles to the track. (The sling is not suitable for use with all ceiling lifts. Please check with your supplier.)
7. Raise the carry bar just enough to tension the straps and ensure that they are still securely attached.
8. The person can now be raised to the standing position. To remove the sling, carry out the fitting procedure in reverse.
9. Lower the carry bar of the ceiling lift to approximately the seated person’s eye level height. Attach all four straps to the carry bar using loops of the same colour. Block the person’s knees with a bed or frame. (Instructions also apply to fig. 6b). The sling is not suitable with all ceiling lifts. Please check with your supplier.
Ordering Guidelines
Part Number Description
510436 Walking Sling
510435 Deluxe Walking Sling
507905 Full Standing Support – Junior
507910 Full Standing Support – Small
507920 Full Standing Support – Medium
507930 Full Standing Support – Large
507940 Full Standing Support – X Large
507950 Full Standing Support – XX Large
510421 Rehab Walking Total Support System-JR
510422 Rehab Walking Total Support System-S
510423 Rehab Walking Total Support System-M
510424 Rehab Walking Total Support System-L
510425 Rehab Walking Total Support System-XL
510426 Rehab Walking Total Support System-XXL
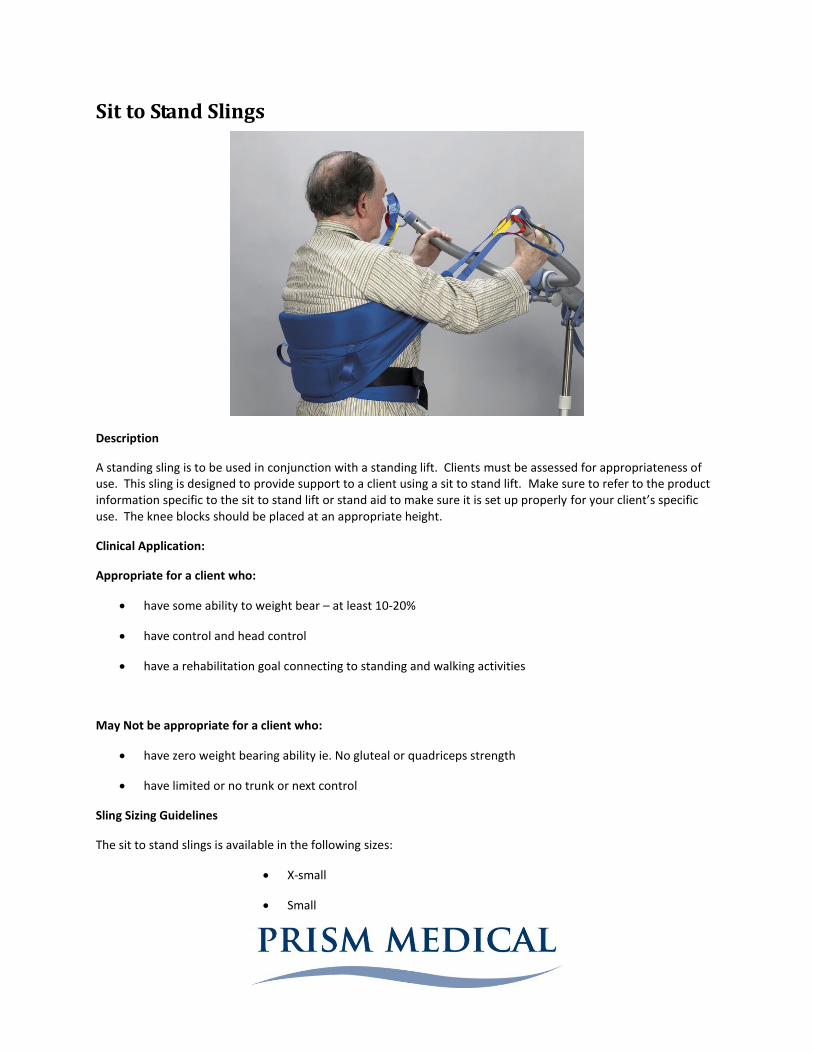
Sit to Stand Slings
Description
A standing sling is to be used in conjunction with a standing lift. Clients must be assessed for appropriateness of use. This sling is designed to provide support to a client using a sit to stand lift. Make sure to refer to the product information specific to the sit to stand lift or stand aid to make sure it is set up properly for your client’s specific use. The knee blocks should be placed at an appropriate height.
Clinical Application:
Appropriate for a client who:
have some ability to weight bear – at least 10-20%
have control and head control
have a rehabilitation goal connecting to standing and walking activities
May Not be appropriate for a client who:
have zero weight bearing ability ie. No gluteal or quadriceps strength
have limited or no trunk or next control
Sling Sizing Guidelines
The sit to stand slings is available in the following sizes:
X-small
Small
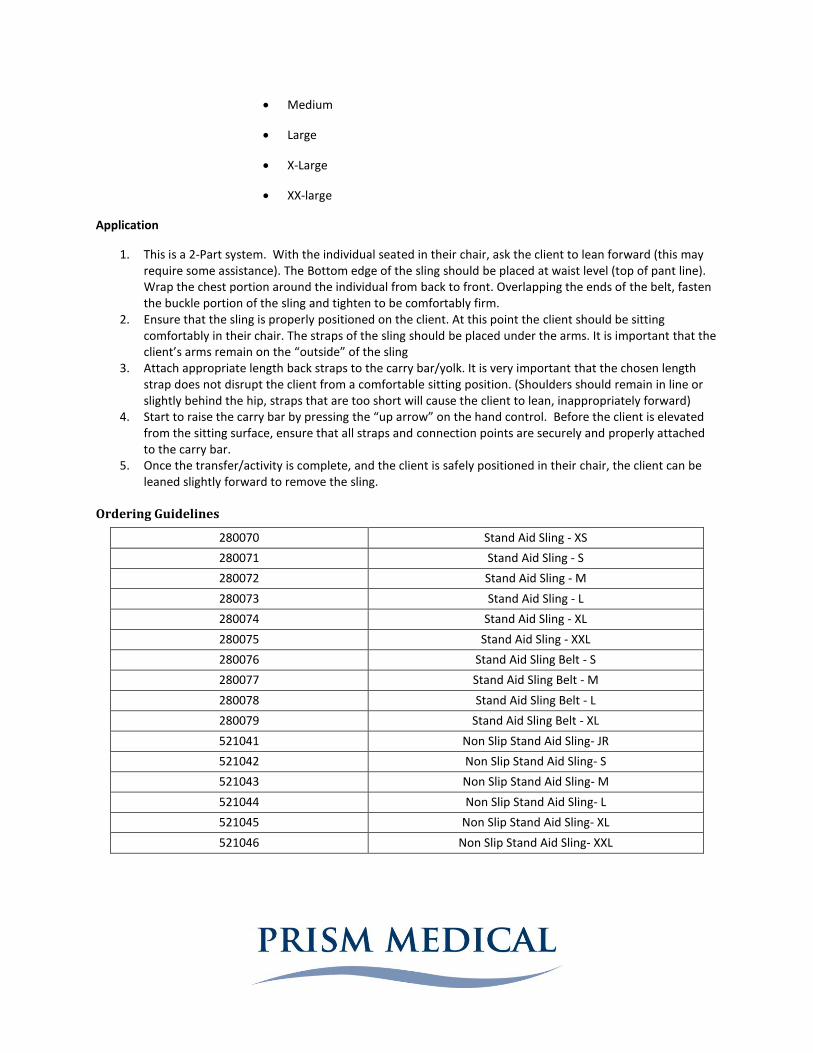
Medium
Large
X-Large
XX-large
Application
1. This is a 2-Part system. With the individual seated in their chair, ask the client to lean forward (this may require some assistance). The Bottom edge of the sling should be placed at waist level (top of pant line). Wrap the chest portion around the individual from back to front. Overlapping the ends of the belt, fasten the buckle portion of the sling and tighten to be comfortably firm.
2. Ensure that the sling is properly positioned on the client. At this point the client should be sitting comfortably in their chair. The straps of the sling should be placed under the arms. It is important that the client’s arms remain on the “outside” of the sling
3. Attach appropriate length back straps to the carry bar/yolk. It is very important that the chosen length strap does not disrupt the client from a comfortable sitting position. (Shoulders should remain in line or slightly behind the hip, straps that are too short will cause the client to lean, inappropriately forward)
4. Start to raise the carry bar by pressing the “up arrow” on the hand control. Before the client is elevated from the sitting surface, ensure that all straps and connection points are securely and properly attached to the carry bar.
5. Once the transfer/activity is complete, and the client is safely positioned in their chair, the client can be leaned slightly forward to remove the sling.
Ordering Guidelines
280070 Stand Aid Sling - XS
280071 Stand Aid Sling - S
280072 Stand Aid Sling - M
280073 Stand Aid Sling - L
280074 Stand Aid Sling - XL
280075 Stand Aid Sling - XXL
280076 Stand Aid Sling Belt - S
280077 Stand Aid Sling Belt - M
280078 Stand Aid Sling Belt - L
280079 Stand Aid Sling Belt - XL
521041 Non Slip Stand Aid Sling- JR
521042 Non Slip Stand Aid Sling- S
521043 Non Slip Stand Aid Sling- M
521044 Non Slip Stand Aid Sling- L
521045 Non Slip Stand Aid Sling- XL
521046 Non Slip Stand Aid Sling- XXL

Alternate Sling Application Tips and Tricks
The instructions provided in this document are the recommended methods for use and application; however, Prism Medical recognizes that techniques for use and application may need to be adapted to meet the needs of individual clients.
The following is an overview of tips and tricks for sling application that the users of Prism Medical slings have found useful.
The following techniques will not work for all clients or in all scenarios. If a client is experiencing significant challenges with transferring and repositioning, a thorough moving and handling assessment is recommended and will be of value in determining the most safe and efficient techniques. Additionally, caregivers should practice all transfer techniques to establish a level of comfort with the technique prior to applying the technique in patient care scenarios.
Tip #1:
Difficulty: Due to medical or equipment based restrictions the client cannot be turned to a side-lying position to facilitate “standard” sling application.
Solution: The use of two individual slide sheets can facilitate sling application in a supine position or may facilitate repositioning to a side-lying position to allow for “standard” sling application.
Tip #2:
Difficulty: Removal of the sling from behind/under the client may be difficult when concerns exist regarding the client’s skin integrity. The concern arises from the fact that removal often creates friction which will further impair skin integrity. Removal is more often identified as a concern when the client is in a seated position as opposed to a supine position (where rolling the client for removal eliminates friction).
Solution: Efforts should be made to reduce the potential of friction occurring between the sling and skin. Friction reduction can be achieved by elevating the leg/thigh off of the sling prior to removal. If only partial elevation can be achieved, friction can be reduced by folding the leg strap under the leg band and peeling the leg band back on itself. Removing the leg band in this manner causes the friction to occur between the two pieces of material rather than between the material and the client’s leg.
To reduce the potential of friction occurring between the sling and the client’s back, the client should be encouraged to lean forward (independently or with assist) prior to sling removal. Once the client is leaning forward the sling can be removed without difficulty as the leg bands have already been removed.
Tip #3:
Difficulty: Elevating the client’s torso off of the bed surface to allow for hair washing/grooming tasks.
Solution: Place the sling under the client and attach the shoulder straps to the carry bar. Use the lift to elevate the torso off of the bed surface, allowing access to the client’s head and neck

Sling Sizing Guidelines Prism Medical slings are designed to fit a variety of clients. Slings are sized based on client safety, comfort, and positioning. There are many variables that impact how a sling will fit a client and how a client will “sit” in a sling. The following information is a general guide only and does not eliminate the need for assessment. The client should be assessment to determine the appropriate sling model, size and positioning following application. Determining the appropriate size is a three step process: Step 1: The evaluator will use the ‘Sling Sizing Chart’ below to determine the size the client will most likely require.
Note: These sling sizing guidelines were current at the time of completion of The Sling Guide. Please consult your dealer to ensure that sling sizing has not changed.
In some circumstances the chart may direct the caregiver to use a particular size however, due to the client’s physical abilities, strengths and weaknesses, or weight distribution the client may be better suited to a sling size other than the size indicated on the chart. To determine if the size selected is appropriate, continue to Step 2.
Step 2: Once the size is determined, the sling will be applied to the client. The evaluator will compare the fit to the ‘Determining Sling Fit’ information outlined in this document for each sling model. Please link to the appropriate sling model section to review this information: Determining Universal Sling Fit Determining Hammock Sling Fit Determining Comfort Recline Sling Fit Determining Hygiene Sling Fit Determining Deluxe Support Sling Fit Step 3: The evaluator will lift the client in the sling to assess client safety, comfort, and positioning when suspended in the sling.
If the evaluator and client are not satisfied with the fit, other sling sizes can be trialed or custom slings can be considered. Your vendor representative or product specialist will be an invaluable resource in this process.

BC SLINGS Moving and Handling practitioners in the province of British Columbia have been the Canadian Champions of safe and advanced practice. As a result of input from these experienced practitioners the Universal Sling, Hammock Sling, and Hygiene Sling designs were customized for the customer base in British Columbia. These designs are now the slings of choice for clients using floor and ceiling based lifts in the province of British Columbia. These slings are available to all Waverly Glen customers. The differences between the “standard” Universal Sling and the BC Universal Sling are as follows: Addition of:
Colour-coded sizing strip along center line of sling
Larger overall measurements
Elimination of:
Horizontal Handle at top of sling body
Colour-coded/sizing strip on border
The BC Universal Sling has slightly The differences between the “standard” Hammock Sling and the BC Hammock Sling are as follows: Addition of:
Coloured/Sizing Strip included along center line of sling
Horizontal Handle at top of sling body
The “Hip Strap” (Part #: 521010) (this is considered optional on the standard Hammock Sling)
Elimination of:
Colour-coded/sizing strip on border The differences between the “standard” Hygiene Sling and the BC Hygiene Sling are as follows: Addition of:
Slightly larger measurements in the following areas: o Leg straps are longer o Loops on leg straps are shorter o Shoulder loops are shorter o Buckle is longer and attaches further back on the sling
Elimination of:
Colour-coded/sizing strip on border
BC Sling Ordering Guidelines
Universal
Part Number Description
537205 BC Universal – Net – Junior
537210 BC Universal – Net – Small
537220 BC Universal – Net – Medium
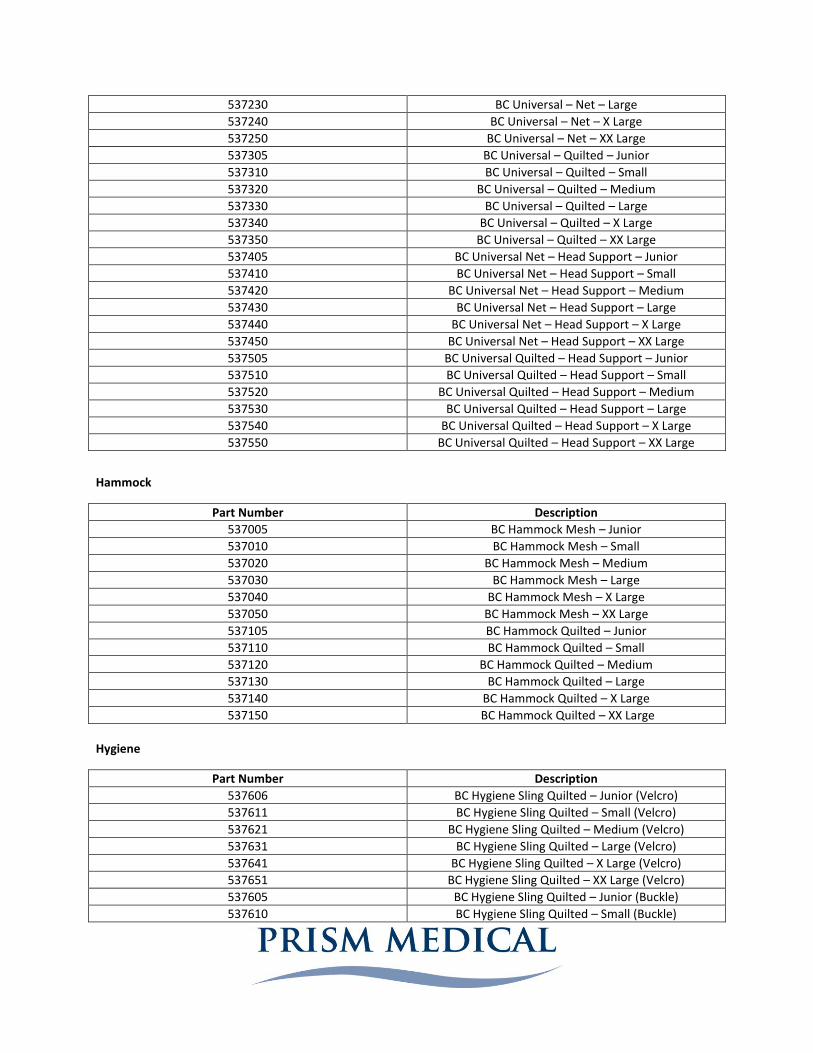
537230 BC Universal – Net – Large
537240 BC Universal – Net – X Large
537250 BC Universal – Net – XX Large
537305 BC Universal – Quilted – Junior
537310 BC Universal – Quilted – Small
537320 BC Universal – Quilted – Medium
537330 BC Universal – Quilted – Large
537340 BC Universal – Quilted – X Large
537350 BC Universal – Quilted – XX Large
537405 BC Universal Net – Head Support – Junior
537410 BC Universal Net – Head Support – Small
537420 BC Universal Net – Head Support – Medium
537430 BC Universal Net – Head Support – Large
537440 BC Universal Net – Head Support – X Large
537450 BC Universal Net – Head Support – XX Large
537505 BC Universal Quilted – Head Support – Junior
537510 BC Universal Quilted – Head Support – Small
537520 BC Universal Quilted – Head Support – Medium
537530 BC Universal Quilted – Head Support – Large
537540 BC Universal Quilted – Head Support – X Large
537550 BC Universal Quilted – Head Support – XX Large
Hammock
Part Number Description
537005 BC Hammock Mesh – Junior
537010 BC Hammock Mesh – Small
537020 BC Hammock Mesh – Medium
537030 BC Hammock Mesh – Large
537040 BC Hammock Mesh – X Large
537050 BC Hammock Mesh – XX Large
537105 BC Hammock Quilted – Junior
537110 BC Hammock Quilted – Small
537120 BC Hammock Quilted – Medium
537130 BC Hammock Quilted – Large
537140 BC Hammock Quilted – X Large
537150 BC Hammock Quilted – XX Large
Hygiene
Part Number Description
537606 BC Hygiene Sling Quilted – Junior (Velcro)
537611 BC Hygiene Sling Quilted – Small (Velcro)
537621 BC Hygiene Sling Quilted – Medium (Velcro)
537631 BC Hygiene Sling Quilted – Large (Velcro)
537641 BC Hygiene Sling Quilted – X Large (Velcro)
537651 BC Hygiene Sling Quilted – XX Large (Velcro)
537605 BC Hygiene Sling Quilted – Junior (Buckle)
537610 BC Hygiene Sling Quilted – Small (Buckle)

537620 BC Hygiene Sling Quilted – Medium (Buckle)
537630 BC Hygiene Sling Quilted – Large (Buckle)
537640 BC Hygiene Sling Quilted – X Large (Buckle)
537650 BC Hygiene Sling Quilted – XX Large (Buckle)
Prism Medical’s Custom Sling Program As North America’s largest manufacturer of client handling slings we are well equipped to address any need you may have related to the customization or modification of one of our slings.
Our large offering of “standard” slings, as outlined in this manual, will fit and function well for the majority of clients. However, we recognize that customization may be required to improve comfort, safety, and/or positioning.
We have recognized that 90% + of all sling customizations are simply modifications of one of our already manufactured slings. As a result, we have included many of these standard modifications in our price list and these can be ordered on an as-needed basis. In instances when a standard modification is not sufficient to meet the needs of the client a customization can be requested. Please be specific when ordering about the additional straps or custom sizing that is requires.
Custom slings may take longer than standard slings, do to manufacturing times. Please contact Prism Medical directly if you would like to discuss a custom order or obtain specific information about customization options.
Sling Warranty Information All Prism Medical slings are warranted against manufacturer defects for a period of one year from the date of purchase. This guarantee does not apply to failure attributable to normal wear and tear, damage by natural forces, user neglect, user misuse, or deliberate destruction.
The liability of Prism Medical under the terms of this guarantee shall be limited to the replacement of the sling.
To file a warranty inquiry or claim, please contact your local Waverley Glen distributor or sales agent. In addition, Prism Medical can be contacted directly at the following address:
Prism Medical - Canada:
480 University Avenue
Suite 100
Toronto, ON
M5G 1V2
(800)265-0677
Prism Medical – USA:
45 Progress Parkway
Maryland Heights, Missouri
63043
(866)891-6502
Ordering Information
Should you have any questions regarding use, application, compatibility or customization please feel free to contact Prism Medical and speak to one of our sales, customer service, or clinical team members.
To order any Waverley Glen/Prism Medical sling please contact your local dealer or sales representative.
In addition, you may also call our offices.
Prism Medical - Canada:
480 University Avenue
Suite 100
Toronto, ON
M5G 1V2
(800)265-0677
Prism Medical – USA:
45 Progress Parkway
Maryland Heights, Missouri
63043
(866)891-6502