printing the official transcript for seniors-2018-withpostingtofa-sa the official... · 1) open...
TRANSCRIPT

SENIOR FINAL TRANS‐ SMS 2.0 PAGE 1 OF 13 Technology/TSM 6/11/2018
Printing the Official Transcript for Seniors‐ End of Year 6/2018
Since you are going to run GPA, make sure that anyone else who might be running
grade reports or transcripts or any other item, that runs GPA, is using the last term of
the year to run it. Otherwise, credits will disappear for the transcript.
1. Set all seniors that are not graduating as retained a. Edit the Profile
b. Change the Retained indictor from NO to yes
c. Up the NY GRAD Year by 1 (eg 2018 to 2019)
d. Click SAVE
Set all seniors that are graduating to YES graduated and input the Grad
date. Be sure Step #1 has been completed before technology does the
step #2.
2. ***Technology will be doing this for you on Friday afternoon before
graduation a. Edit the Profile
b. Change the Graduated indicator from NO to YES
c. Input the Official Graduation Date
d. Make sure the NY GRAD YEAR matches the Grad Year.
e. Click SAVE
3. Be sure all NC s are cleared or assigned as needed
4. Make sure all Foundation HS Program Participants’ Achievements have
the correct coding in place for the following: (If they have completed them the
yellow highlighted information must be on their transcripts and must be coded)
a. NCLB/Grad Inf‐ screen
i. Grad Type Code: 34 (or other appropriate code)
ii. FHSP Participant: 0‐Student Not Pursuing or Participating, 1‐ pursuing or
2‐completed
iii. FHSP Distinguished Level: 0‐Student not Pursuing, 1‐Student is Pursuing,
or 2‐Student has completed
iv. Advanced Measures: Add a record and indicate the correct date and
which measure. Click SAVE
b. Grad Reqs/Endorsements screen
i. Declared Endorsement
ii. Received Endorsement

SENIOR FINAL TRANS‐ SMS 2.0 PAGE 2 OF 13 Technology/TSM 6/11/2018
c. TX/NCLB‐Performance Acknowledgement
i. Click ADD to add a record for the student.
1. Include the date
2. Performance Acknowledgement
3. Category
4. Click SAVE
d. These students’ seal will be the same as the minimum (according to what we’ve
been told).
5. Selected Grades report: If teachers have entered grades in their grade book, the grades will be posted for Term 6. If they entered grades for previous terms, that have not been
posted back but should be, they will need to request grade changes.
a. OFFICE>GRADING>REPORTS
Suggested uses of this report:
Blank Grades for
specific terms
Grades over 100
Incomplete Grades
Look for missing Final
grades which will
indicate the teacher
has not input transfer
S1 grades into their
gradebook for
calculation of the
Final grade.

SENIOR FINAL TRANS‐ SMS 2.0 PAGE 3 OF 13 Technology/TSM 6/11/2018
b. GRADE INFORMATION/ANALYSIS>SELECTED GRADES
If you have already built a report template for this purpose you MUST EDIT that template to ensure
the correct year and other settings are up to date. If you do not have a template, you can ADD one.
c. Click the ADD or EDIT button
d. Name your template
SENIOR FINAL TRANS‐ SMS 2.0 PAGE 4 OF 13 Technology/TSM 6/11/2018
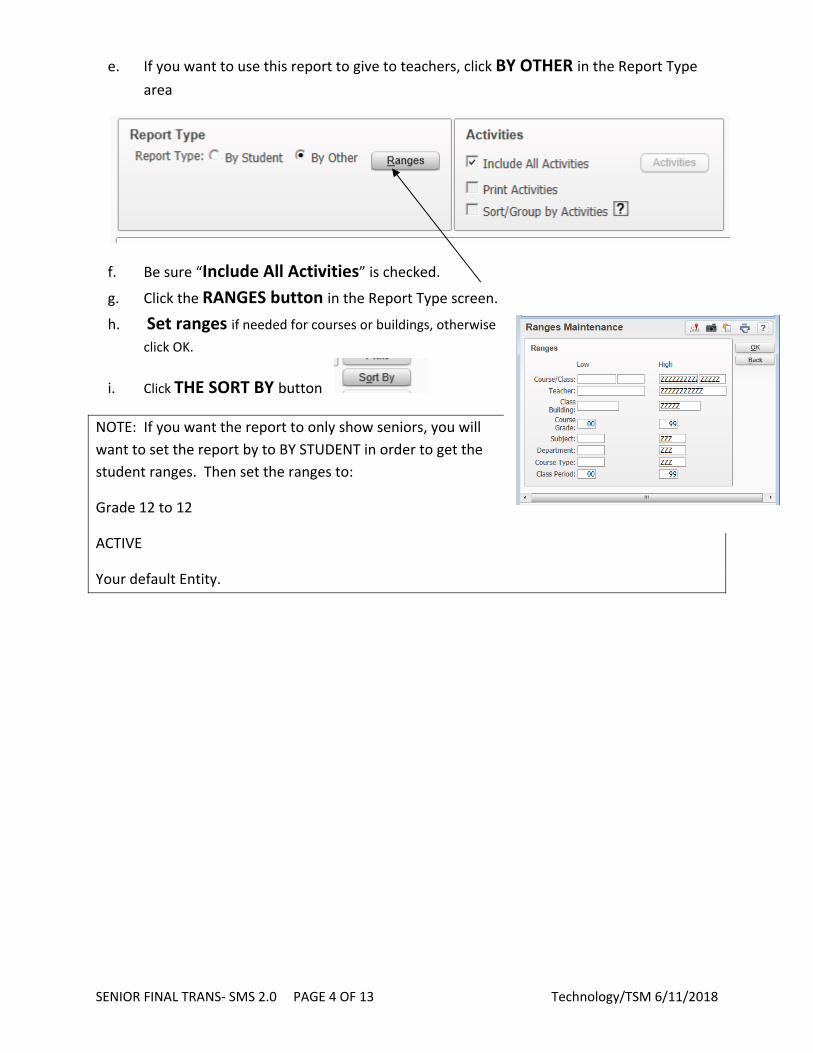
e. If you want to use this report to give to teachers, click BY OTHER in the Report Type
area
f. Be sure “Include All Activities” is checked.
g. Click the RANGES button in the Report Type screen.
h. Set ranges if needed for courses or buildings, otherwise click OK.
i. Click THE SORT BY button
NOTE: If you want the report to only show seniors, you will
want to set the report by to BY STUDENT in order to get the
student ranges. Then set the ranges to:
Grade 12 to 12
ACTIVE
Your default Entity.
SENIOR FINAL TRANS‐ SMS 2.0 PAGE 5 OF 13 Technology/TSM 6/11/2018
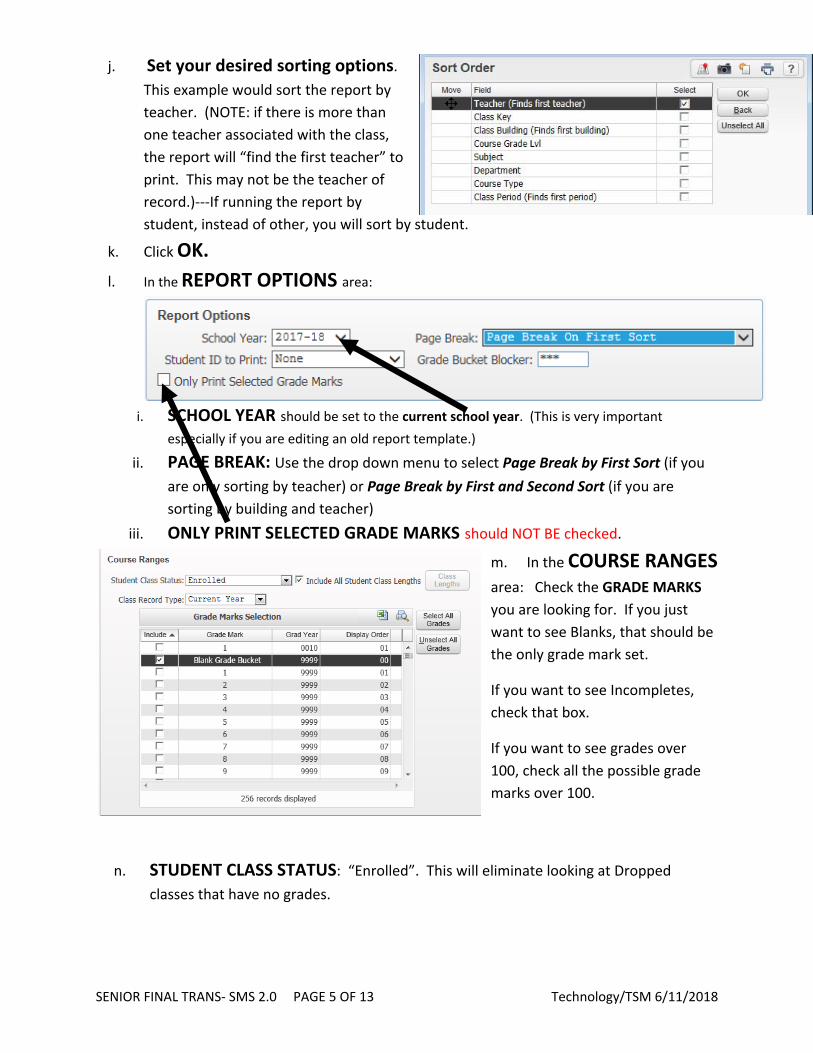
j. Set your desired sorting options.
This example would sort the report by
teacher. (NOTE: if there is more than
one teacher associated with the class,
the report will “find the first teacher” to
print. This may not be the teacher of
record.)‐‐‐If running the report by
student, instead of other, you will sort by student.
k. Click OK.
l. In the REPORT OPTIONS area:
i. SCHOOL YEAR should be set to the current school year. (This is very important
especially if you are editing an old report template.)
ii. PAGE BREAK: Use the drop down menu to select Page Break by First Sort (if you
are only sorting by teacher) or Page Break by First and Second Sort (if you are
sorting by building and teacher)
iii. ONLY PRINT SELECTED GRADE MARKS should NOT BE checked.
m. In the COURSE RANGES area: Check the GRADE MARKS
you are looking for. If you just
want to see Blanks, that should be
the only grade mark set.
If you want to see Incompletes,
check that box.
If you want to see grades over
100, check all the possible grade
marks over 100.
n. STUDENT CLASS STATUS: “Enrolled”. This will eliminate looking at Dropped
classes that have no grades.

SENIOR FINAL TRANS‐ SMS 2.0 PAGE 6 OF 13 Technology/TSM 6/11/2018
o. “INCLUDE ALL STUDENT CLASS LENGTHS” should be checked. If you uncheck it,
you will be able to click the button “Class Lengths” to select specific lengths if needed.
p. CLASS RECORD TYPE: “Current
Year”
q. GRADE BUCKETS TO CHECK:
Select the grade buckets (terms) you
want the report to look at for the
grade marks you indicated.
FINAL IS NO LONGER NEEDED
r. CLICK SAVE AND PRINT
SENIOR FINAL TRANS‐ SMS 2.0 PAGE 7 OF 13 Technology/TSM 6/11/2018
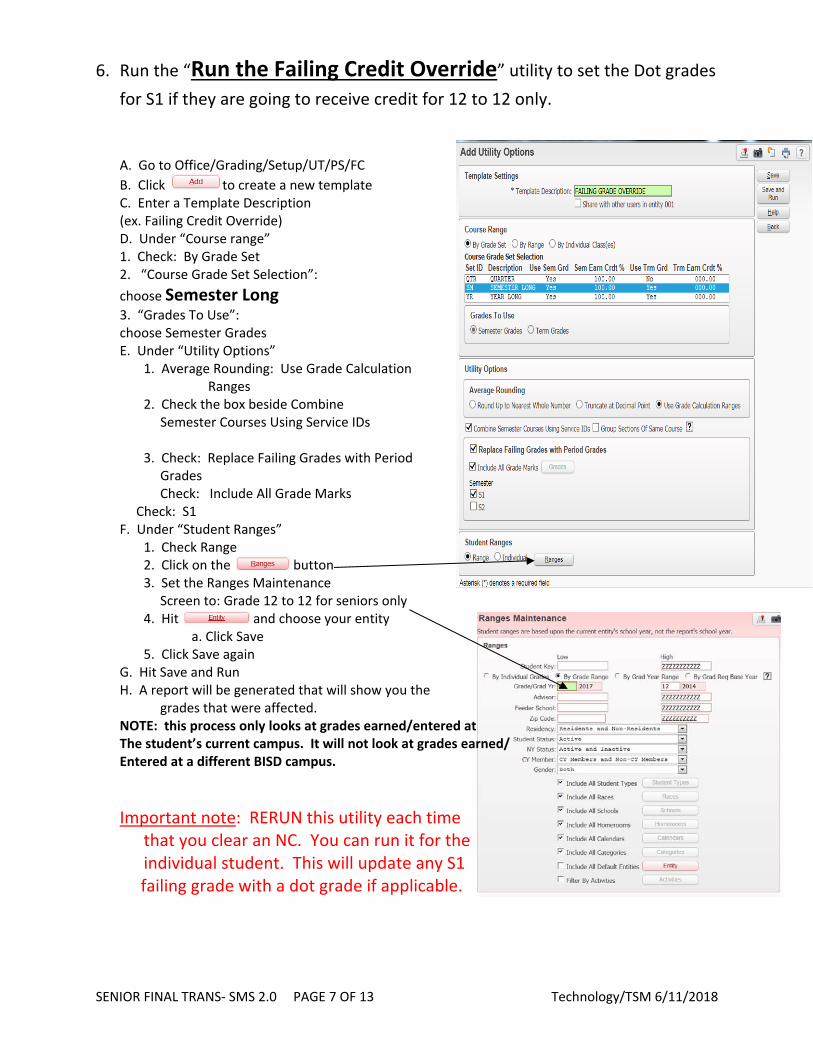
6. Run the “Run the Failing Credit Override” utility to set the Dot grades for S1 if they are going to receive credit for 12 to 12 only.
A. Go to Office/Grading/Setup/UT/PS/FC
B. Click to create a new template C. Enter a Template Description (ex. Failing Credit Override) D. Under “Course range” 1. Check: By Grade Set 2. “Course Grade Set Selection”:
choose Semester Long 3. “Grades To Use”: choose Semester Grades E. Under “Utility Options” 1. Average Rounding: Use Grade Calculation Ranges 2. Check the box beside Combine Semester Courses Using Service IDs 3. Check: Replace Failing Grades with Period Grades Check: Include All Grade Marks Check: S1 F. Under “Student Ranges” 1. Check Range 2. Click on the button 3. Set the Ranges Maintenance Screen to: Grade 12 to 12 for seniors only 4. Hit and choose your entity a. Click Save 5. Click Save again G. Hit Save and Run H. A report will be generated that will show you the grades that were affected. NOTE: this process only looks at grades earned/entered at The student’s current campus. It will not look at grades earned/ Entered at a different BISD campus.
Important note: RERUN this utility each time that you clear an NC. You can run it for the individual student. This will update any S1 failing grade with a dot grade if applicable.

SENIOR FINAL TRANS‐ SMS 2.0 PAGE 8 OF 13 Technology/TSM 6/11/2018
7. Check and clear up any omissions on the error report from the utility.
8. Run a selected grades report again to look for S1 failures to see if there are any that
were missed in the prior utility. They will need to be manually adjusted.
a. See the set up used in step 4 by student, with the following changes
b. Course Ranges: Enrolled and Dropped
c. Current Year
d. All Class Lengths
e. Grade Marks: All failing grade marks
f. Grade Bucket: S1
g. Check any student with a failing grade mark (no dot) and see if they earned the
credit, but it was not awarded by the utility. Manually change it in the grade
screen if needed.
9. Office/Grading/Setup/Utilities/MASS AUDIT—This can be done ahead of
time as long as you are not adding grades into history.

SENIOR FINAL TRANS‐ SMS 2.0 PAGE 9 OF 13 Technology/TSM 6/11/2018
a. Create a new template or Edit an existing one
b. Click the RANGES button and set the ranges to
i. ACTIVE – 12‐12
ii. Default Entity (uncheck and click the button, Select your entity, click save)
c. SAVE.
d. Check the box to Print Students on Report‐ if you would like to review the information.
This is an option.
e. Click SAVE and RUN
SENIOR FINAL TRANS‐ SMS 2.0 PAGE 10 OF 13 Technology/TSM 6/11/2018
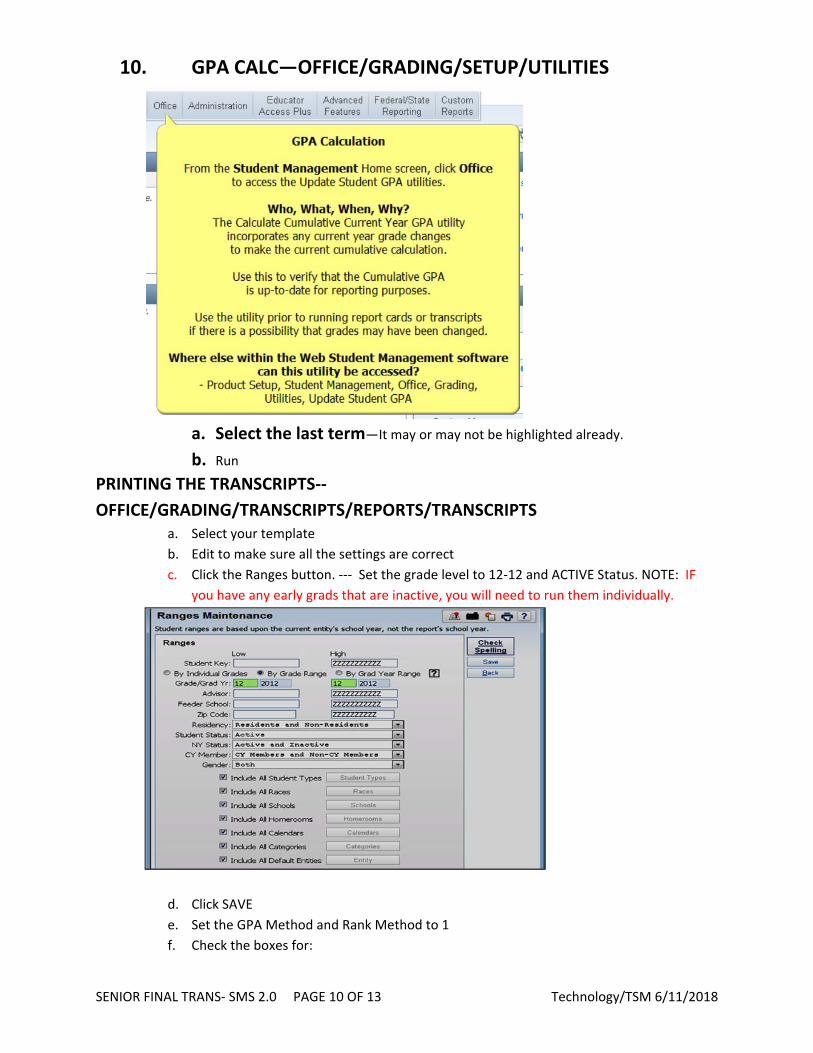
10. GPA CALC—OFFICE/GRADING/SETUP/UTILITIES
a. Select the last term—It may or may not be highlighted already.
b. Run PRINTING THE TRANSCRIPTS‐‐
OFFICE/GRADING/TRANSCRIPTS/REPORTS/TRANSCRIPTS a. Select your template
b. Edit to make sure all the settings are correct
c. Click the Ranges button. ‐‐‐ Set the grade level to 12‐12 and ACTIVE Status. NOTE: IF
you have any early grads that are inactive, you will need to run them individually.
d. Click SAVE
e. Set the GPA Method and Rank Method to 1
f. Check the boxes for:

SENIOR FINAL TRANS‐ SMS 2.0 PAGE 11 OF 13 Technology/TSM 6/11/2018
a. Class Rank
b. GPA
c. Grad Program Type
d. TAAS/TAKS ( just in case you have some still under TAKS)
e. EOC *
f. Endorsements*
g. Performance Acknowledgments*
h. SSN
i. Digital Signature
j. Grade Level
g. Service ID’s
a. Scroll through this list to be sure that all possible MIDDLE SCHOOL courses that
award HS credit are listed. If not,
b. Click the ADD button
c. Type the Service ID in the look up box. Select the appropriate course by
checking the box. Click SAVE
h. Grading Period should be 16‐ Term 6
a. If there is any possibility that a grade has changed since you ran the GPA calc,
you can check the box to Run GPA each time the report is run.
i. CLICK THE SORT BY BUTTON. Set the sort order as you would like.
j. Click BACK.

SENIOR FINAL TRANS‐ SMS 2.0 PAGE 12 OF 13 Technology/TSM 6/11/2018
k. Enter the freeform comments, check the box and type in the information. This will print
on all the transcripts.
l. SAVE and PRINT
NOTE: Students graduating under FHSP will have a different Seal printed on their transcript.
Be sure to check
EOC
Endorsements and
Performance
Acknowledgements if
you have any seniors
opting for FHSP and
earning those.
If this is the official
transcript be sure to
check the Digital
Signature option.
NEW:
Check the box for “Exclude Entities from Schools Awarding Credit”
Click the Entities Box
Check both 699 and 009 so that these campuses do not show as the entity awarding credit on the transcript.
The campus awarding credit needs to be the student’s home campus.
SENIOR FINAL TRANS‐ SMS 2.0 PAGE 13 OF 13 Technology/TSM 6/11/2018
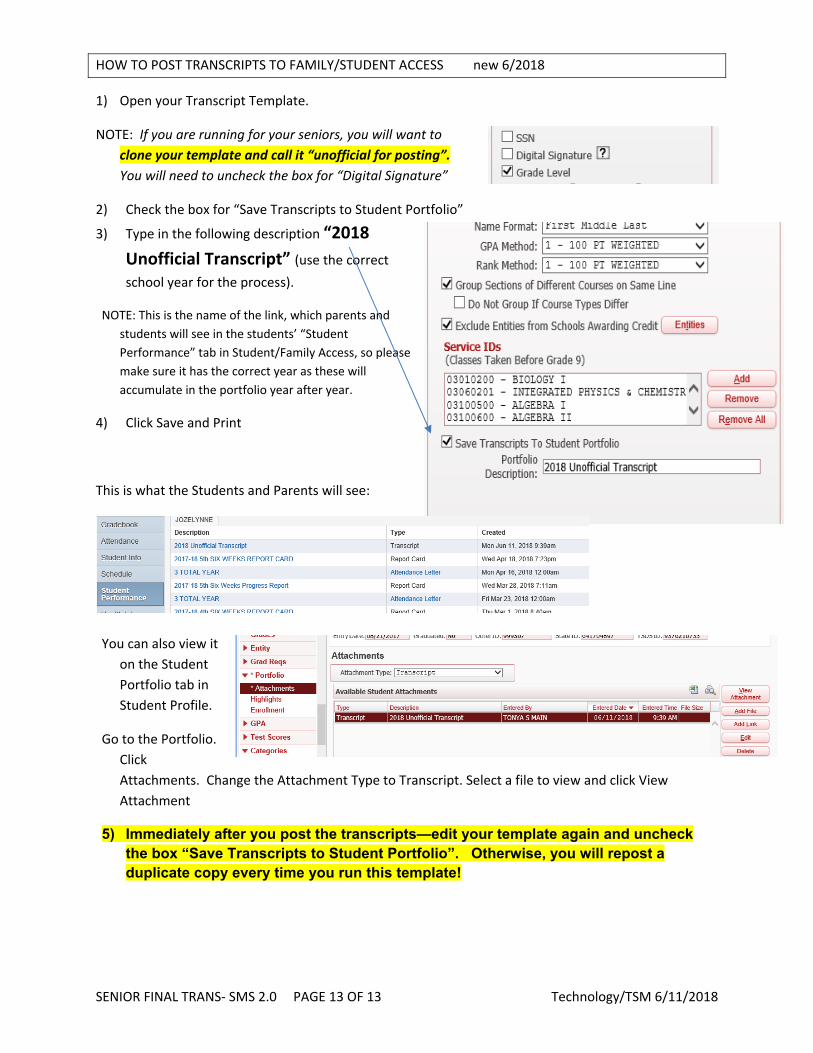
HOW TO POST TRANSCRIPTS TO FAMILY/STUDENT ACCESS new 6/2018
1) Open your Transcript Template.
NOTE: If you are running for your seniors, you will want to
clone your template and call it “unofficial for posting”.
You will need to uncheck the box for “Digital Signature”
2) Check the box for “Save Transcripts to Student Portfolio”
3) Type in the following description “2018
Unofficial Transcript” (use the correct school year for the process).
NOTE: This is the name of the link, which parents and
students will see in the students’ “Student
Performance” tab in Student/Family Access, so please
make sure it has the correct year as these will
accumulate in the portfolio year after year.
4) Click Save and Print
This is what the Students and Parents will see:
You can also view it
on the Student
Portfolio tab in
Student Profile.
Go to the Portfolio.
Click
Attachments. Change the Attachment Type to Transcript. Select a file to view and click View
Attachment
5) Immediately after you post the transcripts—edit your template again and uncheck the box “Save Transcripts to Student Portfolio”. Otherwise, you will repost a duplicate copy every time you run this template!