principles of care - who
TRANSCRIPT

2.Principles
of care
WORLD HEALTH ORGANIZATIONDEPARTMENT OF NUTRITION FOR HEALTH AND DEVELOPMENT
TRAI
NIN
G C
OUR
SE O
N T
HE
MAN
AGEM
ENT
OF
SEVE
RE M
ALN
UTRI
TIO
N
WHO/NHD/02/.4(P)2ORIGINAL: ENGLISH
DISTR: GENERAL


TRAINING COURSE ON THE MANAGEMENT OF SEVERE MALNUTRITION
PRINCIPLES OF CARE
World Health Organization Department of Nutrition for Health and Development

Training Course on the Management of Severe Malnutrition
was prepared by the
World Health Organization Department of Nutrition for Health and Development (NHD), Geneva, Switzerland, and
Regional Office for South-East Asia (SEARO), New Delhi, India
in cooperation with the
Public Health Nutrition Unit of the London School of Hygiene and Tropical Medicine, London, UK
through a contract with
ACT International, Atlanta, Georgia, USA.
© World Health Organization, 2002 This document is not a formal publication of the World Health Organization (WHO), and all rights are reserved by the Organization. The document may, however, be freely reviewed, abstracted, reproduced and translated, in part
or in whole, but not for sale for use in conjunction with commercial purposes.
The views expressed in documents by named authors are solely the responsibility of those authors.
Cover photo: UNICEF/5877/Roger Lemoyne Cover design for modules: minimum graphic
Illustrations for modules: Susan Kress

CONTENTS Introduction................................................................................................................................1 Learning objectives....................................................................................................................1 1.0 Recognize signs of severe malnutrition .........................................................................2 EXERCISE A.................................................................................................................5 2.0 Weigh and measure the child.........................................................................................7 2.1 Measure length/height........................................................................................7 2.2 Standardize measuring board and stadiometer ................................................10 2.3 Weigh the child ................................................................................................10 2.4 Standardize scales ............................................................................................11 3.0 Identify the child with severe malnutrition..................................................................11 3.1 Determine standard deviation score (SD-score) ..............................................11 EXERCISE B...............................................................................................................13 3.2 Recommended criteria for admission to a severe malnutrition ward...........................................................................14 EXERCISE C...............................................................................................................15 4.0 How does the physiology of severe malnutrition affect care of the child?..........................................................................................................16 4.1 What is reductive adaptation?..........................................................................16 4.2 How does reductive adaptation affect care of the child? .................................16 5.0 Overview of the essential components of care ............................................................19 5.1 Feeding formulas: What are F-75 and F-100? ................................................19 5.2 Process for successful management of the severely malnourished child ............................................................................23 5.3 Important things NOT to do and why..............................................................24 6.0 Discharge policies for a severe malnutrition ward ......................................................26 Answers to Short Answer Exercise .........................................................................................27 Annex A: Explanation of SD-scores.......................................................................................29 Annex B: Weight-for-Height Reference Card ........................................................................31


1
TRAINING COURSE ON THE
MANAGEMENT OF SEVERE MALNUTRITION: PRINCIPLES OF CARE
Introduction This module will describe how to recognize a child with severe malnutrition and will outline the essential components of care. The severely malnourished child is likely to have many serious health problems in addition to malnutrition. In many cases these problems may not be clinically apparent. In some cases the usual treatment for a problem may be harmful or even fatal for a severely malnourished child. This module will describe how the physiology of the severely malnourished child is different, and how these differences affect care. Learning objectives This module will describe and allow you to practise the following skills needed to identify children with severe malnutrition: • Recognizing signs of severe malnutrition • Weighing and measuring children (in clinical session) • Determining a standard deviation score (SD-score) based on the child’s weight
and length. In addition the module will describe: • How the physiology of severe malnutrition affects care of the child • Essential components of care • Recipes for special feeding formulas (F-75 and F-100) • Important things NOT to do and why • Recommended admission and discharge policies for a severe malnutrition
ward.

2
1.0 Recognize signs of severe malnutrition
You may be familiar with the following conditions that are related to severe malnutrition. The starred conditions (Ρ) indicate signs used in determining whether or not a child should be admitted to the severe malnutrition ward. The other signs are used in determining treatments needed. Ρϕ Severe wasting A child with severe wasting has lost fat and muscle and appears like “skin and bones”. Another term used for this condition is marasmus. To look for severe wasting, remove the child’s clothes. Look at the front view of the child:
• Is the outline of the child’s ribs easily seen? • Does the skin of the upper arms look loose? • Does the skin of the thighs look loose?
Look at the back view of the child:
• Are the ribs and shoulder bones easily seen? • Is flesh missing from the buttocks?
When wasting is extreme, there are folds of skin on the buttocks and thighs. It looks as if the child is wearing “baggy pants”. Because a wasted child has lost fat and muscle, this child will weigh less than other children of the same height and will have a low weight-for-height.
3
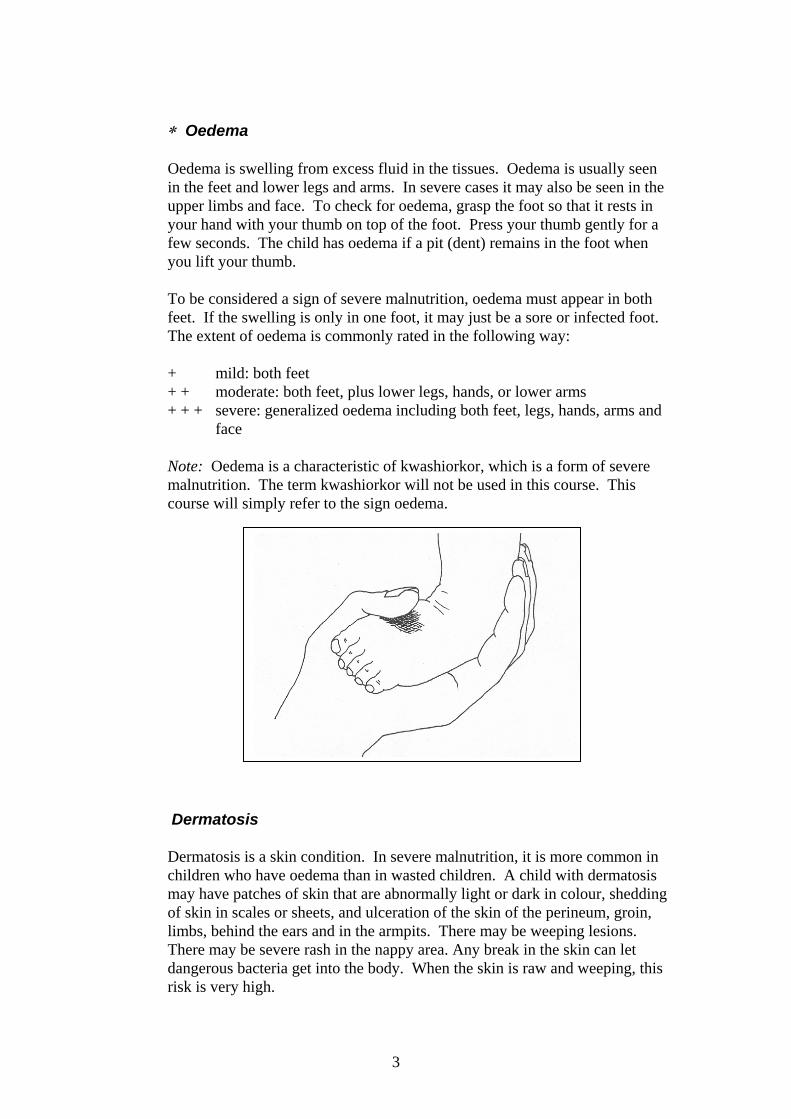
∗ Oedema Oedema is swelling from excess fluid in the tissues. Oedema is usually seen in the feet and lower legs and arms. In severe cases it may also be seen in the upper limbs and face. To check for oedema, grasp the foot so that it rests in your hand with your thumb on top of the foot. Press your thumb gently for a few seconds. The child has oedema if a pit (dent) remains in the foot when you lift your thumb. To be considered a sign of severe malnutrition, oedema must appear in both feet. If the swelling is only in one foot, it may just be a sore or infected foot. The extent of oedema is commonly rated in the following way:
+ mild: both feet + + moderate: both feet, plus lower legs, hands, or lower arms + + + severe: generalized oedema including both feet, legs, hands, arms and
face Note: Oedema is a characteristic of kwashiorkor, which is a form of severe
malnutrition. The term kwashiorkor will not be used in this course. This course will simply refer to the sign oedema.
Dermatosis
Dermatosis is a skin condition. In severe malnutrition, it is more common in children who have oedema than in wasted children. A child with dermatosis may have patches of skin that are abnormally light or dark in colour, shedding of skin in scales or sheets, and ulceration of the skin of the perineum, groin, limbs, behind the ears and in the armpits. There may be weeping lesions. There may be severe rash in the nappy area. Any break in the skin can let dangerous bacteria get into the body. When the skin is raw and weeping, this risk is very high.

4
The extent of dermatosis can be described in the following way: + mild: discoloration or a few rough patches of skin + + moderate: multiple patches on arms and/or legs
+ + + severe: flaking skin, raw skin, fissures (openings in the skin)
Treatment of dermatosis will be discussed in Daily Care.
Eye signs Children with severe malnutrition may have signs of eye infection and/or vitamin A deficiency. • Bitot’s spots – superficial foamy white spots on the conjunctiva (white
part of the eye). These are associated with vitamin A deficiency.
• Pus and inflammation (redness) are signs of eye infection.
• Corneal clouding is seen as an opaque appearance of the cornea (the transparent layer that covers the pupil and iris). It is a sign of vitamin A deficiency.
• Corneal ulceration is a break in the surface of the cornea. It is a severe sign of vitamin A deficiency. If not treated, the lens of the eye may push out and cause blindness. Corneal ulceration is urgent and requires immediate treatment with vitamin A and atropine (to relax the eye).
Treatment of all eye signs will be discussed in Initial Management and in Daily Care.
Stunting Stunting is unusually low height or length for age, often due to chronic malnutrition. A stunted child may be adequate in weight-for-height but low in weight-for-age because he is very short. Stunted children should be managed in the community rather than the hospital.

5
EXERCISE A
In this exercise you will look at photographs of children and identify signs related to severe malnutrition. Open your photo booklet. Each photo is numbered. For each photo listed below in this exercise, write down all of the following signs you see: severe wasting oedema dermatosis eye signs (Bitot’s spots, pus, inflammation, corneal clouding, corneal ulceration) If the child has dermatosis or oedema, try to estimate the degree of severity (+, ++, or +++). If you see none of the signs, write NONE. When everyone in the group has finished, there will be a discussion of the photographs. Photo 1 is described below as an example. Photo 1: Moderate (++) oedema, seen in feet and lower legs Severe wasting of upper arms -- Ribs and collar bones clearly show. Photo 2: Photos 3 and 4 (front and back view of same child): Photo 5:

6
Photo 6: Photo 7: Photo 8: Photo 9: Photo 10: Photo 11: Photo 12: Photo 13: Photo 14: Photo 15:
When you have completed this exercise, tell a facilitator that you are ready for the group discussion.

7
2.0 Weigh and measure the child In addition to looking for visible signs of severe malnutrition, it is important to weigh and measure the child. Then the child’s weight-for-height can be compared to averages. 2.1 Measure length/height Carefully measure the child's length or height once, on the first day.
For children less than 85 cm in length, or children too weak to stand, measure the child’s length while supine (lying down).
For children 85 cm or more, measure standing height. Note: Length is usually
greater than standing height by 0.5 cm. This difference has been accounted for in the weight-for-height table in Appendix 1 of the manual1 (and on your Weight-for-Height Reference Card). If the child is 85 cm or more but cannot be measured standing, subtract 0.5 from the supine length. Whether measuring length or height, the mother should be nearby to help soothe and comfort the child. To measure length:
Use a measuring board with a
headboard and sliding foot piece. Lay the measuring board flat, preferably on a stable, level table. Cover the board with a thin cloth or soft paper to avoid causing discomfort and the baby sticking to the board.
Measurement will be most accurate if the child is naked; diapers make it
difficult to hold the infant’s legs together and straighten them. However, if the child is upset or hypothermic, keep the clothes on, but ensure they do not get in the way of measurement. Always remove shoes and socks. Undo braids and remove hair ornaments if they interfere with positioning the head. After measuring, re-dress or cover the child quickly so that he does not get cold.
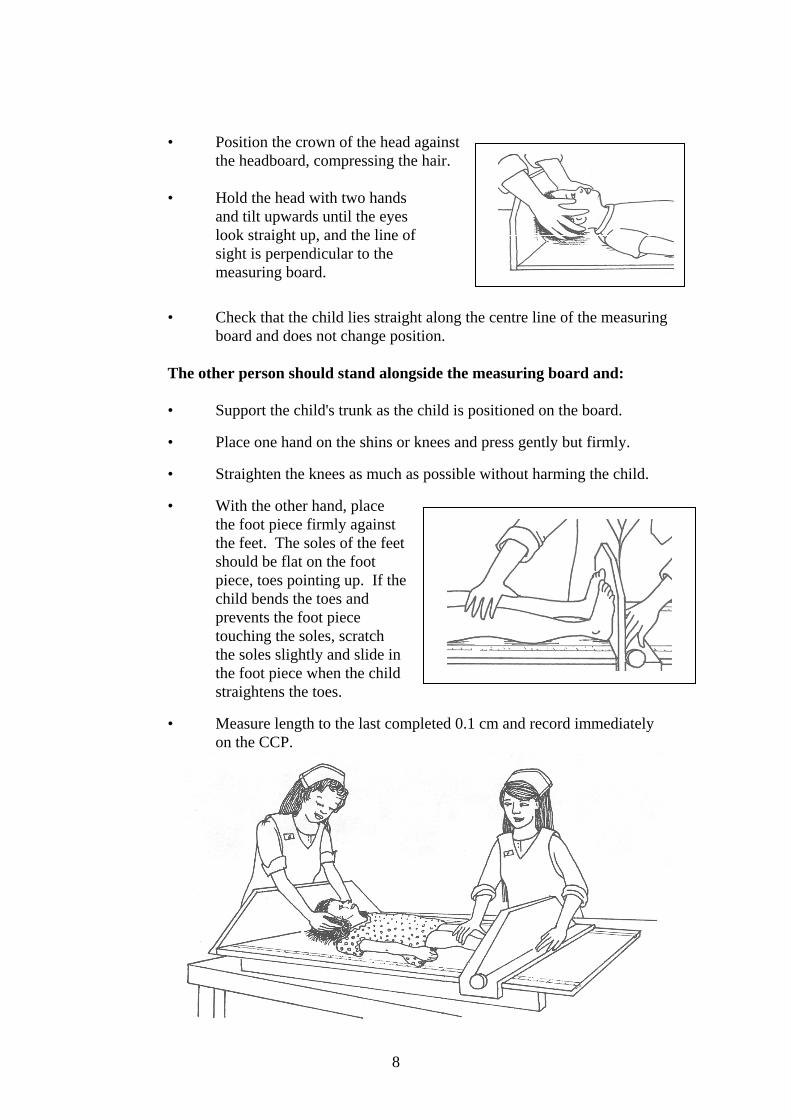
Work with a partner. One person should stand or kneel behind the headboard and:
• Position the child lying on his back on the measuring board, supporting
the head and placing it against the headboard.
1 All references to the manual are to the WHO document Management of Severe Malnutrition; a manual for physicians and other senior health workers.
8
• Position the crown of the head against the headboard, compressing the hair.
• Hold the head with two hands
and tilt upwards until the eyes look straight up, and the line of sight is perpendicular to the measuring board.
• Check that the child lies straight along the centre line of the measuring board and does not change position.
The other person should stand alongside the measuring board and:
• Support the child's trunk as the child is positioned on the board.
• Place one hand on the shins or knees and press gently but firmly.
• Straighten the knees as much as possible without harming the child.
• With the other hand, place the foot piece firmly against the feet. The soles of the feet should be flat on the foot piece, toes pointing up. If the child bends the toes and prevents the foot piece touching the soles, scratch the soles slightly and slide in the foot piece when the child straightens the toes.
• Measure length to the last completed 0.1 cm and record immediately on the CCP.

9
To measure standing height:
A stadiometer is any device used to measure standing height. Use a stadiometer with a vertical back board, a fixed base board, and a movable head board. The stadiometer should be placed on a level floor.
Remove the child’s socks and shoes for accurate measurement. Also remove hair ornaments and undo braids if they interfere with measurement.
Work with a partner. One person should kneel or crouch near the child’s feet and:
• Help the child stand with back of the head, shoulder blades, buttocks,
calves and heels touching the vertical board.
• Hold the child’s knees and ankles to keep the legs straight and feet flat. Prevent children from standing on their toes.
• Young children may have difficulty standing to full height. If necessary, gently push on the tummy to help the child stand to full height.
The other person should bend to level of the child’s face and:
• Position the head so that the
child is looking straight ahead (line of sight is parallel to the base of the board).
• Place thumb and forefinger over the child’s chin to help keep the head in an upright position.
• With the other hand, pull down the head board to rest firmly on top of the head and compress hair.
• Measure the height to the last completed 0.1 cm and record it immediately on the CCP.

10
2.2 Standardize measuring board and stadiometer
Once a month, measure rods of known length on the measuring board and stadiometer. For the measuring board, measure rods of 50 cm and 100 cm. For the stadiometer, measure rods of 100 cm and 150 cm. If there is 0.3 cm or more difference between the rod's known length and the measured length, re-calibration may be needed. First get a second person to re-check your measurements. Also check that: • Measuring tape is flat on the board, not buckled, in correct position,
reading 0 cm at headboard end. • Sliding foot piece is not too loose on the board (less than 0.2 cm
wobble). • Base of board is not warped; runners are straight and secure.
2.3 Weigh the child Weigh the child as soon as possible after he arrives. If the child is admitted, weigh the child once daily, preferably at about the same time each day. The weighing time should be about one hour before or after a feed.
To weigh the child:
• Remove the child's clothes, but keep the child warm with a blanket or cloth while carrying to the scale.
• Put a cloth in the scale pan to prevent chilling the child. • Adjust the scale to zero with the cloth in the pan. (If using a scale with
a sling or pants, adjust the scale to zero with that in place.) • Place the naked child gently in the pan (or in the sling or pants). • Wait for the child to settle and the weight to stabilize. • Measure weight to the nearest 0.01 kg (10 g) or as precisely as
possible. Record immediately on CCP. • Wrap the child immediately to re-warm.
Types of scales

11
2.4 Standardize scales Standardize scales daily or whenever they are moved:
• Set the scale to zero. • Weigh three objects of known weight (e.g., 5, 10, and 15 kg) and
record the measured weights. (A container filled with stones and sealed may be used if the weight is accurately known.)
• Repeat the weighing of these objects and record the weights again. • If there is a difference of 0.01 kg or more between duplicate
weighings, or if a measured weight differs by 0.01 kg or more from the known standard, check the scales and adjust or replace them if necessary.
3.0 Identify the child with severe malnutrition 3.1 Determine standard deviation score (SD-score)
based on child’s weight and length/height2
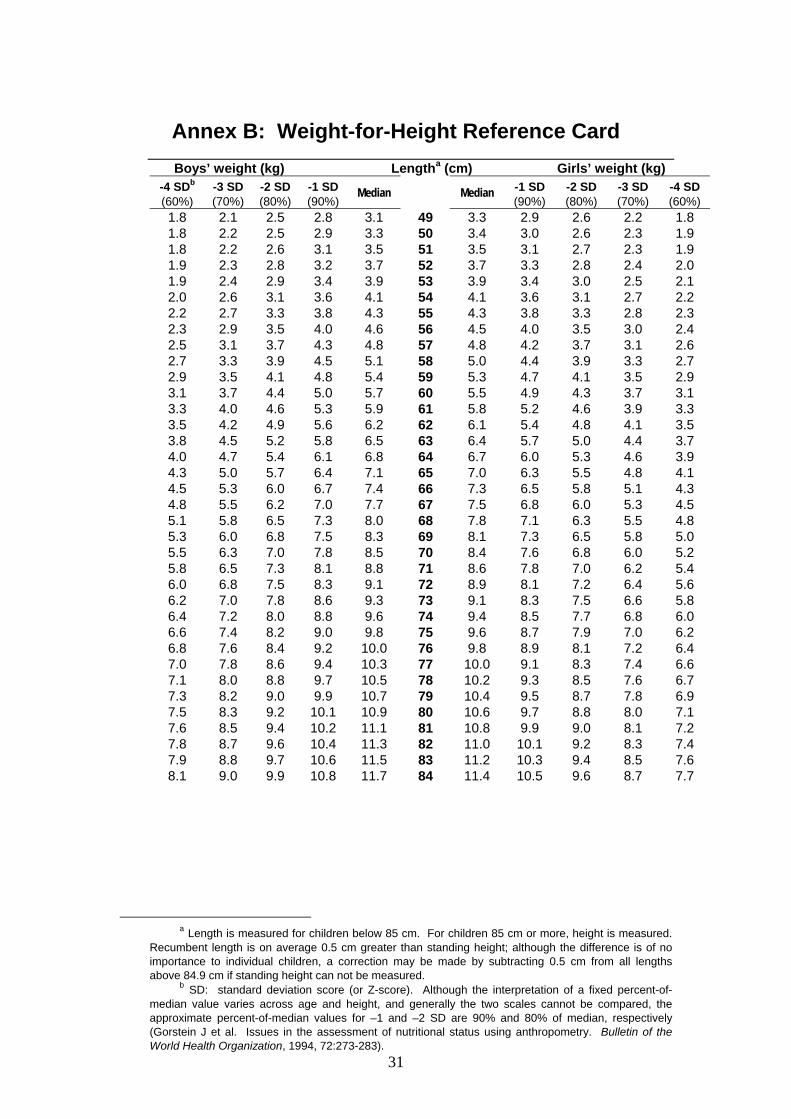
What is an SD-score? An SD-score is a way of comparing a measurement, in this case a child’s weight-for-length, to an “average”. The “averages” used in the manual and in this course are NCHS/WHO normalized reference values for weight-for-height and weight-for-length. A table is given in the manual in Appendix 1 that shows the SD-scores for children of different weights and heights. This table is also presented in Annex B of this module and on the Weight-for-Height Reference Card.
Although SD-scores generally are not comparable to percentage of the median3, the SD-scores may be loosely interpreted as follows:
–1 SD approximately corresponds to 90% of the median weight-for-height.
–2 SD approximately corresponds to 80% of the median weight-for-height.
–3 SD approximately corresponds to 70% of the median weight-for-height.
Optional: To learn more about SD-scores, how they are calculated, and how they relate to percentage of the median, refer to Annex A of this module.
2 Although the terms “length” and “height” are often used interchangeably in the text of these modules and the manual, it should be understood that length is measured for children less than 85 cm, and standing height is measured for children 85 cm or more. 3 The median is the middle value in a set of values. It is one type of “average”.

12
It is important to consider a child’s weight-for-height rather than simply weight-for-age. The latter is affected by stunting. Stunting may cause low weight-for-age when a child is adequate weight-for-height. Feeding can correct wasting but cannot easily correct stunting.
To use the reference table (in Annex B of this module or on your Weight-for-Height Reference Card): • First find the child's length or height in the middle of the table.
If the length or height is between those listed, round up or down as follows: If the length/height is 0.5 or more cm greater than the next lower length/height, round up. Otherwise, round down.
• Then look in the left columns for boys, or the right columns for girls, to find the child's weight.
• Look at the top of the column to see what the child’s SD-score is. The child’s weight may be between two SD-scores. If so, indicate that the weight is between these scores by writing less than (<). For example, if the score is between – 1 SD and –2 SD, write < −1 SD. Examples of SD scores
A boy is 80 cm in length and weighs 9.2 kg. His score is –2 SD (roughly 80% of the median weight for boys his length). A girl is 76.5 cm in length and weighs 7.4 kg. Round her length to 77 cm. Her score is –3 SD (roughly 70% of the median weight for girls her length). A girl is 90 cm in height and weighs 10.3 kg. Her weight is between –2 SD and –3 SD. Record her SD-score as < −2 SD.

13
EXERCISE B
Refer to the table of SD-scores in Appendix 1 of the manual or on your SD-score Reference Card. Indicate the SD-score for each child listed below. 1. Shana, girl, length 63 cm, weight 5.0 kg 2. Rico, boy, height 101 cm, weight 11.8 kg 3. Tonya, girl, length 69.8 cm, weight 6.3 kg 4. Kareem, boy, length 82 cm, weight 8.5 kg
When you have completed this exercise, please discuss your answers with a facilitator.

14
3.2 Recommended criteria for admission to a severe malnutrition ward
Recommended admission criteria Admit to the severe malnutrition ward (or area) children who have:
• weight-for-height less than −3 SD (less than 70%) and /or • oedema of both feet
Reasons for criteria If the child is less than –3 SD or 70% weight-for-height, he or she is severely wasted. If there is oedema of both feet (+ oedema or worse), the child is severely malnourished even though retained fluid may add to the child’s weight, making the weight-for-height greater than –3 SD.
Admission criteria may need to be adjusted at some hospitals (for example, if so many children are less than –3 SD that the ward would be overloaded). All severely malnourished children should go to the severe malnutrition ward, regardless of other presenting symptoms such as diarrhoea, respiratory infections, or other infections. Children with severe malnutrition are in danger of death from hypoglycaemia, hypothermia, fluid overload, and undetected infections. They cannot be treated like other children. Their feeding and fluids must be carefully controlled, or they could die. To ensure the proper feeding and treatment routines, it is critical to keep these children in the severe malnutrition ward. Other health problems and infections should be treated on the severe malnutrition ward. Note about low-birth-weight babies:
Low-birth-weight babies are not usually severely wasted or oedematous and so are unlikely to meet the criteria for severe malnutrition. Management of low- birth-weight babies is not taught in this course. Low-birth-weight babies should be breastfed.

15
EXERCISE C
In this exercise you will look at photographs and consider information about a child in order to determine if the child should be admitted to the severe malnutrition ward. Use the criteria given on the previous page in this module. Refer to Annex B of this module or your Weight-for-Height Reference Card as needed. Photo 18: This child is a girl, age 20 months. She is 67 cm in length. She weighs 6.5 kg. Should she be admitted to the severe malnutrition ward? Why or why not? Photo 19: This child is a girl, age 6 months. She is 60 cm in length and weighs 4.0 kg. Should she be admitted to the severe malnutrition ward? Why or why not? Photo 20: This child is a boy, age 18 months. He is 65 cm in length and weighs 4.8 kg. Should he be admitted to the severe malnutrition ward? Why or why not?
When you have completed this exercise, tell a facilitator that you are ready for the group discussion and drill.

16
4.0 How does the physiology of severe malnutrition affect care of the child?
The child with severe malnutrition must be treated differently because his physiology is seriously abnormal due to reductive adaptation.
4.1 What is reductive adaptation?
The systems of the body begin to “shut down” with severe malnutrition. The systems slow down and do less in order to allow survival on limited calories. This slowing down is known as reductive adaptation. As the child is treated, the body's systems must gradually "learn" to function fully again. Rapid changes (such as rapid feeding or fluids) would overwhelm the systems, so feeding must be slowly and cautiously increased.
Optional: To learn more about how reductive adaptation affects the body’s systems, refer to Appendix 3 of the manual. A simplified explanation of the implications for care is provided below.
4.2 How does reductive adaptation affect care of the child?
Reductive adaptation affects treatment of the child in a number of ways. Three important implications for care are described in the next paragraphs.
Presume and treat infection Nearly all children with severe malnutrition have bacterial infections. However, as a result of reductive adaptation, the usual signs of infection may not be apparent, because the body does not use its limited energy to respond in the usual ways, such as inflammation or fever. Examples of common infections in the severely malnourished child are ear infection, urinary tract infection, pneumonia. Assume that infection is present and treat all severe malnutrition admissions with broad spectrum antibiotics. If a specific infection is identified (such as Shigella), add specific appropriate antibiotics to those already being given. Note: Choices of antibiotics will be discussed in the next module and are described in the manual on pages 16-17.

17
Do not give iron early in treatment Due to reductive adaptation, the severely malnourished child makes less haemoglobin than usual. Iron that is not used for making haemoglobin is put into storage. Thus there is “extra” iron stored in the body, even though the child may appear anaemic. Giving iron early in treatment will not cure anaemia, as the child already has a supply of stored iron. Giving iron early in treatment can also lead to “free iron” in the body. Free iron can cause problems in three ways: • Free iron is highly reactive and promotes the formation of free
radicals, which may engage in uncontrolled chemical reactions with damaging effects.
• Free iron promotes bacterial growth and can make some infections
worse. • The body tries to protect itself from free iron by converting it to
ferritin. This conversion requires energy and amino acids and diverts these from other critical activities.
Later, as the child recovers and begins to build new tissue and form more red blood cells, the iron in storage will be used and supplements will be needed. Provide potassium and restrict sodium Normally the body uses much energy maintaining the appropriate balance of potassium inside the cells and sodium outside the cells. This balance is critical to maintaining the correct distribution of water inside the cells, around the cells and in the blood. In reductive adaptation, the “pump” that usually controls the balance of potassium and sodium runs slower. As a result, the level of sodium in the cells rises and potassium leaks out of the cells and is lost (for example, in urine or stools). Fluid may then accumulate outside of the cells (as in oedema) instead of being properly distributed through the body. All severely malnourished children should be given potassium to make up for what is lost. (They should also be given magnesium, which is essential for potassium to enter the cells and be retained.) Malnourished children already have excess sodium in their cells, so sodium intake should be restricted. If a child has diarrhoea, a special rehydration solution called ReSoMal should be used instead of regular ORS; ReSoMal has less sodium and more potassium than regular ORS.

18
Briefly answer these questions as a review of the previous section: 1. When a child is severely malnourished, why is it important to begin feeding
slowly and cautiously? 2. Why should all severely malnourished children be given antibiotics? 3. Why is it dangerous to give iron early in treatment? 4. Why is ReSoMal preferable to regular ORS for severely malnourished
children who have diarrhoea?
Tell the facilitator when you are ready to discuss these questions with the group.

19
5.0 Overview of the essential components of care
5.1 Feeding formulas: What are F-75 and F-100?
F-75 is the "starter" formula to use during initial management, beginning as soon as possible and continuing for 2−7 days until the child is stabilized. Severely malnourished children cannot tolerate usual amounts of protein and sodium at this stage, or high amounts of fat. They may die if given too much protein or sodium. They also need glucose, so they must be given a diet that is low in protein and sodium and high in carbohydrate. F-75 is specially made to meet the child’s needs without overwhelming the body’s systems in the initial stage of treatment. Use of F-75 prevents deaths. F-75 contains 75 kcal and 0.9 g protein per 100 ml. As soon as the child is stabilized on F-75, F-100 is used as a "catch-up" formula to rebuild wasted tissues. F-100 contains more calories and protein: 100 kcal and 2.9 g protein per 100 ml. The composition of F-75 and F-100 is described in Table 8 on page 14 of the manual. Several recipes are given for F-75 and F-100 on the next page of this module. The choice of recipe may depend on the availability of ingredients, particularly the type of milk, and the availablilty of cooking facilities. The principle behind the recipes is to provide the energy and protein needed for stabilization and catch-up. For stabilization (F-75), it is important to provide a formula with the energy and protein as shown (no less and no more). For catch-up (F-100), the recipes show the minimum energy and protein contents needed. The first three recipes given for F-75 include cereal flour and require cooking. The second part of the table shows recipes for F-75 that can be used if there is no cereal flour or no cooking facilities. However, the recipes with no cereal flour have a high osmolarity (415 mOsmol/l) and may not be tolerated well by some children with diarrhoea. The F-100 recipes do not require cooking as they do not contain cereal flour. More instructions on how to prepare F-75 and F-100 will be given in the Feeding module. It is hoped that one or more of the recipes can be made in your hospital. If your hospital cannot use any of the recipes due to lack of ingredients, seek expert help to modify a recipe using available ingredients.

20
Recipes for F-75 and F-100
If you have cereal flour and cooking facilities, use one of the top three recipes for F-75:
Alternatives Ingredient Amount for F-75
If you have dried skimmed milk
Dried skimmed milk Sugar Cereal flour Vegetable oil Mineral mix* Water to make 1000 ml
25 g 70 g 35 g 30 g
20 ml 1000 ml**
If you have dried whole milk
Dried whole milk Sugar Cereal flour Vegetable oil Mineral mix* Water to make 1000 ml
35 g 70 g 35 g 20 g
20 ml 1000 ml**
If you have fresh cow’s milk, or full-cream (whole) long life milk
Fresh cow’s milk, or full-cream (whole) long life milk Sugar Cereal flour Vegetable oil Mineral mix* Water to make 1000 ml
300 ml
70 g 35 g 20 g
20 ml 1000 ml**
If you do not have cereal flour, or there are no cooking facilities, use one of the following recipes for F-75:
No cooking is required for F-100:
Alternatives Ingredient Amount for F-75 Amount for F-100 If you have dried skimmed milk
Dried skimmed milk Sugar Vegetable oil Mineral mix* Water to make 1000 ml
25 g 100 g
30 g 20 ml
1000 ml**
80 g 50 g 60 g
20 ml 1000 ml**
If you have dried whole milk
Dried whole milk Sugar Vegetable oil Mineral mix* Water to make 1000 ml
35 g 100 g
20 g 20 ml
1000 ml**
110 g 50 g 30 g 20 ml
1000 ml** If you have fresh cow’s milk, or full-cream (whole) long life milk
Fresh cow’s milk, or full- cream (whole) long life milk Sugar Vegetable oil Mineral mix* Water to make 1000 ml
300 ml 100 g
20 g 20 ml
1000 ml**
880 ml
75 g 20 g 20 ml
1000 ml**
*Contents of mineral mix are given in Appendix 4 of the manual. Alternatively, Combined Mineral Vitamin Mix (CMV) may be used; see next page.
**Important note about adding water: Add just the
amount of water needed to make 1000 ml of formula. (This amount will vary from recipe to recipe, depending on the other ingredients.) Do not simply add 1000 ml of water, as this will make the formula too dilute. A mark for 1000 ml should be made on the mixing container for the formula, so that water can be added to the other ingredients up to this mark.

21
Mineral mix Mineral mix is included in each recipe for F-75 and F-100. It is also used in
making ReSoMal. The contents of the mineral mix are listed in Appendix 4 of the manual. The mix contains potassium, magnesium, and other essential minerals. It must be included in F-75 and F-100 to correct electrolyte imbalance. The mineral mix may be made in the pharmacy of the hospital, or a commercial product called Combined Mineral Vitamin Mix (CMV) may be used to provide the necessary minerals.
Vitamins Vitamins are also needed in or with the feed. The vitamin mix described in
Appendix 4 of the manual cannot be made in the hospital pharmacy because amounts are so small. Thus, children are usually given multivitamin drops as well. Recommended vitamins to be included in the multivitamin preparation are listed in Appendix 5 of the manual. The multivitamin preparation should not include iron.
If available, CMV may be used to provide the necessary vitamins. If CMV is
used, separate multivitamin drops are not needed. Whether using CMV or multivitamin drops, extra vitamin A and folic acid are
needed. These additional requirements will be discussed in Initial Management and Daily Care.

22
Briefly answer these questions as a review of the previous section: 1. What are two important differences between F-75 and F-100? 2. Why is it important to have two different formulas (F-75 and F-100)
for treating severe malnutrition? 3. Mineral mix (or CMV) is included in F-75 and F-100 to correct
electrolyte imbalance. What are two important minerals in this mix and why?
4. If F-75 and F-100 are made with mineral mix instead of CMV, what
must the child be given in addition to the feeds?
Tell the facilitator when you are ready to discuss these questions with the group.

23
Look at Appendix 4 and Appendix 5 of the manual now.
Appendix 4 shows the composition of mineral mix that can be made in the hospital pharmacy. The vitamin mix is included in CMV but cannot be made in the hospital pharmacy.
Appendix 5 includes a list of water-soluble and fat-soluble vitamins that should be included in a multivitamin selected for severely malnourished children. (The other nutrients listed are in the mineral mix and feeds.)
5.2 Process for successful management of the severely malnourished child
The following process is essential for successful management of the severely malnourished child. You will learn how to do these important steps in Initial Management, Feeding, and Daily Care.
1 – 2. Treat/prevent hypothermia and hypoglycaemia (which are often related) by feeding, keeping warm, and treating infection.
3. Treat/prevent dehydration using Rehydration Solution for Malnutrition (ReSoMal).
4. Correct electrolyte imbalance (by giving feeds and ReSoMal prepared with mineral mix or CMV).
5. Presume and treat infection with antibiotics.
6. Correct micronutrient deficiencies (by giving feeds prepared with mineral mix or CMV and by giving extra vitamins and folic acid as needed).
7. Start cautious feeding with F-75 to stabilize the child (usually 2 − 7 days).
8. Rebuild wasted tissues through higher protein/calorie feeds (F-100).
9. Provide stimulation, play, and loving care.
10. Prepare parents to continue proper feeding and stimulation after discharge.
Read pages 1 – 2, Introduction, of the manual now.

24
Notice how the preceding process fits into the time frame shown in Table 1 on page 1 of the manual.
5.3 Important things NOT to do and why
Do not give diuretics to treat oedema. The oedema is partly due to
potassium and magnesium deficiencies that may take about 2 weeks to correct. The oedema will go away with proper feeding including a mineral mix containing potassium and magnesium. Giving a diuretic will worsen the child’s electrolyte imbalance and may cause death.
Do not give iron during the initial feeding phase. Add iron only
after the child has been on F-100 for 2 days (usually during week 2). As described earlier, giving iron early in treatment can have toxic effects and interfere with the body’s ability to resist infection.
Do not give high protein formula. (over 1.5 g protein per kg body
weight daily). Too much protein in the first days of treatment may be dangerous because the severely malnourished child is unable to deal with the extra metabolic stress involved. Too much protein could overload the liver, heart, and kidneys and may cause death.
Do not give IV fluids routinely. IV fluids can easily cause fluid
overload and heart failure in a severely malnourished child. Only give IV fluids to children with signs of shock. (Treatment will be described in Initial Treatment.)
Be sure that personnel in the emergency treatment area of the hospital know these important things NOT to do, as well as what to do.
25
Fill in the blanks based on your reading in the module and the manual: 1. Two conditions that are related and must be treated immediately in a severely
malnourished child are _________________ and __________________.
2. Cautious feeding with _______ is necessary at first to stabilize the child.
Later, ______ is given to rebuild wasted tissues and gain weight.
3. To correct electrolyte imbalance, it is important to give feeds prepared with
___________ mix or a product called Combined Mineral Vitamin Mix (CMV).
4. If a severely malnourished child has diarrhoea, a special rehydration solution
called ___________ should be given. This solution has less ____________
and more ________________ than regular ORS.
Indicate in the blank whether the statement is true or false: 5. ______ Giving iron too early in treatment can have toxic effects. 6. ______ All severely malnourished children should be given antibiotics. 7. ______ Giving IV fluids too quickly can cause heart failure in a severely
malnourished child. 8. ______ Diuretics should be given to reduce oedema. 9. ______ Unless CMV is used to prepare feeds, the child needs multivitamin
drops.
Check your own answers to this exercise by comparing them to the answers given at the end of the module on page 27.
26
6.0 Discharge policies for a severe malnutrition ward WHO recommends that children be kept in the severe malnutrition ward or area until they reach −1 SD (90%) weight-for-height. Additional discharge criteria are given in Table 11 on page 25 of the manual. It usually requires about 2 – 6 weeks for a child to achieve the target weight if feeding recommendations are followed. It may be difficult to keep children for this long, but the risks of early discharge are great. If a child leaves before achieving –1 SD (90%) weight-for-height, he is likely to get worse and have to return, or he may die. If early discharge is necessary, many preparations must be made to ensure that the parents can continue care at home. Follow-up visits are essential. There will be a discussion exercise about early discharge situations in the module Involving Mothers in Care.
Tell a facilitator when you have reached this point in the module. There will be a brief video showing signs of severe malnutrition and the transformations that can occur when severely malnourished children are correctly managed. You will also discuss photos 21 – 29, which show children before and after treatment for severe malnutrition. Look at these photos while waiting for the video.
27
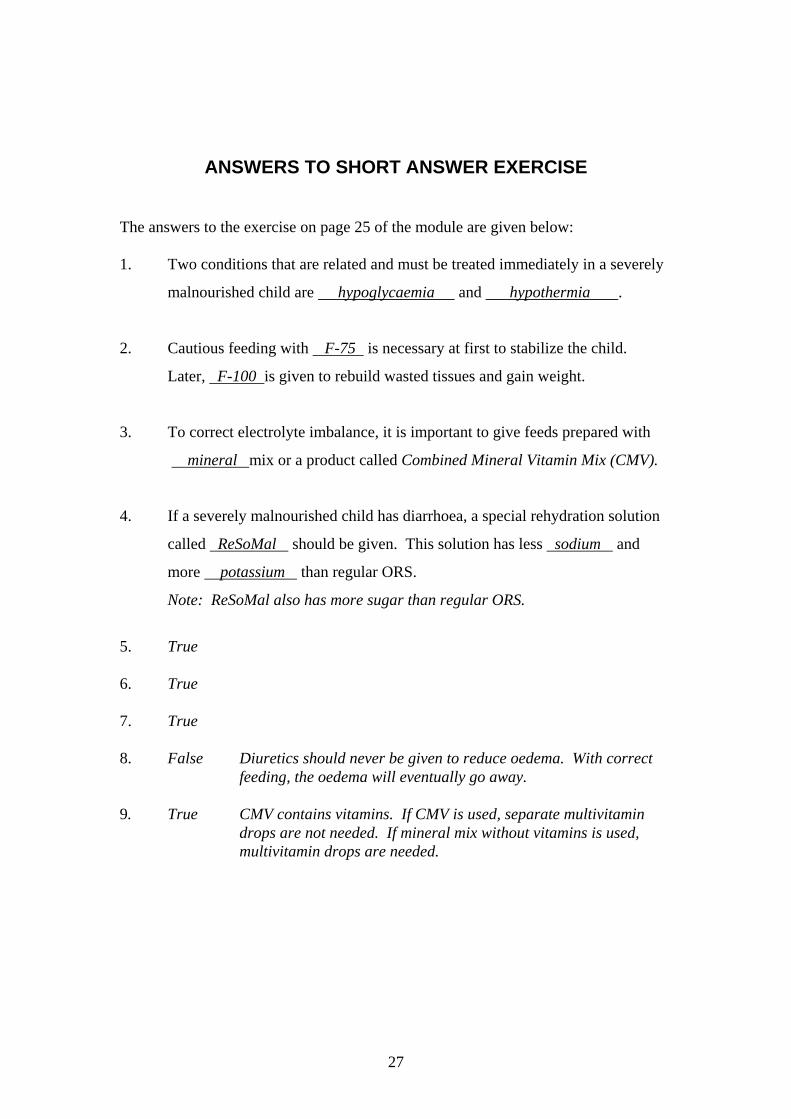
ANSWERS TO SHORT ANSWER EXERCISE The answers to the exercise on page 25 of the module are given below: 1. Two conditions that are related and must be treated immediately in a severely
malnourished child are hypoglycaemia and hypothermia .
2. Cautious feeding with F-75 is necessary at first to stabilize the child.
Later, F-100 is given to rebuild wasted tissues and gain weight.
3. To correct electrolyte imbalance, it is important to give feeds prepared with
mineral mix or a product called Combined Mineral Vitamin Mix (CMV).
4. If a severely malnourished child has diarrhoea, a special rehydration solution
called ReSoMal should be given. This solution has less sodium and
more potassium than regular ORS.
Note: ReSoMal also has more sugar than regular ORS.
5. True 6. True 7. True 8. False Diuretics should never be given to reduce oedema. With correct
feeding, the oedema will eventually go away. 9. True CMV contains vitamins. If CMV is used, separate multivitamin
drops are not needed. If mineral mix without vitamins is used, multivitamin drops are needed.

28

29
Annex A: Explanation of SD-Scores
Definition and formula for standard deviation (SD) score An SD-score (also called a Z-score) is defined as the deviation of an observed individual value from the median4 value of the reference population, divided by the standard deviation of the reference population: SD-score = (observed value) – (median reference value)
standard deviation for reference population Following is an example that applies the above formula to weight-for-height in children: - The “observed value” is an individual child’s weight. In this example, the
child is a boy named Sam who weighs 7.0 kg. - The “median reference value” is the median weight for all boys who are Sam’s
length in the reference population. Sam’s length is 73 cm, and the median weight for boys of this length is 9.3 kg.
- The “standard deviation for the reference population” is more difficult to explain. A simplified explanation is that it is a sort of average of differences from the median for each member of the reference population.
To determine the standard deviation for a population (in this example, boys who are 73 cm in length): 1. Find the median value for the population. For example, find the median
weight for boys who are 73 cm in length. 2. For every individual value in the reference population, find the difference
(deviation) from the median. For example, find the difference of every boy’s weight from the median weight.
3. Square the deviations from the median; total them; and find the average. 4. Take the square root of the average. The result is the standard deviation for
the population. After extensive research and statistical work, researchers have found that, for boys 73 cm in length, the standard deviation is about 0.76 kg.
Thus we can compute Sam’s SD-score as follows: Sam’s weight – median weight for 73 cm boys = 7.0 kg – 9.3 kg = −2.3 = −3 SD standard deviation for 73 cm boys 0.76 kg 0.76 Fortunately, extensive research has been done to develop tables showing SD-scores for boys and girls of different weights and heights. To develop the tables of SD-scores in Appendix 1 of the manual, researchers had to find the standard deviation for weights of boys and girls of each height listed in the tables. To do this, they applied the above statistical process to data on children from around the world. Thus, we can easily look on the tables for Sam’s height and weight and find out that his SD-score is –3 SD. 4 The median is the middle value in a set of values. It is one type of “average”.

30
What does an SD-score tell us? SD-scores can be used to indicate how far a child’s weight is from the median weight for that child’s height. The concept of a normal distribution is important for understanding what an SD-score is. In a normal distribution, most values are grouped around the middle, or “normal”. If you can visualize a normal distribution curve, an SD-score gives an image of how far a child is from “normal” or the median. The weights of all boys or all girls of a certain height fall into a normal (or almost normal) distribution. When the weights are graphed, the result resembles a normal bell-shaped curve.
A normal bell-shaped curve cut into standard deviations
Notice that most of the weights are in the middle, with a very few high and low weights at the extreme ends. Each segment on the horizontal axis represents one standard deviation. +3 SD is at the far right end of the curve, and – 3 SD is at the far left end. When looking at a graph, you can see that very few weights are at these extremes. In any truly normal distribution (no matter what is being graphed, and no matter whether the bell curve is narrow or wide), approximately 68.27% of all cases fall between –1 SD and +1 SD. Approximately 99.7% of all cases fall between –3 SD and + 3 SD. Thus, when a child has a weight-for-height that is –3 SD or below, we can be very sure that this is not the child’s normal state, as the child is outside the normal range. How do SD-scores relate to percent-of-median? Percent-of-median is simpler to calculate than an SD-score and was a useful way to describe and compare weights-for-height in the past, before much research was done to develop the SD-score tables in the manual. However, percent-of-median does not take into account the distribution of the population around the median in the way that an SD-score does. Thus, a child who is 75% of the median weight might be closer to “normal” on one curve than another, depending on the width of the curve. The advantage of the SD-score is that it has the same meaning whether the distribution (curve) is tall and narrow or short and wide. Even though SD-scores and percent-of-median are not truly comparable, the approximate percent-of-median values for –1 SD, –2 SD, and –3 SD are 90%, 80%, and 70% of the median, respectively.
31
Annex B: Weight-for-Height Reference Card
Boys’ weight (kg) Lengtha (cm) Girls’ weight (kg) -4 SDb (60%)
-3 SD (70%)
-2 SD (80%)
-1 SD (90%)
Median
Median -1 SD (90%)
-2 SD (80%)
-3 SD (70%)
-4 SD (60%)
1.8 2.1 2.5 2.8 3.1 49 3.3 2.9 2.6 2.2 1.8 1.8 2.2 2.5 2.9 3.3 50 3.4 3.0 2.6 2.3 1.9 1.8 2.2 2.6 3.1 3.5 51 3.5 3.1 2.7 2.3 1.9 1.9 2.3 2.8 3.2 3.7 52 3.7 3.3 2.8 2.4 2.0 1.9 2.4 2.9 3.4 3.9 53 3.9 3.4 3.0 2.5 2.1 2.0 2.6 3.1 3.6 4.1 54 4.1 3.6 3.1 2.7 2.2 2.2 2.7 3.3 3.8 4.3 55 4.3 3.8 3.3 2.8 2.3 2.3 2.9 3.5 4.0 4.6 56 4.5 4.0 3.5 3.0 2.4 2.5 3.1 3.7 4.3 4.8 57 4.8 4.2 3.7 3.1 2.6 2.7 3.3 3.9 4.5 5.1 58 5.0 4.4 3.9 3.3 2.7 2.9 3.5 4.1 4.8 5.4 59 5.3 4.7 4.1 3.5 2.9 3.1 3.7 4.4 5.0 5.7 60 5.5 4.9 4.3 3.7 3.1 3.3 4.0 4.6 5.3 5.9 61 5.8 5.2 4.6 3.9 3.3 3.5 4.2 4.9 5.6 6.2 62 6.1 5.4 4.8 4.1 3.5 3.8 4.5 5.2 5.8 6.5 63 6.4 5.7 5.0 4.4 3.7 4.0 4.7 5.4 6.1 6.8 64 6.7 6.0 5.3 4.6 3.9 4.3 5.0 5.7 6.4 7.1 65 7.0 6.3 5.5 4.8 4.1 4.5 5.3 6.0 6.7 7.4 66 7.3 6.5 5.8 5.1 4.3 4.8 5.5 6.2 7.0 7.7 67 7.5 6.8 6.0 5.3 4.5 5.1 5.8 6.5 7.3 8.0 68 7.8 7.1 6.3 5.5 4.8 5.3 6.0 6.8 7.5 8.3 69 8.1 7.3 6.5 5.8 5.0 5.5 6.3 7.0 7.8 8.5 70 8.4 7.6 6.8 6.0 5.2 5.8 6.5 7.3 8.1 8.8 71 8.6 7.8 7.0 6.2 5.4 6.0 6.8 7.5 8.3 9.1 72 8.9 8.1 7.2 6.4 5.6 6.2 7.0 7.8 8.6 9.3 73 9.1 8.3 7.5 6.6 5.8 6.4 7.2 8.0 8.8 9.6 74 9.4 8.5 7.7 6.8 6.0 6.6 7.4 8.2 9.0 9.8 75 9.6 8.7 7.9 7.0 6.2 6.8 7.6 8.4 9.2 10.0 76 9.8 8.9 8.1 7.2 6.4 7.0 7.8 8.6 9.4 10.3 77 10.0 9.1 8.3 7.4 6.6 7.1 8.0 8.8 9.7 10.5 78 10.2 9.3 8.5 7.6 6.7 7.3 8.2 9.0 9.9 10.7 79 10.4 9.5 8.7 7.8 6.9 7.5 8.3 9.2 10.1 10.9 80 10.6 9.7 8.8 8.0 7.1 7.6 8.5 9.4 10.2 11.1 81 10.8 9.9 9.0 8.1 7.2 7.8 8.7 9.6 10.4 11.3 82 11.0 10.1 9.2 8.3 7.4 7.9 8.8 9.7 10.6 11.5 83 11.2 10.3 9.4 8.5 7.6 8.1 9.0 9.9 10.8 11.7 84 11.4 10.5 9.6 8.7 7.7
a Length is measured for children below 85 cm. For children 85 cm or more, height is measured.
Recumbent length is on average 0.5 cm greater than standing height; although the difference is of no importance to individual children, a correction may be made by subtracting 0.5 cm from all lengths above 84.9 cm if standing height can not be measured.
b SD: standard deviation score (or Z-score). Although the interpretation of a fixed percent-of-median value varies across age and height, and generally the two scales cannot be compared, the approximate percent-of-median values for –1 and –2 SD are 90% and 80% of median, respectively (Gorstein J et al. Issues in the assessment of nutritional status using anthropometry. Bulletin of the World Health Organization, 1994, 72:273-283).

32
Boys’ weight (kg) Heighta (cm) Girls’ weight (kg) -4 SDb (60%)
-3 SD (70%)
-2 SD (80%)
-1 SD (90%)
Median
Median -1 SD (90%)
-2 SD (80%)
-3 SD (70%)
-4 SD (60%)
7.8 8.9 9.9 11.0 12.1 85 11.8 10.8 9.7 8.6 7.67.9 9.0 10.1 11.2 12.3 86 12.0 11.0 9.9 8.8 7.78.1 9.2 10.3 11.5 12.6 87 12.3 11.2 10.1 9.0 7.98.3 9.4 10.5 11.7 12.8 88 12.5 11.4 10.3 9.2 8.18.4 9.6 10.7 11.9 13.0 89 12.7 11.6 10.5 9.3 8.28.6 9.8 10.9 12.1 13.3 90 12.9 11.8 10.7 9.5 8.48.8 9.9 11.1 12.3 13.5 91 13.2 12.0 10.8 9.7 8.58.9 10.1 11.3 12.5 13.7 92 13.4 12.2 11.0 9.9 8.79.1 10.3 11.5 12.8 14.0 93 13.6 12.4 11.2 10.0 8.89.2 10.5 11.7 13.0 14.2 94 13.9 12.6 11.4 10.2 9.09.4 10.7 11.9 13.2 14.5 95 14.1 12.9 11.6 10.4 9.19.6 10.9 12.1 13.4 14.7 96 14.3 13.1 11.8 10.6 9.39.7 11.0 12.4 13.7 15.0 97 14.6 13.3 12.0 10.7 9.59.9 11.2 12.6 13.9 15.2 98 14.9 13.5 12.2 10.9 9.6
10.1 11.4 12.8 14.1 15.5 99 15.1 13.8 12.4 11.1 9.810.3 11.6 13.0 14.4 15.7 100 15.4 14.0 12.7 11.3 9.910.4 11.8 13.2 14.6 16.0 101 15.6 14.3 12.9 11.5 10.110.6 12.0 13.4 14.9 16.3 102 15.9 14.5 13.1 11.7 10.310.8 12.2 13.7 15.1 16.6 103 16.2 14.7 13.3 11.9 10.511.0 12.4 13.9 15.4 16.9 104 16.5 15.0 13.5 12.1 10.611.2 12.7 14.2 15.6 17.1 105 16.7 15.3 13.8 12.3 10.811.4 12.9 14.4 15.9 17.4 106 17.0 15.5 14.0 12.5 11.011.6 13.1 14.7 16.2 17.7 107 17.3 15.8 14.3 12.7 11.211.8 13.4 14.9 16.5 18.0 108 17.6 16.1 14.5 13.0 11.412.0 13.6 15.2 16.8 18.3 109 17.9 16.4 14.8 13.2 11.612.2 13.8 15.4 17.1 18.7 110 18.2 16.6 15.0 13.4 11.912.5 14.1 15.7 17.4 19.0 111 18.6 16.9 15.3 13.7 12.112.7 14.4 16.0 17.7 19.3 112 18.9 17.2 15.6 14.0 12.312.9 14.6 16.3 18.0 19.6 113 19.2 17.5 15.9 14.2 12.613.2 14.9 16.6 18.3 20.0 114 19.5 17.9 16.2 14.5 12.813.5 15.2 16.9 18.6 20.3 115 19.9 18.2 16.5 14.8 13.013.7 15.5 17.2 18.9 20.7 116 20.3 18.5 16.8 15.0 13.314.0 15.8 17.5 19.3 21.1 117 20.6 18.9 17.1 15.3 13.614.3 16.1 17.9 19.6 21.4 118 21.0 19.2 17.4 15.6 13.814.6 16.4 18.2 20.0 21.8 119 21.4 19.6 17.7 15.9 14.114.9 16.7 18.5 20.4 22.2 120 21.8 20.0 18.1 16.2 14.315.2 17.0 18.9 20.7 22.6 121 22.2 20.3 18.4 16.5 14.615.5 17.4 19.2 21.1 23.0 122 22.7 20.7 18.8 16.8 14.915.8 17.7 19.6 21.5 23.4 123 23.1 21.1 19.1 17.1 15.116.1 18.0 20.0 21.9 23.9 124 23.6 21.6 19.5 17.4 15.416.4 18.4 20.4 22.3 24.3 125 24.1 22.0 19.9 17.8 15.616.7 18.7 20.7 22.8 24.8 126 24.6 22.4 20.2 18.1 15.917.0 19.1 21.1 23.2 25.2 127 25.1 22.9 20.6 18.4 16.217.3 19.4 21.5 23.6 25.7 128 25.7 23.3 21.0 18.7 16.417.6 19.8 21.9 24.1 26.2 129 26.2 23.8 21.4 19.0 16.717.9 20.1 22.3 24.5 26.8 130 26.8 24.3 21.8 19.4 16.9
a Length is measured for children below 85 cm. For children 85 cm or more, height is measured. Recumbent
length is on average 0.5 cm greater than standing height; although the difference is of no importance to individual children, a correction may be made by subtracting 0.5 cm from all lengths above 84.9 cm if standing height can not be measured.
b SD: standard deviation score (or Z-score). Although the interpretation of a fixed percent-of-median value varies across age and height, and generally the two scales cannot be compared, the approximate percent-of-median values for –1 and –2 SD are 90% and 80% of median, respectively (Gorstein J et al. Issues in the assessment of nutritional status using anthropometry. Bulletin of the World Health Organization, 1994, 72:273-283).

33
