prime quick start guide - isp.ncifcrf.gov · prime quick start guide chapter 2: comparative...
TRANSCRIPT

Prime Quick Start Guide
Prime 2.1
Quick Start Guide
Schrödinger Press

Prime Quick Start Guide Copyright © 2009 Schrödinger, LLC. All rights reserved.
While care has been taken in the preparation of this publication, Schrödinger
assumes no responsibility for errors or omissions, or for damages resulting from
the use of the information contained herein.
Canvas, CombiGlide, ConfGen, Epik, Glide, Impact, Jaguar, Liaison, LigPrep,
Maestro, Phase, Prime, PrimeX, QikProp, QikFit, QikSim, QSite, SiteMap, Strike, and
WaterMap are trademarks of Schrödinger, LLC. Schrödinger and MacroModel are
registered trademarks of Schrödinger, LLC. MCPRO is a trademark of William L.
Jorgensen. Desmond is a trademark of D. E. Shaw Research. Desmond is used with
the permission of D. E. Shaw Research. All rights reserved. This publication may
contain the trademarks of other companies.
Schrödinger software includes software and libraries provided by third parties. For
details of the copyrights, and terms and conditions associated with such included
third party software, see the Legal Notices for Third-Party Software in your product
installation at $SCHRODINGER/docs/html/third_party_legal.html (Linux OS) or
%SCHRODINGER%\docs\html\third_party_legal.html (Windows OS).
This publication may refer to other third party software not included in or with
Schrödinger software ("such other third party software"), and provide links to third
party Web sites ("linked sites"). References to such other third party software or
linked sites do not constitute an endorsement by Schrödinger, LLC. Use of such
other third party software and linked sites may be subject to third party license
agreements and fees. Schrödinger, LLC and its affiliates have no responsibility or
liability, directly or indirectly, for such other third party software and linked sites,
or for damage resulting from the use thereof. Any warranties that we make
regarding Schrödinger products and services do not apply to such other third party
software or linked sites, or to the interaction between, or interoperability of,
Schrödinger products and services and such other third party software.
June 2009

Contents
Document Conventions ...................................................................................................... v
Chapter 1: Introduction ....................................................................................................... 1
Chapter 2: Comparative Modeling Tutorial ........................................................... 3
2.1 Importing the Query Sequence............................................................................... 3
2.2 Finding Sequence Homologs.................................................................................. 5
2.3 Editing the Alignment ............................................................................................... 9
2.4 Building a Model Structure.................................................................................... 14
2.5 Refining Target Regions of the Structure ........................................................... 16
2.5.1 Refining Loops .................................................................................................. 16
2.5.2 Minimizing Target Regions................................................................................ 17
Getting Help ............................................................................................................................. 19
Glossary ...................................................................................................................................... 23
Prime 2.5 Quick Start Guide iii

iv
Prime 2.5 Quick Start Guide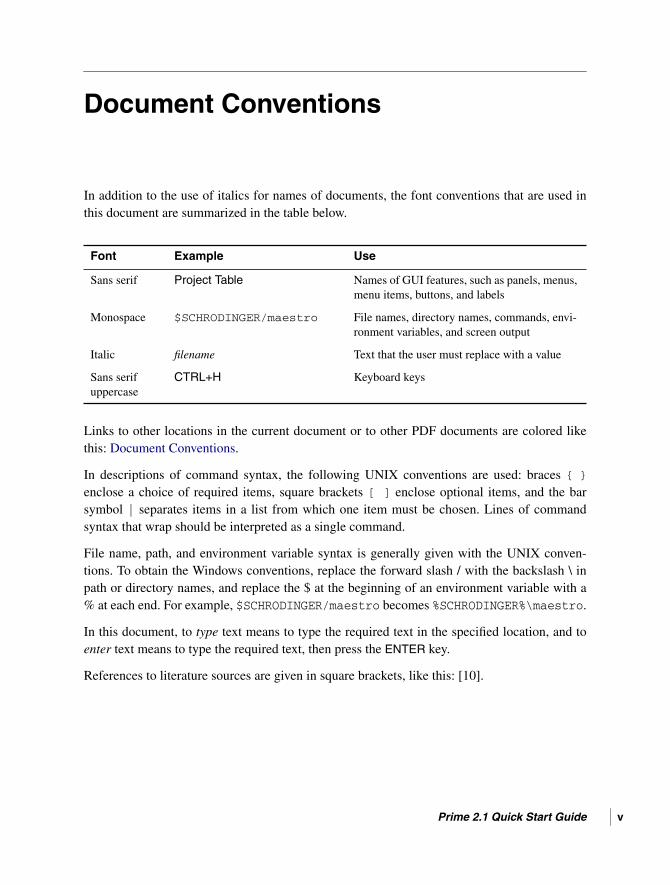
Document Conventions
In addition to the use of italics for names of documents, the font conventions that are used inthis document are summarized in the table below.
Links to other locations in the current document or to other PDF documents are colored likethis: Document Conventions.
In descriptions of command syntax, the following UNIX conventions are used: braces { }
enclose a choice of required items, square brackets [ ] enclose optional items, and the barsymbol | separates items in a list from which one item must be chosen. Lines of commandsyntax that wrap should be interpreted as a single command.
File name, path, and environment variable syntax is generally given with the UNIX conven-tions. To obtain the Windows conventions, replace the forward slash / with the backslash \ inpath or directory names, and replace the $ at the beginning of an environment variable with a% at each end. For example, $SCHRODINGER/maestro becomes %SCHRODINGER%\maestro.
In this document, to type text means to type the required text in the specified location, and toenter text means to type the required text, then press the ENTER key.
References to literature sources are given in square brackets, like this: [10].
Font Example Use
Sans serif Project Table Names of GUI features, such as panels, menus,menu items, buttons, and labels
Monospace $SCHRODINGER/maestro File names, directory names, commands, envi-ronment variables, and screen output
Italic filename Text that the user must replace with a value
Sans serifuppercase
CTRL+H Keyboard keys
Prime 2.1 Quick Start Guide v

vi
Prime 2.1 Quick Start Guide
Prime Quick Start Guide
Chapter 1
Chapter 1: Introduction
This manual provides a tutorial introduction to using the Prime protein structure predictionsuite. It includes tutorial exercises for the Prime–Structure Prediction Comparative ModelingPath. For a tutorial introduction to the Induced Fit Docking protocol, which uses Prime andGlide, see the document Induced Fit Docking.
Maestro is the graphical interface for Schrödinger products. The two Prime modules, Prime–Structure Prediction and Prime–Refinement, are run from Maestro panels which are openedfrom the Maestro Applications menu. Prime also uses the main Maestro window to display 3Dstructures and the Maestro Project Facility to handle information about the structures itproduces. For an overview of Maestro, see the Maestro Overview. For more information onusing Maestro, see the Maestro online help or the Maestro User Manual.
The Prime modules are briefly described in the tutorial chapters. For more information aboutPrime features, see the Prime User Manual.
It is assumed that you have already installed Maestro 9.0, Prime 2.1, and supporting third-partyprograms and databases (PDB, BLAST, HMMER/Pfam) from the Schrödinger CDs. In addi-tion, it is assumed that you have downloaded and installed the optional (but highly recom-mended) third-party secondary structure prediction program PSIPRED. To find out how toobtain third-party programs, go to the Third Party Programs page of our website.
Before you can do the tutorial exercises, you must first set the SCHRODINGER environmentvariable to the installation directory for your Schrödinger software. To set this variable, enterthe following command at a shell prompt:
Once you have set the SCHRODINGER environment variable, you can start Maestro with thefollowing command:
$SCHRODINGER/maestro &
It is usually a good idea to change to the desired working directory before starting Maestro.This directory then becomes Maestro’s working directory. For more information on startingMaestro, including starting Maestro on a Windows platform, see Section 2.1 of the MaestroUser Manual.
csh/tcsh: setenv SCHRODINGER installation-directory
bash/ksh: export SCHRODINGER=installation-directory
Prime 2.1 Quick Start Guide 1

2
Prime 2.1 Quick Start Guide
Prime Quick Start Guide
Chapter 2
Chapter 2: Comparative Modeling Tutorial
Below is a step-by-step tutorial that takes you through the Comparative Modeling path ofPrime–Structure Prediction and demonstrates the use of stand-alone Prime–Refinement. Youwill be building and refining a model of a query sequence for which a sequence homolog canbe identified using BLAST. While the tutorial is self-contained, you may find it useful to referto the Prime User Manual or the online help (click the Help button in any Prime panel) formore detailed information about the individual programs that make up the ComparativeModeling path. If you have not already done so, set the Schrödinger environment variable andstart Maestro. See Chapter 1 for instructions.
2.1 Importing the Query Sequence
The query sequence that will be used is closely related to that of phosphoglycerate kinase fromPyrococcus furiosus, but has been modified slightly to provide a case that best demonstratesvarious features of Prime’s Comparative Modeling path:
>QueryYNRTVFLRVDLNSPMSNGKVQSDARFRAVLPTIKYLIESGAKVVVGTHQGKEYSTTEEHARILSELLNMHVEYVEDYAIFGISKARERAAMKPGEVIVLENLRFSAEEFVRKLSQVIDLVVNDAFAAAHRSQPSLVGFARIKPMIMGFL
In this section, you will copy the query sequence from the tutorial directory and import it intoPrime as the first step of the Structure Prediction workflow.
1. Copy the sequence file for this tutorial into your working directory:
cp $SCHRODINGER/psp-vversion/tutorial/PrimeTutorial1.fasta dir
2. Start Maestro by entering the command:
$SCHRODINGER/maestro &
3. On the main toolbar, click the Save as button:
The Save As Project dialog box is displayed.
Prime 2.1 Quick Start Guide 3
Chapter 2: Comparative Modeling Tutorial
4
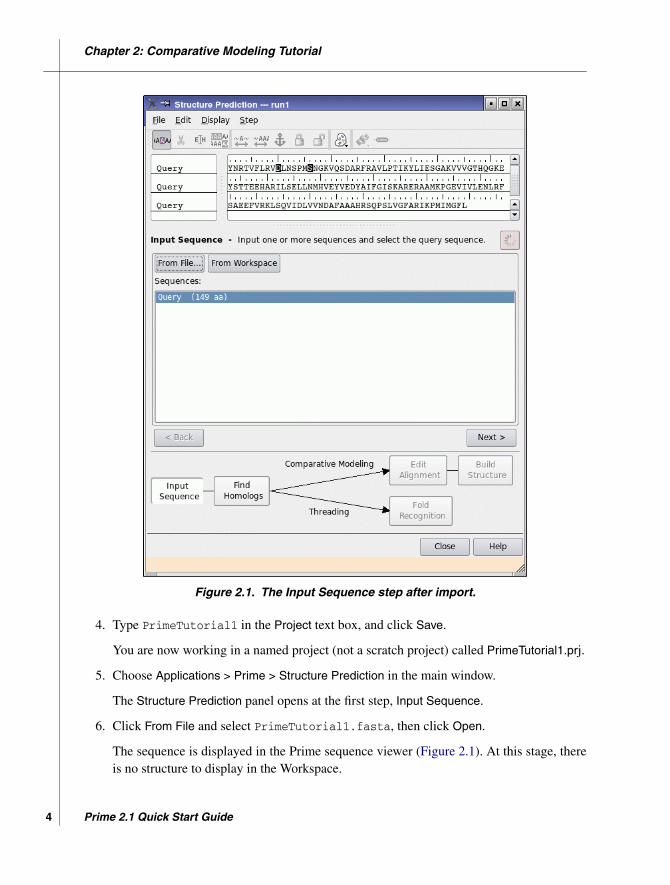
Figure 2.1. The Input Sequence step after import.
4. Type PrimeTutorial1 in the Project text box, and click Save.
You are now working in a named project (not a scratch project) called PrimeTutorial1.prj.
5. Choose Applications > Prime > Structure Prediction in the main window.
The Structure Prediction panel opens at the first step, Input Sequence.
6. Click From File and select PrimeTutorial1.fasta, then click Open.
The sequence is displayed in the Prime sequence viewer (Figure 2.1). At this stage, thereis no structure to display in the Workspace.
Prime 2.1 Quick Start Guide

Chapter 2: Comparative Modeling Tutorial
Unlike the Prime sequence viewer, the Workspace sequence viewer in the lower part ofthe Maestro main panel displays sequences only for named entries in a project. Until theend of this tutorial, when the finished structure is added to the Project Table, the Work-space sequence viewer remains empty.
7. Click Next to proceed to the next step, Find Homologs.
2.2 Finding Sequence Homologs
In this step, you will search for homologous proteins with known structure using BLAST, thenselect one homolog as a template.
1. Click Search.
The Find Homologs Run Search job is started.
This search usually takes less than 1 minute on a 1-GHz processor. When the job finishes, a listof potential templates is displayed in the Homologs table. The highest-scoring template isselected by default, as shown in Figure 2.2.
The PDB and BLAST databases provided are continually being updated. Therefore, the rankorder and scores of the homologs found might differ slightly from that shown.
2. If the SSA is not visible in the sequence viewer, click the View SSA button on the toolbar.
This button displays the secondary structure assigment in the sequence viewer. If it wasnot selected, when you select it the assignment for the homolog is displayed in thesequence viewer, with _ssa added to the homolog name.
3. Select the 1VPE_A template (by clicking its row).
This template should be near the top of the Homologs table.
The BLAST alignment between the template and query sequences is displayed in thePrime sequence viewer, along with the secondary structure assignment of the template. Inaddition, the selected template is displayed in the Workspace.
Prime 2.1 Quick Start Guide 5

Chapter 2: Comparative Modeling Tutorial
6
Figure 2.2. The Find Homologs step after searching for homologs.
4. Zoom in on the region of the template that is aligned to the query (the colored region ofthe ribbon representation.) and manipulate the view to resemble Figure 2.3.
5. Once you are satisfied with the view, save the view so you can easily return to it. To dothis, click the Save View button on the Maestro toolbar:
Prime 2.1 Quick Start Guide

Chapter 2: Comparative Modeling Tutorial
Figure 2.3. The 1VPE_A template, showing the region aligned with the query.
(Optional) To obtain HMMER/Pfam family and sequence data:
1. Click Find Family.
This job should take 2 to 3 minutes to complete. A Hidden Markov Model (HMM) isgenerated from a multiple sequence alignment and used to identify the query family andprovide information about which residues are conserved in the consensus sequence.
When the job finishes, the family appears in the Query family name text box, and thesequence is displayed in the sequence viewer, labeled Query_pfam.
A minus sign appears beside the query name in the sequence viewer: this is a collapse/expand “button”. Clicking on the minus sign hides the Pfam sequence, and the minus signbecomes a plus sign; clicking on the plus sign displays the Pfam sequence again.
2. Choose Legend from the Display menu or from the right-click menu in the sequenceviewer.
Prime 2.1 Quick Start Guide 7
Chapter 2: Comparative Modeling Tutorial
8
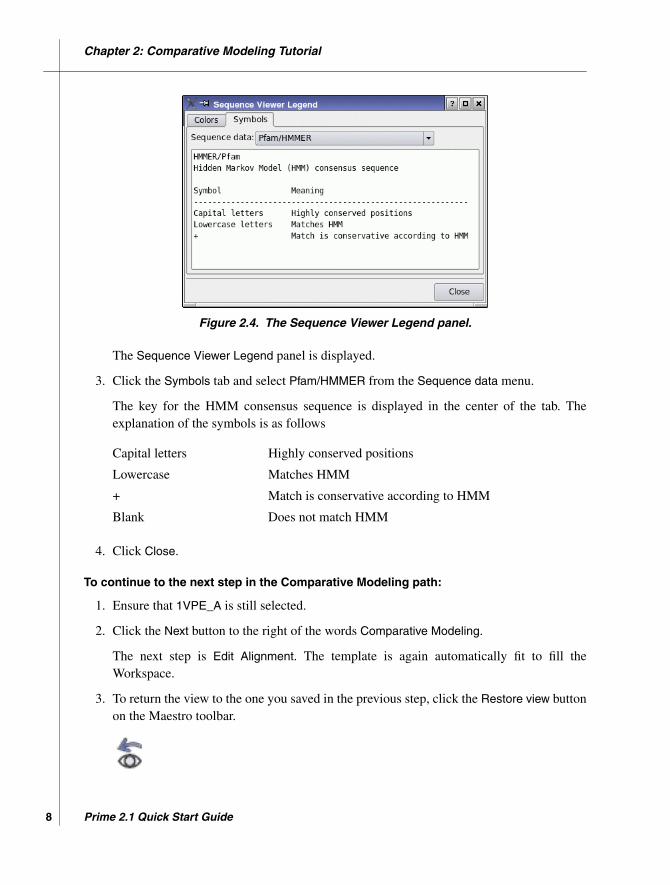
Figure 2.4. The Sequence Viewer Legend panel.
The Sequence Viewer Legend panel is displayed.
3. Click the Symbols tab and select Pfam/HMMER from the Sequence data menu.
The key for the HMM consensus sequence is displayed in the center of the tab. Theexplanation of the symbols is as follows
4. Click Close.
To continue to the next step in the Comparative Modeling path:
1. Ensure that 1VPE_A is still selected.
2. Click the Next button to the right of the words Comparative Modeling.
The next step is Edit Alignment. The template is again automatically fit to fill theWorkspace.
3. To return the view to the one you saved in the previous step, click the Restore view buttonon the Maestro toolbar.
Capital letters Highly conserved positions
Lowercase Matches HMM
+ Match is conservative according to HMM
Blank Does not match HMM
Prime 2.1 Quick Start Guide

Chapter 2: Comparative Modeling Tutorial
2.3 Editing the Alignment
Because the alignment provided by the Find Homologs step is based only on sequence infor-mation, there is room for improvement. For example, the default alignment has placed a gap atquery residue His59, which corresponds to the middle of a helix in the template (Figure 2.5).Therefore, it is unlikely that the alignment returned by BLAST is correct in this region. Thiscan be rectified either by hand-editing the alignment or by using the Prime Align program,which takes secondary structure into account.
Figure 2.5. Initial view of the Edit Alignment step.
Prime 2.1 Quick Start Guide 9
Chapter 2: Comparative Modeling Tutorial
10
Before making changes to the BLAST alignment, save the current run:
1. From the File menu, choose Rename.
2. Enter Blast_Alignment in the dialog box, then click OK.
Name the new run you will be working in:
3. From the File menu, choose Save As.
4. Type New_Alignment in the text box and click OK.
The New_Alignment run is the one that is now open. The Blast_Alignment run hasbeen closed, but can be reopened at any time.
In order to deal with the fact that secondary structure prediction is only about 75% accurate,1
Prime supports running two distinct secondary structure prediction programs. One of these,SSpro, is bundled with Prime. However, the other, PSIPRED, is not. If you have not alreadydone so, you can find out how to obtain third-party programs from the Third Party Programspage of our website.
Now generate secondary structure predictions for the query to help guide the Align program:
5. Click Run SSP to run all available SSP programs.
If the optional SSP program PSIPRED was installed (strongly recommended), this jobshould take about 5 minutes.
Once the SSP job is completed (when the job status button turns pink and stops spinning),the secondary structure predictions of the query are displayed in the sequence viewer, asin Figure 2.6.
This and subsequent operations may produce different views of the structure in the Workspace.Click Restore view as needed.
6. Click Align.
The Prime Align program starts running. This job may take 20 minutes to complete.
Once the Align job finishes, the new alignment is displayed in the sequence viewer andthe values in the Alignments table are updated. The template’s Score, which was 0.0 priorto running the Align job, is now a non-zero number. In addition to some other minorchanges in the alignment, the gap at His59 has been moved to an adjacent loop. Thismakes more physical sense and is likely to result in a more accurate homology model.
1. For example, visit the EVA site at http://cubic.bioc.columbia.edu/eva/sec/res_sec.html for more details
Prime 2.1 Quick Start Guide
Chapter 2: Comparative Modeling Tutorial
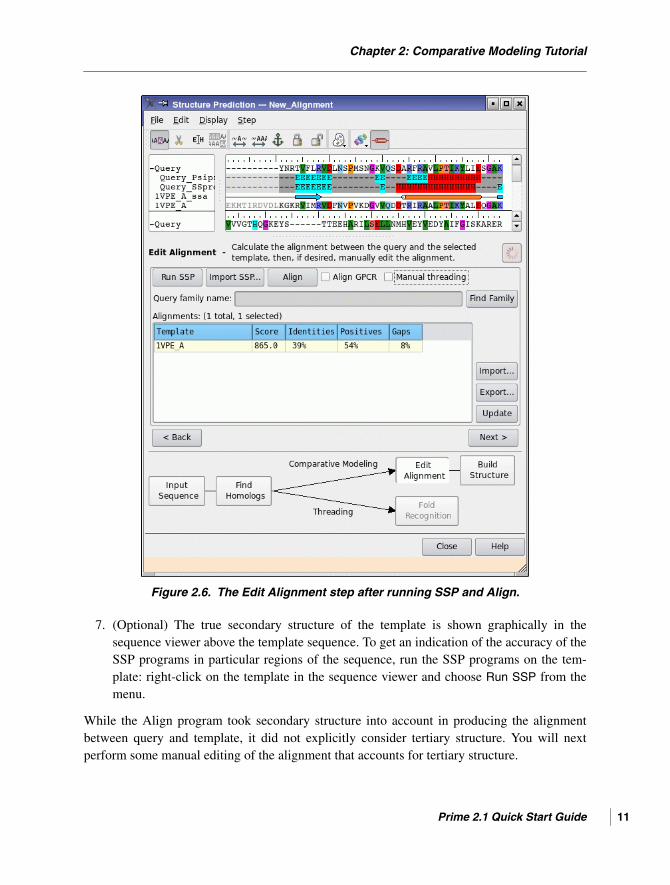
Figure 2.6. The Edit Alignment step after running SSP and Align.
7. (Optional) The true secondary structure of the template is shown graphically in thesequence viewer above the template sequence. To get an indication of the accuracy of theSSP programs in particular regions of the sequence, run the SSP programs on the tem-plate: right-click on the template in the sequence viewer and choose Run SSP from themenu.
While the Align program took secondary structure into account in producing the alignmentbetween query and template, it did not explicitly consider tertiary structure. You will nextperform some manual editing of the alignment that accounts for tertiary structure.
Prime 2.1 Quick Start Guide 11

Chapter 2: Comparative Modeling Tutorial
12
8. Select Manual Threading to enter the Manual Threading mode.
Aligned residues in the template in the Workspace are now colored according to thequery’s Residue Property (Figure 2.7). That is, they are colored according to the residuetype to which they will be converted once the model is built. Residues that are not beingused in the current alignment are undisplayed, revealing where gaps exist in thealignment.
9. Examine the structure to confirm that hydrophobic residues (green) are directed towardthe interior of the protein and charged residues (negative: red, positive: blue) are directedtoward solvent (polar uncharged residues are colored cyan).
The only exception is Helix 97-104 (template numbering), shown in Figure 2.7. To findthis helix in the Workspace:
a. Scroll the Prime sequence viewer to the second row.
b. Locate the residue labeled (98) Asp97 by moving the pointer over the residues inthe sequence viewer for the template.
c. Drag to select the residues in the template from (98) Asp97 to (105) Glu104.
The selected residues are highlighted in the Workspace with yellow markers.
Figure 2.7. The template colored by the query’s residue property.
Helix 97-104
Prime 2.1 Quick Start Guide

Chapter 2: Comparative Modeling Tutorial
10. Remove the markers by clicking in a blank area in the sequence viewer or the Workspace.
Several charged residues appear to be directed towards the interior of the protein, which islikely to result in buried charges in the model once built. This problem can be rectified bymanually editing the alignment in this region. Fortunately, there is a two-residue gap near thehelix that allows for some flexibility in the local alignment.
11. Change to Slide Freely mode by clicking Slide Freely on the Prime toolbar:
12. Drag residue Leu106 (of the template) to the left by two positions.
The original gap is closed, and a new C-terminal gap is created.
13. Click Update to view the effect of the change in the Workspace.
The problematic charged residues are now mapped to residues directed outward, which ismore physically reasonable (see Figure 2.8).
Now that an optimal alignment between query and template has been generated, you canproceed to the next step.
14. Click Next to proceed to the Build Structure step.
Figure 2.8. Helix from Figure 2.7 after hand editing in Manual Threading mode.
Helix 97-104
Prime 2.1 Quick Start Guide 13

Chapter 2: Comparative Modeling Tutorial
14
2.4 Building a Model Structure
The Build Structure program builds insertions, closes gaps, and predicts side-chain conforma-tions of non-conserved residues to produce a model with no unphysical clashes. However, itdoes this efficiently, without extensive conformational sampling. The structure produced in theBuild Structure step is likely to represent only a local energy minimum and not the globalminimum. Therefore, regions with gaps in the alignment are likely to require refinement in therefinement step.
Figure 2.9. The Build Structure step after building.
Prime 2.1 Quick Start Guide

Chapter 2: Comparative Modeling Tutorial
Figure 2.10. Workspace after building structures.
In this part of the exercise, you will construct a homology model that is based on the alignmentproduced in the previous step and that includes the template ligand 3PG.
1. Select the ligand 3PG from the Include ligand and cofactors list .
The selected ligand is highlighted in the Workspace.
2. Click Build.
This job takes about 15 minutes on a 1-GHz processor.
Once the model-building calculation is complete, the model is displayed in the Work-space superimposed on the template (Figure 2.10).
3. When the job finishes, click Add to Project Table.
The Project Table panel opens with the selected structure as an entry.
4. Close the Structure Prediction panel.
Prime 2.1 Quick Start Guide 15

Chapter 2: Comparative Modeling Tutorial
16
5. Click the In column in the Project Table panel to include the entry in the Workspace.
The predicted structure is incorporated into the Project Table and is displayed in theWorkspace.
Structures visible in the Workspace while working in the Structure Prediction interface arescratch entries (not yet part of the Project Table.) The Workspace sequence viewer does notdisplay scratch entries. Now that this structure is a Project Table entry, its sequence and SSAare displayed in the Workspace sequence viewer. The Workspace sequence viewer is notdisplayed by default. To display it, choose View > Sequence Viewer from the main window.
2.5 Refining Target Regions of the Structure
2.5.1 Refining Loops
To improve the structure most efficiently, you should focus refinement efforts on areas of thestructure that are likely to be problematic. In general terms, this means refining loops (particu-larly where insertions have been made or gaps closed) and re-predicting side-chain conforma-tions. A particular structure may also have atom position clashes, non-ideal bond lengths andangles, and residues with unfavorable energies.
1. Choose Applications > Prime > Refinement from the main window.
The Refinement panel opens.
There are four refinement tasks available: Refine loops, Predict side chains, Minimize, andEnergy Analysis. Refine loops is the default task.
2. Click Load from Workspace.
The Loops table is populated.
3. In the table of loops, click on the word loop4.
Loop 4, which includes residues 47 through 56, is selected. Markers appear in the Work-space to indicate the location of this loop in the structure.
Refinement of loops of six or more residues should be performed using extended, notdefault, sampling. You can change the sampling method in the Structure RefinementOptions panel.
In this exercise, the length of the loop will be edited so that the faster default samplingcan be used.
4. Change the beginning residue (Res1) to 53 for loop4.
Prime 2.1 Quick Start Guide

Chapter 2: Comparative Modeling Tutorial
You can edit the table by clicking in a cell and entering a new value.
5. Click the check box for loop4 in the Run column.
6. Click Start.
The Refinement - Start dialog box opens.
7. Choose Append new entries as a new group from the Incorporate option menu.
8. Enter LoopRefinement in the Name text box.
9. Click Start to launch the job.
The refinement calculation is started. This job may take 30 minutes. The Monitor panel isdisplayed and lists the log file.
When the job finishes, the predicted structure is incorporated into the Project Table and isdisplayed in the Workspace.
While we have been referring to the calculation that was just performed as a refinement, it ismore accurately described as a prediction. The so-called refinement of loop 53-56 was in factan ab initio loop prediction, in that the program initially deleted the loop, reconstructed it in aparticular way, and then exhaustively sampled it to identify the lowest energy conformation.
Refinement of loops that are less than 9 residues long yield excellent results in a large majorityof cases. Loops 10 to 12 residues long yield very good results in a majority of cases. Loops 13to 15 residues long produce a low energy conformation most of the time, but probably not theglobal minimum. Loops 16 to 20 residues long produce a low energy conformation, but refine-ment of loops this long will take on the order of 1-2 days. Loops longer than 20 residues longshould not be attempted, partly because of the sampling problem, but also because the runtimes will be unreasonably long.
2.5.2 Minimizing Target Regions
Since only side chains (not the backbone) of residues within 7.5 Å were sampled during theprevious loop refinement, it is not unreasonable to minimize the local environment of the loopbefore considering refinement complete.
1. In the Refinement panel, choose Minimize from the Task menu.
To open the panel, choose Applications > Prime > Refinement from the main window.
2. Choose Minimize from the Task menu.
3. Click Select.
The Atom Selection dialog box is displayed.
Prime 2.1 Quick Start Guide 17

Chapter 2: Comparative Modeling Tutorial
18
4. In the Residue Number text box, enter 53-56 and click Add.
5. Click Proximity.
The Proximity dialog box is displayed.
6. Type 8.5 in the text box, select Residues, and click OK.
7. Click OK in the Atom Selection dialog box.
Loop 53-56 and all residues within 8.5 Å are now selected.
8. Click Start.
The Refinement - Start dialog box opens.
9. Choose Append new entries as a new group from the Incorporate option menu.
10. Enter LoopMinimization in the Name text box.
11. Click Start to launch the job.
When the job finishes, the minimized structure is automatically incorporated into theproject. It is now possible to use the refined homology model as input to otherSchrödinger programs.
Prime 2.1 Quick Start Guide

Prime Quick Start Guide
Getting Help
Schrödinger software is distributed with documentation in PDF format. If the documentation isnot installed in $SCHRODINGER/docs on a computer that you have access to, you should installit or ask your system administrator to install it.
For help installing and setting up licenses for Schrödinger software and installing documenta-tion, see the Installation Guide. For information on running jobs, see the Job Control Guide.
Maestro has automatic, context-sensitive help (Auto-Help and Balloon Help, or tooltips), andan online help system. To get help, follow the steps below.
• Check the Auto-Help text box, which is located at the foot of the main window. If help isavailable for the task you are performing, it is automatically displayed there. Auto-Helpcontains a single line of information. For more detailed information, use the online help.
• If you want information about a GUI element, such as a button or option, there may beBalloon Help for the item. Pause the cursor over the element. If the Balloon Help doesnot appear, check that Show Balloon Help is selected in the Maestro menu of the mainwindow. If there is Balloon Help for the element, it appears within a few seconds.
• For information about a panel or the tab that is displayed in a panel, click the Help buttonin the panel, or press F1. The help topic is displayed in your browser.
• For other information in the online help, open the default help topic by choosing OnlineHelp from the Help menu on the main menu bar or by pressing CTRL+H. This topic is dis-played in your browser. You can navigate to topics in the navigation bar.
The Help menu also provides access to the manuals (including a full text search), the FAQpages, the New Features pages, and several other topics.
If you do not find the information you need in the Maestro help system, check the following:
• Maestro User Manual, for detailed information on using Maestro• Maestro Command Reference Manual, for information on Maestro commands• Maestro Overview, for an overview of the main features of Maestro• Maestro Tutorial, for a tutorial introduction to basic Maestro features• Prime User Manual, for detailed information on using Prime• Prime Frequently Asked Questions pages, at
https://www.schrodinger.com/Prime_FAQ.html• Known Issues pages, available on the Support Center.
Prime 2.1 Quick Start Guide 19

Getting Help
20
The manuals are also available in PDF format from the Schrödinger Support Center. Localcopies of the FAQs and Known Issues pages can be viewed by opening the fileSuite_2009_Index.html, which is in the docs directory of the software installation, andfollowing the links to the relevant index pages.
Information on available scripts can be found on the Script Center. Information on availablesoftware updates can be obtained by choosing Check for Updates from the Maestro menu.
If you have questions that are not answered from any of the above sources, contact Schrödingerusing the information below.
E-mail: [email protected]: Schrödinger, 101 SW Main Street, Suite 1300, Portland, OR 97204Phone: (503) 299-1150Fax: (503) 299-4532WWW: http://www.schrodinger.comFTP: ftp://ftp.schrodinger.com
Generally, e-mail correspondence is best because you can send machine output, if necessary.When sending e-mail messages, please include the following information:
• All relevant user input and machine output• Prime purchaser (company, research institution, or individual)• Primary Prime user• Computer platform type• Operating system with version number• Prime version number• mmshare version number
On UNIX you can obtain the machine and system information listed above by entering thefollowing command at a shell prompt:
$SCHRODINGER/utilities/postmortem
This command generates a file named username-host-schrodinger.tar.gz, which youshould send to [email protected]. If you have a job that failed, enter the followingcommand:
$SCHRODINGER/utilities/postmortem jobid
where jobid is the job ID of the failed job, which you can find in the Monitor panel. Thiscommand archives job information as well as the machine and system information, andincludes input and output files (but not structure files). If you have sensitive data in the joblaunch directory, you should move those files to another location first. The archive is namedjobid-archive.tar.gz, and should be sent to [email protected] instead.
Prime 2.1 Quick Start Guide

Getting Help
If Maestro fails, an error report that contains the relevant information is written to the currentworking directory. The report is named maestro_error.txt, and should be sent [email protected]. A message giving the location of this file is written to the terminalwindow.
More information on the postmortem command can be found in Appendix A of the JobControl Guide.
On Windows, machine and system information is stored on your desktop in the fileschrodinger_machid.txt. If you have installed software versions for more than onerelease, there will be multiple copies of this file, named schrodinger_machid-N.txt,where N is a number. In this case you should check that you send the correct version of the file(which will usually be the latest version).
If Maestro fails to start, send email to [email protected] describing the circumstances,and attach the file maestro_error.txt. If Maestro fails after startup, attach this file and thefile maestro.EXE.dmp. These files can be found in the following directory:
%USERPROFILE%\Local Settings\Application Data\Schrodinger\appcrash
Prime 2.1 Quick Start Guide 21

22
Prime 2.1 Quick Start Guide
Prime Quick Start Guide
Glossary
alignment—The optimal matching of residue positions between sequences, typically a querysequence and one or more template sequences.
anchor—A constraint on alignment set at a given residue position. Alignment changes mustpreserve the query-template pairing at that residue until the anchor is removed.
ASD—Atom Selection dialog box.
ASL—Atom Specification Language.
button menu—The menu available from a toolbar menu button, which you open by holdingdown the left mouse button.
Comparative Modeling—Protein structure modeling based on a query-template match with asubstantial percentage of identical residues (usually 50% or greater sequence identity).
composite template—A type of template used in the Threading Path, produced from the core(invariable) and variable regions of a family of structurally similar proteins.
constraints—Tools to keep regions of a sequence (alignment constraints) or structure (duringminimization) in a particular configuration.
deletions—The residues missing from a query sequence that are present in a templatesequence.
entry—A structure or set of structures and associated properties. Entries are represented as arow in the project table, and can be used as input for jobs.
Fold Recognition—The use of secondary structure matching and profiles generated frommultiple sequence/structure alignments to find templates when sequence methods are unsuc-cessful.
gaps—The spaces in an alignment resulting from insertions and deletions.
HETATMs—The atoms of residues, including amino acids, that are not one of the standard 20amino acids. In PDB files, HETATM.
homolog—A sequence/structure related to the query sequence; i.e., a sequence with many ofthe same residues in the same patterns as the query sequence. Usually these sequences arederived from the same family and may have similar function.
Prime 2.1 Quick Start Guide 23

Glossary
24
insertions—The extra residues found in a query sequence that are not found in a templatesequence.
loop—A region of undefined secondary structure.
Maestro toolbar—The array of icon buttons which provides tools for common Maestro tasks,located by default along the left side of the main window. There are buttons for operations suchas moving structures in the Workspace, changing what is displayed, opening a project, orundoing the most recent Maestro operation.
Main menu bar—The menu bar at the top of the main Maestro window below the Auto-Helpwindow. The main menu bar contains menu titles (Maestro, Project, Edit, etc.) that, whenclicked, display menus from which selections can be made.
menu button—A toolbar button that has a menu, which you open by holding down the leftmouse button. The button has a black triangle in the lower right corner.
Prime toolbar—The row of icon buttons which provides tools for common Prime tasks,located near the top of the Prime-SP panel.
project—A collection of related data, such as structures with their associated properties. InPrime a project comprises one or more runs (executions of the Prime workflow). The projectmay include data that does not appear in the project table.
project table—The Maestro panel associated with a project, featuring a table with rows ofentries and columns of properties.
query sequence—A sequence of unknown structure or fold.
Ranking Score—The score used to rank composite templates derived from different seedtemplates. Generated by the Global Scoring Function in the Threading Path.
refinement—An improvement of a model structure through energy-based optimization ofselected regions.
run—A single execution of the Prime workflow using a particular set of choices (of templates,of Paths, and of settings). Each run belongs to a project. Runs cannot be saved without savingthe project to which they belong.
SSA—Secondary structure assignment.
SSP—Secondary structure prediction.
sequence viewer—An area in which protein sequences are displayed. Right-clicking asequence opens an option menu.There are sequence viewers in the Prime–SP panel and in theMaestro main window. The Prime sequence viewer displays query and template sequences,
Prime 2.1 Quick Start Guide

Glossary
including family and conservation data in sequence format, SSAs, and SSPs. The Workspacesequence viewer displays the sequence and (by default) the SSA for the structures included inthe Workspace, provided that they are entries in a named Maestro project.
template sequence—A sequence of known structure and fold used as a basis for building amodel of the query.
Threading—A structure prediction process in which Fold Recognition is used to definetemplates, then backbone models are built via alignment to composite templates and refined.May be used when query-template sequence identity is low.
Workspace—The open area in the center of the Maestro main window in which structures aredisplayed.
Z-Score—Measures the compatibility of the query sequence with the model structure, relativeto the compatibility of randomly shuffled sequences of the same composition.
Prime 2.1 Quick Start Guide 25

26
Prime 2.1 Quick Start Guide

120 West 45th Street, 29th Floor
New York, NY 10036
101 SW Main Street, Suite 1300
Portland, OR 97204
8910 University Center Lane, Suite 270
San Diego, CA 92122
Zeppelinstraße 13
81669 München, Germany
Dynamostraße 13
68165 Mannheim, Germany
Quatro House, Frimley Road
Camberley GU16 7ER, United Kingdom
SCHRÖDINGER ®