press inspection procedures - smith & assoc
TRANSCRIPT

Informal and Formal Press Inspection Procedures C45.doc rev February 1, 2006 Smith & Associates, 530 Hollywood Drive, Monroe, Michigan 48162-2943 © 1993, 1997
INFORMAL AND FORMAL PRESS INSPECTION PROCEDURES
Inspecting the condition of a stamping press can range in complexity from a visual inspection while in operation, to careful examination of all parts when the machine is disassembled. A person experienced in determining press condition can tell a great deal about the condition of the machine by noting any irregular operation when in use. Inspection and record keeping requirements vary. In the United States, current OSHA law requires the employer to establish and follow a program of regular periodic inspections of the press. This is done to insure that the machine together with auxiliary equipment and safeguards are in safe condition and properly adjusted. A maintenance file must be kept for each press. The file includes a record of all inspection reports and maintenance performed. A backlog of open maintenance items must not be allowed to develop. Safety related items must be corrected at once.
Scope of Inspections Performing press inspections as part of the preventive maintenance program allows orderly scheduling of repairs and permits the correction of problems before they result in downtime or endanger personnel. Formal press inspections must be made at regular intervals based on the manufacturer's recommendations. 1 2 In addition, a routine inspection must be made at the start of each shift when operators are changed and whenever dies are changed. Checking the engaging means for proper functioning and proper safeguarding of the point of operation is of paramount importance. Many things can be noted by a visual and listening check. It is especially important to note any new vibration or noises. Other items to look for are loose machine parts, evidence of machine overloading and lubrication problems.
1 C. Wick, J. T. Benedict, R. F. Veilleux, "Tool and Manufacturing Engineers Handbook" Volume 2 fourth edition, Forming, The Society of Manufacturing Engineers, Dearborn, Michigan © 1984. 2 J. Fredline, "Practical Solutions for Troubleshooting Metal Stamping Presses" SME Technical Paper MS88-200, The Society of Manufacturing Engineers, Dearborn, Michigan. ©1988.
1

Informal and Formal Press Inspection Procedures C45.doc rev February 1, 2006 Smith & Associates, 530 Hollywood Drive, Monroe, Michigan 48162-2943 © 1993, 1997
Management's Responsibility Management has the legal primary responsibility to insure safe press functioning. 3 However, the operator and/or diesetter should be part of the process if informal inspection and immediate reporting to management of any obvious machine malfunctions.
Example of Operator and/or Diesetter Press Malfunction Reporting In many shops, they are assigned the task of making an informal inspection. They are usually very familiar with the machine's operation. A partial list of things to look and listen for that should be reported at once is:
1. Lubricant level and pressure. 2. Proper distribution of lubricant to parts of the press visible to the operator and
diesetter. 3. Any leakage of lubricant other than normal seepage. 4. Evidence of overheating such as strange smells, vapor and smoke. 5. Any new sound or change in operation of the press. 6. Press overloading based on tonnage monitor readings and/or irregular press
operation.
A simple set procedure can simplify the routine inspection task. Management must investigate any change at once, and schedule maintenance. It is far better to remove the machine from service to correct a problem, than to ignore the situation and risk serious machine damage and potential danger of injury to personnel.
3 US Department of Labor Occupational Safety and Health Regulations OSHA Regulations (Standards - 29 CFR) PART 1910 Occupational Safety and Health Standards (e) Inspection, maintenance, and modification of presses -.1910.217(d)(9)(iii) (1) Inspection and maintenance records. (i) It shall be the responsibility of the employer to establish and follow a program of periodic and regular inspections of his power presses to ensure that all their parts, auxiliary equipment, and safeguards are in a safe operating condition and adjustment. The employer shall maintain a certification record of inspections which includes the date of inspection, the signature of the person who performed the inspection and the serial number, or other identifier, of the power press that was inspected. NOTE: This footnote contains material extracted from US Department of Labor Occupational Safety and Health Regulations OSHA Regulations (Standards - 29 CFR) PART 1910. Depending on the type of press actuating means and safeguarding employed, the minimum frequency of inspection may be spelled out. The basic duty of the employer to maintain a safe workplace by following sound engineering practice must be followed. The Federal Law may be administered by the state which must meet the Federal OSHA requirements as a minimum standard. More stringent restrictions may be required by state administrative law governing power press operation. In addition, insurance regulations may require more stringent safety regulations as a condition of providing coverage.
2

Informal and Formal Press Inspection Procedures C45.doc rev February 1, 2006 Smith & Associates, 530 Hollywood Drive, Monroe, Michigan 48162-2943 © 1993, 1997
Figure 1. A simplified generic example of a formal inspection form. The items on the list are not all inclusive. Immediate action must be taken to correct all safety related items.
3

Informal and Formal Press Inspection Procedures C45.doc rev February 1, 2006 Smith & Associates, 530 Hollywood Drive, Monroe, Michigan 48162-2943 © 1993, 1997
The Formal Inspection 4
Competent personnel should inspect all machine components at regular intervals. The results of the inspection together with any corrective action taken or needed should be entered into a formal record keeping system. Often the record keeping is aided by a computerized maintenance management system. It is of the utmost importance that any safety related items such as improper functioning of clutch, brake, counterbalance and control systems be corrected before the machine is returned to service. Also, proper power lockout procedures are to be followed when required during the inspection procedure. Follow a Set Procedure Just as an aircraft flight crew follows an established check off procedure before take off, maintenance technicians are required to inspect the press in a thorough way. To aid this procedure, many shops develop a check sheet based on the press manufacturer's recommendations and applicable law. Figure 1 illustrates a generic example of such a sheet. It is reproduced for purposes of illustration discussion only. The reader may find it helpful as a starting point for developing a standardized form to suit their shop's requirements. The press manufacturer should supply a maintenance inspection and servicing checklist that is appropriate for the machines that they build. It is very much like the instructions for periodic maintenance checks and servicing of an automobile. Like an automobile, a press may require more frequent checks and servicing based on the severity of service to which the machine is subjected. All Parts Tight The term all encompasses everything. Obviously, a loose part may cause an expensive machine failure. In addition there is danger of injury to personnel if a part should fall. Safety Covers and Cables Some components have covers or safety cables to prevent a broken or detached part from falling. Figure 2 illustrates a safety cable used to ensure that a drive motor cannot fall off in the event that the motor mount should fail.
4 D. Smith, Quick Die Change, Chapter 27, Selecting Maintenance Software, (courtesy of P. Stang, Vice President of Professionals for Technology), The Society of Manufacturing Engineers, Dearborn, Michigan ©1991.
4

Informal and Formal Press Inspection Procedures C45.doc rev February 1, 2006 Smith & Associates, 530 Hollywood Drive, Monroe, Michigan 48162-2943 © 1993, 1997
Figure 2. Example of a safety cable used to ensure that a press drive motor cannot fall off in the event that the motor mount should fail. Smith & Associates Major Machine Components The screws, studs, nuts and other fasteners used to hold bearing caps, gears, gibbing and other parts should be manually checked for correct tightness. Safety covers and guarding devices intended to retain broken machine components in place should also be checked for proper attachment.
Press Alignment and Bearing Clearances Figure 3 illustrates a maintenance technician checking a straightside press for parallelism of the slide with the bed at bottom dead center of stroke. To perform this test, the bolster has been removed and the press bed stoned to eliminate a variable. A cast iron die parallel is used to provide a movable reference surface for the dial indicator. A precision machinist's level is also placed on the parallel. This step should be done before the rest of the machine is checked for alignment accuracy. When making formal press inspections, several approaches may be used to check and correct alignment. In our discussion we will illustrate a straightside press having two connections.
5

Informal and Formal Press Inspection Procedures C45.doc rev February 1, 2006 Smith & Associates, 530 Hollywood Drive, Monroe, Michigan 48162-2943 © 1993, 1997
Figure 3. A maintenance technician checking a straightside presses for parallelism of the slide with the bed with a dial indicator. Note that the bolster is removed to eliminate a source of inaccuracy and a machinist’s level is placed on the iron die parallel. Midway Products Corporation Press Identification The press used for purposes of illustration has a die space (and bolster) that is 60 inches (1.524 m) long and 42 inches (1.067 m) wide. A typical tonnage for a press of this size is 300 tons (2,669 KN). Standards adopted by the Joint Industry Conference (JIC) of press manufacturers and users, provide for a uniform system of press identification. This press would be conspicuously identified in a central position on the front of the press as follows:
S2-300-60-42 The “S” indicates straightside top driven construction. If the press were under-driven, the letter "U" would be used. The 2 following the “S” indicates the number of driving points or connections. The figure 300 indicates the tonnage. The next two sets of numbers give the bolster size in inches, starting with the left to right dimension.
6

Informal and Formal Press Inspection Procedures C45.doc rev February 1, 2006 Smith & Associates, 530 Hollywood Drive, Monroe, Michigan 48162-2943 © 1993, 1997
Figure 4. An exaggerated view of a precision straightedge used to check a press bolster for flatness: feeler gages are used to locate and measure any low spots. Smith & Associates
Standard Measuring Procedures There are several approaches to measuring press alignment and wear. The traditional approach to a comprehensive inspection involves making a number of measurements with a dial indicator, straightedge and square. One or more jacks capable of lifting the slide and attached linkage are needed.
The inspection can be performed by press repair contractors on an as needed basis. However, it is highly recommended that in house skills be developed to conduct the tests as part of the regular maintenance program. Training in press maintenance skills is available from several sources.
The traditional testing procedure includes:
1. Checking and aligning the bed to correct any skew. 2. Checking the ram, bed and bolster surfaces for flatness. 3. Measuring slide to bed parallelism at 90°, 180°, 270° and 360°. 4. Inspecting the bearings for proper clearances. 5. Checking slide perpendicularity (tracking) with a square and dial indicator. 6. Checking the gears for correct clearance, amount of wear and any damage. 7. Checking the gib clearances and wear condition. 8. Checking the clutch and brake for wear and proper function. 9. Examining all parts for cracks and other damage.
7

Informal and Formal Press Inspection Procedures C45.doc rev February 1, 2006 Smith & Associates, 530 Hollywood Drive, Monroe, Michigan 48162-2943 © 1993, 1997
Checking Surfaces for Flatness Figure 4 illustrates an exaggerated view of a precision straightedge used to check a press bolster for flatness. Feeler gages are used to locate and measure any low spots. A low spot in the bolster may result from wear resulting from many die changes. Quick die change rollers installed in the bolster will greatly lessen the wear due to metal-to-metal sliding friction. If the low spot is a result of an extreme overload, the bottom of the bolster will have a convex bow as well. The bed of the press may have been damaged by such a large overload, also. In the same way, a straightedge is used to check the face of the press ram and bed for low spots. A low spot in the center of a press bolster due to wear can be corrected by remachining. The cost and down time are comparatively low. If the bed or ram requires remachining the cause is probably an extreme overload condition. The machine should be disassembled for such work. Such repairs are costly.
Figure 5. A dial indicator having one inch (25.4 mm) travel equipped with a magnetic base: when used with swivel adapters and extension rods it is useful for measuring press bed to slide alignment and bearing clearances. Smith & Associates Figure 5 illustrates a dial indicator having one inch (25.4 mm) travel equipped with a magnetic base that can be turned on and off with a knob. It is used with accessories such as swivel adapters and extension rods. The magnetic base can also serve as a movable surface gauge when the magnetism is switched off. The dial indicator including the magnetic base and other accessories are essential tools for measuring press alignment and bearing clearances.
8

Informal and Formal Press Inspection Procedures C45.doc rev February 1, 2006 Smith & Associates, 530 Hollywood Drive, Monroe, Michigan 48162-2943 © 1993, 1997
Ram to Bed Parallelism The most common test method is to measure the parallelism of the slide to bed or bolster at bottom dead center as shown in Figure 3. The counterbalance air is raised above normal empty press values in order to draw up as much bearing clearance as possible. This test is easy to perform and provides useful information, especially if compared with previous readings over time. However, testing at top dead center, a quarter down (90°) and a quarter up (270°) is required for a more comprehensive evaluation of press timing and adjustment errors. Measuring Bearing Clearances A comprehensive formal machine examination normally involves measuring the clearance in each bearing. Here, the magnetic base dial indicator is also used. To assist with drawing up the bearing clearance to permit measurement, one or more hydraulic jacks capable of lifting the slide and attached linkage are used. This method is illustrated in Figure 6. Whenever unexpected machine movement could endanger personnel, it is important to follow correct lockout procedure. For example, should the slide connection fail, the slide could fall to the bolster. Here, power lockout and appropriate interlocked safety blocks should be used whenever working under the slide. Choice of Testing Method The complexity of the procedure needed to check and adjust press alignment varies according to the type of machine. Single point machines are relatively simple to check and adjust. Measuring and correcting multiple point press alignment can be complex. The maintenance technician must have a thorough understanding of the mechanical principles involved to safely and correctly check and align any machine. Single Point Presses For a single point machine having only one connection, the press to bed parallelism is determined mainly by the condition and adjustment of the gibs. If the wear surfaces of the slide and gibs are in good condition, the side-to-side and front-to-back alignment of the ram to bed can set within close limits by adjusting the gibbing. Two-Point Presses A two-point press, such as illustrated in Figure 8, depends upon the gibbing to maintain correct front-to-back alignment. However, the left-to-right parallelism can be affected by bearing wear, adjusting screw synchronization, gear timing and a number of other factors including gibbing adjustment. Four-Point Presses Machines having four connections are, in many cases, inherently self-guided by the driving mechanism. This self-guiding effect occurs in both the front-to-back and left-to-right directions. This is especially true of those machines having guided plunger type connections.
9

Informal and Formal Press Inspection Procedures C45.doc rev February 1, 2006 Smith & Associates, 530 Hollywood Drive, Monroe, Michigan 48162-2943 © 1993, 1997
Figure 6. Examples of magnetic base dial indicator and hydraulic jack placement on a straightside press to measure alignment and bearing clearances. Smith & Associates However, correct adjustment of the gibbing is necessary to increase the lateral rigidity of the machine. The gibbing greatly increases the machine's ability to resist lateral forces. Four point presses are more expensive than the less complex two-point machines. However, the extra expense is justified if tooling requires excellent guiding by the press used, if the press is very large, or if the tooling used in the process tends to tip the ram due to uneven loads.
10

Informal and Formal Press Inspection Procedures C45.doc rev February 1, 2006 Smith & Associates, 530 Hollywood Drive, Monroe, Michigan 48162-2943 © 1993, 1997
The four point, and to a lesser extent, the two point press has a redundant guiding system. There is a very real possibility of the machine guiding systems being misadjusted, causing the machine to run in a bind. Should this occur, the press and die may be damaged and poor quality work can result. A Quick Static Test The test for ram to bed or bolster parallelism performed at bottom dead center of stroke illustrated in Figure 3 should be done on a regular basis to track the health of the press. Only a dial indicator with a movable base and extension rods is required together with power lockout. Use appropriate lockout procedure and safety blocks whenever unexpected machine movement could cause injury to personnel. There is always danger whenever stored energy including gravity can cause unexpected machine movement. To take up as much bearing clearance as possible, the counterbalance pressure is raised to its maximum value once the press is inched onto BDC. The readings should be recorded on a standard inspection report form and filed for reference. The maximum out of parallel condition considered acceptable for good quality presswork is 0.001-inch (0.0254 mm) per foot (304.8 mm). For high-speed work with tooling having precise clearance requirements, including electrical lamination and computer terminal work, 0.0005-inch (0.0127 mm) per foot (304.8 mm) is the maximum allowable out of parallel condition permitted. Attaining and exceeding the press alignment tolerance in all classes of pressworking operations is a very worthwhile goal. The extra effort expended in maintaining press alignment will greatly reduce machine wear. In addition, the dies, especially where close clearance cutting operations are involved, will produce more parts before die resharpening is required. Parallelism at Other Points in the Stroke 5In addition to the measurement of press bed or bolster to ram parallelism at bottom of stroke (BDC), a thorough check involves taking measurements at top dead center (TDC), one-quarter down (90 degrees) and one-quarter up (270 degrees) on the upstroke. It is important to check ram to bed parallelism at these three other points in the stroke periodically. A record should be entered on a standard reporting form and the information maintained to pinpoint any changes over time.
5 J. Fredline, “Practical Solutions for Troubleshooting Metal Stamping Presses” SME Technical Paper MS88-200, The Society of Manufacturing Engineers, Dearborn, Michigan, ©1988.
11

Informal and Formal Press Inspection Procedures C45.doc rev February 1, 2006 Smith & Associates, 530 Hollywood Drive, Monroe, Michigan 48162-2943 © 1993, 1997
Examples of Readings When working on two and four point machines each of the following areas has an effect on parallelism:
1. Adjustment screw drive. 2. Drive train gear timing. 3. Differences in stroke lengths of crankshafts and eccentrics. 4. Slide centering with the gibbing. 5. Proper tie rod pre-stressing.
RAM HIGH RIGHT HAND SIDE OF PRESS LEFT RIGHT
TDC 0 + 1/4 DOWN 0 +
BDC 0 + 1/4 UP 0 +
Table 1. Ram High on right hand side of the press.
Interpreting the Readings 6
Our examples will cover an analysis of the readings obtained from the inspection illustrated in Figure 3. One set of readings at bottom dead center is shown in Table 1. From our readings shown in Table 1, the right side of the machine remains higher than the left side throughout the stroke. This problem is usually a misadjustment of the adjusting screw drive. 6 D. Smith Fundamentals of Pressworking, Chapter 10, Press Inspection and Maintenance © The Society of Manufacturing Engineers, Dearborn, Michigan, 1994.
12

Informal and Formal Press Inspection Procedures C45.doc rev February 1, 2006 Smith & Associates, 530 Hollywood Drive, Monroe, Michigan 48162-2943 © 1993, 1997
This problem is normally corrected by disconnecting the coupling between the left hand and right hand adjustment assemblies and lowering the high side to bring the machine back into parallel. The gibbing clearance should be checked and readjusted as needed after realigning the screw drive. Drive Train and Crankshaft Timing Misalignment due to incorrect drive train timing or a twisted crankshaft will cause the machine to run in a bind and greatly accelerate wear on the press. The following is an example of the readings taken from a machine with a timing problem.
CRANKSHAFT TWIST OR TIMING ERROR LEFT RIGHT
TDC 0 0 1/4 DOWN 0 +
BDC 0 0 1/4 UP + 0
Table 2. Example of readings obtained if there is a twisted crankshaft or eccentric gear-timing problem. Analysis of Readings In the case shown in Table 2, the slide is level at both bottom and top dead center. The right side is high at the quarter down or 90-degree position. Likewise, the left side is high at the quarter up or 270-degree position. Correction of Timing Problems On many geared machines, the problem can be corrected by leveling the slide. A driving key is removed and the gear or pinion rotated to the point where the gear clearance is evenly distributed throughout the machine. An offset key is machined and fitted in the keyway. If the problem is not a twisted crankshaft, this procedure will often correct timing problems at very little expense. Of course, if a large correction is needed, the key offset should be distributed through two or more keys to avoid any one key being offset so much that it cannot transmit the required torque without danger of shearing. If a twisted crankshaft is the source of the misalignment, it is very likely that an extreme overload caused the problem. Here, the correction will require removal of the crankshaft for repair or replacement.
13
Informal and Formal Press Inspection Procedures C45.doc rev February 1, 2006 Smith & Associates, 530 Hollywood Drive, Monroe, Michigan 48162-2943 © 1993, 1997
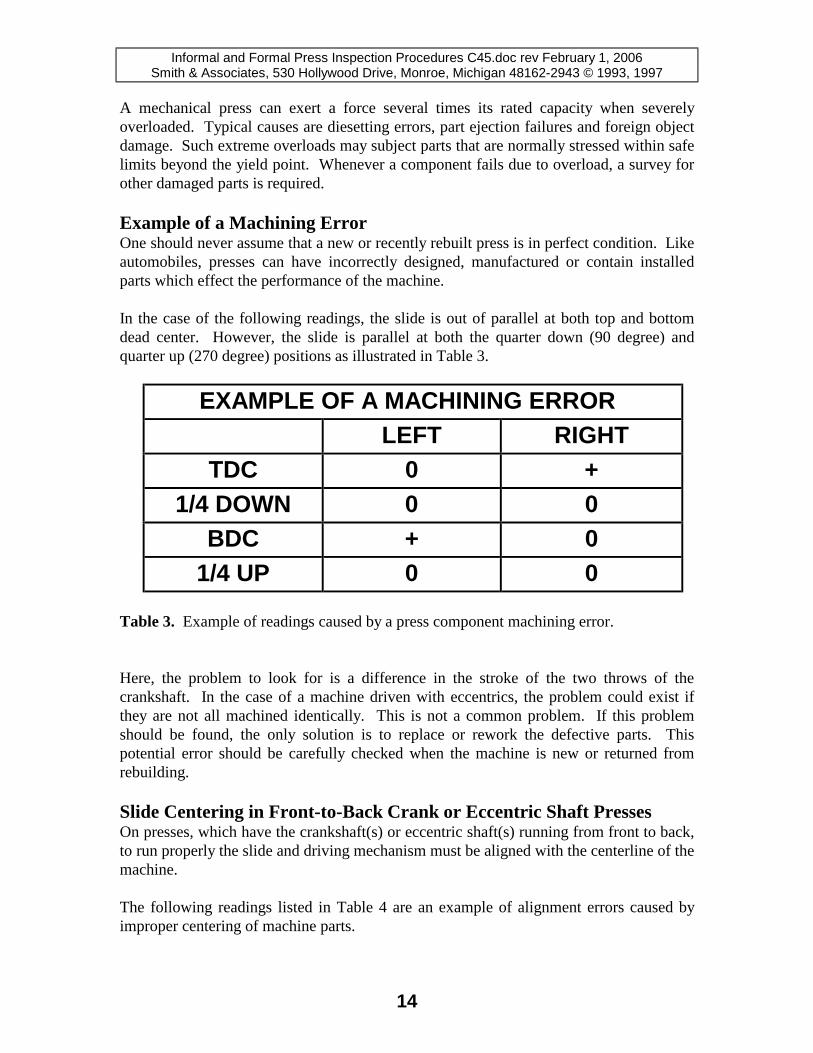
A mechanical press can exert a force several times its rated capacity when severely overloaded. Typical causes are diesetting errors, part ejection failures and foreign object damage. Such extreme overloads may subject parts that are normally stressed within safe limits beyond the yield point. Whenever a component fails due to overload, a survey for other damaged parts is required. Example of a Machining Error One should never assume that a new or recently rebuilt press is in perfect condition. Like automobiles, presses can have incorrectly designed, manufactured or contain installed parts which effect the performance of the machine. In the case of the following readings, the slide is out of parallel at both top and bottom dead center. However, the slide is parallel at both the quarter down (90 degree) and quarter up (270 degree) positions as illustrated in Table 3.
EXAMPLE OF A MACHINING ERROR LEFT RIGHT
TDC 0 + 1/4 DOWN 0 0
BDC + 0 1/4 UP 0 0
Table 3. Example of readings caused by a press component machining error. Here, the problem to look for is a difference in the stroke of the two throws of the crankshaft. In the case of a machine driven with eccentrics, the problem could exist if they are not all machined identically. This is not a common problem. If this problem should be found, the only solution is to replace or rework the defective parts. This potential error should be carefully checked when the machine is new or returned from rebuilding. Slide Centering in Front-to-Back Crank or Eccentric Shaft Presses On presses, which have the crankshaft(s) or eccentric shaft(s) running from front to back, to run properly the slide and driving mechanism must be aligned with the centerline of the machine. The following readings listed in Table 4 are an example of alignment errors caused by improper centering of machine parts.
14

Informal and Formal Press Inspection Procedures C45.doc rev February 1, 2006 Smith & Associates, 530 Hollywood Drive, Monroe, Michigan 48162-2943 © 1993, 1997
INCORRECT SLIDE CENTERING IN PRESS LEFT RIGHT
TDC 0 0 1/4 DOWN 0 +
BDC 0 0 1/4 UP + 0
Table 4. Example of readings caused by incorrect centering of the slide or other machine parts in the press uprights. The cause of these readings is often due to improper centering of the slide. Here, the gibbing must be adjusted to recenter the slide in the machine. Another common cause is excessive wear on the thrust flanges of the drive mechanism. Correction in this case requires reworking or replacement of the worn thrust surfaces. The Bolster Effects Alignment On most presses, the bolster plate is attached to the press bed with relatively large bolts, which must remain tight. These bolts are normally designed to withstand large stripping or upward forces. This is an important safety factor in the event of an excessive stripping load. A typical cause of a very high stripping load is mislocated stock or double hits in deep drawing operations. Should the bolster attaching bolts fail; the bolster may lift up with the die. Broken bolster bolts and other machine parts may become airborne, endangering pressroom personnel. Severe press and die damage can also result, especially if one end of the bolster or die lifts before the other resulting in severe bending forces. The bolts also serve to hold the bolster in proper contact with the press bed. When checked with a feeler gauge, there should be no detectable clearance. Be sure to look for the following problem areas:
1. Dirt, slugs and debris between the bed and bolster plate, 2. Tightness of the bolster tie-down bolts, and 3. Proper locating device function and clamp actuation in the case of presses having
self-moving bolsters.
15
Informal and Formal Press Inspection Procedures C45.doc rev February 1, 2006 Smith & Associates, 530 Hollywood Drive, Monroe, Michigan 48162-2943 © 1993, 1997
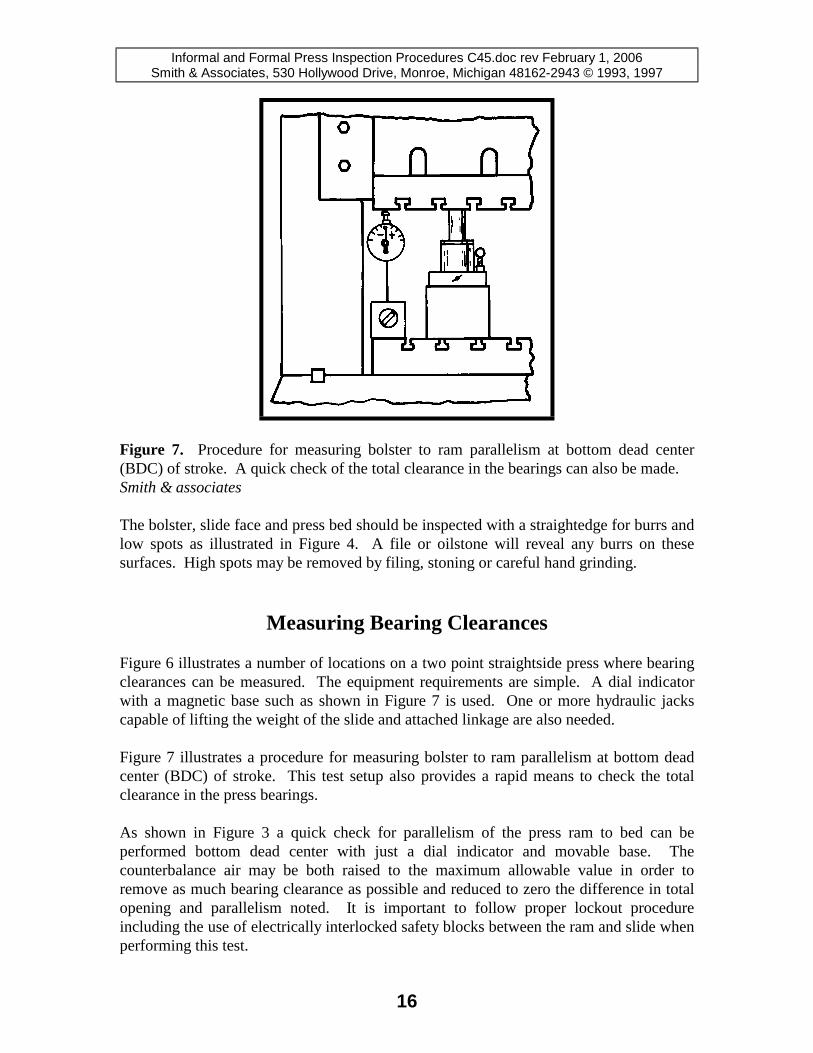
Figure 7. Procedure for measuring bolster to ram parallelism at bottom dead center (BDC) of stroke. A quick check of the total clearance in the bearings can also be made. Smith & associates The bolster, slide face and press bed should be inspected with a straightedge for burrs and low spots as illustrated in Figure 4. A file or oilstone will reveal any burrs on these surfaces. High spots may be removed by filing, stoning or careful hand grinding.
Measuring Bearing Clearances Figure 6 illustrates a number of locations on a two point straightside press where bearing clearances can be measured. The equipment requirements are simple. A dial indicator with a magnetic base such as shown in Figure 7 is used. One or more hydraulic jacks capable of lifting the weight of the slide and attached linkage are also needed. Figure 7 illustrates a procedure for measuring bolster to ram parallelism at bottom dead center (BDC) of stroke. This test setup also provides a rapid means to check the total clearance in the press bearings. As shown in Figure 3 a quick check for parallelism of the press ram to bed can be performed bottom dead center with just a dial indicator and movable base. The counterbalance air may be both raised to the maximum allowable value in order to remove as much bearing clearance as possible and reduced to zero the difference in total opening and parallelism noted. It is important to follow proper lockout procedure including the use of electrically interlocked safety blocks between the ram and slide when performing this test.
16
Informal and Formal Press Inspection Procedures C45.doc rev February 1, 2006 Smith & Associates, 530 Hollywood Drive, Monroe, Michigan 48162-2943 © 1993, 1997
The test illustrated in Figure 7 makes use of large hydraulic jacks to lift the slide. After inching the press onto BDC and following lockout procedure, the counterbalance air is drained with the jacks in place, but not touching the slide. To speed up the work and assure the most accurate results, it is best to place a jack under each connection and a separate dial indicator on each side of the machine. The dial indicator plungers are placed against the slide and the dials set to zero. Checking Total Clearance The jacks are then pumped to lift the slide. The dial indicators show the amount of upward movement. Take up as much clearance as possible with the jacks, and the readings noted. These readings, while subject to several sources of error, indicate the approximate total bearing clearance in each side of the press. Sources of Error If a connection or crankshaft bearing has an extreme amount of wear and the gibbing is correctly adjusted to guide the slide with minimal side play, the jacks may not take up the full clearance. In such a case, the gibbing may need to be loosened for this and other bearing clearance tests. Measuring Main Bearing Clearance Figure 8 illustrates how to place the dial indicator to measure the clearance between the crankshaft end main bearing and press housing. Here, the procedure is to measure play with the slide hanging without counterbalance support and with the slide and attached parts raised with the jacks. If the counterbalance air is turned on to assist in taking up as much play as possible when measuring bearing clearances, it is very important that personnel not reach into nor enter the space between the top of the slide and crown. Any required readings must be made by remote observation. Should the brake release, the slide may be forcefully drawn up to the top. Performing press inspection and maintenance work must be done in accordance with all legal requirements for zero energy state power lockout where applicable and good safety engineering practice. Shortcuts can lead to serious injury or fatalities. Moderate amounts of wear in an individual crankshaft bearing can be determined with good accuracy. If extreme wear is present in the bearing, the crankshaft may not bend enough under the jacking force to show the total clearance. One cause of large amounts of bearing wear is a lubrication failure. The maintenance technician should check for this when making the inspection. One telltale sign of such a failure is the presence of bronze particles around the bearing.
17

Informal and Formal Press Inspection Procedures C45.doc rev February 1, 2006 Smith & Associates, 530 Hollywood Drive, Monroe, Michigan 48162-2943 © 1993, 1997
Figure 8. Placement of a dial indicator to measure the clearance between the crankshaft end main bearing and press housing. Smith & associates Measuring Pitman Bearing Clearance Figure 9 illustrates the dial indicator placement to measure crankshaft throw to pitman bearing clearance. The gibbing should set loose enough to permit accurate measurement if a large clearance is found. Usually, a single high capacity jack placed under the connection on the side of the press being checked is sufficient. Unless extreme amounts of wear are present in both the throw bearing and the connection, this method provides accurate results. Measuring Center Main Bearing Clearance Figure 10 illustrates the dial indicator placement to measure crankshaft center bearing clearance. Depending on the width of the machine, a press of the type shown in Figure 6 may have two center main bearings. Like the end main bearings, the total clearance may not be indicated if extreme wear is present. Measuring Connection Bearing Clearance Figure 11 illustrates the dial indicator placement to measure the connection bearing clearance. The procedure to obtaining a true reading is essentially the same as that for the crankshaft throw to pitman bearing. The connection is a weak point of the press in terms of stripping loads. If the press is used in heavy punching applications involving considerable snap-through energy release, the connection retaining means is liable to be damaged or fail.
18

Informal and Formal Press Inspection Procedures C45.doc rev February 1, 2006 Smith & Associates, 530 Hollywood Drive, Monroe, Michigan 48162-2943 © 1993, 1997
Figure 9. Placement of a dial indicator to measure crankshaft throw to pitman bearing clearance. Smith & associates The connection should be carefully inspected, especially if a large clearance is measured. The condition of the connection is an important safety consideration. The connection(s) and counterbalance system are all that prevents the static weight of the slide from falling.
Figure 10. Placement of a dial indicator to measure crankshaft center main bearing clearance. Smith & associates Typical Bearing Clearance Allowances A rule of thumb for round bearing clearances in mechanical power presses is one unit of clearance for each 1000 units of journal diameter, or 0.10%. Thus, for each 1.000-inch (25.4 mm) of shaft diameter, 0.001 inch (0.0254 mm) of bearing clearance is provided. For journal diameters larger than 10 inches (254 mm) some press manufacturers allow 0.0005-inch (0.0127 mm) additional clearance for each additional inch (25.4 mm) of journal diameter.
19

Informal and Formal Press Inspection Procedures C45.doc rev February 1, 2006 Smith & Associates, 530 Hollywood Drive, Monroe, Michigan 48162-2943 © 1993, 1997
The actual amount of clearance may vary depending upon the type of lubricant specified and the class of work that the press is designed for. A slow machine using grease lubrication will have a greater percentage of clearance than a high-speed precision machine using heated temperature controlled lightweight mineral oil. The manufacturer's recommendations and good engineering practice should be followed. Effect of Wear Wear will ultimately increase the clearance beyond acceptable limits for the class of work being performed. When the press is in motion, a film of lubricant separates the shaft or journal from the bronze bearing liner by means of hydrodynamic action. Very little wear occurs, especially in machines supplied with filtered recirculating oil under pressure. Once the clearances do become excessive, the hydrodynamic action, which keeps the surfaces separated, is no longer effective.
Figure 11. Placement of a dial indicator to measure connection clearance. Smith & associates The bearing surfaces will come into metal-to-metal contact, greatly accelerating wear. Here, timely adjustment or replacement of the bearings is highly recommended. Not only will the quality of work suffer if maintenance is delayed. The shaft or journal surface may be worn out of round, necessitating expensive rework and extended downtime. Example of Total Clearance Calculation The following example of total machine clearances is based on typical clearance specifications for the type of press illustrated in Figure 6. Assuming a 6.000-inch (152.4 mm) diameter crankshaft and crankshaft throw diameter, the three main and two throw bearings would each have 0.006-inch (0.152.4 mm) clearance. The connection clearance is somewhat greater; typically 0.008-inch (0.2032 mm) or more. Table 5 illustrates how individual clearances are added to obtain a total figure.
20

Informal and Formal Press Inspection Procedures C45.doc rev February 1, 2006 Smith & Associates, 530 Hollywood Drive, Monroe, Michigan 48162-2943 © 1993, 1997
EXAMPLE OF TOTAL CLEARANCE BEARING TOTAL IN. TOTAL MM
CRANKSHAFT MAIN 0.006 0.1524 CRANKSHAFT THROW 0.006 0.1524
CONNECTION 0.008 0.2032 TOTAL 0.020 0.5080
Table 5. Adding individual clearances to obtain the total amount.
Figure 12. Checking the slide motion path for perpendicularity with the press bolster. Smith & associates The adjusting screw also has clearance. However, on many presses, the clearance is taken up with a locking plug. Some precision presses automatically apply hydraulic pressure to the elevating screw connection to take up all play and avoid wear during operation. Checking the Slide for Perpendicularity
21

Informal and Formal Press Inspection Procedures C45.doc rev February 1, 2006 Smith & Associates, 530 Hollywood Drive, Monroe, Michigan 48162-2943 © 1993, 1997
Figure 12 illustrates the procedure for checking the slide motion path for perpendicularity with the press bolster. Before this check is performed, any skew should be removed from the press bed by following the leveling procedure. Also, any high spots and burrs should be removed from the press bed and bolster. Test Procedure The perpendicularity test is known as tracking the slide determines the path of the slide as it travels through the stroke. The equipment required is a dial indicator with a magnetic base and a precision square. The square used may be a precision machinist's square, an angle plate, a tooling inspection cube or a cylinder square precision ground for the test.
As with any pressworking operation all applicable safety rules must be followed and constant caution exercised. The press should be inched onto bottom dead center before the square and dial indicator are placed in the press opening. Follow all required lockout and other safety procedures. There should be enough flat vertical surfaces on the square to permit inching the press through its entire stroke while maintaining contact with the dial indicator plunger. Properly done, this test is a fast reliable method of determining machine perpendicularity throughout the stroke.
Obtaining Readings and Evaluating Results Inch the press completely through the stroke several times while noting the readings. The test is performed in both the front-to-back and left-to-right positions. Acceptable results depend on the size and precision of the machine. For our example, the total indicated reading in both planes should not exceed 0.005-inch (0.127 mm). If ram to bolster parallelism and accurate vertical tracking cannot be obtained simultaneously by adjusting the machine, it is likely that the gib surfaces on the slide are not square with the face of the slide or that there are timing and alignment problems present. NOTES: _____________________________________________________ _____________________________________________________________ ______________________________________________________ _____________________________________________________________ _____________________________________________________________
22