presents make an impression - paper · pdf filemerci card designer: michelle mathey 1 make...
TRANSCRIPT

Make an Impression
16 FREE PROJECTS
PaperCraftsMag.comPaperCraftsConnection.com
PRESENTS

Discover the versatility of dry embossing. From decorative borders and frames to backgrounds and letterpress, this trendy technique is a must-try.
Make an Impression
Editor: Courtney Smith
3www.PaperCraftsMag.com
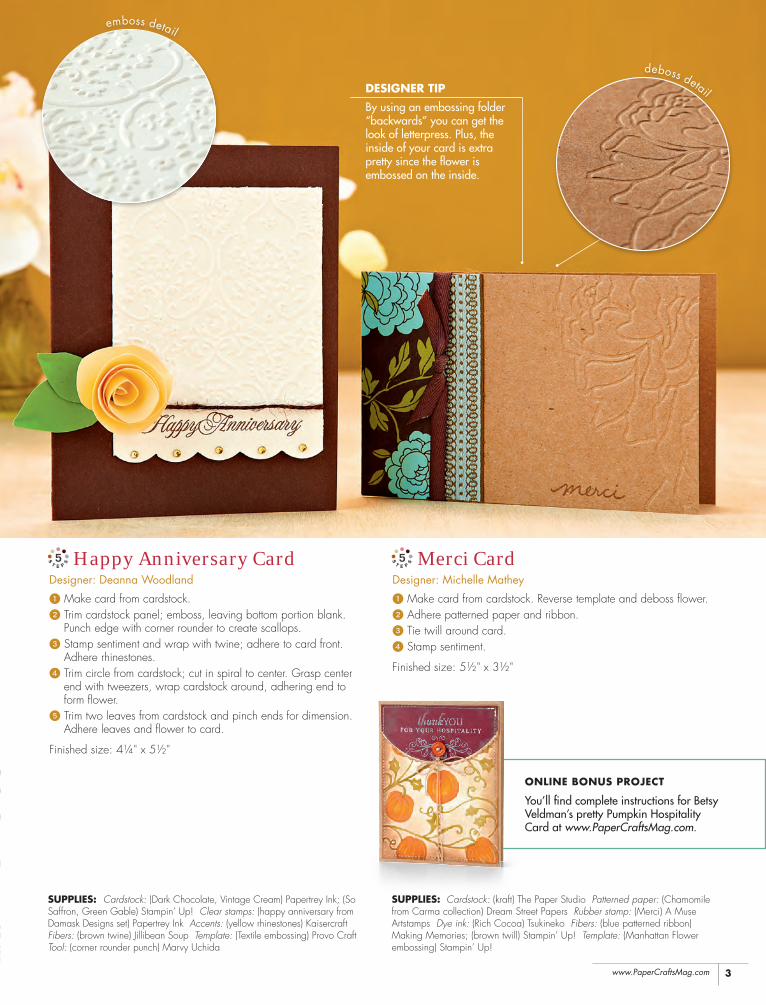
Happy Anniversary Card Designer: Deanna Woodland
1 Make card from cardstock. 2 Trim cardstock panel; emboss, leaving bottom portion blank.
Punch edge with corner rounder to create scallops. 3 Stamp sentiment and wrap with twine; adhere to card front.
Adhere rhinestones.4 Trim circle from cardstock; cut in spiral to center. Grasp center
end with tweezers, wrap cardstock around, adhering end to form flower.
5 Trim two leaves from cardstock and pinch ends for dimension. Adhere leaves and flower to card.
Finished size: 4¼" x 5½"
Merci Card Designer: Michelle Mathey
1 Make card from cardstock. Reverse template and deboss flower. 2 Adhere patterned paper and ribbon. 3 Tie twill around card. 4 Stamp sentiment.
Finished size: 5½" x 3½"
SUPPLIES: Cardstock: (Dark Chocolate, Vintage Cream) Papertrey Ink; (So Saffron, Green Gable) Stampin’ Up! Clear stamps: (happy anniversary from Damask Designs set) Papertrey Ink Accents: (yellow rhinestones) Kaisercraft Fibers: (brown twine) Jillibean Soup Template: (Textile embossing) Provo Craft Tool: (corner rounder punch) Marvy Uchida
SUPPLIES: Cardstock: (kraft) The Paper Studio Patterned paper: (Chamomile from Carma collection) Dream Street Papers Rubber stamp: (Merci) A Muse Artstamps Dye ink: (Rich Cocoa) Tsukineko Fibers: (blue patterned ribbon) Making Memories; (brown twill) Stampin’ Up! Template: (Manhattan Flower embossing) Stampin’ Up!
emboss detail
deboss detailDESIgnEr TIPBy using an embossing folder “backwards” you can get the look of letterpress. Plus, the inside of your card is extra pretty since the flower is embossed on the inside.
OnLInE BOnUS PrOjEcT
You’ll find complete instructions for Betsy Veldman’s pretty Pumpkin Hospitality Card at www.PaperCraftsMag.com.

4 www.PaperCraftsMag.com
Scalloped Hello Card
Designer: Heidi Van Laar
1 Make card from cardstock. 2 Spell “Hello” with stickers; cover with cardstock panel
and emboss over stickers with stylus. Remove stickers. 3 Score border around panel; lightly sand edges and
adhere to card. 4 Trim cardstock panels; emboss two and punch bottom
edges. Crimp third panel. Layer and adhere together. 5 Knot ribbon and adhere panels to card.
Finished size: 4¼" x 5½"
Happy Fall Card Designer: Kelly Marie Alvarez
1 Make card from cardstock; score grid. 2 Trim hills from patterned paper; emboss and adhere
with foam tape. 4 Trim trees from patterned paper; adhere, some with
foam tape. 5 Spell “Happy fall!” with stickers.
Finished size: 5½" x 4¼"
SUPPLIES: Cardstock: (white) Georgia-Pacific; (yellow) Core’dinations; (kraft) The Paper Company Stickers: (Hat Box alphabet) American Crafts Fibers: (yellow gingham ribbon) Michaels Templates: (Just My Type floral, polka dots embossing) Provo Craft Tools: (border punch, paper crimper, embossing stylus) Fiskars; (scorer) Scor-Pal Products
SUPPLIES: Cardstock: (Desert Storm) Neenah Paper Patterned paper: (Falling Down, Maple from Nutmeg collection) Cosmo Cricket Stickers: (Origins Micro alphabet) BasicGrey Tools: (scoring board, scorer, dot embosser) Scor-Pal Products
emboss detail
emboss detail
DESIgnEr TIPSIf the chipboard alphabet stickers you’re trying to emboss over seem too thick, try peeling up the top layers to make them thinner.
This is a great way to use up leftover chipboard stickers. Since only the paper you emboss will be seen, it doesn’t matter what color they are.
OnLInE BOnUS PrOjEcT
For more embossing fun, check out Kimber McGray’s Floral Thank You Card online at www.PaperCraftsMag.com.

5www.PaperCraftsMag.com
Thinking of You Swirls Card Designer: Vanessa Menhorn1 Make card from cardstock. 2 Trim cardstock panel; emboss and stamp text. 3 Trim patterned paper with border punch; adhere to panel. 4 Tie on ribbon and adhere panel to card.5 Stamp sentiment. Adhere pearls.
Finished size: 4¼" x 5½""
Spooky Sweets Card Designer: Betsy Veldman
1 Make matchbook-fold card from cardstock. 2 Cut cardstock to fit card front; emboss. Cut window with craft
knife; ink edges and embossing. 3 Stamp webs and sentiment on cardstock; trim and adhere behind
window. Adhere panel to card. 4 Trim patterned paper strip and adhere to matchbook flap. 5 Stitch buttons to card with twine; wrap twine around buttons
to close.
Finished size: 3¾" x 4½"
SUPPLIES: Cardstock: (Dark Chocolate) Papertrey Ink Patterned paper: (orange floral from In Bloom collection) Papertrey Ink Clear stamps: (sentiment from Everyday Sayings set) Hero Arts; (text from Background Basics: Text Style II set) Papertrey Ink Pigment ink: (Fresh Snow) Papertrey Ink; (Pearlescent Chocolate) Tsukineko Accents: (brown pearls) Prima Fibers: (green ribbon) Papertrey Ink Template: (D’vine Swirl embossing) Provo Craft Tool: (border punch) Fiskars Other: (kraft card) Hero Arts
SUPPLIES: Cardstock: (Orange Zest, Rustic Cream) Papertrey Ink Patterned paper: (Candy Corn from Spooky Alley collection) Making Memories Clear stamps: (sentiment, web from Spooky Sweets II set) Papertrey Ink Chalk ink: (Creamy Brown) Clearsnap; (gray) Specialty ink: (True Black hybrid) Papertrey Ink Accents: (black buttons) Papertrey Ink Fibers: (natural jute twine) Papertrey Ink Template: (Flourished Frame embossing) Provo Craft
emboss detail emboss detail

6 www.PaperCraftsMag.com
Spooky Boo Card Designer: Jessica Witty
1 Make card from cardstock. 2 Remove adhesive from back of alphabet stickers. 3 Open card, place letters face-down inside card front; emboss. 4 Flip card over; ink letters, place on card front to spell “Boo”,
and emboss. 5 Punch bats from cardstock; score wings and adhere to card.
Finished size: 4¼" x 5½"
Bewitched Hat Card Designer: Maren Benedict
1 Make card from cardstock; distress edges. 2 Cut cardstock panel, emboss zigzag along edges.
Color with gel pen. 3 Cut witch hat following pattern; emboss polka dots.
Ink edges and embossing. Adhere to panel with foam tape. 4 Distress panel edges, tie on ribbon, and adhere to card.
Finished size: 4¼" x 5½"
SUPPLIES: Cardstock: (True Black, Plum Pudding, kraft) Papertrey Ink Rubber stamp: (sentiment from Trick or Treat Peeps collection) Unity Stamp Co. Dye ink: (Tuxedo Black) Tsukineko Pigment ink: (white) Stampin’ Up! Color medium: (black gel pen) Sakura Fibers: (lavender ribbon) Papertrey Ink Templates: (Just My Type zigzag, polka dots embossing) Provo Craft
SUPPLIES: Cardstock: (Smokey Shadow, white) Papertrey Ink; (Going Gray) Stampin’ Up! Specialty ink: (Smokey Shadow hybrid) Papertrey Ink Stickers: (Gift Box alphabet) American Crafts Tool: (bat punch) Martha Stewart Crafts
emboss detail emboss detailDESIgnEr TIPSWhen embossing the chipboard alphabet into the card, remove the adhesive with your fingernail, or use a needle tool to peel off adhesive.
When placing letters to emboss, remember to place them mirror-image since you are embossing from behind.
OnLInE PaTTErnTo make Maren Benedict’s Bewitched Hat Card, visit www.PaperCraftsMag.com to download a copy of the pattern.

7www.PaperCraftsMag.com
Each of Us Card Designer: Giovana E. Smith
1 Make card from cardstock. 2 Trim cardstock panel; emboss and ink edges. Adhere to card. 3 Trim cardstock panel; emboss and ink edges. Tie on ribbon.
Trim cardstock strip with border punch and adhere behind panel. 4 Adhere flower and button. Adhere panel to card. 5 Die-cut and emboss circle from cardstock; stamp sentiment.
Ink; adhere with foam tape.
Finished size: 4¼" x 5½"
Fun Friend Card Designer: Julia Stainton
1 Make card from cardstock; emboss. 2 Score grid. Ink edges and embossing. 3 Attach brad and adhere pearls. 4 Spell “Friend” with stickers.
Finished size: 5½" x 4¼"
SUPPLIES: Cardstock: (Ocean Mist, white) Gina K Designs Rubber stamp: (quote from Inside & Out set) Gina K Designs Dye ink: (Rich Cocoa) Tsukineko; (Tea Dye) Ranger Industries Accents: (yellow button) Gina K Designs; (white crocheted flower) Fibers: (blue ribbon) Martha Stewart Crafts Templates: (Swiss Dots, Textile embossing) Provo Craft Tool: (border punch) Fiskars
SUPPLIES: Cardstock: (kraft) Bazzill Basics Paper Pigment ink: (white) Clearsnap Accents: (fabric flower brad) BasicGrey; (aqua pearls) Prima Stickers: (Patchwork alphabet) American Crafts Template: (With Love floral border embossing) Provo Craft Tool: (scorer) Scor-Pal Products
emboss detail
emboss detailDESIgnEr TIPSScoring lines with a scorer adds great texture and is super quick and inexpensive to do.
Heat-set pigment ink before applying pearls so that they will adhere well.

8 www.PaperCraftsMag.com
Houndstooth Love Card Designer: Windy Robinson
1 Make card from cardstock; stamp sentiment. 2 Trim patterned paper; adhere. 3 Emboss wood paper; ink. Mat with cardstock and
adhere to card. 4 Tie on ribbon. Thread button with twine and tie to ribbon.
Finished size: 4½" x 6"
Newsprint Flower Card Designer: Linda Beeson
1 Make card from cardstock; sand edges. 2 Trim cardstock panels; emboss with various templates.
Sand embossing and panel edges. Adhere to card.3 Punch two large and two small flowers from dictionary pages;
crumple petals, layer, and adhere together. Cut circle from cardstock; adhere to flower.
4 Emboss cardstock piece, cut leaves, and sand.5 Punch two circles in card front, thread with twine, and tie bow. 6 Adhere leaves, flower, and pearls.
Finished size: 5½" square
SUPPLIES: Cardstock: (Java) Bazzill Basics Paper; (kraft) DMD, Inc. Patterned paper: (Deck the Halls from Christmas Past collection) Graphic 45 Specialty paper: (Thin Cherry wood from Real Wood collection) Creative Imaginations Clear stamp: (sentiment from Everyday Sayings set) Hero Arts Pigment ink: (Onyx Black) Tsukineko Chalk ink: (Dark Brown) Clearsnap Accent: (red button) Jillibean Soup Fibers: (brown ribbon) Wrights; (natural jute twine) May Arts Template: (Houndstooth embossing) Provo Craft
SUPPLIES: Cardstock: (Cherry Cordial, Maplenut, cream, red) Core’dinations Accents: (red pearls) Queen & Co. Fibers: (natural jute twine) Templates: (Script Texture, Swiss Dots, Herringbone embossing) Provo Craft; (Finial Press embossing) Stampin’ Up! Tools: (large, small flower punches; 1/8" circle punch) Other: (dictionary pages)
emboss detail
emboss detailDESIgnEr TIPCreate your own flower by layering pieces cut with punches, dies, or from a pattern. Crumpling the petals gives the flower more dimension.
OnLInE BOnUS PrOjEcT
You’ll find complete instructions Maile Belles’ cool graphic Mr. & Mrs. Card online at www.PaperCraftsMag.com.

9www.PaperCraftsMag.com
Elegant Miss You Card Designer: Courtney Baker
1 Make card from cardstock. 2 Trim cardstock panel and emboss. 3 Stamp sentiment.4 Tie ribbon around panel; add pin. 5 Adhere panel to card.
Finished size: 4¼" x 5½"
Thanks Card Designer: Natalie Dever
1 Make card from cardstock. 2 Trim cardstock panel; emboss. Lightly ink embossing and edges.
Mat with cardstock and adhere to card. 3 Trim patterned paper strip; ink edges and adhere. 4 Trim patterned paper panel; punch edge. Ink edges. 5 Tie twill around panel; adhere to card.6 Stamp thanks on tag; trim with decorative-edge scissors.
Tie tag to button with twine; adhere to card.
Finished size: 4" x 5½"
SUPPLIES: Cardstock: (Garland, Silent Night) Couture Cardstock Patterned paper: (My Pretty Garden from Domestic Goddess collection) Graphic 45 Clear stamp: (thanks from Celebration of Thanks set) Verve Stamps Dye ink: (Denim) Ranger Industries Accents: (black button) Making Memories; (tag) Graphic 45 Fibers: (yellow twill, white twine) Template: (Victoria embossing) Provo Craft Tool: (border punch, decorative-edge scissors) Fiskars
SUPPLIES: Cardstock: (Vintage Cream) Papertrey Ink; (More Mustard) Stampin’ Up! Clear stamp: (sentiment from Funky Foliage set) Wplus9 Design Studio Pigment ink: (Sepia) Tsukineko Accent: (pearl/rhinestone stick pin) Jenni Bowlin Studio Fibers: (tan striped ribbon) May Arts Template: (Bird Call embossing) Provo Craft
emboss detail emboss detail
10 www.PaperCraftsMag.com
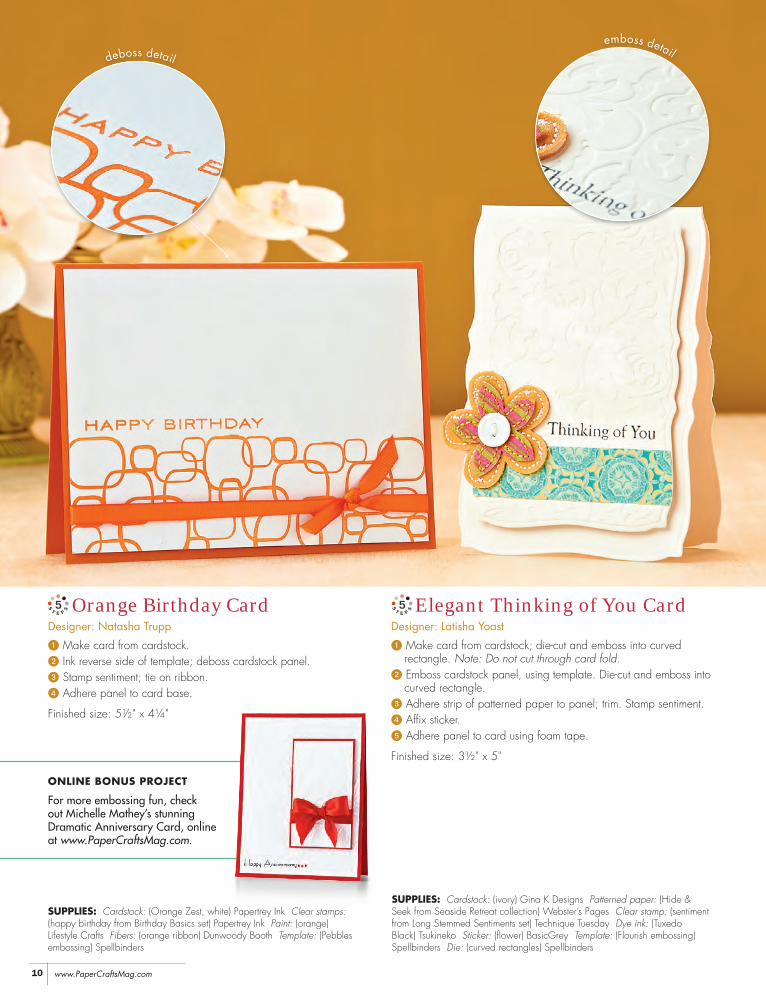
Orange Birthday Card Designer: Natasha Trupp
1 Make card from cardstock. 2 Ink reverse side of template; deboss cardstock panel. 3 Stamp sentiment; tie on ribbon. 4 Adhere panel to card base.
Finished size: 5½" x 4¼"
Elegant Thinking of You Card Designer: Latisha Yoast
1 Make card from cardstock; die-cut and emboss into curved rectangle. Note: Do not cut through card fold.
2 Emboss cardstock panel, using template. Die-cut and emboss into curved rectangle.
3 Adhere strip of patterned paper to panel; trim. Stamp sentiment. 4 Affix sticker. 5 Adhere panel to card using foam tape.
Finished size: 3½" x 5"
SUPPLIES: Cardstock: (ivory) Gina K Designs Patterned paper: (Hide & Seek from Seaside Retreat collection) Webster’s Pages Clear stamp: (sentiment from Long Stemmed Sentiments set) Technique Tuesday Dye ink: (Tuxedo Black) Tsukineko Sticker: (flower) BasicGrey Template: (Flourish embossing) Spellbinders Die: (curved rectangles) Spellbinders
SUPPLIES: Cardstock: (Orange Zest, white) Papertrey Ink Clear stamps: (happy birthday from Birthday Basics set) Papertrey Ink Paint: (orange) Lifestyle Crafts Fibers: (orange ribbon) Dunwoody Booth Template: (Pebbles embossing) Spellbinders
deboss detailemboss detail
OnLInE BOnUS PrOjEcT
For more embossing fun, check out Michelle Mathey’s stunning Dramatic Anniversary Card, online at www.PaperCraftsMag.com.

Get inspired and start creating incredible new designs with a subscription to
• Renew your subscription
• Order a gift subscription
• Change your address
• Make a payment
• Order a new subscription
• Communicate with Subscriber Services
• Check your account status
• Request a replacement issue
You’ll discover hundreds of fresh projects and
ideas in every issue, explore new techniques,
and get expert advice on how to start and fi nish
every project – from greeting cards and invitations
to bags, favors and home décor. Subscribe, renew
or give a gift subscription to Paper Crafts magazine
– it’s quick and easy!
169 169 169
Visi t www.PaperCraf tsMag.com
March/April 2011
LOOK
MaMaMaMaaaaMaaMaaaMaaMMaaaaaaaaaaaaaaaaaaaaaaaaaaaaaaarcrccccccrcrccrrcccccchhhhhhhhhhh/h/h/h/hhhhhhhhhhhhhhhhhhhhhhhhh ApApAAAApAAAAAAA rrrriril ll l l 202020011111
World Card Making Day winners revealed p.75
Vo
l . 34
No
. 2 P
ap
er C
r af t s M
AR
CH
/A
PR
I L 20
11
ww
w. P
ap
er C
r af t s M
ag
. co
m
fresh ideas for
spring paper crafts
•Babies
•Brides
•Hot Air
Balloons
& more!
•Babies
•Brides
•Hot Air
Balloons
& more!
3030CLEVER
IDEAS FOR
BIRTHDAY
DECOR
CLEVER
IDEAS FOR
BIRTHDAY
DECOR
Get Inspired!
DISPLAY UNTIL 4/11/11
$5.99 CANADA
MarchApril_2011-Cover.indd 2
1/10/11 4:30:33 PM
www.PaperCraf tsMag.com
spring paper crafts
147147147 147
Visi t www.PaperCraf tsMag.com
May/June 2011
IDEAS!
Vo
l . 34
No
. 3 P
ap
er C
r af t s M
AY
/J U
NE
20
11
ww
w. P
ap
er C
r af t s M
ag
. co
m
Paper Creations
for Moms, Dads,
Grads, Teachers,
& much more!
5656Show Mom how much you care
PRETTYPAPER PROJECTIDEAS
For Him: Dozens of Masculine Projects p.56
Reach our Subscriber Services Center:
www.papercraftsmag.com/subscriberservices
800-727-2387 (U.S.) / 386-597-4387 (Int’l) • [email protected]
Paper Crafts Subscriber Services • P.O. Box 433054 • Palm Coast, FL • 32143
Visit us today at www.papercraftsmag.com/subscriberservices
Paper Crafts Subscriber Services is the fast and safe way to manage youraccount and ask any questions about your subscription.