presentation version 1.1 using rocksim copyright (c) 2007 cath bashford. permission is granted to...
TRANSCRIPT

Presentation Version 1.1
Using RockSim
Copyright (c) 2007 Cath Bashford. Permission is granted to copy, distribute and/or modify this document under the terms of the GNU Free Documentation License, Version 1.2 or any later version published by the Free Software Foundation; with no Invariant Sections, no Front-Cover Texts, and no Back-Cover Texts. A copy of the license is included in the section entitled "GNU Free Documentation License".

1. Fill in your rockets Name e.g. TR1 (Test Rocket 1)2. Click on tab Rocket design components
First RockSim Screen

Rocket Design Components Tab
1. Click on the button Nose cone2. two new windows will pop up

Choose Nose cone
1. In the select from database window scroll down to find nose cone you want2. Select appropriate nose cone3. Click OK

Confirm Nose cone dimensions
Since this is a standard nose cone you can just click OK on this screen, for other components you may wish to edit some of the settings.

Now add a body tube
1. Now click on Body tube 2. two new windows will pop up

Choose Body Tube
1. Scroll down and to the body tube you want to use2. Highlight the body tube 3. Click on OK

Editing the Body Tube settings
1. Edit the length of the body tube by typing the number in or sliding the slider, once it's set click on one of the other settings and the pictures will update.2. Once it's set then click OK

Continue adding body tubes and coupler tubes until you get your desired rocket length Each tube can be edited by using the slider or by typing a number in to change it's length or position.
Continue adding to the rockets length
Pink – Nose ConeRed – Body TubesYellow – Coupler Tube

Add Fins
1. Highlight the body tube you wish to add the fins to2. Click on the Fins button3. Fins window will pop up
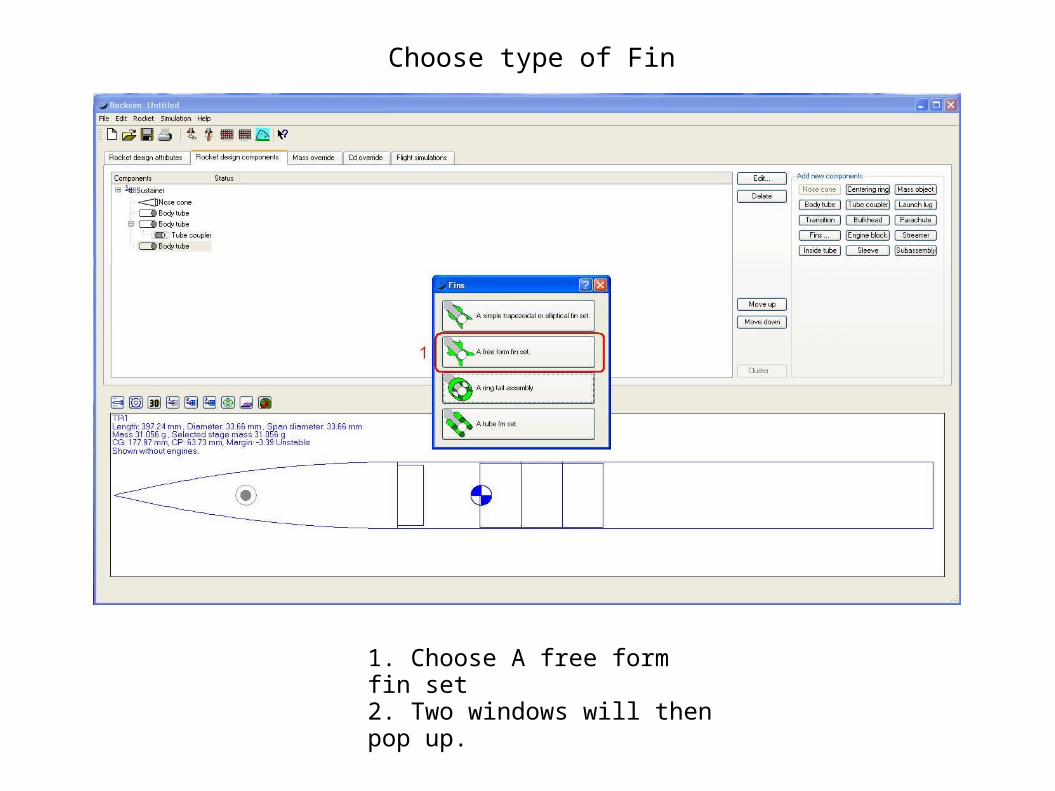
Choose type of Fin
1. Choose A free form fin set2. Two windows will then pop up.

How to draw your own fins
Most people make their own fins, for a rocket like the one needed for UKAYRoC you can probably make your fins from plywood.
1. Click cancel if you are making your own fins2. When this window disappears click on the Plan points tab on the custom fin set window

Setting the fin size
1. Click on the plan point to make the fins the size that you desire.2. The picture at the bottom will automatically update to show those fins3. Click on the general tab when you are happy with the shape.

Other fin settings
1. You will also have to decide on the number of fins, the location, what material they will be made from, the thickness of the material and what the cross section is like (cross section – the leading edge of the fins can be sanded to perform better)2. Click on OK when you are happy with the settings.

Other Components
You will also need to add :
Add a motor mount tube (inside tube button, make sure you check the box to indicate that this is a motor mount tube) Add centring rings to centre the motor mount tube in the body tube. Add Bulkheads to the places where you will have them in the final rocket Add mass object for the altimeter and battery and altimeter bay in the position you will have it in the final rocket Add mass object for the egg in the position you will have the egg in the final rocket Add a parachute into the body tube where it will be in the final rocket

Setting the rocket up to fly
1. Click on Simulation and then choose Prepare for launch...2. A new window will pop up

Choose motor and ejection delay
1. Click on choose engine2. In the new window scroll down until you get to the motors you want3. Choose the motor you want4. Choose the ejection delay you'd like5. Click on OK when done

Confirming the motor and setting launch conditions
In this window you can just click OK, however you may wish to use mass override and launch condition tabs to get a more accurate simulation, this is not used when designing but when about to launch to tweak the rocket.

To Launch
1. Click on Simulation and choose Launch...2. A new window will pop up and run through the sim and then the results window will show up.

Seeing your results
1. Basic simulation results are shown on the main screen2. To get more results double click on the parachute to get the Simulation Results pop-up window.

To make more changes
To go back and make changes to you rocket click on the Rocket Design Components tab.