presentation on momentum optimization -...
TRANSCRIPT

This document is owned by Agilent Technologies, but is no longer kept current and may contain obsolete or
inaccurate references. We regret any inconvenience this may cause. For the latest information on Agilent’s
line of EEsof electronic design automation (EDA) products and services, please go to:
www.agilent.com/fi nd/eesof
Agilent EEsof EDA

EM Optimization - Moving from Analysis to Design Automation 1
Momentum OptimizationEM Seminar 1999
MomentumOptimization
EM Seminar - HP Momentum Paper 1
Moving from Analysis to Design Automation
EM Optimization - Moving from Analysis to Design Automation

EM Optimization - Moving from Analysis to Design Automation 2
page 2 of 36Momentum OptimizationEM Seminar 1999
Objective
• To illustrate circuit design flowwith HP ADS
• To illustrate the use ofMomentum and MomentumOptimization as part of thedesign flow
This presentation will illustrate the design of a 3.2 GHz radial stub filter. Themicrostrip filter focuses on the use of EM simulation as a verification tool.

EM Optimization - Moving from Analysis to Design Automation 3
page 3 of 36Momentum OptimizationEM Seminar 1999
Overview
Microstrip Radial Stub Filter
• Analysis - Momentum
• Design Refinement - Momentum Optimization
Analysis
ModelGeneration
DesignRefinement
Momentum
Momentum Optimization
This presentation will illustrate the design of a 3.2 GHz radial stub filter. Themicrostrip filter focuses on the use of EM simulation as a verification tool.

EM Optimization - Moving from Analysis to Design Automation 4
page 4 of 36Momentum OptimizationEM Seminar 1999
Design Flow
Manufacturing
EM Simulation
Layout
Optimization
Synthesis
System Design
Circuit Design
EM Optimization
DESIGN
FEEDBACK
Post Processing
Sche
mat
i c-b
ased
Des
ign
Lay
out-
b ase
dD
esig
n
EM
Sim
ula
tio
n a
s an
An
alys
is T
oo
l
This diagram illustrates a typical design flow. The design flow is broadly separatedinto two parts: schematic-based design and layout-based design. Also represented isthe design feedback path which goes throughout the entire design process.Schematic-based DesignThe schematic-based design starts with system design, where specifications are setand system architecture is studied to understand design tradeoffs. Once the systemarchitecture is set, the specifications of each sub-module is set.
After the system design and prior to circuit design, there is an initial investigationinto the design approach. This includes literature and textbook study, as well as theuse of specialized synthesis tools. The synthesis tools provide a starting point forthe circuit design.
Circuit Design involves the details of going from the design specification to thefinal schematic-based design. This process involves the circuit simulators (linearsimulation, harmonic balance, transient, convolution, envelope,…), as well asdesign tools such as circuit optimization and post-processing of the analysis data.

EM Optimization - Moving from Analysis to Design Automation 5
page 5 of 36Momentum OptimizationEM Seminar 1999
Schematic-based Design
Project Manager says “… a filter isneeded to reduce the mixer LOfeed-through to the amplifiers”.
Proposed Solution:Design a MICROSTRIP radial stublow pass filterE
M S
imu
lati
on
as
an A
nal
ysis
To
ol
Some motivation starts the design process.In this case, a filter is needed to reduce the mixer LO feed-through to the amplifiersthat follow.
The proposed solution is to design a microstrip radial stub low pass filter.

EM Optimization - Moving from Analysis to Design Automation 6
page 6 of 36Momentum OptimizationEM Seminar 1999
• Low Pass Filter• 1 dB corner freq = 3.2GHz• > 25dB attenuation from3.9-6.0 GHz
System Design
Manufacturing
EM Simulation
Layout
Circuit Design
System Design
SynthesisLO
IF
RF 25 dB
EM
Sim
ula
tio
n a
s an
An
alys
is T
oo
l
From the system analysis, the low pass filter is determined to need a 1 dB cornerfrequency at 3.2 GHz, with at least 25 dB of attenuation in the 3.9-6.0 GHz.
The system design portion of this project is done on the order of hours to days.

EM Optimization - Moving from Analysis to Design Automation 7
page 7 of 36Momentum OptimizationEM Seminar 1999
Synthesis
• 7th order Chebychev• fc = 3.2 GHz• passband ripple 0.5 dB
Manufacturing
EM Simulation
Layout
Circuit Design
System Design
Synthesis
EM
Sim
ula
tio
n a
s an
An
alys
is T
oo
l
Design Synthesis for the filter is done with E-Syn to determine the starting design.It is determined that a 7th order Chebychev filter with fc = 3.2 GHz and passbandripple of 0.5 dB will work. The ideal analysis gives slightly less than 25 dB ofrejection at 3.9 GHz, but the less desirable alternative was to go to a 9th order filter.With the actual implementation in microstrip, the component values can be slightlymodified to achieve the goal.
The synthesis part of the design process can be done on the order of hours to days,depending on the amount of research needed, and the ability of a standard design tomeet the design goals.

EM Optimization - Moving from Analysis to Design Automation 8
page 8 of 36Momentum OptimizationEM Seminar 1999
Circuit Design
C1 = 1.728 pFL1 = 3.129 nH
C3 = 2.624 pFL3 = 3.343 nH
C4 = 2.624 pF C2 = 1.728 pFL2 = 3.129 nH
Manufacturing
EM Simulation
Layout
Circuit Design
System Design
Synthesis
EM
Sim
ula
tio
n a
s an
An
alys
is T
oo
l
The ideal circuit is implemented in the schematic. This serves as a baselinecomparison for the electrical performance.
The goal for the circuit design process is to convert this ideal circuit into a physicalimplementation using microstrip components.
EM Optimization - Moving from Analysis to Design Automation 9
page 9 of 36Momentum OptimizationEM Seminar 1999
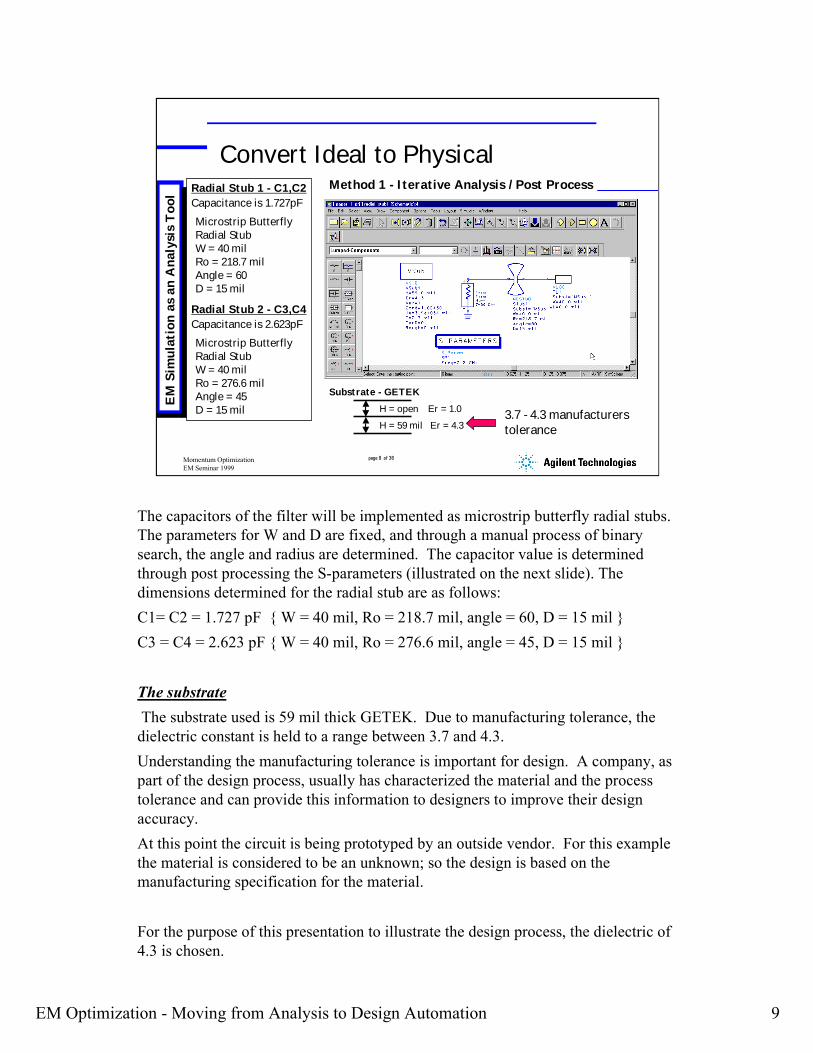
Convert Ideal to Physical
Microstrip ButterflyRadial StubW = 40 milRo = 218.7 milAngle = 60D = 15 mil
Microstrip ButterflyRadial StubW = 40 milRo = 276.6 milAngle = 45D = 15 mil
Radial Stub 1 - C1,C2Capacitance is 1.727pF
Radial Stub 2 - C3,C4Capacitance is 2.623pF
H = 59 mil Er = 4.3
H = open Er = 1.0
Substrate - GETEK
Method 1 - Iterative Analysis / Post Process
3.7 - 4.3 manufacturerstolerance
EM
Sim
ula
tio
n a
s an
An
alys
is T
oo
l
The capacitors of the filter will be implemented as microstrip butterfly radial stubs.The parameters for W and D are fixed, and through a manual process of binarysearch, the angle and radius are determined. The capacitor value is determinedthrough post processing the S-parameters (illustrated on the next slide). Thedimensions determined for the radial stub are as follows:C1= C2 = 1.727 pF { W = 40 mil, Ro = 218.7 mil, angle = 60, D = 15 mil }C3 = C4 = 2.623 pF { W = 40 mil, Ro = 276.6 mil, angle = 45, D = 15 mil }
The substrate The substrate used is 59 mil thick GETEK. Due to manufacturing tolerance, thedielectric constant is held to a range between 3.7 and 4.3.Understanding the manufacturing tolerance is important for design. A company, aspart of the design process, usually has characterized the material and the processtolerance and can provide this information to designers to improve their designaccuracy.At this point the circuit is being prototyped by an outside vendor. For this examplethe material is considered to be an unknown; so the design is based on themanufacturing specification for the material.
For the purpose of this presentation to illustrate the design process, the dielectric of4.3 is chosen.

EM Optimization - Moving from Analysis to Design Automation 10
page 10 of 36Momentum OptimizationEM Seminar 1999
Convert Ideal to Physical -Capacitance Calculation
Radial Stub 1 - C1,C2
Capacitance is 1.727pF
Radial Stub 2 - C3,C4
Capacitance is 2.623pF
EM
Sim
ula
tio
n a
s an
An
alys
is T
oo
l
Method 1 - Iterative Analysis / Post Process
The S-parameters from the analysis on the previous slide are converted intocapacitance. The S-parameter analysis is done at the 1 dB cutoff frequency 3.2 GHz.Since microstrip is dispersive, the capacitor value determined here will appear tohave different values of capacitance at other frequencies. Since it is impossiblewith microstrip to get the same capacitor values at all frequencies, the cutofffrequency is chosen as the design frequency.
Since this is a one-port S-parameter analysis, S11 can be converted into Zin with theequation:Zin = 50*[(1 + S11) / (1 - S11)]
Zin can then be converted into an equivalent capacitance with the equation:Cin = -1 / (2*pi*freq*imag(Zin))

EM Optimization - Moving from Analysis to Design Automation 11
page 11 of 36Momentum OptimizationEM Seminar 1999
Convert Ideal to Physical -Capacitor
The same values for the radial stub can befound through Circuit Optimization
EM
Sim
ula
tio
n a
s an
An
alys
is T
oo
l Method 2 - Circuit component optimization
Circuit optimization can be used as an alternative to the binary search procedureused in the previous slides. For this circuit, the radial stub (which is set up foroptimization) is connected to S-parameter Port 1, and the ideal capacitor isconnected to S-parameter Port 2. Two goals are set up to minimize the differencebetween S11 and S22 for the real and imaginary terms.Goals:-0.001 < imag(S11) - imag(S22) < 0.001-0.001 < real(S11) - real(S22) < 0.001

EM Optimization - Moving from Analysis to Design Automation 12
page 12 of 36Momentum OptimizationEM Seminar 1999
Convert Ideal to Physical -Inductor
MicrostripTransmission LineW = 40 milL = 215 mil
Inductance is 3.129 nH
MicrostripTransmission LineW = 40 milL = 225.7 mil
Inductance is 3.342 nH
Inductor 1 - L1,L2
Inductor 2 - L3
EM
Sim
ula
tio
n a
s an
An
alys
is T
oo
l
In a similar way, a high impedance microstrip line is used for the inductor. Binarysearch or optimization can be used to determine the dimensions. The dimensionsdetermined for the inductors are as follows:L1= L3 = 3.129 nH { W = 40 mil, L = 215 mil }L2 = 3.342 nH { W = 40 mil, L = 225.7 mil }

EM Optimization - Moving from Analysis to Design Automation 13
page 13 of 36Momentum OptimizationEM Seminar 1999
Schematic with PhysicalComponents
EM
Sim
ula
tio
n a
s an
An
alys
is T
oo
l
Replace ideal components with radial stubs andinductive transmission lines
The major components of the circuit have been individually calculated and are nowassembled into the complete circuit. A 50 ohm microstrip transmission line andtaper have been added to each end of the filter, and the overall length is adjusted to1.5 inches. An S-parameter simulation is done of the complete circuit.

EM Optimization - Moving from Analysis to Design Automation 14
page 14 of 36Momentum OptimizationEM Seminar 1999
Ideal vs. Physical Comparison
Ideal
Physical
EM
Sim
ula
tio
n a
s an
An
alys
is T
oo
l
Difference due to lumped versus distributed model
dB(S21) and dB(S11) are shown for the comparison. Each plot shows the idealcircuit response (LC filter) and the microstrip circuit (physical) response. Theresponse at the 1 dB cutoff frequency is very close to the ideal. The response at 3.9GHz achieves the < -25 dB specification. The obvious difference is in the stop bandloss detail above 3.9 GHz.

EM Optimization - Moving from Analysis to Design Automation 15
page 15 of 36Momentum OptimizationEM Seminar 1999
Layout
Manufacturing
EM Simulation
Layout
Circuit Design
System Design
Synthesis
H = 59 mil Er = 4.3
H = open Er = 1.0
Substrate - GETEK
Synchronize layout from Schematic
EM
Sim
ula
tio
n a
s an
An
alys
is T
oo
l
The design flow now crosses the design flow boundary between schematic-baseddesign and layout-based design. A layout of the schematic is produced. At thispoint, there is design feedback to determine if the dimensions of the radial stubs andtransmission lines cause the geometry to overlap. It can also be observed if thegeometry would require EM simulation to determine the effect of parasiticcoupling.

EM Optimization - Moving from Analysis to Design Automation 16
page 16 of 36Momentum OptimizationEM Seminar 1999
EM Simulation
• HP Momentum - planar method of moments
• HP HFSS - 3D finite elements
HP Momentum
EM SimulationHP HFSS
Layout
EM
Sim
ula
tio
n a
s an
An
alys
is T
oo
l
At this point, the designer determines that EM analysis is required. Two choices areavailable: a planar EM solver or a 3D solver. HP offers Momentum as a planarmethod of moments solver, and HFSS as a 3D finite elements solver.HP Momentum is an integrated product which works directly from the Layout ofHP ADS. HP HFSS is a separate product which has translators to directly readlayout from HP ADS. If the layout is part of a solved Momentum project, then thelayout and substrate information are used to form a complete HP HFSS project. Ifthe layout is only in EGS format, then the translator provides the ability to definethe substrate definition and layer mapping.

EM Optimization - Moving from Analysis to Design Automation 17
page 17 of 36Momentum OptimizationEM Seminar 1999
EM Simulation - HP Momentum
• Mesh frequency 3.2 GHz• Edge mesh on• 30 cells per wavelength
Manufacturing
EM Simulation
Layout
Circuit Design
System Design
Synthesis
EM
Sim
ula
tio
n a
s an
An
alys
is T
oo
l
HP Momentum works directly from the layout of HP ADS. The mesh frequency isset at 3.2 GHz. Edge mesh is enabled and the mesh is set to 30 cells per wavelength.The results of the HP Momentum simulation are written out directly in the datasetformat of HP ADS, and viewed using the data display of HP ADS.

EM Optimization - Moving from Analysis to Design Automation 18
page 18 of 36Momentum OptimizationEM Seminar 1999
Translate to 3D EM SimulatorHP ADS
HP HFSS
Add 3D features:
•3D structures, e.g.connectors, finite dielectrics,housing features
•metal thickness
HP ADS - HP HFSSTranslator
EM
Sim
ula
tio
n a
s an
An
alys
is T
oo
l
Designs can be translated from HP ADS to HP HFSS. 3D features can be added tothe geometry, such as connectors, finite dielectrics, housing features, and metalthickness. HP HFSS can write out data in CITIfile or Touchstone format, whichcan be read back into HP ADS.

EM Optimization - Moving from Analysis to Design Automation 19
page 19 of 36Momentum OptimizationEM Seminar 1999
Circuit versus EM comparison
Momentum
Physical
Ideal
Differences due toAdded Parasitics inMomentum
EM
Sim
ula
tio
n a
s an
An
alys
is T
oo
l
The results of the EM simulation can be compared to the ideal results and themicrostrip schematic simulation results. Momentum shows a large deviation in thepredicted stop band performance of the filter. This is due, mainly, to the additionalparasitics present in the actual geometry and not accounted for in the schematicrepresentation.

EM Optimization - Moving from Analysis to Design Automation 20
page 20 of 36Momentum OptimizationEM Seminar 1999
Manufacturing
Manufacturing
EM Simulation
Layout
Circuit Design
System Design
Synthesis
Layout translator(Gerber) used to linkto Manufacturing.
EM
Sim
ula
tio
n a
s an
An
alys
is T
oo
l
Additional geometries needed for manufacturing are added to the layout. Layouttranslators, such as Gerber, GDS-II, IGES, or DXF are available to link tomanufacturing. The completed prototype circuit is shown.The prototype process time for this design was on the order of 3-4 weeks.

EM Optimization - Moving from Analysis to Design Automation 21
page 21 of 36Momentum OptimizationEM Seminar 1999
Design Flow
Manufacturing
EM Simulation
Layout
Optimization
Synthesis
System Design
Circuit Design
EM Optimization
DESIGN
FEEDBACK
Post Processing
Sche
mat
i c-b
ased
Des
ign
Lay
out-
b ase
dD
esig
n
Learning
EM
Sim
ula
tio
n a
s an
An
alys
is T
oo
l
An important aspect of the design flow is the design feedback process. As tests andprototypes are completed, it is important to incorporate the new learning into thedesign. Feedback can affect all stages of the design flow, from the em simulationup through system design.

EM Optimization - Moving from Analysis to Design Automation 22
page 22 of 36Momentum OptimizationEM Seminar 1999
Measured vs. Modeled Results
MeasuredHP Momentum
Ideal
•Does not meetspecification
•Need to account for thedifferences
EM
Sim
ula
tio
n a
s an
An
alys
is T
oo
l
The prototype is measured and compared to the Momentum simulation. In thisexample, there is a significant difference in the filter response from the predicted.

EM Optimization - Moving from Analysis to Design Automation 23
page 23 of 36Momentum OptimizationEM Seminar 1999
Measured vs. ModeledResolution
Check manufacturing
• Actual Geometry vs. Ideal Geometry
•Actual Substrate vs. Ideal Substrate
• EM Optimization
Modify Design
EM
Sim
ula
tio
n a
s an
An
alys
is T
oo
l
Search for causes of discrepancy
Since this is an unknown substrate and manufacturing process, there are severalpossible causes for the differences in the simulation and measured results. It isimportant to check the manufacturing process for the dimensions of the actualgeometry produced as well as the actual substrate properties. If both of these are inagreement with the simulation assumptions, then the designer can look intomodifying the design.

EM Optimization - Moving from Analysis to Design Automation 24
page 24 of 36Momentum OptimizationEM Seminar 1999
Design Feedback - Geometry
Geometry is from 0.5 milto 1 mil over-etched in
different areas
EM
Sim
ula
tio
n a
s an
An
alys
is T
oo
l
The first design feedback is to check the geometry. Using a machinist microscopeto measure the circuit, it is observed that the etching process has over-etched thecircuit by varying amounts. The over-etched circuit is from 0.5 mil to 1 mildifferent than the intended design. This can contribute to the difference in thefrequency response.

EM Optimization - Moving from Analysis to Design Automation 25
page 25 of 36Momentum OptimizationEM Seminar 1999
Design Feedback - Dielectric
Dielectric Measurement - HP 85070B Dielectric Probe
The measured dielectricconstant:
2.7 GHz - 3.75
3.2 GHz - 3.8
3.4 GHz - 3.85
Different fromer= 4.3 used insimulation
EM
Sim
ula
tio
n a
s an
An
alys
is T
oo
l
Using the HP 85070B Dielectric Probe, a sample of the board was tested fordielectric constant. The measured dielectric value was approximately 3.8, and not4.3 that was used in the design assumption. The dielectric constant is also seen tovary with frequency. In the range from 2.7 GHz to 3.4 GHz, the dielectric changesby 0.1 .

EM Optimization - Moving from Analysis to Design Automation 26
page 26 of 36Momentum OptimizationEM Seminar 1999
HP Momentum HP Momentum
Measured
HP HFSS
Measured vs. New Modeled Results
•Dielectric constant= 3.8
•Modified Geometry
EM
Sim
ula
tio
n a
s an
An
alys
is T
oo
l
(thick metal)
•Have determined the processparameters
•Have verified Momentum’sability to analyze performance
•Need to change design tomeet specification
goal
The layout geometry is modified based on the microscope measurements, and thenew dielectric constant is used from the dielectric probe measurement. Theresulting Momentum analysis now compares favorably with the measured results.
This filter design does not meet the original design specification, but the learningthat resulted from the design feedback will help with the further design iterations.The design process is a series of design and re-design steps that are used to gain anunderstanding of the circuit and of the manufacturing considerations.
Simulation time:Momentum - 4.5 min/freq 10 frequencies, total time 45 minutes (23 MB)HP HFSS - 11 min/freq 6 frequencies, total time 70 minutes, thick metal (560 MB)
EM Optimization - Moving from Analysis to Design Automation 27
page 27 of 36Momentum OptimizationEM Seminar 1999
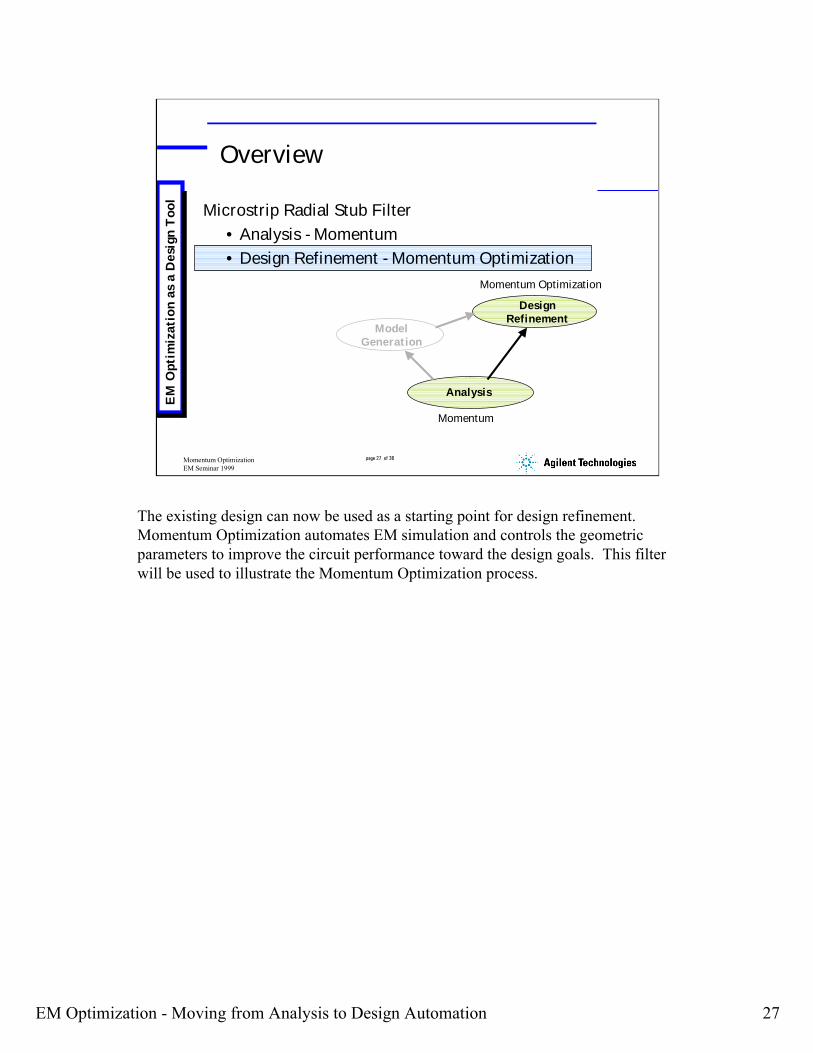
Overview
Microstrip Radial Stub Filter
• Analysis - Momentum
• Design Refinement - Momentum Optimization
Analysis
ModelGeneration
DesignRefinement
Momentum
Momentum Optimization
EM
Op
tim
izat
ion
as
a D
esig
n T
oo
l
The existing design can now be used as a starting point for design refinement.Momentum Optimization automates EM simulation and controls the geometricparameters to improve the circuit performance toward the design goals. This filterwill be used to illustrate the Momentum Optimization process.

EM Optimization - Moving from Analysis to Design Automation 28
page 28 of 36Momentum OptimizationEM Seminar 1999
Define Parameters
Optimize L1 (L3 not shown) Optimize L2
Optimize C3 (C4 not shown)Optimize C1 (C2 not shown)
L2L1
C3C1
ind1 ind2
rad2 rad1
EM
Op
tim
izat
ion
as
a D
esig
n T
oo
l
The parameters for this optimization are illustrated. Each graphic shows andoverlay of the nominal geometry with the perturbed geometry. Each of theseperturbed geometries exists in their own separate layout file. The four parametersfor optimization are:•The length of inductor L1 (L3 is changed at the same time as L1)•The length of inductor L2•The radius of the radial stub C1 (C2 is changed at the same time at C1)•The radius of the radial stub C3 (C4 is changed at the same time at C3)
The two rules to remember for defining an optimization parameter are:•There must be no change in the number of vertices.•The defined parameter represents a linear translation of the vertices

EM Optimization - Moving from Analysis to Design Automation 29
page 29 of 36Momentum OptimizationEM Seminar 1999
The Solution Process - Parameters
Parameter for Radius is defined:
•Allow to vary during optimization
•Lower and Upper Bound for parameter
•‘Add’ makes a copy of the nominal design
EM
Op
tim
izat
ion
as
a D
esig
n T
oo
l
The Momentum Optimization process is started from the Momentum menu. Thegeneral process to start an optimization is the following:•Define candidate parameters for optimization•Specify the design goals•Setup and run the optimization
The parameters for this example are the radius of the radial stubs, and the length ofthe inductive transmission lines. From the parameters dialog, define the following:
•variable name•nominal value•perturbed value•starting value.
With the advanced options, the lower and upper limit can be set for the variable.When ‘Add’ is selected, a copy of the nominal design is automatically made todefine the perturbed design.

EM Optimization - Moving from Analysis to Design Automation 30
page 30 of 36Momentum OptimizationEM Seminar 1999
Momentum Optimization -Geometry Capture
• Define Nominal Design
• Define a Perturbed Design
• Move the affected verticeson the Perturbed Design todefine the parameter foroptimization
EM
Op
tim
izat
ion
as
a D
esig
n T
oo
l
Momentum Optimization uses a process called geometry capture to specify acandidate parameter for optimization.
Geometry capture can be defined by the following process:• Define the nominal design - the geometry of interest will serve as a start• Define the perturbed design - simply define the parameter name to add, andMomentum makes a copy of the nominal design in a new layout window.• Move the affected vertices on the perturbed design to define the parameter foroptimization. The difference between the nominal design and the perturbed designwill define the parameter.

EM Optimization - Moving from Analysis to Design Automation 31
page 31 of 36Momentum OptimizationEM Seminar 1999
The Solution Process - Specification
Specification goals for theoptimization:
•frequency point or sweep
•Goal and Weight
EM
Op
tim
izat
ion
as
a D
esig
n T
oo
l
The next step in the Momentum Optimization process is to define the specificationgoals. For this radial stub filter example, we need to express the two design goalsof interest:dB(S21) at 3.2 GHz = -1dBdB(S21) at 3.9 GHz = -25 dB
Other frequencies (or ranges of frequencies) as well as other inequalities could bespecified in the above goals were not sufficient to achieve the needed performance.

EM Optimization - Moving from Analysis to Design Automation 32
page 32 of 36Momentum OptimizationEM Seminar 1999
The Solution Process - Run
Optimization setup:
•Optimization type
•Interpolation type
•Stopping criteria
EM
Op
tim
izat
ion
as
a D
esig
n T
oo
l
The last step for Momentum Optimization is to define the type of optimization andstopping criteria. Then select the ‘start’ button.
Momentum Optimization starts the optimization process, and displays a windowthat shows the error function result of each iteration.

EM Optimization - Moving from Analysis to Design Automation 33
page 33 of 36Momentum OptimizationEM Seminar 1999
The Solution Process - Results
optimal values displayed•increase rad1 by 17.51•increase rad2 by 4.26•increase ind1 by 5•increase ind2 by 5
EM
Op
tim
izat
ion
as
a D
esig
n T
oo
l
Before and afteroptimization
After the stopping criteria is met, the optimization parameter dialog is updated toshow the optimal value.
Select ‘back annotate optimal values’ to make the starting values the same as theoptimal values. Then select ‘view start design’ to open a layout window with thegeometry that represents the new starting values.
This process can be done for each geometry and each parameter of interest. EMoptimization could also be performed for the width of the high impedancetransmission lines (the inductors), or for the angle parameter of the radial stubs.

EM Optimization - Moving from Analysis to Design Automation 34
page 34 of 36Momentum OptimizationEM Seminar 1999
EM Analysis of entire structure
Goals:1dB loss at 3.2 GHz> 25 dB loss 3.9-6.0 GHz
IdealMomentumafter opt
EM
Op
tim
izat
ion
as
a D
esig
n T
oo
l
Momentumbefore opt
goal
The simulation of the optimal filter shows good agreement with the design goal.

EM Optimization - Moving from Analysis to Design Automation 35
page 35 of 36Momentum OptimizationEM Seminar 1999
Design Flow - Time Optimization
Manufacturing
EM Simulation
Layout
Optimization
Synthesis
System Design
Circuit Design
EM Optimization
DESIGN
FEEDBACK
Post ProcessingSc
hem
ati c
-bas
edD
esig
nL
ayou
t-b a
sed
Des
ign
~ 2-4 weeks
~ 1-2 days
~ 1-2 hrs
~ 1 day
~ 1-2 days
EM optimization has been shown to be a vital part of the complete design flow.
EM Optimization - Moving from Analysis to Design Automation 36
page 36 of 36Momentum OptimizationEM Seminar 1999
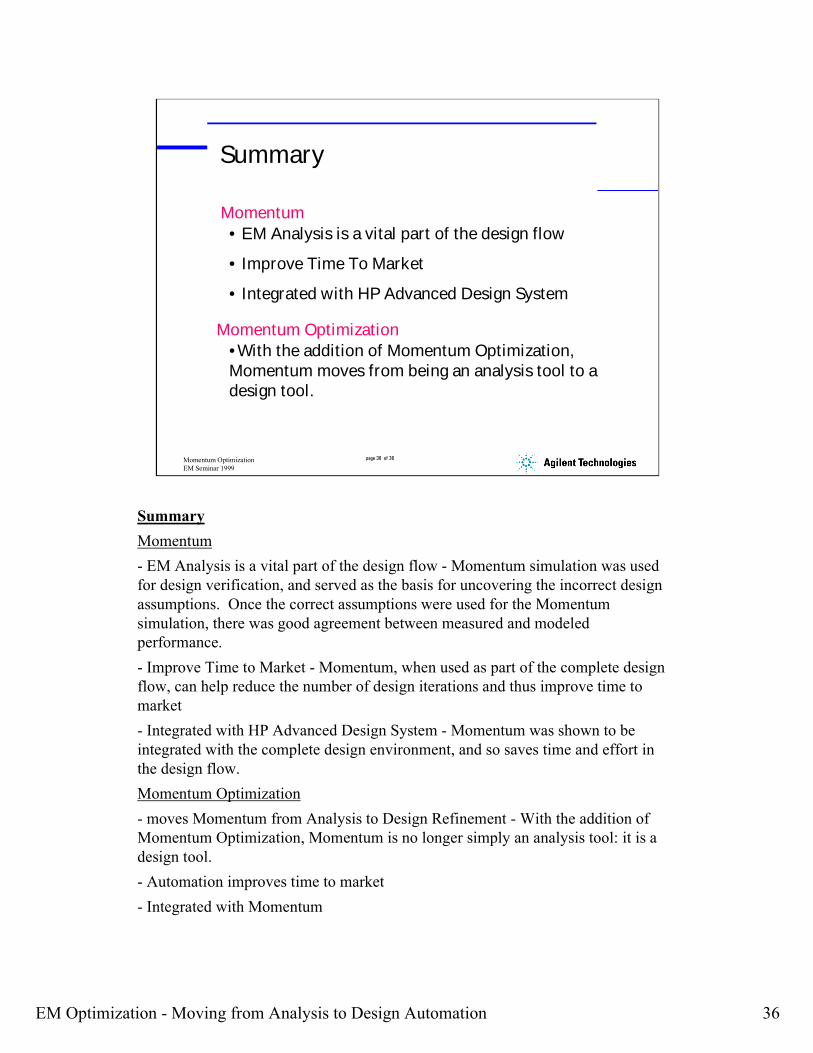
Summary
• EM Analysis is a vital part of the design flow
• Improve Time To Market
• Integrated with HP Advanced Design System
•With the addition of Momentum Optimization,Momentum moves from being an analysis tool to adesign tool.
Momentum Optimization
Momentum
SummaryMomentum- EM Analysis is a vital part of the design flow - Momentum simulation was usedfor design verification, and served as the basis for uncovering the incorrect designassumptions. Once the correct assumptions were used for the Momentumsimulation, there was good agreement between measured and modeledperformance.- Improve Time to Market - Momentum, when used as part of the complete designflow, can help reduce the number of design iterations and thus improve time tomarket- Integrated with HP Advanced Design System - Momentum was shown to beintegrated with the complete design environment, and so saves time and effort inthe design flow.Momentum Optimization- moves Momentum from Analysis to Design Refinement - With the addition ofMomentum Optimization, Momentum is no longer simply an analysis tool: it is adesign tool.- Automation improves time to market- Integrated with Momentum

www.agilent.com/fi nd/emailupdatesGet the latest information on the products and applications you select.
www.agilent.com/fi nd/agilentdirectQuickly choose and use your test equipment solutions with confi dence.
Agilent Email Updates
Agilent Direct
www.agilent.comFor more information on Agilent Technologies’ products, applications or services, please contact your local Agilent office. The complete list is available at:www.agilent.com/fi nd/contactus
AmericasCanada (877) 894-4414 Latin America 305 269 7500United States (800) 829-4444
Asia Pacifi cAustralia 1 800 629 485China 800 810 0189Hong Kong 800 938 693India 1 800 112 929Japan 0120 (421) 345Korea 080 769 0800Malaysia 1 800 888 848Singapore 1 800 375 8100Taiwan 0800 047 866Thailand 1 800 226 008
Europe & Middle EastAustria 0820 87 44 11Belgium 32 (0) 2 404 93 40 Denmark 45 70 13 15 15Finland 358 (0) 10 855 2100France 0825 010 700* *0.125 €/minuteGermany 01805 24 6333** **0.14 €/minuteIreland 1890 924 204Israel 972-3-9288-504/544Italy 39 02 92 60 8484Netherlands 31 (0) 20 547 2111Spain 34 (91) 631 3300Sweden 0200-88 22 55Switzerland 0800 80 53 53United Kingdom 44 (0) 118 9276201Other European Countries: www.agilent.com/fi nd/contactusRevised: March 27, 2008
Product specifi cations and descriptions in this document subject to change without notice.
© Agilent Technologies, Inc. 2008
For more information about Agilent EEsof EDA, visit:
www.agilent.com/fi nd/eesof