practical chemistry introduction -...
TRANSCRIPT

PRACTICAL CHEMISTRY
Introduction
Scientific subjects are, by their nature, experimental. It is accordingly important that an
assessment of a student’s knowledge and understanding of Chemistry should contain a
component relating to practical work and experimental skills. This booklet has been
produced to help students preparing for and taking practical Examinations. The material
contained in this booklet does not extend the curriculum specification content. Rather it
seeks to help the candidate succeed in practical examination by explaining in more depth
what is required of him or her in carrying out the exercises, making observations and
measurements with appropriate precision and recording these methodically. This booklet
advices candidate on how he or she should interpret, explain, evaluate and communicate the
results of the exercises clearly and logically using relevant chemical knowledge and
understanding and using appropriate specialist vocabulary.
1.1APPARATUS IN A CHEMISTRY LABORATORY
1.2 SPECIAL LABORATORY APPARATUS AND TECHNIQUES
(a) USING THE BURETTE

A burette is used to deliver solution in precisely measured, variable volumes. Burettes are
used primarily for titration, to deliver one reactant until the precise end point of the
reaction is reached. To fill a burette, close the stopcock at the bottom and use a funnel. You
may need to lift up on the funnel slightly, to allow the solution to flow in freely.
You can also fill a burette using a disposable transfer pipette. This works better than a
funnel for the small, 10 mL burettes. Be sure the transfer pipette is dry or conditioned with
the titrant, so the concentration of solution will not be changed.
Before titrating, condition the burette with titrant solution and check that the burette is
flowing freely. To condition a piece of glassware, rinse it so that all surfaces are coated
with solution, then drain. Conditioning two or three times will insure that a stray drop of
water does not change the concentration of titrant.
Rinse the tip of the burette with water from a wash bottle and dry it carefully. After a
minute, check for solution on the tip to see if your burette is leaking. The tip should be
clean and dry before you take an initial volume reading.
When your burette is conditioned and filled, with no air bubbles or leaks, take an initial
volume reading. A burette-reading card with a black rectangle can help you to take a more
accurate reading. Read the bottom of the meniscus. Be sure your eye is at the level of
meniscus, not above or below. Reading from an angle, rather than straight on, results in a
parallax error.
Deliver solution to the titration flask by turning the stopcock. The solution should be
delivered quickly until a couple of mL from the endpoint. The endpoint should be approached
slowly, a drop at a time. Use a wash bottle to rinse the tip of the burette and the sides of
the flask. Your TA can show you how to deliver a partial drop of solution, when near the
endpoint.
(b) Volumetric (measuring) Flasks

Erlenmeyer flasks and beakers are used for mixing, transporting, and reacting, but not for
accurate measurements. The volumes stamped on the sides are approximate and accurate to
within about 5%.
(c) Graduated Cylinders
Graduated cylinders are useful for measuring liquid volumes to within about 1%. They are
for general-purpose use, but not for quantitative analysis.
If greater accuracy is needed, use a pipette or volumetric flask.
(d) Pipette
A pipette is used to measure small amounts of solution very accurately. A pipette bulb is
used to draw solution into the pipette.

Start by squeezing the bulb in your preferred hand. Then place the bulb on the flat end of
the pipette.
Place the tip of the pipette in the solution and release your grip on the bulb to pull solution
into the pipette. Draw solution in above the mark on the neck of the pipette. If the volume
of the pipette is larger than the volume of the pipette bulb, you may need to remove the
bulb from the pipette and squeeze it and replace it on the pipette a second time, to fill the
pipette volume completely.
Quickly, remove the pipette bulb and put your index finger on the end of the pipette. Gently
release the seal made by your finger until the level of the solution meniscus exactly lines up
with the mark on the pipette. Practice this with water until you are able to use the pipette
and bulb consistently and accurately.
(e) Volumetric Flask
A volumetric flask is used to make up a solution of fixed volume very accurately. This
volumetric flask measures 500 mL ± 0.2 mL. This is a relative uncertainty of 4 x 10⁻⁴ or 400
parts per million.

To make up a solution, first dissolve the solid material completely, in less water than
required to fill the flask to the mark.
After the solid is completely dissolved, very carefully fill the flask to the 500 mL mark.
Move your eye to the level of the mark on the neck of the flask and line it up so that the
circle around the neck looks like a line, not an ellipse. Then add distilled water a drop at a
time until the bottom of the meniscus lines up exactly with the mark on the neck of the
flask. Take care that no drops of liquid are in the neck of the flask above the mark.
After the final dilution, remember to mix your solution thoroughly, by inverting the flask
and shaking.
(f) Analytical Balance
An analytical balance measures masses to within 0.0001 g. Use these balances when you need
this high degree of precision.
Turn the balance on by pressing the control bar. The display lights up for several seconds,
then resets to 0.0000.
Place creased, small weighing paper on the balance pan.
Close the sliding glass doors. Wait for the green dot on the left to go out. This is the
stability indicator light, indicating that the weight is stable.
Press the control bar to cancel out the weight of the container or paper. The display will
again read 0.0000. Carefully add the substance to be weighed up to the desired mass. Do
not attempt to reach a particular mass exactly. Before recording the mass, close the glass
doors and wait until the stability detector lamp goes out. Record mass of solid.
Don't pick up tare containers with bare hands since your fingerprints add mass. Use tongs
to prevent this.
Don't lean on the bench while weighing.
Do record the mass of your container, if you will need it later.
Do check the level indicator bubble before weighing. The two rear balance feet serve as
levelling screws. Use the brush provided to clean spills in the weighing chamber. Discard any

disposable tare containers or weighing paper, in the nearest wastebasket.
(g) Calorimetry
Calorimetry is used to determine the heat released or absorbed in a chemical reaction. The
calorimeters shown here can determine the heat of a solution reaction at constant
(atmospheric) pressure. The calorimeter is a double Styrofoam cup fitted with a plastic top
in which there is a hole for a thermometer.
(It's crude, but very effective!) Key techniques for obtaining accurate results are starting
with a dry calorimeter, measuring solution volumes precisely, and determining change in
temperature accurately.
(h) Using a Calorimeter
Solutions volumes should be carefully measured with a graduated cylinder. Add solution
completely, to a dry calorimeter. Don't forget to add the spin bar each time!
Set up the calorimeter with the thermometer (0° to 50°C, graduated every 0.1°C)
supported from a stand so that the bulb does not touch the bottom of the cup. Note that
the thermometer used for calorimetry differs from the less accurate one in your glassware
drawer. Clamp the calorimeter so that it rests on the stirrer. Be careful not to turn on the
heat or you will melt the Styrofoam.
The change in temperature is determined by measuring the initial temperature, T1, of the
reactants, and the maximum temperature, T2, of the contents of the calorimeter during the
exothermic reaction. Use a magnifying glass to measure temperature values precisely.
Interpolate between the divisions of the thermometer and record temperatures to +/- 0.01
°C. See your lab manual for a discussion of how to determine accurately the change in
temperature from your graph of temperature vs. time.
(i) Top-loading Balance
Use a top loading balance to weigh solid material when a precision of 0.1 g is adequate. For
more accurate mass measurements or small amounts, use an analytical balance.
Using a Top-loading Balance
Check if the balance is turned on. If not, press the on/off button and wait until the display
reads 0.0 g. Place a container or large, creased weighing paper on the balance pan. Push tare

button to zero the balance. Carefully add substance to the container or paper. Record the
mass. Use the brush provided to clean any spills. Discard any disposable tare containers or
weighing paper in the nearest wastebasket.
GENERAL EXPERIMENTAL PROCESSES
Quantitative Transfer
Quantitative Transfer simply means that all the material to be transferred from one place
to another must make the trip. For example, every particle of solid must be transferred
from the weighing paper to the (clean) beaker.
This can be done be carefully tipping the creased weighing paper to pour the solid into the
beaker. Tapping the paper with a spatula will knock particles into the beaker.
Finally, the paper should be rinsed into the beaker, to remove all traces of the solid.
Transferring a Solution or Mixture
If you are transferring a solution or heterogeneous mixture to another vessel, rinse the
container with solvent to be sure the transfer is quantitative. The rinsing should be
transferred to the second vessel along with the rest of the mixture or solution.
Titration
A titration is a method of analysis that will allow you to determine the precise endpoint of a
reaction and therefore the precise quantity of reactant in the titration flask. A burette is
used to deliver the second reactant to the flask and an indicator or pH Meter is used to
detect the endpoint of the reaction.
COMMON LABORATORY EXPERIMENTAL PROCEDURES
1. BUNSEN BURNER
(i) Close the air hole and turn the gas tap full on. Light the gas and hold a piece of wire in
different parts of the flame, moving it from the bottom to the top. Note the hottest place
in the flame. Open the air hole. Again hold the wire in the flame, moving from the bottom to
the top. Note the hottest place in the flame. Compare the two flames and note which has
the hottest point.
(ii) Close the air hole. Hold a test-tube with its bottom end just above the flame. Carbon
deposits on the glass. To test whether unburned carbon gives the yellow colour to the flame,
sprinkle powdered charcoal into the flame to see if this gives the same effect.
(iii) Open the air hole again. Note whether carbon deposits on a test-tube held in this flame.
Air mixing with the gas helps it to burn more rapidly and efficiently. To test what is in the
cooler inner cone hold a splint of wood in the flame so that it passes through the inner cone.
Note which part of the splint burns. Hold a piece of glass tubing with one end in the inner
cone then ignite the gas that comes out of the other end.
(iv) Investigate a candle flame and the flame of a spirit lamp in a similar way. Find the
hottest part of the flame. Test for unburned carbon particles in the flame. Look for an
inner cone of unburned gases.

IDENTIFICATION OF PURE SUBSTANCES
2. Melting points, mp, of naphthalene
(i) Put a very small amount of naphthalene in a capillary tube sealed at one end. You can pull
out the capillary tube from heated glass tubing. Use a rubber band to attach the capillary
tube, sealed end down, to a thermometer. Heat a thermometer and capillary tube in a
beaker of water on a tripod. Use the thermometer to stir the water but do not let water
enter the capillary tube. Slowly raise the temperature of the water. Note the temperature
of the naphthalene when it melts. Let it cool and note the temperature when the
naphthalene solidifies Calculate the average of these two values.
(ii) Use a clean test-tube and thermometer to repeat the experiment using stearic acid, mp
69o, or use any other substance, mp < 100oC.
3. Impurities affect the melting point of a substance
Mix stearic acid with the naphthalene, thus making the naphthalene impure. Look for
changes in the melting point. Impurities lower the melting point.
4. Boiling point of water
We can identify a pure substance from its melting point or boiling point. Put water in a test-
tube and hold a thermometer with the bulb just under the water. Add boiling chips to
prevent bumping. Bring the water to the boil with a very small flame and read the
thermometer. Note any change in the reading if the thermometer touches the bottom of
the test-tube.
5. Boiling point of inflammable liquids
(i) Use a different method of heating inflammable liquids, e.g. ethanol, bp 78.4oC and
acetone, bp 56oC. Put 2 cm of the inflammable liquid in a test-tube. Put the test-tube in an
empty beaker. Put a thermometer into the test-tube with the bulb in the liquid. Boil water in
an electric jug or on an electrical hot plate. Pour the hot water into the beaker so that the
level is higher than the inflammable liquid in the test-tube. Stir the inflammable liquid
gently with the thermometer and read the thermometer when the inflammable liquid boils.
(ii) Use a very small test-tube or seal one end of a piece of glass tubing, 8 cm length and 3
cm external diameter. Put the inflammable liquid into this tube. Put a capillary tube, sealed
at one end, into the inflammable liquid with the sealed end up and the open end down in the
inflammable liquid. Use a rubber band to attach the tube containing inflammable and
capillary tube to the bulb of a thermometer. Hold the apparatus in a beaker of water and
heat gently with a Bunsen burner flame. When the temperature rises, bubbles slowly come
out of the capillary tube. At the boiling point the bubbles suddenly come out as a steady
stream. Read the temperature. Let the water cool and read the temperature again when the
steady stream of bubbles ceases. Calculate the boiling point as the average of the two
readings.
6. Pressure affects the boiling point
Put water in a sidearm test-tube or in a round-bottom flask with a 2-hole stopper. Insert a
thermometer through a hole in the stopper so that the bulb of the thermometer reaches,

but does not touch, the bottom of the test-tube or flask. Add boiling chips to prevent
bumping. Boil the water and read the temperature on the thermometer. Stop heating.
Connect a water pump to the sidearm or to the second hole of the 2-hole stopper. When the
water stops boiling, turn on the water pump to reduce the pressure. Read the temperature,
heat to boiling and read the temperature again.
7(a). Solubility in water
Test different salts taken to show that each has a different solubility in water. Take 5 g
samples and try to dissolve each in 15 mL of water in a test-tube. Attach the stopper then
shake each test-tube vigorously for the same time to show that solubility is a characteristic
of a particular substance, e.g. sugar, common salt, potassium nitrate, calcium sulphate. The
solubility of a salt is usually expressed as the number of grams able to dissolve in 100 g
water at 20oC, e.g. ammonium chloride 37.2 g, barium chloride 35.7 g, calcium chloride 42.7
g, copper sulphate 20.7 g, lead nitrate 54.4 g, magnesium sulphate 25.2 g, potassium chloride
34.0 g, potassium iodide 144.0 g, sodium bicarbonate 9.6 g, sodium chloride 36.0 g, sodium
hydroxide 109.0 g, sodium nitrate 87.5 g.
(b) Solubility of a substance in water at a given temperature
Put about 50 cm3 of water in a beaker and add baking powder, sodium bicarbonate, gradually
while stirring. Potassium sulphate is an alternative substance. Make a saturated solution by
stirring until no more solute will dissolve. Read the temperature of the saturated solution.
Weigh a clean evaporating dish, w1. Add some clear saturated solution and weigh again, w2.
Carefully evaporate the solution in the evaporating dish to dryness and weigh again, w3. The
mass of the sodium bicarbonate dissolved = w3 - w1. The mass of water = w2 - w1 - w3.
Calculate the solubility of the sodium bicarbonate as g per 100 g water at room
temperature.
Temperature/OC 0 10 20 30 40 50 60
Solubility(g/100g
of water)
6.9 8.2 9.6 11.1 12.7 14.5 16.4
8(a) Solubility and particle size
To show that small particles dissolve faster than the large particles, add 4 g of coarse able
salt to one test-tube half filled with water, and 4 g of fine table salt to a second test-tube
containing the same amount of water or use whole and crushed copper sulphate crystals.
Stir or shake both tubes equally and simultaneously. Pause after every few seconds to
observe the amount of undissolved salt left in each tube.
(b) Solubility and solvents
(i) Fill two test-tubes one third full with (a) water and (b) methylated spirits. To each test-
tube add 1 g sodium chloride, attach a stopper and shake. Sodium chloride dissolves readily
in water but not so readily in methylated spirits.
(ii) Fill two test-tubes one third full with (a) 88g water and (b) a solution of 1 g potassium

iodide in 5 mL water. To each test-tube add iodine crystals, attach a stopper and shake.
Sodium chloride dissolves readily in water but not so readily in alcohol
DETERMINATION OF DENSITY
9(a) Density of a solid
The density of a solid is the ratio of mass to volume. We can find the density of a regular
solid with a balance and ruler. We can find the volume of an insoluble irregular solid with a
measuring cylinder. Half fill a graduated cylinder with water. Read the volume, immerse the
solid in the water and read the volume again. The difference in the two readings is the
volume of the solid.
(b) Density of a liquid
Weigh a small container, fill with liquid and weigh again. Transfer the liquid to a measuring
cylinder. Find the density by dividing the mass of the liquid by the volume.
Heat of fusion and vaporization
10(a) Separate by sublimation
Separate iodine from a mixture of crystals of iodine and sodium chloride. Heat the mixture
in an evaporating dish with a funnel placed over it. The iodine sublimes on to the cool sides
of the funnel.
SEPARATION OF MIXTURES
(b) Separate by distillation
Put 10 mL ink in a flat bottom conical flask. Add boiling chips to prevent bumping. Fit a
stopper with a delivery tube reaching half way down a collecting test-tube or an U-tube, in a
beaker of water. Heat the ink with a Bunsen burner flame. Drops of a colourless liquid
appear in the collecting tube. Identify the liquid as water by its action of turning white
anhydrous copper sulphate to blue hydrated copper sulphate. Do not allow ink to froth up or
splash into the delivery tube.
(c) Separate salt and sand
Prepare a mixture of salt and sand. Put about 2 mL of the mixture in a test-tube. Add 5 mL
water and shake until all the salt has dissolved. Pour the contents of the tube into a filter
paper in a funnel over an evaporating basin. Wash the test-tube with water and add this to
the filter paper. The sand will remain on the filter paper and may be dried and collected.
The salt can be recovered from the filtrate by warming the evaporation basin to drive off
the water.
(d) Solvent extraction of oil from nuts
Put groundnuts (peanuts) or pieces of chopped coconut into a mortar. Add 20 mL of acetone
or methylated spirits. Grind the nuts in the solvent as finely as possible. Pour off the liquid
into a test-tube and filter into an evaporating basin. Warm the evaporating basin for 10
minutes. The solvent evaporates leaving the oil extracted from the nuts.

(e) Separate two immiscible liquids of different density
Use a separating funnel or make a separating funnel with a piece of wide tubing fitted with
a stopper, tube and rubber tube with a clip. Shake the mixture thoroughly in a closed
container then run it into the separating funnel. Wait until a clear boundary appears
between the two liquids and then run off the denser layer into a beaker below.
11(b). HEATING AND BURNING DIFFERENT SUBSTANCES
Substances that gain mass when heated.
Clean 25 cm of magnesium ribbon and cut into 1 cm pieces. Weigh a crucible plus lid, put the
pieces of magnesium ribbon in the crucible and weigh again. Put the crucible on a pipe clay
triangle supported on a tripod. Heat very gently then strongly. Hold the crucible lid in a pair
of tongs close to the crucible. The magnesium ribbon darkens just before it begins to melt.
At the first sign of burning, place the lid on the crucible and remove the Bunsen burner.
Every 4 seconds, raise the lid to allow more air to enter but do not allow any white
magnesium oxide smoke to escape. When the magnesium stops burning on raising the lid,
remove the lid. Heat the crucible again strongly but still hold the crucible lid in a pair of
tongs close to the crucible in case the magnesium starts to burn again. Leave the crucible to
cool. When cool, weigh the crucible plus lid plus contents. Calculate the increase in mass of
the magnesium.
(b) Substances that lose mass when heated
(i) Weigh a test-tube containing 1 cm potassium permanganate crystals and a 1 cm plug of
cotton wool at the mouth to prevent loss of any solid during heating. Heat the test-tube and
cotton wool and weigh it again. Note any change in the potassium permanganate crystals.
Note any loss in mass due to the loss of water of crystallization.
(ii) Weigh a test-tube containing 1 cm copper carbonate and a 1 cm plug of cotton wool at
the mouth to prevent loss of any solid during heating. Heat the test-tube and cotton wool
and weigh it again. Note any change in the copper carbonate. Note any loss in mass.
(b) Substances that neither gain nor lose mass when heated
Weigh a test-tube containing 1 cm dry zinc oxide and a 1 cm plug of cotton wool at the
mouth to prevent loss of any solid during heating. Heat the test-tube and cotton wool and
weigh it again. Note any change in the zinc oxide. Note any loss in mass.
(c) Effect of heat on copper sulphate crystals
Crush blue copper sulphate crystals and put them into a dry test-tube to a depth of 4 cm.
Heat the tube gently. Note whether vapour collects on the cooler parts, change of colour
from blue to white, and any liquid collecting in the receiving tube. Identity of the liquid by
measuring the boiling point. When all the copper sulphate crystals have changed to white
and the tube has cooled, hold the tube in your hand and pour the liquid back on to the white
crystals. Note whether the blue colour restored and if any heat is given back.
Blue copper sulphate crystals + heat -> white, anhydrous copper sulphate + water.
This is a reversible change.
12.PREPARING, COLLECTING AND TESTING GASES
(b) Hydrogen
Be careful! A dangerous explosion may occur if you use any vessel bigger than a small test-
tube when igniting the gas, particularly if it is mixed with air.
Never dry hydrogen gas with concentrated sulphuric acid!
(i) Place a few pieces of granulated zinc or zinc foil from the casing of an old dry cell in a
boiling tube; add 2 drops of copper sulphate solution. An alternative to the thistle funnel at
A is a syringe as shown at B. Pour enough 1 M sulphuric acid down the thistle funnel on to
the zinc to cover the bottom of the funnel tube. Discard the first two or three test tubes
of hydrogen, as they will contain displaced air. Collect test tubes of the gas and stopper
them. Test the third test-tube of gas by holding a lighted taper or splint over the mouth as
soon as you take out the stopper. Pure hydrogen burns with a quiet "pop" sound.
(ii) Alternatively, add sulphuric acid from a syringe. Gas cannot escape through the syringe
so you do not need to cover the tube of the syringe with acid.
(iii) Hydrogen burns in air to form water vapour. When hydrogen ignites in a dry test-tube,
note any vapour or mist on the sides of the test-tube.
(iv) Investigate whether hydrogen is lighter than air by "pouring" the gas into a test-tube
held either above the first tube or below it. Use a lighted taper to investigate where the
hydrogen has gone.
(v) Blow soap bubbles by holding the delivery tube of the apparatus in detergent or soap
solution. The hydrogen bubbles will rise into the air, showing the low density of hydrogen
gas.
(b) Oxygen
(i) Prepare oxygen safely by decomposition of hydrogen peroxide solution. Put 20 mL
hydrogen peroxide into a 100 mL bottle. Fix a delivery tube to the bottle. Add two spatulas
of manganese dioxide and oxygen bubbles off for collection.
(ii) Oxygen is colourless and has no smell. To test whether the test-tube contains oxygen,
light a splint of dry wood, blow out the flame leaving a glowing splint then put the glowing
splint in a test-tube of oxygen. The glowing splint bursts into flame. This experiment is
called the glowing splint test.
(iii) Use an L-shape piece of nichrome wire with a shield to fit on the top to protect your
hand. Fix steel wool into a loop in the lower end of the Nichrome wire. Heat the steel wool
to red hot in a Bunsen burner flame then inserts it quickly into a test-tube of oxygen.
(iv) Fix a small piece of charcoal into the loop in the lower end of the Nichrome wire. Ignite
the charcoal in the Bunsen burner flame and then insert it quickly into another test-tube of
oxygen.
(v) Dip the loop in the lower end of the Nichrome wire into sulphur powder. Ignite the
sulphur powder in a Bunsen burner flame and then insert it quickly into another test-tube of
oxygen.

(c) Hydrogen chloride
Put rock salt, sodium chloride, into a 100 mL filtering flask. Coarse rock salt causes less
frothing than the fine salt. Carefully add concentrated sulphuric acid down the thistle
funnel. You can collect hydrogen chloride gas by upward displacement of air, as in the
diagram.
(i) Collect four test tubes of the gas and cork them. Remove the cork from one of these
test tubes under water. Note the solubility of hydrogen chloride.
(ii) Hold a piece of cotton wool soaked in ammonium hydroxide at the mouth of a test-tube
of hydrogen chloride.
(iii) Shake a test-tube of the gas with water to obtain a solution of hydrogen chloride. Test
the solution with an acid/base indicator. Put a piece of magnesium ribbon in the solution.
Collect any gas formed and test for hydrogen with the glowing splint test.
(d) Ammonia
(i) Put a mixture of calcium hydroxide and ammonium chloride into a test-tube to a depth of
4 cm. Fill a U-tube with lumps of calcium oxide mixed with cotton wool. The cotton wool is to
prevent blocking of the tube. Gently heat the test-tube. The calcium oxide dries the
ammonia gas. Test whether the receiver test-tube is full by holding a piece of red litmus
paper at the opening. Collect test tubes of ammonia and cork them. The method of
collection illustrates that ammonia gas is lighter than air.
(ii) Fill a flask with ammonia. Fit a cork and tube into the flask as shown. The tube should
have been drawn out into a jet. Warm the flask gently to expand the gas and then hold the
flask upside down with the tube in the water. Water will spray into the flask from the jet.
(e) Carbon dioxide
Many reactions can be used to produce carbon dioxide gas. Marble chips or other carbonate
rock treated with dilute acid provides a good source. The gas is not too soluble to be
collected by water displacement, as shown above for the preparation of hydrogen.
Alternatively, carbon dioxide can be collected by displacing air from dry bottles. To test if
the bottle is full, lower a lighted splint or taper into the top of the jar. If the flame is
extinguished at the entrance as at (ii), then the jar is full. Put a cardboard cover over the
top to prevent diffusion of the gas. Check the density of the carbon dioxide by pouring" the
gas into another bottle either above or below the first bottle. Find where the gas is by
testing with a lighted splint. Note: The presence of carbon dioxide can be confirmed by the
fact that limewater becomes "milky" when the gas is Passed through it.
(f) Cooking and carbon dioxide
The purpose of baking powder or soda in cooking is to produce tiny bubbles of carbon
dioxide. This expands the pastry, cake or dough, making it light and pleasant to eat. Yeast
cells do the same thing in bread making, though this takes longer. Baking powder, or sodium
bicarbonate, NHCO3, reacts with an acid such as lactic acid from sour milk to produce
carbon dioxide. Commercial "baking powders" often contain a solid acid, which only reacts
with the sodium bicarbonate when moist.
(i) Put baking powder into water. Note whether carbon dioxide gas forms. Note whether
carbon dioxide forms when you put sodium bicarbonate into water. Add baking powder in a
test-tube with vinegar or lemon juice (acetic acid). Note whether carbon dioxide forms.

(ii) Make a sugar solution and half fill a jar with this solution. Add a spoonful of yeast and
leave to stand for 2 days. Construct a bubbler to fit on the top of the jar. Note whether
the yeast forms a gas. Note whether carbon dioxide gas collects in the upper part of the
jar.
12(a) RUSTING
Take 7 test tubes and 11 clean nails. Prepare the tubes as shown below:
Tube 1: Put 2 clean nails in the test-tube and half cover them with distilled water. These
nails are in contact with air and water and form the control experiment.
Tube 2: Put a few pieces of anhydrous calcium chloride or silica gel in the bottom of a dry
test-tube, and also two nails. Put a plug of cotton wool in the top of the tube. These nails
are in contact with air, but not moisture.
Tube 3: Boil water for several minutes to expel dissolved air and pour into the test-tube
whilst hot. Put 2 nails in the water. Put a little Vaseline or a few drops of olive oil on the
surface of the hot water. The Vaseline will melt and form an airtight layer, solidifying as
the water-cools. These nails are in contact with water but not air.
Tube 4: Half cover 2 nails with water containing a little common salt dissolved in it. These
nails are in contact with air, water and salt.
Tube 5: Wrap a piece of zinc foil round part of a nail. Put the nail in the test-tube and
almost cover with tap water.
Tube 6: Wrap a piece of tin foil round part of the nail. Put the nail in the test-tube and add
tap water as you did for tube 5.
Tube 7: Wrap a piece of copper wire round a nail and put it in the test-tube exactly like
tubes 5 and 6. Stand these 7 test tubes in a rack and leave for several days. Note the
conditions for rusting and which metal, (zinc, copper or tin), is best at preventing rusting.
(b) INCREASE IN MASS OF IRON DURING RUSTING
Counterbalance a piece of iron on a knife-edge, using a brass weight or stone. Leave in moist
air or on a window ledge for a few days and note the effect of the rust on the longer arm of
the lever. During rusting, metallic ion changes to Fe (OH) 3.xH2O.
(c) WHAT COMBINES WITH IRON DURING RUSTING
Moisten the inside of a test-tube with water, sprinkle into it a spatula measure of iron
filings and rotate it horizontally so that the filings spread and adhere to the walls.
Alternatively, push a small plug of moistened iron wool to the bottom of the tube. Invert
the test-tube in a beaker about one third full of water. Use the beaker lip to support the
tube. The water levels inside and outside the tube should be the same and the level should
be marked on the tube. Leave the tube in this position for a few days. The iron will rust and
the water level will rise up inside the tube, finally becoming steady. Again add water to the
beaker until the levels inside and outside the tube are the same and mark the new level. It
will be seen that one fifth of the air volume has been used up, suggesting that oxygen has
been used up in the rusting of iron. The residual gas does not support combustion of a
lighted splint.
13 COLOURED EXTRACTS FROM FLOWERS AS INDICATORS OF ACIDS AND BASES

(a) Extract coloured substances from plants
Select brightly coloured flowers, such as the purple and red bougainvillaea, or coloured
leaves. Squeeze or grind one of the coloured flowers or leaves in a mortar with a mixture
made of 2 mL acetone and 2 mL ethanol. By this means the colouring matter will be
extracted into the solvent. Filter and collect the filtrate. Repeat this experiment with one
or two other flower colours. Keep these coloured solutions for use as "indicators" in the
next experiment.
(b) Plant extracts to indicate whether a substance is acidic or basic
(i) Put a spot of the coloured flower extract on to a filter paper and leave to dry. Put one
drop of lemon juice on to the spot then note any change of colour. Repeat the experiment
with other fruit juices and vinegar. They are acidic substances. Note any colour change with
dilute hydrochloric acid. Different colours suggest that some substances are more acidic
than others.
(ii) Put some of the original filtrate on to another piece of filter paper. When dry, note the
colours given by sodium bicarbonate solution, washing soda, limewater and a dilute solution
of sodium hydroxide. These are alkaline, or basic, substances. Note whether they all give
the same colour: Plant extracts can act as indicators to test whether a substance is acidic
or basic.
(iii) Add a few drops of sodium bicarbonate solution to 1 mL of flower extract indicator in a
test-tube. Then add lemon juice and note any colour change.
(iv) Repeat the experiment with limewater and indicator followed by dilute hydrochloric
acid. Note any colour change. Note whether you can get back the original colour by adding
more limewater. Note how many times you can change the indicator colour before the test-
tube is full.
(v) Litmus, an extract of lichens, is another plant indicator. An acidic solution turns blue
litmus red. An alkaline solution turns red litmus blue.
(v) Universal Indicator can be in the form of a solution or dried on filter paper. Universal
indicator not only indicates whether a substance is acidic or basic but also how acidic it is.
Investigate the effect of Universal Indicator on the solutions above. To avoid using the
name of a colour to indicate acidity, we use a scale of numbers from 0 to 14 called the pH
scale. We can use the pH scale to express the degree of acidity. Acid solutions have a pH
value less than 7. Alkaline or basic solutions have a pH value greater than 7. Solutions with a
pH value of 7 are neither acidic nor basic, they are neutral.
On the bottle or packet of Universal indicator, a colour chart shows the colour and the pH
value associated with this colour as follows:
(a) Colour (b) pH (c) Acid/Base
(a) Red (b) 1-3 (c) very acidic
(a) Orange (b) 4-5 (c) weak acid
(a) Yellow (b) 6 (c) very weak acid
(a) Green (b) 7 (c) neutral
(a) Blue (b) 8 (c) very weak base
(a) Indigo (b) 9-10 (c) weak base
(a) Violet (b) 11- 14 (c) very basic
Use 2 drops of Universal Indicator to 10 mL of solution to be tested. Test the pH value of

lemon juice, vinegar, sodium bicarbonate solution, washing soda, lime water, sodium
hydroxide solution, tap water, distilled water.
14. CRYSTALS
(a) Crystal growth
Sodium thiosulphate crystals grow rapidly from a super-saturated aqueous solution. The
formula for the crystals is Na2S2O3.10H2O. On heating, these crystals dissolve in some of
their water of crystallization. Put 3 cm of sodium thiosulphate crystals in a test-tube. Add
2 drops of water. Heat gently until all the crystals have dissolved. They appear to "melt".
Leave to cool. Crystals may not form unless you drop a tiny seed crystal of sodium
thiosulphate into the solution. Then crystal growth commences and spreads rapidly through
the whole solution. Watch the growth from one centre. Hold the tube in the hand while
crystallization occurs.
(b) Crystals of naphthalene grow from the melt
Put a little naphthalene on a glass slide. Hold over a flame until the crystals melt. Put a
cover slip over the liquid and allow to cool. Watch the crystals grow using a hand lens.
Sometimes crystals will grow from several points simultaneously to make boundaries where
they meet. Draw the shape of the boundary between the forming crystals and the melt.
View the crystals through Polaroid filters.
(c) Grow large crystals
(i) Use a 0.5 - 0.8 cm long seed crystal to start growing large crystals. Make seed crystals
by slow evaporation of 30 mL of saturated solution in a glass dish. Dry a selected seed
crystal. Tie a piece of clean cotton around it without touching the seed crystal with your
hands because impurities easily affect the size and shape of the crystal. Hang the seed
crystal 5 cm from the base of the container with a bent wire. Fill a jar (with a screw-on lid)
with a solution of the salt less than saturation strength before you put the seed crystal in
position. If little crystals grow on the surface of the seed crystal, then screw on the lid of
the jar to make the little crystals dissolve. Prevent crystals growing on the sides of a
crystallizing dish by rubbing Vaseline round the upper inside rim. Evaporation may be
increased by sitting the crystal growing jar on a tin with a 5 watt bulb mounted inside it. An
air flow over the solution surface given by a fan will also hasten crystal growth. You can
preserve large crystals by painting with a clear varnish.
(ii) You can also support the seed crystal at the end of a glass tube. Heat a 3 mm bore piece
of glass tubing in a flame until the end softens sufficiently to squeeze with pliers to make a
smaller hole. When the glass tubing cools, drop seed crystals on its end until one catches in
the smaller hole. Keep this crystal in place by dropping other crystals on it. Support the
glass tubing vertically so that the seed crystal at the end is immersed in the solution of the
salt. The seed crystal should then grow. Turn the crystal regularly so that growth on all
faces is equal.
15. DIFFUSION

(a) Diffusion of heavy carbon dioxide gas upwards
(i) Fill a jar with carbon dioxide and invert it over a similar jar full of air. After a few
moments separate the jars, pour a little lime water in the lower one and shake it. The lime
water will turn milky indicating that the carbon dioxide has fallen into the lower jar because
it is the heavier gas.
(ii) Repeat the experiment with the carbon dioxide in the lower jar and invert a jar of air on
top of it. If the jars are left for about 5 minutes carbon dioxide will be carried into the
upper jar by diffusion; in the same way air will be carried into the lower jar. The lime water
test will show the presence of carbon dioxide in the upper jar.
(b) Diffusion rates of ammonia and hydrogen chloride gases
The long glass tube should be horizontal. Corks should fit at both ends. Using a pair of tongs
or tweezers, dip a piece of cotton wool into concentrated hydrochloric acid and another
piece into concentrated ammonium hydroxide. Drain off excess liquid. As nearly as possible
at the same time, put the ammonia cotton wool at one end of the tube and the acid cotton
wool at the other. Close the ends of the tube with corks. After a while, look carefully for a
white ring which will form where the ammonia gas and the hydrogen chloride gas meet after
diffusing through the air towards each other. Ammonia is the less dense gas and the white
ring of ammonium chloride should form nearer to the hydrogen chloride end than from the
ammonia end of the tube.
(c) Diffusion of liquids
(i) Place a crystal of potassium dichromate, potassium dichromate (VI), or ammonium
dichromate at the bottom of a beaker of water. To do this, put a glass tube into the beaker
of water so that it touches the bottom, then to drop the crystal down the tube. Close the
top of the tube with your finger and remove the tube gently, leaving the crystal in the
beaker. The colour of the dissolving crystal will spread throughout the water in quite a
short time.
(ii) Fill a very small open bottle with a strong solution of potassium permanganate, potassium
manganate (VII). Place this in a larger jar. Fill the larger jar very carefully by pouring water
down the side until the water level is above the top of the small bottle. Leave this for a few
days. The potassium permanganate solution diffuses evenly through the water.
(d) Size of a molecule
We select an oil molecule because it has a density less than the density of water. Oil floats
on the surface and does not dissolve in the water. If the water has a large enough surface
area, we assumed that thin oil will spread out in a layer one molecule thick called a
monomolecular layer and not form little "hills" of molecules. If we know the original volume
of oil and the surface area that it forms, then we can calculate the thickness of a
monomolecular layer dividing the volume by the area. Use a tray with area > 30 cm2 so as not
to restrict the oil film. Sprinkle the surface of the water with a very fine light powder, e.g.
talc powder. When you put oil on the water, it pushes the powder aside so you can easily see
the area covered by the oil. Pour thin petroleum distillate oil into a burette. Find the volume
of fifty drops by running oil from the burette drop by drop and counting the drops. Allow
one more drop to fall on a piece of plastic. Touch the oil drop with the point of a glass rod

and then touch the prepared water surface. The oil spreads out. Measure the approximate
area over which it spreads. Estimate what fraction of oil was removed by the glass point by
using the glass point to remove successive fractions from the drop until it has been used up.
The volume of oil put on the water can be calculated and an estimate made of the thickness
of the oil layer, about 10-6 mm. This is an approximate dimension of a single molecule of the
oil.
16. ELECTRICITY
(a) Solids that conduct electricity
The source of the DC supply can be dry cells in series giving 6 volts. The bulb, which should
be low power, indicates when the current is flowing. The electrodes may be carbon or steel,
perhaps mounted in a wooden support, cork or rubber stopper so as to keep the electrodes a
constant distance apart.
(i) Test the conductivity of solids by making a good contact between the surface of the
solid and the two electrodes. The surface of the solid must first be cleaned. All metals
conduct electricity. Carbon conducts electricity. Note whether non-metallic solids, e.g.
plastics, naphthalene, wax, sugar, sodium chloride and sulphur, conduct electricity.
(ii) Glass can be a conductor. Heat a glass rod until it becomes very hot and begins to
soften. Test the hot, soft part with the conductivity apparatus. When molten, glass is a
good conductor of electricity.
(b) LIQUIDS THAT CONDUCT ELECTRICITY
(i) First test liquids obtained by melting substances. Melt the following substances, but heat
very gently and cautiously because otherwise they may ignite and burn: sulphur, wax,
naphthalene, polyethylene material, tin, lead and, if available, a low melting point salt such as
lead bromide, m.p. 488oC, or potassium iodide, m.p. 682oC . Test the conductivity of the melt
by dipping in the electrodes and waiting a few moments for the electrodes to reach the
same temperature. This ensures that the electrodes are in contact with the liquid and not
the solidified melt. Scrape and clean the electrodes between each test.
(ii) Test ethanol, or methylated spirits, acetone, carbon (IV) chloride, vinegar, sugar
solution, copper (II) sulphate solution, sodium chloride solution, and other substances
dissolved in water. Clean and dry the electrodes between each test.
(iii) Test pure distilled water for conductivity. Put the electrodes into a beaker of distilled
water. The bulb does not light up so pure water does not conduct electricity. Very gradually
stir small crystals of common salt into the water. Note any changes to the bulb as the salt

dissolves. Classify substances into the following groups: (a) those which conduct electricity
in the solid state and those which do not; (b) those which conduct in the liquid state and
those which do not; (c) those which conduct when dissolved in water and those which do not
(c) ELECTROLYSIS OF LEAD BROMIDE
There are very few suitable low melting point salts. Lead bromide has a low melting point
and makes an interesting electrolysis experiment. Potassium bromide may have too high a
melting point, 682oC, to melt easily. The lead bromide is melted in a 100 mL hard glass
beaker, or in a crucible. The carbon electrodes are supported by a strip of wood with two
holes bored 2 cm apart for the electrodes. Connect crocodile clips to the rods and complete
the circuit with a torch bulb, to indicate when a current is flowing, and a 12-volt torch
battery or cells wired in series. The electrodes can be labelled positive and negative. The
only ions present in this melt are the bromide and lead ions. Bromine is readily seen coming
off at the positive electrode, which is the anode. The fact that bromine appears only at the
positive electrode helps in the understanding of the existence of a negative bromide ion.
Lead has both a lower melting point and a greater density than lead bromide and therefore
appears as a melt at the bottom of the beaker. The small globule of lead, which accumulates
at the negative electrode, the cathode, can be seen after about 10 minutes of electrolysis.
Decant off the molten lead bromide carefully into another crucible. The electric current
has split up crystalline lead bromide into bromine gas and lead metal.
(d) ELECTROLYSIS
In aqueous solutions there are usually four ions present, two from the water and two from
the dissolved salt. The products will be gaseous, or metals which are deposited on the
negative electrode. It is composed of an open cylinder of glass approximately 8 cm high and
2.5 cm in diameter. A small bottle of similar size with the bottom cut off would do just as
well. The cylinder has a 2-hole rubber stopper carrying two carbon electrodes with
connecting leads to a battery, or DC supply of 4 to 6 volts. If cork is used, this must be
made leak proof by covering the whole of the bottom surface round the electrodes and the
glass edge with Faraday's wax or a similar soft wax. The electrodes may be carbon rods
from a dry cell or pencil leads. The alloy supports for the coiled filament in electric light
bulbs have also been found suitable for electrodes. The electrodes should project about 2
cm into the cylinder and also 2 cm below for attaching the leads to the battery. Pencil leads
are brittle, and if they are used it is better to fix the electrodes in the following way.
Solder a piece of stout copper wire to a 4 cm length of braided copper screening wire. Drill
two holes in the rubber stopper with a 1 mm drill. Insert the copper wire into the hole from
above and pull it right through the stopper until the screening wire is also pulled a little way
into the hole. Into the core of this screening wire insert the pencil lead securely. Then pull
the screening wire with the lead further into the stopper so that the lead electrode is
firmly held in the stopper. The excess copper wire is cut off. This procedure is repeated
with the other electrode. The solution is placed in the glass cylinder. The two small tubes
are then filled with the solution, and carefully inverted over the electrodes. The electrodes
are connected to a safe DC supply with a small bulb in series. Increase the voltage until the
bulb lights, showing that a current is flowing. When this happens, cut out the bulb from the
circuit by closing the switch, as shown. This will allow a larger current to flow. The tubes

collect any gas given off and the properties of the gas should be tested. Using carbon
electrodes, the following results will be found.
(d) ELECTROLYSIS OF WATER
Pure water does not conduct electricity. For this reason 2 or 3 mL of dilute sulphuric acid or
dilute sodium sulphate solution is added to the water in the electrolysis cell.
Connect the cell to the DC supply and watch for bubbles of gas at both electrodes. If none
appear, add a little more acid or sodium sulphate solution. After 5 to 10 minutes there
should be enough hydrogen and oxygen gas for testing. Predict at which electrode each gas
will appear.
(e) Electrolysis of solutions of ionic salts
Most ionic salts can be used satisfactorily in electrolysis. Concentrations of 1M or less are
suitable. Potassium iodide gives iodine at the anode and hydrogen gas at the cathode. Zinc
sulphate gives a spongy mass of zinc at the cathode, oxygen gas at the anode. Lead acetate

deposits lead on the cathode and oxygen gas is produced at the anode. If the lead acetate
solution is cloudy, add a few drops of acetic acid. Sodium chloride gives hydrogen gas at the
cathode and chlorine gas at the anode. Copper sulphate deposits copper at the cathode and
oxygen gas is produced at the anode.
17. COMMON REACTIONS
(a) DISPLACEMENT OF COPPER FROM AQUEOUS SOLUTION OF COPPER IONS
(i) A metal higher in the activity order can displace copper metal from a solution of copper
ions. Put 10 mL of molar copper sulphate solution in a small beaker. Clean magnesium ribbon
and cut into 0.5 cm pieces. Add these pieces to the copper sulphate solution one at a time.
The reaction can be vigorous! Copper metal deposits and the blue colour gradually disappear
as the magnesium displaces the copper ion. Note any heat given out by the reaction. When
the solution is colourless, decant the solution from the red copper powder at the bottom of
the beaker. Collect the copper and dry it.
Mg(s) + Cu2+(aq) -> Mg2+(aq) + Cu(s)
(ii) Repeat the experiment by attempting to displace copper metal using powdered zinc and
iron metal. Note the comparative activity of the metals.
(b) REACTION OF SODIUM WITH WATER
(i) A very safe way of demonstrating the reaction of sodium and water is to drop a very
small piece of sodium into a swimming pool.
(ii) Pour a 2 cm layer of kerosene on to the surface of water in a test-tube. Drop a 3 mm
diameter piece of sodium into the kerosene. Be careful! Sodium sinks in the kerosene and
float in the water. Adjust the layer of kerosene to be shallow enough to allow the top of the
sodium to protrude above the surface. This reaction between sodium and the water is much
slower than if the sodium had been dropped directly on to the water. You can watch the
reaction through a hand lens held at the side, but never at the top. Sodium metal is lighter
than water but heavier than kerosene. A small area of the sodium suddenly reacts causing a
stream of bubbles to appear. The stream of bubbles at one side causes movement. The
irregular shape of the sodium changes to a sphere. The sodium melts because the reaction
gives off heat. Note any variations in light refraction and reflection below the sodium that
indicates something dissolving in the water. Slight smoke where the hot sodium is above the
kerosene level suggests a slight reaction with air. Test the gas bubbles for oxygen or
hydrogen.
(c) DISPLACEMENT OF HYDROGEN FROM ACIDS BY METALS
(i) Pour 5 cm of the acids in the table below into test-tubes. Place a piece of metal foil in
each test-tube. Note the formation of hydrogen and compare the different rates at which
the bubbles are formed.
Rate of formation of hydrogen gas - very rapid, rapid, slight, very slight, none
Metal (b) 3M hydrochloric acid (c) 3M sulphuric acid
Magnesium (b) Very rapid (c) Rapid
Aluminium (b) Slight (c) None
Zinc (b) Moderate (c) Slight
Iron (b) Very slight (c) Very slight

Tin (b) None (c) None
Lead (b) None (c) None
Copper (b) None (c) None
(ii) Recover the zinc after the reaction has ceased. Evaporate the solution to leave zinc
sulphate crystals. Dissolve the colourless zinc sulphate crystals in water and put two carbon
electrodes (central poles of dry cell batteries) in the solution. Connect the electrodes to a
6-volt or 12 volt DC supply. Zinc forms rapidly on the cathode.
(d) PREPARE SULPHUR DIOXIDE
Do the following preparations in a fume cupboard.
(i) Prepare sulphur dioxide by burning sulphur in air. Put powdered sulphur in a porcelain jar;
ignite it and collecting the gas formed in a funnel. Aspirate the gas into a bottle containing
water.
(ii) Prepare sulphur dioxide in a generator which allows dilute sulphuric or hydrochloric acid
to drip slowly on to sodium sulphate. The acid is contained in a thistle funnel and a tap
controls the flow on to sodium sulphite in a suitable flask. The sulphur dioxide produced can
be collected in gas jars covered with cardboard discs, which have central holes for the
delivery tube.
(e) REDUCTION OF POTASSIUM PERMANGANATE WITH SULFUR DIOXIDE
(i) Add 10 mL of 0.1M solution of potassium permanganate and 10 mL 3M solution of dilute
sulphuric acid to 200 mL of water containing sulphur dioxide. The solution will gradually
become colourless as the sulphur dioxide reacts with the permanganate. The experiment can
be continued further by stirring in a 0.25M solution of barium chloride when the solution
will become "milky" due to the formation of barium sulphate.
(ii) The generator used in experiment 2.75B is a convenient piece of apparatus for giving a
continuous supply of sulphur dioxide for bleaching Bowers and other plants. The gas from
the generator is passed through a jar containing the plant, and excess gas is absorbed in
water. The colour of the bleached plant can easily be regenerated by placing the plant in a
solution of hydrogen peroxide. This experiment could be used as an introduction to the
processes of reduction and oxidation.
(f) REACTION OF MAGNESIUM WITH CARBON DIOXIDE
Fill a gas jar with carbon dioxide as described in experiment 2.38. Hold a piece of clean
magnesium ribbon in a pair of tongs; ignite the magnesium with a Bunsen burner flame and
plunge it into the carbon dioxide gas. The magnesium continues to burn. If the magnesium is
taking oxygen from the carbon dioxide for burning then you would find carbon in the gas jar.
Look for carbon specks in the gas jar. To make the carbon more visible, you can add drops
of sulphuric acid to remove the magnesium oxide and any unburnt magnesium.
(g) TITRATION OF ACIDS AND BASES
Measure exactly 20 drops of a dilute acid such as vinegar and put these into a test-tube.
Add one drop of indicator; either methyl orange or phenolphthalein is satisfactory. To this
mixture of acid and indicator, add a dilute base drop by drop, and count the drops. Within
experimental error, it will always take the same number of drops to neutralize the 20 drops
of acid provided that the same dropper is used. A teat pipette makes a satisfactory

dropper. If the concentration of the acid is known, the concentration of the base can be
estimated by comparing the numbers of drops of acid and drops of base that just react.
(h) MAKE SOAP FROM FATS
Soap can be made from many oils and fats. The reaction is a double displacement involving a
strong base such as sodium hydroxide and fats. (a) Obtain animal fat from a butcher. Boil
this fat in water and the oil will separate on the surface. When cold, the fat will solidify and
it can be separated from the water. Melt the fat again and strain through several layers of
cloth. (b) Weigh this fat and then weigh out about one third as much sodium hydroxide
pellets. Take care not to touch either the solid sodium hydroxide or the solution, because it
is very caustic. Heat the fat in an iron saucepan or dish and, when it is molten, slowly add
the sodium hydroxide solution with continuous stirring. Heat with a small flame to avoid
boiling over. Allow the fat and the sodium hydroxide to boil for 30 minutes. Stir the
mixture frequently. (c) The next stage is to weigh out common salt, sodium chloride; about
twice the weight of sodium hydroxide used in (b) is needed. After the 30 minutes boiling,
stir this salt well into the mixture. Then allow to cool. The soap separates as a layer at the
top. Separate this soap from the liquid below, melt and pour into matchboxes where it will
solidify again as small bars of soap.
17. ENERGY FROM CHEMICAL REACTIONS
The following group of reactions involve ions in aqueous solution. When the water containing
the reacting ions becomes hotter, then we have gained this heat and we can make it do work
for us. During the reaction the ions have lost this heat, which we have gained. On the other
hand, when the water containing the ions becomes colder, it is the ions which have gained
the energy and the water has lost an equivalent amount.
(a) REACTIONS THAT GIVE OUT HEAT ENERGY
Be careful! The reaction is vigorous so do not do the experiment in a stoppered bottle!
(i) Put white anhydrous copper sulphate powder to a depth of about 1 cm in a test-tube. Hold
a thermometer with the bulb in the powder. Add water drop by drop. Record the changes of
the thermometer reading.
(ii) Put about 10 mL of strong aqueous copper sulphate solution into a wide test-tube or
small beaker. Support a thermometer with the bulb in the solution. Add magnesium powder,
or ribbon, a little at a time until the blue colour disappears. Note any changes in the
thermometer reading.
(iii) To a little water in a wide test-tube, add concentrated sulphuric acid, drop by drop,
down the side of the tube. Stir gently with a thermometer after the addition of each drop.
Note any changes in the thermometer reading.
(b) REACTIONS THAT TAKE IN HEAT ENERGY
Put 10 mL of water in a test-tube. Read the temperature of the water. Dissolve about 2 g of
potassium nitrate in the water. The temperature should fall through 90oC. This means that,
in the process of dissolving in the water, the particles have absorbed energy. This energy
has been taken from the surrounding water in the form of heat. A similar result can be
obtained by using potassium chloride instead.

(c) HEAT OF A NEUTRALIZATION REACTION
Dissolve 40 g of sodium hydroxide pellets in water and make up to 500 mL. This is a 2M
solution Also prepare 500 mL of a 2M hydrochloric acid solution. Leave the solutions to cool
to room temperature. Note the actual temperature of the solutions when cool. Then add the
acid to the base quite rapidly and stir with a thermometer. Note the maximum temperature
reached. The increase of temperature should be about 13oC.
(iii) Since the volume of water has been doubled by adding one solution to the other, the
final solution contains 1 mole of OH- (aq) ions which reacted with 1 mole of H+(aq) ions to
form 1 mole of water molecules. We must assume that the specific heat of this moderately
weak solution is the same as that of water.
(d) HEAT OF A COPPER DISPLACEMENT REACTION
(i) Put 25 mL 0.2 M copper sulphate solution in a 100 mL polythene fitted with a 1-hole
stopper and thermometer. Replace the stopper, invert the bottle and shake it gently.
Record the temperature of this solution. Turn the bottle the right way up, remove the
stopper and add 0.5 g of zinc dust. The quantity of zinc powder is in excess to ensure that
all the copper sulphate is used up in the reaction, so some zinc will remain when the reaction
stops. Replace the stopper, invert the bottle, and shake gently. Record the highest
temperature reached. Calculate the rise of temperature. This rise of temperature in not
affected by the volume of 0.2 M copper sulphate used for the experiment. For a 1 M
solution, multiply the rise in temperature by 5 (5 X 0.2M = 1.0 M). The reactants lost
energy to the solution. The temperature change is usually between 9oC and 10oC.
Zn(s) + Cu2+(aq) --> Zn2+(aq) + Cu(s)
(ii) Repeat the experiment with 0.5 g of iron powder or iron filings. This amount is again an
excess so that all the copper sulphate will be used up in the reaction. The temperature
change is usually between 6oC and 7oC.
(e) ELECTRICAL ENERGY FROM CHEMICAL REACTIONS - ELECTROCHEMICAL CELLS
In the preceding experiment zinc metal became zinc ions and copper ions became copper
metal due to transfer of electrons from zinc metal to the copper ion. To get electrical
energy these electrons must flow in an external conductor from the zinc to copper. The
potential or voltage will reflect the greater activity of zinc over copper. The current
flowing will depend on the extent and rate of the reaction.
2.84 Electrical energy from the displacement of copper by zinc
Put concentrated copper sulphate solution in a beaker. Connect copper foil to the positive
terminal of a 5 V voltmeter. Connect zinc foil to the negative terminal. Dip the two metals
briefly into the copper sulphate solution. Note any changes in the voltmeter reading. Note
the maximum reading. Note any changes at the copper foil and the zinc foil. The voltage
falls to zero after a short time because copper deposited on the zinc and caused the
reaction to stop.
18. RATE OF REACTION
(a) SIZE OF PARTICLES AND RATE OF REACTION
Marble chips can be broken up with a hammer and graded into 3 or 4 sizes: (a) coarse
powder; (b) pieces about half the size of a rice grain; (c) pieces as large as rice grains; and
(d) the original lumps of marble chips. Place four 100 X 16 mm test tubes in a stand. Weigh
approximately 2 g of each grade, size, of marble chips and put the four grades separately
into each of the four tubes. Obtain four balloons and blow them up several times to stretch
them. Put 5 mL of bench hydrochloric acid into each of the four balloons and slip the mouth
of the balloon over the top of the tube without letting any acid into the tube. When each
balloon is in place, tip the acid into each test-tube at the same time and observe which
balloon is the fastest and the slowest to be blown up. The smallest should give the carbon
dioxide in the shortest time. Instead of using marble chips you can use granulated zinc. Do
not use metals in powder form because the reaction may be too vigorous and even cause an
explosion. Be careful! This reaction produces hydrogen gas! Instead of collecting the gas in
a balloon or plastic bag, a more accurate method would be to collect the gas in a burette
inverted over water and compare the volume of gas given off in unit time for each grade of
marble chips. Another accurate method is to stand a conical flask containing the marble
chips and acid on a balance and record the loss in mass every half minute. Carbon dioxide is
a heavy gas and most balances will enable the loss in mass to be found as the gas escapes.
(b) CONCENTRATION AND RATE OF REACTION
The reaction between sodium thiosulphate and hydrochloric acid can take a noticeable time.
Sulphur is produced during the reaction making the solution cloudy. The rate of reaction can
be found by finding the time taken to reach a certain degree of cloudiness in the solution.
The degree of cloudiness in this case may be defined as the point at which a black cross
marked below the reaction vessel can no longer be seen by looking through the solution from
above. In this experiment the concentration of sodium thiosulphate is made variable, whilst
the concentration of acid is kept constant. Sodium thiosulphate may be bought as "hypo"
which is used in photography. Make up 500 mL of aqueous solution containing 20 g sodium
thiosulphate. 2 M hydrochloric acid is also needed. Bench dilute acid is usually of this
strength. Using a measuring cylinder, put 50 mL of thiosulphate solution into a 100 mL
beaker. Place the beaker on a black cross marked on a sheet of paper. Add 5 mL of the acid
and note the time given by the second hand of a clock. Stir the acid into the solution. Note
the time when the cross is no longer visible through the sulphur in the solution. Repeat the
experiment with a smaller concentration of thiosulphate. Take 40 mL of thiosulphate
solution and add 10 mL of distilled water. Stir and then add 5 mL of acid as before. The
time for the cross to become invisible should be greater than for the last experiment.
Repeat the experiment using 30 mL, 20 mL and 10 mL of this sulphate mixed with 20 mL, 30
mL and 40 mL of distilled water. Plot concentration of the thiosulphate solution against time
taken for the reaction. Concentration values may be taken as the volume of the original
thiosulphate solution used. Since I/time, reciprocal of time, is the measure of the rate of
the reaction, plot thiosulphate concentrations against I/time. The equation for the reaction
can be written as:
Na2S2O3 (aq) + 2HCl(aq) --> H2O (l) + SO2 (g) + S(s)
(c) TEMPERATURE AND RATE OF A REACTION
Use the reaction in experiment 2.92 to investigate the effect of temperature. Put 10 mL of
sodium thiosulphate solution into the 100 mL beaker and stir in 40 mL of water. Use this
concentration for the series of experiments with the temperature of the solution as the
variable. Add 5 mL of acid as before and record the initial time and the temperature of the

solution. Record the final time when the black cross below the beaker is no longer visible.
Repeat the experiment, each time warming the thiosulphate solution to just over 30oC
(c) CATAL YSTS AND RATE OF REACTION
The variable in this reaction is the substance used as a catalyst in the decomposition of an
aqueous solution of hydrogen peroxide. Set up the burette filled with water as in a standard
water displacement experiment. 2 mL of 20-volume hydrogen peroxide will give enough
oxygen almost to fill the burette. Weigh out 1 g each of copper (II) oxide, nickel oxide,
manganese (lV) oxide and zinc oxide. Put 50 mL of water in the flask and add 2 mL of
hydrogen peroxide solution. Add the 1 g of copper oxide. Immediately insert the bung with
the delivery tube into the flask. Time the volume of oxygen given off at intervals of 15
seconds. Plot the volume of oxygen produced every 15 seconds against the time of the
reaction. Repeat the experiment using the other oxides as catalysts. Plot a graph for each
experiment. Manganese (IV) oxide is usually used as a catalyst in this reaction. The catalyst
is not used up during the reaction. A catalyst may slow down a reaction as well as speed it
up.
19. BREAKDOWN OF STARCH TO SUGAR
FEHLING'S TEST FOR REDUCING SUGARS
Starch can be recognized by the deep blue colour which develops when it is in contact with
iodine solution. This is a very sensitive test. Sugar does not react with iodine, but sugar will
reduce copper (II) in Fehling's solution to red copper (I) oxide, and this is also a sensitive
test. Starch does not react with Fehling's solution. Saliva contains enzyme catalysts, which
convert starch to sugar. This experiment investigates the progress of this reaction. Put
about 10 mL of dilute starch solution into a test-tube. Add to this 1 mL of saliva and stir
this into the starch solution. Record the time of adding the saliva. At 5-minute intervals,
remove 2 or 3 drops by means of a dropper and put them on a clean white tile, taking care to
keep them from running into each other. The dropper must be washed well between each
test. Put a little iodine solution on each drop. The decreasing intensity of the blue colour
indicates that starch is being used up. Test for increasing amounts of sugar at the same
time as testing for starch. To do this, put 2 or 3 drops of the reaction mixture into a small
test-tube. Add 3 mL of Fehling's solution and warm this mixture almost to boiling point. The
test should show that the amount of sugar is increasing. The enzyme in the saliva is
therefore slowly breaking starch down into sugar, which is a smaller molecule. In a previous
experiment yeast was used to break down sugar into ethanol, which is an even smaller
molecule. Living yeast, which is a variety of fungus, produces enzymes which act as catalysts
in the conversion:
C6H12O6 -> 2C2H5OH + 2CO2
20. BREAKDOWN OF ETHANOL TO ETHENE (ETHYLENE)
Absorb ethanol on to cotton wool or asbestos wool and push this to the bottom of a hard
glass test-tube. In the middle of the test-tube pack small pieces of unglazed porcelain. Fit a
delivery tube to collect ethene gas over water. Have 3 test-tubes ready to collect ethene.
First heat the porous pot strongly and then gently warm the cotton wool to produce ethanol
vapour. This vapour will break down over the hot porous pot to produce ethene gas and

water vapour. The ethene is insoluble in water, unlike ethanol, and will collect in the test-
tubes. Test the 3 samples by: (a) burning ethene; (b) shaking with a few drops of dilute
potassium permanganate solution made alkaline with sodium carbonate solution, the colour
should disappear; (c) shaking with a little bromine water, the colour again disappears.
Disconnect the delivery tube when you stop heating to avoid a suck back of water onto the
hot porous pot.
20. BREAKDOWN OF POLYMERS
Usually the smallest molecules are gaseous or liquid at room temperature and the large
molecules are solids. Perspex and polystyrene are solid polymers, which can be broken down
to smaller molecules by heat. Put pieces of Perspex or polystyrene in a hard glass test-tube.
Connect a delivery tube as 2.97 From large molecules to small molecules A Perspex or
polystyrene B receiving tube c cold water D a liquid collects. The collecting test-tube must
be cooled thoroughly with cold water, as the fumes are harmful. Gently heat the test-tube
containing the Perspex. The polymer will melt and give off vapours, which are collected in
the receiving tube. Heating must be carefully controlled to enable all the fumes to be
condensed in the receiving tube. A liquid is obtained. This suggests that the polymer has
been broken down by heat to smaller molecules. The liquid does not return to the solid state
unless a catalyst is used. The specific catalysts are not usually available in school
laboratories.
GENERAL EXAMINATION REQUIREMENTS
Apparatus List
This list given below has been drawn up in order to give guidance to schools concerning the
apparatus that is expected to be generally available per student for examination purposes.
The list is not intended to be exhaustive: in particular, items (such as Bunsen burners,
tripods) that are commonly regarded as standard equipment in a chemical laboratory are not
included in this list.
One burette, 50 cm3
A measuring cylinder, 50 cm³ or 25 cm³
A filter funnel
One pipette, 25cm3
Two conical flasks within the range 150cm3 0r 250cm3
A beaker, squat form with lip: 250 cm³
A thermometer, -10°C to + 110°C at 1 °C
A polystyrene or other plastic beaker of approximate capacity 150 cm³

Clocks (or wall-clock) to measure to an accuracy of about 1s. (Where clocks are specified,
candidates may use their own wristwatch if they prefer)
Wash bottle
Test tubes (some of which should be Pyrex or hard glass). Approximately
125 mm x 16 mm
Boiling tubes, approximately 150 mm x 25 mm
Stirring rod
ACCURACY
Unless a question instructs candidates differently they should assume that readings from
equipment and apparatus ought to be made with the following precision:
Burette readings should be to the nearest 0.05 cm3
Weighings should be made to 0.01 g or 0.001 g depending on the precision of the
balance
0 to 1000C thermometers should be read to the nearest 0.50C and 0 to 500C
thermometers to the nearest 0.20C
Timers will normally be read to the nearest second.
It is important that when candidates record reading they include the appropriate number of
decimal places. For example a burette reading of exactly 24.7 cm3 should be recorded in a
results table as 24.70cm3. A temperature of reading of exactly 350C should be recorded as
35.50C.
When titres have to be averaged, it is important that the mean is expressed to either the
nearest 0.05cm3 or to the second decimal point. For example, if a candidate records four
different titres as listed below, the mean can be worked out.
26.50cm3 26.25cm3 26.60cm3 26.65cm3
The candidate is expected to ignore the second titre and average the remaining three
26.50 + 26.60 + 26.65 = 26.583 this should be recorded as 26.60cm3
3
(to the nearest 0.05cm3)
In general, a final should always be given to the same number of significant figures as is
suggested in the exercise.
A significant proportion of marks for quantitative exercise will be awarded for accuracy.
The marks will be awarded by comparing the candidate’s results with the teacher’s reports.
CALCULATIONS

Usually calculations will be structured. Candidates will be led through a series of steps
leading to a final value. Since most of the marks for these steps will be for a correct
method rather than the numerical answer, it is important that candidates include their
working even if this seems to be trivial. No marks can be awarded for an incorrect answer
without working but a correct method followed by an incorrect answer will receive credit.
GRAPHS
Some exercises in practical chemistry will require candidates to treat their readings
graphically. The question will however instruct the candidate which axes to use for each
quantity being plotted. Some useful points for candidates to keep in mind when constructing
graphs are listed below.
Candidates will normally be instructed to put the dependent variable, the quantity
being measured e.g. temperature on the y- axis. The predetermined quantity e.g.
volume will be on the x-axis.
The scales should be chosen so that the results are spread out as far apart as the
size of the grid allows but not at the expense of using a sensible scale. For example
using 1cm to represent 3 units might spread the readings better than using 1 cm to
represent 4 units but the scale may be difficult to read. It is always advisable ton
use even scales.
The origin (0,0) need not necessarily be included on either scale if it is not relevant.
For example if temperature readings between 210C and 280C are plotted, there is no
need to begin the axes at zero.
The axes must be clearly labelled with the quantity being plotted e.g. mass and its
units e.g. kilograms
The points plotted may be joined with a straight line or a smooth curve. Since
readings are all subject to experimental error, the line drawn may not necessarily
pass through every point. Points should never be joined by a series of short straight
lines.
Doing a Titration
Begin by preparing your burette, as described on the burette page. Your burette should be
conditioned and filled with titrant solution. You should check for air bubbles and leaks,
before proceeding with the titration.
Take an initial volume reading and record it in your notebook. Before beginning a titration,
you should always calculate the expected endpoint volume.
Prepare the solution to be analysed by placing it in a clean Erlenmeyer flask or beaker. If
your sample is a solid, make sure it is completely dissolved. Put a magnetic stirrer in the
flask and add indicator. Use the burette to deliver a stream of titrant to within a couple of
mL of your expected endpoint. You will see the indicator change colour when the titrant hits
the solution in the flask, but the colour change disappears upon stirring.
Approach the endpoint more slowly and watch the colour of your flask carefully. Use a wash
bottle to rinse the sides of the flask and the tip of the burette; to be sure all titrant is
mixed in the flask.

As you approach the endpoint, you may need to add a partial drop of titrant. You can do
this with a rapid spin of a Teflon stopcock or by partially opening the stopcock and rinsing
the partial drop into the flask with a wash bottle. Ask your TA to demonstrate these
techniques for you, in the lab.
Make sure you know what the endpoint should look like. For phenolphthalein, the endpoint is
the first permanent pale pink. The pale pink fades in 10 to 20 minutes.
If you think you might have reached the endpoint, you can record the volume reading and
add another partial drop. Sometimes it is easier to tell when you have gone past the
endpoint.
When you have reached the endpoint, read the final volume in the burette and record it in
your notebook.
Subtract the initial volume to determine the amount of titrant delivered. Use this, the
concentration of the titrant, and the stoichiometry of the titration reaction to calculate
the number of moles of reactant in your analyte solution.
Indicators
An indicator is a substance used in titrations, which has one colour in the presence of an
excess of one reagent and a different colour in the presence of an excess of the other.
Examples of indicators include;
(i) Methyl orange
(ii) Phenolphthalein
(iii) Methyl red
(iv) Bromothymol blue
The pH scale
A much more useful measure of the strength of an acid solution was worked out by the
Danish biochemist S. Sorensen. He worked in the laboratories of the Carlsberg breweries
and was interested in checking the acidity of beer. The scale he introduced was the pH
scale. The scale runs from 1 to 14, and the following general rules apply.
Rules for the pH scale:
a. Acid have a pH less than 7,
b. The more acidic a solution, the lower the pH.
c. Neutral substances, such as pure water, have a pH of 7,
d. Alkalis have a pH greater than 7,
e. The more alkaline a solution, the higher the pH.
The pH of a solution can be measured in several ways. Universal indicator papers that are
sensitive over the full range of values can be used. Some colour changes of common
indicators are shown below.

Indicator colour changes
Indicator Colour change
Acid to alkali
PH Type of acid-
base titration
Methyl orange Red to yellow 3.5 Strong acid –
strong or weak
base
Litmus Red to blue 6.0 Strong acid –
strong or weak
base
Bromothymol blue Yellow to blue 7.0 Strong acid –
strong or weak
base
Phenolphthalein Colourless to red 9.5 Strong base-
strong or weak
acid
Candidates may be asked to carry out exercises involving:
Simple quantitative experiments involving the measurement of volumes:
Speeds of reaction.
Measurement of temperature based on a thermometer with 10C graduations.
Problems of an investigatory nature, possibly including suitable organic compounds.
Filtration.
Identification of ions and gasses as specified in the curriculum.
HEALTH AND SAFETY
Candidates must follow the health and Safety policy normally operates in their laboratories
when carrying out the practical Examination. Eye protection must always be worn.
Laboratory overalls are recommended. All substances should be regarded as being
potentially toxic and hazardous. Hazard labels (e.g. flammable) should be read and
appropriate precautions (e.g. keep liquid away from flame) taken. All substances spilled on
the skin should be rinsed off immediately. Chemicals must never be tasted Gases and
vapours should never be smelt unless the question instructs the candidates to do so and
then only with great care.
2.0 QUANTITATIVE ANALYSIS
2.1 Molar solutions and volumetric analysis.

Amount of substance
In quantitative analysis, it is important to measure the amounts or moles of reacting
substances accurately. To do that, we must use values of relative atomic masses expressed
on a periodic table. If we are given the mass of a compound, we can determine the number
of moles.
The first step is to calculate the mass of one mole of the compound by summing up the
relative atomic masses of the constituent atoms. E.g. 1 mole of calcium carbonate (CaCO3)
will have a mass of 40 + 12 + 48 = 100g
10g of CaCO3 will contain 10/100 = 0.1moles
2.2 concentration of a solution
It is very useful to be know exactly how much of a dissolved substance is present in a
solution of particular concentration or volume of a solution. So we need a standard way
of comparing the concentrations of solutions. The concentration of a solution is
determined from the number of moles of solute dissolved in one litre (1dm3) of solution.
If one mole of a solute is dissolved in water and the volume of the solution made up to 1litre
(1dm3), this solution in known as a molar solution or 1M solution. If two moles are dissolved in
1litre (1dm3), the resulting solution is 2M and so on.
MOLES
DISSOLVED
VOLUME (CM3) CONCENTRATION (M)
1 1000 1M
1 500 2M
1 250 4M

1 2000 0.5M
You need to be able to calculate
(i) The number of moles or mass of substance in an aqueous solution of given
volume and concentration
(ii) The concentration of an aqueous solution given the amount of substance and
volume of water.
(iii) Use the equation: molarity of Z = moles of Z / volume in dm3
Remember: moles Z = mass Z / formula mass of Z
Concentration can also be expressed directly in grams per litre (1dm3). 9.8g of H2SO4 can
be expressed either as 0.1M or 9.8g/dm3
Molarity (M) = g/dm3 / formula mass
Example 1: 5.95g of potassium bromide were dissolved in 400cm3 of water. Calculate its
molarity. [Ar values: K = 39, Br = 80]
Moles = mass / formula mass, (KBr = 39 + 80 = 119)
mol KBr = 5.95/119 = 0.05 mol
400 cm3 = 400/1000 = 0.4 dm3
molarity = moles of solute / volume of solution
molarity of KBr solution = 0.05/0.4 = 0.125M
2.3 Volumetric calculations (acid-alkali titrations)
Chemical Equations
These balancing numbers have an additional meaning where these amount calculations are
concerned. The balancing numbers give the numbers of moles present for each chemical
involved in the reaction.

For example, sodium chloride may be prepared by the reaction of sodium hydroxide and
hydrochloric acid, according to the following equation -
NaOH (aq) + HCl (aq) NaCl (aq) + H2O (l)
The equation specifies what amounts of sodium hydroxide and hydrochloric acid will react
together and what amounts of products are produced.
1NaOH (aq) + 1HCl (aq) 1NaCl (aq) + 1H2O (l)
This equation states that 1 mol of sodium hydroxide and 1 mol of hydrochloric acid will react
together to give of 1 mol sodium chloride and of 1 mol water.
The ratio of NaOH: HCl: NaCl: H2O is 1: 1: 1: 1.
What this means is that if the amount of any one of the components in the above reaction is
known then the others may be worked out from the ratio above.
Or, if the masses of chemicals reacting together are known then amounts can be calculated
and the balancing numbers deduced from the amounts reacting together.
2.4 Titration Experiment
Titrations can be used to find the concentration of an acid or alkali from the relative
volumes used and the concentration of one of the two reactants.
Titration involves the neutralisation of an acid with an alkali or a soluble carbonate.
Since both reactants and products are colourless, an indicator is used to find the
neutralisation point or end point i.e. the point at which the acid has been neutralised.
This process is done in three stages.
(i) The acid is poured into the burette. A known volume of the alkali is
transferred using a pipette into four separate conical flasks. Two or three
drops of suitable indicator are added to each of the conical flasks.
(ii) The acid is run into the flask until the indicator just changes colour. The
difference between the initial and final burette readings gives the volume of
the acid used commonly known as the titre. The first titration usually gives
and approximate end point and is treated as the trial.
(iii) The experiment is repeated for each of the other conical flask, to try to
obtain the end point accurately. This is usually done by running out the acid
to a point one unit away from the trial, the going drop-by-drop until an
accurate end point is obtained. The volume of the acid required for each
change is read off and recorded in a table similar to the one below.

PROCEDURE DURING TITRATION
Titrations require continuous shaking of the conical flask and its contents.
Check the quantity of the pipette as indicated on the bulb of the pipette and
remember to record it in the appropriate place.
As you release the liquid from a pipette into a conical flask, one should not blow
out the last drop remaining in the jet.
Before you take any reading from the burette after filling it, first allow the
solution to run out to fill the tap and jet of the burette, and then you begin
taking your readings.
Always write the reading immediately you take them.
When completing the table of results, you will be expected to complete all
columns as accurately as the as the limits of the apparatus can allow e.g.
burette used is usually read to the nearest read to the nearest 0.05 cm 3,
pipette is accurate to 0.05 cm 3 (1 drop).
Use minimum amount of indicator possible (2 – 3 drops) and recognize the end
point has been reached e.g. when the colour just changes.
Show the values that can be averaged to obtain an acceptable value for use in
calculations (only those values within 0.2 cm 3 should be averaged).
Attempt to work out the questions from the first principles and not use the
formula method, which has its own limitations.
GENERAL NOTES FOR QUALITATIVE AND QUANTITIVE ANALYSIS
Indicators
An indicator is a substance used in titrations, which has one colour in the presence
of an excess of one reagent and a different colour in the presence of an excess of
the other. Examples of indicators include;
(v) Methyl orange
(vi) Phenolphthalein
(vii) Methyl red
(viii) Bromothymol blue
Indicator colour changes
Indicator Colour change
Acid to alkali
PH Type of acid-
base titration
Methyl orange Red to yellow 3.5 Strong acid –
strong or weak
base
Litmus Red to blue 6.0 Strong acid –
strong or weak
base
Bromothymol blue Yellow to blue 7.0 Strong acid –

strong or weak
base
Phenolphthalein Colourless to red 9.5 Strong base-
strong or weak
acid
Candidates may be asked to carry out exercises involving:
Simple quantitative experiments involving the measurement of volumes:
Speeds of reaction.
Measurement of temperature based on a thermometer with 10C graduations.
Problems of an investigatory nature, possibly including suitable organic
compounds.
Filtration.
Identification of ions and gasses as specified in the curriculum.
QUALITATIVE ANALYSIS
Qualitative analysis is mainly about identification of substances. No emphasis is laid
on amount or quantity. In qualitative analysis exercises, candidates should use
approximately 1cm depth of a solution (1-2cm3) for each test and add reagents
slowly, ensuring good mixing, until no further change is seen. Candidates should
indicate at what stage a change occurs, writing any deductions alongside the
observations on which they are based. Answers should include details of colour
changes and precipitates formed and the names and chemical tests for any gases
evolved.
Marks for deductions or conclusions can only be gained if the appropriate
observations are recorded.
QUALITATIVE ANALYSIS NOTES
TABLE 1:TESTING FOR GASES
TEST FOR TEST METHOD OBSERVATIONS TEST CHEMISTRY
Hydrogen gas H2 Lighted splint Squeaky pop sound
(might see
condensation on
2H2(g) + O2(g) 2H2O(l)
+ energy

test tube)
Carbon dioxide gas
CO2
Bubble into
limewater (aqueous
calcium hydroxide
solution)
Turns cloudy - fine
milky white
precipitate of
calcium carbonate
Ca(OH)2(aq) + CO2(g)
CaCO3(s) +
H2O(l)
Oxygen gas O2 Glowing splint re-ignites it -
flame
C(in wood) + O2(g)
CO2(g)
Hydrogen chloride
gas HCl
(i) Damp blue
litmus or
(ii) Drop of silver
nitrate on the end
of a glass rod
(i) Litmus turns
red,
(ii) White
precipitate with
silver nitrate
(i) Litmus turns
red,
(ii) White
precipitate with
silver nitrate
Sulphur dioxide
gas SO2
Freshly made
potassium
dichromate (VI)
paper
Paper changes
from orange to
green
The dichromate
(VI) ion, Cr2O72-
(aq)
is reduced to the
green Cr3+(aq) ion
Ammonia gas NH3 Strong pungent
odour, (i) red
litmus, (ii) fumes
conc. hydrochloric
acid
(i) Litmus turns
blue, (ii) white
clouds with HCl
fumes.
(i) Only common
alkaline gas and (ii)
forms fine
ammonium chloride
crystals with HCl
Chlorine gas Cl2
[test (ii) on its own
is no good, could be
HCl]
(i) blue litmus, (ii)
drop silver nitrate
on the end of a
glass rod
pungent green gas,
(i) litmus turns red
and then is
bleached white, (ii)
white precipitate
(i) non-metal, is
acid in aqueous
solution and a
powerful oxidising
agent, (ii) forms
chloride ion in
water
Nitrogen(IV) oxide
(or nitrogen
dioxide) NO2
No simple
relatively
unambiguous test
Reddish- brown gas Strong oxidising
agent
Water vapour H20 (i) White
anhydrous
copper(II)
sulphate, (ii) dry
blue cobalt
chloride paper
(i) turns from
white to blue, (ii)
turns from blue to
pink
(i) Blue hydrated
copper(II) crystals
or solution formed,
(ii) hydrated cobalt
ion formed
[Co(H2O)6]2+
Hydrogen sulphide (i)Smell
(ii)Burning splint
(iii)Lead (II)
(i)‘Bad eggs’
(ii)Gas burns-
sulphur deposits
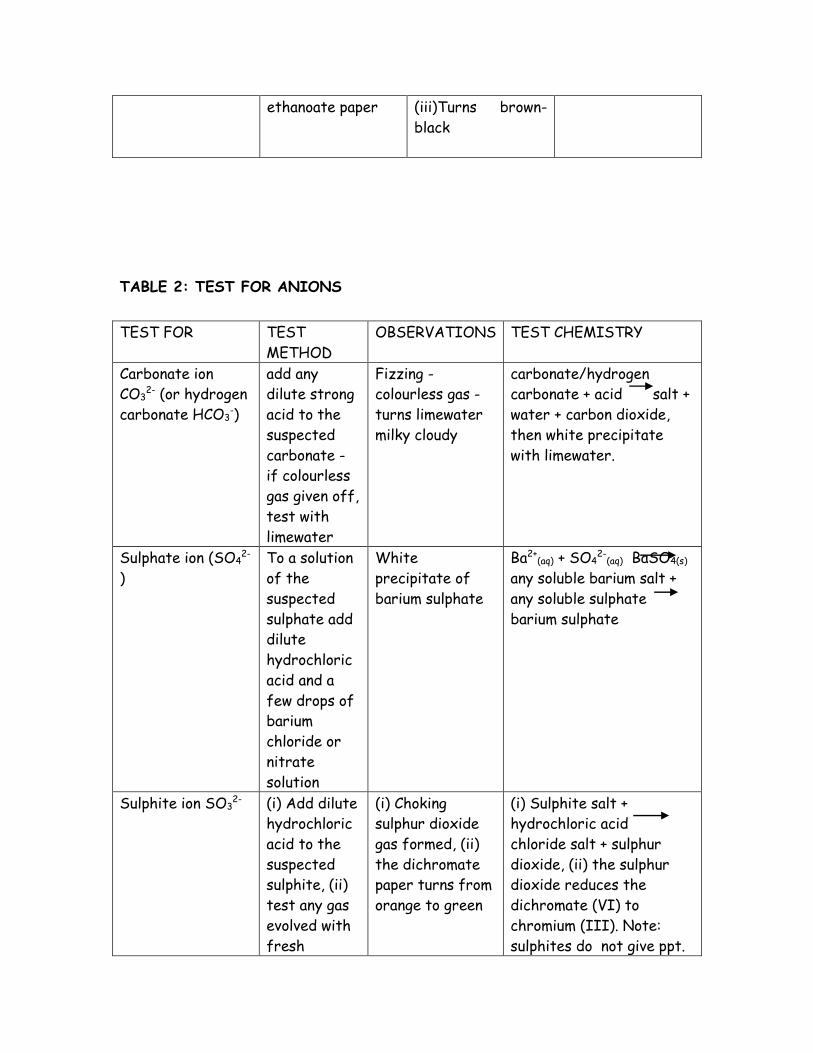
ethanoate paper (iii)Turns brown-
black
TABLE 2: TEST FOR ANIONS
TEST FOR TEST
METHOD
OBSERVATIONS TEST CHEMISTRY
Carbonate ion
CO32- (or hydrogen
carbonate HCO3-)
add any
dilute strong
acid to the
suspected
carbonate -
if colourless
gas given off,
test with
limewater
Fizzing -
colourless gas -
turns limewater
milky cloudy
carbonate/hydrogen
carbonate + acid salt +
water + carbon dioxide,
then white precipitate
with limewater.
Sulphate ion (SO42-
)
To a solution
of the
suspected
sulphate add
dilute
hydrochloric
acid and a
few drops of
barium
chloride or
nitrate
solution
White
precipitate of
barium sulphate
Ba2+(aq) + SO4
2-(aq) BaSO4(s)
any soluble barium salt +
any soluble sulphate
barium sulphate
Sulphite ion SO32- (i) Add dilute
hydrochloric
acid to the
suspected
sulphite, (ii)
test any gas
evolved with
fresh
(i) Choking
sulphur dioxide
gas formed, (ii)
the dichromate
paper turns from
orange to green
(i) Sulphite salt +
hydrochloric acid
chloride salt + sulphur
dioxide, (ii) the sulphur
dioxide reduces the
dichromate (VI) to
chromium (III). Note:
sulphites do not give ppt.

potassium
dichromate
(VI) paper
with acidified barium
chloride/nitrate because
sulphites dissolve in acids.
Chloride ion
Cl-
Add dilute
nitric acid
and silver
nitrate
solution.
White
precipitate of
silver chloride
soluble in dilute
ammonia.
Ag+(aq) + Cl-(aq) AgCl(s).
Any soluble silver salt +
any soluble chloride
silver chloride precipitate.
TEST FOR TEST
METHOD
OBSERVATIONS TEST CHEMISTRY
Bromide ion
Br-
Add dilute
nitric acid
and silver
nitrate
solution
Cream
precipitate of
silver bromide,
partially soluble in
dilute ammonia
(i) Ag+(aq) + Br-
(aq) AgBr(s)
any soluble silver salt +
any soluble bromide
silver bromide precipitate
Iodide ion I- (i) Add
dilute
nitric acid
and silver
nitrate
solution,
OR (ii) Add
lead(II)
nitrate
solution
(i) Yellow
precipitate of
silver iodide
insoluble in dilute
ammonia,
(ii) a yellow
precipitate forms
(i) Ag+(aq) + I-
(aq) AgI(s)
any soluble silver salt +
any soluble iodide
silver iodide precipitate,
(ii) Insoluble lead (II)
iodide formed, Pb2+(aq) +
2I-(aq) PbI2(s)
Nitrate ion
NO3-
boil the
suspected
nitrate
with
sodium
hydroxide
solution
and fine
aluminium
powder
fumes of
ammoniaproduced,
which turns red
litmus blue.
the aluminium powder is a
powerful reducing agent
and converts the nitrate
ion, NO3-, into ammonia
gas, NH3
Hydroxide ion ie an (i) litmus or (i) turns litmus (i) pH meter gives a value

alkali OH- (ii) add
ammonium
salt
blue, (ii) if
strongly alkaline
ammonia should
be released.
of more than 7, the
higher the pH number the
stronger the alkali, the
higher the OH-
concentration, (ii)
ammonia gas is evolved:
NH4+(aq) + OH-
(aq) NH3(g)
+ H2O(l)
TABLE 3: TESTS FOR CATIONS
TEST FOR With aqueous
sodium hydroxide
Test with aqueous
ammonia
TEST CHEMISTRY
Magnesium(Mg2+) White ppt.
insoluble in excess
White ppt.
insoluble in excess
Mg2+(aq) + 2OH-
(aq)
Mg (OH)2(s)
white ppt. The pp
t. is not soluble in
excess of NH3 or
NaOH. You could
distinguish Mg2+
from Ca2+ with a
flame test
Calcium (Ca2+) White ppt.
insoluble in excess
No ppt. or very
slight white ppt
insoluble in excess
Ca2+(aq) + 2OH-
(aq)
Ca(OH)2(s)
white ppt. The ppt.
is not soluble in
excess of NH3 or
NaOH.
Aluminium(Al3+) White ppt. soluble
in excess giving a
colourless solution
White ppt.
insoluble in excess
Aluminium ion:Al3+
+3OH-
Al(OH)3(s) in
excess NaOH
forms soluble
(Al(OH)4-)

Zinc (Zn2+) White ppt. soluble
in excess giving a
colourless solution
White ppt. soluble
in excess giving a
colourless solution
Zinc ion: Zn2+(aq) +
2OH-(aq)
Zn(OH)2(s) white
ppt. The ppt.
dissolves in both
excess sodium
hydroxide and
ammonia to give a
clear colourless
solution.
Lead (Pb2+) White ppt. soluble
in excess giving a
colourless solution
White ppt.
insoluble in excess
Iron(II) (Fe2+) Green ppt.
insoluble in excess
Green ppt.
insoluble in excess
iron(II) ion: Fe2+(aq)
+ 2OH-(aq)
Fe(OH)2(s) dark
green ppt. The ppt.
is not soluble in
excess of NH3 or
NaOH.
Iron (III) (Fe3+) Red-brown ppt
insoluble in excess
Red-brown ppt
insoluble in excess
iron(III) ion:
Fe3+(aq) + 3OH-
(aq)
Fe(OH)3(s) brown
ppt.* The ppt. is
not soluble in
excess of NH3 or
NaOH.
Copper (Cu2+) Light blue ppt.
insoluble in excess
Light blue ppt.
soluble in excess
giving a deep-blue
solution
TABLE 4: ORGANIC TESTS
TEST FOR TEST METHOD OBSERVATIONS TEST CHEMISTRY
ALKENE or alkyne
any other non-
aromatic
unsaturated
hydrocarbons
bubble gas
through, or add
liquid to, a solution
of bromine in
hexane or water
the orange/brown
bromine,
decolourises, as a
saturated
colourless organic
R2C=CR2 + Br2
BrR2C-CR2Br
Colourless
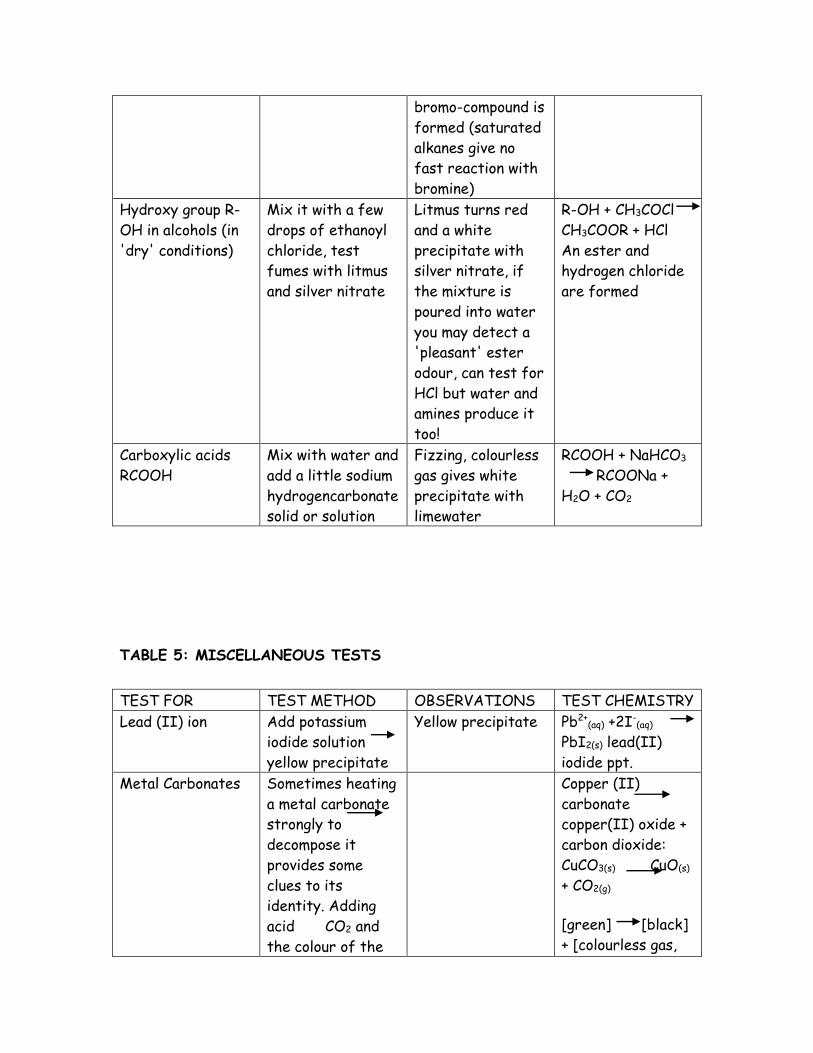
bromo-compound is
formed (saturated
alkanes give no
fast reaction with
bromine)
Hydroxy group R-
OH in alcohols (in
'dry' conditions)
Mix it with a few
drops of ethanoyl
chloride, test
fumes with litmus
and silver nitrate
Litmus turns red
and a white
precipitate with
silver nitrate, if
the mixture is
poured into water
you may detect a
'pleasant' ester
odour, can test for
HCl but water and
amines produce it
too!
R-OH + CH3COCl
CH3COOR + HCl
An ester and
hydrogen chloride
are formed
Carboxylic acids
RCOOH
Mix with water and
add a little sodium
hydrogencarbonate
solid or solution
Fizzing, colourless
gas gives white
precipitate with
limewater
RCOOH + NaHCO3
RCOONa +
H2O + CO2
TABLE 5: MISCELLANEOUS TESTS
TEST FOR TEST METHOD OBSERVATIONS TEST CHEMISTRY
Lead (II) ion Add potassium
iodide solution
yellow precipitate
Yellow precipitate Pb2+(aq) +2I-
(aq)
PbI2(s) lead(II)
iodide ppt.
Metal Carbonates
Sometimes heating
a metal carbonate
strongly to
decompose it
provides some
clues to its
identity. Adding
acid CO2 and
the colour of the
Copper (II)
carbonate
copper(II) oxide +
carbon dioxide:
CuCO3(s) CuO(s)
+ CO2(g)
[green] [black]
+ [colourless gas,

resulting solution
(e.g. blue Cu2+(aq
),
may also provide
clues. The metal
ion solution might
also give a flame
colour or a
hydroxide
precipitate with
sodium hydroxide
e.g. copper.
test with
limewater, white
precipitate]
zinc carbonate
zinc oxide + carbon
dioxide
ZnCO3(s) ZnO(s)
+ CO2(g)
[White] [Yellow
hot, white cold]
+[colourless gas,
test with
limewater, white
precipitate]
Hydrogen ion H+ or
H3O+
(i) litmus or
universal indicator
or pH meter, (ii)
add a little sodium
hydrogen
carbonate powder
(i) litmus turns
red, variety of
colours with
universal indicator.
strong - red, weak
- yellow/orange, (ii)
fizzing with any
carbonate - test
for CO2 as above
(i) PH meter gives
a value of less than
7, the lower the
pH number the
stronger the acid,
the higher the H+
concentration, (ii)
HCO3-(aq) + H+
(aq)
H2O(l) + CO2(g)
Ammonium ion
NH4+
no smell at first,
add COLD sodium
hydroxide solution
to the suspected
ammonium salt and
test any gas with
red litmus
Smelly ammonia
evolved and red
litmus turns blue
Ammonia gas is
evolved: NH4+(aq) +
OH-(aq) NH3(g)
+ H2O(l)
TABLE 6. FLAME TESTS
A tungsten wire loop is first dipped into some concentrated hydrochloric acid to
dissolve any oxides and hence clean the wire. It is then dipped into salt powder and

introduced into a colourless Bunsen burner flame. The colour is then observed and
inferences made.
Metal ion Symbol Flame colour
Lithium Li+ Scarlet
Sodium Na+ Yellow
Potassium K+ Lilac
Calcium Ca2+ Brick red
Strontium Sr2+ Crimson
Barium Ba2+ Apple green
TABLE 7: HEAT ANALYSIS
Observation on heating Conclusion
Water vapour / steam evolved, turning
cobalt chloride paper pink
Crystals contain water of crystallization,
or the solid is a hydroxide which
decomposes
Colourless gas evolved which relights a
glowing splint
Oxygen from a nitrate of potassium or
sodium
Brown gas evolved and a glowing splint
relights
Nitrogen dioxide and oxygen from the
decomposition of a nitrate
Gas given off which turns limewater cloudy Carbon dioxide from the decomposition
of a carbonate
Pungent gas evolved which turns acid
dichromate paper from orange to green
Sulphur dioxide from the decomposition
of a sulphate
Sublimate forms on cool part of the tube Likely to be an ammonium salt. (Ammonia
may also be detected with moist red
litmus: it turns it blue.)
Residue turns yellow when hot and then
white again when cold
Zinc oxide, which may have been formed
by the decomposition of another zinc

compound
Residue which is red when hot and yellow
when cold
Led (II) oxide, which may have been
formed by the decomposition of another
lead compound
TABLE 8: SOLUBLE AND INSOLUBLE SALTS
Soluble Insoluble
Bases The alkalis: sodium and
potassium hydroxides;
calcium hydroxide, which is
slightly soluble; ammonia.
All other metal oxides and hydroxides
Salts All nitrates
All chlorides
except
All sulphates
except
Carbonates of Sodium and
potassium
Silver chloride and lead chloride (lead
chloride is soluble in hot water)
Barium sulphate and lead sulphate; calcium
sulphate is slightly soluble
All other carbonates
TABLE 9: GENERAL PRELIMINARY TESTS
COLOUR POSSIBLE IONS IN
SALT
Blue Copper(II)
Pale green Iron(II)
Green Copper(II)

Brown Iron(III)
TABLE 10 : IGNITION ANALYSIS
Candidates may be asked to heat an unknown alone in an ignition tube. The colour
changes or the identity of any gases evolved may provide evidence as to the
identity of the unknown.
COLOUR CHANGE POSSIBLE HYDRATED SALT
Blue to white Copper (II) sulphate
Blue to black Copper (II) nitrate
Pale green to brown Iron (II) salts
TABLE 10: RESIDUE WHEN HOT AND COLD
Residue remaining after ignition may have a different colour when hot and cold
APPEARANCE OF RESIDUE POSSIBLE IDENTITY
HOT COLD
White Yellow Zinc Oxide
Yellow Red Lead(II)Oxide
Brown Black Iron (III)Oxide
Sublimes - Ammonium salt
TABLE 11: HEATING A SOLID
Gases or vapours may be evolved during heating of the solid
GAS OR VAPOUR POSSIBLE SOURCE
Carbon dioxide Carbonates of metals other than Group 1
or Hydrogen carbonates of group 1
Ammonia Ammonium salts

Oxygen alone Group 1 nitrates
Oxygen and nitrogen dioxide Nitrates (other than Na or K)
Hydrogen chloride Hydrated chloride or ammonium chloride
Water Hydrated salts
TABLE 12: SOLUBILITY
The patterns of solubility for various types of salts
Salts Soluble Insoluble
Sodium salts All are soluble None
Potassium salts All are soluble None
Ammonium salts All are soluble None
Chlorides Most are soluble Silver chloride, lead (II)
chloride
Nitrates All are soluble None
Sulphates Most are soluble Barium sulphate, lead (II)
sulphate, calcium sulphate
Ethanoates All are soluble None
Carbonates Sodium, potassium and
ammonium carbonates
Most are insoluble

KEY
Ppt = precipitate
Sol = solution
Insol = insoluble
Xs = excess
Dil = dilute
1.HYDROGEN CHLORIDE
Physical Properties

Colour Colourless
Odour Pungent odour
Poisonous
Density compared
to air (heavier or
lighter)
Heavier than air.
Chemical Properties
Solubility in
water
Very soluble in water. It
reacts with water to form
hydrochloric acid.
Burning Does not support combustion
Moist pH paper Acidic reaction
Red rose petals No reaction
Specific test It will fume in moist air
Footnotes:
Dilute hydrochloric acid is one of the three common dilute acids used in the
laboratory.
Concentrated hydrochloric acid is used in the manufacture of many
chemicals.
2.CARBON DIOXIDE
Physical Properties
Colour Colourless
Odour Odourless
Density compared
to air (heavier or
lighter)
Heavier than air

Chemical Properties
Solubility in
water
Fairly soluble in water. It
reacts with water to form a
weak acid called carbonic acid.
Burning Does not support combustion.
Moist pH paper Shows a weak acidic reaction
(around pH6)
Red rose petals No change
Specific test Turns lime water "cloudy"
Footnotes:
Makes up 0.04% of the gases in the air. Rainwater is slightly acidic because
carbon dioxide dissolves in it.
Needed by green plants during photosynthesis.
Product of respiration in living things.
Product of combustion
Is one of the "greenhouse" gases present in the atmosphere.
Used in fire extinguishers since it is heavier than air and forms a "blanket"
around the fire. This prevents combustion since carbon dioxide does not
support it and the presence of carbon dioxide stops oxygen reaching the
combustible material.
3.CHLORINE GAS
Physical Properties
Colour Greenish-yellow
Odour Pungent odour
Poisonous
Density compared
to air (heavier or
lighter)
Heavier than air

Chemical Properties
Solubility in
water
Soluble in water. Most of it
reacts with water to form
acids.
Burning Does not support combustion.
Moist pH paper Shows a strong acidic
reaction
Red rose petals Would bleach and lose their
colour
Specific test None
Footnotes:
One of the "family" of halogen gases (iodine and bromine are in the same
family)
Used in water purification.
Used to make bleaching powder, disinfectants and antiseptics
Also used to make some explosives, poison gases and pesticides.
4.HYDROGEN CHLORIDE GAS
Physical Properties
Colour Colourless
Odour Pungent odour
Poisonous
Density compared
to air (heavier or
lighter)
Heavier than air.
Chemical Properties

Solubility in
water
Very soluble in water. It
reacts with water to form
hydrochloric acid.
Burning Does not support combustion
Moist pH paper Acidic reaction
Red rose petals No reaction
Specific test It will fume in moist air
Footnotes:
Dilute hydrochloric acid is one of the three common dilute acids used in the
laboratory.
Concentrated hydrochloric acid is used in the manufacture of many
chemicals.
5.HYDROGEN GAS
Physical Properties
Colour Colourless
Odour Odourless
Density compared
to air (heavier or
lighter)
Lighter than air. Can escape
through the atmosphere into
space.
Chemical Properties
Solubility in
water
Insoluble
Burning Explodes when a burning
match is placed into it. Reacts
with oxygen gas to form
water.
Moist pH paper No reaction

Red rose petals No reaction
Specific test A lighted match will produce a
"squeak" sound. This is a small
explosion.
Footnotes:
The lightest gas known.
Once used in airships but replaced by helium which is not explosive.
Used to make ammonia which is needed in the manufacture of fertilizers and
explosives.
6.NITROGEN
Physical Properties
Colour Colourless
Odour Odourless
Density compared
to air (heavier or
lighter)
Same as air
Chemical Properties
Solubility in
water
Slightly soluble
Burning Does not support combustion
Moist pH paper No reaction
Red rose petals No reaction
Specific test None

Footnotes:
Makes up around 79% of the gases in the air.
Used to make ammonia gas, which in turn is used to make explosives and
fertilizers.
Used in light bulbs and thermometers because it is not reactive.
Also used as the atmosphere in rooms where explosives are stored.
7.OXYGEN
Physical Properties
Colour Colourless
Odour Odourless
Density compared
to air (heavier or
lighter)
Slightly heavier than air
Chemical Properties
Solubility in
water
Slightly soluble in water
Burning Oxygen gas is needed for
burning or combustion.
Something that burns in air
will burn five times more
ferociously in pure oxygen
gas.
Moist pH paper No change
Red rose petals No change
Specific test A glowing match or wooden
spill will relight when placed in
oxygen gas.

Footnotes:
Makes up 20% of the gases in the air.
Needed by the majority of living organisms for respiration
Is produced by green plants as a by-product of photosynthesis.
8.SULPHUR DIOXIDE GAS
Physical Properties
Colour Colourless
Odour Pungent odour
Density compared
to air (heavier or
lighter)
Heavier than air
Chemical Properties
Solubility in
water
Soluble. It reacts with water
to form a strong acid.
Burning Does not support combustion
Moist pH paper Acidic reaction
Red rose petals Are bleached and lose their
colour
Specific test None
Footnotes:
It is used as a bleaching agent.
It is one of the gases responsible for air pollution.
