practical 9 9.1 vi editor - weebly · practical 9 9.1 vi editor there are many ways to edit files...
TRANSCRIPT

Practical 9
9.1 vi editor
There are many ways to edit files in Unix and for me one of the best ways is using screen-
oriented text editor vi. This editor enables you to edit lines in context with other lines in the
file. Now days, you would find an improved version of vi editor which is called VIM. Here VIM
stands for Vi IMproved. The vi is generally considered the de facto standard in Unix editors
because –
It's usually available on all the flavors of Unix system.
Its implementations are very similar across the board.
It requires very few resources.
It is more user friendly than any other editors like ed or ex.
You can use vi editor to edit an existing file or to create a new file from scratch. You can also
use this editor to just read a text file.
To open vi editor in Linux:
Click on Applications->System Tools->Terminal
Then type vi with filename as shown belo:

Once you write vi command you will get the option as shown below:
Open Read Only: Press O
Edit anyway: Press E
Recover: Press R
Quit: Press Q
Abort: Press A
Here we will try to edit our file by pressing E

You will notice a tilde (~) on each line following the cursor. A tilde represents an unused
line. If a line does not begin with a tilde and appears to be blank, there is a space, tab,
newline, or some other nonviewable character present.
Getting Out of vi
The command to save the contents of the editor is :w. You can combine the above command
with the quit command, or :wq and return.
9.2 Graphics
Graphics in Linux can be managed by GThumb editor, which comes by default in RedHat.
To start GThumb:
Click on Applications->Graphics->gThumb Image Viewer
You can browse your image to edit from any folder where you saved.

Once you browse your image you can start with editing. Double Click on the image file.
Below you can see the image tab which consist many options to edit your image file. We will
see all one by one.

We select Resize option to change the size of the image. Here you have option to change height
and width.
Next we will see the Crop option, where you can select the required part of the image.

Here we can do the Color Balance by changing the levels of Colors. After changing color levels
you can see the difference in both the images.
Before saving:
After saving:

Now we also have an option to increase the Hue, Saturation and Lightness of the image as
follows:
After making required changes Save the file.
Next step can be use of Red-Eye Removal, this will remove the red eyed part from your image.

9.3 Terminal
Till now we worked a lot with terminal you just need to explore yourself with every tab of it.

9.4 Display Resolution
Click on the System Menu-> Select preferences-> Click Display to open the Display Preferences.
After that you can change the resolution of your display by increasing or decreasing the value
from drop down list as shown below:

9.5 Using the Web Browsers
This practical we should perform similar ways as given for 8.6 practical. Here in Linux you can
find Browser for example Firefox as shown below:
Select Applications->Internet->Firefox Web Browser.

9.6 Configuring Simple Networking
To run this click System->Preferences->Network Connections as shown below:
We can also run this tool from terminal with command using nm connection-editor command.
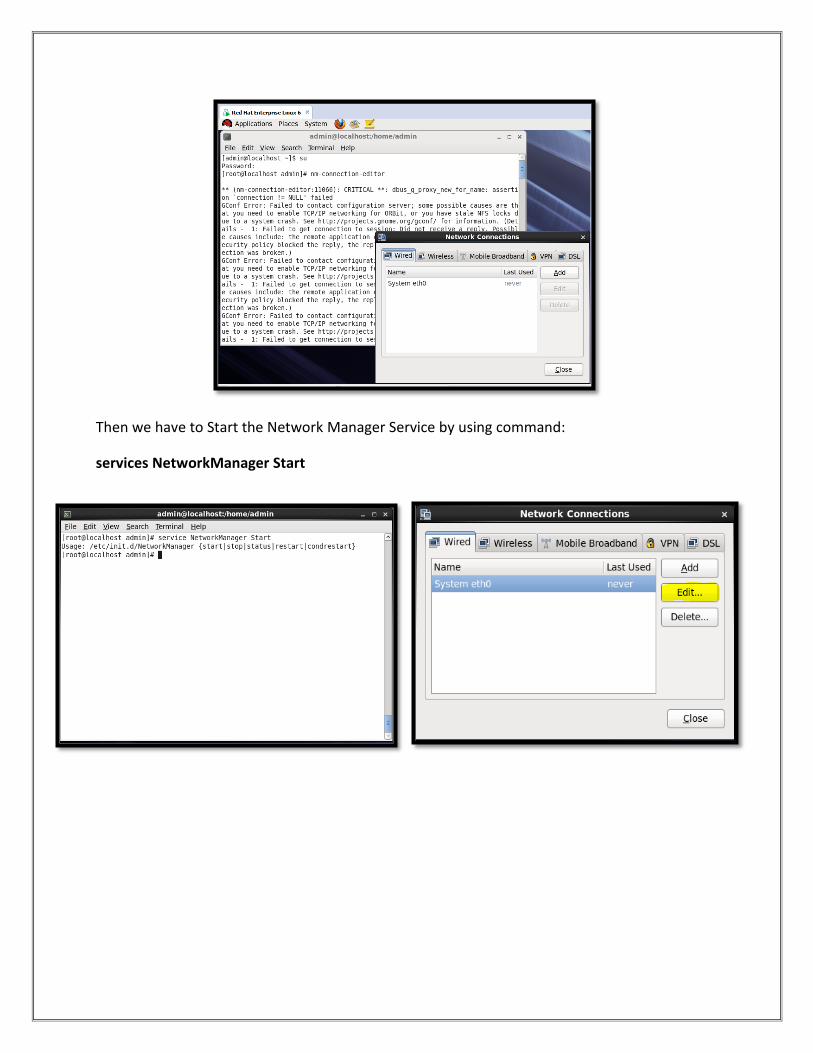
Then we have to Start the Network Manager Service by using command:
services NetworkManager Start

From opened window select eth0 and click
on Edit. Then click on IPv4 tab. For static
configuration select Manual from drop down
and click on Add button as shown above.
For Dynamic configuration select DHCP from
drop down and click Apply. It will
automatically apply IP to our machine in
network.

9.7 Creating Users and Shares.
To start the User Manager Application:
Go to System->Administration->Users and Groups.
The Users tab provides a list of local users along with additional information about their user ID,
primary group, home directory, login shell and full name. To find a specific user use Search
Filter.

Adding a new User
1. Click on Add User Button
2. Enter User name, Full name, Password and select which login shell you want from drop
down list.
3. Clear Home directory option if you don’t want to create home directory for new user
and also clear a private group for the user if you don’t want to create unique group with
the same name as the user created.
4. Click OK after completion of the process.

Now you can be able to see the user which we created just now in the user tab.
Now we can work with the newly created user. Open the terminal and use su command to
switch user where it will ask you for the password, you have to provide the password which you
given for the new user and press enter. After that you will be in the new user login as shown
below.

Configuring a Samba Server
The default configuration file (/etc/samba/smb.conf) allows users to view their home directories as a Samba share. It also shares all printers configured for the system as Samba shared printers. In other words, you can attach a printer to the system and print to it from the Windows machines on your network.
Graphical Configuration
To configure Samba using a graphical interface, use the Samba Server Configuration Tool.
The Samba Server Configuration Tool is a graphical interface for managing Samba shares, users, and basic server settings. It modifies the configuration files in the /etc/samba/directory. Any changes to these files not made using the application are preserved.
Samba Server Configuration Tool
Configuring Server Settings
The first step in configuring a Samba server is to configure the basic settings for the server and a few security options. After starting the application, select Preferences => Server Settings from the pulldown menu.
Configuring Basic Server Settings

On the Basic tab, specify which workgroup the computer should be in as well as a brief description of the computer. They correspond to the workgroup and server string options in smb.conf.
Configuring Security Server Settings
The Security tab contains the following options:
Authentication Mode — This corresponds to the security option. Select one of the following types of authentication.
o ADS — The Samba server acts as a domain member in an Active Directory Domain (ADS) realm. For this option, Kerberos must be installed and configured on the server, and Samba must become a member of the ADS realm using the net utility, which is part of the samba-client package. Refer to the net man page for details. This option does not configure Samba to be an ADS Controller.
o Domain — The Samba server relies on a Windows NT Primary or Backup Domain Controller to verify the user. The server passes the username and password to the Controller and waits for it to return. Specify the NetBIOS name of the Primary or Backup Domain Controller in the Authentication Server field.
The Encrypted Passwords option must be set to Yes if this is selected.
o Server — The Samba server tries to verify the username and password combination by passing them to another Samba server. If it can not, the server tries to verify using the user authentication mode. Specify the NetBIOS name of the other Samba server in the Authentication Server field.
o Share — Samba users do not have to enter a username and password combination on a per Samba server basis. They are not prompted for a username and password until they try to connect to a specific shared directory from a Samba server.
o User — (Default) Samba users must provide a valid username and password on a per Samba server basis. Select this option if you want the Windows Username option to work.

Encrypt Passwords — This option must be enabled if the clients are connecting from a Windows 98, Windows NT 4.0 with Service Pack 3, or other more recent versions of Microsoft Windows. The passwords are transferred between the server and the client in an encrypted format instead of in as a plain-text word that can be intercepted. This corresponds to the encrypted passwords option.
Guest Account — When users or guest users log into a Samba server, they must be mapped to a valid user on the server. Select one of the existing usernames on the system to be the guest Samba account. When guests logs in to the Samba server, they have the same privileges as this user. This corresponds to the guest account option.
After clicking OK, the changes are written to the configuration file and the daemon is restart; thus, the changes take effect immediately.
Managing Samba Users
The Samba Server Configuration Tool requires that an existing user account be active on the system acting as the Samba server before a Samba user can be added. The Samba user is associated with the existing user account.
Managing Samba Users
To add a Samba user, select Preferences => Samba Users from the pulldown menu, and click the Add User button. On the Create New Samba User window select a Unix Username from the list of existing users on the local system.
If the user has a different username on a Windows machine and will be logging into the Samba server from the Windows machine, specify that Windows username in the Windows Username field. The Authentication Mode on the Security tab of the Server Settings preferences must be set to User for this option to work.
Also configure a Samba Password for the Samba User and confirm the Samba Password by typing it again. Even if you select to use encrypted passwords for Samba, it is

recommended that the Samba passwords for all users are different from their system passwords.
To edit an existing user, select the user from the list, and click Edit User. To delete an existing Samba user, select the user, and click the Delete User button. Deleting a Samba user does not delete the associated system user account.
The users are modified immediately after clicking the OK button.
Adding a Share
Adding a Share
To add a share, click the Add button. The Basic tab configures the following options:
Directory — The directory to share via Samba. The directory must exist.
Descriptions — A brief description of the share.
Basic Permissions — Whether users should only be able to read the files in the shared directory or whether they should be able to read and write to the shared directory.
On the Access tab, select whether to allow only specified users to access the share or whether to allow all Samba users to access the share. If you select to allow access to specific users, select the users from the list of available Samba users.
The share is added immediately after clicking OK.