practical 2p1 diffusion - university of oxford
TRANSCRIPT

It is essential that you read through all of this document before the laboratory class
1 (updated October 2018) 2P1 Diffusion
Practical 2P1
Diffusion
What you should learn from this practical
Science The practical aims to familiarise you with a solution of Fick's Second Law
of diffusion by studying the diffusion of carbon into iron. The treatment
makes the simplifying assumption that the diffusion coefficient, D, for
carbon in iron is independent of concentration for the case where surface
concentration is maintained constant. The quantitative analysis of
microstructures will show you how to determine D values from solute
profiles, which can be compared with published and theoretical data.
Practical skills
You will gain experience in the use of image processing software for
quantitative metallography. Heat treatment (pack carburisation) in
furnaces, preparation of metallographic sections and etching will be
demonstrated. Results will be processed using a spreadsheet for curve
fitting; you will need to write the spreadsheet functions. The microscopy
will require interpretation of some complex microstructures.
Safety In the pack-carburisation demonstration, care is needed in handling hot
crucibles. This must be done using proper tongs, and wearing suitable
protection (gloves and visor). Hot materials must not be left on the
bench without a notice that they are hot and the time they were placed
there. Normal safety precautions are adequate for the etches used here,
i.e. lab coat, gloves and eye protection.

It is essential that you read through all of this document before the laboratory class
2 (updated October 2018) 2P1 Diffusion
Overview of the Practical
1. The pack-carburisation of a sample of Swedish Iron (ferrite with a
very low carbon content) will be demonstrated. This is an industrial
process used for case hardening. At the temperatures used, carbon
is diffusing in single-phase austenite. Metallographic sections have
been prepared.
2. You will record digital images of the structures from different
diffusion conditions so that quantitative measurements of phase
areas/volumes different depths can be made using basic image
analysis software.
3. You will determine carbon profiles by measuring the proportions of
the constituents (e.g. primary ferrite, pearlite and primary cementite)
in the normalised structures at selected depths and then calculating
the mean carbon content for each depth.
4. Different ways will be used, and compared, to determine D from the
error function solution of Fick's Second Law. The results at two
temperatures are combined to give the approximate activation
energy.
5. You will need to plan the work so that all samples can be analysed
in the time available.

It is essential that you read through all of this document before the laboratory class
3 (updated October 2018) 2P1 Diffusion
Experimental details
Heat treatment
The samples are small pieces of Swedish Iron; this has a low C content
and is almost entirely single-phase ferrite (some specimens may contain
a small amount of pearlite).
The pack carburisation of these samples will be demonstrated:
• The samples are packed in a graphite / fireclay crucible in a
mixture of powdered charcoal and sodium carbonate activator
(10 % w/w). The carbonate releases carbon dioxide that reacts
with the charcoal give carbon monoxide and forms a carburising
gas. A lid is needed to exclude air, even while the crucible is
cooling, or the surface will begin to decarburise.
• The crucible is placed in the furnace for 1 hour at a temperature in
the region of 1000°C.
• At the end of the carburisation the crucible is allowed to cool in the
furnace (switched off) to at least 500ºC before removing from the
furnace to cool more rapidly. This leaves some uncertainty in the
time of treatment and give increased D values, but ensures
equilibrium microstructures.
**Do not remove the lid until the crucible is completely cold. A suitable warning is must be placed while it is still hot**

It is essential that you read through all of this document before the laboratory class
4 (updated October 2018) 2P1 Diffusion
Metallography
The heat treated samples have been cut in half transversely and
mounted, then ground, polished and etched for examination. You may
need to refresh the etched surfaces.
• After grinding, which needs to remove distorted metal from sawing
during coarse grinding, and polishing, the specimens have been
etched, in 2% nital. It is important that the samples have the best
possible surface finish before etching, because the presence of
scratch marks will interfere with the subsequent image analysis
procedures.
• The etch time needs to be sufficient to show the structure clearly
across the whole carbon profile, and a time of a few seconds
should be ample. If the ferrite matrix has begun to etch (for
example, along the lines of any residual scratch marks), then the
sample is over-etched. In this case, the sample needs to have the
final polish repeated and it needs to be etched with a shorter
etching time.
• If the heat treatment has been carried out correctly your samples
will have a 'case' of carburised iron of uniform depth around the
whole circumference. The specimens have been cut to examine
the mid-section metallographically, and not the end faces of the
specimens. This is because carbon diffuses into the samples from
the ends as well as from the sides. It is not possible to obtain a
valid one-dimensional diffusion profile if the carbon is diffusing into
area of interest from two different directions.

It is essential that you read through all of this document before the laboratory class
5 (updated October 2018) 2P1 Diffusion
Recording and Image Analysis of Micrographs
Using correctly prepared specimens, you need to record images along a
line perpendicular to the surface, and then analyse these to obtain the
proportions of the microstructure constituents.
Instructions for image acquisition and analysis are given in Appendix A.
• In your images, select rectangles parallel to the surface at regular
intervals and measure the proportions of each constituent by
selecting the areas in each rectangle that are above a chosen
threshold of intensity.
• You need to think carefully about the size and position of these
rectangles, taking the observed microstructure into account.
In principle, the image analysis should be able to estimate the proportion
of proeutectoid and eutectoid phases present for both the hypereutectoid
and hypoeutectoid regions. However, proeutectoid cementite formed in
hypereutectoid steels gives rise to difficulties in image processing. This
cementite is mainly in the form of thin films at the prior austenite grain
boundaries, and analysis by image thresholding cannot readily identify
these.
The recommended procedure is to estimate the volume fraction of
pearlite in the hypoeutectoid regions (i.e. from near zero carbon up to
about 0.8 wt.% carbon), and not to attempt measurements in the
hypereutectoid regions. Instead, you may assume that the carbon
content at the outer edge of the sample corresponds to the saturation
carbon content in austenite for the temperature at which the
carburisation heat treatment was carried out. This value can be obtained

It is essential that you read through all of this document before the laboratory class
6 (updated October 2018) 2P1 Diffusion
from the iron-carbon phase diagram, which can be found in any standard
reference handbook.
Using the iron-carbon phase diagram, you then need to obtain data for
the atomic % carbon against depth. You will need to plan your work to
see that everybody has the opportunity to contribute to this operation.
Advice on the calculations and data processing needed to obtain the
carbon concentration profile is given in Appendix B.

It is essential that you read through all of this document before the laboratory class
7 (updated October 2018) 2P1 Diffusion
Analysis of Results to obtain Carbon Diffusivity
If we make the assumption that diffusivity, D, can be treated as a
constant (in reality there is some variation across so wide a range of
concentration) and put constant surface concentration as a boundary
condition, Fick's law can be solved to give:
𝐶(𝑥, 𝑡) = 𝐶( − (𝐶( − 𝐶*)𝑒𝑟𝑓 .𝑥 2√𝐷𝑡2 3
You can analyse a Fickian concentration profile to obtain values of the
diffusivity by three related methods:
1. A simple, but accurate, way to determine D is to find the depth (𝑥)
at which the carbon concentration is half that at the surface
(neglecting the original low level in the iron, by assuming that 𝐶* =
0). The error function (erf) has a value very close to 0.5 at this
point, and hence for this depth, 𝑥 = √𝐷𝑡. Thus, knowing the value
of 𝑥 (and 𝑡), 𝐷 may be calculated. You should check that the value
for this depth increases linearly with the square root of diffusing
time.
2. Another approximate way, if the surface concentration is uncertain,
is to take the total case depth as roughly 2 √𝐷𝑡 . You should check
this also with your data, and consider whether the assumption that
𝐶* = 0 is valid.
3. A better way is to use the full theoretical solution, and obtain a
value of 𝐷 for the best fit of this function to your data. This can be
done using a spreadsheet. The sensitivity to variations in 𝐶* can
also be considered.

It is essential that you read through all of this document before the laboratory class
8 (updated October 2018) 2P1 Diffusion
You should:
• Use the 𝐷 values that you obtain by these different ways to test the
expected result that the same value of diffusivity is obtained
irrespective of the time of heating at a given temperature.
• Use the variation of 𝐷 with temperature to determine an activation
energy for carbon diffusion.
Bibliography
For a short discussion of carburising/diffusion see Porter and Easterling
"Phase transformations in Metals and Alloys" pp 73:4; there is a succinct
treatment of the relevant maths in J.W. Christian "The Theory of
Transformations in Metals and Alloys" pp 385-387. You are
recommended to review these.
Fuller treatments can be found in P.G. Shewmon "Diffusion in Solids" or
J. Crank "The Mathematics of Diffusion".
The following (rather old, but still relevant) papers are worth reading, and
are available online via the University Library.
• Diffusivity of carbon in iron and steels at high temperatures, G. G.
Tibbetts, J. Appl. Phys. 51, 4813 (1980)
• The diffusivity of carbon in iron by the steady- state method, R.
Smith, Acta Metallurgica, 1, 578 (1953)

It is essential that you read through all of this document before the laboratory class
9 (updated October 2018) 2P1 Diffusion
Write up
The allocated marks will be moderated following the discussion of your
report in the marking session
The required report is brief, and should contain a concise description (< 1
page) of the experiment method.
You must include a print out of a representative image of one sample,
accompanied by sketches and explanations of the structure. There must
be a graph (or graphs) reporting the carbon content/distance data from
each of your samples and a table summarising the 𝐷 values obtained by
the different methods described above. You must compare the 𝐷 values
and activation energy that you obtain with values from the literature.
It is very important to explain and justify your analysis method, including
the choices that you made in the image analysis and their effects on
errors and uncertainties. You need to explain or demonstrate why the
particular solution of Fick's Law used applies to the boundary conditions
of your experiment.
This first part of the report carries 50% of the marks
At the end of your report, answer the following questions.
1. There is sometimes a light coloured layer at the free surface of
some samples. What do you think it is? Explain your judgement.
2. Describe the physical significance of the value of activation energy
for carbon diffusion.
3. Explain what the carbon profile should look like if carburising were
carried out at 850ºC.

It is essential that you read through all of this document before the laboratory class
10 (updated October 2018) 2P1 Diffusion
4. Comment on whether your data show that 𝐷 increases or decreases
with carbon content? What is the expected result from theory?
5. Describe briefly the analysis method by which the value of 𝐷 for any
carbon content can be obtained from an accurate carbon
concentration curve.
This second part of the report carries the remaining 50% of the marks.

It is essential that you read through all of this document before the laboratory class
11 (updated October 2018) 2P1 Diffusion
Appendix A: Using Fiji or ImageJ to Measure the Area Fraction of Pearlite
Open Fiji (or ImageJ) and import the image file
Open Fiji, which may also be called (Fiji is just) ImageJ. The icons are
shown in Figure 1. Both are essentially the same software.
Figure1:IconsforFijiandImageJ
Open your image within the software. You can usually do this by
dragging the image file onto the toolbar (Figure 2).
Figure2:Fiji/ImageJToolbar.The‘rectangularselections’toolischosen.
Or, choose the menu sequence File > Open and then select the image
file from the file browser.
You will then have a colour image (e.g. Figure 3) to work with.

It is essential that you read through all of this document before the laboratory class
12 (updated October 2018) 2P1 Diffusion
Figure3:Exampleimage.Thepearliteisdark(asarethegrainboundaries).Thisimageisrecordedatahighermagnificationtoshowthedetail.Youmayfindalowermagnificationismoreusefulforthedataacquisitioninthislaboratory.
Convert Colour to Greyscale
It is usually easier to threshold and segment images if they are
monochrome or ‘greyscale’, rather than colour (e.g. RGB).
Greyscale images can be 8 bit (grey intensity from 0 to 255) or 16 bit
(grey intensity from 0 to 65,535). For most purposes, 8 bit is quite
sufficient.
Change the image type chose Image > Type and select 8 bit (Figure 4)
a) b) Figure4:a)Image>Typemenucommandstoconvertimagetypeto‘16bit’or‘8bit’greyscalefrom‘RGBcolor’;b)convertedgreyscaleimage.

It is essential that you read through all of this document before the laboratory class
13 (updated October 2018) 2P1 Diffusion
The Greyscale Histogram
You can inspect the histogram of greyscale intensities by selecting your
image (click on it) and then using the Analyse > Histogram menu
commands. This creates a chart of the number of counts of each
greyscale level, and also some useful statistics.
The histogram of greyscale intensities in the example image (Figure 5a)
shows a good range of intensities (a bit more illumination could have
been used in the original image). There is a large peak for the brighter
ferrite, and a smaller peak for the darker regions that are mostly pearlite.
If your histogram is mostly to the low or high end of the 0-255 range (e.g.
Figure 5b), then it is under or over-exposed and you may not be able to
segment it reliably.
a) b)
Figure5:Examplehistogramsofgreyscalefora)quitegoodimageandb)over-exposedimage.
Using Thresholds
To separate regions of the image that are within a chosen threshold
greyscale range, select your image (click on it) and then use Image > Adjust > Threshold. This will open a window in which you can drag
sliders to define the range of grey levels (Figure 6).
It is essential that you read through all of this document before the laboratory class
14 (updated October 2018) 2P1 Diffusion
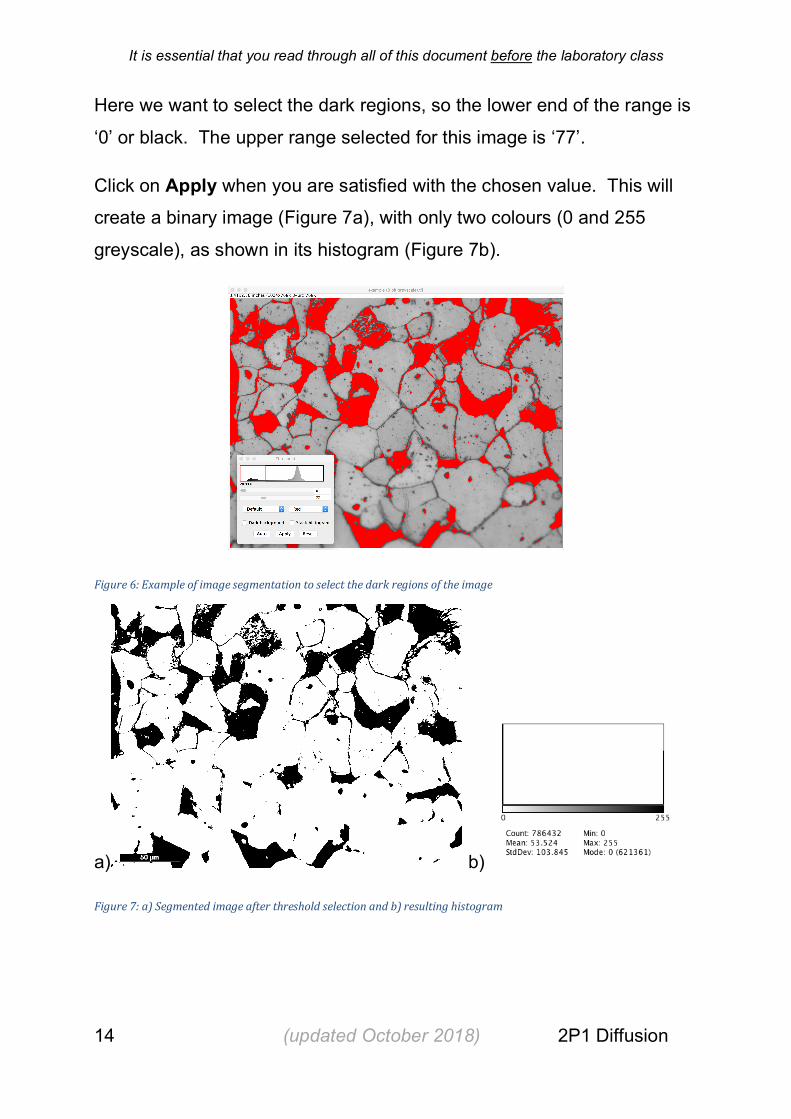
Here we want to select the dark regions, so the lower end of the range is
‘0’ or black. The upper range selected for this image is ‘77’.
Click on Apply when you are satisfied with the chosen value. This will
create a binary image (Figure 7a), with only two colours (0 and 255
greyscale), as shown in its histogram (Figure 7b).
Figure6:Exampleofimagesegmentationtoselectthedarkregionsoftheimage
a) b)
Figure7:a)Segmentedimageafterthresholdselectionandb)resultinghistogram

It is essential that you read through all of this document before the laboratory class
15 (updated October 2018) 2P1 Diffusion
Measuring the Thresholded Area Fraction
To obtain the fraction of the image area that has been selected using the
threshold, the simplest method is as follows:
Select the Rectangular Selections tool in the FiJi toolbar (Figure 2) and
drag a rectangle over the region that you want to measure (Figure 8a).
Choose Analyze > Set Measurements... and click the Area Fraction
and Limit to Threshold checkboxes (Figure 8b). This sets a preference
to measure only the highlighted pixels within the rectangular selection
you made. You can also select Area. Press OK.
Choose Analyze > Measure to measure the area covered by the black
pixels in the rectangle. You may need to choose Window > Results to
bring the Results window forward (Figure 8c).
a) b)
c) Figure8:Examplemeasurement.Theareafractioninthechosenthresholdrangewithinthemarkedrectangleis26.5%

It is essential that you read through all of this document before the laboratory class
16 (updated October 2018) 2P1 Diffusion
Going Further
Fiji/ImageJ is a very powerful image processing tool that is designed for
automation and batch processing of large numbers of images to obtain
quantitative data. You don't need these capabilities for this laboratory
class, but you may like to explore what can be done. You will find many
guides on the internet, and also on the software homepage: imagej.net.
The software is free and open source1, and you can download a copy to
use on your own computer.
1 Schindelin, J.; Arganda-Carreras, I. & Frise, E. et al. (2012), "Fiji: an open-source platform for biological-image analysis", Nature methods 9(7): 676-682, PMID 22743772, doi:10.1038/nmeth.2019

It is essential that you read through all of this document before the laboratory class
17 (updated October 2018) 2P1 Diffusion
Appendix B: Data Analysis
Carbon Concentration Profiles
For the diffusion analysis, you need to calculate the atomic % of carbon
as a function of distance from the sample edge, and hence obtain a
carbon concentration profile.
This is done using the iron-iron carbide phase diagram, assuming
equilibrium conditions. It is also assumed that the fraction of phases
observed in your sample is the same that existed at the higher
temperature at which it formed. Under equilibrium conditions, the
eutectoid reaction occurs at 723°C. The eutectoid composition at this
temperature is 0.8 wt% carbon, while the solubility of carbon in ferrite is
0.035 wt%. The carbon content of cementite (Fe3C) is 6.67 wt%.
The image analysis will give you the total number of pixels in your
selected analysis area, and the number of pixels above or below your
chosen threshold. For instance, if the ferrite is light, this can be used to
calculate the area fraction of ferrite. Assuming a binary microstructure,
depending on whether you have a hypo or hypereutectoid composition,
the area fractions of the other constituents such as pearlite or cementite
can then be calculated.
Assuming the area fractions of the constituents 𝐴 and 𝐵 in a two-
dimensional section are the same as the volume fractions in the
microstructure, the weight fraction (𝐴78%) of constituent 𝐴 with density 𝜌;
and volume fraction 𝐴<% is calculated as below.
𝐴78% =𝐴<%𝜌;
𝐴<%𝜌; + 𝐵<%𝜌>

It is essential that you read through all of this document before the laboratory class
18 (updated October 2018) 2P1 Diffusion
The approximate densities of pearlite, ferrite and cementite are 7.5, 7.9
and 4.0 g/cm3, respectively.
You can use the inverse lever rule and the phase diagram to then
calculate the carbon weight concentration from the weight fractions, such
as the ferrite and pearlite content.
Finally, the atomic concentration, 𝐴?8%, is obtained from the weight
concentrations using equation below, where 𝐴?8@A and 𝐵?8@A are the
atomic weights of elements 𝐴 and 𝐵. The atomic weights of iron and
carbon are approximately 55.9 and 12.0 respectively.
𝐴?8% =𝐴78%𝐵?8@A
𝐴78%𝐵?8@A + 𝐵78%𝐴?8@A× 100
You will have a quite large number of calculations to do, particularly to
make an assessment of the measurement uncertainty in your carbon
concentration data, so you are advised to construct a spreadsheet using
software such as Excel2. However, you can use alternatives, such as
Matlab, if you wish.
In Excel, it is suggested you record the position of each observation
down a column of cells in the spreadsheet, with the raw data for the area
2 If you are unsure how to use formulas in Excel, consult the “help” section “Creating Formulas”, particularly the section “Enter a formula that refers to values in other cells”.
Remember that to quickly apply a formula to the next cells down in the column, double-click the fill
handle on the first cell that contains the formula. Excel calculates the results in each cell of the column automatically.

It is essential that you read through all of this document before the laboratory class
19 (updated October 2018) 2P1 Diffusion
or area fractions of the thresholded selections in the next column. You
can then calculate the weight fractions etc. in further columns to the right.
Diffusion and the Error Function
A simple way to estimate the diffusion coefficient is to apply Fick’s law to
predict the concentration profile and compare this to your data. Assume
an initial value of the diffusion coefficient, 𝐷 and then adjust this to get
the best fit.
Note: Take care with your units! The carbon diffusivity in iron at
austenitisation temperatures is of the order of 10-11 m2s-1.
You can judge the fit by eye, but you should consider more quantitative
ways of comparing the data and prediction. You should also consider
the scatter (i.e. variability) in your data and the uncertainty in your
measurements. You can then obtain a best estimate value of the
diffusion coefficient and your confidence in it.
Fick’s Law is given
𝐶(𝑥, 𝑡) = 𝐶( − (𝐶( − 𝐶*)𝑒𝑟𝑓 .𝑥 2√𝐷𝑡2 3
The Error Function, erf, is the indefinite integral defined by the equation
𝑒𝑟𝑓(𝑧) =2𝜋F𝑒GHIJ
*
𝑑𝑦

It is essential that you read through all of this document before the laboratory class
20 (updated October 2018) 2P1 Diffusion
The function ERF3 is used in Excel to calculate the Error Function, erf.
For carburisation, the surface concentration 𝐶M needs to be obtained
from the phase diagram at the temperature of the carburisation. The
bulk concentration, 𝐶*, should be estimated from the bulk microstructure
of your samples.
3 If you are unsure how to use this function, see the Help section in Excel under “ERF Function”. Typing “=ERF(A1)” into a cell will calculate erf (z) where z is the value in cell A1.