ppart 1art 1 using expressions - elsevier · part 1 using expressions 10 it’s to teach you...
TRANSCRIPT

Using ExpressionsPART 1PART 1
07_K80936_CH01.indd 107_K80936_CH01.indd 1 10/3/2008 3:22:35 PM10/3/2008 3:22:35 PM

07_K80936_CH01.indd 207_K80936_CH01.indd 2 10/3/2008 3:22:35 PM10/3/2008 3:22:35 PM

3
ADDING EXPRESSIONS How do you create an Expression in After Effects (AE)? The easiest way is to Option click (PC: Alt click) any stopwatch in the Timeline or Effect Controls panel. I like to think of Expressions as another option (or another alternative ) to keyframes, which helps me remember to hold down the Option (PC: Alt) key when I’m adding them. To animate with keyframes, you click a stopwatch; to animate with Expressions, you Option click (PC: Alt click) a stopwatch.
Let’s say you want an Expression to control a layer’s position: create a small solid—say 100 by 100. Or you can use the little guy in Chapter01.aep, Comp1. Now do this:
1. Twirl open the layer’s properties in the Timeline. 2. Twirl open the Transform group. 3. Option click (PC: Alt click) the stopwatch by the Position property.
Don’t be alarmed when the Comp window turns black and a scary-looking message appears underneath it in red. Starting in AE6, Adobe introduced a minor bug that causes the display to freeze while you’re adding an Expression.
CHAPTERCHAPTER 1 1
Creating Simple Expressions
07_K80936_CH01.indd 307_K80936_CH01.indd 3 10/3/2008 3:22:35 PM10/3/2008 3:22:35 PM
PART 1 Using Expressions
4
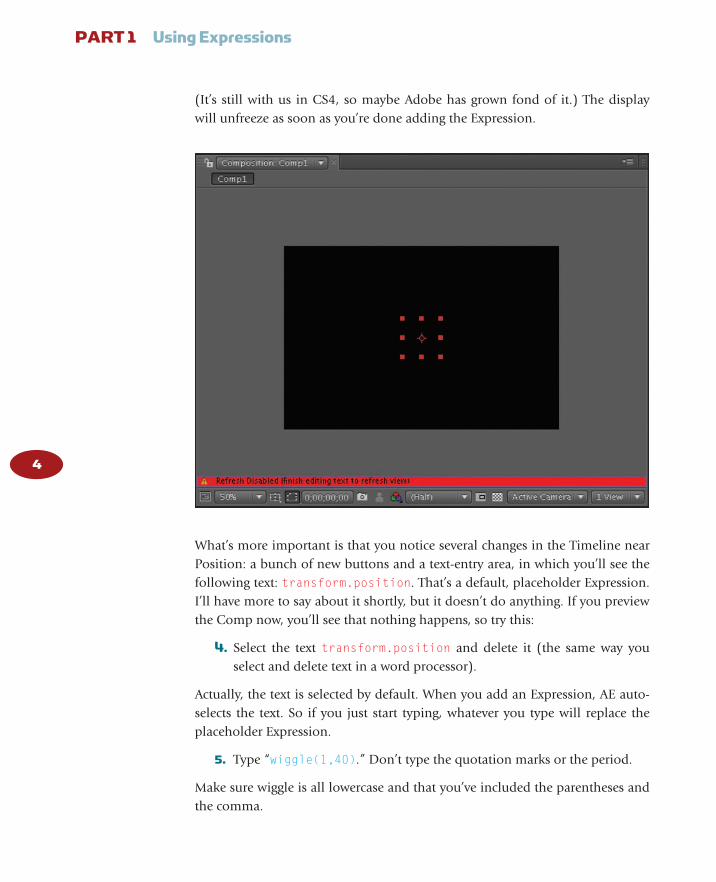
(It’s still with us in CS4, so maybe Adobe has grown fond of it.) The display will unfreeze as soon as you’re done adding the Expression.
What’s more important is that you notice several changes in the Timeline near Position: a bunch of new buttons and a text-entry area, in which you’ll see the following text: transform.position . That’s a default, placeholder Expression. I’ll have more to say about it shortly, but it doesn’t do anything. If you preview the Comp now, you’ll see that nothing happens, so try this:
4. Select the text transform.position and delete it (the same way you select and delete text in a word processor).
Actually, the text is selected by default. When you add an Expression, AE auto-selects the text. So if you just start typing, whatever you type will replace the placeholder Expression.
5. Type “ wiggle(1,40) . ” Don’t type the quotation marks or the period.
Make sure wiggle is all lowercase and that you’ve included the parentheses and the comma.
07_K80936_CH01.indd 407_K80936_CH01.indd 4 10/3/2008 3:22:37 PM10/3/2008 3:22:37 PM

Creating Simple Expressions CHAPTER 1
5
6. With your mouse, click anywhere outside of the text-entry area, say on a gray area of the Timeline. That tells After Effects you’ve fi nished typing the Expression. (It “ fi nalizes ” the Expression.)
If you see an error message, it means you made a typo. Don’t fret. Just click back inside the text-entry area, edit the Expression until it’s correct, and then click outside the text-entry area again.
7. Preview the Comp by pressing the spacebar.
We’ll delve into the meaning of that Expression later. But hopefully you noticed that the layer did, in fact, wiggle. For some fun, try changing the numbers inside the parentheses—for example, change
Note: I printed the default Expression, transform.position , in red and the one
I asked you to type, wiggle(1,40) , in blue. Throughout this book, auto-generated
Expressions (the ones AE types for you) will be red; manual Expressions (the ones you
type) will be blue.
07_K80936_CH01.indd 507_K80936_CH01.indd 5 10/3/2008 3:22:38 PM10/3/2008 3:22:38 PM

PART 1 Using Expressions
6
them to wiggle (3,100) —and see what happens. Don’t worry; you can’t break anything.
In short, use these steps to add an Expression:
1. Option click (PC: Alt click) a stopwatch. 2. Enter the Expression. 3. Finalize the Expression by clicking outside the text-entry area.
You can also fi nalize an Expression by pressing the Enter key on the numeric keypad. (Mac users: Never press the Return key on the main keyboard to fi nal-ize an Expression. PC users: Never press the Enter key on the main keyboard. Those keys drop the cursor down to the next line in the text-entry area, just as they would in a word processor. To fi nalize an Expression, always use the Enter key on the numeric keypad or click outside the text-entry area.)
07_K80936_CH01.indd 607_K80936_CH01.indd 6 10/3/2008 3:22:41 PM10/3/2008 3:22:41 PM

Creating Simple Expressions CHAPTER 1
7
If you’re into menus, you can also add an Expression by following these steps:
1. Clicking a Property name (e.g., Position) to select it. 2. Choosing Animation � Add Expression or clicking Option Shift Equals
(PC: Alt Shift Equals). That’s the keyboard shortcut for the menu option.
DISABLING AN EXPRESSION Let’s say you want to stop the wiggle. Simply click the equal-sign button in the Timeline. It will become a not-equal-sign button, and the Expression will stop working.
07_K80936_CH01.indd 707_K80936_CH01.indd 7 10/3/2008 3:22:43 PM10/3/2008 3:22:43 PM

PART 1 Using Expressions
8
Try previewing the Comp, and you’ll notice that wiggling has stopped. Click the not-equal sign again, and it will toggle back to an equal sign. The layer will wiggle once again. This button is called the Enable Expression button, but a better name for it would be the Disable/Enable Expression button, because it’s a toggle.
Next, I’ll explain how to permanently remove an Expression, but in general I suggest that you disable them rather than remove them. That way, if you change your mind and want them back, you won’t have to type them all over again.
REMOVING EXPRESSIONS You remove an Expression exactly the same way you create one: by Option clicking (PC: Alt clicking) a stopwatch. Option click once to add an Expression; Option click the same stopwatch again to remove the Expression. This is exactly the same toggle pattern you use with keyframes: You click a stopwatch to add keyframes and click it a second time to remove keyframes. The only difference is that with Expressions, you add in the Option key (PC: Alt key).
You can also remove an Expression by selecting the property it’s applied to (e.g., by clicking the word “ Position ” ) and choosing Animation � Remove Expression. Or you can select the property and type Option shift equals (PC: Alt shift equals).
One other way to remove an Expression is by deleting the Expression text and then clicking outside the text-entry area (or pressing Enter on the numeric keypad).
BASIC EXPRESSIONS Now that you know how to add, disable, and remove Expressions, let’s explore what they are and how they work. As I explained in the Introduction, Layer properties are controlled by numbers (with rare exceptions like the Source Text property of Type Layers, which is controlled by text).
This is as true with keyframes as it is with Expressions. Let’s say you turn on the stopwatch for a layer’s Rotation property. You then move the Current Time
07_K80936_CH01.indd 807_K80936_CH01.indd 8 10/3/2008 3:22:44 PM10/3/2008 3:22:44 PM

Creating Simple Expressions CHAPTER 1
9
Indicator (CTI) to 3 seconds and, with the Rotation tool, rotate the layer to 19 degrees. After Effects will plop a key-frame in the Timeline at 3 seconds. This keyframe is “ remembering ” the number 19. Whenever you scrub the Current Time Indicator to 3 seconds (or play the Comp through the 3-second mark), the keyframe reminds AE to rotate the layer to 19 degrees. At 3 seconds, the num-ber 19 is controlling the layer’s Rotation property.
Expressions give you an alternative way to make the numbers that control properties (e.g., the wiggle Expression spits out ran-dom numbers, and those random num-bers control the property). Let’s watch this in action in the simplest possible way:
1. In an empty Comp, create a solid. Or you can use the Red Star layer in Chapter01.aep, Comp2.
2. Twirl open its Transform properties. 3. Add an Expression to the Rotation property. 4. Remove the default Expression, and type “ 45 ” (without the quotation
marks) in its place. 5. Click outside the text-entry area, or press Enter on the numeric keypad.
Note: This is the last time I’m going to tell you to fi nalize an Expression. You’ll thank me
for saving you from having to read “ click outside the text-entry area, or press Enter on the
numeric keypad ” over and over. But please remember that Expressions must be fi nalized
before they can work.
This is the stupidest Expression you’ll ever write. If you want a layer to be rotated 45 degrees, it’s much easier to just use the Rotation tool or scrub the property value. My point here isn’t to show you how to do something useful;
07_K80936_CH01.indd 907_K80936_CH01.indd 9 10/3/2008 3:22:44 PM10/3/2008 3:22:44 PM
PART 1 Using Expressions
10
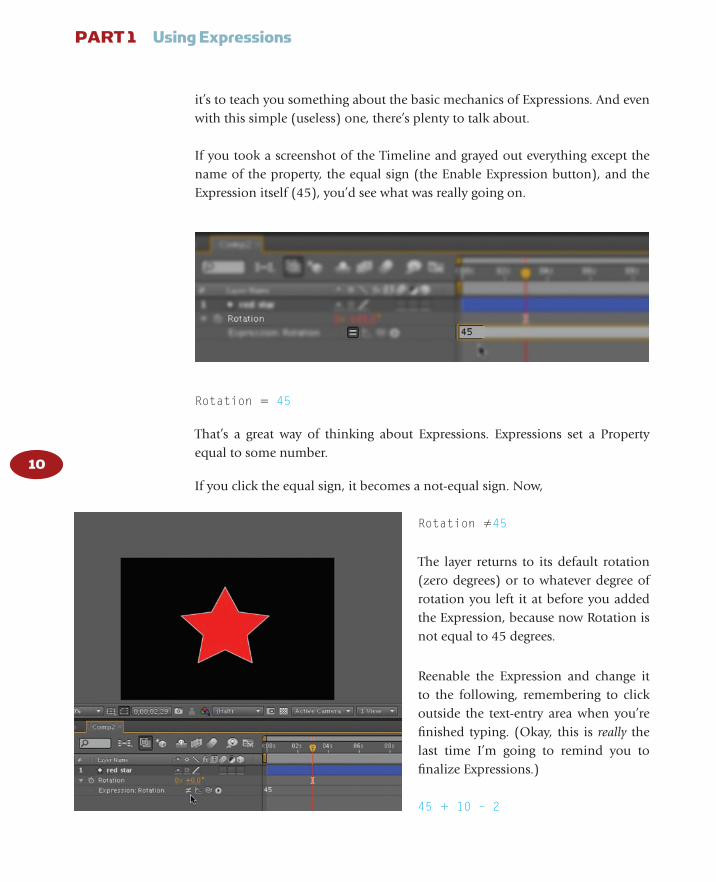
it’s to teach you something about the basic mechanics of Expressions. And even with this simple (useless) one, there’s plenty to talk about.
If you took a screenshot of the Timeline and grayed out everything except the name of the property, the equal sign (the Enable Expression button), and the Expression itself (45), you’d see what was really going on.
Rotation � 45
That’s a great way of thinking about Expressions. Expressions set a Property equal to some number.
If you click the equal sign, it becomes a not-equal sign. Now,
Rotation � 45
The layer returns to its default rotation (zero degrees) or to whatever degree of rotation you left it at before you added the Expression, because now Rotation is not equal to 45 degrees.
Reenable the Expression and change it to the following, remembering to click outside the text-entry area when you’re fi nished typing. (Okay, this is really the last time I’m going to remind you to fi nalize Expressions.)
45 � 10 – 2
07_K80936_CH01.indd 1007_K80936_CH01.indd 10 10/3/2008 3:22:46 PM10/3/2008 3:22:46 PM

Creating Simple Expressions CHAPTER 1
11
This will set the Rotation to 53 degrees. Again, I can’t think of a good reason to do this, but it shows off a little more about how Expressions work.
Properties eat numbers for breakfast. They crave numbers. As long as AE can resolve an Expression into a number, it will work. That number will drive the property. And it can resolve 45 � 10 � 2 into the number 53 by doing some sim-ple arithmetic, which it knows how to do.
If AE could somehow count the number of eggs in my refrigerator, I could write the following Expression.
Rotation � the number of eggs in my refrigerator
Maybe someday.
By the way, you could have written that earlier Expression as 45 � 10 � 2 (without the spaces) or, if you’re a bit eccentric, as 45 � 10 � 2 . JavaScript is pretty lax about spacing. Different people will space out Expressions in dif-ferent ways. So you should get used to slight variations in people’s styles of Expression-writing.
45 � 10 � 2 and 45 � 10 � 2 both work the same way.
07_K80936_CH01.indd 1107_K80936_CH01.indd 11 10/3/2008 3:22:47 PM10/3/2008 3:22:47 PM
PART 1 Using Expressions
12
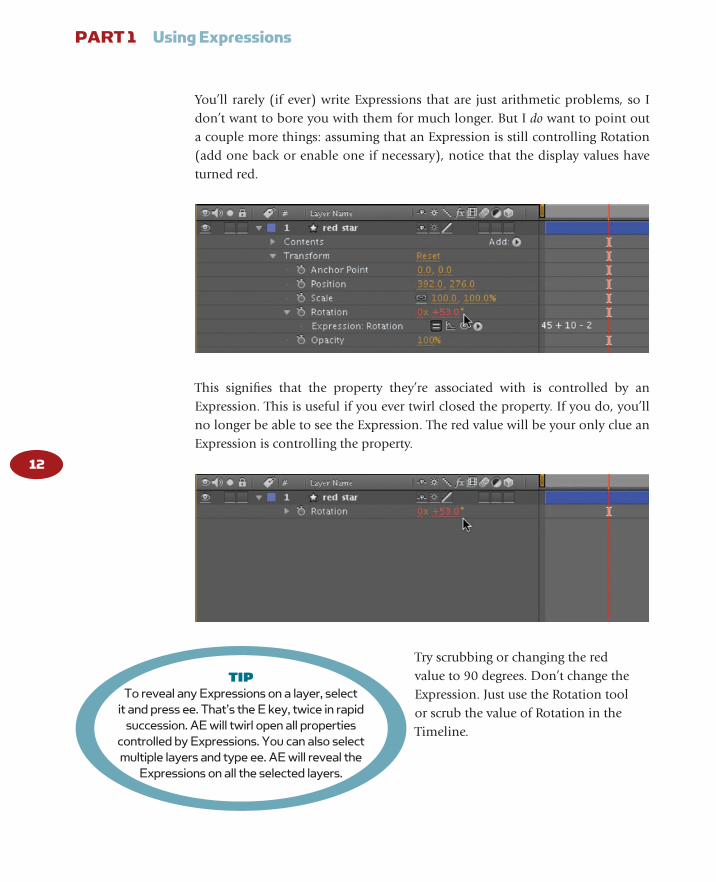
You’ll rarely (if ever) write Expressions that are just arithmetic problems, so I don’t want to bore you with them for much longer. But I do want to point out a couple more things: assuming that an Expression is still controlling Rotation (add one back or enable one if necessary), notice that the display values have turned red.
This signifi es that the property they’re associated with is controlled by an Expression. This is useful if you ever twirl closed the property. If you do, you’ll no longer be able to see the Expression. The red value will be your only clue an Expression is controlling the property.
Try scrubbing or changing the red value to 90 degrees. Don’t change the Expression. Just use the Rotation tool or scrub the value of Rotation in the Timeline.
TIP To reveal any Expressions on a layer, select
it and press ee. That’s the E key, twice in rapid succession. AE will twirl open all properties
controlled by Expressions. You can also select multiple layers and type ee. AE will reveal the
Expressions on all the selected layers.
07_K80936_CH01.indd 1207_K80936_CH01.indd 12 10/3/2008 3:22:49 PM10/3/2008 3:22:49 PM

Creating Simple Expressions CHAPTER 1
13
AE appears to let you do it, but as soon as you quit scrubbing, the value pops back to whatever it’s set to by the Expression. As long as the Expression is enabled, it—not you—controls the property. But AE remembers your 90 degrees. If you disable or remove the Expression, your layer will rotate to 90 degrees.
EXPRESSIONS IN WHICH ONE PROPERTY CONTROLS ANOTHER We’re about to leap out of useless-Expression world and land on a much more interesting planet. Try the following:
1. If you still have an Expression on Rotation, remove it. 2. Add a new Expression to Rotation. This time, instead of a number, type
“ transform.opacity ” (without the quotation marks). 3. Finalize the Expression by pressing the Enter key on the numeric keypad
or clicking outside the text. (I said I wasn’t going to remind you to do
07_K80936_CH01.indd 1307_K80936_CH01.indd 13 10/3/2008 3:22:50 PM10/3/2008 3:22:50 PM
PART 1 Using Expressions
14
this any more. Well, I lied. But this really, really is the last time. Finalize your Expressions!)
Note: If you make a typo, AE will display an error message and disable the Expression.
Once you fi nd the mistake and fi x it (and fi nalize the fi xed Expression), AE will reenable the
Expression.
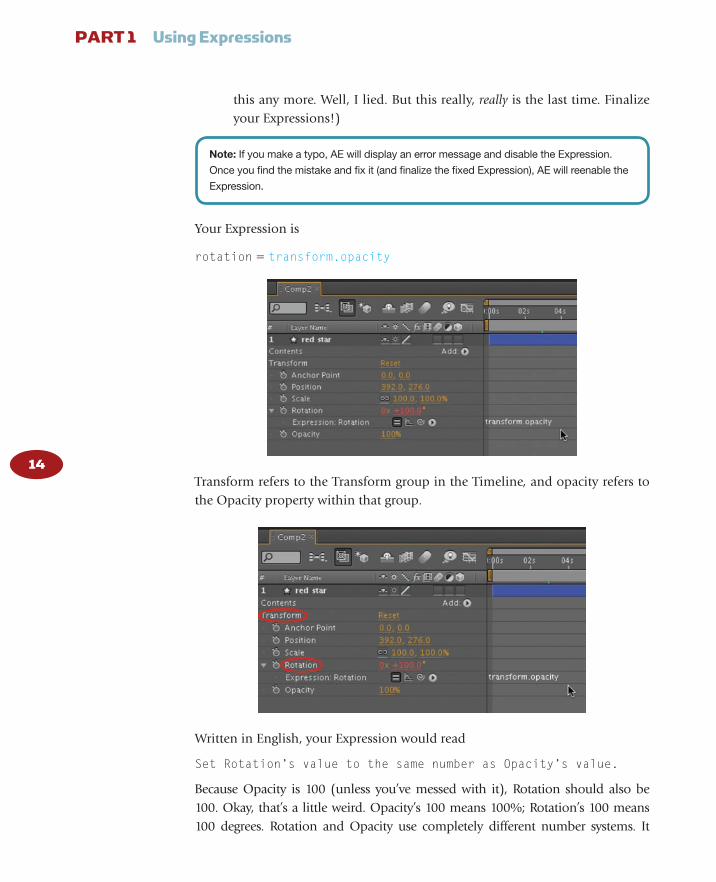
Your Expression is
rotation � transform.opacity
Transform refers to the Transform group in the Timeline, and opacity refers to the Opacity property within that group.
Written in English, your Expression would read
Set Rotation’s value to the same number as Opacity’s value.
Because Opacity is 100 (unless you’ve messed with it), Rotation should also be 100. Okay, that’s a little weird. Opacity’s 100 means 100%; Rotation’s 100 means 100 degrees. Rotation and Opacity use completely different number systems. It
07_K80936_CH01.indd 1407_K80936_CH01.indd 14 10/3/2008 3:22:54 PM10/3/2008 3:22:54 PM

Creating Simple Expressions CHAPTER 1
15
doesn’t matter. In the wacky world of Expressions, it’s just the number itself that counts.
Remember my silly example? Rotation � the number of eggs in my refrigera-tor? Rotation and eggs have nothing in common, except a number (degrees and number in the fridge). Same with Rotation and Opacity. They’re two entirely different sorts of properties, but they now share a controlling number.
Note that you haven’t permanently set Rotation to 100. Instead, you’ve set Rotation to the value of Opacity, and the value of Opacity can change . In essence, you’ve said, “ Let Rotation’s number be whatever Opacity’s number is right now . If Opacity changes, let Rotation change too. ” Opacity is the “ parent ” of Rotation. As you animate or adjust Opacity, Rotation will change automatically.
To test this relationship, try scrubbing Opacity: take it down to zero, and you’ll see the layer rotate to zero degrees as it fades out. Now set Opacity to 50%; Rotation will be 50 degrees.
07_K80936_CH01.indd 1507_K80936_CH01.indd 15 10/3/2008 3:22:55 PM10/3/2008 3:22:55 PM

PART 1 Using Expressions
16
Take a deep breath and think about the ramifi cations of this. With Expressions, you can link any two properties so that one controls the other: Opacity can control Rotation, Rotation can control Opacity, Position can control Scale, The Blurriness of a Gaussian Blur can control the strength of Gravity in Particle Playground.
But before you get carried away, consider this problem: Opacity’s total range of possible values is constrained to numbers between (and including) 0 and 100. It can never be set to � 5 or 210. Because Opacity controls Rotation, this means Rotation is also constrained to a number between 0 and 100. Given our Expression, there’s no way you can possibly rotate the layer to, say, 180 degrees; 100 is as high as Opacity will let Rotation go.
Let’s play around with the Expression and see if we can break through the 0-to-100 barrier:
4. Click the end of the Expression, placing a cursor after the “ y ” at the end of transform.opacity .
If necessary—if you didn’t click in exactly the right place—use your right-arrow key to nudge the cursor into position, right after the “ y. ”
5. Add the following to the Expression: � 10 . (Don’t include the period. That’s just the end of my sentence.)
07_K80936_CH01.indd 1607_K80936_CH01.indd 16 10/3/2008 3:22:58 PM10/3/2008 3:22:58 PM

Creating Simple Expressions CHAPTER 1
17
Note: Spacing around calculations is optional.
The Expression should now read as follows:
transform.opacity � 10
or
transform.opacity � 10
6. Scrub Opacity, watching both its value and Rotation’s value.
Notice that when Opacity is 0, Rotation is 10; when Opacity is 25, Rotation is 35; and when Opacity is 100, Rotation is 110. We’ve broken through the bar-rier! This works because we’re now saying, “ let Rotation be the value of Opacity plus 10 . ” As long as AE can turn that command into a number, it’s happy, and because the value of Opacity is a number, and 10 is a number, AE can add those two numbers together to get a fi nal number.
Now try this:
7. Edit the Expression so it reads transform.opacity * 2 . (Don’t include the period at the end.)
8. Scrub Opacity to see what happens.
Now you’ll see that when Opacity is 5, Rotation is 10; when Opacity is 50, Rotation is 100; and when Opacity is 100, Rotation is 200. This is because, to JavaScript, an asterisk means multiply. Computers don’t have a multiplica-tion symbol on their keyboards (and you can’t use an “ X ” because that’s the letter “ X ” ).
07_K80936_CH01.indd 1707_K80936_CH01.indd 17 10/3/2008 3:22:59 PM10/3/2008 3:22:59 PM

PART 1 Using Expressions
18
If you have trouble remembering that an asterisk is the multiplication symbol, take a look at your numeric keypad. You’ll see the familiar � and � symbols, for addition and subtraction. You’ll also see * and / for addition multiplication and division. To JavaScript, “ 2 times 2 � 4 ” is “ 2 * 2 � 4 ” and “ 10 divided by 2 � 5 ” is “ 10 / 2 � 5. ”
07_K80936_CH01.indd 1807_K80936_CH01.indd 18 10/3/2008 3:23:00 PM10/3/2008 3:23:00 PM

Creating Simple Expressions CHAPTER 1
19
Back to our Expression: It’s saying, “ Let Rotation be the value of Opacity times 2. ” So whatever Opacity is, Rotation will be double that.
We’ll soon leave arithmetic and not return to it for a while. So if you hate math, you can heave a big sigh of relief. But before we move on, spend a little time playing around with the Expression. Modify it as follows, or come up with your own variations:
■ tansform.opacity � 15 ■ transform.opacity/3 ■ transform.opacity � 1 � 1 � 1 � 1 � 1 � 1
All of those—especially the last one—are silly, but they prove, once again, that as long as the Expression resolves into a number, it will control Rotation.
Finally, one advanced move for readers who aren’t math-phobic:
■ transform.opacity * 3.6
Now, as you scrub Opacity from 0 to 100, the layer will rotate from 0 to 360—a full circle! We’ve really broken through the 0-to-100 barrier now. It’s not important that you understand how that last Expression works. I use many Expressions that I don’t understand. Smarter people than me fi gured them out, but—heck—, they work. I just copy them into AE, and they do their job. (But if you want to understand how an Expression works, check out the sidebar titled “ Under the Hood of transform.opacity * 3.6 . ” )
Incidentally, you should now be able to understand the (useless) default Expressions that After Effects adds when you Option click (PC: Alt click) a stopwatch. For instance, when you added an Expression to Rotation, AE typed “ transform.rotation . ” In other words,
Rotation � transform.rotation
This is like saying, “ let Rotation get its number from itself ” or “ let Rotation be whatever it already is ” or “ if you set rotation to 23 degrees before adding this Expression, let it still be 23 degrees. ”
Boring! Good thing you’ll be in charge of Expressions. If After Effects baked a cake, I bet it wouldn’t have any icing.
07_K80936_CH01.indd 1907_K80936_CH01.indd 19 10/3/2008 3:23:02 PM10/3/2008 3:23:02 PM
PART 1 Using Expressions
20
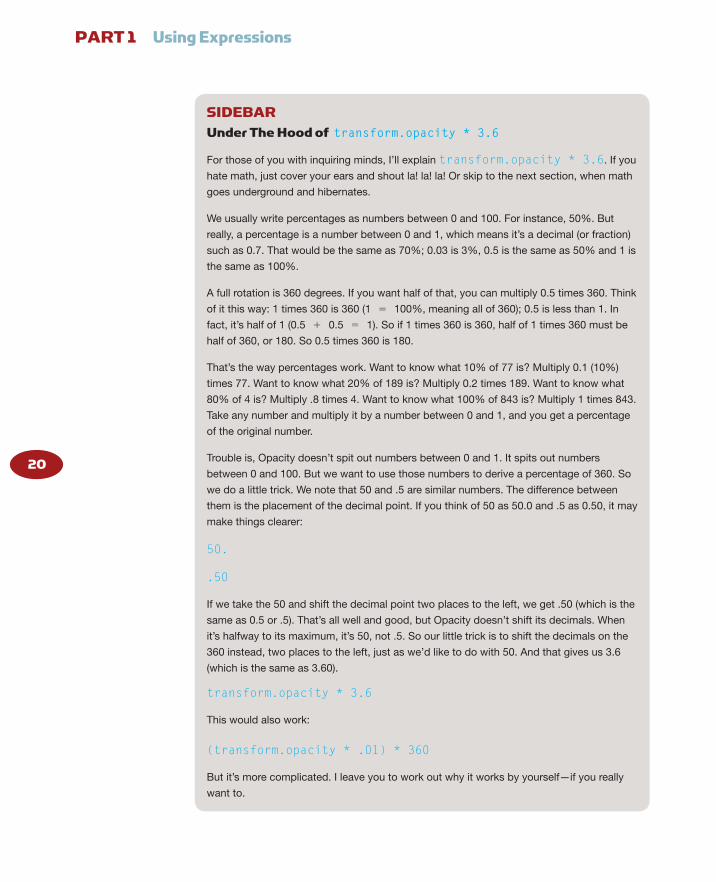
SIDEBAR Under The Hood of transform.opacity * 3.6
For those of you with inquiring minds, I’ll explain transform.opacity * 3.6 . If you
hate math, just cover your ears and shout la! la! la! Or skip to the next section, when math
goes underground and hibernates.
We usually write percentages as numbers between 0 and 100. For instance, 50%. But
really, a percentage is a number between 0 and 1, which means it’s a decimal (or fraction)
such as 0.7. That would be the same as 70%; 0.03 is 3%, 0.5 is the same as 50% and 1 is
the same as 100%.
A full rotation is 360 degrees. If you want half of that, you can multiply 0.5 times 360. Think
of it this way: 1 times 360 is 360 (1 � 100%, meaning all of 360); 0.5 is less than 1. In
fact, it’s half of 1 (0.5 � 0.5 � 1). So if 1 times 360 is 360, half of 1 times 360 must be
half of 360, or 180. So 0.5 times 360 is 180.
That’s the way percentages work. Want to know what 10% of 77 is? Multiply 0.1 (10%)
times 77. Want to know what 20% of 189 is? Multiply 0.2 times 189. Want to know what
80% of 4 is? Multiply .8 times 4. Want to know what 100% of 843 is? Multiply 1 times 843.
Take any number and multiply it by a number between 0 and 1, and you get a percentage
of the original number.
Trouble is, Opacity doesn’t spit out numbers between 0 and 1. It spits out numbers
between 0 and 100. But we want to use those numbers to derive a percentage of 360. So
we do a little trick. We note that 50 and .5 are similar numbers. The difference between
them is the placement of the decimal point. If you think of 50 as 50.0 and .5 as 0.50, it may
make things clearer:
50.
.50
If we take the 50 and shift the decimal point two places to the left, we get .50 (which is the
same as 0.5 or .5). That’s all well and good, but Opacity doesn’t shift its decimals. When
it’s halfway to its maximum, it’s 50, not .5. So our little trick is to shift the decimals on the
360 instead, two places to the left, just as we’d like to do with 50. And that gives us 3.6
(which is the same as 3.60).
transform.opacity * 3.6
This would also work:
(transform.opacity * .01) * 360
But it’s more complicated. I leave you to work out why it works by yourself—if you really
want to.
07_K80936_CH01.indd 2007_K80936_CH01.indd 20 10/3/2008 3:23:02 PM10/3/2008 3:23:02 PM

Creating Simple Expressions CHAPTER 1
21
THE PICK WHIP
One problem with Expressions like transform.opacity is that they’re a bit long. And the longer the Expression, the greater the chance you’ll make a typo while you’re typing it. An Expression is an instruction to After Effects. Alas, software is stu-pid. Or maybe it’s more accurate to say that software is incredibly literal minded. If you make the slightest mistake while you’re typing, the Expression won’t work, and AE will bark at you with one of its embarrassing error messages.
For instance, you’d screw things up if you typed transform.Opacity . What’s wrong with that? The “ O ” in Opacity is capitalized. JavaScript is case sensitive, and it expects layer properties to be lowercase. That’s what I mean by literal minded. “ What the heck is Opacity? ” AE’s Expressions interpreter can’t tell that you mean “ opacity ” when you type “ Opacity ”.
Here are some more typos that would cause the Expression to fail:
■ Transform.opacity (capital " T " in Transform) ■ transform opacity (no period) ■ trandfarm.opacity (transform misspelled) ■ transform.opasity (opacity misspelled)
Luckily, there’s an easy way to eliminate 90% of typos in basic Expressions: let me introduce you to the Pick Whip. The Pick Whip is a wonderful tool that’s located two icons to-the-right-of the equal sign (the Enable Expression button). Its icon looks like a little spiral.
07_K80936_CH01.indd 2107_K80936_CH01.indd 21 10/3/2008 3:23:02 PM10/3/2008 3:23:02 PM

PART 1 Using Expressions
22
Here’s an example of how to use it.
1. Create a Comp with a single layer in it (a small solid) or use the layer in Chaper01.aep, Comp3.
2. Twirl open the layer’s Transform Properties. 3. Add an Expression to Rotation. (Don’t type anything in the text area.
Just leave the default Expression there.) 4. Point to the Pick Whip, and hold down the left mouse button. (Don’t
release the mouse button yet.) 5. Drag the Pick Whip to the Opacity property (to the word “ Opacity ” ). 6. When it’s pointing at Opacity, release the mouse button.
A more compact way of stating steps 4 through 6 is “ drag the Pick Whip, and drop it on Opacity ” or simply “ Pick Whip Opacity. ” That last one sounds kinky!
Notice that AE wrote the Expression for you: transform.opacity . Notice also that I printed that last Expression in red. In this book, I will print any Expression—or any part of an Expression—created using the Pick Whip in red type. Later in this book, when you’re used to using the Pick Whip, I won’t even
07_K80936_CH01.indd 2207_K80936_CH01.indd 22 10/3/2008 3:23:03 PM10/3/2008 3:23:03 PM

Creating Simple Expressions CHAPTER 1
23
have to mention it. I’ll just print Expressions in red type and you’ll know that means “ use the Pick Whip. ”
Let’s try some more Pick Whipping:
7. Remove the Expression. 8. Add an Expression to Scale. 9. Pick Whip Position.
I’ve used some shorthand here. By “ Pick Whip Position, ” I mean drag the Pick Whip and drop it on the Position property (on the word “ Position ” ).
10. Drag the layer around in the Comp window.
Notice that as you drag it, it changes size. That’s because the Pick Whip wrote this Expression:
transform.position
So Scale is being controlled by Position. Watch the value-numbers in the Timeline to see exactly how Position is controlling Scale. Position’s X value gets fed into Scale’s width, and Position’s Y value gets fed into Scale’s height. So if Position is 123x by 87y, Scale will be 123% wide by 87% high.
07_K80936_CH01.indd 2307_K80936_CH01.indd 23 10/3/2008 3:23:04 PM10/3/2008 3:23:04 PM

PART 1 Using Expressions
24
SIDEBAR Pick Whip Problems: What Can Go Wrong
If you get errors when you use the Pick Whip, it’s probably because you’ve been messing
around in the text-entry area. When you fi rst add an Expression, AE performs two actions:
it enters the default Expression, and it selects (highlights) the default Expression. Just so
you know what I’m talking about, here’s a default Expression that is not selected.
Here’s one that has been selected.
If text is selected and you type, whatever you type replaces the selected text. This isn’t
just true in AE; it’s true in pretty much any computer program you own. For instance if you
select the word “ cat ” in MS Word and type “ dog ”, the word “ dog ” replaces the word “ cat ”.
As far as AE is concerned, using the Pick Whip is just like typing. When you use it, AE
types for you, but whether AE is typing or you’re typing, typing still occurs. If the default
Expression is selected before you use the Pick Whip, all will go well, because AE will
replace the default selection with the autotyping. This is what should happen, because the
default Expression is automatically selected. It’s selected, so it will be replaced—that is,
unless you deselect it! If you add the Expression and then (for some reason) click inside
the text-entry area, you will deselect (unhighlight) the default Expression. And now, instead
07_K80936_CH01.indd 2407_K80936_CH01.indd 24 10/3/2008 3:23:06 PM10/3/2008 3:23:06 PM

Creating Simple Expressions CHAPTER 1
25
Perhaps you’re cocky enough to think you can type “ transform.position ” without making a typo. And maybe you’re right, but Expressions can get much longer and more complex. For instance, try the following:
1. Create a Comp with two small solids in it, a red one and a green one. Or you can use the two layers in Chapter01.aep, Comp4.
2. Select Green and press the P key to reveal its Position property. 3. Select Red and press the S key to reveal its Scale property. 4. Add an Expression to Red’s Scale. 5. Pick Whip Green’s Position.
of replacing the default Expression, when you use the Pick Whip, AE will just add the
auto-type wherever you left the cursor. (If you were typing by hand, your text would go
wherever you left the cursor, so AE is just mimicking that process.)
For instance, say I add an Expression to Position. AE will type the default Expression:
transform.position . Now, let’s say for some reason I click in the text-entry area
and leave my cursor between the letters “ s ” and “ i ” in “ position. ”
Then I grab the Pick Whip and point to Scale. AE will autotype where I left my cursor, so
I’ll get this ugly mishmash:
transform.pos tranform.scaleition
only (outside of this book) none of it will be in red, so it will be really hard to see what’s
going on.
So the moral is, try not to deselect the default Expression if you plan on replacing it via the
Pick Whip. Or, if you do deselect it by accident, just reselect it before using the Pick Whip.
07_K80936_CH01.indd 2507_K80936_CH01.indd 25 10/3/2008 3:23:08 PM10/3/2008 3:23:08 PM

PART 1 Using Expressions
26
Now Green’s Position is controlling Red’s Scale. Drag Green around and watch Red’s size change. Once you’re done playing, take a look at the Expression:
thisComp.layer( " Green " ).transform.position
We’re starting to get into major typo territory here. A single mistake (such as forgetting the quotation marks around “ Green ” ) would have botched the whole Expression. Aren’t you glad the Pick Whip did all the typing for you?
Incidentally, if you’re trying to understand that Expression, it’s easier than it looks. Remember, the Expression is controlling Red’s Scale. Red’s Scale is try-ing to fi gure out where to get its width and height values. And the Expression is telling it. The Expression is saying, “ Get your numbers from something in this Comp. More specifi cally, get them from a layer in this Comp (a layer called ‘ Green ’ ). Even more specifi cally, get them from a property in that lay-er’s Transform group. And even more specifi cally, get them from the Transform group’s Position property. ”
Whenever you see a period (or, as a programmer would say, a “ dot ” ), it means “ more specifi cally. ” We’re drilling down from general to specifi c.
It reminds me of how I’d respond to “ Where do you live? ” when I was an annoying kid. I’d say, “ In the universe, in the Milky Way Galaxy, in the Solar System, on Planet Earth, in North America, in the United States, in Indiana, in Bloomington, on First Street, in the gray house, in my room. ”
If I had spoken JavaScript, I would have said thisUniverse.milkyWay.solarSys-tem.planetEarth.northAmerica.unitedStates.indiana.bloomington.fi rstStreet.grayHouse.myRoom
07_K80936_CH01.indd 2607_K80936_CH01.indd 26 10/3/2008 3:23:09 PM10/3/2008 3:23:09 PM

Creating Simple Expressions CHAPTER 1
27
I’m glossing over some stuff here, like the parentheses around “ Green. ” That’s because I don’t want to stray too far from the subject at hand: the Pick Whip. But I’ll get back to dots and parentheses and JavaScript syntax later in this book.
The drilling down can get even more complicated, because, via the Pick Whip, you can hook up a property in one Comp with a property in another Comp. That’s like making a wormhole between two universes! To get a sense of what I’m talking about, try this:
1. Open Chapter01.aep, Comp5. 2. You’ll see a lone blue Solid. 3. Select the Solid, and type S to reveal its Scale property. 4. Now open Chapter01.aep, Comp6.
That’s right: open a whole other Composition. In this one, you’ll see a yellow solid.
5. Select the Solid and type P to reveal its Position property.
As you can see, I’ve animated the yellow Solid so that it moves about the screen.
6. Command � drag (PC: Control � drag) the tab for Comp 6 away from the Timeline, so that Comp 6’s Timeline fl oats in its own window.
7. If necessary, move the fl oating window so that you can see the Timelines
for both Comp 5 and Comp 6 at the same time. 8. Add an Expression to the blue solid’s Scale property (in Comp 5). 9. With the Scale Pick Whip, point to the yellow solid’s Position property.
07_K80936_CH01.indd 2707_K80936_CH01.indd 27 10/3/2008 3:23:10 PM10/3/2008 3:23:10 PM

28
10. Preview Comp 5.
07_K80936_CH01.indd 2807_K80936_CH01.indd 28 10/3/2008 3:23:11 PM10/3/2008 3:23:11 PM

Creating Simple Expressions CHAPTER 1
29
You’ll see that the blue solid’s Scale is changing. It’s being controlled by the Position of the yellow solid in Comp 6.
The Expression looks like this:
comp( " Comp 6 " ).layer( " Yellow " ).transform.position
This looks similar to the last Expression we looked at, except instead of start-ing with a reference to the current Composition (thisComp), it starts with a reference to Comp 6. What’s controlling blue’s Scale? Something in a Comp. Which Comp? Comp 6. What thing in Comp 6? A layer. Which layer? The one called “ Yellow. ” What aspect of “ Yellow? ” Something in its Transform property group. What item in that group? The Position property. That’s a pretty complex Expression. Aren’t you glad the Pick Whip wrote it for you?
I’m thrilled that you know how to use the Pick Whip. There’s not much more to say about it. It’s simple and elegant. It does what it does. But if you’re not appreciating how wonderful it is—how swiftly it can forge a link between any two properties—I’d better show you a few more examples.
THE PICKWHIP AND EFFECTS For me, Expressions really became fun when I started combining them with Effects. “ Oh! ” I thought, “ Expressions can link up any two properties. They don’t have to be boring old Opacity and Rotation; they can be properties of Shatter or Fractal Noise! ”
This is when Expressions became part of my everyday toolkit. Every time I added an Effect (or several Effects), I paused and thought about whether it would be fun to link two Effect properties so that one controlled the other. Sometimes—often—I didn’t know the answer. But it just took a couple of sec-onds to add an Expression and use the Pick Whip. If I didn’t like the result, I just disabled or removed the Expression.
Here are a couple of examples using Effects:
WRITE-ON AND BEAM 1. In a new 30-second Comp, create a Comp-sized solid (or use the one in
Chapter01.aep, Comp7).
07_K80936_CH01.indd 2907_K80936_CH01.indd 29 10/3/2008 3:23:16 PM10/3/2008 3:23:16 PM

PART 1 Using Expressions
30
2. Select the solid and add the Write-on Effect to it: Effects � Generate � Write-on.
3. With the Current Time Indicator (CTI) at the beginning of the Timeline, turn the stopwatch on for Write-on’s Brush Position property.
Just click the stopwatch; don’t Option or Alt click it. You’re adding keyframes now, not Expressions.
4. Move the CTI forward in time about 1 second, and then change the Brush Position so it’s in a different location.
You can change it by scrubbing its x/y values, or you can click the crosshair and then click somewhere in the Comp. If the Effect’s name is selected in the Effect Controls Panel (if the word Write-on is highlighted), you can change the Brush Position by dragging the control in the center of the Comp.
5. Repeat step four several times, each time moving the CTI forward in time another second and then adjusting the Brush Position so that it’s in a new place.
Keep doing this until the CTI has reached the end of the Timeline. If you preview the Comp now, you’ll see a scribble that paints itself on over time.
07_K80936_CH01.indd 3007_K80936_CH01.indd 30 10/3/2008 3:23:16 PM10/3/2008 3:23:16 PM

Creating Simple Expressions CHAPTER 1
31
6. Adjust Write-on’s Color and Brush Size properties until you like the results.
7. Now, with the solid layer still selected, add a second Effect: Effect � Generate � Beam.
8. Beam is one of those selfi sh effects that obliterate the layer you apply it to. To bring back your Write-on scribble, click the Composite on Original option at the bottom of Beam’s controls.
07_K80936_CH01.indd 3107_K80936_CH01.indd 31 10/3/2008 3:23:17 PM10/3/2008 3:23:17 PM

PART 1 Using Expressions
32
9. The beam is shorter than it could be. Scrub its Length property to 100%.
07_K80936_CH01.indd 3207_K80936_CH01.indd 32 10/3/2008 3:23:20 PM10/3/2008 3:23:20 PM

Creating Simple Expressions CHAPTER 1
33
10. Make sure that the Beam effect’s name is highlighted on the Effect Control Panel. If it’s not, click it (click the word “ Beam ” ). This will allow you to adjust the beam by dragging in the Comp window.
07_K80936_CH01.indd 3307_K80936_CH01.indd 33 10/3/2008 3:23:23 PM10/3/2008 3:23:23 PM
PART 1 Using Expressions
34
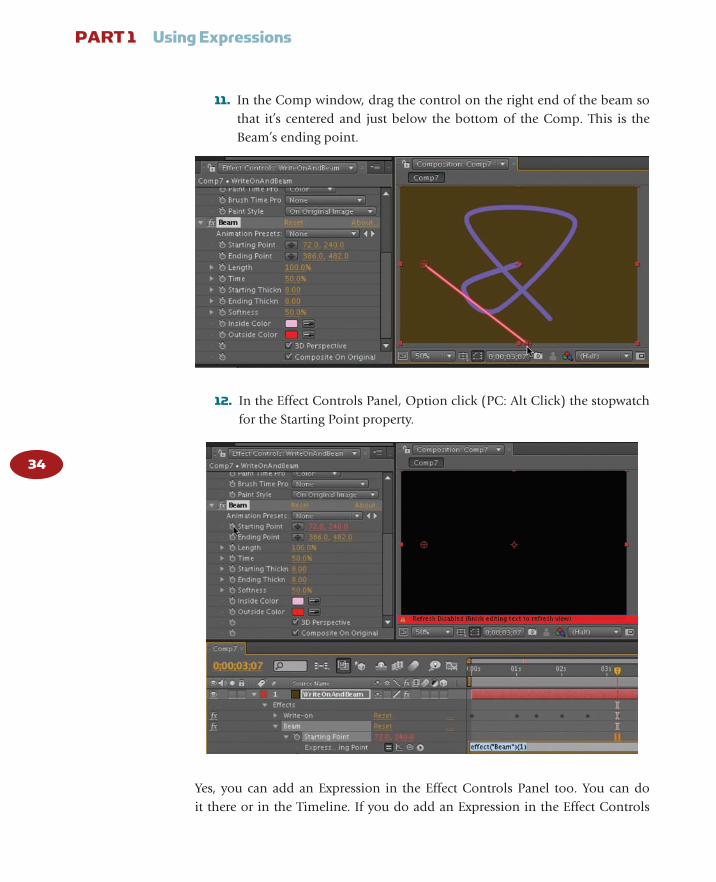
11. In the Comp window, drag the control on the right end of the beam so that it’s centered and just below the bottom of the Comp. This is the Beam’s ending point.
12. In the Effect Controls Panel, Option click (PC: Alt Click) the stopwatch
for the Starting Point property.
Yes, you can add an Expression in the Effect Controls Panel too. You can do it there or in the Timeline. If you do add an Expression in the Effect Controls
07_K80936_CH01.indd 3407_K80936_CH01.indd 34 10/3/2008 3:23:26 PM10/3/2008 3:23:26 PM
Creating Simple Expressions CHAPTER 1
35
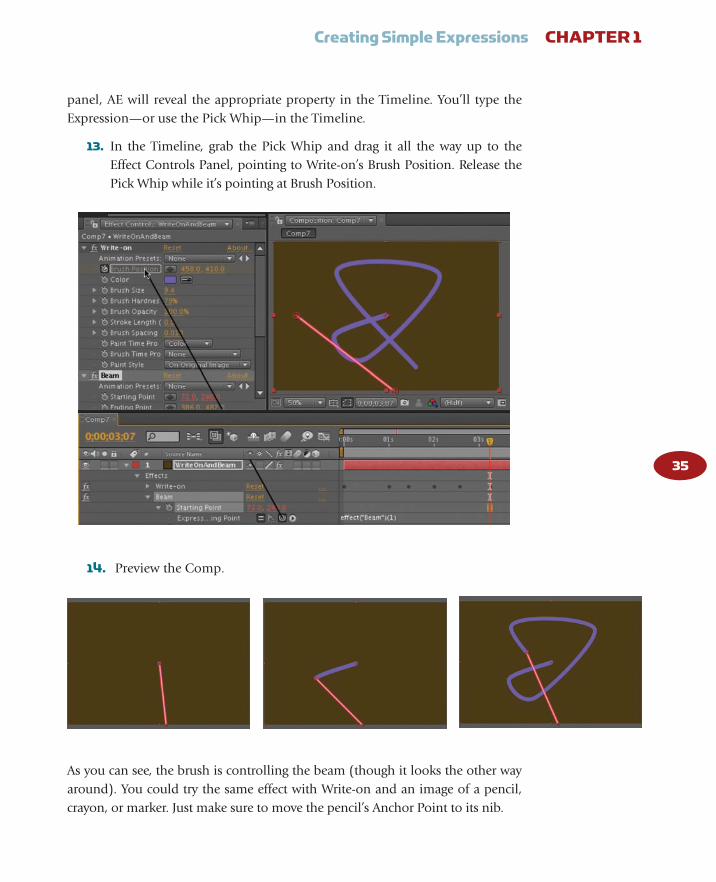
panel, AE will reveal the appropriate property in the Timeline. You’ll type the Expression—or use the Pick Whip—in the Timeline.
13. In the Timeline, grab the Pick Whip and drag it all the way up to the Effect Controls Panel, pointing to Write-on’s Brush Position. Release the Pick Whip while it’s pointing at Brush Position.
14. Preview the Comp.
As you can see, the brush is controlling the beam (though it looks the other way around). You could try the same effect with Write-on and an image of a pencil, crayon, or marker. Just make sure to move the pencil’s Anchor Point to its nib.
07_K80936_CH01.indd 3507_K80936_CH01.indd 35 10/3/2008 3:23:30 PM10/3/2008 3:23:30 PM

PART 1 Using Expressions
36
Why did we use Write-on instead of one of the newer, more sophisticated paint effects? Because only Write-on gives us a Brush Position with X and Y coor-dinates. This makes it a great effect for use with Expressions. You can use it to drive other properties (such as Beam’s Starting Pointing) so that they move along with the brush.
Or you can rig things the other way around. For instance, we could have ani-mated the Beam fi rst, added an Expression to Brush Position and Pick Whipped the Beam’s Starting Point. Along similar lines, you could motion track an air-plane and then use it to control the brush, so that a painted line follows the plane’s course. The possibilities are endless.
By the way, here’s the default Expression that was on Starting Point before you used the Pick Whip:
effect( " Beam " )(1)
By Default, the Starting Point is controlled by the fi rst property (1) of the Beam effect. Looking at the Effect Controls Panel and counting down from the top, the fi rst property is Starting Point. So, unsurprisingly in a default Expression, Starting Point is controlled by Starting Point.
Here’s the Expression that the PickwhipPick Whip created:
effect( " Write-on " )( " Brush Position " )
Hopefully, that’s pretty straightforward. What’s controlling the Beam? Some property of an Effect, specifi cally the “ Write-on ” Effect. Drilling down further, it’s specifi cally the “ Brush Position ” property that’s doing the controlling.
07_K80936_CH01.indd 3607_K80936_CH01.indd 36 10/3/2008 3:23:33 PM10/3/2008 3:23:33 PM

Creating Simple Expressions CHAPTER 1
37
TRACKING AND BLURRINESS 1. Create a new 5-second Comp. With the Type tool, type the text “ stay
focused ” in the center of the Comp window. Or you can use Chapter01.aep, Comp8.
As an alternative to the Type tool, you can use this shortcut to add text: Command Option Shift T (PC: Control Alt Shift T). That looks complicated, but it’s basically mashing down all the modifi er keys and pressing T. If (before using the shortcut) you’ve left your text alignment set to center, AE will auto-matically place a cursor in the center of the Comp.
2. If necessary, use the alignment options in the Paragraph panel to center the text.
07_K80936_CH01.indd 3707_K80936_CH01.indd 37 10/3/2008 3:23:35 PM10/3/2008 3:23:35 PM

PART 1 Using Expressions
38
3. In the Timeline, twirl open the Type layer and then open the Animation menu (in the Timeline).
4. Select the Tracking option to add a Tracking Animator to the Timeline. 5. With the CTI at the beginning of the Comp, turn on the stopwatch for
Tracking Amount. 6. Move the CTI to the halfway point, and scrub Tracking Amount until
you see the letters fan way out. Track as much as you like. 7. Move the CTI to the end of the Timeline, and scrub Tracking Amount
back to zero.
07_K80936_CH01.indd 3807_K80936_CH01.indd 38 10/3/2008 3:23:36 PM10/3/2008 3:23:36 PM

Creating Simple Expressions CHAPTER 1
39
If you preview now, you’ll see the letters fan out and then back again.
8. Select all three keyframes (click the fi rst one and then Shift click the other two) and press F9 to add easing. (Or choose Animation � Keyframe Assistants � Easy Ease.)
If you preview again, the movement should be a little smoother.
9. From the Effects menu, choose Blur and Sharpen � Fast Blur. 10. In the Effect Controls panel, add an Expression to the Blurriness
property. 11. In the Timeline, grab the Pick Whip, point it to Tracking Amount in the
Timeline, and then release the mouse.
Preview one last time, and you’ll see that Tracking Amount is controlling Blurriness. As the letters spread apart, they become blurrier. As they come back together, they return to focus.
07_K80936_CH01.indd 3907_K80936_CH01.indd 39 10/3/2008 3:23:38 PM10/3/2008 3:23:38 PM

PART 1 Using Expressions
40
At this point, it’s tempting to show you example after example of Pick Whipping. But to keep this book from becoming as long as War and Peace, I’ll restrain myself. But in the future, as you add Effects, play matchmaker. Use the Pick Whip to bring properties closer together. It doesn’t matter how different property A is from property B. Vive la difference!
07_K80936_CH01.indd 4007_K80936_CH01.indd 40 10/3/2008 3:23:41 PM10/3/2008 3:23:41 PM