powershell and wmi
DESCRIPTION
PowerShell and WMITRANSCRIPT

M A N N I N G
Richard SiddawayFOREWORD BY
Ed Wilson
Covers 150 practical techniques
www.it-ebooks.info


PowerShell and WMI
RICHARD SIDDAWAY
M A N N I N GShelter Island
www.it-ebooks.info

For online information and ordering of this and other Manning books, please visitwww.manning.com. The publisher offers discounts on this book when ordered in quantity. For more information, please contact
Special Sales DepartmentManning Publications Co.20 Baldwin RoadPO Box 261Shelter Island, NY 11964Email: [email protected]
©2012 by Manning Publications Co. All rights reserved.
No part of this publication may be reproduced, stored in a retrieval system, or transmitted, in any form or by means electronic, mechanical, photocopying, or otherwise, without prior written permission of the publisher.
Many of the designations used by manufacturers and sellers to distinguish their products are claimed as trademarks. Where those designations appear in the book, and Manning Publications was aware of a trademark claim, the designations have been printed in initial caps or all caps.
Recognizing the importance of preserving what has been written, it is Manning’s policy to have the books we publish printed on acid-free paper, and we exert our best efforts to that end.Recognizing also our responsibility to conserve the resources of our planet, Manning books are printed on paper that is at least 15 percent recycled and processed without the use of elemental chlorine.
Manning Publications Co. Development editor: Jeff Bleiel20 Baldwin Road Technical proofreaders: Aleksandar NikolicPO Box 261 Copyeditor: Andy CarrollShelter Island, NY 11964 Proofreader: Melody Dolab
Typesetter: Gordan SalinovicCover designer: Marija Tudor
ISBN 9781617290114Printed in the United States of America1 2 3 4 5 6 7 8 9 10 – MAL – 17 16 15 14 13 12
www.it-ebooks.info

To my parents, June and Ron Without your help, support, and encouragement
I’d never have been able to do this
www.it-ebooks.info


brief contentsPART 1 TOOLS OF THE TRADE 1
1 ■ Solving administrative challenges 3
2 ■ Using PowerShell 24
3 ■ WMI in depth 62
4 ■ Best practices and optimization 101
PART 2 WMI IN THE ENTERPRISE...............................................135
5 ■ System documentation 137
6 ■ Disk systems 171
7 ■ Registry administration 200
8 ■ Filesystem administration 224
9 ■ Services and processes 251
10 ■ Printers 271
11 ■ Configuring network adapters 289
12 ■ Managing IIS 316
13 ■ Configuring a server 339
14 ■ Users and security 359
vii
www.it-ebooks.info

BRIEF CONTENTSviii
15 ■ Logs, jobs, and performance 381
16 ■ Administering Hyper-V with PowerShell and WMI 399
PART 3 THE FUTURE: POWERSHELL V3 AND WMI ........................421
17 ■ WMI over WSMAN 423
18 ■ Your own WMI cmdlets 441
19 ■ CIM cmdlets and sessions 459
www.it-ebooks.info

contentsforeword xixpreface xxiacknowledgments xxiiiabout this book xxvabout the author xxxiiiabout the cover illustration xxxiv
PART 1 TOOLS OF THE TRADE..............................................1
1 Solving administrative challenges 31.1 Administrative challenges 4
Too many machines 5 ■ Too many changes 6 ■ Complexity and understanding 7
1.2 Automation: the way forward 7
1.3 PowerShell overview 10PowerShell scope 11 ■ PowerShell and .NET 12 ■ Breaking the curve 13
1.4 WMI overview 14What is WMI? 14 ■ Is WMI really too hard? 16
1.5 Automation with WMI and PowerShell 16
ix
www.it-ebooks.info

CONTENTSx
1.6 Putting PowerShell and WMI to work 19Example 1: Shutting down a data center 20 ■ Example 2: Auditing hundreds of machines 21
1.7 Summary 23
2 Using PowerShell 242.1 PowerShell in a nutshell 26
2.2 Cmdlets 26Utility cmdlets 27 ■ Where-Object 28 ■ Foreach-Object 30 ■ Aliases 30
2.3 Pipeline 32
2.4 .NET for administrators 34Objects 34 ■ PowerShell objects 34 ■ Creating .NET objects 34Creating your own objects 35
2.5 PowerShell scripting language 37Loops 38 ■ Branching 40 ■ Input and output 41
2.6 Finding help 42Get-Help 43 ■ Get-Command 44 ■ Get-Member 45 ■ PowerShell community 46
2.7 Code reuse 47Editors 48 ■ Scripts 49 ■ Functions 50 ■ Modules 53
2.8 PowerShell remoting 55Remoting by cmdlet 55 ■ PowerShell remote sessions 57
2.9 PowerShell jobs 58
2.10 Summary 60
3 WMI in depth 623.1 The structure of WMI 63
Providers 65 ■ Namespaces 66 ■ Classes 69
3.2 Methods and properties 76Methods 76 ■ Class properties 79 ■ System properties 80 ■ Key properties 81
3.3 Documenting WMI 82
3.4 WMI cmdlets and accelerators 84Cmdlets 84 ■ Type accelerators 87
3.5 Using WQL 89Keywords 89 ■ Operators 90
www.it-ebooks.info

CONTENTS xi
3.6 WMI references and associators 94
3.7 WMI events 96
3.8 Summary 99
4 Best practices and optimization 1014.1 Security 103
Using internet code 103 ■ Code security 105 ■ Access to code 106
4.2 Optimizing PowerShell code 107Data input 107 ■ String substitution 111
4.3 Calculated fields, types, and formatting 113Calculated fields 114 ■ Type files 116 ■ Format files 118
4.4 Debugging and error handling 120Debugging 121 ■ Error handling 123 ■ WMI return codes 125
4.5 Getting the most from WMI 126Issues with learning to use WMI 127 ■ WMI configuration settings 128 ■ Authentication 129 ■ Data filtering 131Data conversions 131
4.6 Summary 134
PART 2 WMI IN THE ENTERPRISE .....................................135
5 System documentation 1375.1 System hardware and configuration 139
TECHNIQUE 1 Get computer system information 140TECHNIQUE 2 Get computer type 142TECHNIQUE 3 Get domain role 144TECHNIQUE 4 Get processor information 145TECHNIQUE 5 Get BIOS information 146TECHNIQUE 6 Get memory configuration 148
5.2 Peripherals 150TECHNIQUE 7 Get display settings 151TECHNIQUE 8 Get input devices 152TECHNIQUE 9 Get ports 153
5.3 Power supplies 154TECHNIQUE 10 Get battery details 155TECHNIQUE 11 Get battery status 156TECHNIQUE 12 Test power source 157TECHNIQUE 13 Get power plans 158
www.it-ebooks.info

CONTENTSxii
5.4 Operating system 160TECHNIQUE 14 Get operating system version 160TECHNIQUE 15 Discover hotfixes 163TECHNIQUE 16 Get boot configuration 164TECHNIQUE 17 Find recovery configuration 165TECHNIQUE 18 Test system time 167
5.5 Software 168TECHNIQUE 19 Discover installed software 168
5.6 Summary 169
6 Disk systems 1716.1 Physical disks 172
TECHNIQUE 20 Discover disk controllers 174TECHNIQUE 21 Physical drive information 175TECHNIQUE 22 Link partitions to disk drives 177TECHNIQUE 23 Enumerating disk partitions 179TECHNIQUE 24 Link partitions to logical disks 180
6.2 Logical disks 181TECHNIQUE 25 Logical disk information 181TECHNIQUE 26 Root directory data 182TECHNIQUE 27 Mount points 184
6.3 Volumes 185TECHNIQUE 28 Enumerate volume information 185TECHNIQUE 29 Using volume change events 187
6.4 Managing disks 191TECHNIQUE 30 Formatting a disk 192TECHNIQUE 31 Performing Chkdsk 194TECHNIQUE 32 Analyzing and removing fragmentation 195
6.5 CD drives 197TECHNIQUE 33 Enumerating CD drives 198
6.6 Summary 199
7 Registry administration 2007.1 Accessing the registry 201
TECHNIQUE 34 Test registry size 202TECHNIQUE 35 Discovering registry data types 203
7.2 Reading the registry 206TECHNIQUE 36 Reading registry keys 206TECHNIQUE 37 Reading registry values 208TECHNIQUE 38 Enumerating keys and values 209
www.it-ebooks.info

CONTENTS xiii
7.3 Creating and modifying registry keys and values 211TECHNIQUE 39 Creating registry keys 211TECHNIQUE 40 Setting registry values 212
7.4 Deleting registry keys 214TECHNIQUE 41 Deleting registry values 214TECHNIQUE 42 Deleting registry keys 215
7.5 Registry access rights 216TECHNIQUE 43 Reading access rights 216TECHNIQUE 44 Taking ownership of a registry key 219
7.6 Registry events 221TECHNIQUE 45 Monitoring registry events 221
7.7 Summary 223
8 Filesystem administration 2248.1 Working with files 226
TECHNIQUE 46 Finding files 227TECHNIQUE 47 Performing actions on files 230TECHNIQUE 48 Compressing files 232
8.2 Folder administration 234TECHNIQUE 49 Discovering the files in a folder 235TECHNIQUE 50 Discovering folders with specific attributes 237TECHNIQUE 51 Decoding the access mask 239
8.3 Listing, creating, and modifying shares 240TECHNIQUE 52 Listing shares 241TECHNIQUE 53 Creating shares 242TECHNIQUE 54 Modifying shares 243
8.4 Filesystem events 244TECHNIQUE 55 Working with filesystem events 244
8.5 Page file management 248
8.6 Summary 249
9 Services and processes 2519.1 Services 252
TECHNIQUE 56 Listing services 254TECHNIQUE 57 Configuring services 255TECHNIQUE 58 Discovering the service load order 257
9.2 Processes 259TECHNIQUE 59 Listing process owners 260TECHNIQUE 60 Creating a process 261TECHNIQUE 61 Terminating a process 263
www.it-ebooks.info

CONTENTSxiv
9.3 Process-related events 265TECHNIQUE 62 Investigating an event 266TECHNIQUE 63 Monitoring processes 268
9.4 Summary 270
10 Printers 27110.1 Printer configuration 272
TECHNIQUE 64 Discovering printers 272TECHNIQUE 65 Testing printer capabilities 274TECHNIQUE 66 Discovering printer ports 276TECHNIQUE 67 Discovering printer drivers 277
10.2 Printer status 279TECHNIQUE 68 Testing printer status 279TECHNIQUE 69 Listing print jobs 280
10.3 Managing printers 282TECHNIQUE 70 Setting a default printer 282TECHNIQUE 71 Printing a test page 284TECHNIQUE 72 Controlling printers 285TECHNIQUE 73 Renaming a printer 287
10.4 Summary 288
11 Configuring network adapters 28911.1 Discovering network adapters 291
TECHNIQUE 74 Identifying network adapters 291TECHNIQUE 75 Discovering adapter configurations 294TECHNIQUE 76 Listing an adapter’s network protocols 296TECHNIQUE 77 Listing network connections 298
11.2 Configuring network adapters 300TECHNIQUE 78 Enabling network adapters 300TECHNIQUE 79 Disabling network adapters 301TECHNIQUE 80 Renaming network adapters 302
11.3 Enabling and setting network addresses 304TECHNIQUE 81 Enabling DHCP 304TECHNIQUE 82 Displaying DHCP configuration 305TECHNIQUE 83 Controlling DHCP leases 306TECHNIQUE 84 Setting an IP address 307TECHNIQUE 85 Setting other properties 309
11.4 Configuring network services 310TECHNIQUE 86 Setting DNS servers 311TECHNIQUE 87 Setting WINS servers 312TECHNIQUE 88 Displaying the routing table 313
11.5 Summary 315
www.it-ebooks.info

CONTENTS xv
12 Managing IIS 31612.1 IIS WMI provider 317
TECHNIQUE 89 Displaying web server defaults 319TECHNIQUE 90 Restarting the web server 322
12.2 Websites 324TECHNIQUE 91 Listing websites 324TECHNIQUE 92 Creating a website 327TECHNIQUE 93 Testing website status 329TECHNIQUE 94 Restarting a website 331
12.3 Application pools and applications 333TECHNIQUE 95 Listing web applications 333TECHNIQUE 96 Listing application pools 334TECHNIQUE 97 Recycling an application pool 336
12.4 Summary 338
13 Configuring a server 33913.1 Initial tasks 341
TECHNIQUE 98 Renaming a server 341TECHNIQUE 99 Joining a computer to a domain 343
13.2 Controlling server restarts 345TECHNIQUE 100 Shutting down a server 346TECHNIQUE 101 Restarting a server 347
13.3 Configuring network adapter settings 348TECHNIQUE 102 Setting an IP address 349TECHNIQUE 103 Configuring other settings 351
13.4 Activating a server 352TECHNIQUE 104 Testing license state 353TECHNIQUE 105 Setting the license key 354TECHNIQUE 106 Activating a server 355TECHNIQUE 107 Setting a power plan 356
13.5 Summary 358
14 Users and security 35914.1 User accounts on the local system 360
TECHNIQUE 108 Listing user accounts 361TECHNIQUE 109 Finding logged on users 364TECHNIQUE 110 Discovering user information 366
14.2 Groups on the local system 370TECHNIQUE 111 Listing local groups 370TECHNIQUE 112 Listing group membership 371
www.it-ebooks.info

CONTENTSxvi
14.3 Security 372TECHNIQUE 113 Testing antivirus status 373TECHNIQUE 114 Testing antispyware status 374TECHNIQUE 115 Testing antimalware status 376TECHNIQUE 116 Testing firewall status 377TECHNIQUE 117 Listing firewall settings 378
14.4 Summary 380
15 Logs, jobs, and performance 38115.1 Event logs 382
TECHNIQUE 118 Discovering event log sources 384TECHNIQUE 119 Backing up event logs 385
15.2 Scheduled jobs 387TECHNIQUE 120 Creating a scheduled job 387TECHNIQUE 121 Discovering scheduled jobs 390TECHNIQUE 122 Deleting scheduled jobs 391
15.3 System performance 392TECHNIQUE 123 Reading performance counters 393TECHNIQUE 124 Windows system assessment report 395TECHNIQUE 125 Stability index data 396
15.4 Summary 398
16 Administering Hyper-V with PowerShell and WMI 39916.1 Creating and configuring virtual machines 401
TECHNIQUE 126 Creating a virtual machine 401TECHNIQUE 127 Adding extra CPUs 404TECHNIQUE 128 Attaching an .iso image to a DVD drive 405TECHNIQUE 129 Adding a virtual disk 407TECHNIQUE 130 Adding a network adapter 408
16.2 Controlling virtual machines 410TECHNIQUE 131 Starting a virtual machine 410TECHNIQUE 132 Starting multiple machines 412TECHNIQUE 133 Stopping virtual machines 413
16.3 Managing virtual disks 414TECHNIQUE 134 Testing virtual disk status 414TECHNIQUE 135 Examining virtual disk usage 416TECHNIQUE 136 Compacting virtual disks 417
16.4 Summary 420
www.it-ebooks.info

CONTENTS xvii
PART 3 THE FUTURE: POWERSHELL V3 AND WMI ..............421
17 WMI over WSMAN 42317.1 Remoting protocols 424
17.2 Using WSMAN 429TECHNIQUE 137 Testing WSMAN 431TECHNIQUE 138 Retrieving WMI data using WSMAN 432TECHNIQUE 139 Modifying WMI instances through WSMAN 433TECHNIQUE 140 Deleting WMI instances through WSMAN 435
17.3 Using CredSSP to access remote machines 436
17.4 How to choose between WMI, remoting, and WSMAN 439
17.5 Summary 440
18 Your own WMI cmdlets 44118.1 Creating a WMI cmdlet 443
TECHNIQUE 141 Creating a simple cmdlet 443TECHNIQUE 142 Extending the cmdlet 446
18.2 Creating multiple cmdlets 448TECHNIQUE 143 Creating cmdlets from multiple WMI classes 449TECHNIQUE 144 Building a super- module 450
18.3 Creating format and type files 451TECHNIQUE 145 Adding a format file 452TECHNIQUE 146 Adding a type file 454
18.4 Using the CIM IDE 456
18.5 Summary 458
19 CIM cmdlets and sessions 45919.1 Using WMI methods 460
TECHNIQUE 147 Adding a method 460TECHNIQUE 148 Adding a method that uses parameters 464
19.2 CIM cmdlets 468
19.3 CIM sessions 474TECHNIQUE 149 Creating a CIM session 476TECHNIQUE 150 Accessing CIM sessions 479
19.4 Summary 481
www.it-ebooks.info

CONTENTSxviii
afterword This is not the end 483appendix A PowerShell reference 485appendix B WMI reference 491appendix C Best practices 496appendix D Useful links 500
index 505
www.it-ebooks.info

forewordI am glad that Richard Siddaway decided to sit down and write a book on WMI. I havehad the privilege of working with Richard over the last several years since becomingthe Microsoft Scripting Guy, and I have long been impressed by his technical prowess.Whether Richard is speaking at a user group or conference or writing a blog article, itdoes not take long before the topic of WMI crops up. When I am planning a guestseries of articles for the Hey Scripting Guy! Blog, Richard is the first person I turn to ifthe subject is WMI. In short, Richard is the perfect person to write this book.
The book is not just about WMI. Richard begins with an overview of WindowsPowerShell technology. In fact, the “Using PowerShell” chapter is an excellent overviewof Windows PowerShell. In less than 40 pages he hits all the highlights—functions, mod-ules, PSDrives, aliases, remoting, and jobs. But it is not simply a fly-by at 30,000 feet; hegets down to the nitty-gritty, boils down essential information, and surfaces a number ofpotential gotchas. Even if you already know Windows PowerShell, this chapter is wortha look; if you don’t know Windows PowerShell, you should read this chapter a coupleof times so you don’t have problems with the remainder of the book.
WMI can be complicated—I know, I wrote a book on the subject for MicrosoftPress a few years ago. Luckily, Richard has devoted an entire chapter to discussing notonly the basics of WMI, but some of the more advanced concepts as well. I love hisWMI documentation script in chapter 3. Of course, one of the nice things about WMIis that it is self-describing, which means that it is possible to write scripts to discoverinformation about WMI. Well, now you do not need to write those scripts yourself,because Richard has done it for you.
xix
www.it-ebooks.info

FOREWORDxx
But if the book were all esoteric academic minutiae, it would be of limited practicalvalue to network administrators and to consultants in the field who are attempting touse this rather difficult technology to solve real world problems. Luckily, Richard livesin the real world and his book quickly begins to produce real value. His section onWMI in the enterprise covers system documentation, working with disk subsystems,the registry, and more.
Windows PowerShell is a powerful, cool technology. WMI is a powerful, cool tech-nology. When you combine the two you have a flexible and powerful solution. WhenRichard Siddaway is the author of the book—you have an unbeatable combination.Buy this book! You will thank me later.
ED WILSON, MCSE, MCSD MICROSOFT SCRIPTING GUY
AUTHOR OF
WINDOWS POWERSHELL 2.0 BEST PRACTICES
www.it-ebooks.info

prefaceI am very passionate about using PowerShell to automate the administration of Win-dows systems. This will become apparent very quickly if you talk to me, listen to me atconferences, or read my other books or blogs. WMI has a reputation for being power-ful but hard to use. PowerShell is the way forward for system administrators, and WMIis that horrible, old technology that no one really knows how to use. So why do weneed a book on PowerShell and WMI?
In reality, PowerShell and WMI are made for each other. They are both powerful,but put them together and you have low-level access to just about every facet of yourWindows system. WMI is a first-class citizen in the PowerShell world, with a set of cmd-lets to make using WMI easier and to provide the ability to work over WSMAN orDCOM protocols. The great strength of the pairing of PowerShell and WMI is that youcan work with both local and remote systems. The other point to remember is thatMicrosoft is putting a lot of effort into WMI for the Windows 8 family of products.There are big changes coming regarding what you can do with WMI and how you canuse it.
In short, it seemed that now was the time to bring WMI in from the cold and intomainstream administration where it belongs.
This book is written for system administrators, and it provides a suite of scripts toautomate a large range of administration tasks. In most cases, these scripts are readyto use in your environment—I use many of them on a regular basis. In the chapters,those scripts are explained and the background to the tasks is discussed so you can putthe script into context for your environment. This isn’t a cookbook or a theoretical
xxi
www.it-ebooks.info

PREFACExxii
book on the PowerShell language—it’s more. It’s a practical guide to taking these twotechnologies and making them do what you need in order to solve the problems youhave in your environment.
Best practices can be an emotive subject, but one of my goals in writing the bookhas been to supply best practice guidelines for using PowerShell and WMI and Win-dows administration in general. There is no point in automating bad practice—it justmakes mistakes happen quicker.
The solutions presented in the book show the way that I solve various problems.Use the scripts to solve your problems, and if you find better solutions, please sharethem with the PowerShell community.
I’ve gained a number of things during the writing of this book:
■ A deeper understanding of PowerShell and WMI■ Some wonderful opportunities to talk with very knowledgeable people■ New friends who share my interest in and passion for PowerShell and WMI
I hope you get a sense of that passion and interest from reading this book, and I hopethat it both helps you in your role as an administrator and inspires you to investigatesome of the areas of PowerShell and WMI that I haven’t been able to cover. Whoknows, we could be talking about it at a PowerShell Deep Dive sometime soon.
Use the techniques, join the PowerShell community, and most of all, enjoy whatyou do.
www.it-ebooks.info

acknowledgmentsProducing a book like this is never a solo effort. My name may appear on the cover,but a whole team of people was required to get this book into your hands. This is myopportunity to thank them for their efforts.
I have to start with the Microsoft PowerShell and WMI teams. Without their work,there wouldn’t be anything to write about. The team members I have met and corre-sponded with have always tried their best to answer my questions, and without theirinput this book would be a very different animal. So a big thank you to current andformer members of these teams, especially Jeffrey Snover, Kenneth Hansen, BrucePayette, Lee Holmes, Jason Shirk, Osama Sajid, Wojtek Kozacynski, Lukasz Anforow-icz, and James Brundage.
I would also like to thank the Microsoft Scripting Guy—Ed Wilson—for writing theforeword to this book and for some very stimulating and thought-provoking discus-sions on the subject of PowerShell and WMI.
The people at Manning continue to be superb. They are a very professional groupwho understand how to put a good book together and how to get the best from theirauthors. Many thanks to Marjan Bace, Michael Stephens, Sebastian Sterling, MariaTownsley, Jeff Bleiel, Andy Carroll, Melody Dolab, Karen Tegtmeyer, Ozren Harlovic,Mary Piergies, Maureen Spencer, and Christina Rudloff.
There were two reviews of this manuscript during its development. The individualreviewers took the time to read and comment, sometimes in great detail, on the con-tents. Without their contributions this would have been a poorer book. Thanks to
xxiii
www.it-ebooks.info

ACKNOWLEDGMENTSxxiv
Jonathan Medd, James Berkenbile, Mike Shepard, Nikander Bruggeman, MargrietBruggeman, Karsten Strøbæk, Amos Bannister, Adam Bell, and Peter Monadjemi.
Special thanks must go to Aleksandar Nikolic for performing the technical reviewof the final manuscript and code. My discussion in the Frankfurt airport with Ravi-kanth Chaganti, after the European PowerShell Deep Dive, was especially useful. Asusual, any and all errors of omission or commission remaining in the book are mineand mine alone.
During the MEAP process, a forum exists for readers to post comments and askquestions. The comments and questions have all been read and incorporated into thebook where appropriate. Thank you for taking the time to post.
The PowerShell community is very enthusiastic and willing to share. Thank you tothose who have helped with example code, discussed topics with me, provided solu-tions to problems, listened to talks (I have been talking a lot about PowerShell andWMI over the last year, and will continue to do so), asked questions, and offeredspeaker slots. The PowerShell MVP community and UK PowerShell group deserve aspecial vote of thanks.
Final thanks must go to my family, friends, and colleagues who’ve supported methrough the writing and production of this book.
www.it-ebooks.info

about this bookThis is a book for system administrators, those who manage administrators, thoseresponsible for auditing systems, and anyone else who needs to discover informationabout Windows-based systems. PowerShell and WMI are powerful individually, but whenthey come together they supply an unrivalled way to access and administer your systems.
I have attempted to show the breadth of problems that PowerShell and WMI cansolve. The depth of these technologies is also exposed by the detailed and practicalexamples. There are areas such as clustering and the System Center family thathaven’t been touched because of space considerations.
This book isn’t a pure cookbook of PowerShell-based scripts nor is it a book on Win-dows administration. It lies between these two points and provides insight into how toautomate the administration of your Windows systems using PowerShell and WMI.
PowerShell versionsThis book was written during the PowerShell v3 development and beta program. Exceptwhere otherwise stated, this book deals with PowerShell v2. Chapters 18 and 19require PowerShell v3 as they use functionality only available in that version.
My development environment is Windows 7 and Windows Server 2008 R2, but I havealso tested on Windows Server 2003 and Windows Server 2008 where possible.
Most of the code will also run on PowerShell 1.0, and I will point out where this is notthe case and what alternatives are available.
xxv
www.it-ebooks.info

ABOUT THIS BOOKxxvi
You may not choose to read this book from cover to cover, but I urge you to keep iton your desk. I hope you will find yourself referring to it on a frequent basis. Once youstart automating, the possibilities are only limited by your knowledge, and this book’stask is to supply you that knowledge along with appropriate examples so you can applyit to your environment.
The scripts are presented as techniques with problem, solution, and discussion sec-tions. They should help you solve your particular problems. If they don’t, a messageon the Author Online forum will reach me, and I may be able to supply some point-ers. But no promises, because I have a day job as well.
Who should read this book?This book is primarily for that overworked, and undervalued, person—the IT adminis-trator. As an administrator, you may well find yourself constantly bombarded with newrequests, new technologies, and user problems, and you may want to automate someof those tasks but not know where to start. Even some simple tools that could discoverthe configuration of the server that your predecessor built but didn’t document wouldbe a help.
This book won’t solve all of your problems, but it will help you start to automatesome of those problem areas. Make sure your manager reads chapter 1. They will thensee what you are trying to achieve and how using the techniques in this book willmake them look good as well.
The sample code in the book is based on real-world examples—I use a lot of scriptsbased on these techniques in my job. I have combined many of the discovery scripts,for example, to create a script that completely documents my servers. Take the code,experiment (in a test lab), and discover how you can start automating now.
RoadmapPowerShell and WMI is divided into three parts. The book starts with an overview of thePowerShell and WMI technologies in part 1, “Tools of the trade.” This introductorysection covers the overall problems you need to solve, provides an overview of Power-Shell and WMI, and offers some best practices.
Chapter 1 describes the challenges we face every day as administrators—increasinglycomplex environments, new applications, fewer staff, and tighter deadlines. A quick lookat PowerShell and WMI shows how they can be used to solve these problems and recoverat least some of the time we need to become proactive in our approach.
Chapter 2 provides an overview of PowerShell. The use of cmdlets at the Power-Shell prompt is described, followed by an introduction to how PowerShell uses .NETand how we can utilize some of the .NET functionality with PowerShell. Don’t worry,this isn’t going to become a developers’ book! PowerShell also has a scripting lan-guage that supplies the framework for our code. Simple scripts are described, leadingup to the advanced functions we’ll be working with throughout the book. This chap-ter also supplies an overview of PowerShell remoting and jobs.
www.it-ebooks.info

ABOUT THIS BOOK xxvii
WMI is the other technology we’ll be using, and it moves to center stage in chap-ter 3. This is the most theoretical chapter in the book, because we delve into thestructure of WMI, discovering how to document providers, namespaces, and classes.Examples of using the five WMI cmdlets are presented, together with some of theissues that may cause problems (workarounds are also presented). WQL is an SQL sub-set that can be used to query the WMI repository. Using WQL may seem like an oldfashioned way of working, but it’s still required in a number of scenarios. A goodworking knowledge of WQL will help in the later chapters of the book. WMI maintainslinks, known as associators and references between many classes. These links can be usedto make administration easier, so we’ll spend some time discovering how to use them.
Part 1 closes with chapter 4. This chapter covers a number of topics that will helpyou get the most out of PowerShell and WMI. It starts with finding code examples andensuring that they’re safe to use. This leads into the topic of securing the PowerShellenvironment, including the digital signing of scripts. The section on optimizing Pow-erShell looks at data input and output, format files, simple debugging techniques, anderror handling. WMI best practices, including the configuration of WMI-related set-tings, authentication within WMI, data filtering, and conversions bring the chapter toa close.
The bulk of the book is taken up by part 2, “WMI in the Enterprise.” A number ofthe chapters in this section discuss using WMI events. By using events, you can per-form actions such as these:
■ Monitor for a USB pen drive being plugged in, and copy data to the drive■ Monitor changes to specific registry keys and values■ Monitor the filesystem for additions, deletions, or modification of the files in a
given folder■ Monitor processes to block specific applications or to ensure that an applica-
tion is restarted if it fails
WMI has traditionally been viewed as a method of gathering information about yoursystem’s configuration. Chapter 5 demonstrates how this can be achieved using Power-Shell and WMI. Techniques for discovering system configuration information, includ-ing hardware, operating system, and installed software are presented.
This theme continues into chapter 6, where you’ll discover how to investigate thestorage systems installed in your servers. The WMI classes that enable you to workwith, and discover information about, disk controllers, physical and logical disks, vol-umes, and mount points will be utilized and explained. Administering disks in termsof formatting and defragmenting disks will also be discussed.
In chapter 7, our attention turns to the registry. The usual warnings regarding reg-istry modifications having the potential to destabilize your system still apply. Tech-niques to discover the registry size, administer registry keys and values, and work withsecurity settings will be discussed.
www.it-ebooks.info

ABOUT THIS BOOKxxviii
The other major data store that administrators work with on a regular basis is thefilesystem—this is the subject of chapter 8. WMI can’t be used to create filesystemobjects, but it can be used to search for files and folders on local and remotemachines. This becomes especially useful when we want to discover files or folderswith special attributes, such as being hidden. Techniques to compress (and uncom-press) files and folders are presented before we move on to examining the security set-tings on filesystems. The chapter closes with a look at file shares, with code that can beused to automate their whole lifecycle.
A server isn’t just a collection of hardware. In many cases, our main interest in a sys-tem is the applications that are running on that system. These are investigated in chap-ter 9, when we turn our attention to services and processes. The service health of asystem (whether the correct services are running) and service load order are investi-gated. The whole process lifecycle from creation through administration to destructioncan be managed with the PowerShell and WMI techniques presented in this chapter.
The one subject that’s guaranteed to upset every administrator at some time intheir career is printing. Chapter 10 discusses printers. It starts by showing how to dis-cover printer configuration and status, followed by a look at printer drivers. The chap-ter then examines how to manage printers and print jobs. The final part of thechapter discusses troubleshooting printers and shows how to perform tests, such assending a test page to the printer.
Networking is the subject of chapter 11. Discovering the physical configuration ofthe network adapters, their IP addressing configuration, and the protocols in useforms the first part of the chapter. This is followed by sections on managing the physi-cal adapters, configuring IP addresses, and related information. The chapter closes byexamining how to discover the IPv4 routing table.
IIS is a common component of the Windows infrastructure. The IIS WMI provideris the subject of chapter 12. The chapter demonstrates how to administer the webserver configuration, the website lifecycle, application pools, and web applications.The IIS WMI provider requires us to use a number of specialized techniques, whichare explained in detail.
Configuring new servers is the subject of chapter 13. We’ll look at how to rename aserver and perform the domain join operation. Network configuration using the tech-niques from chapter 11, setting the license key, and activating the operating systemare all discussed. The final part of the chapter explains how to configure power plans.
Security should always be an important consideration, and in chapter 14 we’ll con-sider the users who have access to our systems, together with a number of othersecurity-related issues. After you’ve discovered how to work with the local users andgroups on the system, we’ll examine the antimalware status. The chapter closes withtechniques for working with the firewall state and settings.
Windows is an event-driven operating system. In chapter 15, techniques for work-ing with the event logs are presented. WMI can only work with the classic event logs,but we can discover event log sources and back up the event logs. Simple scheduled
www.it-ebooks.info

ABOUT THIS BOOK xxix
jobs and performance counters are discussed. In later versions of Windows, systemassessments and a stability index can be produced, and these can be accessed by Pow-erShell and WMI. Accessing this information is an easy way to determine whether aparticular system component isn’t performing or is affecting system stability.
Chapter 16 is a bit different in that we use the Hyper-V PowerShell library, which isbased on WMI, to work with virtual machines. Techniques to create and configureremote machines, control virtual machines, start a group of virtual machines insequence, and administer virtual disks are presented. This chapter is a good exampleof what many administrators do automatically—take the tools that are provided andbuild a wrapper to do exactly what they need in their environment.
In part 3, “The future: PowerShell v3 and WMI,” we take an in-depth look at someof the exciting new functionality associated with PowerShell and WMI; namely, usingWMI over the WS-Management protocols and the introduction of CIM cmdlets and“cmdlets-over-objects” in PowerShell v3.
Chapter 17 examines the WSMAN cmdlets. Using these, it is possible to access theWMI provider from the WinRM service on the remote machine. This enables theretrieval of information and the configuration of the remote machine. It’s possible toperform just about any task through the WSMAN cmdlets that you could using theWMI cmdlets. The advantage is that you bypass DCOM, become firewall friendly, andpotentially can access CIMOM (other non-Windows WMI providers) instances on non-Windows systems. The disadvantage is that it involves a more complex coding syntaxand that you’re not dealing with live objects.
Chapters 18 and 19 should be read together, with the content in chapter 19 build-ing directly on that in chapter 18. The starting point is new functionality in Power-Shell v3 that enables you to wrap a WMI class in XML and use the resulting file as aPowerShell cmdlet—this is known by the catchy title of “cmdlets-over-objects.” Thecmdlet is loaded into PowerShell as a module, and parameters are added to the cmd-let to provide filtering and search options. Two or more WMI classes can be treatedthis way, and the resultant cmdlets are loaded by creating a module file that calls themas submodules. Format and type files are also added to the module to control the for-matting of the output.
In chapter 19, WMI methods are added to the mix. These drive the creation ofadditional cmdlets that are again loaded as part of the module. The ability to “cmdlet-ize” WMI classes gives a huge boost to the ease of use. Much of the new PowerShellfunctionality in Windows Server 8 is produced in this manner.
Chapter 19 continues with the CIM cmdlets. These are analogous to WMI cmdletsbut use a new API and new .NET objects. The CIM cmdlets are compared and con-trasted to the WMI cmdlets to provide a context for their use. These CIM cmdlets com-bine the firewall friendliness of the WSMAN cmdlets and the ease of use of the WMIcmdlets. The chapter, and the book, closes with a review of CIM sessions, which can bethought of as similar to PowerShell remoting sessions. CIM sessions create a persistentconnection to a remote machine to make multiple calls more efficient. They can workover WSMAN or DCOM to enable access to systems running PowerShell v3 or v2.
www.it-ebooks.info

ABOUT THIS BOOKxxx
There are four appendices to the book. They supply a PowerShell reference guide,a WMI reference guide, a best practices guide, and a list of references that can be con-sulted for further information.
Source code downloadsThe source code for this book can be downloaded from the publisher’s website atwww.manning.com/PowerShellandWMI.
WARNING All downloaded code must be tested in your environment.
The code is provided as a zip file with a folder for each chapter, except that the natureof chapters 18 and 19 leads to a single folder spanning both of those chapters. A Pow-erShell file, .ps1, is provided to match each listing in the chapter. The files are namedfor the listings; for example, Listing3.1.ps1.
TIP Each listing is presented as one or more functions. The most efficientway to load these is to use the chapter’s module file.
Other files may be supplied occasionally, such as example output where the data is toobig to include on the page or example input files. In all cases, they’re referenced inthe chapters.
Alternative coding styles are provided where I have used a report production styleof script in the chapter. These can be found in subfolders of the relevant chapter,named “Alternative Non-Report Style”.
In some cases, alternative scripts using the CIM cmdlets from PowerShell v3 areprovided as examples of how to use this new functionality. The CIM alternatives arelocated in a subfolder of the chapter, named “CIM”.
Code and typographical conventionsThis is a book about using PowerShell, and there are a lot of examples providedthroughout the book. A fixed-width font, like this, is used for short lines of code inthe text. Listings and longer code examples embedded in the text also use a fixedwidth font:
like this.
Listings are annotated, where necessary, and full explanations are provided in thetext. In many cases, the code statements have been split across multiple lines in orderto fit the code on the page. These lines either terminate with a back tick (`), which isthe PowerShell continuation character, or the following line has a ➥ symbol to indi-cate that the line is a continuation.
If the code has been typed directly at a PowerShell prompt, it’ll be displayed likethis:
PS> 1kb1024
www.it-ebooks.info

ABOUT THIS BOOK xxxi
I have followed a number of conventions when putting together the code for thisbook. Some of these are standard PowerShell best practices, and others are my per-sonal coding style. I will usually refer to servers when discussing the types of machineswe are administering, but many of the techniques covered in this book can be appliedto desktop machines as well.
PowerShell commands (cmdlets and functions) can have shortcut names, knownas aliases, defined. I don’t normally use aliases in scripts, because I want to ensure thatthe scripts are readable, and are as easy to understand as possible. I also use the fullparameter names in cmdlets. Cmdlet, parameter, property, and attribute names willbe displayed like this.
There is one exception to my rule on aliases, and that’s for the utility cmdlets,where I use the following conventions:
■ Where-Object is aliased as where but never as ?.■ ForEach-Object is aliased as foreach but never as %.■ Select-Object is aliased as select.■ Sort-Object is aliased as sort.
Group-Object and Measure-Object are used less frequently, but they’re aliased to groupand measure respectively. In the discussion around a script, I always use the full cmdletname. I have adopted this convention for a number of reasons:
■ It is advised by the PowerShell team.■ It represents accepted practice and usage.■ It’s more readable.■ It saves some space on the page.
I use double quotes around strings unless I am sure that I don’t want to substitute intothe string. WMI filters and WQL use single quotes to delineate strings within thequery. I also tend to leave keywords, such as do and if in lowercase. My functionnames and their parameters are usually lowercase—I’ll make an exception to this ifthe name is long and some capitalization makes it more readable.
In some cases, the listings in the book are truncated. This is to save space and isalways stated in the script’s discussion. The download code for the book is complete.My goal has been to provide a balance between readability, conciseness, and com-pleteness. Only you can tell if I have succeeded.
Author OnlinePurchase of PowerShell and WMI includes free access to a private web forum run byManning Publications where you can make comments about the book, ask technicalquestions, and receive help from the author and from other users. To access the forumand subscribe to it, point your web browser to www.manning.com/PowerShellandWMI.This page provides information on how to get on the forum once you are registered,what kind of help is available, and the rules of conduct on the forum.
www.it-ebooks.info

ABOUT THIS BOOKxxxii
Manning’s commitment to our readers is to provide a venue where a meaningfuldialog between individual readers and between readers and the author can take place.It is not a commitment to any specific amount of participation on the part of theauthor, whose contribution to the AO remains voluntary (and unpaid). We suggestyou try asking the author some challenging questions, lest his interest stray!
The Author Online forum and the archives of previous discussions will be accessi-ble from the publisher’s website as long as the book is in print.
www.it-ebooks.info

about the authorRichard Siddaway is a technical architect for Serco in the UK, working on transforma-tion projects in the Local Government and Commercial arena. With more than 22years of experience in various aspects of IT, Richard specializes in the Microsoft envi-ronment at an architectural level—especially around Active Directory (AD),Exchange, SQL Server, and infrastructure optimization.
Much of his recent experience has involved Active Directory migrations and opti-mizations, which often include Exchange. Richard has hands-on administration expe-rience and is involved in implementation activity in addition to filling architecturaland design roles. He has extensive experience specifying, designing, and implement-ing high-availability solutions for a number of versions of the Windows platform, espe-cially for Exchange and SQL Server.
Richard is always looking for the opportunity to automate a process, preferablywith PowerShell and WMI. Richard founded and currently leads the UK PowerShellUser Group. Microsoft has recognized his technical expertise and community activi-ties by presenting a Microsoft Most Valued Professional award. Richard has presentedto The Technical Experts conference in the USA and Europe, the Directory ExpertsConference, at various events at Microsoft in the UK and Europe, and for other usergroups worldwide. Richard has a number of articles and technical publications to hiscredit, including PowerShell in Practice (Manning). He is a coauthor of the forthcomingPowerShell in Depth: A system administrator’s guide (Manning).
xxxiii
www.it-ebooks.info

about the cover illustrationThe figure on the cover of PowerShell and WMI is captioned “The Bibliophile,” whichmeans a lover of books. The man on the cover may just be an avid reader or possibly he’sa collector of rare editions or even a bookseller. The illustration is taken from a 19th-century edition of Sylvain Maréchal’s four-volume compendium of regional and pro-fessional dress customs published in France. Each illustration is finely drawn and col-ored by hand. The rich variety of Maréchal’s collection reminds us vividly of howculturally apart the world’s towns and regions were just 200 years ago. Isolated from eachother, people spoke different dialects and languages. In the streets or in the countryside,it was easy to identify where they lived and what their class, trade, or station in life wasjust by their dress.
Dress codes have changed since then and the diversity by region, so rich at thetime, has faded away. It is now hard to tell apart the inhabitants of different conti-nents, let alone different towns or regions. Perhaps we have traded cultural diversityfor a more varied personal life—certainly for a more varied and fast-paced technolog-ical life.
At a time when it is hard to tell one computer book from another, Manning cele-brates the inventiveness and initiative of the computer business with book coversbased on the rich diversity of regional life of two centuries ago, brought back to life byMaréchal’s pictures.
xxxiv
www.it-ebooks.info

Part 1
Tools of the trade
Welcome to PowerShell and WMI. WMI is a mature administration technol-ogy that has been with us for a good number of years. PowerShell is the relativelynew kid on the block that’s bringing automation to administrators who haven’tconsidered it in the past. PowerShell and WMI are a natural pairing, like Batmanand Robin or fish and chips.
The book has three sections. In this first part of the book, we’ll look at thetechnologies in isolation.
Chapter 1 provides a brief overview of the subject as well as some examplesof the benefits that using PowerShell and WMI together will bring to yourenvironment.
In chapter 2, we’ll turn our attention to PowerShell, looking at its major ele-ments and how to use them. This isn’t intended to be a complete PowerShelltutorial, but taken together with appendix A, it will supply the information youneed to get the most from this book.
WMI moves on stage in chapter 3, and you’ll learn what it is and how to use itwith PowerShell. We’ll look at the WQL language along with some advanced top-ics, including using WMI and .NET together.
Finally, chapter 4 shows some ways to optimize your use of WMI and Power-Shell. These suggestions are not intended to be prescriptions but are based onmy accumulation of experience from using PowerShell and WMI. They willhopefully make using these technologies easier and more enjoyable. Learn frommy mistakes, in other words.
www.it-ebooks.info


Solving administrative challenges
Ask any Windows administrator about their biggest problems, and somewhere inthe list, usually near the top, will be too much work and not enough time to do it.They know that automation is possible, will be at least aware of some of the technol-ogies that could solve their problems, such as Windows Management Instrumenta-tion (WMI) and PowerShell, but don’t have the time to spend investigating thetechnologies. That’s a shame because it’s commonly accepted that 70 percent of anorganization’s IT budget is used to “keep the lights on.” Automation can make aworthwhile contribution to reducing that percentage and freeing people andmoney to contribute to the business bottom line.
It’s also possible that they’ve looked at WMI or PowerShell and decided theywere too difficult. This is an understandable view, given the issues with WMI inVBScript—especially the amount of work involved in getting WMI to work in
This chapter covers■ The administrator’s headache■ Solving the challenge with automation■ PowerShell and WMI—the automation tools
3
www.it-ebooks.info

4 CHAPTER 1 Solving administrative challenges
VBScript, and the lack of usable examples that also explain the techniques that have tobe used. Some horrendous examples of PowerShell have been posted on the web thatput me off, never mind someone wanting to start with the subject! Unfortunately,administrators then miss out on the possibilities that automation provides to reducetheir workload and accomplish more.
The aim of this book is to radically lower the entry bar to using WMI productivelyin your environment. The examples that are provided can be used with few or no,changes. You’ll also gain a deeper understanding of WMI that can be used to workwith areas we don’t cover.
PowerShell itself is constructed to make WMI usage much easier and more intuitive.PowerShell is Microsoft’s automation engine that, among other things, provides easy-to-use access to the rich management toolset available in WMI. Together, PowerShell andWMI provide a set of tested techniques that will enable you to administer your Windowsenvironment more quickly and easily. You’ll be able to automate many of the standardtasks that currently consume too much of your attention, freeing up time to do the moreinteresting things that otherwise couldn’t be fitted into your normal working day.
The first thing I’ll do in this chapter is define the problem we’re trying to solve.There are a number of issues that affect any Windows environment of significant size:
■ Number of systems■ Rising infrastructure complexity■ Rate of change
The second part of the chapter shows why PowerShell and WMI provide a great toolsetfor solving these problems. Getting the most out of PowerShell involves investing a lit-tle time in learning it, especially when using WMI. Automation is the key to makingyour life as an administrator easier. The benefits you can achieve with PowerShell andWMI automation provide an excellent return on the investment you make in learningto use the technologies.
The chapter closes with two examples showcasing the power this combination oftechnologies delivers to us. The first example shows how you can shut down all theservers in your data center with one command, and the second shows how you can testsettings on many machines in one pass.
Let’s start with a look at the responsibilities of a modern Windows administratorand the problems administrators face.
1.1 Administrative challengesAdministrators are very busy people. They seem to be continually asked to do morewith fewer resources. Figure 1.1 illustrates this with a sketch graph that I’ll refer to inthe following sections. One thing the graph illustrates is the ever-decreasing cost, inreal terms, of hardware. For example, I recently acquired a laptop with a quad-coreprocessor (hyperthreading allows Windows to see eight cores) and 16 GB of RAM as amobile lab. A few years ago, a machine with those specifications was a mid-rangeserver, not a laptop!
www.it-ebooks.info

5Administrative challenges
The same is true in the server market—4-, 8-, or even 10-core processors and lots of rel-atively cheap memory mean that we can afford to run applications and business pro-cesses that were previously only considered by large corporations with huge budgets.
This leads directly to the other components of the graph, which show the steeprise in infrastructure complexity and the even faster rise in administration costs. Thecontinual upward growth of infrastructure complexity and cost isn’t sustainable.PowerShell and WMI can help you break out of this growth curve. First, though, weneed to examine the problem in a little more depth—where do the complexity andcost of administration come from?
1.1.1 Too many machines
This may seem to be an odd way to look at infrastructure, but do you really need everyserver you’ve created? Many, if not most, organizations have too many servers. Thiscomes about for a number of reasons:
■ The decreasing cost of hardware—This change leads to it being easier to add a newserver than to think about using an existing one.
■ Department- or project-based purchasing—This approach raises questions aboutserver ownership and makes departments or projects unwilling to shareresources.
■ The “one application—one server rule”—Separating applications so that a problemin one doesn’t affect others may still be valid for business-critical applications,
Figure 1.1 The relationship between decreasing hardware costs, increasing infrastructure complexity, and the cost of administering the evolving infrastructure
www.it-ebooks.info

6 CHAPTER 1 Solving administrative challenges
but it’s not necessarily required for second- or third-line applications. It’s defi-nitely not required for testing and training versions.
■ Weak or reactive IT departments—The lack of controls and processes in IT leads todepartments and projects introducing systems that IT doesn’t know about andhas had no involvement with until the systems hit production.
An administrator’s workload increases faster than the rate of increase of machines dueto the time spent switching one’s focus between machines (often requiring a newremote connection to be made) and the additional complexity each machine and itssupported applications bring to the environment.
Virtualization is one of the hot topics in IT at present, with most organizations vir-tualizing at least part of their server estates. There are several advantages of virtualization:
■ Reduced numbers of physical servers■ Reduced requirement for data center facilities, including space, power, and air
conditioning■ Increased use of physical assets, giving a better return on investment
The organization as a whole benefits from virtualization, but the administrator’s loadis increased. If you have 100 servers to administer before virtualization, and youchange to use 4 physical hosts and virtualize the 100 servers, you now have 104 systemsto administer. The complexity may increase as well, because the virtualization plat-form may introduce a different operating system into the environment. The increasein the total (physical plus virtual) number of systems also means that there will bemore change happening as the environment evolves.
1.1.2 Too many changes
Change can be viewed as an administrator’s worst headache. Unfortunately environ-ments aren’t static:
■ Operating system and application patches are released on a regular basis.■ New versions of software are released.■ Storage space needs to be readjusted to match usage patterns.■ Application usage patterns force hardware upgrades.■ Virtualization and other disruptive new technologies change the way environ-
ments are created and configured.
This level of activity, multiplied across the tens, hundreds, or even thousands ofmachines, builds on top of the day-to-day activity, such as monitoring and backups.
This situation isn’t supportable in the long term. Organizations can’t absorb ever-increasing administration costs, and today’s economic realities prevent other mecha-nisms, such as increased revenue, from providing an escape. The situation has to beresolved by reducing the cost of administration. But administrators are hampered indoing this by the fact that many changes bring new technologies into the environmentwithout ensuring they’re supportable.
www.it-ebooks.info

7Automation: the way forward
1.1.3 Complexity and understanding
Complexity is the real problem in many cases. It can arise due to a number of causes:
■ Multiple operating systems bring different toolsets and terminology, evenbetween versions of Windows.
■ Different types of applications, such as databases, email, Active Directory, andweb-based applications, require different skill sets, use different tools, and placedifferent stresses on a server that the administrator must accommodate.
■ Many machines perform the same or similar roles, but subtle, potentiallyundocumented, differences increase the likelihood of error.
Complexity is often compounded by incomplete knowledge and skill sets on the partof the administrators. Too often a project will introduce a new technology and admin-istrators are expected to immediately pick up and manage the systems. Do the admin-istrators have the skills? Do they have the time to learn the intricacies of the newtechnology? Sadly, the answer to both questions is often no.
This leads administrators to make best-guess decisions about how to do things.Sometimes, if the new technology is a version change from something already in use,administrators will continue to use the old methods even if there’s now a better way toperform the task.
This lack of skills and knowledge leads to mistakes, and these mistakes cost money,often in terms of lost revenue for the organization. This puts more pressure on theadministrators and leads to a lack of trust from the business. The IT department isoften then excluded from discussions about new technologies until it’s too late, andthe cycle takes another spiral downwards.
Not only are major changes introduced by projects, administrators also face thehost of minor changes required to keep their environments secure and runningsmoothly.
1.2 Automation: the way forwardThe way to overcome these issues is to introduce automation. Get the machines to dothe mundane, repetitive work—that’s what we invented them for!
Automation means many things to many people. There’s a hierarchy of automa-tion activity that can be considered, as shown in figure 1.2.
Figure 1.2 Hierarchy of automation activity
www.it-ebooks.info

8 CHAPTER 1 Solving administrative challenges
The question that needs to be answered by every organization is, “Where do I get themost benefit?” The answer depends on what you’re trying to achieve and where youare now. I know of a number of organizations that are quite happy using the standardWindows tools and a few bulk-editing tools. Others attempt to schedule everything oreven create automated responses to events. Automation, for most organizations,involves a mixture of command-line tools, scripting, and scheduled tasks.
That leads to the second big question, which is, “How do I automate my adminis-trative tasks?” PowerShell provides a set of command-line tools (called cmdlets) thatcan be used interactively. As the commands become longer and more ambitious,there’s a natural progression into scripting. One of the great strengths of PowerShellis that you can use exactly the same commands in a script or at the command prompt,so everything you’ve learned about commands is still usable in scripts.
PowerShell by itself is a wonderful tool (OK, I am fanatical about it), but you cantake it a stage further and layer WMI on top. This opens a standards-based manage-ment toolset that you can use on local and remote machines and that can poten-tially include non-Windows systems when PowerShell v3 is used. The scripts can berun interactively or they can be scheduled to run at a specific time by using Power-Shell and WMI. But before we get into those delights, let’s have a look at automationin general.
In this book, we’ll be concentrating on scripting as the primary automation activ-ity. It could be argued that because you’re using PowerShell, you could do much ofyour work from the command line. The benefit of scripting, though, is that you canreuse the code and save even more time by not having to rewrite the code each timeyou want to use it. This topic is covered in depth in chapter 4 of PowerShell in Practice(Manning 2010).
Scheduled tasks and automatic responses are too dependent on the particularenvironments for this book, so in chapter 3 we’ll start to look at how you can automateresponses to events that occur on your systems. We’ll revisit this in later chapters as weconsider specific areas of administration. We won’t neglect the use of the commandline, though. Many of the examples are short enough to use interactively.
Let’s look at an example. Suppose you need to determine the amount of free spaceon the C: drive of a number of machines in your environment. One way is to go to thedata center, assuming they’re all in the same data center, and log onto the console ofeach machine. You’d then need to open Windows Explorer or another tool and findthe free space on the C: drive. Write down the answer, and repeat for the nextmachine on the list.
A slightly easier option is to use Windows’ Remote Desktop functionality to con-nect to each machine. Then you’d need to manually obtain the information. With thisapproach you don’t have to move from your desk, but it still takes too much time.
My favorite solution is to use PowerShell as shown in listing 1.1. Don’t worry if youdon’t understand the code right now. We’ll return to this script in chapter 6 when welook at how to administer the disks in servers.
www.it-ebooks.info

9Automation: the way forward
In this PowerShell example you start with a list of server names taken from my labsetup. This list is piped into a ForEach-Object cmdlet (aliased as foreach) that callsGet-WmiObject for each server in the list in order to find the information on the logi-cal disk used as the C: drive. You then format the information and output it as a table,as shown in the following listing.
"dc02", "W08R2CS01", "W08R2CS02", "W08R2SQL08","W08R2SQL08A", "WSS08" | foreach { Get-WmiObject -Class Win32_LogicalDisk `-ComputerName $_ -Filter "DeviceId='C:'" } |Format-Table SystemName, @{Name="Free";
Expression={[math]::round($($_.FreeSpace/1GB), 2)}} -auto
The free space is recalculated from bytes to GB to make the results more understand-able. Notice that PowerShell understands GB, as well as KB, MB, TB, and PB. Theresults look like this:
Listing 1.1 Find free disk space
Scripting ConventionsI discussed these conventions in the introductory material but if you’re like me youskipped that part of the book.
I will usually refer to servers when discussing the types of machines you’re adminis-tering but many of the techniques covered in this book can be applied to desktop ma-chines as well.
PowerShell commands (cmdlets and functions) can have shortcut names, known asaliases, defined. I don’t normally use aliases in scripts as I want to ensure that thescripts are readable and as easy to understand as possible. I also use the full pa-rameter names in cmdlets.
There is one exception to this rule and that’s for the utility cmdlets where I use thefollowing conventions:
■ Where-Object aliased as where but never as ?■ ForEach-Object aliased as foreach but never as %■ Select-Object aliased as select■ Sort-Object aliased as sort
In the discussion around a script I always use the full cmdlet name.
I have adopted this convention for a number of reasons:
■ On the advice of the PowerShell team.■ Because it represents accepted practice and usage.■ Because it’s more readable.■ It saves some space on the page.
www.it-ebooks.info

10 CHAPTER 1 Solving administrative challenges
SystemName Free---------- ----W08R2CS01 119.04W08R2CS02 118.65W08R2SQL08 114.8W08R2SQL08A 115.17WSS08 111.41DC02 118.53
NOTE I don’t intend to show output from every script we discuss in thebook, but I will show output occasionally where it aids in the discussion of aparticular issue.
There are a number of enhancements that you could apply to this script:
■ Put the computer names into a CSV file (as we’ll do in listing 1.4)■ Add the results to an Excel spreadsheet, or a database, so that trends can be
seen■ Schedule the task to run on a periodic basis
I use a similar script, with the first two enhancements, to regularly report on diskspace trends for the organization I’m currently working with. I now have a tool thattakes seconds to run against each machine and provides vital information. It’s alsoquickly and easily extensible to cover other machines that may become of interest.The script took me a few minutes to write and test, and there’s an immediate paybackevery time I use it.
PowerShell is designed to provide this type of return. In the words of JeffreySnover, the architect of PowerShell, “I firmly believe that economics determine whatpeople do and don’t do so PowerShell is designed from the ground up to make com-posable, high-level task oriented abstractions be the cheapest things to produce andsupport.” The full article, “The Semantic Gap,” is available from the Windows Power-Shell Blog at http://blogs.msdn.com/b/powershell/. A search for semantic gap will takeyou to the post.
The second part of this book will show many examples of this concept in action,but for now we’ll have a closer look at PowerShell and discuss why it’s the ideal plat-form for automating your administration.
1.3 PowerShell overviewIn this section, I want to show you why PowerShell is the ideal platform for automatingyour Windows administration.
PowerShell is now on its second version (with the third in beta at the time of writ-ing). It’s part of the default installation of Windows 7 and Windows Server 2008 R2(for Server Core it’s an optional install). PowerShell v2 also can be installed on Win-dows Server 2008, Windows Server 2003, Windows Vista, and Windows XP. PowerShellv3 is an integral part of the Windows 8 family of operating systems. This level of sup-port means you can use PowerShell to manage all of your Windows systems.
www.it-ebooks.info

11PowerShell overview
WINDOWS 2000 SUPPORT Windows 2000 is now out of support and won’t beconsidered in this book. PowerShell doesn’t have an option to install onWindows 2000.
There are also an increasing number of applications that have PowerShell supportbuilt into them. It’s a requirement for all new versions of the major Microsoftproducts, and adoption by third-party vendors is steadily increasing the scope ofPowerShell.
The ability to access remote machines (which we’ll look at in chapter 2) simplifiesadministration, because you can automate your whole Windows environment from asingle administration console. This is how you can break the curve of rising infrastruc-ture complexity. We’ll look at how you can achieve this after we’ve examined Power-Shell’s scope.
1.3.1 PowerShell scope
PowerShell enables you to administer a range of applications, from those havingdirect PowerShell support built into them to community-inspired and -provided addi-tions that are available for download.
A number of major applications have direct PowerShell support:
■ Exchange 2007/2010 (probably the poster child of PowerShell support)■ SQL Server 2008/2012■ SharePoint 2010■ Various members of the System Center family
Other elements of the Windows environment have PowerShell support availablethrough Microsoft or third-party additions, including the following:
■ Active Directory■ IIS■ Clustering■ Terminal Services■ Graphical presentation tools
PowerShell resourcesChapter 2 provides an overview of PowerShell’s features, the language, and how touse it. It isn’t a full PowerShell tutorial, but it will explain what you need to understandthe examples in the second part of the book.
Bruce Payette’s Windows PowerShell in Action, second edition (Manning 2011) pro-vides the most detailed coverage of PowerShell from a language perspective. MyPowerShell in Practice (Manning 2010) supplies many examples of using PowerShellto administer Windows systems.
www.it-ebooks.info

12 CHAPTER 1 Solving administrative challenges
The availability of functionality is good, but to get the most from it you need to get itinto production use, and the sooner the better. One way to achieve this is to takeadvantage of the PowerShell community, which supplies sample code that can shortenthe development cycle. PowerShell has a very strong and productive community thatstarts with the PowerShell team but also includes the following resources (links areprovided in appendix D):
■ Blogs, including mine■ Code repositories for community contributions, such as www.poshcode.org and
www.powershell.com■ Forums, such as www.powershell.com
This provides a breadth and depth of support and additional functionality that almostguarantees you’ll be able to find help with solving your problem.
1.3.2 PowerShell and .NET
Whenever PowerShell is discussed, the fact that it’s .NET-based and can access most ofthe .NET Framework is brought up. At this point, I find that the eyes of many adminis-trators begin to glaze over and they slide down into their seats. WAKE UP!
Yes, PowerShell is .NET-based and there are some really clever things that can bedone by working directly with .NET code in PowerShell, some of which we’ll see inlater chapters. But you don’t need to do this until you’re ready to work at this level.There are a huge number of administration tasks you can perform without dippingyour toes any further into the .NET waters than we did in listing 1.1. Just don’t forgetthat .NET is there when you need it, and there are lots of great examples of how towork with .NET available from the PowerShell community.
As an example of how you can use .NET with PowerShell, let’s look at the servicesrunning on a system. A subset of the installed services on my test system is shown infigure 1.3.
The Get-Service cmdlet (a PowerShell command) returns a list of the runningservices. I have restricted the output by using wi* to only return services starting with“wi.” The results are piped into a Format-Table cmdlet that outputs the results as anicely formatted table.
WMI and .NETIt’s possible to use WMI functionality through .NET code created and run in Power-Shell. This is an advanced technique that we’ll look at in chapter 12, when we’reworking with IIS.
There are generally alternatives to using .NET in this way, and I’ll always choosethose over a .NET-based solution. I’m an administrator, not a developer, and I’ll pres-ent solutions for administrators.
www.it-ebooks.info

13PowerShell overview
NOTE The PowerShell pipeline passes .NET objects rather than text as inwith other shells. This supplies a large measure of PowerShell’s power.
I deliberately chose to use wi* because it demonstrates two services we’ll be seeing alot more of later: WMI and Windows Remote Management (WinRM). (It also keepsthe figure to a reasonable size.)
Underneath the hood, Get-Service is using a .NET class called System.ServiceProcess.ServiceController, which is fascinating but doesn’t mean muchto me without looking up the .NET documentation. The beauty is that you don’tneed to know this 99.99 percent or more of the time. PowerShell abstracts all of this,and you can perform your discovery with an easy-to-use command that has a descrip-tive name.
1.3.3 Breaking the curve
In figure 1.1 you saw that there’s a continuous rise in the complexity of organizationsand the cost of performing the administration in those organizations. This continu-ous increase isn’t supportable in the long term, and we need a way to break theupward curve.
PowerShell can help us break that curve by providing the following:
■ A set of tools to interactively administer servers and applications■ An automation engine that works across the entire Windows estate■ The ability to apply those concepts to a number of applications■ Remote administration engines that enable multiple machines to be adminis-
tered with a single command■ Asynchronous and scheduled tasks to further enhance automation
PowerShell offers a productivity boost that will easily repay the time you spend learn-ing to get the best from the technology. And using PowerShell and WMI together willfurther enhance your productivity gains.
Figure 1.3 Using Get-Service to display a subset of the running services
www.it-ebooks.info

14 CHAPTER 1 Solving administrative challenges
1.4 WMI overviewIn this section, we’ll look at what WMI offers us as administrators. We’ll examine WMIin much greater detail in chapters 3 and 4, where we’ll drill into the details of how touse it to automate administration tasks.
WMI has been available to Windows administrators since the days of Windows NT 4,but it isn’t a static technology. Each new version of Windows brings changes to thefunctionality available through WMI, usually by adding extra capabilities but occasion-ally by removing or radically changing functionality. New versions of other applica-tions can have a similar impact. For instance, Exchange 2003 had WMI support, butthat was removed in Exchange 2007/2010.
WMI AND OFFICE Microsoft Office 2007 supplied a WMI provider in theshape of the root\MSAPPS12 namespace. This functionality was removed inOffice 2010. Remnants of WMI classes will remain on a system if an upgradefrom Office 2007 to 2010 is performed, but they won’t be usable.
The only way to be sure that particular functionality is available on your version ofWindows is to check the documentation on the Microsoft Developer Network(MSDN). The WMI functionality available on a particular system can be discovered in anumber of ways using PowerShell and other tools. Chapter 3 supplies full instructionson this.
There are many automation scripts available using WMI, and most of them useVBScript due to the efforts of the people behind the Microsoft Script Center afterWindows 2000 shipped. This gives the unfortunate impression that WMI requires a lotof coding for you to achieve any gains. This is no longer true, as you’ll see in a littlewhile, and it’s slowly becoming apparent on the internet as the PowerShell commu-nity supplies example code using WMI.
To get started, let’s look at what WMI actually is.
1.4.1 What is WMI?
Just what is WMI? The abbreviation stands for Windows Management Instrumentationand the functionality is automatically installed with Windows. The base functionalitycan be enhanced by adding features and roles to Windows or by installing additionalapplications.
At first glance, it may seem like a very large set of stuff that you might be able touse if you get lucky and someone has mapped out how to use the bit you’re interestedin. When we get to chapter 3, though, you’ll see that there is a structure to WMI thatyou can exploit to discover what is available, and to some degree how to use it.
At this stage you need to be aware that WMI doesn’t exist in a vacuum. It’s Micro-soft’s implementation of the Common Information Model (CIM) that’s produced bythe Distributed Management Task Force (DMTF). The CIM (and WMI) defines a seriesof classes that supply information about Windows systems, and they may allow you todirectly interact with aspects of local and remote systems.
www.it-ebooks.info

15WMI overview
You can look at the WMI classes available for working with disks by usingGet-WmiObject:
Get-WmiObject -List *disk* | sort name | select name
This command will produce output like the following:
Name----CIM_DiskDriveCIM_DisketteDriveCIM_DiskPartitionCIM_DiskSpaceCheckCIM_LogicalDiskCIM_LogicalDiskBasedOnPartitionCIM_LogicalDiskBasedOnVolumeSetCIM_RealizesDiskPartitionWin32_DiskDriveWin32_DiskDrivePhysicalMediaWin32_DiskDriveToDiskPartitionWin32_DiskPartitionWin32_DiskQuotaWin32_LogicalDiskWin32_LogicalDiskRootDirectoryWin32_LogicalDiskToPartitionWin32_LogonSessionMappedDiskWin32_MappedLogicalDiskWin32_PerfFormattedData_PerfDisk_LogicalDiskWin32_PerfFormattedData_PerfDisk_PhysicalDiskWin32_PerfRawData_PerfDisk_LogicalDiskWin32_PerfRawData_PerfDisk_PhysicalDisk
There are a number of classes that start with CIM_ and others that start with Win32_.There isn’t always a one-to-one pairing of the two types, but major object types such aslogical disks are paired. The CIM_ class is the parent, corresponding to the definitionsupplied by the DMTF; the Win32_ classes are child classes that Microsoft has imple-mented. In some cases the classes are identical, and in others there is additional func-tionality in the Microsoft class. We’ll usually be working with the Win32_ classes.
POWERSHELL v3Microsoft invested very heavily in WMI for PowerShell v3, and it offers several im-provements:
■ A new API and associated .NET classes■ Closer adherence to the CIM standards (so expect less deviation from the stan-
dard in Microsoft’s implementations) ■ Simplified creation of WMI providers (see chapter 3 for details on providers)■ The ability to create cmdlets directly from WMI objects (see chapters 18 and 19)
The scripts in chapters 2–16 will use the existing WMI cmdlets for compatibility be-tween PowerShell v2 and v3. Annotated versions of the scripts using the new Power-Shell v3 CIM cmdlets will be available in the book’s source code.
www.it-ebooks.info

16 CHAPTER 1 Solving administrative challenges
There are also classes for working with performance counters that you’ll experimentwith in chapter 15. As you’ll see in future chapters, you can work with many parts ofyour systems.
Technologies that have this level of power tend to seem very complicated whenyou’re first introduced to them. WMI is no exception.
1.4.2 Is WMI really too hard?
In the years since its introduction, WMI has gained a poor reputation for a number ofreasons:
■ Many administrators don’t think to look on MSDN for documentation. I know Ididn’t when I started using WMI.
■ Discovering which classes are available isn’t always easy. (Chapter 3 will show youhow to discover detailed information on the WMI classes installed on a system.)
■ Coding WMI can be time consuming. The examples in this book are ready touse, requiring few or no changes for your environment. They can also be usedas templates for your own scripts.
■ A lot of information is held in a coded form. For instance, theWin32_LogicalDisk class has a media type property that returns a numericvalue—hard drives are type 3. If you don’t know that, you can get into prob-lems. The information about these values is available in the WMI documenta-tion, and simple techniques are presented throughout this book to decodethese values. The new CIM classes in PowerShell v3 also provide alternatives thatsimplify use.
■ Class names aren’t always consistent. For instance, there is aWin32_LogicalDisk class, but the physical counterpart is Win32_DiskDriverather than a class called Win32_PhysicalDisk. This book’s chapters are brokeninto topics that highlight the common classes you’ll need to use, and this infor-mation is also gathered in appendix B.
WMI is a powerful technology that provides low-level access to the workings of yourservers. It has been shunned by the administrator community because it’s viewed asbeing too hard to use, but this need not be the case, as you’ve seen in this section. Therest of this book shows how you can make the most of this free power. Microsoft hasalso realized how much can be done with WMI and is providing a huge boost to thetechnology in the Windows 8 family.
But before we look at how to use WMI, we need to see how it works with PowerShell.
1.5 Automation with WMI and PowerShellPowerShell v1 has good WMI support. You can use Get-WmiObject to access existingWMI objects, as you saw in listing 1.1. You can also create new WMI objects, performsearches, and manipulate the objects that are available. This is all explained in detailin chapter 3.
www.it-ebooks.info

17Automation with WMI and PowerShell
This capability is raised to a new level with PowerShell v2. The functionality of Pow-erShell v1 is at least maintained in v2, and it’s often enhanced. For example, you canwork directly with WMI security levels in the WMI cmdlets. PowerShell v2 also providesadditional cmdlets to modify and even remove objects. You also get the capability towork directly with WMI events, as you’ll see in a number of chapters, including 7, 8,and 15.
Let’s look at a WMI example. The starting point is VBScript and WMI, which you’lltranslate into PowerShell. This will provide a template that can followed if you need totranslate other scripts. The following code listing retrieves some information regard-ing the processes running on your system. The code is modified from Microsoft’sScripting Guide.
set objWMIService = GetObject("winmgmts:" _ & "{impersonationlevel=impersonate}!\\" _ & ".\root\cimv2")
set colProcesses = objWMIService.ExecQuery _ ("SELECT * FROM Win32_Process")
for each objProcess in colProcesses WScript.Echo " " WScript.Echo "Process Name : " + objProcess.Name WScript.Echo "Handle : " + objProcess.Handle WScript.Echo "Total Handles: " + Cstr(objProcess.HandleCount) WScript.Echo "ThreadCount : " + Cstr(objProcess.ThreadCount) WScript.Echo "Path : " + objProcess.ExecutablePathnext
This example uses just a small subset of the available properties to keep the scriptmanageable. The script starts by creating an object, objWMIService, to enable interro-gation of the WMI service B. A list of active processes is retrieved by running a WQLquery C. The collection of processes is iterated through, and you write a caption andthe value of a particular property to the screen D.
Listing 1.2 VBScript to retrieve process information
Internet codeYou may not always have time to create a script to solve a problem, or you may nothave the knowledge. Fortunately, there are a many scripts available on the Internet.
It’s essential that you test any script that you downloaded from the internet or obtainfrom a book (including this one) in your environment to ensure that it works as adver-tised and doesn’t have any adverse effects. The original script writer is always workingbased on the assumptions inherent in their environment—they can’t know any of thequirks in your environment that would cause the scripts to cause accidental damage.
This is a warning that I will repeat periodically throughout the book.
Enable interrogation of WMIB
Select from WMI classC
Output resultsD
www.it-ebooks.info

18 CHAPTER 1 Solving administrative challenges
Writing a script like this takes time, even with cut and paste in your editor. Youhave to set up the link to WMI, run a query, and then manually define the formattingof your display.
This code can be directly translated to PowerShell as shown in the next listing. ThePowerShell commands are explained in more detail in later chapters, but their basicfunctions should be understandable by comparison to the VBScript example.
$procs = Get-WmiObject -Query "SELECT * FROM Win32_Process"foreach ($proc in $procs) { Write-Host "Name :" $proc.ProcessName Write-Host "Handle :" $proc.Handle Write-Host "Total Handles :" $proc.Handles Write-Host "ThreadCount :" $proc.ThreadCount Write-Host "Path :" $proc.ExecutablePath}
You first run the WMI query to select the information you need and put the resultsinto a variable. The variable is a collection of objects representing the different pro-cesses. You can then loop through the collection of processes (using the foreach com-mand), and for each process in that collection use the Write-Host cmdlet to output acaption and the value of the properties you’re interested in.
Using this approach will produce the results that you need, but it doesn’t use Power-Shell to its full capabilities. You end up doing the formatting work yourself rather thanleaving it to PowerShell. Your goal is to get the machines to do as much of the work aspossible. You could just run Get-WmiObject -Class Win32_Process, but this displaysa lot of information that you’d need to wade through, which is another manual pro-cess. You need to select the data you want to see and format it in a sensible way, whichleads to the following PowerShell code:
Get-WmiObject Win32_Process |Format-Table ProcessName, Handle, Handles,ThreadCount, ExecutablePath -AutoSize
Listing 1.3 PowerShell translation
VBScript to PowerShell conversionsWhen you’re working with WMI, it’s inevitable that you’ll end up translating VBScriptcode into PowerShell because of the sheer number of examples that are availablefrom sites such as the Microsoft TechNet Script Center.
The “VBScript-to-Windows PowerShell Conversion Guide” is available on the TechNetScript Center at http://technet.microsoft.com/en-us/scriptcenter/default.aspx.You’ll need to find it through a search engine because it does move around on the site.
Consult this guide if it isn’t obvious how to change a particular piece of VBScriptinto PowerShell.
www.it-ebooks.info

19Putting PowerShell and WMI to work
This final version uses the Get-WmiObject cmdlet directly. Get-WmiObject returns anobject for each process, and you use the PowerShell pipeline to pass them into a Format-Table cmdlet. This combines the data selection and display functionality you saw earlierand produces neatly formatted tabular output. If you wanted the output in a list format,as in the previous two examples, you could substitute Format-List for Format-Table.
In these simple examples, you’ve progressed from a VBScript that requires a largeamount of manual formatting to a one-line PowerShell version that does the format-ting automatically. The final PowerShell version is small enough that you could type itand run it directly from the command line if required. But a better solution is to turnit into a script, or function, that can accept a machine name as a parameter, and youcan use that across your server estate. You’ll learn how to do this in chapters 2 and 3.
So far, the examples in this chapter have focused on day-to-day tasks we face asWindows administrators. We’ll close the chapter with a couple of examples showinghow PowerShell and WMI can help with some of the bigger tasks we might be asked toperform on a less frequent basis.
1.6 Putting PowerShell and WMI to workThe two examples we’ll look at in this section are things that you may not need to per-form on a frequent basis, but they’ll involve a lot of work if you have to do them manually.
The first example involves shutting down all the Windows machines in your datacenter. This isn’t an everyday task, but as an example of the power of PowerShell andWMI, it’s difficult to beat.
The second example involves auditing a large number of machines to discovertheir capabilities. This can be especially useful when starting a new role or if you’reperforming any kind of investigation. In many cases you may have the base informa-tion but need other data to complete your knowledge. The techniques we develop inlater chapters will build on this example.
Could you achieve these results without PowerShell and WMI? Yes, but it would notbe as easy or efficient. You could shut down all the machines in your environment in afew different ways:
■ Physically visiting each machine■ Using a remote desktop utility to access each system and shut it down■ Accessing an “out of band” management card in the server and forcing a shutdown■ Creating a script in another language to access a utility that forces a shutdown
All but the last one involve shutting down the system manually. That may be accept-able for a handful of servers, but not for tens or hundreds of machines.
Auditing can be achieved with a number of utilities, but they involve extraexpense, infrastructure, and a learning curve. If you have PowerShell, WMI, and thisbook, you can perform these tasks for a fraction of the cost and time required to setup alternative systems.
Now, how can you shut down that data center?
www.it-ebooks.info

20 CHAPTER 1 Solving administrative challenges
1.6.1 Example 1: Shutting down a data center
Shutting down a data center isn’t something that you want to do every day. At least, itisn’t if you want to keep your job. But there are times when it’s necessary, such as ifthere will be major work on the power supplies or air conditioning systems and itwould be safer to have all the systems offline.
I first used this technique when I had to shut down all of the servers in a data centerbecause we were moving them to a different location. Instead of having to travel 150miles to supervise the shutdown, I did it all remotely and closed the gateway machinesas I exited the environment.
NOTE I used this script on a regular basis to shut down the lab I used todevelop the scripts presented in this book.
The Win32_OperatingSystem class has a method called Win32Shutdown that can beused to stop all your machines, as shown in the next listing.
Import-Csv computers.csv |foreach { (Get-WmiObject -Class Win32_OperatingSystem ` -ComputerName $_.Computer ).Win32Shutdown(5)}
This script uses a CSV file called computers.csv, which contains a list of computernames. The version that I use to shut down my lab contains the following lines:
ComputerW08R2CS01W08R2CS02W08R2SQL08W08R2SQL08AWSS08DC02
The first line is a header, and each subsequent line has one computer name (com-puter names aren’t case sensitive). You can generate this file manually for a smallnumber of machines or create it with a script that queries Active Directory for a largerenvironment.
In some cases, you need to control the order in which machines shut down; forexample a front end SharePoint server should be closed down before the back enddatabase server. This is achieved by editing the order in which computer namesappear in the CSV file.
In listing 1.4, Import-Csv is used to read the CSV file. The contents are piped intoa ForEach-Object cmdlet (foreach is an alias). For each computer name that’spassed along the pipeline, you use Get-WmiObject and the Win32_OperatingSystemclass. The computer name is passed as $_.Computer, where the $_ symbol refers to thecurrent object on the pipeline and the Computer part comes from the CSV header.
Listing 1.4 Shut down a data center
www.it-ebooks.info

21Putting PowerShell and WMI to work
The Get-WmiObject is contained in parentheses, (), so you can treat it as an objecton which you can call the Win32Shutdown method. The value of 5 that’s passed to themethod forces a shutdown even if users are still logged on. This approach will be revis-ited in chapter 19 when we look at new ways to work with WMI in PowerShell v3.
In PowerShell v2, you could make this script even simpler by using the Stop-Computercmdlet instead of a WMI call. Other possible enhancements included pinging the serverprior to shutdown to ensure you can contact it and putting a delay between each machineyou shut down to ensure that linked servers don’t have problems.
The next example involves auditing servers. You can never have too much informa-tion about your servers’ configuration.
1.6.2 Example 2: Auditing hundreds of machines
This example shows how you can gather basic information from many machines. Youcould get this same level of data by connecting to each machine in turn, running utili-ties on the system to get the information, and then recording it, but that’s a lot ofwork for more than a few machines.
The audit should return the following information:
■ Server make and model■ CPU data (numbers, cores, logical processors, and speed)■ Memory■ Windows version and service pack level
You can use a number of WMI classes, as shown in the following listing, to accomplishthis task.
Import-Csv computers.csv | foreach { $system = "" | select Name, Make, Model, CPUs, Cores, LogProc, Speed, Memory, Windows, SP
$server = Get-WmiObject -Class Win32_ComputerSystem ` -ComputerName $_.Computer
$system.Name = $server.Name $system.Make = $server.Manufacturer $system.Model = $server.Model $system.Memory = $server.TotalPhysicalMemory $system.CPUs = $server.NumberOfProcessors
$cpu = Get-WmiObject -Class Win32_Processor ` -ComputerName $_.Computer | select -First 1
$system.Speed = $cpu.MaxClockSpeed
$os = Get-WmiObject -Class Win32_OperatingSystem ` -ComputerName $_.Computer
$system.Windows = $os.Caption
Listing 1.5 Computer audit
Computer listB
Create objectC
Computer systemD
ProcessorE
Operating system
F
www.it-ebooks.info

22 CHAPTER 1 Solving administrative challenges
$system.SP = $os.ServicePackMajorVersion
if (($os.Version -split "\.")[0] -ge 6) { $system.Cores = $cpu.NumberOfCores $system.LogProc = $cpu.NumberOfLogicalProcessors } else { $system.CPUs = "" $system.Cores = $server.NumberOfProcessors }
$system} |Format-Table -AutoSize -Wrap
As in listing 1.4, you again have a CSV file B that contains a list of computer names.This file is read using Import-Csv and the results are piped into foreach (an alias ofForEach-Object).
The easiest way to present the final data is in a table, so you need to create anobject C to hold the results. One method of creating such an object is to pipe anempty string, "", into a select statement with the names of the properties you wantthe object to have. Note that this only works for properties that are strings. There areother ways of creating objects, which you’ll see in later chapters.
Once you have your object, you can start gathering the data. The first data con-cerns the computer system itself, which you can find with the Win32_ComputerSystemclass D. Get-WmiObject is used, and the results are put into a variable. You can thenmap the required properties across to the object you’re using to store the results.
This process is repeated for CPU data E and operating system details F using theWin32_Processor and Win32_OperatingSystem classes respectively. You test the oper-ating system version:
■ If the major version number (the first part) is greater than or equal to 6, you’redealing with Windows Server 2008, Windows Vista, or later. In this case, the ver-sion of WMI will correctly return the number of cores and logical processors perphysical CPU so you can populate the fields.
■ If the major version number is less than 6, you’re dealing with WindowsServer 2003, Windows XP, or earlier, and you can only retrieve the total num-ber of cores, so you show that and remove the number of processors.
The differences between the output for the two types of operating system are shown inthe following output extract:
Make Model CPUs Cores LogProc Windows---- ----- ---- ----- ------- -------Dell Inc. PowerEdge 1950 2 2 2 Windows Server® 2008Dell Inc. PowerEdge R710 16 Windows(R) Server 2003Dell Inc. PowerEdge 1950 8 Windows(R) Server 2003
When your object is fully populated, you can pipe it into Format-Table G. The-Autosize parameter will control the width of the columns to best display them on
OutputG
www.it-ebooks.info
23Summary
screen, and the -Wrap parameter will cause any data that’s too long to fit in the col-umn to wrap onto multiple lines to ensure you see all of the results.
This script could be enhanced in a number of ways:
■ Ping the server to ensure it’s reachable■ Add further information, such as disks, installed applications, hotfixes, and
page file configuration■ Output the data to a file that could become the basis of your server documentation■ Add the data directly into a CMDB for configuration management
The first two points are covered in later chapters, whereas information on the secondtwo can be found in PowerShell in Practice (Manning 2010).
These two examples show what can be achieved with the right knowledge and afew lines of very simple code. I don’t know of any other combination of out-of-the-boxtools that performs so much work for so little effort. WMI really does put the powerin PowerShell.
1.7 SummaryAs Windows administrators, we’re under increasing pressure due to the rise in com-plexity of the environments we have to work in and the ever-rising costs of administra-tion. On the one hand, we’re being asked to take on more work and administrate asteadily increasing number of servers and applications. On the other hand, we’re fac-ing demands to cut costs.
The way out of this dilemma is to automate as much of our day-to-day work as pos-sible. In a Windows environment, the pairing of PowerShell and WMI provides anunmatched set of capabilities:
■ PowerShell is available on all currently supported Windows platforms exceptWindows Server 2008 Server Core.
■ PowerShell support is built into an increasing number of Microsoft and third-party applications.
■ WMI provides low-level access to hardware, operating systems, and applicationsenabling full lifecycle management.
■ The ability to work with remote systems simplifies administration and stretchesthe envelope of automation.
■ PowerShell enables WMI to be used much more easily and shortens the learningcurve to productive use of the technologies.
■ There is an existing body of knowledge regarding WMI that can be readilyadapted for use in PowerShell.
■ A thriving PowerShell community provides support for PowerShell and WMI usage.■ Both technologies will be available for the foreseeable future, ensuring that
your investment will continue to show returns.
In the next chapter, we’ll dive deeper into PowerShell to make sure you have all of thetools you need to get the most out of WMI.
www.it-ebooks.info

Using PowerShell
You saw in chapter 1 that automation is the key to reducing pressure on Windowsadministrators and that it will also reduce the cost of managing IT environments.PowerShell is my preferred automation platform because it’s available across theWindows environment, it’s built into major Microsoft applications, and it’s beingadopted by an increasing number of third-party vendors. It’s also the most power-ful shell and scripting language available on the Windows platform, as it can lever-age the .NET Framework.
In this chapter, we’ll turn our attention to PowerShell. We’ll focus on WMI inchapter 3. If you’re familiar with PowerShell, you can skip this chapter or treat it asa refresher. It will also introduce some of the aspects of my style of using Power-Shell and go over the terminology I’ll be using. My PowerShell style is to use fullnames for cmdlets and parameters. I don’t use aliases apart from the *object cmd-lets, and I keep the names and parameters of my functions in lowercase so I can
This chapter covers■ PowerShell cmdlets■ PowerShell and .NET■ PowerShell scripting language■ Creating PowerShell code for reuse
24
www.it-ebooks.info

25PowerShell in a nutshell
easily distinguish them. The full details of my coding style can be found in the “aboutthis book” section at the beginning of the book.
If you’re new to PowerShell this chapter, together with appendix A, will supplyenough information for you to understand and use the rest of this book. This chapterwill start by introducing PowerShell, explaining what it is and outlining its major fea-tures. The basic commands (cmdlets) will be explained and you’ll see how to linkthem using the PowerShell pipeline. This is where .NET brings its power to bear. You’lllearn how to use .NET directly, but just where you need to, because this is a book foradministrators rather than developers.
NOTE A full explanation of the PowerShell language can be found in BrucePayette’s Windows PowerShell in Action, second edition (Manning 2011). MyPowerShell in Practice (Manning 2010) supplies many practical examples ofadministering Microsoft environments with PowerShell.
All modern scripting languages have a number of structures that can be used to con-trol the scripts. These structures allow you to loop through the same commands anumber of times and branch to execute different parts of the script depending on theoutcome of a test. As you’ll see, looping is performed using the Do, For, and While key-words; branching capabilities are supplied by the If and Switch statements. Power-Shell also allows you to read from and write to files on your systems using the *-Csv,*-Content, and Out-File cmdlets. PowerShell is to a large degree self-describing, andit has a number of self-discovery mechanisms, including an extensive help system.
Using the PowerShell cmdlets from the command line will enable you to performa lot of tasks, but to get the most from this automation engine you need to be able toreuse the code you devise. This is where scripts and modules earn their keep. Theyprovide two mechanisms for storing your commands on disk so that you can use themas and when required without having to retype everything. Functions are a way of reus-ing code in scripts to make them more efficient, and they’re the basic building blocksof PowerShell modules. Scripts, functions, and modules will be examined in depth insection 2.7 of this chapter.
Administering a single machine is straightforward. Administering tens, hundreds, orthousands of machines requires the ability to work remotely. PowerShell supplies severalways to accomplish this. Some cmdlets have the ability to access remote machines, whichcan save you time and effort when working interactively. PowerShell v2 enables remoteadministration via the industry standard Web Services–Management protocols.
One thing administrators never have enough of is time. Multitasking is muchtalked about but difficult to deliver with command-line or GUI-based tools. PowerShelljobs allow you to run tasks in the background while you get on with other activities.The results are then ready for you to access when you’ve finished your other activities.
Let’s start our investigation by looking at PowerShell itself, and discussing just whatit does.
www.it-ebooks.info

26 CHAPTER 2 Using PowerShell
2.1 PowerShell in a nutshell Starting at the top, what does PowerShell give you for your money? Quite a lot,because it either comes as part of the operating system or it’s a free download. Power-Shell v1 became available for download in November 2006. PowerShell v2 is part ofthe default installation of Windows 7 and Windows Server 2008 R2, and it’s availableas a download for older versions of Windows.
When you start PowerShell, you’ll get a command prompt similar to the old DOSprompt. So what is special about PowerShell?
This is what you get:
■ A shell■ A set of command-line tools (cmdlets)■ A scripting language■ An automation engine that allows for remote access, asynchronous processing,
and integration between products
The shell is where things happen. It’s a basic window with a prompt where you cantype commands and get results. Shells have been available on operating systemsfor many years, and PowerShell is like other shells in that it allows you to do thingssuch as these:
■ Run PowerShell commands■ Run the standard Windows utilities, such as ipconfig or ping■ Work with the filesystem using standard commands■ Run Windows batch files (with some provisos around environmental variables)■ Run VBScripts
PowerShell gets more interesting when you move on and think about the command-line tools that ship with the product.
2.2 CmdletsPowerShell v2 ships with 236 command-line tools that are available as soon as it’sinstalled (this number rises significantly in PowerShell v3). These are called cmdlets (Ipronounce it as “command-lets,” but other pronunciations are available). A cmdletname consists of two words separated by a hyphen, such as Get-Process. The first partof the name is a verb, and the second part is a noun (which should be singular), whichmakes the cmdlet’s function easy to guess. For example, Get-Process will get informa-tion about the processes running on the local, or a remote, machine.
NOTE Not all PowerShell verbs are verbs in English. For example, New is aPowerShell verb; it’s equivalent to “create a new” in English.
A consistent naming standard helps discovery. The PowerShell team introduced astandard set of verbs in PowerShell v2, and they can be discovered using the command
www.it-ebooks.info

27Cmdlets
Get-Verb (which is a built-in function rather than a cmdlet). You can fetch a list of thecmdlets available in PowerShell using Get-Command:
Get-Command -CommandType cmdlet | group verb |sort count -Descending | select name -First 20
This command groups the results by the verb in the cmdlet name and sorts the verbson the number of occurrences (largest first). The top 20 verbs are then displayed, asshown in table 2.1.
Much of what you’ll be doing in this book can be accomplished with these verbs. Theprimary command in the preceding code example is Get-Command; the other com-mands are utility cmdlets that you’ll be seeing a lot in later chapters, so it’s worthunderstanding what they do.
2.2.1 Utility cmdlets
Utility cmdlets function as the glue that binds the working cmdlets together on thepipeline. They enable you to filter, sort, compare, and group data or even create newobjects. They provide a suite of utility actions that you need to be able to performwhen working with any data. PowerShell provides a set of such cmdlets that have theword object as their noun.
In many scripting languages you have to write these utilities yourself, but PowerShellsupplies them out of the box. They’re used so frequently that it’s worth getting to knowthem before we dive deeper into PowerShell. The utility cmdlets, together with theirpurposes, are listed in table 2.2. You may have noticed that the only utility cmdlet verbthat makes our top 20 list in table 2.1 is select. But if you change the previous scriptto discover the top 20 nouns, you’d see that object heads the list at number 1.
Table 2.1 Top 20 verbs used in PowerShell
Get Set New Remove
Out Export Invoke Write
Import Start Add Clear
Test Enable Stop Format
ConvertTo Disable Register Select
Table 2.2 Utility cmdlets, their aliases, and their purposes
Cmdlet Alias Purpose
Compare-Object compare, diff
Compares two sets of objects.
ForEach-Object foreach, % Performs an operation against each member of a set of input objects.
Group-Object group Groups objects that contain the same value for specified properties.
www.it-ebooks.info

28 CHAPTER 2 Using PowerShell
Aliases are explained in more detail in the next section, but for now notice that New-Object doesn’t have an alias and that some of the cmdlets have two possible aliases.
The code snippet in the previous section showed an example of using select,sort, and group. Their purposes are obvious from their names. Of the other utilitycmdlets, where and foreach will be used the most.
2.2.2 Where-Object
The Where-Object cmdlet is used as a filter in that only objects that meet its criteriaare passed along the pipeline. As an example, you can display the services running ona system like this:
Get-WmiObject -Class Win32_Service
An object is returned for each service and displayed in this format:
ExitCode : 1077Name : WinRMProcessId : 0StartMode : ManualState : StoppedStatus : OK
This is probably a bit more information than you need, so you can trim it down usingSelect-Object, like this:
Get-WmiObject -Class Win32_Service |select name, startmode, state
Measure-Object measure Calculates the numeric properties of objects, and the characters, words, and lines in string objects, such as files of text.
New-Object Creates an instance of a Microsoft .NET Framework or COM object.
Select-Object select Selects specified properties of an object or set of objects. It can also select unique objects from an array of objects, or it can select a specified number of objects from the beginning or end of an array of objects.
Sort-Object sort Sorts objects by property values.
Tee-Object tee Saves command output in a file or variable and displays it in the console. This functions exactly like a T junction on a road. The stem of the T is the pipeline. When it reaches the top, it splits into two and the object is duplicated and sent to the variable or file in one direction and along the pipeline in the other.
Where-Object where, ? Creates a filter that controls which objects will be passed along a command pipeline.
Table 2.2 Utility cmdlets, their aliases, and their purposes (continued)
Cmdlet Alias Purpose
www.it-ebooks.info

29Cmdlets
This time you get a nicely formatted table returned. At this point, you could sort onthe service state to put all of the running and all of the stopped services together, oralternatively you could use a filter:
Get-WmiObject -Class Win32_Service |select name, startmode, state |where {$_.state -eq "stopped"}
The objects are piped into a Where-Object cmdlet that has a filter of where{$_.state -eq "stopped"}.
The last code snippet could equally well be written as follows:
Get-WmiObject -Class Win32_Service |where {$_.state -eq "stopped"} |select name, startmode, state
If you’re performing this action over the network, it may be better to filter out theobjects that you don’t want to bring back first, in order to reduce network traffic.When working against a single machine it probably doesn’t matter, but against hun-dreds of machines, filtering as early as possible could improve performance.
SCRIPT BLOCK The code inside the braces, {}, is known as a script block. You’llsee other examples of script blocks throughout the book. A script block is acollection of statements or expressions that can be used as a single unit andthat can accept arguments and return values. Script blocks are most oftenused as filters or unnamed functions.
In this case, the script block is comparing the value of the state property of the objecton the pipeline (denoted by $_) to "stopped". If they’re equal, the object is passed;otherwise it’s filtered out.
When I ran this on the machine I’m using to write this book, I noticed that a cou-ple of services were set to automatically start but hadn’t actually started. This is a sce-nario that could potentially cause problems if it’s the Exchange or SQL Server servicethat’s behaving in this manner. A little extra work will give you this code snippet,which displays the status of services set to start automatically on a particular computer:
$computername = "."Get-WmiObject -Class Win32_Service -ComputerName $computername |where {$_.state -eq "stopped" -and $_.startmode -eq "auto"} |select name, startmode, state
The first line defines a variable to hold the computer name. In this case a period, ".",signifies the local machine (localhost or $env:COMPUTERNAME can also be used todenote the local system). By using the -ComputerName parameter, you can connect to aspecific computer rather than the default local machine. A second filter is added to thescript block to check whether the startmode is set to automatic. If both criteria are met,the object is displayed.
www.it-ebooks.info

30 CHAPTER 2 Using PowerShell
A few lines of PowerShell code have created a troubleshooting tool that you can useto test the state of important services on remote machines. In section 2.7, you’ll see howto use this code in a script or function that can take the computer name as a parameter.
2.2.3 Foreach-Object
The other utility cmdlet we need to consider is ForEach-Object. This performs one ormore commands contained in a script block on each object on the pipeline. Forinstance, you could modify the previous code snippet to this:
$computername = "."Get-WmiObject -Class Win32_Service -ComputerName $computername |where {$_.state -eq "stopped" -and $_.startmode -eq "auto"} |foreach { $_.StartService()}
The select statement has been dropped, and once you’ve filtered down to the ser-vices that you think should be started based on their start mode, you can use ForEach-Object to call the StartService method of the service object. WMI will provide areturn code of 0 if the action was successful. Any other value means something wentwrong, and you’ll need to investigate. In chapter 4 you’ll see how to test the returncode in your scripts to detect errors and problems.
We’ve been discussing the utility cmdlets using their full names, but in the codesnippets the alias has been used. Aliases have a place in your PowerShell usage, butyou need to understand what they are and when you should and shouldn’t use them.
2.2.4 Aliases
A PowerShell alias is a shortcut name for a command. The command can be a cmdletor a function (you’ll learn about functions later in the chapter when we look at codereuse). Table 2.2, earlier in this chapter, listed the aliases for the utility cmdlets. A listof currently defined aliases can be obtained by using Get-Alias.
Data filteringIn the snippet we’ve been considering it doesn’t matter if you perform the select orthe filtering first, because all you’re interested in is the data. In some cases, though,it will matter—especially if you’re filtering a small number of results out of a largeamount of data.
In most cases, it’s best to assume that your scripts will have optimum performanceif the data filtering is performed as soon as possible. This is very definitely true whenyou’re returning data from a remote server. This topic is discussed further in chapter 4.
PowerShell always returns objects. Using Select-Object trims the object to onlythose properties of interest. If the full object is required for further use, such as toaccess a method, you’ll need to use a different technique. One possible solution ispresented in section 2.2.3.
www.it-ebooks.info

31Cmdlets
You can reproduce the list in table 2.2 by filtering using Where-Object (alias where).
Get-Alias | where {$_.definition -like "*object"} |Format-Table Name, Definition -AutoSize
You use where to filter on the definition of the alias, and only return those objects thathave a definition ending in the characters “object”.
Other cmdlets are available for working with aliases:
Get-Command *alias | select name
Name----Export-AliasGet-AliasImport-AliasNew-AliasSet-Alias
If you’re thinking there’s gap in this list, you’re right. There’s no cmdlet to deletealiases. But there’s a way round this, as you’ll see shortly.
The import and export commands are for reading and writing the alias informa-tion to a file so you can reuse it in other PowerShell sessions. Unless you do this, oryou set the alias in your profile, it’s lost when you close PowerShell.
NOTE Profiles are PowerShell scripts that run when you start PowerShell. Usethe command Get-Help about_profiles for more details.
You can create an alias in two ways:
New-Alias -Name filter -Value Where-ObjectSet-Alias -Name sieve -Value Where-Object
You can confirm the creation with the code snippet you used earlier to list the aliasesof the utility cmdlets. You can also substitute your new alias into the snippet:
Get-Alias | filter {$_.definition -like "*object"} |Format-table Name, Definition -AutoSize
Using sieve works just as well!
Alias problemsOne of the main problems with custom aliases is that they’re not necessarily avail-able to other users. For example, suppose you’ve just created a new alias for Where-Object. If you prefer using that to the standard aliases, you could make it permanenton your system by adding the definition to your PowerShell profile.
You might later want to share your scripts with work colleagues, but if they don’t havethe alias defined in their profile, the script will fail. An even worse scenario occurs ifthey have the same alias but it’s defined as something else. The best case outcomeis that the script just fails, but it’s possible that data will be lost or corrupted. Theworst case scenario is that the system is severely damaged and needs rebuilding andthe data needs restoring.
www.it-ebooks.info

32 CHAPTER 2 Using PowerShell
Set-Alias can change an alias if required, but deleting an alias can be a little tricky.The defined aliases in a PowerShell session are exposed as the alias: drive, whichmeans you can view them like this:
"filter", "sieve" | foreach {dir alias:\$_}
This will display your two aliases, and you can adapt it to delete them:
"filter", "sieve" | foreach {Remove-Item alias:\$_}
Checking the alias drive for your two aliases will now show that they’re no longer present.
Cmdlets provide the components that do things for you, but as you’ve seen in theexamples so far, you can get more out of them when you link them on the PowerShellpipeline.
2.3 PipelineA lot is made of the PowerShell pipeline. Administrators who have used UNIX or DOSmay say, “Oh yeah. We’ve had pipelines for years.” Not like this one, you haven’t.
(continued)You can test the effect of not having an alias defined by copying the snippet that usesthe new alias into a new PowerShell window and trying to run it. You’ll be told thatthe alias isn’t recognized. Note that if you have defined the alias in your profile, youwould need to use powershell.exe -noprofile before you test your snippet.
The other problem with aliases is readability. Our original code,
Get-Alias | filter {$_.definition -like "*object"} |Format-table Name, Definition -AutoSize
is much more readable than this:
gal | ? {$_.definition -like "*obj*"} | ft name, definition -a
The bottom line is that aliases are fine at the command line, but don’t publish codeusing them and don’t include them in scripts.
PowerShell drivesPowerShell exposes a number of data stores as if they were part of the filesystem.You can navigate them like a filesystem drive and use the *-Item and *-ItemPropertycmdlets in the same way you would against the filesystem.
The list of installed PowerShell drives can be found using Get-PSDrive.
For more information, see the help:
■ Get-Help about_Providers■ Get-Help Get-PSdrive■ Help files for individual providers
www.it-ebooks.info

33Pipeline
The big difference is that DOS and UNIX commands produce (emit) text, whereasPowerShell cmdlets emit .NET objects. You’re passing .NET objects along the Power-Shell pipeline. This gives you access to all of the methods on those objects, which mas-sively increases the things you can do.
When we started discussing cmdlets in section 2.1.1, we used this piece of PowerShell:
Get-Command -CommandType cmdlet | group verb |sort count -Descending | select name -First 20
This has a number of cmdlets linked on the pipeline. The | symbol is the pipe symbol,as in other shells. Figure 2.1 shows this pipeline as a process diagram.
The starting point is a request for a list of the cmdlets, which is implemented byGet-Command. The -CommandType parameter restricts the returned data to cmdlets.
The next step in the process is to group the cmdlets by verb. The grouped informa-tion is passed to the Sort-Object cmdlet, where the groups are sorted by count,which is the number of cmdlets in each group. They’re sorted in descending order sothat the groups with the largest number of cmdlets are at the top of the list.
The final action in this pipeline is to select the first 20 results passed by the sortingaction and pick off their names.
TIP Always think of the pipeline as a set of processes being applied in thisway. If you start at the top and work through each stage, it will soon becomesecond nature to unravel complex-looking PowerShell statements.
The pipeline is a way to link PowerShell cmdlets together to create a series of actionswhere the sum is very definitely greater than the parts. I refer to PowerShell snippetslike the one in the previous example as scripts. If I’ve saved it to a file with a .ps1extension, it’s definitely a script. There are people who will argue that when you type
Figure 2.1 A process diagram of the PowerShell pipeline at work
www.it-ebooks.info

34 CHAPTER 2 Using PowerShell
them at the prompt they aren’t scripts. But until someone comes up with a bettername that everyone accepts, I’ll keep calling them scripts.
We’ve stated several times that the PowerShell cmdlets emit .NET objects. Theexample in this section used properties of those objects to help in the processing. It’sabout time we had a closer look at .NET itself.
2.4 .NET for administratorsPowerShell is based on .NET. It makes extensive use of .NET under the covers, and asyou saw in the previous section, pipeline processing is one way to work with those .NETobjects. But this doesn’t mean that you have to become a .NET developer in order touse PowerShell. It’s possible to use the PowerShell cmdlets and language without delv-ing into the murky depths of .NET code. The objective is to know enough to under-stand any scripts you may come across that use .NET classes directly.
PowerShell uses .NET objects, so your first task is to understand objects.
2.4.1 Objects
According to Bruce Payette (lead developer on the PowerShell team), “an object is apackage that contains both data and the information on how to use that data” (Win-dows PowerShell in Action, p 11).
What this means is that an object is a thing, such as a process. It has a bunch of attri-butes, which are pieces of data (a name, an amount of CPU usage, or the number of han-dles used by the process). You can also do stuff to the thing, such as terminating a process.
Congratulations! You now know all that you need to know about objects to usethem in PowerShell. However, there is a tiny complication in the way that PowerShellactually works with .NET objects.
2.4.2 PowerShell objects
PowerShell complicates things sometimes because it doesn’t always work with pure.NET objects. Here are some examples:
■ The .NET objects for Active Directory entities, such as users, have the VBScripttype methods, but they aren’t visible using Get-Member, which is a cmdlet youcan use to discover information about objects (it’s aliased as gm).
■ PowerShell puts a wrapper around .NET objects. Sometimes properties andmethods can be added or removed. The pure .NET object can be accessed byusing a .psbase suffix. You’ll see examples of this in later chapters.
You’ve seen how to access .NET objects created by cmdlets, but is there a way to createyour own objects?
2.4.3 Creating .NET objects
I’m really glad you asked that question, because there’s an easy way to create .NETobjects. Back in table 2.1 there was a cmdlet called New-Object. That’s what you usefor creating objects.
www.it-ebooks.info

35.NET for administrators
Let’s assume you want to work with some (pseudo) random numbers:
$rand = New-Object -TypeName System.Random -ArgumentList 42$rand.Next()
It probably doesn’t seem obvious, but this statement uses the New-Object cmdlet tocreate an object that’s stored in the $rand variable. You use the System.Random .NETclass to define the type of object you want to create, and you provide a value of 42 tothe object, which acts as a seed value to the calculation of the random numbers. Usingdifferent seed values each time prevents a repetition of the numbers generated. Fulldetails of the random class can be found on MSDN—search for System.Random.
NOTE PowerShell v2 has its own cmdlet for generating random numbers,Get-Random, but this is a nice simple example of using a .NET object.
As a test, you can use the Next method. This will generate a random number. Com-puters can’t generate true random numbers, so I would expect your first answer tobe 1434747710.
Using the standard .NET objects will satisfy many of your needs, but sometimesyou’ll need to create a brand new object of your very own.
2.4.4 Creating your own objects
You have three ways to create new objects that you’ve designed:
■ Use the select method you saw in listing 1.5 in chapter 1.■ Use New-Object and the PSObject class.■ Create a new .NET class using C#.
Here’s a recap of the first and simplest method:
$myobject = "" | select name, number, description$myobject.Name = "Object1"$myobject.Number = 100$myobject.Description = "Simplest object creation"
If you run this code, you’ll create an object called myobject that has three properties.The properties have the values defined in the script, which you can verify using$myobject | gm.
The drawback to this method is that the resultant object is a string, as are all of itsproperties. Technically, it’s a Selected.System.String, but for all practical purposesit’s a string.
The second method is a bit cleverer and uses New-Object:
$myobject = New-Object System.Management.Automation.PSObject |Add-Member -MemberType NoteProperty -Name "Name" ` -Value "object2" -PassThru |Add-Member -MemberType NoteProperty -Name "Number" ` -Value 100 -PassThru |Add-Member -MemberType NoteProperty -Name "Description" ` -Value "More complicated" -PassThru
www.it-ebooks.info

36 CHAPTER 2 Using PowerShell
This approach uses System.Management.Automation.PSObject to create an object.The Add-Member cmdlet is used to add the properties. This allows you to use the Pow-erShell pipeline, but it still involves a reasonable amount of typing. It’s easy to make amistake in all of the Add-Member statements. The Number property will take an integertype, but if you decide to change that property to a string value, PowerShell will acceptit. That could lead to problems further on in your script.
NOTE If you only want to add one or two extra properties to an existingobject, such as a process object from Get-Process, using Add-Member is agood way to proceed.
You can simplify the second method slightly by using New-Object PSObject ratherthan the full .NET class name, but the other issues remain. It’s possible to simplify theprevious snippet like this:
$myobject = New-Object PSObject -Property @{ Name = "object2a" Number= 100 Description = "More complicated"}
In this example, the Property parameter is used. It’s a hash table of property namesand values that are applied to the object as it’s created. Some PowerShell users don’tlike this method, as the order of the parameters on the object can’t be guaranteedbecause you’re using a hash table.
The final method is to create a new object using a piece of C# code. This is anadvanced technique, and if you’re shuddering after reading it don’t worry. It will beused in some scripts presented in later chapters, so by the end of the book you’ll havea good idea how it works.
The following listing shows how you can convert the previous code snippet to cre-ate the object using C#.
$source = @"public class pawobject { public string Description { get; set;} public string Name { get; set;} public int Number { get; set;} } "@
Add-Type $source -Language CSharpVersion3
$myobject = New-Object -TypeName pawobject -Property @{ Name = "myobject3"; Number = 200; Description = "More complicated again" }
Listing 2.1 Object creation
C# codeb
Create class
C
Create objectD
www.it-ebooks.info

37PowerShell scripting language
The starting point for this adventure is a here-string (a multilined string that can beused to embed chunks of text into your script), $source, that holds your C# code B.The here-string starts with @" and ends with "@. The first line states that you want tocreate a new class called pawobject (PowerShell and WMI object, in case you’re won-dering). A class can be thought of as a template that you use to create an object. Thethree properties, Name, Number, and Description are defined, providing their names,data types, and whether they can be modified (get is used to read the property, andset is used to change the value of the property—I usually define both).
Add-Type, which is only available in PowerShell v2, and above, is then used to com-pile the class c. The class is created and held in memory ready for you to use whenrequired.
NOTE Listing 2.1 uses C# version 3, which allows for simpler C# code. Believeme, this is simplified! If earlier versions of C# are used, the code is muchmore verbose and involves defining variables that are only used inside the.NET class.
Now you’re getting back to familiar territory. The class you created is used in New-Object to give you an object you can work with in PowerShell d. One nice feature ofworking this way is that you can define the properties of the object when you create it.This saves a bit of typing and looks impressive.
The main advantage of using this method is that the properties become stronglytyped, which is developer-speak for saying that the Number property will only acceptinteger values and the Name and Description properties will only accept values thatare strings or that can be converted to strings.
Objects are one of the keys to PowerShell. Once you understand that everything istreated as an object, it makes a lot more sense. As well as working with objects, you needto be able to create them. This is especially important when you combine data from anumber of sources and want to output a single object. You’ll be working with objects forthe rest of the book, so this will be second nature by the time you’re finished.
That’s all I want to say about objects, and it’s probably all you want to read aboutthem for now, so let’s move on and have a look at the features of the PowerShell script-ing language.
2.5 PowerShell scripting languageIn section 2.1, I said that PowerShell consists of four things: a shell, the command-linetools, a scripting language, and an automation engine. We’ve looked at the shell andthe command-line tools (cmdlets); it’s now time to look at the scripting language.
The PowerShell scripting language is the framework that binds the cmdlets,objects, and pipelines together. Two types of constructs—loops and branches—pro-vide the majority of the framework structure. Loops and branches handle data insidethe script, but scripts can’t exist in isolation. You need to provide input so the scripthas data to work with, and you need to be able to access the output and save it to disk.
www.it-ebooks.info

38 CHAPTER 2 Using PowerShell
NOTE I’ll assume in this section that you have sufficient scripting backgroundto be familiar with terms such as array and variable. If not, appendix A providesa brief introduction, but reading my PowerShell in Practice and Bruce Payette’sWindows PowerShell in Action, second edition, is highly recommended.
Data input and output are important parts of any computer-based processing. Thereare a number of cmdlets that perform input and output, and when they’re combinedwith other cmdlets and the scripting language they put the power into PowerShell.
We’ll start by looking at the different ways you can create loops in PowerShell.
TIP In many cases, PowerShell provides multiple methods of solving a partic-ular problem. I’ll present the ways that I think work best. If you find anotherway of doing things that you prefer, then by all means substitute it for what Ido. The PowerShell language is based on the C# syntax, but unlike C# it’s caseinsensitive. You’ll see that demonstrated with my deliberately liberal view ofthe use of case in the PowerShell scripts later in the book.
2.5.1 Loops
You use a loop when you want to perform the same action a number of times. You’vealready seen one type of loop, in the shape of the ForEach-Object cmdlet, in sec-tion 2.2.1. There’s also a foreach loop using a PowerShell keyword, and there arethe usual for, do, and while types of loop structures. Foreach is the most confusing,so we’ll get that one settled first.
FOREACH
The two flavors of the foreach statement can create confusion, but they can be distin-guished because one is never part of a pipeline (the foreach keyword) whereas theother is always on the pipeline (foreach as an alias of ForEach-Object).
When you use the foreach keyword, you can write your script like this:
$lower = "a","b","c","d"foreach ($letter in $lower){Write-Host $letter.ToUpper()}
An array (collection) of letters is defined. For each letter in the collection, you con-vert the letter to uppercase and use Write-Host to write it to the screen. This gives adisplay similar to that shown in figure 2.2.
Figure 2.2 Use of a foreach keyword statement
www.it-ebooks.info

39PowerShell scripting language
You can also use the foreach alias on the pipeline, as you’ve seen. In this exampleyou’re using the ForEach-Object cmdlet:
"a","b","c","d" | foreach {Write-Host $_.ToUpper()}
This is illustrated in figure 2.3. In this case you’re piping the array of letters into the ForEach-Object cmdlet
(using its foreach alias). You don’t need the ($letter in $lower) structure becauseit’s implicit in the use of the pipeline. The other difference is that you use $_ to repre-sent the current object on the pipeline, which is the individual letters.
Both constructions give the same result. If foreach is on the pipeline, it’s an aliasfor the ForEach-Object cmdlet. If foreach is followed by a ($letter in $lower) typeof structure, it’s a language statement.
FOR LOOP
A for loop is a simple counting loop that’s present in most languages. You can turnthe previous looping example into a for loop like this:
for ($i=65; $i -le 68; $i++){Write-Host $([char]$i)}
You define a variable, $i, to have a value of 65, and you define a limit where $i is lessthan or equal to 68. Starting at 65, you convert the value of $i into a character (usingASCII codes) and write it out. The value of $i is incremented until it reaches the limit.This will produce the same results as in figures 2.2 and 2.3.
As an example of PowerShell versatility, you could rewrite this loop as follows:
65..68 | foreach {Write-Host $([char]$_)}
The .. or range operator is used to define a range of numbers. You pipe that range ofnumbers into a ForEach-Object cmdlet and display the character as before.
This isn’t the end of the looping story for PowerShell though.
OTHER LOOPS
There are two other loop formats available in PowerShell. The first of these is the while loop, which takes the following structure:
while (<condition>) { < PowerShell code>}
Figure 2.3 Use of a foreach alias
www.it-ebooks.info

40 CHAPTER 2 Using PowerShell
This reads as “while this condition is true, execute the following code.” The other alternative is a do loop, with this syntax:
do { < PowerShell code>} until (<condition>)
This one performs the condition checking at the end of the script block, rather thanbefore it executes.
You won’t see these loops in action in the scripts later in the book because theseparticular styles of loops aren’t required in the tasks we’ll be investigating. I’ve onlymentioned them here for completeness. Their full details can be found using thesehelp commands:
Get-Help about_WhileGet-Help about_Do
That’s about it for loops. We’ll now branch out a bit and look at how to make deci-sions in PowerShell.
2.5.2 Branching
There will be many occasions where you’ll run one batch of code if a particular condi-tion is met, and otherwise you’ll do something else. This decision-making process iscalled branching.
PowerShell provides two ways of making decisions. If you have one or a small num-ber of possible outcomes, you can use an if statement. For the occasions when youhave a larger number of potential outcomes, PowerShell offers the switch statement.
IF STATEMENT
An if statement has a simple structure that can be read as, “if this statement is true thendo the commands in the following script block.” Here’s a straightforward example:
$date = Get-Dateif ($date.DayOfWeek -eq "Friday"){ "The weekend starts tonight"}elseif ($date.DayOfWeek -eq "Saturday" -or ` $date.DayOfWeek -eq "Sunday"){"It's the weekend"}else {"Still working!"}
The first line gets the current date. You then compare the day of the week to Friday. Ifit’s Friday, you’re happy because it’s the end of the week, and the weekend startstonight. There’s an alternative that you want to check (elseif), just in case it’s a Sat-urday or Sunday, in which case you’re very happy because it’s the weekend. The finalchoice is a catchall (else), in case the condition isn’t true—in that case, you’re still inthe middle of the week and are possibly unhappy about it.
NOTE One thing to notice in the preceding example is that it doesn’t use acmdlet to write the data to screen. If you have a string all by itself on a line,PowerShell will treat it as something you want to output and will write it to thescreen or whatever output mechanism you’ve defined.
www.it-ebooks.info

41PowerShell scripting language
This works very well for a small number of choices, but if you want to extend yourchoices and check for every day of the week, it would be more efficient to switch toanother code structure.
SWITCH STATEMENT
The switch statement is used when you have more choices than can be sensibly man-aged using if statements. You can nest if statements, and it does work, but it’s hard toread and can be very hard to maintain. You don’t want to go looking for work—theidea is to reduce your workload.
A switch statement defines a statement or variable to check and then a number ofpossible outcomes. You can modify the previous example to use a switch statementinstead:
switch ( (Get-Date).DayOfWeek ) { "Sunday" {"It’s the weekend but work tomorrow"; break} "Monday" {"Back to work"; break} "Tuesday" {"Long time until Friday"; break} "Wednesday" {"Half way through the week"; break} "Thursday" {"Friday tomorrow"; break} "Friday" {"It’s the weekend tomorrow"; break} "Saturday" {"It’s the weekend"; break} default {"Something's gone wrong"}}
Here, you find the current day of the week and compare it to the possible outcomes.When one matches, you print out the message and use the break command to skipfurther processing in the switch statement. The default statement is there to catchany values that don’t match one of the defined values—in that case you print a mes-sage to say something has gone wrong because you don’t recognize the day of theweek as reported by Get-Date. The scripts in later chapters will provide many exam-ples of using if and switch statements.
In many cases, your scripts will need to have some kind of input and output. Thismeans that you don’t need to keep typing in data and that you can save results for fur-ther investigation.
2.5.3 Input and output
Input and output can be broken down into three main areas:
■ Writing to the screen and accepting data typed in response to a prompt■ Writing to or reading from a file on disk■ Writing to or reading from a specialized data store, such as Active Directory, the
registry, or SQL Server.
There are a number of input and output cmdlets you can use, as detailed in table 2.3.You’ve seen some of these cmdlets in action already, and you’ll meet more of them inlater examples.
www.it-ebooks.info

42 CHAPTER 2 Using PowerShell
This table is provided for reference. You’ll learn how to use these cmdlets in thescripts in later chapters. If you want to learn more about a particular cmdlet right now,PowerShell’s help system is available for just that purpose.
2.6 Finding helpPowerShell, like all good computer systems, has a way of supplying help to the user.The help information is contained in a series of XML files that are found in thePowerShell install folder, but don’t worry about it being XML—PowerShell providesthe Get-Help cmdlet to read it with, so you don’t have to work out how to do so your-self. In addition, there’s the Get-Command cmdlet for working with commands (includ-ing non-PowerShell commands) and Get-Member for investigating the objects thatPowerShell uses.
The final part of the help system is the PowerShell community. This is an internet-based group of individuals who commit a lot of time and effort to helping others withPowerShell problems.
As with all IT products, the best place to start is with the help system.
Table 2.3 Common cmdlets that provide input and output functionality
Screen Files Specialized
Write-Host Out-File Write-Debug
Read-Host Export-Csv Write-Error
Out-Host Import-Csv Write-EventLog
Out-GridView ConvertFrom-Csv Write-Progress
Write-Output ConvertTo-Csv Write-Verbose
Add-Content Write-Warning
Clear-Content
Get-Content
Set-Content
XML support in PowerShellI’m deliberately ignoring XML in this section, as I don’t intend to use it in most of thescripts in the book. XML will be used in chapters 18 and 19 in a very specialized use.PowerShell has good XML support; for instance, it’s used in the background whenyou use PowerShell remoting, but you see the results not the XML.
The full range of XML support can be seen by following the links obtained from thiscommand: Get-Help xml.
www.it-ebooks.info

43Finding help
2.6.1 Get-Help
You’ve seen that PowerShell uses a verb-noun convention for cmdlets. The obviousname for the cmdlet that reads help files is Get-Help. No aliases are defined for thiscmdlet by default, but a built-in function called Help is available.
The function definition can be viewed in this way:
(Get-Item -Path function:\help).Definition
The working part of the function is the line
Get-Help @PSBoundParameters | more
which pipes the output of the Get-Help cmdlet into more, which produces a paged dis-play. An alias, man, is defined on this function.
The standard way to use Get-Help is to follow it with the name of the cmdlet youwant help for:
Get-Help Get-Command
This will supply basic help about the cmdlet, including a description and a basic viewof the syntax. At the end of the display is a REMARKS section that takes this form:
REMARKS To see the examples, type: "get-help Get-Command -examples". For more information, type: "get-help Get-Command -detailed". For technical information, type: "get-help Get-Command -full".
I tend to use the -Full option as a matter of course, because I usually want to dig intothe individual parameters to solve a problem or discover how to get something towork. Using Get-Help Get-Help -Full will give you the full information on using thehelp system.
One innovation in PowerShell v2 is that you can get access to online PowerShellhelp. This is useful because the PowerShell team corrects documentation bugs online,so this gives you access to the latest version. (In PowerShell v3, your local help files willbe updateable.) If you want to see any changes, use this command:
Get-Help Get-Command -Online
Your browser will be opened at the appropriate TechNet page, providing access to thelatest version of the documentation.
In addition to the information available about cmdlets, there’s also a set of helpfiles that give conceptual information about PowerShell. They cover specific languagefeatures, such as loops, or PowerShell features such as remoting. The range of helpavailable in this category can also be viewed using Get-Help:
Get-Help about*
Text-based help files are good for quick lookups, but they’re not very good forbrowsing. Graphical help files are available as a download from the TechNet ScriptCenter for PowerShell v1 or as part of PowerShell ISE in v2. An updated CHM file for
www.it-ebooks.info

44 CHAPTER 2 Using PowerShell
PowerShell v2 is available for download from Microsoft. Details can be found at http://blogs.msdn.com/b/powershell/—click the “Help file” tag.
2.6.2 Get-Command
Get-Command is another cmdlet that supplies information, though it focuses on thetypes of commands available on the system. Get-Help is restricted to supplying infor-mation from the help system, but Get-Command can look beyond PowerShell. As anexample try running this:
Get-Command ipconfig | fl *
This will display information about the utility, including its path and version. The difference between the PowerShell-related information returned by Get-Help
and Get-Command can be illustrated by comparing the information supplied in theirrespective synopses:
SYNOPSIS - Get-Help Displays information about Windows PowerShell commands and concepts.
SYNOPSIS - Get-Command Gets basic information about cmdlets and other elements of Windows PowerShell commands.
Get-Help will tell you how to use a particular command, but Get-Command will discoverwhat commands are available.
If you type Get-Command *wmi*, you’ll find a long list of cmdlets, aliases, andapplications is returned. If you just want to see the WMI cmdlets, you can use thiscommand:
Get-Command *wmi* -CommandType cmdlet | select name
Name----Get-WmiObjectInvoke-WmiMethodRegister-WmiEventRemove-WmiObjectSet-WmiInstance
By the end of the book, you’ll know a lot about working with these cmdlets. The other use for Get-Command is finding the cmdlets that are loaded by a particu-
lar PowerShell snap-in or module:
Get-Command -Module BitsTransfer
You’ll learn more about snap-ins and modules in section 2.7.4. There are some other useful parameters to remember when using Get-Command:
■ -Syntax—Displays a syntax list for a cmdlet. Useful for checking a parametername or on parameter sets.
■ -Noun—Displays all cmdlets with a particular noun. Get-Command -Noun wmi* isan alternative to the code you used to find the WMI cmdlets earlier.
www.it-ebooks.info

45Finding help
■ -Verb—Displays all cmdlets with a particular verb. If you know you need to getsomething but can’t remember the noun, try Get-Command -Verb get.
■ -CommandType—Returns particular types of commands. Valid values are Alias,Application, Cmdlet, ExternalScript, Function, and Script.
So far we’ve looked at getting help about PowerShell itself. The other area we need toconsider is the objects you’re working on in your PowerShell scripts.
2.6.3 Get-Member
PowerShell is based on .NET and uses .NET objects, as you’ve seen. When you’re work-ing with objects, you need to be able to look at the object to determine what proper-ties and methods it has. This tells you what data the object holds and what you can dowith it.
One option is to go to the MSDN website and browse the .NET documentation forthe class used to create the object. But there are a couple of issues with this option:
■ You need to find the object’s type so you know which class to look up.■ It takes a long time.
A better way is to use the Get-Member cmdlet. The easiest way to use it is to pipe theobject you want to investigate into the cmdlet:
Get-Process powershell | Get-Member
The object under investigation in this example is a process object (restricted to thePowerShell process). The first thing it returns is the type:
TypeName: System.Diagnostics.Process
You then get a list of the properties and methods. A very abbreviated example of theoutput from the preceding example code is as follows:
Name MemberType Definition---- ---------- ----------Handles AliasProperty Handles = HandlecountName AliasProperty Name = ProcessNameOutputDataReceived Event System.Diagnostics...WaitForInputIdle Method bool WaitForInputIdle...__NounName NoteProperty System.String __NounName=ProcessBasePriority Property System.Int32 BasePriority {get;}Container Property System.ComponentModel..WorkingSet64 Property System.Int64 WorkingSet64 {get;}PSConfiguration PropertySet PSConfiguration {Name...PSResources PropertySet PSResources {Name..Company ScriptProperty System.Object Company...CPU ScriptProperty System.Object CPU...
This shows that a wide range of property types is available. Using the -MemberTypeparameter you can select the type of information to return. The full list of options isshown in table 2.4.
www.it-ebooks.info

46 CHAPTER 2 Using PowerShell
You can also view static methods by using the -Static parameter. By default, thesearen’t returned. Get-Member also allows you to view the base object. PowerShell wrapsobjects, and it sometimes adds or removes methods and properties, and the -Viewparameter enables you to peel off these layers.
You’ve now seen the help available in PowerShell itself, but there’s one othersource of help that deserves a mention.
2.6.4 PowerShell community
PowerShell has a very strong, active, and passionate community. Two areas where thecommunity excels are in answering questions on PowerShell forums and providingcode examples, either in specific code repositories or on blogs. These examples canbe very useful when you start writing your own code.
The heart of the PowerShell community is the PowerShell team members them-selves. They can be found in various places:
■ Posting on the team blog■ Answering questions on the Microsoft forums■ Providing code samples■ Commenting on blog posts by members of the community
Their participation can be intermittent, depending on their deadlines, but if you par-ticipate in the community long enough, you’ll come across them. If you’re ever luckyenough to be invited to a PowerShell community dinner at one of the major Microsoftconferences, you’ll certainly get a chance to meet them.
The PowerShell team is backed up by the PowerShell MVPs. There are just over 40of these individuals worldwide, and they’re recognized by Microsoft for their technicalexpertise in PowerShell and their passionate (fanatical?) devotion to the product.Between them they
■ Write blogs■ Write books and articles■ Create podcasts■ Answer questions on forums■ Maintain code repositories and other websites■ Run user groups■ Supply PowerShell code and functionality
Table 2.4 The options for
AliasProperty CodeProperty Property
NoteProperty ScriptProperty Properties
PropertySet Method CodeMethod
ScriptMethod Methods ParameterizedProperty
MemberSet Event All
www.it-ebooks.info

47Code reuse
They also make a lot of suggestions to the PowerShell team regarding new features forPowerShell and problems and bugs with the current version. They generally test it todestruction.
A third group is the vendors who build PowerShell into their products. In many cases,they offer free versions of PowerShell functionality from their websites. They also helppush the boundaries of PowerShell by extending its control to other platforms.
There are many people interested in PowerShell who interact with the three groupsalready mentioned. They range from newcomers to experienced users who want to knowmore. Many of them make contributions to various parts of the PowerShell community.
TIP I was a judge in the 2010 and 2011 Scripting Games organized by Microsoft(see their Script Center on TechNet). I was overwhelmed by the quality of someof the entries. People had really gone to town in creating production-quality code.These are superb learning exercises and they’re well worth studying for ideas.
The PowerShell community is continually growing in strength because of the numberof people who contribute. I strongly recommend getting involved. All you have to dois write some PowerShell code in a way that makes it reusable, as you’re about to learn.
2.7 Code reuseYou’ve now had an introduction to PowerShell’s scripting language and seen how it canbe used with the cmdlets. But so far we’ve just looked at working interactively at the Pow-erShell prompt. A lot of work can be done that way, but for the longer pieces of codeor functionality, you’ll want to reuse the code. That means you need a way to save yourPowerShell masterpieces. There are a number of editors that can be used to write andsave your PowerShell scripts, including those supplied with Windows and PowerShell.
NOTE I am deliberately excluding tools such as PowerGUI and PowerShellPlus from this discussion. Both products are excellent and have a role to playin hosting PowerShell code, but in this book I want to concentrate on produc-ing code with PowerShell and WMI.
Setting PowerShell’s execution policyPowerShell won’t allow you to run scripts when it’s first installed. This is by design—it’s a security policy designed to protect users from the execution of malicious code.
The ability to run scripts is controlled by the PowerShell execution policy, which youcan examine using Get-ExecutionPolicy. This will be set to Restricted for a newinstallation. I recommend you change it like this:
Set-ExecutionPolicy -ExecutionPolicy RemoteSigned
The remote-signed setting allows scripts to run from the local drive but expectsscripts on remote drives to be signed with a recognized code-signing certificate. Youwill need to be running PowerShell with elevated privileges (run as administrator).
I strongly recommend that you don’t use the Unrestricted execution policy setting.
www.it-ebooks.info

48 CHAPTER 2 Using PowerShell
After a quick look at the editor provided with PowerShell, we’ll focus on how to writescripts and functions. PowerShell v2 allows you to utilize a number of advanced capa-bilities in functions (they then become officially known as advanced functions). Thisenables your functions to work on the pipeline as first-class citizens alongside cmdlets.
PowerShell modules enable you to organize your code and load it into PowerShellvery efficiently. They also provide an excellent method of storing code in an easily acces-sible manner, especially once you’ve built up a sizeable library of scripts and functions.You can also unload a module when it’s no longer required, which allows maximumflexibility in your PowerShell configuration. PowerShell v3 modifies this behavior a lit-tle bit in that it will automatically load any module it finds on the module path.
But before you can do any of this good stuff, you need to be able to write the code,which means you need an editor.
2.7.1 Editors
There are a number of PowerShell editors available. I use several of them:
■ Notepad■ PowerShell ISE■ PowerGUI Script Editor■ PowerShell Plus
Other editors are available, but these are the ones I use and am familiar with. Theysupply the functionality I need in the way, more or less, that I want to use it. I haven’texamined all of the possible editors, and this isn’t meant as a definitive list.
Notepad is available on all versions of Windows, but it only supplies text editing.There’s no color syntax highlighting or PowerShell intelligence built into it. I findit very useful if I want to open a script and just read it. It has a fast response andlow overhead.
The other three editors all provide a development environment of some kind,which includes the following:
■ Editing capability with color highlighting and PowerShell intelligence■ Ability to run scripts within the environment■ Debugging features
I tend to use the PowerShell ISE most at the moment because it’s supplied with Power-Shell v2, so I know it will be available on whichever machine I am using. PowerShellISE isn’t installed by default on server operating systems, but it is an optional feature.
PowerGUI and PowerShell Plus need to be downloaded and installed. PowerGUI isa free tool from Quest, and PowerShell Plus is a commercial product from Idera.
The PowerShell ISE is illustrated in figure 2.4, showing the three main areas thateach of the editors possesses.
The top pane is an editing pane where scripts can be created. It’s possible to exe-cute the whole script or to highlight a part of the script and run just that. The middlepane is an interactive PowerShell prompt that works exactly like a normal PowerShell
www.it-ebooks.info

49Code reuse
console. The bottom pane shows the code that was run and the results. The position ofthe various panes can be changed to a certain degree. In PowerShell v3, the interactiveand result panes are combined into a single pane that mimics the PowerShell console.
You now know how to set your environment to run scripts, and you have an idea ofthe editors you can use. It’s time to actually create a script.
2.7.2 Scripts
A script is simply a text file of PowerShell commands that has a .ps1 extension. Thesame extension is used for PowerShell v1, v2, and v3. (There was some discussion dur-ing the beta process of having a different extension for PowerShell v2, but it neverhappened.)
As an example, let’s look at a script that discovers what disks are installed in yourcomputers. The following listing shows the script.
param ( [string]$computername = "localhost") Get-WmiObject -Class Win32_DiskDrive -ComputerName $computername |
Listing 2.2 Script to investigate physical disks
Figure 2.4 The PowerShell ISE
www.it-ebooks.info

50 CHAPTER 2 Using PowerShell
Format-List DeviceID, Status, Index, InterfaceType, Partitions, BytesPerSector, SectorsPerTrack, TracksPerCylinder, TotalHeads, TotalCylinders, TotalTracks, TotalSectors, @{Name="Disk Size (GB)"; Expression={"{0:F3}" -f $($_.Size/1GB)}}
The first line defines the input parameter for the script. You want a computer name,so to prevent any errors you define a default value of localhost. This means that ifyou don’t enter a computer name, the disks in the local system will be evaluated.
TIP In many WMI scripts, a period (.) Is substituted for localhost—bothrefer to the local machine. In a very few instances, however, these values cancause issues, so I will use $env:COMPUTERNAME in the bulk of the book. Allthree are valid as far as WMI is concerned.
The next step is to use Get-WmiObject to return the disk information for the selectedcomputer. You then pipe the results into Format-List, which selects the properties tobe displayed and recalculates the disk size in GB.
You can save this script into a file called Get-DiskInfo.ps1 (available in the codedownload). The script is run by typing the following:
.\Get-DiskInfo.ps1
The .\ is required if you’re in the directory containing the script. PowerShell doesn’tinclude the current folder on the path when searching for scripts. If the script is inanother folder, ensure that folder is on the search path or use the full path to the script.
NOTE It isn’t essential, but I tend to follow the PowerShell cmdlet namingconventions when naming scripts. PowerShell v2 will complain if you use averb that isn’t on the approved standard list.
Running the script in this manner produces a report for the local machine. To accessanother computer, you’d use something like this:
.\Get-DiskInfo.ps1 -computername "rslaptop01"
The parameter name you defined at the beginning of the script is used to pass thename of the machine to be investigated. You could leave the parameter name out, andPowerShell would assign your input to the computername parameter. One extra bonusis that tab completion works on the script name and parameter name.
I can guarantee that you’ll build up a large collection of scripts over time. Some ofthese you’ll want to run regularly, and some you’ll want to keep together for other rea-sons. One way of doing this is to use a script file that contains a library of functions.
2.7.3 Functions
In PowerShell, a function is a set of code (a script block) to which you give a name.When you type that name at the prompt or include it in a script, you call the function,which will then execute its code. Functions can be very advanced, to the point of act-ing like cmdlets written in PowerShell, as you’ll see later in the section.
www.it-ebooks.info

51Code reuse
You can produce a function from the script in listing 2.2. The body of code for thatscript becomes the function, and you can then wrap some code around it to read aCSV file of computer names and pass them to the function. This is shown in the follow-ing listing.
function get-disk {param ( [string]$computername = "$env:COMPUTERNAME") Get-WmiObject -Class Win32_DiskDrive -ComputerName $computername | Format-List DeviceID, Status, Index, InterfaceType, Partitions, BytesPerSector, SectorsPerTrack, TracksPerCylinder, TotalHeads, TotalCylinders, TotalTracks, TotalSectors, @{Name="Disk Size (GB)"; Expression={"{0:F3}" -f $($_.Size/1GB)}}}
Import-Csv computers2.csv | foreach {get-disk $_.computer}
This uses the previous code as a function within the script. A CSV file is used to inputthe computer names to the get-disk function.
An alternative method of using this code is to leave the last line of code out of thisscript and save it as listing2.3a.ps1. You can then run it as follows:
. .\Listing2.3a.ps1
It’s very important to note that there are two dots in the command. The first tells Pow-erShell to keep any functions or variables in memory, rather than discarding themafter execution. You’ll see this referred to as dot sourcing. Once the function has beenloaded into memory, you can use it as any other PowerShell command.
This means you can perform either of these actions at the prompt:
get-disk rslaptop01Import-Csv computers2.csv | foreach {get-disk $_.computer}
The function has become part of PowerShell, and you can use it from the prompt orinclude in your scripts if desired. You can load this function into PowerShell by includ-ing it in your profile or running as you did earlier.
NOTE You can use the filter command to use the function on the pipeline.This was a piece of PowerShell v1 functionality that has been superseded bythe advanced function capabilities introduced in PowerShell v2.
This is good, but it isn’t all you can do. You can make your function behave muchmore like a cmdlet. The following example will demonstrate how you can use thisfunctionality.
I don’t intend to discuss the full details of PowerShell’s advanced function capabil-ities, because I want to concentrate on WMI. More details can be found in these helpfiles:
Listing 2.3 Function to investigate physical disks
www.it-ebooks.info

52 CHAPTER 2 Using PowerShell
■ about_Functions■ about_Functions_Advanced■ about_Functions_Advanced_Methods■ about_Functions_Advanced_Parameters■ about_Functions_CmdletBindingAttribute
The books referenced in chapter 1 can also provide further information. In order to turn the function from listing 2.3 into an advanced function that can
behave like a cmdlet, you need to make the changes shown in the following listing.
function get-disk {[CmdletBinding()] param ( [Parameter(ValueFromPipelineByPropertyName=$true)] [string] [ValidateNotNullOrEmpty()] $computername)PROCESS { Write-Debug $computername Get-WmiObject -Class Win32_DiskDrive -ComputerName $computername | Format-List DeviceID, Status, Index, InterfaceType, Partitions, BytesPerSector, SectorsPerTrack, TracksPerCylinder, TotalHeads, TotalCylinders, TotalTracks, TotalSectors, @{Name="Disk Size (GB)"; Expression={"{0:F3}" -f $($_.Size/1GB)}}}}
The function starts with a name, as previously. The [CmdletBinding()] attribute Bis the clever piece that enables the function to behave like a cmdlet on the pipeline.It also provides access to the common parameters, such as debug (see Get-Help
about_CommonParameters). The other main alteration is that the parameter block gets a large number of
options, some of which are used on the parameter in this function. These options areused individually on each parameter, which can make the parameter block ratherlarge, but the functionality is worth the extra typing.
You can enable this parameter to accept input from the pipeline C. In this case,you’re accepting it by property name. There are a number of validation techniquesyou can apply to the parameter, including checking it against a range or set of values.In this case, you’re testing to see if it’s null or empty D. If it’s empty or null, an erroris thrown and the function isn’t executed.
The final change is to add some debugging capability to the function E. You canadd the -Debug parameter to your use of the cmdlet, and you’ll receive a printout ofthe computer name you’re working with.
The function is loaded by dot sourcing the PowerShell file containing the code:
PS> . .\Listing2.4.ps1
Listing 2.4 Advanced function to investigate physical disks
Act as cmdlet
BAccept pipeline input
C
Perform validationD
Specify debugging
E
www.it-ebooks.info

53Code reuse
After loading the function, you can try it without a computer name and it errors:
PS> get-diskGet-WmiObject : Cannot validate argument on parameter 'ComputerName'. The
argument is null or empty. Supply an Argument that is not null or empty and then try the command again.
Excellent. Another change you made was to add the -Debug parameter:
PS> get-disk rslaptop01 -DebugDEBUG: rslaptop01
ConfirmContinue with this operation?[Y] Yes [A] Yes to All [H] Halt Command [S] Suspend [?] Help (default is
"Y"): y
DeviceID : \\.\PHYSICALDRIVE0Status : OKIndex : 0InterfaceType : IDEPartitions : 3BytesPerSector : 512SectorsPerTrack : 63TracksPerCylinder : 255TotalHeads : 255TotalCylinders : 30401TotalTracks : 7752255TotalSectors : 488392065Disk Size (GB) : 232.883
As you can see, the value of the variable is output, and you’re also asked to confirmyour continuation.
The last change was to enable pipeline input. You can make this work as follows:
Import-Csv computers3.csv | get-disk
The objects that are imported from the CSV file are piped into the function, and youcan process a number of computers quite easily and simply.
Loading functions singly in this way is acceptable when you’re creating and testingthem, but it’s a painful process if you have many to load. In PowerShell v1, you couldput them into a library file and dot source that. PowerShell v2 supplies a superioralternative in the form of modules.
2.7.4 Modules
In PowerShell v1, you could extend PowerShell functionality by adding cmdlets via asnap-in. This method was used very successfully by Exchange 2007 and the Quest ADcmdlets, for instance. The one drawback to snap-ins is that they only allow for theaddition of compiled cmdlets. You have to write your cmdlet in C# or another .NETlanguage, compile it, and then install it. This isn’t a technique that most administra-tors wish to embrace.
A PowerShell v2 module can contain a DLL with cmdlets in the same way as a snap-in. More importantly, it can contain module files (which have a .psm1 extension);
www.it-ebooks.info

54 CHAPTER 2 Using PowerShell
these are PowerShell files containing a set of PowerShell functions. You now have away to load and unload PowerShell functionality very easily, and that functionality iscreated in PowerShell. This provides a way of organizing and delivering working code,and it’s well within the reach of PowerShell-using administrators. Modules of usefulfunctionality are also available from code repositories such as CodePlex. See, forexample, the PowerShell Admin Modules at http://psam.codeplex.com/. I knowthese are safe—I wrote them.
You can discover the modules installed in your system like this:
Get-Module -ListAvailable
Modules, by default, are installed in two locations, which are stored in the PSModule-Path environmental variable. The variable content consists of a number of folderpaths that are separated by semicolons. The -split operator can be used to make thevariable contents easier to read. On my system, I get this result:
PS> $env:psmodulepath -split ";"C:\Users\Richard\Documents\WindowsPowerShell\ModulesC:\Windows\system32\WindowsPowerShell\v1.0\Modules\
The first path is in my profile, and the second path is in the PowerShell installfolder. I also store the modules I’ve written in C:\Scripts\Modules. This is achieved byadding this line to my PowerShell profile:
$env:PSModulePath = "C:\Scripts\Modules;" + $env:PSModulePath
If you examine any of these locations, you’ll find a set of folders that match the mod-ule names. Each of these folders will contain a module file (.psm1), potentially a man-ifest file (.psd1, used to control which functions are visible and to ensure that anyprerequisites are loaded), and possibly a number of script files (.ps1). If the module issupplying compiled cmdlets, it will also contain one or more DLLs.
Deploying a module is simple. Just copy the folder containing the required filesinto a folder on your module path.
NOTE PowerShell v3 will, by default, automatically load all modules it findson the module path when the console or ISE is started.
The module can then be imported into PowerShell like this:
Import-Module BitsTransfer
This is one of the standard PowerShell modules. You can discover the functions orcmdlets it has loaded as follows:
PS> Get-Command -Module BitsTransfer | select name
Name----Add-BitsFileComplete-BitsTransferGet-BitsTransferRemove-BitsTransfer
www.it-ebooks.info

55PowerShell remoting
Resume-BitsTransferSet-BitsTransferStart-BitsTransferSuspend-BitsTransfer
These commands can be used in scripts or at the prompt. Once you’ve finished withthis task, you can remove the module:
Remove-Module BitsTransfer
Automating a process saves time and effort. In order to gain the maximum savings,you need to save the code you’ve produced so that you can reuse it. Scripts, functions,and modules are your tools for this task. Of the three, modules are the best way oforganizing your PowerShell functionality. They’re just one of the new features thatPowerShell v2 offers.
The most requested feature for PowerShell v2 was the ability to work with remotemachines.
2.8 PowerShell remotingThe examples we’ve discussed so far have been run against local, and in some casesremote, machines. An automation tool must be able to work easily and efficientlyagainst a number of remote machines or you won’t fully realize the benefits ofdeveloping scripts. There are a number of ways remote administration has been builtinto PowerShell:
■ Some cmdlets can access remote machines.■ PowerShell can use the WS-Management protocols to create remote PowerShell
sessions.■ You can access data directly through the WS-Management (WSMAN) cmdlets.■ PowerShell v3 allows you to use CIM sessions. These also use the WSMAN proto-
cols and can be thought of as a cross between PowerShell remote sessions andthe WSMAN cmdlets.
■ You can access web services from within some PowerShell cmdlets.
We’ll concentrate on using PowerShell remote sessions and the remoting features builtinto cmdlets in this chapter because they have the most impact on the functions you’llbe working with in part 2 of the book. The WSMAN cmdlets are discussed in chapter 17,and the new CIM cmdlets and sessions are covered in chapters 18 and 19. The lastoption is used in Windows Server 2008 R2 Active Directory and Exchange 2010, thoughthe implementations aren’t identical. Neither of these technologies have a WMI com-ponent, so they won’t be followed up in this work.
We’ll start by looking at the cmdlets that can work remotely.
2.8.1 Remoting by cmdlet
A number of cmdlets have a -ComputerName parameter that enables them to accessremote machines. Get-WmiObject had this ability in PowerShell v1, and others had
www.it-ebooks.info

56 CHAPTER 2 Using PowerShell
the capability added in PowerShell v2. The full list of cmdlets that can work in this waycan be discovered using Get-Help:
PS> Get-Help * -Parameter computername | Format-Wide -Column 3
Get-WinEvent Get-Counter Test-WSManInvoke-WSManAction Connect-WSMan Disconnect-WSManGet-WSManInstance Set-WSManInstance Remove-WSManInstanceNew-WSManInstance Invoke-Command New-PSSessionGet-PSSession Remove-PSSession Receive-JobEnter-PSSession Get-EventLog Clear-EventLogWrite-EventLog Limit-EventLog Show-EventLogNew-EventLog Remove-EventLog Get-WmiObjectInvoke-WmiMethod Get-Process Remove-WmiObjectRegister-WmiEvent Get-Service Set-ServiceSet-WmiInstance Get-HotFix Test-ConnectionRestart-Computer Stop-Computer
We’ll be looking at working directly with the WSMAN cmdlets in chapter 17, but for nowlet’s consider the other cmdlets. Most of them, such as Get-Service, Get-WmiObject,and Get-EventLog, don’t require PowerShell to be installed on the remote machine.The PSSession cmdlets require PowerShell v2 to be installed and configured, but notnecessarily running.
Accessing data from one or more remote computers involves using the -Computer-Name parameter. For example, this is how you would check on a service on the localmachine:
PS> Get-Service winrm
Status Name DisplayName------ ---- -----------Running winrm Windows Remote Management (WS-Manag...
It’s just as easy to do this on remote machines:
PS> Get-Service -Name winrm -ComputerName w08r2sql08
Status Name DisplayName------ ---- -----------
WMI remote accessAll of the WMI cmdlets have a -ComputerName parameter. In order for these cmdletsto be able to work remotely, you need to configure the remote firewall. This can beperformed using the firewall administrative tools or you can run the following com-mands from PowerShell or a command prompt.
Netsh firewall set service RemoteAdminNetsh advfirewall set currentprofile settings remotemanagement enable
On Windows Server 2008 R2, the second command will return a message saying thatit’s deprecated, but it will configure the firewall correctly.
www.it-ebooks.info

57PowerShell remoting
Running winrm Windows Remote Management (WS-Manag...
PS> Get-Service -Name winrm -ComputerName w08r2sql08a
Status Name DisplayName------ ---- -----------Running winrm Windows Remote Management (WS-Manag...
According to the help, you should be able to do this:
PS> Get-Service -Name winrm -ComputerName w08r2sql08, w08r2sql08a
Unfortunately, you’ll only get the results for the first machine in the list. But you canfall back on WMI:
PS> $computers = @("localhost", "w08r2sql08", "w08r2sql08a")PS> Get-WmiObject -Class Win32_Service -Filter "Name='winrm'" ` -ComputerName $computers | ft SystemName, State, StartMode
SystemName State StartMode---------- ----- ---------SERVER02 Running AutoW08R2SQL08 Running AutoW08R2SQL08A Running Auto
This gives you a quick way to test whether the required services are running on remotemachines. We’ll be revisiting this idea in chapter 9.
Working within individual cmdlets is great, but it does have a couple of limitations.The biggest one is that not all cmdlets have a -ComputerName parameter, meaningyou’re confined to the local machine. The second issue is that working in this manneris slow because the connection to the remote machine has to be created, used, anddestroyed for each use. What you need is a way, such as WinRM, to create a connectionbetween the local and remote machines that remains open for as long as you need it.
2.8.2 PowerShell remote sessions
PowerShell can use the WinRM service to create a connection to a remote machine.WinRM is Microsoft’s implementation of the industry standard Web Services for Man-agement (WS-Management) protocol. In PowerShell v2, the installer includes Power-Shell and WinRM.
The following requirements must be met for PowerShell remoting to work:
■ The WinRM service must be installed on the remote systems.■ PowerShell v2 must be installed on both systems.■ The Enable-PSRemoting cmdlet must have been run on the remote machines
with elevated privileges to configure WinRM, the firewall, and other necessaryelements.
You can create a connection to one or more remote systems like this:
$s = New-PSSession -ComputerName W08R2SQL08, W08R2SQL08A
The available sessions can be viewed with Get-PSSession:
www.it-ebooks.info

58 CHAPTER 2 Using PowerShell
PS> Get-PSSession
Id Name ComputerName State ConfigurationName Availability -- ---- ------------ ----- ----------------- ------------ 1 Session1 w08r2sql08 Opened Microsoft.PowerShell Available 2 Session2 w08r2sql08a Opened Microsoft.PowerShell Available
Now you need to be able to use these sessions:
PS> Invoke-Command -Session $s -ScriptBlock {Get-Service winrm}
Status Name DisplayName PSComputerName------ ---- ----------- -------------Running winrm Windows Remote Management w08r2sql08aRunning winrm Windows Remote Management w08r2sql08
Your session currently consists of connections to a number of computers. You canaccess just one of the machines in the session as follows:
$sa = Get-PSSession -Id 2Invoke-Command -Session $sa -ScriptBlock {Get-Service sql*}
This code creates a new session variable that points to the machine (session) you wantto work with. When you have a number of sessions open, you can work with them in anydesired combination to send the right commands to the server you want to work with.
The script block that Invoke-Command uses will be run against the remotemachine. If you give a filename or path within the script block, it will be looked for onthe remote machine. You can run a script from the local machine against a remotemachine by using the -FilePath parameter of Invoke-Command.
When you’ve finished with the sessions, they should be removed:
Get-PSSession | Remove-PSSession
When you’re working with WMI, you can use either the -ComputerName parameterbuilt into the cmdlets or PowerShell remote sessions to access remote machines.
Both options have one thing in common, though. You can run them as back-ground jobs.
2.9 PowerShell jobsThe objective of automating your work is to make the work easier and faster. You canstart a script and let it perform the tasks rather than working through the tasks yourself.But there’s one slight roadblock on the journey to the automation highlands. When youstart a PowerShell script, it takes time to run. If you’re connecting to a number of remotemachines, this can take significant time. Your PowerShell prompt is unavailable for thistime, which could impact other tasks. One way to avoid this problem is to start upanother PowerShell session or, better still, you could use a background job.
PowerShell jobs run asynchronously. They return the prompt for immediate usewhile the job carries on running in the background. When the job has finished, theresults are stored until you’re ready to access them. Note that the results aren’t per-sisted between PowerShell sessions, so they’ll be lost if you close PowerShell.
www.it-ebooks.info

59PowerShell jobs
Jobs can be created in two ways. First, there are a number of cmdlets specificallyfor working with jobs. Second, there are a number of cmdlets that have an -AsJobparameter that allows that cmdlet to be performed as a job. The two sets of cmdletsare listed in table 2.5.
A job can be created on the local machine using Start-Job:
Start-Job -Name PaW1 -ScriptBlock {Get-WmiObject -Class Win32_Service -Filter "Name='winrm'"}
NOTE It could be argued that the Start-Job cmdlet should be called New-Job. You can always create an alias, but remember the issues related to pub-lishing scripts with your own aliases, as mentioned in section 2.1.1.
You can also create a job to run against remote machines:
Invoke-Command -ComputerName w08r2sql08, w08r2sql08a -ScriptBlock {Get-WmiObject -Class Win32_Service -Filter "Name='winrm'"} -AsJob
Get-Job is used to see how your jobs are progressing, as shown in figure 2.5. Note thatwhen you explicitly create a job, you give it a name, but when using the -AsJob param-eter, the system will assign a name.
The important points in figure 2.5 are that both jobs have completed, as shownunder the State column, and that HasMoreData is True. You can access data held inthe jobs by using Receive-Job in a number of ways:
Receive-Job -Name Paw1 -KeepReceive-Job -Name Job3 -KeepGet-Job -Id 3 | Receive-Job -Location w08r2sql08a -Keep
In the first example, you get the information from the job you created with Start-Job.The second example retrieves data from the job created with Invoke-Command. The finalexample shows how you can access the data for one computer when the job has been
Table 2.5 Cmdlets for working with PowerShell jobs
Cmdlets with AsJob parameter Job cmdlets
Invoke-Command Get-Job
Get-WmiObject Receive-Job
Invoke-WmiMethod Remove-Job
Remove-WmiObject Start-Job
Set-WmiInstance Stop-Job
Test-Connection Wait-Job
Restart-Computer
Stop-Computer
www.it-ebooks.info

60 CHAPTER 2 Using PowerShell
run against a number of machines. In all cases, you use the -Keep parameter. If this isn’tused, the data is deleted as it’s accessed and won’t be available for further analysis. I rec-ommend always using -Keep unless you’re sure you won’t need to revisit the data.
The last job-related thing you need to think about is tidying up the environment bydeleting jobs you don’t need. You can use Get-Job to pipe specific jobs into Remove-Job,or for a complete and final cleanup, you can use this:
Get-Job | Remove-Job
PowerShell jobs created using the WMI cmdlets are slightly different from jobs createdwith Start-Job or Invoke-Command -AsJob. Each starts a child process, but they’re dif-ferent. In practical terms, this doesn’t affect how you manage the jobs because the*Job cmdlets work on them all.
PowerShell jobs are one of the most overlooked features of PowerShell that canmake life easier and add flexibility to the way you perform automated tasks.
2.10 SummaryPowerShell is a shell, a language, and a set of command-line tools that supply a frame-work for our automation work. It’s .NET-based and its pipeline works on these objectsrather than on text as is traditional in other shells.
The scripting language provides all of the features you require, including
■ Different types of loops■ Branching via if or switch statements■ File input and output to use data and store results
There are a number of ways of finding help for PowerShell. There are cmdlets thatread the XML help files and display information about cmdlets or the objects they’re
Figure 2.5 Starting and viewing PowerShell jobs
www.it-ebooks.info

61Summary
working with, and there’s web-based help available. A final source of assistance is thePowerShell community.
When you create a piece of PowerShell code, you need to be able to store it so youcan run it again in the future. The simplest way to do this is to create a script. If you havea lot of scripts that potentially interact or that need to be loaded together, you canrewrite them as functions to make code reuse a simpler proposition. PowerShell v2offers you the option of creating modules of functions that ease the work in organizingand loading and unloading them much simpler.
Automation in the enterprise requires that you can work with remote machines.This can be achieved using the remote capabilities built into some cmdlets or by usingPowerShell sessions to specific remote computers. You can also access remotemachines and run PowerShell tasks as background jobs, making you more productiveand more flexible.
PowerShell provides one way of performing administrative tasks. The otherapproach is to use WMI. In the next chapter, we’ll turn our attention to WMI and seehow it works with PowerShell.
www.it-ebooks.info

WMI in depth
Windows Management Instrumentation, known as WMI to its friends, isn’t wellunderstood by the majority of administrators. It appears to be a technology that’sdifficult to use and that isn’t well documented, unless you want to go rummaging inthe depths of TechNet and MSDN. Is this a fair assessment?
Until PowerShell appeared, this was my stance on WMI. I could make it work,but I didn’t really understand it and certainly didn’t feel I could get the best out ofit. Code was difficult to produce and test in VBScript, using WMI interactivelyrequired a different set of tools with a cryptic syntax, and background informationwas very sparse and difficult to find. Now, though, I have the tools to make using itmuch easier, and I can also use those tools to investigate how WMI is put together.By the end of this chapter, you’ll similarly have a good understanding of the under-lying structure of WMI and how all the bits relate, and you’ll know how to make itwork for you.
This chapter covers■ WMI structure■ WMI cmdlets and accelerators■ WMI Query Language■ Discovering links between WMI classes
62
www.it-ebooks.info

63The structure of WMI
In this chapter, we’ll start by considering what WMI is, and we’ll look at the majorcomponents that you need to understand in order to use it:
■ Providers■ Namespaces■ Classes
PowerShell works with .NET objects, as you saw in chapter 2. In this chapter, you’ll dis-cover the makeup of the objects that WMI produces and learn how to use the methodsand properties of those objects. You’ll learn how to produce your own working docu-mentation based on the information stored within WMI. This won’t provide full expla-nations for WMI classes, but it will provide enough information to work productivelywith the classes. The linkages between classes enable a deep level of access to theinformation locked in WMI, and the techniques presented in this chapter will enableyou to unlock that information.
The next item on the agenda is to explore what PowerShell can offer for workingwith WMI. We’ll expand on the brief glimpse you had in chapter 1, and you’ll see howmuch easier WMI becomes in PowerShell. You’ll learn about each of the WMI cmdletsand about the type accelerators, which are shortcuts that make working with WMIobjects via .NET much simpler.
The PowerShell cmdlets remove the need to write WMI queries, which was the onlyway to work with WMI in the past. But there are times when queries are the best way toget the information you need. This is when you’ll want to turn to WMI Query Language(WQL), which is a subset of SQL. You can use WQL in complete queries or in filters.
WMI also enables you to discover the references and associations between differentWMI classes and to work with WMI events. You’ll see throughout the book that WMIexposes a wealth of information about the events occurring on your system. For exam-ple, would you like a specific task to occur when a USB memory stick is plugged intoyour system? Keep reading and you’ll find out how to achieve this.
There are a small number of scenarios where the PowerShell WMI cmdlets can’t solveyour problem. The workaround is to access the .NET objects directly. One of the mostcommon examples of this is the IIS WMI provider, which we’ll look at in chapter 12.
But before you can do any of these things, you need a good understanding of WMIand how it works.
3.1 The structure of WMIThe first step in learning to use a technology involves understanding what it is andwhat it does. You learned in chapter 1 that WMI is Microsoft’s implementation of theDMTF’s Common Information Model (CIM). Microsoft has taken the basic CIM specifi-cation and often enhanced the classes or added new classes to produce WMI.
On modern Windows systems, WMI is part of the base operating system install. It’sthere automatically and you don’t have to worry about it. When you extend the func-tionality of your systems, such as by installing the DNS role, additional WMI functional-ity is automatically installed. All you have to do is work out how to use it.
www.it-ebooks.info

64 CHAPTER 3 WMI in depth
We need to dive a bit deeper into the details before we get to the fun bits. On Win-dows systems there is a C:\Windows\System32\wbem folder that supplies the WMI func-tionality. WBEM stands for Web-Based Enterprise Management, and the architectureof WBEM is used in WMI. The DMTF supplies the standards for WBEM.
According to the DMTF website, WBEM is “a set of management and Internet stan-dard technologies developed to unify the management of distributed computing envi-ronments. WBEM provides the ability for the industry to deliver a well-integrated set ofstandard-based management tools, facilitating the exchange of data across otherwisedisparate technologies and platforms.”
NOTE For more information about WBEM, see the DMTF website: http://www.dmtf.org/standards/wbem.
What that means is that we have astandards-based way of managing dis-tributed systems. The components thatform the architecture of WMI are shownin figure 3.1.
Our starting point for understand-ing WMI’s architecture is the ManagedObject Format (MOF) files, which canbe found in the WBEM folder. There are a large number of these files. The exact num-ber will vary with the version of Windows you are using:
PS> (Get-ChildItem -Path C:\Windows\System32\wbem -Filter *.mof).count207
The MOF files store the definitions of the WMI classes. It’s possible to write your own MOFfile and compile it to extend WMI. The details are available in the WMI SDK on MSDN.I don’t intend to spend any time looking at the structure of MOF files or at how you canwork with them. That topic is firmly outside the scope of this book. Good luck.
Run as administratorWMI, in many cases, can be run and used without elevated privileges. But there aresome namespaces, especially those related to security, that require PowerShell tobe started using Run as Administrator.
If you’re only pulling information, such as info about network cards, PowerShell canbe started normally. If you’re using the methods of a WMI class, you may need ele-vated privileges. Some of the work you’ll do on IIS in chapter 12 will require you tostart PowerShell using Run as Administrator.
The scripts in this chapter will complete without elevated privileges but you’ll be de-nied access to some namespaces. I recommend using elevated privileges when try-ing the code.
Figure 3.1 The structure of WMI
www.it-ebooks.info

65The structure of WMI
Associated with each of the MOF files is a provider. This is a DLL that’s registeredwith Windows and WMI, giving you access to the classes you actually use. The class def-initions are stored in the WMI repository. The instances of those classes are retrieveddynamically by a provider when requested by a consumer, such as a PowerShell cmd-let. The classes are arranged in namespaces to give a logical, hierarchical structurewith the root namespace at the top.
NOTE WMI is based on COM, not .NET. COM stands for Common ObjectModel and it’s the programming model Microsoft used before .NET. It’s slowlybeing replaced by .NET, but a lot of COM-based applications will be with us formany years. While COM uses classes, methods, and properties, these aren’tidentical to the .NET entities of the same name. We’ll ignore these differencesas long as they don’t get in the way of using WMI with PowerShell.
Understanding the relationship between the components that make up WMI enablesyou to achieve a number of things:
■ You can test the integrity of WMI and discover whether you need to rebuild.You’ll know you need to rebuild if you get errors accessing an individualnamespace, provider, or class (but remember to check that you’re running withelevated privileges).
■ You can discover the structure of WMI on your system. The WMI classes that arepresent change with the version of Windows, and of other applications, so it canbe useful to determine whether a class or namespace is present.
■ You can use WMI to its full capabilities.
The first item from figure 3.1 that can supply some useful help is the provider.
3.1.1 Providers
You won’t use providers directly, but there are a couple of reasons for wanting to iden-tify the provider:
■ You know where the class was loaded from and if there are any associatedclasses.
■ You know what it’s providing.■ You know where to start looking if you need to repair WMI (this isn’t something
I’ll cover, but instructions for recompiling WMI can be found on MSDN).
The providers can be found by using the WMI system class __Win32Provider. All system classes are denoted by a prefix of two underscore characters, __. The
class is available on a per namespace basis:
Get-WmiObject -Class __Win32Provider | select name
This lists all of the providers in the namespace that PowerShell uses as a default,root\cimv2. One thing to be aware of is that there’s a namespace called root\DEFAULT.This isn’t the same as PowerShell’s default namespace, just to be confusing.
www.it-ebooks.info

66 CHAPTER 3 WMI in depth
Up to now, I’ve implied that all providers are the same and that they just supplyclasses. Unfortunately things are a bit more complicated. There are a number of dif-ferent provider types, as shown in table 3.1.
A single provider can function as multiple, different provider types. The registry pro-vider, for example, registers a number of WMI elements:
■ Event■ Instance■ Method■ Property
Providers install classes into a namespace. Namespaces are the working part of WMI.You need to understand the namespaces that are installed and what they can do.
3.1.2 Namespaces
WMI namespaces are used to logically subdivide the available WMI classes. Somenamespaces are installed by default on all Windows systems, and others are only avail-able when specific applications or Windows features are installed.
The first question is what namespaces are installed on a system? You know that thenamespace at the top of the hierarchy is called root and that your default namespaceis root\cimv2. How can you find the other namespaces and their relationships?
DISCOVERING NAMESPACES
You saw earlier that WMI system classes are prefixed with a double underscore charac-ter. Take a look at the system classes for a namespace—in this case, root\cimv2:
Get-WmiObject -Namespace 'root\cimv2' -List "__*"
Table 3.1 WMI provider types
Provider type Purpose Registration type
Class Supply applications with class definitions; rarely implemented
__ClassProviderRegistration
Event Provide event notifications to WMI __EventProviderRegistration
Event consumer
Consume WMI events __EventConsumerProviderRegistration
Instance Supply WMI classes, such as Win32_Service
__InstanceProviderRegistration
Method Provide the methods of the rele-vant WMI classes
__Method
Property Supply ways to work with property values, including reading and modifying
__PropertyProviderRegistration
www.it-ebooks.info

67The structure of WMI
You’ll see that there is a class called __NAMESPACE. You can now investigate that classand generate a list of the namespaces in the root\cimv2 namespace:
Get-WmiObject -Class __NAMESPACE | select name
You could generate a list of all namespaces by working from the root down and manu-ally running the preceding code, but that would involve a lot of tedious manual work.The theme of the book is getting the machine to work for you, so you need a way toautomate the discovery process. One way to achieve this is to use the code in the fol-lowing listing.
function get-namespace {param ([string]$name) Get-WmiObject -Namespace $name -Class "__NAMESPACE" | foreach { "$name\" + $_.Name get-namespace $("$name\" + $_.Name) }}"root"get-namespace "root"
The work engine of this script is the get-namespace function. (Functions are explainedin chapter 2, if you skipped that chapter.) The function takes a namespace name as itsonly parameter. It then uses that name to retrieve the namespaces contained within thatnamespace using Get-WmiObject, as you saw previously. The results are piped into aForEach-Object cmdlet that displays the name of the current namespace and the dis-covered namespaces using a backslash (\) as a divider. You can then use that fullnamespace path as the input to get-namespace. The script starts the whole discoveryprocess by displaying root on screen and calling the get-namespace function.
Now I’m going to scare you. This process of getting a function to call itself is calledrecursion. I slipped the description into this discussion before telling you what it’scalled because recursion is one of those topics that causes grown administrators to runaway. But it’s not that bad, is it?
Now let’s adapt listing 3.1 to not only show the namespaces but also show theproviders.
TIP You need to run these scripts from an elevated shell to avoid the accessdenied messages, especially from the security-related namespaces.
If you take listing 3.1 and add the code from section 3.1.1 where we discussed provid-ers, you’ll end up with the following.
function get-namespace {param ([string]$name) Get-WmiObject -Namespace $name -Class "__NAMESPACE" |
Listing 3.1 Find WMI namespaces installed on a system
Listing 3.2 Find WMI providers in each namespace
www.it-ebooks.info

68 CHAPTER 3 WMI in depth
foreach { $ns = "$name\" + $_.Name "`nNameSpace: $ns" "providers:" Get-WmiObject -NameSpace $ns -Class __Win32Provider | select name
get-namespace $("$name\" + $_.Name) }}"root"get-namespace "root"
The get-namespace function is still the work engine. You start off with the rootnamespace, as before, and call the function with the namespace name as a parameter.The function retrieves the namespaces and displays the namespace name, but thistime it’s prefixed with “NameSpace: ”. This enables you to distinguish namespacesfrom providers, which will make the output more meaningful. The namespace is usedto get the list of providers. You then perform the recursion by calling get-namespacewith the new namespace name.
This is a good start to the discovery process, but there are still a few more levels todig into. When we were discussing providers, I mentioned that an individual providercan register itself into WMI in a number of different ways. You can also use PowerShelland WMI to discover how providers register themselves.
REGISTRATIONS
A provider will register itself within a namespace, and the types of registrations weredetailed in table 3.1. As you might guess, there are a number of WMI system classesthat deal with registrations. You can find a full list of the classes involved in dealingwith registrations by using the -List parameter:
Get-WmiObject -Namespace 'root\cimv2' -List "__*Registration*"
If you try this code,
Get-WmiObject -Namespace 'root\cimv2' -Class __ProviderRegistration
you’ll get a long list of information. To see what the registration classes can tell you,you can look at one of each type of registration class:
Get-WmiObject -Namespace 'root\cimv2' -List "__*Registration*" |foreach { Get-WmiObject -Namespace 'root\cimv2' -Class $($_.Name) | select -First 1}
Using Select-Object to just pick off the first of each type of class reduces the outputto something you can work with. It’s worth spending some time examining the outputto discover what information is available. There are a number of properties that storeWQL queries for returning information about events that you’ll be meeting again.
It’s also interesting to look at which providers perform which type of registration:
www.it-ebooks.info

69The structure of WMI
Get-WmiObject -Namespace 'root\cimv2' -List "__*Registration*" |foreach { Get-WmiObject -Namespace 'root\cimv2' -Class $($_.Name) | Format-Table __CLASS, provider -AutoSize}
This variation on the previous code displays the __CLASS (which tells you the type ofregistration) and the provider performing that registration.
Throughout the book, we’ll keep returning to WMI events. A provider can registerevents, and one way you can discover the event classes you need to work with is to lookat the __EventProviderRegistration class:
Get-WmiObject -Namespace 'root\cimv2' ` -Class __EventProviderRegistration |foreach { "`n" $_ | Format-Table EventQueryList, provider -Wrap}
This will display the event classes you can use to discover events related to a specificprovider. Better still, it shows the WMI query you have to run to get the informationyou want. Now that’s something that makes life a lot easier.
We’ll return to providers and namespaces when we put all of this together to docu-ment the WMI environment in section 3.3.
One of the things that providers can supply to namespaces is the WMI classes youneed to work with. Classes are at the bottom of the hierarchy, but they’re the mostimportant component, because you’ll work directly with them to perform your admin-istration tasks.
3.1.3 Classes
A WMI class represents a specific item in your system. It could be a piece of hardware,such as a network card or CPU, or it could relate to software, such as the operating sys-tem, a hotfix, a feature like DNS, or any other installed software. It could even relate toan event or a data store, such as the registry. In the second part of the book, we’ll lookat a large number of WMI classes and see what they can do. For now, though, you needto understand how to work with the WMI classes.
The first thing to understand is the different types of classes available. CIM definesthree class categories:
■ Core classes represent managed objects that apply to all areas of management.■ Common classes represent managed objects that apply to specific management
areas (these classes are prefixed with CIM_).■ Extended classes represent managed objects that are technology-specific—that is,
classes that are created to manage the Windows platform and Microsoft applica-tions. Examples would include the classes for managing IIS, Hyper-V, or DNS.
Within these categories there are a number of class types, as shown in table 3.2.
www.it-ebooks.info

70 CHAPTER 3 WMI in depth
WMI classes can be divided into two groups. The first group is comprised of the systemclasses, which are present in each namespace. They provide information about thenamespace, registrations, and security. They’re also responsible for the processing ofevents created by other WMI classes.
The second group is more heterogeneous and includes the core CIM classes as wellas the extension classes that Microsoft has created. These are the worker classes thatyou use to manage your Windows environment.
You’ve already seen some of the system classes in action. But what else can they dofor you?
SYSTEM CLASSES
Each WMI namespace has an instance of each of the system classes, identified by adouble-underscore prefix (__). The full list for the root\cimv2 namespace can befound by using the -List parameter in Get-WmiObject:
Get-WmiObject -Namespace 'root\cimv2' -List "__*"
The same system classes are present in each namespace. You can see this by compar-ing two namespaces at random:
$cimv2 = Get-WmiObject -Namespace 'root\cimv2' -List "__*" |select name
$scent = Get-WmiObject -Namespace 'root\SecurityCenter' -List "__*" |select name
Compare-Object -ReferenceObject $cimv2 -DifferenceObject $scent ` -IncludeEqual
The preceding code generates a list of system classes for each namespace. TheCompare-Object cmdlet is used to compare the two objects that are produced. If youdon’t use the -IncludeEqual parameter, you’ll get nothing back, which indicates thatthe two objects are identical.
Table 3.2 WMI class types
Class type Purpose Example
System class (can be static or abstract)
Supports WMI configuration and operations. __NAMESPACE
Abstract Template used to define new classes. Identified by Abstract qualifier.
__ProviderCIM_Service
Static Defines data stored in WMI repository; usually used to define system classes. Identified by lack of Abstract or Dynamic qualifier.
__Win32Provider
Dynamic (typically extension classes)
Represents a WMI managed resource; the infor-mation is retrieved from a provider when requested. Identified by Dynamic qualifier.
Win32_Service
Association Links two classes or resources. Identified by Association qualifier.
Win32_SystemServices
www.it-ebooks.info

71The structure of WMI
TIP This is a little gotcha with PowerShell: if it has nothing to return, it won’ttell you that. It can be difficult to tell the difference between an error and asituation with no data to return. The only way to resolve the question is to testaround the problem.
When you use the parameter, you’ll get output with this form:
InputObject SideIndicator----------- -------------@{Name=__SystemClass} ==@{Name=__NAMESPACE} ==
Output truncated for brevity
You’ll get one line of output per system class. Many of the system classes are involvedin the production and consumption of events, and you won’t work with them directlyvery often, though you do need to know that they exist.
When we were discussing providers, you saw that they register classes, but whichprovider registers which class?
CLASSES BY PROVIDER
In figure 3.1, you saw that providers install items into the WMI repository. Thisincludes classes, but a number of other items are also installed by providers. It’s usefulto be able to document just what is being installed into WMI. This can be helpful whenyou’re trying to troubleshoot a problem—discovering that a particular piece of WMIisn’t installed may point to the problem.
For this example, you’ll just work with a single namespace. The following listing takeswhat you know about WMI so far (oh yes, there’s more to come) and demonstrates howyou can use PowerShell and WMI to discover the classes installed by each provider.
$namespace = "root\cimv2"
Get-WmiObject -Namespace $namespace -Class __Win32Provider |foreach { $provider = $_.Name "Provider: $provider"
$refs = Get-WmiObject -Namespace $namespace ` -Query "REFERENCES OF {__Win32Provider.Name='$provider'}"
foreach ($ref in $refs) {
$type = $ref.__CLASS " Registration: $type"
switch ($type) {
"__PropertyProviderRegistration" { " does not have classes" break }
"__ClassProviderRegistration" {
Listing 3.3 Find WMI classes installed by a provider
Define namespaceB
List providersC
Iterate referencesD
Determine registration typeE
Process registrationF
www.it-ebooks.info

72 CHAPTER 3 WMI in depth
" only provides class definitions" break }
"__EventConsumerProviderRegistration" { " uses these classes" " $($ref.ConsumerClassNames)" break }
"__EventProviderRegistration" { " queries these classes:" foreach ($query in $ref.EventQueryList) { $a = $query -split " " " $($a[($a.length-1)])" } break }
default { " supplies these classes:" Get-WmiObject -Namespace $namespace -List -Amended | foreach { if ($_.Qualifiers["provider"].Value -eq "$provider"){ " $($_.Name)" } } # class list break } } #switch } # refs} # provider loop
This is quite a long script, but it can be broken down into a number of easy sections.You start by defining the namespace you want to work with B. As written, the scriptuses the default namespace. The __Win32provider system class returns all of the pro-viders that contribute to the namespace.
A foreach loop iterates through the collection of providers. The provider name isdisplayed as the first action in the loop C. A piece of WMI Query Language (WQL) isused to get a list of the classes to which the provider is linked. These links are knownas references. We’ll examine WQL in more detail when we get to section 3.5.
Another foreach loop is used to work through each reference D. Notice that youhave one foreach loop nested inside another. To help keep track of the braces, {}, I’veput a comment on each of the closing braces to relate it to the appropriate starting point.
The type of registration is found in the __CLASS property of the reference. Aswitch statement E uses the registration type to determine how to process the differ-ent registrations F:
■ A __PropertyProviderRegistration will only provide properties, so you dis-play a message that this provider doesn’t supply classes.
■ A __ClassProviderRegistration only provides class definitions, as explainedby the message.
Process registration
F
Process method and instance registration
G
www.it-ebooks.info

73The structure of WMI
■ An __EventConsumerProviderRegistration will use a number of event classes.The ConsumerClassNames property holds the class names.
■ An __EventProviderRegistration queries one or more classes for WMI eventinformation. The relevant classes are found in the EventQueryList property.This property is very helpful, as it lists the full query rather than just theclass name.
The default clause in the switch statement G enables processing of the__MethodProviderRegistration and __InstanceProviderRegistration types.These will sometimes appear to duplicate the registration in the list.
Running this script against the root\cimv2 namespace as you do here produces overa thousand lines of output. The output from running this script on my Windows 7machine is included in a file called root_cimv2_providers_and_classes.txt, which is avail-able in the script download package associated with the book.
You now know how to find the providers in a namespace and the classes linked to aprovider. The last part of the puzzle is to find out which classes are available to workwithin a particular namespace.
CLASSES IN A NAMESPACE
You’ve used Get-WmiObject for much of your discovery work. It’s the primary Power-Shell tool for retrieving WMI-related information. It’s also useful for investigating theclasses in a namespace.
Compared to the last script, this one is nice and simple:
Get-WmiObject -List
You’ve seen the -List parameter a few times already. You can use Get-Help to look atthe parameter definition:
Get-Help Get-WmiObject -Parameter list
The output from this command is shown in figure 3.2. The -List parameter can be thought of as the dir command of WMI. It shows you
what is there so you can find the class you need to work with.
Figure 3.2 Using the -Parameter option with Get-Help
www.it-ebooks.info

74 CHAPTER 3 WMI in depth
NOTE In PowerShell v3, the Get-CIMClass cmdlet does a similar job. This isdiscussed in chapter 19. Versions of some of the scripts in this chapter writtenusing Get-CIMClass are also available in the download.
The previous example will produce a list of all the classes in the root\cimv2namespace. This is an impressive list of 1,045 classes.
A list of this length is a bit too big to keep scrolling through, so you need a way tofilter the output. In PowerShell v2, you can add a filter to restrict the number ofclasses returned:
Get-WmiObject -List *network*
The filter will use the standard wildcards, as shown. Unfortunately this doesn’t work in PowerShell v1, so you’ll need to do a bit more
work in that case:
Get-WmiObject -List | where {$_.Name -like "*network*"}
The filtering is performed on the pipeline using Where-Object rather than in theGet-WmiObject cmdlet. The results are the same.
You aren’t restricted to the default namespace when discovering the availableclasses. You can change the namespace to be interrogated by using the -Namespaceparameter:
Get-WmiObject -Namespace "root\SECURITY" -List
Remember that the namespaces related to security require PowerShell to be run withelevated privileges; otherwise they enjoy giving you an error message and refusing todisplay the data.
You now know the class name that may help you with your task, but you don’t knowwhat it does or what information it provides. An overview of what the class does can begained from its description. Unfortunately, the description is hidden by default.
QUALIFIERS
WMI classes have a number of hidden properties known as qualifiers. These propertiesare expensive, in processing time, to retrieve, due to the way the information is storedin the WMI repository.
PowerShell v2 added an -Amended parameter to Get-WmiObject that enables you toaccess these details. The qualifiers aren’t directly displayed, but you can view them bytreating them as a collection of properties:
PS> $q = Get-WmiObject -List Win32_Process -AmendedPS> $q.Qualifiers | Format-Table Name, Value -AutoSize -Wrap
Name Value---- -----CreateBy CreateDeleteBy DeleteInstanceDescription The Win32_Process class represents a sequence of events on a Win32 system. Any sequence consisting of the interaction of one or more processors or interpreters,
www.it-ebooks.info

75The structure of WMI
some executable code, and a set of inputs, is a descendent (or member) of this class. Example: A client application running on a Win32 system.DisplayName Processesdynamic TrueLocale 1033provider CIMWin32SupportsCreate TrueSupportsDelete TrueUUID {8502C4DC-5FBB-11D2-AAC1-006008C78BC7}
In the preceding example, you use the -List parameter to generate the class informa-tion and use the class name as a filter to restrict the output. The -Amended parameterensures the qualifiers are captured and piped into Format-Table, where the nameand value of each qualifier are displayed. The -Wrap parameter is used to produce adisplay that wraps any text that’s longer than the display line, making sure you don’tmiss any data.
One area where the qualifiers come in useful is when you have a number of relatedclasses but aren’t sure which one you really need to use. Network adapters are a goodexample. Suppose there are three classes of interest:
■ Win32_NetworkAdapter■ Win32_NetworkAdapterConfiguration■ Win32_NetworkAdapterSetting
You have three choices. You could guess which one you need, but this could be frus-trating and delay solving the problem. A second option is to use MSDN to look up thedescription of the class. This will give the correct result, but it will still take time. Thethird, and best, choice is to display the description of each class:
Get-WmiObject -List Win32*networkadapter* |foreach { "`n$($_.Name)" ((Get-WmiObject -List $($_.Name) -Amended).Qualifiers | where {$_.Name -eq "Description"}).Value}
You start by using Get-WmiObject to fetch a list of the WMI classes that are related tonetwork adapters. This output is piped into a ForEach-Object cmdlet. The name ofthe class is displayed by putting it into a string on a line by itself. The new-line charac-ter (`n) forces the output of at least one blank line between data sets.
You reuse the class name in Get-WmiObject with the -Amended parameter to accessthe qualifiers. A Where-Object filter only allows the description qualifier through, andyou only display the text of the description.
PowerShell treats the contents of the parentheses, (), as an object, so you canselect the qualifiers and the description with minimal code. As an experiment, trybuilding up the code in the foreach cmdlet one section at a time to see how theparentheses control the output. That’s how I created it in the first place!
www.it-ebooks.info

76 CHAPTER 3 WMI in depth
WMI has a structure. The WMI classes are created from providers and are organizedin namespaces. Each namespace has a number of system classes that are always pres-ent, as well as WMI classes representing physical objects such as disks or logical objectssuch as processes. WMI objects are the instances of WMI classes present on a particularmachine. The WMI objects have visible properties and methods, and sometimes a fur-ther set of invisible properties, and you need to explore them to get the most benefitfrom using WMI. As you do, you’ll learn a little more about Get-Member.
3.2 Methods and propertiesIn chapter 2, you saw that Get-Member allows you to discover things about your Power-Shell objects. This includes the available properties (the data describing and definingobjects, such as the drive letter and size of a disk) and methods (which enable you todo things such as stop a process or format a disk).
All classes have a number of system properties (prefixed with a double underscore,__). A class also has a key property, which is the property that differentiates theinstances of the class; for example, you can have multiple instances of Notepad open,each of which has its own unique Handle property. Handle is the key property for theWin32_Process class.
All Windows systems have processes, so they make ideal candidates for investigat-ing WMI methods and properties. We’ll start with methods.
3.2.1 Methods
If you want to work with processes using WMI, a quick look in the cimv2\rootnamespace will show that you want to use the Win32_Process class:
Get-WmiObject -List *process*
There are a large number of processes running on your system, so let’s focus on thefirst one:
Get-WmiObject -Class Win32_Process |select -First 1 | Get-Member
If you look at the help file of Get-Member, you’ll find a parameter called -View.
PS> Get-Help Get-Member -Parameter View
This will produce the following output:
-View <PSMemberViewTypes> Gets only particular types of members (properties and methods). Specify
one or more of the values. The default is "Adapted, Extended".
Valid values are: -- Base: Gets only the original properties and methods of the .NET Framework object (without extension or adaptation). -- Adapted: Gets only the properties and methods defined in the Windows PowerShell extended type system. -- Extended: Gets only the properties and methods that were added in the Types.ps1xml files or by using the Add-Member cmdlet.
www.it-ebooks.info

77Methods and properties
-- All: Gets the members in the Base, Adapted, and Extended views.
The View parameter determines the members retrieved, not just the display of those members.
To get particular member types, such as script properties, use the MemberType parameter. If you use the MemberType and View parameters in the same command, Get-Member gets the members that belong to both sets. If you use the Static and View parameters in the same command, the View parameter is ignored.
The base option is equivalent to using psbase, which was mentioned back in chapter 2. The best way to start examining the structure of the Win32_Process object is by
looking at all of the methods and properties available:
Get-WmiObject -Class Win32_Process |select -First 1 | Get-Member -View all
The methods available through this view are displayed in the Base column of table 3.3.I performed a similar exercise for the adapted and extended views to complete thetable. There are no properties or methods in the extended view, so that column wasn’tincluded in table 3.3.
Table 3.3 Win32_Process methods
Method Base Adapted
AttachDebugger Y
Clone Y
CompareTo Y
CopyTo Y
CreateObjRef Y
Delete Y
Dispose Y
Equals Y
Get Y
GetHashCode Y
GetLifetimeService Y
GetMethodParameters Y
GetOwner Y
GetOwnerSid Y
GetPropertyQualifierValue Y
GetPropertyValue Y
www.it-ebooks.info

78 CHAPTER 3 WMI in depth
The relationship between an object’s members is illustrated in figure 3.3. If an object doesn’t appear to have a method that you think it should, I recom-
mend using either the psbase option or the -View parameter on Get-Member to inves-tigate the base object. What appears when you do this can be very illuminating. ThePowerShell-generated wrapper around the base .NET objects may be useful when
GetQualifierValue Y
GetRelated Y
GetRelationships Y
GetText Y
GetType Y
InitializeLifetimeService Y
InvokeMethod Y
Put Y
SetPriority Y
SetPropertyQualifierValue Y
SetPropertyValue Y
SetQualifierValue Y
Terminate Y
ToString Y
Table 3.3 Win32_Process methods (continued)
Method Base Adapted
Figure 3.3 Relationships between the different views of a PowerShell object, showing that the All view is the sum of the other views
www.it-ebooks.info

79Methods and properties
functionality is added, but it can become awkward when functionality is apparentlyremoved! The same advice applies to properties—check the base object if you can’tsee what you think should be present.
One additional issue arises when you’re investigating properties, and that’s thePowerShell extensible type system. This is covered in detail in chapter 4, but for nowwe need to consider its impact on displaying WMI properties.
3.2.2 Class properties
Many newcomers are confused when they start trying to use WMI in PowerShellbecause they think they aren’t getting all of the data they should. Consider theWin32_OperatingSystem class. When you request the class, you get the followinginformation:
PS> Get-WmiObject -Class Win32_OperatingSystem
SystemDirectory : C:\Windows\system32Organization :BuildNumber : 7600RegisteredUser : RichardSerialNumber : 00426-065-1155216-86852Version : 6.1.7600
At this point, you might think “Is that all? Not worth bothering about!” The defaultdisplay format has struck again. It’s a simple matter to produce the full set of proper-ties, neatly formatted in a list of property names and values.
Get-WmiObject -Class Win32_OperatingSystem | Format-List *
As an experiment, try producing a formatted list of all properties and their valuesin another scripting language. It’s a frustrating exercise because of the many linesof code that have to be written just to format the output. In PowerShell you canuse Format-List * to display all properties, as in the previous example, and
Format typesIf you look in the PowerShell install folder, you’ll see a number of files named *.for-mat.ps1xml. These are the type files that control the default display for a significantnumber of the objects that the PowerShell cmdlets produce. The list of files can befound as follows:
Get-ChildItem -Path $pshome -filter *.format.ps1xml
There is some information about format types available through the PowerShell helpsystem. Look up these cmdlets:
■ Get-FormatData■ Export-FormatData■ Update-FormatData
And take a look at this file: about_format.ps1xml.
Reading this information before you get to chapter 4 will be good preparation.
www.it-ebooks.info

80 CHAPTER 3 WMI in depth
Select-Object can be used to reduce the properties if further processing will beperformed on the pipeline. Calculated fields can be used to look up numeric codevalues or convert sizes and dates to more readable formats.
When you display the full set of an object’s properties, you also get to see the systemproperties.
3.2.3 System properties
In section 3.1.2 (on namespaces), you saw that there are a number of system classes ineach namespace. Each class has a number of system properties whose names start witha double underscore: __. The values for the system properties can be viewed sepa-rately using a format statement to restrict the output. This is illustrated in figure 3.4.
Display errorsOne issue to be aware of is that making a number of calls to Get-WmiObject in thesame script and then attempting to format the results of each call individually canproduce the following display error.
out-lineoutput : The object of type "Microsoft.PowerShell.Commands.Internal.Format.FormatStartData" is not valid or not in the correct sequence. This is likely caused by a user-specified "format-list" command which is conflicting with the default formatting. + CategoryInfo : InvalidData: (:) [out-lineoutput], InvalidOperationException + FullyQualifiedErrorId : ConsoleLineOutputOutOfSequencePacket, Microsoft.PowerShell.Commands.OutLineOutputCommand
As it states, this error is due to the conflict between the coded display parametersand the default parameters. I have managed to overcome this by creating a variablethat holds the output and then displaying that information, or by creating a new objectto hold the required output data and using that for display purposes. You’ll see thesetechniques in later chapters.
Figure 3.4 Viewing the system properties of a WMI class
www.it-ebooks.info

81Methods and properties
The __PATH and __SERVER properties are probably the most useful, and you’ll seethem in later chapters. If you want to avoid displaying the system properties, they canalso be filtered out:
Get-WmiObject -Class Win32_OperatingSystem |select -ExcludeProperty __* -Property *
These system properties don’t really add much, but you can’t do anything about them.Unless you want to display all properties without the system properties, the best prac-tice is to simply choose the properties you require.
One final thing you’ll need to do with properties is discover which property func-tions as the key for a class.
3.2.4 Key properties
The key property is the property you need to supply a value for when you create aclass using the [wmi] type accelerator (which you’ll meet in section 3.4.2). If youdon’t know which property acts as a key for the class, you can’t create an instance ofthat class.
You’ve seen that classes have qualifiers and, following the hierarchical nature ofWMI, so do properties. The property that functions as the key can be discovered usingthe following code, which is adapted from a posting by Jeffrey Snover on the Power-Shell team blog.
function get-key {[CmdletBinding()]param ( [string] [ValidateNotNullOrEmpty()] $class) $t = [WMIClass]$class $t.properties | select @{Name="PName";Expression={$_.name}} -ExpandProperty Qualifiers | where {$_.Name -eq "key"} | foreach {"The key for the $class class is $($_.Pname)"}}
NOTE The original script arose because an MVP reported an error using thetype accelerators. It’s in the “WMI Object Identifiers and Keys” article on thePowerShell blog and can be found at http://mng.bz/0JI2. The post explainswhy a key is required when creating an instance of a WMI class.
This function takes a single parameter—the name of the class. The ValidateNotNull-OrEmpty validation method is used to ensure that a value is passed into the function. Thisis then used to create an object representing that WMI class.
The properties are piped into a Select-Object cmdlet, where you create a calcu-lated field for the name of the property and expand its qualifiers. Where-Object is
Listing 3.4 Discover the key property of a WMI class
www.it-ebooks.info

82 CHAPTER 3 WMI in depth
used to filter out all of the properties except the key. The name of the property thatfunctions as the key is written out using string substitution to create the output.
PowerShell can help you discover the information you need to successfully workwith WMI classes. You may find it helpful to have a function that combines the codefrom this section to fully document a WMI class. I’ve included this combined code inthe script download package as the get-wmiclass function.
You now know how to discover the properties and methods of WMI classes. It’s timeto move on and look at ways to document the specific WMI features on your system.
3.3 Documenting WMIYou’ve seen a number of pieces of the puzzle for documenting WMI in previous sec-tions. In the following listing, they’re put together to produce a script that will docu-ment WMI down to the class level. This is useful at this point in the chapter becausethe next sections deal with using the WMI functionality within PowerShell.
function main { "root" get-namespace "root"}
function get-namespace { param ([string]$name) Get-WmiObject -Namespace $name -Class "__NAMESPACE" | foreach { $ns = "$name\" + $_.Name "`nNameSpace: $ns" get-providerclass $ns get-namespace $ns }}
function get-providerclass { param ([string]$namespace)
Get-WmiObject -Namespace $namespace -Class __Win32Provider | foreach { $provider = $_.Name "Provider: $provider"
$refs = Get-WmiObject -Namespace $namespace -Query "REFERENCES OF {__Win32Provider.Name='$provider'}"
foreach ($ref in $refs) {
$type = $ref.__CLASS " Registration: $type"
switch ($type) {
"__PropertyProviderRegistration" { " does not have classes" break }
Listing 3.5 Document WMI on a machine
Main control functionB
Namespace iterationC
Provider iteration
D
Provider referencesE
Provider typesF
www.it-ebooks.info

83Documenting WMI
"__ClassProviderRegistration" { " only provides class definitions" break }
"__EventConsumerProviderRegistration" { " uses these classes" " $($ref.ConsumerClassNames)" break }
"__EventProviderRegistration" { " queries these classes:" foreach ($query in $ref.EventQueryList) { $a = $query -split " " " $($a[($a.length-1)])" } break }
default { " supplies these classes:" Get-WmiObject -Namespace $namespace -List -Amended | foreach { if ($_.Qualifiers["provider"].Value -eq "$provider"){ " $($_.Name)" } } # class list break } } #switch } # refs } # provider loop}main
This code can be run on a system to determine the namespaces, providers, and classesavailable on the machine. The information produced by this script is a valuableresource for documenting your system. The script can also be used to test for prob-lems with WMI—if it completes, there are no obvious problems.
The script starts on the very last line, where you call the controlling function,main B. This defines your starting point as the root namespace, and it callsget-namespace C. The work of documenting WMI starts here, as you recursively iter-ate through the namespaces installed on the system.
As each namespace is discovered you list out its name and call the get-providerclassfunction D. The instances of the Win32_Provider class for that namespace are returned,and for each of them you determine the references E. You can iterate through the ref-erences, determine the type of provider, and depending on the provider type F, displaysome or all of the following:
■ Event classes that are used■ Event classes that are queried■ Classes that are supplied
www.it-ebooks.info

84 CHAPTER 3 WMI in depth
I have commented the closing brace (}) of the major loops to aid understanding ofthe structure of the script.
This script produces over 2,550 lines of output on my Windows 7 system, whichmakes it a bit unwieldy to use when outputting to screen! One alternative is to sendthe output to a text file (I saved the listing to a script called Get-WmiList):
./Get-WmiList | Out-File wmidoc.txt
The text file can then be searched using Select-String or an editor to find the rele-vant information.
We’ve covered a lot of ground and delved into a lot of background material on WMI.In the course of this investigation, we’ve looked at how to use Get-WmiObject. But thereare other PowerShell cmdlets for working with WMI that we need to consider.
3.4 WMI cmdlets and acceleratorsPowerShell v1 provided the Get-WmiObject cmdlet—this was read-only access to WMI,though it could also be used to create an object from which you could call methods.This one cmdlet enabled you to work with WMI easily, compared to previous scriptinglanguages. PowerShell v1 also offered some type accelerators for working with WMIthrough the .NET classes. Type accelerators are shortcuts for accessing .NET classes.
The delivery of PowerShell v2 expanded the list of cmdlets, as well as giving Get-WmiObject additional functionality. You now have additional cmdlets for invokingWMI methods, setting WMI property values, and removing WMI objects entirely.
TIP The CIM cmdlets available in PowerShell v3 are described in chapter 19.
The type accelerators are still available and provide an easier route to creating WMIclasses and searching for WMI instances, if you have to resort to .NET code. But it’sgenerally easier to work with the PowerShell cmdlets than the accelerators.
3.4.1 Cmdlets
You have a grand total of four cmdlets for working with WMI objects:■ Get-WmiObject■ Set-WmiInstance■ Invoke-WmiMethod■ Remove-WmiObject
A fifth cmdlet deals with WMI events, but we’ll deal with that in section 3.7. Get-Wmi-Object is the one you’ll be working with most, so we’ll start there.
GET-WMIOBJECT
You’ve used Get-WmiObject a number of times already. Its help file synopsis states thatit “Gets instances of Windows Management Instrumentation (WMI) classes or informa-tion about the available classes.” It’s the PowerShell method of discovery for WMI.
www.it-ebooks.info

85WMI cmdlets and accelerators
This cmdlet is normally used to define the namespace and class you want to workwith. You can also supply credentials, authentication, and impersonation levels. Youcan use the cmdlet interactively or configure it to run asynchronously as a PowerShelljob by using the –AsJob parameter. I’ll explain these features as we need them.
SET-WMIINSTANCE
This cmdlet “Creates or updates an instance of an existing Windows ManagementInstrumentation (WMI) class.” You’ll mainly use this to modify existing instances ofWMI objects.
WARNING My experience with Set-WmiInstance suggests that using thiscmdlet to create new WMI instances is of limited practical use. I don’t recom-mend using Set-WmiInstance for anything but modifying the properties ofexisting objects.
WMI objects tend to have a long list of properties. Some properties are read-only,which means you can’t change them. The property you’re interested in should bechecked to ensure that it can be modified before you attempt to change it. You canskip this step, but be prepared for the error messages when you hit a property thatcan’t be changed.
You’ve seen that you can view an object’s properties using Get-Member:
Get-WmiObject -Class Win32_NTEventLogFile `-Filter "LogFileName='Scripts'" | Get-Member
You can view the property information, such as the maximum file size, of your log file:
MaxFileSize Property System.UInt32 MaxFileSize {get;set;}
The fact that it’s modifiable is indicated by the presence of “set” in the curly bracesafter the data type: {get;set;}.
TIP I’ve used an event log called Scripts in these examples to ensure that amistake doesn’t adversely affect your system. If you want to create an event logto experiment with, use the following syntax and change the source and lognames as required: New-EventLog -Source MyNewSource -LogName MyNew-Log. This is discussed in more detail in chapter 15.
One thing this doesn’t tell you is how to present the data. For example, a file sizecould be presented in bytes, KB, MB, or even GB. The two options are to guess fromlooking at the current setting or to check the documentation. The first is more excit-ing, but the second gets the job done faster. When you want to change the maximumfile size of an event log, you need to present the size in bytes:
$log = Get-WmiObject -Class Win32_NTEventLogFile `-Filter "LogFileName='Scripts'"
Set-WmiInstance -InputObject $log ` -Arguments @{MaxFileSize=31457280}
www.it-ebooks.info

86 CHAPTER 3 WMI in depth
You use Get-WmiObject to create an object representing the log file you’re inter-ested in (the Scripts file again, in this example). This object is used as input toSet-WmiInstance. The property or properties that you want to set are given as ahash table. The information could also be presented as follows:
-Arguments @{MaxFileSize=(30*1MB)}.
Note that 30*1MB resolves to 31457280, which is what was used in the preceding exam-ple. It has to be presented in this format, rather than as 30MB, to ensure that the classaccepts the value as bytes.
Objects have both properties and methods. You’ve seen how to manipulate WMIproperties. Now let’s look at how you can work with methods.
INVOKE-WMIMETHOD
PowerShell v2 supplies a brand new cmdlet especially for working with WMI methods.One of the tasks you’ll need to do on a periodic basis is back up your event logs. Let’sreturn to the Scripts log file and see how you can use methods.
Get-WmiObject is used to create a variable for the WMI object:
$log = Get-WmiObject -Class Win32_NTEventLogFile ` -Filter "LogFileName='Scripts'"
Get-Member is then used to determine the methods on this object:
$log | Get-Member -MemberType method
The -MemberType parameter can take a number of options, one of which lists only themethods available on the object.
One of the methods is BackUpEventLog. A look at the documentation indicatesthat you only need to provide the name and path to the file that will be used as a tar-get for your backup:
Invoke-WmiMethod -InputObject $log -Name BackupEventlog ` -ArgumentList "c:\test\paw3.evt"
TIP Remember to use PowerShell with elevated privileges or these com-mands will fail.
With Invoke-WmiMethod, you use the variable you’ve already created as the InputObject.The name of the method is supplied, and the file to be used is given as the argument.
It’s also possible to do this in one pass using the pipeline:
Get-WmiObject -Class Win32_NTEventLogFile ` -Filter "LogFileName='Scripts'" |Invoke-WmiMethod -Name BackupEventlog ` -ArgumentList "c:\test\paw4.evt"
This time you don’t need to specify the object you’re using because the pipeline man-ages that aspect of the processing. Note that I’ve changed the filename in this exam-ple. That’s because the method will fail if the file already exists. In a production script,you’d use Test-Path to determine whether the file exists and throw an exception tostop processing if it did.
www.it-ebooks.info

87WMI cmdlets and accelerators
The three cmdlets we’ve looked at so far enable you to get information about WMIobjects and work with the methods and properties. We’ll look at how you can createnew WMI objects in a while, but first we need to consider what happens when a WMIobject is no longer required.
REMOVE-WMIOBJECT
Remove-WmiObject is a very easy cmdlet to understand. It removes WMI objects fromyour system. Be careful with it, though, as deleting the wrong objects could be acareer-threatening action. There are many WMI objects, such as the computer systemor disk drives, that it doesn’t make sense to remove!
I have a very simple recommendation for working with Remove-WmiObject: useGet-WmiObject first. This is best illustrated with an example. Assume you have a pro-cess running on your machine (such as Notepad) that’s misbehaving, and you need toshut it down. The first thing you have to do is identify the exact process, and this isbest achieved with Get-WmiObject:
Get-WmiObject -Class Win32_Process |where {$_.Name -like "Notepad*"}
A Where-Object filter is used to identify the exact process. Then, the simple way to deletethe process is to pipe the resultant Win32_Process object into Remove-WmiObject:
Get-WmiObject -Class Win32_Process |where {$_.Name -like "Notepad*"} |Remove-WmiObject
Your misbehaving process is gone, and your system can settle back to its normal state.This way you’ve removed the process but you’ve put a check on the way you do it toensure that you remove the correct process.
NOTE This approach removes all instances of the process, in this exampleNotepad, from your system. When you’re trying to remove a misbehaving pro-cess, this is exactly what you need. I once had to remove many (30+) instancesof a cscript process from a system, and this technique would have saved me alot of work.
Cmdlets provide the best way of working with WMI objects, but sometimes you need toget a bit closer to the underlying .NET code.
3.4.2 Type accelerators
In section 2.4 you saw how to use the New-Object cmdlet to create .NET objects. Pow-erShell also has type accelerators, which are shortcuts for creating .NET objects directly.WMI has three type accelerators, and they’re listed in table 3.4 together with the .NETclass they represent.
My experience is that the cmdlets are used much more than the accelerators. Thisis due to the additional WMI functionality introduced in PowerShell v2. The accelera-tors were more important in PowerShell v1 than they are now, but there are still a few
www.it-ebooks.info

88 CHAPTER 3 WMI in depth
occasions when they come in handy. One task you’ll always be performing is searchingfor information that WMI can make available.
[WMISEARCHER]
Get-WmiObject is used for retrieving WMI-based data. You’ve seen WQL queries usedin the -Filter parameter and the -Query parameter. Section 3.5 will dive deeper intoWQL, but you can get a taste of simple WQL queries by looking at the [wmisearcher]type accelerator.
These two PowerShell statements produce identical results:
Get-WmiObject -Class Win32_Process -Filter "Name='powershell.exe'"
Get-WmiObject `-Query "SELECT * FROM Win32_Process WHERE Name='powershell.exe'"
In both cases, you’re finding the WMI object that’s the PowerShell process. You canalso perform this using [wmisearcher]:
$query = [wmisearcher]
➥ "SELECT * FROM Win32_Process WHERE Name='powershell.exe'"$query.Get()
All of these techniques will return the same information. The question now becomeswhich method to use. I use Get-WmiObject nearly 100 percent of the time. It’squicker to type and has the advantage of returning an object you can work with,rather than just the data. It’s also easier to use against remote machines.
You’ve seen an accelerator for finding WMI information, but sometimes you’llneed to create a WMI object. This can be done with the [wmiclass] accelerator.
[WMICLASS]
The [wmiclass] accelerator provides a shortcut for creating new instances of WMIclasses. There isn’t any New-WmiObject cmdlet or an easy way to work with WMI objectsthrough New-Object. In PowerShell v1, the usual way to create a new WMI object wasto use [wmiclass]. Invoke-WmiMethod has, at least partially, taken over this task inPowerShell v2.
Using the accelerator is straightforward:
$p = [wmiclass]'Win32_Process'$p.Create("calc.exe")
TIP If you’re still using PowerShell v1, you’ll need to change the second lineof the preceding example to $p.psbase.Create("calc.exe").
There is one final accelerator to consider.
Table 3.4 WMI type accelerators
Accelerator .NET type
Wmisearcher System.Management.ManagementObjectSearcher
Wmiclass System.Management.ManagementClass
Wmi System.Management.ManagementObject
www.it-ebooks.info

89Using WQL
[WMI]
Table 3.4 shows that [wmi] works with the same .NET class as Get-WmiObject. Whenyou’re using the cmdlet, you can perform a task such as this:
Get-WmiObject -Class Win32_Process -Filter "Name='calc.exe'"
If you want to use the accelerator, you might try this:
[wmi]"root\cimv2:Win32_Process.Name='calc.exe'"
This will generate an error, because when using this accelerator you need to use theproperty that functions as the key for the class. The way to discover the key was cov-ered in listing 3.4. Your code becomes
[wmi]"root\cimv2:Win32_Process.Handle='4456'"
This involves additional steps, and effort, to return the same information that you canget from the cmdlet. As with the [wmisearcher] accelerator, I recommend using theGet-WmiObject cmdlet rather than the accelerator.
Many of the WMI examples in this chapter have involved the use of a filter of somekind that has been created using WQL. You need to learn how WQL works in order touse the technology to its maximum potential.
3.5 Using WQLYou’ve seen WMI queries performed in a number of the examples in this chapter. Ifyou thought that the syntax looked like SQL, you’d be correct. You’ve been using WMIQuery Language (WQL). It’s a subset of SQL that supplies only the functionality youneed for working with the WMI repository. That means you’re restricted to runningsimple SELECT statements without JOINs or any of the other complications you canexpect in SQL.
TIP It’s important to note that the other SQL options—DELETE, UPDATE, andREPLACE—don’t exist in WQL either.
You have a number of options available in the way you use WQL with PowerShell.These options are best explained with reference to the WQL keywords. A number ofkeywords are only used when working with WMI associations and references—thoseparticular keywords will be discussed in section 3.6.
3.5.1 Keywords
WQL, like PowerShell, has a number of keywords that you need to understand ifyou’re to use it properly. This is the basic structure of a WQL query:
SELECT <property list>FROM <WMI class name>WHERE <one or more conditions>
NOTE I have deliberately used uppercase for the WQL keywords in this sec-tion for emphasis. WQL keywords aren’t case sensitive.
www.it-ebooks.info

90 CHAPTER 3 WMI in depth
There are two ways you can use WQL in PowerShell. The first follows the traditionestablished by VBScript of running a full query:
Get-WmiObject `-Query "SELECT * FROM Win32_Process WHERE Name='PowerShell.exe'"
This runs a query that will select all of the data (properties) from a Win32_Processinstance where the name of the process is PowerShell.exe. In WQL you can only spec-ify a single class to query at a time. This restriction also applies to Get-WmiObject inthat the -Class parameter only accepts a single class at a time.
You could restrict the properties returned by your query. For instance, the follow-ing query only returns the three properties you specify in the WQL statement:
Get-WmiObject -Query "SELECT Name, Threadcount, UserModetime FROM Win32_Process WHERE Name='PowerShell.exe'"
TIP If you need to work with an object that has a reduced property set, try usingthis approach: Get-WmiObject -Class Win32_Process -Filter "Name='PowerShell.exe'" -Property Name, Threadcount, UserModetime. It pro-duces an object that has the system properties and the ones you defined only.This approach rarely seems to be adopted in practice for some unknown reason.
The second method of using WQL is to use the -Filter parameter rather than the-Query parameter:
Get-WmiObject -Class Win32_Process -Filter "Name='PowerShell.exe'"
The preceding code is similar to running the full query except that you select the classwith the -Class parameter, and the -Filter parameter uses the part of the query thatfollows the WHERE keyword.
This approach can also restrict the properties you return:
Get-WmiObject -Class Win32_Process ` -Filter "Name='PowerShell.exe'" |Format-List Name, Threadcount, UserModetime
The advantage of this method is that the system properties aren’t returned. Is one approach better than the other? I tend to use a filter rather than a query
because I find it easier to read and it involves less typing. I think it’s also more flexiblebecause I can easily change the properties selected for display without risking the syn-tax of the query.
Our queries so far have been based on simple SELECT statements, but WQL alsoenables us to perform other processing as part of the query.
3.5.2 Operators
There are three groups of WQL operators to consider:
■ Logical operators which define how statements are combined■ Comparison operators which perform matching operations■ Wildcards which enable you to perform matching on a subset of data
www.it-ebooks.info

91Using WQL
The WQL queries you’ve seen so far have only had a single condition in the WHEREclause. That’s a bit limiting, but there is a way to remove this limitation.
LOGICAL OPERATORS
The logical operators are used to combine statements. The logical operators availablein WQL are detailed in table 3.5.
The use of the first two operators in the table can be demonstrated as follows. I startedtwo instances of PowerShell so that I had a choice of targets:
Get-WmiObject -Query "SELECT *
➥ FROM Win32_Process ➥ WHERE Name='PowerShell.exe' ➥ AND Handle='6036'"
In this example, the AND operator is used to link the two comparisons. Both compari-son expressions must evaluate to TRUE for this query to work. On your system, thevalue of the Handle property will be different.
WARNING It isn’t possible to refer to a property name on both sides of thecomparison operator in a WHERE clause. You’ll receive an error if you try it.
An alternative way of using the criteria is to use an OR statement to link the twoexpressions:
Get-WmiObject -Query "SELECT *
➥ FROM Win32_Process ➥ WHERE Handle='6036' ➥ OR Name='PowerShell.exe'"
The Handle property is checked first, and if that evaluates to TRUE, your data isretrieved. If it evaluates to FALSE, the second expression is checked. These operatorscan also be used in a Get-WmiObject Filter statement.
The comparisons you’ve performed so far have involved checking equality. Othercomparisons are also available.
COMPARISON OPERATORS
In this section, we’ll consider numerical comparisons and how you can determinewhether a property has a NULL value. The numerical comparison operators are listedin table 3.6.
Table 3.5 WQL logical operators
Operator Meaning
AND Combines two expressions and returns TRUE if both expressions are TRUE
OR Combines two expressions and returns TRUE if one expression is TRUE
TRUE Boolean operator that evaluates to -1
FALSE Boolean operator that evaluates to 0
www.it-ebooks.info

92 CHAPTER 3 WMI in depth
You may recall the PowerShell comparison operators we discussed in chapter 2: -eq,-lt, -gt, -le, -ge, -neq. Using a PowerShell operator instead of the WMI operator in aWQL query will cause syntax errors. WMI is very unforgiving of syntax errors in WQLqueries, so the script will fail rather than run and cause a problem with your systems.
These comparison operators can be used in a Query or Filter statement, and thesyntax is similar for all of them. Starting with the -Query parameter, you can write thiscode:
Get-WmiObject -Query
➥ "SELECT Name, HandleCount FROM Win32_Process WHEREHandleCount>=550" |Format-Table Name, HandleCount -AutoSize
Alternatively, you can use a -Filter parameter as follows:
Get-WmiObject -Class Win32_Process -Filter "HandleCount>=550" | Format-Table Name, HandleCount -AutoSize
In the two preceding examples, you’re discovering all of the processes that have morethan 550 handles. In the first example, a full WQL query is used to return the data,whereas the second uses the -Filter parameter. Format-Table is used with the prop-erty names in both cases to screen out the system classes.
Using a full query allows you to trim down the amount of data you’re dealing withas soon as possible. This is a good technique when accessing remote machinesbecause it reduces network traffic.
You can, of course, perform the same filtering task in PowerShell:
Get-WmiObject -Class Win32_Process |Where {$_.HandleCount -ge 550} |Format-Table Name, HandleCount -AutoSize
Notice the difference in the comparison operator. They do the same job, but youneed to write them differently. It’s a pain, but you’ll have to live with it because thetechnologies come from two separate teams.
A property may sometimes have a value of NULL. This doesn’t mean that it’s zero orthat a string is empty. It’s best thought of as meaning that a value hasn’t been set.There are two comparison operators for working with NULL values. Try these two
Operator Meaning
= Equal to
< Less than
> Greater than
<= Less than or equal to
>= Greater than or equal to
!= or <> Not equal toTable 3.6 WMI comparison operators
www.it-ebooks.info

93Using WQL
queries with and without a CD in the drive to really see the difference. If you can workout the results before running the query, you’ll have this down solid:
Get-WmiObject -Query "SELECT *
➥ FROM Win32_CDRomDrive ➥ WHERE VolumeName IS NULL"
Get-WmiObject -Query "SELECT *
➥ FROM Win32_CDRomDrive ➥ WHERE Drive IS NOT NULL"
The first query returns all instances of the CD drive that don’t have a volume name set.The second query returns instances of the CD drive that have a drive letter set.
In the examples of using WQL so far, you’ve used the full value of the property.Now let’s consider the case where you aren’t quite sure what the value should be.
WILDCARDS
Wildcards enable you to specify only part of the value you want to compare against.You need to use the LIKE operator and build expressions using wildcards.
TIP You may see statements on the internet claiming that WMI can’t usewildcards. This is incorrect. What those authors have done is tried to use thePowerShell wildcards and failed.
The WQL and PowerShell wildcard equivalents are given in table 3.7 for comparisonpurposes. Technically, the last two options in the table are beginning to get into regu-lar expressions, but I’ll deal with them here for completeness.
The expressions in table 3.7 can be used in a WMI query or with a -Filter parameter:
Get-WmiObject -Class Win32_Process -Filter "Name LIKE 'po%'"
In the preceding statement, all processes whose names start with the letters po will bereturned. This is case insensitive, so PowerShell.exe will be returned. The same resultcould be obtained by using Where-Object:
Get-WmiObject -Class Win32_Process | where {$_.Name -like 'PO*'}
Table 3.7 Comparison of WQL and PowerShell wildcard characters
WQL Meaning PowerShell
_ Any single character ?
% Zero or more characters *
[a=c][abc]
Any one character in the set or range []
[^a=c][^abc]
Any one character not in the set or range use -notmach operator or[^]
www.it-ebooks.info

94 CHAPTER 3 WMI in depth
The matching can be made more sophisticated. For instance, you can test for differ-ent patterns of the name:
Get-WmiObject -Class Win32_Process -Filter "Name LIKE 'P_W%'"Get-WmiObject -Class Win32_Process | where {$_.Name -like 'P?W*'}
In both of these cases, you’re looking for a name that starts with p, that has any secondcharacter, and that has w as the third character.
If you want to get very sophisticated in your testing, you can start to match ongroups of letters:
Get-WmiObject -Class Win32_Process `-Filter "Name LIKE '%[sh][sh]%'" | select name
Get-WmiObject -Class Win32_Process |where {$_.Name -match '.[sh][sh].'} | select name
In this case, you’re looking for processes that have some combination of the letters sand h somewhere together in their name.
It would be possible to fill the chapter with examples of using these expressions. Irecommend experimenting with these options to get a good understanding of howthey work. This is one area where some testing goes a long way to help understanding.
We’ve finished looking at using WQL for simple querying of data, but there are afew more WQL-related topics that we need to consider regarding the relationshipsbetween WMI classes—references and associators.
3.6 WMI references and associatorsWMI classes supply information about a single discrete item in your system. Sometimesthis granularity seems to have been taken too far, such as in the classes dealing withnetwork adapters:
Get-WmiObject -List *Win32_NetworkAdapter*
This will return three results:
■ Win32_NetworkAdapter
■ Win32_NetworkAdapterConfiguration
■ Win32_NetworkAdapterSetting
You need to understand the relationships between these classes, and you need toknow how to use the relationships to make your work easier. This will involve lookingat WMI references and WMI associators.
To investigate the relationship between the WMI classes, you need a starting point.We’re using the network adapters as an example, so the obvious starting point is thephysical adapter:
Get-WmiObject -Class Win32_NetworkAdapter |where {$_.NetEnabled} | select name, deviceid
www.it-ebooks.info

95WMI references and associators
You’re only interested in those adapters that are enabled. The name of the adapterand the deviceid are selected. The name is obvious, but why the deviceid? The par-ticular adapter you’re investigating needs to be identified in such a way that it can beused to determine relationships with other classes. There are many possible identifi-ers, but the property that acts as the key for the class is a good place to start; you canfind the key by using listing 3.4. It’s possible to determine relationships using the WMIdocumentation, but that takes longer.
You’ll work with a single adapter, as that keeps the examples simple. You can startby looking at the references of the adapter. I chose the wireless adapter in my develop-ment system, based on the results of the previous code snippet:
Get-WmiObject ` -Query "REFERENCES OF {Win32_NetworkAdapter.DeviceId='11'}"
Notice the use of {} to define the WMI instance for which you need the references. A number of WMI classes will be returned. They’re classes that show the links
between two other classes. The links are described by a pair of properties. Unfortu-nately the names of the properties can vary. These are some common pairs of names:
■ SameElement, SystemElement■ GroupComponent, PartComponent■ Element, Setting■ Antecedent, Dependent
In some classes, a third property is available, called device. The links can be better displayed by using the __PATH system property of each class:
Get-WmiObject ` -Query "REFERENCES OF {Win32_NetworkAdapter.DeviceId='11'}" |foreach { "" $_.__CLASS $($_.__PATH -split ",")}
This will show the class and the instance that links to your particular adapter. If you onlywant to see the classes involved, you can simplify the code by using the ClassDefsOnlykeyword:
Get-WmiObject -Query "REFERENCES OF
➥ {Win32_NetworkAdapter.DeviceId='11'} ➥ WHERE ClassDefsOnly" |Format-Table Name, Properties -AutoSize
Name Properties---- ----------Win32_PnPDevice {SameElement, SystemElement}Win32_NetworkAdapterSetting {Element, Setting}Win32_SystemDevices {GroupComponent, PartComponent}Win32_AllocatedResource {Antecedent, Dependent}Win32_ProtocolBinding {Antecedent, Dependent, Device}
www.it-ebooks.info

96 CHAPTER 3 WMI in depth
An additional benefit of starting with the classes is that you can see the propertiesinvolved in the links. The information that’s returned can be controlled by using theother keywords that are available for use with references and associators. They’redescribed in table 3.8.
A reference supplies the linking, or associating, WMI classes. In many cases, it’s moreproductive to jump straight to the endpoint of the link. This is where you’ll find theinformation you need. You can find the endpoints by using ASSOCIATORS OF instead ofREFERENCES OF.
You can start with the associated classes:
Get-WmiObject -Query "ASSOCIATORS OF{Win32_NetworkAdapter.DeviceId='11'} WHERE ClassDefsOnly" |select Name
This supplies a list of WMI classes, one of which is theWin32_NetworkAdapterConfiguration class:
Get-WmiObject -Query "ASSOCIATORS OF {Win32_NetworkAdapter.DeviceId='11'} WHERE RESULTCLASS =Win32_NetworkAdapterConfiguration"
You now have a method of linking two related classes and ensuring that you can findall of the required information about the system component. You’ll see more exam-ples of performing these types of queries in later chapters.
Windows is an event-driven operating system. Everything you do, from pressing akey to working in your applications, causes events to be generated. Many of theseevents are WMI-based, and you need to be able to utilize this functionality.
3.7 WMI eventsPowerShell v2 provides access to the Windows event engine through a number ofmechanisms:
Table 3.8 Keywords for references and associators queries
Keyword Meaning References Associators
ClassDefsOnly Returns class definition instead of class instances
Y Y
RequiredQualifier Specifies a qualifier that returned classes must meet
Y Y
ResultClass Restricts results to one class Y
AssocClass Restricts association to a single class Y
RequiredAssocQualifier Only returns instances that are linked through a class with a specific qualifier
Y
www.it-ebooks.info

97WMI events
■ WMI■ .NET■ PowerShell engine
The cmdlets that you can use to work with events are outlined in table 3.9.
As an example, consider plugging in a USB device. There’s a WMI class,Win32_VolumeChangeEvent, that you can use to discover when something changes:
$query = "SELECT * from Win32_VolumeChangeEvent WITHIN 5"Register-WmiEvent -Query $query -SourceIdentifier 'USBEvent'
The first part of this query is a standard select from the class. Within 5 means that theclass is checked every 5 seconds to determine whether an event has occurred. The eventis then registered using USBEvent as an identifier. You can use Get-EventSubscriber tosee the subscription.
When you plug in a USB device, the VolumeChangeEvent will be triggered. You cansee the results by using Get-Event:
$e = Get-Event | select -First 1
The drive that was added can be identified using this code:
$e.SourceEventArgs.NewEvent
A corresponding event is raised when the USB drive is removed. You can also work with other events, such as a process being started:
$process = "calc.exe"$WMIQuery = "SELECT * FROM __InstanceCreationEvent WITHIN 5 WHERE TargetInstance ISA 'Win32_Process' AND TargetInstance.Name =
Table 3.9 Cmdlets for working with events
Cmdlet Purpose
Get-Event Gets the events in the event queue
Get-EventSubscriber Gets the event subscribers in the current session
New-Event Creates a new event
Register-EngineEvent Subscribes to events that are generated by the Windows PowerShell engine and by the New-Event cmdlet
Register-ObjectEvent Subscribes to events that are generated by a Microsoft .NET Frame-work object
Register-WmiEvent Subscribes to a Windows Management Instrumentation (WMI) event
Remove-Event Deletes events from the event queue
Unregister-Event Cancels an event subscription
Wait-Event Waits until a particular event is raised before continuing to run
www.it-ebooks.info

98 CHAPTER 3 WMI in depth
'$Process'"Register-WmiEvent -Query $WMIQuery ` -SourceIdentifier "Process $Process"
This will trigger an event when the Windows calculator is started but not when otherprocesses such as Notepad are started.
This is good, in that you can find out what has happened, but you’ll want more.You’ll want to be able to perform some action when a particular event is triggered.Suppose you have a process that should only run out of normal business hours. If itstarts during business hours, you want to immediately shut it down. You can adapt thelast example to accomplish this, as follows.
$process = "calc.exe"$action = { Write-Host "Calculator is running and must be stopped" Get-WmiObject -Class Win32_Process -Filter "Name='$process'" | Invoke-WmiMethod -Name Terminate Write-Host "Calculator has been stopped"}
$WMIQuery = "SELECT * FROM __InstanceCreationEvent WITHIN 5 WHERE TargetInstance ISA 'Win32_Process' ANDTargetInstance.Name = '$Process'"
Register-WmiEvent -Query $WMIQuery ` -SourceIdentifier "Process $Process" -Action $action
The script starts by defining the process you want to prevent running. A script block Bis created that will perform the processing. You produce a message to say that the processis running, you stop the process using the Terminate method of the Win32_Processclass, and you write out another message to say it has happened.
NOTE I know I could have used Stop-Process to kill the Calculator process,but this is a WMI book after all.
The WMI query to check for the process starting is defined C, and the event is regis-tered D, adding the -Action parameter with the script block as its value. One thing tonote is that when the event is registered in this manner, it creates a PowerShell jobthat runs in the background. The data produced by this job isn’t accessible by the*-Job cmdlets.
When the Windows calculator is started, the event will trigger and close it down.This is illustrated in figure 3.5. Once you’ve finished with the event, it should beunregistered.
Unregister-Event -SourceIdentifier "Process $Process"
The job created by the event can be safely removed at this point. Always unregister theevent before deleting the job. Otherwise, you won’t be able to remove the event!You’ll see further examples of WMI events in the second part of the book.
Listing 3.6 Trigger an action through a WMI event
Action script blockB
WMI query
C
Register event
D
www.it-ebooks.info

99Summary
We’ve covered a lot of ground in this chapter. It provides the basic information thatyou’ll need to perform the management tasks you’ll see in the second part of the book.
3.8 SummaryWMI is one of the most powerful tools available to Windows administrators. It’s a mis-understood and underused technology due to the perceived complexity, the lack of doc-umentation, and the difficulty in using it in the past. PowerShell corrects this and bringsan ease of use to WMI that should make it the tool of choice for all administrators.
WMI is a standards-based management toolset that’s installed by default in modernWindows systems. It supplies a large number of classes that correspond to physicalentities in your systems, such as CPU, operating system, or installed application. Theclasses contained in namespaces are arranged into a logical hierarchy.
PowerShell delivers ease of use through four cmdlets:■ Get-WmiObject■ Set-WmiInstance■ Invoke-WmiMethod■ Remove-WmiObject
There are also three type accelerators that are shortcuts for working with the .NETclasses PowerShell uses to access WMI data. The most useful of these is [wmiclass],which you can use to create new WMI objects.
Figure 3.5 Running listing 3.6 in the PowerShell ISE
www.it-ebooks.info

100 CHAPTER 3 WMI in depth
WMI information resides in the WMI repository (or database). There’s a SQL-likelanguage called WQL for querying the repository. This can be used in a number ofways with Get-WmiObject, but it’s easiest to understand when used in conjunction withthe -Filter parameter.
WQL also enables you to work with the links between WMI classes. These are createdand maintained automatically by WMI, so all you have to do is tap into the information.An example of this is the link between the network adapter and its configuration.
Windows is an event-driven operating system, and WMI and PowerShell provideaccess to the event engine so that you can be alerted when things happen. You canalso configure an action to be performed when an event is triggered. This starts tohead towards the fully automated system we discussed in chapter 1.
In this part of the book, we’ve looked at the problems and issues you’ll solve byautomation. We’ve examined PowerShell and WMI in depth to gain an understandingof the tools you’ll be using. In the next chapter, we’ll look at some best practicesaround using PowerShell, WMI, and scripting in general, to ensure that your scriptsare as efficient as possible and that you maintain the security of your environment.
www.it-ebooks.info

Best practices and optimization
We’ve had a good look at PowerShell and WMI in the last two chapters. In this chap-ter, we’ll start to examine how you can use them to solve your administrative prob-lems. We’re not quite at the point of jumping into lots of scripts, though. That treatis reserved for part 2 of the book, which starts with the next chapter.
As the title suggests, this chapter is about best practices. There are a lot of viewson what constitutes best practices, ranging from a loose collection of tips and tricksto a rigid set of commandments that should be followed to the letter. My approachfalls somewhere between those two extremes, but closer to the loose collection ofideas. I’ll be presenting a collection of techniques that I’ve used or collected overthe last five or six years of using PowerShell (that’s going back into the early Power-Shell v1 betas). I’ll also present a number of advanced techniques. You can adopt
This chapter covers■ Finding code samples■ Securing the PowerShell environment■ PowerShell best practices■ WMI best practices
101
www.it-ebooks.info

102 CHAPTER 4 Best practices and optimization
these as and when required; they can be of great benefit in streamlining the produc-tion of your PowerShell scripts. The idea is that at the end of the chapter, you’ll knowhow to produce a good script.
NOTE I have a very simple definition of a good script. It’s a script that workscorrectly and does the intended job in a reasonable time frame. Sometimesbetter performance is required, in which case I’ll revise the script. It takes 90percent of the estimated development time to perform 90 percent of the taskof creating the best script to do a job. It takes another 90 percent of the timeto get that last 10 percent of polish. Spend the time on another script!
The first thing we’ll look at in this chapter is security. You’ll often need to find samplecode on the internet to help you solve your problems. This raises a number of issues:
■ Where can you find the code?■ Can you trust the code?■ Which code sample supplies the correct answer?
When you utilize the automation techniques described in this book, there are a num-ber of security concerns related to the code: who can access and run it, and how canyou audit that usage. These questions will be answered in the first part of the chapter.
Second, PowerShell has a very wide scope. There are a number of areas where it’s pos-sible to script solutions that don’t take full advantage of PowerShell’s strengths and fea-tures. In this chapter, we’ll examine a number of areas where this is common, including
■ Data input and output (including working with strings)■ Calculated fields, types, and members■ Error handling
You saw in chapter 3 that PowerShell uses format files to determine how the data fromPowerShell objects should be displayed by default. This default behavior can be modi-fied to enable better control of the output, and we’ll also look at that in this chapter.
Next, it’s inevitable that bugs and mistakes will creep into your scripts, and Power-Shell v2 provides a number of simple techniques for finding and eliminating bugs.Errors will also occur when you’re running your scripts. In some cases, you can ignorethem and continue processing your data, but other times the errors could cause sig-nificant problems if you don’t deal with them properly.
Finally, WMI has its own set of best practices that you need to understand. You’veseen some of the underlying WMI structure, but you also need to understand the wayWMI is configured and what you can modify.
Automation usually implies accessing remote machines, which in turn means thatyou need to be able to authenticate yourself on that machine. Your default credentialsmay often be enough, but sometimes you’ll need that little bit more, and we’ll look atthat in this chapter.
WMI will often return data in its own internal format, especially for dates. Luckily,there’s a very simple way to convert them to a readable format. You also need to be
www.it-ebooks.info

103Security
aware that WMI will return sizes (of files, disks, and so on) in bytes, so you need to beable to convert them to more usable forms. PowerShell can do some formatting for usbut we can also perform some simple formatting in our scripts—especially where wewant to make things more readable.
We’ll get to all of these topics in turn. Our first port of call on this journey to goodscripting is security. PowerShell is too powerful to leave unsecured.
4.1 SecurityPowerShell has a number of security features built into it:
■ It doesn’t run scripts by default—you must modify the execution policy toenable this.
■ It doesn’t allow scripts to run by double-clicking—don’t modify this.■ It doesn’t run scripts from the current folder—don’t modify this.
Those features were covered in chapter 2. In this section, we’ll extend our security thinking and look at how you can make
sure that code you download is safe. Beyond that, we’ll look at how you can keep yourcode safe and restrict access to PowerShell scripts. (You also need a way to monitorwho is using your code, and this final point will be covered in chapter 15.)
The internet is a great resource for PowerShell code, but how can you use it safely?
4.1.1 Using internet code
PowerShell is all about solving problems—your administration problems. Ideally, youwould have all the time you require to
■ Properly define the problem■ Research possible solutions■ Decide on the best approach■ Write and test the solution■ Apply it in production
But in reality, you generally have a problem to solve now. There isn’t time to gothrough a full cycle of developing the ideal solution. You need something to useimmediately. You have to find some sample code, and this usually means the internet.
The first thing you need to do is find the code you need. One method is to entersome search criteria into your favorite search engine (no, I’m not getting involved inthat debate, thank you) and see what you get back.
It’s highly probable that you’ll get a number of hits, including some of the sites I’lldiscuss shortly. One group of hits will be question and answer threads on the variousforums that support PowerShell. These sources may be useful depending on who issupplying the answer. If you get lucky and find that someone else has posted a ques-tion that’s similar to your problem, you’ll have a potential answer.
www.it-ebooks.info

104 CHAPTER 4 Best practices and optimization
A second group of hits will include PowerShell-related blogs, several of which are verygood. The ones I regularly read are listed in appendix D. Many of these blogs aremaintained by PowerShell MVPs. I know I’m laboring the point, but you still need totest any scripts you take to use in your environment, even the ones from my blogs.
The third group of hits will likely include the various PowerShell repositories thatare available:
■ CodePlex—Contains over 400 PowerShell-related projects, including the Hyper-V library, PowerShell Community extensions, and my administration modules
■ Microsoft TechNet Script Center—Has lots of WMI examples, but many of the olderones are direct translations of VBScript and so may need reformatting
■ MSDN code gallery—Contains some PowerShell-related projects, including theCIM IDE used in chapters 18 and 19
■ PowerShell Code Repository (PoshCode.org)—The site of the Scripting Games and alarge code repository; many MVPs deposit code here
■ PowerGUI.org—Mainly PowerGUI related, but the ideas can be reused■ PowerShell.com—A large code repository and that has excellent forums, includ-
ing one dedicated to PowerShell and WMI
There are others, but I’ve either used these ones or I know the people who run thesites. Guess what? You still need to test the code!
One thing that shocks many newcomers to PowerShell is that when they look forcode to solve a particular problem, they find two or three different approaches to thesolution instead of the single definitive answer they were hoping for. By the time youget to the end of this book, you’ll be able to look back and say, “You could have solvedthat one by doing ...” for any of the examples in the book.
TRUSTDo you trust code you download from the internet?
I generally don’t, and I know many people who supply code on their blogs or on thesites they run.
If I know the person who actually wrote the code, and I trust them, I will be confidentthat the code isn’t deliberately malicious. But I can’t be sure that it will run error freein my environment. I will perform a read-through of the code at a minimum. If it’s fora production environment, I will test it under controlled conditions.
If I don’t know the code author, I am much more careful about the code. I will performa painstaking examination of the code, especially if a lot of aliasing or cascading func-tion calls have been used. I will test the code extensively in a sandbox before it hitsthe production environment.
Care should be applied to any code received as part of a download package with abook, including this one, or on a CD accompanying a book. The code won’t be delib-erately malicious, but it hasn’t been tested in your environment. Test before usemust be the approach.
www.it-ebooks.info

105Security
There is no right answer. If your solution solves the problem in a reasonable time,it’s a good script. Pick the answer you feel most comfortable with and that you under-stand. Get the problem solved rather than spending time puzzling out some compli-cated piece of code. You can always unravel the complicated code at your leisure forreuse in the future. Remember the KISS principle: Keep It Simple Scripter.
Let’s suppose you’ve found some code that sort of answers your question. Unlessyou’re really lucky, it won’t be a complete answer, so you’ll need to do some work onit. You also need to consider how you’ll ensure that the code you create hasn’t beenmodified to produce a harmful result.
4.1.2 Code security
In chapter 2, I recommended that your execution policy should be set to Remote-Signed. This will run unsigned scripts from your local disk, but it requires that down-loaded scripts, including scripts on network drives, be signed. This eases developmentbut enables you to protect the code you’ve developed. The only question remaining iswhat is code signing and how do you do it?
Code signing is the act of applying a code certificate to your code. This will put a lot ofseemingly random characters at the end of your PowerShell scripts. An example ofthis can be seen if you open any of the XML files in the PowerShell install folder.They’re all signed. Don’t modify them or PowerShell won’t load them.
There are three steps to code-signing a PowerShell script:
1 Obtain a code-signing certificate.2 Install the certificate.3 Apply the certificate.
Easy! You can obtain a code-signing certificate from a number of places:
Developers and signersHow many PowerShell developers are you going to have? Many organizations willhave a single person doing the majority of the development. Other users may dosome of the code writing, but the one guru is the person who approves the code. Atmost, an organization will have a small number of people producing code.
Keeping the number of PowerShell developers small enables better control over thecode. Even with a single person doing all of the work, using a version-control systemensures that you can track the changes made to scripts. If your application develop-ers have a system for doing this, ask them nicely and see if they can let you use alittle bit of it. Otherwise a simple script-naming convention that incorporates a versionnumber would allow you to identify current script versions.
Code signing should be restricted to one or two individuals. If your application devel-opers already have a process, I recommend that you join it. Otherwise, adopt a meth-od that will achieve the security goals outlined in this section.
www.it-ebooks.info

106 CHAPTER 4 Best practices and optimization
■ You can create a self-signed certificate using the makecert utility. This is usableif the scripts will only run on your machine.
■ Your enterprise’s Public Key Infrastructure (PKI), if you have one, can generatea certificate for you. Talk to the PKI administrators. This is a good solution if thescripts will only be used inside the organization.
■ You can buy a code-signing certificate from a commercial certificate authority(CA). This is the best solution if scripts will be shared beyond a single organization.
You can install the certificate with the Certificates management tool. This isn’treadily available, so open the MMC and add the Certificates snap-in. Select Personal.Right-click and select Import. A wizard will guide you through importing the certifi-cate. This GUI tool can also be used to request a certificate from your PKI or a com-mercial authority.
It’s generally a good idea to secure the certificate by exporting the private key. Thiscan be performed using Internet Explorer. Alternatively Quest supplies tools to workwith the certificate store in their AD cmdlets (search for AD cmdlets at http://www.quest.com). There is also a PowerShell module for administering certificatesdeveloped by one of the PowerShell MVPs, which you can download from http://pspki.codeplex.com/.
The last step is the most straightforward. The following code can be used to applythe certificate. Change the name of the certificate and script to work in your environ-ment. This code can be used interactively or can become part of a script if you have alot of signing to perform:
$cert = Get-ChildItem -Path cert:\CurrentUser\my -CodeSigningCertSet-AuthenticodeSignature myscript.ps1 $cert
Once you’ve signed the script, any modifications to it will cause it to fail unless it’sre-signed.
Now you know how to secure your code against tampering. How can you ensurethat only the right people can access your scripts?
4.1.3 Access to code
PowerShell scripts do a wonderful job of automating the administration of Windowsmachines. But like all powerful tools, they have the potential to cause a lot of dam-age if they’re misused. You need to ensure that only authorized personnel can accessyour scripts.
There are two basic solutions to the problem of controlling who has access to youradministration scripts. The first depends on them being on your personal workstation.This ensures that you’re the only person who has access. With this approach, you needto follow the normal security guidelines:
■ Lock the machine when you aren’t using it.■ Possibly encrypt the folder, or drive, that contains the scripts.■ Don’t share the folder containing the scripts.■ Don’t divulge your password.
www.it-ebooks.info

107Optimizing PowerShell code
This will work unless someone gains access to the machine. At that point, unlessthere’s a further layer of protection, such as encryption, the scripts are accessible.
The second approach is more common and must be adopted if multiple peopleare using the scripts. This involves putting the scripts on a network share. Access canbe controlled by only allowing the group of administrators who need to use the scriptspermissions to the network share containing the scripts. An Active Directory groupcan be assigned the appropriate permissions. Make sure that the group membership isunder change control or is treated as a Restricted Group in Group Policy to maintainthe security. Check the group membership periodically, just to be sure.
An essential part of any administrator’s job is maintaining security on the data andresources in their area of responsibility. Using PowerShell and WMI to administer thatenvironment doesn’t remove the need for security procedures and awareness. In fact,a few extra security requirements come into play:
■ Be careful with code downloaded from the internet. Always ensure that youunderstand how it works and always, always test it very carefully.
■ Use code-signing techniques to ensure that your code hasn’t been changed.■ Restrict access to production code. Only those who need to use it should have
access. Be even more careful about who has permissions to modify produc-tion code.
PowerShell has a number of areas where adherence to best practices can save timeand effort when writing and testing scripts. Optimized code will run more efficientlyand be easier to maintain.
4.2 Optimizing PowerShell codeUsing PowerShell effectively is about getting the job done with the minimum amountof code. And within your PowerShell code, there are a number of areas where you canbe more productive:
■ Data handling (input, output, string substitution, and so on)■ Format files■ Debugging■ Error handling
Notice that I’m not including the standard best practices, such as
■ Commenting code■ Using functions■ Code formatting■ Using naming conventions for scripts, variables, and the like
I’ll assume that you know the basics and want to progress to getting the best out ofPowerShell. The first area to consider is how you get data into PowerShell.
4.2.1 Data input
There are two aspects to getting data into your PowerShell scripts (assuming you aren’tgoing off to another data store, such as Active Directory or SQL Server—that would be
www.it-ebooks.info

108 CHAPTER 4 Best practices and optimization
a completely different problem). The first is the bulk use of data through reading a file.The second is getting single values for the main variables into PowerShell.
READING FILES
There are two cmdlets that you can use to read the content of files:■ Import-CSV■ Get-Content
Which one you should use tends to be dictated by the type of data. If it’s a CSV file, youuse Import-CSV, and if its text, you use Get-Content. This covers the majority of situa-tions. The important part is what you do with the data after you’ve read it.
Let’s create a CSV file to work with:
Get-Service | select Status, Name, DisplayName |Export-CSV chapt4.csv -NoTypeInformation
If you want to read this file, you can simply use
Import-CSV chapt4.csv | Format-Table -AutoSize -Wrap
The choice comes when you want to do something with the data. Consider a littlescript that checks the status of each service; if the service is stopped, the information iswritten out in red, and otherwise the normal foreground color is used. You need toaccess each service to test its status. As you’ll recall from chapter 2, you have twooptions. You can use the foreach PowerShell keyword as in figure 4.1.
Figure 4.1 Using the foreach keyword
www.it-ebooks.info

109Optimizing PowerShell code
The other alternative is to use the ForEach-Object cmdlet (aliased as foreach) as infigure 4.2.
The contents of the loop are the same. The variation is in how you set up the loop.If you use the pipeline, you can start processing immediately, but if you use a loop youhave the option of doing more with the data later in the script.
Import-CSV doesn’t demand that a file have a .csv extension. You can use .txt oranything else sensible. The delimiter can be defined, and you can even force a headeronto the data if one doesn’t exist.
Get-Content can be used in a similar manner except that you use it to read textfiles. These files are either structureless or the data needs to be handled on a row byrow basis.
You’ve now seen how to perform a bulk read from a file, but what about gettingvalues for individual variables?
PARAMETERS
I’ve mentioned several times that WMI can access remote computers. This is one ofthe big selling points for WMI. We need to get the computer name into a variable sothat we can use it in the script. But the bigger problem is getting the computer nameinto the script in the first place.
Figure 4.2 Using the ForEach-Object cmdlet
www.it-ebooks.info

110 CHAPTER 4 Best practices and optimization
Imagine for a moment that you’ve been tasked with gathering information on theamount of physical memory in the PC estate. You could go round and visit them all,but it would be much easier to use WMI and the Win32_ComputerSystem class:
Get-WmiObject -Class Win32_ComputerSystem |Select Name, @{Name="RAM"; Expression={$_.TotalPhysicalMemory / 1GB}}
Great. That works on the local machine, but you need the -ComputerName parameterto work with remote machines:
$computer = "rslaptop01"Get-WmiObject -Class Win32_ComputerSystem -ComputerName $computer |Select Name, @{Name="RAM"; Expression={$_.TotalPhysicalMemory / 1GB}}
You don’t want to have to hard-code the computer name, so you might do this:
$computer = Read-Host "Computer name?"Get-WmiObject -Class Win32_ComputerSystem -ComputerName $computer |Select Name, @{Name="RAM"; Expression={$_.TotalPhysicalMemory / 1GB}}
No, no, and thrice no! Don’t do it! If you want to pass data into a script (or function)use the param block, as shown in the next listing.
function get-ram {[CmdletBinding()]param ( [parameter(Mandatory=$true)] [string]$computername) Get-WmiObject -Class Win32_ComputerSystem -ComputerName $computername | Select Name, @{Name="RAM"; Expression={$_.TotalPhysicalMemory / 1GB}}}
You can use the [parameter(Mandatory=$true)] advanced parameter. It forces aprompt for a value if you don’t supply one. This technique prevents a number ofpotential errors that would stop the script from running and forces you to present thecomputer name to the script. All of this value from a simple line of code.
Listing 4.1 Using the param block
Advanced parameters and methodsAdvanced parameters enable you to add static and dynamic parameters to functionsthat use the [CmdletBinding()] attribute. Dynamic parameters are parametersthat are only available in a particular PowerShell provider—see about_Providersand the individual provider help files.
Static parameters include the following:
■ Mandatory■ Position■ ValueFromPipeline■ HelpMessage■ Alias
www.it-ebooks.info

111Optimizing PowerShell code
The function in listing 4.1 can be used within your scripts as an additional piece ofPowerShell functionality. You can call it from loops or any other script block.
Now that you know how to get data into a script, let’s look at what you can do withit. Many of your scripting actions will revolve around creating and manipulating thecontents of strings.
4.2.2 String substitution
I was a judge in Microsoft’s Scripting Games in 2010 and 2011, and one of the thingsthat I noticed was that many of the entries spent a lot of effort building up elaboratestrings when they could have done it in a single line of PowerShell.
String substitution is one of my favorite bits of PowerShell. If you’ve not seen itbefore, the idea is that you can substitute a variable into a double-quoted string.Note that single-quoted strings won’t work. As an example, consider this pieceof PowerShell:
$colour = "red""The balloon is $colour"
That code will produce this output:
The balloon is red
However, this line,
'The balloon is $colour'
will produce this output:
The balloon is $colour
(continued)There are a number of parameters that can be used to validate the data input to afunction, including testing for null values or empty strings. The data can also be test-ed against a set or range of data.
Advanced methods include the following:
■ Input-processing methods that compiled cmdlets use to do their work■ The ShouldProcess and ShouldContinue methods, which are used to get user
feedback before an action is performed■ The ThrowTerminatingError method for generating error records■ Several Write methods that return different types of output
Full details are available in the following PowerShell help files:
■ about_Functions_Advanced■ about_Functions_Advanced_Methods■ about_Functions_Advanced_Parameters■ about_Functions_CmdletBindingAttribute
www.it-ebooks.info

112 CHAPTER 4 Best practices and optimization
One place where this breaks down is when substituting properties of an object. Con-sider something you might pull back with WMI, such as the output from accessing theWin32_OperatingSystem class:
PS> $os = Get-WmiObject -Class Win32_OperatingSystem PS> $os
SystemDirectory : C:\Windows\system32 Organization : BuildNumber : 7600 RegisteredUser : Richard SerialNumber : 00426-065-1155216-86852 Version : 6.1.7600
You can pick off a couple of properties, like this:
PS> $os | select Caption, ServicePackMajorVersion | Format-ListCaption : Microsoft Windows 7 Ultimate ServicePackMajorVersion : 0
Then you can use Write-Host,
PS> Write-Host $os.Caption, $os.ServicePackMajorVersion Microsoft Windows 7 Ultimate 0
and even expand it a bit:
PS> Write-Host $os.Caption, "Service Pack", $os.ServicePackMajorVersion Microsoft Windows 7 Ultimate Service Pack 0
But if you try string substitution,
PS> Write-Host "The OS is $os.Caption with Service Pack $os.ServicePackMajorVersion"
The OS is \\RSLAPTOP01\root\cimv2:[email protected] with Service Pack \\RSLAPTOP01\root\cimv2:[email protected]
Oops—that’s not what you want. The problem is that you’re getting the object ratherthan the value. You need to use a subexpression:
PS> Write-Host "The OS is $($os.Caption) with Service Pack $($os.ServicePackMajorVersion)"
The OS is Microsoft Windows 7 Ultimate with Service Pack 0
All this does is say, “give me the result of the expression in the parentheses and substi-tute that in the string.” Easy and neat. No need to concatenate strings to create thedisplay line in your scripts.
NOTE The double space in the previous result is due to there being a spaceas the last character of the Caption property. I have never seen a reason pre-sented for its presence, but be aware that it exists—especially if you try filter-ing on the Caption value.
www.it-ebooks.info

113Calculated fields, types, and formatting
There’s one further point on building strings to consider, and it has to do with build-ing file paths. How many times have you seen this type of code?
$path = "C:\Test" + "\" + "proc1.txt"Get-Content $path
You could use string substitution and change the code to this:
$file = "proc1.txt"Get-Content "C:\test\$file"
Better still, you could use Join-Path:
$file = "proc1.txt"Get-Content (Join-Path -Path c:\test -ChildPath $file)
Join-Path, and the other cmdlets for working with paths, will also work on Power-Shell drives such as the registry. They save a lot of typing and save you from having toremember to add the dividers.
Any automation techniques involving scripting will need to access data at somepoint. You’ll either get it in bulk by reading from a file, or as single values via theparameters used with functions and cmdlets. Handling the data inside the scriptscan be made much simpler by using the string substitution functionality and the*Path cmdlets.
The data you produce in your scripts can be used as is, but in many cases you needto perform further calculations or change the way the data is formatted.
4.3 Calculated fields, types, and formattingPowerShell provides a very good set of presentation opportunities via the Format-*cmdlets. Sometimes these aren’t quite enough, though, and you’ll need to create yourown values to display. This is done by creating a calculated field—an expression thatinvolves one or more properties of the object you’re displaying. You could, alterna-tively, modify the PowerShell type system to always add this calculated field to theobject you want to work with. This is more work in the short term, but it provides amore powerful and easier-to-use solution. Just keep in mind that you need to distrib-ute the new format file to every machine that will run the script requiring that format.
Many of the PowerShell cmdlets and WMI classes have a default set of propertiesthat are displayed. Compare the output from these two PowerShell examples:
Get-WmiObject -Class Win32_ComputerSystemGet-WmiObject -Class Win32_ComputerSystem | Format-List *
The first example displays a total of six properties (the default display), whereas thesecond displays all of the properties on the object.
These default displays are controlled by PowerShell format files. The bad news isthat they’re XML. The good news is that the format system is easy to change.
First, though, let’s look at how you can use calculated fields.
www.it-ebooks.info

114 CHAPTER 4 Best practices and optimization
4.3.1 Calculated fields
A calculated field can be used in a number of ways:
■ To recalculate a value—For example, to change a file size from bytes to GB■ To reformat a value—For example, to change a date from WMI’s format to a for-
mat commonly used■ To calculate a new value—For example, to calculate a value based on two or more
existing values
TIP A calculated field in PowerShell is analogous to a calculated column in a SQLServer database table.
The Win32_LogicalDisk class can be used to return information about the logicaldisk volumes in a computer. This WMI class returns the disk size and free space inbytes. In many cases it may be simpler, and more meaningful, to report the percentageof free space remaining on the disk. A system that has a disk that’s 80 percent fullneeds attention, irrespective of the size of the disk. The following listing shows howyou can achieve this.
function calcfree { param ( $disk) $free = ($disk.FreeSpace / $disk.Size) * 100 "{0:F2}" -f $free }
Get-WmiObject -Class Win32_LogicalDisk |Format-Table DeviceId,@{Name="PercFree"; Expression={calcfree $_}}
This script starts by defining a function that will calculate the percentage of free spaceon the disk B. It takes a single parameter. I haven’t typed this parameter for two rea-sons. First, the function only exists in this simple script, so there’s no risk of sendingthe wrong type of data. Second, the type doesn’t have a shortcut, so it would be ratheroverwhelming in terms of the space taken.
The function then calculates the percentage of free space on the disk in the usualmanner, rounding the result to two decimal places to make it more presentable C. Ituses the .NET format string—the bit in the braces, {}—and the PowerShell formatoperator, -f. This line is worth spending a little time understanding as this method offormatting is very simple once you understand it, and very powerful.
A .NET formatted string consists of one, or more, fields defined in a string. Theindividual fields are defined by curly braces, {}. Within the curly braces, the numberto the left of the semicolon provides an index for the field; in this case, it’s the firstfield. The F2 tells PowerShell to format the data as a floating-point number with twodecimal places. Other formats are available.
Listing 4.2 Calculated field in Format-Table
Function with parameterB
Calculate free spaceC
Calculated field
D
www.it-ebooks.info

115Calculated fields, types, and formatting
The line then continues with the PowerShell format operator -f, which will takethe data to its right and format it into the fields on the left C. Individual items on theright side of the operator are separated by commas. This is a string on a line by itself,so the function returns the formatted string.
The function needs to be called somehow, and you do that by piping the results ofa Get-WmiObject call using the Win32_LogicalDisk class. The results are piped intoFormat-Table D where you display the DeviceId that denotes the drive and a calcu-lated field that gives you the percentage free space.
The calculated field is a hash table—denoted by @{}. The hash table has twoentries. The first entry provides a name for the calculated field. The second providesan expression that calculates its value, and in this case it’s a call to the calcfreemethod. You could put a calculation in the expression itself, but that can make itmore difficult to read and maintain. You’ll be seeing this technique in a lot morescripts as you progress through the book.
A calculated field can be used with Select-Object as well as the Format-* cmdlets.When used in Select-Object, it becomes part of the object, so it can be used in fur-ther processing. This enables you to modify listing 4.2 to give the next listing.
function calcfree {param ( $disk) $free = ($disk.FreeSpace / $disk.Size) * 100 "{0:F2}" -f $free}
Get-WmiObject -Class Win32_LogicalDisk |select DeviceId,@{Name="PercFree"; Expression={calcfree $_}} |sort perfree -Descending |Format-Table -AutoSize
The main change here is that you replace Format-Table with Select-Object. You canthen continue the pipeline by sorting on the PercFree property you’ve created andfinally displaying the results with Format-Table.
NOTE In the first version of PowerShell, the calculated fields used in theSelect-Object and Format-* cmdlets were slightly different. Select-Objectused Name and Expression, as demonstrated in the previous example, but theFormat cmdlets used Label and Expression instead. The Format cmdlets willstill accept Label, so old scripts won’t break, but I recommend standardizingon Name in PowerShell v2 and above.
I use a technique based on listing 4.3 to monitor the fullest disks in my customers’server estate. I’ll show you how to do that in chapter 6.
You’ve just seen how to use calculated fields to modify the data that’s presented.It’s also possible to alter the default data that’s displayed by using the type and format
Listing 4.3 Calculated field in Select-Object
www.it-ebooks.info

116 CHAPTER 4 Best practices and optimization
files. These files are created when PowerShell is installed and they’re loaded everytime PowerShell is started.
4.3.2 Type files
Type files enable you to add properties and methods to the Windows PowerShellobjects. Format files define the default display of objects in Windows PowerShell. Bothsets of files are XML and can be modified to add further customization to PowerShell.We’ll start by looking at how you can use type files to extend an object, and you’ll getto format files in the next section.
WARNING Don’t overwrite the format and type files in the PowerShell installfolder because any future PowerShell updates will destroy your changes. Also,the files are digitally signed and will stop working if you modify them!
PowerShell type files can be found in the PowerShell install folder with a .ps1xmlextension:
Get-ChildItem $pshome\*types.ps1xml
The majority of the information is stored in the types.ps1xml file.
NOTE On a 64-bit machine, PowerShell installs both 32- and 64-bit versionsof PowerShell in separate folders. If you need changes to type or format filesto apply to both, you have to explicitly apply them in both folders.
You’ve seen how to create a calculated field that identifies the percentage of freespace on a disk. Let’s look at how you can add that as a property that will always beproduced.
We’ll start by looking at what PowerShell is already doing to theWin32_LogicalDisk class. You haven’t seen much of Select-String so far, but it’s agreat tool for poking into the contents of text files. It will display the lines of a file thatcontain the pattern you define. You can also display the lines before and after theones you’re searching for to put your match into context. Use Get-Help Select-String for full details.
In this case, you want to discover the type and format files that modify the way theWin32_LogicalDisk class is processed by PowerShell:
Select-String -Path $pshome\*.ps1xml -Pattern "Win32_Logicaldisk"
On my machine, this gives three references to the types.ps1xml file, of which the lastlooks most likely. If you open up the file, you’ll see XML that defines a property setand the standard members. It’s the standard members you see when you use thedefault display.
TIP A quick way to open a file from the PowerShell prompt is to use Invoke-Item (aliased as ii). This is one place where the alias is worth remembering, asit means you can quickly type ii $pshome\types.ps1xml to open the file. It alsoworks for CSV, Excel, and Word files—any file that has a file association defined.
www.it-ebooks.info

117Calculated fields, types, and formatting
Your mission, and you don’t get an option about accepting it, is to add a property tothe default set that shows the percentage of free space on the disk. Don’t try to mod-ify types.ps1xml, because it’s digitally signed and will stop working. It’s much betterpractice to create a type file with the changes, if for no other reason than that youcan just restart PowerShell to make your changes go away if you get somethingwrong. Listing 4.4 shows the XML you need. Details of the XML structure can befound in Get-Help about_Types.ps1xml.
TIP The name about_Types.ps1xml may seem odd, but it’s what is returnedif you try get-help about_t*. This help file can be accessed with get-helpabout_types or get-help about_types.ps1xml. That’s just one of the oddi-ties of PowerShell.
<?xml version="1.0" encoding="utf-8" ?><Types> <Type> <Name>System.Management.ManagementObject# root\cimv2\Win32_LogicalDisk</Name> <Members> <ScriptProperty> <Name>PercFree</Name> <GetScriptBlock> "{0:F2}" -f $(($this.FreeSpace/$this.Size)*100) </GetScriptBlock> </ScriptProperty> </Members> </Type></Types>
Note that the name of the type should on a single line. It’s only split here to fit intothe page width.
The important part of the type definition starts with the <ScriptProperty> tag.You define the name of the new property and provide a script block that calculates thevalue of the property. The script block is taken directly from the calcfree functionyou used in listing 4.3.
The XML is saved to a file called listing4.4.ps1xml, and this new type informationneeds to be loaded into PowerShell. The Update-TypeData cmdlet forces a reload oftype data, including any extras you want to add.
Update-TypeData -PrependPath listing4.4.ps1xml
The -PrependPath parameter instructs PowerShell to load your type data ahead of thedefault data. This ensures that your new type structure is used.
Figure 4.3 shows this occurring. If the load is successful, no messages are returned(as in this case). Unfortunately, on some occasions PowerShell doesn’t return any feed-back if the command hasn’t worked either. This is a feature of PowerShell that can cause
Listing 4.4 Win32_LogicalDisk type file
www.it-ebooks.info

118 CHAPTER 4 Best practices and optimization
issues sometimes, in that you’re never quite sure if something has worked or not. In thiscase, you can use Get-Member to prove that the script property has been added.
Get-WmiObject Win32_Logicaldisk | gm -MemberType ScriptProperty
The information produced by Get-Member is also shown in figure 4.3. The final test is to try and use the new property:
Get-WmiObject Win32_LogicalDisk |select SystemName, DeviceId, PercFree
Figure 4.3 shows the results. The C: and D: drives have a percfree value calculated.The E: and F: drives are DVD drives that don’t contain disks at present.
The first time I used a script like this across my server estate, I found two disks thathad zero free space! A quick check showed that they were both CD drives where anengineer had left the disk in the drive! In chapter 6, you’ll see how you can filter theoutput so that you can cut down on the number of shocks you get.
In the meantime, we need to look at how you can control the default formatting ofPowerShell’s output.
4.3.3 Format files
Format files define how objects are displayed in Windows PowerShell by default. ThePowerShell format files have a .ps1xml extension and are also found in the PowerShellinstall folder:
Get-ChildItem $pshome\*format*
Figure 4.3 Extending the PowerShell type system
www.it-ebooks.info

119Calculated fields, types, and formatting
The WMI classes don’t use the format file very much. Most of the formatting is han-dled by the type files you’ve already seen. You can perform a search of the format filesusing Select-String:
Select-String -Path $pshome\*format*ps1xml -Pattern "Win32_"
You’ll see results returned for the Win32_PingStatus andWin32_QuickFixEngineering classes. You’ll use Win32_PingStatus for this exercise.The first part of figure 4.4 shows how to use this class and the results you can expect. Idon’t use IPv6, so I’m going to drop that result from the default display.
The first task is to extract the format data for the Win32_PingStatus class:
Get-FormatData -TypeName `System.Management.ManagementObject#root\cimv2\Win32_PingStatus | Export-FormatData -Path chapt4_ping_status.ps1xml-IncludeScriptBlock -Force
This pulls the XML out of the current format file and creates a file for you to use. Youcan examine the file like this:
ii chapt4_ping_status.ps1xml
At this point, you’ll discover that it isn’t formatted. In fact it’s horrible to try and readthrough. To be kind, I’ve created a nicely formatted version that is also included inthe download file for the book. Access the file by typing this command at a Power-Shell prompt:
ii prettychapt4_ping_status.ps1xml
If you examine the file, you’ll notice that you need to remove the following sections:
<TableColumnHeader> <Label>IPV6Address</Label> <Width>40</Width></TableColumnHeader>
<TableColumnItem> <PropertyName>IPV6Address</PropertyName> </TableColumnItem>
The file can then be saved as Win32_PingStatus.format.ps1xml. Once you have a new format file, you need to apply it:
Update-FormatData -PrependPath Win32_PingStatus.format.ps1xml
As with the type file, using the -PrePendPath parameter ensures that your formattingis used in preference to the default. Figure 4.4 shows that you don’t get any response ifthe format data is successfully updated.
The final test is to use Win32_PingStatus again. This time you won’t get the IPv6address showing in the output.
Note that this change also works for the Test-Connection cmdlet. The reason forthis can be discovered if you try the following:
Test-Connection 127.0.0.1 | Get-Member
www.it-ebooks.info

120 CHAPTER 4 Best practices and optimization
At some point when creating a script, you’ll find that the thing won’t work. “Thing” isthe politest name you’ll use for the offending script. You need to track down what iscausing your script to fail. This is known as debugging.
4.4 Debugging and error handlingAs you progress with PowerShell, your scripts will become more complex. Thisincreases the possibility of bugs, or errors, creeping into the code. An error termi-nating a script may not be too bad if you’re only gathering information, but it couldcause your system to become unstable if you’re performing changes. An error that
Figure 4.4 Modifying the default display format
Calculated fields or type/format filesThis and the previous sections have shown how you can modify the way PowerShelloutputs objects:
■ Create a calculated field.■ Add a script property by modifying the type files.■ Modify the default formatting to include or exclude a field.
The best approach to use depends on what you’re doing. My personal approach is touse calculated fields, because they only apply to the script in which they’re defined,and they make the scripts more portable, which is an important consideration for aconsultancy role. Calculated fields are also easier to implement.
In a situation where these scripts will only be used by you, or possibly by a small num-ber of users, modifying the format or type files is a good approach. This is also a goodapproach if you’re delivering the functionality through a module, though loading for-mat files through a module requires care to ensure they are prepended. The Hyper-Vmanagement module from CodePlex (see chapter 16) provides a good example.
www.it-ebooks.info

121Debugging and error handling
doesn’t terminate the script but that makes the wrong change could have drasticconsequences. You need to be able to cope with potential errors and discover thebugs in your scripts.
Using the [CmdletBinding()] attribute in your functions provides access to the-Debug and -Verbose parameters. By using Write-Debug and Write-Verbose in yourfunctions, you can produce output as the function executes, which enables you to per-form simple debugging techniques.
TIP PowerShell provides very good debugging functionality—see Get-Helpabout_Debuggers. I’ve never found it necessary to use this functionality whendebugging my PowerShell code. If you’re interested in this sort of thing, feelfree to investigate.
The best-written function will come across situations where errors occur. This isoften, if not usually, due to the data being passed to the function. PowerShellincludes try-catch functionality to ensure that these errors can be handled grace-fully if required.
The last part of error handling we’ll deal with is the return codes supplied by WMI.There is a simple rule—zero is good and everything else is bad—but what do you dowhen you get a nonzero return code?
Debugging is the art of finding problems in the code syntax (often typing mis-takes) that prevent the code from running or produce the wrong results. We’ll start bylooking at how you can remove these bugs.
4.4.1 Debugging
A bug is something that prevents a script from running correctly. It may be a codingor typographic error, or it may be an error in the logic of your script. How can youfind bugs? One way is to read through the code until you spot the error. But this cantake a bit too much time. A quicker way is to put some debug statements into yourscript. These statements will show you the values of particular variables, which willenable you to track what is happening. The problem with this approach is remem-bering to remove them after you’ve finished debugging. Ideally, you could switchthem on and off. The advanced functions capabilities you’ve already seen give youthis capability.
NOTE If you would like to practice debugging on a script with known errors,search for “Beginners PowerShell Event 7” on my blog at http://richardspow-ershellblog.wordpress.com/. It was posted on 2 March 2008 and was a com-mentary on one of the events from the Microsoft 2008 Scripting Games.
Let’s create and debug a script. The script in the following listing ensures that yoursystems are up and running. It does this with a list of computers passed into aForEach-Object cmdlet.
www.it-ebooks.info

122 CHAPTER 4 Best practices and optimization
function test-status { Import-Csv computers4.csv | foreach { Get-WmiObject -Class Win32_PingStatus -Filter "Address='$($_.Computer)'" } }
function test-status2 { [CmdletBinding()] param() Import-Csv computers4.csv | foreach { Write-Debug $_.Computer Get-WmiObject -Class Win32_PingStatus ` -Filter "Address='$($_.Computer)'" }}
You can start with a simple function B that reads the contents of a CSV file and usesWin32_PingStatus to test if the system is responding. This function is used in thesame way as test-status. It will return one ping per computer.
If you start having problems with this script, you may want to check that the com-puter name is being passed correctly. The second version of the function adds the[CmdletBinding()] attribute C. This brings the advanced function capabilityinto play. You also need the param() statement, or PowerShell will throw an error.A Write-Debug statement is added to write out the computer name when yourequire it D.
This second function is used from the PowerShell command prompt as test-status2. As before, you get a single ping returned per computer. If you want to invokethe debugging functionality, you simply add the debug switch:
test-status2 -Debug
This allows you to switch debug reporting on or off as required, without the need tomodify your code, which could introduce other errors.
Most of the time, I find that simple instrumentation of the script is sufficient to dis-cover any bugs—especially if the script is tested in sections as it’s written. If you havemore complicated debugging needs, PowerShell ISE provides a debug capability thatallows you to step through the code one line at a time and discover where it’s goingwrong. This functionality can be invoked from the PowerShell prompt using the cmd-lets listed in table 4.1. A good example of using these cmdlets can be found in theabout_Debuggers help file.
Now that you have an idea of how to track down bugs in your code, it’s time tothink about handling errors when the script is running.
Listing 4.5 Script debugging
Initial function
b
Add debug capability
C
Debug statement
D
www.it-ebooks.info

123Debugging and error handling
4.4.2 Error handling
PowerShell has a number of ways to handle errors. There are a number of PowerShellautomatic variables that deal with errors that are summarized in table 4.2.
The $ErrorActionPreference setting can be overridden by using the ErrorActionparameter on an individual cmdlet basis.
The $error variable contains a collection of the recent errors that have occurred,with the most recent error being in the first element—$error[0]. The easiest way tosee the error contents is to generate an error! You can do this by trying to access a pro-cess that isn’t running (make sure Notepad isn’t running before trying this):
Get-Process notepad$?$error[0]
Table 4.1 PowerShell debugger cmdlets
Cmdlet Purpose
Set-PSBreakpoint Sets breakpoints on lines, variables, and commands
Get-PSBreakpoint Gets breakpoints in the current session
Disable-PSBreakpoint Turns off breakpoints in the current session
Enable-PSBreakpoint Re-enables breakpoints in the current session
Remove-PSBreakpoint Deletes breakpoints from the current session
Get-PSCallStack Displays the current call stack
Table 4.2 PowerShell error handling variables
Variable Description
$ErrorActionPreference Determines response to a non-terminating error.
Values: Stop, Inquire, Continue, SilentlyContinue
$ErrorView Displays format of error information.
Values: NormalView, CategoryView
$error Contains an array holding recent error messages.
$error[0] is the latest.
$? Tests if last command completed successfully (True) or produced an error (False).
$lastexitcode Contains the exit code of the last command run. It only works for Windows commands and PowerShell scripts. It doesn’t capture the WMI return code.
www.it-ebooks.info

124 CHAPTER 4 Best practices and optimization
This command generates an error that can be viewed using $error. The contents ofthe error messages can be separated out (to a certain extent) by using the individualparameters of $error.
Instead of working out why an error has occurred, it may be a better proposition tocatch the error as it happens. You can do this with a new feature in PowerShell v2—the try-catch block.
We’ll start by considering a simple function that performs arithmetic on two integers:
function div { param ([int]$a, [int]$b )$a+$b$a/$b}
div 10 2div 3 2div 7 0
The function accepts the integers as parameters. Then it produces the sum of theintegers and divides the first integer by the second. All will go well until your third callto the function, when the divide fails with a divide-by-zero exception.
An exception is a .NET term for a terminating error, which is one that will cause yourscript to stop. This may be a bad thing if you have a script performing many actions.One way to handle this situation is to rewrite the function to use try-catch-finallyscript blocks, as shown in the next listing.
function div { param ( [int]$a, [int]$b ) try { $a+$b $a/$b } catch [Exception]{"It’s gone wrong" } finally {"end"}}
div 10 2div 3 2div 7 0
When you run this script, you’ll get the following output:
125end51.5end7It’s gone wrongend
Listing 4.6 Using Try-Catch-Finally
www.it-ebooks.info

125Debugging and error handling
The first two calls to the function produce the results you’d expect. The integers aresummed and divided correctly. Everything within the try block has worked. Notice,however, that after each set of results the word end is printed out. This is because thefinally block has performed its job. The finally block is an optional extra that willalways execute irrespective of what happens in the try block.
Your third and final call to the function performs the sum as expected, but whenthe divide goes wrong you get a message stating, It’s gone wrong rather than the fail-ure report you’d expect. The finally block then executes.
The job of the catch block is to catch exceptions. .NET exceptions are defined inthe documentation, such as MSDN. Be warned—there are a lot of them. I used themost generic exception in the preceding example, but there’s also a specific divide-by-zero exception. The best way to find the specific exception is to look in$error[0].exception and then perform an internet search to track down the spe-cific exception. The preceding script could be altered so it reads as follows:
catch [DividebyZeroException] {"oops - divide by zero"}catch [Exception]{"It’s gone wrong" }
An attempt is made to catch the specific exception first. If that doesn’t match, thegeneric exception functions as a catchall statement. When using multiple catchstatements, always start with the most specific one first as PowerShell will use the firstcatch statement that can handle the exception. The download code contains thisadditional line of code. Try commenting out the different catch statements to seethe effect.
One question remains: how much code should you put in the try block? Thisdepends on what your script is trying to achieve. Ideally it should be minimal, so thatevery individual exception that could occur can be caught. But this increases theamount of code you need to type and makes the script more cumbersome. A betterresult is gained by putting the more critical code into individual try blocks. The safercode can be contained in larger blocks. Only experience, together with knowledge ofthe problem you’re solving and the data involved, can produce the correct answer.Your approach to exception-handling will change over time as you become moreaccustomed to PowerShell.
The try-catch-finally blocks are designed to work with .NET exceptions. ButWMI isn’t .NET-based—it’s a COM-based technology. This means you need anotherapproach.
4.4.3 WMI return codes
When you invoke a WMI method, a numeric code is returned to report on the out-come of the action. The rule when dealing with WMI return codes is very simple:
0 = GoodAnything else = bad
The return code is normally displayed on screen, but you can capture it in a variable,as the following listing shows.
www.it-ebooks.info

126 CHAPTER 4 Best practices and optimization
Start-Process notepadStart-Sleep -Seconds 5
$ret = Get-WmiObject -Class Win32_Process ` -Filter "Name='notepad.exe'" | Invoke-WmiMethod -Name terminate
if ($ret.ReturnValue -eq 0) {Write-Host "Worked OK"}else {Write-Host "FAILED"}
The script starts by opening Notepad. I recommend you close any open instances ofNotepad before running the script, or they will be shut down as well. “Oops, I didn’tmean to shut that one down” isn’t a recognized PowerShell statement.
Start-Sleep pauses the script for five seconds. The cmdlet also has a -Millisecondsparameter for shorter pauses. After the pause, the script finds the Win32_Process classcorresponding to Notepad and pipes it to Invoke-WmiMethod, which kills the process.
WARNING WMI methods don’t have any -WhatIf or -Confirm parameters.You call it, and it works. Remember this—it may just save some valuable data.(I’ll repeat this warning at various points throughout the book.)
The $ret variable catches the output of the pipeline. The pipeline ends by invoking aWMI method, so the return information includes the return code. A generic way ofdealing with the return code is shown in the script. The contents of the if-else scriptblocks are totally dependent on the WMI classes being used, the script, and the datainvolved. A full list of the return codes is available in the WMI documentation for eachmethod. One option is to use a switch statement for the most important return codesand lump the rest into the default bucket.
That’s it for debugging. Next, WMI has a few areas you need to consider to ensureyou’re getting the best out of it.
4.5 Getting the most from WMIWMI, like all technologies, has some issues. In this section, we’ll look at common prob-lems and how to overcome them. Along the way, we’ll cover some best practices thatyou can take forward into the rest of the book.
NOTE The previous part of the chapter covered a number of points, such asthe format files, that apply to PowerShell in general as well as to WMI inparticular.
The primary issue with WMI is the number of classes available and, in many cases, thelack of documentation for those classes. The WMI cmdlets can extract information onthe classes, as you saw in chapter 3. There are also some internet sources you can utilize.In this section, we’ll look at some things that can be done to mitigate these deficiencies.
There are also a number of configuration settings you need to set on your systemsto ensure that WMI will work correctly. WMI doesn’t require PowerShell remoting toaccess remote machines, but the WSMAN and CIM cmdlets require the WinRM service
Listing 4.7 WMI return codes
www.it-ebooks.info

127Getting the most from WMI
to be running on the remote machine. If you make enabling PowerShell remoting apart of your configuration checks, you’ll have covered all eventualities. The tech-niques to test that these settings are configured correctly, as well as how to performthe configuration changes, will be covered later in this section.
Controlling access to resources is an important part of system administration, andWMI is no exception. The cmdlets will negotiate authentication whenever possible,but occasionally you’ll have to override the defaults. The WMI cmdlets provide a wayto do this. When, and how to, change the default authentication mechanisms willbe explained.
TIP Run PowerShell with elevated privileges when working with WMI. It’s theonly way to access some classes.
The final parts of this section cover data filtering and conversions. Reducing theamount of data you work with will make your scripts more efficient. WMI doesn’talways return data in the best of formats, so you need to know how to convert theresults into a format you can work with.
We’ll look first at how you can overcome WMI’s imperfections.
4.5.1 Issues with learning to use WMI
Two major issues stand out when working with WMI:
■ Inadequate documentation■ The large number of classes available
These issues sometimes overlap, in that some classes aren’t documented, or the docu-mentation hasn’t been brought up to date as changes have been made.
The primary issue with WMI is one of documentation. For example, the root\cimv2namespace is well documented, but the classes in the root\wmi namespace are undoc-umented. In chapter 5 I’ll introduce the BatteryStatus class, but I haven’t been ableto discover any documentation on this class. Attempting to read the class descriptionisn’t much of a help:
(Get-WmiObject -Namespace 'root\wmi' -List BatteryStatus ` -Amended).Qualifiers |Format-Table Name, Value -AutoSize -Wrap
This will return the class description, among other information, but unfortunately allyou get is the rather terse BatteryStatus. You can make some guesses based on theclass name and the property names you can find as follows:
Get-WmiObject -Namespace 'root\wmi' -Class BatteryStatus |Get-Member
An internet search doesn’t reveal much more useful information. There appear to bea number of potentially useful classes in this namespace, but their usage is hamperedby the lack of documentation.
www.it-ebooks.info

128 CHAPTER 4 Best practices and optimization
The available classes aren’t always very well publicized. Did you know that there area set of WMI classes for working with failover clusters? They’re still present in WindowsServer 2008 R2, even though there are PowerShell cmdlets for working with clusters aswell! On your nearest cluster, try this:
Get-WmiObject -Namespace 'root\cluster' -List
The cluster properties can be discovered with
Get-WmiObject -Namespace 'root\cluster' -Class MSCluster_cluster
If you have any clusters in your organization, it’s worth checking out. Another issue is that some WMI classes don’t return any data. PowerShell has one
habit that I find annoying and confusing—this lack of return messages. If a Power-Shell statement is wrong, sometimes there’s no return message. If a WMI class doesn’treturn data, there’s no return message. How do you know whether your PowerShellstatement has failed or there isn’t any data to return? All you can do is try other waysof formatting the statement.
The second major issue with WMI is the sheer number of classes available. No onecan know them all. We’ll look at some of the most commonly used classes in the follow-ing chapters, but we’ll only be scratching the surface. Furthermore, WMI functionalityis constantly changing as Microsoft products evolve, but some of the documentationdoesn’t evolve as quickly. In chapter 5, we’ll look at the devices that can be carried ona system’s motherboard. The documented list of devices hasn’t been updated recently,so one of the machines I was testing against had a device that wasn’t recognized.
Next, WMI works out of the box on the local system, as long as the Winmgmt serviceis running, but you need to do a little bit of work to enable access to remote systems.
4.5.2 WMI configuration settings
There are a number of settings you need to check and configure before you startworking with WMI:
■ Required services are running■ Windows firewall is configured for remote access to WMI■ PowerShell remoting is enabled
I recommend that installing and configuring these items should be a part of the setupprocedure for all new servers.
NOTE Among other things, enabling PowerShell remoting ensures that theWinRM service is configured and running. This isn’t required for WMI but it isrequired for using the WSMAN cmdlets and the CIM cmdlets in PowerShell v3,so you should ensure it’s configured with the other requirements.
The first thing you need to do is make sure that the services you need are running.This includes the WMI service:
Get-WmiObject -Class Win32_Service -Filter "Name LIKE 'win%'" |select Name, State
www.it-ebooks.info

129Getting the most from WMI
You’re interested in the Winmgmt (WMI) and WinRM services. If they’re running,you’re in good shape. On machines that will be accessed remotely, also check that theDCOM Launcher is running because WMI uses DCOM for remote access.
The introduction of the Windows firewall in the more recent server versions hasimpacted WMI. You need to open the firewall to allow WMI access. This can beachieved through the GUI, a GPO, or by using the following Netsh commands (Ihaven’t found a way to configure the firewall using PowerShell directly yet):
Netsh firewall set service RemoteAdminNetsh advfirewall set currentprofile settings remotemanagement enabled
This gives you a route to connect to remote machines using WMI. You can now workwith your remote machines whether or not they have PowerShell installed.
If you’re performing a significant number of actions on a remote machine, you’llbe accessing it frequently and you’re better advised to enable PowerShell remoting.This is a simple case of ensuring that the WinRM service is running on both machinesand that you’ve run the Enable-PSRemoting cmdlet to perform the configuration.
TIP Technically you only need PowerShell remoting enabled on the remotemachine, but if you have it enabled on both machines you can use theWSMAN provider (see chapter 17) because enabling remoting ensures thatthe WinRM service is configured correctly.
If a PowerShell WMI cmdlet can’t connect to a remote server, it will time out eventu-ally. This can take a significant amount of time and will significantly delay the results ifyou’re testing a number of remote machines. This process can be accelerated by test-ing the connection to the remote machine first:
$computer = "server02"if (Test-Connection -ComputerName $computer -Count 1) { Get-WmiObject -Class Win32_Service -Filter "Name LIKE 'win%'" | select Name, State}else {Write-Host "Cannot connect to $computer"}
You can use the Test-Connection cmdlet, which uses Win32_PingStatus to test ifyour machine can be reached. If it can be, you perform your actions; otherwise youwrite a message stating that you couldn’t contact the machine.
The next step is to make sure that you have the required permissions to access theWMI data on the remote machine.
4.5.3 Authentication
PowerShell v2 introduced a number of new parameters for Get-WmiObject, one ofwhich was the -Authentication parameter. This parameter is available on the fourcmdlets you use with WMI:
■ Get-WmiObject
■ Invoke-WmiMethod
www.it-ebooks.info

130 CHAPTER 4 Best practices and optimization
■ Remove-WmiObject
■ Set-WmiInstance
This may seem confusing because there is also a -Credential parameter available onthese cmdlets. The -Credential parameter deals with passing a userid and passwordto access the remote system. If credentials aren’t supplied, the cmdlets use the creden-tials of the user.
NOTE WMI only needs credentials for remote machines. The WMI cmdletswon’t accept a credential when accessing the local system.
This is best done by using Get-Credential to create the credential rather than tryingto create it using the -Credential parameter, which has been known to cause errorsbecause Get-WmiObject attempts the connection before it has used the credential toprompt for the password. The connection doesn’t have a credential and so fails:
$cred = Get-CredentialGet-WmiObject Win32_ComputerSystem `-Credential $cred -ComputerName dc02
The -Authentication parameter deals with DCOM authentication. WMI is COM-basedand uses DCOM to access remote systems. There are a number of possible settings, asshown in table 4.3.
Under normal circumstances, the -Authentication parameter doesn’t need to be spec-ified. The default value is applied and negotiates the correct level of authentication.There aren’t many WMI providers that require an authentication level above default.
Table 4.3 WMI authentication
Value Meaning
-1 Unchanged—authentication remains as it was before.
0 Default COM authentication level. Authentication is negotiated. WMI uses default Windows Authentication setting. An authentication level of 1 (none) will never be negotiated.
1 None. No COM authentication is performed.
2 Connect. COM authentication is performed only when the client establishes a relationship with the server. No further checks are performed.
3 Call. COM authentication is performed only at the beginning of each call when the server receives the request. Only packet headers are signed. No data is encrypted.
4 Packet. COM authentication is performed on all the data that’s received from the client. Only packet headers are signed. No data is encrypted.
5 PacketIntegrity. All the data that’s transferred between the client and the application is authen-ticated and verified. All packets are signed. No data is encrypted.
6 PacketPrivacy. The properties of the other authentication levels are used, and all the data is encrypted.
www.it-ebooks.info

131Getting the most from WMI
The one you’re most likely to meet is the ISS provider, where the PacketPrivacy levelis needed. This will be explained in more detail in chapter 12.
Once you’re authenticated to the remote server, you can retrieve your data.
4.5.4 Data filtering
We’ve already touched on the fact that WMI can return a lot of data. This can slowdown your scripts, especially if you’re returning data from remote machines, becauseof the amount of data returned across the network.
You have a number of ways to filter your data. All three of the following code snip-pets will return the same results:
Get-WmiObject -Class Win32_Service |where {$_.ExitCode -ne '0'} |select Name, ExitCode, StartMode, State
Get-WmiObject -Query "SELECT Name, ExitCode, StartMode, State FROM Win32_Service WHERE ExitCode <> 0"
Get-WmiObject -Class Win32_Service -Filter "ExitCode <> '0'" | select Name, ExitCode, StartMode, State
The first option uses the Win32_Service class and then filters with Where-Object andSelect-Object to restrict the output. This works, but it has the drawback of returningall of the Win32_Service properties before you start filtering. When you’re workingremotely, it means you extract all of the data, return it to base, and then start filtering.
Technically the second option will return a bit more, because it also returns the sys-tem properties, but all of the filtering is performed as you extract the data from theWMI database. This means you only transport the objects and properties you’re inter-ested in (plus the overhead of the system properties). You could perform anotherselect once you get the data back to filter out the system properties.
The third approach uses a WMI filter to only return the services showing the exitcodes that aren’t zero. You then use Select-Object to filter down to the properties ofinterest.
Which is the best approach? As always, it depends. I would probably go for thethird option because it filters out the objects of no interest and is more easily modifiedthan the second option. I also don’t need to worry about the system properties gettingin the way.
Returning just the subset of data you need is good, but you’ll find that some of thedata isn’t in a format that you can easily use.
4.5.5 Data conversions
One of the things about computer systems that prevents us from getting bored is thatevery technology seems to have at least a couple of quirks in the way data is stored andhandled. WMI is no exception. Most sizes, such as disk capacities, are measured inbytes, and dates are stored in a format that’s readable but difficult to work with (forexample, 20101020191535.848200+060).
www.it-ebooks.info

132 CHAPTER 4 Best practices and optimization
Both of these can cause problems, but there are fairly simple ways to cope withthem.
SIZES
There are a number of places you need to deal with sizes, including memory size, fileand folder sizes, and disk sizes. WMI nearly always returns sizes in bytes, which isn’t themost understandable of formats. If you’re presented with a disk that has 118530666496bytes of free space, how quickly can you work out what that means? A lot slower thanunderstanding 110.39 GB, I’ll bet.
PowerShell understands the same sizes that administrators do, from kilobytes topetabytes. You can see this by running the following code:
1kb, 1mb, 1gb, 1tb, 1pb |foreach {"{0,16}" -f $_ }
You pipe a collection of the size constants into a foreach command, where you displaythe value in right-justified fields using .NET string formatting and the -f operator.Notice that you can’t just use kb and the like—you have to put a numeric value in frontof the constant. The value doesn’t have to be an integer; 1.5mb is understood as 1572864.
A calculated field can be used to display the result of changing a value in bytes toone in another unit, such as gigabytes. Compare the output produced by the twooptions presented in the following snippets:
Get-WmiObject -Class Win32_ComputerSystem |Format-List Manufacturer, Model, TotalPhysicalMemory
The first option uses the Win32_ComputerSystem class and produces a list includingmanufacturer, model, and the total amount of memory. This is in bytes. If you’re test-ing machines to ensure that they have sufficient RAM for a new piece of software, youneed to compare against the vendor specifications, which will be in megabytes or giga-bytes:
Get-WmiObject -Class Win32_ComputerSystem |Format-List Manufacturer, Model,@{Name="RAM(GB)";Expression={$([math]::round(($_.TotalPhysicalMemory / 1gb),2))}}
The second option provides a more usable display. The manufacturer and model aredisplayed as before. This time you use a calculated field to divide the memory by 1 GBand round the result to two decimal places. This is much easier to understand and com-pare against the specifications. I’m in the middle of checking the specifications on 150machines as I write this section, and I’m using the second approach. It does work!
The other area where WMI causes problems with data is when you consider dates.
DATES
WMI has its own format for dealing with dates. This can be seen in figure 4.5, wherethe Win32_OperatingSystem class is used to determine the last time the machine wasbooted. There are other ways of measuring the time when a machine was started,including checking when the event log service was started, but I find this technique
www.it-ebooks.info

133Getting the most from WMI
more accurate. The date is returned as year, month, day, hours, and seconds. This isfollowed by a value indicating the number of microseconds and the time zone.
I can read it and figure it out, but I can’t easily work with it. Use Get-Member on the Win32_OperatingSystem class and you’ll find two script
methods added to the object (they are automatically added to all WMI objects):
■ ConvertToDateTime
■ ConvertFromDateTime
You’ll be converting WMI values to normal date formats most often, so let’s start withthat. The second line of code in figure 4.5 shows how this works:
Get-WmiObject Win32_OperatingSystem |select @{Name="BootTime"; Expression={$_.ConvertToDateTime($_.LastBootUpTime)}}
Call the method on the object on the pipeline, and use the object’s LastBootUpTimeas the argument. It looks a bit messy, but if it’s something you’re going to use a lot, putit into a function that’s loaded into PowerShell from your profile.
I use the ConvertToDateTime method much more than the ConvertFromDateTimemethod. But as the method is available, it would be rude not to show how it works:
$date = [datetime]"8 October 2010 19:46:00"Get-WmiObject -Class CIM_DataFile -Filter "Path='\\Test\\'" |where {$_.LastModified -gt ($_.ConvertFromDateTime($date))}
A .NET DateTime object is created. The format used to present the date and time isusable in any locale, which makes it the safest option if your code is likely to be usedin different countries. If you post it to the internet, expect it to be used in differentcountries.
The CIM_DataFile class is used to retrieve the files from the c:\test folder. Notehow you have to use a double backslash (\\) to represent a single backslash (\) in thefolder path. This is because the backslash symbol is an escape character in WMI. Moreon this topic in chapter 8.
Figure 4.5 Using the WMI date conversion methods
www.it-ebooks.info

134 CHAPTER 4 Best practices and optimization
A PowerShell filter is used to test the LastModified property against your date. Youhave to convert the date into WMI format for each test.
TIP Combining the information about data filtering and data formattingthat has been presented in this chapter leads to a simple rule of thumb: filteras soon as possible and format as late as possible.
There is always more to learn about WMI, but we’ve reached the point where it’s timeto stop looking at the theory and see how you can use it in practice to make youradministrative tasks easier.
4.6 SummaryYou’ve seen three broad areas of best practices. These can be applied in any environmentto help maximize the return from your investment in learning PowerShell and WMI.
Security is a major issue in any organization. The internet is a great source of Pow-erShell examples, but you should use a trusted source and always, without fail, test anycode you download.
Keeping the code secure once you’ve created your scripts involves a number of steps:
■ Sign code to reduce the risks of tampering.■ Restrict access to the shares containing the code.■ Audit the use of administrative scripts.
When you’re using PowerShell, there are some best practices you can employ to makeyour code more efficient and easier to write:
■ Use the pipeline when reading from files if possible.■ Use parameters instead of prompting for values.■ Use string substitution to save a lot of typing.■ Use calculated fields to change the data you output.■ Use type and format files to add new properties to PowerShell objects.■ Use the PowerShell debugging and error handling to find and fix problems in
your code.
WMI adds another handful of items to consider:
■ WMI documentation may be out of date or nonexistent.■ It can be difficult to discover what classes are available.■ The Windows firewall must be configured to allow WMI access.■ Use Test-Connection rather than waiting on multiple timeouts.■ Some providers such as IIS and Microsoft Clustering require authentication for
remote access.■ Filter early and format late.■ Size and date conversions are simple with PowerShell
We’ve now completed our look at PowerShell and WMI theory. It’s time to start usingthese tools to administer your systems. Chapter 5 starts this process by showing whatyou can discover about your systems with some simple WMI scripts.
www.it-ebooks.info

Part 2
WMI in the enterprise
This is where the fun starts. You’ve learned how to use PowerShell and WMIin part 1 of the book. In this second part, we’ll concentrate on solving adminis-trative problems using PowerShell scripts. Lots and lots of scripts.
WMI has been traditionally been used to gather information about com-puter systems. This where we’ll start with chapter 5, looking at system hard-ware, peripherals, the operating system, and installed software. Chapter 6extends this theme by examining the storage systems attached to our comput-ers. We’ll look at performing actions such as defragmentation as well as discov-ering the disk configuration.
Chapters 7 and 8 examine the registry and filesystem respectively. The man-agement of these two data stores is essential to the well-being of your servers. Inchapter 9 we’ll look at how to manage the services and processes you have running.
Chapter 10 looks at printers and chapter 11 focuses on discovering and con-figuring network adapters and performing other network-related tasks. IIS has aWMI provider that you’ll use in chapter 12; it enables you to configure websitesand applications.
In chapter 13, we’ll bring these topics together to configure a server’s name,network, domain, and power plan, among other items.
Chapter 14 looks at security, focusing on what WMI has to offer regardingusers and the firewall. Chapter 15 extends the security aspect with a look at eventlogs. We’ll also consider performance counters.
Virtualization is a hot topic, and Hyper-V has its own WMI provider, which iscovered in chapter 16.
Throughout these chapters, you’ll see examples of discovery and manage-ment scripts that are immediately usable in your environment.
www.it-ebooks.info


System documentation
Using WMI to discover information about your systems is the traditional role ofthe technology. Many of the WMI-based scripts that you’ll find will show howto perform these tasks. Documenting systems is a necessary task, but one thatmost administrators put off until they’re forced into it. It’s a long, tedious, andboring process.
Not anymore! The scripts you’ll work with in this chapter won’t necessarilymake documenting your systems interesting, but they will make it a quick and rela-tively painless process. Run the functions from this chapter and output the resultsto a file. Instant documentation! I recently had to update the documentation forseveral hundred servers ahead of an audit, and the scripts I used were based on thischapter. It ran as an overnight task. A quick check the next morning, and that activ-ity was marked as complete. Compare that to how long the documentation wouldtake to prepare manually, and the savings in time and effort available through Pow-erShell and WMI soon become apparent.
This chapter covers■ Discovering system hardware■ Discovering operating system configuration■ Discovering installed software
137
www.it-ebooks.info

138 CHAPTER 5 System documentation
TIP Notes on the structure of the scripts and on how to use the functions aregiven in the “about this book” section at the start of this book. Remember alsothat the functions can be quickly rewritten if you only need a subset of thedata, such as if you only need the operating system version and service pack.
This chapter opens with a look at system hardware, covering topics such as the com-puter itself, its role in the domain, the processor, the motherboard, and memory con-figuration. At the end of section 5.1, you’ll know how to retrieve information aboutthe computer hardware that comprises your system. I use these scripts to create serverdocumentation whenever I build a new server. It’s so easy that it doesn’t really registeras a task. Updating documentation becomes a simple matter.
NOTE In this chapter, we’ll concentrate on information-gathering, but themethods available with these WMI classes won’t be forgotten. They’ll be dis-cussed in later chapters, especially chapter 13.
You also need to discover the peripherals attached to your systems. The basic set is themonitor, keyboard, and mouse. USB ports play an important part in computer periph-eral usage, so discovering what is available through them is an important task. Paralleland serial ports may have declined in popularity, but are still present on many systems.These peripherals may be more orientated toward your desktop estate, but under-standing the capabilities of your systems is a requirement for upgrades. I once had todetermine if we could roll out a new piece of software to a number of machines in aremote site. This software interacted with a USB device, so I had to check if themachines had USB ports. I used the USB-related scripts in section 5.2 and easily discov-ered the answer.
Computers all have one thing in common. They need power. Understanding a com-puter’s power supply, battery status, and power plans are important configuration items.These items also form part of the computer’s documentation. Being able to access themremotely makes producing documentation easier and quicker. Testing the battery statusis also a useful diagnostic step. All these and more are covered in section 5.3.
After the hardware, the operating system is the next most important item. Thescripts in section 5.4 show how you can discover the operating system configuration,installed hotfixes, boot and recovery configurations, as well as the system time andtime zone. I regularly need to report on when my servers were last rebooted to provemy uptime statements. I use a script based on this section to easily check the time syn-chronization on domain controllers.
Systems in the enterprise are usually running a suite of applications. We’ll close thechapter by looking at the installed software and registered COM applications. Thiscompletes our documentation requirements.
You may have noticed that the preceding hardware lists don’t include disks andnetwork cards. Don’t worry, I haven’t forgotten them. Chapter 6 is devoted to disk sys-tems, and network cards are covered in chapter 11. Before we get to those items, youneed to know how to discover your basic hardware.
www.it-ebooks.info

139System hardware and configuration
5.1 System hardware and configurationThe starting point for any investigation of your computer estate has to be the basic sys-tem hardware. In this section, you’ll learn how to retrieve information about the con-figuration of your servers from local and remote systems. This information will allowyou to document your servers as well as test for specific situations. I’ve used subsets ofthese scripts to test whether a system meets the requirements for installing or runninga particular piece of software.
We’ll start by examining the basic computer system, including the make andmodel. Don’t worry if you’re running virtual systems, as WMI will report them as vir-tual servers. The type of computer can be important when determining what else canbe done with the machine, and the role of the machine in the domain can similarly beimportant. Simple scripts enable you to discover this information remotely.
One of the most important parts of the system is the CPU. Determining how manyand what types there are can help you balance loads across the server estate. WithWindows Server 2008 and above, you also get an easy way to discover the number ofprocessor cores in each physical processor.
The BIOS controls how the system starts. A recent project I was working on had aproblem because of bugs in a particular version of the BIOS. Using WMI, you can easilycheck the BIOS versions of all the servers involved.
Memory is often one of the main areas of concern. If you don’t have enough, yourapplications won’t run properly. As well as discovering how much memory is in yourmachines, you can discover how many banks of memory are in use and hence whetheryou can upgrade these systems to prolong their life and reduce costs for the organization.The final script of section 5.1 presents a technique for discovering this information.
The WMI classes used in this section are listed in table 5.1. These classes cover themajor pieces of hardware you’ll meet in your systems. Some of the classes will be usedin more than one script, and some scripts use multiple classes, but the table presentsthem in the order you’ll meet them in this section. I normally start with the basics ofthe computer system and then work down to the fine details.
Table 5.1 System hardware classes
Component WMI class
Computer make and model,Computer type, Domain role
Win32_ComputerSystem
Chassis type Win32_SystemEnclosure
Motherboard Win32_BaseBoard
Devices on motherboard Win32_OnBoardDevice
CPU Win32_Processor
BIOS Win32_BIOS
Memory Win32_PhysicalMemoryArrayWin32_PhysicalMemory
www.it-ebooks.info

140 CHAPTER 5 System documentation
Get computer system information
Ideally organizations should possess an asset database or, better still, a configuration-management database. The database would detail the configuration of the computersand other parts of the IT infrastructure. Unfortunately, many organizations don’t havethis information.
There are a number of WMI classes you can use to find this information.
PROBLEM
You need to discover the configuration of the computers in your organization. Thismay be to determine if the computers meet the requirements for a new softwareinstallation. Alternatively, the information could be used to form the initial load ofyour asset database or as a check on the currently loaded data.
SOLUTION
The WMI used in the following listing will supply the basic data you require, includingmake and model of the computer.
$chassis = DATA {ConvertFrom-StringData -StringData @' 3 = Desktop5 = Pizza Box7 = Tower10 = Notebook'@}
$obd = DATA {ConvertFrom-StringData -StringData @' 3 = Video
Listing 5.1 Basic system information
Code samplesThe scripts in this chapter are designed to be used as the basis of a system-docu-mentation process. I’ve treated the scripts as report-generation tools, and in someinstances, usually where multiple WMI classes have been called, I’ve inserted stringsthat will be output as headers. They also function as reminders of the data we areretrieving when multiple WMI classes are accessed in one script.
PowerShell purists may view this as a cardinal sin, because these scripts aren’t out-putting pure objects. But these scripts are written to fulfill a purely reporting functionand aren’t designed to be used in any further processing.
If you prefer not to have the headers produced, I’ve created alternative scripts inthe Chapter05\Alternative Non-Report Style folder of the download code. Thesealternatives use Write-Verbose to control whether or not the header is producedwhen the script runs. A further possibility would be to use Write-Warning to dis-play the messages.
Alternative code will be provided at other points in the book where similar reportingstyles are used.
TECHNIQUE 1
Data lookups
B
www.it-ebooks.info

141TECHNIQUE 1 Get computer system information
5 = Ethernet'@}
function get-computersystem {[CmdletBinding()]param ( [parameter(ValueFromPipeline=$true, ValueFromPipelineByPropertyName=$true)] [string]$computername="$env:COMPUTERNAME")PROCESS { "Computer System" Get-WmiObject -Class Win32_ComputerSystem ` -ComputerName $computername| select Name, Manufacturer, Model, SystemType, Description, NumberOfProcessors, NumberOfLogicalProcessors, @{Name="RAM(GB)"; Expression={[math]::round($($_.TotalPhysicalMemory/1GB), 2)}}
"System Enclosure:" Get-WmiObject -Class Win32_SystemEnclosure ` -ComputerName $computername | select Manufacturer, Model, @{Name="Chassis"; Expression={$chassis["$($_.ChassisTypes)"]}}, LockPresent,SerialNumber, SMBIOSAssetTag
"Base Board:" Get-WmiObject -Class Win32_BaseBoard ` -ComputerName $computername | select Manufacturer, Model, Name, SerialNumber, SKU, Product, Replaceable, Version
"On Board Devices:" Get-WmiObject -Class Win32_OnBoardDevice ` -ComputerName $computername | select Description, @{Name="Device"; Expression={$obd["$($_.DeviceType)"]}}}}
This script follows the basic pattern you’ll see throughout the book. You define somehash tables B as lookup tables and use Get-WmiObject to retrieve the required data.Convert-FromStringData is a PowerShell v2 cmdlet that converts a here-string (a Power-Shell multiline string) into a hash table. If PowerShell v1 is being used, the hash tablewill need to be defined from scratch (see appendix A). The Win32_ComputerSystem classsupplies data C, such as the make and model, the number of processors, and the amountof RAM. The RAM is recalculated from bytes to gigabytes (GB) to make a more readilyunderstood display.
The system enclosure D and the motherboard (baseboard) E are returned by theappropriate classes. They both have properties labeled manufacturer, which won’tnecessarily be the same. It’s always interesting to compare the manufacturers givenhere with the manufacturer of the whole system.
Computer system
C
Chassis type
D
MotherboardE
Onboard devices
F
www.it-ebooks.info

142 CHAPTER 5 System documentation
Motherboards may possess a number of components, such as video controllers ornetwork cards, that are additional devices on the board. These can be discovered bythe Win32_OnBoardDevice class F. The list of available devices in the WMI documen-tation is a little out of date, but the description of the device will usually supply suffi-cient information.
DISCUSSION
A calculated field in Select-Object uses the lookup tables. The type of onboarddevice is a good example of using the lookup tables F:
@{Name="Device"; Expression={$obd["$($_.DeviceType)"]}}
A name is defined as a string, and the lookup is performed by the expression. In thiscase, the $obd variable holds the hash table and the DeviceType property is used asthe lookup. A subexpression is used to ensure the value of the property is obtained.
NOTE The full hash tables may not be given in the listings. Selected valuesare used to illustrate the scripts in the book, but the full list of values is in thecode download.
The function can be used from the command line:
".", "127.0.0.1" | foreach {get-computersystem}
Alternatively, a list of computers could be supplied in a CSV file and piped to the function. As an example of the evolving nature of WMI, the NumberofLogicalProcessors
property on the Win32_ComputerSystem class C is only available on WindowsVista/2008 and above.
One of the things about WMI that may cause confusion is that there can be multi-ple answers to the same question, such as the computer type.
Get computer type
In listing 5.1 you saw that the Win32_SystemEnclosure class returned the chassis type.This data is also available on the Win32_ComputerSystem class.
PROBLEM
You’ve been tasked with discovering which machines in your environment are desk-tops and which are servers.
SOLUTION
The data can be discovered using the Win32_ComputerSystem class. The next listingshows how this class can be used.
$comptype = DATA {ConvertFrom-StringData -StringData @'0 = Unspecified1 = Desktop2 = Mobile
Listing 5.2 Computer type
TECHNIQUE 2
www.it-ebooks.info

143TECHNIQUE 2 Get computer type
3 = Workstation4 = Enterprise Server5 = Small Office and Home Office (SOHO) Server6 = Appliance PC7 = Performance Server8 = Maximum'@}function get-computertype {[CmdletBinding()]param ( [parameter(ValueFromPipeline=$true, ValueFromPipelineByPropertyName=$true)] [string]$computername="$env:COMPUTERNAME")PROCESS { Get-WmiObject -Class Win32_ComputerSystem ` -ComputerName $computername | select Name, @{Name="ComputerType"; Expression={$comptype["$($_.PCSystemType)"]}}}}
The imaginatively named $comptype hash table is created using ConvertFrom-StringData and defines the computer types. This is then used in a calculated field toreturn the computer type.
DISCUSSION
The computer types produced by listings 5.1 and 5.2 are similar but not identical. Anexample is shown in figure 5.1. Note that you can use Select-Object on the results ofthese functions. Remember that you’re dealing with objects.
Figure 5.1 Results of running the functions from listings 5.1 and 5.2
www.it-ebooks.info

144 CHAPTER 5 System documentation
In addition to determining its physical type, you can view a computer in the light of itsrole in a domain.
Get domain role
A Windows machine can be in a domain or a work group. It can be a workstation or aserver. If it’s in a domain, it could be a domain controller. You can find your domaincontrollers in a number of ways using .NET, ADSI, or the AD cmdlets from Microsoft orQuest. If you’re retrieving computer information using WMI, you can also finddomain controllers.
PROBLEM
You need to determine if your systems are in the domain and what role they play inthe domain. You specifically want to know if any machines are domain controllers.
SOLUTION
The script in the next listing follows the pattern established in previous scripts.
$domrole = DATA {ConvertFrom-StringData -StringData @'0 = Standalone Workstation1 = Member Workstation2 = Standalone Server3 = Member Server4 = Backup Domain Controller5 = Primary Domain Controller'@}function get-domainrole {[CmdletBinding()]param ( [parameter(ValueFromPipeline=$true, ValueFromPipelineByPropertyName=$true)] [string]$computername="$env:COMPUTERNAME")PROCESS { Get-WmiObject -Class Win32_ComputerSystem ` -ComputerName $computername | select Name, Domain, @{Name="DomainRole"; Expression={$domrole["$($_.DomainRole)"]}}}}
The hash table defines the possible outcomes for the domain role. The function acceptsa string containing a computer name as a parameter, and the parameter has a defaultof $env:COMPUTERNAME, which means the local system name. Win32_ComputerSystem isused to return the information using a calculated field to decode the domain role.
DISCUSSION
The default value on the parameter enables you to use just the function name to getthe information on the local machine. One of the really great things about the
Listing 5.3 Domain role
TECHNIQUE 3
www.it-ebooks.info

145TECHNIQUE 4 Get processor information
advanced functions is that tab completion works on the parameter names. It just hap-pens—no coding required!
If you don’t want to use a default parameter, I suggest you use a mandatory param-eter. This will force PowerShell to prompt for the computer name. You can do this bychanging the parameter statement to the following syntax:
[parameter(Mandatory=$true, ValueFromPipeline=$true, ValueFromPipelineByPropertyName=$true)]
If a default value and mandatory parameter are used together, the default is ignored. You’ve now learned about as much as you can at the machine level. It’s time to dive
into the computer hardware and configuration. We’ll start by looking at the processor.
Get processor information
The computer’s processor performs the computational effort in your systems thatenable you to play games or even write a book. The number of cores in a physical CPUcontinues to rise, but you still need to understand what your servers are capableof processing.
As a consultant, I’ve often ended up on new sites where no one can tell me the con-figuration of a particular machine. Now I can find out for myself in much less time.
PROBLEM
Will your server support an increased workload? The answer depends on two things:First, how busy is the server at the moment? You’ll learn how to discover this inchapter 15. Second, what size processors do you have, and how many of them are inyour computer?
Another thing you need to know is whether the processor can support 64-bitapplications.
SOLUTION
Discovering the speed and type of the processors in a computer can be achieved withthe Win32_Processor class, as shown in the following listing. Be careful when typing,as the Win32_Process class will give you unexpected results if it’s selected by an editorwith IntelliSense on WMI class names.
$arch = DATA {ConvertFrom-StringData -StringData @'0 = x86 9 = x64'@}
$fam = DATA {ConvertFrom-StringData -StringData @'29 = AMD Athlon™ Processor Family112 = Hobbit Family 131 = AMD Athlon™ 64 Processor Family132 = AMD Opteron™ Processor Family'@}
$type = DATA {ConvertFrom-StringData -StringData @'
Listing 5.4 CPU type
TECHNIQUE 4
Lookup hash tables
B
www.it-ebooks.info

146 CHAPTER 5 System documentation
3 = Central Processor4 = Math Processor 6 = Video Processor'@}
function get-cputype {[CmdletBinding()]param ( [parameter(ValueFromPipeline=$true, ValueFromPipelineByPropertyName=$true)] [string]$computername="$env:COMPUTERNAME")PROCESS { Get-WmiObject -Class Win32_Processor ` -ComputerName $computername | Select DeviceID, @{Name="Processor Type"; Expression={$type["$($_.ProcessorType)"]}}, Manufacturer, Name, Description, @{Name="CPU Family"; Expression={$fam["$($_.Family)"]}}, @{Name="CPU Architecture"; Expression={$arch["$($_.Architecture)"]}}, NumberOfCores, NumberOfLogicalProcessors, AddressWidth, DataWidth, CurrentClockSpeed, MaxClockSpeed, ExtClock, L2CacheSize, L2CacheSpeed, L3CacheSize, L3CacheSpeed, CurrentVoltage, PowerManagementSupported, ProcessorId, SocketDesignation, Status}}
Executing the listing creates a function called get-cputype and some hash tables Bto be used as data lookups. The function takes a computer name as a parameter Cand performs a call to Win32_Processor D. Where applicable, Select-Object uses acalculated field to convert the numeric codes into meaningful values using the hashtables. The results are displayed as a list. A separate listing will be created for eachCPU. Note that the CPU device IDs start numbering at zero.
DISCUSSION
A limited number of hash table members are shown for brevity. The full type listingsare available in the download version of the script. In case anyone is wondering, theHobbit processor is genuine.
If this function is run against a Windows Server 2008/Vista or later system, thenumber of logical processors and number of cores are reported correctly. Earlieroperating systems won’t report values for these properties and will report logical pro-cessors as physical processors.
Next, the BIOS controls how a system starts up. The version can have an impact onyour systems.
Get BIOS information
The Basic Input/Output System (BIOS) runs when the computer starts. It initializescertain system devices and then loads the operating system. On modern systems, the
Lookup hash tablesB
Parameter blockC
Processor propertiesD
TECHNIQUE 5
www.it-ebooks.info

147TECHNIQUE 5 Get BIOS information
BIOS can be upgraded. This may need to happen before other firmware canbe upgraded.
PROBLEM
What version of the BIOS is being used to start your system? This information has to berecovered so that you can determine if an upgrade is required to work with a new device.
SOLUTION
The following listing shows how you can create a function to return the BIOS informa-tion. You need to use the class twice in order to unravel the BIOS characteristics.
$bioschar = DATA {ConvertFrom-StringData -StringData @' 7 = PCI is supported8 = PC Card (PCMCIA) is supported9 = Plug and Play is supported11 = BIOS is Upgradable (Flash)15 = Boot from CD is supported33 = USB Legacy is supported'@}
function get-biosinfo { [CmdletBinding()]param ( [parameter(ValueFromPipeline=$true, ValueFromPipelineByPropertyName=$true)] [string]$computername="$env:COMPUTERNAME")PROCESS { Get-WmiObject -Class Win32_Bios `-ComputerName $computername | Select BuildNumber, CurrentLanguage, InstallableLanguages, Manufacturer, Name, PrimaryBIOS, @{Name="Release Date"; Expression={ $_.ConvertToDateTime( $_.ReleaseDate) }}, SerialNumber, SMBIOSBIOSVersion, SMBIOSMajorVersion, SMBIOSMinorVersion, SMBIOSPresent, Status, Version
"BIOS Characteristics:" Get-WmiObject -Class Win32_Bios -ComputerName $computername | Select -ExpandProperty BiosCharacteristics | foreach {$bioschar["$($_)"]}
}}
The BIOScharacteristics property is an array of integers that you’ll need to expandso that you can decode the meaning of the integer. These values are defined in thehash table called $bioschar B. The characteristics are a good guide to the devicesthat the system can support.
The get-biosinfo function C is used to get the BIOS information D. This data isdisplayed as a list, as shown in figure 5.2. A data conversion using the ConvertToDateTimemethod is performed on the BIOS release date.
Listing 5.5 Listing 5.5 BIOS
Hash tableB
Function definition
C
Main data
D
Expand BIOS characteristics
E
www.it-ebooks.info

148 CHAPTER 5 System documentation
A second call to Win32_Bios is made E to access the BIOS characteristics. It would bepossible to slightly improve the function by making a single call to Get-WmiObjectand putting the results into a variable. The variable would then be used twice to displaythe data.
The BiosCharacteristics property is expanded by Select-Object, and eachinteger code is looked up in the hash table to determine its meaning. Figure 5.2 showsthe output.
DISCUSSION
There are a number of WMI classes that use arrays of values as a property. In somecases, you don’t need to worry about them because the information is available fromother properties. When the information can only be recovered from an array, youhave to use Select-Object and ExpandProperty to access the data.
The drawback to ExpandProperty is that you can’t display other properties at thesame time as you’re expanding a property. You have to use two individual calls toSelect-Object.
The last object on our tour of the main computer system is memory.
Get memory configuration
The amount of memory in computer systems has rocketed. I remember having argu-ments with management ten years ago because I wanted to put 256 MB in some PCs.
Figure 5.2 Expanding the BIOS characteristics
TECHNIQUE 6
www.it-ebooks.info

149TECHNIQUE 6 Get memory configuration
Now you wouldn’t really consider a new full-size machine that has less than 2 GB. Net-books currently tend to come with 1 GB of RAM, but the Windows 7 Starter Edition isconfigured to run with a low memory footprint.
NOTE Just in case you were thinking of jumping to using 1 GB of RAM andWindows 7 Starter Edition for your main machines, remember that StarterEdition can’t join a domain.
PROBLEM
Memory is normally arranged on one or more chips. You need to know the arrange-ment so that you can determine if the system can be upgraded in a cost-effective man-ner. You also need to know the amount of RAM in the system.
SOLUTION
Listing 5.1 showed how to use the Win32_ComputerSystem class to find the total systemmemory. If you need that information as part of the memory information, the follow-ing line of PowerShell can be utilized:
get-computersystem | where{$_."RAM(GB)"} | select "RAM(GB)"
Your functions can be used on the pipeline just like cmdlets. The rest of the memoryinformation is obtained from the get-memory function defined in the following listing.
$memuse = DATA {ConvertFrom-StringData -StringData @' 3 = System memory'@}
$memcheck = DATA {ConvertFrom-StringData -StringData @' 3 = None4 = Parity'@}
$memform = DATA {ConvertFrom-StringData -StringData @' 7 = SIMM8 = DIMM'@}
$memtype = DATA {ConvertFrom-StringData -StringData @' 2 = DRAM20 = DDR21 = DDR-2'@}
function get-memory {[CmdletBinding()]param ( [parameter(ValueFromPipeline=$true, ValueFromPipelineByPropertyName=$true)] [string]$computername="$env:COMPUTERNAME")PROCESS{ Get-WmiObject -Class Win32_PhysicalmemoryArray `
Listing 5.6 Memory configuration
Hash tables
B
Memory array
C
www.it-ebooks.info

150 CHAPTER 5 System documentation
-ComputerName $computername | Select @{Name="Location"; Expression={ if ($_.Location -eq 3){"System Board"} else {"Other"} } }, @{Name="Use"; Expression={$memuse["$($_.Use)"]}}, MemoryDevices, HotSwappable, @{Name="MaxRAM(GB)"; Expression={[math]::round($($_.MaxCapacity/1mB), 2)}}, @{Name="CheckType"; Expression={$memcheck["$($_.MemoryErrorCorrection)"]}}
"" Get-WmiObject Win32_Physicalmemory `-ComputerName $computername | select BankLabel, @{Name="Size(GB)"; Expression={[math]::round($($_.Capacity/1gb), 2)}}, DataWidth, DeviceLocator, @{Name="Form"; Expression={$memform["$($_.FormFactor)"]}}, @{Name="Type"; Expression={$memtype["$($_.MemoryType)"]}}, Speed, TotalWidth, @{Name="Detail"; Expression={$memdetail["$($_.TypeDetail)"]}}}}
After defining the hash tables B, this script makes use of two WMI classes. The firstclass, Win32_PhysicalMemoryArray C, displays the basic information, includingwhere the memory is located and how many memory devices can be fitted. TheMaxRAM(GB) is important for determining if further RAM can be fitted.
The second class is Win32_Physicalmemory D, which is used to display informa-tion about each individual memory device. This will include the memory size in GB,the type of memory, and its speed.
DISCUSSION
If only the number of devices and the total size is required, you can use Measure-Object to determine the results:
get-memory | Measure-Object -Sum "Size(GB)"
Comparing the results of this code with using get-computersystem (shown at thebeginning of the solution) can very quickly identify whether any memory has beendiverted for graphics or other uses.
Memory is the last of the basic computer system components we’ll consider. It’stime to look at the peripherals attached to your computers.
5.2 PeripheralsComputer systems aren’t self-contained boxes—you have to attach other devices tothem, such as a monitor, keyboard, and mouse. You also need to think about the
Memory chips
D
www.it-ebooks.info

151TECHNIQUE 7 Get display settings
hardware ports that are available on the system. Parallel and serial ports are often stillavailable, even though they’re being superseded by USB ports in many systems.
The WMI classes we’ll be dealing with in this section are summarized in table 5.2.
The monitor is the primary peripheral you need to consider.
Get display settings
Every client machine will have a monitor. Servers may not have a monitor physicallyattached if they’re virtual machines or connected to a KVM to allow screen sharing.
PROBLEM
You need to determine the display characteristics of your system.
SOLUTION
There are two WMI classes you need to consider to solve this problem.Win32_DesktopMonitor will provide information on the monitor that’s attached to thesystem. There’s also the video controller to take into consideration; this information isdiscovered using the Win32_VideoController class. The following listing shows howthese can be combined into a single function.
function get-display {[CmdletBinding()]param ( [parameter(ValueFromPipeline=$true, ValueFromPipelineByPropertyName=$true)] [string]$computername="$env:COMPUTERNAME")PROCESS{ "Monitor" Get-WmiObject -Class Win32_DesktopMonitor ` -ComputerName $computername | select Name, Description, DeviceId, MonitorManufacturer, MonitorType, PixelsPerXLogicalInch, PixelsPerYLogicalInch, ScreenHeight, ScreenWidth
Table 5.2 Computer peripheral classes
Component WMI Class
Display settings Win32_DesktopMonitorWin32_VideoController
Input device Win32_KeyboardWin32_PointingDevice
Hardware ports Win32_ParallelPortWin32_SerialPortWin32_USBHubWin32_USBController
Listing 5.7 Display settings
TECHNIQUE 7
www.it-ebooks.info

152 CHAPTER 5 System documentation
"Video" Get-WmiObject -Class Win32_VideoController ` -ComputerName $computername | select Name, @{Name="RAM(MB)"; Expression={$_.AdapterRAM/1mb}}, VideoModeDescription, CurrentRefreshRate, InstalledDisplayDrivers, @{Name="DriverDate"; Expression={$_.ConvertToDateTime($_.DriverDate)}}, DriverVersion}}
This function is very straightforward. It starts with the standard parameter of a com-puter name. This could also be an IP address. The Win32_DesktopMonitor class isused first, and the required properties are selected.
The Win32_VideoController class is called. Two calculated fields are used: thefirst calculates the video RAM into megabytes from bytes, and the second converts thedriver date to a readable format.
DISCUSSION
The Win32_DesktopMonitor class was introduced with Windows Vista to replace theWin32_DisplayConfiguration class. The Win32_VideoController class was intro-duced at the same time to replace the Win32_DisplayControllerConfigurationclass. The old classes are still available in Windows up to at least Windows 7. The newclasses may misreport on devices using old drivers on older operating systems. It maybe worth trying the older classes in that case.
The situation is much simpler when you consider input devices.
Get input devices
The standard input devices are a keyboard and mouse. You’ll usually only have a sin-gle keyboard, but you may have multiple mice, especially on laptops.
PROBLEM
The keyboard and mouse attached to your computer need to be determined to com-plete the documentation of your system.
SOLUTION
Listing 5.8 shows how you can retrieve this information. The Win32_Keyboard classwill return the information on the keyboard. I’ve selected the properties that I thinkare most useful, but as with all of the listings in the book, I encourage you to examinethe full list of available properties to determine if there are any others you require tomeet your particular needs.
function get-input {[CmdletBinding()]param ( [parameter(ValueFromPipeline=$true,
Listing 5.8 Input devices
TECHNIQUE 8
www.it-ebooks.info

153TECHNIQUE 9 Get ports
ValueFromPipelineByPropertyName=$true)] [string]$computername="$env:COMPUTERNAME")PROCESS { "Keyboard" Get-WmiObject -Class Win32_Keyboard ` -ComputerName $computername | select Name, Description, DeviceId, Layout, NumberOfFunctionKeys
"Mouse" Get-WmiObject Win32_PointingDevice ` -ComputerName $computername | select Manufacturer, Name, DeviceID, DeviceInterface}}
The information on the mouse is provided by the Win32_PointingDevice class, whichisn’t exactly an intuitively named WMI class. If other, more exotic, input devices areused on a particular system, I’m afraid you’ll need to experiment to determine ifthey’re detected by this class.
DISCUSSION
The Win32_PointingDevice class will return multiple devices, especially on a laptop.On the laptop I’m using to write this book, I have the touchpad and a Bluetooth-attached wireless mouse, both of which are recorded. On IBM/Lenovo laptops, thetouchpad is recorded as well as the red mouse button in the middle of the keyboard.
The last category of devices we need to consider in this section is the hardwareports to which you attach other peripherals. Printers, disks, and other devices thatmay be attached through these ports will be covered in the relevant chapters.
Get ports
The standard hardware ports, for many years, were the parallel port and the serialport. These are being replaced by USB ports, and many laptops only have USB ports.There are also FireWire (1394) ports that may have to be considered.
PROBLEM
A new service is being introduced into your organization. This service requires adevice to be attached to some of the computers used in the organization. Do thosemachines have a suitable hardware port?
SOLUTION
The parallel and serial ports can be discovered using the appropriately named port, asshown in listing 5.9. Each of the relevant WMI classes is called and the appropriateproperties displayed. The Win32_SerialPort class has a number of properties thatindicate what is supported and settable. These can be quickly viewed using
Get-WmiObject Win32_SerialPort | select Support*, Settable*
These properties could be incorporated into the script if you deem it necessary.
TECHNIQUE 9
www.it-ebooks.info

154 CHAPTER 5 System documentation
function get-port {[CmdletBinding()]param ( [parameter(ValueFromPipeline=$true, ValueFromPipelineByPropertyName=$true)] [string]$computername="$env:COMPUTERNAME")PROCESS {"Parallel Port"Get-WmiObject -Class Win32_ParallelPort ` -ComputerName $computername |select Name, OSAutoDiscovered, PNPDeviceID
"Serial Port"Get-WmiObject -Class Win32_SerialPort ` -ComputerName $computername |select Name, OSAutoDiscovered,PNPDeviceID, ProviderType, MaxBaudRate
"USBHub" Get-WmiObject -Class Win32_USBHub ` -ComputerName $computername | select Name, PNPDeviceID
"" "USB Controller" Get-WmiObject -Class Win32_USBController ` -ComputerName $computername | Select Name, PNPDeviceID}}
Accessing the information about the USB ports is more problematic. There are twoclasses you can use: Win32_USBHub and Win32_USBController. Neither of the classesdirectly show the number of USB ports that are available, and there is no apparent wayto determine this. All you can do is show that USB connectivity is available.
DISCUSSION
As with all of the functions in this chapter, you can use it in a number of ways. If youjust need information on the local machine, you can use get-port. If you’reaccessing a remote machine, then get-port -computer server02 or get-port-computer 10.10.54.201 will work.
If required, the Win32_1394Controller and Win32_1394ControllerDevice classescan be added to listing 5.9 to supply information on FireWire (1394) ports.
Laptops are replacing desktop machines as the client of choice in many organiza-tions. If you use laptops, you need to consider the state of their batteries.
5.3 Power suppliesDiscovering information about the battery and its state is an interesting task. You needto look beyond the default root\cimv2 namespace to discover the information. Table 5.3summarizes the classes you need to work with and the namespaces you need to use.We’ll start simply with the default namespace.
Listing 5.9 Hardware ports
www.it-ebooks.info

155TECHNIQUE 10 Get battery details
Get battery details
Our starting point is the battery itself. What type is it, and what is it doing?
PROBLEM
How can you discover the battery type installed in your system?
SOLUTION
The Win32_Battery class in the root/cimv2 namespace is used in the following listingto determine the battery type.
$status = DATA {ConvertFrom-StringData -StringData @'1 = Discharging2 = On AC. No battery discharge. Not necessarily charging.6 = Charging'@}
$chem = DATA {ConvertFrom-StringData -StringData @'6 = Lithium-ion'@}
function get-battery {[CmdletBinding()]param ( [parameter(ValueFromPipeline=$true, ValueFromPipelineByPropertyName=$true)] [string]$computername="$env:COMPUTERNAME")PROCESS { Get-WmiObject -Class Win32_Battery ` -ComputerName $computername | select DeviceID, Name, Description, @{Name="Status"; Expression={$status["$($_.BatteryStatus)"]}}, @{Name="Chemistry"; Expression={$chem["$($_.Chemistry)"]}}, @{Name="Voltage(V)"; Expression={$($_.DesignVoltage / 1000)}}, @{Name="PecentChargeLeft"; Expression={$($_.EstimatedChargeRemaining)}}, PowerManagementSupport}}
Table 5.3 Computer power classes
Component WMI class
Battery Win32_Battery
Battery status
Test power source
root\wmi BatteryStatus
Power plans root\cimv2\power Win32_PowerPlan
Listing 5.10 Battery details
TECHNIQUE 10
www.it-ebooks.info

156 CHAPTER 5 System documentation
Some lookup tables are created at the beginning of the listing. These are truncated forbrevity, but the full lists are available in the download code. The Win32_Battery class isused with a number of calculated fields, decoding the integers to meaningful values.
The voltage is reported in millivolts which we divide by 1000 to produce the displayin volts.
DISCUSSION
EstimatedRunTime on Windows 7 (and Windows Server 2008 R2) always seems toreturn 71582788, which is approximately 136 years if the documentation is correct.Talk about a lifetime guarantee!
Knowing how long the battery will last may be important to you. There is an indi-rect way of discovering this.
Get battery status
There’s another way to get information on your battery status. This involves using anundocumented WMI class from the root\wmi namespace. There are many classes inthis namespace that appear as if they should be useful, but when investigated theydon’t return any data. You’re interested in the Batterystatus class:
Get-WmiObject -Namespace 'root\wmi' -Class Batterystatus
PROBLEM
How can you determine the status of your battery and use that to determine how longit will take to discharge the battery?
SOLUTION
There isn’t a simple solution to this problem, so you need to approach it in a round-about fashion. Your starting point is to determine the battery status, as shown in thefollowing listing. I have left the voltage in millivolts in this script. The appropriatecalculated field from listing 5.10 can be utilized in this script to convert it to voltsif required.
function get-batterystatus {[CmdletBinding()]param ( [parameter(ValueFromPipeline=$true, ValueFromPipelineByPropertyName=$true)] [string]$computername="$env:COMPUTERNAME")PROCESS { Get-WmiObject -Namespace 'root\wmi' -Class BatteryStatus ` -ComputerName $computername | Select Active, ChargeRate, Charging, Critical, DischargeRate, Discharging, PowerOnline, RemainingCapacity, Tag, Voltage}}
Listing 5.11 Battery status
TECHNIQUE 11
www.it-ebooks.info

157TECHNIQUE 12 Test power source
The key to determining the time left on the battery is the RemainingCapacity prop-erty. If you measure this while the battery is discharging, you can calculate the time todischarge. As an example, you can let the battery discharge for approximately onehour. At the start of the discharge period, run these lines of code:
$c1 = (get-batterystatus).RemainingCapacity$d1 = Get-Date
After sufficient time has elapsed, repeat the measurements using $c2 and $d2 for the vari-ables. The difference between $d1 and $d2 creates a timespan object that will have atotalminutes property. The difference between $c1 and $c2 shows how much capacityhas been used in the period. Divide that number by the totalminutes property to deter-mine capacity used per minute. Divide that into $c1 to determine how long the batterywill take to discharge. Finally, now that you know the discharge rate, you’ll be able to cal-culate the time remaining on the battery for any RemainingCapacity value.
This approach assumes that the rate of discharge is always the same. You may needto repeat this experiment under different loads to determine the complete batteryusage pattern.
DISCUSSION
I saw a post that stated the value of RemainingCapacity divided by 252 gave the timeto discharge. This doesn’t seem to hold on the systems I’ve tested under Windows 7and Windows Server 2008 R2 Datacenter edition. (Yes, I run Datacenter on my laptop.It runs Hyper-V very nicely.)
You can also use the Batterystatus class to give a quick indication of whether thelaptop is running on battery or external power.
Test power source
I was recently giving a talk using two laptops for the demonstration. I had an RDP linkfrom one to the other that repeatedly disconnected toward the end of the demonstra-tion. It wasn’t until I’d finished that I realized that I’d left the second laptop on bat-tery power!
PROBLEM
How can you determine if a laptop is running on battery power or external power?This question could arise for the reason given in the introduction, or a user couldcomplain that their screen is dull, which could indicate being on battery.
SOLUTION
The following listing provides a simple test to determine the state of the power supply.
function test-powersource {[CmdletBinding()]param ( [parameter(ValueFromPipeline=$true, ValueFromPipelineByPropertyName=$true)] [string]$computername="$env:COMPUTERNAME"
Listing 5.12 Test power source
TECHNIQUE 12
www.it-ebooks.info

158 CHAPTER 5 System documentation
)PROCESS { $status = Get-WmiObject -Namespace 'root\wmi' -Class BatteryStatus ` -ComputerName $computername
if ($status.PowerOnLine) {"System on External Power"} else {"System on Battery Power"}}}
The BatteryStatus class is interrogated as shown. You then use the PowerOnLineproperty as the condition in the if statement. It returns a Boolean (true or false), soyou can use it directly rather than testing the value. If the property returns true,you’re on external power and you print the appropriate message. Otherwise you’re onbattery power.
DISCUSSION
In the example I gave at the beginning of this section, the power had been switchedto battery because the power switch had been knocked off. It would be possible to usethe techniques we’ll discuss in chapter 15 to create a scheduled job that tests thepower source during the presentation. If it’s running on external power, nothing isreturned, but if the system switches to battery power, a warning is given to the pre-senter. Alternatively, a WMI event could be used to detect the change using theBatteryStatusChange class.
The last power-related item to be investigated is the power plan.
Get power plans
Windows 7 and Windows Server 2008 R2 introduced a new WMI namespace calledroot\cimv2\power for working with power plans. A power plan controls how themachine reacts to being on external or battery power. This includes the control ofitems such as screen brightness or hibernation after a period of inactivity.
You can view the classes in this namespace:
Get-WmiObject -Namespace 'root\cimv2\power' -List
The documentation for these classes can be found on MSDN in the WMI section under“Power Policy classes.” The classes involve a number of associations, as you’ll see whenyou discover how to use them.
PROBLEM
The active power plan needs to be checked and its settings displayed.
SOLUTION
The script in the following listing makes use of a number of the WMI and PowerShellfeatures you saw in chapters 2 and 3. Refer to those chapters if you need a refresher.
function get-powerplan {[CmdletBinding()]param ( [parameter(ValueFromPipeline=$true,
Listing 5.13 Power plan
TECHNIQUE 13
www.it-ebooks.info

159TECHNIQUE 13 Get power plans
-
y
r
r
ValueFromPipelineByPropertyName=$true)] [string]$computername="$env:COMPUTERNAME")PROCESS { Get-WmiObject -Namespace 'root\cimv2\power' ` -Class Win32_PowerPlan -ComputerName $computername | sort IsActive -Descending | Format-List ElementName, Description, InstanceID, IsActive
"'nActive Plan Details"$plan = Get-WmiObject -namespace 'root\cimv2\power' `-Class Win32_PowerPlan -ComputerName $computername | where {$_.IsActive}
$id = ($plan.InstanceID).Replace("\","\\")
$query = "ASSOCIATORS OF {Win32_PowerPlan.InstanceID=""$id}""}"$psIndexes = Get-WmiObject -ComputerName $computername `-namespace 'root\cimv2\power' -Query $query
"Battery Power"foreach ($psIndex in ($psIndexes | where {$_.InstanceID -like "*DC*"})){ $inxid = ($psIndex.InstanceId).Replace("\","\\") $query = "ASSOCIATORS OF
➥ {Win32_PowerSettingDataIndex.InstanceID=""$inxid}""} ➥ WHERE RESULTCLASS = Win32_PowerSetting " Get-WmiObject -ComputerName $computername ` -namespace 'root\cimv2\power' -Query $query | Add-Member -MemberType Noteproperty -Name "SettingIndexValue"` -Value $($psIndex.SettingIndexValue) -PassThru | Format-List InstanceId, Description, SettingIndexValue}
"External Power" foreach ($psIndex in ($psIndexes | where {$_.InstanceID -like "*AC*"}) ) { $inxid = ($psIndex.InstanceId).Replace("\","\\") $query = "ASSOCIATORS OF
➥ {Win32_PowerSettingDataIndex.InstanceID=""$inxid}""} ➥ WHERE RESULTCLASS = Win32_PowerSetting " Get-WmiObject -ComputerName $computername ` -namespace 'root\cimv2\power' -Query $query | Add-Member -MemberType Noteproperty `-Name "SettingIndexValue" ` -Value $($psIndex.SettingIndexValue) -PassThru| Format-List InstanceId, Description, SettingIndexValue}}}
The function starts by obtaining a list of the current power plans on the system B.This is sorted in descending order to ensure that the active plan is at the top of thelist. The information about the plans is displayed.
The details of the active plan are obtained by creating a variable that representsthe active plan C. WMI uses the backslash (\) as an escape character, so you need toreplace single instances with double occurrences of the character. A WMI query D isconstructed and run to find the power setting indexes associated with the power plan.
Identify active power plan
B
Separate active plan
C
Get PowersettingDataindex
D
Discover power settingsfor batteryE
DisplaresultsF
Discover powesettings for external powe
G
Discover WMI asociatorH
Display resultsI
www.it-ebooks.info

160 CHAPTER 5 System documentation
The settings for battery power are discovered first. The indexes are filtered in theforeach condition to only pass those referring to battery power (DC). A query to findthe associators is constructed, with the results limited to the power settings E. Thequery is executed F and the results are passed on to the pipeline. Add-member is usedto add the value of the setting, and the results are displayed.
The process is repeated for external power (AC) G, with the associators being dis-covered via a query H and the correct value I being added again.
DISCUSSION
This is the most complicated script we’ve looked at so far. If you can follow the logic,then congratulations! You’re well on the way to being a PowerShell and WMI expert.
The Win32_PowerPlan class can be used to change the active plan. You’ll learn howto perform this task in chapter 13 when we consider server configuration.
The power plan classes are only available on Windows 7 and Windows Server 2008R2. You could refine listing 5.13 by testing that you’re running against the correctoperating system. But first you need to learn to discover the operating system in useon your computers.
5.4 Operating systemThe operating system is fundamental to your system. It determines what applicationscan run and how you administer the system. Table 5.4 lists the main WMI classes you’lluse when you’re working with the operating system.
In many cases the operating system determines what you can do with the system,which often makes it the best place to start.
Get operating system version
You need to document the operating system for a number of reasons. The obviousreason is to complete the system documentation, but you also need to be able to
Table 5.4 Operating system classes
Component WMI class
Operating system
Service pack
Boot time
Win32_OperatingSystem
Hotfix Win32_QuickFixEngineering
Boot-up configuration Win32_BootConfigurations
Recovery configuration Win32_OSRecoveryConfiguration
Win32_LocalTime
System time Win32_UTCTime
Win32_TimeZone
TECHNIQUE 14
www.it-ebooks.info

161TECHNIQUE 14 Get operating system version
answer questions such as when did the system last restart, how long has it been run-ning, and what is the latest service pack that’s been applied.
PROBLEM
The system documentation on your servers is incomplete, and you need to add infor-mation about the operating system. You’ve also been tasked with finding a way to mea-sure the up-time of your servers as a measure of their reliability.
SOLUTION
The Win32_OperatingSystem class has a large number of properties that can helpanswer these questions. Listing 5.14 shows the output of the apparently useful proper-ties of this class. I say “apparently” because you may well discover a use for one of theother parameters.
The script starts by defining a set of lookup tables. Extracts from some of the moreinteresting ones are shown here. The full set is available in the download listing.
$sku = DATA {ConvertFrom-StringData -StringData @'1 = Ultimate Edition8 = Datacenter Server Edition'@}
$lang = DATA {ConvertFrom-StringData -StringData @'1033 = English US2057 = English UK'@}
$code = DATA {ConvertFrom-StringData -StringData @'1252 = Latin I'@}
$fboost = DATA {ConvertFrom-StringData -StringData @'0 = None1 = Minimum2 = (Default) Maximum'@}
function get-operatingsystem {[CmdletBinding()]param ( [parameter(ValueFromPipeline=$true, ValueFromPipelineByPropertyName=$true)] [string]$computername="$env:COMPUTERNAME")PROCESS { Get-WmiObject -Class Win32_OperatingSystem ` -ComputerName $computername | select CSName, Caption, @{Name="Operating System SKU"; Expression={$sku["$($_.OperatingSystemSKU)"]}}, SerialNumber, ServicePackMajorVersion, ServicePackMinorVersion, BuildNumber, Version, OSArchitecture, SystemDevice, SystemDrive,
Listing 5.14 Operating system
www.it-ebooks.info

162 CHAPTER 5 System documentation
WindowsDirectory, SystemDirectory, @{Name="OS Language"; Expression={$lang["$($_.OSLanguage)"]}}, @{Name="OS Type"; Expression={$os["$($_.OSType)"]}}, @{Name="Code Set"; Expression={$code["$($_.CodeSet)"]}}, @{Name="Country Code"; Expression={$country["$($_.CountryCode)"]}}, EncryptionLevel, @{Name="Foreground Application Boost"; Expression={$fboost["$($_.ForegroundApplicationBoost)"]}}, DataExecutionPrevention_32BitApplications, DataExecutionPrevention_Available, DataExecutionPrevention_Drivers, @{Name="Data Execution Prevention Support Policy"; Expression={$depsupport["$($_.DataExecutionPrevention_SupportPolicy)"]}}, @{Name="Installation Date"; Expression={$_.ConvertToDateTime($_.InstallDate)}}, @{Name="Last Bootup time"; Expression={$_.ConvertToDateTime($_.LastBootUpTime)}}, @{Name="Local Date Time"; Expression={$_.ConvertToDateTime($_.LocalDateTime)}}, @{Name="Offset from GMT"; Expression={"$($_.CurrentTimeZone) minutes"}}, @{Name="Locale "; Expression={$loc["$($_.Locale)"]}}, MaxNumberOfProcesses, @{Name="Max Process Memory Size (GB)"; Expression={"{0:F3}" -f $($_.MaxProcessMemorySize*1kb /1GB)}}, PAEEnabled, @{Name="Free Physical Memory (GB)"; Expression={"{0:F3}" -f $($_.FreePhysicalMemory/1GB*1kb)}}, @{Name="Size Stored In Paging Files (GB)"; Expression={"{0:F3}" -f $($_.SizeStoredInPagingFiles *1kb /1GB)}}, @{Name="Free Space In Paging Files (GB)"; Expression={"{0:F3}" -f $($_.FreeSpaceInPagingFiles *1kb /1GB)}}, @{Name="Total Visible Memory Size (GB)"; Expression={"{0:F3}" -f $($_.TotalVisibleMemorySize *1kb /1GB)}}, @{Name="Total Virtual Memory Size (GB)"; Expression={"{0:F3}" -f $($_.TotalVirtualMemorySize *1kb /1GB)}}, @{Name="Free Virtual Memory (GB)"; Expression={"{0:F3}" -f $($_.FreeVirtualMemory*1kb /1GB)}}}}
Csname is the first property selected; it returns the name of the computer. The major-ity of the script is comprised of calculated fields in the Select-Object, and the major-ity of them use the lookup hash tables to decode integer values into more meaningfuloutput. Dates are changed from WMI format into the more normal format you’re usedto by the ConvertToDateTime method. Service pack information includes a major andminor version number, though usually only the major version number is populated.
The memory-related properties at the end of the script are converted from kilo-bytes to gigabytes by a simple calculation using the PowerShell constants. They’rethen formatted to three decimal places using .NET formatting.
www.it-ebooks.info

163TECHNIQUE 15 Discover hotfixes
DISCUSSION
The system uptime can be calculated from the "Last Bootup Time" property you cal-culate in the script:
(Get-Date) - (get-operatingsystem)."Last Bootup time"
The current date and time is retrieved by using Get-Date. It’s wrapped in parenthesesso that it’s treated as an object.
The "Last Bootup Time" property is used from the get-operatingsystem functionfrom listing 5.14. Notice how PowerShell happily accepts property names withspaces—just wrap them in quotes. Subtracting the two dates creates a TimeSpan objectthat will give the uptime, as shown in figure 5.3. The TotalDays property is the mostappropriate to use for reporting purposes.
One thing to note is that time zone and daylight saving time offsets will be included inthe "Offset from GMT" property. You’ll learn more about time zones soon, but first weneed to consider hotfixes.
Discover hotfixes
Patching is a fact of life for Windows administrators. The speed of evolution of newthreats to Windows systems means you have to keep them up to date. There are anumber of mechanisms for applying patches to your servers, and they all report inslightly different manners.
PROBLEM
You need to interrogate your systems to determine which patches have been applied.You’d also like to be able to test if a particular hotfix has been applied.
Figure 5.3 Calculating system uptime
TECHNIQUE 15
www.it-ebooks.info

164 CHAPTER 5 System documentation
SOLUTION
PowerShell v2 introduced a cmdlet that can perform this task—Get-HotFix. In Power-Shell v1, you can use the underlying WMI class, Win32_QuickFixEngineering, that theGet-HotFix cmdlet uses. The only problem is how to determine if you’re runningPowerShell v2 or v1. The following listing shows how you can resolve this.
function get-hf {[CmdletBinding()]param ( [parameter(ValueFromPipeline=$true, ValueFromPipelineByPropertyName=$true)] [string]$computername="$env:COMPUTERNAME")PROCESS {if ($psversiontable.PSversion.Major -qe 2) { $fixes = Get-HotFix -ComputerName $computername } else { $fixes = Get-WmiObject -Class Win32_QuickFixEngineering ` -ComputerName $computername }
$fixes | select CSName, HotFixID, Caption, Description, InstalledOn, InstalledBy}}
DISCUSSION
The PowerShell automatic variable $psversiontable only exists in PowerShell v2. Youstart by testing for its existence (the Major property will have a value of 2 for Power-Shell vs2 and 3 for PowerShell v3. If it exists, you can use the cmdlet; otherwise youcan use the WMI class directly. You could just use WMI, but this is a simple example ofhow you can test for PowerShell versions, so it’s worth doing this way.
You can use the function to test whether a particular hotfix has been applied.
get-hf | where {$_.Hotfixid -eq "KB982799"}
There may be some hotfixes that can’t be discovered by this mechanism. These shouldbe found in the registry under these keys:
HKEY_LOCAL_MACHINE\SOFTWARE\Microsoft\Windows NT\CurrentVersion\HotfixHKEY_LOCAL_MACHINE\SOFTWARE\Microsoft\Updates
You’ll learn how to look at this information in chapter 7. In the meantime we need toconsider how the system is configured to boot up.
Get boot configuration
When a Windows system boots up, it needs to find the files it needs in order to boot. Ifthe directory with these files is incorrectly stored, the system won’t boot. Checkingthat the boot configuration is correct can save a lot of troubleshooting effort andpotentially save you having to rebuild the system.
Listing 5.15 Hotfixes
TECHNIQUE 16
www.it-ebooks.info

165TECHNIQUE 17 Find recovery configuration
PROBLEM
You need to check the boot configuration on your systems to ensure that themachines will start up correctly.
SOLUTION
The following listing shows how you can use the Win32_BootConfiguration class tosolve this problem.
function get-bootconfig {[CmdletBinding()]param ( [parameter(ValueFromPipeline=$true, ValueFromPipelineByPropertyName=$true)] [string]$computername="$env:COMPUTERNAME")PROCESS { Get-WmiObject -Class Win32_BootConfiguration ` -ComputerName $computername | select ConfigurationPath, BootDirectory, Caption, LastDrive, ScratchDirectory, TempDirectory}}
There are no surprises in this script. It retrieves the information from the WMI classand displays the required properties. Note that the ScratchDirectory and Temp-Directory properties relate to the folders that are used during startup, not the user’stemp folder.
DISCUSSION
If you explore the root/cimv2 namespace, the Win32_SystemBootConfiguration classshould be ignored, as it only links the Win32_ComputerSystem class with theWin32_BootConfiguration class.
Closely related to the boot configuration is the recovery configuration.
Find recovery configuration
In an ideal world, your servers would be started and would keep running until youshut them down or until you initiate a restart due to a change, such as the applicationof patches. Unfortunately, this isn’t always true, and your servers will sometimes failfor no apparent reason. Windows can supply you with information related to the fail-ure if it’s configured correctly.
PROBLEM
Windows has a number of options for determining what happens if a crash occurs. Youneed to ensure that they’re set consistently across the server estate. You also need to beable to check on any exceptions enabled for servers that need a different configuration.
SOLUTION
This information is recovered using the Win32_OSRecoveryConfiguration class, asthe following listing shows.
Listing 5.16 Boot configuration
TECHNIQUE 17
www.it-ebooks.info

166 CHAPTER 5 System documentation
$dump = DATA {ConvertFrom-StringData -StringData @'1 = Complete Memory Dump2 = Kernel Memory Dump'@}
function get-OSrecovery {[CmdletBinding()]param ( [parameter(ValueFromPipeline=$true, ValueFromPipelineByPropertyName=$true)] [string]$computername="$env:COMPUTERNAME")PROCESS { Get-WmiObject Win32_OSRecoveryConfiguration ` -ComputerName $computername | select Name, AutoReboot, DebugFilePath, @{Name="Debug Info"; Expression={$dump["$($_.DebugInfoType)"]}}, ExpandedDebugFilePath, ExpandedMiniDumpDirectory, KernelDumpOnly, MiniDumpDirectory, OverwriteExistingDebugFile, SendAdminAlert, WriteDebugInfo, WriteToSystemLog}}
A hash table is constructed to store the lookup information for the type of memorydump produced during a failure. Think carefully about this, because a full memorydump of a 64-bit machine could take a lot of disk space. The properties are displayedas shown in figure 5.4.
DISCUSSION
The DebugFilePath and the MiniDumpDirectory contain the environmental variable%SystemRoot%. The value of this variable can be discovered using
$env:SystemRoot
Listing 5.17 Recovery configuration
Figure 5.4 Output of running the get-OSrecovery function in listing 5.17
www.it-ebooks.info

167TECHNIQUE 18 Test system time
On my systems, it returns C:\Windows. This is the standard value if Windows has beeninstalled with the default installation path. The function could be modified to replacethe full variable with its value if you suspect that a nondefault installation path hasbeen used.
One last configuration item needs to be considered: the system time.
Test system time
In an Active Directory environment, the system clocks are only allowed a maximumdifference of five minutes from the domain controllers, by default. If this allowabledifference is exceeded, the machine can’t authenticate to the domain and nothingworks properly. This is generally viewed as a bad thing to happen.
PROBLEM
The local time on the system has to be checked to ensure that it’s correct. In an orga-nization that spans time zones, you need to check the UTC (GMT) time to ensure thatthe time settings across the organization are correct. Twice yearly, you have an addi-tional issue with the changes to and from daylight saving time.
SOLUTION
There are a number of classes you can use to work with the system time, as shown inthe following listing. It starts by using the Win32_LocalTime and the Win32_UTCTimeclasses to determine the respective time values.
function test-systemtime {[CmdletBinding()]param ( [parameter(ValueFromPipeline=$true, ValueFromPipelineByPropertyName=$true)] [string]$computername="$env:COMPUTERNAME")PROCESS { $now = Get-WmiObject -Class Win32_LocalTime ` -ComputerName $computername
$now2 = Get-WmiObject -Class Win32_UTCTime ` -ComputerName $computername
$local = Get-Date -Year $($now.Year) -Month $($now.Month) ` -Day $($now.Day) -Hour $($now.Hour) ` -Minute $($now.Minute) -Second $($now.Second)
$utc = Get-Date -Year $($now2.Year) -Month $($now2.Month) ` -Day $($now2.Day) -Hour $($now2.Hour) ` -Minute $($now2.Minute) -Second $($now2.Second)
$tz = Get-WmiObject -Class Win32_TimeZone ` -ComputerName $computername
$daylton = Get-Date -Month $tz.daylightmonth -Day $tz.daylightday ` -Hour $tz.daylighthour -Minute $tz.daylightminute `
Listing 5.18 System time
TECHNIQUE 18
www.it-ebooks.info

168 CHAPTER 5 System documentation
-Second $tz.daylightsecond
$stndon = Get-Date -Month $tz.standardmonth -Day $tz.standardday ` -Hour $tz.standardhour -Minute $tz.standardminute ` -Second $tz.standardsecond
if (($local -ge $daylton) -and ($local -le $stndon)){ $timename = $tz.DaylightName}else {$timename = $tz.StandardName}
"Server : $($now.__SERVER)" "Time Zone : $($tz.Description)" "Time Setting: $timename" "Local Time : $local" "UTC Time : $utc"}}
The information isn’t returned in a format that enables simple conversion to a datetimeformat, so you use Get-Date to create the objects you need. You can then retrieve thetime zone information. The information on when the change to and from daylight sav-ing time occurs can be used to determine which time setting you display. The data is dis-played at the end of the function, where the dates will display as MM/DD/YYYY.
DISCUSSION
It isn’t possible to use the IsDaylightSavingTime method of Get-Date because thatwill only apply to the local machine, not the remote machine. This could lead toerrors where you cross time zones and localities with different dates for changing thedaylight saving time settings.
Win32_CurrentTime will display both Win32_LocalTime and Win32_UTCTime. In myexperience it’s easier to deal with them separately.
This completes our investigation of the operating system configuration. The lastarea we need to explore is the installed software.
5.5 SoftwareComputers are great, but they can’t do much without software. The main task whenyou’re working on the system configuration is discovering what software has beeninstalled.
Discover installed software
Software can end up on machines for a number of reasons, including a corporatedecision to install it and a user taking an arbitrary decision to install the software.When you’re troubleshooting issues with a client machine or server, you need to knowwhat has been installed.
PROBLEM
The software that has been installed on your computers can affect their performance.In some cases, the installed versions need to be checked before an upgrade to other soft-ware can occur. You need to be able to determine what software is installed on a system.
TECHNIQUE 19
www.it-ebooks.info

169Summary
SOLUTION
Software can be installed in a number of ways. If the software was installed by the Win-dows installer, you can use the Win32_Product class to discover what has beeninstalled. The following listing shows how this class is used, following the standard pat-tern we’ve adopted throughout the chapter.
function get-software {[CmdletBinding()]param ( [parameter(ValueFromPipeline=$true, ValueFromPipelineByPropertyName=$true)] [string]$computername="$env:COMPUTERNAME")PROCESS {"Installed Software" Get-WmiObject -Class Win32_Product ` -ComputerName $computername | select Name, IdentifyingNumber, InstallLocation, Vendor, Version
"Installed COM Applications" Get-WmiObject -Class Win32_COMApplication ` -ComputerName $computername |select Name, AppID}}
Win32_Product supplies information on application and version, which is probablythe most important data that you need. Many applications also register COM compo-nents. You can use Win32_COMApplication to discover this aspect of the data.
DISCUSSION
The get-software function will return the majority, if not all, of the installed soft-ware. There is always the possibility that an odd application is installed in some man-ner that doesn’t register correctly, so you can’t find it with these classes. In chapter 7,we’ll look at the information held in the registry on installed software.
This concludes our journey around system configuration. Applying these tech-niques will enable you to derive information about your systems. One issue to thinkabout is how you’ll store it. An easy way is to pipe the output from these functions intotext files as follows:
get-software | out-file c:\reports\software.txt
5.6 SummaryUnderstanding your system configuration is the first step toward controlling the envi-ronment and being able to automate your administration. The techniques in thischapter enable you to discover configuration settings for each of the following:
Listing 5.19 Installed software
www.it-ebooks.info

170 CHAPTER 5 System documentation
■ The computer system, including make, model, form factor, motherboard,onboard devices, processors, and memory
■ The peripheral devices including keyboard, mouse, and hardware ports■ The battery and power plan active on the system■ The operating system, including service packs, hotfixes, boot and recovery
options, and the time settings■ The installed software
These techniques, in isolation, enable you to discover information about specificaspects of your servers.
I use these functions, on a regular basis, to document new servers as they come intoproduction. The production of the documentation is fully automated because my Pow-erShell script writes the data directly into a Microsoft Word document. (An explanationof this is beyond the scope of this chapter, but details can be found in my PowerShell inPractice, page 214.) All I have to do is complete the front cover of the document.Producing the documentation takes at least a day per server if performed manually;automating the task allows it to run as a background task and takes about five minutesof my time.
We haven’t covered storage systems yet. We’ll look at them in the next chapter,where you’ll learn how to discover the disk configuration and perform some adminis-tration tasks on your disks.
www.it-ebooks.info

Disk systems
Disk systems, along with CPU and memory, are the primary system resources we’reinterested in as administrators. We looked at how to explore CPU and memory con-figurations in chapter 5. In this chapter, we’ll turn our attention to the disk systems.
Working with the disk system on a local machine is easy. Administering the diskson remote machines gets more difficult. As a real-world example consider the 200virtual servers I have running. Virtual disks become fragmented just like physicaldisks, leading to poor performance. The techniques you’ll learn later in this chap-ter will show you which disks need defragmenting and could be used to performthe defragmentation overnight. All from a single script. This is a classic of exampleof how PowerShell and WMI can save you time and effort—quicker, easier adminis-tration, and you get the benefits.
We’ll start by considering physical disks and their controllers. Disk controllerscan be IDE- or SCSI-based. You can easily test for both in the same script. PowerShelland WMI don’t return error messages if there’s no data, so you can use that featureto test both types of controllers without worrying if they’re both present.
This chapter covers■ Discovering the physical disks in your systems■ Relating physical and logical disks■ Managing disk volumes
171
www.it-ebooks.info

172 CHAPTER 6 Disk systems
A physical disk can contain one or more partitions. Discovering the partitions andhow they relate to the physical disks starts to build the picture of your disk systems.There are a good set of relationships defined in WMI between the various componentsof the disk system, so you can look forward to getting lots of practice finding associ-ated classes. Now would be a good time to review WQL if you skipped chapter 3.
NOTE This information is all viewed from within Windows. If your disk sys-tem consists of five disks in a RAID 5 array on your SAN that’s presented toWindows as a single disk, WMI will report it as a single disk. WMI can’t drilldown into the structure of external disk arrays.
Partitions are the stepping stone to logical disks. You can have multiple partitions andlogical disks defined for a single physical disk, and discovering the relationships is aquick and easy way to discover any unallocated space on your physical disk. The lastlink in the chain is the volumes to be found on a system. These are the real pointwhere you work with the disks on a day-to-day basis. At the volume level, you can mon-itor changes to the disk system as well as perform management tasks, such as format-ting, running chkdsk, or defragmenting a volume. PowerShell and WMI enable you toperform this as easily on a remote machine as on a local machine.
The chapter closes with a quick look at CD/DVD drives to complete your explora-tion of working with disks through WMI.
Physical disks are the starting point of any investigation into disk management.
6.1 Physical disksThe hardware involved in disk systems consists of the physical disks themselves andthe disk controllers used by the operating system to communicate with the disks. Therelationships between the various components we’ll deal with in this chapter are illus-trated in figure 6.1.
Figure 6.1 The components of disk systems
www.it-ebooks.info

173Physical disks
A disk controller can work with one or more physical disks. A physical disk can haveone or more partitions, and a partition can contain one or more logical disks. TheWMI classes that correspond to these physical entities are listed in table 6.1.
Notice the names of Win32_LogicalDisk and Win32_DiskDrive for working with logi-cal and physical disks respectively. This is one place where the logical naming of WMIclasses breaks down. Don’t try to search for Win32_PhysicalDisk, or you’ll have thesame frustrating experience I did.
Disk controllers are at the head of the line for the physical side of disk systems.
Table 6.1 Disk-related WMI classes
Component WMI class
Disk controller
Win32_IDEController
Win32_IDEControllerDevice
Win32_SCSIController
Win32_SCSIControllerDevice
Physical disk Win32_DiskDrive
Partition
Win32_DiskDriveToDiskPartition
Win32_DiskPartition
Win32_LogicalDiskToPartition
Logical disk Win32_LogicalDisk
Mount point Win32_MountPoint
Volume Win32_Volume
CD drive Win32_CDROMDrive
WMI changesAs an example of how the IT infrastructure landscape is changing I’ve deliberatelydecided to not include any content on floppy disks. These drives aren’t standardon modern servers and are rapidly disappearing from our environments. If informa-tion is required on these devices use the Win32_FloppyController andWin32_FloppyDrive classes.
WMI itself is constantly changing and evolving in addition to hardware changes. If youhave worked with WMI before you may notice that the Win32_PhysicalMedia classisn’t mentioned. It gives inconsistent results on Windows 7 and it appears this classis being replaced by Win32_DiskDrive. I recommend only using Win32_DiskDrive.
www.it-ebooks.info

174 CHAPTER 6 Disk systems
Discover disk controllers
Figure 6.1 shows that storage systems consist of a number of items that all need to beconnected and working properly. Disk controllers can be split into two main types:
■ IDE—Generally used in PCs, laptops and low-end servers■ SCSI—Generally used in servers
But this isn’t a hard and fast division, especially when you’re dealing with virtualmachines.
PROBLEM
The disk controllers in your systems need to be enumerated so that you know how thestorage solution is configured. Ideally you also want to be able to discover the physicaldisks that are connected to the controllers.
SOLUTION
There are two WMI classes for working with disk controllers: Win32_IDEControllerand Win32_SCSIController, as shown in table 6.1. You can use both classes in yourdiscovery script, as shown in the following listing.
$dprot = DATA { ConvertFrom-StringData -StringData @' 9 = SCSI Parallel Interface10 = SCSI Fibre Channel Protocol11 = SCSI Serial Bus Protocol42 = Enhanced ATA/IDE'@}
function get-diskcontroller {[CmdletBinding()]param ( [parameter(ValueFromPipeline=$true, ValueFromPipelineByPropertyName=$true)] [string]$computername="$env:COMPUTERNAME")PROCESS{ $ide = $null $scsi= $null
$ide = Get-WmiObject -Class Win32_IDEController ` -ComputerName $computername
$scsi = Get-WmiObject -Class Win32_SCSIController ` -ComputerName $computername
if ($ide){ "IDE Controllers" $ide | select Name, Status, Manufacturer, MaxNumberControlled, @{Name="Protocol"; Expression={$dprot["$($_.ProtocolSupported)"]}} }
Listing 6.1 Disk controllers
TECHNIQUE 20
Define data valuesB
Get IDE controllers
C
Get SCSI controllers
D
Display IDE dataF
www.it-ebooks.info

175TECHNIQUE 21 Physical drive information
if ($scsi){ "SCSI Controllers" $scsi | select Name, Status, Manufacturer, MaxNumberControlled, @{Name="Protocol"; Expression={$dprot["$($_.ProtocolSupported)"]}} }}}
The script follows the pattern established in chapter 5. The script starts by definingthe lookup values for the supported protocols B. The function takes a computername as a parameter with a default of “.”, which signifies the local host. Two variablesare created to represent the controller information and are deliberately set to null.
The Win32_IDEController C and Win32_SCSIController D classes are called toget the required information. In this function, you’re returning the information to thepreviously defined variables rather than directly to the user. The variables are checkedindividually to determine if they have a value. If IDE controllers exist E, the appropriatedata is displayed. Similarly, the SCSI controllers F are checked and displayed.
DISCUSSION
This script relies on the way the null values are handled by PowerShell to deter-mine whether data should be displayed. A null value isn’t equal to $false. Try thisexperiment:
$test = $nullif ($test){"hello"}if (-not $test){"hello"}
You’ll get a result from the last line. Now try this:
$test -eq $false
It will return False. When testing variables, if the value is $null, it will react as if it’s$false, but it doesn’t carry a value of $false.
Now that you know which disk controllers are in your system, you need to under-stand how the controllers are linked to the physical disks. This can be achieved byusing the appropriate associating class:
Get-WmiObject Win32_IDEControllerDevice |Format-List Antecedent, Dependent
And for SCSI controllers, you use this:
Get-WmiObject Win32_SCSIControllerDevice |Format-List Antecedent, Dependent
You know what controllers you have, and you know which disks are attached to them.What can you discover about the disks themselves?
Physical drive information
The physical drives in your computers control how much data you can store. Evenwith compression, there is a finite limit to the amount of data you can cram onto a
Display SCSI dataF
TECHNIQUE 21
www.it-ebooks.info

176 CHAPTER 6 Disk systems
disk. Understanding the capacity limits of your disk systems is the first step toward arealistic capacity management plan.
NOTE Win32_DiskDrive doesn’t include information on CD drives, butWin32_LogicalDisk does. This can lead to confusion when matching logicalto physical disk information.
The Win32_DiskDrive class only works with disks that Windows counts as being inter-nal. Any disks in the computer and in external storage systems that are allocated tothe computer will be included. Mapped drives won’t be included.
PROBLEM
The physical disks in your machines need documenting, including their capacity.
SOLUTION
The following listing shows a function that uses Win32_DiskDrive to solve this problem.The function takes a computer name as a parameter and then accesses the WMI class.
function get-diskdrive {[CmdletBinding()]param ( [parameter(ValueFromPipeline=$true, ValueFromPipelineByPropertyName=$true)] [string]$computername="$env:COMPUTERNAME")PROCESS{ Get-WmiObject -Class Win32_DiskDrive ` -ComputerName $computername | select DeviceID, InterfaceType, Manufacturer, Model, FirmwareRevision, SerialNumber, Signature, StatusInfo, Partitions, TotalHeads, BytesPerSector, TotalSectors, SectorsPerTrack, TotalTracks, TracksPerCylinder, TotalCylinders, @{Name="Disk Size (GB)"; Expression={"{0:F3}" -f $($_.Size/1GB)}}, SCSIBus, SCSILogicalUnit, SCSIPort, SCSITargetId
"Capabilities:" Get-WmiObject -Class Win32_DiskDrive ` -ComputerName $computername | select -ExpandProperty CapabilityDescriptions}}
Select-Object is used to choose the properties you want to display. The ones selectedin this script are the ones I’ve found most useful, but as with all of these scripts, it’sworth checking if there are other properties that may be of use to you in your specificcircumstances.
The majority of the properties can be just displayed, but the disk size is returned inbytes. This gives you a number that’s more than a bit unwieldy. A simple calculated
Listing 6.2 Disk drives
Calculate capacity
B
Determine capabilitiesC
www.it-ebooks.info

177TECHNIQUE 22 Link partitions to disk drives
field B is used to divide the returned size by 1 GB to give a more meaningful result.The result is formatted to three decimal places.
The Win32_DiskDrive class returns a collection of capability descriptions as well asthe numeric code representing those descriptions. You can work directly with the capa-bility descriptions by using the -ExpandProperty parameter of Select-Object C. Thisprovides a neatly formatted display of the disk capabilities.
DISCUSSION
The disk capabilities will include some of the following:
■ Random access■ Supports writing■ Encryption■ Compression■ Supports removable media
Expect the first two on all physical hard drives.
Link partitions to disk drives
Figure 6.1 shows that a physical disk can contain a number of partitions. Assumingthat you’re using master boot record (MBR) partitioning, you can create either
■ Up to four primary partitions on a physical disk ■ Up to three primary partitions and an extended partition that can be divided
into multiple logical partitions
A primary partition is bootable.
PROBLEM
The disk systems on a number of remote servers need to be examined to determinethe relationship between the physical disks and the disk partitions. The boot partitionalso needs to be determined.
SOLUTION
A quick list of the partitions on each physical disk can be obtained using theWin32_DiskDriveToDiskPartition class. This class associates the disk drive and itspartitions. The information can be found with this simple PowerShell script:
Get-WmiObject -Class Win32_DiskDriveToDiskPartition |Format-List Antecedent, Dependent
This just supplies the partition identifiers. You really need to find more detailed infor-mation. You can use the Win32_DiskPartition class, but you have to relate it to thephysical drive. The physical drives will always be numbered from 0, so you can discoverif disk partitions can be directly associated with disk drives:
$query = "ASSOCIATORS OF{Win32_DiskDrive.DeviceID=""\\\\.\\PHYSICALDRIVE0""} WHEREClassDefsOnly"Get-WmiObject -Query $query
TECHNIQUE 22
www.it-ebooks.info

178 CHAPTER 6 Disk systems
This WMI query will produce the following output:
■ Win32_PnPEntity
■ Win32_ComputerSystem
■ Win32_DiskPartition
■ Win32_PhysicalMedia
This leads to the following listing, which allows you to discover the partitions that areassociated with each disk drive.
function get-drivetopartition {[CmdletBinding()]param ( [parameter(ValueFromPipeline=$true, ValueFromPipelineByPropertyName=$true)][string]$computername="$env:COMPUTERNAME")PROCESS{ Get-WmiObject -Class Win32_DiskDrive -ComputerName $computername | foreach { $_.DeviceId $inxid = ($_.DeviceID).Replace("\","\\") $query = "ASSOCIATORS OF {Win32_DiskDrive.DeviceID=""$inxid""}
➥ WHERE RESULTCLASS = Win32_DiskPartition" Get-WmiObject -ComputerName $computername -Query $query
}}}
The function accepts a computer name as a parameter. The Win32_DiskDrive class isused to discover the physical drives. These are piped into a ForEach-Object cmdletthat displays the device ID of the physical disk.
Single backslash (\) characters are replaced by doubles (\\)because the backslashis a WMI escape character and you need to ensure that the device ID is read correctly.Alternatively, the __RELPATH property could be used.
A query is created to find the associated partitions and is executed.
DISCUSSION
The display produced by running this script uses the default display ofWin32_DiskPartition. This produces something similar to the following display foreach of the partitions present on the disk:
NumberOfBlocks : 204800BootPartition : TrueName : Disk #0, Partition #0PrimaryPartition : TrueSize : 104857600Index : 0
Listing 6.3 Link disk drives to partitions
www.it-ebooks.info

179TECHNIQUE 23 Enumerating disk partitions
I’ve deliberately left the size in bytes in this display. It would be possible to combinelisting 6.3 with the next listing to give more information and to recalculate the parti-tion size.
Enumerating disk partitions
We’ve seen how to discover the disk partitions created on a specific physical disk drive.There’s more information available about the partition that may be of use to us.
PROBLEM
In many organizations there’s a tendency to over partition the physical disks. Thisis especially true on the C: drive which is used to boot Windows. Many systems areconfigured with small partitions which can lead to them running out of disk space.Can we determine the size distribution of the partitions to discover if this will bea problem?
SOLUTION
We’ve seen in listing 6.3 that the Win32_DiskPartition class can be used to investi-gate the disk partitions on our system. The next listing extends the use of this class todetermine more information including the size of the partition.
function get-partition {[CmdletBinding()]param ( [parameter(ValueFromPipeline=$true, ValueFromPipelineByPropertyName=$true)][string]$computername="$env:COMPUTERNAME")PROCESS{ Get-WmiObject -Class Win32_DiskPartition -ComputerName $computername | select DeviceID, Description, Bootable, BootPartition, PrimaryPartition, BlockSize, NumberOfBlocks, @{Name="Partition Size (GB)"; Expression={"{0:F3}" -f $($_.Size/1GB)}}, StartingOffset}}
The function follows our usual pattern with the Win32_DiskPartition class beingused to return the partition data. The required properties are selected for display. Acalculated field is used to display the size in gigabytes rather than bytes.
DISCUSSION
The device id is of the form “Disk #0, Partition #0” which means that you can linkthe partition information directly to the physical disk information. Figure 6.1 showsthat partitions form the link between physical disks and logical disks. The next step isto link the partition information to the logical disks you’ve defined in the system.
Listing 6.4 Disk partitions
TECHNIQUE 23
www.it-ebooks.info

180 CHAPTER 6 Disk systems
Link partitions to logical disks
The logical disks are the ones that you’re used to working with. They’re identified bydrive letters and are where you’re used to storing your files.
PROBLEM
You need to enumerate the logical disks that are contained within your partitions. Ide-ally you want to start at the partition and discover the logical disks.
SOLUTION
If you search for WMI classes that refer to disk partitions using
Get-WmiObject -List *partition*
you’ll find a class called CIM_LogicalDiskBasedOnPartition. This appears to give youwhat you want, but the information is the same as what you’d find with Win32_Logical-DiskToPartition. The following listing uses Win32_LogicalDiskToPartition to deter-mine the relationships between partitions and logical disks.
function get-logicaltopartition {[CmdletBinding()]param ( [parameter(ValueFromPipeline=$true, ValueFromPipelineByPropertyName=$true)][string]$computername="$env:COMPUTERNAME")PROCESS{ Get-WmiObject -Class Win32_LogicalDiskToPartition ` -ComputerName $computername | Format-List Antecedent, Dependent, StartingAddress, EndingAddress}}
The Antecedent and Dependent properties show the partition and logical disk respec-tively. On machines with a separate system partition, where they’ve been configuredfor dual boot, the small partition configured to control bootup may not be displayed.
DISCUSSION
You can perform a similar exercise to the one in technique 22 to discover the WMIclasses associated with Win32_LogicalDiskToPartition. The following three classeswill be returned:
■ Win32_DiskDrive
■ Win32_ComputerSystem
■ Win32_LogicalDisk
Using these classes and the examples in listings 6.2 to 6.5, it’s possible to construct ascript that starts with the physical disks and discovers the partitions and logical disks inone pass. I’ll leave that as an exercise for you. (There’s a solution in the downloadcode—it’s called get-disk.ps1 and it can be found in the Extras folder for this chapter.)In the meantime, let’s turn our attention to logical disks.
Listing 6.5 Partitions to logical disks
TECHNIQUE 24
www.it-ebooks.info

181TECHNIQUE 25 Logical disk information
6.2 Logical disksLogical disks are where you start to get close to the data. These are the disks that yousee when you look in Windows Explorer. There are two items of interest related to log-ical disks.
First, all logical disks have a root directory. While the name of the root directory isof obvious interest, its other properties also reveal interesting information. We’ll lookat root directories first.
The second item of interest is mount points, where you mount another disk into adirectory on your disk. Before we look at mount points, you need to discover the logi-cal disks you have in the system.
Logical disk information
The Win32_LogicalDisk class returns both local as well as mapped logical disks. Usethis class for obtaining information on local disks, and use theWin32_MappedLogicalDisk class for information on mapped disks.
PROBLEM
Some of your servers are running out of disk space. You need to be able to check thefree space left on the disks in your servers.
SOLUTION
You’ve already seen that that the Win32_LogicalDisk class returns information aboutyour local disks. This is the class you want to use, because you’re interested in the disksthat belong to the server, and not anything that’s mapped. The following listing showshow you can use the Win32_LogicalDisk class.
$dtype = DATA {ConvertFrom-StringData -StringData @' 3 = Local Disk4 = Network Drive'@}
$media = DATA {ConvertFrom-StringData -StringData @' 11 = Removable media other than floppy12 = Fixed hard disk media'@}
function get-logicaldisk {[CmdletBinding()]param ( [parameter(ValueFromPipeline=$true, ValueFromPipelineByPropertyName=$true)][string]$computername="$env:COMPUTERNAME")PROCESS{
Get-WmiObject -Class Win32_LogicalDisk ` -ComputerName $computername | select DeviceID, Compressed, Description,
Listing 6.6 Logical disks
TECHNIQUE 25
Define lookups
BB
Call WMI class
C
www.it-ebooks.info

182 CHAPTER 6 Disk systems
@{Name="Drive Type";
➥ Expression={$dtype["$($_.DriveType)"]}}, @{Name="Media Type";
➥ Expression={$media["$($_.MediaType)"]}}, FileSystem, @{Name="Disk Size (GB)";
➥ Expression={"{0:F3}" -f $($_.Size/1GB)}}, @{Name="Free Space (GB)";
➥ Expression={"{0:F3}" -f $($_.FreeSpace/1GB)}}, SupportsDiskQuotas, SupportsFileBasedCompression, VolumeName, VolumeSerialNumber}}
You start by defining some lookups B; the listing is truncated for brevity. TheWin32_LogicalDisk class is called C, and the results are piped into Select-Object.You can select the properties in which you’re interested.
The lookups are used to determine the drive type and the media type D. The disksize and free space are returned in bytes. Calculated fields are used to change thesenumbers to gigabytes E.
DISCUSSION
This listing can be adapted to only return the size information. This makes it easier tosee servers with disk issues. Alternatively, you could use Select-Object on the output:
get-logicaldisk | select "Disk Size (GB)", "Free Space (GB)",@{Name="% Free"; Expression={"{0:F3}" -f `$(($_."Free Space (GB)"/$_."Disk Size (GB)")*100)}}
You take the output from the function and select the two properties related to disksize. Remember that they’re calculated fields. You need to use quotes around theproperty names because they have spaces and special characters. You can then usethose two properties to calculate the percentage of free space. How flexible is that?
Now that you know about the logical disks installed in your system, what can youdiscover about their root directories?
Root directory data
You can get a view of the root directory by using Win32_LogicalDiskRootDirectorylike this:
Get-WmiObject Win32_LogicalDiskRootDirectory |select GroupComponent, PartComponent
This will return the logical disk device ID and the associated root directory. But discovering that C:\ is the root directory of C: probably doesn’t come as much
of a surprise. You need to be able to dig a bit deeper than this.
PROBLEM
You need to determine if the root directory of a logical disk is hidden, compressed, orencrypted, as these can have an impact on how the folder structure system is used andseen.
Use lookups
D
Calculate fields
E
TECHNIQUE 26
www.it-ebooks.info

183TECHNIQUE 26 Root directory data
SOLUTION
The root directory controls a number of properties of its child directories. If you lookat the root directory in detail, you can discover how it affects the folder structure. TheWMI class Win32_Directory can be used to discover the properties of your folders, asyou’ll see in chapter 8. If you check the classes associated with Win32_LogicalDisk,like this,
Get-WmiObject -Query "ASSOCIATORS OF {Win32_LogicalDisk.DeviceID='C:'} WHERE CLASSDEFSONLY"
you’ll see that Win32_Directory is one of them and returns the root directory. Youcan use this information, as in the following listing, to discover the directories associ-ated with a logical disk.
function get-rootdirectory {[CmdletBinding()]param ( [parameter(ValueFromPipeline=$true, ValueFromPipelineByPropertyName=$true)][string]$computername="$env:COMPUTERNAME")PROCESS{Get-WmiObject -Class Win32_LogicalDisk ` -ComputerName $computername | foreach { $_.DeviceId $inxid = ($_.DeviceID).Replace("\","\\") $query = "ASSOCIATORS OF {Win32_LogicalDisk.DeviceID=""$inxid""} WHERE RESULTCLASS = Win32_Directory" Get-WmiObject -ComputerName $computername -Query $query | select Name, Hidden, Archive, Compressed, Encrypted, Readable, FSName, EightDotThreeFileName, FileSize, LastAccessed, LastModified }}}
The function uses Win32_LogicalDisk to return the logical disks on the computer. Thedevice ID of each disk is printed, and the device ID is then modified by doublingthe backslash (\) characters (the backslash is a WMI escape character that needs to bedoubled to use it literally).
You can find the Win32_Directory instances associated with that logical disk andselect the properties you want to display.
DISCUSSION
The important properties are Hidden, Compressed, and Encrypted. You can alwaysselect just those properties using this line:
get-rootdirectory | select Name, Hidden, Compressed, Encrypted
The other way that directories interact with logical disks is through mount points.
Listing 6.7 Root directory
www.it-ebooks.info

184 CHAPTER 6 Disk systems
Mount points
When you create a logical disk (volume), you can choose to give it a drive letter andmake it accessible as g:\, for instance. Alternatively, you can take an empty folder, suchas c:\data, and mount the volume in the folder. This makes the volume’s disk spaceappear as part of the c: drive, but it’s only accessible through the c:\data folder.
I often use the latter technique for big Exchange or SQL Server systems where Ihave more volumes than drive letters available. It also makes configuring Exchangereplication easier, because creating the same folder structure becomes asimple proposition.
You can use Get-WmiObject Win32_MountPoint to discover the active mountpoints on your system, but this class only returns the directory and the volume that areassociated through a mount point.
PROBLEM
You’ve inherited a large Exchange server with multiple mount points defined. Youneed to discover the volumes associated with those mount points.
SOLUTION
We’ll assume that you have a single root folder that holds the folders used for mountpoints. We’ll also assume, for the sake of brevity, that you know the path to this folder.The usual function structure is modified in the following listing by the addition of asecond parameter.
function get-mountpoint {[CmdletBinding()]param ( [parameter(ValueFromPipeline=$true, ValueFromPipelineByPropertyName=$true)] [string]$computername="$env:COMPUTERNAME", [string]$path ="C:\Data*") $test = 'Win32_Directory.Name="' +
➥ $path.Replace("\","\\") + '"'
Get-WmiObject -Class Win32_MountPoint ` -ComputerName $computername | where {$_.Directory -like $test} | foreach { $vol = $_.Volume Get-WmiObject -Class Win32_Volume ` -ComputerName $computername | where {$_.__RELPATH -eq $vol} | Select @{Name="Folder"; Expression={$_.Caption}}, @{Name="Size (GB)"; Expression={"{0:F3}" -f $($_.Capacity / 1GB)}}, @{Name="Free (GB)"; Expression={"{0:F3}" -f $($_.FreeSpace / 1GB)}},
Listing 6.8 Mount points
TECHNIQUE 27
Create parameters
B
Set folder for WMI
C
Test folder
D
Test volume
E
www.it-ebooks.info

185TECHNIQUE 28 Enumerate volume information
@{Name="%Free"; Expression={"{0:F2}" -f $(($_.FreeSpace/$_.Capacity)*100)}} }}}
The second parameter enables you to input the folder you want to test against B. Thefolder name must be changed from a Windows format to a WMI format C. This isachieved by doubling the backslash (\) characters. You can find the mount points thatmatch your folder D. This script uses Where-Object rather than a WMI filter becausethe -like operator gives you an easier way to code the test, and I think it’s more flexible.
The mount points are piped into ForEach-Object, where you display the volumename and use the Win32_Volume class to retrieve the volume data. A filter is placed onthe volume using Where-Object E to compare the volume name to the __RELPATH(relative path) property returned by WMI.
When a volume is mounted in a folder, Win32_Volume returns the folder name inthe Caption property. You can display the folder and use three calculated fields to dis-play the volume size, free space, and percentage free space. This provides instantspace monitoring for your Exchange systems with mount points.
DISCUSSION
The script could be extended by using Test-Path to ensure that the folder you’re test-ing against is in existence.
In practical terms, there isn’t a great deal of difference between volumes and logi-cal disks. In WMI terms there’s a big difference, because the Win32_Volume class hassome methods for doing good things to your volumes.
6.3 VolumesVolumes are the most useful of the disk structures we’ll deal with. They can beregarded in the same light as logical disks, though there are technical differences. Vol-umes are where you can directly administer your disks through the methods of theWin32_Volume class. The classes that we dealt with for physical and logical disks don’thave useful methods, so you can only use them to discover information. The situationchanges with volumes, as you’ll see in this section and the next.
In this section, you’ll learn how to enumerate the volumes in your system. It’sworth comparing listing 6.9 (coming up next) with listing 6.6 (which usedWin32_LogicalDisk) to see the similarities and differences in the data you can getabout logical disks and volumes. This section closes with a look at managing changeevents related to your volumes.
Enumerate volume information
The main class for working with volumes is Win32_Volume. It has a large number ofproperties and some very useful methods. A quick look at the available methods andproperties can be obtained with
Get-WmiObject Win32_Volume | Get-Member
TECHNIQUE 28
www.it-ebooks.info

186 CHAPTER 6 Disk systems
You can view the arguments needed by a particular method like this:
$v = Get-WmiObject Win32_Volume -Filter "DriveLetter='C:'"$v.AddMountPoint
In this case, the method takes a directory path as an argument. An example of usingthis method is supplied in section 6.4.
TIP This technique can be used for any method. Use the method name with-out any arguments or parentheses, and you’ll get information on the method,including the arguments that are required.
PROBLEM
You need to enumerate the volumes in your system. This will enable you to managethe disk space.
SOLUTION
The following listing shows the solution to this problem. You can use theWin32_Volume class to directly find the information you need.
$dtype = DATA {ConvertFrom-StringData -StringData @' 2 = Removable Disk3 = Local Disk5 = Compact Disk'@}
function get-volume {[CmdletBinding()]param ( [parameter(ValueFromPipeline=$true, ValueFromPipelineByPropertyName=$true)][string]$computername="$env:COMPUTERNAME" )PROCESS{
Get-WmiObject Win32_Volume -ComputerName $computername| select Caption, Label, Automount, Blocksize, BootVolume, SystemVolume, @{Name="Drive Type"; Expression={$dtype["$($_.DriveType)"]}}, @{Name="Disk Size (GB)"; Expression={"{0:F3}" -f $($_.Capacity/1GB)}}, @{Name="Free Space (GB)"; Expression={"{0:F3}" -f $($_.FreeSpace/1GB)}}, Compressed, FileSystem, IndexingEnabled, MaximumFileNameLength, PageFilePresent, QuotasEnabled, QuotasIncomplete, QuotasRebuilding, SerialNumber, SupportsDiskQuotas, SupportsFileBasedCompression}}
The script starts by defining a lookup hash table to supply the information on the disktypes B. Note that the Win32_Volume class does show information about CD/DVDdrives. There won’t be much returned if the drive is empty.
Listing 6.9 Enumerate volumes
Lookup dataB
Function parameter
C
WMI call
D
www.it-ebooks.info

187TECHNIQUE 29 Using volume change events
The function takes a computer name as a parameter C and uses theWin32_Volume class to retrieve the data D. Calculated fields are used to make the disksize and free space values more presentable.
DISCUSSION
The Win32_Volume class is of most value for the methods it provides. But before you jump into managing the disks with those methods, you need to
consider how you can manage events related to volumes.
Using volume change events
We discussed using WMI events in chapter 3. Events are triggered when somethinghappens on your system. If you try looking for WMI classes related to events,
Get-WmiObject -List *Event*
you’ll find a long list of classes, including Win32_VolumeChangeEvent. The name sug-gests that it deals with events involving changes to a volume. But if you try to access theclass directly using
Get-WmiObject Win32_VolumeChangeEvent
you get nothing back! The event-handling cmdlets have to be used before you canaccess the event engine.
PROBLEM
You’ve been tasked with copying a folder full of files onto a large number of USBmemory sticks. In order to speed the operation and spread the work across a numberof people, you want to automate the process.
SOLUTION
The solution depends on you detecting a USB memory stick being plugged in. WMItreats the USB device as another volume. Run this PowerShell statement:
Get-WmiObject Win32_Volume |Format-Table DriveLetter, DriveType, FileSystem, `SerialNumber -AutoSize
Insert a USB device and repeat. You should see that the new volume is recognized. Note that the new drive type is given as 2, which is a removable drive (see listing 6.9)
but existing volumes are type 3 (hard drive) or type 5 (CD). This enables you to test forthe addition of a USB drive, as shown in listing 6.10.
WARNING This script is presented as a standalone script, rather than beingincorporated into the PowerShell module for the chapter. It’s presented inthis manner to avoid issues with variable scope. Feel free to rename the scriptif that’s more convenient.
The script is run as follows:
. ./listing6.10 c:\teszzt2
TECHNIQUE 29
www.it-ebooks.info

188 CHAPTER 6 Disk systems
You dot-source the script to ensure that the functions and variables remain in memory.The path to the folder you wish to copy to the USB sticks is passed to the script as a param-eter. Use quotes around the folder path if it contains spaces or other special characters.
param ( [string]$folder)if (-not (Test-Path $folder)){ Throw "Folder $($folder) not found"}
function add-drive { param ( [string]$drive) Write-Host "Drive $($drive) Added" Write-Host "Copying Files to Drive $($drive) "
Copy-Item -Path $folder -Destination $drive -Recurse -Force -Verbose Write-Host "Finished Copying Files to Drive $($drive)"}
function remove-drive { param ( [string]$drive) Write-Host "Drive $($drive) Removed"}
if (Get-EventSubscriber | where {$_.SourceIdentifier -eq "usb plug in"}) { Unregister-Event -SourceIdentifier "usb plug in"}
if (Get-EventSubscriber | where {$_.SourceIdentifier -eq "usb plug out"}) { Unregister-Event -SourceIdentifier "usb plug out"}
$queryIn = "SELECT * FROM __InstanceCreationEvent WITHIN 2 WHERE TargetInstance ISA 'Win32_Volume'AND TargetInstance.DriveType=2"$queryOut = "SELECT * FROM Win32_VolumeChangeEvent WHERE EventType=3"
$actionIn = { add-drive $($event.SourceEventArgs.NewEvent.TargetInstance.DriveLetter)}
$actionOut = { remove-drive $($event.SourceEventArgs.NewEvent.DriveName)}
Register-WmiEvent -Query $queryIn ` -SourceIdentifier "usb plug in" -Action $actionInRegister-WmiEvent -Query $queryOut `-SourceIdentifier "usb plug out" -Action $actionOut
Listing 6.10 Automatic copy to USB memory stick
Test folder existence
B
Perform on USB additionC
Perform on USB removalD
Clean up events
E
Define queries
F
Define actions G
Register eventsH
www.it-ebooks.info

189TECHNIQUE 29 Using volume change events
The script will test to see if the folder exists B. If Test-Path doesn’t return True, thescript will throw an error and stop. The test only determines if the folder exists—itdoesn’t test to see if the folder has any content!
Two functions are defined. The first function provides the actions that will occurwhen a USB stick is plugged into the system C. It takes the device’s drive letter as aparameter and copies the folder to the drive with appropriate messages. The-Recurse and -Force parameters on Copy-Item ensure that the folder contents arecopied and that an existing copy of the folder on the USB device is overwritten. The-Verbose parameter displays a message as each file is copied, as shown in figure 6.2.
The second function is executed when the USB stick is removed. In this case, it pro-vides a message to say that the drive has been removed D.
If the script is run multiple times, the existing events need to be removed beforenew events are created E. A test is performed to determine whether an event sub-scriber exists with the specific source identifier. If it does exist, it’s removed. The eventsubscriptions will also be deleted when PowerShell is shut down.
You’ve determined what you’re going to do when a USB device is plugged in, buthow do you recognize that event? There are two methods you can use to determine ifa change has occurred to your volumes. These are defined in the WMI queries thescript uses F.
The first method uses the __InstanceCreationEvent class, which is a system classdefined in each WMI namespace:
$queryIn = "SELECT * FROM __InstanceCreationEvent
➥ WITHIN 2 WHERE TargetInstance ISA 'Win32_Volume' ➥ AND TargetInstance.DriveType=2"
This query selects all of the data from the __InstanceCreationEvent class, whichlooks for the events related to the creation of an instance of a WMI class. The WITHIN 2statement means that it checks every two seconds to determine if an event
Figure 6.2 Running the automatic copy of files when a USB stick is plugged in
www.it-ebooks.info

190 CHAPTER 6 Disk systems
has occurred. The events are filtered by using WHERE TargetInstance ISA
'Win32_Volume', which only passes events related to volume creation. A further filter,TargetInstance.DriveType=2, ensures that the volume has to be a removable onebefore you take any notice of it.
The second method checks for the removal of the drive. This uses a much simplerquery:
$queryOut = "SELECT * FROM Win32_VolumeChangeEvent WHERE EventType=3"
It uses the Win32_VolumeChangeEvent class and tests for event type 3, which is theremoval of a device (see table 6.2).
Two actions are defined G, and these are performed when the events are trig-gered. The actions call the two functions discussed earlier, C and D. The script’s lastaction is to register the WMI events using the queries and actions you’ve defined H.Suitable identifiers are used so that you can distinguish the events.
DISCUSSION
Two different methods have been presented to work with volume-related events. Ifyou prefer, a single method could be used to access the events. This involves changingthe queries to use either the Win32_VolumeChangeEvent class or the system classes.
When using the Win32_VolumeChangeEvent class, you need to modify your queriesto detect the relevant events. Event type 2 is used for a device arrival (USB deviceplugged in) and event type 3 is used when it’s removed. The full list of event types isgiven in table 6.2.
This would make the relevant portions of the script read as follows:
$queryIn = " SELECT * FROM Win32_VolumeChangeEvent WHERE EventType=2"
$queryOut = "SELECT * FROM Win32_VolumeChangeEvent WHERE EventType=3"
$actionIn = { add-drive $($event.SourceEventArgs.NewEvent.DriveName)}
$actionOut = { remove-drive $($event.SourceEventArgs.NewEvent.DriveName)}
Notice that the event type is different in the two queries and that the way the drive let-ter of the USB stick is accessed is now identical in both action statements.
Value Meaning
1 Configuration changed
2 Device arrival
3 Device removal
4 Docking Table 6.2 Win32_VolumeChangeEventevent types
www.it-ebooks.info

191TECHNIQUE 29 Managing disks
Alternatively, you could use the system classes, which would change those portionsof the script as follows:
$queryIn = "SELECT * FROM __InstanceCreationEvent WITHIN 2 WHERE TargetInstance ISA 'Win32_Volume' AND TargetInstance.DriveType=2"
$queryOut = " SELECT * FROM __InstanceDeletionEvent WITHIN 2 WHERE TargetInstance ISA 'Win32_Volume' AND TargetInstance.DriveType=2"
$actionIn = { add-drive $($event.SourceEventArgs.NewEvent.TargetInstance.DriveLetter)}
$actionOut = { remove-drive `$($event.SourceEventArgs.NewEvent.TargetInstance.DriveLetter)}
Your query to detect the removal of the drive has to be changed to use the__InstanceDeletionEvent class, and the drive letter access is also changed to beconsistent.
The most difficult task when working with events is determining how to access theinformation produced by the event. The examples in this script show two of the majorWMI-related methods.
At the first meeting of the UK PowerShell User Group, two of us sat and copied thePowerShell downloads onto USB sticks. I think we did about 50 of them. I could haveused this script at that time. Now I would use listing 6.10 and be able to control theprocess just by plugging in the USB stick. With most laptops having three USB ports,that speeds up the process.
You’ve now used a number of disk-related WMI classes to discover informationabout your disks. It’s time to discover how you can manage the disks in your systems.
6.4 Managing disksThe Win32_Volume class presents a number of methods for managing disks, includingformatting, performing a chkdsk, and defragmenting the data on the disk. But beforewe get to that, let’s see how you can work directly with the volumes by modifyingthe properties.
The two properties you’re most likely to change are the drive letter and the vol-ume label. Changing the drive letter is a matter of altering the DriveLetter property:
Get-WmiObject -Class Win32_Volume -Filter "DriveLetter='D:'" |Set-WmiInstance -Arguments @{DriveLetter='K:'}
You can remove the drive letter completely by using @{DriveLetter=$null} as theargument for Set-WmiInstance. If you try to set the drive letter to be the same as onein use, an error will occur.
Changing the volume label follows a similar pattern:
Get-WmiObject -Class Win32_Volume -Filter "DriveLetter='K:'" |Set-WmiInstance -Arguments @{Label='PaWtest'}
www.it-ebooks.info

192 CHAPTER 6 Disk systems
You use Get-WmiObject and filter on the drive letter. This is piped into Set-WmiInstancewhere you can change the label.
WARNING This technique can’t be used to change properties such as the vol-ume block size. That involves reformatting the volume.
One issue that you meet in Windows is that drives have to be allocated letters, andthere are only 26 letters in the alphabet. This can mean that on very big systems yourun out of drive letters. Exchange systems with a dozen or so databases with separatedrives for the data and logs will soon reach this limit. You can overcome this problemby using mount points. Listing 6.8 showed how to discover mount points. Creatingthem is performed using the AddMountPoint method:
Get-WmiObject -Class Win32_Volume -Filter "DriveLetter='D:'" |Invoke-WmiMethod -Name AddMountPoint -ArgumentList "C:\\pawtest"
This example uses a drive letter for simplicity, but it’s also possible to use the device IDof the volume:
Get-WmiObject -Class Win32_Volume | where
➥ {$_.DeviceId -eq "\\?\Volume{d203ba64-8654-11de-add0- ➥ 001f1663f5df}\"}|Invoke-WmiMethod -Name AddMountPoint -ArgumentList "C:\\pawtest"
In both cases, the result is piped into Invoke-WmiMethod to call the AddMountPointmethod. The folder to be used as the mount point has to be presented in WMI formatwith double backslashes (\\) rather than a single one.
One of the first management tasks you’ll have to perform on your volume is for-matting it so that it becomes usable.
Formatting a disk
The disks have to be formatted when you first install a new server. You also need to for-mat them when you’re rebuilding the system so that it can be repaired or repurposed.Occasionally, reformatting may be necessary if a machine has been infected with avirus. Formatting is a destructive process, so it’s a good way of clearing the disks of alldata prior to reuse.
PROBLEM
You’re rebuilding a server because you’re changing its purpose. You need to formatthe data drives. The C: drive will be reformatted during the installation of Windows.
SOLUTION
In the following listing, you use the Format method of the Win32_Volume class to refor-mat the disk.
function format-drive {[CmdletBinding()]param (
Listing 6.11 Formatting a disk
TECHNIQUE 30
www.it-ebooks.info

193TECHNIQUE 30 Formatting a disk
[parameter(ValueFromPipeline=$true, ValueFromPipelineByPropertyName=$true)] [string]$computername="$env:COMPUTERNAME",
[parameter(Mandatory=$true)] [string]$drive,
[ValidateSet("NTFS", "FAT", "FAT32")] [string]$filesys = "NTFS", [boolean]$quick = $true, [int]$cluster = 4096, [string]$label = "")PROCESS{ if (-not $drive.EndsWith(":")){$drive = "$drive:"}
$v = Get-WmiObject -Class Win32_Volume ` -Filter "DriveLetter='D:'" -ComputerName $computername $ret = $v.Format($filesys, $quick, $cluster, $label, $false)
if ($ret.ReturnValue -eq 0){"Drive $drive formatted"} else {"Formatting of drive $drive failed" }} }
The function accepts a number of parameters B. You’ve seen the computer nameand drive before. There are a limited number of choices available for the filesystem.You should be using NTFS for the filesystem, so you set that as the default. TheValidateSet() method is used on the parameter to check that only acceptable valuescan be passed.
If the drive doesn’t end with a colon (:), you add one. Get-WmiObject is used tocreate a variable to represent the volume you want to format C.
WARNING Remember that you don’t get -Whatif or -Confirm with WMI. Becareful when using this function. I’ve included a version of this function thatimplements –Whatif using functionality from PowerShell’s advanced func-tions. It’s in the Chapter06\Extras folder of the code download.
The Format method is invoked on the volume object using the parameters you’vepassed into the function.
If a result of 0 is returned, the formatting has succeeded D; otherwise a message isdisplayed to say that it has failed.
DISCUSSION
One surprise while researching this technique was that using Invoke-WmiMethod andformatting arguments didn’t work. For instance, this code should work:
Get-WmiObject -Class Win32_Volume -Filter "DriveLetter='D:'" |Invoke-WmiMethod -Name Format `-ArgumentList "NTFS", $true, 4096, "Test", $false
In fact, it returns an error stating, “Input string was not in a correct format.” Luckily,you have more than one way to format a disk, and the method described in listing 6.11works.
Set parameters
B
Format drive
C
Display resultsD
www.it-ebooks.info

194 CHAPTER 6 Disk systems
Now that your disk has been formatted, you can put it into use. During the lifetime ofthe system, you may have to perform routine maintenance on the disk.
Performing Chkdsk
Chkdsk performs a low-level check on the disk. It’s especially useful for detectingwhether sectors on the disk have become corrupted. Unfortunately, it’s often userscomplaining that they can’t access a file that alerts you to a potential disk problem.
PROBLEM
A user has complained that they can’t access a file. It won’t open, even though otherfiles in the same folder are usable. You need to perform a chkdsk operation on thevolume to determine if there is any corruption of the media.
SOLUTION
The Win32_Volume class has a Chkdsk method. If you have used the command-linechkdsk utility, you’ll find it very similar. The advantage of using WMI is that you canwork on the disks of remote machines.
I have called this function invoke-chkdsk, following the PowerShell naming con-ventions. It’s shown in the following listing. The function can be used as
invoke-chkdsk mycomputer f:
MVPs find the answerI discussed the problem of Invoke-WmiMethod and how it takes arguments with theother PowerShell MVPs, and after some investigation Shay Levy discovered that thiswould work:
Get-WmiObject Win32_Volume -Filter "DriveLetter='D:'" |Invoke-WmiMethod -Name Format ` -ArgumentList @(4096,$false,'NTFS','King',$true,$null)
where the arguments are in the order of:
■ ClusterSize
■ EnableCompression
■ FileSystem
■ Label
■ QuickFormat
■ Version
He looked at the parameters that were returned by
([wmiclass]"Win32_Volume").GetMethodParameters('Format')
These are in the order given in the code in this sidebar, whereas the order given onMSDN matches what I used in the listing and what is produced by using
(Get-WmiObject Win32_Volume -Filter "DriveLetter='D:'").Format
Very odd.
TECHNIQUE 31
www.it-ebooks.info

195TECHNIQUE 32 Analyzing and removing fragmentation
function invoke-chkdsk {[CmdletBinding()]param ( [parameter(ValueFromPipeline=$true, ValueFromPipelineByPropertyName=$true)] [string]$computername="$env:COMPUTERNAME", [string]$drive ="D:", [boolean]$fixerrors = $false, [boolean]$vigorousIndexCheck = $true, [boolean]$skipFolderCycle = $true, [boolean]$forcedismount = $false, [boolean]$recoverbadsectors = $false, [boolean]$oktorunatbootup = $false)PROCESS { if (-not $drive.EndsWith(":")){$drive = "$drive:"}
Get-WmiObject Win32_Volume -Filter "DriveLetter='$drive'" ` -ComputerName $computername | Invoke-WmiMethod -Name ChkDsk ` -ArgumentList $fixerrors, $vigorousIndexCheck,$skipFolderCycle, ` $forcedismount, $recoverbadsectors, $oktorunatbootup}}
The function takes the usual computer and drive parameters. It also takes a numberof Boolean (true or false) parameters. The default values will perform a chkdsk butwon’t attempt to repair any errors. If you want that to happen, the function should beused as follows:
invoke-chkdsk mycomputer f: -fixerrors $true `-recoverbadsectors $true
DISCUSSION
Performing a chkdsk in this manner will work on all drives except the C: drive (assum-ing C: is the boot drive). On the boot drive, the chkdsk will be performed the nexttime the system is restarted.
The other maintenance activity you need to consider is how you deal with filefragmentation.
Analyzing and removing fragmentation
When a file is deleted from a volume in a Windows system, the remaining files aren’tshuffled around to use the space that has been made. New files will start to be writteninto the first available space on a disk. If there isn’t enough space for the file to fit in asingle piece, it will be written into whatever space is next available.
As this process proceeds and more files are deleted, the resulting space gets bro-ken up into small pieces, meaning that files can be spread across multiple areas of thedisk. This is fragmentation. If the level of fragmentation becomes too high, perfor-mance can be affected.
Listing 6.12 Performing a chkdsk
TECHNIQUE 32
www.it-ebooks.info

196 CHAPTER 6 Disk systems
Modern Windows systems perform a certain amount of defragmentation automati-cally, but it isn’t always enough. Sometimes you have to step in and do the job yourself.
PROBLEM
The users are complaining (again) that one of your servers is slow to respond whenfiles are requested. You need to analyze the volume for its fragmentation state and, ifnecessary, perform a defragmentation on the disk.
SOLUTION
The following listing shows how you can use the DefragAnalysis and Defrag methodsof the Win32_Volume class to solve this problem.
function invoke-defraganal {[CmdletBinding()]param ( [parameter(ValueFromPipeline=$true, ValueFromPipelineByPropertyName=$true)] [string]$computername="$env:COMPUTERNAME", [string]$drive ="D:", [switch]$defrag )PROCESSif (-not $drive.EndsWith(":")){$drive = "$drive:"}
if (-not $defrag) { "Analysing drive $drive" $dfa = Get-WmiObject Win32_Volume ` -Filter "DriveLetter='$drive'" -ComputerName $computername | Invoke-WmiMethod -Name DefragAnalysis if ($($dfa.ReturnValue) -eq 0){ "Defrag Recommended: $($dfa.DefragRecommended)" }} else { "Defraging drive $drive" $dfa = Get-WmiObject Win32_volume ` -Filter "DriveLetter='$drive'" -ComputerName $computername | Invoke-WmiMethod -Name Defrag -ArgumentList $false}
if ($($dfa.ReturnValue) -eq 0){ $dfa.DefragAnalysis | select AverageFileSize, AverageFragmentsPerFile, @{Name="AverageFreeSpacePerExtent (GB)"; Expression={"{0:F3}" -f $($_.AverageFreeSpacePerExtent/1GB)}}, ClusterSize, FragmentedFolders, ExcessFolderFragments, FilePercentFragmentation, @{Name="FreeSpace (GB)"; Expression={"{0:F3}" -f $($_.FreeSpace/1GB)}}, FreeSpacePercent, FreeSpacePercentFragmentation, @{Name="LargestFreeSpaceExtent (GB)"; Expression={"{0:F3}" -f $($_.LargestFreeSpaceExtent/1GB)}}, MFTPercentInUse, MFTRecordCount, PageFileSize, TotalExcessFragments, TotalFiles, TotalFolders,
Listing 6.13 Analyzing and performing defragmentation
Set parameters
B
Perform analysis
C
Perform defragmentation
D
Display results
E
www.it-ebooks.info

197TECHNIQUE 32 CD drives
TotalFragmentedFiles, TotalFreeSpaceExtents, TotalMFTFragments, TotalUnmovableFiles, @{Name="TotalMFTSize (GB)"; Expression={"{0:F3}" -f $($_.TotalMFTSize/1GB)}}, TotalPageFileFragments, TotalPercentFragmentation, @{Name="UsedSpace (GB)"; Expression={"{0:F3}" -f $($_.UsedSpace/1GB)}}, VolumeName, @{Name="VolumeSize (GB)"; Expression={"{0:F3}" -f $($_.VolumeSize/1GB)}}}else {"Error occurred - return code: $($dfa.ReturnValue)"}}}
The function accepts the computer and drive parameters as usual for this chapter B,but you also have another parameter, defrag. This is a switch that’s set to False bydefault. If you use it, a defragmentation occurs, and if you don’t, you just get the analysis.
The script checks the formatting of the drive parameter and corrects it if required. If the defrag switch isn’t set C, then an analysis is performed using the Defrag-
Analysis method. Get-WmiObject is used to retrieve the volume, and then it’s pipedinto Invoke-WmiMethod.
A similar process is used if the defrag switch is set D, except that the Defragmethod is used.
In both cases, the results are output to a variable, $dfa. If the return code is 0, theresults are displayed E; otherwise an error message is displayed. The results are simi-lar to those obtained from running the analysis in the GUI tools. The sizes are all recal-culated as gigabytes for ease of use.
DISCUSSION
The defrag switch makes the function easy to use:
Invoke-defraganal mycomputer f:
This line will test the F: drive on the stated computer. If the results come back suggest-ing that defragmentation is required, you simply add the defrag parameter:
Invoke-defraganal mycomputer f: -defrag
This then performs the defragmentation and returns the results so you can see theprogress.
Sometimes you’ll need to run multiple defragmentation passes to remove the max-imum amount of fragmentation. This can be achieved with a slight modification:
1..5 | foreach {Invoke-defraganal mycomputer f: -defrag}
That completes our look at the system’s hard drives, but before we close the chapterwe need to consider CD drives.
6.5 CD drivesCD/DVD drives (for simplicity, I’ll refer to them as CD drives throughout this section)are often the forgotten component when you’re discussing disks. They’re included by
www.it-ebooks.info

198 CHAPTER 6 Disk systems
Win32_LogicalDisk and Win32_Volume but are excluded by Win32_DiskDrive. You’veseen how to deal with them as logical disks and volumes earlier in the chapter. All thatremains is to discover the data you need on the physical drive.
Enumerating CD drives
Most modern systems have a CD drive. Virtual machines can gain access to the physicaldrive of the host or can attach an ISO file through a virtual CD drive.
PROBLEM
In order to complete the documentation of your servers you have to enumerate theCD drives that are present in the system.
SOLUTION
The listings presented earlier in the chapter will provide information on the vol-umes present because of the CD drive. You can discover the required information onthe physical aspect of the CD drive using Win32_CDROMDrive. This class also works forDVD drives.
WARNING Be careful with the name of this class. It’s easy to get it wrong,especially if you’re in a hurry and just type Win32_CDROM as many people do.(Yep, done that.) It’s a pity we can’t establish aliases for WMI classes.
The following listing shows how you can use this class.
function get-cdrom {[CmdletBinding()]param ( [parameter(ValueFromPipeline=$true, ValueFromPipelineByPropertyName=$true)] [string]$computername="$env:COMPUTERNAME")PROCESS{ Get-WmiObject -Class Win32_CDROMDrive ` -ComputerName $computername | foreach { "" $_ | select Drive, MediaLoaded, Status, Name, MediaType, SCSIBus, SCSILogicalUnit, SCSIPort, SCSITargetId, TransferRate
"Capabilities:" Get-WmiObject -Class Win32_CDROMDrive ` -ComputerName $computername -Filter "Drive='$($_.Drive)'" | select -ExpandProperty CapabilityDescriptions }}}
The function takes a computer name as a parameter. The default is the local machine,as usual.
Listing 6.14 Enumerating CD drives
TECHNIQUE 33
www.it-ebooks.info

199Summary
You can then use Win32_CDROMDrive to return the information on the physicalaspects of the drive. A further call is made to the class to determine the capabilities. Youcan use the capability descriptions via the ExpandProperty parameter of Select-Objectto create a formatted list of the capabilities. The capabilities are things like
■ Random access■ Supports removable media
Notice that the call Win32_CDROMDrive to determine the capabilities uses the drive let-ter as a filter to ensure that the capabilities are linked to the correct drive.
DISCUSSION
This script could be adapted to determine whether a CD drive is present in themachine by testing to see if Win32_CDROMDrive returns data. If it doesn’t, there isn’t aCD drive present.
This brings our tour of the disk-related WMI classes to a close.
6.6 SummaryThe functionality presented in this chapter and chapter 5 will provide most, if not all,of the information you require about the physical aspects of your systems. It’s how Idocument my systems.
This chapter has worked through the WMI classes that enable you to work with
■ Physical disks and disk controllers■ Partitions■ Logical disks and volumes■ CD drives
You’ve also seen how to work with events raised by the disk systems. This techniquealso can be used to format drives and perform other management activities.
Disks, like all aspects of your systems, need managing occasionally. You can use thetechniques in this chapter to format your disks, run disk-checking routines, and per-form defragmentation.
Chapters 5 and 6 have covered the hardware aspects of our systems. In the nextchapter, we’ll start to investigate some other aspects, starting with the registry.
www.it-ebooks.info

Registry administration
The registry is used to contain configuration information about your Windows sys-tems. It’s entirely separate from the information maintained by the WMI providerswe discussed in chapter 3, though some of the information may overlap.
WARNING This is the point where I issue the traditional warning aboutbeing careful with the registry. If you damage the registry, you may have torebuild your system. I’m assuming that if you’re reading this, you aren’tgoing to deliberately wreck your system, but do be careful. Creating a sys-tem restore point before experimenting with the registry is highly recom-mended—use Checkpoint-Computer on a client system.
Working with the registry on your local computer is easy because you have the registryprovider. This means you can use the standard cmdlets (*-Item, *-ItemProperty,and so on) to perform your administration tasks. If you have PowerShell v2 installedon all of your machines, you could use PowerShell remoting to access the registryprovider on your servers. But many organizations aren’t in that position, so you’ll
This chapter covers■ Discovering the registry’s size■ Manipulating registry keys and values■ Discovering security settings on registry keys■ Monitoring changes on keys and values
200
www.it-ebooks.info

201Accessing the registry
need to use WMI to work with remote registries. There’s similar .NET functionality, butI’m not going to cover it here.
We’ll start the chapter by looking at how you can access the registry. The registrysize can be checked to ensure you don’t have a problem. Also, you’ll probably spendmore time reading registry values compared to other activities, so you need to under-stand the data types available in the registry. Techniques to read, create, modify whereapplicable, and delete registry keys and values are presented in turn to enable you tomanage the whole lifecycle.
TIP When working with the registry, the paths are known as keys, and theactual entries are known as values, even though a registry value will have aname and a value.
Security is always a concern. The registry needs to be protected from rogue actions, soyou need to be able to check access permissions on particular keys. If an untowardaction has occurred, you may need to reset the ownership of a registry key so that youcan perform further actions on the key and its values.
There are some keys and values that you may need to protect further. You can usethe WMI registry events to monitor for changes to a key or its values.
Before you can do anything, though, you need to learn how to access the registryand what data types are available.
7.1 Accessing the registryThe registry consists of a number of areas known as hives. Each hive has a number ofkeys. When you look at these in regedit.exe (see figure 7.1), they appear to bearranged in a hierarchy similar to the filesystem. The keys can have subkeys. A key orsubkey can act as a container for values. A registry value has a name and an actual value.Figure 7.1 displays these various elements.
Figure 7.1 The structure of the registry
www.it-ebooks.info

202 CHAPTER 7 Registry administration
WMI uses a constant numeric value to identify each hive, as you’ll see in the later sec-tions. These constants are listed in table 7.1, together with the variables I’ll use in thischapter’s scripts.
Before we dive into reading and writing in the registry, let’s look at a couple morethings about it.
Test registry size
Do you know how big the registry is on your systems? The registry is createdat machine startup from a number of files on the hard drive. If these files becomefull of rubbish, then server startup time will be slower and performance will poten-tially suffer.
PROBLEM
You need to be able to test the current and maximum sizes of the registry to ensurethat it isn’t becoming bloated, which could cause problems. You need to be able toperform this test on local and remote machines.
SOLUTION
The Win32_Registry class provides the information you need to solve this problem.The following listing shows how you can use this class.
function get-registrysize {[CmdletBinding()]param ( [parameter(ValueFromPipeline=$true, ValueFromPipelineByPropertyName=$true)] [string]$computername="$env:COMPUTERNAME")PROCESS {Get-WmiObject -Class Win32_Registry -ComputerName $computername |Select CurrentSize, ProposedSize, MaximumSize, Status,@{Name="InstallationDate";Expression={$_.ConvertToDateTime($_.InstallDate)}}}
Table 7.1 Constants for accessing registry hives
Variable Value Hive
$HKCR 2147483648 HKEY_CLASSES_ROOT
$HKCU 2147483649 HKEY_CURRENT_USER
$HKLM 2147483650 HKEY_LOCAL_MACHINE
$HKUS 2147483651 HKEY_USERS
$HKCC 2147483653 HKEY_CURRENT_CONFIG
Listing 7.1 Discovering the registry size
TECHNIQUE 34
www.it-ebooks.info

203TECHNIQUE 35 Discovering registry data types
This function is similar in structure to the functions you saw in the previous chapter. Ifyou’re automating the documentation of your systems, you may want to include thisfunction. I do!
The function takes a computer name as a parameter and calls the Win32_Registryclass. The appropriate properties are displayed by piping the WMI object intoSelect-Object.
DISCUSSION
Converting WMI dates into a readable format was covered in detail in chapter 4. One potential enhancement to this function would be to add a calculation of regis-
try size as a percentage of the maximum size of the registry, as configured for that sys-tem. This gives a more immediate indicator of the size and potential issues. After theStatus property in listing 7.1, add this line of code:
@{N="PercSize"; E={"{0:F3}" -f $(($($_.CurrentSize)/$($_.MaximumSize))*100)}},
The comma at the end is required so that the date conversion is still part of the state-ment. In this snippet, I used N and E as abbreviations for Name and Expression respec-tively. This is valid PowerShell, but I generally use the full versions for clarity.
Now that you know the registry size, you need to think about reading the registryitself. In figure 7.1 the values are shown with data types such as REG_SZ. You need toknow the type before you can read the data on a particular value.
Discovering registry data types
The registry can store multiple data types, including strings, numbers, and binarydata. Table 7.2 lists the data types you’ll meet most commonly.
One of the difficulties when working with the registry is that you need to use a dif-ferent WMI method to access each data type. These methods are listed in the firstcolumn of table 7.2. A similar set of methods exists to write to the registry (for exam-ple, SetDWORDValue).
Table 7.2 Registry data types
Method Data type Comments
GetBinaryValue REG_BINARY Returns an array of bytes
GetDWORDValue REG_DWORD Returns a 32-bit number
GetExpandedStringValue REG_EXPAND_SZ Returns expanded references to environ-mental variables, such as %SYSTEMROOT%
GetMultiStringValue REG_MULTI_SZ Returns multiple string values, such as "A","B","C","D"
GetQWORDValue REG_QWORD Returns a 64-bit number
GetStringValue REG_SZ Returns a string
TECHNIQUE 35
www.it-ebooks.info

204 CHAPTER 7 Registry administration
Before you can successfully read the registry you have to understand the data typesyou’re dealing with.
PROBLEM
You need to check on a registry value across many machines in your environment toensure that they’re configured correctly. Unfortunately, you don’t know the correctdata type to access the value.
SOLUTION
The WMI registry provider supplies a method known as EnumValues. Listing 7.2 showshow you can utilize this method. The function accepts a number of parametersincluding hive type, registry key, and computer name. The computer name defaults to“$env:COMPUTERNAME”, which is the local machine.
The parameters for the hive and the key both carry a mandatory tag. This meansthat if you don’t supply them, you’ll be prompted for them. That’s a lot of functional-ity for adding one line of code to the parameter definition! The hive parameter is alsotested against the set of valid hive types. PowerShell is the perfect doorman—if it isn’ton the list it doesn’t get in.
function get-regvaluetype {[CmdletBinding()]param( [parameter(Mandatory=$true)] [string] [Validateset("HKCR", "HKCU", "HKLM", "HKUS", "HKCC")] $hive,
[parameter(Mandatory=$true)] [string]$key,
[parameter(ValueFromPipeline=$true, ValueFromPipelineByPropertyName=$true)] [string]$computername="$env:COMPUTERNAME")PROCESS {switch ($hive) { "HKCR" {$rh = 2147483648} "HKCU" {$rh = 2147483649} "HKLM" {$rh = 2147483650} "HKUS" {$rh = 2147483651} "HKCC" {$rh = 2147483653}}
$regtype = DATA { ConvertFrom-StringData -StringData @'1 = REG_SZ2 = REG_EXPAND_SZ3 = REG_BINARY4 = REG_DWORD7 = REG_MULTI_SZ'@
Listing 7.2 Discovering registry value types
Set hive constant
B
Lookup table for data types
C
www.it-ebooks.info

205TECHNIQUE 35 Discovering registry data types
}
$reg = [wmiclass]\\$computername\root\default:StdRegprov $data = $reg.EnumValues($rh, $key)$x = ($data.snames).Lengthfor ($i=0; $i -le $x; $i++){"{0,-30} {1}" -f $($data.snames[$i]), $regtype["$($data.types[$i])"] } }}
A switch statement B is used to set the hive constant based on the input parameter. Ahash table is created, holding the possible data types C. This is the same techniqueyou saw in chapters 5 and 6.
The registry provider can’t be accessed using Get-WmiObject D. You have to use[wmiclass] to create an instance of the class that you can then populate. Chapter 3covers the [wmiclass] type accelerator in detail.
NOTE I deliberately used the StdRegprov class from the root\defaultnamespace. In Windows Vista, Windows 2008, and later, the registry classesare also available in the root\cimv2 namespace. I’ve used root\default forconsistency with earlier versions of Windows.
The EnumValues method is used with the hive and key as parameters to retrieve theregistry values associated with that particular key. The names and data types are dis-played in a formatted string E. This listing also uses an extra line of code to get thenumber of values, to keep the loop coding simpler.
DISCUSSION
The function is loaded as part of the chapter module, or the individual listing can berun. Remember to dot-source the listing!
Advanced functions are used in the same way as cmdlets, as you can see in the fol-lowing example:
get-regvaluetype -hive HKLM `-key "SOFTWARE\Microsoft\Windows\CurrentVersion"
The results of running this example are shown in figure 7.2.
WMI registry provider
D
Display values
E
Figure 7.2 Displaying registry value types
www.it-ebooks.info

206 CHAPTER 7 Registry administration
In this particular case, you have strings (REG_SZ) and expanded strings(REG_EXPAND_SZ).
NOTE Setting the hive constant in each function is inefficient. In the nextlisting you’ll move this functionality into a separate function so that it can bereused easily.
Now that you know how to discover data types, you can move on to reading the registry.
7.2 Reading the registryReading the registry comprises two separate actions:
■ Reading a registry key to find subkeys■ Reading registry values
We’ll start by reading a registry key.
Reading registry keys
One nice thing about working with the registry through WMI is that the same patternof code is repeated. You’ll see this and you’ll also see the function for setting the hiveconstant that I promised earlier.
PROBLEM
An application requires a particular subkey to be present. You need to be able to testremote systems to determine whether this key is present to troubleshoot a problem.
SOLUTION
The solution to this problem is shown in listing 7.3. It consists of two functions: set-HiveValue and get-regkey. The set-HiveValue function accepts a hive, such asHKLM, as a parameter and returns the appropriate constant using the switch state-ment you saw in listing 7.2. You don’t need to test the hive name because it’s tested inthe parent function.
TIP If you load the chapter module, the set-HiveValue function will beautomatically loaded for you. If you use the listings individually, cut and pastethe set-HiveValue function into another script and be sure to run it first.
function set-HiveValue {param([string]$hive)switch ($hive) { "HKCR" {$rh = 2147483648} "HKCU" {$rh = 2147483649} "HKLM" {$rh = 2147483650} "HKUS" {$rh = 2147483651} "HKCC" {$rh = 2147483653}} $rh}
Listing 7.3 Reading registry keys
TECHNIQUE 36
www.it-ebooks.info

207TECHNIQUE 36 Reading registry keys
function get-regkey {[CmdletBinding()]param ( [parameter(Mandatory=$true)] [string] [Validateset("HKCR", "HKCU", "HKLM", "HKUS", "HKCC")] $hive,
[parameter(Mandatory=$true)] [string]$key,
[parameter(ValueFromPipeline=$true, ValueFromPipelineByPropertyName=$true)] [string]$computername="$env:COMPUTERNAME")PROCESS {$rh = set-HiveValue $hive$reg = [wmiclass]"\\$computername\root\default:StdRegprov"$subkeys = $reg.EnumKey($rh, $key)switch ($subkeys.ReturnValue){ 0 {$subkeys.snames; break} 2 {"Key $key not found"; break} default {"Error has occurred"; break}}}}
The get-regkey (remember the PowerShell verb-noun naming conventions) takes ahive and key as mandatory parameters. The computer name is an optional parameter.A call is made to set-HiveValue to get the hive constant.
An instance of StdRegprov (the registry provider) is created so that you canretrieve the subkeys using the EnumKey method. This takes the hive constant and keyas parameters, as do most of the registry methods.
The switch statement is an example of the type of error handling that can be usedwith these functions. It tests the return value, and if the value is 0 it prints the subkeys;otherwise an error message is shown. I haven’t done this in all the examples in thechapter for brevity.
DISCUSSION
Being able to read registry keys is fundamental to working with the registry. It’s worthexperimenting with this function. As well as returning subkeys, the function can also beused to test whether a key is present. Try the following code after loading the function:
get-regkey -hive HKLM -key "SYSTEM\CurrentControlSet\Services"
The output will be a list of services. If the key doesn’t exist, however, an error messagewill be displayed. This can be illustrated by trying this version which has deliberatelymisspelled the final part of the registry key:
get-regkey -hive HKLM -key "SYSTEM\CurrentControlSet\Servicez"
You’ll receive a message stating that the key doesn’t exist. Two purposes fulfilled withone function—that’s productivity!
www.it-ebooks.info

208 CHAPTER 7 Registry administration
Reading the registry keys is step one. Step two is to drop down a level and read thevalues.
Reading registry values
Reading registry values is where the real administrative effort lies. These are theentries that control the configuration of your systems and can potentially cause prob-lems, especially if they are wrong.
PROBLEM
You need to be able to read registry values for an arbitrary key. The function mustwork across a number of hives and with the standard registry data types. A genericfunction of this sort will save you from having to recreate scripts.
SOLUTION
You’ve seen how to work with multiple hives in previous listings in this chapter. Youneed to add the ability to read multiple data types. The following listing shows howyou can perform this task.
function get-regvalue {[CmdletBinding()]param ( [parameter(Mandatory=$true)] [string] [Validateset("HKCR", "HKCU", "HKLM", "HKUS", "HKCC")] $hive,
[parameter(Mandatory=$true)] [string]$key,
[parameter(Mandatory=$true)] [string]$value,
[parameter(Mandatory=$true)] [string] [Validateset("DWORD", "EXPANDSZ", "MULTISZ", "QWORD", "SZ")] $type,
[parameter(ValueFromPipeline=$true, ValueFromPipelineByPropertyName=$true)] [string]$computername="$env:COMPUTERNAME")PROCESS {$rh = set-HiveValue $hive$reg = [wmiclass]"\\$computername\root\default:StdRegprov"switch ($type) {"DWORD" {$data =
➥ ($reg.GetDwordValue($rh, $key, $value)).uvalue}"EXPANDSZ" {$data =
➥ ($reg.GetExpandedStringValue($rh, $key, $value)).svalue}"MULTISZ" {$data =
➥ ($reg.GetMultiStringValue($rh, $key, $value)).svalue}"QWORD" {$data =
➥ ($reg.GetQwordValue($rh, $key, $value)).uvalue}
Listing 7.4 Reading registry values
TECHNIQUE 37
www.it-ebooks.info

209TECHNIQUE 38 Enumerating keys and values
"SZ" {$data =
➥ ($reg.GetStringValue($rh, $key, $value)).svalue}}$data}}
The get-regvalue function builds on listing 7.3. The parameters for the hive, key,and computer name work as described earlier. You add a parameter ($type) todescribe the data type. This parameter will automatically validate the data it’s givenagainst the set of acceptable values.
The hive constant and WMI registry provider are configured. A switch statement isused to perform the hard work. The registry data type is tested, and the appropriatemethod is used to read the data.
The code extracts the value from the data returned by WMI. An svalue indicates astring and a uvalue indicates a numeric. The data is returned to the user.
DISCUSSION
This function may seem complicated, given the variety of data that can be entered forthe hive and the data type. The following examples will show how it works.
This first example retrieves a DWORD value:
get-regvalue -hive HKLM `-key "SOFTWARE\Microsoft\Windows\CurrentVersion\BITS" `-value "LogFileMinMemory" -type DWORD
This reads the LogFileMinMemory value and returns a result of 120 on my system. The second example reads a string value—in this case, the Common Files directory:
get-regvalue -hive HKLM -key "SOFTWARE\Microsoft\Windows\CurrentVersion" `-value "CommonFilesDir" -type SZ
This returns the expected result of C:\Program Files\Common Files. Our final example reads an expanded string. The path for program files is a good
example:
get-regvalue -hive HKLM -key "SOFTWARE\Microsoft\Windows\CurrentVersion" `-value "ProgramFilesPath" -type EXPANDSZ
It returns C:\Program Files, and it’s stored in the registry as %ProgramFiles%. Its valuecan be checked using $env:ProgramFiles.
Often you’ll want to read a number of keys at the same time.
Enumerating keys and values
There are times when reading a single value is insufficient. You must read multiplekeys and extract a value from each of them. This is known as enumeration.
PROBLEM
You need to discover what software is installed on your servers. This is to determinewhat they’re doing and will help complete the documentation of the servers.
TECHNIQUE 38
www.it-ebooks.info

210 CHAPTER 7 Registry administration
SOLUTION
You can restrict the number of parameters you need for the function in the followinglisting because you know exactly what you want to read. The computer name defaultsto the local system, which is always good for testing. In this type of case, I tend todevelop a script to give a specific result rather than try to be too generic. The registrykey could be made a parameter to provide a more generic approach.
function get-software {[CmdletBinding()]param ( [parameter(ValueFromPipeline=$true, ValueFromPipelineByPropertyName=$true)] [string]$computername="$env:COMPUTERNAME")PROCESS {$rh = set-HiveValue "HKLM"$key = "SOFTWARE\Microsoft\Windows\CurrentVersion\Uninstall"$reg = [wmiclass]"\\$computername\root\default:StdRegprov"$subkeys =
$reg.EnumKey($rh, $key)$subkeys.snames | foreach { if ($_ -notlike "{*}") { $key2 = "$key\$_" $value = "DisplayName" $name = $reg.GetStringValue($rh, $key2, $value) if (($name.sValue -ne "") -and ($name.sValue -notlike "*(KB*)*")){ $name.sValue } } }}}
You can use the set-HiveValue function to set the hive constant. You give an explicitvalue rather than a variable. The key is also set. You can enumerate the subkeys of akey by using the EnumKey method.
TIP This code doesn’t show all installed software. The Win32_Productclass should be used as well as this code to retrieve a fuller list of installedsoftware.
The names of the keys are returned. Each name is tested to ensure it isn’t a value inbraces. The original key and the subkey names are joined and used to retrieve the dis-play name of the software, which is displayed.
DISCUSSION
This may seem complicated if you have used the PowerShell registry provider. You canaccomplish the same task with this code:
Listing 7.5 List installed software
www.it-ebooks.info

211TECHNIQUE 39 Creating registry keys
Get-ChildItem `-Path HKLM:SOFTWARE\Microsoft\Windows\CurrentVersion\Uninstall |where {$_.Name -notlike "*{*" } |foreach { Get-ItemProperty -Path $($_.PSPAth) -Name DisplayName |select DisplayName}
The drawback here is that you can’t use provider-based code on remote machines. Being able to read registry values is a good thing. Being able to create or modify
them is even better.
7.3 Creating and modifying registry keys and valuesMaking modifications to systems is an essential part of being able to administer them.You can make bulk changes to the registry by using Group Policies (GPOs), but inmany cases you only need to modify a single value or create a single key. A PowerShellfunction is a simpler, easier, and safer proposition.
WARNING You’ll need administrator privileges to be able to write to the regis-try or to perform deletions. Run PowerShell with elevated privileges for theseexamples.
Before you can create a value, you need to create a key.
Creating registry keys
At this point, I need to emphasize my warning from the beginning of the chapter.You’ll be making changes to the registry, so be careful. It’s a good idea to create a sys-tem restore point before working with these examples.
WARNING These examples worked on my test system. There’s no guarantee thatthey’ll work on your system. Please test them thoroughly in your environment.
PROBLEM
You need to create a registry key on one or more machines.
SOLUTION
There is a CreateKey method on the registry provider that will perform the key-cre-ation task. The use of this method is shown in the following listing.
function new-regkey {[CmdletBinding()]param ( [parameter(Mandatory=$true)] [string] [Validateset("HKCR", "HKCU", "HKLM", "HKUS", "HKCC")] $hive,
[parameter(Mandatory=$true)] [string]$key,
[parameter(ValueFromPipeline=$true, ValueFromPipelineByPropertyName=$true)]
Listing 7.6 Create registry key
TECHNIQUE 39
www.it-ebooks.info

212 CHAPTER 7 Registry administration
[string]$computername="$env:COMPUTERNAME")PROCESS {$rh = set-HiveValue $hive$reg = [wmiclass]"\\$computername\root\default:StdRegprov"$reg.CreateKey($rh,
$key)}}
The usual hive, key, and computer parameters are input to the function. In this case,the key doesn’t exist. The hive constant is obtained and an instance of the WMI regis-try provider is created. A call to the CreateKey method using the hive and key com-pletes the function and creates the new key.
DISCUSSION
You could extend the script by incorporating the code from listing 7.3, testing the out-put from that portion of code, and creating the key if it doesn’t exist.
The function is used like this:
new-regkey -hive HKLM -key "SOFTWARE\PAW"
This example creates a key on the local machine. You can test whether it has workedby using the PowerShell registry provider:
Test-Path HKLM:\SOFTWARE\PAW
If we use something like this,
new-regkey -hive HKLM -key "SOFTWARE\PAW\Ch7"
the full path will be created (the PAW subkey will be created with its own subkey of Ch7). That’s how you create keys, but what about setting values?
Setting registry values
When you want to set or create registry values, you’re faced with the same problemyou had in technique 37, in that you have to be able to deal with multiple data types. Itwould be possible to create one function per data type, but that sounds like a lot ofrepetitious coding to me. It’s also harder to maintain. When creating scripts, alwaysthink about how you’re going to maintain them.
TIP I recommend that you always add comments to your scripts, even if they’resimple reminders of what the script does. I haven’t used them in the scripts inthis book for brevity and because I’m explaining the scripts in the text.
PROBLEM
You have to modify, or create if it isn’t present, a registry value on a number of servers.
SOLUTION
You can amend listing 7.4 to provide the solution, as demonstrated in the followinglisting. The set-regvalue function (notice I’m using approved verbs) takes the hive,key, value, type, and computer parameters you saw in listing 7.4. Remember that the
TECHNIQUE 40
www.it-ebooks.info

213TECHNIQUE 40 Setting registry values
value parameter takes the value name. In addition, you have three parameters you canuse to supply the data to be written into the registry.
function set-regvalue {[CmdletBinding()]param ( [parameter(Mandatory=$true)] [string] [Validateset("HKCR", "HKCU", "HKLM", "HKUS", "HKCC")] $hive,
[parameter(Mandatory=$true)] [string]$key,
[parameter(Mandatory=$true)] [string]$value,
[parameter(Mandatory=$true)] [string] [Validateset("DWORD", "EXPANDSZ", "MULTISZ", "QWORD", "SZ")] $type,
[string]$svalue,
[int32]$dvalue,
[int64]$qvalue,
[parameter(ValueFromPipeline=$true, ValueFromPipelineByPropertyName=$true)] [string]$computername="$env:COMPUTERNAME")PROCESS { switch ($type) {"DWORD" {$data = ($reg.SetDwordValue($rh, $key, $value, $dvalue))}"EXPANDSZ" {$data = ($reg.GetExpandedStringValue($rh, $key, $value,
$svalue))}"MULTISZ" {$data = ($reg.GetMultiStringValue($rh, $key, $value, $svalue))}"QWORD" {$data = ($reg.SetQwordValue($rh, $key, $value, $qvalue))}"SZ" {$data = ($reg.SetStringValue($rh, $key, $value, $svalue))}}if ($data.ReturnValue -eq 0) {"Setting $key\$value was successful"}else {"Setting $key\$value was unsuccessful"}}}
The hive constant and registry provider are set. A switch statement is used to call theappropriate method based on the data type. If the registry value exists, it’s updated;otherwise it’s created and the data written into it. A test of the WMI return code deter-mines whether the registry value was updated successfully.
DISCUSSION
Here are two examples (for a string and a DWORD respectively) that show how to usethe function. These are the value types you’ll deal with most often:
Listing 7.7 Set registry value
www.it-ebooks.info

214 CHAPTER 7 Registry administration
set-regvalue -hive HKLM -key "SOFTWARE\PAW" `-value "stringvalue" -type SZ -svalue "This is a string"get-regvalue -hive HKLM -key "SOFTWARE\PAW" `-value "stringvalue" -type SZset-regvalue -hive HKLM -key "SOFTWARE\PAW" `-value "integervalue" -type dword -dvalue 98get-regvalue -hive HKLM -key "SOFTWARE\PAW" `-value "integervalue" -type DWORD
Each example of using set-regvalue is followed by the equivalent get-regvalue toshow that it has been set.
The last part of our registry lifecycle is to delete keys and values.
7.4 Deleting registry keysAll good things come to an end, and that includes the registry keys you’ve come toknow and love. Sooner or later you’re faced with the task of deleting registry keys andvalues. This section will show you the most painless way to perform this task.
The order of play is reversed, compared to the earlier sections, and we’ll start withregistry values.
Deleting registry values
You first created keys and then values, and here you’ll reverse this to delete values andthen keys. If you delete the key, you delete all subkeys and associated values, whichmay be a bit heavy-handed.
PROBLEM
A registry value has become obsolete because software versions have changed orbecause some other aspect of your system has been modified. You need to be able todelete this value across one or more machines.
SOLUTION
You can use the pattern established in earlier scripts. The following listing illustrateshow this will work. The usual parameters are accepted—hive, key, value, and com-puter. The hive is tested to ensure it’s part of the accepted set of values.
function remove-regvalue {[CmdletBinding()]param ( [parameter(Mandatory=$true)] [string] [Validateset("HKCR", "HKCU", "HKLM", "HKUS", "HKCC")] $hive,
[parameter(Mandatory=$true)] [string]$key,
[parameter(Mandatory=$true)] [string]$value,
Listing 7.8 Delete registry value
TECHNIQUE 41
www.it-ebooks.info

215TECHNIQUE 42 Deleting registry keys
[parameter(ValueFromPipeline=$true, ValueFromPipelineByPropertyName=$true)] [string]$computername="$env:COMPUTERNAME")PROCESS {$rh = set-HiveValue $hive$reg = [wmiclass]"\\$computername\root\default:StdRegprov"$reg.DeleteValue($rh, $key, $value)}}
The hive constant and registry provider instance are created. The WMI registry pro-vider supplies a method called DeleteValue, which takes the hive, key, and value asarguments.
DISCUSSION
The function follows the same standards as the rest of the functions in the chapter. It’sused as follows:
remove-regvalue -hive HKLM -key "SOFTWARE\PAW" -value "stringvalue"
This will remove the stringvalue from the SOFTWARE\PAW key in the HKLM hive.
WARNING Remember that with WMI methods, you don’t get the standardPowerShell -Confirm or -WhatIf options. Deletion will occur immediately.
It’s now time to bring out the big guns to delete registry keys. Given that you use theDeleteValue method to remove registry values, can you guess what you’ll use to deleteregistry keys?
Deleting registry keys
Deleting registry keys removes the key, all subkeys, and all associated values. Re-creatinga value that has been deleted in error is a relatively simple task. Re-creating a registrykey can be a lot more work. I recommend exporting the key on a test machine prior toany widespread deletion activity. This will make it available for restore operations.
PROBLEM
A piece of software has been removed from your machines. Unfortunately it didn’tperform a clean uninstall and left a registry key behind. You need to remove that reg-istry key.
SOLUTION
You can adapt listing 7.8 to use the DeleteKey method. This is shown in in the follow-ing listing.
function remove-regkey {[CmdletBinding()]param ( [parameter(Mandatory=$true)] [string] [Validateset("HKCR", "HKCU", "HKLM", "HKUS", "HKCC")]
Listing 7.9 Delete registry key
TECHNIQUE 42
www.it-ebooks.info

216 CHAPTER 7 Registry administration
$hive,
[parameter(Mandatory=$true)] [string]$key,
[parameter(ValueFromPipeline=$true, ValueFromPipelineByPropertyName=$true)] [string]$computername="$env:COMPUTERNAME")PROCESS {$rh = set-HiveValue $hive$reg = [wmiclass]"\\$computername\root\default:StdRegprov"$reg.DeleteKey($rh, $key)}}
The difference between listings 7.8 and 7.9 is that in 7.9 you don’t have a parameter toget the value, and you use the DeleteKey method of the WMI registry provider.
DISCUSSION
The function is used as follows:
remove-regkey -hive HKLM -key "SOFTWARE\PAW"
On a local machine, you can test that the deletion has worked by using the PowerShellregistry provider:
Test-Path HKLM:\SOFTWARE\PAW
This should return a value of False, indicating that the key can’t be found. Security is extremely important, and the registry needs to be protected. Do you
know who has permission to access your registry keys?
7.5 Registry access rightsIn a Windows environment, security permissions, or access rights, are set on theobject. These permissions control what you, as an individual, can do with that object—read, write, delete, and so on.
Permissions on registry keys are usually set when the key is created. These permis-sions are then normally sufficient for the lifetime of the object. Occasionally a prob-lem will occur that can be traced back to permissions on registry keys. At that time,you need to be able to discover the permissions on a particular key.
If the permissions on a key become corrupted for any reason, you may need totake ownership of the key so that the problem can be corrected.
Reading access rights
You have two potential methods of reading the access rights on a registry key. You candiscover all of the rights of all of the users, or you can discover the rights that youhave. In the tradition of the little boy in the sweetshop, when you’re faced with achoice, grab both.
TECHNIQUE 43
www.it-ebooks.info

217TECHNIQUE 43 Reading access rights
PROBLEM
A particular registry key appears to be giving problems and is preventing a piece ofsoftware from working. You need to check the access rights on the key to determinewhether they need changing. The rights of all users need to be checked, as well asyour individual rights.
SOLUTION
When you’re faced with two choices, as in this case, you have a number of options:
■ Create two scripts■ Return both sets of data, even though you may only need one set in most
situations■ Use a mechanism to switch between the options
You’ll use the latter choice in the following listing and switch between the options.PowerShell provides the [switch] data type for just this situation. The switch param-eter defaults to false, but when you supply it to the function, its value is set to trueand a different branch of the code is executed.
$regmask = DATA { ConvertFrom-StringData -StringData @'1 = Query the values of a Registry key.2 = Create, delete, or set a Registry value.4 = Create a subkey of a Registry key.8 = Enumerate the subkeys of a Registry key.32 = Create a Registry key.65536 = Delete a Registry key.524288 = Write Ownership'@}
function get-regsecurity { [CmdletBinding()]param ( [parameter(Mandatory=$true)] [string] [Validateset("HKCR", "HKCU", "HKLM", "HKUS", "HKCC")] $hive,
[parameter(Mandatory=$true)] [string]$key,
[parameter(ValueFromPipeline=$true, ValueFromPipelineByPropertyName=$true)]
[string]$computername="$env:COMPUTERNAME",
[switch]$all)PROCESS {$rh = set-HiveValue $hive$reg = [wmiclass]"\\$computernamename\
Listing 7.10 Discovering registry key security settings
Lookup dataB
Function parameters
C
www.it-ebooks.info

218 CHAPTER 7 Registry administration
➥ root\default:StdRegprov"
if ($all) { $sd = $reg.GetSecurityDescriptor($rh, $key)
"Owner " $sd.Descriptor.Owner | Format-Table Domain, Name -AutoSize
$sd.Descriptor.DACL | foreach { "`n$($_.Trustee.Domain)/$($_.Trustee.Name)" $accessmask = $_.AccessMask
$regmask.GetEnumerator()| sort Key | foreach { if ($accessmask -band $_.key){ "$($regmask[$($_.key)])" } } }}else { "You have the following permissions:"
$regmask.GetEnumerator()| sort Key | foreach { $test = Invoke-WmiMethod -InputObject $reg ` -Name CheckAccess -ArgumentList $rh, $key, $($_.Key) if ($test){ " $($regmask[$($_.key)])" } }}
}}
The script starts by defining a hash table B as lookup data. If you’re familiar with the permissions set on files, you’ll notice that these are dif-
ferent. The function defines a number of parameters C. The [switch] parameterdefaults to false, remember. The hive constant and registry provider are also set D.
Now you get to the decision point. If the $all parameter is true (the switch hasbeen set) E, you retrieve the security descriptor of the registry key.
NOTE The security descriptor structure is described in the documentationfor the Win32_SecurityDescriptor class.
The object owner can be displayed using the Owner property of the descriptor. Theaccess mask is held as a collection. For each member of the collection, you display theuser (or group) and get the access mask.
You need to get the enumerator of your lookup table and sort it by the key F. Thatway you can compare each value in order against the access mask to determine if thatpermission is set.
If the -all switch isn’t set G, you’re looking for your own permissions. This is asimpler proposition. You sort the lookup table as before, but you use each hash table
Registry providerD
All permissionsE
Display permissions
F
Your permissions
G
www.it-ebooks.info

219TECHNIQUE 44 Taking ownership of a registry key
key in turn as an argument to the CheckAccess method. If the test is passed, you printthe permission.
DISCUSSION
The function is used as follows:
get-regsecurity -hive HKLM -key "SOFTWARE\Microsoft\Windows\CurrentVersion"
If all permissions are required, the -all parameter is added to the end. We’ll be working more with security descriptors in chapters 8 and 14. Being able to
read access permissions is a useful skill, but you’ll sometimes need to go further andtake control of the key.
Taking ownership of a registry key
Once you have ownership of an object, such as a registry key, you can do anything with it.
TIP The WMI SetSecurityDescriptor method can only be used on Win-dows Vista and above or Windows Server 2008 and above. Downlevel operat-ing systems won’t be able to use this method and will return an error. In thatcase, you’ll have to use a .NET-based solution. I will post a .NET version on myblog. It’s also included in the source code as listing 7.11a.
PROBLEM
The permissions on a registry key have become corrupted. You need to take owner-ship of the key so that you can resolve the issue.
SOLUTION
This solution is based on an answer provided by PowerShell MVP Vadims Podans to aquestion on the PowerShell MVP mailing list.
The following listing shows how you can use PowerShell and WMI to take owner-ship of a registry key. If you compare it to listing 7.10, you’ll notice that you’re stillworking with the security descriptor.
function set-regkeyowner {[CmdletBinding()] param ( [parameter(Mandatory=$true)] [string] [Validateset("HKCR", "HKCU", "HKLM", "HKUS", "HKCC")] $hive,
[parameter(Mandatory=$true)] [string]$key,
[parameter(ValueFromPipeline=$true, ValueFromPipelineByPropertyName=$true)] [string]$computername="$env:COMPUTERNAME")PROCESS {$rh = set-HiveValue $hive
Listing 7.11 Take ownership of a registry key
TECHNIQUE 44
Set parameters and constantsB
www.it-ebooks.info

220 CHAPTER 7 Registry administration
$reg = [wmiclass]"\\$computername\root\default:StdRegprov"$Trustee=([WMIClass]"Win32_Trustee").CreateInstance()$sd=([WMIClass]"Win32_SecurityDescriptor").
➥ CreateInstance()
$user = New-Object -TypeName Security.Principal.NTaccount `-ArgumentList "Administrators"
$sid=$user.Translate([Security.Principal.SecurityIdentifier])[byte[]] $SIDArray = ,0 * $sid.BinaryLength$sid.GetBinaryForm($SIDArray,0)
$Trustee.Name = "Administrators"$Trustee.SID = $SIDArray $sd.Owner = $Trustee$sd.ControlFlags = 524288
$reg.Scope.Options.EnablePrivileges = $true $reg.SetSecurityDescriptor($rh,$key, $sd)}}
The function commences by taking the usual parameters B and setting the hive con-stant and registry provider. You then create two WMI objects C. The first is from theWin32_Trustee class, which you use to hold the information about the new owner ofthe registry key. The second is from the Win32_SecurityDescriptor class, whichyou use to take ownership.
TIP I have assumed that this script will be run on the local machine. Accessingthe registry remotely to perform these changes adds an additional layer of risk.In that situation, use PowerShell remoting to create the connection, and use the-FilePath parameter to run a local script with this function embedded.
The security descriptor has to be populated with information. You start by creating anobject representing the new owner D. This uses a .NET class, because you can’t per-form this task in WMI. The user’s Security Identifier (SID) is created in binary form Eand used with the name to create the trustee information F. The trustee and the con-trol flags are used to create the security descriptor. The value of 524288 for the con-trol flag indicates that the account (or group in this listing) you have created will betaking ownership of the registry key.
You need to enable all of your privileges on the registry provider G. This has to beperformed even if you’ve started PowerShell with elevated privileges. The final act ofthe function is to apply the security descriptor, which transfers ownership of the regis-try key to the Administrators group.
DISCUSSION
Using this function is a lot easier than describing it. The hive and key are provided asfollows:
set-regkeyowner -hive HKLM -key software\PAW
These two parameters are mandatory, so you’ll be prompted for them if they aren’tsupplied. The function uses the built-in local Administrators group as the new owner.This could be modified, but I recommend leaving it in place.
Create objects
C
Create administrator accountD
Set SIDE
Set propertiesF
Take ownership
G
www.it-ebooks.info

221TECHNIQUE 45 Monitoring registry events
One last topic and then we’re finished with the registry. You can be more proactivewith your registry administration by monitoring the WMI events related to registrychanges.
7.6 Registry eventsYou’ve seen how the PowerShell and WMI eventing engines combine in chapter 6. Youuse a WMI query to interrogate the appropriate event class. The Register-WmiEventcmdlet is used to register this query with the PowerShell event engine and define theactions to be taken when the event is triggered. The registry WMI provider suppliessimilar functionality using the classes listed in table 7.3.
Notice the difference between RegistryKeyChangeEvent and RegistryTreeChange-Event. The first one monitors only a specific key, but the second also monitors subkeysand values.
WARNING HKEY_CLASSES_ROOT and HKEY_CURRENT_USER hives aren’t sup-ported by the registry event classes listed in table 7.3. In most cases, this won’timpact you because you’re not likely to work directly with these hives.
This technique can be useful for determining which keys are modified during a soft-ware install.
Monitoring registry events
It has been stated many, many times that the registry is a potential source of problemsin Windows environments. You have to protect it, and you need to know what’s hap-pening and, in some cases, when changes are made. A registry change that sneaksthrough and takes down the organization’s email server won’t look good on a resume.
PROBLEM
The registry is being changed on a server. How can you monitor when the changes areoccurring and which subkeys are affected?
SOLUTION
Listing 7.12 provides a template that you can modify as required to monitor registryevents. This listing shows you how to monitor change events at the tree and value lev-els. Key event changes could be added using the same structure. Notice that I haven’tparameterized this script. I think this activity should be explicitly set up rather thanusing generic code, because it’s not something you’re likely to be doing every day.
Table 7.3 Registry event handling classes
Class Purpose
RegistryKeyChangeEvent Represents changes to a specific key (not its subkeys)
RegistryTreeChangeEvent Represents changes to a key and its subkeys
RegistryValueChangeEvent Represents changes to a singular value of a specific key
TECHNIQUE 45
www.it-ebooks.info

222 CHAPTER 7 Registry administration
function valuechange { param ($e) Write-Host "The following value has changed" $e.SourceEventArgs.NewEvent | Format-Table Hive, KeyPath, ValueName, @{N="Time"; E={$([datetime]::FromFileTime($_.TIME_CREATED))}} | Out-Host}
function treechange { param ($e) Write-Host "The following tree has changed" $e.SourceEventArgs.NewEvent | Format-Table Hive, RootPath, @{N="Time"; E={$([datetime]::FromFileTime($_.TIME_CREATED))}} | Out-Host}
if (Get-EventSubscriber | where {$_.SourceIdentifier -eq "regvalue"}) {Unregister-Event -SourceIdentifier "regvalue" }
if (Get-EventSubscriber | where {$_.SourceIdentifier -eq "regtree"}) {Unregister-Event -SourceIdentifier "regtree" }
$vquery = "SELECT * FROM RegistryValueChangeEvent WHERE
➥ Hive='HKEY_LOCAL_MACHINE' AND KeyPath='SOFTWARE\\PAW' AND ➥ ValueName='stringvalue'"
$tquery = "SELECT * FROM RegistryTreeChangeEvent WHERE
➥ Hive='HKEY_LOCAL_MACHINE' AND RootPath='SOFTWARE\\PAW'"
$vaction = {valuechange $($event)} $taction = {treechange $($event)}
Register-WmiEvent -Query $vquery ` -SourceIdentifier "regvalue" -Action $vactionRegister-WmiEvent -Query $tquery `-SourceIdentifier "regtree" -Action $taction
You start by defining two functions to handle the events that are produced B. Thefunctions for value changes and tree changes are similar in that they’re passed theevent as an argument and then write out the registry object that has been changedand the time the change occurred. Other activities could be included in these func-tions, including checking the data in particular values and resetting it if required. Theevent-handling functions use N and E as abbreviations for Name and Expression forbrevity. The script will run, but this abbreviation makes it slightly less readable.
WMI events return the time in file time format, which is a 64-bit value that repre-sents the number of 100-nanosecond intervals that have elapsed since 12:00 A.M. on 1January 1601 Coordinated Universal Time (UTC). The .NET DateTime class provides asimple way to convert this value to a more readable format.
Listing 7.12 Monitor registry events
Define event-handling functions
B
Clean event subscribers
C
Create event queries
D
Create event actionsE
Register eventsF
www.it-ebooks.info

223Summary
When registering events, you have to supply a source identifier. If a particular sourceidentifier exists, you need to delete it to enable the script to run C. WMI queries are cre-ated D to retrieve the events. You have to supply the key and value you want to monitorin the query. It’s possible to monitor the root of the hive to get all changes.
Two simple actions are created to pass the event into your event-handling func-tions E. The script then registers the events, supplying the query and the actions F.
DISCUSSION
This script isn’t included in the chapter module. It can be invoked as
. ./Listing7.12.ps1.
Feel free to change the name to something more meaningful if you desire. The PowerShell and WMI functionality provided in this chapter will allow you to
become an expert in administering the registry in a safe and productive manner. I mustemphasize again that registry changes must be tested before using them in production.
7.7 SummaryIn this chapter you’ve learned several things about working with the registry:
■ The structure of the registry■ How to read, write, and create registry keys and values■ How delete objects from the registry■ How the security on registry objects works and how to change it■ How to monitor changes to the registry
This functionality will help protect your environment and allow you to safely adminis-ter a fundamental part of your Windows systems.
In chapter 8, we’ll look at the filesystem and how you can work with files, folders,and shares.
www.it-ebooks.info

Filesystem administration
Filesystem administration is probably one of the most neglected aspects of our jobs.You create a disk volume and then set up some folders and shares. The area isturned over to the users, and they proceed to fill it up with their files.
You’ll have areas on specific servers for SQL Server databases or Exchange mailstores, but much of your storage space is still taken up by files of one sort oranother. These files are often referred to as unstructured data and can includeMicrosoft Word documents, spreadsheets, pictures, and output produced by themany applications in your organization.
Files are the basic building blocks of your filesystem. As an administrator, youneed to understand what files are stored and how you can find them. Files can behidden, compressed, and possibly encrypted (but not all three at once). Being ableto easily discover which files have gone through this process increases your abilityto administer the system.
This chapter covers■ Working with files■ Working with folders■ Administering shares■ Filesystem events
224
www.it-ebooks.info

225Working with files
PowerShell and WMI provide tools to perform these management tasks, as you’llsee in the first section of this chapter. In addition to discovering information aboutyour files, you’ll see how to use WMI to perform actions on the files. You’ll create tech-niques to compress, encrypt, and hide files. You’ll also learn techniques to copy filesand remove unwanted files.
TIP One thing that’s true of both files and folders when working throughWMI is that you can’t create these objects. You can analyze, manipulate, anddelete them, but you can’t create new ones.
Folders are used to organize files. You arrange them in hierarchies and often forgetabout files in the bottommost layers. I have a vague memory of creating the files in fig-ure 8.1 when I was working on a problem posted on one of the forums. I don’t reallyneed them, but I haven’t got around to deleting them. Multiply this by several otherfolders in a similar situation, and then by the hundreds, or thousands, of users in yourenvironment, and you’ll soon see where your disk space is going.
Discovering the folders on your system is the first step to controlling the filesystem.You then need to examine the files in those folders. If the files aren’t needed, thefolder can be deleted—reclaimed and reused disk space means reduced costs to yourorganization because you don’t need to buy more disks! You’ll also see how to workwith folders that are compressed or encrypted. You’ll learn about all of these subjectsin the folder administration section of this chapter (section 8.2).
Another important part of administering the filesystem is controlling access to filesand folders. Do you know who has access to a particular folder? You’ll learn to usePowerShell and WMI to discover this information via the folder’s security access mask(also in section 8.2).
Figure 8.1 The hierarchy of folders and files
www.it-ebooks.info

226 CHAPTER 8 Filesystem administration
Folders are made available across the network by creating shares on the folders. Thisis an area where you can, and will, manage the whole lifecycle (creation, discovery,modification, and deletion) through PowerShell and WMI. Shares are always on aremote machine to you, so being able to use WMI to manage the lifecycle is beneficial.Shares are discussed in section 8.3.
Do you know what the users are doing to your filesystem? Are they changing ordeleting files that they shouldn’t? In section 8.4 you’ll see how to use the PowerShelleventing system to discover WMI events related to the filesystem and then to create amonitoring system that can be applied to your important and confidential files.
Our final stop when exploring the filesystem is the page file. This is used to swapinformation from memory to disk, and it’s essential for the wellbeing of your systems.Some applications, such as SQL Server, shouldn’t be using the page file much. If theydo, it’s an indication that something is not quite right with the machine’s setup. You’llsee how to use PowerShell and WMI to manage the page file, once you’ve learned howto take control of it from the system.
Our starting point is the place where we store our data—the files themselves.
8.1 Working with filesFiles are where you store your data. They may be valuable or they may be worthless a fewhours after they’re written. Users become frustrated when they can’t find a file, andadministrators become frustrated when the users don’t clean up their old files. You canuse the file management capabilities of WMI to remove both of these frustrations.
NOTE One oddity of WMI is that you work with the CIM_DataFile class ratherthan a Win32 class. I’ve never seen a reason for this when nearly everythingelse has a Win32 class.
On a large remote system, PowerShell and WMI may not be the fastest solution. Theywill, however, be one of the cheapest. These technologies will work for you at a reason-able speed unless your file stores are in the multi-terabyte range.
If you need to find out how long your commands are taking, use the Measure-Commandcmdlet as follows:
$sb = {$query = "SELECT * FROM CIM_DATAFILE WHERE Extension='ps1'"Get-WmiObject -Query $query | select Name}Measure-Command -Expression $sb
Create a script block of the commands you want to run—that’s everything betweenthe braces: {}. Measure-Command will then run the script block and tell you how long ittook. On my Windows 7 laptop, it took 21.577 seconds.
One drawback to using this cmdlet is that you don’t get the output of the scriptblock, just the timings. Replace Measure-Command with Invoke-Command and you’ll getthe output.
www.it-ebooks.info

227TECHNIQUE 46 Finding files
Now it’s time to return to our main topic and start looking at the other ways youcan find files. Once you’ve found your files, you’ll usually want to do something withthem. The usual suspects include copying, renaming, and deleting. You could alsochange the compression or encryption state of the files. All of these activities arebased on finding the files in the first place.
Finding files
One common scenario you’ll need to deal with is finding a file or group of files. Ifyou’re connected directly to the system you can use the search capabilities built intoWindows, but if you’re working across multiple machines, you’ll need a remote capa-bility. You saw one possible way to search for files in the introduction to this section.Other filter options are available.
PROBLEM
You need to start tidying up the filesystem on a server. Unfortunately the personresponsible for administering this server has left, and the documentation is inade-quate. No one really knows what’s on this server or what should be on it. Your job is tostart investigating the files stored on this system.
SOLUTION
There isn’t a single technique you can use to investigate the files on a machine. We’lllook at a number of ways that you can use WMI to provide information about the files.The code in the following listing provides a series of code snippets that you can use asthe basis of scripts to access files based on various criteria.
$query = "SELECT * FROM CIM_DATAFILE
➥ WHERE Drive='C:' AND Path='\\Test\\'"Get-WmiObject -Query $query |select Name
$query = "SELECT * FROM CIM_DATAFILE
➥ WHERE Extension='log'"Get-WmiObject -Query $query | select Name
$query = "SELECT * FROM CIM_DATAFILE
➥ WHERE Writeable='$false'"Get-WmiObject -Query $query | select Name
$query = "SELECT * FROM CIM_DATAFILE
➥ WHERE Hidden='$true'"Get-WmiObject -Query $query | select Name
$query = "SELECT * FROM CIM_DATAFILE
➥ WHERE Drive='C:' AND Path='\\Test\\' ➥ AND Encrypted = '$true'"Get-WmiObject -Query $query |
Listing 8.1 Investigating files with WMI
TECHNIQUE 46
Select from folderB
Select specific extensionC
Select read-onlyD
Select hiddenE
Select encryptedF
www.it-ebooks.info
228 CHAPTER 8 Filesystem administration
select Name
$test = (Get-Date).AddDays(-60) $query = "SELECT * FROM CIM_DATAFILE WHERE Drive='C:' AND Path='\\Test\\' "Get-WmiObject -Query $query | foreach { $date = $_.ConvertToDateTime($_.CreationDate) if ($date -lt $test ) { $_ | select Name }}
The easiest way I’ve found to use the CIM_DataFile class is to write a query. You coulduse the -Filter parameter of Get-WmiObject, but I find it gets a bit complicated. Sep-aration adds a line of code, but it makes things easier to read.
One of the first things you may want to do is look at the contents of a particularfolder B. You can use this query:
$query = "SELECT * FROM CIM_DATAFILE WHERE
➥ Drive='C:' AND Path='\\Test\\'"Get-WmiObject -Query $query | select Name
The query looks clumsy because you have to specify the drive and folder path indepen-dently, but it gives you the flexibility to parameterize the query if you need to check thesame folder on multiple drives. Another common issue is that the drive letters aren’tcommon across machines. If you can parameterize the query, it makes life easier.
When you use Get-ChildItem to search the local filesystem, you can recursethrough the subfolders, but there’s no built-in recursion facility in WMI. If you want tosearch subfolders as well, you need to do it yourself. We’ll come back to this when welook at folders later in the chapter.
You may have noticed that I haven’t used the -Computername parameter in any ofthe code in this section. This was a deliberate decision to simplify the discussion.When you do add the -Computername parameter, remember to use it before the query.I’ve seen problems when the computer name is specified after the query. This is anintermittent failure that can be difficult to reproduce.
A frequent task is to search the filesystem for a particular type of file. You saw anexample of this at the beginning of the section. When searching for particular files,you’ll often search for a particular extension C. You saw how to find all of the .ps1files earlier. A common need is to discover the .mp3 and .jpg files your users havemanaged to squirrel away on your servers.
Many applications hide log files in odd places. The extension property supplies themeans to discover files of a particular type such as log files:
$query = "SELECT * FROM CIM_DATAFILE WHERE Extension='log'"Get-WmiObject -Query $query | select Name
It’s possible to use multiple extensions in the query, or you can simply run multiplequeries. The latter option is more flexible and maintainable.
Select on creation date
G
www.it-ebooks.info

229TECHNIQUE 46 Finding files
There are other criteria you can use when searching for files. Normally your filescan be modified, but in some cases you may want the files to be read-only D. Do youknow which files on your system are set to be read-only? This is how you find out:
$query = "SELECT * FROM CIM_DATAFILE WHERE Writeable='$false'"Get-WmiObject -Query $query | select Name
The oddity here is that you’re testing whether the file is writable rather thanwhether it’s read only—you’re looking for confirmation of the negative case. You usethe PowerShell Boolean value $false to provide the test value.
NOTE If you think back to chapter 4 where we discussed string substitution,you’ll remember that you can only substitute in strings bounded by doublequotes. In this case, it may look like you’re substituting into a string boundedby single quotes, but you really aren’t, because the single quotes form part ofthe overall string.
A similar situation holds when you want to test for hidden files E. The users thatsneaked their MP3s, photos, or other personal and inappropriate files onto yourserver may know just enough to hide them.
$query = "SELECT * FROM CIM_DATAFILE WHERE Hidden='$true'"Get-WmiObject -Query $query | select Name
In this case, you’re testing for a positive outcome. If you want to see the full range ofproperties, you can retrieve a file and pipe it into Get-Member, as for any other object.
Another area you might think of testing is encrypted files F. If your users use EFSand one such user leaves, you may want to ensure that they haven’t left any encryptedfiles behind before they actually exit the organization:
$query = "SELECT * FROM CIM_DATAFILE WHERE Drive='C:'
➥ AND Path='\\Test\\' AND Encrypted = '$true'"Get-WmiObject -Query $query |select Name
The change on this query is that you include a test to determine whether theEncrypted property is set to true. You can test for compressed files in this way aswell—just change Encrypted to Compressed in the query.
In many cases, you may want to put an end-of-life date on your documents G. Ifyou buy a document management system this is a feature you’d expect, but organiza-tions that aren’t in a position to implement such a system can use a simple WMI queryto test the age of a particular document:
$test = (Get-Date).AddDays(-60)$query = "SELECT * FROM CIM_DATAFILE WHERE Drive='C:'
➥ AND Path='\\Test\\' "Get-WmiObject -Query $query |foreach { $date = $_.ConvertToDateTime($_.CreationDate) if ($date -lt $test) { $_ | select Name }}
www.it-ebooks.info

230 CHAPTER 8 Filesystem administration
You start by creating a test date. This example uses a date 60 days in the past to be sureyou catch something. It uses the AddDays method with a negative number of days to geta date in the past. There are a number of methods you can use to create a test date:
■ AddDays
■ AddHours
■ AddMilliseconds
■ AddMinutes
■ AddMonths
■ AddSeconds
■ AddTicks
■ AddYears
Once you’ve created your test date you can create a query to discover the files in a par-ticular folder. (You could test the whole drive, but that would take a lot longer to run.)A test is performed against each file to determine whether the creation date is lessthan the test date, and you display the filenames that pass the test. Alternatively, youcould just as easily delete them or move them to an archive. It’s also possible to test onInstallDate, LastAccessed, and LastModified dates.
DISCUSSION
It may seem that it would be possible to perform these searches by pulling all of thefiles back and then using Where-Object to perform your filtering. This is an option,and on the local machine it probably doesn’t matter which you do. If you’re perform-ing the queries against a remote machine, though, it’s definitely a best practice to per-form the filtering on the source machine, in the query. This restricts the amount ofdata that’s returned across your network.
Now that you know how to discover files that meet certain criteria, what can you dowith them?
Performing actions on files
WMI doesn’t provide a mechanism for creating files or modifying the contents of afile. You can, however, manage other aspects of the file’s lifecycle, including deletion,copying, and renaming.
PROBLEM
A group of files are created on a regular basis in a particular folder, with the samenames each time. Those files are copied to another folder, and any files with matchingnames have to be deleted from the second folder before the copy occurs. The originalfiles have to be renamed to preserve them against future processing.
SOLUTION
This solution may seem a bit odd, but I’ve seen similar activities where files are createdand then copied to a working folder. The original folder acts as an archive. It makesthe most sense to delete the files in the target folder, perform the copy action, andthen rename the original files.
TECHNIQUE 47
www.it-ebooks.info

231TECHNIQUE 47 Performing actions on files
The following listing presents a WMI based solution to this problem.
$query = "SELECT * FROM CIM_DATAFILE WHERE Drive='C:'
➥ AND Path='\\Test\\' AND FileName LIKE 'file_'"Get-WmiObject -Query $query | foreach { $_.Delete() | Out-Null }
$query = "SELECT * FROM CIM_DATAFILE WHERE Drive='C:' AND
➥ Path='\\Teszzt2\\' AND FileName LIKE 'file_'"$files = Get-WmiObject -Query $queryforeach ($file in $files){ $newcopy = "C:\Test\$($file.FileName).$($file.Extension)" $file.Copy($newcopy) | Out-Null
$name = $file.FileName -replace "file", "test" $ext = $file.Extension -replace "txt", "csv" $newname = "C:\Teszzt2\$name.$ext"
$file.Rename($newname) | Out-Null }
The script starts by creating a query to find all of the files in the target folder thatmatch the pattern you’re working with. In this case, you’re looking for files that startwith the characters “file” and have a single other character in the name.
TIP The underscore character (_) is the WQL wildcard equivalent of a ques-tion mark (?); it represents a single character. If you think you might havemultiple wildcard characters to deal with, change the query to be "FileNameLIKE 'file%'"
Get-WmiObject is used to run the query. The results are piped into ForEach-Objectwhere the Delete method of the WMI file object is used to perform the deletion B.Out-Null is used to absorb the return code information from the multiple deletionsand prevent its display on screen. Alternatively, you could capture the return code anddisplay warning messages for files that fail to delete.
The second query selects the files from the source folder. This time you create acollection for the files, and each file in the files collection is processed in turn. A newfile path is created ($newcopy) and the file is copied C.
The filename and extension are modified using the -replace operator, and thefile is renamed D. The return codes from the copy and the rename actions are againsuppressed by using Out-Null.
DISCUSSION
There are alternatives to using Out-Null. The following three lines of code all per-form the same action in suppressing the output:
$file.Rename($newname) | Out-Null$null = $file.Rename($newname)[void]$file.Rename($newname)
Listing 8.2 File actions
Delete files
B
Copy files
C
Rename files
D
www.it-ebooks.info

232 CHAPTER 8 Filesystem administration
I
Which one should you use? Whichever one you like best. They all perform the same job.It really comes down to which fits best with the way you like to work and the way you thinkabout the code. I tend to use Out-Null mainly because it’s easiest to add on to the lineof code when I’ve finished testing that section and want to clean up the output.
You may come across a Win32_MoveFileAction class during your investigations ofWMI. It won’t really help you in this case because it’s one of a series of classes associ-ated with installing software.
In technique 46 you saw how to discover files that had been compressed. PowerShelland WMI provide you with a method of performing file compression and decompression.
Compressing files
The amount of data stored by organizations seems to be on a continuous upward spiral.Disk space is comparatively cheap, so one strategy is to keep buying more disk space.This works for a while, but eventually you’ll run out of space in your SAN racks or datacenter. An alternative is to use file compression to reduce the size files occupy. This cansave up to 80 or 90 percent of the space a file occupies, depending on the file type.
PROBLEM
Your file server drives are running out of space. There isn’t any money in the budgetto acquire extra storage. The larger files on the disk need to be compressed to reclaimsome space.
SOLUTION
The solution presented in listing 8.3 follows the pattern established in technique 47: youdiscover the files you need to work with, and then you perform the required actions.This is a common approach to developing administration scripts because you can testthat you’ve discovered the correct files before you perform any actions on them.
function compress-file {[CmdletBinding()]param ( [parameter(ValueFromPipeline=$true, ValueFromPipelineByPropertyName=$true)] [string]$computername="$env:COMPUTERNAME", [string]$path="c:\test", [int]$size = 2MB )PROCESS {$drive = Split-Path -Path $path -Qualifier$folder = $path.Remove(0,2).Replace("\","\\") + "\\"
$query = "SELECT * FROM CIM_DATAFILE WHERE Drive='$drive' AND Path='$folder' AND Filesize > $size"
Get-WmiObject -ComputerName $computername -Query $query | foreach { $_.Compress() }}}
Listing 8.3 Compress a file
TECHNIQUE 48
Set parameters
B
Specify drive and path
C
Run WMqueryD
Compress fileE
www.it-ebooks.info

233TECHNIQUE 48 Compressing files
The function starts by setting out the parameters it will accept B. The computername has been a common parameter in many of the scripts presented to date, andyou’ll see a lot more of that. The path to the folder you want to test is presented as astring and the file size is presented as an integer. CIM_DataFile handles file sizes inbytes, and PowerShell translates 2MB to 2097152 bytes automatically.
Split-Path is used on the path to get the drive letter (including the colon) byusing the -Qualifier parameter C. The path is then modified to work in WMI que-ries. The query is created and run through Get-WmiObject D. Your results are pipedinto ForEach-Object, where you use the Compress method on the file E.
This script could be converted to encrypt the files by replacing Compress() withEncrypt(). Remember that you can’t do both to the same file!
DISCUSSION
This script compresses files above the size of 2 MB. If you want to use larger sizes youmay run into the limits of the int32 data type. The maximum file size you can presentas a parameter is
PS> [int]::MaxValue / 1gb1.99999999906868
If you want to use a larger value as your test point, the data type will have to bechanged to [int64]. This allows much larger file sizes to be used:
PS> [int64]::MaxValue /1gb8589934592
In case you’re curious (I know I was), this translates to a large amount of storage:
PS> [int64]::MaxValue / 1pb8192
If you have files this big, you may need to look at other techniques. Compressing files is a good thing when you’re short on disk space. If at a later date
you manage to acquire more storage, you may want to uncompress these files so thatthe overhead of uncompressing the data to work on it and then compressing it againis removed.
WARNING Don’t compress, or encrypt, SQL Server data files, Exchange data-bases, or similar files with high I/O levels. The overhead can have a severeimpact on performance.
The function to perform the uncompression is shown in the following listing. I’vecalled it expand-file, using the recommended verb, which stops Import-Modulefrom throwing up warning messages about unapproved verbs.
function expand-file {[CmdletBinding()]param ( [parameter(ValueFromPipeline=$true,
Listing 8.4 Uncompress a file
www.it-ebooks.info

234 CHAPTER 8 Filesystem administration
ValueFromPipelineByPropertyName=$true)] [string]$computername="$env:COMPUTERNAME", [string]$path="c:\test")PROCESS {$drive = Split-Path -Path $path -Qualifier$folder = $path.Remove(0,2).Replace("\","\\") + "\\"
$query = "SELECT * FROM CIM_DATAFILE
➥ WHERE Drive='$drive' AND Path='$folder' ➥ AND Compressed = '$true'"Get-WmiObject -ComputerName $computername -Query $query | foreach { $_.UnCompress() }}}
If you compare listing 8.4 to listing 8.3, you’ll see that the file size parameter hasbeen removed. This query looks for compressed files in the folder and then uses theUncompress method.
The scripts have been deliberately restricted to a single folder for ease of use. Theycould be modified to work against the whole drive by changing the query to test justthe drive. The query would then read
$query = "SELECT * FROM CIM_DATAFILE
➥ WHERE Drive='$drive' AND Compressed = '$true'"
Files don’t exist in isolation. Let’s step up the hierarchy a level and see what can bedone with folders.
8.2 Folder administrationFolders provide the organizational components of your filesystem. You can createfolder hierarchies to control the filesystem and help you find your files. Sometimes,though, the hierarchy gets a bit too deep and you forget where you put things. At thispoint you need to start searching for folders.
A simple WMI call will list all of the folders on a machine:
Get-WmiObject -Class Win32_Directory | select Name
You’ll be surprised by the number of folders that are listed. Remember that NTFS filepaths are limited to 260 characters when creating folders. If you exceed this length,most of your programs won’t be able to access the folder. And no, you can’t pass thisoff as a security measure.
You can easily retrieve data on a single folder:
Get-WmiObject -Class Win32_Directory `-Filter "Name = 'C:\\Teszzt2'"
The PowerShell formatting files control what is displayed for the WMI class, so if youwant to see all of the information you need to bypass the default display:
Get-WmiObject -Class Win32_Directory `-Filter "Name = 'C:\\Teszzt2'" | Format-List *
www.it-ebooks.info

235TECHNIQUE 49 Discovering the files in a folder
ip
Win32_Directory only displays information about the folder itself. Listing the filesand subfolders of a particular folder is covered in technique 49. The other techniquesin this section look at folders with specific attributes (compressed or encrypted) andhow you can decode the security settings on a folder.
Discovering the files in a folder
In technique 46 you saw how to discover the files in a particular folder. Unfortunately,if you’re working from the folder and want to get to its contents there’s no direct asso-ciation between a Win32_Directory object and the files contained within the folder,but the CIM_DirectoryContainsFile class is a WMI association class providing somelinkage information you can use.
PROBLEM
You need to be able to access the files in one or more folders based on the foldername. Your filesystem contains a number of folders with similar names that you’ve dis-covered using the code in the introduction to this section. You now need to look atthe files in those folders.
SOLUTION
The most direct route to solving this problem is to use the code in the introduction tosection 8.1 and access each folder individually. If you need to work through the rela-tionship between a folder and its files, you can use the following listing to discoverhow this works.
function get-foldercontent {[CmdletBinding()]param ( [parameter(ValueFromPipeline=$true, ValueFromPipelineByPropertyName=$true)] [string]$computername="$env:COMPUTERNAME", [string]$path )PROCESS{ $target = $path.Replace("\", "\\\\") $filter = "GroupComponent = '" +'Win32_Directory.Name="' + $target + '"' + "'"
Get-WmiObject -ComputerName $computername `-Class CIM_DirectoryContainsFile -Filter $filter | foreach { $ff =
➥ ($_.PartComponent -split "CIM_DATAFile.")[1].Replace('"',"'")
Write-Debug $ff Get-WmiObject -ComputerName $computername -Class CIM_DataFile -Filter $ff | select Name, FileSize, AccessMask }}}
Listing 8.5 Folder contents
TECHNIQUE 49
Take ownership
B
ParametersC
File and folderrelationshD
File information
E
www.it-ebooks.info

236 CHAPTER 8 Filesystem administration
The get-foldercontents function takes a computer name and folder path asparameters B. The path is used to create a filter for accessing theCIM_DirectoryContainsFile class C. This is an association class that contains twoproperties per instance. The first property is the GroupComponent, which maps to thefolder. The second is the PartComponent, which maps to the file. I built the filterstring using concatenation rather than string substitution because I found it sim-pler—getting the different sets of quotes correct became more trouble than it wasworth. Sometimes you just have to go with the simple approach.
The filter is used to find the files associated with the folder D. Each instance of theCIM_DirectoryContainsFile class that’s returned is piped through ForEach-Object,where PartComponent is split and modified for use in CIM_DataFile E.
The name, file size, and access mask (security permissions) are displayed for eachfile. The file size is left in bytes in the listing, but this could be converted to MB or GBif required. Other properties are available for display, as discussed in section 8.1.
DISCUSSION
You use the PartComponent property from the CIM_DirectoryContainsFile class inlisting 8.5. The value of this property is of this form:
\\RSLAPTOP01\root\cimv2:CIM_DataFile.Name="c:\\teszzt2\\paw4.evt"
On the left side of the equal sign you have the WMI path, and on the right side youhave the folder path in the correct format for WMI. The quotes aren’t correct for usein further WMI processing, so you need to work on this.
You need to extract sufficient information from the PartComponent to create thefilter in this form:
Name='c:\\teszzt2\\paw4.evt'
The PartComponent string is split at "CIM_DATAFile.". The period (.) is effectivelyremoved by including it in the split operator (it’s possible to retain the patterns usedfor deciding where to split, but that’s beyond the scope of this book). The stringReplace() method can be used on the second element produced by the split to pro-duce the filter you need. Creating multi-operation string-processing code like this mayseem complicated, but it’s straightforward if you build it up one bit at a time and testeach stage as you add it to the process.
While we’re looking at folders, consider how you’d copy a folder and all itscontents:
$d = Get-WmiObject -Class Win32_Directory -Filter "Name='c:\\teszzt2'"$d.Copy("d:\test")
Simply use Get-WmiObject to create the WMI object for the relevant folder, and thenuse the Copy method to create the copy. Notice that the path to which the foldershould be copied only uses single backslashes (\). Consistency isn’t one of WMI’sstrong points. If you’re copying to the root of a drive, you only need the single back-slash, as shown in the previous example.
www.it-ebooks.info

237TECHNIQUE 50 Discovering folders with specific attributes
Listing 8.5 generates a list of the files within a folder. It doesn’t include subfolders.You can create a list of subfolders in a couple of ways. First, you can useWin32_Directory and use the Path property as a filter:
Get-WmiObject -Class Win32_Directory -Filter "Path='\\Test\\'"
This will generate a list of the first-level subfolders. It won’t recurse through thosefolders to find their subfolders.
The second option is to use a wildcard in the WMI filter:
Get-WmiObject -Class Win32_Directory `-Filter "Drive='C:' AND Path LIKE '\\Test\\%'" |select Name
Adding the percent character (%)to the path and using LIKE means that you’re testingfor all folders whose path starts with \Test\. This will generate all subfolders to what-ever depth is present.
Now that you’ve found your folders, what can you discover about them?
Discovering folders with specific attributes
In section 8.1 we looked at how you could discover files that were hidden, encrypted,or compressed. But it’s more likely that you’ll need to deal with these issues at a folderlevel than at a file level.
PROBLEM
A number of machines need to be tested to discover if there are any hidden, com-pressed, or encrypted folders.
SOLUTION
You could write a total of three functions to solve this problem—one to test each attri-bute. The only part that changes is the filter that decides the type of folder for whichyou’re searching. But it’s more efficient to write a single function, as in the followinglisting. It also gives you a chance to practice using the switch statement.
function test-folder {[CmdletBinding()]param ( [parameter(ValueFromPipeline=$true, ValueFromPipelineByPropertyName=$true)] [string]$computername="$env:COMPUTERNAME", [string] [Validateset("Hidden", "Compressed", "Encrypted")] $test )PROCESS{ switch($test){ "Hidden" {$filter = "Hidden='$true'"; break} "Compressed" {$filter = "Compressed='$true'"; break} "Encrypted" {$filter = "Encrypted='$true'"; break}
}
Listing 8.6 Folders with specific properties
TECHNIQUE 50
Create filter
B
www.it-ebooks.info

238 CHAPTER 8 Filesystem administration
Get-WmiObject -ComputerName $computername `-Class Win32_Directory -Filter $filter | select Name}}
The function takes the usual computer name parameter. A second parameter deter-mines the type of folder. The possible values that can be input are limited by theValidateSet() attribute on the parameter. The results of inputting an incorrect valueto the -test parameter are shown in figure 8.2.
The function throws an error, but more importantly it supplies feedback to theuser informing them of the correct values. Using the validation attributes in this man-ner can supply a lot of error checking with minimal effort. They also make your scriptslook more professional and ready for production.
The switch statement B takes the type of folder you’re testing and creates theappropriate WMI filter. Get-WmiObject can then be used to retrieve the data C.
DISCUSSION
You can perform a number of actions on Win32_Directory objects. Hiding, encrypt-ing, or compressing are the actions in the script in listing 8.6. Compressing a folder isstraightforward:
$d = Get-WmiObject -Class Win32_Directory -Filter "Name='c:\\teszzt2'"$d.Compress()$d.UnCompress()
The other methods available on folder objects include the following:
■ ChangeSecurityPermissions■ Compress■ Copy■ Delete■ GetEffectivePermission■ Rename■ TakeOwnerShip■ Uncompress
When creating folders using Windows Explorer, I sometimes get finger trouble andend up with folders called “New folder.” You can clean out these mistakes like this:
Get-WmiObject -Class Win32_Directory -Filter "Name Like '%New folder%'" |Invoke-WmiMethod -Name Delete
Run query
C
Figure 8.2 Result of inputting an incorrect value when using ValidateSet()
www.it-ebooks.info

239TECHNIQUE 51 Decoding the access mask
Use Get-WmiObject to show the folders that meet the criteria and then invoke thedelete method on the folder. This can only be performed if you have the correct levelof permissions on the folder.
Decoding the access mask
Windows, unlike some other operating systems, sets permissions on the object—in thiscase a folder. You have to interrogate the object itself (the folder) to discover the per-missions that have been set.
PROBLEM
A user is complaining that they can’t access the files in a particular folder. You need todiscover the permissions set on the folder to determine if they’ve been granted access.
SOLUTION
You can solve this problem by decoding the access mask. Back in technique 43 (inchapter 7) you did this for registry keys. You can adopt a similar approach, as shown inthe next listing.
$fmask = DATA {ConvertFrom-StringData -StringData @'4 = Grants the right to append data to the file.
➥ For a directory, this value grants the right ➥ to create a subdirectory.8 = Grants the right to read extended attributes.65536 = Grants delete access.524288 = Assigns the write owner.'@}
function get-foldermask {[CmdletBinding()]param ( [parameter(ValueFromPipeline=$true, ValueFromPipelineByPropertyName=$true)] [string]$computername="$env:COMPUTERNAME", [string]$path)PROCESS{$path = $path.Replace("\","\\")$sd = Get-WmiObject -Class Win32_LogicalFileSecuritySetting ` -ComputerName $computername -Filter "Path='$path'" | Invoke-WmiMethod -Name GetSecurityDescriptor
"Owner " $sd.Descriptor.Owner | Format-Table Domain, Name -AutoSize
$sd.Descriptor.DACL | foreach { "`n$($_.Trustee.Domain)/$($_.Trustee.Name)" $accessmask = $_.AccessMask
$fmask.GetEnumerator()| sort Key | foreach {
Listing 8.7 Folder access mask
TECHNIQUE 51
www.it-ebooks.info

240 CHAPTER 8 Filesystem administration
if ($accessmask -band $_.key){ "$($fmask[$($_.key)])" } } }}}
The script starts by creating a hash table of the permissions and the values associatedwith them. The listing doesn’t show the full set for brevity, but it’s available in the codedownload. The get-foldermask function takes a computer and path as parameters.
The Win32_LogicalFileSecuritySetting class is used to get the security descrip-tor. This class works with files and folders, even though it has file in the name! Thesecurity descriptor stores the permissions data in which you’re interested.
The data you want is in the Descriptor property of the security descriptor. Youstart by displaying the owner of the folder and then work through each DACL in thedescriptor. The keys in the hash table are compared to the access mask using thebinary AND (band) operator. Where there is a match, the appropriate permissions aredisplayed.
DISCUSSION
Once you have the set of permissions on the folder, you can determine whether the userhas any rights assigned on the folder. File and folder permissions are usually assignedto groups rather than individual users, so you need to discover the user’s group mem-bership. That’s an ADSI task rather than a WMI task, so it isn’t included here.
If the permissions have been set incorrectly, you may need to take ownership of thefolder to rectify the problem:
Get-WmiObject -Class Win32_Directory -Filter "Name='c:\\teszzt2'" |Invoke-WmiMethod -Name TakeOwnership
In a network environment, folders are normally made available as shares. You can alsowork directly with shares using WMI.
8.3 Listing, creating, and modifying sharesShares are an important part of administering Windows systems. They control howyou make resources available to the user population. You’ll normally think in terms offile shares, but you can also share printers and other devices.
If you want to view the available shares on the local system try this command:
ls hklm:\system\currentcontrolset\services\lanmanserver\shares |select -ExpandProperty property
This will provide a list of the available shares. It would be possible to use the techniques you saw in chapter 7 to read the registry
of a remote machine, but shares on a cluster are a slightly different proposition.Details can be found in KB article 971403 from http://support.microsoft.com.
You can access share information directly using WMI. The Win32_Share classenables you to manage the share lifecycle, including creation and deletion.
www.it-ebooks.info

241TECHNIQUE 52 Listing shares
Listing shares
As a consultant I often need to discover how a machine is configured before I canwork on it. I’ve used many of the techniques you’ve seen so far in the book when pre-sented with a new set of machines to work with.
PROBLEM
A file server is in the process of failing. You need to list the shares so that you can rec-reate them on another machine when you move the data.
SOLUTION
WMI provides the Win32_Share class which you can use to answer this question. List-ing 8.8 shows how you can use it. The function has two parameters: -name and-computername, which supply a share name and computer name respectively. Thename parameter defaults to %, which is the standard WMI wildcard for any charac-ter. This means that by default information on all shares is displayed. The parame-ter can also accept standard Windows wildcard characters. A check is performed tochange the Windows wildcard * to %, which is the WMI equivalent.
function get-share {[CmdletBinding()]param ( [string]$name="%", [parameter(ValueFromPipeline=$true, ValueFromPipelineByPropertyName=$true)] [string]$computername="$env:COMPUTERNAME")PROCESS{$name = $name -replace "\*","%"if ($name -eq "%") { Get-WmiObject -Class Win32_Share -ComputerName $computername}else{ Get-WmiObject -Class Win32_Share -ComputerName $computername ` -Filter "Name LIKE '$name'" }}}
If a name is given, you search for a specific share that contains the value given to the -name parameter. Otherwise you dump information for all available shares. The defaultdisplay includes the path to the folder.
DISCUSSION
This script will display all share types as written. You could just produce output relatedto file shares or printer shares by adding a type parameter that takes the value of 0 forfile shares and 1 for printer shares. The WMI filters could be altered to add the type asa search parameter. I’ve included that option as listing 8.8a in the download code.
Listing 8.8 Listing shares
TECHNIQUE 52
www.it-ebooks.info

242 CHAPTER 8 Filesystem administration
Jumping back to the share lifecycle, you need to be able to create shares beforeyou can do anything with them.
Creating shares
The data-access requirements of organizations are constantly changing, and you’llneed to create and remove shares to accommodate these changes. The changes canoccur due to reorganizations, mergers and acquisitions, or the setting up of majorproject areas. Add the occasional need to move data between servers, and a largeorganization can have a very fluid environment.
PROBLEM
A major new project has started within your organization. It needs its own separatedata area, and this data area has to be shared for access across the network.
SOLUTION
The Win32_Share class has a Create method that you’ll use to create the share. Thefunction in listing 8.9 has been deliberately written to only create file shares, but I leftthe share type as a parameter in case you wish to extend this script to cover creatingother types of shares.
The other parameters are the computer name, the name of the share and thefolder you’re sharing, a description, and the maximum number of connections you’reallowing to the share. A value of 0 means the number of users simultaneously able toaccess the share is unlimited.
function new-fileshare {[CmdletBinding()]param ( [string]$name, [string]$path, [int]$type=0, [int]$maxcon,[Alias("Description")][string]$desc, [parameter(ValueFromPipeline=$true, ValueFromPipelineByPropertyName=$true)][string]$computername="$env:COMPUTERNAME")PROCESS{ if (!(Test-Path -Path $path)){Throw "Folder does not exist"} $s = [WmiClass]"\\$computername\root\cimv2:Win32_Share" $ret = $s.Create($path, $name, $type, $maxcon, $desc)
if ($ret.ReturnValue -ne 0){ Write-Host "Share $name was not created" } else {Write-Host "Share $name was created"}}}
An instance of the Win32_Share class is created using the [wmiclass] type acceleratorand is put into the variable $s. The Create method is called on this object. The folder
Listing 8.9 Creating shares
TECHNIQUE 53
www.it-ebooks.info

243TECHNIQUE 54 Modifying shares
path, share name, share type (0 for a file share), maximum connections, and descrip-tion are used as arguments to the method.
The return value is tested, and if the value is 0 a success message is displayed. Anyother value causes the display of a failure message.
DISCUSSION
It would be nice to be able to create the underlying folder structure and then createthe share on top, but WMI doesn’t give you a way to create folders. One possible solu-tion is to use PowerShell remoting. The folders could be created using New-Item, andthen your new-fileshare function could be used to create the share. If the function isused through PowerShell’s remote administration capabilities, the computer nameshould be left as $env:COMPUTERNAME to represent the local machine.
The opposite end of the share’s lifecycle is deleting the share. It’s an activity thatsometimes gets forgotten because of more pressing work. WMI can be used to delete ashare:
Get-WmiObject -Class Win32_Share -Filter "Name='Test'" |Remove-WmiObject
The share is identified by using Get-WmiObject. The resultant object is piped intoRemove-WmiObject. Adding the -computername parameter to Get-WmiObject enablesyou to work with shares on remote machines.
Creation and deletion form the endpoints of a share’s lifecycle. In the middle, youmay need to modify the share.
Modifying shares
There aren’t many aspects of a share that you can modify. The maximum number ofconnections and the description are the only properties you can sensibly change. Any-thing else involves recreating the share.
PROBLEM
During an audit of your fileservers you discover that none of the shares on yourfileservers have descriptions set. It will be easier for your junior administrators to workwith the shares if descriptions are set.
SOLUTION
The following listing demonstrates how you can use the SetShareInfo method tomodify a share’s properties. The function takes the share name, maximum connec-tions, description, and computer name as parameters.
function set-share {[CmdletBinding()]param ( [string]$name, [int]$maxcon,[Alias("Description")]
Listing 8.10 Modifying shares
TECHNIQUE 54
www.it-ebooks.info

244 CHAPTER 8 Filesystem administration
[string]$desc, [parameter(ValueFromPipeline=$true, ValueFromPipelineByPropertyName=$true)][string]$computername="$env:COMPUTERNAME")PROCESS{ $share = Get-WmiObject -Class Win32_Share ` -Filter "Name='$name'" -ComputerName $computername
if (!$maxcon){$maxcon = $share.MaximumAllowed } if (!$desc){$desc = $share.Description}
$share.SetShareInfo($maxcon, $desc, $null)}}
A variable is created to hold the object created when Get-WmiObject retrieves theshare information. The variables for the maximum connections and description aretested. If they haven’t been created because values haven’t been passed into theparameters, then the existing values from the share are used.
The SetInfo method is used to apply the modification to the share. The maxi-mum connections and description are set simultaneously. This is why you need to pickup the existing values if they aren’t being changed.
DISCUSSION
I suspect that most shares are created and not touched again until they’re deleted, butyou still need to be aware of how to modify shares for the times when it becomesnecessary.
You’ve seen that Windows is an event-driven system. In previous chapters we’velooked at disk events and registry events. It’s time to turn our attention to filesystemevents.
8.4 Filesystem eventsWhen we talk about events affecting the filesystem, we’re really discussing events thatimpact the files themselves. There are three possible actions that could affect our files:
■ Creation■ Deletion■ Modification
There are techniques available to monitor these events using WMI or .NET. In this sec-tion, we’ll look at how to use the WMI filesystem events.
Working with filesystem events
There are a number of reasons for wanting to monitor parts of your filesystem. Thefiles could contain sensitive information that you don’t want changed or deleted. Per-haps the files perform a function in one of your critical applications and you can’tafford to have them deleted. Alternatively, a third-party organization may deliver a fileto a certain location, and you need to be made aware of any new files being created sothat you can trigger further processing.
TECHNIQUE 55
www.it-ebooks.info

245TECHNIQUE 55 Working with filesystem events
PROBLEM
You need to monitor part of the filesystem for creation, deletion, and modificationevents. Each of these events needs to trigger a separate action.
SOLUTION
The solution presented in the following listing sticks with the pattern established in pre-vious chapters. You have a separate function for handling the events, and the main bodyof the script defines the queries and actions you’ll use when registering the events.
function eventhandler { param ($e) $time = $e.TimeGenerated if (!($e.SourceIdentifier -eq "modfile")){ $pc = $e.SourceEventArgs.NewEvent.TargetInstance.PartComponent $data = $pc -split "=" $file = $data[1].Replace("\\","\").Replace("""","") } else { $file = $e.SourceEventArgs.NewEvent.PreviousInstance.Name }
switch ($e.SourceIdentifier) { "newfile" {Write-Host "$time : File $file has been created" break}
"delfile" {Write-Host "$time : File $file has been deleted" break}
"modfile" { Write-Host "$time : File $file has been modified" Write-Host "Original" $e.SourceEventArgs.NewEvent.PreviousInstance | fl AccessMask, Archive, Encrypted, Extension, FileName, FileSize, Hidden, Readable, Status, System, Writeable | Out-Host
Write-Host "Modified" $e.SourceEventArgs.NewEvent.TargetInstance | fl AccessMask, Archive, Encrypted, Extension, FileName, FileSize, Hidden, Readable, Status, System, Writeable | Out-Host break} }}
if (Get-EventSubscriber | where {$_.SourceIdentifier -eq "newfile"}) {Unregister-Event -SourceIdentifier "newfile" }
if (Get-EventSubscriber |where {$_.SourceIdentifier -eq "delfile"}) {Unregister-Event -SourceIdentifier "delfile" }
if (Get-EventSubscriber |where {$_.SourceIdentifier -eq "modfile"}) {Unregister-Event -SourceIdentifier "modfile" }
$nquery = "SELECT * FROM __InstanceCreationEvent
Listing 8.11 Filesystem monitoringEvent handler
B
Event type
C
Event processing
D
Clean up
E
Define queries
F
www.it-ebooks.info

246 CHAPTER 8 Filesystem administration
➥ WITHIN 5 WHERE TargetInstance ISA ➥ 'CIM_DirectoryContainsFile' ➥ AND TargetInstance.GroupComponent = ➥ 'Win32_Directory.Name=""C:\\\\Teszzt2""'"
$dquery = "SELECT * FROM __InstanceDeletionEvent
➥ WITHIN 5 WHERE TargetInstance ISA ➥ 'CIM_DirectoryContainsFile' ➥ AND TargetInstance.GroupComponent = ➥ 'Win32_Directory.Name=""C:\\\\Teszzt2""'"
$mquery = "SELECT * FROM __InstanceModificationEvent
➥ WITHIN 5 WHERE TargetInstance ISA ➥ 'CIM_DataFile' AND TargetInstance.Name = ➥ 'C:\\Teszzt2\\proc1.txt'"
$action = {eventhandler $($event)}
Register-WmiEvent -Query $nquery ` -SourceIdentifier "newfile" -Action $actionRegister-WmiEvent -Query $dquery `-SourceIdentifier "delfile" -Action $actionRegister-WmiEvent -Query $mquery `-SourceIdentifier "modfile" -Action $action
The event handler function B is called when one of the registered events is triggered.It takes the event information as a parameter. The time the event was generated ispicked out of the event object.
The file that has been affected by the event is recovered from the event object C.The recovery method depends on whether you’re dealing with a file modificationevent or a file creation or deletion event.
A switch statement is used to perform the bulk of the event processing D. Theswitch criterion is the event source identifier (the type of event). If the file has beencreated or deleted, you display the time the event occurred, the name of the file, andwhether the file was created or deleted.
File modification is a bit more complicated. You display a number of properties ofthe file in its original state and in its modified state. The change in file size could indi-cate that data has been added to the file or has been removed. Changes to the encryp-tion, compression, and hidden states are also immediately obvious.
You need to register for the file events before your function can receive and pro-cess them. The main body of the script starts by deleting the registration of any previ-ously defined instances of these events E. The WQL queries that are used to discoverthe events are defined next F.
There are two types of queries in this script. The first type is for the creation and dele-tion events. You use the CIM_DirectoryContainsFile class and look for the__InstanceCreationEvent and __InstanceDeletionEvent events respectively. Thereis a five second window in which you test for events, and the search is further restrictedto the defined folder. This query works because the CIM_DirectoryContainsFile classmaintains the link between a folder and its constituent files. A new instance of the classis created when a file is created, and an instance is removed when a file is deleted.
Define action
G
Register eventsH
www.it-ebooks.info

247TECHNIQUE 55 Working with filesystem events
Unfortunately this approach won’t work for file modifications, because the WMIinstance linking the file to the folder hasn’t been changed—only the file contentshave been changed. You can overcome this by using the second type of query. TheCIM_DataFile class is used to look for instances of __InstanceModificationEvent.You have to monitor individual files rather than a whole folder with this approach.
TIP It’s important to remember that you can monitor a whole folder for cre-ation and deletion events but you have to monitor individual files for modifi-cation events.
The action G is a simple statement that calls the eventhandler function. The event ispassed to the function. Registration of the events occurs as the last action of the scriptH. One registration is made for each type of event using the appropriate query andsource identifier. The action is identical across all registrations.
DISCUSSION
Discovering the information that’s available within the event object can be a time-consuming task, because it will vary depending on the type of event that’s triggered.One way to find out what you’re working with is to use a modified version of list-ing 8.11 to discover this information. You can test any event by putting these lines inthe eventhandler function:
$e | fl * | Out-Host$e.SourceEventArgs.NewEvent | fl * | Out-Host
They can either replace what is there, or they can just be added to the function. The first line displays the basic event information. The following example is from a
file deletion event:
ComputerName :RunspaceId : fef8fee4-2113-4b99-8471-a2513e1c4dbcEventIdentifier : 1Sender : System.Management.ManagementEventWatcherSourceEventArgs : System.Management.EventArrivedEventArgsSourceArgs : {System.Management.ManagementEventWatcher,
System.Management.EventArrivedEventArgs}SourceIdentifier : delfileTimeGenerated : 10/02/2011 21:54:44MessageData :
The second line displays the contents of the SourceEventArgs.NewEvent property.The same file deletion event produced this output:
__GENUS : 2__CLASS : __InstanceDeletionEvent__SUPERCLASS : __InstanceOperationEvent__DYNASTY : __SystemClass__RELPATH :__PROPERTY_COUNT : 3__DERIVATION : {__InstanceOperationEvent, __Event,
__IndicationRelated, __SystemClass}__SERVER : RSLAPTOP01
www.it-ebooks.info

248 CHAPTER 8 Filesystem administration
__NAMESPACE : //./root/CIMV2__PATH :SECURITY_DESCRIPTOR :TargetInstance : System.Management.ManagementBaseObjectTIME_CREATED : 129418484845666000Properties : {SECURITY_DESCRIPTOR, TargetInstance, TIME_CREATED}SystemProperties : {__GENUS, __CLASS, __SUPERCLASS, __DYNASTY...}Qualifiers : {abstract}ClassPath : \\.\root\CIMV2:__InstanceDeletionEventSite :Container :
Once you have this information, you can add further lines to drill down deeper intothe event information. It’s worth looking at the description of the System.Management.EventArrivedEventArgs class on MSDN. It will help explain what is happening.
This is the technique that I used to discover the TargetInstance andPreviousInstance properties on the file modification event. A cut-down version oflisting 8.11 configured to test an event can be found in the source code for thischapter. It’s the script called test-event.ps1.
The last lap of our race around the filesystem involves a quick look at the page file.
8.5 Page file managementThe page file is used to swap data out of memory and onto disk when the system isbusy. It’s also known as virtual memory. The page file is usually created during theinstallation of the operating system and often is just left to get on with its job. TheWindows operating system does a good job of managing the page file.
Nevertheless, the page file can take up a lot of space on disk, and you may want tomake modifications to the way the file works, such as moving it to another disk. Thereare some WMI classes for working with the page file. If we try this,
Get-WmiObject -Namespace root\cimv2 -List *pagefile*
the following classes will be returned:
■ Win32_PageFileUsage
■ Win32_PageFile
■ Win32_PageFileSetting
■ Win32_PageFileElementSetting
On Windows 7 or Windows Server 2008 R2, you won’t get any output if you try any ofthese PowerShell commands:
Get-WmiObject -Class Win32_PageFileGet-WmiObject -Class Win32_PageFileSettingGet-WmiObject -Class Win32_PageFileElementSetting
The Win32_PageFileUsage class will return information:
Get-WmiObject -Class Win32_PageFileUsage |Format-Table Name, CurrentUsage, PeakUsage,AllocatedBaseSize, TempPageFile
www.it-ebooks.info

249Summary
If you substitute Format-List for Format-Table, the output may be easier to present(if you want to pipe to a file for saving in a report). You’ll get something like this:
Name : C:\pagefile.sysCurrentUsage : 146PeakUsage : 146AllocatedBaseSize : 2814TempPageFile : False
The sizes are in megabytes. Don’t panic. Your machine isn’t broken, even though some of the classes don’t
return information. The problem is that the system is configured to automaticallymanage the page file. You need to revert to manual management before you can workwith it. If you look back at the Win32_ComputerSystemClass that we used in chapter 5,
Get-WmiObject -Class Win32_ComputerSystem | select *pagefile*
you’ll find that the AutomaticManagedPageFile property is set to true. The way to mod-ify this is to run PowerShell with elevated privileges and use the -EnableAllprivilegesparameter on Get-WmiObject:
Get-WmiObject -Class Win32_ComputerSystem -EnableAllPrivileges |Set-WmiInstance -Arguments @{AutomaticManagedPageFile=$false}
TIP This combination of running with elevated privileges and using the-EnableAllPrivileges parameter forces the system to accept that you havethe permissions to perform this action. The combination is essential. Usingonly one of the options will generate an access-denied message.
The three reluctant page file classes are now accessible, and you can now work withthe page file to modify the maximum size, as follows:
$pf = Get-WmiObject -Class Win32_PageFileSetting$pf.InitialSize = 5120$pf.MaximumSize = 5120$pf.Put()
Alternatively, having discovered the information you need, you can return the pagefile to automatic management:
Get-WmiObject -Class Win32_ComputerSystem -EnableAllPrivileges |Set-WmiInstance -Arguments @{AutomaticManagedPageFile=$true}
Most of the time you’re better off leaving the system to manage the page file.
8.6 SummaryThe filesystem is fundamental to the operation of your Windows systems. Files areresponsible for storing your valuable data, and they’re grouped into folders for ease ofmanagement. You can perform a number of actions on files and folders:
■ Discovery■ Compression, encryption, and hiding (plus their reversal)
www.it-ebooks.info

250 CHAPTER 8 Filesystem administration
■ Copying and moving■ Deleting■ Setting permissions
You can monitor files and folders for creation, deletion, and modification events. Thiscan help you protect your most critical files.
Shares are used to make the server’s filesystem accessible across the network. Youcan manage the full share lifecycle through WMI.
The page file is used by the system as virtual memory. Information is swapped todisk as required to meet an application’s requirements. You can usually allow the pagefile to be managed automatically, but it’s possible to override this to fine tune its per-formance.
In chapter 9 we’ll start to look at the applications running on our systems and turnour attention to services and processes.
www.it-ebooks.info

Services and processes
Operating system components and applications run as processes on Windows sys-tems. Examples of operating system processes include the Local Security AuthorityProcess (lsass.exe), Windows Explorer (explorer.exe), and the Desktop WindowManager (dwm.exe). Processes created by applications could include Word, Note-pad, or PowerShell.
A service is a process that’s controlled by the Service Control Manager, such asDNS, Net Logon, Exchange, or SQL Server. Services usually start when the systemboots up and runs in the background.
TIP Run the scripts in this chapter from PowerShell, or the ISE, when ithas been started with elevated privileges. You’ll get partial informationreturned or errors if you run with PowerShell started as normal.
This chapter covers■ Discovering services and their load order■ Configuring services■ Managing processes through their lifecycle■ Working with process events
251
www.it-ebooks.info

252 CHAPTER 9 Services and processes
This chapter opens by examining how you can interact with the services on local andremote machines. WMI enables you to discover information about services that youcan’t get through the PowerShell cmdlets, and configuration can be simpler whenworking through WMI. Services, and their dependencies, have to be loaded in a partic-ular order—the order and the list of dependencies form a useful troubleshooting toolwhen services won’t start.
Processes potentially provide more opportunities for automation than services, asthey tend to be more volatile. Discovering who has started a process on your serverthat’s eating resources can enable you to stop the process to return the resources tothe critical applications that need them and prevent that user from performing otheractions that degrade the system’s performance. PowerShell and WMI also enable youto manage the process lifecycle for local and remote systems. The creation and termi-nation of processes provides an extra level of control over your systems.
PowerShell enables you to utilize the WMI event system easily and efficiently. You’llsee how to use WMI events to discover when processes are stopped or started. You’vealready seen WMI events in some of the earlier chapters, and in this chapter you’lllearn how to investigate WMI events of any kind. This is a generic technique that youcan apply in any situation—we’ll look at a practical example that shows you how tomonitor processes. This will be extended to restart process that shouldn’t stop, and tostop processes that shouldn’t be started.
Before we dive into these events, though, we need to go back and look at the ser-vices on our systems.
9.1 ServicesServices start when the system starts. They can be part of the base system functionalityor host important infrastructure components, such as DNS or DHCP. Services also pro-vide a way for applications such as Exchange or SQL Server to function.
Managing the services on your systems is an important administrative task. Power-Shell supplies a number of cmdlets for working directly with services, as listed intable 9.1.
Get-Service and Set-Service can work remotely because they have a -ComputerNameparameter. The other cmdlets can only work on the local system.
There are some differences between the way the cmdlets work with services andthe way WMI works with services. You can see this by running these two lines of codeand comparing the output:
Get-Service -Name W32Time | Format-List *Get-WmiObject -Class Win32_Service -Filter "Name='W32Time'" |Format-List *
Table 9.1 PowerShell service cmdlets
Get-Service New-Service Restart-Service Resume-Service
Set-Service Start-Service Stop-Service Suspend-Service
www.it-ebooks.info

253Services
TIP Use two PowerShell consoles to compare the results directly. It’s often agood plan to have a couple of consoles open to dip into help or to testsomething.
WMI adds some interesting and useful properties:
■ Description—The description seen in the Services GUI■ StartName—The account used to start the service■ PathName—The path to the service executable■ DesktopInteract—Whether the service can interact with the desktop
Table 9.2 lists the methods available for use through WMI. Many of the methods listedin table 9.2 have cmdlet equivalents listed in table 9.1. A very important difference isthat the WMI methods don’t have access to the -WhatIf and -Confirm parameters thatare present on the cmdlets. This means you need to be very careful when testingscripts involving methods that can change the state of your systems.
On the other hand, the Get-Service cmdlet supplies an easy way to discover depen-dent services (Win32_DependentService can also be used, but it’s more cumbersome)and the services a particular service depends on. Set-Service can be used to modifysome properties of a service, including the following:
■ Description■ Display name■ Status—running, stopped ,or paused■ Start mode
At this point, you may be thinking that you don’t need WMI at all when working withservices. It may not be the only way to work with remote services, as it once was, but itstill supplies some valuable and unique functionality.
When troubleshooting a problem, one of the first diagnostic techniques isto determine whether the services related to a particular application are running.This is a very straightforward technique, as you’ll see shortly, especially when you useit to compare those services that are running against those services that shouldbe running.
There are also a number of service-related configuration items you can modify withPowerShell and WMI, such as the service account and the start mode. Changing a service
Table 9.2 Methods of the Win32_Service class
Change ChangeStartMode Delete GetSecurity-Descriptor
InterrogateService PauseService ResumeService SetSecurity-Descriptor
StartService StopService UserControlService
www.it-ebooks.info

254 CHAPTER 9 Services and processes
account password on many machines is a painfully slow process, but it’s essential attimes, such as when an administrator leaves the organization. The technique we’ll uselater brings automation and efficiency to this task, making it easy to accomplish (don’tforget the change-control process though).
Many services (and other parts of the operating system) are loaded as the machinestarts. The loading has to occur in a precise order to ensure that all system dependen-cies are honored. The final service-related technique we’ll examine enables you todetermine the load order, which is very useful for troubleshooting startup errors onyour systems.
Before we can get to the deep technicalities of service loading, you need to under-stand the services that are running and the services that should be running.
Listing services
You saw in the section introduction that WMI adds access to some properties over andabove those returned by the Get-Service cmdlet. You can use this to find out moreinformation about the services running on your systems.
PROBLEM
Get-Service will tell you if a particular service is running or not. It can’t tell you if theservice should be running. You need a method of comparing the running servicesagainst those that should be running (those that are set to start automatically).
SOLUTION
This problem can be solved by comparing the status of the service (running orstopped) against the mode of starting. The following listing shows how to obtain theinformation required for this comparison.
function get-servicestatus {[CmdletBinding()]param ( [parameter(ValueFromPipeline=$true, ValueFromPipelineByPropertyName=$true)] [string]$computername="$env:COMPUTERNAME", [string]$name)PROCESS{if (-not $name) {$services = Get-WmiObject -Class Win32_Service `-ComputerName $computername }else {$services = Get-WmiObject -Class Win32_Service `-Filter "Name='$name'" -ComputerName $computername}
$services | select DisplayName, StartMode, State, Description}}
Listing 9.1 Listing services
TECHNIQUE 56
www.it-ebooks.info

255TECHNIQUE 57 Configuring services
The get-servicestatus function takes an optional computer name as a parameter. Itcan also take a service name as a parameter. Be careful with this parameter as it’s theservice name rather than the display name that’s required.
If a service name isn’t supplied, the function returns all instances of theWin32_Service class from the required computer. Supplying a service name restrictsthe information to the particular service of interest.
The service information is then piped into Select-Object to restrict output to therequired information. The StartMode property shows how the service should start—automatically or manually.
DISCUSSION
The combination of the start mode and the current state of the service shows youwhich services are running and which services should be running.
The function emits objects and can be used as follows:
get-servicestatus |where {$_.StartMode -eq "Auto" -and $_.State -ne "Running"} |Format-Table -Autosize
Notice that the start mode is Auto and not Automatic! This information could be usedto force a restart of a service that hasn’t started.
When applying patches to the server estate I work with, occasionally some serviceswon’t restart. I need to check them and force them to start if required.
TIP There is a school of thought that says that PowerShell best practice is toalways return objects. A lot of the work I do is investigative rather than directadministration. I have found it quicker to write scripts and functions thatreturn the results directly. As with many other aspects of PowerShell, I end uptaking a pragmatic view to solve the immediate problem.
Step one is always discovering what is happening. You’ve just done that. Step two is todo something about it. You need to be able to configure services to complete step two,and it just happens that’s our next topic.
Configuring servicesIn many cases, you’ll install your services and leave them alone, especially if they’remajor applications such as Exchange or SQL Server. A service account is created with apassword that doesn’t expire, and you never get around to changing it. This could bea security vulnerability, exploitable by a rogue administrator, if the password is knownand the service needs a high level of privilege.
PROBLEM
You have a number of servers running a service that has a high level of privilege. Thepassword used by the service account has been compromised and needs to bechanged. You’ve been instructed to use a new account to be extra sure.
SOLUTION
One possible solution is to do this manually. It would work for a few machines, but youcan automate this activity, as shown in the following listing.
TECHNIQUE 57
www.it-ebooks.info

256 CHAPTER 9 Services and processes
function set-serviceaccount {[CmdletBinding()]param ( [parameter(ValueFromPipeline=$true, ValueFromPipelineByPropertyName=$true)] [string]$computername="$env:COMPUTERNAME",
[parameter(Mandatory=$true)] [string] [ValidateNotNullOrEmpty()] $servicename,
[parameter(Mandatory=$true)] [string]$account, [parameter(Mandatory=$true)] [string]$password)PROCESS{ $service = Get-WmiObject -Class Win32_Service ` -ComputerName $computername -Filter "Name='$servicename'"
$service.StopService()
$service.Change($null,$null,$null,$null,$null,$null,
➥ $account,$password,$null,$null,$null)
$service.StartService()} }
The set-serviceaccount function has the service name as a mandatory parameter. Avalidation test is performed to ensure that the name given isn’t null or empty. Theaccount and password to use for the service are deliberately left as optional. If theyaren’t given, all that happens is that the service is stopped and restarted. Sometimesthat’s all you need to do.
Get-WmiObject is used to create an object for the service in question. TheStopService method is called, and while the service is in a stopped state, the Changemethod is used to make the required changes to the account and password.
The function then restarts the service.
DISCUSSION
The Change method takes a long list of arguments, and their meaning is given intable 9.3.
Listing 9.2 Configure services
Table 9.3 Options for the Change method of the Win32_Service class
Argument name Comment
DisplayName Display name of the service; maximum of 256 characters
PathName Full file path to the service executable
ServiceType Type of service—usually set as $null to indicate no change
www.it-ebooks.info

257TECHNIQUE 58 Discovering the service load order
It’s possible to not give the three arguments after the password because they will defaultto a NULL value. I have given them for completeness. The function is used like this:
set-serviceaccount -servicename BITS `-account RSLAPTOP01\BITSTEST -password Pa55w0rd
WARNING The service won’t restart on Windows 7. If you try to start the ser-vice manually, you’ll get an error stating that it can’t start because the serviceisn’t using the same account as other services running in the same process. Ihave used this service as a safe example, even though it will fail. It also givesan opportunity to show how to reset to system accounts.
You’d better put it back like it was:
set-serviceaccount -servicename BITS ` -account LocalSystem -password ""
Notice that you’re using an empty string for the password. This is the correct way toreset to using the system type accounts. If you use $null you’ll generate an error.
You now know how to discover the running services and configure them asrequired. The last aspect of service administration to cover is how they’re loaded atsystem startup.
Discovering the service load orderMost services are loaded when the system starts. There is a defined order in which ser-vices and their dependencies must be loaded. Many services are loaded in groups, butnot all services are members of a group and not all groups have members. Systemstartup involves the loading of other functionality, such as drivers, and is a complexprocess that can occasionally exhibit problems.
PROBLEM
There are intermittent problems with one of your servers. You need to discover theservices, drivers, and other things that are loaded at system startup to determinewhether the problem is related to a malfunction of the load process.
ErrorControl Severity of error if service fails to start; accepts 0–4
StartMode Start mode of service—usually automatic or manual
DesktopInteract Set to true if service can communicate with window on desktop
StartName Service account name
StartPassword Password for service account
LoadOrderGroup Group in which service loads—see technique 58
LoadOrderGroupDependencies Load order groups that must start before this service starts
ServiceDependencies List of services that must start before this service starts
Table 9.3 Options for the Change method of the Win32_Service class (continued)
Argument name Comment
TECHNIQUE 58
www.it-ebooks.info

258 CHAPTER 9 Services and processes
SOLUTION
The solution involves some repetitive processing, because the WMI associations don’twork in the direction that you require. You can start with a service and associate a loadgroup, but you can’t start with the load group and discover the associated services.This is illustrated in the following listing.
function get-serviceloadorder {[CmdletBinding()]param ( [parameter(ValueFromPipeline=$true, ValueFromPipelineByPropertyName=$true)] [string]$computername="$env:COMPUTERNAME")PROCESS{ $LOGSM = Get-WmiObject -Class Win32_LoadOrderGroupServiceMembers ` -ComputerName $computername
Get-WmiObject -Class Win32_LoadOrderGroup -ComputerName $computername | foreach { $name = $_.Name "{0,2} {1}" -f $_.GroupOrder, $name
$LOGSM | where {$_.GroupComponent -like "*$name*"} | foreach { " $((($_.PartComponent).Split(':'))[1]) " } }}}
The get-serviceloadorder function only requires a computer name as a parameter,because you want to know the information for all the services.
The processing starts by retrieving all instances of theWin32_LoadOrderGroupServiceMembers class. The parts you’re interested in are theGroupComponent, which supplies the load order group, and the PartComponent, whichsupplies the name of the service or driver. Here’s an example:
GroupComponent :\\RSLAPTOP01\root\cimv2:
➥ Win32_LoadOrderGroup.Name="Boot Bus Extender"PartComponent :\\RSLAPTOP01\root\cimv2:Win32_SystemDriver.Name="ACPI"
You could try to sort and group based on the GroupComponent, but the output is easierto understand if you approach the problem slightly differently. The instances of theWin32_LoadOrderGroup class are retrieved and piped into a ForEach-Object. Eachgroup has the group order and name displayed.
The Win32_LoadOrderGroupServiceMembers that you’ve loaded into the $LOGSMvariable are filtered on the name of the load order group. The PartComponent of eachof the accepted instances is split on the colon (:) and the result is displayed.
DISCUSSION
The resultant display is too large to include in the book, but here’s a small portion:
Listing 9.3 Service load order
www.it-ebooks.info

259TECHNIQUE 58 Processes
53 Cryptography Win32_SystemDriver.Name="KSecPkg"54 PNP_TDI Win32_SystemDriver.Name="AFD" Win32_SystemDriver.Name="NDProxy"
The WMI class is deliberately left as part of the display to aid in discovering furtherinformation about the item.
We didn’t cover the Win32_SystemDriver class in chapter 5, but you can use it asfollows:
Get-WmiObject -Class Win32_SystemDriver |sort State, DisplayName |Format-Table DisplayName, State, Status -AutoSize
Adding a function to the chapter 5 module to return driver information is a goodexercise to test your understanding. A possible solution is available in the downloadcode—see get-systemdriver.ps1.
Services tend to be static when compared to processes. New processes can bestarted by users or by other processes, and you need to turn your attention to pro-cesses to determine whether this volatility is having an adverse effect on your systems.
9.2 ProcessesDo you know and understand the full list of processes running on your systems?PowerShell provides a set of cmdlets for working with processes, as listed in table 9.4.
Only Get-Process has the ability to work against remote machines.
Debug-Process Get-Process
Start-Process Stop-Process
Wait-Process
Using Start-ProcessOne little known use for the Start-Process cmdlet is accessing websites and open-ing them directly in your browser:
Start-Process http://www.manning.com/siddaway2
You can make this easier to use if you create an expression for the command andput it into your profile:
$meap = "Start-Process http://www.manning.com/siddaway2"
You can then execute it like this:
Invoke-Expression -Command $meap
Better still, from the command line you can use the alias:
iex $meap
This is a nice easy way to get to your favorite websites.
Table 9.4 Process-related cmdlets
www.it-ebooks.info

260 CHAPTER 9 Services and processes
Many processes are started by the system, but you also need to understand the pro-cesses that users are starting. Processes have a limited lifecycle in that users tend tostart them, let them do their work, and then close them down. There is little need tomodify processes.
Listing process owners
You can use the Get-Process cmdlet to discover which processes are running on yourlocal and remote systems. Unfortunately this cmdlet doesn’t tell you who is the ownerof the process—it doesn’t tell you who started it. This is a limitation of the .NET classused by Get-Process rather than a PowerShell issue.
PROBLEM
A remote server is running slowly because extra processes are being started on it thatuse badly needed resources. You need to determine who is starting these processes.
SOLUTION
The Win32_Process class can be used as shown in the following listing. The functiononly requires a computer name as a parameter, which defaults to the local system,as usual.
function get-processowner {[CmdletBinding()]param ( [parameter(ValueFromPipeline=$true, ValueFromPipelineByPropertyName=$true)] [string]$computername="$env:COMPUTERNAME")PROCESS{Get-WmiObject -Class Win32_Process `-ComputerName $computername |select Name,@{Name="Domain";Expression={($_.GetOwner()).Domain}},@{Name="User";Expression={($_.GetOwner()).User}}
}}
The call to Get-WmiObject will return running processes. The Win32_Process classhas a method to find the process owner—GetOwner(). You can’t access this informa-tion directly, but you can use Select-Object to create two calculated fields that dis-play the domain and userid of the process owner by calling the GetOwner method.
DISCUSSION
This technique can also be used to check that processes such as Exchange, Share-Point, and SQL Server are being started with the correct account.
TIP You won’t get system processes, such as winlogon.exe, unless you run thisfunction in PowerShell started with elevated privileges. This mimics the behav-ior of the Task Manager utility, which only shows your own processes by default.
Listing 9.4 List process owners
TECHNIQUE 59
www.it-ebooks.info

261TECHNIQUE 60 Creating a process
Usually you’ll start processes interactively, but there are times when you need to createa process on a remote machine.
Creating a process
The “Using Start-Process” sidebar earlier in this section showed you how to start a pro-cess on the local machine using the Start-Process cmdlet. If you look at the help filefor Start-Process, you can see that it doesn’t have a -ComputerName parameter. Alter-natively, you can use Get-Command to check the available parameters:
Get-Command Start-Process -Syntax
PROBLEM
You need to be able to start a process on a remote machine. This will enable you torun programs on the remote machine as well as put additional load on that machine’sresources to simulate additional load on the existing processes.
SOLUTION
The Win32_Process class has a Create method that you can use to start a new processon a remote machine, as shown in listing 9.5. This will start the process in a defaultmanner.
You can take this a stage further and use the Win32_ProcessStartUp class to refinehow the processes are started. This class can accept a number of options, as listed intable 9.5.
The X and Y properties refer to the position on screen of the top left corner of thewindow in which the application runs.
function new-process {[CmdletBinding()]param ( [parameter(ValueFromPipeline=$true, ValueFromPipelineByPropertyName=$true)] [string]$computername="$env:COMPUTERNAME",
[parameter(Mandatory=$true)] [string]$name)PROCESS{ $prcstart1 = [wmiclass]"\\$computername\root\cimv2:Win32_ProcessStartup"
Table 9.5 Win32_ProcessStartUp options
CreateFlags EnvironmentVariables ErrorMode FillAttribute
PriorityClass ShowWindow Title WinstationDesktop
X XCountChars XSize Y
YCountChars YSize
Listing 9.5 Create process
TECHNIQUE 60
www.it-ebooks.info

262 CHAPTER 9 Services and processes
$prcstart1.Properties["ShowWindow"].Value = 2
$prcstart2 = [wmiclass]"\\$computername\root\cimv2:Win32_ProcessStartup" $prcstart2.Properties["PriorityClass"].Value = 128
$proc = [wmiclass]"\\$computername\root\cimv2:Win32_Process" $proc.Create($name, $null, $prcstart1)
$proc.Create($name, $null, $prcstart2)}}
TIP This function is written to demonstrate how to use these classes andoptions. If you need this in your own environment, I suggest rewriting it tomeet your requirements.
The function takes two parameters. The first is the usual computer name parameterthat accepts the name of the remote machine you’re going to work with. The secondparameter is the name of the process you intend to start. The process name is manda-tory. Remember that with WMI, you need to include the extension if you’re starting anapplication, such as notepad.exe.
This demonstration function then creates two instances of theWin32_ProcessStartup class. The [wmiclass] type accelerator is the easiest way toachieve this, as shown. The first instance is used to set the ShowWindow property to avalue of 2, which forces the application to start with a minimized window.
The second instance has the PriorityClass property set to 128, which forces theapplication to start with its priority set to High.
A single instance of the Win32_Process class is created. You can then call theCreate method twice using the name of the process and the relevant startup proper-ties, as shown. The middle parameter that’s set to $null is the current drive anddirectory for the process. If left as $null, it has the same path as the calling process,which is PowerShell.
DISCUSSION
Windows supplies a few utilities that are ideal for testing this type of functionality,most notably Notepad and the Calculator. In this case we’ll use Notepad to performour tests. The function is used as follows:
new-process -name notepad.exe
The WMI return information includes the ProcessIds of the new processes. Thisinformation could be captured in a variable if required for future processing.
You can test that the processes start with different priorities by using this code:
Get-WmiObject Win32_Process -Filter "Name='notepad.exe'" |Format-Table Name, ProcessId, Priority -AutoSize
It will return a result similar to this:
Name ProcessId Priority---- --------- --------notepad.exe 5980 8notepad.exe 5520 13
www.it-ebooks.info

263TECHNIQUE 61 Terminating a process
You’ll get visual confirmation that one of the instances of Notepad starts in a mini-mized window.
This function was tested using Invoke-WmiMethod as a variant. If I was just creatingthe process, it would have worked as shown in this example:
$proc = [wmiclass]"\\.\root\cimv2:Win32_Process"Invoke-WmiMethod -InputObject $proc -Name Create `-ArgumentList "notepad.exe"
Extending the code to utilize the startup options produces this code:
$proc = [wmiclass]"\\.\root\cimv2:Win32_Process"Invoke-WmiMethod -InputObject $proc -Name Create `-ArgumentList "notepad.exe", $null, $prcstart2
Unfortunately this code throws an invalid operation error and won’t work. I’ve deter-mined that Invoke-WmiMethod expects the parameters in the order that was used, butit still fails. In any case, you have a method that works, using listing 9.5, which is theimportant point.
Creating processes and checking ownership of processes leads you to the situationwhere you’ll need to terminate a process.
Terminating a process
Stopping a process on the local machine can be achieved in many ways:
■ Close the application window with a mouse click■ Right-click the minimized application and select Close Window.■ Use the Task Manager utility■ Use Stop-Process
But none of these can be used when you’re dealing with a remote machine, so youneed a different approach.
PROBLEM
You’ve determined that there are processes running on a remote machine that needto be terminated in order to conserve the resources used by that machine.
SOLUTION
If this is an ad hoc activity, you could perform the action at the PowerShell prompt.But it’s likely that you’ll need to perform this action more frequently, so you can wrapit in a function that you call as required and use easily against multiple machines. Thefollowing listing shows how you can solve this problem.
function stop-remoteprocess {[CmdletBinding()]param ( [parameter(ValueFromPipeline=$true, ValueFromPipelineByPropertyName=$true)] [string]$computername="$env:COMPUTERNAME",
Listing 9.6 Terminate process
TECHNIQUE 61
www.it-ebooks.info

264 CHAPTER 9 Services and processes
[parameter(Mandatory=$true)] [string]$name)PROCESS{ Get-WmiObject -Class Win32_Process ` -ComputerName $computername -Filter "Name='$name'" | Remove-WmiObject}}
This function is derived directly from listing 9.5. The computer name and processname are input as parameters. Get-WmiObject is used with the Win32_Process class todiscover the relevant processes, based on the computer name and a filter createdfrom the process name. The results of that search are piped to Remove-WmiObject,which deletes the instances of the Win32_Process class, which thus terminates theprocess and closes the application.
DISCUSSION
This function takes a heavy-handed approach in that it stops all processes with a givenname. If you want to be more selective, substitute the ProcessId for the name. Betterstill, you can write a function that will take a name or a ProcessId and either termi-nate all processes of that name or the individual process by ID. This is shown in thefollowing listing.
function stop-remoteprocessid {[CmdletBinding()]param ( [parameter(ValueFromPipeline=$true, ValueFromPipelineByPropertyName=$true)] [string]$computername="$env:COMPUTERNAME",
[parameter(ParameterSetName="Procname")] [string]$name,
[parameter(ParameterSetName="Procid")] [int]$procid
)PROCESS{ switch ($psCmdlet.ParameterSetName) { "Procname" { Get-WmiObject -Class Win32_Process ` -ComputerName $computername -Filter "Name='$name'" | Remove-WmiObject } "Procid" { Get-WmiObject -Class Win32_Process ` -ComputerName $computername -Filter "ProcessId=$procid" | Remove-WmiObject
} }}}
Listing 9.7 Terminate process by name or ProcessId
www.it-ebooks.info

265TECHNIQUE 61 Process-related events
You start with listing 9.6 and add a new parameter—$procid—to hold the ProcessId.The goal is to use either the process name or ProcessId to identify the processes toterminate. These two options can be separated by using parameter sets. The processname is put into a parameter set called ProcName whereas the ProcessId is in aparameter set called ProcId. The computer name parameter isn’t put into an explicitparameter set and is therefore in both.
This can be illustrated by displaying the syntax of the function:
Get-Command stop-remoteprocessid -Syntaxstop-remoteprocessid [-computer <String>] [-name <String>]...stop-remoteprocessid [-computer <String>] [-procid <Int32>] ...
Get-Command displays two different syntaxes, one for each parameter set. The “...” rep-resents the common parameters, which I removed for brevity. The good thing aboutparameter sets is that they’re mutually exclusive. If you start to use the parameters inone set, you can’t mix them with the parameters from another. Both of the followingexamples will work:
stop-remoteprocessid -name notepad.exestop-remoteprocessid -procid 3280
If You tried to use name and ProcessId, like this,
stop-remoteprocessid -name notepad.exe -procid 3280
you’d get an error, as shown in figure 9.1. Processes consume resources on your systems. Sometimes you may want to prevent
particular processes from running to ensure that valuable resources are available foryour critical processes. Alternatively, you may need to ensure that a critical process isrestarted in the event of failure. You can accomplish both of these goals through theWMI events related to processes.
9.3 Process-related eventsAn event is triggered on your systems when something happens or something changesstate. The two most common events related to processes are
■ New processes starting up■ Processes shutting down
Figure 9.1 Error message when mixing parameter sets
www.it-ebooks.info

266 CHAPTER 9 Services and processes
These events are similar to events you’ve seen previously in that they produce infor-mation in a known format. The difference is in the exact information returned.
You know from previous chapters that the following WMI system classes can beused to monitor process creation and deletion:
■ __InstanceCreationEvent
■ __InstanceDeletionEvent
WMI spoils you for choice with process-related events because you also get the classeslisted in table 9.6.
Events relating to the registry and filesystem have been discussed in previous chapters,and a pattern of working with events has been established. Processes provide an easy,and safe, way of investigating the WMI event engine in more detail. After we look atthat, we’ll look at using the WMI classes to monitor process events and to add furthercontrols to your systems.
Investigating an event
You’ve seen, for instance in listing 8.11, that Register-WmiEvent is used to registera WMI event so you can work with it. When the event is triggered an object is cre-ated using the System.Management.Automation.PSEventArgs .NET class. You needto understand the anatomy of this object if you want to get the most from workingwith events.
PROBLEM
The objects produced by a WMI-based event need to be investigated so that you candetermine the optimum method of processing events.
SOLUTION
Listing 9.8 will create an event object that you can work with at the command line.
WARNING This code should not be run as a script because you won’t see theoutput due to the script being in a different scope. Paste each line into thePowerShell console and run it. I also recommend opening a new PowerShellconsole to run this code. That will ensure that there are no other events regis-tered that could interfere with the investigation.
Table 9.6 Process event classes
Class Purpose
Win32_ProcessTrace Base class for process events
Win32_ProcessStartTrace Indicates a new process has started
Win32_ProcessStopTrace Indicates a process has stopped
TECHNIQUE 62
www.it-ebooks.info

267TECHNIQUE 62 Investigating an event
$query = "Select * FROM __InstanceCreationEvent
➥ within 3 WHERE TargetInstance ISA 'Win32_Process'"
Register-WmiEvent -Query $query `-SourceIdentifier "WMI process start"
Get-EventSubscriber
Start-Process notepad
Get-Event$e = Get-Event | select -First 1
$e.SourceEventArgs
$e.SourceEventArgs.NewEvent
$e.SourceEventArgs.NewEvent.TargetInstance
The first step is to define a query. This will extract all instance-creation events wherethe target is a member of the Win32_Process class. The next step is to register theWMI event. In this case, you aren’t registering an action, so the event information isaccessible from the event queue. The event queue is simply the collection of eventsthat have occurred, to which the current PowerShell session has subscribed via theregistration cmdlets, and for which no processing action is registered. Events createdusing New-Event will also appear on the queue if an action isn’t registered.
You can test the registration by using Get-EventSubscriber which will confirm theSourceIdentifier you’ve chosen. An instance of Notepad is started using the Start-Process cmdlet. You could use the WMI function in listing 9.5 as an alternative to thisline. The event information can be displayed using Get-Event, but this only works ifan action hasn’t been defined when registering the event. If an action is defined, theaction handles the event and the event doesn’t appear on the event queue. A displaysimilar to figure 9.2 should result at this point.
Listing 9.8 Investigate process events
Figure 9.2 Event processing
www.it-ebooks.info

268 CHAPTER 9 Services and processes
A variable, $e, can be created to hold the event. In this example, I forced the selectionof the first event, in case any other events occurred while working through the previ-ous steps. The various components of the event object can be displayed using the syn-tax provided.
The final step is to recover the name of the process that has been started:
$e.SourceEventArgs.NewEvent.TargetInstance.name
DISCUSSION
The event information in figure 9.2 includes a ComputerName property. This is usefulwhen events are being forwarded to you. You can easily determine which machine isgenerating the event.
The Sender property contains three items:
■ Scope■ Query■ Options
They’re worth investigating to completely understand the event object, though thereis no information you need to access for the purposes of this example.
This gives you two different methods of analyzing events. You can use the manualsteps given in listing 9.8, or you can adopt the test harness described in technique 55(chapter 8).
TIP I strongly recommend experimenting with the information presented bythe event object. Event handling is one of those subjects that can seem incom-prehensible until you’ve experimented enough to get to the Eureka! moment.
You’ve learned a lot about administering processes and process-related events in thischapter. Let’s close out the chapter by putting it all together: you’ll create a method ofmonitoring your processes.
Monitoring processes
You saw event-handling scripts at the end of chapters 7 and 8 where you were workingwith the registry and filesystem respectively. In both cases, you used the__InstanceCreation system class as you did in technique 62. There are two alterna-tive classes you can use when working with process events:
■ Win32_ProcessStartTrace
■ Win32_ProcessStopTrace
The same information can be retrieved, whether you work with the system class or thetrace classes.
PROBLEM
You have a server that’s running a critical application. The application’s process mustbe immediately restarted if it stops. Resources are in short supply on the server, so youwant to prevent some other processes from starting and using those resources.
TECHNIQUE 63
www.it-ebooks.info

269TECHNIQUE 63 Monitoring processes
SOLUTION
The following listing shows one possible solution to this problem. I used the Solitaireand Calculator applications as examples in this listing so that you can experiment insafety. Other applications can be substituted as required.
function eventhandler {param ($e) $proc = $e.SourceEventArgs.NewEvent.ProcessName if ($e.SourceIdentifier -eq "Process Start") { Write-Host "$proc has started"
if ($proc -eq "Solitaire.exe") { Write-Host "Solitaire is not allowed. It is stopping" Get-WmiObject Win32_Process -Filter "Name='solitaire.exe'" | Remove-WmiObject } } else { Write-Host "$proc has stopped" if ($proc -eq "calc.exe") { Write-Host "Calc.exe must be restarted." $np = [wmiclass]"Win32_Process" $np.Create("calc.exe") } }
}
if (Get-EventSubscriber |where {$_.SourceIdentifier -eq "Process Start"}) { Unregister-Event -SourceIdentifier "Process Start" }if (Get-EventSubscriber |where {$_.SourceIdentifier -eq "Process Stop"}) {Unregister-Event -SourceIdentifier "Process Stop" }
$queryStart = "SELECT * FROM Win32_ProcessStartTrace"$queryStop = "SELECT * FROM Win32_ProcessStopTrace"
$action = {eventhandler $($event)}
Register-WmiEvent -Query $queryStart `-SourceIdentifier "Process Start" -Action $actionRegister-WmiEvent -Query $queryStop `-SourceIdentifier "Process Stop" -Action $action
The script starts by defining the eventhandler function. Notice that you only need asingle function to handle the events from two different registrations. The process nameis immediately recovered from the event information. The examples in listing 9.8 illus-trated how you get to this structure.
A test on the SourceIdentifier property determines whether you’re dealing witha process that’s starting or stopping. If the process is starting, you display the appropri-ate message and then test if it’s the Solitaire application. When using WMI, you have toinclude the program’s extension (.exe). In the event that Solitaire has been started,
Listing 9.9 Process monitoring
www.it-ebooks.info

270 CHAPTER 9 Services and processes
you get the WMI object corresponding to its process and remove it, which closes downthe application.
If you’re dealing with a process that has been stopped, you display the message,test if it’s calculator.exe, and start it up again if necessary.
The body of the script is similar to previous event handling scripts in that it cleansup the registrations if you’re rerunning it, creates the queries and action, and thenregisters the events.
DISCUSSION
This example uses two applications that are safe to experiment with. In reality, youmay want to stop a number of applications from running—I never have understoodwhy Windows server editions include the games. A small number of applications (sixor so) could be managed by creating an array and testing the newly started applicationagainst the array using the -contains operator. A larger number of applicationswould require using a file and comparing the newly started process against the filecontents. The whole concept could be extended to include the time of day. For exam-ple, perhaps some applications could only be run out of business hours.
It’s worth leaving the script running for a while to watch the processes that stopand start automatically during the normal running of your system—it’s quite educa-tional. And on that note, our coverage of services and processes is brought to a close.
9.4 SummaryServices and processes enable you to work with the applications running on your sys-tems. You can use WMI to work with these objects to perform efficient managementand troubleshooting, including
■ Service discovery and configuration■ Service load order and dependency diagnosis■ Process owner discovery (who is running what)■ Process lifecycle management■ Process events, enabling you to control which applications can be run and when
Managing services and processes ensures that you concentrate your computerresources where they’re required—running your critical applications.
In chapter 10, we’ll move on to the favorite topic of many administrators, namelyprinters and printing.
www.it-ebooks.info

Printers
Printers are probably the second most common cause of issues in Windows envi-ronments (password resets are the first). In many cases, these are logistical issuesinvolving toner, paper, and mechanical problems that administrators can’t controldirectly, but we can control the printer and its associated print jobs. PowerShell andWMI enable us to perform the control tasks on remote or local systems.
NOTE A printer in Windows terminology is the queue to which a print job issent. It’s linked to one or more physical print devices.
The first two parts of this chapter are concerned with discovering informationabout printers. Our starting point will be to determine what printers are connectedto a particular computer. The capabilities of those printers are very important; forexample, can a particular printer print in color? This information is availablethrough WMI, but you have to deal with collections of properties to determine theanswers. We’ll then look at printer drivers and printer ports. Many printer issues
This chapter covers■ Discovering printer configuration and status■ Discovering and comparing printer drivers■ Managing printers and print jobs■ Testing printers
271
www.it-ebooks.info

272 CHAPTER 10 Printers
can be traced to using an incorrect driver, and having a quick way to determine theexact driver can save time when troubleshooting.
Users tend to be more interested in the status of the printer and their print jobs thanin the technicalities of the printer configuration. PowerShell and WMI techniques forretrieving this information are presented in the second section of the chapter.
The third section of the chapter is concerned with managing printers. Setting thedefault printer for users can save them, and you, a lot of effort in determining what’shappening to their printouts. You can force a test page to be printed to determinewhether the connection is working correctly. The printer can be paused for mainte-nance work and then resumed to allow the accumulated print jobs to be printed. Youcan, if necessary, cancel all print jobs associated with a particular printer. Printers, likemany objects you deal with, can be renamed with more suitable and descriptive namesto make it easier for users to select the printer they need. The combination of Power-Shell and WMI enables you to perform these tasks on remote systems, enhancing yourservice to your users without any additional spending or effort.
First, you need to discover your printer configurations before you can start manag-ing them.
10.1 Printer configurationWMI provides a number of classes for dealing with printers. You can discover theseclasses using the -List parameter of Get-WmiObject, as you’ve seen previously:
Get-WmiObject -List *print*
The amended qualifiers of the WMI class will yield a description. You have to retrievethis information specifically, as it’s relatively expensive to produce. This exampleexpands on the simple list to display the description of each class:
Get-WmiObject -List *print* | sort name |foreach {"`n$($_.Name)" (( Get-WmiObject -List $_.Name -Amended ).Qualifiers | Where {$_.Name -eq "Description"}).Value}
The two main classes we’ll consider are Win32_Printer and Win32_PrintJob. In thissection, you’ll use these two classes to discover your printers, printer status, and capa-bilities, together with the print jobs, ports, and drivers associated with the printers.The first task is to discover the printers to which a particular machine is connected.
Discovering printers
Some organizations have simplified printer management by using third-party soft-ware. This enables the users to all print to the same printer, but delivery is controlledby the user physically accessing the device to “pull” their prints from a central queue.
Many, if not most, organizations work with a mixture of printers distributedthroughout the organization. Some of these will manage their own print queues, andsome will utilize a dedicated printer server. Users can be allocated printers via logonscripts, GPOs, or even as part of the base build of their PC. The situation is further
TECHNIQUE 64
www.it-ebooks.info

273TECHNIQUE 64 Discovering printers
complicated by some applications and other technologies, such as faxes appearing asprinters. Discovering which printer a particular user is accessing can be problematical.
PROBLEM
A user calls the help desk saying, “My printer is not working.” You need to discover towhich printers the user is connected before any action can be taken to resolve the call.
SOLUTION
The function presented in the following listing solves this problem. It has a singleparameter that accepts a computer name. The local machine is the default, as usual.
function get-printer {[CmdletBinding()]param ( [parameter(ValueFromPipeline=$true, ValueFromPipelineByPropertyName=$true)] [string]$computername="$env:COMPUTERNAME")PROCESS { Get-WmiObject -Class Win32_printer ` -ComputerName $computername | select Name, Default, Direct, DoCompleteFirst, HorizontalResolution, VerticalResolution, KeepPrintedJobs, Local, Network, PortName, PrintJobDataType, PrintProcessor, Priority, Published, Queued, RawOnly, Shared, WorkOffline}}
The working part of the function uses the Win32_Printer class on the required system.This will pull back the properties defined to Select-Object, which are then displayed.
The function outputs an object that the PowerShell engine then displays in thedefault manner. This enables you to use the function at the prompt and perform fur-ther filtering if required, as shown in figure 10.1, where the printer name and whetherit’s the default or shared are listed.
Listing 10.1 Discover available printers
Figure 10.1 Filtering the output of the get-printer function
www.it-ebooks.info

274 CHAPTER 10 Printers
DISCUSSION
One common requirement is to determine the default printer on a system. You coulduse the get-printer function as shown in figure 10.1, or you can access the informa-tion directly:
Get-WmiObject -Class Win32_Printer -Filter "Default='$true'" |Select Name
The properties defined to Select-Object can be modified to suit your particularpurposes.
It can be useful to examine the WMI classes associated with your printer:
Get-WmiObject -Query "ASSOCIATORS OF
➥ {Win32_Printer.DeviceId='HP DeskJet 812C'} WHERE CLASSDefsOnly"
TIP You have to use the DeviceId parameter rather than the name to findthe associations in this case. If you’re in doubt about which property to try,look at the Path property and use that syntax.
The Win32_PrinterDriver and Win32_PrinterConfiguration classes are the onlyresults that look to be of interest:
Get-WmiObject -Query "ASSOCIATORS OF
➥ {Win32_Printer.DeviceId='HP DeskJet 812C'} ➥ WHERE ResultClass = Win32_PrinterConfiguration"
The results show that the Win32_PrinterConfiguration class doesn’t add much toyour knowledge of printers because it contains the same information as theWin32_Printer class. We’ll return to the Win32_PrinterDriver class in technique 67.
The other thing you need to be able to determine is what your printers can do.
Testing printer capabilities
Printers come in all shapes and sizes. They have a large number of possible capabili-ties, such as
■ Printing to specific paper sizes■ Printing in color■ Printing on both sides of the paper (duplex)
The printer name or description usually doesn’t carry this information.
PROBLEM
Common questions from users include, “Which printer can I use to produce coloroutput?” and “Which printers will print on both sides of the paper?” There are alsorequests to determine which printers support specific paper sizes. You need to be ableto answer these questions easily and quickly.
SOLUTION
The solution involves unraveling the CapabilityDescriptions and PrinterPaper-Names properties of the Win32_Printer class, as shown in the following listing. Theseproperties are collections that WMI doesn’t deal with very well. You can use the Power-
TECHNIQUE 65
www.it-ebooks.info

275TECHNIQUE 65 Testing printer capabilities
Shell -contains operator to solve this. You can also use the PowerShell advancedfunction capabilities to validate your input.
function test-printercapabilities {[CmdletBinding(DefaultParameterSetName="Pcap")]param ( [parameter(ValueFromPipeline=$true, ValueFromPipelineByPropertyName=$true)] [string]$computername="$env:COMPUTERNAME",
[parameter(ParameterSetName="Pcap")] [string] [ValidateSet("Duplex", "Color", "Collate")] $capability="Color",
[parameter(ParameterSetName="Paper")] [string] [ValidateSet("Letter", "Legal", "Executive", "A4", "A3")] $paper
) PROCESS { $printers = Get-WmiObject -Class Win32_Printer ` -ComputerName $computername
switch ($psCmdlet.ParameterSetName) { "Pcap" { "$capability printers on $computername" $printers | Where {$_.CapabilityDescriptions -contains $capability} | select Name } "Paper" { "$paper printers on $computername" $printers | Where {$_.PrinterPaperNames -contains $paper} | select Name }
}}}
Two parameters are defined in addition to the usual computer name parameter B. Inboth cases, you use the ValidateSet() advanced function parameter to restrict theinput to predefined paper sizes and printer capabilities. The examples presented inthe code are the common sizes and capabilities and can easily be changed to itemsthat meet your particular requirements.
The -capability and -paper parameters are presented as two parameter sets. The-computername parameter isn’t labeled as being a member of an individual parameterset, so it’s a member of both. Parameter sets restrict the parameters that can be usedtogether so you can test for paper size or printer capability but not both together. The
Listing 10.2 Test printer capabilities
Define parameter sets
B
Switch statement
C
www.it-ebooks.info

276 CHAPTER 10 Printers
use of a default parameter set and default values means that you can run the functionwithout using any parameters and it won’t fail.
Get-WmiObject is used to fetch the WMI objects representing all of the printers onthe target machine. A switch statement based on the parameter set name is used todisplay the printers that match either the desired capability or printer size C. This isachieved by using the -contains operator to test if the capability or paper type is amember of the collection returned by the relevant property.
DISCUSSION
Ideally, filtering should be performed as soon as possible, but in this particular caseit’s easier to use Where-Object. The full range of possible paper types a printer sup-ports can be found by using the -ExpandProperty parameter of Select-Object:
Get-WmiObject -Class Win32_Printer -Filter "Default='$true'" |select -ExpandProperty PrinterPaperNames
If you introduce ForEach-Object into the code, you can get a nice output where youdisplay the printer name and then the paper types it supports:
Get-WmiObject -Class Win32_Printer |foreach {"`n $($_.Name)"$_ | select -ExpandProperty PrinterPaperNames}
A similar activity can be performed for printer capabilities:
Get-WmiObject -Class Win32_Printer -Filter "Default='$true'" |select -ExpandProperty CapabilityDescriptions
On my system, using an HP DeskJet 812C, the following capabilities are reported:
■ Copies■ Color■ Collate
Servers connect to printers via printer ports. You need to be able to discover theprinter ports to further your understanding of the printing environment.
Discovering printer ports
Most of the information about printer ports can be found by using the Win32_Printerclass:
Get-WmiObject -Class Win32_Printer | select Name, PortName
This works well for USB, old-style parallel ports, and the ports created for the fax sys-tem or applications such as Microsoft OneNote. It doesn’t work for TCP/IP ports.
PROBLEM
Many of your printers are networked rather than being directly attached to a server.You need to discover the relevant TCP/IP ports used to connect to these servers.
TECHNIQUE 66
www.it-ebooks.info

277TECHNIQUE 67 Discovering printer drivers
SOLUTION
Listing 10.3 presents a solution for this problem using the Win32_TCPIPPrinterPortclass. There are two possible protocols used to print to networked devices: the originalLPR protocol or the newer RAW protocol. The protocol is stored as a numeric value.The listing starts by defining a hash table to be used as a lookup for the proto-col meaning.
$pp = DATA {ConvertFrom-StringData -StringData @'1 = RAW Printing directly to a device or print server.2 = LPR Legacy protocol, which is eventually replaced by RAW'@}
function get-tcpport {[CmdletBinding()]param ( [parameter(ValueFromPipeline=$true, ValueFromPipelineByPropertyName=$true)] [string]$computername="$env:COMPUTERNAME")PROCESS {Get-WmiObject -Class Win32_TCPIPPrinterPort ` -ComputerName $computername |select Name, HostAddress, PortNumber,@{N="Protocol"; E={$pp["$($_.Protocol)"]}},SNMPCommunity, SNMPDevIndex, SNMPEnabled
}}
The get-tcpport function has a single parameter for a computer name. It then usesthe Win32_TCPIPPrinterPort class to retrieve data about the ports. The propertiesare filtered using Select-Object, including the lookup of the printing protocol.
DISCUSSION
The last three properties are important in that they define the Simple Network Man-agement Protocol (SNMP) configuration of the port. SNMP is a protocol for managingdevices on IP networks. The SNMPCommunity property shouldn’t be set to Public orany other well-known setting. If it’s configured in that way, you need to talk to yournetwork administrators.
The last configuration item to investigate is printer drivers.
Discovering printer drivers
Printers, like all computer peripherals, need drivers to enable the computer operatingsystem to communicate with the printer. Printer drivers seem to be more prone tocausing problems than other drivers. A simple way of checking the driver version canbe very useful.
Listing 10.3 List TCP/IP printer ports
TECHNIQUE 67
www.it-ebooks.info

278 CHAPTER 10 Printers
PROBLEM
You have a number of printers, of the same type, scattered throughout the organiza-tion. Most of them are functioning correctly, but one or two are causing problems.You need to check that the drivers are the same across all of the printers.
SOLUTION
You could use the Win32_PrinterDriver class to get information about the printerdrivers installed on the system. This, however, isn’t the best way to solve the problembecause you want to associate the driver with the printer. WMI associations can enableyou to do this, as shown in the following listing.
function get-printerdriver {[CmdletBinding()]param ( [parameter(ValueFromPipeline=$true, ValueFromPipelineByPropertyName=$true)] [string]$computername="$env:COMPUTERNAME",
[string]$printer)PROCESS {$query = "ASSOCIATORS OF {Win32_Printer.DeviceId='$printer'}
➥ WHERE ResultClass = Win32_PrinterDriver"
$driver = Get-WmiObject -ComputerName $computername -Query $query
"Driver for $printer"$driver | select Version, SupportedPlatform, OEMUrl,DriverPath, ConfigFile, DataFile, HelpFile
" Dependent Files"$driver | select -ExpandProperty DependentFiles
}}
The get-printerdriver function accepts a computer and a printer name as parame-ters. Both parameters are optional. A WMI query is created by substituting the printername into the string. Notice that you need to use the DeviceId property to identifythe printer, instead of the Name property.
The query is run against the printer, and the results are held in the $driver vari-able because you want to access them twice. The driver information is selected anddisplayed, including the driver version. The dependent files property is thenexpanded to show the other files that are loaded with this driver.
DISCUSSION
The -printer parameter in this function could be made mandatory to ensure that it’sentered. At present the function throws an error if a printer name isn’t supplied.You’ve seen how to make parameters mandatory in several functions already. Modify-ing this script will be a good test of your understanding.
Listing 10.4 Discover printer drivers
www.it-ebooks.info

279TECHNIQUE 68 Testing printer status
In theory, you could use PowerShell and WMI to install printer drivers, as this codefrom PowerShell MVP Aleksandar Nikiloc shows:
$server = "PrintServer"$printdriver = [wmiclass]"Win32_PrinterDriver"$driver = $printdriver.CreateInstance()
$driver.Name="HP2420"$driver.DriverPath = "\\$server\drivers\printers\hp\lj2420"$driver.Infname = "\\$server\drivers\printers\hp\lj2420\hpc24x0c.inf"
$printdriver.AddPrinterDriver($driver)$printdriver.Put()
Personally, in an enterprise, I prefer to install drivers via a software distribution mech-anism such as System Center, as I find there is more flexibility. It’s interesting thatMicrosoft has added an Add-PrinterDriver cmdlet in Windows 8, but it’s based on anew MSFT_PrinterDriver class rather than the Win32_PrinterDriver class.
You know how to find the printers that are available and their capabilities. Nowyou need to consider whether the printer is available to the user.
10.2 Printer statusPrinter status can be split into two parts. The first part is the printer itself: Is it onlineand available to the user? The second part is the print jobs sent to the printer: Is thereanything stopping a print job being produced? This section will answer both ques-tions, starting with the status of the printer.
Testing printer status
When considering the status of printers, you may see references to a PrinterStateproperty. This property has been deprecated by Microsoft, which means it will beremoved in a future version of Windows.
PROBLEM
A user is having difficulties printing. You need to check on the status of the printer todetermine if the problem is confined to a single user or will affect many users becausethe printer is unavailable.
SOLUTION
The following listing presents a quick function that will return the status of the print-ers connected to a particular machine.
$pstatus = DATA {ConvertFrom-StringData -StringData @'1 = Other2 = Unknown3 = Idle4 = Printing5 = Warming Up
Listing 10.5 Test printer status
TECHNIQUE 68
www.it-ebooks.info

280 CHAPTER 10 Printers
6 = Stopped printing7 = Offline'@}
function get-printerstatus {[CmdletBinding()]param ( [parameter(ValueFromPipeline=$true, ValueFromPipelineByPropertyName=$true)] [string]$computername="$env:COMPUTERNAME")PROCESS { Get-WmiObject -Class Win32_printer ` -ComputerName $computername | select Name, @{N="Status"; E={$pstatus["$($_.PrinterStatus)"]}}} }
A hash table is used to define the meanings of the numeric status codes returned byWMI. The function only takes a computer name as a parameter. Get-WmiObjectreturns the printer objects. The printer name and a descriptive version of the statusare displayed. The numeric status value is converted to the description using the hashtable lookup defined at the beginning of the listing.
DISCUSSION
This listing could be combined with listing 10.1 if a single function to investigateprinters is required.
The calculated field uses N and E as abbreviations for Name and Expression respec-tively. You’ve seen the full names used in previous listings; they’ll be abbreviated infuture listings to save space where necessary.
Printers are just the devices you use to print. Users are often much more interestedin the jobs they’ve submitted to the printer, especially if those jobs haven’t appeared.
Listing print jobs
Printers can find many ways to go wrong. The paper jams, they run out of toner, or themaintenance warnings start to flash. Many of these issues can stop the user’s printoutfrom appearing.
PROBLEM
Users are complaining that their printout isn’t appearing. You need to check the printjobs associated with the printer to determine if there is a backlog that could indicate aproblem.
SOLUTION
It isn’t unknown for users to send print jobs to the wrong printer and then complainthat they can’t find them. You can use the Win32_PrintJob class to determine whichprint jobs are still outstanding for a particular printer. The following listing shows howyou can test a single printer or all of the printers on a server.
TECHNIQUE 69
www.it-ebooks.info

281TECHNIQUE 69 Listing print jobs
function get-printjob {[CmdletBinding()]param ( [parameter(ValueFromPipeline=$true, ValueFromPipelineByPropertyName=$true)] [string]$computername="$env:COMPUTERNAME", [string]$printer)PROCESS { if (-not $printer ){ $pjobs = Get-WmiObject -Class Win32_PrintJob ` -ComputerName $computername } else { $pjobs = Get-WmiObject -Class Win32_PrintJob ` -ComputerName $computername -filter "DriverName='$printer'" }
$pjobs | select Document, JobId, Name, PagesPrinted, Status, Color, DataType, DriverName, Owner, PaperSize, Size, TotalPages, @{N="SubmissionTime"; E={$($_.ConvertToDateTime($_.TimeSubmitted))}}}}
The get-printjob function takes the usual computer name as a parameter. It also hasan optional parameter of a printer name. If the -printer parameter isn’t supplied,Get-WmiObject is used with the Win32_PrintJob class to return all of the print jobs onthe designated computer. Inputting a printer name causes a filter to be used thatrestricts the output to the print jobs for the designated printer. Notice that the filter-ing is performed on DriverName not printer name. This is an artifact of WMI in theway the classes are coded. WMI associations can’t be used to link the Win32_Printerclass and the Win32_PrintJob class.
The collection of print jobs is piped into Select-Object. A calculated field is usedto determine the time the print job was submitted.
DISCUSSION
The function is used as follows:
get-printjobget-printjob -printer "HP DeskJet 812C"
The first example will display all of the print jobs on the local machine, and the sec-ond will display those for the "HP DeskJet 812C" printer.
Remove-WmiObject can be used to delete print jobs:
Get-WmiObject Win32_PrintJob | Remove-WmiObject
Where-Object could be used to restrict the jobs being deleted. It isn’t easy to filter aprint job on its name as it’s a combination of the printer name and the JobId, asshown in figure 10.2.
Listing 10.6 List print jobs
www.it-ebooks.info

282 CHAPTER 10 Printers
The Owner property would be a useful filter if you needed to find all of the print jobsfor a single user.
The Pause and Resume methods on Win32_PrintJob can be used to control printjobs. For example, this code will halt all print jobs on a server:
Get-WmiObject Win32_PrintJob | Invoke-WmiMethod -Name Pause
The Resume method can be used to restart printing. This is discussed further in tech-nique 72.
That concludes our investigation of the printer configuration and status. The nextstep is to look at how you can manage printers using WMI.
10.3 Managing printersPrinter management tasks can be split into two broad groups. The first group com-prises mundane tasks such as adding paper, changing toner or ink supplies, and clear-ing jams. Unfortunately WMI can’t help with this sort of activity.
TIP A bonus function, get-printersecurity, is available in the downloadcode for this chapter. It can be used to determine the security permissions seton a shared printer.
The second group of tasks comprises activities such as printing a test page, pausingand restarting the printer, and renaming a printer. The act of setting a default printeralso falls into this group, and it’s the first task we’ll examine.
Setting a default printer
All users have a default printer defined if they have any printers installed. The defaultprinter is the one an application will print to if the print icon is clicked and then thePrint button is clicked. It’s also the printer used by the Out-Print cmdlet if a printerisn’t specified.
This example will send the output to the default printer:
Get-WmiObject -Class Win32_Printer |select Name, PortName | Out-Printer
Figure 10.2 Win32_PrintJoboutput
TECHNIQUE 70
www.it-ebooks.info

283TECHNIQUE 70 Setting a default printer
PROBLEM
A significant number of users have moved location within your organization. Theirnew printer has been configured. Now you need to set the new printer as their defaultprinter.
SOLUTION
The following listing shows how you can use the Win32_Printer class to solve thisproblem.
function set-defaultprinter {[CmdletBinding()]param ( [parameter(ValueFromPipeline=$true, ValueFromPipelineByPropertyName=$true)] [string]$computername="$env:COMPUTERNAME",
[string]$printer)PROCESS {Get-WmiObject -Class Win32_Printer `-ComputerName $computername -Filter "Name='$printer'" |Invoke-WmiMethod -Name SetDefaultPrinter
}}
The function accepts the usual computer name and printer parameters. The appro-priate printer instance is retrieved using Get-WmiObject with the printer name as thefilter. It’s piped to Invoke-WmiMethod, where the SetDefaultPrinter method of theWin32_Printer class is called.
DISCUSSION
The default printer can be discov-ered using the get-printer functionfrom listing 10.1. This is demon-strated in figure 10.3, where the fol-lowing code is used:
get-printer | where{$_.Default
➥ -eq $true}
Alternatively, the Win32_Printer
class can be used at the prompt, asexplained in the discussion of tech-nique 64.
Once you’ve set the defaultprinter, you’ll probably want to printa test page from it to ensure that itworks for the user.
Listing 10.7 Set default printer
Figure 10.3 Discovering the default printer
www.it-ebooks.info

284 CHAPTER 10 Printers
Printing a test page
Most printers have the ability to print a test page. This is often done to prove connec-tivity, that the printer is configured correctly, or that the printer hardware is working.Talking a user through producing a test page can be difficult.
PROBLEM
Printing a test page is a good diagnostic technique. You need to be able to performthis task, remotely, for a user on their machine.
SOLUTION
The Win32_Printer class can also solve this problem for you as the following listingdemonstrates.
function send-testpage {[CmdletBinding()]param ( [parameter(ValueFromPipeline=$true, ValueFromPipelineByPropertyName=$true)] [string]$computername="$env:COMPUTERNAME",
[parameter(ParameterSetName="NonDefPrint")] [string]$printer,
[parameter(ParameterSetName="DefPrint")] [switch]$default)PROCESS { switch ($psCmdlet.ParameterSetName) { NonDefPrint {$filt = "Name='$printer'"} Defprint {$filt = "Default='$true'" } }
$device = Get-WmiObject -Class Win32_printer ` -Filter $filt -ComputerName $computername
if ($device) { $device | Invoke-WmiMethod -Name PrintTestPage } else { "Printer not found" }}}
A printer name and switch parameter that selects the default printer are defined, inaddition to the computer name parameter. The printer and default parameters arein different parameter sets, with the computer name parameter being a memberof both.
A Switch statement creates a WMI filter based on the parameter set selected. It willeither create a filter based on the printer name or on the fact that the target printer isthe default printer.
Listing 10.8 Print test page
TECHNIQUE 71
www.it-ebooks.info

285TECHNIQUE 72 Controlling printers
The WMI object representing the printer is retrieved and put into the $device vari-able. If a printer is found that matches the filter criteria, the object represented by$device is piped into Invoke-WmiMethod where the PrintTestpage method is called.A message stating that the printer couldn’t be found is produced if the $device vari-able is NULL (empty).
DISCUSSION
On my development system, these will both work:
send-testpage -printer "Send To OneNote 2010"send-testpage -default
The following command will fail because the printer doesn’t exist:
send-testpage -printer "Send To OneNote 2001"
You can also use a simple loop to send multiple test pages:
1..5 | foreach {send-testpage -default}
TIP This is an easy way to build up a number of print jobs to experiment withfor listing 10.6 and technique 72.
There are times when you need to control the printer, pause, and resume, so thatessential maintenance can be performed. It’s recommended that you inform the usersbefore this happens to avoid a lot of irate callers.
Controlling printers
Remote control of the printer could involve working at the individual job level or atthe printer level. You saw in technique 69 that you can pipe Win32_PrintJob objectsinto Remove-WmiObject to delete print jobs individually or in groups.
The Win32_PrintJob class has Pause and Resume methods that can be used to con-trol print jobs. Pausing the print job is performed in this manner:
Get-WmiObject Win32_Printjob -Filter "JobId=7" |Invoke-WmiMethod -Name Pause
The job is started again by using the Resume method:
Get-WmiObject Win32_Printjob -Filter "JobId=7" |Invoke-WmiMethod -Name Resume
You can pause all of the jobs destined for a particular printer by filtering on theprinter name. You have to use the DriverName property to perform the filtering:
Get-WmiObject Win32_Printjob `-Filter "DriverName='HP DeskJet 812C'" |Invoke-WmiMethod -Name Pause
The state of the print jobs can be tested using the get-printjob function from list-ing 10.4, or you can use the WMI class directly:
Get-WmiObject Win32_Printjob `-Filter "DriverName='HP DeskJet 812C'" |select name, JobStatus
TECHNIQUE 72
www.it-ebooks.info

286 CHAPTER 10 Printers
You can also control the printer rather than the print jobs.
PROBLEM
You have a printer that needs some maintenance work. You have to stop jobs that havebeen submitted from printing but still allow new jobs to be submitted and queueduntil the printer is ready.
SOLUTION
The following listing demonstrates a solution to this problem.
function set-printer {[CmdletBinding()]param ( [parameter(ValueFromPipeline=$true, ValueFromPipelineByPropertyName=$true)] [string]$computername="$env:COMPUTERNAME",
[string]$printer,
[parameter(ParameterSetName="Pause")] [switch]$pause,
[parameter(ParameterSetName="Resume")] [switch]$resume,
[parameter(ParameterSetName="Cancel")] [switch]$cancelall
)PROCESS {$device = Get-WmiObject -Class Win32_Printer `-ComputerName $computername -Filter "Name='$printer'"
switch ($psCmdlet.ParameterSetName) { Pause {$device | Invoke-WmiMethod -Name Pause} Resume {$device | Invoke-WmiMethod -Name Resume } Cancel {$device | Invoke-WmiMethod -Name CancelAllJobs } }
}}
The computer and printer parameters are joined by three switches that pause print-ing, resume printing, or cancel all print jobs. The printer object is put into the$device variable, which, depending on the parameter set being used, is piped into aninstance of Invoke-WmiMethod that calls the correct method to perform the task.
DISCUSSION
The function is used like this (assuming it has already been loaded):
set-printer -printer "HP DeskJet 812C" -cancelall
If a printer isn’t supplied, an error is thrown. Error checking similar to that per-formed in listing 10.8 could be added to the function.
Listing 10.9 Pause and resume printer
www.it-ebooks.info

287TECHNIQUE 73 Renaming a printer
The final management task we need to consider in this chapter is renaming aprinter.
Renaming a printer
Renaming a printer isn’t a task that you’ll need to perform every day, but it does becomeuseful when you’re changing the way you do things in the organization. Another poten-tial reason for changing printer names is that you have to change the printer.
PROBLEM
A printer has been changed, and you need to rename it to match user expectationsand your organization’s naming standards. You can also reduce the level of help deskcalls if the users are able to find printers themselves.
SOLUTION
It would be possible to send instructions to the users so they could perform this taskthemselves, but that would potentially introduce another source of error into the envi-ronment. Instead, you can use the Win32_Printer class to solve this problem as shownin the following listing.
function rename-printer {[CmdletBinding()]param ( [parameter(ValueFromPipeline=$true, ValueFromPipelineByPropertyName=$true)] [string]$computername="$env:COMPUTERNAME",
[string]$printer, [string]$newname)PROCESS {Get-WmiObject -Class Win32_Printer `-ComputerName $computername -Filter "Name='$printer'" |Invoke-WmiMethod -Name RenamePrinter -ArgumentList $newname
}}
Three parameters are required by the rename-printer function, namely computername, printer, and its new name. The WMI object representing the printer is retrievedusing Get-WmiObject. The object’s RenamePrinter method is called by piping theprinter object into Invoke-WmiMethod.
DISCUSSION
The function is used in this way:
rename-printer -printer fax -newname test21
Neither parameter checking nor error recovery has been included in the function.There are sufficient examples in the other listings in the chapter to illustrate how thiscould be achieved.
This concludes our use of WMI to manage printers.
Listing 10.10 Rename a printer
TECHNIQUE 73
www.it-ebooks.info

288 CHAPTER 10 Printers
10.4 SummaryPrinters may be viewed as a necessary evil, but until the day of the paperless officereally arrives they’re something you have to live with and manage. WMI is an excellenttool for discovering information about your computing and printing environment.
The functions in this chapter supply the capability of remotely managing printersacross your organization but are customizable to meet your exact requirements. Withthem, you’re able to
■ Discover printers and their configuration■ Test printer capabilities and status■ Discover existing print jobs■ Find printer ports and drivers
You can also use PowerShell and WMI to actively manage your printers by
■ Setting the default printer■ Printing a test page■ Controlling printers and print jobs■ Renaming printers
Being able to perform these tasks in a more efficient manner won’t change your viewof printers, but it will make life easier when you have to manage them.
In chapter 11 we’ll look at networking and you’ll see how PowerShell and WMIenable you to manage network cards across the environment.
www.it-ebooks.info

Configuring network adapters
Networking is the glue that holds your infrastructure together. If the network isn’tworking or configured correctly the users can’t connect to the applications and youcan’t administer the systems. Your primary concern is the configuration of the net-work adapters in your servers. This chapter presents a number of techniques youcan use to test the configuration and configure the network adapters.
NOTE The WMI networking classes, and especially their methods, dis-cussed in this chapter only work with IPv4. As of Windows 7 and WindowsServer 2008 R2, WMI isn’t able to configure IPv6 settings.
This chapter covers■ Network adapters, configuration, and protocols■ Managing network adapters■ Configuring DHCP and static addresses■ Managing entries for DNS and WINS servers■ Displaying the IPv4 routing table
289
www.it-ebooks.info

290 CHAPTER 11 Configuring network adapters
Table 11.1 presents the WMI classes that you can use to work with network adapters.You’ll be using many of them in this chapter. The Win32_NetworkAdapter andWin32_NetworkAdapterConfiguration classes can cause some confusion. The firstone deals with the physical adapter and the second with the configuration ofthe device.
NOTE Win32_NetworkConnection doesn’t seem to work on Windows 7 SP1. Itdoes work on Windows Server 2008 R2.
This chapter begins with a section that explains how you can discover informationabout the network adapters in your systems. We’ll look at techniques to discover thephysical adapters and their configuration and then consider the network protocolsassociated with an adapter. The section closes with a look at the connections mappedfrom a machine.
The second section shows how you can configure a computer’s adapters. Thisincludes enabling, disabling, and renaming the adapters. Once you have the networkadapters enabled, you need to configure the IP addresses.
The third section illustrates how you can configure the adapters to acceptaddresses from DHCP or to have static addresses set for the adapter. You need to beable to view the DHCP configuration and control the lease. If a static address is set it’simportant that you set a default gateway as well.
In the fourth section of the chapter, we’ll look at setting the Domain Name System(DNS) and Windows Internet Name Service (WINS) servers your systems will use, andyou’ll see how to display the routing table.
Regardless of what you’re doing you need to be able to discover the network adapt-ers in your systems before you can work with them.
Table 11.1 WMI networking-related classes
Class Use
Win32_NetworkAdapter Works with physical adapters
Win32_NetworkAdapterConfiguration Works with adapter settings
Win32_NetworkAdapterSetting Associates Win32_NetworkAdapter and Win32_NetworkAdapterConfiguration
Win32_NetworkConnection Displays information about the active network con-nections on a Windows system
Win32_NetworkProtocol Displays the network protocols and their characteris-tics associated with an adapter
Win32_NetworkClient Displays information regarding the network client software installed on the system
Win32_IP4RouteTable Displays information about IP routing from the system
www.it-ebooks.info

291TECHNIQUE 74 Identifying network adapters
11.1 Discovering network adaptersNetwork adapters are the physical devices you rely on to link your computers to thenetwork. In this section, we’ll start by looking at how you can discover the physical net-work adapters that are installed in your system. Those adapters have a configurationthat you need to be able to access to determine if their settings are correct. Discover-ing the adapter configuration is the second task you’ll learn to perform.
Network protocols are used to perform the communication between systems, andcommunication can break down if the protocols associated with an adapter aren’tconfigured correctly. This section’s third technique demonstrates how protocols canbe related to a network adapter.
Computers can have connections defined that enable access to resources on othermachines. These connections may be critical to the continued performance of yourapplications and need to be checked. This section closes by examining the connec-tions a machine makes and, where appropriate, discovering information about theremote disk accessed through that connection.
Until you’ve determined what network adapters are installed in your system youcan’t do anything else.
Identifying network adapters
Network adapters (also known as network interface cards or NICs) are the starting pointfor our discussion. They’re also the foundation for administering network-relatedissues. There are a number of different types of adapters—the laptop I’m using towrite this has these adapters:
■ 1 wireless adapter■ 1 Ethernet adapter■ 1 Bluetooth adapter■ 3 Microsoft ISATAP adapters (provides ability to transmit IPv6 on IPv4 networks)■ 1 RAS async adapter■ 1 Teredo tunneling adapter■ 8 WAN miniport adapters
That’s a lot of adapters, and many of them won’t be used the majority of the time. Youneed to be able to determine which adapters are carrying useful traffic on your systems.
PROBLEM
You need to identify the network adapters in your system so that you can determinewhich ones are carrying the traffic to your applications. This will also enable you toidentify the adapters with which you’ll be working.
SOLUTION
Using table 11.1 or Get-WmiObject -List *network*, you can determine that theWin32_NetworkAdapter class will satisfy your needs. The following listing shows howyou can use this class in a PowerShell function.
TECHNIQUE 74
www.it-ebooks.info

292 CHAPTER 11 Configuring network adapters
function get-nic {[CmdletBinding()]param ( [parameter(ValueFromPipeline=$true, ValueFromPipelineByPropertyName=$true)] [string]$computername="$env:COMPUTERNAME", [int]$device)PROCESS {if ($device) { $nics = Get-WmiObject -Class Win32_NetWorkAdapter ` -ComputerName $computername -Filter "DeviceID='$device'"}else { $nics = Get-WmiObject -Class Win32_NetWorkAdapter ` -ComputerName $computername} $nics | select NetConnectionID, Name, DeviceID, AdapterType, AutoSense, GUID, Index, Installed, InterfaceIndex, MACAddress, Manufacturer, MaxSpeed, NetConnectionStatus, NetEnabled, PhysicalAdapter, ProductName, ServiceName, Speed}}
The usual computer name parameter is used so you can access remote machines, andit’s joined by a -device parameter. This takes an integer value that’s the DeviceId of aparticular adapter.
NOTE Most if not all of the functions in the remaining part of the book willhave a -computername parameter. It will be shown in the code but not neces-sarily mentioned in the text to avoid repetition.
Get-WmiObject is used with the Win32_NetworkAdapter class to return data on alladapters or a single adapter to a variable called $nics. Whether it returns data for oneor all adapters is controlled by the use of the -device parameter. The contents of the$nics variable are piped into Select-Object, where the required properties areselected. These are then displayed by the PowerShell engine.
DISCUSSION
A Selected.System.Management.ManagementObject type is output by the function.This means that you can use your function as the start of a pipeline. If you only wantedto see information on physical adapters, you could use this snippet:
get-nic | where{$_.PhysicalAdapter}
This would include the wireless and Ethernet adapters but exclude the WAN miniportadapters if applied to the list of adapters on my laptop.
There are a number of properties that could be used to identify a network adapter,including the following:
Listing 11.1 Listing network adapters
www.it-ebooks.info
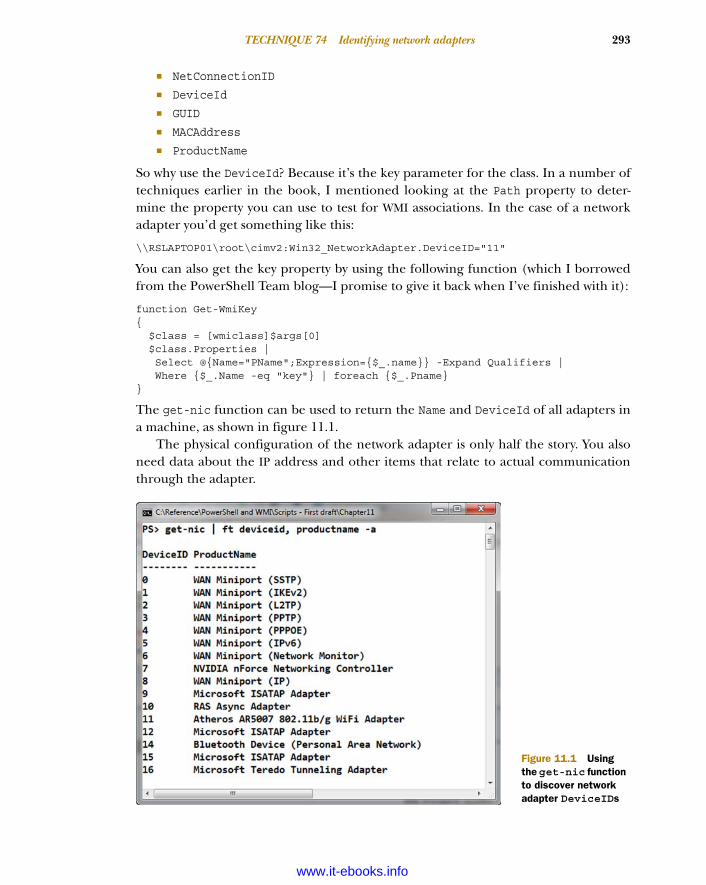
293TECHNIQUE 74 Identifying network adapters
■ NetConnectionID
■ DeviceId
■ GUID
■ MACAddress
■ ProductName
So why use the DeviceId? Because it’s the key parameter for the class. In a number oftechniques earlier in the book, I mentioned looking at the Path property to deter-mine the property you can use to test for WMI associations. In the case of a networkadapter you’d get something like this:
\\RSLAPTOP01\root\cimv2:Win32_NetworkAdapter.DeviceID="11"
You can also get the key property by using the following function (which I borrowedfrom the PowerShell Team blog—I promise to give it back when I’ve finished with it):
function Get-WmiKey{ $class = [wmiclass]$args[0] $class.Properties | Select @{Name="PName";Expression={$_.name}} -Expand Qualifiers | Where {$_.Name -eq "key"} | foreach {$_.Pname}}
The get-nic function can be used to return the Name and DeviceId of all adapters ina machine, as shown in figure 11.1.
The physical configuration of the network adapter is only half the story. You alsoneed data about the IP address and other items that relate to actual communicationthrough the adapter.
Figure 11.1 Using the get-nic function to discover network adapter DeviceIDs
www.it-ebooks.info

294 CHAPTER 11 Configuring network adapters
Discovering adapter configurations
The network adapters for your system have been located using listing 11.1. Unfortu-nately, the Win32_NetworkAdapter class doesn’t supply IP addressing information,which is an essential item if you’re to administer your servers.
PROBLEM
Users are reporting issues communicating with a particular server. The networkadapter appears to be functioning, but you need to check that the IP addressing isconfigured correctly.
SOLUTION
The following listing shows how this problem can be solved. The code is similar to list-ing 11.1, with the main difference being the use of the Win32_NetworkAdapter-Configuration class.
$nbstatus = DATA {ConvertFrom-StringData -StringData @'0 = EnableNetbiosViaDhcp1 = EnableNetbios2 = DisableNetbios'@}
function get-nicsetting {[CmdletBinding()]param ( [parameter(ValueFromPipeline=$true, ValueFromPipelineByPropertyName=$true)] [string]$computername="$env:COMPUTERNAME", [int]$index)PROCESS {if ($index) { $nics = Get-WmiObject -Class Win32_NetWorkAdapterConfiguration ` -ComputerName $computername -Filter "Index='$index'"}else { $nics = Get-WmiObject -Class Win32_NetWorkAdapterConfiguration ` -ComputerName $computername}
$nics | select ServiceName, Description, Index, DHCPEnabled, DHCPServer, @{N="DHCPLeaseStart"; E={$_.ConvertToDateTime($_.DHCPLeaseObtained)}}, @{N="DHCPLeaseEnd"; E={$_.ConvertToDateTime($_.DHCPLeaseExpires)}}, IPEnabled, IPAddress, IPSubnet, DefaultIPGateway, IPConnectionMetric, IPFilterSecurityEnabled, DNSDomain, DNSDomainSuffixSearchOrder, DNSEnabledForWINSResolution, DNSHostName, DNSServerSearchOrder, DomainDNSRegistrationEnabled, FullDNSRegistrationEnabled, WINSEnableLMHostsLookup, WINSHostLookupFile, WINSPrimaryServer, WINSScopeID,
Listing 11.2 Display the network adapter configuration
TECHNIQUE 75
www.it-ebooks.info

295TECHNIQUE 75 Discovering adapter configurations
WINSSecondaryServer, DatabasePath, DeadGWDetectEnabled, DefaultTOS, DefaultTTL, ForwardBufferMemory, GatewayCostMetric, IGMPLevel, InterfaceIndex, IPPortSecurityEnabled, IPSecPermitIPProtocols, IPSecPermitTCPPorts, IPSecPermitUDPPorts, IPUseZeroBroadcast, KeepAliveInterval, KeepAliveTime, MACAddress, MTU, NumForwardPackets, PMTUBHDetectEnabled, PMTUDiscoveryEnabled, SettingID, @{N="NetBIOSOption"; E={$nbstatus["$($_.TcpipNetbiosOptions)"]}}, TcpMaxConnectRetransmissions, TcpMaxDataRetransmissions, TcpNumConnections, TcpUseRFC1122UrgentPointer, TcpWindowSize}}
}
A hash table is defined to enable the lookup of the TCPIPNetBios setting value. Thisfunction uses -index as the parameter, instead of -device as in listing 11.1. Index is thekey value for the Win32_NetworkAdapterConfiguration class, which can be confusingbecause it takes the same numeric value as the Win32_NetworkAdapter DeviceId prop-erty when referring to the same adapter. This can be illustrated on your system by run-ning this code.
Get-WmiObject -Class Win32_NetworkAdapterSetting | Format-Table Element, Setting -AutoSize
TIP I recommend running the previous code using PowerShell ISE ratherthan a PowerShell console as the output is rather wide.
By default, information is returned on all adapters in the system unless the -indexparameter is used. This parameter takes an integer value as input. The resultant infor-mation, held in the $nics variable, is piped into Select-Object. A number of calcu-lated fields are defined. Two convert the start and end dates of the DHCP lease fromWMI format to a more readable format. The third calculated field resolves the TCPIP-NetBIOS property from its integer value to an understandable description.
DISCUSSION
The script may look ugly with the large set of properties in the Select-Object, but if youcompare it to the information put out by the WMI class you’ll see that the function is fil-tering out a lot of nonessential or empty properties. A lot of the information presentedby the get-nicsetting function will be very familiar if you’ve used ipconfig.exe. Thefunction could just as easily have been called get-ipconfig!
NOTE The IPX protocol settings have been deliberately excluded. If yourequire them, please check the WMI documentation for details and add theproperties into the function.
There is a WMI association between the Win32_NetworkAdapter andWin32_NetworkAdapterConfiguration classes:
Get-WmiObject -Query "ASSOCIATORS OF
➥ {Win32_NetworkAdapter.DeviceID=7} WHERE ➥ ResultClass=Win32_NetworkAdapterConfiguration"
www.it-ebooks.info

296 CHAPTER 11 Configuring network adapters
Alternatively, the two functions in listings 11.1 and 11.2 could be used like this:
7,11 | foreach {get-nic -device $_; get-nicsetting -index $_}
The preceding line of code will display the adapter information and the configurationinformation for network adapters whose DeviceId is 7 or 11.
You could even use these functions in other PowerShell functions, like this:
function get-ipconfig {[CmdletBinding()]param ( [parameter(ValueFromPipeline=$true, ValueFromPipelineByPropertyName=$true)] [string]$computername="$env:COMPUTERNAME", [parameter(ValueFromPipeline=$true, ValueFromPipelineByPropertyName=$true)] [int]$device)PROCESS{ get-nic -computername $computername -device $device get-nicsetting -computername $computername -index $device}}
NOTE This function is available in the code download. See get-ipconfig.ps1.
The physical and IP addressing configuration information needs to be supplementedby the protocols bound to the individual adapters.
Listing an adapter’s network protocols
You’re mainly interested in the TCP/IP protocol suite being available on the Ethernetadapters for the servers in your enterprise environment. Other protocols may be ofinterest at the workstation level.
The network protocols are associated to adapters by WMI as can be shown by test-ing an individual adapter:
gwmi -Query "ASSOCIATORS OF {Win32_NetworkAdapter.DeviceId=7}
➥ WHERE ClassDefsOnly"
When you look at the Win32_NetworkProtocol class, you’ll see that there isn’t a prop-erty such as DeviceId or Index that enables you to identify the adapter to which theprotocol is bound. You need to approach the problem in a slightly different way.
PROBLEM
The network protocols bound to your adapters need to be checked to ensure that therequired protocols are available and that they’re configured correctly.
SOLUTION
The following listing builds on what you know about network adapters and uses WMIassociations to link the protocols to the adapter.
TECHNIQUE 76
www.it-ebooks.info

297TECHNIQUE 76 Listing an adapter’s network protocols
function get-protocol {[CmdletBinding()]param ( [parameter(ValueFromPipeline=$true, ValueFromPipelineByPropertyName=$true)] [string]$computername="$env:COMPUTERNAME")PROCESS { Get-WmiObject -Class Win32_NetWorkAdapter ` -ComputerName $computername | sort DeviceId | foreach { "$($_.NetConnectionID) - $($_.Name)"
Get-WmiObject -ComputerName $computername -Query
➥ "ASSOCIATORS OF ➥ {Win32_NetworkAdapter.DeviceId=$($_.DeviceId)} ➥ WHERE Resultclass=Win32_NetworkProtocol" | select Name, ConnectionlessService, Description, GuaranteesDelivery, GuaranteesSequencing, MaximumAddressSize, MaximumMessageSize, MessageOriented, MinimumAddressSize, PseudoStreamOriented, Status, SupportsBroadcasting, SupportsConnectData, SupportsDisconnectData, SupportsEncryption, SupportsExpeditedData, SupportsFragmentation, SupportsGracefulClosing, SupportsGuaranteedBandwidth, SupportsMulticasting, SupportsQualityofService, @{N="InstallDate"; E={$($_.ConvertToDateTime($_.InstallDate))}}}}}
You use Get-WmiObject twice in this function. The first time you retrieve the net-work adapters in a computer using Win32_NetworkAdapter. The results are sorted byDeviceId and then piped into ForEach-Object. String substitution is used to displaythe network connection (the connection name in Windows) and the adapter name.
The second call to Get-WmiObject uses an association query to determine theinstances of Win32_NetworkProtocol associated with the particular adapter. Theresults are piped through Select-Object to filter the display to show the properties ofinterest and to convert the protocols’ installation date to a readable format.
DISCUSSION
This function could be modified to take a network adapter’s DeviceId as a parame-ter. This would enable checks to be made on single adapters if required. The otherpotential modification would be to add some of the network adapter’s properties tothe protocol object using Add-Member. This would then output a single object for fur-ther analysis.
Network adapters, adapter configurations, and protocols define how communica-tions take place. You need to create explicit network connections between systems tofacilitate the functioning of particular applications.
Listing 11.3 List an adapter’s associated protocols
www.it-ebooks.info

298 CHAPTER 11 Configuring network adapters
Listing network connections
The connections between your servers would look like a ball of spaghetti if you tracedthem. No, I’m not talking about the network cables! There are various mappingsmade between systems to enable applications to work. These connections are oftenmade when an application is installed and then forgotten about. Do you know all thenetwork mappings made from your servers?
PROBLEM
You need to move an application to a new server. It has become so popular that usagehas exceeded the original assumptions and the current hardware is proving to beinsufficient. There are some connections between the server and other systems thatneed to be analyzed so that they can be reproduced on the new server.
SOLUTION
The get-networkconnection function in listing 11.4 looks a little different from pre-vious functions. After the param block, there are three script blocks:
■ Begin
■ Process
■ End
When Begin, Process, and End blocks aren’t defined, the code is treated as an Endblock.
function get-networkconnection {[CmdletBinding()]param ( [parameter(ValueFromPipeline=$true, ValueFromPipelineByPropertyName=$true)] [string]$computername="$env:COMPUTERNAME")BEGIN {$data = @()}
PROCESS { Get-WmiObject -Class Win32_NetWorkConnection ` -ComputerName $computername | foreach {
$connection = New-Object -TypeName PsObject ` -Property @{ Local = $_.LocalName Remote = $_.RemoteName Type = $_.ConnectionType Description = $_.Description Display = $_.DisplayType Provider = $_.ProviderName Resource = $_.ResourceType User = $_.Username DiskSize = 0 FreeSpace = 0 }
Listing 11.4 List the network connections from a machine
TECHNIQUE 77
www.it-ebooks.info

299TECHNIQUE 77 Listing network connections
if ($_.ResourceType -eq "Disk"){ $disk = Get-WmiObject -Class Win32_MappedLogicalDisk ` -ComputerName $computername -Filter "DeviceId='$($_.LocalName)'"
$connection.Disksize = [math]::round($($disk.Size / 1GB), 3) $connection.FreeSpace = [math]::round($($disk.FreeSpace / 1GB), 3) }
$data += $connection }}
END {$data}}
The Begin block is executed once, and only once, when the first object on the pipe-line enters the function. If there are multiple instances of the function on the pipe-line, the Begin block will execute once for each instance of the function as the objectson the pipeline reach that instance. In this case, the Begin block initializes an arraythat will be used to accumulate your results.
The Process block executes once for each object on the pipeline that enters thefunction. This function’s Process block retrieves the network connections using theWin32_NetworkConnection class. The results are piped into ForEach-Object. A newPowerShell object is created and the properties are set using the information in theWMI object on the pipeline ($_). The DiskSize and FreeSpace properties are set to 0.
The WMI object’s ResourceType parameter is tested to determine whether you’redealing with a disk connection (the other connection type that may be of interest isprint). The Win32_MappedLogicalDisk class is used to return information on theremote disk. The DiskSize and FreeSpace properties on your connection object arepopulated after the results have been converted to gigabytes.
The last act of the Process block is to add the connection object you created intothe array. Remember that in PowerShell everything is an object, so arrays can happilycontain objects.
When the last object on the pipeline has been processed, the End block is exe-cuted once. The data in the array is pushed onto the pipeline, where the default dis-play processes take over and display the data.
DISCUSSION
The function accepts computer names on the pipeline, so it can be used like this:
"server02", "10.10.54.201" | get-networkconnection
One extension to the function would be to use the functionality developed in chap-ter 10 to add information about whether the connection is to a printer. Extraproperties would need to be added to the object in $connection to accommodatethis information.
You’ve now gathered information on your adapters and their configuration. In thenext section, we’ll look at configuring the adapters.
www.it-ebooks.info

300 CHAPTER 11 Configuring network adapters
11.2 Configuring network adaptersMost of the network adapter configuration activity will be around IP addresses and therelated properties, which we’ll look at in the next section. In this section, we’ll look atconfiguring the adapters themselves.
You can work directly with the adapters to enable or disable them. These two tech-niques are presented separately to give a little more safety in their use. The wholefunction has to be called, rather than choosing a switch on a single function.
WARNING The WMI methods presented in this chapter don’t have a safety netlike PowerShell cmdlets. There are no -WhatIf or -Confirm parameters.
The other task you can perform is renaming the adapter. We’ll refer back to this tech-nique in chapters 13 and 16.
First up is enabling an adapter.
Enabling network adapters
Network adapters are no use to you if you can’t get network traffic through them. Youneed to ensure that your adapters are enabled. Disabled adapters can be discoveredusing listing 11.1.
get-nic | where {!$_.NetEnabled}
If all of the network adapters are disabled, you’ll need to issue this command whenphysically logged on to the server.
PROBLEM
Communication has been broken with the server because the network adapter hasbeen disabled while you performed some maintenance on the server. You have toenable the adapter so that users can reconnect to their applications.
SOLUTION
The enable-connection function in the following listing has parameters that willidentify a network adapter by device (DeviceId) or connection (NetConnectionid).These are kept mutually exclusive by being in different parameter sets.
function enable-connection {[CmdletBinding()]param ( [parameter(ValueFromPipeline=$true, ValueFromPipelineByPropertyName=$true)] [string]$computername="$env:COMPUTERNAME",
[parameter(ParameterSetName="Device")] [int]$device,
[parameter(ParameterSetName="Connection")] [string]$NetConnectionID
)
Listing 11.5 Enable a network adapter
TECHNIQUE 78
www.it-ebooks.info

301TECHNIQUE 79 Disabling network adapters
PROCESS { switch ($psCmdlet.ParameterSetName) { Device {$filt = "DeviceID=$device"} Connection {$filt = "NetConnectionID='$NetConnectionID'"} }
Get-WmiObject -Class Win32_NetWorkAdapter `-ComputerName $computername -Filter $filt |Invoke-WmiMethod -Name Enable
}}
A Switch statement is used to create a WMI filter. The filter is used withWin32_NetworkAdapter to select the adapter you want to enable. Invoke-WmiMethodaccepts the WMI object and calls the Enable method. A return code of 0 indicates success.
DISCUSSION
The following two examples show how you can use the function with either a deviceidentity (first) or a connection (second):
enable-connection -computer win7 -device 11enable-connection -computer win7 -NetConnectionID "VWireless"
How did your adapter become disabled in the first place? That’s answered in the nexttechnique.
Disabling network adapters
Disabling a network adapter may seem like an odd thing to do, but there are timeswhen it becomes necessary, such as when you’re doing the following:
■ Performing maintenance on an application■ Investigating a problem■ Updating the Active Directory schema
The disablement in these cases is expected to be a temporary measure. There are alsotimes when an almost permanent disabling of the adapter is required.
PROBLEM
You have two adapters in all of the virtual machines in a test environment. The first isan Ethernet adapter that enables normal communication. The second is a link to thewireless adapter in the host that enables Internet access for activation and so on. Youwant this wireless link to be disabled.
SOLUTION
You can adapt listing 11.5 to provide a way of disabling network adapters. The func-tion shown in the following listing differs in the method that’s called.
function disable-connection {[CmdletBinding()]param ( [parameter(ValueFromPipeline=$true,
Listing 11.6 Disable a network adapter
TECHNIQUE 79
www.it-ebooks.info

302 CHAPTER 11 Configuring network adapters
ValueFromPipelineByPropertyName=$true)] [string]$computername="$env:COMPUTERNAME",
[parameter(ParameterSetName="Device")] [int]$device,
[parameter(ParameterSetName="Connection")] [string]$NetConnectionID
)PROCESS { switch ($psCmdlet.ParameterSetName) { Device {$filt = "DeviceID=$device"} Connection {$filt = "NetConnectionID='$NetConnectionID'"} }
Get-WmiObject -Class Win32_NetWorkAdapter `-ComputerName $computername -Filter $filt |Invoke-WmiMethod -Name Disable
}}
The network adapter’s WMI object is retrieved using the appropriate filter based onthe parameter choice. This object is then piped into Invoke-WmiMethod, where theDisable method is called.
DISCUSSION
The function can be used with either a device identifier or the network connectionidentifier, as shown in these two examples:
disable-connection -computer win7 -device 11disable-connection -computer win7 -NetConnectionID "VWireless"
WARNING Be careful not to disable the network adapter you’re connectingthrough. You’ll need to visit the machine to re-enable it.
When you add network adapters, especially in a virtual environment, they’re givennames that don’t help you in distinguishing them. You need to be able to change thename given to the adapter.
Renaming network adapters
There are a number of situations in which you may want to rename network adapters:
■ In clusters, where you want to differentiate the public and private networks■ In virtual environments, where your adapters are called “Local Area Connec-
tion n” (where n is a digit)■ In a server that has connections to multiple networks (multihomed server),
such as where public and management networks exist
As you’ll see in chapter 13, you want to be able to do this as part of a server setup routine.
PROBLEM
A new server has been commissioned with multiple network adapters. The adaptershave to be renamed to differentiate their purposes.
TECHNIQUE 80
www.it-ebooks.info

303TECHNIQUE 80 Renaming network adapters
SOLUTION
There isn’t a method to perform the renaming, but you can change the value of aproperty to perform this action, as shown in the following listing.
function rename-connection {[CmdletBinding()]param ( [parameter(ValueFromPipeline=$true, ValueFromPipelineByPropertyName=$true)] [string]$computername="$env:COMPUTERNAME",
[parameter(ParameterSetName="Device")] [int]$device,
[parameter(ParameterSetName="Connection")] [string]$NetConnectionID,
[parameter(Mandatory=$true)] [string]$newname)PROCESS { switch ($psCmdlet.ParameterSetName) { Device {$filt = "DeviceID=$device"} Connection {$filt = "NetConnectionID='$NetConnectionID'"} }
Get-WmiObject -Class Win32_NetWorkAdapter `-ComputerName $computername -Filter $filt |Set-WmiInstance -Arguments @{NetConnectionID=$newname}
}}
The adapter to be renamed is identified by the device identifier or the current name(NetConnectionId). The new name is a mandatory parameter, so you’ll beprompted for it if you forget. A Switch statement is used to create a WMI filter fromthe input parameters.
Get-WmiObject pipes the object representing the adapter to Set-WmiInstance.The adapter’s new name is used in a hash table as the value, and the property nameyou’re changing—NetConnectionId—is the key. Set-WmiInstance uses the hash tableas input to its Arguments parameter and makes the change.
DISCUSSION
It’s possible to perform multiple changes with one call of Set-WmiInstance by provid-ing the required number of key-value pairs in the hash table. In this case you onlyneed the one pair.
The function is used as follows:
rename-connection -computer win7 `-NetConnectionID "Local Area connection 2" -newname "VWireless"
The new name will be prompted for, even if you run the function in ISE or anothereditor environment instead of from the console.
Listing 11.7 Rename a network adapter
www.it-ebooks.info

304 CHAPTER 11 Configuring network adapters
Your adapters are now enabled and named. The next step is to set the IP addressinformation so that users can communicate with the server.
11.3 Enabling and setting network addressesNetworks identify computers so that they can communicate (that’s a gross simplifica-tion, but it’s sufficient for this book). Addresses can be supplied automatically byDynamic Host Configuration Protocol (DHCP) or you can manually set a staticaddress, which is the preferred solution for servers.
Enabling DHCP is a quick way to clear the old address from an adapter. The firsttechnique in this section shows how to perform this task. If your system should useDHCP you need to be able to view the DHCP configuration, which you’ll learn to do inthe second technique. This is followed by a method you can use to control DHCPleases through WMI. No more ipconfig.exe for you!
NOTE One of the major pieces of functionality missing from WMI and Power-Shell is the ability to manage DHCP servers. This is addressed in WindowsServer 8.
The alternative to DHCP is to set a static address, which means that the other proper-ties also have to be set manually. This section also covers techniques to set a static IPaddress and other properties, such as the default gateway. You’ll have to dip into usingregular expressions for these techniques but it’s relatively painless.
DHCP is simpler to configure, which makes it the ideal place to start.
Enabling DHCP
Life used to be simple. We used static addresses for servers and DHCP for clientmachines. The rules have changed a bit with Windows Server 2008, where using DHCPfor servers isn’t so bad. You can even use them in cluster scenarios.
IP addresses and related settings are configured using theWin32_NetworkAdapterConfiguration class. This is an important point to rememberand can save lots of frustration when scripts don’t work because you’re usingWin32_NetworkAdapter!
PROBLEM
You need to change the configuration on a network adapter to use DHCP addressesrather than a static address.
SOLUTION
The enable-dhcp function in the following listing solves this problem.
function enable-dhcp {[CmdletBinding()]param ( [parameter(ValueFromPipeline=$true, ValueFromPipelineByPropertyName=$true)]
Listing 11.8 Enable DHCP on an adapter
TECHNIQUE 81
www.it-ebooks.info

305TECHNIQUE 82 Displaying DHCP configuration
[string]$computername="$env:COMPUTERNAME", [int]$index
)PROCESS { Get-WmiObject -Class Win32_NetWorkAdapterConfiguration ` -ComputerName $computername -Filter "Index=$index" | Invoke-WmiMethod -Name EnableDHCP
}}
The -index parameter is used to identify the adapter you want to configure.Win32_NetworkAdapter uses DeviceID and Win32_NetworkAdapterConfigurationuses Index. They both have the same numeric value for a given adapter.
Get-WmiObject pipes the adapter’s object to Invoke-WmiMethod, which calls theobject’s EnableDHCP method.
DISCUSSION
In some cases you may find that not all manually configured settings are removedwhen DHCP is enabled. If the DHCP scope doesn’t set DNS servers they’ll retain thestatic settings.
You may want to extend this function by using the SetTCPIPNetBIOS method withan argument of 0 to control the setting through DHCP. See technique 85 for thedetails of using the method.
When DHCP is enabled there are a number of configuration settings you may wantto investigate.
Displaying DHCP configuration
How can you test that an adapter is configured for DHCP? This code snippet showshow:
Get-WmiObject Win32_NetworkAdapterConfiguration `-ComputerName win7 | where {$_.DHCPEnabled}
When troubleshooting, you may want to test the DHCP configuration of a system.
PROBLEM
Users are reporting that they can’t connect to a server. You’ve discovered that the net-work adapter is configured to use DHCP. You need to display the DHCP configuration.
SOLUTION
Listing 11.2 could be used to perform this task, but it examines all adapters and pro-duces a lot of information you don’t need at this point. The following listing producesjust the output you need.
function get-dhcpsetting {[CmdletBinding()]param ( [parameter(ValueFromPipeline=$true,
Listing 11.9 Display DHCP configuration
TECHNIQUE 82
www.it-ebooks.info

306 CHAPTER 11 Configuring network adapters
ValueFromPipelineByPropertyName=$true)] [string]$computername="$env:COMPUTERNAME")PROCESS { Get-WmiObject -Class Win32_NetWorkAdapterConfiguration ` -ComputerName $computername -Filter "DHCPEnabled='$true'" | select ServiceName, Description, Index, DHCPEnabled, DHCPServer, IPAddress, IPSubnet, @{N="DHCPLeaseStart"; E={$_.ConvertToDateTime($_.DHCPLeaseObtained)}}, @{N="DHCPLeaseEnd"; E={$_.ConvertToDateTime($_.DHCPLeaseExpires)}}}}
You apply a filter of "DHCPEnabled='$true'" to the Win32_NetworkAdapter-
Configuration class. This will only return information for those adapters that haveDHCP enabled. Filtering data at the remote system speeds up your processing byreducing the data that’s returned.
The Select-Object cmdlet then filters the properties you want to see. The DHCPlease start and end times are converted to a readable format. An example of the out-put from this function is shown in the discussion of technique 83.
DISCUSSION
If the adapter is configured for DHCP and an address of the form 169.254.x.x isreturned, this means your server couldn’t communicate with the DHCP server. The IPaddress and subnet should be checked to ensure that the adapter has been assignedan address from the correct scope.
DHCP leases don’t last forever (usually), and it may be necessary to control the leases.
Controlling DHCP leases
IT administrators learn to use ipconfig.exe to release and renew DHCP leases. This isgreat for the local machine, but doesn’t work remotely.
PROBLEM
You need to be able to control DHCP leases on local and remote systems. This couldinvolve releasing a DHCP lease when you want to put a static address on an adapter, orit may require you to force the renewal of a lease.
SOLUTION
Listing 11.10 provides a solution for this problem. The network adapter you need towork with is identified by the -index parameter. Two switch parameters are used todetermine whether you are releasing or renewing a lease. They’re in different param-eter sets, so the release and renew choices are mutually exclusive.
function set-dhcp {[CmdletBinding()]param ( [parameter(ValueFromPipeline=$true, ValueFromPipelineByPropertyName=$true)]
Listing 11.10 Release or renew DHCP lease
TECHNIQUE 83
www.it-ebooks.info

307TECHNIQUE 84 Setting an IP address
[string]$computername="$env:COMPUTERNAME", [int]$index,
[parameter(ParameterSetName="Release")] [switch]$release,
[parameter(ParameterSetName="Renew")] [switch]$renew
)PROCESS { $nic = Get-WmiObject -Class Win32_NetWorkAdapterConfiguration ` -ComputerName $computername -Filter "Index=$index"
switch ($psCmdlet.ParameterSetName) { Release {$nic | Invoke-WmiMethod -Name ReleaseDHCPLease} Renew {$nic | Invoke-WmiMethod -Name RenewDHCPLease} }}}
The Win32_NetworkAdapterConfiguration object is stored in the $nic variable. ASwitch statement based on the parameter set name is used to determine whetheryou’re releasing or renewing. $nic is piped to Invoke-WmiMethod, which calls theappropriate method to perform the desired action.
DISCUSSION
After releasing a DHCP lease you can test the results using the get-dhcpsetting func-tion from technique 82:
PS> get-dhcpsetting -computer win7
ServiceName : netvscDescription : Microsoft Virtual Machine Bus Network Adapter #2Index : 11DHCPEnabled : TrueDHCPServer : 255.255.255.255IPAddress : {169.254.201.55, fe80::bc37:dcdf:70f7:c937}IPSubnet : {255.255.0.0, 64}DHCPLeaseStart : 14/03/2011 20:29:00DHCPLeaseEnd : 15/03/2011 20:29:00
Notice the DHCPServer and IPAddress values. They indicate that DHCP is disabledeven though the lease start and end times appear valid.
The alternative to using DHCP is to manually set a static IP address.
Setting an IP addressA server will have its IP address set when it’s first created. Servers don’t normallychange their IP addresses. Very occasionally you may have to perform this task, andwhen you do, you need to be able to perform the task remotely rather than visit thehundreds or even thousands of servers in the estate.
PROBLEM
Your network team has decided that the IP addressing scheme needs to change due tocompany growth requiring many more servers than originally thought. You need to beable to change the IP addresses of your servers remotely.
TECHNIQUE 84
www.it-ebooks.info

308 CHAPTER 11 Configuring network adapters
SOLUTION
You’ll be using the Win32_NetworkAdapterConfiguration class again to solve thisproblem. The PowerShell function to perform this is supplied in the following listing.
function set-IPAddress {[CmdletBinding()]param ( [parameter(ValueFromPipeline=$true, ValueFromPipelineByPropertyName=$true)] [string]$computername="$env:COMPUTERNAME",
[parameter(Mandatory=$true)] [int]$index,
[parameter(Mandatory=$true)] [string] [ValidatePattern("\b\d{1,3}\.\d{1,3}\.\d{1,3}\.\d{1,3}\b")] $ipaddress,
[parameter(Mandatory=$true)] [string] [ValidatePattern("\b\d{1,3}\.\d{1,3}\.\d{1,3}\.\d{1,3}\b")] $subnet)PROCESS {$nic = Get-WmiObject -Class Win32_NetWorkAdapterConfiguration `-ComputerName $computername -Filter "Index=$index" -EnableAllPrivileges$nic.EnableStatic($ipaddress, $subnet)
}}
The first point to note about the parameters is that all but the -computer aremandatory. You can’t set the address if the new address isn’t supplied. You couldhave left the subnet as non-mandatory but it’s better to think about both together toensure consistency.
The second point is that you’re using the ValidatePattern advanced parameterwith the -ipaddress and -subnet parameters. This uses a regular expression to vali-date the input. If you aren’t a regular expression expert (I don’t like them myself), theregular expression breaks down as follows:
■ Four groups of 1–3 digits■ A dot separator■ \b to indicate that the first and last matches must occur on the boundaries of
the string
NOTE Thanks to PowerShell MVP Tobias Weltner for the regular expression.
The WMI object representing the network adapter configuration is put into the $nicvariable. The EnableStatic method is called on the object with the IP address andsubnet as parameters.
Listing 11.11 Set an IP address
www.it-ebooks.info

309TECHNIQUE 85 Setting other properties
I tried using Invoke-WMImethod, but itfailed to work with this method. There’s alot of discussion surrounding Invoke-
WmiMethod in the PowerShell community, aswe haven’t been able to completely under-stand its quirks. There’s a bug that causes itto fail sometimes with multiple parameters,which is what I suspect was happening inthis situation.
DISCUSSION
The addresses you’re changing are the onesshown in the IP address dialog box from theIPv4 properties of a network adapter, asshown in figure 11.2.
The function can be used as follows:
set-IPAddress -computer win7 -index 13 `-ipaddress "100.99.98.97" -subnet "255.255.255.0"
WARNING The regular expression can check that the string follows the cor-rect pattern for an IP address. It can’t validate that a correct address is pre-sented. If you used “700.99.98.97” in the previous example, it would passvalidation even though it isn’t a valid address.
There are a few other properties that you need to think about setting as well.
Setting other properties
This technique could be combined with technique 86 and the techniques in section 11.4if you want to create a super-script that enables you to set all of the IP address propertiesin one go. The mandatory property would need to be removed from the input param-eters unless you want to perform a lot of typing.
PROBLEM
The default gateway and the use of NetBIOS over TCP/IP need to be configured tocomplete the settings on your network adapter.
SOLUTION
Listing 11.11 can be modified to produce Listing 11.12. This is a common techniquein administration scripting. Take something that works and modify it to performanother similar task.
In this case, the parameters supply the default gateway ($gateway), which is vali-dated against a regular expression pattern and the value for tcpnetbios, which canbe 1 (Enable) or 2 (Disable).
TECHNIQUE 85
Figure 11.2 IPv4 Properties dialog box
www.it-ebooks.info

310 CHAPTER 11 Configuring network adapters
function set-IPdetails {[CmdletBinding()]param ( [parameter(ValueFromPipeline=$true, ValueFromPipelineByPropertyName=$true)] [string]$computername="$env:COMPUTERNAME",
[parameter(Mandatory=$true)] [int]$index,
[parameter(Mandatory=$true)] [string] [ValidatePattern("\b\d{1,3}\.\d{1,3}\.\d{1,3}\.\d{1,3}\b")] $gateway,
[parameter(Mandatory=$true)] [int] $metric,
[int] [ValidateRange(1,2)] $tcpnetbios)PROCESS {$nic = Get-WmiObject -Class Win32_NetWorkAdapterConfiguration `-ComputerName $computername -Filter "Index=$index"$nic.SetGateways($gateway, $metric)$nic.SetTcpipNetbios($tcpnetbios)
}}
$nic is the variable that holds the configuration object for your adapter. The Set-Gateways method is called to set the default gateway and the SetTcpipNetbiosmethod is used to set NetBIOS over TCP/IP.
DISCUSSION
The default gateway needs to be configured correctly to ensure that the system cancommunicate with machines on other subnets. Any organization with more than 200computers is probably running on multiple subnets, which make it essential that youget this setting correct.
The remaining configuration items you need to consider are the addresses of theDNS and WINS servers.
11.4 Configuring network servicesThe primary network services in a Windows environment are DNS and DHCP. Youcan’t do anything about DHCP, but you can configure the DNS servers that will beused, which is what you’ll do in the section’s first technique. Then you’ll configureWINS in the second technique. WINS is an older name-resolution method that’s usedin many organizations with legacy applications.
Listing 11.12 Set default gateway and TCP/IP NetBIOS setting
www.it-ebooks.info

311TECHNIQUE 86 Setting DNS servers
A final check on the networking configuration can be supplied by looking at the IProuting table to see which networks your system is connecting to and the routes it triesto apply to reach those networks. The function to perform this is presented in the sec-tion’s last technique.
You can use WMI to configure DNS servers directly as discussed in chapter 9 ofPowerShell in Practice. On the client side, you need to configure the DNS servers yoursystems will contact.
Setting DNS servers
DNS is the name resolution method of choice for modern Windows environments.You need to make sure the DNS and DHCP client services are running and that you’veconfigured the correct DNS servers in your network adapter’s properties.
PROBLEM
The DNS servers have changed due to an upgrade to your domain controllers (you’rerunning integrated DNS). You need to modify the DNS server that your systems use.
SOLUTION
Workstations will usually have their DNS server settings controlled by DHCP. Serversand those workstations with static addresses can be modified using the following list-ing. The -index parameter identifies the network adapter whose properties you’llmodify. The -dnsserver parameter takes an array of strings representing the IPaddresses of the DNS servers.
function set-DNSserver {[CmdletBinding()]param ( [parameter(ValueFromPipeline=$true, ValueFromPipelineByPropertyName=$true)] [string]$computername="$env:COMPUTERNAME",
[parameter(Mandatory=$true)] [int]$index,
[parameter(Mandatory=$true)] [string[]] [ValidatePattern("\b\d{1,3}\.\d{1,3}\.\d{1,3}\.\d{1,3}\b")] $dnsserver)PROCESS {$nic = Get-WmiObject -Class Win32_NetWorkAdapterConfiguration `-ComputerName $computername -Filter "Index=$index"$nic.SetDNSServerSearchOrder($dnsserver)
}}
The $nic variable holds the adapter configuration object. The object’s SetDNSServer-SearchOrder method is used to set the DNS server list. The array of addresses musthold one or more addresses.
Listing 11.13 Configure DNS server
TECHNIQUE 86
www.it-ebooks.info

312 CHAPTER 11 Configuring network adapters
DISCUSSION
The SetDNSServerSearchOrder method can also be used to clear the DNS server settings:
Get-WmiObject Win32_NetworkAdapterConfiguration `-ComputerName win7 -Filter "Index=13" |Invoke-WmiMethod -Name SetDNSServerSearchOrder
Listing 11.8 could be modified to incorporate this code, because calling the Enable-DHCP method clears the IP address, subnet, and default gateway. It doesn’t clear theDNS servers.
As stated earlier, WINS is an older name-resolution method, but you still need toknow how to configure the addresses of your WINS servers.
Setting WINS servers
You can set a number of WINS servers if you use the IPv4 Properties dialog box, butyou’re limited to setting a primary and secondary WINS server if you use WMI. Thiswould normally be considered sufficient.
PROBLEM
You need to set the WINS servers that your server will access because it has to commu-nicate with a legacy application that demands the presence of WINS.
SOLUTION
The set-WINSserver function presented in listing 11.14 will solve this problem foryou. The -winsprimary parameter uses the ValidatePattern advanced parameter tocheck the address. You may not want to set a secondary WINS server, so that parameterisn’t mandatory in this function.
function set-WINSserver {[CmdletBinding()]param ( [parameter(ValueFromPipeline=$true, ValueFromPipelineByPropertyName=$true)] [string]$computername="$env:COMPUTERNAME",
[parameter(Mandatory=$true)] [int]$index,
[parameter(Mandatory=$true)] [string] [ValidatePattern("\b\d{1,3}\.\d{1,3}\.\d{1,3}\.\d{1,3}\b")] $winsprimary,
[string] $winsseconndary)PROCESS {if ($winsseconndary -and $winsseconndary -notmatch
"\b\d{1,3}\.\d{1,3}\.\d{1,3}\.\d{1,3}\b") { throw "Invalid WINS Secondary address $winsseconndary"}
Listing 11.14 Configure WINS server
TECHNIQUE 87
www.it-ebooks.info

313TECHNIQUE 88 Displaying the routing table
$nic = Get-WmiObject -Class Win32_NetWorkAdapterConfiguration `-ComputerName $computername -Filter "Index=$index"$nic.SetWINSServer($winsprimary, $winsseconndary )
}}
If an address for a WINS secondary server is presented through the -winssecondaryparameter, you use a regular expression to test that a string of the correct pattern ispresented. The SetWINSServer method is used to set the addresses.
DISCUSSION
This function will accept one or two addresses, as shown in these examples:
set-WINSserver -computer win7 -index 13 -winsprimary "10.10.10.200"
set-WINSserver -computer win7 -index 13 `-winsprimary "10.10.10.200" -winssecondary "10.10.89.51"
You can clear the WINS server settings like this:
Get-WmiObject Win32_NetworkAdapterConfiguration `-ComputerName win7 -Filter "Index=13" |Invoke-WmiMethod -Name SetWINSserver -ArgumentList "", ""
You use a string to define the original WINS server settings, and empty strings are usedto remove the WINS servers that are configured. Remember that an empty string,defined as "", is different from a NULL value defined by $null.
The last stop on our journey around networking is to look at the routing table.
Displaying the routing table
The routing table shows how your server is communicating with the outside world. Anexample is shown in figure 11.3 (in the following discussion). One point to note isthat WMI can’t provide information on IPv6 routing, at present.
PROBLEM
You need to examine the IP routing table to determine whether network connectivityis configured correctly on your server.
SOLUTION
The following listing uses Win32_IP4RouteTable to solve this problem. The functionis presented as a single block of code, but it could be divided into Begin, Process, andEnd blocks as in listing 11.4.
function get-routetable {[CmdletBinding()]param ( [parameter(ValueFromPipeline=$true, ValueFromPipelineByPropertyName=$true)] [string]$computername="$env:COMPUTERNAME")BEGIN {
Listing 11.15 Display routing table
TECHNIQUE 88
www.it-ebooks.info

314 CHAPTER 11 Configuring network adapters
$source=@"public class WmiIPRoute{ public string Destination {get; set;} public string Mask {get; set;} public string NextHop {get; set;} public string Interface {get; set;} public int Metric {get; set;}}"@Add-Type -TypeDefinition $source -Language CSharpversion3}PROCESS {$data = @()Get-WmiObject -Class Win32_IP4RouteTable -ComputerName $computername |foreach { $route = New-Object -TypeName WmiIPRoute $route.Destination = $_.Destination $route.Mask = $_.Mask $route.NextHop = $_.NextHop $route.Metric = $_.Metric1
$filt = "InterfaceIndex='" + $_.InterfaceIndex + "'" $ip = (Get-WmiObject -Class Win32_NetworkAdapterConfiguration
➥ -Filter $filt -ComputerName $computername).IPAddress
if ($_.InterfaceIndex -eq 1) {$route.Interface = "127.0.0.1"} elseif ($ip.length -eq 2){$route.Interface = $ip[0]} else {$route.Interface = $ip}
$data += $route}$data | Format-Table -AutoSize}}
A here-string (a multiline PowerShell string whose structure is @"..."@) is used todefine the C# code for a new class, WmiIPRoute, that you create for this function. Thisis compiled using Add-Type. An empty array, $data, is created to store the data priorto display.
Get-WmiObject puts all of the instances of Win32_IP4RouteTable on the pipeline.ForEach-Object is used to create a new instance of the WmiIPRoute class and populateits properties from the WMI object.
The InterfaceIndex is used in a WMI filter to retrieve the IP address viaWin32_NetworkAdapterConfiguration. The IP address is set and the new route objectis added to the collection in $data.
When all of the routes have been processed, the data is displayed usingFormat-Table.
DISCUSSION
The data takes the form shown in figure 11.3. The Interface property corresponds tothe IP address on the network adapter. The NextHop property is the default gatewayyou’ve configured on the adapter.
www.it-ebooks.info

315Summary
This finishes our look at working with network adapters using WMI.
11.5 SummaryConfiguring servers to communicate on the network is an essential activity. You canuse WMI to accomplish a variety of networking tasks:
■ Display information about network adapters and their IP configuration■ Discover network protocols and connections■ Enable, disable, and rename adapters■ Examine the DHCP configuration, enable DHCP, and manage the leases■ Set static IP addresses and default gateway properties■ Configure the DNS and WINS servers that will be used by the server■ Display the IP routing table
WMI only allows you to work with IPv4 at the moment, but as only a small fraction oforganizations have moved to IPv6 this likely won’t be an issue. The techniques pre-sented in this chapter, together with cmdlets such as Test-Connection, provide agood foundation for a PowerShell-based network administration toolkit.
Chapter 12 is a little different in that we’ll look at using WMI to administer IIS.
Figure 11.3 An IPv4 routing table
www.it-ebooks.info

Managing IIS
Internet Information Server (IIS) is used in many situations in Windows-based envi-ronments. It’s used directly as a web server and it’s also used in the background inproducts such as Windows Server Update Services (WSUS), Exchange 2007/2010,and SharePoint. IIS may not be the first application that comes to mind when youthink of using PowerShell and WMI to administer remote servers, but it provides alot of functionality. You need to be able to administer IIS remotely the same as anyother application.
IIS 7 This chapter will only consider working with IIS 7 (Windows Server 2008and 2008 R2). A WMI provider is available for IIS 6 on Windows Server 2003,but it isn’t identical. The techniques in this chapter can be used as a guide forworking with the older version.
This chapter covers■ IIS WMI providers■ Configuring web servers ■ Website lifecycle and management■ Application pools and web applications
316
www.it-ebooks.info

317IIS WMI provider
There are a number of ways you can administer IIS using PowerShell, as listed intable 12.1.
When you install IIS on a system, a .NET assembly is installed that provides administra-tion access to IIS. The WMI provider is also installed.
NOTE Remember that a version of IIS is available on client versions of Win-dows, including Vista and 7, as well as the server versions.
You can access the WMI provider directly through the standard PowerShell cmdlets, butyou’ll encounter a few issues, which we’ll look at later. It’s possible to wrap the use ofWMI in the .NET objects you create in PowerShell, and we’ll also look at this technique.
Windows Server 2008 R2 supplies an IIS provider and cmdlets. An optional down-load from www.iis.net (check the Manage category on the Download page) is availableto install this functionality on Windows Server 2008. These cmdlets can’t workremotely, but you can use PowerShell remoting to work with them on a remote system.
The focus of this chapter is on using WMI, so we’ll start by examining the WMI pro-vider, its features, and its limitations. This leads to working at the web server level, wherewe’ll investigate the server configuration and use WMI to restart the web service.
Websites are covered in section 12.2, including discovering their properties, con-trolling them (restarting is the usual control option you’ll need), and creating newsites. In the final section of this chapter, we’ll look at how you can discover web appli-cations and application pools. The recycling of application pools is an important topicthat we’ll cover at the end of the chapter.
First, you need to learn a bit more about the IIS WMI provider, because it has somequirks that you haven’t seen before.
12.1 IIS WMI providerYou access the functionality to administer your IIS servers through the IIS WMI provider.It installs its classes into the root\webadministration namespace. Everything you’ve seenso far would suggest that you can discover the classes in this namespace like this:
Get-WmiObject -Namespace 'root\webadministration' -List -ComputerName web01
Afraid not, as figure 12.1 shows.
Method Remote working
.NET No
WMI Partial
WMI with .NET Yes
IIS cmdlets No
IIS provider NoTable 12.1 Methods of accessing IIS through PowerShell
www.it-ebooks.info

318 CHAPTER 12 Managing IIS
You need to use Packet Privacy to encrypt the traffic to a remote web server for this towork, which changes the code as follows:
Get-WmiObject -Namespace 'root\webadministration' `-List -ComputerName web01 -Authentication 6
We’ll investigate Packet Privacy authentication and how you can work with it, and thenwe’ll look at how you can discover your web server configuration and how you cancontrol the IIS service to restart the web server.
12.1.1 Packet Privacy authentication
The various WMI authentication levels were explained in section 4.5.3. Table 12.2 ispresented as a recap.
Table 12.2 WMI authentication
Value Meaning
-1 Unchanged—authentication remains as it was before.
0 Default COM authentication level. Authentication is negotiated. WMI uses the default Windows Authentication setting. The None setting (1) is never the result of a negotiated authentication.
1 None. No COM authentication is performed.
2 Connect. COM authentication is performed only when the client establishes a relationship with the server. No further checks are performed.
3 Call. COM authentication is performed only at the beginning of each call, when the server receives the request. Only packet headers are signed. No data is encrypted.
4 Packet. COM authentication is performed on all the data that’s received from the client. Only packet headers are signed. No data is encrypted.
5 Packet Integrity. All the data that’s transferred between the client and the application is authenticated and verified. All packets are signed. No data is encrypted.
6 Packet Privacy. The properties of the other authentication levels are used, and all the data is encrypted.
Figure 12.1 Error message when accessing the IIS WMI provider remotely
www.it-ebooks.info

319TECHNIQUE 89 Displaying web server defaults
The IIS WMI provider insists on level 6 authentication (Packet Privacy), which ensuresthe data is encrypted. In order to use this level of authentication, you need to belogged on to the domain, have the correct level of permissions, and run PowerShellfrom an elevated prompt. In a non-domain situation, you’d need to supply explicitcredentials for the remote machine as well as using Packet Privacy.
Use Get-Credential to create the credential rather than attempting to create it inthe -Credential parameter. The latter option will fail because Get-WmiObjectattempts to contact the server before resolving the credential.
NOTE PowerShell v1 can’t be used for these techniques because its version ofGet-WmiObject can’t set the level of authentication to be used. But you couldwrap the WMI in .NET code, which would enable you to use Packet Privacy.
Now you know how to use WMI authentication. It’s time to look at accessing the WMIclasses and see what you can discover about your web server.
Displaying web server defaults
One issue with the provider is that many of the properties you’ll want to work with arereturned as embedded objects. They can’t be accessed directly. This is illustrated infigure 12.2, where the results of retrieving the Server class are displayed.
The Server class returns four properties of interest:
■ ApplicationDefaults
■ ApplicationPoolDefaults
■ SiteDefaults
■ VirtualDirectoryDefaults
All that you see is a System.Management.ManagementBaseObject object. It consists ofother WMI classes that are held as embedded objects in the parent object. Many of the
TECHNIQUE 89
Figure 12.2 Embedded objects returned by Server class
www.it-ebooks.info

320 CHAPTER 12 Managing IIS
n
other classes you’ll meet in this chapter also behave in this manner. You need to be ableto drill down further into the properties to discover how your web server is configured.
PROBLEM
There are a number of web servers in your internal environment that have been man-aged by different people over a period of time. You suspect that the default configura-tion of some of these servers has drifted from their desired state. You need to retrievethe default configuration so comparisons can be made to determine which serversneed reconfiguring.
SOLUTION
Listing 12.1 demonstrates how you can solve this problem. The get-webserverdefaultfunction takes a computer name as its only parameter.
NOTE The expand-property function used in this script is described in thediscussion section that follows.
function get-webserverdefault {[CmdletBinding()]param ( [parameter(ValueFromPipeline=$true, ValueFromPipelineByPropertyName=$true)] [string]$computername="$env:COMPUTERNAME"
)PROCESS{ $server = Get-WmiObject -Namespace 'root\webadministration' `-Class Server -ComputerName $computername -Authentication 6
$webdata = New-Object -TypeName PSobject $webdata | Add-Member -MemberType NoteProperty -Name "Server" `-Value $server.__SERVER
expand-property
➥ $server.ApplicationDefaults.Properties "Application"
$apdproperties = $server.ApplicationPoolDefaults.Properties | where {$_.type -ne "Object"} expand-property
➥ $apdproperties "ApplicationPoolDefaults"
expand-property
➥ $server.ApplicationPoolDefaults.CPU.Properties "APD_CPU" expand-property
➥ $server.ApplicationPoolDefaults.Failure.Properties "APD_Failure" expand-property
➥ $server.ApplicationPoolDefaults.ProcessModel.Properties ➥ "APD_ProcessModel"
$apdproperties =
➥ $server.ApplicationPoolDefaults.Recycling.Properties | where {$_.type -ne "Object"}
Listing 12.1 Display web server default settings
Create object
B
Add applicatiodata
C
www.it-ebooks.info

321TECHNIQUE 89 Displaying web server defaults
expand-property $apdproperties "APD_Recycling"
expand-property
➥ $server.ApplicationPoolDefaults.Recycling.PeriodicRestart. ➥ Properties "APD_Recycle_Periodic"
$webdata | Add-Member -MemberType NoteProperty -Name "SiteAutoStart" `-Value $server.SiteDefaults.ServerAutoStart
expand-property
➥ $server.SiteDefaults.Limits.Properties "SiteLimits" expand-property
➥ $server.SiteDefaults.Logfile.Properties "SiteLogfile" expand-property
➥ $server.SiteDefaults.TraceFailedRequestsLogging.Properties ➥ "SiteTraceFailedRequestsLogging"
expand-property
➥ $server.VirtualDirectoryDefaults.Properties ➥ "VirtualDirectoryDefaults"
$webdata}}
The Server class from the root\webadministration namespace holds the data youneed. The object needs to be held in a variable, $server, because you need to use itseveral times as you unravel the embedded data.
The next step is to create a PowerShell object to store the results B. The object isinitially created without any properties. Add-Member is used to extend the object bycreating additional properties. The first one is the server name, which you retrievefrom the __SERVER system property.
You can then step through the four properties you saw in figure 12.2 to add addi-tional data to the object. You start with the application defaults C and move on to theapplication pool data. At this point, you meet another level of embedded objects,necessitating more explicit expansion. Each time you expand an embedded object toretrieve its properties, you ensure that you can identify the resultant data by passing atitle into the expand-property function, which acts as a prefix to the property name.
The final property sets are the site defaults D and the virtual directory defaults E.The function returns the $webdata object, which can be filtered using the standardPowerShell utility and formatting cmdlets.
DISCUSSION
The workhorse of listing 12.1 is the expand-property function. This function is partof the module of functions for this chapter. It has two parameters. The first is a prop-erty set that you expand, and the second is a string that is used as a prefix for the prop-erty name:
function expand-property { param ($properties, $title)
foreach ($property in $properties) { Add-Member -InputObject $webdata -MemberType NoteProperty `
Add site dataD
Add virtual directory dataD
www.it-ebooks.info

322 CHAPTER 12 Managing IIS
-Name "$title-$($property.Name)" ` -Value $property.Value }}
You loop through the properties and use Add-Member to create a property on your$webdata object that will hold the property you’re working with. You can use$webdata directly in this way because expand-property is executing in a child scopeof get-webserverdefault—that’s because it was called by that function. A child scopecan access variables created in the parent scope. The expand-property function willalso be used in other scripts in the chapter.
Compared to the description, using the function is very simple. Assuming themodule is loaded the syntax is as follows:
get-webserverdefault -computername web01
IIS servers tend not to need a lot of looking after once they’re set up and running.There are a few things, though, such as patching, that you need to do on a regularbasis. One task you may need to perform is restarting the IIS service on yourweb server.
Restarting the web server
The one task we seem to have to keep doing is restarting the IIS service on ourweb servers. This need can arise for a number of reasons, including an issuewith a website or application, or introducing a change to a website or to the webserver configuration.
Being able to restart IIS quickly and efficiently minimizes the downtime of the ser-vice and ensures that the system’s users suffer the minimum of inconvenience. It’s alsoa good way to help maintain availability service-level agreements (SLAs).
PROBLEM
An application that’s installed on a number of web servers is undergoing a series ofupgrades. After each upgrade, the IIS service must be restarted to ensure that thechanges are brought online immediately.
SOLUTION
You could write a function that restarts the IIS service on a local, or remote, system,but if you break down the problem a little further, the underlying issue is that youneed to stop and then restart the web server.
Listing 12.2 shows how you can deliver a granular solution that provides for thethree possible situations that arise:
■ Stop the IIS service■ Start the IIS service■ Restart the IIS service
The following solution consists of three functions that perform the tasks of stopping,starting, and restarting the service.
TECHNIQUE 90
www.it-ebooks.info

323TECHNIQUE 90 Restarting the web server
function restart-webserver { [CmdletBinding()]param ( [parameter(ValueFromPipeline=$true, ValueFromPipelineByPropertyName=$true)] [string]$computername="$env:COMPUTERNAME")PROCESS{ stop-webserver -computer $computername start-webserver -computer $computername}}
function stop-webserver { [CmdletBinding()]param ( [parameter(ValueFromPipeline=$true, ValueFromPipelineByPropertyName=$true)] [string]$computername="$env:COMPUTERNAME"
)PROCESS{ $www = Get-WmiObject -Class Win32_Service ` -ComputerName $computername -Filter "Name='W3SVC'"
if ($www.State -eq "Running") { $ret = $www.StopService() if ($ret.ReturnValue -ne 0) { Write-Host "$($computername): IIS did not stop correctly" $return } } else {Write-Host "$($computername):
➥ IIS service not started"} }}
function start-webserver { [CmdletBinding()]param ( [parameter(ValueFromPipeline=$true, ValueFromPipelineByPropertyName=$true)] [string]$computername="$env:COMPUTERNAME"
)PROCESS{ $www = Get-WmiObject -Class Win32_Service `-ComputerName $computername -Filter "Name='W3SVC'"
if ($www.State -ne "Running") { Write-Host "$($computername): IIS Stopped. Attempting restart" $ret = $www.StartService() if ($ret.ReturnValue -ne 0) { Write-Host "$($computername): IIS did not start correctly" $return
Listing 12.2 Restart web server
Restart-webserver functionB
Call worker functions
C
Stop-webserver function
D
Get WMI object
E
Stop serviceF
Display error message
G
Start-webserver functionH
www.it-ebooks.info

324 CHAPTER 12 Managing IIS
} } else {Write-Host "$($computername): IIS is running" }}}
The restart-webserver function B accepts a computer name as the input parame-ter and then calls the functions C to stop and start the service. The computer name ispassed through to the child functions.
The stop-webserver function D performs the task of stopping the web server.The computer name is accepted and then used in the WMI call to Win32_Service E.A check on the state of the service is performed, and if the service is running, anattempt is made to stop it F; otherwise an error message is issued. The return code istested to determine whether the service shut down correctly G. An error message isreturned if the service didn’t close properly.
The start-webserver function H has a similar construction, except that theStartService method is used. The error messages are modified to reflect the task thisfunction is performing.
DISCUSSION
The tasks performed by this technique are straightforward, common administrativechores that you’ll need to perform on a regular basis, making them ideal candidatesfor automation. Similar functions could be created for other important services.Approaching the solution in the most granular way ensures that you achieve the maxi-mum flexibility and reuse in your use of PowerShell. The time spent developing asolution at this scale is repaid, because you gain the flexibility to perform three tasksout of the solution.
Administering web servers is the high-level task for this chapter. We’ll now drilldown a level and look at the websites that are hosted on those servers.
12.2 WebsitesWebsites are where your user’s interests are concentrated because this is where they’llbe accessing the server and performing their work. They won’t care whether theserver is running if the website itself is unavailable.
The first technique in this section will look at retrieving a list of the websites on aparticular server, together with their properties. Subsequent techniques will exam-ine the website lifecycle—specifically creation and deletion—and how you can con-trol websites.
You need the ability to discover which websites exist on a particular server beforeyou can administer those sites.
Listing websites
You can list the sites on a server by using the Site class, as this code snippet demonstrates:
Get-WmiObject -Namespace 'root\webadministration' -Class Site ` -ComputerName web01 -Authentication 6 `-Filter "Name='Default Web Site'"
TECHNIQUE 91
www.it-ebooks.info

325TECHNIQUE 91 Listing websites
Packet Privacy authentication is used by passing a value of 6 to the -Authenticationparameter, and a WMI filter ensures that only the information for the default websiteis returned.
You still have the problem of embedded objects to overcome, as figure 12.2demonstrated.
PROBLEM
Web servers can be configured in a farm, where multiple servers host the same set ofsites and access is load-balanced across the farm to provide scalability and resiliency.Comparing the configuration of the various websites across the farm can be a time-consuming and error-prone task if performed manually. You need to be able to gener-ate the site configuration so that an automatic comparison can be performed.
SOLUTION
The comparison operation can be performed using Compare-Object, as you saw inchapter 2, if you can get the configuration into a suitable format. The following listingshows how you can obtain the data you need.
function get-website {[CmdletBinding()]param ( [parameter(ValueFromPipeline=$true, ValueFromPipelineByPropertyName=$true)] [string]$computername="$env:COMPUTERNAME", [string]$site
)PROCESS{if ($site) { $sites = Get-WmiObject -Namespace 'root\webadministration' `-Class Site -ComputerName $computername -Authentication 6 `-Filter "Name='$site'"}else { $sites = Get-WmiObject -Namespace 'root\webadministration' `-Class Site -ComputerName $computername -Authentication 6}$data = @()
foreach ($site in $sites){ $webdata = New-Object -TypeName PSobject $webdata | Add-Member -MemberType NoteProperty -Name "Name" `-Value $site.Name -PassThru | Add-Member -MemberType NoteProperty -Name "Id" `-Value $site.Id -PassThru | Add-Member -MemberType NoteProperty -Name "ServerAutoStart" `-Value $site.ServerAutoStart
expand-property
➥ $site.ApplicationDefaults.Properties "Application"
Listing 12.3 Listing websites
Input parameters
B
Get site data
C
Add site properties to output
D
Add applicationdefaults tooutput
E
www.it-ebooks.info

326 CHAPTER 12 Managing IIS
$i = 0 foreach ($binding in $site.Bindings) { $webdata | Add-Member -MemberType NoteProperty `-Name "Binding$i-BindingInformation" ` -Value $binding.BindingInformation -PassThru | Add-Member -MemberType NoteProperty -Name "Binding$i-Protocol" ` -Value $binding.Protocol
$i++ }
expand-property $site.Limits.Properties "Limits" expand-property $site.Logfile.Properties "Logfile" expand-property $site.TraceFailedRequestsLogging.
➥ Properties "TraceFailedRequestsLogging" expand-property $site.VirtualDirectoryDefaults.
➥ Properties "VirtualDirectoryDefaults"
$data += $webdata}$data}}
A good design practice for PowerShell cmdlets and functions is to return all of theobjects in question by default. An optional parameter is then used to filter the datadown to a specific subset of the possible objects. The get-website function followsthis practice by using the -Site parameter to allow a single site to be selected B.
A WMI call is made to retrieve the data for a single desired site or for all sites on theserver C. The presence of a WMI filter determines whether one or all sites arereturned. In either case, the data is returned to the sites variable, which enables youto use a single set of code for the remainder of the function’s processing.
The foreach keyword loop is used to iterate through the sites D. The processingin this loop uses a similar technique to listing 12.1. An empty object is created andAdd-Member is used to extend the object by adding the properties that define the site.
You can deal with embedded objects, such as ApplicationDefaults E, by callingthe expand-property function from technique 89. This will drill down into the givenobject and add the appropriate properties and their values to your object.
A website can have multiple bindings F. Each binding defines a unique combina-tion of protocol, IP address, and port that are used to communicate with the website.Bindings are a common source of problems. This technique provides an easy way todetermine their current settings.
Additional embedded objects have to be expanded G. In some cases, these areidentical to those discussed in relation to listing 12.1.
DISCUSSION
The function can be used in two modes. The first mode requires a website name to besupplied, as shown in the following example:
get-website -computername web01 -site "Default Web Site"
Add binding data to outputF
Add other properties to outputG
www.it-ebooks.info

327TECHNIQUE 92 Creating a website
This option will only return the details for the website, as discussed in the solution. If information relating to all websites is required, you can use the second mode, as
shown in this snippet:
get-website -computername web01
The only parameter you need is the computer name if you’re dealing with a remotecomputer.
Knowing which sites exist on a server provides you with a starting point for manag-ing the website lifecycle.
Creating a website
You can create websites using the WMI provider, but there are some issues with per-forming this action due to Packet Privacy being enforced by the provider. This meansyou need to be a little bit sneaky in the way you approach this problem. I don’t recom-mend this approach for all use of WMI, but it’s a useful fallback technique if you can’twork directly with the WMI cmdlets.
PROBLEM
You have to create a website on a number of servers in your web farm. Once the site iscreated, you can copy in the data and web pages. Some of the web servers are in aremote location, so you can’t physically get to them without travelling.
SOLUTION
Your immediate thought might be to use the [wmiclass] type accelerator to create aninstance of the Site class and then configure its properties. Unfortunately, this won’twork because the accelerator can’t work with Packet Privacy when working with aremote machine.
You can solve this problem, as shown in the following listing, by working directlywith the WMI-related .NET classes and therefore bypassing the restrictions in the[wmiclass] accelerator.
function new-website {[CmdletBinding()]param ( [parameter(ValueFromPipeline=$true, ValueFromPipelineByPropertyName=$true)] [string]$computer="$env:COMPUTERNAME", [parameter(Mandatory=$true)] [string]$site, [parameter(Mandatory=$true)] [string]$domain, [parameter(Mandatory=$true)] [string]$dirpath)PROCESS{$conopt = New-Object System.Management.ConnectionOptions
Listing 12.4 Create website
TECHNIQUE 92
Create options
B
www.it-ebooks.info

328 CHAPTER 12 Managing IIS
$conopt.Authentication =
➥ [System.Management.AuthenticationLevel]:: ➥ PacketPrivacy
$scope = New-Object System.Management.ManagementScope $scope.Path = "\\$computer\root\WebAdministration"$scope.Options = $conopt
$path = New-Object System.Management.ManagementPath$path.ClassName = "Site"
$website = New-Object System.Management.ManagementClass(
➥ $scope, $path, $null)
$path2 = New-Object System.Management.ManagementPath$path2.ClassName = "BindingElement"
$bind = New-Object System.Management.ManagementClass(
➥ $scope, $path2, $null) $BInstance = $bind.CreateInstance()
$Binstance.BindingInformation = "*:80:$site.$domain"$BInstance.Protocol = "http"
$website.Create($site, $Binstance, $dirpath, $true) }}
The standard computer name parameter is joined by parameters for the new sitename, the domain, and the directory path used by the site. These are made manda-tory to ensure that they have to be input. You don’t set a default value when usingmandatory parameters, because the default is never accessed.
The .NET classes you need are in the System.Management namespace (.NETnamespaces aren’t connected to WMI namespaces). You start with the Connection-Options class B which enables you to configure the connection WMI is making. Inthis case you’re setting the authentication level. Other options include a timeout,userid, and password to be used on the connection. The timeout is especially useful,as you’ll see in the next chapter.
Your next step is to set the scope in which you’re working C. This defines the WMInamespace you’ll be using. The connection options become the options of the scope.
The ManagementPath class is used to define the WMI class you’re using, which inthis case is Site. At this point there isn’t a check to determine that the class exists inthe namespace! You can then create a .NET ManagementClass object that representsthe site D. This is equivalent to using [wmiclass]. The final parameter representsother options, which in this case are nonexistent, so you use $null.
You then have to repeat your use of ManagementPath and ManagementClass to cre-ate the binding for the site E. The binding is set to port 80, and you’re only using theHTTP protocol.
After all that’s accomplished you can create the site using the Create method F. Thistakes the site and binding objects as parameters. You also supply the path to the virtualdirectory associated with the site. If this doesn’t exist you can perform a simple copy tocreate an instance of it on the remote machine as a precursor step in your script. The
Create scope
C
Create site object
D
Create binding
E
Create site
F
www.it-ebooks.info

329TECHNIQUE 93 Testing website status
final parameter is set to $true, which means the site will automatically start when IIS isstarted. Set this parameter to $false if you don’t want this behavior to occur.
DISCUSSION
If you can remote desktop, or establish a PowerShell remote connection, to the sys-tem, the website creation code can be simplified to the following:
$Site = [WMIClass]'root\webadministration:Site'$Binding = [WMIClass]'root\webadministration:BindingElement'
$BInstance = $Binding.CreateInstance()$Binstance.BindingInformation = "*:80:testwmi.manticore.org"$BInstance.Protocol = "http"
$Site.Create('NewSiteWMI', $Binstance, 'C:\Inetpub\TestWMI', $true)
The [wmiclass] accelerator is used to create instances of the Site and BindingElementclasses. The binding information is created, and then the Create method on the siteobject is used as previously. This version is available in code download for this chapteras new-site.ps1.
Once you’ve created your site you need to be able to determine if it’s running. Itshould start automatically, but you shouldn’t rely on that happening. Being able totest if a site is running is also a good troubleshooting technique.
Testing website status
Like any applications, websites require a number of other components, such as thenetwork and the operating system, in order to function. In the case of a problem youneed to isolate the component causing the problem. One quick test is to see if thewebsite is running. If you can confirm that it shows that the network and other com-ponents are functioning.
PROBLEM
The phone rings. “The website isn’t available,” shouts the user. You need to checkwhether the website is up before performing other diagnostics.
SOLUTION
The following listing enables you to retrieve the website status, either for a single site ifthe -site parameter is used, or for all sites if it’s omitted.
$ws = DATA {ConvertFrom-StringData -StringData @'1 = Started2 = Starting3 = Stopped4 = Stopping5 = Unknown'@}function get-websitestatus {
Listing 12.5 Get website status
TECHNIQUE 93
www.it-ebooks.info

330 CHAPTER 12 Managing IIS
[CmdletBinding()]param ( [parameter(ValueFromPipeline=$true, ValueFromPipelineByPropertyName=$true)] [string]$computername="$env:COMPUTERNAME", [string]$site
)PROCESS{if ($site) { $sites = Get-WmiObject -Namespace 'root\webadministration' `-Class Site -ComputerName $computername `-Authentication 6 -Filter "Name='$site'"}else { $sites = Get-WmiObject -Namespace 'root\webadministration' `-Class Site -ComputerName $computername -Authentication 6}$data = @()
foreach ($site in $sites){ $wsdata = New-Object -TypeName PSobject Add-Member -InputObject $wsdata -MemberType NoteProperty
➥ -Name "Name" -Value $site.Name
$state = $site.GetState() Add-Member -InputObject $wsdata -MemberType NoteProperty
➥ -Name "Status" -Value $ws["$($state.ReturnValue)"]
$data += $wsdata}$data}}
The function will use Get-WmiObject to return the site information for all sites or forthe specified site. A WMI filter is used to restrict the output to a single site.
The collection of sites (one or all of them) is processed to create a new object rep-resenting each site containing just the information you need. The first property is thesite name. You then have to use the GetState method to find out if the site is running.
NOTE It would have been so much easier if the site status had been main-tained as a property on the site object.
GetState returns an integer code to describe the site status. You can use a hash tablelookup to decipher the code when you add the status member to your object. Theobject you created is then added to your storage array.
The array of objects is output to the pipeline when you’ve finished loopingthrough the sites.
DISCUSSION
The function emits a collection of objects. This means that you can perform furtherprocessing of the output:
get-websitestatus | sort Name -descendingget-websitestatus | sort status | Format-Table -GroupBy status
www.it-ebooks.info

331TECHNIQUE 94 Restarting a website
The first example sorts the sites into alphabetical order. The second example is moreinteresting in that it sorts on the website status and then uses the -GroupBy parameteron Format-Table to create a more report-like display, as shown in figure 12.3.
If a website is showing problems you may need to restart it to resolve the issue.
Restarting a website
Restarting a website is a common administrative task. Many websites are started on anightly basis, which makes the task an ideal candidate for automation. The Site classdoesn’t have a Restart method, but it does have Start and Stop methods.
PROBLEM
A website needs to be restarted on a regular basis as well as on demand. The webserver is in another location and you need to be able to schedule a task to perform theaction.
SOLUTION
A little thought produces the three functions in the following listing. You have a stopand a start function, which you then combine to produce the restart function. Thisprovides maximum flexibility for administering the website.
function stop-website { [CmdletBinding()]param ( [parameter(ValueFromPipeline=$true, ValueFromPipelineByPropertyName=$true)]
Listing 12.6 Restart website
Figure 12.3 Website status reporting using Format-Table and GroupBy
TECHNIQUE 94
Stop websiteB
www.it-ebooks.info

332 CHAPTER 12 Managing IIS
[string]$computername="$env:COMPUTERNAME", [parameter(Mandatory=$true)] [string]$site
)PROCESS{Get-WmiObject -Namespace 'root\webadministration' `-Class Site -ComputerName $computername -Authentication 6 `-Filter "Name='$site'" |Invoke-WmiMethod -Name Stop
}}
function start-website { [CmdletBinding()]param ( [parameter(ValueFromPipeline=$true, ValueFromPipelineByPropertyName=$true)] [string]$computername="$env:COMPUTERNAME", [parameter(Mandatory=$true)] [string]$site
)PROCESS{Get-WmiObject -Namespace 'root\webadministration' `-Class Site -ComputerName $computername -Authentication 6 `-Filter "Name='$site'" |Invoke-WmiMethod -Name Start
}}
function restart-website { [CmdletBinding()]param ( [parameter(ValueFromPipeline=$true, ValueFromPipelineByPropertyName=$true)] [string]$computername="$env:COMPUTERNAME", [parameter(Mandatory=$true)] [string]$site
)PROCESS{Write-Verbose "Stopping Website $site on $computername"stop-website -computer $computername -site $siteget-websitestatus -computer $computername -site $site
Write-Verbose "Starting Website $site on $computername"start-website -computer $computername -site $siteget-websitestatus -computer $computername -site $site
}}
The script begins with the stop-website function B. The -site parameter is manda-tory—you can’t stop a site if you don’t know its name. You use the name in the WMI filterto retrieve the object representing the site. This is then piped into Invoke-WmiMethod,which calls the Stop method.
A site is started using the start-website function C. It works in exactly the sameway, but it calls the Start method.
Start websiteC
Restart websiteD
www.it-ebooks.info

333TECHNIQUE 95 Listing web applications
You can then use the two functions together to perform a restart of the site in therestart-website function D. The site name is passed in to stop-website, and thesite status is checked using get-websitestatus from listing 12.5. Start-website isthen called and another check on the website status is performed.
DISCUSSION
The use of [CmdletBinding()] provides a suite of functionality for free. This includesadding the -Debug and -Verbose common parameters to the function. If the -Verboseparameter is used with the function, the Write-Verbose commands embedded in thefunction will output extra informational messages.
Websites are the outward facing portion of an IIS server—they are the parts thatthe users see and interact with. You’ve seen how to list the websites on a server andhow to create, test, and restart individual websites. That covers the major administra-tion tasks at the site level.
Next we’ll turn our attention to the internals of IIS—the parts that users don’t seedirectly. You need to learn to work with application pools.
12.3 Application pools and applicationsAn IIS server can host multiple websites. Each website can host multiple applications.An application is a group of files delivering specific content or services. An applica-tion pool defines a set of applications that share worker processes.
Using multiple worker processes isolates applications ensuring that a problem inone doesn’t leak into all of the applications on the server. This increases stability andreliability of the IIS server.
Your first technique is to discover the web applications hosted on the server.That leads us to the application pools defined on the server and finally we’ll lookat how you can recycle them. This is analogous to a server reboot but doesn’tcause downtime.
Listing web applications
Web applications are the reason we have web servers. They’re the only part in whichusers have an interest. The web applications are linked to sites and application pools.Understanding web applications means that you can understand what is happeningon the servers.
PROBLEM
Users are reporting issues with the web server. It hosts a number of web applications. Yoususpect that one particular application is causing the problem. The applications andtheir related application pools need to be tested to determine their configuration.
SOLUTION
The following listing provides a view of the relationship between the websites, webapplications, and application pools. You’re looking at this at a server level so there’sno parameter to select an individual application pool. This could be added using list-ing 12.5 as a template.
TECHNIQUE 95
www.it-ebooks.info

334 CHAPTER 12 Managing IIS
function get-application {[CmdletBinding()]param ( [parameter(ValueFromPipeline=$true, ValueFromPipelineByPropertyName=$true)] [string]$computername="$env:COMPUTERNAME"
)PROCESS{Get-WmiObject -Namespace 'root\webadministration' `-Class Application -ComputerName $computername `-Authentication 6 |select SiteName, ApplicationPool, Path, EnabledProtocols}}
The body of the function consists of a call to the Application WMI class. Select-Objectis then used to deliver the properties you need to see. In this case, you get the site andapplication pool that are related to the application.
DISCUSSION
This is probably the simplest script in the chapter, but it’s the one that probably has themost impact. The secret of a happy IIS server is to ensure that each application is iso-lated in its own application pool with its own worker processes. The get-applicationfunction provides an easy way to discover whether applications are sharing applicationpools and could therefore interfere with each other.
Now that you know that application pools exist you need to investigate them a bitmore.
Listing application poolsWhen an IIS server is created a default application pool is created. Application poolsare the way you can control the worker processes on your IIS server. Other applica-tion pools can be created as required to host your applications, but they aren’t cre-ated automatically.
If the application pool associated with an application isn’t responding then theapplication won’t work.
PROBLEM
After checking the web applications defined on the server you notice that a number ofthe applications are sharing an application pool. This could be the source of the prob-lem, so you need to dig deeper into the application pool configuration.
SOLUTION
Listing 12.8 provides a solution to this problem. You can either look at all of the appli-cation pools on a server, or you can examine a single application pool.
NOTE This script displays the properties that I think are most useful. Thereare a significant number of other properties available, and I strongly urge youto experiment with the ApplicationPool class to discover if there’s any otherinformation you need for your particular environment.
Listing 12.7 List web applications
TECHNIQUE 96
www.it-ebooks.info

335TECHNIQUE 96 Listing application pools
n
The script starts by defining a hash table lookup of the possible application poolstates. These are subtly different from the list of states for websites (see listing 12.5).Don’t you just love consistency!
$as = DATA {ConvertFrom-StringData -StringData @'0 = starting1 = started2 = stopping3 = stopped4 = unknown'@}
function get-apppool {[CmdletBinding()]param ( [parameter(ValueFromPipeline=$true, ValueFromPipelineByPropertyName=$true)] [string]$computername="$env:COMPUTERNAME", [string]$apppool
)PROCESS{if ($apppool) { $apppools = Get-WmiObject -Namespace 'root\webadministration' `-Class ApplicationPool -ComputerName $computername `-Authentication 6 -Filter "Name='$apppool'"}else { $apppools = Get-WmiObject -Namespace 'root\webadministration' `-Class ApplicationPool -ComputerName $computername `-Authentication 6}$data = @()
foreach ($apppool in $apppools){
$state = $apppool.GetState()
$webdata = New-Object -TypeName PSobject $webdata | Add-Member -MemberType NoteProperty -Name "Name" ` -Value $apppool.Name -PassThru |
Add-Member -MemberType NoteProperty -Name "Status" ` -Value $as["$($state.ReturnValue)"] -PassThru |
Add-Member -MemberType NoteProperty -Name "AutoStart" `-Value $apppool.AutoStart -PassThru |
Add-Member -MemberType NoteProperty -Name "RunTime" ` -Value $apppool.ManagedRunTimeVersion -PassThru |
Add-Member -MemberType NoteProperty -Name "CPULimit" ` -Value $apppool.CPU.Limit -PassThru |
Listing 12.8 List application pools
Input parameters
B
Get applicatiopools
C
Add properties
D
www.it-ebooks.info

336 CHAPTER 12 Managing IIS
Add-Member -MemberType NoteProperty -Name "RapidFailprotection" `-Value $apppool.Failure.RapidFailProtection
$data += $webdata}$data}}
The function parameters are the computer name and an optional applicationpool B. All application pools, or a single application pool, depending on the use ofthe parameter, are retrieved and stored in the $apppool variable using a WMI call tothe ApplicationPool class C. The foreach loop then iterates over the collection ofapplication pools.
The state of the application pool is placed into the $state variable. A new object iscreated and populated with the desired properties D.
NOTE The Add-Member statements are shown with a line between them tomake the code more readable. The function will still run like this becausePowerShell ignores the white space. The version in the code downloaddoesn’t have these gaps.
The -PassThru parameter passes the newly extended object to the pipeline, whichenables you to simplify the code required to add multiple properties to an object. Theobject is added to the array you defined to act as a holding collection. At the end ofthe script the array is passed to the pipeline for further processing and display.
DISCUSSION
An alternative method of setting the properties is as follows:
$webdata = New-Object -TypeName PSobject -Property @{ Name = $apppool.Name Status = $as["$($state.ReturnValue)"] AutoStart = $apppool.AutoStart RunTime = $apppool.ManagedRunTimeVersion CPULimit = $apppool.CPU.Limit RapidFailprotection = $apppool.Failure.RapidFailProtection }
This is a lot less typing and is preferred when you understand what’s happening,whereas the Add-Member approach is more meaningful for newcomers to PowerShell.Regardless of your experience, I still recommend using Add-Member when you need toadd a single property to an existing object.
One activity that occurs with some regularity is recycling application pools. Thisenables you to achieve a finer level of control over the activities on your web server.
Recycling an application poolYou’ve seen that application pools are directly related to the worker processes withinIIS. There are times you’ll need to restart the IIS server, times you’ll need to restart awebsite, and times you’ll need to restart an application within a website. You canaccomplish the latter task by recycling the application pool. This limits the impact tothe minimum number of applications rather than the whole site or server.
TECHNIQUE 97
www.it-ebooks.info

337TECHNIQUE 97 Recycling an application pool
PROBLEM
A web application is intermittently exhibiting strange behavior. There are a numberof websites on the server, each with several applications. It isn’t possible to restart theserver or the website due to the needs of other users. You need to recycle the applica-tion pool of the application to effectively restart the application.
SOLUTION
The following listing demonstrates how you can use the ApplicationPool class torecycle an application pool. The -apppool parameter is mandatory. You don’t want torecycle every application pool on the IIS server at this stage.
function restart-apppool {[CmdletBinding()]param ( [parameter(ValueFromPipeline=$true, ValueFromPipelineByPropertyName=$true)] [string]$computername="$env:COMPUTERNAME", [parameter(Mandatory=$true)] [string]$apppool
)PROCESS{Get-WmiObject -Namespace 'root\webadministration' `-Class ApplicationPool -ComputerName $computername `-Authentication 6 -Filter "Name='$apppool'" |Invoke-WmiMethod -Name Recycle
}}
This function follows a pattern you’ve seen a number of times in that you get a WMIobject that represents the application pool you’re working with. You then pipe thisinto Invoke-WmiMethod and call the Recycle method.
TIP This piece of WMI code, like many in the book that deal with performingactions, could be executed at the PowerShell prompt. Wrapping it in a func-tion reduces the amount of typing and increases productivity. When you findyourself using the same code repeatedly it’s time to wrap it in a function.
DISCUSSION
The ApplicationPool class has Stop and Start methods. It’s possible to createstop-apppool and start-apppool functions using listing 12.6 as a template. I suspectthat the functions to restart a website and to recycle an application pool will be themost-used ones from this chapter.
This concludes our work with the IIS WMI provider, though we haven’t coveredeverything it can do. The techniques presented in this chapter will enable you to digfurther into the provider to make your IIS administration easier and more productive.
Listing 12.9 Recycle application pool
www.it-ebooks.info

338 CHAPTER 12 Managing IIS
12.4 SummaryPowerShell and WMI provide a robust mechanism to administer local and remote IISservers. There’s an issue with using the provider in that it expects to use Packet Privacyauthentication. You’ve seen how to use that to retrieve information, create new objectson the server, and perform administrative actions on the server.
IIS has a number of components. You’ve learned to administer
■ The web server itself■ Websites■ Applications■ Application pools
In addition, you must remember the other WMI techniques you’ve seen in previouschapters that enable you to administer the operating system, networking, and otheraspects of the system as a whole. One of the great strengths of WMI is that it worksfrom the hardware to the application and enables you to use the same types of tech-niques to perform administration at all levels.
The next chapter looks at how you can use WMI to configure a brand new server.This will combine some of the techniques that you’ve already seen with some newtechniques.
www.it-ebooks.info

Configuring a server
I add servers to my test domain on a regular basis. An organization of any size couldbe adding many servers over the course of a year, especially if they’re undertaking amajor piece of infrastructure work, such as server consolidation or the introductionof a thin client environment using Terminal Services or Citrix. The key premise ofthis chapter is that you’re adding a new server to a domain. Many of the techniquesare still valid in a workgroup environment, but most organizations with more thana handful of computers will be using a domain.
TIP I’ve assumed in this chapter that the new server has a usable IPaddress (possibly via DHCP) and that the Windows Firewall is either off orconfigured to allow remote WMI-based management.
There are a number of tasks you’ll need to perform after the operating system hasbeen installed and prior to the installation of applications. These tasks are common
This chapter covers■ Renaming a server and joining it to a domain■ Configuring network adapter settings■ Setting the license key and activating a server■ Setting the power plan
339
www.it-ebooks.info

340 CHAPTER 13 Configuring a server
across most servers, providing a good reason for automating them. As you’ll see, theautomation of these tasks builds on some of the PowerShell and WMI functions you’veseen in earlier chapters.
NOTE The order of the tasks described in this chapter isn’t the order inwhich you have to perform them. I prefer to rename the server and set thecorrect IP address before joining it to the domain. You may prefer a differentapproach. The techniques can be applied in whatever order is required to sat-isfy your process.
Modern Windows systems don’t supply an option to provide a name for the machineduring the installation process. It’s unlikely that you’ll want to use the name the installroutine invents, so your first task will be to rename the server. This technique can alsobe used at other times in a server’s life, such as if it’s being repurposed. Once it’srenamed, you can then join the machine to the domain to ensure the correct securitypolicies are applied and that you can administer the system more efficiently.
You’ll need to restart the server several times during the overall process. You mayalso need to shut it down to perform a cold start. We’ll look at how these tasks can beperformed using PowerShell and WMI-based functions.
TIP If you ever need to shut down a whole data center, the shutdown func-tion presented in this chapter can be used as the basis of that process (or youcould use listing 1.4). It works—I’ve done it. Compare that to logging on toseveral hundreds of machines to close them down.
I usually configure the network settings next. You saw how to configure networkadapters in chapter 11, and you’ll use those functions with a wrapper to overcome theissue of resetting the address on the adapter you’re connecting through. You’ll alsosee how to reuse the chapter 11 functions to set the DNS servers and other network-related configuration items.
Microsoft’s system activation process means that a license key needs to be set forthe machine. You’ll set the license key through PowerShell and WMI (though this onlyworks for the latest version of Windows). The same WMI classes will be used to activatethe machine. This can be always performed at a later date, as you have a number ofdays grace after installation before you have to activate the server.
Power plans are usually more important for managing client machines than serv-ers. But there are occasions when you may need to set a plan to reduce your server’spower consumption. We’ll finish the chapter by looking at a technique to performthis task using PowerShell and WMI.
NOTE You can’t use these techniques to configure Windows componentssuch as creating a DNS server or installing IIS. Those actions need to be per-formed using PowerShell remoting to access the ServerManager module inWindows Server 2008 R2.
The first task on our list is renaming the server.
www.it-ebooks.info

341TECHNIQUE 98 Renaming a server
13.1 Initial tasksWhen creating a new server, I normally rename it and then join it to the domain. Thisavoids having the temporary name in DNS. I also get the time-consuming reboots outof the way by performing these two tasks up front.
Renaming a server
PowerShell v2 doesn’t supply a cmdlet to rename a computer. You can find cmdlets torename Active Directory objects, but that doesn’t change the name of the server.
TIP You may see references on the internet to a Rename-Computer cmdlet.This was available during part of the PowerShell v2 beta process but was with-drawn before version 2 was finalized. The Rename-Computer cmdlet has beenreinstated in PowerShell v3 (at least as far as the beta version).
This gap in the functionality provides us another opportunity to dip into our WMI bagof tricks.
PROBLEM
An operating system has been installed on a new server. The name assigned to thecomputer by the Windows install process isn’t suitable for your domain, so you needto change it.
SOLUTION
Listing 13.1 shows how you can use the Win32_ComputerSystem class to perform thistask. The rename-computer function has the current computer name and the newname as mandatory parameters. It’s important to remember that an IP address can besupplied as the current computer name, as shown in figure 13.1 later in the discussion.
function rename-computer {[CmdletBinding()]param ( [parameter(ValueFromPipeline=$true, ValueFromPipelineByPropertyName=$true, Mandatory= $true)] [string]$computername, [parameter(Mandatory= $true)] [string]$newname
)BEGIN{ $cred = Get-Credential}PROCESS { $comp = Get-WmiObject Win32_ComputerSystem
➥ -ComputerName $computername -Credential $cred $ret = $comp.Rename($newname, $null, $null) if ($ret.ReturnValue -eq 0){ Write-Host "Rename of $computer succeeded. Restarting $computer"
Listing 13.1 Rename server
TECHNIQUE 98
www.it-ebooks.info

342 CHAPTER 13 Configuring a server
Restart-Computer -ComputerName $computername -Credential $cred -Force } else {Write-Host "Rename of $computer failed"}}}
If you’ve renamed a computer using the manual process, then you know that itrequires administrator privileges on the system. The machine isn’t part of the domainyet, so you can’t use your domain accounts (these techniques are a real-life “chickenand egg” situation—which do you perform first?). You can use Get-Credential tosupply the password in a secure manner for the Administrator account on the server,as illustrated in figure 13.1. In my test it wasn’t necessary to supply the machine nameas part of the credential. It’s an available option if required.
TIP I put Get-Credential into the BEGIN block in listing 13.1 so it executesonce if a number of machine names are piped to the function. This may notbe appropriate if the same password hasn’t been used for all Administratoraccounts (ideally they should all be different, but it rarely happens). In thatcase, move it into the PROCESS block, and you’ll be prompted for credentialsfor each machine.
The Win32_ComputerSystem class is used to create a WMI object for the machine. Thecredential you created in the previous step is used during the WMI call. This ensuresthat the object is assigned the correct permissions. The Rename method is used with
Figure 13.1 Renaming a computer
www.it-ebooks.info

343TECHNIQUE 99 Joining a computer to a domain
the value of the script’s newname parameter. The second and third possible parameterson this method are set to $null as they represent an account and password that haspermission to perform the rename. You’ve already supplied this information whenyou created the WMI object.
The return code is tested, and if it’s 0 (success), a message is displayed and thecomputer is restarted. If any other value is returned, a message stating that therename action was unsuccessful is displayed.
TIP The vast majority of rename failures can be traced to mistyping the cre-dentials or using the wrong credentials.
DISCUSSION
This function uses the Restart-Computer cmdlet from PowerShell v2. This could bereplaced by a call to the Reboot method of Win32_ComputerSystem as shown in sec-tion 13.2.2.
This function could also be used if a computer is being repurposed and you needto rename the machine. You can’t use WMI to move the server to an OrganizationalUnit (OU) within Active Directory, but that capability could be added to the script, ifrequired, by utilizing the [adsi] type accelerator.
An organization with multiple servers will find that administering those computersthrough an Active Directory domain is more efficient. You’ll need to join your newserver to the domain before you can administer it in this way.
Joining a computer to a domain
You can use GUI tools to join a computer to the domain, but that means creating aremote desktop connection to the server. It’s more efficient to send a command froma script to enable this action.
NOTE The Add-Computer cmdlet can be used to join a computer to thedomain, but it only works on the local machine. You can’t use it to join aremote machine to the domain.
PROBLEM
You need to join your new server to the domain. The correct credentials are availableand you need to perform this action in the most efficient manner possible.
SOLUTION
You’re joining computers to domains, as shown in the following listing, which meansyou’ll find the WMI method for this on the Win32_ComputerSystem class. The impor-tant point to note about this script is that two sets of credentials are required.
function join-domain {[CmdletBinding()]param ( [parameter(ValueFromPipeline=$true,
Listing 13.2 Join computer to domain
TECHNIQUE 99
www.it-ebooks.info

344 CHAPTER 13 Configuring a server
ValueFromPipelineByPropertyName=$true, Mandatory= $true)] [string]$computername
)BEGIN {$cred = Get-Credential -Credential Administrator
$domcred = Get-Credential$domain = $domcred.GetNetworkCredential().Domain$user = $domcred.UserName$password = $domcred.GetNetworkCredential().Password}PROCESS {$comp = Get-WmiObject Win32_ComputerSystem
➥ -ComputerName $computername -Credential $cred ➥ -Authentication 6$ret = $comp.JoinDomainOrWorkgroup($domain, $password, $user, $null, 3)if ($ret.ReturnValue -eq 0){ Write-Host "Joining $computer to $domain succeeded. Restarting $computer" Restart-Computer -ComputerName $computername -Force}else {Write-Host "Joining $computer to $domain failed"}}}
You start by getting the administrator credential for the new server—it wasn’t neces-sary in my testing to give the machine name as part of the credential. When you join amachine to the domain, you have to provide the credentials of a domain account thathas permissions to perform this act.
A second Get-Credential call is performed to allow input of the domain creden-tial—the domain name must be part of the credential. The domain is determinedfrom the credential information and the password is also retrieved. The password hasto be in a clear string for this technique to work—it’s encrypted within the credential.Figure 13.2 shows the encrypted and unencrypted versions of the password in a cre-dential object. Obtaining the password in this way means that you don’t store it any-where for it to be compromised, and it can’t be read as you input it.
Figure 13.2 Accessing a password from a network credential
www.it-ebooks.info

345Controlling server restarts
A WMI object based on the Win32_ComputerSystem class is obtained from the remotemachine. The administrator credential for the server is used in this call.
NOTE You have to use Packet Privacy (by using -Authentication 6 as param-eter and value) on the WMI call. The connection has to be encrypted for thisaction; otherwise an error is thrown by the WMI engine.
The JoinDomainOrWorkgroup method is used to add the computer to the domain.The argument given a value of $null represents the OU you want the machine to beplaced in ($null indicates that you’re using the default), and the final parameter indi-cates that you’re joining the machine to the domain and creating an account.
A final check on the return value indicates whether the attempt to join themachine to the domain was successful or not. You can then restart the server. If theattempt to join the domain fails for any reason it may be necessary to restart the serverbefore reattempting the action.
DISCUSSION
One of the major reasons for failure when attempting to join a machine to a domainis that the server can’t find a domain controller in the domain because DNS isn’t con-figured correctly. This technique assumes that at least one DNS server is configured viaDHCP, as is usual in most organizations. If for some reason there isn’t one you shouldperform the tasks in section 13.3 before attempting to join the server to the domain.
I always put new systems into the default Computers container when joining themto the domain. This ensures that Group Policies (GPOs) don’t affect the system untilI’ve finished configuring it. If you want to put the machine directly into an OU add aline something like this to define the OU to the script:
$ou = "OU=MyOU,DC=Mydomain,DC=COM"
The call to the JoinDomainOrWorkgroup method is then changed to this:
$ret = $comp.JoinDomainOrWorkgroup($domain,
➥ $password, $user, $ou, 3)
A computer restart is required when you rename the computer or join it to a domain,but you also need to be able to perform these actions at other times. When you usethe GUI tools to configure a new server the reboot is triggered by the GUI. When usingWMI you need to trigger server shutdown and restarts within the script. Controllingserver restarts with WMI is the topic we’ll cover next.
13.2 Controlling server restartsThere are two actions you need to consider when you want to control a new server.You either want to shut it down completely, or you want to perform a restart so thatyour configuration changes will be committed and used.
PowerShell v2 supplies cmdlets to perform these actions:
■ Stop-Computer
■ Restart-Computer
www.it-ebooks.info

346 CHAPTER 13 Configuring a server
It’s useful to be able to perform these actions directly from WMI.
Shutting down a server
A server may need to be shut down for a number of reasons:
■ It’s a system that isn’t needed at present.■ Configuration hasn’t been completed, and you don’t want people accessing it
until it’s ready.■ It’s a virtual machine, and the host resources are needed for something else.■ Hardware maintenance has to be performed.
PROBLEM
There’s an issue with the power supply in your data center. The power supply will beswitched off for safety reasons while this issue is rectified. This requires that all of thesystems be shut down during the period of the work.
SOLUTION
The following listing shows how you can shut down one or more servers. This will alsowork with client machines.
function stop-server {[CmdletBinding()]param ( [parameter(ValueFromPipeline=$true, ValueFromPipelineByPropertyName=$true)] [string]$computername="$env:COMPUTERNAME"
)BEGIN{$cred = Get-Credential}PROCESS {$comp = Get-WmiObject Win32_OperatingSystem
➥ -ComputerName $computername -Credential $cred$ret = $comp.Shutdown()if ($ret.ReturnValue -eq 0){ Write-Host "Shutting down $computername succeeded."}else {Write-Host "Shutting down $computername failed"}}}
The computername parameter can be supplied on the command line for a singlemachine or via the pipeline for a number of machines. You get credentials that giveyou permission to shut down the server (usually the local administrator on non-domain machines or the domain administrator if in a domain).
The Win32_OperatingSystem class is used on the remote machine and the Shut-down method is called. A test of the return value can be used to check for a successfulshutdown.
Listing 13.3 Shut down server
TECHNIQUE 100
www.it-ebooks.info

347TECHNIQUE 101 Restarting a server
DISCUSSION
If the same credentials can’t be used to shut down all computers you can move thecontent of the BEGIN block into the start of the PROCESS block.
PROCESS {$cred = Get-Credential
…}
In the perimeter network you may have different administrator passwords on the sep-arate machines.
You can also use the Stop-Computer cmdlet for this action. When in a domain,you’d use this:
Stop-Computer -ComputerName web01
Otherwise you’d use this:
$cred = Get-CredentialStop-Computer -ComputerName 10.10.54.246 -Credential $cred -Force
Stopping the server is a bit drastic and not something you’d want to do on a regularbasis. It’s more common, especially when configuring a new server, to have to restartthe server multiple times.
Restarting a server
There’s a school of thought that states that “Windows servers should be restarted on aregular (often nightly or weekly) basis.” I haven’t found this to be necessary with mod-ern versions of Windows. The idea is left over from the Windows NT days when theoperating system and applications were not as reliable (there are still a few applica-tions that need a regular restart, but this is definitely application driven rather thanoperating system driven). But you still need to reboot the server after specific taskshave been performed.
PROBLEM
A server has to be restarted due to a problem with an application. That particularapplication is business critical at this time of year, so you need to initiate the restart asquickly as possible.
SOLUTION
A minor change to technique 99 produces the following listing. The comments in thediscussion of listing 13.2 regarding the positioning of the Get-Credential commandalso apply to this listing.
function restart-server {[CmdletBinding()]param ( [parameter(ValueFromPipeline=$true,
Listing 13.4 Restart server
TECHNIQUE 101
www.it-ebooks.info

348 CHAPTER 13 Configuring a server
ValueFromPipelineByPropertyName=$true)] [string]$computername="$env:COMPUTERNAME"
)BEGIN{$cred = Get-Credential}PROCESS {$comp = Get-WmiObject Win32_OperatingSystem `-ComputerName $computername -Credential $cred$ret = $comp.Reboot()if ($ret.ReturnValue -eq 0){ Write-Host "Restarting $computername succeeded."}else {Write-Host "Restarting $computername failed"}}}
The change from listing 13.2 is that the Reboot method is used rather than the Shutdownmethod. The return value is tested to determine whether the restart has succeeded.
DISCUSSION
It would be possible to combine listings 13.2 and 13.3 and use switches to indicatewhether a restart or shutdown is required. That was my initial approach, but I decidedthat it was less confusing to have the granularity of two functions. It also reduces thechances of error!
TIP When designing your functions I recommend that you build the maxi-mum amount of granularity into your code. Make many small functions, eachperforming a single job, rather than a small number of large functions. Main-tenance will be much easier.
When giving credentials be careful if you use Administrator as the user account. If themachine is a member of a domain it will attempt to use the domain administratoraccount which may not have rights to the system. It’s safest to always fully define theaccount that’s being used:
■ Domain\user_name for an Active Directory account■ Computer\user_name for a local account
NOTE One thing to remember is that restarting the server doesn’t necessarilyensure that the applications and services restart. In some cases you’ll need totest whether specific services have restarted. You can use the Get-Servicecmdlet or listing 9.1 to perform this task.
When I create a new server I normally use DHCP to configure it with an IP address. It’sa best practice to use a static IP address for servers. Setting the networking configura-tion is the next task.
13.3 Configuring network adapter settingsWhen you configure a server’s network adapter two main groups of tasks need to beperformed:
www.it-ebooks.info

349TECHNIQUE 102 Setting an IP address
■ Set the IP address and subnet.■ Configure the DNS servers that the server will use and set the connection name.
If you’ve read these chapters in order you’ll remember that you created functions todo this in chapter 11. Setting the DNS servers and connection name can be performedusing the functions directly. There’s a problem with setting the IP address, but you canfind a way around that.
You need to know which adapter you’re working with before you start. In this sec-tion, I’m assuming you’re working with a single adapter. Network adapter teamingcan’t be performed by WMI and will need to be configured manually.
You can find the adapters using technique 74 in chapter 11:
get-nic -computer webr201 |ft DeviceId, NetConnectionID -a
The results for my system show that I need to work with the adapter that has a DeviceIDof 7 and a NetConnectionID of Local Area Connection. Your results will probablybe different.
Now that you’ve established which adapter you need to configure we’ll look at set-ting the IP address and then the other information.
Setting an IP address
The function in technique 84 (chapter 11) will set an IP address. It works fine whenyou’re modifying the adapter on the local machine or an adapter on a remotemachine that’s not the adapter through which you’re connecting to the system. Butwhen you try to modify the IP address of an adapter on a remote machine, which isalso the adapter you’re attached to, you’ll find the following:
1 The IP address will be changed immediately.2 PowerShell will appear to hang.3 The server doesn’t immediately reset its information in DNS.
Item 1 is good. Item 3 isn’t a problem because you can work with the new IP addressinstead of the name. Item 2 is a problem. What happens is that the IP address on theremote machine is changed, and PowerShell and WMI immediately lose their connec-tion to the machine because the address has changed. You can set WMI to time out,but the network connection doesn’t time out as quickly, so PowerShell doesn’t regaincontrol of the prompt.
The only way around this that I’ve discovered, apart from restarting PowerShell, isto wrap the change in a PowerShell job. This immediately returns the prompt, whichmeans you can keep on working while the job waits for the timeout. It’s an ugly work-around but it does work. This is the essence of administration scripting—doing what’snecessary to get the job done. There are no points for style and artistic interpretationin this game.
TECHNIQUE 102
www.it-ebooks.info

350 CHAPTER 13 Configuring a server
PROBLEM
You need to change the IP address on a remote machine. It has a single networkadapter and you don’t want to wait for the timeout to occur.
SOLUTION
Listing 13.5 is a script rather than a function mainly because using a function addedsome unnecessary layers of complexity. I’ve called it set-ipaddress as can be seen inthe discussion section. The script takes a computer name, IP address, subnet, and net-work adapter index as parameters (see technique 74 in chapter 11 for details on dis-covering the index value).
[CmdletBinding()]param ( [string$computername="$env:COMPUTERNAME", [string]$address, [string]$subnet, [int]$index)
$script = @"`$tspan = New-TimeSpan -Seconds 20 `$conopt = New-Object System.Management.ConnectionOptions`$conopt.TimeOut = `$tspan
`$scope = New-Object System.Management.ManagementScope `$scope.Path = "\\$computername\root\cimv2"`$scope.Options = `$conopt
`$path = New-Object System.Management.ManagementPath `$path.Path = "Win32_NetworkAdapterConfiguration.Index=$index"
`$nic =
➥ New-Object System.Management.ManagementObject( ➥ `$scope, `$path, `$null)`$nic.EnableStatic('$address', '$subnet') "@
$script | Set-Content -Path setnic.ps1$path = Join-Path -Path (Get-Location) -ChildPath "setnic.ps1"
Start-Job -Name setnic -FilePath $path
The next step is to create a here-string (a PowerShell structure for multiline strings)that holds PowerShell code. The backticks (`) are used to escape the dollar symbols($) so that variable substitution is not attempted. This script uses the .NET classes towrap the WMI functionality as an example of how they can be used.
The code starts by creating a timespan object of 20 seconds B and applying it tothe timeout property of the WMI connection. The scope defines the WMI namespaceand includes the connection options C.
The path to the WMI instance you need is defined D, and a WMI object is createdrepresenting that network adapter configuration E. The EnableStatic method isused to set the IP address and subnet.
Listing 13.5 Set IP address
Create timespan
B
Set WMI scope
C
Set WMI path
D
Create object
E
Start job
F
www.it-ebooks.info

351TECHNIQUE 103 Configuring other settings
The contents of the here-string are written to a file using Set-Content. The fullpath to the file is created, and the final act is to start a job F using the file you’ve cre-ated as the item to action. It’s important to remember that the file is on your local sys-tem but because of its contents will run against the remote machine.
DISCUSSION
The script can be used as follows. This assumes that you’ve discovered the index of theadapter you need to modify:
set-ipaddress -computername webr201 -address "10.10.54.118" ` -subnet "255.255.255.0" -index 7
That’s the hard part out of the way. Setting the DNS servers and the connection nameis a piece of cake by comparison.
Configuring other settings
You need to set the DNS servers so that the machine can find a domain controller forits domain. The network connection name on the adapter should be changed so thatit’s consistent with your other servers.
PROBLEM
You need to complete the configuration of your network adapter by setting the DNSservers and connection name.
SOLUTION
Listing 13.6 shows how you can do this at the command line. You start by loading themodule you created in chapter 11 (it’s OK to rename the module if you want, butremember that the .psm1 file needs to be renamed as well).
Alternatively, you could use this line:
Import-Module ./Chapter11.psm1 -Force
This will reimport the module if it’s already loaded. You may need to give the full pathon your machine.
The second act is to define the network address of the machine (this assumesyou’ve just changed the IP address, so the name isn’t available because DNS hasn’tcaught up).
if (-not(Get-Module -Name Chapter11)){ Import-Module ./Chapter11.psm1}$computername = "10.10.54.118"
"Set Connection Name"rename-connection -computername $computername `-NetConnectionID "Local Area Connection" -newname "Virtual LAN"
"Set DNS Servers"$dnssvr = "10.10.54.201","10.10.54.98"set-DNSserver -computername $computername -index 7 -dnsserver $dnssvr
Listing 13.6 Set network information
TECHNIQUE 103
www.it-ebooks.info

352 CHAPTER 13 Configuring a server
You can then use the rename-connection (technique 80) and set-DNSserver (tech-nique 86) functions from chapter 11. I’ve added a couple of strings as comments thatwill be displayed to show progress.
DISCUSSION
This section on configuring the network addresses has illustrated two key points youshould keep in mind regarding the use of PowerShell (or any other automation tool):
■ Look for reuse when you create your scripts and functions. Technique 103 is allabout reuse in that you’re using preexisting functions to do the job.
■ Concentrate on getting the task completed. The solution in technique 102 isn’telegant but it works. At some stage in the future you may discover a differentway of performing the task, but for now your time is better spent on solvingother problems.
The remaining major problem to solve is how to activate the servers.
13.4 Activating a serverProduct activation for Windows servers may seem to be a pain, but it’s a fact of life.You have to do it for two reasons:
■ To ensure the software is properly licensed and you remain legal■ To keep the servers working
How can you do it in the most efficient manner? My friend James O’Neill answered this in a blog post. Check http://
jamesone111.wordpress.com/ and search for “SoftwareLicensingProduct.” You’ll findreferences to two WMI classes:
■ SoftwareLicensingProduct
■ SoftwareLicensingService
NOTE These classes are new in Windows 7 and Windows Server 2008 R2.They’re not available on earlier versions of Windows.
This section is derived from James’ post. You can test the license status of Windowslike this:
Get-WmiObject SoftwareLicensingProduct |select Name, LicenseStatus
LicenseStatus will return an integer value where 0 = Unlicensed and 1 = Licensed. Anumber of results are returned that represent the various ways Windows can belicensed or activated. The important result is the one with a partial product key:
Get-WmiObject SoftwareLicensingProduct |where {$_.PartialProductKey} |ft Name, ApplicationId, LicenseStatus -a
This indicates the licensing situation you’re dealing with. It would be nice, though, ifyou could get a little bit more information about the licensing state of your system.
www.it-ebooks.info

353TECHNIQUE 104 Testing license state
Testing license state
Has your IT environment ever been audited? Can you prove that all of your servers areproperly activated? This section will help you answer that second question. As well asbeing a useful test while you’re building a new server, you can also use it to test thesetup of your whole estate.
PROBLEM
You need to test the activation and license state of your servers for auditing purposes.Some of the servers are in remote locations and you don’t have the time or resourcesto physically visit them all.
SOLUTION
You’ve seen that the license status information is available through the Software-LicensingProduct class. The following listing shows how you can use that class to gen-erate a meaningful statement about the license status of your server.
$lstat = DATA {ConvertFrom-StringData -StringData @'0 = Unlicensed1 = Licensed2 = OOB Grace3 = OOT Grace4 = Non-Genuine Grace5 = Notification6 = Extended Grace'@}function get-licensestatus {param ([parameter(ValueFromPipeline=$true, ValueFromPipelineByPropertyName=$true)] [string]$computername="$env:COMPUTERNAME")PROCESS { Get-WmiObject SoftwareLicensingProduct -ComputerName $computername | where {$_.PartialProductKey} | select Name, ApplicationId, @{N="LicenseStatus"; E={$lstat["$($_.LicenseStatus)"]} }}}
A hash table, $lstat, is defined at the beginning of the script. You can then call theSoftwareLicensingProduct class against the computer passed as a parameter to thefunction. The results are filtered on the PartialproductKey property to ensure youonly get the results you need. There are three pieces of data you need:
■ The name of the product■ The ApplicationId, which is a GUID■ The decoded license status
Listing 13.7 Test license status
TECHNIQUE 104
www.it-ebooks.info

354 CHAPTER 13 Configuring a server
The decoding of the license status is managed by the calculated field in the Select-Object statement.
DISCUSSION
Figure 13.3 shows the results of running the function. The ApplicationId is fixed forversions of Windows. You should get the same result returned on all versions.
The results in figure 13.3 show that you’re still in the grace period after installationof the operating system. You need to set the license key before you can activate theserver.
Setting the license key
A Windows license key consists of five groups of five alphanumeric characters. A validlicense key is required for each instance of Windows. The key is usually found with themedia. Keys are specific to the version of Windows and the source of the media. Forinstance, you can’t use an MSDN key on a commercial version of Windows.
PROBLEM
The license key needs to be set before you can activate the system. You need to per-form this act remotely and ensure that the license key is in the correct format.
SOLUTION
Windows 7 and Windows Server 2008 R2 have a WMI class—SoftwareLicensing-
Service—that you can use to solve this problem, as shown in the following listing.The license key and computer name have been made mandatory parameters. Thisremoves the need for default values. The license key pattern is evaluated using a regu-lar expression and the ValidatePattern method. This won’t guarantee that the key iscorrect, but it will ensure it’s in the right format.
function set-licensekey {param ([parameter(Mandatory=$true)][string][ValidatePattern("^\S{5}-\S{5}-\S{5}-\S{5}-\S{5}")]$Productkey,
[parameter(Mandatory=$true)][string]$computername="$env:COMPUTERNAME"
Listing 13.8 Set license key
Figure 13.3 Testing the license status
TECHNIQUE 105
www.it-ebooks.info

355TECHNIQUE 106 Activating a server
)
$product = Get-WmiObject -Class SoftwareLicensingService `-computername $computername $product.InstallProductKey($ProductKey) $product.RefreshLicenseStatus()}
You use the SoftwareLicensingService class to create a WMI object. You can use theInstallProductKey method with the license key as an argument. The last line of thefunction refreshes the license status information.
DISCUSSION
The function is used as follows:
set-licensekey -Productkey "XXXXX-XXXXX-XXXXX-XXXXX-XXXXX" `-computername "10.10.54.118"
The "XXXXX-XXXXX-XXXXX-XXXXX-XXXXX" represents the license key. You didn’t reallythink I’d use my real key? The computer on which you’re installing the key can be des-ignated by IP address as here or by its name.
TIP One additional possibility is to use WMI to read the operating system type(see technique 14 in chapter 5), retrieve the key from a secure store, and applyit. Ideally, the script would then activate the server as well (technique 106, com-ing up next).
The server is now properly licensed. All you have to do is activate the license.
Activating a server
Product activation can be accomplished in a number of ways. In this section, we’llassume that the server has a connection to the internet so that direct activation canoccur. It’s possible to activate manually via a phone call, but you can’t get PowerShelland WMI to do that for you—yet.
TIP Reactivation will be required if you move a virtual server between hoststhat have different CPU architectures.
Activation is based on the hardware configuration of your server. If it changes toomuch be prepared to reactivate.
PROBLEM
Your server needs to be activated. Activation is required because you’ve just created anew server and you need to ensure that it remains usable beyond the grace period.
SOLUTION
You can use the SoftwareLicensingProduct class to solve this, as shown in the nextlisting. Your invoke-activation function has a mandatory parameter for the com-puter name. I wasn’t sure which PowerShell verb to use in the name of this function—“invoke” seems to be the closest match.
TECHNIQUE 106
www.it-ebooks.info

356 CHAPTER 13 Configuring a server
function invoke-activation {param ( [parameter(Mandatory=$true)] [string]$computername="$env:COMPUTERNAME")
$product = Get-WmiObject SoftwareLicensingProduct `-ComputerName $computername | where {$_.PartialProductKey}
$product.Activate()}
You create a WMI object using the SoftwareLicensingProduct class. The results arefiltered down to a single instance by using the PartialProductKey property. TheActivate method is called to perform the task.
You should be aware that it takes a little while for the activation to complete, as thesystem has to link to the Microsoft website to register the activation.
DISCUSSION
Once you’ve completed the activation process, you should double-check that every-thing has worked by using get-licensestatus from technique 104. The resultsshould be similar to those shown in figure 13.4. Notice how the LicenseStatus haschanged to read Licensed, as compared to Grace in figure 13.3.
Your server is now renamed, licensed, activated, and joined to the domain. You’veconfigured the network adapters. The server is ready for the installation of the appro-priate applications.
One last optional task is to set the power plan for the server.
Setting a power plan
Windows power plans control how your system consumes power. You can view theexisting power plans using the Win32_PowerPlan class:
Get-WmiObject -Namespace 'root\cimv2\power' `-Class Win32_PowerPlan -ComputerName "10.10.54.118" |select ElementName, IsActive
A new Windows Server 2008 R2 or Windows 7 system will have three power plans defined:
Listing 13.9 Activate server
Figure 13.4 A licensed server
TECHNIQUE 107
www.it-ebooks.info

357TECHNIQUE 107 Setting a power plan
■ Balanced■ High performance■ Power saver
The Balanced plan is usually the active one on new installs.
NOTE Power plans are arguably less important when you’re dealing with avirtualized server, because it’s the power plan of the host that controls thepower consumption. You may be able to save some power by configuring thevirtual server’s power plan, but it would be very difficult to quantify.
Most organizations have a number of physical servers and you can make an impact byconfiguring the power plans on those systems.
PROBLEM
You need to be able to configure the Windows power plans across your server estate toensure that all servers are consuming the minimum amount of power that’s consistentwith them being able to perform their functions correctly.
SOLUTION
There’s a root\cimv2\power namespace tucked away inside WMI. It’s often overlookedbecause it’s a child of the more important root\cimv2 namespace. In that namespaceyou’ll find a Win32_PowerPlan class. This is the core of the solution to the problem, asshown in the following listing.
function set-powerplan {param ([string]$plan="Balanced",
[parameter(Mandatory=$true, ValueFromPipeline=$true, ValueFromPipelineByPropertyName=$true)][string]$computername)PROCESS { Get-WmiObject -Namespace 'root\cimv2\power' -Class Win32_PowerPlan -ComputerName $computername ` -Filter "ElementName='$plan'" | Invoke-WmiMethod -Name Activate}}
A string representing the power plan name and a computer name are the only param-eters you need for this function. You call the Win32_PowerPlan class (notice that youneed to give the namespace because you’re not working in the default). The planname is used as a filter on Get-WmiObject.
The resultant object is piped into Invoke-WmiMethod, where you call the Activatemethod. This will replace any existing active plan with the one you want.
Listing 13.10 Set power plan
www.it-ebooks.info

358 CHAPTER 13 Configuring a server
DISCUSSION
It’s possible to create power plans using the WMI classes in the root\cimv2\powernamespace. In my experience the plans that are built into Windows are sufficient forservers. The classes in the namespace are listed in table 13.1.
This quick look at power plans concludes our look at configuring a new server. Thisisn’t necessarily the complete list of things you need to do to a server, but the tech-niques in other chapters will supply ways to complete those other tasks, such as creat-ing registry keys (chapter 7) or creating shares (chapter 8).
13.5 SummaryConfiguring a new server is a task that occurs on a regular basis in most organizations.There are a number of steps to be completed after the operating system is installed:
■ Rename the server to something more meaningful.■ Stop and restart the server as required.■ Set the IP address and DNS servers.■ Rename the network connection.■ Join the server to the domain.■ Install the license key.■ Activate the server.■ Set the power plan.
All of these activities take time. You can use PowerShell functions to perform thesetasks remotely so you don’t need to spend time accessing the server directly.
That completes our look at server configuration. In the next chapter you’ll dis-cover how you can work with users and groups. You’ll also learn how to work with thesecurity configurations of your servers.
Table 13.1 Classes in the root\cimv2\power namespace
Win32_PowerMeter Win32_PowerMeterConformsToProfile
Win32_PowerMeterEvent Win32_PowerPlan
Win32_PowerSetting Win32_PowerSettingCapabilities
Win32_PowerSettingDataIndex Win32_PowerSettingDataIndexInPlan
Win32_PowerSettingDefine-Capabilities
Win32_PowerSettingDefinition
Win32_PowerSettingDefinition-PossibleValue
Win32_PowerSettingDefinitionRangeData
Win32_PowerSettingElementSetting-DataIndex
Win32_PowerSettingInSubgroup
Win32_PowerSettingSubgroup Win32_PowerSupply
www.it-ebooks.info

Users and security
If it wasn’t for the users we wouldn’t have our jobs. Sometimes it may seem that theusers cause all our problems, but they’re an essential part of the IT environment.Honest! In this chapter, we’ll focus on administrating user accounts and also onsecurity, related both to user accounts and external threats.
The majority of the user administration in a Windows environment occursthrough Active Directory. The WMI connector for Active Directory is deprecated inWindows Server 8. Active Directory administration is best performed using thePowerShell cmdlets. However a significant amount of administration is stillrequired for accounts local to a specific machine, and this is where WMI and Power-Shell can be of assistance.
TIP Chapters 5, 10, and 11 of my PowerShell in Practice book cover usingPowerShell to administer Active Directory in great detail.
This chapter covers■ Working with local users and groups■ Discovering antimalware software status■ Testing firewall state■ Listing firewall settings
359
www.it-ebooks.info

360 CHAPTER 14 Users and security
Most organizations have a set of procedures that are followed when people join orleave. This can include setting up user accounts, adding users to groups, creatingmailboxes, and setting permissions on data shares. The WMI classes associated withusers don’t really lend themselves to being involved in this activity, apart from the set-ting of permissions on file shares, as we discussed in chapter 8.
Do you know what local accounts have been created on your servers and why theywere created? Do you know who is a member of the local Administrators group onyour SQL Server machine? You had better be able to answer these questions, especiallythe last one, because it can leave a serious security hole if the wrong people have toomuch access.
WARNING The reason for asking specifically about local administrators onSQL Server systems is that the group is automatically given sysadmin (full)rights to SQL Server. Oops.
WMI enables you to view the list of user accounts on the server. You can also investigatewhich users are logged onto the system. In addition you can delve into the useraccounts and discover their membership in local groups, their desktop and profile,and their logon session.
You can work with local groups to discover the members of a particular group. Thisis great for checking who has been granted membership in the local Administratorsgroup. The techniques discussed for discovering user and group information will alsowork on client machines. In some respects they may be more useful when applied toclient machines because many organizations have to grant administrator privileges tousers to ensure that their applications work, and some users like to tinker. You can usethe WMI techniques presented in this chapter to undo some of those changes withouthaving to visit the machines.
Security has many aspects. In this chapter we’ll concentrate on the steps you needto take to protect your systems directly against external threats. This involves checkingthe status of the antivirus and antispyware software. Windows provides some WMIclasses to perform these tasks, and there are other classes introduced by specific prod-ucts that can help. We’ll examine both.
The last aspect of security we’ll examine is the firewall on the machine. Modernversions of Windows ship with a software firewall built into the system. This can bereplaced by a third-party offering if desired. You can use WMI to discover the firewallstatus and settings.
We’ll start by looking at the local user accounts.
14.1 User accounts on the local systemLocal user accounts can be defined for a number of reasons, such as allowing a third-party organization access to a system to maintain the application or even giving a useraccess to work with a specific part of an application. We’ll work on the principle thatthere’s a good reason for creating local accounts.
www.it-ebooks.info

361TECHNIQUE 108 Listing user accounts
The first item on the agenda in this section is to discover which accounts are pres-ent on your local system. Creating accounts using WMI isn’t something I recommendas there are easier methods of performing the task. But WMI is useful for auditing pur-poses—for determining what accounts have been created.
The usual outcome of an audit of this sort is that some user accounts will be foundto be no longer required. We’ll look at a function to delete those unwanted accounts.This will also provide you with an opportunity to discover how to use the PowerShellutility cmdlets to link functions that work with different object types and parameters.
While the list of user accounts is useful for housekeeping, when it comes to trou-bleshooting you need to know which accounts are actually logged on. This techniqueaids in determining whether the accounts linked to services are configured correctly.
This section closes with a technique to discover information associated with a user,such as the desktop and profile. The profile information is especially useful if you sus-pect profile corruption is causing problems for the user.
All objects in a Windows environment have a Security Identifier (SID). This is whatWindows uses under the covers to work with objects, assign permissions, managegroup membership, and so on. Table 14.1 lists the SID types you’re likely to encounter.Most of the time you’ll be working with types 1 or 2—users and groups respectively.
Once you know what users have been created on your system you can determinewhich accounts are valid and which should be removed.
Listing user accounts
Windows has a simple model for granting permissions. Put the users into a group andapply the permissions to the group. In many of the organizations I’ve worked with thismodel has been ignored either through lack of knowledge or for expediency. This canlead to the situation where a lot of accounts are defined on local systems that you
Value Meaning
1 SidTypeUser
2 SidTypeGroup
3 SidTypeDomain
4 SidTypeAlias
5 SidTypeWellKnownGroup
6 SidTypeDeletedAccount
7 SidTypeInvalid
8 SidTypeUnknown
9 SidTypeComputer
TECHNIQUE 108
Table 14.1 SID types
www.it-ebooks.info

362 CHAPTER 14 Users and security
don’t need. In a domain environment all permissions should be managed throughdomain-level accounts rather than local accounts.
PROBLEM
You need to investigate the user accounts that have been created on your local systemsto ensure that your security model isn’t being bypassed. Ideally you need an efficientmethod of removing unrequired local user accounts.
SOLUTION
The following listing illustrates how you can solve this problem. TheWin32_UserAccount class was created to supply this information.
function get-useraccount{[CmdletBinding()]param ( [parameter(ValueFromPipeline=$true, ValueFromPipelineByPropertyName=$true)] [string]$computername="$env:COMPUTERNAME")PROCESS{ Get-WmiObject -Class Win32_UserAccount -ComputerName $computername | select AccountType, Description, Disabled, Domain, FullName, InstallDate, LocalAccount, Lockout, Name, PasswordChangeable, PasswordExpires, PasswordRequired, SID, SIDType}}
The function has a computer name as a parameter, and then it accesses theWin32_UserAccount class to discover the users. The properties of immediate interestare chosen using Select-Object.
DISCUSSION
Figure 14.1 illustrates the output from this function. I’ve applied a further restrictionto the output using Format-Table (aliased to ft). The domain, name, and descriptionare displayed. The -a is a shortened form of -AutoSize.
TIP PowerShell will accept the minimum number of characters in a parame-ter name to unambiguously identify the parameter. It’s a great idea at thecommand line but shouldn’t be used in scripts.
Listing 14.1 List user accounts on the local machine
Figure 14.1 Discovering local user accounts
www.it-ebooks.info

363TECHNIQUE 108 Listing user accounts
One property that isn’t shown in the figure is AccountType. You’d generally expectthe AccountType property to have a value of 512, which indicates a normal useraccount.
The Win32_UserAccount class enables you to rename a user account but you can’tdo much else with it directly. The WMI provider doesn’t support deleting accountswhich means you need to drop out of WMI to perform that task. Let’s take a little sidetrip. I happen to have a function that you can use to delete local accounts, as the nextlisting shows.
function remove-user {[CmdletBinding(SupportsShouldProcess=$true)]param ( [parameter(ValueFromPipeline=$true, ValueFromPipelineByPropertyName=$true)] [string]$computername,
[parameter(ValueFromPipeline=$true, ValueFromPipelineByPropertyName=$true)] [string]$id)BEGIN {Add-Type -AssemblyName System.DirectoryServices.AccountManagement}
PROCESS { switch ($computername){ "." {$computername = $env:COMPUTERNAME} "localhost" {$computername = $env:COMPUTERNAME} }
$ctype = [System.DirectoryServices.AccountManagement.ContextType]::Machine
$context = New-Object -TypeName
➥ System.DirectoryServices. ➥ AccountManagement.PrincipalContext ➥ -ArgumentList $ctype, $computername
$user = [System.DirectoryServices.AccountManagement.
➥ UserPrincipal]::FindByIdentity($context, $id)
if ($psCmdlet.ShouldProcess("$id", "Will be deleted")) { $user.Delete() }}}
The function takes a computer name and ID as parameters. It uses theSystem.DirectoryServices.AccountManagement classes to specify that you’re deal-ing with a local account (machine context type) and then find the account of inter-est. The account is then deleted. Just to be safe, I’ve added the ability to use the-WhatIf parameter.
Ideally you’ll want the WMI function that discovers the local user accounts to beable to talk to the function that deletes them. Unfortunately, the WMI function out-puts all user accounts and it doesn’t output a property called computername or id. Notgood. Will you have to rewrite one of the functions or write a brand new function?
Listing 14.2 Delete local user account
www.it-ebooks.info

364 CHAPTER 14 Users and security
If you remember back to chapter 2, we discussed the utility cmdlets, such asWhere-Object and Select-Object. These are designed to be the glue between yourprocessing cmdlets or functions.
You can use Where-Object to restrict the output of get-useraccount:
get-useraccount |where {$_.Name -eq "BITSTEST"}
You now have a single user account on the pipeline. You can use calculated fields inSelect-Object to redefine the names of the properties:
get-useraccount |where {$_.Name -eq "BITSTEST"} |select @{N="computer"; E={$_.Domain}},@{N="id"; E={$_.Name}}
Your object now consists of two properties—computer (name) and id (user accountname). This can be piped into the remove-user function to perform the deletion:
get-useraccount |where {$_.Name -eq "BITSTEST"} |select @{N="computer"; E={$_.Domain}}, @{N="id"; E={$_.Name}} |remove-user -WhatIf
I used the -Whatif parameter during testing. It’s always a good idea to experimentwith it present, just to avoid unpleasant surprises. This PowerShell pipeline could nowbe put into a function to make an admin tool for deleting local user accounts onremote machines.
This exercise demonstrates a very important point about using PowerShell. You’llacquire functionality from a number of sources. The output and property names youneed won’t always match up and you have two choices:
■ Rewrite everything to produce a unified set of properties and parameters■ Use the utility cmdlets to integrate the various cmdlets and functions
The second option maximizes your return from the time spent doing the integration.You end up being able to automate more in a shorter time and so get the maximumbenefit from the time you spend working on the problem.
You can now find the user accounts that exist on the server, but can you find theusers that are currently logged on to the system?
Finding logged on users
The list of user accounts defined on a system gives you one part of the jigsaw, but itdoesn’t tell you if those users are active. When you’re troubleshooting a problem, youmay need to determine whether an account has established a logon session with thesystem. As an example, if SQL Server won’t start, it may be because the service accounthasn’t successfully connected to the server.
TECHNIQUE 109
www.it-ebooks.info

365TECHNIQUE 109 Finding logged on users
PROBLEM
You need to discover which accounts are logged on to a system. This may include indi-vidual user accounts as well as service accounts.
SOLUTION
You don’t have any direct way to determine this information, but WMI maintains linksbetween classes using association classes. The following listing uses an association classto discover the information you need to solve this problem.
function get-loggedonuser{[CmdletBinding()]param ( [parameter(ValueFromPipeline=$true, ValueFromPipelineByPropertyName=$true)] [[string]$computername="$env:COMPUTERNAME")
PROCESS{ Get-WmiObject -Class Win32_LoggedOnUser -ComputerName $computername | foreach { $ud = $_.Antecedent -split "," $user = New-Object -TypeName PSObject -Property @{ Domain = (($ud[0] -split "\.")[2] -split "=")[1] -replace '"', '' User = ($ud[1] -split "=")[1] -replace '"', '' Id = (($_.Dependent -split "\.")[2] -split "=")[1] -replace '"', '' } $user.PSTypeNames[0] = "LoggedOnUser" $user }}#process}
The function uses the Win32_LoggedOnUser class to retrieve data from the system of inter-est. An instance of the class is returned for every user account that’s logged on to thesystem. Each instance associates a user account with a logon session. The Antecedentproperty stores the user account. Here’s an example:
\\.\root\cimv2:Win32_Account.Domain="RSLAPTOP01",Name="SYSTEM"
The Dependent property stores the logon session, like this:
\\.\root\cimv2:Win32_LogonSession.LogonId="999"
You pipe each of the returned WMI objects into ForEach-Object. The first task is tosplit the Antecedent property on the comma. A new PowerShell object is created tostore the output and the properties are populated.
The Domain property is found by taking the first element of the array created bysplitting the Antecedent property. That’s then split again on the period (.). The slash(\) is an escape character to ensure you split on the literal character, which gives youDomain="RSLAPTOP01" as the third element (index 2). That’s split on the equal sign
Listing 14.3 Discover logged on users
www.it-ebooks.info

366 CHAPTER 14 Users and security
(=)and the double quotes are removed. The domain should be the machine name fora local user.
The User name is also present in the Antecedent property. You go back to youroriginal split of this property and use the second element (index 1). This is split onthe equal sign (=)and the double quotes are removed.
The session Id can be found on the dependent property. You can split on theperiod (.) and then split the third element on the equal sign (=) and remove the dou-ble quotes.
TIP Work through this example to ensure that you fully understand how toarrive at the answer. PowerShell is object-based but that doesn’t mean you canavoid string handling completely.
The object type is renamed and output to complete the processing.
DISCUSSION
Renaming the type of the output object is very useful if you intend on creating defaultdisplay formats for your output. You’ve seen default display formats in action whenyou use Win32_ComputerSystem—compare the six properties displayed by default withthe full set of properties.
Default display formats are based on the .NET type name of the object to be for-matted (you’ll see an example of a format file in chapter 18). You can’t create adefault display format for a PSObject because that type is used for numerous differentsets of data. But if you rename the type you can then create individual default formatsas required. The original type name can be seen like this:
New-Object PSObject | gm
It returns a type of System.Management.Automation.PSCustomObject. When youchange the object type and test again
get-loggedonuser | gm
you get a type name of LoggedOnUser. You can also access other information regarding user accounts on your system.
Discovering user information
You’ve seen the concept of associations between WMI classes a number of timesthroughout the book. The concept applies to the Win32_UserAccount class too. Thereare a number of classes associated with users, as you’d expect.
You can display the associated classes using this piece of PowerShell.
Get-WmiObject -Query "ASSOCIATORS OF
➥ {Win32_UserAccount.Domain='RSLAPTOP01',Name='Richard'} WHERE ➥ ClassDefsOnly"
This takes a while to run, but it produces the following list:
TECHNIQUE 110
www.it-ebooks.info

367TECHNIQUE 110 Discovering user information
■ Win32_Desktop
■ Win32_ComputerSystem
■ Win32_LogonSession
■ Win32_Group
■ Win32_SID
■ Win32_NTLogEvent
You can ignore Win32_ComputerSystem, Win32_SID, and Win32_NTLogEvent forour current purposes. The computer system you already know, the SID is also deliv-ered by Win32_UserAccount, and the event log entries will be investigated further inthe next chapter.
When you’re investigating issues that users may be having, you need to lookbeyond the account. You need to consider other aspects related to users, such as theprofile, desktop, and group membership.
PROBLEM
A full investigation into the user configuration on a system is required. You need to beable to retrieve as much information on the configuration of the user account andassociated items as is practicable.
SOLUTION
Listing 14.4 may seem to be a very long script to solve this problem. A lot of the lengthcomes from the use of Add-Member to add properties to the object you’re creating.
NOTE The following listing is truncated for brevity. A number of propertiesare added that aren’t shown in the listing. The listing in the code downloadhas the full property set.
The goal of this function is to output a single object that includes all of the informa-tion you need. This will enable you to put the data onto the PowerShell pipeline forfurther processing.
function get-userinfo{[CmdletBinding()]param ( [parameter(ValueFromPipeline=$true, ValueFromPipelineByPropertyName=$true)] [string]$computername="$env:COMPUTERNAME", [parameter(Mandatory=$true)] [string]$user)PROCESS{ if ($computername -eq "." -or
➥ $computername -eq "localhost"){ $domain = $env:COMPUTERNAME} else {$domain = $computername}
Listing 14.4 Get user information
Set domain
B
www.it-ebooks.info

368 CHAPTER 14 Users and security
$userfilt = "Name='$user'" $userinfo = Get-WmiObject -Class Win32_UserAccount ` -ComputerName $computername -Filter $userfilt | select Name, Domain, FullName, Description, LocalAccount, Disabled, Lockout, PasswordChangeable, PasswordExpires, PasswordRequired, SID
if (!$userinfo){Throw "User NOT found"}
$qdesktop = "ASSOCIATORS OF
➥ {Win32_UserAccount.Domain='$domain',Name='$user'} ➥ WHERE ResultClass = Win32_Desktop" $desktop =
➥ Get-WmiObject -ComputerName $computername -Query $qdesktop
$userinfo | Add-Member -MemberType NoteProperty -Name DeskScreenSaverActive ` -Value $desktop.ScreenSaverActive -PassThru |
Add-Member -MemberType NoteProperty -Name DeskScreenSaverExecutable ` -Value $desktop.ScreenSaverExecutable -PassThru |
Add-Member -MemberType NoteProperty -Name DeskScreenSaverSecure ` -Value $desktop.ScreenSaverSecure -PassThru |
Add-Member -MemberType NoteProperty -Name DeskScreenSaverTimeout ` -Value $desktop.ScreenSaverTimeout -PassThru |
Add-Member -MemberType NoteProperty -Name DeskWallpaper ` -Value $desktop.Wallpaper
$profilt = "SID='$($userinfo.SID)'" Write-Debug $profilt $profile = Get-WmiObject -Class Win32_UserProfile ` -Filter $profilt -ComputerName $computername
$userinfo | Add-Member -MemberType NoteProperty -Name ProfileLastUseTime ` -Value $($profile.ConvertToDateTime($profile.LastUseTime)) -PassThru |
Add-Member -MemberType NoteProperty -Name ProfileLocalPath ` -Value $profile.LocalPath -PassThru |
Add-Member -MemberType NoteProperty -Name ProfileSpecial ` -Value $profile.Special
$qlogon = "ASSOCIATORS OF
➥ {Win32_UserAccount.Domain='$domain',Name='$user'} ➥ WHERE ResultClass = Win32_LogonSession" $logons = Get-WmiObject -ComputerName $computername -Query $qlogon
$ls = 1 foreach ($logon in $logons) { $userinfo | Add-Member -MemberType NoteProperty ` -Name "Logon$ls-AuthenticationPackage" ` -Value $logon.AuthenticationPackage -PassThru |
Add-Member -MemberType NoteProperty ` -Name "Logon$ls-LogonId" -Value $logon.LogonId -PassThru |
Get userC
Get desktop data
D
Get profile
E
Get logon session
F
www.it-ebooks.info

369TECHNIQUE 110 Discovering user information
Add-Member -MemberType NoteProperty -Name "Logon$ls-StartTime" ` -Value $($logon.ConvertToDateTime($logon.StartTime))
$ls++ }
$qgroups = "ASSOCIATORS OF
➥ {Win32_UserAccount.Domain='$domain',Name='$user'} ➥ WHERE ResultClass = Win32_Group" $groups = Get-WmiObject -ComputerName $computername -Query $qgroups
$groupnames = @() foreach ($group in $groups){$groupnames += $group.Name} $userinfo | Add-Member -MemberType NoteProperty -Name Groups -Value $groupnames
$userinfo
}#process}
The function commences by taking a computer name and user name as parameters.The user name is a mandatory parameter to ensure you have something to work with.You need to ensure that the computer name is in a format you can work with; convert-ing it to the actual computer name ensures that you can also use it as the domainname when required B.
The next step is to get the Win32_UserAccount object representing the user C.The output object ($userinfo) is created by selecting the properties you want. If theuser account can’t be found an error is thrown and the function stops processing.
A WQL query is created and run to get the Win32_Desktop associated with theuser D. Properties are added to the $userinfo object using Add-Member.
The user profile information is added in a similar manner, except this time youcreate a WMI filter based on the SID of the user E. There isn’t a direct associationbetween the user account and the profile. This is just one of WMI’s little mysteries.
You’re back to using an "ASSOCIATORS OF" type WQL query when you want toretrieve the logon sessions associated with the user account F. There may well bemore than one logon session associated with an account, so you need to use foreachto iterate through the sessions. Add-Member continues to be used to add more prop-erties to the $userinfo object, but you differentiate each logon session using aninteger counter.
The function ends by getting the groups the user is a member of by associatingthe Win32_Group class G. In this case you only need the group names. You caniterate through the groups, add the group name to an array, and then add the arrayas the value of a new property. The $userinfo object is then output to the Power-Shell pipeline.
DISCUSSION
This technique returns a lot of information. There are a few options for restricting thedata returned:
Get group membership
G
www.it-ebooks.info

370 CHAPTER 14 Users and security
■ Break the script into a number of smaller functions. This has the drawback oflosing the ability to retrieve all information in one pass.
■ Add more parameters to switch functionality on or off.■ Use Where-Object to restrict the output.
These options show PowerShell at its best—very flexible and able to meet your partic-ular needs.
You saw at the end of listing 14.4 how you can discover the groups associated with auser. We need to investigate local groups a little bit more.
14.2 Groups on the local systemI’ve mentioned groups several times in the chapter. Groups are an important conceptin Windows environments. Without them we’d have to administer each user accountindividually, which would increase our workload significantly.
Groups are important for allocating permissions, but there are only two things youreally need to consider in this section—discovering which groups are present on thesystem, and then discovering the membership of those groups.
Listing local groupsActive Directory groups are used for the majority of administration needs, but thereare a number of scenarios where you’ll need to investigate local groups and theirmembership. The first task is to discover what local groups are present on the system.
PROBLEM
The list of local groups on your servers has to be determined so that you can properlyaudit the security settings on the system. You need to ensure that additional groupshaven’t been created to bypass your Active Directory–based security.
SOLUTION
The following listing shows how you can obtain a list of groups. You only need a com-puter name as a parameter.
function get-group{[CmdletBinding()]param ( [parameter(ValueFromPipeline=$true, ValueFromPipelineByPropertyName=$true)] [string]$computername="$env:COMPUTERNAME")PROCESS{ Get-WmiObject -Class Win32_Group -ComputerName $computername | select Description, Domain, InstallDate, LocalAccount, Name, SID, SIDType}}
The Win32_Group class supplies everything you need to solve the problem. A call toGet-WmiObject with the ComputerName parameter, ensuring you target the correct sys-tem, is followed by Select-Object to filter the properties you wish to output.
Listing 14.5 List local groups
TECHNIQUE 111
www.it-ebooks.info

371TECHNIQUE 112 Listing group membership
DISCUSSION
One point that must be remembered when looking at local users and groups withWMI is that the Domain property will have a value of the local computer name, but fordomain-level accounts, the Domain property will carry the name of the domain. Thiscan appear confusing if the results are just skimmed.
It’s one thing to know what groups are on the system. It’s more important, though,to understand the membership of those groups.
Listing group membershipThere are some local groups, such as the Administrators group, for which it’s veryimportant that you keep a tight control on membership. You could use RestrictiveGroups in GPOs, but that can lead to administrative overhead. It can also lead togroup membership being wiped out if you get the GPO wrong. I prefer to audit thegroup membership on a regular basis.
PROBLEM
You need to determine the group membership for the local groups on a specified sys-tem. This ensures that too many privileges haven’t been granted.
SOLUTION
The following listing demonstrates how to solve this problem. The computer name isthe only parameter again.
function get-groupmembership{[CmdletBinding()]param ( [parameter(ValueFromPipeline=$true, ValueFromPipelineByPropertyName=$true)] [string]$computername="$env:COMPUTERNAME")PROCESS{ Get-WmiObject -Class Win32_Group -ComputerName $computername | foreach { $group = $_.Name $domain = $_.Domain $query = "ASSOCIATORS OF {
➥ Win32_Group.Domain='$domain',Name='$group'} ➥ WHERE ResultClass = Win32_UserAccount" Get-WmiObject -ComputerName $computername -query $query | foreach { $member = New-Object -TypeName PSObject -Property @{ GroupName = $group GroupDomain = $domain UserName = $_.Name UserDomain = $_.Domain } $member }}}}
Listing 14.6 List group membership
TECHNIQUE 112
www.it-ebooks.info

372 CHAPTER 14 Users and security
You retrieve the list of groups on the system using Win32_Group (alternatively, it wouldhave been possible to use a call to the get-group function from listing 14.5). You theniterate through the groups, and for each of them you find the associated users.
An object is created that contains the user name, the group name, and theirrespective domains. The function outputs the object as its last act.
DISCUSSION
If you only want to check the membership of one or two groups you could modify thefunction to filter out the other groups using Where-Object. The local Administratorsgroup should always be included in any audit activity.
The other aspect of the computers that you need to consider is their security set-tings. This includes the antimalware and the firewall installed on the server.
14.3 SecuritySecurity is a massive subject, and I could fill the book just on that topic. In this book,we’ll touch on various security-related topics as we progress because I prefer to dealwith security as something that everyone needs to consider, whatever they’re doing,rather than as something that those funny guys in the corner do.
In this section we’ll look at some security products that are likely to be present onyour Windows systems, including
■ Antivirus■ Antispyware■ Firewall
NOTE Antivirus and antispyware will be grouped together as antimalware inparts of this section.
You’ve already seen a number of times that WMI documentation is a bit sparse inplaces—well, OK, it’s nonexistent in many places. As there doesn’t seem to be muchdocumentation available for these areas I tried a bit of digging, like this:
Get-WmiObject -Namespace root -Recurse -List *firewall*
I started at the top of the WMI tree and worked through the namespaces. I ended upwith four namespaces to consider, as listed in table 14.2. These namespaces are onlyaccessible if PowerShell is running with elevated privileges.
Table 14.2 WMI security namespaces
Namespace Notes
ROOT\SecurityCenter Windows Vista and earlier
ROOT\SecurityCenter2 Windows Vista SP1 and later
ROOT\Microsoft\SecurityClient Forefront Endpoint Protection 2010
ROOT\Microsoft\PolicyPlatform\WindowsFirewallConfiguration Forefront Endpoint Protection 2010
www.it-ebooks.info

373TECHNIQUE 113 Testing antivirus status
Two of the namespaces are standard for Windows. There are three active classes in theROOT\SecurityCenter* namespaces:
■ AntiSpywareProduct■ AntiVirusProduct■ FirewallProduct
The specific namespace to use is dependent on the version of Windows, as shown intable 14.2. You can use the Windows build numbers to quickly determine the version,as shown in table 14.3. An example of how to apply this is shown in listing 14.7.
The other two namespaces are installed with my antivirus software. Similar classes maybe present with other such products.
Now that you know the WMI classes that are available, what are you going to dowith them? The obvious starting point is to ensure that the various types of antimal-ware software are working. You’ll work with these WMI classes to create techniquesthat test that the antivirus, antispyware, and antimalware software is working correctlyand that the files are up to date.
Modern Windows systems incorporate a firewall to increase the security of the sys-tem. You’ll use PowerShell and WMI to test the firewall status and determine the fire-wall settings so you know which applications are being blocked and which are allowedthrough the firewall.
The standard Windows namespaces enable you to test your antivirus software.
Testing antivirus status
Viruses are a fact of life. Cleaning up an enterprise after it has suffered a major virusinfection isn’t a pleasant task; even cleaning up a single machine can be a painfullytedious procedure, as I discovered recently. You need to ensure that your antivirussoftware is working. Many enterprise level antivirus products have a central reportingconsole, but being able to test individual systems can supply a quicker answer.
PROBLEM
A test needs to devised that will quickly show if the antivirus software on one or moresystems is working and up to date. Ideally this should work across multiple antivirusproducts.
Build number OS version
6000 Windows Vista RTM
6001 Windows Vista SP1
6002 Windows Vista SP2
7600 Windows 7 RTM
7601 Windows 7 SP1
TECHNIQUE 113
Table 14.3 Windows build numbers
www.it-ebooks.info

374 CHAPTER 14 Users and security
SOLUTION
Listing 14.7 illustrates the solution to this problem. The difficult part is decidingwhich of the WMI namespaces to use. This is resolved by using theWin32_OperatingSystem class—you test the BuildNumber property to determine theoperating system version, and hence which namespace to use.
function get-antivirus{[CmdletBinding()]param ( [parameter(ValueFromPipeline=$true, ValueFromPipelineByPropertyName=$true)] [string]$computername="$env:COMPUTERNAME")PROCESS{ $os = Get-WmiObject -Class Win32_OperatingSystem ` -ComputerName $computername
if ($os.BuildNumber -ge 6001 ) { $av = Get-WmiObject -Namespace 'ROOT\SecurityCenter2' ` -Class AntiVirusProduct -ComputerName $computername } else { $av = Get-WmiObject -Namespace 'ROOT\SecurityCenter' ` -Class AntiVirusProduct -ComputerName $computername } $av | select displayName, instanceGuid, pathToSignedProductExe, pathToSignedReportingExe, productState
}}
The AntiVirusProduct class of the appropriate namespace is interrogated. You canthen pipe the object into Select-Object to restrict the display to the properties ofinterest.
DISCUSSION
Product state is a numeric value—I get 397312 on my system. I’m assuming that this isOK, as the GUI shows that my antivirus software is up to date and working. There doesn’tseem to be a definitive statement I can find that describes how the product state valueis produced. I’ve seen a lot of speculation but little corroborated data. What little infor-mation there is supports the notion that 397312 is a good result and that other valuesindicate an issue with the antivirus software that should be investigated.
Unfortunately, viruses aren’t the only malware. You also need to determine the sta-tus of your antispyware software.
Testing antispyware status
Spyware does exactly what it says. It spies on what you’re doing, recording informationabout your activities and reporting to ... someone. This information could just identifywebsites visited, or it could be actual keystrokes, in which case your passwords are
Listing 14.7 Get antivirus status
TECHNIQUE 114
www.it-ebooks.info

375TECHNIQUE 114 Testing antispyware status
exposed. Many antivirus products also function as antispyware, but there are also inde-pendent antispyware products, such as Windows Defender.
PROBLEM
The antispyware product on your systems needs to be checked to determine if it’sworking correctly and that it’s up to date.
SOLUTION
You can adapt listing 14.7 to produce the following listing. The same test for com-puter operating system version is performed as in the original listing, and dependingon the result, the AntiSpywareProduct class is used in the appropriate namespace.
function get-antispyware{[CmdletBinding()]param ( [parameter(ValueFromPipeline=$true, ValueFromPipelineByPropertyName=$true)] [string]$computername="$env:COMPUTERNAME")PROCESS{ $os = Get-WmiObject -Class Win32_OperatingSystem ` -ComputerName $computername
if ($os.BuildNumber -ge 6001 ) { $aspys = Get-WmiObject -Namespace 'ROOT\SecurityCenter2' ` -Class AntiSpywareProduct -ComputerName $computername } else { $aspys = Get-WmiObject -Namespace 'ROOT\SecurityCenter' ` -Class AntiSpywareProduct -ComputerName $computername }
foreach ($aspy in $aspys) { $aspy | select displayName, instanceGuid, pathToSignedProductExe, pathToSignedReportingExe, productState }
}}
There could well be multiple results from this listing, so you use foreach to iteratethrough the set of results. Each instance of antispyware software is piped throughSelect-Object and the desired properties are displayed.
DISCUSSION
The productState property has the same meaning as discussed in listing 14.7. I rec-ommend double-checking the result against a known healthy instance of your antispy-ware software to determine the value to look for.
It’s very possible that you may acquire other WMI functionality through theinstallation of a specific antivirus product. This could cover both antimalware and thefirewall.
Listing 14.8 Get antispyware status
www.it-ebooks.info

376 CHAPTER 14 Users and security
Testing antimalware status
The ROOT\Microsoft\SecurityClient namespace is installed by Microsoft ForefrontEndpoint Protection 2010. It supplies the following classes:
■ ProtectionTechnologyStatus
■ FirewallState
■ AntimalwareHealthStatus
■ AntimalwareInfectionStatus
■ Malware
■ AntimalwareDetectionStatus
Using the ProtectionTechnologyStatus class is equivalent to using the Antimalware-HealthStatus and FirewallState classes. Hopefully you’ll never have to use the Anti-malwareInfectionStatus class, because its job is to report on the status of infectionsand pending cleanup operations.
We’ll concentrate on the health status of the antimalware software and the firewall.
PROBLEM
You’re using Forefront Endpoint 2010 as your antivirus software, and you want to dis-cover more about its health than is shown by listings 14.7 and 14.8.
SOLUTION
The AntimalwareHealthStatus class can be used for this. The following listing dem-onstrates how it’s used.
function get-antimalwarehealth{[CmdletBinding()]param ( [parameter(ValueFromPipeline=$true, ValueFromPipelineByPropertyName=$true)] [string]$computername="$env:COMPUTERNAME")PROCESS{ Get-WmiObject -Namespace 'ROOT\Microsoft\SecurityClient' ` -Class AntimalwareHealthStatus -ComputerName $computername | select AntispywareEnabled, AntispywareSignatureAge, AntispywareSignatureUpdateDateTime, AntispywareSignatureVersion, AntivirusEnabled, AntivirusSignatureAge, AntivirusSignatureUpdateDateTime, AntivirusSignatureVersion, BehaviorMonitorEnabled, Enabled, EngineVersion, IoavProtectionEnabled, LastFullScanAge, LastFullScanDateTimeEnd, LastFullScanDateTimeStart, LastFullScanSource, LastQuickScanAge, LastQuickScanDateTimeEnd, LastQuickScanDateTimeStart, LastQuickScanSource, Name, NisEnabled, NisEngineVersion, NisSignatureVersion, OnAccessProtectionEnabled, ProductStatus, RealTimeScanDirection, RtpEnabled
}}
Listing 14.9 Antimalware health check
TECHNIQUE 115
www.it-ebooks.info

377TECHNIQUE 116 Testing firewall status
A single parameter takes the computer name, which is used in the Get-WmiObjectcall. The namespace and class are given as part of the call. Select-Object is used tofilter the properties you need returned. The useful information is buried in amongst alot of properties you don’t need. The properties related to signature update times,scan times, and ages will be most useful. One advantage of wrapping these WMI callsin a function is that you only have to type out the property selection once.
DISCUSSION
There is a property called PackedXML that returns the data in XML format. It has beenexcluded from the display.
Dates look like this:
2011-05-16T04:49:41.000Z
This can be translated as Year-Month-Day, followed by a T to signify time, which is dis-played as Hours:Minutes:Seconds. The Z indicates that the time is given as Coordi-nated Universal Time (UTC). UTC is also known as GMT or Zulu time (military),which is where the Z comes from. The time zones and their corresponding lettercodes can be found here: http://wwp.greenwichmeantime.com/info/timezone.htm.
The time can be put into Get-Date (or the .NET DateTime class) to resolve to localtime as shown in figure 14.2. There’s a difference between the input and output ofone hour due to the clock’s advancement for daylight saving time at the time of writ-ing (I’m UK-based, so this figure is based on GMT).
We’ve considered the status of the antimalware software in a number of ways. Weneed to consider the firewall next.
Testing firewall status
Modern versions of Windows ship with a software-based firewall. This will default to onor off depending on the version of Windows. The FirewallProduct class in theROOT\SecurityCenter* namespaces doesn’t seem to report in versions of Windowslater than Windows XP.
Figure 14.2 Working with dates from the AntimalwareHealth-Status class
TECHNIQUE 116
www.it-ebooks.info

378 CHAPTER 14 Users and security
PROBLEM
The firewall status needs to be checked across your systems.
SOLUTION
The following listing solves the problem by using the FirewallState class. The classcan be found in the ROOT\Microsoft\SecurityClient namespace.
function get-firewallstate{[CmdletBinding()]param ( [parameter(ValueFromPipeline=$true, ValueFromPipelineByPropertyName=$true)] [string]$computername="$env:COMPUTERNAME")PROCESS{ Get-WmiObject -Namespace 'ROOT\Microsoft\SecurityClient' `-Class FirewallState -ComputerName $computername | select Name, Enabled, FirewallServiceRunning
}}
The only useful properties in this class are the name of the firewall product and Bool-ean values that indicate if the firewall is enabled and if its service is running.
DISCUSSION
This class also has a PackedXML property, as explained in listing 14.9. The state of the firewall is important, but the firewall settings are also vital to the
security of your systems.
Listing firewall settings
There’s another namespace that you can use to investigate the firewall settings—ROOT\Microsoft\PolicyPlatform\WindowsFirewallConfiguration. This namespace, alsofrom Forefront Endpoint 2010, contains the following classes:
■ Firewall_PredefinedRuleGroup
■ Firewall_Profile_Parameters
■ Firewall_Profile_Public
■ Firewall_Profile_Private
■ Firewall_Profile_Domain
■ Firewall_PredefinedRuleGroup_Baseline
With Windows Vista and later, networks are categorized as being one of three types:
■ Public■ Private■ Domain
Listing 14.10 Get firewall status
TECHNIQUE 117
www.it-ebooks.info

379TECHNIQUE 117 Listing firewall settings
Separate firewall rules can be created for each type of network. TheFirewall_Profile_* classes relate directly to the network type.
PROBLEM
You want to investigate the firewall settings on your system to ensure that you aren’tinadvertently blocking a critical application.
SOLUTION
The following listing provides one solution to this problem. The computer name isthe only parameter to this function.
function get-firewallsetting{[CmdletBinding()]param ( [parameter(ValueFromPipeline=$true, ValueFromPipelineByPropertyName=$true)] [string]$computername="$env:COMPUTERNAME")PROCESS{ Get-WmiObject ` -Namespace 'ROOT\Microsoft\PolicyPlatform\WindowsFirewallConfiguration' ` -Class Firewall_Profile_Parameters -ComputerName $computername | select __Class, AllowedIcmpTypes, BlockAllInboundTraffic, DefaultInboundActionIsDeny, DefaultOutboundActionIsAllow, DisableInboundNotifications, DisableUnicastResponsesToMulticastBroadcast, EnableFirewall, LocalLegacyAppRulesMergeAllowed, LocalLegacyPortRulesMergeAllowed, LocalRulesMergeAllowed
}}
This function calls the Firewall_Profile_Parameters WMI class and uses Select-Object to filter the properties you want to display.
WARNING The classes in this namespace require PowerShell to be startedwith elevated privileges.
DISCUSSION
The Firewall_Profile_Parameters class calls the three profile classes we discussedearlier. If you only want settings for a particular network, you can use one of theseclasses as appropriate:
■ Firewall_Profile_Public
■ Firewall_Profile_Private
■ Firewall_Profile_Domain
This completes our look at users and security settings. I’ve attempted to pick the prop-erties I think will be most useful. You should investigate the classes further to deter-mine whether there’s any information vital to your needs that I haven’t mentioned.
Listing 14.11 Get firewall settings
www.it-ebooks.info

380 CHAPTER 14 Users and security
14.4 SummaryUsers and security go hand in hand. Sometimes you’re protecting the users fromthemselves, and other times you’re protecting them from external threats.
WMI enables you to work with local user accounts and local groups. You can’t cre-ate new accounts but you can do several other things:
■ Discover the local accounts and groups on a system, and delete them if neces-sary
■ Check the group membership of local accounts■ Discover other information, such as profile and desktop settings■ Test the membership of powerful groups, such as the local administrators group
Protecting users from external threats includes installing a firewall and antimalwaresoftware. There are WMI classes to do the following:
■ Test the status of antivirus and antispyware software■ Check that the signature data is up to date■ Test the firewall status■ List firewall settings
You don’t get many opportunities to directly administer these products through WMIbut you can easily test their functioning. This can be a very useful test when checkingfor possible problems.
The next chapter continues our investigation of our systems and looks at usingWMI to work with event logs, scheduled jobs, and performance counters.
www.it-ebooks.info

Logs, jobs, and performance
Things go wrong even in the best-run IT operations. When they do, you need to beable to investigate and troubleshoot the problem. One of the first places to look isthe event logs. These logs record information (events) from a number of sourcesacross the system. WMI can be used to access and manage the logs, but in manycases the PowerShell event log cmdlets are easier to use. We’ll look at how you canuse PowerShell and WMI to discover some information that the cmdlets don’treturn and how to back up the logs.
The ability to schedule jobs, which are also known as scheduled tasks, to run at aspecified time has been available in Windows for a long time. But a change to thescheduled jobs infrastructure was introduced with Windows Vista. As you’ll
This chapter covers■ Discovering event log sources■ Backing up event logs■ Managing simple scheduled jobs■ Investigating performance counters, system
assessment reports, and stability indices
381
www.it-ebooks.info

382 CHAPTER 15 Logs, jobs, and performance
discover, you can still create, access, and manage the older, simpler job types throughWMI and PowerShell.
If there is one certainty in IT, it’s that users will complain about the performance oftheir systems. It doesn’t matter what you do, they’ll claim its running slower! We’ll lookat how you can view performance information on remote systems using WMI classes.
System performance is closely related to the installed hardware. In the final sec-tion of this chapter, we’ll look at techniques for using PowerShell and WMI to accessthis information. The information provided by these techniques may indicate an areaof hardware that’s causing problems. The other thing we’ll look at is the stability ofthe system. The latest Windows versions provide stability indices that can be accessedthrough WMI. These indices are a good starting point for getting a general overview ofthe system’s health.
I’ve spent a lot of time investigating the contents of event logs over the years.They’re an invaluable resource for discovering what’s happening on your systems,especially when troubleshooting, so they’re the logical place to start.
15.1 Event logsEvent logs used to be simple. You had the Application, System, and Security logs. Butnew logs have been introduced in the later versions of Windows, and now a standardinstallation of Windows 7 will have nine event logs. Nine classic-type event logs, that is.If you include the entire collection of new-style event logs introduced with WindowsVista, you get up to a total of 166 event logs on a standard install of Windows 7.
In the days of VBScript you had to use WMI to work with event logs. This changed withthe introduction of PowerShell v1, which included a Get-EventLog cmdlet for readingevents from the log. Much easier and simpler to use! This support ramped up a levelwhen PowerShell v2 arrived. A suite of cmdlets was made available, as listed in table 15.1.Their purposes should be clear from their names, apart from possibly Show-EventLog,which displays the event log viewer GUI application, and Limit-Eventlog, which is usedto configure event log settings.
All of these cmdlets can access event logs on remote computers. The following codecan be used to test for the presence of a ComputerName parameter.
Get-Help *eventlog -Parameter computername | sort name
TIP These cmdlets and WMI only work with the original, classic-style eventlogs.
Table 15.1 Event log cmdlets
Clear-EventLog Get-EventLog Limit-EventLog
New-EventLog Remove-EventLog Show-EventLog
Write-EventLog
www.it-ebooks.info

383Event logs
The event logs available on a machine can be discovered using a cmdlet:
Get-EventLog -List | select -f 1 | fl *
This code shows that the properties listed in table 15.2 are available (-f is a short formof -first; PowerShell will accept shortened forms of parameter names as long asthey’re unambiguous). These properties can be configured using Limit-Eventlog orthe Win32_NTLogEventLog WMI class.
Don’t forget to check the new Windows Vista–style event logs. Use this code:
Get-WinEvent -ListLog * | select -f 1 | fl *
Staying with the classic event logs, you can retrieve a lot more useful informationwith WMI:
gwmi Win32_NTEventlogFile | select -f 1 | fl *
This produces the property list seen in table 15.3. The Name property gives the full filepath to the event log file. The other really useful property is Sources, which displaysthe identities of the event sources writing to the log.
One use of event logs that’s often overlooked is using them to log script usage. A callto Write-Eventlog can be used to write data about specific scripts as they run. Eitherthe Application event log or a specific event log can be used.
But before you can write to an event log, you need to discover some information.
Table 15.2 Event log properties
LogDisplayName Log MachineName
MaximumKilobytes OverflowAction MinimumRetentionDays
EnableRaisingEvents
Table 15.3 WMI properties of event logs
LogfileName Name Archive Caption
Compressed CreationDate CSName Description
Drive EightDotThreeFileName Encrypted Extension
FileName FileSize FileType FSName
Hidden InstallDate LastAccessed LastModified
MaxFileSize NumberOfRecords OverwriteOutDated OverWritePolicy
Path Readable Sources System
Writeable
www.it-ebooks.info

384 CHAPTER 15 Logs, jobs, and performance
Discovering event log sources
When you write to an event log you need to know which source to use. A source iseffectively a label and a route to use when writing. Try this snippet to see some exam-ples of the sources available:
Get-EventLog -LogName Application |Format-Table TimeGenerated, Source, Message -AutoSize
Source information isn’t available using the event log cmdlets, but you can discover itusing WMI.
PROBLEM
You want to discover the event log sources available on a server. Sources are event log–specific, so you need to be able to recover data for all event logs or for a specific event log.
SOLUTION
Listing 15.1 illustrates a solution to this problem using the Win32_NTEventLogFileclass. The function can take a computer name as a parameter as well as an optionalevent log name. The -computername parameter is aliased to CN or Computer as anexample of how to use this advanced function attribute.
function get-eventlogsource{[CmdletBinding()]param ([parameter(ValueFromPipeline=$true, ValueFromPipelineByPropertyName=$true )] [Alias("CN", "Computer")] [string]$computername="$env:COMPUTERNAME",
[string]$logname)PROCESS{if ($logname) { $logs = Get-WmiObject -Class Win32_NTEventlogFile ` -ComputerName $computername -Filter "LogfileName = '$logname'"}else { $logs = Get-WmiObject -Class Win32_NTEventlogFile -ComputerName $computername}
foreach ($log in $logs) { $logsource = New-Object -TypeName PSObject $logsource | Add-Member -MemberType NoteProperty -Name Computer -Value $computername -PassThru | Add-Member -MemberType NoteProperty -Name Logfile -Value $log.LogfileName
$i = 1 $log | select -ExpandProperty Sources | foreach {
Listing 15.1 Listing event log sources
TECHNIQUE 118
Get data
B
Loop through logs and sources
C
www.it-ebooks.info

385TECHNIQUE 119 Backing up event logs
Add-Member -InputObject $logsource ` -MemberType NoteProperty -Name "Source$i" ` -Value $_ $i++ } $logsource }}#process}
The log file information is retrieved B for all log files or for a single log file, depend-ing on whether the -logname parameter has been used.
You create an empty object and add the computer name and log name for eachevent log C. You can then loop through the sources for that event log and add theirnames as a unique property on the object. The object is added to the PowerShell pipe-line at the completion of processing D.
DISCUSSION
Once event logs are created, there is usually very little to be done in terms of configu-ration. Any changes, such as modifying the maximum file size, can be achieved usingLimit-EventLog or through WMI:
Get-WmiObject -Class Win32_NTEventLogFile -Filter "LogFileName='Scripts'" |Set-WmiInstance -Arguments @{MaxFileSize=40MB}
A particular event log is selected and passed to Set-WmiInstance. A hash table of theproperties to be changed and their new values is used as the argument.
WARNING This snippet needs to be executed when PowerShell is runningwith elevated privileges.
Multiple properties can be set simultaneously. Applying a standard set of changes tothe event logs when a server is created is a very efficient way to make those changes.
Protecting and collecting the data held in the event logs is a necessity if an organi-zation needs to be able to investigate historic events on a server.
Backing up event logs
There are two ways you can approach the backing up of event logs. The first, morecomplicated, way would be to read the events using Get-Eventlog and then write theinformation into a SQL Server database. This has the advantage of bringing the logsfor a number of machines together for further analysis.
The second, simpler, technique is to perform a backup of the event log. You canthen search the backup file using the PowerShell event log cmdlets.
PROBLEM
Your organization has created a policy that states event logs must be backed up to pre-vent information being lost when the logs cycle round as they fill up. You also need tobe able to clear the event log when the backup has been performed.
Output data
d
TECHNIQUE 119
www.it-ebooks.info

386 CHAPTER 15 Logs, jobs, and performance
SOLUTION
Listing 15.1 can be amended to create a solution for this problem, as shown in the fol-lowing code. You add parameters defining a destination folder for the backup filesand an optional switch that enables you to clear the log files.
function backup-eventlog{[CmdletBinding()]param ([parameter(ValueFromPipeline=$true, ValueFromPipelineByPropertyName=$true )] [string]$computername="$env:COMPUTERNAME" ,
[string]$logname, [string]$destination="C:\Backup", [switch]$clear)PROCESS{if ($logname) { $logs = Get-WmiObject -Class Win32_NTEventlogFile ` -ComputerName $computername -Filter "LogfileName = '$logname'"}else { $logs = Get-WmiObject -Class Win32_NTEventlogFile ` -ComputerName $computername}
foreach ($log in $logs) { $filename = Join-Path -Path $destination ` -ChildPath "$($log.LogFileName)-$((Get-Date -Format 's').
➥ Replace(':','-')).evt"
Write-Debug $filename $log.BackUpEventLog($filename) if ($clear){$log.ClearEventLog()}}}#process}
WMI objects representing the log, or logs, are created B. You can then loop throughthe collection of logs. A filename is formed that incorporates the destination folder,the name of the log file, and the date C. The file is given an extension of .evt. Anexample file name would be C:\Backup\Application-2011-06-03T11-30-42.evt.
TIP The colons (:) are removed from the time portion of the date becausethat character isn’t allowed in filenames.
The filename is written out to screen when the function is executed with the -debugswitch. Win32_NTEventlogFile has a BackUpEventLog method that you can use to per-form the backup D. It takes the filename of the backup file as its argument.
The function will use the ClearEventLog method to wipe the contents of the eventlog if required. If you’re using these methods in your own scripts, double-check that
Listing 15.2 Backing up event logs
Get data
B
Create filename
C
Perform backup
D
www.it-ebooks.info

387TECHNIQUE 120 Creating a scheduled job
you use them in the correct order. It’s very embarrassing to clear the log file beforeperforming the backup!
DISCUSSION
You could use Clear-EventLog to perform the data removal, but it’s more efficient touse the WMI method because you’ve already invested the computer resources in creat-ing the WMI object.
A possible refinement to the function would be to delete backup files that are olderthan a given period. If the organization’s policy was to keep log information for 30 days,you could add this line to the function:
Get-ChildItem -Path $destination |where {$_.CreationTime -lt (Get-Date).AddDays(-30)} |Remove-Item
The backup files can be read in a similar way to reading the event log. The only differ-ence is that you use the Get-WinEvent cmdlet. To read a backup file of the Applica-tion log you’d use code similar to this example:
Get-WinEvent -Path c:\backup\application-2011-06-03T11-30-42.evt -Oldest
Running backups manually is acceptable if it’s an ad hoc process. In a productionenvironment you need a way to be able to schedule this type of task.
15.2 Scheduled jobsThe Win32_ScheduledJob class only shows those tasks created with the AT commandor WMI. It doesn’t work with tasks created in the GUI or with the COM objects intro-duced in Windows Vista. If a job is accessed or modified through the GUI, it isn’taccessible using WMI anymore.
NOTE We’re discussing operating system scheduled tasks, not PowerShellbackground jobs, though it’s possible to start a PowerShell job through ascheduled task.
You can manage the lifecycle of creation, discovery, and deletion through WMI start-ing with creation.
Creating a scheduled job
There are a large number of utility commands available that you can use within ascheduled job. If you want to run a PowerShell script through a scheduled task, youneed to investigate the PowerShell startup parameters. This can be achieved by typingpowershell /? at the PowerShell prompt.
To start a PowerShell session and run a script, you can do this:
powershell -nologo -noexit -file "c:\scripts\test.ps1"
The -noexit parameter can be dropped if your script creates an output file and youdon’t want PowerShell sessions remaining open. Alternatively, Stop-Process can beused to shut down the sessions.
TECHNIQUE 120
www.it-ebooks.info

388 CHAPTER 15 Logs, jobs, and performance
PROBLEM
You need to create simple scheduled jobs on the local and remote machines. Whichcommands are executed should be an option within the script.
SOLUTION
The parameters in listing 15.3 are an interesting mixture. The standard computername parameter is present, and the remainder relate to the scheduled job. Thedefault is running a dir command on the root of the C: drive if a command isn’t pre-sented. This is a safe command that won’t do any damage. Alternatively, you couldmake the parameter mandatory to force the user to present a value.
function new-scheduledjob{[CmdletBinding()]param ([parameter(ValueFromPipeline=$true, ValueFromPipelineByPropertyName=$true )] [string]$computername="$env:COMPUTERNAME",
[string]$command="cmd /K dir c:",
[ValidatePattern("[0-9]{1,2}:[0-9][0-9]")] [string]$time="12:30", [bool]$repeat=$true, [int]$day = 1, [int]$monthly = 0, [bool]$interact=$false
)PROCESS{$tz = Get-WmiObject -Class Win32_TimeZone -ComputerName $computernameif ((Get-Date).IsDaylightSavingTime()) {$bias = $tz.DaylightBias}else {$bias = $tz.StandardBias}
switch ($bias.ToString().Length) { 1 {$bias = "+000"} 3 {$bias = $bias.ToString().Insert(1,"0")} default {$bias = $bias.ToString()}}
$start = "********$($time.Replace(':',''))00.000000$bias"
Invoke-WmiMethod -ComputerName $computername `-Class Win32_ScheduledJob -Name Create `-ArgumentList $command, $monthly, $day, $interact, $repeat, $start}#process}
The time of day when the job is to be run is validated by a regular expression. Thereare so many ways to present a time that it’s best to pick one and force compliance.When turning this into a production script, add some help that explains the format.
The -day parameter represents the day of the week, and the -month parameterrepresents the day of the month. You want the job to run repeatedly and you don’twant to interact with it while it’s running.
Listing 15.3 Creating a scheduled job
www.it-ebooks.info

389TECHNIQUE 120 Creating a scheduled job
The Win32-TimeZone class on the system is interrogated to discover the time zonebias, which is the offset from GMT. There is a standard format to the start time of ascheduled job. You use string substitution to add the time and the bias into the string.
Invoke-WmiMethod can be used directly on the Win32_ScheduledJob class with therequired arguments.
DISCUSSION
The -day parameter is a numeric value to designate the days of the week on which thejob should be run. The values are rising powers of 2: Monday = 1, Tuesday = 2,Wednesday = 4, and so on. If you want to run the job on multiple days, use a binary ORto derive a composite value.
In a similar manner, the days of the month are based on powers of 2 from day 1,which has a value of 1, to day 31, which has a value of 1073741824. Binary OR is againused to create a composite value for running the job on multiple days of the month.
TIP In order to make these parameters easy to use, I have provided new-dayand new-monthday functions in the code download for the chapter. These willcalculate the correct values for you.
It’s possible to create a WMI object for the Win32_ScheduledJob class and call theCreate method on that, rather than using Invoke-WmiMethod. By doing so, the fol-lowing code,
Invoke-WmiMethod -ComputerName $computername `-Class Win32_ScheduledJob -Name Create `-ArgumentList $command, $monthly, $day, $interact, $repeat, $start
is replaced with these two lines:
$newjob = [wmiclass]"\\$computername\root\cimv2:Win32_ScheduledJob"$newjob.Create($command, $start, $repeat, $day, $monthly, $interact)
You can see in these two examples that the order in which the arguments are pre-sented is different. This is one of the delightful quirks built into PowerShell and WMIjust to keep you awake.
There’s a way you can discover the order of the arguments. If Invoke-WmiMethodfails with the argument list as presented in the documentation, try running these twocommands (modified for the appropriate WMI class and method):
([wmiclass]"Win32_ScheduledJob").Create.OverloadDefinitions
([wmiclass]"Win32_ScheduledJob").GetMethodParameters("Create")
In both cases, the order of the arguments will be shown. The first method (usingOverloadDefinitions) presents the arguments in the same order as the documenta-tion. This is the order you should use to create a WMI object and call the method onthe object.
The second method (using GetMethodParameters) presents the parameters in theorder expected by Invoke-WmiMethod.
www.it-ebooks.info

390 CHAPTER 15 Logs, jobs, and performance
Table 15.4 summarizes the results of running the previous two commands. It pres-ents the parameters required by the Create method of Win32_ScheduledJob. Theparameters are listed in the order in which they must be used if you’re creating a WMIobject and using the Create method directly (in the method 1 column) or if you’reusing Invoke-WmiMethod (the method 2 column).
You now have two code options for creating scheduled jobs. It’s time to check whetherthere are any other jobs on your systems that you might not know about.
Discovering scheduled jobs
A large part of any administrator’s time is spent checking the configuration of systemsor investigating them to discover the cause of problems. One aspect that’s often over-looked is the time of day when scheduled jobs are executed.
PROBLEM
One of your servers is having intermittent performance issues. The users are com-plaining that periodically the applications hosted on that server will slow down. Youneed to determine whether there are any scheduled jobs running at those times.
SOLUTION
The following listing can produce a report of all scheduled jobs, or a specific job if youknow its JobId.
function get-scheduledjob{[CmdletBinding()]param ([parameter(ValueFromPipeline=$true, ValueFromPipelineByPropertyName=$true )] [string]$computername="$env:COMPUTERNAME", [int]$jobid)PROCESS{if ($jobid) { $jobs = Get-WmiObject -Class Win32_ScheduledJob `
Table 15.4 Parameter order for the Create method
Order Method 1 Method 2
1 Command Command
2 StartTime DaysOfMonth
3 RunRepeatedly DaysOfWeek
4 DaysOfWeek InteractWithDesktop
5 DaysOfMonth RunRepeatedly
6 InteractWithDesktop StartTime
Listing 15.4 Discovering scheduled tasks
TECHNIQUE 121
www.it-ebooks.info

391TECHNIQUE 122 Deleting scheduled jobs
-ComputerName $computername -Filter "JobId = $jobid"}else { $jobs = Get-WmiObject -Class Win32_ScheduledJob ` -ComputerName $computername}
foreach ($job in $jobs){ $job | select Status, JobId, JobStatus, ElapsedTime, StartTime, Owner, Caption, Command, DaysOfMonth, DaysOfWeek, Description, InstallDate, InteractWithDesktop, Name, Notify, Priority, RunRepeatedly, TimeSubmitted, UntilTime}}#process}
The required job information is recovered using Win32_ScheduledJob. Each of theWMI objects for the retrieved jobs is passed through Select-Object to filter thedesired properties for output.
DISCUSSION
The daysofmonth and daysofweek properties are based on powers of 2, as discussed intechnique 120. If the script is run on days 1, 5, 9, and 26 of the month, a valueof 33554705 will be returned in the daysofmonth property. This can be decipheredusing this code:
$value = 335547051..31 | foreach { $calc = $value -band [math]::Pow(2, $($_ -1)) if ($calc -ne 0 ){$_}}
The values 1 to 31 are input into the PowerShell pipeline. Each value is used to createa power of 2 value and then a band (binary and) is performed using the value from thedaysofmonth property. If you get a result that’s nonzero, you output the day value.This code also works for the daysofweek property.
If you do find jobs that shouldn’t be running you need a method to delete them.
Deleting scheduled jobs
Were you continually told to tidy up as a child? The same applies to server administra-tion. You’ll be continually pressured to fix somebody’s problem or to get a new appli-cation into service. Do you have the time to clean up old applications, data, or evenscheduled jobs?
PROBLEM
It has been discovered that a number of scheduled jobs that are no longer requiredstill exist on your servers. They should have been removed when an application wasretired. These jobs are scheduled to run during the working day and are consumingresources best devoted to other applications.
TECHNIQUE 122
www.it-ebooks.info

392 CHAPTER 15 Logs, jobs, and performance
SOLUTION
The following listing will perform this cleanup task in an efficient manner.
function remove-scheduledjob{[CmdletBinding()]param ([parameter(ValueFromPipeline=$true, ValueFromPipelineByPropertyName=$true )] [string]$computername="$env:COMPUTERNAME", [int]$jobid)PROCESS{if ($jobid) { Get-WmiObject -Class Win32_ScheduledJob ` -ComputerName $computername -Filter "JobId = $jobid" | Remove-WmiObject}else { Get-WmiObject -Class Win32_ScheduledJob -ComputerName $computername | Remove-WmiObject}}#process}
The function can accept a -jobid as an optional parameter. The WMI object for thespecific job is retrieved, or by default all jobs are retrieved. Remove-WmiObject is usedto perform the deletion.
DISCUSSION
The Win32_ScheduledJob class does have a Delete method if you’d prefer to use that.I think it’s better, and safer, to use Get-WmiObject and pipe into Remove-WmiObject,because it’s easier to test that the correct objects have been selected. Remove-WmiObjectalso has the -WhatIf parameter for further safety. I used both of these techniques as Ideveloped and tested the function.
In technique 121, we discussed the possibility of unnecessary scheduled jobsimpacting system performance. We need to look at how you can measure the perfor-mance of your systems and at what we actually mean by performance.
15.3 System performanceMeasuring system performance has traditionally involved looking at the performancecounters. These can be accessed through the performance monitor (sysmon for thosewho remember earlier versions of Windows) and they can be saved as required. Youcan also use the Get-Counter cmdlet (which works against remote machines), or youcan use the WMI Win32_Perf* classes, as you’ll see in technique 123.
Windows Vista introduced the system assessment report. This rates a number of sys-tem hardware components, including memory, CPU, disk, and graphics, to produce anoverall rating for the system. The higher the score, the better the system should perform.
Listing 15.5 Removing scheduled task
www.it-ebooks.info

393TECHNIQUE 123 Reading performance counters
I’m often asked about system stability. The number of unscheduled restarts is oneway to measure stability. Later versions of Windows calculate a stability index on anhourly basis. This is calculated based on failures and changes, with recent events beingmore heavily weighted. The maximum possible score is 10.
Performance counters are still required to dig into individual aspects of the system.
Reading performance counters
If you’ve spent any time investigating system performance you’ll know that there’s ahuge list of available Windows performance counters. The problem of finding the cor-rect counter to use is increased when you consider that applications such as SQLServer, IIS, and Exchange add their own raft of counters. WMI enables you to accesssome, but not all, of the counters.
You can see which counters are available on a specific system like this:
Get-WmiObject -List Win32_PerfFormattedData* | select name
Here’s an extract from the results:
Win32_PerfFormattedData_PerfDisk_LogicalDiskWin32_PerfFormattedData_PerfDisk_PhysicalDiskWin32_PerfFormattedData_PerfOS_PagingFileWin32_PerfFormattedData_PerfOS_ProcessorWin32_PerfFormattedData_PerfOS_Memory
You should use the -Recurse parameter when searching for these classes as they won’tnecessarily be added to the default WMI namespace.
TIP The Win32_PerfFormattedData class is a superclass that will call theother performance formatted data classes. There will be a lot of data to wadethrough.
There are also related classes that return the raw performance counter data. Theseclasses are difficult to use, because each value has to be processed through a calcula-tion to derive a meaningful result. It’s easier to use the formatted WMI classesor Get-Counter.
PROBLEM
You need to monitor the processor performance of one of your systems. The serverhas multiple processors (or cores), and you need to display the information for eachprocessor core and the total to ensure that the application is using the processorresources in an optimum manner.
SOLUTION
The following listing presents a function that takes a computer name and a number asparameters. The number determines how many times you’ll sample the processorinformation.
TECHNIQUE 123
www.it-ebooks.info

394 CHAPTER 15 Logs, jobs, and performance
function get-cpucounter{[CmdletBinding()]param ([parameter(ValueFromPipeline=$true, ValueFromPipelineByPropertyName=$true)] [string]$computername="$env:COMPUTERNAME", [int]$number=1)BEGIN{ $source=@"public class CPUcounter{ public string Timestamp {get; set;} public string Name {get; set;} public ulong PercProcTime {get; set;}}"@Add-Type -TypeDefinition $source -Language CSharpversion3}#beginPROCESS{1..$number | foreach {
$date = (Get-Date).ToString()
Get-WmiObject -Class Win32_PerfFormattedData_PerfOS_Processor ` -ComputerName $computername | foreach { $value = New-Object -TypeName CPUCounter -Property @{ TimeStamp = $date Name = $_.Name PercProcTime = $_.PercentProcessorTime } $value}
Start-Sleep -Seconds 1 }}#process}
Some inline C# code is used to create a new .NET class to store your results B. Theclass defines three properties—a timestamp, the name of the processor, and the per-centage processor time (how much it was used during the measurement period). Thisis compiled using Add-Type. Creating a class in this manner enables you to stronglytype the properties, which supplies another level of error checking.
The range operator (..) is used to put the required series of numbers onto thepipeline. PowerShell will process each value, and for each of them retrieve the proces-sor performance data using Win32_PerfFormattedData_PerfOS_Processor. Oneobject per processor, plus one for the total, will be returned. You create an objectusing your specially created .NET class, populate its properties C, and output it. Aone-second pause is activated before you start again D.
On my development system, using this code,
1..10 | foreach {Measure-Command -Expression {Get-WmiObject
➥ -Class Win32_PerfFormattedData_PerfOS_Processor }}
Listing 15.6 Accessing performance counters
Create class
B
Create object and set propertiesC
Pause executionD
www.it-ebooks.info

395TECHNIQUE 124 Windows system assessment report
shows that the Get-WmiObject command takes about 300 milliseconds to retrieve thedata. The function could be altered to change the delay, or you could even make it aparameter.
DISCUSSION
Figure 15.1 displays the results from using this function. The results show that process-ing is relatively equally distributed across the two cores. I wouldn’t expect to see thevalues being identical across all processors or cores all of the time.
TIP In case you’re wondering how I managed to drive processor performanceso high, I set a few continuously looping recursive directory listings going. They’rea good way to tax the system without spending a lot of money on simulation tools.
Each of the WMI performance counter classes will need to be investigated to deter-mine the properties that you need to record. For example, the class used here alsoreturns information regarding interrupts.
One common scenario that you’ll get is users claiming a difference in perfor-mance between two systems. You can use the Windows system assessment report toprovide a high-level comparison between the hardware of the two systems.
Windows system assessment reportThe assessment report was introduced with Windows Vista. It examines a number ofhardware components to determine an overall score for the system.
TIP The overall score is determined by the lowest of the individual compo-nent scores. Always examine the full report to determine whether a singlecomponent is adversely affecting performance.
Accessing this information for the local machine through the GUI is acceptable, butyou need a way to perform this action remotely as well.
PROBLEM
You need to create Windows system assessment reports for a number of remotemachines. This will enable you to determine which machines should be refreshed andwhich are worth reusing.
Figure 15.1 CPU performance counters
TECHNIQUE 124
www.it-ebooks.info

396 CHAPTER 15 Logs, jobs, and performance
SOLUTION
The following listing utilizes the Win32_WinSat class to solve this problem. A hashtable lookup is created to decode the assessment state property.
$satstate = DATA {ConvertFrom-StringData -StringData @'0 = StateUnknown1 = Valid2 = IncoherentWithHardware3 = NoAssessmentAvailable4 = Invalid'@}
function get-systemassessment{[CmdletBinding()]param ([parameter(ValueFromPipeline=$true, ValueFromPipelineByPropertyName=$true )] [string]$computername="$env:COMPUTERNAME")PROCESS{ Get-WmiObject -Class Win32_WinSat -ComputerName $computername | select CPUScore, D3DScore, DiskScore, GraphicsScore, MemoryScore, TimeTaken, @{N="AssessmentState"; E={$satstate["$($_.WinSATAssessmentState)"]}}, @{N="BaseScore"; E={$_.WinSPRLevel}}
}#process}
The function returns the data from the WMI class and uses Select-Object to outputthe properties and two calculated fields. One calculated field decodes the assessmentstate and the other renames the overall score.
DISCUSSION
This report shouldn’t be taken in isolation when looking at system performance. Theage of the system and any remaining warranty should also be considered.
Proving the stability of a system is more complex than simply measuring how longit has been running.
Stability index data
System stability is a measure of a number of factors, including up-time, changes, andenvironmental factors. You can’t measure the environmental factors directly but youcan look at the internal system stability.
PROBLEM
You need to measure the stability index for your Windows systems. The index valuecan range from 1 to 10, with 1 being set immediately after a reboot and 10 being
Listing 15.7 System assessment information
TECHNIQUE 125
www.it-ebooks.info

397TECHNIQUE 125 Stability index data
returned when the system has run continuously for 30 days with no restarts orchanges. This metric will be used as part of your periodic reporting on the health ofyour systems.
SOLUTION
The WMI class Win32_ReliabilityStabilityMetrics is used to solve this problem inthe following listing. You can retrieve this information for the local or remote systems.
function get-stabilityindex {[CmdletBinding()]param ( [parameter(ValueFromPipeline=$true, ValueFromPipelineByPropertyName=$true)] [string]$computername="$env:COMPUTERNAME ") Get-WmiObject -Class Win32_ReliabilityStabilityMetrics ` -ComputerName $computername | select @{N="TimeGenerated";
➥ E={$_.ConvertToDatetime($_.TimeGenerated)}}, SystemStabilityIndex}
The returned object has two properties of interest—the stability index and the time atwhich it was generated. You need to convert the date information from WMI format toyour normal format. The results of running the function are illustrated in figure 15.2.
DISCUSSION
Over a year’s worth of data is retained, even though Windows only uses the last 28days’ worth of events to compute the index. You may need to restrict the results,especially if you’re only interested in recent data. You can pull back a full month’sdata like this:
get-stabilityindex |where {$_.TimeGenerated -lt ([datetime]"1 June 2011")
➥ -and $_.TimeGenerated -ge ([datetime]"1 May 2011")}
Listing 15.8 Retrieving stability index data
Figure 15.2 System stability index results
www.it-ebooks.info

398 CHAPTER 15 Logs, jobs, and performance
Alternatively, you could calculate an average value across the month:
get-stabilityindex |where {$_.TimeGenerated -lt ([datetime]"1 June 2011")
➥ -and $_.TimeGenerated -ge ([datetime]"1 May 2011")} |Measure-Object -Average SystemStabilityIndex
This concludes our look at event logs, scheduled tasks, and system performance, butthere’s always more to discover. The techniques presented in this chapter will be agood foundation for your investigations.
15.4 SummaryWorking with event logs, scheduled jobs, and performance indicators is an essentialpart of the administrator’s role. PowerShell and WMI provide a number of tools tohelp you in these tasks:
■ Event log discovery and configuration■ Backup and clearing of event logs■ Lifecycle management for scheduled jobs, including creation, discovery, and
deletion■ Retrieval of data from performance counters■ Production of system assessment reports and stability index data
These techniques enable you to gather data for possible forensic investigations, per-form out-of-hours tasks through scheduling jobs, and determine how your systems areperforming in real time and with a historic perspective.
In the next chapter, we’ll look at managing Hyper-V through WMI both directlyand using the PowerShell Hyper-V library.
www.it-ebooks.info

Administering Hyper-V with PowerShell and WMI
Virtualization technologies have caused a major change in the way we deliverand administer server-based infrastructure to our users. Virtualization provides away for us to run multiple servers on the same hardware and maximize the use ofthat hardware.
Robert Heinlein frequently has his characters quote, “There ain’t no suchthing as a free lunch.” This is also true in IT. The fact that we can run multipleservers on a single piece of hardware doesn’t make our jobs any easier. In fact, theybecome harder:
This chapter covers■ Creating and configuring virtual machines■ Controlling virtual machines■ Starting a sequence of virtual machines■ Administering virtual disks
399
www.it-ebooks.info

400 CHAPTER 16 Administering Hyper-V with PowerShell and WMI
■ We have more servers to administer (the hosts always seem to be forgottenwhen adding up the number of servers).
■ The risks increase. With 6, 12, or more servers running on a single piece ofhardware, a failure in that hardware means more servers offline, more down-time, and more potential loss of business for the organization. Managing thehigh availability requirements increases the complexity.
■ A virtual server doesn’t have a power button we can press to start it or a cover wecan take off to add more memory. We need tools to enable us to administerthese servers.
Hyper-V is Microsoft’s virtualization platform. Introduced in Windows Server 2008, itwas refined in Windows Server 2008 R2 (which is the version I recommend until Win-dows Server 8 becomes available). There are a number of options for automating theadministration of virtual machines running under Hyper-V:
■ Hyper-V cmdlets in Windows Server 8■ System Center Virtual Machine Manager (VMM) cmdlets—These cmdlets supply a set
of canned functionality. The drawback is that it costs extra to buy System CenterVMM.
■ Hyper-V Management Library—This is similar to the preceding option, in that thelibrary (available from www.codeplex.com) provides a wrapper around the rawWMI by supplying a large number of functions. The functions are supplied as aPowerShell module and behave in a similar way to cmdlets.
■ WMI—This is the most complex option because you have to create all of thefunctionality yourself. You’ve seen in previous chapters that using WMI withPowerShell is easier, but it still involves a lot of work
These options are illustrated in figure 16.1. At the bottom of the diagram, you’reaccessing PowerShell and WMI directly—this approach provides the minimum ease ofuse. At the next level up, you’re using modules (or snap-ins) to make life easier. At thetop of the diagram, you use scripts to callthe modules, which gives you ease of useand the means to extend, and adapt, thefunctionality to meet your exact needs.
One thing you mustn’t forget is admin-istering the host systems. Hyper-V is a Win-dows feature, which means you can use thetechniques you’ve already learned to per-form the administration tasks. You’ll bereusing a number of functions developedin earlier chapters.
In this chapter, we’ll look at using theHyper-V Management Library by JamesO’Neill. It’s got great functionality and it’s Figure 16.1 PowerShell, modules, and scripts
www.it-ebooks.info

401TECHNIQUE 126 Creating a virtual machine
free! It wraps the WMI calls to make them easier to use. The code is worth examiningto see how you could put something like this together. The library supplies 122 func-tions that are ready to use, and if you don’t use VMM I very strongly recommend thatyou use this library. As you’ll see throughout the chapter, it saves a lot of effort.
After you have Hyper-V up and running, your first task will be to create virtualmachines. You’ll also learn to configure them by adding (or removing) resources suchas CPU, memory, disks, or network adapters.
Controlling the virtual machines is the next requirement. Stopping them is easy,but learning how to start them involves some work on your part. You can then moveon to the more complex situation where you want to start a number of machines in acertain order.
Virtual disks are a major component of the Hyper-V infrastructure. You’ll discoverhow to monitor, check usage, and compact as required.
First, though, you need to create a virtual machine.
16.1 Creating and configuring virtual machinesCreating a new virtual machine is a trivial task, but it becomes nontrivial when yourealize that all you get is an empty shell. You need to configure the virtual machinewith CPUs, memory, disks, and network adapters. Some configuration items are addedautomatically, but most you’ll have to add explicitly.
TIP Remember that the virtual machine must be switched off for configura-tion items to be applied. We aren’t at the hot-plug device quite yet.
Once you have your virtual machine configured you need to install an operating sys-tem. You could use an automated install process or add a file containing an image ofinstallation media (an .iso file) to the virtual DVD drive. Starting the virtual machinethen initiates the installation process. Once you’ve installed the operating system youcan use the techniques in chapter 13 to configure the server.
Let’s start on this journey by looking at how to create a virtual machine.
Creating a virtual machine
Using the wizard in Hyper-V Manager to create a virtual machine isn’t too painful, butyou can make life easier for yourself by creating a function to do all the hard work.When I create a machine, I always add a network adapter and at least one disk. Theamount of memory and the number of CPUs are more variable.
PROBLEM
You need to create a virtual machine. Ideally, the method you choose should berepeatable and should ensure that the machine matches your organization’sstandards.
SOLUTION
Listing 16.1 presents a solution to this problem. The first thing to notice is the nameof the function—new-pawVM. The noun is still VM—I’m just adding a prefix.
TECHNIQUE 126
www.it-ebooks.info

402 CHAPTER 16 Administering Hyper-V with PowerShell and WMI
y
TIP Add a prefix to the noun in your function name if you need to distin-guish it from another function with the same name. You can use the -prefixparameter in Import-Module to do this at load time.
The parameters set the Hyper-V host and virtual machine names, the path to thefolder that contains the files comprising the virtual machine, the number of CPUs,and the amount of memory to be allocated to the new virtual machine.
function new-pawVM{[CmdletBinding()]param ( [string]$hvhost="$env:COMPUTERNAME", [string]$vm, [string]$path = "D:\Virtual Machines\",
[ValidateRange(1,4)] [int]$cpu, [long]$ram)BEGIN{ $vswitch = "Local Area Connection - Virtual Network"}
PROCESS{
$vpath = Join-Path -Path $path -ChildPath $vmNew-Item -Path $path -Name $vm -ItemType Directory
$newvm = New-VM -Name $vm -Path $vpath -Server $hvhost
Set-VMCPUCount -VM $newvm -CPUCount $cpu `-Server $hvhost -Force
$hostram = (Get-WmiObject -Class Win32_ComputerSystem ` -ComputerName $hvhost).TotalPhysicalMemoryif($ram -gt ($hostram/4) ){$ram = math::Truncate($hostram/4)}
Set-VMMemory -VM $newvm -Memory $ram `-Server $hvhost -Force
Add-VMNIC -VM $newvm -VirtualSwitch $vswitch -Server $hvhost -Force
Add-VMNewHardDisk -VM $vm -VHDPath "$vpath\$vm.vhd" `-ControllerID 0 -LUN 0 -Size 125GB `-Server $hvhost -Force
Add-VMDrive -VM $vm -ControllerID 1 -LUN 1 `-OpticalDrive -Server $hvhost -Force}}
The command to set the virtual switch, specifying which network you want the virtualmachine to join, is in the BEGIN block. It could be part of the PROCESS block if it waslikely to become a parameter.
The name of the new virtual machine is joined to the path to the virtual machine stor-age area. You can then create the virtual machine shell B. The number of CPUs is also
Listing 16.1 Create a standard virtual machine
Create virtual machine
B
Add CPUsC
Add memor
D
Add disksE
www.it-ebooks.info

403TECHNIQUE 126 Creating a virtual machine
set C. I can set a maximum number of 4 on my host machine, and this is tested in the-cpu parameter validation. Change this value to match the capabilities of your host.
The total amount of physical memory in the host server is obtained, and if you’reattempting to give the virtual machine an amount of memory that’s more than 25 per-cent of the host’s memory it’s scaled back to the 25 percent mark. The memory of thevirtual machine can then be set D. A virtual network card (NIC) is added to the virtualmachine using the virtual switch defined earlier.
A virtual hard disk E and virtual DVD drive are added to complete the virtualmachine’s configuration. The virtual disk size is hard-coded, but this could be param-eterized if more flexibility is required.
DISCUSSION
Here’s an example of using this function:
new-pawvm -vm Test51 -cpu 2 -ram 2GB
It’s a very simple command to create a fairly complex object. The function could bemodified to standardize the machines even further. These lines,
[ValidateRange(1,4)][int]$cpu,[long]$ram
could be changed to
[ValidateSet(1,2,4)][int]$cpu
In the body of the function you could change these lines
$hostram = (Get-WmiObject -Class Win32_ComputerSystem ` -ComputerName $hvhost).TotalPhysicalMemoryif($ram -gt ($hostram/4) ){$ram = math::Truncate($hostram/4)}
Set-VMMemory -VM $newvm -Memory $ram -Server $hvhost -Force
to this:
switch ($cpu){ 1 {Set-VMMemory -VM $newvm -Memory 1GB -Server $hvhost -Force} 2 {Set-VMMemory -VM $newvm -Memory 2GB -Server $hvhost -Force} 4 {Set-VMMemory -VM $newvm -Memory 4GB -Server $hvhost -Force}}
The amount of memory in the machine is standardized based on the number of CPUs. When a new virtual machine is created, IDE controllers 0 and 1 are added automat-
ically. Each has two disk logical units (LUNs), labeled 0 and 1. I deliberately createdthe hard disk and DVD drive on different controllers and LUNs to emphasize this. Thefinal configuration is shown in figure 16.2.
Over the lifetime of the virtual machine you may need to modify the amount ofmemory and number of CPUs allocated to the machine. Adjusting memory isstraightforward using the Set-VMMemory function from the Hyper-V module (it’s pos-sible to check the total amount of physical RAM in the machine to ensure that you
www.it-ebooks.info

404 CHAPTER 16 Administering Hyper-V with PowerShell and WMI
don’t overcommit). For modifying the number of CPUs you need to ensure that youdon’t breach the limits set for virtual machines.
Adding extra CPUs
It isn’t possible to allocate more virtual CPUs than there are physical cores in the hostsystem. You checked the number of CPUs at creation (in technique 126), but you alsoneed to test the number when modifying.
PROBLEM
A test is needed to compare the number of virtual CPUs being allocated to a virtualmachine against the maximum number that can be allocated.
SOLUTION
Listing 16.2 uses a ValidateRange() test on the -cpu parameter to test that the num-ber of CPUs that you propose to add is valid for that host. I’ve hardcoded that numberinto the test in this listing, but it would be possible to use ValidateScript() to testagainst a WMI call to get the number of cores (see technique 4 in chapter 5).
Figure 16.2 Properties of the new virtual machine
TECHNIQUE 127
www.it-ebooks.info

405TECHNIQUE 128 Attaching an .iso image to a DVD drive
function set-pawCPU{[CmdletBinding()]param ( [string]$hvhost="$env:COMPUTERNAME", [string]$vm,
[ValidateRange(1,4)] [int]$cpu)BEGIN{}
PROCESS{
$count = (Get-VMCPUCount -VM $vm).VirtualQuantityWrite-Host "Current CPUs = $count"
Set-VMCPUCount -VM $vm -CPUCount $cpu -Server $hvhost -Force
$count = (Get-VMCPUCount -VM $vm).VirtualQuantityWrite-Host "New CPUs = $count"
}}
You then get the current number of virtual CPUs allocated to the machine, make thechanges, and display the new number of CPUs.
DISCUSSION
If you need to know how many virtual CPUs have been allocated to the virtualmachines on your host you can use this snippet:
Get-VM |Get-VMCPUCount |Measure-Object -Sum VirtualQuantity
You’ll receive a count of the number of virtual machines and the total number of vir-tual CPUs allocated.
You now have a virtual machine, but before you can do anything with it, you needto install an operating system.
Attaching an .iso image to a DVD drive
When you created your virtual machine in listing 16.1, you didn’t attach an .iso imageto the DVD drive. If you attach the operating system image and start the virtualmachine it will kick straight into the install routine.
PROBLEM
You need to be able to add .iso files (DVD images) to the DVD drive so that you caninstall software and operating systems.
SOLUTION
The following listing shows how this is accomplished. The virtual machine to whichyou’ll attach the image, and the image to be attached, are specified in the parameters.It’s assumed that there’s only a single DVD drive allocated to the virtual machine.
Listing 16.2 Set the number of virtual CPUs
TECHNIQUE 128
www.it-ebooks.info

406 CHAPTER 16 Administering Hyper-V with PowerShell and WMI
function add-pawiso{[CmdletBinding()]param ( [string]$hvhost="$env:COMPUTERNAME", [string]$vm,
[ValidateSet("W2K8R2")] [string]$source)BEGIN{}
PROCESS{
$dvd = Get-VMDisk -VM $vm -Server $hvhost | where {$_.DriveName -eq "DVD Drive"}
switch ($source) {"W2K8R2" {$file = (Get-ChildItem -Path "C:\Source\Window
➥ 2008R2\*.iso").Fullname}}
Write-Debug $fileAdd-VMDisk -VM $vm -ControllerID $($dvd.ControllerID) `-LUN $($dvd.DriveLUN) -Path $file -OpticalDrive
Get-VMDisk -VM $vm -Server $hvhost | where {$_.DriveName -eq "DVD Drive"}}}
The .iso image to attach is defined by a short code. After you create an object repre-senting the DVD drive you use a switch statement to find the full name of the .iso imagefile. The image is attached using Add-VMDisk, and the function uses Get-VMDisk to showthat the file image is attached.
DISCUSSION
The function is used as follows:
add-pawiso -vm test51 -source w2k8r2
The length of the .iso image’s name for Windows Server 2008 R2 (92 characters)means you likely won’t want to type it out! Other codes can be used to point to otherimages (put one per directory for simplicity). If an invalid code is used the functionwill throw an error and present you with the list of valid codes.
The following function can be used to remove the image once the software instal-lation has occurred:
function remove-pawiso{[CmdletBinding()]param ( [string]$hvhost="$env:COMPUTERNAME", [string]$vm)PROCESS{Get-VMDisk -VM $vm -Server $hvhost |where {$_.DiskPath -like "*.iso"} |
Listing 16.3 Attach an .iso image
www.it-ebooks.info

407TECHNIQUE 129 Adding a virtual disk
foreach { Remove-VMDrive -Diskonly -VM $_.VMElementName ` -ControllerID $_.ControllerId -LUN $_.DriveLun -Force}
Get-VMDisk -VM $vm -Server $hvhost |where {$_.DriveName -eq "DVD Drive"}}}
The function is used like this:
remove-pawiso -vm test51
You may need to add complete new disks as well as .iso images, depending on whatyou want your virtual machine to accomplish.
Adding a virtual disk
There are a number of reasons for adding another hard disk to a system. You mayneed the extra storage for files, or you may want to separate a particular part of thefunctionality, such as Exchange log files or SQL Server tempdb.
PROBLEM
An extra hard disk must be added to the virtual machine. This will be the first SCSIdisk attached to the virtual machine, so you also need to add a SCSI controller.
SOLUTION
The new-pawSCSIdisk function in the following listing takes a Hyper-V host and a vir-tual machine name as arguments to the parameters. Get-VMDisk is used to discoverthe path to the folder containing the machine’s virtual disks.
function new-pawSCSIdisk{[CmdletBinding()]param ( [string]$hvhost="$env:COMPUTERNAME", [string]$vm)PROCESS{ $disk = Get-VMDisk -VM $vm | where {$_.DiskName -eq "Hard Disk Image"} | select -First 1 $path = Split-Path -Path $disk.DiskPath -Parent
Add-VMSCSIController -VM $vm -Server $hvhost -Force Add-VMNewHardDisk -VM $vm -VHDPath "$path\$vm-SCSI.vhd" ` -ControllerID 0 -LUN 0 -Size 125GB -SCSI ` -Server $hvhost -Force
}}
A virtual SCSI controller is added, followed by a new virtual disk. Compare the state-ment in this function with that in listing 16.1 to see that the -SCSI parameter is usedto create a SCSI disk rather than the IDE disk created earlier.
Listing 16.4 Add a SCSI disk
TECHNIQUE 129
www.it-ebooks.info

408 CHAPTER 16 Administering Hyper-V with PowerShell and WMI
DISCUSSION
This function is called as follows:
new-pawSCSIdisk -vm test51
You can add further disks by wrapping this function in a wrapper function that thentests to see which LUNs are available.
When you created the first hard disk for the virtual machine, the assumption wasthat the disk would be formatted when the operating system was installed. Additionalhard disks have to be explicitly formatted—see technique 30 in chapter 6.
The other piece of virtual hardware you need to consider adding is a networkadapter.
Adding a network adapter
I normally create virtual machines with a single network adapter, which gives connec-tivity to my virtual environment’s internal network. When I’ve finished configuringthe machine, I add another network adapter to give me internet access for Windowsproduct activation. I use Network Address Translation (NAT) to span the virtualmachines onto my host’s wireless adapter.
PROBLEM
A new network adapter must be added to the virtual machine so that it can link to theinternet.
SOLUTION
The following listing shows how you can accomplish this task. After accepting a hostand virtual machine name, the function defines the virtual switch to use and createsan object representing the virtual machine.
function new-pawNIC{[CmdletBinding()]param ( [string]$hvhost="$env:COMPUTERNAME", [string]$vm)
PROCESS{
$vswitch = "New Virtual Network for Wireless"
$target = Get-VM -Name $vm -Server $hvhost
Add-VMNIC -VM $target -VirtualSwitch $vswitch -Server $hvhost -Force
start-pawvm -hvhost $hvhost -vm $vm
Write-Host "Waiting for 3 minutes"Start-Sleep -Seconds 180
$nic = Get-WmiObject Win32_NetworkAdapterConfiguration -ComputerName $vm |
Listing 16.5 Add a network adapter
TECHNIQUE 130
Start virtualmachine
B
Get new adapterC
www.it-ebooks.info

409TECHNIQUE 130 Adding a network adapter
where{$_.DHCPEnabled -and $_.IPAddress[0].ToString() -like "169.254*"}
$ping = Test-Connection $vm -count 1 $nets = $ping.IPV4Address.IPAddressToString -split "\."
$ipaddress = "192.168.2.$($nets[3])"$subnet = "255.255.255.0"
$nic.EnableStatic($ipaddress, $subnet) $nic.SetGateways("192.168.2.1", 1)$nic.SetDNSServerSearchOrder("192.168.2.1")
Get-WmiObject Win32_NetworkAdapter -ComputerName $vm `-Filter "DeviceID=$($nic.Index)" |Set-WmiInstance -Arguments @{NetConnectionID='Virtual Wireless LAN 99'}
}}
A virtual network adapter is added and the virtual machine is started B. The start-pawvm function is defined in listing 16.6 in the next technique. When the machine hasstarted you can discover the new adapter C (an address that starts with 169.254 istaken by an adapter that’s configured to use DHCP but that can’t find a DHCP server).
Test-Connection is used to find the IP address on the internal network D. Thelast octet of the address is taken to use in the address to be configured on the newadapter. A subnet mask is defined, and the adapter configured E. The appropriatedefault gateway and DNS server are applied. The network connection ID is changed asthe last act of the function.
WARNING The name that’s used for the NetConnectionID must not havebeen used before. If it has, you’ll see a COM exception if running locally or anerror about the number arguments if running against a remote machine.
DISCUSSION
The function can be used like this:
new-pawNIC -vm Win7
A number of actions can be performed directly on the adapters of the various virtualmachines on the host. You can view all adapters or select some properties of interest:
get-vmnicget-vmnic | select VMElementName, SwitchName
You can test whether the adapter belongs to a particular switch:
get-vmnic |where {$_.SwitchName -like "Local Area Connection - Virtual Network"}
Alternatively, you can get all adapters not on a given switch:
get-vmnic |where {$_.SwitchName -notlike "Local Area Connection - Virtual Network"}
Finally, you can remove all adapters associated with a virtual switch prior to theremoval of that switch:
Get IP addressD
Configure adapterE
www.it-ebooks.info

410 CHAPTER 16 Administering Hyper-V with PowerShell and WMI
get-vmnic |where {$_.SwitchName -notlike
➥ "Local Area Connection - Virtual Network"} | Remove-VMNIC
Once the virtual machine has been created and configured you have to learn to con-trol it.
16.2 Controlling virtual machinesVirtual machines are no different from physical machines in that your control at themachine level is generally restricted to starting and stopping virtual machines. Youcan safely stop a virtual machine using the Stop-Computer cmdlet or a WMI shutdowncommand as in listing 13.3. Starting a virtual machine can’t be done directly fromPowerShell, so you need to use the Hyper-V library.
In my test environment I have two Exchange servers, but I need a domain control-ler to start first. A similar situation exists with SharePoint and SQL Server, where thedatabase server must start before the SharePoint server. Starting machines in a prede-termined order is an interesting problem that you’ll solve in technique 132.
Also, if virtual machines are offline for an extended period of time, the patch lev-els will become out of date. The ideal solution is to have an automated solution thatperiodically brings virtual machines online, ensures that the patches are applied, andthen closes down the machines.
A quick test you can apply to determine the state of a virtual machine is to use theGet-VM cmdlet. If you only want to see which machines are running you can use this:
Get-VM -Running
You can now determine which machines to start because you know which ones arecurrently active.
Starting a virtual machine
Starting physical machines is easy—you press the power-on button. Virtual machinesdon’t have buttons, so you need to send the virtual host a command to start the machine.
PROBLEM
You need to be able to start a virtual machine on a remote host. The function you useshould report the progress and let you know when the virtual machine is up and running.
SOLUTION
The following listing solves this problem. It accepts a Hyper-V host and virtualmachine name as parameters and loads the Hyper-V module if it’s not already loaded.
function start-pawVM{[CmdletBinding()]param ( [string]$hvhost="$env:COMPUTERNAME",
Listing 16.6 Start a virtual machine
TECHNIQUE 131
www.it-ebooks.info

411TECHNIQUE 131 Starting a virtual machine
[string]$vm)PROCESS{if (-not(Get-Module -Name hyperv)){Import-Module -Name hyperv -Force}
$machine = Get-VM -Name $vm -Server $hvhostif ($machine.EnabledState -eq 3){ Start-VM -VM $vm do{ Write-Host "System $vm starting $(get-date -Format T )" if (-not (Test-Connection -ComputerName $vm -Count 1 -Quiet)) { Start-Sleep -Seconds 5 } else { Write-Host "System $vm started $(get-date -Format T )" break } }until(1 -gt 2)}else { write-Host "$vm is not stopped. Check Status"}}}
You get an object representing the virtual machine and test its status. If the status is 3,it means the machine is stopped so you can start it. If the status isn’t 3, you output amessage saying that the machine’s status needs to be checked—this includes the situa-tion where the machine is running.
Assuming that the status is correct (it’s stopped), you issue a Start-VM command.A do loop is used to write a message stating that the machine is starting and giving thedate and time. Test-Connection is used to determine connectivity to the virtualmachine. If you don’t get a result it means that the machine is still starting, in whichcase the function pauses for five seconds before processing the loop again.
TIP Setting the until condition on the do loop to be impossible forces theloop to run indefinitely.
If you do get a response from Test-Connection it means the machine is available, soyou send a message to that effect and break out of the loop.
DISCUSSION
When you use the Start-VM command you receive a message that a background jobhas started. These jobs can be viewed as follows:
Get-WmiObject -Namespace root\virtualization -Class Msvm_ConcreteJob
One drawback to this approach is that the Msvm_ConcreteJob WMI class doesn’t tellyou to which machine the job is related.
Starting a single machine is useful. Starting multiple machines in the correct orderwith a single command is even more useful.
www.it-ebooks.info

412 CHAPTER 16 Administering Hyper-V with PowerShell and WMI
Starting multiple machines
There are multiple scenarios where you may want to start multiple machines in a par-ticular order, such as starting one domain controller and two Exchange servers. Alter-natively, you may just need to start multiple machines in a sequential manner so thatyou can control resource usage on the host.
PROBLEM
There’s a relationship between the functionality of a number of virtual machines,which means you have to start the machines in the correct order for them to workcorrectly.
SOLUTION
The following listing demonstrates a solution to this problem. The first parameter isthe Hyper-V host, as seen previously.
function start-pawVMset{[CmdletBinding()]param ( [string]$hvhost="$env:COMPUTERNAME", [string[]]$vmset)PROCESS{if (-not(Get-Module -Name hyperv)){Import-Module -Name hyperv -Force}
foreach ($vm in $vmset){ start-pawVM -hvhost $hvhost -vm $vm}}}
The second parameter shows a coding syntax you’ve not seen often:[string[]]$vmset. Read this from the inside out. String[] represents a string array,which means that the parameter expects an array (multiple virtual machine names).An array containing a single name is acceptable.
You loop through the list of machines in that array and call the start-pawVM func-tion (from listing 16.6) for each one.
DISCUSSION
The function is used in this manner:
start-pawVMset -vmset dc02, exch07, exch071
In this case, my domain controller is up and running before my Exchange serversstart. This ensures that the Exchange servers can contact the domain controller, andthere won’t be any problems with the Exchange services starting.
The function can also be used to start a set of unrelated machines; for instance, Icould start all of my SQL Server systems in one pass.
Starting machines is a good idea, but sometimes you have to stop them as well.
Listing 16.7 Start multiple virtual machines
TECHNIQUE 132
www.it-ebooks.info

413TECHNIQUE 133 Stopping virtual machines
Stopping virtual machines
There are a number of methods available for stopping virtual machines. A brute forceapproach is to stop the host, but that will probably leave you with more work tidyingup the state of the virtual machines when you want to start them again. You can shutdown all running virtual machines like this:
Get-VM -Running | Stop-VM -Force
Alternatively, either of the following examples will close down a single machine:
Stop-VM -VM dc02 -ForceStop-computer dc02
The drawback to these approaches is that you don’t get any reporting on progress.
PROBLEM
A function is needed that will shut down, in a controlled manner, one or more virtualmachines. The close-down procedure must report progress and inform you when thevirtual machine is completely shut down.
SOLUTION
The solution to this problem can be found by adapting the code in listing 16.7 asshown in the following listing. The parameters are the virtual host and the set ofmachines you wish to close down.
function stop-pawVMset{[CmdletBinding()]param ( [string]$hvhost="$env:COMPUTERNAME", [string[]]$vmset)PROCESS{if (-not(Get-Module -Name hyperv)){Import-Module -Name hyperv -Force}
foreach ($vm in $vmset){ $machine = Get-VM -Name $vm -Server $hvhost if ($machine.EnabledState -eq 2){ Stop-VM -VM $vm -Force do{ $machine = Get-VM -Name $vm -Server $hvhost if ($machine.EnabledState -eq 3){ Write-Host "System $vm stopped $(Get-Date -Format T )" break } else{ Write-Host "System $vm stopping $(Get-Date -Format T )" Start-Sleep -Seconds 2 } }until(1 -gt 2) } else {
Listing 16.8 Stop a virtual machine
TECHNIQUE 133
www.it-ebooks.info

414 CHAPTER 16 Administering Hyper-V with PowerShell and WMI
write-Host "$vm is not running. Check Status" }}}}
The function iterates through the set of machines and for each machine tests that themachine is running and then calls Stop-VM. The machine state is tested periodicallyduring the close-down process (every 2 seconds in the code, but this can easily bechanged to allow for latency on really remote machines). When the machine statereaches 3 (stopped) a message is written out confirming that the machine is stopped,and the function breaks out of the loop.
DISCUSSION
The function can be used directly:
stop-pawVMset -vmset exch071, exch07, dc02
Alternatively, you can predefine the list of machines in a variable:
$close = "exch071", "exch07", "dc02"stop-pawVMset -vmset $close
Virtual machines consist of one or more virtual disks. You need to be able to adminis-ter those virtual disks.
16.3 Managing virtual disksThe final area to be covered in this chapter is virtual disks. These are files on the hostthat the virtual machine treats as disks. You’ve already seen how to create virtual disksas you create the machine and how to add virtual disks to an existing machine. Wenow need to turn our attention to managing virtual disks.
You need to be able to view the status of the virtual disks attached to a virtualmachine, determine how much free space is available within your virtual disk, andcompact the virtual disk to save space and make the disk more efficient.
The first job is to test the status of the virtual disk.
Testing virtual disk status
Understanding the status of the virtual disks in your system can go a long way whentroubleshooting problems. If the disks have problems you’ll definitely see those prob-lems show up in the virtual machine, which could affect a business-critical application.
PROBLEM
You need to be able to determine the status of the various virtual storage devicesattached to your virtual machine. This includes DVD drives and virtual hard disks. Youalso need the option to display information about disk usage.
SOLUTION
The following listing presents a solution to the problem. Two parameter sets are pre-sented to make the selection of DVD or hard disks mutually exclusive options. A furtherparameter enables you to discover further information about the virtual hard disk.
TECHNIQUE 134
www.it-ebooks.info

415TECHNIQUE 134 Testing virtual disk status
function test-pawVHD{[CmdletBinding()]param ( [string]$hvhost="$env:COMPUTERNAME",
[parameter(ParameterSetName="DVD")] [switch]$dvd,
[parameter(ParameterSetName="HD")] [switch]$hd,
[parameter(ParameterSetName="HD")] [switch]$info
)$vmdisks = Get-VMDisk -Server $hvhost
switch ($psCmdlet.ParameterSetName) { "DVD" {$disks = $vmdisks | where {$_.DriveName -eq "DVD Drive"} | select @{N="VMname"; E={$_.VMElementName}}, ControllerName, DriveName}
"HD" {$disks = $vmdisks | where {$_.DriveName -eq "Hard Drive"} | select @{N="VMname"; E={$_.VMElementName}}, ControllerName, DriveName, DiskPath
foreach ($disk in $disks) {
$tp = Test-Path -Path $disk.DiskPath $disk | Add-Member -MemberType NoteProperty ` -Name "PathFound" -Value $tp
if($tp -and $info){ $vhdinfo = Get-VHDInfo -VHDPaths "$($disk.DiskPath)" $disk | Add-Member -MemberType NoteProperty ` -Name "FileSize" -Value $vhdinfo.FileSize -PassThru | Add-Member -MemberType NoteProperty ` -Name "MaxSize" -Value $vhdinfo.MaxInternalSize -PassThru | Add-Member -MemberType NoteProperty ` -Name "Inuse" -Value $vhdinfo.Inuse -PassThru | Add-Member -MemberType NoteProperty ` -Name "InSavedState" -Value $vhdinfo.InSavedState -PassThru | Add-Member -MemberType NoteProperty ` -Name "Type" -Value $vhdinfo.TypeName} } }}$disks
}
You start by retrieving all of the virtual disks defined on the host. A switch statementdetermines whether you’re working with DVDs or hard disks based on the parameter
Listing 16.9 Test virtual disk status
www.it-ebooks.info

416 CHAPTER 16 Administering Hyper-V with PowerShell and WMI
set. Using parameter set names makes the choices mutually exclusive. Virtual DVDshave the virtual machine name, controller name, and drive name selected.
The processing for a hard disk is slightly more complicated. You select the sameinformation as for DVDs but add the path to the virtual disk file. Test-Path is used todetermine whether the file exists. If the file exists and you’ve selected the option formore information, you add properties to the object you’re creating to hold disk size,usage, and status.
DISCUSSION
The following examples illustrate how to use the function:
test-pawVHD -dvd
The preceding example displays the DVD devices allocated to virtual machines. If youwant to display the information about virtual hard disks you’d use this syntax:
test-pawVHD -hd | ft -a
The choice between displaying information on DVD or hard disk is mutually exclusive,as can be illustrated by trying this:
test-pawVHD -hd -dvd
It generates an error. Finally, using this syntax,
test-pawVHD -hd -info
generates output in the following format for every virtual hard disk on every virtualmachine on the host:
VMname : Exch071ControllerName : IDE Controller 0DriveName : Hard DriveDiskPath : C:\Virtual Machines\Exch071\Exch071.vhdPathFound : TrueFileSize : 22241793536MaxSize : 136365211648Inuse : FALSEInSavedState : FALSEType : Dynamic
The file sizes are in bytes but you could easily convert to MB or GB. Examples of suchconversion can be found in earlier chapters, such as listing 6.2 in technique 21. Alter-natively, you could use the following technique.
Examining virtual disk usage
Virtual disks have storage limitations in exactly the same way as physical disks. Animportant part of administering the virtual machines is testing their storage capacity.
PROBLEM
You need to be able to check on the free space of the virtual disks in your environ-ment. This will feed into the capacity-planning reports you need to maintain.
TECHNIQUE 135
www.it-ebooks.info

417TECHNIQUE 136 Compacting virtual disks
SOLUTION
There are two ways you can solve this problem. If a virtual machine is running you canuse technique 27 from chapter 6 to determine the disk space information. The follow-ing listing will work for virtual disks connected to machines that are either running orswitched off.
function get-pawdisksize{[CmdletBinding()]param ( [string]$hvhost="$env:COMPUTERNAME", [string]$vm)PROCESS{
Get-VMDisk -VM $vm -Server $hvhost |where {$_.DriveName -eq "Hard Drive"} |foreach { Get-VHDInfo -VHDPaths $($_.DiskPath) | select Path, @{N="MaxSize"; E={[math]::round(($_.MaxInternalSize / 1GB), 4)}}, @{N="Size"; E={[math]::round(($_.FileSize / 1GB), 4)}}, @{N="PercFree"; E= {100-(($_.FileSize / $_.MaxInternalSize)*100)}}, Type}}}
The function takes the usual host and virtual machine names as parameters. Get-VMDiskis used to retrieve the disk information, with Where-Object used to restrict the returnedinformation to virtual hard disks (you filter out DVD drives).
The pipeline is completed by piping the disks into Foreach-Object, where theDiskPath property is used in Get-VHDInfo to discover the disk capacity information.The usual calculations are performed to convert the results from bytes to more mean-ingful gigabytes.
DISCUSSION
The calculations round to four decimal places to ensure that new disks register. Thiscould be altered to two decimal places if preferred (new disks will register as 0used space).
Knowing the available capacity of a virtual disk is one part of the puzzle. You alsoneed to know if the space allocated to the virtual disk is being used efficiently.
Compacting virtual disksVirtual disks are files in the host’s storage system (the specification of .vhd files is avail-able from Microsoft if you want to dig deeper). All disks, physical or virtual, sufferfrom fragmentation. This was discussed in detail in chapter 6 (technique 31).
When physical disks are defragmented the file fragments are made contiguous, butno allowance is made for moving white space to the end of the disk. You can compactvirtual disks to remove the white space and make more efficient use of the host’s storage.
Listing 16.10 Determine virtual disk usage
TECHNIQUE 136
www.it-ebooks.info

418 CHAPTER 16 Administering Hyper-V with PowerShell and WMI
PROBLEM
You need to be able to compact virtual hard disks to optimize the host’s storage. Theoption should be presented to defragment the virtual disk at the same time.
SOLUTION
The function presented in the listing 16.11 solves this problem.
NOTE The defragmentation and compaction require the virtual machine tobe offline.
The parameters are the virtual machine whose disks you’ll compact and an optionalswitch to prevent defragmentation. By default defragmentation will occur.
function compress-pawVHD{[CmdletBinding()]param ( [string]$vm, [switch]$nodefrag)PROCESS{if (-not(Get-Module -Name hyperv)){Import-Module -Name hyperv -Force}if (-not(Get-Module -Name Chapter06)){ Import-Module "C:\Scripts\PowerShell-WMI\Chapter06\Chapter06.psm1" ` -Force}
$dl = get-nextdriveletter $pn = get-nextpartition
if (-not $nodefrag) {
Get-VMDisk -VM $vm | where {$_.DriveName -eq "Hard Drive"} | foreach { Mount-VHD -Path $($_.DiskPath) -Partition $pn -letter $dl
$mount = Get-VHDMountPoint -VHDPaths $($_.DiskPath) | where {$_.VolumeName -notlike "System Reserved" }
Write-Verbose "Defragging disk $($mount.DeviceID)" $def = invoke-defraganal -drive $($mount.DeviceID) -defrag
Dismount-VHD -VHDPaths $($_.DiskPath) -Force }}
Write-Verbose "Compacting disks for $vm" Get-VMDisk -VM $vm |where {$_.DriveName -eq "Hard Drive"} |foreach { Compress-VHD -VHDPaths $($_.DiskPath) -Wait}
}}
Listing 16.11 Compact a hard disk
Get drive letter
B
Mount driveC
Defragment drive
D
Compact driveE
www.it-ebooks.info

419TECHNIQUE 136 Compacting virtual disks
The function loads this chapter’s module and also the module from chapter 6 if it’snot already loaded. You also need to mount the virtual disk as part of the host’s filesys-tem if you want to perform a defragmentation. In order to achieve this you need thenext drive letter and partition number B. The two functions used for this are shownin listings 16.12 and 16.13 respectively.
If you’re performing a defragmentation C (the default action and recom-mended), you get the virtual hard disks. Note I’ve had to use a double negative in thelogic! It’s not a best practice but it works.
Each virtual hard disk associated with the virtual machine is mounted usingMount-VHD. The virtual disk is mounted as two disks (one small System Reserved disk andthe main disk). You can use Get-MountPoint to discover the main disk’s DeviceId,which you feed into the invoke-defraganal function (from chapter 6) D. Once thedefragmentation is complete you can dismount the virtual disk.
The virtual hard disks associated with the machine are presented to compress-VHDto perform the compaction and reclaim the space E. The -wait parameter shows aprogress bar for the compaction.
DISCUSSION
The function is easy to use:
compress-pawVHD -vm W08R2SQL08 -verbose
I recommend using the -verbose switch so you receive more information regardingthe function’s progress.
WARNING Performing a defragmentation can take a long time and you don’tget any information regarding its progress.
The defragmentation option is the default for this function. If you want to perform acompaction without defragmentation use the -nodefrag switch:
compress-pawVHD -vm Win7 -nodefrag
Compaction is a much quicker process than defragmentation.
WARNING Fragmented .vhd files may throw an error when you’re attemptingto compress them. The host filesystem needs to be defragmented in this case.
The function to discover the next drive letter simply gets the currently used drive let-ters, sorts them in descending order, and then calculates the next letter, as shown inthe following listing. A test is performed to determine whether you’ve already used Z,in which case you have a problem and another solution is required.
function get-nextdriveletter {
$disk = Get-WmiObject -Class Win32_LogicalDisk |sort DeviceId -Descending |select -First 1 -Property DeviceID
Listing 16.12 Get next drive letter
www.it-ebooks.info

420 CHAPTER 16 Administering Hyper-V with PowerShell and WMI
$letter = ($disk.DeviceID).Substring(0,1).ToUpper()if ($letter -eq "Z"){ Write-Host "No more drive letters available"}else { $nextletter = [char](([byte][char]$letter) + 1) $nextletter}}
The next partition index is calculated in a similar manner, as shown in the next listingThis is an easier calculation because you’re dealing with integers.
function get-nextpartition {
$disk = Get-WmiObject -Class Win32_DiskPartition |sort Index -Descending |select -First 1 -Property Index
$nextindex = ($disk.Index) + 1$nextindex
}
This concludes our examination of the Hyper-V library and how you can use it.There’s a lot more you can do with these functions—the more you experiment withthem, the more functionality you’ll discover.
16.4 SummaryVirtualization is an essential part of most organizations’ infrastructure. Being able toautomate the administration of the virtual environment is an increasingly importantability. Hyper-V is a Windows feature, which means you can use the same techniquesto administer your virtual machines and their hosts.
These are some common tasks that you’ve automated in this chapter:
■ The creation and configuration of virtual machines■ Controlling individual machines and groups of machines■ Testing virtual disks and determining their remaining capacity■ Defragmenting and compacting virtual disks to improve performance
At the heart of these techniques is the PowerShell Hyper-V library. This free-to-downloadPowerShell module will prove to be of great assistance as you develop further techniquesfor automating the administration of your virtual environment.
The topic of the next chapter is working with WMI directly through WindowsRemote Management, rather than using the remoting capabilities of PowerShell orthe WMI cmdlets.
Listing 16.13 Get next partition index
www.it-ebooks.info

Part 3
The future: PowerShell v3 and WMI
WMI has always been a first-class citizen in the PowerShell universe. Itsimportance has increased immensely with the introduction of PowerShell v3.But before we dive into the new functionality, we’ll look at using WMI over theWSMAN protocol in chapter 17. WSMAN increases in importance in PowerShellv3, so a sound grounding in the protocol is a must.
WARNING The last two chapters of the book are based on a betarelease of PowerShell v3. Changes could occur before the final versionsof PowerShell v3 and Windows 8 are released.
PowerShell v3 introduces a number of improvements to WMI usage:
■ New WMI namespaces and classes■ A new API for accessing WMI locally and remotely■ A new set of cmdlets (CIM) for working with WMI■ Creation of cmdlets from WMI classes
Many of the new cmdlets introduced with PowerShell v3 are created from WMIclasses. In chapter 18, we’ll look at how you can create your own cmdlets fromWMI classes (including legacy classes). The creation of format and type files tocontrol the display will also be demonstrated. This is a technique with generalapplication in PowerShell.
Chapter 19 starts by showing how you can create cmdlets from WMI methods.We’ll then look at the new CIM cmdlets, compare them with the WMI and
www.it-ebooks.info

WSMAN cmdlets we’ve already seen, and close with a look at the capabilities forremote administration introduced with the CIM API and cmdlets.
WMI has always been viewed as powerful, and these enhancements take it to a com-pletely new level. It’s going to be a fun time as these techniques evolve.
www.it-ebooks.info

WMI over WSMAN
In the previous chapters, we’ve looked at using the capabilities built into the WMIcmdlets to provide access to remote systems. Using the -ComputerName parameter isa simple method of creating a connection to a remote machine, and this is theapproach we’ve used in the majority of the techniques explored in previous chap-ters. But there are a number of scenarios where this approach isn’t enough:
■ WMI uses Distributed COM (DCOM) to connect to a remote machine. Thismay not be available or may be blocked by a firewall.
■ You may want to run multiple WMI commands against the same machine—this involves creating and destroying multiple connections. It would be moreefficient to create one session and run multiple commands. Some informa-tion about the connection is cached, but it’s still quicker to create one ses-sion and run multiple commands.
■ You may need to perform out-of-band hardware management (accessing thehardware by dedicated management links that aren’t used by general users)or access non-Windows machines.
This chapter covers■ WSMAN protocols■ Using WMI through WSMAN■ Using CredSSP■ Comparing WSMAN and other remoting techniques
423
www.it-ebooks.info

424 CHAPTER 17 WMI over WSMAN
Where DCOM isn’t available, you’ll need to use PowerShell remoting (section 2.8 inchapter 2) or, if remoting isn’t available, use WSMAN protocols to directly access theWMI resources. We’ll investigate the full PowerShell remoting options and look at howthe WSMAN protocols can be used to directly access resources on a remote machine.
NOTE This chapter will look only at working with the WMI provider throughWSMAN.
The WSMAN configuration is exposed as a PowerShell drive enabling you to configureWSMAN settings on local and remote machines.
By using WSMAN directly, you can perform three distinct types of tasks:
■ Information discovery■ Modification of WMI objects■ Removal of WMI objects
One potential issue with any remoting scenario is trying to directly access one or moreother machines from the remote machine. This is blocked by default, but the use ofthe Credential Security Support Provider (CredSSP) enables this restriction to beovercome by delegating the user’s credentials from the local to the remote machine.This capability was introduced to PowerShell with the release of PowerShell v2 in Win-dows 7 and Windows Server 2008 R2.
After we review the remoting protocol and WSMAN and CredSSP usage, the chap-ter closes with a review of the options for accessing remote machines and some recom-mendations for their use.
We’ll start by looking at the options available to you.
17.1 Remoting protocolsPowerShell has a number of protocols that can be used to connect to, and work with,remote machines. In this section, we’ll review these protocols so that using WSMANcan be put into context and to determine the best approach for working in a particu-lar scenario.
You’ve seen throughout the book that the WMI cmdlets can access remote comput-ers directly. As an example, the following command returns information about thelogical disks on a computer called DC02:
Get-WmiObject -Class Win32_LogicalDisk -ComputerName DC02
WMI uses DCOM to access the remote machine, which requires the COM- and DCOM-related services to be running on the remote system. It also requires that any firewallsbe configured to allow this traffic.
An alternative is to use PowerShell remoting. This can be achieved as a one-offcommand using Invoke-Command or by creating a session to the remote machine. Ifyou use Invoke-Command, the WMI command is modified to use this syntax:
Invoke-Command `-ScriptBlock {Get-WmiObject -Class Win32_LogicalDisk} `-ComputerName DC02
www.it-ebooks.info

425Remoting protocols
Each returned object has a property that shows the computer name that was accessed.It’s of this form:
PSComputerName : dc02
To do this, you need to have enabled the PowerShell remoting functionality on theremote machine using Enable-PSRemoting run in a PowerShell console with elevatedprivileges.
A third option is to communicate directly with the WinRM service and access thedata:
Get-WSManInstance -ComputerName DC02 `-ResourceURI wmicimv2/Win32_LogicalDisk `-SelectorSet @{DeviceId='C:'}
TIP Try running these commands in your environment to see the differ-ences in the results. They can be run on the local machine, but you’ll need tostart PowerShell with elevated privileges for the WSMAN example.
There are differences between the data returned by Get-WmiObject and that returnedby PowerShell remoting or by using WSMAN:
■ Get-WmiObject returns objects from local or remote machines. These are liveobjects with methods and properties that can be manipulated as allowed by theWMI class.
■ PowerShell remoting returns inert objects that have just the properties available.■ WSMAN cmdlets return XML renderings of the object. These are inert, meaning
that methods don’t work and properties can’t be modified.
You need to understand the differences and similarities of using full PowerShellremoting compared to using WSMAN.
17.1.1 PowerShell remoting
Remoting was probably the most eagerly awaited addition to PowerShell when ver-sion 2 was released. It’s based on the WS-Management (Web Services Management,usually abbreviated to WSMAN) protocols established by the Distributed ManagementTask Force (http://dmtf.org/). WSMAN is a SOAP-based protocol for the manage-ment of servers, devices, applications, and web services.
Microsoft implemented WSMAN as the Windows Remote Management (WinRM)service. The architecture is illustrated in figure 17.1.
A PowerShell session on the local machine passes the commands to the PowerShellremoting protocol on the local machine. The protocol is installed as part of WinRM.The remoting protocol communicates via SOAP with the WinRM service on theremote machine. The commands are then passed to a PowerShell session for execu-tion. The results are passed back via WinRM.
The communication between the machines is performed using HTTP orHTTPS (if the appropriate certificate is installed). Configuration is performed by
www.it-ebooks.info

426 CHAPTER 17 WMI over WSMAN
Enable-PsRemoting in the first instance and then by the WSMAN cmdlets or pro-vider if any fine-tuning of the WSMAN/WinRM configuration is required.
Individual commands can be run on the remote machine using Invoke-Command,or you can create a PowerShell session to the remote machine and work through that.Using a session is more efficient if you’ll be running multiple commands on theremote machine. This was described in detail in section 2.8.
17.1.2 WSMAN
When you use WSMAN, you access the resource directly from the WinRM service, asshown in figure 17.2. You don’t need to access PowerShell on the remote machine.This means that you could administer remote machines that don’t use the Windowsoperating system, assuming that they have an instance of WSMAN running and have aCIM (WMI) provider.
In the introduction to section 17.1, you saw how to access a WMI resource usingGet-WSManInstance. The -SelectorSet parameter is analogous to the -Filter param-eter in Get-WmiObject, but it uses the WMI class key as its filter. For instance, this works:
Get-WSManInstance -ComputerName DC02 `-ResourceURI wmicimv2/Win32_Service `-SelectorSet @{Name='WinRm'}
But this code doesn’t:
Get-WSManInstance -ComputerName DC02 `-ResourceURI wmicimv2/Win32_Process `-SelectorSet @{Name=
➥ 'Microsoft.ActiveDirectory.WebServices.exe'}
Figure 17.1 The PowerShell remoting architecture, showing the information flow from a PowerShell session on the local machine through the PowerShell remoting protocol to WinRM on the remote machine and terminating at a remote PowerShell session
www.it-ebooks.info

427Remoting protocols
You need to use this format:
Get-WSManInstance -ComputerName DC02 `-ResourceURI wmicimv2/Win32_Process `-SelectorSet @{Handle=1420}
Section 3.2.4 shows how to discover the WMI key for a class. Review that section if youdidn’t read it earlier.
You can perform other administration tasks in addition to discovering informa-tion. These other tasks require you to be familiar with the WSMAN cmdlets.
17.1.3 WSMAN cmdlets
The WSMAN cmdlets can be discovered using Get-Command:
Get-Command *wsman* -CommandType cmdlet |Select name
They’re listed for convenience in table 17.1. We’ll be working mainly with Get-WSMan-Instance and Invoke-WSManAction in this chapter. These cmdlets can be comparedto Get-WmiObject and Invoke-WmiMethod respectively.
Table 17.1 Cmdlets for working directly with WSMAN
Connect-WSMan Disable-WSManCredSSP Disconnect-WSMan
Enable-WSManCredSSP Get-WSManCredSSP Get-WSManInstance
Invoke-WSManAction New-WSManInstance New-WSManSessionOption
Remove-WSManInstance Set-WSManInstance Set-WSManQuickConfig
Test-WSMan
Figure 17.2 Using WinRM to access resources. The local PowerShell session talks through the local PowerShell remoting protocol to the remote WinRM service, which accesses the resources directly.
www.it-ebooks.info

428 CHAPTER 17 WMI over WSMAN
The Get-WSManInstance cmdlet has an -Enumerate parameter. It’s used when thereare multiple instances of a particular resource and the -SelectorSet parameter isn’tused. To see all of the logical disks on a remote system you’d use this syntax:
Get-WSManInstance -ComputerName DC02 `-ResourceURI wmicimv2/Win32_LogicalDisk -Enumerate
If you want information on a particular disk, you’d use this:
Get-WSManInstance -ComputerName DC02 `-ResourceURI wmicimv2/Win32_LogicalDisk `-SelectorSet @{DeviceID='C:'}
New-WSManInstance and Remove-WSmanInstance are used to manage resources,such as WSMAN listeners. They can’t be used to manipulate WMI-based objects.Set-WSManInstance can be used to perform some changes to WMI-based objects aswell as WSMAN resources. The *CredSSP cmdlets are explained in section 17.3.
Connect-WSMan and Disconnect-WSMan enable you to connect to the WinRM ser-vice on a remote machine. The configuration information for the remote machine isthen available through the WSMAN provider.
17.1.4 WSMAN provider
PowerShell provides access to data stores through providers. The providers expose thedata store in a similar manner to the filesystem. A well written provider should supplyaccess to the data store through the core cmdlets, such as *Item and *ItemProperty(see Get-Help about_core_commands for the full list).
A quick overview of the properties exposed in the provider can be found like this:
Get-ChildItem -Path wsman: -Recurse | ft Name, Value -a
The top-level containers for the provider are shown in figure 17.3. There are a number of default settings:
■ Port 5985 for HTTP and 5986 for HTTPS.■ Machine names, not IP addresses, identify remote machines.■ Credential delegation through CredSSP is disabled.■ Nondomain machines must be in the trusted hosts list.
Figure 17.3Top-level containers in the WSMAN drive
www.it-ebooks.info

429Using WSMAN
These defaults (apart from the last one) can be changed, though nondomainmachines can be added to the trusted hosts list.
TIP I don’t recommend changing the ports or any other of the default set-tings unless there’s a security imperative in your organization that mandatesthe change.
If changes have to be made, they can be performed using code like this:
Set-Item -Path wsman:\localhost\listener\listener*\port `-Value 8080
Set-Item -Path WSMan:\localhost\Client\DefaultPorts\HTTP `-Value 8080
The first line changes the port that WinRM listens on, and the second line makes it thedefault.
TIP If you have to change the ports, be consistent across your environmentto avoid troubleshooting problems.
The WSMAN provider connects to the WinRM service on the local machine:
PS> dir wsman:
WSManConfig:
ComputerName Type------------ ----localhost Container
If you use the Connect-WSMan cmdlet, you can create a connection to the WinRM ser-vice on a remote machine:
PS> Connect-WSMan -ComputerName dc02PS> dir wsman:
WSManConfig:
ComputerName Type------------ ----localhost Containerdc02 Container
The WinRM settings can be configured on the remote machine using the provider.The connection can be destroyed using Disconnect-WSMan -ComputerName dc02.
You’ve seen what the WSMAN protocol is and how you can configure it. It’s time toput it to work.
17.2 Using WSMANAny administration tool is only as good as the tasks you can accomplish with it. Usingthe WSMAN cmdlets enables you to perform similar tasks to those you could do byusing WMI directly without the use of DCOM.
www.it-ebooks.info

430 CHAPTER 17 WMI over WSMAN
In this section, you’ll discover how you can use aliases for the WSMAN resourceURIs and how to test that the WSMAN protocols are available.
TIP This is also a good test when troubleshooting PowerShell remoting orthe CIM cmdlets in PowerShell v3.
The bulk of your administrative work likely involves discovering information about amachine or managing the resources on that machine. We’ll investigate how thosetasks can be accomplished using WSMAN—specifically, how you can discover, modify,and delete WMI objects.
17.2.1 WSMAN URIs
In the examples you’ve seen so far, the code using the WSMAN cmdlet has contained aUniform Resource Identifier (URI), which has been stated like this:
-ResourceURI wmicimv2/Win32_LogicalDisk
That coding is an alias for this URI:
http://schemas.microsoft.com/wbem/wsman/1/wmi/root/cimv2/Win32_LogicalDisk
The full URI consists of three parts:
■ A root—http://schemas.microsoft.com■ A namespace—wbem/wsman/1/wmi/root/cimv2■ A class—Win32_LogicalDisk
The aliases are a lot easier to use and involve a lot less typing than using the full URI(and they reduce the chances of error). Table 17.2 lists the available aliases and theircorresponding full URIs.
Before you can get into using these aliases, you need to make sure that the WinRM ser-vice is up and running.
Table 17.2 WSMAN URI aliases
Alias Full resource URI
wmi http://schemas.microsoft.com/wbem/wsman/1/wmi
wmicimv2 http://schemas.microsoft.com/wbem/wsman/1/wmi/root/cimv2
cimv2 http://schemas.dmtf.org/wbem/wscim/1/cim-schema/2
winrm http://schemas.microsoft.com/wbem/wsman/1
wsman http://schemas.microsoft.com/wbem/wsman/1
shell http://schemas.microsoft.com/wbem/wsman/1/windows/shell
www.it-ebooks.info

431TECHNIQUE 137 Testing WSMAN
Testing WSMAN
It is always a good idea to test the tools you’ll be using, and the WSMAN protocols areno exception. You could use the Get-Service cmdlet to determine whether theWinRM service was running on a remote system, but you need a little bit more to besure you can communicate with the service.
PROBLEM
You need to perform an end-to-end test to ensure that the WSMAN communication isconfigured correctly. It’s only necessary to test the remote machine to determine thatyou can communicate with it, but testing the local machines supplies information thatmay be useful in troubleshooting.
SOLUTION
The function takes the usual -computername parameter to identify the remotemachine, as shown in the following listing. When using WSMAN, this has to be a nameby default, not an IP address.
function test-wsmanlink{[CmdletBinding()]param( [string]$computername)
"Testing local machine: $env:COMPUTERNAME"Test-WSMan -ComputerName "localhost" -Authentication default
"Testing remote machine: $computername"Test-WSMan -ComputerName $computername -Authentication default
}
The Test-WSMan cmdlet submits an identification request that determines whetherthe WinRM service is running on a local or remote computer. If the tested computer isrunning the service, the cmdlet displays the WSMAN identity schema, the protocol ver-sion, the product vendor, and the product version of the tested service.
The -Authentication default statement is added to the command to ensure thatthe product version information is displayed; without that, you’d just get zeros.
DISCUSSION
One interesting point is that $env:COMPUTERNAME is used to identify the local machinewhen returning information. You can use localhost in the Test-WSMan call, but itdoesn’t tell you which machine you’re on!
The output from Test-WSMan for the remote machine looks like this:
Testing remote machine: dc02wsmid : http://schemas.dmtf.org/wbem/wsman/
➥ identity/1/wsmanidentity.xsdProtocolVersion : http://schemas.dmtf.org/wbem/wsman/1/wsman.xsdProductVendor : Microsoft CorporationProductVersion : OS: 6.1.7601 SP: 1.0 Stack: 2.0
Listing 17.1 Test WSMAN links
TECHNIQUE 137
www.it-ebooks.info

432 CHAPTER 17 WMI over WSMAN
Now that you know that WSMAN is working, how can you use it to get at the data?
Retrieving WMI data using WSMANOne of the primary uses for WMI is to retrieve data from remote systems. You canduplicate this action using WSMAN. The code becomes a little more complex, but therelationship to Get-WmiObject is readily discernible.
PROBLEM
You want to determine which network adapters in your machines have TCP/IPenabled and what their IP properties are. This could be performed using ipconfig.exefor the local machine, but you need to be able to access remote systems as well.
SOLUTION
The following listing shows how you can solve the problem using the Get-WSManInstance cmdlet. You’ll be using the Win32_NetworkAdapter andWin32_NetworkAdapterConfiguration classes in listing 17.2. These classes will beused in a similar way to when you solve the problem directly with WMI.
function get-ipinfo{[CmdletBinding()]param ([parameter(ValueFromPipeline=$true, ValueFromPipelineByPropertyName=$true)] [Alias("CN", "Computer")] [string]$computername="$env:COMPUTERNAME")
Get-WSManInstance -ResourceURI wmicimv2/* -Enumerate -Dialect WQL ` -Filter "SELECT * FROM Win32_NetworkAdapterConfiguration WHERE
➥ IPenabled='$true'" -ComputerName $computername | foreach {$nic = Get-WSManInstance -ResourceURI wmicimv2/* `-Enumerate -Dialect Association `-Filter "{Object=Win32_NetworkAdapterConfiguration?
➥ Index=$($_.Index);ResultClassName= ➥ Win32_NetworkAdapter}" ` -ComputerName $computername
$output= New-Object -TypeName PSObject -Property @{ NICCardName = $nic.NetConnectionId DHCPEnabled = $($_.DHCPEnabled) IPAddress = $($_.IPAddress) SubnetMask = $($_.IPSubnet) Gateway = $($_.DefaultIPGateway) DHCPServer = $($_.DHCPServer) DNSDomain = $($_.DNSDomain) DNSDomainSuffixSearchOrder = $($_.DNSDomainSuffixSearchOrder) DNSServerSearchOrder = $($_.DNSServerSearchOrder) }$output}}
Listing 17.2 Retrieve IP configuration with WSMAN
TECHNIQUE 138
Get parameters
B
Get adaptersC
Get configurationD
Output resultsE
www.it-ebooks.info

433TECHNIQUE 139 Modifying WMI instances through WSMAN
The usual -computername parameter is used to provide access to remote machines.The parameter is provided with two aliases as a reminder of how to code parameteraliases B.
You start with a call to Get-WSManInstance that accesses theWin32_NetworkAdapterConfiguration class C. The resource URI is coded aswmicimv2/*, which means you’re looking at WMI’s root\cimv2 namespace. The-Enumerate parameter is used because you expect (or even just suspect) that there’smore than one WSMAN instance involved.
The -Filter parameter performs the selection for you. It uses the same syntaxyou’d use in a WMI query. The command could be rewritten like this:
Get-WmiObject -ComputerName $computer `-Query "SELECT * FROM Win32_NetworkAdapterConfiguration
➥ WHERE IPenabled='$true'"
You pipe the results into ForEach-Object. Each of the adapter configurations has thecorresponding Win32_NetworkAdapater class retrieved D. The -Dialect parameterinforms the cmdlet you’re looking for associations, and the -Filter defines the cur-rent object using the Index property (its key) and the class you’re looking for—in thiscase, Win32_NetworkAdapter.
An object is created using New-Object and the -Property parameter E. The prop-erties are defined and populated, and the object is output at the end of the processing.
DISCUSSION
There’s little difference between using WMI directly or through WSMAN when retriev-ing information.
The fact that you get an inert object returned isn’t an issue because you’re onlylooking to read the data. It does become an issue when you want to modify or removean instance.
Modifying WMI instances through WSMANChanging the configuration of your systems is something you can’t get away from. Ide-ally you’d create a server, install the applications, and it would remain unchanged fromthat time until it was decommissioned. Unfortunately, it doesn’t work that way, and youneed to be able to make modifications. You’ve seen throughout the book how to use WMIdirectly to achieve this. Now we’ll look at using WSMAN as the transport mechanism.
PROBLEM
A new disk has been added to the server. The junior administrator (what would we dowithout them to blame?) has allocated an incorrect drive letter to a removable disk.You need to change the drive letter to bring the system into compliance with yourorganization’s standards.
SOLUTION
The function provided in the following listing will change the drive letter associatedwith a volume. A computer name, for accessing remote systems, and a new drive letterare the function’s parameters.
TECHNIQUE 139
www.it-ebooks.info

434 CHAPTER 17 WMI over WSMAN
function set-driveletter{[CmdletBinding()]param ([parameter(ValueFromPipeline=$true, ValueFromPipelineByPropertyName=$true)] [Alias("CN", "Computer")] [string]$computername="$env:COMPUTERNAME", [string]$olddrive, [string]$newdrive = "Z:")Get-WSManInstance -ResourceURI wmicimv2/* -Enumerate -Dialect WQL `-Filter "SELECT * FROM Win32_Volume WHERE DriveType=2
➥ AND DriveLetter = '$olddrive'" -ComputerName $computername |foreach { Set-WSManInstance -ResourceURI wmicimv2/Win32_Volume ` -SelectorSet @{DeviceID=$($_.DeviceID)} ` -ValueSet @{DriveLetter=$newdrive} -ComputerName $computername}}
The function uses Get-WSManInstance to discover those volumes with a drive type of 2(removable media—in this case, USB drives). A similar syntax to listing 17.2 is used,with the work being performed by the WQL statement defined in the -Filter param-eter. This is the equivalent of
Get-WmiObject -Query "SELECT * FROM Win32_Volume WHERE DriveType=2"
The result from Get-WSManInstance is piped into ForEach-Object. A call to Set-WSMan-Instance is used to perform the change of drive letter. The -SelectorSet parameteris used to identify the exact volume. The DeviceID (the key to the Win32_Volume class)is obtained from the information on the pipeline.
TIP It would be possible to modify the function to accept a DeviceID as aparameter instead of discovering it.
Set-WSManInstance has a -ValueSet parameter, which defines the new values of theproperties that are going to be changed. It accepts a hash table so you can changemultiple properties at once. Here’s an example:
-ValueSet @{DriveLetter=$newdrive; Label="MyNewUSBdrive"}
This would change the drive letter and the volume label in one pass.
DISCUSSION
The function does assume that there’s only one volume that will meet the filter crite-rion specified in Get-WSManInstance. Identifying the correct resource is the primaryissue when attempting to perform modifications through the WSMAN cmdlets. I’vefound it easier to develop the functions by identifying the correct instance using Get-WSManInstance and then piping the results to the change process. Many of the pureWMI functions in the rest of the book work in a similar manner.
Listing 17.3 Change a drive letter
www.it-ebooks.info

435TECHNIQUE 140 Deleting WMI instances through WSMAN
Discovery and modification will form a large part of your interaction with WMIobjects. But at some stage you’ll be called upon to delete objects.
Deleting WMI instances through WSMAN
When you’re working directly with WMI, you can use the Remove-WMIObject cmdlet todelete WMI objects. Remember that not all WMI-related objects can be deleted; forinstance, deleting the Win32_OperatingSystem object would not be a good idea.
Using the WSMAN cmdlets, you have to be a little less direct in your processingapproach as the Remove-WSManInstance cmdlet will only work on WSMAN configura-tion items.
PROBLEM
Your junior administrator has been at it again and has left a large number of instancesof notepad.exe running on a server. You need a way to delete those instancesremotely.
SOLUTION
The following listing provides an answer to this problem. When dealing with WSMANinstances, you have to work with the WMI class key if you want to use the -SelectorSetparameter. This constrains your function to a structure of discovery and action thatyou’ve used in previous listings in this chapter.
function remove-notepad{[CmdletBinding()]param ([parameter(ValueFromPipeline=$true, ValueFromPipelineByPropertyName=$true)] [Alias("CN", "Computer")] [string]$computername="$env:COMPUTERNAME")
Get-WSManInstance -ResourceURI wmicimv2/* -Enumerate -Dialect WQL `-Filter "SELECT * FROM Win32_Process WHERE Name='Notepad.exe'" `-ComputerName $computername |foreach {
Invoke-WSManAction -ResourceURI wmicimv2/Win32_Process `-Action Terminate -SelectorSet @{Handle=$($_.Handle)} `-ComputerName $computername
}}
The function has a computer name as a parameter. You can then use Get-WSManInstanceto discover the instances of the Notepad.exe process running on the remote machine.Alternative ways to retrieve this information are available, such as the following:
Get-Process notepad -ComputerName $computer
Get-WmiObject -Class Win32_Process `-Filter "Name='notepad.exe'" -ComputerName $computer
Listing 17.4 Delete objects through WSMAN
TECHNIQUE 140
www.it-ebooks.info

436 CHAPTER 17 WMI over WSMAN
Get-WSManInstance results are piped into ForEach-Object, where a call to Invoke-WSManAction is made. This uses the Handle property of the pipeline object to identifythe individual instance of Notepad. The -Action parameter defines the WMI methodto call, which in this case is Terminate, which stops and deletes the process.
DISCUSSION
The process followed here is analogous to the one you employed when using the WMIcmdlets; namely, get the object and pipe it to Invoke-WmiMethod. It’s slightly morecumbersome to code, but in my opinion a lot safer, as the “get” process can be testedduring development to ensure that the correct objects are being accessed.
All of the PowerShell remoting techniques are designed to connect the local com-puter to a remote computer. You may connect to multiple computers simultaneously,but the tasks are performed on the machine to which you connect. There are timeswhen this causes problems and you need to run a command on a remote machinethat accesses a third machine.
17.3 Using CredSSP to access remote machinesIf you access a machine remotely through PowerShell you can run commands on thatmachine. If you attempt to run a command that needs a direct connection to a thirdmachine it will fail; for example, running a job on the third machine, accessing ashare on a remote machine, or running a cmdlet with the -ComputerName parameterto perform an action against the third machine. This is a deliberate security devicebuilt into the Windows operating system to prevent malicious software or people per-forming actions across the domain if a machine is compromised.
As an illustration, suppose you have two remote machines, dc02 and web01. Bothare configured for PowerShell remoting, meaning that you can run commandsagainst both machines, as illustrated in figure 17.4.
Figure 17.4 Executing remote commands against two machines
www.it-ebooks.info

437TECHNIQUE 140 Using CredSSP to access remote machines
If you attempt to run a command on one machine that accesses another you’ll get anerror, as shown in figure 17.5. Attempting to access a third machine from a remotemachine is known as a double hop.
NOTE If the remote machine is a domain controller and you have domainadministrator rights (or higher), some double-hop commands will work, butnot all.
The error occurs because your credentials aren’t available on the remote machine.You’re attempting to access resources for which you can’t be authorized.
There’s a mechanism to overcome this restriction, known as the Credential Secu-rity Support Provider (CredSSP). This enables you to delegate your credentials to aremote machine so that it can access other remote machines on your behalf. Thedefault CredSSP settings are illustrated in figure 17.6.
You can enable credential delegation by running this command on the localmachine:
Enable-WSManCredSSP -Role client -DelegateComputer web01 -Force
Figure 17.5 Error when attempting double-hop access
Figure 17.6 Default CredSSP response
www.it-ebooks.info

438 CHAPTER 17 WMI over WSMAN
The following has to be run on the remote machine (in this example, web01):
Enable-WSManCredSSP -Role server -Force
Both commands must be run from a PowerShell prompt with elevated privileges. Thefirst command enables the delegation of credentials, and the second enables theremote system to receive delegated credentials. You need to use -AuthenticationCredSSP and the -Credential parameter when calling Invoke-Command, as shown infigure 17.7.
The user’s credentials must be presented to Invoke-Command. The easiest way is tosave them in a credential object for multiple re-use. Remember to include the domainor you’ll get local credentials that won’t work in this scenario. Invoke-Command can becalled as shown. The *WSManInstance cmdlets can also use the CredSSP mechanism toperform double-hop access.
When the need for delegated credentials has ceased, remember to use the follow-ing commands:
Disable-WSManCredSSP -Role clientDisable-WSManCredSSP -Role server
These are run on the local and remote machine respectively to stop delegation.
WARNING The use of CredSSP is not recommended as an everyday practice. Itshould be reserved for a situation in which there is no other way to access theremote machines. CredSSP should not be permanently switched on.
The need to access remote machines to enable CredSSP makes using it more difficult.CredSSP can’t be enabled using PowerShell remoting techniques because the remote
Figure 17.7 Using CredSSP to access a system via a double hop
www.it-ebooks.info

439How to choose between WMI, remoting, and WSMAN
session doesn’t run with elevated privileges. It’s possible to use a scheduled job to per-form this action, but that could be viewed as a security risk.
This completes our examination of using WSMAN directly. Before we close thechapter, let’s review the various remoting mechanisms.
17.4 How to choose between WMI, remoting, and WSMANThis chapter raises the question of how you should access remote machines. You’veseen three mechanisms:
■ Using DCOM via the WMI cmdlets■ Using PowerShell remoting via Invoke-Command or PowerShell remote sessions■ Using WSMAN cmdlets
The obvious question is, “Which approach should I use?” The answer, as always, is, “Itdepends.” A comparison of the techniques is presented in table 17.3.
The bulk of the functions presented in this book have used the first option (DCOMand the WMI cmdlets). This is a simple to use, powerful, and well-understood mecha-nism, but it isn’t firewall-friendly. I still recommend it for use within the domain.
PowerShell remoting is one of the “big things” in PowerShell v2, and as such it’sgetting a lot of attention. GPOs can be used to configure remoting in a domain envi-ronment. I would use remoting when I need to access the same machine multipletimes in a single session.
WSMAN is the weakest of the three mechanisms at the moment, and I would onlyuse it when conditions prevent other mechanisms from working. I strongly recom-mend learning how it works, as it offers the potential of access to non-Windows sys-tems, which gives you a single administration tool that can be used across aheterogeneous environment.
Microsoft is making PowerShell functionality available through web services, suchas Exchange 2010 and Active Directory in Windows Server 2008 R2. At the moment,
Table 17.3 Comparison of remote access techniques
Mechanism Pros Cons
DCOM and WMI cmdlets Simple
Understood and obvious
Returns live objects
Needs DCOM available
Not firewall-friendly
PowerShell remoting Uses HTTP, so firewall-friendlyCan enter the session
Needs to be enabled
Returns “inert objects”
Needs PowerShell v2
WSMAN Uses HTTP, so firewall-friendly Syntax is complicated
Not well understood
Returns XML
www.it-ebooks.info

440 CHAPTER 17 WMI over WSMAN
this seems to be the preferred direction, which means learning how to use WSMANcould be advantageous. Knowledge of WSMAN will definitely be useful when it comesto using the CIM cmdlets and CIM sessions introduced in PowerShell v3, as you’ll seein chapters 18 and 19.
17.5 SummaryThe major efficiency to be gained from using PowerShell is the ability to administerremote servers. You can use the WMI cmdlets to perform this action directly as long asthe DCOM-related services are available and not blocked by a firewall. If DCOM isn’tavailable, you’ll need to use one of the following:
■ PowerShell remoting■ WSMAN
The WSMAN cmdlets can be used to retrieve information, modify WMI objects, andremove WMI objects. In a remoting scenario, you can’t directly access a third machinefrom your remote server. This restriction can be overcome using CredSSP, but thereare security implications that must be observed.
The recommended approach to accessing remote machines is to use the WMI cmd-lets for single access. If multiple commands will be run against a remote machine, usePowerShell remoting.
WSMAN should be learned, because it provides the potential for out-of-band hard-ware management, for accessing non-Windows systems, and for use with the CIM cmd-lets in PowerShell v3.
www.it-ebooks.info

Your own WMI cmdlets
In the previous 17 chapters of the book, you’ve seen how to use the WMI cmdletsprovided in PowerShell v2. PowerShell v3, introduced with Windows 8, enables youto take this a step further and create your own WMI cmdlets! The ability to createcmdlets directly from the WMI classes will radically alter the way we work with WMIin the future. This functionality is referred to as cmdlets-over-objects—you create acmdlet directly from the WMI object. The use of WMI and CIM is massivelyexpanded in the Windows 8 product line. In fact, much of the new PowerShellfunctionality introduced in the Windows 8 family is cmdlets produced directly fromWMI classes.
In one respect, this makes our job easier, because we have a lot of new function-ality out of the box, but in another respect it makes things more difficult, as wehave new technologies and concepts to learn. This chapter and the next will showhow it all works, when you should use the new options, and when you should stickwith the traditional ways.
This chapter covers■ Creating cmdlets from WMI classes■ Creating a module to load multiple cmdlets■ Creating format and type files
441
www.it-ebooks.info

442 CHAPTER 18 Your own WMI cmdlets
WARNING This material is based on beta versions of PowerShell v3, and theremay be changes between the time of writing and the release of Windows 8 andPowerShell v3.
We looked at retrieving information about your operating system in technique 14 (chap-ter 5). This was based on the Win32_OperatingSystem class, as shown in figure 18.1.
Figure 18.1 demonstrates using WMI to fetch information about the operating sys-tem using this code:
Get-WmiObject -Class Win32_OperatingSystem |Format-Table CSName, Caption, ServicePackMajorVersion,OSArchitecture,LastBootUpTime -AutoSize
You call the Win32_OperatingSystem class and use Format-Table to control the dis-play. This is standard PowerShell that you’ve seen many times now. But wouldn’t it benice (no I’m not singing that) to use a cmdlet instead, with the option of searchingusing parameters, as shown in figure 18.2.
The cmdlet Get-Win32OperatingSystem displays information about the operatingsystem that’s similar to what the Win32_OperatingSystem class offers. At this point youmay well be jumping up and down shouting, “He’s using an advanced function!”
Figure 18.1 Using the Win32_OperatingSystem class to display data, including boot time
Figure 18.2 Using the Get-Win32OperatingSystem cmdlet used to display information
www.it-ebooks.info

443TECHNIQUE 141 Creating a simple cmdlet
Nope. I’m not. I’m using a module created directly from the WMI class. How thisworks is the subject of this chapter.
We’ll start by examining how to create a cmdlet from a WMI class. TheWin32_OperatingSystem class will be used in these examples, and we’ll look at theexamples first. The tools that can be used to make this even easier will be discussedlater in the chapter.
WMI provides many properties as integer codes. In earlier chapters we used hashtables or .NET enumerations to decode these values. The cmdlet will be extended todecode the OperatingSystemSKU property as an example.
NOTE These examples are based on the CIM cmdlets and the new API forusing WMI that’s introduced in PowerShell v3. This is detailed in chapter 19.
A single cmdlet is good, but a module of cmdlets is even better. The second section ofthe chapter introduces a cmdlet based on the Win32_ComputerSystem class and alsoexplains how you can load both cmdlets as a single module.
WMI classes have default display formatting, as you’ve seen. The penultimate partof the chapter covers adding a format file and a type file (to add extra properties tothe objects you produce). The chapter closes with an overview of a tool that makescreating cmdlets from WMI classes much easier.
We’ll start looking at all of this new functionality by showing you how to create acmdlet from WMI.
18.1 Creating a WMI cmdletIn this section, you’ll use the Win32_OperatingSystem WMI class to create a cmdlet.The initial version will provide an alternative means of retrieving the operating systemdata. You’ll then enhance it by creating a number of search parameters based onproperty values. One of the property values will involve the decoding of an integer-coded property as an example.
Creating a simple cmdlet
In the first two parts of the book, you used a PowerShell cmdlet to access a WMI class:
Get-WmiObject -Class Win32_OperatingSystem
SystemDirectory : C:\Windows\system32Organization :BuildNumber : 7601RegisteredUser : RichardSerialNumber : 00426-065-1155216-86881Version : 6.1.7601
The output is a default set of properties, as shown. You can provide wrapper functionsto control the output, provide input parameters, and process flow control. These canalso be combined into modules as demonstrated in chapters 5–16. The next evolutionin this process, introduced with PowerShell v3, is to create the cmdlet directly fromthe WMI class.
TECHNIQUE 141
www.it-ebooks.info

444 CHAPTER 18 Your own WMI cmdlets
PROBLEM
The functions you’re using to retrieve operating system information need to beupdated to work with the Windows 8 generation of operating systems. You need toconvert the functions to PowerShell cmdlets based on the WMI class.
SOLUTION
The core of the solution is contained in an XML file shown in the following listing.That’s right—XML. The bad news about this functionality is that you have to work withXML. The good news is that it’s relatively easy.
<?xml version="1.0" encoding="utf-8"?><PowerShellMetadata xmlns:xsi=
➥ "http://www.w3.org/2001/XMLSchema-instance" xmlns:xsd="http://www.w3.org/2001/XMLSchema" xmlns="http://schemas.microsoft.com/cmdlets-over-objects/2009/11"> <Class ClassName="root\cimv2\Win32_OperatingSystem"> <Version>1.0.0.0</Version> <DefaultNoun>Win32OperatingSystem</DefaultNoun> <InstanceCmdlets> <GetCmdletParameters
➥ DefaultCmdletParameterSet="ByName"> <QueryableProperties> <Property PropertyName="Name"> <Type PSType="System.String" /> <RegularQuery AllowGlobbing="true"> <CmdletParameterMetadata PSName="Name"
➥ Position="0" ➥ ValueFromPipelineByPropertyName="true" ➥ CmdletParameterSets="ByName" /> </RegularQuery> </Property> </QueryableProperties> </GetCmdletParameters> </InstanceCmdlets> </Class></PowerShellMetadata>
The first two lines are standard and will be used in all examples in this chapter andchapter 19 relating to this technology. They define the XML schema you’ll use so thatthe XML can be checked when you build the cmdlet.
Next, the WMI class is defined B. The WMI path, including the namespace andclass, has to be provided. The default noun for the cmdlet is required C. The nounwill become more important in chapter 19 when you use the class methods. Theremainder of the XML defines the way parameters are presented to the cmdlet D.This information should be familiar from the parameter options in PowerShelladvanced functions, such as Position="0".
The ultimate definition of your module will be a folder on the module path. Themodule path can be found using this line:
$env:psmodulepath -split ";"
Listing 18.1 Simple WMI-based cmdlet
WMIclass
B
Cmdlet nounC
Cmdlet parametersD
www.it-ebooks.info

445TECHNIQUE 141 Creating a simple cmdlet
PowerShell v3 automatically loads all modules it finds on the module path when aPowerShell console or the ISE is started. This isn’t something I want to occur while I’mdeveloping modules, so I create the module in a development folder and move it tothe module path when I’m happy it’s working properly.
The XML file shown in listing 18.1 is saved as Win32OperatingSystem.cdxml. The.cdxml extension is new to PowerShell v3 and means “Cmdlet Definition XML.” Onceyou have the file saved, you can import it into your PowerShell session by changingthe location to the folder in which you created the file, and then typing
Import-Module ./Win32OperatingSystem.cdxml
Alternatively, the full path to the file can be supplied. The module loads and you can use the standard commands, such as Get-Module
and Get-Command, on it, as shown in figure 18.3. Notice that the module type is shown as CIM, and Get-Command shows the Capability
as CIM. These are indicators that you’re dealing with cmdlets-over-objects—cmdlets cre-ated from WMI classes.
NOTE The download code for chapters 18 and 19 is combined, with a subfolderfor each stage of development. The final version is also available in a subfoldercalled SystemInfo that can be copied directly into your module path.
The important thing to note is that you have a single .cdxml file that you can directlyimport as a module. Think of it as a .psm1 file for cmdlets-over-objects.
Now that you’ve built it and loaded it, how do you use it?
DISCUSSION
When the Get-Win32OperatingSystem | Format-List * command is used, the resultis almost identical to running this command:
Get-WmiObject -Class Win32_OperatingSystem | Format-List *
Figure 18.3 Performing standard PowerShell actions on your module
www.it-ebooks.info

446 CHAPTER 18 Your own WMI cmdlets
These are the slight differences:
■ No system parameters are displayed—those are the properties with the doubleunderscore (__) prefix.
■ Dates are converted from the WMI format to a normal format. This is equivalentto using the ConvertToDateTime() method.
The date formatting means that you’ll see is this:
InstallDate : 16/03/2011 19:10:44LastBootUpTime : 06/09/2011 18:46:20LocalDateTime : 06/09/2011 19:30:52
The following is what you’d see with a direct call to the WMI object using Get-WmiObject:
InstallDate : 20110316191044.000000+000LastBootUpTime : 20110906184620.919125+060LocalDateTime : 20110906193539.192000+060
These changes alone, especially the conversions of dates, are a major productivitygain. The other fundamental change is that the object type is now
Microsoft.Management.Infrastructure.CimInstance#
➥ ROOT\cimv2\Win32_OperatingSystem
rather than the type you’re used to seeing, which is
System.Management.ManagementObject#root\cimv2\Win32_OperatingSystem
The differences between these two types are discussed further in chapter 19, wherethe CIM cmdlets are covered.
We can now look at extending the functionality of your basic cmdlet.
Extending the cmdlet
The basic cmdlet can be extended in a number of ways. In this section, you’ll addmore parameters to make searching easier. You could also extend the module by cre-ating cmdlets to utilize the methods available on the WMI classes. This more advancedfeature will be added in chapter 19.
PROBLEM
Your basic cmdlet is the equivalent of using the WMI class in Get-WmiObject. You needto add extra parameters to filter on the operating system type (the Caption property)and the SKU (the OperatingSystemSKU property).
NOTE Any property could be used in this manner. You could, for instance,create a cmdlet that looks for computer systems with more than a certainamount of physical memory (see technique 143).
SOLUTION
The solution involves enhancing the XML file you created in listing 18.1. The resultantfile is shown in the following listing. The description will concentrate on the additionsto the XML file.
TECHNIQUE 142
www.it-ebooks.info

447TECHNIQUE 142 Extending the cmdlet
ting-
<?xml version="1.0" encoding="utf-8"?><PowerShellMetadata xmlns:xsi=
➥ "http://www.w3.org/2001/XMLSchema-instance" xmlns:xsd="http://www.w3.org/2001/XMLSchema" xmlns="http://schemas.microsoft.com/cmdlets-over-objects/2009/11"> <Class ClassName="root\cimv2\Win32_OperatingSystem"> <Version>1.0.0.0</Version> <DefaultNoun>Win32OperatingSystem</DefaultNoun> <InstanceCmdlets> <GetCmdletParameters DefaultCmdletParameterSet="ByName"> <QueryableProperties> <Property PropertyName="Name"> <Type PSType="System.String" /> <RegularQuery AllowGlobbing="true"> <CmdletParameterMetadata PSName="Name" ➥ Position="0" ➥ ValueFromPipelineByPropertyName="true" ➥ CmdletParameterSets="ByName" /> </RegularQuery> </Property>
<Property PropertyName="Caption"> <Type PSType="System.String" /> <RegularQuery AllowGlobbing="true"> <CmdletParameterMetadata PSName="Caption"
➥ Position="1" ➥ CmdletParameterSets="ByCaption" /> </RegularQuery> </Property>
<Property PropertyName="OperatingSystemSKU"> <Type PSType="OperatingSystem.OperatingSystemSKU" /> <RegularQuery> <CmdletParameterMetadata IsMandatory="false"
➥ CmdletParameterSets="BySKU" /> </RegularQuery> </Property> </QueryableProperties> </GetCmdletParameters> </InstanceCmdlets> </Class>
<Enums> <Enum EnumName="OperatingSystem.OperatingSystemSKU"
➥ UnderlyingType="uint32"> <Value Name="UltimateEdition" Value="1" /> <Value Name="StandardServerEdition" Value="7" /> <Value Name="DatacenterServerEdition" Value="8" /> <Value Name="EnterpriseServerEdition" Value="10" /> </Enum> </Enums></PowerShellMetadata>
The XML file starts off identical to listing 18.1. The caption parameter is added bydefining an additional property B, because you’re creating these parameters directlyfrom the properties of the class. The parameter is set as second by using Position=1.
Listing 18.2 Extended WMI-based cmdlet
Add caption parameter
B
Add OperaSystemSKUparameter
C
Add enumeration
D
www.it-ebooks.info

448 CHAPTER 18 Your own WMI cmdlets
Another parameter, OperatingSystemSKU, is added in a similar manner C. The pointto note here is that the property type is set as OperatingSystem.OperatingSystemSKU.Don’t go searching for this in .NET as you won’t find it—you have to create it yourself.
You’ve seen enumerations used many times in the code you’ve created in previouschapters. They’re a simple data structure to store a preset suite of values. They normallyhold an integer value that’s associated with a string value. The enumeration to hold theoperating SKU values is defined after the properties D. The numeric values don’t haveto be consecutive. It’s possible to define multiple enumerations at this stage.
WARNING Ensure that the string part of your enumeration doesn’t contain anyspaces. If it does, an error will be thrown when you try to create the cmdlet. Forexample, "UltimateEdition" will work, but "Ultimate Edition" will fail.
The file is saved as Win32OperatingSystem.cdxml, as you did in technique 141. I useindividual folders to separate the versions.
DISCUSSION
These additional parameters give you more options and ways to use the cmdlet. Forexample, these are all valid ways to call the cmdlet:
Get-Win32OperatingSystemGet-Win32OperatingSystem -OperatingSystemSKU 1Get-Win32OperatingSystem -OperatingSystemSKU "UltimateEdition"Get-Win32OperatingSystem -Caption "Microsoft Windows 7 Ultimate "
NOTE There’s a space at the end of the value passed to the Caption propertyin that last cmdlet call! It has to be exactly right!
The OperatingSystemSKU parameter will accept the numeric or string value of theenumeration for maximum flexibility. The last example is equivalent to this:
Get-WmiObject -Class Win32_OperatingSystem `-Filter "Caption = 'Microsoft Windows 7 Ultimate '"
The additional parameters enable you to use the cmdlet to perform queries. Theseare WMI queries under the hood, but you don’t have to write the queries yourself. Thehard work is done when you create the cmdlet. This is part of the increased ease of usethat is brought to WMI by creating cmdlets from the WMI classes.
In the Caption parameter, the AllowGlobbing option is set to true so you can do this:
Get-Win32OperatingSystem -Caption "*Ultimate*"
Globbing is shorthand for saying you allow the use of wildcards. You now have a very useful cmdlet, so it’s time to find it a friend and work out how
to build multiple cmdlets into a module.
18.2 Creating multiple cmdletsYou need to be able to extend the functionality of section 18.1 with the eventual goal ofhaving a suite of cmdlets that can supply all the information you’re likely to need about
www.it-ebooks.info

449TECHNIQUE 143 Creating cmdlets from multiple WMI classes
your systems. Technique 143 shows how to create a cmdlet that retrieves computer sys-tem information using the Win32_ComputerSystem class. This will result in the creationof a second .cdxml file and therefore another module. An overarching super-module isrequired if your intention is to combine the functionality from different WMI classes.The creation of such a super-module is demonstrated in technique 144.
Creating cmdlets from multiple WMI classes
You’ve created modules of advanced functions in chapters 5–16, but they’ve all beencreated on the basis of one function equals one file. This level of granularity makesthe functions easy to maintain and troubleshoot.
PROBLEM
The overarching task is to create PowerShell functionality to use for system configura-tion recording and reporting. The operating system information you can find usingthe cmdlet from the previous technique is a start. Your next job is to add a cmdlet thatwill report on computer system information.
SOLUTION
You have to create another XML file because you can’t have multiple class statementsin a single XML file. This leads to the production of the following listing.
<?xml version="1.0" encoding="utf-8"?><PowerShellMetadata xmlns:xsi=
➥ "http://www.w3.org/2001/XMLSchema-instance" xmlns:xsd="http://www.w3.org/2001/XMLSchema" xmlns="http://schemas.microsoft.com/cmdlets-over-objects/2009/11"> <Class ClassName="root\cimv2\Win32_ComputerSystem"> <Version>1.0.0.0</Version> <DefaultNoun>Win32ComputerSystem</DefaultNoun> <InstanceCmdlets> <GetCmdletParameters DefaultCmdletParameterSet="ByName"> <QueryableProperties> <Property PropertyName="Name"> <Type PSType="System.String" /> <RegularQuery AllowGlobbing="true"> <CmdletParameterMetadata PSName="Name"
➥ Position="0" ➥ ValueFromPipelineByPropertyName="true" ➥ CmdletParameterSets="ByName" /> </RegularQuery> </Property> <Property PropertyName="TotalPhysicalMemory"> <Type PSType="System.UInt64" /> <MaxValueQuery> <CmdletParameterMetadata PSName="MaxSize"
➥ CmdletParameterSets="BySize" /> </MaxValueQuery> <MinValueQuery> <CmdletParameterMetadata PSName="MinSize"
Listing 18.3 Add a computer system cmdlet
TECHNIQUE 143
WMIclass
B
Noun C
Filter parameter
D
www.it-ebooks.info

450 CHAPTER 18 Your own WMI cmdlets
➥ CmdletParameterSets="BySize" /> </MinValueQuery> </Property> </QueryableProperties> </GetCmdletParameters> </InstanceCmdlets> </Class></PowerShellMetadata>
One of the good things about using an XML format is that the schema provides theframework in which you work. In this case, you can take listing 18.1 as a templateand make the required changes. The first change is to the WMI class. You need touse the Win32_ComputerSystem class B. The default noun is changed toWin32ComputerSystem C.
In this case, you want to be able to test for systems that have a defined range ofphysical memory D. The Win32_ComputerSystem class has a TotalPhysicalMemoryproperty. It’s a 64-bit integer (uint64) that records the physical memory in bytes. Youcan add the query metadata that allows you to search for minimum or maximumamounts of memory. Save listing 18.3 as Win32ComputerSystem.cdxml.
Adding other parameters is a simple case of adding the XML using the existingcode as a template, and then rebuilding the module. The small amount of XMLrequired to add a lot of powerful functionality makes this process very cost effective.
DISCUSSION
The really great thing about creating modules like this is that you can test each pieceof functionality separately. Navigate to the folder where you saved theWin32ComputerSystem.cdxml file and run this:
Import-Module .\Win32ComputerSystem.cdxml
The following commands will give it a good workout, though I recommend that youmodify the memory values to bracket what’s installed in your systems:
Get-Win32ComputerSystemGet-Win32ComputerSystem -MinSize 1gbGet-Win32ComputerSystem -MaxSize 2gbGet-Win32ComputerSystem -MaxSize 3gbGet-Win32ComputerSystem -MaxSize 1gb
Examine the output of these carefully. On my test machine, the last example doesn’treturn anything because the filters are based on greater-than or equals (MaxSize) orless-than (MinSize) rather than a direct equality.
Next, we need to look at how you can load multiple cmdlets.
Building a super- module
With all new technologies, there are challenges around how to implement it and howto use it to make our lives as administrators easier. The ability to create cmdlets fromobjects (WMI classes) is going to be very useful, but importing the modules and sub-modules individually could be painful.
TECHNIQUE 144
www.it-ebooks.info

451Creating format and type files
Submodules? So far you have two modules: Win32OperatingSystem.cdxml andWin32ComputerSystem.cdxml. It’s time to create a super-module that calls the othersas nested modules.
PROBLEM
Your organization is determined to derive the maximum benefit from PowerShell v3,so you’ll be investing heavily in creating modules from your WMI classes. You need aprocess to create the modules and import the super-module that calls them all.
SOLUTION
One of the great things about PowerShell is that there are usually multiple ways to per-form a task. This is true of turning XML definition files into cmdlets. The way I’ve cho-sen to do it is presented in the following listing. It enables you to add extrasubmodules with minimum effort.
Import-Module ./Win32OperatingSystem.cdxmlImport-Module ./Win32ComputerSystem.cdxml
It really is that easy. Put all of your .cdxml files into a folder on your module path. Callthe folder SystemInfo. Add a SystemInfo.psm1 file with the contents of listing 18.4 tothat folder. I know it’s only two lines of code, but I wanted to emphasize how easy this is.
DISCUSSION
It would be possible to use a module manifest file (.psd1) instead of the .psm1 file inlisting 18.4, but they’re more complicated to code and they create complicationswhen you get to the format and type files in the next section.
This system is easily extendable by creating other .cdxml files using theWin32_Processor class or the disk classes, for example, and adding the appropriatelines to listing 18.4. Once you have the basics, as presented in sections 18.1 and 18.2,in place, the rest is easy because you already have XML files to use as templates. This iswhy I think creating your own cmdlets will become the way to work with WMI.
Retrieving the data is the first step. Presenting that data is the second step, forwhich you need to create format and type files. This is next on the agenda.
18.3 Creating format and type filesMany PowerShell cmdlets produce objects with more properties than can be sensiblydisplayed on screen. Get-ChildItem $pshome shows a number of files with formats ortypes in their name. These are used to control the default display of cmdlet output.
Figure 18.4 shows the default output produced by the Get-Win32OperatingSystemcmdlet you’ve created. This isn’t necessarily the set of information you want bydefault. Suppose you actually want your default display to be the equivalent of
Get-Win32OperatingSystem |Format-Table ComputerName, Caption, ServicePackMajorVersion,OSArchitecture, LastBootUpTime
Listing 18.4 Build multiple cmdlets
www.it-ebooks.info

452 CHAPTER 18 Your own WMI cmdlets
Getting this information displayed doesn’t involve changing the properties on theobject that’s produced—you’re only changing the data that’s displayed by default.
WARNING Don’t change the format files supplied by PowerShell. This willcause problems. Create new format files and load them using a module orUpdate-FormatData.
The change in default format for the output can be achieved by creating a format fileand loading it when the module loads. Format files are XML-based and can be easilycreated using existing files as a template. You can also modify the output by addingmembers to the object using a type file. This has the same effect as the actions in pre-vious functions using Add-Member, but the work takes place as the object is generated.
Adding a format fileA common question for newcomers to PowerShell and WMI is, “Why do I only see a fewproperties when I get a WMI class?” The answer is that a default format file is controllingthe output. If you want to change the default, you need to work with format files.
PROBLEM
The default output produced by your Get-Win32OperatingSystem cmdlet doesn’tmeet your needs. You could use Select-Object or a format cmdlet to control the out-put, but it’s more efficient to change the default display format.
SOLUTION
The solution to the problem involves producing a format file, as shown in listing 18.5.It’s saved as Win32OperatingSystem.format.ps1xml in the folder where you create theXML definition files for your cmdlets. You’ll need to modify the SystemInfo.psm1 fileto load the new format file.
<?xml version="1.0" encoding="utf-8" ?><Configuration><ViewDefinitions>
Listing 18.5 Create a format file
Figure 18.4 Default formatting for the Get-Win32OperatingSystem cmdlet
TECHNIQUE 145
www.it-ebooks.info

453TECHNIQUE 145 Adding a format file
<View> <Name>Formatting For Win32_OperatingSystem
➥ (Table View)</Name> <ViewSelectedBy> <TypeName>Microsoft.Management.Infrastructure.
➥ CimInstance#root/cimv2/Win32_OperatingSystem</TypeName> </ViewSelectedBy><TableControl><TableHeaders> <TableColumnHeader><Label>OS</Label><Width>30</Width> </TableColumnHeader> <TableColumnHeader> <Label>SP</Label><Width>2</Width><Alignment>right</Alignment> </TableColumnHeader> <TableColumnHeader><Label>Arch</Label><Width>6</Width> </TableColumnHeader> <TableColumnHeader><Width>19</Width></TableColumnHeader> </TableHeaders> <TableRowEntries><TableRowEntry> <TableColumnItems> <TableColumnItem><PropertyName>SKU</PropertyName> </TableColumnItem> <TableColumnItem> <PropertyName>ServicePackMajorVersion</PropertyName> </TableColumnItem> <TableColumnItem><PropertyName>OSArchitecture</PropertyName> </TableColumnItem> <TableColumnItem><PropertyName>LastBootUpTime</PropertyName> </TableColumnItem> </TableColumnItems> </TableRowEntry></TableRowEntries></TableControl></View><View> <Name>Formatting For Win32_OperatingSystem
➥ (List View)</Name> <ViewSelectedBy> <TypeName>Microsoft.Management.Infrastructure.
➥ CimInstance#root/cimv2/Win32_OperatingSystem</TypeName> </ViewSelectedBy> <ListControl><ListEntries><ListEntry><ListItems> <ListItem><PropertyName>Caption</PropertyName></ListItem> <ListItem> <PropertyName>ServicePackMajorVersion</PropertyName> </ListItem> <ListItem><PropertyName>OSArchitecture</PropertyName></ListItem> <ListItem><PropertyName>LastBootUpTime</PropertyName></ListItem> </ListItems></ListEntry></ListEntries></ListControl></View></ViewDefinitions></Configuration>
The format file may seem complicated, but it breaks down into a set of easy to under-stand components. It may be beneficial to refer to figure 18.5, where the outputresulting from this format file is shown.
Format files can be used to define both table and list displays. In this case, youstart with the table display B. This means that in the absence of any other formatting
Table viewB
Column headerC
Newproperty
D
Columncontents E
List viewF
www.it-ebooks.info
454 CHAPTER 18 Your own WMI cmdlets
commands you’ll get a table display. The object type that this format will be appliedto is defined.
The table itself is defined as a number of column headers C, where items suchas the label (such as SP for the ServicePackMajorVersion property), width, andalignment can be defined. In the absence of a label, the property name will be used.The contents of the table columns are defined as either new types added to theobject D, or existing properties E. The addition of the SKU property is covered inthe next section.
After defining a shiny new format for table type displays you can’t ignore lists, so youdefine the properties that will appear in the default list view F. This format can also beoverridden by explicit selection of properties via Select-Object or a format cmdlet.
DISCUSSION
You have to be careful when loading format files as part of a module. Using a modulemanifest (.psd1) file appends the new format data to any formatting data that existsfor the type. This doesn’t matter if the type is being created in the module, but it doesbecome an issue when you’re modifying an existing type because your formattingwon’t be used by default. The SystemInfo.psm1 file that was created in listing 18.4 ismodified to become the following:
Import-Module ./Win32OperatingSystem.cdxmlImport-Module ./Win32ComputerSystem.cdxmlUpdate-FormatData -PrependPath ./Win32OperatingSystem.format.ps1xml
This forces PowerShell to use the new formatting information first. The drawback isthat the format information isn’t removed if you unload the module.
Choosing to change the default formatting in this manner has a number ofconsequences:
■ Get-Win32OperatingSystem will use the new format.■ Get-CimInstance will use the new format (see chapter 19) if the module is
loaded.■ Get-WmiObject will ignore the new format because it’s a different .NET type.
You need to complete your definition of the new format by defining the SKU type.
Adding a type file
PowerShell has been designed to be extremely extensible. This extensibility rangesfrom adding extra cmdlets to adding properties to the objects you’re working with.The most efficient way to add properties that are always available to an object is to cre-ate a type file. If this module will be used on multiple machines the format and typefiles need to be available on those machines.
WARNING Don’t change the type files supplied by PowerShell. This will causeproblems. Create new type files and load them using a module or Update-TypeData.
TECHNIQUE 146
www.it-ebooks.info

455TECHNIQUE 146 Adding a type file
Type files are also XML-based, but as with format files, if a template is followed the cre-ation becomes simpler.
PROBLEM
The default formatting for the Get-Win32OperatingSystem cmdlet requires theoperating system name to be displayed. This information is contained within theCaption property, but it’s very verbose. A shorter name will enable you to displaymore information.
SOLUTION
The solution is shown in the following listing, where you create a type file for the SKUproperty. This is a new property that you’re adding to the object.
<Types> <Type> <Name>Microsoft.Management.Infrastructure.CimInstance#
➥ root/cimv2/Win32_OperatingSystem</Name> <Members> <ScriptProperty> <Name>SKU</Name> <GetScriptBlock> [Microsoft.PowerShell.Cmdletization.GeneratedTypes.
➥ OperatingSystem.OperatingSystemSKU][System.uint32] ➥ $this.OperatingSystemSKU </GetScriptBlock> </ScriptProperty> </Members> </Type></Types>
The XML starts by defining the existing object type to which this file applies. You thenhave a script block that defines the property name and how the value is defined. Thevalue is derived from the OperatingSystemSKU property using the enumeration youcreated in listing 18.2.
The type file is saved as Win32OperatingSystem.types.ps1xml in the folder with theformat file and XML cmdlet definitions. The SystemInfo.psm1 file (listing 18.4) ismodified as follows:
Import-Module ./Win32OperatingSystem.cdxmlImport-Module ./Win32ComputerSystem.cdxmlUpdate-FormatData -PrependPath ./Win32OperatingSystem.format.ps1xmlUpdate-TypeData ./Win32OperatingSystem.types.ps1xml
DISCUSSION
The format and type files you’ve created are automatically loaded when yourmodule is imported into PowerShell. They function in the background and don’trequire any intervention by the user. When you use the Get-Win32OperatingSystemcmdlet you now receive the data in the default format you’ve defined, as shown infigure 18.5.
Listing 18.6 Create a type file
www.it-ebooks.info

456 CHAPTER 18 Your own WMI cmdlets
The New-CimSession cmdlet provides access to remote machines (similar to remotingand the WSMAN cmdlets) and is explained in chapter 19. Notice the date format. Theother big thing is that the cmdlets you’re creating will work over DCOM or WSMAN.PowerShell v3 brings some big bonuses for ease of use.
You’ve now seen how to create the following types of XML files:
■ Cmdlet definition files—.cdxml■ Format files—.format.ps1xml■ Type files—types.ps1xml
You don’t have a tool to create the format and type files easily, but there’s help for cre-ating the cmdlet definition files.
18.4 Using the CIM IDEIn sections 18.1 and 18.2 you’ve created a number of versions of the cmdlet definitionfile (Win32OperatingSystem.cdxml). It’s possible to create these files by hand usingan XML editor or even Notepad—I used Notepad to create the first versions of thesefiles. The advantages of using a simple editor are that it’s cheap and always available,but the drawback is that it makes the work of producing .cdxml files harder.
There’s a tool available that can ease the effort involved in creating a cmdlet defi-nition file. It’s called the CIM IDE, and it’s available from MSDN at http://archive.msdn.microsoft.com/cimide. Download and install the CIM IDE following theinstructions in the Installation.txt file.
NOTE The CIM IDE is a plugin to Visual Studio 2010. You’ll need Visual Stu-dio installed before you can use the IDE.
Once you have the CIM IDE installed, open Visual Studio and create a new project.Two new templates are available under a CIM folder—CIM Authoring and CIM Provid-ers. You’ll be using the CIM Authoring template here.
Figure 18.5 The cmdlet accessing multiple machines with the desired default output
www.it-ebooks.info

457Using the CIM IDE
Next, you’ll need a MOF file of the WMI class you want to work with. I’ve included MOFfiles for Win32_ComputerSystem and Win32_OperatingSystem in the download code.Drag the MOF file onto the module name in the Solution Explorer pane at the rightside of the IDE, as shown in figure 18.6.
Right click the Win32_OperatingSystem node in the CIM Explorer (at the left side)and select PowerShell metadata. This enables details such as version number, defaultnoun, and filename to be set. A skeleton .cdxml file (visible in Solution Explorer) andthe PowerShell metadata (visible in CIM Explorer, marked with the PowerShell icon)are generated.
The main working area is the PS Metadata Details tab shown in the middle pane. Ifit isn’t visible double-click the metadata file in CIM Explorer. The PS Metadata Detailstab supplies functionality to add the following:
■ Query parameters, as in section 18.1■ Instance cmdlets utilizing the WMI class methods, as in section 19.1
When you’re adding a query parameter, the GUI provides a simple technique fordefining the parameter metadata:
■ The property name and type can be selected.■ The parameter name defaults to the property name but can be overridden.■ Aliases can be defined for the parameter.■ The parameter sets to which the parameter belongs can be defined.■ Parameter options can be set:
Figure 18.6 Using the CIM IDE
www.it-ebooks.info

458 CHAPTER 18 Your own WMI cmdlets
– Mandatory– Accept pipeline input– Validate not null– Allow empty string or collection– Validation parameters, such as maximum or minimum counts, a range or set
of values– The use of wildcards (globbing)
The Instance Cmdlets option enables you to access the methods of the WMI class.Click Add New and the dialog box shown in figure 18.6 appears, where you can do thefollowing:
■ Select the method■ Define the verb and noun for the cmdlet and any aliases■ Set Result to Interpret as error code■ Set the impact parameters (-WhatIf and -Confirm)■ If the method requires parameters use the Parameters option to provide their
definitions (in a dialog box to the one for query parameters in figure 18.6)
Once the cmdlet definition file has been produced it can be copied from the VisualStudio project folder to your PowerShell module folder and it’s ready to use.
Visual Studio can also be used to edit format and type XML files, though there areno templates to assist with that.
18.5 SummaryThis chapter has introduced the new functionality in PowerShell v3 that enables the cre-ation of cmdlets from WMI classes. This is a huge change in working with PowerShell andWMI. It will make you much more productive and make using WMI much easier.
You’ve seen how to create multiple cmdlets, build a module, and modify thedefault display formatting. In chapter 19 we’ll show you how to extend this further byutilizing the methods available on WMI classes and we’ll look at the new administra-tion opportunities presented by the new APIs for using WMI and the CIM cmdlets.
www.it-ebooks.info

CIM cmdlets and sessions
In this chapter, we’re going to continue our investigation of the CIM API intro-duced in PowerShell v3. In chapter 18, you saw how to create cmdlets directly fromWMI classes. In this chapter, you’ll learn how to extend the use of PowerShell v3’scmdlets-over-objects functionality to utilize the methods presented by WMI classes.You’ll create additional cmdlets to provide a mechanism to utilize those methods.WMI methods may or may not require parameters. You’ll learn how to work withboth of these scenarios.
NOTE This chapter builds on chapter 18 and should be read after thatchapter.
The CIM cmdlets are analogous to the WMI cmdlets that you’ve been using in Pow-erShell v2, but there are some subtle differences in the way you can access informa-tion. These differences provide a great opportunity to brush up on WQL. I strongly
This chapter covers■ Using WMI methods in cmdlets created from
WMI objects■ Demonstrating the PowerShell v3 CIM cmdlets■ Using CIM sessions to access remote machines
459
www.it-ebooks.info

460 CHAPTER 19 CIM cmdlets and sessions
advise mastering WQL, as the changes introduced with PowerShell v3 will ensure itbecomes an important part of your administration toolset.
WMI has always had great support for working with remote machines. The onlysnag is that it has required you to use the DCOM protocol. The CIM cmdlets continueto support DCOM, but you can also use WSMAN in a much simpler way that’s similar tothe way you use PowerShell remoting sessions.
We’ll open the chapter by showing you how to create cmdlets to use WMI methods.
19.1 Using WMI methodsIn chapter 18, you saw how to use the PowerShell cmdlets-over-objects functionality tocreate cmdlets based on WMI classes. This provides an abstraction layer that makes theWMI classes easier to use (which is the whole purpose of this book!). It’s highly unlikelythat you’ll end up with all WMI classes being wrapped in cmdlets, but performing thistask for your commonly used WMI classes (or those critical to your role) will make lifeeasier. This process had already started in PowerShell v2 with Test-Connection andGet-HotFix acting as wrappers for WMI classes. In fact, many of the new PowerShellmodules introduced with Windows Server 8 are created from WMI classes. They makea great reference source.
The cmdlets that you’ve created up to now return information. This is great, butyou need to be able to do stuff to your servers. Otherwise the boss won’t believe you’reworth keeping around. When you use Get-WmiObject, the PowerShell object that’sreturned gives you access to most, if not all, of the methods available to that WMI class.That’s how you get things done, as you saw in part 2 of this book.
You can extend the XML source files that you created in chapter 18 to provideaccess to the WMI classes’ methods. One difference in the way you use WMI in Power-Shell v3 as compared to v2 is in the way that the methods of a WMI class are accessed.You won’t add methods to the objects your cmdlets return. You’ll create another cmd-let, in the same module, to execute the method!
You’ll start by utilizing simple methods that don’t take parameters (technique 147)and then extend this to methods that need one or more parameters (technique 148).When we deal with parameters, we’ll also look at how to validate the data input to theparameter.
Adding a method
The first type of method we’ll consider is one you’ll meet in various scenarios andWMI classes. It’s a simple method that doesn’t require any further input. You just call itand it does its stuff.
PROBLEM
Your Get-Win32OperatingSystem cmdlet (from chapter 18) enables you to retrieveinformation about remote systems. Due to application changes, there’s a requirementto reboot remote systems on a periodic basis. This functionality needs to be producedquickly and be firewall friendly.
TECHNIQUE 147
www.it-ebooks.info

461TECHNIQUE 147 Adding a method
NOTE For this technique, we’ll assume that there isn’t a native PowerShell mech-anism to accomplish this task. PowerShell v3 betas have a Restart-Computercmdlet, but it’s possible that it may be removed, as happened in PowerShell v2.
SOLUTION
The Win32_OperatingSystem class has a Reboot method that’s used in the followinglisting to solve the problem. The listing is identical to listing 18.2 in the early sections(these sections are truncated to concentrate on the new section of code). The listingin the download is complete.
<?xml version="1.0" encoding="utf-8"?><PowerShellMetadata xmlns:xsi=
➥ "http://www.w3.org/2001/XMLSchema-instance" xmlns:xsd="http://www.w3.org/2001/XMLSchema" xmlns="http://schemas.microsoft.com/cmdlets-over-objects/2009/11"> <Class ClassName="root\cimv2\Win32_OperatingSystem"> <Version>1.0.0.0</Version> <DefaultNoun>Win32OperatingSystem</DefaultNoun> <InstanceCmdlets> <GetCmdletParameters DefaultCmdletParameterSet="ByName"> .. as listing 18.2
</GetCmdletParameters>
<Cmdlet> <CmdletMetadata Verb="Restart"
➥ Noun="Win32OperatingSystem" ➥ ConfirmImpact="None" /> <Method MethodName="Reboot"> <ReturnValue> <Type PSType="System.UInt32" /> <CmdletOutputMetadata> <ErrorCode /> </CmdletOutputMetadata> </ReturnValue> </Method> </Cmdlet>
</InstanceCmdlets> </Class>
<Enums> .. as listing 18.2 </Enums></PowerShellMetadata>
To generate a cmdlet representing the Reboot method, you put the XML between<Cmdlet> tags B. The cmdlet verb is defined—in this case we use Restart. The methodname is Reboot C, but if you use that as the verb, PowerShell will throw a warning whenyou import the module, because Reboot isn’t an approved PowerShell verb.
TIP Use Get-Verb to view the list of approved verbs. The warning can be sup-pressed by using the -DisableNameChecking parameter of Import-Module.
Listing 19.1 Add a restart operating system method
Method definition starts
B
Method nameC
Return typeD
www.it-ebooks.info

462 CHAPTER 19 CIM cmdlets and sessions
A return code is defined to be an integer value D. That’s all you have to do. You stillhave a single file—Win32OperatingSystem.cdxml—but it now supplies two cmdlets!The Listing 19.1 folder in the download code contains these files:
■ SystemInfo.psm1■ Win32ComputerSystem.cdxml■ Win32OperatingSystem.cdxml■ Win32OperatingSystem.format.ps1xml■ Win32OperatingSystem.types.ps1xml
Import the module and test the contents:
PS> Import-Module .\SystemInfo.psm1PS> Get-Command -Module systeminfo
Capability Name---------- ----CIM Get-Win32ComputerSystemCIM Get-Win32OperatingSystemCIM Restart-Win32OperatingSystem
One very powerful feature of working with this functionality is that as well as the defaultcommon parameters, the query parameters you created for Get-Win32Operating-System are automatically added to your Restart-Win32OperatingSystem cmdlet:
PS> Get-Help Restart-Win32OperatingSystem
NAME Restart-Win32OperatingSystem
SYNTAX Restart-Win32OperatingSystem [[-Name] <string[]>] [-CimSession <CimSession[]>] [-ThrottleLimit <int>] [-AsJob] [-PassThru] [<CommonParameters>]
Restart-Win32OperatingSystem [[-Caption] <string[]>] [-CimSession <CimSession[]>] [-ThrottleLimit <int>] [-AsJob] [-PassThru] [<CommonParameters>]
Restart-Win32OperatingSystem [-OperatingSystemSKU <OperatingSystemSKU[]> {UltimateEdition | StandardServerEdition | DatacenterServerEdition | EnterpriseServerEdition}] [-CimSession <CimSession[]>] [-ThrottleLimit <int>] [-AsJob] [-PassThru] [<CommonParameters>]
Restart-Win32OperatingSystem -InputObject <CimInstance#Win32_OperatingSystem[]> [-CimSession <CimSession[]>] [-ThrottleLimit <int>] [-AsJob] [-PassThru] [<CommonParameters>]
That’s a massive return on the few lines of code you wrote.
DISCUSSION
The use of the new cmdlet is illustrated in figure 19.1.
www.it-ebooks.info

463TECHNIQUE 147 Adding a method
Remote systems are accessed by creating a CIM session (analogous to a Power-Shell remoting session). These are covered in detail in section 19.3. The code inthe figure starts by creating a session to a computer called WebR201 and usesGet-Win32OperatingSystem to display the LastBootUpTime, among other details.Restart-Win32OperatingSystem is used, and another call to Get-
Win32OperatingSystem shows the revised boot time. Notice that there was no needto reestablish the CIM session. It automatically reconnects. There is an appreciabledelay (up to a few minutes) once the target system has rebooted while the session isreestablished, but the reestablishment will happen.
CIM sessions to remote machines use WSMAN by default, but they can be con-strained to use DCOM as shown in figure 19.2.
NOTE Connectivity to systems by the CIM cmdlets, including New-CIMSession,always uses WSMAN by default if the -ComputerName parameter is used, even ifthe computer name supplied is the local machine. If the -ComputerName param-eter isn’t used, then a COM connection is made to the local machine.
A session option to use the DCOM protocol is created. This is used to create a CIM ses-sion to a machine called Win7. The difference between this system and WebR201,used in figure 19.1, is that this system is running PowerShell v2 and version 2.0 of theWSMAN stack. In this case, you need to use DCOM.
Get-Win32OperatingSystem is used with the session to retrieve the LastBootUpTime.A call to Restart-Win32OperatingSystem causes the system to reboot. Once it comesback online, you can attempt to use Get-Win32OperatingSystem again. This results ina nasty, big error message. The error’s meaning isn’t obvious from the message, but itactually means that the session link to the remote machine has been broken and needsto be reestablished.
Figure 19.1 Using the Restart-Win32OperatingSystem cmdlet
www.it-ebooks.info

464 CHAPTER 19 CIM cmdlets and sessions
TIP WSMAN-based sessions automatically reconnect, but DCOM sessionsdon’t.
Once you have reestablished the CIM session, you can use Get-
Win32OperatingSystem again. The flexibility of the CIM cmdlets is shown at the bot-tom of the figure, where WSMAN and DCOM sessions are used together.
That’s the simple type of method dealt with, but real admins need methods withparameters.
Adding a method that uses parameters
Many of the methods to be found on WMI objects require one or more parameters. Sofar you’ve seen how to add a method that doesn’t require parameters. There are manymethods on WMI classes that don’t require parameters, enabling you to build a set offunctionality very simply. Eventually, though, you’ll come across a method that doesrequire parameters.
Figure 19.2 Using DCOM with CIM sessions
TECHNIQUE 148
www.it-ebooks.info

465TECHNIQUE 148 Adding a method that uses parameters
An example is the Win32Shutdown method of the Win32_OperatingSystem class. Itcan take the values shown in table 19.1 and perform different actions depending onthe value. If you can harness this type of method, you can easily add powerful func-tionality to your module.
Technique 147 demonstrated how to restart a remote system, but there are timeswhen you’ll need to shut down the remote system completely.
PROBLEM
The functionality of your module needs to be expanded by adding the capability toshut down a remote machine. This could be achieved using the Stop-Computer cmd-let, but you want to ensure that potential firewall issues don’t interfere by using theWSMAN protocol.
SOLUTION
Listing 19.2 extends listing 19.1 by adding the functionality to use the Win32Shutdownmethod. The listing has been compressed by removing statements that have beenshown in previous listings so that we can concentrate on the new items. The full listingis available in the download code that accompanies the book.
<?xml version="1.0" encoding="utf-8"?><PowerShellMetadata xmlns:xsi=
➥ "http://www.w3.org/2001/XMLSchema-instance" xmlns:xsd="http://www.w3.org/2001/XMLSchema" xmlns="http://schemas.microsoft.com/cmdlets-over-objects/2009/11"> <Class ClassName="root\cimv2\Win32_OperatingSystem"> <Version>1.0.0.0</Version> <DefaultNoun>Win32OperatingSystem</DefaultNoun> <InstanceCmdlets> <GetCmdletParameters DefaultCmdletParameterSet="ByName"> .. as listing 19.1 </GetCmdletParameters>
Value Meaning
0 Log off
4 Forced log off
1 Shutdown
5 Forced shutdown
2 Reboot
6 Forced reboot
8 Power off
12 Forced power off
Listing 19.2 Add a method with parameters
Table 19.1 Values for the Win32Shutdown method
www.it-ebooks.info

466 CHAPTER 19 CIM cmdlets and sessions
<Cmdlet> <CmdletMetadata Verb="Restart" /> .. as listing 19.1 </Cmdlet>
<Cmdlet> <CmdletMetadata Verb="Stop"
➥ ConfirmImpact="High" /> <Method MethodName="Win32Shutdown"> <ReturnValue> <Type PSType="System.UInt32" /> <CmdletOutputMetadata> <ErrorCode /> </CmdletOutputMetadata> </ReturnValue> <Parameters> <Parameter ParameterName="Flags"> <Type PSType="System.Int32" /> <CmdletParameterMetadata PSName="Flags"> <ValidateNotNull /> <ValidateSet> <AllowedValue>4</AllowedValue> <AllowedValue>5</AllowedValue> <AllowedValue>6</AllowedValue> <AllowedValue>12</AllowedValue> </ValidateSet> </CmdletParameterMetadata> </Parameter> </Parameters> </Method> </Cmdlet> </InstanceCmdlets>
</Class> <Enums> .. as listing 19.1 </Enums></PowerShellMetadata>
The XML file is identical to listing 19.1 until you get to the point where you want toadd the cmdlet that uses the Win32Shutdown method. The new cmdlet is assigned theverb Stop B, and it’s linked to the Win32Shutdown method C. A return value isdefined D.
This method has a single parameter E. It’s given the same name that’s used in theWMI documentation, but that isn’t mandatory. A different name could be used if pre-ferred. My recommendation is to conform to the WMI documentation for ease ofmaintenance. The type of data to be input through the parameter (in this case aninteger) is also defined.
When you used PowerShell advanced functions in chapters 5–16 you utilized theinput validation techniques when defining parameters. You can do exactly the samewith the cmdlets you create from WMI objects F. The code will test that the parameterisn’t null and that it contains one of the allowed values taken from table 19.1.
Cmdlet start
B
Methodname
C
Return valueD
Parameter nameE
ValidationF
www.it-ebooks.info

467TECHNIQUE 148 Adding a method that uses parameters
DISCUSSION
Once the module has been imported, you’ll find that it contains three cmdlets:
■ Get-Win32OperatingSystem
■ Restart-Win32OperatingSystem
■ Stop-Win32OperatingSystem
You created the Get cmdlet in chapter 18, and the Restart and Stop cmdlets wereadded in this section. Building functionality in this granular manner makes develop-ment and testing easier and more efficient, as it’s a simple matter to isolate the newaspects of the module.
You can use the Stop-Win32OperatingSystem cmdlet as follows:
$cs = New-CimSession -ComputerName WebR201Stop-Win32OperatingSystem -CimSession $cs -Flags 6
Creating CIM sessions is covered in section 19.3. The cmdlet is used with the appropri-ate Flag value to trigger the desired action. If you input a value for the -Flags param-eter that isn’t in the allowed set you’ll get an error message:
PS> Stop-Win32OperatingSystem -Flags 9Stop-Win32OperatingSystem : Cannot validate argument on parameter 'Flags'.
The argument "9" does not belong to the set "4,5,6,12" specified by the ValidateSet attribute. Supply an argument that is in the set and then try the command again.
The system very helpfully informs you of the values the cmdlet will accept.
TIP If you need to discover the acceptable values for a parameter, input anincorrect value and the error message will supply the correct set.
Some methods require more than one parameter, in which case the informationbetween the <Parameter> and </Parameter> tags needs to be duplicated and modi-fied as required. You could extend the module to cover the other methods on theWin32_OperatingSystem module:
■ SetDateTime
■ Shutdown
■ Win32ShutdownTracker
As these are similar activities, I’ll just supply the code in the final version of the mod-ule, to be found in the SystemInfo folder of the chapter 18–19 code download.
When you incorporate a method from a WMI object into your code, you generatean extra cmdlet to perform the action. Some methods require parameters, as you’veseen. Adding multiple parameters is equally easy.
This provides a very granular method of adding functionality to modules. Youcan quickly get the functionality into production as it becomes available, allowingthe module to repay the investment in development sooner than if developmentwere slower.
www.it-ebooks.info

468 CHAPTER 19 CIM cmdlets and sessions
In this section, and in chapter 18, you’ve seen and used a number of the CIM-related cmdlets. It’s time to investigate these in depth and see how they relate to theWMI cmdlets you know and love.
19.2 CIM cmdletsThe other big WMI-related change with PowerShell v3 is the introduction of the CIMcmdlets. These are analogous to the WMI cmdlets, and they can work with the legacyWMI classes and provide access to the new CIM API. These cmdlets are discussed in sec-tion 19.2.2. Windows 8 also supplies a number of new WMI namespaces.
WARNING On pre-Windows 8 systems, PowerShell v3 won’t install the newWMI providers, or namespaces, that are introduced with Windows 8. If thenew cmdlets access currently available classes, they will work; otherwise anerror will occur.
You need to understand the similarities and differences between the CIM cmdlets andthe WMI cmdlets you’ve been using. The second part of this section will compare andcontrast the two sets of cmdlets to illustrate how to best use each set.
Our old friends, the WMI cmdlets, don’t get any new parameters and are used inthe same manner as in PowerShell v2.
19.2.1 WMI and CIM objects
The WMI cmdlets that you’ve been using in PowerShell v2 remain in PowerShell v3:
■ Get-WmiObject
■ Invoke-WmiMethod
■ Set-WmiInstance
■ Remove-WmiObject
■ Register-WmiEvent
The WMI cmdlets are unchanged as far as using them is concerned. I’ve mentioned several times that there’s a new API for accessing the CIM cmdlets.
They also use a different set of .NET classes. Consider the types returned by the WMIcmdlets:
Get-WmiObject Win32_OperatingSystem | Get-Member
You’d get this type returned:
System.Management.ManagementObject#root\cimv2\Win32_OperatingSystem
The corresponding CIM cmdlet is as follows:
Get-CimInstance Win32_OperatingSystem | Get-Member
This returns a completely different type:
TypeName: Microsoft.Management.Infrastructure.CimInstance#
➥ root/cimv2\Win32_OperatingSystem
www.it-ebooks.info

469CIM cmdlets
TIP Remember that the CIM cmdlets return objects that have been deserial-ized from XML. The classes’ methods aren’t included on the returned object.
The best way to see the differences is to use Get-WmiObject and Get-CimInstanceagainst the same class and compare the results. Try this:
Get-WmiObject -Class Win32_LogicalDisk -Filter "DeviceID='C:'" | fl *Get-CimInstance -ClassName Win32_LogicalDisk -Filter "DeviceID='C:'" | fl *
The best way to perform the comparison is to use two PowerShell consoles and runone command in each. These are some of the differences:
■ The CIM cmdlet doesn’t display the system properties (those with a double-underscore prefix).
■ The CIM cmdlet has a ComputerName property, whereas the WMI cmdlet has aPSComputerName property.
■ The CIM cmdlet doesn’t display the WMI class qualifiers.■ The class and namespace information is different for the two cmdlets.
On a Windows 8 system try this code:
Get-WmiObject -Class Win32_LogicalDisk -Filter "DeviceID='C:'"Get-CimInstance -ClassName Win32_LogicalDisk
The new root\standardcimv2 namespace adds a number of additional WMI classes for themodules shipped with PowerShell v3. These can be accessed using Get-CimInstance, aswell as by the module (many of the new modules in Windows Server 8 are cmdlets createdfrom WMI classes):
Get-CimInstance -NameSpace ROOT/StandardCimv2 `-ClassName MSFT_NetAdapter
You can also use Get-WmiObject on these new classes:
Get-WmiObject -Namespace ROOT/StandardCimv2 -Class MSFT_NetAdapter
The classes are accessible on remote systems using the -ComputerName parameter:
Get-WmiObject -NameSpace ROOT/StandardCimv2 `-Class MSFT_NetAdapter -ComputerName server8build
If you try to access this class on a Windows 7 machine (even though it has PowerShellv3 installed), like this
Get-WmiObject -NameSpace ROOT/StandardCimv2 `-Class MSFT_NetAdapter -ComputerName win7test
the following error message will be returned:
Get-WmiObject : Invalid namespace "ROOT/StandardCimv2"
This is all great. You get more WMI classes to work with, and you can access them usingthe standard WMI tools that you’ve seen throughout the book. The only catch is thatthe new classes are only available on Windows 8 and above.
www.it-ebooks.info

470 CHAPTER 19 CIM cmdlets and sessions
The big question is what can the CIM cmdlets do for you and how do you use them.
19.2.2 CIM and WMI cmdlets
The new CIM cmdlets are listed in table 19.2. Comparing them with the WMI cmdletsand the WSMAN cmdlets (table 17.1 in chapter 17) will show many points of similarityin the names and functionality, as you can see in table 19.3. The cmdlets for workingwith CIM sessions will be discussed in section 19.3.
TIP In PowerShell v2, the Remove-WSManInstance cmdlet can only be usedto remove WSMAN configuration information.
The best way to compare the WMI and CIM cmdlets is to see them in action (theWSMAN cmdlets were discussed in chapter 17). As usual, notepad.exe has volunteeredto be the central part of the examples. You can start an instance of Notepad like this:
Start-Process notepad
There are a number of ways you can use Get-WmiObject to return information on theNotepad process. The one with the least typing involves using a filter:
Get-WmiObject -Class Win32_Process -Filter "Name='notepad.exe'"
This is equivalent to using the following WQL query:
Get-WmiObject -Query "SELECT * FROM Win32_Process `WHERE Name='notepad.exe'"
Queries and filters can be used in Get-CimInstance to produce the same result:
Table 19.2 CIM cmdlets
Export-CimCommand Get-CimAssociatedInstance Get-CimClass
Get-CimInstance Get-CimSession Invoke-CimMethod
New-CimInstance New-CimSession New-CimSessionOption
Register-CimIndicationEvent
Remove-CimInstance Remove-CimSession
Set-CimInstance
Table 19.3 Comparison of WMI, WSMAN, and CIM cmdlets
WMI cmdlets WSMAN cmdlets CIM cmdlets
Get-WmiObject Get-WSManInstance Get-CimInstance
Invoke-WmiMethod Invoke-WSManAction Invoke-CimMethod
Set-WmiInstance Set-WSManInstance Set-CimInstance
Remove-WmiObject (Remove-WSManInstance) Remove-CimInstance
www.it-ebooks.info

471CIM cmdlets
Get-CimInstance -ClassName Win32_Process
➥ -Filter "Name='notepad.exe'"Get-CimInstance -Query "SELECT * FROM Win32_Process `WHERE Name='notepad.exe'"
TIP The -Filter parameter was added in PowerShell v3 CTP 2. Early com-mentary on PowerShell v3 may state that these cmdlets don’t have a -Filterparameter.
Notice that the WMI cmdlets use the -Class parameter, but the CIM cmdlets use the-ClassName parameter. The CIM cmdlets have a -Class parameter, but it’s used in adifferent manner, as you’ll see shortly.
One drawback with the WMI cmdlets is that you have to completely refetch thedata from the server to refresh the data. The CIM cmdlets provide an easier way torefresh the data. Start by creating a CIM instance. In this case, you’ll only be using asingle process, but it would work just as effectively if multiple, or even all, processeswere selected:
$proc = Get-CimInstance -ClassName Win32_Process `-Filter "Name='System Idle Process'"
You can then display the contents of the variable:
$proc | Format-Table Name, KernelModeTime -AutoSize
Name KernelModeTime---- --------------System Idle Process 183482968750
The data is refreshed by simply piping it through Get-CimInstance:
$proc | Get-CimInstance |Format-Table Name, KernelModeTime -AutoSize
Name KernelModeTime---- -------------- System Idle Process 183838906250
The variable $proc still contains the original data. You can create a process using WMI:
Invoke-WmiMethod -Class Win32_Process -Name Create `-ArgumentList notepad.exe
The Create method of the Win32_Process class is called with the path to notepad.exebeing passed as the argument. You don’t need the full path because notepad.exe is inWindows\System32, which is on the search path by default.
You can use Invoke-CimMethod in the same way:
Invoke-CimMethod -ClassName Win32_process -MethodName Create `-Arguments @{CommandLine = "notepad.exe"}
The only slight difference is that you have to provide the parameter name that theCreate method expects (CommandLine).
www.it-ebooks.info

472 CHAPTER 19 CIM cmdlets and sessions
When it comes to removing WMI objects you have a number of options. When you’redealing with processes, you can get the object and pipe it to Invoke-WmiMethod:
Get-WmiObject -Class Win32_Process -Filter "Name='notepad.exe'" |Invoke-WmiMethod -Name Terminate
Alternatively, you can pipe it to Remove-WmiObject:
Get-WmiObject Win32_Process -Filter "Name='notepad.exe'" |Remove-WmiObject
This is my preferred way of removing WMI objects, because I can test the filter beforepiping to ensure I’m working with the correct object.
You can perform similar actions with the CIM cmdlets:
Get-CimInstance -ClassName Win32_Process `-Filter "Name='notepad.exe'" |Invoke-CimMethod -MethodName Terminate
Get-CimInstance -ClassName Win32_Process ` -Filter "Name='notepad.exe'" |Remove-CimInstance
The -Class parameter can be used to provide much improved error messages. If youtry to use a nonexistent method—for example the “DieYouHorribleProcess”method—you’ll get results like the following by default:
PS> Invoke-CimMethod -Class Win32_Process `-MethodName DieYouHorribleProcess `-Argument @{CommandLine='notepad.exe'}Invoke-CimMethod : Not foundAt line:1 char:1+ Invoke-CimMethod -Class Win32_Process -MethodName DieYouHorribleProcess -Argumen ...+ ~~~~~~~~~~~~~~~~~~~~~~~~~~~~~~~~~~~~~~~~~~~~~~~~~~~~~~~~~~~~~~~~~~~~~~~~~~~~~~~~ + CategoryInfo : ObjectNotFound: (:) [Invoke-CimMethod], CimException + FullyQualifiedErrorId : HRESULT 80041002,Microsoft.Management.Infrastructure.
➥ CimCmdlets.InvokeCimMethodCommand
As you can see, the error message here just states that something is not found. Not themost helpful of messages. You can use Get-CimClass (similar to using Get-WmiObject-Class -List) to get the class definitions:
PS> $c = Get-CimClass Win32_Process
If you then try using the non-existent method, you’ll get the following results:
PS> Invoke-CimMethod -Cimclass $c `-MethodName DieYouHorribleProcess `-Argument @{CommandLine='notepad.exe'}Invoke-CimMethod : Method 'DieYouHorribleProcess' is not declared in class 'Win32_Process'.At line:1 char:1
www.it-ebooks.info
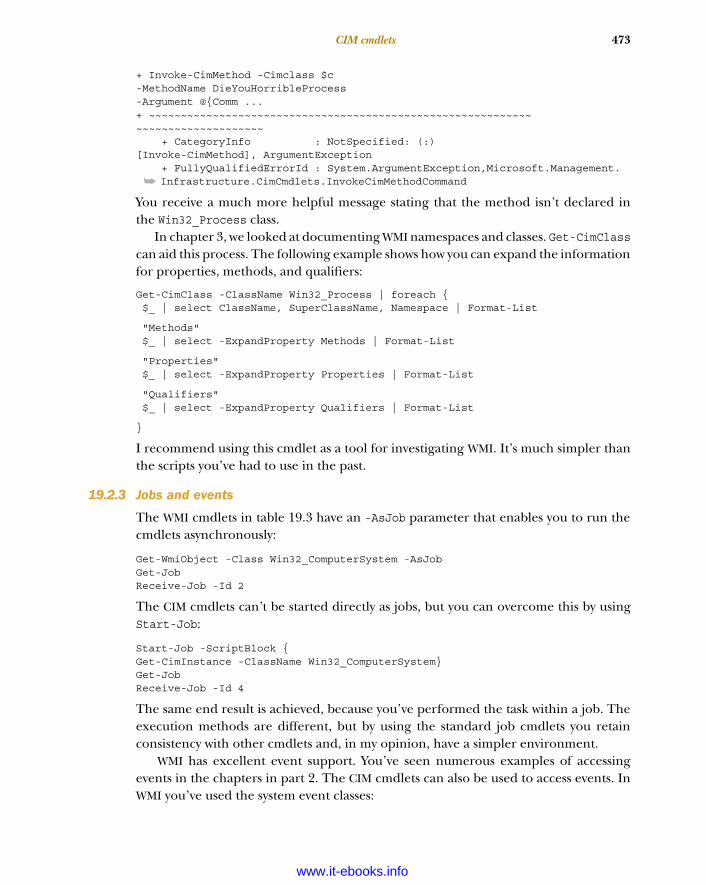
473CIM cmdlets
+ Invoke-CimMethod -Cimclass $c -MethodName DieYouHorribleProcess -Argument @{Comm ...+ ~~~~~~~~~~~~~~~~~~~~~~~~~~~~~~~~~~~~~~~~~~~~~~~~~~~~~~~~~~~~~~~~~~~~~~~~~~~~~~~~ + CategoryInfo : NotSpecified: (:) [Invoke-CimMethod], ArgumentException + FullyQualifiedErrorId : System.ArgumentException,Microsoft.Management.
➥ Infrastructure.CimCmdlets.InvokeCimMethodCommand
You receive a much more helpful message stating that the method isn’t declared inthe Win32_Process class.
In chapter 3, we looked at documenting WMI namespaces and classes. Get-CimClasscan aid this process. The following example shows how you can expand the informationfor properties, methods, and qualifiers:
Get-CimClass -ClassName Win32_Process | foreach { $_ | select ClassName, SuperClassName, Namespace | Format-List
"Methods" $_ | select -ExpandProperty Methods | Format-List
"Properties" $_ | select -ExpandProperty Properties | Format-List
"Qualifiers" $_ | select -ExpandProperty Qualifiers | Format-List
}
I recommend using this cmdlet as a tool for investigating WMI. It’s much simpler thanthe scripts you’ve had to use in the past.
19.2.3 Jobs and events
The WMI cmdlets in table 19.3 have an -AsJob parameter that enables you to run thecmdlets asynchronously:
Get-WmiObject -Class Win32_ComputerSystem -AsJobGet-JobReceive-Job -Id 2
The CIM cmdlets can’t be started directly as jobs, but you can overcome this by usingStart-Job:
Start-Job -ScriptBlock {Get-CimInstance -ClassName Win32_ComputerSystem}Get-JobReceive-Job -Id 4
The same end result is achieved, because you’ve performed the task within a job. Theexecution methods are different, but by using the standard job cmdlets you retainconsistency with other cmdlets and, in my opinion, have a simpler environment.
WMI has excellent event support. You’ve seen numerous examples of accessingevents in the chapters in part 2. The CIM cmdlets can also be used to access events. InWMI you’ve used the system event classes:
www.it-ebooks.info

474 CHAPTER 19 CIM cmdlets and sessions
Get-WmiObject -List __Instance*event* | select Name
Name----__InstanceOperationEvent__InstanceModificationEvent__InstanceCreationEvent__InstanceDeletionEvent
The CIM cmdlets utilize similar classes:
Get-CimClass -ClassName *modification | Select ClassName
ClassName---------CIM_ClassModificationCIM_InstModification
When working with WMI events through the CIM cmdlets you start by defining a WQLquery in exactly the same way as when working with the WMI cmdlets. Here’s an example:
$q = "SELECT * FROM CIM_InstModification WHERE `TargetInstance ISA 'Win32_LocalTime'"
An event registration is performed using the query:
Register-CimIndicationEvent -Query $q
The events can be viewed using Get-Event. Because they’re triggered every second,it’s more meaningful to just view the timestamp on the event:
Get-Event | select TimeGenerated
The event system is cleaned up in the usual way:
Get-Event | Remove-EventUnregister-Event *
As you can see, the CIM cmdlets are analogous to the WMI and WSMAN cmdlets. The big-gest difference is the way that the WMI and CIM cmdlets connect directly to remotemachines using the -ComputerName parameter. When using the WMI cmdlets, this is per-formed over the DCOM protocol. The CIM cmdlets use the WSMAN protocols, but theycan also use DCOM via CIM sessions, which make them more powerful and flexible.
19.3 CIM sessionsIn PowerShell v2, you have three ways to access a remote system using WMI:
■ Use the -ComputerName parameter on the WMI cmdlets to access the remote sys-tem via DCOM.
■ Use PowerShell remoting via WinRM and PowerShell on the remote system.This can be used for a single command or to establish a session to the remotemachine for repeated use.
■ Use the WSMAN cmdlets to access the WMI providers directly from the WinRMservice (which was the subject of chapter 17).
www.it-ebooks.info

475CIM sessions
PowerShell v3 retains all of these options and adds another—the use of CIM sessions.
BIG WIN This option will prove to be one of the big wins for administrators inPowerShell v3, as it enables us to access systems running Windows 8 operatingsystems and older legacy versions of Windows without needing to upgradethem to PowerShell v3.
In this section, we’ll examine the theory behind CIM sessions and then look at how touse them. This discussion follows the lifecycle of creating, accessing, and removingCIM sessions.
19.3.1 CIM sessions explained
I’ll briefly explain the structure of the environment I used to test this functionalitybecause it’s important to understanding the following sections. The systems I used aredetailed in table 19.4.
The important point regarding CIM sessions is that they use a completely new applica-tion programming interface (API), which is made available through new .NET classesintroduced with PowerShell v3. This new API is referred to as the Management Infra-structure Client API, abbreviated to MI. The API enables the following:
■ Standards-based and -compliant access to any CIM Object Manager (CIMOM).WMI is Microsoft’s implementation of CIMOM, but you now get access to CIM onnon-Windows machines, such as Open Pegasus (www.openpegasus.org) onLinux systems.
■ Support for all the standard operations supported by the WS-Management(WSMAN) protocols. A set of cmdlets are provided that are analogous to theWSMAN cmdlets (see table 19.1).
■ Use of the WS-Management protocol, which is an industry standard and fire-wall-friendly protocol. This is implemented as the WinRM service in a Microsoftenvironment. WinRM provides the basis of PowerShell remoting, WSMANremote access, and CIM sessions.
■ Access to a full range of classic Windows operating systems through DCOMwhen PowerShell v3 isn’t installed.
Table 19.4 Systems involved in testing CIM sessions
Machine Type Operating system PowerShell version
Server02 Physical—Hyper-V host and domain controller
Windows Server 2008 R2 SP 1 PowerShell v2
Win7Test Virtual Windows 7 SP 1, 64-bit PowerShell v3
Server8BUILD Virtual Windows Server 8 PowerShell v3
Win8BUILD32 Virtual Windows 8, 32-bit PowerShell v3
www.it-ebooks.info

476 CHAPTER 19 CIM cmdlets and sessions
In short, you can now access WMI over the WinRM service and still drop back to usingDCOM if you need to access legacy systems. It’s this flexibility that provides the powerof the new API. The combinations can get a bit confusing, but the summary presentedin table 19.5 puts them into context.
The next step is learning how to create CIM sessions.
Creating a CIM sessionTable 19.2 shows that you have four cmdlets to use when working with CIM sessions:
■ New-CimSession
■ New-CimSessionOption
■ Get-CimSession
■ Remove-CimSession
The New-* cmdlets are used when creating sessions. The Get- and Remove-CimSessioncmdlets are used to enumerate and destroy sessions respectively.
Creating a CimSession appears to be straightforward:
PS> New-CimSession -ComputerName Server8BUILD
Id : 1Name : CimSession1InstanceId : 5ed6fca5-df1f-4767-be7a-c4db9569333eComputerName : Server8BUILDProtocol : WSMAN
Notice that the protocol defaults to WSMAN. If you use this syntax to connect to a machinerunning Windows Server 2008 R2 and PowerShell v2, you’ll get an error, as follows:
Get-CimInstance : The WS-Management service cannot process the request. A DMTF resource URI was used to access a non-DMTF class. Try again using a non-DMTF resource URI.
The same error will be returned if you try to use this syntax:
Get-CimInstance -ClassName Win32_OperatingSystem
➥ -ComputerName server02
Table 19.5 Protocols and parameters for remote access mechanisms
Access by Protocol Parameters
WMI cmdlets DCOM ComputerName
Invoke-Command WSMAN ComputerName
Session
PSSession cmdlets WSMAN ComputerName
Session
CIM cmdlets WSMAN
DCOM
CimSession or Computername CimSessionor used without Computername
TECHNIQUE 149
www.it-ebooks.info

477TECHNIQUE 149 Creating a CIM session
The way to resolve this is to force the CIM session to use DCOM, as shown in figure 19.3. Start by creating a CIM session option. The option forces use of the DCOM proto-
col. A session connecting to Server02 is created using that option. You can then accessthe session to retrieve data.
This just leaves one tiny problem. You need to know the configuration, operatingsystem, WSMAN version, and PowerShell version before you create the session. Or doyou?
PROBLEM
The cmdlets you created from WMI objects in chapter 18 and section 19.1 don’t have a-ComputerName parameter. They use CIM sessions to access remote computers. TheWin32_OperatingSystem and Win32_ComputerSystem classes are available on bothWindows 8 and earlier versions of Windows. The only available access mechanism forCIM cmdlets in earlier versions of Windows is DCOM. Windows 8 and above can useWSMAN. You need a mechanism to create CIM sessions that takes into account the con-figuration of the remote machine and that utilizes the appropriate protocol.
SOLUTION
The following listing demonstrates how you can build on your knowledge of theWSMAN cmdlets to determine which protocol to use. Refer to technique 137 in chap-ter 17 for an in-depth explanation of the Test-WSMan cmdlet.
function set-cimsession {[CmdletBinding()]param ( [string]$computername="$env:COMPUTERNAME" )BEGIN { $opt = New-CimSessionOption -Protocol DCOM }
PROCESS {switch ($computername){ "." {$computername="$env:COMPUTERNAME" } "localhost" {$computername="$env:COMPUTERNAME" }}
Listing 19.3 Set CIM session protocol
Figure 19.3 Using the New-CimSessionOption cmdlet to force a CIM session to use the DCOM protocol
Set default computer name
B
Create DCOM optionC
www.it-ebooks.info

478 CHAPTER 19 CIM cmdlets and sessions
if (-not (Test-Connection -ComputerName $computername -Quiet -Count 1)){ Throw "Computer: $($computername)
➥ could not be contacted" }
$twsman = Test-WSMan -ComputerName $computername `-Authentication Default $pva = $twsman.ProductVersion -split ": "$stack = $pva[-1]Write-Debug $stack
switch ($stack){ "2.0" {$ncs = New-CimSession -ComputerName $computername ` -SessionOption $opt } "3.0" {$ncs = New-CimSession -ComputerName $computername } default {Throw "Error - could not recognize WSMAN stack for $computername"}}$ncs } # end process}
The function takes a single parameter—the name of the remote computer to whichyou wish to connect B. The function will convert “.” or “localhost” to $env:COMPUTER-NAME. This is because Test-Connection throws an error when “.” is used.
TIP $env: is a shortcut to using the environmental variables via the Environ-ment provider and PowerShell drive. The full list of environmental variablescan be viewed using Get-ChildItem -Path env:.
The only CIM session option to be configured is the protocol, and that’s set usingNew-CimSessionOption C. WSMAN is the default protocol, and your option is to useDCOM instead. The function starts by testing that the remote machine can be pingedusing Test-Connection D. The -Quiet parameter ensures that a Boolean (True orFalse) result is returned. If a result of False is returned—meaning the remotemachine isn’t contactable—an error is thrown and the function terminates.
Test-WSMan is used to determine the version of the WSMAN stack on the remotemachine E. The -Authentication Default parameter is used to ensure that the ver-sion information is returned. A split of the ProductVersion property is performed,and the last item is allocated to a variable ($stack).
Switch is used to test the value of the $stack variable F. If version 2.0 (PowerShellv2) is found, DCOM is set as the protocol using the option you created earlier (at B).Version 3.0 (PowerShell v3) can use WSMAN as its protocol.
The function finally returns the created session to its caller. The variable isreturned by placing it on a line by itself G. If the function is used in a standalonemanner, the details of the session are displayed on screen.
DISCUSSION
The problem originally appeared to involve a number of possible variables that had tobe checked, including operating system version, PowerShell version, and the version
Test connection to computerD
Test WSMAN stackE
Create sessionF
Return sessionG
www.it-ebooks.info

479TECHNIQUE 150 Accessing CIM sessions
of the WSMAN stack. But only the version of the WSMAN stack is a determining factorfor the protocol you can use.
When you run Test-WSMan, Server02 (Windows Server 2008 R2 SP 1) returns this data:
ProductVersion : OS: 6.1.7601 SP: 1.0 Stack: 2.0
Win7Test (Windows 7 SP1 with PowerShell v3) returns this:
ProductVersion : OS: 6.1.7601 SP: 1.0 Stack: 3.0
The important difference is in the Stack version. PowerShell v3 uses version 3.0. Thisprovides the differentiator. If further stack versions are introduced, the switch state-ment can be extended to accommodate them.
The hard work of creating a CIM session has been accomplished. You can sit backand enjoy yourself for a while. Oh, hang on, you haven’t figured out how to use thesession yet.
Accessing CIM sessionsYou have a shiny new cmdlet created from a WMI class, and you have a CIM session.You can put the two together like this (as you’ve seen in the examples in chapter 18and earlier in this chapter):
$cs7 = set-cimsession -computername Win7testGet-Win32OperatingSystem -CimSession $cs7
Does this seem familiar? Think of creating PowerShell remoting sessions and usingInvoke-Command, and you have the correct comparison.
You can also be a little sneaky and take advantage of the fact that PowerShell willtreat an expression in parentheses as an object:
Get-Win32OperatingSystem -CimSession
➥ (set-cimsession -computername Win7test)
In this example, the (set-cimsession -computername Win7test) expression is eval-uated first to produce a CIM session object that’s used by the cmdlet.
You can create sessions to multiple computers as follows:
$cs = New-CimSession -ComputerName server02, win7test
All sessions will default to WSMAN in this case. Ideally you’ll want to automate some, or all of the session creation process.
PROBLEM
When accessing remote systems using the *CIMInstance cmdlets, or cmdlets you’vecreated yourself, you need to be able to reuse sessions without having to rememberwhich machines you’ve created sessions for. The session protocol should be deter-mined automatically as part of the creation process.
SOLUTION
The following listing shows how you can solve this problem by building on the func-tion you created in technique 149. This function pulls together a lot of the ideasyou’ve seen throughout the chapter.
TECHNIQUE 150
www.it-ebooks.info

480 CHAPTER 19 CIM cmdlets and sessions
function get-systeminfo {[CmdletBinding()]param ( [string]$computername="$env:COMPUTERNAME" )BEGIN { Import-Module systeminfo -Force }
PROCESS {switch ($computername){ "." {$computername="$env:COMPUTERNAME" } "localhost" {$computername="$env:COMPUTERNAME" }}
if (-not (Test-Connection -ComputerName $computername -Quiet -Count 1)){ Throw "Computer: $($computername)
➥ could not be contacted" }
if (-not(Test-Path -Path variable:\"cs_$computername")){ New-Variable -Name "cs_$computername" ` -Value (set-cimsession -computer $computername)}
Get-Win32OperatingSystem ` -CimSession (Get-Variable -Name "cs_$computername").Value |Out-Default
Get-CimInstance -ClassName Win32_ComputerSystem ` -CimSession (Get-Variable -Name "cs_$computername").Value |Out-Default} # end process}
The function takes a computer name as a parameter, with the name of the local com-puter taken from the environmental variables acting as a default value. You’re usingthe systeminfo module created in chapter 18, so it’s imported B. The -Force param-eter ensures that the import occurs even if it’s already loaded.
TIP Many cmdlets have a -Force parameter to ensure that restrictions can beovercome. If your syntax isn’t working, check to see if the cmdlet is a Jedi andcan use the force.
The remote system is pinged to determine if it’s contactable C. If it is, the functionthen uses Test-Path to determine whether the variable cs_$computername is presentD. If not, the variable will be created (note that the variable name doesn’t have a $prefix) with a value set to a CIM session created using set-cimsession from tech-nique 149. Test-Path is normally seen used on the filesystem, but it should functionon any correctly written provider.
You can then use your session with a WMI object-based cmdlet E or a PowerShellCIM cmdlet F. In both cases, the CIM session is set by using (Get-Variable -Name"cs_$computername").Value.
Listing 19.4 Access CIM sessions
Force module import
B
Testconnection
C
Test variable existenceD
Use your cmdletE
Use PowerShell cmdletF
www.it-ebooks.info

481Summary
DISCUSSION
When accessing a single remote machine, the function can be used like this:
get-systeminfo -computername win7test
If multiple machines are to be accessed, you can put the names into a CSV file andpipe them into the function:
Import-CSV myfile.csv | foreach {get-systeminfo -computer $_.ComputerName}
Closing your PowerShell session will remove the CIM sessions, but you should be a bitbetter organized and be able to clean up after yourself.
19.3.2 Removing CIM sessions
Removing CIM sessions is a simple matter of using Remove-CimSession. The fun bitcomes in identifying the correct session to close. The existing CIM sessions can be dis-covered using Get-CimSession. Each session returns information like this:
Id : 1Name : CimSession1InstanceId : 5c95e7ad-f347-4409-a644-65ce9f726b55ComputerName : win7testProtocol : WSMAN
You can remove sessions using a number of criteria. For example, you can removeindividual sessions based on Id:
Remove-CimSession -Id 1
$cs = Get-CimSession -Id 2Remove-CimSession -CimSession $cs
Get-CimSession -Id 3 | Remove-CimSession
Or, you can remove all of the sessions associated with a particular computer:
Remove-CimSession -ComputerName server02
Alternatively, you can remove all sessions:
Get-CimSession | Remove-CimSession
Get-CimSession also allows you to select sessions based on computer name, instanceID (GUID), or name. Selections based on any of these criteria could be piped toRemove-CimSession.
19.4 SummaryThe cmdlets that you create from WMI objects can be extended to utilize the WMIobject’s methods. This creates an additional cmdlet in the module for each methodyou include, providing a very granular and simple way to access the functionality. Youcan use these cmdlets across CIM sessions, which gives you an instance remoting capa-bility that can bypass some of the issues with DCOM and firewalls.
www.it-ebooks.info

482 CHAPTER 19 CIM cmdlets and sessions
The CIM cmdlets are analogous to the WMI and WSMAN cmdlets, but they havesome subtle differences that could cause problems if you forget them. You can usethese cmdlets to access the new WMI classes as well as the legacy ones.
CIM sessions are an additional tool for accessing remote machines. You can usethem with the CIM cmdlets as well as the cmdlets you create from WMI classes. Theycan access systems using DCOM or WSMAN to provide maximum flexibility. Justremember that these sessions return XML-based objects, which means you have a dif-ferent way to utilize WMI methods. It’s not difficult, just different.
www.it-ebooks.info

afterwordThis is not the end
You’ve come a long way since you started on this journey. You’ve learned how touse PowerShell and WMI to manage many parts of your environment, includingthe following:
■ Computer systems and hardware■ Performance counters and stability measures■ Filesystem, event logs, and page files■ Printers and scheduled jobs■ Disk systems■ Network configurations■ IIS, DNS, and Hyper-V■ The registry■ Local accounts and groups
Is this the end? Very definitely not! WMI is constantly changing as new versions ofWindows and applications are released. You need to keep on top of the changes toensure that you can manage your systems as efficiently as possible and that youfind all the new toys to play with. The real fun in all of this is getting somethingnew to work.
The third part of this book opened the door to some of the most exciting devel-opments of all, with the CIM APIs released in PowerShell v3 and Windows 8. Withthese you can create your own cmdlets from WMI objects and finally break free ofthe restrictions of DCOM. WMI has always been a powerful tool for performingmanagement tasks remotely, and it has taken a huge step forward in capability withthese new releases.
Having said all that, there’s still much to investigate. I deliberately didn’tinclude any content on working with clusters or NLB in this book. A lot of WMI is
483
www.it-ebooks.info

484 AFTERWORD This is not the end
used in the System Center family of products, and it’s waiting for an intrepid explorerto investigate and publish the details. The classes that lurk in the root\wmi namespaceneed investigating and documenting. And that’s just the tip of the iceberg.
When Windows 8 arrives, there will be a number of new namespaces to investigate.Some of these can be accessed via the modules that are provided, but there will still beactivities where you’re better off dropping back to WMI or CIM and using the classesdirectly. The CIM APIs also provide an opportunity to manage non-Windows deviceswith PowerShell and WMI. This will provide many new opportunities.
Creating your own WMI providers has become much easier with PowerShell v3 andWindows 8. I haven’t determined the exact scenarios, but I have a few possibilities inmind.
The enjoyment produced by writing a script (or module) to solve a unique prob-lem is very real. I’ve produced over 150 scripts for this book alone, not to mentionthose created for my blogs and work. Savor it and then move on to the next problem.PowerShell and WMI, like all skills, need constant practice. Don’t be too upset lookingback on scripts you created six months ago when you were just beginning with Power-Shell and WMI. Think instead of the things you’ve learned and how much you’veaccomplished with those scripts.
I said at the beginning of the book that there’s a fantastic PowerShell community.Join it. Bring your scripts and problems and share them with the community. If youget really excited about something you’ve discovered, I and many others are alwayslooking for speakers for User Group meetings. Help build a bigger and better Power-Shell community.
The closing words of this book belong to Jeffrey Snover, the man who inventedPowerShell:
“Experiment! Enjoy! Engage!”
RICHARD SIDDAWAY
www.it-ebooks.info

appendix APowerShell reference
This appendix supplies a number of templates, syntax formats, and other usefulinformation that you can use when creating your PowerShell scripts.
A.1 Automatic variablesThere are a large number of variables that PowerShell automatically creates. Thelist can be seen by using
Get-Help about_Automatic_Variables
Reviewing the contents of this help file is highly recommended.
A.2 Calculated fieldsUse calculated fields to create new properties or to perform calculations:
Get-WmiObject -Class Win32_OperatingSystem | select @{Name="BootTime"; Expression={$_.ConvertToDateTime($_.LastBootUpTime)}}
A.3 Flow syntaxThe if and switch statements are used to control flow:
if (<condition>){ .. statements .. }elseif (<condition>){ .. statements .. }else { .. statements .. }
switch (variable or pipeline) { value { .. statements .. } {expression} { .. statements .. } default { .. statements .. }}
In the switch statement, use break in each statement block to prevent furtherprocessing.
485
www.it-ebooks.info

486 APPENDIX A PowerShell reference
A.4 Function templateThe following listing provides a template for advanced functions, containing all vali-dation options as well as comment-based help options.
function verb-noun{ [CmdletBinding(SupportsShouldProcess=$true, ConfirmImpact="Medium Low High None", DefaultParameterSetName="XXXXX")] param ( [parameter(Position=0, Mandatory=$true, ParameterSetName="YYYYYYYYYY", ValueFromPipeline=$true, ValueFromPipelineByPropertyName=$true, ValueFromRemainingArguments=$true, HelpMessage="Put your message here" )] [Alias("CN", "ComputerName")] [AllowNull()] [AllowEmptyString()] [AllowEmptyCollection()] [ValidateCount(1,10)] [ValidateLength(1,10)] [ValidatePattern("[A-Z]{2,8}[0-9][0-9]")] [ValidateRange(0,10)] [ValidateScript({$_ -ge (get-date)})] [ValidateSet("Low", "Average", "High")] [ValidateNotNull()] [ValidateNotNullOrEmpty()] [string]$computer="." ) BEGIN{}#begin PROCESS{
if ($psCmdlet.ShouldProcess("## object ##", "## message ##")) { ## action goes here}
}#process END{}#end
<# .SYNOPSIS
.DESCRIPTION
.PARAMETER <Parameter-Name>
.EXAMPLE
.INPUTS
.OUTPUTS
.NOTES
.LINK
#>
}
Listing A.1 Advanced function template
www.it-ebooks.info

487Operators
A.5 Hash tablesCreate hash tables from here strings:
$arch = DATA {ConvertFrom-StringData -StringData @'0 = x869 = x64'@}
A.6 LoopsPowerShell supplies a number of looping mechanisms. The syntax of these mecha-nisms is summarized in the following examples:
1..10 | foreach-object {$_}1..10 | foreach {$_}
$xs = 1..10foreach ($x in $xs){$x}
for ($i=0; $i -le $($xs.length-1); $i++){$xs[$i]}
$i = 0while ($i -le $($xs.length-1)){$xs[$i]; $i++}
$i = 0do {$xs[$i]; $i++} while ($i -le $($xs.length-1))
$i = 0do {$xs[$i]; $i++} until ($i -gt $($xs.length-1))
A.7 OperatorsPowerShell uses a wide variety of operators. These are listed in table A.1. Operatorsare case-insensitive by default. The c and i prefixes create case-sensitive and case-insensitive versions of the operators.
Table A.1 PowerShell operators
Type Operators
Arithmetic + - * / % is modulo operator
Assignment =, +=, -=, *=, /=, %=
Bitwise -band, -bor, -bxor
Comparison: Equality -eq, -ceq, -ieq
Comparison: Inequality -ne, -cne, -ine
Comparison: Greater -gt, -cgt, -igt; -ge, -cge, -ige
Comparison: Less -lt, -clt, -ilt; -le, -cle, -ile
www.it-ebooks.info

488 APPENDIX A PowerShell reference
A.8 PowerShell install folderIn case you were wondering how find the PowerShell install folder, there’s an auto-matic variable that will give you this information:
PS> $pshomeC:\Windows\System32\WindowsPowerShell\v1.0
A.9 Size constantsThere are a number of size constants defined in PowerShell as shown in table A.2.
Contains: Wildcard match -like, -clike, -ilike; -notlike, -cnotlike, -inotlike
Contains: Regex -match, -cmatch, -imatch; -notmatch, -cnotmatch, -inotmatch
Contains -contains, -ccontains, -icontains; -notcontains, -cnotcontains, -inotcontains
Logical -and, -or, -xor, -not ! is alternative to -not
Pipeline | pipeline symbol$_ current object on the pipeline
Range ..
String -replace, -creplace, -ireplace; -split; -join
Type -is, -isnot, -as
Unary -, +, --, ++, [<type>]
Special &, -f, $(), @(), @{}, Note: , as a unary operator creates an array.
Table A.2 PowerShell constants
Constant Meaning Usage Size
KB Kilobyte 1kb = 1,024
MB Megabyte 1mb = 1,048,576
GB Gigabyte 1gb = 1,073,741,824
TB Terabyte 1tb = 1,099,511,627,776
PB Petabyte 1pb = 1,125,899,906,842,624
Table A.1 PowerShell operators (continued)
Type Operators
www.it-ebooks.info

489Type shortcuts
A.10 Type shortcutsA number of type shortcuts or accelerators have been mentioned throughout thebook. They are used as shortcuts for .NET types. You can use the shortcut instead oftyping the whole name of the type. The most commonly used are probably [adsi] forSystem.DirectoryServices.DirectoryEntry and the datatype shortcuts [int] and[string] for integer and string respectively.
A full list does not seem to have been published, but Oisin Grehan, a PowerShellMVP, has shown how to obtain the list from PowerShell itself on his Nivot Ink blog(http://www.nivot.org/). The full list for PowerShell v2 is shown in table A.3.
Table A.3 PowerShell type shortcuts (accelerators)
Shortcut .NET type
adsi System.DirectoryServices.DirectoryEntry
adsisearcher System.DirectoryServices.DirectorySearcher
array System.Array
bool System.Boolean
byte System.Byte
char System.Char
decimal System.Decimal
double System.Double
float System.Single
hashtable System.Collections.Hashtable
int System.Int32
ipaddress System.Net.IPAddress
long System.Int64
powershell System.Management.Automation.PowerShell
pscustomobject System.Management.Automation.PSObject
psmoduleinfo System.Management.Automation.PSModuleInfo
psobject System.Management.Automation.PSObject
psprimitivedictionary System.Management.Automation.PSPrimitiveDictionary
ref System.Management.Automation.PSReference
regex System.Text.RegularExpressions.Regex
runspace System.Management.Automation.Runspaces.Runspace
www.it-ebooks.info

490 APPENDIX A PowerShell reference
runspacefactory System.Management.Automation.Runspaces.RunspaceFactory
scriptblock System.Management.Automation.ScriptBlock
single System.Single
string System.String
switch System.Management.Automation.SwitchParameter
type System.Type
wmi System.Management.ManagementObject
wmiclass System.Management.ManagementClass
wmisearcher System.Management.ManagementObjectSearcher
xml System.Xml.XmlDocument
Table A.3 PowerShell type shortcuts (accelerators) (continued)
Shortcut .NET type
www.it-ebooks.info

appendix BWMI reference
This appendix supplies a collection of WMI-related reference material to help youwhen writing PowerShell scripts that use WMI.
B.1 Useful WMI namespacesThere are a number of WMI namespaces that you’ll often use. These are collectedin table B.1.
Table B.1 Useful WMI namespaces
Namespace Comments
Root\cim2 Default WMI namespace; contains the majority of the Win32 classes
Root\wmi Contains many hardware-related classes but is mainly undocumented
root\MicrosoftDNS DNS server management
root\virtualization Hyper-V management
Root\MSCluster Cluster
Root\MicrosoftNLB NLB management
Root\webadministration IIS management
root\StandardCimv2 New classes introduced with Windows 8; drives many of the new modules
root\Hardware Hardware-related data
root\Microsoft\Windows\dns PowerShell v3 DNS client configuration and utilities
root\Microsoft\Windows\PowerShellv3 Information on PowerShell modules
root\Microsoft\Windows\Storage Windows storage server management
root\Microsoft\Windows\Smb SMB management
491
www.it-ebooks.info

492 APPENDIX B WMI reference
B.2 Useful classesThe list in table B.2 doesn’t include classes from specific providers, such as DNS or IIS.Those namespaces should be investigated directly. All classes are in the root\cimv2namespace unless stated otherwise.
Table B.2 Useful classes
Component WMI class Chapter
Computer make and model, computer type, domain role
Win32_ComputerSystem Chapter 5
Chassis type Win32_SystemEnclosure Chapter 5
Motherboard Win32_BaseBoard, Win32_OnBoardDevice Chapter 5
Buses Win32_Bus Chapter 5
CPU Win32_Processor, Win32_CacheMemory Chapter 5
BIOS Win32_BIOS Chapter 5
Memory Win32_PhysicalMemoryArray, Win32_PhysicalMemory
Chapter 5
Display settings Win32_DesktopMonitor, Win32_VideoController
Chapter 5
Input device Win32_Keyboard, Win32_PointingDevice Chapter 5
Hardware ports Win32_ParallelPort, Win32_SerialPort, Win32_USBHub, Win32_USBController, Win32_1394Controller, Win32_1394ControllerDevice
Chapter 5
Battery Win32_Battery Chapter 5
Battery status, test power source
root\wmi\BatteryStatus Chapter 5
Power plans root\cimv2\power\Win32_PowerPlan Chapter 5
Operating system, service pack, boot time
Win32_OperatingSystem Chapter 5
Hotfix Win32_QuickFixEngineering (see get-hotfix also) Chapter 5
Bootup configuration Win32_BootConfigurations Chapter 5
Recovery configuration Win32_OSRecoveryConfiguration Chapter 5
System time Win32_LocalTime, Win32_UTCTime, Win32_TimeZone
Chapter 5
Installed software Win32_Product Chapter 5
COM applications Win32_COMApplication Chapter 5
www.it-ebooks.info

493Useful classes
Disk controller Win32_IDEController, Win32_SCSIController Chapter 6
Physical disk Win32_DiskDrive Chapter 6
Disk partition Win32_DiskDriveToDiskPartition, Win32_DiskPartition, Win32_LogicalDiskToPartition
Chapter 6
Logical disk Win32_LogicalDisk Chapter 6
Mount point Win32_MountPoint Chapter 6
Volume Win32_Volume Chapter 6
CD drive Win32_CDROMDrive Chapter 6
Registry: file data Win32_Registry Chapter 7
Registry: access data root\default:StdRegprov,root\cimv2:StdRegprov
Chapter 7
Files CIM_DATAFILE Chapter 8
Folder Win32_Directory Chapter 8
File security Win32_LogicalFileSecuritySetting Chapter 8
Shares Win32_Share Chapter 8
Page file Win32_PageFileUsage, Win32_PageFile, Win32_PageFileSetting, Win32_PageFileElementSetting
Chapter 8
Services Win32_Service Chapter 9
Service load order Win32_LoadOrderGroup, Win32_LoadOrderGroupServiceMembers
Process Win32_Process Chapter 9
Printers Win32_Printer, Win32_PrintJob, Win32_TCPIPPrinterPort, Win32_PrinterDriver
Chapter 10
Network adapters Win32_NetworkAdapter, Win32_NetworkAdapterConfiguration
Chapter 11
Network connections Win32_NetworkConnection Chapter 11
Network protocols Win32_NetworkProtocol Chapter 11
Client software Win32_NetworkClient Chapter 11
Routing table Win32_IP4RouteTable Chapter 11
Table B.2 Useful classes (continued)
Component WMI class Chapter
www.it-ebooks.info

494 APPENDIX B WMI reference
B.3 WQLTables B.3 through B.5 summarize the WQL query language, focusing on keywords,operators, and wildcard characters respectively.
System activation SoftwareLicensingProduct, SoftwareLicensingService
Chapter 13
Local user account Win32_UserAccount, Win32_LoggedOnUser Chapter 14
Local groups Win32_Group, Chapter 14
ROOT\SecurityCenter2\AntiVirusProduct, ROOT\SecurityCenter2\AntiSpywareProduct
Chapter 14
Event logs Win32_NTEventlogFile Chapter 15
Scheduled jobs Win32_ScheduledJob Chapter 15
System stability Win32_WinSat Chapter 15
System reliability Win32_ReliabilityStabilityMetrics Chapter 15
Table B.3 WQL keywords
Keyword Meaning
AND Combines two Boolean expressions and returns TRUE when both expressions are TRUE.
ASSOCIATORS OF Retrieves all instances that are associated with a source instance.
__CLASS References the class of the object in a query.
FROM Specifies the class that contains the properties listed in a SELECT statement. Can only query one class at a time.
GROUP Clause Causes WMI to generate one notification to represent a group of events. Use this clause with event queries.
HAVING Filters the events that are received during the grouping interval that is specified in the WITHIN clause.
IS Comparison operator used with NOT and NULL. The syntax for this statement is the following: IS [NOT] NULL (where NOT is optional).
ISA Operator that applies a query to the subclasses of a specified class.
KEYSONLY Used in REFERENCES OF and ASSOCIATORS OF queries to ensure that the resulting instances are only populated with the keys of the instances, which reduces the overhead of the call.
LIKE Operator that determines whether or not a given character string matches a specified pattern.
Table B.2 Useful classes (continued)
Component WMI class Chapter
www.it-ebooks.info

495WQL
NOT Comparison operator that’s used in a WQL SELECT query.
NULL Indicates that an object does not have an explicitly assigned value. NULL is not equivalent to 0 or blank.
OR Combines two conditions. When more than one logical operator is used in a statement, the OR operators are evaluated after the AND operators.
REFERENCES OF Retrieves all association instances that refer to a specific source instance. Use this statement with schema and data queries. The REFERENCES OF statement is similar to the ASSOCIATORS OF statement, but it doesn’t retrieve endpoint instances; it retrieves the association instances.
SELECT Specifies the properties that are used in a query.
TRUE Boolean operator that evaluates to -1.
WHERE Narrows the scope of a data, event, or schema query.
WITHIN Specifies a polling or grouping interval. Use this clause with event queries.
FALSE Boolean operator that evaluates to 0.
Table B.4 WQL operators
Operator Description
= Equal to
< Less than
> Greater than
<= Less than or equal to
>= Greater than or equal to
!= or <> Not equal to
LIKE Matches a pattern
Table B.5 WQL/WMI wildcards
Character Description
[ ] Any one character within the specified range ([a=f]) or set ([abcdef]).
^ Any one character not within the range ([^a=f]) or set ([^abcdef]).
% Any string of zero or more characters.
_ (underscore) Any one character. Any literal underscore used in the query string must be escaped by placing it inside square brackets ([]).
Table B.3 WQL keywords (continued)
Keyword Meaning
www.it-ebooks.info

appendix CBest practices
Best practice is a topic that can, and will, cause arguments, especially among themany passionate members of the PowerShell community. Many people, includingmyself, have a view of what constitutes best practice. In this appendix, I’ll presentsome suggestions that distill both my observation of and my experience with Power-Shell. These suggestions are based on using PowerShell for over six years, writingand speaking about it, talking to many PowerShell users, and observing the scriptsthat are available.
WARNING Some the functions in the book do not follow all of these sug-gestions. This is to reduce the length of the examples (for readability) andto concentrate on the working parts of the functions.
The contents of this appendix are not meant to be prescriptive but to provide aframework for you to adopt or adapt to suit your needs. Be prepared, and knowwhen to step outside of these best practices to solve the problem you have rightnow. These best practices cover the majority of cases but not necessarily every case.
The first section covers PowerShell in general and the second section extendsto WMI.
C.1 PowerShell best practicesThis list of tips and suggestions for using PowerShell provides a framework of bestpractices that will help you produce better scripts in a shorter time. Always remem-ber that your particular situation may cause you to ignore them—getting the jobdone is the important point.
■ Don’t use aliases in scripts and functions. Don’t create new aliases unless youpublish them with your module.
■ Use full parameter names.
496
www.it-ebooks.info

497PowerShell best practices
■ If you use proxy functions, ensure they are published with your module.■ Read the help files. There’s a mass of useful information, especially in the
examples, that will help you overcome problems.■ Use the pipeline. It reduces code, passes objects directly between cmdlets, and
lets PowerShell work in the way it’s designed.■ Use advanced functions. The validation methods and the -debug and -whatif
parameters all become available to your function for a few lines of code that canbe put in a template (see appendix A). Don’t waste time reinventing the wheel.
■ Advanced functions should be like cmdlets—small pieces of functionality thatperform a single job.
■ Create objects for output. The output can then be filtered, displayed, or evenpassed to other PowerShell commands (functions, scripts, or cmdlets). Somescripts in the book may not adhere to this rule, but that’s to reduce repetitionand conserve space.
■ Use string substitution and multiplication. It’s much easier and simpler thanusing string concatenation.
■ Use the built-in constants. Don’t divide by 1024—use 1MB! Remember that kb,mb, gb, tb, and pb are all recognized by PowerShell.
■ Use remoting sessions. If you are accessing a remote machine once, use thecomputername parameter (on a cmdlet or via Invoke-Command). If you areaccessing multiple machines or the same machine multiple times, use Power-Shell remoting.
■ Use PowerShell jobs for long-running tasks.■ Use standard verbs, and always use a verb-noun syntax for functions that are
exposed. Hidden helper type functions do not have to follow this convention,but it will make maintenance easier if they do.
■ Test-Path is often overlooked. It should be used to check on a file’s existencebefore attempting to read the file.
■ Add help files to modules and functions. Comment-based help is the easiestto add.
■ Use Write-Debug and Write-Verbose to comment your functions rather thansimple comments. Write-Warning can be used to pass information back to theconsole.
■ Filter early and format late. In other words, restrict the data set you’re workingon as soon as is practicable, but don’t format for display until the end of your script.Better still, output objects and format independently for maximum flexibility.
■ Use double quotes for strings unless you are sure you will never want to substi-tute into the string. WMI filters (see listing 11.1) and WQL queries (see list-ing 3.3) will modify this behavior, as demonstrated in the listings.
■ Be careful with code downloaded from the internet. Always ensure that youunderstand how it works, and always, always test it very carefully.
www.it-ebooks.info

498 APPENDIX C Best practices
■ Use code-signing techniques to ensure that your code has not been changed.■ Restrict access to production code. Only those who need to use it should have
access. Be even more careful about who has permission to modify productioncode.
■ Keep the logic simple. For instance, avoid double negatives in if statements.
C.2 WMI best practicesThese tips bring together the things you need to remember when using WMI. Thetechnology has some quirks, but if you keep these tips in mind when writing yourscripts, you shouldn’t meet too many problems.
■ Use Test-Connection -ComputerName $computer -Count 1 -Quiet to test theavailability of a remote machine before using WMI.
■ Ensure that DCOM is working and the firewall is opened for WMI on remotemachines.
■ Ensure that WinRM is running on remote machines for access via WSMAN orCIM cmdlets.
■ WMI filters are quicker to type than WQL queries. The results are the same, butyou get there quicker. Save queries for WSMAN, WMI events, and WMI associations.
■ Wrap WMI in functions for ease of use. In PowerShell v2 use functions, but inPowerShell v3 use the “cmdlet from object” functionality to create a module forthe class (see chapters 18 and 19).
■ Use WMI cmdlets ahead of WSMAN cmdlets if possible. In PowerShell v3, use theCIM cmdlets.
■ Use the WMI and CIM cmdlets rather than .NET code.■ When running against a remote machine, reducing the amount of data
returned by using -Filter or -Query is much quicker than returning allinstances of a WMI class and then filtering with Where-Object. There is noappreciable difference in performance between using -Filter or -Query.
■ Test the return codes from WMI methods. A return code of 0 is good. Any othervalue is bad.
■ Many WMI classes can only be accessed when PowerShell is running with ele-vated privileges. The -EnableAllPrivileges parameter is also sometimesrequired. The page file classes on Windows 7 and above are a good examplewhere both are required.
■ Use Get-WmiObject -List *network* or similar to get all classes containing aparticular string in their name.
■ If you are using -Query and -ComputerName, you may see error messages unlessyou put the -ComputerName parameter first. This is an intermittent error.
■ Credentials should be created before being used. Attempting to create a cre-dential as a subexpression in the WMI cmdlets can lead to errors if the WMI
www.it-ebooks.info

499WMI best practices
connection is made before the credential is available, because the connectionwill use the user’s security context.
■ Use Get-WmiObject | Remove WmiObject when deleting. It allows you to seewhat is going to be removed and allows more testing using the -WhatIf parame-ter on Remove-WmiObject.
■ Make sure WinRM is running on remote machines to use WSMAN connectivity.Enabling PowerShell remoting is the simplest way to configure the service andfirewall.
■ CIM sessions using WSMAN will reconnect if the remote machine restarts. Thoseusing DCOM need to be re-created.
■ Remember that a WMI method’s parameter order can change when usingInvoke-WmiMethod. Use ([wmiclass]"<class name>").GetMethodParameters("<method name>") to discover the correct order.
■ If you are making a change that may break the link to the remote machine, putthe code into a PowerShell job. This allows the network timeout to occur in thejob so that your main script can keep working.
■ Be prepared for a lack of WMI documentation. The only way around this it toperform internet searches to determine if someone else has information or hasexperimented with it.
■ Remember the ASSOCIATORS and REFERENCES keywords in WQL. These canreduce the effort in linking classes.
www.it-ebooks.info

appendix DUseful links
These are the links that I’ve found useful during my investigations of PowerShelland WMI. I consulted many of them during the writing of this book.
D.1 WMIWMI SDKhttp://msdn2.microsoft.com/en-us/library/aa394582.aspx
WQLhttp://msdn.microsoft.com/en-us/library/aa394606(VS.85).aspx
WMI .NET CLASSES
System.Management.ManagementObject:
http://msdn.microsoft.com/en-us/library/system.management.managementobject.aspx
System.Management.ManagementClass:
http://msdn.microsoft.com/en-us/library/system.management.managementclass.aspx
System.Management.ManagementObjectSearcher:
http://msdn.microsoft.com/en-us/library/system.management.managementobjectsearcher.aspx
WINDOWS SCRIPTING GUIDE
http://www.microsoft.com/technet/scriptcenter/guide/sas_ent_qpyo.mspx?mfr=true
WMIEXPLORER
http://thepowershellguy.com/blogs/posh/archive/2007/03/22/powershell-wmi-explorer-part-1.aspx
500
www.it-ebooks.info

501PowerShell blogs
D.1.1 Forums for WMI questions
THIS BOOK’S FORUM
http://www.manning-sandbox.com/forum.jspa?forumID=719&start=0
MY FORUM http://powershell.com/cs/forums/217.aspx
USING POWERSHELL AND WMI http://powershell.com/cs/forums/78.aspx
D.2 Microsoft MSDN .NET.NET FRAMEWORK
http://msdn.microsoft.com/en-us/library/w0x726c2.aspx
.NET FRAMEWORK CLASS LIBRARY
http://msdn.microsoft.com/en-us/library/ms229335.aspx
D.3 PowerShell blogsThis isn’t meant to be an exhaustive list, but it represents a good cross section of thePowerShell community. These blogs will include links to many other areas of thePowerShell community.
RICHARD SIDDAWAY
Richard Siddaway’s Blog (my primary blog):
http://msmvps.com/blogs/RichardSiddaway/Default.aspx
PowerShell and Windows Admins (this one concentrates on PowerShell and WMI):
http://itknowledgeexchange.techtarget.com/powershell/
PowerShell Admin Modules (many of the code examples from my blogs will be pub-lished as PowerShell modules):
http://psam.codeplex.com/
POWERSHELL TEAM BLOG
http://blogs.msdn.com/PowerShell/
WMI TEAM BLOG
http://blogs.msdn.com/b/wmi/
MICROSOFT SCRIPTING GUY http://blogs.technet.com/b/heyscriptingguy/
JEFFERY HICKS
http://jdhitsolutions.com/blog/
DON JONES
http://www.windowsitpro.com/blogcontent/seriespath/powershell-with-a-purpose-blog-36
www.it-ebooks.info

502 APPENDIX D Useful links
JAMES O’NEILL
http://jamesone111.wordpress.com/
DMITRY SOTNIKOV
http://dmitrysotnikov.wordpress.com/
LEE HOLMES
http://www.leeholmes.com/blog/
THOMAS LEE
http://tfl09.blogspot.com/
SHAY LEVY
http://blogs.microsoft.co.il/blogs/ScriptFanatic/
Shay also has a PowerShell IE toolbar download available with many useful links.
JONATHAN MEDD
http://www.jonathanmedd.net/
MICROSOFT PERFORMANCE TEAM
http://blogs.technet.com/b/askperf/
D.3.1 Other PowerShell downloads
POWERGUIhttp://www.powergui.org
Check on a regular basis for new power packs.
POWERSHELL PLUS
http://www.idera.com/Products/PowerShell/
POWERSHELL MANAGEMENT LIBRARY FOR HYPER-Vhttp://pshyperv.codeplex.com/
D.4 Code sourcesCODEPLEX
http://www.codeplex.com/
Check CodePlex on a regular basis for new PowerShell and WMI projects.
TECHNET SCRIPT CENTER
http://technet.microsoft.com/en-gb/scriptcenter/default.aspx
Code examples can be found here.
GOOD POWERSHELL CODE REPOSITORIES
PowerShell.com:
www.powershell.com
PowerShell Code Repository:
www.poshcode.org
www.it-ebooks.info

503User groups
D.5 PodcastsPOWERSCRIPTING
http://powerscripting.wordpress.com/
GET-SCRIPTING
http://get-scripting.blogspot.com/
D.6 User groupsPOWERSHELL COMMUNITY GROUPS
http://powershellgroup.org/
www.it-ebooks.info


index
A
accelerators. See type acceleratorsaccess mask, for folders 239–240access rights, for registry
216–221reading 216–219taking ownership of registry
key 219–221accessing
CIM sessions 479–481code 106–107
AccountType property 363Action parameter 98, 436Activate method 356–357activating servers 352–358
setting license key 354–355testing license state 353–354
adapters, network 289–315configurations for 294–296connections for 298–299disabling 301–302enabling 300–301listing 291–293network protocols for
296–297renaming 302–304
AddDays method 230AddMountPoint method 192administrators
automating tasks 7–10challenges for 4–7
complexity of tasks 7many changes 6many machines 5–6
advanced functions 497
advantages, of PowerShell 13aliases 30–32Amended parameter 74–75AND keyword 494–495Antecedent property 365–366antimalware, testing status
of 376–377AntimalwareHealthStatus
class 376–377AntimalwareInfectionStatus
class 376antispyware, testing status
of 374–375AntiSpywareProduct class 375antivirus, testing status of373–374AntiVirusProduct class 374application pools, on IIS
listing 334–336recycling 336–337
ApplicationPool class334, 336–337
Arguments parameter 303AsJob parameter 59, 85, 473ASSOCIATORS keyword 499ASSOCIATORS OF
keyword 494–495associators, for WMI 94–96AT command 387attributes, for folders 237–239auditing hundreds of machines
example 21–23Authentication default
statement 431authentication parameter, for
WMI 129–131
automatic variables 485AutomaticManagedPageFile
property 249automating
overview 7–10with PowerShell 16–19
Autosize parameter 22
B
backing up, event logs 385–387BackUpEventLog method 386Base class 266Base column 77battery, documenting
details 155–156status 156–157
BatteryStatus class 127, 156–158BatteryStatusChange class 158BEGIN block 402BIOS information,
documenting 146–148BIOScharacteristics
property 147blogs 501–502boot configuration,
documenting 164–165BuildNumber property 374built-in constants 497
C
calculated fields 114–116, 485capabilities, of printers 274–276Caption parameter 448
505
www.it-ebooks.info

INDEX506
Caption property 112, 185, 446, 448, 455
CD drives 197–199central processing units. See
CPUschallenges, for
administrators 4–7complexity of tasks 7many changes 6many machines 5–6
Change method 256Chassis type 139, 141, 492CheckAccess method 219Chkdsk method 194CHM file 43CIM cmdlets 459–482, 498
-AsJob parameter for 473–474and WMI cmdlets 470–473CIM sessions 474–481
accessing 479–481creating 476–479overview 475–476removing 481
methods for 460–468adding 460–464parameters for 464–468
objects for 468–470CIM IDE, for custom
cmdlets 456–458CIM sessions 474–481
accessing 479–481creating 476–479overview 475–476removing 481
CIM_ class 15CIM_DataFile class 133, 226,
228, 247CIM_DirectoryContainsFile
class 235–236, 246CIM_LogicalDiskBasedOn-
Partition class 180CLASS keyword 494Class parameter 90, 471–472class properties, for WMI 79–80Class type 70classes, for WMI 69–76, 492
by providers 71–73in namespace 73–74qualifiers for 74–76system classes 70–71
ClassName parameter 471ClearEventLog method 386cmdlets 26–32
aliases 30–32custom 441–458
CIM IDE for 456–458creating 443–446extending 446–448format files for 452–454from multiple WMI
classes 449–450super- modules 450–451type files for 454–456
for WMI 84–87Get-WmiObject cmdlet
84–85Invoke-WmiMethod
cmdlet 86–87Remove-WmiObject
cmdlet 87Set-WmiInstance
cmdlet 85–86for WSMAN 427–428Foreach-Object cmdlet 30remote administration by
55–57utility cmdlets 27–28Where-Object cmdlet 28–30
codelinks for 502security of
access to 106–107signing 105–106using downloaded 103–105
code examplesauditing hundreds of
machines 21–23shutting down data
center 20–21COM object 28CommandType parameter 33community, help from 46–47compacting, virtual disks
417–420comparison operators, for
WQL 91–93complexity of tasks, challenges
for administrators 7Compress file 232Compress() method 232–233,
238compressing files 232–234computer type,
documenting 142–144ComputerName parameter
55–58, 110, 252, 370, 463ComputerName property
268, 469configuration settings, for
WMI 128–129
configuringDHCP 305–306network adapters 294–296services 255–257
Connect-WSMan 427–429ConnectionOptions class 328connections, for network
adapters 298–299ConsumerClassNames
property 73ConvertFromDateTime
method 133ConvertToDateTime
method 133, 147, 162, 446Copy method 236counters, for performance
393–395CPU type 145CPUs (central processing units),
for virtual machines404–405
Create class 394Create method 242, 261–262,
328–329, 389–390, 471Create object 220, 320CreateKey method 211–212Credential parameter
130, 319, 438CredSSP (Credential Security
Support Provider), using with WSMAN 436–439
CSV file 10, 20, 22, 51, 53, 108, 122, 142, 481
custom cmdlets 441–458CIM IDE for 456–458creating 443–446extending 446–448format files for 452–454from multiple WMI
classes 449–450super- modules 450–451type files for 454–456
D
data conversions, for WMI131–134
dates 132–134sizes 132
data input 107–111parameters 109–111reading files 108–109
data types, of registry 203–206dates, data conversions for
WMI 132–134
www.it-ebooks.info

INDEX 507
DateTime class 133, 222, 377debug parameter 52–53, 497Debug statement 122debugging 121–122Default parameter 478default, printer 282–283Define parameter 275Defrag method 196–197DefragAnalysis method 197Delete method 231, 392DeleteKey method 215–216DeleteValue method 215deleting scheduled jobs
391–392Dependent property 365Descriptor property 240DeviceId parameter 274DeviceId property 278, 295DeviceType property 142DHCP
controlling leases for 306–307displaying configuration
for 305–306enabling 304–305
Dialect parameter 433Disable method 302Disable-WSManCredSSP
427, 438DisableNameChecking
parameter 461disabling network adapters
301–302Disconnect-WSMan 427–429disk controllers,
discovering 174–175disk drives, linking partitions
to 177–179disk systems 171–199
CD drives 197–199logical disks 181–185
logical disk information 181–182
mount points 184–185root directory data 182–183
managing 191–197analyzing fragmentation
195–197formatting disk 192–194performing Chkdsk
194–195physical disks 172–180
disk controllers 174–175enumerating disk
partitions 179
linking partitions to disk drives 177–179
linking partitions to logical disks 180
physical drive information 175–177
volumes 185–191enumerating volume
information 185–187volume change events
187–191DiskPath property 417display settings,
documenting 151–152DMTF class 476DNS servers, setting 311–312,
351–352documenting 137–170
hardware 139–150BIOS information 146–148computer type 142–144domain role 144–145memory
configuration 148–150processor information
145–146system information
140–142operating system 160–168
boot configuration164–165
discovering hotfixes163–164
operating system version 160–163
recovery configuration 165–167
testing system time167–168
peripherals 150–154display settings 151–152input devices 152–153ports 153–154
power supplies 154–160battery details 155–156battery status 156–157power plans 158–160testing power source
157–158software 168–169with WMI 82–84
Domain property 365, 371domain role,
documenting 144–145
domains, adding servers to343–345
double hop 437–438double quotes 497downloaded code, security
of 103–105DriveLetter property 191DriverName property 285drivers, for printers 277–279DVD drive, attaching .iso images
to 405–407
E
editors, for reusing code 48–49Enable method 301Enable-WSManCredSSP
427, 437–438EnableAllPrivileges
parameter 249, 498EnableDHCP method 305, 312EnableStatic method 308, 350enabling
DHCP 304–305network adapters 300–301
Encrypt() 233encrypted property 229Enumerate parameter 428, 433enumerating
CD drives 198–199partitions 179volumes 185–187
EnumKey method 207, 210EnumValues method 205error handling 123–125ErrorAction parameter 123event logs 382–387
backing up 385–387discovering sources for
384–385Event type 245EventQueryList property 73events
for filesystem 244–248for processes 265–270
monitoring processes268–270
overview 266–268for registry 221–223for WMI 96–99
ExpandProperty parameter177, 199, 276
ExpandProperty property 240extending, custom cmdlets
446–448
www.it-ebooks.info

INDEX508
F
FALSE keyword 495FilePath parameter 58, 220files 226–234
compressing 232–234discovering in folders
235–237finding 227–230performing actions on
230–232filesystem 224–250
events for 244–248files in 226–234
compressing 232–234finding 227–230performing actions
on 230–232folders 234–240
access mask for 239–240discovering files in 235–237with attributes 237–239
page file in 248–249shares in 240–244
creating 242–243listing 241–242modifying 243–244
Filter parameter 90, 92–93, 100, 228, 426, 433–434
Filter statement 91–92filtering data, for WMI 131Firewall_Profile_Parameters
class 379FirewallProduct class 378firewalls
listing settings for 378–380testing status of 378
FirewallState class 376, 378Flags parameter 467folders 234–240
access mask for 239–240discovering files in 235–237with attributes 237–239
for loop 39Force parameter 480Foreach-Object cmdlet 30format files, for custom
cmdlets 118–120, 452–454Format method 192–193formatting disks 192–194forums, for WMI 501fragmentation, analyzing
195–197Framework object 76, 97FROM keyword 494
Function parameter 186function template 486functions, reusing code 50–53
G
Get-Command cmdlet 44–45Get-Credential command 347Get-Help cmdlet 43–44Get-Member cmdlet 45–46Get-MountPoint 419Get-VM cmdlet 410Get-VMDisk 406–407, 415,
417–418Get-WmiObject cmdlet 84–85Get-WmiObject command 395Get-WSManCredSSP 427Get-WSManInstance 425–428,
432–436GetOwner() method 260GetState method 330GMT property 163GROUP Clause keyword 494GroupBy parameter 331groups 370–372
H
Handle property 436hardware, documenting
139–150BIOS information 146–148computer type 142–144domain role 144–145memory configuration
148–150processor information
145–146system information 140–142
hash tables 147, 149, 487HAVING keyword 494help 42–47
from community 46–47Get-Command cmdlet 44–45Get-Help cmdlet 43–44Get-Member cmdlet 45–46
Help file 32, 44hotfixes, documenting 163–164Hyper-V module 403, 410Hyper-V virtualization
platform 399–420virtual disks 414–420
compacting 417–420
testing status of 414–416usage of 416–417
virtual machines 401–414adding CPUs 404–405adding network
adapters 408–410adding virtual disks
407–408attaching .iso image to DVD
drive 405–407creating 401–404starting 410–411starting multiple 412stopping 413–414
I
IDE disk 407if statements 40–41, 485IIS (Internet Information
Server) 316–338applications 333–337
listing application pools 334–336
listing web applications 333–334
recycling application pools 336–337
displaying defaults 319–322restarting 322–324websites 324–333
creating 327–329listing 324–327restarting 331–333testing 329–331
WMI provider for 317–324Import-Module 402, 411–413,
418IncludeEqual parameter 70Index property 433input devices,
documenting 152–153input, for scripting
language 41–42install folder 488Installation.txt file 456InstallProductKey method 355Interface property 314Internet Information Server. See
IISInvoke-Command 424, 426,
438–439invoke-defraganal function 419Invoke-WmiMethod 86–87,
427, 436
www.it-ebooks.info

INDEX 509
Invoke-WSManAction427, 435–436
IP addressesfor servers 349–351setting 307–309
IS keyword 494ISA keyword 494IsDaylightSavingTime
method 168ISO file 198.iso images, attaching to DVD
drive 405–407issues, with WMI 127–128
J
jobs 58–60JoinDomainOrWorkgroup
method 345
K
key properties, for WMI 81–82keys, in registry 211–216
creating 211–212deleting 215–216deleting values for 214–215enumerating 209–211reading 206–208setting values for 212–214taking ownership of 219–221
KEYSONLY keyword 494keywords, for WQL 89–90
L
LastModified property 134leases, for DHCP 306–307licenses, for servers
setting key for 354–355testing state of 353–354
LIKE keyword 494linking partitions
to disk drives 177–179to logical disks 180
links 500–503blogs 501–502for code 502for WMI 500–501Microsoft MSDN .NET 501Podcasts 503user groups 503
List parameter 68, 70, 73, 75, 272
listingapplication pools 334–336network adapters 291–293printers 272–274
drivers for 277–279ports for 276–277print jobs 280–282
processes 260–261scheduled jobs 390–391services 254–255shares 241–242websites 324–327
load order, for services 257–259logged on users, finding
364–366logical disks 181–185
linking partitions to 180logical disk information
181–182mount points 184–185root directory data 182–183
logical operators, for WQL 91logical units. See LUNslogs, event logs 382–387
backing up 385–387discovering sources for
384–385Lookup table 204loops 38–40, 487
for loop 39foreach 38–39
LUNs (logical units) 403
M
ManagementClass object 328ManagementPath class 328MemberType method 86MemberType parameter
45, 77, 86memory configuration,
documenting 148–150methods
for CIM cmdlets 460–468adding 460–464parameters for 464–468
for WMI 76–79Microsoft class 15Microsoft MSDN .NET,
links 501Milliseconds parameter 126modules, reusing code 53–55MOF file 64–65, 457monitoring, events 221–223
mount points 184–185MSFT_PrinterDriver class 279
N
Name property 278, 383Namespace parameter 74namespaces, for WMI
66–69, 491classes in 73–74discovering 66–68registrations of 68–69
Neither parameter 287NET class 34–37, 266,
327–328, 394NET objects 34–37
creating 34–35creating own objects 35–37overview 34PowerShell objects 34
NET type 88, 366, 454, 489NET, and PowerShell 12–13network adapters
adding to virtual machines 408–410
for servers 348–352setting DNS servers
351–352setting IP address 349–351
network card. See NICnetworking
adapters 289–315configurations for 294–296connections for 298–299disabling 301–302enabling 300–301listing 291–293network protocols for
296–297renaming 302–304
DHCPcontrolling leases for
306–307displaying configuration
for 305–306enabling 304–305
DNS servers, setting 311–312IP addresses, setting 307–309routing table, displaying
313–315WINS servers, setting
312–313new-pawVM function 401–402New-WSManInstance 427–428New-WSManSessionOption 427
www.it-ebooks.info

INDEX510
NextHop property 314NIC (network card) 403nodefrag switch 419nondomain machines 429NOT keyword 495NTFS file 234NULL keyword 495Number property 36–37NumberofLogicalProcessors
property 142
O
objects, for CIM cmdlets468–470
OF statement 495operating system,
documenting 160–168boot configuration 164–165discovering hotfixes 163–164operating system version
160–163recovery configuration
165–167testing system time 167–168
OperatingSystemSKU parameter 447–448
OperatingSystemSKU property 443, 446, 455
operators, for WQL 90–94, 487comparison operators 91–93logical operators 91wildcards 93–94
optimizing code 107–113data input 107–111
parameters 109–111reading files 108–109
string substitution 111–113OR keyword 495OR statement 91output, for scripting
language 41–42Owner property 218, 282owners, for processes 260–261ownership, of keys in
registry 219–221
P
PackedXML property 378packet privacy authentication,
WMI provider for IIS318–319
page file, managing 248–249
param() 122parameters
data input using 109–111for CIM cmdlets
methods 464–468PartComponent property 236PartialProductKey property 356partitions
enumerating 179linking
to disk drives 177–179to logical disks 180
PassThru parameter 336Path property 237, 274, 293PercFree property 115performance 392–398
reading counters for 393–395stability index 396–398Windows system assessment
report 395–396peripherals, documenting
150–154display settings 151–152input devices 152–153ports 153–154
physical disks 172–180disk controllers 174–175enumerating disk
partitions 179linking partitions to disk
drives 177–179linking partitions to logical
disks 180physical drive
information 175–177pipeline, overview 32–34Podcasts 503ports
documenting 153–154for printers, listing 276–277
power plansdocumenting 158for servers, setting 356–358
power source, documenting 157–160
power supplies, documenting 154–160
battery details 155–156battery status 156–157power plans 158–160testing power source 157–158
PowerOnLine property 158PowerShell 10–13
advantages of 13and .NET 12–13, 34–37
creating own objects 35–37overview 34PowerShell objects 34
automation with 16–19overview 26scope 11–12tips for 496–498
PowerShell command 9, 12, 18, 42, 44, 49, 51, 122
PowerShell file 52, 54PowerShell method 84PowerShell object 34, 76, 78,
102, 116, 134, 299, 321PowerShell statement 33, 88,
126, 128, 187PowerShell type 113, 116,
118, 489prefix parameter 402PrePendPath parameter 119printers 271–288
listing 272–274drivers for 277–279ports for 276–277print jobs 280–282
printing test page 284–285remote controlling 285–287renaming 287setting default 282–283testing
capabilities of 274–276status of 279–280
PrinterState property 279PrintTestpage method 285PriorityClass property 262PROCESS block 402Process method 72, 77processes 259–265
creating 261–263events for 265–270
monitoring processes268–270
overview 266–268listing owners for 260–261terminating 263–265
processor information, documenting 145–146
ProductVersion property 478properties, for WMI
class properties 79–80key properties 81–82system properties 80–81
Property parameter 36, 433ProtectionTechnologyStatus
class 376
www.it-ebooks.info

INDEX 511
protocols, for network adapters 296–297
Provider type 66, 82providers
classes by 71–73for WMI 65–66for WSMAN 428–429
PSComputerName property 469PSObject class 35
Q
Qualifier parameter 233qualifiers, for WMI 74–76Query parameter 88, 90, 92Quiet parameter 478
R
reading, registry 206–211enumerating keys and values
in 209–211keys 206–208values 208–211
Reboot method 343, 348, 461recovery configuration,
documenting 165–167Recurse parameter 393Recycle method 337recycling, application
pools 336–337REFERENCES keyword 499REFERENCES OF
keyword 494–495references, for WMI 94–96registering namespaces 68–69registry 200–223
access rights for 216–221reading 216–219taking ownership of
registry key 219–221accessing 201–206
discovering data types203–206
testing size of 202–203events for 221–223keys in 211–216
creating 211–212deleting 215–216deleting values for 214–215setting values for 212–214
reading 206–211enumerating keys and
values in 209–211
keys 206–208values 208–211
Registry file 493RELPATH property 178RemainingCapacity
property 157remote access
options for 439–440with WSMAN 425–427
remote access techniques 439remote administration 55–58
by cmdlet 55–57remote sessions 57–58
remote controlling, printers 285–287
remoting sessions 57–58, 497Remove-WMIObject 435Remove-WSManInstance
427, 435Rename method 342RenamePrinter method 287renaming
network adapters 302–304printers 287servers 341–343
Replace() method 236reputation, of WMI 16ResourceType parameter 299Restart method 331restarting
IIS 322–324servers 347–348websites 331–333
Resume method 282, 285return codes, for WMI 125–126Return type 461reusing code 47–55
editors for 48–49functions 50–53modules 53–55scripts 49–50
root directory data 182–183routing table, displaying
313–315
S
Saves command 28scheduled jobs 387–392
creating 387–390deleting 391–392listing 390–391
scope, of PowerShell 11–12scripting language 37–42
if statement 40–41
input and output 41–42loops 38–40
for loop 39foreach 38–39
switch statement 41Scripts file 86scripts, reusing code 49–50SCSI parameter 407security 103–107, 372–380
firewallslisting settings for 378–380testing status of 378
of codeaccess to 106–107signing 105–106using downloaded 103–105
testing forantimalware status 376–377antispyware status 374–375antivirus status 373–374
SELECT keyword 495SELECT statement 494Select-Object statement 354Selected.System.Manage-
ment.ManagementObject type 292
SelectorSet parameter 426, 428, 434–435
Sender property 268Server class 319, 321Server database 114, 385servers 339–358
activating 352–358setting license key 354–355testing license state
353–354adding to domain 343–345network adapter settings
for 348–352setting DNS servers
351–352setting IP address 349–351
power plans for, setting356–358
renaming 341–343restarting 347–348shutting down 346–347
ServicePackMajorVersion property 454
services 252–259configuring 255–257listing 254–255load order for 257–259
Set-VMMemory function 403Set-WmiInstance cmdlet 85–86
www.it-ebooks.info

INDEX512
Set-WSManInstance427–428, 434
Set-WSManQuickConfig 427SetDefaultPrinter method 283SetDNSServerSearchOrder
method 311–312SetGateways method 310SetInfo method 244SetSecurityDescriptor
method 219SetShareInfo method 243SetTCPIPNetBIOS method 305SetTcpipNetbios method 310SetWINSServer method 313shares 240–244
creating 242–243listing 241–242modifying 243–244
ShowWindow property 262Shutdown method 346, 348shutting down data center
example 20–21shutting down servers 346–347signing code 105–106Site class 324, 327, 331Site parameter 326size constants 488sizes
data conversions for WMI 132of registry 202–203
SKU property 454–455SNMPCommunity property 277software, documenting 168–169SoftwareLicensingProduct
class 353, 355–356SoftwareLicensingService
class 355SourceEventArgs.NewEvent
property 247SourceIdentifier property 269sources, for event logs 384–385stability index 396–398Start method 332, 337start-pawVM function 412Start-VM command 411StartMode property 255StartService method 30, 324State column 59Static parameter 46, 110status
of printers 279–280of virtual disks 414–416
Status property 203StdRegprov class 205Stop method 331–332Stop-Computer cmdlet 410
StopService method 256string substitution 111–113super- modules, for custom
cmdlets 450–451Switch statement 25, 41, 275,
284, 301, 303, 307system classes, for WMI 70–71system information,
documenting 140–142system properties, for WMI
80–81system time, documenting
167–168System.Array 489System.Boolean 489System.Byte 489System.Char 489System.Collections.Hashtable
489System.Decimal 489System.DirectoryServices
.DirectoryEntry 489System.DirectoryServices
.DirectorySearcher 489System.Double 489System.Int32 489System.Int64 489System.Management.Automation
.PowerShell 489System.Management.Automation
.PSModuleInfo 489System.Management.Automation
.PSObject 489System.Management.Automation
.PSPrimitiveDictionary 489System.Management.Automation
.PSReference 489System.Management.Automation
.Runspaces.Runspace 489System.Management.Automation
.Runspaces.RunspaceFactory490
System.Management.Automation.ScriptBlock 490
System.Management.Automation.SwitchParameter 490
System.Management.Event-ArrivedEventArgs class 248
System.Management.Manage-mentBaseObject object 319
System.Management.ManagementClass 490
System.Management.ManagementObject 490
System.Management.ManagementObjectSearcher 490
System.Net.IPAddress 489System.Single 489–490System.String 490System.Text.RegularExpressions
.Regex 489System.Type 490System.Xml.XmlDocument 490
T
TCPIPNetBIOS property 295Terminate method 98terminating processes 263–265test page, printing 284–285Test-Connection 409, 411Test-Path 415–416, 497Test-WSMan 427, 431testing
antimalware status 376–377antispyware status 374–375antivirus status 373–374firewall status 378printers
capabilities of 274–276status of 279–280
websites 329–331WSMAN 431–432
ThrowTerminatingError method 111
Time property 163TimeSpan object 163TimeZone class 389tips 496–499
for PowerShell 496–498for WMI 498–499
TotalDays property 163TotalPhysicalMemory
property 450TRUE keyword 495type accelerators, for WMI
87–89[wmi] type accelerator 89[wmiclass] type
accelerator 88[wmisearcher] type
accelerator 88type files 116–118, 454–456type shortcuts 489
U
Uncompress method 234URIs (Uniform Resource
Identifiers) 430usage, of virtual disks 416–417
www.it-ebooks.info

INDEX 513
user groups 503users
discovering information for 366–370
finding logged on 364–366groups of 370–372listing accounts 361–364
utility cmdlets 27–28
V
ValidatePattern method 354ValidateRange() 404ValidateScript() 404ValidateSet() 193, 238, 275values, in registry
deleting 214–215reading 208–211setting 212–214
ValueSet parameter 434variables, automatic 485VBScript type 34verb-noun syntax 497Verbose parameter
121, 189, 333verbose switch 419View parameter 46, 77–78virtual disks 414–420
adding 407–408compacting 417–420testing status of 414–416usage of 416–417
virtual machines 401–414adding CPUs 404–405adding network
adapters 408–410adding virtual disks 407–408attaching .iso image to DVD
drive 405–407creating 401–404starting 410–411starting multiple 412stopping 413–414
volumes 185–191enumerating 185–187volume change events
187–191
W
wait parameter 419web applications, listing
333–334Web Services Management. See
WSMAN
websites 324–333creating 327–329listing 324–327restarting 331–333testing 329–331
WhatIf parameter 363, 392, 499WHERE keyword 495Where-Object 28–30, 417, 498wildcards, for WQL 93–94Win32_Directory 183–184Win32_DiskDrive class 176–178Win32_DiskPartition class
177, 179Win32_FloppyController
class 173Win32_IDEController #2
class 175Win32_LogicalDisk class
181–182Win32_LogicalDiskToPartition
173, 180Win32_NetworkAdapater
class 433Win32_NetworkAdapterConfigu
ration class 433Win32_PhysicalMedia class
173, 178Win32_SCSIController #3
class 175Win32_Volume class 434Windows Management Instru-
mentation. See WMIWindows system assessment
report 395–396WINS servers, setting 312–313WITHIN keyword 495WMI 491–494
and WSMANdeleting instances
with 435–436modifying instances
with 433–435retrieving data using
432–433classes 492custom cmdlets for, from
multiple classes 449–450links for, forums 500–501namespaces 491tips for 498–499WQL query language 494
WMI (Windows Management Instrumentation) 14–16, 62–100, 126–134
associators 94–96
authentication parameter 129–131
classes 69–76by providers 71–73in namespace 73–74qualifiers for 74–76system classes 70–71
cmdlets 84–87Get-WmiObject cmdlet
84–85Invoke-WmiMethod
cmdlet 86–87Remove-WmiObject
cmdlet 87Set-WmiInstance
cmdlet 85–86configuration settings
128–129data conversions 131–134
dates 132–134sizes 132
documenting with 82–84events 96–99filtering data 131issues with 127–128methods 76–79namespaces 66–69
discovering 66–68registrations of 68–69
overview 14–16properties
class properties 79–80key properties 81–82system properties 80–81
providers 65–66references 94–96reputation of 16return codes for 125–126type accelerators 87–89
[wmi] type accelerator 89[wmiclass] type
accelerator 88[wmisearcher] type
accelerator 88WQL 89–94
keywords 89–90operators 90–94
WMI cmdlets 470–473, 498WMI command 423–424WMI database 131WMI file 231, 244WMI method 125–126, 203,
300, 343, 387, 459–460WMI object 203, 220, 236, 270,
276, 285, 287, 299WMI property 84
www.it-ebooks.info

INDEX514
WMI provider, for IIS 317–324WMI Query Language. See WQLWMI shutdown command 410WMI type 88[wmi] type accelerator, for
WMI 89[wmiclass] type accelerator, for
WMI 88WmiIPRoute class 314[wmisearcher] type accelerator,
for WMI 88WQL (WMI Query
Language) 89–94keywords 89–90operators 90–94
comparison operators91–93
logical operators 91wildcards 93–94
WQL keywords 494WQL operators 494WQL query language 494WQL statement 90, 434WQL/WMI wildcards 494Wrap parameter 23, 75Write-Debug 122, 497Write-Verbose 497Write-Warning 497WSMAN (Web Services Manage-
ment) protocol 423–440and WMI
deleting WMI instances with 435–436
modifying WMI instances with 433–435
retrieving WMI data using 432–433
cmdlets 427–428providers for 428–429remoting with 425–427testing 431–432URIs for 430using CredSSP 436–439
WSMAN cmdlets 498
X
XML file 444–447, 449, 451, 456, 458
www.it-ebooks.info

Richard Siddaway
WMI, on its own, is simply a collection of Windows management facilities. Paired with PowerShell, however, WMI becomes a brilliant toolset for automating servers,
networks, and remote Windows computers.
PowerShell and WMI is an industrial strength guide for adminis-trators of Windows networks, servers, and desktops. You’ll start with practical overviews of PowerShell and of WMI. Th en you’ll explore 150 specifi c examples—all with ready-to-use scripts—designed to simplify your day-to-day system management. Each tested technique is confi gured to load as part of a PowerShell module.
What’s Inside● Managing Windows, IIS, and Hyper-V● Remote desktops and devices● Logs, jobs, and performance● New PowerShell v3 WMI functionality
A set of handy appendixes include references for PowerShell and WMI. Prior exposure to PowerShell and WMI is helpful but not required.
Richard Siddaway is a veteran IT architect, server administrator,support engineer, and PowerShell MVP. He’s the author of PowerShell in Practice, published in 2010 by Manning.
To download their free eBook in PDF and mobile formats, owners of thisbook should visit manning.com/PowerShellandWMI
$59.99 / Can $62.99 [INCLUDING eBOOK]
PowerShell AND WMI
WINDOWS ADMINISTRATION
M A N N I N G
“PowerShell, WMI, and Richard Siddaway—an
unbeatable combination.” — From the Foreword by
Ed WilsonMicrosoft Scripting Guy
“Th e defi nitive dive into using WMI with PowerShell.”—Adam Bell
ZOE Systems Pty Ltd
“Belongs on the desk of every Windows administrator
and engineer.” —James Berkenbile
Berkenbile Consulting
“A great resource.” —Jonathan Medd
Get-Scripting Podcast
SEE INSERT
www.it-ebooks.info