powerpoint 2007 essentials reduced quality … 2007 essentials...and the mini toolbar. figure 1-1 :...
TRANSCRIPT

PowerPoint 2007 Essentials
Mobile MOUSePowerPoint 2007Version # 1.0
Red
uced
Qua
lity
Sam
ple
About this Course…
Microsoft PowerPoint is the presentation application included with Microsoft Office. In this course you will learn about customizing Microsoft PowerPoint as well as critical aspects (theory and practical) regarding designing successful and efficient presentations in Microsoft PowerPoint. In this course you will learn how to master and come to grips with the essential features of this defacto presentation application, increasing your productivity, efficiency and overall presentation skills. This course is divided up into various logically progressing sessions that will also focus on the core skills to help you pass the MOS certification.
Chapters in the Workbook…
Chapter 1 - About Microsoft PowerPoint ..............................................................................(1)
Chapter 2 - Presentation Basics ................................................................................................(6)
Chapter 3 - Working with Graphic Elements .................................................................... (27)
Chapter 4 - Themes, Slide Masters and Templates.......................................................... (75)
Chapter 5 - Finalizing the Presentation.............................................................................(104)
Chapter 6 - Additional Exercises ..........................................................................................(127)
What you Will Need…
In order to complete the exercises in this workbook, the following is required…
A desktop computer (or laptop) running Microsoft Windows 2000, XP or Vista (or later).
Microsoft Office PowerPoint 2007.
A set of Mobile MOUSe Practice Files.
Red
uced
Qua
lity
Sam
ple

Table of Contents
Chapter 1 -About Microsoft PowerPoint.......................................................................................... 11.1 The PowerPoint 2007 Interface.............................................................................................11.2 New Features of the Microsoft Office Interface..................................................................... 2
1.2.1 The Ribbon ....................................................................................................................................21.2.2 Quick Access Toolbar ....................................................................................................................31.2.3 The Microsoft Office button .........................................................................................................31.2.4 Contextual Tabs ............................................................................................................................31.2.5 Groups...........................................................................................................................................41.2.6 Galleries ........................................................................................................................................41.2.7 Live Preview ..................................................................................................................................5
Chapter 2 -Presentation Basics........................................................................................................ 62.1 General Presentation Concepts.............................................................................................6
2.1.1 Presentation Planning and Creation .............................................................................................72.2 Starting a New Presentation .................................................................................................7
2.2.1 Starting with a Blank Slide.............................................................................................................72.2.2 Using a PowerPoint Template.......................................................................................................8
2.3 Navigating the PowerPoint Application Window ...................................................................92.3.1 Viewing Slides ...............................................................................................................................92.3.2 Adjusting Panes in Normal View .................................................................................................122.3.3 Navigating from Slide to Slide .....................................................................................................122.3.4 Selecting a Slide ..........................................................................................................................122.3.5 Selecting Text on a Slide .............................................................................................................13
2.4 Adding and Deleting PowerPoint Slides............................................................................... 132.4.1 Adding Slides to a Presentation ..................................................................................................132.4.2 Using Slides from an Existing Presentation.................................................................................182.4.3 Importing Text from Microsoft Word .........................................................................................202.4.4 Deleting Slides from a Presentation............................................................................................22
2.5 Formatting Text ................................................................................................................. 232.6 Modifying the Quick Access Toolbar ................................................................................... 25
Chapter 3 -Working with Graphic Elements ................................................................................... 273.1 Working with Tables........................................................................................................... 27
3.1.1 Create a table using Table Styles ................................................................................................273.1.2 Create, Format and Modify tables Manually ..............................................................................28
3.2 Slide Layouts...................................................................................................................... 373.3 Pictures and Shape Elements.............................................................................................. 40
3.3.1 Searching for and Inserting Clipart .............................................................................................403.3.2 Inserting and Formatting Pictures from Existing files .................................................................423.3.3 Shapes and WordArt ...................................................................................................................50
3.4 Organizational Charts and SmartArt.................................................................................... 543.4.1 Organization Chart Overview......................................................................................................543.4.2 Create an Organization Chart......................................................................................................543.4.3 Change the Hanging Layout of the Organization Chart ..............................................................583.4.4 Change the Colours and Effects of your Organization Chart ......................................................59
3.5 Creating Flowcharts............................................................................................................ 613.6 Slide Background Formats .................................................................................................. 72
Chapter 4 -Themes, Slide Masters and Templates.......................................................................... 754.1 Applying Themes................................................................................................................ 75
4.1.1 Applying a Theme to your Presentation .....................................................................................754.2 Working with Slide Masters to Create / Modify / Customise Themes................................... 77
4.2.1 Modifying Slide Masters .............................................................................................................77Red
uced
Qua
lity
Sam
ple
Table of Contents4.2.2 Modifying and Adjusting Bullets and Numbering .......................................................................824.2.3 Modifying Layouts within the Slide Master ................................................................................854.2.4 Slide Animation (including Custom Animation) ..........................................................................884.2.5 Slide Transitions ..........................................................................................................................944.2.6 Inserting Headers and Footers to Slides .....................................................................................97
4.3 Templates and Themes....................................................................................................... 984.3.1 The Difference between Themes and Templates .......................................................................984.3.2 Creating or Modifying a Template ..............................................................................................984.3.3 Generating a Presentation from a Template ............................................................................1004.3.4 Creating or Modifying a Theme ................................................................................................102
Chapter 5 -Finalizing the Presentation..........................................................................................1045.1 Working with Data from Other Sources............................................................................. 104
5.1.1 Importing Data from Microsoft Excel........................................................................................1045.1.2 Inserting Movies and Sounds ....................................................................................................108
5.2 Setting Up the Slide Show................................................................................................. 1115.3 Working with Notes Pages and Handouts.......................................................................... 113
5.3.1 Preparing Handouts and Notes.................................................................................................1135.3.2 The Handout Master .................................................................................................................1135.3.3 Notes Master ............................................................................................................................1155.3.4 Adding Notes to a Presentation ................................................................................................117
5.4 Printing Presentations...................................................................................................... 1185.4.1 Using Print Preview...................................................................................................................1185.4.2 Printing Outlines, Handouts, Speaker Notes and Slides............................................................1195.4.3 Exporting a Presentation as Handouts in Microsoft Word .......................................................122
5.5 Delivering a Slide Presentation ......................................................................................... 1235.5.2 Package for CD ..........................................................................................................................125
Chapter 6 -Additional Exercises....................................................................................................1276.1 Adding Hyperlinks to Slides .............................................................................................. 1276.2 Collaboration ................................................................................................................... 129
6.2.1 Spell Checker.............................................................................................................................1296.2.2 Comments .................................................................................................................................1306.2.3 Making Presentations Available on the Web............................................................................131
6.3 Creating Charts (Graphs) with Microsoft Chart .................................................................. 1336.4 Line and Paragraph Spacing.............................................................................................. 1346.5 Timings through Rehearsal ............................................................................................... 136
6.5.1 Set Timing through Rehearsal ...................................................................................................1366.5.2 Editing Slide Timings .................................................................................................................138
6.6 Optimising the Presentation for Compatibility and Portability........................................... 1386.6.1 Embedding Fonts for Flawless Design.......................................................................................1386.6.2 Replacing Fonts .........................................................................................................................139
6.7 More on Themes.............................................................................................................. 1416.7.1 Modifying / Creating Theme Colours (within the Slide Master) ...............................................1416.7.2 Modifying / Creating Theme Fonts (within the Slide Master)...................................................142
Red
uced
Qua
lity
Sam
ple
Copyright © 2008 – Mobile MOUSe. No part of this manual may be reproduced in any form or fashion without the written permission of Mobile MOUSe. Visit us online at www.mobilemouse.com.au or email us at [email protected] – Intellectual property rights retained by Russell Kitching.
How to Use this Manual
When you see this… It means…
You MUST read this, because it could have an effect on the final outcome of an action you perform.
This is optional to read, but these tips often point out quicker ways of doing things, or alternative methods.
You are about to start an exercise in the workbook.
Bold Text in Exercises Objects that you click on, like buttons, tabs or menus are often listed in bold. Locations and folders are also listed in bold.
Super Shake When you see text like this it means you should type the text.
F+G+L Keyboard shortcuts are displayed like this. In this example you would press and hold CTRL, hold SHIFT and then press ESC once (while still holding CTRL and SHIFT).
Home > Copy Click the tab, click the button
“This is a paragraph...” This is existing typed text in a document you are currently working on.
Download and Install the Exercise Files
In addition to the exercises you will complete in class, there are also exercises in this workbook. These workbook exercises can only be completed in conjunction with your practice files. In order to locate your exercise files visit www.mobilemouse.com.au/dowloads.php.
To install the practice files perform the following steps...
1. Start Internet Explorer, click in the Address Bar and type the following address: http : //www.mobi lemouse .com .au/downloads . php and then press ENTER
2. Scroll down the page and click the link: Microsoft PowerPoint practice files (all courses)
3. At the screen that appears, click the Save button
Red
uced
Qua
lity
Sam
ple

Copyright © 2008 – Mobile MOUSe. No part of this manual may be reproduced in any form or fashion without the written permission of Mobile MOUSe. Visit us online at www.mobilemouse.com.au or email us at [email protected] – Intellectual property rights retained by Russell Kitching.
Download and Install the Exercise Files
Figure A : File Download Security
4. At the Save As dialog box, click the Desktop link on the left hand side of the screen, click Save
Figure B : Saving the file to be downloaded
5. Depending on your internet connection, the time it takes to download the practice files may vary. Once the download completes, close any open programs.
6. On your Windows Desktop you should see Mobile MOUSe – PowerPoint Practice Files.exe (or Mobile MOUSe - PowerPoint Practice Files). Double click this file to start the installation process; you may be presented with the following screen...Red
uced
Qua
lity
Sam
ple

Copyright © 2008 – Mobile MOUSe. No part of this manual may be reproduced in any form or fashion without the written permission of Mobile MOUSe. Visit us online at www.mobilemouse.com.au or email us at [email protected] – Intellectual property rights retained by Russell Kitching.
Download and Install the Exercise Files
Figure C : Security Warning
7. If presented with the above image, click the Run button, which will present the following screen…
Figure D : Starting the Installation
8. Click Next
9. Click Next, which takes you to the following screen...
Red
uced
Qua
lity
Sam
ple

Copyright © 2008 – Mobile MOUSe. No part of this manual may be reproduced in any form or fashion without the written permission of Mobile MOUSe. Visit us online at www.mobilemouse.com.au or email us at [email protected] – Intellectual property rights retained by Russell Kitching.
Download and Install the Exercise Files
Figure E : The default installation location
10. At this screen, you would typically choose Next. This will install the practice files onto your Windows Desktop (the location referred to in the exercises in this manual). You can however choose a different location if you like, however we would recommend that you click Next... (so click Next)
11. Click Next to install the files
Figure F : Completing the installation
12. At the final screen click Finish to complete the installation. Your practice files are now installed and you can commence the exercises in this manual
Red
uced
Qua
lity
Sam
ple

PowerPoint 2007 Essentials Page 1 / 147
Copyright © 2008 – Mobile MOUSe. No part of this manual may be reproduced in any form or fashion without the written permission of Mobile MOUSe. Visit us online at www.mobilemouse.com.au or email us at [email protected] – Intellectual property rights retained by Russell Kitching.
Chapter 1 - About Microsoft PowerPointThis chapter covers the following concepts…
The PowerPoint 2007 Interface An Overall Review of the new Microsoft Office 2007 Interface
1.1 The PowerPoint 2007 Interface
In the following image you can see a screenshot of the new PowerPoint Interface. What follows in this section is a quick walkthrough of the PowerPoint 2007 interface - unlike earlier versions of PowerPoint; this version of PowerPoint doesn't use toolbars and menus. The menus and toolbars have been replaced by the Ribbon, Tabsand the Mini Toolbar.
Figure 1-1 : The PowerPoint Window
The table that follows provides a cross-reference to the image above, listing and explaining the various parts of the PowerPoint 2007 screen…
A
G
B
C
D
E
F
IH J
Red
uced
Qua
lity
Sam
ple

PowerPoint 2007 Essentials Page 2 / 147
Copyright © 2008 – Mobile MOUSe. No part of this manual may be reproduced in any form or fashion without the written permission of Mobile MOUSe. Visit us online at www.mobilemouse.com.au or email us at [email protected] – Intellectual property rights retained by Russell Kitching.
Table 1-1 : The Various elements of the PowerPoint Interface
Option… Is the…
A Office Button. This is a replacement for the File Menu (in older versions of PowerPoint). Here are the options to create New presentations, Save and Open presentations, Print and more.
B Quick Access Toolbar. A small toolbar next to the Office Button, which you can customize and add more icons to launch options you would use most frequently.
C Ribbon. This has almost all of the commands that PowerPoint users need. The commands are organized as buttons within groups on the various Tabs of the Ribbon.
D Tabs. The Ribbon is comprised of tabs. Each tab presents different icons within groups.
E Group. A Group is a set of icons.
F Outline Pane. Contains two tabs - the Slides tab and the Outline tab. The Slides tab shows thumbnails of the slides in the presentation. The Outline tab shows the slides in Outline view.
G Slide Pane. Displays the slide and its content.
H Notes Pane. This is used for speaker notes or audience participant notes for the current slide.
I Status Bar. Provides info about the presentation like slide numbers, theme name etc…
J Zoom Slider. Used to quickly zoom in and out of the presentation.
1.2 New Features of the Microsoft Office Interface
While the overall look and feel of the new version of Microsoft Office is new, most people quickly become accustomed to the way the new way the various programs work.
1.2.1 The Ribbon
The traditional menus and toolbars have been replaced by the Ribbon. The tabs on the Ribbon display the commands that are most relevant for each of the tasks in the programs. For example, in PowerPoint 2007 there are a set of tabs that are relevant to picture editing, tabs for working with animations, inserting objects, adjusting designs, reviewing and adjusting the way you view your presentations. The Home tab provides easy access to the most frequently used commands.
Figure 1-2 : A Portioned view of the PowerPoint Ribbon (the Home tab is selected)
Red
uced
Qua
lity
Sam
ple

PowerPoint 2007 Essentials Page 3 / 147
Copyright © 2008 – Mobile MOUSe. No part of this manual may be reproduced in any form or fashion without the written permission of Mobile MOUSe. Visit us online at www.mobilemouse.com.au or email us at [email protected] – Intellectual property rights retained by Russell Kitching.
1.2.2 Quick Access Toolbar
The Quick Access Toolbar is where you will find (or place) your own frequently used commands. Essentially, you can use the Quick Access Toolbar to create shortcuts to the various features of PowerPoint.
Figure 1-3 : The Quick Access Toolbar
1.2.3 The Microsoft Office button
Many of the most valuable features in previous versions of Microsoft Office were not about the document formatting and editing experience at all. Instead, they were about all the things you can do with a document: share it, protect it, print it, publish it, and send it. In spite of that, previous releases of the Microsoft Office applications lacked a single central location where a user can see all of these options in one place.
The new interface brings together the capabilities of the Microsoft Office system into a single entry point: the Microsoft Office Button. This offers two major advantages. First, it helps users find these valuable features. Second, it simplifies the editing of documents by freeing up the Ribbon to focus on the actual creation and formatting of the documents.
Figure 1-4 : The Office Button
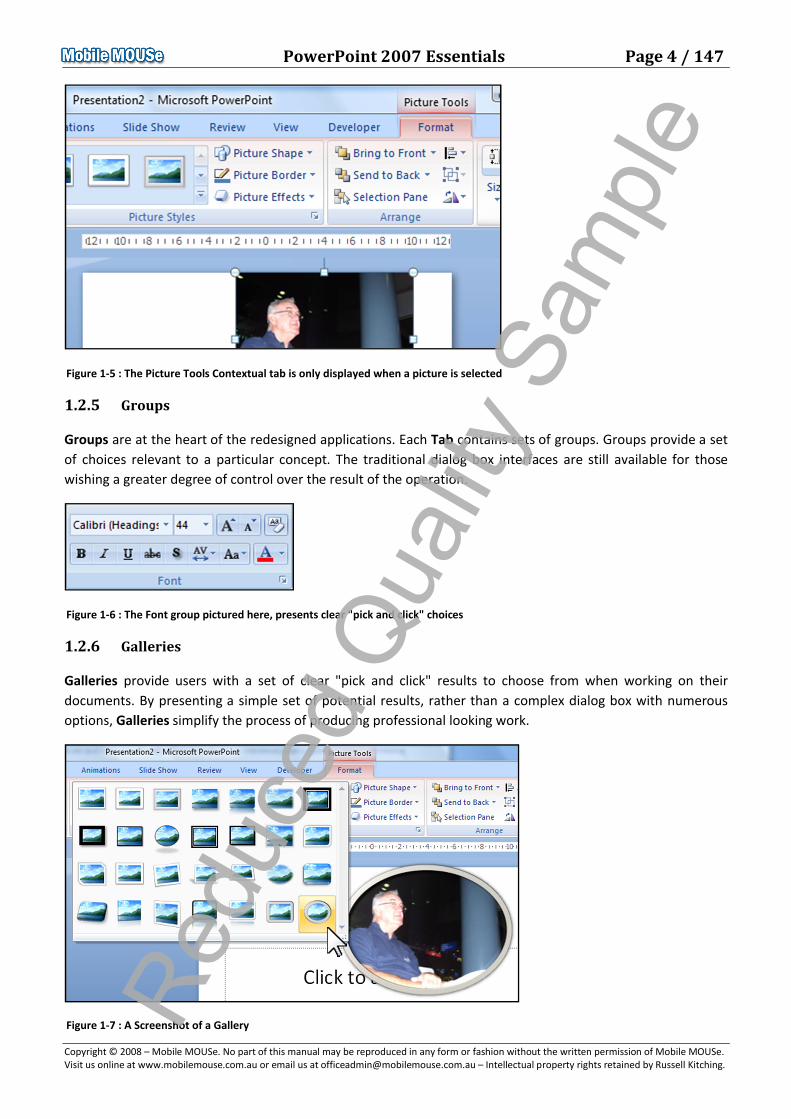
1.2.4 Contextual Tabs
Certain sets of commands are only relevant when objects of a particular type are being edited. For example, the commands for editing a picture are not relevant until a picture within a document is clicked and the user is focusing on modifying it. Contextual tabs only appear when they are needed and make it easier to find and use the commands needed for the operation at hand.
Red
uced
Qua
lity
Sam
ple
PowerPoint 2007 Essentials Page 4 / 147
Copyright © 2008 – Mobile MOUSe. No part of this manual may be reproduced in any form or fashion without the written permission of Mobile MOUSe. Visit us online at www.mobilemouse.com.au or email us at [email protected] – Intellectual property rights retained by Russell Kitching.
Figure 1-5 : The Picture Tools Contextual tab is only displayed when a picture is selected
1.2.5 Groups
Groups are at the heart of the redesigned applications. Each Tab contains sets of groups. Groups provide a set of choices relevant to a particular concept. The traditional dialog box interfaces are still available for those wishing a greater degree of control over the result of the operation.
Figure 1-6 : The Font group pictured here, presents clear "pick and click" choices
1.2.6 Galleries
Galleries provide users with a set of clear "pick and click" results to choose from when working on their documents. By presenting a simple set of potential results, rather than a complex dialog box with numerous options, Galleries simplify the process of producing professional looking work.
Figure 1-7 : A Screenshot of a GalleryRed
uced
Qua
lity
Sam
ple

PowerPoint 2007 Essentials Page 5 / 147
Copyright © 2008 – Mobile MOUSe. No part of this manual may be reproduced in any form or fashion without the written permission of Mobile MOUSe. Visit us online at www.mobilemouse.com.au or email us at [email protected] – Intellectual property rights retained by Russell Kitching.
1.2.7 Live Preview
Live Preview is a new technology that shows the results of applying an editing or formatting change as the user moves the pointer over certain options. This new, dynamic capability streamlines the process of laying out, editing, and formatting which allows users to create excellent results with less time and effort.
Figure 1-8: Live Preview displays formatting as you move your mouse over the effect
Red
uced
Qua
lity
Sam
ple

PowerPoint 2007 Essentials Page 6 / 147
Copyright © 2008 – Mobile MOUSe. No part of this manual may be reproduced in any form or fashion without the written permission of Mobile MOUSe. Visit us online at www.mobilemouse.com.au or email us at [email protected] – Intellectual property rights retained by Russell Kitching.
Chapter 2 - Presentation BasicsWe will now cover the following concepts…
Creating Presentations from Scratch Adding and Deleting slides from a presentation Navigating a presentation Modifying the Content within a presentation Working with Outline View Importing Slides from other existing presentations Importing Text from a Word document Formatting text on slides Customizing the Quick Access Toolbar
2.1 General Presentation Concepts
In this chapter, we’ll focus on the text of your presentation. You’ll learn about several different possibilities for starting a new presentation, adding text, editing text and deleting text from your presentation.
Every PowerPoint presentation consists of a series of slides, which contain text or objects displayed on a graphic background as shown in Figure 2-1. You create your presentation using text and objects like charts, images, sound files, or even video clips on slides. Once you complete this chapter you should be fairly comfortable with adding and editing text.
Figure 2-1: A Slide within PowerPoint
Red
uced
Qua
lity
Sam
ple

PowerPoint 2007 Essentials Page 7 / 147
Copyright © 2008 – Mobile MOUSe. No part of this manual may be reproduced in any form or fashion without the written permission of Mobile MOUSe. Visit us online at www.mobilemouse.com.au or email us at [email protected] – Intellectual property rights retained by Russell Kitching.
2.1.1 Presentation Planning and Creation
For every presentation you create in PowerPoint, you should perform the following steps.
1. Plan the presentation and gather materials you’ll want to include: clipart, tables, charts, and other graphic objects.
2. Create the presentation; creating slides, entering and editing text, and arranging slides.
3. Apply and modify the presentation design.
4. Format individual slides if so desired.
5. Add objects to the presentation: charts, tables, and pictures.
6. Apply and modify transitions, animation effects, and links for electronic presentations.
7. Create audience materials and speaker notes.
8. Rehearse the presentation and add slide timings.
9. Deliver the presentation.
You don’t have to work through all the steps sequentially. You can create and modify a few slides, add objects, animation, speaker notes and then insert more slides. You may find working directly on the slides distracting, in which case you can generate your presentation content as an outline and then work on the aesthetics later.
2.2 Starting a New Presentation
PowerPoint 2007 makes getting started a snap. You have essentially three choices: start with a blank slide, start with a wizard, or start with a template.
2.2.1 Starting with a Blank Slide
When you launch PowerPoint, the options for starting a presentation appear in the task pane. You can open an existing presentation or create a new presentation using one of several listed options. The blank slide in the centre of the window is set up as a title slide, ready and waiting for your text. The following exercise walks you through the process of adding text.
A D D I NG T E X T T O A B LA N K S LI D E
1. Launch PowerPoint from the Windows Start Menu or from the Windows Desktop. A blank slide is displayed in the main part of the PowerPoint window
2. Click within the Click to Add Title text box. A cursor appears, centred with the text box
3. Type the title of your presentation. For this exercise, type: Sample Presentation
4. Click within the Click to Add Subtitle text box. Once again, a centred cursor appears
5. Type your name. Then press J6. Type some additional information about yourself, such as your company name or job title
7. Close the file without saving the changes (by clicking The Microsoft Office Button and choosing Close, or by pressing F+W, then choosing No at the resulting dialog box) Red
uced
Qua
lity
Sam
ple

PowerPoint 2007 Essentials Page 8 / 147
Copyright © 2008 – Mobile MOUSe. No part of this manual may be reproduced in any form or fashion without the written permission of Mobile MOUSe. Visit us online at www.mobilemouse.com.au or email us at [email protected] – Intellectual property rights retained by Russell Kitching.
As evidenced in Step 5 of the previous exercise, pressing J in a text box allows you to create a new line of text within that text box. PowerPoint also supports word wrap. If the content you enter is longer than the width the text box, the text wraps to the next line automatically, just as it does when it reaches the right margin in a Word document.
When you add text to a slide, the text also appears on the slide miniature in the slide pane at the left side of the PowerPoint window.
2.2.2 Using a PowerPoint Template
In versions of PowerPoint earlier than PowerPoint 2007, to change the look of your presentation — such as the types and sizes of bullets, background design and fill colours, and placeholder sizes and positions — you applied a design template. With Office PowerPoint 2007, you apply a theme to achieve the same result. For more information about how apply a theme to change the look of your presentation, see Applying Themes on page 75.
As already mentioned; you can start with a blank slide and create your presentation from scratch. This method helps you to focus on text without the distraction of backgrounds, graphics and placeholder text supplied by existing presentations, or you can simply choose from one of PowerPoint’s many built-in Templates.
You can apply templates that are built-in to PowerPoint 2007, created by you and then saved to your computer, or use templates downloaded from Microsoft Office Online.
In PowerPoint 2007, you can apply templates to structure style and page layout and give you a jump-start on a new, blank presentation. If you choose to start with a template, you get the backgrounds, graphics and depending on the template, varying amounts of placeholder’s text. Follow the steps in the following exercise to discover two different ways to start a presentation using template.
In the following exercise, you will generate a new presentation from one of PowerPoint’s built-in templates.
S T A R T I NG A P R E S E N T A T I O N B Y US I N G A T E M P LA T E
1. Click The Microsoft Office Button, and then click New
2. In the New Presentation dialog box, do one of the following:
Under Templates, click Blank and recent, Installed Templates, or Installed Themes, click the built-in template that you want, and then click Create.
Under Templates, click New from existing, locate and then click the other presentation file that contains the template, and then click Create New.
Under Templates, click My templates, select a custom template that you created, and then click OK.
Under Microsoft Office Online, click a template category, select a template, and then click Downloadto download the template from the Microsoft Office website.Red
uced
Qua
lity
Sam
ple

PowerPoint 2007 Essentials Page 9 / 147
Copyright © 2008 – Mobile MOUSe. No part of this manual may be reproduced in any form or fashion without the written permission of Mobile MOUSe. Visit us online at www.mobilemouse.com.au or email us at [email protected] – Intellectual property rights retained by Russell Kitching.
3. Having experimented with one or more of the options above, Close the presentation without saving your changes (by clicking The Microsoft Office Button and choosing Close, or by pressing
F+W, then choosing No at the resulting dialog box)
2.3 Navigating the PowerPoint Application Window
In order to work comfortably in PowerPoint, it is necessary to have a general understanding of the multi-paned PowerPoint application window and each of the following topics, specifically;
Viewing slides
Navigating from slide to slide
Selecting a slide (or slides)
In this section, you’ll learn about PowerPoint views and how to switch between them. You’ll practice navigating through a presentation as well as selecting slides one at a time as well as more than one slide at a time.
2.3.1 Viewing Slides
The term View refers to how you look at and work on your presentation. PowerPoint offers several different views, all of which are accessible from the View tab and three views from the View buttons (namely, Normal View, Slide Sorter view, and Slide Show View). The other views, (including the various Master Views) and Notes Pages View, have special features that we will discuss in more detail at a later stage. While you’ll quickly adopt one view as your favourite, you inevitably work in all of the views while you’re building a presentation.
You can change to any view by clicking the appropriate view button at the bottom-right corner of the PowerPoint window or by choosing the view name from the View tab.
Figure 2-2: The Normal, Slide Sorter and Slide Show buttons
NORMAL VIEW
This is the probably the most commonly used view in PowerPoint. The outline (with text… if any) is displayed on the left; your first slide is shown in the main part of the PowerPoint window. The smaller pane at the bottom of the window allows you to add notes for this slide (We will cover notes at a later stage).
Normal View is a tri-pane view that allows you to see three different aspects of your presentation within one window. The sections of the tri-pane window are resizable so you can choose the element(s) of the presentation you wish to focus on.
The Outline Pane in Normal View has two tabs: Outline and Slides. Outline is suited to working with text, where as for visually oriented people, the Slide option, displays the slides themselves rather than the text of the slides. To see slide miniatures in the left pane, as shown in the figure overleaf click the Slides tab.
Red
uced
Qua
lity
Sam
ple

PowerPoint 2007 Essentials Page 10 / 147
Copyright © 2008 – Mobile MOUSe. No part of this manual may be reproduced in any form or fashion without the written permission of Mobile MOUSe. Visit us online at www.mobilemouse.com.au or email us at [email protected] – Intellectual property rights retained by Russell Kitching.
Figure 2-3: Normal View (with the Slides pane active) lets the user display slide miniatures in the left pane
When you’re viewing slide miniatures in the left pane and the pane has not been widened enough, the tabs at the top of the pane show icons rather than words.
If you accidentally close the left pane that displays outline and slide miniatures, you can bring it back by clicking View and clicking Normal.
Figure 2-4: Normal View (with the Outline pane active) lets the user display outline text in the left paneRed
uced
Qua
lity
Sam
ple

PowerPoint 2007 Essentials Page 11 / 147
Copyright © 2008 – Mobile MOUSe. No part of this manual may be reproduced in any form or fashion without the written permission of Mobile MOUSe. Visit us online at www.mobilemouse.com.au or email us at [email protected] – Intellectual property rights retained by Russell Kitching.
SLIDE SORTER VIEW
Slide Sorter view (shown in the figure below) allows you to see many slides at once. The number of slides shown depends on the zoom setting, your monitor size, and your screen resolution. PowerPoint defaults to 66% zoom, which allows you to see approximately 12 slides at once. If you want to adjust the number of slides visible, simply increase or decrease the zoom level. The focus in Slide Sorter view is on entire slides: selecting, deleting moving, and so on. You can’t edit text on a slide from within Slide Sorter view.
Figure 2-5: Slide Sorter view is used to display multiple slides
SLIDE SHOW VIEW
Click the Slide Show button to see how the current slide will look in full-screen mode when you display your presentation. Click the mouse or press J to move from one slide to the next. Note that if a slide has multiple lines of text, you might have to click once for each line of text. After the last slide, PowerPoint automatically returns to the previous view. Press L if you want to end the slide show before the last slide has run.
When you switch from one view to another, the current slide remains current, regardless of view. For example, if you are on the fifth slide in Normal View, and switch to Slide Sorter view, the fifth slide will be selected. Clicking the Slide Show button (or pressing o) starts the slide show the fifth slide.
Red
uced
Qua
lity
Sam
ple