powerdyne instructions full mod - tunedparts.net instructions.pdf · 2007-04-26 · 2001-2004 lexus...
TRANSCRIPT

PRECISION ENGINEERED LEXUS PARTS AND ACCESSORIES
LEXUS IS300 Supercharging System Installation Instructions
2001-2004 Model Year
*Legal in California only for racing vehicles which may never be used upon public roads or a highway.
FOR OFF ROAD USE ONLY
FREMONT, CA, U.S.A., TOLL FREE: (866) 8-PROLEX FAX: (888) 883-9413 WWW.PROLEXPERFORMANCE.COM EMAIL: [email protected]
P/N: VSC001-0103 COPYRIGHT 2003 PRO LEX PERFORMANCE, INC. ALL RIGHTS RESEREVED

FOREWORD
Proper installation of this supercharger kit requires general automotive mechanic knowledge and experience. Please browse through each step of this instruction manual prior to beginning the installation to determine if you should refer the job to a professional installer/technician.
NOTE: Due to the horsepower and torque that your vehicle will produce after installation of this supercharging system, it is strongly suggested that the factory clutch be replaced with a high capacity after market unit. All rights reserved. No parts of this publication may be reproduced, transmitted, transcribed, or translated into another language in any form, by any means without written permission of
Pro Lex Performance Inc. P/N: VSC001-0103 COPYRIGHT 2003 PRO LEX PERFORMANCE, INC. ALL RIGHTS RESEREVED 1 of 35

2001-2004 LEXUS IS300
INSTALLATION INSTRUCTIONS
Congratulations on selecting the best performing Lexus supercharging system available today… the PLP Supercharger!
Before beginning installation, please read through this entire instruction booklet.
PLP supercharging systems are performance improving devices. In most cases, increase in torque of 30-35% and horsepower of 35-45% can be expected with boost levels specified by Pro Lex Performance. This product is for OFF ROAD use only on vehicles which may never be used upon public roads or a highway. Pro Lex Performance is not responsible for engine damage. For best performance and continued durability, please take note of the following key points: 1. Use only premium grade fuel 91 octane or higher (R+M/2). 2. The engine must have stock compression ratio. 3. If the engine has been modified in any way, check with Pro Lex Performance prior to using this product. 4. Always listen for any sign of detonation (pinging) and discontinue hard use (no boost) until problem is resolved. 5. Change spark plugs at least every 30,000 miles. TOOL & SUPPLY REQUIREMENTS: Factory Repair Manual 8mm-14mm Socket Set 5/8” Spark Plug Socket 3/8” Drive Rachet 8mm-14mm Open End Wrench Set Slotted Screwdriver Philips Screwdriver Metric Allen set Standard Allen set Soldering Gun Electrical Tape or Heatshrink Tubing Dremel Tool with Cutting Disc Teflon Tape Razor Blade P/N: VSC001-0103 COPYRIGHT 2003 PRO LEX PERFORMANCE, INC. ALL RIGHTS RESEREVED 2 of 35

2001-2004 Lexus IS300 Part No. BD-11SC PARTS LIST P/N: BD-11SC COPYRIGHT 2003 PRO LEX PERFORMANCE, INC. ALL RIGHTS RESEREVED 3 of 35
QTY DESCRIPTION PACKAGE #9 1 2 3/4" ID x 2 3/4” Silicone Coupler 1 3” ID x 3” Silicone Coupler 1 3" x 2 3/4" x 3” Silicone Transition PACKAGE #10 6 3 1/4" Stainless Hose Clamp PACKAGE #11 1 Supercharger Air Inlet Tube 1 3 3/4" Stainless T-Bolt Clamp PACKAGE #12 1 Air Filter Tube with MAF Sensor Flange 1 1/4" x 10” Vacuum Hose PACKAGE #13 1 3” PLP Hi-Flow Filter Element 1 3 1/2" Stainless Hose Clamp PACKAGE #14 1 SC Discharge Tube PACKAGE #15 1 By-Pass Valve 1 1/8”x18 3/4” By-Pass Valve Vacuum Line 2 1”x2" By-Pass Hose 4 1” Stainless Hose Clamp PACKAGE #16 1 5/8” x 20” Breather Hose 2 1/2" Hose Clamp
PACKAGE #17 1 E-manage Ignition Controller 1 E-manage Ignition Controller Harness 1 Fuel Controller with Pressure Sensor and
Harness 1 Fuel Injector 1 3/16” x 5’ Hard Vacuum Line 2 5/32” x 2” vacuum Line 1 5/32” Tee 20 Tie Wrap 1 1/2" x 3’ Split Loom Tubing 1 1/4" x 12” Split Loom Tubing 2 M4 x 14 MAF Sensor Allen Head Bolts 1 01-04 Wiring Diagram
QTY DESCRIPTION PACKAGE #1 1 Powerdyne BD-11 Supercharger 1 3.12” Hard Anodized Pulley 1 Pulley Retainer Assembly
PACKAGE #2 1 Heavy Duty Drive Belt PACKAGE #3 1 Main Supercharger Bracket 7 BD-11 Spacer 7 3/8”-16 x 2” Allen Head Bolt 7 3/8” Flat Washer 1 Water Pump - Main Bracket Spacer 1 M8-1.25 x 80mm Water Pump Bolt 1 5/16” Flat Washer PACKAGE #4 1 Lateral Supercharger Bracket 1 M10-1.25 x 30mm Hex Head Bolt 3 1/4"-20 x 3/4” Allen Head Bolt 3 1/4” Flat Washer PACKAGE #5 2 6203RZ Tension Bearing 1 1/2"-13 x 1” Hex Head Bolt 1 1/2" Flat Washer PACKAGE #6 1 ABS Pump Bracket 2 M6-1.25 x 10mm Hex Head Bolt
PACKAGE #7 1 Fuel Supply Line Assembly 1 Fuel Rail Union Bolt 1 Copper Crush Washer (small) 1 Copper Crush Washer (large) 2 -6 Flare – 1/4" NPT, 90 Degree 1 Fuel Injector Retainer 2 8/32” x 3” Allen Head Bolt
PACKAGE #8 6 NGK Iridium Spark Plugs

2001-2004 Lexus IS300 Part No. BD-11SC Installation Instructions
1. PREPERATION/REMOVAL A. Disconnect the negative battery cable. B. Disconnect MAF sensor connector, VSV valve hose and connector. P/N: BD-11SC COPYRIGHT 2003 PRO LEX PERFORMANCE, INC. ALL RIGHTS RESEREVED 4 of 35

2001-2004 Lexus IS300 Part No. BD-11SC Installation Instructions C. Remove engine cover, air cleaner inlet, PCV hose, intake air resonator pipe and air cleaner box assembly, refer to factory repair manual. (a) Remove MAF sensor from intake air resonator pipe and set the MAF sensor aside for assembly in a later step. (b) Remove VSV valve from the air cleaner box assembly and set the VSV valve aside for assembly in a later step. D. Locate PACKAGE #8 E. Install the new NGK Iridium Spark Plugs (refer to factory repair manual). Torque spec 13ft-lbs P/N: BD-11SC COPYRIGHT 2003 PRO LEX PERFORMANCE, INC. ALL RIGHTS RESEREVED 5 of 35

2001-2004 Lexus IS300 Part No. BD-11SC Installation Instructions
2. Fuel Line Install A. Locate PACKAGE #7 B. Remove the fuel pulsation dampener with old crush washers from the fuel rail and under incoming fuel line (pulsation dampener has a white plastic cap). C. Position the new Copper Crush Washer (small) under the incoming fuel line, Position the new Copper Crush Washer (large) on top of the incoming fuel line, Install the new Fuel Rail Union Bolt (be sure to properly align the crush washers before tightening, you may slightly pinch the large crush washer on the fuel rail union bolt to hold its position while installing). P/N: BD-11SC COPYRIGHT 2003 PRO LEX PERFORMANCE, INC. ALL RIGHTS RESEREVED 6 of 35

2001-2004 Lexus IS300 Part No. BD-11SC Installation Instructions D. Install one -6 Flare – 1/4" NPT, 90 Degree into the Fuel Rail Union Bolt (use teflon tape) position as pictured. E. Install one end of the Fuel Supply Line Assembly to the -6 Flare – 1/4" NPT (use Teflon tape) D The other end of the Fuel Supply Line Assembly will be installed in a later step. P/N: BD-11SC COPYRIGHT 2003 PRO LEX PERFORMANCE, INC. ALL RIGHTS RESEREVED 7 of 35

2001-2004 Lexus IS300 Part No. BD-11SC Installation Instructions
3. ABS Pump Relocation A. Unplug ABS pump harness. B. Remove factory ABS pump bracket. P/N: BD-11SC COPYRIGHT 2003 PRO LEX PERFORMANCE, INC. ALL RIGHTS RESEREVED 8 of 35

2001-2004 Lexus IS300 Part No. BD-11SC Installation Instructions
C. Remove the ABS line bracket’s (x2) P/N: BD-11SC COPYRIGHT 2003 PRO LEX PERFORMANCE, INC. ALL RIGHTS RESEREVED 9 of 35

2001-2004 Lexus IS300 Part No. BD-11SC Installation Instructions
D. Locate PACKAGE #6 E. Install the new ABS pump bracket using the supplied M6-1.25 x 10mm hex head bolt P/N: BD-11SC COPYRIGHT 2003 PRO LEX PERFORMANCE, INC. ALL RIGHTS RESEREVED 10 of 35
2001-2004 Lexus IS300 Part No. BD-11SC Installation Instructions
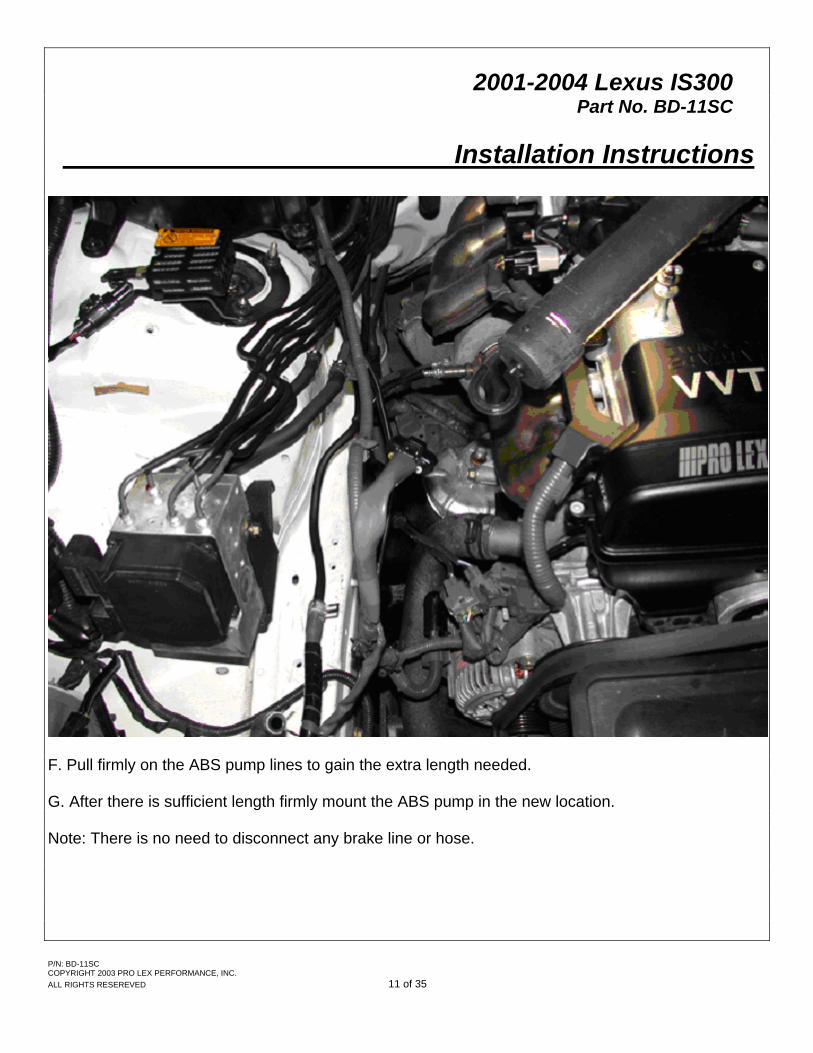
F. Pull firmly on the ABS pump lines to gain the extra length needed. G. After there is sufficient length firmly mount the ABS pump in the new location. Note: There is no need to disconnect any brake line or hose. P/N: BD-11SC COPYRIGHT 2003 PRO LEX PERFORMANCE, INC. ALL RIGHTS RESEREVED 11 of 35

2001-2004 Lexus IS300 Part No. BD-11SC Installation Instructions
H. Disconnect VSV valve hose. P/N: BD-11SC COPYRIGHT 2003 PRO LEX PERFORMANCE, INC. ALL RIGHTS RESEREVED 12 of 35

2001-2004 Lexus IS300 Part No. BD-11SC Installation Instructions
I. ABS pump line orientation. P/N: BD-11SC COPYRIGHT 2003 PRO LEX PERFORMANCE, INC. ALL RIGHTS RESEREVED 13 of 35

2001-2004 Lexus IS300 Part No. BD-11SC Installation Instructions
J. ABS pump relocation overview. P/N: BD-11SC COPYRIGHT 2003 PRO LEX PERFORMANCE, INC. ALL RIGHTS RESEREVED 14 of 35

2001-2004 Lexus IS300 Part No. BD-11SC Installation Instructions
3. 02 Sensor Plug Bracket Removal. A. Unclip the 02 sensor connectors and wire harness from bracket. B. Using a 10mm socket remove the bracket. P/N: BD-11SC COPYRIGHT 2003 PRO LEX PERFORMANCE, INC. ALL RIGHTS RESEREVED 15 of 35

2001-2004 Lexus IS300 Part No. BD-11SC Installation Instructions
C. Position the 02 Sensor connectors and wire harness as shown. P/N: BD-11SC COPYRIGHT 2003 PRO LEX PERFORMANCE, INC. ALL RIGHTS RESEREVED 16 of 35

2001-2004 Lexus IS300 Part No. BD-11SC Installation Instructions
4. Serpentine Belt Removal A. Remove serpentine drive belt and water pump pulley, refer to factory repair manual. (a) Using a 10mm socket loosen the 4 nuts holding the water pump pulley to the water pump. (b) Using SST, loosen the drive belt tension by turning the drive belt tensioner clockwise, and remove the drive belt. Tip: Instead of using Lexus special tool (SST) 09216-00041 you may use a 14mm socket with a long breaker bar to turn the drive belt tensioner clockwise to release drive belt tension. B. Remove the 4 nuts and water pump pulley. Set the pulley and bolts aside for assembly in a later step. 5. Alternator and Water Pump Bolt Removal A. Using a 12mm socket, remove the lower water pump bolt. B. Using a 14mm socket, remove the upper alternator bolt. Set the bolt aside for assembly in a later step. P/N: BD-11SC COPYRIGHT 2003 PRO LEX PERFORMANCE, INC. ALL RIGHTS RESEREVED 17 of 35

2001-2004 Lexus IS300 Part No. BD-11SC Installation Instructions
6. Cable Tray Trimming A. Using a Dremel tool with a cutting disc (or similar device) carefully trim the cable tray as pictured. Be careful not to cut any wires inside the cable tray. P/N: BD-11SC COPYRIGHT 2003 PRO LEX PERFORMANCE, INC. ALL RIGHTS RESEREVED 18 of 35

2001-2004 Lexus IS300 Part No. BD-11SC Installation Instructions
B. Route the wire harness as pictured. P/N: BD-11SC COPYRIGHT 2003 PRO LEX PERFORMANCE, INC. ALL RIGHTS RESEREVED 19 of 35

2001-2004 Lexus IS300 Part No. BD-11SC Installation Instructions
7. Supercharger Bracket and Spacer Installation A. Locate PACKAGE # 3. B. Install the M8-1.25 x 80mm Water Pump Bolt with 5/16” Flat Washer through the lower front of the Supercharger Main Bracket. C. Install the Water Pump - Main Bracket Spacer on the rear on the Supercharger Main Bracket over the M8-1.25 x 80mm Water Pump Bolt. P/N: BD-11SC COPYRIGHT 2003 PRO LEX PERFORMANCE, INC. ALL RIGHTS RESEREVED 20 of 35

2001-2004 Lexus IS300 Part No. BD-11SC Installation Instructions D. Tighten the water pump bolt (do not tighten all the way!) E. Reinstall the alternator bolt (do not tighten all the way!) F. Locate PACKAGE # 4. G. Install the 1/4"-20 x 3/4” Allen Head Bolt with 1/4” Flat Washer through the front of the Supercharger Main Bracket into the Lateral Supercharger Bracket (do not tighten all the way!) H. Install M10-1.25 x 30mm Hex Head Bolt through the Later supercharger bracket into the cylinder head (do not tighten all the way!) I. Align all brackets and tighten all bolts securely. J. Install the 3/8”-16 x 2” Allen Head Bolt with 3/8” Flat Washer through the front of the Supercharger Main Bracket. K. Install the BD-11 Spacer on the rear of the Supercharger Main Bracket over the 3/8”-16 x 2” Allen Head Bolt, it may be necessary to lightly tap the spacers with a hammer. P/N: BD-11SC COPYRIGHT 2003 PRO LEX PERFORMANCE, INC. ALL RIGHTS RESEREVED 21 of 35

2001-2004 Lexus IS300 Part No. BD-11SC Installation Instructions
8. Supercharger Installation A. Locate PACKAGE # 1. B. It will be necessary to reclock the valute/discharge of the Supercharger to the correct postion. C. Loosen the valute/discharge of the Supercharger. D. Temporarily install the Supercharger to the Supercharger Main Bracket. P/N: BD-11SC COPYRIGHT 2003 PRO LEX PERFORMANCE, INC. ALL RIGHTS RESEREVED 22 of 35

2001-2004 Lexus IS300 Part No. BD-11SC Installation Instructions E. Using the SC Discharge Tube from PACKAGE # 14 and a 2 3/4" ID x 2 3/4” Silicone Coupler from PACKAGE # 9 and the 3" x 2 3/4" x 3” Silicone Transition also from PACKAGE # 9 temporarily install the Silicone Transition on the Supercharger discharge with the SC Discharge Tube, Install the Silicone Coupler on the throttle body and the SC Discharge Tube. F. Once the Supercharger discharge is perfectly aligned, tighten one or two bolts on the Supercharger valute/discharge to hold this position. G. Remove the Supercharger and completely tighten the Supercharger valute/discharge with the correct position. H. Reinstall the Supercharger and tighten securely. P/N: BD-11SC COPYRIGHT 2003 PRO LEX PERFORMANCE, INC. ALL RIGHTS RESEREVED 23 of 35

2001-2004 Lexus IS300 Part No. BD-11SC Installation Instructions
9. Air Inlet Installation A. Locate PACKAGE #11 B. Install the supplied 3 3/4" Stainless T-Bolt Clamp on the Supercharger Air Inlet Tube and position on the rear of the Supercharger as pictured. C. Install the 3” ID x 3” Silicone Coupler from PACKAGE #9 with two 3 1/4" Stainless Hose Clamp from PACKAGE #10 on the Supercharger Air Inlet Tube. D. Push the Supercharger Air Inlet Tube so that it is seated on the Supercharger Later Bracket, then securely tighten 3/4" Stainless T-Bolt Clamp. P/N: BD-11SC COPYRIGHT 2003 PRO LEX PERFORMANCE, INC. ALL RIGHTS RESEREVED 24 of 35

2001-2004 Lexus IS300 Part No. BD-11SC Installation Instructions
10. Breather Hose Installation A. Locate PACKAGE #16. B. Securely attach the 5/8” x 20” Breather Hose to the valve cover and Supercharger Air Inlet Tube using two 1/2" Hose Clamps. P/N: BD-11SC COPYRIGHT 2003 PRO LEX PERFORMANCE, INC. ALL RIGHTS RESEREVED 25 of 35

2001-2004 Lexus IS300 Part No. BD-11SC Installation Instructions
11. MAF Sensor Wire Extension A. Using a razor blade carefully cut the tape on the split loom tubing 3” - 4”. B. Carefully pull the MAF sensor wiring out and retape. 12. VSV Valve Install A. Reinstall the VSV Valve that was removed at the beginning of the install (the short hose will be connected in a later step). P/N: BD-11SC COPYRIGHT 2003 PRO LEX PERFORMANCE, INC. ALL RIGHTS RESEREVED 26 of 35

2001-2004 Lexus IS300 Part No. BD-11SC Installation Instructions
13. Tension Bearing and Serpentine Install A. Locate PACKAGE #5. B. Slide the two 6203RZ Tension Bearings on the Main Supercharger Bracket (please note: the tension bearings may differ from picture). C. Using the 1/2"-13 x 1” Hex Head Bolt with 1/2” Flat Washer securely tighten the 6203RZ Tension Bearings to the Main Supercharger Bracket. D. Reinstall the water pump pulley and serpentine belt that was removed in step 3, use factory routing. P/N: BD-11SC COPYRIGHT 2003 PRO LEX PERFORMANCE, INC. ALL RIGHTS RESEREVED 27 of 35

2001-2004 Lexus IS300 Part No. BD-11SC Installation Instructions
14. SC Discharge Tube Installation A. Locate PACKAGE #14. B. Install the 2 3/4" ID x 2 3/4” Silicone Coupler from PACKAGE #9 with two 3 1/4" Stainless Hose Clamp from PACKAGE #10 on the throttle body. C. Install the 3" x 2 3/4" x 3” Silicone Transition from PACKAGE #9 with two 3 1/4" Stainless Hose Clamp from PACKAGE #10 on the Supercharger discharge. D. Install the SC Discharge Tube between the throttle body and Supercharger discharge, securely tighten hose clamps. P/N: BD-11SC COPYRIGHT 2003 PRO LEX PERFORMANCE, INC. ALL RIGHTS RESEREVED 28 of 35

2001-2004 Lexus IS300 Part No. BD-11SC Installation Instructions 15. By-Pass Valve Install A. Locate PACKAGE #15 B. Install one 1”x2" By-Pass Hose on the SC Discharge Tube and Air Inlet Tube. C. Slide two 1” Stainless Hose Clamp over each 1”x2" By-Pass Hose. D. Install the By-Pass Valve between the 1”x2" By-Pass Hose and securely tighten the hose clamps. E. Connect one end of the 1/8”x18 3/4” By-Pass Valve Vacuum Line to the By-Pass Valve. F. Connect the other end of the 1/8”x18 3/4” By-Pass Valve Vacuum Line to the vacuum port of the intake plenum (remove small rubber cap on the front side of the intake plenum). P/N: BD-11SC COPYRIGHT 2003 PRO LEX PERFORMANCE, INC. ALL RIGHTS RESEREVED 29 of 35

2001-2004 Lexus IS300 Part No. BD-11SC Installation Instructions
16. Fuel Injector Install A. Locate PACKAGE #17. B. Insert the Fuel Injector into the SC Discharge Tube. C. Thread (use Teflon tape, be sure not to block fuel flow) one -6 Flare – 1/4" NPT, 90 Degree into the Fuel Injector Retainer from PACKAGE #7. P/N: BD-11SC COPYRIGHT 2003 PRO LEX PERFORMANCE, INC. ALL RIGHTS RESEREVED 30 of 35

2001-2004 Lexus IS300 Part No. BD-11SC Installation Instructions C. Position the Fuel Injector Retainer form PACKAGE #7 over the fuel injector and securely tighten using two 8/32” x 3” Allen Head Bolt from PACKAGE #7 (be sure to clock the 6 Flare – 1/4" NPT, 90 Degree towards the fuel rail). D. Connect the Fuel Supply Line Assembly (use Teflon tape, be sure not to block fuel flow). P/N: BD-11SC COPYRIGHT 2003 PRO LEX PERFORMANCE, INC. ALL RIGHTS RESEREVED 31 of 35

2001-2004 Lexus IS300 Part No. BD-11SC Installation Instructions
17. Air Filter Installation A. Locate PACKAGE #12 & #13 B. Install the 3” PLP Hi-Flow Filter Element using the 3 1/2" Stainless Hose Clamp on the Air Filter Tube with MAF Sensor Flange, tighten securely. C. Install the 1/4" x 10” Vacuum Hose on the Air Filter Tube with MAF Sensor Flange, connect the opposite side to the VSV valve. P/N: BD-11SC COPYRIGHT 2003 PRO LEX PERFORMANCE, INC. ALL RIGHTS RESEREVED 32 of 35

2001-2004 Lexus IS300 Part No. BD-11SC Installation Instructions D. Install the Air Filter Tube with MAF Sensor Flange into the 3” ID x 3” Silicone Coupler, position and tighten securely. E. Install the MAF sensor on the Filter Tube with MAF Sensor Flange using 2 M4 x 14 MAF Sensor Allen Head Bolts from PACKAGE #17. F. Reconnect the MAF sensor connector. P/N: BD-11SC COPYRIGHT 2003 PRO LEX PERFORMANCE, INC. ALL RIGHTS RESEREVED 33 of 35

2001-2004 Lexus IS300 Part No. BD-11SC Installation Instructions
18. Engine Management Installation A. Locate PACKAGE #17 B. Disconnect the vacuum hose in the picture (see arrow). C. Install the 5/32” Tee between the disconnected vacuum hose and the intake plenum using 1 5/32” x 2” vacuum Line. D. Install the other 5/32” x 2” Vacuum Line to the 5/32” Tee. P/N: BD-11SC COPYRIGHT 2003 PRO LEX PERFORMANCE, INC. ALL RIGHTS RESEREVED 34 of 35

2001-2004 Lexus IS300 Part No. BD-11SC Installation Instructions E. Push one end of the 3/16” x 5’ Hard Vacuum Line into the 5/32” x 2” Vacuum Line. F. Install the Fuel Controller with Pressure Sensor and Harness under driver side knee panel in the passenger compartment (secure using tie wraps). G. Route the 3/16” x 5’ Hard Vacuum Line into the passenger compartment under the driver side knee panel and push into the vacuum line on the Fuel Controller. H. Position the E-mange Ignition Controller above the driver side kick panel. I. Route both the Fuel Controller Harness and E-manage Harness into the engine compartment (it may be necessary to cut the fuel injector connector to pass through the firewall, once through use solder to connect it back to the harness). J. Route the injector connector to the Fuel Injector (secure the wire using tie wraps) Install the 1/4" x 12” Split Loom Tubing on the Fuel Injector side. K. Route the E-manage Harness and Fuel Controller Harness to the ecu housing in the engine compartment, connect the wires using the supplied wiring diagram for the appropriate year (solder all connections!). L. Install the 1/2" x 3’ Split Loom Tubing over the harness from the ecu to the passenger compartment. 19. Start Up A. Check all connections and make sure all nuts and bolts are tightened securely. B. Reconnect the negative cable on the battery. C. Start vehicle and check for any leaks. P/N: BD-11SC COPYRIGHT 2003 PRO LEX PERFORMANCE, INC. ALL RIGHTS RESEREVED 35 of 35
