powerbox pbx 90 manual - bosch-motorsport.de · bosch motorsport powerbox_pbx_90_manual 11 / 40 the...
TRANSCRIPT
PowerBox PBX 90
Manual
Version 2.0 26/09/2019

Content
ii / 40 PowerBox_PBX_90_Manual Bosch Motorsport
Content1 About PowerBox PBX 90................................................................................................................................................ 3
2 Hardware ......................................................................................................................................................................... 42.1 Housing .................................................................................................................................................................................................................... 42.2 Status LEDs.............................................................................................................................................................................................................. 52.3 Connectors .............................................................................................................................................................................................................. 62.4 Pin Configuration.................................................................................................................................................................................................. 72.5 Warnings and shutdown Thresholds ............................................................................................................................................................ 92.6 Mounting ................................................................................................................................................................................................................. 9
3 PBX Suite Installation..................................................................................................................................................... 10
4 The Structure Editor: Create a new configuration ...................................................................................................... 114.1 Function Blocks ..................................................................................................................................................................................................... 114.2 Utilities for placing and arranging of Function Blocks........................................................................................................................... 134.3 Navigating through the configuration......................................................................................................................................................... 144.4 Example “Blower Control” ................................................................................................................................................................................. 144.5 Structuring of complex configurations ........................................................................................................................................................ 214.6 Utilities for navigating through complex configurations...................................................................................................................... 234.7 Password protecting a configuration ........................................................................................................................................................... 23
5 First Upload of a configuration..................................................................................................................................... 24
6 Update of an existing configuration ............................................................................................................................ 26
7 The Powerbox Manager................................................................................................................................................. 277.1 Switch between configurations....................................................................................................................................................................... 277.2 View Live Data ....................................................................................................................................................................................................... 297.3 Error log ................................................................................................................................................................................................................... 30
8 Integration to RaceCon .................................................................................................................................................. 32
9 FAQ................................................................................................................................................................................... 34
10 Disposal............................................................................................................................................................................ 35
11 Technical Specifications ................................................................................................................................................. 36

About PowerBox PBX 90 | 1
Bosch Motorsport PowerBox_PBX_90_Manual 3 / 40
1 About PowerBox PBX 90The Bosch PowerBox PBX 90 takes the whole Power Control Module concept much furtherthan existing modules. It provides an effective and inspired alternative to conventional re-lays, circuit breakers, fuses and wires that can so often be a tangle of complexity and un-tidiness around a typical racing car’s power junction box.
Bosch PowerBox PBX 90 is a compact and light weight module, measuring 214 x 159 x57.5 mm (including connectors).
Bosch PowerBox PBX 90 has 36 outputs. All outputs are protected against reversed batterypolarity. Current draw can be measured on all outputs from 500 mA .
Any of these channels can be controlled by various types and combinations of inputs.You’ll find more information at Technical Specifications.
Instead of using a conventional control program, Bosch PowerBox PBX 90 benefits from a667 MHz dual Core Processor and a multitasking operating system, allowing simultaneousexecutions of operations.
Please note that the maximum recommended current draw per channel is limited by theconnector contacts (wiring loom side) - not by Bosch PowerBox PBX 90s driver stages. Wehave rated the individual channel’s current draw in relation to the connector manufac-turer’s specifications.
Bosch PowerBox PBX 90 is programmed to shut overloaded channels down if the currentdraw or internal junction temperatures exceed pre-set levels.
A smart algorithm allows automatically turning-on of loads with a high inrush current.
The current draws and channel status can be logged internally and exported via one ofthe three available CAN bus.
WARNING
Please note that the PowerBox PBX 90 is not intended to be used tocontrol safety-critical systems on a vehicle, such as ABS braking,power steering, etc..Bosch Motorsport shall not be responsible for any incidental or consequential damages orinjuries that may occur if the unit is used to control these, or similar, safety-critical sys-tems.

2 | Hardware
4 / 40 PowerBox_PBX_90_Manual Bosch Motorsport
2 HardwareThe Bosch PowerBox PBX 90 enclosure is partially CNC machined to the highest standards.The two parts of the casing are sealed by an O-ring, located in a recess in the main half. Alip in the lid presses on the O-ring and assures a water tight sealing (IP67). The connectorsare individually sealed.
2.1 Housing
On the housing you’ll find the three connectors X1, X2 and X3 and the LEDs for Failure,User, Power and Run.

Hardware | 2
Bosch Motorsport PowerBox_PBX_90_Manual 5 / 40
2.2 Status LEDsEach LED on the PBX 90 has its own color code with different meanings.
The following table explains the different meanings:
Failure
OffNo error
Red solidAt least one entry in the error log
Red blinking (2 Hz)At least one active error present
User Off/BlueControlled by functionblock „User_LED“
Power
OffPower supply missing
Green solidPower supply valid
Run
Green solidNo configuration active
Green blinking (2 Hz)Configuration active
Orange blinking (2 Hz)Configuration error
Orange solidEmergency state

2 | Hardware
6 / 40 PowerBox_PBX_90_Manual Bosch Motorsport
2.3 Connectors
HP_OUT3 PWM_OUT6 OUT21 ANA_IN07 SENS_OUT22 HP_OUT4
ANA_IN03 DIG_IN3 DIG_IN4 BAT_GNDANA_IN04
HP_OUT7OUT19 OUT20 OUT17 OUT18 OUT15
HP_OUT8
40 Ampere25 Ampere15 Ampere
X1 PBX90
CAN_3_H SENSGND
ANA_IN09 ANA_IN10 CAN_3_L
ANA_IN05 ANA_IN06 ANA_IN11 OUT16 ANA_IN12
ANA_IN08 PWM_OUT4 PWR_5V PWM_OUT2 PWM_OUT1
BAT_GND BAT_GND BAT_GND
PWM_OUT3 PWM_OUT5
HP_OUT1 HS_OUT14 HS_OUT13 HS_OUT02 HS_OUT01 TimestampINOUT CAN_B_H CAN_A_HOUT13 OUT02 OUT01 TIMESTAMPINOUT CAN_2_H CAN_1_H ETH_1_RXN ETH_1_TXN ETH_2_RXN ETH_2_TXNOUT14 HP_OUT2
BAT_GND ANA_IN01 DIG_IN1 DIG_IN2 CAN_2_L ETH_1_RXP ETH_1_TXP ETH_2_RXP ETH_2_TXPCAN_1_LANA_IN02
HP_OUT5OUT11 OUT09 OUT12 OUT10 OUT07 OUT08 OUT05 OUT06 OUT03 OUT04
HP_OUT6LIN_OUT SHIELD_GND
40 Ampere25 Ampere15 Ampere
X2 PBX90

Hardware | 2
Bosch Motorsport PowerBox_PBX_90_Manual 7 / 40
2.4 Pin Configuration
Connector X1: 38 way (ABS/ESR) Code 1
Pin Signal Cont. [A] Peak [A]
1 HP_OUT3 40 150
2 OUT22 15 100
3 PWM_OUT6 15 75
4 OUT21 15 100
5 ANA_IN07 0 to 5 V, Pull-up
6 ANA_IN08 0 to 5 V, Pull-up
7 PWM_OUT4 15 75
8 CAN_3_H 1 Mbaud max.
9 SENSGND GND for AIN[x]
10 SENSPWR_5V 0.4
11 PWM_OUT2 15 75
12 PWM_OUT1 15 75
13 HP_OUT4 40 150
14 ANA_IN03 0 to 5 V, Pull-up
15 ANA_IN04 0 to 5 V, Pull-up
16 DIG_IN3 0 to 12 V, Pull-up, Pull-down
17 DIG_IN4 0 to 12 V, Pull-up, Pull-down
18 ANA_IN09 0 to 5 V, Pull-up
19 ANA_IN10 0 to 5 V, Pull-up
20 CAN_3_L 1 Mbaud max.
21 BAT_GND 15 100
22 BAT_GND 15 100
23 BAT_GND 15 100
24 BAT_GND 15 100
25 HP_OUT7 25 150
26 OUT19 15 100
27 ANA_IN05 0 to 5 V, Pull-up
28 OUT20 15 100
29 ANA_IN06 0 to 5 V, Pull-up
30 OUT17 15 100
31 OUT18 15 100
32 ANA_IN11 0 to 5 V, Pull-up
33 OUT15 15 100
34 OUT16 15 100
35 ANA_IN12 0 to 5 V, Pull-up
36 PWM_OUT3 15 75
37 PWM_OUT5 15 75
38 HP_OUT8 25 150
2 | Hardware
8 / 40 PowerBox_PBX_90_Manual Bosch Motorsport
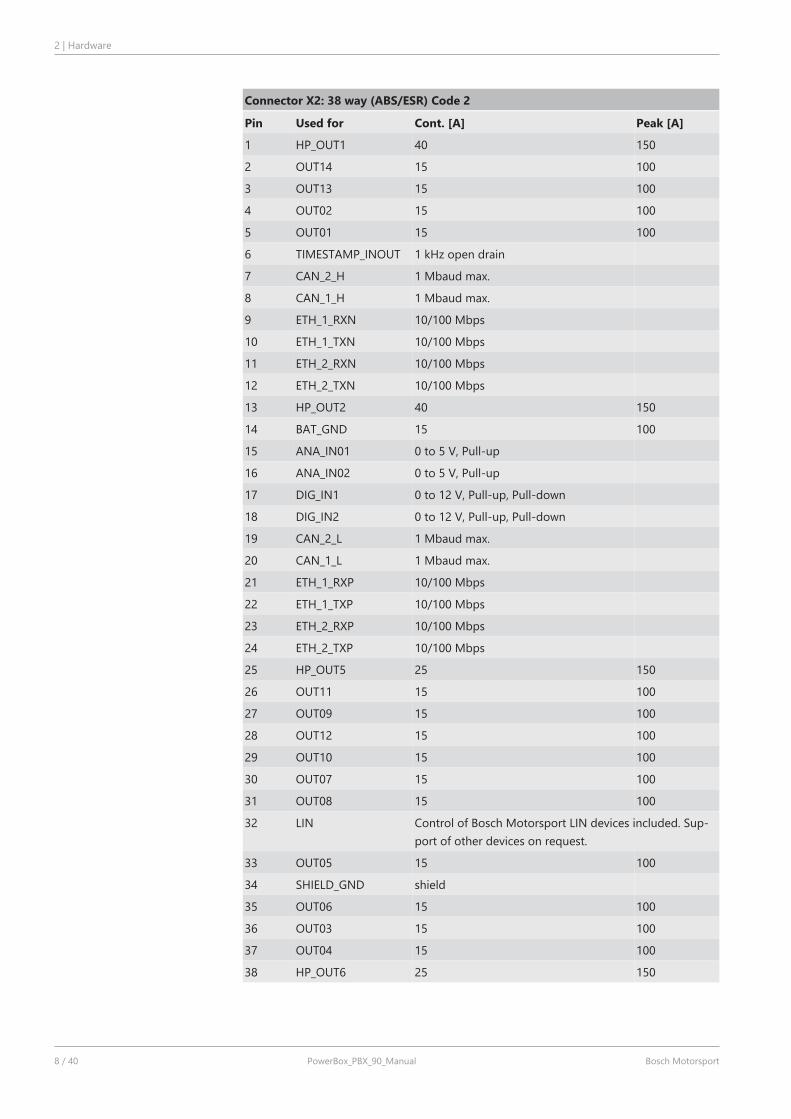
Connector X2: 38 way (ABS/ESR) Code 2
Pin Used for Cont. [A] Peak [A]
1 HP_OUT1 40 150
2 OUT14 15 100
3 OUT13 15 100
4 OUT02 15 100
5 OUT01 15 100
6 TIMESTAMP_INOUT 1 kHz open drain
7 CAN_2_H 1 Mbaud max.
8 CAN_1_H 1 Mbaud max.
9 ETH_1_RXN 10/100 Mbps
10 ETH_1_TXN 10/100 Mbps
11 ETH_2_RXN 10/100 Mbps
12 ETH_2_TXN 10/100 Mbps
13 HP_OUT2 40 150
14 BAT_GND 15 100
15 ANA_IN01 0 to 5 V, Pull-up
16 ANA_IN02 0 to 5 V, Pull-up
17 DIG_IN1 0 to 12 V, Pull-up, Pull-down
18 DIG_IN2 0 to 12 V, Pull-up, Pull-down
19 CAN_2_L 1 Mbaud max.
20 CAN_1_L 1 Mbaud max.
21 ETH_1_RXP 10/100 Mbps
22 ETH_1_TXP 10/100 Mbps
23 ETH_2_RXP 10/100 Mbps
24 ETH_2_TXP 10/100 Mbps
25 HP_OUT5 25 150
26 OUT11 15 100
27 OUT09 15 100
28 OUT12 15 100
29 OUT10 15 100
30 OUT07 15 100
31 OUT08 15 100
32 LIN Control of Bosch Motorsport LIN devices included. Sup-port of other devices on request.
33 OUT05 15 100
34 SHIELD_GND shield
35 OUT06 15 100
36 OUT03 15 100
37 OUT04 15 100
38 HP_OUT6 25 150

Hardware | 2
Bosch Motorsport PowerBox_PBX_90_Manual 9 / 40
Connector X3: Amphenol Radsok Automotive Pinlock Connector 8 mm (35 mm²,50 mm²)
Pin Used for Cont. [A] Peak [A]
1 BATT_POS 120 180
2.5 Warnings and shutdown ThresholdsDue to thermal or pin current overload there are several warnings and shutdownthresholds. You can see an overview of these below.
Overcurrent
Warning overcurrent X3 140 A for 0.2 s
Shutdown overcurrent X3 180 A for 2 s
Overtemperatur
Warning overtemperature CPU 95°C for 2 s
Shutdown overtemperature CPU 100°C for 2 s
Warning overtemperature Device 110°C for 2 s
Shutdown overtemperature Device 115°C for 2 s
2.6 MountingHardwareMake sure that all connectors are plugged and locked before appyling supply voltage.PowerBox PBX 90 will instantly start operation when supply is available.
Boot time is about 1 sec.
New hardware is preconfigured, no outputs will turn on.

3 | PBX Suite Installation
10 / 40 PowerBox_PBX_90_Manual Bosch Motorsport
3 PBX Suite InstallationThe setup file for the PBX Suite is provided at the Bosch Motorsport internet homepage atthe product page of the PowerBox PBX 90.
For the PBX Suite a personal license key is required. This can be requested at order time ofa PowerBox PBX 90 device or later by mail to [email protected](For evaluation purpose a 30 days limited setup is also available without needing a li-cense).
The installation requires administrator rights.
Start the installation by running setup.exe and follow the wizard steps.

The Structure Editor: Create a new configuration | 4
Bosch Motorsport PowerBox_PBX_90_Manual 11 / 40
4 The Structure Editor: Create a newconfigurationA configuration is the unit you exchange between the programming tool PBX Suite andyour PowerBox PBX 90 after all changes and modifications.
For creating a configuration we developed the PBX Suite. This software tool enables visualprogramming of the configuration of your PowerBox.
– Start the program PBX Suite.
– Click Structure Editor in the menu box on the left side (1).
– Click New (2).
– Select your PBX type (3).
– Load the corresponding PST file (4).
– Confirm by clicking OK (5).
4.1 Function BlocksThe key technology of the PBX Suite is the function block. All functions of the PowerBoxcan be programmed and modified by using a string of function blocks.
Every function block is divided into three parts:
C
B
A
– A is the top part that includes the unique name of the function block. It is userchangeable.

4 | The Structure Editor: Create a new configuration
12 / 40 PowerBox_PBX_90_Manual Bosch Motorsport
– B is the middle part that shows static parameters of the function block.
– C is the bottom part that shows dynamic input and output signals of the functionblock.
In part B and part C the colored rectangles symbolize the signal connections: inputs onthe left side and outputs on the right side.
4
2
65
3
1
1. Client assignment
2. Optional global block enable input.
3. Optional global block enable output, daisy-chained with input.
4. Signal input. Data type Boolean. Enabled for online view and export to RaceCon.
5. Signal output. Data type Integer. Enabled for online view and export to RaceCon.
6. Signal output. Data type Float. Enabled for online view and export to RaceCon.
As you will have realized in the steps 4 to 6, the system offers signals of three differentdata types:
– Boolean (Background color always GREEN)
– Integer (Background color always YELLOW)
– Float (Background color always ORANGE)
If function blocks are available as different data type, you can identify the data type fromthe background color of the inputs and outputs and from the end of the function blocksname. The last letter will show the data type.
Example:
The function block CAN_Input is available as data type Boolean or data type Integer ordata type Float. To separate one from the other we put a letter at the end of the functionblocks name:
The Structure Editor: Create a new configuration | 4
Bosch Motorsport PowerBox_PBX_90_Manual 13 / 40
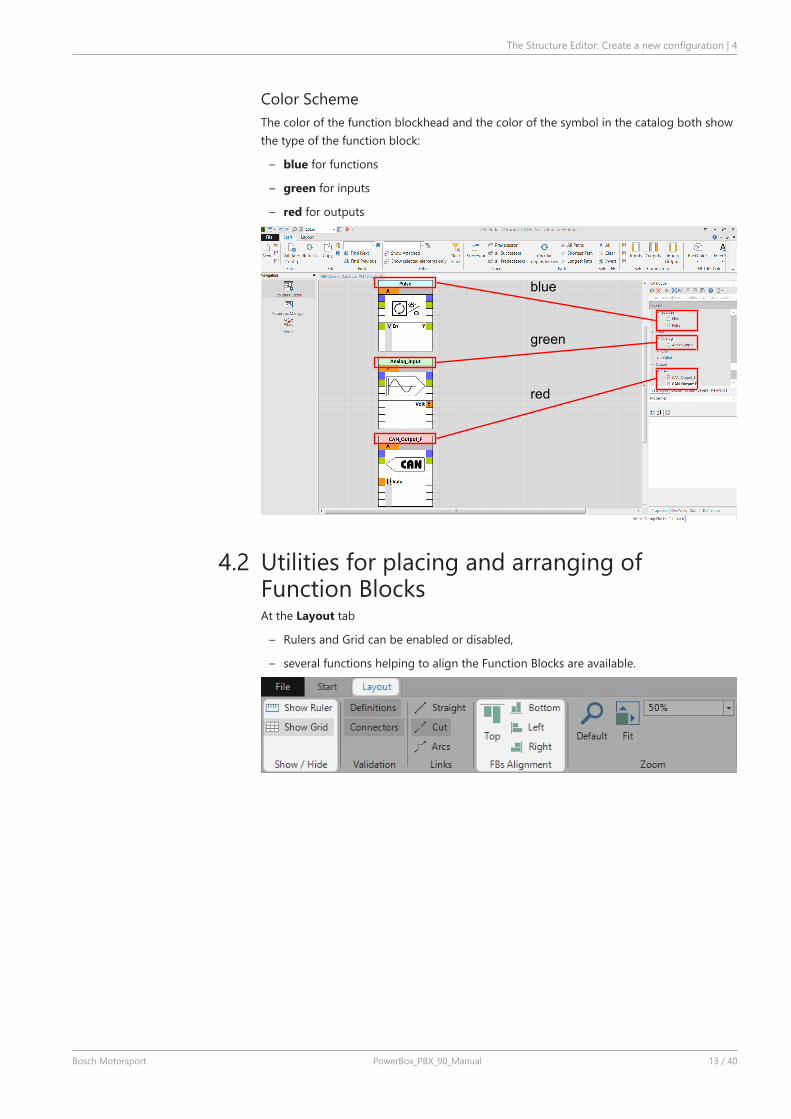
Color SchemeThe color of the function blockhead and the color of the symbol in the catalog both showthe type of the function block:
– blue for functions
– green for inputs
– red for outputs
blue
green
red
4.2 Utilities for placing and arranging ofFunction BlocksAt the Layout tab
– Rulers and Grid can be enabled or disabled,
– several functions helping to align the Function Blocks are available.

4 | The Structure Editor: Create a new configuration
14 / 40 PowerBox_PBX_90_Manual Bosch Motorsport
4.3 Navigating through the configurationUse mouse wheel for zooming in or out.
Space bartoggles between current view and Zoom to Fit.
At the Quick Access Toolbarseveral zoom options are provided.
Use OverView or Zoom tab for a second farer or closer view.
4.4 Example “Blower Control”This chapter shows an example how to program the function Blower Control with thePBX Suite. The function shall start the cooling fan when the water temperature exceedse.g. 90°C and stops it when the temperature falls below e.g. 80°C. You’ll reach it by settingDefault to 90 and Hysteresis to 10 as shown in the following instructions.
1. Start the PBX Suite.
2. Click Structure Editor in the menu box on the left side.
3. Click New.
4. Select your PBX Type.
5. Load the corresponding PST File.
6. Confirm by clicking OK.
7. Write Input in the text field of the Catalogue [Insert here all words to filter, use “;” asseparator].

The Structure Editor: Create a new configuration | 4
Bosch Motorsport PowerBox_PBX_90_Manual 15 / 40
8. Drag and Drop the function Analog_Input from the Catalogue onto the screen. TheAnalog_Input function block will pop up as shown in the following screenshot.
9. With double-click on the selected function block you open the pin assignment wizard.Select Input X1_15 from the pull down menu. X1 is the connectors name and 15 is thepins name.
10. The assigned connector and pin are part of the function blocks name shown in theheadline of the function block. Here it is X1_15, as you can see in the following screenshot. Notice: All function blocks can be renamed by changing the name in Properties /Name.

4 | The Structure Editor: Create a new configuration
16 / 40 PowerBox_PBX_90_Manual Bosch Motorsport
With click on F1 while function block selected, you open the context sensitive onlinehelp. Here you find further information.
11. Write Table in the text field of the Catalogue.
12. Drag and Drop the function OneDLookuptable from the Catalogue onto the screen.
If you want to see the actual temperature in the Live Data later, please enable theOneDLookupTable by setting Y to enabled (red ring). Therefore you click on the or-

The Structure Editor: Create a new configuration | 4
Bosch Motorsport PowerBox_PBX_90_Manual 17 / 40
ange rectangle right of the Y. It gets red if activated. Choose Event Enabled -> True inthe Properties block as shown in the following screenshot.
13. For more information about Live Data, please see View Live Data [} 29].
14. Double-click on the function OneDLookuptable opens a curve and a table where youcan fill in your sensor data.
15. Write hyst in the text field of the Catalogue.

4 | The Structure Editor: Create a new configuration
18 / 40 PowerBox_PBX_90_Manual Bosch Motorsport
16. Drag and Drop the function Hysteresis_left from the Catalogue onto the screen. TheHysteresis_left function block will pop up as shown in the following screenshot.
17. For setting the default values click the orange square left to Lim in the Hysteresis_leftfunction block. It changes color to red when activated. Sign in the value 90.0 as De-faultValue under Properties as shown in the following screenshot.
18. Set 10.0 as DefaultValue under Hyst in the same function block.
The Structure Editor: Create a new configuration | 4
Bosch Motorsport PowerBox_PBX_90_Manual 19 / 40
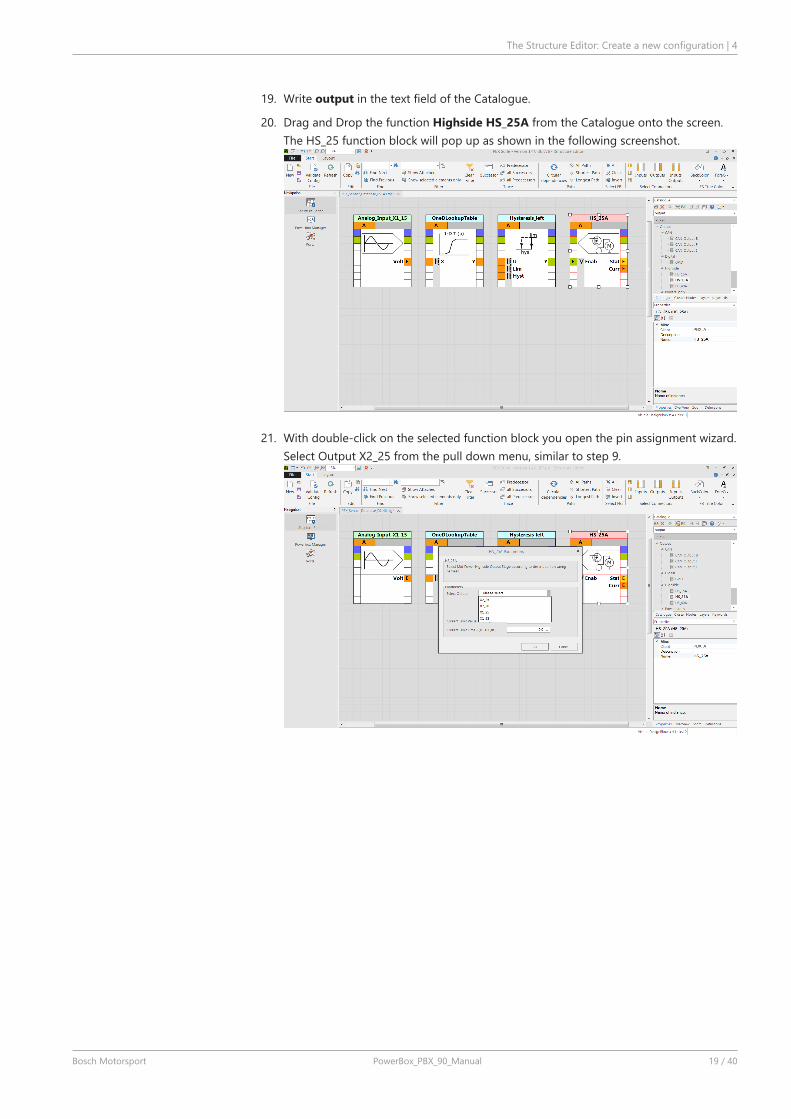
19. Write output in the text field of the Catalogue.
20. Drag and Drop the function Highside HS_25A from the Catalogue onto the screen.The HS_25 function block will pop up as shown in the following screenshot.
21. With double-click on the selected function block you open the pin assignment wizard.Select Output X2_25 from the pull down menu, similar to step 9.

4 | The Structure Editor: Create a new configuration
20 / 40 PowerBox_PBX_90_Manual Bosch Motorsport
22. Connect the square angles of the function blocks by pulling lines as shown in the fol-lowing screenshot.
23. Save the function by click on Save as shown in the following screenshot.
Congratulations! You have programmed your first function!
Further stepsAfter creating the configuration, you got the following options:
– transfer and activate the configuration to the PowerBox PBX 90 with PowerBox Man-ager,
– follow the signal values with PowerBox Manager,
– use the automatically generated *.prg file for RaceCon to measure, record and ana-lyze, see also Integration to RaceCon [} 32].
Please visit our website bosch-motorsport.com for more information on how to work withthe PBX suite.

The Structure Editor: Create a new configuration | 4
Bosch Motorsport PowerBox_PBX_90_Manual 21 / 40
4.5 Structuring of complex configurations
4.5.1 LayerUse Layer mechanism for logically grouping of Function Blocks.
Function Blocks can belong to several Layers.
Layers are supported by the View Online Data of the Powerbox Manager allowing an easyfiltering for the data of interest.
4.5.2 Container1. Select two or more function blocks.
2. Right click on a selected function block to open the context menu
3. Select Create Container
A Container block appears which is connected to the environment.
In the properties tab a description, an image or an alternative name can be setup.

4 | The Structure Editor: Create a new configuration
22 / 40 PowerBox_PBX_90_Manual Bosch Motorsport
Double clicking the Container switches inside the container, showing the included func-tionblocks and the outside connections.
Navigation to the outside is done in the lower left corner.
A further outside connection can be generated by
1. Right clicking on an in- or output port,
2. Select Add Connector to Container.
The Structure Editor: Create a new configuration | 4
Bosch Motorsport PowerBox_PBX_90_Manual 23 / 40
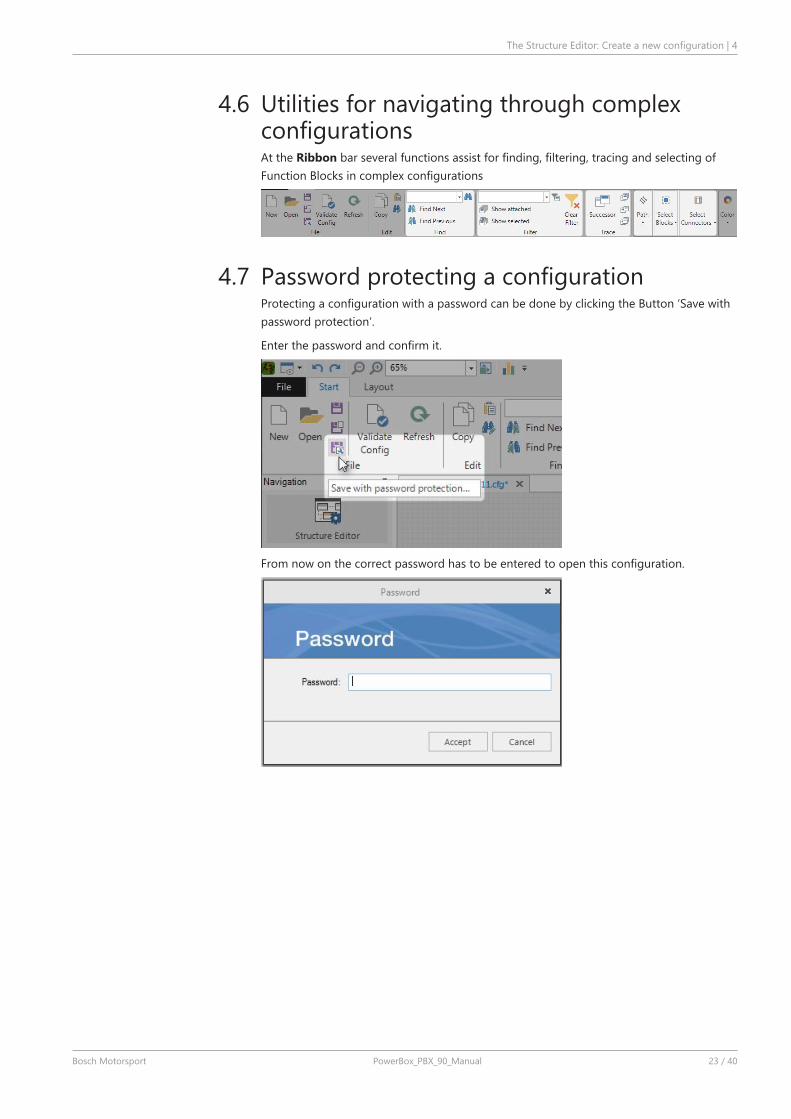
4.6 Utilities for navigating through complexconfigurationsAt the Ribbon bar several functions assist for finding, filtering, tracing and selecting ofFunction Blocks in complex configurations
4.7 Password protecting a configurationProtecting a configuration with a password can be done by clicking the Button ‘Save withpassword protection‘.
Enter the password and confirm it.
From now on the correct password has to be entered to open this configuration.
5 | First Upload of a configuration
24 / 40 PowerBox_PBX_90_Manual Bosch Motorsport
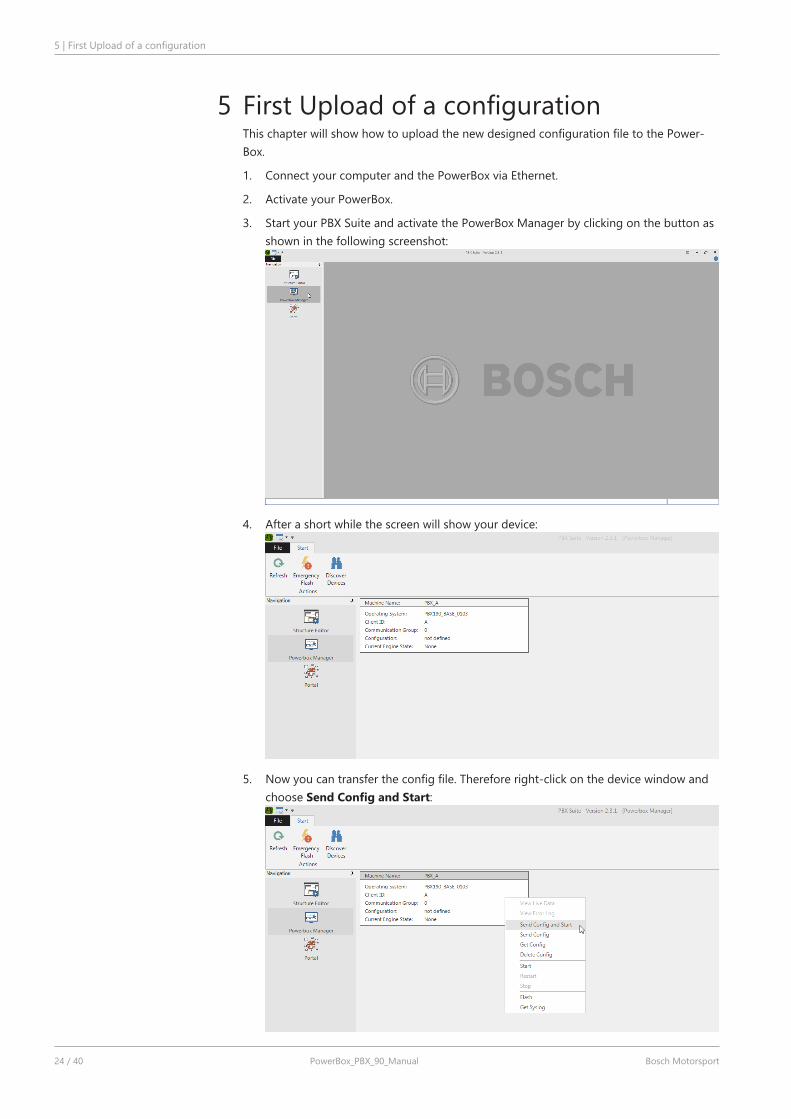
5 First Upload of a configurationThis chapter will show how to upload the new designed configuration file to the Power-Box.
1. Connect your computer and the PowerBox via Ethernet.
2. Activate your PowerBox.
3. Start your PBX Suite and activate the PowerBox Manager by clicking on the button asshown in the following screenshot:
4. After a short while the screen will show your device:
5. Now you can transfer the config file. Therefore right-click on the device window andchoose Send Config and Start:
First Upload of a configuration | 5
Bosch Motorsport PowerBox_PBX_90_Manual 25 / 40
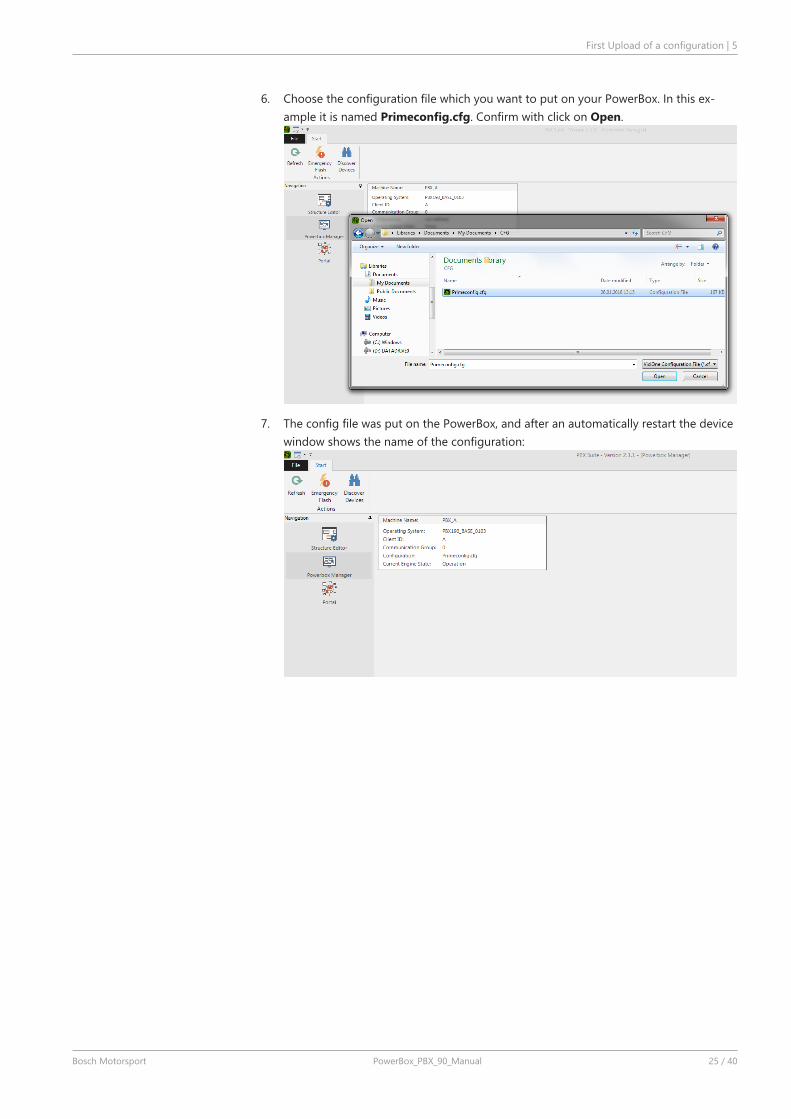
6. Choose the configuration file which you want to put on your PowerBox. In this ex-ample it is named Primeconfig.cfg. Confirm with click on Open.
7. The config file was put on the PowerBox, and after an automatically restart the devicewindow shows the name of the configuration:

6 | Update of an existing configuration
26 / 40 PowerBox_PBX_90_Manual Bosch Motorsport
6 Update of an existing configurationThis chapter will show how to update a configuration.
1. Click Project Configuration on Catalogue tab as shown in the following picture.
2. Select the corresponding PST file.
3. Confirm by clicking OK.

The Powerbox Manager | 7
Bosch Motorsport PowerBox_PBX_90_Manual 27 / 40
7 The Powerbox ManagerThe Ribbon Bar
1. Refresh: Updates the current view
2. Emergency Flash: Allows to Flash a device which has entered the emergency state
3. Discover Devices: Used to assign in a double-PBX system the 2nd PBX device a differ-ent allocation
7.1 Switch between configurationsThis chapter will show how to switch between different configurations on your PowerBox.
1. Right mouse click on the device window will open the menu as shown in the followingscreenshot.
2. Click on Stop to end the active configuration.
3. Click Start to choose the new configuration.
7 | The Powerbox Manager
28 / 40 PowerBox_PBX_90_Manual Bosch Motorsport
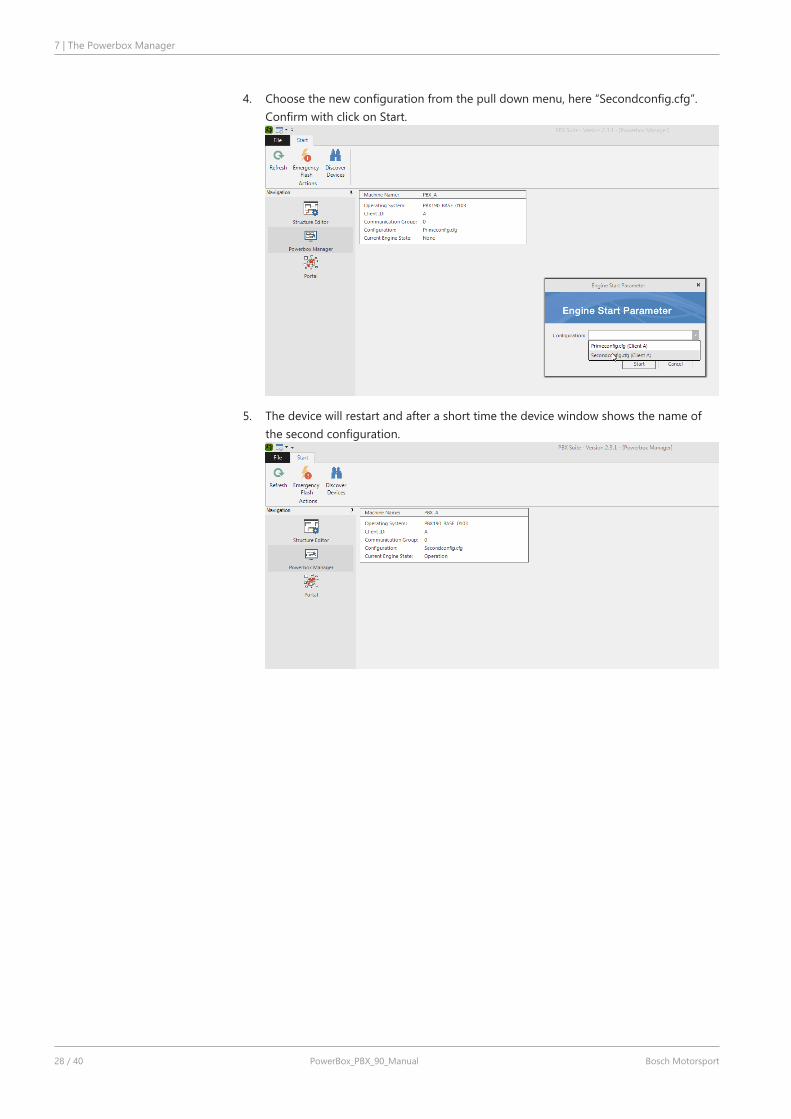
4. Choose the new configuration from the pull down menu, here “Secondconfig.cfg”.Confirm with click on Start.
5. The device will restart and after a short time the device window shows the name ofthe second configuration.

The Powerbox Manager | 7
Bosch Motorsport PowerBox_PBX_90_Manual 29 / 40
7.2 View Live DataThis chapter will show how you can view live data with your PowerBox Suite. Right click onyour device opens a window where you choose View Live Data.
Now you can see the entire Event enabled data on your screen.
Every in- or output port of the Function Blocks checked for EventEnabled is represented asa row.
For output ports the current value is shown, some with additional Description information.
For input ports it is possible to affect the operative value. The result is controlled by theselected PoolingMode.
Various support for filtering the amount of data is provided, including the support for Lay-ers.
7 | The Powerbox Manager
30 / 40 PowerBox_PBX_90_Manual Bosch Motorsport
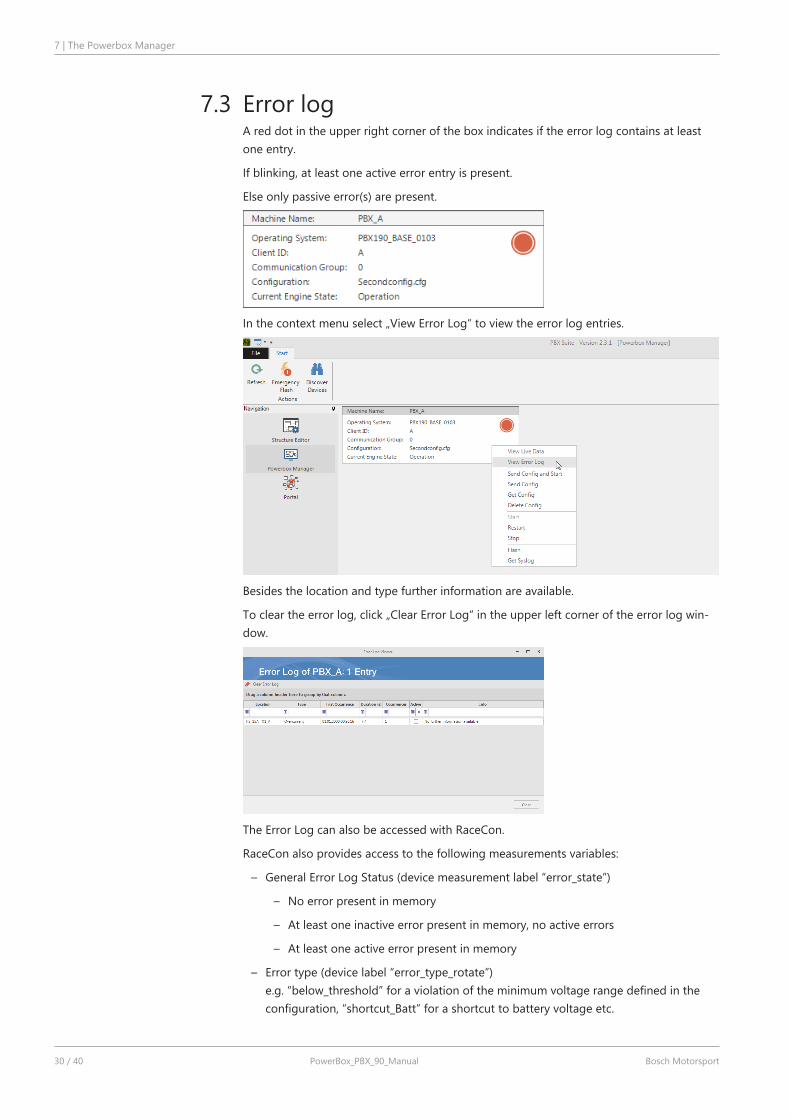
7.3 Error logA red dot in the upper right corner of the box indicates if the error log contains at leastone entry.
If blinking, at least one active error entry is present.
Else only passive error(s) are present.
In the context menu select „View Error Log“ to view the error log entries.
Besides the location and type further information are available.
To clear the error log, click „Clear Error Log“ in the upper left corner of the error log win-dow.
The Error Log can also be accessed with RaceCon.
RaceCon also provides access to the following measurements variables:
– General Error Log Status (device measurement label “error_state”)
– No error present in memory
– At least one inactive error present in memory, no active errors
– At least one active error present in memory
– Error type (device label “error_type_rotate”)e.g. “below_threshold” for a violation of the minimum voltage range defined in theconfiguration, “shortcut_Batt” for a shortcut to battery voltage etc.

The Powerbox Manager | 7
Bosch Motorsport PowerBox_PBX_90_Manual 31 / 40
– Error location (device label “error_location_rotate”)e.g. “ANA01” for an error concerning the first ANA channel
– Error active state (device label “error_active_rotate”)All failure modes are continuously diagnosed; any error detected will be written to theerror memory. Once an error is detected, it is qualified as “active”.
– 1 (TRUE) Error was detected in most recent diagnose run (active)
– 0 (FALSE) Error is inactive: error was not detected in most recent diagnostic run,however the error has not been cleared from the memory by the user and re-mains in the non‐volatile memory
The aforementioned labels (error_active_rotate, error_location_rotate, error_type_rotate)cycle through the errors currently present in the memory and represent the respectiveproperty of each error periodically.

8 | Integration to RaceCon
32 / 40 PowerBox_PBX_90_Manual Bosch Motorsport
8 Integration to RaceConAt the same location the Configuration is saved, an additional export file for RaceCon iswritten. It is suffixed by an ‚_A‘ or ‚_B‘ and the extension is ‚PRG‘:
Drag & Drop a PowerBox PBX 90 in RaceCon into the project and select this ‚PRG‘ file ifasked for the program archive:
All the In- and Output Ports of the configuration with EventEnabled set to True are nowavailable and can be used for
1. Logger
2. Display
3. Measuring

Integration to RaceCon | 8
Bosch Motorsport PowerBox_PBX_90_Manual 33 / 40

9 | FAQ
34 / 40 PowerBox_PBX_90_Manual Bosch Motorsport
9 FAQYou’ll find an FAQ list on the PowerBox product site of bosch-motorsport.com.

Disposal | 10
Bosch Motorsport PowerBox_PBX_90_Manual 35 / 40
10 DisposalHardware, accessories and packaging should be sorted for recycling in an environment-friendly manner.
Do not dispose of this electronic device in your household waste.

11 | Technical Specifications
36 / 40 PowerBox_PBX_90_Manual Bosch Motorsport
11 Technical SpecificationsMechanical DataSize 214 x 159 x 57.5 mm
Weight 830 g
Temp. range (at internal sensors) -20 to 85°C
Electrical DataSupply voltage range 5 to 20 V
Current consumption <1 A
Maximum recommended output current 120 A continuously>180 A peak current (2 s)
InputsNumber of digital inputs 4
Number of analogue inputs 12 x 0 to 5 V; 16 bit resolution
Number of CAN input channels 500
OutputsAll driver stages are thermally and reverse polarity protected.
Very high power channels
Number of individual outputs 4
Maximum continuously current draw peroutput*)
40 A
Maximum peak current each output 150 A inrush
High power channels
Number of individual outputs 4
Maximum continuously current draw peroutput *)
25 A
Maximum peak current each output 150 A inrush
Low power channels
Number of individual outputs 22
Maximum continuously current draw peroutput
15 A
Maximum peak current each output 100 A inrush
PWM channels
Number of individual outputs 6
Maximum continuously current draw peroutput*)
15 A
Maximum peak current each output 75 A inrush
Maximum applied frequency 20 kHz
Technical Specifications | 11
Bosch Motorsport PowerBox_PBX_90_Manual 37 / 40
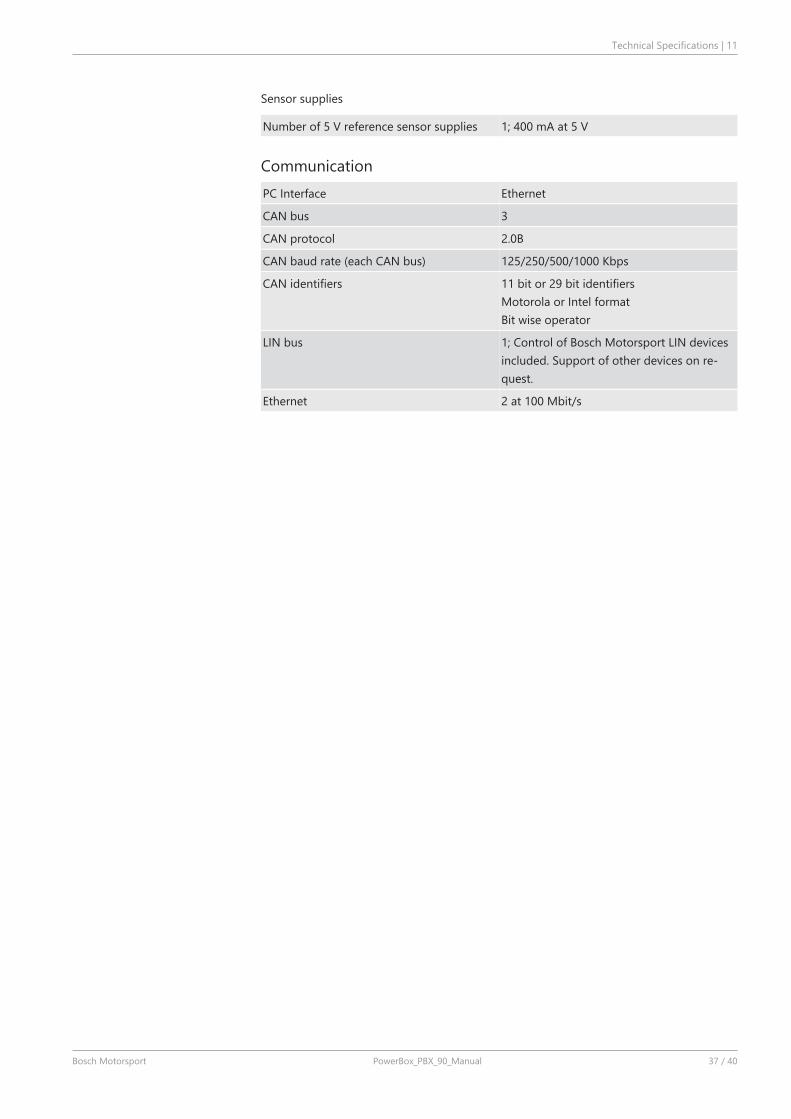
Sensor supplies
Number of 5 V reference sensor supplies 1; 400 mA at 5 V
CommunicationPC Interface Ethernet
CAN bus 3
CAN protocol 2.0B
CAN baud rate (each CAN bus) 125/250/500/1000 Kbps
CAN identifiers 11 bit or 29 bit identifiers Motorola or Intel format Bit wise operator
LIN bus 1; Control of Bosch Motorsport LIN devicesincluded. Support of other devices on re-quest.
Ethernet 2 at 100 Mbit/s

38 / 40 PowerBox_PBX_90_Manual Bosch Motorsport

Bosch Motorsport PowerBox_PBX_90_Manual 39 / 40

Bosch Engineering GmbHMotorsportRobert-Bosch-Allee 174232 AbstattGermanywww.bosch-motorsport.com