pottery making - ceramic arts daily · cover: tea bowl, approximately 5 inches in diameter,...
TRANSCRIPT


Pottery Making illustrated 1

2 Fall 2000

Cover: Tea bowl, approximately 5 inches in diameter, reduction fired to Cone 11, by Mel Jacobson. See story on page 9.
Pottery Making illustrated 3
FeaturesThe Japanese Technique of Hump Throwing.................9by Mel JacobsonLearn how to throw off the hump using a method handed down for generations.
The Dynamic Art of Throwing Clay............................ 17by Ivor LewisInsight to what happens to your clay as you center, cone, push, pull and prod it on the wheel.
Preventing S-Cracks .................................................... 20by Jeff ZamekOnce you’ve learned that clay has a mind of its own, the next step is to convince it to behave.
Small Treasures.............................................................25by Dannon Rhudy Shaking things up a little.
How to Make a Clay Whistle........................................29by Chris HenleyJust pucker your lips and blow! Here’s another method for making music from your clay.
The Stamp Story........................................................... 32by Barbara BrownLearn how to get started on collecting pottery stamps.
It’s Extraterrestrial!.......................................................37by Craig HinshawChildren explore space when modeling planet surfaces in clay.
Bottle Screen Sieve ...................................................... 44by Don AdamaitisStrain your glazes before they strain your spray gun.
DepartmentsClayLinks by Barbara Coultry......................................................................... 6
Museums—Tour pottery collections around the world.
Down to Business by Chris Campbell............................................................40Are You Ready?—Three easy steps to determine if you’re ready to put your work on the market.
The Budget Potter by Sylvia Shirley...............................................................42Clay Slip Processing—A scrap pail with a twist.
Off the Shelf by Sumi von Dassow................................................................. 46Southwest Indian Pottery—The rich culture of Native Americans revealed in this quality selection of books.
Volume 3, Number 5Editor: Bill Jones
Production Manager: John Wilson Circulation Supervisor: Cleopatra G. Eddie
Graphic Design: Debi Hampton Graphic Production: Dave Houghton
Advertising Manager: Steve Hecker Advertising Assistant: Debbie Plummer
Customer Service: Mary HopkinsPublisher: Mark Mecklenborg
Editorial, Advertising & Circulation Offices 735 Ceramic Place
PO Box 6136 Westerville, OH 43086-6136
Phone: (614) 794-5890 Fax: (614) 794-5892
E-mail: [email protected]
www.potterymaking.orgPottery Making Illustrated (ISSN 1096-830X) is published 5 times a year in January, April, June, August and October by The American Ceramic Society, 735 Ceramic Place, Westerville, OH 43081. Periodical postage paid at Westerville, OH, and additional mailing offices.Opinions expressed are those of the contributors and do not necessarily represent those of the editors or The American Ceramic Society.Subscription rates: 5 issues (1 year) $18,10 issues (2 years) $34, 15 issues (3 years) $49. Add $15 per year for subscriptions outside North America. In Canada, add 7% GST (R123994618). All payments must be in US$ and drawn on a US bank. Allow 6-8 weeks for delivery.Advertising: Ad rates and ad information are available on the web site or by contacting Steve Hecker at the address above or by phone at (614) 794-5809.Change of address: Send your change of address via e-mail or to the Circulation Department. Allow six weeks advance notice.
Contributors: Writing and photographic guidelines are available on request and on the web site. Mail manuscripts and visual materials to the editorial offices.
Photocopies: For a fee, searchable databases and document delivery are available through The American Ceramic Society’s Ceramic Information Center, PO Box 6136, Westerville, OH 43086-6136; e-mail [email protected]; or phone (614) 794-5810. Permission to photocopy for personal or internal use beyond the limits of Sections 107 and 108 of the U.S. Copyright Law is granted by The American Ceramic Society, ISSN 1096-830X, provided that the appropriate fee is paid directly to the Copyright Clearance Center, 222 Rosewood Dr., Danvers, MA 01923 USA (978) 750- 8400; www.copyright.com. Prior to photocopying items for educational classroom use, please contact Copyright Clearance Center, Inc. This consent does not extend to copying items for general distribution, for advertising or promotional purposes or to republishing items in whole or in part in any work and in any format. Please direct republication or special copying permission requests to the Director of Publications, The American Ceramic Society, PO Box 6136, Westerville, OH 43086-6136.Back Issues: When available, back issues are $5 each plus $3 postage for the first copy and $1 for each additional copy thereafter. For orders outside North America, add $6 ($2 for additional copies). In Canada, add 7% GST.Postmaster: Send address changes to Pottery Making Illustrated, PO Box 6136, Westerville, OH 43086-6136. Form 3579 requested.
Copyright © 2000 The American Ceramic Society
All rights resewedwww.ceramics.org
Fall 20004
Pottery Making illustrated 5
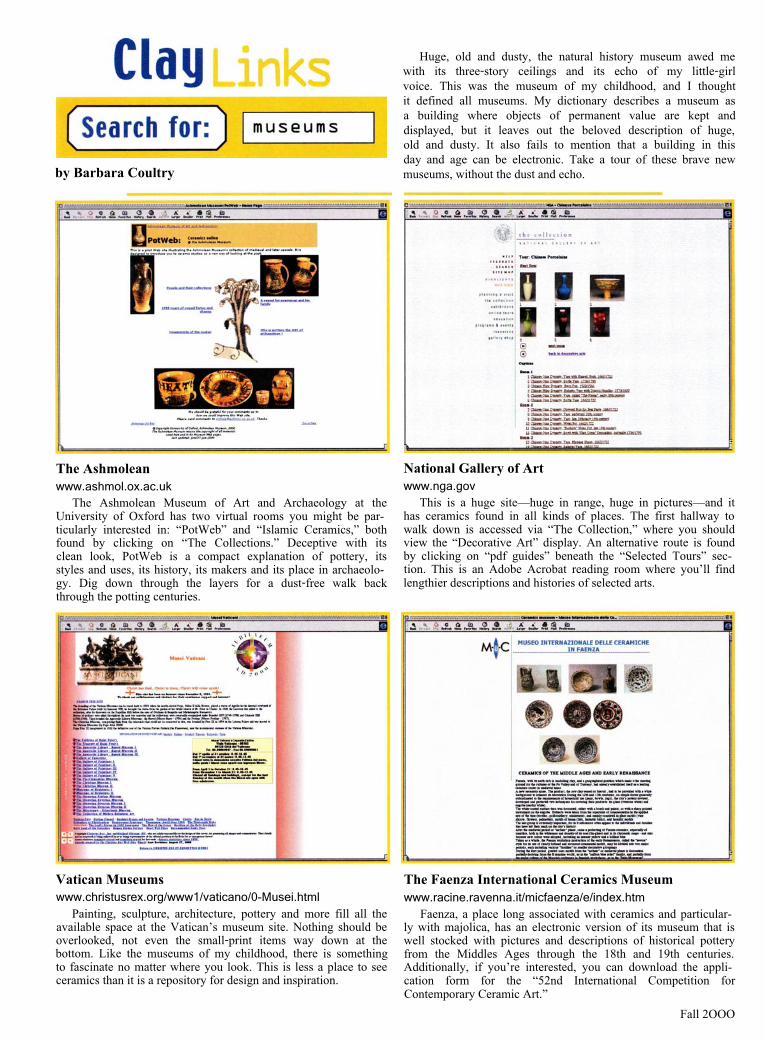
by Barbara Coultry
The Ashmoleanwww.ashmol.ox.ac.uk
The Ashmolean Museum of Art and Archaeology at the University of Oxford has two virtual rooms you might be particularly interested in: “PotWeb” and “Islamic Ceramics,” both found by clicking on “The Collections.” Deceptive with its clean look, PotWeb is a compact explanation of pottery, its styles and uses, its history, its makers and its place in archaeology. Dig down through the layers for a dust-free walk back through the potting centuries.
Vatican Museumswww.christusrex.org/www1/vaticano/0-Musei.html
Painting, sculpture, architecture, pottery and more fill all the available space at the Vatican’s museum site. Nothing should be overlooked, not even the small-print items way down at the bottom. Like the museums of my childhood, there is something to fascinate no matter where you look. This is less a place to see ceramics than it is a repository for design and inspiration.
Huge, old and dusty, the natural history museum awed me with its three-story ceilings and its echo of my little-girl voice. This was the museum of my childhood, and I thought it defined all museums. My dictionary describes a museum as a building where objects of permanent value are kept and displayed, but it leaves out the beloved description of huge, old and dusty. It also fails to mention that a building in this day and age can be electronic. Take a tour of these brave new museums, without the dust and echo.
National Gallery of Artwww.nga.gov
This is a huge site—huge in range, huge in pictures—and it has ceramics found in all kinds of places. The first hallway to walk down is accessed via “The Collection,” where you should view the “Decorative Art” display. An alternative route is found by clicking on “pdf guides” beneath the “Selected Tours” section. This is an Adobe Acrobat reading room where you’ll find lengthier descriptions and histories of selected arts.
The Faenza International Ceramics Museum www.racine.ravenna.it/micfaenza/e/index.htm
Faenza, a place long associated with ceramics and particularly with majolica, has an electronic version of its museum that is well stocked with pictures and descriptions of historical pottery from the Middles Ages through the 18th and 19th centuries. Additionally, if you’re interested, you can download the application form for the “52nd International Competition for Contemporary Ceramic Art.”
Fall 2OOO

Here are a few more museums to visit:The Alexandria Archaeology Museum: The Potter’s Artci.alexandria.va.uslohalarchaeologylar-ex-potter.htmlThis site contains a fascinating little history of our brethren potters living and working in the 19th century in Alexandria, Virginia.University of Michigan Museum of Anthropologywww.umma.lsa.umich.edulumma.htmlTry “Ethnology” and “Asian” for good examples of early pottery.Minnesota State University Emuseum: Artifact Typologywww.anthro.mankato.msus.edularchaeolo-gylartifactslindex.shtmlHere you’ll find a small picture tour of pottery from pre-Columbian times in Wisconsin and Minnesota.Esslingen Museummy.bawue.del-wmwernerlesslinglenglishlindex.html“Excavations at the Carmelite friary” is an interesting piece about urban archaeology that includes ceramics (which begins on the fifth page).Museum of Medieval and Encaustic Tilewww.euro-archt-salvage.comlmsmpg.htmlPresented by the Historic Tile Company, this is an online display of tiles from the 13th through the 19th centuries.Tracing the Art of Pueblo Potterywww.cmnh.orglresearchlculturallpueblo-potteryltracing.htmlThe Cleveland Museum of Natural History gives an excellent overview of the history of Southwestern pottery.Michael C. Carlos Museum at Emory Universitywww.emory.edulcarlosFascinating pieces from the past. Many ceramics are found in the “Permanent Collections ”Smithsonian American Art Museumwww.nmaa.si.eduGo to “Collections & Exhibitions,” then click on “Browse the Collection.”The Art Institute of Chicago www.artic.edulaiclindex.html“Collections” sends you to a choice of various cultures and their art, each complete with pictures and accompanying descriptions.The Metropolitan Museum of Artwww.metmuseum.orglcollectionslindex.aspGreat collection of digital images. Check out the decorative art collection.
Barbara Coultry welcomes suggestions and comments from readers about Clay Links. Please send your favorite sites and discoveries to her at [email protected]. While she can’t respond to each e-mail, she will check every link suggested. There is a dust-free plethora of museums on the Web. Go to On the Way to Clay for many more at h ttp: / /home, nycap. rr. com /way2clay /.
Pottery Making illustrated 7

8 Fall 2000
by Mel Jacobson
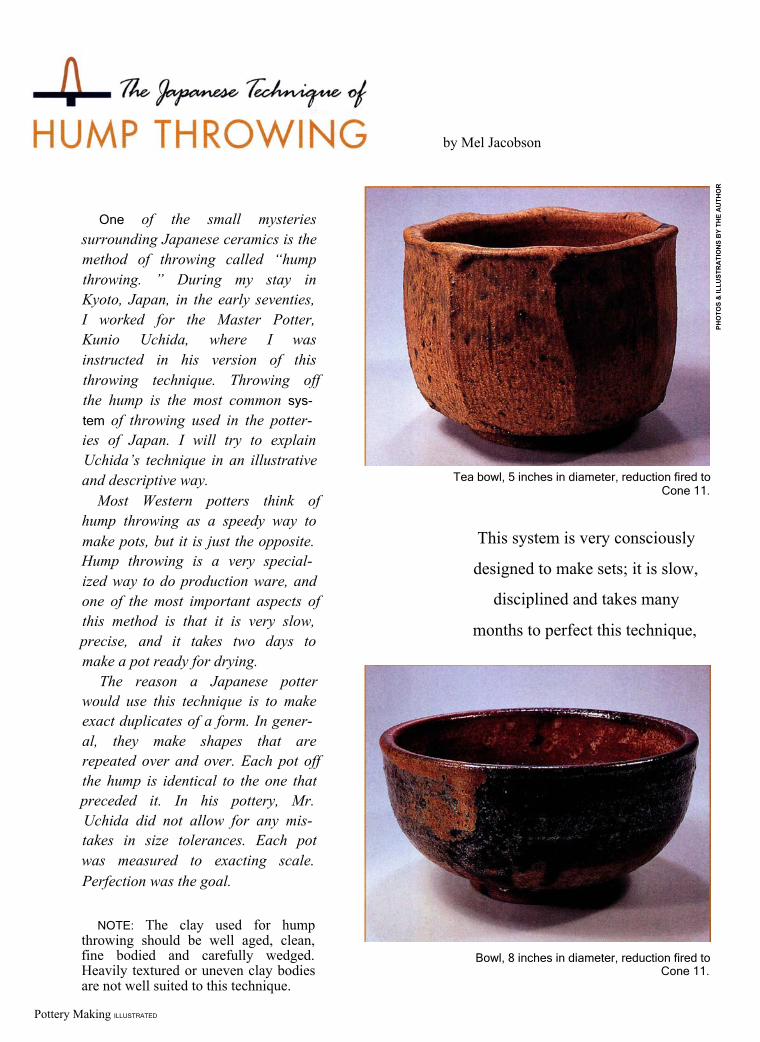
Tea bowl, 5 inches in diameter, reduction fired toCone 11.
This system is very consciously designed to make sets; it is slow,
disciplined and takes many months to perfect this technique,
Bowl, 8 inches in diameter, reduction fired toCone 11.
One of the small mysteries surrounding Japanese ceramics is the method of throwing called “hump throwing. ” During my stay in Kyoto, Japan, in the early seventies, I worked for the Master Potter, Kunio Uchida, where I was instructed in his version of this throwing technique. Throwing off the hump is the most common system of throwing used in the potteries of Japan. I will try to explain Uchida’s technique in an illustrative and descriptive way.
Most Western potters think of hump throwing as a speedy way to make pots, but it is just the opposite. Hump throwing is a very specialized way to do production ware, and one of the most important aspects of this method is that it is very slow, precise, and it takes two days to make a pot ready for drying.
The reason a Japanese potter would use this technique is to make exact duplicates of a form. In general, they make shapes that are repeated over and over. Each pot off the hump is identical to the one that preceded it. In his pottery, Mr. Uchida did not allow for any mistakes in size tolerances. Each pot was measured to exacting scale. Perfection was the goal.
NOTE: The clay used for hump throwing should be well aged, clean, fine bodied and carefully wedged. Heavily textured or uneven clay bodies are not well suited to this technique.
Pottery Making illustrated
PHO
TOS
& IL
LUST
RA
TIO
NS
BY
THE
AU
THO
R

Step 1
Begin with about 12 to 18 pounds of clay in one lump. Place it on the wheel and center it carefully, coning the clay up and down to make sure that no air pockets are present.
Step 4
After completing the general shape of the pot, use a pre-designed wooden rib that is exactly half the width of the pot and insert it into the roughly-shaped form. Place this rib with the left bottom corner exactly in the center of the pot, and the right side of the rib against the wall of the pot.
Step 2
Open a small disc or pancake of clay from the top of the hump. The size of this piece of clay is critical, as each piece made will have the same size disc as a starting point. (You should have, of course, a plan or schematic for the pots you are going to be throwing. In Japan, these plans were often drawn on graph paper to exacting proportions.)
Step 5
Hold the rib in the left hand while pressing the right-hand fingers against the outside of the pot and pull the pot to its height. Repeat this process several times until the proper thickness of the wall is complete and the height of the pot is achieved. If the pot is thrown too tall, trim and adjust the height with a very sharp needle.
Step 3
Roughly shape the sidewalls of the pot at this time.
Step 6
Check the size of the pot with a tool known as a tombo (see box on p. 11). Adjust the size of the pot to fit the three points. You may need to cut a small piece off the top of the pot to make the correct height. Using a rib, adjust the span of the pot to exactly fit the tombo. When all three points come together, the pot is finished. Finish the lip with a chamois and use a sponge to smooth the sides.
10 Fall 2OOO

Step 7
Precision is needed to cut the pot from the wheel, and a cut-off string (see box) is used. Form a small groove at the base of the pot with the index fingernail. Make this groove fairly deep. Judge the depth of the bottom of the pot and make the groove for the string at a place that will give the pot a 1/4-inch footring. It is imperative that you do not leave large amounts of clay at the bottom of the pot, as it takes a great deal of time to trim that clay away, and those are precious minutes when making perhaps 40 pots an hour.
Step 8
Place the cut-off tool with your left hand against the groove, and fling the string around the pot with the right fingers as you pull the tool horizontally away from the pot. The string slices the pot from the hump.
Step 9
After you have cut the pot from the hump, pluck it off the spinning wheel with the fingers and place it on a flat board. Start the next pot by drawing out a new disc or pancake, and repeat the entire process. When the pots are leather hard, place them upside down on a clay chuck the following day and trim them with an exact measured footring. The process of making footrings takes several minutes longer than the throwing process.
To measure the inside of the pot, the Japanese use a T- shaped tool called a tombo that looks like a dragonfly. It is a three-point measuring stick that sizes the span and the depth of the pot at one time.
Pottery Making illustrated ll
TOOLS OF THE TRADEFor a cut-off tool, a string connected to a wooden handle is needed. I have found that “old time” 18-pound -test fish line (braided) works the best.

A Japanese potter will sit at his wheel for many hours each day, six days a week-and repeat forms over and over. The Japanese thrower is hired to only throw pots and no other task in the studio is usually undertaken The master potter does all the design wor and almost never throws the pots designed. Glazing is done by a full-time glaze techm-S under the car^l eye of the master potter
I was very fortunate to have the opportum- ty to live and work in a Japanese pottery for a year. I worked long hours, became very disciplined in my work habits, and develope very tight set of muscle memory systems that I still have 28 years later.
Pots drying in Mr. Uchida’s outdoor courtyard
12 Fall 2000
Mei (right) and other workers (below).
J^ri 'Tah0ri'thrower> driver; Mr Naaata chief thrower; Mr. Tanabi, glaze technician.
Mr. Kunio Uchida, 1972.

Shino teapot, 9 inches in height, reduction fired to Cone 10.
Tea bowl, 5 inches in diameter, reduction fired to Cone 11.
Tea bowl, 5 inches in diameter, reduction fired to Cone 11.
Once you throw the first six to ten pots, it becomes almost second
nature to throw the rest.
Tea bowl, 5 inches in diameter, reduction fired to Cone 11.
Mel Jacobson is a Minnesota potter and teacher. He is currently the moderator of Clayart, an online discussion group for potters. Visit MeVs website at http://www.pclink.com/melpots.Pottery Making illustrated 13


16 Fall 2000

The Dynamic Art of Throwing Clay
Witness clay at the base of the pot. Repeated coning motions cause shearing and fragmentation of the structure; the clay is mixing and blending.
For this investigation, dark clay was strategically inserted in balls of white clay. Here the dark contrasting clay indicates that the circumference of the ball moves slower than the center. The witness becomes progressively more “S” shaped.
Contrasting clay sandwiched between white clay. Coning causes clay from below to be extruded upward in the center and downward on the outside, early evidence of radial shearing.
Throwing clay is a fluid medium, governed by the laws of hydraulics and electrostatic cohesion. Potters who have thrown marbled clay are familiar with the apparent random and turbulent patterns revealed by faceting or turning the surface of a pot. I have exploited this phenomenon to reveal movements in the clay and to determine some flow patterns at each stage of the throwing process.
For this investigation, I prepared specimens where strands of dark clay were inserted in strategic places in balls of white clay. Several specimens were made for each stage of the process. The cones, as well as the short and tall cylinders that resulted, were then sectioned to reveal contrasting patterns against a white background (see photos). Visual information from early trials indicated that there was a need to inject contrasting clay into the clay at various stages so that it would be possible to discriminate between structures that formed during centering, coning and raising the cylinder.
Observations were limited to the first three phases of the throwing process: centering and coning, opening and forming the inner base diameter, and raising the wall of the preliminary cylinder and consolidating the base. I observed that the clay mass moved in three directions as it was thrown in three directions: radially or outward, due to the centrifugal forces of rotation and outward pressure of the inner hand; vertically or upward in response to the raising of the hands on the inner and outer surfaces of the wall; and circumferen- tially with the rotation of the wheel head. Sectioning of the specimens was planned to reveal information about each of these movements within the clay.
The results obtained from this investigation have been summarized as diagrams with explanatory texts. These indicate and explain the dynamics of the forces active during throwing and show the fluid nature of clay when hands deform it. The flow lines illustrated are generalized composites based on results from several specimens. A test used to validate the main concept was to throw balls of clay made from half red, half white clays. The coning process was repeated to the extent that the red clay that had started at the bottom came to the top through the axis and moved down the outside of the cone.
The results illustrated are based on my throwing technique, but you may wish to carry out your own investigations and could possibly arrive at differing conclusions. The concepts I put forward to explain observed clay behavior have given me greater understanding of the dynamics of throwing clay, and have provided me with knowledge that I can use to refme and improve my technique.
continued
Pottery Making illustrated 17

Throwing Clay
Step 1 - Attaching
The first action is to secure the clay to the wheel head. It can either be thrown on forcefully and slapped as the wheel turns slowly, or it can be lubricated and subjected to pressure as it rotates at high speed. Broken arrows indicate thrust of the hands onto the clay, line arrows the direction the clay flows, and the flighted arrows are the resultant movement of the clay.
Step 2 - Centering
Pressure is applied horizontally as the wheel spins. Movement upward, toward the center of rotation, is restricted by the right hand. The intention is to smooth away undulations in the original shape and create a hemisphere that rotates without buffeting the hands. The interior arrows show the movement of clay inward and upward, while the broken arrows show the direction of the exerted pressure.Note: If the clay is not responsive, a void may open between the wheel head and the clay. This is indicated by the notch.
Step 3 - Coning
Pressure is applied radially inward at the base with one or both hands. The clay distorts into one or two lobes that are lifted upward. Clay in the outer regions is retarded. Torsional forces twist the clay. As the hands move upward, tension extends the height and reduces the diameter of the cone.An alternative method is to cradle the clay at the wheel head with the left hand and force the right hand downward and slightly off center front the top of the mound. This results in the cone being extruded upward and prevents tensional fractures in short clays. Friction from the hands continues to increase internal twisting.
Step 4 - Consolidation
The height of the cone is reduced when pressure is applied to the apex with one hand while bracing the other hand against the rotating clay. Patterns show that the clay moves out and down. Containment at the base causes clay to circulate inward. Repeated coning and consolidation gives a laminated flow structure that approximates a toroidal (donut) form in the finished mound of clay.
18 Fall 2OOO

Throwing Clay
Step 6 - Creating a Cavity
When creating a cavity, the fingers are forced downward (A), and the rotating clay responds by moving outward. This stretches the annular laminated structure, spreading the layered floes. When the thickness of the base is sensed, the fingers are moved radially outward to make a flat open cavity. This thins the base of the cylinder wall. It also stretches and consolidates the laminated structure.If pressure is applied to the base (B) as a precaution against base cracks, it is done by moving the fingers radially inward from the base of the wall to the center. Fingers spiral inward, moving clay to the axis. Resistance from the interior mass causes clay to extrude back and beneath, then outward. This consolidates the clay and eliminates voids.
Ivor Lewis is a retired teacher of arts, crafts and sciences. He has a studio at his home in Redhill, South Australia, and is a frequent contributor to PMI. Contact Mr. Lewis via e-mail at [email protected] or by snail mail at Box 70, CMA Redhill, South Australia 5521.
Pottery Making illustrated
Step 7 - Raising a Cylinder
Fingertips squeeze the clay to obtain an appropriate wall thickness. This dimension is kept constant as the hands are lifted. The effect is to stretch and raise the clay. The fingers also exert a drawing force on the rotating clay, continuing plastic deformation of the spiral floe structure. Torsional forces continue to cause a retrograde motion relative to the wheel through clay being retarded by the hands. This increases and refines the spiral structure. Note: Excessive pressure used when collaring to reduce the base diameter may cause an annular cavity to form, indicated by the notches.
See related article on page 20, “Preventing S-Cracks” by Jeff Zamek.
Step 5 - Centered Clay
Markers show centered clay has an approximate toroidal (doughnut) spiral structure that is caused during coning. Clay is cycled upward in the center, outward and down, and backward against the rotation of the wheel.
19

Preventing S-Cracks
A typical S-crack usually runs along the inside or outside bottom of wide-based, wheel-thrown forms. Shown above is the bottom outside of a thrown, trimmed and bisque-fired pot.
If the clay platelets are not properly aligned, there is a greater likelihood for S-cracks to form. Incorrect alignment may result from such factors as a potter’s centering technique or even the specific clay body formula.
The one constant in working with clay is that at some point something will crack. Wheel-thrown objects are subject to various types of cracks either before, during or after they are bisqued or glaze fired. Frequently; the type of crack is identi
fied by the shape it takes when the clay is either bone dry; bisqued or glaze fired. The crack might be caused by factors other than improper firing of the kiln.
Cracks that have rounded borders where the fired glaze surface rolls back from the edge are caused either in the drying, forming or bisque firing stages before the glaze is applied to the pot. Cracks that have a sharp hairline edge to the fired glazed surface are cooling cracks occurring after the liquid glaze has “set” or hardened in the kiln. The specific cause of each individual crack, round or sharp edged, can be determined by several factors, such as clay body/glaze combinations, clay body/glaze formulas, forming techniques, drying cycles, and firing cycles. Cracks can take the shape ofY- cracks, O-cracks, half-moon C-cracks, I-cracks, spiral cracks, and the common S-crack. S-cracks can also appear as shallow S-cracks running across inside or outside base of thrown forms, and they can be observed in the bone-dry, bisque, or glazed-fired stages. On pottery surfaces that are glazed, S-cracks usually appear with a rounded edge where the glaze rolls back from the crack. This is an indication that the crack occurred in the forming stage or before any glaze was applied to the clay.
While S-cracks can be a chronically frustrating problem, luckily, they can be easily prevented by correctly executing the technique of bringing the clay up into a cone before the centering operation takes place. In fact, the diagnosis and cure for S-cracks are so clear cut it can be described over the phone to a troubled potter. Not fully understanding the cause of S-cracking leads to marginally successful methods of trying to solve one of the most common throwing defects. While other methods of preventing S-cracks do work sometimes, they do not fully address the central cause of the problem, namely unequal dry shrinkage rates between the base or floor of the pot and the walls of the pot.
The correction for S-cracks is to align the clay platelets in the base of the pot with the direction of the spinning wheel. When this occurs, the base and walls of the pot will have an equalized shrinkage rate.
See related article on page 16,“The Dynamic Art ofThrowing Clay” by Ivor Lewis.
by Jeff Zamek
Fall 2OOO

Preventing S-Cracks
5 Steps to Prevention
S-cracks can be averted by the correct precentering technique, which involves pulling the clay up into a cone shape and then pushing it down before opening stage takes place in the throwing operation. The technique is sometimes called coning.
Note: Directions apply to potters throwing counterclockwise.
Step 1
Center the clay. Use equal pressure with the right palm pushing down and the edge of the small finger on the left hand resting lightly on the bat. Make sure the left hand is positioned straight up at a right angle to the bat before pushing in toward the center. When used with the correct amount of water, the equal pressure down with the right palm and the pressure of the left hand pushing in toward the center of the bat will result in a centered piece of clay.
Step 2
Pull up the cone. Wet the centered clay and grasp it with both hands. As the wheel is turning, apply equal pressure inward with both hands to bring the clay up into a cone-shaped form. As your hands move up the form, apply increased pressure equally with the index fingers and thumbs of both hands.
Step 5
The centered shape. The height and width of the centered form helps determine the proportion of the object to be thrown. Horizontal forms, such as plates, start with a wider base than narrow- based forms such as cups.
Step 4
Push the cone down. With the left hand pushing toward the center and the upper palm of the right hand exerting slightly more pressure in a downward direction, press the cone shape into itself. If the form takes on a “mushroom” shape as it is pressed downward, increase the pressure with the left hand pushing toward the center as the wheel spins.
Step 3
Repeat the coning process several times. Always start from the base. The form should look more like a cylinder than a pyramid. When it is complete, it should have a slightly wider base.
Jeff Zamek is a ceramics consultant residing in Southampton, Massachusetts, and is the author of What Every Potter Should Know. Contact Mr. Zamek by e-mail at [email protected]
Pottery Making illustrated
Why do corrections for the S-crack problem work for some potters, while being ineffective or inconsistent for others? Below are some of the methods used to prevent S-cracks. Some corrections do in fact work at times, but when they succeed, they do so because in some way they have aligned the clay platelets in the base of the pot with the clay platelets in the walls of the pot, allowing both to shrink at a compatible rate. The most effective way to solve the S-crack problem is to pull the clay up into a cone before the centering operation takes place.
The Myths of S-cracks
• Forcefully throwing the clay on the batWhether the moist clay is thrown, dropped or placed on the bat is unrelated to the formation of S-cracks.
• Changing the clay bodySome potters report an improvement when they change clay body formulas. While a different clay body might temporarily or sometimes permanently resolve the problem, it doesn’t address the actual cause of the defect.
• Cutting the pot from the bat after throwingAfter the pot is thrown on the wheel, a cut-off wire is passed between the bottom of the pot and the bat. The assumption being it will relieve the pressure on the base of the pot as it dries on the bat.
• Using a different type of batThrowing bats fall into two categories—nonabsorbent, such as plastic, or absorbent bats made from plaster, wood, particle board, etc. The absorbency characteristics of the bat do not promote or hinder the formation of S-cracks in the pot.
• Ribbing the inside or outside bottom of the pot when leather-hardAnother Ucureyyfor S-cracks is to rib the inside bottom of the pot before it is removed from the wheel. A similar technique involves running the rib on the outside bottom of the leather hard pot once it has been taken off the wheel. While pressing a rib over the surface of a pot does align the clay platelets in a circular direction (which is beneficial) it does not do the same for platelets below the surface layer of clay.
• Smoothing the bottom of clay before throwing it on the batDuring the wedging operation, creases or lines can form in the bottom part of the clay that contacts the bat. S-cracks can
form whether the bottom of the clay is smooth or creased.• Using harder or softer clay for throwing
The moisture content of the clay is irrelevant to the formation of S-cracks.
• Slow drying pots to prevent crackingSlow drying of the completed pot will not prevent the development of S-cracks. Slow drying will only delay the time until the cracks are discovered. As a general rule, once cracks are formed, they stay the same or get worse as the clay dries and is eventually fired.
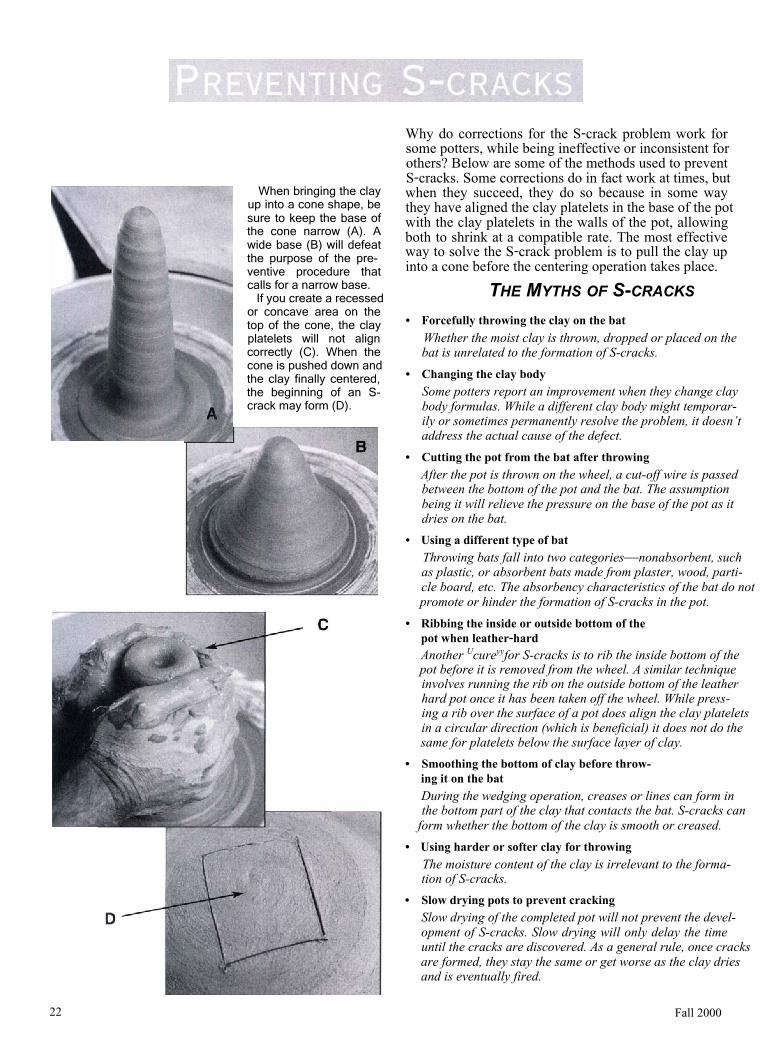
When bringing the clay up into a cone shape, be sure to keep the base of the cone narrow (A). A wide base (B) will defeat the purpose of the preventive procedure that calls for a narrow base.
If you create a recessed or concave area on the top of the cone, the clay platelets will not align correctly (C). When the cone is pushed down and the clay finally centered, the beginning of an S- crack may form (D).
22 Fall 2000

Pottery Making illustrated 23
24 Fall 2000

Copper Green Set, porcelain, fired to Cone 10 reduction.
by Dannon RhudyMaking small and relatively inexpensive items adds a bit
of spice to a potter’s repertoire. Items, such as mugs, spoon rests and trivets, are among the most common, but if you’re looking for additional quick and easy ideas, try this simple one-piece salt (or pepper or spice) shaker. These shakers are popular with buyers, intriguing for students and ideal for class assignments.
Thrown in one piece, these shakers require only wheel trimming and are very quick once the idea has been practiced a couple of times, and they’re suitable for any throwing clay body and temperature range from low fire to Cone 10. These shakers can be made in any useful size, and the shapes can be altered after throwing if desired. An added bonus is that salt does not tend to clump in these little gems, probably due to the slight porosity of the unglazed interiors.
Shaker, porcelain with turquoise matt glaze with titanium crystals, fired to Cone 10 reduction.
Shaker, stoneware with Shino glaze, Red set, porcelain with copper red glaze, Shaker, porcelain with Shino glaze, wood fired to Cone 10 reduction. fired to Cone 10 reduction. fired to Cone 10.
Pottery Making illustrated 25

Step 1
Center as usual, then flatten the clay to a disk slightly larger than the diameter of the desired finished piece.Tip: For first efforts, start with about ¾ lb of wedged clay. This amount makes a fair-sized salt shaker, but learning the technique is easier.
Step 2
Open the center all the way to the wheel head or bat. The center hole should be about the size of a quarter or a bit smaller.
Step 3
Press your finger into the spinning clay and split the ring. Keep about ¾ of the clay to the outside and V* on the inside. Raise the inside ring of clay, and make a closed inner form. The closed form should be about 1½ inches high. If there is any extra clay, trim it off.
Step 4
Use a needle tool or bamboo skewer and open a small hole (about 1/s inch diameter) in the center of the closed form. Keep the center well of the closed form dry and the well between the two walls dry. See cutaway detail below.
Step 5
Once the inner form is finished, make sure the bottom of the well between the two walls is approximately Va inch thick (check this with a needle tool if you’re uncertain). Then use the outer ring of clay to raise the outside wall of the piece. It should be at least twice as high as the inner wall. It’s useful when raising this wall to pull slightly toward the center. See cutaway detail below.
Cutaway Detail - Step 4
Cutaway Detail - Step 5
Step 6
Once the wall is up, collar it by gently pulling or pushing it to the center until the form is closed well above the inner form, leaving a space of about ¾ to 1 inch between the top of the inner form and the inside of the outer form.Note: This is similar to making a double- walled bowl, but on a very small scale.
HOW TO FILL SHAKER
To fill the bottomless shaker, turn it upside down, pour the salt (or whatever) into the little well, shake slightly to encourage the salt to fall through the center hole like an hourglass. Turn the shaker right-side up and the salt falls into the space between the walls where it remains dry and ready to use. Hold the shaker upright over your food, and shake!
26 Fall 2OOO

Step 7
If desired, leave enough clay at the closure to make a small knob for lifting.
Step 8
Once the outer form is closed, you can easily manipulate the knob to whatever shape you prefer, because the trapped air will prevent the collapse of the piece.Tip: If you do make a knob, be sure to undercut it sufficiently to make it easy to lift the shaker when it’s glazed and in use.
Step 9
Trim the bottom edge and use a wire cutoff tool to cut the piece free from the wheel-head or bat. The piece is now ready for whatever decorative marks, lines, slips, facets, flutes, gouges, pinches, etc., you wish to have. See cutaway detail to the right.
Finishing TouchesNo further trimming is needed,
except perhaps a light sanding of the bottom when the piece is dry. Some people like to put a small needle hole in the side of the outer form to release trapped air while the piece is drying. If you do this, remember to smooth a bit of clay over the hole once the piece is leather hard or the shaker may leak.
Bisque fire as usual. If you dip-glaze these shakers, it is easiest to turn them upside down, grasp with tongs and dip into the glaze. Trapped air will prevent glaze from filling up the inside of the shaker or the hole.To be on the safe side,Pottery Making illustrated
Dannon Rhudy maintains a studio and teaches ceramics and drawing at Paris Junior College in Paris, Texas. You can send comments by e-mail to her at [email protected].
you can put a drop of wax over the hole, or put a piece of bamboo skewer in the hole while you’re glazing. The inside of the form does not need to be glazed. Clean the foot as you usually would for your glazes and fire.
These little shakers can be made in matched sets, but there is no real reason to do so. If each piece is merely similar, or glazed similarly, they make clever sets. They can be incised with “S” or “Salt,” “P” or “Pepper,” or anything one might wish. These designations can also be made with a brush and oxides, slips or whatever you choose.
27
Cutaway Detail - Step 9

28 Fall 2000

by Chris Henley
the process
Step 1
Start with a ball of wedged clay about two inches in diameter. Use your favorite throw- inglhandbuilding body, but any reasonably plastic clay will do.Tip: Avoid heavily grogged clays or clays with extremely fine particles, because they will present problems when forming the whistle wedge and air slot.
Many potters find it difficult to make a lump of clay emit a sound more pleasing than the splat that they get from throwing it against the wall. Satisfying as that can be, it doesn’t offer quite the same range of tones you can get from a clay wind instrument. Here is a guide to help you take a mute wad of clay and turn it into your very own clay whistle. Once you get the hang of it, whistle making will be like riding a bicycle, and with imagination and a bit of experimenting, this technique can open a lot of possibilities in the whistle world.
A clay whistle can take any shape or form— the only requirement is that it be hollow.
Detail of whistle aperture.
Chris Henley has been a part-time potter for 33 years. He lives and maintains a small studio in Encinitas, California. He developed this whistle-making technique in the early 1970s while living in Raquira, a small pottery village in the Colombian Andes. Please send your comments and questions to him at [email protected], or visit his website at wunv.hominid.net/chris.htm where you can see a modified version of this sequence. An interesting alternative method with tuning instructions can be found at www.geocities.com/RainForest/Canopy/ 2525/whistles /whistle, html
Step 2
Form a pinch pot. The 2-inch ball of clay is just a starting point. The hollow form you make is the whistle chamber, and its size determines the tone—the smaller the chamber, the higher the tone. Keep the wall thickness as uniform as possible.
Pottery Making illustrated 29

Step 3
Fold the edges together. Be careful to fold just the edges, since you want to make a hollow form with as much interior volume as possible. This makes the chamber that will become the whistle body. You now should be holding something that resembles a three-cornered pillow.
Step 4
Seal the seam you just created. I pinch the edges, then use a needle tool or a modeling stick to score, or “sew,” the seam. The seam must be airtight.
Step 5
Smooth the seam. Use your fingers or the modeling stick. The next step completely obliterates the seam.
Step 6A
Shape the whistle. If you plan to make a whistle resembling something more than a lump of clay, this is the time; however, keep your first whistle simple. Use your fingers to push, pinch, pull or whatever. I like to use a small paddle to move the clay into the general form of my design.
Step 6B
Shaping can be pretty aggressive. As part of this shaping, you’ll need to start forming a tip or stem that will become the site for creating the whistle parts.
Step 6C
The paddle will help you do this. Extra clay can be added if needed. This is also the time to add attachments.
Step 7
Form the whistle wedge. About ½ inch from the tip, pierce the sealed form at about a 45° angle with a %-inch dowel (the blunt end of the needle tool handle works well). Pull the dowel out at the exact same angle you pushed it in to make a clean, sharp wedge to split the air. Check to see that the hole you just made is not plugged. After forming the wedge, don’t mess with it!
Step 8
Form the tip. Slightly push the clay in and up in front of the hole you just made. This makes the form a bit thicker here and facilitates forming the air slot.
Step 9
Make the initial air slot guide hole. Push a needle tool through the thick ridge on the tip until it just touches the far edge of the hole. It is crucial to make the air slot parallel to the thin edge of the wedge. No wiggling up and down!
30 Fall 2OOO

troubleshootingIf you get no sound on the initial try, do the following:
1. Check lip placement. Are you blocking the air passage?
2. Check alignment. Is the air slot distorted, or the wedge out of alignment?
3. The position of the slot may be directing the air above or below the wedge. Air slot was not formed so that the wedge splits the air. The floor of this slot should be nearly even with the thin edge of the wedge. Plug the wedge hole, smooth over the ridge and go to step 7.
4. Air slot is not a slot. Typically, beginners tend to make this air passage a round hole instead of a slot.
5. Debris is clogging the air slot. Check both sides. Be cautious in clearing this and don’t distort by enlarging it or changing its angle relative to the wedge.
6. Secondary tone hole is too large. Plug it up and try again.
7. If none of the above solutions works, start over. It’s only clay!
Step 11
Complete the slot. Gently insert the needle tool in one of the guide holes, and move it side to side, not up and down like a seesaw. Enlarging the hole by moving side to side clears out the little bits of clay separating the guide holes. This forms the slot.
Step 12
The ridge is like a little bridge that forms the roof of the air slot. This slot directs the air across the wedge and creates the dynamics that produce the sound. Be sure the slot is clean and clear of clay debris.
altering the soundOnce you get the whistle to produce a tone, you can alter it to make more. Use the needle tool to pierce the body in a location convenient to finger placement. First, just make the hole the diameter of the needle. This should cause a change in sound. Test this by blowing the whistle and moving your finger on and off the hole. Depending on the size of the chamber inside the body, the note will go up or down. Adding more holes adds more tones. Be aware that eventually you will add one too many holes and lose the sound altogether.
Step 13
Try out the whistle by carefully putting your lips on the end of the slot and blowing. Do not hang your lip over the slot, and be very gentle because the clay is still moist and can easily be distorted. Small chambers tend to produce a high tone and may require a good blow to get the sound. Larger chambers tend to produce a lower tone and may sound only with a soft, gentle steady breath. If the whistle doesn’t work now, it won’t miraculously start after it’s fired. Now that you have it whistling, and maybe even producing more than one tone, put it down and leave it alone until it dries.
Step 10
Working at eye level, make 3 or 4 more holes parallel to the first guide hole. It is important that the floor of the air slot be even with the thin edge of the wedge (edge of hole across from the air slot). If you do not keep the tool parallel to the top surface of the whistle body as you pierce the ridge, you won’t get a peep! Also, this air passage has to be a slot, not a round hole.
Pottery Making illustrated 31

Barbara Broum is a studio ceramic artist residing in Sunnyvale, California. You can send comments to her at [email protected]
Pottery Making illustrated 33
34 Fall 2000

Pottery Making illustrated 35

Each extraterrestial sculpture is as unique as the student who made it and, collectively, the pieces look “out of this world.”
The Project: In Three Easy Parts
by Craig HinshawWhen students studied space exploration, we did a
project to help reinforce the lessons learned in the classroom. We used inexpensive plastic bowls as drape molds to make our extraterrestrial surfaces, and we made press molds for the astronauts and equipment on page 38.
Part 1
Part 2
Terra cotta was used for the Martian surface.
Before class, I rolled out 8-inch circles of clay, approximately ½-inch thick, for each student. Plastic wrap was placed over the inverted plastic bowl to keep the clay from sticking to the plastic bowl. The clay disk was pressed and paddled over the plastic bowl. Craters were made by pressing a toilet paper tube into the clay, creating a circle, then pinching and shaping more clay around the imprinted circle (see figure 1). Rocks were made by rolling small balls and flattening them on the desk surface.
Astronauts were made by pressing clay into plaster press molds of small plastic replicas of astronauts. I had purchased the replicas at a teachers store and made one- part plaster molds ahead of time (see Making a Press Mold on page 38).The students easily learned how to press soft clay into the mold, pull it out and use a needle tool to trim away excess clay.Part 3
The students referred to pictures or plastic replicas when making landing modules and lunar rovers. Toothpicks were used for modeling detailed work. Water was brushed onto the astronauts’ feet and equipment to secure them to the planets surface (see figure 2).
Figure 1
Making craters.
Craig Hinshaw is an elementary art specialist in the Lamphere School District in Madison Heights, Michigan. E-mail comments to Craig at [email protected].
Pottery Making illustrated 37
Figure 2
Adding details.

Finishing the Project
At the end of the hour, the clay was lifted off the plastic bowl, plastic wrap pulled away and initials scratched in the base. After bisque firing, low-fire underglazes were brushed on. Color pictures and the plastic replicas were helpful as students strove for accuracy in glazing.
The detail, accuracy and charm of each small sculpture is amazing, considering they were made by elementary students. Presenting the project in specific steps made a complex- looking project successful.
Making a Press Mold
Using soft clay, a plastic toy astronaut and modeling tools, a clay mold box is formed. Liquid soap prevents the pottery plaster from sticking to the mold. Once the plaster is hardened, the astronaut is pried out of the plaster. After about 24 hours, the dried mold is ready for soft clay to be pressed into it to create the extraterrestrial sculpture (see steps 1-6 to the right).
Step 1
A plastic toy astronaut is embedded halfway into soft clay. Modeling tools are used to build clay around the astronaut, ensuring there are no undercuts.
Step 3
Pottery plaster is mixed and poured over the astronaut.
Step 5
After the mold has dried, soft clay is pressed into it. Clay does not stick to plaster and is easily pulled out.
Step 2
A clay mold box is formed. Liquid soap is brushed over the astronaut, acting as a release agent from the plaster.
Step 6
Using a needle tool, excess clay is trimmed away from the astronaut.
Fall 2OOO
Step 4
When the plaster has hardened (approximately 2 hours), the clay is pulled away and the astronaut is pried out of the plaster.
38

Pottery Making illustrated 39

40
Are your pots ready to sell?If you’ve been practicing your pottery for a few years, you probably have a selection of ware filling your shelves. The urge to sell some pots
might be lurking in the back of your mind, but you don’t know where or how. Let’s start by honestly assessing your work to date.Step 1. Find the Good
Select only your very best pots and examine them carefully to determine if your ware is “ready for sale.” Setting aside all aesthetic considerations of design, what are the desirable technical aspects of saleable pots?They should have a good glaze fit with no crazing, crawling or pitting.They should be glazed with food- safe glazes that are fired to the recommended temperature.
Lips and bases should be smooth so they won’t scratch, and they should also be free of dirt-catching creases.Use your work for its intended purpose. Put it in the oven, the microwave, the freezer and the dishwasher, then test it again for crazing or discoloration. How easy was it to use? Was it too heavy or too light? Was it awkward to handle?Step 2. Delete the Awful
Now that you have your good pots together in one place, go back and honestly take a look at the others. How many of these were bad before the bisque firing? You could have recycled the clay then and tried again. How many were flawed after the first firing? They should have been discarded at that point or used for glaze testing. Ask yourself if they are the pots you want out in the world with your name attached to them. Can you ever get a reputation as a good potter with these pots?Never sell or even give away your really gross mistakes. It’s not worth the few dollars you might make. In the future, you’ll meet your work in
various places. While you might be embarrassed at the novice skills you possessed at the time, you should never be ashamed of the quality. Your customers will seldom admit to buying seconds and that pot will stand as a permanent example of your skills. Put on your safety goggles, grab a hammer and get to work.
There is no permanent warning tag to attach to your pottery. It’s up to you to sell pots that are safe for their intended purpose. Are your handles firmly attached? Do your functional vessels hold water? Are all surfaces that touch food well glazed? Are there any visible cracks? Most defects in pots show up when they are drying. There is no amount of glazing or firing that is going to fix a dud, so recycle the clay.Step 3. Check Out the Competition
Get out to craft shows, art fairs and exhibitions in your area to measure your work against the local standards. Where do you fit in? Your work will not sell in all venues, so try to get a feel for where you might be comfortable trying your first sales.In the next issue, I’ll give some pointers on how you can get started with sales.Pots for sale must be safe to use, free of defects and appeal to the buying public.
Chris Campbell is a full-time studio potter residing in Raleigh, North Carolina. E-mail comments to her at [email protected].
Fall 2000
PHO
TO: J
EFF
ZAM
EK
The Basics of Selling Your Workby Chris Campbell

Pottery Making illustrated 41

42 Fall 2000
Pottery Making illustrated 43

MATERIALSI often use a siphon-type spray gun
to apply glaze to my pottery. The main problem with using spray guns is that they spit or clog easily when large suspended particles are introduced or formed in the glaze. If you want to apply an even coat of glaze (and not lose your patience), you must filter your glaze as you fill the bottle of the spray unit. To accomplish this simple operation, you need to use a sieve to pour the glaze through and into the spray- gun jar. The main reason to use a small hand sieve is to sieve small amounts of glaze into a spray jar to prevent spitting. I have found that a coarse screen equal to about 40 mesh works fine for the removal of the larger particulate material from my glaze and allows a smooth flow through the spray gun that I’m presently using. While small sieves are available through catalogs and supply stores, I developed a couple of methods for making inexpensive ones.
• Plastic (PVC) pipe reducer, 3-in. to 2-in.• Stainless-steel screen fabric• Metal cutting shears• Small tube of construction adhesive• Small section of 2-in. PVC pipe• 2-in. PVC pipe cap
There are two options open for constructing ajar sieve—the first is to place the screen fabric in the large opening, using existing bracing construction (the white pipe reducer). The second is to place the screen fabric in the smaller opening and brace it with a small piece of thin-walled 2-inch pipe (the black pipe reducer). Both types of construction work well.
You also have several options of stainless-steel screen material. You can use stock flat-screen fabric, a piece of screen from a sieve used in cooking, or a stainless-steel skimmer ladle that can be found in most Oriental specialty food stores.
Don Adamiatis has been an active potter since 1962. He has a degree in the physical sciences, and , since retiring in 1987, has devoted his attention to glaze chemistry and the physics of kiln firing and construction.
METHOD ONE
Step 1
Purchase the plastic pipe reducer and take it with you to find a stainless-steel skimmer ladle that will fit inside the larger opening. Skimmer ladles come in various diameters. You are looking for one that will fit snuggly inside the larger opening of the pipe reducer.
Step 2
Clip off the wire ladle handle, leaving about 1/4-inch stubs extending from the rim. With a pair of pliers, bend these stubs over to secure them to the sieve rim.
Step 3
Take your glue tube and cut the end of the applicator off so that you have a very small opening. Apply an even bead of glue around the edge of the ladle screen’s rim. Place the ladle screen inside the plastic pipe reducer and seat it firmly. Let the glue dry thoroughly before using.
44 Fall 2OOO
By Don Adamaitis

METHOD TWO
Step 2
Place a very thin layer of glue around the edge of the screen circle and carefully place it inside and against the ridge of the 2-inch reducer.
Step 3
Squeeze a thin layer of glue around the inside wall surface of the 2-inch end of the plastic pipe reducer, just above the screen area.
Step 4
Take the VA inch length of 2-inch thin- walled plastic pipe and force it into the reduced end of the pipe reducer.
Step 5
Tap the pipe home with a rubber mallet to make a solid fit.
Step 6
The optional 2-inch pipe cap is used as a sieve holder and to catch any drips after you filter your glaze into your spray bottle.
Step 1
Cut a 11/4-inch piece of 2-inch, thin- walled plastic pipe. Place the pipe on a piece of screen fabric and trace the outside with a felt-tipped marker. Cut along the inside of the scribed circle of the screen fabric.
Pottery Making illustrated 45

46
RECOMMENDED READINGS®Y Sumi von Dassotv
Pu e b l o Po t t e r y
North America is the home of a cen- turies-old tradition of ceramic art, many of whose modern practitioners are world-famous and represented in the collections of individuals and museums of many nations. Yet the artists working in this tradition are rarely featured in juried or invitational shows of contemporary ceramic art. I am, of course, referring to the Native American potters of the Southwestern United States.
There are many books featuring Pueblo Indian pottery; however, most are aimed at collectors, giving biographical information about the potters and describing their work and listing awards won, but offering little technical information. Other books are written from an archaeological or anthropological point of view, to the point of including recognizable work by well-known contemporary Indian artists, captioning these items with their place of origin and placing them within a particular traditional style, without giving the artist’s name! These books can be frustrating for the clay lover who would like to understand Pueblo pottery. So, for the potter interested in seeing pictures of pretty pots as well as in how and why these beautiful works of art are made, the following books are worth a look.
Fall 2OOO

Duane Anderson All That Glitters
School of American Research Press, Santa Fe, NM, 1999
The subject of this book is one not extensively covered in other books about Pueblo pottery The work shown is simple in form and sparingly decorated, allowing the beauty of the clay to speak for itself Micaceous pottery has long been
used for utilitarian ware in the Southwest because of its durability, but despite its sparkling beauty, it is relatively new in the art market. Anyone who has experimented with the mica-con- taining clay bodies now available commercially might be interested in seeing the work of potters experienced in handling this difficult material.
This book focuses on a “convocation” of ten potters organized by the School of American Research (S AR) to discuss the future of this type of pottery, and the subsequent “First Micaceous Pottery Market” that took place in 1995. Biographical information is given for each featured artist, as well as some information about their work styles and philosophy. The author is an anthropologist rather than an artist, so the technical information is light. However, the author is acutely aware of the artistic value of the work and writes with sensitivity about the concerns of the individual artists. The chapters on the history and development of micaceous pottery are interesting, and there are lots of photos of contemporary work, as well as an appendix picturing historical work in the SAR collection.
Susan Peterson Pottery by American Indian Women
Abbeville Press, New York, 2000
Peterson, author of in-depth books about the lives and work of Pueblo potters Maria Martinez and Lucy M. Lewis, covers the work of 28
American Indian women in this book. The book, companion to an exhibition Peterson curated at the National Museum of Women in the Arts, includes the work of six American Indian “matriarchs” of pottery, twelve of their descendants, and ten “avant-garde” Indian women potters, including three from outside the Southwest.
The first chapter, covering the history of Indian pottery, discusses Navajo and West Coast Indian pottery, as well as the better-known Pueblo pottery. The second chapter explains the making of Pueblo pottery, from clay preparation to the traditional outdoor bonfire. Primarily, however, the book consists of biographical information and a gallery of work by the 28 featured artists, beginning with the six matriarchs. These are Nampayo of Hano, Maria Martinez, Lucy Martin Lewis, Margaret Tafoya, Helen Cordero, and Blue Corn, whose works collectively spans the gamut of Pueblo Indian pottery styles: polychrome, black-on- black, burnished red, and storyteller figures.
The work included in this book is truly magnificent and beautifully photographed, and the biographical and technical information is interesting and informative. The “avant-garde” work included forms a bridge between traditional Indian culture and contemporary Anglo culture and gives the reader a glimpse of the directions other Indian potters may begin exploring as they seek to establish their own individual style.
R ick D illingham Acoma and Laguna PotterySchool of American Research Press, Santa Fe, NM, 1992
The pottery of the Acoma and Laguna Pueblos is polychrome, that is, white clay with black, red and orange designs painted on. Its burnished, though not to the high sheen of the red or black-on-black work of
other Pueblos, and nowadays most often fired in electric kilns rather than the traditional open bonfire. This book examines the history of the pottery and the evolution of the patterns used to decorate these works, and describes what makes a pot “authentic” or “traditional.” Dillingham briefly describes the making of the work, including the preparation of the clay and slips, coil building, burnishing, decorating and firing. He then analyzes the basic forms and design elements, the distinction between ceremonial pots and pots made for the marketplace, and the differences between Acoma and Laguna pottery.
The heart of the book explores the development of the forms and designs used by modern Indian potters. Interestingly, prior to the arrival of the Spanish, potters from these pueblos decorated their work with a lead-based glaze that due to its runniness didn’t lend itself to finely painted patterns.This production ceased when the Spanish took control of the lead mines, and the clay slips, which supplanted glazes, allowed the development of the intricate patterns we now associate with Pueblo pottery. Dillingham also traces the origins of the traditional design elements, relating some of the imagery to Spanish embroidery and even Pennsylvania Dutch pottery. This is not to denigrate the designs as borrowed, but rather to point out that any rigid definition of pottery as “traditional” versus “contemporary” is essentially meaningless.
In conclusion, Dillingham examines the effects, both positive and negative, of the collector market on both the pottery and the potters. He argues vigorously for examining each potters work on its own merits as works of art, rather than pigeonholing them as more or less “traditional.” He decries the collecting, sometimes illicit, of ceremonial works, while appreciating the enormous economic benefits of the market in Indian pottery. As long as work is not misrepresented to buyers, Dillingham sees room in the market for all types of pottery.
Stephen Trimble Talking with the ClaySchool of American Research Press, Santa Fe, NM, 1987
Trimble briefly explains the history and social organization of the Pueblos, then covers the general techniques of digging and processing clay, coil building, sanding, burnishing, decorating and firing. The bulk of the book is a detailed exam
ination of the work of the various Pueblos, both the traditional styles and the innovations of contemporary potters.
This book describes how the pottery of each Pueblo is influenced by both history and the materials available there, as well as by important individual potters. It is filled with interesting details about the materials, such as the tendency of the clay from Zia and Acoma to pit; and the use by pre-Columbian Pecos potters of lead-based glaze made from ground galena ore. The author interviewed sixty potters and the book tells us largely in their own words the story of the clay and the decoration, the life, the joys and the frustrations of a Pueblo potter. Though not a large book, this is the most comprehensive of the works discussed here, and offers a good overview to the many different styles of Pueblo pottery.
Pottery Making illustrated 47

48 Fall 2000

