portal guidance notes - assets.publishing.service.gov.uk · sponsor types there are various types...
TRANSCRIPT

OFFICIAL
Version 2.1
May 2018
National Security Vetting Solution (NSVS) Portal
GUIDANCEfor
SPONSORS
OFFICIAL
Version 2.0
April 2018
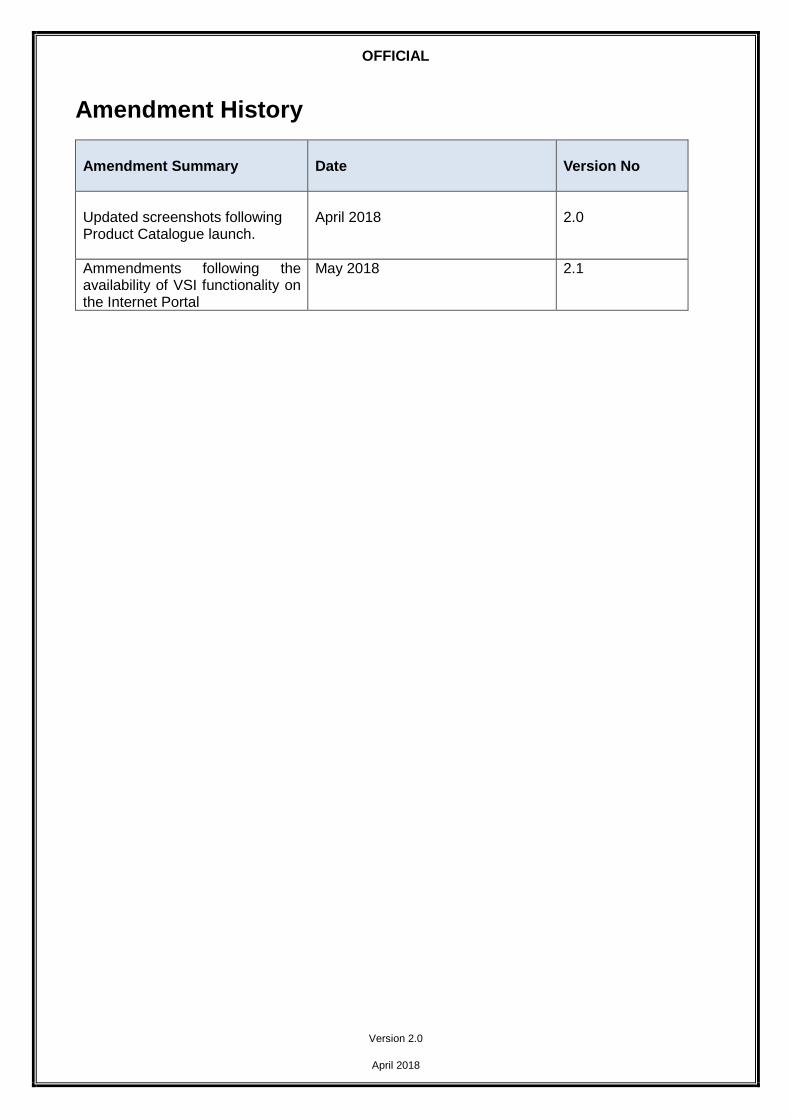
Amendment History
Amendment Summary Date Version No
Updated screenshots following Product Catalogue launch.
April 2018 2.0
Ammendments following the availability of VSI functionality on the Internet Portal
May 2018 2.1

OFFICIAL
Version 2.0
April 2018
INTRODUCTION
These guidance notes provide instruction to Sponsors and explain how to:
• activate their NSVS Portal account • use the NSVS Portals (ALI/PSN or Internet) from a Sponsor’s perspective
The guidance is broken down in to sections that show the functionality of each screen within the NSVS Portal. Clicking on the main topic headings in the index will take you to the requested section without having to scroll through the full document.
A flowchart providing an overview of the NSVS Portal process is available if required.
Please Note: All screen shots used in these guidance notes are training examples. No live data has been used.
OFFICIAL
Version 2.0
April 2018
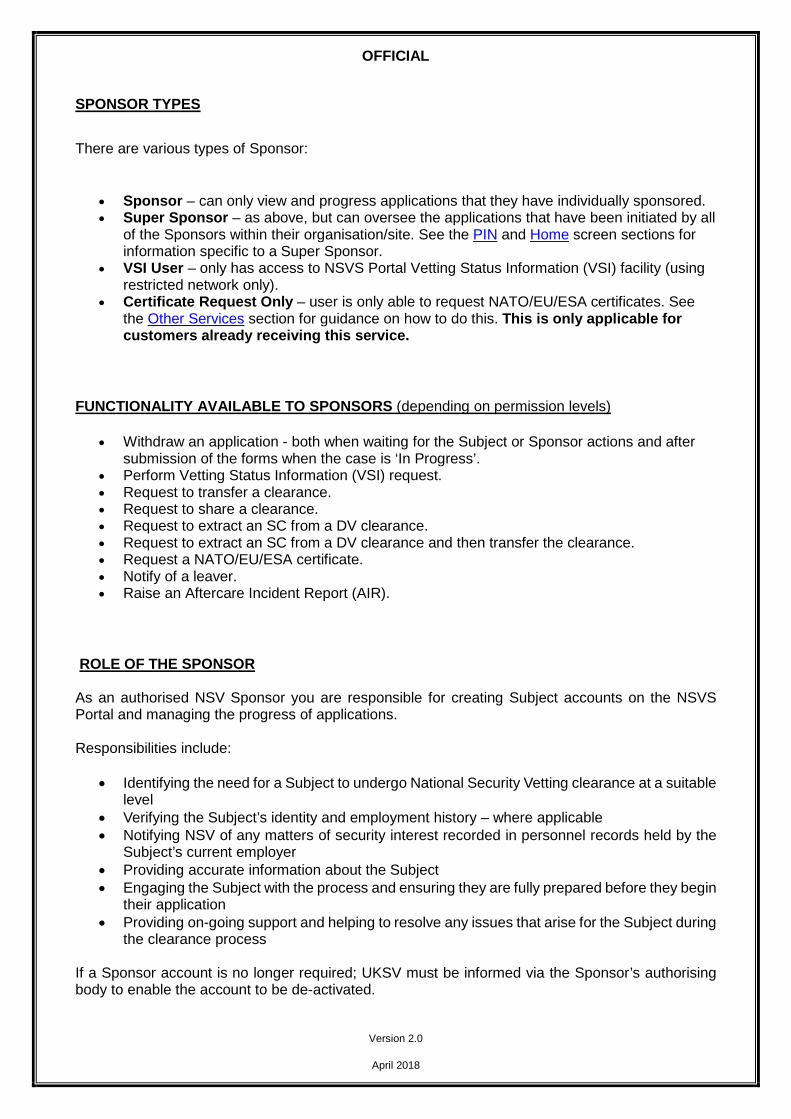
SPONSOR TYPES
There are various types of Sponsor:
• Sponsor – can only view and progress applications that they have individually sponsored. • Super Sponsor – as above, but can oversee the applications that have been initiated by all
of the Sponsors within their organisation/site. See the PIN and Home screen sections for information specific to a Super Sponsor.
• VSI User – only has access to NSVS Portal Vetting Status Information (VSI) facility (using restricted network only).
• Certificate Request Only – user is only able to request NATO/EU/ESA certificates. See the Other Services section for guidance on how to do this. This is only applicable for customers already receiving this service.
FUNCTIONALITY AVAILABLE TO SPONSORS (depending on permission levels)
• Withdraw an application - both when waiting for the Subject or Sponsor actions and after submission of the forms when the case is ‘In Progress’.
• Perform Vetting Status Information (VSI) request. • Request to transfer a clearance. • Request to share a clearance. • Request to extract an SC from a DV clearance. • Request to extract an SC from a DV clearance and then transfer the clearance. • Request a NATO/EU/ESA certificate. • Notify of a leaver. • Raise an Aftercare Incident Report (AIR).
ROLE OF THE SPONSOR
As an authorised NSV Sponsor you are responsible for creating Subject accounts on the NSVS Portal and managing the progress of applications.
Responsibilities include:
• Identifying the need for a Subject to undergo National Security Vetting clearance at a suitable level
• Verifying the Subject’s identity and employment history – where applicable • Notifying NSV of any matters of security interest recorded in personnel records held by the
Subject’s current employer • Providing accurate information about the Subject • Engaging the Subject with the process and ensuring they are fully prepared before they begin
their application • Providing on-going support and helping to resolve any issues that arise for the Subject during
the clearance process
If a Sponsor account is no longer required; UKSV must be informed via the Sponsor’s authorising body to enable the account to be de-activated.
OFFICIAL
Version 2.0
April 2018
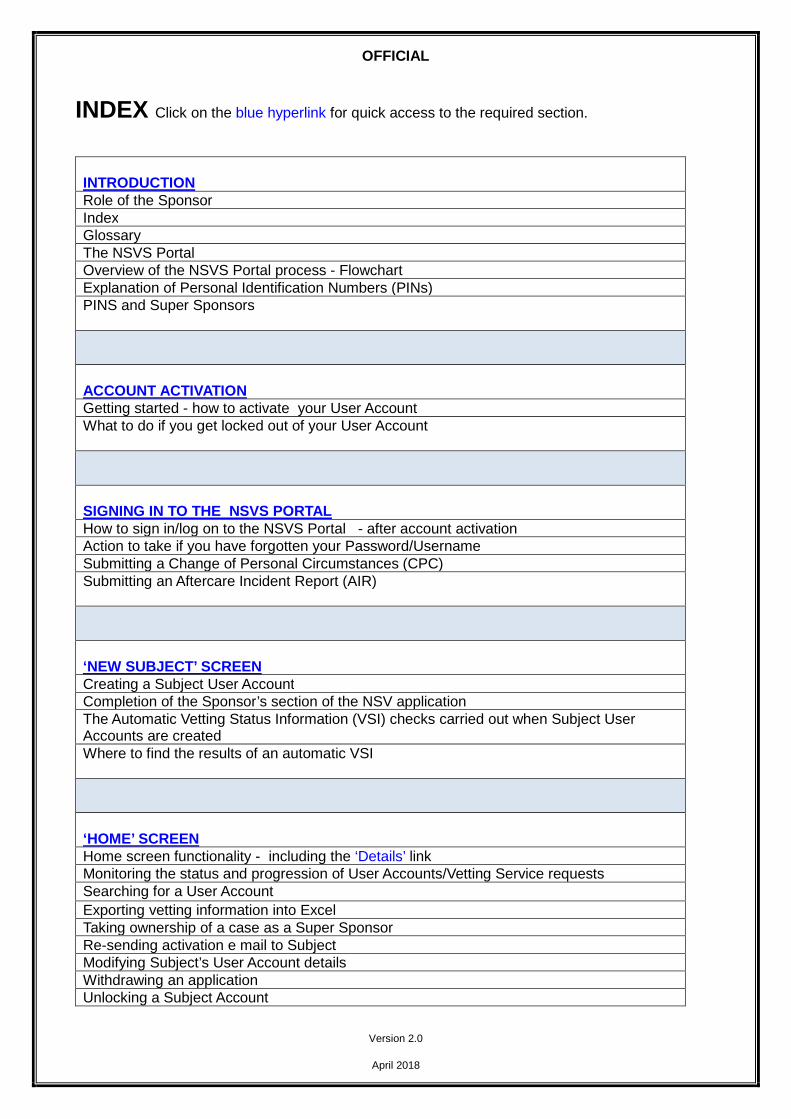
INDEX Click on the blue hyperlink for quick access to the required section.
INTRODUCTIONRole of the SponsorIndexGlossaryThe NSVS PortalOverview of the NSVS Portal process - Flowchart Explanation of Personal Identification Numbers (PINs)PINS and Super Sponsors
ACCOUNT ACTIVATIONGetting started - how to activate your User Account What to do if you get locked out of your User Account
SIGNING IN TO THE NSVS PORTALHow to sign in/log on to the NSVS Portal - after account activationAction to take if you have forgotten your Password/Username Submitting a Change of Personal Circumstances (CPC)Submitting an Aftercare Incident Report (AIR)
‘NEW SUBJECT’ SCREENCreating a Subject User AccountCompletion of the Sponsor’s section of the NSV applicationThe Automatic Vetting Status Information (VSI) checks carried out when Subject User Accounts are createdWhere to find the results of an automatic VSI
‘HOME’ SCREENHome screen functionality - including the ‘Details’ link Monitoring the status and progression of User Accounts/Vetting Service requests Searching for a User Account
Exporting vetting information into Excel Taking ownership of a case as a Super SponsorRe-sending activation e mail to SubjectModifying Subject’s User Account details Withdrawing an applicationUnlocking a Subject Account

OFFICIAL
Version 2.0
April 2018
‘OTHER SERVICES’ SCREENAction to take to report/request the following: Aftercare – Transfer Aftercare – Request NATO/ESA/EU only available to customers currently receiving this service
Aftercare – Notify of Leaver Aftercare – Share Aftercare – Extract Aftercare – Transfer & Extract Aftercare – AIR(Aftercare Incident Report)
‘VETTING STATUS INFORMATION (VSI) REQUEST SCREEN Guidance for carrying out a Vetting Status Information (VSI) enquiry
‘MY ACCOUNT’ SCREENGuidance on how to change your passwordAction required to re-set your PIN - and the consequences of taking this action Setting your Default Values
‘HELP’ SCREENNSVS Portal guidance
‘LOGOUT’ SCREEN

OFFICIAL
Version 2.0
April 2018
GLOSSARY
AIR Aftercare Incident Report
ALI/PSN The restricted network used by MOD and Other Government Departments
ASI Application Status Information
CPC Change in Personal Circumstances.
DBS NSVDefence Business Services National Security Vetting.
Enquiry Centre Tel: 01904 66 2644 (Mil: 94777 2644) Email: [email protected]
eSC Enhanced Security Clearance only available for current users of this service.
EUA Emergency Unsupervised Access (EUA) may exceptionally be authorised by the relevant SLC/ DefSy on military cases for a limited period (e.g. for short notice operational deployment). EUA maximum validity 9 months, but usually 6 months or less. This option only applies to UK Service personnel.
FCO Services Foreign & Commonwealth Office Services.
NATO/EU/ESA Certificate
A NATO certificate may be required when an individual goes into a specific NATO job outside of the UK. The request will only be granted if the Subject holds an in date national security clearance (SC/DV) and is a national of a NATO country. Only available to current users of this service.
NSV National Security Vetting.
NSVS National Security Vetting Solution.
OGDOther Government Department.

OFFICIAL
Version 2.0
April 2018
Other Services
A selection of additional Post Clearance activities available for Sponsors:
Aftercare – Transfer When an individual currently holds a valid Security Clearance with another organisation you can request that their clearance is transferred to the new organisation.
Aftercare – Request NATO/ESA/EUNATO is required when an individual goes into a specific NATO job. NATO certificate request will only be granted if the Subject holds an in date national security clearance. Available for MOD users only.
Aftercare – Notify of Leaver When a clearance holder leaves your organisation, their Security Clearance is no longer required and must be lapsed.
Aftercare – Share In some instances it may be possible to share a security clearance with another organisation if the holder is working for you temporarily.
Aftercare – Extract It is possible where an individual holds a higher level of security clearance to extract a lower level of clearance out of it (e.g. extract an SC from a DV).
Aftercare – Transfer & Extract As above for extract but also transfer the clearance to your organisation.
Aftercare – AIR Should information become available that raises doubts about an individual’s suitability for access to protectively marked or sensitive assets, the circumstances are to be reported via this form.
SAF Security Appraisal Form.
PIN Personal Identification Number. Additional information can be found in the PIN section of these guidance notes.
SponsorAn authorised individual who is responsible for initiating an application for National Security Vetting.
Subject An individual who is applying for National Security Vetting – the vetting applicant.
Super SponsorAn individual within an organisation who has the ability to oversee applications on NSVS initiated by all Sponsors within their organisation.
UKSV United Kingdom Security Vetting.
VSI Vetting Status Information.

OFFICIAL
Version 2.0
April 2018
THE NSVS PORTAL
National Security Vetting Solution (NSVS) is the foundation of future UK security vetting capability. Using an intuitive user interface it provides applicants and vetting case workers with secure access from different locations.
The NSVS Portal is the front end of the NSVS vetting system and enables National Security Vetting
applications to be initiated, completed and submitted by secure electronic means.
There are two ways to access the NSVS Portal – either via the Internet (www) or by the ALI/PSN
network. It is important to remember that the NSVS Portal used by the Sponsor to set up a User
Account is the same portal the vetting Subject needs to use to complete their NSV application.
THE VETTING PROCESS ON THE NSVS PORTAL
Flowchart explaining the NSVS Portal process
OFFICIAL
Version 2.0
April 2018
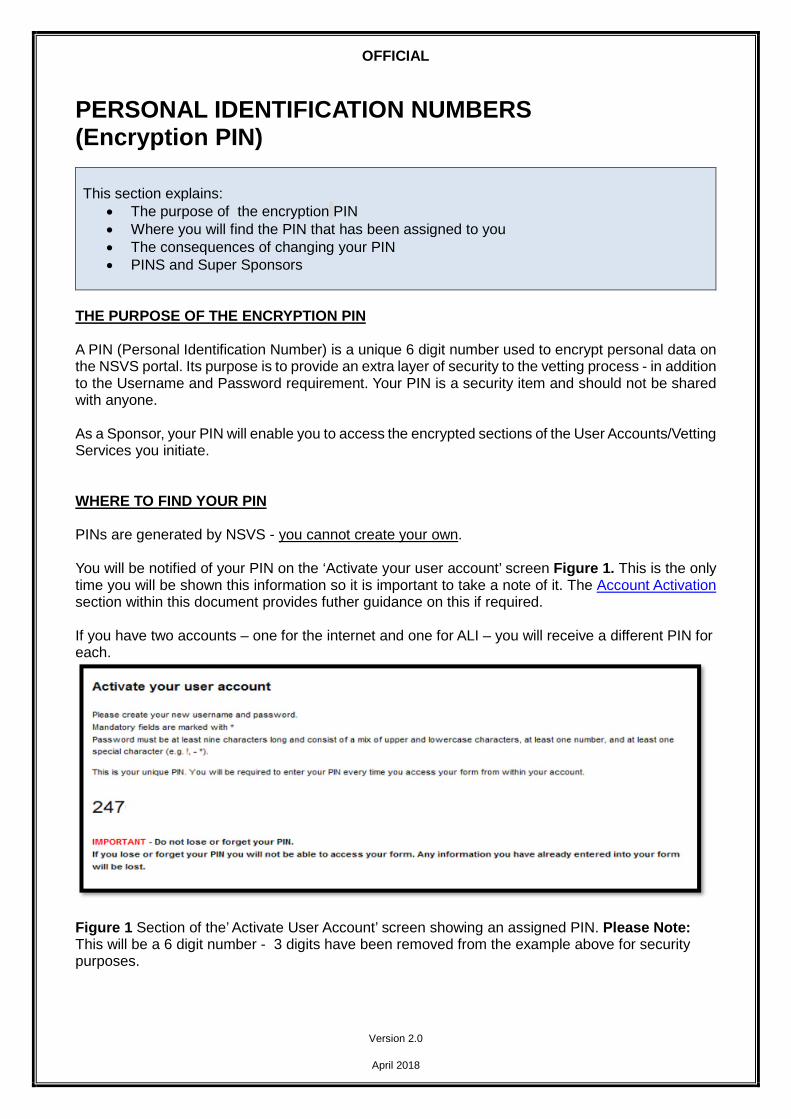
PERSONAL IDENTIFICATION NUMBERS(Encryption PIN)
This section explains:• The purpose of the encryption PIN • Where you will find the PIN that has been assigned to you• The consequences of changing your PIN• PINS and Super Sponsors
THE PURPOSE OF THE ENCRYPTION PIN
A PIN (Personal Identification Number) is a unique 6 digit number used to encrypt personal data on the NSVS portal. Its purpose is to provide an extra layer of security to the vetting process - in addition to the Username and Password requirement. Your PIN is a security item and should not be shared with anyone.
As a Sponsor, your PIN will enable you to access the encrypted sections of the User Accounts/Vetting Services you initiate.
WHERE TO FIND YOUR PIN
PINs are generated by NSVS - you cannot create your own.
You will be notified of your PIN on the ‘Activate your user account’ screen Figure 1. This is the only time you will be shown this information so it is important to take a note of it. The Account Activationsection within this document provides futher guidance on this if required.
If you have two accounts – one for the internet and one for ALI – you will receive a different PIN for each.
Figure 1 Section of the’ Activate User Account’ screen showing an assigned PIN. Please Note:This will be a 6 digit number - 3 digits have been removed from the example above for security purposes.

OFFICIAL
Version 2.0
April 2018
RE-SETTING YOUR PIN
The ‘My Account’ section provides guidance on how to re-set your PIN.
CONSEQUENSES OF RE-SETTING YOUR PIN
IMPORTANT: As an extra layer of security, each individual form is encrypted with your unique PIN number. This means that if the PIN is re-set then while a form is partially completed then you will not be able to access it again without the original PIN. When this number is re-set a new form needs to be completed. For Sponsors this includes their sections of any NSV applications or any of the ‘Other Services’ forms they have initiated, but not completed (Transfer, Share, Extract, Extract & Transfer, Request NATO/EU/ESA, Notification of Leaver, and AIR). The information in a previous application started with the original PIN is not recoverable and will have to be re-entered.
If a Sponsor re-sets their PIN it will have no impact on the Subject’s part of the form.
PINS AND SUPER SPONSORS
If a Super Sponsor takes ownership of an application from another Sponsor any un-submitted information entered by the original Sponsor will be erased and will need to be re-entered. This is because the information entered by the original Sponsor is protected by their encryption PIN.
This action will have no impact on the Subject’s section of the form.

OFFICIAL
Version 2.0
April 2018
ACCOUNT ACTIVATION
This section explains: • How to activate your Sponsor User Account. • The confirmation you will receive when your Sponsor User Account has been activated. • The Sponsor ID.
ACCOUNT ACTIVATION GUIDANCE
STEP 1 Once the registration process has been completed you will receive a standard email from UKSV Figure 2. Follow the instructions in the email and click on the relevant link – this will take you to the ‘Account Activation’ screen Figure 3.
Please Note: The top set of links in the activation email Figure 2 is your unique activation link for your account, you must use the link to the correct portal that you have been initiated on. The second is to be used for all subsequent access and it is recommended that you save the second link to your Browser favourites.
IMPORTANT: Apple products are not compatible with the UKSV Portal.
The browsers we recommend you use are: • Internet Explorer • Google Chrome
Any other browsers are not supported and may not work correctly.
SPONSOR ID
Your unique Sponsor ID will be included in the activation email Figure 2. It should be kept secure and quoted in all correspondence with UKSV. It should NEVER be used by anyone other than the Sponsor it was assigned to. If UKSV believe a Sponsor Account has been compromised they reserve the right to de-activate it pending investigation.
If both portal accounts (Internet and ALI/PSN) have been requested the Sponsor ID will be the same for both.
Figure 2 Example of an account activation email from UKSV to the Sponsor

OFFICIAL
Version 2.0
April 2018
STEP 2 Complete the ‘Account Activation’ screen Figure 3 using exactly the same details you provided to UKSV to set up your User Account.
You are also required to confirm you agree to abide by the ‘Security Operating Procedures’.
ACTION TO TAKE IF YOU LOCK YOUR USER ACCOUNT
If you input any of the required information in Figure 3 incorrectly, more than 5 times, your User Account will lock and you will need to contact the Enquiry Centre.
Figure 3 The ‘Account Activation’ screen where you are required to input details that match those used by UKSV when they set up your User Account.
Once you have completed and submitted the information at Figure 3 the ‘Activate your user account’ screen Figure 4 will appear.
STEP 3 You are required to activate your user account by creating a username and password Figure 4.

OFFICIAL
Version 2.0
April 2018
Figure 4 – The’ Activate your User Account’ used to create a username and password.This screen also includes your assigned PIN. Please Note: The PIN will be a 6 digit figure, for security purposes 3 digits have been removed from the example above.
A Figure 4 Enter the required information e.g. usernames, password using the on screen
guidance.
B Figure 4 Click the ‘Activate’ button.
Figure 5 will appear on screen to confirm that your account has been activated.

OFFICIAL
Version 2.0
April 2018
Figure 5 Confirmation that your User Account has been activated
STEP 4 If you click on the ‘Home’ button in Figure 5 you will be able to access the NSVS Portal and begin to initiate vetting applications. All subsequent access to the NSVS Portal must be made through the second link in the activation email sent to you by UKSV Figure 2 – see the Signing in the NSVS Portal section for further guidance.
DEFAULT VALUES
Default Values – it is recommended you input your default values when you set up your User Account. Further guidance can be in the My Account section.
OFFICIAL
Version 2.0
April 2018
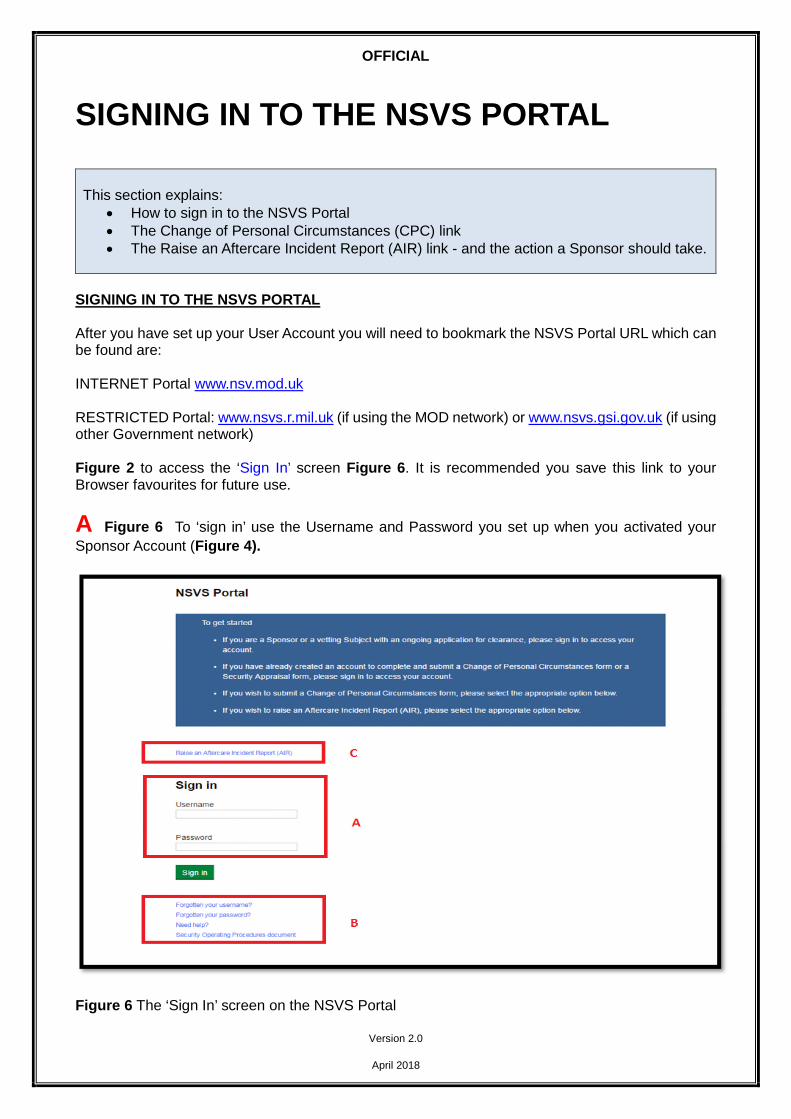
SIGNING IN TO THE NSVS PORTAL
This section explains: • How to sign in to the NSVS Portal • The Change of Personal Circumstances (CPC) link • The Raise an Aftercare Incident Report (AIR) link - and the action a Sponsor should take.
SIGNING IN TO THE NSVS PORTAL
After you have set up your User Account you will need to bookmark the NSVS Portal URL which can be found are:
INTERNET Portal www.nsv.mod.uk
RESTRICTED Portal: www.nsvs.r.mil.uk (if using the MOD network) or www.nsvs.gsi.gov.uk (if using other Government network)
Figure 2 to access the ‘Sign In’ screen Figure 6. It is recommended you save this link to your Browser favourites for future use.
A Figure 6 To ‘sign in’ use the Username and Password you set up when you activated your
Sponsor Account (Figure 4).
Figure 6 The ‘Sign In’ screen on the NSVS Portal

OFFICIAL
Version 2.0
April 2018
ACTION TO TAKE IF YOU HAVE FORGOTTEN YOUR USERNAME
B Figure 6 Link to recover a forgotten username
Click on the ‘Forgotten your Username?’ link and you will be asked to provide your forename, surname and the email address you used to create your User Account. Press ‘Submit’ and an email containing your username will be sent to you. If you have not received an email within 24 hours you may want to check in your junk mail.
Please ensure that you are using the link on the correct Portal to recover your Username. If you use an incorrect Portal then you will not receive the reminder email.
ACTION TO TAKE IF YOU HAVE FORGOTTEN YOUR PASSWORD
B Figure 6 Link to re-set your password.
When you click on the ‘Forgotten your Password?’ link you will be asked to provide your username (you may want to consider clicking on the ‘Forgotten your Username?’ link first to check you are using the correct one). Press ‘Submit’ and an email containing further information will be sent to you. If you have not received a response within 24 hours you may want to check in your junk mail.
THE NEED HELP? LINK
B Figure 6 The ‘Need Help?’ link provides additional guidance on a range of topics related to the
NSVS Portal.
CHANGE OF PERSONAL CIRCUMSTANCES AND AFTERCARE INCIDENT REPORT LINKS
C Figure 8 Links to:
Raise an Aftercare Incident Report (AIR). It is not recommended Sponsors use this link as it does not feed directly on to NSVS. Sponsors should follow the guidance set out below if they wish to submit an AIR.
AFTERCARE - TRANSFER
One of the services available to you as a Sponsor is the ability to request a clearance transfer. This will be used when an individual currently holds a valid Security Clearance with another Government department. You are able to request this clearance is transferred to your Organisation if the clearance follows security criterea.
OFFICIAL
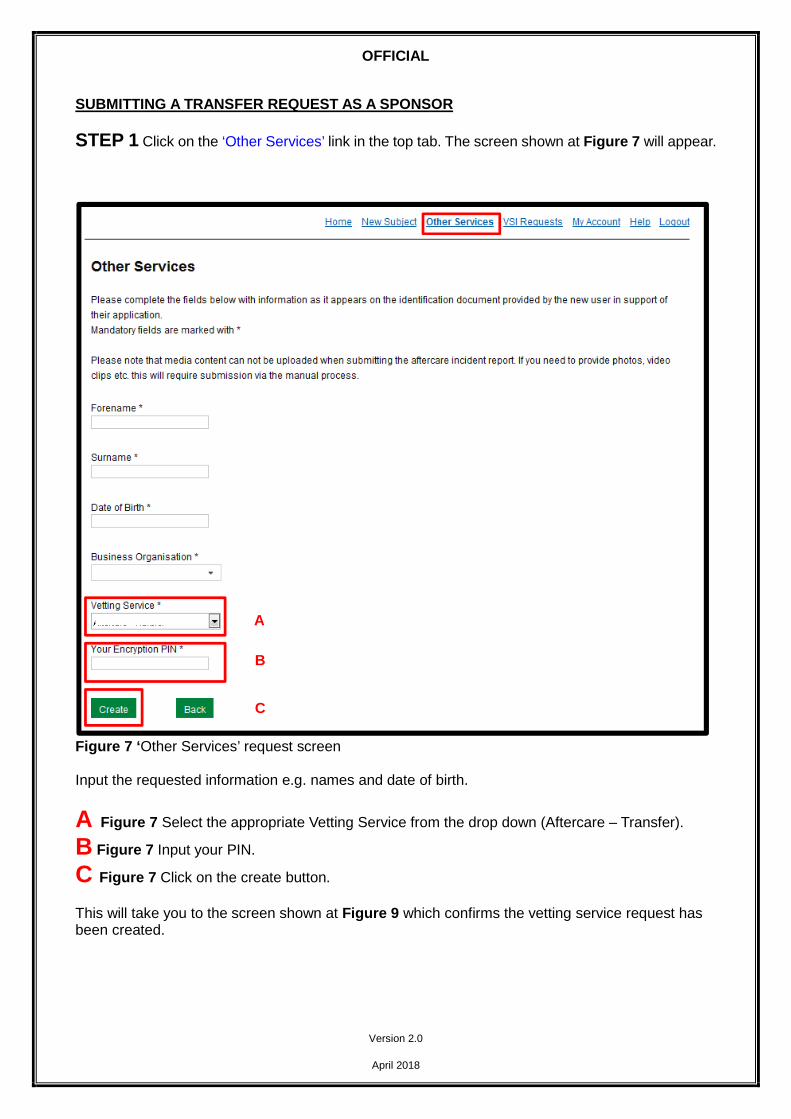
SUBMITTING A TRANSFER REQUEST AS A SPONSOR
STEP 1 Click on the ‘Other Services’ link in the top tab. The screen shown at Figure 7 will appear.
Figure 7 ‘Other Services’ r
Input the requested inform
A Figure 7 Select the ap
B Figure 7 Input your PIN
C Figure 7 Click on the c
This will take you to the scbeen created.
A
B
Version 2.0
April 2018
equest screen
ation e.g. names and date of birth.
propriate Vetting Service from the drop down (Aftercare – Transfer).
.
reate button.
reen shown at Figure 9 which confirms the vetting service request has
C

OFFICIAL
Version 2.0
April 2018
Figure 9 Screen confirming Other Service request has been created
STEP 2 Click on the ‘Back to main menu’ button shown in Figure 9. The Home: Sponsor view screen will appear Figure 10.
Figure 10 Home: Sponsor view showing status of Vetting Service request
STEP 3 You need to search your Home: Sponsor view page for the vetting service request you created. This can be done various ways e.g. by using the search facilities on the left hand side of
A B
C

OFFICIAL
Version 2.0
April 2018
the screen or by clicking on a relevant heading (‘Created Date’ or ‘Surname’ etc.) to sort the column into a logical order.
A Figure 10 Shows the Status of the requested Vetting Service is ‘Waiting for Sponsor actions’.
B Figure 10 Shows the Vetting Service that has been requested. In this example an Aftercare –
Transfer.
C Figure 10 The ‘Details’ link which needs to be accessed to enable you to progress the Transfer.
Once you have found the relevant entry click on the ‘Details’ link. The screen shown at Figure 11will appear.
Figure 11 This screen enables the completion of Sponsor’s part of the requested vetting service
STEP 4 Input your PIN and click on the ‘Complete sponsor’s part of the Aftercare Transfer’ link - Figure 11.
The screen shown at Figure 12 will appear.

OFFICIAL
Version 2.0
April 2018
Figure 12 Screen showing the Sponsor’s section of the requested vetting service.
STEP 5 Work through the section heading links (by each of the red circles) and input the required information.
A Figure 12 Show the sections of the NSV form that require completion.
B Figure 13 It is suggested you click on the Check for errors button as you are completing each
page as it will highlight any missing or incorrect information and enable you to amend it. If the section is correct you will automatically be moved on to the next section. You will find this at the bottom of each page.
STEP 6 When all the sections are complete (indicated by a green tick ) you need to confirm the information is correct before you able to submit the form

OFFICIAL
Version 2.0
April 2018
NOTE: When the declaration is ticked the form becomes read-only and you will not be able to amend any of the information provided. If you wish to make amendments before the form is submitted you need to uncheck the declaration and make the changes.
Figure 13 All sections completed
OFFICIAL
Version 2.0
April 2018
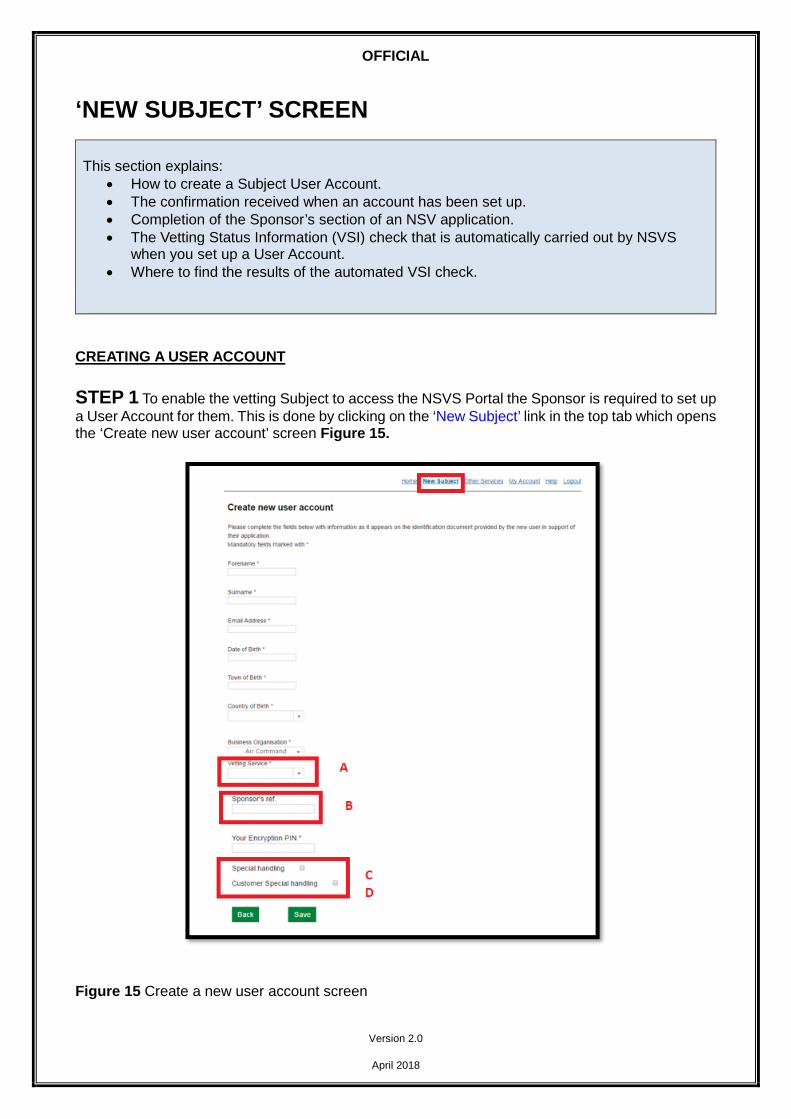
‘NEW SUBJECT’ SCREEN
This section explains:• How to create a Subject User Account. • The confirmation received when an account has been set up.• Completion of the Sponsor’s section of an NSV application.• The Vetting Status Information (VSI) check that is automatically carried out by NSVS
when you set up a User Account. • Where to find the results of the automated VSI check.
CREATING A USER ACCOUNT
STEP 1 To enable the vetting Subject to access the NSVS Portal the Sponsor is required to set up a User Account for them. This is done by clicking on the ‘New Subject’ link in the top tab which opens the ‘Create new user account’ screen Figure 15.
Figure 15 Create a new user account screen

OFFICIAL
Version 2.0
April 2018
The following provides guidance for completing the various fields shown in Figure 15.
A Figure 15 - Vetting Service: The vetting services listed in the drop down menu are the services
which are available to you as a UKSV customer. These will have been agreed with UKSV and will be specific to your requirements.
B Figure 15 - Sponsor’s Reference: This is chosen by you. You may wish to choose something that links to your internal business practice. Including your initials or the first three letters of the site you work at could help a Super Sponsor identify your cases.
C Figure 15 - Special Handling: This should only be answered as ‘yes’ where the Subject (or a
close relative) is connected personally or professionally to UKSV. When considering the Special Handling option you may wish to think about the following - Is the vetting subject (a) an employee of, (b) applying for employment with or (c) closely associated with UKSV? Please Note: A ‘yes’ in this checkbox when not relevant will delay an application.
D Figure 15 - Customer Special Handling: This functionality has to be requested and set up through UKSV. When in place it restricts the number of people who can view vetting information – which, therefore, also limits the number of people who can work on the case on NSVS. When considering the Special Handling option for your organisation you may wish to think about the following - Does the vetting subject (a) make security clearance decisions on behalf of your organisation or (b) provide direct support to the decision maker?
STEP 2 When you have completed the ‘Create a new user’ screen and clicked on the ‘Save’ button you will receive confirmation that an account has been created and a notification e mail containing further instructions has been sent to the new user Figure 16.
Figure 16 Screen confirming user account has been created
If you need to:
• Re-send activation email
• Modify Subject’s details
• Withdraw application
please see the guidance in the Home Screen section.

OFFICIAL
Version 2.0
April 2018
AUTOMATED VETTING STATUS INFORMATION (VSI) CHECK
When you set up a new application, the system will automatically perform a Vetting Status Information (VSI) enquiry, which means it will check to see if the individual currently holds a valid clearance or is in the process of obtaining one.
The results of the VSI check will appear on the details page for that individual’s application – which can be accessed through the ‘Details’ link on the Home screen. The automated VSI check will not be immediate and it will not stop you from continuing with the individual’s application.
If you receive VSI details confirming the Subject already holds the required clearance level you may wish to consider whether one of the ‘Other Services’ options e.g. Transfer is appropriate.
SPONSOR’S SECTION OF NSV APPLICATIONS
As part of the NSV process Sponsors are required to complete a section of the NSV application.
IMPORTANT: There is a set time-frame for both the Sponsor and Subject to complete their respective sections of an NSV application. This can vary between organisations so you will need to find out what your time-frame is. A reminder will be sent - usually three weeks before the deadline – if any parts of the form (Subject or Sponsor) are still outstanding. If the Subject and/or Sponsor fail to submit their information by the deadline NSVS will automatically cancel the application and a new one will need to be generated.
COMPLETION OF SPONSOR’S SECTION OF NSV APPLICATION FORM
STEP 1 To access the Sponsor’s section of the form:
• Access the ‘Home: Sponsor view page’ using the ‘Home’ link in the top tab. • Find the User Account you have created – this can be done in various ways e.g. by using
the search facilities on the left side of the page or by clicking on a column heading (‘Created Date’ or ‘Surname’ etc.) to sort it into a logical order.
• Click on the ‘Details’ link of the relevant entry. The screen shown at Figure 17 will appear. • Enter your PIN and click on the ‘Complete Sponsor’s part of NSV Form’ (DV in the
example shown) (Figure 17)• The sponsor’s section of the application will appear (Figure 18)

OFFICIAL
Version 2.0
April 2018
Figure 17 Screen showing link to Sponsor’s section of the NSV application (DV in the example shown).
STEP 2 Work through the section headings, indicated by a red circle, entering the relevant information Figure 18. When a section is complete a green tick will appear by the topic heading.

OFFICIAL
Version 2.0
April 2018
Figure 18 Screen showing a section of the Sponsor’s section of the NSV application
A Figure 18 The red circles on the left side of the screen indicates the sections of the application
that require your completion.
B Figure 18 Hovering the curser over the question mark will reveal useful completion
guidance.
C Figure 18 The ‘Check for errors’ box is a useful option if you are struggling to understand why a
section isn’t showing as completed. By clicking on the ‘Check for errors’ box you can validate the page and check it has been successfully completed. Any errors will appear in red, either below the relevant question or at the top of the page. The question will also be highlighted in grey. Clicking on the underlined error, shown in red at the top of the page, will take you to the relevant question.
D Figure 18 The Save and Exit button enables you to save information on an incomplete section
and return to it at a later date. You may move to another screen before one section is completed – however you will need to complete all sections before you can successfully submit the form. You can exit and return to your part of a Subjects application as many times as you wish prior to submission. Each time you access a form you will be asked to provide your unique PIN.
E Figure 18 The ‘Next’ button is a navigational tool that will move you between topic headings and
will open all pages within a topic that need to be completed.

OFFICIAL
Version 2.0
April 2018
SUBMISSION OF SPONOR’S SECTION OF NSV APPLICATION FORM
STEP 3 Once all parts of the Sponsor section of the application form have been completed you can submit it.
To submit the Sponsor’s section of the application click on the End button Figure 19 and select the ‘Form Completed’ option.
When you have ticked the box to confirm the information you have provided is correct Figure 19you cannot edit any of the information you have provided unless you ‘untick’ this box first. Once you have submitted the application you cannot amend it.
Figure 19 Screen confirming Sponsor’s section of the form has been completed and submitted
Once both the Sponsor and the Subject have submitted their respective sections of the NSV application the NSVS Portal will forward the information to the NSVS Case Management System which manages the onward processing of the application.
Information entered into Sponsor’s section of an NSV application cannot be seen by the Subject.

OFFICIAL
Version 2.0
April 2018
‘HOME’ SCREEN – Sponsor View
This section explains the general functionality of the Home Screen.
It also explains how to: • View and monitor User Accounts and the progression of applications• Search for a specific User Account • Export vetting information into Excel
And through the ‘Details’ link how to:• Drill down into the requested vetting activity to ascertain the status of the application AND
complete the Sponsor’s section of the associated form • Re-send activation email• Modify Subject’s details • Withdraw an application • Unlock a vetting Subject’s User Account
GENERAL FUNCTIONALITY OF THE HOME SCREEN
Figure 20 Functionality of the Home Screen

OFFICIAL
Version 2.0
April 2018
A Figure 20 Links to various functionality within the Portal
New Subjects This option will allow you to initiate a new vetting application.
Other Services This option enables you to request or submit the following:
• Transfer – where an individual holds a valid clearance with another organisation, you may request the clearance is transferred to your organisation.
• Extract SC from DV – where a DV clearance is due to expire, or is no longer required, you can request the underlying SC clearance.
• Extract SC from DV & Transfer Clearance – where a DV clearance is due to expire, or is no longer required, you can request the underlying SC clearance. This can then be transferred to your organisation.
• Share Clearance – if you have a vetting Subject who works for an organisation but is contracted to another department or is a member of the Reserves, you can request to share their clearance.
• Request NATO/EU/ESA Certificate – NATO is required when an individual goes into a specific NATO job. NATO certificate request will only be granted if the Subject holds an in date national security clearance. Only available for those customers currently receiving this service
• Notification of Leaver – when a clearance holder leaves your organisation, their Security Clearance is no longer required and must be lapsed.
• Raise Aftercare Incident Report (AIR) – if information becomes available that raises doubts about an individual’s suitability for access to protectively marked or sensitive assets, the circumstances are to be reported via this form.
VSI Requests - The Vetting Subject Information option is only available on the ALI/PSN portal. Please Note: The screen shot example above in Figure 20 was taken using the internet portal so ‘VSI Requests’ is not showing an available option.
My Account - selecting this tab will allow you to complete and edit your contact details.
Before creating any applications you should ensure that the ‘Default Values’ have been completed. This is important because NSVS draws on this information and pre-populates the ‘Sponsor Notification’ part of the form ensuring accuracy and consistency. It is the e mail address given here that is provided to Subjects for them to contact you.
Help - selecting this tab will provide guidance relating to the NSVS Portal.
Logout - selecting this tab will allow you to securely log out of your NSVS Portal User Account.
B Figure 20 Only Super Sponsor accounts will show the ‘My Organisations’ filter option. Super
Sponsors are able to see all their cases within their organisation enabling them to take ownership of another Sponsor’s cases.
C Figure 20 The ‘Search’ function on the left side of the screen enables the user to search for
applications under the set headings. You can also search for information by clicking on the section heading e.g. ‘Status’, ‘Created Date’ to sort it into a logical order.
D Figure 20 This option enables the user to export vetting information into Excel.

OFFICIAL
Version 2.0
April 2018
MONITORING THE STATUS AND PROGRESSION OF USER ACCOUNTS
Once a User Account has been created or a Vetting Service initiated/requested the Sponsor is able to monitor its status and progression on the Home: Sponsor View Page. Additional information is provided on each case via the ‘Details’ link associated to it.
Figure 21 Sponsor’s Home view showing information to help monitor the progress of initiated activities
A Figure 21 Status Definitions
This column shows the status of the activity initiated by the Sponsor.
• Waiting for Subject registration – the activation link has been sent to the Subject but their account has not yet been created
• Waiting for Subject – a portal account has been created and the Subject is currently completing their online form
• Waiting for Sponsor – Sponsor has not completed their part of the application • Withdrawn by Sponsor – Sponsor has withdrawn an application they have initiated • Withdrawn by Subject – Subject has withdrawn their application • In Progress – application has been successfully submitted into NSVS and the case is in
action • Completed – all required checks have been completed and a vetting decision has been
made • Cancelled – the application has been cancelled

OFFICIAL
Version 2.0
April 2018
B Figure 21 ‘Details’ link
Clicking on the ‘Details’ link provides additional information relating to the activity the Sponsor has initiated. The example in Figure 22 relates to an NSV application, but a similar screen will appear for all ‘Other Services’ requests.
Figure 22 Additional information accessed through the ‘Details’ link of an activity initiated by a Sponsor – this example relates to a DV NSV application request
A Figure 22 You will only see this entry if you have Super Sponsor permissions. By entering your PIN and clicking the ‘Re-assign’ button you are able to take ownership of the case. Please Note: If you take ownership of an application from another Sponsor any un-submitted information entered by the original Sponsor will be erased and will need to be re-entered. This is because it is protected by their encryption PIN. This action will have no impact on the Subject’s section of the form.
B Figure 22 This shows the status of both the Subject and Sponsors part of the application.
OFFICIAL
Version 2.0
April 2018
C Figure 22 Sponsors may see the following links:
• ‘Resend activation email – if the Subject fails to receive the email to activate their account you can resend the email by clicking on this link.
• ‘Modify Subject’s details’ – If the personal mandatory information you use to create the Subject’s account needs amending i.e. it’s the cause of the Subject not being able to activate their account you can select this option to modify the details. Following any amendment you will need to re-send the activation e mail and inform the Subject this has been done so they can activate the amended account.
• ‘Withdraw application’ – If a clearance is no longer required you can withdraw an application by clicking on this option at any point. However, if you wish to withdraw an application that has already been submitted, please ensure you inform all relevant parties e.g. Decision Makers.
• ‘Unlock Subject Account’ (not showing in Figure 22) – If a vetting Subject locks their User Account a link will appear to enable you to unlock it. Please Note: You will need to inform the vetting Subject when you have unlocked their account – NSVS does not notify them.

OFFICIAL
Version 2.0
April 2018
‘OTHER SERVICES’ SCREEN
The section explains how to action the additional post clearance activities available to Sponsors including:
• Aftercare – Transfer/ Aftercare • Aftercare – Request NATO/ESA/EU • Aftercare – Notify of Leaver • Aftercare – Share • Aftercare – Extract • Aftercare – Transfer & Extract • Aftercare – AIR
Definitions of the above can be found in the Glossary.
Please Note: Selection of Aftercare services may result in charges being incurred.
The example given below is for a Transfer request, but similar action is taken for all of the available ‘Other Services’ options.
STEP 1 To access the Other Service options click on the ‘Other Services’ link in the top tab of any screen. The screen at Figure 23 will appear.

OFFICIAL
Version 2.0
April 2018
Figure 23 Screen to request ‘Other Services’
STEP 2 Enter the requested information in Figure 23.
A Figure 23 After entering the details e.g. name and date of birth select the vetting service you
require from the drop down.The options available are:
Aftercare – Transfer When an individual currently holds a valid Security Clearance with another organisation you can request that their clearance is transferred to the new organisation.
Aftercare – Adv Transfer - Advanced Transfer is only applicable to a small number of customers who request additional checks before a clearance is transferred.
Aftercare – Request NATO/ESA/EUNATO is required when an individual goes into a specific NATO job. NATO certificate request will only be granted if the Subject holds an in date national security clearance.
Aftercare – Notify of Leaver When a clearance holder leaves your organisation, their Security Clearance is no longer required and must be lapsed.
AA
BA

OFFICIAL
Version 2.0
April 2018
Aftercare – Share In some instances it may be possible to share a security clearance with another organisation if the holder is working for you temporarily.
Aftercare – Extract It is possible where an individual holds a higher level of security clearance to extract a lower level of clearance out of it (e.g. extract an SC from a DV).
Aftercare – Transfer & Extract As above for extract but also transfer the clearance to your organisation.
Aftercare – AIR Aftercare Incident Report Should information become available that raises doubts about an individual’s suitability for access to protectively marked or sensitive assets, the circumstances are to be reported via this form.
B Figure 23 Enter your PIN and click on the ‘create’ button.
You will receive confirmation of your Other Service request – Figure 24
Figure 24 Screen confirming an Other Service request has been successfully completed
STEP 3 Click on the ‘Back to the Main Menu’ button or the ‘Home’ link in the top tab and you will return to the Home: Sponsor View screen - Figure 25.
IMPORTANT: You need to search for the Vetting Service entry you have created and click on the associated ‘Details’ link. This action will take you to the screen in Figure 26.
Figure 25 Home: Sponsor view screen where you will need to search for the relevant vetting service entry – this example shows a Transfer request

OFFICIAL
Version 2.0
April 2018
A Figure 25 Indicates the vetting service requested.
B Figure 25 Clicking on the ‘Details’ link at takes you to the Sponsor view at Figure 26.
STEP 4 Enter your PIN Figure 26 and click on the link to complete the Sponsor’s section of the requested vetting service. This action will take you to the screen at Figure 27.
Figure 26 Screen with link to the Sponsor’s section of the requested/initiated vetting service.
A Figure 26 Indicates the vetting service requested.
B Figure 26 PIN and link to the Sponsor’s section of the requested vetting service - ‘Complete
Sponsor’s part of Aftercare Transfer’ in this example.
STEP 5 Complete each of the sections listed by the red circles on the left hand side Figure 27. If required, click here for completion guidance. When all the sections are complete (shown by a green tick against the topic heading) check the Declaration box in this section section to submit.

OFFICIAL
Version 2.0
April 2018
Figure 27 Screen where Sponsor enters specific details about the vetting service they have requested/initiated.
STEP 6 You will be able to monitor the progress of the application from the Home screen.

OFFICIAL
Version 2.0
April 2018
‘VETTING STATUS INFORMATION (VSI) REQUESTS’ SCREEN
This section explains how to:
• Action a VSI request.• Interpret the information returned from the enquiry.
PERFORM A VETTING STATUS INFORMATION REQUEST (VSI) Now available on the Internet Portal
In order to perform a VSI enquiry you will need a minimum of Forename, Surname and DOB.
STEP 1 Click on the VSI Requests link in the top tab. Figure 28 will appear.
Figure 28 VSI Requests screen
STEP 2 Click on the ‘Request a new VSI’ box in Figure 28 and the screen shown at Figure 29 will appear. Input the required information and click on the ‘Create’ button.
Figure 29 Screen to input details for VSI request

OFFICIAL
Version 2.0
April 2018
GUIDANCE ON RETURNED VSI INFORMATION
Once a search has been submitted, after a short time you will see the status of the request on the VSI screen.
The VSI information will remain for 5 days before being deleted.
There will be three VSI responses:
NOT FOUND - no match for the information provided. There is no record held for this individual.
CONTACT THE VETTING PROVIDER – there may be multiple matches based on the information you have provided. Contact our Enquiry Centre who should be able to identify the individual and provide the information you require. Please Note: you may be asked for additional information in order to ascertain the correct clearance. Contact details for the Enquiry Centre can be found in the glossary.
LIST – clicking on the ‘Details’ link will display the following information held for that Subject:
• level of clearance, • when clearance was issued and • when it is due to expire.

OFFICIAL
Version 2.0
April 2018
‘MY ACCOUNT’ SCREEN
This section explains how to:• Change your password • Request a new PIN • Set/change your default values
Figure 30 Overview of links available in the My Account: Sponsor’s view screen
CHANGE PASSWORD AND FORGOTTEN PIN
If you want to change your Password or if you have forgotten your PIN you will need to click on the relevant links in Figure 30 and take the requested action.
You should be aware that re-setting your PIN will result in the loss of all un-submitted information. Please refer to the PIN section for additional information.
SETTING YOUR DEFAULT VALUES
Before creating any new accounts you should ensure the Default Values have been completed.
The details entered on this page will automatically be populated into the sponsor section of any application or ‘Other Services’ request you initiate. It is important to keep this information up to date to ensure you receive any email notifications or hard copy correspondence that may be sent to you. The contact information provided is made available to vetting Subjects in case they need to contact you.
If you click on the ‘Default Values’ hyperlink Figure 30 it will take you to the Default Information screen Figure 31 where you can input the relevant information.

OFFICIAL
Version 2.0
April 2018
Figure 31 Screen for Sponsors to input their Default Value information

OFFICIAL
Version 2.0
April 2018
‘HELP’ SCREEN
The Help screen provides a range of guidance, instruction and hyperlinks
Figure 32 Help screen guidance
‘LOGOUT’ SCREEN
If you click on the Logout screen you will automatically log out of the system and the ‘Sign In’ screen will appear Figure 6.