polycom video media center (vmc) 1000 version 2.0...
TRANSCRIPT

2.0 | July 2010 | 3725-77100-004C
Polycom® Video Media Center (VMC)™ 1000 Version 2.0 Administrator Guide

© 2010 Polycom, Inc. All rights reserved.
Polycom, Inc.4750 Willow RoadPleasanton, CA 94588-2708USA
No part of this document may be reproduced or transmitted in any form or by any means, electronic or mechanical, for any purpose, without the express written permission of Polycom, Inc. Under the law, reproducing includes translating into another language or format.
As between the parties, Polycom, Inc., retains title to and ownership of all proprietary rights with respect to the software contained within its products. The software is protected by United States copyright laws and international treaty provision. Therefore, you must treat the software like any other copyrighted material (e.g., a book or sound recording).
Every effort has been made to ensure that the information in this manual is accurate. Polycom, Inc., is not responsible for printing or clerical errors. Information in this document is subject to change without notice.
ii
Trademark Information
Polycom®, the Triangles logo, ReadiManager®, SoundPoint®, SoundStation®, ViaVideo®, VoiceStation®, Vortex®, and VSX® are registered trademarks of Polycom, Inc. Convene™ , Global Management System™, iPower™, MGC™, People+Content™, People On Content™, Polycom Conference Suite™, Polycom Converged Management Application™ (CMA™), Polycom Distributed Media Application™ (DMA™), Polycom HD Voice™, Polycom PathNavigator™, Polycom VideoPlus™, Polycom VoicePlus™, PVX™, RAS™, ReadiConvene™, RMX 2000™, RSS™, V2iU™, VBP™, VS4000™, and VTX™ are trademarks of Polycom, Inc.
All other trademarks are the property of their respective owners.
Patent Information
The accompanying product is protected by one or more U.S. and foreign patents and/or pending patent applications held by Polycom, Inc.

Contents
Polycom, Inc. iii
Contents
1 About the VMC 1000 . . . . . . . . . . . . . . . . . . . . . . . . . . . . . 1About the Polycom VMC 1000 . . . . . . . . . . . . . . . . . . . . . . . . . . . . . . . . . . . . . 1
Key Polycom VMC 1000 Features . . . . . . . . . . . . . . . . . . . . . . . . . . . . . . . 2RSS Registration and Monitoring . . . . . . . . . . . . . . . . . . . . . . . . . . . . 2External Live Stream Sources . . . . . . . . . . . . . . . . . . . . . . . . . . . . . . . 2Content Creation and Publishing . . . . . . . . . . . . . . . . . . . . . . . . . . . . 2Content Editing . . . . . . . . . . . . . . . . . . . . . . . . . . . . . . . . . . . . . . . . . . . 2Content Backup . . . . . . . . . . . . . . . . . . . . . . . . . . . . . . . . . . . . . . . . . . . 3Security and Access Control . . . . . . . . . . . . . . . . . . . . . . . . . . . . . . . . 3Polycom VMC 1000 System Monitoring . . . . . . . . . . . . . . . . . . . . . . 3Reporting . . . . . . . . . . . . . . . . . . . . . . . . . . . . . . . . . . . . . . . . . . . . . . . . 3
Key Concepts . . . . . . . . . . . . . . . . . . . . . . . . . . . . . . . . . . . . . . . . . . . . . . . . . . . . 4Realm . . . . . . . . . . . . . . . . . . . . . . . . . . . . . . . . . . . . . . . . . . . . . . . . . . . . . . . 4Roles . . . . . . . . . . . . . . . . . . . . . . . . . . . . . . . . . . . . . . . . . . . . . . . . . . . . . . . . 4
Site Administrator . . . . . . . . . . . . . . . . . . . . . . . . . . . . . . . . . . . . . . . . . 4Content Owner . . . . . . . . . . . . . . . . . . . . . . . . . . . . . . . . . . . . . . . . . . . 5Viewer . . . . . . . . . . . . . . . . . . . . . . . . . . . . . . . . . . . . . . . . . . . . . . . . . . . 5
Category . . . . . . . . . . . . . . . . . . . . . . . . . . . . . . . . . . . . . . . . . . . . . . . . . . . . . 5Channels . . . . . . . . . . . . . . . . . . . . . . . . . . . . . . . . . . . . . . . . . . . . . . . . . . . . 5Programs . . . . . . . . . . . . . . . . . . . . . . . . . . . . . . . . . . . . . . . . . . . . . . . . . . . . 5Groups . . . . . . . . . . . . . . . . . . . . . . . . . . . . . . . . . . . . . . . . . . . . . . . . . . . . . . 5Content Repository . . . . . . . . . . . . . . . . . . . . . . . . . . . . . . . . . . . . . . . . . . . . 6
2 Getting Started with the Polycom VMC 1000 . . . . . . . . . . . . 7Logging into Polycom VMC 1000 . . . . . . . . . . . . . . . . . . . . . . . . . . . . . . . . . . . 7
Logging in as a Site Administrator or Content Owner . . . . . . . . . . . . . . 8Logging in as a Viewer . . . . . . . . . . . . . . . . . . . . . . . . . . . . . . . . . . . . . . . . 8
Navigating the Polycom VMC 1000 User Interface . . . . . . . . . . . . . . . . . . . . 9
3 Setting Up Domains . . . . . . . . . . . . . . . . . . . . . . . . . . . . . 11About Domains . . . . . . . . . . . . . . . . . . . . . . . . . . . . . . . . . . . . . . . . . . . . . . . . . 11Domain Setup Options . . . . . . . . . . . . . . . . . . . . . . . . . . . . . . . . . . . . . . . . . . . 12
Domain Information Options . . . . . . . . . . . . . . . . . . . . . . . . . . . . . . . . . . 12Domain System Properties . . . . . . . . . . . . . . . . . . . . . . . . . . . . . . . . . . . . 13About Login Options . . . . . . . . . . . . . . . . . . . . . . . . . . . . . . . . . . . . . . . . . 15About Programming Options . . . . . . . . . . . . . . . . . . . . . . . . . . . . . . . . . . 17
Polycom VMC 1000 Administrator Guide
iv Polycom, Inc.
About Employee Generated Content . . . . . . . . . . . . . . . . . . . . . . . . 19Creating a Domain . . . . . . . . . . . . . . . . . . . . . . . . . . . . . . . . . . . . . . . . . . . . . . . 20Editing a Domain . . . . . . . . . . . . . . . . . . . . . . . . . . . . . . . . . . . . . . . . . . . . . . . . 22Changing to a Different Domain . . . . . . . . . . . . . . . . . . . . . . . . . . . . . . . . . . . 22Deleting Domains . . . . . . . . . . . . . . . . . . . . . . . . . . . . . . . . . . . . . . . . . . . . . . . 22System Resource Mapping . . . . . . . . . . . . . . . . . . . . . . . . . . . . . . . . . . . . . . . . 22Component Configuration . . . . . . . . . . . . . . . . . . . . . . . . . . . . . . . . . . . . . . . . 24Email Configuration . . . . . . . . . . . . . . . . . . . . . . . . . . . . . . . . . . . . . . . . . . . . . 25
Email Templates . . . . . . . . . . . . . . . . . . . . . . . . . . . . . . . . . . . . . . . . . 27CSS Layouts . . . . . . . . . . . . . . . . . . . . . . . . . . . . . . . . . . . . . . . . . . . . . . . . . . . . 28Video Edge Configuration . . . . . . . . . . . . . . . . . . . . . . . . . . . . . . . . . . . . . . . . 29Ingests . . . . . . . . . . . . . . . . . . . . . . . . . . . . . . . . . . . . . . . . . . . . . . . . . . . . . . . . . 31File Transfers . . . . . . . . . . . . . . . . . . . . . . . . . . . . . . . . . . . . . . . . . . . . . . . . . . . 31Build Info . . . . . . . . . . . . . . . . . . . . . . . . . . . . . . . . . . . . . . . . . . . . . . . . . . . . . . 32
4 Setting up LDAP Security Realms . . . . . . . . . . . . . . . . . . . . 33About Security Realms . . . . . . . . . . . . . . . . . . . . . . . . . . . . . . . . . . . . . . . . . . . 33
VMC Security Realm . . . . . . . . . . . . . . . . . . . . . . . . . . . . . . . . . . . . . . . . . 33LDAP Security Realm . . . . . . . . . . . . . . . . . . . . . . . . . . . . . . . . . . . . . . . . 34Single Sign-on . . . . . . . . . . . . . . . . . . . . . . . . . . . . . . . . . . . . . . . . . . . . . . . 34
Comparing Security Realms . . . . . . . . . . . . . . . . . . . . . . . . . . . . . . . . . . . . . . . 35Adding a Security Realm . . . . . . . . . . . . . . . . . . . . . . . . . . . . . . . . . . . . . . . . . 35
SSO Provider Configuration . . . . . . . . . . . . . . . . . . . . . . . . . . . . . . . . . . . 38Enabling SSO . . . . . . . . . . . . . . . . . . . . . . . . . . . . . . . . . . . . . . . . . . . . . . . . 39Troubleshooting SSO Configuration Problems . . . . . . . . . . . . . . . . . . . 43SSO Caveats . . . . . . . . . . . . . . . . . . . . . . . . . . . . . . . . . . . . . . . . . . . . . . . . . 43
5 Managing Access to the Polycom VMC 1000 . . . . . . . . . . . 45About Roles . . . . . . . . . . . . . . . . . . . . . . . . . . . . . . . . . . . . . . . . . . . . . . . . . . . . 45
Role Definitions . . . . . . . . . . . . . . . . . . . . . . . . . . . . . . . . . . . . . . . . . . . . . 45Super User . . . . . . . . . . . . . . . . . . . . . . . . . . . . . . . . . . . . . . . . . . . . . . 46Domain Administrator . . . . . . . . . . . . . . . . . . . . . . . . . . . . . . . . . . . . 46Broadcaster . . . . . . . . . . . . . . . . . . . . . . . . . . . . . . . . . . . . . . . . . . . . . . 46Presenter . . . . . . . . . . . . . . . . . . . . . . . . . . . . . . . . . . . . . . . . . . . . . . . . 46Moderator . . . . . . . . . . . . . . . . . . . . . . . . . . . . . . . . . . . . . . . . . . . . . . . 47Viewer . . . . . . . . . . . . . . . . . . . . . . . . . . . . . . . . . . . . . . . . . . . . . . . . . . 47Custom Roles . . . . . . . . . . . . . . . . . . . . . . . . . . . . . . . . . . . . . . . . . . . . 47
Creating a Custom Role . . . . . . . . . . . . . . . . . . . . . . . . . . . . . . . . . . . . . . . 48Editing a Role . . . . . . . . . . . . . . . . . . . . . . . . . . . . . . . . . . . . . . . . . . . . . . . 49Editing Members Assigned to a Role . . . . . . . . . . . . . . . . . . . . . . . . . . . 49Deleting a Role . . . . . . . . . . . . . . . . . . . . . . . . . . . . . . . . . . . . . . . . . . . . . . 50

Contents
Polycom, Inc. v
About Users . . . . . . . . . . . . . . . . . . . . . . . . . . . . . . . . . . . . . . . . . . . . . . . . . . . . 51Adding New Users . . . . . . . . . . . . . . . . . . . . . . . . . . . . . . . . . . . . . . . . . . . 51Editing a User . . . . . . . . . . . . . . . . . . . . . . . . . . . . . . . . . . . . . . . . . . . . . . . 52Changing a User's Password . . . . . . . . . . . . . . . . . . . . . . . . . . . . . . . . . . 52Deleting a User . . . . . . . . . . . . . . . . . . . . . . . . . . . . . . . . . . . . . . . . . . . . . . 53Emailing a User . . . . . . . . . . . . . . . . . . . . . . . . . . . . . . . . . . . . . . . . . . . . . . 53
About Groups . . . . . . . . . . . . . . . . . . . . . . . . . . . . . . . . . . . . . . . . . . . . . . . . . . . 53Creating a New Group . . . . . . . . . . . . . . . . . . . . . . . . . . . . . . . . . . . . . . . 54Deleting a Group . . . . . . . . . . . . . . . . . . . . . . . . . . . . . . . . . . . . . . . . . . . . 55Viewing a List of Programs Associated with a Group . . . . . . . . . . . . . 56Emailing Members of a Group . . . . . . . . . . . . . . . . . . . . . . . . . . . . . . . . . 57Editing Members of a Group . . . . . . . . . . . . . . . . . . . . . . . . . . . . . . . . . . 57Searching for Users and Groups . . . . . . . . . . . . . . . . . . . . . . . . . . . . . . . 59
Example Search . . . . . . . . . . . . . . . . . . . . . . . . . . . . . . . . . . . . . . . . . . 59About Reviews . . . . . . . . . . . . . . . . . . . . . . . . . . . . . . . . . . . . . . . . . . . . . . . . . . 59
Moderating a Review . . . . . . . . . . . . . . . . . . . . . . . . . . . . . . . . . . . . . . . . . 60Access Control . . . . . . . . . . . . . . . . . . . . . . . . . . . . . . . . . . . . . . . . . . . . . . . . . . 61Your Profile . . . . . . . . . . . . . . . . . . . . . . . . . . . . . . . . . . . . . . . . . . . . . . . . . . . . . 65
6 Assigning Encoders . . . . . . . . . . . . . . . . . . . . . . . . . . . . . . 67About Locations . . . . . . . . . . . . . . . . . . . . . . . . . . . . . . . . . . . . . . . . . . . . . . . . . 68Adding Encoders . . . . . . . . . . . . . . . . . . . . . . . . . . . . . . . . . . . . . . . . . . . . . . . . 68General Encoder Properties . . . . . . . . . . . . . . . . . . . . . . . . . . . . . . . . . . . . . . . 69Format-Specific Properties (Audio Bridge Encoder) . . . . . . . . . . . . . . . . . . 70Format-Specific Properties (Capture Studio) . . . . . . . . . . . . . . . . . . . . . . . . . 70Format-Specific Properties (Digital Rapids Encoders) . . . . . . . . . . . . . . . . . 70
Windows Media/Silverlight . . . . . . . . . . . . . . . . . . . . . . . . . . . . . . . 71Format-Specific Properties (Windows Media) . . . . . . . . . . . . . . . . . . . . . . . 72Format-Specific Properties (RSS 2000 Encoder) . . . . . . . . . . . . . . . . . . . . . . 73Format-Specific Properties (RSS 4000 Encoder) . . . . . . . . . . . . . . . . . . . . . . 74Format-Specific Properties (External Source) . . . . . . . . . . . . . . . . . . . . . . . . 75Format Specific Properties (ViewCast) . . . . . . . . . . . . . . . . . . . . . . . . . . . . . . 75Encoder Profiles . . . . . . . . . . . . . . . . . . . . . . . . . . . . . . . . . . . . . . . . . . . . . . . . . 76Encoder Profile Configuration (Capture Studio) . . . . . . . . . . . . . . . . . . . . . 78Encoder Profile Configuration (Digital Rapids) . . . . . . . . . . . . . . . . . . . . . . 78Encoder Profile Configuration (Windows Media) . . . . . . . . . . . . . . . . . . . . 79Encoder Profile Configuration (RSS 2000) . . . . . . . . . . . . . . . . . . . . . . . . . . . 81Encoder Profile Configuration (RSS 4000) . . . . . . . . . . . . . . . . . . . . . . . . . . . 82Encoder Profile Configuration (External) . . . . . . . . . . . . . . . . . . . . . . . . . . . 83Encoder Profile Configuration (ViewCast) . . . . . . . . . . . . . . . . . . . . . . . . . . 84

Polycom VMC 1000 Administrator Guide
vi Polycom, Inc.
Defining a ViewCast Encoder in the ViewCast UI . . . . . . . . . . . . . . . . 84ViewCast Encoder Properties in the Polycom VMC 1000 . . . . . . . . . . 85
About Studios . . . . . . . . . . . . . . . . . . . . . . . . . . . . . . . . . . . . . . . . . . . . . . . . . . . 87Creating a Studio . . . . . . . . . . . . . . . . . . . . . . . . . . . . . . . . . . . . . . . . . . . . 87
Encoder Troubleshooting . . . . . . . . . . . . . . . . . . . . . . . . . . . . . . . . . . . . . . . . . 88IP Address Configuration . . . . . . . . . . . . . . . . . . . . . . . . . . . . . . . . . 88
7 Using RSS Devices in the VMC 1000 . . . . . . . . . . . . . . . . . 91RSS Discovery Workflow . . . . . . . . . . . . . . . . . . . . . . . . . . . . . . . . . . . . . . . . . 91Polycom RSS 4000 Configuration . . . . . . . . . . . . . . . . . . . . . . . . . . . . . . . . . . 92
Adding a Template . . . . . . . . . . . . . . . . . . . . . . . . . . . . . . . . . . . . . . . 92Adding a Channel . . . . . . . . . . . . . . . . . . . . . . . . . . . . . . . . . . . . . . . . 93Adding a Virtual Recording Room . . . . . . . . . . . . . . . . . . . . . . . . . . 93
Adding RSS Devices in the VMC . . . . . . . . . . . . . . . . . . . . . . . . . . . . . . . . . . 94Adding a Polycom RSS 4000 v6 Device . . . . . . . . . . . . . . . . . . . . . . 95Adding an RSS 2000 Device . . . . . . . . . . . . . . . . . . . . . . . . . . . . . . . . 96
Creating Default Program Templates . . . . . . . . . . . . . . . . . . . . . . . . . . . . . . . 98Creating an Automated File Broadcast Template . . . . . . . . . . . . . 98Creating an On-Demand Template . . . . . . . . . . . . . . . . . . . . . . . . 100
Configuring the RSS for use with the Discovery Service . . . . . . . . . . . . . . 101Polycom RSS 4000 Discovery . . . . . . . . . . . . . . . . . . . . . . . . . . . . . . 102Polycom RSS 2000 Discovery . . . . . . . . . . . . . . . . . . . . . . . . . . . . . . 106
Viewing the Discoveries List . . . . . . . . . . . . . . . . . . . . . . . . . . . . . . . . . 109Adding an RSS Device as an Encoder . . . . . . . . . . . . . . . . . . . . . . . . . . . . . . 109
RSS 2000 Encoder . . . . . . . . . . . . . . . . . . . . . . . . . . . . . . . . . . . . . . . . . . . 111RSS 4000 Encoder . . . . . . . . . . . . . . . . . . . . . . . . . . . . . . . . . . . . . . . . . . . 113
Creating Live Broadcast Programs with an RSS 4000 Encoder . 114Troubleshooting and Caveats . . . . . . . . . . . . . . . . . . . . . . . . . . . . . . . . . . . . 115
Discovery Ingests . . . . . . . . . . . . . . . . . . . . . . . . . . . . . . . . . . . . . . . 115Polycom RSS 2000 Caveats . . . . . . . . . . . . . . . . . . . . . . . . . . . . . . . 115
8 Exchange Discovery . . . . . . . . . . . . . . . . . . . . . . . . . . . . 119Using the Polycom Microsoft Outlook Plugin . . . . . . . . . . . . . . . . . . . . . . 119Exchange Discovery Configuration . . . . . . . . . . . . . . . . . . . . . . . . . . . . . . . 120
Reviewing Exchange Discoveries . . . . . . . . . . . . . . . . . . . . . . . . . . 122
125 9 Distributing Content . . . . . . . . . . . . . . . . . . . . . . . . . . . . 125About Content Distribution Systems . . . . . . . . . . . . . . . . . . . . . . . . . . . . . . 125
Adding an HTTP Server . . . . . . . . . . . . . . . . . . . . . . . . . . . . . . . . . . . . . 126Adding an HTTP Access Point . . . . . . . . . . . . . . . . . . . . . . . . . . . . . . . . 127Adding a Windows Media Server . . . . . . . . . . . . . . . . . . . . . . . . . . . . . 128

Contents
Polycom, Inc. vii
Adding a Windows Media Server Live Access Point . . . . . . . . . . . . . 129Adding a Windows Media Server VOD Access Point . . . . . . . . . . . . 131Configuring Polycom Video Edge . . . . . . . . . . . . . . . . . . . . . . . . . . . . . 131
Video Edge Groups . . . . . . . . . . . . . . . . . . . . . . . . . . . . . . . . . . . . . . 131Adding a Video Edge Delivery Option in the Polycom VMC 1000 . 133
Adding a Blue Coat Delivery Option . . . . . . . . . . . . . . . . . . . . . . . . . . 135Adding an Access Point for a Blue Coat Delivery Option . . . . . 137
ICDS Delivery Option Configuration . . . . . . . . . . . . . . . . . . . . . . . . . . 138Download Access Point Configuration . . . . . . . . . . . . . . . . . . . . . 139VOD Access Point Configuration . . . . . . . . . . . . . . . . . . . . . . . . . . 139Live Access Point Configuration . . . . . . . . . . . . . . . . . . . . . . . . . . . 140ICDS Webcast Configuration . . . . . . . . . . . . . . . . . . . . . . . . . . . . . . 141Access Point Configuration . . . . . . . . . . . . . . . . . . . . . . . . . . . . . . . 142
Adding a Cisco Delivery Option . . . . . . . . . . . . . . . . . . . . . . . . . . . . . . 143Adding an Access Point for a Cisco Delivery Option . . . . . . . . . 144
Adding a Flash Delivery Option . . . . . . . . . . . . . . . . . . . . . . . . . . . . . . 146Adding an Access Point for a Flash Delivery Option . . . . . . . . . 146
Adding a Configured URL Delivery Option . . . . . . . . . . . . . . . . . . . . 147Adding an Access Point for a Configured URL Delivery Option . . 147
Adding a MediaNet Delivery Option . . . . . . . . . . . . . . . . . . . . . . . . . . 148Adding a MediaNet Failover Delivery Option . . . . . . . . . . . . . . . . . . 148Adding an Akamai Delivery Option . . . . . . . . . . . . . . . . . . . . . . . . . . . 149
Creating an Akamai Live Stream . . . . . . . . . . . . . . . . . . . . . . . . . . 149Setting Up Credentials for An Akamai CDN . . . . . . . . . . . . . . . . 150Adding an Akamai CDN to Polycom . . . . . . . . . . . . . . . . . . . . . . . 151Adding an Access Point for an Akamai Delivery Option . . . . . . 155
Editing a Delivery Option . . . . . . . . . . . . . . . . . . . . . . . . . . . . . . . . . . . . 156Deleting a Distribution System . . . . . . . . . . . . . . . . . . . . . . . . . . . . . . . . 156
Outlets . . . . . . . . . . . . . . . . . . . . . . . . . . . . . . . . . . . . . . . . . . . . . . . . . . . . . . . . 156Proximity Services . . . . . . . . . . . . . . . . . . . . . . . . . . . . . . . . . . . . . . . . . . . . . . 157
Configuring Proximity Services . . . . . . . . . . . . . . . . . . . . . . . . . . . . . . . 157Content Storage Options . . . . . . . . . . . . . . . . . . . . . . . . . . . . . . . . . . . . . . . . . 158
Storage Definition . . . . . . . . . . . . . . . . . . . . . . . . . . . . . . . . . . . . . . . . . . . 158Configuring the Local Storage Content Storage . . . . . . . . . . . . . . 159
Adding Access Points . . . . . . . . . . . . . . . . . . . . . . . . . . . . . . . . . . . . . . . 159Required Properties . . . . . . . . . . . . . . . . . . . . . . . . . . . . . . . . . . . . . 160Optional Properties (if Login is Required) . . . . . . . . . . . . . . . . . . 160
CIFS Storage Configuration . . . . . . . . . . . . . . . . . . . . . . . . . . . . . . . . . . 161Adding CIFS Storage . . . . . . . . . . . . . . . . . . . . . . . . . . . . . . . . . . . . 161Adding an Access Point . . . . . . . . . . . . . . . . . . . . . . . . . . . . . . . . . . 163
About Audiences . . . . . . . . . . . . . . . . . . . . . . . . . . . . . . . . . . . . . . . . . . . . . . . 164

Polycom VMC 1000 Administrator Guide
viii Polycom, Inc.
Creating an Audience . . . . . . . . . . . . . . . . . . . . . . . . . . . . . . . . . . . . . . . 165Sample Audience Diagram . . . . . . . . . . . . . . . . . . . . . . . . . . . . . . . . . . . 169
Cisco Audience Rule . . . . . . . . . . . . . . . . . . . . . . . . . . . . . . . . . . . . . 169
10 Using the Content Repository . . . . . . . . . . . . . . . . . . . . . . 171About the Content Repository . . . . . . . . . . . . . . . . . . . . . . . . . . . . . . . . . . . . 172Content Repository Items . . . . . . . . . . . . . . . . . . . . . . . . . . . . . . . . . . . . . . . . 172Adding a New Folder . . . . . . . . . . . . . . . . . . . . . . . . . . . . . . . . . . . . . . . . . . . 174Moving Items Between Folders . . . . . . . . . . . . . . . . . . . . . . . . . . . . . . . . . . . 175Adding New Content Repository Items . . . . . . . . . . . . . . . . . . . . . . . . . . . . 175Add Simple Streaming Media . . . . . . . . . . . . . . . . . . . . . . . . . . . . . . . . . . . . 176Add External Streaming Media . . . . . . . . . . . . . . . . . . . . . . . . . . . . . . . . . . . 177Adding New Downloadable File . . . . . . . . . . . . . . . . . . . . . . . . . . . . . . . . . 178Add New External Link . . . . . . . . . . . . . . . . . . . . . . . . . . . . . . . . . . . . . . . . . 179Adding New Image . . . . . . . . . . . . . . . . . . . . . . . . . . . . . . . . . . . . . . . . . . . . . 180Adding New Slides . . . . . . . . . . . . . . . . . . . . . . . . . . . . . . . . . . . . . . . . . . . . . 182Adding a New Poll . . . . . . . . . . . . . . . . . . . . . . . . . . . . . . . . . . . . . . . . . . . . . 183Add Complex Presentation . . . . . . . . . . . . . . . . . . . . . . . . . . . . . . . . . . . . . . 184Editing Content Repository Items . . . . . . . . . . . . . . . . . . . . . . . . . . . . . . . . . 185Deleting Content Repository Items . . . . . . . . . . . . . . . . . . . . . . . . . . . . . . . . 186Searching the Content Repository . . . . . . . . . . . . . . . . . . . . . . . . . . . . . . . . . 187
11 Polycom VMC 1000 Viewer Portal . . . . . . . . . . . . . . . . . . 189Classic Viewer Portal Feature Matrix . . . . . . . . . . . . . . . . . . . . . . . . . . . . . . 189Domain Setup for Employee-Generated Content . . . . . . . . . . . . . . . . . . . . 190
Domain Login Options . . . . . . . . . . . . . . . . . . . . . . . . . . . . . . . . . . . 191Domain Programming Options . . . . . . . . . . . . . . . . . . . . . . . . . . . . 192
Channel Setup for Employee-Generated Content . . . . . . . . . . . . . . . . . . . 193Creating an EGC Master Program Template . . . . . . . . . . . . . . . . . . . . . . . . 194
Creating an Employee-Generated Content Template . . . . . . . . . 194Featured Items . . . . . . . . . . . . . . . . . . . . . . . . . . . . . . . . . . . . . . . . . . . . . . . . . 199
Setting and Editing Featured Items . . . . . . . . . . . . . . . . . . . . . . . . . . . . 200Moderate Reviews . . . . . . . . . . . . . . . . . . . . . . . . . . . . . . . . . . . . . . . . . . . . . . 200Custom Program Attributes . . . . . . . . . . . . . . . . . . . . . . . . . . . . . . . . . . . . . . 201Using the Social Video Portal . . . . . . . . . . . . . . . . . . . . . . . . . . . . . . . . . . . . . 202My Videos . . . . . . . . . . . . . . . . . . . . . . . . . . . . . . . . . . . . . . . . . . . . . . . . . . . . . 204
Editing an EGC Program . . . . . . . . . . . . . . . . . . . . . . . . . . . . . . . . . 204
12 Using the Live Broadcast Console . . . . . . . . . . . . . . . . . . . 207About the Live Broadcast Console . . . . . . . . . . . . . . . . . . . . . . . . . . . . . . . . 208

Contents
Polycom, Inc. ix
Launching the Live Broadcast Console . . . . . . . . . . . . . . . . . . . . . . . . . . . . 208Broadcast Status Bar . . . . . . . . . . . . . . . . . . . . . . . . . . . . . . . . . . . . . . . . . 209Broadcast Metadata . . . . . . . . . . . . . . . . . . . . . . . . . . . . . . . . . . . . . . . . . 209Broadcast Configuration . . . . . . . . . . . . . . . . . . . . . . . . . . . . . . . . . . . . . 209Starting Encoder Output . . . . . . . . . . . . . . . . . . . . . . . . . . . . . . . . . . . . . 211Resetting a Broadcast . . . . . . . . . . . . . . . . . . . . . . . . . . . . . . . . . . . . . . . . 211
Starting a Live Broadcast . . . . . . . . . . . . . . . . . . . . . . . . . . . . . . . . . . . . . . . . 212Using Archiving Control . . . . . . . . . . . . . . . . . . . . . . . . . . . . . . . . . . . . . . . . 212
Starting Archiving . . . . . . . . . . . . . . . . . . . . . . . . . . . . . . . . . . . . . . . . . . 213Pausing Archiving . . . . . . . . . . . . . . . . . . . . . . . . . . . . . . . . . . . . . . . . . . 213Stopping Archiving . . . . . . . . . . . . . . . . . . . . . . . . . . . . . . . . . . . . . . . . . 214Restarting Archiving . . . . . . . . . . . . . . . . . . . . . . . . . . . . . . . . . . . . . . . . 214Clicking through Slides During a Live Broadcast . . . . . . . . . . . . . . . . 214
Live Reporting . . . . . . . . . . . . . . . . . . . . . . . . . . . . . . . . . . . . . . . . . . . . . . . . . 214About Moderating Audience Questions . . . . . . . . . . . . . . . . . . . . . . . . . . . 216About Polling Control . . . . . . . . . . . . . . . . . . . . . . . . . . . . . . . . . . . . . . . . . . . 216
About Using Polls During a Broadcast . . . . . . . . . . . . . . . . . . . . . . . . . 216Sending a Question to the Audience . . . . . . . . . . . . . . . . . . . . . . . 217Previewing Responses from the Audience . . . . . . . . . . . . . . . . . . 217Closing a Question . . . . . . . . . . . . . . . . . . . . . . . . . . . . . . . . . . . . . . 218Pushing the Results of a Question to the Audience: . . . . . . . . . . 219
Adding a Survey to a Program . . . . . . . . . . . . . . . . . . . . . . . . . . . . . . . . 219Stopping a Live Broadcast . . . . . . . . . . . . . . . . . . . . . . . . . . . . . . . . . . . . 220
The Monitor Tab . . . . . . . . . . . . . . . . . . . . . . . . . . . . . . . . . . . . . . . . . . . . . . . 220Launching the Presenter or Moderator Broadcast Control . . . . . . . . . . . . 221
13 Using the Media Editor . . . . . . . . . . . . . . . . . . . . . . . . . . 223About Media Editor . . . . . . . . . . . . . . . . . . . . . . . . . . . . . . . . . . . . . . . . . . . . . 223Editing Video Content . . . . . . . . . . . . . . . . . . . . . . . . . . . . . . . . . . . . . . . . . . 223
The Control Area . . . . . . . . . . . . . . . . . . . . . . . . . . . . . . . . . . . . . . . . . . . 224The Slide and Caption Preview Area . . . . . . . . . . . . . . . . . . . . . . . . . . 224The Timeline Area . . . . . . . . . . . . . . . . . . . . . . . . . . . . . . . . . . . . . . . . . . 225
Filtering Events . . . . . . . . . . . . . . . . . . . . . . . . . . . . . . . . . . . . . . . . . 225Adding Slides, Chapters, or Captions . . . . . . . . . . . . . . . . . . . . . . 225
14 Creating Reports . . . . . . . . . . . . . . . . . . . . . . . . . . . . . . . 227About Reports . . . . . . . . . . . . . . . . . . . . . . . . . . . . . . . . . . . . . . . . . . . . . . . . . 227About Aggregate Program Reports . . . . . . . . . . . . . . . . . . . . . . . . . . . . . . . 227
Generating Aggregate Program Reports . . . . . . . . . . . . . . . . . . . . . . . 229Exporting the Entire Report . . . . . . . . . . . . . . . . . . . . . . . . . . . . . . . . . . 230

Polycom VMC 1000 Administrator Guide
x Polycom, Inc.
About Program Reports . . . . . . . . . . . . . . . . . . . . . . . . . . . . . . . . . . . . . . . . . 232Generating Program Reports . . . . . . . . . . . . . . . . . . . . . . . . . . . . . . . . . 232
Printing Reports From Internet Explorer . . . . . . . . . . . . . . . . . . . . . . . . . . . 232Setting the Page Orientation . . . . . . . . . . . . . . . . . . . . . . . . . . . . . . . . . . 232Setting Printing Background Color & Images . . . . . . . . . . . . . . . . . . . 233Setting Page Print Margins . . . . . . . . . . . . . . . . . . . . . . . . . . . . . . . . . . . 233
15 Troubleshooting . . . . . . . . . . . . . . . . . . . . . . . . . . . . . . . 235About System Monitoring Tools and Reports . . . . . . . . . . . . . . . . . . . . . . . 235
About AppServer Background Process Status Report . . . . . . . . . . . . 235Accessing AppServer Background Processes Status Report . . . . 235
About the Broadcast Monitor Report . . . . . . . . . . . . . . . . . . . . . . . . . . 238Accessing Broadcast Monitor Report . . . . . . . . . . . . . . . . . . . . . . . 238
About the ACL Tool . . . . . . . . . . . . . . . . . . . . . . . . . . . . . . . . . . . . . . . . . . . . 238Reviewing ACL Issues . . . . . . . . . . . . . . . . . . . . . . . . . . . . . . . . . . . . . . . 239
Log4j Levels and Debugging Reference . . . . . . . . . . . . . . . . . . . . . . . . . . . . 239Windows Media Log Files . . . . . . . . . . . . . . . . . . . . . . . . . . . . . . . . . . . . . . . 241
Client-Side Logging . . . . . . . . . . . . . . . . . . . . . . . . . . . . . . . . . . . . . 241Log Parser Configuration . . . . . . . . . . . . . . . . . . . . . . . . . . . . . . . . . 241Manually Ingesting LOG Files . . . . . . . . . . . . . . . . . . . . . . . . . . . . 247
A Appendix . . . . . . . . . . . . . . . . . . . . . . . . . . . . . . . . . . . . 249HTTP Download for Flash VOD Content . . . . . . . . . . . . . . . . . . . . . . . . . . 249Adding Custom Pages to Viewer Portal . . . . . . . . . . . . . . . . . . . . . . . . . . . 251Configuring HTTPS for the Polycom VMC 1000 . . . . . . . . . . . . . . . . . . . . 252

Polycom, Inc. xi
About This Guide
This introduction provides a brief overview of the Polycom VMC 1000 Administrator Guide, describes the conventions used in this manual, and explains how to get additional information or support.
PurposeThe Polycom VMC 1000 Administrator Guide describes how to administer the Polycom Video Media Center (VMC) 1000. This document addresses tasks associated with the Administrative Portal interface and gives an understanding of all administrative procedures.
AudienceThis guide is for administrators who use and manage the Polycom VMC 1000 appliance. This guide is for those familiar with Web fundamentals such as URLs and HTML.
You may require a working knowledge of network protocols, multicast, and streaming media content delivery to use some advanced configuration features in this manual.
Depending on your administrative role, some of the screens and features described in this manual are not available to you. For a list of roles and permissions, see Getting Started: Roles and Permissions.

Polycom VMC 1000 Administrator Guide Documentation Set
xii Polycom, Inc.
Documentation SetThe Polycom VMC 1000 Administrator Guide is part of the Polycom VMC 1000 documentation set, which includes:
• The Polycom VMC 1000 Administrator Guide - This document.
• The Polycom VMC 1000 Getting Started Guide- Describes how to set up and configure the Polycom VMC 1000 appliance.
• The Polycom VMC 1000 Release Notes - Describes the product release. This document also identifies known problems and their workarounds, information not covered in the manuals or that has been modified since publication, as well as problems that have been fixed since previous releases.

Customer Support About This Guide
Polycom, Inc. xiii
Document ConventionsThis document uses the following typographical conventions.
Customer SupportRecognizing that technology alone cannot solve today’s complex challenges, Polycom Global Services provides the industry’s best technical support staff and programs to let you concentrate on the task at hand. Polycom users can select from a variety of support solutions to obtain the level of support that best meets their needs.
Before contacting your Polycom Global Services representative for technical assistance, gather as much information as possible about your situation. Any information you can provide helps us assess the problem and develop an appropriate solution.
bold Names of fields, screens, windows, dialog boxes,and other user interface elements; for example:
1 Type the number into the Phone Numberfield and click Dial.
2 Click Cancel to close the dialog box.
italics New terms, book titles, or emphasis; for example:According to the VERITAS Cluster Server UserGuide, crash tolerant applications are sometimesreferred to as cluster friendly applications.
code Computer output, command references within text,and filenames; for example:Performs the initial configuration and reads the.vcsrc file
code, bold Command line entries, for example:>> Type cp ../default_group.ini group.ini.
code, bold & italics
Command line variables, for example:>> Type cp ../default_group.ini groupnn.ini replacing nn with the subscriber group number.
SMALL CAPS Specific keys on the keyboard, for example:>> Move the cursor by pressing TAB orSHIFT+TAB.

Polycom VMC 1000 Administrator Guide Customer Support
xiv Polycom, Inc.
Polycom Global Services TelephoneIf you have comments or questions about Polycom or if you need technical assistance, contact:
• Polycom Global Services in U.S.A. 800-827-7782
• Denver metro or outside U.S.A. +1-303-223-5223
Polycom, Inc. 1
1About the VMC 1000
This chapter explains key concepts about the Polycom VMC 1000 appliance as part of the Polycom video conferencing solution.
This chapter contains the following sections:
• About the Polycom VMC 1000
• Key Concepts
About the Polycom VMC 1000The Polycom VMC 1000 manages live and video-on-demand (VOD) content from Polycom RSS devices, third-party encoders, and viewer uploads. It provides scalable and reliable content access by means of streaming protocols to end users across the entire enterprise.
The Polycom VMC 1000 discovers new live and archived video calls recorded by RSS devices by periodically polling all registered servers for a list of live and archived calls. The Polycom VMC 1000 uses this information to create assets (Content Repository items) and published events (Programs) to be accessed by end users.
The Polycom VMC 1000 only requires a single stream to be pulled from a recording and streaming server to enable hundreds of streams. The Polycom VMC 1000 publishes live event links on its Viewer Portal and redirects end users to the live streams from a streaming server.
Additionally, live broadcasts can include streams from external sources such as the Polycom Recording Studio (PRS) 2000, VBrick encoders, ViewCast encoder, and other encoders. The content can then be distributed via a wide range of distribution options.
The Polycom VMC 2.0 now contains a Social Video Portal. The Social Video Portal enables the direct upload and sharing of video-on-demand content, straight from the portal. Content is subject to an administrative approval workflow.

Polycom VMC 1000 Administrator Guide About the Polycom VMC 1000
2 Polycom, Inc.
Key Polycom VMC 1000 FeaturesThe following are important features of the Polycom VMC 1000.
RSS Registration and MonitoringThe Polycom VMC 1000 registers an unlimited number of RSS devices. Once registered, the Polycom VMC 1000 monitors the state of the RSS devices. A link to the RSS native UI enables users (Site Administrators) to access the RSS device directly from the Polycom VMC 1000 interface.
External Live Stream SourcesUsing an External Streaming Media item allows the VMC to ingest any Windows Media live stream not controlled directly by the VMC.
Examples:
• Polycom Recording Studio (PRS) 2000
• Any Windows encoder
• Internet live video channels
Content Creation and PublishingThe Polycom VMC 1000’s user interface for content creation and publication:
• Provides you with a simple workflow for creating and publishing content to the Polycom VMC 1000 Viewer Portal.
• Allows you to specify rich descriptive information about content, availability, expiration dates, and presentation options.
• Allows you to control content access by supporting the following access control modes:
— Group and user access - Leverages AD/LDAP group/user permission to control access to content.
— PIN code access - Leverages the Polycom RSS pin code mechanism for providing access control to live and VOD content.
— Open access - Provides unrestricted access to content.
Content EditingThe Polycom VMC 1000 allows you to perform simple editing of VOD content using the Media Editor. The following editing capabilities are supported:
• Trimming
• Inserting chapters for quick navigation

About the Polycom VMC 1000 About the VMC 1000
Polycom, Inc. 3
• Inserting slides
• Inserting captions
Content BackupThe Polycom VMC 1000 allows you to backup video content and system configuration data.
Security and Access ControlThe Polycom VMC 1000 supports the following types of user authentication:
• LDAP Authentication
Integration with LDAP enables the Polycom VMC 1000 to authenticate a user's login against the company directory. A user, once authenticated, is associated with a Polycom VMC 1000 group and role that defines authorized user permissions and access rights.
• Local Database Authentication
If a company does not have an external directory service, or does not want to leverage their existing directory service, an optional database authentication mechanism is available to leverage the Polycom VMC 1000 database.
Polycom VMC 1000 System MonitoringThe Polycom VMC 1000 System Monitoring:
• Monitors the VMC 1000’s run-time system parameters including the number of active sessions, utilized memory, and the average request response time.
• Provides access to system alerts and logs.
• Reports critical system-level and application-level events, such as low storage, and streaming connections errors because of license limitations on the number of supported streams, etc.
ReportingThe Polycom VMC 1000 includes five Aggregate Program Reports that allow the Site Administrator to find out how the VMC 1000 is performing. The Polycom VMC 1000 includes the following Aggregate Program Reports:
• Program Summary Report
• Media Viewing Report
• Viewer Activity Report
• Program Popularity Report
Polycom VMC 1000 Administrator Guide Key Concepts
4 Polycom, Inc.
• Domain Summary Report
The Polycom VMC 1000 also includes four Program Reports that allow the Site Administrator and Content Owner to get information about a particular program or user. The Polycom VMC 1000 includes following Program Reports:
• Question Submission
• Viewer Attendance
• Media Viewing Records
• Detailed Program Viewing Report
Key ConceptsThis section explains key concepts that can help you understand how the Polycom VMC 1000 works.
RealmA realm is a complete database of roles, users, and groups used to identify valid users of the Polycom VMC 1000.
RolesEach user is assigned one or more roles, which provide a package of permissions allowing users of the role to perform tasks within the Polycom VMC 1000 user interface. The VMC 1000 has three roles:
• Site Administrator
• Content Owner
• Viewer
Site AdministratorSite Administrator is the user who has complete access to all aspects of the Polycom VMC 1000. The Site Administrator manages all aspects of the Polycom VMC 1000 domain and manages all users, including Content Owners and Viewers. Site Administrators also manage the domain messaging and the domain configuration, which enables and disables a variety of features.
Key Concepts About the VMC 1000
Polycom, Inc. 5
Content OwnerThe Content Owner user is another administrator role. Content Owners have fewer permissions than Site Administrators. Content Owners manage Viewers, Programming, the Content Repository, and Reports. Content Owners have the authority to add, edit, and delete Viewers; upload streaming and downloadable resource files; add, edit, and delete channels and programs. Content Owners manage only those channels and programs that they create.
ViewerThe Viewer is a user who has been granted access to the Polycom VMC 1000 Viewer Portal.
CategoryA category is the top level of content hierarchy. A category is a container for channels and programs within a domain. They provide an easy way for you to organize content and for your audience to find it. A Site Administrator can edit, add, and delete categories.
ChannelsA channel is the middle level of content hierarchy. A channel is a container for programs generally of the same subject matter. Channels are commonly used to package a series of programs, or to provide your audience the option access to a set of programs over time. Site Administrators and Content Owners can edit, add, and delete channels.
ProgramsA program is the bottom level of the content hierarchy. A program is a metadata “wrapper” that controls access to resources published using Polycom VMC 1000. Programs aggregate related streaming files and downloadable files from the Content Repository for online presentation. There can be several Content Repository items associated with a single program. For example, a program can contain the same video in multiple bit rates, or non-related video files with different bit rates. Programs are owned by the owner of the channel in which the program resides.
GroupsGroups allow Site Administrators to create groups of users and assign roles to them. These groups are also available to Site Administrators to assign to programs to limit access of the program to specified groups.

Polycom VMC 1000 Administrator Guide Key Concepts
6 Polycom, Inc.
Content RepositoryThe Content Repository is a virtual file system for all streaming and downloadable files uploaded into the Polycom VMC 1000. In order to create a program with streaming files, or streaming and downloadable files, you must first populate your Content Repository. In the Content Repository, you can:
• Upload new resources.
• View or edit information associated with existing resources.
• Organize Content Repository items within Content Repository folders.
• View shared resource files.
When you create a program, you are prompted to choose resource files from the Content Repository. The Site Administrator and the Content Owner can both manage the Content Repository. The Site Administrator can view all resources. Content Owners can only view shared or public resources, and only the private resources they own or manage (streaming, downloadable, thumbnail, etc).
NOTE: In a domain that uses an LDAP realm, groups are read from the datastore, and cannot be modified, nor can additional groups be manually added through the system.

Polycom, Inc. 7
2Getting Started with the Polycom VMC 1000
This chapter explains how to log into and navigate within the Polycom VMC 1000. It contains the following sections:
• Logging into Polycom VMC 1000
• Navigating the Polycom VMC 1000 User Interface
Logging into Polycom VMC 1000The Polycom VMC 1000 login page is the entry point for all users. Each Site Administrator, Content Owner, and Viewer has an individually assigned username and password that gives them access to the Polycom VMC 1000. When the Polycom VMC 1000 uses an enterprise LDAP system for user authentication, the users log in using their regular LDAP credentials.
In addition to the Polycom VMC 1000 secure logon system and secure page encryption, the VMC 1000 has implemented a Domain Level Security System (DLSS).
The Polycom VMC 1000 domain is a logical partition of content, users, and media. A domain has its own:
• Categories and Channels
• Users - Site Administrators, Content Owners, and Viewers
• Programming
• Resource Management
• Report Generation
Site Administrators have the authority to manage everything within the Polycom VMC 1000 domain.

Polycom VMC 1000 Administrator Guide Logging into Polycom VMC 1000
8 Polycom, Inc.
If you do not have a user name and password, please contact your Site Administrator. If you have forgotten your password, and you have the option “Forgotten Password?” link enabled, you can click this link, enter your e-mail address, and a temporary password is e-mailed to you. If this link is not available and your user account is being drawn from an enterprise user database, such as LDAP, and you must follow the instructions provided by your IT department to recover your password.
Logging in as a Site Administrator or Content OwnerSite Administrators and Content Owners can bypass the single Login page for all users and directly log into the Video Media Center Administrative UI by using a URL that has the following convention:
http://<server>/adminportal/login.do
where <server> is the IP Address of the Polycom VMC 1000 appliance.
Logging in as a ViewerViewer users only have access to the Viewer Portal. The URL for the Viewer Portal Login page uses the following default convention:
http://<server>/viewerportal/<domain>/login.do
where <server> is the name or IP Address of the Polycom VMC 1000 appliance, and <domain> is the given domain (see the following chapter for more information).
This values can be changed in domain configuration.

Navigating the Polycom VMC 1000 User Interface Getting Started with the Polycom VMC 1000
Polycom, Inc. 9
Navigating the Polycom VMC 1000 User InterfaceThe Polycom VMC 1000 UI uses a dynamically generated menu which provides all the navigation links necessary to use the application.
You activate the menu by clicking the menu option in the left navigation menu. For those menu options that have sub-options, the sub options open up. Simply click the sub option and the next page loads.
The Polycom VMC 1000 UI menu is generated according to the logged in user's role. This means not all menu options are available to all users. For more information on user roles, please see Chapter 1, “About the VMC 1000.”

Polycom VMC 1000 Administrator Guide Navigating the Polycom VMC 1000 User Interface
10 Polycom, Inc.

Polycom, Inc. 11
3Setting Up Domains
This chapter explains how to set up and manage Domains in the Polycom VMC 1000.
This chapter contains the following sections:
• About Domains
• Creating a Domain
• Editing a Domain
About DomainsA domain is a logical partition of configuration, content and media. Each domain has its own portal—Viewer and Administrator—as if it was a separate Web application.
Only the Super Administrator and the Domain Administrator initially have permission to view or edit or delete the domain configurations. Domain configuration consists of login dependent options, programming, navigation, and other settings.
Note: Please use caution when editing Domain Configuration Settings. Editing the Configuration features of both the administrative- and viewer-side interfaces immediately alters the functionality and security of your domain.

Polycom VMC 1000 Administrator Guide Domain Setup Options
12 Polycom, Inc.
Domain Setup Options
Domain Information Options The following table lists all properties and definitions associated with the Domain Setup Options section of Domain Setup page. Options are displayed hierarchically in some cases to represent dependencies.
Domain Information Options
Property Definition
Domain ID The name used for domain identification. Only alpha numeric lowercase characters are allowed. The Domain ID will appear in the URLs for both the Administrator interface and the Program Browser. For more information see “Logging into the VMC."
Display Name The name that is displayed for other administrators to see. This field cannot be blank.
Description The description and/or purpose of the domain. This field is optional.
Enabled The status of the domain (enabled or disabled). This domain's Program Browser will only be visible to the public if the domain is enabled. If it is disabled, Viewers will receive a 404 (not found) error when they attempt to access the domain. Administrator may still access the domain to add programming and content.
Default Locale The language for this domain.
Options Template A list of predefined configuration templates may be available.
Domain Setup Options Setting Up Domains
Polycom, Inc. 13
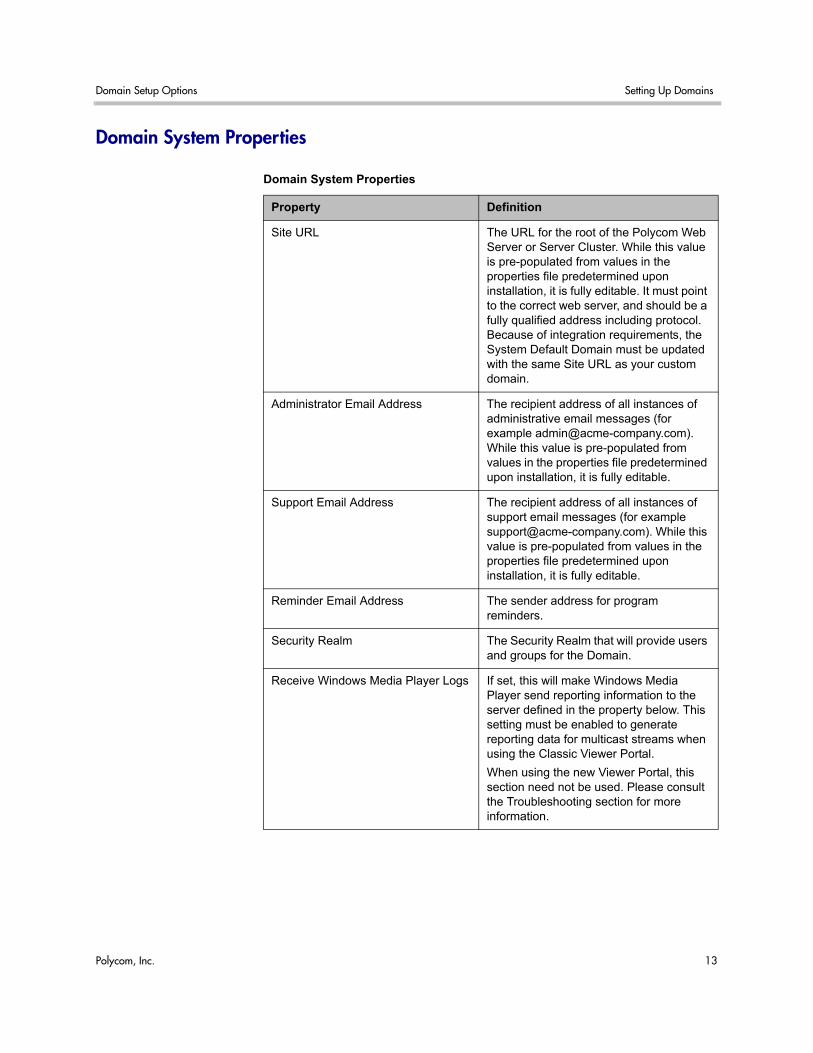
Domain System Properties
Domain System Properties
Property Definition
Site URL The URL for the root of the Polycom Web Server or Server Cluster. While this value is pre-populated from values in the properties file predetermined upon installation, it is fully editable. It must point to the correct web server, and should be a fully qualified address including protocol. Because of integration requirements, the System Default Domain must be updated with the same Site URL as your custom domain.
Administrator Email Address The recipient address of all instances of administrative email messages (for example [email protected]). While this value is pre-populated from values in the properties file predetermined upon installation, it is fully editable.
Support Email Address The recipient address of all instances of support email messages (for example [email protected]). While this value is pre-populated from values in the properties file predetermined upon installation, it is fully editable.
Reminder Email Address The sender address for program reminders.
Security Realm The Security Realm that will provide users and groups for the Domain.
Receive Windows Media Player Logs If set, this will make Windows Media Player send reporting information to the server defined in the property below. This setting must be enabled to generate reporting data for multicast streams when using the Classic Viewer Portal.When using the new Viewer Portal, this section need not be used. Please consult the Troubleshooting section for more information.

Polycom VMC 1000 Administrator Guide Domain Setup Options
14 Polycom, Inc.
Windows Media Player LoggingURL (LOGURL)
The URL to the logging component installed on an IIS server. The URL should be in the form: http://<Web_Server>/viewerportal/wmiislog.loggerorhttp://<LoadBalancer>/viewerportal/wmiislog.logger
Domain Storage Quota You may use the Domain Storage Quota and the Domain Storage Warning Threshold (below) together to warn the Domain Administrator by email when the content stored in the domain reaches a percentage of the quota. Note: If multiple domains use the same physical storage device, you will need to allocate this device's space appropriately between the domains. If the sum of quotas across ALL domains is greater than the storage device's capacity, the device may become full without warnings being issued.
Domain Storage Warning Threshold (See above)Possible values:0 = No warning will be issued, 1 or > 1 = Percentage of quota at which to warn (can be greater than 100%)
Slide Sizes for PowerPoint Extraction A comma-separated list of x dimension (width) that slides will be extracted at for administrative use in addition to the slide size specified for Viewer use at the time of slide-deck creation. Sizes 800 and 1024 are used in the Live Broadcast Console, and the others are for full-screen display during Presenter Mode broadcasts.
Maximum Size of Uploaded FIle A value in megabytes that dictates the maximum size of uploaded files.
Domain System Properties
Property Definition

Domain Setup Options Setting Up Domains
Polycom, Inc. 15
About Login Options
Login Options
Property Definition
Use 5.2 Viewer Portal If this box is checked, the Admin Portal will automatically launch the VMC 2.0 Viewer Portal, as opposed to the Classic Viewer Portal.Please note: the hard-coded URL for the viewer portal may still lead to the VMC 2.0 Portal even when this option is unselected. Be sure to delete the cache on your browser after selecting this setting.
Enable Carousel If this box is checked, the Carousel feature is present on the VMC 2.0 Viewer Portal.
Viewer Login If this box is checked, the Viewer Portal login page is enabled.
Require Viewers to Log in Requiring Viewers to log in ensures the privacy of your content by ensuring that each Viewer has a username and password. The Viewer username and password are generated when a site administrator creates a profile for the Viewer or when a Viewer self registers (if the option in enabled). If an administrator manually creates a Viewer profile, a notification with the login information will be emailed to the Viewer. This option is dependent on the Viewer Login option being selected.
Include All Contact Information in User Profiles
If this option is checked, the user profile will include contact fields such as address and phone. If it not checked, only information required for Login and the user's name will be required.
Allow Viewer Self-Registration Allows Viewers to register themselves in the system. When unchecked, the Broadcasters must create each Viewer's login account, or the Viewers must be imported from an LDAP database. If an LDAP realm is used, there is no self-registration.

Polycom VMC 1000 Administrator Guide Domain Setup Options
16 Polycom, Inc.
Allow Viewers to Manage Their Profile Allows users to edit profile information, including First Name, Last Name, Email Address, and Password.
Allows Reviews Allows Viewers to post reviews of the streaming content.
Reviews Require Approval Allows Domain Administrators to edit, delete, flag, or approve an individual review. If this option is enabled, any new reviews written must first be approved by an administrator before they appear on the Program Browser.
Allows Ratings Allows Viewers to post ratings of the streaming content. The rating is based on a five-star system.
Allow Invitations Allows users to receive email inviting them to view programs.
Allow Favorites Allows users to select channels and programs to be added to their Favorites Folder. This option is dependent on the Enable Login option being selected.
Allow Subscriptions Allows users to opt to receive email messages from designated Broadcasters. The Broadcasters will see the list of subscribers while managing programs and channels in the Programming section. This option is dependent on the Enable Login and Allow Favorites options being selected. A user who subscribes to a channel or program will not receive automatic email updates when content is changed; broadcasters must send an email to the subscriber list manually.
Override Group Authorization Check When checked, disables group-based access control.
Login Options
Property Definition
Note: Changes to these settings will require a restart of the VMC 1000 to take effect.

Domain Setup Options Setting Up Domains
Polycom, Inc. 17
About Programming Options
Programming Options
Property Definition
Enable Channels Taxonomy and Viewer portal navigation will include Channels.
Enable Categories Taxonomy and Viewer portal navigation will include Categories.
Enable Featured Programming Allows Domain Administrators to choose channels and programs to feature on the homepage.
Allow Live Programs Allows live program creation and live resource management. Enables the Live Broadcast Console. Requires additional hardware, software and network capabilities.
Show Live Calendar and Upcoming Live
Allows Administrators the ability to display or not display the Live Calendar link in the Program Browser menu and Upcoming Live Programs on the Program Browser Home Page.
Allow iCal Reminder Publishing Allows Administrators the ability to turn on or off the Calendar Reminder functionality in Polycom. If enabled, users may download or receive by email a published iCal file, which will save an appointment for that live program to any calendar supporting the iCal standard.
User Defined Private Program Pass Codes to Programs
Sets whether Broadcasters can create their own private codes for private programs, or whether the codes are system generated.
Allow Duplicate Passwords If checked, this will prevent users from creating user-defined Private Pass Codes that have previously been used. This would increase the security to programs by preventing users from reusing the same passcode.Please note: if this option is selected, the Access Code link will not appear in the menu bar of the Poycom Version 2.0 Viewer Portal.

Polycom VMC 1000 Administrator Guide Domain Setup Options
18 Polycom, Inc.
Enable Channel RSS Feeds Enables users to subscribe to a channel as an RSS feed.Note: In order to subscribe to a channel as an RSS feed, users will need to use the RSS icon in their browser toolbar. A list of channels available for subscription will then appear. Subscription pages are no longer accessible directly through the Viewer Portal.
Enable Channel Podcasting Allows users to create programs with podcasts. This feature is not supported in the VMC 2.0 Social Video Portal.
Embedded Media Player by Default Sets the default option for "Use Embedded Player" in the program wizard for VOD programs. Users still have the option of choosing embedded or stand-alone playback on a per program basis.
Allow User Defined Tags Allows users to tag programs in the VMC 2.0 Viewer Portal.
Allow HTML in Long Descriptions Allows system to accept and display partial HTML source code to be displayed on the Channel and program pages. If the option is not checked, only text will be accepted and displayed.
Secure External Links When Polycom generates content links for publishing on external portals or web sites, this option protects the security of the links by creating dynamic links with a hashed content ID that hides page and content Ids from the Viewers.
Enable Employee Generated Content Checking this box allows users to upload content from the Viewer portal. In the menu bar an Add Video link will appear.
Require Program Approval All programs will need to be approved before being published.
Programming Options
Property Definition

Domain Setup Options Setting Up Domains
Polycom, Inc. 19
About Employee Generated ContentIn addition to checking Employee Generated Content checkbox in domain setup, at least one channel needs to be enabled for the EGC content. This is done by checking the Is Employee Generated Content Enabled? checkbox in the channel configuration page. Additionally, at least one Program must be saved as a Master Program. The Master Programs will appear as EGC content templates that are applied when a user uploads content via the Viewer Portal. Please consult Chapter 9, Configuring and Using the Viewer Portal.
Require EGC Program Approval Programs created via the Viewer portal Add Video link need to be approved before being published.
Enable Bios Bios can be created and displayed by users.
Use Question Moderation Labels When enabled, audience questions can be filtered by and assigned to specific moderator groups, allowed greater control over the Q&A process.
Programming Options
Property Definition

Polycom VMC 1000 Administrator Guide Creating a Domain
20 Polycom, Inc.
Creating a Domain
To create a domain:
1 Log into the Polycom VMC 2.0.
The Domain Management page appears.

Creating a Domain Setting Up Domains
Polycom, Inc. 21
2 Click the Add icon.
The Setup for New Domain page appears.
3 Enter the Domain ID name and Display Name.
The Domain ID and Display Name can only contain lowercase alphanumeric characters. The Domain ID cannot be changed once the Domain is created.
4 Choose whether to enable the domain for viewers.
5 Select a locale.
6 Select the Options Template.
Depending on your configuration template and your system properties, a list of Setup options appears.
7 Click Save to continue.
8 Choose your desired setup options from the Domain Setup Options section and click Commit to save changes.

Polycom VMC 1000 Administrator Guide Editing a Domain
22 Polycom, Inc.
Editing a Domain
To edit a domain:
1 Click the Domain.
2 Choose your desired setup options, as explained in the “Domain Setup Options” on page 12.
Changing to a Different Domain
To change domains:
>> If you are already working within a domain, you can also choose a different domain by clicking the Change Domain link at the top of any page, and selecting a domain from the list.
Deleting Domains
To delete a domain:
1 From the Domain Management page, check the box next to the domain you want to remove and click the Delete button.
A page appears asking if you really want to delete a domain. If you choose to delete a domain, then all programs and Content Repository items associated with that domain are permanently destroyed.
2 Click Confirm to delete the domain.
System Resource MappingManage the availability of system resources (Delivery, Encoders, Storage, Studios, Audiences, CSS Layouts, and Discovery Source Devices) to each domain by selecting the appropriate checkboxes in each domain. Click the Update button to save your changes, or Reset to undo your changes since the page was last saved.

System Resource Mapping Setting Up Domains
Polycom, Inc. 23
You may select a specific system resource or domain to manage by choosing the appropriate values in the select boxes.

Polycom VMC 1000 Administrator Guide Component Configuration
24 Polycom, Inc.
Component ConfigurationThe Component Configuration menu enables editing of settings for the Administrator and Viewer Portals, as well as configuration of Web Services.
To configure the Administrative Portal
1 Click Edit.
2 Select or deselect the Require HTTPS for Login field. For more information on HTTPS, consult the Appendix.
3 Click Save.
To change Device Management settings:
1 Click Edit.
2 Enter a Device Token Validity Time. The time (in seconds) designated here accomodates for potential latency in the request between the requesting service on the device and the receiving server.
3 Enter a Server Token Validity Time. The time (in seconds) designated here accomodates for potential latency in the request between the requesting service and the receiver, both located on the server running the Polycom VMC 1000 appliance.
4 Click Save.
Email Configuration Setting Up Domains
Polycom, Inc. 25
To configure the Viewer Portal
1 Click Edit.
2 Edit or create an Image Files Base Directory.
3 Edit or create a Layout Files Base Directory.
4 Select or deselect the Require HTTPS for Login field. For more information on HTTPS, consult the Appendix to the Polycom Install Guide.
5 Select or deselect the Use System Time field.
6 Click Save.
To change Web Services Configuration
1 Click Edit.
2 Select or deselect Enable Web Service Authentication. When checked, the Polycom VMC 1000 requires that web services requests provide web service security login and passwords.
3 Select or deselect Use Integrated Authentication Credentials. This option assumes that Integrated Authentication (NTLM) is enabled on the IIS web server fronting the web services, and that the user credential passed in the Remote User Header has been authenticated against Active Directory. This allows .NET clients to supply Credentials instead of setting the principal in the Service Context Header. This option is only valid for domains using AD/LDAP realms.
4 Click Save.
Email ConfigurationPolycom is able to generate email messages from the system upon the following triggers. These emails are (with sender’s email address):
Email Sender
Invitation to a channel or a program Comes from the inviter's email.
Invitation to register for the viewer portal
Comes from the inviter's email.
Password recovery Comes from the support email address set per domain.

Polycom VMC 1000 Administrator Guide Email Configuration
26 Polycom, Inc.
To configure email client settings:
1 Click System.
2 Click Email Client Configuration.
3 Specify the "From" address.
4 Specify the SMTP Host.
5 Check the Use authentication box, if required.
6 Specify a User ID.
7 Specify a Password.
8 Click Save.
Welcome to the viewer portal Comes from the administrator email address set per domain
User profile change Comes from the support email address set per domain
Reminder for upcoming event Comes from the reminder email address set per domain
Email Sender

Email Configuration Setting Up Domains
Polycom, Inc. 27
Email Templates
To edit an email template:
1 Click System > Emails. This menu provides a set of default email templates.

Polycom VMC 1000 Administrator Guide CSS Layouts
28 Polycom, Inc.
2 For the message you wish to edit, click the Edit button
3 Edit the text directly in the Subject or Body fields. Available template variables appear along the left side of the window. These will appear in the templates in all capital letters, surrounded by brackets.
4 To revert to the original message, click the Revert Message button
5 Click Save.
CSS LayoutsCSS Layouts can be uploaded to the System > CSS Layout menu. CSS Layouts allow extensive branding for the Polycom VMC Classic Viewer Portal. For more information, consult the Polycom VMC 1000 Branding Guide.

Video Edge Configuration Setting Up Domains
Polycom, Inc. 29
Video Edge ConfigurationPrior to registering individual Video Edge devices users must specify a common system configuration in the Polycom VMC 1000. Video Edge is a videocentric delivery appliance provided by Polycom. For more information on Video Edge, consult the Polycom Video Edge Getting Started and Administrator Guides.
To set the system configuration for all Video Edge devices:
1 Navigate to System > Video Edge Configuration.
The Edit VideoEdge System Configuration page should appear.
2 Specify the Application Server Host Name or IP Address.
3 Specify the Application Server Protocol. The options are HTTP or HTTPS.
4 Provide the Application Server Port.
5 Provide the Frequency of client configuration requests. This dictates the space between configuration requests generated in the Polycom VMC 1000.

Polycom VMC 1000 Administrator Guide Video Edge Configuration
30 Polycom, Inc.
6 Choose alert thresholds for CPU Usage Percentage and Disk Space Usage Percentage. When these points are reached, an alert will appear in the VideoEdge user interface and will be retransmitted to the Polycom VMC 1000 via SNMP.
7 Define the SNMP Host.
8 In the Alert Emails area, define the SMTP Host. Provide a list of recipients and a default source email address for email alerts.

Ingests Setting Up Domains
Polycom, Inc. 31
IngestsThe Ingests page, accessible at System > Ingests, lists all in-progress and recently completed file ingests. To view details, click the name of specific ingested file. The Ingest Details page will appear.
To delete an Ingest listing, select the checkbox beside the file name in the Ingests main menu. Click Confirm in the dialog that appears.
File TransfersCurrent, pending, and complete file transfers can be reviewed by navigating to System > File Transfers.

Polycom VMC 1000 Administrator Guide Build Info
32 Polycom, Inc.
To change an upcoming file transfer, select the checkbox by the file name. The buttons above the
• To cancel an upcoming file transfer, click Cancel and proceed through the confirmation dialog.
• To reschedule a file transfer, click Reschedule and proceed through the date and time dialog that appears.
• To execute a file transfer immediately, click Execute Now.
To view details of the file transfer, click the file name. The File Transfer Task Details page will appear.
Build InfoThe Build Info section details information about the Polycom VMC 1000 version running. This information cannot be edited.

Polycom, Inc. 33
4Setting up LDAP Security Realms
This chapter explains how to log into and navigate within the Polycom VMC 1000. It contains the following sections:
• About Security Realms
• Comparing Security Realms
• Adding a Security Realm
About Security RealmsA realm represents a complete security database of roles, users, and groups. Realms are the cornerstone of the Polycom VMC 1000’s identity and authorization management. They provide both an out-of-the-box security solution, as well as a bridge to an organization’s existing user & group information from sources like LDAP. Realms are system objects and can be used by more than one VMC domain.
VMC Security RealmA realm that uses Polycom VMC 1000’s internal database to offer security services is known as a VMC Realm. The Polycom VMC 1000 appliance is pre-configured to use a VMC Realm to get customers up and running quickly. Users and groups are managed manually within the Polycom VMC 1000 and there are no dependencies on additional hardware or software. The Polycom VMC 1000 appliance’s default realm provided and recommended:
• For product evaluations and trials
• For use by small organizations
• For departmental installations
• When no LDAP server is available
Polycom VMC 1000 Administrator Guide About Security Realms
34 Polycom, Inc.
LDAP Security RealmUser and group information can also be leveraged from an existing LDAP datastore. The LDAP provider is a read-only implementation that can authenticate and search against an LDAP service. The LDAP directory is searched and cached at run-time; results are not imported into Polycom VMC 1000’s database. This provider uses an existing directory service allowing seamless integration between the Polycom VMC 1000 and an organization’s identity management process. The provider can work with LDAP directories from several vendors including: Microsoft, Sun and Novell. The LDAP provider should be used:
• By large organizations
• When there is a sizable Polycom VMC 1000 user-base
• If an LDAP server is available
Single Sign-onThe Polycom VMC 1000 also supports single sign-on for LDAP configured realms. Single sign-on allows user identification and authentication to be handled outside of the Polycom VMC 1000 by some other trusted application allowing the administrators and end-users to bypass the login process.
When a single sign-on provider is selected, an additional “configure” link is added to the realm configuration page which opens a pop-up with the configuration page that corresponds to the selected single sign-on provider. Any changes to the selected provider are not saved until the selected realm is saved.
Currently Polycom VMC 1000 supports Web Proxy based single sign-on which assumes that the incoming user request was first directed to a proxy server where the user is authenticated and their credentials are placed into the HTTP Request headers. Once the header is updated, the request is then forwarded to Polycom VMC 1000 from the proxy server and the user is automatically logged into the Polycom VMC 1000 application.
Note: The Polycom VMC 1000 appliance stores the LDAP DN credential information in the database to identify who and which groups have access to a specific piece of content. Once a user is authenticated through SSO (or potentially through LDAP), their DN is then compared against the value in the Polycom VMC 1000 database.

Comparing Security Realms Setting up LDAP Security Realms
Polycom, Inc. 35
Comparing Security RealmsThe following is a comparison between security providers in the Polycom VMC 1000:
Adding a Security Realm1 Click the User Management menu.
2 Click the Realms option.
3 Click the Add button, or click on an existing Realm.
4 Provide a name for the realm.
5 Choose its provider type: LDAP, Database, or Composite.
Security Feature Polycom VMC 1000 LDAP
Default Realm x
User & Group Creation
x
Read-only x
Authentication x x
SSO x
User Information x x
Viewer DB x x
Administrator DB x x
Group Information x x
Authorization x x
Mechanisms Database LDAP
Platforms N/A Active Directory,Sun Java SystemDirectory,Novell eDirectory

Polycom VMC 1000 Administrator Guide Adding a Security Realm
36 Polycom, Inc.
6 If creating an Database Realm, click Save to add this realm.
7 If creating an LDAP Realm, specify the connection URL, connection credentials, search strings and other options using the following information:
• Connection
— Type - Selects the type of the LDAP system, either Active Directory, Novell NDS, IBM Tivoli, or iPlanet.
— URL(s) - The URL, or a list of URLs for fail-over support, specifying which LDAP service to connect to. If using multiple URLs, separate them by a comma.
• Binding - Specifies if LDAP binding should be done anonymously or with the specified set of credentials.
— Anonymous Binding - Select this option if you want to connect to LDAP anonymously. No binding or password is required.
— Credentials: Select this option if you want to connect to LDAP using credentials. The following three fields are required:
» Principal - Name of the LDAP domain manager.
» Password - Enter the password for the LDAP domain manager.
» Confirm Password - Confirm the password you entered for the LDAP domain manager.
• Settings
— Follow Referrals - Specifies if LDAP referrals should be followed in search results. Following referrals negatively impacts performance, but might be necessary for some LDAP configurations.
— Use Connection Pooling - Specifies if connections should be pooled. The default is to pool connections, since pooling can improve performance significantly in certain situations. Pooling should only be disabled in rare situations.
— Cache Size - The maximum size of the cache represented as the number of principals it can contain.
— Cache Expiration - The maximum amount of time, in milliseconds, that information can remain in the cache.

Adding a Security Realm Setting up LDAP Security Realms
Polycom, Inc. 37
• Identity
— Base search DN - The distinguished name of the tree that should be searched for users. Specifies the most targeted root DN to use for finding users and groups.
— Search sub-trees - Indicates if a recursive search should be performed from the specified root.
— Login Query - Dynamic search criteria used to lookup a user by the login information they supply. '{0}' denotes the value of the supplied user logon. This value is used to lookup user information during authentication.
— User Search Expression - This field allows configuration of the how the user term appears in the Viewer Portal and Admin Portal.
— Display Name Expression - Instead of using the default name, this field allows you to set up how the user’s name appears once the user is logged in.
— Email Display expression - - This field allows configuration of the how the user’s email address appears in the viewer portal and admin portal.
— Additional attributes - Refers to attributes that are not normally retrieved by a standard query.
• Authentication
— Manual Login or SSO - If LDAP is selected, users of the system are authenticated using the LDAP credentials. If SSO is selected, you must choose an SSO Provider and configure the Provider by clicking the Configure link. See “SSO Provider Configuration” on page 38.
• Groups
— Base search DN - The distinguished name of the tree that should be searched for groups. Specifies the most targeted root DN to use for finding groups.
— Search sub-trees - Indicates if a recursive search should be performed from the specified root.
— Group Query - Search criteria that should be used to find groups. This is a required field.
— Group membership attribute - Refers to how LDAP associates you with a group.
8 Click Save to add this realm.

Polycom VMC 1000 Administrator Guide Adding a Security Realm
38 Polycom, Inc.
SSO Provider ConfigurationIn order to use SSO-base authentication, you must configure the following properties.
Property Description
User ID Header This property represents the HTTP request parameter inserted by the Web Proxy host that contains the value that uniquely identifies the user making the web request.
Use Group Header This checkbox, when checked, indicates to the Polycom VMC 1000 that the end user's group memberships are included with the HTTP request. When this field is left unchecked, the Polycom VMC 1000 does an additional lookup to the configured LDAP server to acquire the user's groups. When this field is unchecked, the fields “Group ID Header Field Name” and “Group Split Regular Expression” have no effect.
Group Header This property represents the HTTP request parameter inserted by the Web Proxy host that contains the group memberships of the user.
Group Regex This property is used to split the list of groups contained in the Group ID Header Field Name request parameter. This value must be a character, or series of characters that reflect a regular expression that divides the list of groups into values that can be matched to their unique groups in the LDAP directory.
Use trusted servers? This checkbox indicates to the Polycom VMC 1000 that each request to the domain should verify its origin address IP or host name against a list of trusted servers contained in the Trusted Server List parameter. The Trusted Server List parameter has no effect when this parameter is left unchecked and all requests to the domain are accepted.
Trusted Servers A comma separated list of the Web Proxy Hosts that are accepted as the origin of HTTP requests.

Adding a Security Realm Setting up LDAP Security Realms
Polycom, Inc. 39
Enabling SSO
Enabling SSO in the Polycom VMC 1000 Administrative Portal:
1 Login to Polycom VMC 1000 Administrative Portal, select your domain and go to the User Management Menu > Realms.
2 Edit your LDAP Realm. Make sure the Domain is configured with your LDAP realm as described in Adding a Security Realm. At the bottom of the page under the Authentication section select SSO Type Windows Integrated.
3 Within the Administrative Portal, select System > Domains.
4 Select your domain. Under Domain System Properties section select your LDAP realm in the Security Realm field.
Note: Under the Domain Information section you will find Domain ID. Write this value down as you will need it later on.

Polycom VMC 1000 Administrator Guide Adding a Security Realm
40 Polycom, Inc.
Enabling SSO in IIS:
1 Go To Start Menu > Administrative Tools > Internet Information Services Manager. Expand the Server name and sites until the Polycom VMC 1000 website displays. It may be named Default Website. Make sure you select the Features View tab at the bottom of the Window and then double click on Authentication.
Enable only Windows Authentication by right-clicking on Windows Authentication and select Enable.
NOTE: Windows Authentication will not work for a Windows Media Server delivery option.

Adding a Security Realm Setting up LDAP Security Realms
Polycom, Inc. 41
2 Under Default Website (or the name you have given to the Polycom VMC 1000 Website) select the "adminportal" virtual directory. Follow the procedure from Step 1 to access and enable only Windows Authentication.
3 Under the "adminportal" virtual directory select the "service" virtual directory. Follow the procedure from the Step 1 to access and enable only Windows Authentication.
4 Right click on Default Website (or the name you have given to the Polycom VMC 1000 Website) and select Add Virtual Directory.
In the Alias Name field enter "viewerportal". In the Physical Path field enter "C:\inetpub\wwwroot" and select OK.
5 Right click on the "viewerportal" virtual directory and select Add Virtual Directory.
In the alias path enter the <Domain ID> of your Polycom VMC 1000 Domain if you have created a custom skin and specify this path (i.e. C:\Program Files\Polycom V\deploy\viewerportal.war\images \custom\<Domain Id>. This directory and its contents need to be copied from the Polycom VMC 1000 App Server to the Web Server).
If you do not have a custom skin then the alias name for virtual directory will be "defaultdomain" and the default physical path will be C:\Program Files\Polycom\deploy\viewerportal.war\images\default. This directory and its contents need to be copied from the Polycom VMC 1000 App Server to the Web Server.
6 Select the "viewerportal" virtual directory. Follow the procedure from the Step 1 to access and enable only Windows Authentication.

Polycom VMC 1000 Administrator Guide Adding a Security Realm
42 Polycom, Inc.
7 Under the "viewerportal" virtual directory select the virtual directory you created in Step #7. Follow the procedure from the above step to access and enable only Windows Authentication.
8 You can then use the following URLs to access the Administrative and Viewer Portals respectively:
http://<PolycomWebServer>/adminportal/login_<Domain Id>.do
http://<PolycomWebServer>/viewerportal/<Domain Id>/home.vp

Adding a Security Realm Setting up LDAP Security Realms
Polycom, Inc. 43
Troubleshooting SSO Configuration ProblemsTo troubleshoot any SSO issues you need to get a request trace for a user for whom the request fails SSO. Use Ethereal or any other tracer from the machine where the browser is running. Filter by HTTP. Look at the request headers. For Windows NTLM there must be a REMOTE_USER header. Check if it is there and also the value. Normally it should be in the DOMAIN\userid format.
SSO CaveatsPlease note that enabling single sign-on in the Polycom VMC 1000 entails reduced or otherwise changed functionality:
• Video Edge configuration errors: When SSO is enabled in the Polycom VMC 1000, the Polycom Video Edge device cannot load configuration or manifest files from the Polycom VMC 1000.
• Windows Media Server Delivery Option: A Windows Media Server, configured as a delivery option in the Polycom VMC 1000, will not function properly if Windows Authentication is being used on the domain.
Note: If the Polycom VMC 1000’s Storage mount point is on a server with an SSO system, the SSO needs to be turned off for the Storage mount point: right-click on the mount point; select Directory Security; click Edit; deselect Windows Authentication; and turn on Enable Anonymous Access.

Polycom VMC 1000 Administrator Guide Adding a Security Realm
44 Polycom, Inc.

Polycom, Inc. 45
5Managing Access to the Polycom VMC 1000
This chapter explains how to manage user access to content in Polycom VMC 1000.
This chapter contains the following sections:
• About Roles
• About Users
• About Reviews
• About Users
• About Reviews
About RolesEach user is assigned a role to perform tasks within the Polycom VMC 1000 or to access the Program Browser. For more information about users, please refer to the About Users section in this chapter.
Role DefinitionsSystem roles are roles that exist by default for the Polycom VMC 1000. These are:
• Super User
• Domain Administrator
• Broadcaster
• Presenter
• Moderator
• Viewer
Polycom VMC 1000 Administrator Guide About Roles
46 Polycom, Inc.
Super UserThe Super User is the administrator who has complete access to all aspects of Polycom VMC 1000. The Super User manages all aspects of any number of domains. They have the same permissions as the Domain Administrators and the authority to manage all users, including Domain Administrators, Broadcasters, and Viewers. Super Users also manage the domain messaging, and the domain configuration, which enables and disables a variety of features.
Domain AdministratorThe Domain Administrator is the default administrator role. The Domain Administrator manages all aspects of a given domain. They have the same permissions as the Broadcaster, as well as the authority to manage all users, including Broadcasters, Viewers, and other Domain Administrators (within their Domain). Domain Administrators also manage the domain messaging, Program Browser messaging, the domain configuration, and all Categories, Channels, Programs, and Content.
BroadcasterBroadcasters have fewer permissions than Domain Administrators. Broadcasters manage Viewers, Programming, the Content Repository, and Reports. Broadcasters, Domain Administrators, and Super Users, have the ability to approve and deny Employee Generated Content (EGC) programs. Broadcasters do not have the ability to add users. Broadcasters have the authority to upload resource files and add, edit, and delete channels and programs. Broadcasters manage only those channels and programs that they create.
PresenterPresenter is a role that defines permissions for users who access the Presenter Broadcast Console by means of a Presenter Private Code. Although this user does not authenticate, they are granted permissions as if they were a user of role “Presenter”.
NOTE: In order to view reports, Broadcasters and other users must have the following permissions enabled: Can Edit Domain Setup Options; Can Edit Domain Configuration Options; Can Edit Domain CSN & CDN Settings; Can Administer Live Encoders; Can Edit Domain Emails.
About Roles Managing Access to the Polycom VMC 1000
Polycom, Inc. 47
ModeratorModerator is a role that defines permissions for users who access the Moderator Broadcast Console by means of a Moderator Private Code. Although this user does not authenticate, they are granted permissions as if they were a user of role “Moderator”.
ViewerThe Viewer role's only permission is that it allows access to the Polycom VMC Program Browser for a domain for which a particular realm has been assigned.
Custom RolesCustom Roles are roles that are created by administrative users of Polycom VMC 1000. A custom role can include any number of feature permissions, and can be crafted to match specific needs of users with respect to their business role. For example, you might want to create a role where the only feature a user can access in the Administrative Interface is Reports.
The following table shows what permissions you can use to create a custom role.
NOTE: All users who are Authorized Editors, or who have the “Manage Any Program” permission selected in the Viewer Portal, can view programs that are suspended and/or programs for which the End Listing date has passed.

Polycom VMC 1000 Administrator Guide About Roles
48 Polycom, Inc.
Creating a Custom Role
To create a custom role:
1 Click User Management.
2 Click Roles.
Permission Type Permission
System Administration Domain Setup Domain Administration Storage and Delivery Encoders and Studios Domain Emails Groups Roles System Resources View Reports
Message Editing Welcome Messages Domain Messages Home Page Messages
Programming Management
Manage own Programs Manage any Program Manage own Channels Manage any Channel Manage own Content Manage any Content Manage Featured Programming Manage Categories Manage Custom AttributesManage BiosApprove Reviews Control Live Broadcasts Approve Programs
Live Broadcast Control Control Broadcasts Control Slides Control Polls Moderate Questions
Role Administration You can choose whether the role you are administering can add, edit or delete users of each role in the system. You can also choose which of the roles in the system can add, edit or delete users of the role you are administering.

About Roles Managing Access to the Polycom VMC 1000
Polycom, Inc. 49
3 Click the Add button.
4 Using the previous table, make changes to the role parameters by checking or unchecking boxes.
5 Click Save.
Editing a Role
To edit a role:
1 Click User Management.
2 Click Roles.
3 Click the name of the role you want to edit.
4 Make desired changes to the role parameters by checking the desired boxes.
5 Click Save.
Editing Members Assigned to a Role
To edit members assigned to a role:
1 Click User Management.
2 Click Roles.

Polycom VMC 1000 Administrator Guide About Roles
50 Polycom, Inc.
3 Click the Assign icon next to the role you want to edit.
A page appears that is divided vertically into two parts. On the right is a list of all agents that are currently assigned the role. To the left is a list of all other available agents in the realm assigned to the domain.
4 You can select as many agents from each list, using the scrollbar to navigate through the list.
By clicking the left and right arrow icons, you can assign agents selected on the left to the role and users selected on the right are removed from the role.
5 On the list of available agents, you can filter the list by providing a search string that is matched against available users.
See the “Searching for Users and Groups” on page 59 section for more information.
6 Reset the page to the initial state by clicking the Reset button, or you can revert to the original assigned list by clicking the < icon.
7 When the Assigned Agents list is as desired, click Save.
Deleting a Role1 Click User Management.

About Users Managing Access to the Polycom VMC 1000
Polycom, Inc. 51
2 Click Roles.
3 Click the box next to the role you want to delete.
4 Click the Delete button.
About UsersUsers refers to all users who have access to Polycom VMC 1000, as part of the six default roles are user created custom roles. Each user is assigned one or more roles. Roles define a set of permissions allowing access to certain areas of the application.
Only a domain using the Polycom VMC 1000 realm allows an Domain Administrator to manage individual users. If the domain uses an LDAP realm, user characteristics are read from the datastore and cannot be edited.
The following instructions are for Polycom VMC 1000 realms only.
Adding New Users
To add a new user:
1 Click User Management.
2 Click Users.
3 Click the Add button.
4 Supply the required information on the subsequent page, including which groups the new user should belong to.

Polycom VMC 1000 Administrator Guide About Users
52 Polycom, Inc.
5 Click the Save button.
Editing a User
To edit a user:
1 Click User Management.
2 Click Users.
3 Click on the User name
4 Make the necessary changes.
5 Click the Save button.
Changing a User's Password
To change user’s password:
1 Click User Management.
2 Click the Users.
3 Click the Edit icon to the right of the appropriate user name.
IMPORTANT: When you change a user's groups, you could be affecting their access to some features, media, and content.

About Groups Managing Access to the Polycom VMC 1000
Polycom, Inc. 53
4 Click the Reset Password checkbox.
5 Make password change.
6 Click the Save button.
Deleting a User
To delete a user:
1 Check the box the left of the appropriate user name.
2 Click the Delete button.
Emailing a User
To email a user:
1 Click User Management.
2 Click Users.
3 Select the user you want to email by clicking the Email icon for that user.
4 Fill out the subject line and body message in the fields provided.
5 Click the Send button.
About GroupsGroups allow Polycom VMC 1000 administrators to create groups of users and assign roles to them. These groups are also available to administrators to assign to programs to limit access to the program to specified groups. You can also limit access to programs for individual users.
IMPORTANT: If you delete a user from an LDAP realm and that user owns programs and content, then the system administrator must reassign those programs and content to a current Polycom VMC 1000 user in that LDAP realm.
NOTE: In a domain that uses an LDAP realm, groups are read from the datastore and cannot be modified, nor can additional groups be manually added through the system.

Polycom VMC 1000 Administrator Guide About Groups
54 Polycom, Inc.
Creating a New Group
To create a new group:
1 Click User Management.
2 Click Groups.
3 Click the Add button.
4 Enter a name for the group.
5 Click Save.
To edit a group:
1 Click User Management.
2 Click Groups.
3 Click the group name for the group you want to edit.
4 Change the group name.
To add users to a group:
1 Click User Management.
2 Click Groups.
3 Click the Assign button next to the group you wish to edit.

About Groups Managing Access to the Polycom VMC 1000
Polycom, Inc. 55
4 The Assign to Group window will appear.
5 Enter a term in the Search box in order to generate a list of users. Select the users you wish to add to the group and click the right-facing arrow.
6 When all users have been added, click Assign.
Deleting a Group
To delete a group:
1 Click User Management.
2 Click Groups.

Polycom VMC 1000 Administrator Guide About Groups
56 Polycom, Inc.
3 Click the Delete icon next to the appropriate group.
Viewing a List of Programs Associated with a Group
To view a list of programs associated with a group:
1 Click User Management.
2 Click Groups.
3 Click the Program icon for the group you want to administer.
4 On the Associated Programs page, you can click the Edit icon to edit the program, or click the Disassociate Group from Program icon to remove the association.
All other program details remain unchanged.
NOTE: If you delete a group, users in that group are no longer able to access any programs that were restricted to that group. You can also leave programs that are not viewable by any Viewers.
About Groups Managing Access to the Polycom VMC 1000
Polycom, Inc. 57
Emailing Members of a Group
To email members of a group:
1 Click User Management.
2 Click Groups.
3 Click the Email Group icon for the group you want to email.
4 On the Email Users page, complete the subject and body fields and click Send Mail to deliver the email.
Editing Members of a Group
To edit members of a group:
1 Click User Management.
2 Click Groups.
3 Click the Assign icon for the group you want to administer.

Polycom VMC 1000 Administrator Guide About Groups
58 Polycom, Inc.
4 You are presented with a page that is divided vertically into two parts. On the right is a list of all users that are currently assigned to the group. To the left is a list of all other available users in the realm assigned to the domain.
5 Select as many users from each list, using the scroll bar to navigate through the list.
Upon clicking the arrow buttons, users selected on the left are assigned to the group, and users selected on the right are removed from the group.
6 On the list of available users, you can filter the list by providing a search string that is matched against available users.
See the “Searching for Users and Groups” on page 59 for more information.
7 Reset the page to the initial state by clicking the Reset button, or you can revert to the original assigned list by clicking the Restore to Original Selection icon.
8 You can also assign individual users by clicking the Assign Users icon or link in the right pane.
This action will launch a pop-up window. From this pop-up window you can search for users by email, last name or login.

About Reviews Managing Access to the Polycom VMC 1000
Polycom, Inc. 59
9 Enter search parameters and click Go!
Once the correct user is displayed, you may select the checkbox next to that user.
10 Click OK.
This action adds the user to the right pane of the previous window. You can then either perform another search, or close the popup window.
11 When the Assigned Users list is as desired, click Save.
Searching for Users and GroupsWhen searching for users or user groups, either to assign them to a group, to a role, or to a program, you can search by the name of the user or group.
You can search by complete name (first and last name) or last name only. You can search for a fragment of the name by using the * character as a wildcard. All searches are case insensitive.
Example SearchThe following table shows three sample users and two sample groups. In the following cases, the search is for both users and groups.
Note the following:
• Searching for *Managers returns Bob Amanagersal and Development Managers.
• Searching for *smith returns John Smith, [email protected].
About ReviewsThe Polycom VMC 1000 allows Viewers to review and rate programs. By default, reviews are automatically approved. If you enable Ratings and Reviews for a domain under Domain > Setup, and set the approval flag to “on”, then a Viewer’s comments are sent to a queue for the Domain Administrator to review. A Domain Administrator can approve, edit, delete, or flag a review. Only approved reviews are visible on the Viewer’s page.
Users Groups
Bob Amanagersal, [email protected] User, [email protected] Smith, [email protected]
Development ManagersALL Polycom Staff (group name)

Polycom VMC 1000 Administrator Guide About Reviews
60 Polycom, Inc.
Moderating a Review
To moderate a review:
1 Click Programming.
2 Select Moderate Reviews.
3 Using the Filter Reviews pull down menu, you can filter your reviews to show all, unapproved, approved or flagged reviews.
4 To change the status of a review, select a radio button corresponding to the condition you want to assign that review:
— Approve - The review is published and available to everyone on the Program Browser page.
— Unapprove - The review is not published on the Program Browser page.
— Flag – The review is flagged for further examination.
— Delete – The review is deleted.
5 If you want to edit a review, double click one.
6 When you are done, click Save to commit the changes.

Access Control Managing Access to the Polycom VMC 1000
Polycom, Inc. 61
Access ControlThe Polycom VMC 1000 provides an Access Control dialog, from which administrators can directly assign managers to programming, as well as users to roles.
To assign managers or publishers to Programs, Channels, or Content:
1 Within the Access Control dialog, navigate to the Programs, Channels, or Content tabs.

Polycom VMC 1000 Administrator Guide Access Control
62 Polycom, Inc.
2 A list of records will appear.
If you wish to view all available programs, channels, or content, select the Show Records Without Errors checkbox. Otherwise, only the items will no users assigned will appear.

Access Control Managing Access to the Polycom VMC 1000
Polycom, Inc. 63
3 Select an item or multiple items from the list. Click Assign Managers to designate Managers for the item, or click Assign Publishers to designate Publishers.
4 Assign as many managers/publishers as are necessary using the dialog above. When complete, click OK.
To assign users to a role:
1 Within the Access Control dialog, navigate to the Roles tab. The list of roles will appear.
If you wish to view all available roles, select the Show Records Without Errors checkbox. Otherwise, only the roles will no users assigned will appear.
2 Select the checkbox beside the role(s) to which you wish to assign users. Click Assign Members.

Polycom VMC 1000 Administrator Guide Access Control
64 Polycom, Inc.
3 The user assignment dialog will appear.
4 Assign as many users as necessary using the dialog above. When complete, click OK.

Your Profile Managing Access to the Polycom VMC 1000
Polycom, Inc. 65
Your ProfileUsers can edit the settings for their personal account by navigating to User Management > Your Profile.
To make changes to your profile:
1 To change the name associated with your profile, make edits directly in the First and Last Name fields.
2 To change the email address associated with your profile, enter a new address in the Email field.
3 To change your password:
a Select the Reset Password checkbox.
b Enter a password of suitable length and complexity in the Password field.
c Re-enter this password in the Confirm Password field.
4 Click Save.

Polycom VMC 1000 Administrator Guide Your Profile
66 Polycom, Inc.

Polycom, Inc. 67
6Assigning Encoders
This chapter explains how you can assign encoders in the Polycom VMC 1000.
This chapter contains the following sections:
• About Locations
• General Encoder Properties
• Format-Specific Properties (Audio Bridge Encoder)
• Format-Specific Properties (Capture Studio)
• Format-Specific Properties (Digital Rapids Encoders)
• Format-Specific Properties (Windows Media)
• Format-Specific Properties (RSS 2000 Encoder)
• Format-Specific Properties (RSS 4000 Encoder)
• Format-Specific Properties (External Source)
• Format Specific Properties (ViewCast)
• Encoder Profiles
• Encoder Profile Configuration (Capture Studio)
• Encoder Profile Configuration (Digital Rapids)
• Encoder Profile Configuration (Windows Media)
• Encoder Profile Configuration (RSS 2000)
• Encoder Profile Configuration (RSS 4000)
• Encoder Profile Configuration (External)
• Encoder Profile Configuration (ViewCast)
• About Studios
• Encoder Troubleshooting

Polycom VMC 1000 Administrator Guide About Locations
68 Polycom, Inc.
About LocationsPrior to adding an Encoder, you may wish to add Locations. Locations are names used for convenience to associate Encoders and Delivery Options with location labels (e.g., West Coast, HQ). You might use HQ for Encoders in HQ and reuse the same location label to refer to a delivery option based in HQ.
Locations will appear on the Encoders and Delivery Options configuration pages after they are created. If no locations have been created, then they do not appear (are hidden) on the Encoder or Delivery Option configuration pages.
To add locations:
1 Click Delivery.
2 Click Locations.
3 Click the Add button.
4 Enter a Location Name.
5 Click the Add button.
Adding EncodersIn order to perform live broadcasts using the Polycom VMC 1000 appliance, you will need some manner of encoder. In order to use an encoder in the Polycom VMC 1000, you must perform two levels of configuration.
First, you must add this encoder as a resource for Polycom VMC 1000. Then you must specify a profile that defines the stream. The process of adding an encoder is explained in the first half of this chapter; the process of adding profiles to these encoders is detailed in the second half.

General Encoder Properties Assigning Encoders
Polycom, Inc. 69
To add encoders:
1 Click Resources.
2 Click Encoders.
3 Click the Add button.
4 From the context menu, click the Encoder Type you want to create.
5 Use the information in the subsequent sections of this chapter to fill out the fields associated with your encoder.
General Encoder PropertiesFor any encoder, you must have the following properties:
NOTE: The Select Type context menu includes several encoders that are not fully supported in the Polycom VMC 1000 2.0 release. These encoders are:• Digital Rapids Encoder (Flash)• Digital Rapids Encoder (MPEG4/H.264)• Envivio 4Caster• Envivo 4Forum• VBrick Encoder (MPEG4)• VBrick Encoder (Windows Media)These encoders will not be detailed below.

Polycom VMC 1000 Administrator Guide Format-Specific Properties (Audio Bridge Encoder)
70 Polycom, Inc.
Format-Specific Properties (Audio Bridge Encoder)For those users with network connectivity issues, the Audio Bridge Encoder can be used. When using an Audio Bridge Encoder in a live broadcast, a live stream from an external audio stream will accompany slides imported via the Live Broadcast Console.
The Audio Bridge Encoder and Encoder Profile include no format-specific encoder or encoder profile configuration properties. Please note, however, that the Audio Bridge does not include a standardized delay when broadcasting.
Format-Specific Properties (Capture Studio)
Format-Specific Properties (Digital Rapids Encoders)The Polycom VMC 1000 now supports the use of Digital Rapids encoders for Windows Media.
Encoder Properties
Property Definition
Display Name The display name appears on the Live Encoder Setup.
Description The description only appears on the Add Encoder page. Other users can view this description by Editing the Encoder information.
Host Name or IPAddress
The host name or IP address of the computer on which the encoder runs.
Encoder Properties
Property Definition
Communication Port The port on the encoder through which encoded output is made available. This value must be 80.

Format-Specific Properties (Digital Rapids Encoders) Assigning Encoders
Polycom, Inc. 71
Windows Media/Silverlight
Encoder Properties
Property Definition
Web Service Port Number The port used by the Digital Rapids web service. This field is required.
Web Service Path The pathway of the publishing point in the Digital Rapids web service configuration.
Use Secure Communication Indicate whether the Digital Rapids web service is using a secure connection. If selected, you will be prompted to enter a User Name and Password.
Archive Storage available as Indicate from the drop-down whether the archived storage from the Digital Rapids encoder is available as a Shared Folder, a Web Server, or an FTP Server.
Archive Storage Folder The name of the storage location.

Polycom VMC 1000 Administrator Guide Format-Specific Properties (Windows Media)
72 Polycom, Inc.
Format-Specific Properties (Windows Media)In order to publish the output from a Windows Media encoder, you must have a Windows Media Server to stream through. You can have a particular Windows Media Server for streaming live content, or you can use the Windows Media Server configured for streaming VOD in the Polycom VMC 1000. Follow the instructions for creating a broadcast publishing point for an encoder on the Windows Media Server. During this process please take note of the following properties.
Encoder Properties
Property Definition
Communication Port The port on the encoder through which encoded output is made available to the Windows Media Server (8080 by default).
Document Root The path to a directory on the encoder machine where encoder output can be written temporarily during broadcasts. This folder should be located on a drive with enough space to accommodate output from multiple encoding sessions.
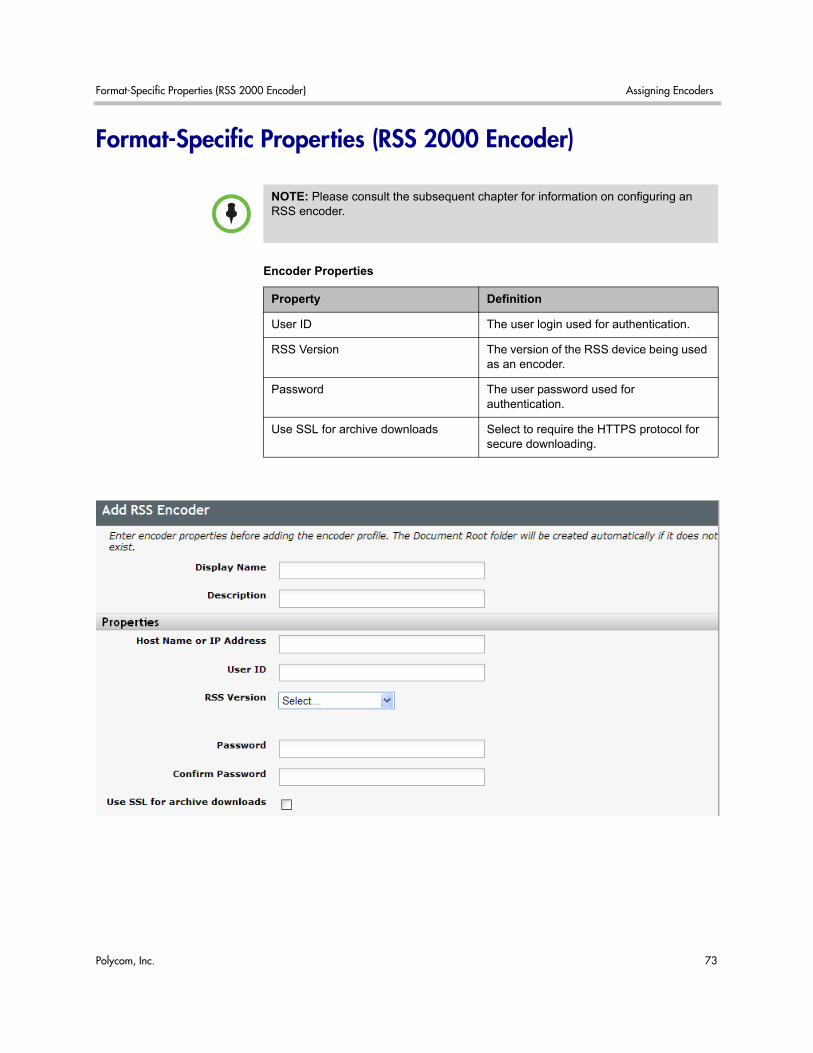
Format-Specific Properties (RSS 2000 Encoder) Assigning Encoders
Polycom, Inc. 73
Format-Specific Properties (RSS 2000 Encoder)
NOTE: Please consult the subsequent chapter for information on configuring an RSS encoder.
Encoder Properties
Property Definition
User ID The user login used for authentication.
RSS Version The version of the RSS device being used as an encoder.
Password The user password used for authentication.
Use SSL for archive downloads Select to require the HTTPS protocol for secure downloading.
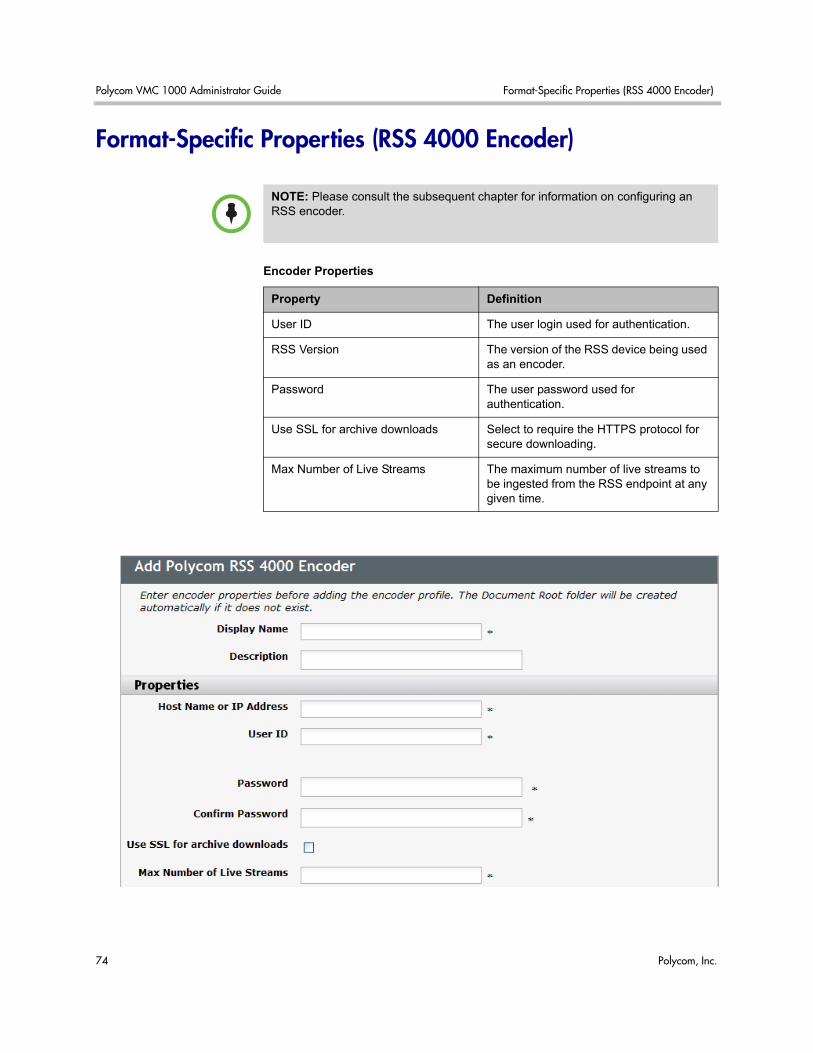
Polycom VMC 1000 Administrator Guide Format-Specific Properties (RSS 4000 Encoder)
74 Polycom, Inc.
Format-Specific Properties (RSS 4000 Encoder)
NOTE: Please consult the subsequent chapter for information on configuring an RSS encoder.
Encoder Properties
Property Definition
User ID The user login used for authentication.
RSS Version The version of the RSS device being used as an encoder.
Password The user password used for authentication.
Use SSL for archive downloads Select to require the HTTPS protocol for secure downloading.
Max Number of Live Streams The maximum number of live streams to be ingested from the RSS endpoint at any given time.

Format-Specific Properties (External Source) Assigning Encoders
Polycom, Inc. 75
Format-Specific Properties (External Source)An External Source Encoder type is used for encoders not managed directly by the Polycom VMC 1000. After adding a Display Name and Description, create the Encoder Profile.
Format Specific Properties (ViewCast)ViewCast encoders support the Akamai CDN “Pull” and “Push” technology.
Pull technology requires that the encoder is accessible from the Internet. An Akamai ingest broadcast point designated to pull a stream must be able to resolve the encoder's address. However, this creates a security risk for enterprises because encoders (or streaming servers) must be placed outside a firewall. Pull technology exposes streaming sources to malicious attacks and stream interception.
Push technology does not require that the encoder or streaming server be assessible from the Internet, but can exist from within a firewall. Push technology is also supported with Windows Media an VBrick via Akamai. Push technology is a much more secure way to distribute live streams. With Push technology, the encoder must be aware of an Akamai CDN ingest point server address to successfully resolve it.
Contrary to the Pull method, with the Push method, the ingest server does not need to resolve the encoder address.
For information on how to define the ViewCast Encoder to push a stream to an Akamai CDN, see the section “Defining a ViewCast Encoder in the ViewCast UI” on page 84 in this chapter.
For more information on how to define ViewCast encoder properties in the Polycom VMC 1000, see “ViewCast Encoder Properties in the Polycom VMC 1000” on page 85 in this chapter.
Encoder Properties
Property Definition
Display Name The user login used for authentication.

Polycom VMC 1000 Administrator Guide Encoder Profiles
76 Polycom, Inc.
Encoder ProfilesFor each Live Encoder in the Polycom VMC 1000, you must create at least one Live Encoder Profile. The profile specifies encoder configuration parameters that are used at broadcast time to determine how content is encoded, such as bit-rate, sound quality and video size. For the encoder profile, you must have the properties below. The following properties pertain to all encoder profiles.
Public Encoder URL for External CDNs
The encoder public pingable address, or the URL that is built of a public streaming server and a publishing point, (i.e. "http://server.com/live"). This field sets the Akamai Live Stream encoder URL to this IP and registered port by means of the Akamai Web Service APIs.
User ID The user login used for authentication.
Password The user password used for authentication.
Encoder Properties
Property Definition
Encoder Profile Properties
Property Definition
Name A name to distinguish this profile from others. The display name appears on the Live Encoder Setup page and as an option when configuring Live Streams.

Encoder Profiles Assigning Encoders
Polycom, Inc. 77
Description The description only appears on the Edit Live Encoder and the Viewers Profile page. Other users can view this description by editing the profile information.
Video Size The video size specifies the size of the video window shown to Viewers when they view content encoded using this encoder profile. Please note: This option only applies to the Classic Viewer Portal. The Version 2.0 Viewer Portal output will always have a displayable content area of 440 x 330 when using Microsoft Silverlight.
Video Bit Rate The value entered for bit rate is displayed to Viewers as part of the link to content encoded using this encoder profile. This value helps Viewers to choose from multiple streams based on their bandwidth capabilities. This bit rate value should reflect the actual bit rate of the encoded content based on the specification of the Profile Encoder Configuration properties below.
Encoder Profile Properties
Property Definition

Polycom VMC 1000 Administrator Guide Encoder Profile Configuration (Capture Studio)
78 Polycom, Inc.
Encoder Profile Configuration (Capture Studio)
Encoder Profile Configuration (Digital Rapids)
Encoder Properties
Property Definition
Enable Archiving Enables archiving of PRS 2000 broadcasts.
Encoder Output Port The port on the encoder through which output is published to the media server. This value must not be 8099.
Public URL for External CDNs The encoder public pingable address, or the URL that is built of a public streaming server and a publishing point, (i.e. "http://server.com/live").
Audio Bit Rate Designates the audio bit rate for the encoder. This bit rate value should reflect the actual bit rate of the encoded audio content.
Audio Only Broadcasts conducted from this encoder will only contain audio, not video content.
Encoder Properties
Property Definition
Audio Only Select to exclusively stream audio content.
Port Ports cannot conflict within a project.
Instance ID Select 0. This value should not affect functionality.
Project Name Select a project from the drop-down menu. Projects must be added in the Digital Rapids web service interface.
Profile Name Select a profile from the drop-down menu. Profiles must be added in the Digital Rapids web service interface.
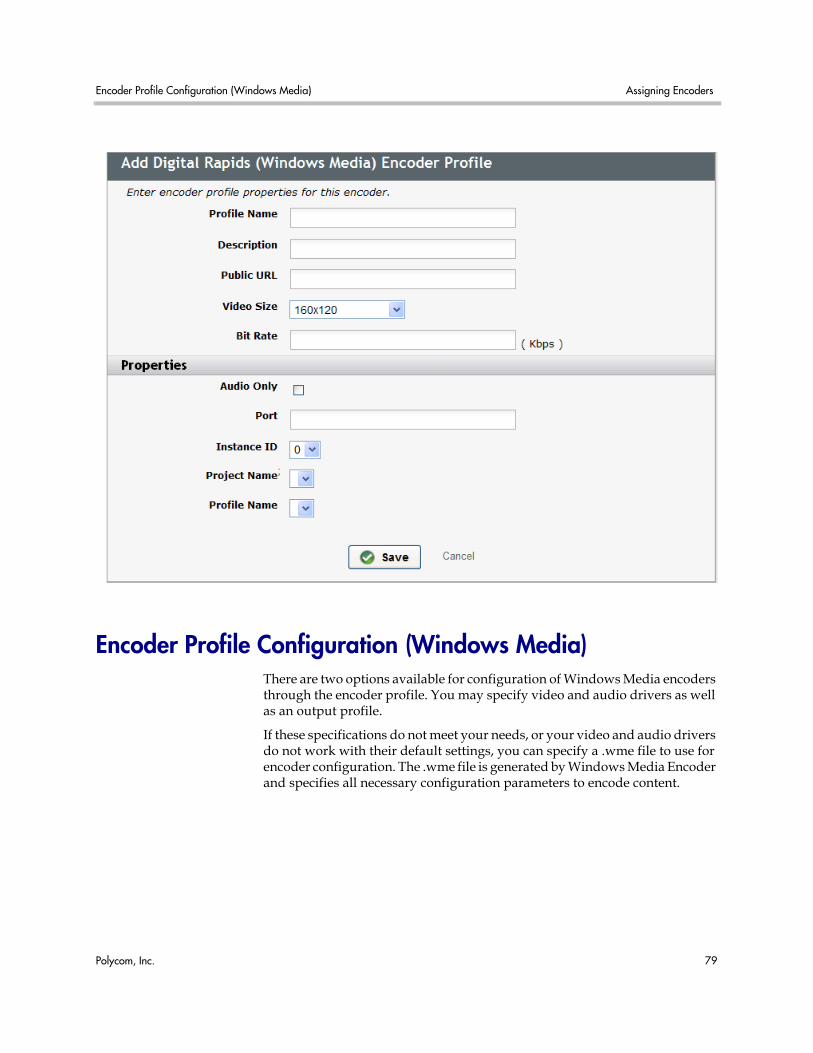
Encoder Profile Configuration (Windows Media) Assigning Encoders
Polycom, Inc. 79
Encoder Profile Configuration (Windows Media)There are two options available for configuration of Windows Media encoders through the encoder profile. You may specify video and audio drivers as well as an output profile.
If these specifications do not meet your needs, or your video and audio drivers do not work with their default settings, you can specify a .wme file to use for encoder configuration. The .wme file is generated by Windows Media Encoder and specifies all necessary configuration parameters to encode content.

Polycom VMC 1000 Administrator Guide Encoder Profile Configuration (Windows Media)
80 Polycom, Inc.
Encoder Properties
Property Definition
Stream URl The URL by which output from this encoder is accessed (i.e. mms://WMTServerName/EncoderMountPoint)
Encoder Output Port The port on the encoder through which output is published to the media server.
Fully Qualified .wme File Name If you choose to use a .wme file, you must enter the path to the file on the encoder machine. This .wme file describes audio and video input and output profile properties. Please refer to Windows Media Encoder documentation for instructions on generating .wme files.NOTE: Any .wme file used by the Polycom VMC 1000 for broadcasts that contain slides MUST support script events. Script event support is a feature of the output profile described in the .wme file.
Audio Driver Audio driver selection specifies the audio input device to use for your broadcast. A selection of "(Default)" causes Windows Media Encoder to use the encoder's default audio capture device.
Video Driver Video driver selection specifies the video input device to use for your broadcast. A selection of "(Default)" causes Windows Media Encoder to use the encoder's default video capture device.
Output Profile The output profile determines the characteristics of the encoded output from Windows Media Encoder including bit-rate, video size, codec used, etc. You must use an output profile that supports script events. If you do not have any output profiles with script events, you can manually create such profiles from existing profiles by running Windows Media Encoder on the encoder machine.

Encoder Profile Configuration (RSS 2000) Assigning Encoders
Polycom, Inc. 81
Encoder Profile Configuration (RSS 2000)
NOTE: Please see Using RSS Devices in the VMC 1000 for more information.

Polycom VMC 1000 Administrator Guide Encoder Profile Configuration (RSS 4000)
82 Polycom, Inc.
Encoder Profile Configuration (RSS 4000)
Property Definition
External URL The URL by which output from this encoder is accessed.
Call startup report delay Inserts a delay (in seconds) into the output from the encoder.
Record H239 Content Designates whether to record and broadcast H.239 content capture along with video from endpoints.
NOTE: Please see Using RSS Devices in the VMC 1000 for more information.
Property Definition
External URL The URL by which output from this encoder is accessed.

Encoder Profile Configuration (External) Assigning Encoders
Polycom, Inc. 83
Encoder Profile Configuration (External)There are only three unique configuration options for an External encoder profile.
These are as follows.Property Definition
Stream URL The URL by which output from this encoder is accessed (i.e. mms://WMTServerName/EncoderMountPoint). Use this field only if the selectedProfile uses Pull Style output checkbox.
Public URL for External CDNs The encoder public pingable address, or the URL that is built of a public streaming server and a publishing point, (i.e. "http://server.com/live").
Format Select the Format of the stream (e.g., Adobe Flash, Windows Media, etc)

Polycom VMC 1000 Administrator Guide Encoder Profile Configuration (ViewCast)
84 Polycom, Inc.
Encoder Profile Configuration (ViewCast)
Defining a ViewCast Encoder in the ViewCast UIBefore you add a ViewCast encoder profile to the Polycom VMC 1000, you must define a ViewCast Windows Media Service (WMS) encoder using the ViewCast UI in order to push a stream to an Akamai CDN. You must create an encoder profile in the Polycom VMC 1000 that corresponds to a ViewCast encoder profile set up for WMS push.
To define a ViewCast encoder:
1 From the ViewCast UI, select the Enable Push check box and set the following fields:
— Push to Port - The port in the Akamai entry point URL, typically “8080.” It is not a reflector port.
— Server - The entry point specified in an Akamai WMS Push Live Stream. A port must not be included. For example, "p.ep42717.m.akamaientrypoint.net".
— Alias - Refers to the reflector port in the form of "reflector:port". For example, "reflector:42717."
— User Name and Password - Refers to a WMS push user credentials.

Encoder Profile Configuration (ViewCast) Assigning Encoders
Polycom, Inc. 85
ViewCast Encoder Properties in the Polycom VMC 1000
Encoder Properties
Property Definition
Profile Uses Pull Style Output Select this check box to define this encoder and a pull encoder and enable Akamai provisioning.
Encoder Output Port The port on the encoder through which output is published to the media server. Use this field only if the selected Profile uses Pull Style output checkbox.
Audio Only Specify if the broadcast will not include video.
SCX Encoder Name Refers to a predefined ViewCast Encoder profile. ViewCast SCX encoder profiles utilize the "Push Accounts" in order to push a WMS stream to an Akamai ingest point.
Specify Drivers and Profile Allows you to specify audio, video and output profiles for a ViewCast encoder.
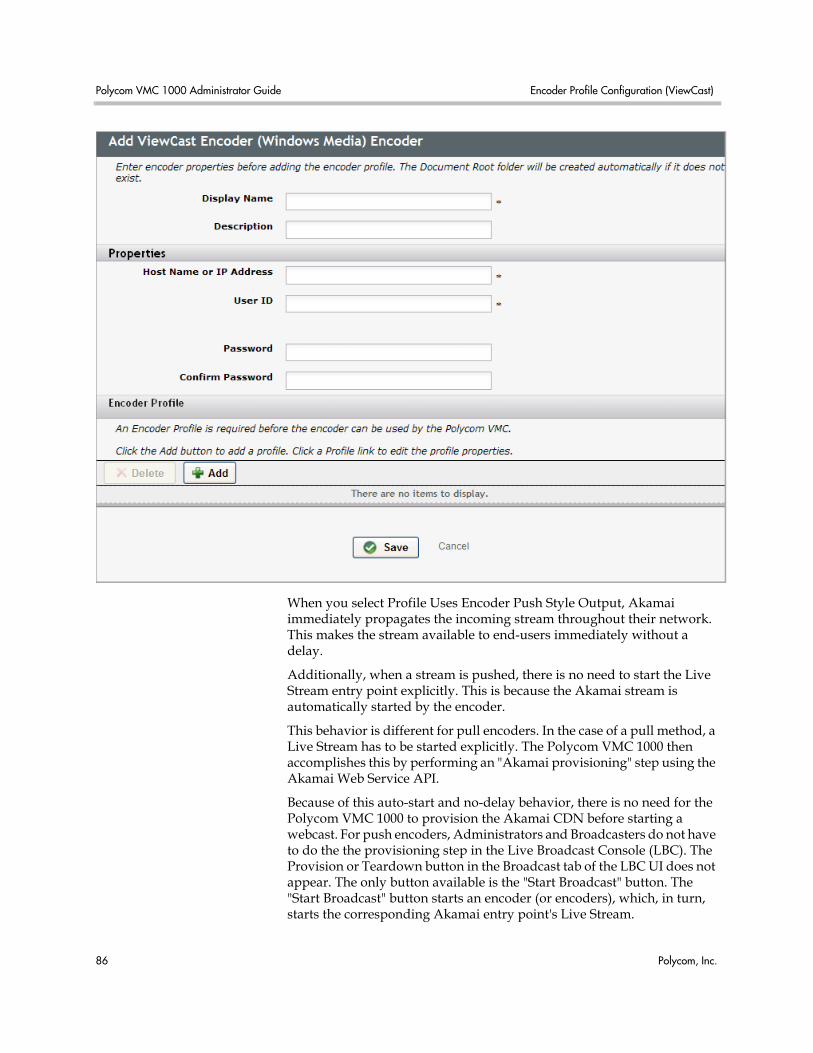
Polycom VMC 1000 Administrator Guide Encoder Profile Configuration (ViewCast)
86 Polycom, Inc.
When you select Profile Uses Encoder Push Style Output, Akamai immediately propagates the incoming stream throughout their network. This makes the stream available to end-users immediately without a delay.
Additionally, when a stream is pushed, there is no need to start the Live Stream entry point explicitly. This is because the Akamai stream is automatically started by the encoder.
This behavior is different for pull encoders. In the case of a pull method, a Live Stream has to be started explicitly. The Polycom VMC 1000 then accomplishes this by performing an "Akamai provisioning" step using the Akamai Web Service API.
Because of this auto-start and no-delay behavior, there is no need for the Polycom VMC 1000 to provision the Akamai CDN before starting a webcast. For push encoders, Administrators and Broadcasters do not have to do the the provisioning step in the Live Broadcast Console (LBC). The Provision or Teardown button in the Broadcast tab of the LBC UI does not appear. The only button available is the "Start Broadcast" button. The "Start Broadcast" button starts an encoder (or encoders), which, in turn, starts the corresponding Akamai entry point's Live Stream.

About Studios Assigning Encoders
Polycom, Inc. 87
About StudiosBroadcast services (encoders and their profiles) may be aggregated into Studios. Within these studios, failover groupings can be defined.
Creating a Studio
To create a Studio:
1 Click Resources.
2 Click Studios.
3 Click the Add.
4 Specify a Studio Name.
5 Specify a Description.
6 Click the Add button to associate an encoder profile.
7 Select the appropriate radio buttons to select an encoder and profile
8 Check the box to Archive Encoder Output.
9 Check the box to Distribute Encoder Output.
10 Click Save.

Polycom VMC 1000 Administrator Guide Encoder Troubleshooting
88 Polycom, Inc.
11 Click the Add button to add a Failover Group.
12 Specify a Failover Group Name.
13 Specify the Role(s) for the profiles to be selected.
14 Click the Add button.
15 Select the appropriate radio buttons to select an encoder and profile.
16 Click Save.
Encoder Troubleshooting
IP Address ConfigurationIf the Polycom VMC 1000 is unable to communicate with an encoder using a Dynamic IP address via the host name, and a static IP address is impractical, the following steps can be taken:
1 From each Polycom VMC 1000 appliance, copy the file D:\Qumu\jre\lib\security\java.security outside of the VMC directory structure.
2 Open \java.security.
3 Find this section of the code:
# The Java-level namelookup cache policy for successful lookups: # # any negative value: caching forever # any positive value: the number of seconds to cache an address for # zero: do not cache # # default value is forever (FOREVER). For security reasons, this # caching is made forever when a security manager is set. When a security # manager is not set, the default behavior is to cache for 30 seconds. # # NOTE: setting this to anything other than the default value can have # serious security implications. Do not set it unless # you are sure you are not exposed to DNS spoofing attack. # #networkaddress.cache.ttl=-1
4 Remove the comment from "networkaddress.cache.ttl." Set it to a positive value that defines in seconds how long to cache an address.
5 After saving the changes, you will need to restart the Polycom VMC 1000 appliance.

Encoder Troubleshooting Assigning Encoders
Polycom, Inc. 89
6 To test the new configuration:
a Select a mobile encoder that is currently attached to and configured for the Polycom VMC 1000 network.
b Unplug the encoder from the network.
c Plug the encoder in again. Confirm a new IP Address is assigned to it, and then check in DNS to make sure DNS has been updated with the new IP address.
d Within the Polycom VMC 1000 Administrative Portal you can go to Encoder > Encoder Profile and can confirm that the Polycom VMC 1000 can no longer connect because you will see an error in the drop down for Video and Audio drivers and in the Server.log you will see an error in the attempt to connect.
e At this point you can wait until the time you specified (in my example I set the value to 3600) has passed and then test again.

Polycom VMC 1000 Administrator Guide Encoder Troubleshooting
90 Polycom, Inc.

Polycom, Inc. 91
7Using RSS Devices in the VMC 1000
This chapter explains how to configure the RSS 2000 and the RSS 4000 to work with the Polycom VMC 1000. It contains the following main sections:
• RSS Discovery Workflow
• Polycom RSS 4000 Configuration
• Adding RSS Devices in the VMC
• Creating Default Program Templates
• Configuring the RSS for use with the Discovery Service
• Adding an RSS Device as an Encoder
• Troubleshooting and Caveats
RSS Discovery WorkflowPlease note that the following workflow must be followed in order to ensure successful use of the Discovery service for Polycom RSS devices:
1 For Polycom RSS 4000 v6 devices only: Templates, VRRs, and channels must be created within the RSS interface. See Polycom RSS 4000 Configuration.
2 Polycom RSS Devices must be added in the Polycom VMC 1000 interface. See Adding RSS Devices in the VMC.
3 Master Programs must be created. See Creating Default Program Templates.
4 The RSS Discovery service must be configured. See Configuring the RSS for use with the Discovery Service.
NOTE: The Polycom VMC 1000 interface, and subsequent sections of this guide, will make reference to the RSS 4000. Please note that this is shorthand for the Polycom RSS 4000 v6. Polycom RSS 4000 v5 are configured via the Polycom RSS 2000 tools in the VMC.

Polycom VMC 1000 Administrator Guide Polycom RSS 4000 Configuration
92 Polycom, Inc.
Polycom RSS 4000 ConfigurationPrior to adding a Polycom RSS 4000 v6 device to your Polycom VMC 1000 system resources, you should create at least one template, channel, and Virtual Recording Room (VRR) dedicated to publication to the Polycom VMC 1000.
Adding a TemplateA template must be added in the Polycom RSS 4000 in order for programs to be exported to the Polycom VMC 1000. To add a template:
1 Log into the Polycom RSS 4000 administrative interface. Navigate to VRR > Templates.
2 The Templates menu will appear. Click Add. The Add Template screen will appear.
NOTE: For more detailed information on the Polycom RSS 4000 device, please consult the Polycom RSS 4000 User Guide.

Polycom RSS 4000 Configuration Using RSS Devices in the VMC 1000
Polycom, Inc. 93
3 Designate your template Name, Primary Recording and Streaming Rate, Secondary Recording and Streaming Rate if necessary, MP4 Resolution, and Video & Content Layout.
Select the Live Streaming checkbox if you wish to use your template to import live calls from the RSS 4000.
4 Click OK.
Adding a ChannelAfter configuring a template, a channel must be created.
1 In the Polycom RSS 4000 administrative interface, navigate to VRR > Channels. The Channels screen appears.
2 Click Add. The Add Channel window appears.
3 Provide a Name and an optional Description.
4 Click OK.
Adding a Virtual Recording RoomA VRR should also be established in the Polycom RSS 4000.
1 In the Polycom RSS 4000 administrative interface, navigate to VRR > VRRs. The VRRs screen appears.

Polycom VMC 1000 Administrator Guide Adding RSS Devices in the VMC
94 Polycom, Inc.
2 Click Add. The Add VRR window appears.
3 In the General Properties screen, enter a Name, VRR Number, and select an Owner from the RSS 4000 users.
4 Select the Channel and Templates you have configured in the sections above.
5 Select Enable PIN Code for Playback if you wish to create a PIN-protected calls. Enter the PIN in the PIN Code field.
6 Ensure Recording Immediately is checked.
7 If you wish to limit user access to the VRR, click the Allowed Users/Groups tab. Designate the users or groups to whom you wish to grant control.
8 Click OK.
Adding RSS Devices in the VMCPolycom RSS devices must be added as domain-level resources in the Polycom VMC 1000 Administrative Portal before calls can be imported and distributed.

Adding RSS Devices in the VMC Using RSS Devices in the VMC 1000
Polycom, Inc. 95
Adding a Polycom RSS 4000 v6 Device
To add an RSS 4000 v6 Device:
1 Go to Resources > Polycom RSS Devices.
2 Click Add. Select RSS 4000 from the context menu that appears.
The RSS Source Device Parameters page will appear.
3 In the Name field, enter a display name for your RSS host.
This is a required field.
4 In the Host Name or IP Address field, enter the IP address for your RSS host. This is also a required field.
5 In the User ID field, enter your RSS host administrator ID.
6 In the Password field, enter your RSS host administrator password. Enter this password again in the Confirm Password field.

Polycom VMC 1000 Administrator Guide Adding RSS Devices in the VMC
96 Polycom, Inc.
7 Select the Import Live Calls checkbox if you want the Polycom VMC 1000 to poll the RSS device for live calls and expose their streams as Broadcast Programs through the Viewer Portal.
8 Select the Import Recorded Calls checkbox if you want the Polycom VMC 1000 to poll the RSS device for recorded calls and ingest the media in the VMC storage repository.
9 When configuration has been completed, click Submit.
Adding an RSS 2000 Device
To add an RSS 2000 Device:
1 Go to Resources > Polycom RSS Devices.
NOTE: Do not select this option until Discovery has been configured. If you select this option before Discovery has been configured for each domain, existing calls will be found by the Polycom VMC 1000 but the content will not be ingested, nor will programs be created.
NOTE: Do not select this option until Discovery has been configured. If you select this option before Discovery has been configured for each domain, existing calls will be found by the Polycom VMC 1000 but the content will not be ingested, nor will programs be created.
NOTE: The following configuration information applies to all Polycom RSS 4000 devices v5 and below as well as Polycom RSS 2000 devices.

Adding RSS Devices in the VMC Using RSS Devices in the VMC 1000
Polycom, Inc. 97
2 Click Add. Select RSS 2000/RSS 4000 v.4 from the context menu that appears.
The RSS 2000 Source Device Parameters page will appear.
3 In the Name field, enter a display name for your RSS host. This is a required field.
4 In the Host Name or IP Address field, enter the IP address for your RSS host. This is also a required field.
5 Specify the Port used by the device.
6 In the User ID field, enter your RSS host administrator ID.
7 In the Password field, enter your RSS host administrator password. Enter this password again in the Confirm Password field..
8 Select the Use Secure Connection if your RSS host uses the HTTPS protocol.
You must check this box when your RSS host is SSL enabled and you are using https:// to access this host. Leave this box unchecked if your RSS host does not have a certificate and SSL is not enabled.
9 Select the Import Live Calls checkbox if you want the Polycom VMC 1000 to poll the RSS device for live calls and expose their streams as Broadcast Programs through the Viewer Portal.
10 Select the Import Recorded Calls checkbox if you want the Polycom VMC 1000 to poll the RSS device for recorded calls and ingest the media in the storage repository.

Polycom VMC 1000 Administrator Guide Creating Default Program Templates
98 Polycom, Inc.
11 When configuration has been completed, click Submit.
Creating Default Program TemplatesBefore using RSS discovery, master programs must be created for both Automated File Broadcast and Automated Encoder Broadcast program types in the Polycom VMC 1000 Administrative Portal.
Please note that the Polycom VMC 1000 appliance ships with default master programs preconfigured. Please consult these programs before proceeding with template creation.
Creating an Automated File Broadcast TemplateAn Automated File Broadcast master program is used as a template for live calls from Polycom RSS devices.
1 Navigate to Programming > Programs. The Programs screen will appear.
2 Click the Add button. Choose Automated File Broadcast from the context menu that appears.
3 Enter program Name.
This name appears to Viewers to identify the program.
4 Select a Channel in which to save this program if prompted.
5 Fill in Author, Copyright, Descriptions, and Keywords. Choose or create appropriate Tags. These are optional.
6 Click Next to continue.
7 Under Start Listing, select when you want the program to begin being listed on the Program Browser. Please note that Discovery will supercede this template configuration.
8 Under End Listing, enter an expiration date/time if you would like the program to expire at a certain date.
When this time is reached, the program will no longer be listed on the Program Browser or available to Viewers. Please note that Discovery will supercede this template configuration.
9 You can choose to suspend the program. This will remove it from the Viewer page and make it unavailable to Viewers, but will retain the program in its current channel for later reuse.
10 Disregard the Broadcast Schedule section. The Polycom VMC 1000 will broadcast live content when it is discovered.
NOTE: For more information on creating programs, please consult the Polycom VMC 1000 Broadcaster Guide.

Creating Default Program Templates Using RSS Devices in the VMC 1000
Polycom, Inc. 99
11 Click Next to continue.
12 To add a program image (thumbnail) to be displayed on the Program Browser, click the Select icon in the Image section.
Clicking the Select button takes you to the Content Repository.
13 From the Content Repository, click on the thumbnail you want to use.
Click Save. If you don't select a thumbnail, the system uses the default thumbnail set by your system administrator (typically a company logo).
14 Click the Streaming icon in the Streaming Media section. The Content Repository will appear. Select a Windows Media file.
The storage assigned to this Windows Media file will apply to all content ingested from the RSS devices. This is a required step.
15 Click the Save button.
16 Select the Use Embedded Media Player for Media checkbox if you want this program's media content items to be launched in a branded pop-up window.
17 Enter the program duration in minutes.
18 To associate downloadable media with this program, click the Select icon in the Downloadables section.
Clicking the Select icon takes you to the Content Repository.
19 In the Content Repository, highlight the items you want to add and click the right arrow button to select the items.
20 Click the Save button.
21 Click Next.
22 The Program Content Delivery page appears. Select either the Delivery or Audience radio button and click Next.
a If you selected Delivery, for each content type attached to the program (e.g., downloads, streaming media) select a Delivery Option and at least one Access Point
b If you selected Audience, select one or more Audiences from the list that appears.
Click Next when completed.
23 Designate your program and user access settings and click Next.
24 The program summary page will appear. Check Save as Master Program
25 Click Finish.
NOTE: The master program checkbox must be selected in order to create a program template.

Polycom VMC 1000 Administrator Guide Creating Default Program Templates
100 Polycom, Inc.
Creating an On-Demand TemplateAn On-Demand master program is used as a template for live calls from Polycom RSS devices.
1 Navigate to Programming > Programs. The Programs screen will appear.
2 Click the Add button. Choose On-Demand from the context menu that appears.
3 Enter program Name.
This name appears to Viewers to identify the program.
4 Select a Channel in which to save this program if prompted.
5 Fill in Author, Copyright, Descriptions, and Keywords. Choose or create appropriate Tags. These fields are optional.
6 Click Next to continue.
7 Under Start Listing, select when you want the program to begin being listed on the Program Browser.
Depending on how the Polycom VMC 1000 appliance is configured to update the programming cache, it may take a few minutes for the program to become visible to Viewers. You can choose to not list the program yet (save as a draft for publishing later).
8 Under End Listing, enter an expiration date/time if you would like the program to expire at a certain date.
When this time is reached, the program will no longer be listed on the Program Browser or available to Viewers.
You can choose to suspend the program. This will remove it from the Viewer page and make it unavailable to Viewers, but will retain the program in its current channel for later reuse.
9 To add a program image (thumbnail) to be displayed on the Program Browser, click the Select icon in the Image section.
Clicking the Select button takes you to the Content Repository.
10 From the Content Repository, click on the thumbnail you want to use.
Click Save. If you don't select a thumbnail, the system uses the default thumbnail set by your system administrator (typically a company logo).
11 To associate streaming media with this program, click the Streaming icon in the Streaming Media section.
The Content Repository will appear. Select a Windows Media file. The storage assigned to this Windows Media file will apply to all content ingested from the RSS devices.
12 Click the Save button.
13 Select the Allow to Download Program Media checkbox if you want the content ingested from the RSS device to be downloadable by end users.
Configuring the RSS for use with the Discovery Service Using RSS Devices in the VMC 1000
Polycom, Inc. 101
14 Enter the program duration in minutes.
15 To associate downloadable media with this program, click the Select icon in the Downloadables section.
Clicking the Select icon takes you to the Content Repository.
16 In the Content Repository, highlight the items you want to add and click the right arrow button to select the items.
17 Click the Save button.
18 Click Next.
19 The Program Content Delivery page appears. Select either the Delivery or Audience radio button and click Next.
a If you selected Delivery, for each content type attached to the program (e.g., downloads, streaming media) select a Delivery Option and at least one Access Point
b If you selected Audience, select one or more Audiences from the list that appears.
Click Next when completed.
20 Designate your program and user access settings and click Next.
21 The program summary page will appear. Check Save as Master Program
Click Finish.
Configuring the RSS for use with the Discovery ServiceAfter RSS devices have been added in the Polycom VMC 1000 interface, the Discovery service must be configured for each domain.
NOTE: The master program checkbox must be selected in order to create a program template.
NOTE: The Discovery service must be configured separately for each domain.

Polycom VMC 1000 Administrator Guide Configuring the RSS for use with the Discovery Service
102 Polycom, Inc.
Polycom RSS 4000 Discovery1 Navigate to Programming > Polycom RSS Discovery. The Polycom RSS
Discovery Configuration page will appear.
2 Click the Add button. The RSS devices which have not yet been configured in Discovery will appear in the Select RSS Source Device dialog.
If all source devices have already been configured for the domain, the Add button will be disabled.
3 A device selection screen will appear. Choose the device you want to configure.

Configuring the RSS for use with the Discovery Service Using RSS Devices in the VMC 1000
Polycom, Inc. 103
4 The Domain-level Polycom RSS4000 Delivery Configuration screen will appear.
5 The RSS Source Device Name and Host should populate automatically with the values supplied during Device configuration.
6 In the Program Naming fields, select the format for how you want an RSS recorded call to be named when it is imported as a program into the Polycom VMC 1000. Designate:
a A Program Naming Prefix. This is an administrator-defined field. The prefix added to your imported programming name ensures that you can easily identify what RSS device the program came from.
b A Program Naming Suffix. Choose an option from the drop-down menu. Original Filename preserves the filename determined on the RSS device, while YYYY_MM_DD_HH:MM affixes a timestamp in the given format (i.e., “2010_05_01_21:14”).

Polycom VMC 1000 Administrator Guide Configuring the RSS for use with the Discovery Service
104 Polycom, Inc.
7 In the Content Naming fields, select the format for how you want an RSS recorded call to be named when it is imported as a Content Repository item into the Polycom VMC 1000.
a A Content Naming Prefix. This is an administrator-defined field. The prefix added to your imported programming name ensures that you can easily identify what RSS device the content repository item came from.
b A Content Naming Suffix. Choose an option from the drop-down menu. Original Filename preserves the filename determined on the RSS device, while YYYY_MM_DD_HH:MM affixes a timestamp in the given format (i.e., “2010_05_01_21:14”).
8 Check Make the VRR owner the publisher of the program if you want to designate the VRR owner in the Polycom RSS 4000 as the publisher of the program in the Polycom VMC 1000.
9 Under Manage Live Calls:
a Select the Auto-Publish non-PIN-protected Calls on browser checkbox if you want the Polycom VMC 1000 to import live, non-PIN-protected calls and make them immediately viewable by all on the Viewer Portal.
b Select the Auto-Publish PIN-protected Calls on browser checkbox if you want the Polycom VMC 1000 to import live, PIN-protected calls and make them immediately viewable by those with a PIN number on the Viewer Portal.
10 Under Manage Recorded Calls:
a Select the Create programs for non-PIN Protected calls checkbox if you want the Polycom VMC 1000 to create a program from the RSS recorded call in addition to having the recorded call sent to the Content Repository.
b Select the Auto publish non-PIN Protected Calls on portal checkbox if you want the Polycom VMC 1000 to import recorded, non-PIN-protected calls and make them immediately viewable by all on the Viewer Portal in addition to having the call sent to the Content Repository.
c Select the Create programs for PIN Protected calls checkbox if you want the Polycom VMC 1000 to create a program from the RSS recorded call in addition to having the recorded call sent to the Content Repository.
NOTE: This option will work for domains where the RSS device and the Polycom VMC 1000 are using the same LDAP repository. Selecting this option will result in addition queries to your LDAP during discovery. If LDAP is not used by the RSS, then the user can be set up in the VRR to match the LDAP user in VMC. This will result in programs being automatically assigned to the specified user.

Configuring the RSS for use with the Discovery Service Using RSS Devices in the VMC 1000
Polycom, Inc. 105
d Select the Auto publish PIN Protected Calls on portal checkbox if you want the Polycom VMC 1000 to import recorded, PIN-protected calls and make them immediately viewable by all on the Viewer Portal in addition to having the call sent to the Content Repository.
11 Select Ingest Content Even If No Program Will Be Created if you have not selected the Create Programs options.
12 If you have created default program templates and intend to use the given Discovery profile for live calls, click Use Default Template for Live Calls.
Choose the configured template from the list of drop-down master programs. For more information on configuring default program templates, see below.
13 If you have created default program templates and intend to use the given Discovery profile for recorded calls, click Use Default Template for Recorded Calls.
Choose the configured template from the list of drop-down master programs.
14 If you have configured VRRs in the Polycom RSS 4000, click Load the List of Available Virtual Recording Rooms. A list of VRRs will be imported from the RSS device.
To set the parameters of a given VRR:
a Click on its name in the list. The Edit screen will appear.
b The VRR Name, VRR Alias, and VRR Owner will populate automatically with information imported from the RSS device.
c Choose a Template for Live Calls and Template for Recorded Calls from the respective drop-down lists.
d Click Save in the Edit VRR dialog.
15 Click Save in the RSS Device dialog.
16 Navigate to Resources > Polycom RSS Devices. Click on the device you have already configured.
17 Select Import Live Calls and Import Recorded Calls (depending on your intended use).
18 Click Submit.
NOTE: The default program templates specified in the steps above are intended as catch-all settings in the event that no template mappings are found for the specified VRRs when the call is discovered. Assigning program templates per VRR, as outlined below, is the recommended mode of use.

Polycom VMC 1000 Administrator Guide Configuring the RSS for use with the Discovery Service
106 Polycom, Inc.
Polycom RSS 2000 Discovery1 Navigate to Programming > Polycom RSS Discovery. The Polycom RSS
Discovery Configuration page will appear.
2 Click the Add button. The RSS devices which have not yet been configured in Discovery will appear in the Select RSS Source Device dialog.
If all source devices have already been configured for the domain, the Add button will be disabled.
3 A device selection screen will appear. Choose the device you want to configure.

Configuring the RSS for use with the Discovery Service Using RSS Devices in the VMC 1000
Polycom, Inc. 107
4 The Domain-level Polycom RSS 2000 Delivery Configuration screen will appear.
5 The RSS Source Device Name and Host should populate automatically with the values supplied during Device configuration.
6 In the Programming Configuration fields, select the format for how you want an RSS recorded call to be named when it is imported as a program into the Polycom VMC 1000. Designate:
a A Program Naming Prefix. This is an administrator-defined field. The prefix added to your imported programming name ensures that you can easily identify what RSS device the program came from.
b A Program Naming Suffix. Choose an option from the drop-down menu. Original Filename preserves the filename determined on the

Polycom VMC 1000 Administrator Guide Configuring the RSS for use with the Discovery Service
108 Polycom, Inc.
RSS device, while YYYY_MM_DD_HH:MM affixes a timestamp in the given format (i.e., “2010_05_01_21:14”).
c A Content Naming Prefix. This is an administrator-defined field. The prefix added to your imported programming name ensures that you can easily identify what RSS device the content repository item came from.
d A Content Naming Suffix. Choose an option from the drop-down menu. Original Filename preserves the filename determined on the RSS device, while YYYY_MM_DD_HH:MM affixes a timestamp in the given format (i.e., “2010_05_01_21:14”).
7 Under Manage Live Calls:
a Select the Auto-Publish non-PIN-protected Calls on browser checkbox if you want the Polycom VMC 1000 to import live, non-PIN-protected calls and make them immediately viewable by all on the Viewer Portal.
b Select the Auto-Publish PIN-protected Calls on browser checkbox if you want the Polycom VMC 1000 to import live, PIN-protected calls and make them immediately viewable by those with a PIN number on the Viewer Portal.
8 Under Manage Recorded Calls:
a Select the Create programs for non-PIN Protected calls checkbox if you want the Polycom VMC 1000 to create a program from the RSS recorded call in addition to having the recorded call sent to the Content Repository.
b Select the Auto publish non-PIN Protected Calls on portal checkbox if you want the Polycom VMC 1000 to import recorded, non-PIN-protected calls and make them immediately viewable by all on the Viewer Portal in addition to having the call sent to the Content Repository.
c Select the Create programs for PIN Protected calls checkbox if you want the Polycom VMC 1000 to create a program from the RSS recorded call in addition to having the recorded call sent to the Content Repository.
d Select the Auto publish PIN Protected Calls on portal checkbox if you want the Polycom VMC 1000 to import recorded, PIN-protected calls and make them immediately viewable by all on the Viewer Portal in addition to having the call sent to the Content Repository.
9 Select Ingest Content Even If No Program Will Be Created if you have not selected the Create Programs options.
10 Navigate to Resources > Polycom RSS Devices. Click on the device you have already configured.
11 Select Import Live Calls and Import Recorded Calls (depending on your intended use).

Adding an RSS Device as an Encoder Using RSS Devices in the VMC 1000
Polycom, Inc. 109
12 Click Save.
Viewing the Discoveries ListAfter configuring RSS devices and setting up Discovery, administrators can review and edit the ongoing list of discoveries.
To review the Discoveries list:
1 To view the discoveries on a given device, navigate to Resources > Polycom RSS Devices.
To view the discoveries made via a given Discovery Profile, navigate to Programming > RSS Discovery.
2 Click the link in the Discoveries column next to a device or Discovery Profile.
3 The Polycom RSS Discoveries List will appear.
To remove a discovery from the list, select the inline checkbox and click Delete. This means that the content item will be “rediscovered,” meaning that the content will be ingested again and a new program created.
Adding an RSS Device as an EncoderInstead of having the VMC 1000 use the Discovery Service feature to “discover” an RSS device, you can configure the VMC 1000 to use the RSS device as an encoder to be referenced by live broadcast programs or automated broadcast programs.
To add an RSS Device as an Encoder:
1 In the Polycom VMC 1000 administrative interface, click Resources > Encoders. The Encoders page appears.
NOTE: Deleting a Discovery will not delete the program generated or content imported in that discovery.RSS media imported via Discovery cannot be deleted if a program continues to point to it. Navigate to Programming > Programs and delete the program; then navigate to Programming > Content to find and delete the content item.
NOTE: For more information on program creation and encoder control, consult the Polycom VMC 1000 Broadcaster Guide.

Polycom VMC 1000 Administrator Guide Adding an RSS Device as an Encoder
110 Polycom, Inc.
2 Click Add. The Select Type wizard will appear. Select RSS 2000 Encoder or RSS 4000 Encoder from the list.
The respective configuration processes are detailed below.

Adding an RSS Device as an Encoder Using RSS Devices in the VMC 1000
Polycom, Inc. 111
RSS 2000 Encoder1 The Add Polycom RSS Encoder screen will appear.
2 Enter a Display Name and optional Description.
3 In the Host Name or IP Address field, enter the host name or IP address of the Polycom RSS device.
4 In the User ID field, enter the user login for authentication.
5 In the RSS Version drop-down menu, select which version of the Polycom RSS device you are using.
6 In the Password and Confirm Password fields, enter the password for authentication.
7 Check Use SSL for archive downloads.

Polycom VMC 1000 Administrator Guide Adding an RSS Device as an Encoder
112 Polycom, Inc.
8 Click the Add button in the Encoder Profile section. The Add Polycom RSS Encoder Profile window will appear.
9 Provide a Name for the encoder profile.
10 In the External URL field, enter the URL of the RSS output stream.
11 Provide an optional Description.
12 Choose a default Video Size from the drop-down menu, and enter the default Video Bit Rate for the encoder.
13 Enter a time value, in seconds, in the Call Startup Report Delay. This inserts a delay in the output from the encoder.
14 Select whether to Record H.239 Content. When selected, the Polycom VMC 1000 broadcasts H.239 content capture along with video from endpoints.
15 Click Save.
16 You will be returned to the Add Polycom RSS Encoder screen. Click Save again.

Adding an RSS Device as an Encoder Using RSS Devices in the VMC 1000
Polycom, Inc. 113
RSS 4000 Encoder1 The Add Polycom RSS 4000 Encoder screen will appear.
2 Enter a Display Name and optional Description.
3 In the Host Name or IP Address field, enter the host name or IP address of the Polycom RSS device.
4 In the User ID field, enter the user login for authentication.
5 In the Password and Confirm Password fields, enter the password for authentication.
6 Check Use SSL for archive downloads.
7 Specify a Max Number of Live Streams. This is a required field.

Polycom VMC 1000 Administrator Guide Adding an RSS Device as an Encoder
114 Polycom, Inc.
8 Click the Add button in the Encoder Profile section. The Add Polycom RSS 4000 Encoder Profile window will appear.
9 Provide a Name for the encoder profile.
10 In the External URL field, enter the URL by which output from the RSS device is accessed.
11 Provide an optional Description.
12 Click Save.
You will be returned to the Add Polycom RSS 4000 Encoder screen. Click Save again.
Creating Live Broadcast Programs with an RSS 4000 Encoder When a Polycom RSS 4000 device is designated as an encoder for a live broadcast program, a unique page will appear in program creation wizard.
You will need to specify a Host Name or IP address for the selected encoder, and designate the Recording Room you have established for Polycom VMC 1000 programs.

Troubleshooting and Caveats Using RSS Devices in the VMC 1000
Polycom, Inc. 115
Troubleshooting and Caveats
Discovery IngestsIf a discovery ingest has failed, a simple fix will allow you to perform the discovery again.
1 Navigate to System > Ingests.
2 If a given file associated with a discovery displays the status INGESTFAILED, then the content ingest from the discovery has failed. Record the name and time of this ingest.
3 Navigate to Programming > Polycom RSS Discovery.
4 Click the link under the Discoveries tab.
The Ad Hoc Discoveries List will appear.
5 Scroll through to locate the discovery associated with the file.
6 Check the box next to the discovery name and click Delete.
Click Confirm in the confirmation dialog that appears.
7 When the VMC polls the RSS device again, the file should be ingested as part of a new discovery.
Polycom RSS 2000 CaveatsThe following section details configuration requirements for the RSS 2000 integration with the VMC 1000.

Polycom VMC 1000 Administrator Guide Troubleshooting and Caveats
116 Polycom, Inc.
• To use the RSS 2000 as an encoder, ensure that you are using the RSS 2000 Version 4.0.0.005 657α. You can get this patch from Polycom Support by referencing JIRA Ticket ESCVMC-30.
• For the VMC to be able to dial out and record an E.164 number on an RMX bridge, the RSS 2000 device must be defined on the RMX.

Troubleshooting and Caveats Using RSS Devices in the VMC 1000
Polycom, Inc. 117
• The RSS 2000 does not support HD streaming. To disable:
— Log into the RSS 2000 Administration page. Navigate to Recording Setting > Single Point Settings.
— Ensure Enable 4CIF/4SIF/720P/1080P recording is not checked.
• The RSS 2000 does not support H.264 streaming. To disable:
— Navigate to System Configuration > System Settings.
— Ensure that Enable H.264 Content is not checked.

Polycom VMC 1000 Administrator Guide Troubleshooting and Caveats
118 Polycom, Inc.

Polycom, Inc. 119
8Exchange Discovery
This chapter explains how to configure the Polycom VMC 1000 to discover calendar events in Microsoft Exchange 2007 SP1. It contains the following sections:
• Using the Polycom Microsoft Outlook Plugin
• Exchange Discovery Configuration
Using the Polycom Microsoft Outlook PluginPolycom now offers a conference scheduling plug-in for Microsoft Outlook. This plug-in enables users to create a meeting invite in Outlook. This invite contains metadata that allows Polycom devices to automatically initiate a conference call to all participants using HDX devices or CMA Desktop.
To set the default settings for the Microsoft Outlook plugin:
1 Open Microsoft Outlook. Please note that you must already have the Polycom Outlook plugin installed.
2 Click the Schedule Polycom Conference tab in the Outlook toolbar.
3 A meeting invite will appear. Click Conference > Options.
NOTE: For more information on the Polycom Microsoft Outlook plugin, please consult the Polycom Scheduling Guide for Microsoft Outlook.
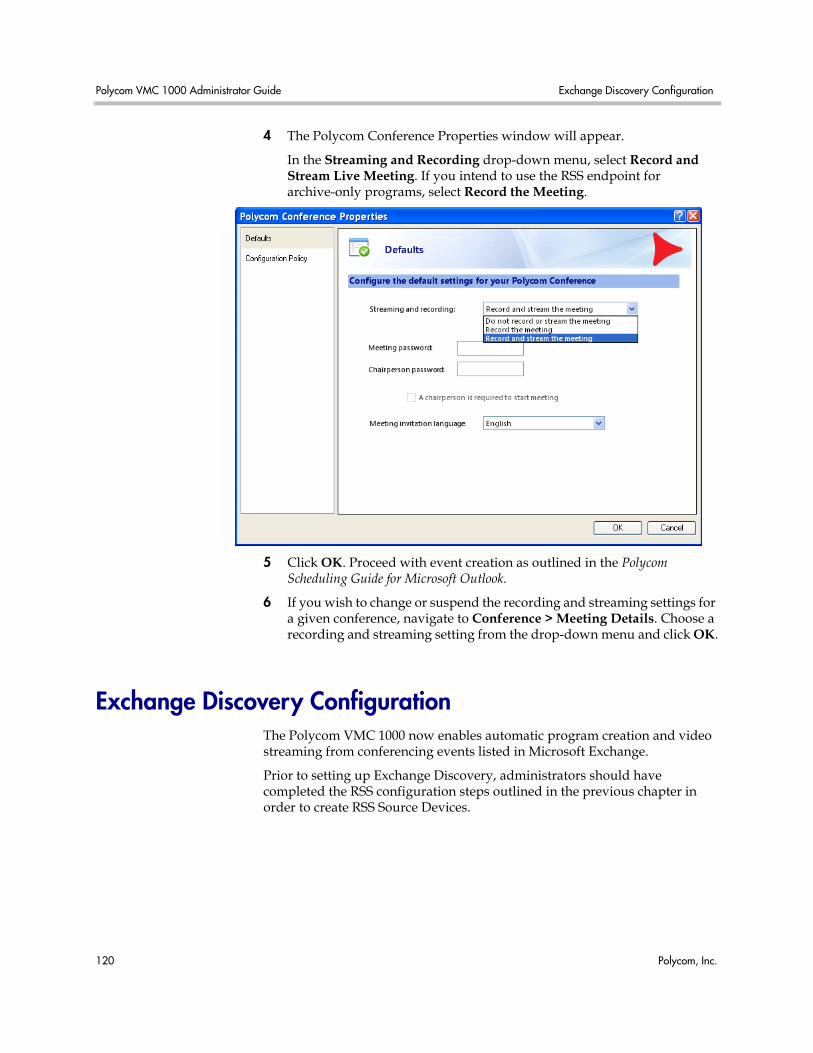
Polycom VMC 1000 Administrator Guide Exchange Discovery Configuration
120 Polycom, Inc.
4 The Polycom Conference Properties window will appear.
In the Streaming and Recording drop-down menu, select Record and Stream Live Meeting. If you intend to use the RSS endpoint for archive-only programs, select Record the Meeting.
5 Click OK. Proceed with event creation as outlined in the Polycom Scheduling Guide for Microsoft Outlook.
6 If you wish to change or suspend the recording and streaming settings for a given conference, navigate to Conference > Meeting Details. Choose a recording and streaming setting from the drop-down menu and click OK.
Exchange Discovery ConfigurationThe Polycom VMC 1000 now enables automatic program creation and video streaming from conferencing events listed in Microsoft Exchange.
Prior to setting up Exchange Discovery, administrators should have completed the RSS configuration steps outlined in the previous chapter in order to create RSS Source Devices.

Exchange Discovery Configuration Exchange Discovery
Polycom, Inc. 121
1 Log into the Polycom VMC 1000 Administrative Portal. Navigate to Programming > Calendar Discovery. The Exchange Discovery Configuration List will appear.
2 Click Add. The Exchange Configuration window will appear.
3 In the Exchange Server Connection Info section, enter the Display Name you wish to associate with the Exchange Server.
4 Provide the Exchange server IP address in the Exchange Host field.
5 Specify the Login name the Exchange server uses for authentication purposes. If necessary, enter and confirm the Password.
6 Under the Discovery Settings section, enter the Mailbox you wish to poll. This will be the mailbox commonly used by the various components of the Polycom VC2 solution, such as RSS devices, DMA, and RMX. The user credentials supplied above must have access to this mailbox.

Polycom VMC 1000 Administrator Guide Exchange Discovery Configuration
122 Polycom, Inc.
7 Enter a value (in days) in the Calendar View Window Size. This value determines how many days in advance the discovery service will poll calendar items.
8 Choose a master program from the drop-down lists for both Broadcasts and Archives. The template programs available follow the same rules as those that are available for mapping to RSS VRRs.
9 Select the Auto Publish Archive Programs if you wish to automatically create VOD programs from exchange calls. If this option is not selected, users will need to manually create Programs before they can appear on the Viewer Portal.
10 Click Submit.
Reviewing Exchange DiscoveriesIndividual discoveries and their associated programs can be reviewed by accessing the Exchange Discoveries list.
Using and reviewing the Exchange Discoveries list:
1 Navigate to Programming > Calendar Discovery.
2 Click the link in the Discoveries column for the mailbox you wish to review. The Exchange Discoveries List will appear.
3 To manually perform a discovery poll of the Exchange server, click Call.
4 To delete an individual discovery, select the checkbox next to that discovery.
Meetings that occur in the future or the current day will be rediscovered after deletion. Meetings scheduled in the past will not be found again by

Exchange Discovery Configuration Exchange Discovery
Polycom, Inc. 123
the discovery service. The Polycom VMC 1000 only polls from the start of the day to the send period specified by the Calendar View Window.
5 To access an individual program automatically created by the discovery service, click on the Broadcast Program or Archive Program icons, depending on availability.
The program listing will then appear. If you wish to change the program’s parameters from the defaults established by the program templates selected above, you can do so now. Click Finish when completed.
NOTE: Deleting a Discovery will not delete the program generated or content imported in that discovery.RSS media imported via Discovery cannot be deleted if a program continues to point to it. Navigate to Programming > Programs and delete the program; then navigate to Programming > Content to find and delete the content item.
NOTE: For more information about managing live broadcasts and program creation, please consult the Polycom VMC 1000 Broadcaster Guide.

Polycom VMC 1000 Administrator Guide Exchange Discovery Configuration
124 Polycom, Inc.

Polycom, Inc. 125
9Distributing Content
This chapter explains how you can distribute content from the Polycom VMC 1000 using distribution systems and proximity services.
This chapter contains the following sections:
• About Content Distribution Systems
• Outlets
• Content Storage Options
• About Audiences
About Content Distribution SystemsThe Polycom VMC 1000 supports the ability to actively distribute content across CDNs. Video and static HTTP content can be pushed to the edge of the network based on publishing rules of the programs that use the content. It can also distribute live streams across a network of Microsoft Windows Media Servers using the Video Edge distribution appliance.

Polycom VMC 1000 Administrator Guide About Content Distribution Systems
126 Polycom, Inc.
In order to be able to communicate with these Distribution Systems, they must be registered with the Polycom VMC 1000. For Blue Coat and Video Edge, the Distribution System must be defined before you create a corresponding CDN. For Cisco, the connection credentials are defined at time of CDN creation, and a Distribution System is created automatically. A Distribution system will be displayed for each Cisco or Blue Coat CDN created.
Because Video Edge appliances are configured from the Polycom VMC 1000, additional steps are required. Please consult the Video Edge product documentation.
Delivery Options are accessed from the System section of the Polycom VMC 1000 Administrative Portal. The list page allows you to add, edit or delete distribution systems, view status information, view outlets defined by the CDN, and also access the administrative home page of a CDN, if the vendor provides one.
Adding an HTTP Server
To add an HTTP Server Delivery Option:
1 Navigate to Delivery > Delivery Options.
2 Click the Add button.
3 Select HTTP Server from the context menu.
4 Specify a Delivery Option Name. Provide an optional description.
5 Specify a Host name or IP address.
6 The default port value should be 80.

About Content Distribution Systems Distributing Content
Polycom, Inc. 127
7 Indicate whether you want to use a secure connection.
Adding an HTTP Access Point
To add an HTTP Access Point:
1 From within an HTTP Server setup screen, click the Add button.
2 Select Download from the context menu.
3 Specify an Access Point Name.
4 Specify a Mount Point.

Polycom VMC 1000 Administrator Guide About Content Distribution Systems
128 Polycom, Inc.
5 Specify a Storage location.
Adding a Windows Media ServerThe Polycom VMC 1000 appliance ships with a preconfigured Windows Media Server Delivery Option by default. To add a new Windows Media Server Delivery Option, follow the steps below.
To add a Windows Media Server Delivery Option:
1 Navigate to Delivery > Delivery Options.
2 Click the Add button
3 Select Windows Media Server from the context menu
4 Specify a Delivery Option Name
5 Specify a Host name or IP address
6 Designate the Windows Media Server role (Edge, Origin, Any)
7 Specify the protocols to be supported and, for RTSP and HTTP, the ports to be used.
8 If the Server Control Agent Web Service is installed on the server, specify:
a Web Service Username - If web server authentication is required
b Web Service Password - If web server authentication is required
c Web Service Port
Note: HTTP is required for Silverlight and consequently for full functioning of the VMC 2.0 Viewer Portal.

About Content Distribution Systems Distributing Content
Polycom, Inc. 129
d Service Path - default is /WMSControl/Service.asmx
9 Click the Finish button and proceed to add an Access Point.
Adding a Windows Media Server Live Access Point
To add a Live Access Point Delivery Option:
1 From within a Windows Media Server setup screen, click the Add button.

Polycom VMC 1000 Administrator Guide About Content Distribution Systems
130 Polycom, Inc.
2 Select Live from the context menu.
3 Specify an Access Point Name.
4 Choose whether to use a Dynamic Publishing Point.
If selected, the value specified in the Publishing Point field is assigned to a Dynamic publishing point. If it is not selected, then the Polycom VMC 1000 assumes a manually-created Publishing Point exists on the WMS. In either case, you should specify a Publishing Point in the Publishing Point field.
5 Specify the Rebroadcast, Archiving, Unicast, and Multicast properties.
6 Click Save.
Note: When designating a multicast range, provide a comma-separated range.
Note: The Publishing Point name must be one word (or multiple words connected by hyphens or underscores).
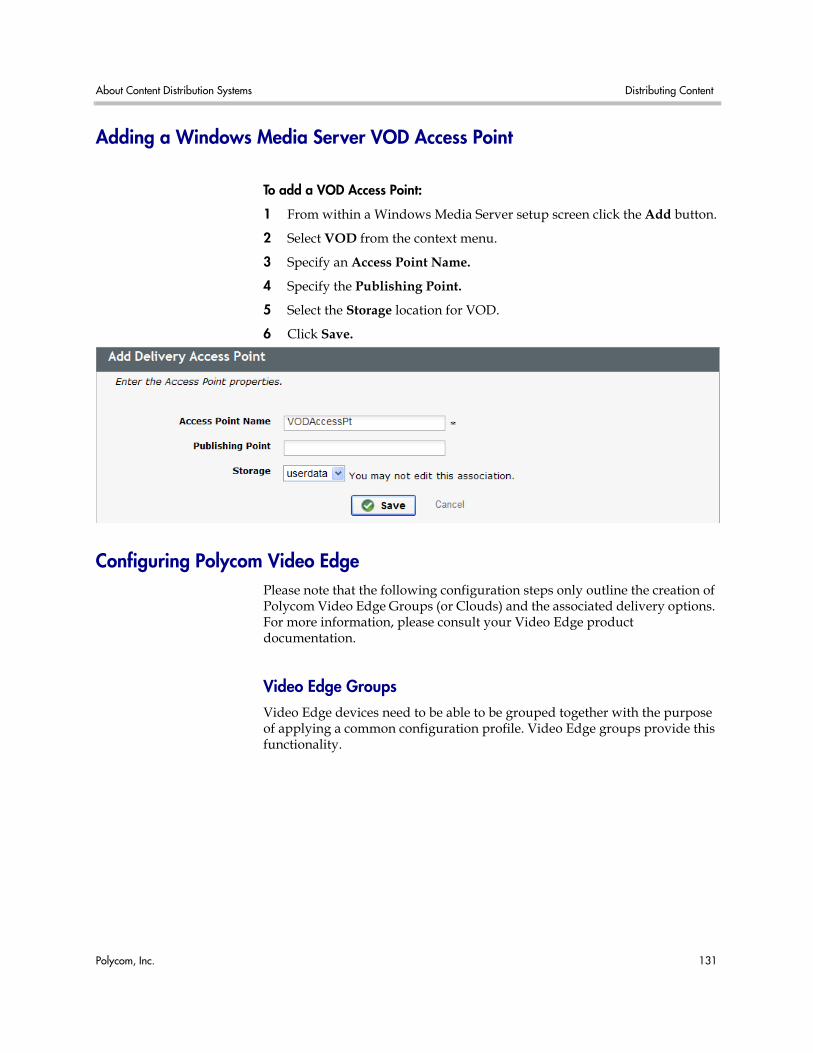
About Content Distribution Systems Distributing Content
Polycom, Inc. 131
Adding a Windows Media Server VOD Access Point
To add a VOD Access Point:
1 From within a Windows Media Server setup screen click the Add button.
2 Select VOD from the context menu.
3 Specify an Access Point Name.
4 Specify the Publishing Point.
5 Select the Storage location for VOD.
6 Click Save.
Configuring Polycom Video EdgePlease note that the following configuration steps only outline the creation of Polycom Video Edge Groups (or Clouds) and the associated delivery options. For more information, please consult your Video Edge product documentation.
Video Edge GroupsVideo Edge devices need to be able to be grouped together with the purpose of applying a common configuration profile. Video Edge groups provide this functionality.

Polycom VMC 1000 Administrator Guide About Content Distribution Systems
132 Polycom, Inc.
To set up a Video Edge group:
1 Navigate to Delivery > Video Edge Groups. The Video Edge Device Groups menu should appear. Any extant groups will appear in the menu.
2 Click Add. The Add Group screen should appear.
3 Provide a Device Group Name.
4 The list of configured Video Edge devices should appear in the lefthand column; select which devices you wish to enroll in the group and click the rightward arrow.
5 Choose a Profile for Edge Device. This configuration profile will apply to all devices enrolled in this group.
6 If you wish to add Live Distribution Nodes to the group, enroll them from the available device list. Designate a profile for these devices.

About Content Distribution Systems Distributing Content
Polycom, Inc. 133
7 Click Save.
Adding a Video Edge Delivery Option in the Polycom VMC 1000In order for content distribution to occur, a Video Edge Delivery Option must be set up and made active within the Polycom VMC 1000. The delivery option is the final step and overarching level of administrator control over delivery processes.
Delivery options must be set up with Video Edge Groups. A single device can constitute a group and consequently a delivery option. For larger enterprise video deployments, however, Video Edge clouds can be configured.
To add a Video Edge cloud as a delivery option:
1 Log into the Polycom VMC 1000 Administrative Portal. Navigate to Delivery > Delivery Options.
2 Click Add. Select Video Edge Cloud from the context menu.
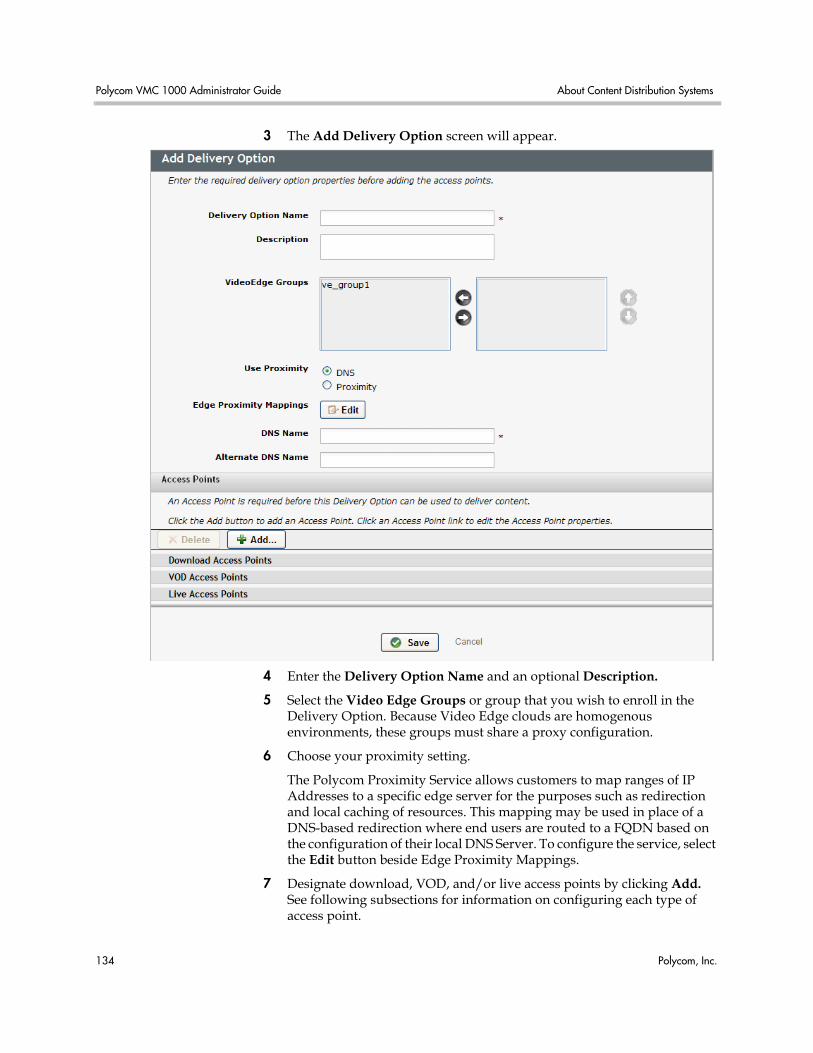
Polycom VMC 1000 Administrator Guide About Content Distribution Systems
134 Polycom, Inc.
3 The Add Delivery Option screen will appear.
4 Enter the Delivery Option Name and an optional Description.
5 Select the Video Edge Groups or group that you wish to enroll in the Delivery Option. Because Video Edge clouds are homogenous environments, these groups must share a proxy configuration.
6 Choose your proximity setting.
The Polycom Proximity Service allows customers to map ranges of IP Addresses to a specific edge server for the purposes such as redirection and local caching of resources. This mapping may be used in place of a DNS-based redirection where end users are routed to a FQDN based on the configuration of their local DNS Server. To configure the service, select the Edit button beside Edge Proximity Mappings.
7 Designate download, VOD, and/or live access points by clicking Add. See following subsections for information on configuring each type of access point.

About Content Distribution Systems Distributing Content
Polycom, Inc. 135
8 Click Save.
To add a download access point:
1 Select Download from the context menu. The Add Delivery Access Point screen will appear.
2 Enter the Access Point Name.
3 Choose a Server from the dropdown list.
4 Designate the Access Point of Origin.
5 Click Save.
To add a VOD access point:
1 Select VOD from the context menu. The Add Delivery Access Point screen will appear.
2 Enter the Access Point Name.
3 Choose a Format from the drop-down menu.
4 Choose a Server from the drop-down menu.
5 Designate the Access Point of Origin.
6 Click Save.
To add a Live access point:
1 Select Live from the context menu. The Add Delivery Access Point screen will appear.
2 Enter the Access Point Name.
3 Select a Format from the drop-down menu.
4 Select the Origin Servers.
5 Designate Playlist Customization.
6 Designate an Edge Provisioning Requirement.
7 Detail Edge Server-Side Playlist Customization.
8 Select Encoder Location.
Adding a Blue Coat Delivery Option
To add a Blue Coat delivery option:
1 Navigate to Delivery > Delivery Options.

Polycom VMC 1000 Administrator Guide About Content Distribution Systems
136 Polycom, Inc.
2 Click the Add button.
3 Select Blue Coat from the context menu.
4 Fill in the DS Type form as follows:
BlueCoat Distribution System
Field Definition
Delivery Option Name This is how the Distribution System will be identified within the Polycom VMC 1000. The name is arbitrary.
Description An optional description of the delivery option.
Host Server Host is host name of the Blue Coat Director.
Reload Frequency Time interval between validations of the manifest

About Content Distribution Systems Distributing Content
Polycom, Inc. 137
5 Once the form is completed, click Save.
Adding an Access Point for a Blue Coat Delivery Option
To add an access point for a Blue Coat DS:
1 Click the Add button.
2 From the context menu, select Live, VOD, or Download.
3 For Live:
a Specify an Access Point Name.
b Select a video Format.
c Select a Source Stream:
» If using an existing publishing point, specify the Live URL.
» If using a source Delivery Option, select the Server and Access Point of Origin.
d Select one of the Multicast Setup options. If required, specify the Multicast Address, Port, and TTL.
e Select whether you wish to support Unicast rollover from the Blue Coat Edge, Origin Streaming Server, or from an Optional Custom URL.
4 For VOD:
a Specify an Access Point Name.
b Select a video Format from the drop-down list.
c Select a Server from the drop-down list.
d Select the Access Point of Origin from the drop-down list.
e Select the Channel(s).
Username The login name of the user to access the Blue Coat Director.
Password The password for the login account specified above.
Passwordfor Enable Mode
The password for the login account specified above to enable Administrative mode.
Use Proximity Specify if Proximity Services or DNS Redirection is to be used.
BlueCoat Distribution System
Field Definition
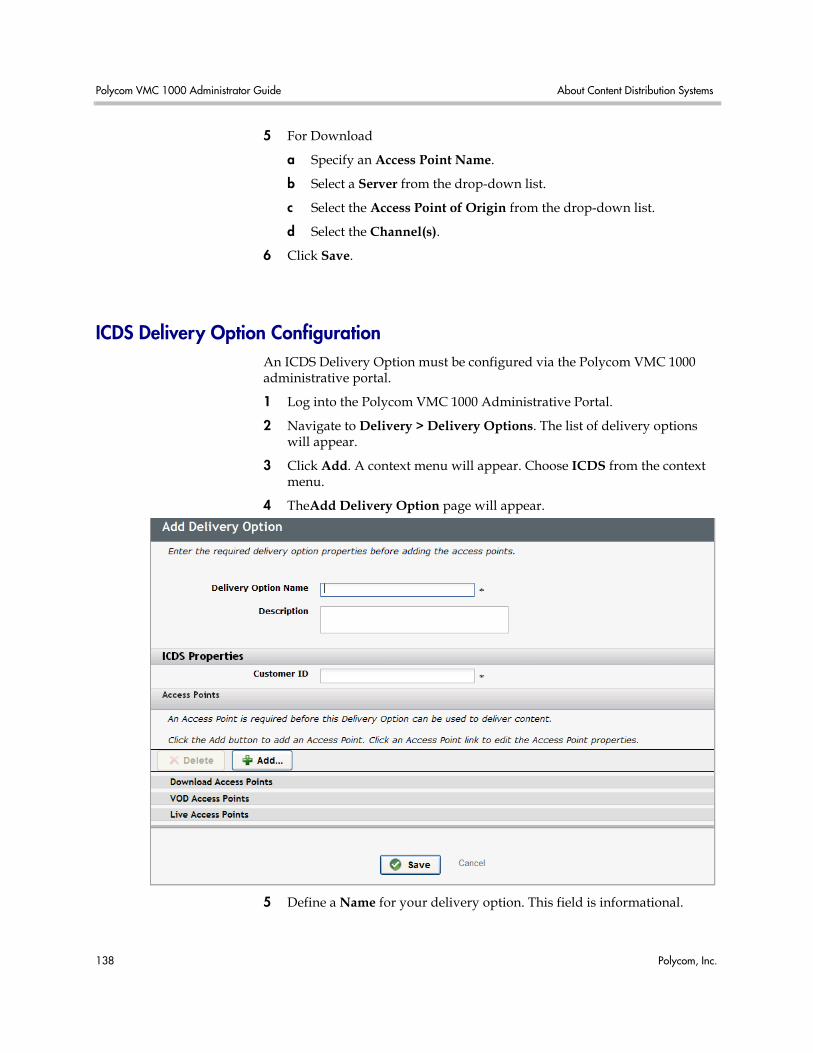
Polycom VMC 1000 Administrator Guide About Content Distribution Systems
138 Polycom, Inc.
5 For Download
a Specify an Access Point Name.
b Select a Server from the drop-down list.
c Select the Access Point of Origin from the drop-down list.
d Select the Channel(s).
6 Click Save.
ICDS Delivery Option ConfigurationAn ICDS Delivery Option must be configured via the Polycom VMC 1000 administrative portal.
1 Log into the Polycom VMC 1000 Administrative Portal.
2 Navigate to Delivery > Delivery Options. The list of delivery options will appear.
3 Click Add. A context menu will appear. Choose ICDS from the context menu.
4 TheAdd Delivery Option page will appear.
5 Define a Name for your delivery option. This field is informational.

About Content Distribution Systems Distributing Content
Polycom, Inc. 139
6 Define a Customer ID. The Customer ID is provided by ICDS and is essential for proper functioning of the Delivery Option. The Customer ID can be found in the ICDS portal.
7 You can now add access points as necessary. When all access points have been added, click Save.
Download Access Point ConfigurationA Download access point provides download access to files stored within a single storage option in the Polycom VMC 1000 system.
Before creating a download access point, a HTTP caching site must exist within the ICDS system. An access point with role "HTTP Distribution" must exist for the storage option that should be exposed through ICDS.
To add a Download Access Point:
1 Click Add in the Access Points region of the Add/Edit Delivery Option page. The Select Type context menu will appear.
2 Choose Download from the context menu.
3 Provide a Name for the download access point.
4 Define a Storage Option for the Access Point. Each Download Access Point is assigned to a unique storage. It can only serve content from this storage.
5 Select a Protocol.
6 Provide a Host Name. This is the host name to write in to URLs generated from this access point. You can determine this from your ICDS site configuration, or any DNS alias you have created for the ICDS provided host name.
7 Select whether to Use Secure Token. Whether to use the ICDS Secure Token mechanism to authenticate users ability to download content. If enabled requires that the storage access point defined uses the string ‘1cdss3c’ as the name for one of its path elements.
8 If using a secure token, provide a Token Validity Window.
VOD Access Point ConfigurationA VOD access point provides streaming access to Windows Media or Flash files stored within a single storage option in the Polycom VMC 1000 system.
To add a VOD Access Point:
1 Click Add in the Access Points region of the Add/Edit Delivery Option page. The Select Type context menu will appear.
2 Choose VOD from the context menu.
3 Provide a Name for the access point.

Polycom VMC 1000 Administrator Guide About Content Distribution Systems
140 Polycom, Inc.
4 Provide a Host Name. This is the ICDS-supplied host name used for URL generation.
5 Choose a Format, depending on whether you intend to use the access point for Windows Media or Flash video files.
6 Dictate an Origin Server Mode. If you wish to use an AT&T-provided server to originate your content, choose Network origin.
If your ICDS streaming site is configured to fetch content from a server on your premises, choose Customer origin.
7 If you have chosen Customer origin:
a Designate the COS Site ID. This the ICDS-assigned ID for the customer origin server.
b Designate the COS Origin Server Path. This is an optional path on the origin server, inserted into the URL.
8 If you have chosen Network origin:
a Provide the FTP Host. This is the SFTP host to which content is distributed.
b Provide the FTP Login/Password. These are the SFTP credentials to use when distributing content if using network origin servers.
9 Designate the ICDS Site ID.
10 Designate the Volume. This is the ICDS-supplied storage volume. This is the first component of the ICDS-provided URL for a VOD site, and typically looks like ‘v1’ or v5.’
11 Choose whether or not to Use Secure Token. This indicates whether or not to use the ICDS Secure Token mechanism to authenticate users’ ability to stream content. If enabled, requires that any customer origin server use the string ‘lcdss3c’ as the name for one of its path elements. Network origin servers will automatically create the proper path element.
12 If using a secure token, provide a Token Validity Window.
Live Access Point ConfigurationA Live Access Point provides streaming access to Windows Media or Flash webcasts. Before a Live Access Point is created in the Polycom VMC 1000, a webcast corresponding to the Live Access Point must be created in the ICDS portal.

About Content Distribution Systems Distributing Content
Polycom, Inc. 141
ICDS Webcast ConfigurationA Live Access Point corresponds to a single webcast in the ICDS portal. Each webcast in the ICDS portal must be configured as a 24x7 broadcast, and can be reused for multiple broadcasts within the Polycom VMC 1000 system. You should create as many webcasts and Live Access Points as you expect simultaneous broadcasts.
If the webcast is a Flash webcast, the webcast must be created as a Flash live webcast. ICDS will provide a primary and backup push host in this case.
If the broadcast is a Window Media format broadcast, the webcast must be created as a WMT Encoder, WMT Dual Encoder, or WMS Remote Publishing Point. Note that WMS Dual Remote Publishing Point is not supported. This can be simulated by using multiple webcasts in conjunction, one per origin access point.
The following table describes the functionality provided by each option:

Polycom VMC 1000 Administrator Guide About Content Distribution Systems
142 Polycom, Inc.
Access Point ConfigurationAfter configuring a webcast in ICDS, a Live Access Point must be created. To add a Live Access Point:
1 Click Add in the Access Points region of the Add/Edit Delivery Option page. The Select Type context menu will appear.
2 Choose Live from the context menu.
3 Provide a Name for the access point.
Webcast Type Provisioning Remarks
WMT Encoder None For Encoder webcasts, the Polycom VMC 1000 will perform no provisioning. The webcast should be configured to permanently pull from an encoder controlled by the VMC 1000 such that ICDS can ingest the stream when the VMC 1000 starts the encoder as part of a broadcast. A single primary stream should be specified in the access point configuration.
Dual WMT Encoder None For Dual Encoder webcasts, the Polycom VMC 1000 will perform no provisioning. The webcast should be configured to permanently pull from two encoders controlled by Polycom VMC 1000 such that ICDS can ingest the stream from both encoders when Polycom VMC 1000 starts the encoder as part of a broadcast. A primary and backup stream should be specified in the ICDS configuration.
WMS Remote Publishing Point
Origin Delivery For Remote Publishing Point broadcasts, the Polycom VMC 1000 will provision a customer-provided origin server. This origin server must be configured within the Polycom VMC 1000 system as a Windows Media delivery option with at least one static publishing point. At broadcast time, the publishing point on the origin WMS server will be dynamically provisioned to pull from the encoder serving the broadcast. The ICDS webcast should be configured to pull from the origin publishing point, and hence during a particular broadcast will pull indirectly from the encoder assigned to the broadcast.

About Content Distribution Systems Distributing Content
Polycom, Inc. 143
4 Provide a Host Name. This is the ICDS-supplied host name used for URL generation.
5 Choose a Format, depending on whether you intend to use the access point for Windows Media or Flash streams.
6 If you chose Windows Media in Step 5:
a Designate a Windows Media Provisioning Mode. If using an ICDS stream mapped directly to an encoder, no provisioning is required. If using an origin server, the origin must be provisioned to serve a stream from the encoders in use.
b Designate a WM Origin Server. This is the Windows Media delivery option used as an origin server. This delivery option must have a static publishing point available; the ICDS webcast should have been configured to source from this publishing point.
c Designate a WM Origin Access Point. This is the static publishing point described above.
7 If you chose Flash in Step 5:
a Designate the Flash Primary Push Server.
b Designate the Flash Backup Push Server.
8 Provide the Primary Stream Name. This is the ICDS-supplied name of the webcast primary stream. This is generally of the form ‘<siteID>_<webcastID>_<streamnumber>.asf.’ This information is provided in the ICDS portal user interface.
9 Provide the Backup Stream Name. This is the ICDS-supplied name of the webcast backup stream, if used. This is generally of the form ‘<siteID>_<webcastID>_<streamnumber>.asf.’ This information is provided in the ICDS portal user interface.
10 Choose whether or not to Use Secure Token. This indicates whether or not to use the ICDS Secure Token mechanism to authenticate users’ ability to stream content.
If using a secure token, provide a Token Validity Window.
Adding a Cisco Delivery Option
To add a Cisco Delivery Option:
1 Navigate to Delivery > Delivery Options.
2 Click the Add button.
3 Select Cisco from the context menu.
4 Specify a Delivery Option Name.
5 Specify an optional Description.

Polycom VMC 1000 Administrator Guide About Content Distribution Systems
144 Polycom, Inc.
6 Dictate a Reload Frequency, in minutes.
7 Specify if Content Router Redirection is used.
8 Check the No Redirect to Origin box if appropriate.
9 Specify the Cisco Host Name or IP Address and Port in the Connection URL field.
10 Designate whether the Cisco Delivery Option uses the ACNS or CDS Dialect.
11 Specify the Cisco Username and Password
12 Click Save.
Adding an Access Point for a Cisco Delivery Option
To add a access point for a Cisco CDS:
1 Click the Add button
2 From the context menu select Live, VOD, or Download
3 For Live:
a Specify an Access Point Name.
b Select a video Format.
About Content Distribution Systems Distributing Content
Polycom, Inc. 145
c Select a Server.
d Select the Access Point of the Origin.
e Select Unicast and/or Multicast.
f Select the appropriate live Channels.
4 For VOD:
a Specify an Access Point Name.
b Choose a Format.
c Select a Server.
d Select the Access Point of Origin.
e Select the Channel(s).
5 For Download:
a Specify an Access Point Name.
b Select a video Format.
c Select a Server.
d Select the Access Point of Origin.
e Select the Channel(s).
6 Click Save.

Polycom VMC 1000 Administrator Guide About Content Distribution Systems
146 Polycom, Inc.
Adding a Flash Delivery OptionFlash Server configuration for VOD is done through the Flash Delivery Option:
To add a Flash Delivery Option:
1 Click Delivery.
2 Click Delivery Options.
3 Click the Add button.
4 Select Flash Server from the context menu.
5 Specify a Delivery Option Name.
6 Specify an optional Description.
7 Specify the Flash Server Host Name or IP address
8 Specify the Flash Server Port
Adding an Access Point for a Flash Delivery Option
To add an access point for a Flash Delivery Option:
1 Click the Add button.
2 From the context menu select VOD.
3 Specify an Access Point Name.
4 Specify the Flash Server Mount Point.
5 Select the Storage location to use.
6 Click Save.

About Content Distribution Systems Distributing Content
Polycom, Inc. 147
Adding a Configured URL Delivery OptionThe Configured URL delivery option can be used to support Flash Server for live broadcasts.
To add a Configured URL Delivery Option:
1 Navigate to Delivery > Delivery Options.
2 Click the Add button.
3 Select Configured URL from the context menu.
4 Specify a Delivery Option Name.
5 Specify an optional Description.
Adding an Access Point for a Configured URL Delivery Option
To add a Download access point for a Configured URL Delivery Option:
1 Click the Add button.
2 From the context menu select Download.
3 Specify an Access Point Name.
4 Specify a URL.
5 Click Save.
To add a VOD access point for a Configured URL Delivery Option:
1 Click the Add button.
2 From the context menu select VOD.
3 Specify an Access Point Name.
4 Select the video Format.
5 Specify a URL.
6 Click Save.
To add a Live access point for a Configured URL Delivery Option:
1 Click the Add button.
2 From the context menu select VOD.
3 Specify an Access Point Name.
4 Select the video Format.

Polycom VMC 1000 Administrator Guide About Content Distribution Systems
148 Polycom, Inc.
5 Specify a URL.
6 Click Save.
Adding a MediaNet Delivery OptionMediaNet is a scalable, automated webcasting infrastructure that enables organizations to quickly deploy a enterprise video communications platform that delivers secure, live and on-demand business video to thousands of desktops around the world.
To add a MediaNet Delivery Option:
1 Navigate to Delivery > Delivery Options.
2 Click the Add button.
3 Select MediaNet from the context menu.
4 Provide a name for your MediaNet Distribution System.
5 Select Origin Servers and Edge Servers highlighting the appropriate server and using the right arrow icon. Conversely, de-select the servers by using the left arrow icon.
6 Click Edit to modify Edge Proximity Settings.
Note: if you use DNS for Edge Selection for MediaNet, when configuring each Windows Media Server the NSC Host field must be left blank and named live publishing points are not supported.
7 Click Save.
Adding a MediaNet Failover Delivery OptionMediaNet supports designating a failover delivery option.
To add a MediaNet Failover Delivery Option:
1 Navigate to Delivery > Delivery Options.
2 Click the Add button.
3 Select MediaNet Failover from the context menu.
4 Provide a Name for your MediaNet Failover Delivery Option, and an option Description.
5 Choose a Server Role from the drop-down menu.
6 Designate whether All or At least one server will be provisioned.

About Content Distribution Systems Distributing Content
Polycom, Inc. 149
7 Select Delivery Options, highlighting the appropriate server and using the right arrow icon. Conversely, de-select the servers by using the left arrow icon.
8 Click Save.
Adding an Akamai Delivery Option
Creating an Akamai Live StreamYou must create lives streams in Akamai prior to using push encoders in the Polycom VMC 1000 for a Live Broadcast. You create live streams using the Akamai EdgeControl UI. Before you can create an existing Akamai stream, you must contact them to get an account.
Once a push live stream is created, Akamai sends a notification email to the creator with the stream parameters. These parameters can also be referenced by means of the Akamai GUI. The Polycom VMC 1000 configuration requires the "Entry Point" and "Port" values to create an encoder profile for a ViewCast encoder.
To create an Akamai Stream:
1 Once you get an account, go to: https://control.akamai.com/EdgeAuth/login.jsp.

Polycom VMC 1000 Administrator Guide About Content Distribution Systems
150 Polycom, Inc.
2 Log in with the username and password provided by Akamai.
Got to Live Streams > Manage Streams.
3 On the Live Stream properties page set the Encoder Type field to “Push.”
Although a value for Encoder IP is required, it does not have to be the IP of the encoder since the encoder most likely resides behind a firewall. However, you must provide another "pingable" IP.
Once you create a push Live Stream, Akamai sends a notification email to with the stream parameters.
4 These parameters can also be referenced by means of the Akamai GUI. The "Entry Point" and "Port" values are required to create an encoder profile in the ViewCast encoder.
Setting Up Credentials for An Akamai CDNIn order to push a WMS stream to an Akamai ingest point, Akamai requires a special "Push User" account. These accounts differ from the Akamai EdgeControl user accounts.

About Content Distribution Systems Distributing Content
Polycom, Inc. 151
To setup a Akamai push user account:
1 From the Akamai UI, select the WMS Push Users option.
This option is in a drop-down list located in the upper right corner of the Manage Streams page.
ViewCast SCX encoder profiles utilize the "Push Accounts" in order to push a WMS stream to an Akamai ingest point.
Adding an Akamai CDN to Polycom
To add an Akamai Delivery Option:
1 Click Delivery.
2 Click Delivery Options.
3 Click the Add button.
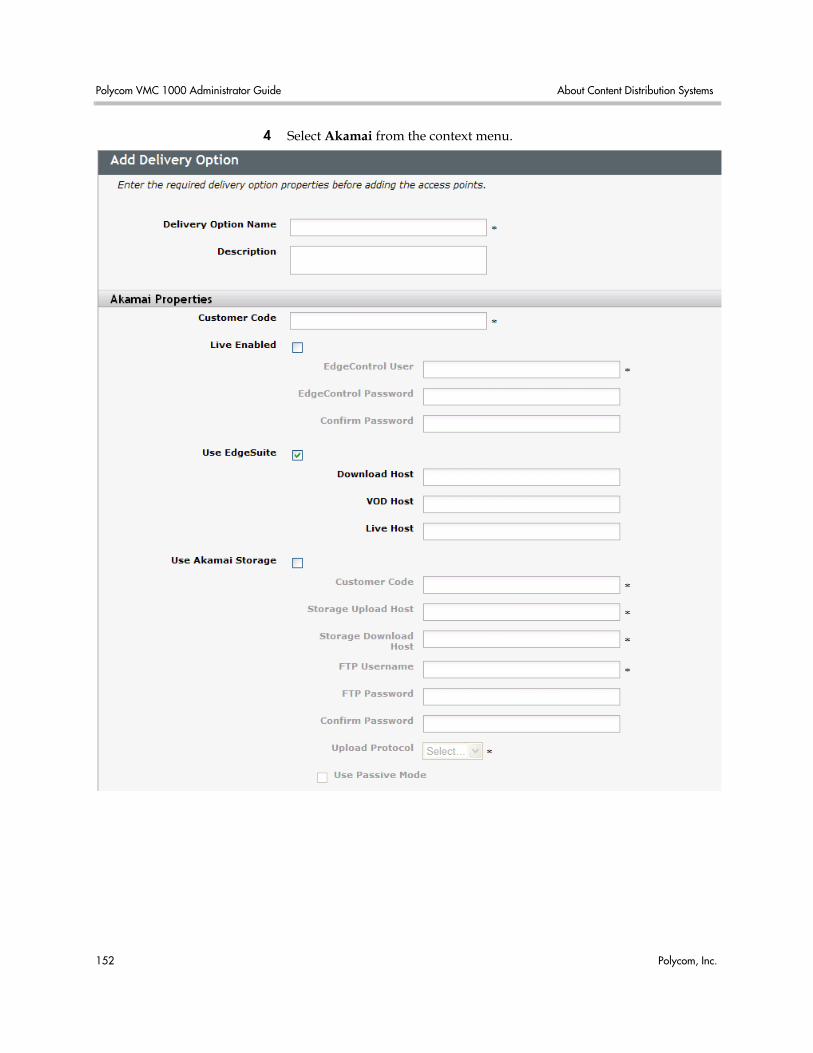
Polycom VMC 1000 Administrator Guide About Content Distribution Systems
152 Polycom, Inc.
4 Select Akamai from the context menu.

About Content Distribution Systems Distributing Content
Polycom, Inc. 153
5 Use the following table to fill out the properties for the Akamai Streaming page.
Field Definition
Delivery Display Name The name that will identify this set of configuration values for the delivery option within the domain.
Customer Code The Akamai CP Code designated for this domain.
Service Type The type of Akamai service you are using: EdgeSuite or FreeFlow.
Live Enabled Check this box if the Akamai Delivery Option will be used for live broadcasts.
EdgeControl User Your User ID for logging into EdgeControl.
EdgeControl Password Your password for logging into EdgeControl.
Confirm Password Confirm your password for logging into EdgeControl.
Use EdgeSuite Check this box if the EdgeSuite service from Akamai will be used.
Download Host Domain (Host) Name used by Akamai EdgeSuite for directing HTTP requests to the optimal Akamai edge. Example:images.mydomain.comRequires configuration on the Akamai side. Not used in FreeFlow.
VOD Host Domain (Host) Name used by Akamai EdgeSuite for directing VOD requests to the optimal Akamai edge. Example:images.mydomain.comRequires configuration on the Akamai side. Not used in FreeFlow.
Live Host Domain (Host) Name used by Akamai EdgeSuite for directing Live content requests to the optimal Akamai edge. Example:images.mydomain.comRequires configuration on the Akamai side. Not used in FreeFlow.
Use Akamai Storage Determines if Akamai storage will be used when generating URLs.

Polycom VMC 1000 Administrator Guide About Content Distribution Systems
154 Polycom, Inc.
Customer Code The Akamai customer code designated for this domain.
Storage Upload Host The host to use when uploading files to Akamai storage for this domain (typically custname.upload.akamai.com).
Storage Download Host The host to use when uploading files to Akamai storage for this domain (typically custname.download.akamai.com).
FTP Username The user name to use when uploading files to Akamai storage for this domain.
FTP Password The password to use when uploading files to Akamai storage for this domain.
Confirm FTP Password Confirm the password to use when uploading files to Akamai storage for this domain.
Upload Protocol Select FTP in this field. SFTP is not currently supported.
Use Passive Mode Flag indicating whether to use FTP in passive mode.
Use Secure Streaming? Determines whether to use secure streaming for delivery..
Akamai Token Type Determines type of Akamai token (C or D) to use for authentication.
Token Fields Designates which fields are supplied by the token. Select all but IP address.
Token Password Designates the password for the token.
Confirm Token Password Confirms the password for the token.
Token Profile Assigns a profile to the Akamai token. Should be the same name as the secure domain directory profile name in Akamai.
Token Fingerprint Assigns a fingerprint to the Akamai token. Must be changed if secure domain directory in Akamai changes.
Token Validity Window Indicates time (in seconds) for token validation. 60 is suggested value.
Field Definition

About Content Distribution Systems Distributing Content
Polycom, Inc. 155
Adding an Access Point for an Akamai Delivery Option
To add a Download access point for an Akamai DS:
1 Click the Add button.
2 From the context menu select Download
3 Specify an Access Point Name.
4 Select the Storage location to use.
5 Click Save.
To add a VOD access point for an Akamai DS:
1 Click the Add button.
2 From the context menu select VOD.
3 Specify an Access Point Name.
4 Select the Storage location to use.
5 Click Save.
To add a Live access point for an Akamai DS:
1 Click the Add button.
2 From the context menu select Live.
3 Specify an Access Point Name.
4 Select a Primary Akamai Stream (the Stream Name, Port, and Entry Point will automatically populate).
5 Select a Secondary Akamai Stream (the Stream Name, Port, and Entry Point will automatically populate).
6 If Rebroadcasts are to be enabled, check the box and specify a Source Delivery Option.
7 If Push is to be enabled, check the box and specify a Push Username and Password.
8 Click Save.
NOTE: Contrary to some Akamai documentation, not all Akamai secure streams start with “6.” Contact Akamai for more information.

Polycom VMC 1000 Administrator Guide Outlets
156 Polycom, Inc.
Editing a Delivery Option
To edit a distribution system:
1 Click Delivery.
2 Click Delivery Options.
3 Click the name of the Distribution System you wish to edit.
4 Fill in the required connection information.
5 Click Save.
Deleting a Distribution System
To delete a distribution system:
1 Click Delivery.
2 Click Delivery Options.
3 Check the box(es) for the Distribution System(s) you wish to delete
4 Click the Delete button
OutletsWhen using active distribution as the delivery method for a program, outlets are the distribution targets that the content items are pushed to. In Cisco ACNS, these targets are called Channels.
From the Distribution Systems listing page, each available Distribution System has an Outlets icon. Clicking this icon will direct you to a page that lists all outlets known by this distribution. For all Distribution systems other than MediaNet or Blue Coat Distribution Systems, for each outlet you have the ability to View the manifest or force a Write of that manifest.
You also have the ability to Write All manifests. Clicking Reload will cause the Distribution System to reload and present the most up-to-date information to Polycom VMC 1000.

Proximity Services Distributing Content
Polycom, Inc. 157
Proximity ServicesThe Polycom Proximity Service allows customers to map ranges of IP Addresses to a specific edge server for the purposes such as redirection and local caching of resources. This mapping may be used in place of a DNS based redirection where end users are routed to a FQDN based on the configuration of their local DNS Server.
Polycom VMC 1000 Delivery Options may be configured to use the Proximity Service when generating URLs to content for a particular end user. The Proximity Service will be given the end user’s remote host as specified in the header of their requests to the Polycom VMC 1000 for content. The Proximity Service will then select the host to which the user will be redirected to obtain the content they have selected.
The Proximity Service is configured by System Level users of the Polycom VMC 1000 appliance (such as the default “Super User” account Administrator/polycom). To configure the service, select the Edit button from the delivery option configuration screen.
Configuring Proximity Services
To configure proximity services:
1 From the delivery option configuration screen, click the Edit button for Edge Proximity Mappings.
2 Select an Edge Server.
3 Click the Add button.

Polycom VMC 1000 Administrator Guide Content Storage Options
158 Polycom, Inc.
4 Using CIDR notation, specify an address block to map to this edge server (An address in CIDR notation is written with a suffix indicating the number of bits in the prefix, such as 192.168.0.0/16.)
a Click the Add button to add additional mappings to this edge server.
b Click the Delete button to remove a mapping.
c Use the radio button to select different Edge Server to edit mappings for.
5 Click the Submit button to save mappings.
Content Storage OptionsA Content Storage Option defines the location where the application stores files. The files may be stored on a local machine, using a network drive or even the local drive of the application server, or it may instead be stored on a more extensive storage network provided by an outside party.
Storage DefinitionThe default Content Storage Option in the Polycom VMC 1000 is called “Local Storage.” Local Storage allows content to be stored on a local machine, a network drive or even the local drive of the application server. The Local Storage option also allows you to set Access Point properties and define how you want to define and schedule the backup of Content Repository items.
NOTE: For a given audience, all included Delivery Options’ proximity must match the proximity of the Audience.

Content Storage Options Distributing Content
Polycom, Inc. 159
Configuring the Local Storage Content Storage
To configure Local Storage Content Storage:
1 Go to Resources > Storage.
2 Click the Add button. Choose Local Storage from the context menu that appears.
3 Specify the Storage Name.
4 Specify the Root Path, the location on the server to be used for storage.
5 You will now need to add Storage Access Points.
Adding Access PointsOnce a Content Storage has been created, you can edit it to add Access Points. Access Points are used for programmatically accessing content as part of an integration with a 3rd party system such as distribution through Cisco ACNS.
To add an access point:
1 Click the Add icon to add an Access Point.
NOTE: When entering Host Name or Root Path in the storage configuration, enter the name or IP without a http:// prefix.
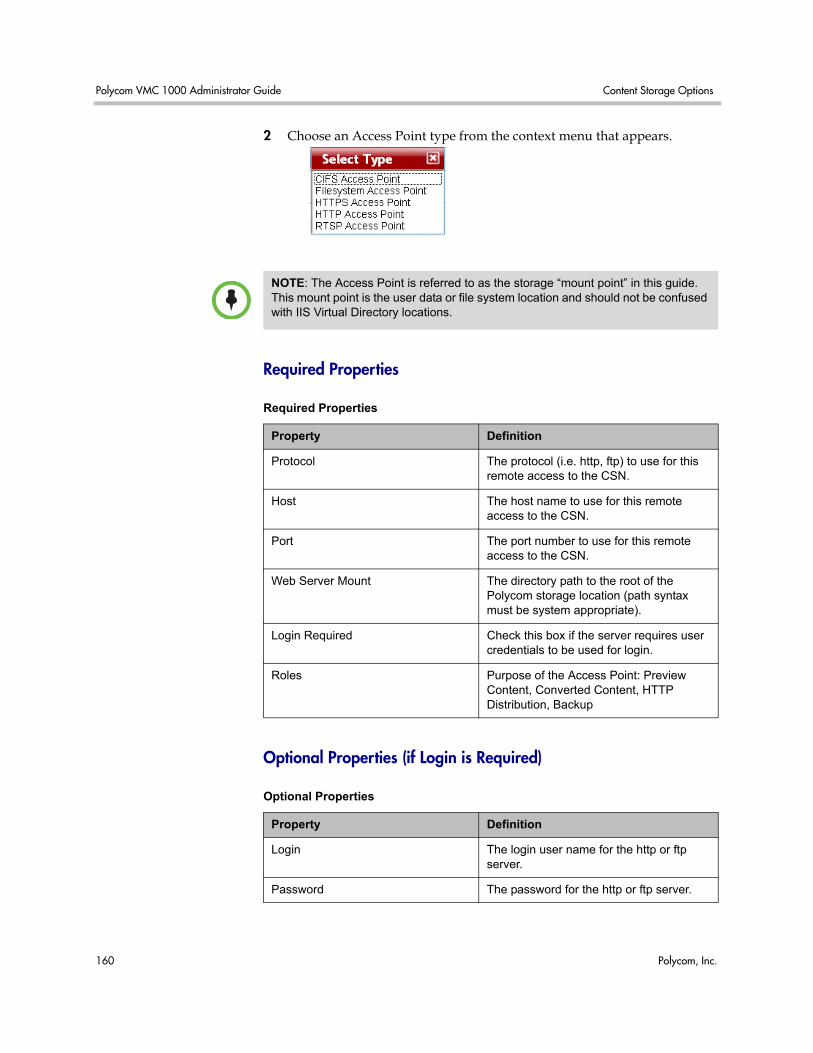
Polycom VMC 1000 Administrator Guide Content Storage Options
160 Polycom, Inc.
2 Choose an Access Point type from the context menu that appears.
Required Properties
Optional Properties (if Login is Required)
NOTE: The Access Point is referred to as the storage “mount point” in this guide. This mount point is the user data or file system location and should not be confused with IIS Virtual Directory locations.
Required Properties
Property Definition
Protocol The protocol (i.e. http, ftp) to use for this remote access to the CSN.
Host The host name to use for this remote access to the CSN.
Port The port number to use for this remote access to the CSN.
Web Server Mount The directory path to the root of the Polycom storage location (path syntax must be system appropriate).
Login Required Check this box if the server requires user credentials to be used for login.
Roles Purpose of the Access Point: Preview Content, Converted Content, HTTP Distribution, Backup
Optional Properties
Property Definition
Login The login user name for the http or ftp server.
Password The password for the http or ftp server.

Content Storage Options Distributing Content
Polycom, Inc. 161
CIFS Storage ConfigurationThe Polycom VMC version 2.0 supports CIFS (Common Internet File System) storage as well as local storage. CIFS runs over TCP/IP but uses the SMB (Server Message Block) protocol found in Microsoft Windows for file and printer access. This allows you to share files across the Internet.
Adding CIFS Storage1 Navigate to Resources > Storage.
2 Click Add. Choose CIFS Storage from the context menu that appears.

Polycom VMC 1000 Administrator Guide Content Storage Options
162 Polycom, Inc.
3 The Add Storage menu will appear.
4 Specify a Storage Name for display within the VMC 1000.
5 In the Host field, enter the hostname or IP of the storage server.
6 In the Mount Point field, enter the share on the storage server.
7 In the Domain and User fields, enter the information for a user with write access to the share on the storage server.
Click Change Password to enter and confirm the stored password associated with the account.
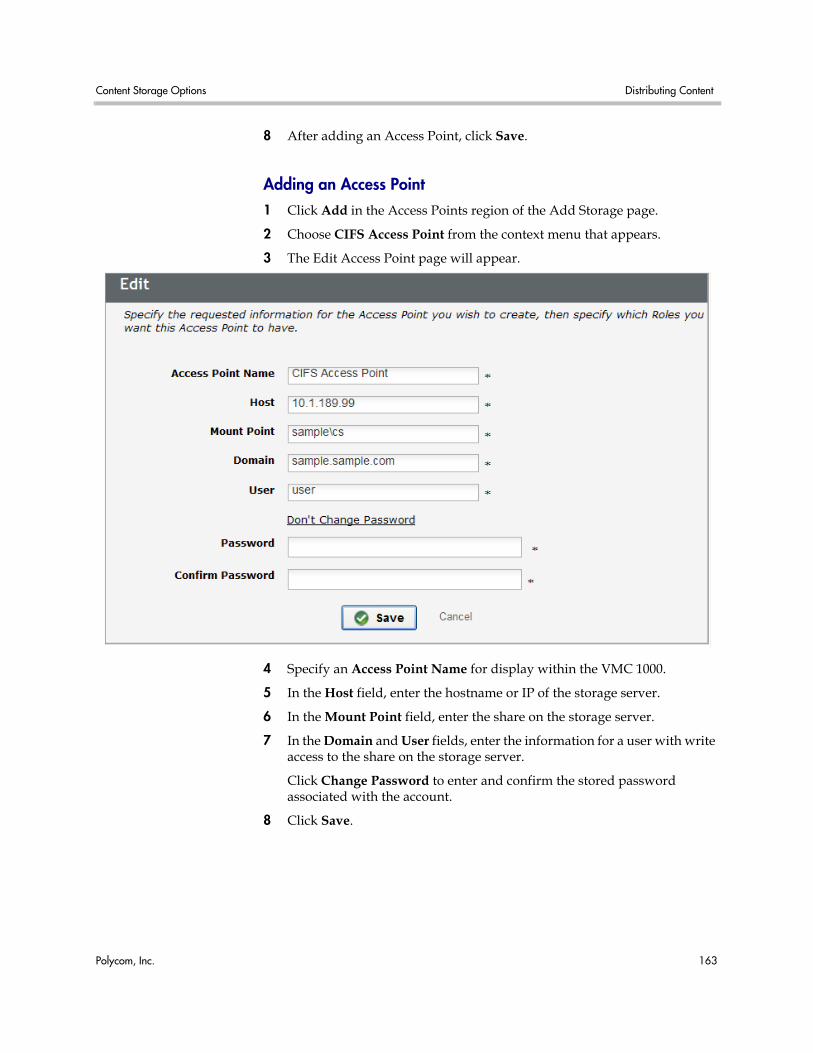
Content Storage Options Distributing Content
Polycom, Inc. 163
8 After adding an Access Point, click Save.
Adding an Access Point1 Click Add in the Access Points region of the Add Storage page.
2 Choose CIFS Access Point from the context menu that appears.
3 The Edit Access Point page will appear.
4 Specify an Access Point Name for display within the VMC 1000.
5 In the Host field, enter the hostname or IP of the storage server.
6 In the Mount Point field, enter the share on the storage server.
7 In the Domain and User fields, enter the information for a user with write access to the share on the storage server.
Click Change Password to enter and confirm the stored password associated with the account.
8 Click Save.

Polycom VMC 1000 Administrator Guide About Audiences
164 Polycom, Inc.
About AudiencesYou can assign a single Delivery Options to distribute your program to your users or you can distribute your program using Delivery Optionss associated with an Audience. An Audience in Polycom is a collection of network routing information that decides what type of program should be distributed to what type of Viewers. Audiences are defined by a set of delivery rules. Delivery rules contain criteria that a program request needs to meet in order to be processed by a particular Delivery Option. A delivery rule always has a corresponding Delivery Option and one of more failover Delivery Options.
Domain and System Administrator users can define Audiences. Broadcaster Administrators can only select Audiences as part of creating a program.

About Audiences Distributing Content
Polycom, Inc. 165
For example, System Administrator could divide Viewers into internal or external Audiences for a Broadcaster Administrator to select. The external Audience could consist of Viewers who are requesting a VOD or Live program and who would have that program delivered to them through a Cisco CDS. The internal Audience could consist of users who are requesting a VOD or Live program and who would have that program delivered to them through an Akamai CDN.
Polycom VMC 1000 checks where the content request comes from and decides how to serve that content to an internal or an external Audience. Polycom VMC 1000 uses request IP addresses, host names, and server port numbers to decide what CDN to use to serve the content to the Viewer.
Creating an AudienceAudience Management allows you to define the network parameters by using a series of Boolean expressions using request IP addresses, host names, and server port numbers to define an Audience’s rules. These rules help define the conditions in which Viewers are served what programs from what CDN.
To create an audience:
1 Click Delivery.
2 Click Audiences.
3 Click the Add button.
4 Enter an Audience Name and Description for your audience.

Polycom VMC 1000 Administrator Guide About Audiences
166 Polycom, Inc.
5 Click Next.
This page allows you to create rules that define your audience.
6 Click on Add a rule.
7 Select options from the drop down menus to create a variable for your rule.
Use request IP addresses, host names, and server port numbers to define your rules. You can use an (*) asterisk as a “wildcard” value if you want to

About Audiences Distributing Content
Polycom, Inc. 167
suggest a range of values. For example, you could use a wild card to suggest a range of IP address you wanted to associate with an audience:
requestIP equals 10.1.99.3*
This rule would return a value of 10.1.99.31, 10.1.99.32, 10.1.99.33, as acceptable values.
You are not limited by the number of variables you can create. You can nest the variables using boolean expressions “and” or “or”, but you cannot have more than two expressions within closed parentheses.
In addition to using the asterisk as a wild card, you can also use regular expressions. For more information about regular expressions, see:
— http://www.oreilly.com/catalog/regex/
— http://www.regular-expressions.info/tools.html
8 Click Create.
NOTE: Asterisks in “like” expressions do not work as wild cards. For example:Create an audience with a rule like: requestIP like 10.1.99.3* to include a box with the address 10.1.99.37 The result: 10.1.99.3* doesn't produce a match on box 10.1.99.37. You can use either of the following to work: 1) 10.1.99.3% produces a match on 10.1.99.37 2) 10.1.99.3.* produces a match (dot asterisk) However, Asterisk wildcard works in cases like 10.1.99.*

Polycom VMC 1000 Administrator Guide About Audiences
168 Polycom, Inc.
9 Click Next.
The Audience Management wizard now takes you to the Audience Definition page that allows you to associate CDNs with your Audience, based upon the type of content requested.
10 Select the CDNs you want to use to deliver each type of content for your audience.
11 In each category, click up or down arrow you can set a fail over priority for every CDN, so that when one CDN fails, the other takes over during the broadcast within that.
12 Select Distribute Content under Distribution, if available. Dictate push and delete offsets.
13 Click Next.
14 Specify Access Points for your Audience.
15 Click Next to review your options on the Audience Summary page.
16 Click Finish.

About Audiences Distributing Content
Polycom, Inc. 169
Sample Audience DiagramThis section shows a diagram and rules for different Audiences.
Cisco Audience RuleFrom the previous diagram, here is the rule for a user who requests access to a Polycom VMC 1000 program from a WAN connection and that content is routed to them through an Cisco ACNS CDN.
Rule:
• Only 10.100-109.*, or 10.230-239.*
• Request IP Like (?=10.(?=10(?=[0-9]))).*
• Request IP Like (?=10.(?=23(?=[0-9]))).*

Polycom VMC 1000 Administrator Guide About Audiences
170 Polycom, Inc.

Polycom, Inc. 171
10Using the Content Repository
This chapter explains how you can add, delete, and manage program media in Polycom VMC 1000 through the Content Repository. For more information about programming, please consult the Polycom VMC 1000 Broadcaster Guide.
This chapter contains the following sections:
• About the Content Repository
• Content Repository Items
• Adding a New Folder
• Moving Items Between Folders
• Adding New Content Repository Items
• Add Simple Streaming Media
• Add External Streaming Media
• Add External Streaming Media
• Adding New Downloadable File
• Add New External Link
• Adding New Image
• Adding New Slides
• Adding a New Poll
• Add Complex Presentation
• Deleting Content Repository Items
• Searching the Content Repository

Polycom VMC 1000 Broadcaster Guide About the Content Repository
172 Polycom, Inc.
About the Content RepositoryThe Content Repository is a virtual file system for all streaming and downloadable resource files listed by user. In the Content Repository you can upload new content, view or edit information associated with existing content, and view shared resource files. When you create a program, you are prompted to choose files from the Content Repository. If your Content Repository is empty, you cannot create a useful program.
The Content Repository can be managed by a Domain Administrator, a Broadcaster or a user who is assigned a custom role that includes the “Can manage own content” or “Can manage any content” permission. Domain Administrators can view content associated with all Broadcasters. Broadcasters and other users with the “Can manage own content” permission but without the “Can manage any content” permission can only view content they manage themselves.
Content Repository ItemsContent Repository items consist of the following:
• Streaming Media - Video and audio files. Supported formats include WMV, .flv, .mov, .mp4, H.264/MPEG-4, and .mp3.
• External Streaming Media - An External Stream is a resource bin item that is used for streams not managed by the Polycom VMC 1000. Examples are streams generated by an encoder and streams syndicated by content providers.
• Downloadable File - Any media type. Examples include PDF documents and PowerPoint slides. These are available to download by Viewers of Polycom VMC 1000 programs.
• External Link - Any URL.
• Image - Images that appear in categories, channels, and programs. Acceptable file formats for thumbnails are GIF, PNG, and JPEG. The recommended size for thumbnails is 100X100 pixels.
• Poll - A list of questions and associated answers that can be sent to viewers during a live broadcast.
• Slides - Consist of PowerPoint slides uploaded and converted to JPEG images by the Polycom VMC 1000. You can use these slide packages to sync with their video.
NOTE: The Polycom VMC 1000 may support files that are unsupported for distribution by by your CDN. Review your CDN documentation for its supported files.

Content Repository Items Using the Content Repository
Polycom, Inc. 173
• Complex Presentations - A complex presentation combines http based assets (htm, html, css, script, etc) and video files. Examples include presentations from Microsoft Producer and the Polycom PRS 2000.

Polycom VMC 1000 Broadcaster Guide Adding a New Folder
174 Polycom, Inc.
Adding a New Folder
To add a new folder:
1 Click Programming.
2 Click Content.
3 Select the folder in which you want to add a folder.
4 Click Add Folder at the top of the resource listings.
5 A popup will appear.
6 Provide a name for the folder.
7 Click Finish to create the folder.

Moving Items Between Folders Using the Content Repository
Polycom, Inc. 175
Moving Items Between Folders
To move items between folders:
1 Click Programming.
2 Click Content.
3 Click the item you want to move into another folder.
4 Drag and drop the item into the destination folder
Adding New Content Repository Items
To add new Content Repository items:
1 Click Programming.
2 Click Content.
3 Click on the target folder.
4 Click Add Item.
5 Select the radio button for the item type you want to add.
6 Click Next.
7 If the item you want to add is a file that must be uploaded to the Content Repository, continue with Step 7. Otherwise, skip to step 11.

Polycom VMC 1000 Broadcaster Guide Add Simple Streaming Media
176 Polycom, Inc.
8 From the Upload New Resource page, click the Browse… button.
9 Select the file to be uploaded from your hard drive or mapped network drives in the pop-up window and click Open.
The file's path appears in the text field of the Upload New Resource page.
10 Click Next to continue.
A progress indicator alerts you to the status of the upload process. When the file has successfully uploaded, the next page appears.
11 For every Content Repository item you may designate what users and groups have Content Manager permissions and Content Publisher permissions.
— Content Manager - Has the ability to administer and edit the content (which includes modifying its source file, its metadata, and managing its place within the folder hierarchy).
— Content Publisher - Has the ability to publish the content (i.e., include it in a program).
Add Simple Streaming Media
To add new hosted on demand streaming media:
1 Follow the steps from the “Adding New Content Repository Items” on page 175.
2 Specify the bitrate of the uploaded file.
You can use an approximate value from the pull-down menu, or specify an exact value, which can be text. For Windows Streaming Media files, the bitrate is extracted from the file itself during upload and a value is shown in the bitrate field.
3 Specify where the content item is to be stored by choosing a Storage Option.
4 Specify a Display Name.
5 Enter an optional description for the item.

Add External Streaming Media Using the Content Repository
Polycom, Inc. 177
6 You must fill in a positive duration value for streaming media in minutes.
For Windows streaming media files, the approximate duration is extracted from the file and entered into the Duration box or you can change this manually. If a lower duration is selected for the content than is actually present in the media, the actual duration will be used.
7 Click Finish.
Add External Streaming Media
To add new external media:
1 Follow the steps from the “Adding New Content Repository Items” on page 175.
2 Specify the fully-qualified URL to the resource item.
3 Specify a Display Name.
4 Enter an optional description for the item.
5 Specify the format of the streaming item.

Polycom VMC 1000 Broadcaster Guide Adding New Downloadable File
178 Polycom, Inc.
6 Select whether the media file is Audio or Video.
7 Specify the height and width of the video for the external stream.
8 Specify the bitrate of the uploaded file. You may use an approximate value from the pull-down menu, or specify and exact value, which can be text.
9 You must fill in a positive duration value for streaming media in minutes.
10 Click Finish.
Adding New Downloadable File
To add new downloadable media:
1 Follow the steps from the “Adding New Content Repository Items” on page 175.
2 Specify a Display Name.
3 Enter an optional description for the item.
4 Specify where the content item is to be stored by choosing a Storage Option.

Add New External Link Using the Content Repository
Polycom, Inc. 179
5 Click Finish.
Add New External Link
To add a new external link:
1 Follow the steps from the “Adding New Content Repository Items” on page 175.
2 Specify the fully-qualified URL to the resource item.
3 Specify a Display Name.
4 Enter an optional description for the item.
5 Click Finish

Polycom VMC 1000 Broadcaster Guide Adding New Image
180 Polycom, Inc.
6 Click Save.
Adding New Image
To add new image:
1 Follow the steps from the “Adding New Content Repository Items” on page 175.
2 Enter a Display Name.
3 Enter an optional description for the item.
4 Specify where the content item is to be stored by choosing a Storage Option
5 Click Finish.

Adding New Image Using the Content Repository
Polycom, Inc. 181

Polycom VMC 1000 Broadcaster Guide Adding New Slides
182 Polycom, Inc.
Adding New Slides
To add new slides:
1 Follow the steps from the “Adding New Content Repository Items” on page 175.
2 In the Display Name field, enter the name for the slide presentation.
3 In the Description field, enter a description for the slide presentation.
4 In the Slide Size field, select the dimensions for how the slide presentation displays in a program.
5 Specify where the content item is to be stored by choosing a Storage Option.
6 Click the Finish button.
The slides are uploaded to the Content Repository as individual JPEG images that you can use to sync with your video in a program.

Adding a New Poll Using the Content Repository
Polycom, Inc. 183
Adding a New Poll
To add a new poll:
1 Follow the steps from the “Adding New Content Repository Items” on page 175.
2 Specify a Display Name.
3 Specify a Description.
4 If you want to add Questions to the Poll at this point, click the Add button, then skip to Step 6.
5 Once you are done adding questions, click Finish.
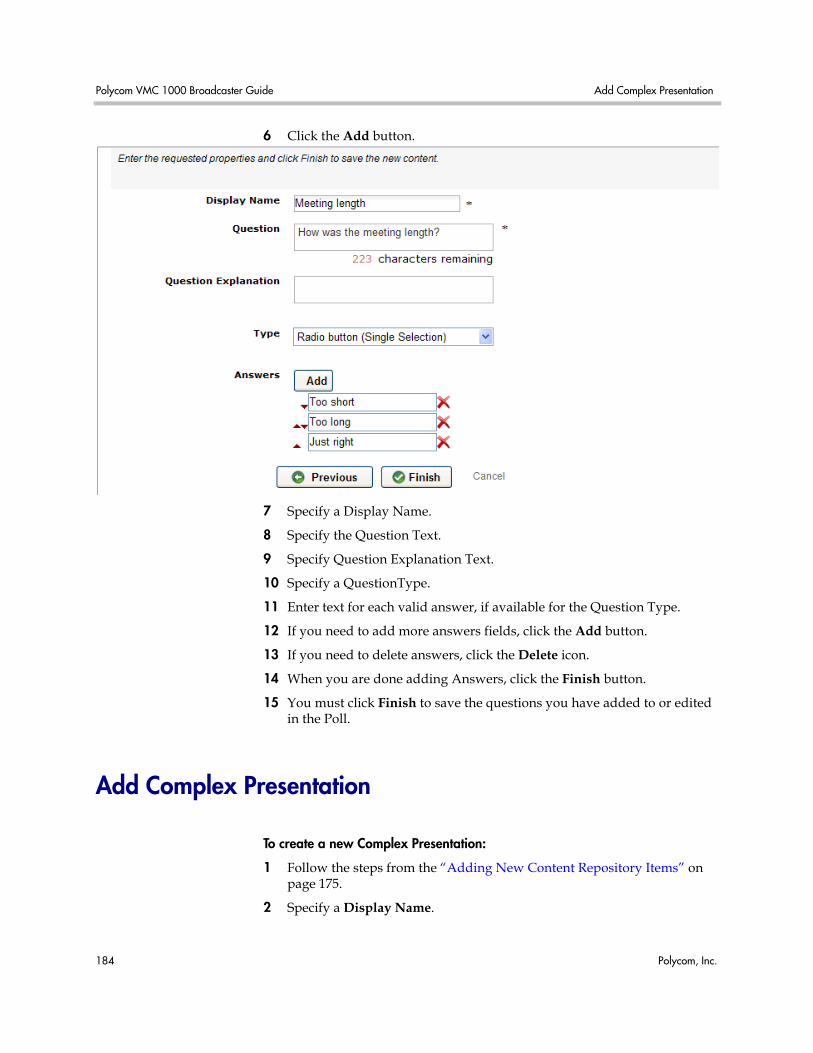
Polycom VMC 1000 Broadcaster Guide Add Complex Presentation
184 Polycom, Inc.
6 Click the Add button.
7 Specify a Display Name.
8 Specify the Question Text.
9 Specify Question Explanation Text.
10 Specify a QuestionType.
11 Enter text for each valid answer, if available for the Question Type.
12 If you need to add more answers fields, click the Add button.
13 If you need to delete answers, click the Delete icon.
14 When you are done adding Answers, click the Finish button.
15 You must click Finish to save the questions you have added to or edited in the Poll.
Add Complex Presentation
To create a new Complex Presentation:
1 Follow the steps from the “Adding New Content Repository Items” on page 175.
2 Specify a Display Name.

Editing Content Repository Items Using the Content Repository
Polycom, Inc. 185
3 Specify the presentation Duration.
4 Specify where the content item is to be stored by choosing a Storage Option.
5 Click the Finish button.
Editing Content Repository Items
To edit Content Repository items:
1 Click Programming.
2 Click Content.
The Content Repository will be displayed showing the Root Folder contents.
3 Click the relevant folder link to open a particular folder and display its contents.
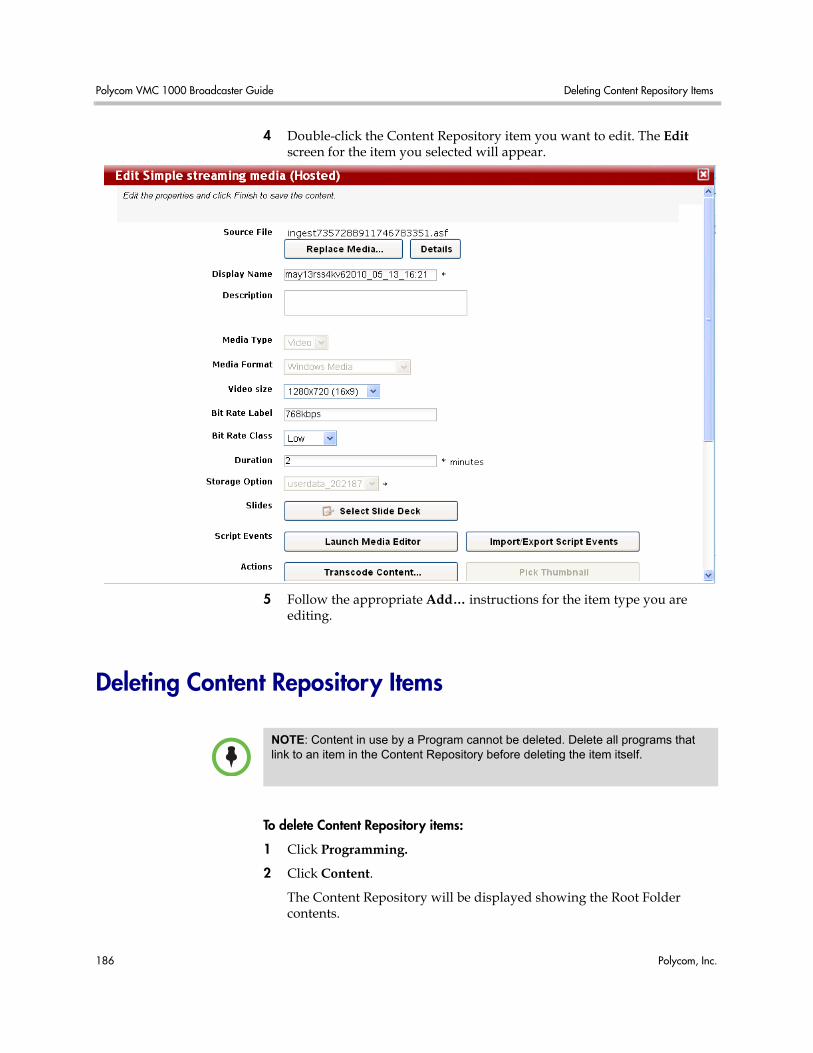
Polycom VMC 1000 Broadcaster Guide Deleting Content Repository Items
186 Polycom, Inc.
4 Double-click the Content Repository item you want to edit. The Edit screen for the item you selected will appear.
5 Follow the appropriate Add… instructions for the item type you are editing.
Deleting Content Repository Items
To delete Content Repository items:
1 Click Programming.
2 Click Content.
The Content Repository will be displayed showing the Root Folder contents.
NOTE: Content in use by a Program cannot be deleted. Delete all programs that link to an item in the Content Repository before deleting the item itself.

Searching the Content Repository Using the Content Repository
Polycom, Inc. 187
3 Click the folder link to open a particular folder and display its contents.
4 Single-click the Content Repository item you want to delete. To select a group of items, click the first item in the list and shift-click the final item. To select multiple items not in sequential order, control-click each individually.
5 Click the Delete button.
You will be asked to confirm the deletion.
6 Click OK to delete the items.
7 Cancel to return to the default Content Repository view.
Searching the Content RepositoryThe Content Repository Search feature allows Administrative Users to find content based on keywords and a variety of attributes. This feature requires that the domain be configured to have search. For more details, see the Installation Guide.
The Content Repository Search feature allows you to find content based on keywords and a variety of attributes. A simplified version of Content Repository search is available from the Content Repository page. This simplified search allows you to search by resource name only.
To use the simplified search:
1 Click Programming.
2 Click Content.
The Content Repository will be displayed showing the Root Folder contents.
3 Enter your keyword in the text box to left of the Search button.
You can search for content by additional attributes, including media type, format, bitrate, and upload status.
4 Click the Search button.
To use the advanced search:
1 Click Programming.
2 Click Content.
The Content Repository will be displayed showing the Root Folder contents.

Polycom VMC 1000 Broadcaster Guide Searching the Content Repository
188 Polycom, Inc.
3 Click the More button.
The Content Repository: Advanced Media Search page appears.
The attributes available for searching depend upon the configuration of your domain.
4 Enter the keywords and select the attributes you want to search by and click the Search button.
Search results are displayed in a manner similar to how they are listed in the Content Repository. If more than 10 search results are found, you have the option of scrolling through your result set.

Polycom, Inc. 189
11Polycom VMC 1000 Viewer Portal
This chapter outlines certain basic procedures to enable full employee-generated content functionality in the Polycom VMC 1000 Viewer Portal. Please note, however, that Featured Items, Moderated Reviews, Bios, and Custom Attributes can be used even in situations in which EGC functionality is not enabled.
The 2.0 release of the Polycom VMC 1000 now includes a unified portal for the uploading and viewing of employee generated content (EGC). The EGC Viewer Portal enables easy publication and management of video assets created across an organization.
For more information on program creation and content management, please consult the Polycom VMC 1000 Broadcaster Guide. For information on skinning the Viewer Portal, please consult the Polycom VMC 1000 Branding Guide.
This guide includes these sections:
• Classic Viewer Portal Feature Matrix
• Domain Setup for Employee-Generated Content
• Channel Setup for Employee-Generated Content
• Creating an EGC Master Program Template
• Featured Items
• Moderate Reviews
• Custom Program Attributes
• Using the Social Video Portal
• My Videos
Classic Viewer Portal Feature MatrixThis chapter details configuration processes for employee-generated content and the Polycom VMC 1000 Viewer Portal. The details in this chapter largely apply to the Polycom VMC 1000 version 2.0 Viewer Portal, but the Polycom

Polycom VMC 1000 Administrator Guide Domain Setup for Employee-Generated Content
190 Polycom, Inc.
VMC 1000 also includes the option of launching a “Classic’ Viewer Portal. Certain configuration details in the following chapter will therefore apply to both, and some will affect only the classic portal.
The Version 2.0 Viewer Portal contains significantly added functionality, outlined in the Polycom VMC 1000 Version 2.0 Release Notes and Polycom VMC 1000 Branding Guide. However, the table below outlines some features which will work only with the Classic Viewer Portal.
Domain Setup for Employee-Generated ContentThe Viewer Portal is configured by domain. Users can choose to create a dedicated EGC domain, or use one or many existing domains.
This section will explain the options on the domain set-up page that are relevant to the Social Video Portal. To access the Domain edit screen, navigate to System > Domains and click on the name of the domain you wish to edit.
Feature Classic Viewer Portal New Viewer Portal
Tags Not supported (but can be set up in Admin Portal)
Supported
Extended Attributes Not supported (but can be set up in Admin Portal)
Supported
RSS by Channel Supported Not supported
RSS for Feature and Live Programs
Not supported Supported
Bios Supported Not supported (but can be set up in Admin Portal)
Featured Channels Supported Not supported (but can be set up in Admin Portal)
CSS Layouts Supported Not supported (but can be set up in Admin Portal)
Audience Stream Failover Supported Not supported (but can be set up in Admin Portal)
Long Descriptions on Categories and Channels
Supported Not supported (but can be set up in Admin Portal)

Domain Setup for Employee-Generated Content Polycom VMC 1000 Viewer Portal
Polycom, Inc. 191
Domain Login OptionsAfter opening the Edit Domain page, scroll down to Login Options. The relevant options are detailed below. For information on the options not discussed here, please consult “Setting Up Domains” on page 11.
1 Select Use v5.2 Viewer Portal if you want to use the version 5.2 user interface as a default for your viewer portal.
2 Select Viewer Login and Require Viewers to Login to limit access to the Social Video Portal.
3 Select Allow Reviews. This option allows viewers to post reviews of content in the Social Video Portal. Choose Reviews require Approval if you want administrative oversight.
4 Select Allow Ratings. This allows viewers to rate content. Searches can then be conducted by rating.
5 Select Allow Invitations. Users can invite viewers by email, allowing for easier dissemination of employee-generated content.
6 Select Allow Favorites.

Polycom VMC 1000 Administrator Guide Domain Setup for Employee-Generated Content
192 Polycom, Inc.
Domain Programming OptionsAfter editing Login Options, scroll to Programming Options.
1 Select Enable Channels. Channels allow greater specificity in the implementation of an Social Video Portal.
2 Select Enable Employee Generated Content.
Note: If you want an Social Video Portal, you must select Enable Employee Generated Content.

Channel Setup for Employee-Generated Content Polycom VMC 1000 Viewer Portal
Polycom, Inc. 193
3 Select Require EGC Program Approval. This option gives administrative oversight to employee-generated content.
4 Select Enable Carousel to provide a carousel in the Social Video Portal with which users can easily access videos.
5 Click Save.
Channel Setup for Employee-Generated ContentAfter EGC has been enabled in a domain, each channel within that domain can be independently configured. See the Polycom VMC 1000 Broadcaster Guide for more information on creating Channels and Programs.
To configure employee-generated content within a channel:
1 Navigate to Programming > Channels. Add a new channel or click an existing channel to edit.
2 Select Is Employee Generated Content enabled? to enable EGC uploads to this channel.
3 Choose an Employee Generated Content Template from the drop-down menu.
— To create an Employee Generated Content Template, navigate to Programming > Programs.

Polycom VMC 1000 Administrator Guide Creating an EGC Master Program Template
194 Polycom, Inc.
— Select an extant program and choose Save as Master Program. This will add a template to the drop-down menu.
4 Scroll down to Permissions.
5 Choose Managers for the channel. Channel Managers have the power to edit and delete the channel. Managers are essential to the proper functioning of a channel. Click Assign when done.
6 Choose Viewers for the channel. Click Assign when done.
7 Choose EGC Authors for the channel. These are the people who can add or edit EGC in the channel. Click Assign when done.
8 Choose EGC Approvers for the channel. These users will approve files uploaded by employees for publication if the domain requires approval for publication. Click Assign when done.
9 Assign category tags for the channel. This will provide greater organization within the Viewer Portal.
10 Click Save.
Creating an EGC Master Program TemplateBefore enabling EGC, master programs must be created for the On-Demand program type in the Polycom VMC 1000 Administrative Portal.
Creating an Employee-Generated Content TemplateAn On-Demand master program is used as a template for all employee-generated content.
1 Navigate to Programming > Programs. The Programs screen will appear.
2 Click the Add button. Choose On-Demand from the context menu that appears.
Note: In order to upload EGC content, a master program must be configured and a Program Asset must be associated it. See Creating an EGC Master Program Template.
NOTE: For more information on creating programs, please consult the Polycom VMC 1000 Broadcaster Guide.

Creating an EGC Master Program Template Polycom VMC 1000 Viewer Portal
Polycom, Inc. 195
3 The Add On-Demand Program dialog will appear.
4 Enter program Name.
This name appears to Viewers to identify the program.
5 Select a Channel in which to save this program if prompted.
6 Fill in Author, Copyright, Descriptions, and Keywords. Choose or create appropriate Tags. These are optional.
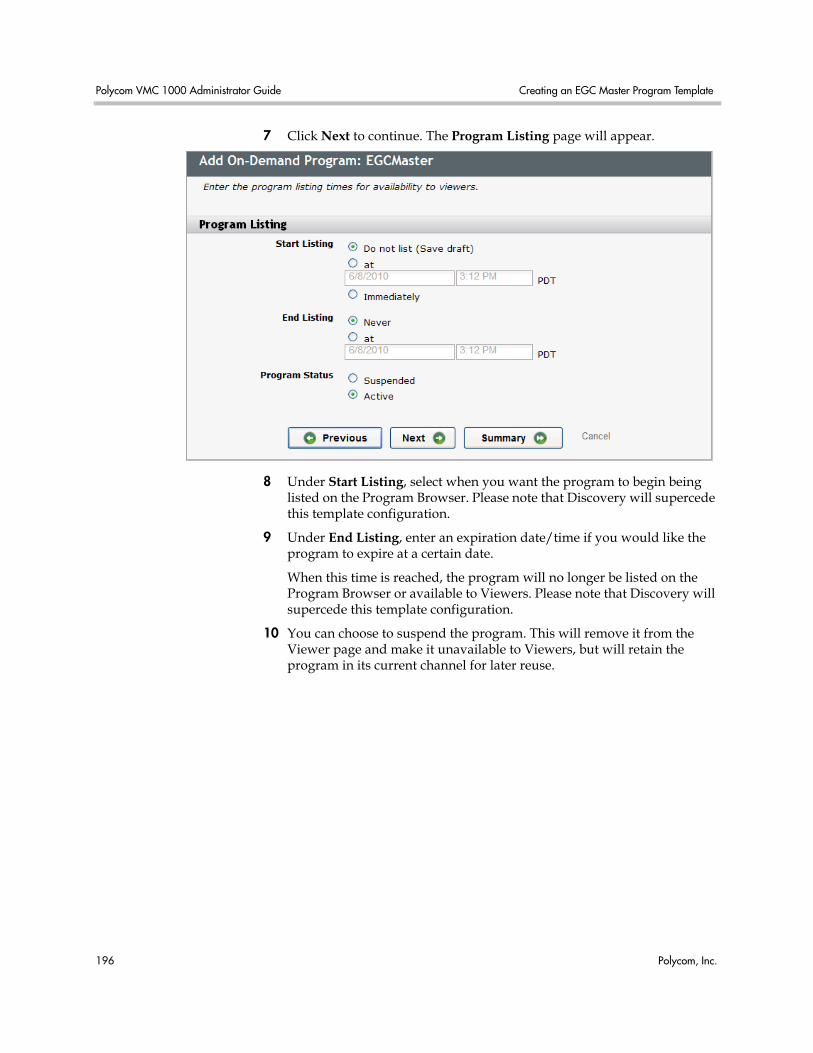
Polycom VMC 1000 Administrator Guide Creating an EGC Master Program Template
196 Polycom, Inc.
7 Click Next to continue. The Program Listing page will appear.
8 Under Start Listing, select when you want the program to begin being listed on the Program Browser. Please note that Discovery will supercede this template configuration.
9 Under End Listing, enter an expiration date/time if you would like the program to expire at a certain date.
When this time is reached, the program will no longer be listed on the Program Browser or available to Viewers. Please note that Discovery will supercede this template configuration.
10 You can choose to suspend the program. This will remove it from the Viewer page and make it unavailable to Viewers, but will retain the program in its current channel for later reuse.

Creating an EGC Master Program Template Polycom VMC 1000 Viewer Portal
Polycom, Inc. 197
11 Click Next. The next page will appear.
12 To add a program image (thumbnail) to be displayed on the Program Browser, click the Select icon in the Image section.
Clicking the Select button takes you to the Content Repository.
13 From the Content Repository, click on the thumbnail you want to use.
Click Save. If you don't select a thumbnail, the system uses the default thumbnail set by your system administrator (typically a company logo).
14 Click the Streaming icon in the Streaming Media section.
The Content Repository will appear. Select an appropriate file. The storage assigned to this file will apply to all EGC content. This is a necessary step.
15 Click the Next button.
16 Select the Allow to Download Program, Media checkbox if you want this program's media content items to be downloadable by viewers.
17 Enter the program duration in minutes.

Polycom VMC 1000 Administrator Guide Creating an EGC Master Program Template
198 Polycom, Inc.
18 To associate downloadable media with this program, click the Select icon in the Downloads section.
Clicking the Select icon takes you to the Content Repository.
19 In the Content Repository, highlight the items you want to add and click the right arrow button to select the items.
20 Click the Save button.
21 Click Next.
22 The Content Delivery page appears.
For each content type attached to the program (e.g., downloads, streaming media) select a Delivery Option and at least one Access Point
Click Next when completed.
23 Designate your program and user access settings and click Next.

Featured Items Polycom VMC 1000 Viewer Portal
Polycom, Inc. 199
24 The program summary page will appear.
Check Save as Master Program
Click Finish.
Featured Items Featured items are channels and programs that are prominently highlighted on the initial pages of the Program Browser and listed in the Featured Items section of the View Content page. The Domain Administrator selects these channels. The Domain Administrator can configure the domain to list featured channels from the Domain Configuration page.
NOTE: The master program checkbox must be selected in order to create a program template.
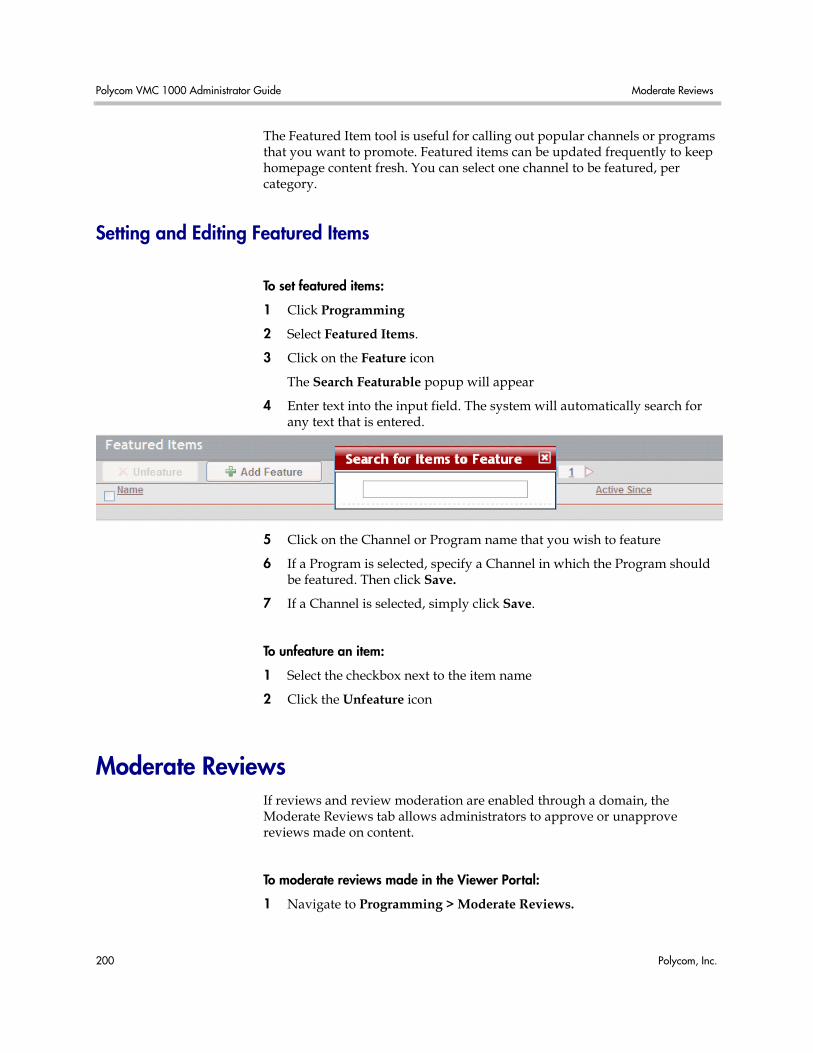
Polycom VMC 1000 Administrator Guide Moderate Reviews
200 Polycom, Inc.
The Featured Item tool is useful for calling out popular channels or programs that you want to promote. Featured items can be updated frequently to keep homepage content fresh. You can select one channel to be featured, per category.
Setting and Editing Featured Items
To set featured items:
1 Click Programming
2 Select Featured Items.
3 Click on the Feature icon
The Search Featurable popup will appear
4 Enter text into the input field. The system will automatically search for any text that is entered.
5 Click on the Channel or Program name that you wish to feature
6 If a Program is selected, specify a Channel in which the Program should be featured. Then click Save.
7 If a Channel is selected, simply click Save.
To unfeature an item:
1 Select the checkbox next to the item name
2 Click the Unfeature icon
Moderate ReviewsIf reviews and review moderation are enabled through a domain, the Moderate Reviews tab allows administrators to approve or unapprove reviews made on content.
To moderate reviews made in the Viewer Portal:
1 Navigate to Programming > Moderate Reviews.

Custom Program Attributes Polycom VMC 1000 Viewer Portal
Polycom, Inc. 201
2 Click on the review to view the full text. If you choose to edit the text, click Save.
3 Select Approve, Unapprove, or Flag from the drop-down menu for each given item. Approve will publish, unapprove and flag will not.
Custom Program AttributesThe Polycom VMC 1000 Viewer Portal allows administrators to designate Custom Program Attributes. When custom attributes are predefined in a domain, a new drop-down attribute field can be associated with programs.
To add a custom attribute:
1 Navigate to Programming > Custom Attributes.
2 Click Add.
3 Provide values in the Key and Name fields for the attribute.
4 Choose whether you wish the attribute to be Visible. If this option is not selected, the attribute will still function as searchable metadata but will not be visible to viewers.
5 Click Add Value.
6 Add values for the Key and Name fields for each value to appear in the drop-down menu.

Polycom VMC 1000 Administrator Guide Using the Social Video Portal
202 Polycom, Inc.
7 Click Save. The Custom Attribute page will now appear during program creation.
Using the Social Video PortalThe Social Video Portal streamlines uploading of video files. This section outlines the user upload process and the approval of those files.
To upload content in the Social Video Portal:
1 Log into the Viewer Portal, if login is required.
2 Click the Add Video button on the header. The Add a Program screen should appear.
3 Enter a Video Name and Description.
4 Choose a Channel from the drop-down list. Only EGC-enabled channels will appear.

Using the Social Video Portal Polycom VMC 1000 Viewer Portal
Polycom, Inc. 203
5 Enter Keywords to allow for easier searching.
6 Upload the Media file you wish to stream.
7 Select Allow Viewers to Download Video Media to enable viewer downloads of the content.
8 Add a Thumbnail, if desired, by clicking Browse and uploading an image file.
9 Add Downloadable files to the Program by clicking Browse and uploading the files.
10 Assign Tags, if enabled. If you wish to create a new Tag, enter it in the Add Tag field and click Add.
11 If Custom Program Attributes have been created, add them in the Attributes dialog.
12 Click Save.
To approve video files uploaded into the Social Video Portal:
1 Navigate to Programming > Approve EGC Programs.
2 Select Approve, Unapprove, or Flag from the drop-down menu for each given item. Approve will publish, unapprove and flag will not.
3 Navigate to Programming > Programs to check the status of the approved content.

Polycom VMC 1000 Administrator Guide My Videos
204 Polycom, Inc.
My VideosWhen a user with EGC upload permissions logs into the Social Video Portal, a My Videos tab will appear in the navigation bar. Clicking on this tab brings up a list of all programs created by the user:
To view a program in the My Videos page, click the thumbnail or name of the video. The Program Browser will then launch.
To delete a program, click the red x in its program listing.
To edit a program, click the Edit link. For more information, consult the following section.
Editing an EGC Program1 Navigate to My Videos.
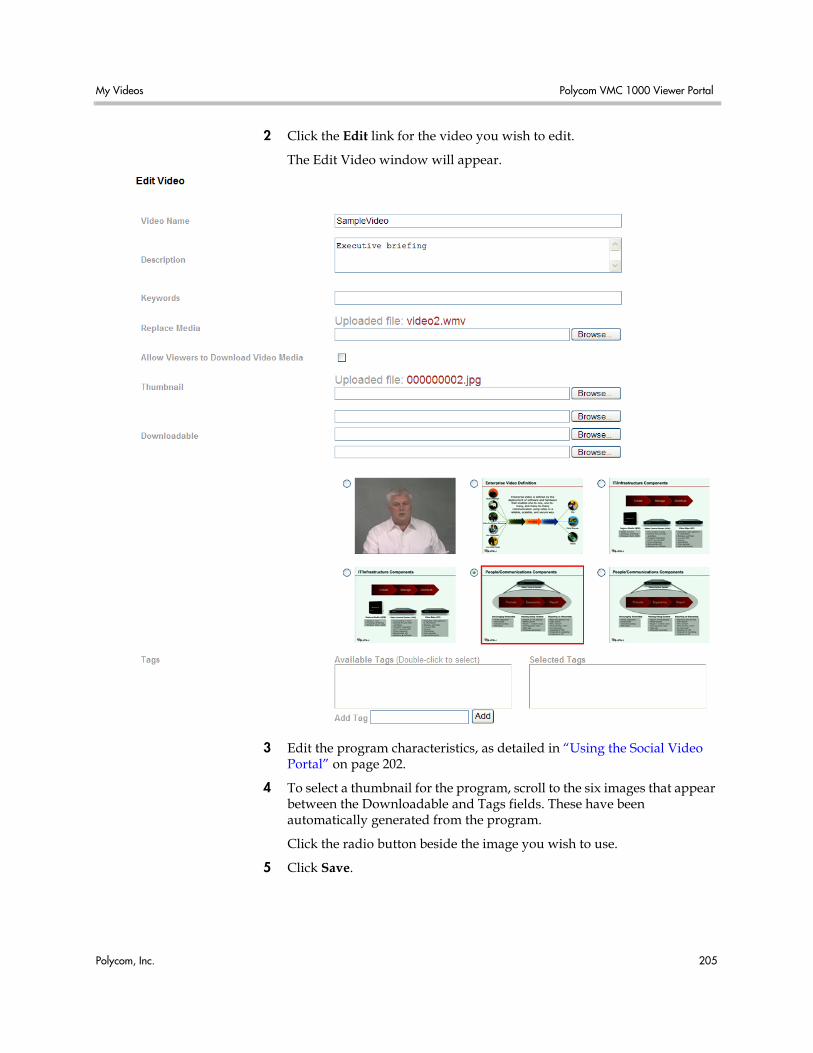
My Videos Polycom VMC 1000 Viewer Portal
Polycom, Inc. 205
2 Click the Edit link for the video you wish to edit.
The Edit Video window will appear.
3 Edit the program characteristics, as detailed in “Using the Social Video Portal” on page 202.
4 To select a thumbnail for the program, scroll to the six images that appear between the Downloadable and Tags fields. These have been automatically generated from the program.
Click the radio button beside the image you wish to use.
5 Click Save.

Polycom VMC 1000 Administrator Guide My Videos
206 Polycom, Inc.
Polycom, Inc. 207
12Using the Live Broadcast Console
This chapter explains how you can create and manage a broadcast in the Polycom VMC 1000.
This chapter contains the following sections:
• About the Live Broadcast Console
• Launching the Live Broadcast Console
• Starting a Live Broadcast
• Using Archiving Control
• About Moderating Audience Questions
• About Polling Control
• Launching the Presenter or Moderator Broadcast Control

Polycom VMC 1000 Administrator Guide About the Live Broadcast Console
208 Polycom, Inc.
About the Live Broadcast ConsoleThe Live Broadcast Console (LBC) provides controls for managing the life cycle of Live Broadcast programs. Unlike Automated Broadcasts, Live Broadcast programs must be manually launched from the LBC before they are available for viewing from the Viewer Portal. The LBC exposes controls for setting the archiving parameters for the broadcast, previewing encoder and server output, starting the live broadcast, clicking through slides during the broadcast (if slides are included), receiving and managing questions from the audience (if this is enabled for the program), pushing poll questions and results to the audience, and eventually stopping the broadcast and archiving the broadcast for later on-demand viewing.
There are also two variants of the Live Broadcast Console that are used to allow users who are NOT a Broadcaster or Domain Administrator the ability to control pre-defined aspects of a live program.
• Presenter Broadcast Control – A version of the Live Broadcast Console that displays slides at full-screen resolution so that the person controlling the slides during the broadcast can also display the slides using his laptop to a local audience using a projector.
• Moderator Broadcast Control – A version of the Live Broadcast Console that allows all aspects of control with the exception of provisioning, starting, stopping, or tearing-down the broadcast.
The Live Broadcast Console is also used for Capture Only Programs. In the case of Capture Only Programs, you do not have the option to select whether Archived Live Streams are generated. For Capture Only Programs, Archived Live Streams are always generated.
For instructions on accessing these consoles, please see Launching the Presenter or Moderator Broadcast Control.
Launching the Live Broadcast Console
To launch the Live Broadcast Console:
1 Click Programming > Programs.
2 Click the Type icon for the program you want to start.
NOTE: The Live Broadcast Console, Presenter Broadcast Control, and Moderator Broadcast Control are not intended to be run by the same user on the same system or VM instance. Doing so may interfere with your broadcast.

Launching the Live Broadcast Console Using the Live Broadcast Console
Polycom, Inc. 209
3 From the context menu that appears, select the appropriate Broadcast Date to launch the Live Broadcast Console. The Live Broadcast Console will appear.
Broadcast Status BarThe top area of the live broadcast console indicates the current status of the program. Each status after “Not Started” is initiated by an administrator action.
Broadcast MetadataAll metadata added to the live stream is be embedded in the stream. It cannot be edited once the broadcast has begun. Metadata (e.g., Author, Copyright) are edited through the Program Wizard.
Broadcast Configuration
To Run as a Test Broadcast:
1 Choose if the use of the program is for test purposes.
If you check Test Broadcast, several things will happen.The program will be run as usual, including stream distribution, but the intended audience will not be able to access the program. They will still see the program as Not Yet Started, and will only reach the Waiting Room. Only users who log into the Admin interface and access the program by using the Preview

Polycom VMC 1000 Administrator Guide Launching the Live Broadcast Console
210 Polycom, Inc.
link for the program will be able to view the test broadcast. This will allow users to test the distribution of a stream to remote locations.
Upon conclusion of the test, the program will revert to its initial state, a new broadcast instance of the program will NOT be created, and the Live Broadcast Console will not close. This will allow you to modify the “test” status, and immediately run the broadcast proper.
To archive a live from encoder broadcast:
1 From the drop-down archiving options, choose Automatic Start or Manual Start.
Automatic Start will archive the entire broadcast. Manual Start allows the broadcaster to dictate start and end times for archiving.
2 Check the sources you want to include in your archived program.
You may only want to archive a subset of the streams offered for the live broadcast itself.
3 Click Save.
To archive an encode only program:
1 If available for the encoder selection you have made, you may be presented with the option of Manual Start for archiving. Checking this option will allow you to pause and resume archiving, and restart archiving to a new file, overwriting the existing archive.
2 Check the encoders you want to capture Archive Live Streams from. You may only want to archive a subset of the streams offered.

Launching the Live Broadcast Console Using the Live Broadcast Console
Polycom, Inc. 211
Starting Encoder Output
To start encoder output:
1 From the Broadcast Control tab, click Start Sources to activate the encoders.
Note that this does not mean that you have begun broadcasting.
2 Click the Provision Network button to continue.
The preview content will buffer, then appear in the player.
3 If you wish to stop the encoders, click Stop Sources. Otherwise, proceed.
Resetting a BroadcastThe Reset button serves two purposes:
• Test mode: in test mode the reset button is available even if broadcasting has started. It resets the broadcast back to the initial state. The program can then be run again in normal mode.

Polycom VMC 1000 Administrator Guide Starting a Live Broadcast
212 Polycom, Inc.
• Normal mode: in normal mode the reset button is available in all stages prior to Broadcast Started. It fully resets the state of the broadcast. Using the reset button preserves the same schedule ID and end-user URL, unlike rescheduling through the Program wizards.
Starting a Live Broadcast
To start a Live Broadcast
1 Under Broadcast Control, click Provision Network.
2 Click the Start Broadcast button to begin the live Broadcast.
3 Once you see the Stop Broadcast button appear, the broadcast has begun.
Using Archiving ControlIf you choose the “Manual Start” option, once you start the broadcast you will be presented with an additional set of buttons under the heading “Archiving Control.” Initially, the broadcast will NOT be archived; you MUST click Start Archiving to begin capturing the streams.
NOTE: If you find that the automated broadcast program always says Not Started, the following needs to be done (Change from using UDP to TCP):1) In the file: C:\Program Files\MPI\jboss\server\default\deploy\cluster-service.xml,
COMMENT OUT the section that starts:<Config>
<UDP mcast addr=${jboss.partition.udpGroup:228.1.2.3}"
2) Uncomment this section and add the server IP address:<Config>
<TCP bind addr="ipaddress" start_port="7800"loopback=true
3) In this line in the same TCP section, add your server IP addresses: <TCPPING initial hosts="serverIP[7800]" port_range="3"
NOTE: If using an Akamai ViewCast Push live program, the Live Broadcast Console will indicate “Start Broadcast Success” even if the stream has failed. No stream will appear in the viewer portal if the stream has failed.

Using Archiving Control Using the Live Broadcast Console
Polycom, Inc. 213
Starting Archiving
To start archiving:
1 Under Archiving Control, click the Start Archiving button to begin archiving.
2 You must confirm that you want to stop the live broadcast by clicking the OK button.
Pausing Archiving
To pause archiving:
1 Under Archiving Control, click the Pause button to pause archiving.

Polycom VMC 1000 Administrator Guide Live Reporting
214 Polycom, Inc.
Stopping Archiving
To stop archiving:
1 Under Archiving Control, click the Stop button to stop archiving. You must confirm that you want to stop archiving by clicking the OK button.
Restarting Archiving
To restart archiving:
1 Under Archiving Control, click the Restart Archiving button to begin archiving again.
Any previous archiving of this instance of the live program will be lost since the archive file will be overwritten.
2 You must confirm that you want to restart archiving by clicking the OK button.
Clicking through Slides During a Live BroadcastThe broadcast slides default to a pre-selected domain default slide before you have clicked on any other slide.
To click through slides during a live broadcast:
1 Under Slides select the desired slide from the Slide gallery. Click on the thumbnail image of the slide.
2 You can choose any slide in or out of sequence
Live ReportingIn the header of the Live Broadcast Console, statistics for the broadcast will appear.

Live Reporting Using the Live Broadcast Console
Polycom, Inc. 215
Click on Broadcast Quality to see users by viewing quality.
Click on the carat at the top right to minimize the display.
Click on the Total Users link to see users distributed by connection state.
Again, click on the carat at the top right to minimize the display.
Polycom VMC 1000 Administrator Guide About Moderating Audience Questions
216 Polycom, Inc.
About Moderating Audience QuestionsIf enabled for a Live from Encoder Program, Viewers are able to submit questions to the Broadcaster or moderator from the Live Program Viewer. The Question Moderation feature in the Live Broadcast Console allows the Broadcaster or the Moderator to view newly submitted questions, flag them for response, flag them as responded or delete them.
Questions are responded to be the Broadcaster through the audio or video feed; there is no mechanism to respond to the questions by text. Each tab in the question moderation module displays question of a different status. These statuses are New, Pending, Responded and All.
To change the status of a question:
1 Select questions by clicking the icon next to the question you wish to modify.
Clicking the icon next to a New question will change the status to Pending. Clicking the icon next to a Pending question will change the status to Responded.
2 Click the delete icon to remove the question.
About Polling ControlIf polling is enabled for a live program, the Polling Control window will be displayed on the Broadcast Control Tab of the Live Broadcast Console. If a poll is not attached to the live program, the Broadcast Control window of the Broadcast tab will display an Enable Polling button that will allow polling to be enabled by creating a poll on-the-fly and attaching it to the live program.
About Using Polls During a BroadcastOnce a live program broadcast has been started, you may initialize the Poll by clicking the Open Poll button. This will allow you to send questions, receive and preview responses, close questions and send results.
About Polling Control Using the Live Broadcast Console
Polycom, Inc. 217
Sending a Question to the Audience
To send a question to an audience:
1 If available as an option, click the Open icon, the first icon on from the left.
2 For the question you want to push to the audience, click the Start icon.
The audience will receive a pop-up window with the question in it after a delay to allow for encoding and distribution of the stream across the network. Once they respond, they will receive a message that their response has been submitted.
Previewing Responses from the AudienceOnce you have opened a question to the audience, the Preview icon will be available.

Polycom VMC 1000 Administrator Guide About Polling Control
218 Polycom, Inc.
To preview responses from the audience:
1 Clicking the Preview icon (the bar graph) will launch a pop-up containing a graph showing the responses submitted so far.
Once you feel that sufficient time has elapsed, or enough responses have been received, you may move to stop a poll question.
Closing a Question
To close a question:
1 Click the Stop icon for that question.
Any Viewers who still have a question window open will receive a message that the Question has been closed, after an appropriate delay. Further responses will not be accepted by the server.

About Polling Control Using the Live Broadcast Console
Polycom, Inc. 219
Pushing the Results of a Question to the Audience:
To push the results to an audience:
1 After the question has been closed, you may push the results to the audience by clicking the Push Results to Viewers icon for that question.
After an appropriate delay, a pop-up window will open on the Viewer’s page, displaying the results of the poll in graph format. You may push the question later in the broadcast should the need arise.
Adding a Survey to a ProgramPolls are conducted during a broadcast. The Polycom VMC 1000 also supports surveys, which are pushed to the audience upon program completion. Polls are supported for both on-demand and live broadcasts.
To add a survey to a program:
1 A Poll should exist in the Content Repository. Consult “Adding a New Poll” on page 183 for more information on this process.
2 Navigate to Programming > Programs in the Administrative Portal.
3 Click Edit by Program Assets. The Program Assets editing window will appear.
4 Click Select in the Survey region. The Add Survey dialog will appear.

Polycom VMC 1000 Administrator Guide The Monitor Tab
220 Polycom, Inc.
5 Locate the poll you created in Step 1 and click Save.
6 The survey will now automatically appear upon program completion.
Stopping a Live Broadcast
To stop a live broadcast:
1 Under Broadcast Control, click the Stop button to end broadcasting. Any on-going archiving will automatically stop.
The Monitor TabThe Live Broadcast Console provides a Monitor tab. In this area, you can consult deliver option information and statuses, encoder status, and preview your video content.

Launching the Presenter or Moderator Broadcast Control Using the Live Broadcast Console
Polycom, Inc. 221
Launching the Presenter or Moderator Broadcast Control
To launch the Presenter or Moderator Broadcast Control:
1 In a browser click the Private Code link in the viewer portal header.
2 Enter the Presenter Code from the program you want to control.
3 Click Go.
Using the Presenter Control:
>> There are three options for transitioning slides:
1 Click a thumbnail in the slide gallery.
2 Click the Next, Previous, Reset to First Slide, or Go to Last Slide navigation buttons.
3 Select a slide from the dropdown list
Using the Presenter Control:
1 Refer to “About Moderating Audience Questions” on page 216 for instructions on moderating questions.
2 Refer to “About Polling Control” on page 216 for instructions on using the polling control.

Polycom VMC 1000 Administrator Guide Launching the Presenter or Moderator Broadcast Control
222 Polycom, Inc.

Polycom, Inc. 223
13Using the Media Editor
This chapter explains how to use the Media Editor to edit video media used in your programs.
This chapter contains the following sections:
• About Media Editor
• Editing Video Content
About Media EditorMedia Editor is a web-based tool that allows you to edit script events associated with an archive of a video file. These script events, such as slides, closed captioning messages, and chapters can be added, deleted, or have their timestamp edited.
The archived media file can also be non-destructively trimmed to remove unwanted portions of the start and/or end of the video. When played though the Polycom VMC 1000, only the specified portion of the video is streamed.
Editing Video ContentThe Media Editor interface consists of four main areas: the Video Player area (top left), the Slide and Caption preview area (top right), the Timeline Area (bottom left), and the Edit Window area (bottom right).
NOTE: Media Editor requires Windows Media Player 9, 10, or 11, and does not support Windows Media Player 12.
NOTE: If slides have not yet been added to the media, they can be added by clicking the Select button in the media wizard.
Polycom VMC 1000 Administrator Guide Editing Video Content
224 Polycom, Inc.
To launch the Media Editor:
1 Click the video in the Content Repository.
2 Click the Launch Media Editor button to bring up the Media Editor interface.
The Control AreaThere are the standard video player controls attached to the player. In addition, there are buttons to jump five seconds forwards or backwards in the video, as well as a Jump To feature that allows you to cue the player to a specified timestamp.
The Slide and Caption Preview AreaThis area shows what slide and caption (if any) are displayed at the Video Player's current timestamp. If there are captions in more than one language, the Preview Language pull-down between the Preview area and the Video area selects which language displays.

Editing Video Content Using the Media Editor
Polycom, Inc. 225
The Timeline AreaThe Timeline Area shows a list of events associated with the video in chronological order. Each event type has its own icon:
• Slide
• Chapter
• Caption
Filtering EventsThe list of events can be filtered by un-checking some of the event types to be displayed from the top of the Timeline.
To only show captions:
• From the Timeline area, un-check Chapters and Events.
To only show English captions:
• From the Timeline area, select English from the pull-down at the top of the Timeline.
Clicking the timestamp for the event cues the video player to that time in the video.
Adding Slides, Chapters, or Captions
To add slides, chapters, or captions:
1 Click Add Slide, Add Chapter or Add Caption, or the Edit icon for one of the events.
The appropriate edit page in the Edit window opens.
2 Enter the requested information.
3 To populate the Timestamp field with the video player's current timestamp, click the Paste Current Player Timestamp from the Player icon.

Polycom VMC 1000 Administrator Guide Editing Video Content
226 Polycom, Inc.
Polycom, Inc. 227
14Creating Reports
This chapter contains the following sections:
• About Reports
• About Aggregate Program Reports
• About Program Reports
• Printing Reports From Internet Explorer
About ReportsReports allow administrators to see information and statistics on the use and effectiveness of their streaming media. While all available reports are listed below, it should be noted that the number of reports available to each administrator varies, depending on their level of permissions and the parameters of their Polycom VMC 1000 implementation. All reports are generated in HTML format.
The Polycom VMC 1000 supports two types of reports:
• Aggregate Program Reports
• Program Reports
About Aggregate Program ReportsPolycom VMC 1000 has the following Aggregate Program Reports:
• Content Storage Report - Reports storage totals for all content in the domain on which the report is run.
• Program Popularity Report - This report lists the most popular programs, based on the number of views of the programs, over the time period designated.
• Broadcast Summary Report - Report snapshots of broadcast quality and viewer status, viewer questions and poll results.

Polycom VMC 1000 Administrator Guide About Aggregate Program Reports
228 Polycom, Inc.
— “Viewers with Errors”indicates the number of users who are not connecting, buffering, playing or streaming.
• Viewer Attendance Report - Report viewer activity (media views) for a selected program.
— “Number of Requests” shows how many times the player page was requested for that program by the viewer.
• Media Viewing Report - This report lists the total number of times that a content link was clicked by a site visitor for each program. The results are reported by channel.
• Live Program Poll/Survey Detailed - This report provides detailed, high-resolution results from polls or surveys pushed to viewers of a live broadcast.
• Live Program Poll/Survey Summary - This report provides an aggregate summary of poll or survey results from viewers of a live program.
• On-Demand Poll/Survey Detailed - This report provides detailed, high-resolution results from polls or surveys available to viewers of an on-demand program.
• On-Demand Poll/Survey Summary - This report provides an aggregate summary of poll or survey results from viewers of an on-demand program.
• Domain Summary Report - A summary of content streamed, content storage, channel usage and user totals.

About Aggregate Program Reports Creating Reports
Polycom, Inc. 229
Generating Aggregate Program Reports
To generate Aggregate Program Reports:
1 Navigate to Reporting > Reports.
2 Select the radio button for the report type you want to generate and click Next.

Polycom VMC 1000 Administrator Guide About Aggregate Program Reports
230 Polycom, Inc.
3 Select the time range over which you want to include report data.
You can choose to include data over a one week, an eight week, or a six month period.
For program-specific reports (as pictured above), select a program from the drop-down menu.
4 Click Next, if available. If prompted, select the channels you want to include in the report.
5 Click Run Report.
Exporting the Entire Report1 A report can exported to a file format by clicking the Export Report (PDF
or Excel) buttons in the upper righthand corner.

About Aggregate Program Reports Creating Reports
Polycom, Inc. 231
2 Click the Save button, if available, to save the reporting file locally.

Polycom VMC 1000 Administrator Guide About Program Reports
232 Polycom, Inc.
About Program Reports Program Reports are available in HTML format for a particular program or user. These reports are available from the Program listing page, or the Viewer listing page. The Polycom VMC 1000 has the following Program Reports:
• Activity - This report contains the media viewing times by viewers of a program. Viewing times are aggregated across the selected date range and may exceed a program duration.
• Attendance - This report lists the number of media requests and date of last request for a particular program.
• Broadcast - This report contains broadcast quality and viewer statistics, in addition to a summary of poll results and viewer questions asked during the broadcast
• Media Viewing Records - This report lists user activity by program. This report includes time of viewing, minutes viewed, format, and percentage of compliance (percentage of entire program viewed), but is not available for live programs.
• Detailed Program Viewing Report - This report includes date, time and percentage viewed information for each program viewed by a particular Viewer.
Generating Program Reports1 Click Programming > Programs.
2 Click the Report icon next to a program.
3 Click the name link for the broadcast instance you want to generate a report on.
Printing Reports From Internet Explorer
Setting the Page OrientationUsing this feature, you can choose to format the report for either portrait or landscape printing. For on-screen viewing, it is recommended to use “Portrait.” If you choose to generate your report in “Landscape” format, choose the “Landscape” print mode for your printer.
To set the page orientation:
1 From Internet Explorer, choose File > Print.
Printing Reports From Internet Explorer Creating Reports
Polycom, Inc. 233
2 Click the Layout tab.
3 Choose Landscape.
4 Click OK.
Setting Printing Background Color & ImagesBy default, most browsers do not print background colors and background images. If you print your report and do not see table background color, perform the following procedure to enable the feature in your browser.
To set printing background color and images:
1 From Internet Explorer, choose Tools > Internet Options...
2 Click the Advanced tab.
3 Under Printing, check the Print background colors and images box.
4 Click OK.
5 Print your report as normal.
Setting Page Print Margins In order for the reports to fit on the page properly, it may be necessary to set the print margins for the page. If the right-hand edge of the report is cut off, perform the following procedure to set the margins.
To set page margins:
1 From Internet Explorer, choose File... Page Setup...
2 Enter 0.5 for each of the four margins.
3 Click OK.
4 Print your report as normal.

Polycom VMC 1000 Administrator Guide Printing Reports From Internet Explorer
234 Polycom, Inc.

Polycom, Inc. 235
15Troubleshooting
This chapter explains how to troubleshoot common problems with Polycom.
About System Monitoring Tools and ReportsSystem Monitor tools and reports provide status about Polycom. Use these System Monitor tools to diagnose problems within the Polycom network. Polycom provides the following tools and reports to help you diagnose problems:
• AppServer Background Process Status Report
• The Broadcast Monitor Report
• The ACL Tool
• Log4j Tool
About AppServer Background Process Status ReportPolycom controls a large number of background processes that perform various tasks in the application. This report details each process, its status, and the last time the process was run. This is helpful in debugging.
Accessing AppServer Background Processes Status Report
To access AppServer Background Processes Status Report:
1 Click System.

Polycom VMC 1000 Administrator Guide About System Monitoring Tools and Reports
236 Polycom, Inc.
2 Click Scheduled Processes.
The Scheduled Processes page appears. The status of these jobs are indicated in the Status column. The jobs are described below.
e
Process Name Action
AverageRatingUpdate Aggregates user ratings of programs to show ratings in the viewer portal.
concludedBroadcastPollerJobDetail Used for automated broadcasts, this job stops the broadcasts of automated live programs based on the end time of their schedule.
DistSync Initiates Push/Delete for content on distribution systems according to the schedules set in programs.

About System Monitoring Tools and Reports Troubleshooting
Polycom, Inc. 237
MediaBinItemDestroyer Deletes the underlying files of Content Repository items that have been designated for deletion through the Administrator Portal.
nextOccurJobDetail Used for automated broadcasts, this job queries the schedules of upcoming automated live programs to calculate the next occurrence that needs to be started by the system.
PollingBroadcastActionJob Used to check whether various broadcast setup tasks (start encoders, provisioning, etc.) have completed.
Program AvailabilityMonitor Publishes an event when a Programs available date passes.
ReindexingJob Performs a reindex of the content in the Polycom VMC 1000.
StorageThresholdWarner Sends a pre-configured alert email when the storage threshold is reached.
WMSStateMonitorCleanerJob Background task that collects status and performance information for any Windows Media Delivery Options.
WMSStateMonitorJob Deletes log data from the WMSStateMonitorJob that is over an hour old.
AppEventLogFlush Ensures that recorded application events (login records, event view records, etc.) are persisted in the database.
InhouseWMSParser Runs the Windows Media Log Parser.
ArchiveIngestStatusUpdate Checks for completed archiving jobs and marks archiving as complete for the assets ingested by those jobs.
DistJobManagerRunMaint Checks for completed/failed distribution jobs and marks the content as successfully pushed or needing a retry.
Process Name Action
NOTE: Aside from ReindexingJob, detailed in the Polycom Installation and Configuration Guide, the processes outlined above will probably not need to be run manually. For more information, consult Polycom Support.

Polycom VMC 1000 Administrator Guide About the ACL Tool
238 Polycom, Inc.
About the Broadcast Monitor ReportThe Live Program Registry shows any live programs that are in progress across all domains. It allows an administrator to end a live broadcast that may not be stopped through the Live Broadcast Console due to incorrect configuration.
Accessing Broadcast Monitor Report
To access Broadcast Monitor Report:
1 Click Programming.
2 Click Broadcast Monitor.
The Broadcast Monitor page appears.
About the ACL ToolThe ACL Tool allows a Site Administrator to monitor and fix potential Polycom security problems.

Log4j Levels and Debugging Reference Troubleshooting
Polycom, Inc. 239
The ACL Tool makes it easy to review and quickly troubleshoot inconsistencies that affect roles, programs, channels, and Content Repository items. Examples of the types of problems it highlights include:
• Defined, but unassigned roles.
• Broken users and/or group assignments because the principal was deleted or moved
• Channels or content that no longer have an owner.
• Programs that have been secured, but are inaccessible from the Program Browser.
Reviewing ACL Issues
To review ACL issues:
1 Click User Management.
2 Click Access Control. The Access Control troubleshooting page appears
3 Select from any of the four tabs to view objects that have missing users. In each section, selecting a set of object and clicking the appropriate assignment button allows users to be associated. The "Show All" checkbox will allow for showing even those objects that have no error condition.
Log4j Levels and Debugging ReferenceThe Polycom VMC 1000 provides the Log4j logging tool. Log4j operates by a set of logging levels:
Log Level Value Description
ALL Turns on all logging.
DEBUG Logs informational events that are most useful to debug an application.
ERROR Logs runtime errors or other errors which may not lead to application failure.
FATAL Logs severe errors that lead to application failure.
INFO Provides information on the running application.

Polycom VMC 1000 Administrator Guide Log4j Levels and Debugging Reference
240 Polycom, Inc.
The following table collects the various Log4j categories, accessible in <Polycom Instance>\jboss\server\default\conf\jboss-log4j.xml, that can be used to trace or debug the Polycom VMC 1000:
.
OFF Turns off logging.
TRACE Provides a finer level of detail than DEBUG.
WARN Indicates situations that could result in errors.
Log Level Value Description
NOTE: For more information on Log4j, please consult the Log4j documentation available here:http://logging.apache.org/log4j/1.2/apidocs.
Name Description Category
Security Principals, Users, Groups, Access Control, Roles, Realms, Authorization, LDAP
com.mpi.security
Content Objects and functions related to Content, Assets and Storage.
com.mpi.mp.content
Storage Functionality related to Storage Options and the storage of content assets.
com.mpi.mp.content.storage
Ingest Functionality related to adding files to a Storage Option.
com.mpi.mp.content.storage.ingest
Player Functionality related to selecting a Player for a given Asset and its Format
com.mpi.mp.content.player
Delivery Objects and functions related to delivery of content.
com.mpi.mp.delivery
Audiences (Delivery) Functionality for retrieving the appropriate Delivery Option for a given Audience
com.mpi.mp.delivery.audience
Windows Media Delivery
API's used with delivering content from Windows Media Servers via static and dynamic publishing points
com.mpi.mp.delivery.impl.wms
ACNS Delivery API's used with delivering content from ACNS
com.mpi.mp.delivery.impl.acns

Windows Media Log Files Troubleshooting
Polycom, Inc. 241
Windows Media Log FilesThe reporting functionality in Polycom Administrator Portal relies heavily on data gathered from the log files supplied by streaming servers and Windows Media Player.
The only components that collect these data are the streaming server and the media player, and virtually the only place other software components can access them is the media log files being written by the server and/or the player.
The Polycom platform includes means to extract these data from these log files. Unfortunately, third party software may require post-install action to maintain this functionality. This section summarizes the necessary steps.
This section details both client-side and server-side logging.
Client-Side Logging1 Log into the Polycom VMC 1000 Administrative Portal. Navigate to
Domains and edit the domain you wish to change.
2 Select Receive Windows Media Player Logs to enable client-side logging. This setting must be enabled to generate reporting data for multicast streams.
3 Designate a Windows Media Player Logging URL (LOGURL). This URL points to the logging component installed on an IIS server. The URL should be in the form: http://<Web_Server_Name>/viewerportal/wmiislog.logger
Log Parser ConfigurationTo enable server-side logging, you will need to check if the log parsers are configured properly.
A log parser is a software component that is scheduled to read and analyze media log files on a regular basis (once an hour, by default). Different servers use different formats for their log files, so there are several log file parsers, one for each supported format. The most important for the Polycom VMC 1000 is the Windows Media Log Parser - as its name implies, it parses log files created by the Windows Media Services and Windows Media Player.
1 Make sure if the scheduled process for the parser is enabled. (It is, by default.) If everything is configured correctly, you should be able to see the entry for InhouseWMSParser in Admin Portal, under System > Scheduled Processes.
Note: Polycom strongly recommends client-side logging for the Classic VIewer Portal. However, this section is not necessary if you are using the new Viewer Portal.

Polycom VMC 1000 Administrator Guide Windows Media Log Files
242 Polycom, Inc.
2 If it is not there, you will need to go to the Quartz configuration file (C:\Program Files\Polycom\deploy\adminportal.war\WEB-INF\config\ default\ quartz\mpBgTasks.xml, or wherever Admin Portal resides) and make sure that:
A.) The bean called ClusteredScheduler includes the entries for the task called InhouseWMSParser and the are not commented out. The correct bean definition should look like this:
<bean id="ClusteredScheduler" class="com.media3k.escene.util.background.TriggerFactoryBean">
{...}
<property name="triggers">
<list>
{...}
<ref bean="InhouseWMSParserTrigger"/>
{...}
</list>
</property>
<property name="jobDetails">
<list>
{...}
<ref bean="InhouseWMSParser"/>
{...}
</list>
</property>
{...}
</bean>
B.) These two entries are present in the file:
<bean id="InhouseWMSParser" class="com.media3k.escene.util.background.DefaultManageableJobDetail">
<property name="jobClass">
<value>com.media3k.escene.reports.parsers.WMLogParser

Windows Media Log Files Troubleshooting
Polycom, Inc. 243
</value>
</property>
<property name="description">
<value>A service that parses Inhouse Windows Media Server (WMS) formatted log files.</value>
</property>
<property name="jobDataAsMap">
<map>
<!-- parser settings -->
<entry key="CDNName" value="Inhouse Windows Media Server (WMS)"/>
<entry key="CDNID" value="1"/>
<entry key="logNameMask" value=".log"/>
<entry key="entryDateMask" value="yyyy-MM-dd:HH:mm:ss"/>
<entry key="fileExtensionNeedsQueryString">
<list>
<value>asf</value>
<value>asx</value>
<value>wmv</value>
<value>wma</value>
<value>wm</value>
<value>mov</value>
<value>moov</value>
<value>qt</value>
</list>
</entry>
<entry key="ignoreNewestFile" value="true"/>
<!-- debugging settings -->
<entry key="debugging" value="false"/>
<entry key="loggingInfo" value="true"/>
<entry key="verboseOn" value="false"/>
<entry key="commitOff" value="false"/>
<entry key="persistInvalidDomainID" value="false"/>
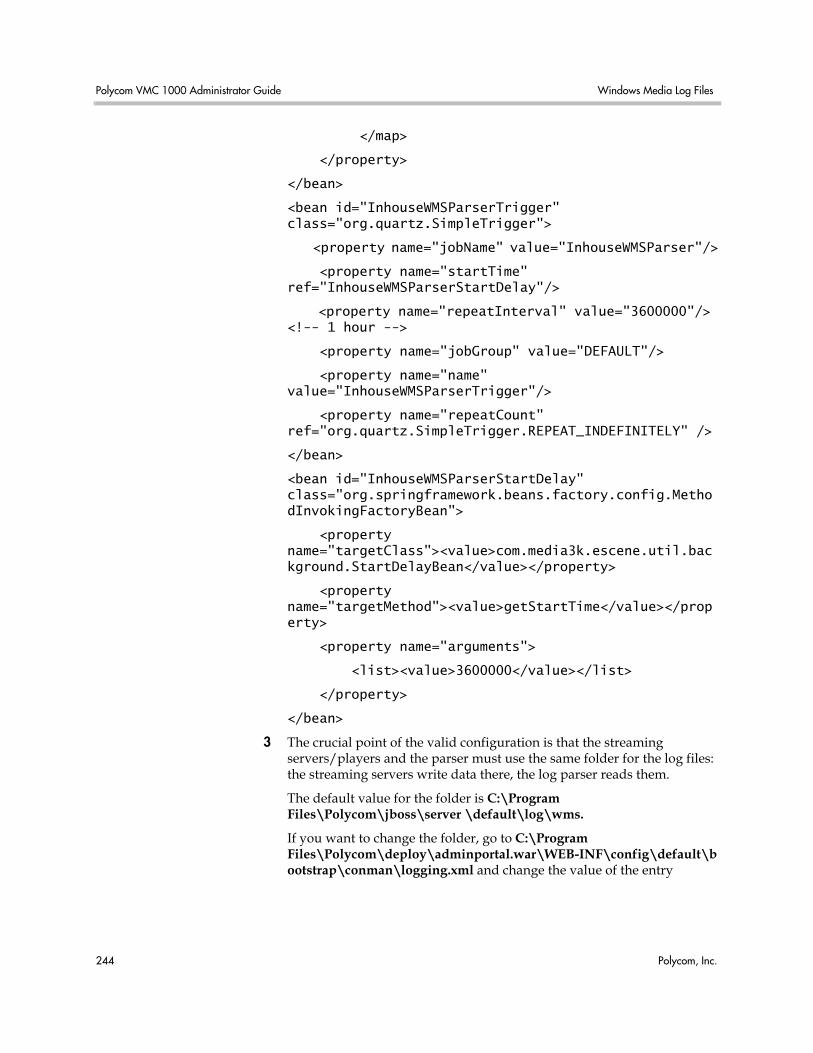
Polycom VMC 1000 Administrator Guide Windows Media Log Files
244 Polycom, Inc.
</map>
</property>
</bean>
<bean id="InhouseWMSParserTrigger" class="org.quartz.SimpleTrigger">
<property name="jobName" value="InhouseWMSParser"/>
<property name="startTime" ref="InhouseWMSParserStartDelay"/>
<property name="repeatInterval" value="3600000"/> <!-- 1 hour -->
<property name="jobGroup" value="DEFAULT"/>
<property name="name" value="InhouseWMSParserTrigger"/>
<property name="repeatCount" ref="org.quartz.SimpleTrigger.REPEAT_INDEFINITELY" />
</bean>
<bean id="InhouseWMSParserStartDelay" class="org.springframework.beans.factory.config.MethodInvokingFactoryBean">
<property name="targetClass"><value>com.media3k.escene.util.background.StartDelayBean</value></property>
<property name="targetMethod"><value>getStartTime</value></property>
<property name="arguments">
<list><value>3600000</value></list>
</property>
</bean>
3 The crucial point of the valid configuration is that the streaming servers/players and the parser must use the same folder for the log files: the streaming servers write data there, the log parser reads them.
The default value for the folder is C:\Program Files\Polycom\jboss\server \default\log\wms.
If you want to change the folder, go to C:\Program Files\Polycom\deploy\adminportal.war\WEB-INF\config\default\bootstrap\conman\logging.xml and change the value of the entry

Windows Media Log Files Troubleshooting
Polycom, Inc. 245
defaultValue in the bean ViewerLogging_LogFolder_WMS, as shown below:
<bean id="ViewerLogging_LogFolder_WMS" class="com.mpi.config.ConfigEntry">
{...}
<property name="defaultValue">
<value>C:\Program Files\Polycom\jboss\server\default\log\wms</value>
</property>
{...}
</bean>
Then change the same value in the Viewer Portal counterpart of this configuration file, C:\Program Files\Polycom\deploy\viewerportal.war \WEB-INF\config\default\bootstrap\conman\logging.xml.
4 If you use the streaming server to create these log files, do not forget to update the log folder settings in the server configuration.
If the streaming server is running on a different machine, you will need to expose the folder as a shared folder with read-write access and refer to it from the server by its networking alias.
5 If you want to use client-side logging (in this case, Windows Media Player sends streaming statistics data over the network to a special logging URL every time a program is being watched), make sure you set correctly your domain properties in Admin Portal.
a In Admin Portal, go to System > Domains, click on your domain link in the list of the domains and scroll down to the section "Domain System Properties".
b Check the check box "Receive Windows Media Player Logs". Set the value of "URL for Logging Data" to http://<SiteURL>:<Port>/viewerportal /wmiislog.logger, where <SiteURL>:<Port> is the site URL and the port number by which is Viewer Portal is available.
c Click on Save. To check if the URL is correct, you can type or paste it in your browser address line. You should get a page that reads: WMS ISAPI Log Dll/9.01.01.3841
6 If the JBoss installer running on the Polycom VMC 1000 appliance has been altered from the default, you will need to make some changes..
Note: The following changes to the JBoss Log 4J settings must be made for logging to perform correctly.

Polycom VMC 1000 Administrator Guide Windows Media Log Files
246 Polycom, Inc.
For this, open the file called jboss-log4j.xml (normally it can be found under C:\ProgramFiles\Polycom\jboss\server\default\conf\jboss-log4j.xml) and make the following adjustments there:
A.) Add the appender called WMSIISLOG, as shown:
<!-- A time/date based rolling appender used by the WM client-side logging servlet -->
<appender name="WMSIISLOG" class="org.jboss.logging.appender.DailyRollingFileAppender">
<errorHandler class="org.jboss.logging.util.OnlyOnceErrorHandler"/>
<param name="File" value="C:/Program Files/Polycom/jboss/server/default/log/wms"/>
<param name="Append" value="false"/>
<param name="Threshold" value="INFO"/>
<param name="DatePattern" value="yyyyMMddHH'.log'"/>
<layout class="org.apache.log4j.PatternLayout">
<param name="ConversionPattern" value="%m%n"/>
</layout>
</appender>
B.) Add the logger with name "wmsiislog" that uses this appender, as shown:
<logger name="wmsiislog">
<level value="INFO" />
<appender-ref ref="WMSIISLOG"/>
</logger>
Note: The value of the parameter “File” above may or may not coincide with the path to the folder set at step 2. It is a default value to be overridden by the value from step 2.
Note: Do not add the appender to the root logging category. See following.

Windows Media Log Files Troubleshooting
Polycom, Inc. 247
<root>
<priority value="INFO" />
<appender-ref ref="CONSOLE"/>
<appender-ref ref="FILE"/>
<appender-ref ref="MPIFILE"/>
<appender-ref ref="DS"/>
<appender-ref ref="VIEWERPORTAL"/>
<appender-ref ref="ADMINPORTAL"/>
<appender-ref ref="SERVICEPORTAL"/>
<appender-ref ref="MANAGEMENTAPP"/>
<appender-ref ref="ANGUS"/>
<!--appender-ref ref="WMSIISLOG"/ <--- Do not add the WMSIISLOG appender here!
</root>
Save the changes.
7 Restart JBoss.
Manually Ingesting LOG Files1 From C:\Program Files\Polycom\jboss\server\default\log\wms pick
the LOG file you want to ingest E.g. “WMS_ISAPI_2009092510.log”
2 Go to C:\Program Files\Polycom\jboss\server\default\log\wms\dyn_logged and pick the last parsed file / any already parsed file, E.g. WMS_ISAPI_2009092906.log
3 Rename the file in Step 1 to the file name in Step 2. [WMS_ISAPI_2009092510.log => WMS_ISAPI_2009092906.log]
4 Go to the Admin Portal and navigate to System > Scheduled Processes and click on Run Now against InhouseWMSParser.
Confirm the newly renamed file is parsed and moved to C:\Program Files\Polycom\jboss\server\default\log\wms\dyn_logged folder.

Polycom VMC 1000 Administrator Guide Windows Media Log Files
248 Polycom, Inc.

Polycom, Inc. 249
AAppendix
This appendix contains four supplementary sections:
• HTTP Download for Flash VOD Content
• Adding Custom Pages to Viewer Portal
• Configuring HTTPS for the Polycom VMC 1000
HTTP Download for Flash VOD ContentThis section describes how to use the HTTP download option to download Flash VOD content (*.flv) from a remote (storage) network location for a VOD program:
In this example the local Polycom VMC 1000 JBoss and IIS is on machine 10.1.202.197 and the remote storage is on 10.1.202.195.
1 Create a new "Resources\Storage" for example: On-ma-training-51 with the network storage as the "Root Path":

Polycom VMC 1000 Administrator Guide HTTP Download for Flash VOD Content
250 Polycom, Inc.
2 In the local IIS which maps to the JBoss for the Polycom VMC 1000, create a virtual directory (for example, "remote") pointing to the remote network share \\10.1.202.195\Content, with the permissions shown:
In the "Connect As..." button in the Virtual Directory tab, specify the user who has permissions to connect to the network share \\10.1.202.195\Content.
3 Add a "HTTP Access Point" to the Storage , for example APremote. Note that the Host is the IIS webserver which maps to JBoss for the Polycom VMC 1000. Save the Access point and the Storage created.
4 Create just one HTTP Server Delivery Option for the IIS webserver which maps to the JBoss for the Polycom VMC 1000. Create a Download Access Point for the remote storage and save the access point and the HTTP Delivery Option.
5 Upload Flash content to the remote storage.
6 Now when you create a program for the flash VOD choose the remote download access point created in the HTTP Delivery Option for the Adobe Flash Video and save the program. Now the Flash content can be viewed in the Viewer Portal.

Adding Custom Pages to Viewer Portal Appendix
Polycom, Inc. 251
Adding Custom Pages to Viewer PortalThe Polycom VMC 1000 allows custom pages to be added to the Viewer Portal without coding.
1 Edit viewerportal-servlet.xml.
2 Add a new bean definition per custom page using the example below (You can replace the "name" attribute with anything, it is just used to identify the page within the context of the xml file. The "viewName" attribute identifies the view file to be resolved. Either jsp's or templates can be used, they must just exist under the appropriate domain directory, or be in the default directory (under jsp or template). The example below would be found under /WEB-INF/templates.
<bean name="CustomPage" class="org.springframework.web.servlet.mvc.ParameterizableViewController"> <property name="viewName" value="accenture/customPage.vm" /> </bean>
3 Find the bean xml fragment named "StaticUrlMapping" in viewerportal-servlet.xml. Add your custom page to the list of entries in the "urlMap" property, with the key being the url fragment that will be referenced and the value referencing the bean created in step 2.
<bean id="StaticUrlMapping" class="org.springframework.web.servlet.handler.SimpleUrlHandlerMapping"> <property name="order" value="2"></property> <property name="pathMatcher"> <bean class="com.mpi.mp.webutil.util.TailEndPathMatcher"></bean> </property> <property name="urlMap"> <map> <entry key="/ScheduledOccurrenceService.json.do" value="ScheduledOccurrenceServiceExporter"/> <entry key="/LiveCalendarService.json.do" value="LiveCalendarExporter"/> <entry key="/ReviewService.json.do" value="ReviewServiceExporter"/> <entry key="/RateService.json.do" value="RatingServiceExporter"/> <entry key="/ViewerQuestionSubmissionService.json.do" value="QuestionServiceExporter"/> <entry key="/BroadcastStatusService.json.do" value="BroadcastStatusServiceExporter"/> <entry key="/viewEventCompat.do" value="ViewEventRedirectController"></entry> <entry key="/event.ics" value="ICalController"/> <entry key="/customPage.do" value="CustomPage"/> </map>

Polycom VMC 1000 Administrator Guide Configuring HTTPS for the Polycom VMC 1000
252 Polycom, Inc.
</property> <property name="interceptors"> <list> <ref bean="SecuredObjectInterceptor"/> <ref bean="EventSecurityInterceptor"/> <ref bean="RequiredLoginInterceptor"/> </list> </property> </bean>
4 The example above can be accessed by the url http://host/viewerportal/defaultdomain/customPage.do. It will contain the default application header and footer.
Configuring HTTPS for the Polycom VMC 1000HTTPS is an option for Polycom users.
1 Log on to the IIS Web Server(s) and import the certificate into IIS.
2 Specify the SSL port on your Polycom VMC 1000 Website.
3 Import the certificate into the Windows Keystore window.
If you select "Automatically select the certificate store based on the type of certificate," there is a shortcut to importing the certificate through the local machine's certificate store: Internet Explorer > Tools > Internet Options > Content Tab > Certificates > Import.
4 Log in to the Polycom VMC 1000 and go to System Menu. Select Component Configuration.
5 Click the top Edit button.
6 Under the Admin Portal and Viewer Portal section enable “Require HTTPS for Login.”
7 Save this file and restart the Polycom Application Service from each Polycom App Server.
8 With the above changes, HTTPS should be required only on the login page for Polycom VMC 1000 Admin and Viewer Portals. Once logged in, HTTPS no longer displays on any of the pages you navigate to.
NOTE: When HTTPS is enabled, Windows Media Server / IIS does not support logging.
NOTE: When HTTPS is enabled, a message may appear as a pop-up in the Live Broadcast Console, asking whether you wish to view non-secure content. Click Yes or OK. Encoders that do not support HTTPS will result in this message.