po 403 - bushcraft (canadian scout manual)
TRANSCRIPT

8/14/2019 PO 403 - Bushcraft (Canadian Scout Manual)
http://slidepdf.com/reader/full/po-403-bushcraft-canadian-scout-manual 1/98
A-CR-CCP-121/PT-001
3-1
PO 403 BUSHCRAFT
EO DESCRIPTION PAGE01 Select personal clothing and equipment. 3-202 Pack and carry individual clothing and
equipment.3-9
03 Apply the principles of safe toolcraft. 3-1504 Assemble a survival kit. 3-1705 Light a stove and lantern. 3-1806 Discuss the principles of outdoor cooking
with water procured in the field.3-23
07 Construct a shelter. 3-25
08 Follow camp routine and discipline in thefield. 3-2709 Discuss natural hazards. 3-2910 Demonstrate a concern for the environment. 3-3711 Tie a knot (thumb, figure 8, and reef knots;
clove and half hitches).3-40
12 Light a fire. 3-45
G r e e n
S t a r
13 Apply field signals and formations. 3-4814 Employ methods of environmentally safe
waste disposal in the field.3-49
15 Maintain section equipment. 3-5116 Tie a knot (bowline, Fisherman’s, and square
lashing).3-55
17 Identify bivouac site and all its variouscomponents. 3-5718 Observe hiking techniques. 3-6019 Prepare for an expedition. 3-6420 Discuss dangerous animals. 3-67
R e d
S t a r
21 Employ voice procedures 3-6922 Discuss survival psychology and strategy. 3-7223 Predict a change in weather. 3-8024 Judge a distance. 3-87 S
i l v e r
S t a r
25 Construct an improvised shelter. 3-90
INTRODUCTION
The skills and knowledge of Bushcraft are some of the key elements inthe Army Cadet training program. Many of the greatest challenges andrewards in this program will occur in adventurous outdoor training. Once

8/14/2019 PO 403 - Bushcraft (Canadian Scout Manual)
http://slidepdf.com/reader/full/po-403-bushcraft-canadian-scout-manual 2/98

8/14/2019 PO 403 - Bushcraft (Canadian Scout Manual)
http://slidepdf.com/reader/full/po-403-bushcraft-canadian-scout-manual 3/98
A-CR-CCP-121/PT-001
3-3
changes. More people die from being improperly prepared for weatherchanges than any other cause in the outdoors.
CLOTHING
Clothing that you wear for outdoor activity must protect you from sun,wind, rain and snow, variations of temperature and insects.
The components of outdoor clothing can be identified as:a. hat – your hat should be wide brimmed for sun and rain
protection, with holes for ventilation;b. shell (jacket) – your shell is your primary protection from wind
and rain or snow and keeps your insulation layer dry. It shouldbe long enough to reach your thighs. It should have a hood aswell as wrist, neck and waist closures that you can loosen ortighten to allow ventilation. You need to remember thatmoisture can also come from inside your clothes as youperspire in warm weather or while you are participating instrenuous activities. You can control the build up of moisture inyour clothes by wearing a shell that is made from a waterproof breathable fabric and has extra ventilation openings under thearmpits. The extra vents and the ability of the material to allowmoist air out without allowing rain in helps keep you dry. Alsolook for a shell that has a zippered opening in the front and hasno permanent insulation layer attached to it. You may alsochoose a pair of wind or rain pants to compliment theprotection of your shell;
c. insulation – you will want to have appropriate insulation forthe coldest weather expected during your activity outside. Thebest method of insulating yourself is to have several thin layersof insulative clothing as opposed to one thick layer. The thinlayers will allow you to adjust the amount of insulation youhave on at one time, and add or subtract as the temperature oryour physical activity changes. The air space created betweenthe layers is excellent insulation! Wool, and the morelightweight synthetic fleece materials, make good insulatorsbecause they maintain their insulative capacity even when wet.Be sure the insulation layers you choose fit under your shell,and that they insulate your neck, shoulders, torso and lowerback. Insulation for your legs should be chosen with the type of
activities and the lowest expected temperature in mind;d. shirt – in warm weather you will need a long sleeve shirt toprotect you from the sun and insects. The sleeves should have
8/14/2019 PO 403 - Bushcraft (Canadian Scout Manual)
http://slidepdf.com/reader/full/po-403-bushcraft-canadian-scout-manual 4/98
A-CR-CCP-121/PT-001
3-4
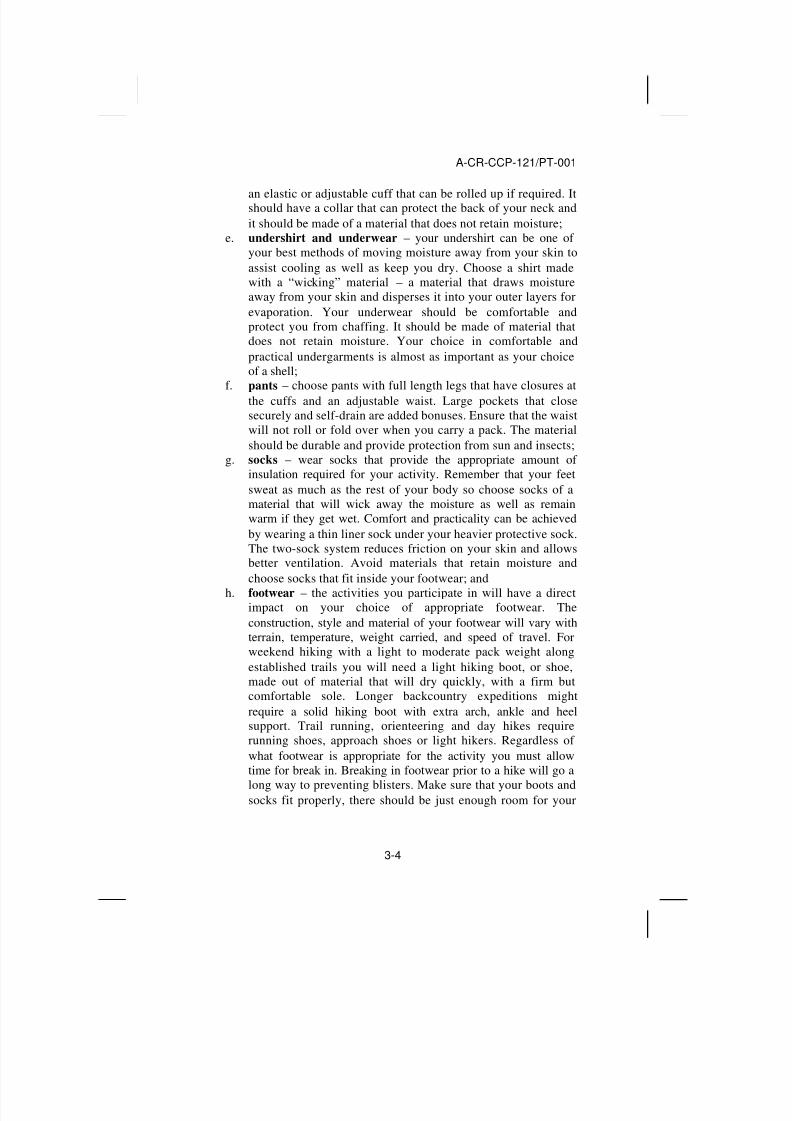
an elastic or adjustable cuff that can be rolled up if required. Itshould have a collar that can protect the back of your neck andit should be made of a material that does not retain moisture;
e. undershirt and underwear – your undershirt can be one of your best methods of moving moisture away from your skin toassist cooling as well as keep you dry. Choose a shirt madewith a “wicking” material – a material that draws moistureaway from your skin and disperses it into your outer layers forevaporation. Your underwear should be comfortable andprotect you from chaffing. It should be made of material thatdoes not retain moisture. Your choice in comfortable andpractical undergarments is almost as important as your choiceof a shell;
f. pants – choose pants with full length legs that have closures atthe cuffs and an adjustable waist. Large pockets that closesecurely and self-drain are added bonuses. Ensure that the waistwill not roll or fold over when you carry a pack. The materialshould be durable and provide protection from sun and insects;
g. socks – wear socks that provide the appropriate amount of insulation required for your activity. Remember that your feetsweat as much as the rest of your body so choose socks of amaterial that will wick away the moisture as well as remainwarm if they get wet. Comfort and practicality can be achievedby wearing a thin liner sock under your heavier protective sock.The two-sock system reduces friction on your skin and allowsbetter ventilation. Avoid materials that retain moisture andchoose socks that fit inside your footwear; and
h. footwear – the activities you participate in will have a directimpact on your choice of appropriate footwear. Theconstruction, style and material of your footwear will vary withterrain, temperature, weight carried, and speed of travel. Forweekend hiking with a light to moderate pack weight alongestablished trails you will need a light hiking boot, or shoe,made out of material that will dry quickly, with a firm butcomfortable sole. Longer backcountry expeditions mightrequire a solid hiking boot with extra arch, ankle and heelsupport. Trail running, orienteering and day hikes requirerunning shoes, approach shoes or light hikers. Regardless of what footwear is appropriate for the activity you must allowtime for break in. Breaking in footwear prior to a hike will go a
long way to preventing blisters. Make sure that your boots andsocks fit properly, there should be just enough room for your
8/14/2019 PO 403 - Bushcraft (Canadian Scout Manual)
http://slidepdf.com/reader/full/po-403-bushcraft-canadian-scout-manual 5/98
A-CR-CCP-121/PT-001
3-5
toes to move a little forward (this allows room for your toeswhen you walk downhill).
In general, your clothing should be comfortable and loose fitting. Tryall your individual items on before going out to ensure fit and thatthere is no damage or missing parts. Check your range of motion withall your layers on and be sure that you can reach and stretch withoutbeing bound by your clothes. You can complement your cold weatherclothing with mitts and a toque made from a good insulator that shedsmoisture. Keep all your clothes as clean as possible, repair and washwhen required.
Moisture management is a technique of controlling moisture build-upin your clothes. Along with choosing appropriate outdoor clothing youcan manage moisture by:
a. ventilating your clothing by opening cuffs, “pit zips” and thefront zipper;
b. wearing clean layers that are loose that don’t retain moisture;c. removing your hat when participating in strenuous activities –
except when in direct sunlight;d. choosing insulation that is appropriate to the temperature and
activity, and adding or subtracting layers for changes as theyoccur; and
e. keeping your socks clean and dry. Always carry extra socks,and change your socks regularly.
Remember “COLD ” if you don’t want to be cold:C –c lean clothes breathe and insulate better;O – avoidoverheating by ventilating;L – dress inlooselayers; andD – staydry.
PERSONAL EQUIPMENT
Your personal equipment is divided into two categories: objects thatyou carry in your pockets, and objects that find a place in your loadcarrying device.
Items you would ordinarily carry in your pockets are:a. whistle (plastic);
b. folding pocket knife with a large (10cm) and small blade;c. personal identification and medical insurance card;d. map and compass;

8/14/2019 PO 403 - Bushcraft (Canadian Scout Manual)
http://slidepdf.com/reader/full/po-403-bushcraft-canadian-scout-manual 6/98
A-CR-CCP-121/PT-001
3-6
e. matches;f. survival kit;g. lip balm;h. notepad and pencil; andi. small flashlight.
Keep your knife blades sharp and remove or reverse flashlight batterieswhen storing your flashlight.
SLEEPING BAGS
Your choice of a sleeping bag has a lot in common with your choice of outdoor clothing. It must be the right size (length and width), have theappropriate amount of insulation for the coldest expected temperature,be made of a material that breathes and doesn’t retain moisture, andhave a good quality fastener (zipper).Sleeping bag construction – the parts of a sleeping bag are:
a. outer shell – constructed from a light weight fabric, oftennylon or polyester, it should be of sufficient weight and qualityto protect the insulation layer;
b. insulation – sleeping bag insulation is divided into twocategories: natural and synthetic. Natural insulation is usuallywaterfowl down – the short feathers closest to a duck’s, orgoose’s, body that insulate the animal when in cold water.There is a variance in quality of down and the methods used tosecure it in place inside the bag’s inner and outer shell. Lookfor a bag with good quality down with the insulation held inplace by “baffles” – dividers sewn between the two shells thatkeep the down in place. Down is the warmest and lightestinsulation that can be found in a sleeping bag, however it losesalmost all of its insulative value when it gets wet – and it isvery difficult to dry in the field. Synthetic insulation comes insheets and is secured between the shells in layers. Check howmany layers of insulation are used and how they are attached.Some bags offer more insulation on the top than on the bottom.Avoid bags where the insulation is secured by sewing the twoshells together creating seams where there is no insulation.Most synthetic insulation retains its insulative value when wet.Some synthetics are very light and warm – they make a betterall-round choice than down for a general purpose sleeping bag;
c. inner shell – constructed from a light weight fabric. Look foran inner shell that doesn’t retain moisture. Many inexpensivebags use cotton/flannel inner shells, which are comfortable, but

8/14/2019 PO 403 - Bushcraft (Canadian Scout Manual)
http://slidepdf.com/reader/full/po-403-bushcraft-canadian-scout-manual 7/98
A-CR-CCP-121/PT-001
3-7
not suitable for a trekking or expedition bag as cotton takes toolong to dry;d. hood – a part of the main bag that you can pull around your
head in cold weather. This keeps your head warm without abuild up of moisture from your breath in the bag;
e. liner – a thin bag you place inside your main bag to help keepthe main bag clean and to offer a little more insulation;
f. overbag – a durable bag placed over your main bag to protectthe outer shell, and to offer more insulation. Overbags madefrom waterproof and waterproof-breathable material can beused as mini-shelters – there are several good designs of these“bivi-bags” that have screened openings to protect your facefrom bugs and to allow some ventilation in warm weather; and
g. vapour barrier – a non-permeable membrane designed to keepwarm moist air created by your body inside the sleeping bagcomponents. It is used only in temperatures below 0º.
Choosing a sleeping bag – check your bag size by getting in andmoving around. You need some space for a liner and extra clothes incold weather. Be sure you have enough room to move your arms to zipup from the inside, and enough room around your feet so that they canrest in a comfortable position. Bags come in three basic styles, eachone offering their own advantages:
a. rectangular bag – the most common economical bag. Thezipper often opens fully to create a double sized blanket. Thisstyle is roomy and can be useful for warm weather camping orindoor accommodation. The disadvantages as a bag fortrekking or expeditions are numerous. The extra air spacearound your torso, legs and feet means that it takes more heatenergy to heat up and keep the space warm. The extra materialmeans the bag is bigger and heavier. There is no protection foryour head in cold weather, and the liner materials used tend toretain moisture and odours;
b. mummy bag – named this because you resemble an ancientEgyptian mummy when you’re in it! The bag tapers from theopening following the contours of your body closely. There isvery little extra air space once you are in the bag. The zippermay only reach halfway down the side of the bag and it isprotected by an insulated flap (called a “draft tube”). Theopening of the bag will have an insulated hood with a draw
cord to pull the hood snug around your face to keep warm airin. Mummy bags for extreme cold will come with two separatebags, an inner and outer, that are used together. The mummy

8/14/2019 PO 403 - Bushcraft (Canadian Scout Manual)
http://slidepdf.com/reader/full/po-403-bushcraft-canadian-scout-manual 8/98
A-CR-CCP-121/PT-001
3-8
bag is certainly the warmest of the bag styles. The amount andtype of the insulation will determine the overall bag weight;and
c. barrel bag – this is a compromise between the efficiency of themummy design and the economy of the rectangular bags. Theshape tapers from the opening towards the foot, but is stillconsiderably roomier than a mummy. Quite often there will bea hood with a draw cord, or at least an extension of one side of the opening that offers some head insulation. Depending on theinsulation, this design is a good choice for spring, summer andfall camping.
Care of your sleeping bag – keep your bag clean! Do not eat while inor sitting on your sleeping bag. Repair rips and damage as soon as ithappens. Protect your bag from moisture, water from outside andmoisture created by your own body. Air out your bag after each night’suse and do not sleep with your head tucked into your bag. When youpack your bag use a “stuff sack” and do just that – stuff the bag in, donot roll or fold it.
SLEEPING PAD
You need a layer of insulation between you and the ground when yousleep, especially in cold weather. As with the sleeping bag, choose apad that is appropriate for the activity you are participating in and theweather you expect. The colder the ground temperature, the moreinsulation you’ll need. Pads come in several length and designs:
a. closed cell foam pad – the foam is lightweight and doesn’tabsorb water. You can get foam pads in a variety of thickness,depending on your desired amount of insulation and comfort.Most foam pads are low priced and usually durable;
b. air mattress – rubber, vinyl or a combination of materials in avariety of thickness. Usually they’re heavier than a foam pad,but offer good insulation when fully inflated. Disadvantages arethat they are easily damaged, and they take a long time toinflate for use and deflate to pack. In cold weather, if youinflate your air mattress by mouth, ice crystals will form insidefrom the moisture in your breath (later, in the warmth, themoisture will cause your mattress to rot); and
c. self-inflating foam-air combination pads – these pads use
foam as well as an adjustable valve to create a quick-to-inflatepad that has the insulative values of an air mattress with theconvenience and light weight of a foam pad.

8/14/2019 PO 403 - Bushcraft (Canadian Scout Manual)
http://slidepdf.com/reader/full/po-403-bushcraft-canadian-scout-manual 9/98
A-CR-CCP-121/PT-001
3-9
ACCESSORIES
Some small pieces of kit you should always carry in your pack:a. stainless steel cup, knife/fork/spoon (KFS);b. insect repellant and sunscreen;c. a small tarp (at least 2m x 2m);d. small trowel for digging;e. sewing kitf. a first aid kit; andg. hygiene products (as required).
EO 403.02: PACK AND CARRY INDIVIDUAL
CLOTHING AND EQUIPMENTLOAD CARRYING DEVICES
There are many devices made to assist you in carrying loads on yourtrek or expedition. Some of these devices are:
a. backpack (also known as a “rucksack”);b. “load bearing vest” or “webbing” – used primarily by
military forces, webbing (small compartments attached to acommon harness) and the vest allow soldiers to carry theessential pieces of their equipment with them at all times.Enough kit can be carried to support a person for 24 hours;
c. canoe pack and “dry bags” – used by canoeists to carry all
their equipment in their canoe. The special features of a canoepack are large volume and soft sides – to avoid damage to thecanoe. Dry bags are specially constructed to be waterproof,even in the case of being capsized;
d. barrel – while voyageurs used to pack wooden hardwoodbarrels for trade and food supplies, modern plastic barrels forexpeditions offer animal-proof and water tight storage for foodand fragile equipment. Often, these are used in canoeing andexpeditions in bear country; and
e. pack board and tumpline – are two traditional load carryingdevices for carrying heavy loads. The pack board is carriedbalanced on your shoulders and upper back, a tumpline (a bandfrom the top of the load around your forehead) assists inkeeping the balance of the load high and resting on your bonestructure. The combination pack board with tumpline is still

8/14/2019 PO 403 - Bushcraft (Canadian Scout Manual)
http://slidepdf.com/reader/full/po-403-bushcraft-canadian-scout-manual 10/98
A-CR-CCP-121/PT-001
3-10
common with traditional porters and canoeists (for portagingheavy loads).
BACKPACKS
The common parts of backpacks are:a. harness – includes backplate, shoulder straps and sternum strap;b. hip belt;c. frame – internal or external; andd. bag.
The two common backpack designs are:a. external frame; andb. internal frame.
EXTERNAL FRAME BACKPACK
External frame backpacks are constructed with a bag attached to avisible metal or resin frame. Some external frame packs offer a framethat adjusts in length, however most are not adjustable. It is importantto choose a frame that is the correct size. Try the pack on and ensurethe hip pads and hip belt rest snugly on your hips – the shoulder strapsshould connect to the harness at the same level as your shoulders.
External frame packs have the advantages of:a. adaptability of components – bags can interchange and you can
add objects from one person’s pack onto another’s (great if oneof your teammates is having trouble and you want to help carrysome of their kit);
b. you can carry large and awkwardly shaped objects;c. the bag and cargo does not press against your back, offering
ventilation and a comfortable carry;d. frames can be used to make an emergency stretcher; ande. heavy objects are easily attached close to the shoulders.
The disadvantage of this frame is that the pack is very rigid and theload is held higher up your back, raising your centre of gravity.
These characteristics make an external frame pack great for novicetrekkers, and for carrying heavy loads over worn trails and fairly level
terrain.

8/14/2019 PO 403 - Bushcraft (Canadian Scout Manual)
http://slidepdf.com/reader/full/po-403-bushcraft-canadian-scout-manual 11/98
A-CR-CCP-121/PT-001
3-11
External frame pack
INTERNAL FRAME BACKPACK
Internal frame packs are constructed with a resin or aluminum framesewn into pockets in the harness of the bag. Often the frame consists of two “stays” running vertically along the backplate. Aluminum staysare meant to be moulded to the shape of your back. The bag isdesigned to carry all your gear internally with only pockets andaccessories attached to the outside. Some smaller packs may offer theoption of attaching a sleeping bag stuff sack to the top or bottom. Likethe external frame packs, it is important to correctly size your internalframe pack. Some models offer a range of pack sizes and some offeradjustable or replaceable stays.
The opening to the bag is an important feature. A small opening aids inweatherproofing but makes packing and unpacking more difficult. Awide opening is handy but the longer zippers or extra fasteners areoften more prone to trouble. Be sure that the zipper or fastener for theopening(s) is not at a place that will receive a lot of stress when the bagis packed and carried. If the zipper breaks you might not be able toclose the bag! Most larger bags will offer two or more compartments
inside the pack. This will assist you in placing heavier items in theproper place, and keeping all your kit organized.

8/14/2019 PO 403 - Bushcraft (Canadian Scout Manual)
http://slidepdf.com/reader/full/po-403-bushcraft-canadian-scout-manual 12/98
A-CR-CCP-121/PT-001
3-12
The benefits of an internal frame pack are:a. comfortable harness that can be adjusted and moulded to you;b. a bag that holds its load close to your back and close to your
centre of gravity;c. easy to pack bag; andd. the lack of projections and protrusions from pack make
trekking in forests and through tight spaces easier.
The disadvantages of this design are:a. hard to move equipment from one person to another;b. hard to carry large or awkward objects;c. with the backplate pressed against your back, care must be
taken while packing to pad sharp or hard objects; andd. ventilation is restricted across your back.
These characteristics make internal frame packs a good choice fortreks with light to medium weight packs through forest or hilly terrain.Internal frame packs are excellent for climbing and mountaineeringwhere range of motion and a lower centre of gravity are important.
Internal frame pack

8/14/2019 PO 403 - Bushcraft (Canadian Scout Manual)
http://slidepdf.com/reader/full/po-403-bushcraft-canadian-scout-manual 13/98
A-CR-CCP-121/PT-001
3-13
HOW TO WEAR YOUR RUCKSACK
You must take the time to adjust all the features of your pack beforeheading out into the wilderness. Get a teammate to assist you whenputting on your pack – it will be easier to adjust properly with ahelping hand.
Shoulder straps:a. check shoulder straps for length – padding should cover across
shoulder and down front of chest;b. some shoulder straps offer a tensioning strap at the top of the
shoulder that is used once the pack is on to draw the top of theframe closer to the shoulders;
c. some straps offer a quick release feature on one or bothshoulder straps (hip belts as well). These are especially handy if you have fallen into water, or you are in an emergency and youneed to get the pack off immediately. Quick releases are not forroutinely taking off your pack;
d. only tighten the shoulder straps enough to hold the pack to yourback. They are designed to work cooperatively with the hip beltto support your pack; and
e. a sternum strap connects the two shoulder straps together.Because the hip belt takes most of the weight, your shoulderstraps may wander towards the outsides of your shoulders. Thesternum strap holds the shoulder straps in place.
Hip belt:a. wear the hip belt snugly around your hips, not your waist;b. when putting on your pack, tighten your hip belt first, then
your shoulder straps – this ensures that the weight is resting onyour hips; and
c. you can attach a water bottle holster to your hip belt.

8/14/2019 PO 403 - Bushcraft (Canadian Scout Manual)
http://slidepdf.com/reader/full/po-403-bushcraft-canadian-scout-manual 14/98
A-CR-CCP-121/PT-001
3-14
PACKING
General rules:a. fasten all pocket covers and do not let anything hang or dangle
from the outside of your pack;b. place a plastic garbage bag inside the main compartment to
keep your items dry;c. place heavy objects close to the back of the frame, centred and
higher on the load. This will balance your pack;d. carry long items vertically. The width of your load should not
exceed 60cm;e. the shape of the load should be kept as flat as possible;f. snug up all compression straps to keep your load compact;g. place all toiletries in a protective bag inside your pack to avoid
toothpaste flavoured clothes;h. carry all fuels in an approved sealed container;i. pack all the things you will need in an emergency in pockets or
in the top of your pack; j. you want to pack things in the order you are likely to use them
for example, pack your shelter and cooking kit at the top of your bag so that it is the first thing you pull out. If it is rainingwhen you arrive at your biv site, you will not have to pull allyour clothes and sleeping bag out looking for your shelter;k. pack your days meals and snacks in an outside pocket – so youdo not have to open the main bag at lunch or snack time;

8/14/2019 PO 403 - Bushcraft (Canadian Scout Manual)
http://slidepdf.com/reader/full/po-403-bushcraft-canadian-scout-manual 15/98
A-CR-CCP-121/PT-001
3-15
l. get a hydration bag (a soft plastic water bottle with a longflexible drinking tube) or position water bottles in convenientpockets or pouches;
m. avoid carrying more than 16kg (35lbs) – heavier weights inany kind of pack may injure or damage the nerves in yourshoulders. If you notice your hands becoming numb whencarrying a pack, try loosening your shoulder straps, lighteningyour load or padding your shoulders. Experienced and strongertrekkers may find they are comfortable with heavier loads, butthey should still be watchful for signs of injury;
n. Some external frame packs may require extra padding at thesmall of your back to hold the frame away from you. Try yourpack on before your trek and ensure that you do not get anychaffing on your back or hips; and
o. Always protect and pad sharp edges of equipment and tools.
EO 403.03: APPLY PRINCIPLES OF SAFETOOLCRAFT
SAFETY
When using an axe, shovel or bow saw:a. store tools in a secure place, never leave them lying around or
touching the ground;b. always use the right tool for job;
c. follow the safety procedures for using the equipment; andd. keep edges and blades sharp, handles tight, and clean andlightly oil steel parts before storage.
USING A SAW :
To use your saw safely use steady strokes without excessive weight onthe blade. Be sure to firmly secure the wood, and be careful not to sawyour fingers!
USING YOUR AXE :
To use your axe safely;a. set yourself up a safe distance from other people;b. check that the axe head is secure on the handle;
8/14/2019 PO 403 - Bushcraft (Canadian Scout Manual)
http://slidepdf.com/reader/full/po-403-bushcraft-canadian-scout-manual 16/98
A-CR-CCP-121/PT-001
3-16
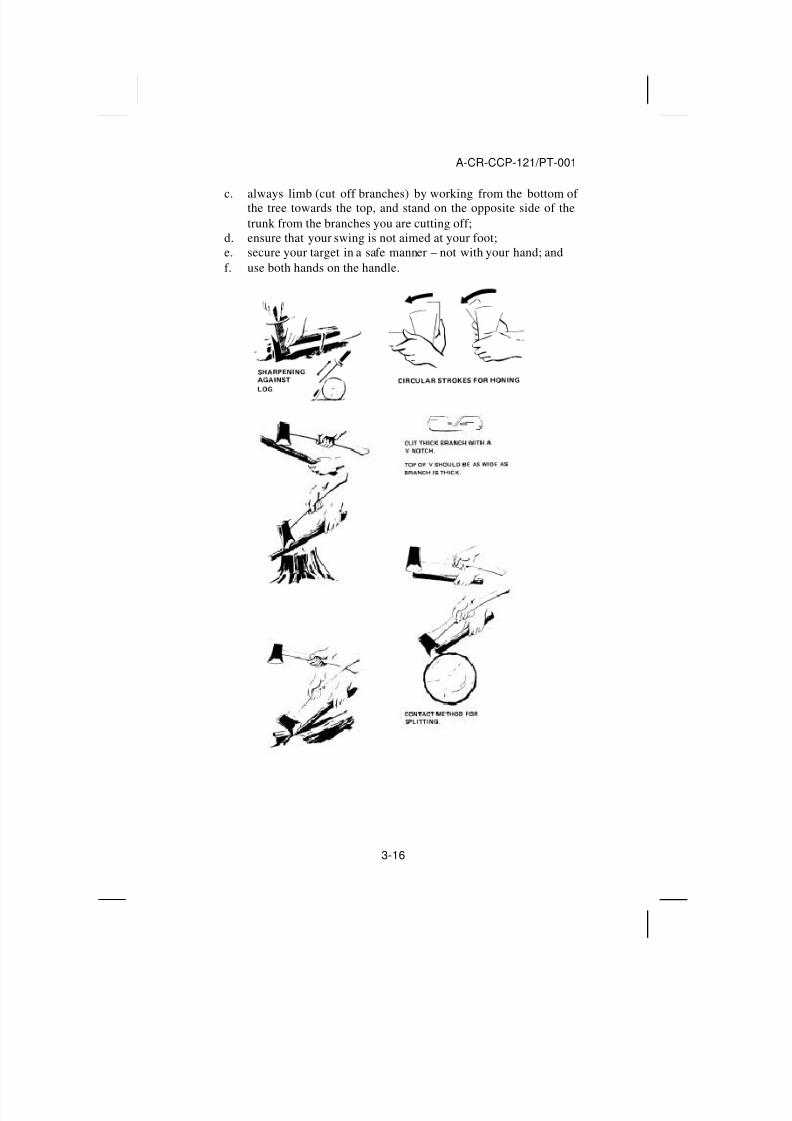
c. always limb (cut off branches) by working from the bottom of the tree towards the top, and stand on the opposite side of thetrunk from the branches you are cutting off;
d. ensure that your swing is not aimed at your foot;e. secure your target in a safe manner – not with your hand; andf. use both hands on the handle.

8/14/2019 PO 403 - Bushcraft (Canadian Scout Manual)
http://slidepdf.com/reader/full/po-403-bushcraft-canadian-scout-manual 17/98
A-CR-CCP-121/PT-001
3-17
EO 403.04: ASSEMBLE A SURVIVAL KIT
You should carry a compact survival kit when travelling or working inthe wilderness. The tools, supplies and medical items in your kit maysave your life in an emergency. Carry your kit in a pocket – it ispossible that you will become separated from your pack (voluntarily ornot) in an emergency.
When you are selecting a container for your kit ask yourself thesequestions:
a. will it float?b. is it sturdy?c. is it water proof?
d. is it compact, light weight and manageable?e. can I get into it in a hurry with cold hands?f. Is it a bright colour so I can find it?
YOUR PERSONAL SURVIVAL KIT
Each survival kit will reflect the needs of the user. Fill yours withitems that you know you will use, and alter the contents to reflect theexpected environment you will be travelling in.
This is a list of items that you can select from to fill your kit. Add tothis list when you discover another useful item. There is no need tocarry all of these items:
a. matches – at least 20, the kind that will strike anywhere andare waterproof – it is a good idea to store matches in a separatecontainer inside you kit. Put the striker from the match box inthe container with them. 35mm film canisters are good for this.Break matches in half to save space if required;
b. candles – tea light or small candles;c. snare wire – #18 gauge brass wire – 5m;d. strong thin cord – 10m;e. fishing gear – 5m of 15 lbs line, bare hooks, a lead weight and
a cork;f. medical kit – iodine, adhesive bandages of various sizes, roll
bandage, small medical scissors, adhesive tape and dressing,moleskin or second skin for blisters, water purification tabs;
g. small safety pins;
h. plastic bags – 2 large orange garbage bags for shelter andsignaling, 2 small bags for water collection;

8/14/2019 PO 403 - Bushcraft (Canadian Scout Manual)
http://slidepdf.com/reader/full/po-403-bushcraft-canadian-scout-manual 18/98
A-CR-CCP-121/PT-001
3-18
i. food – concentrated soup, tea, coffee, sugar, hard candy, orOXO cubes; j. aluminum foil – 3 m (to bake or to make a temporary pot);k. fuel tablets or fire starters – sealed in plastic to avoid
contamination of the rest of your kit;l. alternate to matches for fire starting – magnesium stick or
flint and steel;m. mirror – unbreakable and shatter proof (not glass), for
signaling;n. small simple compass;o. emergency blanket;p. spare flashlight bulb and batteries;q. several sizes of needles and 2m strong thread;r. flexible saw – wire type, oiled before storage;s. crayon (will write anywhere) and paper;t. personal hygiene items – dental floss, baking soda for teeth
brushing, a small piece of soap; andu. duct tape (wrapped around crayon or outside of container).
Note: if you can carry only a bare minimum, carry matches, a signalingdevice (whistle), protection for your body from the elements (garbagebags), a container to heat water, quick energy food and adhesivebandages. In winter you can dip string in paraffin wax and wrap thisaround your matches. This will make the match burn longer and willhelp with starting fires.
EO 403.05: LIGHT A STOVE AND LANTERN
INTRODUCTION
Coleman lanterns and stoves are designed to burn Coleman’s ownbrand of fuel (or naphtha) which is a very flammable liquid fuel. Thisfuel is pressurized in a tank attached to the unit, heated in a generatorand then burned as a gas. Keep your stove and lantern clean and in

8/14/2019 PO 403 - Bushcraft (Canadian Scout Manual)
http://slidepdf.com/reader/full/po-403-bushcraft-canadian-scout-manual 19/98
A-CR-CCP-121/PT-001
3-19
good working condition. Hot food and light in the dark are two keyelements of an enjoyable outdoor experience.
PARTS OF A COLEMAN LANTERN
SAFETY
Remember these safety procedures for the lantern:a. fill, light, and use the lantern outside of tents, buildings and
confined shelters;b. ensure nothing flammable is placed on top of the lantern;c. only fill or pack up a lantern that is cool to your touch;d. be careful to avoid splashing fuel on your skin, or in your eyes;
e. always fill the lantern in a different place than where you planto use it – stay downhill and downwind from stoves or lanternsthat are being used or other sources of fire;
HEATSHIELD

8/14/2019 PO 403 - Bushcraft (Canadian Scout Manual)
http://slidepdf.com/reader/full/po-403-bushcraft-canadian-scout-manual 20/98
A-CR-CCP-121/PT-001
3-20
f. set the lantern on a stable, level and clean surface when you useand fill it. If you hang the lantern for use, ensure that it issecure and a safe distance away from flammable objects;
g. always fill using a funnel, wiping up any spilled fuel; andh. ensure that the heat shield is in place.
TO USE THE LANTERN
After filling your lantern, clean and finger-tighten the filler cap. Topressurize the fuel tank: turn the pump handle counter-clockwise threeturns, pump 10 to 15 strokes and then turn the pump handle clockwiseuntil tight. When pumping, place your thumb over the hole in thepump handle when pushing in, and release it when pulling out.
To light your lantern, light a match, insert the match through the accesshole at the bottom of the globe, and then turn the control knobclockwise just enough to allow some fuel into the mantle. Somelanterns may have a “gas tip cleaning lever” which will have to beengaged to light. Do not touch the mantle with the match. When thelantern is burning with an even white light, turn the control knob tofully open, and return the gas tip cleaning lever.
You will need to re-pressurize the fuel tank on a regular basis duringthe 6 to 8 hours that the fuel will last. Never open a pressurized fueltank when the lantern is lit.
To turn off, simply stop the gas flow by turning the control knob.Always refill your lantern immediately after use (when cool) if youplan to use it again soon.

8/14/2019 PO 403 - Bushcraft (Canadian Scout Manual)
http://slidepdf.com/reader/full/po-403-bushcraft-canadian-scout-manual 21/98
A-CR-CCP-121/PT-001
3-21
PARTS OF A COLEMAN STOVE
SAFETY
Remember these safety procedures for the stove:a. fill, light, and use the stove outside of tents, buildings and
confined shelters;b. ensure no pots or objects are placed on the stove when filling or
lighting;c. only fill or pack up a stove that is cool to your touch;d. always fill the fuel tank in a different place than where you
plan to use the stove – stay downhill and downwind fromstoves or lanterns that are being used or other sources of fire;
e. set the stove on a stable, level and clean surface when you useand fill it; and
f. always fill using a funnel, wiping up any spilled fuelimmediately.
TO USE THE STOVE
After filling your stove, ensure that you clean and finger-tighten thefiller cap. To pressurize the fuel tank: turn the pump handle counter-clockwise three turns, pump 30 to 40 strokes and then turn the pumphandle clockwise until tight. When pumping, place your thumb overthe hole in the pump handle when pushing in, and release it whenpulling out.
Stove lid with baffles
Fuel Tank
Burners Pump
Filler cap
Generator valve &generator assembly

8/14/2019 PO 403 - Bushcraft (Canadian Scout Manual)
http://slidepdf.com/reader/full/po-403-bushcraft-canadian-scout-manual 22/98
A-CR-CCP-121/PT-001
3-22
Ensure that the lid is properly supported by the adjustable braces at thebottom edge of each baffle.
To light your stove, lift the grate and turn the “lighting lever” up. Lighta match, turn the generator valve to the “light” position and, holdingthe match horizontally, place the match close to the right hand burner.When the stove is burning with an even blue flame (about 1 minute),turn the generator valve to the desired setting and return the lightinglever to the down position. If required, light the second burner bylighting a match, pulling the control valve out and opening it 2 to 3turns, and place the match close to the burner.
You will need to re-pressurize the fuel tank on a regular basis duringuse. As the level of fuel decreases, the number of strokes required tore-pressurize will increase. Never open a pressurized fuel tank whenthe stove is lit.
To turn off, simply stop the gas flow by turning the generator valve.Always turn off the left hand burner first. Refill your stoveimmediately after use (when cool) if you plan to use again soon.
SINGLE BURNER STOVE
The single burner stove follows the same lighting procedures as listedabove. The single burner stove is lightweight, convenient to pack andcarry, and is good for one to five people on an expedition.
Burner
Generator
Control valve
Pump

8/14/2019 PO 403 - Bushcraft (Canadian Scout Manual)
http://slidepdf.com/reader/full/po-403-bushcraft-canadian-scout-manual 23/98
A-CR-CCP-121/PT-001
3-23
EO 403.06: DISCUSS THE PRINCIPLES OFOUTDOOR COOKING WITH WATER PROCUREDIN THE FIELD
FINDING DRINKING WATER
We have to be careful of the water we drink – even water in remotewilderness areas can be unsafe. Drinking water can contain hazardsthat are either natural or a result of pollution by human activity.
Water is essential to survival. If there is no safe drinking wateravailable to you, you will have to find your own.
To find safe drinking water, collect rainwater or clean ground water(from a spring or a fast moving stream) in order to avoid large hazardslike silt and debris. For other sources of ground water like lakes, pondsand swamps, you may need to filter out visible hazards with a cloth orscreen. Brown or green water can be somewhat cleaned by adding asmall amount of white ash from a fire to the water, stirring or gentlyshaking for 5 minutes, allowing it to settle, then filtering through acloth. This step doesn’t purify the water, but will make it easier andcleaner for the purifying process. No matter how clean water looks,there could be microscopic hazards as well. These smallest hazards arecalled “pathogens” (disease-causing micro-organisms) and include:
a. protozoa: these include “Giardia” and “Cryptosporidium.”Both of these are caused by fecal-oral transmission, which
means that if you drink water (lake, stream, pond) that ananimal has used as a washroom, you are at risk of getting sick.It effects the intestine and digestive tract causing cramps,diarrhea and nausea. These effects can last up to 21 days;
b. bacteria – these cause diarrhea and dysentery; andc. viruses – these can cause illnesses like hepatitis and polio.
No matter where you have collected your water in the wilderness,bring water to a rolling boil, then cool, before drinking.
An alternative to boiling is a water filter and purifier system. Thesemechanical and chemical devices filter and clean drinking water. Eachwater filter/purifier is designed to eliminate up to a certain size of hazard (stated by the manufacturer) – some systems require the use of iodine or other chemicals to make water completely safe. All filters

8/14/2019 PO 403 - Bushcraft (Canadian Scout Manual)
http://slidepdf.com/reader/full/po-403-bushcraft-canadian-scout-manual 24/98
A-CR-CCP-121/PT-001
3-24
have limits in the amount of water that can be processed during aperiod of time, and in the lifetime of the parts.
OUTDOOR COOKING
Eating regularly in the field is a very important factor in maintainingyour strength and energy. Even though you may be preoccupied withother things going on, you must eat as much healthy food as possiblewhen engaged in physical outdoor activities. Cold weather, strenuousexercise and constant activity use up a lot of your energy reserves, andonly a good, healthy meal can replace them.
As an Army Cadet, you will be introduced to at least one form of military field ration – most likely an Individual Meal Pack (or “IMP”).Each IMP is divided between cooked meat, vegetables and fruit insealed foil pouches, and dried foods in paper pouches. The foilpouches can be heated in boiling water until hot, and some of driedfood may need water added. All of the food items are safe to eat coldand dry – they might not taste as good, though. You will also find highsugar items like chocolate, hard candies and drink mixes, as well ascoffee and tea. Each IMP contains a fair amount of paper, cardboardand foil garbage. One way of reducing the amount of excess garbagethat you’ll have to carry is to “break down” the rations before packing.This entails selecting only the food items that you intend to use andleaving behind the extra packaging. Remember that you will likely behungrier when you’re on your trek than you are when you’re packing –always bring a little extra food.
For snacks on the trail you can supplement your IMPs with highcalorie trail mixtures of nuts, seeds, granola, dried fruit, cereals,candies, etc.
You may also have the opportunity to learn about other ways to cookfresh food in the field:
a. boiling is one of the simplest and surest ways of cooking freshfood. Almost every food source can be made safe to eat byboiling. Save the water left over from cooking plants andanimals to make a soup;
b. food can be baked over a fire, or wrapped in aluminum foil (orwet leaves and mud) and covered in hot coals;

8/14/2019 PO 403 - Bushcraft (Canadian Scout Manual)
http://slidepdf.com/reader/full/po-403-bushcraft-canadian-scout-manual 25/98
A-CR-CCP-121/PT-001
3-25
c. fresh meat and fish can be smoked to cure it, or leave it to dryin bright sun on a rack; andd. food can be fried in a pan on a stove, or on a rock by a fire.
EO 403.07: CONSTRUCT A SHELTER
INTRODUCTION
When you construct your shelter in the wilderness you need toconsider several factors. Not only do you need protection from wind,precipitation and direct sunlight, you must also consider the effect youractivities have on the environment around you.
SELECTING A WILDERNESS SHELTER SITE
To protect yourself and your shelter:a. avoid overhanging tree branches and other overhead hazards;b. avoid open hilltops – you will be exposed to wind and
lightning;c. avoid depressions where water might pool after rainfall;d. ensure you are at least 100 m from your cooking area (bears
and other animals will be attracted to food smells);e. orient the opening of your shelter away from the wind; andf. never site your shelter on a road or path.
To lessen the impact on the environment and other wilderness users:a. ensure you are at least 100m from open water – local wildliferelies on water access for survival and your presence at thewater’s edge may interrupt their habits;
b. select a shelter site out of the direct view of other wildernessusers – at least 10m from a trail, path or road; and
c. construct your shelter on a durable surface like sand, rock orgrass – fragile plant life may be permanently damaged by youruse of the area. Avoid moving large stones and branches.
TENTS AND PRE-MADE SHELTERS
Tents and pre-made shelters come in many styles, sizes, shapes andmaterials. Most will use poles (aluminum, carbon fibre or fibreglass)and “guy” lines for support, and will be constructed from a lightweightwater-resistant material. Tents and shelters are traditionally made from

8/14/2019 PO 403 - Bushcraft (Canadian Scout Manual)
http://slidepdf.com/reader/full/po-403-bushcraft-canadian-scout-manual 26/98
A-CR-CCP-121/PT-001
3-26
nylon, polyester, canvas or cotton. Some require pegs driven into theground for support. No tent or shelter is fire proof, so use extremecaution with open flame.
Modern tent styles include dome, tunnel and ridge (or a-frame)designs. Each tent is rated by the manufacturer for 3-season (spring,summer and fall), or 4-season use. A 4-season tent has strongermaterials and is designed to withstand strong winds and use in coldenvironments.
For backpacking expeditions, choose a tent or shelter that offerssufficient protection for you and your kit. Sometimes you can dividethe parts of the tent to carry among the other members of your “tentgroup” – the group of people sleeping in one tent. Each tent will berated for the number of people that are supposed to fit in the tent tosleep. Often, you will need to choose a tent rated for at least one moreperson than you plan to have in your tent group to allow for room foryour kit. Some tents have a small sheltered area at the door, called avestibule, to allow a storage area for kit.
Some tents use a separate “fly” (a waterproof tarp that fits over thetent) to keep you dry, while some have just a single wall and roof withwaterproof qualities.
All tents must be dried completely before long-term storage.
IMPROVISED SHELTER
Pre-made shelters, lightweight tarps, bivi-bags, and military ponchosand half-shelters can be used as light weight alternatives to a tent. Theeasiest improvised shelter is the “A-frame” shelter. Check forsufficient height by sitting up inside – it should not touch your head.Keep the sides low to protect you from wind, and to trap body heat. .To construct an "A" type shelter:
a. select two trees that are approximately seven feet apart;b. zip the two ground sheets together, or use a tarp 3m x 3m;c. attach a string to the centre grommet and tie to a tree at waist
level (high enough to sit upright inside) with the rubberizedside of the groundsheet down. Be sure to protect the tree bywrapping twice or more, or by padding the string where it goes
around the tree. Repeat this at the other end. The fabric shouldbe tight;

8/14/2019 PO 403 - Bushcraft (Canadian Scout Manual)
http://slidepdf.com/reader/full/po-403-bushcraft-canadian-scout-manual 27/98
A-CR-CCP-121/PT-001
3-27
d. pull the edges of the groundsheet out and place pegs througheach of the corner grommets. Sturdy twigs that areapproximately five inches long will serve well as pegs.Starting with the corners, then pegging the centre is easier.There should be approximately three inches gap between theground and the ground sheet, this will allow for air to circulatethrough and reduce the condensation; and
e. attach a sting to the grommets on the top sides of the groundsheet and pull the sides out (shown below). This will give youmore room inside and prevent rain from pooling.
Note: Elastic cords can be used instead of string, and small metal tentpegs will speed up the setup.
EO 403.08: FOLLOW CAMP ROUTINE ANDDISCIPLINE IN THE FIELD
HYGIENE
A high standard of personal hygiene is important in the field because itprotects you against illness and promotes good health. Keep yourself,your clothing and your equipment clean and dry. Change your clothes,especially socks and undergarments, regularly. Avoid non-biodegradable soap, and soaps or shampoos with perfumes or strongodours – animals and insects will find you more irresistible than youwould probably prefer. Good personal hygiene not only makes you feelbetter, your teammates will appreciate it too!

8/14/2019 PO 403 - Bushcraft (Canadian Scout Manual)
http://slidepdf.com/reader/full/po-403-bushcraft-canadian-scout-manual 28/98
A-CR-CCP-121/PT-001
3-28
Be sure toread EO 403.10 along with these healthy hints:a. wash yourself daily – completely when possible with cleanwater or snow. Wash your hands carefully with water andbiodegradable soap after dirty work or using the washroom, andbefore cooking or eating. When water or privacy is restrictedwash at least the areas of your body that sweat the most – face,neck, feet, armpits and crotch;
b. keep your hair neat and wash with soap or shampoo at leastonce a week;
c. brush your teeth and use floss at least twice a day;d. use body powder on your feet and crotch to help avoid chaffing
in warm weather. Petroleum jelly will also help protect fromchaffing, especially in sensitive areas.
e. it is very important to go to the washroom regularly. Dailybowel movements will keep your system working properly. Achange in activity and diet will often put extra stress on yourdigestive system, so maintain a healthy diet and drink plenty of fluids. Never try to “hold it” when you have to go, especially atnight – you will lose more sleep and be more uncomfortableholding it than if you just get up and go!
f. eat all your food despite whether you think it tastes good or not.Your body requires food for energy;
g. always treat injuries properly and immediately. Keep dressingsand bandages clean and dry. Make sure you inform someone incommand of any serious injury. Wounds that will not heal orthat get bright red could be infected – get medical helpimmediately; and
h. keep alert, cheerful and work hard.
SAFETY REGULATIONS, ROUTINE AND DISCIPLINE :
In a bivouac site, there are general rules that apply to you at all times.These rules do not change and some may not be written or told to youat every occasion. They are procedures that you are expected toremember and follow whenever you are camping with cadets. Theseare called “Standard Operating Procedures” or SOPs.
Each corps will develop their own SOPs for Bushcraft training. Hereare some common SOPs for cadets:
a. you will not go into water above your knees without
supervision and an approved personal floatation device;b. you will use tools safely, and only after receiving instruction;

8/14/2019 PO 403 - Bushcraft (Canadian Scout Manual)
http://slidepdf.com/reader/full/po-403-bushcraft-canadian-scout-manual 29/98
A-CR-CCP-121/PT-001
3-29
c. you will know the location of the group first aid kit, the firefighting equipment and the location of your leader’s shelter;d. you will keep your shelter and the surrounding area tidy and
free from hazards – keep your equipment orderly and protectedwhen not in use;
e. male and female cadets will not enter the other’s shelter;f. you will know the action to take in case of a fire, or other
emergency;g. you will inform your leader before leaving the bivouac site;h. human, food, and water waste will be disposed of properly at
all times;i. you will not venture further than the latrine by yourself; and j. you will protect yourself, you teammates and your equipment
from natural hazards – including fire, animals, insects, heatand cold injuries, lightning and dehydration.
EO 403.09: DISCUSS NATURAL HAZARDS
The Canadian wilderness is a great classroom for learning. There aresome lessons however, that you may not want to learn the hard way.Poisonous plants, biting and stinging insects, nuisance animals,lightning, heat and cold injuries, and hazardous terrain can make anotherwise enjoyable experience a nightmare.
POISONOUS PLANTS
Poison ivy is the most common poisonous plant in Canada. It grows inmany locations and in many varieties. It is common to find it inwooded areas, hillsides and sandy terrain. All varieties share thecommon feature of three shiny leaves that taper to a point at the endand emerge from one common stem. The plant, which can climb orgrow free-standing up to 45cm, may grow a cluster of green berriesthat turn white during the growing season. Contact between the sap of the plant and your skin can cause irritation, redness, swelling andeventually blisters on your skin that can spread if you scratch. About85% of people will react to poison ivy, and your level of sensitivitymay increase over time – meaning that just because you don’t reactnow, you may not be immune later. The sap can be carried on clothingor animals and can be found in the plant at any time of year – even thewinter. The effects of poison ivy will last 14 to 20 days or longer if you spread it by scratching, or by not taking care of it.

8/14/2019 PO 403 - Bushcraft (Canadian Scout Manual)
http://slidepdf.com/reader/full/po-403-bushcraft-canadian-scout-manual 30/98
A-CR-CCP-121/PT-001
3-30
Your simplest defence is to wear long pants when in areas wherepoison ivy grows, wash clothing and boots after suspected contact andtake a good look for it before setting up your shelter for the night. If you come into contact with it, clean the affected area with rubbingalcohol if you have it, or let the area dry and then wash gently withsoap and water. Do not break blisters if they form. Some people mayhave severe allergic reactions to poison ivy, watch for swelling andbreathing problems.
Poison oak (a close relative of poison ivy, but with leaves more like an
oak tree’s) and poison sumac (like regular sumac, except with whiteberry clusters and smooth edged leaves) are two other poisonous plantsfound in Canada. Treat them the same as poison ivy.
INSECTS
Biting and stinging insects are found everywhere in our wilderness.They are the most common hazard for the nature enthusiast. For mostpeople, insects are a nuisance that can be defended against byprotective clothing and repellant. About 15% of people will reactseriously to bee and wasp stings and insect bites. For them, an insectcan produce a condition known as "“anaphylactic shock" – wheretissues swell extensively and can constrict their airway. Reactions can
start with headaches, fever and muscle spasms, and can develop intowidespread hives, nausea, dizziness, and difficulty breathing. Somewill require immediate assistance in the form of antihistamines,

8/14/2019 PO 403 - Bushcraft (Canadian Scout Manual)
http://slidepdf.com/reader/full/po-403-bushcraft-canadian-scout-manual 31/98
A-CR-CCP-121/PT-001
3-31
epinephrine and immediate professional medial aid. Usually thosepeople allergic to stings will carry a kit with them with appropriatemedication in it. If you are allergic, or one of your teammates is, makesure you know how to use the medication in the case of an emergency.
Mosquitoes, black flies, horse flies and deer flies may also causereactions in people. Although not as severe as bee and wasp stings,swelling and fever may result from multiple bites. Wear protectiveclothing, avoiding dark colours (insects are attracted to them), and usea repellant if necessary.
Ticks can also cause irritation and in some cases carry harmful germs.Wear long pants, tucked into socks or closed at the ankle whenwalking in the woods, and check your legs each day for ticksembedded in your skin – they’re about the size of a pinhead. If youfind one, pull it out immediately with tweezers – don’t use yourfingers. You can use a sterile needle to remove any remaining parts. Atick bite may show up early on as a red bump at the site, followed 3 to30 days later by a red rash with a white centre – a “bulls eye.” Save thetick part(s) that you remove in a plastic container and bring it to aphysician if you suspect disease. Wash the bite with soap and water.
NUISANCE ANIMALS
You have the potential to meet a lot of animals during your travels inthe wilderness. Some of these animals will be scared of humans andyou may only catch glimpses of them, or just see their tracks and scat(droppings). Some animals however, you will wish you had never met.
Raccoons, skunks, mice, squirrels and chipmunks are commonwoodland animals that are not shy of human activity. Keep all foodcontainers sealed, avoid spilling food on your clothing, and washdishes and cutlery away from shelters. Don’t feed wild animals, anddissuade animals that hang around your bivouac site. Never eat in yourshelter. Hang food containers from an overhanging branch well awayfrom your shelter to keep persistent animals out. Stay out of oldbuildings and structures.
Bites from animals are rarely harmful, but wolves, coyotes, fox, dogs,bats, skunks and raccoons are known to carry rabies. Squirrels, rabbits,
mice and rats may become rabid but rarely transmit the disease –however they may carry other infections.

8/14/2019 PO 403 - Bushcraft (Canadian Scout Manual)
http://slidepdf.com/reader/full/po-403-bushcraft-canadian-scout-manual 32/98
A-CR-CCP-121/PT-001
3-32
HEAT AND COLD INJURIES
“Hypothermia” is the rapid lowering of your body’s core temperature.“Hyperthermia” is the raising of your body’s core temperature andcomes in two general stages: heat exhaustion and then heat stroke.Both these conditions develop over periods of continued exposure tothe elements, and can be exacerbated by poor planning and poorsupervision.
COLD
Hypothermia, or “exposure,” is the most severe form of cold-relatedinjury. It is defined as a body temperature of less than 35° Celsius or95° Fahrenheit. Hypothermia is a major danger because the symptomscome on so gradually that many victims and their teammates don'tnotice them until it's too late. Hypothermia is usually first noticedwhen a person is shivering and can’t stop. At this point the condition isnot serious and can be treated by getting the person warm, dry andsheltered. Warm food and drink will also help. Severe hypothermiastarts when the person stops shivering – their body is giving up tryingto stay warm. They will become drowsy and eventually lapse intounconsciousness and die without treatment. You can becomehypothermic in almost any weather, in any season – but especially incold, wet and windy environments. Protect yourself from wind andprecipitation, keep warm and dry, make sure you are fit, well-fed andwell-rested before working in the cold. Every person who displayssigns of hypothermia must receive appropriate first aid immediately –that means stop at the closest safe location and treat the person! Mildhypothermia can degrade into serious in a short amount of time.Victims of serious hypothermia must receive medical attention.
In cold weather you must also beware of frostbite. Frostbite happenswhen soft tissue freezes. It is a particular danger on days with a highwind-chill factor. If not properly treated, frostbite can lead to the lossof tissues or even limbs. Exposed and remote skin (face, ears, fingersand toes) is often the first to freeze. Prevent frostbite by wearingappropriate clothing, mitts, hat/toque, socks and footwear. Keep activein a cold environment and stay dry. Treat frostbite by slowly warmingthe affected area. Do not allow this area to freeze again or the fleshcells will die. In cold weather partner cadets (and yourself!) together
to watch each other for signs of cold related injuries.

8/14/2019 PO 403 - Bushcraft (Canadian Scout Manual)
http://slidepdf.com/reader/full/po-403-bushcraft-canadian-scout-manual 33/98
A-CR-CCP-121/PT-001
3-33
Wind Chill is the term used to describe the rate of heat loss on thehuman body resulting from the combined effect of low temperatureand wind. As winds increase, heat is carried away from the body at afaster rate, driving down both the skin temperature and eventually theinternal body temperature.
Interpreting the chart – working like a grid reference, find thecurrent temperature and wind speed, then follow each to where theyintersect on the chart. That gives you the watts per square metrereading. Compare that to the list below.
Under 900 – Comfortable with normal winter clothing900 to 1400 – Work and recreation becomes uncomfortable unlessproperly clothed. Hats, coats and gloves are recommended.1400 to 1600 – Outdoor work and travel are safe with quality winterclothing.1600 to 1800 – Frostbite can occur with prolonged exposure. Heavyouter clothing is essential. Your weather office will add the currentwind chill to public forecasts at this level.1800 to 2000 – Frostbite can occur in a few minutes. Multiple layersof clothing become essential. (May feel like minus 30° C).2000 or more – Unprotected skin can freeze in one minute. Adequateface protection becomes important. Cadets require continuoussupervision while outdoors. Work and travel alone is not advisable.
(May feel like minus 40° C).

8/14/2019 PO 403 - Bushcraft (Canadian Scout Manual)
http://slidepdf.com/reader/full/po-403-bushcraft-canadian-scout-manual 34/98
A-CR-CCP-121/PT-001
3-34
2200 or more – Adequate face protection becomes mandatory. Workand travel alone is hazardous. Special warm-up breaks arerecommended for anyone working outside.2300 or more – Outdoor conditions become dangerous. Postponementof training should be considered. (May feel like minus 50° C).2400 or more – Outdoor conditions are dangerous even for shortperiods of time. All non- emergency outdoor work should cease.Buddy system and observation are mandatory. (May feel like minus60° C).2600 or more – These are rare wind chill values which will beexperienced in some major blizzards. Danger is extreme.
HEAT
Heat exhaustion and heat stroke can be avoided by drinking plenty of water before and during activity in warm weather (up to 1 litre perhour), wearing a hat and sunscreen, and by moderating activity inextremely hot environments. A person suffering from heat exhaustionmay be pale, dizzy, or nauseous, and have cold and clammy skin. Theymay also have a headache or cramps. In fact, a headache is often thefirst sign that you are dehydrated! Heat exhaustion can be treated bygiving the victim cool water to drink and allowing them to rest in theshade. If there is little or no improvement after 30 minutes, seekmedical attention. Untreated, heat exhaustion symptoms willprogressively get worse, leading to heat stroke and eventually death.
Heat stroke is just the next step from untreated heat exhaustion.Symptoms are all of the above getting worse, leading to disorientationand irrational or even violent behaviour. If conscious, the victim willcomplain of chills and nausea and their skin will become hot and dryas their body looses its ability to sweat. Heat stroke requires immediatemedical attention! Be prepared to carry out lifesaving first aid.
Sunburn is the result of the suns UV A and UV B ray’s on your skinover a period of time. It can start with a minor burn which shows redon your skin, followed by more serious burns that could include

8/14/2019 PO 403 - Bushcraft (Canadian Scout Manual)
http://slidepdf.com/reader/full/po-403-bushcraft-canadian-scout-manual 35/98
A-CR-CCP-121/PT-001
3-35
second degree (blisters) or third degree burns. Exposure to the sun is aknown cause of skin cancer. The amount of time it takes to burn yourskin depends on several factors:
a. your genetics;b. the protection that you put on – sunscreen (SPF 15 or more!) or
protective clothing;c. amount of time you spend in direct sunshine (note that the
sun’s rays can still burn you through light cloud/fog/smog/mist,as well as shallow water);
d. time of year – there is more risk during summer, but you canstill get sunburn on the coldest day of winter!
e. pollution, and other meteorological factors; andf. your state of health, medication you might be taking, and other
physiological factors.
UV Index – indicates the intensity of the sun's UV rays on a givenday. There are four categories -- low, moderate, high and extreme. Alow UV Index means it will take more than an hour to burn your skin;an extreme level means it will take less than 15 minutes. The index isoften included with weather reports.
Protect yourself by:a. covering up – wear light clothing, long sleeve shirts and full
length pants (or long shorts at least). Alwayswear a hat ,preferably with a wide brim;
b. applying sunscreen to exposed skin every 2 hours, or moreoften if you are near water or perspiring heavily. Put sunscreenon your skin at least 20 minutes before you go out in the sun.Get your cadets used to wearing sunscreen, paying particularattention to the most exposed parts – ears, face, neck, shouldersand back, knees and tops of feet. Do not forget your lips, earsand nose. These parts of your body burn easily; and
c. reducing or avoiding extended exposure during the peak sunhours, 1000-1600hrs.
A sunburn gets worse, even after you move out of the sun. It's adelayed reaction, with most of the pain occurring 12-24 hours afterexposure. Because their skin is thinner and more sensitive than anadult's, children and teenagers need extra protection from ultravioletradiation. A tan indicates that your skin has already been damaged.
Remember, sunburn is not caused by heat. Infrared gives us heat... UVrays give us skin damage.

8/14/2019 PO 403 - Bushcraft (Canadian Scout Manual)
http://slidepdf.com/reader/full/po-403-bushcraft-canadian-scout-manual 36/98
A-CR-CCP-121/PT-001
3-36
People with dark skin can get sunburns and skin cancer. Dark skingives an SFP protection of only about 8.
Penetration of ultraviolet (UV) light increases about 4% per 300m gainin altitude.
Your eyes can be damaged as well by the sun’s rays. This is especiallycommon on the water, and even more on the snow, where the rays arereflected back from the surface. Select a pair of sunglasses rated forfull UV A and UV B protection. On snow, further protect corners of your eyes by placing shields on the temples of the glasses.
DEHYDRATION
Water is more essential to your survival than food. For ordinaryactivity, it is recommended that you drink at least 1 litre of water eachday. For strenuous activity, or activity in a warm environment you mayneed to consume as much as 1 litre per hour. Do not forget that youwill need to drink water regularly, even in the winter, if you areworking hard. Cool water, with no additives, is the best possible drinkto replenish your body.
Take advantage of all rest stops to drink. Drink slowly, take small sipsand hold the water in your mouth for a short time before swallowing.Refill your water bottle(s) at any opportunity. Avoid all caffeinateddrinks, as they will dehydrate you. The two main ways of telling if you are dehydrating are;
a. you have a headache; andb. your urine is dark yellow, or you’ve gone 24hrs without
urinating.
LIGHTNING AND DANGEROUS TERRAIN
Lightning strikes kill people every year. When you notice athunderstorm approaching, stop whatever you are doing and take stepsto ensure your safety. Get out of the water, do not stay on a hill top orin an open field, stay out from under tall single trees, and stay awayfrom towers and poles. If the storm has caught you off-guard, crouchdown as low as you can with your feet close together – this will reducethe surface area of your body exposed to possible ground current from
a nearby strike. Place yourself in a cluster of trees, spread out 10mfrom other members of your team. Avoid depressions where water may
8/14/2019 PO 403 - Bushcraft (Canadian Scout Manual)
http://slidepdf.com/reader/full/po-403-bushcraft-canadian-scout-manual 37/98
A-CR-CCP-121/PT-001
3-37
gather as it will conduct ground current. If your sleeping pad is dry,place it under your feet for insulation.
You should take extra care when crossing dangerous terrain. Steepslopes and cliffs, wet rocks, obstacles on a trail, and deep flowingwater all create risks to your safety when you try to cross them, or passnear them. For difficult obstacles, pass your rucksack over to ateammate first, then cross. Or use a “spotter” at the obstacle to assistteammates. Do not try to wade through water when you can not see thebottom. Only attempt to cross water obstacles deeper than knee-deepwith supervision and the required safety equipment.
If you are required to travel at night, ensure that you can see and beseen. Stay off roads where visibility is limited, and do not try to passthrough dense bush where you can lose your way, become separatedfrom your group or walk off a cliff. Reflective, or bright clothing,glowsticks or flashlights are recommended for each team member.
EO 403.10: DEMONSTRATE A CONCERN FORTHE ENVIRONMENT
MINIMUM IMPACT CAMPING
The goal of minimum impact camping is to leave behind no trace thatyou have used or passed through a wilderness area. By actingresponsibly and taking a few precautions, you can leave a bivouac or atrail in the same natural condition for the next person to enjoy. Youwill also help the wildlife and plants to recover faster from your visit.
There are three types of locations that you may discover in thewilderness. “Pristine” areas (places that show no signs of humanactivity), popular areas, and places that show only some human use.Popular camping areas and trails have obvious and well-worn pathsand bivouac sites. The vegetation is often damaged permanently andthe earth may be worn smooth.
When travelling in the wilderness you will have to choose betweenstaying on established trails and using established bivouac sites, or
going out into pristine areas. Avoid areas and trails that show only alittle use as they have not been permanently damaged and could growback to their natural condition if left alone. By using popular areas and
8/14/2019 PO 403 - Bushcraft (Canadian Scout Manual)
http://slidepdf.com/reader/full/po-403-bushcraft-canadian-scout-manual 38/98
A-CR-CCP-121/PT-001
3-38
trails you actually limit the extension of damage to the wilderness.Many trails have been created to allow people to use the wildernesswithout harming it – they have established toilets, water points andbivouac sites that take the environment into consideration for you.
Remember that you are not the only one using the wilderness – you area guest in someone else’s home. Always clean up after yourself. Anygarbage that you bring in, you must bring out. When possible, clean upother garbage that you find along your way or at your biv. Keep noise,and lights at night, to a minimum, and try not to disturb the naturalsetting by unnecessarily moving or damaging trees, plants or rocks.
If you are lucky enough to find artifacts or traces of previousinhabitants, be careful not to disturb or move them. Respect burialsites, private property, local residences and the privacy of otherwilderness users.
TRAIL ETIQUETTE
Wear shoes and boots with shallow treads so you don’t rip up theground – in the wilderness, the most widespread type of damagecaused by recreational use is caused by people trampling the flora.When following an established trail, avoid taking short cuts or walkingaround wet or muddy sections. These deviations from the trail widen itor unnecessarily damage the land around it. When walking in pristineareas, spread out and take a slightly different route than the person infront of you – you can still follow your leader, but you will not make apermanent trail.
Travel in small groups (4-12 people) whenever possible, and berespectful to others you might meet along the way. Check your clothesregularly and remove hitchhiking noxious weed seedlings and burrs.When you leave a bivouac site it should look exactly as when youarrived – if not better.
COOKING
Read EO 403:12 for safe and appropriate methods of starting and usingfires.
Avoid dropping or draining food on the ground in your cooking area.Waste water from cooking, when cooled, should be evenly distributed

8/14/2019 PO 403 - Bushcraft (Canadian Scout Manual)
http://slidepdf.com/reader/full/po-403-bushcraft-canadian-scout-manual 39/98
A-CR-CCP-121/PT-001
3-39
across the ground away from the cooking area and bivouac site. Do notdump waste water into ground water.
Eat all of your meal and pack up any garbage immediately. Pack wetwaste in a sealed container or plastic bag. Remember to divide garbageup for recycling –cardboard, paper, metal, plastic, glass, etc.
HUMAN WASTE
Wherever possible you should use an established toilet, outhouse orportable toilet. Your choice for an alternative will depend on yourlocation, the size of the group you are in and the time of year.At your bivouac site, the proper disposal of human waste is importantto your health and hygiene, as well as your enjoyment of the outdoors.
In small groups, you should use a “cat-hole” or “one-sit hole.” Eachperson selects a private and dry place and digs a small hole only 15 to20cm deep. Make your deposit and then mix in the dirt from the holewith a stick, covering everything well.
In a group of more than 12 people, you should dig a latrine forcommunal use. A hole about 60cm x 60cm, 30 to 60cm deep willwork for about 20 people for one or two days. Cut the coveringvegetation in one piece and preserve it for covering the hole later.Leave the pile of loose earth and the shovel beside the hole to allowusers to spread some dirt over their deposit. When the hole is full toabout 15cm from the top, cover it with the remaining dirt and originalnatural cover.
8/14/2019 PO 403 - Bushcraft (Canadian Scout Manual)
http://slidepdf.com/reader/full/po-403-bushcraft-canadian-scout-manual 40/98
A-CR-CCP-121/PT-001
3-40
The primary considerations for an appropriate location for a latrine orcat-hole are privacy and the prevention of fecal matter entering groundwater. Choose a site at least 100m from a ground water source, on dryground, in a location away from your bivouac and cooking area, andoff trails and roads. Urine is not especially harmful to the environmentso if you are on the trail and you have to go, and no facilities areavailable, you should find a private, dry and sunny place to relieveyourself.
In the winter it is often too difficult to dig into the ground, or to ensurethat your waste will not pollute ground water. If no establishedfacilities exist, wait for the waste to freeze, then pack it out in adoubled plastic bag.
WASHING
Soap, body oils, sunscreen, grease and fuel residue can all contribute toground water pollution if you are not careful. Wash these off beforeswimming, and don’t use soap when bathing. To bathe with soap, carrya pot or basin of water at least 100m away from a ground water source,and sponge bathe. Use as little soap as possible, and ensure the site youselect is on high and dry ground. In the winter you can wash usingclean snow following the same guidelines.
EO 403.11: TIE A KNOT
TYPES OF ROPES
Ropes are made with natural and synthetic fibres. Natural plant fibrefrom sisal, hemp, manila or cotton can be processed and made intorope. Hemp and manila are the most common natural fibre ropes. Theyare often used in larger sizes for rope bridging because they don’tstretch very much and are easy to grip when wet.
Synthetic ropes are usually made from nylon, polyester, polypropyleneor dacron. These synthetic ropes are generally stronger and lighter thannatural ropes. Nylon is the strongest, but it also stretches significantlyand sinks in water. Polypropylene ropes float, but are not as strong asnylon or polyester.
They can be manufactured using “laid,” “woven,” “kernmantle” or“sash” methods. Laid ropes are usually made of three main strands

8/14/2019 PO 403 - Bushcraft (Canadian Scout Manual)
http://slidepdf.com/reader/full/po-403-bushcraft-canadian-scout-manual 41/98
A-CR-CCP-121/PT-001
3-41
twisted around each other, each strand consisting of many individualfibres which are also twisted around each other. Laid and woven ropesare made for use in many situations while sash ropes are oftendecorative or made for light-duty purposes. Kernmantle ropes are usedprimarily for climbing, abseiling and rescue. They are synthetic ropes,with a protective outer sheath, that are tested for strength usingstandards set by the Union International des Associations d’Alpinisme.
CARE OF ROPES
Ropes, like other pieces of equipment, require care and maintenance toensure they work when you need them to. Some rules of rope care toremember are:
a. do not step on a rope;b. distribute wear on the rope;c. keep it dry and clean – wash with mild soap when dirty;d. store coiled, in a dry place with all knots and kinks removed;e. do not store near strong chemicals (acids , cleaning solutions)
as the fumes may damage the rope fibers;f. rope ends should be whipped, melted or bound to keep rope
from unraveling;g. avoid snagging on, or dragging across, sharp rocks; andh. always inspect a rope before and after use for damage.
TERMS
The following terms are used when describing the formation of thevarious bends and hitches.
Bight – is the middle part of a length of rope. This term also refers toa loop of rope, and to make a bight is to form a loop. Note that the ropedoes not cross over itself in a bight.

8/14/2019 PO 403 - Bushcraft (Canadian Scout Manual)
http://slidepdf.com/reader/full/po-403-bushcraft-canadian-scout-manual 42/98
A-CR-CCP-121/PT-001
3-42
End – (or ‘running end’) is the short length at either end of a rope, whichmay be formed into an eye, or used for making a bend or a hitch. Theend of a rope is also that length of rope left over after making such aneye, bend or hitch. This is commonly the part of the rope that youmanipulate to make the knot, bend, lashing etc.
Standing Part – t his part of the rope usually ‘stands still’ during theknot tying process. Often it is the longer end that leads away from theloop bight or knot.
KNOTS
Knots, bends and lashings are all used to employ rope as a tool forbinding, building or securing. A good knot will maintain much of thestrength of a rope, be easy to untie even after loaded, and won’t slip orcome undone accidentally. Knots are always a temporary connection,and should not be left in ropes after use. Each knot has a specificpurpose and is suitable for use with specific sizes of rope. You need toknow how to tie each knot properly, and when and where to use whichknot.
The Thumb Knot. Another common name for this is the overhandknot. It is used to keep the end of a rope from unravelling, or to stop arope from passing through an eye such as when attaching pegs the guyof your tent. To tie this knot form a loop, making sure the running end of the rope crosses the standing part. Then pass the end around the standingpart. It’s also the first half of tying your shoes.
The Figure Eight Knot. This knot has the same uses as the thumb knot,but is easier to undo. To tie this knot, with the ropeaway from you, takethe standing part in the left hand, palm upward and the running partmaking a loop, then carry on with the running end round behind thestanding part, over the top, then down through the loop which you haveformed .

8/14/2019 PO 403 - Bushcraft (Canadian Scout Manual)
http://slidepdf.com/reader/full/po-403-bushcraft-canadian-scout-manual 43/98
A-CR-CCP-121/PT-001
3-43
The Double Figure of Eight Knot – is used to anchor a rope around atree trunk, pole or such item. Start this knot by tying a figure of eightknot several feet in from the end of the rope. Pass the end aroundwhatever anchor you have chosen. With the end of the rope, trace thepath of the rope that the figure of eight knot takes. Be sure to keep therunning end alongside the standing end as you pass it through theoriginal knot – stay on one side as shown below (on the outside of thestanding rope). This knot will not slip and is easy to undo.

8/14/2019 PO 403 - Bushcraft (Canadian Scout Manual)
http://slidepdf.com/reader/full/po-403-bushcraft-canadian-scout-manual 44/98
A-CR-CCP-121/PT-001
3-44
The Reef Knot – is used for joining two ropes of equal thickness. It isalso used in first aid for tying bandages. It lies flat, holds well and iseasily untied. This knot can also be used for tying packages. To tie thisknot remember: ‘left over right and under, right over left and under.’
The Clove Hitch – is used to secure a rope to a spar, rail or similarfitting. It will slip along the spar or rail if subjected to a sideways pull.It can be made with the end or with the bight of the rope. To tie theclove hitch, follow the diagram below. Be sure to leave enough ropeon the end so that it does not unravel.
The Half Hitch – is used whenever the end of a rope is to be fastenedaround a spar or ring. A ‘round-turn and two half-hitches’ is tied bypassing the rope around the spar, then tying two half hitches – this is avery common knot for tying off shelter cords.
Whipping – Before using a rope, whip the two ends to keep them
from unravelling. To whip the ends of a rope, use a piece of twine orcotton fishing line about 15 cm (6 in.) long. Make it into a loop andplace it at the end of the rope. About 6 cm (3 in.) from the end, begin
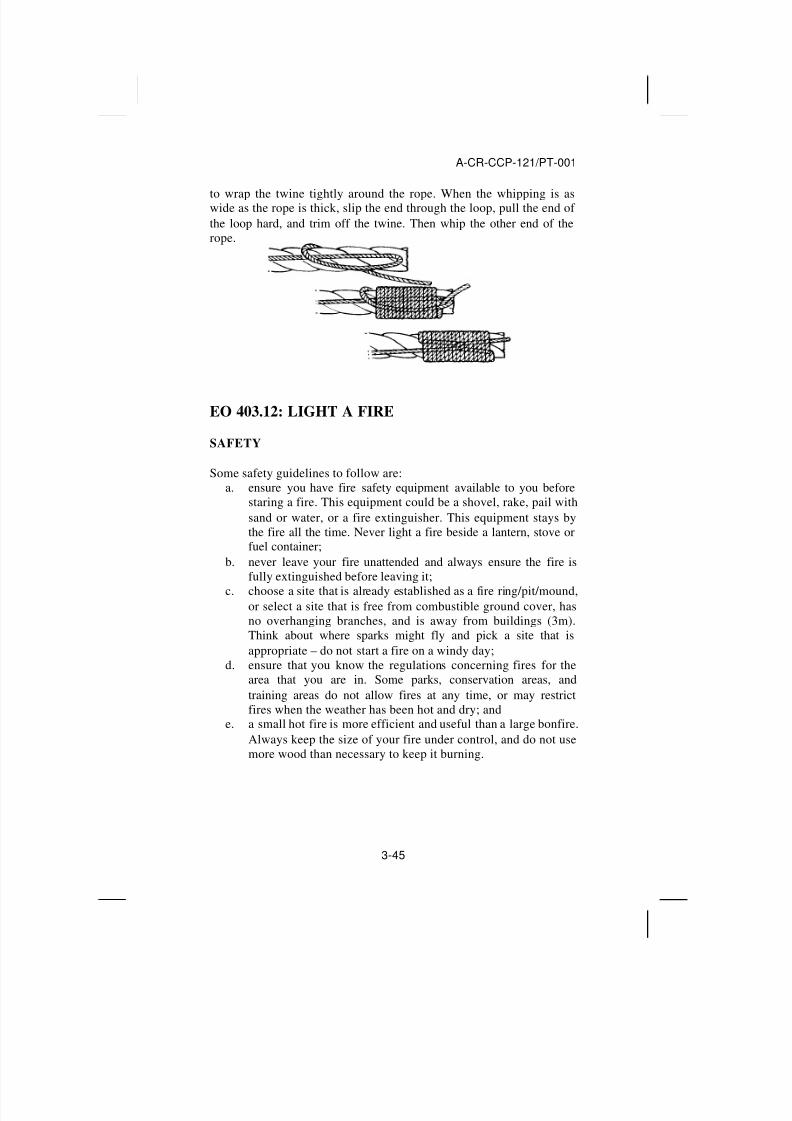
8/14/2019 PO 403 - Bushcraft (Canadian Scout Manual)
http://slidepdf.com/reader/full/po-403-bushcraft-canadian-scout-manual 45/98
A-CR-CCP-121/PT-001
3-45
to wrap the twine tightly around the rope. When the whipping is aswide as the rope is thick, slip the end through the loop, pull the end of the loop hard, and trim off the twine. Then whip the other end of therope.
EO 403.12: LIGHT A FIRE
SAFETY
Some safety guidelines to follow are:a. ensure you have fire safety equipment available to you before
staring a fire. This equipment could be a shovel, rake, pail withsand or water, or a fire extinguisher. This equipment stays bythe fire all the time. Never light a fire beside a lantern, stove orfuel container;
b. never leave your fire unattended and always ensure the fire isfully extinguished before leaving it;
c. choose a site that is already established as a fire ring/pit/mound,or select a site that is free from combustible ground cover, hasno overhanging branches, and is away from buildings (3m).Think about where sparks might fly and pick a site that isappropriate – do not start a fire on a windy day;
d. ensure that you know the regulations concerning fires for thearea that you are in. Some parks, conservation areas, andtraining areas do not allow fires at any time, or may restrictfires when the weather has been hot and dry; and
e. a small hot fire is more efficient and useful than a large bonfire.Always keep the size of your fire under control, and do not usemore wood than necessary to keep it burning.
8/14/2019 PO 403 - Bushcraft (Canadian Scout Manual)
http://slidepdf.com/reader/full/po-403-bushcraft-canadian-scout-manual 46/98
A-CR-CCP-121/PT-001
3-46
A FRIENDLY FIRE
Even though stoves have replaced fires as our main method of cookingfood, you may still find that a small campfire brings warmth andcomfort to your bivouac. Except in survival situations, fires are aluxury, not a necessity.
Campfires can sterilize soil to a depth of 10cm, and overeagerfirewood collectors can strip a bivouac site clean of all available wood– wood that would ordinarily decay and provide nutrients for plantsand insects. Building an environmentally safe and friendly fire takesonly a little extra preparation, and makes cleaning up and disguisingthe fire site after much easier.
Check your area for a sufficient supply of firewood. If there is ashortage in the vicinity, do not build a fire there – this will only add tothe shortage of wood. Only collect firewood that you can break withyour hands and do not take all the available wood from one place –leave some for future use. Only chop or split wood that has beensupplied as firewood by the property manager or owner. Only collectenough firewood for your use – do not stockpile.
If a fire site has already been established, use it. If it is more than 30cmin diameter, remove the excess ashes and coals, distribute them thinlyaround the area, and reform the site to a ring no larger than 30cm.
If you are in a pristine location, you need a fire site that protects theunderlying ground as well as the surrounding environment. The bestway of building a safe and environmentally friendly fire is to use a firepan – a steel pan at least 30cm across, with 10cm high sides, that youplace on top of a dirt or rock platform. Build your fire in the pan andyou can use the sides to hold up a grill for cooking.
As a second choice you can build a platform about 15cm high and30cm across, from sand and dirt to place your fire ring and fire on.Place the sand pile on a piece of tarp, ground sheet or a stuff sack tomake cleanup easier. Do not dig a hole in order to supply the dirt –find loose sand or dirt that is available.
Lastly, you could dig through the top layers of loose and decomposing
matter, called “duff,” to the soil below to create a fire pit. Check forroot systems that might ignite and carry the fire underground. Build
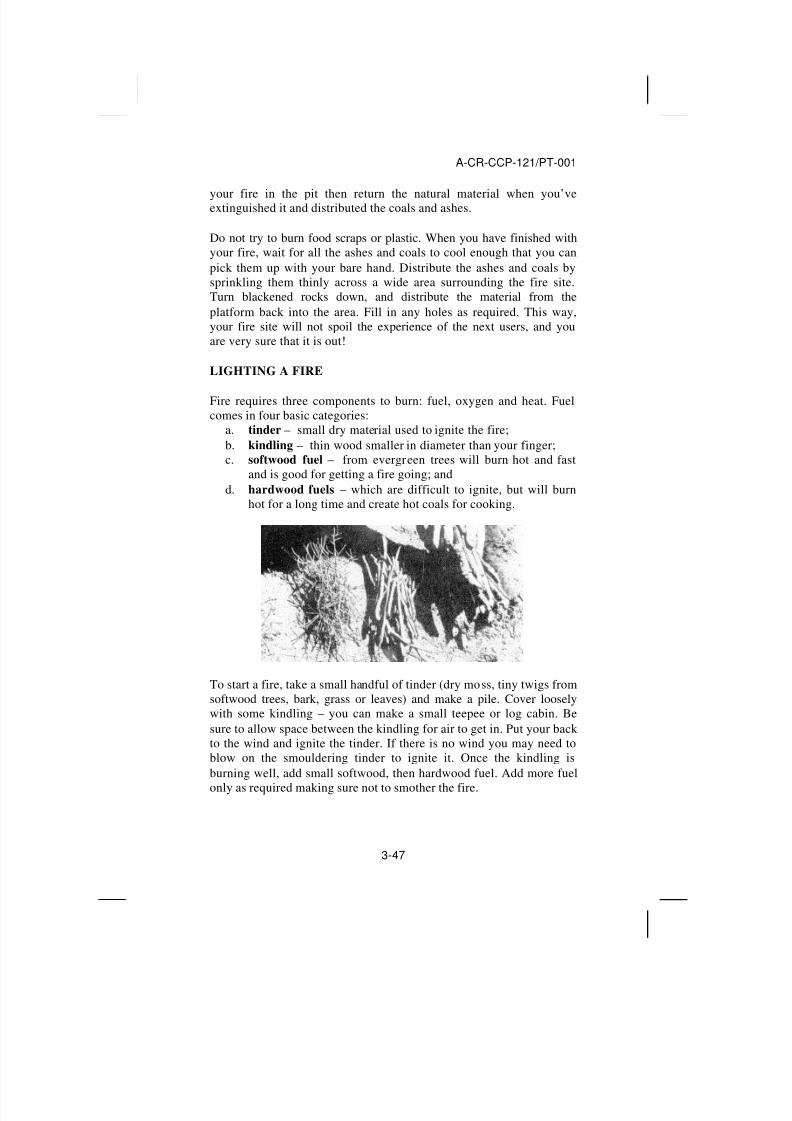
8/14/2019 PO 403 - Bushcraft (Canadian Scout Manual)
http://slidepdf.com/reader/full/po-403-bushcraft-canadian-scout-manual 47/98
A-CR-CCP-121/PT-001
3-47
your fire in the pit then return the natural material when you’veextinguished it and distributed the coals and ashes.
Do not try to burn food scraps or plastic. When you have finished withyour fire, wait for all the ashes and coals to cool enough that you canpick them up with your bare hand. Distribute the ashes and coals bysprinkling them thinly across a wide area surrounding the fire site.Turn blackened rocks down, and distribute the material from theplatform back into the area. Fill in any holes as required. This way,your fire site will not spoil the experience of the next users, and youare very sure that it is out!
LIGHTING A FIRE
Fire requires three components to burn: fuel, oxygen and heat. Fuelcomes in four basic categories:
a. tinder – small dry material used to ignite the fire;b. kindling – thin wood smaller in diameter than your finger;c. softwood fuel – from evergreen trees will burn hot and fast
and is good for getting a fire going; andd. hardwood fuels – which are difficult to ignite, but will burn
hot for a long time and create hot coals for cooking.
To start a fire, take a small handful of tinder (dry moss, tiny twigs fromsoftwood trees, bark, grass or leaves) and make a pile. Cover looselywith some kindling – you can make a small teepee or log cabin. Besure to allow space between the kindling for air to get in. Put your backto the wind and ignite the tinder. If there is no wind you may need toblow on the smouldering tinder to ignite it. Once the kindling isburning well, add small softwood, then hardwood fuel. Add more fuelonly as required making sure not to smother the fire.
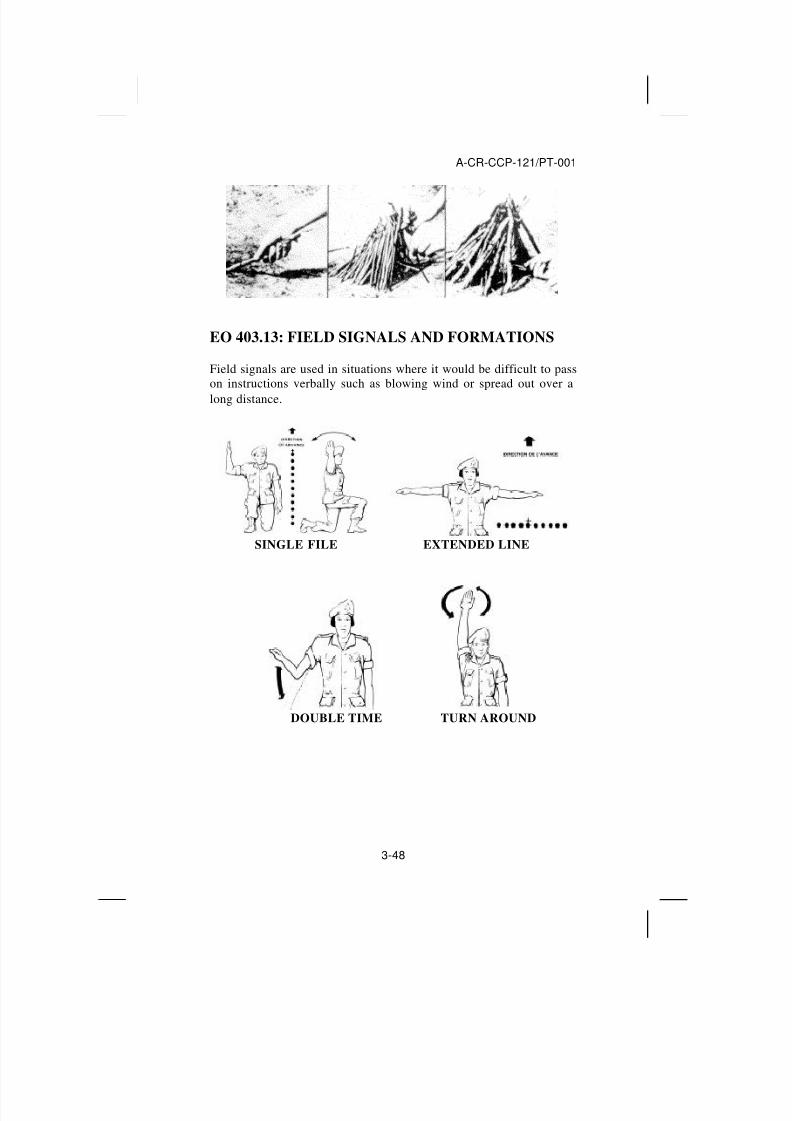
8/14/2019 PO 403 - Bushcraft (Canadian Scout Manual)
http://slidepdf.com/reader/full/po-403-bushcraft-canadian-scout-manual 48/98
A-CR-CCP-121/PT-001
3-48
EO 403.13: FIELD SIGNALS AND FORMATIONS
Field signals are used in situations where it would be difficult to passon instructions verbally such as blowing wind or spread out over along distance.
SINGLE FILE EXTENDED LINE
DOUBLE TIME TURN AROUND

8/14/2019 PO 403 - Bushcraft (Canadian Scout Manual)
http://slidepdf.com/reader/full/po-403-bushcraft-canadian-scout-manual 49/98
A-CR-CCP-121/PT-001
3-49
JOIN ME HALT
EO 403.14: EMPLOY METHODS OF
ENVIRONMENTALLY SAFE WASTE DISPOSAL INTHE FIELD
Waste is created by several activities by members of your team.Packaging material from IMP’s or other food sources, damagedequipment, accidental spills, careless use of equipment, and humanwaste, all create waste that must be dealt with properly.
FOOD AND MEAL WASTE
Divide waste from IMP’s into paper, plastic, foil, and cardboard. Packthis waste out and recycle where appropriate. Remember to encourageteammates to finish all the food they open, and not to dump food
scraps or extra liquid on the ground – it is polluting, and itwill attractanimals. Tin cans, glass, plastic containers and other food relatedgarbage can be treated the same way. Do not try to burn any of these.Large groups staying in one bivouac site may set up a garbage point.Collect garbage after each meal and place it in doubled bags.
WASTE FROM EQUIPMENT
Damaged and broken equipment is a common source of pollution,either from the broken pieces being left around or fuel (or otherliquids) leaking out. If equipment is broken or damaged, and repair isnot possible, ensure you have all the pieces picked up, mark the deviceas not serviceable, and return it/pack it out. If fuel or oil has leakedfrom it, you will have to clean that up as well. Naphtha fuel willevaporate quickly, so a small spill will soon disappear, large spills(more than 500ml) will have to be brought to the attention of your

8/14/2019 PO 403 - Bushcraft (Canadian Scout Manual)
http://slidepdf.com/reader/full/po-403-bushcraft-canadian-scout-manual 50/98
A-CR-CCP-121/PT-001
3-50
corps’ environmental officer immediately. Leaked oil will notevaporate. Oil soaked soil will have to be bagged and carried out of thearea. Naphtha and oil can be cleaned from equipment easily with a rag,and the rag packed out to be disposed of properly.
Large accidental large fuel spills can be deterred by packing fuel in 1litre approved fuel bottles. When you refill a stove or lantern alwaysuse a filter funnel and take care not to spill or waste fuel. Wipe upspilled fuel immediately, and pack out the rag. Avoid refuelingvehicles in the field.
HUMAN WASTE
You have learned of some of the alternatives to using establishedwashrooms to dispose of human waste. Some parks and wildernessareas now require that all solid human waste be packed out of the areaand disposed of in an approved septic facility. Avoid putting urine orother liquids in portable toilets.
The CF has a portable toilet, a cardboard box lined with a heavy plasticbag, that is suitable for groups up to 40 to use for a weekend. The bagis sealed and packed out when full, and a new bag can be inserted. Thisis too large for trekking or canoeing, but can be used where a vehiclecan be brought in. For packing, many people make their own portabletoilets from pails or surplus steel ammunition boxes. Some even havetoilet seats that fit on top. These are useful for canoe or raft trips, andcan be used for trekking short distances. For long treks, mountain bikeor kayak trips, it is best that each team member has their own smallcontainer – the easiest to make is a short piece of 4” plastic pipe withscrew-on end caps. Only put human waste and toilet paper in theseportable toilets – no garbage, foliage or dirt. You can clean these out atapproved septic facilities that will be provided by the park orwilderness area. Be sure to clean the container thoroughly with a toiletbrush and a septic-system friendly cleaner. Wash your hands well.
In the winter, only solid waste need be packed out – each personshould be responsible for their own. Keep it frozen if you can. Disposeof it down a toilet, and clean and dispose of the bags as required.
To cut down on toilet paper waste you can experiment with broad
leaves, moss and even smooth stones – be sure to study the poison ivypicture!

8/14/2019 PO 403 - Bushcraft (Canadian Scout Manual)
http://slidepdf.com/reader/full/po-403-bushcraft-canadian-scout-manual 51/98
A-CR-CCP-121/PT-001
3-51
EO 403.15: MAINTAIN SECTION EQUIPMENT
ROUTINE MAINTENANCE
Routine maintenance can be carried out before use and/oreach day by:a. cleaning equipment – stoves, lanterns, tools, etc;b. checking ropes for dirt and damage;c. check first aid kit, and refill as required;d. only using the approved fuel in stoves and lanterns, and
cleaning spilled fuel immediately;e. checking sleeping bags and shelters for damage and dirt – clean
and repair immediately; andf. checking proper operation of stoves and lanterns.
MAINTENANCE BEFORE STORAGE
Before storing equipment for a length of time:
a. ensure all equipment is clean, dry and in good repair;b. ensure first aid kit is full;c. ensure all metal tools are sharp and oiled;d. remove batteries from the radio’s, flashlights, etc; ande. repair, clean, and refill team storage boxes as required.
COLEMAN STOVE
2 Burner Gas Stove will produce 21,000 BTUs on main burner alone;11,500 BTUs on main burner and 9,500 BTUs on auxiliary burner. Ithas a 1.25 litres fuel tank capacity, and 2 hours burn time on high, 7.5hours on low. It can boil a litre of water in 4 minutes.
1 Burner Gas Stove wil produce 10,500 BTUs. It has a 550ml fuel tankcapacity, and 1.75 hours burn time on high, 6.5 hours on low. It willboil a litre of water in 4 minutes.

8/14/2019 PO 403 - Bushcraft (Canadian Scout Manual)
http://slidepdf.com/reader/full/po-403-bushcraft-canadian-scout-manual 52/98
A-CR-CCP-121/PT-001
3-52
STOVE MAINTENANCE AND REPAIR
Coleman two-burner stoves require regular maintenance to ensureproper operation. Remember not to work on a stove until it is cool toyour touch.

8/14/2019 PO 403 - Bushcraft (Canadian Scout Manual)
http://slidepdf.com/reader/full/po-403-bushcraft-canadian-scout-manual 53/98
A-CR-CCP-121/PT-001
3-53
The most common problems and repairs are:Problem RepairWill not pump –dried-out pump seal
Remove pump assembly and apply oil or lipbalm to leather seal until pliable.
Will not light – nofuel at burner
Either the generator is blocked, or there isinsufficient pressure in the fuel tank. Checkfuel level in tank, pump up the tank and tryagain.
Lights, but flame islow and yellow
Low pressure in tank, or generator is damagedor blocked. Pump up the tank and see if theflame improves.
Large yellow flame,
singed eyebrows
Move your head back, turn the fuel off and
wait for the flame to burn down. You mayhave turned on the fuel and let too much fuelpool in the burner before lighting (“flooding”the stove), or the generator may not beproperly seated in the gooseneck. Ensure thegenerator is pushed fully into the gooseneckand follow proper lighting procedure.
Generator blocked Remove generator for replacement or repair.
COLEMAN LANTERN
1 Mantle Gas Lantern weighs 3.63 lbs. It has a 750ml fuel tankcapacity, and 7 hours burn time on high, 14 hours on low.
2 Mantle Gas Lantern weighs 5 lbs. It has a1 litre fuel tank capacity ,and 7 hours burn time on high, 14 hours on low. #
LANTERN MAINTENANCE AND REPAIR
Common problems occurring with the Coleman lantern includedamaged or missing mantles, insufficient pressure in the fuel tank, andgenerator malfunctions as in the stove.
To replace a damaged mantle:a. remove the ventilator and globe;b. clean pieces of the old mantle from the burner cap and tie a
new mantle in place securely;
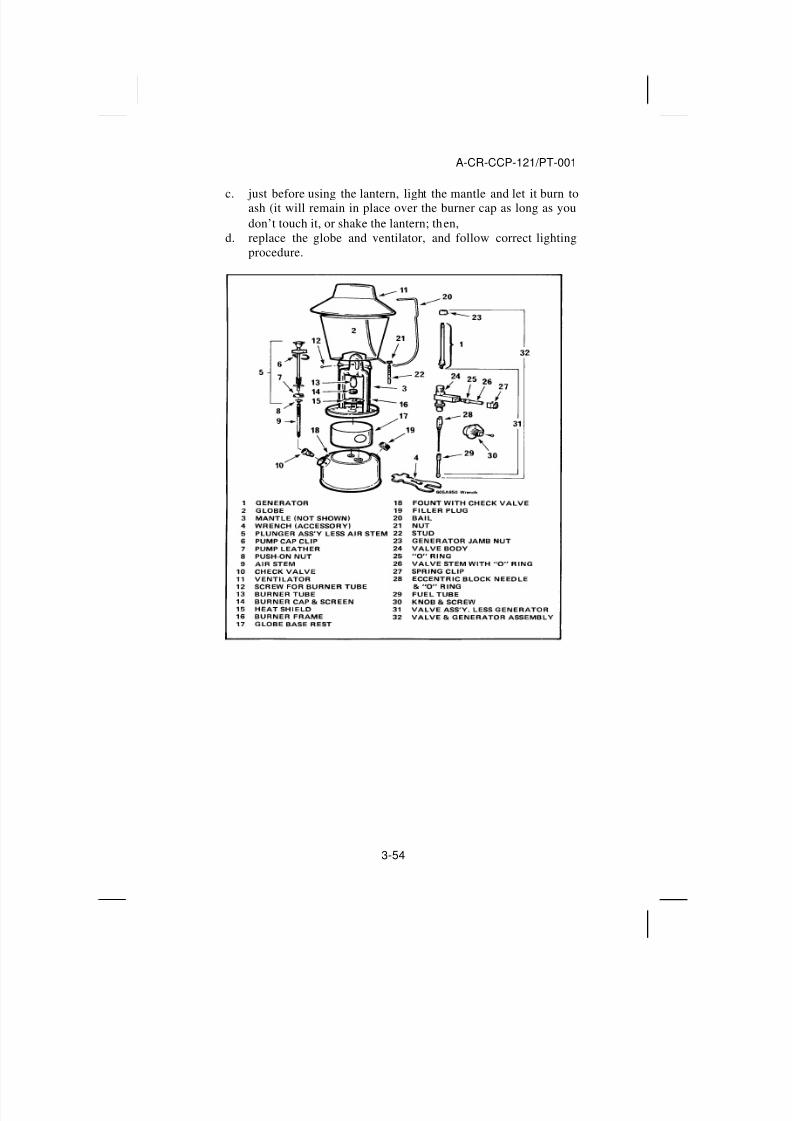
8/14/2019 PO 403 - Bushcraft (Canadian Scout Manual)
http://slidepdf.com/reader/full/po-403-bushcraft-canadian-scout-manual 54/98
A-CR-CCP-121/PT-001
3-54
c. just before using the lantern, light the mantle and let it burn toash (it will remain in place over the burner cap as long as youdon’t touch it, or shake the lantern; then,
d. replace the globe and ventilator, and follow correct lightingprocedure.

8/14/2019 PO 403 - Bushcraft (Canadian Scout Manual)
http://slidepdf.com/reader/full/po-403-bushcraft-canadian-scout-manual 55/98
A-CR-CCP-121/PT-001
3-55
EO 403.16: TIE A KNOT
The bowline – is often called the rescue knot as it makes a simpleloop that does not slip. It can be used to tie around yourself or throw tosomeone who needs a lifeline (or to tie to the bow of a ship).
a. make a simple overhand loop (looks like the # 6);b. pass the short end through the hole from the bottom;c. bend the end around the length, and pass it through the small
loop just formed and alongside its own continuation; andd. tighten the bowline by holding onto the bight formed by the end
and pulling hard on the standing part.
The fisherman’s knot – is used to join fishing line and ropes together:
a. tie an overhand knot in one of the ropes, do not tighten it; andb. pass the other rope end through the loop, and tie an overhand
knot.
Standing
Bight

8/14/2019 PO 403 - Bushcraft (Canadian Scout Manual)
http://slidepdf.com/reader/full/po-403-bushcraft-canadian-scout-manual 56/98
A-CR-CCP-121/PT-001
3-56
A square lashing is used to lash spars which cross at a right angle,touching where they cross.
Back view
REMEMBER : Startwith a clove hitch, dothree or fourwrappings, frap twice,and end with a clovehitch.
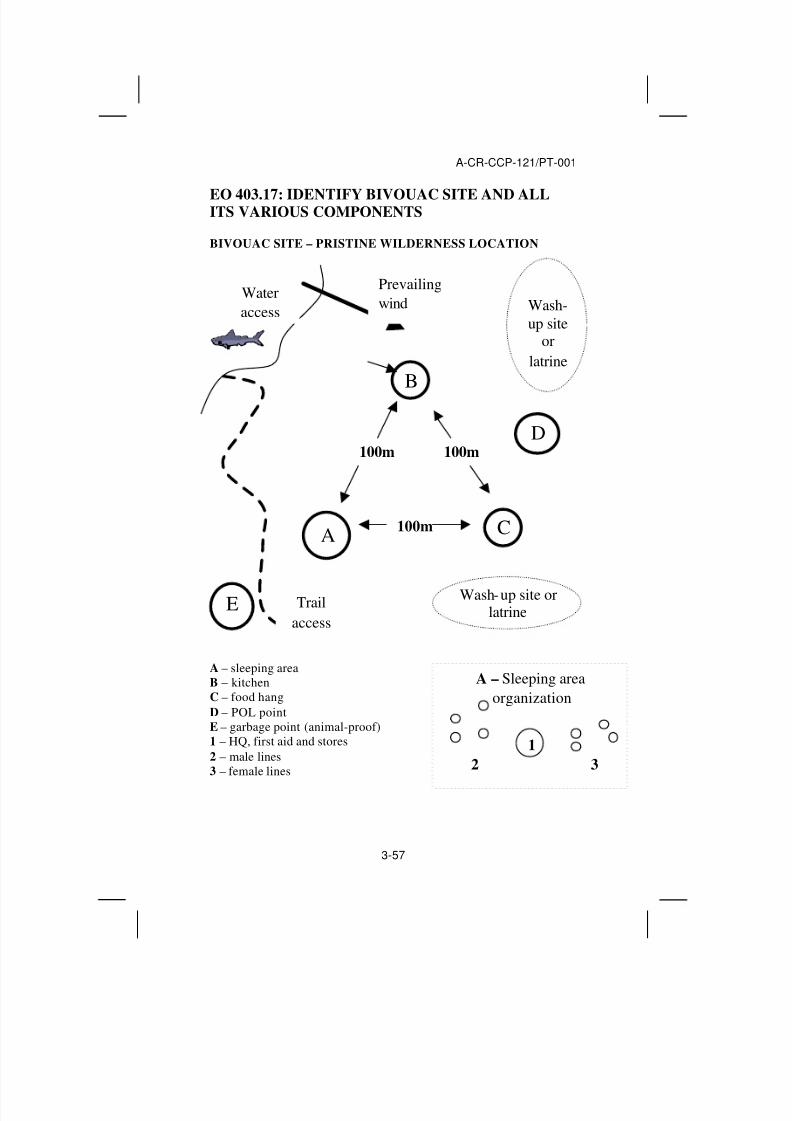
8/14/2019 PO 403 - Bushcraft (Canadian Scout Manual)
http://slidepdf.com/reader/full/po-403-bushcraft-canadian-scout-manual 57/98
A-CR-CCP-121/PT-001
3-57
EO 403.17: IDENTIFY BIVOUAC SITE AND ALLITS VARIOUS COMPONENTS
BIVOUAC SITE – PRISTINE WILDERNESS LOCATION
A – sleeping areaB – kitchenC – food hangD – POL pointE – garbage point (animal-proof)1 – HQ, first aid and stores2 – male lines3 – female lines
B
A C
100m 100m
100m
Wash-up site
orlatrine
Wash-up site orlatrine
Wateraccess
Trailaccess
A – Sleeping areaorganization
12 3
D
E
Prevailingwind

8/14/2019 PO 403 - Bushcraft (Canadian Scout Manual)
http://slidepdf.com/reader/full/po-403-bushcraft-canadian-scout-manual 58/98
A-CR-CCP-121/PT-001
3-58
A bivouac site in a pristine wilderness location looks different than anestablished campground. Each component of the site is spread out, bothto make the impact less severe on one area, as well as to protect yourteam from unwanted visits from local animals. Note that the prevailingwind blows cooking, latrine and garbage smells away from yoursleeping area.
In an established campsite, the locations for latrines, wash-up areas,shelters and kitchen may already be set for you. Be sure your teammembers use these established facilities.
Remember to avoid areas that show little use or damage – chooseanother location to allow that site to fully recover.
TIPS FOR FINDING A GOOD BIV SITE
The key to a good biv site is planning. Do not wait until the lastmoment before dark to pick a site. Look at your map and have a coupleof areas picked out before you arrive. Give your team at least one hourof daylight to get set up and a meal cooked. You can judge how muchdaylight you will have by keeping track of when it gets dark on thedays leading up to your activity, or by holding your hand horizontallyunder the sun – for each finger width between the sun and the horizon,you have about 15 minutes. If you are using established sites, planyour travel to ensure you arrive in time.
Choose a location that is large enough for your group. Look for asource of clean water, privacy for wash-up and latrine areas, dry levelsites for shelters, and a safe place to hang (hide) your food. Rememberto select places where the ground cover is very durable – grass, sand,rock, clear forest floor or snow. Avoid wetlands, ferns, newundergrowth or delicate foliage.
In the winter, or cold weather, choose a site that is protected from thewind. A location half-way up a hillside, with a south exposure, is agood place. Cold air will pool in valleys and depressions and hilltopsare subject to strong wind.
Heavy vegetation, wet land and dense brush are havens for insects inwarm weather. Look for a site that has some open areas for wind to
blow through. Higher altitudes will have fewer bugs.

8/14/2019 PO 403 - Bushcraft (Canadian Scout Manual)
http://slidepdf.com/reader/full/po-403-bushcraft-canadian-scout-manual 59/98
A-CR-CCP-121/PT-001
3-59
Always check for danger – overhead branches, loose rocks on slopes,or large amounts of snow uphill. Look for signs that your site might besubject to flooding in heavy rain, and avoid obvious paths for mud,rock or snow slides.
Choose a site that is visually pleasing. Your team’s morale andmotivation will improve with a nice biv site.
BIV SITE ORGANIZATION AND SAFETY
Keep your site organized by ensuring that all team members knowexactly where each component (kitchen, sleeping, latrine) is planned tobe. Once shelters are erected, all personal kit is placed in or besideeach person’s shelter. All guy lines for shelters should be low and notstrung across footpaths.
Team equipment can be placed at the HQ or placed in an obviouslocation for team use. Return all equipment to its location after use.
A well organized and clean biv site is very important if the weathergets bad, or if there is an emergency. Prepare a small sketch map of thesite with each shelter and a list of its inhabitants.
If you have containers for POL (petroleum, oil, lubricants), then youwill need a safe place for storage and refilling stoves and lanterns. Picka visible site, downhill and downwind from the kitchen, with a solidand level surface. Stoves and lanterns not in use can also be storedthere. Ensure that no one lights a stove or lantern at the POL point. Usea flashlight at night for refueling.
FOOD HANG
All animals are attracted to food. This is why it is very important thatwhen you are out on An expedition that you “animal proof” your food.This could include locking it up in your vehicle, putting it into animal-proof food containers or barrels, or hanging food packs from a tree.Before you select a site to hang your food you should be lookingaround for animal indicators. These can include tracks in the snow,sand, dirt or on a path. Look for signs on the trees like claw marks,missing bark, and look for scat on the ground. Avoid areas with berry
patches, acorns or nutcrops on the ground, and orchards – these attractnot only humans but animals. Some parks and wilderness areasprovide animal proof garbage and food areas.

8/14/2019 PO 403 - Bushcraft (Canadian Scout Manual)
http://slidepdf.com/reader/full/po-403-bushcraft-canadian-scout-manual 60/98
A-CR-CCP-121/PT-001
3-60
When you hang up your food pack, remember that you are to includeall of your food, snacks, gum, candy, any beverage, plus toiletries. Inanother pack you should put all of your cooking utensils, pots, pans,and all clothing that you cook in. You should never go into your tentwith the clothing that you cooked in – change right after cooking andwash your face and hands after meals.
To hang your food and equipment:a. make sure the tree is at least 100m from your camp site and
cooking area;b. find a tree with a strong branch at least 6m from the ground. If
one is not available use a rope attached to two trees;c. make sure the pack is at least 5m off the ground and 2m from
the tree trunk;d. if available you can hang food over a rock face or cliff for the
night; or,e. if the above is not available, hide your food in air sealed
containers under bushes and rocks away from any path or trail.You can place pots on top to act as a warning device anddeterrent.
EO 403.18: OBSERVE HIKING TECHNIQUES
Walking with a pack is different than just walking. There aretechniques that will make you more comfortable and efficient. Alwaysstretch and warm up before starting a trek.
FOOT CARE
Use a comfortable insole and ensure that you change your socksregularly on a long trek. Keep your feet dry – use foot powder to keep

8/14/2019 PO 403 - Bushcraft (Canadian Scout Manual)
http://slidepdf.com/reader/full/po-403-bushcraft-canadian-scout-manual 61/98
A-CR-CCP-121/PT-001
3-61
your sweat from soaking your socks. By wearing two pair of socks,friction is reduced on your skin, and moisture can be drawn away fromyour foot into the outer sock.
Check your feet every hour and reapply powder or change socks asrequired. Treat all “hot spots” and blisters immediately. Always carrysome adhesive bandages and blister treatment (like moleskin) for footcare. Avoid popping blisters unless you can be sure that the area andimplements are sterilized. Do not be afraid to stop your team if you, ora teammate, is having foot problems or needs to dry out feet after adunk. Time taken in prevention is always less than being slowed downby injuries or emergencies later on.
Keep your boots dry! Avoid wade into water unnecessarily, and airthem out at rest stops and overnight. Do not tuck wet socks into themat night.
ENERGY CONSERVATION TECHNIQUES
When you are on a trek, you want to conserve your energy so that youwill have spare energy to deal with a changed plan or an emergency.Prepare yourself by being well fed, well rested and physically fitbefore you start a trek. Stretch and warm up well before you start.Being overly tired increases your chances of accidents, injuries andmaking poor decisions.
A good indicator of efficient walking is your rate of breathing. Heavy,laboured breathing is a sign you may be working too hard. Yourmuscles need sufficient oxygen to work well, and breathing normallyand rhythmically allows enough oxygen to transfer into yourbloodstream. On level ground, carrying a pack, an average person willtake one full breath in and out per 3 paces. On difficult terrain yourrate of breathing should increase, but do not let yourself get to a pointwhen you are struggling to breath evenly (gasping or wheezing).
Work with your teammates to create a suitable pace that everyone canmanage. Pace is adjusted by two means; changing the length of eachstride, or changing the speed of each stride. It is like changing gears onyour bike. Difficult terrain can be crossed with short fast paces, easyterrain may be better suited for long relaxed paces. The best judge of
pace is whether the team has to stop often and the pace slows graduallyduring the day, or whether the team can maintain the pace throughout

8/14/2019 PO 403 - Bushcraft (Canadian Scout Manual)
http://slidepdf.com/reader/full/po-403-bushcraft-canadian-scout-manual 62/98
A-CR-CCP-121/PT-001
3-62
the day with only the regular rest stops. Do not treat trekking like arace – the fastest team doesn’t win.
Each step you take should feel relaxed. Place each foot on the groundin front as flat as possible, not heel first. Use your thigh muscles toswing your leg forward. To increase your pace, place your foot furtherin front, rather than just trying to push harder with each stride. Whengoing up steep slopes use a “rest step” – pause between each stride ona straight leg.
TEAMWORK
Set each team member up with a partner, including yourself. Theyshould talk when they can (being able to talk is a good sign that no oneis being pushed too hard), and check each other for signs of injury.Remember to set the pace to the slowest member of your team. Usingup the energy reserves of a teammate is dangerous! It creates anenvironment where injury is more likely, as well as lowering teammorale. Put slower hikers up front or in the middle with a strong“buddy.”
REST STOPS
Establish a routine of rest stops during the trek. Always stop briefly 10minutes into the trek for people to check their equipment (boot laces,loose straps, etc), then stop for 10 minutes every hour – or if you areon tough terrain, 5 minutes every half-hour. The time taken for a breakmay vary due to circumstances. Use the opportunity to check feet andto ensure everyone is drinking water. In hot weather check for sunburnand signs of heat exhaustion. In cold weather check for frostbite andhypothermia. Ensure your team doesn’t block the trail during a break –move at least 10m from the trail where possible. Watch out for rapidcooling while resting – put on an extra layer to keep warm, especiallyin cool, wet or windy weather.
TREKKING TECHNIQUES
When walking on an established trail avoid increasing your pacebecause the going is easier. Keep team members well spaced (2-3mday time, 1-2m night), and don’t allow shortcuts or unnecessary
detours around puddles/obstacles. On roads, keep well to the sidefacing oncoming traffic and ensure vehicles can see you. Carryreflective safety vests when you plan to walk on roads. If you meet

8/14/2019 PO 403 - Bushcraft (Canadian Scout Manual)
http://slidepdf.com/reader/full/po-403-bushcraft-canadian-scout-manual 63/98
A-CR-CCP-121/PT-001
3-63
another group, move to the side to allow them to pass. Be cautiousaround horses or other pack animals on the trail – move well off thetrail and do not make sudden movements or noises.
Small footpaths and game trails in the woods make great trekkingtrails, just remember that the animals or people who made these trailsmay not have been going where you want to go. Always keep track of your position on a map. Do not follow trails blindly.
Walking off-trail is both exhilarating and challenging. Navigating,obstacle crossing, and safety concerns make “bushwhacking” all themore interesting! Ensure your teammates keep their spacing to avoidbranches swinging back, and to be able to see upcoming danger.Beware of pushing rocks or snow down on teammates, always checkup and down a steep loose slope before crossing.
When walking up a steep hill, keep your body straight. It will be easierto regain your balance, and if you fall at least you will fall forward.Take small steps and try to always keep going up – rather than cross anobstacle that would require you to climb up and then down the otherside, find a route around that lets you stay at the same height, orincrease slowly. If you can’t easily step over it, go around. Reduce theangle of the slope by walking across rather than straight up – this iscalled “traversing.” Keep the angle less than 45º.
Walking down a steep hill is as difficult and dangerous as walking up.Keep control of your speed and watch out for loose soil, snow, ice orloose/wet rock. Keep your knees slightly bent and place each stepgently to reduce the impact and friction on your feet. Try to step on theuphill side of obstacles and rocks.
CROSSING OBSTACLES
When crossing boulders and land obstacles plan your route beforestarting to cross. Always choose safety over convenience. If you wearyour pack across, keep all your straps tight to keep the pack close toyour body. You can always take your pack off for difficult obstaclesand hand it over to a teammate – on long obstacles make a chain of people to ferry packs. On difficult obstacles one person can act as aspotter for the next. Keep your hands free for balance – do not try to
carry something while crossing. Ensure that the obstacle doesn’tbecome too crowded, keep extra distance between each person.

8/14/2019 PO 403 - Bushcraft (Canadian Scout Manual)
http://slidepdf.com/reader/full/po-403-bushcraft-canadian-scout-manual 64/98
A-CR-CCP-121/PT-001
3-64
Do not try to wade through a water obstacle where the water is aboveyour knee, or if the water is fast flowing. Always be sure you can seethe bottom clearly. If the water is murky and you can not see thebottom, find another way across. Examine the consequences of fallingin before considering crossing a makeshift or suspicious bridge. Do notrisk falling into deep, cold or dangerous water because you are too lazyto look for another route. With the appropriate safety equipment, yourofficer may choose to cross or make a bridge. Only cross a deep orunknown water obstacle with the direct supervision of an officer.When you cross, either remove your pack and ferry it across (ensure itis waterproofed!), or carry it on your back with the waistbelt andsternum strap undone, and be ready to remove your pack if you fall.Do not cross a water obstacle alone. You can use a walking stick as anaid for balance and cross in pairs or groups. If the bottom is smooth,you may want to remove your boots and wear running shoes or sandalsacross. If the bottom is rocky, wear your boots – if the water is not toocold you may want to remove your socks to keep them dry. Alwaysgive your team time to dry their feet after crossing. In cold weatherconsider the consequences of a teammate getting soaked before riskinga water crossing.
EO 403.19: PREPARE FOR AN EXPEDITION
What is an expedition? An expedition is an organized voyage or journey across land or water, with a specific aim in mind. For example;a weekend trek in a local park to give junior cadets leadership practice,a seven day trek through Riding Mountain National Park for Duke of Edinburgh Award qualification, or a canoe trip through AlgonquinPark as part of a Regional Expedition.
To prepare yourself for an expedition you must be physically andmentally ready to go. To be physically ready, you must be physicallyfit (at the appropriate fitness level for the expedition, and not have anyrecent or recurrent injuries), your personal and team equipment mustbe ready, and you need the expedition plan and map. To be mentallyready you need to be prepared for an emergency, able to communicate,and have a clear understanding of the expedition aim. As a teamleader, you will have to assist your teammates with their preparationsas well. The golden rule is, “Check, then check again.”

8/14/2019 PO 403 - Bushcraft (Canadian Scout Manual)
http://slidepdf.com/reader/full/po-403-bushcraft-canadian-scout-manual 65/98
A-CR-CCP-121/PT-001
3-65
PREPARING EQUIPMENT
The expedition plan will have a list of kit each person is required tobring, as well as equipment that will be issued – personal and team. Afew days before the expedition, check the weather forecast for theexpedition dates. Note both high and low temperatures, as well as windspeed and precipitation. Few weather forecasts are exactly right, but itwill be a good guide for choosing clothing. Go hour by hour, or eventby event through the expedition plan, and make a checklist of equipment and clothing you think you’ll need. Some small equipmentmay be left off the plan list and you have the option of bringing extrastuff – remember that you will have to carry it.
Lay all your kit out and check each piece for serviceability andcleanliness. Wash and fix it as required. Ensure batteries are in yourflashlight, and check your survival kit for all the appropriate items.With experience you will be able to create master kit lists of your ownfor each season and each different activity – one list for canoe trips inthe fall, one for trekking in the winter, etc. Always check your kitbefore the expedition – once you have started it is too late to rememberyou have no toilet paper, or that there’s a hole in your rain jacket.
When you are issued team equipment, check it as well. Set up the tentto make sure there’s no holes and that all the parts are there. Light thestove and lantern and let them burn for 5-10 minutes to be sure.
Check your copy of the expedition plan and map before leaving. Lookfor changes in the route, discuss possible problem areas, and make sureyou know what the emergency plan is and what to do in an emergency.
When you finish an expedition check your kit again and fix and cleanright away! If your kit is clean, dry and in good order when it gets putaway, it will be quicker and easier to get ready for the next expedition.
PREPARING YOURSELF
You must be ready. Get yourself into good physical condition and staythere. You will not be able to lead or contribute to your team if you cannot keep up. All leaders need to be capable of completing the physicalaspects of an expedition so that can react to emergencies and changes
in plans. It is important to build up to an expedition. Start off slow,over easy terrain, then move up to progressively longer distances andmore difficult terrain. You do not need to be the fastest of strongest on

8/14/2019 PO 403 - Bushcraft (Canadian Scout Manual)
http://slidepdf.com/reader/full/po-403-bushcraft-canadian-scout-manual 66/98
A-CR-CCP-121/PT-001
3-66
your team – but you should be at least at the team average. Thewilderness treats everybody the same, it will not go easy on youbecause you were not ready.
Make sure your technical skills are ready. Practice the small skills sothat you can teach and perform them easily. Your teammates will nothave confidence in you if you struggle through tying knots, setting up ashelter or navigating. Seek advice from experienced cadets and bringsome notes or this manual with you if you think you will needsomething to act as a reference.
During the expedition, take a few moments to assess how things aregoing and do not let yourself get overconfident or overtired. Allowyour teammates to help you if you need it – pass over some smallerresponsibilities to competent teammates so that you can concentrate onthe important stuff. Be confident enough to respect your personallimits and stop if you need to. Write down your thoughts and reactions,as well as memorable events in your journal.
Ask yourself:a. am I ready?b. is the team ready?c. do I need to practice any skills?d. are there new skills required from me or the team?e. does the team need practice time?f. what is the weather forecast?g. do we have food, water, a place to sleep?h. do I understand the emergency plan, the route and the
timetable?
PREPARE FOR EMERGENCIES
Emergencies can happen any number of different ways. Suddenchanges in weather, accidents, natural disasters, poor decisions by oneor more people, or even attacks by animals. You can lower the risk toyour team by making reasonable and sensible decisions, and byfollowing established safety guidelines. Communicate with your teamand ensure they understand your aim and instructions. Establish a teamplan for what each member will do in an emergency.
Monitor the members of your team for injuries and exhaustion.Remember that few emergencies in the wilderness are caused by a

8/14/2019 PO 403 - Bushcraft (Canadian Scout Manual)
http://slidepdf.com/reader/full/po-403-bushcraft-canadian-scout-manual 67/98
A-CR-CCP-121/PT-001
3-67
single event. Most emergencies are the product of a chain of eventsand decisions.
Carry a first aid kit and ensure all team members know where it is andhow to use the components. Encourage all cadets to qualify in FirstAid training.
One of the most stressful wilderness situations is getting lost. Somepeople panic when they realize they are lost, and by running aroundthey make themselves even more tired, disoriented and confused.RememberSTOP from EO 403.04.
EO 403.20: DISCUSS DANGEROUS ANIMALS BEARS
Bears pose a distinct threat to you and themselves. They will often visitareas inhabited by humans, usually to their own detriment. Informyourself as to signs of bear activity, and avoid areas where you suspectbear activity or where bear warnings are posted (e.g. garbage dumps,in some areas of national parks). There are several breeds of bears youmay encounter in Canada. The most common are Black bears, Grizzlybears, and Polar bears.
Some things you can do to decrease dangerous bear encounters are:a. Plan your expedition with protection from/for bears in mind –
keep your clothes, equipment and biv site clean;b. avoid known bear habitats, and where possible plan what you’ll
do in the event of an encounter; andc. research your route and bivouac sites for recent bear activity.
Do not surprise a bear. Never startle, crowd, corner, pursue orapproach a bear for any reason. The space a bear needs to feelunthreatened varies from a few feet to several hundred metres.
Control bear attractants. Bears have a strong sense of smell and, asomnivores, they are attracted to just about any food source. Minimizefoods with strong odours (e.g. bacon, fish), perfumes, and scentedtoiletries (sunscreen, shampoos, etc.).
Properly dispose of all garbage or seal in an airtight container. Washall equipment (packs, sleeping bags, stoves, etc.) before bringing to the

8/14/2019 PO 403 - Bushcraft (Canadian Scout Manual)
http://slidepdf.com/reader/full/po-403-bushcraft-canadian-scout-manual 68/98
A-CR-CCP-121/PT-001
3-68
wilderness and again if they get food spilled or cooked onto them.Clean pots, dishes and utensils immediately after use. Dispose of wastewater at least 100m away from cooking and bivouac sites.
Do not feed bears. Keep as clean as possible. Do not sleep in the sameclothes you ate or cooked in. Choose unscented personal hygiene itemsand secure them overnight in the same manner as food – away from thebivouac site. Used feminine hygiene products should be sealed in aplastic bag and packed out as garbage – do not try to burn or burythem.
Do not learn about bears the hard way. Research bears habits andhabitats for the area that you will be camping and or visiting; learnhow to avoid mishaps and what to do in the case of an emergency.
Inform yourself on the appropriate action to take if confronted orattacked by a bear. Read research material, always travel in a group of four or more, and take precautions to protect you and the bear. Carrybear repellent spray (or other deterrent) for use only as a last resort.Report bear encounters to the appropriate authorities as soon aspossible. Some people choose to wear bells attached to their packs toalert bears that may not be within sight.
In the case of confrontation or attack, stick together and keep yourpack on. Face the animal and back away slowly. You can not outrun orout-climb a bear so do not try.
WILDCATS, AND OTHER DANGEROUS ANIMALS
Bears are not the only dangerous animal in the wilderness. Wildcats,wolverines, wild dogs, and even moose can be dangerous whenprovoked, or while hunting. It is your responsibility to protect yourself,as well as them, from harm. Follow the steps for bear-proofingyourself, your kit, and your biv site.
Cougars, mountain lions, and pumas are all the same species of largewildcat. They are rare, however their population is increasing, and theexpansion of human development is encroaching on their naturalhabitat. Take the same precautions as for bears. When a wildcat attacksit is usually hunting and will target what it thinks is easy prey. By
staying in a group and keeping your pack on, you will likely not lookmuch like lunch.

8/14/2019 PO 403 - Bushcraft (Canadian Scout Manual)
http://slidepdf.com/reader/full/po-403-bushcraft-canadian-scout-manual 69/98
A-CR-CCP-121/PT-001
3-69
Never provoke a big animal. Moose, caribou, elk, musk ox, and evendomestic cattle will protect their territory and their young. Give them apolite amount of space. If confronted, stay in a group and back awayslowly. Think of the headlines, “Cadets trampled by Bessie the cow.”
Report all animal attacks to local wildlife authorities.
POISONOUS SNAKES
Poisonous snakes are rare in Canada. Rattlesnakes live in limitednumbers in south-western Ontario and south-central BC. Bites arepainful but not usually fatal. These snakes will likely be found onwarm rocks, or curled up in crevices and under rocks, in dry and warmclimates during the summer months (May to Sept). Give them theirspace as they will only attack in self-defence.
Any bite victim must seek medical attention immediately. Move thevictim away from the snake to avoid a second bite. Treat victims byrinsing the bite area with clean water, applying a cold compress,immobilizing and elevating the bite area, keeping them calm andtransporting them with the victim at rest. Be prepared for the victim todevelop respiratory problems. Do not apply a tourniquet.
Report a bite or sighting to local wildlife authorities.
EO 403.21: EMPLOY VOICE PROCEDURES
For some training you may be issued a radio to assist communicationsbetween teams and the headquarters, or other components of yourcorps. While the mechanics of a radio, its range, type of antenna, etc.will vary, the way that you talk “on the air” is guided by national andinternational standards. The skill of talking on a radio is referred to as“voice procedure.”
The phonetic alphabet is a universally recognized radiocommunications aid, which assigns a common word to represent eachletter of the alphabet. You use the phonetic alphabet when you havedifficult words or groups in the text that you are communicating.When you are going to spell a word you would say, "I SPELL" _ _ _ _.Example: "Home base just to let you know the – I SPELL CharlieAlpha Kilo Echo is ready"

8/14/2019 PO 403 - Bushcraft (Canadian Scout Manual)
http://slidepdf.com/reader/full/po-403-bushcraft-canadian-scout-manual 70/98
A-CR-CCP-121/PT-001
3-70
Numbers are often used to give a grid reference or numbers of items.When you are about to tell numbers on the radio you would say"FIGURES" _ _ _ _. Decimal are: DAY-SEE-MAL. Example:"Home base we had chili last night, and we need FIGURES Wun FifeZero rolls of toilet paper quick!"
AAlpha
BBravo
CCharlie
DDelta
EEcho
FFoxtrot
GGolf
HHotel
IIndia
JJuliet
KKilo
LLima
M
Mike
N
November
O
Oscar
P
Papa
Q
Quebec
R
Romeo S
Sierra T
Tango U
Uniform V
Victor W
Whisky X
X-ray
YYankee
ZZulu
1WUN
2TOO
3TREE
4FO-
WER 5
FIFE 6
SIX 7
SEV-EN 8
AIT 9
NIN-ER 0
ZE-RO
Operating Rules: a. emergency calls take priority over all other calls. If you are
talking then stop and wait until the emergency is finished;b. do not chat;c. be brief – write down your message before talking; andd. profane, indecent or obscene language is forbidden.
To aid in security and keeping the message short, key people havebeen given appointment titles. Prowords are words or phrases that haveassigned meanings for the purpose of expediting messages.
Position Call Sign Commander Sunray2I/C Sunray MinorMedical Representative StarlightMovements Staff ContractorSupply and Transport Playtime
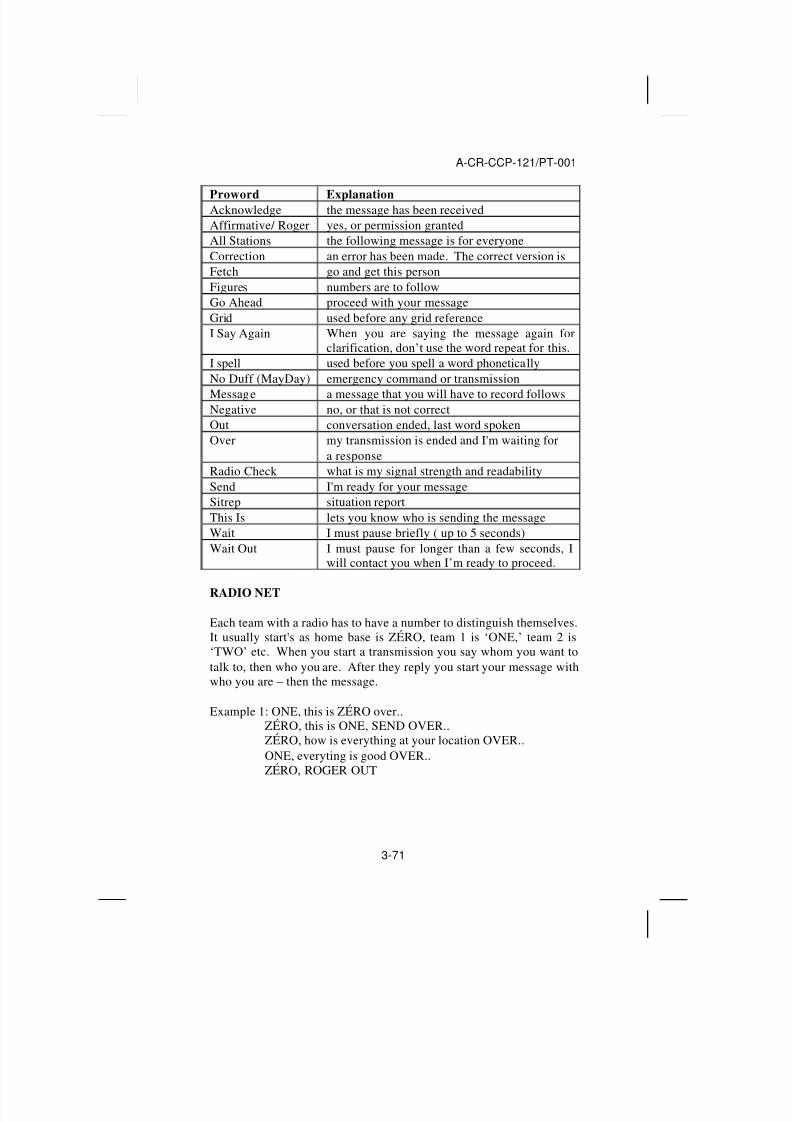
8/14/2019 PO 403 - Bushcraft (Canadian Scout Manual)
http://slidepdf.com/reader/full/po-403-bushcraft-canadian-scout-manual 71/98
A-CR-CCP-121/PT-001
3-71
Proword Explanation Acknowledge the message has been receivedAffirmative/ Roger yes, or permission grantedAll Stations the following message is for everyoneCorrection an error has been made. The correct version isFetch go and get this personFigures numbers are to followGo Ahead proceed with your messageGrid used before any grid referenceI Say Again When you are saying the message again for
clarification, don’t use the word repeat for this.I spell used before you spell a word phoneticallyNo Duff (MayDay) emergency command or transmissionMessage a message that you will have to record followsNegative no, or that is not correctOut conversation ended, last word spokenOver my transmission is ended and I'm waiting for
a responseRadio Check what is my signal strength and readabilitySend I'm ready for your messageSitrep situation reportThis Is lets you know who is sending the messageWait I must pause briefly ( up to 5 seconds)Wait Out I must pause for longer than a few seconds, I
will contact you when I’m ready to proceed.
RADIO NET
Each team with a radio has to have a number to distinguish themselves.It usually start's as home base is ZÉRO, team 1 is ‘ONE,’ team 2 is‘TWO’ etc. When you start a transmission you say whom you want totalk to, then who you are. After they reply you start your message withwho you are – then the message.
Example 1: ONE, this is ZÉRO over..ZÉRO, this is ONE, SEND OVER..ZÉRO, how is everything at your location OVER..ONE, everyting is good OVER..ZÉRO, ROGER OUT

8/14/2019 PO 403 - Bushcraft (Canadian Scout Manual)
http://slidepdf.com/reader/full/po-403-bushcraft-canadian-scout-manual 72/98
A-CR-CCP-121/PT-001
3-72
EO 403.22: DISCUSS SURVIVAL PSYCHOLOGYAND STRATEGY
INTRODUCTION
Not too many people plan to get lost and have to survive outdoors. Infact, what makes a situation one of survival are the circumstances of emergency, or sudden departure from the plan. Getting lost and havingto sleep out overnight, in a tent, with all your kit is not survival – it iscamping.
So, a survival situation is the absence of all, or most, of the equipmentand conditions you expect in a routine outdoor experience. Injuries,
accidents, severe weather, human error, or quite often, a combinationof several factors lead people into survival situations. It is when youare left outside with only the contents of your pockets that you arefaced with the real life or death struggle of survival.
Recent search and rescue statistics tell us that 92% of people that diewhen lost, die within the first 4 days (with 50% of mortalitiesoccurring within the first 24hrs). This puts a new perspective onsurvival strategy. Before you need to learn how to hunt or trap animals,or select edible plants, you simply need to be able to live through thefirst few days – with heat, shelter, water, and the ability to assistsearchers in finding you.
If you survive the first few days, then you can afford the luxury of scavenging for food.
THE SURVIVAL PRIORITY LIST
First Aid – for yourself and others. Treat all injuries to the best of yourability. Any health problems left untreated can severely affect yourability to carry out all the other actions required for survival.Complete first aid also includes observing and analyzing current orfuture dangers.
Fire – is a lifesaver! It will provide an important source of heat, assistin providing safe drinking water, and will be a primary tool forsignaling your location to rescuers. Even under wet conditions you canstart a fire. Gather what you think is enough firewood, then times that

8/14/2019 PO 403 - Bushcraft (Canadian Scout Manual)
http://slidepdf.com/reader/full/po-403-bushcraft-canadian-scout-manual 73/98
A-CR-CCP-121/PT-001
3-73
by four, that should be enough. Start collecting wood far from yoursite, then as you grow weaker, collect from closer in.
Shelter – is what is going to keep you alive for any extended period of time. You need your shelter to be waterproof, windproof and asinsulated as possible. Select a safe location, protected from theelements, but close to a clearing for your signal, and as close as youcan to fresh water.
Signals – a clearing is the best place to make a signal, anything can beused to make your signal. Toilet paper, rocks, fire and smoke, a mirror,piles of branches, patterns in the snow, etc. Place objects in the formof a triangle as this is a universal distress signal. Bright fire during thenight, and smoky fire during the day are your best signals.
Water – you can only survive for three days without water. Heatingthe water to drink will increase your body core temperature in poorconditions. Always melt snow before ingesting as it uses more fluid foryour mouth to melt snow than a mouthful of snow provides.Remember the rules for safe drinking water – do not make yourself sick by drinking water from a suspicious source.
Food – you can go a long time without food if you are conserving yourenergy and body heat. You can not rely on the availability of largegame, or your ability to catch it to provide food. In some locationsplants with nutritional value may be sparse. Choose food that will giveyou more food energy than the energy you will expend trying to get it.In most cases the simplest of food sources is the best. Some of thesimple things to eat are:
a. snails (lakeshores, forests and fields – boil them);b. bugs, ants, grubs, grasshoppers and maggots (under rocks, logs,
near fields – wash them before boiling, or roasting); andc. plants: in the north, rose hips are good (eat the flesh and get rid
of the seeds and bristles), cattails (eat the roots of them).
There are many other edible things in the wilderness. You can enhanceyour awareness through proper research, preparation and cooking.
HEALTH AND SURVIVAL
As a cadet, you have access to good training and equipment for use inthe outdoors. However, regardless of how good your equipment is, orhow skillful you are, people faced with a survival situation still have

8/14/2019 PO 403 - Bushcraft (Canadian Scout Manual)
http://slidepdf.com/reader/full/po-403-bushcraft-canadian-scout-manual 74/98
A-CR-CCP-121/PT-001
3-74
themselves to deal with. The psychological reactions to the stresses of survival often make them unable to make use of their availableresources of equipment, experience, and skill.
By neglecting aspects of your mental or physical health in anemergency, you limit your ability to think and act. As a potentialleader of a group of people faced with survival, your health may be thekey to their survival as well.
Drink water regularly, eat when you can, conserve your energy, andkeep a positive attitude. Do not sacrifice your long-term health forimmediate gratification – e.g. wait until the meat is fully cooked beforeeating it, or do not drink straight from the creek. You know the rules,and you have the training – two of the most important tools forsurvival.
THE PSYCHOLOGY OF SURVIVAL
Fear – is a very normal reaction for people faced with an emergencywhich threatens any of their important needs. Fear influences yourbehaviour, and thus your chances for survival. Acceptance of fear as anatural reaction to a threatening situation will lead to purposeful ratherthan random behaviour, and in this way will greatly increase yourchances for survival. Fear and confidence are not opposites – areasonable person can acknowledge fear and still remain confident intheir ability to overcome it.
How people react to fear depends more on themselves than on thesituation. Physical strength may not be as effective a tool against fearas a sense of humour, or a cool head under pressure. Some fears canlead directly to a sense of helplessness and hopelessness. Fear must berecognized, lived with, and if possible, used to your to advantage bychanneling your excess energy created by adrenaline towards the tasksat hand. You can fight this by identifying each fear, understanding it,and coping with it.
Fear of the unknown – “What is out there? What’s going to happen tome? Where is it safe?” By accepting this fear as normal you canremain calm and begin to answer each question. Do not criticizeyourself for having critical or negative thoughts, just concentrate on,
and resolve each new question or problem calmly and confidently.

8/14/2019 PO 403 - Bushcraft (Canadian Scout Manual)
http://slidepdf.com/reader/full/po-403-bushcraft-canadian-scout-manual 75/98
A-CR-CCP-121/PT-001
3-75
Fear of your own weakness – leads to a pessimistic attitude and thengiving up. Every person can do something, no matter how bad thesituation, to make that situation better for themselves and theirteammates. Have confidence in your equipment and your skill to use it.Compare the current problem with successful solutions you have used(or learned about) in the past to get through something similar.
Fear of discomfort – is what causes people to continue into bad stormto get back to the warmth and security of base camp, instead of stopping and making a safe, albeit uncomfortable, emergency shelterfor the night before they are soaked, exhausted and hypothermic.
Fear of being alone – even the most independent people can feel theeffects of loneliness unless steps are taken to adapt to, and deal withthe isolation. A strong imagination and sense of humour will help.
Phobias about the dark, or animals, etc. – people with phobias caneasily imagine their worst nightmares coming true, especially in thestressful survival situation. Again, approach each fear with a actionplan and an understanding of this fear in context with the wholesituation – should your fear of snakes cost you your life?
Fear of suffering or death – actually might be your strongest ally insurvival. If you always keep it in your mind that unless you act you candie, you can use this energy to focus yourself in tough times. Byaccepting this fear, and not dwelling on it, you can rate your plans onwhether a specific action is going to keep you alive or not. Haveconfidence in your teammates’, your leader(s) and your rescuers’abilities to get you out.
“Courage is not about being free from fear. Only a fool is fearless.Courage is the ability to do the right thing, and do it well, even when
you are afraid.” John Graham.
SEVEN ENEMIES OF SURVIVAL
Pain, cold, thirst, hunger, fatigue, boredom and loneliness everyone hasexperienced these, but few have known them where they have threatenedtheir survival. In the survival situation, the feelings of pain, cold, etc, areno different from those experienced elsewhere; they are only more
severe and more dangerous. With thes e feelings, as with fear, the moreyou know about them and their effects on you, the better you will be ableto control them, rather than letting them control you.
8/14/2019 PO 403 - Bushcraft (Canadian Scout Manual)
http://slidepdf.com/reader/full/po-403-bushcraft-canadian-scout-manual 76/98
A-CR-CCP-121/PT-001
3-76
Pain – is your body’s way of making you pay attention to somethingthat is wrong with you. Hard or desperate work will sometimes coverpain for a while, but pain is unlikely to cease on its own. Carry outappropriate first aid to the best of your ability. Pain that is ongoing willseriously impact your ability to remain positive and get required workdone. So deal with it right away. Some injuries or illnesses may not becurable, and you can expect your situation to be uncomfortable. Keepyour mind occupied with the important work, and allow enough time forrest and recuperation.
Cold – is a much greater threat to survival than it sounds. It not onlylowers your ability to think, but it also tends to lower your will to doanything but get warm again. Even a few degrees drop in your bodytemperature can affect your ability to make reasonable decisions. Fireand shelter are your primary methods of keeping warm, in any season –you will not have the energy to work to stay warm for any real length of time.
Thirst – even when thirst is not extreme, it can dull your mind. As withpain and cold, lack of water will slowly degrade your ability to survive.Diarrhoea caused by micro-organisms in unsafe water can slowlydehydrate you and lead to future difficulties, but do not abstain fromdrinking out of fear. Make a point of drinking regularly
Hunger – is dangerous because of the effects it can have on the mind,primarily in lessening the person's ability for rational thought. Both thirstand hunger increase a person's susceptibility to the weakening effects of cold, pain and fear. Solid food is not a real necessity until a week ormore has passed – this is not to say that you would not eat given thechance. It is usually the fear of starving to death – a fear that manifestsitself long before the risk of starvation is real – that leads people tomaking poor decisions about safe or appropriate food.
Fatigue – even a very moderate amount of fatigue can reduce mentalability. Fatigue can make you careless it becomes increasingly easy toadopt the feeling of just not caring. This is one of the biggest dangers insurvival. The confused notion that fatigue and energy use are directlyrelated may be responsible for many deaths in survival situations.Certainly, there is a real danger of over-exertion, but fatigue may
actually be due to hopelessness, lack of a goal, dissatisfaction, frustrationor boredom. Fatigue may represent an escape from a situation that has
8/14/2019 PO 403 - Bushcraft (Canadian Scout Manual)
http://slidepdf.com/reader/full/po-403-bushcraft-canadian-scout-manual 77/98
A-CR-CCP-121/PT-001
3-77
become too difficult. If you recognize the dangers of a situation, you canoften summon the strength to go on.
Boredom and Loneliness – are two of the toughest enemies of survival.They are dangerous mainly because they are unexpected. When nothinghappens; when something is expected and does not come off; when youmust stay still, quiet, and alone, these feelings creep up on you. Keepyourself busy, even if it means creating luxuries around your shelter,fishing or setting traps, etc.
STOP! IN A EMERGENCY SITUATION
STOP where you are! Don’t panic. Many lost people waste valuableenergy, and risk injury by panicking – running aimlessly, continuing totravel after dark, walking in circles, etc. T HINK about immediate and future dangers and the factors involvedin your situation. Consider the time of day, your physical condition,and the last time you had a drink or something to eat. Try to list theoptions that are open to you.OBSERVE your immediate environment, weather, terrain, resourcesavailable and how each of these affect your options. Look for alocation for a shelter, for fresh drinking water, and for clues to yourlocation or the route you took to get where you are now (e.g. ‘Ifollowed a stream until it went into a swamp, then I walked over thishill behind me…)PLAN your best course of action. Include in your plan the methodsyou will use to signal rescuers.
Remember! In a survival situation, stay in one place that is close to asupply of drinking water and is visible from the air.
ATTITUDES FOR SURVIVAL
“I can handle this” – the willingness to approach the situation incontrol, and with confidence, will go a long way towards getting youout alive. This confidence can be generated by being prepared foremergencies, by accepting that “it can happen to me,” and by knowingthat your unexpected stay in the Canadian wilderness is likely to beshort if you carry out the appropriate actions.
“I know what to do” – research has shown that survival knowledgeand skills, when employed, are key elements in successful survivalstories. The ability to react to a new situation, or to cope with the

8/14/2019 PO 403 - Bushcraft (Canadian Scout Manual)
http://slidepdf.com/reader/full/po-403-bushcraft-canadian-scout-manual 78/98
A-CR-CCP-121/PT-001
3-78
important little things, will create a sense of confidence and security.Just the knowledge of the priorities of survival, and how to recognizeand fight fear will set you up for survival. Hundreds of survival storiesindicate that there is rarely unlimited time in which to make decisions.Many decisions will have to be made using the information andresources available at that moment – you will have to make the bestplan and act on it immediately.
“I am a survivor!” – curiosity, humour, imagination, willpower andcommon sense are the attributes of a survivor. Make the best of eachsituation, and adapt positively to new crisis when they may occur.
“I can take care of myself” – knowing what to do, how to do it, andhaving the confidence to act on these strengths will keep you frombeing a burden on other team members, as well as allowing you to bean active leader. Positive acts and attitudes are contagious.
“I will get out of this” – remember that people are likely looking foryou – even if you fear that no one will find you. Modern search andrescue makes use of various techniques and technologies – it is almostat the point that you would have to consciously hide to avoid beingfound. The one thing that you need to do to make the rescue work is tostay alive and conscious. A lost person who can signal or respond tosignals will be found sooner.
“[Human] capacities have never been measured: nor are we to judgewhat we can do by any precedents, so little has been tried. What
people say you cannot do, you try and find you can.” H.D. Thoreau
TEAM BEHAVIOUR IN SURVIVAL
Organization – chances of surviving depend largely on a team’sability to organize themselves for activity, and cooperate in setting andachieving goals. An emergency does not weld a crew together; rather,the more difficult and disordered the situation, the greater are thedisorganized team’s problems. This is particularly true in the face of common danger, when fear can result in panic rather thanconcentration. A team that is well trained and prepared will cope betterwith the prolonged stress of a surv ival situation.
Communication between members, sharing tasks, and planningconcurrent activities are keys to organization. In well-organized teams,

8/14/2019 PO 403 - Bushcraft (Canadian Scout Manual)
http://slidepdf.com/reader/full/po-403-bushcraft-canadian-scout-manual 79/98
A-CR-CCP-121/PT-001
3-79
people excel in the job that most closely fits their personalqualifications – assign tasks conscientiously.
Morale – high team morale has many advantages:a. individuals feel strengthened and protected since they realize
that their survival depends on others whom they trust;b. the team can meet failure with greater persistency; andc. the team can formulate goals to help each other
face the future.
High morale must come from internal cohesiveness and not merelythrough external pressures. Under certain conditions, moods andattitudes become wildly contagious. Panic often may be prevented byconscious, well-planned organization and leadership on the basis of delegated or shared responsibility, combined with faith in the groupand realization of the need for cooperation.
Reaction speed – is key to a team’s success. By reacting immediatelyto new hazards, a team will stay occupied (defence against boredom),and will be better able to cope with new problems later. Staying on topof the situation will allow the team to plan, set goals, and assistsurvival – a team that is constantly overwhelmed will have no time toplan.
EMERGENCY SIGNALS
As stated before, modern search and rescue relies on sound and visualsignals to find lost people. The more you do, the quicker the rescuewill be. Stay close by your signals so you can employ them whenrequired. Always set out signals, even if you fear that no one islooking.
You can use anything to form a triangle (make three points) to use as adistress signal. Use rocks, a big pile of logs and brush, or anything aslong as it is in an open area that can be seen from above. Fire isanother form of communicating. During the day, use a smoky fireburning green brush, at night use a bright fire using dry softwoodbranches. Triangles and signals in sets of three are internationaldistress signals.
A whistle or the mirror from a compass are good signals that yourshould have. Do as many other things as you can think of to try tocommunicate or signal someone. Unroll toilet paper or lay out your

8/14/2019 PO 403 - Bushcraft (Canadian Scout Manual)
http://slidepdf.com/reader/full/po-403-bushcraft-canadian-scout-manual 80/98
A-CR-CCP-121/PT-001
3-80
extra clothing to make a signal, you have to be creative and keep yourmind busy.
GROUND TO AIR SIGNALS
XRequire doctor
I IRequire medical
supplies
FRequire food and
water
VUnable to proceed,require help
↑
Going this direction
~ Need map andcompass
Letters should be at least 10m long and visible from the air (openriverbanks, clearings, frozen lake, etc). If making a signal in winteryou must make sure that you stomp down the snow so a shadowappears to form the signals.
EO 403.23: PREDICT A CHANGE IN WEATHER
INTRODUCTION
Weather in Canada has a massive range throughout the year.Temperatures can change as much as 20° C in one day, winds candevelop or drop off, it can rain, snow, hail, or drizzle, and all changescan happen suddenly. Knowing the weather influences your choice inclothing, routes, plans, etc. One thing to remember is that weather is acombination of systems, and as such, it gives warnings of change inadvance of a new system. Your ability to notice and interpret thesewarnings will give you an advantage in making decisions for yourteam’s safety and well-being.
You do not need to be a meteorologist to make some weatherpredictions, but you do need to have some knowledge of what is goingon up there. As a leader in the outdoors, you need to be aware of upcoming changes in weather in order to make appropriate decisionsconcerning training. While equipment is available to assist weather
8/14/2019 PO 403 - Bushcraft (Canadian Scout Manual)
http://slidepdf.com/reader/full/po-403-bushcraft-canadian-scout-manual 81/98
A-CR-CCP-121/PT-001
3-81
forecasting, the average outdoor leader shouldat least be able torecognize changes based on observation.
CANADIAN WEATHER SYSTEMS
Over Canada, warm air (tropical) masses usually move north from theCaribbean and the U.S., and cold air (polar) masses move south fromthe arctic. Air masses can form over both the land and the ocean. Airmasses generally move from west to east. Weather associated with apolar air mass is apt to change abruptly as the cool air warms rapidlyover land, while weather associated with tropical air masses will likelyremain constant for a while as the air is already warm.
Air pressure – the force air exerts on an object – is effected by airtemperature. Cold air is heavier, and therefore creates areas of highpressure as more air is close to the ground. Warm air creates lowpressure because warm air rises and reduces the pressure on theground. These areas are calledpressure systems . Usually , lowpressure systems are associated with fair weather, and high pressurewith foul weather. Both systems can bring precipitation. In Canadahigh pressure systems create winds that rotate in a clockwise direction,and low pressure systems create winds that rotate counter-clockwise.As these systems move over you, you may notice the wind shiftdirections.
High and low systems can not occupy the same space, they displaceeach other. The line where two air masses meet is called afront . Thereare three types of fronts: warm, cold and occluded.
Warm fronts – are more stable than cold, which makes the weatherless severe, but more long lasting. As warm air meets cold, it raisesover the cold, and the moisture in the air condenses, both from the risein elevation and from contact with the cold air, creating clouds andpossibly precipitation. Warm fronts move between 15-30km/h, and theair is moist with low ceilings and poor visibility, but there may be noappreciable precipitation. Warm fronts can be forecast up to two daysin advance by a consistent sequence of cloud formations – cirrus,cirrostratus, altostratus, and then nimbostratus.
Cold fronts – are more unstable than warm, and consequently very
active. As cold air comes in contact with a warm air mass, it forcesitself underneath, pushing the warm air up where the moisturecondenses into clouds and possibly precipitation. Weather conditions

8/14/2019 PO 403 - Bushcraft (Canadian Scout Manual)
http://slidepdf.com/reader/full/po-403-bushcraft-canadian-scout-manual 82/98
A-CR-CCP-121/PT-001
3-82
are commonly more severe, although shorter in duration than thoseassociated with a warm front. Cold fronts move between 40-80km/h,and form to the north or west. Cold fronts can arrive with littlewarning, altostratus clouds usually preceding nimbostratus andcumulonimbus.
Occluded fronts – occurs when one air mass is caught between twoothers. In most cases, the weather will include precipitation, oftenheavy – altostratus clouds preceding cumulonimbus.
TYPES OF CLOUD FORMATIONS
Cirrus – are detached clouds in the form of white, delicate filamentsor white (or mostly white) patches or narrow bands. These clouds havea fibrous (hair-like) appearance, or a silky sheen, or both. Cirrus cloudsleave milky white swirls and curls etched across the sky.
Cirrus
Cumulus – Often referred to as heap clouds, cumulus clouds aretypified by heaped or fluffy formations.
Cumulus
Cirrocumulus – High-level heap clouds. Very often seen combined
with cirrus clouds. Cirrocumulus clouds indicate a condition of unstable air and may lead to precipitation before long.

8/14/2019 PO 403 - Bushcraft (Canadian Scout Manual)
http://slidepdf.com/reader/full/po-403-bushcraft-canadian-scout-manual 83/98
A-CR-CCP-121/PT-001
3-83
Cirrocumulus
Fair-weather cumulus – Low-level cumulus clouds that often form inthe late morning or early afternoon. Clouds are not very dense, arewhite in colour, and are well separated from one another. These cloudsform when the air mass is stable and being warmed.
Fair weather cumulus
Cumulus congestus – High-level cumulus cloud formed by massiveuplifting of heated air within a very unstable air mass. Its top is stillbumpy and forming. If clouds form in the west there is a likelihood of gusty winds and showers in 5 to 10 hr.
Cumulus congestusAltocumulus -medium-level, fleecy or puffy clouds, similar to densecirrostratus, but without any telltale halo. When viewed in the earlymorning, altocumulus usually indicates thunderstorms or precipitationwithin twenty-four hours (often that afternoon).

8/14/2019 PO 403 - Bushcraft (Canadian Scout Manual)
http://slidepdf.com/reader/full/po-403-bushcraft-canadian-scout-manual 84/98
A-CR-CCP-121/PT-001
3-84
Altocumulus
Cumulonimbus – Often massive cumulus with a broad base rangingfrom 3,000 feet upward to 16,000 feet, even 65,000 feet is not unusual.Top is fuzzy or anvil shaped. Heavy downpours, coupled with hail,lightning, and thunder, are common.
Cumulonimbus
Stratus – means layered, essentially formless with no real definingbase or top. Fog is a type of stratus cloud that lies close to the groundand is caused when the earth's surface cools. This cooling effectivelylowers the air temperature, resulting in condensation.
Stratus

8/14/2019 PO 403 - Bushcraft (Canadian Scout Manual)
http://slidepdf.com/reader/full/po-403-bushcraft-canadian-scout-manual 85/98
A-CR-CCP-121/PT-001
3-85
Cirrostratus – High-level veil-like cloud formations composed of icecrystals and often spreading out over a very large surface area. Halosaround the sun are very often observed in cirrostratus clouds, whenobserved decreasing in size, it indicates a lowering of the cloud ceilingand possible precipitation within forty-eight hours.
Cirrostratus
Altostratus – Medium-level clouds that are flat, and dark grey incolour. A darkening of the cloud cover indicates possible precipitationwithin forty-eight hours.
Altostratus
Nimbostratus – Low-level, dark and thick clouds, often without anyreal defining shape. Their ragged edges, known as scud, producesteady precipitation.
Nimbostratus

8/14/2019 PO 403 - Bushcraft (Canadian Scout Manual)
http://slidepdf.com/reader/full/po-403-bushcraft-canadian-scout-manual 86/98
A-CR-CCP-121/PT-001
3-86
FORECASTING FROM CLOUDS When the weather is going to change for the worse you will noticeseveral general cloud activities. Clouds, regardless of their formation,will thicken (darken), increase in number or join together, form layersor stacks, and/or lower in elevation. Clouds that form banks in thewest, with winds from the south forecast storms. Other signs of changefor the worse are:
a. clouds that are moving in all directions, or contrary to theground wind;
b. altostratus clouds that darken and lower mean precipitationover the next 24 hours;
c. there is a halo around the moon;d. altocumulus clouds moving quickly across the sky, or forming
with turrets in the morning are signs of storms within 12 hours;and
e. cumulus clouds forming in the morning and stacking in theafternoon, or moving from the south or south-west, expect rainor storms that day.
When the weather is going to change for the better you will notice thecloud cover lifting, becoming lighter, and small patches of blue skydeveloping. If cumulus clouds form in the afternoon, or float alonewithout stacking, expect fair weather for 24 hours. Stratocumulusclouds drifting with the prevailing wind remaining scattered indicates24 hours of the current weather. Other indicators of stable weather:
a. the condensation trail (‘contrail’) left by high altitude aircraftdisperses quickly; and
b. morning fog burns off before noon.
FORECASTING FROM WIN DS
Changing for the worse:a. winds from the east increasing in speed usually indicate a
coming storm;b. winds from the south increasing in speed; or,c. winds shift in a counter-clockwise direction (e.g. north wind
shifting to west then south).
Changing for the better:
a. winds from the north-west usually indicate clearing, orcontinued clear weather for 24 hours;b. winds from the south or north decrease; and

8/14/2019 PO 403 - Bushcraft (Canadian Scout Manual)
http://slidepdf.com/reader/full/po-403-bushcraft-canadian-scout-manual 87/98
A-CR-CCP-121/PT-001
3-87
c. winds change in a clockwise direction (e.g. south to west).KEEPING TRACK
Forecasting weather is an imperfect art – even for those equipped withthe latest technology. Make notes in your journal in the morning, atnoon and at night about the weather. You can use these notes to trackchanges and to help make forecasts. Do not let this replace researchingweather patterns for your area, listening to professional weatherforecasts, or common sense.
EO 403.24: JUDGE A DISTANCE
While electronic range finders and GPS receivers have made the averageperson better able to measure distance accurately in the field, the abilityto judge distances without electronic aids remains an important skill.From assisting navigation, to communicating information about featuresor people, to the routine of setting up a biv site, the skill of judgingdistance is of daily value. At short distances it is easy – but longerdistances require a great deal of practice. There are several methods toassist you in judging a distance: theunit of measure, appearance, halving, bracketing, and unit average methods.
UNIT OF MEASURE METHOD
This method relies on you observing and remembering a measureddistance and then estimating other distances using your “unit of measure.” The most common unit of measure is 100m. Your local soccerpitch or football field is 100m long. Stand at one end and familiarizeyourself with the distance. This distance then becomes your imaginarymetre stick as you place it between yourself and the object you are judging a distance to. By saying to yourself, “That object is 3 footballfields away” – you have judged it to be 300m. This method can only beused when there is nothing obstructing your field of vision.
THE APPEARANCE METHOD
Another way to judge the distance to an object is to study what it lookslike compared to its surroundings; this is called the appearance method.It takes a lot of practice to become good at it. One way of practising is toagain go back to a place where you have accurately measured 100m.Place people, kit, vehicles, etc. at the 100m mark so you can memorize

8/14/2019 PO 403 - Bushcraft (Canadian Scout Manual)
http://slidepdf.com/reader/full/po-403-bushcraft-canadian-scout-manual 88/98
A-CR-CCP-121/PT-001
3-88
what they look like at that distance. Do the same with the targets at200m, 300m, 500m or more. When standing at a distance from suchobjects as a house, a vehicle or a person, you can learn to judge distancefrom the appearance of the object, i.e. from its size and the amount of detail you can distinguish.
By comparing the appearance of a person's body at 100 m, 200 m, 300m, and 500 m you will find as the distance increases the body appearssmaller and other features gradually fade out. The following may beused as a guide to judge the distance between you and another person:
a. 200 m – all parts of the body are distinct;b. 300 m- outline of the face becomes blurred;c. 400 m – outline of the body remains clear but the face is
difficult to distinguish; andd. 500 m – the body appears to taper from the shoulders and
movement of limbs can be observed.
There are several optical distracters that make the appearance methodchallenging.
An object will appear closer than it is when: a. the object is in bright light or the sun is shining from behind
you;b. the colour of the object contrasts sharply with the colour of the
background;c. you are looking over water, snow or a uniform surface;d. you are in a clear atmosphere found at high altitudes;e. there is dead ground (dead ground is that terrain between you
and the object which you cannot observe because of anobstruction, e.g. ridge, hill, trees, etc.); and
f. it is larger than other things around it.
An object will appear further away than it really is when: a. there is poor light or fog or the sun is in your eyes;b. only a small part of the object can be seen;c. you are looking down a street or tree-lined road;d. the object tends to blend with the background;e. the object is smaller than other things around it; andf. you are lying down.

8/14/2019 PO 403 - Bushcraft (Canadian Scout Manual)
http://slidepdf.com/reader/full/po-403-bushcraft-canadian-scout-manual 89/98
A-CR-CCP-121/PT-001
3-89
THE HALVING METHOD The first two methods are great for distances under 500m, but when thedistance is greater, they become more difficult. By breaking the totaldistance in half (and even breaking that half into quarters) you may beable to employ the unit of measure, or appearance methods to judge thesmaller distance. Once you have judged the fraction of the total distance(1/2, 1/4, etc.) just do the math.
THE BRACKETING METHOD
This method is a very rough estimating tool. Say to yourself, "Thatobject is at least X metres away, but it is not Y metres." Take the averageof your two estimates, for example if "X" is 600 m and "Y" is 1000 m,your distance is 800 m. This is definitely the fastest method to use.THE UNIT AVERAGE METHOD
When you are uncertain of the distance to an object, get several of yourteammates to judge the distance using their choice of the previousmethods. Calculate the average of all estimates. This method takes thelongest, but quite often a group of skilled cadets will be very accurate.

8/14/2019 PO 403 - Bushcraft (Canadian Scout Manual)
http://slidepdf.com/reader/full/po-403-bushcraft-canadian-scout-manual 90/98
A-CR-CCP-121/PT-001
3-90
EO 403.25: CONSTRUCT AN IMPROVISEDSHELTER
Types of improvised shelters:a. lean-to;b. lopped tree shelter;c. natural shelters;d. ground sheet shelters (EO 403.07); ande. snow shelters.
LEAN-TO

8/14/2019 PO 403 - Bushcraft (Canadian Scout Manual)
http://slidepdf.com/reader/full/po-403-bushcraft-canadian-scout-manual 91/98
A-CR-CCP-121/PT-001
3-91

8/14/2019 PO 403 - Bushcraft (Canadian Scout Manual)
http://slidepdf.com/reader/full/po-403-bushcraft-canadian-scout-manual 92/98
A-CR-CCP-121/PT-001
3-92
LOPPED TREE

8/14/2019 PO 403 - Bushcraft (Canadian Scout Manual)
http://slidepdf.com/reader/full/po-403-bushcraft-canadian-scout-manual 93/98
A-CR-CCP-121/PT-001
3-93
When you select a tree, ensure that it is in a safe position, or reinforceits position with a lashing. Never select a tree that would severelyinjure you if it fell on you when you were sleeping.

8/14/2019 PO 403 - Bushcraft (Canadian Scout Manual)
http://slidepdf.com/reader/full/po-403-bushcraft-canadian-scout-manual 94/98
A-CR-CCP-121/PT-001
3-94
SNOW SHELTERS
Snow shelters – snow is an excellent insulator. There are severaltypes of shelters you can build, depending on the condition and depthof the snow.
Snow cave – is made from a large snowdrift, or deep snow. Dig intothe snow bank or drift, away from the wind so drifting snow will notblock the entrance. Dig a small tunnel (less than 1 metre across)directly into the side of the drift about two feet in. Then dig upwardsand to the left and right of the door. Create a space high enough to situp in.
Quinzhees – simple and made out of any kind of snow. Clear out thearea of snow where you want your shelter – 3-4metres. Then put it allback into the center packing it down as you go. You need a wellpacked pile 1.5 to 2 metres high. Gather several sticks to stick into thetop and sides about one foot in; this will be your guide as you arescraping out the inside so you don't go too close to the walls and theroof.

8/14/2019 PO 403 - Bushcraft (Canadian Scout Manual)
http://slidepdf.com/reader/full/po-403-bushcraft-canadian-scout-manual 95/98
A-CR-CCP-121/PT-001
3-95
Igloos – a traditional snow house. They require a certain degree of skill, teamwork, time, and snow tools to build; and they must havevery well packed cold (Arctic) snow.

8/14/2019 PO 403 - Bushcraft (Canadian Scout Manual)
http://slidepdf.com/reader/full/po-403-bushcraft-canadian-scout-manual 96/98
A-CR-CCP-121/PT-001
3-96
Tips for snow shelters :a. digging a snow shelter will make you very wet! Always havedry clothing set aside for after, and ensure you take breaks forhydration and rest (to keep from overheating and soaking yourclothes from the inside) when required;
b. snow shelters take a long time to build – a quinzhee may takeas much as 4 hours to make, with only enough room for 3-4people;
c. tunnel entrance should lead into the lowest level of thechamber, this is because cold air is heavy and will not rise, sooutside air will not spread.;
d. the inside ceiling should be high enough to providecomfortable sitting space;
e. sleeping and sitting benches should be higher than highestpoint of the tunnel entrance – this prevents the warm air fromslipping out through the door opening;
f. all sleeping and sitting platforms require insulation – sleepingpads, or evergreen boughs in an emergency;
g. before entering for the night, place a burning candle or smalllantern inside, the heat will cause the inner layer of snow tomelt and harden – strengthening the roof. Extinguish thecandle/lantern before sleeping;
h. the roof must be arched so that the melting drops of water willfollow the curved sides and become refrozen;
i. plan for a door flap, or place your pack in the doorway afteryou enter;
j. the roof should be at least one foot thick. Never put any weighton the roof; and
k. make two ventilation holes about 10cm across, one near thedoor and the second will be one in the roof. Do not let themclose as you may suffocate.

8/14/2019 PO 403 - Bushcraft (Canadian Scout Manual)
http://slidepdf.com/reader/full/po-403-bushcraft-canadian-scout-manual 97/98
A-CR-CCP-121/PT-001
3-97
“Only those who have had the experience can know what asense of physical and spiritual excitement comes to those who turntheir face away from [civilization and] towards the unknown.”
Arthur Lower
NOTES:

8/14/2019 PO 403 - Bushcraft (Canadian Scout Manual)
http://slidepdf.com/reader/full/po-403-bushcraft-canadian-scout-manual 98/98
A-CR-CCP-121/PT-001
Volenti, non fit injuria – [Those] who knowingly enter in a risk situation cannot complain about difficulties.
NOTES: