pny duo-link 4 user manual library/support/pny products/guides and... · pny duo-link 4 user manual...
TRANSCRIPT

Version 1.0
PNY DUO-LINK 4 User Manual

2
Table of Contents
1. PRODUCT DESCRIPTION 3
2. SYSTEM REQUIREMENTS 4
3. DUO-LINK APP INSTALLATION 4
4. DUO-LINK APP DESCRIPTION 6
5. FILE MANAGEMENT 7
5.1 Types of Views 7
5.2 Select Files to Copy, Move, Share or Rename 8
5.3 Copy Files 9
5.4 Move Files 11
5.5 File Transfer Status 12
5.6 Share Files 14
5.7 Rename Files 15
5.8 Sort Files 16
5.9 File Types Supported by DUO-LINK4 16
6. PHOTO & VIDEO PLAY 17
6.1 Browse Photos 17
6.2. Play Video 17
7. MUSIC PLAY 18
8. USE CAMERA WHILE IN DUO-LINK APP 19
8.1 Shoot Photos 19
8.2.Shoot Video 20
9. BACKUP DIRECTORY 21
9.1 Phone backup 22
9.2 Contacts Backup 24
9.3 Restore Phone Contents and Contacts backed up 25
10. SETTINGS 26
10.1 Cache 26
10.2 Language settings 27
10.3 Third Party Settings 27
10.4 Format 28
10.5 ABOUT 29
10.6 Contact Us 29

3
Compatible PNY DUO-LINK On-The-GO (OTG) Products
1. PRODUCT DESCRIPTIONPNY DUO-LINK is an on-the-go USB flash drive with an integrated Apple Lightningconnector that works with iOS devices (iPhone, iPad, iPod touch) and a standard USBconnector that works with both Mac and PC Computers.
DUO-LINK 4 App allows users to:
• Easily transfer files between Mac/PC computers and iOS devices (iPhone, iPad, iPodtouch). Browse and view documents, photos and video files and listen to music filesstored on the DUO-LINK OTG flash drive and iOS device.
• Backup and restore iOS contacts and Phone contents• Use DUO-LINK as an traditional USB flash drive on Mac and PC
* Note: The DUO-LINK 4 App is not required for use on a Mac or PC.
Physical Description
No. Name Description
1 Apple Lightning Connector Connector to iOS devices, such as iPhone and iPad
2 Standard USB Type A Connector
Connector to Mac or PC

4
2. SYSTEM REQUIREMENTSDUO-LINK is compatible with:
• iOS device: iPhone 5 and newer, iPad mini, iPad mini with Retina display,iPad (4th generation), iPad Air, iPod touch (5th generation) and later.
• iOS: Version 8 and higher• PC: Windows 8 and 10. Mac OS 10.5 and higher
DUO-LINK 4 supports FAT32 and exFAT file systems.
3. DUO-LINK APP INSTALLATIONNote: App installation requires an Apple ID and Internet connection to perform. If you donot have an Apple ID, please refer to the following links to apply for an Apple ID:http://support.apple.com/kb/HT5622
When you insert the DUO-LINK USB 3.0 OTG flash drive into your iOS device for the firsttime, a message will appear and ask if you would like to get the app from the App Store.Tap “App Store” to go to the DUO-LINK 4 app.

5
Tap the “GET” button. Tap “INSTALL” button to download the app onto the iOS device. Tap “open” to open the DUO-LINK 4 app.
Alternative Method to access App:
Go the App store. Find the DUO-LINK 4 app ( ).

6
4. DUO-LINK APP DESCRIPTION
Name Description 1 Photos • Can access photos, videos and music. The files can be uploaded and
downloaded, deleted, renamed and sorted.• Click the icon on the home menu to enter to the directory.2 Videos
3 Music
4 Backup • Backup and restore contacts, photos and videos
5 File Folder • Contains all files stored on the DUO-LINK OTG flash drive.• Use this folder to browse all files or save, transfer or copy a range of
different files collectively.
6 Camera • Takes photos and shoots video without leaving the app. The photos orvideo will be saved automatically on the DUO-LINK OTG flash drive.
7 iOS Storage • When DUO-LINK 4 is connected to the iOS, it shows the availablestorage space and used space on the DUO-LINK OTG flash drive.
8 Drive Storage • Shows the available storage space and used space.
9 Music Bar • Appears on the top left section of the home screen when music is playing on the device. Tap the music bar to go to the music player.
10 Settings • Provides access to information about the app, user manual andPNY.com.
• Allows formatting of DUO-LINK OTG flash drive.
7
5. FILE MANAGEMENT
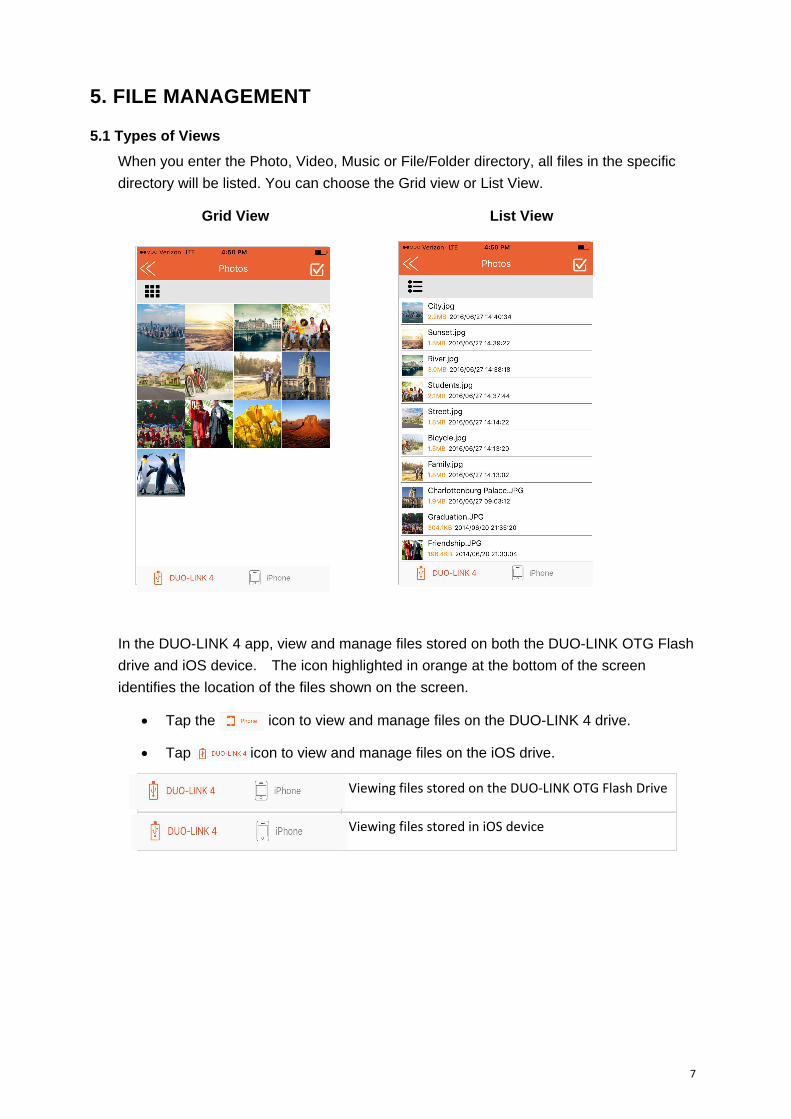
5.1 Types of Views When you enter the Photo, Video, Music or File/Folder directory, all files in the specific directory will be listed. You can choose the Grid view or List View.
Grid View List View
In the DUO-LINK 4 app, view and manage files stored on both the DUO-LINK OTG Flash drive and iOS device. The icon highlighted in orange at the bottom of the screen identifies the location of the files shown on the screen.
• Tap the icon to view and manage files on the DUO-LINK 4 drive.
• Tap icon to view and manage files on the iOS drive.
Viewing files stored on the DUO-LINK OTG Flash Drive
Viewing files stored in iOS device

8
5.2 Select Files to Copy, Move, Share or Rename
Select files, tap the icon in the top right section of the screen.
You can choose to select all files in the directory or specific files for copying or moving files.
To select ALL files in the directory, select the icon on the left hand section of the screen. To unselect ALL files, select the icon on top left section of the screen again.

9
To select specific files or folders, select the white circle next to the individual file or folder. Repeat this action for each file or folder that you want to select. To unselect a file or folder, tap the orange circle and it will change to a white circle.
After files have been selected, you can choose to copy (see section 5.2), move (section 5.3), share (section 5.6) or rename (section 5.7) the selected files. When renaming a file, you can select only one file at a time.
Select the files and folders to be copied (see instructions in 5.2). Copy the selected files
and folders by selecting the icon in the lower left section of the screen.
5.3 Copy Files
While in the File/Folder, you can select the to go directly to the home screen.

10
Choose the location to place the file copies.
• Select “iOS storage” to save the files on the iOS drive (i.e. iPhone or iPad).
• Select “Drive storage” to save the files on the DUO-LINK OTG flash drive.
Choose the specific location where the file should be pasted.
• For “Drive storage” you can choose to place the file copy 1) on the flash drive,2) in an existing folder on the flash drive, or 3) create a new folder to store thefile copy. A new folder can be created by tapping “Create a folder” in thelower left section of the screen.
• For “iOS storage”, you can choose to place the file copy 1) on the iOS deviceor 2) in an existing folder on the iOS device.
Select “Paste’ in the bottom right section of the screen.

11
The transfer screen will show then the file transfer has been completed. See section 5.5 for more details about the file transfer status.
5.4 Move Files Select the files to be moved (See instructions at 5.2). Move the selected files by tapping
the icon in the lower right section of the screen.

12
Select “Move to” button. Choose the specific location where the file should be pasted.
• For “Drive storage” you can choose to place the file copy 1) on the flash drive,2) in an existing folder on the flash drive, or 3) create a new folder to store thefile copy. A new folder can be created by tapping “Create a folder” in thelower left section of the screen.
• For “iOS storage”, you can choose to place the file copy 1) on the iOS deviceor 2) in an existing folder on the iOS device.
Select “Paste’ in the bottom right section of the screen.
5.5 File Transfer Status When you “paste” files that were copied or moved, a transfer screen will appear and provide a status of the selected files.
5.5.1 “Transferring” Status The “Transferring” window will show the files in the progress of being transferred. Tap the X on the right of the file to cancel the file transfer in progress.

13
5.5.2 “Transfer Complete” Status
Tap “Transfer Complete” in the middle section of the screen to view the record(s) of the completed file transfers.
The records of the transfers can be deleted by tapping the trash can icon ( ) in the top right section of the screen. Note: Tapping the will delete the records of the transfers completed. It does not delete the actual files.

14
5.5.3 “Transfer Failed” Status
The “Transfer Failed” window will show files that did not successfully transfer. Typically, a file transfers fails because the file format is not supported or the file size is too large for the destination folder. See section 6.9 for the list of file formats supported by DUO-LINK 4.
5.6 Share Files Select the files to be shared (see instructions in 5.2). Share the selected files by selecting the icon at the bottom middle section of the screen.
Apple’s built-in sharing tools will appear.

15
5.7 Rename Files Select the file to be renamed (see instructions in 5.2). Only one file can be renamed at a time. Rename the selected file by tapping the icon in the lower right section of the screen. Select “Rename.
Type to new name into the box. Tap “OK”. Note: The name length can be no more than 200 bits and cannot contain the following characters: \ / : * ? “ < >

16
5.8 Sort Files Tap the or icon on the left side of the screen and the sort options will appear. Sort by time, name or file type.
5.9 File Types Supported by DUO-LINK4
Movie, video, and audio files that are DRM-protected cannot be played on the drive.

17
6. PHOTO & VIDEO PLAY
6.1 Browse Photos
Tap the Photo Directory icon ( ) on the home screen to access the Photo Directory. Tap a photo file and it will switch to the picture browsing mode. While in the photo browsing mode, swipe right to continue browsing other photos. Swipe left to go back to photos previously viewed.
The menu at the bottom contains buttons to play/pause, play background music, save a photo to the device and share a photo.
Delete photos by tapping the ( ) icon in the top right section of the screen.
6.2. Play Video Tap the Video Directory icon ( ) on the home screen to access the Video Directory. Tap a video file and it will switch to the video playback mode. Slide the progress bar from left to right to adjust the broadcast pace. Listed below, the menu contains buttons to change screen orientation, “play/pause" video, rewind video and fast-forward video,
Swipe the menu to access controls to adjust the brightness or the video of the video.

18
The player supports the following file formats: M4V, MP4 and MOV. If a file format is not noted above, tap “Use third-party player” to open the video. Use VLC, Good player, OPlayer or OPlayer Lite.
Movie and video files that are DRM-protected cannot be played on the drive.
7. MUSIC PLAYAccess files in the Music Directory or File/Folder Directory. Tap a music file to access themusic playback mode. The menu is at the bottom of the screen. The following actions canbe taken in the music playback mode.
Shuffle music order
Repeat song(s)
Go back to the
last music file
Play or Pause Go to the next
music file
Share the file
Adjust the playing progress by dragging the progress bar.
Audio files that are DRM-protected cannot be played on the drive.

19
8. USE CAMERA WHILE IN DUO-LINK APP
8.1 Shoot Photos
Tap camera icon ( ) in the home menu, and the photo/video play mode will appear.
Tap the white round button at the bottom of the screen to shoot the photo.

20
After you shoot the photo, the photo will be saved automatically to “Camera” folder in the File/Folder Directory.
8.2.Shoot Video
Tap camera icon ( ) in the home menu, and the photo/video showing mode will appear.
Swipe the screen to the right to enter the video shooting mode.

21
After you shoot the video, the video clip will be saved automatically in the “Video” folder in the File/Folder Directory
9. BACKUP DIRECTORYSelect the backup icon ( ) in the home menu. There are phone backup and contactsbackup.

22
9.1 Phone backup The phone backup will back up photos and video files.
Tap the "Start backup" button and the backup process will begin. You can tap "Cancel backup" button to stop and cancel the backup process.

23
When the backup is completed successfully, a prompt will appear indicating that the files have been backed up.
The backed up files will be stored in the “Backup” folder in the File/Folder Directory. Access the Backup folder by tapping the File/Folder Directory icon ( ) on the home menu. Tap the Backup folder.

24
9.2 Contacts Backup
Tap the backup icon ( ) to access the Backup Directory.
Tap “Start Backup” button to begin contact process, and then the contacts on your iPhone will be saved on the DUO-LINK OTG drive. When the backup is completed successfully, a message appears and indicates that the files have been backed up.

25
The backed up files will be stored in the “Backup” folder in the File/Folder Directory. Access the Backup folder by tapping the File/Folder Directory icon ( ) on the home menu. Tap the Backup folder.
9.3 Restore Phone Contents and Contacts backed up Tap the backup icon ( ) in the home menu to access the Backup Directory.
Tap “contact backup” to restore contacts. Tap “Restore backup”. Select the backup record that you would like to restore. The example below shows one record, 2016061816372.vcf. Multiple records could appear depending on the number backups made.

26
10. SETTINGSAccess the Settings Directory by tapping the icon in the top right section in the home menu. The information noted in the image below can be accessed in the Settings Direction.
10.1 Cache The cache acts as a temporary storage space for App. You can set the limit of data to be saved in the cache before it automatically clears. Choose 512M, 1G or 2G by tapping the white circle, and an orange circle will appear.
Select “Clear Cache” button to clear data in the cache and free up space on the iOS device.

27
10.2 Language settings Set the default language of the DUO-LINK 4 app. This setting does not affect the language on the iPhone or iPad.
10.3 Third Party Settings Set the third party media player to be used while in the DUO-LINK 4 app, or disable the third party player setting.

28
10.4 Format Tap “Format” button on the settings menu to format the DUO-LINK OTG Flash drive. A message will appear to confirm that you want to format the drive. Tap the “Format” button to format the drive. WARNING: Formatting the OTG flash drive will erase all data on the flash drive.
The following message will appear, “WARNING: Formatting will erase all of the data on the flash drive. Please confirm that you want to format the drive”. Tap “OK” to confirm that you want to format the drive.

29
10.5 ABOUT Access “About” to learn about the PNY DUO-LINK 4 firmware and app version information, and visit the PNY.com website.
10.6 Contact Us E-Mail Technical Support: [email protected] (USA)
Phone Technical Support: 1 (800) 234-4597 (USA)
Website: www.PNY.com