please note: you need the spring 2017 sims upgrade to ... · this information notice explains how...
TRANSCRIPT
Phonics 2017 – Page 1
This information notice explains how to enter your statutory Year 1 Phonics Screening scores and Year 2 retake scores into Assessment Manager and how to return them to Management Information.
To check this, in SIMS.net go to Help | About SIMS.net option from the menu. The version should be 7.174 or later. As last year there are two Phonics Wizards available, one for your Year 1 cohort and another for your Year 2 cohort (retakes only). Phonics scores will have to be entered into both Wizards and a single CTF created (containing all of your Year 1 pupils together with your Year 2 retake pupils) for submission to Management Information. Section 1 – User Defined Groups Before you use the new Phonics wizards, you need to consider whether you need to set up a User Defined Group. This is used when you have pupils who are eligible for Year 1 Phonics but who are not marked as being in NC Year 1 (or Year 2 if applicable) in SIMS.net. You will also need to set up a group to:
Include any pupils who may have left your school AFTER they took the Phonics Screening Check – all pupils who take the screening check in your school must have their result submitted AND/OR
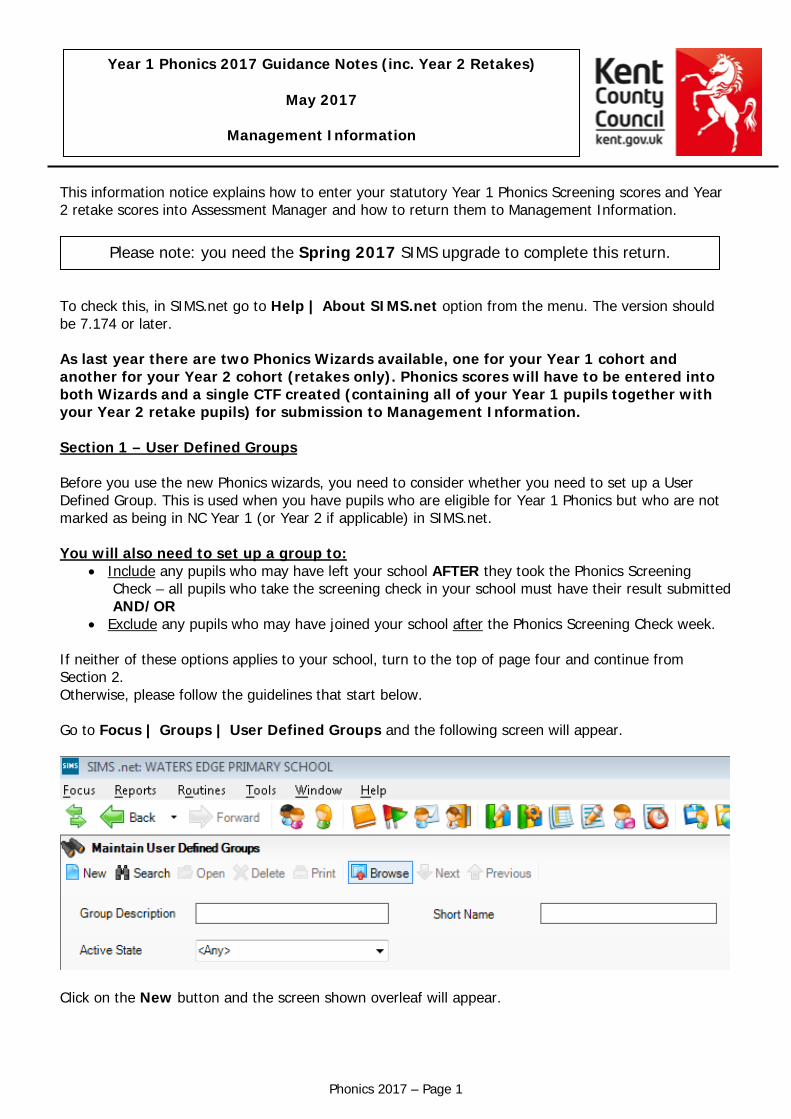
Exclude any pupils who may have joined your school after the Phonics Screening Check week. If neither of these options applies to your school, turn to the top of page four and continue from Section 2. Otherwise, please follow the guidelines that start below. Go to Focus | Groups | User Defined Groups and the following screen will appear.
Click on the New button and the screen shown overleaf will appear.
Please note: you need the Spring 2017 SIMS upgrade to complete this return.
Year 1 Phonics 2017 Guidance Notes (inc. Year 2 Retakes)
May 2017
Management Information

Phonics 2017 – Page 2
Change the Group Type filter to National Curriculum Year, then click Search. All the pupils in your school will now be displayed. To ensure that all pupils in each year group are shown together, click on the Current Group header. This will sort the pupils by Year Group as shown below.
Add a relevant Group Description and Short Name. Make sure the Active State Is Active. If you wish, add a brief note. Then click on the Action button and click Add Member. The screen shown below will appear.
Select all the relevant pupils by clicking on them while holding down the Shift key.
You can also select any pupils who are not listed as NC Year 1 but whom you need to return a score for. Remember to exclude any pupils who joined you after the Phonics test week.
When all pupils are selected click the OK button.

Phonics 2017 – Page 3
You will be returned to the Membership screen as shown below which has now been populated with the selected pupils.
If you need to add a pupil to the group who has left, click the Action | Add Member button again. You will be returned to the Select Members screen as shown below.
Finally, click on the Save button near the top of the screen and Close the window.
Change the Group Type filter to All, then click Search. Find the relevant pupil/s on the list – click to highlight, then click on OK when finished. You’ll be returned to the Membership screen where all chosen pupils will be displayed.

Phonics 2017 – Page 4
Section 2 – Importing the Phonics Wizards (AMPA folder) If you have any problems with the AMPA files, please contact the EIS Help Desk on 0300 065 8888 (if you have a current support contract). If you do not have a contract please contact Management Information on one of the telephone numbers on page 22. Importing the Phonics Wizards into Assessment Manager Go to Routines | Data In | Assessment | Import
Click on the magnifying glass and the screen shown below will appear.
If the following panel appears, make sure all the boxes are ticked and click Yes. All resources (including the Wizards) will be imported. This can take a a few minutes to complete. During the import, a progress bar is displayed - when the resources have been imported and the activity log appears, you can continue these guidance notes from Section 3 on page 7.
If this panel does not appear or the Wizards do not import, continue with the screen shot immediately below.

Phonics 2017 – Page 5
Within your SIMS.net folder there should be an AMPA folder as shown above. Double click on this folder, then on the following folders in succession:
England Primary (and Middle Deemed Primary) Assessment Manager
Once the Assessment Manager folder is open, all related Wizards will be displayed as shown overleaf.
The import screen will be shown. Make sure the “Overwrite with default values” box is ticked and then click Finish followed by Yes to start the import. This may take some time depending on the speed of your PC. An Activity Log will be displayed when the import is complete. Make sure the Log states that all items were successfully imported. Click on the Close button. You now need to import the Year 2 Phonics Wizard. If you imported all the Assessment Manager Resources (page 4) go to Section 3 on page 7. If you did not import all the Resources or the panel didn’t appear, continue from the top of the next page.
The system should default to your SIMS.net folder as shown. If it does not, you will need to navigate to it by clicking on the arrow by the Look in box. It is normally located at C:\Program Files(x86)\SIMS\SIMS.net For EIS hosted schools this will be – Shared Sims Folder W:\Program Files\SIMS\SIMS.net
Click on the Year 1 Phonics Screening Wizard 2017 as shown opposite and click on the Open button.

Phonics 2017 – Page 6
Go to Routines | Data In | Assessment | Import
Within your SIMS.net folder there should be an AMPA folder as shown above. Double click on this folder, then on the following folders in succession:
England Primary (and Middle Deemed Primary) Assessment Manager
Once the Assessment Manager folder is open, all related Wizards will be displayed as shown below.
Click on the magnifying glass and the screen shown below will appear.
The system should default to your SIMS.net folder as shown. If it does not, you will need to navigate to it by clicking on the arrow by the Look in box. It is normally located at C:\Program Files(x86)\SIMS\SIMS.net For EIS hosted schools this will be – Shared Sims Folder W:\Program Files\SIMS\SIMS.net
Click on the Year 2 Phonics Screening Wizard 2017 as shown opposite and click on the Open button.

Phonics 2017 – Page 7
The import screen will be shown. Make sure the “Overwrite with default values” box is ticked and then click Finish followed by Yes to start the import. This may take some time depending on the speed of your PC. An Activity Log will be displayed when the import is complete. Make sure the Log states that all items were successfully imported. Click on the Close button. Section 3 – Running the Year 1 Phonics Wizard Go to Tools | Performance | Assessment | Wizard Manager and the following screen will appear.
You then need to select a group of pupils to work with.
A list of all the Wizards on your system will be displayed. Make sure the filter says Incomplete. If you can’t see the Wizard you need change the drop down box to All. Do not tick the Complete box on the right. Click on the Year 1 Phonics Screening Wizard 2017 and click on the Next button.
Click on the magnifying glass and the screen shown overleaf will appear.

Phonics 2017 – Page 8
If you set up a User Defined Group (pages 1-3), click on the + symbol next to the User Defined Groups category and a list of Groups will be displayed. Click on the name of the group you set up (Y1 Phonics 2017) and click on the Apply button.
If you did not set up a group, click on the + symbol next to the National Curriculum Year category. Select Curriculum Year 1 by clicking on the text once, then click Apply.
You will be returned to the Wizard screen where your selected group will now be displayed. Click on the Next button. The list of available marksheets will be displayed as shown below.
There is only one statutory marksheet that schools need to complete for Year 1: Phonics Screening Year 1 2017 Click on the name of the marksheet to select and then click on the Edit Marksheet button.
The marksheet will be displayed as shown overleaf.

Phonics 2017 – Page 9
Section 4 – Entering Year 1 Results on the Marksheet
The marksheet will now be displayed as below.
You can now start entering the Year 1 Phonics Screening scores for each pupil.
When you have finished entering scores for all pupils, click on the Save button at the top of the screen. Because the DfE are not releasing the pass mark until 26th June an exclamation mark will be displayed in the Data Check column – this will not have an effect on the data you return to us. When the pass mark is released on 26th June, you can enter it into the Threshold Score Phonics Check Year 1 column. Right click on the column header and choose Select Grade for Column. Click on the pass mark that has been announced by the DfE and click OK. Then click Calculate and the Grade for Phonics Check Year 1 will be filled with WA (working at or above) or WT (working towards). Then click Save. You now need to enter the scores for Year 2 pupils retaking the Phonics test.
You can export the marksheet for teachers to complete electronically, or you can print it out for them. For instructions on exporting marksheets please email [email protected]
The score the pupil achieved should be entered in the Mark for Phonics Check Year 1 column. Valid entries are from 0 to 40. If a pupil was Absent or was Disapplied from the test, do not enter a score in the Mark for Phonics Check Year 1 column, enter the A or D value in the Grade for Phonics Check Year 1 column.

Phonics 2017 – Page 10
Section 5 – Running the Year 2 Phonics Wizard Go to Tools | Performance | Assessment | Wizard Manager and the following screen will appear.
You then need to select a group of pupils to work with.
A list of all the Wizards on your system will be displayed. Make sure the filter says Incomplete. Do not tick the Complete box on the right. Click on the Year 2 Phonics Screening Wizard 2017 and click on the Next button.
Click on the magnifying glass and the screen shown overleaf will appear.

Phonics 2017 – Page 11
If you needed to set up a User Defined Group for your Year 2 cohort (pages 1-3), click on the + symbol next to the User Defined Groups category and a list of Groups will be displayed. Click on the name of the group you set up and click on the Apply button.
If you did not set up a group, click on the + symbol next to the National Curriculum Year category. Select Curriculum Year 2 by clicking on the text once, then click Apply.
You will be returned to the Wizard screen where your selected group will now be displayed. Click on the Next button. The list of available marksheets will be displayed as shown below.
There is only one statutory marksheet that schools need to complete for Year 2: Phonics Screening Year 2 2017 Click on the name of the marksheet to select and then click on the Edit Marksheet button.
The marksheet will be displayed as shown overleaf.

Phonics 2017 – Page 12
First of all, click Calculate. This will then highlight the year 2 pupils who need to retake the test as shown below (pupils with no score, Wt, D or A).
If there are some pupils who do not have a Year 1 mark, this may be because they are new and this data was not transferred on the CTF you received from their school. In late April 2017 Management Information supplied all schools with a list of year 2 pupils who needed to retake the test this year. If you have not got this list please email [email protected] to obtain a copy. To enter any missing Year 1 scores from 2016 on to the marksheet please see the last page of this notice.

Phonics 2017 – Page 13
Once you are sure that you know all the pupils you need to enter a score for you can start entering the Year 2 Phonics Screening scores for them.
When you have finished entering scores for all pupils, click on the Save button at the top of the screen. Because the DfE are not releasing the pass mark until 26th June the “Missing” text will remain – this will not have an effect on the data you return to us. When the pass mark is released on 26th June, you can enter it into the Threshold Score Phonics Check Year 2 column. Right click on the column header and choose Select Grade for Column. Click on the pass mark that has been announced by the DfE and click OK. Then click Calculate and the Grade for Phonics Check Year 2 will be filled with WA (working at or above) or WT (working towards). Then click Save. Finally, when all data has been entered, click Save then Close the marksheet. Reports You can print out pupil and school reports if you wish. Please see the second to last page of these notes for guidance.
You now need to create a CTF file in SIMS.net to return your results to Management Information. Instructions for this start on the following page.
The score the pupil achieved for the Year 2 retake should be entered in the Mark for Phonics Check Year 2 column. Valid entries are from 0 to 40.
If a pupil was Absent or was Disapplied from the Year 2 retake, do not enter a score in the Mark for Phonics Check Year 2 column, enter the A or D value in the Grade for Phonics Check Year 2 column.

Phonics 2017 – Page 14
Section 6 – Creating your Return File The final step is to create a CTF (in the form of an XML file) that will contain all of your Year 1 and relevant Year 2 Phonics scores. As last year you will be transferring the XML created to us through Perspective Lite (used for returning your School Census to us) and you can send us your file from Monday 12 June to Friday 23 June 2017. Creating an XML file in SIMS.net From the SIMS homepage go to Tools | Setups | CTF and the following screen will appear.
CTF Import Directory: _________________________________________________ CTF Export Directory: __________________________________________________ If the boxes are blank, you will need to set up the directories. Click on the magnifying glass next to each box and navigate to where your SIMS.net directory is. For example the path may be: F:\SIMS\STAR\CTFOut You now need to select which pupils to transfer results for.
Your directory details may be different – make a note of these two file paths here as you will need to know what they are later on in the process.
PLEASE NOTE: There is an extra “page” in the Wizard that creates an export file. Please do not go through this process.

Phonics 2017 – Page 15
Go to Routines | Data Out | CTF | Export CTF and the screen shown below will appear.
The following screen will appear.
Your Year 1 current pupils will now be filtered as shown overleaf.
Click Phonics Test Results, then Select.
Firstly, make sure the view is for Current and Leavers this year.
Then ensure that the Include Students already exported box is ticked.
Click the Refresh Students button.
Now click on the Year Group arrow and select Year 1.
Phonics 2017 – Page 16
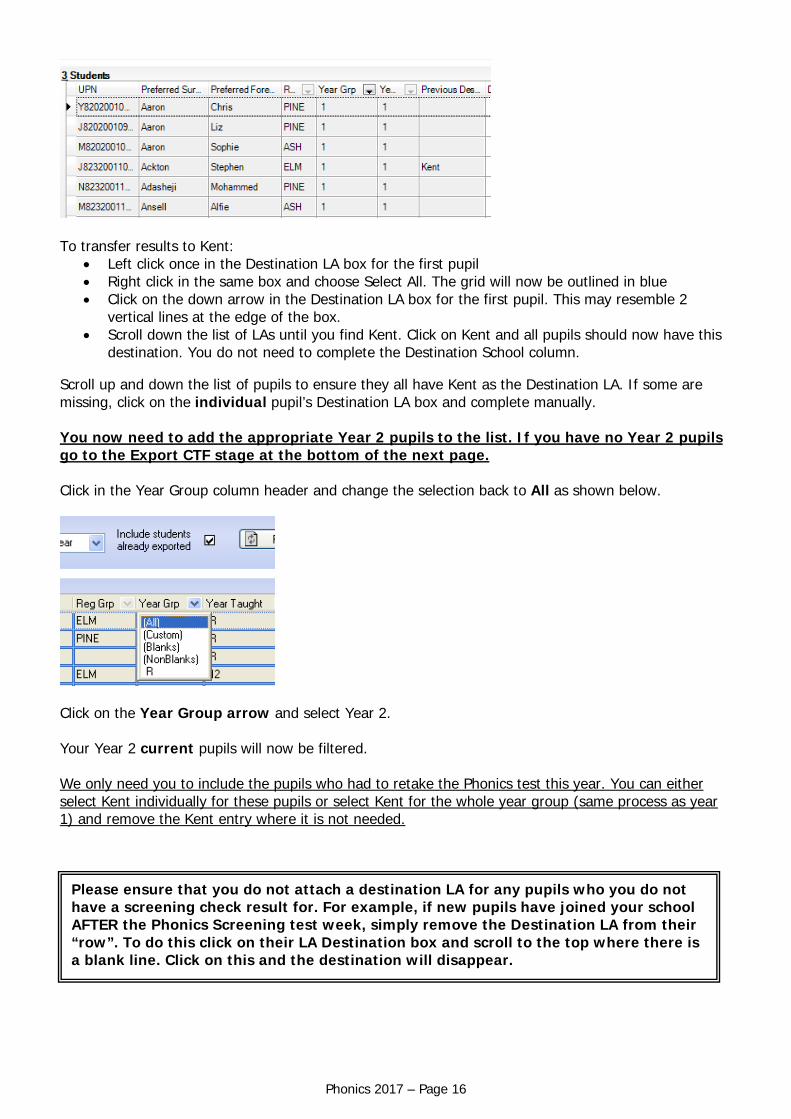
To transfer results to Kent:
Left click once in the Destination LA box for the first pupil Right click in the same box and choose Select All. The grid will now be outlined in blue Click on the down arrow in the Destination LA box for the first pupil. This may resemble 2
vertical lines at the edge of the box. Scroll down the list of LAs until you find Kent. Click on Kent and all pupils should now have this
destination. You do not need to complete the Destination School column. Scroll up and down the list of pupils to ensure they all have Kent as the Destination LA. If some are missing, click on the individual pupil’s Destination LA box and complete manually. You now need to add the appropriate Year 2 pupils to the list. If you have no Year 2 pupils go to the Export CTF stage at the bottom of the next page. Click in the Year Group column header and change the selection back to All as shown below.
Click on the Year Group arrow and select Year 2. Your Year 2 current pupils will now be filtered. We only need you to include the pupils who had to retake the Phonics test this year. You can either select Kent individually for these pupils or select Kent for the whole year group (same process as year 1) and remove the Kent entry where it is not needed.
Please ensure that you do not attach a destination LA for any pupils who you do not have a screening check result for. For example, if new pupils have joined your school AFTER the Phonics Screening test week, simply remove the Destination LA from their “row”. To do this click on their LA Destination box and scroll to the top where there is a blank line. Click on this and the destination will disappear.

Phonics 2017 – Page 17
When you have added the Destination LA for your current Year 1 and 2 pupils, your screen should resemble the one shown below.
If you have had pupils leaving your school who took the Phonics Screening Check with you, you must also return these assessments to us. If this does not apply to your school please continue with these notes from the bottom of this page (Export CTF button). To add these leavers to your file, firstly click in the Year Group column header and change the selection back to All as shown below.
Then click in the Year Group column header again and depending on the pupil, select the ( 1 ) or ( 2 ) year group. The brackets round the year group signify that the pupil/s have left. Add Kent into the Destination LA box for these pupils the same way as before. When you have done this click in the Year Group header again and change the Year back to All. You should then be able to see that all relevant Year 1 and Year 2 pupils have Kent listed in the Destination LA box. When all the relevant pupils have been selected, scroll to the bottom of the screen. To complete the CTF process, click on the Export CTF button.

Phonics 2017 – Page 18
A message may appear about an Address Tidy and Merge. Click on the Yes button to proceed. An egg timer will appear. This is the only visible “working” symbol. When the CTF has been created a dialogue box will appear as shown below.
Click on OK once you have written the file name down.
The Exception Log will appear. Please make sure that the Number of students in file is what you expect it to be and that it matches the Number of students processed. Number of students not exported should be zero. Any errors regarding missing UPNs or Year 1 or Year 2 Phonics Screening scores must be resolved in SIMS.net (UPNs) or Assessment Manager (phonics scores) and a new CTF created. If you get any errors relating to missing “FS” or KS1 teacher assessments data (for Y2 pupils), you can ignore these and carry on. Once a correct CTF file has been produced you can exit SIMS.net. The file now needs to be transferred to Management Information.
Write down the file name here: ________________________ This is VERY important and will be needed later.

Phonics 2017 – Page 19
Section 6 – Transferring your CTF to Management Information As last year, files will be transferred via Perspective Lite. This is the website you use to transfer your School Census files to us. Firstly, open Internet Explorer.
Type the website address in the address line https://perspective.angelsolutions.co.uk and press return.
Login to Perspective Lite using the login details you use to transfer your census file to us.
If you need help with your login details please e-mail Angel Solutions at [email protected] or call them on 0845 129 7196. Alternatively, if you click on the Need a Username / Password reminder? link you can enter either your username (this is normally the school URN) or your e-mail address and a reminder of your login details will be e-mailed to you. The e-mail address that you enter will need to be the address that is assigned to your Perspective Lite login or the password retrieval will not work.
Phonics 2017 – Page 20
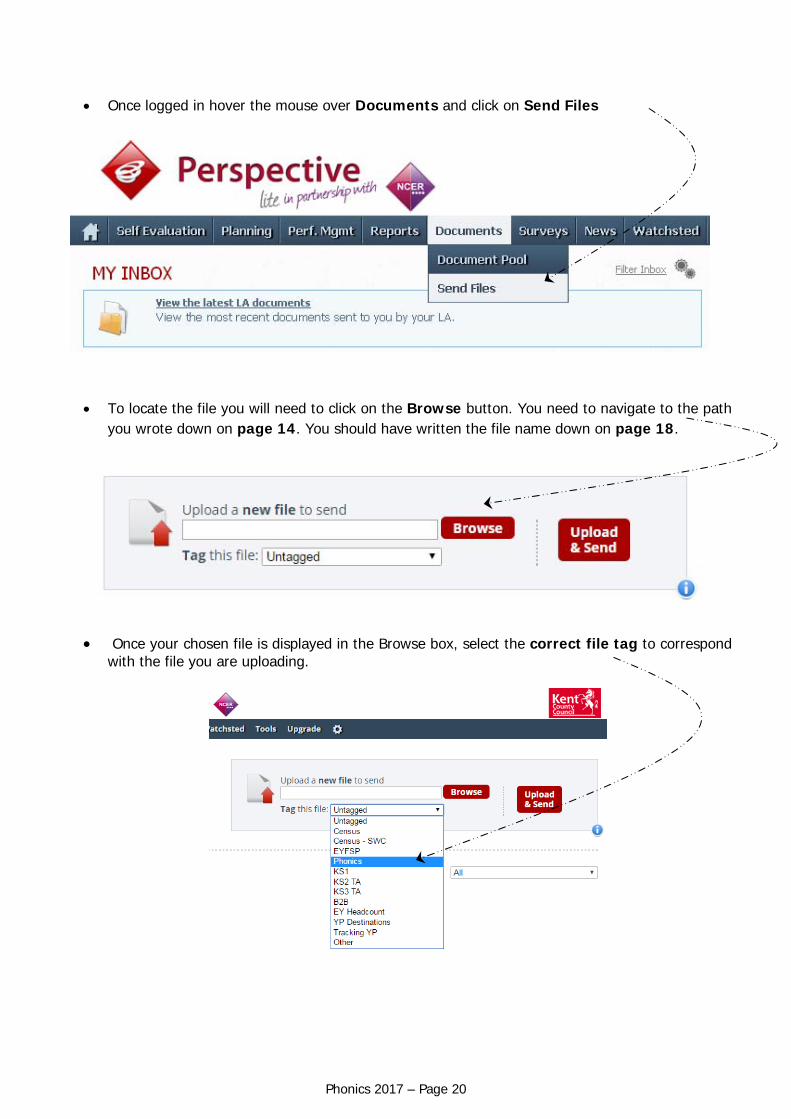
Once logged in hover the mouse over Documents and click on Send Files
To locate the file you will need to click on the Browse button. You need to navigate to the path you wrote down on page 14. You should have written the file name down on page 18.
Once your chosen file is displayed in the Browse box, select the correct file tag to correspond with the file you are uploading.

Phonics 2017 – Page 21
When the file is correctly tagged, you can then click Upload & Send to start the secure upload process for adding the file to Perspective Lite and sending to the LA.
When the file has uploaded/sent you will receive a message on screen to let you know if this
process has been successful.
You have now sent the file and can exit if you wish, or you can locate another file that you wish to send
All sent files are visible in the Files Previously Sent section at the bottom of the page.
You will be able to see the name of the file, who uploaded it and the date it was sent.
You can also see if the file has been received by the LA, when they have received it and who
downloaded it.
There are three options available to you when you are viewing the Files Previously Sent. These are:
o All o Sent and Not Yet Received o Received
You will only be able to recall a file that has not yet been received by your LA.
You can do this by simply clicking on the Recall button next to the document that you want to recall. This will remove the file from Perspective Lite and mean that this file can no longer be accessed by the LA.
Please transfer your Phonics Results file between:
Monday 12 June and Friday 23 June 2017
Thank you.

Phonics 2017 – Page 22
Management Information Contacts If you have any problems with any of the Assessment Manager or SIMS.net procedures outlined in this Information Notice please contact: Early Years Foundation Stage Michelle Hastie 03000 417091 Helen Hogan 03000 416246 Teresa Westbrook 03000 417197 Year 1/2 Phonics Teresa Westbrook 03000 417197 Abi Maunders 03000 417131 Michelle Hastie 03000 417091 Key Stage One Wahida Siddique 03000 414655 Ed Lacey 03000 417113 Erika Griffiths 03000 417082 Key Stage Two Hayley Savage 03000 414286 Katie Sedgwick 03000 417924 Cheryl Prentice 03000 417154 Erika Griffiths 03000 417082

Phonics 2017 – Page 23
Reports There is a facility within the Phonics Screening wizard to print and preview pupil and school reports.
To access the reports go to:
Tools | Performance | Assessment | Wizard Manager Click on Year 1 (or 2) Phonics Screening Wizard 2017 and then the Next button Check that Year 1 (or 2) or the correct user defined group are selected and click Next TWICE.
The report screen is displayed as shown below. There are 2 reports you can print or preview: KS1 Y1 (or Y2) Phonics Comparative Eng 2017 KS1 Y1 (or Y2) Phonics Student Eng 2017
The Student Report
If you want to print all the pupils at once, click on the Select All button. All pupil boxes will now be ticked. Click on the Print button once. If you want to preview the report, make sure that just one pupil box is ticked then click on the Preview button once.
The School and National Report (Comparative)
Make sure only one pupil is “ticked”. Click on the KS1 Y1 (or Y2) Phonics Comparative Eng 2017 report and click the Preview or Print button. The report displays percentages for all pupils, boys and girls within your school and 2016 National results by gender and all pupils. You may choose to print one or multiple copies of either report by setting the number of copies required on the print manager screen.
The reports are opened in Microsoft Word. We advise that you save them to your network for future reference.
This is the Preview button. This is the Print button. The “cog” button will upload a copy of the pupil report to the Linked documents on the pupil’s record.

Phonics 2017 – Page 24
When you have finished printing and/or previewing reports click on the Cancel button to exit the wizard. Entering Missing 2016 Year 1 Scores If, when you enter the 2017 Year 2 Phonics marksheet there are pupils with 2016 Year 1 scores missing, you can enter them manually into the marksheet. There are 2 scenarios: If the child was on roll at your school last year and their Year 1 result is missing: Go the Year 1 Phonics wizard for 2017. Tools | Performance |Assessment | Wizard
Manager. Click on the Year 1 Phonics Screening Wizard 2017 option and click Next. Year 1 needs to be selected on the Select Group screen. Once Year 1 is displayed click Next. Click on the Phonics Screening Year 1 2017 row and click the Edit Marksheet button (green
pencil). Change both the Result Date and Group Membership Date boxes to a date in the last academic
year (20/06/2016 for example) and click on Refresh – this will then display the pupils who were in Year 1 during the last academic year.
Enter any missing Phonics scores into the Mark for Phonics Check Year 1 column. Calculate then Save.
Close the Marksheet and the Wizard. If the pupil was not on roll at your school last year and their Year 1 results is missing: Go the Year 1 Phonics wizard for 2017. Tools | Performance |Assessment | Wizard
Manager. Click on the Year 1 Phonics Screening Wizard 2017 option and click Next. Year 2 needs to be selected on the Select Group screen (the year group the pupil is in now). Once
Year 2 is displayed click Next. A message will appear saying the Group selection has been modified. Click Yes to save the change.
Click on the Phonics Screening Year 1 2017 row and click the Edit Marksheet button (green pencil).
Change the Result Date to a date in the last academic year (20/06/2016 for example) and click on Refresh – this will then display your current Year 2 pupils.
Enter any missing Phonics scores into the Mark for Phonics Check Year 1 column. Calculate then Save.
Close the Marksheet and the Wizard.
In this second scenario you will need to change the Group back to Year 1 when you next select the Year 1 Phonics Screening Wizard 2017. Again, a message will appear saying the Group selection has been modified. Click Yes to save the change.