planar pd42ed plasma tv user's guide - digital … · analog sources to the progressive-scan...
TRANSCRIPT

PD42ED Plasma TV
USER’S GUIDE
www.planar.com


The information contained in this document is subject to change without notice.
This document contains proprietary information that is protected by copyright. All rights are reserved. No part of this document may be reproduced, translated to another language or stored in a retrieval system, or transmitted by any means, electronic, mechanical, photocopying, recording, or otherwise, without prior written permission.
Windows is a registered trademark of Microsoft, Inc.
Other brand or product names are trademarks of their respective holders.

Contents Important Information...........................................................................................................................1 Safety Precautions ...................................................................................................................................2 Product Features ......................................................................................................................................3 Content of Package.................................................................................................................................4 Quick Start..................................................................................................................................................6
Front Panel ..................................................................................................................................6 Front Panel Controls ................................................................................................................7 Rear Panel....................................................................................................................................8
Set-up Instructions..................................................................................................................................9 Getting Started..........................................................................................................................9 Video/Audio Connection.................................................................................................... 10 External Speakers .................................................................................................................. 11 Other Connections................................................................................................................ 12
Full Function Remote Control .......................................................................................................... 13 Remote Control Overview.................................................................................................. 13 Using the Remote Control.................................................................................................. 15
On-Screen Display (OSD) Settings .................................................................................................. 18 OSD Menu Overview............................................................................................................ 18 OSD Menu Operation........................................................................................................... 19
Display Settings ............................................................................................................20 Image Settings ..............................................................................................................20 Language and Color Temp........................................................................................21 Audio Settings...............................................................................................................21 OSD Window Settings ................................................................................................22 Advanced Settings.......................................................................................................23 Advanced Settings.......................................................................................................24
Parental Control..................................................................................................................................... 25 V-Chip Setup ........................................................................................................................... 25 Change Password .................................................................................................................. 28
Closed Caption ...................................................................................................................................... 29 Using Closed Caption........................................................................................................... 29
Technical Information ......................................................................................................................... 30 Specifications.......................................................................................................................... 30 Video Modes............................................................................................................................ 32
Troubleshooting.................................................................................................................................... 33 Planar Customer FirstTM 1—Year Warranty ................................................................................... 36 Maintenance Guidelines .................................................................................................................... 40 Regulatory Information ...................................................................................................................... 41
Agency Approvals ................................................................................................................. 41 FCC Information..................................................................................................................... 41

1
Important Information
"CAUTION: If the same image is displayed continuously, a permanent image may remain on the screen. This is due to burning of the fluorescent material and is typical for all Plasma displays. To minimize this, use at least the display picture move feature, selectable through the on-screen display adjustment menu (OSD)."
Warning: To reduce the risk of fire or electric shock, do not expose this product to rain or moisture.
Caution: To reduce the risk of electric shock, do not remove cover (or back). No user-serviceable parts inside. Refer servicing to qualified service personnel.
Note to CATV system installer: This reminder is provided to call CATV system installer’s attention to Article 820-40 of the National Electrical Code (Section 54 of Canadian Electrical Code, Part 1), that provides guidelines for proper grounding and, in particular, specifies that the cable ground shall be connected to the grounding system of the building as close as to the point of cable entry as practical.
Example of antenna grounding as per National Electrical Code is as the following picture.
Caution: FCC/ CSA regulations state that any unauthorized changes or modifications to this equipment may void the user's authority to operate it.
Important: One Federal Court has held that unauthorized recording of copyrighted TV programs is an infringement of U.S. copyright laws. Certain Canadian programs may also be copyrighted and any unauthorized recording in whole or in part may be in violation of these rights.
CAUTION Risk of electric shock. Do not open.
2
Safety Precautions
1. Read these instructions.
2. Keep these instructions.
3. Heed all warnings.
4. Follow all instructions.
5. Do not use this apparatus near water.
6. Clean only with dry cloth.
7. Do not block any ventilation openings. Install in accordance with the manufacturer's instructions.
8. Do not install near any heat sources such as radiators, heat registers, stoves, or other apparatus (including amplifiers) that produce heat.
9. Do not defeat the safety purpose of the polarized or grounding-type plug. A polarized plug has two blades with one wider than the other. A grounding type plug has two blades and a third grounding prong. The wide blade or the third prong is provided for your safety. If the provided plug does not fit into your outlet, consult an electrician for replacement of the obsolete outlet.
10. Protect the power cord from being walked on or pinched particularly at plugs, convenience receptacles, and the point where they exit from the apparatus.
11. Only use attachments/accessories specified by the manufacturer.
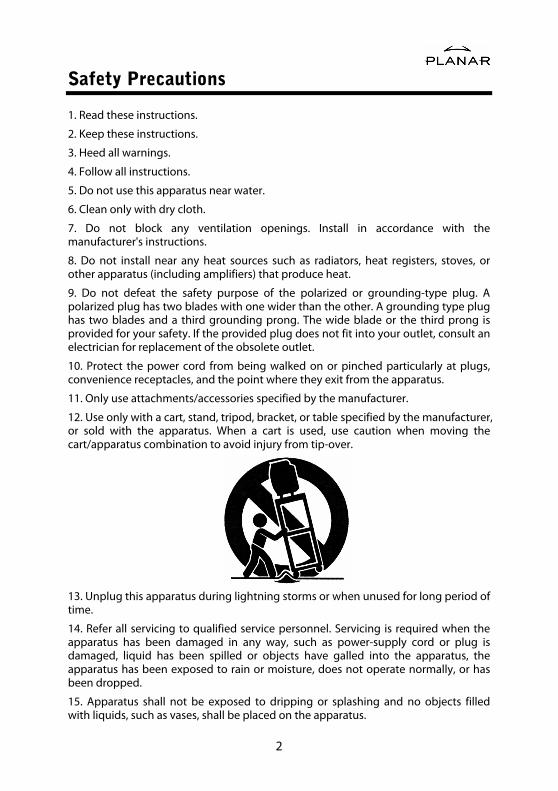
12. Use only with a cart, stand, tripod, bracket, or table specified by the manufacturer, or sold with the apparatus. When a cart is used, use caution when moving the cart/apparatus combination to avoid injury from tip-over.
13. Unplug this apparatus during lightning storms or when unused for long period of time.
14. Refer all servicing to qualified service personnel. Servicing is required when the apparatus has been damaged in any way, such as power-supply cord or plug is damaged, liquid has been spilled or objects have galled into the apparatus, the apparatus has been exposed to rain or moisture, does not operate normally, or has been dropped.
15. Apparatus shall not be exposed to dripping or splashing and no objects filled with liquids, such as vases, shall be placed on the apparatus.
3
Product Features
The Product features include:
Built-in Screen Move: Screen move feature to reduce the possibility of screen burn.
3-D Digital Comb Filter: Enhances color purity of Composite Video and TV input sources, reducing cross-color artifacts like dot crawl and moiré.
Wide Viewing Angle: Over 160 degrees (horizontal and vertical) viewing angle.
Picture in Picture: Users may simultaneously watch two images from different video sources.
Channel Memory: Allows users to add and remove channel according to personal preference.
16:9 Enhancement: Widescreen technology that maximizes picture quality when playing widescreen enhanced video.
Parental Control: V-Chip technology allows parents to block unsuitable programming for under age viewers.
Color Temperature: 3 user selectable color temperature settings are available for image optimization.
D-Sub 15 VGA Input: Allows users to connect the computer to the plasma TV to use the plasma TV as a computer monitor.
Digital Visual Interface (DVI): This product is equipped with a DVI-D interface for a digital-to-digital connection.
TV Tuner Built-in: Built-in NTSC tuner to receive conventional analog broadcasts; de-interlacing circuit with 3:2 pull down converting interlaced analog sources to the progressive-scan display, significantly improving picture quality
Built-in TV Video and Audio Out: Outputs TV video/audio signal to an external device.
Built-in Speakers: Built-in stereo speakers with 3 watts per channel.
Input Signals Component Video (YCbCr/ YPbPr) Composite Video S-Video Analog VGA (D-Sub 15pin) Digital DVI RS232 Communication Port (D-Sub 9pin) TV Tuner Built-in
(1) an optional set-top HDTV receiver box is required to receive digital signals

4
Content of Package
When you are unpacking the product, make sure that you have the following items:
Plasma TV Monitor Monitor Stand
Power cord S-Video cable
Analog video signal cable (D-Sub 15 cable)
RCA Video/Audio cable
Remote Control and AAA Battery User’s Manual

5
If you find that any of these items are missing or appear damaged, please contact your dealer immediately. Do not throw away the packing material or shipping carton in case you need to ship or store the plasma TV in the future.
Optional Accessories External Speakers and Stands
Wall mount bracket

6
Quick Start
Front Panel
Indicator Light
Remote Control Sensor
Remote Control Sensor: Receives infrared signals from the remote control.
Aim the remote control within 30 degrees left and right.
Indicator Light: This LED light indicates the main power status.
Indicator (Amber): Standby mode
Indicator (Blue): Power ON mode

7
Front Panel Controls
Button Function
Menu Displays the OSD menu
Volume Up ( ) Down ( )
(1) Adjust volume by pressing " " to decrease the volume and " " to increase the volume (2) Change the configurations under the OSD menu
Select
Switches between signal sources. The signal source selection is in a loop: Composite-Video --> S-Video --> Component-Video --> TV --> ANALOG VGA --> DVI
Channel Up ( ) Down ( )
(1) Changing channel under TV mode (2) Select options under OSD menu
Standby/On Power on the plasma TV or change to Standby mode
Menu Volume Up/Down Channel Up/Down Select Standby/On
8
Rear Panel
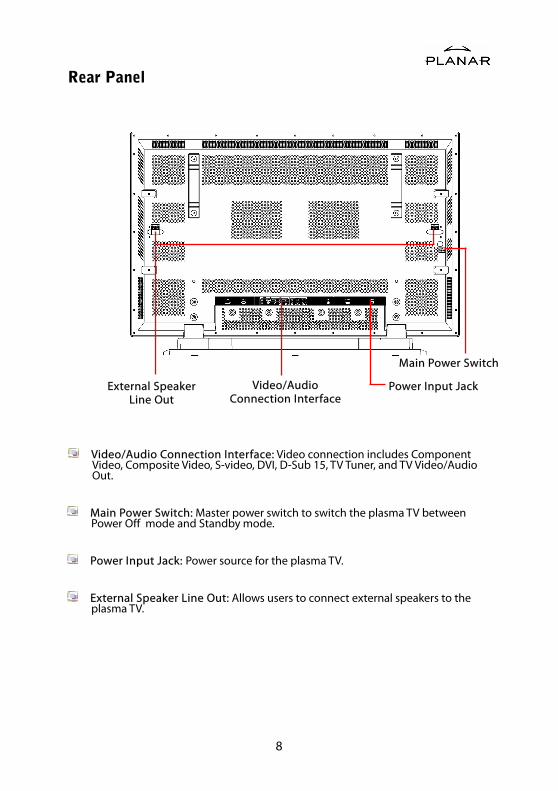
Video/Audio Connection Interface: Video connection includes Component Video, Composite Video, S-video, DVI, D-Sub 15, TV Tuner, and TV Video/Audio Out.
Main Power Switch: Master power switch to switch the plasma TV between Power Off mode and Standby mode.
Power Input Jack: Power source for the plasma TV.
External Speaker Line Out: Allows users to connect external speakers to the plasma TV.
Video/Audio Connection Interface
Power Input Jack External Speaker Line Out
Main Power Switch

9
Set-up Instructions
Getting Started
Power Input Jack: Auto switch power supply accepts input of 100 VAC~240 VAC. Use only UL approved power cord with proper grounding.
Main Power Switch: Press the Power Switch on the back of your plasma TV. The Indicator Light on the front will turn to Amber color indicating the plasma TV is in Standby mode. If the plasma TV will not be used for an extended period of time, turn off your plasma TV with the Main Power Switch.

10
Video/Audio Connection
Composite (AV) Input: Single RCA connector to connect with the composite video output of a DVD Player, VCR or any other device with a composite video connection.
S-Video Input: Single S-video connector to connect with the S-video output of a DVD Player, VCR or any other device with a S-video connection.
Component Video Input: 3 RCA connectors to connect with the component video output of a DVD player, DTV receiver or any other device with a component connection.
Composite (AV)/S-Video Audio: 2 RCA connectors to connect with the audio output of the composite or s-video source.
Component Audio: 2 RCA connectors to connect with the audio output of the component Y/Cb/Cr or Y/Pb/Pr source.
PC Audio: 2 RCA connectors to connect with the audio output of a PC.
TV Video/Audio Out: 3 RCA connectors (1 video and 2 audio) that output the TV video and audio signals to an external device.

11
+
+
+
External Speakers
External Speaker Line Out: External speaker output. Please refer to the drawing for the connection details. It is strongly recommend to use only Planar Accessories for performance and safety purposes.

12
Other Connections
DVI: DVI-D connector for high quality digital PC connection.
D-Sub 15: Regular analog VGA connection for PC usage.
RF: RF input that connects to the antenna, cable box, or CATV cable. Supports NTSC TV system with 125 channels receivable.
RS-232: D-Sub 9 Serial port for communication between the display and the PC.

13
Full Function Remote Control
Remote Control Overview 1. Power Button
Turns ON or OFF (Standby mode) the Plasma TV
2. Scaling Button
Adjusts image aspect ratio
3. Display Button
Displays status information
4. Audio Swap Button
Switches audio between the main display and the PIP display
5. Swap Button
Switches video between the main display and the PIP display
6. PIP Position Button
Adjusts the position of the PIP display
7. PIP Size Button
Adjusts the size of the PIP display
8. PIP Input Button
Activates the picture in picture display and selects the source of the picture in picture display
9. Quick+/Quick- Buttons
Shortcut to access the product’s features
10. Zoom +/- Buttons
Zooms In or Out on the image
11. Auto Button
Auto adjusts the image
12. Freeze Button
Pauses the image
13. MTS Button
Switches between Mono, Stereo, and SAP
14. Exit Button
Exits the OSD menu or displayed information
15. Menu Button
Activates the OSD menu

14
16. Up/Down/Left/Right Buttons
Navigation buttons for the OSD menu (The Right Arrow button also functions as the “ENTER” key)
17. Channel Up/Down Buttons
Changes TV channels
18. Recall Button
Recalls to the previous channel
19. Mute Button
Mutes the volume
20. Volume Up/Down Buttons
Changes the volume
21. Numbers Buttons
Number keys for channel selection
22. Sleep Button
Sleep timer
23. TV Button
Direct key to the TV mode
24. YCbCr Button
Direct key to the YCbCr mode
25. AV Button
Direct key to the Composite mode
26. PC Button
Direct key to the PC mode
27. YPbPr Button
Direct key to the YPbPr mode
28. S-Video Button
Direct key to the S-Video mode

15
Using the Remote Control
Inserting Batteries Remove the battery cover from the back of the remote control.
Insert two AAA batteries by matching + and – sign on both batteries to the diagram inside the remote control battery compartment.
Replace the battery back cover.
Precaution Always make sure to have the batteries installed correctly. Incorrect installation
can cause damage to the remote control.
Always replace the batteries in pair. Do not mix an old battery with a new battery. Be sure to use the same type of batteries.
Remove the batteries when knowing the remote control will not be used for an extended period of time to avoid damage from possible battery leakage.
To ensure normal operation, the remote control should not be dropped or damaged in any way.
Using the Remote Control Power Button: Press the Power button to turn ON the TV. The LED indicator will
become Blue. Press the button again to turn OFF the TV into Standby mode. The LED indicator will become Amber.
Scaling Button: Press the Scaling button to change the image to different aspects. Aspects include Full, Fill Aspect Ratio, 4:3 to 16:9, Letterbox to 16:9, Letterbox Subtitles to 16:9, One to One.
Display Button: Press the Display button to enable information display such as TV channel or source of connection. Press the button again to turn off the information display.
Audio Swap Button: Press the Audio Swap button to swap the main window’s audio signal source with the PIP window’s audio signal source.
Swap Button: Press the Swap button to swap the main window’s video signal source with the PIP window’s video signal source.
PIP Position Button: Press the PIP Position button to cycle through 9 different PIP window positions.

16
PIP Size Button: Press the PIP Size button to select through 3 different PIP window sizes.
PIP Input Button: Press the PIP Input button to activate the PIP window. Pressing the PIP Input button will cycle the PIP window through all available input sources. The PIP window will deactivate once it cycles through all inputs. Note: The PIP input source cannot be the same with the main window’s input source.
Quick+/Quick- Buttons: Shortcut to access the Brightness, Contrast, Volume, Treble, Bass, and Balance adjustment. Make selection by pressing + and – and use Volume Up/Down to change the setting. Press repeatedly to circle through the selections.
Zoom +/- Buttons: Zoom in on the image by pressing the Zoom + button and press the Zoom – button to zoom out.
Auto Button: When the image is not even or not in the center of the screen under PC mode, press Auto button for auto adjustment.
Freeze Button: Freeze button allows the user to temporarily pause the current image displayed. Press to freeze the image. Press again to restore the picture.
MTS Button: Press MTS button to select Mono, Stereo, and SAP (Second Audio Program) under TV mode.
Exit: Press to exit the OSD menu.
Menu Button: Press to access the OSD menu for features adjustment.
Up/Down/Left/Right Buttons:
Press the Up/Down/Left/Right buttons to select the options under OSD menu.
Press the Right button to change the setting.
Channel Up/Down Buttons:
Press the Channel Up/Down buttons to switch to TV mode when under video mode.
When TV is the PIP window’s input source, users may press Up/Down or Number buttons to change the channel directly.
Recall Button: Press to jump back and forth between two channels.
Mute Button: Press to mute the volume. Press again to restore the volume.
Volume Up/Down Buttons:
Press the Volume Up button to increase the volume.
Press the Volume Down button to decrease the volume.

17
Number Buttons: Use Number buttons to choose specific channel. For example, to select channel 27, first press 2 and then press 7. For channel 101, first press +100 and then press 0 and 1.
Sleep Button: Press the sleep button repeatedly to set the sleep timer to 30, 60, 90, and 120 minutes.
TV Button: Press to switch directly to the TV mode.
YCbCr Button: Press to switch directly to Component YCbCr mode.
AV Button: Press to switch directly to Composite mode.
PC Button: Press to switch directly to PC mode. Press again to change between
D-Sub 15 and DVI mode.
YPbPr Button: Press to switch directly to Component YPbPr mode.
S-Video Button: Press to switch directly to S-Video mode.
18
On-Screen Display (OSD) Settings
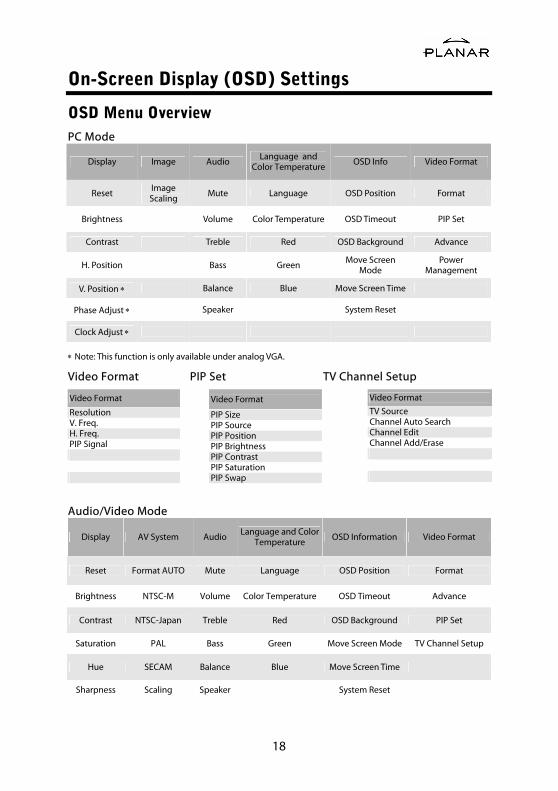
OSD Menu Overview PC Mode
Display Image Audio Language and Color Temperature OSD Info Video Format
Reset Image Scaling Mute Language OSD Position Format
Brightness Volume Color Temperature OSD Timeout PIP Set
Contrast Treble Red OSD Background Advance
H. Position Bass Green Move Screen Mode
Power Management
V. Position ∗ Balance Blue Move Screen Time
Phase Adjust ∗ Speaker System Reset
Clock Adjust ∗
∗ Note: This function is only available under analog VGA.
Video Format PIP Set TV Channel Setup
Audio/Video Mode
Display AV System Audio Language and Color Temperature OSD Information Video Format
Reset Format AUTO Mute Language OSD Position Format
Brightness NTSC-M Volume Color Temperature OSD Timeout Advance
Contrast NTSC-Japan Treble Red OSD Background PIP Set
Saturation PAL Bass Green Move Screen Mode TV Channel Setup
Hue SECAM Balance Blue Move Screen Time
Sharpness Scaling Speaker System Reset
Video Format
PIP Size PIP Source PIP Position PIP Brightness PIP Contrast PIP Saturation PIP Swap
Video Format
Resolution V. Freq. H. Freq. PIP Signal
Video Format
TV Source Channel Auto Search Channel Edit Channel Add/Erase

19
OSD Menu Operation
How to Operate?
Press Menu button to enter OSD Menu. Refer to the picture above; there are six icons on the top and seven options to choose from. For the top icons, icon highlighted in yellow is the one being selected. To change to different icon simply press Menu button repeatedly until correct icon is being selected. To access the options simply press Up/Down button until reaches the correct option and then use Right buttons to change the settings.
20
Display Settings
PC Video
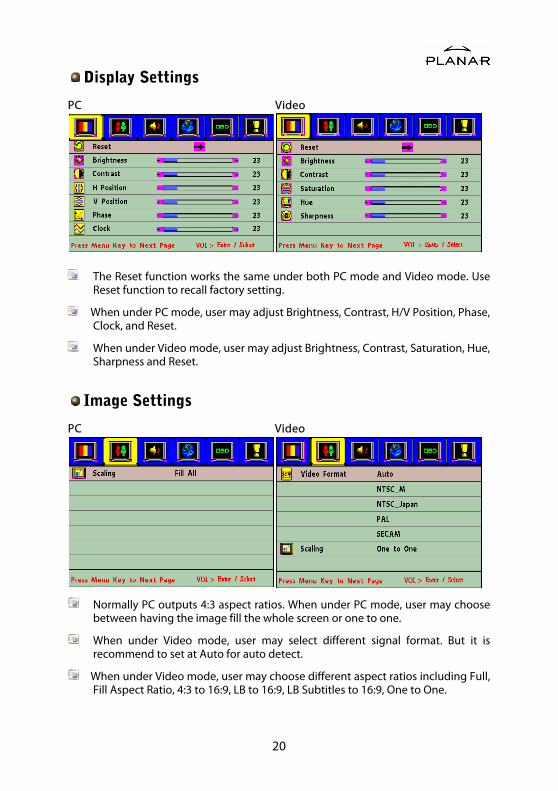
The Reset function works the same under both PC mode and Video mode. Use Reset function to recall factory setting.
When under PC mode, user may adjust Brightness, Contrast, H/V Position, Phase, Clock, and Reset.
When under Video mode, user may adjust Brightness, Contrast, Saturation, Hue, Sharpness and Reset.
Image Settings
PC Video
Normally PC outputs 4:3 aspect ratios. When under PC mode, user may choose between having the image fill the whole screen or one to one.
When under Video mode, user may select different signal format. But it is recommend to set at Auto for auto detect.
When under Video mode, user may choose different aspect ratios including Full, Fill Aspect Ratio, 4:3 to 16:9, LB to 16:9, LB Subtitles to 16:9, One to One.

21
Language and Color Temp.
PC/Video
Image color and language functions and selections are identical for both PC mode and Video mode. For OSD language item, user may select from 10 different languages including English, German, French, Italian, Spanish, Portuguese, Netherlands, Traditional Chinese, Simplified Chinese, and Japanese.
For the image color, user may adjust the luminance of R/G/B colors and color temperature. When selecting “Cool”, “Neutral”, and “Warm” for the Color Temperature, R/G/B colors will be disabled.
Audio Settings
PC/Video
Audio functions and selections are identical for both PC mode and Video mode. User may adjust Mute, Volume, Treble, Bass, Balance, and Speaker from this menu. Most of the functions in this menu can also access by using Quick +/- button on the remote control.

22
OSD Window Settings
PC/Video
This menu is for adjusting the OSD menu window. User may change OSD Position, OSD Timeout, OSD Background, and System Reset for back to default.
The screen move feature decreases chance of image burn. When a static image is being displayed on the screen for an extended period of time, enable the “move screen mode” feature to protect the screen.
Under move screen mode, user may select from 3 different types including off, mode1, and mode2.
For move screen time item, user may adjust the length of time between the images from 5 to 255 sec.

23
Advanced Settings
PC Video
This menu will also allow user to enter advance mode and change DPMS setting.
When under Video mode, user can set up V-Chip and Closed Caption.
PC Video
When under PC mode, Signal Format will display Resolution, Horizontal/Vertical Frequency, PIP Video Source, and PIP Video Format.
When under Video mode, Signal Format will display Main Signal Source, Main Signal Format, and PIP Video Source.
24
Advanced Settings
PC/Video
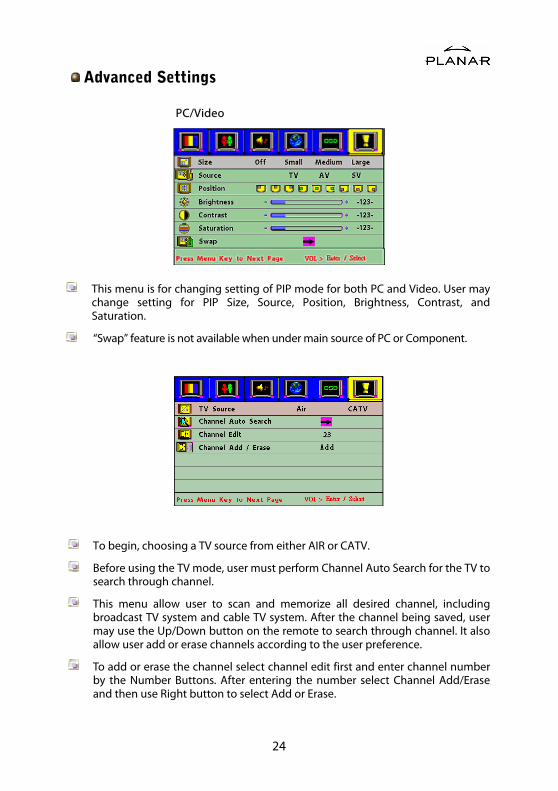
This menu is for changing setting of PIP mode for both PC and Video. User may change setting for PIP Size, Source, Position, Brightness, Contrast, and Saturation.
“Swap” feature is not available when under main source of PC or Component.
To begin, choosing a TV source from either AIR or CATV.
Before using the TV mode, user must perform Channel Auto Search for the TV to search through channel.
This menu allow user to scan and memorize all desired channel, including broadcast TV system and cable TV system. After the channel being saved, user may use the Up/Down button on the remote to search through channel. It also allow user add or erase channels according to the user preference.
To add or erase the channel select channel edit first and enter channel number by the Number Buttons. After entering the number select Channel Add/Erase and then use Right button to select Add or Erase.

25
Parental Control
V-Chip Setup
V-Chip technology allows parents to block unsuitable programming for under age viewers. First user must set up a password. Press Menu button on the remote control to select Video Information page and then select V-Chip. Press Right button and then key in 111111 to enter the “password change” screen. Enter new password and then exit out of the menu. If you have forgotten your password, you may use reminder code “168168” to go into Change Password Number screen.
After setting up the password, go back into V-Chip menu with the new password. It will display the following items: “TV Guidelines”, “MPAA Rating” and “Change Password Number”, and “V-chip (Volatile).

26
To set up parental control, select TV Guidelines Blocking and then press
Right button to the set the TV Guidelines Blocking Press Up/Down buttons to select any rating, then press Right button, it will display the different contents of age-defined ratings. For TV-PG, it will display these cycling contents: SHOW, BLOCK, D, S, L, V, DL, DS, DV, LS, LV, SV, DLS, DLV, DSV, LSV, DLSV as the below list. For TV-Rating press “ ” key to change to “Rating Off”. Then all the ratings will set to “Show”.
The age-defined ratings for Television
TV-Y Young children
TV-Y7 Children 7 and over
TV-G General audience
TV-PG Parental guidance
TV-14 Viewers 14 and over
TV-MA Mature audience
TV Guidelines is for the younger ages. When restricting the younger ages, the elder ages will also have certain level of restrictions. Setting LSV for TV-PG, the TV-14 and TV-MA are also restrict to LSV, or the system will automatically set content at LSV for the three ratings. But it does not affect the TV-Y, TV-Y7, and TV-G ratings. While watching TV with parents, it will conceal the improper programs for the youngest children in family.

27
The contents of TV Guidelines rating
FV: Fantasy violence
D: Sexual suggestive dialog
L: Adult language
S: Sexual situation
V: Violence
MPAA Ratings:
The MPAA stands for The Motion Picture Association of America system. It is mainly restrictions for the movies. When using V-Chip, TV will automatically block any critical encoding program. To set up MPAA first to select MPAA Rating and then press Up/Down button to select the rating to change. Then choose either Show the rating or Block the rating.
G: General audience (no restrictions).
PG: Parental guidance suggested.
PG-13: Parents strongly cautioned.
R: Restricted. Children under 17 should be accompanied by an adult.
NC-17: No Children under 17.
X: Adults only
28
Change Password
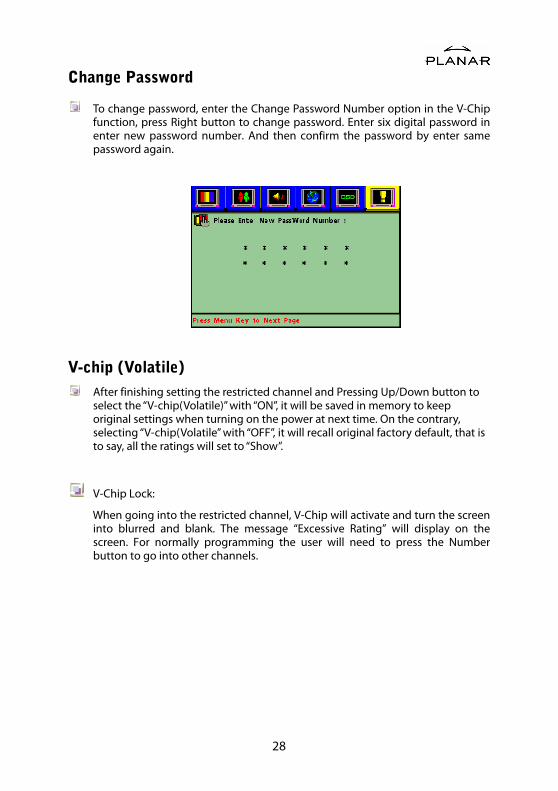
To change password, enter the Change Password Number option in the V-Chip function, press Right button to change password. Enter six digital password in enter new password number. And then confirm the password by enter same password again.
V-chip (Volatile)
After finishing setting the restricted channel and Pressing Up/Down button to select the “V-chip(Volatile)” with “ON”, it will be saved in memory to keep original settings when turning on the power at next time. On the contrary, selecting “V-chip(Volatile” with “OFF”, it will recall original factory default, that is to say, all the ratings will set to “Show”.
V-Chip Lock:
When going into the restricted channel, V-Chip will activate and turn the screen into blurred and blank. The message “Excessive Rating” will display on the screen. For normally programming the user will need to press the Number button to go into other channels.

29
Closed Caption
For some TV programs, the PDP has the de-coding and “Closed Caption” functions. This caption is usually served for the deaf or the foreign language translation. All of the VCRs can record the Closed Caption signals from TV program, so the family video types also serve for “Closed Caption” function. And similarly for business videotapes, you can check “cc” mark on the box of video type.
Using Closed Caption
Select Closed Caption in the OSD Menu by pressing “Menu” key on remote and select “video information page. Use Up/Down Button to Select “Closed Caption” and then use “ ” button to choose between OFF, CC1, CC2, TT1, TT2.
Use CC Background to choose between Transparent and Black for the closed caption display.
30
Technical Information
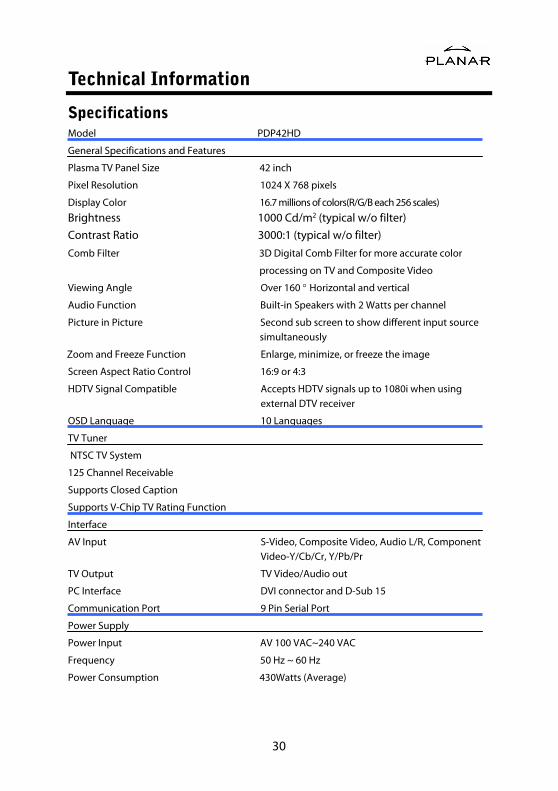
Specifications Model PDP42HD
General Specifications and Features
Plasma TV Panel Size 42 inch
Pixel Resolution 1024 X 768 pixels
Display Color 16.7 millions of colors(R/G/B each 256 scales)
Brightness 1000 Cd/m2 (typical w/o filter)
Contrast Ratio 3000:1 (typical w/o filter)
Comb Filter 3D Digital Comb Filter for more accurate color
processing on TV and Composite Video
Viewing Angle Over 160 ° Horizontal and vertical
Audio Function Built-in Speakers with 2 Watts per channel
Picture in Picture Second sub screen to show different input source simultaneously
Zoom and Freeze Function Enlarge, minimize, or freeze the image
Screen Aspect Ratio Control 16:9 or 4:3
HDTV Signal Compatible Accepts HDTV signals up to 1080i when using external DTV receiver
OSD Language 10 Languages
TV Tuner
NTSC TV System
125 Channel Receivable
Supports Closed Caption
Supports V-Chip TV Rating Function
Interface
AV Input S-Video, Composite Video, Audio L/R, Component Video-Y/Cb/Cr, Y/Pb/Pr
TV Output TV Video/Audio out
PC Interface DVI connector and D-Sub 15
Communication Port 9 Pin Serial Port
Power Supply
Power Input AV 100 VAC~240 VAC
Frequency 50 Hz ~ 60 Hz
Power Consumption 430Watts (Average)

31
Environment
Operating environment
Temperature 5°C to 40°C
Relative humidity 20% to 85% (non-condensing)
Storage environment
Temperature -20°C to 60°C(-4o to 140°F)
Relative humidity 5% to 95% (non-condensing)
Dimension and Weight
Dimension 1030 mm (W) x 700 mm (H) x 300 mm (D) (with Stand)
Weight 34 kg (without Stand)
Display Size 922 mm (W) X 518mm (H)
Aspect Ratio 16:9

32
Video Modes
There are total of 15 default timing modes in factory setting listed in the table below:
Factory Setting Modes (ANALOG VGA)
No Resolution
Horizontal
Horizontal
Frequency
(kHz)
Vertical
Frequency
(Hz)
Dot Frequency Clock
(MHz)
Remark
1 640×480 31.50 60.00 25.18 VESA
2 640×480 35.00 67.00 30.24 MAC
3 640×480 37.50 75.00 31.50 VESA
4 640×480 37.86 72.81 31.50 VESA
5 640×480 43.30 85.00 36.00 VESA
6 720×400 31.47 70.09 28.32 VGA
7 800×600 35.16 56.25 36.00 VESA
8 800×600 37.90 60.32 40.00 VESA
9 800×600 46.90 75.00 49.50 VESA
10 800×600 48.08 72.19 50.00 VESA
11 800×600 53.70 85.00 56.30 VESA
12 1024×768 48.363 60.004 65.00 VESA
13 1024×768 56.476 70.069 75.00 VESA
14 1024×768 60.023 75.029 78.75 VESA
15 1024×768 68.70 85.00 94.50 VESA
* When the input signal exceeds the unit’s allowable range, it will display “Signal
out of range” message on the screen.
* Refer to Video information menu in OSD menu to ensure the correct format of
input signal.

33
Troubleshooting
Before calling the technical support or service technician, please read through this lists of problems and possible solutions.
According to the industrial standards, there are a certain number of defective pixels both bright and dark that are acceptable. Although we produce panel with more than 99.99 percent active cells, there still may be some cells that do not produce light or remain lit. For more information, please contact sales or the technical support.
There is no picture or sound
• Make sure the power cord is properly inserted in
the Power outlet. • Reception other than those of broadcasting
stations can be considered. • Make sure the main power switch of the unit is on.
There is no picture from AV.
• Make sure the BLACK LEVEL is properly adjusted. • Backlight may have reached the end of service life. • Make sure all the video connections are connected
properly.
There is no sound.
• Make sure the volume is not set to minimum. • Make sure the sound is not set to mute. • Make sure that speaker are properly connected.
34
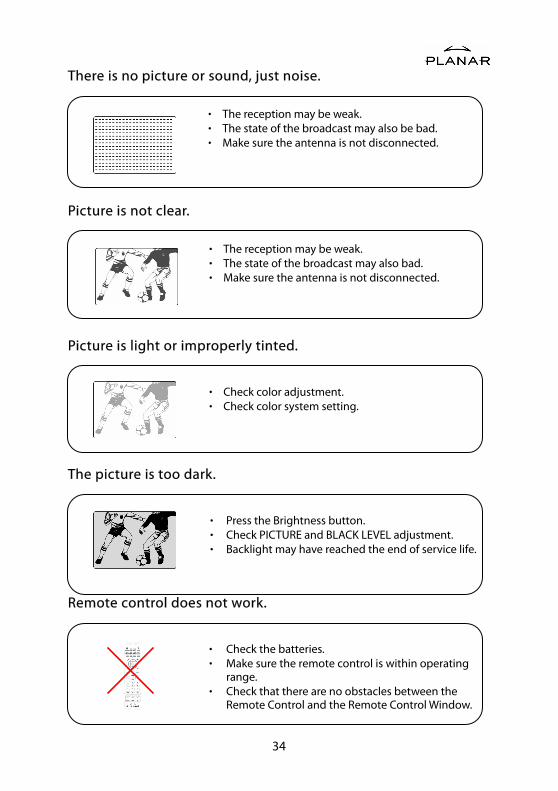
There is no picture or sound, just noise.
• The reception may be weak. • The state of the broadcast may also be bad. • Make sure the antenna is not disconnected.
Picture is not clear.
• The reception may be weak. • The state of the broadcast may also bad. • Make sure the antenna is not disconnected.
Picture is light or improperly tinted.
• Check color adjustment. • Check color system setting.
The picture is too dark.
• Press the Brightness button. • Check PICTURE and BLACK LEVEL adjustment. • Backlight may have reached the end of service life.
Remote control does not work.
• Check the batteries. • Make sure the remote control is within operating
range. • Check that there are no obstacles between the
Remote Control and the Remote Control Window.

35
The picture is not sharp.
• The reception may be weak. • The state of the broadcast may also be bad. • Make sure the antenna is not disconnected.
The picture moves.
• The reception may be weak. • The state of the broadcast may also be bad. • Make sure the antenna is not disconnected.
The picture is doubled or tripled.
• Make sure the antenna is facing the right direction. • There may be reflected electric waves from
mountains or buildings.
The picture is spotted.
• There may be interference from automobiles,
trains, high voltage lines, neon light, etc. • There may be interference between the antenna
cable and power cable. Try possible them further apart.
There are stripes on the screen or colors fade.
• Is the unit receiving interference from other
devices? • Transmission antennas of radio broadcasting
station and transmission antennas of amateur radio and cellular phones may also cause interference.
• Use the units as far apart as possible from device that may cause possible interference.

36
Planar Customer FirstTM 1—Year Warranty
Plasma display Systems – Standard Warranty
Features
• Standard 1 year warranty
• Replacement Plasma TV1 ships immediately upon determination that
customer’s display is non-functional2
• Plasma TV immediately replaced upon confirmation of defect – no returns to
depot for repair!
Technical Support and Warranty Claim Procedure
As a Planar Standard Warranty customer, here is the simple procedure to follow if you
have a non-functioning Plasma display:
Planar’s customer-service staff will attempt to correct any minor issues that may be
causing the problem. Once Planar has determined the customer has a
non-functioning product, Planar will arrange or delivery of the replacement unit and
pickup of the non-functioning product.
1. Contact Planar via the web at (http://www.planar.com/support), or call
(866) LANAR1, (866.752.6271). The customer must have the model number,
serial number, and proof-of-purchase for their Plasma display available.
2. Our customer service staff will attempt to correct any minor issues that
may be causing the problem. If we are unable to fix the problem to the
customers’ satisfaction, Planar will schedule an appointment for the
non-functioning Plasma TV unit to be replaced3.
3. Upon arrival, Planar’s onsite service technician will confirm the unit’s
malfunction, replace the unit, and remove the non-functioning unit. The
customer will not be asked to pay any service, shipping, handling, or other
fees4.
37
Standard Warranty Limitations and Exclusions
1. Plasma TV warranty is valid only for the first customer purchaser (non-
transferable).
2. The customer must provide original proof of purchase of the Plasma TV
system.
3. Onsite service is only available within the contiguous 48 United States.
Planar offers web, mail and phone support for displays worldwide.
4. Any damage or dissatisfaction associated with latent images,” burn-in”, or
any other damage determined by Planar to be the result of customer use
patterns.
5. Any product with a defaced, modified, or removed serial number.
6. Any product with damage, deterioration or malfunction resulting from:
a) Accident, misuse, neglect, fire, water, lightning, or other acts of
nature, unauthorized product modification, or failure to follow
instructions supplied with the product.
b) Repair or attempted repair by anyone not authorized by Planar.
c) Any damage of the product due to shipment.
d) Removal or installation of the product.
e) Cause external to the product, such as electric power
fluctuations failure.
f) Use of suppliers or parts not meeting Planar’s specifications.
g) Normal wear and tear, including backlights dimming over time.
h) Any other cause, which does not relate to a product defect.
i) Any damage related to peripherals not provided by Planar
Systems, including TV Tuners, Cat-5 Interfaces, or other
audio-video equipment.
7. Installation and set-up service charges.
1The program allows for exchange of a non working unit with a comparable refurbished or new unit. The customer agrees to retain the replacement of the Plasma display, and the customer’s non- working display shall become the property of Planar.

38
2In the continental U.S., calls must be received by 12:00 p.m., Eastern Time. Saturday, Sundays and major U.S. holidays excluded. Subject to availability of replacement stock. Delivery in certain areas may be delayed due to the shipper’s practices.
3Customer agrees to be present for the entire scheduled appointment. Failure to comply may result in refusal of service and/ or service charges.
4If symptom reported by the customer is determined by Planar Systems to be deliberately incorrect, the customer may be charged for all related expenses, including materials, shipping, handling, and administrative costs.
De-installation, Removal, and Replacement of non-functioning Plasma display
The customer always has the option to place the non-functioning Plasma display on the floor for exchange. If the following conditions are met, Planar’s Service Technicians will remove the customer’s non-functioning Plasma display and re-install the replacement unit,
Including re-establishing the existing connections to peripheral equipment (DVD Players, PCs, etc):
a) The Plasma display is readily and immediately accessible without the aid
of ladders or other tools.
b) The Plasma display utilizes a standard Wall or Desk mounting solution, or is
placed on the floor.
c) The Plasma display is not a “built-in” or a part of custom paneling, molding,
or woodwork.
In instances where Planar Systems, at its sole discretion, determines the above conditions have not been met, the customer will be responsible for placing the non-functioning Plasma display in a location that meets all requirements. Planar Systems will not reinstall software or other programs related to customers’ peripheral equipment.
Limitation of Implied Warranties
THERE ARE NO WARRANTIES, EXTRESS OR IMPLIED, WHICH EXTEND BEYOND THE DESCRIPTION CONTAINED HEREIN INCLUDING THE IMPLIED WARRANTY OF MERCHANTABILITY AND FITNESS FOR A PARTICULAR PPURPOSE.
39
Exclusion of damages
PLANAR’S LIABILITY IS LIMITED TO THE COST OF REPAIR OR REPLACEMENT OF THE PRODUCT. PLANAR SHALL NOT BE LIABLE FOR:
1) DAMAGE TO OTHER PEOPERTY CAUSED BY ANY DEFECTS IN THE PRODUCT,
DAMAGESBASED UPON INCONVENIENCE, LOSS OF USE OF THE PRODUCT,
LOSS OF TIME, LOSS OF PROFITS, LOSS OF BUSINESS OPPORTUNITY, LOSS
OF GOODWILL, INTERFERENCE WITH BUSINESS RELATIONSHIPS, OR OTHER
COMMERCIAL LOSS, EVEN IF ADVISED OF THEIR POSSIBILITY OF SUCH
DAMAGES.
2) ANY OTHER DAMAGES, WHETHER INCIDENTAL, INDIRECT,
CONSEQUENTIAL OR OTHERWISE.
3) ANY CLAIM AGAINST THE CUSTOMER BY ANY OTHER PARTY.
Effect of Local Law
The warranty gives you specific legal rights, and you may have other rights, which vary from locality to locality. Some localities do not allow limitations on implied warranties and/ or do not allow the exclusion of incidental or consequential damages, so the above limitations and exclusions may not apply to you.

40
Maintenance Guidelines
It is required to provide proper care to the PDP. Please follow the instructions on the maintaining your PDP.
Attention
Before cleaning, be sure to unplug the power core.
Do not use the PDP near water as it contains sensitive electronic parts and high voltage.
Do not use any chemical or alcohol to clean the surface of the PDP.
Do not drop liquid of any kind or stick any object into the PDP.
Cleaning for Cover and Remote
Use soft cotton cloth.
When the dust gets on cover or remote control, dipping cloth in diluted neutral detergent, dry it to wipe out the dust, do not let liquid goes inside of unit and then clean it with cloth.
Cleaning for Screen
The surface of screen is fragile glass; do not clean with sharp objects for fear of scraping glass. Do not heavily press or slap glass to prevent glass crack.
When cleaning the PDP glass, use a soft or a lint-free cloth with alcohol to gently clean the glass. Do not use window cleaners or solutions that contain ammonia and chemical of any kind to clean the display.

41
Regulatory Information
Agency Approvals
European USA
Safety UL 6500
Emissions FCC Class B
Immunity
Ergonomic
Federal Communications Commissions (FCC) Statement
FCC Information
The FCC Radio Interface Statement includes the following warning:
This equipment has been tested and found to comply with the limits for a Class B digital device, pursuant to part 15 of the FCC rules. These limits are designed to provide reasonable protection against harmful interference in a residential installation. This equipment generates, uses, and can radiate radio frequency energy, and if not installed and used in accordance with the instructions, may cause harmful interference to radio communications. When such interference to radio or television reception occurs, the user will be required to correct the interference at own expense. The interference may be correctly using one or more of the following measures:
- Increase the separation between the equipment and receiver. - Reorient or relocate the receiving antenna. - Connect the equipment into an different outlet from the receiver.
FCC Warning
To assure continued FCC compliance, the user must use the provided grounded power supply cord and the provided shielded video interface cables to connect to this equipment. Changes or modifications not expressly approved by Planar Systems, Inc. could void the FCC compliance and negate the user's authority to operate the product.

P/N:5030009013D


Planar Systems, Inc.
Customer Service
Online Support:http://planar.custhelp.com
Email:[email protected]
Tel:1-866-PLANAR-1 (1-866-752-6271)
Hours:m-f, 8am-9pm, Eastern Time
©2004 Planar Systems, Inc. Planar is a registered trademark of Planar Systems, Inc.
Other brands and names are the property of their respective owners.
Technical information in this document is subject to change without notice.
P/N:5030009013D