pipette calibration system quick start guide · remove existing eeprom card by gently ... for...
TRANSCRIPT

Pipette Calibration System
Quick Start Guide
15A6856B 1

Installing PCS SoftwareTM
15A6856B
PCS Software is supported in several different configurations. The most common configurations will be stand-alone installations on a single computer and client-server
installations for sharing networked databases between multiple computers.
In a stand-alone installation, where PCS
Software is installed only on one computer,
all items on the software installer should be
installed, in order, from the PCS Database
installation through the PCS Client
installation. Note that in a stand-alone
installation, this computer will need to be
powered on with network connectivity for
the PCS Email Notifications features to work.
In a client-server installation, where the PCS
software will be used on multiple computers
with a shared database on a separate
computer, the PCS Database and PCS Email
Notifications installs should be completed on
the database server and the PCS Service and
PCS Client installations should be completed
on all of the other computers.
SQL Server Express 2014 included
If a supported version of SQL Server is not found on the PC,
the PCS Software installer will install SQL Server Express 2014
automatically. This installation can take several minutes before
any progress is displayed.
2

Signing in for the first time
15A6856B
Artel recommends changing the password on this
account immediately and using it only to create
your first named administrator account
PCS Software installs with a default
administrator account preconfigured. To
sign for the first time, use the user name
PCSAdmin and password PCSAdmin@123
Select the database to be used for the
initial and subsequent connections
PCS Software requires users to sign in for traceability and reporting. Settings can be configured for a variety of security needs, ranging from a single administrator
account through finely managed groups and permissions.
3

Connecting system components – PCS Instrument
15A6856B
Connect power and USB cables to the rear of the instrument and
the other end of the USB cable to the computer.1
Do not connect label printer to the computer yet. The printer
driver software installer will specify when to make this
connection.
a
Configure the label printer for use with the computer.2
On first connect to the computer, Microsoft Windows will begin installing drivers for the
integrated bar code reader and the PCS instrument. This process may take a few moments. The
PCS instrument driver is also available on the PCS Software installation media if your version of
Windows is unable to automatically install the driver.
4
Install the appropriate Brother printer driver from the PCS
Software installation media’s Support folder. Follow on-
screen instructions for connecting the printer.
b
Configure printer for PCS Software settings by following the
instructions in the PCS User Guidec

Connecting system components – PCS2/PCS3 Instruments
Connect power and serial cables to the rear of the instrument.
15A6856B
1
Connect the serial end of the USB-Serial adapter to the serial
cable connected in Step and the USB end to an available
USB port on your computer (if required).
a
Connect the USB bar code scanner to an available USB port
on your computer.b
(Optional) Configure the label printer for use with the
computer.c
Connect other system components to the computer.2
1
5
Do not connect label printer to the computer yet. The printer
driver software installer will specify when to make this
connection.
Install the appropriate Brother printer driver from the PCS
Software installation media’s Support folder. Follow on-
screen instructions for connecting the printer.
Configure printer for PCS Software settings by following the
instructions in the PCS User Guide

With the power switch turned off and
instrument unplugged from power
outlet, loosen two quarter-turn
fasteners on rear of instrument and
gently lift off instrument rear cover.
Remove existing EEPROM card by gently
pulling up on the card. Follow the placement
instruction printed on the new EEPROM card.
Carefully insert new EEPROM card by gently
but fully pressing card into slot.
Place cover back on instrument,
tighten quarter-turn fasteners, and
power on the instrument.
PCS Instruments purchased prior to August, 2016 will require a replacement EEPROM card for use with PCS Software.
How to install the new EEPROM card:
1 2 3
Configuring PCS2/PCS3 Instruments for PCS Software use
15A6856B 6

Configuring PCS2/PCS3 Instrument for PCS Software use
Turn the PCS instrument power switch ON
and use the MENU SCROLL key on the PCS
to advance the menu to Link to Computer.
Press YES to enter Link to Computer
mode. This completes the link and the
PCS instrument indicates that it is ready
for use with the PCS software.
To leave Link to Computer mode at any
time, press RESET but note that any
unused reagent in the PCS will need to
be discarded.
All PCS2/PCS3 instruments need to be configured to Link to Computer mode for use with PCS software
1
2
3
15A6856B 7

Using PCS Reagents
• Ensure all Blank and Sample Solutions belong to the same Lot Code.
• Transfer only an amount of Sample Solution to the aliquot container that will be used
within 30 minutes.
• Always keep Sample Solution bottles and aliquot containers tightly capped when not
in use.
PCS2/PCS3 Instrument Use
• PCS2/PCS3 instruments do not have an integrated infrared temperature sensor and
require all PCS vials to be equilibrated within the vial block for 15 minutes before use.
• If the reagents have been moved from another location, additional time may be
required.
• Removing the kit components from the box and letting them stand in free air will
hasten equilibration.
• The Reagent Kit should be stored at room temperature (18 to 28) °C.
• Kits should be stored in the dark to the extent practical.
• Frozen reagents should be brought to room temperature and inverted several times
prior to use.
Vial Cleaning
To ensure accurate results, all vials should be free of fingerprints
and smudges prior to use.
• Holding the vial by the cap, immerse the lower portion of the vial
(about 2.5 cm) into clean isopropyl alcohol.
• Remove the vial from the alcohol and gently wipe the lower
portion of the vial by rotating the vial against a lint-free wipe.
Storage
Disposal
Dispose of PCS reagents in accordance with local, state, and federal regulations.
PCS Consumables
15A6856B 8

Get Started with the Home screen
Easy navigation
Quick access to the Home, Administration,
Configuration, Calibration, and Results screens.
Useful shortcutsCustomize the shortcuts to have your
common tasks right at your finger tips.
Need help?
Context-sensitive help is available
to answer any questions on any screen.
Review notifications
Quickly view, approve, or reject
calibration results as soon as they are
completed and calibration plans as soon
as they are created.
Quick setup
Use the Get Started bar to quickly get up
and running by following the numbered
steps in order.
No more guessing
PCS Software notifies you directly on the
Home screen what is required right now.
Primary actionsJump right into calibrating or training
directly from the home screen.
15A6856B
Status barDisplays status messages about actions performed, warnings or
errors which occurred, the signed-in user, connected server,
database name, and current server time.
9

Add User and Add Location can be
started directly from the Home screen.
Click on the shortcut in the Get Started
section to launch the edit screen and then
click the Home icon to return.
Users need a unique User Name, an initial
Password (users will need to set a new
password on first sign-in), a Full Name, and an
Email ID for notifications.
Pipettes are assigned an Owner and Location to facilitate email notifications and filtering views of due items and results.
At least one user and location must be created before pipettes can be added.
Get Started - Adding Users and Locations
15A6856B
Locations only require a Location Name.
New users are created without a group association. To take on the role of Administrator, Operator, Reviewer, or Trainer, users will need to be added to a group.
10

Get Started - Adding Pipettes
15A6856B
PCS Software includes a catalog of over 2000
pipette models, including manufacturer and ISO
tolerances for those pipettes. Start adding a
pipette into the software by browsing by
Manufacturer and Model. New models can be
added to the catalog through the Pipette
Catalog screen.
Pipette ID is the unique identifier for the pipette
for traceability through history and results.
All pipettes in PCS Software have an assigned
Location and Owner. Locations are used to filter
views on due items and results. Owners are also
used for filtering and can receive automatic
notifications when tasks are due or completed.
11

Get Started - Creating Calibration Plans
Calibration Plans are used to describe the calibration procedures in PCS Software. Each calibration requires the selection of a Calibration Plan.
ReplicatesEnter the number of replicates or data
points to be taken for the calibration.
Evaluation criteriaChoose inaccuracy, imprecision, or
inaccuracy and imprecision. These can
be recorded as absolute or relative
values.
Tolerance sourcePCS Software can automatically use ISO
tolerances or manufacturer
specifications, or you can enter your own
custom tolerances.
Add a target volumePCS Software will direct you to perform
the pipette calibration in the same order
as the tolerances are entered here.
15A6856B 12

Get Started - Creating Schedules
Schedule TypeYou can schedule:
• Pipette Calibrations
• Operator Trainings
• Instrument Calibrations
Select PlanFor pipette calibration and operator
training schedules, choose the
calibration or training plan.
First Due BySelect the date when the schedule must
first be completed.
Repetition OptionsDecide how frequently the schedule
needs to be completed and how date
rescheduling is determined. Due Date
rescheduling stays true to the first due
date and Completion Date rescheduling
adds the repetition cycle to the latest
date the schedule has been completed.
Scheduled ItemsSelect the pipettes, operators, or instruments which
need to follow the schedule.
15A6856B 13

Get Started – Adding PCS Instrument
15A6856B
From the Home screen, click the
Add Instrument button.
Select the Instrument Type, provide
a unique Instrument ID, select the
COM Port where the PCS is
connected, and click Test
Connection. The Serial Number will
be automatically read from the
instrument if communication is
established with the PCS.
1
2
Reminder: PCS2/PCS3 instruments need to be in Computer Link mode to connect with PCS Software.
14
(Recommended) Return to Create
Schedule and create an instrument
calibration schedule for every 30 days.
3

Get Started – Basic Instrument Operation
15A6856B 15
Integrated Bar Code Scanner
During calibrations and operator trainings, the
integrated bar code scanner will activate and the
software screen will indicate which consumable
to scan.
When scanning vials and reagents, position the
item to be scanned between 2 and 5 inches (5-
13 cm) from the scan window.
Status Light BarThe light bar displays system status.
• Solid illumination indicates that the
instrument is connected to the host
PC and idle.
• Fast pulsing illumination indicates
that the instrument is connected to
the host PC and performing a
reading.
• Slow pulsing illumination indicates
that the instrument is not
connected to the host PC.
Touch BarTouch anywhere on this bar to close the PCS lid after
dispensing reagent, replacing vials, or as instructed
on screen by the PCS Software.
Optionally, the instrument can be configured to
require a touch on this bar to open the lid for the
next dispense. By default, the instrument is
configured to automatically open the lid when ready.
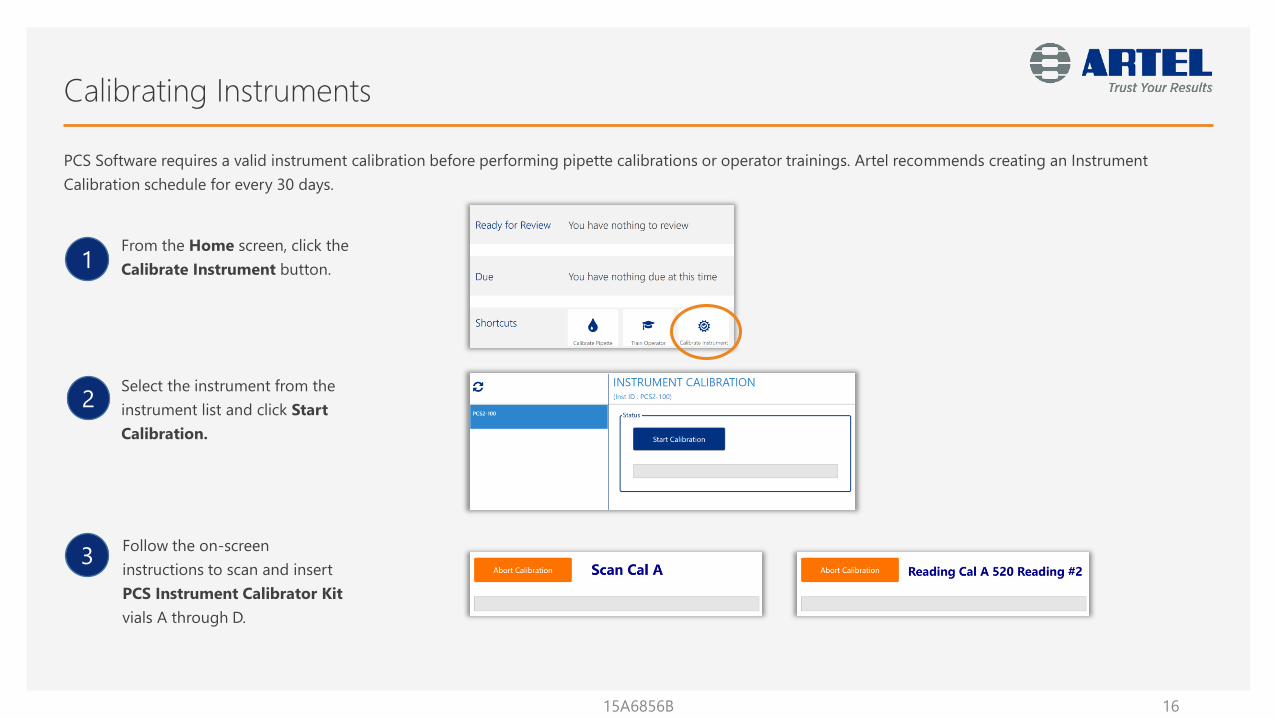
Calibrating Instruments
From the Home screen, click the
Calibrate Instrument button.
Select the instrument from the
instrument list and click Start
Calibration.
Follow the on-screen
instructions to scan and insert
PCS Instrument Calibrator Kit
vials A through D.
PCS Software requires a valid instrument calibration before performing pipette calibrations or operator trainings. Artel recommends creating an Instrument
Calibration schedule for every 30 days.
1
2
3
15A6856B 16

15A6856B
Calibrating the PCS Instrument – Report Overview
Imprecision ResultsThe Instrument Calibration Report shows
the calculated standard deviation and
the specified allowable limit. Any failed
results are highlighted.
MaterialsThe report shows the lot code and
expiration date of the PCS Instrument
Calibrator Kit used for the calibration.
The PCS Software enforces the use of
valid instrument calibrator kit vials
through bar code scanning.
Overall ResultThe Instrument Calibration Report
displays the overall pass/fail status at the
top of the report.
Inaccuracy ResultsThe Instrument Calibration Report shows
the measured absorbance ratios and the
values scanned from the instrument
calibrator kit. Any failed results are
highlighted.
17

Calibrating Pipettes
From the Home screen, click any Due
pipettes, or click Calibrate Pipette to select
a pipette which is not scheduled for
calibration.
Select the connected PCS instrument or
choose to manually enter data acquired
by other instruments.
Follow the on-screen
instructions to complete the
pipette calibration.
1
2
3
15A6856B 18

Calibrating Pipettes – Report Overview
15A6856B
ReplicatesDisplayed by target volume and pipette
channel, this table shows each data
point collected during the calibration as
well as any added comments.
Target Volume ResultsPass/fail results by target volume as well
as relevant statistics for the replicates
collected at each target volume.
MaterialsThe PCS consumables used including lot
number and expiration date.
PCS InfoThe serial number, firmware version, last
calibration ID, and next calibration date
(if scheduled).
EnvironmentThe temperature, pressure, and humidity,
if entered by the operator during the
calibration.
Overall ResultThe overall pass/fail status of the
calibration, completion time stamp,
calibration plan used, and unique
calibration result ID.
Pipette InfoPipette ID, manufacturer, model, serial
number (if entered), nominal volume,
owner, and location of the pipette.
Operator/ReviewerThe operator who performed the
calibration and the reviewer who
reviewed the calibration. If electronic
signature is used, the signature line will
be completed, otherwise a blank
signature line will be shown along with
the date field.
Approval StatusShows whether the calibration is
pending review or has been reviewed
and is approved or rejected.
19

Performing Operator Trainings – As Trainer
1
2
3
15A6856B
From the Home screen, click any Due
operators, or click Train Operator to
select an operator who is not scheduled
for training.
Select the connected PCS instrument,
the pipette to be used for the training,
and have the operator provide their
login credentials to begin.
Follow the on-screen
instructions to complete the
training.
20

Performing Operator Trainings – As Self Assessment
1
2
3
15A6856B
From the Home screen, click Self
Assessment if an assessment is due.
Select the connected PCS instrument
and the pipette to be used for the self
assessment.
Follow the on-screen
instructions to complete the self
assessment.
21

Performing Unscheduled Volume Measurements
15A6856B 22
To measure a volume dispensed by a device without requiring a calibration plan, use the Measure Volume option from the Home screen. Measurements taken in
from this option do not get recorded in the system database and are discarded after ending the measurement cycle.
1
2
3
From the Home screen, click Measure
Volume.
Enter the expected target volume in µL,
the number of replicates to dispense,
and make a selection to display
statistics as relative or absolute error.
Select the instrument to use, click
OK and then follow the on screen
instructions for completing the
volume measurement session.

Migrating from Artel Pipette Tracker™ - Exporting Data
15A6856B
Artel has created migration tools to reduce the amount of effort required to configure PCS Software. Users, groups, pipettes, locations, calibration
plans, and schedules* can all be automatically created to shorten your setup time with PCS Software.
How to export your configuration settings from Artel Pipette Tracker (versions 3.2 and 3.3) into an import format for PCS Software:
Connect the PCS Software installation USB
drive to the computer running Artel Pipette
Tracker. Open the APT Data Export Tool
located in the Support\Artel\Artel Pipette
Tracker Support. Create a new subfolder in
this folder to contain the exported data.
Select the appropriate Artel Pipette Tracker (APT)
software version in the Data Export Tool. For
version 3.2, browse to the Access database files as
prompted. For version 3.3, enter the database
server information, database names, and provide a
login account. Click Export Data to begin the
export.
When prompted to save the exported Artel Pipette
Tracker data, select the folder on the USB drive
created during the first step. The export process
will begin and an export result log will be displayed
with information about the export.
1 2 3
*Artel is unable to move previous calibration results or audit trail entries from Artel Pipette Tracker into PCS Software and your current instance of Artel Pipette Tracker should be used in the event of an audit of existing records.
23

Migrating from Artel Pipette Tracker™ - Importing Data
15A6856B
How to import your configuration settings from Artel Pipette Tracker data exported during the previous step:
Connect the PCS Software installation USB
drive to the computer running PCS Software.
Open the APT Data Import Tool located in
the Support\Artel\Artel Pipette Tracker
Support folder of the USB drive.
Click Select exported data from APT and select
the location on the USB drive where data was saved
during the export step to begin importing the data
into the PCS Software.
On a computer where PCS Software is currently
installed, open the Data Import Tool. An import
result log will be displayed at the end of the import
process. If PCS Software is open, you may need to
Refresh the active screen.
1 2 3
24

Setting up Accessory Hardware
15A6856B
PCS Software supports the following label printers for printing
of pipette identification and calibration labels. To configure the
appropriate label sizes, refer to the steps detailed in the PCS
User Guide.
Brother PT-9700PC Brother PT-9500PC
The Artel PCS Instrument has an integrated bar code scanner,
preconfigured for use with the PCS Software.
For PCS2/PCS3 Instruments purchased prior to PCS Software,
the following previous bar code scanners can be used by scanning
the bar code below.
Honeywell Xenon 1900/1902HHP/Honeywell 4600G
25
Brother PT-P900W

Finding Things…
To… Click… And then click…
Add a new model of pipette into the system DATA IMPORT/EXPORT, enter pipette details and manufacturer limits, click Add Pipette
to Catalog.
Assign permissions to users GROUPS, edit an existing group to include a new user, or create a new group and add the
appropriate permissions and users to the group.
Reset a user’s password / unlock user’s account RESET ACCOUNT, select the user name from the drop down list, enter a new password for
the account, and click Apply.
Create pipette calibration intervals SCHEDULES, click +, then Select Plan to choose a calibration plan, make selections for the
due date and repetition settings, and click + to add pipettes to the schedule. Click Save
when completed.
Activate/Deactivate a pipette PIPETTES, find and select the pipette in the pipette list, and click to deactivate the
pipette temporarily in the system. Repeat steps to reactivate.
Retire a pipette permanently PIPETTES, find and select the pipette in the pipette list, and click to permanently retire
the pipette from the system.
Print a pipette inventory label PIPETTES, find and select the pipette in the pipette list, click and select Pipette Label
from the drop down menu.
Print a pipette calibration label PIPETTES, find and select the pipette in the pipette list, click and select Calibration
Label from the drop down menu.
Limit what shows on the Home screen as due for
calibration
In the Due bar and choose a filter option based on Time (Days), Location Name, and/or
Owner Name.
15A6856B 26

More questions about the PCS?
Click the Help button to access topic-specific help or expand and see the full user guide.
Visit artel-usa.com for Artel Lab Reports and 10 Tips to Improve Your Pipetting to get the most out of your new system and operators.
Host an Artel Pipetting Proficiency Certification training at your facility or attend an Artel Pipette Quality Management Certification seminar at Artel.
15A6856B
artel-usa.com25 Bradley Drive
Westbrook, Maine 04092
toll-free: 888-406-3463
tel: 207-854-0860
fax: 207-854-0867
ordering:
technical support: