pineapple heaven - georgia seitz - ribbonwinners … heaven by doretha albee round 1: create the...
TRANSCRIPT
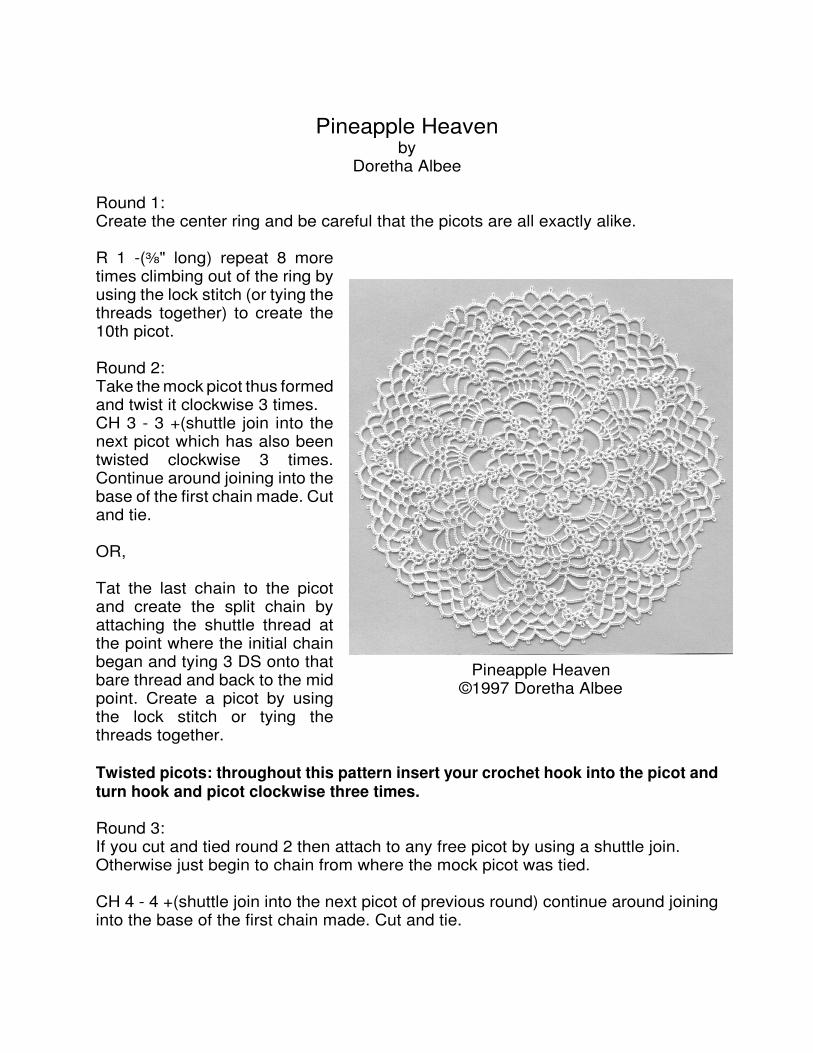
Pineapple Heaven©1997 Doretha Albee
Pineapple Heavenby
Doretha Albee
Round 1:Create the center ring and be careful that the picots are all exactly alike.
R 1 -(d" long) repeat 8 moretimes climbing out of the ring byusing the lock stitch (or tying thethreads together) to create the10th picot.
Round 2:Take the mock picot thus formedand twist it clockwise 3 times.CH 3 - 3 +(shuttle join into thenext picot which has also beentwisted clockwise 3 times.Continue around joining into thebase of the first chain made. Cutand tie.
OR,
Tat the last chain to the picotand create the split chain byattaching the shuttle thread atthe point where the initial chainbegan and tying 3 DS onto thatbare thread and back to the midpoint. Create a picot by usingthe lock stitch or tying thethreads together.
Twisted picots: throughout this pattern insert your crochet hook into the picot andturn hook and picot clockwise three times.
Round 3:If you cut and tied round 2 then attach to any free picot by using a shuttle join.Otherwise just begin to chain from where the mock picot was tied.
CH 4 - 4 +(shuttle join into the next picot of previous round) continue around joininginto the base of the first chain made. Cut and tie.

OR
Tat the chain to the mid point and create split chain as before climbing out after themock picot is tied.
Round 4:If you cut and tied round 3 then tat the first ring joining to a free picot from round 3.Otherwise create a split ring of 4 / 4 and close ring.RWCH 2 - 2 RWR 4 + (join into the space picot as the initial ring) 4. RWCH 4 - 4 RWRepeat around.
SHELL: these two rings just made joined into the same picot will be refered to as ashell in the following rounds. Throughout this pattern the shell consists of the samepattern R4+4; CH 2 - 2; R4+4. Always attach the shell into the picot of the shell in theprevious round.
Note: as you can see this pattern may be worked the traditional way by cutting and tyingoff each round. However, by using the split ring and split chain techniques, the doily canprogress through many rounds without cutting and making ends to be hidden. Bear this inmind as the instructions continue.
Round 5:Tat shell of R 4 +(join to the picot of the short chain of the previous round) 4 RWCH 2 - 2 RWR 4 + (join to the same picot as the initial ring) 4 close ring RWCH 6 + (join to the picot of the long chain of the previous round) 6 RWRepeat around.
Round 6:Tat shell of R 4 +(join to the picot of the short chain in the shell of the previous round4 close ring. RWCH 2 - 2R 4 + (join into the same picot as the initial ring) 4 close.CH 7 -(d" long) 1; repeat three more times; CH 6. RWRepeat around.
Round 7:Tat shell as directed above.CH 5 - * (d" long), CH 1 + (twist the long picot of the previous 3 times and join to it.Repeat from * 3 more times making one more picot (d" long) CH 5. RWRepeat around.

Round 8:Tat shell as directed above.CH 5 *twist long picot of previous round 2 times and join to it.CH 1 -(d" long) 1 repeat from * 3 more times.Twist long picot of previous round 2 times and join to it. CH 5. RWRepeat around.
Round 9:Tat shell.CH 6 * + (join to the next picot of the previous round.)CH 2 -(normal size picots) 2 repeat from * 2 more times.Join to the next picot of the previous round CH 6. RWRepeat around.
Round 10:Tat shell.CH 2 - (normal size) 2 RWR 4 + (join into the same picot as the two shell rings) 4 close ring. RWCH 8 * + (join into the next picot) 2 - 2; repeat from * once more.Join into the next picot CH 8.Repeat around.
Round 11:Tat shell.CH 3 - 3 - 3; tat another shelljoining to the next picot.CH 9 + (join into the next picot) 2 -2 + (join into the next picot) 9.Repeat around.
Round 12:Tat shell.CH 3 - 3 + (join in next picot);repeat once; 3 - 3.Tat another shell.CH 12 + (join to next picot) 12.Repeat around.
Round 13:Tat shell.CH 4 - 4 + (join into next picot);repeat twice; 4 - 4.Tat another shell.CH 8.Repeat around.

Round 14:Tat shell.CH 3 - 3 + (join into next picot.Tat another shell.CH 5 - 5 + (join into next picot); repeat three more times; 5 - 5.Tat another shell.CH 3 - 3 + (join at base of ring).Repeat around.
Round 15:Join into the picot of the first shell.*Tat shell in the next picot; + (join into picot of next shell.)CH 5 - 5 + (join into next picot); repeat five more times. *Repeat from * to * around.
Round 16:In this final round do not join any of the chains to the picots of the shells.Join into picot; CH 6 - 6 + (join into next picot). Repeat around.
If made with size 40 cordonnet thread this doily would be approx. 12' in diameter.
Doretha Albee of Santee, California began tatting in 1982 while attending someclasses at Brigham Young University. She took tatting classes from Marie Craig ofSouth Carolina. Doretha became "addicted" immediately and has been an avid lacemaker ever since. Of the more than 150 awards she has won at the local and statefairs, nearly half are for tatting! In 1995 she also won Best of Show at the CaliforniaState Fair. From 1994-1997 she has always been among the top winners.
Doretha's love of tatting encouraged her to becomeco-editor of Tatting Knots and Notes with Pat Perry in1988. Since Pat's death from cancer in 1991, Dorethahas continued to share tatting with hundreds of tattersas the editor of the newsletter.
Tatting and the newsletter keep her informed about thestate of lacemaking throughout the world and hasbrought her many friends. Among her other interestsare quilting, crocheting, knitting, bobbin lace,hardanger and Battenberg lace, however, tattingremains her #1 hobby and first love.
Tatting Knots & Notes, Doretha Albee, editor, 9202 Inverness Road, Santee CA 92071-2261