pianoman capstone design project
TRANSCRIPT

1 18-500 Final Project Report: 05/06/2019
PianoMan Capstone Design Project
Authors: Surbhi Inani (Class of 2019), Lizzy Thrasher (Class of 2019), Vanessa Hwang (Class of 2019)
Electrical and Computer Engineering, Carnegie Mellon University
Abstract—A self-learning for beginner Piano players where
the user can choose the complexity of learning by scanning the Sheet Music of a song and learning to play it using a teaching module on a LED Matrix system in a game-like fashion as well as getting performance feedback at the end. This cost-efficient and fun way to learn playing the Piano makes use of more visual cues and allows learning any song of any complexity with the help of Optical Music Recognition.
Index Terms— Adafruit Industries, LED Matrix, MIDI, MusicXML, Music Sheets, Optical Music Recognition (OMR), Raspberry Pi
I. INTRODUCTION Learning Piano can be challenging for many beginner
players. Being able to keep track of reading sheet music properly, knowing where the keys are, and pressing them at the correct times and for the right amount of time is intimidating at best and makes learning a daunting and perplexing task. However, music should be a positive factor on someone’s life and learning an instrument should not be discouraging. Therefore, we aim to simplify this process of learning to play the piano and make it a fun experience. Piano players will be able to use a game-like system where they can take any sheet music that they want to learn and transform it so that it is easier and more enjoyable. Other competing technologies only allow you to select from a specific music library for pieces you want to play and are not portable, so cannot be used on multiple pianos. Because they are embedded into the piano keyboard already, they are also fairly expensive and inaccessible to the average beginner player. There is also other software that is able to read sheet music, but it does not include the hardware component and is not intended for learning piano, but rather archiving sheet music.
Therefore, our goals for this project include being able to take an ideal scan (PDF) of most sheet music (some restrictions on the music itself) and being able to convert it to a series of falling lights above a keyboard that are accurately shown for pitch and duration based on the original sheet music. This should be completed as the user asks to upload a new piece of music and within the span of a few minutes. Then the keyboard will be responsive by accurately calculating a score for how well the player did
and provide feedback to the user. So, we hope that our device will be able to maintain the industry standards of musical education and piano playing as a useful tool for all proficiency players.
II. DESIGN REQUIREMENTS A. Requirements
For the PianoMan project to be a viable method of Piano learning as well as stay within the budget for the class, we have implemented the following requirements in the three major areas of the project.
One of the major components for this project is that we should be able to take accurate scans of sheet music, automatically read the different notes to be played at the correct times for the piece. We will then be able to perform OMR on appropriate sheet music in 60s/120 recognizable elements with 90% accuracy compared to the original sheet music. In terms of accuracy, we will be looking at each notehead, rest, accent (dots, sharps, flats, naturals), time signature, clef symbols, key signature, and comparing pitch, note-type/duration, general correctness (time signature, key signature, etc.) as well as where in the piece it is played. This will be tested visually by checking that the ending MusicXML looks correct, as well as by comparing to the original MusicXML for the file. We believe that 90% accuracy is possible because certain notes may be difficult to determine (chords with notes close to each other, connected notes, etc.), however the large majority should be accurate to be able to play the piece properly. Also, the OMR should be completed in 60s/120 recognizable items because while there is a fairly large amount of image processing that must occur, the user will not want to wait too long in order to play a piece of music. Beginner piano students will also probably not be playing extremely long pieces on a regular basis, so increasing the time based on the number of items should be a fine tradeoff.
During the transition of data from the OMR Software side to the LED Hardware side, we need to employ a programming language that can be used to transfer the MusicXML files to the Microcontroller within 15 seconds of creation, so as to not let the LED system be idle for too long in front of the user. It's important that this transition

2 18-500 Final Project Report: 05/06/2019 is relatively quick, again, so as to not bore the user or make them frustrated waiting for the module to begin. However, we are taking into account less than optimal internet and bandwidth situations.
For the LED Matrix Hardware system to be a stable system with minimum noise and flickering in its display during the teaching module, we will require the use of a coding language in the microcontroller that allows for files to be sent automatically over WIFI, the efficient parsing of MusicXML files into data components and independent controlling of each LED in the chosen LED device so that we are able to display features of the song notes for the user to notice and follow with extreme clarity and low time consumption. The Microcontroller should be able to parse a MusicXML file and start a teaching song module within 3 seconds, so as to not make the user wait unnecessarily and guarantee a smooth flow of the pipeline. The teaching module program needs to show the right keys within 98% accuracy, accounting for LED bugs and hardware device flickering, and should assign the correct colors to each feature at all times. This is important since we cannot have a user learn an incorrect part of a song during every instance of the song’s execution. Finally, the chosen LED device must be scalable enough to cover the entire 61 keys of an electronic keyboard, so as to allow the user to play a wide variety of songs.
The Performance score evaluator should convert the MusicXML file, sent previously to the microcontroller, to a MIDI file while the user is performing and once the user finishes playing the piece, a MIDI file should be collected from the keyboard. It should then calculate a performance score by comparing these two MIDI files according to the scoring rubric that we have defined and send the output back to the microcontroller within one minute.
Some major assumptions being made for this project to be a viable product within the class’s budget. Our product will be cover all the keys of Electronic keyboards but not those of a grand piano, so as to constrain our power consumption and allow people from all backgrounds to be able to successfully use this decide. We will only be allowing ideal scans of sheet music in pdf form. They should have little noise, rotation (staff lines should be horizontal), and a page of sheet music should cover a page of the pdf. Furthermore, for the music itself, there should be no key changes or time signature changes in the middle of a song
B. Testing and Validation
To guarantee the smooth running of each area of our project and verify that our designs meet our specifications for our problem scope, we plan to test the systems independently and concurrently in the following fashion.
The Optical Music Recognition Software program
written by our team will be tested for accuracy of music features in the MusicXML file output. We will download ideal scans of sheet music in PDF format from MuseScore website and and use the SoundSlice website to convert it into a MusicXML file. Then, we will check this file against our own software program’s output MusicXML file and check for differences.
The team’s LED Matrix hardware system will be tested on accuracy of notes features like key and duration displayed over time. We will download standard MusicXML files from MuseScore and test if the C++ program can light up the correct LEDs in the teaching module game without any major bugs.
For testing the Performance Score Evaluator, MIDI files from the MuseScore website will be paired with various different MusicXML files and will be passed to the performance score evaluator program in order to see if the score is accurately by the scoring rubric. Moreover, we’ll see if it successfully transfers the evaluated score to LED matrices and check if the score is correctly displayed.
Once all three systems are working accurately according to the requirements, the pipeline of our project will be tested for bugs with integration through performing “run-throughs” of the whole system. Our classmates will be invited to participate for feedback and will be asked to provide the proficiency at which they want to test our product. Based on the Speed Mode chosen and complexity of selected song, we will get a better idea of what parameters need to be tweaked in order to make the product an extremely fun and viable Piano teaching product.

3 18-500 Final Project Report: 05/06/2019
III. ARCHITECTURE The Block Diagram for this project is attached at the end
as Figure 1a on page 9 with the various components colored by Hardware, Software and Other systems.
A. Optical Music Recognition
For OMR, the primary software library we will be using is openCV with a language of Python 3. Python was chosen because of it’s speed of development. Being that this is only a semester long project, we decided to develop in a language we are all comfortable working in, and that has access to a variety of strong libraries to make use of if need be. OpenCV was chosen because of it’s powerful image processing capabilities, strong online documentation, stability, and variety of built-in functions that may help, especially as we get close to deadlines. Primarily, the OMR is set up in a pipeline fashion (see Figure 1b on Page 9).
B. LED Hardware System
A Raspberry Pi 3 Model B+ has been chosen as the Microcontroller of the LED Matrix system. Its 40 GPIO Pins connect to the Hub 75 Input Pins of the first LED Matrix in the chain in the following way:
Figure A, B, C: RPi GPIO, Matrix Hub-75, Connections
Four 32x16 LED Matrices are daisy chained together to
form the 128x16 LED Matrix whose sets of columns have been mapped to represent the keys of the piano keyboard
using the standard “CDEFGAB” format with all sharps and flats between them on a 12-keys Octave. The 61 keys Electronic Keyboard supports Octaves 2 to 6.
C. Performance Score Evaluator
Because the performance score evaluator should compare two very different file formats (MIDI file for user performance and MusicXML for the original sheet music), a Python library called Music21 was used to convert them to Music21’s internal data structures. Music21 easily converts MIDI and MusicXML files to Streams, which is simply a list of Notes that contain data such as offset, pitch, and duration. These three are the main points that are evaluated while calculating a performance score, so Music21 was chosen for its simplicity in converting different files into a single identical format.
D. Integration of Pipeline
In order for these discrete subsystems to work together, a variety of signals will be sent between them in the form of whether files exist or not.
First the OMR, after it is finished processing, will create and send a MusicXML file (“outputXML.xml”) to the Raspberry Pi. The the Pi sees this file exists, it knows it has the right file to run.
When the user wants to start the LEDs for the song, they will press a button on the GUI that sends a text file to the Pi (“start.txt”). When the Pi sees it has both the xml and the txt file, it knows to start playing the song on the LEDs.
The Performance score evaluator is dependent on a MIDI file (“performance.mid”) so it waits until the user creates this file to begin evaluating the performance. Once it is finished however, it creates a txt file to send to the Pi (“end.txt”). Once the Pi sees this file, it knows the performance is done, has been evaluated, and to display the score on the LEDs.

4 18-500 Final Project Report: 05/06/2019
IV. DESIGN TRADE STUDIES To meet the requirements of being a cheap and viable
teaching tool for Piano Players, our project required major design decisions when it came to portability vs durability, easy accessibility and range of acceptable music for the programs. We had the following major tradeoff decisions in the three areas of the project.
A. Optical Music Recognition For OMR, the first trade off was what language to code
in. We knew we would probably need to use openCV due to the heavy computer vision part of the project, so any of the languages that were supported by that were included. While python would be slower to run, we were not expected to detect anything very computationally difficult, and since the team member in charge of OMR knew python well, it would be quick to program what we were looking to do.
Another trade off was using a built in connected components method, or making our own. At first we attempted making our own as we could more closely specify what component we wanted to find and what would be considered a component, however it took much longer to perform (several seconds) than the builtin one (almost instantaneous).
Similarly to above, we also used a built-in Hough circle transform so that it could be done quickly and accurately since it was such a vital part of the project.
B. LED Hardware System The major decision for the design of the hardware system
was the choice of LED product. A minimal viable version of this project would just require a simple LED strip on top of the keyboard that lit up for the right key at the right time. But this design would not have contributed to the game aspect of Piano learning. When looking at potential LED Matrices that could do the job, cost and complexity had to be kept in mind since we did not want to allocate our entire budget to a product we had never used before. The flexible and long rectangular matrices of Adafruit were much more appealing from a design standpoint but were extremely expensive per piece and would be a significant risk if we could not control it properly. We decided to do for a simpler and most cost-efficient LED Matrix that came with daisy chaining capabilities in bulk and included a open source Control Library to make our job easier.
Another design decision made in the C++ program for the LEDs was considering the Note’s duration and division for calculating width of segment vs considering the Note’s type and speed mode chosen by user. We decided to go for the second option so as to provide the user with speed mode capabilities as well as generalize similar song features for consistency.
C. Performance Score Evaluator The initial plan to evaluate a performance score was
converting the keyboard MIDI file to musicXML then comparing it with the original musicXML file. However, we’ve discovered that when a MIDI file is converted, the output is a lot more complicated than it should be. For example, Figure A is the original musicXML, and when it was converted to MIDI then back to musicXML, Figure B was the result.
Figure D: original MusicXML
Figure E: converted MusicXML
Figure B clearly contains a lot of noises such as
unnecessary rests and slurs, which makes the comparison much difficult. Thus, we’ve chosen to compare MIDI files instead, using a Python library Music21 that contains various methods and internal data structures for music.
Hence, we can see that the trade-offs made early on in the
project’s planning
5 18-500 Final Project Report: 05/06/2019
V. SYSTEM DESCRIPTION The three major areas of the project have been designed
in detail in accordance with our requirements and specifications.
A. Optical Music Recognition Program
An input pdf will be converted into a few pages of images. Each image will be preprocessed to binarize it and remove some noise. The staff lines will then be found in the image, locations recorded, and then removed for the image so as to ease symbol finding. From there, connected components will be used to separate out each symbol from the music to process separately, while their original x and y coordinates are recorded. For each component, it will be checked against a variety of templates for common features (clef symbols, sharps, flats, etc.) as well as checked for any circles (note-heads). If it matches a template, it be assumed to be that symbol, otherwise, each found note-head will be processed for pitch and duration. Then each component will be put back together with a grammar, and processed into a MusicXML file. This MusicXML file will be sent to the Raspberry Pi for interpretation of the LEDs and it will also be saved into a “library” folder of known, already processed songs.
The original input pdf as well as the song title will be taken from user input. However, if a pdf has the same path in the OS and the same song name as a song that is in the library, it will not be reprocessed again and will simply use the already known MusicXML to send to the Raspberry Pi. This will save significant time for the user, especially if they are practicing a song and want to continue to play it over and over again.
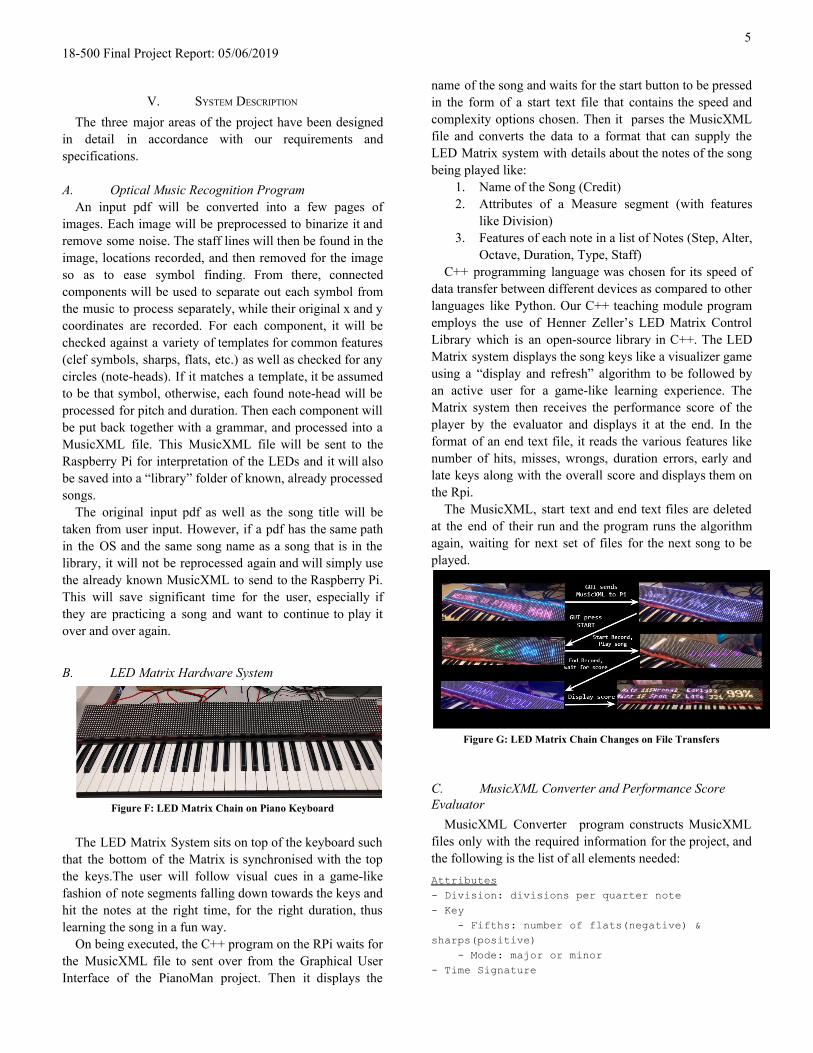
B. LED Matrix Hardware System
Figure F: LED Matrix Chain on Piano Keyboard
The LED Matrix System sits on top of the keyboard such
that the bottom of the Matrix is synchronised with the top the keys.The user will follow visual cues in a game-like fashion of note segments falling down towards the keys and hit the notes at the right time, for the right duration, thus learning the song in a fun way.
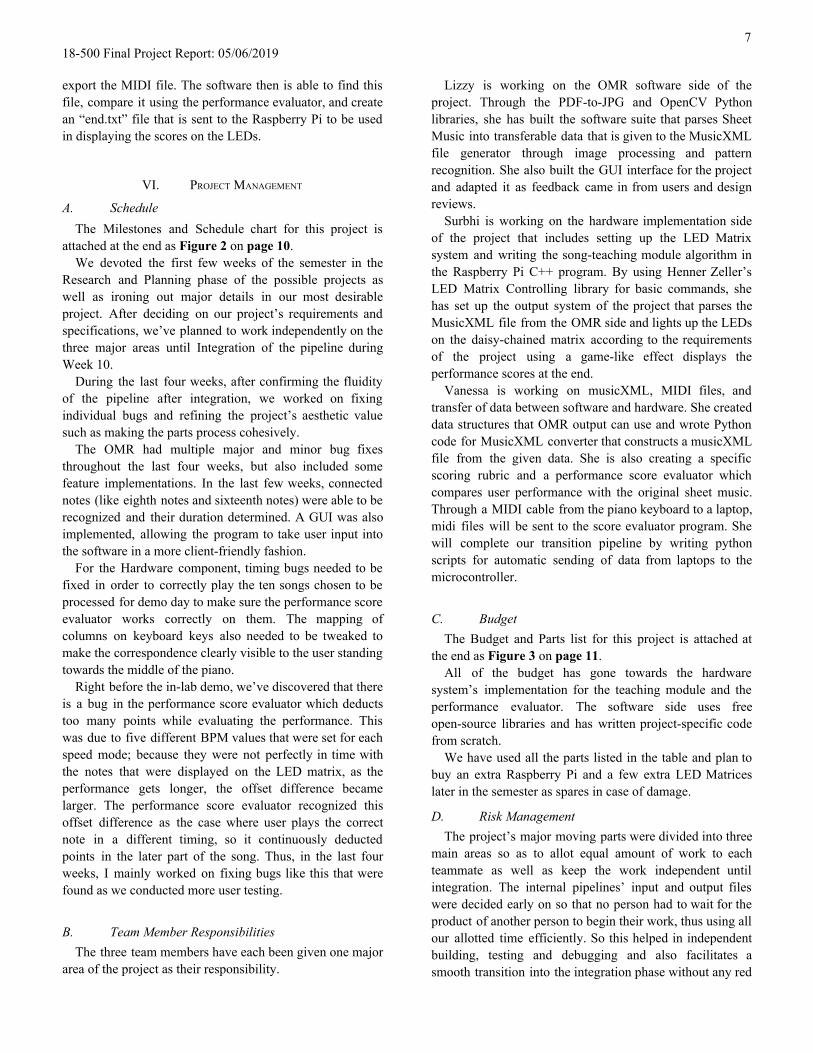
On being executed, the C++ program on the RPi waits for the MusicXML file to sent over from the Graphical User Interface of the PianoMan project. Then it displays the
name of the song and waits for the start button to be pressed in the form of a start text file that contains the speed and complexity options chosen. Then it parses the MusicXML file and converts the data to a format that can supply the LED Matrix system with details about the notes of the song being played like:
1. Name of the Song (Credit) 2. Attributes of a Measure segment (with features
like Division) 3. Features of each note in a list of Notes (Step, Alter,
Octave, Duration, Type, Staff) C++ programming language was chosen for its speed of
data transfer between different devices as compared to other languages like Python. Our C++ teaching module program employs the use of Henner Zeller’s LED Matrix Control Library which is an open-source library in C++. The LED Matrix system displays the song keys like a visualizer game using a “display and refresh” algorithm to be followed by an active user for a game-like learning experience. The Matrix system then receives the performance score of the player by the evaluator and displays it at the end. In the format of an end text file, it reads the various features like number of hits, misses, wrongs, duration errors, early and late keys along with the overall score and displays them on the Rpi.
The MusicXML, start text and end text files are deleted at the end of their run and the program runs the algorithm again, waiting for next set of files for the next song to be played.
Figure G: LED Matrix Chain Changes on File Transfers
C. MusicXML Converter and Performance Score Evaluator
MusicXML Converter program constructs MusicXML files only with the required information for the project, and the following is the list of all elements needed:
Attributes
- Division: divisions per quarter note
- Key
- Fifths: number of flats(negative) &
sharps(positive)
- Mode: major or minor
- Time Signature

6 18-500 Final Project Report: 05/06/2019 - Staves: number of staves
- Clef
Note
- Pitch
- Step: actual key - A, B, C, D, E, F, G
- Alter: sharp(+1) or flat(-1)
- Octave: octave index (default: bass = 3,
treble = 4)
- Duration: duration value relative to division
in attributes
- Voice: index of voice (if polyphonic, notes
are divided into separate voices)
- Type: whole, half, quarter, eighth, ...
- Dot: whether it is a dotted note or not
- Stem: stem direction of the note - down, up,
double
- Staff: location of the note
MusicXML converter receives this information from OMR in dictionary or list form then recursively converts it to an XML structure.
Once the user finishes playing the piece with the keyboard, the corresponding MIDI file is transferred to performance score evaluator. MusicXML of the original sheet music (output of OMR) will be converted to MIDI file using MuseScore application, using the bpm that the user has chosen.
Music21, a Python library that extracts data from MIDI files, will be used to compare the two files. Using midi.translate.midiFileToStream method, two files will be converted into Stream objects, which are the fundamental container for Music21 objects. Various methods such as Stream.notes, Stream.notesAndRests, and Stream.duration will be used to compare these two in detail. The highest performance score is 100, and points will be deducted if the two MIDI files are different every time segment. Thus, there are several circumstances that may deduct performance score (ranked in order of effectiveness):
1. When the user misses a note – never plays anything for that beat
2. When the user plays a wrong note (wrong note or no rest)
3. When the user plays a wrong note with the correct note (correct + extra key)
4. When the user plays the correct note in different timing (when there are unnecessary rests between notes)
5. When the user plays the correct note in shorter/longer duration (wrong type of note)
The exact points of deduction will be a relative value to the total number of notes in the piece, so as the number of notes increases, a single mistake becomes insignificant.
D. Graphical User Interface (GUI) The User Interface for the project will be created using
Python 3’s tkinter framework do to the speed of creation and that other parts of our project are already written in Python. It will be designed with usability in mind so that it is simple to understand without much instruction (see Figure H).
From this screen the user will be able to select the original pdf to play, the name of the song (not recognized by the OMR), the speed they want to play it at, and which clefs they want to play.
After the pdf is processed with the OMR, the user sees some instruction screens on how to set up the Ableton software for recording, and later evaluating, their performance. There is also a screen explaining what each of the colors mean on the piano LEDs so that the user is not confused when the song starts playing.
This transitions into a screen where the user can press start playing. The screen was created so that if the user becomes distracted while the OMR is occuring, the song doesn’t automatically start without them.
After this, the user sees more instructions on Ableton and explains the performance score numbers to the user. And allows the user to start over with a new song.
Figure H: Main GUI screen
E. Integrations In order to integrate the multiple systems running in this
project, we will be sending a variety of files back and forth. After the OMR is done processing the pdf, it will send an “outputXML.xml” file to the Raspberry Pi that contains all the MusicXML information. Later, when the user clicks the “Start Playing” button on the GUI, a “start.txt” file will also be sent to the Raspberry Pi to tell it to start the song’s LEDs. This file contains the speed and hand/clef information as well, telling the pi how to run the song. This information is not included in the MusicXML because it is not part of the standard MusicXML file type and we wanted to stay as close to the true standard as possible.
Before, the user presses “Start Playing”, they must set up the Ableton MIDI recording software, as per the instructions in the GUI, so that their performance can be recorded and evaluated. After the song finishes, they follow the instructions again to stop the recording process and
7 18-500 Final Project Report: 05/06/2019 export the MIDI file. The software then is able to find this file, compare it using the performance evaluator, and create an “end.txt” file that is sent to the Raspberry Pi to be used in displaying the scores on the LEDs.
VI. PROJECT MANAGEMENT
A. Schedule The Milestones and Schedule chart for this project is
attached at the end as Figure 2 on page 10. We devoted the first few weeks of the semester in the
Research and Planning phase of the possible projects as well as ironing out major details in our most desirable project. After deciding on our project’s requirements and specifications, we’ve planned to work independently on the three major areas until Integration of the pipeline during Week 10.
During the last four weeks, after confirming the fluidity of the pipeline after integration, we worked on fixing individual bugs and refining the project’s aesthetic value such as making the parts process cohesively.
The OMR had multiple major and minor bug fixes throughout the last four weeks, but also included some feature implementations. In the last few weeks, connected notes (like eighth notes and sixteenth notes) were able to be recognized and their duration determined. A GUI was also implemented, allowing the program to take user input into the software in a more client-friendly fashion.
For the Hardware component, timing bugs needed to be fixed in order to correctly play the ten songs chosen to be processed for demo day to make sure the performance score evaluator works correctly on them. The mapping of columns on keyboard keys also needed to be tweaked to make the correspondence clearly visible to the user standing towards the middle of the piano.
Right before the in-lab demo, we’ve discovered that there is a bug in the performance score evaluator which deducts too many points while evaluating the performance. This was due to five different BPM values that were set for each speed mode; because they were not perfectly in time with the notes that were displayed on the LED matrix, as the performance gets longer, the offset difference became larger. The performance score evaluator recognized this offset difference as the case where user plays the correct note in a different timing, so it continuously deducted points in the later part of the song. Thus, in the last four weeks, I mainly worked on fixing bugs like this that were found as we conducted more user testing.
B. Team Member Responsibilities The three team members have each been given one major
area of the project as their responsibility.
Lizzy is working on the OMR software side of the project. Through the PDF-to-JPG and OpenCV Python libraries, she has built the software suite that parses Sheet Music into transferable data that is given to the MusicXML file generator through image processing and pattern recognition. She also built the GUI interface for the project and adapted it as feedback came in from users and design reviews.
Surbhi is working on the hardware implementation side of the project that includes setting up the LED Matrix system and writing the song-teaching module algorithm in the Raspberry Pi C++ program. By using Henner Zeller’s LED Matrix Controlling library for basic commands, she has set up the output system of the project that parses the MusicXML file from the OMR side and lights up the LEDs on the daisy-chained matrix according to the requirements of the project using a game-like effect displays the performance scores at the end.
Vanessa is working on musicXML, MIDI files, and transfer of data between software and hardware. She created data structures that OMR output can use and wrote Python code for MusicXML converter that constructs a musicXML file from the given data. She is also creating a specific scoring rubric and a performance score evaluator which compares user performance with the original sheet music. Through a MIDI cable from the piano keyboard to a laptop, midi files will be sent to the score evaluator program. She will complete our transition pipeline by writing python scripts for automatic sending of data from laptops to the microcontroller.
C. Budget The Budget and Parts list for this project is attached at
the end as Figure 3 on page 11. All of the budget has gone towards the hardware
system’s implementation for the teaching module and the performance evaluator. The software side uses free open-source libraries and has written project-specific code from scratch.
We have used all the parts listed in the table and plan to buy an extra Raspberry Pi and a few extra LED Matrices later in the semester as spares in case of damage.
D. Risk Management The project’s major moving parts were divided into three
main areas so as to allot equal amount of work to each teammate as well as keep the work independent until integration. The internal pipelines’ input and output files were decided early on so that no person had to wait for the product of another person to begin their work, thus using all our allotted time efficiently. So this helped in independent building, testing and debugging and also facilitates a smooth transition into the integration phase without any red

8 18-500 Final Project Report: 05/06/2019 flags.
While choosing the LED Matrix for the hardware implementation, we picked a reliable but cheap matrix from a well known source (Adafruit Industries) that mitigated the chances of device defects and allowed us to experiment with their functionality before buying the rest in bulk. We will also be purchasing extra matrices later in the semester to keep a few spare in case of burn outs and damage.
VII. RELATED WORK The PianoMan project was inspired by the work of a
YouTuber Rousseau who shares his virtual reactive piano visualizer videos on his YouTube channel. We wanted to create cheaper, physical implementation of his idea through a fun game-like module that could teach any song to a user. This influenced us to implement our own OMR (Optical Music Recognition) Software to work on any songs sheet music to feed a MusicXML file to the Raspberry Pi microcontroller.
The structure of the OMR program was based on papers like “Optical music recognition: state-of-the-art and open issues” [4]. Here, an overview of the most recent research into OMR is discussed in detail including ways to split up the problem of recognition and common algorithms used for these parts. Some limitations and advantages are discussed for many algorithms, and there are some open questions they describe as still being worked on.
VIII. SUMMARY Towards the end of the semester, the team focused on
refining the project’s features to make the final demo as noteworthy as possible. We pre-processed 10 songs songs to be played during the demo with ease.
On the OMR side, all of these 10 songs met both the time and accuracy specifications (60s/120 recognizable elements; 90% accuracy) based on the output XML files. However, after testing the OMR on a variety of songs, it was found that songs with many ties and slurs caused problems, primarily because the connected components were not always separate at that point (a tie/slur can go through a measure bar for example, causing problems recognizing the measure bar). It also, has trouble recognizing lots of chords correctly, due to the limitations of the Hough Circle-transform. One approach to potentially use to fix this problem is to use contours to find noteheads instead of the transform.
The OMR also only supports notes and rests up to sixteenth. This allowed us to simplify the OMR, and since the project is aimed at beginner piano players, this was a fine tradeoff.
The file transfers from the GUI to the RPi work almost instantaneously which covers our 3 seconds requirement. The RPi can parse those files also almost instantaneously.
A. Future Work
From the feedback of our faculty and peers, we believe that our project has so many avenues to improve the music teaching industry by adding Real-Time feedback technology to our system as well as detailing the performance score by giving more visual information about the exact mistakes in the played piece. Real-time feedback was beyond the scope of our project but we hope that given more time and budget, a system could be designed around our current architecture to incorporate that.
B. Lessons Learned Order your parts as early as possible to conduct
functionality tests. Order extra in case the parts go out of stock later. Make a detailed schedule by reducing each task into list of agreeable goals. Think of a design project that will have enough independent work for three people but will come together at the end and not end up like three separate projects.
Our project’s website: http://course.ece.cmu.edu/~ece500/projects/s19-teamd7/ Our project’s YouTube Video: https://www.youtube.com/watch?time_continue=1&v=k1
iDhHrUKVM
REFERENCES [1] LED Matrix Control Library.,
https://github.com/hzeller/rpi-rgb-led-matrix/ [2] Raspberry Pi and LED Matrices Connection,
https://learn.adafruit.com/16x32-rgb-display-with-raspberry-pi-part-2 [3] YouTuber Rousseau,
https://www.youtube.com/channel/UCPZUQqtVDmcjm4NY5FkzqLA
[4] A. Rebelo, I. Fujinaga, F. Paszkiewicz, A. Marcal, C. Guedes, and J. Cardoso, “Optical music recognition: state-of-the-art and open issues,” International Journal of Multimedia Information Retrieval, pp. 1–18, 2012.

9 18-500 Final Project Report: 05/06/2019
Figure 1a: System Block Diagram - Hardware, Software, Other objects
Figure 1b: OMR Block Diagram

10 18-500 Final Project Report: 05/06/2019
Figure 2: Milestones and Schedule Chart

11 18-500 Final Project Report: 05/06/2019
No. Item / Part Quantity Total Cost
1 Raspberry Pi 3 B+ Kit (Amazon) 1 $48.99
2 16x32 RGB LED Matrix (Adafruit) 4 $99.80
3 5V 10A Switching Power Supply (Adafruit) 1 $25.00
4 Female DC Power Adapter (Adafruit) 1 $2.00
5 Female-Female Jumper Cables (Adafruit) 1 (Pack of 40) $3.95
6 Male-Male Jumper Cables (Adafruit) 1 (Pack of 40) $3.95
7 GPIO Reference Card (Adafruit) 1 $2.50
8 FORE USB In-out MIDI Interface Converter (Amazon) 1 $21.99
9 Nonda USB Type C to USB 3.0 Converter (Amazon) 1 $7.99
10 Shipping Expenses + Taxes from Adafruit 2 Orders $30.00
11 Laptop Stand (Amazon) 1 $30.80
12 Hair Ties (Amazon) 1 (Pack of 200) $3.00
TOTAL 13 $279.97
Figure 3: Budget and Parts List