phone user guide - find help for your cell phone: sprint...
TRANSCRIPT
Phone User Guide
www.sprint.com
© 2006 Sprint Nextel. All rights reserved. SPRINT, the “Going Forward”logo, the NEXTEL name and logo, and other trademarks are trademarks ofSprint Nextel. Sanyo is a registered trademark of Sanyo Electric Co., Ltd.
Sprint Power VisionSM Phone M1 by Sanyo®
Table of ContentsWelcome to Sprint . . . . . . . . . . . . . . . . . . . . . . . . . . . . . . . . .iIntroduction . . . . . . . . . . . . . . . . . . . . . . . . . . . . . . . . . . . . . .iiYour Phone’s Menu . . . . . . . . . . . . . . . . . . . . . . . . . . . . . . . .ivSection 1: Getting Started . . . . . . . . . . . . . . . . . . . . . . . . . .1
1A. Setting Up Service . . . . . . . . . . . . . . . . . . . . . . . . . . . . . . . . .2Getting Started With Sprint PCS Service . . . . . . . . . . . . . . . . . . . . . . .3
Setting Up Your Voicemail . . . . . . . . . . . . . . . . . . . . . . . . . . . . . . . . . . . .4
Sprint PCS Account Passwords . . . . . . . . . . . . . . . . . . . . . . . . . . . . . . .5
Getting Help . . . . . . . . . . . . . . . . . . . . . . . . . . . . . . . . . . . . . . . . . . . . . . . .6
Section 2: Using Your Phone . . . . . . . . . . . . . . . . . . . . . . . .92A. Phone Basics . . . . . . . . . . . . . . . . . . . . . . . . . . . . . . . . . . . . .10
Front View of Your Phone . . . . . . . . . . . . . . . . . . . . . . . . . . . . . . . . . . .11
Viewing the Display Screen . . . . . . . . . . . . . . . . . . . . . . . . . . . . . . . . .15
Features of Your Phone . . . . . . . . . . . . . . . . . . . . . . . . . . . . . . . . . . . . .18
Turning Your Phone On and Off . . . . . . . . . . . . . . . . . . . . . . . . . . . . . .20
Using Your Phone’s Battery and Charger . . . . . . . . . . . . . . . . . . . . .21
Navigating Through Phone Menus . . . . . . . . . . . . . . . . . . . . . . . . . .24
Displaying Your Phone Number . . . . . . . . . . . . . . . . . . . . . . . . . . . . .25
Making and Answering Calls . . . . . . . . . . . . . . . . . . . . . . . . . . . . . . . .26
Entering Text . . . . . . . . . . . . . . . . . . . . . . . . . . . . . . . . . . . . . . . . . . . . . .41
2B. Controlling Your Phone’s Settings . . . . . . . . . . . . . . . . . .46Sound Settings . . . . . . . . . . . . . . . . . . . . . . . . . . . . . . . . . . . . . . . . . . . .47
Display Settings . . . . . . . . . . . . . . . . . . . . . . . . . . . . . . . . . . . . . . . . . . . .54
Location Settings . . . . . . . . . . . . . . . . . . . . . . . . . . . . . . . . . . . . . . . . . .61
Messaging Settings . . . . . . . . . . . . . . . . . . . . . . . . . . . . . . . . . . . . . . . .62
Airplane Mode . . . . . . . . . . . . . . . . . . . . . . . . . . . . . . . . . . . . . . . . . . . . .67
TTY Use With Sprint PCS Service . . . . . . . . . . . . . . . . . . . . . . . . . . . . .68
Wireless Backup . . . . . . . . . . . . . . . . . . . . . . . . . . . . . . . . . . . . . . . . . . .70
Phone Setup Options . . . . . . . . . . . . . . . . . . . . . . . . . . . . . . . . . . . . . . .72

2C. Setting Your Phone’s Security . . . . . . . . . . . . . . . . . . . . . .79Accessing the Security Menu . . . . . . . . . . . . . . . . . . . . . . . . . . . . . . . .80
Using Your Phone’s Lock Feature . . . . . . . . . . . . . . . . . . . . . . . . . . . . .80
Restricting Calls . . . . . . . . . . . . . . . . . . . . . . . . . . . . . . . . . . . . . . . . . . . .83
Using Special Numbers . . . . . . . . . . . . . . . . . . . . . . . . . . . . . . . . . . . . .84
Erasing Phone Content . . . . . . . . . . . . . . . . . . . . . . . . . . . . . . . . . . . . .85
Resetting the Browser . . . . . . . . . . . . . . . . . . . . . . . . . . . . . . . . . . . . . .86
Resetting Favorites . . . . . . . . . . . . . . . . . . . . . . . . . . . . . . . . . . . . . . . . .86
Resetting Your Phone . . . . . . . . . . . . . . . . . . . . . . . . . . . . . . . . . . . . . . .87
Resetting Your Picture Mail Account . . . . . . . . . . . . . . . . . . . . . . . . .87
Resetting Default Settings . . . . . . . . . . . . . . . . . . . . . . . . . . . . . . . . . .88
Resetting and Locking Your Phone Through SMS . . . . . . . . . . . . . .89
Security Features for Sprint PCS Vision . . . . . . . . . . . . . . . . . . . . . . .91
2D. Controlling Your Roaming Experience . . . . . . . . . . . . . . .92Understanding Roaming . . . . . . . . . . . . . . . . . . . . . . . . . . . . . . . . . . .93
Setting Your Phone’s Roam Mode . . . . . . . . . . . . . . . . . . . . . . . . . . .95
Using Call Guard . . . . . . . . . . . . . . . . . . . . . . . . . . . . . . . . . . . . . . . . . . .96
Using Data Roam Guard . . . . . . . . . . . . . . . . . . . . . . . . . . . . . . . . . . . .97
2E. Managing Call History . . . . . . . . . . . . . . . . . . . . . . . . . . . .98Viewing History . . . . . . . . . . . . . . . . . . . . . . . . . . . . . . . . . . . . . . . . . . . .99
Call History Options . . . . . . . . . . . . . . . . . . . . . . . . . . . . . . . . . . . . . . .100
Making a Call From Call History . . . . . . . . . . . . . . . . . . . . . . . . . . . .101
Saving a Phone Number From Call History . . . . . . . . . . . . . . . . . .102
Prepending a Phone Number From Call History . . . . . . . . . . . . .103
Erasing Call History . . . . . . . . . . . . . . . . . . . . . . . . . . . . . . . . . . . . . . .103
2F. Using Contacts . . . . . . . . . . . . . . . . . . . . . . . . . . . . . . . . . .104Adding a New Contacts Entry . . . . . . . . . . . . . . . . . . . . . . . . . . . . . .105
Assigning a Group Entry . . . . . . . . . . . . . . . . . . . . . . . . . . . . . . . . . . .106
Finding Contacts Entries . . . . . . . . . . . . . . . . . . . . . . . . . . . . . . . . . .107
Contacts Entry Options . . . . . . . . . . . . . . . . . . . . . . . . . . . . . . . . . . . .109
Adding a Phone Number to a Contacts Entry . . . . . . . . . . . . . . . .110
Editing a Contacts Entry’s Phone Number . . . . . . . . . . . . . . . . . . .110
Assigning Speed Dial Numbers . . . . . . . . . . . . . . . . . . . . . . . . . . . .111

Editing a Contacts Entry . . . . . . . . . . . . . . . . . . . . . . . . . . . . . . . . . . .112
Assigning an Image to a Contacts Entry . . . . . . . . . . . . . . . . . . . . .112
Selecting a Ringer Type for an Entry . . . . . . . . . . . . . . . . . . . . . . . .113
Secret Contacts Entries . . . . . . . . . . . . . . . . . . . . . . . . . . . . . . . . . . . .114
Dialing Sprint PCS Services . . . . . . . . . . . . . . . . . . . . . . . . . . . . . . . .115
2G. Using the Phone’s Calendar and Tools . . . . . . . . . . . . . .116Using Your Phone’s Calendar . . . . . . . . . . . . . . . . . . . . . . . . . . . . . . .117
Using Your Phone’s Tools . . . . . . . . . . . . . . . . . . . . . . . . . . . . . . . . . .125
Connecting Your Phone to Your PC . . . . . . . . . . . . . . . . . . . . . . . . . .129
File Manager . . . . . . . . . . . . . . . . . . . . . . . . . . . . . . . . . . . . . . . . . . . . .130
Personal Information Management . . . . . . . . . . . . . . . . . . . . . . . .133
2H. Using Your Phone’s Voice Services . . . . . . . . . . . . . . . . .134Using Voice-Activated Dialing . . . . . . . . . . . . . . . . . . . . . . . . . . . . .135
Using Automatic Speech Recognition . . . . . . . . . . . . . . . . . . . . . .137
Using the Voice Recorder . . . . . . . . . . . . . . . . . . . . . . . . . . . . . . . . . .144
Setting Up Screen Call . . . . . . . . . . . . . . . . . . . . . . . . . . . . . . . . . . . . .149
2I. Using the Built-in Camera . . . . . . . . . . . . . . . . . . . . . . . .152Taking Pictures . . . . . . . . . . . . . . . . . . . . . . . . . . . . . . . . . . . . . . . . . . .153
Using the Settings & Info Menu . . . . . . . . . . . . . . . . . . . . . . . . . . . .161
Recording Videos . . . . . . . . . . . . . . . . . . . . . . . . . . . . . . . . . . . . . . . . .163
Storing Pictures and Videos . . . . . . . . . . . . . . . . . . . . . . . . . . . . . . . .168
Sending Sprint PCS Picture Mail . . . . . . . . . . . . . . . . . . . . . . . . . . . .171
Managing Sprint PCS Picture Mail . . . . . . . . . . . . . . . . . . . . . . . . . .174
Printing Pictures Directly From Your Phone . . . . . . . . . . . . . . . . .178
2J. Using Sprint PCS Ready Link . . . . . . . . . . . . . . . . . . . . . .180Getting Started With Sprint PCS Ready Link . . . . . . . . . . . . . . . . .181
Making and Receiving a Sprint PCS Ready Link Call . . . . . . . . . .183
Adding and Editing Ready Link Contacts . . . . . . . . . . . . . . . . . . . .191
Erasing Ready Link List Entries . . . . . . . . . . . . . . . . . . . . . . . . . . . . .197
Updating Sprint PCS Ready Link Lists . . . . . . . . . . . . . . . . . . . . . . .199
Managing Sprint PCS Ready Link Settings . . . . . . . . . . . . . . . . . . .199
2K. Using the Built-In Media Player . . . . . . . . . . . . . . . . . . .205Your Multimedia Channel Options . . . . . . . . . . . . . . . . . . . . . . . . .206

Accessing Your Media Player’s Channel Listings . . . . . . . . . . . . .207
Playing a Video or Audio Clip . . . . . . . . . . . . . . . . . . . . . . . . . . . . . . .208
Multimedia FAQs . . . . . . . . . . . . . . . . . . . . . . . . . . . . . . . . . . . . . . . . .213
2L. Using Bluetooth . . . . . . . . . . . . . . . . . . . . . . . . . . . . . . . .216Turning Bluetooth On and Off . . . . . . . . . . . . . . . . . . . . . . . . . . . . .217
Using the Bluetooth Settings Menu . . . . . . . . . . . . . . . . . . . . . . . .218
Bluetooth Profiles . . . . . . . . . . . . . . . . . . . . . . . . . . . . . . . . . . . . . . . .221
Pairing Bluetooth Devices . . . . . . . . . . . . . . . . . . . . . . . . . . . . . . . . .223
Using the Trusted Devices Options . . . . . . . . . . . . . . . . . . . . . . . . .224
Printing Data via Bluetooth . . . . . . . . . . . . . . . . . . . . . . . . . . . . . . . .225
Sending Data via Bluetooth . . . . . . . . . . . . . . . . . . . . . . . . . . . . . . .226
Section 3: Sprint PCS Service Features . . . . . . . . . . . . .2273A. Sprint PCS Service Features: The Basics . . . . . . . . . . . . .228
Using Voicemail . . . . . . . . . . . . . . . . . . . . . . . . . . . . . . . . . . . . . . . . . .229
Using SMSText Messaging . . . . . . . . . . . . . . . . . . . . . . . . . . . . . . . .237
Using SMS Voice Messaging . . . . . . . . . . . . . . . . . . . . . . . . . . . . . . .241
Using Caller ID . . . . . . . . . . . . . . . . . . . . . . . . . . . . . . . . . . . . . . . . . . . .242
Responding to Call Waiting . . . . . . . . . . . . . . . . . . . . . . . . . . . . . . . .243
Making a Three-Way Call . . . . . . . . . . . . . . . . . . . . . . . . . . . . . . . . . .244
Using Call Forwarding . . . . . . . . . . . . . . . . . . . . . . . . . . . . . . . . . . . . .245
3B. Sprint PCS Voice Command . . . . . . . . . . . . . . . . . . . . . . .246Getting Started With Sprint PCS Voice Command . . . . . . . . . . .247
Creating Your Own Address Book . . . . . . . . . . . . . . . . . . . . . . . . . .248
Making a Call With Sprint PCS Voice Command . . . . . . . . . . . . .249
Accessing Information Using Sprint PCS Voice Command . . . .250
Section 4: Safety and Warranty Information . . . . . . . .2514A. Important Safety Information . . . . . . . . . . . . . . . . . . . .252
General Precautions . . . . . . . . . . . . . . . . . . . . . . . . . . . . . . . . . . . . . .253
Maintaining Safe Use of and Access to Your Phone . . . . . . . . . .254
Using Your Phone With a Hearing Aid Device . . . . . . . . . . . . . . . .256
Caring for the Battery . . . . . . . . . . . . . . . . . . . . . . . . . . . . . . . . . . . . .257
Radiofrequency (RF) Energy . . . . . . . . . . . . . . . . . . . . . . . . . . . . . . .259
Owner’s Record . . . . . . . . . . . . . . . . . . . . . . . . . . . . . . . . . . . . . . . . . . .262

Phone Guide Proprietary Notice . . . . . . . . . . . . . . . . . . . . . . . . . . .262
4B. Manufacturer’s Warranty . . . . . . . . . . . . . . . . . . . . . . . .263Manufacturer’s Warranty . . . . . . . . . . . . . . . . . . . . . . . . . . . . . . . . .264
Index . . . . . . . . . . . . . . . . . . . . . . . . . . . . . . . . . . . . . . . . . .267

Welcome to Sprint
Sprint and Nextel have come together offering you morechoice and flexibility to do whatever you want, whenever you want.
This powerful combination brings you access to moreproducts, more services, and more of what you need to domore of what you want. Welcome to a future full ofpossibility. Welcome to the new Sprint.
Welcome and thank you for choosing Sprint.
i

ii
Introduction
This Phone User Guide introduces you to Sprint PCS® Serviceand all the features of your new phone. It’s divided into foursections:
l Section 1: Getting Started
l Section 2: Using Your Phone
l Section 3: Sprint PCS Service Features
l Section 4: Safety and Warranty Information
Throughout this guide, you’ll find tips that highlight specialshortcuts and timely reminders to help you make the mostof your new phone and service.The Table of Contents andIndex will also help you quickly locate specific information.
You’ll get the most out of your phone if you read each section.However, if you’d like to get right to a specific feature, simplylocate that section in the Table of Contents and go directly tothat page. Follow the instructions in that section, and you’llbe ready to use your phone in no time.
WARNING Please refer to the Important Safety Informationsection on page 252 to learn about information thatwill help you safely use your phone. Failure to readand follow the Important Safety Information in thisphone guide may result in serious bodily injury,death, or property damage.
PhoneGuideNote:
Because of updates in phone software, this printedguide may not be the most current version for yourphone.Visit www.sprint.com and log on to MyPCSWireless to access the most recent version of the phoneuser guide.

Want to keep track of your minutes?It’s easy to check right from your phone!
You’ll hear a summary of your service plan minutes and the minutes remaining in your current billing cycle, alongwith your phone’s individual usage if you’re on a sharedplan. You’ll also hear a summary of your account balance and your most recent payment information.
From the Sprint PCS Vision Home Page, select My Account(Option 0). You’ll see many helpful categories includingPayment Due, Current Usage, and Plan Overview. Select a topic to display the latest information.
Dial
Use Your Phone’s Web Browser
NoteReported minutes and balances are estimates only. Please consult your Sprint PCS invoice for actual minutes used.
iii

iv
Your Phone’s Menu
The following table outlines your phone’s list menu structure.For more information about using your phone’s menus, see“Navigating Through Phone Menus” on page 24.
2: Call History
1: Missed Alerts
1: Outgoing 2: Incoming 3: Missed 4: Recent Calls5: Erase History
1: Outgoing 2: Incoming
3: Missed 4: Recent Calls
3: Contacts 1: Find/Add Entry
3: Speed Dial #s 2: Group
4: My Name Card
6: Services
5: Wireless Backup
5: All
1: Customer Service 2: Dir Assistance
3: Account Info 4: Sprint Operator
1: Subscribe (sign-out state)/Unsubscribe (sign-in state)
2: Alert 3: Learn More
5: Voice Command
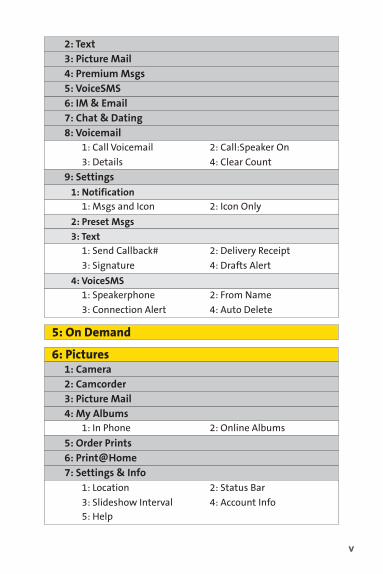
4: Messaging 1: Send Message
1: Text
3: VoiceSMS
2: Picture Mail
v
5: On Demand
7: Chat & Dating8: Voicemail
1: Call Voicemail 2: Call:Speaker On
3: Details 4: Clear Count
1: Send Callback# 2: Delivery Receipt
3: Signature 4: Drafts Alert
1: Msgs and Icon 2: Icon Only
1: In Phone 2: Online Albums
6: Pictures 1: Camera 2: Camcorder3: Picture Mail
5: Order Prints6: Print@Home
4: My Albums
7: Settings & Info
6: IM & Email
4: Premium Msgs5: VoiceSMS
1: Location 2: Status Bar
3: Slideshow Interval 4: Account Info5: Help
3: Picture Mail2: Text
9: Settings1: Notification
2: Preset Msgs
3: Text
1: Speakerphone 2: From Name
4: Auto Delete3: Connection Alert
4: VoiceSMS
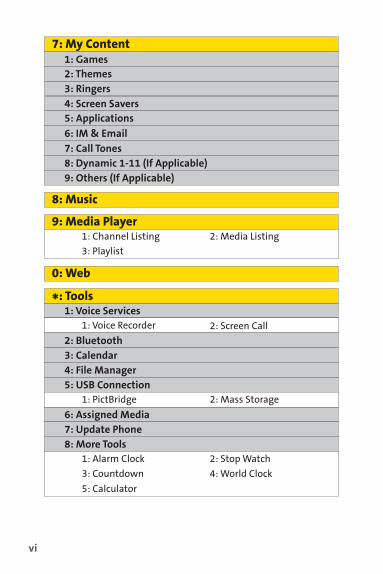
vi
*: Tools 1: Voice Services
1: Voice Recorder 2: Screen Call
1: PictBridge 2: Mass Storage
8: More Tools 1: Alarm Clock 2: Stop Watch
3: Countdown 4: World Clock
2: Bluetooth3: Calendar
5: USB Connection
6: Assigned Media7: Update Phone
8: Music
9: Media Player
0: Web
5: Calculator
4: File Manager
7: My Content 1: Games
3: Ringers 2: Themes
4: Screen Savers 5: Applications 6: IM & Email7: Call Tones 8: Dynamic 1-11 (If Applicable) 9: Others (If Applicable)
1: Channel Listing 2: Media Listing
3: Playlist
vii
5: Others
1: Tone Length 2: Start-up Tone
3: Power-off Tone 4: Voice Prompt
5: Key Press Echo
2: Display 1: Backlight
1: Main LCD 2: Key
3: Sub LCD
3: Greeting
2: Power Save Mode
1: Default 2: Custom
#: Settings 1: Sounds
1: Ringer Type
1: Incoming Calls 2: Ready Link
3: Voicemail 4: Messaging
5: Calendar/Alarm
3: Vibrate Pattern
1: Incoming Calls 2: Ready Link
3: Voicemail 4: Messaging
5: Calendar/Alarm
4: Alerts
1: Service 2: Ready Link
3: Voicemail 4: Messaging
5: Minute Beep 6: Signal Fade
2: Volume
1: Ringer 2: Advanced Ringer
3: Receiver 4: Application
6: Key Beep5: Start-up/Pw-off
4: Animation
1: Standby 2: Outgoing Calls
3: Service Search

viii
2: Net Guard
3: Update Profile
4: Ready Link 1: Enable/Disable
2: List Update
3: Sounds
1: Ringer Type
3: Vibrate Pattern
2: Ringer Volume
4: Alerts
4: Speakerphone
5: Default View
6: Floor Display
7: R-Link Guard
8: Restart
9: Help
5: Wireless Backup
3: Power Vision 1: Enable Vision (sign-out state)/Disable Vision (sign-in state)
5: Incoming Calls
6: Themes
8: Clock/Calendar
1: Main LCD 2: Sub LCD
7: Screen Saver
1: Main LCD 2: Sub LCD
9: Others
1: Font Size 2: Match Area Code
3: My Buddy 4: Return to Idle
5: Sleep Mode
1: Subscribe (sign-out state)/Unsubscribe (sign-in state)
2: Alert 3: Learn More6: Location
ix
2: Picture Mail
1: Lock Pictures 2: Reset Picture Mail
1: Msgs and Icon 2: Icon Only
3: Erase/Reset
1: Erase Ph. Book 2: Erase My Content
5: Erase Voice Tag 6: Erase Messages
3: Erase Pictures 4: Erase Voice Data
7: Erase Cal. Events 8: Erase Memory
9: Reset Browser 10: Reset Favorites
11: Default Settings 12: Reset Phone
3: Voice Priority
4: My Device Name
5: My Device Info
8: Messaging 1: Notification
2: Preset Msgs
3: Text
4: VoiceSMS
9: Security 1: Lock Phone
1: Unlocked 2: Lock Now
3: On Power-up
1: Send Callback# 2: Delivery Receipt
4: Drafts Alert3: Signature
1: Speakerphone 2: From Name
4: Auto Delete3: Connection Alert
2: Visibility
7: Bluetooth1: Enable/Disable

x
9: Headset Mode
1: Turbo Button 2: Earpiece
3: Ringer Sound
11: Navigation Keys
1: Left Navigation (Media Player) 2: Right Navigation (On Demand)
3: Up Navigation (Send Text to) 4: Down Navigation (My Content)
10: TTY
12: Key Guard
13: Language
1: English 2: Español
3: Text Entry
1: Auto-Capital 2: My Words
3: Input Language 4: Default Input
5: Auto-Space 6: Recent Access
7: T9 Settings
9: Auto-Complete
8: Add Word
10: Help
4: Any Key Answer
5: Auto Answer
1: Hands-free 2: Speakerphone
6: Open/Close Flip
1: Open 2: Close
7: Abbrev. Dial
8: Power On to Alert
2: Roaming
1: Set Mode 2: Call Guard
3: Data Roam Guard
10: Others 1: Airplane Mode
1: Change Lock 2: Limit Use
5: Lock Services
3: Special #s 4: Found Me
4: Others
xi
IN USE MENUSelect Options (right softkey) to display the following options:
1: Flash 2: Mute/Unmute
3: Speaker On/Speaker Off 4: Three-Way Call
6: Call History5: Missed Alerts
8: Messaging7: Contacts
10: Settings9: Tools
11: Phone Info 1: Phone#/User ID
2: Icon Glossary
3: Version
4: Advanced
5: Phone Status


Section 1
Getting Started
2 Section 1A: Setting Up Service
Section 1A
Setting Up Service
In This Section
l Getting Started With Sprint PCS Service (page 3)
l Setting Up Your Voicemail (page 4)
l Sprint PCS Account Passwords (page 5)
l Getting Help (page 6)
Setting up service on your new phone is quick and easy.Thissection walks you through the necessary steps to unlockyour phone, set up your voicemail, establish passwords,and contact Sprint for assistance with your Sprint PCSservice.

Section 1A: Setting Up Service 3
Getting Started With Sprint PCS Service
Determining if Your Phone is Already Activated
If you purchased your phone at a Sprint Store, it is probablyactivated, unlocked, and ready to use. If you received yourphone in the mail, it probably has been activated; all you needto do is unlock it.
If your phone is not activated, please refer to the activationcard included with your phone.
Unlocking Your Phone
To unlock your phone, follow these easy steps:
1. Press to turn the phone on.
2. Select Unlock (left softkey).
3. Enter your four-digit lock code. (For security purposes,the code is not visible as you type.)
Tip: If you can’t recall your lock code, try using the last four digits of either your Social Security number or wireless phonenumber, or try 0000 or NATL (6285). If none of these work, callSprint Customer Service at 1-888-211-4PCS (4727).
Note: To select a softkey, press the softkey button directly below thesoftkey text that is displayed at the bottom left and bottomright of your phone’s display screen. Softkey actions changeaccording to the screen you’re viewing and will not bedisplayed if there is no corresponding action available.
Setting Up Service

4 Section 1A: Setting Up Service
Setting Up Your Voicemail
All unanswered calls to your phone are automaticallytransferred to your voicemail, even if your phone is in use orturned off. Therefore, you will want to set up your voicemailand personal greeting as soon as your phone is activated.
To set up your voicemail:
1. From standby mode, press and hold .
2. Follow the system prompts to:
n Create your passcode.
n Record your name announcement.
n Record your greeting.
n Choose whether to activate One-Touch MessageAccess (a feature that lets you access messagessimply by pressing and holding , bypassing theneed for you to enter your passcode).
For more information about using your voicemail, see “UsingVoicemail” on page 229.
Note: Voicemail PasscodeIf you are concerned about unauthorized access to yourvoicemail account, Sprint recommends that you enable yourvoicemail passcode (do not activate One-Touch MessageAccess).

Section 1A: Setting Up Service 5
Sprint PCS Account Passwords
As a Sprint PCS customer, you enjoy unlimited access to yourpersonal account information, your voicemail account, andyour Sprint PCS Vision® or Sprint Power VisionSM account. Toensure that no one else has access to your information, youwill need to create passwords to protect your privacy.
Account Password
If you are the account owner, you’ll have an account passwordto sign on to www.sprint.comand to use when calling SprintCustomer Service. Your default account password is the lastfour digits of your Social Security number. If you are not theaccount owner (if someone else receives the bill for yourSprint PCS service), you can get a sub-account password atwww.sprint.com.
Voicemail Password
You’ll create your voicemail password (or passcode) when youset up your voicemail. See “Setting Up Your Voicemail” onpage 4 for more information on your voicemail password.
Sprint PCS Vision or Sprint Power Vision Password
With your Sprint PCS Vision Phone or Sprint Power VisionPhone, you will be assigned a Sprint PCS Vision or Sprint PowerVision user name and password.
For more information, or to change your passwords, sign on to www.sprint.comor call Sprint Customer Service at1-888-211-4PCS (4727).
Setting Up Service

6 Section 1A: Setting Up Service
Getting Help
Visit www.sprint.com
You can go online to:
v Access your account information.
v Check your minutes used (depending on your Sprint PCS service plan).
v View and pay your bill.
v Make your life easier by enrolling in Sprint PCS onlinebilling and automatic payment.
v Purchase accessories.
v Shop for the latest Sprint phones.
v View available Sprint PCS service plans and options.
v Learn more about the Sprint Power Vision Network andother great products like Sprint PCS® Picture Mail, games,ringers, screen savers, and more.
Reaching Sprint Customer Service
You can reach Sprint Customer Service many different ways:
v Dial on your phone.
v Sign on to your account atwww.sprint.com.
v Call us toll-free at 1-888-211-4727 (Consumer customers)or 1-888-788-4727 (Business customers).
v Write to us at Sprint Customer Service, P.O. Box 8077,London, KY 40742.
Section 1A: Setting Up Service 7
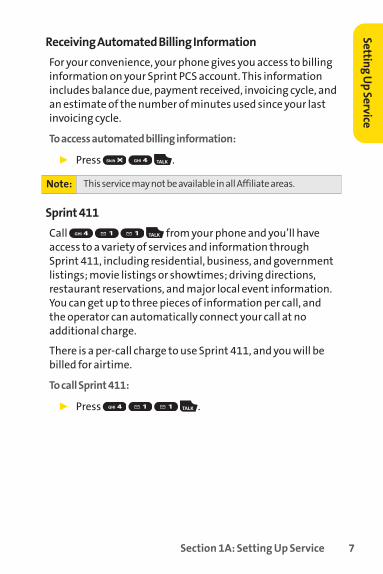
Receiving Automated Billing Information
For your convenience, your phone gives you access to billinginformation on your Sprint PCS account. This informationincludes balance due, payment received, invoicing cycle, andan estimate of the number of minutes used since your lastinvoicing cycle.
To access automated billing information:
© Press .
Sprint 411
Call from your phone and you’ll haveaccess to a variety of services and information through Sprint 411, including residential, business, and governmentlistings; movie listings or showtimes; driving directions,restaurant reservations, and major local event information.You can get up to three pieces of information per call, and the operator can automatically connect your call at noadditional charge.
There is a per-call charge to use Sprint 411, and you will bebilled for airtime.
To call Sprint 411:
© Press .
Note: This service may not be available in all Affiliate areas.
Setting Up Service

8 Section 1A: Setting Up Service
Sprint PCS Operator Services
Sprint PCS Operator Services provides assistance whenplacing collect calls or when placing calls billed to a localtelephone calling card or third party.
To access Sprint PCS Operator Services:
© Press .
For more information or to see the latest in products andservices, visit us online atwww.sprint.com.

Section 2
Using Your Phone

10 Section 2A: Phone Basics
Section 2A
Phone Basics
In This Section
l FrontView of Your Phone (page 11)
l Viewing the Display Screen (page 15)
l Features of Your Phone (page 18)
l Turning Your Phone On and Off (page 20)
l Using Your Phone’s Battery and Charger (page 21)
l Navigating Through Phone Menus (page 24)
l Displaying Your Phone Number (page 25)
l Making and Answering Calls (page 26)
l Entering Text (page 41)
Your phone is packed with features that simplify your life and expand your ability to stay connected to the people andinformation that are important to you.This section will guideyou through the basic functions and calling features of your phone.

FrontView of Your Phone
18. Softkey (right)
21. Headset Jack 27. Flash
22. Sub LCD
3. Navigation Key
8. TALK Key
9. Side Volume Key
4. Softkey (left)
5. MENU/OK Key
6. Camera Key
7. Ready Link/ Recorder Button
2. Main LCD (display)
12. Accessories Jack
26. Camera Lens
19. LED Indicator
20. Speaker
25. Internal Antenna
1. Earpiece
14. END/POWER Key
15. Side Camera Key
16. BACK Key
17. Side Call Key
23. Charger Jack
24. External Control Key
10. SPEAKER Key
11. Microphone
13. Keypad
Section 2A: Phone Basics 11
PhoneB
asics

12 Section 2A: Phone Basics
Key Functions1. Earpiece lets you hear the caller and automated prompts.
2. Main LCD (display)displays all the information needed tooperate your phone, such as the call status, the Contacts list,the date and time, and the signal and battery strength.
3. Navigation Keyallows you to scroll through menus quicklyand easily. These keys can also be reassigned to createcustomized shortcuts.
4. Softkey (left) lets you select softkey actions or menu itemscorresponding to the bottom left line on the Main LCD.
5. MENU/OK Key lets you access the phone’s menus and selectsthe highlighted choice when navigating through a menu.
6. Camera Key lets you access the Pictures menu and takepictures and videos.
7. Ready Link/Recorder Buttonallows you to access the Sprint PCS Ready Link® List or Voice Recorder menu. (See“Using Sprint PCS Ready Link” on page 180 or “Using theVoice Recorder” on page 144.)
8. TALK Keyallows you to place or receive calls, answer CallWaiting, use Three-Way Calling, or activate Voice Dial.
9. Side Volume Keyallows you to adjust the ringer volume instandby mode (with the phone open) or adjust the voicevolume during a call. The volume key can also be used to scrollup or down to navigate through the different menu options.
10. SPEAKER Key lets you place or receive calls in speakerphonemode.
11. Microphoneallows other callers to hear you clearly when youare speaking to them.

Section 2A: Phone Basics 13
12. Accessories Jackallows you to connect a USB cable (included).CAUTION! Inserting an accessory into the incorrect jack maydamage the phone.
13. Keypad lets you enter numbers, letters, and characters, and navigate within menus. Press and hold keys 2-9 for speed dialing.
14. END/POWER Key lets you turn the phone on or off, end a call,or return to standby mode. While in the main menu, itreturns the phone to standby mode and cancels your input.When you receive an incoming call, press to enter silent modeand mute the ringer.
15. Side Camera Key lets you access the camera and video modeand take pictures and videos.
16. BACK Keydeletes characters from the display in text entrymode. When in a menu, pressing the Back key returns you totheprevious menu. This key also allows you to return to theprevious screen in a Sprint PCS Vision session.
17. Side Call Key lets youplace calls by using Automatic SpeechRecognition.
18. Softkey (right) lets you select softkey actions or menu itemscorresponding to the bottom right line on the Main LCD.
19. LED Indicatorshows your phone’s connection status ataglance.
20. Speaker lets you hear the different ringers and sounds. Youcan mute the ringer when receiving incoming calls bypressing , or any of the external keys. The speaker alsolets you hear the caller’s voice in speakerphone mode.
PhoneB
asics

14 Section 2A: Phone Basics
21. Headset Jackallows you to plug in either a stereo headset(included) or an optional headset for convenient, hands-freeconversations. CAUTION! Inserting an accessory into theincorrect jack may damage the phone.
22. Sub LCD lets you monitor the phone’s status and see who’scalling without opening the phone.
23. Charger Jackconnects the phone to the Travel Charger(included).
24. External Control Key lets you access the Sprint Music Store ornavigate through the media player menu and play musicwithout opening the phone.This keycan also be used whenusing the Camera and Voice Recorder functions.
25. Internal Antennafacilitates reception and transmission. Tomaximizecall performance, do not obstruct the internalantenna area. (See page 26.)
26. Camera Lens,as part of the built-in camera, lets you takepictures and videos.
27. Flash lets you take pictures and videos in low light.
Note: To use the stereo headset included with your phone, pleaseattach the supplied adapter plug.

Section 2A: Phone Basics 15
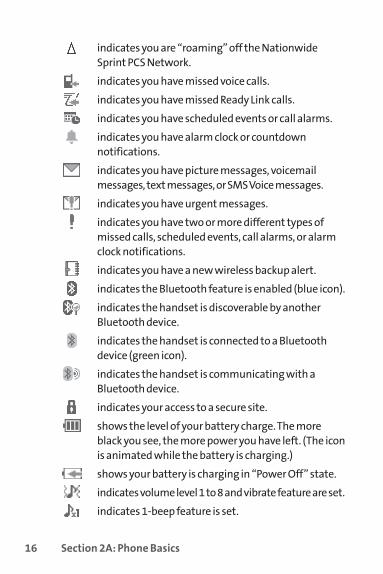
Viewing the Display Screen
Your phone’s display screen provides a wealth of informationabout your phone’s status and options. This list identifies thesymbols you’ll see on your phone’s display screen:
shows your current signal strength. The more linesyou have, the stronger your signal.
means your phone cannot find a signal.
indicates the call is on hold.
tells you a call is in progress.
indicates the Sprint PCS Ready Link service is enabled.
indicates the Sprint PCS Ready Link service is enabledand the speakerphone mode is set to on.
indicates the Sprint PCS Ready Link service isdisabled.
indicates Sprint PCS Vision/Sprint PCS Ready Linkaccess is active.
indicates Sprint PCS Vision/Sprint PCS Ready Linkaccess is dormant.
indicates Sprint PCS Vision/Sprint PCS Ready Linkaccess is disabled.
indicates Sprint Power Vision status.
indicates Sprint Power Vision service is available.(The icon is animated while service is active.)
indicates Sprint Power Vision service is dormant.
Tip: To view a list of your phone’s icons and descriptions, from themain menu select Settings > Phone Info > Icon Glossary.
Phone Basics
16 Section 2A: Phone Basics
indicates you are “roaming” off the NationwideSprint PCS Network.
indicates you have missed voice calls.
indicates you have missed Ready Link calls.
indicates you have scheduled events or call alarms.
indicates you have alarm clock or countdownnotifications.
indicates you have picture messages, voicemailmessages, text messages, or SMS Voice messages.
indicates you have urgent messages.
indicates you have two or more different types ofmissed calls, scheduled events, call alarms, or alarmclock notifications.
indicates you have a new wireless backup alert.
indicates the Bluetooth feature is enabled (blue icon).
indicates the handset is discoverable by anotherBluetooth device.
indicates the handset is connected to a Bluetoothdevice (green icon).
indicates the handset is communicating with aBluetooth device.
indicates your access to a secure site.
shows the level of your battery charge. The moreblack you see, the more power you have left. (The iconis animated while the battery is charging.)
shows your battery is charging in “Power Off” state.
indicates volume level 1 to 8 and vibrate feature are set.
indicates 1-beep feature is set.
Section 2A: Phone Basics 17
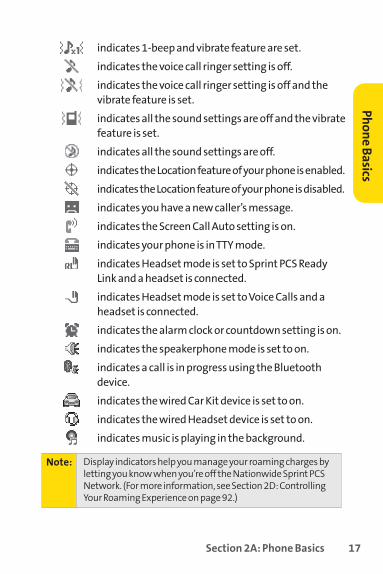
indicates 1-beep and vibrate feature are set.
indicates the voice call ringer setting is off.
indicates the voice call ringer setting is off and thevibrate feature is set.
indicates all the sound settings are off and the vibratefeature is set.
indicates all the sound settings are off.
indicates the Location feature of your phone is enabled.
indicates the Location feature of your phone is disabled.
indicates you have a new caller’s message.
indicates the Screen Call Auto setting is on.
indicates your phone is in TTY mode.
indicates Headset mode is set to Sprint PCS ReadyLink and a headset is connected.
indicates Headset mode is set to Voice Calls and aheadset is connected.
indicates the alarm clock or countdown setting is on.
indicates the speakerphone mode is set to on.
indicates a call is in progress using the Bluetoothdevice.
indicates the wired Car Kit device is set to on.
indicates the wired Headset device is set to on.
indicates music is playing in the background.
Note: Display indicators help you manage your roaming charges byletting you know when you’re off the Nationwide Sprint PCSNetwork. (For more information, see Section 2D: ControllingYour Roaming Experience on page 92.)
PhoneB
asics

18 Section 2A: Phone Basics
Features of Your Phone
Congratulations on the purchase of your phone. The M1 bySanyo is lightweight, easy-to-use, and reliable, and it alsooffers many significant features and service options. Thefollowing list previews some of those features and providespage numbers where you can find out more:
v Digital dual-band capability allows you to make andreceive calls while on the Nationwide Sprint PCS Networkand to roam on other 1900 and 800 MHz digital networkswhere Sprint has implemented roaming agreements(page 92).
v SMS Text Messaging (page 237), and SMS Voice Messaging(page 241) provide quick and convenient messagingcapabilities.
v Sprint PCS Voice Command lets you dial phone numbersby speaking someone’s name or the digits of that person’sphone number (page 246).
v Your Contacts list allows you to store up to 500 entries,with up to seven phone numbers per entry (page 105). A separate Sprint PCS Ready Link Contacts list provideseasy access to up to 200 personal contacts and 200company-provided contacts (page 183).
v The built-in Calendar offers several personal informationmanagement features to help you manage your busylifestyle (page 117).
v Your phone is equipped with a Location feature for use inconnection with location-based services that may beavailable in the future (page 61).
v Your phone’s external LCD display allows you to monitorthe phone’s status and to see who’s calling withoutopening the phone.

Section 2A: Phone Basics 19
v T9 Text Input lets you quickly type messages with onekeypress per letter (page 43).
v Speed dial lets you dial phone numbers with one keypress(page 40).
v The built-in camera allows you to take full-color digitalpictures and videos, view your pictures and videos usingthe phone’s display, and instantly send them to family andfriends using Sprint PCS Picture Mail service (page 152).
v The external control key allows you to access the SprintMusic Store or navigate through the media player menuand play music without opening the phone (page 212).
v The Automatic Speech Recognition (ASR) allows you toplace calls by speaking to your phone (page 137).
v The File Manager allows you to manage multiple filestored in the phone’s memory (page 130).
v Supports PictBridge to connect and print to any PictBridgecompliant printer (page 178).
v The Media Player allows you to enjoy streaming video andaudio with your phone (page 205).
v The built-in Bluetooth technology allows you to connectwirelessly to a number of Bluetooth devices to shareinformation more easily than ever before (page 216).
Note: Sprint Power Vision –Your phone and service provide access tothe Sprint Power Vision Network and its enhanced dataservices, including SprintTVSM, the Sprint Music StoreSM, fastWeb access, downloadable games, ringers, and applications,and more. For complete information on the services available,see the Experience the Sprint Power Vision Network guide thatcame with your phone.
PhoneB
asics

20 Section 2A: Phone Basics
Turning Your Phone On and Off
Turning Your Phone On
To turn your phone on:
© Press .
Once your phone is on, it may display “Looking for service...,”which indicates that your phone is searching for a signal.When your phone finds a signal, it automatically entersstandby mode – the phone’s idle state. At this point, you areready to begin making and receiving calls.
If your phone is unable to find a signal after 15 minutes ofsearching, a Power Save feature is automatically activated.When a signal is found, your phone automatically returns tostandby mode.
In Power Save mode, your phone searches for a signalperiodically without your intervention. You can also initiate asearch for Sprint PCS service by pressing any key (when yourphone is turned on).
Turning Your Phone Off
To turn your phone off:
© Press and hold for two seconds until you see thepowering down animation on the display screen.
Your screen remains blank while your phone is off (unless thebattery is charging).
Tip: The Power Save feature helps to conserve your battery powerwhen you are in an area where there is no signal.

Section 2A: Phone Basics 21
Using Your Phone’s Battery and Charger
Sprint-approved or manufacturer-approved batteries andaccessories can be found at Sprint Stores or through yourphone’s manufacturer; or call 1-866-343-1114 to order.They’re also available atwww.sprint.com– click on the Wirelesslink under Personal, and then click Accessories.
Battery Capacity
Your phone is equipped with a Lithium Ion (Li-Ion) battery. It allows you to recharge your battery before it is fully drained.The battery provides up to 3.8 hours of continuous digital talk time.
When there are approximately two minutes of talk time left,the phone sounds an audible alert and then powers down.
Tip: Be sure to watch your phone’s battery level indicator andcharge the battery before it runs out of power.
Note: Long backlight settings, searching for service, vibrate mode,browser use, and other variables may affect the battery’s talkand standby times.
WARNING Use only Sprint-approved or manufacturer-approvedbatteries and chargers with your phone. The failureto use a Sprint-approved or manufacturer-approvedbattery and charger may increase the risk that yourphone will overheat, catch fire, or explode, resultingin serious bodily injury, death, or property damage.
PhoneB
asics

22 Section 2A: Phone Basics
Installing the Battery
To install the Li-Ion battery:
© To install, insert the battery into the opening on the backof the phone and gently press down until the latch snapsinto place.
Removing the Battery
To remove your battery:
1. Make sure the power is off so that you don’t lose anystored numbers or messages.
2. Push up on the battery release latch and lift the batteryup and away from the phone.
WARNING Do not handle a damaged or leaking Li-Ion battery asyou can be burned.

Section 2A: Phone Basics 23
Charging the BatteryYour phone’s Li-Ion battery is rechargeable and should becharged as soon as possible so you can begin using your phone.
Keeping track of your battery’s charge is important. If yourbattery level becomes too low, your phone automaticallyturns off, and you will lose all the information you were justworking on. For a quick check of your phone’s battery level,glance at the battery charge indicator located in the upper-right corner of your phone’s display screen. If thebattery charge is getting too low, the battery icon ( )appears and the phone displays a warning message.
Always use a Sprint-approved or manufacturer-approveddesktop charger, travel charger, or vehicle power adapter tocharge your battery.
Using the Charger
Touse the travel charger provided with your phone:
1. Plug the travel charger into a wall outlet.
2. Plug the other end of the travel charger into the chargerjack at the lower left portion of your phone (with thebattery installed).
n A red indicator light on the phone lets you know thebattery is charging.
n A green indicator light lets you know when chargingcompleted.
With the Sprint-approved Li-Ion battery, you can recharge thebattery before it becomes completely run down.
Note: You can also charge your phone’s battery with the includedUSB cable. Simply plug one end of the USB cable into yourphone and the other end into a free USB port on your desktopor laptop computer.
If your battery has been completely run down, it cannot becharged via the USB cable.
PhoneB
asics

24 Section 2A: Phone Basics
Navigating Through Phone Menus
The navigation key on your phone allows you to scroll throughmenus quickly and easily. The scroll bar at the right of themenu keeps track of your position in the menu at all times.
To navigate through a menu, simply press the navigation keyup or down. If you are in a first-level menu, such as Settings,you may also navigate to the next or previous first-level menuby pressing the navigation key right or left.
For a diagram of your phone’s menu, please see “Your Phone’sMenu” on page iv-xi.
Selecting Menu Items
As you navigate through the menu, menu options arehighlighted. Select any numbered option by simply pressingthe corresponding number on the phone’s keypad. You mayalso select any item by highlighting it and pressing .
For example, if you want to view your last incoming call:
1. Select to access the main menu.
2. Select Call History by pressing or by highlighting itand pressing . (It may already be highlighted.)
3. Select Incoming by pressing or by highlighting itand pressing . (If you have received any calls, they aredisplayed on the screen.)
Note: For the purposes of this guide, the above steps condense into“SelectMENU > Call History > Incoming.”

Section 2A: Phone Basics 25
Backing Up Within a Menu
To go to the previous menu:
© Press .
To return to standby mode:
© Press .
Displaying Your Phone Number
Just in case you forget your phone number, your phone canremind you.
To display your phone number:
© Select > Settings > Phone Info > Phone#/User ID. (Yourphone number and other information about your phoneand account will be displayed.)
Note: To select menu options (such as Settings, above), highlight theoption and press MENU. (If the menu options are numbered,you may also select an option simply by pressing thecorresponding number key.)
Tip: You can also display your phone number through theContacts menu. Select MENU > Contacts > My Name Card. Tosend your contact information using Bluetooth, selectOptions (right softkey) > Send via Bluetooth.
Phone Basics

26 Section 2A: Phone Basics
Making and Answering Calls
Holding your PhoneTo maximize performance, do not obstruct the upper backportion of your phone where the internal antenna is locatedwhile using the phone.
Making CallsPlacing a call from your wireless phone is as easy as making a call from any landline phone. Just enter the number, press , and you’re on your way to clear calls.
To make a call using your keypad:
1. Make sure your phone is on.
2. Enter a phone number from standby mode. (If you makea mistake while dialing, press to erase one digit at atime. Press and hold to erase the entire number.)
3. Press . (To make a call when you are roaming and Call Guard is enabled, highlight Roam Call and press .See “Using Call Guard” on page 96.)
4. Press or close the phone when you are finished.
Tip: Toredial your most recent call (outgoing, incoming, or missed),press TALK twice.
When making calls off the Nationwide Sprint PCS Network,always dial using 11 digits (1 + area code + phone number).
Correct Incorrect
Internal Antenna

Section 2A: Phone Basics 27
You can also place calls from your phone by using Sprint PCSVoice Command (page 249), speed dialing numbers from yourContacts (page 40), and by using your Call History listings(page 101), Automatic Speech Recognition (page 137), andVoice-Activated Dialing (page 135).
Dialing OptionsWhen you enter numbers in standby mode, select Options(right softkey) to display the following dialing options.
To initiate an option, highlight it and press .
v Abbrev. Dial to dial the phone number in your Contacts listthat ends with the digits you entered. (See “UsingAbbreviated Dialing” on page 38.)
v Call to dial the phone number.
v Call:Speaker On to dial the phone number in speakerphonemode.
v Send Message to send an SMS Text message (page 237), anSMS Voice message (page 241), or a Picture Mail (page 171).
v Save Phone# to save the phone number in your Contactslist. (See “Saving a Phone Number” on page 36.)
v Find to display Contacts list entries that end with thedigits you entered. (See “Finding a Phone Number” onpage 37.)
v Hard Pause to insert a hard pause. (See “Dialing andSaving Phone Numbers With Pauses” on page 37.)
v 2-Sec. Pause to insert a two-second pause. (See “Dialingand Saving Phone Numbers With Pauses” on page 37.)
v Hyphen to insert a hyphen. (Hyphens are generally forvisual appeal only; they are not necessary when enteringnumbers.)
Phone Basics

28 Section 2A: Phone Basics
Answering CallsTo answer an incoming call with the phone open:
1. Make sure your phone is on. (If your phone is off,incoming calls go to voicemail.)
2. Press to answer an incoming call. (Depending onyour phone’s settings, you may also answer incomingcalls by opening the phone or by pressing any numberkey. See “Setting the Open/Close Flip Option” on page 74and “Setting Any Key Answer” on page 73 for moreinformation.)
To answer an incoming call with the phone closed:
1. Make sure your phone is on. (If your phone is off,incoming calls go to voicemail.)
2. When your phone rings or vibrates, press and hold theSide Call key ( ) on the right side of the phone. (Thecall will be answered in speakerphone mode.)– or –Open the phone to use the earpiece.
Note: If the setting for Open Flip is set to “No Action,” opening thephone will not answer the call. (See “Setting the Open/CloseFlip Option” on page 74.)

Section 2A: Phone Basics 29
Your phone notifies you of incoming calls in the followingways:
v The phone rings or vibrates.
v The indicator light flashes.
v The backlight illuminates.
v The screen displays an incoming call message.
If the incoming call is from a number stored in your Contacts,the entry’s name is displayed. The caller’s phone number mayalso be displayed, if available.
When receiving a call, the following options are also displayedby selecting Options (right softkey). To select an option,highlight it and press .
v Call Guard to answer the call when you are in roamingmode. (See “Using Call Guard” on page 96.)
v Answer or Answer:Speaker to answer the call.
v Select Audio to switch the call to your desired device (ifavailable).
v Answer on Hold to put the call on hold.
v Screen Call to answer the call by using a prerecordedannouncement. (See “Setting Up Screen Call” on page 149.)
v Quiet Ringer to mute the ringer (if available).
Phone Basics

30 Section 2A: Phone Basics
Answering a Roam Call With Call Guard Enabled
Call Guard is an option that helps you manage your roamingcharges when making or receiving calls while outside theNationwide Sprint PCS Network. Please see Section 2D:Controlling Your Roaming Experience for more informationabout roaming.
To answer a call when you are roaming and Call Guard is enabled:
1. Press .
2. Press to proceed while the pop-up message isdisplayed.
Ending a Call
To disconnect a call when you are finished:
© Close the phone or press .
Note: If the setting for Close Flip is not set to “End,” closing thephone will not end the call. (See “Setting the Open/Close FlipOption” on page 74.)
Note: When your phone is off, incoming calls go directly tovoicemail.
Section 2A: Phone Basics 31
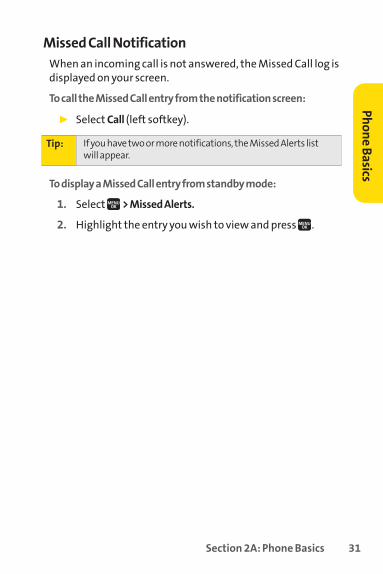
Missed Call NotificationWhen an incoming call is not answered, the Missed Call log isdisplayed on your screen.
To call the Missed Call entry from the notification screen:
© Select Call (left softkey).
To display a Missed Call entry from standby mode:
1. Select > Missed Alerts.
2. Highlight the entry you wish to view and press .
Tip: If you have two or more notifications, the Missed Alerts listwill appear.
Phone Basics

32 Section 2A: Phone Basics
Calling Emergency NumbersYou can place calls to 911 (dial ), even ifyour phone is locked or your account is restricted.
During an emergency call select Options (right softkey) todisplay your options. To select an option, highlight it and press .
v Speaker On to activate speakerphone mode. (If you arealready in speakerphone mode, Speaker Off will bedisplayed.)
v Unlock Phone to unlock your phone (appears only if thephone is locked).
v Close Menu to close the pop-up menu (appears only if thephone is unlocked).
To exit Emergency mode:
1. Press to end a 911 call.
2. Select Options (right softkey) to display the optionsmenu.
3. Highlight Exit Emergency and press .
Note: When you are in Emergency mode, you can exit only from theoptions menu.
Tip: Select My Phone (left softkey) to display your phone numberduring an emergency call.
Note: When you place an emergency call, your phone automaticallyenters Emergency mode.

Section 2A: Phone Basics 33
To select Emergency mode options:
1. Press to end a 911 call.
2. Select Options (right softkey).
n Call 911 to call 911.
n Call 911: Speaker to call 911 in speakerphone mode.
n Exit Emergency to exit Emergency mode.
3. Highlight an option and press .
Enhanced 911 (E911) Information
This phone features an embedded Global Positioning System(GPS) chip necessary for utilizing E911 emergency locationservices where available.
When you place an emergency 911 call, the GPS feature ofyour phone begins to seek information to calculate yourapproximate location. Depending on several variables,including availability and access to satellite signals, it maytake up to 30 seconds or more to determine and report yourapproximate location.
IMPORTANT Always report your location to the 911 operator whenplacing an emergency call.Some designatedemergency call takers, known as Public SafetyAnswering Points (PSAPs) may not be equipped toreceive GPS location information from your phone.
Phone Basics
34 Section 2A: Phone Basics
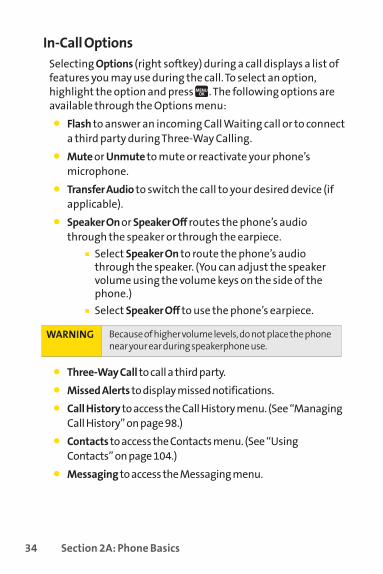
In-Call OptionsSelecting Options (right softkey) during a call displays a list offeatures you may use during the call. To select an option,highlight the option and press . The following options areavailable through the Options menu:
v Flash to answer an incoming Call Waiting call or to connecta third party during Three-Way Calling.
v Mute or Unmute to mute or reactivate your phone’smicrophone.
v Transfer Audio to switch the call to your desired device (ifapplicable).
v Speaker On or Speaker Off routes the phone’s audiothrough the speaker or through the earpiece.
n Select Speaker On to route the phone’s audiothrough the speaker. (You can adjust the speakervolume using the volume keys on the side of thephone.)
n Select Speaker Off to use the phone’s earpiece.
v Three-Way Call to call a third party.
v Missed Alerts to display missed notifications.
v Call History to access the Call History menu. (See “ManagingCall History” on page 98.)
v Contacts to access the Contacts menu. (See “UsingContacts” on page 104.)
v Messaging to access the Messaging menu.
WARNING Because of higher volume levels, do not place the phonenear your ear during speakerphone use.

Section 2A: Phone Basics 35
v Tools to access the Tools menu. (See “Using the Phone’sCalendar and Tools” on page 116.)
v Settings to access the Settings menu. (See “Controlling YourPhone’s Settings” on page 46.)
During a call, both the left softkey button and the Side Call key( ) function as the Mute button. Press either one to mutethe phone’s microphone for privacy. Press it again to unmutethe phone.
End-of-Call OptionsTo display the following options, select Options (right softkey)within 10 seconds after disconnecting a call. To select anoption, highlight it and press .
v Call Again to dial the phone number.
v Call:Speaker On to dial the phone number in speakerphonemode.
v Send Message to send a Text, Picture Mail, or SMS Voicemessage.
v Save Phone# to save the phone number in your Contacts list.
n Go to Phone Book appears when the number isalready in your Contacts list. (See “Saving a PhoneNumber” on page 36.)
v Rename to change the current entry’s name to Caller IDname (if applicable).
Tip: You can also choose to send a message by selecting Send Msg(left softkey).
Note: The End-of-Call options are not displayed for calls identified asNo Caller ID or Restricted.
PhoneB
asics

36 Section 2A: Phone Basics
Saving a Phone NumberYour phone can store up to 700 phone numbers in up to 500Contacts entries. Each entry’s name can contain 32 characters.Your phone automatically sorts the Contacts entriesalphabetically. (For more information, see Section 2F: UsingContacts on page 104.)
To save a number from standby mode:
1. Enter a phone number and select Options (right softkey) >Save Phone#.
2. Select New Name to create a new Contacts entry for thenumber or From Ph. Book to save the number to anexisting entry. (This step is not necessary on the very firstentry in Contacts.)
3. Select a label and press .
4. Enter a name for the new entry using the keypad andpress .– or –Search for an existing contact name and press to savethe new number.
5. Select Save (left softkey) to save the entry.
6. Select Done (left softkey) to return to standby mode.

Section 2A: Phone Basics 37
Finding a Phone NumberYou can search Contacts entries for phone numbers thatcontain a specific string of numbers.
To find a phone number:
1. Enter the last four or more digits of the number instandby mode. (The more numbers you enter, the morespecific the search becomes.)
2. Select Options (right softkey) > Find. (The Contacts entrythat ends with the digits you entered appears.)
3. To display the Contacts entry that contains the phonenumber you entered, highlight the entry and press .To dial the number, press .
Dialing and Saving Phone Numbers With PausesYou can dial or save phone numbers with pauses for use withautomated systems, such as voicemail or credit card billingnumbers.
There are two types of pauses available on your phone:
v Hard Pause sends the next set of numbers when you press .
v 2-Sec. Pause automatically sends the next set ofnumbers after two seconds.
Note: You can have multiple pauses in a phone number andcombine two-second and hard pauses.
Phone Basics
38 Section 2A: Phone Basics
To dial or save phone numbers with pauses:
1. Enter the phone number.
2. Select Options (right softkey) and select either Hard Pause or 2-Sec. Pause. (Hard pauses are displayed asa “P” and two-second pauses as a “T.”)
3. Enter additional numbers.
4. Press to dial the number.
– or –
Select Options (right softkey) > Save Phone# to save thenumber in your Contacts.
Using Abbreviated DialingAbbreviated Dialing is similar to speed dialing. It allows you todial a number by entering the last four or five digits of anynumber in your Contacts directory. This feature becomesavailable when you enable Abbreviated Dialing and programa five-or six- digit prefix you wish to use for abbreviateddialing. (See “Setting Abbreviated Dialing” on page 77.)
To place a call using Abbreviated Dialing:
1. Enter the last four or five digits of the prefix phonenumber.
2. Press .
Tip: You can also place a call by selecting Options (right softkey) >Abbrev. Dial after step 1 above.
Note: If the digits match more than one entry, the Abbrev. Dial listwill be displayed; select the correct entry and press TALKagain.
Note: When dialing a number with a hard pause, press TALK to sendthe next set of numbers.

Section 2A: Phone Basics 39
Plus (+) Code DialingWhen placing international calls, you can use Plus CodeDialing to automatically enter the international access codefor your location (for example, 011 for international callsmade from the United States). This feature is subject tonetwork availability.
To make a call using Plus Code Dialing:
1. Press and hold until a “+” is displayed on yourphone screen.
2. Dial the country code and phone number you’re calling,and press . (The access code for international dialingwill automatically be dialed, followed by the countrycode and phone number.)
Dialing From the Contacts ListTo dial directly from a Contacts entry:
1. Select > Contacts > Find/Add Entry.
2. Highlight the entry you want to call and press to dialthe entry’s default phone number.
– or –
To dial another number from the entry, highlight thename and press , and then highlight the number youwish to call and press .
Shortcut: From standby mode, select Contacts (right softkey) to listentries.
Phone Basics

40 Section 2A: Phone Basics
Using Speed DialingYou can store up to eight numbers in your phone’s speed dialmemory to make contacting friends and family as easy aspressing a button. With this feature, you can dial speed dialentries using one keypress for locations 2–9. (For informationon setting up speed dial numbers, see “Assigning Speed DialNumbers” on page 111.)
To use speed dial:
© From standby mode, press and hold the appropriate keyfor approximately two seconds. The display confirmsthat the number has been dialed when it shows“Connecting...”.
Note: Speed dialing may not be available when you are roaming;when you are roaming off the Nationwide Sprint PCSNetwork, you must always dial using 11 digits (1 + area code +number).

Section 2A: Phone Basics 41
Entering Text
Selecting a Character Input ModeYour phone provides convenient ways to enter words, letters,punctuation, and numbers whenever you are prompted toenter text (for example, when adding a Contacts entry orwhen using Sprint PCS Mail and SMS Text Messaging).
To change the character input mode:
1. When you display a screen where you can enter text,select Mode (right softkey) to change the characterinput mode.
2. Use your navigation key to select one of the followingoptions:
n T9 Word to enter characters using predictive T9 TextInput. (See page 43.)
n Alphabet to enter characters by using the Alphabetmode. (See page 45.)
n SYMBOL to enter symbols.
n SMILEYS to enter smile icons.
n Emoticons to enter “emoticons.”
n Web Shortcuts to enter Web shortcuts (for example,www., http://www., or .com).
n Preset Messages to enter preset messages. (See page 63.)
n Recent Messages to enter messages used recently.
Tip: When you see triangles on the left and right of the menu, youcan press the navigation key left or right to switch betweendifferent input modes.
PhoneB
asics
42 Section 2A: Phone Basics
n Paste List to paste copied or cut text (if applicable).
n NUMBER to enter numbers.
n Signature to enter your signature. (See page 64.)
n Select Language to select the language (English orSpanish).
n Erase All to erase all text (if applicable).
n SelectText to select stored text for copying or cutting(if applicable).
n Add Word to store words that you use frequently.(See page 43.)
n Text Options to display the Text Entry settings menu.(See page 44.)
Tip: When entering text, press [shift*] to change lettercapitalization (ABC > abc > Abc).
Note: The Input Mode will vary according to the entry field.

Section 2A: Phone Basics 43
Entering Characters Using T9 Text InputT9 Text Input lets you enter text in your phone by pressingkeys just once per letter. (To select the T9 Word mode whenentering text, see “Selecting a Character Input Mode” on page 41.)
T9 Text Input analyzes the letters you enter using an intuitiveword database and creates a suitable word. (The word maychange as you type.)
To enter a word using T9 Text Input:
1. Select the T9 Word character input mode. (See “Selectinga Character Input Mode” on page 41.)
2. Press the corresponding keys once per letter to enter a word. (For example, to enter the word “Bill,” press
.) (If you make a mistake, press to erase a single character. Press and hold to erase anentire word.)
3. To accept a word and insert a space, press .
Adding a Word to the T9 Database
If a word you want to enter is not displayed as an option whenyou are using T9 Text Input, you can add it to the database.
To add a word to the T9 Text Input database:
1. Select the Add Word input mode. (See “Selecting aCharacter Input Mode” on page 41.)
2. Enter the word using Alphabet Mode and select Save(left softkey). (See “Entering Characters Using AlphabetMode” on page 45.) The word will appear as an optionthe next time you scroll through options during T9 TextInput.
Phone Basics

44 Section 2A: Phone Basics
Customizing the T9 Settings
To customize the T9 Settings:
1. Select > Settings > Others > Text Entry > T9 Settings.
– or –
Select the Text Options input mode, and then selectT9 Settings. (See “Selecting a Character Input Mode” onpage 41.)
2. Select an option and press .
n NextWord Prediction to automatically display theword by retrieving incoming messages that mayfollow the current T9 text input.
n Word Completion to allow T9 text input to recognizewords by searching Contacts list and messages.
n Predict. Text Mode to allow T9 text input to recognizewords you have added to the T9 database.
n WordChoiceList to display the word choice list.
n Show after enter to select when (after 1–3 digits) todisplay the word choice list. The word choice list willbe displayed based on the number of digits youselected.
n Showafter wait to select how many seconds thephone should wait to display the word choice list.
For more information about T9 Text Input, visit the Tegic Website atwww.T9.com.

Section 2A: Phone Basics 45
Entering Characters Using Alphabet ModeTo enter characters using Alphabet Mode (multi-tap key entry):
1. Select the Alphabet mode. (See “Selecting a CharacterInput Mode” on page 41.)
2. Press the corresponding keys repeatedly until thedesired letter appears. (For example, to enter the word“Bill,” press twice, three times, threetimes, and three times again.) (If you make amistake, press to erase a single character. Press andhold to erase an entire word.)
By default, the first letter of an entry is capitalized and thefollowing letters are lowercased. After a character is entered,the cursor automatically advances to the next space after twoseconds or when you enter a character on a different key.
Characters scroll in the following order:
English SequenceUpper Case
Key
. , @ 1 ? ! * # / A B C 2D E F 3G H I 4J K L 5M N O 6P Q R S 7T U V 8W X Y Z 9
a b c 2d e f 3g h i 4j k l 5m n o 6p q r s 7t u v 8w x y z 9
0SpaceOne-character- shifted Caps Lock Unshifted
Lower Case
ABC
DEF
GHI
JKL
MNO
PQRS
TUV
WXYZ
Shift
Space
Phone Basics

46 Section 2B: Controlling Your Phone’s Settings
Section 2B
Controlling Your Phone’s Settings
In This Section
l Sound Settings (page 47)
l Display Settings (page 54)
l Location Settings (page 61)
l Messaging Settings (page 62)
l Airplane Mode (page 67)
l TTY Use With Sprint PCS Service (page 68)
l Wireless Backup (page 70)
l Phone Setup Options (page 72)
Using the available menu options, you can customize yourphone to sound, look, and operate just the way you want it to.This section describes how you can change your phone’ssettings to best suit your needs. Take a few moments toreview these options and to adjust or add settings that areright for you.

Section 2B: Controlling Your Phone’s Settings 47
Sound Settings
Ringer TypesRinger types help you identify incoming calls and messages.You can assign ringer types to individual Contacts entries,types of calls, and types of messages.
v Preprogrammed Ringers include a variety of standardringer types and familiar music.
v Vibrating Ringer alerts you to calls or messages withoutdisturbing others.
v Downloaded Ringers can be downloaded right to yourphone.
Selecting Ringer Types for Incoming Calls
Your phone provides a variety of ringer options that allow youto customize your ring and volume settings. These optionsallow you to identify incoming calls by the ring.
To select a ringer type for incoming calls:
1. Select > Settings > Sounds > Ringer Type > Incoming Calls.
2. Select With Caller ID or No Caller ID.
3. Use your navigation key to scroll through the availableringers.
4. Press to assign the desired ringer.
To select a distinctive ringer for incoming calls while roaming:
1. Select > Settings > Sounds > Ringer Type > Incoming Calls.
2. Select Roaming > Distinctive. (Select Normal todeactivate this feature.)
Your Phone’s Settings
48 Section 2B: Controlling Your Phone’s Settings
Selecting Ringer Types for Sprint PCS Ready Link Calls
To select a ringer type for Sprint PCS Ready Link calls:
1. Select > Settings > Sounds > Ringer Type > Ready Link.
2. Select Ready Link Calls, R-Link Missed, or R-Link Floor Tone.
3. Use your navigation key to scroll through the availableringers.
4. Press to assign the desired ringer.
Selecting Ringer Types for Voicemail or Calendar/Alarm
To select a ringer type for voicemail or calendar/alarm:
1. Select > Settings > Sounds > Ringer Type > Voicemail orCalendar/Alarm.
2. Press , and then use your navigation key to scrollthrough the available ringers.
3. Press to assign the desired ringer.
Selecting Ringer Types for Messaging
To select a ringer type for messaging:
1. Select > Settings > Sounds > Ringer Type > Messaging.
2. Select Text, Picture Mail, or VoiceSMS.
3. Use your navigation key to scroll through the availableringers.
4. Press to assign the desired ringer.

Section 2B: Controlling Your Phone’s Settings 49
Selecting a Vibrate PatternWith this feature, you can select a vibrate pattern forincoming calls, messages, and alarms.
To select a vibrate pattern:
1. Select >Settings > Sounds > Vibrate Pattern.
2. Select Incoming Calls, Ready Link, Voicemail, Messaging,or Calendar/Alarm. The following items require anadditional step:
n Incoming Calls: select With Caller ID, No Caller ID, orRoaming.
n Ready Link: select Ready Link Calls or R-Link Missed.
n Messaging: select Text, Picture Mail, or VoiceSMS.
3. Using the navigation key, select a setting and press .
Selecting a Tone LengthYour phone offers two options for selecting the audible tonesaccompanying a keypress. (Longer tone lengths may be betterfor tone recognition when dialing voicemail or otherautomated systems.)
To select a key tone:
1. Select >Settings > Sounds > Others > Tone Length.
2. Select Short or Long and press .
YourPhone’sSettings
50 Section 2B: Controlling Your Phone’s Settings
Setting a Start-up/Power-off ToneTo set a start-up/power-off tone:
1. Select >Settings > Sounds > Others.
2. Select Start-up Tone or Power-off Tone.
3. Scroll to select a tone and press .
Using Voice PromptThis feature allows you to hear voice prompts at VoiceRecorder, Screen Call setting, etc. (default setting is off).
Toenable or disable voice prompt:
1. Select >Settings > Sounds > Others > Voice Prompt.
2. Select On or Off and press .
Setting Up Key Press EchoWith this feature, you can hear a voice say the numbers whenyou press the keypad. This feature is available when you are instandby mode.
To turn Key Press Echo on or off:
1. Select >Settings > Sounds > Others > Key Press Echo.
2. Select On or Off and press .
Tip: When ringer volume is set to “Silence All” or “Vibrate All,”voice prompts cannot be heard.

Section 2B: Controlling Your Phone’s Settings 51
Adjusting the Phone’s Volume SettingsYou can adjust your phone’s volume settings to suit yourneeds and your environment.
To adjust the ringer volume:
1. Select > Settings > Sounds > Volume > Ringer.
2. Using the navigation key, choose a volume level andselect Done (left softkey).
n When selecting a volume, press to put a checkmark in the box next to Always Vibrate. This settingmakes the ringer vibrate at any volume level.
Adjusting the AlertVolume Settings
This setting controls the alert volume of Ready Link,Voicemail,message, and Calendar/Alarm. You can set the alert volumeseparate from the ringer volume setting.
To adjust the alert volume setting:
1. Select > Settings > Sounds > Volume> Advanced Ringer.
2. Select Ready Link, Voicemail, Messaging, orCalendar/Alarm.
3. Using the navigation key, select Separate Vol.
4. Press the navigation key right or left to choose a volumelevel, and select Done (left softkey).
Tip: You can adjust the ringer volume in standby mode (or theearpiece volume during a call) by using the volume key on theleft side of your phone.
Your Phone’s Settings

52 Section 2B: Controlling Your Phone’s Settings
Adjusting the Phone’s Receiver Volume
To adjust the receiver volume:
1. Select > Settings > Sounds > Volume > Receiver.
2. Select either Earpiece or Speaker.
3. Using the navigation key, choose a volume level, andselect Done (left softkey).
Adjusting the Application, Start-up/Power-off, or Key Beep Volume
To adjust the Application, Start-up/Power-off, or Key Beepvolume:
1. Select > Settings >Sounds > Volume.
2. Select Application, Start-up/Pw-off, or Key Beep.
3. Using the navigation key, choose a volume level, andselect Done (left softkey).
Alert NotificationYour phone can alert you with an audible tone when youchange service areas, once a minute during a voice call, orwhen there are incoming or missed Sprint PCS Ready Link calls.
To enable or disable alert sounds:
1. Select > Settings > Sounds > Alerts.
2. Select Service, Ready Link, Voicemail, Messaging, Minute Beep, or Signal Fade and press .
3. Use your navigation key to select a setting and press .

Section 2B: Controlling Your Phone’s Settings 53
Silence AllThere may be times when you need to silence your phoneentirely. The phone’s Silence All option allows you to mute allsounds without turning your phone off.
To activate Silence All:
© With the phone open, press and hold the volume key downin standby mode. (The screen will display “Silence All.”)
To deactivate Silence All:
© Press the volume key up repeatedly to select a desiredvolume level.
Tip: You can also select Vibrate Allto set your phone to vibrate only(all sounds will be muted).
YourPhone’sSettings
54 Section 2B: Controlling Your Phone’s Settings
Display Settings
Changing the Text GreetingThe text greeting can be up to 15 characters and is displayedon your phone’s screen in standby mode. You may choose tokeep the phone’s default greeting (“Sprint”), or you may enteryour own custom greeting.
To display or change your greeting:
1. Select > Settings > Display > Greeting > Custom.
2. Enter a custom greeting using your keypad and press .(See “Entering Text” on page 41.) (To erase the existinggreeting one character at a time, press . To erase theentire greeting, press and hold .)
Changing the BacklightTime LengthThe backlight setting lets you select how long the displayscreen and keypad remain backlit after any keypress is made.
To change the backlight setting:
1. Select > Settings > Display > Backlight.
2. Select Main LCD or Sub LCD.
3. Select a time setting and press .
To change the Keypad backlight setting:
1. Select > Settings > Display> Backlight > Key.
2. Select a time setting and press .
Note: Long backlight settings affect the battery’s talk and standbytimes.
Section 2B: Controlling Your Phone’s Settings 55
Changing the Display Screen AnimationYour new phone offers options for what you see on the displayscreen during various phone functions.
To change the animation display:
1. Select > Settings > Display > Animation.
2. Select Standby, Outgoing Calls, or Service Search.
3. Select Set, and then select an option (Preset, My Content,Get New, My Albums, Assigned Media, or Off) and press .
n For standby, you can select Time to set the animationstarting time. To set the display size, select Video Size(if applicable).
4. Select an animation display and press .
Changing the Display for Incoming CallsYou can set the color or downloaded image to be shown onthe Incoming Calls display.
To change the incoming calls display:
1. Select > Settings > Display > Incoming Calls.
2. Select an option (Preset, My Content, Get New, My Albums, Assigned Media, or Off) and press .
3. Select a color or image and press .
Your Phone’s Settings

56 Section 2B: Controlling Your Phone’s Settings
Changing the Clock/Calendar Display for Standby Mode
Select from among a variety of items to be displayed instandby mode.
To set the clock/calendar display for standby mode:
1. Select > Settings > Display > Clock/Calendar.
2. Select Main LCD or Sub LCD.
3. Select an item and press .
4. Select OK (left softkey) to apply the clock display setting.
Changing the Screen SaverYour new phone offers you the option of displaying a screensaver while in standby mode.
To change the screen saver:
1. Select > Settings > Display > Screen Saver.
2. Select Main LCD or Sub LCD.
3. Select an option (Preset, My Content, Get New, My Albums, Assigned Media, or Off) and press .
4. Select the desired screen saver and press .

Section 2B: Controlling Your Phone’s Settings 57
Power Save ModeThis feature helps conserve your battery power by setting theMain LCD and Sub LCD backlights to “Always Off,” and bysetting the Main LCD sleep mode to “after 30 sec.” and the SubLCD sleep mode to “after 5 sec.”
To set this feature:
1. Select >Settings > Display > Power Save Mode.
2. A message appears. Select OK (left softkey) to continue.
3. Select On and press . (Select Off to deactivate thisfeature.)
Customizing the User InterfaceYour phone lets you customize the user interface (UI) of theStandby Screen, Main Menu, and My Favorites with yourchoice of downloaded themes to reflect your personality.(By default, the theme is set to “SANYO.”)
Tocustomize the display theme:
1. Select >Settings > Display > Themes.
2. Select an available theme and press .
n SANYO displays the preset standard clock displayselected in the Calendar/Clock menu. (See“Changing the Clock/Calendar Display for StandbyMode” on page 56.)
Note: If you change back to SANYO after you have applied a theme,the phone will return to the previous clock display. Also, if youselect a theme other than SANYO, the navigation keyshortcuts are disabled.
YourPhone’sSettings

58 Section 2B: Controlling Your Phone’s Settings
Changing the Phone’s Menu StyleYour phone allows you to choose how the menu is displayedon the screen.
To select the display’s menu style:
© Press to access the main menu, and then selectOptions (right softkey) > Change View.
Changing the Display for Area NameThis feature enables you to show the area of the phonenumber you are calling or are called from when the number isnot registered in your Contacts list. For example, a call to orfrom 213-555-5555 will display “California.”
To set your area name display:
1. Select > Settings > Display > Others > Match Area Code.
2. Select On or Off and press .
Note: This feature is available only when the phone number has 10digits, or 11 digits beginning with 1, and matches an area code.

Section 2B: Controlling Your Phone’s Settings 59
Changing the Display for My BuddyThis feature enables you to see a humorous animation on theMain LCD by opening the phone.
To activate or deactivate My Buddy:
1. Select > Settings > Display > Others > My Buddy.
2. Select On or Off and press .
Changing the Text Font SizeThis setting allows you to adjust the display appearance whenentering text (for example, when writing a message or whenadding a Contacts entry) or when viewing a message.
To change the text font size:
1. Select > Settings > Display > Others > Font Size.
2. Select View or Input.
n View to select Messaging or Browser.
n Input to select Phone#s, Messaging, or Others.
3. Select a font size and press .
Tip: From the font preview display, select a font size by pressingthe navigation key right or left.
Your Phone’s Settings
60 Section 2B: Controlling Your Phone’s Settings
Setting Return to Standby ModeThis feature allows you to select the way to return to standbymode.
To set this feature:
1. Select > Settings > Display > Others > Return to Idle.
2. A message appears. Select OK (left softkey) to continue.
3. Select Automatically or End Key and press .
n Automatically to return to standby modeautomatically when no key is pressed for 30 seconds.
n End Key to return to standby mode by pressing .
Sleep ModeThis feature helps conserve your battery power by restrictingthe display.
To set this feature:
1. Select > Settings > Display > Others > Sleep Mode.
2. Select Main LCD or Sub LCD.
3. Select an option and press . (Select Off to deactivatethis feature.)
Note: End Key setting affects the battery’s talk and standby times.

Section 2B: Controlling Your Phone’s Settings 61
Location Settings
Your phone is equipped with a Location feature for use inconnection with location-based services that may beavailable in the future.
The Location feature allows the network to detect yourposition. Turning Location off will hide your location fromeveryone except 911.
To enable your phone’s Location feature:
1. Select > Settings > Location. (The Location disclaimerwill be displayed.)
2. Read the disclaimer and select OK (left softkey).
3. Select On or Off and press .
When the Location feature is on, your phone’s standby screenwill display the icon. When Location is turned off, the icon will be displayed.
Note: Turning Location on will allow the network to detect yourposition using GPS technology, making some Sprint PCSapplications and services easier to use. Turning Location offwill disable the GPS location function for all purposes except911, but will not hide your general location based on the cellsite serving your call. No application or service may use yourlocation without your request or permission. GPS-enhanced911 is not available in all areas.
Your Phone’s Settings

62 Section 2B: Controlling Your Phone’s Settings
Messaging Settings
Staying connected to your friends and family has never beeneasier. With your phone’s advanced messaging capabilities,you can send and receive many different kinds of textmessages without placing a voice call.
Your phone’s messaging settings make text messaging evenfaster and easier by letting you decide how you would like tobe notified of new messages, create a signature with eachsent message,and create your own preset messages, to namejust a few.
Setting Message Notification
When you receive a message, your phone notifies you by displaying an icon on your display screen. You can alsochoose to be notified with a message notification on yourdisplay screen.
To set message notification:
1. Select > Settings > Messaging > Notification.
2. Select Msgs and Icon or Icon Only and press .
Tip: To access Messaging settings menu, you can also select MENU> Messaging > Settings.

Section 2B: Controlling Your Phone’s Settings 63
Managing Preset Messages
Your phone is loaded with twenty preset messages, in Englishand in Spanish, to help make sending text messages fasterand easier. These messages, such as “Where are you?,” “Let’sget lunch,” and “Meet me at,” can be customized or deleted tosuit your needs.
To edit a preset message:
1. Select > Settings > Messaging > Preset Msgs. (The list ofpreset messages is displayed.)
2. Select the message you want to edit and press .
3. Use your keypad to edit the message and select OK (leftsoftkey) to save your changes.
n To reset all messages, select Options (right softkey) >Reset All Msgs > Yes during step 2 above.
To change the language of the preset messages:
1. Select > Settings > Messaging > Preset Msgs.
2. Select Options (right softkey) > Select Language.
3. Select English or Spanish and press .
Setting Auto Delete
With this feature, messages are automatically erased startingwith the oldest if your Voice SMS Inbox becomes full.
To set Auto Delete:
1. Select > Settings > Messaging > VoiceSMS > Auto Delete.
2. Select On or Off and press .
Note: For information on editing text, see “Entering Text” on page 41.
Your Phone’s Settings
64 Section 2B: Controlling Your Phone’s Settings
Setting a Callback Number
With this feature, you can notify your recipients of yourcallback number with a text message.
To set the callback number:
1. Select > Settings > Messaging > Text > Send Callback#.
2. Press , and then select an option from the followingand press .
n None to send no callback number.
n My Phone# to send your phone number.
n Other to send a specific callback number. To set anumber, enter a phone number and press .
Adding a Customized Signature
Each message you send can have a customized signature toreflect your personality.
To add a customized signature to each sent message:
1. Select > Settings > Messaging > Text > Signature.
2. Press , and then select On.
3. Select Text, enter your signature, and select OK (leftsoftkey). (See “Entering Text” on page 41.)
4. Select Save (left softkey) to save your signature.

Section 2B: Controlling Your Phone’s Settings 65
Setting the Delivery Receipt
You can set to receive a delivery receipt message confirmingthat your message was successfully delivered to yourrecipient.
To set the delivery receipt:
1. Select >Settings > Messaging > Text > Delivery Receipt.
2. Select On or Off and press .
Setting Drafts Alert
Drafts Alert gives you a reminder when you have unsentmessages waiting in the drafts folder.
To set Drafts Alert:
1. Select >Settings > Messaging > Text > Drafts Alert.
2. Select On or Off and press .
Setting the Speakerphone for SMS Voice Messaging
You can set the speakerphone on or off for SMS Voicemessaging. By default, the speakerphone is set to on.
To set the speakerphone on or off:
1. Select >Settings > Messaging > VoiceSMS >Speakerphone.
2. Select On or Off and press .
Note: The Delivery Receiptfeature may notcurrently be implemented.
YourPhone’sSettings

66 Section 2B: Controlling Your Phone’s Settings
Setting the Sender’s Name for SMS Voice Messaging
With this feature, you can identify yourself to people whoreceive your SMS Voice messages.
To set the sender’s name:
1. Select >Settings > Messaging > VoiceSMS > From Name.
2. Enter your name and select OK (left softkey).
Setting an Alert Notification for SMS Voice Messaging
SMS Voice Messaging uses your phone’s data services. You canset your phone to play an alert to let you know you areconnecting to data services each time you access an SMS Voicemessage.
Toset an alert for SMS Voice messaging:
1. Select >Settings > Messaging > VoiceSMS > Connection Alert.
2. Select Mark (right softkey) to warn you each time youaccess SMS Voice Messaging.
3. Select Done (left softkey) to save the setting.

Section 2B: Controlling Your Phone’s Settings 67
Airplane Mode
Airplane Mode allows you to use many of your phone’sfeatures, such as Games, Music, Voice Recorder, etc., when youare in an airplane or in any other area where making orreceiving calls or data is prohibited. When your phone is inAirplane Mode, it cannot send or receive any calls or accessonline information.
To set your phone to Airplane Mode:
1. Select > Settings > Others > Airplane Mode.
2. Read the disclaimer and select OK (left softkey).
3. Select On or Off and press .
While in Airplane Mode, your phone’s standby screen willdisplay “Phone Off.”
Your Phone’s Settings

68 Section 2B: Controlling Your Phone’s Settings
TTY Use With Sprint PCS Service
A TTY (also known as a TDD or Text Telephone) is atelecommunications device that allows people who are deaf,hard of hearing, or who have speech or language disabilities,to communicate by telephone.
Your phone is compatible with select TTY devices. Please checkwith the manufacturer of your TTY device to ensure that itsupports digital wireless transmission. Your phone and TTYdevice will connect via a special cable that plugs into yourphone’s headset jack. If this cable was not provided with yourTTY device, contact your TTY device manufacturer to purchasethe connector cable.
When establishing your Sprint PCS service, please call Sprint Customer Service via the state TelecommunicationsRelay Service (TRS) by first dialing . Thenprovide the state TRS with this number: 866-727-4889.

Section 2B: Controlling Your Phone’s Settings 69
To turn TTY Mode on or off:
1. Select > Settings > Others > TTY. (An informationalmessage will be displayed.)
2. Read the disclaimer and select OK (left softkey).
3. Select Enable and press to turn TTY mode on.– or –Select Disable and press to turn TTY mode off.
WARNING 911 Emergency CallingSprint recommends thatTTY users make emergencycalls by other means, including TelecommunicationsRelay Services (TRS), analog cellular, and landlinecommunications. Wireless TTY calls to 911 may becorrupted when received by public safety answeringpoints (PSAPs), rendering some communicationsunintelligible. The problem encountered appearsrelated to TTY equipment or software used by PSAPs.This matter has been brought to the attention of theFCC, and the wireless industry and the PSAPcommunity are currently working to resolve this.
Note: In TTY Mode, your phone will display the TTY access icon.
If TTY mode is enabled, the audio quality of non-TTY devicesconnected to the headset jack may be impaired.
Your Phone’s Settings

70 Section 2B: Controlling Your Phone’s Settings
Wireless Backup
This feature allows you to back up all of your contacts to theSprint Web site and restore them if your phone is lost, stolen,damaged, or replaced.
To subscribe to the wireless backup service, you will need topurchase a license to use the wireless backup service via theSprint vending machine, accessed through the WAP browseron your phone. The license expires after a set period of timeand must be renewed regularly. As part of the initialsubscription process, a random wireless backup password isgenerated. The randomly-generated password will be sent tothe handset as an SMS text message. (Subscribe launches thesubscription process. If you are already subscribed to wirelessbackup, Unsubscribe will be displayed.)
Activating and Deactivating Wireless Backup ServiceTo activate Wireless Backup service:
1. Select > Contacts > Wireless Backup.
2. Select Subscribe. (You will be prompted to confirm yourlicense status.)
3. Select Yes (left softkey) and follow the onscreeninstructions to purchase the license.
4. Please wait while registering the license. (You will see aconfirmation screen if it has been successfullyregistered.)
Note: Wireless Backup can also be activated by selecting MENU >Settings > Wireless Backupand following steps 2–4 above.
Note: To use the Wireless Backup service, you are required toactivate the service from your phone.

Section 2B: Controlling Your Phone’s Settings 71
To deactivate Wireless Backup service:
1. Select > Contacts > Wireless Backup.
2. Select Unsubscribe. (A message will be displayed.)
3. Follow the onscreen instructions to unsubscribe fromthe Wireless Backup service.
Setting Wireless Backup AlertThis feature turns the pop-up alert on or off when a WirelessBackup is in progress.
To setWireless Backup alert:
1. Select > Contacts > Wireless Backup > Alert.
2. Select On or Off and press .
Tip: To display the Wireless Backup service information, selectMENU > Contacts > Wireless Backup > Learn More.
Note: You can unsubscribe from the Wireless Backup service onlythrough the SprintWeb site.
Tip: Each time you edit your phone’s contacts, they are backed upatwww.wirelessbackup.sprint.com.
Note: Once you have completed the registration, you will receive anSMS text message with your password. You will need thispassword to access the Sprint PCS Wireless Backup Web site(www.wirelessbackup.sprint.com) and edit your contacts fromyour personal computer.
Your Phone’s Settings

72 Section 2B: Controlling Your Phone’s Settings
Phone Setup Options
My FavoritesYour phone offers you the option of assigning a shortcut keyto a favorite or often-used function. Selecting Favorites (leftsoftkey) in standby mode will launch your personallydesignated shortcut.
To assign your shortcut key:
1. Select Favorites (left softkey) to display the My Favoriteslist.
2. Highlight <Add Favorite> and press .
3. Select one of the following options.
n Contact to display stored Contacts entries.
n My Content to display downloaded items stored inyour phone.
n My Album to display thumbnail images stored inyour In Phone folder.
n Web Bookmark to display your bookmarked sites.
n Menu Item to assign an often-used menu item.
4. Using the navigation key or your keypad, selectfunctions to be assigned to the My Favorites list.
5. Select Assign (left softkey) to save.
From My Favorites list, select Options (right softkey) to displaythe following items. To select an item, highlight it and press :
v Replace to replace an existing shortcut key.
v Remove to remove an existing shortcut key.
v Remove All to remove all the existing shortcut key.
v Help to display the My Favorite list information.

Section 2B: Controlling Your Phone’s Settings 73
Auto-Answer ModeYou may set your phone to automatically pick up incomingcalls in speakerphone mode or when connected to an optionalhands-free device.
To set Auto-Answer mode:
1. Select >Settings > Others > Auto Answer.
2. To select an option, highlight it and press .
n Hands-free to answer calls automatically when thephone is connected to a hands-free device (soldseparately). Remember, your phone will answer callsin Auto-Answer mode even if you are not present.
n Speakerphone to answer calls automatically inspeakerphone mode.
3. Select 5Seconds, 15 Seconds, or Off and press .
Display LanguageYou can choose to display your phone’s onscreen menus inEnglish or in Spanish.
Toassign a languagefor the phone’sdisplay:
1. Select >Settings > Others > Language.
2. Select English or Español and press .
Setting Any Key AnswerThis feature allows you to answer incoming calls by pressingany key (except , , softkeys, and external keys).
To turn Any Key Answer on or off:
1. Select >Settings > Others > Any Key Answer.
2. Select On or Off and press .
YourPhone’sSettings

74 Section 2B: Controlling Your Phone’s Settings
Setting the Open/Close Flip OptionThis feature enables you to answer an incoming call byopening the phone or to end a call by closing the phone.
To activate the Open Flip feature:
1. Select > Settings > Others > Open/Close Flip.
2. Select Open and press .
3. Select Answer Call and press .
n To deactivate this feature, select No Action.
To activate the Close Flip feature:
1. Select > Settings > Others > Open/Close Flip.
2. Select Close. (You will see a message on the display.)
3. Select OK (left softkey) to continue.
4. Select an option from the following and press .
n End to end the call.
n Continue(Mute) to continue the call. Your voice ismuted; however you can hear the caller’s voice fromthe speaker.
n Continue(Unmute) to continue the call. You can hearthe caller’s voice and speak to the phone to answer.
Note: The Close Flip feature does not apply during Ready Link calls orwhen you are using the speakerphone, a headset, or a car kit.

Section 2B: Controlling Your Phone’s Settings 75
Setting Power On to AlertPower On to Alert helps prevent unintentional or accidentalpower-on of your phone’s alarm settings while your phone isturned off (default setting is off). This feature applies only toEvent Alerts, Call Alarm, and Alarm Clock.
To turn Power On to Alert on or off:
1. Select >Settings > Others > Power On to Alert.
2. Select On or Off and press .
n On activates alarm in Airplane Mode even if thephone is turned off.
n Off deactivates all alarm settings while the phone isturned off.
Setting the Key GuardThis feature enables you to lock external keys while the phoneis closed.
Toturn the Key Guard on or off:
1. Select >Settings > Others > Key Guard.
2. Select On or Off and press .
Note: This feature does not apply when the phone is open.
YourPhone’sSettings
Tip: You can deactivate this feature temporarily by pressing andholding either the Side Call key ( ) or on the externalcontrol key while the phone is closed.

76 Section 2B: Controlling Your Phone’s Settings
Setting Navigation Key ShortcutsYou can use the navigation key as a shortcut to access specificmenu items directly from standby mode. With this feature,you can reassign the default shortcut keys to the menu itemsyou choose.
To set the navigation key shortcuts:
1. Select >Settings > Others > Navigation Keys.
2. Select the shortcut key you wish to reassign and press .
3. Using the navigation key or your keypad, select afunction.
4. Select Assign (left softkey) to save.
Setting Text Entry OptionsToset your text entry options:
1. Select >Settings > Others > Text Entry.
2. Select an option and press .n Auto-Capital to turn auto-capitalization on or off.n MyWords to add or edit a word in the T9 database
(see page 43).n Input Language to select the language (English
or Spanish).n Default Input to select T9 word, Alphabet, or Retain
Mode for the initial entry mode.n Auto-Space to turn auto-spacing on or off after T9
words you enter.n Recent Access to display the three most recently used
input mode menu items from the top of the listwhen this setting is set to on.
Note: These shortcuts are available only when the display theme isset to SANYO (see “Customizing the User Interface” on page 57).
Section 2B: Controlling Your Phone’s Settings 77
n T9 Settings to customize the T9 settings (see page 44).
n Add Word to store words that you use frequently (seepage 43).
n Auto-Complete to turn auto-completion on or off.n Help to see the T9 instruction page.
Setting Abbreviated DialingAbbreviated Dialing allows you to dial a number using the lastfour or five digits of the phone number. You can use either ofthe following options for this feature:
v Ph. Book Match allows you to retrieve any number saved inyour Contacts list by entering the last three to six digits ofthe number.
v Prepend # allows you to predefine the first five- or six-digitprefix you wish to use for abbreviated dialing, so that youcan dial a number by entering only the last four or fivedigits of the number.
To set Abbreviated Dialing:
1. Select > Settings > Others > Abbrev. Dial.
2. Select Ph. Book Match, and then select Enable or Disable.
3. Select Prepend, and then select Enable.
4. Select Prepend#, enter the first five- or six- digit prefix,and then select OK (left softkey).
n To deactivate this feature, select Disable during step 3 above.
Note: This setting does not apply to 911 or Sprint 411.
Tip: To make an Abbreviated Dial call, see “Using AbbreviatedDialing” on page 38.
Your Phone’s Settings

78 Section 2B: Controlling Your Phone’s Settings
Setting Headset ModeThis feature allows you hands-free phone use. Set the headsetmode to Voice Call or Ready Link call and press the TurboButton (the operation button) on the headset to activateuseful functions.
To connect the headset:
© Simply plug the headset into your phone’s headset jack.
To set the headset mode:
1. Select > Settings > Others > Headset Mode.
2. Select Turbo Button.
3. Select Voice Calls, Ready Link, or Off and press .
To set the sound mode:
1. Select > Settings > Others > Headset Mode.
2. Select Earpiece.
3. Select Stereo or Mono and press .
To set the ringer sound:
1. Select > Settings > Others > Headset Mode.
2. Select Ringer Sound.
3. Select Normal or Headset Only and press .
Note: Be sure to use only the stereo headset that comes with yourphone. Using other headsets could damage your phone.
Section 2C: Setting Your Phone’s Security 79
Section 2C
Setting Your Phone’s Security
In This Section
l Accessing the Security Menu (page 80)
l Using Your Phone’s Lock Feature (page 80)
l Restricting Calls (page 83)
l Using Special Numbers (page 84)
l Erasing Phone Content (page 85)
l Resetting the Browser (page 86)
l Resetting Favorites (page 86)
l Resetting Your Phone (page 87)
l Resetting Your Picture Mail Account (page 87)
l Resetting Default Settings (page 88)
l Resetting and Locking Your Phone Through SMS (page 89)
l Security Features for Sprint PCS Vision (page91)
By using the security settings on your phone, you receivepeace of mind without sacrificing flexibility.This section willfamiliarize you with your phone’s security settings. Withseveral options available, you can customize your phone tomeet your personal needs.
Your Phone’s Security

80 Section 2C: Setting Your Phone’s Security
Accessing the Security Menu
All of your phone’s security settings are available through theSecurity menu. You must enter your lock code to view theSecurity menu.
To access the Security menu:
1. Select > Settings > Security.
2. Enter your lock code to display the Security menu.
Using Your Phone’s Lock Feature
Locking Your PhoneWhen your phone is locked, you can only receive incomingcalls or make calls to 911, Sprint Customer Service, or specialnumbers. (See “Using Special Numbers” on page 84.)
To lock your phone:
1. From the Security menu, select Lock Phone > Lock Now.(To set your phone to lock the next time it is turned on,select On Power-up.)
2. Select Full Lock or Excep. Incoming Calls and press .
Tip: If you can’t recall your lock code, try using the last four digits ofeither your Social Security number or phone number or try0000 or NATL (6285). If none of these work, call SprintCustomer Service at 1-888-211-4PCS (4727).

Section 2C: Setting Your Phone’s Security 81
Unlocking Your PhoneTo unlock your phone:
1. From standby mode, select Unlock (left softkey).
2. Enter your lock code.
Changing the Lock CodeTo change your lock code:
1. Select > Settings > Security, and then enter your lockcode. (The Security menu is displayed.)
2. Select Others > Change Lock, and then enter and re-enteryour new lock code.
Calling in Lock ModeYou can place calls to 911, to Sprint Customer Service, and toyour special numbers when in lock mode. (For information onspecial numbers, see “Using Special Numbers” on page 84.)
To place an outgoing call in lock mode:
© To call an emergency number, special number, or Sprint Customer Service, enter the phone number andpress .
Your Phone’s Security

82 Section 2C: Setting Your Phone’s Security
Locking the Pictures MenuWith this feature, you must enter your lock code when youaccess the pictures menu.
To lock the pictures menu:
1. Select > Settings > Security, and then enter your lockcode. (The Security menu is displayed.)
2. Select Picture Mail > Lock Pictures > Lock Now. (SelectUnlocked to deactivate this feature.)
Lock ServicesWith this feature, you can choose to restrict access to Sprint PCS Vision services, incoming and outgoing voice calls,and Sprint PCS Ready Link calls or settings.
To activate lock services:
1. From the Security Menu, select Others > Lock Services.
2. Select Voice Calls, Power Vision, or Ready Link.
3. Select Locked. (Select Unlocked to deactivate thisfeature.)

Section 2C: Setting Your Phone’s Security 83
Restricting Calls
There may be occasions when you want to limit the numbersyour phone can call or from which it can receive calls. You canuse the Restrict Calls setting to do just that. (The Restrict Callssetting does not apply to 911 or Sprint Customer Service.)
To restrict calls:
1. Select > Settings > Security, and then enter your lockcode. (The Security menu is displayed.)
2. Select Others > Limit Use.
3. Select Outgoing Calls or Incoming Calls.
4. Select an option and press .
n Allow All lets you make or receive all calls.
n Phone Book Only lets you make or receive calls to or from Contacts entries, voicemail, or specialnumbers only.
n Special #s Only lets you make or receive calls to orfrom three special numbers only. (See “Using SpecialNumbers” on page 84.)
Note: Restricted incoming calls are forwarded to voicemail.
Your Phone’s Security

84 Section 2C: Setting Your Phone’s Security
Using Special Numbers
Special numbers are important numbers that you havedesignated as being “always available.” You can call andreceive calls from special numbers even if your phone islocked.
You can save up to three special numbers in addition to yourContacts entries. (The same number may be in bothdirectories.)
To add or replace a special number:
1. Select > Settings > Security, and then enter your lockcode. (The Security menu is displayed.)
2. Select Others > Special #s.
3. Select a field for your entry.
4. Enter the number and press .
Note: Special numbers cannot be called if Lock Services (see page 82) is set to Locked.
Note: There are no speed dial options associated with specialnumbers.

Section 2C: Setting Your Phone’s Security 85
Erasing Phone Content
You can quickly and easily erase all the content that you havecreated in your phone.
To erase phone content:
1. Select >Settings > Security, and then enter your lockcode. (The Security menu is displayed.)
2. Select Erase/Reset, and then select an option from thefollowing and press .
n Erase Ph. Book to erase all of your Contacts entries.
n Erase My Content to erase all items you havedownloaded to your phone.
n Erase Pictures to erase all pictures and videos saved inthe phone.
n Erase Voice Data to erase all voice data and callmemos saved in the phone.
n Erase VoiceTag to erase all voice tags you haverecorded.
n Erase Messages to erase all messages (includinglocked ones) in the Inbox, Sent Mail ,Pending, andDrafts folders; all Recent Lists; and all user-createdpreset messages (text messages, SMS Voicemessages, etc.).
n Erase Cal. Events to erase all scheduled events(including secret ones).
n Erase Memory to erase all data and folders you havemade in File Manager.
3. If you are certain you would like to erase, select OK (leftsoftkey), and then select Yes.
YourPhone’sSecurity

86 Section 2C: Setting Your Phone’s Security
Resetting the Browser
This option resets your Web browser’s history, bookmarks,cookies, auto-complete text, and URLs.
To reset the browser:
1. Select > Settings > Security, and then enter your lockcode. (The Security menu is displayed.)
2. Select Erase/Reset > Reset Browser.
3. If you are certain you would like to reset , select OK (leftsoftkey), and then select Yes.
Resetting Favorites
This option resets all of your favorites settings.
To reset favorites:
1. Select > Settings > Security, and then enter your lockcode. (The Security menu is displayed.)
2. Select Erase/Reset > Reset Favorites.
3. If you are certain you would like to reset your favoritessettings, select OK (left softkey), and then select Yes.

Section 2C: Setting Your Phone’s Security 87
Resetting Your Phone
Resetting the phone resets all settings and erases all data onyour phone (except data saved in the File Manager).
To reset your phone:
1. Select >Settings > Security, and then enter your lockcode. (The Security menu is displayed.)
2. Select Erase/Reset > Reset Phone. (A disclaimer isdisplayed.)
3. Read the disclaimer and select OK (left softkey).
4. If you are certain that you would like to erase all the dataand reset your settings, select Yes.
Resetting Your Picture Mail Account
This option resets your authentication ID for your Sprint PCSPicture Mail account.
To reset your Picture Mail account:
1. Select >Settings > Security, and then enter your lockcode. (The Security menu is displayed.)
2. Select Picture Mail > Reset Picture Mail. (A warning isdisplayed.)
3. Read the disclaimer and select OK (left softkey).
4. If you are certain that you would like to reset yourPicture Mail account, select Yes.
YourPhone’sSecurity
88 Section 2C: Setting Your Phone’s Security
Resetting Default Settings
Resetting the default settings restores all the factory defaults,including the ringer types and display settings. The Contacts,Call History, Calendar, and Messaging are not affected.
To reset default settings:
1. Select > Settings > Security, and then enter your lockcode. (The Security menu is displayed.)
2. Select Erase/Reset > Default Settings. (A warning isdisplayed.)
3. Read the disclaimer and select OK (left softkey).
4. If you are certain that you would like to restore all thefactory settings, select Yes.

Section 2C: Setting Your Phone’s Security 89
Resetting and Locking Your PhoneThrough SMS
When your phone is lost or stolen, you can erase yourimportant personal information (such as Contacts entries, callhistory, and messages) and lock your phone by sending aspecially-formatted SMS message to your phone.
From your computer, sign on to www.sprint.comand send amessage to your phone (input your 10-digit wireless phonenumber) in the following format:
\ \ RESET **<Passcode>** RESET<Passcode> - your defined passcode.
The default passcode is your phone’s 11-digit ESN (ElectronicSerial Number), which can be found on the phone’s packagingor on the phone itself. The locked phone will display thefollowing message: “If found, please call Sprint CustomerService 1-888-211-4727.”
To enable locking your phone through SMS:
1. Select > Settings > Security, and then enter your lockcode. (The Security menu is displayed.)
2. Select Others > Found Me > Reset/Lock > Enable. To unlock a phone that has been locked through SMS,please take the phone to your nearest Sprint Store.
Note: To send a message from mailer software, input your 10-digitwireless phone number followed by“@messaging.sprintpcs.com.”
Your Phone’s Security

90 Section 2C: Setting Your Phone’s Security
Changing the PasscodeTo change the passcode for the specially-formatted SMSmessage:
1. Select > Settings > Security, and then enter your lockcode. (The Security menu is displayed.)
2. Select Others > Found Me > Change Passcode.
3. Enter a new passcode (11 digits).
4. Re-enter the new passcode.

Section 2C: Setting Your Phone’s Security 91
Security Features for Sprint PCS Vision
Enabling and Disabling Sprint PCS Vision ServicesYou can disable Sprint PCS Vision services, including SprintPower Vision, without turning off your phone; however, you will not have access to all Sprint PCS Vision services,including Web and messaging. Disabling Sprint PCS Visionwill avoid any charges associated with Sprint PCS Visionservices. While signed out, you can still place or receive phonecalls, check voicemail, and use other voice services. You mayenable Sprint PCS Vision services again at any time.
To disable Sprint PCS Vision services:
1. Select > Settings > Power Vision > Disable Vision. (A message will be displayed.)
2. Select Disable (right softkey) to confirm that you want to sign out.
To enable Sprint PCS Vision services:
1. Select > Settings > Power Vision > Enable Vision. (A message will be displayed.)
2. Select OK (left softkey) to enable Vision service.
Your Phone’s Security

92 Section 2D: Controlling Your Roaming Experience
Section 2D
Controlling Your Roaming Experience
In This Section
l Understanding Roaming (page 93)
l Setting Your Phone’s Roam Mode (page 95)
l Using Call Guard (page 96)
l Using Data Roam Guard (page 97)
Roaming is the ability to make or receive calls when you’re offthe Nationwide Sprint PCS Network.Your new M1 by Sanyoworks anywhere on the Nationwide Sprint PCS Networkand allows you to roam on 1900 and 800 MHz digitalnetworks.
This section explains how roaming works as well as specialfeatures that let you manage your roaming experience.

Section 2D: Controlling Your Roaming Experience 93
Understanding Roaming
Recognizing the Roaming Icon on the Display Screen
Your phone’s display screen always lets you know when you’reoff the Nationwide Sprint PCS Network. Any time you areroaming, the phone displays the roaming icon ( ).
Roaming on Other Digital Networks
When you’re roaming on digital networks, your call qualityand security will be similar to the quality you receive whenmaking calls on the Nationwide Sprint PCS Network.However, you may not be able to access certain features,depending on the available network.
Note: If you’re on a call when you leave the Nationwide Sprint PCSNetwork and enter an area where roaming is available , yourcall is dropped. If your call is dropped in an area where youthink Sprint PCS service is available, turn your phone off andon again to reconnect to the Nationwide Sprint PCS Network.
Note: Unless your Sprint PCS service plan includes roaming, you willpay a higher per-minute rate for roaming calls.
Tip: Remember, when you are using your phone off theNationwide Sprint PCS Network, always dial numbers using11 digits (1 + area code + number).
Roaming

94 Section 2D: Controlling Your Roaming Experience
Checking for Voicemail Messages While Roaming
When you are roaming off the Nationwide Sprint PCSNetwork, you may not receive on-phone notification of newvoicemail messages. Callers can still leave messages, but youwill need to periodically check your voicemail for newmessages if you are in a roaming service area for an extendedperiod of time.
To check your voicemail while roaming:
1. Dial 1 + area code + your phone number.
2. When you hear your voicemail greeting, press .
3. Enter your passcode at the prompt and follow the voiceprompts.
When you return to the Nationwide Sprint PCS Network,voicemail notification will resume as normal.

Section 2D: Controlling Your Roaming Experience 95
SettingYour Phone’s Roam Mode
Your phone allows you to control your roaming capabilities. Byusing the Roaming menu option, you can determine whichsignals your phone accepts.
Set Mode
Choose from three different settings on your phone to controlyour roaming experience.
To set your phone’s roam mode:
1. Select > Settings > Others > Roaming > Set Mode.
2. To select an option, highlight it and press .
n Sprint Only allows you to access the NationwideSprint PCS Network only and prevents roaming onother networks.
n Automatic seeks Sprint PCS service. When Sprint PCSservice is unavailable, the phone searches for analternate system.
n Roaming Only forces the phone to seek a roamingsystem. The previous setting (Sprint Only orAutomatic) is restored the next time the phone isturned on.
Roaming

96 Section 2D: Controlling Your Roaming Experience
Using Call Guard
Your phone has two ways of alerting you when you areroaming off the Nationwide Sprint PCS Network: the onscreenroaming icon and Call Guard. Call Guard makes it easy tomanage your roaming charges by requiring an extra stepbefore you can place or answer a roaming call. (This additionalstep is not required when you make or receive calls while onthe Nationwide Sprint PCS Network.)
To turn Call Guard on or off:
1. Select > Settings > Others > Roaming > Call Guard.
2. Highlight On or Off and press .
To place roaming calls with Call Guard on:
1. From standby mode, dial 1 + area code + the seven-digitnumber and press .
2. Press to proceed while the pop-up message isdisplayed.– or –Press any key to erase the pop-up message, and thenselect Options (right softkey) > Roam Call.
To answer incoming roaming calls with Call Guard on:
1. Press . (A message will be displayed notifying youthat roaming charges will apply.)
2. Press to proceed while the pop-up message isdisplayed.– or –Press any key to erase the pop-up message, and thenselect Options (right softkey) > Answer.
Note: If the Call Guard feature is set to On, you need to take extrasteps to make and receive roaming calls.

Section 2D: Controlling Your Roaming Experience 97
Using Data Roam Guard
Depending on service availability and roaming agreements,your phone may be able to access data services while roamingon certain digital systems. You can set your phone to alert youwhen you are roaming off the Nationwide Sprint PCS Networkand try to use data services such as messaging.
To set your Data Roam Guard notification:
1. Select >Settings > Others > Roaming > Data Roam Guard.
2. Select an option and press .
n Always Ask sets your phone’s Data Roam Guardfeature on. You will see a prompt and will be requiredto respond anytime you access data services whileroaming.
n Never Ask turns your phone’s Data Roam Guardfeature off. You will not be notified of your roamingstatus when accessing data services.
To use data services when Data Roam Guard is active:
© When a pop-up notification appears informing you thatdata roam charges may apply, select Roam (left softkey)to connect.
Note: Call Guard and Data Roam Guard are turned off by default onyour phone.
Roaming

98 Section 2E: Managing Call History
Section 2E
Managing Call History
In This Section
l Viewing History (page 99)
l Call History Options (page 100)
l Making a Call From Call History (page 101)
l Saving a Phone Number From Call History (page 102)
l Prepending a Phone Number From Call History (page 103)
l Erasing Call History (page 103)
The Call History keeps track of incoming calls, outgoing calls,and missed calls.This section guides you through accessingand making the most of your Call History.

Section 2E: Managing Call History 99
Viewing History
You’ll find the Call History feature very helpful. It is a list of thelast 20 phone numbers (or Contacts entries) for calls youplaced, accepted, or missed. Call History makes redialing anumber fast and easy. It is continually updated as newnumbers are added to the beginning of the list and the oldestentries are removed from the bottom of the list.
Each entry contains the phone number (if it is available) andContacts entry name (if the phone number is in yourContacts). Duplicate calls (same number and type of call) mayonly appear once on the list.
To view a Call History entry:
1. Select >Call History, and then select Outgoing,Incoming, Missed, or Recent Calls.
2. Highlight the entry you wish to view and press .
Note: Call History records only calls that occur while the phone isturned on. If a call is received while your phone is turned off, it will not be included in the phone’s Incoming or Missed call logs.
CallHistory

100 Section 2E: Managing Call History
Call History Options
For additional information about and options for a particularcall, highlight a Call History entry and press . This featuredisplays the date and time of the call, the phone number (ifavailable), and the caller’s name (if the number is already inyour Contacts). By selecting Options (right softkey), you canchoose from the following options:
v Call to dial the phone number.
v Call:Speaker On to dial the phone number in speakerphonemode.
v Send Message to send a Text, Picture Mail, or SMS Voicemessage.
v Save Phone# to save the phone number (if applicable).
n Go to Phone Book appears when the number isalready in your Contacts list. (See “Saving a PhoneNumber From Call History” on page 102.)
v Rename to change the current entry’s name to Caller IDname (if applicable).
v Prepend to add numbers to the beginning of the phonenumber. (See “Prepending a Phone Number From CallHistory” on page 103.)
v Copy to Personal to copy the phone number to the ReadyLink Personal List (only appears when Sprint PCS ReadyLink mode is set to Enable and the number does not matchany stored entry in your Personal List).
v Erase to erase the entry.
Tip: You can also view the next Call History entry by pressing thenavigation key right or view the previous entry by pressing thenavigation key left.

Section 2E: Managing Call History 101
Making a Call From Call History
To place a call from Call History:
1. Select > Call History, and then select Outgoing,Incoming, Missed, or Recent Calls.
2. Use your navigation key to select a Call History entry andpress .
Note: You cannot make calls from Call History to entries identifiedas No Caller IDor Restricted.
Call History
102 Section 2E: Managing Call History
Saving a Phone Number From Call History
Your phone can store up to 500 Contacts entries. Contactsentries can store up to a total of 700 phone numbers, and eachentry’s name can contain 32 characters.
To save a phone number from Call History:
1. Use your navigation key to select a Call History entry andselect Options (right softkey) > Save Phone#.
2. Select New Name to create a new Contacts entry for thenumber or From Ph. Book to save the number to anexisting entry.
3. Select a label and press .
4. Enter a name for the new entry using the keypad andpress .– or –Search for an existing contact name and press to savethe new number.
5. Select Save (left softkey) to save the entry.
After you have saved the number, the new Contacts entry isdisplayed. (See “Contacts Entry Options” on page 109.)
Note: You cannot save phone numbers already in your Contacts orfrom calls identified as No Caller IDor Restricted.

Section 2E: Managing Call History 103
Prepending a Phone Number From Call History
If you need to make a call from Call History and you happen tobe outside your local area code, you can add the appropriateprefix by prepending the number.
To prepend a phone number from Call History:
1. Select a Call History entry and select Options (rightsoftkey).
2. Select Prepend.
3. Enter the prefix and press to call the number.
Erasing Call History
To erase individual Call History entries, see “Call HistoryOptions” on page 100.
To erase Call History:
1. Select > Call History > Erase History.
2. Select Outgoing, Incoming, Missed, Recent Calls, or All.
3. Select Voice Calls or Ready Link.
4. If you are certain you want to erase the call history,select Yes.– or –Select No to return to the previous menu.
Call History

104 Section 2F: Using Contacts
Section 2F
Using Contacts
In This Section
l Adding a New Contacts Entry (page 105)
l Assigning a Group Entry (page 106)
l Finding Contacts Entries (page 107)
l Contacts Entry Options (page 109)
l Adding a Phone Number to a Contacts Entry (page 110)
l Editing a Contacts Entry’s Phone Number (page 110)
l Assigning Speed Dial Numbers (page 111)
l Editing a Contacts Entry (page 112)
l Assigning an Image to a Contacts Entry (page 112)
l Selecting a Ringer Type for an Entry (page 113)
l Secret Contacts Entries (page 114)
l Dialing Sprint PCS Services (page 115)
Now that you know the basics that make it easier to stay intouch with people and information, you’re ready to exploreyour phone’s more advanced features.This section explainshow to use your phone’s Contacts list and helps you makethe most of your time when you are trying to connect withthe important people in your life.

Section 2F: Using Contacts 105
Adding a New Contacts Entry
Your phone can store up to 500 Contacts entries. Contactsentries can store up to a total of 700 phone numbers, and eachentry’s name can contain 32 characters.
To add a new entry:
1. Select > Contacts > Find/Add Entry > Add Contact.
2. Enter a name for the entry and press the navigation keydown. (See “Entering Text” on page 41.)
3. Enter the phone number for the entry and press .
4. Select a label for the entry (Mobile, Home, Work, Pager,Fax, or Other) and press .
5. Select Save (left softkey).
After you have saved the number, the new Contacts entry isdisplayed. (See “Contacts Entry Options” on page 109.)
Tip: ICE – In Case of EmergencyTo make it easier for emergency personnel to identifyimportant contacts, you can list your local emergencycontacts under “ICE” in your phone’s Contacts list. Forexample, if your mother is your primary emergency contact,list her as “ICE–Mom” in your Contacts list. To list more thanone emergency contact, use “ICE1–___,” “ICE2–___,” etc.
Shortcut: Enter the phone number in standby mode and pressMENU. Proceed with steps 2-6 in “Saving a PhoneNumber” on page 36.
Contacts

106 Section 2F: Using Contacts
Assigning a Group Entry
Your phone can create up to 20 separate group lists.By assigning a contact to a group, you can search easily using auser-defined group name.
To assign a Contact to a group:
1. Select >Contacts > Group.
2. Select an available group entry location and selectOptions (right softkey) >Add Members.
3. Select the desired contact and press .
4. Select Add (left softkey) when you have finishedselecting members.
To edit a group entry:
1. Select >Contacts > Group.
2. Select the group entry you want to edit and selectOptions (right softkey) >Edit.
3. Select the field you want to edit (Name, Ringer, or PictureID) and press .
4. Edit the entry and press .
5. Select Save (left softkey) to save your changes.
To erase a group member:
1. Select >Contacts > Group.
2. Select the group titles and press to display the groupmembers.
3. Select the member you want to erase and select Options(right softkey) >Erase > This or All.
4. Select Yes and press .

Section 2F: Using Contacts 107
Finding Contacts Entries
There are several ways to display your Contacts entries: byname, by speed dial number, by group, and by voice dial tags.Follow the steps outlined in the sections below to displayentries from the Contacts menu.
Finding Names
To find Contacts entries by name:
1. Select > Contacts > Find/Add Entry.
2. Scroll through all the entries using your navigation key.– or –Enter the first letter of a name or part of a name. (Themore letters you enter, the more your search narrows.)
3. To display an entry, highlight it and press .
4. To dial the entry’s default phone number, press .– or –To display additional Contacts entries, press thenavigation key left or right.
Shortcut: From standby mode, select Contacts (right softkey) todisplay the Contacts list.
Contacts

108 Section 2F: Using Contacts
Finding Speed Dial Numbers
To find phone numbers you have stored in speed dial locations:
© Select > Contacts > Speed Dial #s.See “Using Speed Dialing” on page 40 for how to usespeed dialing.
Finding Group Entries
To find entries designated as part of a group:
1. Select > Contacts > Group.
2. Scroll through the group titles using your navigation key.To display entries belonging to a group, highlight thegroup and press .
3. To dial the entry’s default phone number, press .

Section 2F: Using Contacts 109
Contacts Entry Options
To access a Contacts entry’s options, highlight an entry andpress . Then select a phone number and select Options(right softkey). To select an option, highlight it and press .
v Edit to edit the selected entry.v Call to dial the selected number.v Call:Speaker On to dial the phone number in speakerphone
mode.v Send Message to send a Text, Picture Mail, or SMS Voice
message.v Call Alarm to set a call alarm for the entry. (See page 123 for
Call Alarm.)v Set Speed Dial to assign speed dial numbers to your
favorite entries. (See “Assigning Speed Dial Numbers” onpage 111.)
v SetVoice Tag to set a voice dial for the entry. (See page 135for Voice Dial.)
v Prepend to alter a phone number by adding numbers tothe beginning of the entry. (See “Prepending a PhoneNumber From Call History” on page 103.)
v Copy to Personal to copy the phone number to your ReadyLink Personal List (only appears when Sprint PCS ReadyLink mode is set to Enable and the number does not matchany stored entry in your Personal List).
v Send Contact to send a Contacts entry in the Contacts listvia Bluetooth.
v Print to print the Contacts data.
Tip: You can view the next entry by pressing the navigation key rightor view the previous entry by pressing the navigation key left.
Contacts

110 Section 2F: Using Contacts
Adding a Phone Numberto a Contacts Entry
To add a phone number to an entry:
1. Display a Contacts entry. (See “Finding Contacts Entries”on page 107.)
2. Scroll to the entry you wish to add a phone number toand press .
3. Select a phone number, and then select Options (rightsoftkey) >Edit; or if you are selecting an item other thanthe phone number, select Edit (right softkey).
4. Select the box next to the icon and press .
5. Enter the number and press .
6. Select a label for the number and press .
7. Select Save (left softkey) to save the new number.
Editing a Contacts Entry’s Phone Number
To edit an entry’s phone number:
1. Display a Contacts entry. (See page 107.)
2. Select the entry you wish to edit and press .
3. Select the number you wish to edit and select Options(right softkey)>Edit.
4. Press again to edit the number.
5. Press to clear one digit at a time, or press and hold to erase the entire number.
6. Re-enter or edit the number and press .
7. Select a label for the number and press .
8. Select Save (left softkey) to save the number.

Section 2F: Using Contacts 111
Assigning Speed Dial Numbers
With this feature you can dial Contacts directory entries withone keypress for locations 2–9. (For details on how to makecalls using speed dial numbers, see “Using Speed Dialing” onpage 40.)
To assign a speed dial number:
1. Select > Contacts > Speed Dial #s.
2. Select an available speed dial location and press .
3. Select an entry from the list and press .
4. Select the phone number you want to set as a speed dialnumber and press .
– or –
1. Display a Contacts entry.
2. Scroll to an entry in the Contacts list and press .
3. Select the phone number you want to set as a speed dialnumber, and then select Options (right softkey) > Set Speed Dial.
4. Select an available speed dial location and press .
Note: If you attempt to assign an already in-use speed dial locationto a new phone number, a dialog will be displayed asking ifyou wish to replace the existing speed dial assignment. SelectYes to assign the location to the new phone number anddelete the previous speed dial assignment.
Contacts

112 Section 2F: Using Contacts
Editing a Contacts Entry
To make changes to an entry:
1. Display a Contacts entry.
2. Select the entry you wish to edit and press .
3. Select a phone number, and then select Options (rightsoftkey) >Edit; or if you are selecting an item other thanthe phone number, select Edit (right softkey).
4. Select the field you want to edit and press .
5. Add or edit the desired information and press .
6. Select Save (left softkey) to save your changes.
Assigning an Image to a Contacts Entry
You can assign an image to a Contacts entry. The image isdisplayed when the entry calls you.
Toassign an image for an entry:
1. Display a Contacts entry.
2. Select the entry for which you want to assign the imageand press .
3. Select a phone number, and then select Options (rightsoftkey) >Edit; or if you are selecting an item other thanthe phone number, select Edit (right softkey).
4. Press the navigation key up to highlight the icon andpress .
5. Select an image and press to assign the image to theentry.
6. Select Save (left softkey) to save the image type.
Section 2F: Using Contacts 113
Selecting a Ringer Type for an Entry
You can assign a ringer type to a Contacts entry so you canidentify the caller by the ringer type. (See “Ringer Types” onpage 47.)
To select a ringer type for an entry:
1. Display a Contacts entry.
2. Select the entry for which you want to set the incomingringer and press .
3. Select a phone number, and then select Options (rightsoftkey) >Edit; or if you are selecting an item other thanthe phone number, select Edit (right softkey).
4. Scroll down to the box next to the icon and press todisplay the Ringer Type menu.
5. Use your navigation key to scroll through availableringers. (When you highlight a ringer type, a sampleringer will sound.)
6. Highlight your desired ringer and press .
7. Select Save (left softkey) to save the new ringer type.
Contacts

114 Section 2F: Using Contacts
Secret Contacts Entries
You can hide an entry’s phone number(s) and require your lockcode to edit the entry by making it secret. The entry name isstill displayed, but the entry’s information is replaced with“<Secret>”.
To make an entry secret:
1. Display a Contacts entry.
2. Select the Contacts entry you want to tag as secret.
3. Select Options (right softkey) >Set Secret.
4. Enter the four-digit lock code.
5. Select On and press .
Tomakean entry public:
1. Display a Contacts entry.
2. Select the Contacts entry you want to tag as public.
3. Select Options (right softkey) >Set Secret.
4. Enter the four-digit lock code.
5. Select Off and press .
Tip: If you can’t recall your lock code, try using the last four digits ofeither your Social Security number or wireless phone number,or try 0000 or NATL (6285). If none of these work, call Sprint Customer Service at 1-888-211-4PCS (4727).

Section 2F: Using Contacts 115
Dialing Sprint PCS Services
Your Contacts list is preprogrammed with contact numbersfor various Sprint PCS services.
To dial a service from your Contacts:
1. Select > Contacts > Services.
2. Select Customer Service, Dir Assistance (Sprint 411),Account Info, Sprint Operator, or Voice Command.
3. Press to place the call.
To dial a service from standby mode using your keypad:
1. Dial the appropriate service number:
n Customer Service –
n Sprint 411 –
n Account Info –
n Sprint Operator –
n Voice Command –
2. Press to place the call.
Contacts

116 Section 2G: Using the Phone’s Calendar and Tools
Section 2G
Using the Phone’s Calendar and Tools
In This Section
l Using Your Phone’s Calendar (page 117)
l Using Your Phone’s Tools (page 125)
l Connecting Your Phone to Your PC (page 129)
l File Manager (page 130)
l Personal Information Management (page 133)
Your phone is equipped with several personal informationmanagement features that help you manage your busylifestyle.This section shows you how to use these featuresto turn your phone into a time management planner thathelps you keep up with your contacts, schedules, andcommitments.
Section 2G: Using the Phone’s Calendar and Tools 117
Using Your Phone’s Calendar
Displaying your CalendarTo display your calendar:
© Select > Tools > Calendar.
Changing the Calendar SettingsThis setting allows you to change the default settings for yourphone’s calendar. You can customize the calendar displayaccording to your needs.
To change the calendar settings:
1. From the calendar display, select Options (right softkey)> Settings.
2. Select one of the following options and press .
n Holiday to add a holiday to the calendar or edit thecalendar (Set Date, SetWeekly, Reset Date, ResetWeekly, or Reset All).
n Display to change the display settings of thecalendar (Calendar View, Monthly View, or Time starts at).
n Alarm to change the alarm settings of the calendar(Ringer Length, Snooze Interval, or Snooze Times).
3. Use your navigation key to change the settings and press to save and exit.
Tip: To change the calendar display views, select Monthly/Weekly(left softkey). In the weekly view, you can easily add to or edityour own schedule.
Calendar & Tools

118 Section 2G: Using the Phone’s Calendar and Tools
Adding an Event to the CalendarYour Calendar helps organize your time and reminds you ofimportant events. You can schedule up to 200 events.
To add an event:
1. Select > Tools > Calendar.
2. Using your navigation key, highlight the day to whichyou would like to add an event and select Options (rightsoftkey) > Add Schedule.
3. Enter the description using your keypad and press .
4. Select the following items you want to edit and press .
n Description to enter a description for the event.
n Category to select an event category (Appointment,Business, Meeting, Personal, Vacation, Travel, orMiscellaneous).
n Priority to select an event priority (None, High, or Low).
n Start to schedule a start time for the event.
n End to schedule an end time for the event.
n Location to edit a location for the event.
n Alarm to select a ringer type for the alarm.
n Alarm Time to edit the alarm time (number of hoursor minutes before the event starts). The defaultalarm time is 10 minutes before an event.
n Repeat to select a repeating status for the event(Once, Daily, Weekly, Monthly, or Yearly).
5. Select Save (left softkey) to save the event.
Tip: In the monthly view, days with events scheduled are indicatedwith a triangle “ ©.” In the weekly view, times for which youhave scheduled events will be highlighted.

Section 2G: Using the Phone’s Calendar and Tools 119
Event AlertsThere are several ways your phone alerts you to scheduledevents:
v By playing the assigned ringer type.
v By illuminating the backlight.
v By flashing the LED.
Event Alert MenuWhen your phone is turned on and you have an event alarmscheduled, your phone alerts you and displays the eventsummary.
To silence the alarm:
© Press any key to stop the alarm. (The alarm will stop andthen sound again after the selected snooze interval.)
n Press and hold the side camera key to cancel snoozing.
n Select Dismiss (right softkey) to dismiss the event.
Viewing Day’s EventsTo view your scheduled events:
1. Select > Tools > Calendar.
2. From the monthly view, highlight the day for which youwould like to view events and press . (If you haveevents scheduled for the selected day, they will be listedin chronological order.)
3. To display the details of an event listed in the schedule,highlight the event and press .
Tip: If you are in the weekly view, select the highlighted cell in thespreadsheet and press MENUto display the event’s details.
Calendar & Tools

120 Section 2G: Using the Phone’s Calendar and Tools
Event List OptionsWhile you are displaying the day’s events list, select Options(right softkey) to access the following options:
v Add Schedule to add an event to the calendar.
v Add Call Alarm to add a call alarm to the calendar.
v Add To Do to add To Do items to the To Do List.
v Schedule List to display the Schedule List on the calendar.
v Call Alarm List to display the Call Alarm List on the calendar.
v To Do List to display the To Do List on the calendar.
v Edit to edit the event.
v Set Cal. Secret to make an event secret.
v Send Event to send the event via Bluetooth.
v Erase to erase the event.
v Go To Date to jump to another date on the calendar.
v View Memory to view the memory status saved in thephone.
v Erase Memory to erase memory saved in the phone.
v Print to print the calendar events.

Section 2G: Using the Phone’s Calendar and Tools 121
Going to a Specified DateTo use the Calendar menu to get to a specified date:
1. Select > Tools > Calendar > Options (right softkey) > Go to Date.
2. Enter the date you wish to go to using the navigation keyand/or the keypad and press .
Erasing a Day’s EventsTo erase a day’s scheduled events:
1. Select > Tools > Calendar.
2. From the monthly view, highlight the day for which youwould like to erase events and press .
3. Select one of the events and select Options (rightsoftkey) > Erase.
4. Highlight your desired option and press .
n This to erase a single event.
n Select to erase selected events at one time.
n All on This List to erase all events on the list.
5. Select Yes to erase or No to cancel.
Note: The Erase function will not delete events that you havedesignated as “secret.” (See “Event List Options” on page 120.)
Calendar & Tools

122 Section 2G: Using the Phone’s Calendar and Tools
Purging EventsTo delete events scheduled before a specific time and date:
© Select > Tools > Calendar > Options (right softkey) >Erase Memory > Erase Old > Yes.
Purging All EventsTo delete all scheduled events:
1. Select > Tools > Calendar > Options (right softkey) >Erase Memory > Erase All > Yes. (An alert will be displayedasking you to confirm the deletion.)
2. Select Yes (left softkey) to erase all events; select No(right softkey) to cancel.
Note: All events are erased including Call Alarms (see page 123) andTo Do List items (see page 124).

Section 2G: Using the Phone’s Calendar and Tools 123
Adding a Call Alarm to the CalendarYou can set call alarms to notify you when you need to place acall. The call alarm will let you know when and to whom toplace a scheduled call. You can set up to 15 call alarms.
To add a call alarm to the calendar:
1. Select > Tools > Calendar.
2. Select the day to which you want to add a call alarm andselect Options (right softkey).
3. Press the navigation key left or right to selectAdd Call Alarm and press .
4. Enter the phone number directly or select Options (rightsoftkey) for options.
n From Ph. Book to select the desired number fromyour Contacts list.
n Voicemail to select the number for voicemail access.
5. Select the following items you want to edit and press .
n Category to select a category for the call alarm(Appointment, Business, Meeting, Personal, Vacation,Travel, or Miscellaneous).
n Time/Date to edit the start time and date.
n Alarm to select the ringer alarm.
n Repeat to set the Call Alarm’s repeat status (Once,Daily, Weekly, Monthly, or Yearly).
6. Select Save (left softkey).
Tip: You can also add a call alarm from the Contacts menu. (See“Contacts Entry Options” on page 109.)
Calendar & Tools

124 Section 2G: Using the Phone’s Calendar and Tools
Adding To Do List ItemsYour phone can store and manage up to 40 To Do List items.
To add an item to your To Do List:
1. From the Calendar display, select Options (right softkey).
2. Press the navigation key left or right to select Add To Do,and then press .
3. Enter the description using your keypad and press .
4. Select from the following options those you want to editand press .
n Category to select an event category.
n Priority to select an event priority (None, High, or Low).
n Due Time/Date to schedule a due time and date.
n Status to select a status for the To Do items (Needs Action or Completed).
5. Select Save (left softkey) to save the To Do items.
Adding a To Do List Item to the ScheduleTo add a To Do List item to the schedule:
1. From the Calendar display, select Options (right softkey).
2. Highlight Schedule List and press the navigation key leftor right to select different list options.
3. Select To Do List from the options and press .
4. Select the item you want to add to the schedule, andselect Options (right softkey) > Add To Schedule.
5. Enter a description and other information using yourkeypad and press . (See “Adding an Event to theCalendar” on page 118 for entering.)
6. Select Save (left softkey).
Section 2G: Using the Phone’s Calendar and Tools 125
Using Your Phone’s Tools
In addition to helping you be more efficient and organized,your phone offers useful and entertaining tools.
Using the Alarm ClockYour phone comes with a built-in alarm clock with multiplealarm capabilities.
To use the alarm clock:
1. Select > Tools > More Tools > Alarm Clock.
2. Select a number and press .
3. Select the items you want to edit and press .
n Description to enter a description of the alarm.
n Time to enter the alarm time.
n Repeat to select the alarm frequency.
n Alarm to set the alarm on or off.
4. Select Save (left softkey) to save the alarm settings.
Note: Depending on the Power On to Alert setting, the alarmsetting will be active even if the phone is turned off. (See“Setting Power On to Alert” on page 75.)
In a no-service area , it’s necessary to set the actual time anddate to use the Alarm Clock function after removing andinstalling your battery.
Tip: Select On/Off (left softkey) to toggle the alarm on and off.
To change the alert settings, select Settings (right softkey) toset the ringer length and snooze options.
Calendar & Tools

126 Section 2G: Using the Phone’s Calendar and Tools
Using the StopwatchTo start the stopwatch:
© Select >Tools > More Tools > Stop Watch.
n Select Start (left softkey) to start the stopwatch.
n Select Stop (left softkey) to stop the stopwatch.
n Select Resume (left softkey) to restart the stopwatch.
To record a lap time while the stopwatch is running:
n Select Lap (right softkey) to record time of the first lap.
n Select Lap (right softkey) again to record the next lap.(You can record up to five laps.)
To display the stopwatch options:
1. During stopwatch operation, select Options (rightsoftkey).
2. To select an option, highlight it and press .
n Go to Lap List to display a saved Lap List. Select Detail(left softkey) to display the Lap List detail.
n Save to Lap List to save the recorded lap times.
n Reset to reset the time to zero and clear any recordedlap times.

Section 2G: Using the Phone’s Calendar and Tools 127
Using the Countdown TimerThis feature allows you to use the countdown timer withalarm capabilities. You can set up to five timers.
To use the countdown timer:
1. Select > Tools > More Tools > Countdown.
2. Select a number and press .
3. Select the items you want to edit and press .
n Description to enter a description of the countdown.
n Time to enter the countdown time.
n Alarm to set the countdown alarm on or off.
4. Select Save (left softkey) to save the countdown settings.
World ClockThis feature is available only in digital service areas.
To view the time in different locations:
1. Select > Tools > More Tools > World Clock.
2. Press the navigation key left or right to scroll throughdifferent time zones.
Tip: Select Summer (left softkey) or Standard (right softkey) toselect daylight saving or standard time (if applicable).
Note: This feature is not available while your phone is turned off.
Tip: Select On/Off (left softkey) to toggle the countdown alarm on and off.
To change the alert settings, select Settings (right softkey) toset the ringer length and snooze options.
Calendar & Tools

128 Section 2G: Using the Phone’s Calendar and Tools
Using the CalculatorYour phone comes with a built-in calculator.
To use the calculator:
1. Select > Tools > More Tools > Calculator.
2. Enter numbers using your keypad.
3. Press the appropriate navigation key for an arithmeticoption (Up for addition, Down for subtraction, Left formultiplication, Right for division). Press the left softkeyto insert a decimal point.
4. Enter numbers and press for the result.
n To clear the numbers, select CLR (right softkey).
Updating Your PhoneThe update phone software option allows you to downloadand update the software in your phone over the air. Only theinternal software is updated; no Contacts entries or otherinformation saved in your phone will be deleted.
To update your phone through the Tools menu:
1. Select > Tools > Update Phone.
2. If a new software version is available, select Yes (leftsoftkey) to continue.
3. Read the onscreen information and select Next (leftsoftkey) to continue.
4. Select Update Phone to update your phone.
Note: If your phone’s signal strength is low, Update Phone may notbe completed. Please update your phone when you’re in anarea with better signal strength.

Section 2G: Using the Phone’s Calendar and Tools 129
Connecting Your Phone to Your PC
Before using your phone’s mass storage capabilities, you needto prepare your phone’s data services to synchronize withyour desktop or laptop computer. Once the phone isconnected to the PC, you can transfer your data to or from thephone quickly and easily.
To connect your phone to your PC:
1. Select >Tools > USB Connection > Mass Storage.
2. Connect your phone to your PC using the provided USBcable. (Wait for the connection to be completed. Whenconnected, the host computer will automatically detectyour phone.)
To remove the connection:
© When you have finished transferring data, click the USBdevice icon on your computer’s taskbar, and follow theonscreen instructions to safely unplug the USB cable.(The process may vary depending on the PC.)
Note: Make sure your battery is fully charged before using the Mass Storage function.
We recommend using Windows 2000/ME/XP.Synchronization is guaranteed only for computers using oneof these operating systems.
To avoid loss of data, DO NOT remove the USB cable or thebattery while files are being accessed or transferred.
DO NOT turn off or restart your computer, or put it intostandby mode, while using a mass storage device. Doing sowill result in loss or damage of data.
While you areconnected to the computer, your phone’s screenwill display“Phone Off.” You cannot make or receive calls.
Calendar&Tools

130 Section 2G: Using the Phone’s Calendar and Tools
File Manager
File Manager allows you to manage your files such as pictures,videos, music and applications stored in the phone’s memory.With this feature, you can search, move, erase, import,rename and open files more easily.
Accessing File Manager To access file manager:
© Select >Tools > File Manager. (The preset folders willbe displayed: DCIM, MEDIA, MUSIC, and VOICE.)
File Manager Icon Indication
Note: If you want to delete all files in File Manager, be sure to deleteyour files using only the phone’s Security menu. (See “ErasingPhone Content” on page 85.) If you delete all files using a PC,the File Manager will not work properly.
Content Type Icons File Extension
Picturem3g
jpeg, jpg, wbmp, png, bmp, gif
Video m4v, mp4, 3gp, 3gpp, 3gp2, 3g2
Audio
mp3, aac, m4a, amr
qcp
mid, midi
pmd
Contact vcf
Calendar vcs
Unknown unsupported file format

Section 2G: Using the Phone’s Calendar and Tools 131
Opening Files in the File ManagerTo open files in the file manager:
1. Select >Tools > File Manager.
2. Select your desired folder and press .
3. Use your navigation key to select an item you wish to open.
Using File Manager OptionsWhen you are navigating files and folders in the file manager,several user options are available by selecting Options (rightsoftkey). To select an option, highlight it and press .
v Move to move the file from the current folder to anotherfolder.
v Erase to delete the file or folder from File Manager.
v Import to import the phonebook file or the calendar file.
v View to view the image file.
v Listen to listen to the audio file.
v Play to play the audio/video file.
v Sort by to sort folder contents by name, date, or size.
v Properties to view the properties of the file.
v Rename to change the name of the selected file.
v Set as to set images as your wallpaper, screen saver, orCaller ID for the contacts.
Note: You may not be able to use the file if you change the filenameextension.
Calendar&Tools
132 Section 2G: Using the Phone’s Calendar and Tools
Sorting the Folder Contents To sort the folder contents:
1. Select > Tools > File Manager.
2. Select the folder that includes the content you want tosort and press .
3. Select Options (right softkey) > Sort by.
4. Select an item (Name, Size, or Date) and press .
5. Select Ascending or Descending and press .
Viewing Memory in File ManagerTo view the used and available memory in File Manager:
1. Select > Tools > File Manager.
2. Select Options (right softkey) > View Memory. (The usedand available memory space will be displayed.)

Section 2G: Using the Phone’s Calendar and Tools 133
Personal Information Management
Displaying Your User AddressTo display the phone’s current user address:
© Select > Settings > Phone Info > Phone#/User ID.
Finding Icon DefinitionsTo view an explanation of icons that appear on the display:
1. Select > Settings > Phone Info > Icon Glossary.
2. Select the item for which you want to see the explanationand press . (The icon’s explanation appears.)
Displaying the Version InformationTo display the version number of the software, hardware, PRL(Preferred Roaming List), PRI (Product Release Instructions), etc.,installed on your phone:
© Select > Settings > Phone Info > Version.
Displaying Advanced InformationTo display advanced information such as frequency and othertechnical information:
© Select > Settings > Phone Info > Advanced.
Displaying Your Phone StatusTo display the phone’s current phone status:
© Select > Settings > Phone Info > Phone Status.
Calendar & Tools

134 Section 2H: Using Your Phone’s Voice Services
Section 2H
Using Your Phone’s Voice Services
In This Section
l Using Voice-Activated Dialing (page 135)
l Using Automatic Speech Recognition (page 137)
l Using the Voice Recorder (page 144)
l Setting Up Screen Call (page 149)
Your phone’s Voice Services let you place calls using your voice,store voice reminders, and record memos right on your phone.This section includes easy-to-follow instructions for usingvoice-activated dialing and managing voice memos.

Section 2H: Using Your Phone’s Voice Services 135
Using Voice-Activated Dialing
In addition to Sprint PCS Voice Command (see page 246), youcan use a voice dial tag to automatically dial a phone numberin your Contacts. (A voice dial tag is a command you recordand use to place calls without using the keypad.) Your phonecan store up to 30 voice dial tags.
Making a Call Using Voice-Activated DialingTo use a voice dial tag to call a phone number:
1. Press and hold or .
2. Follow the voice prompts and recite the entry’s voice dialtag into your phone’s microphone.
Programming Voice Dial TagsTo program a voice dial tag:
1. Display a Contacts entry.
2. Select a contact and press .
3. Select a phone number, and then select Options (rightsoftkey) > SetVoice Tag > Add.
4. After you are prompted to say the name you wish toprogram, wait for the beep and then say the name intoyour phone’s microphone.
Tip: Record voice dial tags in a quiet environment.
Note: Please set the Voice Prompt feature (see page 50) to On beforeusing the Voice-Activated Dialing so that you can hear thevoice instruction from the phone. The default setting is off.
Voice Services

136 Section 2H: Using Your Phone’s Voice Services
5. Respond to the prompt by repeating the name after thebeep. (The display shows “Voice Tag Recorded.”)
n If you set a voice tag, the icon is shown next tothe phone number on the Contacts list.
Reviewing Voice Dial TagsTo review voice dial tags:
1. Display a Contacts entry.
2. Select a voice dial entry you want to review and press .
3. Highlight the desired voice dial entry and select Options(right softkey) > SetVoice Tag.
4. To select an option, highlight it and press .
n Play to play the selected voice dial tag.
n Play:Speaker to play the tag in speakerphone mode.
n Change to change the recorded voice dial tag.
n Erase to erase the voice dial tag. Select Yes to erase;select No to cancel.
Erasing All Voice Dial TagsTo erase all voice dial tags:
1. Select > Settings > Security, and then enter your lockcode. (The Security menu is displayed.)
2. Select Erase/Reset > Erase Voice Tag.
3. Select OK (left softkey), and then select Yes to erase allrecorded voice dial tags; select No to cancel.

Section 2H: Using Your Phone’s Voice Services 137
Using Automatic Speech Recognition
Your Sprint PCS Phone is equipped with an Automatic SpeechRecognition (ASR) feature. This feature allows you to makecalls or use the phone’s functions by simply using your voice.All you have to do is to talk into the phone, and the phone willrecognize your voice and complete tasks by itself.
Activating Automatic Speech RecognitionTo activate Automatic Speech Recognition:
© From standby mode, press .
The phone displays the Command menu and prompts you tosay the name of the command you want to use. To completeyour task, simply follow the voice prompts.
The following is a list of available ASR commands:v Call to call an entry in your Contacts list. (See page 138 for
details.)v Dial Number to dial a phone number by speaking the
number. (See page 139 for details.)v Find to find an entry stored in your Contacts list. (See
page 139 for details.)v International to make an international call. (See page 140
for details.)v Phone Status to tell you the current phone status.v Voice Tag to call an entry in your Contacts list by speaking
voice tag. (See page 140 for details.)v MyPhone# to display your phone number.v DigitTraining to train the phone to your voice to achieve
better recognition. (See page 141 for details.)v Prompt On or Prompt Off to activate or deactivate voice
prompt.
VoiceServices
138 Section 2H: Using Your Phone’s Voice Services
v Go to <item or application> to jump directly to the menuitems or applications. (See page 142 for details.)
Making a Voice Call by Using ASRWith ASR, you can make a voice call by speaking a name,phone number, or using a voice tag.
Tomakeavoicecall byspeaking a name:
1. Press to activate the Command menu.
2. Say “Call” to your phone.
3. Say the full name of a contact in your Contacts list (forexample, “John Jones”).
4. Say the phone type you’d like to call (for example,“Mobile”).
5. The phone will automatically place a call if it recognizesyour voice.
6. When you are finished, press .
Tip: During ASR operation, you can also select your desired itemsby using the navigation key or pressing available softkeys onthe display.
Shortcut: To execute several commands at a time, you can also sayseveral commands continuously (for example, “Call,John Jones, Mobile”).
Tip : During ASR operation, select Help (right softkey) to getinstructions for Automatic Speech Recognition.
Note : Use the Automatic Speech Recognition feature in a quietenvironment so it can accurately identify your voice.
Tip: When you display a Command menu, say “More” or “Previous”to display additional commands or go back to the previouscommand display.

Section 2H: Using Your Phone’s Voice Services 139
To make a call by speaking a phone number:
1. Press to activate the Command menu.
2. Say “Dial Number” to your phone.
3. Say the phone number you wish to dial one digit at a time.
4. The phone automatically places the call if it recognizesyour voice.
5. When you are finished, press .
Finding Contacts List EntriesThis feature allows you to find an entry in your Contacts list bysaying the name.
To find a contact in the Contacts list:
1. Press to activate the Command menu.
2. Say “Find” to your phone.
3. Say the full name of a contact in your Contacts list (forexample, “John Jones”).
4. The phone will display the contact details for therecognized name.
5. To make a call, select the desired number from the list byusing your navigation key and press .
Note: If the phone does not recognize the name/number, the phonewill find the most likely match name/number and display alist of up to three names/numbers. You will hear the voiceprompt “Did you say…” followed by the matchedname/number.You can confirm the name/number by saying“Yes,” or say “No” to change the selection.
Shortcut: You can also say “Dial Number” followed by the numberyou want to call.
VoiceServices

140 Section 2H: Using Your Phone’s Voice Services
Making a Call Using a Voice TagWith a voice tag you record, your phone will automatically diala phone number. (To create a voice tag, see “ProgrammingVoice Dial Tags” on page 135.)
To make a call by using a voice tag:
1. Press to activate the Command menu.
2. Say “Voice Tag” into your phone.
3. Say your recorded voice tag. (The phone automaticallyplaces the call if it recognizes your voice.)
4. When you are finished, press .
Making International Calls by Using ASRYour phone’s ASR Dialing feature allows you to makeinternational calls by speaking the digits of the country code.
Tomakeinternational calls byusing ASR:
1. Press to activate the Command menu.
2. Say “International.”
3. Say the country code one digit at a time.
4. Say the phone number you wish to dial one digit at a time.(The phone automatically places the call if it recognizesyour voice.)
5. When you are finished, press .
Section 2H: Using Your Phone’s Voice Services 141
Using DigitTrainingThis feature allows you to train the phone to recognize yourvoice when speaking a phone number. You can get betterrecognition accuracy by programming your intonationpattern into your phone.
To program DigitTraining:
1. Press to activate the Command menu.
2. Say “DigitTraining.”
3. Say “Start” or select Start (left softkey) to startprogramming.
4. Follow the voice prompts and recite the digits into yourphone’s microphone. (A voice prompt will indicate thecurrent rate of adaptation.)
5. Respond to the voice prompt repeatedly untiladaptation is complete. (When you have finishedtraining, you will hear a confirmation that theadaptation has been successfully completed.)
To activate DigitTraining:
1. Press to activate the Command menu.
2. Say “DigitTraining.”
3. Say “On” or select On (right softkey) to activate theexisting data. (A voice prompt will announce theactivation of digit training.)
Note: Try digit training in a quiet environment for the best results.When you train, make sure you speak clearly and distinctly inyour natural voice.
Voice Services

142 Section 2H: Using Your Phone’s Voice Services
To deactivate DigitTraining:
1. Press to activate the Command menu.
2. Say “DigitTraining.”
3. Say “Off” or select Off (right softkey) to deactivate theexisting data. (A voice prompt will announce thedeactivation of digit training. The adaptation returns toits default setting.)
Opening the Menu by Using ASRThis feature allows you to jump directly to the menu items orapplications by saying “Go to” followed by an item in the menu.
To access the menu by using ASR:
1. Press to activate the Command menu.
2. Say “Go to” and the menu you want to open (forexample, “Go to Messaging”).
3. The menu you have chosen will open.
Section 2H: Using Your Phone’s Voice Services 143
Making a Sprint PCS Ready Link Call by Using ASRYou can place a Sprint PCS Ready Link call by using automaticspeech recognition from your Sprint PCS Ready Link List. Tomake a Sprint PCS Ready Link Call, your phone’s Sprint PCSReady Link mode must be set to Enable. (See “Setting Sprint PCS Ready Link Mode” on page 181 for details.)
To make a Sprint PCS Ready Link Call by using ASR:
1. Press and hold the Ready Link/Recorder button on theside of your phone ( ). (The Command menu of yourSprint PCS Ready Link List will display.)
2. Choose from one of the following options:
n Call to place a Sprint PCS Ready Link call from thePersonal List.
n Group to place a Sprint PCS Ready Link call from thePersonal Groups.
n Company Call to place a Sprint PCS Ready Link callfrom the Company List (if applicable).
n CompanyGroup to place a Sprint PCS Ready Link callfrom the Company Group List (if applicable).
n Dial Number to place a Sprint PCS Ready Link call byspeaking a number.
3. Say “Call,” “Group,” “Company Call,” “Company Group,” or“Dial Number.”
4. Say the contact’s name in your Sprint PCS Ready Link Listor the digits of the phone number. (Wait for the prompt.)
5. To place the call, press and hold . (See “Making andReceiving a Sprint PCS Ready Link Call” on page 183 fordetails.)
Tip: If you say “Call” or “Dial Number” during step 4 above, you cansay additional commands continuously (for example, “Call,John Jones” or “Dial Number, 999-999-9999”).
VoiceServices

144 Section 2H: Using Your Phone’s Voice Services
Using the Voice Recorder
With this feature, you can easily record meetings, lectures, oreven brief memos to remind you of important events, phonenumbers, or grocery list items.
Recording Voice MemosTo record a voice memo:
1. Select > Tools > Voice Services > Voice Recorder > Record or Record:Speaker.
2. Start recording after the beep.
To end the recording of your voice memo:
© Press , or .
Shortcut: From standby mode, press and hold the ReadyLink/Recorder button on the side of the phone to record avoice memo.
Note: Your phone can store up to 1000 voice memos (maximumrecording time for each memo is 12 hours).
The total recording time depends on the available memoryspace on your phone.
Tip: If you haven’t signed up for the Sprint PCS Ready Link serviceand Sprint PCS Ready Link mode is set to Disable or the Sprint PCS Ready Link service is locked, you can use the ReadyLink/Recorder Button as a Voice Recorder button in standbymode. You can use it to record memos or display voice recorderoptions.

Section 2H: Using Your Phone’s Voice Services 145
To record a voice memo with the phone closed:
1. When the phone is closed, press the side camera key toactivate the launch menu.
2. Press the external control key up or down to selectVoice Recorder, and press .
3. Select Record:Speaker and and press .
4. Start recording after the beep.
To end the recording of your voice memo:
© Press and hold .
Reviewing Voice MemosTo play the voice memos you have recorded:
1. Select > Tools > Voice Services > Voice Recorder > Play orPlay:Speaker > Voice Data.
2. Select a voice memo from the list or select All if you wantto play all voice memos continuously.
3. Select Play (left softkey) to play the voice memos.
n Select Speed (left softkey) to change the playingspeed.
n Select Pause (right softkey) to pause. To restart,select Play (right softkey).
To review the voice memos with the phone closed:
1. Press the side camera key to activate the launch menu.
2. Using the side volume key or external control key, selectVoice Recorder.
3. Select Play:Speaker > Voice Data.
4. Select the voice memo you want to play and press to play.
Voice Services
146 Section 2H: Using Your Phone’s Voice Services
Setting the Recording GuardWith this feature, you can record voice memos withoutinterruption by incoming calls.
To set the recording guard:
1. Select >Tools > Voice Services > Voice Recorder.
2. Highlight Record or Record:Speaker, and then selectRecGuard (right softkey).
3. Select On or Off and press .
While Recording Guard is on, your phone’s standby screen willdisplay “Phone Off.” You cannot make or receive calls.
Voice Memo OptionsThere are several user options available for managing voicememos.
To display the voice memo options:
1. Select >Tools > VoiceServices > Voice Recorder > Play orPlay:Speaker > Voice Data.
2. Select the desired voice memo and select Options (rightsoftkey).
3. To select an option, highlight it and press .n Speaker On or Speaker Off to activate or deactivate
speakerphone mode.n PlaySelected or PlayAll to play a selected voice memo
or all voice memos.n Display/Edit to edit or display details relating to your
voice memos.n Go to Time to set the starting point of the recording.n Send via Bluetooth to send voice memo via
Bluetooth.n Erase or Erase All to erase an individual memo or all
voice memos.

Section 2H: Using Your Phone’s Voice Services 147
Erasing Voice MemosTo erase an individual voice memo:
1. Select > Tools > Voice Services > Voice Recorder > Play orPlay:Speaker > Voice Data.
2. Select the memo you want to erase and select Options(right softkey) > Erase > Yes.
To erase all voice memos:
1. Select > Tools > Voice Services > Voice Recorder > Erase All > Voice Data.
2. Select Yes to erase all voice memos saved in the phone.
Recording Call MemosYou can use your phone’s Voice Services to record the otherparty’s voice during a phone call.
To record a call memo:
1. During a call, select Options (right softkey) > Tools > Voice Services > Call Memo > Record.
2. Start recording after the beep.
3. To finish recording, press or .
n Recording also stops when the call is disconnected.
Tip : To record a call memo with the phone closed, press and holdthe Ready Link/Recorder button while you’re on a call.
Note: Only the other party’s voice is recorded during this process.
Tip: If you select All during step 1 above, you can erase all voicerecordings (voice memos and call memos) saved in the phone.
Voice Services

148 Section 2H: Using Your Phone’s Voice Services
Reviewing Call MemosTo play the call memos you have recorded:
1. Select >Tools > Voice Services > Voice Recorder > Play orPlay:Speaker > Call Memo.
2. Select a call memo from the list or select All if you wantto play all call memos continuously.
3. Press to play the call memos.
n Select Slow (left softkey) or Fast (right softkey) tochange the playing speed.
To review the call memos with the phone closed:
1. Press the side camera key to activate the launch menu.
2. Using the side volume key or external control key, selectVoice Recorder.
3. Select Play:Speaker > Call Memo.
4. Select the call memo you want to play and press toplay.
Erasing Call MemosToerase an individual call memo:
1. Select >Tools > Voice Services > Voice Recorder > Play orPlay:Speaker > Call Memo.
2. Select the memo you want to erase and select Options(right softkey) >Erase > Yes.
To erase all call memos:
1. Select >Tools > Voice Services > Voice Recorder > Erase All > Call Memo.
2. Select Yes to erase all call memos saved in the phone.

Section 2H: Using Your Phone’s Voice Services 149
Setting Up Screen Call
This feature enables you to screen incoming calls by using arecorded announcement, either one that is prerecorded orone that you have recorded. You can also record the caller’smessage into the Voice Data list.
Activating Screen CallTo start Screen Call when you have incoming calls:
© When the phone rings or vibrates, select Options (rightsoftkey) > Screen Call.
To set Auto Screen Call:
1. Select > Tools > Voice Services > Screen Call > Auto.
2. Select On and press .
3. Set the answering time by using numeric keys or bypressing the navigation key up or down.
4. Select OK (left softkey). (The icon is displayed on thestandby display.)
Selecting an Announcement for Screen CallTo select a Screen Call announcement:
1. Select > Tools > Voice Services > Screen Call >Announcement.
2. Select Pre-Recorded or Custom and press .
Tip: While the caller’s message is being recorded, press TALK toanswer the call, or press END to stop recording and disconnectthe call.
Voice Services
150 Section 2H: Using Your Phone’s Voice Services
Recording Your Name for a PrerecordedAnnouncement
You can use a prerecorded announcement with or withoutyour name. If you record your name, your phone adds yourname to the prerecorded message to announce that you arenot available to answer calls.
To record your name:
1. Select > Tools > Voice Services > Screen Call >Announcement.
2. Select Pre-Recorded and select Edit (right softkey) >Record Name.
3. Press to start the first recording. (Press to stoprecording. The maximum recording time is 12 seconds.)
4. After the first recording, press again to start thesecond recording.
5. Press to stop recording.
Recording a Customized AnnouncementTo record an announcement:
1. Select > Tools > Voice Services > Screen Call >Announcement.
2. Select Custom and select Edit (right softkey) > Record.
3. Press to start the first recording. (Press to stoprecording. The maximum recording time is 12 seconds.)
4. After the first recording, press again to start thesecond recording.
5. Press to stop recording.

Section 2H: Using Your Phone’s Voice Services 151
Reviewing an AnnouncementTo review an announcement:
1. Select > Tools > Voice Services > Screen Call >Announcement.
2. Select Pre-Recorded or Custom, and select Edit (rightsoftkey) > Play or Play:Speaker.
Erasing an AnnouncementTo erase an announcement:
1. Select > Tools > Voice Services > Screen Call >Announcement.
2. Select Pre-Recorded or Custom, and select Edit (rightsoftkey).
3. Select Erase or Erase Name. (A confirmation will bedisplayed.)
4. Select Yes and press .
Voice Services

152 Section 2I: Using the Built-in Camera
Section 2I
Using the Built-in Camera
In This Section
l Taking Pictures (page 153)
l Using the Settings & Info Menu (page 161)
l Recording Videos (page 163)
l Storing Pictures and Videos (page 168)
l Sending Sprint PCS Picture Mail (page 171)
l Managing Sprint PCS Picture Mail (page 174)
l Printing Pictures Directly From Your Phone (page 178)
Your phone’s built-in camera gives you the ability to take full-color digital pictures, view your pictures using the phone’sdisplay, and instantly send them to family and friends. It’s funand as easy to use as a traditional point-and-click camera:just take a picture, view it on your phone’s display, and sendit from your phone to up to 25 people.
This section explains the features and options of yourphone’s built-in camera.

Section 2I: Using the Built-in Camera 153
Taking Pictures
Taking pictures with your phone’s built-in camera is as simpleas choosing a subject, pointing the lens, and pressing abutton. You can activate the phone’s camera mode whetherthe phone is open or closed.
To take a picture with the phone open:
1. Select >Pictures > Camera to activate camera mode.(Additional camera options are available through thecamera mode Options menu. See “Camera ModeOptions” on page 156 for more information.)
2. Using the phone’s Main LCD as a viewfinder, aim thecamera lens at your subject.
3. Press , , or the side camera key until the shuttersounds.
4. To save the picture, select Save (left softkey). (The picturewill be saved in the In Phone folder.)
n To discard the picture and return to camera mode,press , or Cancel (right softkey).
5. Select Next (right softkey) for more options:
n Take New Picture to return to camera mode to takeanother picture.
n Send to Contacts to send your picture. (See page 171for details.)
Tip: You may lock the focus manually by selecting Focus Lock (leftsoftkey).
Shortcut: To activate camera mode, you can also press and hold thecamera key.
Camera

154 Section 2I: Using the Built-in Camera
n Print to print an image by mail, at a retail store, byusing PictBridge, or by using Bluetooth.
n Post to Services to access available services. SelectUpdate to display the latest services.
n Upload to upload the picture you just took to theSprint PCS Picture Mail Web site(www.sprint.com/picturemail). Depending on yoursettings, you may be prompted to accept a dataconnection.
n Review Media to go to the In Phone folder to reviewyour saved pictures and videos.
n Send via Bluetooth to send a picture via Bluetooth.
n Set as to assign the picture. Select an option andpress .
n Delete to delete the picture you just took.
n Details/Edit to edit or display details relating to yourpictures.
To take a picture with the phone closed:
1. Press the side camera key to activate the launch menu.
2. Select Camera.
3. Point the camera lens at your subject. (You can check thepicture framing through the external display screen.)
4. Press the side camera key or on the external controlkey to take the picture.
Section 2I: Using the Built-in Camera 155
Creating Your Sprint PCS Picture Mail PasswordThe first time you use any of the picture management optionsinvolving the Sprint PCS Picture Mail Web site, you will need toestablish a Sprint PCS Picture Mail password through yourphone. This password will also allow you to sign in to theSprint PCS Picture Mail Web site atwww.sprint.com/picturemailto access and manage your uploaded pictures and albums.
To create your Sprint PCS Picture Mail password:
1. Select > Pictures > My Albums > Online Albums. (You will be prompted to create a Sprint PCS Picture Mailpassword.)
2. Enter your password and press . (You will beprompted to confirm your password.)
3. Please wait while the system creates your account.
Once you have received confirmation that your account hasbeen successfully registered, you may upload and sharepictures and access the Sprint PCS Picture Mail Web site.
Tip: Write down your Sprint PCS Picture Mail password in a secureplace.
Note: If your Sprint PCS service plan does not include Sprint PCSPicture Mail, you will first be prompted to subscribe to theservice for an additional monthly charge.
Camera

156 Section 2I: Using the Built-in Camera
Camera Mode OptionsWhen the phone is open and in camera mode, select Options(right softkey) to display additional camera options:
v Picture Mode to select a picture mode from Normal,Beach/Snow, Scenery, Mirror Image, Night/Dark, or Self Portrait.
v Flash to activate the flash. (See “Setting the Flash” on page 157 for details.)
v Auto Focus to use the autofocus functions. (See “SettingAuto Focus” on page 159 for details.)
v Zoom to zoom in on a subject. (See “Using the Zoom” onpage 159 for details.)
v Self-Timer to activate the camera’s timer. (See “Setting theSelf-Timer” on page 157 for details.)
v Fun Tools to select an option from the following:n Multiple Shots to take multiple shots. (See “Taking
Multiple Shots” on page 158.)n Fun Frames to select your favorite fun picture frame
to decorate your picture.n Color Tone to select a wide variety of color tones for
the picture.v ImageControls to select an option from Brightness,
White Balance, Sharpness, or Contrast.v CameraSettings to select your settings. (See “Selecting
Camera Settings” on page 160 for details.)v ReviewMedia to go to the In Phone folder to review your
saved pictures and videos.v Camcorder Mode to switch to video mode. (See “Recording
Videos” on page 163 for details.)v Key Guidance to indicate the key functions in camera mode.v My Favorite Settings to select your favorite setting.

Section 2I: Using the Built-in Camera 157
Setting the Flash
To activate the flash:
1. From camera mode, select Options (right softkey) > Flash.
2. Select one of the following options and press :
n Off to deactivate the flash.
n On This Shot to activate the flash for one shot.
n On Always to activate the flash for all pictures.
n Auto to activate the flash automatically.
Setting the Self-Timer
To activate the self-timer:
1. From camera mode, select Options (right softkey) > Self-Timer.
2. Highlight the length of delay you want the timer to use(10 Seconds or 5 Seconds) and press .
3. Select Start (left softkey) when you are ready to start thetimer. ( appears on the upper right portion of theMain LCD during the self-timer countdown.)
4. Get ready for the picture. (When the timer is down tothree seconds, the self-timer icon will turn red and thephone will begin to beep.)
To cancel the self-timer after it has started:
© Select Cancel (right softkey).
Note: While the self-timer is active, all keys are disabled exceptBack, END, and the right softkey button (Cancel).
Camera
Note: While the phone is open and in camera mode, press toswitch between flash modes.

158 Section 2I: Using the Built-in Camera
Taking Multiple Shots
This feature allows you to take up to nine continuous shots insequence. When you take multiple shots, the icon will bedisplayed in the viewfinder.
To take multiple shots:
1. From camera mode, select Options (right softkey)> Fun Tools > Multiple Shots.
2. Select an option from the following and press .
n Off to deactivate multiple shots.
n 3 Shots to take a series of 3 shots.
n 6 Shots to take a series of 6 shots.
n 9 Shots to take a series of 9 shots.
3. Select the duration of the interval between shots(Normal or Fast ) and press .
4. Select to take the pictures.
5. Select Save (left softkey) to save the pictures. (TheMultiple Shots folder will be displayed, up to ninethumbnail pictures per screen.)
6. Select Next (right softkey) to display picture options, orpress to return to Camera mode to take anotherpicture.
Note: When taking multiple shots, the resolution is temporarily setto Low (240x320).

Section 2I: Using the Built-in Camera 159
Setting Autofocus
With this feature, you can adjust the focus automaticallydepending on the distance of the subject from the cameralens. By default, the autofocus is set to on.
To set autofocus:
1. From camera mode, select Options (right softkey) >Auto Focus.
2. Select On or Off and press .
n While in camera mode, you can select Focus Lock (leftsoftkey) to lock the focus. To take the picture, selectCapture (left softkey), or press , , or the sidecamera key.
Using the Zoom
This feature allows you to zoom in on an object when you takea picture. You can adjust the zoom from 1x to 16x.
To use the zoom:
1. From camera mode, press the navigation key right orleft, or the Side Volume key up or down to adjust thezoom. (The gauge bar is displayed.)
2. Press to take the picture.
Tip: If you are taking a picture with the phone closed, you canzoom in and out by pressing the external control key left orright.
Camera

160 Section 2I: Using the Built-in Camera
Selecting Camera SettingsTo select your camera settings:
1. From camera mode, select Options (right softkey) >Camera Settings.
2. Select one of the following options and press :
n Resolution to select a picture’s file size (2M-1200x1600, 1.3M-960x1280, Medium-480x640,or Low-240x320).
n Quality to select the picture quality setting (Fine,Normal, or Economy).
n Shutter Sound to select a shutter sound (Default, Say “Cheese,” “Ready,” or Off).
n Status Bar to switch the status bar display on or off.

Section 2I: Using the Built-in Camera 161
Using the Settings & Info Menu
The Settings & Info menu allows you to set up many of thesettings of your phone’s picture’s function.
To access the settings and info menu:
1. Select > Pictures > Settings & Info.
2. Select one of the following options and press .
n Location to select whether to include the locationinformation.
n Status Bar to select whether to display theinformation bar for the pictures and videos.
n Slideshow Interval to set the slideshow interval time.
n Account Info to view your account information.
n Help to view the Pictures instruction page.
Camera

162 Section 2I: Using the Built-in Camera
Camera Icon Indication
Function
Flash
Picture Mode
White Balance
Contrast
To use a flash every time you take a picture.
To use the auto flash function.
Use this setting for sunny weather.
Use this setting for cloudy weather.
Use this setting for standard household lighting.
Use this setting for fluorescent lighting.
To set the white balance manually.
To set contrast manually.
Sharpness To set sharpness manually.
Brightness To set brightness manually.
To use the flash for only one shot.
Use this setting in bright light.
Use this setting for scenery from a distance.
Use this setting to take a mirror image.
Use this setting in low light.
On This Shot
On Always
Auto
Beach/Snow
Scenery
Mirror Image
Night/Dark
Sunny
Cloudy
Tungsten
Fluorescent
Manual
Manual
Manual
Manual
Icons Details
Auto Focus To use the autofocus function.
Multiple Shots Use this setting for multiple shots.
Self-Timer Numeric countdown will appear when the self-timer has been activated.
ResolutionFor 1.3 megapixel picture resolution.
For 2 megapixel picture resolution.
For medium picture resolution.
For low picture resolution.
2M
1.3M
Medium
Low
Section 2I: Using the Built-in Camera 163
Recording Videos
In addition to taking pictures, you can also record, view, andsend videos to your friends and family with your phone’s built-in video camera.
To record a video:
1. Select >Pictures > Camcorder to activate video mode.(Additional video options are available through thevideo mode Options menu. See “Video Mode Options”on page 165 for more information.)
2. Using the phone’s main LCD as a viewfinder, aim thecamera lens at your subject.
3. Press , , or the side camera key to begin recording.
4. Press , Stop (right softkey), or the side camera key tostop recording. (The recorded video is automaticallysaved in the In Phone folder.)
5. Select Next (right softkey) for more options:
n TakeNewVideo to return to video mode to takeanother video.
n Play to play the video you just took.
n Send to Contacts to send your video. (See page 171for details.)
n Post to Services to access available services. Select Update to display the latest services.
n Upload to upload the video you just took to theSprint PCS Picture Mail Web site.
Tip: You may lock the focus manually by selecting Focus Lock (leftsoftkey).
Camera

164 Section 2I: Using the Built-in Camera
n Review Media to go to the In Phone folder to reviewyour saved pictures and videos.
n Send via Bluetooth to send the video via Bluetooth.
n Set as to assign the video. Select an option and press .
n Delete to delete the video you just took.
n Details/Edit to edit or display details relating to yourvideos.
To take a video with the phone closed:
1. Press the side camera key to activate the launch menu.
2. Using the side volume key or external control key, selectCamcorder.
3. Point the camera lens at your subject. (You can check thevideo framing through the Sub LCD.)
4. Press the side camera key or on the external controlkey to start recording.
5. Press the side camera key or on the external controlkey to stop recording.

Section 2I: Using the Built-in Camera 165
Video Mode OptionsSeveral options are available from video mode.
Select Options (right softkey) to display additional options:
v Video Mode to select a video mode from Normal,Beach/Snow, Scenery, Mirror Image, Night/Dark, or Self Portrait.
v Video Light to select a Video Light setting. Select On to turnon the video light.
v Auto Focus to use the autofocus function.
v Zoom to zoom in on an object. You can adjust the zoomfrom 1x to 9x.
v Self-Timer to activate the timer function. (See “Setting theSelf-Timer” on page 157 for details.)
v Color Tone to select a wide variety of color tones for your video.
v Image Controls to select an option from Brightness,White Balance, or Contrast.
v Camcorder Settings to select your settings. (See “SelectingCamcorder Settings” on page 166 for details.)
v Review Media to go to the In Phone folder to review yoursaved pictures and videos.
v CameraMode to switch to camera mode (if applicable).
v KeyGuidance to indicate the key functions in video mode.
v My Favorite Settings to select your favorite setting.
Camera

166 Section 2I: Using the Built-in Camera
Selecting Camcorder SettingsTo select your camcorder settings:
1. From video mode, select Options (right softkey) >Camcorder Settings.
2. Select an option from the following.
n Resolution to select a file size (High–320x240 orGood–176x144) for a video.
n Quality/Length to select video quality from Economy–30sec., Normal–15sec., Rich–10sec., or Rich–120min.
n Silent Movie to select On to record without sounds.Select Off to deactivate this feature.
n Cue Sound to select a cue sound (Default, “Action & Cut,”“Ready & Stop,” or Off).
n Skins to select your favorite frame.
Note: Recording time varies depending on the Quality/Lengthsetting.
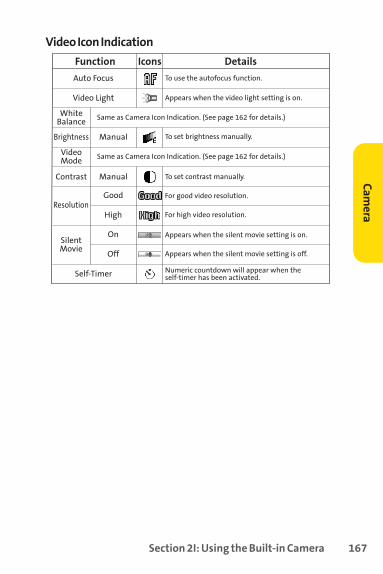
Section 2I: Using the Built-in Camera 167
Video Icon Indication
Function
For good video resolution.
For high video resolution.
Icons
ResolutionGood
High
Appears when the silent movie setting is on.
Appears when the silent movie setting is off.
Silent Movie
On
Off
Manual
Video Light Appears when the video light setting is on.
Brightness
Same as Camera Icon Indication. (See page 162 for details.)White Balance
Same as Camera Icon Indication. (See page 162 for details.)Video Mode
Manual To set contrast manually.Contrast
To set brightness manually.
Details
Self-Timer Numeric countdown will appear when the self-timer has been activated.
Auto Focus To use the autofocus function.
Camera

168 Section 2I: Using the Built-in Camera
Storing Pictures and Videos
Your phone’s picture and video storage area is called My Albums.There are two types of storage areas for your pictures andvideos that can be used separately according to your needs:
v In Phone (see below)
v Online Albums (see page 175)
In Phone FolderThe storage area of your phone is called the In Phone folderand it can store up to 1000 images. From the In Phone folder,you can view pictures and videos saved in your phone, sendthem to the Sprint PCS Picture Mail Web site(www.sprint.com/picturemail), delete images, and accessadditional options.
To review your pictures and videos saved in the In Phone folder:
1. Select >Pictures > My Albums > In Phone. (Thumbnailswill be displayed, up to nine at a time. )
2. Use your navigation key to view and scroll through thepictures and videos.
In Phone Folder OptionsWhen you are viewing the In Phone folder, select Options(right softkey) to display the following options:
v Play to play your videos.
v Send to Contacts to send your pictures and videos. (Seepage 171 for details.)
v Upload to upload pictures and videos from the In Phonefolder to the Sprint PCS Picture Mail Web site(www.sprint.com/picturemail).

Section 2I: Using the Built-in Camera 169
v Print to print an image by mail, at a retail store, by usingPictBridge, or by using Bluetooth.
v Post to Services to access available services. Select Updateto display the latest services.
v Send via Bluetooth to send your pictures and videos viaBluetooth.
v Set as to assign the picture or video. Select an option andpress .
v Delete to delete pictures and videos.
v Details/Edit to edit or display details relating to yourpictures or videos.
v Slideshow to view your pictures in slideshow mode.
v Media Filter to filter only pictures, only videos, or to displayall media files.
v Album List to display the album list.
v Camera Mode to activate camera mode.
v Camcorder Mode to activate video mode.
Tip: While displaying the In Phone folder, you can select Info (rightsoftkey) to display album information.
Note: Deleting data will free up memory space to enable you to takemore pictures and videos. Once deleted, the data cannot beuploaded your online Sprint PCS Picture Mail account or yourphone.
Camera
170 Section 2I: Using the Built-in Camera
Assigned Media FolderWhen you assign a picture or video, it will automatically besaved in the Assigned Media folder. The folder allows you tostore copies of pictures on your phone and to assign picturesand videos to various phone tasks.
To save a picture or video to the Assigned Media folder:
1. From the In Phone folder (see “In Phone Folder” on page 168), select a picture or video you wish to save tothe Assigned Media folder and press .
2. Select Options (right softkey) > Set as.
3. Select an option and follow the onscreen instructions toassign. (A copy of the picture will automatically be savedto the Assigned Media folder.)
To view pictures and videos stored in the Assigned Media folder:
1. Select > Tools > Assigned Media. (Thumbnails will bedisplayed, up to nine at a time.)
2. Use your navigation key to view and scroll.

Section 2I: Using the Built-in Camera 171
Sending Sprint PCS Picture Mail
Once you’ve taken a picture or video, you can use themessaging capabilities of your phone to instantly share yourpicture or video with family and friends. You can send picturesor videos to up to 25 people at a time using their emailaddresses or their wireless phone numbers.
Sending Pictures and Videos From the In PhoneFolder
To send pictures from the In Phone folder:
1. Select >Pictures > My Albums > In Phone.
2. Highlight a picture or video you wish to send and press . (The check box on the lower right corner will bemarked. You can select multiple pictures and videos.)
3. Select Options (right softkey) >Send toContacts.
4. Select one of the following options and press :n Contacts to select recipients from your Contacts list.
Highlight a recipient and press to select.n Phone# to enter a phone number directly.n Email to enter an email address directly.
Tip: You can also select Others (right softkey) to select recipientsfrom your desired list.
Note: The first time you send Sprint PCS Picture Mail, you will beprompted to establish a Sprint PCS Picture Mail Web siteaccount and password. (See “Creating Your Sprint PCS PictureMail Password” on page 155.)
Camera

172 Section 2I: Using the Built-in Camera
5. Select Next (left softkey) when you have finished addingrecipients. (You may include up to 25 recipients permessage.)
6. If you wish to include a subject, scroll to Subject andenter your subject using the keypad.
7. If you wish to include a text message, scroll to Text, andthen enter your message using your keypad (or selectMode [right softkey] to change the input mode). (See“Entering Text” on page 41.)
8. If you wish to include a voice message with the pictureand video, scroll to Audio and select Record (rightsoftkey) to record. (Maximum recording time is 10seconds.)
9. To set the priority, scroll to Priority, and then select High,Normal, or Low.
10. Confirm the recipients, message, voice message, andpicture or video. (You may also select additional optionsby selecting the right softkey. Follow the onscreeninstructions to add available options.)
11. Press the appropriate softkey to send the pictures and videos.

Section 2I: Using the Built-in Camera 173
Sending Pictures and Videos From MessagingYou can also send Sprint PCS Picture Mail from your phone’sMessaging menu.
To send pictures and videos from the Messaging menu:
1. Select >Messaging > Send Message > Picture Mail.
2. Select Contacts, Phone#, or Email to select or enterrecipients.
3. Select Next (left softkey).
4. Select In Phone or Online Albums.
5. Use the navigation key to select the picture or video youwish to send and press . (You can select multiplepictures and videos.)
6. Select Next (left softkey). To complete and send thepictures or videos, follow steps 6-11 in “Sending Picturesand Videos From the In Phone Folder” on page 171.
Tip: To take and send a new picture or a video from Messaging,select Take New Pictureor Take New Videoduring step 4above. Then take the new picture or video, select Next (rightsoftkey), and follow steps 6-11 in “Sending Pictures andVideos From the In Phone Folder” on page 171.
Camera

174 Section 2I: Using the Built-in Camera
Managing Sprint PCS Picture Mail
Using the Sprint PCS Picture Mail Web SiteOnce you have uploaded pictures and videos from your phoneto your online Sprint PCS Picture Mail account atwww.sprint.com/picturemail (see “Uploading Pictures andVideos” on page 175), you can use your personal computer tomanage your pictures. From the Sprint PCS Picture Mail Website (www.sprint.com/picturemail) you can share pictures andvideos, edit album titles, add captions, and organize images.You can even send your pictures to be printed at participatingretail locations.
You will also have access to picture management tools toimprove and customize your pictures. You’ll be able to lighten,darken, crop, add antique effects, add comic bubbles andcartoon effects, and use other features to transform yourpictures.
To access the Sprint PCS Picture Mail Web site:
1. From your computer’s Internet connection, go towww.sprint.com/picturemail.
2. Enter your phone number and Sprint PCS Picture Mailpassword to register. (See “Creating Your Sprint PCSPicture Mail Password” on page 155.)
Section 2I: Using the Built-in Camera 175
Managing Online Pictures and Videos From Your Phone
You can use your phone to manage, edit, or share pictures andvideos you have uploaded to the Sprint PCS Picture Mail Website atwww.sprint.com/picturemail. (See “Uploading Picturesand Videos” below for information about uploading.)
To view your online pictures and videos from your phone:
1. Select > Pictures > My Albums > Online Albums.
2. Highlight an album title and press to displaythumbnail images.
3. Use your navigation key to select a picture or video.
4. Select Options (right softkey) to display your onlinepicture or video options.
Uploading Pictures and VideosTo upload pictures and videos:
1. Select > Pictures > My Albums > In Phone.
2. Select the picture(s) and video(s) you wish to upload,and then select Options (right softkey) > Upload.
3. Select This, Selected, or All.
4. Select “Uploads”Area or Other Albums.
Tip: To switch a selected picture from thumbnail view to expandview mode, select Expand (left softkey).
Camera
176 Section 2I: Using the Built-in Camera
Downloading Your Online Pictures and VideosFrom your online Sprint PCS Picture Mail albums display atwww.sprint.com/picturemail, you can select pictures and videosto download to your phone’s In Phone folder.
To download pictures and videos from the Sprint PCS Picture MailWeb site:
1. From the online pictures display, select the pictures andvideos you wish to download and select Options (rightsoftkey). (See “Managing Online Pictures and VideosFrom Your Phone” on page 175.)
2. Select Save to.. and press .
Accessing Online Picture and Video Options FromYour Phone
To access your online Picture and Video options from your phone:
1. Select a picture or video from your Online Albums. (See “Managing Online Pictures and Videos From YourPhone” on page 175.)
2. Select Options (right softkey) to display options.
3. To select an option, highlight it and press .
n Play to play the video.
n Send to Contacts to send your picture or video.
n Order Prints to order prints of the pictures. You canchoose whether to pick up your prints at a retailstore or have them mailed to you.
n Post to Services to access available services. SelectUpdate to display the latest services.
n Set as to assign the picture or video.
n Save to.. to save the pictures and videos to the InPhone folder.
Section 2I: Using the Built-in Camera 177
n Delete to erase pictures and videos saved in thecurrent album (or Uploads folder).
n Copy/Move to copy or move pictures and videos to aselected album.
n Details/Edit to edit or display details relating to yourpictures or videos.
n Media Filter to filter only pictures or only videos, or todisplay all media files.
n Album List to display the album list.
To access your Online Albums options from your phone:
1. Display the album list in the Online Sprint PCS PictureMail menu. (See “Managing Online Pictures and VideosFrom Your Phone” on page 175.)
2. Use your navigation key to select an album (or Uploadsfolder).
3. Select Options (right softkey) to display options.
4. To select an option, highlight it and press .
n Edit/Delete to select an option from the following:
n Delete Album to delete the selected album.
n Rename Album to rename the selected album.
n Album Info to display detailed information aboutthe album.
n Create New Album to create a new album. Enter anew album name and select Save (left softkey).
Note: The Uploads folder cannot be erased or renamed.
Note: The online Picture and Video options may vary depending onthe item you select.
Camera

178 Section 2I: Using the Built-in Camera
Printing Pictures Directly From Your Phone
Your phone is PictBridge compatible, allowing you to printdirectly from your phone without connecting to a computer.Simply connect your phone to a PictBridge-enabled printerand enjoy printing your photos.
To print pictures directly from your phone:
1. Select >Tools > USB Connection > PictBridge.
– or –
Select >Pictures > Print@Home > PictBridge.
2. Connect your phone to the PictBridge-enabled printerby using the included USB cable. (Wait until theconnection is completed.)
3. Set the printer settings using your navigation key.
n Picture to Print:You can select the picture from the InPhone folder. (You can select up to 99 pictures.)
n Layout:You can select the print mode from DefaultPrinter, Standard Print, or Index.
n Number of Copies:You can set the number of copies(1-10). (You cannot specify number of copies whenIndex is selected.)
n Print Size:You can set the print size from DefaultPrinter, 4'' x 6'', 5'' x 7'', 8'' x 10'', or Letter. (Print sizesmay vary according to the type of printer you have.)
n Date Stamp:You can imprint the date on yourpictures. Select Yes or No. (Date stamping may notbe available depending on the type of printer youhave.)
Section 2I: Using the Built-in Camera 179
4. When you have finished selecting the printer settings,select Print (left softkey).
5. When printing is finished, press .
6. Select Yes. Follow the instructions on the display tounplug the USB cable from the phone.
PictBridgeErrorMessages:
From time to time you may encounter printingproblems. Any printer error messages will be displayedon your phone, informing you of the specific problemsencountered. Please refer to the user’s guide that camewith your printer for descriptions, explanations, andpossible resolutions for any error messages.
Note: While you are connected to the printer, your phone’s screenwill display “Phone Off.” You cannot make or receive callsduring this time.
Make sure your battery is fully charged before using thePictBridge.
Pictures not taken on this phone may not be printable.
Camera

180 Section 2J: Using Sprint PCS Ready Link
Section 2J
Using Sprint PCS Ready Link
In This Section
l Getting Started With Sprint PCS Ready Link (page 181)
l Making and Receiving a Sprint PCS Ready Link Call (page 183)
l Adding and Editing Ready Link Contacts (page 191)
l Erasing Ready Link List Entries (page 197)
l Updating Sprint PCS Ready Link Lists (page 199)
l Managing Sprint PCS Ready Link Settings (page 199)
Your Sprint PCS Ready Link-enabled phone gives you theability to quickly connect with other Sprint PCS Ready Linkusers for “walkie-talkie-style” communication fromanywhere, to anywhere on the Nationwide Sprint PCSNetwork.
This section explains the features and options of yourphone’s Sprint PCS Ready Link capabilities and service.

Section 2J: Using Sprint PCS Ready Link 181
Getting Started With SprintPCS Ready Link
Sprint PCS Ready Link allows you to enjoy quick, two-way,“walkie-talkie-style” communication with your friends,family, and coworkers. You can make one-to-one or one-to-many calls (up to five others on the same call) to anyother Sprint PCS Ready Link user, anywhere on the NationwideSprint PCS Network. You can make and receive Sprint PCSReady Link calls when your phone displays the Ready Link icon ( ).
Setting Sprint PCS Ready Link ModeTo enable or disable Sprint PCS Ready Link mode:
© Select > Settings > Ready Link > Enable/Disable >Enable. (The default is Disable.)
n Enable: Lets you make or receive Sprint PCS ReadyLink calls anytime your phone is not in use.
n Disable: Disables your phone’s Sprint PCS Ready Link service. You will not be able to make or receiveSprint PCS Ready Link calls or access your Ready Linkcontacts.
Tip: If you haven’t signed up for the Sprint PCS Ready Link service,and Sprint PCS Ready Link mode is set to Disable or the Sprint PCS Ready Link service is locked, you can use the ReadyLink/Recorder Button as a Voice Recorder button in standbymode.
SprintPCS Ready Link

182 Section 2J: Using Sprint PCS Ready Link
Preparing Your Phone for Sprint PCS Ready Link Service
Every time you turn on your phone, your phone will identifyitself and make itself available to the Ready Link network.
When the Ready Link icon ( ) is displayed, your phone isready to make and receive Sprint PCS Ready Link calls.
Ready Link Call AlertsThere are several ways your phone alerts you during Sprint PCS Ready Link calls.
When you make or receive a Sprint PCS Ready Link call:
v The phone sounds (depending on the Ringer Type andRinger Volume setting).
v The backlight illuminates.
v The screen displays a Sprint PCS Ready Link call message.
v The other party’s Sprint PCS Ready Link number and name(if available) are displayed.
v The screen displays who has the floor.
The status of a Sprint PCS Ready Link call is displayed asfollows:
v The Green LED On indicates you have the floor and mayspeak.
v The Red LED On indicates another contact has the floor.
v The LED Off indicates the floor is open. (You can take thefloor and speak by pressing and holding .)

Section 2J: Using Sprint PCS Ready Link 183
Making and Receiving a Sprint PCS Ready Link Call
Displaying the Sprint PCS Ready Link List© From standby mode, press the Ready Link/Recorder
button on the side of your phone ( ) to access theSprint PCS Ready Link List.
Selecting a Contacts ListWhen your phone displays a Sprint PCS Ready Link List, the left softkey is labeled Go to. To switch to another contacts list,select Go to (left softkey), highlight your desired list, and press .
v Company List/ Company Grps. contain company-providedcontacts (up to 200 entries). Your company list can becreated and modified only by an authorized administratoron the Sprint PCS Ready Link server. When the lists areempty, Company List/Company Grps. will not bedisplayed.
v Personal List/Personal Grps. contain your personal ReadyLink contact names and numbers, separately or in groups.You can create and edit your Personal List. Your phone canstore a total of 200 entries. (You may include up to fivecontacts per group.)
v Outgoing shows the last 20 different Sprint PCS Ready Linkcalls that you placed.
Tip: The first time you access the list, the Sprint PCS Ready LinkHelp message will be displayed. Select Yes (left softkey) andNext (left softkey) to read a brief introduction to Sprint PCSReady Link. SprintPCS Ready Link

184 Section 2J: Using Sprint PCS Ready Link
v Incoming shows the last 20 different Sprint PCS Ready Linkcalls that you accepted.
v Missed shows the last 20 Sprint PCS Ready Link calls thatyou missed.
Making a Sprint PCS Ready Link Call (One-to-One Call)
You can place a one-to-one Sprint PCS Ready Link call byentering a Sprint PCS Ready Link number or by selecting acontact from the Sprint PCS Ready Link List.
To place a Sprint PCS Ready Link call by selecting a contact:
1. Press .
2. Select Go to (left softkey), and then select the list fromwhich you want to place a call (Company List, Personal List, Outgoing, Incoming, or Missed).
3. Scroll to the contact you want to call, and press and hold to place the call and get the floor. (You will see“R-Link calling...” and “Connecting...” followed by “Youhave floor.” You can now begin speaking.)
– or –
Scroll to the contact you want to call and press andrelease to place the call. (The call will connect asdescribed above, but “Floor is open” will be displayed onthe screen. Either you or your contact may press andhold to take the floor and speak.)
Tip: You can also select Enter R-Link# from the Go to option toenter a Sprint PCS Ready Link number directly. (See page 187for details.)
Section 2J: Using Sprint PCS Ready Link 185
4. Continue holding as you speak. (When you havefinished speaking, release to allow the other partyto speak. When the other party takes the floor, you willsee the speaker’s name, phone number, and the text“has floor.”)
5. When you are finished, press .
Tip: If you press TALK or SPEAKER during step 3 on the previouspage, you can make a standard voice call.
Note: When neither party has the floor during a Sprint PCS ReadyLink call, “Floor is open” is displayed. If no one takes the floorfor 20 seconds, the Sprint PCS Ready Link call endsautomatically.
Note: During a Sprint PCS Ready Link call, the “floor” is the right tospeak. When you see “Floor is open,” the first person to pressthe Ready Link/Recorder button can speak (while holding thebutton). Only the person who has the floor can speak. Thephone beeps if you press the Ready Link button when anothercontact has the floor.
SprintPCSReady
Link

186 Section 2J: Using Sprint PCS Ready Link
Making a Sprint PCS Ready Link Call (Group Call)You can make a Sprint PCS Ready Link call to all members in aGroup entry that you have in your Sprint PCS Ready Link List.You can communicate with up to five members at a time.
To place a Sprint PCS Ready Link Group call:
1. Press .
2. Select Go to (left softkey), and then select the list fromwhich you want to make a Group call (Company Grps. orPersonal Grps.).
3. Scroll to the group you want to call, and press and holdto place the call and take the floor. (You will see
“R-Link calling...” and “Connecting...” followed by “Youhave floor.” Continue with the Sprint PCS Ready Link callas described on the previous page.)
n To make a Sprint PCS Ready Link call to a groupmember, select a group, highlight a group member,and press and hold .
n If one of the group members takes the floor, you willsee the member’s name and Sprint PCS Ready Linknumber on the display.
4. When the call is finished, press .
Tip: The phone beeps if you press the Ready Link button whenanother party has the floor.
You can also make a Group Call after checking the groupmember. Select MENU to display group members, highlight<Call Group> and press and hold the Ready Link button duringstep 3 above.
To redial your last Sprint PCS Ready Link call, highlight Redialand press the Ready Link button from the Sprint PCS ReadyLink List.

Section 2J: Using Sprint PCS Ready Link 187
Making a Sprint PCS Ready Link Call by Entering a Number
To place a Sprint PCS Ready Link call by entering a number:
1. From standby mode, enter the Sprint PCS Ready Linknumber you want to dial.
2. Press to place the Sprint PCS Ready Link call.Continue holding to take the floor and speak.
n The contact’s name is displayed if there is a matchednumber in your Sprint PCS Ready Link List.
3. Continue with the Sprint PCS Ready Link call, pressingand holding to speak and releasing it to allowothers to reply.
4. When the call is finished, press .
– or –
1. Press .
2. Select Go to (left softkey) > Enter R-Link#.
3. Enter the Ready Link number you want to dial.
4. Follow steps 2–4 above.
Note: Sprint PCS Ready Link numbers must contain 10 digits (areacode + phone number) or 11 digits (1 + area code + phonenumber). Your Sprint PCS Ready Link number is the same asyour wireless phone number.
SprintPCS Ready Link
188 Section 2J: Using Sprint PCS Ready Link
Missed Call Notification for Sprint PCS Ready Link Calls
When an incoming Sprint PCS Ready Link call is not answered,the Missed Call Notification is displayed.
To call the last Missed Sprint PCS Ready Link call:
© Simply press and hold while the Missed CallNotification is displayed. (Continue with the Sprint PCSReady Link call as described previously.)
To erase the Missed Call log:
© Select Dismiss (right softkey).
To display the Missed Ready Link Call log:
© Select View (left softkey) while the Missed CallNotification is displayed. To call the entry, highlight theentry you want to call, and press and hold .(Continue with the Sprint PCS Ready Link call asdescribed previously.)
Tip: If you have two or more missed calls, the call log list will bedisplayed. Different icons will be displayed for different typesof notifications.
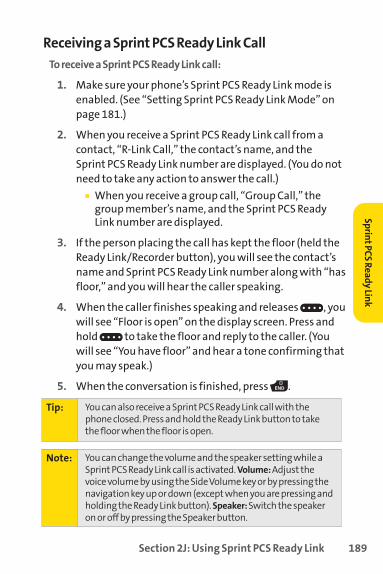
Section 2J: Using Sprint PCS Ready Link 189
Receiving a Sprint PCS Ready Link CallTo receive a Sprint PCS Ready Link call:
1. Make sure your phone’s Sprint PCS Ready Link mode isenabled. (See “Setting Sprint PCS Ready Link Mode” onpage 181.)
2. When you receive a Sprint PCS Ready Link call from acontact, “R-Link Call,” the contact’s name, and the Sprint PCS Ready Link number are displayed. (You do notneed to take any action to answer the call.)
n When you receive a group call, “Group Call,” thegroup member’s name, and the Sprint PCS ReadyLink number are displayed.
3. If the person placing the call has kept the floor (held theReady Link/Recorder button), you will see the contact’sname and Sprint PCS Ready Link number along with “hasfloor,” and you will hear the caller speaking.
4. When the caller finishes speaking and releases , youwill see “Floor is open” on the display screen. Press andhold to take the floor and reply to the caller. (Youwill see “You have floor” and hear a tone confirming thatyou may speak.)
5. When the conversation is finished, press .
Note: You can change the volume and the speaker setting while aSprint PCS Ready Link call is activated. Volume: Adjust thevoice volume by using the Side Volume key or by pressing thenavigation key up or down (except when you are pressing andholding the Ready Link button). Speaker: Switch the speakeron or off by pressing the Speaker button.
Tip: You can also receive a Sprint PCS Ready Link call with thephone closed. Press and hold the Ready Link button to takethe floor when the floor is open.
SprintPCS Ready Link

190 Section 2J: Using Sprint PCS Ready Link
Sprint PCS Ready Link OptionsWhen you use Sprint PCS Ready Link, several user options areavailable by selecting Options (right softkey). To select anoption, highlight it and press .
v Edit to edit a Sprint PCS Ready Link number or name.(See “Editing a Contact in Your Personal List” on page 195.)
v Send Message to send a Text, Picture Mail, or SMS Voicemessage.
v Copy to Personal to copy a contact to the Personal List.
v Copy Group to copy a Company Group to the PersonalGroup List.
v Copy to Ph. Book to copy a contact to the Contacts list.
v Erase to erase a contact. Erase Group is displayed when youhighlight a group.
v Add Contact to add a new contact. Add Group is displayedwhen you highlight a group list.
v Erase R-Link List to erase entries saved in the Sprint PCSReady Link List (except Company List/Company Grps) andin Ready Link Call History.
v Help to see the Sprint PCS Ready Link instruction page.

Section 2J: Using Sprint PCS Ready Link 191
Adding and Editing Ready Link Contacts
Copying an Entry to Your Personal List or PersonalGroup List
You can copy an entry to your Personal Lists from severaldifferent sources. If the selected entry is already stored in thePersonal Lists, the “copy” option is not displayed.
To copy an entry from the Sprint PCS Ready Link List:
1. Press .
2. Select Go to (left softkey), and then select the list fromwhich you want to copy an entry (Company List,Company Grps., Personal List, Personal Grps., Outgoing,Incoming, or Missed).
3. Select the entry you want to copy (or scroll to highlightthe Redial entry at the top of your screen), and selectOptions (right softkey). To select an option, highlight itand press .
n Copyto Personal to copy the contact to the Personal List. (This option will not be available if theselected entry is already stored in the List.)
n Copy Group to copy the group to the Personal Group List.
n Copy to Ph. Book to copy the contact to the Contacts list.
4. Select Yes (left softkey) to copy and save the entry to yourPersonal List or Personal Group List.
Note: Your Company Lists can be set up and edited only by anadministrator on the Sprint PCS Ready Link server. You cannotadd or edit contacts/groups to your Company Lists.
SprintPCSReady
Link

192 Section 2J: Using Sprint PCS Ready Link
Saving a Sprint PCS Ready Link NumberWhen you have finished a Sprint PCS Ready Link call, you willsee the Sprint PCS Ready Link number and the text “R-Link callended” on the display. You can save a Sprint PCS Ready Linknumber to your Personal Lists from this end display.
To save the number:
1. From the end display, select Options (right softkey) >Save.
n If the entry has no name, you are prompted to entera name.
2. Select Yes (left softkey) to save the entry.
Finding an Entry in the Sprint PCS Ready Link ListYou can find your desired entry by entering a few letters.
To find a Sprint PCS Ready Link entry:
1. Press .
2. Select Go to (left softkey), and then select your desired list (CompanyList, CompanyGrps., Personal List, or Personal Grps.).
3. Enter the first letter or the first few letters of the name.
n The display shows the list beginning with theletter(s) you entered.
4. Scroll through the list and press to select your desiredentry.
Note: If the number is already stored in the Personal List or PersonalGroups, the “Save” option is not displayed.

Section 2J: Using Sprint PCS Ready Link 193
Adding a New Contact to Your Personal ListYou can store a total of 200 entries in the Personal Lists.
To add a new Sprint PCS Ready Link contact:
1. Press .
2. Select Go to > Personal List > Add Contact.
– or –
Select a contact, select Options (right softkey), and thenselect Add Contact.
3. Enter a name for the new contact and press . (This isthe name you will see when calling or receiving a callfrom the contact.)
4. Select R-Link Number, enter the contact’s 10-digitSprint PCS Ready Link number (the contact’s wirelessphone number), and press .
5. Select Save (left softkey) to save the new contact to yourPersonal List.
Tip: Tip: You are not allowed to use the following symbols duringstep 3: @ : ; / * ) (.
SprintPCS Ready Link

194 Section 2J: Using Sprint PCS Ready Link
Adding a New Group to Your Personal Group ListYou can add new groups to the Personal Group List. Eachgroup can include up to five members. You can enter a groupmember directly or select the member from the Company Listor Personal List.
To add a new Sprint PCS Ready Link group entry:
1. Press .
2. Select Go to > Personal Grps. > Add Group.– or –From the Personal Group List, select an entry, and thenselect Options (right softkey) > Add Group.
3. Enter a Group Name, press , and select Next (leftsoftkey).
4. To add contacts to the group, select Add (right softkey).
5. Highlight one of the following options and press :
n New to add a new contact. See the previous page for details.
n from Company to add a contact from your CompanyList (if applicable).
n from Personal to add a contact from your Personal List.
6. Scroll to the contacts you want to add and press orselect Pick (right softkey) to include the entries.
7. Select Done (left softkey) when you have finished selectingcontacts, and then select Update (left softkey) to updateyour Personal Group List with the new group entry.
Tip: You can also add members directly. From step 4 above,highlight <Add Members> and press MENU. Enter the newmember’s name and R-Link number and select Save (leftsoftkey) to save the entry.

Section 2J: Using Sprint PCS Ready Link 195
Editing a Contact in Your Personal ListTo edit a Personal List contact:
1. Press .
2. Select Go to > Personal List.
3. Scroll to the entry you want to edit and select Options(right softkey).
4. Select Edit, and then select the field you want to edit(Name or R-Link Number).
5. Edit the entry, select OK (left softkey), and then selectSave (left softkey) to save your changes. SprintPCS Ready Link

196 Section 2J: Using Sprint PCS Ready Link
Editing a Group in Your Personal Group ListTo edit a group name:
1. Press .
2. Select Go to > Personal Grps.
3. Scroll to the group entry you want to edit and selectOptions (right softkey) > Edit.
4. Edit the group name and select OK (left softkey).
5. Select Save (left softkey) to save your changes.
6. To edit a group member, scroll to the contact you want toedit and select Options (right softkey).
7. Select Edit, and then select the field you want to edit(Name or R-Link Number).
8. Edit the entry, select OK (left softkey), and select Save(left softkey) to save your changes.
9. Select Update (left softkey) to update your PersonalGroup List.
Tip: If you don’t need to edit the group name, select Next (leftsoftkey) during step 4 above and skip step 5.

Section 2J: Using Sprint PCS Ready Link 197
Erasing Ready Link List Entries
Erasing an Entry in Your Personal ListsTo erase a contact or a group:
1. From the Sprint PCS Ready Link List, select Go to, andthen select Personal List or Personal Grps.
2. Scroll to the entry you want to erase, and select Options(right softkey) > Erase.
n Erase Group is displayed when you selectPersonal Grps.
3. Select Yes.
To erase a group member:
1. From the Sprint PCS Ready Link List, select Go to >Personal Grps.
2. Scroll to your desired group, and press to display thegroup members.
3. Select the contact you want to erase, and select Options(right softkey).
4. Select Erase > Yes > Update (left softkey) to erase themember and update your Personal Group List.
SprintPCS Ready Link
198 Section 2J: Using Sprint PCS Ready Link
Erasing a Sprint PCS Ready Link ListYou can erase all entries saved in the Sprint PCS Ready Link List(except Company List/Company Grps.).
To erase a Sprint PCS Ready Link List:
1. From the Sprint PCS Ready Link List, select Options (rightsoftkey) > Erase R-Link List.
2. Select an option and press .
n Outgoing to erase all outgoing Sprint PCS Ready Linkcalls.
n Incoming to erase all incoming Sprint PCS Ready Linkcalls.
n Missed to erase all missed Sprint PCS Ready Linkcalls.
n All Calls to erase all Sprint PCS Ready Link call history(except the redial number).
n All Personal Ent. to erase all entries in Personal Listand Personal Grps. You are prompted to enter yourfour-digit lock code.
3. Select Yes and press .
Tip: Redial numbers will not be erased.

Section 2J: Using Sprint PCS Ready Link 199
Updating Sprint PCS Ready Link Lists
Updating the Company List and Personal ListTo update your Company List and Personal List manually throughthe Sprint PCS Ready Link server:
© Select > Settings > Ready Link > List Update.
Managing Sprint PCS Ready Link Settings
Assigning Speed Dialing for Sprint PCS Ready Link Entries
To assign speed dialing for Sprint PCS Ready Link entries:
1. Select > Contacts > SpeedDial #s.
2. Select an unassigned number and press .
3. Select Go to (left softkey), and then select the list fromwhich you want to set a speed dial (Company List,Company Grps., Personal List, or Personal Grps.).
4. Select the contact and press .
– or –
Select the group, and then select an option.
n Assign to assign the selected group as a speed dial.
n Details to display the group details. You can selectthe group member from the group list.
To use speed dial for a Sprint PCS Ready Link entry:
© From standby mode, press the appropriate key, andpress .
SprintPCS Ready Link

200 Section 2J: Using Sprint PCS Ready Link
Restarting the Ready Link ServiceTo restart the Sprint PCS Ready Link service:
© Select > Settings > Ready Link > Restart.
Setting Ready Link GuardThis feature enables you to display a warning message whenyou cannot receive Sprint PCS Ready Link calls.
To set the Ready Link Guard:
1. Select > Settings > Ready Link > R-Link Guard. (A message will be displayed.)
2. Select OK (left softkey) to continue.
3. Select On and press . (Select Off to deactivate thisfeature.)
Setting Ringer Types for Sprint PCS Ready Link CallsYour phone provides a variety of ringer types that allow you tocustomize your ringer and volume settings.
To select a ringer type for Sprint PCS Ready Link calls:
1. Select > Settings > Ready Link > Sounds > Ringer Type.
2. Select Ready Link Calls, R-Link Missed, or R-Link Floor Tone.
3. Select your desired ringer type and press .
n To hear the selected ringer, select Play (right softkey).

Section 2J: Using Sprint PCS Ready Link 201
Setting Ringer Volume for Sprint PCS Ready Link Calls
To select a ringer volume for Sprint PCS Ready Link calls:
1. Select > Settings > Ready Link > Sounds > Ringer Volume.
2. Select Separate Vol. and press the navigation key left orright to select a volume level.
3. Select Done (left softkey) to save.
Setting Vibrate Pattern for Sprint PCSReady Link Calls
You can select your favorite vibrate pattern for Sprint PCSReady Link calls.
To select a vibrate pattern for Sprint PCS Ready Link calls:
1. Select > Settings > Ready Link > Sounds > Vibrate Pattern.
2. Select Ready Link Calls or R-Link Missed.
3. Select your desired vibrate pattern and press .
SprintPCS Ready Link

202 Section 2J: Using Sprint PCS Ready Link
Setting an Alert Notification for Sprint PCS Ready Link Calls
Your phone can alert you with an audible tone when youreceive a Sprint PCS Ready Link call.
To set alerts for Sprint PCS Ready Link calls:
1. Select >Settings > Ready Link > Sounds > Alerts.
2. Select Ready Link Calls, R-Link Missed, or Headset Alert.
3. Select your desired option and press .
To adjust the floor tone volume:
1. Select >Settings > Ready Link > Sounds > Alerts.
2. Select Floor Tone Vol. > Earpiece or Speaker.
3. Press the navigation key left or right to select a volumelevel and select Done (left softkey).
Tip: You can also set alerts using the Alerts settings menu. (See“Alert Notification” on page 52.)

Section 2J: Using Sprint PCS Ready Link 203
Setting the Speakerphone for Sprint PCS Ready Link Calls
You can set your phone to use speakerphone mode for Sprint PCS Sprint Ready Link calls. By default, thespeakerphone is set to on.
To set the speakerphone mode:
© Select >Settings > Ready Link > Speakerphone > Onor Off.
Setting the DefaultView of the Sprint PCS Ready Link List
You can select the default Sprint PCS Ready Link List whenSprint PCS Ready Link is launched.
To select the default view of the Sprint PCS Ready Link List:
1. Select >Settings > Ready Link > DefaultView. (Thedefault setting is Personal List.)
2. Select your desired list and press .
Note: If the phone’s ringer volume is set to Vibrate All, Ringer off, orSilence All, the speakerphone turns off. Press SPEAKER key toturn the speakerphone mode on. SprintPCS
ReadyLink
204 Section 2J: Using Sprint PCS Ready Link
Setting the Floor Display of the Sprint PCS Ready Link Calls
With this feature, you can select the floor display duringSprint PCS Ready Link calls.
To select the floor display:
1. Select > Settings > Ready Link > Floor Display.
2. Select Text Only or Image 1–3 and press .
n To see a display preview of the image, select Preview(right softkey).
Section 2K: Using the Built-in Media Player 205
Section 2K
Using the Built-In Media Player
In This Section
l Your Multimedia Channel Options (page 206)
l Accessing Your Media Player’s Channel Listings (page 207)
l Playing a Video or Audio Clip (page 208)
l Multimedia FAQs (page 213)
Your phone’s built-in media player gives you the ability tolisten to audio clips and to view video clips right from yourphone’s display. It’s a great way to stay up-to-date on news,weather, and sports information while also enjoying thelatest blockbuster movie trailers or music videos –anywhere, anytime on the Nationwide Sprint PCS Network.Just access your media player from your phone’s mainmenu, scroll to your choice of channel, and select one of thevideo or audio clips to play. It’s like having a TV in the palmof your hand.
This section explains the features and options of yourphone’s built-in media player.
Media Player

206 Section 2K: Using the Built-in Media Player
Your Multimedia Channel Options
Sprint TVSM offers a variety of accessible audio or videochannels, depending on your Sprint PCS service plan andmultimedia subscriptions. Your subscription options include acomprehensive basic service as well as a full menu ofadditional channel options.
v Preview Channel:This free channel lets you sample clipsfrom all the available channels before you make a decisionto subscribe. It’s like viewing the movie preview beforedeciding whether you want to spend the money to go seethe full motion picture.
v SprintTV:This comprehensive basic service gives youaccess to a variety of content from familiar brands. Thinkof it as “basic cable” for your phone. It allows youunlimited access to this content as long as you continue topay the monthly subscription fee.
v Available Individual Channel Options:You also have theoption of subscribing to individual channels from anextensive menu offering. These channels are available fora monthly subscription fee and allow you unlimitedaccess as long as you continue to pay your monthlysubscription fee.
You can always visitwww.sprint.com for a comprehensive up-to-date Channel Guide that provides an explanation of theavailable channels and information on subscription rates.

Section 2K: Using the Built-in Media Player 207
Accessing Your Media Player’s ChannelListings
It’s easy to access and view the channel listings on your M1 by Sanyo from the phone’s main menu.
To access your media player and channel listings:
© Select > Media Player > Channel Listing. Your channellistings will be displayed, divided into the followingsections:
n My Channels:These include the complimentaryPreviews channel that Sprint provides, as well as anyavailable individual channels for which you havepurchased access. If you have purchased Sprint TV,either through a Vision Plan subscription or bypurchasing it separately, it will be displayed here.
n Available Channels:These are channels that have notyet been purchased but are available to access for amonthly subscription fee. Use your navigation key toscroll through and select a channel, and follow theonscreen instructions to purchase access to it. Uponpurchasing access to one of these channels, thechannel will be listed, along with its correspondingchannel number, in the My Channels section of yourmedia player’s channel listings. You will see itdisplayed in this section the next time you accessyour phone’s media player.
Note: The first time you access one of your Available Channels, youwill be prompted to accept the corresponding monthly fee(unless it’s a channel that doesn’t have an associatedmonthly fee). Accepting the charge gives you access to thechannel for as long as you continue to pay the monthly fee. Ifyou accept the charge, the next time you access your phone’smedia player, this channel will be displayed in the MyChannels section of your Channel Listings.
Media Player
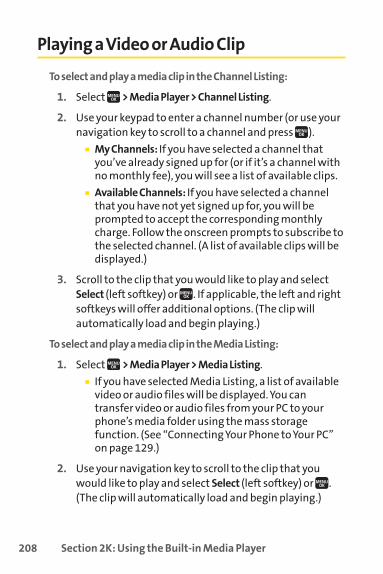
208 Section 2K: Using the Built-in Media Player
Playing a Video or Audio Clip
To select and play a media clip in the Channel Listing:
1. Select >Media Player > Channel Listing.
2. Use your keypad to enter a channel number (or use yournavigation key to scroll to a channel and press ).
n My Channels: If you have selected a channel thatyou’ve already signed up for (or if it’s a channel withno monthly fee), you will see a list of available clips.
n Available Channels: If you have selected a channelthat you have not yet signed up for, you will beprompted to accept the corresponding monthlycharge. Follow the onscreen prompts to subscribe tothe selected channel. (A list of available clips will bedisplayed.)
3. Scroll to the clip that you would like to play and selectSelect (left softkey) or . If applicable, the left and rightsoftkeys will offer additional options. (The clip willautomatically load and begin playing.)
To select and play a media clip in the Media Listing:
1. Select >Media Player > Media Listing.
n If you have selected Media Listing, a list of availablevideo or audio files will be displayed. You cantransfer video or audio files from your PC to yourphone’s media folder using the mass storagefunction. (See “Connecting Your Phone to Your PC”on page 129.)
2. Use your navigation key to scroll to the clip that youwould like to play and select Select (left softkey) or .(The clip will automatically load and begin playing.)

Section 2K: Using the Built-in Media Player 209
Media Folder OptionsTo access a media folder’s options, display the media folderand select Options (right softkey). To select an option,highlight it and press .
v Media Listing to display the media file list under the mediafolder.
v Channel Listing to display the channel list.
v Info to display the media clip information.
v Play Mode to switch the play mode in the media folder.
v Media Filter to sort audio and video clips in the mediafolder.
v Player Settings to customize the player settings fromEqualizer, Display Size, or Skins.
v Minimize to play music in the background during standbymode or while using the application.
v Playlist to display a customized playlist you’ve created.
v Add to Playlist to add a media clip to the playlist.
v Send via Bluetooth to send media clips via Bluetooth.
v Use Bluetooth to play media clips through a Bluetoothheadset.
v Help to see the Multimedia instruction page.
v Exit to terminate the Media Player.
Note: The phone’s Media Player support the following fileextensions: “mp3,” “aac,” “mp4,” “3gp,” “3gpp,” “3gp2,”“3g2,” “qcp,” “amr,” “m4a,” “m4v.”
Media
Player
Tip: You can stop background music by pressing in standbymode.
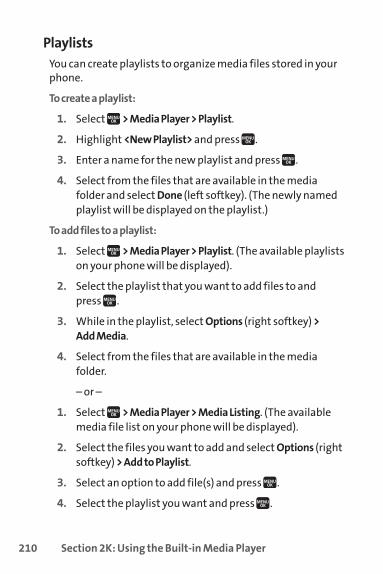
210 Section 2K: Using the Built-in Media Player
PlaylistsYou can create playlists to organize media files stored in yourphone.
To create a playlist:
1. Select >Media Player > Playlist.
2. Highlight <New Playlist> and press .
3. Enter a name for the new playlist and press .
4. Select from the files that are available in the mediafolder and select Done (left softkey). (The newly namedplaylist will be displayed on the playlist.)
To add files to a playlist:
1. Select >Media Player > Playlist. (The available playlistson your phone will be displayed).
2. Select the playlist that you want to add files to and press .
3. While in the playlist, select Options (right softkey) >Add Media.
4. Select from the files that are available in the mediafolder.
– or –
1. Select >Media Player > Media Listing. (The availablemedia file list on your phone will be displayed).
2. Select the files you want to add and select Options (rightsoftkey) >Add to Playlist.
3. Select an option to add file(s) and press .
4. Select the playlist you want and press .
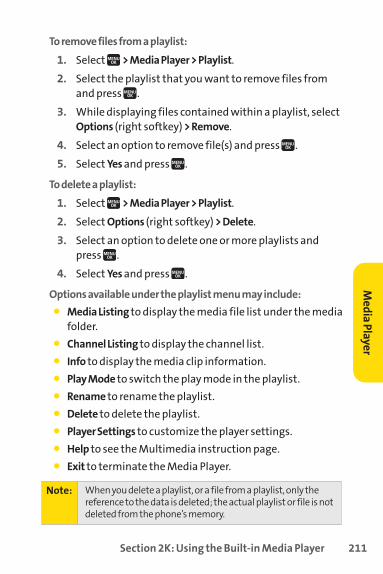
Section 2K: Using the Built-in Media Player 211
To remove files from a playlist:
1. Select >Media Player > Playlist.
2. Select the playlist that you want to remove files fromand press .
3. While displaying files contained within a playlist, selectOptions (right softkey) >Remove.
4. Select an option to remove file(s) and press .
5. Select Yes and press .
To delete a playlist:
1. Select >Media Player > Playlist.
2. Select Options (right softkey) >Delete.
3. Select an option to delete one or more playlists andpress .
4. Select Yes and press .
Options available under the playlist menu may include:v Media Listing to display the media file list under the media
folder.v Channel Listing to display the channel list.v Info to display the media clip information.v Play Mode to switch the play mode in the playlist.v Rename to rename the playlist.v Delete to delete the playlist.v Player Settings to customize the player settings.v Help to see the Multimedia instruction page.v Exit to terminate the Media Player.
Note: When you delete a playlist, or a file from a playlist, only thereference to the data is deleted; the actual playlist or file is notdeleted from the phone’s memory.
Media
Player

212 Section 2K: Using the Built-in Media Player
Playing Media Clips Using the External Control KeyThe external control key can be used to play, pause, stop,forward, or rewind a media clip while the phone is closed. Itcan also be used to navigate through a media player option.
To launch a Music or Media player:
© Press to activate a launch menu, and press the controlkey up or down to select Music or Media Player.
Key Operation While Playing Media Clips
Keys Operation
Plays or pauses a media clip.
Stops the media clip.
Returns the phone to standby mode when held down.
Skips to the next clip.
Fast forwards within the current clip when held down.
Returns to the beginning of the current clip.
Rewinds within the current clip when held down.
List Displays a list of media clips.
Rewind Fast Forward/ Next
Play/Pause List
Stop

Section 2K: Using the Built-in Media Player 213
Multimedia FAQs
1. Will I know if I’m receiving an incoming call while I’mviewing or listening to an audio clip?No. All incoming calls will roll into voicemail while youare playing a clip. If the caller leaves a voicemail, thevoicemail icon will be displayed on the screen.
2. How long are the clips? Will I know the estimated time itwill take to play the clip prior to accessing it?Once you have selected a channel, you will see a listingof the available clips, with each clip’s length displayedafter the clip’s title. In general, a clip’s duration willdepend on the story or content being provided, and canbe fairly short or as long as a few minutes.
3. Can I access a multimedia clip wherever I am, as long as Ihave my phone?As long as you are on the Nationwide Sprint PCS Network,you will have access to the audio and video clips.
4. Are the videos that I’m viewing “live” videos?It depends on the content provider. Some of thechannels available through Sprint TV stream livecontent. Others provide media on demand with videoand audio clips that are refreshed throughout the day,but that are not “live.”
Note: SprintTV Service does not work while roaming off of theNationwide Sprint PCS Network or where service isunavailable.
Media Player

214 Section 2K: Using the Built-in Media Player
5. After purchasing access to an Available Channel for amonthly fee, do I receive any confirmation? That is, how doI know it has been purchased?The next time you access your media player’s channellistings, the purchased channel title and correspondingnumber will be displayed in the My Channels section.
6. Why are some channels already preloaded into the MyChannels section?Some channels, such as Previews, are offered free ofcharge as a customer courtesy. These channels areautomatically displayed in the My Channels section ofyour channel listings.
7. If I don’t subscribe to a Sprint PCS Vision Plan or Sprint Power Vision Plan, will I still be able to view themultimedia clips?Yes. For service access charges, please consult yourSprint PCS service plan or visitwww.sprint.com.
8. How can I easily access a channel without having to scrollthrough all the channels in my channel listings?Each channel will have a number to the left of it. You cansimply press this number to quickly access the clipslocated within that channel.
9. What does it mean when the video pauses and I see theword “loading” at the bottom of the screen?This happens when the media player is loading the datanecessary to play the clip. It typically occurs when thereis heavy traffic on the network.
Tip: When entering the specific channel number, channels 01–09do not require you to enter a “0.” For example, to accesschannel “07,” just press the “7” key.

Section 2K: Using the Built-in Media Player 215
10. How can I cancel service if I decide I don’t want it?To cancel your Multimedia Service, visitwww.sprint.comand sign on to My PCS with your account number andpassword. From this page, you have the ability to cancelthe service or any Available Channels to which yousubscribe.
11. If I put on my stereo headphones and insert them into thephone’s headset jack, can I close the phone while I amplaying an audio (or video) clip without interrupting theclip?Yes. When you insert your stereo headset into thephone’s headset jack, the phone automatically goes into“headset mode,” allowing you to close the phone andcontinue playing the clip. (Likewise, if your phone is in“headset mode,” a phone call will not disconnect whenyou close the phone.)
12. Can I surf to a different channel while I am playing a clip?Yes. While you are playing a clip, you can use the up anddown navigation buttons to surf to a different channel.A small pop-up screen will be displayed that tells youwhich channel you are watching as well as otherchannels that you have access to. Use the navigationbuttons to scroll through the different channels. Onceyou find a channel that you want to watch, scroll to itand press (or simply wait approximately threeseconds), and the channel will begin loading.
Media Player

216 Section 2L: Using Bluetooth
Section 2L
Using Bluetooth
In This Section
l Turning Bluetooth On and Off (page 217)
l Using the Bluetooth Settings Menu (page 218)
l Bluetooth Profiles (page 221)
l Pairing Bluetooth Devices (page 223)
l Using the Trusted Devices Options (page 224)
l Printing Data via Bluetooth (page 225)
l Sending Data via Bluetooth (page 226)
Your phone features built-in Bluetooth technology, allowingyou to share information more easily than ever before.Bluetooth is a short-range communications technologythat allows you to connect wirelessly to a number ofBluetooth devices, such as headsets and hands-free car kits,and Bluetooth-enabled handhelds, PCs, printers, andwireless phones. The Bluetooth communication range isusually up to approximately 10 meters (30 feet).
This section details how to set up and make the most of yourphone’s Bluetooth capabilities.

Section 2L: Using Bluetooth 217
Turning Bluetooth On and Off
By default, your phone’s Bluetooth feature is turned off.Turning Bluetooth on makes your phone “available” to otherin-range Bluetooth devices. To make your phone visible toother devices you must also set your phone’s visibility to otherthan Hidden. (See page 219.)
To turn Bluetooth on:
1. Select >Settings > Bluetooth > Enable/Disable.
2. Select Enable to enable Bluetooth.
To turn Bluetooth off:
1. Select >Settings > Bluetooth >Enable/Disable.
2. Select Disable to disable Bluetooth.
Bluetooth Status Indicators
The following icons show your Bluetooth connection status ata glance:
v – Bluetooth feature is active. It turns to green whenconnected to a Bluetooth device.
v – Your phone is discoverable by another Bluetoothdevice.
v – Your phone is communicating with a Bluetoothdevice.
Note: Enabling the Bluetooth settings affects the battery’s talk andstandby times.
Using
Bluetooth

218 Section 2L: Using Bluetooth
Using the Bluetooth Settings Menu
The Bluetooth Settings menu allows you to set up many of thecharacteristics of your phone’s Bluetooth service, including:
v Entering or changing the name your phone uses forBluetooth communication
v Setting your phone’s visibility (or “discoverability”) toother Bluetooth devices
v Displaying your phone’s Bluetooth address
To access the Bluetooth Settings menu:
1. Select >Settings > Bluetooth.
2. Use the navigation key to select Enable/Disable,Visibility, VoicePriority, MyDeviceName, or My Device Info, and press .
Bluetooth Settings: My Device NameThe My Device Name section of the Bluetooth Settings menuallows you to select a Bluetooth name for your phone. Yourphone’s Bluetooth name will be seen by other in-range Bluetooth devices, depending on your Visibilitysettings.
To set a Bluetooth name for your phone:
1. Select >Settings > Bluetooth > MyDeviceName.
2. Press and hold to clear the current name.
3. Use your keypad to enter a new name and press tosave and exit.

Section 2L: Using Bluetooth 219
Bluetooth Settings: VisibilityThe Visibility section of the Bluetooth Settings menu allowsyou to manage your availability to other Bluetooth devices.
To configure your phone’s visibility (discoverability) to otherBluetooth devices:
1. Select > Settings > Bluetooth > Visibility.
2. Select your desired Visibility setting and press :
n Always Visible to allow other Bluetooth devices todetect and identify your phone.
n Visible for 3 min. to allow other Bluetooth devices todetect your phone for 3 minutes, after which itreturns to hidden mode.
n Hidden to prevent other Bluetooth devices fromdetecting and identifying your phone.
Bluetooth Settings: Voice PriorityThe Voice Priority section of the Bluetooth Settings menuallows you to choose the default device you want to use forincoming and outgoing calls.
To set the voice priority:
1. Select > Settings > Bluetooth > Voice Priority.
2. Select Phone or Hands-free.
n Phone allows you to switch the audio between yourphone and hands-free devices.
n Hands-free allows only hands-free devices to beused.
Note: It is recommended that your phone is in standby mode whenreceiving data from other devices via Bluetooth.
Using B
luetooth
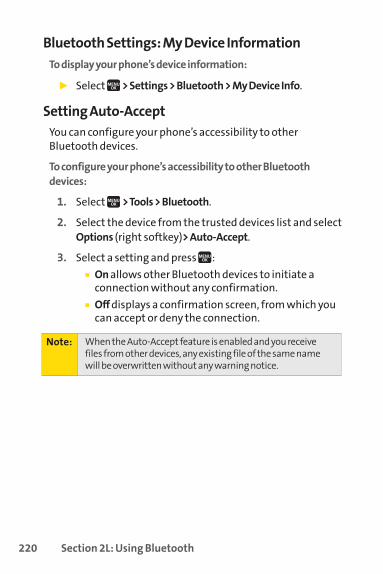
220 Section 2L: Using Bluetooth
Bluetooth Settings: My Device InformationTo display your phone’s device information:
© Select >Settings > Bluetooth > My Device Info.
Setting Auto-AcceptYou can configure your phone’s accessibility to otherBluetooth devices.
To configure your phone’s accessibility to other Bluetoothdevices:
1. Select >Tools > Bluetooth.
2. Select the device from the trusted devices list and selectOptions (right softkey)>Auto-Accept.
3. Select a setting and press :
n On allows other Bluetooth devices to initiate aconnection without any confirmation.
n Off displays a confirmation screen, from which youcan accept or deny the connection.
Note: When the Auto-Accept feature is enabled and you receivefiles from other devices, any existing file of the same namewill be overwritten without any warning notice.

Section 2L: Using Bluetooth 221
Bluetooth Profiles
All the Bluetooth settings you configure are stored in yourphone’s Bluetooth user profile. Different profiles can be usedfor specific Bluetooth functions.
v Headset Profile – This profile functions as a wireless earjack. When an incoming call is received, the ringer can beheard through the headset instead of through the phone.The call can then be received by pushing a button. Whileusing your phone, you can use the headset instead of thephone by pushing a button on the headset, the same asinserting a jack into the phone. Increase or decrease thevolume by using the volume key on the side of the phone.
v Hands-Free Profile – This profile functions as a wireless car-kit. Incoming calls ring to the hands-free headset ordevice. Calls can be received by pressing a button on theheadset or device. For dialing, four functions aresupported: recent call dial, voice dial, speed dial, andnumber dial. Increase or decrease the volume by using thevolume key on the side of the phone.
v DUN: Dial-Up Network Profile – This profile functions as awireless data cable, connecting a PC or PDA to a networkthrough your phone.
v OPP:Object Push Profile –This profile uses the GenericObject Exchange profile services to send data objectsbetween devices and can be used to exchange objects likemusic files, pictures, calendar (vCal), and business cards(vCard).
Using
Bluetooth

222 Section 2L: Using Bluetooth
v FTP: File Transfer Profile –This profile allows you to transferfiles to or from other Bluetooth-enabled devices.
v BPP: Basic Printing Profile –This profile enables simplerprinting from your phone to a Bluetooth-enabled printer.
v A2DP: Advanced Audio Distribution Profile –This profileallows you to transmit high quality stereo music fromyour phone to other compatible accessories includingBluetooth stereo headsets.
v AVRCP: Audio/Video Remote Control Profile –This profileenables your phone to remotely control compatibleaccessories including Bluetooth stereo headsets. You canplay, pause, stop, forward, reverse, fast forward, or rewindfrom a headset. (Playback functions may vary amongBluetooth accessories.)
Note: The A2DP profile supports the following file extensions:“aac,” “m4a,” “mp3,” “mp4,” “3gp,” “3gpp,” “3g2,” “3gp2,”“mid.” Streaming media and movie media are not supported.

Section 2L: Using Bluetooth 223
Pairing Bluetooth Devices
Paired Devices
The Bluetooth pairing process allows you to establish trustedconnections between your phone and another Bluetoothdevice. When devices are paired, a passcode (sometimescalled a PIN) is shared between devices, allowing for fast,secure connections while bypassing the discovery andauthentication process.
To pair your phone with another Bluetooth device:
1. Select > Tools > Bluetooth> Add New > Search. (Your phone will display a list of discovered in-rangeBluetooth devices.)
2. Select the device you wish to pair with and press .
3. Select Add to Trusted.
4. Enter the PIN and press . (When the owner of the otherdevice enters the same PIN, the pairing is complete.)
Waiting for Request
If you are going to be using a Dial-Up Network (DUN) profile topair with a PC or PDA, you will need to allow the other deviceto initiate pairing with your phone.
To allow your phone to be paired with another Bluetooth device:
1. Select > Tools > Bluetooth > Add New > Wait for Request.
2. Follow the onscreen prompts to enter your PIN and press .
Using B
luetooth

224 Section 2L: Using Bluetooth
Using the Trusted Devices Options
Once you have created paired devices, several options areavailable from the trusted devices list.
To use the trusted devices options:
1. From the trusted devices list, select a device.
2. Select Options (right softkey) to display the followingoptions:
n Connect or Disconnect to connect to or disconnectfrom the Bluetooth device (if applicable).
n Send Item to send an item saved on your phone toanother Bluetooth device.
n Browse to browse and transfer files betweenBluetooth devices using FTP.
n Print to print the data using Basic Printing Profile orObject Push Profile (if applicable).
n Edit Name to edit the name of the trusted device.
n Auto-Accept to configure your phone’s accessibilityto other Bluetooth devices. (See page 220.)
n Device Info to display the trusted device’sinformation.
n Sort by to sort the trusted devices.
n Delete to delete the selected device from the list.
n Delete All to delete all devices from the list.
n Settings to display the Bluetooth settings menu. (Seepage 218.)

Section 2L: Using Bluetooth 225
Printing Data via Bluetooth
You can print out your pictures, Contacts entries, businesscard, calendar event, and messages stored on the phone.(Some Bluetooth-enabled printers may not support thisfeature.)
To print data via Bluetooth:
1. Select >Tools > Bluetooth.
2. Select the device from the trusted devices list and thenselect Options (right softkey) >Print.
3. Select a category (Picture, Business Card, Contacts,Calendar Event, or Message) and press .
4. Select Create Print Job or Printer Default and press .(This step only appears when you select a picture.)
n Create Print Job to print pictures by creating a printjob via the Basic Printing Profile.
n Printer Default to print pictures using the defaultprinter settings via the Object Push Profile.
5. Follow the onscreen instructions to select the item(s) to print.
6. Make sure the printer is ready to print data, and thenselect Print (left softkey).
7. If necessary, enter the PIN and press .
Note: Before you start using the Bluetooth feature, make sure yourphone’s battery is fully charged.
Using
Bluetooth
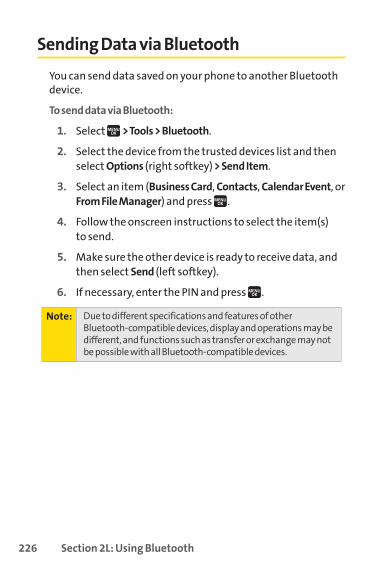
226 Section 2L: Using Bluetooth
Sending Data via Bluetooth
You can send data saved on your phone to another Bluetoothdevice.
To send data via Bluetooth:
1. Select >Tools > Bluetooth.
2. Select the device from the trusted devices list and thenselect Options (right softkey) >Send Item.
3. Select an item (Business Card, Contacts, Calendar Event, orFrom File Manager) and press .
4. Follow the onscreen instructions to select the item(s) to send.
5. Make sure the other device is ready to receive data, andthen select Send (left softkey).
6. If necessary, enter the PIN and press .
Note: Due to different specifications and features of otherBluetooth-compatible devices, display and operations may bedifferent, and functions such as transfer or exchange may notbe possible with all Bluetooth-compatible devices.

Sprint PCS Service Features
Section 3

228 Section 3A: Sprint PCS Service Features – The Basics
Section 3A
Sprint PCS Service Features: The Basics
In This Section
l Using Voicemail (page 229)
l Using SMS Text Messaging (page 237)
l Using SMS Voice Messaging (page 241)
l Using Caller ID (page 242)
l Responding to Call Waiting (page 243)
l Making a Three-Way Call (page 244)
l Using Call Forwarding (page 245)
Now that you’ve mastered your phone’s fundamentals, it’s time to explore the calling features that enhance yourSprint PCS service.This section outlines your basic Sprint PCSservice features.

Section 3A: Sprint PCS Service Features – The Basics 229
Using Voicemail
Setting UpYour VoicemailAll unanswered calls to your phone are automaticallytransferred to your voicemail, even if your phone is in use orturned off. Therefore, you will want to set up your Sprint PCSVoicemail and personal greeting as soon as your phone isactivated.
To set up your voicemail:
1. Press and hold .
2. Follow the system prompts to:
n Create your passcode.
n Record your name announcement.
n Record your greeting.
n Choose whether to activate One-Touch MessageAccess (a feature that lets you access messagessimply by pressing and holding , bypassing theneed for you to enter your passcode).
Note: Voicemail PasscodeIf you are concerned about unauthorized access to yourvoicemail account, Sprint recommends that you enable yourvoicemail passcode (do not activate One-Touch MessageAccess).
SprintPCS Service

230 Section 3A: Sprint PCS Service Features – The Basics
Voicemail NotificationThere are several ways your phone alerts you to a newmessage:
v By displaying a message on the screen.
v By sounding the assigned ringer type.
v By the LED blinking red.
v By displaying at the top of your screen.
New Voicemail Message AlertsWhen you receive a new voice message, your phone alerts youand prompts you to call your voicemail.
To call your voicemail:
© Press .
To display your Missed Log:
© Press > Missed Alerts.
Note: When you are roaming off the Nationwide Sprint PCSNetwork, you may not receive notification of new voicemailmessages. It is recommended that you periodically check yourvoicemail by dialing 1 + area code + your wireless phonenumber. When your voicemail answers, press (*)and enteryour passcode. You will be charged roaming rates whenaccessing voicemail while roaming off the Nationwide Sprint PCS Network.
Your phone accepts messages even when it is turned off.However, you are notified of new messages only when yourphone is turned on and you are in a Sprint PCS service area.

Section 3A: Sprint PCS Service Features – The Basics 231
RetrievingYour Voicemail MessagesYou can review your messages directly from your wirelessphone or from any other touch-tone phone. To dial from yourwireless phone, you can either speed dial your voicemail oruse the menu keys.
Using One-Touch Message Access
© Press and hold . (Your phone will dial your voicemailbox.)
Using the Menu Keys on Your Phone to Access YourMessages
1. Select > Messaging > Voicemail.
2. Select Call Voicemail to listen to your messages.
Using a Phone Other Than Your Wireless Phone to Access Messages
1. Dial your wireless phone number.
2. When your voicemail answers, press .
3. Enter your passcode.
Tip: When you call into voicemail, you first hear the headerinformation (date, time, and sender information) for themessage. To skip directly to the message, press 4 during theheader.
Note: You are charged for airtime minutes when you are accessingyour voicemail from your wireless phone.
SprintPCS Service

232 Section 3A: Sprint PCS Service Features – The Basics
Voicemail Button Guide
Here’s a quick guide to your keypad functions while listeningto voicemail messages. For further details and menu options,see “Voicemail Menu Key” on page 235.
Date/Time Send Reply Advance
Replay Rewind Forward
Erase Call Back Save
Cancel Help Skip
Voicemail OptionsYour phone offers several options for organizing andaccessing your voicemail.
Using Expert Mode
Using the Expert Mode setting for your personal voicemailbox helps you navigate through the voicemail system morequickly by shortening the voice prompts you hear at each level.
To turn Expert Mode on or off:
1. Press and hold to access your voicemail.
2. Press to change your Personal Options, followingthe system prompts.
3. Press for Expert Mode.
4. Press to turn Expert Mode on or off.

Section 3A: Sprint PCS Service Features – The Basics 233
Setting Up Group Distribution Lists
Create up to 20 separate group lists, each with up to 20customers.
1. Press and hold to access your voicemail.
2. Press to change your Personal Options, followingthe system prompts.
3. Press for Settings.
4. Press for Group Distribution Lists.
5. Follow the voice prompts to create, edit, rename, ordelete group lists.
Sprint PCS Callback
Return a call after listening to a message withoutdisconnecting from voicemail.
© Press after listening to a message. (Once the call iscomplete, you’re returned to the voicemail main menu.)
Voicemail-to-Voicemail Message
Record and send a voice message to other Sprint PCSVoicemail users.
1. From the main voicemail menu, press to send amessage.
2. Follow the voice prompts to enter the phone number.
3. Follow the voice prompts to record and send your voicemessage.
SprintPCSService

234 Section 3A: Sprint PCS Service Features – The Basics
Voicemail-to-Voicemail Message Reply
Reply to a voice message received from any other Sprint PCSVoicemail user.
1. After listening to a voice message, press .
2. Follow the voice prompts to record and send your reply.
Voicemail-to-Voicemail Message Forwarding
Forward a voice message, except those marked “Private,” toother Sprint PCS Voicemail users.
1. After listening to a message, press .
2. Follow the voice prompts to enter the phone number.
3. Follow the voice prompts to record your introductionand forward the voice message.
Voicemail-to-Voicemail Receipt Request
Receive confirmation that your voice message has beenlistened to when you send, forward, or reply to other Sprint PCS users.
1. After you have recorded a message, press to listento the recorded message.
2. Press for More Options.
3. Press to mark receipt requested.
4. Press to send your voicemail message.
Section 3A: Sprint PCS Service Features – The Basics 235
Extended Absence Greeting
When your phone is turned off or you are off the NationwideSprint PCS Network for an extended period, this greeting canbe played instead of your normal personal greeting.
1. From the main voicemail menu, press for PersonalOptions.
2. Press for Greetings.
3. Press to record an Extended Absence Greeting.
Clearing the Message IconYour phone may temporarily continue to display the messageicon after you have checked your voice and text messages.
Toclear the icon from the displayscreen:
1. Select >Messaging > Voicemail > Clear Count.
2. Select Yes and press .
Voicemail Menu KeyFollowing the prompts on the voicemail system, you can useyour keypad to navigate through the voicemail menu. Thefollowing list outlines your phone’s voicemail menu structure.
Listen
Envelope Information
Reply
Advance 8 Seconds
Replay
Rewind
Forward Message
Erase
Callback
SprintPCSService

236 Section 3A: Sprint PCS Service Features – The Basics
Save
Options
Send a Message
Personal Options
Settings
Skip Passcode
Autoplay
Message Date & Time On/Off
Change Passcode
Group Distribution List
Numeric Paging to a Phone
Return to Personal Options Menu
Greetings
Personal Greetings
Name Announcement
Extended Absence Greeting
Return to Personal Options Menu
Expert Mode (On/Off)
Place a Call
Disconnect

Section 3A: Sprint PCS Service Features – The Basics 237
Using SMS Text Messaging
With SMS Text Messaging, you can use other people’s phonenumbers to send instant text messages from your phone totheir messaging-ready phones – and they can send messagesto you. When you receive a new message, it will automaticallydisplay on your phone’s screen.
In addition, SMS Text Messaging includes a variety of presetmessages, such as “Can’t talk right now. Send me a message.”that make composing messages fast and easy. You can alsocustomize your own preset messages (up to 50 characters)from your phone.
Composing SMS Text MessagesTocompose an SMS Text message:
1. Select >Messaging > Send Message > Text and selectthe entry method you prefer:
n Contacts to select a recipient from your internalContacts. (Qualifying Contacts entries must containa phone number or an email address.)
n Phone# to use the keypad to enter the phonenumber of the person to whom you wish to send amessage.
n Email to enter the recipient’s email address.
2. Press to save the recipient. (You may include up to 50recipients per message.)
3. Select Next (left softkey) when you have finishedselecting and entering recipients.
Tip: You can also select Others (right softkey) to select recipientsfrom your desired list.
SprintPCSService

238 Section 3A: Sprint PCS Service Features – The Basics
4. Compose a message or use the preset messages orsmileys (icons).
n To type a message, use your keypad to enter yourmessage. Select Mode (right softkey) to select acharacter input mode. (See “Entering Text” on page 41.)
5. Scroll down to select the message priority (Ordinary orUrgent), set the callback number, set the signature, orset the delivery receipt.
6. Review your message and select Send (left softkey). (Youmay also select additional messaging options byselecting Options [right softkey] to change the recipientsor save to draft.)
Tip: You can also send an SMS Text message when the left softkeydisplays the Send Msg option.
Section 3A: Sprint PCS Service Features – The Basics 239
Accessing SMS Text MessagesTo read an SMS Text message:
© When you receive a text message, it will be displayedautomatically on your phone’s screen. Use yournavigation key to scroll down and view the entiremessage.
To reply to an SMS Text message:
1. While the message is open, select Reply (left softkey).
2. Select Text, and then compose your reply or use thepreset messages or icons.
n To type a message, use your keypad to enter yourmessage. Use Mode (right softkey) to select acharacter input mode. (See “Entering Text” on page 41.)
3. Review your reply and select Send (left softkey). (You may also select additional messaging options byselecting Options [right softkey] to change the recipientsor save to draft.)
SprintPCS Service

240 Section 3A: Sprint PCS Service Features – The Basics
Using Preset MessagesPreset messages make sending text messages to your friends,family, and coworkers easier than ever.
To send preset messages into the text box:
1. Select > Settings > Messaging > Preset Msgs.
2. Highlight a message you wish to send and select Options(right softkey) > Send Text.
To edit preset messages:
1. Select > Settings > Messaging > Preset Msgs.
2. Highlight a message you wish to edit and press .
3. Enter your new message or changes and press . (See “Entering Text” on page 41.)
To reset preset messages:
1. Select > Settings > Messaging > Preset Msgs.
2. Select Options (right softkey) > Reset All Msgs > Yes.

Section 3A: Sprint PCS Service Features – The Basics 241
Using SMS Voice Messaging
In addition to sending and receiving SMS Text messages, yourphone is enabled with SMS Voice Messaging. With SMS VoiceMessaging, you can quickly and easily send a voice message toother SMS-enabled phones or to working email addresseswithout making a phone call. Just record a message and sendit directly to the recipient’s phone messaging inbox.
Playing an SMS Voice MessageTo play an SMS Voice message from the main menu:
1. Select >Messaging > VoiceSMS.
2. Select the message you want to play and press . (The message will begin playing.)
3. Select Reply (left softkey) to reply the message.(To display the message options, select Options [rightsoftkey].)
Composing SMS Voice MessagesTocompose an SMS Voice message:
1. Select >Messaging > Send Message > VoiceSMS.
2. Select Contacts, Phone#, or Email to select a recipient orenter a recipient’s phone number or email addressdirectly.
3. Select Next (left softkey) when you have finishedselecting and entering recipients.
4. Start recording after the beep. (You can record for up totwo minutes.)
5. To finish recording, select Done (left softkey).
6. Select Send (left softkey) to send the voice message.
SprintPCSService
242 Section 3A: Sprint PCS Service Features – The Basics
Accessing SMS Voice MessagesTo play an SMS Voice message:
© When you receive a voice message, a pop-up notificationwill automatically be displayed on your phone’s screen.Use your softkeys to view and play the voice message.
To reply to an SMS Voice message:
1. From the SMS Voice inbox, select Reply (left softkey).
2. Select VoiceSMS.
3. Record your reply, and then select Send (left softkey).
Using Caller ID
Caller ID allows people to identify a caller before answeringthe phone by displaying the number of the incoming call. Ifyou do not want your number displayed when you make a call,just follow these easy steps.
To block your phone number from being displayed for a specificoutgoing call:
1. Press .
2. Enter the number you want to call.
3. Press .
To permanently block your number, call Sprint CustomerService.
Tip: If an SMS Voice message has several recipients, you canchoose Reply All to send your response to all the recipients ofthe message, or Reply to Sender to reply only to the personwho sent you the message.

Section 3A: Sprint PCS Service Features – The Basics 243
Responding to Call Waiting
When you’re on a call, Call Waiting alerts you to incoming callsby sounding beeps. Your phone’s screen informs you thatanother call is coming in and displays the caller’s phonenumber (if it is available).
To respond to an incoming call while you’re on a call:
© Press . (This puts the first caller on hold and answersthe second call.)
To switch back to the first caller:
© Press again.
Tip: For those calls where you don’t want to be interrupted, youcan temporarily disable Call Waiting by pressing *7 0 beforeplacing your call. Call Waiting is automatically reactivatedonce you end the call.
SprintPCS Service
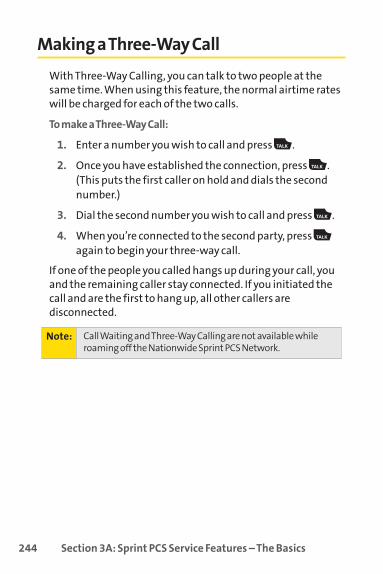
244 Section 3A: Sprint PCS Service Features – The Basics
Making a Three-Way Call
With Three-Way Calling, you can talk to two people at thesame time. When using this feature, the normal airtime rateswill be charged for each of the two calls.
To make a Three-Way Call:
1. Enter a number you wish to call and press .
2. Once you have established the connection, press .(This puts the first caller on hold and dials the secondnumber.)
3. Dial the second number you wish to call and press .
4. When you’re connected to the second party, press again to begin your three-way call.
If one of the people you called hangs up during your call, youand the remaining caller stay connected. If you initiated thecall and are the first to hang up, all other callers aredisconnected.
Note: Call Waiting and Three-Way Calling are not available whileroaming off the Nationwide Sprint PCS Network.

Section 3A: Sprint PCS Service Features – The Basics 245
Using Call Forwarding
Call Forwarding lets you forward all your incoming calls toanother phone number – even when your phone is turned off.You can continue to make calls from your phone when CallForwarding is activated.
To activate Call Forwarding:
1. Press .
2. Enter the area code and phone number to which yourfuture calls should be forwarded.
3. Press . (You will hear a tone to confirm the activationof Call Forwarding.)
To deactivate Call Forwarding:
1. Press .
2. Press . (You will see a message and hear a tone toconfirm the deactivation.)
Note: You are charged a higher rate for calls you have forwarded.
SprintPCS Service

246 Section 3B: Sprint PCS Voice Command
Section 3B
Sprint PCS Voice Command
In This Section
l Getting Started With Sprint PCS Voice Command (page 247)
l Creating Your Own Address Book (page 248)
l Making a Call With Sprint PCS Voice Command (page 249)
l Accessing Information Using Sprint PCS Voice Command (page 250)
With Sprint PCS, reaching your friends, family, and co-workershas never been easier – especially when you’re on the go.Youcan even listen to Web-based information, such as news,weather, and sports. Your voice does it all with Sprint PCSVoice Command.
This section outlines the Sprint PCS Voice Command service.

Section 3B: Sprint PCS Voice Command 247
Getting Started With Sprint PCS Voice Command
With Sprint PCS Voice Command:
v You can store all your contacts’phone numbers, so you cansimply say the name of the person you want to call.
v There’s no need to punch in a lot of numbers, memorizevoicemail passwords, or try to dial while you’re driving.
v You can call anyone in your address book – even if youdon’t remember their phone number.
v You don’t need to worry about losing your contacts oraddress book. This advanced service is network-based, soif you switch or happen to lose your phone, you won’t loseyour contacts or address book.
It’s Easy to Get Started
There are two easy ways to sign up for Sprint PCS VoiceCommand:
© Sign up when you purchase and activate your phone.
© Just dial from your phone to contactSprint Customer Service and sign up.
There is a monthly charge for Sprint PCS Voice Command.
Voice Comm
and

248 Section 3B: Sprint PCS Voice Command
Creating Your Own Address Book
You can program up to 500 names into your personal addressbook, with each name having up to five phone numbers.That’s 2500 phone numbers, and with the advancedtechnology of Sprint PCS Voice Command, you can haveinstant access to all of them.
There are four ways to update your address book:
v On the Web. Go to www.talk.sprintpcs.comand sign on withyour phone number and password to access a fullyfunctional Web-based address book to create and updateyour contacts.
v Use an Existing Address Book. Automatically merge address books from desktop software applications withSprint SyncSM Services for no additional charge. Simply click the “Click to synchronize” button within your SprintPCS Voice Command personal address book atwww.talk.sprintpcs.com.
v Use Voice Recordings. Simply dial and say, “Addname.” You will then be asked to say the name andnumber you want to add to your personal address book.Your address book can store up to 20 voice recorded namesat once.
v Call Sprint 411. If you don’t have a computer or Internetaccess handy, you can have Sprint 411 look up phonenumbers for you and automatically add them to youraddress book. Just dial and say “Call operator”and we’ll add two names and all the numbers associatedwith those names to your address book for our standarddirectory assistance charge.
Section 3B: Sprint PCS Voice Command 249
Making a CallWith Sprint PCS Voice Command
To make a call with Sprint PCS Voice Command:
1. Press and you’ll hear the “Ready” prompt.
2. After the “Ready” prompt, simply say, in a natural voice,“Call” and the name of the person or the number you’dlike to call. (For example, you can say, “Call Jane Smith atwork,” “Call John Baker on the mobile phone,” “Call 555-1234,” or “Call Bob Miller.”)
3. Your request will be repeated and you will be asked toverify. Say “Yes” to call the number or person. (Thenumber will automatically be dialed.) Say “No” if youwish to cancel.
For more helpful hints on Sprint PCS Voice Command,including a list of recognized commands and an interactivetutorial, visitwww.talk.sprintpcs.com.
Tip: Keep in mind that Sprint PCS Voice Command recognizes notonly your voice, but any voice, so that others can experiencethe same convenience if they use your phone.
Voice Comm
and

250 Section 3B: Sprint PCS Voice Command
Accessing Information Using Sprint PCS Voice Command
To access information using Sprint PCS Voice Command:
1. Press .
2. Say “Call the Web” and choose from a listing ofinformation categories like news, weather, and sports.– or –Simply say “Call news room,” “Call the weather,” “CallSports Central,” etc.
Note: Sprint PCS Voice Command is not available while roaming offthe Nationwide Sprint PCS Network.

Section 4
Safety and WarrantyInformation

252 Section 4A: Important Safety Information
Section 4A
Important Safety Information
In This Section
l General Precautions (page 253)
l Maintaining Safe Use of and Access to Your Phone (page 254)
l Using Your Phone With a Hearing Aid Device (page 256)
l Caring for the Battery (page 257)
l Radiofrequency (RF) Energy (page 259)
l Owner’s Record (page 262)
l Phone Guide Proprietary Notice (page 262)
This phone guide contains important operational and safetyinformation that will help you safely use your phone. Failureto read and follow the information provided in this phoneguide may result in serious bodily injury, death, or propertydamage.

Section 4A: Important Safety Information 253
General Precautions
There are several simple guidelines to operating your phone properly andmaintaining safe, satisfactory service.
v To maximize performance, do not touch the upper back portion of yourphone where the internal antenna is located while using the phone.
v Speak directly into the mouthpiece.
v Avoid exposing your phone and accessories to rain or liquid spills. Ifyour phone does get wet, immediately turn the power off and removethe battery.
v Do not expose your phone to direct sunlight for extended periods oftime (such as on the dashboard of a car).
v Although your phone is quite sturdy, it is a complex piece of equipmentand can be broken. Avoid dropping, hitting, bending, or sitting on it.
v Any changes or modifications to your phone not expressly approved inthis document could void your warranty for this equipment and voidyour authority to operate this equipment.
Note: For the best care of your phone, only Sprint-authorized personnelshould service your phone and accessories. Failure to do so may bedangerous and void your warranty.
ImportantSafety Inform
ation

254 Section 4A: Important Safety Information
Maintaining Safe Use of and Access to Your Phone
Do Not Rely on Your Phone for Emergency CallsMobile phones operate using radio signals, which cannot guaranteeconnection in all conditions. Therefore you should never rely solely uponany mobile phone for essential communication (e.g., medicalemergencies). Emergency calls may not be possible on all cellular networksor when certain network services or mobile phone features are in use.Check with your local service provider for details.
Using Your Phone While DrivingTalking on your phone while driving (or operating the phone without ahands-free device) is prohibited in some jurisdictions. Laws vary as tospecific restrictions. Remember that safety always comes first.
Following Safety GuidelinesTo operate your phone safely and efficiently, always follow any specialregulations in a given area. Turn your phone off in areas where use isforbidden or when it may cause interference or danger.
Using Your Phone Near Other Electronic DevicesMost modern electronic equipment is shielded from radiofrequency (RF)signals. However, RF signals from wireless phones may affect inadequatelyshielded electronic equipment.
RF signals may affect improperly installed or inadequately shieldedelectronic operating systems or entertainment systems in motor vehicles.Check with the manufacturer or their representative to determine if thesesystems are adequately shielded from external RF signals. Also check withthe manufacturer regarding any equipment that has been added to yourvehicle.
Consult the manufacturer of any personal medical devices, such aspacemakers and hearing aids, to determine if they are adequately shieldedfrom external RF signals.
Note: Always turn off the phone in healthcare facilities, and requestpermission before using the phone near medical equipment.
Tip: Purchase an optional hands-free accessory at your local Sprint Store, orcall the Sprint PCS Accessory HotlineSM at 1-800-974-2221 or by dialing# 2 2 2 on your phone.

Section 4A: Important Safety Information 255
Turning Off Your Phone Before FlyingTurn off your phone before boarding any aircraft. To prevent possibleinterference with aircraft systems, the U.S. Federal Aviation Administration(FAA) regulations require you to have permission from a crew member touse your phone while the plane is on the ground. To prevent any risk ofinterference, FCC regulations prohibit using your phone while the plane isin the air.
Turning Off Your Phone in Dangerous AreasTo avoid interfering with blasting operations, turn your phone off when in ablasting area or in other areas with signs indicating two-way radios shouldbe turned off. Construction crews often use remote-control RF devices toset off explosives.
Turn your phone off when you’re in any area that has a potentially explosiveatmosphere. Although it’s rare, your phone and accessories could generatesparks. Sparks can cause an explosion or fire, resulting in bodily injury oreven death. These areas are often, but not always, clearly marked. Theyinclude:
v Fueling areas such as gas stations.
v Below deck on boats.
v Fuel or chemical transfer or storage facilities.
v Areas where the air contains chemicals or particles such as grain, dust,or metal powders.
v Any other area where you would normally be advised to turn off yourvehicle’s engine.
Restricting Children’s Access to Your PhoneYour phone is not a toy. Do not allow children to play with it as they couldhurt themselves and others, damage the phone or make calls that increaseyour Sprint PCS invoice.
Note: Never transport or store flammable gas, flammable liquids, orexplosives in the compartment of your vehicle that contains yourphone or accessories.
ImportantSafety Inform
ation

256 Section 4A: Important Safety Information
Using Your Phone With a Hearing Aid Device
Your phone has been tested for hearing aid device compatibility. When somewireless phones are used near some hearing devices (hearing aids andcochlear implants), users may detect a buzzing, humming, or whining noise.Some hearing devices are more immune than others to this interferencenoise, and phones also vary in the amount of interference they generate.
The wireless telephone industry has developed ratings for some of theirmobile phones, to assist hearing device users in finding phones that may becompatible with their hearing devices. Not all phones have been rated.Phones that are rated will have the rating on the box. Your M1 has an M4rating.
The M3/M4 ratings do not guarantee successful interoperation betweenyour phone and hearing aid device. Results will vary depending on the levelof immunity of your hearing device and degree of your hearing loss.
The more immune your hearing aid device is, the less likely you are toexperience interference noise from your wireless phone. Hearing aiddevices should have ratings similar to phones. Ask your hearing healthcareprofessional for the rating of your aids. Most new hearing aids have at leastan M2 immunity level. Add the “M” ratings of your hearing aid and yourphone to determine probable usability:
v Any combined rating equal to or greater than six offers best use.
v Any combined rating equal to five is considered normal use.
v Any combined rating equal to four is considred usable.
Thus, if you pair an M3 hearing aid with an M3 phone, you will have acombined rating of six for “best use.”
Sprint Nextel further suggests you experiment with multiple phones (eventhose not labeled M3 or M4) while in the store to find the one that worksbest with your hearing aid device. Should you experience interference orfind the quality of service unsatisfactory after purchasing your phone,promptly return it to the store within 30 days of purchase. With the Sprint 30-day Risk-Free Guarantee, you may return the phone within 30 days of purchase for a full refund.
Note: Phones rated M3 or M4 meet FCC requirements and may generate lessinterference to hearing devices than phones that are not labeled. M4 isthe better/higher of the two ratings.
Section 4A: Important Safety Information 257
Getting the Best Hearing Device Experience With Your Phone
To further minimize interference:
v There is usually less interference on the microphone setting than thetelecoil setting.
v Set the phone’s Display and Keypad backlight settings to ensure theminimum time interval:
1. Select > Settings > Display > Backlight.
2. Select Main LCD, Key, or Sub LCD and press .
3. Select the minimum time interval setting and press .
v Position the phone so the internal antenna is farthest from your hearingaid.
v Move the phone around to find the point with least interference.
Caring for the Battery
Protecting Your BatteryThe guidelines listed below help you get the most out of your battery’sperformance.
v Recently there have been some public reports of wireless phonebatteries overheating, catching fire or exploding. It appears that many,if not all, of these reports involve counterfeit or inexpensive,aftermarket-brand batteries with unknown or questionablemanufacturing standards. Sprint is not aware of similar problems withSprint PCS phones resulting from the proper use of batteries andaccessories approved by Sprint or the manufacturer of your phone. Useonly Sprint-approved or manufacturer-approved batteries andaccessories found at Sprint Stores or through your phone’smanufacturer, or call 1-866-343-1114 to order. They’re also available atwww.sprint.com— click the Wireless option under “Personal,” and thenclick Accessories. Buying the right batteries and accessories is the bestway to ensure they’re genuine and safe.
ImportantSafety Inform
ation

258 Section 4A: Important Safety Information
v In order to avoid damage, charge the battery only in temperatures thatrange from 32° F to 113° F (0° C to 45° C).
v Don’t use the battery charger in direct sunlight or in high humidityareas, such as the bathroom.
v Never dispose of the battery by incineration.
v Keep the metal contacts on top of the battery clean.
v Don’t attempt to disassemble or short-circuit the battery.
v The battery may need recharging if it has not been used for a long periodof time.
v It’s best to replace the battery when it no longer provides acceptableperformance. It can be recharged hundreds of times before it needsreplacing.
v Don’t store the battery in high temperature areas for long periods oftime. It’s best to follow these storage rules:
Less than one month:
-4° F to 140° F (-20° C to 60° C)
More than one month:
-4° F to 113° F (-20° C to 45° C)
Disposal of Lithium Ion (Li-Ion) BatteriesFor safe disposal options of your Li-Ion batteries, contact your nearestSprint authorized service center.
Special Note:Be sure to dispose of your battery properly. In some areas,the disposal of batteries in household or business trash may be prohibited.

Section 4A: Important Safety Information 259
Radiofrequency (RF) Energy
Understanding How Your Phone OperatesYour phone is basically a radio transmitter and receiver. When it’s turnedon, it receives and transmits radiofrequency (RF) signals. When you useyour phone, the system handling your call controls the power level. Thispower can range from 0.006 watt to 0.2 watt in digital mode.
Knowing Radiofrequency SafetyThe design of your phone complies with updated NCRP standards describedbelow.
In 1991–92, the Institute of Electrical and Electronics Engineers (IEEE) andthe American National Standards Institute (ANSI) joined in updating ANSI’s1982 standard for safety levels with respect to human exposure to RFsignals. More than 120 scientists, engineers and physicians fromuniversities, government health agencies and industries developed thisupdated standard after reviewing the available body of research. In 1993,the Federal Communications Commission (FCC) adopted this updatedstandard in a regulation. In August 1996, the FCC adopted hybrid standardconsisting of the existing ANSI/IEEE standard and the guidelines publishedby the National Council of Radiation Protection and Measurements (NCRP).
Body-Worn OperationTo maintain compliance with FCC RF exposure guidelines, if you wear ahandset on your body, use the Sprint supplied or approved carrying case,holster or other body-worn accessory. If you do not use a body-wornaccessory, ensure the antenna is at least 1.9 centimeters from your bodywhen transmitting. Use of non-Sprint-approved accessories may violateFCC RF exposure guidelines.
For more information about RF exposure, visit the FCC Web site atwww.fcc.gov.
ImportantSafety
Information

260 Section 4A: Important Safety Information
Specific Absorption Rates (SAR) for Wireless PhonesThe SAR is a value that corresponds to the relative amount of RF energyabsorbed in the head of a user of a wireless handset.
The SAR value of a phone is the result of an extensive testing, measuringand calculation process. It does not represent how much RF the phoneemits. All phone models are tested at their highest value in strict laboratorysettings. But when in operation, the SAR of a phone can be substantiallyless than the level reported to the FCC. This is because of a variety of factorsincluding its proximity to a base station antenna, phone design and otherfactors. What is important to remember is that each phone meets strictfederal guidelines. Variations in SARs do not represent a variation in safety.
All phones must meet the federal standard, which incorporates asubstantial margin of safety. As stated above, variations in SAR valuesbetween different model phones do not mean variations in safety. SARvalues at or below the federal standard of 1.6 W/kg are considered safe foruse by the public.
The highest reported SAR values of the M1 are:
Cellular CDMA mode (Part 22):Head: 0.711W/kg; Body-worn: 0.472 W/kg
PCS mode (Part 24):Head: 1.22 W/kg; Body-worn: 0.583 W/kg
FCC Radiofrequency EmissionThis phone meets the FCC Radiofrequency Emission Guidelines. FCC ID number: AEZSCP-M1.
More information on the phone’s SAR can be found from the following FCCWeb site: http://www.fcc.gov/oet/fccid.

Section 4A: Important Safety Information 261
FCC NoticeThis device complies with Part 15 of the FCC Rules. Operation is subject tothe following two conditions: (1) this device may not cause harmfulinterference, and (2) this device must accept any interference received,including interference that may cause undesired operation.
Changes or modifications not expressly approved by the party responsiblefor compliance could void the user’s authority to operate the equipment.
These limits are designed to provide reasonable protection against harmfulinterference in a residential installation. This equipment generates, usesand can radiate radio frequency energy and, if not installed and used inaccordance with the instructions, may cause harmful interference to radiocommunications.
However, there is no guarantee that interference will not occur in aparticular installation.
If this equipment does cause harmful interference to radio or televisionreception, which can be determined by turning the equipment off and on,the user is encouraged to try to correct the interference by one or more ofthe following measures:
v Reorient the direction of the internal antenna.
v Increase the separation between the equipment and receiver.
v Connect the equipment into an outlet on a circuit different from that towhich the receiver is connected.
v Consult the dealer or an experienced radio/TV technician for help.
Note: This equipment has been tested and found to comply with the limitsfor a Class B digital device, pursuant to Part 15 of the FCC Rules. Im
portantSafety Information

262 Section 4A: Important Safety Information
Owner’s Record
The model number, regulatory number, and serial number are located on anameplate inside the battery compartment. Record the serial number inthe space provided below. This will be helpful if you need to contact usabout your phone in the future.
Model: Sprint Power VisionSM Phone M1 by Sanyo®
Serial No.:
Phone Guide Proprietary Notice
CDMA Technology is licensed by QUALCOMM Incorporated under one ormore of the following patents:
4,901,307 5,109,390 5,267,262 5,416,797
5,506,865 5,544,196 5,657,420 5,101,501
5,267,261 5,414,796 5,504,773 5,535,239
5,600,754 5,778,338 5,228,054 5,337,338
5,710,784 5,056,109 5,568,483 5,659,569
5,490,165 5,511,073
T9 Text Input is licensed by Tegic Communications and is covered by U.S. Pat.5,818,437, U.S. Pat. 5,953,541, U.S. Pat. 6,011,554 and other patentspending.
Phone Guide template version 6A-NV_3 (May 2006)

Section 4B: Warranty 263
Section 4B
Manufacturer’s Warranty
In This Section
l Manufacturer’s Warranty (page 264)
Your phone has been designed to provide you with reliable,worry-free service. If for any reason you have a problem withyour equipment, please refer to the manufacturer’swarranty in this section.
For information regarding the terms and conditions ofservice for your phone, please visitwww.sprint.comor callSprint Customer Service at 1-888-211-4PCS .
Note: In addition to the warranty provided by your phone’smanufacturer, which is detailed on the following pages,Sprint offers a number of optional plans to cover yourequipment for non-warranty claims. SprintTotal EquipmentProtectionprovides the combined coverage of the SprintEquipment Replacement Programand the Sprint EquipmentService and Repair Program, both of which are availableseparately. Each of these programs may be signed up forwithin 30 days of activating your phone. For more details,please visit your nearest Sprint Store or call Sprint at1-800-584-3666.
Warranty
264 Section 4B: Warranty
Manufacturer’s Warranty
Manufacturer’s Limited WarrantySANYO FISHER COMPANY (“SANYO”) offers you, the original purchaserwho has purchased the enclosed subscriber unit (“Product”) only from anauthorized dealer in the United States, a limited warranty that the Product,including accessories in the Product’s package, will be free from defects inmaterial or workmanship as follows:
A. ONE (1) YEAR LIMITED WARRANTY:For a period of one (1) year fromthe date of original purchase, SANYO will, at its option, either repair orreplace a defective Product (with new or rebuilt parts/replacements).
B. LIMITED WARRANTY ON REPAIRED/REPLACED PRODUCTS:For aperiod equal to the remainder of the limited warranty period on theoriginal Product or, on warranty repairs which have been effected onProducts for 90 days after the date of its repair or replacement, whichever islonger, SANYO will repair or replace (with new or rebuiltparts/replacements) defective parts or Products used in the repair orreplacement of the original Product under the Limited Warranty on it.
Proof that the Product is within the warranty period in the form of a bill ofsale or warranty repair document that includes the date of purchase,Product serial number and the authorized dealer’s name and address, mustbe presented to obtain warranty service. This limited warranty is nottransferable to any third party, including but not limited to any subsequentpurchaser or owner of the Product. Transfer or resale of a Product willautomatically terminate warranty coverage with respect to it.
This limited warranty covers batteries only if battery capacity falls below80% of rated capacity or the battery leaks. Also this limited warranty doesnot cover any battery if (i) the battery has been charged by a battery chargernot specified or approved by SANYO for charging the battery, (ii) any of theseals on the battery are broken or show evidence of tampering, or (iii) thebattery has been used in equipment other than the SANYO phone for whichit is specified.

Section 4B: Warranty 265
This limited warranty does not cover and is void with respect to thefollowing: (i) Products which have been improperly installed, repaired,maintained or modified (including the antenna); (ii) Products which havebeen subjected to misuse (including Products used in conjunction withhardware electrically or mechanically incompatible or Products used withsoftware, accessories, goods or ancillary or peripheral equipment notsupplied or expressly authorized by SANYO for use), abuse, accident,physical damage, abnormal use or operation, improper handling or storage,neglect, exposure to fire, water or excessive moisture or dampness orextreme changes in climate or temperature, (iii) Products operated outsidepublished maximum ratings; (iv) cosmetic damage; (v) Products on whichwarranty stickers or Product serial numbers have been removed, altered, orrendered illegible; (vi) customer instruction; (vii) cost of installation, set up,removal or reinstallation; (viii) signal reception problems (unless caused bydefect in material or workmanship); (ix) damage the result of fire, flood,acts of God or other acts which are not the fault of SANYO and which theProduct is not specified to tolerate, including damage caused bymishandling and blown fuses; (x) consumables (such as memory cards,fuses, etc.); or (xi) any Products which have been opened, repaired,modified or altered by anyone other than SANYO or a SANYO authorizedservice center.
This warranty is valid only in the United States.
REPAIR OR REPLACEMENT, AS HEREINABOVE PROVIDED, IS YOURSOLE ANDEXCLUSIVE REMEDY FOR BREACH OF THE LIMITEDWARRANTY. SANYO SHALL HAVE NO LIABILITY FOR ANY INCIDENTALOR CONSEQUENTIAL DAMAGES, INCLUDING, BUT NOT LIMITED TOLOSS OF PROFITS, LOST SALES, LOSS OF DATA, LOSS OF USE OF THEPRODUCT, OR ANTICIPATED PROFITS ARISING OUT OF USE ORINABILITY TO USE ANY PRODUCT (FOR EXAMPLE, WASTED AIRTIMECHARGES DUE TO THE MALFUNCTION OF A PRODUCT). THISWARRANTY DOES NOT COVER PRODUCTS SOLD “AS IS” OR “WITH ALLFAULTS”. SANYO MAKES NO OTHER EXPRESS WARRANTY WITHRESPECT TO THE PRODUCTS. THE DURATION OF IMPLIEDWARRANTIES, INCLUDING IMPLIED WARRANTIES OFMERCHANTABILITY AND FITNESS FOR A PARTICULAR PURPOSE ISLIMITED TO THE DURATION OF THIS EXPRESS WARRANTY.
Warranty

266 Section 4B: Warranty
Some States do not allow the exclusion or limitation of incidental orconsequential damages, or allow limitations on how long an impliedwarranty lasts, so the above limitations or exclusions may not apply to you.
This limited warranty gives you specific legal rights, and you may haveother rights which vary from State to State.
To obtain warranty service, contact
SANYO Fisher Company
Attention : Customer Services for Wireless Products
Phone : 866-SANYOWC (866-726-9692)
Web : http://www.sanyowireless.com
Copyright © 2006 ACCESS Systems America Inc. ACCESS, NetFront are registered trademarks ortrademarks owned by ACCESS Co., Ltd. in Japan and selected countries worldwide. NetFront is aregistered trademark of NetFront Communications, Inc. in the United States and is used under alicense. Portions of this software are based in part on the work of the Independent JPEG Group.
Copyright © 2006 InnoPath Software. All rights reserved.
© 2006 Sprint Nextel. All rights reserved. SPRINT, the “Going Forward” logo, and other trademarksare trademarks of Sprint Nextel. Sanyo is a registered trademark of Sanyo Electric Co., Ltd.

Index 267
Index
AAbbreviated Dialing 38, 77Airplane Mode 67Alarm Clock 125Alert Notification 52, 66, 202Animation 55Answering Calls 28Any key Answer 73Area Name Display 58Auto-Answer Mode 73Automatic Speech
Recognition (ASR) 137-143
BBacklight 54Battery 21-23
Capacity 21Charging 23Installing 22
Bluetooth 216-226
CCalculator 128Calendar 117-124Call Alarm 123Call Forwarding 245Call Guard 96Call History 98-103
Erasing 103Making a Call From 101Prepending a Phone
Number 103
Saving a Phone NumberFrom 102
Call Waiting 243Caller ID 242Camera 152-179Clock Display 56Contacts 104-115
Adding Phone Number110
Adding an Entry 105Dialing From 39Editing an Entry 110Entry Options 109Finding Entries 107
Countdown Timer 127
DData Roam Guard 97Dialing Options 27DisplayLanguage 73DisplayScreen 15Display Settings 54
EEntering Text 41-45
Alphabet Mode 45Emoticons 41Numbers 42Preset Messages 63Select Language 42Symbols 41T9 Word 43
Index

268 Index
FFile Manager 130
KKey Functions 12Key Press Echo 50
LLocation 61Lock Code 81
Changing 81Locking Your Phone 80
MMaking Calls 26Media Player 205-215
Channel Listing 207Channel Options 206FAQs 213Playing Video and Audio
Clips 208Playlists 210-211
Menu iv-xiMenu Style 58Messaging
Preset Messages 63Setting Alerts 52Signature 64
My ContentErasing 85
My Favorites 72
PPhone (Illus.) 11Phone Number
Displaying 25Finding 37Saving 36With Pauses 37
Phone Settings 46-78Airplane Mode 67Auto-Answer Mode 73Display Settings 54-60Location Settings 61Messaging Settings 62-66Shortcut 72, 76Sound Settings 47-53TTY Use 68-69
PictBridge 178Plus (+) Code Dialing 39Preset Messages 63, 240
RReady Link - See Sprint PCS
Ready LinkResetting Your Phone 87, 89Restricting Calls 83Ringer Types 47Roaming 92-97
Setting Roam Mode 95

Index 269
SSafety Information 252-262Saving a Phone Number 36Screen Call 149Security 79-91
Security Menu 80Silence All 53Sleep Mode 60SMS Text Messaging
237-239SMS Voice Messaging
241-242Special Numbers 84Speed Dialing 40
Assigning Numbers 111, 199
Sprint Customer Service 6Sprint PCS Picture Mail
Downloading Pictures176
Password 155Sending 171-173Uploading Pictures and
Videos 175Web Site 174
Sprint PCS Ready Link 180-204Erasing Entries 197Making a Call 184-187Ready Link Contacts 183Ready Link Mode 181Receiving a Call 189Settings 199Updating Ready Link Lists
199
Sprint PCS ServiceAccount Passwords 5Dialing Sprint PCS Services
115Operator Services 8Setting Up 2-8Sprint 411 7
Sprint PCS Voice Command246-250Address Book 248Making a Call 249
Stop Watch 126Storing Pictures and Videos
168
TT9 Text Input 43Taking Pictures 153-162Text Greeting 54Three-Way Calling 244To Do List 124TTY Use 68Turning Your Phone On and
Off 20
UUnlocking Your Phone 81Updating Your Phone 128
Index
270 Index
VVideos
Options 165Recording 163Sending 171Storing 168Settings 166
Voice Recorder 144-148Call Memo 147-148Voice Memos 144-147
Voice Services 134-151Voice-Activated Dialing
135-136Voicemail
Menu Key 235Options 232Retrieving 231Setting Up 4, 229While Roaming 94
Volume 51
WWarranty 263Welcome iWireless Backup 70-71World Clock 127

Notes___________________________________________________
___________________________________________________
___________________________________________________
___________________________________________________
___________________________________________________
___________________________________________________
___________________________________________________
___________________________________________________
___________________________________________________
___________________________________________________
___________________________________________________
___________________________________________________
___________________________________________________
___________________________________________________
___________________________________________________
___________________________________________________
___________________________________________________
___________________________________________________