phantom miro m / lc cameras manual - ats rentals miro m & lc series camera manual w w w . v i s...
TRANSCRIPT

M / LC
M A N U A L
P H A N T O M C A M E R A S
12460_VR_10.9_Manual Cover_MIRO M-LC.indd 1 10/9/12 1:12 PM

Phantom Miro M & LC Series Camera Manual
w w
w .
v i s
i o
n r e
s e
a r
c h
. c o
m
PN: ZDOC-64084-MA-0003 Rev 1 Last Updated: Nov. 2012

Phantom Miro M & LC Series Camera Manual
Phantom Miro M & LC Series
M A N U A L
100 Dey Road, Wayne, New Jersey 07470 USAPN: ZDOC-64084-MA-0003 Rev 1
Last Updated: Nov. 2012

Phantom Miro M & LC Series Camera Manual
w w
w .
v i s
i o
n r e
s e
a r
c h
. c o
m
W r i t t e n a n d p r o d u c e d b y t h e M a r k e t i n g D e p a r t m e n t a t V i s i o n R e s e a r c h .
T h e c o n t e n t s o f t h i s m a n u a l m a y b e s u b j e c t t o c h a n g e w i t h o u t n o t i f i c a t i o n .
PN: ZDOC-64084-MA-0003 Rev 1Last Updated: Nov. 2012
Updated: 06.10.2012

Phantom Miro M & LC Series Camera Manual
C o n t e n t s
1 1Introduction
2 7
3 17
4 35
5 49
Quick Start Guides
Miro LC Touchscreen Interface
Phantom Software
CineFlash & CineFlash Dock
6 55Phantom RCU
7 57Batteries & Battery Charger
8 63FAQ/Support

Phantom Miro M & LC Series Camera Manual
Phantom Miro M310 (top) and Miro LC320S (bottom)
• Factory and user-definable ‘Presets’ can be saved and retrieved
• Extreme Dynamic Range
• Continuous Recording
• Auto-Exposure
• Multi-cine Acquisition
• Internal Mechanical Shutter
• 1Gb Ethernet
• Tiered Service Contracts to protect your investment
• 3.0 lbs, 1.4kg
• 7.5 x 3.5 x 4 inches, 19 x 19 x 10 cm (L, W, H)
• 1 Megapixel and 2 Megapixel custom-designed CMOS sensors
• Up to 3.2 Gigapixels/second throughput
• Excellent light sensitivity
• Compact, rugged design
• LC-Series includes flip-out LCD touch screen for on-camera control and monitoring
• Rechargeable battery (Sony BP-U30 or BP-U60)
• Phantom CineFlash® storage system (60GB, 120GB and 240GB CineFlash; CineFlash Dock, eSATA Connectivity)
• Image-Based Auto-Trigger
fea
ture
s
All specifications are subject to change. Updated specifications are avialble on our website.

Chapter 1: Introduction1
Introduction1Sensor Characteristics
Throughput / Speed
Exposure
The Miro 110 and Miro 310 are both based on a 1 Megapixel (Mpx) custom-designed CMOS sensor. The maxiumum resolution is 1200 x 800, with a 20 micron (µm) pixel size and with 12-bit pixel depth. The Miro 110 and 310 cameras are rated at ISO 11,100T (mono) and 1800T (color).
The Miro 120 and 320S are both based on a >2 Mpx, custom designed CMOS sensor. The maximum resolution is 1920 x 1200, with a 10 µm pixel size, and 12-bit pixel depth. The Miro 120 and 320S are both rated at ISO 8900T (mono) and 1100T (color).
Both the Miro 110 and Miro 120 cameras provide a 1.6 Gigapixel/second (Gpx/s) throughput while the Miro 310 and Miro 320S double that for 3.2 Gpx/s throughput.
These throughputs translate to the Miro 110 yielding over 1600 frames-per-second (fps), the Miro 310 over 3200 fps, 720 fps for the Miro 120 and 1380 fps for the Miro 320S, all at full resolutions.
Maximum frame rates at reduced resolution are 400,000 fps for the Miro 110, 650,000 for the Miro 310, 250,000 fps for the Miro 120, and 325,000 for the Miro 320S monochrome.
Depending on the model, the minimum exposure time is either 1 µs or 2 µs for sharp, blur-free images using a global electronic shutter.
Vision Research’s unique Extreme Dynamic Range (EDR) feature is standard on all models. With EDR enabled, each pixel in a frame will receive one of two exposure times – a short exposure for potentially overexposed pixels and a longer exposure for pixels receiving normal light levels.

Phantom Miro M & LC Series Camera Manual2
This provides detail in areas of the image that would otherwise be overexposed. EDR is usually recommended for monochrome cameras only.
The Shutter Off mode was designed for PIV applications, and maintains a maximum exposure regardless of frame rate. This allows for a straddle time of 500 ns on the Miro 110 and Miro 310 and 1.4 µs on the Miro 120 and Miro 320S monochrome.
An internal mechanical shutter for remote and automatic black references comes standard on all models. This means each shot is properly black referenced for maximum image quality without the need to manually cap the lens or even touch the camera.
Each camera model comes in three memory configurations: 3 Gigabytes (GB), 6 GB or 12 GB. The high-speed internal memory can be segmented into as many as 16 partitions for Cine storage. (A Cine is Vision Research’s raw image format that stores all image data in a compact file.)
At the end of any shot, save your Cine to the removable Phantom CineFlash storage media at about 4GB/minute. CineFlash allows you to save a copy of your Cine to non-volatile memory for later retrieval, and avoid costly downtime while you download from camera memory to a computer hard disk. When done with an experiment, just remove the CineFlash from the camera, insert it into its docking station connected to a PC, and drag-and-drop Cines from the CineFlash onto your computer disk or connected hard drive.
Phantom Miro M- and LC-Series cameras are available with 4 different interchangable lens mounts, which must be chosen at the time of purchase. Choose between a Canon EOS, Nikon F, C-mount or 35mm PL-mount. The EOS mount enables the use of compatible EF and EF-S lenses, and focus and aperture can be adjusted via our Phantom Remote Control Unit (RCU), Phantom
Memory
Lensing
Mechanical Shutter

Chapter 1: Introduction3
Camera Control software (PCC), or using an adjustment ring on the lens mount. Remote control of focus and aperture is a huge benefit when cameras are remotely located and/or difficult to reach.
Using Phantom Camera Control (PCC) software, you can configure, capture, view, edit, enhance and analyze Cine files. Easily extract still shots, or convert Cines into web- and presentation-compatible formats for sharing with colleagues and documenting experiments. Use PCC’s measurement tools to determine distances, angles and speed. Advanced tools let you crop, scale, rotate and enhance the image to get to the most valuable information out of your Cine file.
Control your camera with an extensive suite of tools in PCC via a 1Gb Ethernet connection, or use the Phantom RCU and its easy-to-learn and easy-to-use touch screen interface.
The Miro LC-Series cameras have a flip-out LCD touchscreen for on-camera control and monitoring. Camera settings can be changed with a few taps on the screen which doubles as a monitor for live preview and Cine playback from internal memory. The LCD user interface is available in multiple languages.
Advanced control signals are available, including a Frame Synchronization signal (FSYNC) on the camera back panel. Trigger, Ready, IRIG In, Video Out, IRIG Out and an Auxiliary signal connection (Event, Strobe, Memgate) are all available on the standard capture cable.
Video Out is either NTSC or PAL on the Miro 110, Miro 310 and Miro 120. An HD-SDI port is available on the Miro 320S. And, a live image is always available in PCC, on the RCU or LC-Series touch screen. You can adjust the video to fill the available monitor space for framing a shot, and then zoom to a 1:1 pixel representation (center-cropped) for focusing using the ‘Autoset’ button on the front of the camera.
Software Control
Signaling
Camera Control

Phantom Miro M & LC Series Camera Manual4
co
nn
ec
tor
pa
ne
l AB
C
D E
F
G
H
I
Release Switch
Sony BP-U30 or BP-U60 Battery
60GB, 120GB, or 240GB removable Flash drive
Switchable (In/Out) TTL Pulse (Falling Edge)
4:2:2 HD-SDI (1080psf, 1080i, 720p) / Trigger (Switch closure or TTL Pulse)
OFF/AUTO/ON Switch
12 -28 Volts DC
Trigger, Ready, Strobe, A-Sync, Video (120, 110 & 310 only), IRIG-B In (Modulated/Unmod.), IRIG-B Out (Unmod.), Aux (Strobe, Event, MemoryGate)
CAT5 UTP (for control and data transfer)
A
B
C
D
E
F
G
H
I
Power Switch
DC Input
F-Sync
HD-SDI (Miro 320S) / Trigger (Miro 120, 110, 310)
CineFlash Compartment
Battery Compartment
Battery Release
1Gbps Ethernet
Capture

Chapter 1: Introduction5
on
-ca
me
ra c
on
tro
ls
Tap to scroll through video tools functions:
Zoom (1:1), Threshold and Live mode
Long press (3 seconds) will perform an internal CSR (current session reference)
Tap once to trigger the camera
Long press (5 seconds) will delete the last RAM Cine file and re-arm the camera
A
B
Autoset
Trigger
A
B

Phantom Miro M & LC Series Camera Manual6
lcd
pa
ne
l c
on
tro
ls
A
B
C
Menu
OSD Display
Menu
A Turns on/off ‘Menu’ icons. Exiting the menu is an electronic reset of the touchscreen. Reset takes about 5 seconds. Double-clicking the square button also resets the screen.
Turns on/off all on-screen displays.
Displays the main ‘capture and setting’ control interface.
Tapping the center of the screen will also bring up menu icons
B
C
See ‘Chapter 3: Miro LC Touchscreens’ for a brief description of the various ‘Menu’ screens
Image shown is of the LCD screen flipped around and folded back into the side of the camera

Chapter 2: Quick Start Guides7
Quick Start Guides2
Mount camera onto suitable support.
Attach and adjust appropriate lens.
Insert battery or connect appropriate power supply (12-28VDC) to the DC Input connector, then set the power switch to the ‘ON’ position.
Insert a Phantom CineFlash, if available. For detailed instruction see Chapter 5: Phantom CineFlash & CineDock.
Click the ‘Menu’ button (square) to display touch screen menu.
Tap the ‘Menu’ icon as to bring up the main capture and setting control interface.
• Set ‘Resolution’ to the required width x height
• Choose the required ‘Speed’ (frame rate) and ‘Exposure Time’ (shutter)
• Set the ‘Post Trigger’ (trigger position) at the begining, or the end, or some position within the internal memory
Scroll up and down for desired setting. Tap once to select parameter to change.
Press (3 seconds) the ‘Autoset’ button (front of the camera) to perform an internal CSR (Current Session Reference).
Tap on ‘AWB’ (Automatic White Balance) icon (upper right).
Place a white or neutral non-saturated object in the center square and tap once.v
ia m
iro
lc
to
uc
hs
cre
en
Power Up Camera
Insert Phantom CineFlash
Set Recording Parameters
Perform CSR
CSR should be performed after all recording parameters have been set
Perform White Balance (Color Cameras Only)
Prepare Camera

Phantom Miro M & LC Series Camera Manual8
‘Arm’ Camera
Trigger
Edit Cine
Press the ‘Trigger’ button (front of camera) for 5 seconds to switch from ‘Pre-trigger’ or ‘Cine Stored’ to ‘Waiting for Trigger’ (recording) mode.
Tap the ‘T’ (Trigger) icon (right-side) or Press the ‘Trigger’ button (front of camera).
Tap the play icon in the ‘Cine Stored’ screen.
Tap ‘Forward’ or ‘Reverse’ icons to play RAM cine (multiple times to speed up playback).
Tap ‘Pause’ icon to stop playback.
Locate the first image to be saved and select ‘Mark-In’ icon.
Locate the last image to be saved and tap the ‘the Mark-Out’ icon.
Review the edited Cine.
‘Save’ marked frames to Phantom CineFlash.
Tap the ‘file management’ icon on the LCD menu, and then tap on the ‘CF’ (CineFlash) icon to bring up the CF menu. This will show the entire list of files on the CineFlash drive. Ensure the last shot is there by checking the time and file size.
Note that the files stored within the CineFlash can not be played back on the LCD menu or over video. They can however be viewed in Phantom PCC software.
Save to CineFlash
Apply a long press over the Mark-In and/or Mark-Out icons to reset Cine file start/end points respectively
Verify Save to CineFlash (optional)

Chapter 2: Quick Start Guides9
‘Re-Arm’ Camera From the LCD menu, tap on the File Management icon. The RAM Cine and status will be visible. Tap on the RAM Cine and then tap the X to delete. Tap the Record icon to start the camera in capture.
Alternatively, a long press (5 seconds) on the front camera trigger button will also delete the last RAM Cine and put the camera back in Capture mode.
If there is an asterisk* next to the RAM file that means it has not been saved to the CineFlash.

Phantom Miro M & LC Series Camera Manual10
via
pc
c s
oft
wa
rePrepare Your Computer
Connect the Camera to the Computer
Camera controlling computers:
1. Must have either the Microsoft Windows NT, Window XP Pro, VISTA Business Edition or Windows 7 operating system installed
2. Firewalls must be turned off (Contact your IT Group if necessary)
3. Using the ‘Windows Control Panel’ set the IP address of your computer’s network card to 100.100.100.1 with a 255.255.0.0 subnet mask.
If camera is controlled by multiple computer’s IP addresses must be unique (i.e., Comp. 1: 100.100.100.1, Comp. 2 100.100.100.2, etc.)
Install the latest version of Phantom Camera Control (PCC) software from the accompanying CD or USB key.
Mount camera onto suitable support.
Attach and adjust appropriate lens.
If necessary, connect the supplied ‘Capture’ cable to the capture port on the camera. If an external trigger is being used, connect it to the capture cable’s ‘trigger’ BNC, or directly to the back of the camera on the Miro 110, 310 or 120.
Connect the 12 - 28 VDC power supply to the camera’s DC Input connector, then set the power switch to the ‘ON’ position.
Attach the supplied Ethernet cable bewteen the Phantom camera and the computer.
Insert a Phantom CineFlash, if available. For detailed instruction see Chapter 5: Phantom CineFlash & CineDock.
Start PCC application.
In the ‘Manager’ tab double mouse-click on the Phantom camera to be used from the ‘Cameras’ group folder.
Install PCC Software
Insert Phantom CineFlash
Prepare Camera
Power Up Camera
Select Camera for Use

Chapter 2: Quick Start Guides11
Click the ‘Live’ tab.
Click ‘Cine Settings’ and define following parameters by either the selecting a value from the pull-down selection list, or type the required value into the respective data entry field:
1. Set ‘Resolution’ to the required width x height
2. Choose the required ‘Sample Rate’ and ‘Exposure Time’
3. Ensure the EDR, (Extreme Dynamic Range) exposure time is set to zero (0).
4. Post Trigger to one (1) by:
a. Moving the ‘T’ (Trigger Position) slider to the right, or
b. Enter zero (0) into the ‘Last’ data entry field.
Click on the CSR button to perform a Current Session Reference.
Move the cursor over a white or neutral non-saturated object in the image and right mouse click.
Click the White Balance command pop-up window, or
Click anywhere, other than the pop-up window to cancel.
Click the ‘Capture’ button to start recording to the camera’s internal memory (circular buffer).
Click the ‘Trigger’ button at the bottom of the ‘Live’ panel, or
Provide a switch closure or an external trigger signal (TTL pulse) via the Trigger connector, or
Press the Trigger button on front of camera.
Set Recording Parameters
‘Arm’ Camera
Trigger
Perform CSR
Perform White Balance (Color Cameras Only)

Phantom Miro M & LC Series Camera Manual12
Click the ‘Play’ tab.
Using the following ‘Video Control Buttons’
Locate the first image of the Cine to be saved and click the ‘Mark-In button.
Locate the last image of the Cine to be saved and click the ‘Mark-Out’ button.
Click ‘Play, Speed, & Options” and enable (check) ‘Limit to Range’.
Under the Video Control Buttons click the ‘Jump to Start’ button.
Review the edited Cine using the Video Control Buttons.
Click the ‘Save Cine...’ button at the bottom of the ‘Play’ panel
In the ‘Save Cine’ window:
1. Navigate to the folder where you want to save the Cine file
2. Enter a file name for the Cine file in the ‘File name:’ data entry field
3. From the ‘Save as type’ pull-down selection list select the ‘Cine Raw, *.Cine’ file format
4. Click the Save button to begin downloading the cine file from the camera to the computer’s hard drive
Click the down-arrow of the ‘Save Cine... button
Select ‘Save RAM Cine to Flash’ (in popup window)
Click the Save button to save the cine file to Phantrom CineFlash
Review Edited Cine
Save to Computer
Or, Save to Phantom CineFlash
Edit Cine
Rewind
Pause
Play
Fast Rewind
Rewind 1 Frame
Advance 1 Frame
Fast Forward

Chapter 2: Quick Start Guides13
Confirm Computer Save (optional)
Click the ‘Open File’ button.
In the ‘Open Cine’ window:
1. Navigate to the folder containing the saved Cine file.
2. Highlight the Cine file to be opened.
3. Click the Open button.
Using the Video Control Buttons review the saved Cine file.
Click the ‘Manager’ tab.
Double-click on the ‘Cine F#’ file under the camera used to record the cine.
Using the Video Control Buttons review the saved Cine file.
After ensuring the Cine file has been saved:
via ‘Manager’ tab:
1. Highlight the recorded Cine file under the selected Phantom camera, then
2. Click the ‘Remove From Tree’ button to erase the Cine stored in the camera’s RAM.
3. Click the OK button when the “Delete all cines from camera?” warning message appears.
via ‘Live’ tab:
1. Click on the Capture button (bottom of ‘Live’ tab), then
2. Click the OK button when the “Delete existing RAM cines and proceed to new recording?” warning message appears.
Confirm CineFlash Save
‘Re-Arm’ Camera

Phantom Miro M & LC Series Camera Manual14
via
re
mo
te c
on
tro
l u
nit
Connect the the Remote cable between the RCU unit and the Miro-RCU Y-cable
Connect the Miro-RCU Y-cable to the power connector on the camera.
Connect the appropriate power supply to the Miro-RCU Y-cable.
On the Miro M & LC320S with HD-SDI, connect a BNC cable between the ‘video-in’ on the RCU and the HD-SDI on the rear panel of the camera.
Set the power switch to the ‘ON’ position.
Hold in the RCU ‘Menu’ button (2 seconds).
Insert a Phantom CineFlash, if available. For detailed instruction see Chapter 5: Phantom CineFlash & CineDock.
Gently depress the ‘Setup’ button, then the Acq, (Acquisition), button.
Set the‘Aspect Ratio’: Press the down-arrow (right of ‘Aspect Ratio’ field) and select an ‘Aspect Ratio’ from the pull-down selection list.
Define the Resolution, Frame Rate, Exposure, and Post Trigger settings using the Numerical Keypad to specify the desired setting.
To overwrite the present value:
1. Tap the entry field once, (turn entry field yellow), then
2. Tap the key pad to enter the desired value.
3. Tap the Enter key to set the value.
To append the value:
1. Tap the entry field twice, (turns entry field white), then
2. Tap the key pad to append the value.
3. Tap the Enter key to set the value.
Connect Camera to Remote Control Unit
Power Up Camera
Power Up RCU
Insert Phantom CineFlash
Set Recording Parameters

Chapter 2: Quick Start Guides15
Press the Return, , icon (upper-left) to return to the Setup Screen.
Press the ‘Capture’ button.
Tap the CSR, (Current Session Reference), button
When prompted tap the Begin button.
Tap the ‘White Balance’ button.
Place a white or neutral non-saturated object in front of the camera.
When prompted tap the Begin button.
Press the Rec, (Record), button.
Apply a trigger to the camera by depressing the hardware Trigger’ button (on RCU), or apply ‘Trigger-In’ (TTL pulse) signal to the Trigger connector on attached Capture cable.
Click the Play button.
Locate the first / last image to be saved by:
Performing a Quick Search:
Rotate the Jog/Scroll dial until desired point in Cine is achieved, or
Press and hold down on ‘Image Location Identifier’ arrow, , located just below the Cine Editor Bar and slide finger right to quickly advance Cine, slide left to quickly rewind (present image number is displayed above).
Using Video Control buttons:
Play
Reverse
Pause
Click the Mark-In and Mark-Out buttons to set the first / last images, respectively, of the Cine to be saved.
Tap the ‘Save’ button to save the edited RAM Cine file to the Phantom CineFlash.
Perform CSR
Perform White Balance (Color Cameras Only)
‘Arm’ Camera
Trigger
Edit Cine
Save to CineFlash

Phantom Miro M & LC Series Camera Manual16
ca
ptu
re &
Se
ttin
gA B C D E F Q H
IJKLM
N
O
P
A Camera State
B Cine # (for multi-Cine setups)
C Time Stamp
D Internal Memory
E Number of Frames Available
F Record Time
G Trigger
H Menu Button
I OSD Button
J Resolution
K Voltage / Battery Life
L Exposure Time
M Speed
N Serial Number / Name
O Cine Management
P Menu
Q CineFlash Status
R IBAT Enabled
G
R

Chapter 3: Miro LC Touchscreens17
Miro LC Touchscreens3
The LCD Touchscreen can be used both as a viewfinder and for touch screen controls.
The display will flip vertically when positioned upside down (such as mounted against the side of a camera, facing outward).
The symbol and color will change based on the state of the camera.
Live: camera is not recording to internal memory. Displays a ‘Live’ image on the LCD and attached video monitor.
Capture: camera is recording to internal memory (RAM), and awaiting a trigger signal. Displays a ‘Live’ image on the LCD and attached video monitor.
Triggered: camera has been triggered, and is filling internal memory (‘Post-Trigger’ frames). Displays a ‘Live’ image on the LCD and attached video monitor.
Cine Stored: recording has ended, and a Cine is stored in internal memory. Displays a ‘Live’ image on the LCD and attached video monitor.
Playback: camera is in PLAYBACK mode. RAM Cines can be selected for playback.
Indicates the internal memory (RAM) partition the Cine is being recorded into.
Indicates the day of the year/hour:minute:second:microsecond.
This ‘time line’ represents all frames available in the camera’s internal memory (RAM buffer / circular buffer). The ‘T’ symbol above the time line represents the user-defined trigger point.
Introduction
Camera State A
Cine B
Time Stamp C
Internal Memory D

Phantom Miro M & LC Series Camera Manual18
Indicates the exact number of recordable frames available in the camera’s internal memory.
Indicates the total length of recording time (in minutes and/or seconds).
Triggers the camera. Trigger is also available from the red button on the front of the camera body, or via capture port.
Turns on/off ‘Menu’ icons. Exiting the menu is an electronic reset of the touch screen. Reset takes about 5 seconds. Double-clicking the square button also resets the screen.
Record Time F
Trigger G
Menu Button H
Tapping the center of the screen will also bring up menu icons.
Turns on/off all on-screen displays.
Indicates the user-defined resolution (width x height), in pixels.
Indicates the power status (counts down).
Indicates the user-defined Exposure Time (in milliseconds or microseconds).
Indicates the user-defined frame rate.
Indicates the camera serial number or user-defined camera name.
Tap to view and select Cine files stored in RAM, save and/or delete to re-arm the camera.
Tap to view the main ‘Capture and Setting’ control interface.
Displays the status, number of gigabytes used, and size (in gigabytes) of the Phantom CineFlash.
Displays when IBAT (Image-Based Auto-Tigger) is enabled.
OSD Button I
Number of Frames Available E
Resolution J
Volatge / Battery Life K
Exposure Time L
Speed M
Serial Number / Name N
Cine Management O
Menu P
CineFlash Status P
IBAT Enabled P

Chapter 3: Miro LC Touchscreens19
ma
in m
en
u A B D
EF
H
C
Tap to display ‘Factory & User Settings’ menu used to load the factory settings, access 3 factory-saved presets, or store up to 6 of your own presets.
Scroll up and down for desired setting. Tap once to select parameter to change.
Used to jump to menu categories in the camera’s main menu list.
Factory & User Settings A
Capture & Settings B
Menu Categories C
G

Phantom Miro M & LC Series Camera Manual20
AWB (Automatic White Balance) automatically adjusts the camera’s white balance.
Place a white or neutral object in the center square and tap once. White subject must not be fully saturated.
Camera Info displays model, serial #, memory size, firmware level, and current temperature readings.
Scroll up the ‘Capture & Setting’ menu.
Scroll down the ‘Capture & Setting’ menu.
Move up one level in the menu structure.
AWB D
Camera Info E
Scroll Up F
Scroll Down G
Return H

Chapter 3: Miro LC Touchscreens21
Expanded menu (above) is displayed when ‘Advanced Settings’ is set to ‘On’
Menu above is always available
me
nu
de
sc
rip
tio
n

Phantom Miro M & LC Series Camera Manual22
From the ‘Main’screen tap the ‘Menu’ icon as indicated to bring up the main ‘capture and setting control interface’.
Scroll up and down for desired setting, then tap once to select parameter to change.
Defines the ‘Speed’ (Frame Rate / Sample Rate) that the camera will capture at. The available speeds will change according to the ‘Resolution’ selected. Smaller resolutions allow higher speeds.
Setting Access
Speed
Exp. Time
The Resolution parameter should be set before setting the Speed.
Defines the amount of time the sensor is exposed to light (in µs of exposure time and degrees of shutter angle). A smaller exposure time or sutter angle reduces the chance of motion blur.
Resolution is the number of pixels used to capture an image. For example, on the Miro M120, if 1920 x 1200 (width x height) is set, the full sensor space is available.
Smaller resolutions allow higher recording speeds.
The image aspect ratio will be displayed with the defined Resolution setting.
Defines the number of frames past the trigger point to be stored in the camera’s internal memory (RAM / circular buffer).
Adjusts the overall exposure of the image based on the light level measured within a user defined area of interest. The default is a 50% avaerage exposure. As the lighting changes, the camera automatically adjusts the shutter speed to maintain a constant light level in the defined area.
Resolution
Post Trigger
Auto Exposure
This feature should not be enabled while performing a CSR, (Current Session Reference). Once enabled EDR (Extreme Dynamic Range) will be disabled.

Chapter 3: Miro LC Touchscreens23
EI (Exposure Index) is a reference value for the ISO level of the current shooting settings. A camera’s default EI value is measured at the default gamma of 2.222. Increasing the EI adds gain to the video image, the more gain that is added the more digital noise will be visible in the resulting Cine. Vision Research recommends maintaining the EI as close to default as possible for best image quality.
Defines the video signal format the camera will transmit to a monitor. Formats include; NTSC, PAL, HD-SDI (1080psf, 1080i, 720p).
These are SMPTE Color bars, generated by the camera and output over the video signal. They are used for setting up a video monitor.
The camera will show the PA (Production Area) specified placing a red rectangle over the image. The production area is an overlay and is not recorded in the RAW data.
The camera’s white balance can be set with the AWB on the upper right or manually by adjusting the color temperature and color compensation.
Exposure Index
Video Format
Color Bars
Production Area
Color temperature adjusts the red and blue components of white balance.
Color Compensation (CC+0) adjusts the magenta and green components of the white balance.
White Balance
Color Comp.

Phantom Miro M & LC Series Camera Manual24
Gamma is the nonlinear relationship between signal level and brightness output of pixels, (a small signal level change at low voltage produces a larger variation in brightness than the same change in level at high voltage). A linear gamma would have the value of 1.0. The camera’s default gamma setting is 2.2, which is a standard Rec709 compensation for most video monitors.
With IBAT (Image-Based Auto-Trigger) Enable set to ‘On’ the camera triggers itself when the image changes occur in a selectable region of the frame.
Defines the size of the area (width x heght) in pixels to check for an auto-trigger event.
Defines the position of the ‘IBAT Area’ from the top left of the image at 0,0.
Defines the number of frames (interval) between updates the auto-trigger region is checked.
Defines the amount a pixel value must change for auto-trigger purposes.
Defines the number of partitions, (15 segments maximum), the camera’s internal memory buffer (RAM) will be evenly divided into.
End of recording, or ‘automatic actions’ can be set:Play, Save, Play & Restart, Save & Restart, Play Save & Restart.
Changes the menu display to the desired language.
With ‘Advanced Settings’ set to ‘Off’, the menu ends here, and all advanced parameters are set to the camera’s defaults.
With ‘Advanced Settings’ set to ‘On’, the menu expands and the camera’s full functionality can be accessed.
Allows for + or - the equivalent of F-stops from the from the default value of 50% of average exposure.
Master Gamma
IBAT Enable
IBAT Area
IBAT Position
IBAT Speed
IBAT Sensitivity
RAM Partitions
At End of Recording
Language
Advanced Settings
Auto Exp. Comp.

Chapter 3: Miro LC Touchscreens25
This activates shutter-off mode for PIV applications
EDR (Extreme Dynamic Range™) sets a unique exposure time (defined in microseconds or a percentange of the defined ‘Exposure Time’) to pixels that may become saturated, (over exposed).
Shutter
EDR
This feature should not be enabled while performing a CSR, (Current Session Reference). Once enabled ‘Auto Exposure’ will be disabled.
Sets the number of frames in a burst, (‘off’ disables Burst Mode).
Sets the interval between frames in a burst (defined in microseconds).
When set to ‘On’ a black refernce operation will be performed when the camera is placed into the capture or ‘waiting for trigger’ mode with the results being saved with the Cine.
Sets the first frame for automatic functions like auto-save to CineFlash and Auto-Play to video. If not selected the first frame will always be the beginning of the full recording.
Sets the last frame for automatic functions like auto-save to CineFlash and Auto-Play to video. If not selected the last frame will always be the end of the full recording.
This field instructs the camera to utilize one of the following three frame sync clock sources:
- Internal - instructs the camera to utilize its’ internal crystal oscillator to drive the camera’s ‘Speed’ (sample / frame rate).
- External - should be selected when an externally supplied frame sync clock pulse is supplied to drive the camera’s sample rate.
- IRIG - should be selected when an IRIG-B signal is supplied to drive the camera’s sample rate.
Frame Burst
Burst Period
Auto Black Ref.
Save Region Start
Save Region End
Frame Sync

Phantom Miro M & LC Series Camera Manual26
Defines whether the ‘Rising Edge’ (leading edge) or ‘Falling Edge” (trailing edge) of a TTL supplied input trigger signal is used to trigger the camera.
Specifies the length of time (defined in microseconds) the trigger signal state (high or low) must be held at to be a valid trigger signal.
Trigger Polarity
If ‘Trigger Polarity’ is set to ‘Rising Edge’ the signal must be held low for a minimum of 10-times the ‘Trigger Filter’ time prior to going high to be a valid trigger signal.
Trigger Filter
Sets a delay time (defined in microseconds) between the ‘Frame Sync’ clock pulse and the frame capture to provide a phase shift in the timing.
Sets the signal type to be activated on the ‘Auxiliary’ pin of the capture connector.
Defines when the ‘Ready’ signal is turned off.
Adjust the color ‘Saturation’ of the images being displayed. Increasing the value results in the images being displayed with more brilliant color, while decreasing the value results in the images being displayed with less brilliant color.
The ‘Master Black’ (Pedestal) parameter is used to change the voltage level corresponding to black or to the maximum limit of black peaks.
‘Gain’ will raise or lower the gain in each independent color channel when adjusted.
‘Pedestal will raise or lower the black level of each independent color channel when selected.
‘Gamma’ will apply an independent gamma curve to each color channel.
Frame Delay
Aux Signal
Ready Deasserts
Saturation
Master Black
Gamma
Pedestal
Gain
Gain, Pedestal, and Gamma settings are applied on top of the overall gamma and color corrections.

Chapter 3: Miro LC Touchscreens27
Color Matrix is an advanced color matching tool, which previously was reserved for video engineers to match the HD-SDI output of cameras in a broadcast environment. In Phantom Miro M- and LC-series cameras a user ‘Matrix’ can be specified to fine tune the color of both the Cine image and HD-SDI output.
By adjusting the user ‘Matrix’ the image can be finely tuned, so that individual colors are adjusted in terms of tint and saturation. A common use for this is to accurately match the color with another camera on the same shoot.
Tone allows manual control over the tone curve of the image. Tone curves change the shadows / highlights relationship between the original values (on X axis) and resulting values (on Y axis).
Tone curves can be useful to boost midtones of the image without effecting highlights or shadows, for example. They can also be used to push the darks lower, which may result in richer images when detail in the shadows are not required. There is a relationship with overall image gamma, which has a predefined curve, which is the equivalent of Rec709.
The Production Area Offset is used to move a user-defined ‘Production Area’ displayed on the LCD or attached monitor. By default, the ‘Production Area’ is displayed in the center of the image display area.
Matrix
Tone
PA Offset

Phantom Miro M & LC Series Camera Manual28
Click the ‘Square’ button once to bring up touch screen menu. Tapping the center of the screen will also bring up ‘main menu’ icons.
Tap the menu icon to bring up the main ‘capture and setting’ control interface.
Scroll up and down for desired setting, then tap once to select parameter to change.
On the right, + and - symbols will appear when applicable, and a keyboard symbol can also be selected for data entry.
The keyboard/data entry menu allows you to enter any available value, then tap the ‘return’ key to accept.
Menu Access
Set Parameter
Select Setting
se
ttin
g p
ara
me
ters

Chapter 3: Miro LC Touchscreens29
Factory & User SettingsClick the ‘Factory & User Settings’ icon.
Load the factory settings, access 3 factory-saved presets, or store up to 6 of your own presets.
When saving a user-setup, enter a name and tap the ‘return’ button to save it. Any of the 3 factory saved presets can be modified or overwritten.
When loading any of the user settings or factory defaults, you must tap to confirm or cancel.

Phantom Miro M & LC Series Camera Manual30
file
ma
na
ge
me
nt
A B C D E F G
HIJK
M
A Camera State
B Time Stamp
C Internal Memory
D Number of Frames Available
E Record Time
F CineFlash Status
G Menu Button
H OSD Button
I Play Cine
J Cine List
K CineFlash Mangement
L Erase Cine
M Return
L

Chapter 3: Miro LC Touchscreens31
See ‘Capture & Setting’ earlier in this chapter for descriptions.
See ‘Main Menu’ earlier in this chapter for description.
Displays the status of the Phantom CineFlash, space used and the number of frames being saved.
Opens the ‘Play’ Cine screen.
Used to select a Cine from the list to play or erase (asterisk indicates Cine had not yet been saved).
Opens the CineFlash Management screen (displays list of Cine files stored on CineFlash drive).
Erases selected Cine from camera RAM (displays when a Cine is selected).
Delete individual takes or tap ‘XCF’ to format (secure erase) the drive.
When deleting Cine files from the CineFlash, you must tap to confirm or cancel.
CineFlash Status F
CineFlash Mangement K
M
Cine List J
Play Cine I
A B C D E G H
Erase Cine L

Phantom Miro M & LC Series Camera Manual32
pla
yA B D H I J K
LNOP
T
A Camera State
B Cine
C Mark In Point
D Image Location
E Time Stamp
F Internal Memory
G Mark Out Point
H Number of Available Frames
I Record Time
J CineFlash Status
K Menu Button
L OSD Button
M Save to CineFlash
N Mark Out
O Forward
P Forward 1-Frame
Q Stop / Pause
R Reverse
S Mark In
T Return
F
QS R
E GC
M

Chapter 3: Miro LC Touchscreens33
See ‘Capture & Setting’ earlier in this chapter for descriptions.
See ‘Main Menu’ earlier in this chapter for description.
Indicates the internal memory (RAM) partition Cine being reviewed.
Indicates the first image of the entire Cine to be saved.
Indicates the displayed frame’s location within the stored Cine file.
Indicates the last image of the entire Cine to be saved.
Displays the status of the CineFlash and the frame number being saved (counts up).
Saves Cine file to CineFlash.
Sets the end point of the Cine file to save.
Plays the Cine file. Tap multiple times to speed up playback.
Advances the Cine file one image.
Pauses playback. When paused button changes to ‘Reverse 1-Frame’ button.
Plays the Cine file in reverse. Tap multiple times to speed up playback.
Sets the starting point of the Cine file to save.
A H I K LFE
T
Cine B
Mark In Point C
Image Location D
Mark Out N
Forward O
Forward 1-Frame P
Stop / Pause Q
Reverese R
Mark In S
Apply a long press over the ‘Mark In’ and ‘Mark Out’ buttons to reset .
Mark Out Point G
CineFlash Status J
Save to CineFlash M

Phantom Miro M & LC Series Camera Manual34
The latest version of Phanom PCC software can be found and downloaded from the support section of the Vision Research website:www.visionresearch.com

Chapter 4: Phantom Software35
Phantom Software4Pre-Installation The Phantom cameras have a few requirements,
which must be met before you can use it.
1. The Phantom Control Unit must have either the Microsoft Windows NT, Window XP Pro, VISTA Business Edition or Windows 7 operating system installed.
2. The Phantom Control Unit’s Firewalls must be turned off. (Contact your IT Group if necessary.)
3. The Phantom Control Unit must be set to IP Address (i.e., 100.100.100.1) with a Sub-network Mask set to: 255.255.0.0.
pc
c s
oft
wa
re
When using multiple computers to control the same camera, each computer requires a unique IP address, for example, 100.100.100.1 (255.255.0.0), 100.100.100.2 (255.255.0.0), and so on.
The software is built around a multi-layered work area that includes the following work areas:
Provides quick access to the most frequently used functions. Position the mouse over a button and wait for a second to display a brief text describing what it is.
The buttons will be covered in detail later in this section. Note the ‘Help’ button which provides valuable reference information on the software and different camera models.
PCC (Phantom Camera Control) Application Overview
Toolbar

Phantom Miro M & LC Series Camera Manual36
‘Preview’ panel displays exactly what the camera is imaging, while the ‘Playback’ panel displays recorded Cine files for review and/or editing. The type of panel displayed depends on the active control tab.
When first started, the ‘Manager’ tab is selected. It is in this tab connected cameras are displayed, select for use, and renamed. It is also used to manage saved Cine files. To rename, highlight then click the name of a camera. This can be useful when working with multiple cameras.
All camera control and setting of shooting parameters (frame rate, shutter, etc.) is performed in the ‘Live’ tab.
The ‘Play’ tab is used to review, edit, and save Cine files, (either from the camera or from files on the local hard drive).
PVP works with the camera’s HD-SDI, NTSC and/or PAL outputs as connected to a compatible monitor.
PVP, provides the ability to view, capture, review, edit, and/or save a Cine recorded into the camera’s RAM to a hard drive, or installed Phantom CineFlash. PVP is extremely effective when used with the high-resolution cameras since most computer monitors will not refresh quickly enough to produce a smooth visual display.
The camera’s video mode and display settings are also set through PVP. Video systems will vary based on the country you are in, what kind of video monitor used, and the required display resolution. All available video setting for the connected camera can be found in the ‘Settings’ menu of PVP.
PVP can be launched directly from the desktop, or by clicking the ‘Video Out’ toolbar button in PCC.
Preview & Playback Panel
Control Tabs
PVP (Phantom Video Player) Application Overview

Chapter 4: Phantom Software37
PCC provides the ability to select various units for specific camera parameters by clicking the ‘Preference’ button at the bottom Manager tab.
Units can be set to commonly used values (‘Presets’) or they can be customized using the pull-down selection lists. First time user should use one of the three ‘Presets’.
The ‘Exp’ unit is probably the most important unit to be set. It specifies what unit to use when setting the exposure time. The other two units are EDR (Extreme Dynamic Range™) and PTF (Post Trigger Frames). All of these settings will be covered later in this section.
Double-click the camera to be controlled listed in the Manager tab, select the camera from the ‘Camera’ pull-down list in the Live tab.
Camera Control via PCC
Selecting a Camera
Multiple cameras, if available, will be displayed in the Manager tab and the Live tab ‘Camera’ pull-down list.
Once a camera is selected a ‘Preview’ panel will display to the left of the control tabs showing the current image being captured by the camera. This image may differ slightly to that of the image being output over the camera’s HD-SDI port due to display differences in the video monitor and computer screens.
You can adjust the display options by clicking on the ‘Image Tools’ toolbar button.
Image Processing
Phantom Miro M & LC Series Camera Manual38
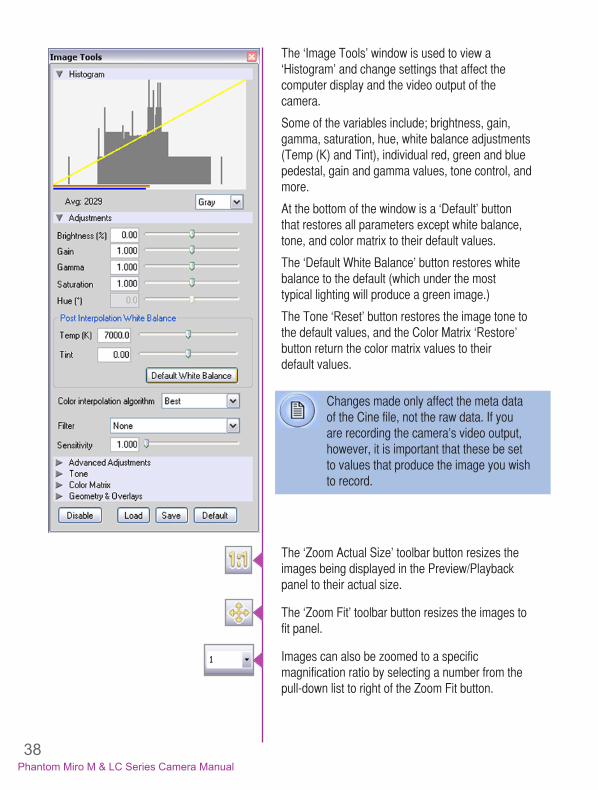
The ‘Image Tools’ window is used to view a ‘Histogram’ and change settings that affect the computer display and the video output of the camera.
Some of the variables include; brightness, gain, gamma, saturation, hue, white balance adjustments (Temp (K) and Tint), individual red, green and blue pedestal, gain and gamma values, tone control, and more.
At the bottom of the window is a ‘Default’ button that restores all parameters except white balance, tone, and color matrix to their default values.
The ‘Default White Balance’ button restores white balance to the default (which under the most typical lighting will produce a green image.)
The Tone ‘Reset’ button restores the image tone to the default values, and the Color Matrix ‘Restore’ button return the color matrix values to their default values.
The ‘Zoom Actual Size’ toolbar button resizes the images being displayed in the Preview/Playback panel to their actual size.
The ‘Zoom Fit’ toolbar button resizes the images to fit panel.
Images can also be zoomed to a specific magnification ratio by selecting a number from the pull-down list to right of the Zoom Fit button.
Changes made only affect the meta data of the Cine file, not the raw data. If you are recording the camera’s video output, however, it is important that these be set to values that produce the image you wish to record.

Chapter 4: Phantom Software39
Automatic White Balance Performing a White Balance should be the first step in color adjustment (color cameras only).
Right mouse click on area that resemble white in the image in the ‘Preview’ or Playbak’ panel, then click on the ‘White Balance’ pop-up window. It is not necessary to fill the frame with white – a small target can be used.
Capture Setup Just below the ‘Camera’ selector in the ‘Live’ tab are a series of expandable headers, which contain groups of related camera settings.
This manual will cover the most commonly used settings, see the ‘Pcc Help’ file for details of more rarely-used settings.

Phantom Miro M & LC Series Camera Manual40
Used to display, reset, or synchronize the time stamp clock, set the pixel bit depth, and/or partition (segment) the RAM of the camera.
Click the ‘SetTime…’ button, then click ‘Update and Set’ in the ‘Set Camera Time’ window to synchronize the time stamps embedded in the recorded image data to the computer’s clock.
The Phantom Miro M- and LC-series camera models operate in 12-bit mode only. No other option will be available from the ‘Bit Depth’ pull down selector.
Select the number of partitions (evenly divided memory segements) desired from the ‘Partition’ pull-down selection. Partitioning the memory allows you record more than one clip to the camera’s memory at a time. For basic camera setups, this should be set to one.
Select the required setting from the Resolution (number of pixels used to capture an image), Sample Rate (frame rate / speed), ExposureTime (shutter), EDR (Extreme Dynamic Range) exposure time, and Last (Image Range and Trigger Position) pull-down menu. If not displayed type value in the data entry field (software will round value to the closest supported value).
A third method can be used to set the ‘Image Range and Trgger position’. Drag the trigger (T) slider to the position where the trigger is to occur in the shot. The visual representation closely matches the on-screen display of the camera.
Displayed below the ‘Image Range and Trigger Position’ slider is the ‘Duration’ (total length of recoding time in seconds), and the exact number of recordable frames available in the camera’s internal memory.
One of the most common operations performed is a CSR (Current Session Reference). A CSR must be performed after changing the resolution, sample rate or exposure time.
Camera Settings
Cine Settings

Chapter 4: Phantom Software41
After pressing this button, the camera’s internal mechanical shutter will close, and a progress meter will be displayed (bottom of the image window). When completed the shutter re-opens, and the camera is ready for shooting.
The first of these key features is the option to enable the ‘Start/End of recording actions’ to be performed automatically at the beginning or end of a shot. The most common ones are:
• ‘Auto save to CineFlash/CardFlash;’ this feature saves a user-specified portion of a clip to the Phantom CineFlash immediately after recording.
• ‘Auto play Video Out’ begins playback after recording. The range marked under ‘Auto play Video Out’ affects both playback and saving to the Phantom CineFlash.
• ‘Restart Recording,’ when enabled, automatically restarts the recording process after the auto actions have been performed.
Key Advanced Settings
When ‘Restart Recording’ is enabled PCC does not provide any user confirmation before the clip is erased from RAM and starts recording again.
This feature should be used with care!
‘External Sync’ instructs the camera to utilize one of the following three frame sync clock sources:
- Internal - instructs the camera to utilize its’ internal crystal oscillator to drive the camera’s ‘Speed’ (sample / frame rate).
- External - should be selected when an externally supplied frame sync clock pulse is supplied to drive the camera’s sample rate.
- IRIG - should be selected when an IRIG-B signal is supplied to drive the camera’s sample rate.

Phantom Miro M & LC Series Camera Manual42
Recording a Cine To begin recording to RAM click the red ‘Capture’ button.
The red ‘Capture’ button changes to “Abort Recording” and the green “Trigger” button is enabled when the camera is recording
The Abort Recording button instructs the camera to stop recording, leaving the camera’s RAM empty.
Selecting the ‘Trigger’ button instructs the camera to immediately stop recording when the ‘Trigger Position’ is set to zero. If a value greater than zero is set, the camera will continue to record ‘post-trigger’ frames until the user-specified value is met.
Using the camera’s hardware ‘Trigger’ button, or an external trigger signal provides a more accurate trigger to the camera.
Once the camera has completed recording a Cine in the camera’s RAM or saving to the Phantom CineFlash it can be reviewed by selecting it from the ‘Cine’ pull-down selection list in the PCC ‘Play’ tab.
A previously saved Cine stored on the computer’s hard drive can be opened using the ‘Open File’ toolbar button (also places the file under the ‘Cines’ group folder in the Manager tab).
The viewing option can be changed via the ‘Play Speed & Options’ and the Cines’ metadata can be viewed in the ‘Frame Info’ and ‘Cine Info’ sections.
Triggering the Camera
Reviewing a Cine

Chapter 4: Phantom Software43
Use the ‘Video Control’ buttons to review the Cine.
Rewind
Pause
Play
Fast Rewind
Rewind 1 Frame
Advance 1 Frame
Fast Forward
To quickly search through Cine files to find the points of interest:
‘Scroll’ (scrub) through the clip using the ‘Image Location’ slider or click anywhere on the timeline to jump to points in the Cine quickly.
‘Jump’ to the trigger frame by clicking on the ‘T’ button, or jump to specific frames by entering the frame number into the jump “#” data entry field, then hit the enter key.
‘Image Search’. The goal is to search or find an image change in the recording, based on the difference between image content. Image Search utilizes two methods, or algorithms, to discover the image change:
- Difference Method which compares the difference between two images.
- Correlation Method based on the Normalized Cross Correlation (NCC) coefficient between two images.
Besides image content changes, Image Search can also look for images that are tagged as ‘Event’ images.
Performing a Quick Search Through a Cine
For details on how to use Image Search see the Pcc Help file in PCC.

Phantom Miro M & LC Series Camera Manual44
Using the following ‘Video Control’ buttons locate the first image of the Cine to be saved and click the ‘Mark-In’ button.
Locate the last image of the Cine to be saved and click the ‘Mark-Out’ button.
Click ‘Play, Speed, & Options” and enable (check) ‘Limit to Range’.
Under the ‘Video Control’ buttons click the ‘Jump to Start’ button, then review the edited Cine.
Click the ‘Save Cine...’ button to save the edited Cine to the computer’s hard drive.
If you wish to save the clip to an attached Phantom CineFlash, click the down-arrow to the right of the ‘Save Cine...’ button and select ‘Save RAM Cine to Flash’.
Editing a Cine
Vision Resaerch recommends reviewing the save cine file before erasing it from the camera’s internal memory (RAM).
Saving a Cine
The PCC software provides you with the ability to convert Cine files into a number of other formats.
Single Cine files can be converted by selecting the desired format from the ‘Save as Type’ selection list in the ‘Save Cine’ dialogue window.
The file formats above the separator line in the ‘Save as Type’ selection list is ‘movie-like’ formats (meaning the entire clip will be saved as a single file) while the formats below the line are image formats (meaning each frame of Cine will be saved as a sequence of images.)
Converting Cine Files
Re-saving a clip in the ‘Cine RAW’ format can be useful for creating sub-clips with no loss in image quality or metadata.

Chapter 4: Phantom Software45
To save a Cine clip in a ‘movie-like’ format simply select the desired format from the list, navigate to the destination folder, assign a file name and save.
To convert a Cine clip into a sequence of frames you must add one of the following annotations to the end of the file name: ‘!n’ or ‘+n (where n is the number between 1 to 8). The number you choose depends on the Cine’s frame count. A Cine with up to 9,999 frames can use the number 4. If it has 10,000 frames, then the number 5 is needed. This will assign the sequential frame numbers to the file name for each frame being created.
Example: image_!5.tif
The ‘!’ annotator instructs the software to append the cine’s image number (relative to the trigger point) to the file name. If the first frame in the clip is - 100, then the first converted frame will have the name: image_-00100.tif.
The ‘+’ annotator will add frame numbers starting from 1.
Example: image_+5.tif
This will cause the first converted frame to have the name: image_00001.tif
Ensure all image adjustments have been applied prior to initiating the conversion process. All metadata (gain, gamma, saturation, etc.) will be embedded into the converted images.
Batch Convert The ‘Batch Convert Files’ toolbar button can be used to convert a single, or multiple saved Cine files into any one of the supported file formats.
Use the shift and/or control keys, to select the Cine files you wish to convert in the ‘Open Cine’ dialogue window, then click the ‘Open’ button.
Navigate to the destination folder and select the file format. The ‘File Name’ will depend on the type of file format you are converting to.

Phantom Miro M & LC Series Camera Manual46
If you are converting the Cine file into ‘movie-like’ formats leave the file name as ‘All selected file.’ The software automatically assigns the original file name to the converted file and appends the appropriate file extension.
However, if you are converting the file into a sequence of images, you need to enter the annotation only detailed in the ‘Convert a Cine’ topic earlier in this chapter.
Example: +4
The software automatically creates a separate folder for each of the files being converted, assigns the original file name, and appends the appropriate image number and file extension to each image.
Once the ‘Convert’ button is clicked a progress window appears. Each converted Cine will be placed in it’s own folder named after the original Cine file.
PVP (PhantomVideo Player) can be opened directly from the desk top or by clicking the ‘Video Out’ toolbar button in the PCC software.
The video output parameters are set by opening the ‘Image Tools’ and ‘Pvp Settings’ windows.
The ‘Image Tools’ window is used to set various video controls, including; brightness, gain, gamma, saturation, hue, post interpolation white balance, flare percentage, pedestal, gain and gamma of individual red, green, and blue channels, tone, and color matrix.
Using PVP (Phantom Video Player)

Chapter 4: Phantom Software47
The video format is set via the “Pvp Settings...” window.
Video capture and playback are performed from the main ‘PVP’ window. The ‘Capture’ button places the camera into the recording mode writing frames into the camera’s RAM awaiting a trigger.
Switch to the desired clip to view by selecting it in the ‘Cine:’ pull-down menu. Note: Clips in the Phantom CineFlash are not available for video playback. To return to the live output, select ‘Live’.
Scroll through a cine by dragging the play head back
and forth on the timeline. Use the playback controls to play forward and in reverse. Use the speed slider to change the playback speed.
Use the ‘[‘ and ‘]’ buttons to mark in and out points. After trimming a clip, press the ‘Save to Flash’ button to save it to the Phantom CineFlash, or ‘Save to File…’ to download it to the computer.
It is also possible to erase the entire contents of a CineFlash by clicking the ‘Erase All…’ button.

Phantom Miro M & LC Series Camera Manual48

Chapter 5: Phantom CineFlash49
CineFlash & CineFlash Dock5
Introduction The Phantom CineFlash is a powerful component of the Phantom Miro M and LC product line, enabling Cine raw footage to be quickly transferred from the camera’s RAM to safe, non-volatile storage. These lightweight, solid-state storage devices are hot-swappable and designed to keep you shooting on the go.
There are several benefits to Phantom CineFlash drives:
- Security. Immediately save your high-speed images from the camera’s dynamic RAM to CineFlash non-volatile memory so you have a secure copy of your shot.
- Productivity. Eliminates the need to download the file after each shot, meaning less down-time in between takes.
- Quality. Files saved to the CineFlash are always saved in the Cine raw format, which maximizes image quality and workflow options.
- Portability. Whether using a Phantom RCU, the LCD interface or an auto-save setup, when saving to the CineFlash there’s no need to connect the camera to a PC during capture.
Once the CineFlash drive is full, download Cine raw files over the camera’s Ethernet connection or via the Phantom CineFlash Dock’s E-Sata connection. Using the CineFlash Dock and appropriate drivers, you can mount the CineFlash on a PC or Mac computer and easily manage your Cines files.
Every Miro M-series camera purchase comes standard with a Phantom CineFlash drive and CineFlash Dock. CineFlash drives are available in 60GB (Gigabyte), 120GB, or 240GB sizes.

Phantom Miro M & LC Series Camera Manual50
Phantom CineFlash Installation Open the Phantom CineFlash compartment door. Carefully align the insertion key guards, and slide the CineFlash into the camera until it is properly seated, then close the CineFlash compartment door.
Re-open the CineFlash compartment door.
Prior to removing the Phantom CineFlash verify that it safe to remove it by ensuring the ‘CineFlash Recording Indicator’ (located inside the CineFlash compartment on the lower right-hand side) is inactive.
If the indicator is active (red), do not remove the CineFlash because a Cine is being recorded to the CineFlash.
Phantom CineFlash Removal
CineFlash Recording Indicator

Chapter 5: Phantom CineFlash51
Phantom CineFlashDock Introduction
Cine raw files are stored on the Phantom CineFlash in a 10-bit log’packed format. The files can be viewed and transferred to a hard drive via PC or Mac computers directly from the CineFlash Dock, as long as the proper drivers are installed. On a PC the file will open in Phantom PCC software. On a Mac with the Glue Tool Phantom Cine Toolkit, the file will open in Quicktime 7. Third party solutions that can read Phantom Cine raw files can also see tge file directly on the CineFlash.
The CineFlash is a Linux EXT2 device, and a driver that recognizes this format must be installed on any PC or Mac that will read the CineFlash directly (without going through PCC.)
For Windows PC download the driver from: http://www.ext2fsd.com/
This will install the driver and a program called Ext2 Volume Manager, which you can use to assign a drive letter to the CineFlash.
For Macintosh computer running OSX: http://www.paragon-software.com/home/extfs-mac/
You can use a commercial driver from Paragon Software. Alternatively, you can install a driver that runs under the FUSE package at no cost: http://code.google.com/p/macfuse/
The specific driver is available here: http://sourceforge.net/projects/fuse-ext2/
None of the above solutions are provided by Vision Research and we cannot guarantee they will work or continue to be supported. You can always access and manipulate Cine files stored on a CineFlash using the PCC application over the camera’s Ethernet port, and the above mentioned solutions are provided for convenience.
Download EXT2 Driver
To view Cine raw files on a macintosh computer, you must be using software that recognizes the Phantom Cine format such as Glue Tools. www.gluetools.com
Phantom CineFlash Dock Installation

Phantom Miro M & LC Series Camera Manual52
Follow the installation instructions provided with the EXT2 driver.
Insert one end of the eSATA connector to the Phantom CineFlash Dock.
Insert the other end of the eSATA connector to the PC/MAC computer’s eSATA interface.
Insert the Phantom CineFlash into the docking station, and ensure the computer recognizes the drive.
Install the EXT2 Driver
Connecting the CineFlash Dock to a Computer
Verify Setup

Chapter 5: Phantom CineFlash53
Reviewing a CineFlash Cine If the Phantom Cine Flash is in the docking station click the ‘Open File’ button in the PCC. Navigate to the folder the Cine file is saved in, highlight the file, and click the Open button.
If the Phantom CineFlash is in the camera select the CineFlash Cine file to be reviewed from the:
- ‘Manager’ tab by highlighting the file, then click the Play Control Panel, or double mouse-click on the file.
- ‘Play’ tab by clicking the down-arrow to the right of the ‘Cine:’ field and selecting the file from the pull-down list.
Review the saved Cine using the ‘Video Control’ buttons.
In PCC click the ‘Manager’ tab, then double-click on the Phantom camera with the Phantom CineFlash files to be erased.
In the ‘Live’ tab click on the Flash Memory selector and click the Erase button.
When the dialog box appears with thumbnails of the Cines select the appropriate command:
- Delete the selected Cine
- Delete All the Cines stored on the Phantom CineFlash
- Format the Phantom CineFlash
The software will display an ‘Erasing Flash’ message and an Erasing Flash progress indicator.
Erasing CineFlash Cine Files

Phantom Miro M & LC Series Camera Manual54

Chapter 6: Phantom Remote Control Unit55
The Remote Control Unit6
Overview The Phantom Remote Control Unit (RCU) is an ideal companinon for the Phantom Miro M & LC-Series cameras. This small, lightweight, hand-held controller allows you to control most settings on your camera as well as view and save recorded Cines to a Phantom CineFlash drive.
A kit is available that includes everything you need to connect the Phantom Miro to an RCU. The kit includes a mounting bracket, a cable that breaks out the remote connection from the power port, and a short .6m cable. Longer cables can be used for hand-held control when the camera is positioned up to 5 meters away.
The 5” active TFT display is easy to use – even outdoors. The display can act as both an analog or HD-SDI video monitor, a full-featured touch-screen controller, or both.
A manual similar to this one is available that explains the full menu system of the Phantom RCU.
Connection
Display
Functionality

Phantom Miro M & LC Series Camera Manual56
Sony BP-U30 Lithium-ion Rechargeable Battery
Sony BP-U60 Lithium-ion Rechargeable Battery

Chapter 7: Battery Installation57
Batteries & Battery Charger7
The Sony BP-U30 and BP-U60 are a lithium-ion batteries designed for professional video shooting in both the field and the studio. These BP-U Series compact lithium-ion batteries boasts high power in a compact body.
The batteries are equipped with the professional ‘INFO’ function that intelligently communicates battery status data to the camera.
The remaining capacity of the battery is displayed on the LCD monitor and viewfinder when the camera is powered on. This intelligent battery-management function allows operators to monitor the battery status easily and accurately.
The BP-U30 and BP-U60 also have LED displays to indicate the remaining capacity of the battery at the push of a button on the battery itself.
The BC-U1 Battery Charger can be used to charge one BP-U60 or BP-U30 battery at a time. And provides a 12 VDC, 2.0A power output.
Introduction
BC-U1 Battery Charger

Phantom Miro M & LC Series Camera Manual58
Dimensions (W x H x D): 1 11/16 x 3 1/4 x 2 3/4 in (41.5 x 82.5 x 69.7 mm)
Mass: 8 oz (220 g)
Maximum / nominal voltage: 16.4 VDC / 14.4 VDC
Miro Run Time: 45 min
Charging time (using the BC-U1): Approx. 130 min
Operating temperature: -4 to +113 °F (-20 to +45 °C)
Remaining capacity display: Four LED (20, 40, 60, and 80%)
Dimensions (W x H x D): 1 11/16 x 3 1/4 x 2 3/4 in (41.5 x 82.5 x 69.7 mm)
Mass: 15 oz (350 g)
Maximum / nominal voltage: 16.4 VDC / 14.4 VDC
Miro Run Time: 90 min
Charging time (using the BC-U1): Approx. 170 min
Operating temperature: -4 to +113 °F (-20 to +45 °C)
Remaining capacity display: Four LED (20, 40, 60, and 80%)
BP-U30 Lithium-ion Battery Specifications
BP-U60 Lithium-ion Battery Specifications

Chapter 7: Battery Installation59
Power requirements: 100 VAC to 240 VAC, 50/60 Hz
Power consumption: 38W
Operating temperature:
+32 to +113 °F (0 to +45 °C)
Demensions (W x H x D):
5 1/8 x 1 13/16 x 3 7/8 in (128 x 45 x 98 mm)
Weight:
12 oz (330 g)
DC output:
12V, 2.0A
Number of mountable batteries:
1
Chargable battery:
BP-U90 / BP-U60 / BP-U30
Supplied accesories:
Operating Instructions (1)
DC Output Cable (1)
Warrenty Booklet (1)
Approximate charge time:
170 min (BP-U60, 57 Wh)
130 min (Bp-U30, 28 Wh)
BC-U1 Battery Charger Specification
BC-U1 Battery Charger must be used to recharge the batteies.
Batteries do not recharge through the camera.

Phantom Miro M & LC Series Camera Manual60
Battery Installation
Carefully insert the battery just above the terminals. Notice the key guides on the sides of the battery and camera.
Insert battery either bottom-first or perfectly straight, then press down gently to lock in place.
Never insert the battery at a top-first angle.
Vision Research recommends the following procedure for safe battery installation and removal.
Only Sony BP-U30 and BP-U60 batteries are gaurenteed. Larger, heavier batteries should not be used.
Failure to follow this procedure could result in physical damage to the camera, which must be repaired at a Vision Research service center.

Chapter 7: Battery Installation61
Battery should lower smoothly, then snap in place. Guides will ensure the battery lowers over the terminals perfiectly straight.
Slide the battery lock, on the top of the camera, forward, and lift the battery up and back to remove.
Battery Removal

Phantom Miro M & LC Series Camera Manual62
Be sure to check www.visionresearch.com for additional troubleshooting info, support information, FAQs, software and firmware releases, and the Phantom Zone, an online community of Phantom users.

Chapter 8: FAQs & Support63
FAQs & Support8The native resolution of the Miro LC touchscreen is 800 x 480 pixels. The physical size is 4” diagonal, or 3.5 x 2.0” (87.5 x 52.5mm).
The Miro LC uses a capacitive LCD touchscreen. Advantages of the capacitive screen include better sensitivity and accuracy of the human touch, and also better image rendition of the screen.
The touchscreen works best when the person controlling it is also touching the casing around or in back of the screen, or a metallic surface on the camera body. Some people will naturally draw more current than others when using a capacitive touchscreen, so the severity of this potential issue can differ between person to person. If you find this to be an issue, we recommend always holding the back or edge of the screen while controlling it, or touch any metallic surface on the camera with either hand.
This is not an issue when the camera is running on AC power.
Yes the physical button on the side of the screen marked with a square icon turns the menu display on and off. When turning the menu off the screen automatically resets. A good way to force the re-set is to double click that square button. The reset will take 5-10 seconds before you can access the controls again.
No, Vision Research has not identified a stylus to work with the Miro LC. The screen only responds to a human touch.
What is the resolution and size of the touchscreen?
Is the touchscreen resistive or capacitive?
When running under battery power, the touchscreen seems to
be less responsive. Why?
Is it possible to re-set the the touchscreen, in case it becomes
less responsive over time?
Can you use a stylus with the Miro LC screen?

Phantom Miro M & LC Series Camera Manual64
In the On position, the camera will boot up with a battery connected and/or an external power supply connected to the camera’s DC input. When using a power supply, the battery acts as a battery backup. Note: the battery does not charge in the camera.
In the AUTO position, the camera will only power up when voltage is applied to the DC input of the camera. A battery can be installed without the camera booting up. This is useful when a user intends to power up the camera remotely, and maitain the battery backup feature.
A handy feature on all LC cameras is threshold mode. Tap the top button on the front of the camera (autoset) to cycle through threshold, zoom, and live video tools. Threshold mode makes it easy to see the sections of the image that are overexposed.
The main difference is the addition of a flip-out touchscreen on the LC-Series. This adds about 12mm to the width of the camera. It also adds an on-camera control interface and a live preview image for framing, focus, and playback from RAM. There are no other functional differences or differences in specifications.
The camera’s menu system allows you to review the amount of takes on the CineFlash, their size, and the drive’s remaining capacity, however they can not be played back on the screen. Files that are still in the camera’s RAM can however be played over video and on the screen.
There are two ways to view and save stored Cine files from CineFlash drives. The camera can be connected to Phantom PCC software via an Ethernet connection, or the drive can be mounted outside the camera via a CineFlash Dock where files can be viewed and saved over an eSata connection, from PC or Mac operating systems.
Are there any tools available to help judge exposure, especially
on bright sunny days?
What are the differences between the Miro M-Series and
Miro LC-Series cameras?
Can saved Cine files in the CineFlash drive be reviewed
on the LCD screen?
What does the OFF / AUTO / ON switch do?

Chapter 8: FAQs & Support65
When selecting the trigger point using frames, you set the number of post-trigger frames. To be consistent with this, when using percent, you set the percentage of frames you want to be post-trigger, rather than pre-trigger.
This means the Cine, in internal DRAM, has not yet been saved and will be lost if erased or if power is lost. Once the Cine is saved to CineFlash, the asterisk will disappear.
Yes. If you double tap on any Cine in the Cine list display, all Cines with the same save state will be selected. This way you can save all unsaved Cines, or delete all saved Cines.
If you need to cancel your in- or out-point setting, just long-press on the mark-in or mark-out button.
There is currently no “scrub” gesture, but subsequent presses on the play or rewind controls will increase the playback speed allowing you to do a fast-forward or fast-reverse playback.
The LCD screen on the side of the camera uses slightly more power, therefore battery life is slightly diminished. A BPU-30 battery provides about 45 minutes of battery life, where the BPU-60 provides about 90 minutes
Support details are available as follows:
For technical questions and help troubleshooting, contact: [email protected] or call 1-973-692-4003
For basic questions and help with RMAd, please contact: [email protected], or call 1-973-692-4402
When I select a trigger point using a percentage number like 20%, the trigger is set 20% from the end of the available frames
not 20% from the beginning. What is going on?
What does the ‘*’ symbol next to a cine number on the
cine list display mean?
Is there any way to select multiple cines for deletion or saving?
How can I cancel and reset the in-point or out-point that I set in
the playback screen?
Can I scrub through the video on the playback screen?
Is there any difference in battery life between the M and
LC-Series cameras?
What is the best way to get technical support if I encounter
any issue?

Phantom Miro M & LC Series Camera Manual

Phantom Miro M & LC Series Camera Manual

Phantom Miro M & LC Series Camera Manual
Vision Research - Corporate Headquarters 100 Dey Road
Wayne, New Jersey 07470 USA
Ph: +1.973.696.4500 Toll Free: 800.737.6588
Fax: +1.973.696.0560
Vision Research - Florida Office 1002 Monterey Commons, Suite 200
Stuart, Florida 34997 USA
Ph: +1.772.286.7000 Fax: +1.772.286.6206
Vision Research Ltd. - UK Suite F8, Bedford i-lab
Priory Business Park Stannard Way, Bedford
MK44 3RZ, United Kingdom Ph: +44 1234 834 850
Fax: +44 1234 834 851
Vision Research Asia Ametek Singapore Pte Ltd
No. 43 Changi South Avenue 2, #04-01 Singapore 486164
Ph: +65 6505 9034
w w
w .
v i s
i o
n r e
s e
a r
c h
. c o
m
PN: ZDOC-64084-MA-0003 Rev 1