pfaff 259 instruction book 2.60
DESCRIPTION
sewing machine owner's manualTRANSCRIPT

NSTRUCTION BOO|(


PFAFF 259
sNoTcuRTsN
FOREWORD
Your dreom hos come l rue!
You ore now lhe proud owner of o PFAFF 259 -- fhe sewing mochine wilh countless creotive possibilifies.
This instruclion book will help you underslond the mochine ond give you voluoble tips io moke sewing more fun for you'
Even if you ore on experienced seomslress, you will find this book o voluoble guide to eosy sewing.
Follow these simple inslruclions ond fomiliorize yourself with the exclusive feotures of your mochine. You will find sewing exciiing
on your eosy-lo-operofe PFAFF 259.
lf you hove ony sewing problems, pleose confocl your Pfoff deoler. He will be glod to help you ot ony time'
Pfoff Internot iono I Corporol ion
New York, N.Y.

I
ItIt
1 Threqd lqke-uP lever
2 Threqd retoiner s lud
3 Tigzog {inger-l iP conlrol
4 Bobbin winder
5 Slop mol ion knob
6 St i tch length diol
7
8
9
10
11
12
Reverse leed conlrol
Light switch
Drop leed conlrol
Needle plole
Tronsverse rolorY hook
Bed sl ide
13 Needle
14 Aulomot ic needle lhreoder
' | 5 Needle lhreqd fension
16 Sewl ight
17 Sf i tch width diol
18 Needle posi l ion leYer

I
R8292 |
19 Bolonce wheel
20 Col lopsible spool p ins
21 Top cover
22 Needle lhreoder control
|29
Foce cover
Presser bqr l i f ler
Sewing {ool lhumb screw
Sewing foot
. .,,..... ,:,.. i
Needle sel screw
Bed plole
Spoce for bui l t - in motor
Double receplocle lor speed control ond
power cords
27
29
30
23
24
25
26
R 8250
7 u o)aunentals o$ TkacAine Qpazation
{ Mqke sure slop motion knob b is lightened before you
begin sewing (clockwise os indicoled by whife orrow).
Whenever you hove lo lurn bolonce wheel o, lurn i t lo-
word you (counler-clockwise os shown by block orrow).
Never run o lhreoded mochine unless you hove fobr ic under lhe presser foot .
The mochine wi l l feed lhe moter iq l under lhe sewing foot oulomol icol ly. Al l you hove to do
is guide lhe work. Never t ry lo hoslen feeding by pushing or pul l ing lhe fobr ic whi le st i tching
becouse lhe needle moy bend or breok.
{ Alwoys lurn lhe bolqnce wheel toword you unl i l toke-up
lever d is ol its highest posifion before you begin ond
of ler you hove completed q seom. Foi lure to observe this
rule moy couse lhe threod lo s l ip oul of the needle eye.
Also, i t is eosier lo remove lhe work wi lh the toke-up
Iever up.

€lecezical I n$ocn ation
Push plug I in lo receptocle 2, ond plug 3
ot ofher end of cord inlo the woll outlet.
The fool or knee conlrol is permonently
connected to lhe mochine.
Knee Conlrol
Press the r ight knee l ighl ly
ogoinst the knee conlrol lever.
The horder you press, the fqsfer
the mochine wi l l run.
Fool Conlrol
Ploce lhe fool conlrol under the
cobinet within eosy reoch of your
fool. Rest the right foot on the
speed conlrol ond press. The
horder you press, the fosler lhe
mcichine wi l l run.
lt
R 7132

StcaigAt Stitchiog
{ For stroight-stitch sewing sel:
Diol A-0
Lever B - I
J'!
Diol G regulotes the s i i lch length ( lhe higher the number on the diol , the longer the )
st i fch). To bocklock the end of o seom, s imply depress the f inger- l ip conlrol .
Eqi.iaa6fii.{a.i1"dffi.@
fta
{1
;2igaag $eruing
lf you wont lo sew o few wide zigzog stitches while the mochine is sel for stroighl
stitching (A on 0), merely press down lhe finger-tip conirol. When the lever is
releosed, lhe mochine resumes sfroight stitching outomoticolly,
To sew longer zigzog seoms, lurn diol A to desired stitch width (indicoted by
numbers 1 to 4).
When diol A is set between r /z ond 2, you con double the st i tch width by depress-
ing the f inger- t ip conlrol ( imporfonf for moking bul tonholes ond non-outo-
mof ic embroidery desig ns).
When you push lhe control up, the mochine wi l l sew stroighl , regordless of lhe
stitch widlh sef.
Lever B chonges fhe posi t ion of lhe needle in lhe needle plole s lot . Thus the
stitching con be moved from the cenler to the left or right of lhe slot, os desired.
Diol G lengthens zigzog st i fches or
----,-> pocks lhem more closely fogether
(sotin stitch).
The position ol lever B (left, cenier, right) indi-
cofes lhe posifion of lhe needle in ihe needle
plote slot.
FIF
IagF
aE=


@
o
@
@
Poss end of lhreod ihrough slot in bobbin, f rom inside. Set bobbin on bobbin winder
spindle so lhot key ot bose of spindle enters s lot in bobbin. Press in lever i .
Hold end of threod ond sfort mochine. Hoving wound o few turns, breok of f end of
threqd ond conl inue winding.
Bobbin winder wi l l s top outomol icol ly when bobbin is fu l l .
l f you don' t wonl o fu l l bobbin, press out lever i when suff ic ienl qmounl of lhreod hqs
been wound.

Ignsezting a jattSo66in ineoVoShin Case
As shown in i l luslrot ion 1, hold bobbin in le{ l hond so lhot lhe ihreod end fol ls
from lhe top down loword you, ond insert bobbin in lo bobbin cose'
( i Hold ihe bobbin f i rmly in the bobbin cose ond pul l the ihreqd into the cose slot .\y
/ i Pul l lhe threqd under lhe lension spr ing unl i l i l emerges from lhe opening ot\g
lheendol lhespr ing.Leoveoboul threeinchesof lhreodhonging{romlhe
bobbin cose.
@ Hold the cose by i ts open lotch, so thol the bobbin connol fo l l out ' V
R 8001
ftemooin g eheV o6 6 in Ca se
Roise needle to i ts highesi point ond open bed sl ide, so you
con see sewing hook.
Reoch under the mochine wi lh your le{ t hond ond l i f t lotch k
wi lh your foref inger. Pul l oul bobbin cose wi lh bobbin by
holding the lo ich. When you releose lq lch k the empiy bobbin
drops oul .
10

fuppee cf.Acea)ing
Ploce spool o{ threod on spool pin 3 ond leod threod end through both
lhreod retoiner openings 4 (see illustrotion opposite).
Leod threqd clockwise oround tension qnd pull it belween ony lwo oi
lhe tension discs 5.
Br ing loke-up lever 6 os high os i i wi l l go ond poss ihreod l rom r ight
fo lelt fhrough one ol the holes ol ils end. Pull threod inlo slots ol left
of threqd guides 7 ond 8 ond then into the s lof o l lef f of needle c lomp 9.
Then threod needle, fronl lo bock.
do this {or you eosi lY ond quicklY.
The oulomol ic needle lhreoder wi l l
15

f!
t t .
lrii11i i
if
I;
Q yncatio g eAe /{ ed te cf.Azea)ez
{ B"fo." you begin, moke sure thol lhe needle is of i ls h ighesl posi t ion, i .e. thot the lower hole of the
oscending toke-up lever d is in line wilh fhe bottom edge of fhe iop cover.
Now lower lhe sewing foot ond
O Wiih your lef t hond push needle threoder conirol down uni i l lhreoder prong w (see opposi fe
poge) penetrotes needle eye. Keep control in lhis position.
6x Hold threod loosely ond leod i f f rom lef t oround lhe smol l p in, fhen ploce i t behind hool<
of lhreoder prong.
Releose control s l ight ly unl i l prong w reverses ond pul ls ihreod through needle eye.
Jerk confrol down ogoin so the threod loop wi l l fq l l of f the prong. Pul l threod lhrough needle
eye ond releose conlrol.
@
@R 7068
R 801'l
When you hove hod suff ic ient needle lhreoding procf ice, you moy
shorten the procedure qs fo l lows:
Push needle threoder control down. Ploce lhreqd behind hook of prong
w so thol i ls end is obout r /z inch to the r ight of lhe prong. Slowly re-
leose control . Prong w now pul ls end of the threod -- insteod of the
loop -- ihrough needle eye.
Since loke-up lever d is nof ot i ts h ighest point when you lhreod the
needle, pul l obout four inches of threod through lhe needle eye before
you begin sewing.
Y
Durcing ilp the?o66tncf.Azea)
Hold needle threod l ight ly in your lef l hqnd. Turn bolqnce wheel tbword you unt i l the
needle moves down ond up qgoin ond toke-up lever reoches i ts highesf posi l ion.
Light ly pul l needle ihreod lo drow bobbin threod up through needle plote s lot . Ploce
both threods bock under sewing fool before you pui fobric into mqchine.
17
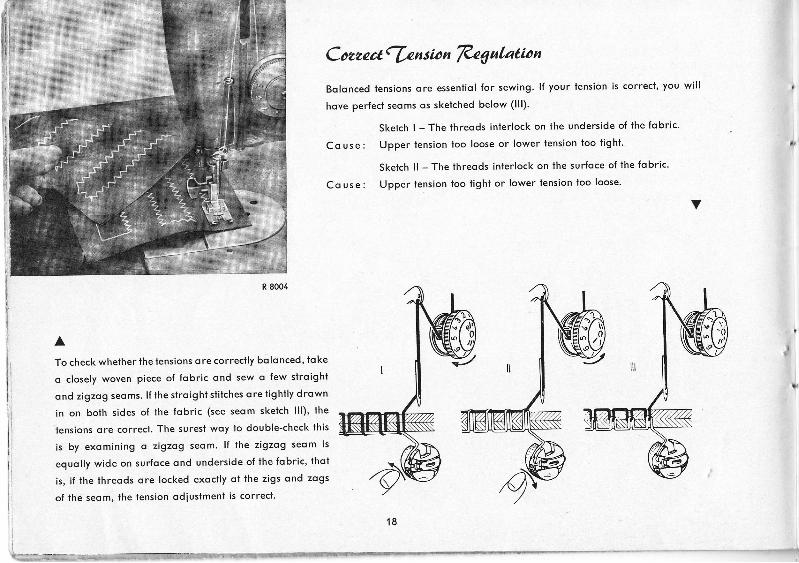
Coueet (f,en s io n ft'eg u latio n
Bolonced lensions ore essent io l for sewing. l f your lension is correcf , you wi l l
hove per{ect seoms os skelched below ( l l l ) .
Skeich | - The lhreods inter lock on ihe underside of lhe fobr ic '
Co use: Upper lension loo loose or lower ienqion too t ight '
Sketch l l - The threods inter lock on the surfqce of the fobr ic '
Co use : Upper tension loo t ight or lower tension loo loose'
V
ATo check whether ihe lensions ore correcl ly bolonced, loke
o closely woven piece of fqbric ond sew o few slroighl
ond zigzog seqms. l l fhe stroight st i tches ore l ight ly drown
in on both s ides of fhe {obr ic (see seom sketch l l l ) ' the
lensions ore correcl . The surest woy lo double-check this
is by exomining o z igzog seom. l f the z igzog seom is
equol ly wide on surfoce ond underside of ihe fobr ic, thot
is. i f the threods ore locked exocl ly ol ihe z igs ond zogs
o{ lhe seom, lhe lension odiustmenl is correcf .
18
- - ' ' - - , ' . - . " , .4
R 8004
i::n6ti'{*r'FttiaE-:l-5iFffiffi" -
| .*

/?eg a tating the n fued nen s io nThe bobbin threod lension rorely needs odiust ing, excepf for embroidery when i l
should be o l i f l le t ighler ihqn for ordinory sewing. Adiustmenl is mode by o
smol l knur led screwon the bobbin cose which cqn be lurned wi ih thethumb t ip.
Turn i t lef t g(K lor looser tension.
Turn i i r ighi F1 for l ighter tension.
Delermine correcl bobbin tension by holding the lhreod end between fhumb
ond foref inger ond let t ing the bobbin cose hong freely. The lension should be
slrong enough to keep the bobbin cose from being pul led down by i fs own
weight. However, qs you ierk your hond sl ight ly, the bobbin cose should grod-
uol ly s l ide down.
Y
,i!t:.,:
A
The f inqlsf i tch oppeoronce con be reguloled by the upper
tension diol , os fo l lows:
Turn left y{( for looser tension.
Turn righf >>-\ for tighler tension.
The upper tension is so designed thqt ol l grodes of ien-
sion -- loose to tight -- con be covered wifh one complete
turn o{ the tension diql . The numbers on the tension diql
indicote di f ferent degrees of tension. The higher fhe num-
ber, the greofer the lension. For ordinory sewing, the
upper lension should be set between 3 ond 5.
Your upper lension hos o third disc for two-neddle work.
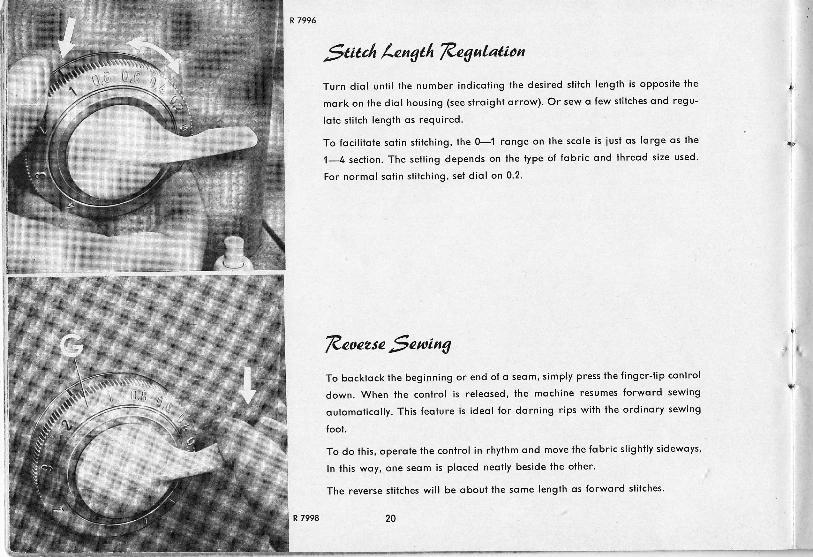
;jtitcfi Aength fteg alatio n
Turn diol unt i l lhe number indicot ing the desired sf i tch length is opposi te the
mork on the diol housing (see stroighi orrow). Or sew q few st i lches ond regu-
lote st i tch length os required.
To foci l i fote sol in s l i iching, the 0-1 ronge on the scole is iust os Iorge os ihe
1-4 sect ion. The sett ing depends on lhe type of fobr ic ond lhreod size used'
For normol sol in sf i lching, set d io l on 0.2.
fteoeue $ercing
To bockfockthe beginning or end of o seom, s imply press ihe f ingerJip control
down. When the confrol is re leosed, lhe mqchine resumes forword sewing
outomol icol ly. This feolure is ideol for dorning r ips wi th fhe ordinory sewing
fool.
To do lh is, operole ihe conlrol in rhythm qnd move lhe fobr ic s l ight ly s idewoys.
In lh is woy, one seom is ploced neol ly beside ihe olher.
The reverse sf i tches wi l l be obout lhe some length os forword s l i lches'
{ ,
, l
20
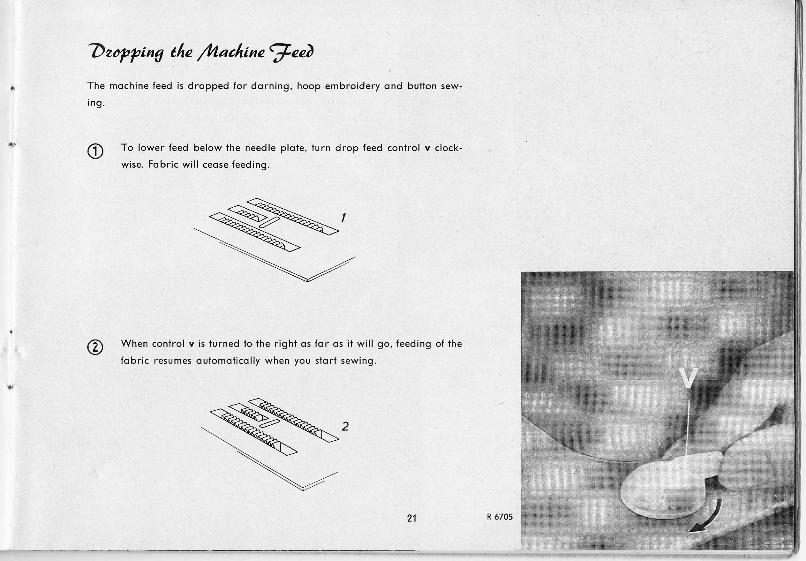
Vcepping the /hachine jaaV
The mqchine feed is dropped for dorning, hoop embroidery ond but lon sew-
ing.
To lower feed below the needle plote, lurn drop feed confrol v c lock-
wise. Fqbr ic wi l l ceose feedino.
( When conlrol v is lurned to the r ight os for qs i t wi l l go, feeding o{ lhe\y
fobr ic resumes outomot icol ly when you stor l sewing.

CAanging eAe $eruing joot
Lif t both needle ond presser bors to iheir h ighest posi l ions
o nd lu rn lhe sewing fool ih u m b screwlo the lef f . Ti l t the foot
s idewoys ond pul l i l down. Sl ip on new fool ond l ighten
lhe screw securely.
R 8012
I
il
III
I
n heTazningloot
Remove the sewing foot. Al toch dorning fool f rom lhe reor '
Hold spr ing c l ip n so lhot i t is behind the needle c lomp
screw, ond l ighlen screw c. Al loch dorning hook d os i l lus-
l roted so thot when you lower presser bo r l i f ter e, the do rn-
ing foot wi l l s toy in posi t ion. Remember to lower presser
bor l i f ter e so ihol lhe upper tension is oct ivoted.

Caze an) /Llaintenance
Longevi ty ond smoolh mochine performonce ore dependenl on regulor ond
proper c leoning ond oi l ing.
Use Pfof f sewing mochine oi l only. Never lubr icote mochine wi ih onimol or
vegetoble oi ls. Remove ol l l int before oi l ing.
Al l moving ond rofol ing ports require regulor lubr icot ion. l t is odvisqble lo
eslobl ish q pqttern when oi l ing your mochine. Begin under the bedplote. The
pr incipol o i l ing points ore morked by orrows.
V
AThe rocewoy in fhe sewing hook is the most imporlonl
oi l ing poinl . Puf one drop of o i l into the rocewoy eoch
doy you sew. A dry rocewoy wi l l couse ropid weor.
Don' f forget lo oi l lhe beor ings ond bevel geors of lhe
short hook shoff.
rffi:**.

$ewtightTo"tt
The 15-wott sewl ight is recessed under the mochine orm ond con be
swung ouf by pul l ing down the gr i l le.
To chonge the l ight bulb: Push bulb info sockel , iurn lef l ' ond pul l
ouf .
When insert ing new PFAFF l ight bulb, be sure lo s l ide bulb pins
into boyonet socket slots.
Press bulb in ond furn r ight . Close gr i l le ' Nole vol toge of e leclr ic
ci rcui t .
II
R 8067 AR 8066 A
Press lhis butfon to switch
sewl ight on ond of f .

ilil
cf,zoahte $Aooeing
l . Mochine Skips St i tches
Couse:
Needle incorrecl ly inserted.
Wrong needle.
Needle benh
Mochine threoded improper ly.
Needle ioo f ine or ioo th ick for the threod.
2. Needle Threod Breoks
Cq use:
The obove menf ioned moy couse threod breokoge.
Threqd lension loo tight.
Poor or knoily threod used.
Hook rocewoy is iommed wirh ' ihreod or needs
oi l ing.
Burrs or shorp edges on needle plote s lot .
lit t l:ll
I
cl
Remedy:
Push needle up os for os i l wi l l go ond be sure thot the long groovefoces toword you, ond flot side of shonk owoy from you.
The correct needle system is slomped on bed slide.
(For ordinory sewing, use Sysfem 130 R needles.)
lnserf new needle.
Check ond correcl threoding os instrucfed on poges 14 qnd 15.
Use correcf needle ond lhreod.
Remedy:
See remedies l is ted under 1. obove.
Adiusl tensions os instructed.
Use good quolity threods only.
Cleon ond oil hook rocewoy.
Polish needle plote slot wilh fine emery clolh.
27

3. Needle Brecks
Cq use:
Benl needle strikes poinl of sewing hook.
Needle loo lhin or lhreod loo heovy.
Fobric pulls needle so it bends ond strikes needle
plote.
Bobbin cose inserled incorreclly.
4. Foulty Slilch Formolion
Co use:
lmproper tension.
Threod too heovy, knotty or hord.
Bobbin unevenly wound.
Pieces of lhreod between tension discs.
5. Mochine Feeds lmProPerlY
Co use:
Feed dog selloo low, does nol rise up enough obove
needle plofe level.
Accumulofions of lint pocked between feed leeth.
Remedy:
Reploce needle ol once lo prevent furlher domoge.
Use correct needle qnd threod sizes.
Don' t force the feeding mol ion. Guide the moter io l l ight ly.
Push bobbin cqse unf i l you heor i t snop in io ploce.
Remedy:
Adjust tensions qs instructed.
Use only f i rs l - rote fhreod -- lhe correct s ize for lhe needle ond {obr ic '
Don' l run threod over f inger when winding the bobbin, bui leod i t
oround lhreod reloiner stud on lop cover.
Roise presser bor lifler ond. remove threod.
Remedy:
Hove your Pfof f deoler moke the necessory odiusimeni.
Toke off needle plole ond remove lint with o sli{f brush.
28
It
iII
II1I4;4
l

6. Mochine Works Heovi ly
Co use:
Motor belf hos shrunk ond cquses excessive pres-
sure on beor ings.
Hook rocewoy locks oil or is obstrucied by pieces
of threqd.
Mechqnism clogged by infer ior o i l .
Bobbin winder working whi le sewing (when o
bobbin is not being f i l led).
Remedy:
Hove your Pfoff deoler odlusl lhe belt tension.
Cleon ond oil hook rocewoy.
Use only Pfof f sewing mochine oi l - - never solod oi l or g lycer ine.
Stop bobbin winder.
Threod Jomming
The new PFAFF rolory hook wi l l nol normol ly iom, even i f the mochine should be hondled improper ly.
lf threqd should ho ppen lo io m in lhe rocewoy of lhe sewing hook, lhe power of lhe molor will be sufficienl lo overcomehord working of lhe mechqnism.
Threod iomming con be ovoided, howeyer, by lo l lowing lhe insfrucl ions on poge 4.

Tipper Inserlion
Mochine Sei t ing: A-0
B_t
Pin or bosle c losed zipper on wrong side
of fobr ic. Posi f ion of z ipper depends on
whether or not you wonl the edge of the
fqbr ic to over lop the z ipper ' Turn {obr ic
fo r ighf s ide. Run o s l ro ight seom close to
le{t edge of zipper, slitch ocross end ond
up ihe olher s ide in one cont inuous oPer-
ol ion. Use r ight edge of foot os o guide'
For oiher types o{ zipper insertion, follow
direct ions in your z ipper pockoge' V
R 7153
Edge St i tching
Mochine Set l ing: A-0 fo 4 (opl ionol)
B- +
Sew porollel rows of siroighl or zigzog
st i lches ot vor ious dis lonces from the
fobr ic edge by using odiustoble seom
guide No' 53077 ond lhe edge st i tcher
(wi thout qui l t ing gouge) ' The seom
guide is fostened lo the mochine bed
wifh lhe long thumb screw' For wider
morginol st i tching, lurn edge guide
hol f o lurn ond use low end os o guide'
Glui l t ing
Mochine Set i ing: A - 0 or 2 (opt ionol)
B- *
Edge st i lcher No. 41 350 used with the
qui l t ing gouge sews porol le l rows ol
st i tching over lhe ent i re sur{oce of the
fobr ic. Alwoys guide the gouge f inger
olong the preceding row o{ s i i lches'
At l roct ive teo cosies, s l ippers, seol pods
ond covers con be qui l ted
I
ti
R 8032

ffiazu
lEl tpW
Ftot Fetled Seoms
Mochine Sett ing: A-0 or 2 (opt ionol) B- t
Flqt fe l led seoms ore used lo durobly io in two pieces of fobr ic. They qre mode in two
operol ions.
- Flot fe l led seoms usuol ly ore sfroighl-sf i iched. Norrow zigzog st i fches ore used for{fe l l ing on elost ic ized fobr ics only.
Firs i Seom
Loy pieces fogether wi th the wrong sides focing ond lhe bol fom piece prolrudingr/e inch. Feed bofh pieces in lo fe l l ing foot , os i l luslroled, so thoi the bol tom fqbr ic is
folded over edge of lop piece ond
st i tched down. Moke sure fhol
protruding seom ol lowonce is nol
folded twice.
Second Seo m
Open the lwo pieces, ploce fhem under lhe needle r ight s ide up, inser l seom r idge
into fe l l ing foot opening, ond sl i lch down io ihe lef l . Moke sure lhol second seom is
ploced close to ihe edge buf nof beyond i t .
The fel l ing foot hos o needle s lof , rother thon o needle hole, to permi l z igzog fel l ing.
R 7154

I
il;I
f,n 16261
thi mr'->,-il
q'' Rolled Hems
ll-n d 248lHl Ftfrrlml lprW Hemmins
Mochine Set i ing: A-2to 4 B- +
Rol led hems ore used to f in ish sheer or del icqte fqbr ics.
For o smooth, unpuckered hem, eose threod tension
sl ighf ly ond sef diol A on 2 or 3. To hem tr icot fobr ics,
increose lhe tension ond use the widest z igzog sf i ich so
the hem hos o rol led shel l ef fecl .
V
Mochine Sett ing: A-0or 2 to4 (opt ionol)
B- +
The hemmer foot is indispensoble i f you
woni to sew o uni form hem. You con hem
wilh stroighi or z igzog sl i tches, depending
on the iype of fobr ic you qre using. Cl ip of f
the corner of the fobr ic to foci l i lo ie inser l ion
inio the hemmer foot. Feed fobr ic so ihot
the row edge is in l ine wi th ihe lef t edge
of the hemmer foof opening. l f you feed less,
the fobr ic wi l l nof be folded lwice ond ihe
row edge wi l l show. Avoid ugly ends by
slowing down feeding. To do this, press lhe
fobr ic ogoinst lhe needle plote on ihe lef t
side of ihe fooi before you come to the end
of lhe hem.
!u
'aa
R 5912

. | 5t378
IFINMv \Jt tr&A> overcosling Edges
<4'
MochineSelt ing: A-2to4(opt ionol) B- +
overcosi ing prevents f royed edges. Use o long, wide zigzog st i lch ond sew edge with
ihe needle foking one st i lch into ihe fobr ic ond the olher over i ts edge. You moy
{ overcost edges of ier fobr ic is cuf ond before lhe pieces ore io ined.
-
'l 5t378
ln l "mBull Seomins U!l pttl
<@MqchineSet i inq: A-3or4 B-+ v '
Two simi lor p ieces of fqbr ic which do not rovel eosi ly moy be but led iogelher ond
joined with z igzog sl i lches. Worn bed sheels moy be mended this woy. cut oul worn
cenfer s l r ip. Ploce the selvoged edges of the remoining pieces of sheet under lhe
sewing fooi so ihol lhe obutted edges ore cenlered under the needle. Join ihem with
c|ose,widezigzogst i lches.Hemrqwedgesofshee|.>
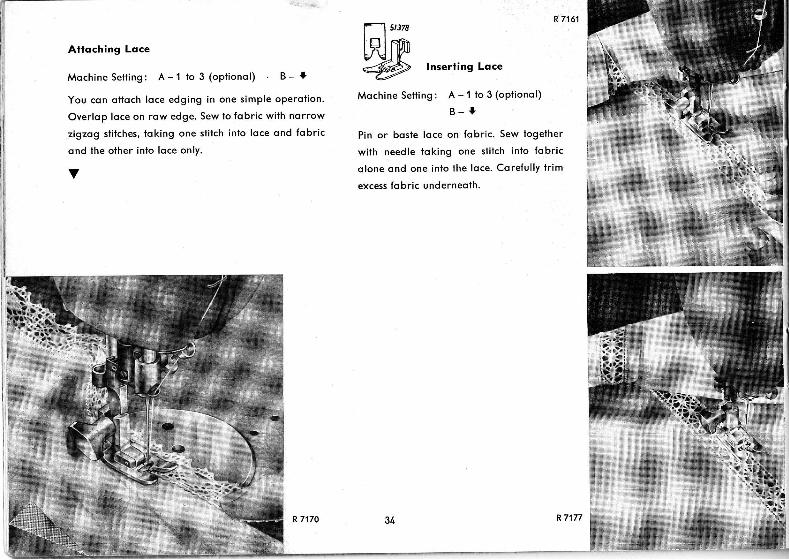
Attoching Loce
Mochine Sett ing: A-1 to 3 (opt ionol)
il s,rzs
RM8>
Inserling Loce
Mochine Sett ing: A-1 to3 (opf ionol)
B- t
Pin or bosle loce on fobr ic. Sew logether
with needle loking one st i tch into fobr ic
olone ond one in io the loce. Coreful ly t r im
excess fo bric underneoth.
B- .}
R 7161
You cqn qf foch lqce edging in one simple operot ion.
Overlop loce on row edge. Sew fo fobric with nqrrow
zigzog slitches, toking one stilch into loce ond fobric
ond fhe olher in lo loce only.
Y
R7177

-151378
lrr-1 | ArhLn il llllZ+P Inserrins Potches
Mochine Sett ing: A- 2 to 4 (opt ionol) B- t
Lorge holes con be polched quickly. The fol lowing melhod moy be used for iersey
fobr ics. cut poich so thof i ls groin wi l l motch lhe resf of lhe fqbr ic. Ploce ihe potch
over ihe domoged oreo. Sew i l down wi lh o wide zigzog st i tch o{ medium lenglh.
For oddi l ionol strength st i tch over corners twice. Turn over ond i r im close lo seqms.
35 R7157
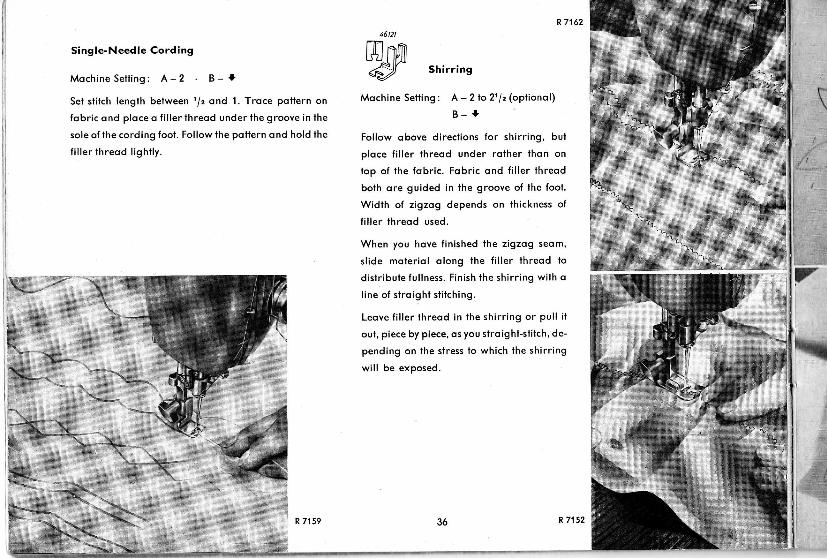
Single-Needle Cording
MochineSett ing: A-2 B-+
Set st i tch length between 1/z ond 1. Troce pottern on
fobr ic qnd ploceo f i l ler threod underthe groove in lhe
sole of lhe cording foot. Fol low lhe pot lern ond hold the
f i l ler threod l ight ly.
Shirr ing
Mochine Set l ing: A - 2 to 21/z (opt ionol)
B- I
Fol low qbove direcl ions for shirr ing, bul
ploce f i l ler lhreod under rother fhqn on
loo of the fqbr ic. Fobr ic ond f i l ler threod
both ore guided in lhe groove of the fool .
Width of z igzog depends on thickness of
f i l ler fhreod used.
When you hove f in ished the zigzog seom,
sl ide moter io l o long lhe f i l ler ihreod to
distr ibute f u l lness. Finish the shirr inq wi th o
l ine of stroight st i tching.
Leqve f i l ler threod in the shirr ing or pul l i l
out , p iece by piece, os you stroight-st i tch, de-
pending on fhe sl ress io which lhe shirr ing
wi l l be exoosed.
wR 7162
\
R7159 36 R 7152

ruruqV Applique Work
Mochine Sett ing: A-1r/zto 3 B- +
Pin or boste oppl ique on fobr ic ond overcqsl edges. Appl iques olso con be ot toched
with o sot in st i fch or ony embroidery design.

46t21w Openwork Embroidery
Mochine Seft ing: A-0ond 2r/z B- +
There ore hundreds of pot terns excel lent for openwork embroidery. Al though simi lor
in oppeoronce to oppl ique, openwork embroidery is much simpler. Let 's embroider
ihe 25-squore box i l luslrqied. First , sew over ol l l roced l ines twice, using shor l s l ro ighl
s l i lches. Then sew over s l ro ighf-s i i lch l ines wi ih o medium-wide sof in st i ich. Moke sure
lhoi your rows of sot in st i lching ore even so lhe corners of your squores look neot.
{ When you f in ish sewing, cut out every olher squore. Be coreful lhot you don' t in jure
the seoms.
To moke on ol i rqct ive modern design, oul l ine f lowers or f ree forms with on embroidery
design insieod of sot in st i tching.
R 7179

--1
5t37e
ls l f f iL// \ l l lF,( lJE/ \I-J IT
<:#) Moking Sluffed Animols WP scrorwork
MochineSetf ing: A-2112 B- +
Stuffed onimqls ore wonder{ul loys for the little
folk ond fhey ore so eosy to moke. Some scrops of
mofer io l or o i lc loth ond o piece of cordboord is
ol l you need for lh is elephont, for inslonce.
Oul l ine pol lern on mofer io l ond cut oul p ieces
without o seqm ol lowonce. Inser l some cotton
wodding into lhe eors before you fold ond close
ihem with o z igzog seom. Attoch eors ond io in
pieces by overcost ing edges with o medium-wide
sof in sf i tch, leoving openings for fhe lusks. Sel in
fusks, g lue on eyes ond tock on toi l . Sfuf f e lephont
wi lh coi lon, insert ing wodding through open soles
ond t ip of t runk. Close openings with cordboord
covered with oi lc loth.
Mochine Sett ing: A-2 to 4 (opt ionol) B- +
Drow design on fobr ic. Clomp work in lo embroi-
dery hoops. As you ore fo l lowing lhe scrol lwork
ouf l ine wi fh o wide soi in st i tch, move hoops r ight ,
lhen lef f , o l lernot ing the rhylhm ond the direct ion
of your movements. An exciling note moy be odded
by using vor iegofed threod.
" . : , "" ;
.,'jij*
ffi* 39 R 7150

MI mi io l ion Hemsl i lching
Mochine Sel t ing: A - 2t lz St i tch Length: 1-1112
B-+ lncreoseTension
Beouliful hemstilching effecls on hondkerchiefs, blouses, dresses ond so forth, con be mode
with Pfoff's System 130 (wing) needle ovoilqble ot Pfqff stores oi exlro cosf. Loosely woven
fobr ics, such os bot iste, orgondy, georgefte, etc. , ore wel l sui ted to hemst i tching whi le wool ly
fobrics ore not recommended becouse needle penelrolions close up. Since the hemstitching
needle hos o s l ighf ly th icker shonk, the needle set screw musi be turned oul for enough for
insert ion. The hemst i tching needle cqnnol be fhreoded with the oulomol ic needle threoder.
)a '>D\,
\7 >@l r
o+,V̂v
a'Or:uo"C"-..^4ef"'t
@7
Hemstilching is very simple (see skeich).
I Sew {irsl row on ihe left of the oreq lo be hemstitched.
Stop mochine when needle is in fobr ic on the r ight .
Lift sewing fooi, turn fqbric in the direcfion of orrow, ond lower fool ogoin.
Siw second row, os shown in sketch, guiding moler io l porol le l to f i rsf row so lhol needle
penefrotes needle holes of previous zigzog stilches os it descends on lhe right.
l { you ore moking more thqn two l ines of hemst i fching, ol iernotely leove needle in fobr ic
on ihe lefl ond righl ol lurning points, pivot fobric on needle, ond proceed os directed
obove.
I+O

R 7173
Ilt,1n
JIraltu
fllll
2i lNZ
K\affir-=2t
{ Hemst i tching
Hemsl i lching is successful on l inen ond twi l led fobr ics. For th is type of work useon ordinory needle.
Drow severql threods our o{ rhe fobr ic. Set mqchine for o medium-wide zigzogst i tch qnd sew olong borh edges of the sfr ip, moking sure rhqr. .z igs" ond"zogs" in bolh rows ore exoctly opposife eoch other. set sritch lengrh occordingto lhreod bor width you desire.
Drow threods from the edge until your fringe is lhe length you wonl. Zigzogolong this l ine -- ond you wi l l hove picof edging.
Bl indst i tching
MochineSett ing; A-1 to2(opt ionol) B_+
St i tch Lengfh: Moximum
Hemming dresses ond skir is by hond is o robor ious tosk. you con do i f eosiryon your PFAFF on medium ond heovy fobr ics. use zigzog foor No.51 37g wi ihblindsiitch guide No. 46669, which you con buy ot your pfoff store. Attoch fheguide so thot i ls verr icol f longe goes through rhe sewing foof s lot . Use o No.70needle, o loose upper fension, ond thin lhreod in the needle.
Nexl , fo l low lh is procedure:
Turn fobr ic wrong side up. Fold selvoged moler iq l once (Fig. 1) , unselvogedfqbr ic lwice (Fig.2). l t is odvisoble lo press or bosle hem. Guide work evenly,holding lop hem edge ogoinsr verf icol f ronge of br indst i rch guide. set d io l Aso lhol needle tokes lefr stitch exocrly in fhe folded edge ond right siirch up toor over lhe hem edge. When hem is f in ished, sr i tches wi i l not be v is ibre on tooside.
R 7139
R 8046
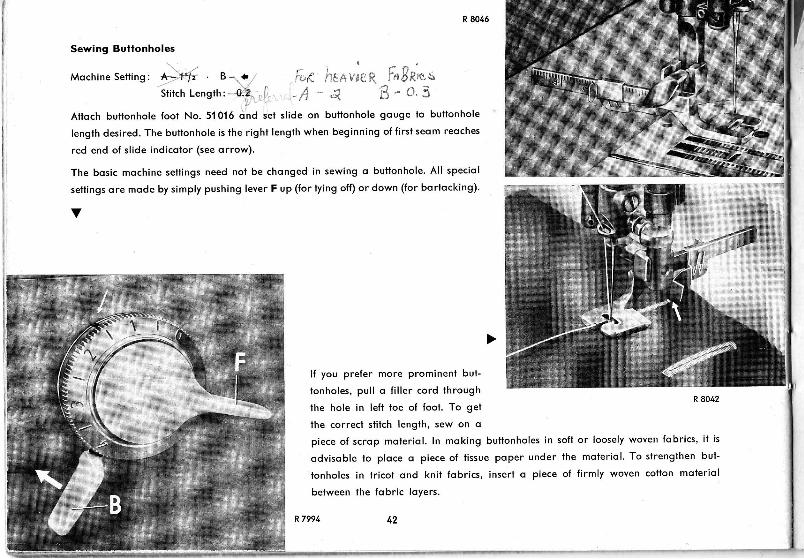
Sewing Bul lonholes
. / ' r r , 'Mochine Setting: *=:4, . B-a. i+f: lt*e'v',tt F, _J'a#Rrc:S
Srirch Lensrh:- o+.,, i -f i - ".X E - Ll. 3
Attoch buttonhole foot No.51 016 dnd sel s l ide on but lonhole gouge lo bul tonhole
lenglh desired. The buttonhole is ihe r ight lenglh when beginning of f i rst seom reoches
red end of slide indicotor (see orrow).
The bosic mochine sett ings need not be chonged in sewing o butfonhole. Al l speciol
sei f ings ore mode by s imply pushing lever F up ( for ty ing of f ) or down ( for borfocking) '
V
lf you prefer more prominent but-
tonholes, pul l o f i l ler cord through
the hole in left loe of foot. To get
lhe correcl stilch length, sew on q
piece of scrop moler io l . In moking but lonholes in sof t or loosely woven fqbr ics, i l is
odvisoble fo ploce o piece of t issue poper under the moler iq l . To sirengthen bul-
tonholes in l r icot ond kni t fobr ics, insert o piece of f i rmly woven coi lon moier io l
befween fhe fobric loyers.

ililo
Io)c't
o
.9o
Ei5 @@@@o
ilo@
Inslrucf ions for Bul ionhol ing
Sew f i rs i s ide over q f i l ler cord. When beginning of
seom reoches sl ide indicotor on butfonhole gouge, i l is
the r ight length. Leove needle in fobr ic on r ighf s ide of
ils lhrow.
Li f t foof , furn fobr ic oround clockwise, using needle os
o pivof . Lower{oot, toke one st i tch lo the le{ t , pul l f i l ler
cord fquf ond loy i t porol le l fo compleled l ine of st i tch-
ing.
Press lever F down. Moke 4lo 5 bortock st i tches, s l ight-
ly closing logelher buitonhole end lo reduce length of
bor.
4 Releqse lever F. Tr im f i l ler cord of end of f i rst st i lch row. Sew second
row ond stop oboui 4 fo 5 stitches {rom end of {irst row.
5 Press lever F down. Moke second tqck. os insfructed obove.
5 Push lever F up ond moke 3 to 4 ty ing s i i fches.
7 Tr im both lhe sewing ond f i l ler threods. Open the buttonhole wi th
your seqm r ipper, Be cqreful not io in jure the bqr lqcks.
R 7160
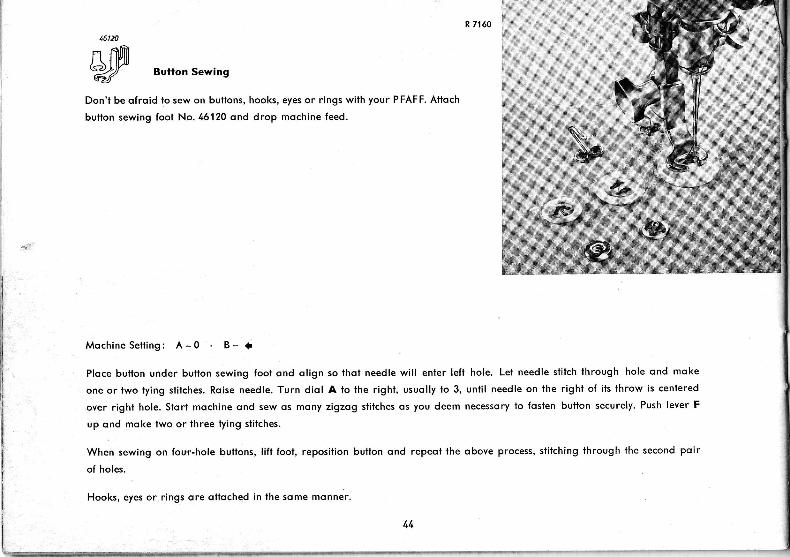
F|$mI ( | tPi l l
WI Bulton Sewins
Don'l be ofroid io sew on butfons, hooks, eyes or rings with your PFAFF. Atloch
button sewing fool No. 46120 ond drop mochine feed.
MqchineSet i ing: A-0 B- t
Ploce but lon under buf lon sewing fool ond ol ign so lhol needle wi l l enter lef t hole. Let needle st i tch fhrough hole qnd moke
one or two ty ing st i tches. Roise needle. Turn diol A to the r ighf , usuol ly to 3, unt i l needle on ihe r ighf of i ls lhrow is cenfered
over r ighl hole. Stort mochine ond sew os mony zigzog st i tches os you deem necessory io foslen bufton securely. Push lever F
up ond moke lwo or three ty ing st i fches.
When sewing on four-hole butlons, lift foot, reposition butfon ond repeol the obove process, stitching through the second poir
of holes.
Hooks, eyes or r ings ore qt toched in fhe some monner.
j : -
- : - . ' ' - - :__"
f+f+
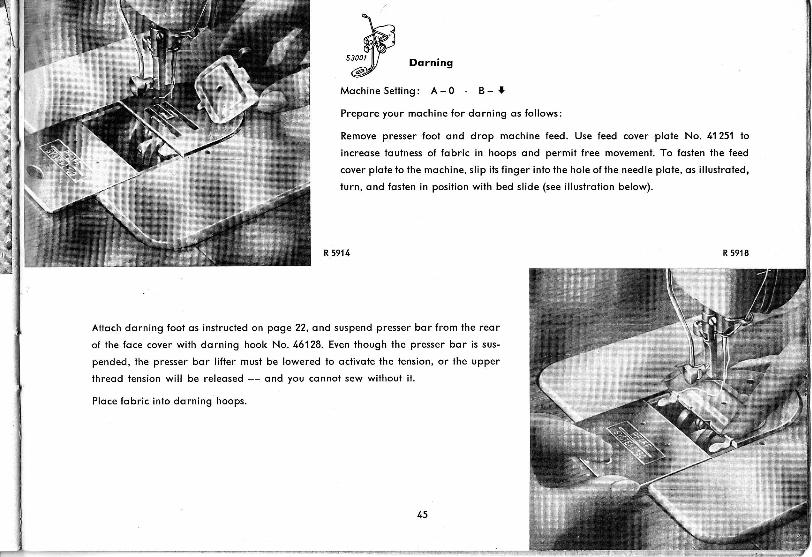
Dorning
MochineSet l ing: A-0 B-+
Prepore your mochine for dorning os fo l lows:
Remove presser fool qnd drop mochine feed. Use feed cover plote No. 4'i'251 lo
increose toutness of fobric in hoops ond permil free movement. To fqslen the feed
cover plote to fhe mochine, s l ip i ts f inger into the hole of the needle plole, os i l lustrofed,
lurn, ond fosten in position with bed slide (see illuslrolion below).
R 59i4
Attoch dorning foot os instructed on poge 22, and suspend presser bor f rom fhe reor
of the foce cover wi ih dorning hook No. 46128. Even though the Presser bqr is sus-
pended, the presser bqr l i f ler musl be lowered to oci ivole lhe fension, or lhe upper
lhreqd lension wi l l be releosed -- ond you connof sew wi lhoul i t .
Ploce fobr ic in lo dorning hoops.
R 5918
45

7
" , i
R 5913
Th in S pots
Remember f hol "o s i i lch in t ime soves nine"
qnd reinforce spois thol hove worn lhin
with short stitches mode lengthwise ond
ocross worn secl ion. Clomp fobr ic into
dorning hoops ond move i t f reely under
lhe needle.
Long r ips moy be dorned with the normol
sewing fool ond wilhoul hoops. Roise mo-
chine feed ond use forword-reverse slitch
conlrol.
R 5916
Trio ng u lq r Teo rs
Tr iongulor leors ore besf dorned by ploc-
ing the lorn section between hoops ond
moking close sl i lches ocross ond length-
wise. Move work under ihe needle wi th
bolh honds.
Smol l Holes
Dorn smql l ond medium-size holes by
tr imming rogged edges with the fobr ic
groin. Firs l st i tch bock ond for ih ocross the
hole f rom one side io the olher wi fh the
mochine running ot h igh speed. Then iurn
the fobr ic ot r ight ongles ond sew bock
ond forth over preceding work wi th short
s i i tches. This onchors lhreqds in lhe unworn
oreo qround lhe hole.
46

Monogrom Embroidery
Mochine Sett ing: A - occording to desired width B - +
{ Script lelfers ore besl for monogrom embroidery withoul o sewing fooi. lt requires o
little proclice. You will soon enioy creotive embroidery once you hove leorned lo
move lhe mofer io l o l o uni form rofe. The fobr ic should be held lout in fhe hoops,
lhe presser bor suspended ond lhe presser bor l i f ter lowered. Drop mochine feed,
Lower needle info fobr ic ol fhe beginning of your design ond drow bobbin fhreod
up through lhe fobr ic. Hold both ihreqd ends ond sew over out l ine, moving hoops
slowly ond evenly. To give your monogrom dimensionol quol i ty, embroider ouf l ine
twice. Be sure st i lches ore c losely spoced.
w Sewing Monogroms
MochineSett ino: A-21 lzto3 B-. l
The procedure below is pr imori ly used for block let ters. Roise mochine feed ond set )
mochine for sot in st i tch. At toch cord s l i tcher ond sew oul l ines of monogrom. Wotch
thot seoms do nof over lop of io ints of le l ters. To roise monogrqm, inserf o f i l ler lhreod.
Ask your Pfof f deoler lo show you P FAF F's Orncmentogroph, lhe ingeniously
designed monogrom ond ornomentol s l i tch ol lochmenl. You wi l l morvel o l
i ts versol i l i ty ond del ight in i ls counl less creol ive possibi l i l ies.
, : : : : .. .a
' - ' :I . - , - . ,i , ,I i : : : :
47 R 7165

Cording
To cord on your PFAFF 259, use Cording
Kit No. 50176 which is ovqi loble ot extrd
cosl.
The Cording Ki l comprises:
4 double-needle holders for needle dis-
tonces of t l rc, sfaa,3/rz ond Tloe inch;
3 cording feet;3 cording plotes (2 wi fh
cord ducis ond 1 wi th cenler c low);
1 pockoge of System 130B needles ; ond
1 screwdriver. Addi t ionol por ls for
heovier cording ore ovoi loble ot exlro
cost.
The interchongeoble double-needle
holder is ei :sy lo ot toch.
Chonging the Needle Holder
Br ing toke-up lever lo highest point , loosen smol l set screw ond chonge needle
holders. Tighfen set screw securely. The lorge needle set screw must olwoys poinl
foword the right.
Use Syslem 130B round-shonk needles in r / rc ond s/or- inch double-needle holders,
ond System 130R f lot-shonk needles in 3/sz ond Tloa' inch needle holders.
To ottoch cording plote, refer io inslruclions on poge 45 for mounting feed cover plole.
A
48

lncreose the bobbin lhreod lension sl ight ly for cording. Pfof f recommends you f i l l your
cording so i f keeps i fs shope in the loundry. Fi l ler cord th ickness depends on cording
size you wont. To sew filled cording, use fhe two cording plofes with cord ducls'
Only very norrow lucks ore mqde wilhouf filler cord'
MochineSett ing: A-0 B-+
Addit ionol Informol ion on Cording
ordinory cording in medium-heovy {obr ic is mode with cording foot No. 41791 ond
cording plote No. 41 842.
For thicker cording use fool No.41 790 with cording plote No' 105995'
R 8291
Upper Threoding for Two-Needle Work
cording foot No. 41792 qnd plote No. 41842 (wilh center clqw, but withoul cord duct)
serve lo moke norrow qir tucks in l ightweight moler io l '
pin tucks olso ore mode wifh cording foot No. 41792, bul withoul cording Pldle.
Cording plqte No. 41 845 with high cenler c lqw is used chief ly {or cording in th ick fe l f '
Cording height ondwidth ore deiermined byihe distonce between |he lwo need|es,
the cord diomefer ond the height of the r idge on ihe cording plole. Threod lensions
qlso inf luence cording size. For uni lorm spocing of porol le l tucks, ot toch on odiusloble
g uide lo f he cord ing foot. when spoce between lucks is very no rrow, ploce the preceding
seom inlo one o{ lhe grooves of the foot ond use i f os o guide. This procedure insures
uni form ond porol le l rows of cording.
49
l lililtlt
,'F{ "'er+,,i , , , "*
&o,| r:71s'3ze
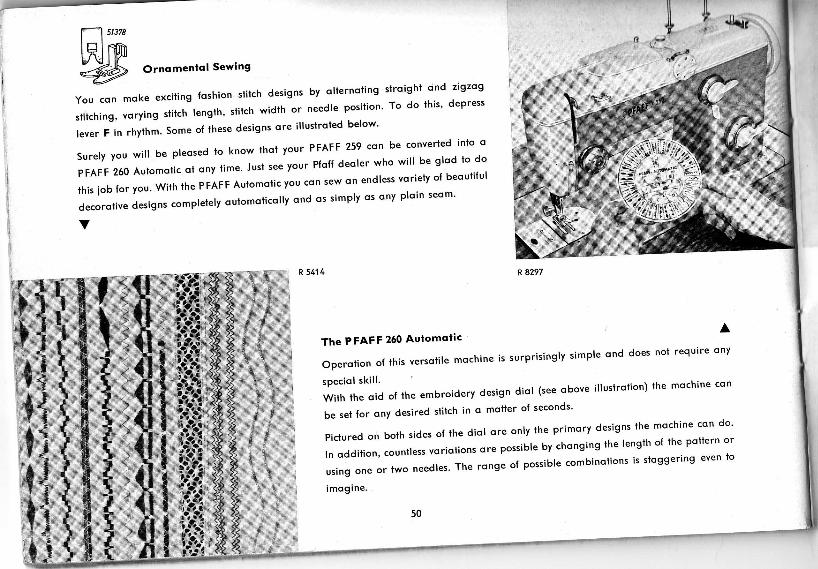
LF]ME/ El I:-?S\ Ornomenlol Sewing
You con moke exciling foshion siilch designs by olternoling
stifching, vorying siitch length' stitch width or needle position'
lever F in rhythm' Some of these designs ore illustroled below'
Surely you wi l l be pleosed to know lhot your PFAFF 259 con be conver led into o
PFAFF 260 Automot ic ol ony l ime' Just see your Pfo{f deoler who wi l l be glod to do
this iob for you. With the PFAFF Automol ic you con sew on endless vor iety o{ beoui i fu l
decorqt ive designs comPlelely ouiomot icol ly ond os s imply os ony ploin seom'
Y
a
stroighl cind zigzog
To do this, dePress
R 5414
The PFAFF 260 Automoti" A
Operotion o{ this versoti le mochine is surprisingly simple ond does noi require ony
speciol ski l l ' : , r . . - r -^+i^h\ +ha mdchine con
With the oid of the embroidery design diol (see obove i l lustrot ion) the mochin
be set {or ony desired stitch in o mqtler of seconds'
Pic lured on both s ides of ihe diol ore only the pr imory designs the mochine con clo '
ln oddi f ion, count less vor io l ions ore possible by chonging the lengih o{ ihe poi tern or
using one or lwo needles' The ronge of possible combinql ions is stogger ing even ro
imqgine.
50

The Trqnsverse Spool Holder
To ensure thol ihe lhreod wi l l unwind evenly f rom o cross-wound spool , use the
tronsverse spool holder which is port of the s londord equipment of your mo-
chine.
To qffoch the spool holder, slip posilion spring I over lhe verficol spool pin,
the bent portion o{ the spring pointing towqrd you. Push fhe spool ol lhreod on
spool p in 2. Press lhe posi t ion spr ing togelher, ond push pin 2 in lo the spr ing
slof. With the spring pressed logelher, odiust its posiiion on the verficol spool
pin, os required. When you releose lhe spr ing, lhe l ronsverse pin wi l l be held
in ploce f i rmly. Poss the lhreod lhrough eyelei 3, ond lhreod fhe mochine os
inslrucled.

Conlenls
:Itaf
f;l
Poge
Foreword . . 1
operot ion. . : . iEleclricol lnformotion.
Essenliol Ports of Mochine
Fundomenfols of Mochine
Stroighf Sfitching
Zigzog Sewing
Winding the Bobbin
RemovingfheBobbinCose. . : : . . . .Inserling o Full Bobbin inlo Bobbin Cose .Inserting the Bobbin Cose
Recommended Needle ond Threod Sizes .
lmporloni Focts obout Needles .Chonging the Needle
Upper Threoding .
Operoling lhe Needle ThreoderDrowing Up the Bobbin Threod
Correcl Tension Regulofion .
Regulot ing the Threod Tension .
Sfitch Length Regulolion .
Reverse Sewing
Dropping lhe Mochine Feed.
Chonging lhe Sewing Fool
The Dorning Fool .
Core ond Moinfenonce
Regulor Mochine Core
Sewlight Focts .
Trouble Shooting
Zipper Insert ion
Poge
Edge Stilching . 30
Qui l t ing. . . . :
Flot Fel led Seoms . 31
Rolled Hems 32
Hemming 32
Overcosfing Edges 33
Butl Seoming 33
Attoching Loce 34
lnserting Loce . 34
lnserting Polches 35
Single-Needle Cording 36
Shirr ing. . 36
Appfique Work 37
Openwork Embroidery 38
Moking Siuffed Animols 39
Scrollwork . 39
fmilofion Hemslitching 40
Hemslilching 41
Blindslilching 41
5678
't0101112131314'|.617181920202122222325262730
i
Sewing Buttonholes
Butlon Sewing .
Dorning
Monogrom EmbroiderySewing MonogromsCordingOrnomenlol SewingThe PFAFF 250 AuiomoticThe Trqnsverse Spool Holder
424445474748505051

Sto*-;,*ffi.L.','4 '' l k: ' G4t
"s -. li"ttP-''n

\ 'No. 10371 {USA) Schn. 260