performance-based equipment training (pbet) instructor guide
TRANSCRIPT

SEMATECHTechnology Transfer 95102996A-TRG
Performance-Based EquipmentTraining (PBET) Instructor Guide

© 1995, 1996, 1997 SEMATECH, Inc.
SEMATECH and the SEMATECH logo are registered service marks of SEMATECH, Inc.
Product names used in this publication are for identification purposes only and may be trademarks of their respective companies.

Performance-Based Equipment Training (PBET) Instructor GuideTechnology Transfer # 95102996A-TRG
SEMATECHApril 30, 1997
Abstract: This document serves as the instructor’s guide in the SEMATECH Performance-Based EquipmentTraining (PBET) program. The document is designed to guide PBET instructors in theorganization,management, and delivery of thre three-day PBET workshop. This publicationcontains copies of the pages of a related document, Performance-Based Equipment Training(PBET) Participant Guide, Technology Transfer #95102995A-GEN. Each page is accompanied bya page of prompts and instructions to guide the instructor during execution of the course. Thisdocument is supplemented by three additional documents: Performance-Based EquipmentTraining (PBET) Transparency Masters, Technology Transfer #95103004A-TRG; Performance-Based Equipment Training (PBET) Templates, Technology Transfer #95103011A-TRG; and avideotape, Performance-Based Equipment Training (PBET) Task Analysis , Technology Transfer#95052836A-TRG.
Keywords: Equipment, Manufacturing Technicians, Quality Management, Training
Approvals: Julian Serda, Author and Project ManagerOlivia Miller-Snapp,, Director, Total QualityDan McGowan, Technical Information Transfer Team Leader
Acknowledgements
The Organizational Learning and Performance Technology Department would like to extendits appreciation to all SEMATECH employees, SEMATECH and SEMI/SEMATECHemployees, SEMATECH and SEMI/SEMATECH members, and consultants who contributedto the development of this training program.
Organizational Learning and Performance TechnologyJudity McCrackin, Manager, SEMATECH
Project Management and Original DesignJulian Serda, SEMATECH
Content Expertise and Technical EditingTim Decker, Intel
Dick Goutal, Performance Solutions
Instructional Design and Production ConsultantsMarge Krohn, MascoTech
Cynthia MacLean, MascoTech
Program Implementation ConsultantsCarol Croft, SEMATECH
Vickie Pruett, SEMI/SEMATECHSEMATECH Supplier Development Department
SEMATECH Technician Training CouncilSEMATECH Technical Information Transfer Department

Technology Transfer #95102996A-TRG SEMATECH
EXECUTIVE SUMMARY
This document provides instructor materials for teaching an entry-level course in theconcepts of Performance-Based Equipment Training (PBET). It contains copies of thepages of a related document, Performance-Based Equipment Training (PBET)Participant Guide (Technology Transfer #95102995A-GEN), with each such pagetypically followed by a page of notes and commentary for the instructor’s benefit.
The PBET course explains the basic steps for designing and developing effective trainingcourses, with emphasis on the instructional module development process. The visionbehind these materials is to improve corporate training practices while raising the skilllevel of the U.S. semiconductor workforce.
The PBET course outlined in this document is designed for persons who are responsiblefor training others in the operation, maintenance, and/or repair of process equipment. Tobenefit from this material, a participant need not have a degree in education orengineering, nor have training experience. However, the course is best suited forequipment trainers, technical trainers, and technical training developers. The classschedule for this course is available through the SEMATECH and SEMI/SEMATECHcomunications systems.
The course includes eight modules covering the following topics:
• Introduction: Course orientation and characteristics and design phases of PBET
• Identify Module: Perform needs analysis
• Analyze Module: Perform task analysis, write performance objectives, and develop askills hierarchy
• Design Module: Develop skills tests, describe relevant practice, analyze materials,select delivery method, summarize a PBET lesson, and complete a second PBETlesson plan
• Develop Module: Develop instructional materials
• Pilot Module: Describe trainer characteristics and pilot a short PBET lesson
• Deliver Module: Describe trainer responsibilities, prepare a training curriculumchecklist, create an action plan for PBET implementation
• Evaluate Module: Describe evaluation levels
Also, appendixes include course-related forms, lists, and bibliography.


Technology Transfer #95102996A-TRG SEMATECH
PERFORMANCE-BASED EQUIPMENT TRAINING
A Performance Improvement Program Developed by the SEMATECH
Organizational Learning and Performance Technology Department
INSTRUCTOR GUIDE
October 1, 1995
1
2
3
4
5
6
7
8
9
INTRODUCTION
IDENTIFY
ANALYZE
DESIGN
DEVELOP
PILOT
DELIVER
EVALUATE
APPENDICES

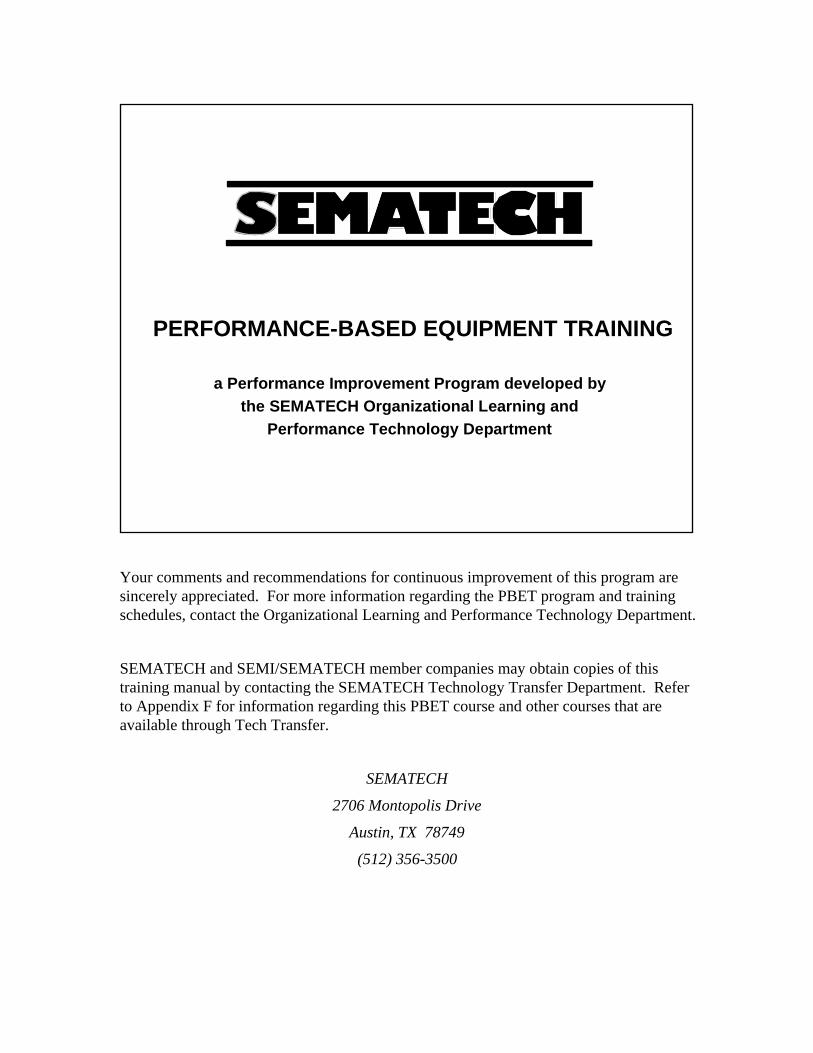
PERFORMANCE-BASED EQUIPMENT TRAINING
a Performance Improvement Program developed bythe SEMATECH Organizational Learning and
Performance Technology Department
Your comments and recommendations for continuous improvement of this program aresincerely appreciated. For more information regarding the PBET program and trainingschedules, contact the Organizational Learning and Performance Technology Department.
SEMATECH and SEMI/SEMATECH member companies may obtain copies of thistraining manual by contacting the SEMATECH Technology Transfer Department. Referto Appendix F for information regarding this PBET course and other courses that areavailable through Tech Transfer.
SEMATECH
2706 Montopolis Drive
Austin, TX 78749
(512) 356-3500

The Organizational Learning and Performance Technology Department would like toextend its appreciation to all SEMATECH employees, SEMATECH andSEMI/SEMATECH members, and consultants who contributed to the development ofthis training program.
ACKNOWLEDGEMENTS
Organizational Learning and Performance TechnologyJudith McCrackin, Manager, SEMATECH
Project Management and Original DesignJulian Serda, SEMATECH
Content Expertise and Technical EditingTim Decker, Intel
Dick Goutal, Performance Solutions
Instructional Design and Production ConsultantsMarge Krohn, MascoTech
Cynthia MacLean, MascoTech
Program Implementation ConsultantsCarol Croft, SEMATECH
Vickie Farr, SEMI/SEMATECHSEMATECH Supplier Development Department
SEMATECH Technician Training CouncilSEMATECH Technology Transfer Department
Copyright 1995, SEMATECH

NOTES TO THE INSTRUCTOR
Materials/Equipment:
• PBET Instructor Guide (Technology Transfer (#95102996A-TRG), PBET ParticipantGuide (Technology Transfer #95102995A-GEN), PBET Templates (TechnologyTransfer #95103011A-TRG, and PBET Transparency Masters (Technology Transfer#95103004A-XFR)
• PBET Task Analysis, a video (Technology Transfer #95052836A-TRG)
• VCR and TV -- for use with Task Analysis video
• Overhead projector, pointer, markers for transparency foils
• Flipchart pad -- one or two for instructor and one for each table of participants
• 3M Post-it pads or index cards (3x5) -- one set per table
• Pens, pencils, flipchart markers and transparency markers, masking tape
• Name tents, note pads -- one per participant
• Legos -- enough so each pair of participants shares one box
• Envelope with enabling objectives for skills hierarchy practice exercise -- one per pair
• Basket of assorted candies in pairs with total number equal to class size (optional)
• Cleanroom garb (hairnet, gloves, booties) for Honeymooners skit (optional)
• Music playback system for Classical and Baroque recorded music (optional)
• Posters to decorate room and for instructional purposes (list of posters)
• Blank lesson planning forms -- two per participant
• Course evaluation forms -- one per participant
• Attendance sheet -- one for each day
• Mager Six Pack and or Robert Mager book list (optional)
• Provide breakfast and lunch catering (optional, but recommended to conserve time)
Instructor’s Notes:
Always read the foils aloud to the class. Make sure all of your materials are collected andready. Have name tents for each participant. Remember to pass out the course evaluationforms before the end of the third day.
The modules in this course are numbered and follow the sequence of PBET phases. It’sat the discretion of the instructor to use the modules in a sequence that seems best suitedfor the circumstances. Refer to the course map accompanying this guide, located on pageIN-1-6. This course map describes the most logical sequencing of each unit ofinstruction.


Introduction
Module No. Page No.
IN-1: Course Orientation IN-1-1
IN-2: Identify Characteristics of PBET IN-2-1Six Characteristics of PBETPerformance Objectives -- the Heart of PBET
IN-3: List PBET Design Phases IN-3-1Seven Basic Phases in the Development of PBETIdentify a NeedAnalyze the NeedDesign the CourseDevelop the CoursePilot the CourseDeliver the CourseEvaluate the CourseReview
Instructor Guide
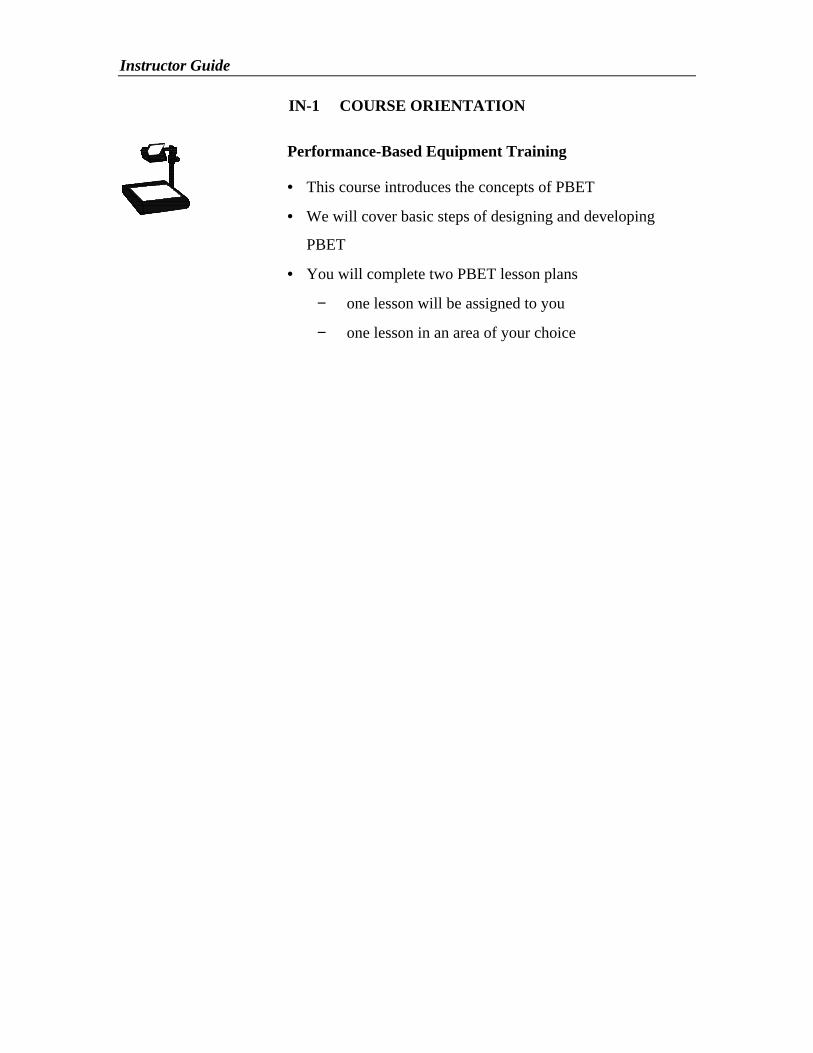
IN-1 COURSE ORIENTATION
Performance-Based Equipment Training
• This course introduces the concepts of PBET
• We will cover basic steps of designing and developing
PBET
• You will complete two PBET lesson plans
− one lesson will be assigned to you
− one lesson in an area of your choice
PBET Module IN-1: Introduction
Technology Transfer #95102996A-TRG IN-1-1
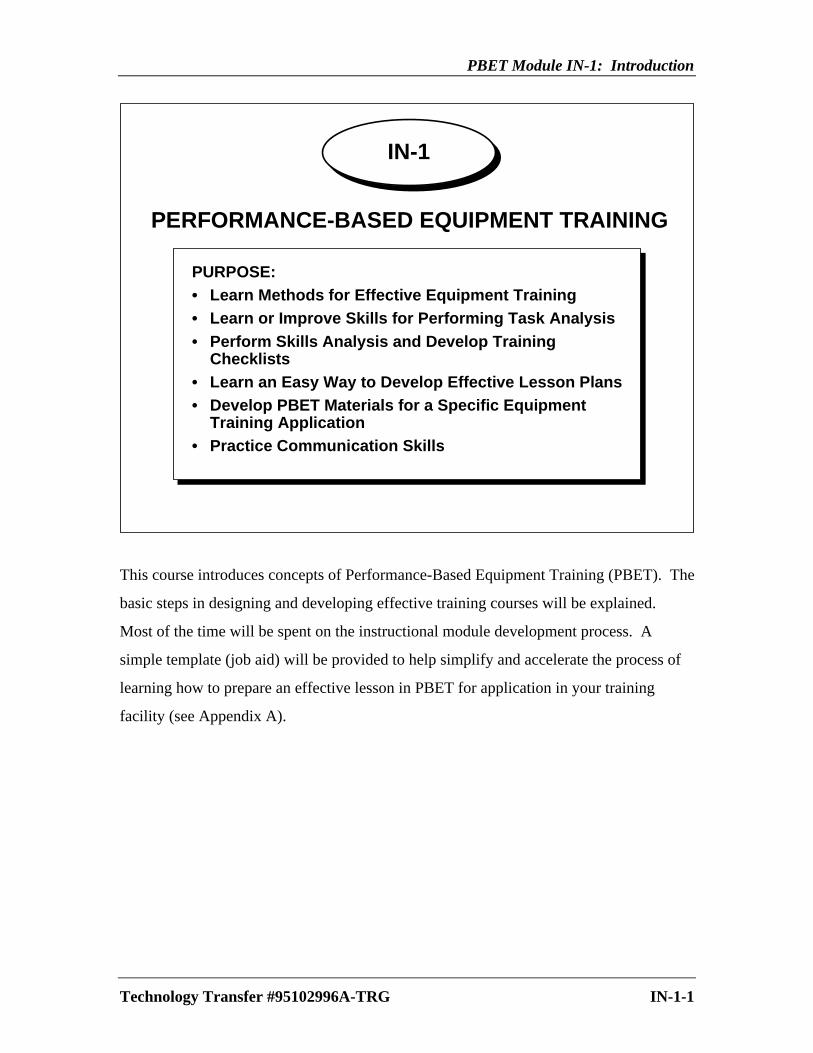
PERFORMANCE-BASED EQUIPMENT TRAINING
PURPOSE:• Learn Methods for Effective Equipment Training• Learn or Improve Skills for Performing Task Analysis• Perform Skills Analysis and Develop Training
Checklists• Learn an Easy Way to Develop Effective Lesson Plans• Develop PBET Materials for a Specific Equipment
Training Application• Practice Communication Skills
IN-1
This course introduces concepts of Performance-Based Equipment Training (PBET). The
basic steps in designing and developing effective training courses will be explained.
Most of the time will be spent on the instructional module development process. A
simple template (job aid) will be provided to help simplify and accelerate the process of
learning how to prepare an effective lesson in PBET for application in your training
facility (see Appendix A).


Instructor Guide
A4
Performance-Based Equipment Training Definition
• PBET is the result of the work of two task forces
− Following the 1992 Technician Training Workshop,
the best methods for technical and equipment training
were explored
− Reference foil -- SEMATECH umbrella
• The results were published and are available
− Doc. # 93031567A-XFR
Reference Appendix F for SEMATECH Technology
Transfer document request forms (page F-7)
− Additional SEMATECH transferable courses (pages
F1-F7)
• Some of the task forces’ recommendations included:
− Training providers should adopt a performance-based
training approach
− Training users/suppliers should adopt and use the first
three levels of evaluation
-- We will cover levels of evaluation later
− Educate managers on how PBET is efficient
− Educate trainers on why PBET is necessary and how
to implement it
− Educate participants on why PBET is necessary and
how they will benefit
PBET Module IN-1: Introduction
Technology Transfer #95102996A-TRG IN-1-2
SEMATECHSEMI-SEMATECH
SEMATECHTraining Projects
• Mass Flow ControllerDoc. #93021493A-TRG
• Performance-BasedEquipment Training
• Furnace ProcessesCourse Development
• Electronic Document
92
93
94
1993-94 Task Forces
• Benchmarking Training Programs
• Semiconductor Technical Curriculum
• Levels 3 & 4 Training Evaluation
• Standards for Electronic Documentation
• Define Technician Certification Process
Proceedings Doc. #94062402A-WS
Presentations Doc. #94062403A-XFR
Reports Doc. #94062404A-XFR
1992-93 Task Forces
• Reference Manual
• Training Course Outline
• Training Evaluation
Doc. #93031567A-XFR
Technician TrainingPlanning Committee
Technician TrainingWorkshop
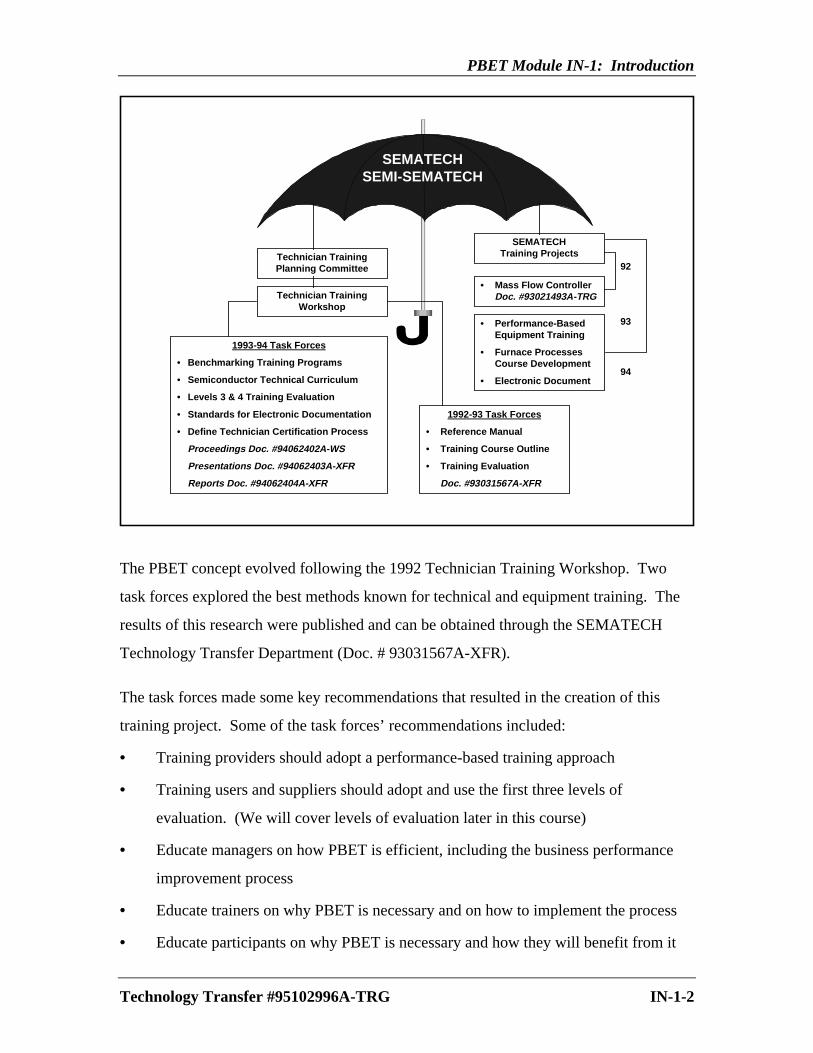
The PBET concept evolved following the 1992 Technician Training Workshop. Two
task forces explored the best methods known for technical and equipment training. The
results of this research were published and can be obtained through the SEMATECH
Technology Transfer Department (Doc. # 93031567A-XFR).
The task forces made some key recommendations that resulted in the creation of this
training project. Some of the task forces’ recommendations included:
• Training providers should adopt a performance-based training approach
• Training users and suppliers should adopt and use the first three levels of
evaluation. (We will cover levels of evaluation later in this course)
• Educate managers on how PBET is efficient, including the business performance
improvement process
• Educate trainers on why PBET is necessary and on how to implement the process
• Educate participants on why PBET is necessary and how they will benefit from it

Instructor Guide
Intended Audience
• Originally intended for SEMI/SEMATECH members, but
methodology is also recommended for SEMATECH
members
• Anyone who trains others in the concepts of operation,
maintenance, and/or repair of process equipment
• PBET applies for all of the following:
− Rules, laws, regulations
− Concept
− Procedure
− Process or principle
• This course is instructor-led and foil-driven
− Feel free to ask questions
• Each module has a practice session and skill test
− Ample opportunity will be provided to master
concepts presented in this course
Introductions:
Instructor Note: Take a few minutes to have all participants
give their name, where they’re from, their background, project
description, and why they’re taking the PBET course
(expectations)
• Document (record) expectations and post flipchart
• Throughout this course, use the flipchart to record
concerns, questions, ideas, etc.
• Post on wall.

PBET Module IN-1: Introduction
Technology Transfer #95102996A-TRG IN-1-3
Intended Audience
• SEMI/SEMATECH Member Companies– Equipment Suppliers– OEM Manufacturers
• SEMATECH Member Companies
• Who should attend this workshop?– Equipment Trainers– Technical Training Developers– Technical Trainers . . . no experience necessary
This training session is intended for any participant who is responsible for training others
in the operation, maintenance, and/or repair of process equipment.
This is an entry level course in instructional design. Neither a degree in education nor a
degree in engineering is required. Training experience is also not necessary.
While the principles presented in this course can benefit anyone who is responsible for
training others, equipment trainers, technical trainers, and technical training developers
can best profit from this class.
Although this class is instructor-led and foil-driven, interaction with the instructor is
always encouraged. Feel free to ask questions. “No question is dumb, except for the
thoughts that remain silent and hidden in someone’s conscience.”
You will have an opportunity to exercise your mastery of the concepts presented in this
class. Each module will have a practice section as well as a skill test section.

Instructor Guide
Lunch
Breaks
Amenities
Telephones
Emergency
Exits
Instructional
Assistants
Evaluation
Forms
Class Schedule, Facilities, and Logistics:
1. Class will be held ____________ through _____________
from ____________ to _____________
2. Lunch break from ____________ to ___________
3. A 15-minute break will be provided during the morning
and afternoon sessions. The class will resume exactly 15
minutes after each break.
4. Coffee, soft drinks, and water have been provided at the
rear of the conference room. Feel free to refill at any time.
5. Telephones are located ____________________________
_____________________________________. Restrooms
are in the area __________________________________.
6. In the event of an emergency, we would exit this room
through the ______________ doors, exit out of the
building through _______________, and gather at the
___________________________.
7. There are several instructional consultants monitoring the
class to lend assistance during the training session. Feel
free to call on them if you have a question or a concern.
8. Please don’t forget to fill out both sides of the course
evaluation sheet before you leave the class today. Your
input is appreciated. Without your feedback we have no
idea if we are serving your training needs.

PBET Module IN-1: Introduction
Technology Transfer #95102996A-TRG IN-1-4
Workshop Logistics

Instructor Guide
Course Outline
• Course title is Performance-Based Equipment Training
• These are the modules this course covers
• This foil is an example of a serial or linear listing of
lessons, referred to as a course outline
Instructor Note:
Estimated time for each module --
Day 1 Day 2 Day3 (suggested order)
IN-1 0:45 1IN-2 0:45 2IN-3 1:00 3ID-1 0:30 4AN-1 2:00 5AN-2 2:00 6 AN-3 1:30 1DS-1 0:30 2DS-2 1:00 3DS-3 1:00 4DS-4 0:30 5DS-5 0:45 6DS-6 2:00 3DV-1 1:30 7PL-1 1:00 1PL-2 1:30 2DL-1 0:30 4DL-2 0:30 5DL-3 0:30 6EV-1 0:30 7
Total estimated time = 20:15 hrs.
NOTE: Estimated time for completion of 20 modules does not
include time for breaks. Use the course map on next page to
optimize time and instructional efficiency. The average day
should include approximately 6:45 hours of class time.
PBET Module IN-1: Introduction
Technology Transfer #95102996A-TRG IN-1-5
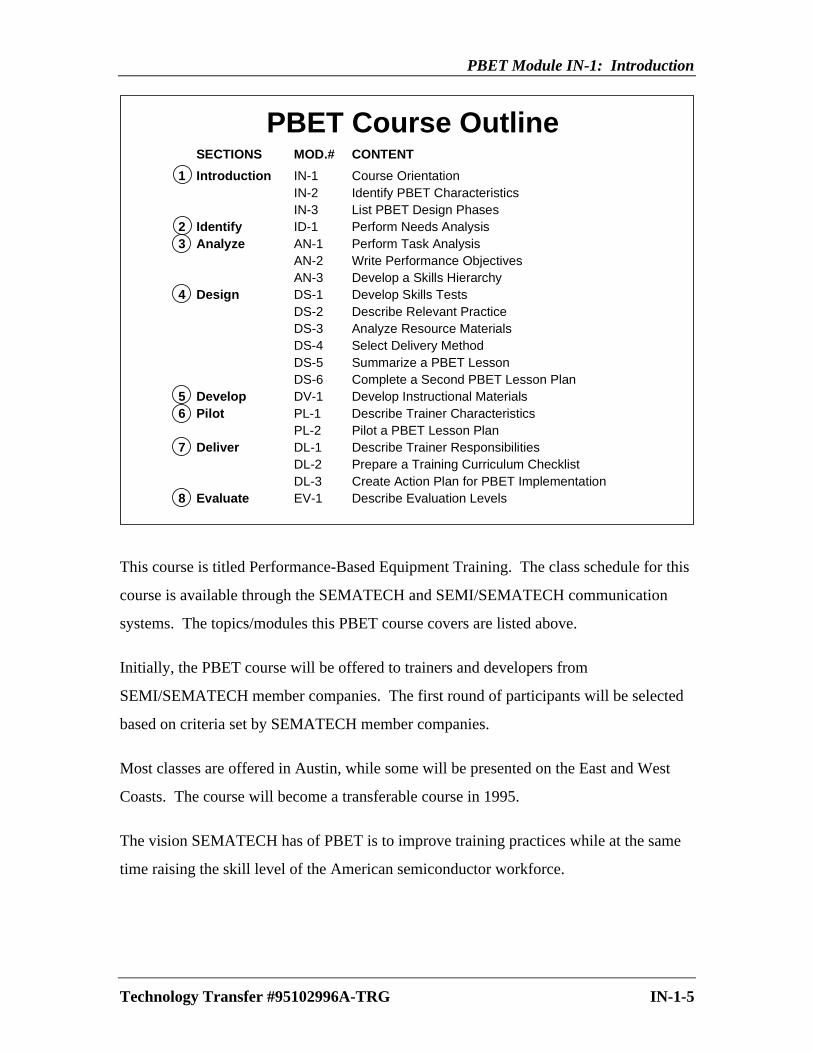
PBET Course OutlineSECTIONS MOD.# CONTENT
1 Introduction IN-1 Course OrientationIN-2 Identify PBET CharacteristicsIN-3 List PBET Design Phases
2 Identify ID-1 Perform Needs Analysis3 Analyze AN-1 Perform Task Analysis
AN-2 Write Performance ObjectivesAN-3 Develop a Skills Hierarchy
4 Design DS-1 Develop Skills TestsDS-2 Describe Relevant PracticeDS-3 Analyze Resource MaterialsDS-4 Select Delivery MethodDS-5 Summarize a PBET LessonDS-6 Complete a Second PBET Lesson Plan
5 Develop DV-1 Develop Instructional Materials6 Pilot PL-1 Describe Trainer Characteristics
PL-2 Pilot a PBET Lesson Plan7 Deliver DL-1 Describe Trainer Responsibilities
DL-2 Prepare a Training Curriculum ChecklistDL-3 Create Action Plan for PBET Implementation
8 Evaluate EV-1 Describe Evaluation Levels
This course is titled Performance-Based Equipment Training. The class schedule for this
course is available through the SEMATECH and SEMI/SEMATECH communication
systems. The topics/modules this PBET course covers are listed above.
Initially, the PBET course will be offered to trainers and developers from
SEMI/SEMATECH member companies. The first round of participants will be selected
based on criteria set by SEMATECH member companies.
Most classes are offered in Austin, while some will be presented on the East and West
Coasts. The course will become a transferable course in 1995.
The vision SEMATECH has of PBET is to improve training practices while at the same
time raising the skill level of the American semiconductor workforce.

Instructor Guide
PBET Course Map
• The course map (page IN-1-6) shows the branching
capabilities
− Logical sequencing of modules
− Equipment availability
− Materials availability
− Time constraints
− Audience needs
• Class schedule is available in SEMATECH and
SEMI/SEMATECH communication systems
• Most classes are offered in Austin; some are offered on
the East and West coasts
• The PBET course will become a transferable course in
1995
• SEMATECH’s vision of PBET is:
− To improve training practices and raise the skill
level of the American semiconductor workforce
• This course is an extension of the short February 1994
SEMATECH Technician Training Workshop
− Ten modules were covered in that workshop
• Some modules were developed subsequent to the
February workshop
Instructor Note: Leave the PBET course map foil out for
use throughout the course

PBET Module IN-1: Introduction
Technology Transfer #95102996A-TRG IN-1-6
IN--3. List PBET Design Phases
DL -2. Prepare a TrainingCurriculum Checklist
PBETCourse MapIN-2. Identify PBET Characteristics
IN-1. Course Orientation
ID-1. Perform Needs Analysis
AN-1. Perform Task Analysis
AN-2. Write Performance Objectives
AN-3. Develop a Skills HierarchyDS -1. Develop Skills Tests
DS -4. Select Delivery Method
DS -3. Analyze Materials
DS -2. Describe Relevant Practice
E V-1. Describe Evaluation Levels
PL 1. Describe Trainer Characteristics
PL .-2. Pilot a PBET Lesson Plan
DL -1. Describe Trainer Responsibilities
DL -3. Create Action Plan forPBET Implementation
DV-1. Develop Instructional Materials
DS -6. Complete a Second PBET Lesson Plan
DS-5 Summarize a PBET Lesson
This course is an extension of the short session presented at the SEMATECH Technician
Training Workshop held in February 1994. Ten modules were covered in that workshop
and more were developed subsequent to the February workshop.
The PBET workshop agenda for the week will be as follows: Monday, Tuesday, and
Wednesday morning we will cover the first 15 modules of instruction. You will develop
a lesson plan for a task assigned by the course instructor. On Wednesday afternoon you
will work on developing a second PBET lesson plan for a specific course. The remainder
of the modules will be covered on the afternoon of the third day.

Instructor Guide
PBET Workshop Agenda
• Agenda for the week:
− Monday through Wednesday morning, cover 15
modules up through and including the Pilot section in
your manual
− Develop a lesson plan on a task assigned by the
course instructor and one on your own
− Wednesday afternoon, develop a second PBET lesson
in an area of specific interest (DS-6)
− The remaining five modules will be covered in the
remaining time on Wednesday afternoon
A4Instructor Note: Show participants the examples in the
Appendix A. Also show the location of extra blank Lesson
Planning Forms following tab #9.
ä3• Take out the PBET Individual Performance Checklist from
your binder (Appendix, A-17). Fill out your name and
today’s date, and initial the first blank under Participant
• Fill out name and date, initial completed modules
• Leave the checklist on your table at all times
• One of the course instructors will sign the checklist for
each completed module
Introduction of Performance-Based Equipment Training
• We’ve talked about how PBET came about at
SEMATECH and how this week will proceed
• Now we’re going to cover Performance-Based Equipment
Training

PBET Module IN-1: Introduction
Technology Transfer #95102996A-TRG IN-1-8
Developer: Class:
Module Title:
Target Audience: Location:
Module Objective:
Prerequisite Skills:
Skill Test:
Additional Resources:
Relevant Practice Description:
Conditions:
Type of Modeling:
Feedback Mechanism:
Module Content Description: Training Aids & Media Tools & Materials
PBET Lesson Planning Form
In Appendix A you will find examples of Lesson Planning Forms.

Instructor Guide
NOTES:

PBET Module IN-1: Introduction
Technology Transfer #95102996A-TRG IN-1-8
NOTES:

Instructor Guide
IN-2 IDENTIFY CHARACTERISTICS OF PBET
• Every module has a performance objective
• The performance objective is a clearly stated, measurable
description of how participants will perform the intended
activity or task
• Ask a volunteer to read the objective from the foil
• In this module, participants will list six characteristics of
PBET -- not five or seven-- just six
• Point out the test on page IN-2-9. Explain that each PBET
module objective has a test that is used to measure
participant performance of the objective
Brainstorm Activity:
Directions:
Ask participants to count 1-4 or 5. Form groups of same
numbers. Ask participants: “What are your pet peeves or
things that bother you about training?”
Have them think about these things in their small groups (table
groups) and make a group list. Give them five minutes to
compile their list and one minute to choose the top four items
on their list.
Record the top 4-5 items from each group’s answers on your
flipchart as one list. Tell them that all or most of these things
do not apply to PBET. Ask participants to return to seats.
Time: 5 – 10 minutes

PBET Module IN-2: Characteristics of PBET
Technology Transfer #95102996A-TRG IN-2-1
IN-2
IDENTIFY CHARACTERISTICS OFPERFORMANCE-BASED EQUIPMENT
TRAINING
OBJECTIVE:
Upon completion of this module, you willidentify the six characteristics ofPerformance-Based Equipment Training(PBET).
Every one of our modules has a performance objective. The performance objective is a
clearly stated and measurable description of how participants will perform the intended
activity or task. In other words, it describes what the participant is expected to do at the
end of the module to demonstrate a desired level of understanding or competency in the
specific skill covered.
In this module you will be expected to list, in writing, the six characteristics of
Performance-Based Equipment Training.

Instructor Guide
Performance-Based Equipment Training• This is our definition for PBET
• Actually, PBET is SEMATECH’s formula for Building
Excellence in Training
• Here’s how this course will do it:
Principles
Practice
Preparation
Performance
P = B E T
Training
Excellence in
Building

PBET Module IN-2: Characteristics of PBET
Technology Transfer #95102996A-TRG IN-2-2
Performance-Based Equipment Training
DEFINITION:
PBET is equipment training based on front-endanalysis that ensures participants are able toreach mastery of job skills as described in clearlystated and measurable learning objectives.
Instructor Guide
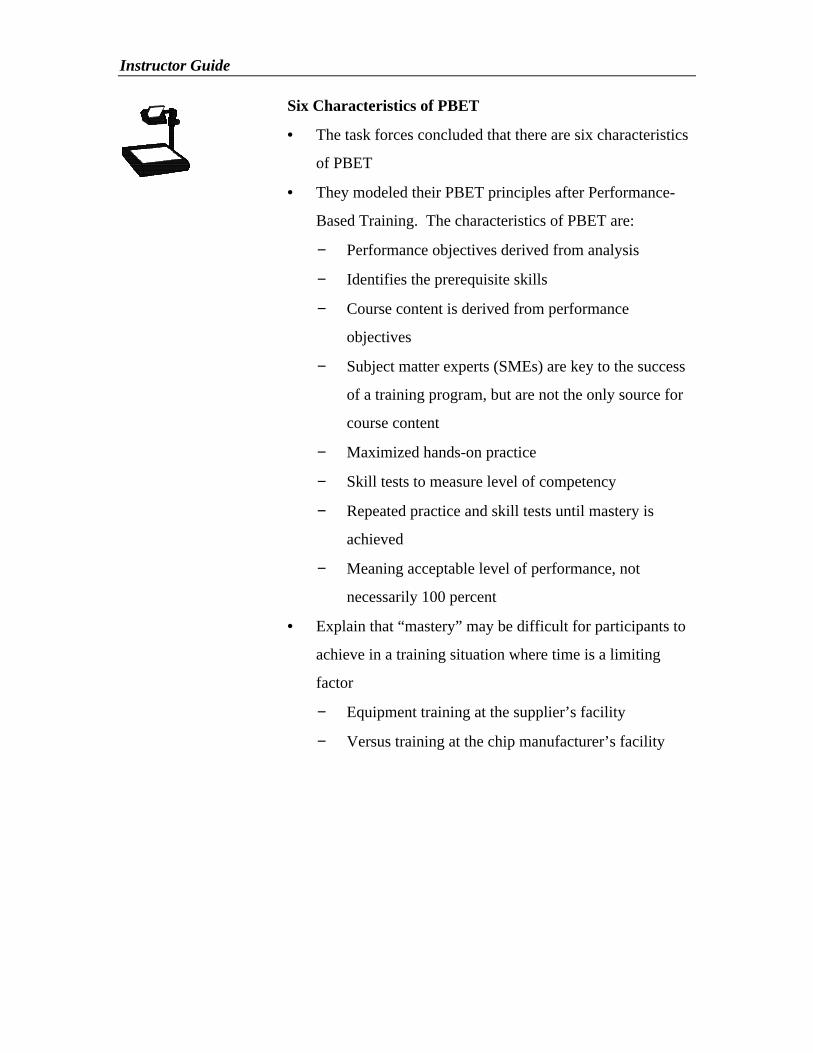
Six Characteristics of PBET
• The task forces concluded that there are six characteristics
of PBET
• They modeled their PBET principles after Performance-
Based Training. The characteristics of PBET are:
− Performance objectives derived from analysis
− Identifies the prerequisite skills
− Course content is derived from performance
objectives
− Subject matter experts (SMEs) are key to the success
of a training program, but are not the only source for
course content
− Maximized hands-on practice
− Skill tests to measure level of competency
− Repeated practice and skill tests until mastery is
achieved
− Meaning acceptable level of performance, not
necessarily 100 percent
• Explain that “mastery” may be difficult for participants to
achieve in a training situation where time is a limiting
factor
− Equipment training at the supplier’s facility
− Versus training at the chip manufacturer’s facility
PBET Module IN-2: Characteristics of PBET
Technology Transfer #95102996A-TRG IN-2-3
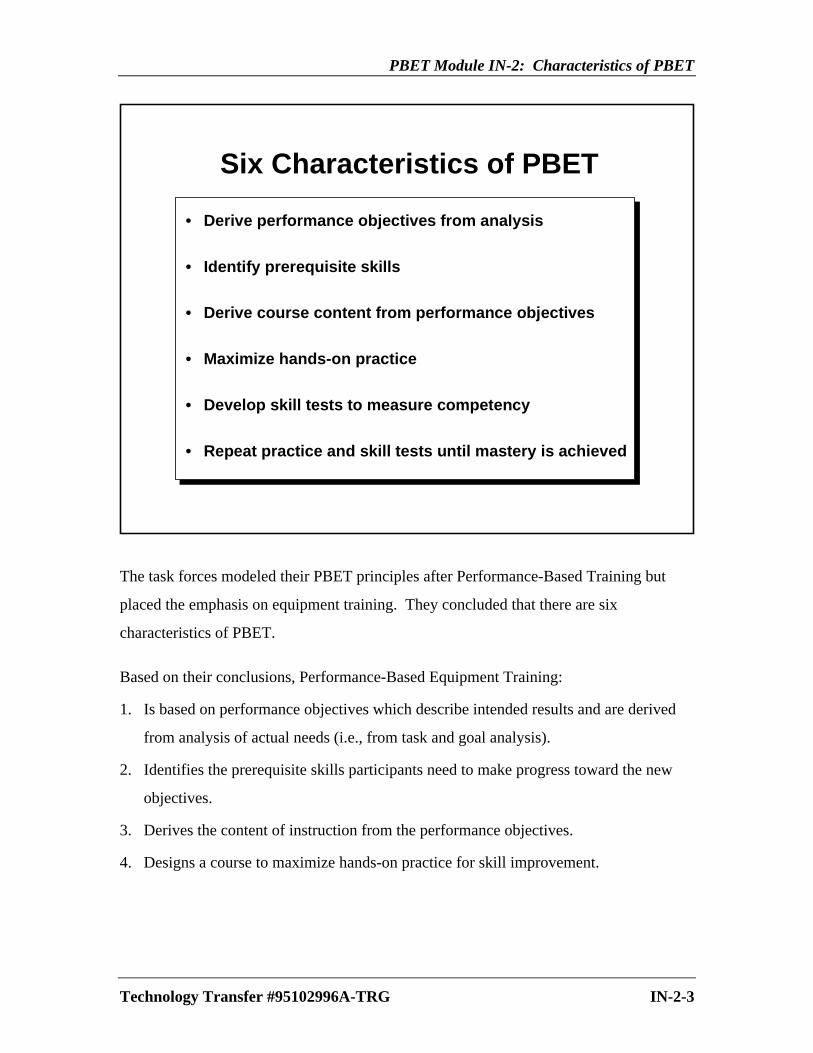
• Derive performance objectives from analysis
• Identify prerequisite skills
• Derive course content from performance objectives
• Maximize hands-on practice
• Develop skill tests to measure competency
• Repeat practice and skill tests until mastery is achieved
Six Characteristics of PBET
The task forces modeled their PBET principles after Performance-Based Training but
placed the emphasis on equipment training. They concluded that there are six
characteristics of PBET.
Based on their conclusions, Performance-Based Equipment Training:
1. Is based on performance objectives which describe intended results and are derived
from analysis of actual needs (i.e., from task and goal analysis).
2. Identifies the prerequisite skills participants need to make progress toward the new
objectives.
3. Derives the content of instruction from the performance objectives.
4. Designs a course to maximize hands-on practice for skill improvement.

Instructor Guide
NOTES:

PBET Module IN-2: Characteristics of PBET
Technology Transfer #95102996A-TRG IN-2-4
5. Provides skill test (skill checks) for diagnosing difficulties and confirming mastery of
the skills.
6. Allows for continued practice on each objective, followed by skill checks, until
mastery is demonstrated. (Mastery means an acceptable/adequate level of
performance. It does not reflect a specific percentage such as 100 percent or
90 percent.)
Instructor Guide
Performance Objectives -- the Heart of PBET
• Performance objectives are the heart of PBET
• Creating a list of performance objectives is the most
important thing in planning for training
• Objectives answer the question, “How will I know if they
can do it?”
− The answer is, “When they can perform as stated in
the objective”
• Performance objectives emerge from the analysis phase
• Performance objectives help guide the instructional plan,
and later they function in a more detailed capacity within
the instructional design
− We will cover these elements in detail later
PBET Module IN-2: Characteristics of PBET
Technology Transfer #95102996A-TRG IN-2-5
• Business objectives• Performance analysis• Goal analysis• Job analysis• Task analysis• Target audience analysis
Performance Objectives --the Heart of PBET
PERFORMANCEPERFORMANCEPERFORMANCEOBJECTIVESOBJECTIVESOBJECTIVES
ANALYSISPHASE
DESIGNPHASE
• Course content• Practice sessions• Feedback methods• Modeling methods• Learning conditions• Skill checks/tests• Program evaluation
The single most important step in instructional planning is creating a list of performance
objectives. They are the heart of the performance-based training program. Performance
objectives emerge from needs that are discovered during the analysis phase.
Objectives are participant-oriented. They help answer the question, “How will I know if
they can do it?” The answer is, “When they can perform as stated in the objective.”
In a way, performance objectives contribute in two capacities. Initially, they help guide
the overall instructional plan, and later in a more detailed capacity, they function within
the instructional design. This will be explained later in more detail.

Instructor Guide
NOTES:

PBET Module IN-2: Characteristics of PBET
Technology Transfer #95102996A-TRG IN-2-6
NOTES:

Instructor Guide
Practice Exercise
• Practice exercises allow the participants to review
information that’s been presented
• Practice exercises should be relevant to intended
performance
• Feedback should be immediate
• Select the six statements that represent true characteristics
of PBET
PBET Module IN-2: Characteristics of PBET
Technology Transfer #95102996A-TRG IN-2-7
PRACTICE EXERCISE
Place a ä next to the statements that represent true characteristics of
PBET.
o A. Performance objectives are derived from analysis.
o B. Any student, regardless of education, may participate.
o C. Trainees must possess certain prerequisite skills.
o D. Performance objectives determine course content.
o E. Tests determine the ranking of students in a class.
o F. PBET maximizes the use of hands-on practice.
o G. Skill tests determine mastery of skills.
o H. PBET allows for practice on each objective, followed by skill
checks, until mastery is demonstrated.
!!!!!
In typical performance-based training classes, practice exercises are used so the
participants have opportunities to review information that’s just been presented. The
practice exercise should always be relevant to intended performance.
In the above practice exercise you are asked to select the true characteristics of PBET.
Please make your selections and then turn the page to check your answers.

Instructor Guide
Self-Check
• When participants select six correct statements and feel
confident in mastery, they take the skill test
• However, if more practice is needed because mastery
wasn’t attained, participants may practice further
− For example, writing the six PBET characteristics
• Once mastery level is attained, participants proceed to
actual skill test
• If participants had difficulty identifying the six
characteristics of PBET, walk them through the following
on the flipchart:
− Performance objectives from analysis
− Prerequisite skills needed
− Performance objectives determine course content
− Hands-on practice
− Skill tests
− Repeat practice, skill checks, mastery
PBET Module IN-2: Characteristics of PBET
Technology Transfer #95102996A-TRG IN-2-8
Self-Check
æ
ææ
æææ
A. Performance objectives are derived from analysis.B. Any student, regardless of education, can participate.C. Trainees must possess certain prerequisite skills.D. Performance objectives determine course content.E. Tests determine the ranking of students in a class.F. PBET maximizes the use of hands-on practice.G. Skill tests determine mastery of skills.H. PBET allows for practice on each objective, followed
by skill checks, until mastery is demonstrated.
NOTE: If you feel you need more practice, review the module, andthen practice writing the six characteristics of PBET on ablank sheet of paper. Otherwise, proceed to the skill test.
If the participants selected the correct six statements and feel confident that they have
achieved mastery of this objective, they may take the skill test. However, if more practice
is needed because the desired level of mastery wasn’t attained, then the participants may
choose to practice the skill further.
For instance, they may choose another method of practice such as writing the six PBET
characteristics. Once participants are comfortable with their mastery level, they may take
the actual skill test.

Instructor Guide
Skill Test
• Skill test should always match requirements of the
performance objective
• If participants don’t achieve mastery, then they may ask:
− For more practice
− For assistance
− To retake the test (until mastery is achieved)
• Let me know when you have completed the skill test and
we will review the correct answers

PBET Module IN-2: Characteristics of PBET
Technology Transfer #95102996A-TRG IN-2-9
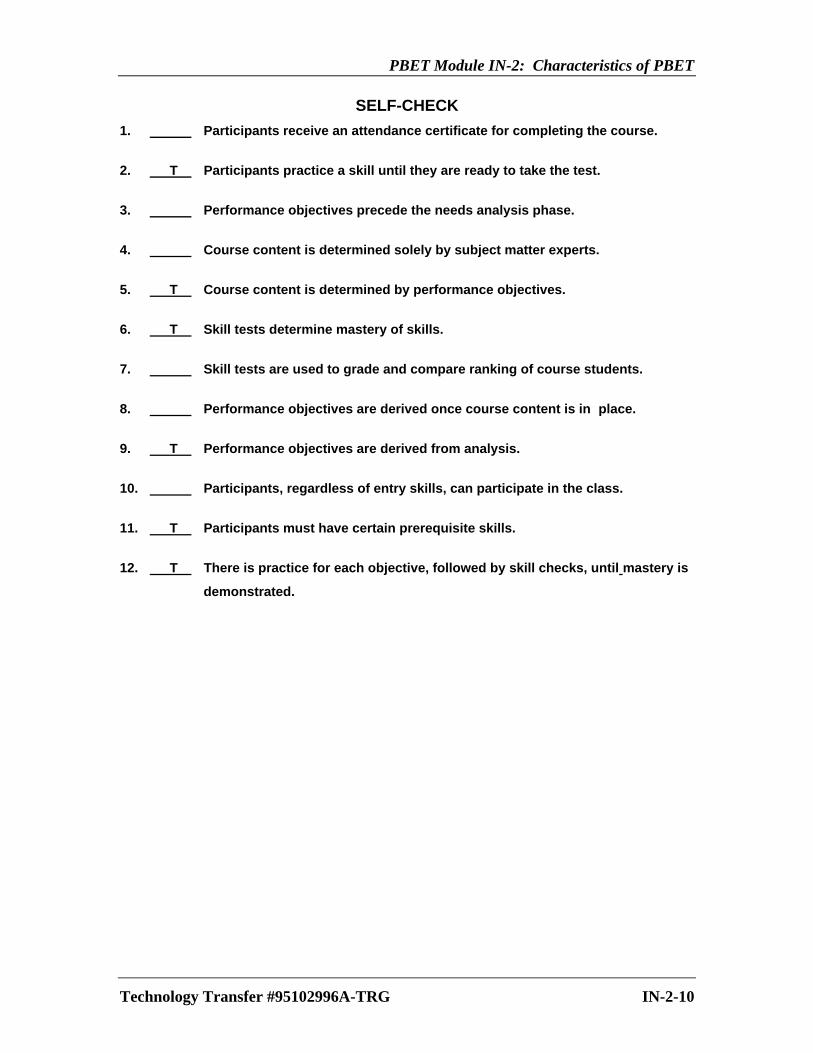
SKILL TEST
Place a T in front of the statements that are true regarding PBET training.
1. Participants receive an attendance certificate for completing the course.
2. Participants practice a skill until they are ready to take the test.
3. Performance objectives precede the needs analysis phase.
4. Course content is determined solely by subject matter experts.
5. Course content is determined by performance objectives.
6. Skill tests determine mastery of skills.
7. Skill tests are used to grade and compare ranking of course students.
8. Performance objectives are derived once course content is in place.
9. Performance objectives are derived from analysis.
10. Participants, regardless of entry skills, can participate in the class.
11. Participants must have certain prerequisite skills.
12. There is practice for each objective, followed by skill checks, until mastery is
demonstrated.
!!!!!
The skill test should match the requirements of the objective as stated earlier in the
module.
Again, if the participant does not achieve mastery of the intended skill, then the
participant may ask for more practice or assistance, or retake the test until mastery is
achieved.

Instructor Guide
Self-Check
• Have participants check their own work
• Discuss differences
• Explain similarities
PBET Module IN-2: Characteristics of PBET
Technology Transfer #95102996A-TRG IN-2-10
SELF-CHECK
1. Participants receive an attendance certificate for completing the course.
2. T Participants practice a skill until they are ready to take the test.
3. Performance objectives precede the needs analysis phase.
4. Course content is determined solely by subject matter experts.
5. T Course content is determined by performance objectives.
6. T Skill tests determine mastery of skills.
7. Skill tests are used to grade and compare ranking of course students.
8. Performance objectives are derived once course content is in place.
9. T Performance objectives are derived from analysis.
10. Participants, regardless of entry skills, can participate in the class.
11. T Participants must have certain prerequisite skills.
12. T There is practice for each objective, followed by skill checks, until mastery is
demonstrated.

Instructor Guide
IN-3 LIST PBET DESIGN PHASES
• We’ve covered performance objectives and how they are
the heart of PBET
• We’ve looked at PBET’s six characteristics and how
PBET came about at SEMATECH
• Now we’re going to cover the seven basic phases in
developing PBET
List Seven Basic Phases in the Development of PBET
Systems
• Ask a volunteer to read the objective from the foil
• The seven basic phases of PBET development may also
be referred to as steps
• Point out the test on page IN-3-17
PBET Module IN-3: PBET Design Phases
Technology Transfer #95102996A-TRG IN-3-1
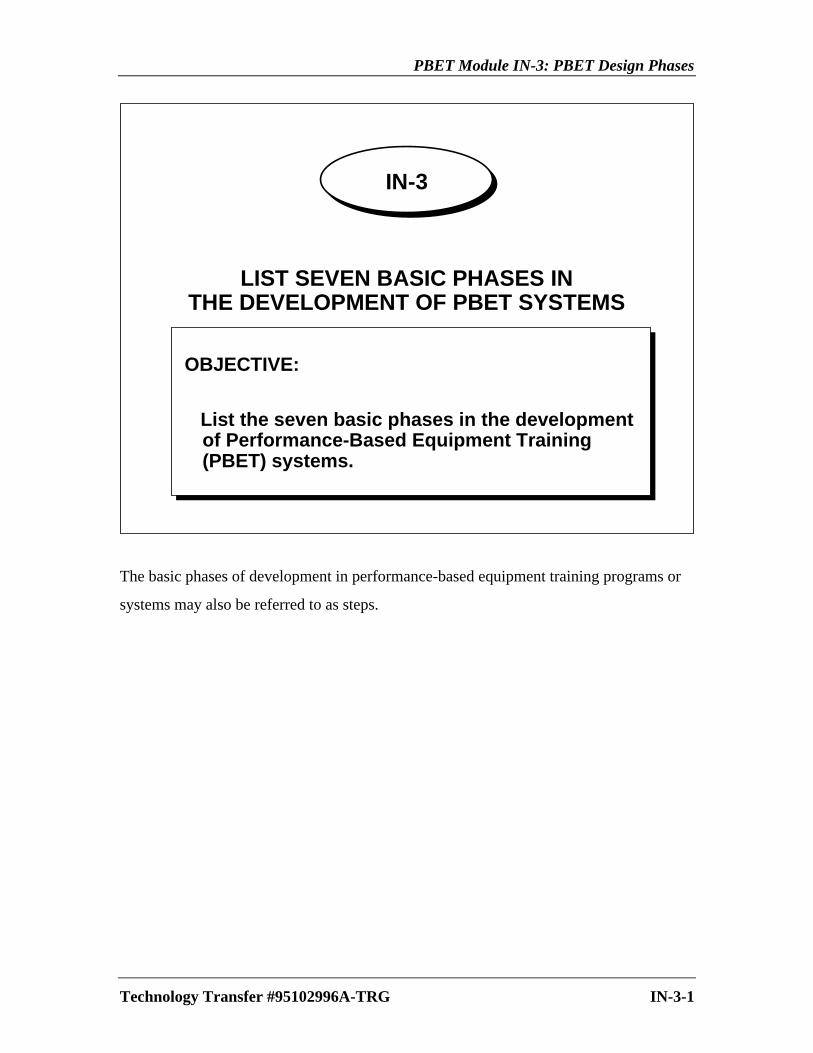
IN-3
LIST SEVEN BASIC PHASES INTHE DEVELOPMENT OF PBET SYSTEMS
OBJECTIVE:
List the seven basic phases in the developmentof Performance-Based Equipment Training(PBET) systems.
The basic phases of development in performance-based equipment training programs or
systems may also be referred to as steps.
Instructor Guide
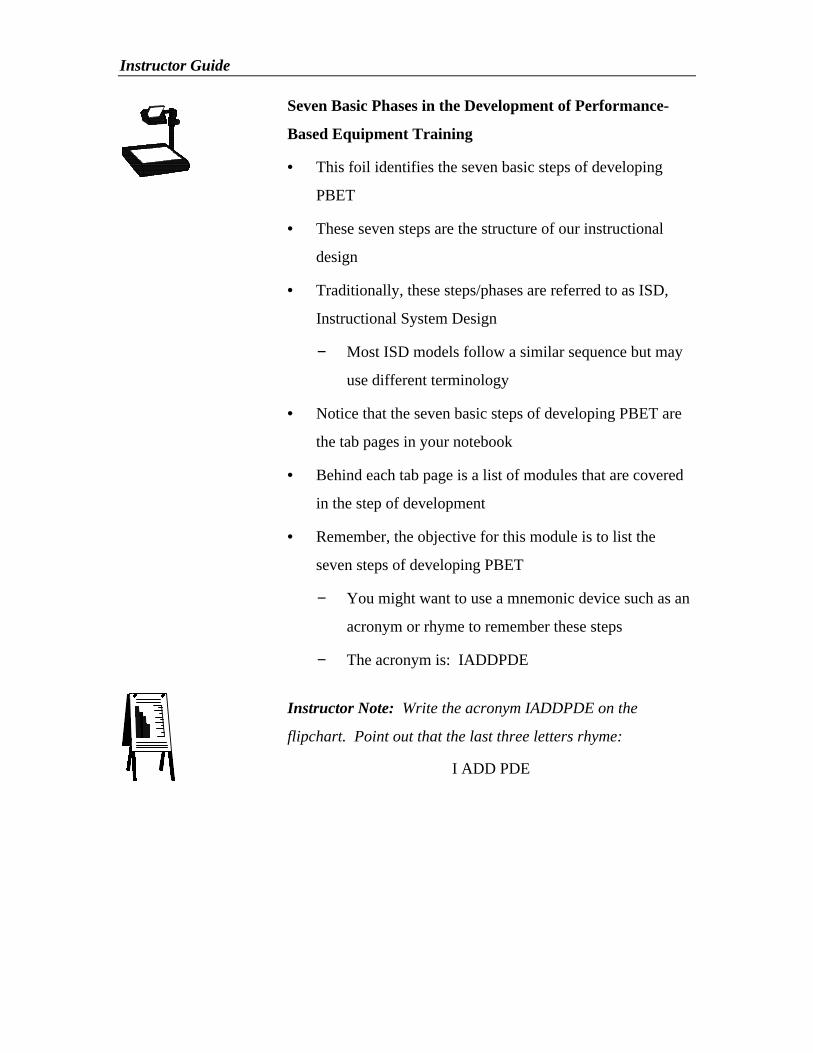
Seven Basic Phases in the Development of Performance-
Based Equipment Training
• This foil identifies the seven basic steps of developing
PBET
• These seven steps are the structure of our instructional
design
• Traditionally, these steps/phases are referred to as ISD,
Instructional System Design
− Most ISD models follow a similar sequence but may
use different terminology
• Notice that the seven basic steps of developing PBET are
the tab pages in your notebook
• Behind each tab page is a list of modules that are covered
in the step of development
• Remember, the objective for this module is to list the
seven steps of developing PBET
− You might want to use a mnemonic device such as an
acronym or rhyme to remember these steps
− The acronym is: IADDPDE
Instructor Note: Write the acronym IADDPDE on the
flipchart. Point out that the last three letters rhyme:
I ADD PDE

PBET Module IN-3: PBET Design Phases
Technology Transfer #95102996A-TRG IN-3-2
Seven Basic Phases in the Development ofPerformance-Based Equipment Training
1. Identify2. Analyze3. Design4. Develop5. Pilot6. Deliver7. Evaluate
These are the seven basic steps of developing performance-based equipment training.
They’re the steps we used as our structure in the instructional design of PBET.
Traditionally, development steps or phases are referred to as ISD, Instructional System
Design. Most ISD models follow a similar sequence but may use different terminology.
For instance, the step we refer to as “Deliver” may be “Implement” in another ISD model.
Notice that the seven basic steps of developing PBET are used as the tab pages in your
participant guide. Behind each tab page there’s a list of modules that are covered in that
step of development.
As you may recall, the objective for this model is to list the seven steps of developing
PBET.
Instructor Guide
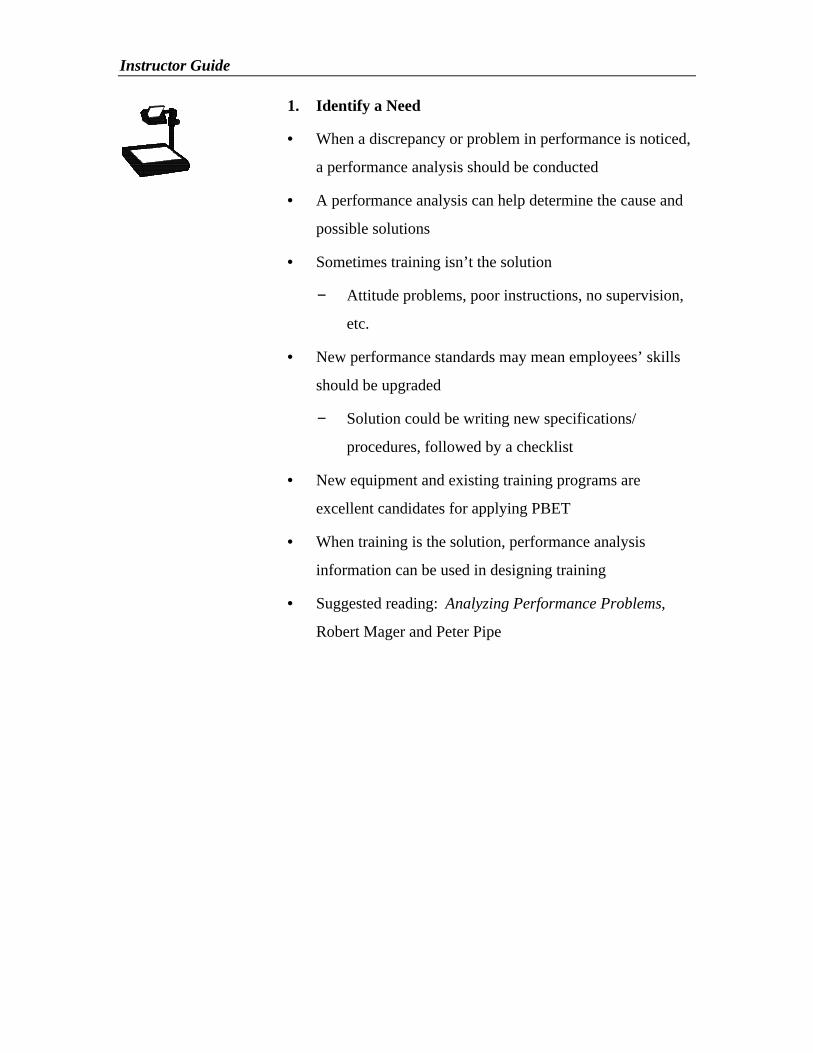
1. Identify a Need
• When a discrepancy or problem in performance is noticed,
a performance analysis should be conducted
• A performance analysis can help determine the cause and
possible solutions
• Sometimes training isn’t the solution
− Attitude problems, poor instructions, no supervision,
etc.
• New performance standards may mean employees’ skills
should be upgraded
− Solution could be writing new specifications/
procedures, followed by a checklist
• New equipment and existing training programs are
excellent candidates for applying PBET
• When training is the solution, performance analysis
information can be used in designing training
• Suggested reading: Analyzing Performance Problems,
Robert Mager and Peter Pipe

PBET Module IN-3: PBET Design Phases
Technology Transfer #95102996A-TRG IN-3-3
• Identify a performance discrepancy• Identify a new performance standard• Identify a need for new product training (PBET)
1. Identify a Need
1. Identify2. Analyze3. Design4. Develop5. Pilot6. Deliver7. Evaluate
F
There are many reasons for developing training programs, but training isn’t always the
best or only solution to a performance problem. When a discrepancy or problem in
performance is noticed, a performance analysis should be conducted to help determine the
cause and possible solutions.
Sometimes training isn’t the solution. Perhaps the problems stem from inadequate
environment, an attitude problem, lack of incentive, no specifications, poor instructions,
or no supervision; or perhaps employees aren’t in a position to practice their skills.
(Use it or lose it.)
For instance, if new performance standards have been established, employees’ skills may
need upgrading. Maybe all that’s required to pass along the information to employees is
writing new specifications and procedures, followed by a checklist.

Instructor Guide
NOTES:
PBET Module IN-3: PBET Design Phases
Technology Transfer #95102996A-TRG IN-3-4
New equipment and existing training programs are excellent candidates for applying
PBET methodology. When new products are released, this usually means new training
programs should be developed; that is unless training already exists for an older model
with similar features and processes. When training is the solution, performance analysis
information can be used in designing the training program.
For more information on performance analysis, consult the bibliography. Mager and
Pipe’s Analyzing Performance Problems is widely used in the industry.
Once it’s evident that new or revised equipment training is needed, there are many issues
the instructional developer and equipment user need to address, including:
• What are the customer’s expectations beyond training objectives? For example,
delivery date, deliverables, budget, etc.
• What are the supplier requirements for meeting expectations? For example, time,
access to experts, access to equipment, access to baseline data, cost, etc.
• Who has training needs, problems, or skill deficiencies? What is known about this
person or group? (Apply target audience analysis and job description analysis.)
• What are the performance problems or needs? (Apply performance analysis and
task analysis.)
• Who are the customers/performers in the training evaluation cycle?
• What are the performance (training) objectives? What are the criteria and
conditions under which the performer will be evaluated for each training objective?
Note: A suggested checklist of questions for training user/training supplier planning
meeting (an expansion of the above list is provided in Appendix A of the 1992-93 Task
Force Guidelines on Training Evaluation, SEMATECH DOC. # 93031567A-XFR).

Instructor Guide
A4
2. Analyze the Need
• During the second phase of PBET, designers and
developers look at:
− The business goals,
− Nature of the job and tasks associated with the
equipment
− Target audience--who will be trained.
• After front-end analysis, developers are ready to determine
performance objectives for the course they will design
• Performance objectives state in clear language what the
performer must do to demonstrate competency
• There are three levels of performance objectives:
− Terminal objectives
− Enabling objectives
− Prerequisite objectives
• A skills hierarchy shows the relationships of the course
objectives
• Once it’s evident that new or revised equipment training is
needed, there are many issues to consider
− Customer’s expectations beyond training objectives
− Supplier requirements for meeting expectations
− Who has training needs, problems, or skill
deficiencies
− Performance problems or needs
− Customers/participants in training evaluation cycle
− Performance objectives
Instructor Note: The bibliography appears in Appendix A on
page A-19

PBET Module IN-3: PBET Design Phases
Technology Transfer #95102996A-TRG IN-3-5
1. Identify2. Analyze3. Design4. Develop5. Pilot6. Deliver7. Evaluate
F
• Perform job/task analysis• Determine target audience• Derive performance objectives from analysis
• Terminal objectives• Enabling objectives• Prerequisite objectives
• Develop a skills hierarchy
2. Analyze the Needs
The terminology used for analyzing needs is often used synonymously. To quote from
the Trainer’s Professional Development Handbook, “Harless’ front-end analysis and
Mager and Pipe’s performance analysis, which once signified their specified methods of
performance problem solving, have now become synonymous in some circles for the
process of needs assessment. So have the terms task analysis, competency assessment,
competency modeling, and job analysis, although each originally referred to a particular
approach to analyzing performance problems and determining learning needs.”

Instructor Guide
NOTES:
PBET Module IN-3: PBET Design Phases
Technology Transfer #95102996A-TRG IN-3-6
The second step in the PBET development process is to analyze the needs. During this
phase of PBET development, designers and developers look at the business goals as well
as the nature of the job and tasks associated with the equipment and the target audience.
PBET design is always preceded by a thorough front-end analysis.
Once front-end analysis has been completed, instructional developers are better prepared
to determine the performance objectives for the course they will design.
Performance objectives are the statements that appear at the beginning of a training
session that explain in clear, simple language what the performer must do to demonstrate
competency in a particular skill.
Performance objectives can be categorized into three groups: terminal objectives,
enabling objectives, and prerequisite objectives.
The performance objectives are systematically arranged into a skills hierarchy that shows
the logical sequence for designing the training (see example on page IN-1-6). The
hierarchy of skills helps illustrate how the skills relate to each other while progressing
from the simplest to the most complex.

Instructor Guide
3. Design the Course
• Skill tests are written
• Relevant practice descriptions are written, including:
− What skills will be practiced
− How the skills will be modeled
− The practice conditions
− The feedback mechanisms
• Additional resource materials are considered and analyzed
• Delivery method and media are selected
• A summary and sequence for the instructional events of
each module (or lesson) is written.
PBET Module IN-3: PBET Design Phases
Technology Transfer #95102996A-TRG IN-3-7
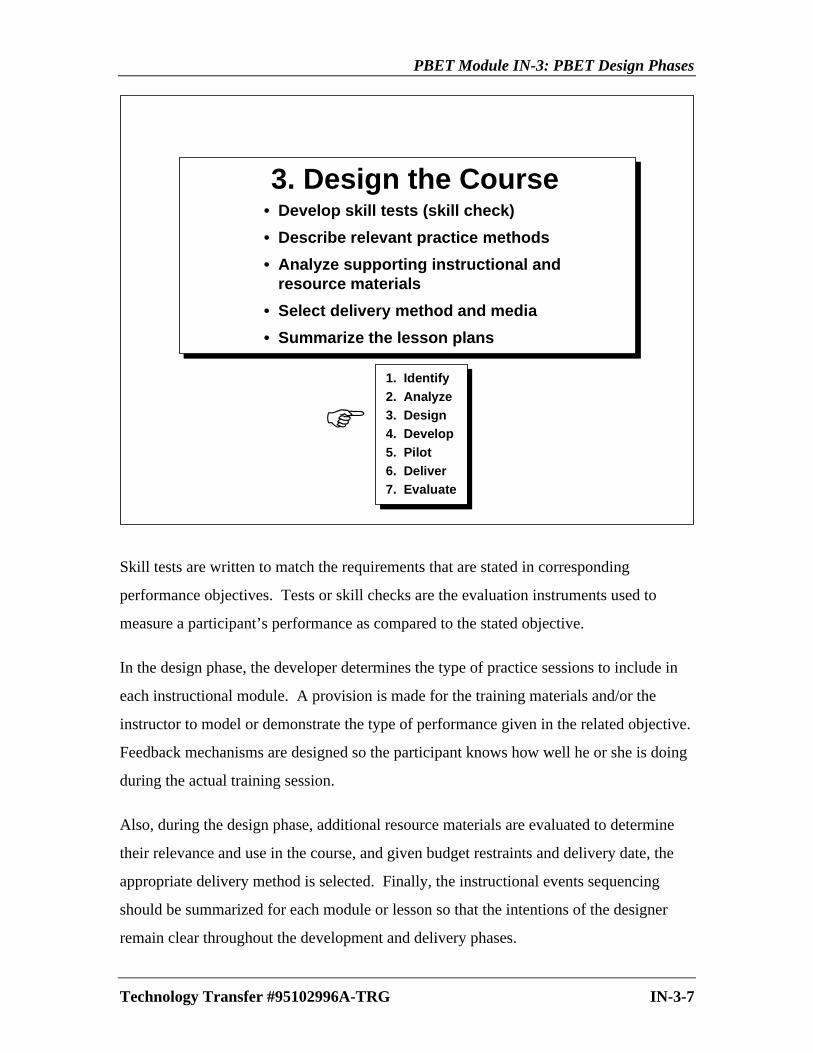
3. Design the Course• Develop skill tests (skill check)
• Describe relevant practice methods
• Analyze supporting instructional andresource materials
• Select delivery method and media
• Summarize the lesson plans
1. Identify2. Analyze3. Design4. Develop5. Pilot6. Deliver7. Evaluate
F
Skill tests are written to match the requirements that are stated in corresponding
performance objectives. Tests or skill checks are the evaluation instruments used to
measure a participant’s performance as compared to the stated objective.
In the design phase, the developer determines the type of practice sessions to include in
each instructional module. A provision is made for the training materials and/or the
instructor to model or demonstrate the type of performance given in the related objective.
Feedback mechanisms are designed so the participant knows how well he or she is doing
during the actual training session.
Also, during the design phase, additional resource materials are evaluated to determine
their relevance and use in the course, and given budget restraints and delivery date, the
appropriate delivery method is selected. Finally, the instructional events sequencing
should be summarized for each module or lesson so that the intentions of the designer
remain clear throughout the development and delivery phases.

Instructor Guide
4. Develop Course Material
• The instructional development phase is like the
construction phase in the building industry
• Building contractor/developer reviews:
− Objectives, skills hierarchy
− Available resources
− Delivery method and media
− Modeling/practice method
− Suggested feedback mechanism
• The outcomes of this phase are:
− Participant guide
− Instructor guide
− Instructional aids, etc.
PBET Module IN-3: PBET Design Phases
Technology Transfer #95102996A-TRG IN-3-8
• Determine course content
• Develop course materials
• Develop instructional aids
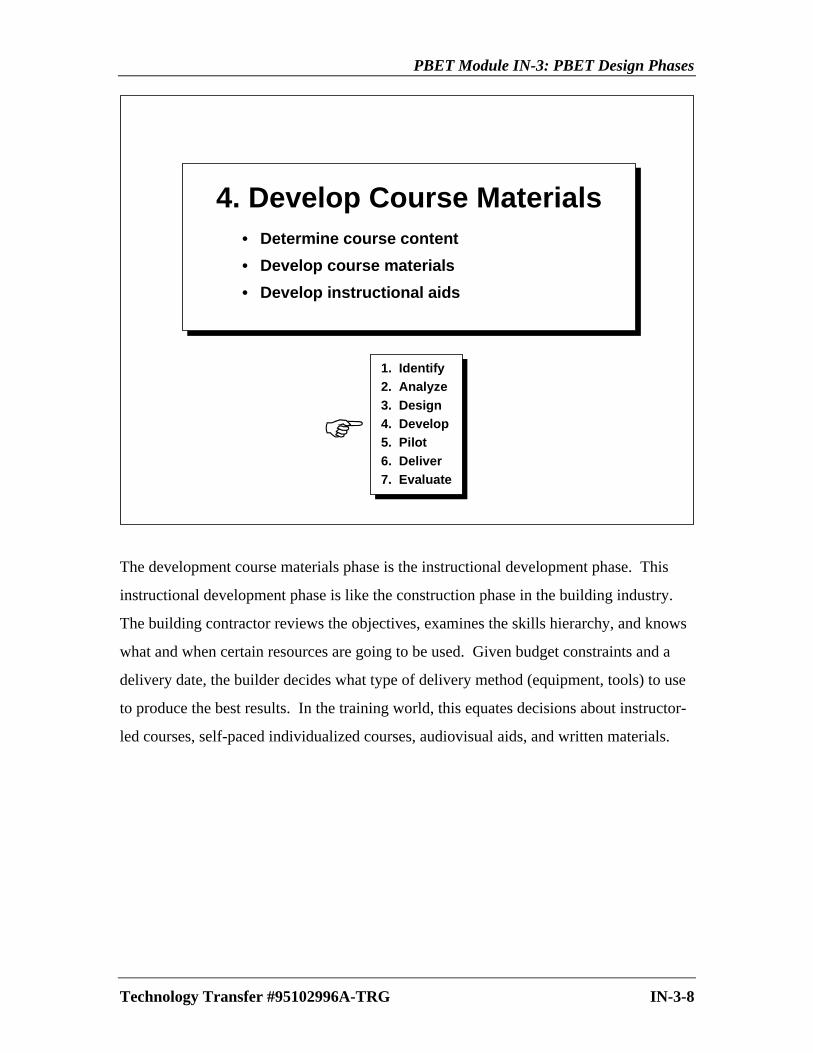
4. Develop Course Materials
1. Identify2. Analyze3. Design4. Develop5. Pilot6. Deliver7. Evaluate
F
The development course materials phase is the instructional development phase. This
instructional development phase is like the construction phase in the building industry.
The building contractor reviews the objectives, examines the skills hierarchy, and knows
what and when certain resources are going to be used. Given budget constraints and a
delivery date, the builder decides what type of delivery method (equipment, tools) to use
to produce the best results. In the training world, this equates decisions about instructor-
led courses, self-paced individualized courses, audiovisual aids, and written materials.

Instructor Guide
5. Pilot the Course
• Piloting the course is a tryout of the course and materials
• It allows for fine-tuning of the course before it’s delivered
• PBET helps ensure successful results
• The developer may or may not teach the course
• The course can be taught by trainers or SMEs under
developer guidance
• Provide a participant evaluation sheet for their initial
reactions
• Revise the course based on assessment
• PBET course was piloted four times
− Revised accordingly
− Continuous improvement

PBET Module IN-3: PBET Design Phases
Technology Transfer #95102996A-TRG IN-3-9
• Try out the course• Assess course performance• Revise the course
5. Pilot the Course
1. Identify2. Analyze3. Design4. Develop5. Pilot6. Deliver7. Evaluate
F
Piloting the course is like having the dress rehearsal before the actual performance. The
pilot phase is the tryout or test of the course and materials. It also allows for fine-tuning
before a course is delivered. The PBET methodology helps ensure that the results will be
successful and gratifying to participants, developers, and customers.
Assuming that all phases of the analysis, design, and development were conducted
according to the details summarized in preceding discussions, then it is easy to predict
success during the first test of the course materials.
The course developer may or may not be the person to teach the course. Perhaps the
course can be taught initially by trainers or other subject matter experts under the
guidance of the developer. In either case, subject matter experts should be on hand to
assess the course performance and to edit course materials as they are presented.

Instructor Guide
NOTES:

PBET Module IN-3: PBET Design Phases
Technology Transfer #95102996A-TRG IN-3-10
An evaluation sheet should be available for course participants to provide feedback
regarding the course, instructor, and course materials.
Based on the outcomes of the pilot class, subject matter experts, trainers, and developers
can determine which areas of the course worked well and which components need
improvement. The next step is to revise the course as necessary before it is delivered a
second time.

Instructor Guide
6. Deliver the Course
• In this phase of PBET, the course is implemented
• Developers provide an instructor and participant guide
• Developers may also:
− Arrange a “train-the-trainer” session
(e.g. fourth day of PBET course)
− Arrange practice and feedback
− Provide an evaluation instrument

PBET Module IN-3: PBET Design Phases
Technology Transfer #95102996A-TRG IN-3-11
6. Deliver the Course
1. Identify2. Analyze3. Design4. Develop5. Pilot6. Deliver7. Evaluate
• Implement the training course– Participant Guide
• Orient and direct the trainers– Instructor Guide
• Arrange practice and feedback
F
This is the phase everyone has been waiting for -- it’s the indication that all of the hard
work of the design and development staff is completed, and now the trainers can begin to
implement the course.
In PBET systems, the developers provide an instructor guide and a participant guide, as
well as any additional instructional aids that are needed during the course.
The developers may also provide a “train-the-trainer” program to teach trainers how to
administer the new course. Training the trainer would include explanation and procedure
for modeling the desired performance, adequate time for relevant practice, and how to
incorporate feedback into the course.
An evaluation instrument should be available for feedback from class participants
regarding the course, instructor, course materials, and their general satisfaction with the
training.
Instructor Guide
7. Evaluate the Course
• The evaluation phase determines effectiveness and
relevance of the equipment training program
• PBET programs are the communication between
equipment supplier and equipment user
• Training must be accurate, relevant, and appropriate for the
audience
• How well the workforce understands equipment affects
manufacturing
PBET Module IN-3: PBET Design Phases
Technology Transfer #95102996A-TRG IN-3-12
1. Identify2. Analyze3. Design4. Develop5. Pilot6. Deliver7. Evaluate
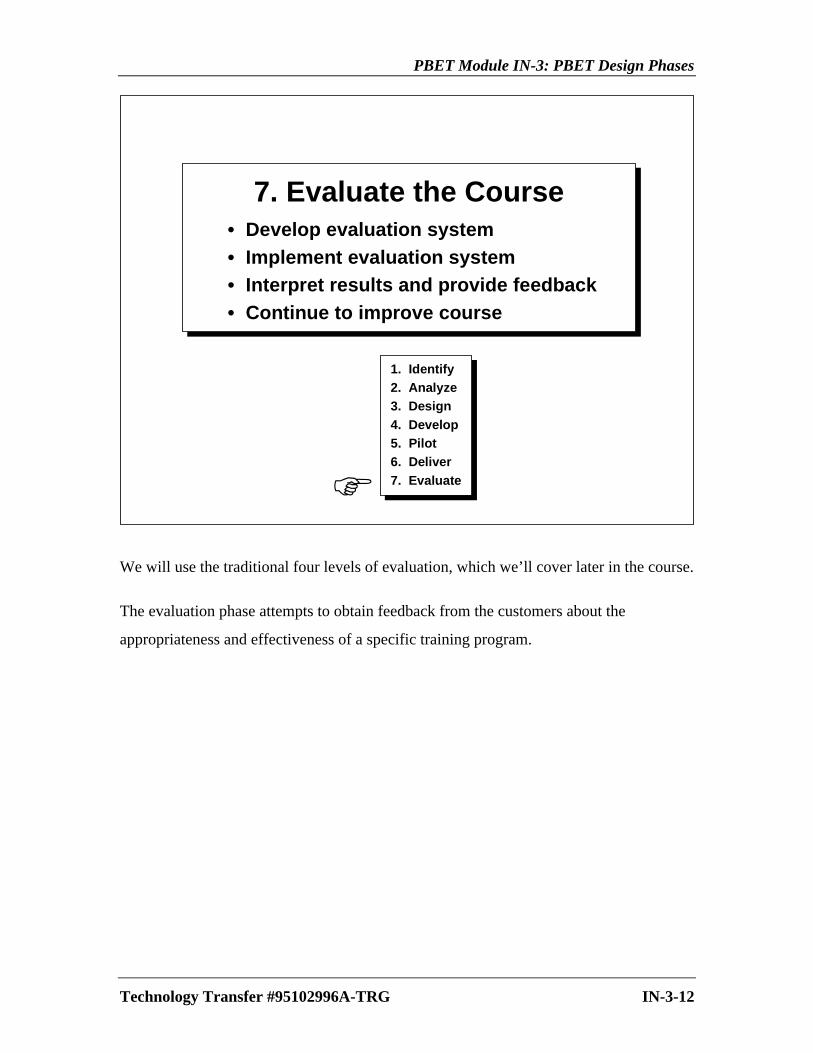
7. Evaluate the Course• Develop evaluation system• Implement evaluation system• Interpret results and provide feedback• Continue to improve course
FWe will use the traditional four levels of evaluation, which we’ll cover later in the course.
The evaluation phase attempts to obtain feedback from the customers about the
appropriateness and effectiveness of a specific training program.
Instructor Guide
Review
Instructor Note: Have the audience participate in the
review by using the flipchart. Record their responses
• There are seven phases or steps in the PBET
development process
• Ask participants to list the seven phases
• Identify
− Performance discrepancy
− Performance standard
− Need for new product training
• Analyze
− Goals
− Jobs/tasks
− Target audience
− Performance objectives
− Skills hierarchy
• Design
− Skill tests
− Analyze supporting resources
− Practice methods

PBET Module IN-3: PBET Design Phases
Technology Transfer #95102996A-TRG IN-3-13
Review
Seven Phases in the Development ofPerformance-Based Equipment Training
1. Identify2. Analyze3. Design4. Develop5. Pilot6. Deliver7. Evaluate
These are the seven phases or steps of the PBET development process. Let’s review the
activities of each step.
1. Identify. In the first phase there is a request or need for a training course as the result
of identifying a performance discrepancy. Identifying a performance standard, the
desired outcome, or the need to develop training for a new product is also part of this
phase.
2. Analyze. At the start of the project, time is spent analyzing various important issues
before any design or development work is begun. Issues analyzed include:
performance objectives, goals, jobs, tasks, the target audience, and a skills hierarchy.
3. Design. In the design phase, information from the analysis phase is used to derive:
skill tests to analyze appropriate supporting resources for the course and to design
appropriate practice methods. The design phase is the foundation for the content and
the structure of the course.
Instructor Guide
• Develop
− Modules with:
-- Performance objectives
-- Skill tests (Level 2 evaluation)
-- Resources
-- Content
-- Practice
-- Feedback• Pilot
− Try out the course
− Level 1 evaluation
− Make revisions as necessary
• Deliver
− Course is implemented
− Instructor orientation
• Evaluate
− Evaluation instruments (Level 3) are implemented
− Feedback data is used to improve the course over
its lifetime
Instructor Note: If you use the example of building a new
home as an example of the seven phases of PBET:
• Identify – is the need for a new home
• Analyze – is how many bedrooms or how large akitchen
• Design – is the floor plan and type of roof/windows
• Develop – is when the contractor takes over
• Pilot – is when you move in and try it out
• Deliver – is when the contractor returns to makechanges
• Evaluate – is when you decide on what improvementsshould be made throughout the life of the home
PBET Module IN-3: PBET Design Phases
Technology Transfer #95102996A-TRG IN-3-14
4. Develop. This is the construction phase of the process. Decisions are made about the
most appropriate delivery and media to use. During this time, individual units of
instruction, or modules, are developed. Each module will have its own corresponding
performance objective, skill test, set of resources and aids, content, practice, and
feedback mechanisms.
5. Pilot. When the course materials are completed, the developer must pilot (test) the
course. A course evaluation is also used to assess participant reaction to the course.
Revisions are made as necessary to ensure the course is accurate, relevant, and free of
mistakes in content or typing.
6. Deliver. At this point the course is ready to be delivered or implemented. The
developer gives the trainers an orientation or explanation of how the class is to be
conducted.
7. Evaluate. Once the course is in place and operational, the developer will want to
evaluate or assess the performance of the course. Evaluation instruments are
implemented, and the results provide feedback to the developers, trainers, managers,
investors, and customers about the adequacy of the course. Feedback data is used
primarily to improve the course over its useful lifetime.

Instructor Guide
Practice Exercise
Instructor Note: Have participants complete the practice
exercise in their notebooks
• Recall, if you will, the acronym “I ADD PDE”
I mentioned earlier

PBET Module IN-3: PBET Design Phases
Technology Transfer #95102996A-TRG IN-3-15
PRACTICE EXERCISE
List the seven basic phases in the design of Performance-Based Equipment Training in
the correct order:
1.
2.
3.
4.
5.
6.
7.
!!!!!

Instructor Guide
Self-Check
• Your answers should match the answers on the foil
• If you’re confident you’ve mastered this objective, you
may take the skill test
• If you need more practice, practice listing the seven
phases on a separate sheet of paper
− Then when ready, take the skill test
PBET Module IN-3: PBET Design Phases
Technology Transfer #95102996A-TRG IN-3-16
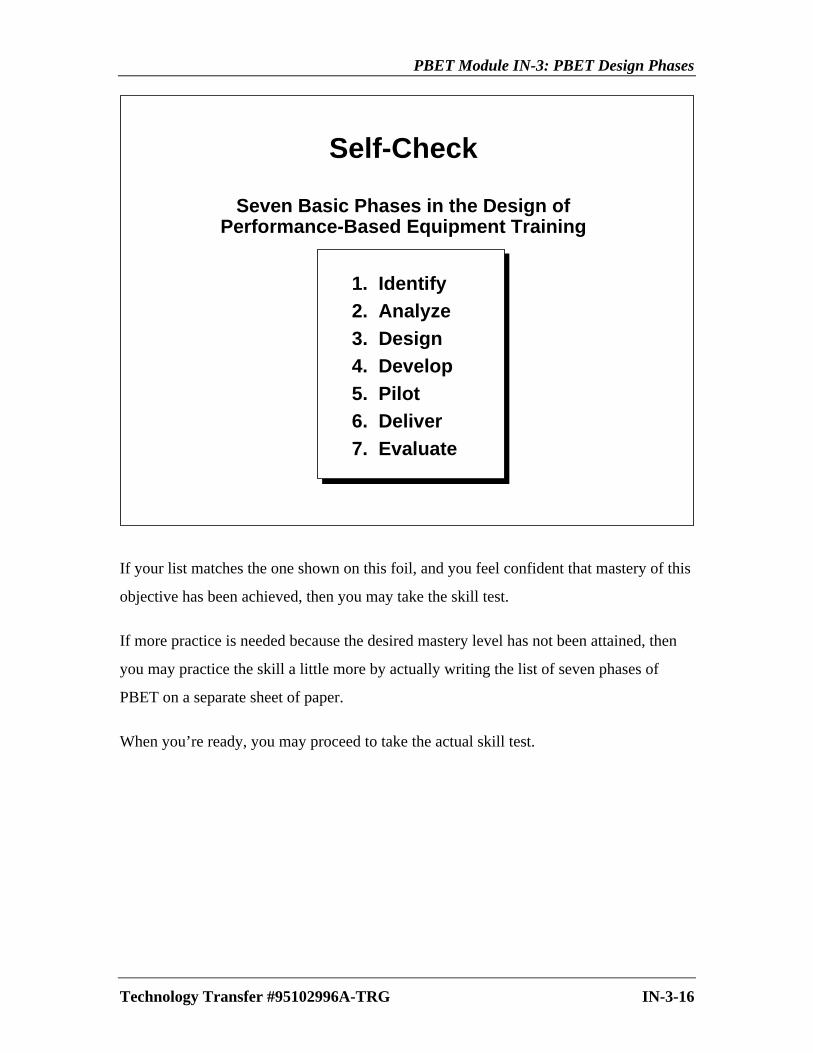
Self-Check
Seven Basic Phases in the Design ofPerformance-Based Equipment Training
1. Identify2. Analyze3. Design4. Develop5. Pilot6. Deliver7. Evaluate
If your list matches the one shown on this foil, and you feel confident that mastery of this
objective has been achieved, then you may take the skill test.
If more practice is needed because the desired mastery level has not been attained, then
you may practice the skill a little more by actually writing the list of seven phases of
PBET on a separate sheet of paper.
When you’re ready, you may proceed to take the actual skill test.

Instructor Guide
Skill Test
• The skill test should match the requirements of the
stated objective
• If you do not achieve mastery, you may:
− Ask for more practice or assistance, or retake the
test until mastery is achieved

PBET Module IN-3: PBET Design Phases
Technology Transfer #95102996A-TRG IN-3-17
SKILL TEST
On a blank sheet of paper, list the seven basic phases in the design of Performance-Based
Equipment Training.
When finished, compare your answers with the list provided in this module. Repeat the
test if necessary, and ask for additional practice or assistance.
!!!!!
The skill test should match the requirements of the objective as stated earlier in the
module.
Again, if you do not achieve mastery of the intended skill, then you may ask for more
practice or assistance, or retake the test until mastery is achieved.


Identify
Module No. Page No.
ID-1: Perform Needs Analysis ID-1-1PBET phasesList the basic techniques of needs analysisList possible causes to performance problemsBrainstorm solutions to performance problemsImplement a needs analysis worksheet


Instructor Guide
ID-1 PERFORM NEEDS ANALYSIS
PBET Phases
• We’ve talked about the seven phases of Performance-
Based Equipment Training
• Now we’re going to move to the first phase in PBET --
Identify a Need, and talk about needs analysis
Perform Needs Analysis
• There are different approaches to conducting a needs
analysis
• Experts have spent years researching and writing about
determining needs
− In this workshop, we only have time to touch on
the basics and steer you toward some excellent
references
• Ask a volunteer to read the objective from the foil
• This course looks at two phases of needs analysis
− The first is to identify the performance need
− The second is to identify the performance solution
• Refer them to the PBET Simplified Needs Analysis
Worksheet and the test on page ID-1- 7.
• You will learn to use this worksheet to conduct a
simplified needs analysis

PBET Module ID-1: Perform Needs Analysis
Technology Transfer #95102996A-TRG ID-1-1
ID-1
PERFORM NEEDS ANALYSIS
OBJECTIVE:
Working in teams use the needs analysisworksheet provided for this lesson to analyzea performance problem. Each team will workthrough the needs analysis process describedin this module.
Over the years, much research has been conducted and many books have been written on
the subject of needs analysis. This course simplifies the process by utilizing a two-phased
approach to this skill: (1) Identify the performance need. This phase is triggered by
events that lead to concerns about a performance problem. To help you understand why
there is concern, you may use four different techniques to gather information to help you
analyze the performance problem. (2) Identify the performance solution. In this phase
you may examine four categories of causes to performance problems. These categories
may help you select the correct solution for a specific performance problem.
From this lesson, you will learn to use a worksheet to conduct a simplified needs analysis.
You will be provided scenarios of performance problems and the opportunity to use the
worksheet with a group of peers to -- (1) select the most appropriate techniques for
gathering data, (2) list possible causes of the discrepancy, and (3) list solutions for each
possible cause.
Instructor Guide
PBET SIMPLIFIED NEEDS ANALYSIS
Informal Triggers
• Triggers can instigate a need for performance
improvement. For example:
− New standards, goals, or desired outcomes
− New equipment, products, or processes
− Examination of performance data
• The trigger is followed by a formal needs analysis
− A good analyst will not jump to quick solutions
PBET Module ID-1: Perform Needs Analysis
Technology Transfer #95102996A-TRG ID-1-2
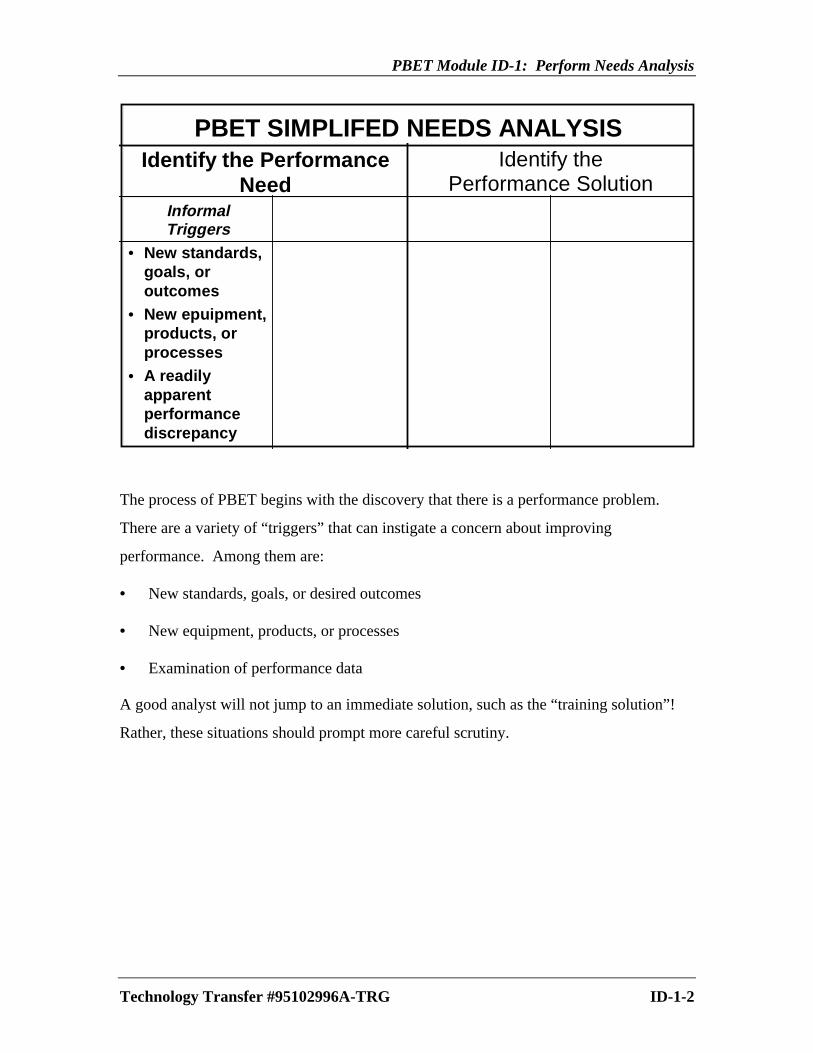
PBET SIMPLIFED NEEDS ANALYSISIdentify the Performance
NeedIdentify the
Performance SolutionInformalTriggers
• New standards,goals, oroutcomes
• New epuipment,products, orprocesses
• A readilyapparentperformancediscrepancy
The process of PBET begins with the discovery that there is a performance problem.
There are a variety of “triggers” that can instigate a concern about improving
performance. Among them are:
• New standards, goals, or desired outcomes
• New equipment, products, or processes
• Examination of performance data
A good analyst will not jump to an immediate solution, such as the “training solution”!
Rather, these situations should prompt more careful scrutiny.
Instructor Guide
PBET SIMPLIFIED NEEDS ANALYSIS
Formal Techniques
• Care must be taken to avoid wasting money on the
wrong solutions to performance problems.
• In Figuring Things Out: A Trainer’s Guide to Needs
and Task Analysis, authors Ron Zemke and Tom
Kramlinger identify four major techniques to use in
identifying performance needs:
− Observations
− Interviews
− Surveys/questionnaires
− Performance data:
• Ask students to suggest types of data that can be
analyzed. They will likely suggest: production rates,
scrap rates, down time, mean-time between failure,
yield, time to repair, setup time, etc.
Activity
Directions: Have a few participants tell the group how the
training need for his/her project was determined.
Participants may need to begin by reviewing with the class
what their specific project is.
As each person tells how his/her project’s need was
determined, write on the flipchart whichever of the four
approaches was used -- observations, interviews, questions,
or performance data.
PBET Module ID-1: Perform Needs Analysis
Technology Transfer #95102996A-TRG ID-1-3
PBET SIMPLIFED NEEDS ANALYSISIdentify the Performance
NeedIdentify the
Performance SolutionInformalTriggers
FormalTechniques
• New standards,goals, oroutcomes
• New epuipment,products, orprocesses
• A readilyapparentperformancediscrepancy
• Conductobservations
• ConductInterviews
• Conductsurveys and/orquestionnaires
• Examineperformancedata
Performance problems are often difficult to detect. Therer may seem to be obvious
symptoms and training is often the most prescribed solution. However, without careful
analysis, it is all too easy to spend a lot of money and still have a performance
discrepancy. In Figuring Things Out: A Trainer’s Guide to Needs and Task Analysis,
authors, Ron Zemke and Tom Kramlinger, identify four major techniques to use in
identifying performance needs:
1. Observations
2. Interviews
3. Surveys/questionnaires
4. Performance data
Their book presents information for trainers who are trying to select the right needs
analysis procedure. Their book, and others in the bibliography, can be helpful in creating
worksheets and tools for implementing analysis techniques. In addition, guidelines are
provided for interpreting the data that is collected.

Instructor Guide
PBET SIMPLIFIED NEEDS ANALYSIS
Possible Causes of Performance Problems
• Once the performance need or discrepancy is clearly
identified, it is time to consider the possible causes of
the problem
− Consider four categories of possible causes:
− Equipment problem. Consider some of these
equipment related problems that can contribute to
poor performance: design flaws, unrealistic specs
(wrong tool for the desired task), inaccurate, out
of calibration, too complex, poor ergonomics, not
reliable, requires too much maintenance, etc.
− Improper or inadequate incentives. Organizations
and environments can provide incentives or
disincentives. Consider such possibilities as:
rewarding negative behavior (sacrificing quality
for quantity), failing to reward positive behavior,
positive behavior is difficult and unrewarding, etc.
PBET Module ID-1: Perform Needs Analysis
Technology Transfer #95102996A-TRG ID-1-4
PBET SIMPLIFED NEEDS ANALYSISIdentify the Performance
NeedIdentify the
Performance SolutionInformalTriggers
FormalTechniques
Possible Causesof Performance
Problems• New standards,
goals, oroutcomes
• New epuipment,products, orprocesses
• A readilyapparentperformancediscrepancy
• Conductobservations
• ConductInterviews
• Conductsurveys and/orquestionnaires
• Examineperformancedata
• Equipmentproblem
• Improper orinadequateincentives
• Lack ofinformation
• Lack of skills
Once the performance need or discrepancy is clearly identified, it is time to consider the
possible causes of the problem. One or more of the formal identification techniques may
have given you some good clues about the causes. But, it is best to give systematic
consideration to four categories of causes:
1. Equipment problem. Poor performance can be attributed to equipment related
problems, for example: design flaws, unrealistic specifications (wrong tool for the
desired task), inaccuracy, out of calibration, too complex, poor ergonomic design,
unreliable, and requires too much maintenance.
2. Improper or inadequate incentives. Organizations and the environment provide
incentives and disincentives. Consider these possibilities: rewarding negative
behavior (rewarding high throughput while sacrificing quality), failing to reward
positive behavior, and making positive behavior unnecessarily difficult or
unpleasant.
Instructor Guide
− Lack of information. People may not be able to
perform as desired because of these possible
reasons: no feedback, inadequate feedback, no
instrumentation available, cannot read
instruments, no specs, poorly written specs, poor
labeling, lack of communications, etc.
− Lack of skills. When the equipment performs
properly, the individual wants to perform
according to standard, and the individual has been
provided the needed information about the task
and the individual still cannot perform according
to standard, there is a skill deficiency that needs to
be addressed.
• Two performance “gurus” have developed expanded
models for determining performance problems
− Thomas F. Gilbert, Human Competence:
Engineering Worthy Performance
− Robert F. Mager, Analyzing Performance
Problems -- or, You Really Oughta Wanna.

PBET Module ID-1: Perform Needs Analysis
Technology Transfer #95102996A-TRG ID-1-5
3. Lack of information. When a person is not provided the information they need to
make the correct task decision, they are unable to perform according to standard.
But, if the person is told what to do, that may be all that is needed to enable them to
do it. So consider systems that provide little or no information: no feedback
mechanisms, inadequate feedback mehanisms, no instrumentation available, cannot
read instruments, no printed specifications, and poor labeling of parts, tools,
manuals, pipes, connections and gauges.
4. Lack of skills. When the equipment performs properly, the individual wants to
perform according to standard, and the individual has been provided the needed
information about the task and the individual still cannot perform according to
standard, there is a skill deficiency that needs to be addressed.
Two performance “gurus” have developed expanded models for determining the cause of
performance problems:
• Thomas F. Gilbert has developed a six-cell matrix for examining six areas that affect
an individual’s ability to perform according to standard. You can find out more by
consulting his book, Human Competence -- Engineering Worthy Performance.
• Robert F. Mager has developed a flow chart and a job aid that ensure that no stone is
left unturned when seeking the cause of performance problems. His ideas are clearly
developed in his book, Analyzing Performance Problems or You Really Oughta
Wanna.

Instructor Guide
PBET SIMPLIFIED NEEDS ANALYSIS
Possible Solutions to Performance Problems
Each of the four categories of causes suggest their own
solutions:
1. Equipment problem -- may require re-engineering
2. Improper or inadequate incentives -- may require a
change in the performance management system
3. Lack of information -- provide feedback via: job aids,
specs, manuals, signs, readbacks, expert systems,
EPSS, and labeling
4. Lack of skills -- provide practice, give instructions,
provide training
Brainstorm Solutions to Performance Problems
• Ask the audience to think of some possible causes for
this performance discrepancy: Product is failing
electrical test.
− Lack of data or information
− Equipment or instrument problem
− Improper or inadequate incentives
− Lack of knowledge or skills

PBET Module ID-1: Perform Needs Analysis
Technology Transfer #95102996A-TRG ID-1-6
PBET SIMPLIFED NEEDS ANALYSISIdentify the Performance
NeedIdentify the
Performance SolutionInformalTriggers
FormalTechniques
Possible Causesof Performance
Problems
Possible Solutionsto Performance
Problems• New standards,
goals, oroutcomes
• New epuipment,products, orprocesses
• A readilyapparentperformancediscrepancy
• Conductobservations
• ConductInterviews
• Conductsurveys and/orquestionnaires
• Examineperformancedata
• Equipmentproblem
• Improper orinadequateincentives
• Lack ofinformation
• Lack of skills
• Re-engineering • Create or
improveincentives
• Providefeedback or jobaids
• Provide practiceor training
Each of the four categories of causes suggest their own solutions:
1. Equipment problem. An equipment problem requires re-engineering.
2. Improper or inadequate incentives. An incentive problem requires the creation, the
improvement, or the elimination of certain incentives.
3. Lack of information. A lack of information requires that information be provided.
This may be provided through on-the-job feedbace. Or, it may be provided in the
form of job aids which include: specifications sheets, manuals, signs, readbacks,
expert systems, electronic performance support systems, or labeling.
4. Lack of skills. A lack of skills requires that an individual have a chance to receive
renewed practice with feedback or a training program may be required.
Instructor Guide
Practice Exercise
Time: 10 minutes
Directions:
• Refer to page 7.
• Read the scenario.
• Refer to the needs analysis worksheet in your manual.
• As a group brainstorm the following items:
• (1) Suggest types of data gathering technique(s) that
could be used to determine possible causes, e.g.,
observations, interviews, surveys, and/or performance
data
• (2) Suggest possible causes for the performance
problem, e.g., data, instrument, incentive, and/or
knowledge
• (3) Suggest possible solutions for each possible cause
Instructor Note: Have participants fill in the matrix in
their notebooks. Lead this activity and fill-in data on foil
or flipchart. “Lack of Skills” is the only item that requires
a training solution.

PBET Module ID-1: Perform Needs Analysis
Technology Transfer #95102996A-TRG ID-1-7
PRACTICE EXERCISE
HUMAN PERFORMANCE PROBLEM IDENTIFIED: The business has committed tolowering the percentage of scrap. Data shows that the breakage that occurswhile removing wafers from furnaces is higher in Fab 1 than in Fab 2.
ANALYZE: Brainstorm for possible causes and solutions to the problem. Fill inthe needs analysis worksheet with specific examples for each item.
(1) How will you gather data?Observations: ___________________________________________________________Interviews: ______________________________________________________________Surveys: ________________________________________________________________Performance Data: _______________________________________________________
(2) What are some possible causes? (3) What are some possible solutions?
Lack of data or information: Suggested solution(s):
Problem(s) with equipment or instrument: Suggested solution(s):
Improper or inadequate incentives: Suggested solution(s):
Lack of skills: Suggested solution(s):
!!!!!

Instructor Guide
Skill Test
• Refer to the scenario in the Skill Test
• Repeat the same procedure as in the preceding practice
exercise
• Work with the team at your table and together decide
on the best solution(s) to the possible causes of the
performance problem

PBET Module ID-1: Perform Needs Analysis
Technology Transfer #95102996A-TRG ID-1-8
SKILL TEST
HUMAN PERFORMANCE PROBLEM IDENTIFIED: Downtime problems on an ionimplanter have been traced to problems with ion sources. They are frequentlyrebuilt incorrectly (parts re-installed backwards or upsidedown) and/or found tobe contaminated (bits of bead blasting present).
ANALYZE: Brainstorm for possible causes and solutions to the problem. Fill inthe needs analysis worksheet with specific examples for each item.
(1) How will you gather data?Observations: ___________________________________________________________Interviews: ______________________________________________________________Surveys: ________________________________________________________________Performance Data: _______________________________________________________
(2) What are some possible causes? (3) What are some possible solutions?
Lack of data or information: Suggested solution(s):
Problem(s) with equipment or instrument: Suggested solution(s):
Improper or inadequate incentives: Suggested solution(s):
Lack of skills: Suggested solution(s):
!!!!!

Instructor Guide


Analyze
Module No. Page No.
AN-1: Perform Task Analysis AN-1-1Basic steps of a task analysisExample No. 1: Task listingExample No. 2: Task detailing – flowchartingExample No. 3: Task detailing – cause-effect relationship chartReview: Basic steps of a task analysis
AN-2: Write Performance Objectives AN-2-1An objective statementThree characteristics of a well-stated objectivePerformanceConditionStandardExample of a well-stated objectiveQuestions to “get at” the performance objectivePerformance wordsCommonly used performance words
AN-3: Develop a Skills Hierarchy AN-3-1Types of objectivesSkills hierarchy with three types of objectivesGuidelines for developing skills hierarchyOperations training hierarchyService training hierarchy
Instructor Guide
AN-1 PERFORM TASK ANALYSIS
• We’ve completed the Identify phase of PBET
• Now we will move on to the Analyze phase
− Please turn to the Analyze section of your
notebooks (Tab #3)
Describe the Basic Steps of Task Analysis
• Due to time constraints, we can’t thoroughly cover task
analysis in this module
• However, you will have the opportunity to perform a
simple task analysis
• Ask a volunteer to read the objective from the foil
• Refer participants to the test on page AN-1-10
Brainstorming Activity
• What are the benefits of task analysis?

PBET Module AN-1: Perform a Task Analysis
Technology Transfer #95102996A-TRG AN-1-1
AN-1
PERFORM A TASK ANALYSIS
OBJECTIVE:
Upon completion of this lesson, you willperform a task analysis.
It’s beyond the scope of this training session to thoroughly cover the task analysis process.
It would probably take four to eight hours to really master the skills of performing a task
analysis.
In this lesson, you’re expected to remember the eight basic steps in the task analysis
process.
Later, you’ll have the opportunity to perform a simple task analysis.

Instructor Guide
Basic Steps of a Task Analysis
• Task analysis is one of the key features of the PBET
development process
• Begin by gathering and reading all documentation on
the equipment and tasks
− During reading research, compile a list of
questions you still need answered
• Observe and interview the people considered expert
performers, or subject matter experts (SMEs)
− This is your opportunity to get answers to your
questions
• Record all of the steps and decisions involved in the
performance of task
− Record by writing, audiotape, or videotape
• Always look for hidden knowledge
− Hidden knowledge often takes the form of:
-- Prerequisite skills
-- Rules and procedures
-- Small bits of information
-- Theory or technique
-- Any information the SME relies on from
memory
• When hidden information is detected, record all steps,
events, tools, materials, etc.

PBET Module AN-1: Perform a Task Analysis
Technology Transfer #95102996A-TRG AN-1-2
Basic Steps of a Task Analysis
1. Gather and read all relevant documentation2. Interview and observe the expert performers3. Record the steps and decisions involved4. Look for hidden knowledge5. Flowchart the steps in the task6. Detail each step in the task7. List tools, materials, documents, etc.8. Perform the task
Task analysis is one of the key features of the PBET development process. Analysts use
the information obtained from task analysis to determine the skills and background
information needed to identify performance objectives and eventually determine the
contents of the new course.
Analysts begin by gathering and reading all available documentation on the equipment
and tasks. They compile a list of questions regarding information that’s not available or
isn’t clearly defined in the documentation.
After analysts identify people who are regarded as expert performers, or SMEs, they
interview the experts and ask questions about the equipment, tasks, and documentation.

Instructor Guide
• Detail tasks in a step-by-step fashion so anyone can
read and follow them
• Test the completeness of the details by performing the
task from the new written procedure

PBET Module AN-1: Perform a Task Analysis
Technology Transfer #95102996A-TRG AN-1-3
The expert is observed performing the actual tasks the course participants would be
expected to perform under the same conditions. Even while the expert explains what is
being done at each step of the task, analysts continue to ask questions. Analysts record in
writing, audiotape, and/or videotape the steps involved in the performance of the task.
Videotaping is recommended because analysts can give their full attention to the
environment, equipment, expert, tools, materials, and interaction as the tasks are being
performed. The results of taping are beneficial since an audio/visual capture of the events
can be replayed later. Furthermore, parts of the task analysis can be played back during a
training session or specific frames captured by computer software to create 35mm slides
or overhead transparencies or to include in the actual participant guide.
In the process of conducting a task analysis, analysts are constantly looking for hidden
knowledge that’s not available in the documentation for the equipment, or that experts
have failed to mention. Hidden knowledge may include small bits of information,
prerequisite skills, concepts, rules, procedures, theory, techniques, or data which the
expert may recall from memory and that is required or helpful in the execution of the
specific task. Analysts’ investigative tactics must be very keen to sense a situation when
the expert performer is in the process of recalling hidden knowledge during the
performance of a task.
Analysts should be alert, so pertinent knowledge isn't overlooked. These bits of
information should be recorded along with the steps, events, tools, and materials that are
used in performing the task.
Finally, the detailing of the task in a step-by-step fashion should be refined so it's readable
by anyone else. Another recommendation is for analysts to perform the task with the
newly written procedure.

Instructor Guide
Video Task Analysis Exercise
1. State the purpose of the videotape exercise and describe
some details about the machine in the example; include
some background information about why the task
analysis was required. There is about a one-minute
segment of tape that shows the machine with protective
panels in place and then with the panels removed. The
machine is shown with the wafer autofeeder in operation
2. Identify things to look for during the playback of the 15
minute task analysis example videotape. Have the
participants count from 1-6 and split the class into
groups for this activity. Have the participants write
information on the task analysis worksheet. Have each
person in their small groups watch for something
different in the video and record the information on the
worksheet; identify:
Note: The 7th activity is done as one group
(1) Prerequisite skills needed for performing the task
(2) Types of tools, materials, and equipment needed
(3) Hidden knowledge used by the subject matter expert
(4) Concepts that may need to be explained but are not
introduced by the SME
(5) Possible hazards and safety procedures
(6) Other related procedures
(7) Ways in which the design of the instructional lesson
could make it easier to train others to perform the
procedure in the example

PBET Module AN-1: Perform a Task Analysis
Technology Transfer #95102996A-TRG AN-1-4
VIDEO TASK ANALYSIS EXERCISE
Now you’ll have the opportunity to perform an important part of a task analysis. As you
observe the expert performer, remember to look for prerequisite skills, types of tools,
materials and equipment, hidden knowledge, important concepts, possible hazards and
safety procedures, and other related procedures. When the video exercise is completed,
think of ways in which you could design an instructional lesson to make it easier to teach
someone to perform the task demonstrated in the video.
You will be using the worksheet located on the following page.
!!!!!

Instructor Guide
Note: An additional task
analysis worksheet is located
in Appendix A.
3. Play the tape and start taking notes related to the
preceding items. At the place where the SME’s glasses
are shown dangling over the autofeeder (12:30 min.),
press the Pause button. Ask participants for their
comments regarding the items on the list. Compare
your notes to theirs and discuss them.
Using the flipchart, write all comments based on the
six categories. Here are some examples:
Prerequisites:
− Overview of machine
− Basic mechanical skills
− Location and names of parts
− Basic machine knowledge
− Knowledge of wafer characteristics
Safety:
− When and where to turn power on/off
− Preparation of system prior to maintenance
− Proper use of safety glasses
− List of hazards
Tools and materials:
− Allen wrenches (hex tools)
− Brush
− Lubricants
− Screwdriver
− Flashlight
− Cleaning materials
− Arkansas stone (polishing)

PBET Module AN-1: Perform a Task Analysis
Technology Transfer #95102996A-TRG AN-1-5
PERFORMANCE-BASED EQUIPMENT TRAINING
TASK ANALYSIS WORKSHEET FOR VIDEO EXERCISE
Analyst: Date:
Subject Matter Expert:
Location:
Job or Course Title:
Task:
Task Description:
Importance Statement:
Prerequisites:
Tools and Materials:
Instructor Guide
Hidden Knowledge:
− Handwritten instructions
− Type of brush to use
− Manual operation of components
− Why you shouldn’t remove the realigner
− Why not use Acetone?
Critical Concepts:
− Names and functions of autofeeder parts
− Backlash gear
− Leadscrew
− Vacuum switch
− Theta rotation motor
− Vacuum chuck
Other Related Procedures:
− Removal of covers
− Lock-out Tag-out
− Special tests
− Power-down procedure
− How to move components
4. Continue to play the tape until the end of the task
analysis to give participants more practice identifying
more of the items mentioned in the flipcharts
5. Stop the tape when it gets to the end of the task
analysis demonstration, and then ask for more
comments regarding the example. They should come
up with many more additions to the original lists
including several major safety issues
6. Rewind the video tape and remove it from the VCR.

PBET Module AN-1: Perform a Task Analysis
Technology Transfer #95102996A-TRG AN-1-6
Hazards and Safety:
Hidden Knowledge:
Critical Concepts:
Other Related Procedures:
Course Design Considerations:
Instructor Guide
Design of instruction:
− Classroom preparation of participants prior to
performance of the procedure, including: tool
list, materials, overview of subassemblies,
overview of procedure, and safety issues
− Have available a documented procedure
− Show what panels to remove
− Provide related nomenclature
− Provide exploded view pictorial diagrams
− Provide a free-standing unit
− Demonstrate subassembly removal/replacement
Example No. 1 of a Task Listing
• There are different ways to detail a task
• This foil is an example of a simple task listing
Instructor Note: Have the participants read the foil
silently

PBET Module AN-1: Perform a Task Analysis
Technology Transfer #95102996A-TRG AN-1-7
Starting a Car and Pulling Out from a Parking Space1. Insert key into ignition switch.2. Rotate the key and ignition switch to ON position.3. Hold key at START position until the engine starts.4. If necessary, using your right foot, press accelerator pedal
slightly to keep the engine running.5. Release the accelerator pedal and step on the brake pedal.6. Check rearview mirror and sideview mirrors.7. Place gear shift lever in Reverse (R) position.
Example No. 1: Task Listing
There are different ways to detail a task. The foil on this page illustrates an example of a
simple task listing.

Instructor Guide
Example No. 2: Task Detailing -- Flowcharting
• This is another example of task detailing/listing
− Flowcharts work well when thinking through the
process and when making decisions becomes
more difficult than doing the task
• Flowcharts make it easy to see, at a glance, the
relationships between the steps in the sequence
• Actions are always written in rectangles
• Decisions are always written in diamonds

PBET Module AN-1: Perform a Task Analysis
Technology Transfer #95102996A-TRG AN-1-8
Example No. 2: Task Detailing --Flowcharting
1. Insert key into ignition switch
2. Rotate key & switch to ON position
3. Hold key at START position untilengine starts
Did engine start?
4. If necessary, press accelerator untilengine runs smoothly
5. Release accelerator andpress brake pedal
3a. Ensure gearshift lever is in Park
and retry 3b. Did engine
start?
3c. Try pressing acceleratorslightly until engine starts
No
Yes
No
Yes
6. Check rearview mirror and sideview mirrors
Another way of detailing or listing a task is to put it into flowchart form. Flowcharts
work well when thinking through the process, and when making decisions becomes more
difficult than doing the task. The use of flowcharts makes it easy to see, at a glance, the
relationships between steps in the sequence. Actions are always written in rectangles, and
decisions are always written in diamonds.
Actions and
SignsDecisions
Instructor Guide
Example No. 3: Task Detailing -- Cause-Effect
Relationship Chart
• This example of task detailing is a cause-effect
relationship chart
• This foil shows the sequence of steps, actions taken,
and results
− The results are feedback
• This type of chart can be used in providing feedback to
participants to indicate the effect of their performance
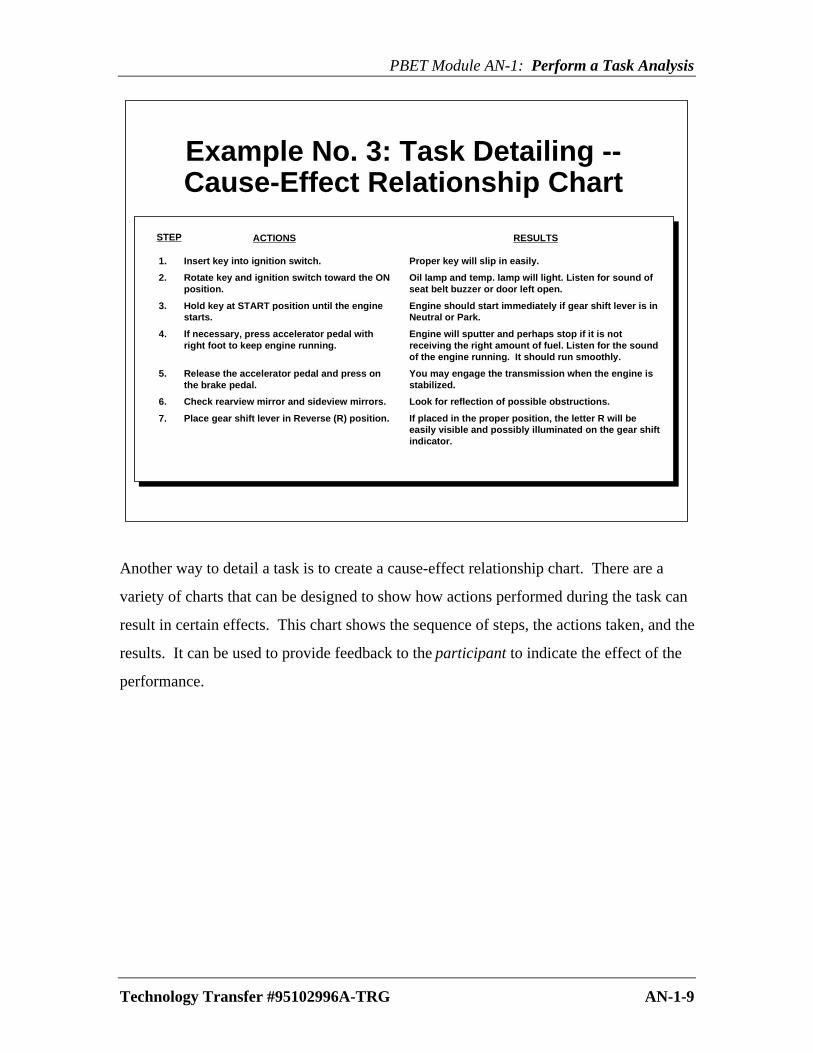
PBET Module AN-1: Perform a Task Analysis
Technology Transfer #95102996A-TRG AN-1-9
Example No. 3: Task Detailing --Cause-Effect Relationship Chart
ACTIONS
1. Insert key into ignition switch.
2. Rotate key and ignition switch toward the ONposition.
3. Hold key at START position until the enginestarts.
4. If necessary, press accelerator pedal withright foot to keep engine running.
5. Release the accelerator pedal and press onthe brake pedal.
6. Check rearview mirror and sideview mirrors.
7. Place gear shift lever in Reverse (R) position.
RESULTS
Proper key will slip in easily.
Oil lamp and temp. lamp will light. Listen for sound ofseat belt buzzer or door left open.
Engine should start immediately if gear shift lever is inNeutral or Park.
Engine will sputter and perhaps stop if it is notreceiving the right amount of fuel. Listen for the soundof the engine running. It should run smoothly.
You may engage the transmission when the engine isstabilized.
Look for reflection of possible obstructions.
If placed in the proper position, the letter R will beeasily visible and possibly illuminated on the gear shiftindicator.
STEP
Another way to detail a task is to create a cause-effect relationship chart. There are a
variety of charts that can be designed to show how actions performed during the task can
result in certain effects. This chart shows the sequence of steps, the actions taken, and the
results. It can be used to provide feedback to the participant to indicate the effect of the
performance.
Instructor Guide
Skill Test
Legos Task Detailing/Listing
Materials: Legos -- enough for each pair of participants, pad of
paper
Time: 1 hour
PBET Course Map
Relevance: The Legos and the task analysis will be used in the
development for the first PBET lesson plan and in later modules.
Directions: Tell participants that during the PBET analysis phase
a Lego assembly training need was discovered. Tell them they will
do a Lego task detailing/listing. At their tables, have participants
team up into pairs. Explain that while each pair will do the task
detailing/listing, one person will act as the SME and assemble the
Legos, and the other will act as analyst and record the step-by-step
task. Remind them to look for hidden knowledge.
Rules: They may only record the task in words.
Break: When participants have completed the task detailing/listing
exercise, ask them to disassemble their Legos and take a ten-minute
break.
Ask: What they discovered about doing a task detailing/listing
− It’s very time-consuming
− The expert performer may not mention many of the steps
and decisions
− It requires a great deal of mental energy to look for hidden
knowledge and to capture all of the steps

PBET Module AN-1: Perform a Task Analysis
Technology Transfer #95102996A-TRG AN-1-10
SKILL TEST
In this module, you will complete a task listing and detailing on a specific task that the
course instructor will assign to designated teams. This is the initial step in the
development of your first PBET lesson plan.
!!!!!

Instructor Guide
AN-2 WRITE PERFORMANCE OBJECTIVES
• We’ve talked about the importance of task analysis in the
development of PBET training
• Now, we’re going to discuss how to prepare effective
performance objectives
Brainstorm: When Do We Know that Learning Has Occurred?
• Learning requires an observable change in performance
• Learning is a series of steps (draw seven steps on flipchart or
use poster):
− Baseline knowledge (bottom)
− Instruction
− Knowledge
− Attitude
− Experience
− Habit
− Desired skill (top)
Prepare Performance Objectives
• As part of PBET, the instructional designer describes what
participants need to demonstrate while in the course
• Performance objectives are clear statements understood by all
the participants
• Objectives are:
− Performance-based
− Specific
− Measurable or observable
− Relevant to requirements of task to be performed
• Ask a volunteer to read the objective from the foil
• Reference the test on page AN-2-15

PBET Module AN-2: Write Performance Objectives
Technology Transfer #95102996A-TRG AN-2-1
AN-2
WRITE PERFORMANCE OBJECTIVES
OBJECTIVE:
Prepare at least one performanceobjective in an area of your expertise. Theobjective must contain three minimumrequirements: performance, condition,and standard.
Note: Write the objective in the Lesson PlanningForm provided for you in this workshop.
As part of the analysis phase in developing PBET, the instructional designer sets out to
describe the performance the participant needs to demonstrate while enrolled in a course.
The performance objective serves as this vehicle for description.
The performance objective or instructional objective is a clear statement that’s understood
by all participants. The objective is performance-based, specific, measurable or
observable, and relevant to the requirements of the course or task to be performed.

Instructor Guide
An Objective Statement Answers Questions
• Objective statements answer questions like these
• Objective statements provide information to questions
of who, what, where, when, and how (4Ws and 1H)
• Simple, clearly stated objectives tell participants
exactly what’s expected of them
PBET Module AN-2: Write Performance Objectives
Technology Transfer #95102996A-TRG AN-2-2
An Objective Statement AnswersQuestions Like These
• Who is the performer?• What task is the performer expected to do?• How will the performance be evaluated?• How accurate must the performance be?• What are the conditions for performing the task?• What materials and resources will be needed?• When is the performance supposed to occur?• Where is the performance to occur?
An objective statement provides information that answers typical questions such as those
in the foil above.
If a single, clear statement can provide all of the needed information, then there is very
little left for the participant to interpret. Objectives take the guesswork out of the training
program and ensure that everyone, including instructors and participants, have a clear
understanding of what is expected. Course participants should never need to try to out-
guess or "psyche-out" the instructor.

Instructor Guide
Three Characteristics of a Well-Stated Objective
• Performance tells what action will be performed
• Condition tells how or with what the action will be
performed
• Standard tells the performance standard, criterion, or
measurement method

PBET Module AN-2: Write Performance Objectives
Technology Transfer #95102996A-TRG AN-2-3
• Performance• Condition• Standard
Three Characteristics of aWell-Stated Objective
A well-stated objective has at least three components:
• Performance
• Condition
• Standard
Performance tells what action will be performed.
Condition tells how or with what the action will be performed.
And, Standard tells the performance standard, criterion, and measurement method.

Instructor Guide
Three Characteristics of a Well-Stated Objective No. 1
• The performance part of the objective tells what
participants will do as a result of training

PBET Module AN-2: Write Performance Objectives
Technology Transfer #95102996A-TRG AN-2-4
Performance The performance is the action thatresults from executing the task that isdescribed in the objective.
<Example> Calibrate a QM-500 mass flowcontroller.
Three Characteristics of aWell-Stated Objective
No. 1
The performance part of the objective tells what the participants will do as a result of
training.

Instructor Guide
Three Characteristics of a Well-Stated Objective No. 2
• The condition tells the circumstances/conditions that
must be present during the course participant’s
performance
• The condition part of the objective should clearly state
the conditions under which the performance will occur

PBET Module AN-2: Write Performance Objectives
Technology Transfer #95102996A-TRG AN-2-5
Condition The condition describes the environment,location, and/or the situation where theperformance is to occur, and it tells whatmaterials, supplies, tools, equipment, andresources may be used while performingthe objective.
<Example> In a classroom the trainee will beprovided with a mis-calibrated QM-500MFC, hand tools, and appropriate testinstruments.
Three Characteristics of aWell-Stated Objective
No. 2
The condition part of the objective tells the circumstances or "conditions" that must be
present when the performance occurs. The condition should be clearly stated.

Instructor Guide
Three Characteristics of a Well-Stated Objective No. 3
• The standard tells the acceptable level of performance
• Often, standards refer to:
− A specific manual or procedure, “in accordance
with procedure 5-2-1”
− A time limitation, “in 15 minutes”
− Numbers, as in, “10 per cycle, to the nearest
hundredth, with zero errors”
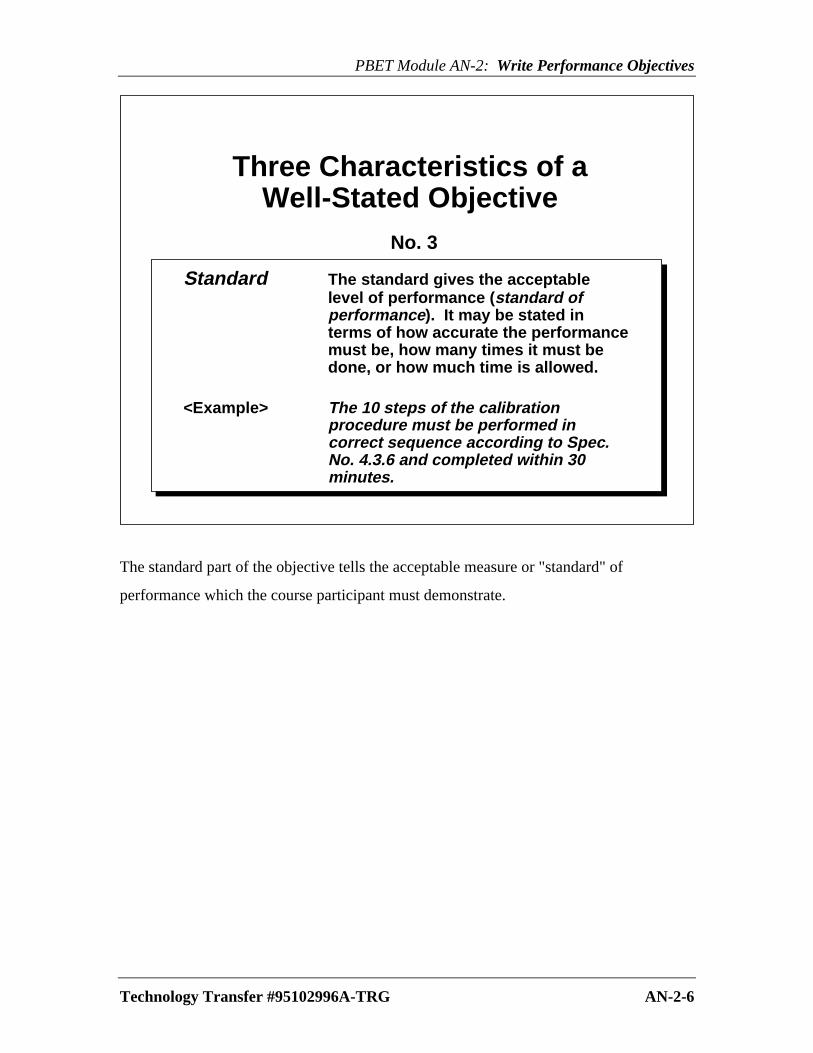
PBET Module AN-2: Write Performance Objectives
Technology Transfer #95102996A-TRG AN-2-6
Standard The standard gives the acceptablelevel of performance (standard ofperformance). It may be stated interms of how accurate the performancemust be, how many times it must bedone, or how much time is allowed.
<Example> The 10 steps of the calibrationprocedure must be performed incorrect sequence according to Spec.No. 4.3.6 and completed within 30minutes.
Three Characteristics of aWell-Stated Objective
No. 3
The standard part of the objective tells the acceptable measure or "standard" of
performance which the course participant must demonstrate.
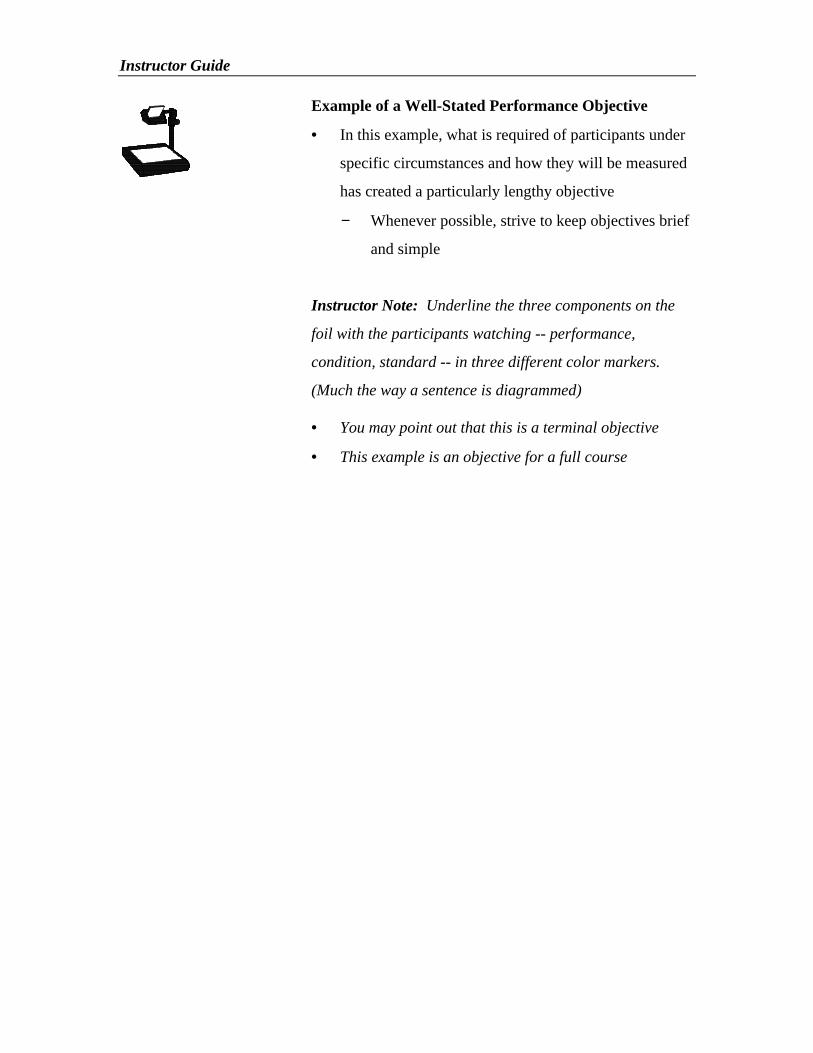
Instructor Guide
Example of a Well-Stated Performance Objective
• In this example, what is required of participants under
specific circumstances and how they will be measured
has created a particularly lengthy objective
− Whenever possible, strive to keep objectives brief
and simple
Instructor Note: Underline the three components on the
foil with the participants watching -- performance,
condition, standard -- in three different color markers.
(Much the way a sentence is diagrammed)
• You may point out that this is a terminal objective
• This example is an objective for a full course
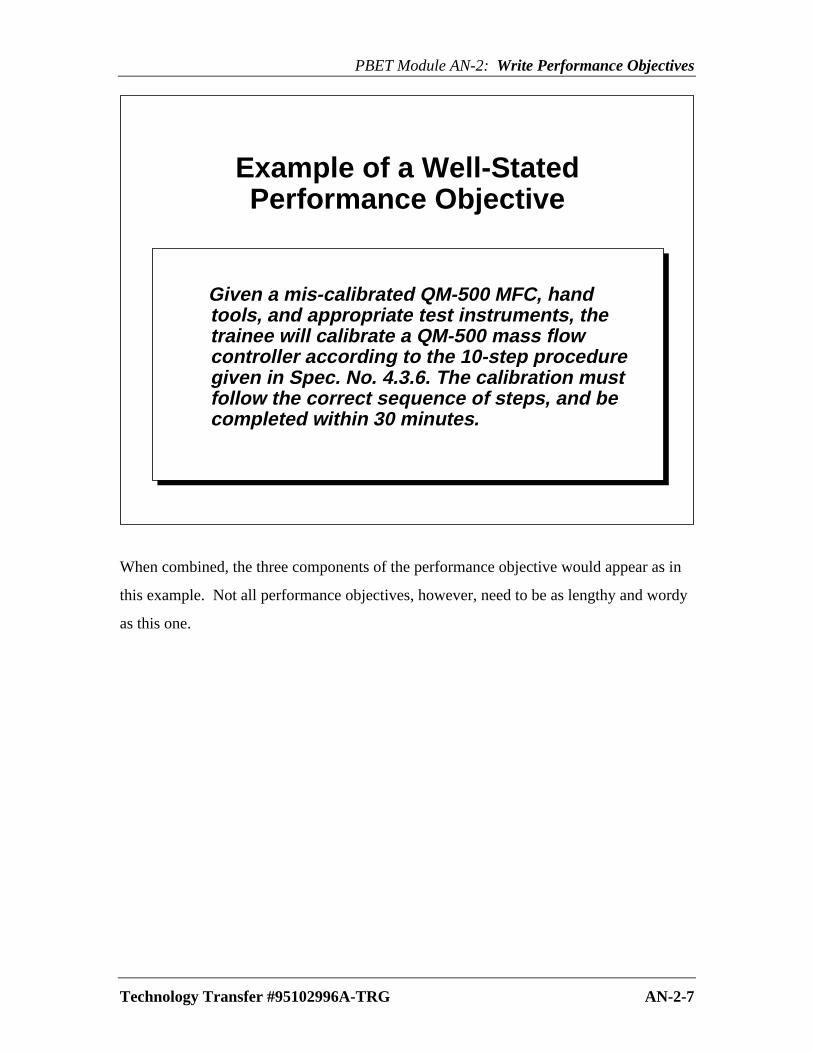
PBET Module AN-2: Write Performance Objectives
Technology Transfer #95102996A-TRG AN-2-7
Example of a Well-StatedPerformance Objective
Given a mis-calibrated QM-500 MFC, handtools, and appropriate test instruments, thetrainee will calibrate a QM-500 mass flowcontroller according to the 10-step proceduregiven in Spec. No. 4.3.6. The calibration mustfollow the correct sequence of steps, and becompleted within 30 minutes.
When combined, the three components of the performance objective would appear as in
this example. Not all performance objectives, however, need to be as lengthy and wordy
as this one.

Instructor Guide
Questions and Answers to “Get at” the Three Parts of a
Performance Objective
Instructor Note: Introduce Questions/Answers table
Participant Activity:
• You have four examples of performance-based
objectives in your notebooks
• Take a few minutes to read them to yourselves, and
underline (diagram) the three components in each
objective
Instructor Note: Allow five minutes or so to complete this
activity, and then as a group review their answers
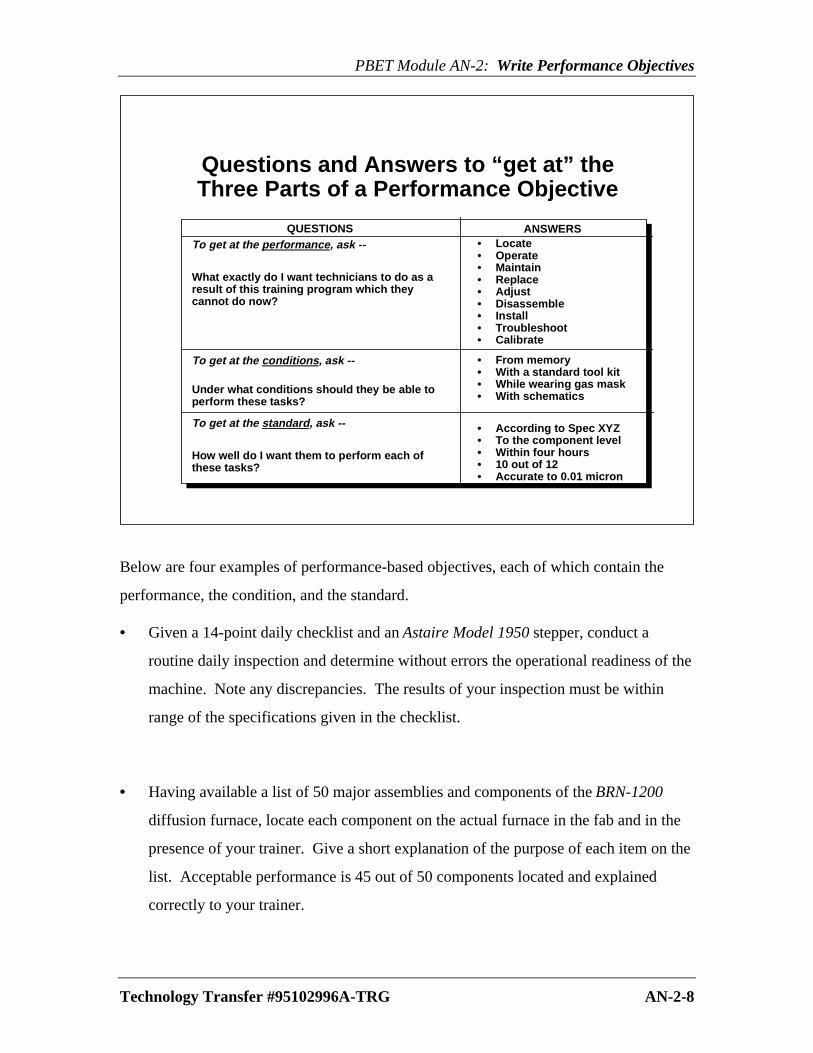
PBET Module AN-2: Write Performance Objectives
Technology Transfer #95102996A-TRG AN-2-8
Questions and Answers to “get at” theThree Parts of a Performance Objective
ANSWERS• Locate• Operate• Maintain• Replace• Adjust• Disassemble• Install• Troubleshoot• Calibrate
• From memory• With a standard tool kit• While wearing gas mask• With schematics
• According to Spec XYZ• To the component level• Within four hours• 10 out of 12• Accurate to 0.01 micron
QUESTIONSTo get at the performance, ask --
What exactly do I want technicians to do as aresult of this training program which theycannot do now?
To get at the conditions, ask --
Under what conditions should they be able toperform these tasks?
To get at the standard, ask --
How well do I want them to perform each ofthese tasks?
Below are four examples of performance-based objectives, each of which contain the
performance, the condition, and the standard.
• Given a 14-point daily checklist and an Astaire Model 1950 stepper, conduct a
routine daily inspection and determine without errors the operational readiness of the
machine. Note any discrepancies. The results of your inspection must be within
range of the specifications given in the checklist.
• Having available a list of 50 major assemblies and components of the BRN-1200
diffusion furnace, locate each component on the actual furnace in the fab and in the
presence of your trainer. Give a short explanation of the purpose of each item on the
list. Acceptable performance is 45 out of 50 components located and explained
correctly to your trainer.

Instructor Guide
NOTES:

PBET Module AN-2: Write Performance Objectives
Technology Transfer #95102996A-TRG AN-2-9
• Given a list of 10 parts, a list of functional descriptions, and a pictorial of the Robby
wafer handler, match each part exactly to its corresponding location in the picture
and the appropriate description.
• At the location of the ZAP-5500 plasma etch system, (1) point out each of six
potential equipment hazards, (2) explain the type and significance of each hazard,
and (3) briefly state the proper working safety procedures. Each of the six items
must agree with the list of hazards and safety descriptions given in the National
Laboratory Safety training manual.
Instructor Guide
Performance Words
• When you write objectives, choose specific action
words:
− Mark
− Recall
− Circle
− Label
− Install
• Avoid vague or abstract words:
− Learn
− Know
− Conclude
− Understand
− Awareness
• Be sure the words you use state measurable or
observable performance standards
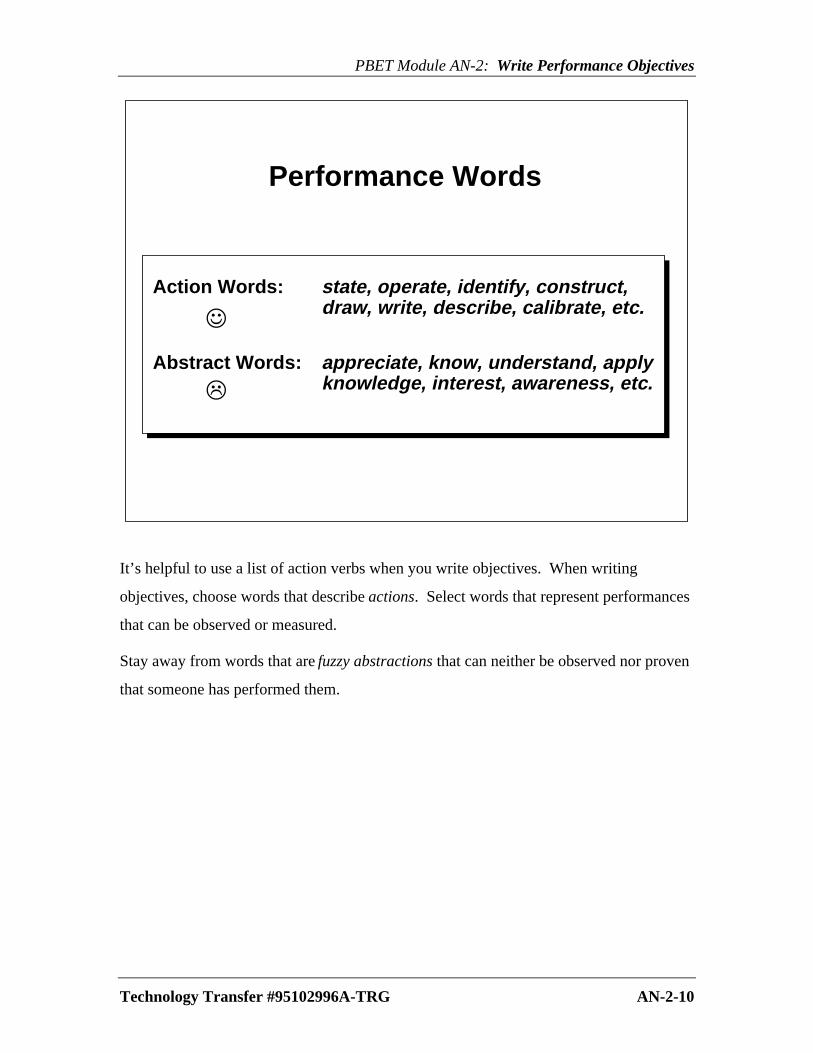
PBET Module AN-2: Write Performance Objectives
Technology Transfer #95102996A-TRG AN-2-10
Performance Words
Action Words: state, operate, identify, construct,draw, write, describe, calibrate, etc.
Abstract Words: appreciate, know, understand, applyknowledge, interest, awareness, etc.L
J
It’s helpful to use a list of action verbs when you write objectives. When writing
objectives, choose words that describe actions. Select words that represent performances
that can be observed or measured.
Stay away from words that are fuzzy abstractions that can neither be observed nor proven
that someone has performed them.
Instructor Guide
Commonly Used Performance Words
• Performance words may be regarded as skills
• Some skills may:
− Overlap
− Never be used in certain job classifications
− Always be used by all job classifications
• There’s a list of performance words in your notebooks
that may help to create performance objectives for your
participants
• Some performance words (*) may require some kind of
indicator to fully demonstrate capability or competence
Participant Activity
• Have the group name a real tool that’s used in their
business
• Write the name of the tool at the top of the flipchart
• Tool example: Have participants select performance
words from the foil and brainstorm how they’d use
them in creating objectives for learning the specific
tool
• Write their responses under the tool name
− State the function of ______________
− Calibrate the ____________________
• More examples: If more practice seems necessary,
repeat this activity by creating objectives for a real
work-related process, for example:
-- Product inspection
-- Data collection
-- Interpreting alarms, etc.

PBET Module AN-2: Write Performance Objectives
Technology Transfer #95102996A-TRG AN-2-11
Commonly Used Performance Wordsshowselectusefindstatedrawwriteidentify*locate*gather illustratedescribe*measureprepareclassifycompute*discriminateoperateassembleadjust
testtuneprovejustifyapplyrelateverifyspecifycontrastconstructanalyze*organize*formulateestimateinterpretdistinguishcomparedeterminedifferentiateprogram
designinfer*deduce*predict*inventdiscoverpropose*integratesynthesize*generalize*examinemanipulatediagnosetroubleshootformulatefacilitate*reorganizecalibraterepair
* Performance words which may require an indicator
Performance words may be regarded as skills. Some skills may tend to overlap and
dovetail with each other; some may never be used in certain job classifications; and still
others may always be used by all job classifications.
Here are some performance words, or skills, that may help to create appropriate
performance objectives for your specific audience.
Some performances (*) are invisible or neutral as in compute, organize, or identify. In
such cases it is useful to add a visible indicator to the desired performance. For example,
to clarify identify, write: identify by matching items, pointing, or writing a paragraph.

Instructor Guide
Practice Exercise
• Practice writing performance objectives using the list
of commonly used performance words and selecting a
topic in an area of your own choice.
• Write the objectives in the chart in your notebook and
review your objectives with your colleagues from your
table group
• Create a third performance objective for an area of
your expertise and review it with your colleagues

PBET Module AN-2: Write Performance Objectives
Technology Transfer #95102996A-TRG AN-2-12
PRACTICE EXERCISE
Performance Condition Standard
1
2
3
!!!!!
Using the list of commonly used performance words, write two performance objectives in
the chart above. When you have completed your objectives, review them with your
colleagues from your group table.
In the third space in the chart, create a performance objective from your own area of
expertise and review it with your colleagues.

Instructor Guide
Practice Exercise
• Please complete the practice exercise by circling or
marking the objectives that are well-stated

PBET Module AN-2: Write Performance Objectives
Technology Transfer #95102996A-TRG AN-2-13
Practice Exercise
1. Having attended at least one class in semiconductorprocessing, be able to have a sense of appreciation forsubmicron technology.
2. Having attended the Thermite Furnace Class, be able tocalibrate a thermocouple.
3. Having available 10 wafers and the MiG-19 inspectionsystem, be able to locate 100% of the defects and correctlycategorize them according to the station job aid. You willhave 30 minutes in which to perform this task.
4. Assuming that all tools, parts, and documentation areavailable, the lamp uniformity must be within 0.5% of thespecification.
5. Without referring to any resources, locate and describe thefunction of each component on the BRN-1 gas control panelwith 100% accuracy.
Here is an opportunity to practice differentiating between well-stated objectives and
objectives that are not. Read each statement and determine if the statement has all of the
elements of a good objective.
Check each objective for the following criteria:
• Does the objective have a performance, that is, an action to be done?
• Does the objective state the condition(s) for performing the action?
• Does the objective indicate the standard of performance for the action?
Circle or mark the objectives that are well-stated.

Instructor Guide
Self-Check
• Compare your answers to the correct answers, and then
proceed to the skill test

PBET Module AN-2: Write Performance Objectives
Technology Transfer #95102996A-TRG AN-2-14
Self-Check
1. Having attended at least one class in semiconductorprocessing, be able to have a sense of appreciation forsubmicron technology. NO PERFORMANCE WORDS USED
2. Having attended the Thermite Furnace Class, be able tocalibrate a thermocouple. NO CONDITION OR STANDARD
3. Having available 10 wafers and the MiG-19 inspectionsystem, be able to locate 100% of the defects and correctlycategorize them according to the station job aid. You willhave 30 minutes in which to perform this task. GOOD P.O.
4. Assuming that all tools, parts, and documentation areavailable, the lamp uniformity must be within 0.5% of thespecification. NO PERFORMANCE IS INDICATED
5. Without referring to any resources, locate and describe thefunction of each component on the BRN-1 gas control panelwith 100% accuracy. GOOD PERFORMANCE OBJECTIVE
L
J
L
J
L
When ready, participants may proceed to take the actual skill test.

Instructor Guide
Introduction to the Lesson Planning Form
Please remove the Lesson Planning Form from the front
pocket of your Participant’s Guide:
• Fill out the forms as follows:
• The first form will be used for the Lego Assembly
project, which will be used as the common project for
all class participants
− Developer: your name
− Class Title: Performance-Based Equipment
Training
− Module Title: Assemble Legos Model
− Target Audience: PBET course participant
− Location: PBET classroom
• The second form will be used for a specific individual
project in your own area of expertise
− Developer: your name
− Class Title: Name of the course for which you
have brought materials and expertise
− Module Title: The specific lesson within the
course that you will be developing in this class
− Target Audience: A few words that describe the
typical learners to attend this lesson
− Location: The place or places where you would
expect to train students in this module. This may
be a classroom, a fab, a lab, or other location.
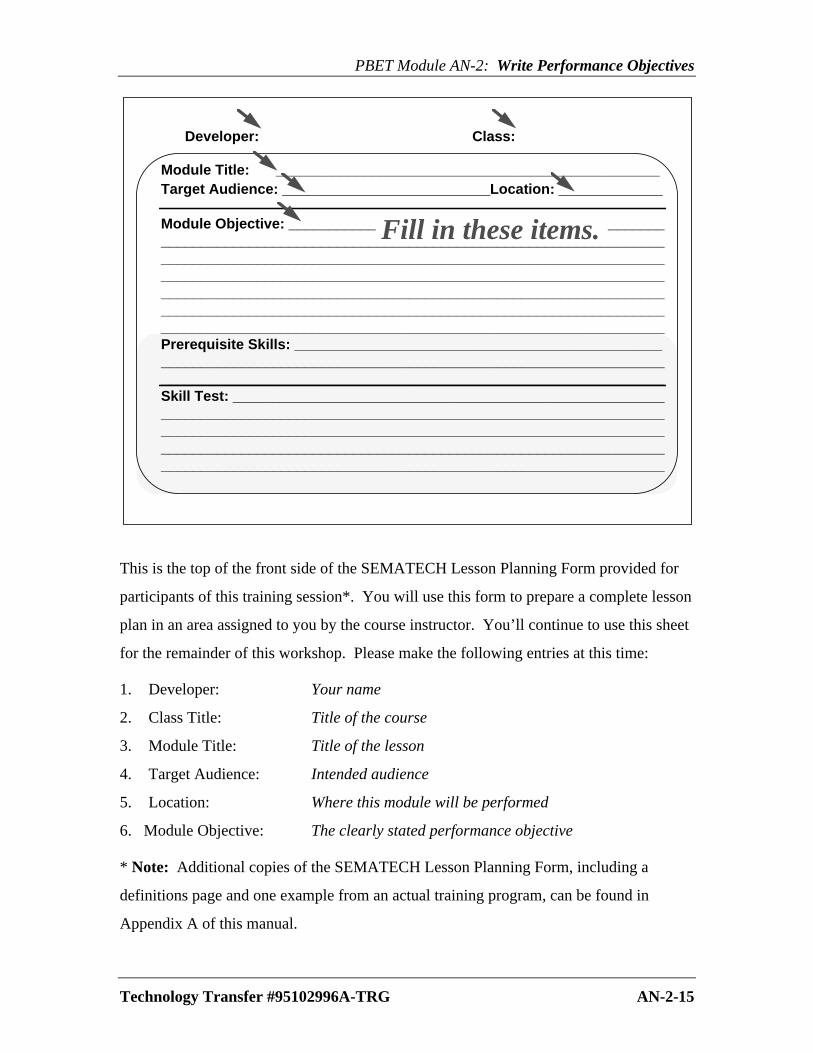
PBET Module AN-2: Write Performance Objectives
Technology Transfer #95102996A-TRG AN-2-15
Target Audience: __________________________Location: _____________
Module Objective: _________________________________________________________________________________________________________________________________________________________________________________________________________________________________________________________________________________________________________________________________________________________________________________________________________________________________________Prerequisite Skills: ____________________________________________________________________________________________________________________________________________________________________________Skill Test: __________________________________________________________________________________________________________________________________________________________________________________________________________________________________________________________________________________________________________________
Developer: Class:
Module Title: ________________________________________________
Fill in these items.
This is the top of the front side of the SEMATECH Lesson Planning Form provided for
participants of this training session*. You will use this form to prepare a complete lesson
plan in an area assigned to you by the course instructor. You’ll continue to use this sheet
for the remainder of this workshop. Please make the following entries at this time:
1. Developer: Your name
2. Class Title: Title of the course
3. Module Title: Title of the lesson
4. Target Audience: Intended audience
5. Location: Where this module will be performed
6. Module Objective: The clearly stated performance objective
* Note: Additional copies of the SEMATECH Lesson Planning Form, including a
definitions page and one example from an actual training program, can be found in
Appendix A of this manual.

Instructor Guide
Skill Test (Test has two parts)
(1) Lego Assembly
Using the space on page AN-2-16, write a clearly stated performance
objective that includes all of the following elements:
Instructor Note: Write bullets on flipchart
− Trainees must assemble a _________ Lego model
− Must use available Lego parts
− May use an approved job aid
− May use verbal instructions
− When completed, the model must match the model shown in
the Lego model container or some other accepted regulation
prototype.
• Check your work against the requirements on page AN-2-16
• When satisfied, have instructor review your objective
• If acceptable, transfer objective to Legos Assembly Lesson
Planning Form
Instructor Note: The module objective should be close to the
following: Given a set of Lego parts, verbal instructions, and an
appropriate job aid, assemble the Lego model so it matches the exact
specifications of the model shown on the Lego container or some
other acceptable regulation prototype
(2) Individual Project
• Using the space on page AN-2-16, write a clearly stated
performance objective in an area of your own expertise
• Check your work against the requirements on page AN-2-16
• When satisfied, have instructor review your objective
• If acceptable, transfer objective to the second Lesson Planning
Form
PBET Module AN-2: Write Performance Objectives
Technology Transfer #95102996A-TRG AN-2-16
SKILL TEST
This test requires that you write two clearly stated objectives. Both objectives must
satisfy these minimum requirements:
• The objective should contain three minimum requirements: performance, condition,
and standard. If necessary, underline the three parts of the objective as you did on
page AN-2-8.
• The performance part of the objective must not be abstract nor fuzzy. (Review page
AN-2-10, if necessary.)
• The objective should be written clearly so that a peer will understand what is required.
1. The first objective must include the elements which your instructor has written on the
flip chart. Use this space to write your first draft. When you are ready, your instructor
will review your draft.
2. The second objective is to be in an area of your own expertise. On the third day of this
class, you will write an entire lesson plan based on the objective you write here today.
Use this space to write your first draft. When you are ready, your instructor will review
your draft.
!!!!!
Instructor Guide
AN-3 DEVELOP A SKILLS HIERARCHY
Phases of PBET
• We’ve completed a task analysis and derived some
performance objectives
• Now we’re ready to develop a skills hierarchy
Develop a Skills Hierarchy for Equipment Training
• In the Prepare Performance Objective module we
identified what is necessary in a well-stated
performance objective
• Now we will use some of that information as we
develop a skills hierarchy of enabling objectives
• Ask a volunteer to read the objective from the foil
• The test for AN-3 matches the objective. See page
AN-3-10.
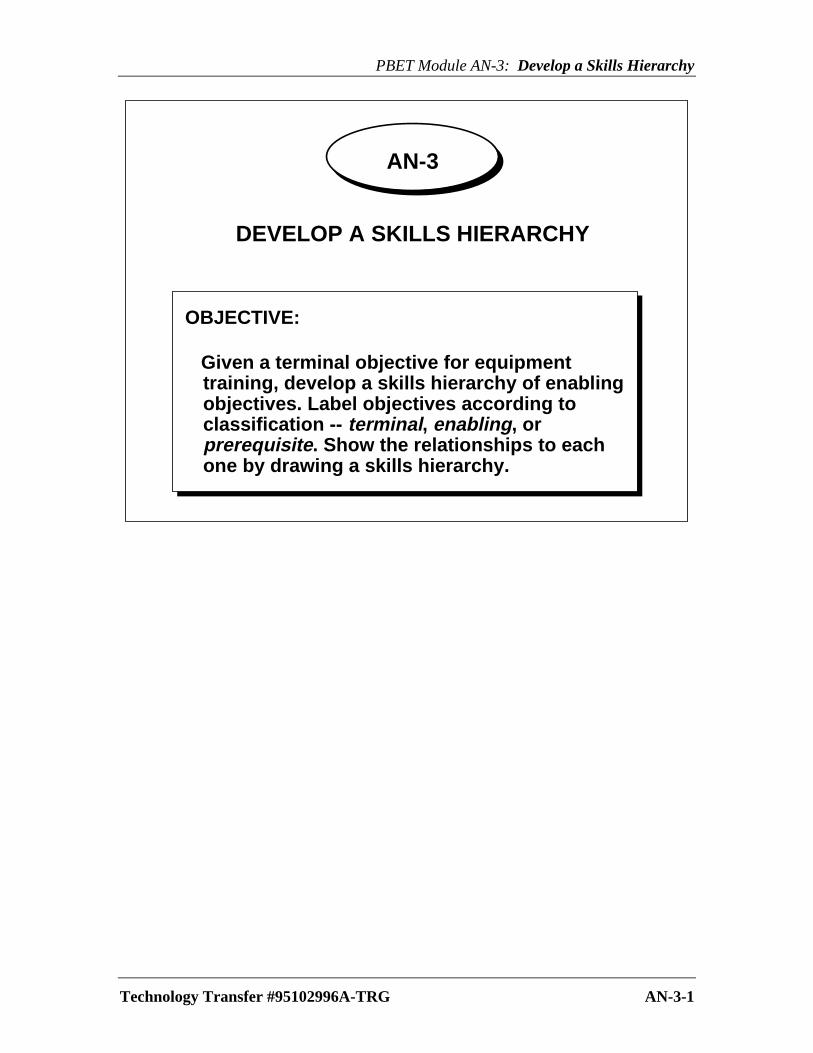
PBET Module AN-3: Develop a Skills Hierarchy
Technology Transfer #95102996A-TRG AN-3-1
AN-3
DEVELOP A SKILLS HIERARCHY
OBJECTIVE:
Given a terminal objective for equipmenttraining, develop a skills hierarchy of enablingobjectives. Label objectives according toclassification -- terminal, enabling, orprerequisite. Show the relationships to eachone by drawing a skills hierarchy.

Instructor Guide
Early Stages of Course Design
• Have you ever seen yourself in this predicament -- all
these topics to cover and confused by how they should
be sequenced?
• Initially, you may find that it’s difficult to decide how
the training course will fit together
• You may wonder what the logical sequence of the
topics should be
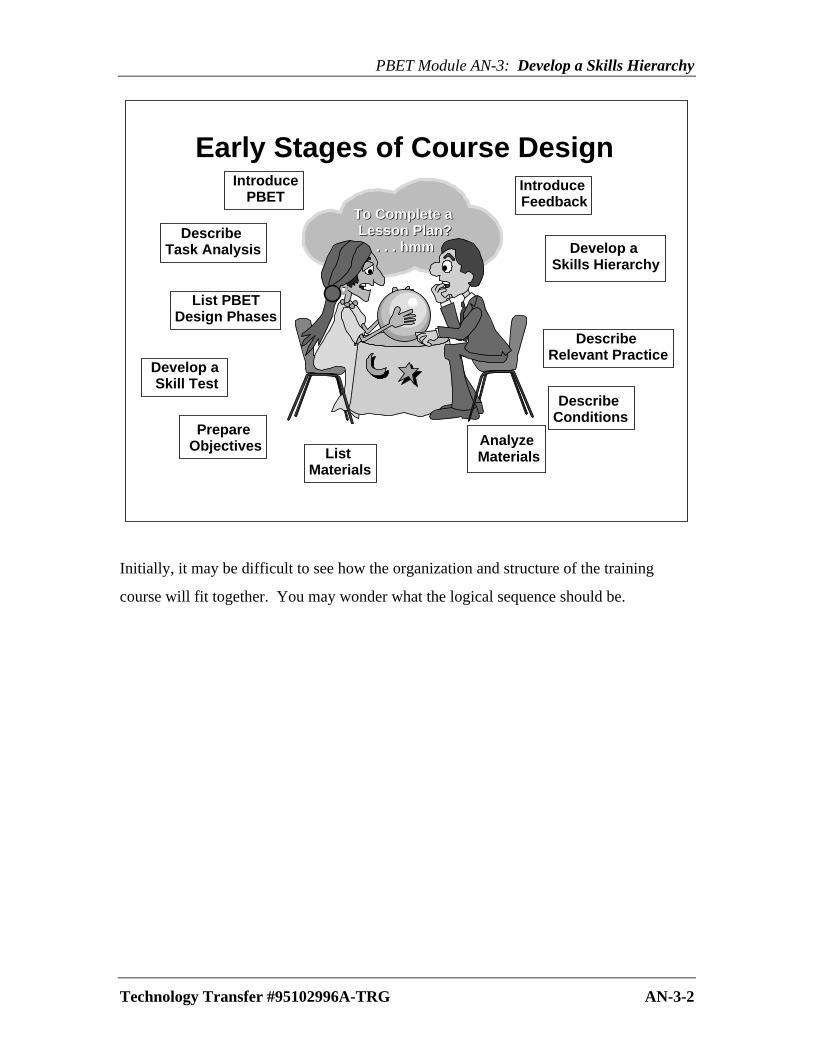
PBET Module AN-3: Develop a Skills Hierarchy
Technology Transfer #95102996A-TRG AN-3-2
IntroducePBET
List PBETDesign Phases
Describe Task Analysis
Prepare Objectives
Develop a Skills Hierarchy
Develop a Skill Test
Analyze MaterialsList
Materials
Describe Relevant Practice
Describe Conditions
Introduce Feedback
To Complete a To Complete a Lesson Plan?Lesson Plan?
. . . hmm. . . hmm
Early Stages of Course Design
Initially, it may be difficult to see how the organization and structure of the training
course will fit together. You may wonder what the logical sequence should be.
Instructor Guide
Skills Hierarchy
• A skills hierarchy is like a roadmap
• It graphically shows how subordinate skills serve as
enabling objectives to the terminal objective
• Subordinate skills are arranged in the most logical
sequence and in levels of increasing sophistication
• Some skills may have no relevance to others
− They can be performed at any time prior to
terminal objectives
− This diagram is sometimes referred to as a
shorthand pyramid
• Designing a PBET training course requires a logical
and sound structure
− Also helpful for designing self-paced instructional
programs, CBT and multimedia

PBET Module AN-3: Develop a Skills Hierarchy
Technology Transfer #95102996A-TRG AN-3-3
Introduce PBET
List PBET Design Phases
Perform Task Analysis
Prepare Objectives
Develop aSkills Hierarchy
Develop a Skill Test
Analyze Materials
List Materials
Describe Relevant Practice
Describe Conditions
Introduce Feedback
Skills HierarchyPrepare a Lesson Plan Terminal
Objectives
FlowFlow
EnablingObjectives
A skills hierarchy is like a road map. It’s a graphic representation of paths in a course. It
shows how the different levels of subordinate skills serve as enabling objectives that lead
to the terminal objectives.
The structure of the hierarchy in this foil shows how instructional elements of a course
are logically arranged. It’s easy to see which subskills are prerequisites to others. There
may be some skills that have no relevance to other skills; these can be performed at any
time prior to attempting the terminal objectives.
Normally, instructional designers use shorthand objectives to label individual boxes in the
skills hierarchy. This may be why this type of diagram is also referred to as a shorthand
pyramid. There are different types of performance objectives. The objectives in this slide
have been categorized as enabling objectives and terminal objectives.
Instructor Guide
Objectives in a Skills Hierarchy
• To determine the best structure for the course, you
need to look at the final, terminal objectives
• A skills hierarchy provides a structure for relating the
different supporting skills and competencies to the
terminal objectives
• This skills hierarchy shows three categories of
objectives
− Prerequisite objectives
− Enabling objectives
− Terminal objectives
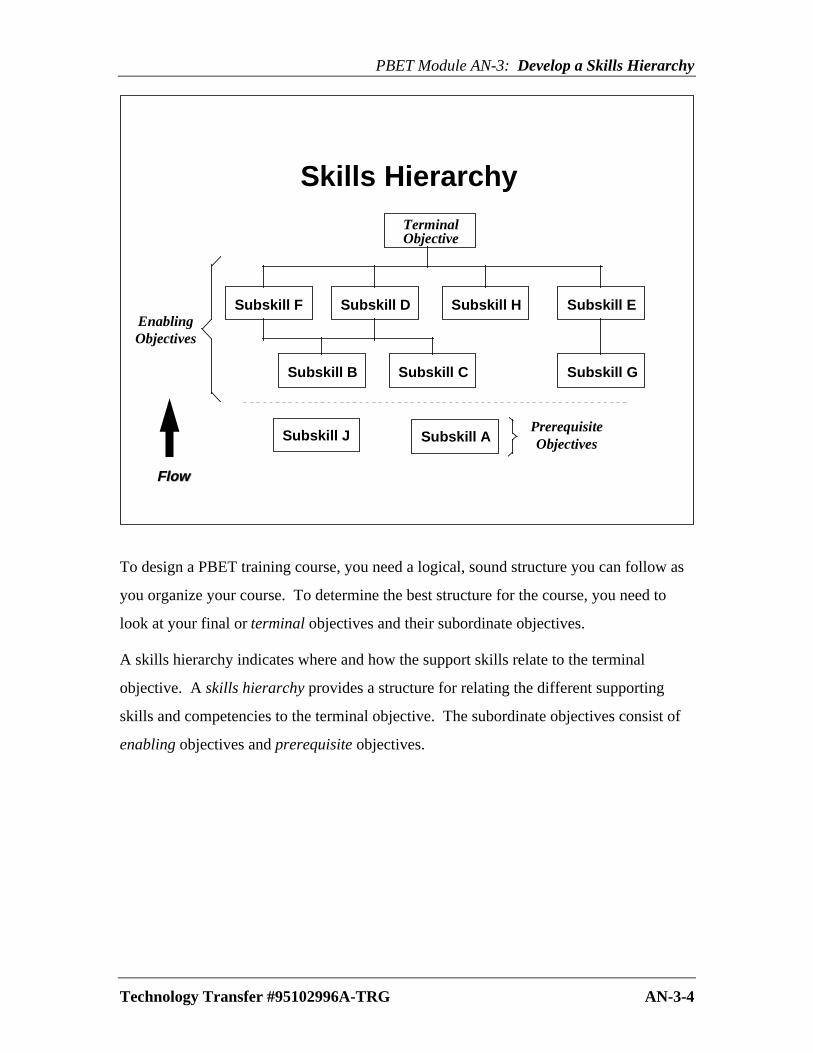
PBET Module AN-3: Develop a Skills Hierarchy
Technology Transfer #95102996A-TRG AN-3-4
Skills Hierarchy
TerminalObjective
Subskill G
Subskill D Subskill ESubskill H
Subskill C
Subskill F
Subskill B
Subskill ASubskill JPrerequisiteObjectives
EnablingObjectives
FlowFlow
To design a PBET training course, you need a logical, sound structure you can follow as
you organize your course. To determine the best structure for the course, you need to
look at your final or terminal objectives and their subordinate objectives.
A skills hierarchy indicates where and how the support skills relate to the terminal
objective. A skills hierarchy provides a structure for relating the different supporting
skills and competencies to the terminal objective. The subordinate objectives consist of
enabling objectives and prerequisite objectives.

Instructor Guide
Three Categories of Objectives
• There are three categories of objectives:
− Prerequisite -- these objectives state what
performers must have mastered before taking the
course
− Enabling -- these objectives are what the
performers must master to “enable” or assist them
to master the terminal objective
− Terminal -- these objectives are the significant
final or “terminal” outcomes of the training
program
• Training programs generally have a set of course
objectives that organize the sequence of topics covered

PBET Module AN-3: Develop a Skills Hierarchy
Technology Transfer #95102996A-TRG AN-3-5
Three Categories of ObjectivesTYPE
• TerminalObjectives
• EnablingObjectives
• PrerequisiteObjectives
DESCRIPTION
These are the significant, finaloutcomes of a training program.
These are the objectives whichmust be mastered if anindividual is to master theterminal objective.
These are the objectives thatstate what an individual musthave mastered before enteringthe training course.
EXAMPLES
• Design a process• Troubleshoot problems• Repair equipment• Perform maintenance• Program a process recipe• Operate a machine
• Write a process recipe• Interpret computer screens• Follow safety procedures• Identify hazards• Locate and describe parts• Describe process steps• List process steps
• List four areas of a fab• Describe a cleanroom• Use Ohm’s law to calculate . . .• Operate a multimeter• Interpret the metric system• Read and write English
Training programs generally have a set of course objectives that organize the sequence of
the topics covered. There are three categories of performance objectives as illustrated in
this foil. They are:
• Terminal objectives
• Enabling objectives (subordinate to the terminal objective)
• Prerequisite objectives (subordinate to the terminal and enabling objectives).

Instructor Guide
Guidelines for Interpreting a Skills Hierarchy
• The skills hierarchy shows which subskills must be
learned before going on to a higher skill.
• It does not tell which skill out of the entire group
should be learned first. There could be a variety of
starting points.
• It does not indicate the proper sequence in which steps
of a task should be performed.
• It does not relate anything about the importance of each
skill.
• The relative importance of a skill in a skills hierarchy
does not indicate the degree of difficulty that a person
will have learning that skill.

PBET Module AN-3: Develop a Skills Hierarchy
Technology Transfer #95102996A-TRG AN-3-6
Guidelines for Interpretinga Skills Hierarchy
• The skills hierarchy shows which subskills must belearned before going on to a higher skill.
• It does not tell which skill out of the entire group shouldbe learned first. There could be a variety of startingpoints.
• It does not indicate the proper sequence in which stepsof a task should be performed.
• It does not relate anything about the importance of eachskill.
• The relative importance of a skill in a skills hierarchydoes not indicate the degree of difficulty that a personwill have learning that skill.
A skills hierarchy has one main purpose -- it tells you the sequence in which lessons, or
modules, can be learned.
A skills hierarchy should not be misunderstood with the steps in a procedure. It is not
necessarily the sequence in which a task should be performed. This is because a course
designer may have determined that several steps of a task could be learned in any order.
In addition, the lessons listed in a skills hierarchy are not necessarily in the order of
importance nor in the order of difficulty.
Instructor Guide
Guidelines for Developing a Skills Hierarchy
Prior to creating a skills hierarchy, you will need a well-
stated terminal objective containing all 3 elements, then
• Place the paper at the top of the workspace
• Write subordinate objectives in shorthand form on
sticky-back paper (Post-it Notes TM)
• When designing, you generally start from the top and
work your way down
• Begin with the terminal objective by asking “what skills
must I be able to do first before I can do this one?”
• Repeat the process for each of these subordinate
objectives and so on
• Be ready and willing to create new objectives
• All subskills must be derived from terminal skills. If
not relevant to the terminal skill, it should be set aside
• Skills hierarchies should be created and approved by
committee
Class Brainstorming Activity
Instructor Note: You will lead this activity. Write this
terminal objective and enabling skills on large Post-it Notes
and attach to flip chart at front of room. Have participants
practice creating a skills hierarchy. Start with “what skills
must I be able to do first before I can do the next one?”
“Meet and greet an old acquaintance”
greet lookspeak recallidentify compareshake hands seewalk observe

PBET Module AN-3: Develop a Skills Hierarchy
Technology Transfer #95102996A-TRG AN-3-7
Guidelines for Developinga Skills Hierarchy
• Write out the complete terminal objective and place it atthe top of the workspace.
• Write out all subordinate objectives in short form onindividual index cards, sticky note paper, etc.
• To organize the hierarchy, look at each objective andask, “what must I be able to do before I can do this?”Then, position objectives accordingly.
• Be ready and willing to create new objectives if required.
• All subskills must be derived from terminal skills. If asubskill has no relevance to the terminal skill, it shouldnot be included in the hierarchy.
• Skill hierarchies should be validated.
There is no easy way to develop skills hierarchies; however, the process can be facilitated
with the use of index cards or sticky-back paper such as 3-M Post-it NotesTM. Write the
complete terminal objective and place it at the top of the workspace, then ask yourself,
“what (skills) must I be able to do before I can do this?” Place these skills under the
terminal objective, then repeat the process for these skills and so on.
To reduce time and errors, the skills hierarchy should be developed and approved by a
committee made up of interested parties, such as; trainers, developers, subject matter
experts, and customers.
Now is a good time to practice developing a simple skills hierarchy. Your instructor will
lead the class through an exercise on designing a skills hierarchy required to “meet and
greet an old acquaintance.”

Instructor Guide
Skills Hierarchy Practice Exercise
• Now you will have an opportunity to practice building
a skills hierarchy for this set of objectives
Two-Person Team Activity
• Hand out the envelopes containing the shorthand
objectives designated for the AN-3 Skills Hierarchy
Practice Exercise.
• Have participants work in pairs to develop a skills
hierarchy from the objectives contained in the
envelope.
• Review each skills hierarchy and assist each group as
necessary.
• Review results with class to clarify any major issues.
The answers are apparent when the class is shown the
overhead for page AN-3-9
• Audience may have difficulty understanding logic of
why safety procedures don’t always come first in a
training situation.
− Use analogy of unfamiliar equipment such as a
disposable diaper production system, automatic
white blood cell counter, electrocardiogram,
sterilization system, engine diagnostic system, etc.
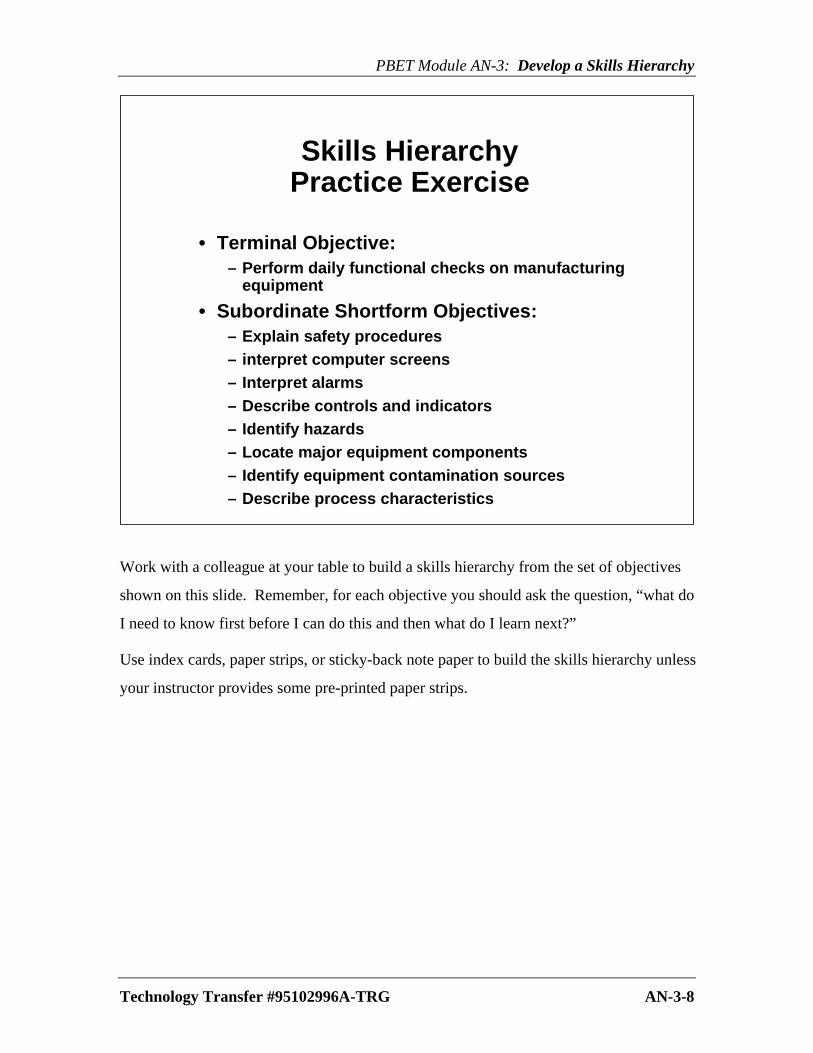
PBET Module AN-3: Develop a Skills Hierarchy
Technology Transfer #95102996A-TRG AN-3-8
Skills HierarchyPractice Exercise
• Terminal Objective:– Perform daily functional checks on manufacturing
equipment
• Subordinate Shortform Objectives:– Explain safety procedures– interpret computer screens– Interpret alarms– Describe controls and indicators– Identify hazards– Locate major equipment components– Identify equipment contamination sources– Describe process characteristics
Work with a colleague at your table to build a skills hierarchy from the set of objectives
shown on this slide. Remember, for each objective you should ask the question, “what do
I need to know first before I can do this and then what do I learn next?”
Use index cards, paper strips, or sticky-back note paper to build the skills hierarchy unless
your instructor provides some pre-printed paper strips.

Instructor Guide
Operations Training Skills Hierarchy
• Most PBET courses for training in operations and
product inspection contain skills similar to the ones in
this foil
• Depending on the tool and manufacturer, the
sequencing number and type of modules may vary
Instructor Note: Ask participants which of the skill boxes
they would need to train an operator in everything, except
how to “power-up and power-down the equipment”
Which boxes/modules would be needed to teach wafer
inspection for a specified tool?
• Ask if they can think of any prerequisites for this
hierarchy foil

PBET Module AN-3: Develop a Skills Hierarchy
Technology Transfer #95102996A-TRG AN-3-9
Identify hazards
Read and follow process recipes
Interpret alarms
Interpret computer screens
Explain process parameters
Describe controls and indicators
Explain safety procedures
Locate and describe major components
Operate the equipment
Perform daily functional checksUse computer software to input recipes
Power up/down the equipment
Perform an emergency shutdown
Describe related processes
Describe process characteristics
State the purpose of the equipment
Place the equipment in standby mode
Locate and describe facilities Describe sources of contamination
Operate metrology tools
Inspect product before/after process
Set up machine for processing
PBET Skills Hierarchy:
Operations Training
Explain course proceduresFlowFlow
This slide represents a typical skills hierarchy or course map for an equipment operations
training course. Most PBET courses designed to train operators, technicians and
engineers in the operations and product inspection for a specific processing tool will
contain a set of skills similar to these.
Depending on the type of tool -- its complexity and sophistication, and its manufacturer --
the number and types of modules, as well as their sequence may vary.

Instructor Guide
Service Training Skills Hierarchy
• This is a PBET skills hierarchy for a course for
technicians/service engineers
• This course trains technicians/engineers in the skills
and knowledge necessary for a semiconductor
processing tool including:
− Maintenance
− Troubleshooting
− Installation
− Qualification
• The operations training course as seen in the foil we
just viewed is a prerequisite to this course
• With each of these hierarchies, you can see how easy it
can be to customize training for specific needs
Instructor Note: Ask participants which of the skill boxes
they would need to qualify a tool for processing
Which boxes/modules would be needed to perform
calibrations? To perform routine maintenance?
• Ask if they can determine the prerequisites for this
hierarchy foil
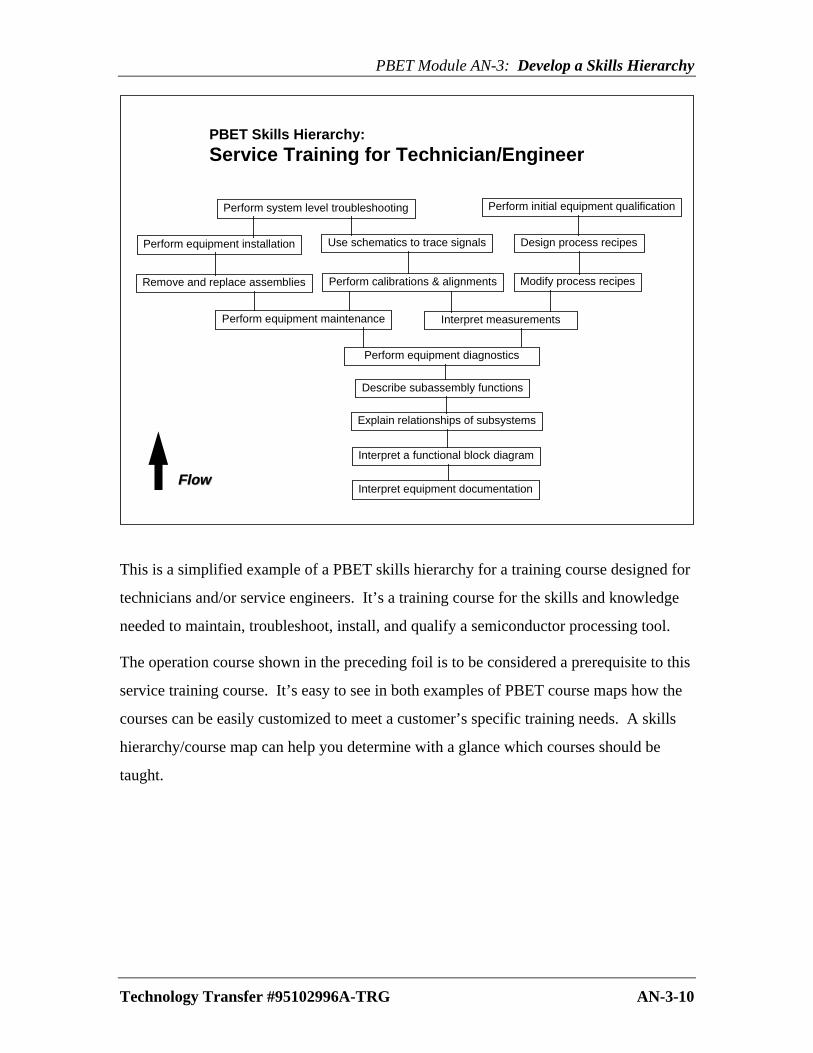
PBET Module AN-3: Develop a Skills Hierarchy
Technology Transfer #95102996A-TRG AN-3-10
Perform equipment maintenance
Interpret a functional block diagram
Perform equipment installation
Perform system level troubleshooting
Use schematics to trace signals
Perform calibrations & alignments
Perform equipment diagnostics
Interpret equipment documentation
Describe subassembly functions
Explain relationships of subsystems
Remove and replace assemblies
PBET Skills Hierarchy:
Service Training for Technician/Engineer
Modify process recipes
Design process recipes
Perform initial equipment qualification
Interpret measurements
FlowFlow
This is a simplified example of a PBET skills hierarchy for a training course designed for
technicians and/or service engineers. It’s a training course for the skills and knowledge
needed to maintain, troubleshoot, install, and qualify a semiconductor processing tool.
The operation course shown in the preceding foil is to be considered a prerequisite to this
service training course. It’s easy to see in both examples of PBET course maps how the
courses can be easily customized to meet a customer’s specific training needs. A skills
hierarchy/course map can help you determine with a glance which courses should be
taught.

Instructor Guide
Skill Test
• Brainstorm with your Legos teammate(s) a list of enabling objectives for
the Legos Assembly activity
− Identify the materials they will need to assemble the Legos model
• Use the 3-M Post-it Notes and flipchart paper to create a skills hierarchy
with “Assembling a Legos Model” as the terminal objective.
• Have the instructor review the results of your team’s work.
Instructor Note: When everyone has completed this exercise, review the Legos
skills hierarchy with each group. Compare differences and discuss them. Have
participants transfer prerequisites to Lego Assembly Lesson Planning Form.
• Examples of objectives:
− Prerequisite
-- Differentiate colors
-- Count from 1 to 100
-- Identify geometric shapes and concepts
-- Manual dexterity
-- Follow verbal instructions
-- Distinguish left from right
− Enabling
-- State the purpose of the model
-- Visualize the model
-- Name the parts
-- Identify the parts
-- State purpose of the parts
-- Categorize the parts
-- Use the job aid
-- Follow assembly procedures
-- Fasten/unfasten Lego parts
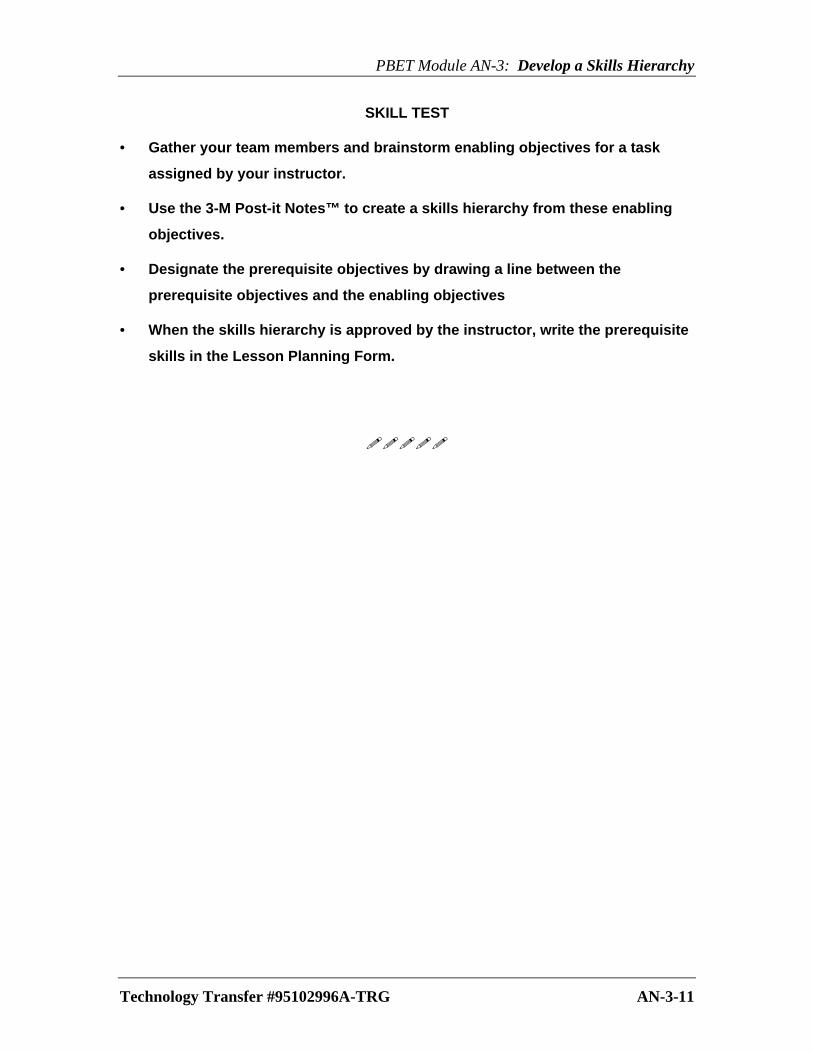
PBET Module AN-3: Develop a Skills Hierarchy
Technology Transfer #95102996A-TRG AN-3-11
SKILL TEST
• Gather your team members and brainstorm enabling objectives for a task
assigned by your instructor.
• Use the 3-M Post-it Notes™ to create a skills hierarchy from these enabling
objectives.
• Designate the prerequisite objectives by drawing a line between the
prerequisite objectives and the enabling objectives
• When the skills hierarchy is approved by the instructor, write the prerequisite
skills in the Lesson Planning Form.
!!!!!
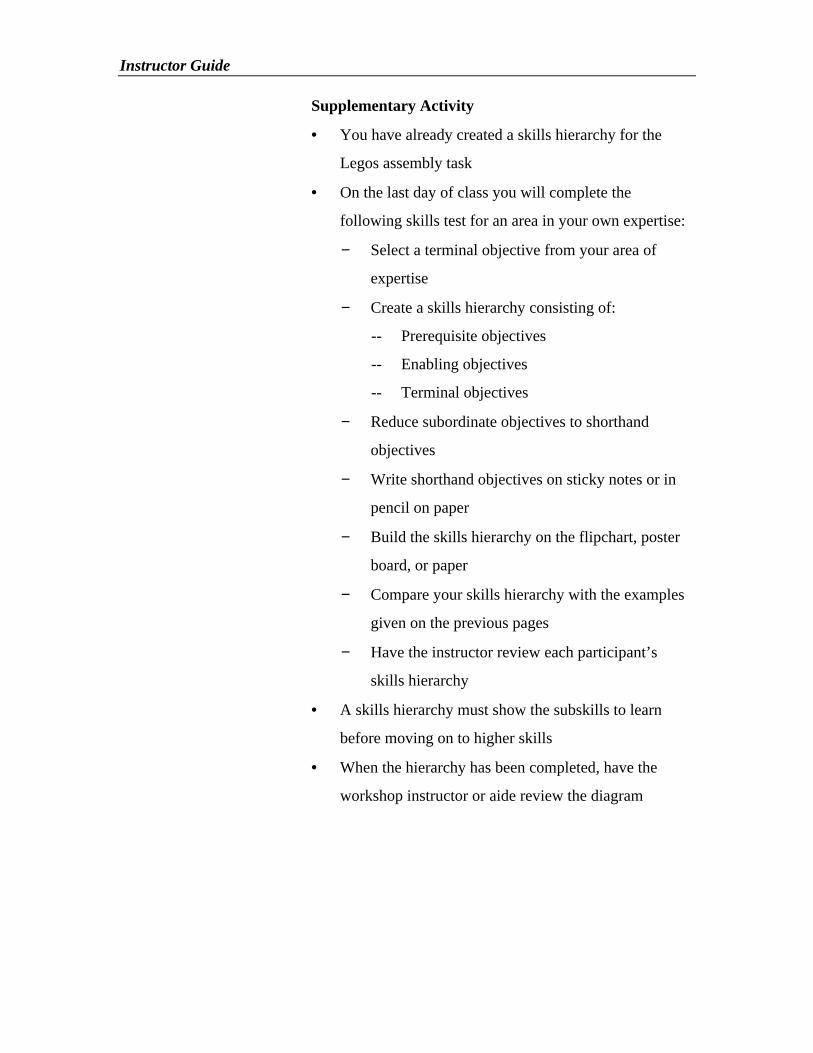
Instructor Guide
Supplementary Activity
• You have already created a skills hierarchy for the
Legos assembly task
• On the last day of class you will complete the
following skills test for an area in your own expertise:
− Select a terminal objective from your area of
expertise
− Create a skills hierarchy consisting of:
-- Prerequisite objectives
-- Enabling objectives
-- Terminal objectives
− Reduce subordinate objectives to shorthand
objectives
− Write shorthand objectives on sticky notes or in
pencil on paper
− Build the skills hierarchy on the flipchart, poster
board, or paper
− Compare your skills hierarchy with the examples
given on the previous pages
− Have the instructor review each participant’s
skills hierarchy
• A skills hierarchy must show the subskills to learn
before moving on to higher skills
• When the hierarchy has been completed, have the
workshop instructor or aide review the diagram
PBET Module AN-3: Develop a Skills Hierarchy
Technology Transfer #95102996A-TRG AN-3-12
SUPPLEMENTARY ACTIVITY
You have created a skills hierarchy for the assigned task. On the last day of class
you will complete the following skills test for an area in your own expertise.
1. Select a terminal objective from your own area of expertise or one that the
instructor has assigned to you. Create a skills hierarchy consisting of
performance objectives, including terminal, enabling, and prerequisite
objectives.
A. Start by reducing the subordinate objectives to shorthand objectives.
B. If available, write each shorthand objective on sticky-back paper or index
cards. If not available, then use pencil and paper so you can easily erase
and make changes.
C. Use a sheet of paper, posterboard, or flipchart paper on which to build
the skills hierarchy.
2. The skills hierarchy must show which subskill must be learned before going
on to higher skills.
3. When you have finished, have the workshop instructor or one of the
workshop aides review your diagram.
!!!!!

Instructor Guide

Design
Module No. Page No.
DS-1: Develop Skill Tests DS-1-1Traditional applications of testsNorm-referenced vs. PBETWriting effective PBET skill testsSkill test examples
DS-2: Describe Relevant Practice DS-2-1Four components of relevant practiceModel behaviorRelevant practice, relevant conditionsFeedback mechanismsExamples of relevant performanceExamples of relevant conditionsExamples of modeling methodsExamples of feedback mechanisms
DS-3: Analyze Materials DS-3-1Select instructional materialsEvaluate instructional materials
DS-4: Select Delivery Method DS-4-1Decide on delivery method and mediaList supporting materialsTraining media decision chart
DS-5: Summarize a PBET Lesson DS-5-1Description of relevanceSpecial instructionsLocation, environment, conditionsPurchases, rentals, reservationsSequence of events
DS-6: Complete a Second PBET Lesson Plan DS-6-1PBET Lesson Planning FormLesson Planning Form is not an instructor guideLesson Planning Form is your outlineStructure of lessonPerformance chart
Instructor Guide
DS-1 DEVELOP SKILL TESTS
• We’ve seen how important objectives are in
developing a skills hierarchy
PBET Course Map
• Here’s where we are on the PBET course map
• We have three possible routes to follow
• Now we’ll talk about developing PBET skill tests
Develop Skill Tests
• The instructional goal should be successful
instructional programs
• Excellent instructional design and delivery still require
measuring results of the learning activity
• Skill tests are the measurement instruments
• Level 2 evaluation tools

PBET Module DS-1: Develop Skills Tests
Technology Transfer #95102996A-TRG DS-1-1
DS-1
DEVELOP SKILL TESTS
OBJECTIVE:
Given a performance objective for equipmenttraining, develop a skill test to match therequirements of the objective. The test mustbe conducted under the same conditions asindicated in the corresponding objective. Theperformance standard must also match thatof the stated objective.
The purpose of instruction is to produce improvements in human performance. It should
be the instructional goal, therefore, to design the instructional program for success. But,
even the finest instructional design techniques and dynamic delivery methods cannot be
proven successful unless there is some way to measure the results of the learning activity.
This is the reason for having measurement instruments we often refer to as "tests."
Instructor Guide
Traditional Applications of Tests
• Tests come in many forms
• Some determine how well course participants perform
in comparison to others
− In the same course
− In the same area
− In the same country
• Some tests determine how well participants perform
against requirements of the course
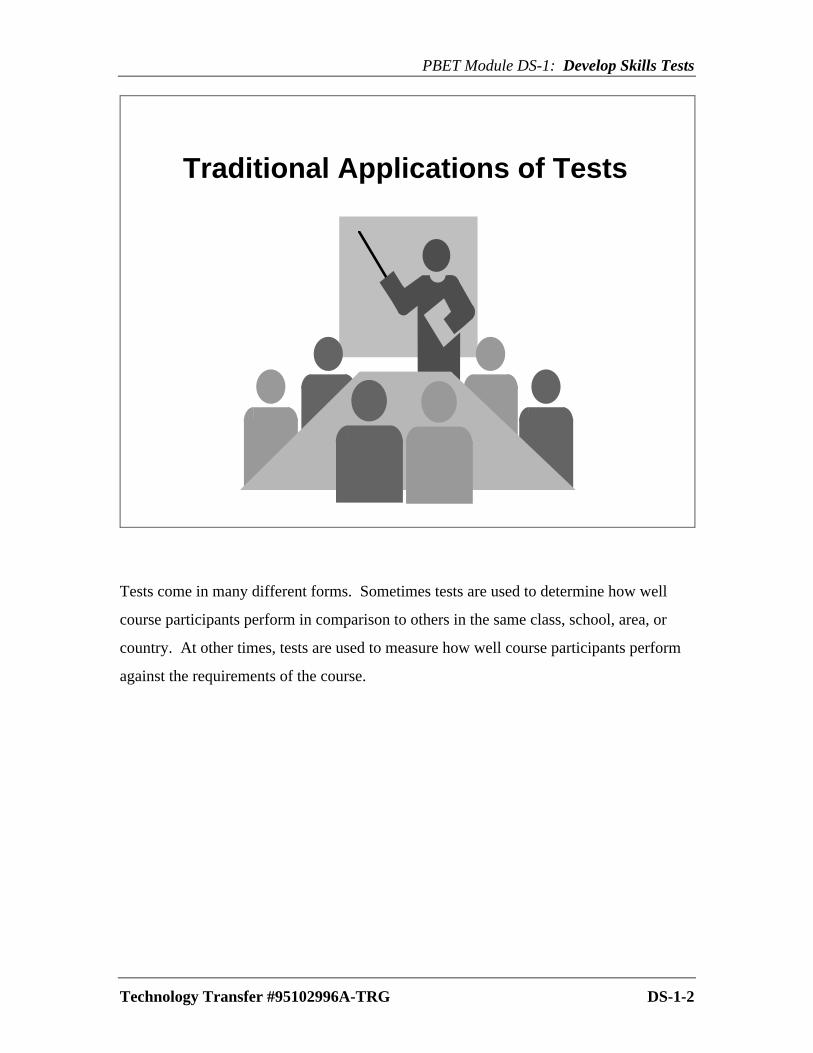
PBET Module DS-1: Develop Skills Tests
Technology Transfer #95102996A-TRG DS-1-2
Traditional Applications of Tests
Tests come in many different forms. Sometimes tests are used to determine how well
course participants perform in comparison to others in the same class, school, area, or
country. At other times, tests are used to measure how well course participants perform
against the requirements of the course.

Instructor Guide
A4
Norm-Referenced Testing vs. Performance-Based
Testing
• There are two ways to look at the results of testing:
− Norm-referenced approach
− Performance-based approach
• In a norm-referenced test, a technician scored 90 out of
100:
− Despite failing the safety section, the overall grade
looks good
• In performance-based scoring, NC indicates not
complete:
− Final score remains blank until requirement is
satisfied
− Technician is not allowed to operate equipment
until all skills are complete
Instructor Note: There’s a performance checklist in
Appendix A, page A-17
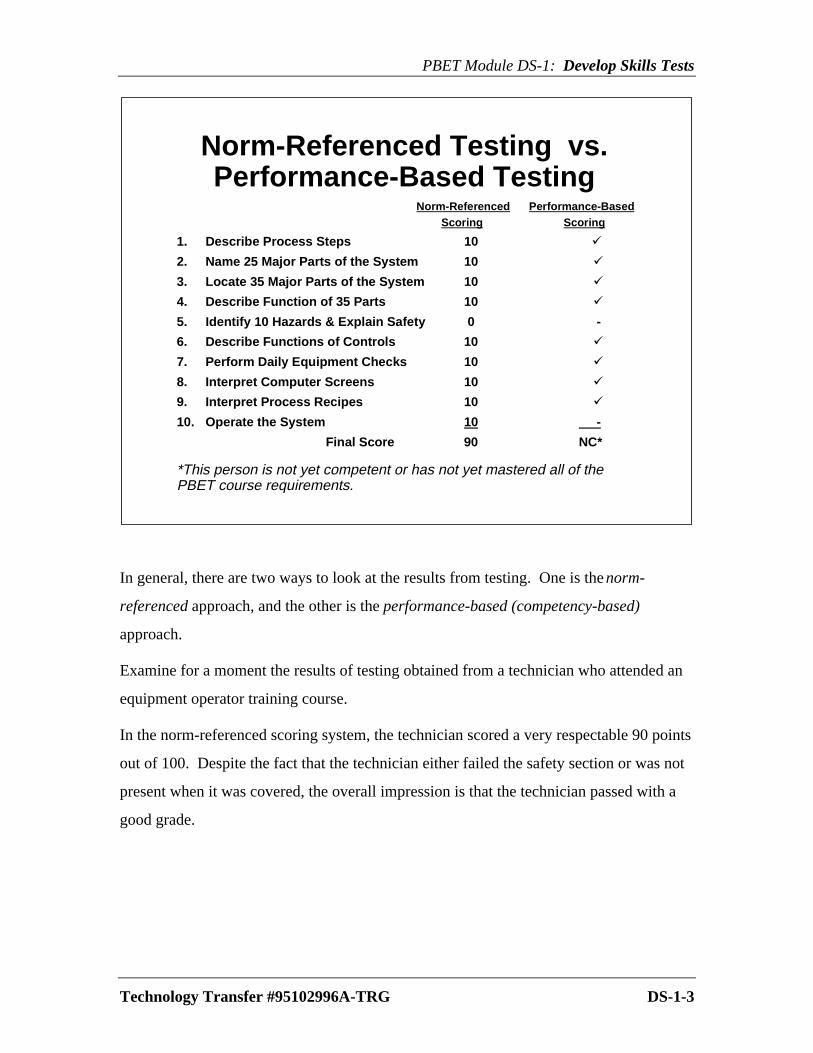
PBET Module DS-1: Develop Skills Tests
Technology Transfer #95102996A-TRG DS-1-3
Norm-Referenced Performance-Based Scoring Scoring
1. Describe Process Steps 10 ä
2. Name 25 Major Parts of the System 10 ä
3. Locate 35 Major Parts of the System 10 ä
4. Describe Function of 35 Parts 10 ä
5. Identify 10 Hazards & Explain Safety 0 -
6. Describe Functions of Controls 10 ä
7. Perform Daily Equipment Checks 10 ä
8. Interpret Computer Screens 10 ä
9. Interpret Process Recipes 10 ä
10. Operate the System 10 -
Final Score 90 NC*
*This person is not yet competent or has not yet mastered all of thePBET course requirements.
Norm-Referenced Testing vs.Performance-Based Testing
In general, there are two ways to look at the results from testing. One is the norm-
referenced approach, and the other is the performance-based (competency-based)
approach.
Examine for a moment the results of testing obtained from a technician who attended an
equipment operator training course.
In the norm-referenced scoring system, the technician scored a very respectable 90 points
out of 100. Despite the fact that the technician either failed the safety section or was not
present when it was covered, the overall impression is that the technician passed with a
good grade.

Instructor Guide
NOTES:

PBET Module DS-1: Develop Skills Tests
Technology Transfer #95102996A-TRG DS-1-4
On the other hand, the performance-based method of scoring simply indicates an NC to
inform the technician and others that the course is not complete or that the technician is
not yet competent. The final score remains blank until the requirement is satisfied. Also,
if the training system is truly performance-based, the technician would not be allowed to
operate the equipment until all the prerequisite skills have been completed, including the
safety skills. This explains the blank space next to the Operate the System under the
Performance-Based scoring column.

Instructor Guide
Requirements for Writing Effective PBET Skill Tests
• A skill test needs to match the objective to measure the
outcome of performance
• Performance objectives must include performance,
condition, and standard
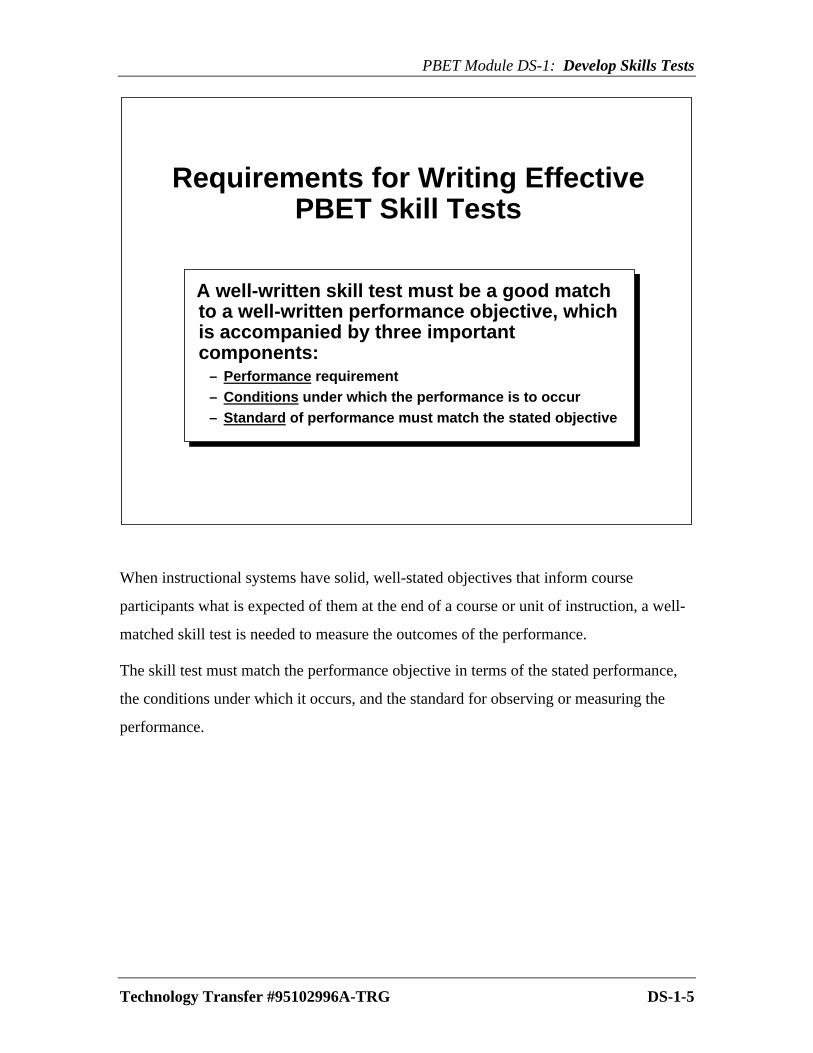
PBET Module DS-1: Develop Skills Tests
Technology Transfer #95102996A-TRG DS-1-5
A well-written skill test must be a good matchto a well-written performance objective, whichis accompanied by three importantcomponents:
– Performance requirement– Conditions under which the performance is to occur– Standard of performance must match the stated objective
Requirements for Writing EffectivePBET Skill Tests
When instructional systems have solid, well-stated objectives that inform course
participants what is expected of them at the end of a course or unit of instruction, a well-
matched skill test is needed to measure the outcomes of the performance.
The skill test must match the performance objective in terms of the stated performance,
the conditions under which it occurs, and the standard for observing or measuring the
performance.

Instructor Guide
Practice Exercise
• Verify that practice examples have skill tests that
match their performance examples
• After reading the examples and determining an answer,
compare your answer with a colleague
• If you need assistance, consult with the workshop
instructor or assistant
Instructor Note: If you prefer, you may have the
participants complete the practice exercises as a group
Skill Test Example No. 1
Instructor Note: After participants have completed the
practice, review the correct answer
• The correct answer is, “Yes, they match”
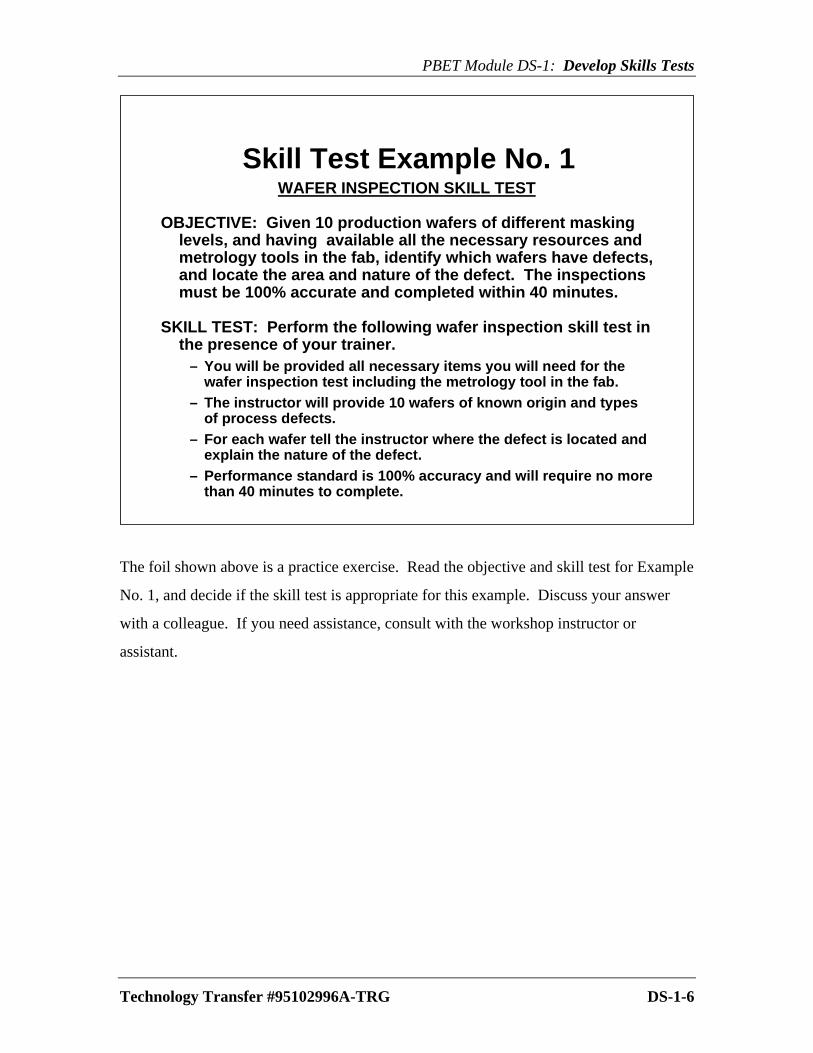
PBET Module DS-1: Develop Skills Tests
Technology Transfer #95102996A-TRG DS-1-6
Skill Test Example No. 1WAFER INSPECTION SKILL TEST
OBJECTIVE: Given 10 production wafers of different maskinglevels, and having available all the necessary resources andmetrology tools in the fab, identify which wafers have defects,and locate the area and nature of the defect. The inspectionsmust be 100% accurate and completed within 40 minutes.
SKILL TEST: Perform the following wafer inspection skill test inthe presence of your trainer.
– You will be provided all necessary items you will need for thewafer inspection test including the metrology tool in the fab.
– The instructor will provide 10 wafers of known origin and typesof process defects.
– For each wafer tell the instructor where the defect is located andexplain the nature of the defect.
– Performance standard is 100% accuracy and will require no morethan 40 minutes to complete.
The foil shown above is a practice exercise. Read the objective and skill test for Example
No. 1, and decide if the skill test is appropriate for this example. Discuss your answer
with a colleague. If you need assistance, consult with the workshop instructor or
assistant.

Instructor Guide
Skill Test Example No. 2
Instructor Note: After participants have completed the
practice, review the correct answer
• The correct answer is, “No, they don’t match”
− Objective says “execute”
− Skill test says “show”

PBET Module DS-1: Develop Skills Tests
Technology Transfer #95102996A-TRG DS-1-7
RUN A FIRST MASK EXPOSURE JOB
OBJECTIVE: Given the proper reticle, resist-coatedwafers, and a job number, load the reticle and thewafers into the Astaire-1950 Stepper, call up the properjob parameters, and execute a first mask exposure job.Your performance will be evaluated by the courseinstructor against the Operations Specifications.
SKILL TEST: At the designated stepper, explain to yourtrainer the procedure for executing a first maskexposure job.
– Show him where you would load the wafers and where toplace the reticle.
– Show him on the stepper which job parameters to use.
Skill Test Example No. 2
Read the objective and skill test for Example No. 2, and decide if the skill test is
appropriate for the objective. Discuss your answer with a colleague. If you need
assistance, consult with the workshop instructor or assistant.

Instructor Guide
Skill Test Example No. 3
Instructor Note: After participants have completed the
practice, review the correct answer
• The correct answer is, “No, they don’t match”
− Objective says “perform”
− Skill test says “number”

PBET Module DS-1: Develop Skills Tests
Technology Transfer #95102996A-TRG DS-1-8
PERFORM AN RF GENERATOR ALIGNMENT
OBJECTIVE: Assuming all tools, parts, schematics, andalignment specifications are available, perform acomplete alignment on an FRQ-5000 RF generator. Thealignment must be completed in less than 20 minutesand the harmonic distortion <5%.
SKILL TEST: Given the following steps required in theFRQ-5000 RF generator alignment, number them in theproper order from 1 to 6.
– Set up the frequency counter for a frequency of 13.5 MHz.– Adjust crystal amplifier for maximum output.– Connect the oscilloscope to the AGC test point.– Adjust the output of the first IFPA to maximum.– Monitor the SWR meter on the front panel.– Adjust the PA LC network for maximum power.
Skill Test Example No. 3
Read the objective and skill test for Example No. 3, and decide if the skill test is
appropriate for the objective. Discuss your answer with a colleague. If you need
assistance, consult with the workshop instructor or assistant.

Instructor Guide
Skill Test Example No. 4
Instructor Note: After participants have completed the
practice, review the correct answer
• The correct answer is “Yes, they match”
A4Instructor Note: Talk to the participants about the
different types of skill tests as you walk them through the
Guidelines for Writing Certification Tests in the Appendix
of their notebook -- page C-8 and C-9.

PBET Module DS-1: Develop Skills Tests
Technology Transfer #95102996A-TRG DS-1-9
Skill Test Example No. 4
LOCATE AND DESCRIBE SIX PARTS OF A WAFER
OBJECTIVE: Given a diagram of a wafer and the correctwafer terminology, locate the six parts of a wafer bymatching the correct descriptions.
SKILL TEST: Using the wafer diagram and the list ofmatching words and statements from the Appendix,correctly locate and identify the six parts of a wafer.
Read the objective and skill test for Example No. 4, review the Appendix pages and
decide if the skill test is appropriate for the objective. Discuss the answer with a
colleague. Refer to pages C-8 and C-9 in Appendix C for an example of this test.

Instructor Guide
A4Instructor Note: Walk the participants through the
Guidelines for Writing Certification Tests in Appendix C
(page C-5) of their notebooks following Tab 9
Skill Test
Instructor Note: Two parts to this test: (1) Legos,
(2) Participants individual project
Lesson Planning Form
(1) The skill test for the Lego assembly lesson will be
written in the Lesson Planning Form
• Have participants describe what will be included in the
test
(2) Using a performance objective from your area of
expertise, or one created in Module AN-3, develop a
skill test to match the objective
• Test must be conducted under the same conditions as
stated in the objective
• Write the objective and skill test on a separate sheet of
paper
• Please note that this skill test matches the objectives
for this module
• Review each participant’s test
• You may ask for assistance

PBET Module DS-1: Develop Skills Tests
Technology Transfer #95102996A-TRG DS-1-10
Instructor: Class:
Module Title: __________________________________________________
Target Audience: ________________________ Location: ______________
Module Objective: ________________________________________________________________________________________________________________________________________________________________________________________________________________________________________________________________________________________________________________________________________________________________________________________________________________________________________________________
Prerequisite Skills: _______________________________________________________________________________________________________________________________________Skill Test: ___________________________________________________________________________________________________________________________________________________________________________________________________________________________________________________________________________________________________________________________________________________________________________________
Write the skill test in this area.
Skill Test
SKILL TEST
• Review the module objective with your project colleague.
• Review the important elements of designing skill tests as described in this module.
• Draft a skill test on separate paper, then review and edit your work so that it conforms
to the criteria described in this module. Does the skill test match the objective in terms
of: __ performance, __ condition and __ standard?
• If it is a “hands-on” test, have you provided instructions for both trainer and trainee in
clear, user-friendly language?
• If it is a written test, have you provided some sample test items or a clear description
of the type of written test that will be given?
• Ask the course instructor to review the test description. The instructor will use the
same criteria as above to evaluate your work.
• When the drafted test is approved by the course instructor, you and your colleague
should transfer the extended narrative form to your Lesson Planning Forms.
• Now, take your second Lesson Planning Form on which you have already written an
objective for a lesson of your own choosing. Design a test for that objective and fill in
the Skill Test section. When finished, have the course instructor review this test.
Instructor Guide
DS-2 DESCRIBE RELEVANT PRACTICE
• We’ve covered how to develop skill tests for PBET
• Now we’re going to talk about relevant practice in
training materials
Describe Relevant Practice to Support Objectives
• Ask a volunteer to read the objective from the foil
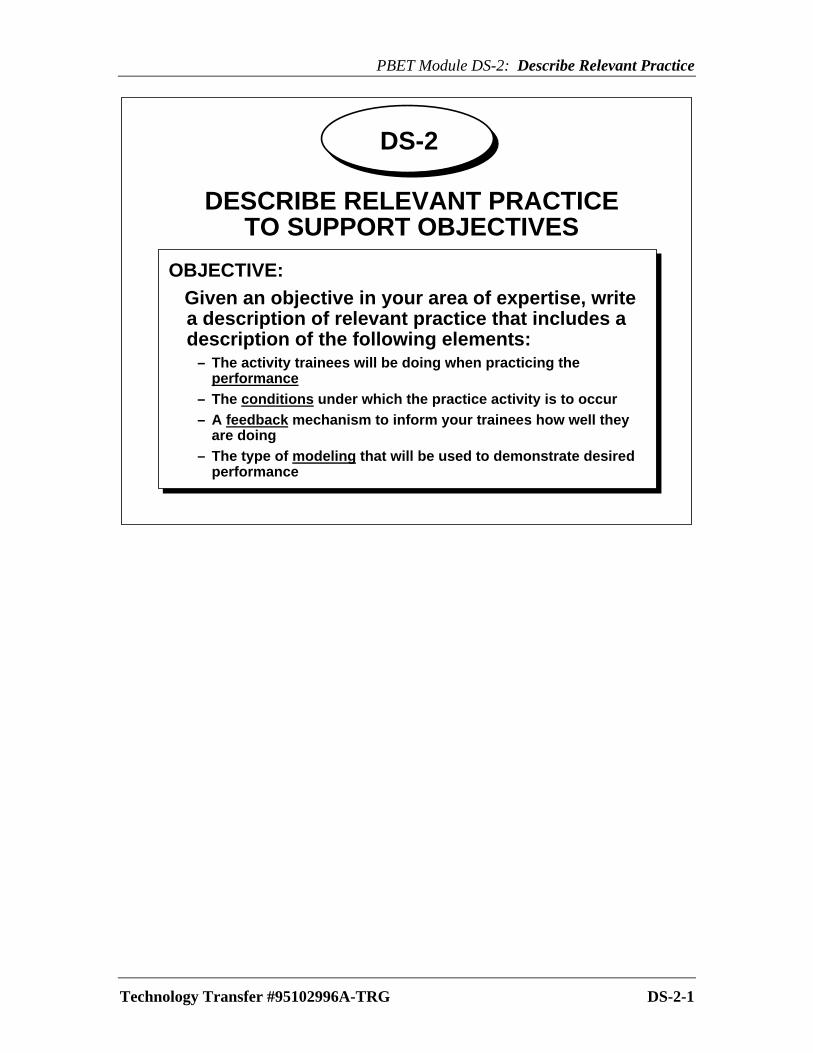
PBET Module DS-2: Describe Relevant Practice
Technology Transfer #95102996A-TRG DS-2-1
DESCRIBE RELEVANT PRACTICETO SUPPORT OBJECTIVES
OBJECTIVE: Given an objective in your area of expertise, write
a description of relevant practice that includes adescription of the following elements:
– The activity trainees will be doing when practicing theperformance
– The conditions under which the practice activity is to occur– A feedback mechanism to inform your trainees how well they
are doing– The type of modeling that will be used to demonstrate desired
performance
DS-2
Instructor Guide
Four Components of Relevant Practice
• Relevant practice includes:
− Performance
− Conditions
− Modeling
− Feedback
• Performance -- the activity performed based on the
performance objective (This has been defined in a
previous module.)
• Conditions -- how, where, and with what the practice
occurs
• Modeling -- a way of demonstrating the performance to
the course participants
• Feedback -- given during the practice, a way of letting
course participants know how they are progressing
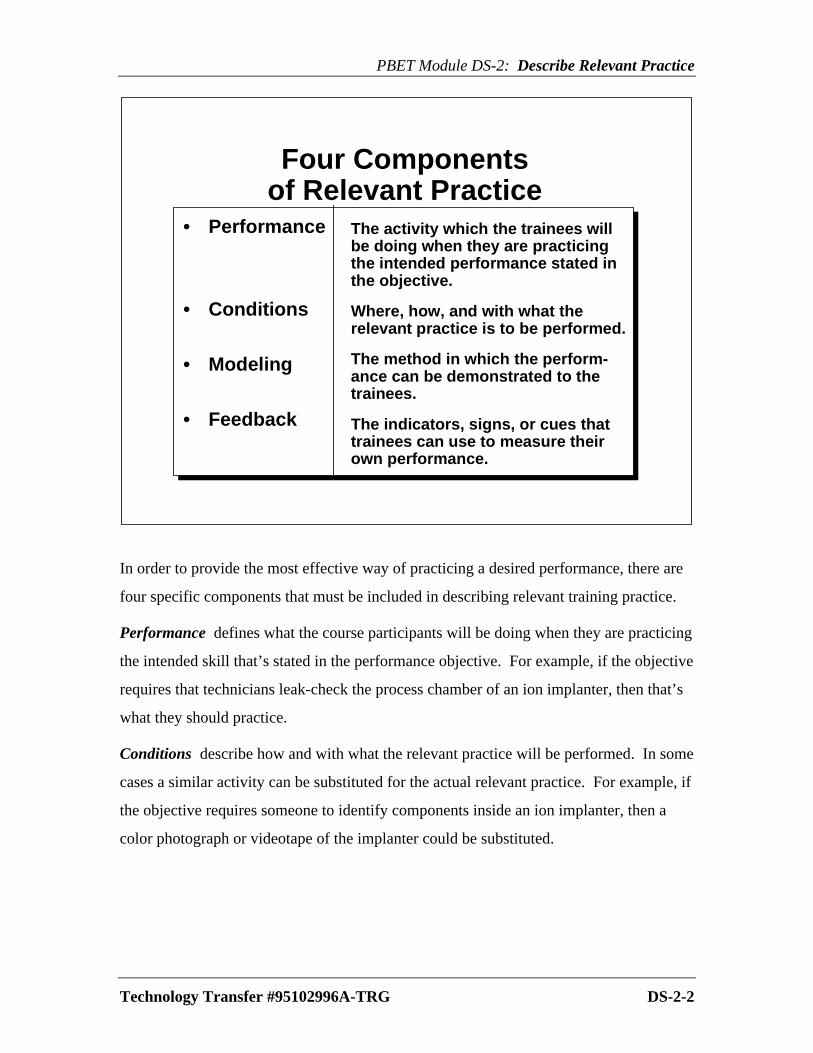
PBET Module DS-2: Describe Relevant Practice
Technology Transfer #95102996A-TRG DS-2-2
Four Componentsof Relevant Practice
• Performance
• Conditions
• Modeling
• Feedback
The activity which the trainees willbe doing when they are practicingthe intended performance stated inthe objective.
Where, how, and with what therelevant practice is to be performed.
The method in which the perform-ance can be demonstrated to thetrainees.
The indicators, signs, or cues thattrainees can use to measure theirown performance.
In order to provide the most effective way of practicing a desired performance, there are
four specific components that must be included in describing relevant training practice.
Performance defines what the course participants will be doing when they are practicing
the intended skill that’s stated in the performance objective. For example, if the objective
requires that technicians leak-check the process chamber of an ion implanter, then that’s
what they should practice.
Conditions describe how and with what the relevant practice will be performed. In some
cases a similar activity can be substituted for the actual relevant practice. For example, if
the objective requires someone to identify components inside an ion implanter, then a
color photograph or videotape of the implanter could be substituted.

Instructor Guide
NOTES:

PBET Module DS-2: Describe Relevant Practice
Technology Transfer #95102996A-TRG DS-2-3
Modeling provides a way in which the performance can be demonstrated to a course
participant. Again, the trainer or another competent performer can model the desired
performance. As with the feedback mechanism, and depending on the type of
performance, there may be other ways in which the performance can be modeled.
Feedback wherever possible, provides indicators, signs, or cues that the course
participants can use to measure their own performance. And, if that’s not possible,
feedback provides a means for informing the participants about how well they are
progressing.

Instructor Guide
Relevant Practice
• The more an activity is repeated, the more successful
the performance
• Unless practice is relevant to the performance
objective, it will have little benefit
• In track and field, a discus thrower gains little by
practicing sprinting and hurdling -- they’re unrelated
skills
• Relevant practice would be gained by practicing with
the hammer -- the motions are similar to discus-
throwing
• In training, as in athletics, practice must be relevant to
the performance required
• Conditions during practice need to be relevant to
conditions that will exist during the actual performance
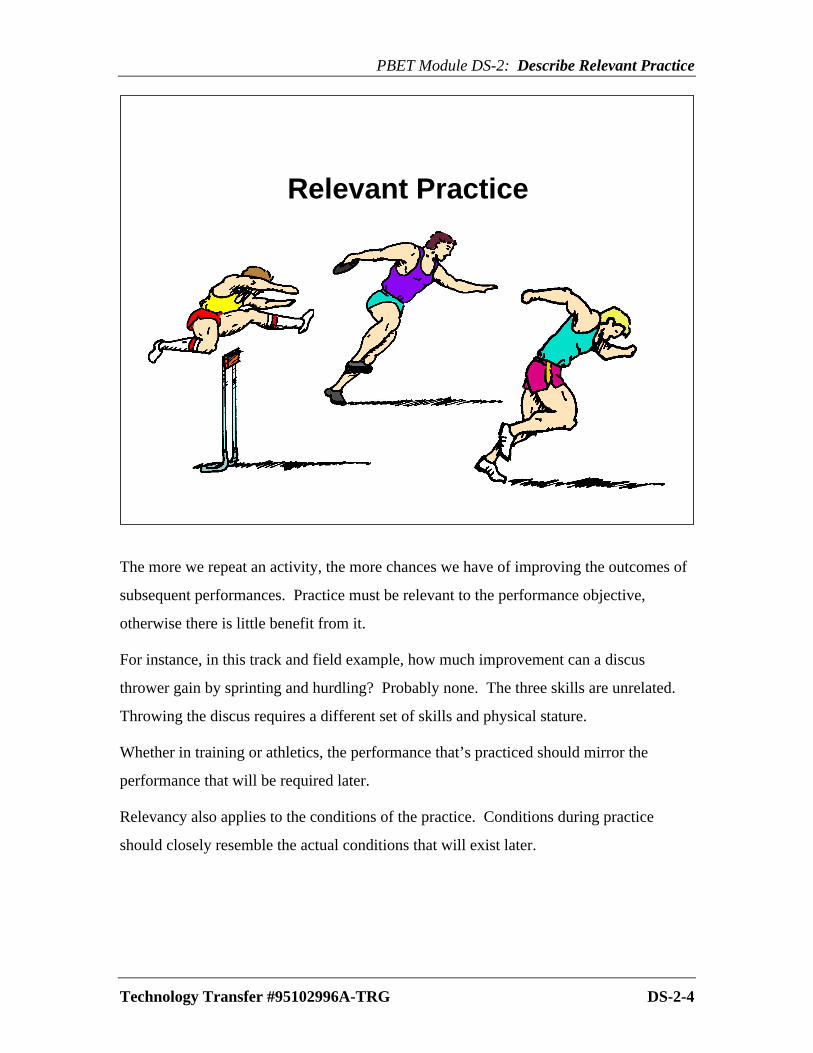
PBET Module DS-2: Describe Relevant Practice
Technology Transfer #95102996A-TRG DS-2-4
Relevant Practice
The more we repeat an activity, the more chances we have of improving the outcomes of
subsequent performances. Practice must be relevant to the performance objective,
otherwise there is little benefit from it.
For instance, in this track and field example, how much improvement can a discus
thrower gain by sprinting and hurdling? Probably none. The three skills are unrelated.
Throwing the discus requires a different set of skills and physical stature.
Whether in training or athletics, the performance that’s practiced should mirror the
performance that will be required later.
Relevancy also applies to the conditions of the practice. Conditions during practice
should closely resemble the actual conditions that will exist later.
Instructor Guide
The Dick Goutal Relevant Practice Conditions Scale
• This scale describes the resulting effect of using other
objects or conditions to practice the requirement of the
actual objective
• Read the objective in the circle
• Look at the change in conditions starting from the top, a
machine in Fab, to the bottom, a list of machine functions
• The result is - as the original conditions are approximated
less and less, the reliability of the inference diminishes
• The inference we (trainers) often make is that trainees can
and will perform the same under Fab conditions as when
certified under the conditions provided when tested
• Does it matter? Only to the degree of importance of the
original performance discrepancy

PBET Module DS-2: Describe Relevant Practice
Technology Transfer #95102996A-TRG DS-2-5
Relevant Conditions Continuum
OBJECTIVE:
Given a fully functioning machine in thewafer fab, locate parts and state onefunction of each part on Lab List B.
PROBLEMS?
Safety? Available instructors? Equipment access? Costs? Not enough time? Effort???
This is the inference: That trainees CAN and WILL performthe same under fab conditions as when certified under theconditions provided when tested.
Does it matter? Only to the degree of importance of theoriginal performance discrepancy.
As the OriginalConditions
Are ApproximatedLess and Less...
...The Reliability ofthe InferenceDiminishes
The Machinein the Fab
The TrainingMachine
in the Lab
PartiallyAssembled
Machine
MachineParts on a
Table
Scale Model ofMachine on a
Table
WalkAround
Video
of Machine
Snapshotsof Machine
Diagramof
Machine
List ofParts &
List ofMachine
Functions
1 2 3
A B C

Instructor Guide
Relevant Practice -- Model Behavior
• Another way of learning proper techniques is to watch
someone demonstrate or model an activity
• If live demonstrations aren’t possible, videos, slides, or
films can be used

PBET Module DS-2: Describe Relevant Practice
Technology Transfer #95102996A-TRG DS-2-6
Relevant Practice
Model Behavior- Demonstrate- Coach- Train
Another way of learning the proper techniques for performing a task during practice is
having someone or something demonstrate or model the activity. In athletics, this task is
usually handled by coaches and trainers, however, other methods can be used. For example,
videotapes, slides, films, etc., can demonstrate or model the necessary activity or procedure.

Instructor Guide
Relevant Practice -- Feedback Mechanisms
• Athletes and others want their progress measured
• They want to see how much they’re improving

PBET Module DS-2: Describe Relevant Practice
Technology Transfer #95102996A-TRG DS-2-7
Relevant Practice
Feedback Mechanisms
Athletes and other performers need to know how well they are progressing toward their
desired objectives. In the case of the discus thrower, a measuring tape can measure the
distance he or she is able to hurl the discus.
The measuring tape becomes the feedback mechanism to measure improvement.
Unfortunately, if there’s no improvement, the measuring tape won’t tell him or her how to
improve. Once again, a coach or a trainer can provide this feedback. Today, technologists
are also using video and computer analysis to improve athletic performance.

Instructor Guide
Pitfalls to Avoid When Planning Relevant Practice
• The following are some common pitfalls to which
some training developers fall victim
• Partial practice -- objective says “calibrate a vacuum
system throttle valve”
− Partial practice would be to “describe how to
calibrate a vacuum system throttle valve”
• Disproportionate practice -- too little or too much
practice; for example, objective says troubleshoot
vacuum system
− Plenty of practice on schematic tracing, but little
time spent on actual vacuum leak detection
methods
• Misdirected practice -- when performers can rely on
signals for the correct answers
− A wear pattern or an instructor’s reaction that
signals the correct answer
• Limited practice -- when practice is limited due to lack
of operational equipment, lack of individualized
practice, or only practice on diagnosis versus
equipment
PBET Module DS-2: Describe Relevant Practice
Technology Transfer #95102996A-TRG DS-2-8
Pitfalls to Avoid WhenPlanning Relevant Practice
• Partial practice
• Disproportionate practice
• Misdirected practice
• Limited practice
In planning and developing practice that’s relevant, avoid the common pitfalls to which
some training developers fall victim.
Partial practice – If the objective is to “calibrate a vacuum system throttle valve,” partial
practice would be to “describe how to calibrate a vacuum system throttle valve.”
Disproportionate practice – Too much practice or too little practice.
Misdirected practice – When performers can rely on other signals for the correct answers,
such as wear patterns or the instructor’s reaction to clue them to the correct answers.
Limited practice – When practice is limited due to lack of operational equipment, lack of
individualized practice and too much group practice; only practicing on paper and
diagrams instead of equipment, etc.
Instructor Guide
1. Examples of Relevant Conditions
Instructor Note: Read the foil to the participants and ask
if there are any questions about the performance of the
practice activity
What if your training scenario is one or more of these:
1A. Best Case Scenario
You have available:
− Unlimited access to production equipment
− A training lab with appropriate equipment
− Plenty of classroom space
− A dedicated trainer for each area
− On-line computer documentation, etc.
-OR-
1B. Alternative Scenario
You have:
− Limited access to production equipment
− Few trainers available
− Adequate classroom space

PBET Module DS-2: Describe Relevant Practice
Technology Transfer #95102996A-TRG DS-2-9
1. Examples of RelevantConditions
Objective: Given a list of 10 parts belonging to an ionsource, locate them and state the purpose of eachone.
1A. Best Case Condition: Have the exact ion sourceavailable so students can practice.
1B. Alternative Condition: Have available one or morecolor photographs of the exact ion source withalphanumeric labels.

Instructor Guide
2. Other Examples of Relevant Conditions
Instructor Note: Read the foil to the participants and ask
if there are any questions about the conditions of the
practice activity

PBET Module DS-2: Describe Relevant Practice
Technology Transfer #95102996A-TRG DS-2-10
2. Other Examples of RelevantConditions
Objective: Given a list of 10 parts belonging to an ionsource, locate them and state the purpose of eachone.
2A. Best Case Condition: Classroom.
2B. 1st Alternative Condition: Shop area, storage area.
2C. 2nd Alternative Condition: Ion implanter inside fab.

Instructor Guide
3. Examples of Modeling Methods
Instructor Note: Read the foil to the participants and ask
if there are any questions about the conditions of the
practice activity
PBET Module DS-2: Describe Relevant Practice
Technology Transfer #95102996A-TRG DS-2-11
3. Examples of Modeling Methods
Objective: Given a list of 10 parts belonging to an ionsource, locate them and state the purpose of eachone.
3A.Best Case Modeling Method: A trainer or othertechnician can point at one part of the ion source,say the name of the part, and describe the purposeof it.
3B.Alternative modeling Method: Provide one or morecolor pictures; one part of the ion source has a labelon it naming the part and a short description of thepurpose of the part.

Instructor Guide
4. Examples of Feedback Mechanisms
Instructor Note: Read the foil to the participants and ask
if there are any questions about the conditions of the
practice activity

PBET Module DS-2: Describe Relevant Practice
Technology Transfer #95102996A-TRG DS-2-12
4. Examples of FeedbackMechanisms
Objective: Given a list of 10 parts belonging to an ionsource, locate them and state the purpose of eachone.
4A.Best Case Feedback Mechanism: A trainer or othertechnician can inform the trainee of the number ofcorrect responses the trainee made and whichspecific ones were correct.
4B.Alternative Feedback Mechanisms: The trainee willhave available a checksheet with the correctresponses.
Instructor Guide
Practice Exercise No. 1
Instructor Note: Assign each of the following practiceexercises to small groups. (The same exercises can beassigned to different small groups if you have a largeclass.)
Have participants read their practice exercise, and as agroup decide on the answers. One person from each groupwill present their answers to the class.
Show the foil for each practice exercise when the smallgroups are explaining their answers.
1. Description of Performance - tell which wafers have
defects and locate the area and nature of the defect
2. Description of Conditions
– Best case - classroom with 10 real wafers or 10
pictures of wafers with defects
– Alternative or none - 120 real wafers in the Fab
3. Description of Modeling Method
– Best case - a person
– Alternative or none - video/slides/color pictures
4. Description of Feedback Mechanism
– Best case - checklist of correct responses*
– Alternative or none - peer trainer
*The best case for feedback mechanism is a systemwhereby the learner can immediately check his/her ownwork and tell what’s wrong and how to correct it.

PBET Module DS-2: Describe Relevant Practice
Technology Transfer #95102996A-TRG DS-2-13
Practice Exercise No. 1
Objective: Given 10 production wafers of different masklevels, tell which wafers have defects and locate the areaand nature of the defect.
1. Description of PerformanceSame as objective
2. Description of Conditions2A. Best case2B. Alternative or none
3. Description of Modeling Method3A. Best case3B. Alternative or none
4. Description of Feedback Mechanism4A. Best case4B. Alternative or none
Decide as a small group what would be the best case and the alternative for the example
above. Be prepared to share your answers with the class.
Instructor Guide
Practice Exercise No. 2
Instructor Note: Ask the small group that was assigned
this practice exercise to share their answers with the class
1. Description of Performance
2. Best case - real stepper in classroom
– Alternative or none - a stepper in fab or photos
with labels
3. Best case - trainer or an expert
– Alternative or none -video or drawings
4. Best case - checksheet
– Alternative or none - real person
Instructor Note: List basic 4-step approach to on-the-job
training and describe how the PBET model is similar.
Traditional OJT Approach PBET Approach
1. Tell them what they State performance objectiveare expected to do in the beginning
2. Show them how Model the performanceto do it
3. Let them do it while Relevant practice withyou coach them feedback
4. Let them show you Skill test

PBET Module DS-2: Describe Relevant Practice
Technology Transfer #95102996A-TRG DS-2-14
Practice Exercise No. 2
Objective: Given an Astaire Stepper and a 14-stepchecksheet designated for “daily checks,” the trainee willperform each daily check accurately, and relate any errorsor nonstandard conditions to the trainer. The trainee mustalso interpret the nonconforming conditions correctly tothe trainer.
1. Description of PerformanceSame as objective
2. Description of Conditions2A. Best case2B. Alternative or none
3. Description of Modeling Method3A. Best case3B. Alternative or none
4. Description of Feedback Mechanism4A. Best case4B. Alternative or none
Decide as a small group what would be the best case and the alternative for the example
above. Be prepared to share your answers with the class.
Here’s an easy way to help you remember the steps in the PBET training model. Let’s
compare it to a more traditional approach to doing on-the-job training.
Traditional OJT Approach PBET Methodology
1. Tell them what they are expected to do State performance objective in the beginning
2. Show them how to do it Model the performance
3. Let them do it while you coach them Give them relevant practice with feedback
4. Let them show you They perform the skill test
Instructor Guide
Skill Test
• Using the performance objective, skill test, additional
resources, and list of aids, tools, and materials for the
Legos lesson you are developing, write a relevant
practice description to explain (list on flip chart):
– How to orient Legos when assembling
– Special verbal or hand cues
– How to hold Legos when assembling
– How to fasten and unfasten Legos
– How the job aid will be used, etc.
• Be sure the description includes the four components of
an effective practice.
• Write the description in your Lesson Planning Form
• Please note that the skill test matches the objective
• If you don’t achieve mastery, ask for assistance, or
rework the test until mastery is achieved
PBET Module DS-2: Describe Relevant Practice
Technology Transfer #95102996A-TRG DS-2-15
SKILL TEST
• Review the Lesson Planning Form you are developing for the lesson assigned to you
by the course instructor.
• Review the important elements of relevant practice covered in this module.
• Discuss with our project partner various ideas for modeling, arranging conditions, and
providing feedback for the trainee’s practice session(s).
• Fill in the Relevant Practice sections (there are four of them) on the back of your
Lesson Planning Form.
• Review your work against this criteria:
– Performance - Does the performance statement match the objective?
– Condition - Does the condition match the objective?
– Modeling - Have you stated who or what will be used to show the trainee how to
perform the activity? Have you stated what part of the practice will be modeled (all
or it or just a part of it)?
– Feedback - Have you stated what indicators, signs, or cues will help trainees
measure their own performance, or have you stated who will evaluate/coach the
trainee?
• Ask the instructor to review your “Relevant Practice Description.” The instructor will
use the same criteria as above to determine “sign off” on this module.
!!!!!
The skill test should match the requirements of the objective as stated earlier in the
module.
Again, if the course participant does not achieve mastery of the intended skill, then the
participant may ask for assistance, or rework the test until mastery is achieved.

Instructor Guide
A4Instructor Note: Reference Semitherm Lesson Planning
Form in Appendix D (pages D-5 & 6) for examples

PBET Module DS-2: Describe Relevant Practice
Technology Transfer #95102996A-TRG DS-2-16
Relevant Practice Description:
Conditions:
Type of Modeling:
Feedback Mechanism:
Module Content Description:
Instructor Guide
DS-3 ANALYZE RESOURCE MATERIALS
PBET Course Map
• We are now at this location on the PBET course map
• Now we’re going to cover how to analyze available
resource materials
Analyze Resource Materials
• Ask a volunteer to read the objective from the foil
• Ask audience “how many brought resource
materials?”
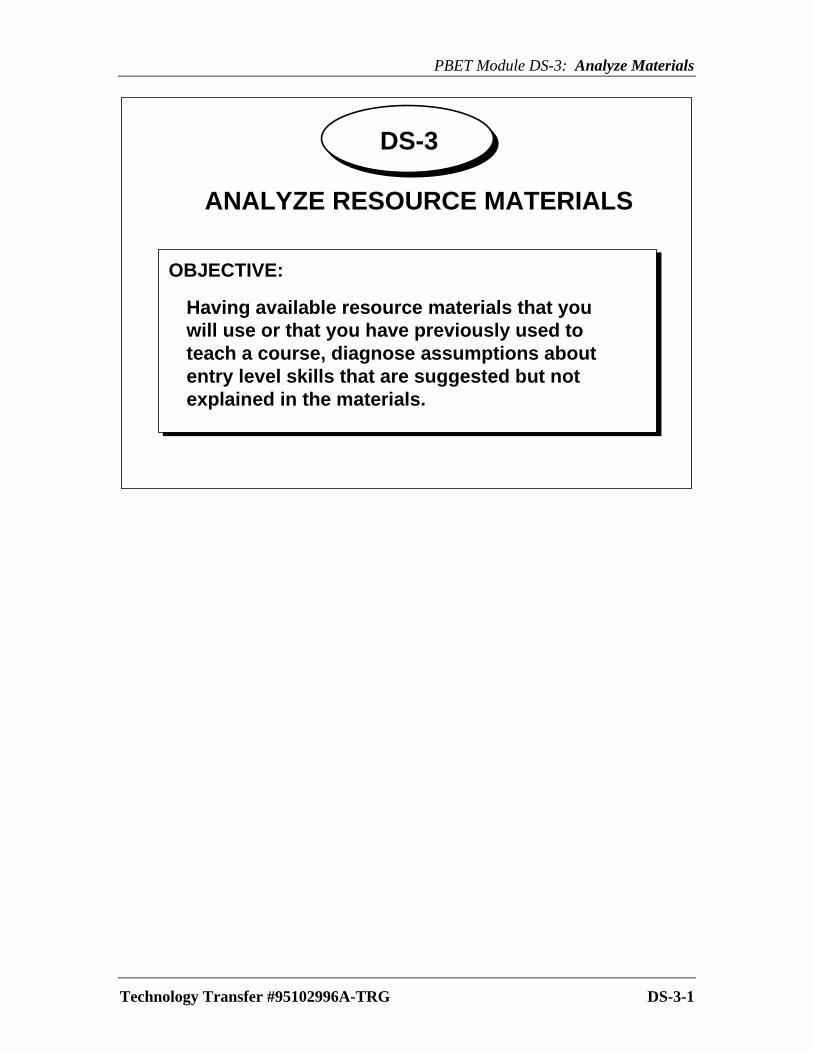
PBET Module DS-3: Analyze Materials
Technology Transfer #95102996A-TRG DS-3-1
ANALYZE RESOURCE MATERIALS
OBJECTIVE:
Having available resource materials that youwill use or that you have previously used toteach a course, diagnose assumptions aboutentry level skills that are suggested but notexplained in the materials.
DS-3
Instructor Guide
Select Supporting Resources and InstructionalMaterials
• Regardless of how the course is presented, developers
need to evaluate supporting resources for relevancy
• Supporting resource materials may include:
– Technical manuals
– Textbooks
– Videotapes
– Charts
– Foils
– Slides
– Written procedures
– Checklists
– Brochures

PBET Module DS-3: Analyze Materials
Technology Transfer #95102996A-TRG DS-3-2
Select Supporting Resourcesand Instructional Materials
• Technical Manuals• Textbooks• Videotapes• Slides• Brochures• Checklists• Written Procedures
Regardless of the style of instructional techniques an instructor uses in the course –
whether it’s traditional instructions, performance-based, self-paced, or group instruction –
the developer must evaluate the supporting resources used in the course for relevancy.
Supporting resource materials can take the form of technical manuals, textbooks,
videotapes, charts, foils, slides, written procedures, checklists, and even sales brochures.
The instructor needs to compare the subject matter resources with the objectives, skill
tests, and target audience description of the course.

Instructor Guide
Evaluate Supporting Resources and InstructionalMaterials
• Ask participants what they consider when the evaluate
supporting instructional materials
• Write their responses on the flipchart
• Possible answers from part groups have included:
– Performer audience
– Reading level
– Vocabulary of materials
– Coverage of content
– Ease of use/reader friendliness
– Appropriate technical level
– Information assumptions
• When developers evaluate instructional materials for
relevancy, they need to consider:
– Target audience
– Performance objectives
– Skill tests
• To supplement materials, developers may decide to:
– Order different materials
– Use visiting subject expert lecturers
– Create material
– Summarize important items
• Explain to the audience the problem with using a list of
technical terms to start a lesson or a course. Show them
what can happen by asking them for a list of technical
terms that are commonly used in our industry.
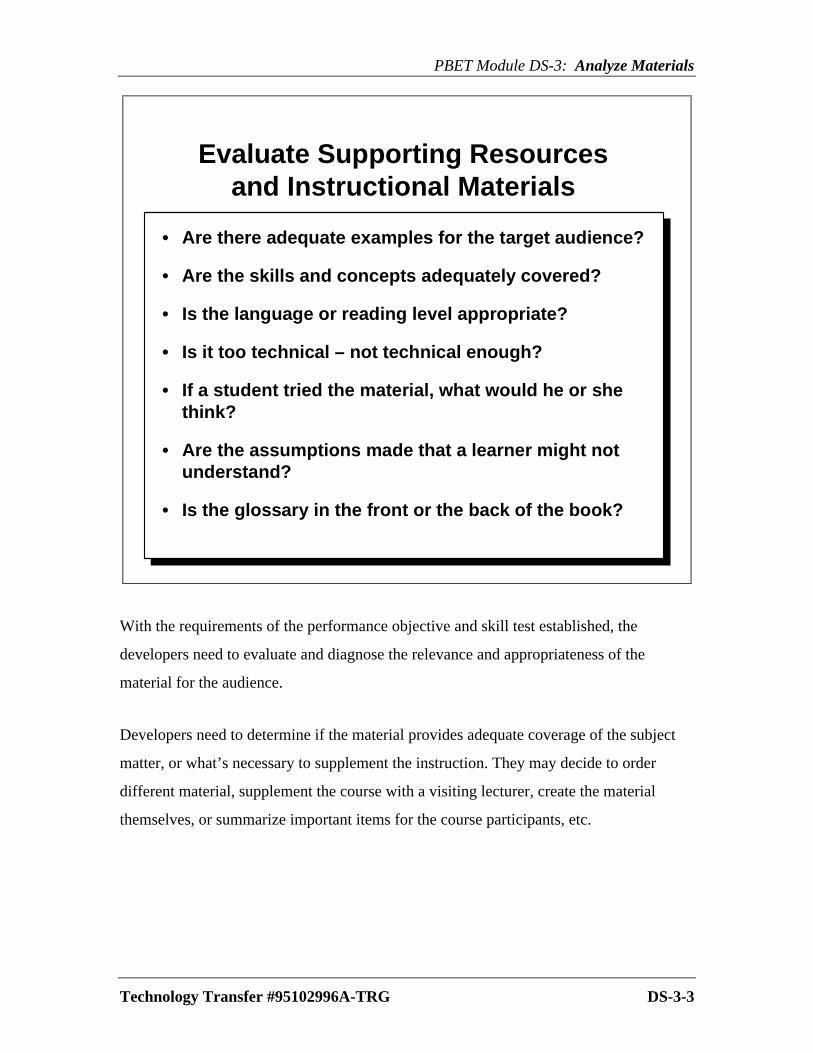
PBET Module DS-3: Analyze Materials
Technology Transfer #95102996A-TRG DS-3-3
Evaluate Supporting Resourcesand Instructional Materials
• Are there adequate examples for the target audience?
• Are the skills and concepts adequately covered?
• Is the language or reading level appropriate?
• Is it too technical – not technical enough?
• If a student tried the material, what would he or shethink?
• Are the assumptions made that a learner might notunderstand?
• Is the glossary in the front or the back of the book?
With the requirements of the performance objective and skill test established, the
developers need to evaluate and diagnose the relevance and appropriateness of the
material for the audience.
Developers need to determine if the material provides adequate coverage of the subject
matter, or what’s necessary to supplement the instruction. They may decide to order
different material, supplement the course with a visiting lecturer, create the material
themselves, or summarize important items for the course participants, etc.

Instructor Guide
A4
Ask them for words that being with the letter “A”, e.g.,
angstrom, arsenic, antimony, align, antisotropic, anti-
reflective coating, acid ampere. Ask them if they can relate
these words to each other.
Practice Exercise
• In Appendix B of your notebook, there are samples of
text materials
– Select a subject in which you lack competency
• Read the sample and highlight or list knowledge
assumptions the author made
• Check your findings with a colleague
Instructor Note: You may wish to review their findings as
a group
Take each sample one at a time. Have the students read the
first one and then critique together

PBET Module DS-3: Analyze Materials
Technology Transfer #95102996A-TRG DS-3-4
PRACTICE EXERCISE
• Select an example of text material with which you are not familiar.
• Read through it and underline or highlight assumptionhs.
• Compare your list with a colleague’s and discuss any differences.
!!!!!
Select at least one example of text material that deals with a subject in which you cannot
claim competence. There are several examples in Appendix B of your notebook.
Read through the text and list any assumptions the writer seems to have made about the
beginning skills of his or her readers. Feel free to underline or highlight the assuptions in
the examples.
Check your list with a colleague to see if he or she agrees with you.

Instructor Guide
Skill Test
• Select a written resource from a subject you teach
• Show it to me so I can select a passage for a colleague
to diagnose
• If available, and time permits, use the copier to make
copies of the pages I select
• Give the copies to a colleague to diagnose assumptions
in the materials
Instructor Note: Instructor assigns colleagues
• Explain to the colleague the intention of the book’s
target audience and any prerequisites
• As you review your colleague’s materials, write
feedback on the pages in pencil or on sticky notes
• Your colleague will do the same for your resource
Instructor Note: Select about 10 pages from the
introductory section for colleagues to review
Reference Appendix D (page D-2) for those who did not
bring documents
PBET Module DS-3: Analyze Materials
Technology Transfer #95102996A-TRG DS-3-5
SKILL TEST
• Select a written resource for a subject you are responsible for teaching.
Show the material to your instructor so he/she can select a passage for a colleague to
diagnose. Typically, the instructor will select the first section in the material.
• The instructor will do the same for all course participants
• Exchange materials with another course participant.
– Describe the target audience who would be required to read the material.
– Explain any prerequisite skills/knowledge that the target audience must have before
attempting to read the material.
• You will review a colleague’s resource material for inappropriate assumptions, unclear
explanations, confusing information, and inappropriate structure. Make comments and
suggestions on a separate sheet of paper or use sticky paper notes to localize problem areas
on specific pages of the document.
• When you have finished diagnosing a colleague’s material, return it to the owner and review
each other’s materials.
Write the titles or names of the resources you plan to use in the Lesson Planning form.
!!!!!

Instructor Guide
Lesson Planning Form
• There’s no need for additional resources for the Legos
training.
PBET Module DS-3: Analyze Materials
Technology Transfer #95102996A-TRG DS-3-6
Module Objective:___________________________________________________________________________________________________________________________________________________________________________________________________________________________________________________________________________________________________________________________________________________________________________________________________________________________
Prerequisite Skills: ______________________________________________________________________________________________________________________________
Skill Test:__________________________________________________________________________________________________________________________________________________________________________________________________________________________________________________________________________________________________________________________________________________________________________________________________________________________________
Additional Resources: ___________________________________________________________________________________________________________________________
Fill in the Additional Resoucesneeded to support the module
Instructor Guide
DS-4 SELECT A DELIVERY METHOD
PBET Course Map
• We’ve covered how to anlayze materials
• Now we’re going to talk about how to select a delivery
method
Select a Delivery Method
• Ask a volunteer to read the objective from the foil
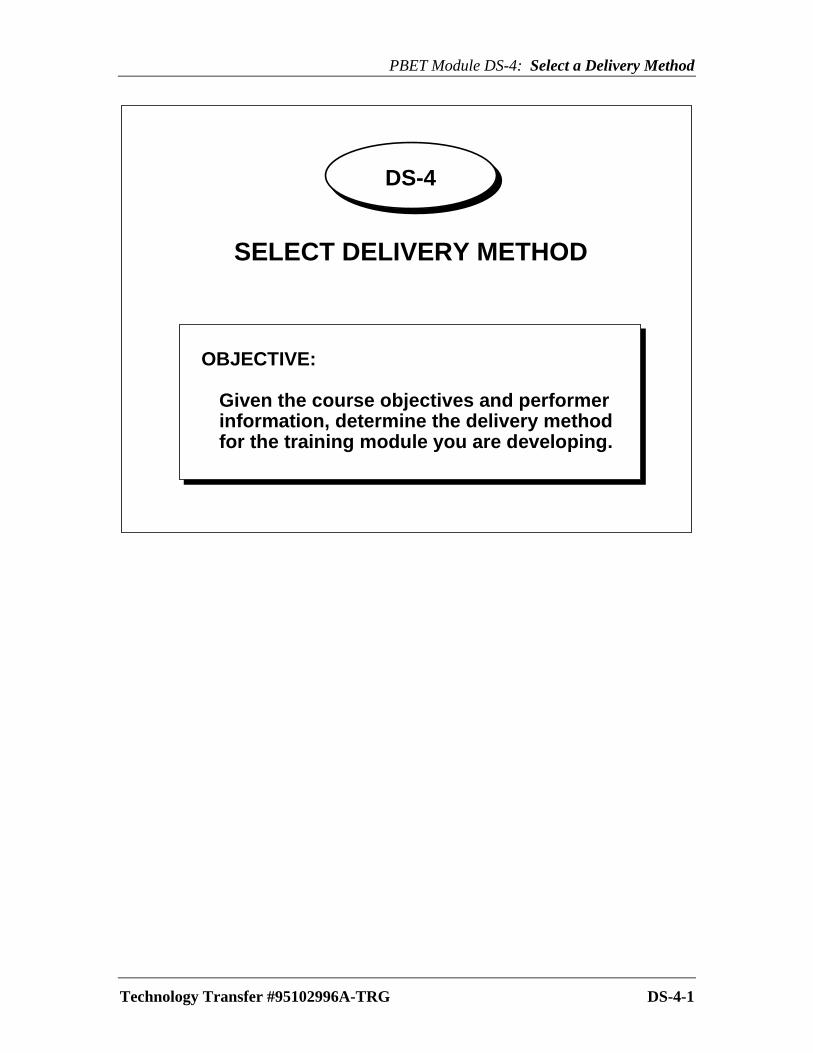
PBET Module DS-4: Select a Delivery Method
Technology Transfer #95102996A-TRG DS-4-1
DS-4
SELECT DELIVERY METHOD
OBJECTIVE:
Given the course objectives and performerinformation, determine the delivery methodfor the training module you are developing.
Instructor Guide
Decide on Delivery Method and Type of Media
• At this stage in the design phase of PBET, developers have a
good sense of needed content
• Now, developers can decide on delivery method and type of
media to use
• Developers should consider a variety of solutions for delivery
methods and media selection
• Developers should consider the following as they make their
selections:
− Training effectiveness
− Learning retention
− Scheduling
− Budget constraints
− Audience characteristics
Brainstorm Delivery Methods
• Instructor-led lecture
• Self-paced individualized instruction
• Computer-based instruction
• Computer-assisted instruction
• Programmed instruction
• One to one, peer training, on-the-job training
• Group activity
• Videotape
• Interactive video
• Multimedia

PBET Module DS-4: Select a Delivery Method
Technology Transfer #95102996A-TRG DS-4-2
By this stage, instructional developers should have a very good idea of the amount and type
of content that’s needed in the training module. The majority of the design work has been
completed along with the task analysis, performance objectives, skill tests, and any review
of available resources.
Based on the results of the preliminary analysis and design work, developers can now
decide on the delivery method and the type of media to use.
There are a variety of options and solutions for developers to consider as they plan for
training effectiveness and learning retention. Developers should consider scheduling and
budget constraints when deciding on the best delivery and media methods.
Instructor Guide
List Additional Instructional Aids and Supporting Materials
• Successful developers know how to organize information and
activities into effective presentations
− They are proactive
• Developers must decide which training aids, tools, materials,
and delivery methods enhance the learning process
• If sound and motion are important elements of the
performance, video and slide film should be considered as aids
• If enlarged or close-up views are important, consider handouts
with illustrations or photos, or posters and charts
Instructor Note: Ask participants if there are any particular types
of aids or materials that haven’t been mentioned, but which they
have found effective. Refer participants to the Training Media
Decision Chart on page A-11 of Appendix A

PBET Module DS-4: Select a Delivery Method
Technology Transfer #95102996A-TRG DS-4-3
List Additional InstructionalAids and Supporting Materials
• Transparency Foils• Equipment Manual• Video• Checklists• Flipchart & Markers• Drawing Board• Paper & Pencils• Job Aid• Camcorder
• Test Wafers• Hand Tools• Test Instruments• Astaire Stepper• Strip Chart Recorder• Microscope• Coater-Developer• Calculator• SPC Control Charts
TRAINING AIDS & MEDIA TOOLS & MATERIALS
Successful instructional developers have learned how to organize a variety of information
and activities into a well-planned presentation. They are proactive project managers.
Developers must look ahead into the application they are creating and decide on the best
delivery method, media, training aids, tools, and materials to enhance the learning process
during the training session. You will find a helpful Training Media Decision Chart in
Appendix A (page A-11).
Developers need to determine the importance of sound and motion to the subject. If they’re
relevant, then video and slide films should be considered. If participants would benefit
from a close view of things, then handouts with illustrations or photographs should be
considered. If having an enlarged view would be helpful, then posters or charts might be a
wise choice. These are just some of the considerations that need to be made by instructional
developers.

Instructor Guide
A4Practice Exercise
• Have participants turn to the sample Lesson Planning
Form in Appendix A, page A-1
− This sample shows what type of information goes
where
• Have participants turn to the real Lesson Planning
Form in Appendix A, page A-3
− This example is from a real lesson
• There are blank forms for you to copy and use at work
• Develop ideas about the delivery of your lesson and the
type of media you’ll use
• Reference Appendix D (Semitherm examples)

PBET Module DS-4: Select a Delivery Method
Technology Transfer #95102996A-TRG DS-4-4
Turn to the Appendix A to review the sample Lesson Planning Form. This sample
explains the type of information that is necessary. Next, review the example of a real
Lesson Planning Form, and look at the information that it contains.
Instructor Guide
Skill Test
• Review the list of prerequisite skills and enabling
objectives for the Lego assembly lesson
• Discuss with a colleague the different delivery methods
you can use based on:
− Topic
− Objective
− Test
− Target audience
• Using the other information you’ve included on your
Lesson Planning Form, decide on the best solutions
and a job aid based on:
− Time
− Cost
− Effectiveness
− Space
• Decide on the type of job aid you will use
• Have the instructor approve your idea for a job aid to
use in the lesson
Instructor Note: When you have approved the job aid idea
for the Lego exercise, sign off on the objective for this
module on the performance checklist

PBET Module DS-4: Select a Delivery Method
Technology Transfer #95102996A-TRG DS-4-5
SKILL TEST
Review the list of prerequisite skills and enabling objectives for the assigned lesson.
Discuss with a colleague the different delivery methods you can use based on: topic,
objective, test, and target audience. Consider the information on your Lesson Planning
Form and decide the best solutions and a job aid based on: time, cost, effectiveness, and
space.
Discuss your job aid idea with the instructor.
!!!!!

Instructor Guide
NOTES:
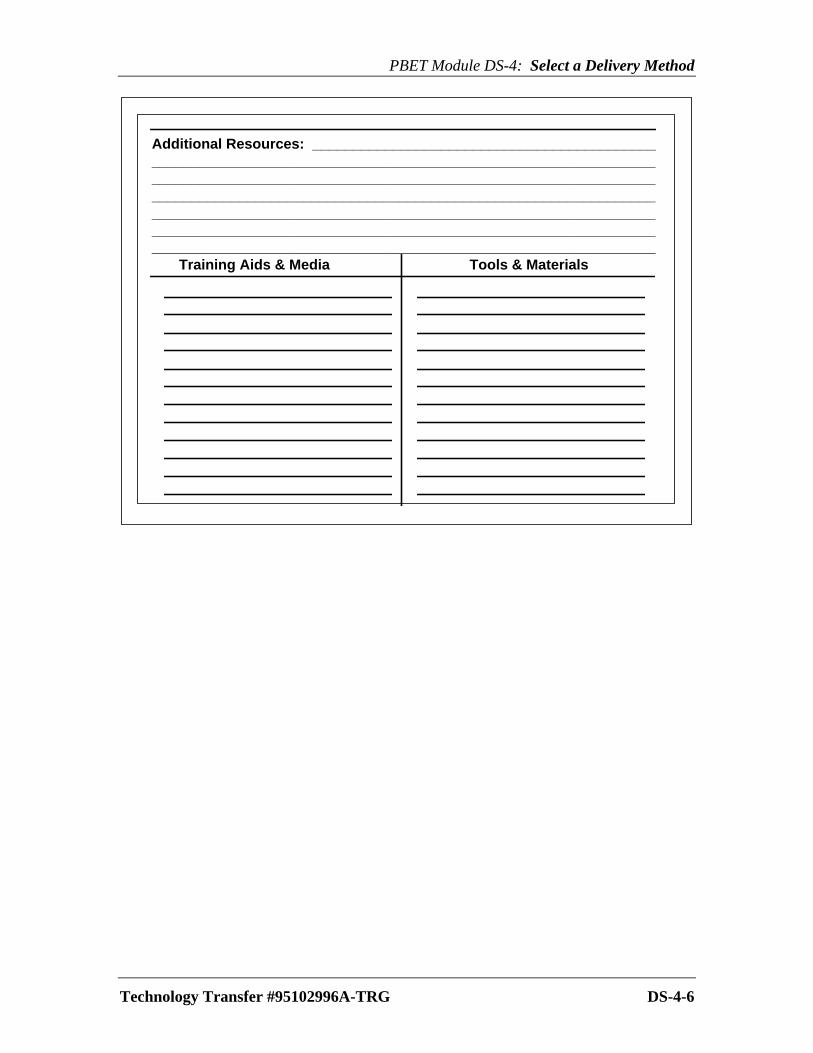
PBET Module DS-4: Select a Delivery Method
Technology Transfer #95102996A-TRG DS-4-6
Additional Resources: _____________________________________________________________________________________________________________________________________________________________________________________________________________________________________________________________________________________________________________________________________________________________________________________________________________________________________ Training Aids & Media Tools & Materials
Instructor Guide
DS-5 SUMMARIZE A PBET LESSON
• By now you have selected the practice activities to include in
your lesson and the type of delivery method and resource
materials you will need for delivering the lesson
• In the next lesson you will learn the importance of writing
instructions to help you structure the elements of a lesson into
a logical and easy-to-follow sequence
Explain the Importance of Writing Instructions in a Lesson
Plan
• The strategy for delivering the lesson: The lesson
− Is an outline showing logical sequence of steps to follow
in delivering the lesson
− Explains what concepts need to be introduced
− Explains what skills the performers will need to learn,
practice, and demonstrate competency
• In general, a written summary of the lesson helps structure
the lesson and serves as a guide for the development and
delivery phase of the lesson
• Ask a volunteer to read the objective from the foil
• Refer to the backside of the Lesson Planning Form
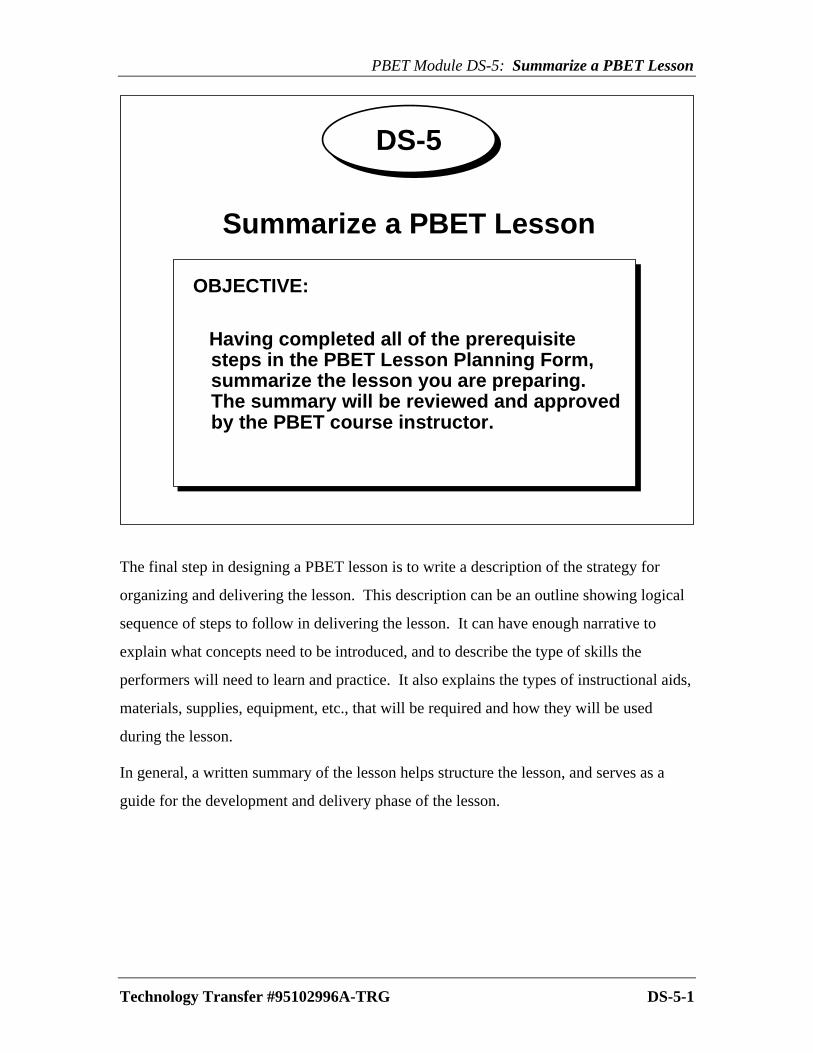
PBET Module DS-5: Summarize a PBET Lesson
Technology Transfer #95102996A-TRG DS-5-1
DS-5
Summarize a PBET Lesson
OBJECTIVE:
Having completed all of the prerequisitesteps in the PBET Lesson Planning Form,summarize the lesson you are preparing.The summary will be reviewed and approvedby the PBET course instructor.
The final step in designing a PBET lesson is to write a description of the strategy for
organizing and delivering the lesson. This description can be an outline showing logical
sequence of steps to follow in delivering the lesson. It can have enough narrative to
explain what concepts need to be introduced, and to describe the type of skills the
performers will need to learn and practice. It also explains the types of instructional aids,
materials, supplies, equipment, etc., that will be required and how they will be used
during the lesson.
In general, a written summary of the lesson helps structure the lesson, and serves as a
guide for the development and delivery phase of the lesson.
Instructor Guide
Items to Include in the Lesson Summary
1. Statement of Relevance:
• Tells how the lesson fits into the larger scheme of things:
e.g.,
− The preceding lessons
− The next lesson(s)
− The overall course
• Legitimizes the reason for the existence of the lesson
− It may also be viewed as a "purpose" statement for the
lesson
• Builds confidence on the part of the audience
• Motivates the audience to listen and participate
• The lesson should provide benefits to the audience in the way
of:
− Increased knowledge and understanding of concepts and
skills
− Improved ability to perform their respective jobs
• What might happen if the lesson were left out?

PBET Module DS-5: Summarize a PBET Lesson
Technology Transfer #95102996A-TRG DS-5-2
1. A description of relevance– What benefit will the lesson provide?
» What’s in it for the student?
– How does this lesson support
» The overall training course?
» A specific training program?
» A trainee’s understanding or skills?
» A specific task, job, career, etc.?
Items to Include in the LessonSummary
The summary of a lesson’s content should answer the basic question: "What’s in it for
me?" In other words, what benefit is the lesson to those who are in attendance?
The lesson summary should have at least one short paragraph describing the relevance of
the lesson. In general, the lesson should support any or all of the following: the
equipment being studied, the overall training program, a trainee’s understanding or skills,
and a specific job in the related industry. The lesson must have a "legitimate" reason for
being included in a training program, or it could be a waste of valuable time and
resources.
Here is an example of a statement of relevancy: "The operating procedures of the Astaire
1950 Stepper were introduced in the preceding lesson of this training program. This
lesson covers maintenance requirements. Maintenance, specifically cleaning and
lubrication, is very important to ensure the reliable operation of the mechanical parts of
the stepper."

Instructor Guide
2. Logistics
• Specify any instructional aids, media, or supplies that
will be used and how they will be applied
• Give a recommended location and an alternative
location or conditions for delivering the lesson
• Describe any special lighting, heating, cooling, or
seating arrangements
• If other human resources are needed, such as SMEs,
indicate how to contact them and how much lead time
is needed
• Indicate whether arrangements need to be made to
purchase, rent, borrow, or reserve any of the items
mentioned

PBET Module DS-5: Summarize a PBET Lesson
Technology Transfer #95102996A-TRG DS-5-3
Items to Include in the LessonSummary
2. Logistics
– Special instructions and/or requirements:
» Instructional aids, media, supplies, etc.
– Location, environment, conditions, etc.:
» Room, temperature setting, lighting,special seating
– Purchases, reservations, rentals, etc.:
» Equipment, supplies, materials, personnel
The lesson summary should include any special instructions or requirements, to remind
you and others who might need to use the lesson plan, about the logistics involved in the
delivery of the lesson. If supplies, materials, equipment, and/or supporting personnel are
needed, how will they be procured? Indicate whether arrangements need to be made to
purchase, rent, borrow, or reserve any of the items mentioned.

Instructor Guide
3. Sequence of Events:
• Can be in outline form with short, but concise narrative, to
describe each step of the lesson
• Shows the logical sequence to be followed in the delivery of
the lesson
• Tells what materials and equipment will be needed at each
step of the lesson
• Sequence of events should include the basic 4-step training
process:
− Read the objective, in other words, tell them
− Model the performance, or show them
− Give them practice & feedback, let them try it
− When ready, give them the skill test, let them show you
• The approximate time needed to conduct each step

PBET Module DS-5: Summarize a PBET Lesson
Technology Transfer #95102996A-TRG DS-5-4
Items to Include in the LessonSummary
3. Sequence of events– Transition into new lesson– Explain lesson objective (tell them)
» Introduce concepts and skills– Model the desired performance (show them)– Provide time for practicing (let them try it)– Provide time for skill test (let them show you)
The key to success in lesson planning is organization. This part of the PBET lesson
designing phase requires the instructional developer to think carefully about each of the
important events that will occur in the lesson being designed. This is where a word
processor may be helpful to accommodate any changes you might want to make along the
way.
You should outline in short narrative form how you will proceed to deliver the lesson.
The outline will show the logical sequence of the major parts in your lesson and the
approximate time needed to accomplish each part. It will also tell what materials you will
need at each step of the lesson and how they will be used.
In this part of the lesson summary, explain how you will follow through the four basic
steps of the PBET training process, including; (1) explaining the objective, (2) modeling
the performance, (3) relevant practice, and (4) the skill test.

Instructor Guide
A4Practice Exercise -- Module Content Descriptions
• Have participants turn to the sample Lesson Planning
Forms in Appendix A
• Review lesson plan on page A-1 together with audience
-- ask them to refer to this in the future
• Review page A-3 together with audience
− Explain what’s good about the Module Content
Description and what was left out
− Ask audience for their comments
• Ask them to review individually several examples of
Module Content Descriptions contained in Appendix D
Skill Test
• Review the Lesson Planning Form you are developing
for the Legos assembly lesson
• Discuss with a colleague the items you will include in
your Module Content Description:
1. Statement of relevance
2. Logistics
• Special instructions and/or requirements
• Location, environment, conditions
• Purchases, rentals, personnel, reservations
3. Sequence of events
PBET Module DS-5: Summarize a PBET Lesson
Technology Transfer #95102996A-TRG DS-5-5
SKILL TEST
• Review the Lesson Planning Form you are developing for the lesson assigned to you
by the course instructor.
• Review the key elements of a content description as covered by the instructor in the
preceding slides.
• Discuss with a colleague the items you will need to include in your Lesson Summary
• Draft the Lesson Summary in outline form first before transferring it to the Lesson
Planning Form, for example:
1. Description of relevance -- explain why this lesson is important to the trainee
2. Logistics -- list items to be used and how they will be used in the lesson
3. Sequencing of events -- list step-by-step plan for sequencing the introduction,
objective, explanation of subject matter, modeling, job aid orientation, practice,
and testing.
• Ask the course instructor to review the outline. The instructor will use the same
criteria as above.
• When the summary outline is approved by the course instructor, transfer the extended
narrative form to the Lesson Planning Form.
• Have the instructor perform a final review of your Lesson Summary and sign-off your
checklist.
!!!!!

Instructor Guide
• On a blank sheet of paper, draft a Lesson Summary in
outline form first, before transferring it to the Lesson
Planning Form
• Ask the course instructor to review the outline
• When the summary outline is approved by the course
instructor, transfer the extended narrative form to the
Lesson Planning Form
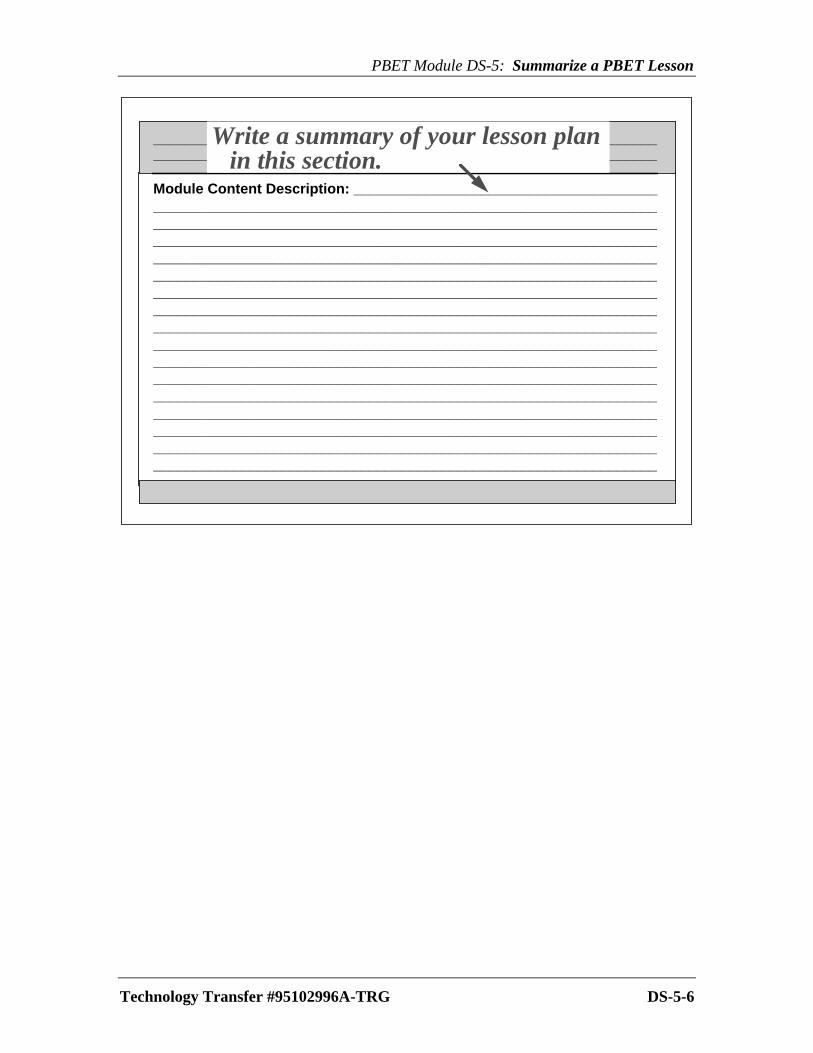
PBET Module DS-5: Summarize a PBET Lesson
Technology Transfer #95102996A-TRG DS-5-6
_______________________________________________________________
Module Content Description: ______________________________________________________________________________________________________________________________________________________________________________________________________________________________________________________________________________________________________________________________________________________________________________________________________________________________________________________________________________________________________________________________________________________________________________________________________________________________________________________________________________________________________________________________________________________________________________________________________________________________________________________________________________________________________________________________________________________________________________________________________________________________________________________________________________________
_______________________________________________________________Write a summary of your lesson planin this section.

Instructor Guide
DS-6 COMPLETE A SECOND PBET LESSON PLAN
PBET Course Map
• Here is where we are on the PBET course map
• We have completed all of the enabling objectives to
this module
• Now in the Design phase of PBET, we’re going to
discuss why the lesson plan is important
• Please turn to the Design phase in your notebooks
Complete a Second PBET Lesson Plan
• Ask a volunteer to read the objective from the foil
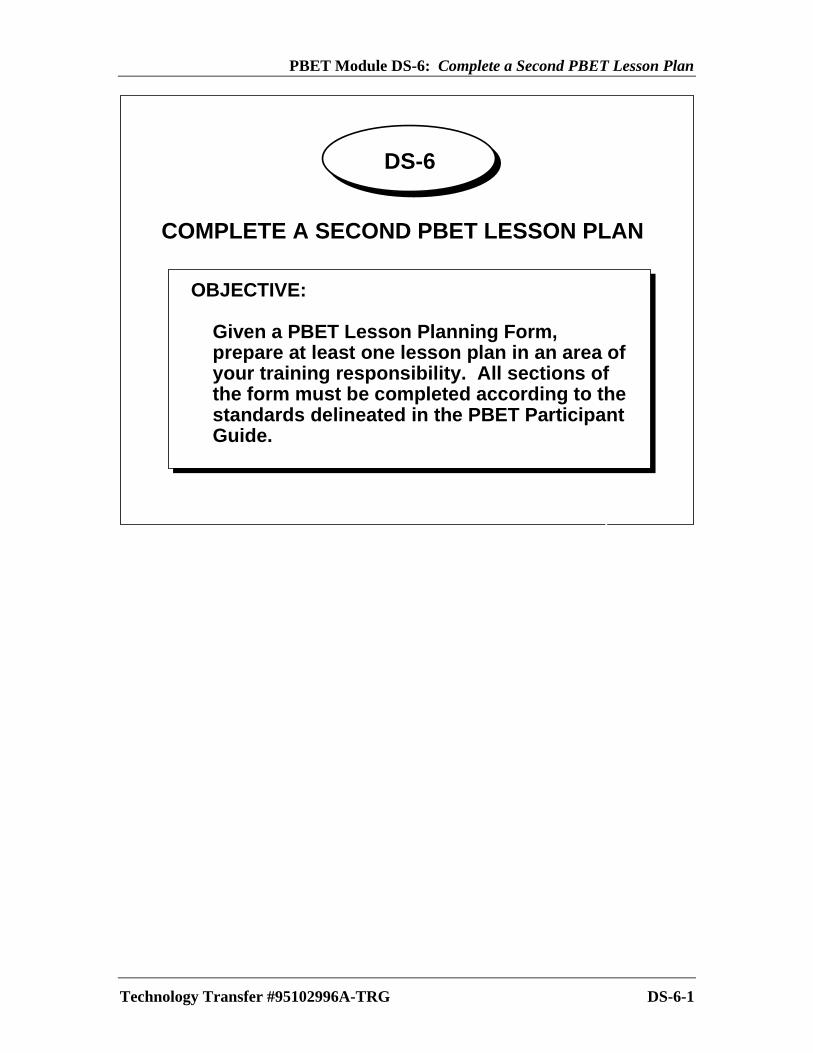
PBET Module DS-6: Complete a Second PBET Lesson Plan
Technology Transfer #95102996A-TRG DS-6-1
DS-6
OBJECTIVE:
Given a PBET Lesson Planning Form,prepare at least one lesson plan in an area ofyour training responsibility. All sections ofthe form must be completed according to thestandards delineated in the PBET ParticipantGuide.
COMPLETE A SECOND PBET LESSON PLAN
Instructor Guide
Lesson Planning Form
• As we have progressed through our PBET modules,
you have been completing a Lesson Planning Form
• The Lesson Planning Form acts as a source document
for the PBET training you develop
• It summarizes in writing the decisions you’ve made
including:
− Class
− Module title
− Target audience
− Location
− Module objective
− Prerequisite skills
− Skill test
− Additional resources
− Training aids and media
− Tools and materials for practice
− Relevant practice description including:
-- Conditions
-- Type of modeling
-- Feedback mechanism
− Summary of module content
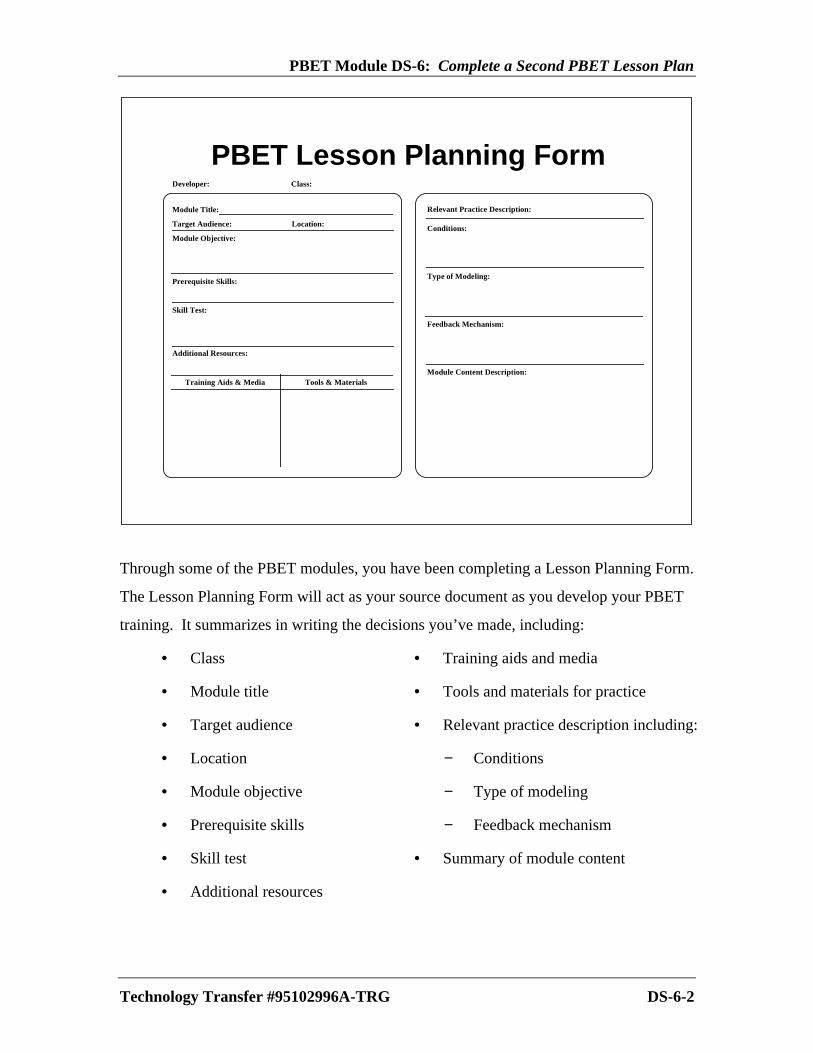
PBET Module DS-6: Complete a Second PBET Lesson Plan
Technology Transfer #95102996A-TRG DS-6-2
PBET Lesson Planning FormDeveloper: Class:
Module Title:
Target Audience: Location:
Module Objective:
Prerequisite Skills:
Skill Test:
Additional Resources:
Relevant Practice Description:
Conditions:
Type of Modeling:
Feedback Mechanism:
Module Content Description: Training Aids & Media Tools & Materials
Through some of the PBET modules, you have been completing a Lesson Planning Form.
The Lesson Planning Form will act as your source document as you develop your PBET
training. It summarizes in writing the decisions you’ve made, including:
• Class
• Module title
• Target audience
• Location
• Module objective
• Prerequisite skills
• Skill test
• Additional resources
• Training aids and media
• Tools and materials for practice
• Relevant practice description including:
− Conditions
− Type of modeling
− Feedback mechanism
• Summary of module content
Instructor Guide
The Lesson Planning Form Is Not an Instructor Guide
• The Lesson Planning Form is not intended to contain
your entire training course
• It’s more of an outline for each of your lessons or
modules--it’s a design tool
• The instructor guide is the document that contains
comprehensive details and all of the modules of your
training course
• In the Deliver phase of PBET, we will take a closer
look at the instructor guide
PBET Module DS-6: Complete a Second PBET Lesson Plan
Technology Transfer #95102996A-TRG DS-6-3
Lesson Planning Form Is Notan Instructor Guide
• Don’t confuse the Lesson Planning Formwith the instructor guide.
• The Lesson Planning Form acts as anoutline for the lessons/modules in PBETtraining courses.
The Lesson Planning Form isn’t intended to contain the detailed information of your
entire training course. It’s more of an outline for each of the lessons or modules that are
part of your training course. Since the Lesson Planning Forms contain information for
each module, they are the perfect documents to review prior to instructing the course.
The instructor guide is the document that contains all of the modules of your training
course as well as the comprehensive details. We will take a closer look at the instructor
guide in the Deliver phase of PBET.
Instructor Guide
The Lesson Planning Form Is Your Outline
• The Lesson Planning Form guides you as you develop
your instructor guide
• It helps you develop each of the modules/lessons that
are part of your entire training course
• Lessons/modules are designed and developed so they
are self-contained units of instruction
− While they can stand alone, they are intended to
be part of the whole training course
− They need to relate to the other lessons/modules in
the course

PBET Module DS-6: Complete a Second PBET Lesson Plan
Technology Transfer #95102996A-TRG DS-6-4
The Lesson Planning Form IsYour Outline
• It contains the instructional decisions youmade about your PBET training.
• It will guide you as you create the trainingcourse.
The Lesson Planning Form functions as an outline as you develop your instructor guide.
It helps you develop each of the modules or lessons that are part of your entire training
course.
Every lesson or module is designed and developed so it is a self-contained unit of
instruction. While these lessons/modules can stand alone, they are intended to be part of
the whole training course. They need to relate to the other lessons/modules in the course
you develop.

Instructor Guide
The Structure of the Lesson
• Lessons/modules vary in length
• They may also vary in location. Some may be taught
in classrooms, some in fabs, labs, etc.
• Every lesson/module needs a common structure or
form:
− Each lesson/module needs:
-- An introduction
-- A statement of relevance
-- Main content
-- A conclusion
PBET Module DS-6: Complete a Second PBET Lesson Plan
Technology Transfer #95102996A-TRG DS-6-5
The Structure of the Lesson
• Each lesson or module will vary in length.
• Lessons or modules may stand alone as self-contained lessons, but they all need aframework or structure.
Lessons/modules are expected to vary in length. They may also vary in training location,
as some may need to be taught in classrooms, some in fabs, labs, etc.
Regardless of their length or content, every lesson/module needs a common structure or
form. They need an introduction, a statement of relevance (to the job, a career, etc.), a
main content, and a conclusion.

Instructor Guide
A4Instructor Note: Have participants refer to the example
and sample Lesson Planning Forms in Appendices A and
D. Briefly walk participants through the information in
each document. Ask if there are any questions
Refer them also to the “Prepare Performance Objectives
Module, AN-2”
Skill Test
• The skill test for this particular module is to complete a
Lesson Planning Form for a simple lesson in an area of
your training responsibility
• When you have completed the form, have the
workshop assistant or instructor review it
• For an example of a lesson to work on, refer to the
sample course map for a PBET Operations course
Performance Chart
• When each item is reviewed and completed, the
assistant/instructor will check the item completed and
sign the chart
• The Performance Chart needs to be signed by you and
the instructor upon completion of the Lesson Planning
Form and Performance Chart

PBET Module DS-6: Complete a Second PBET Lesson Plan
Technology Transfer #95102996A-TRG DS-6-6
Skill Test
Prepare a second Lesson Plan for a simple lesson inan area of your own training expertise.
You may consult any part of this course manual forassistance, or you may ask any of the courseinstructors or participants for help.
Refer to the completed sample Lesson Planning Form in Appendix A and Module AN-2,
which explains how to write objectives, as you complete your Lesson Planning Form.
Make final adjustments to your Lesson Planning Form, and when you feel you are ready,
have your instructor or one of the workshop aides review it. They will review each form
and check off each completed item.
When the entire Lesson Planning Form has been completed, both you and the instructor
should sign the sheet to indicate mastery of this particular module’s objectives.

Instructor Guide

Develop
Module No. Page No.
DV-1: Prepare Training Aids and Materials DV-1Design of overhead transparencyUse of foils, flipchart and marker board
Develop a job aid for a PBET lesson
Instructor Guide
DV-1 DEVELOP INSTRUCTIONAL MATERIALS
• Up to now our discussions have focused on the analysis and
design of a PBET lesson plan
• In this module we will focus our attention on the actual
production of the instructional materials you will need to
pilot your first PBET lesson
• Have a volunteer read the objective from the foil
• We will introduce very basic concepts of instructional
materials development
• There are many resources available to teach these concepts
• The focus will be on developing the job aid and any other
instructional aids you may need to help you pilot your first
PBET lesson

PBET Module DV-1: Develop Instructional Materials
Technology Transfer #95102996A-TRG DV-1-1
DV-1
Develop Instructional Materials
OBJECTIVE:
Having completed a Lesson Planning Form,produce the training aids and media that youwill need to support the PBET lesson you arepreparing. The materials you create will bereviewed and approved by the PBET courseinstructor.
Up to now we have concentrated our discussions on the analysis and design of the
elements that will become a part of the PBET lesson plan. You have completed the
requirements of the lesson planning phase, but you have not yet developed the actual
materials and aids that will be used in the execution of the pilot or delivery phase.
This module introduces very basic concepts of instructional materials development. This
topic is beyond the scope of this course. There are many resources available from
universities, community colleges, and consulting firms that can provide these training
services.
The focus of this module will be on developing the job aid and any other instructional
aids you might need to help you pilot your first PBET lesson.

Instructor Guide
Preparing Training Aids and Materials
• The following are some typical training aids and materials:
− Checklists, flowcharts, state tables, decision trees,
instructions, and other aids, which can be produced at
this time
− Instructions, explanations, data sheets, schematics,
drawings, and job aids, which can be created, also
• In this module we will focus our attention on the job aid you
are to create for use in the pilot phase of the PBET lesson you
are designing
• These first few items can be delivered using any convenient
but effective media such as listed on this foil
• The participant guide is the student’s manual and is a
requirement of the PBET methodology
• The manual provided for you in this class is an example of a
participant guide
• All forms of media are important to learn, however, only the
flipchart and foils will be discussed
• Consult page A-11 in your manual, the Training Media
Decision Chart
• Notice that a glossary list was not included. Although a
glossary can be helpful as a quick reference, it should not be
used as a teaching tool
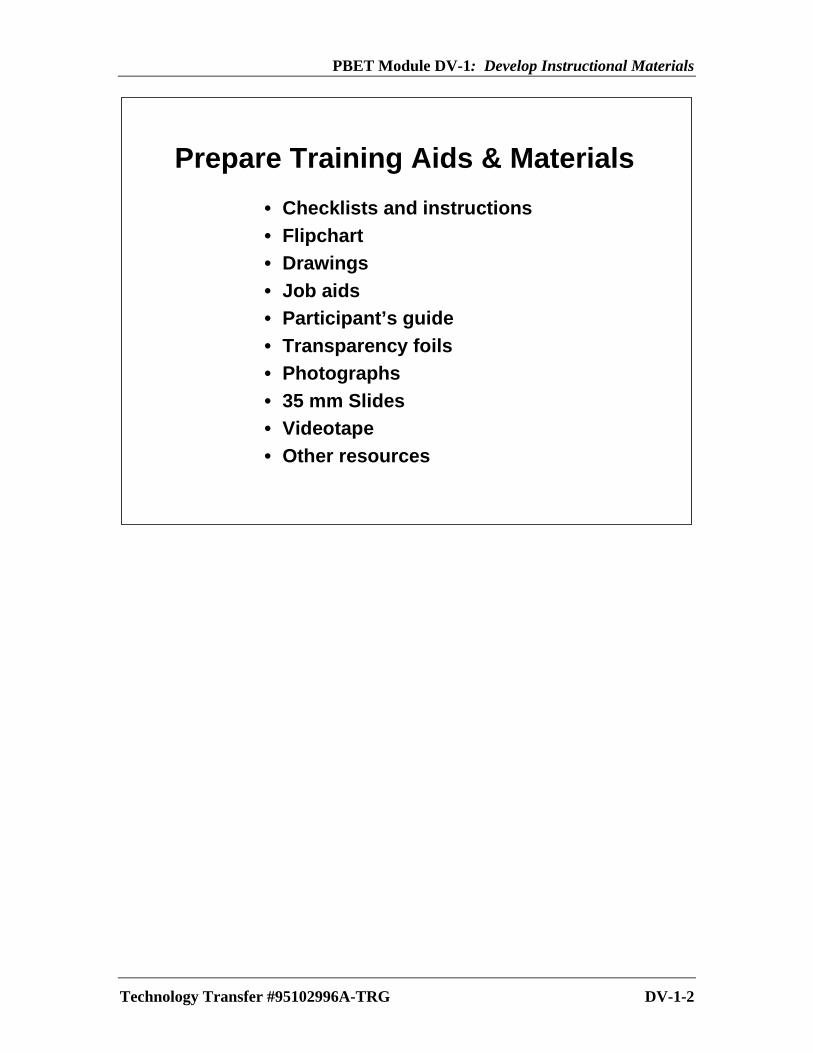
PBET Module DV-1: Develop Instructional Materials
Technology Transfer #95102996A-TRG DV-1-2
Prepare Training Aids & Materials
• Checklists and instructions• Flipchart• Drawings• Job aids• Participant’s guide• Transparency foils• Photographs• 35 mm Slides• Videotape• Other resources

Instructor Guide
Design of Overhead Transparency Foils
• Formats:
− Two basic formats -- portrait versus landscape
− Most books and manuals are printed in portrait
− SEMATECH uses almost exclusively the landscape style
− Stick to one format and try not to mix them in a
presentation
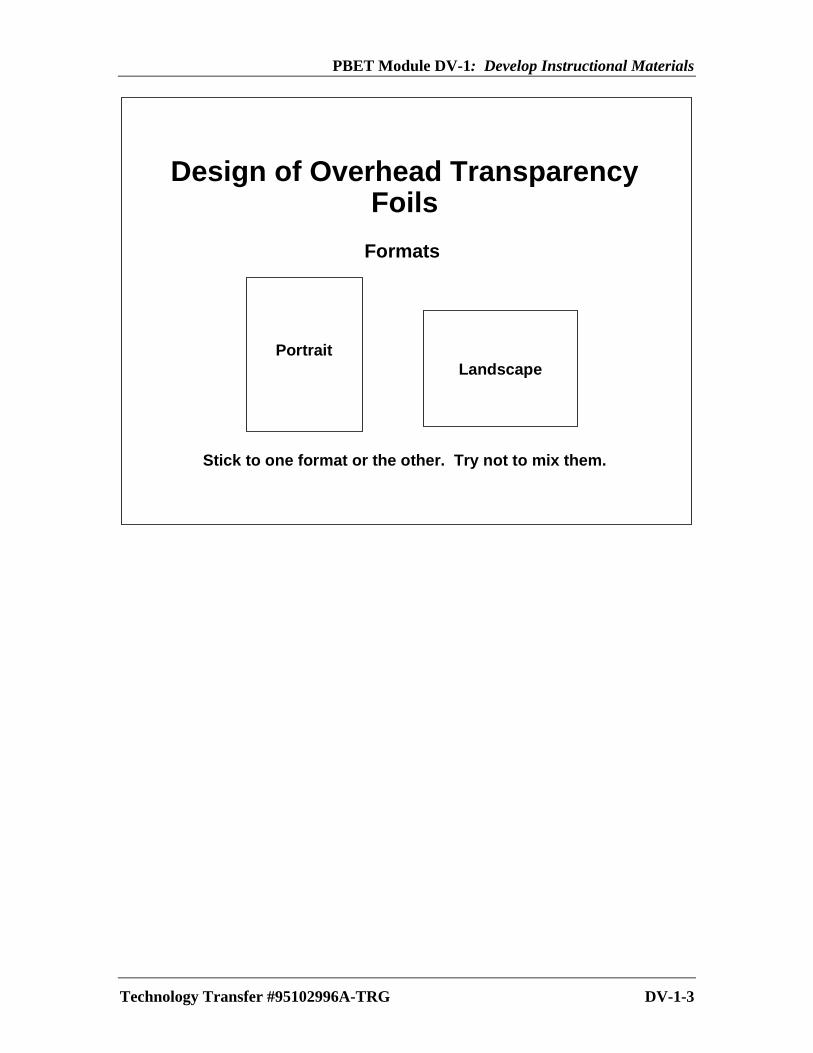
PBET Module DV-1: Develop Instructional Materials
Technology Transfer #95102996A-TRG DV-1-3
Design of Overhead TransparencyFoils
Formats
LandscapePortrait
Stick to one format or the other. Try not to mix them.
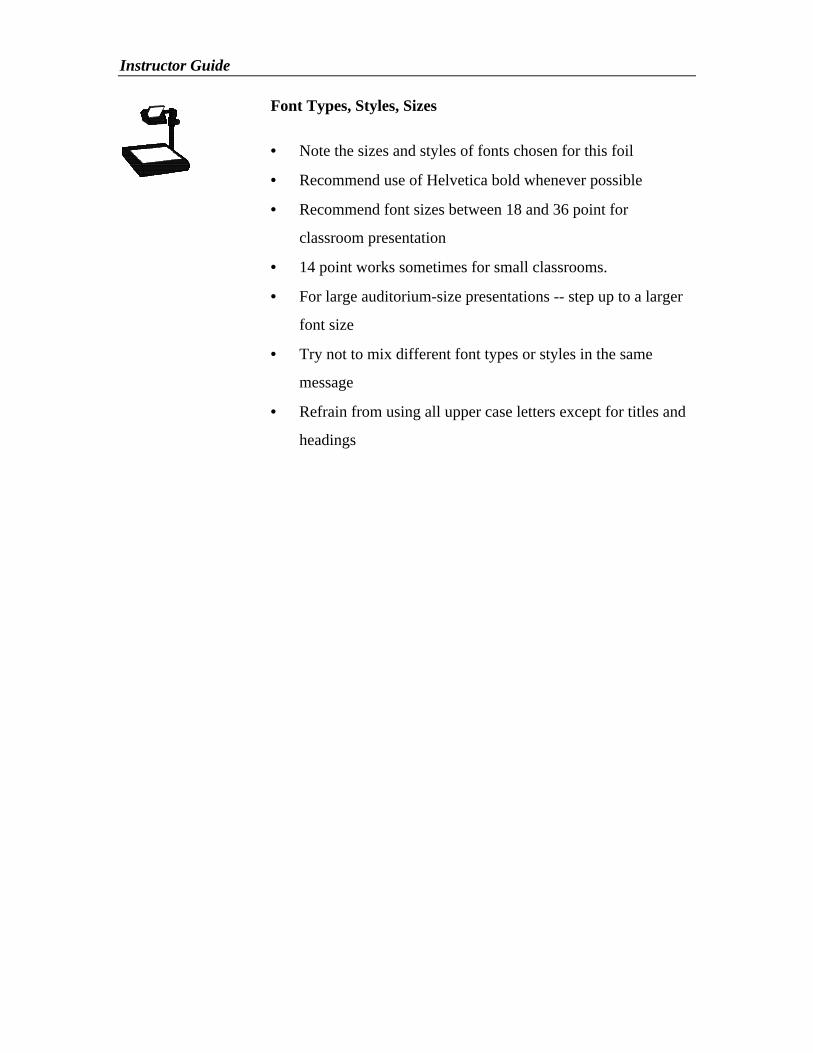
Instructor Guide
Font Types, Styles, Sizes
• Note the sizes and styles of fonts chosen for this foil
• Recommend use of Helvetica bold whenever possible
• Recommend font sizes between 18 and 36 point for
classroom presentation
• 14 point works sometimes for small classrooms.
• For large auditorium-size presentations -- step up to a larger
font size
• Try not to mix different font types or styles in the same
message
• Refrain from using all upper case letters except for titles and
headings
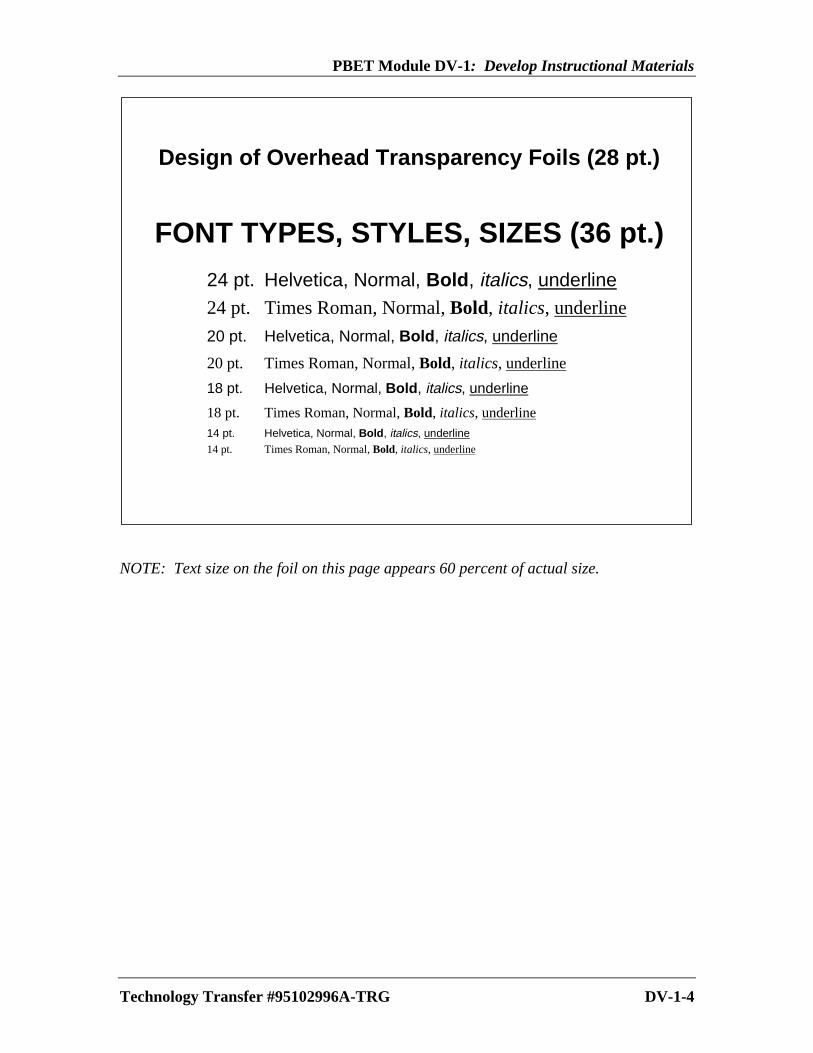
PBET Module DV-1: Develop Instructional Materials
Technology Transfer #95102996A-TRG DV-1-4
Design of Overhead Transparency Foils (28 pt.)
FONT TYPES, STYLES, SIZES (36 pt.)
24 pt. Helvetica, Normal, Bold, italics, underline24 pt. Times Roman, Normal, Bold, italics, underline
20 pt. Helvetica, Normal, Bold, italics, underline
20 pt. Times Roman, Normal, Bold, italics, underline
18 pt. Helvetica, Normal, Bold, italics, underline
18 pt. Times Roman, Normal, Bold, italics, underline14 pt. Helvetica, Normal, Bold, italics, underline14 pt. Times Roman, Normal, Bold, italics, underline
NOTE: Text size on the foil on this page appears 60 percent of actual size.

Instructor Guide
Use of Color for Text Only
• The foil “speaks for itself”
• Color-blind people have difficulty distinguishing shades of
green and red
• Stick to the four B's: black, blue, brown and burple
• Try not to mix too many colors within the same foil
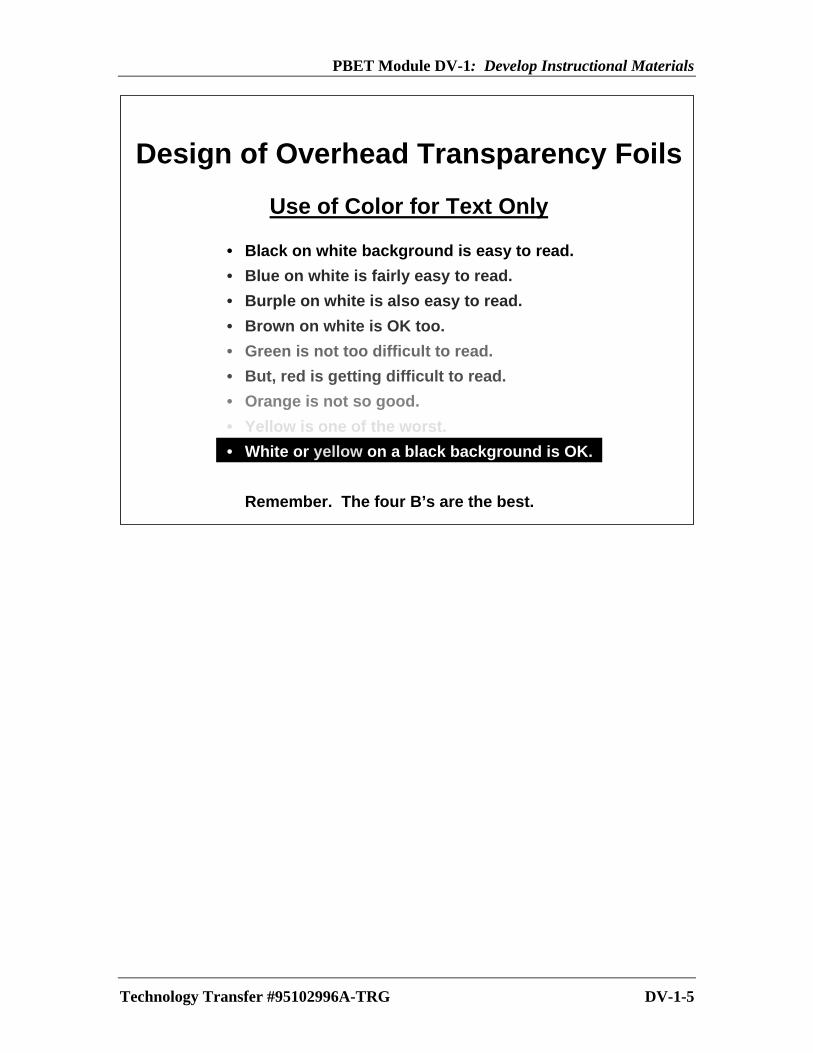
PBET Module DV-1: Develop Instructional Materials
Technology Transfer #95102996A-TRG DV-1-5
Design of Overhead Transparency Foils
Use of Color for Text Only
• Black on white background is easy to read.
• Blue on white is fairly easy to read.
• Burple on white is also easy to read.
• Brown on white is OK too.
• Green is not too difficult to read.
• But, red is getting difficult to read.
• Orange is not so good.
• Yellow is one of the worst.
• White or yellow on a black background is OK.
Remember. The four B’s are the best.
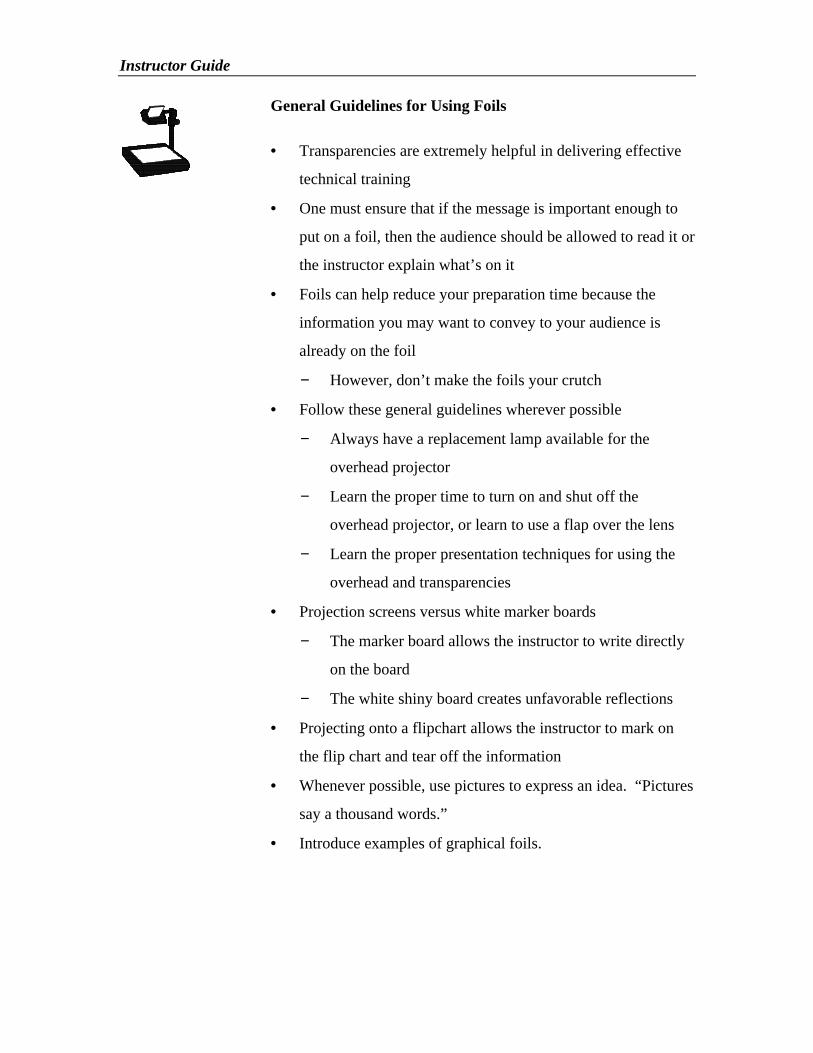
Instructor Guide
General Guidelines for Using Foils
• Transparencies are extremely helpful in delivering effective
technical training
• One must ensure that if the message is important enough to
put on a foil, then the audience should be allowed to read it or
the instructor explain what’s on it
• Foils can help reduce your preparation time because the
information you may want to convey to your audience is
already on the foil
− However, don’t make the foils your crutch
• Follow these general guidelines wherever possible
− Always have a replacement lamp available for the
overhead projector
− Learn the proper time to turn on and shut off the
overhead projector, or learn to use a flap over the lens
− Learn the proper presentation techniques for using the
overhead and transparencies
• Projection screens versus white marker boards
− The marker board allows the instructor to write directly
on the board
− The white shiny board creates unfavorable reflections
• Projecting onto a flipchart allows the instructor to mark on
the flip chart and tear off the information
• Whenever possible, use pictures to express an idea. “Pictures
say a thousand words.”
• Introduce examples of graphical foils.

PBET Module DV-1: Develop Instructional Materials
Technology Transfer #95102996A-TRG DV-1-6
Design of Overhead Transparency Foils
General Guidelines for Using Foils
• Try not to exceed more than 8 lines per foil.
• Stick to one theme in a foil.
• Use bullets rather than paragraph narrative.
• Try not to read from the foils.
• Use pointers or markers to emphasize a point.
• Know when to switch the overhead on and off.
• If it’s important enough to put on a foil, then givepeople a chance to read it.
• Whenever possible, say it with pictures.

Instructor Guide
General Guidelines for Using Flipchart and Marker Boards
• The flipchart is great for brainstorming ideas in class
• It is an excellent notepad for keeping track of class
comments, concerns, and questions to be referred to at a
later time
• Some of the rules for foils apply here, too
• Refer to the flipchart paper taped around the classroom
• Note the different styles
• Some are good examples and others are not
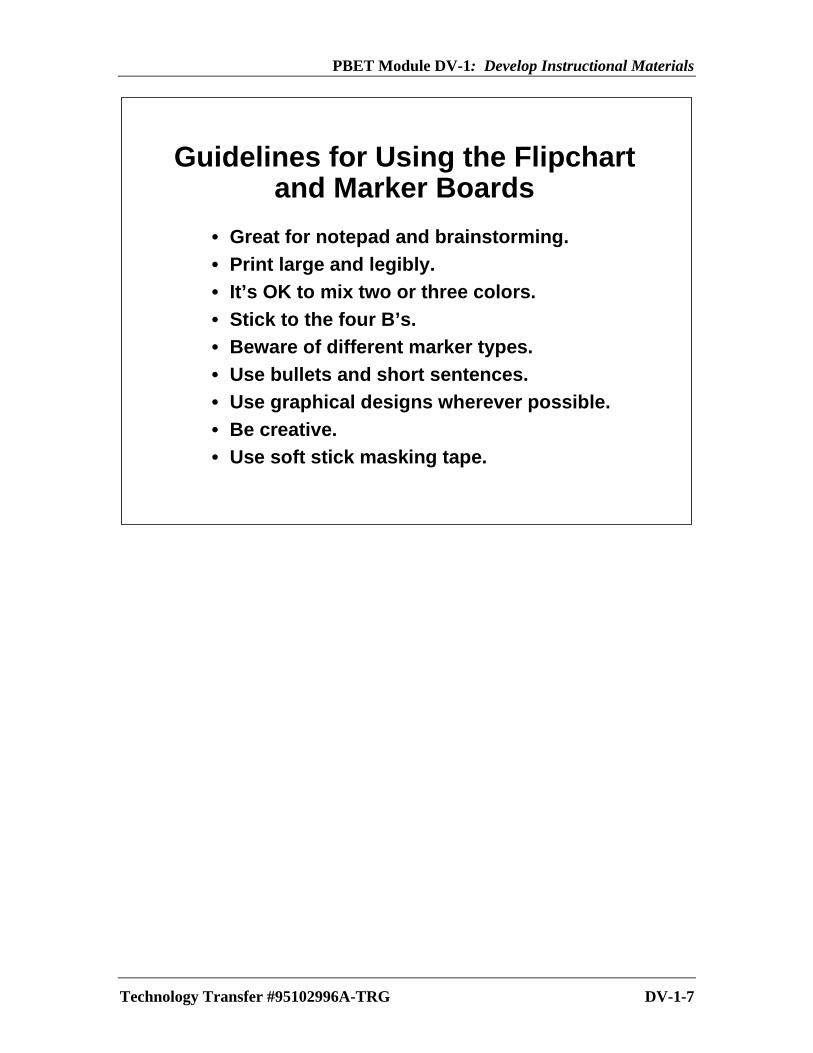
PBET Module DV-1: Develop Instructional Materials
Technology Transfer #95102996A-TRG DV-1-7
Guidelines for Using the Flipchartand Marker Boards
• Great for notepad and brainstorming.• Print large and legibly.• It’s OK to mix two or three colors.• Stick to the four B’s.• Beware of different marker types.• Use bullets and short sentences.• Use graphical designs wherever possible.• Be creative.• Use soft stick masking tape.

Instructor Guide
Skill Test
• Review the Lesson Planning Form you are developing for the
Legos assembly lesson
• Discuss with a colleague the design of the job aid and other
materials you will need for the pilot phase of this class
project
• Draft the job aid and other materials
• Call on one of the course instructors to review your draft
• One of us will do a final review and approve the job aid for
use in the pilot phase of the projectTM
Instructor Notes: Participants will be looking for ideas for a job
aid; tell them of past examples from previous classes:
• Some have used masking tape to label parts
• Some have used a numbering system to identify parts, for
example, “the 3x6 Lego block”
• Some have used flipchart paper to draw designated
subassembly locations
• Some used the skills hierarchy for introducing the lesson to
the student
• Some used 3-M Post-itsTM
to designate specific locations for
parts on the assembly table
• Some drew the outline of the parts on flipchart paper in the
proper assembly sequence
• Some used an assembly checklist so the instructor could
check off each item as it was assembled

PBET Module DV-1: Develop Instructional Materials
Technology Transfer #95102996A-TRG DV-1-8
Skill Test
• Review the Lesson Planning Form you have prepared for the lesson assigned to you
by the course instructor.
• Review the information covered by the instructor in this module.
• Discuss with a colleague the items you will need to include in your job aid and
whatever training materials you will need.
• Draft the job aid and other materials.
• Ask the course instructor to review your draft.
• Have the instructor perform a final review and approval of your job aid, and if needed,
other materials.
!!!!!

Instructor Guide

Pilot
Module No. Page No.
PL-1: Describe Trainer Characteristics PL-1-1Recall trainer characteristicsCompile trainer characteristicsThe effective PBET trainer
PL-2: Pilot a Short PBET Lesson PL-2-1
Piloting PBET Course

Instructor Guide
PL-1 DESCRIBE TRAINER CHARACTERISTICS
PBET Course Map
• Here’s where we are now on the PBET course map
• Before we pilot our lesson, we need to talk about how
trainees react to various trainer characteristics and
training situations. Our goal as trainers is to motivate
students to learn
Describe Trainer Characteristics
• In this module, you will be asked to recall five specific
skills you can use to foster a positive learning
environment
• Ask a volunteer to read the objective from the foil
• Refer to page A-13 in Appendix A to see how the
Observation Sheet will be used to tie PL-1 to PL-2.
Group Activity - Introduction: Read excerpt from
Mager’s “Developing Attitude Toward Learning”
• Play violin music on cassette player
• Read the “Young Violinist” then stop the music
• Now there are several ways that this story could have
ended. Explain
• Ask participants if any have ever taken music lessons
• Ask for a show of hands of how many still play that
same instrument
• Well, in the case of our young violinist, he took music
lessons for a few months, then lost interest
• What could have been some reasons for why a young
musician would lose interest in learning a musical
instrument?

PBET Module PL-1: Describe Trainer Characteristics
Technology Transfer #95102996A-TRG PL-1-1
PL-1
DESCRIBE TRAINERCHARACTERISTICS
OBJECTIVE: Given a scenario in a training activity, be able to
select at least five favorable trainercharacteristics that could be used in dealingwith the situation.

Instructor Guide
Recall Trainer Characteristics
• Think of someone in your past who was exceptional in
the role of:
− Teacher
− Coach
− Boss
− Instructor
• Try to recall some of that individual’s personal and
professional attributes that helped you to successfully
complete a course or perform a task
• List some of those attributes in your notebook
Share Trainer Characteristics with Someone
• Pass basket of candy around the class
• Please take one piece of candy, but do not open it at
this time
• Find a person in the room who has the same type of
candy, that is, same color of wrapper
• Now, each of you take about five minutes to share the
positive experience you had with the trainer or teacher
in your past
• When the 10 minutes are concluded, I will ask you to
return to your seats
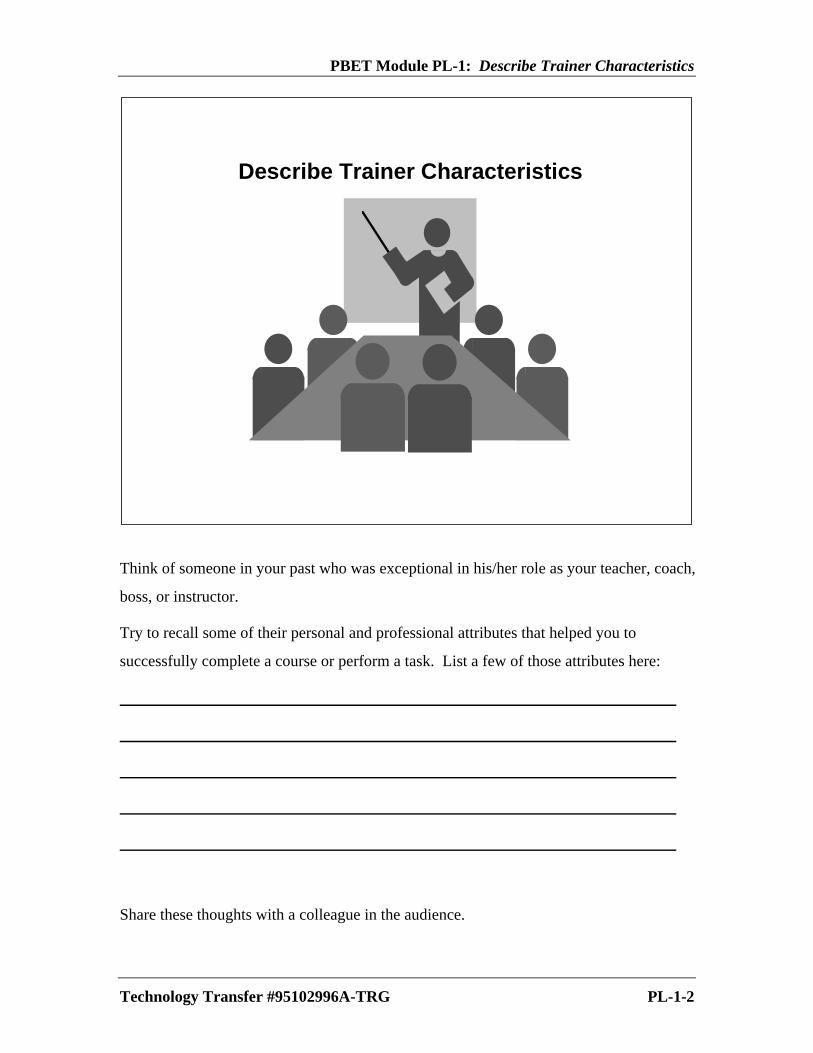
PBET Module PL-1: Describe Trainer Characteristics
Technology Transfer #95102996A-TRG PL-1-2
Describe Trainer Characteristics
Think of someone in your past who was exceptional in his/her role as your teacher, coach,
boss, or instructor.
Try to recall some of their personal and professional attributes that helped you to
successfully complete a course or perform a task. List a few of those attributes here:
Share these thoughts with a colleague in the audience.

Instructor Guide
Group Activity: Trainer Characteristics
• Share your list of effective trainer attributes with the
colleagues at your table and discuss each person’s list
of characteristics
• Compile all of the characteristics suggested by your
group into a master list and write the list on the
flipchart. As you compile:
− Combine similar or duplicate items
− Star (�) at least three items on your list that your
group considers to be the “most important
characteristics”
• Allow 5-10 minutes for groups to create their lists
• Select a spokesperson to present your list to the class
• Have spokespersons present each group’s work

PBET Module PL-1: Describe Trainer Characteristics
Technology Transfer #95102996A-TRG PL-1-3
GROUP ACTIVITY: COMPILE TRAINER CHARACTERISTICS
Share your list of effective trainer attributes with the colleagues at your table and discuss
each person’s list of characteristics.
Compile all of the characteristics you have discussed into a master list and write the
group’s list on the flipchart. As you compile:
• Combine similar or duplicate items.
• Star (�) at least three items on your list that your group considers to be the “most
important characteristics.”
• Select a spokesperson to present your list to the class. Compare your ideas with
those of the other groups.
!!!!!
Instructor Guide
• Point out that many of the items on their lists are desirable
PBET trainer characteristics
• The effective PBET trainer sets the tone of the training by:
− Using positive reinforcement/feedback with trainees
-- This includes throughout the relevant practice, not
just waiting for the finish of the practice
-- Positive reinforcement and words of
encouragement can lead the trainee to the desired
outcome
-- Do not, however, reinforce undesirable behavior
-- Apply constructive criticism in a non-threatening
manner to help trainees learn what they need to do
to improve their performance
− Using words, facial expressions, and body language that
signal acceptance rather than disdain or rejection
Role-Play (optional)
Instructor Note: Demonstrate an example of how you would
respond when a trainee calls you about an alarm situation that
occurred on a machine after a boat or cassette of wafers had just
been loaded
• Demonstrate a bad example or two
• Demonstrate the proper response

PBET Module PL-1: Describe Trainer Characteristics
Technology Transfer #95102996A-TRG PL-1-4
The effective PBET trainer sets a positive tone of training by:
• Using positive reinforcement/feedback with trainees. This includes throughout
relevant practice, not just waiting for the conclusion of the practice. By using
encouragement and positive reinforcement, trainers can lead the trainees to the
desired outcome.
• Applying constructive criticism to help participants understand what they need to do
to improve their performance.
• Encouraging participation.
• Using words, facial expressions, and body language that signal acceptance rather
than disdain or rejection.
Using Plenty of Rewards at Appropriate Times
Why? People tend to repeat things they find rewarding!
A Safe Environment;
Not an Anxious
F Private, not public, practice.
F Relevant, not unpredictable, tests.
A Stimulating Course;
Not a Boring One
F Variety in voice, pacing, activities.
F Student control over length of sessions.
An Ego-Boosting
Experience;
Not a Humiliating One
F “Good accomplishment!”
F “Let me write down your suggestion for others.”
A Satisfying Time;
Not a Frustrating One
F Objectives clear at all times.
F Time for individual practice is provided for all to succeed.

Instructor Guide
Role-Play Scenario A
Norton: Ralph, can you come down to the diffusion bay for a minute? I
think I’ve got a problem.
Ralph: Okay! Norton, what is it this time? This better be quick cause
I’m overdue for a coffee break.
Norton: I don’t know Ralph, I loaded the cassette of wafers like you
showed me, checked the recipe parameters, pressed the start
button and then the alarm started screaming. I didn’t know
what to do.
Ralph: Sheesh! I just showed you how to fix this problem yesterday.
(Man, I don’t believe this.)
Ralph proceeds to the computer screen, reads the alarm
message, figures out what the problem is and corrects it.
Ralph: Okay. Did you see what I did?
Norton: Yeah! Sure, Ralph.
Ralph: See, there’s nothing to it. Next time you should be able to
figure it out yourself. (Boy! One of these days, Norton. Pow!)
Role-Play Scenario B
Norton: Ralph, can you come down to the diffusion bay for a minute. I
think I’ve got a problem.
Ralph: Hey, Norton, what’s happening, ol’ buddy?
Norton: I don’t know Ralph. I loaded the cassette of wafers like you
showed me yesterday, checked the recipe parameters on the
computer screen, pressed the start button and then the alarm
started screaming. I didn’t know what to do.
Ralph: Hey, Norton, relax. No problem. It’s just a little hiccup in the
system. As you might remember from yesterday’s training
session, what’s the first thing we should do when you get an
alarm on the system?
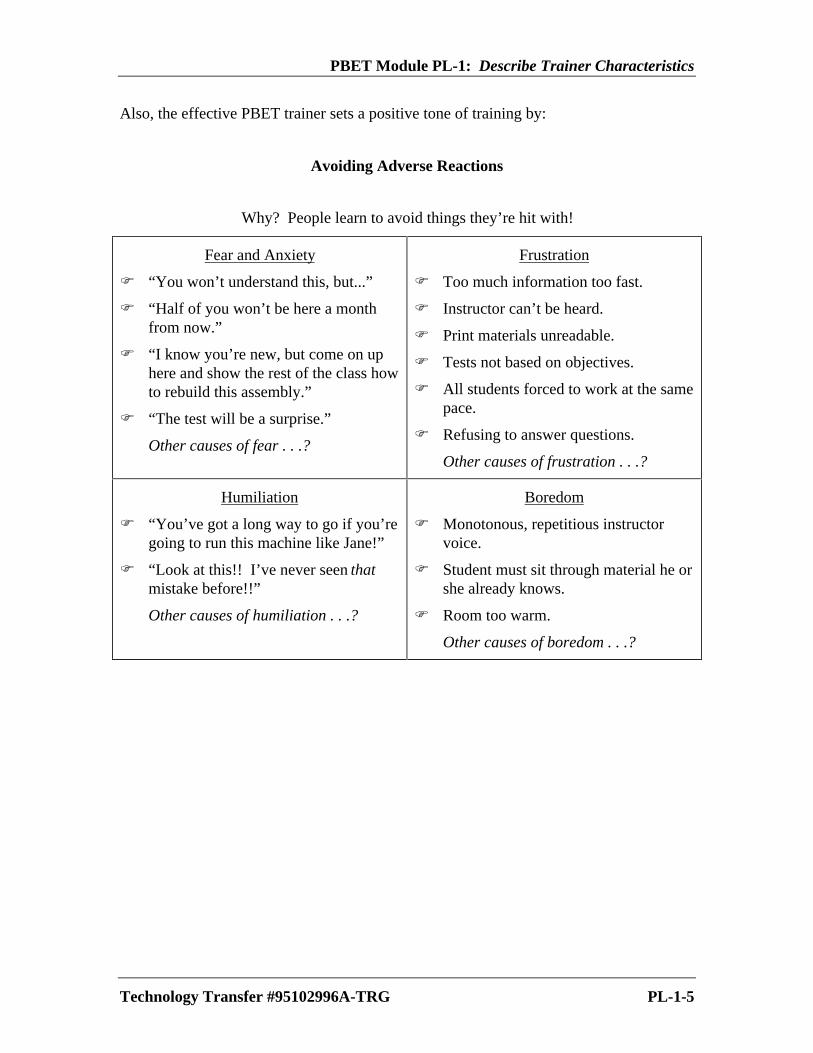
PBET Module PL-1: Describe Trainer Characteristics
Technology Transfer #95102996A-TRG PL-1-5
Also, the effective PBET trainer sets a positive tone of training by:
Avoiding Adverse Reactions
Why? People learn to avoid things they’re hit with!
Fear and Anxiety
F “You won’t understand this, but...”
F “Half of you won’t be here a monthfrom now.”
F “I know you’re new, but come on uphere and show the rest of the class howto rebuild this assembly.”
F “The test will be a surprise.”
Other causes of fear . . .?
Frustration
F Too much information too fast.
F Instructor can’t be heard.
F Print materials unreadable.
F Tests not based on objectives.
F All students forced to work at the samepace.
F Refusing to answer questions.
Other causes of frustration . . .?
Humiliation
F “You’ve got a long way to go if you’regoing to run this machine like Jane!”
F “Look at this!! I’ve never seen thatmistake before!!”
Other causes of humiliation . . .?
Boredom
F Monotonous, repetitious instructorvoice.
F Student must sit through material he orshe already knows.
F Room too warm.
Other causes of boredom . . .?
Instructor Guide
Role-Play Scenario B (continued)
Norton: Well, I did check the computer screen, but I couldn’tremember what to do beyond that.
Ralph: What were you looking for on the computer screen? Imean, what did you expect to see?
Norton: I know what you’re getting at Ralph -- I should haveseen the error message at the bottom of the screen.
Ralph: Good! Now you’re backtracking, Norton, which isexactly what I taught you to do when you have totroubleshoot some of these basic problems.
Okay, where do you check to find out what the errormessage is about?
Norton: The Error Message Cross-Reference Book?
Ralph: Right on! But, remember, we can’t bring it inside thecleanroom until the equipment supplier puts the ErrorMessage Cross-Reference on-line for us. So, whatcan we do in the meantime?
Norton: Backtrack?
Ralph: You got it right again, Norton. Nice going. Alrightgo back through the steps you went through before thealarm went off. Show me what you did.
Eventually, Ralph figures out that the cassette wasnot set properly on the cassette baseplate, which wasthe reason for the alarm.
Ralph: Now, Norton, if another alarm should occur -- trybacktracking. If that doesn’t help you get at theproblem, just give me or Alice a call in the trainingcenter and one of us will look up the corrective actionfor you.

PBET Module PL-1: Describe Trainer Characteristics
Technology Transfer #95102996A-TRG PL-1-6
NOTES:
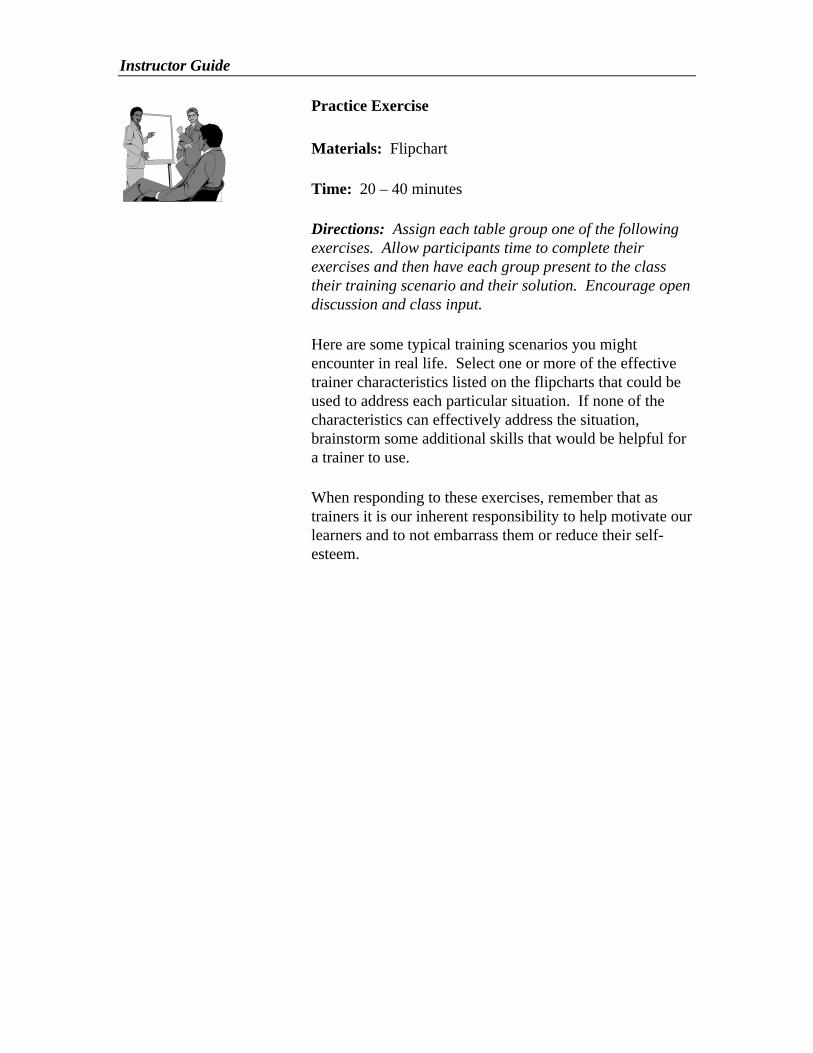
Instructor Guide
Practice Exercise
Materials: Flipchart
Time: 20 – 40 minutes
Directions: Assign each table group one of the followingexercises. Allow participants time to complete theirexercises and then have each group present to the classtheir training scenario and their solution. Encourage opendiscussion and class input.
Here are some typical training scenarios you mightencounter in real life. Select one or more of the effectivetrainer characteristics listed on the flipcharts that could beused to address each particular situation. If none of thecharacteristics can effectively address the situation,brainstorm some additional skills that would be helpful fora trainer to use.
When responding to these exercises, remember that astrainers it is our inherent responsibility to help motivate ourlearners and to not embarrass them or reduce their self-esteem.

PBET Module PL-1: Describe Trainer Characteristics
Technology Transfer #95102996A-TRG PL-1-7
PRACTICE EXERCISE
Your small group will be assigned one of the following training scenarios. Select one or
more of the effective trainer characteristics listed on the flipcharts that could be used to
address each particular situation. If none of the characteristics can effectively address the
situation, brainstorm some additional skills that would be helpful for a trainer to use.
When responding to these exercises, remember that as trainers it is our inherent
responsibility to help motivate our learners and to not embarrass them or reduce their self-
esteem.
Record your solutions on the flipchart, and be prepared to share these with the class.
1. There are six participants in a three-day equipment operations class, and all of them
have satisfied the necessary prerequisites for the course. One of the participants had
to leave class three hours early on the first day, and as a result has fallen behind on
the second day of class.
Which characteristics of a trainer can be applied to this case? Describe how each
skill would best be used. What should the trainer do to improve the participant’s
opportunities for success?
2. In a vacuum pump rebuilding class, the instructor always leads the class through an
explanation and demonstration of the steps required in the proper assembly and
disassembly of a vacuum pump. Each participant is given a copy of the step-by-step
procedure to follow along with the instructor. When the demonstration is completed,
participants are allowed time to practice the same procedure on their own assigned
vacuum pump. During the practice sessions, one of the maintenance technicians
wants to know how much vacuum grease to apply onto an O-ring.
Which characteristics of a trainer can be applied to this case? Describe how each
skill would best be used. What could the instructor do or say that would help the
performer remember this part of the task next time?
!!!!!
(continued on next page)

Instructor Guide
NOTES:
PBET Module PL-1: Describe Trainer Characteristics
Technology Transfer #95102996A-TRG PL-1-8
PRACTICE EXERCISE ( Continued)
3. In a particular equipment maintenance training course, participants are required to
perform specific functional checks on the machine to determine the tool’s readiness
for production use. The participants by this time will have already completed a
component identification lesson, which would have covered the location of all
controls and indicators as well as all major subsystems. One of the maintenance
technicians forgot where the water cooling flow indicator is located on the machine.
Which characteristics of a trainer can be applied to this case? Describe how each
skill would best be used. What could the instructor do or say that would help the
performer recall the location of this part?
4. The instructor of a specific process-related course stated at the beginning of class
that the course is intended to be an introductory course for manufacturing
technicians having less than 12 months of industry experience. After all participants
have introduced themselves, you find out that six of the participants have an average
of ten years experience in the subject, and the remaining seven students in the class
match the target audience description for the course.
How should the trainer handle this situation? Which characteristics of a trainer can
be applied to this case? Describe how each skill would best be used.
5. In a software training class for a specific inspection system, students are required to
work together in groups of three. One student in one of the groups appears to be
dominating the others in his team and doesn’t allow the others time to use the
workstation assigned to their group.
How should the trainer handle this situation? Which characteristics of a trainer can
be applied to this case? Describe how each skill would best be used.
!!!!!
(continued on next page)

Instructor Guide
NOTES:

PBET Module PL-1: Describe Trainer Characteristics
Technology Transfer #95102996A-TRG PL-1-9
PRACTICE EXERCISE (Continued)
6. During a process equipment operations class, performers are asked to stop the tool in
the middle of the process to simulate an emergency intervention procedure. At some
point in the procedure, the performers are required to remove a wafer from the tool
with the aid of a vacuum wand. Near the end of the practice exercise, one person in
the class accidentally drops the wafer. The wafer breaks and there are pieces of
silicon scattered inside the wafer feeding assembly.
How should the trainer handle this situation? Which characteristics of a trainer can
be applied to this case? Describe how each skill would best be used.
7. There are six participants in a three-day equipment operations class, and all of them
have satisfied the necessary prerequisites for the course. One of the participants had
to leave class three hours early on the first day, and as a result will probably fall
behind on the second day of class. One of the participant’s colleagues volunteered to
assist him through lunch and breaks to bring the person up to the level of the others.
Which characteristics of a trainer can be applied to this case? Describe how each
skill would best be used. What should the trainer do?
!!!!!

Instructor Guide
Skill Test
• Repeat the process with one of the unused scenarios
• Compare your work with others at the table

PBET Module PL-1: Describe Trainer Characteristics
Technology Transfer #95102996A-TRG PL-1-10
SKILL TEST
Each participant will repeat the procedure from the practice exercise using one of the
scenarios that was not previously used.
When finished, compare your work with others at your table.
!!!!!

Instructor Guide
PL-2 PILOT A SHORT PBET LESSON
PBET Course Map
• We have reached our first terminal objective in the
PBET course
PBET Lesson
• We’ve talked about why trainer characteristics are
important in PBET
• Now we’re going to look at why testing a lesson is
important during the Pilot phase of PBET
Pilot a Short PBET Lesson
• Ask a volunteer to read the objective from the foil

PBET Module PL-2: Pilot a PBET Lesson Plan
Technology Transfer #95102996A-TRG PL-2-1
PL-2
PILOT A SHORT PBET LESSON
OBJECTIVE:
Try out/pilot a short PBET lesson as eithera performer or trainer and identify the pilotresults.

Instructor Guide
Performance-Based Equipment Training Requires a
Pilot Test
• As part of the PBET Pilot phase, you try out the
training materials that have been developed
• This allows developers/trainers to see how well the
materials work in a training situation
• The pilot is an effective way to determine which areas:
− Need some improvement
− Work particularly well
− Can be eliminated

PBET Module PL-2: Pilot a PBET Lesson Plan
Technology Transfer #95102996A-TRG PL-2-2
Performance-Based EquipmentTraining Requires a Pilot
• All PBET training courses need a tryout orpilot before the courses are delivered.
• The pilot is the first opportunity to try out theefforts from the earlier PBET phases.
As part of the Pilot phase of PBET, you try out the training materials that have been
developed. This is the developer’s/trainer’s opportunity to see how well the materials
work in a training situation.
Piloting the materials is an effective way to determine which areas need some
improvement, work particularly well, or can even be eliminated.

Instructor Guide
Piloting PBET Courses
• During the pilot, developers and trainers need to
determine how effective their course design is. They
need to pay attention to:
− Content
− Sequence
− Clarity
− Comprehension
− Accuracy
− Relevance
− Training medium
− Practice exercises
− Participation and activity levels
− Time and length
• This information is best collected through observations
by SMEs and from the course evaluations
PBET Module PL-2: Pilot a PBET Lesson Plan
Technology Transfer #95102996A-TRG PL-2-3
Piloting PBET Courses
• Need some improvement or reorganization
• Are successful and work well
• Can be eliminated
Allows developers to detect areas that:
During the pilot, developers and trainers need to determine how effective their course
design is. They need to pay attention to:
• Content
• Sequence
• Clarity
• Comprehension
• Accuracy
• Relevance
• Training medium
• Practice exercises
• Participation and activity levels
• Time and length
This type of information is best collected during the pilot through observations by subject
matter experts and from the course evaluations.

Instructor Guide
Practice Exercise
During the PBET Pilot phase, developers have the opportunity to
fine-tune the course before it’s delivered
A4 Pilot a Short PBET Lesson -- Legos Exercise
Instructor Note: Tell participants that now they will have the
opportunity to pilot their Legos training. Everyone in their group is
to present a portion of the training and fill out the pilot observation
sheet that’s in Appendix A
Remind them that the Legos example has included most of the phases
of PBET, while their actual course will include all aspects and
phases of PBET that come before the Pilot phase
Time: Approximately 15 minutes
Materials: Legos, a job aid, a pilot observation sheet (Appendix A,
page A-13), and Legos assembly training directions that were
developed by participants earlier in the training -- i.e., module AN-1
Directions: Have one person from each pair of the Legos training
developers switch tables. Participants are to follow the verbal
directions exactly as they are provided. During the pilot of their
Legos training, developers are to look for areas that indicate
improvement efforts will be needed
Rules: Use the basic 4-step approach to training:
1. Tell them -- explain the objective
2. Show them -- model the performanace
3. Let them try it -- relevant practice with feedback
4. Let them show you -- administer the skill test
PBET Module PL-2: Pilot a PBET Lesson Plan
Technology Transfer #95102996A-TRG PL-2-4
PRACTICE EXERCISE
Pilot the PBET assembly training lesson. As training developers you have:
• Completed the task analysis
• Prepared the objectives
• Developed the skills hierarchy
NOTE: Don’t forget to apply the simple 4-step training process:
1. Tell them what they are going to do -- explain the performance objective
2. Show them what/how to do it -- model the intended performance
3. Let them do it -- give them practice with feedback
4. Let them show you how to do it -- administer the skill test
!!!!!
It’s also during the Pilot phase of PBET that developers have the opportunity to fine-tune
the course before the course is delivered.
This practice exercise will provide the opportunity for you to pilot your PBET assembly
training lesson.

Instructor Guide
Skill Test
Instructor Note: This skill test is done as a group activity.
Ask participants what they discovered about their training
lesson during their Legos pilot training. Have them focus
on what they would improve as a result of the pilot
Ask the audience questions such as:
• Did the instructor follow the lesson plan?
• Did you have adequate time to complete it?
- Enough tme to practice?
• Was there something done that enhanced your ability
to learn and assemble it?
• Was the instructor’s communications okay?
- Adequate feedback and coaching?
• What about the job aid -- helpful?
• Suggestions?
• How would you use this lesson in the future?

PBET Module PL-2: Pilot a PBET Lesson Plan
Technology Transfer #95102996A-TRG PL-2-5
SKILL TEST
Based on the PBET lesson, identify the areas of the training that work well and the areasthat need to be improved.
!!!!!

Instructor Guide

Deliver
Module No. Page No.
DL-1: Describe Trainer Responsibilities DL-1-1Group description of trainer responsibilities
DL-2: Prepare a Training Curriculum Checklist DL-2-1SEMATECH MT training and certificationHow it worksBenefits of MT certificationMajor stepsGuidelinesParts of MT training checklist
DL-3: Create an Action Plan for PBET Implementation DL-3-1Getting buy-in at your companyReasons companies are implementing PBETCreate a PBET Action Plan
Instructor Guide
DL-1 DESCRIBE TRAINER RESPONSIBILITIES
PBET Course Map
• Here’s where we are now on the PBET course map
PBET Phases
• We have completed the Pilot phase of PBET
• Now, as part of the Deliver phase of PBET, we’re
going to discuss the trainer’s responsibilities
Describe Trainer Responsibilities
• Ask a volunteer to read the objective from the foil
• We will be brainstorming the responsibilities of
effective trainers
− We will compile a list of everyone’s impressions

PBET Module DL-1: Describe Trainer Responsibilities
Technology Transfer #95102996A-TRG DL-1-1
DL-1
DESCRIBE PBET TRAINERRESPONSIBILITIES
OBJECTIVE:
List at least five responsibilities of an effectivetrainer.
In this module, you will brainstorm a list of five responsibilities of an effective trainer.
You’ll be asked to share this list with other participants in this class.
Everyone’s opinions will be combined to create a comprehensive listing of an effective
trainer’s responsibilities.
Instructor Guide
Group Activity Trainer Responsibilities
Time: 5-15 minutes
• List in your notebooks five responsibilities of an
effective PBET trainer
• Discuss these responsibilities with the people at your
table
• Compile a group list of these responsibilities on your
flipchart
• Choose a spokesperson for your group
− This person will read the list to the class when
your group is asked

PBET Module DL-1: Describe Trainer Responsibilities
Technology Transfer #95102996A-TRG DL-1-2
1. Each participant will list fiveresponsibilities of an effective trainer; forexample:
– Provides quality instruction at all times– Stays up to date in the latest technology– Updates the employee’s training records
2. Share your list with others in your group.
3. Compile the group’s list on an easel pad.
4. Select a spokesperson from each group.
GROUP ACTIVITY
Describe Trainer Responsibilities
Procedure:
1. Make a list of at least five responsibilities that you would expect of an effective
trainer in your company.
____________________________________________________________________
____________________________________________________________________
____________________________________________________________________
____________________________________________________________________
____________________________________________________________________
2. Share your list with other course participants at your table. Feel free to discuss these
responsibilities with each other.
3. If an easel pad is available at your table, compile a group list from the participants at
your table and write your group’s list on the pad.
4. Select a spokesperson for your group, and when the class facilitator calls on your
table, your spokesperson will read aloud the list compiled by your group.

Instructor Guide
Skill Test
• In your notebooks, list at least five responsibilities of
an effective trainer

PBET Module DL-1: Describe Trainer Responsibilities
Technology Transfer #95102996A-TRG DL-1-3
SKILL TEST
List five responsibilities of an effective trainer:
!!!!!

Instructor Guide
DL-2 PREPARE A TRAINING CURRICULUM CHECKLIST
PBET Course Map
• This is an optional module, depending on the makeup
of the audience or their needs
• We discussed trainer responsibilities
• Now we’re going to cover developing an
individualized curriculum
Complete a Training Checklist
• Ask a volunteer to read the objective from the foil
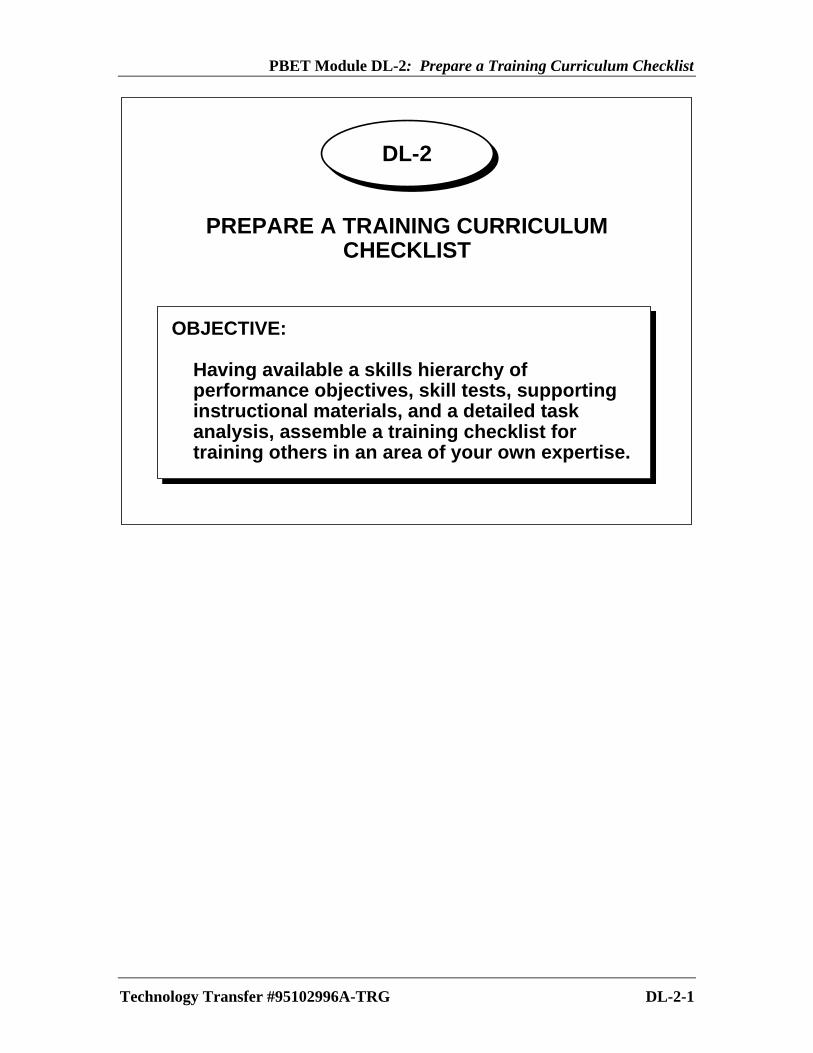
PBET Module DL-2: Prepare a Training Curriculum Checklist
Technology Transfer #95102996A-TRG DL-2-1
DL-2
PREPARE A TRAINING CURRICULUMCHECKLIST
OBJECTIVE:
Having available a skills hierarchy ofperformance objectives, skill tests, supportinginstructional materials, and a detailed taskanalysis, assemble a training checklist fortraining others in an area of your own expertise.

Instructor Guide
• SEMATECH Manufacturing Technician Training and
Certification Process is a good example of a
certification system (Appendix C)
• It is the system that is currently used in the training and
certifying of manufacturing technicians at
SEMATECH
• These techniques can be applied to similar situations,
for example:
− Equipment assembly personnel
− Final test personnel
− Field service engineers (FSE)
− Process engineers
− Certification of customers by supplier

PBET Module DL-2: Prepare a Training Curriculum Checklist
Technology Transfer #95102996A-TRG DL-2-2
SEMATECH ManufacturingTechnician Training and Certification
Process
PURPOSE:
The purpose of the Manufacturing Technician(MT) Training and Certification program is todocument the demonstration of the skillsrequired for safe operating, process monitoringand/or maintaining process equipment accordingto SEMATECH specification.
SEMATECH Manufacturing Technician (MT) Training and Certification Process is a
good example of a certification system. It is the system that is currently used in the
training and certifying of manufacturing technicians at SEMATECH.
These techniques can be applied to similar situations, for example:
• Equipment assembly personnel
• Final test personnel
• Field service engineers (FSE)
• Process engineers
• Certification of customers by supplier

Instructor Guide
What Are Some Other Side Benefits of the MT
Certification Program?
• Read the purpose statement from the SEMATECH MT
Training and Certification Process
• Brainstorm some other benefits of certifying the
technicians and engineers who work on equipment

PBET Module DL-2: Prepare a Training Curriculum Checklist
Technology Transfer #95102996A-TRG DL-2-3
What Are Some Other Side Benefitsof the MT Certification Program?
• Provides a “learning by design” attituderather than by “trial and error.”
• Forces us to organize and manage thetraining of all MTs.
• Develops a cooperative team environment.
• Establishes a baseline for MT skills across allshifts.
• Could be tied to advancement requirementswithin Manufacturing Methods.
The process for training and certifying manufacturing technicians can be found in the
Technician Certification handouts in Appendix C of this notebook. There are four
essential documents:
1. SEMATECH MT Certification Process
2. Guidelines for Writing Certification Tests
3. Guidelines for Developing Training and Certification Checklists
4. Manufacturing Technician Training Checklist (example)
Instructor Guide
A4
How It Works
• In Appendix C of your notebook you’ll find essential
documents such as:
− SEMATECH Manufacturing Technician and
Certification Process
− Guidelines for Developing Training and
Certification Checklists
− Manufacturing Technician Training Checklist
− Guidelines for Writing Certification Tests
• Please refer to the first one, SEMATECH
Manufacturing Technician and Certification Process

PBET Module DL-2: Prepare a Training Curriculum Checklist
Technology Transfer #95102996A-TRG DL-2-4
How It Works
1. Communications and Ownership– Training Request Form Is Issued
» Shift Manager» Document Control» Peer Trainer
• Training specialist• An experienced MT• Process engineer or technician• Equipment engineer or technician• Field service engineer
» Process Engineer or Technician» Equipment Engineer or Technician» MT Trainee
2. Prepare an Individualized Roadmap
Read the purpose statement from the SEMATECH MT Training and Certification
Process. Brainstorm some other benefits of certifying the technicians and engineers that
work on equipment.

Instructor Guide
Major Steps
Instructor Note: Walk performers through the highlights
of the SEMATECH Manufacturing Technician and
Certification Process document. Point out that Step 3, the
4-Step Training Process, is an example of a PBET
technique

PBET Module DL-2: Prepare a Training Curriculum Checklist
Technology Transfer #95102996A-TRG DL-2-5
Major Steps
Step 1 Kickoff Meeting– Manager, MT trainee, and peer trainer– Importance of training, schedule, expectations
Step 2 Roadmap Explanation– What will be done, how long, how evaluation will
be conducted
Step 3 4-Step Training Process– Trainer tells trainee what the trainee will do– Trainer explains, shows and answers questions– Trainee practices and trainer provides coaching– Trainee explains, shows and answers questions
Step 4 Record Keeping– Both agree mastery of a skill has occurred– Both sign and date the training checklist
The foil above shows some of the major steps that are included in the SEMATECH
Manufacturing Technician and Certification Process document.

Instructor Guide
Major Steps (Cont’d)
Instructor Note: Continue explanation of major steps in
Certification Process
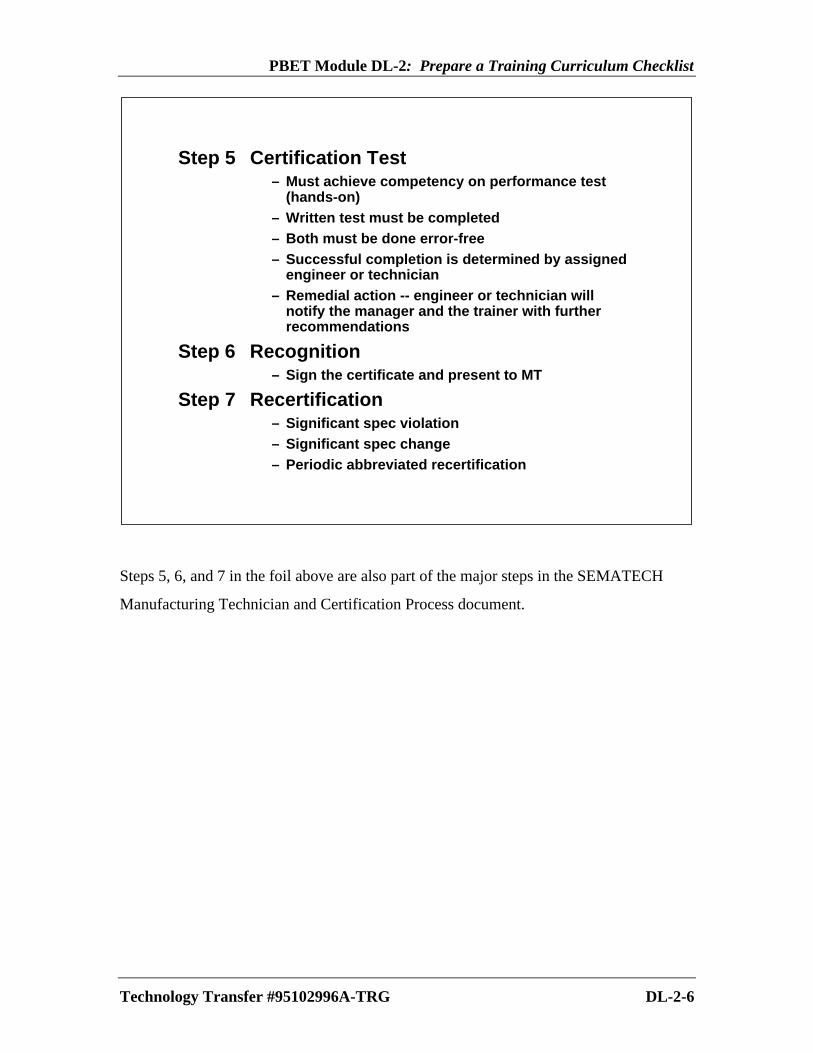
PBET Module DL-2: Prepare a Training Curriculum Checklist
Technology Transfer #95102996A-TRG DL-2-6
Step 5 Certification Test– Must achieve competency on performance test
(hands-on)– Written test must be completed– Both must be done error-free– Successful completion is determined by assigned
engineer or technician– Remedial action -- engineer or technician will
notify the manager and the trainer with furtherrecommendations
Step 6 Recognition– Sign the certificate and present to MT
Step 7 Recertification– Significant spec violation– Significant spec change– Periodic abbreviated recertification
Steps 5, 6, and 7 in the foil above are also part of the major steps in the SEMATECH
Manufacturing Technician and Certification Process document.

Instructor Guide
Guidelines for Developing Training and Certification
Checklists
• Please turn to the Guidelines for Developing Training
Checklists in Appendix C, page C-12
• These guidelines describe the minimum requirements
A4Instructor Note: Walk participants through the highlights
of the Guidelines for Developing Training Checklists
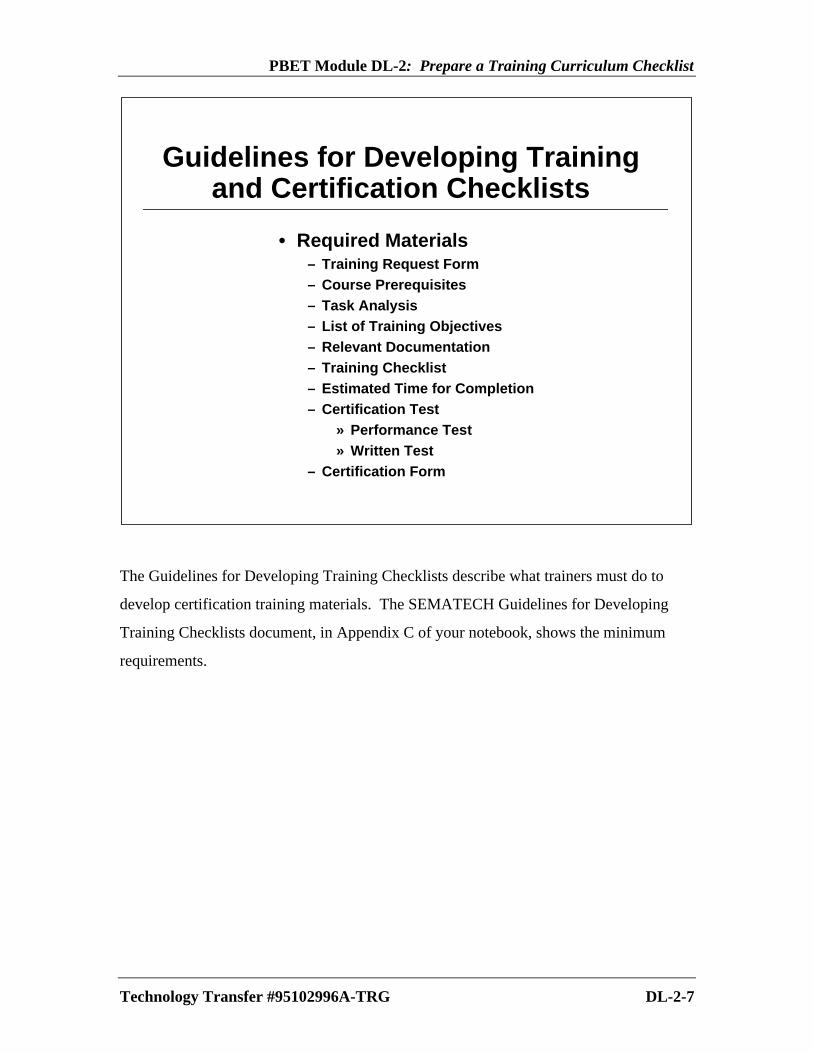
PBET Module DL-2: Prepare a Training Curriculum Checklist
Technology Transfer #95102996A-TRG DL-2-7
Guidelines for Developing Trainingand Certification Checklists
• Required Materials– Training Request Form– Course Prerequisites– Task Analysis– List of Training Objectives– Relevant Documentation– Training Checklist– Estimated Time for Completion– Certification Test
» Performance Test» Written Test
– Certification Form
The Guidelines for Developing Training Checklists describe what trainers must do to
develop certification training materials. The SEMATECH Guidelines for Developing
Training Checklists document, in Appendix C of your notebook, shows the minimum
requirements.

Instructor Guide
Three Parts of a Manufacturing Technician Training
Checklist
A4• Please turn to the Manufacturing Technician Training
Checklist in Appendix C, page C-17
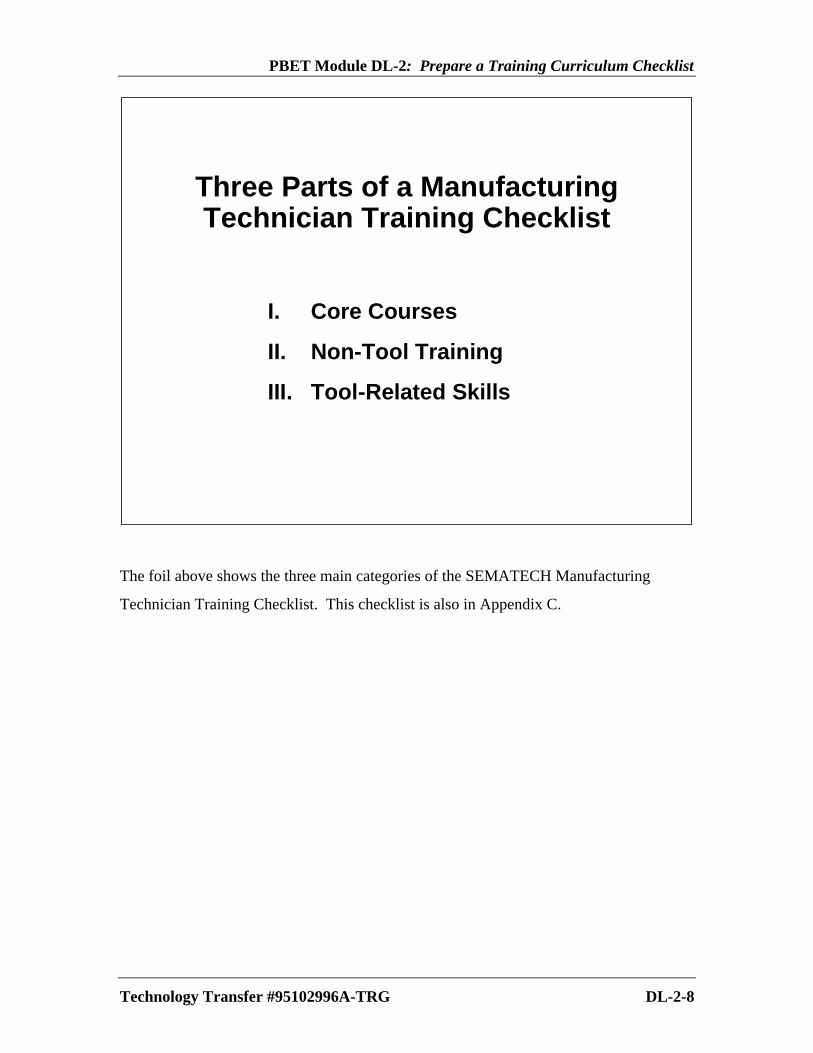
PBET Module DL-2: Prepare a Training Curriculum Checklist
Technology Transfer #95102996A-TRG DL-2-8
Three Parts of a ManufacturingTechnician Training Checklist
I. Core Courses
II. Non-Tool Training
III. Tool-Related Skills
The foil above shows the three main categories of the SEMATECH Manufacturing
Technician Training Checklist. This checklist is also in Appendix C.

Instructor Guide
Core Courses
If you look at the checklist in Appendix C, page C-17, you
will see the columns for participant, trainer, and date
A4Instructor Note: Walk participants through the highlights
of the core courses

PBET Module DL-2: Prepare a Training Curriculum Checklist
Technology Transfer #95102996A-TRG DL-2-9
I. CORE COURSES
DESCRIPTION TIME1. Week One Orientation 28
– PC Windows– E-Mail– HAZCOM– Site Safety– Chemical Safety– Cleanroom Entry Cert.
2. WorkStream Training 143. Semiconductor Process Overview 84. Electrical Safety 65. Lockout/Tagout 16. RS1/Quickstart 77. Intro to Statistical Methods 7.58. Passive Data Collection 7.5
The foil above presents information for some of the core courses from the checklist.
Refer to the example of the SEMATECH Manufacturing Technician Training Checklist
to see how the information for the checklist is recorded.

Instructor Guide
II. Non-Tool ATDF Training
Instructor Note: Walk participants through the highlights
of the Non-Tool ATDF Training segment

PBET Module DL-2: Prepare a Training Curriculum Checklist
Technology Transfer #95102996A-TRG DL-2-10
II. NON-TOOL TRAINING
1. Tour of Bay2. Safety Items3. Key Contacts4. Housekeeping5. Wafer Handling6. Equipment Owners7. Timesheets8. Special Codes9. Hazardous Waste
The foil above is a brief overview of items in the second category of the checklist. Please
refer to the example of the SEMATECH Manufacturing Technician Training Checklist to
see the complete list of Non-Tool Training.

Instructor Guide
Tool-Related Skills
Instructor Note: Walk participants through the highlights
of the Tool-Related Skills segment
• Note that this list of competencies could be the same or
modifications of the skills described in the course map
for operator training mentioned in Module AN-3, page
AN-3-11

PBET Module DL-2: Prepare a Training Curriculum Checklist
Technology Transfer #95102996A-TRG DL-2-11
III. TOOL-RELATED SKILLS
1. Process Overview2. Equipment Overview3. Locate and Describe Related Hazards4. Describe Safety Procedures5. Locate and Describe Controls and Indicators6. Define Operating Codes or Software Commands7. Read and Interpret Specifications8. Process Wafers According to Specifications9. Apply Principles of SPC to the Tool10. Preventive Maintenance11. Qualifications12. Troubleshooting (optional)13. Engineering Audit
The foil above shows an overview of the Tool-Related Skills from the third category.
Please refer to the SEMATECH Manufacturing Technician Training Checklist for the
complete list of tool-related skills.

Instructor Guide
A4
Skill Test (Optional)
Instructor Note: Have participants complete the skill test.
Remind them to ask for assistance if they have questions
• For those participants who are interested in developing a training
checklist of their own, SEMATECH has provided blank forms in
the Appendix
• Additional time will be allotted on the last day of class to allow
participants to work on their certification checklists
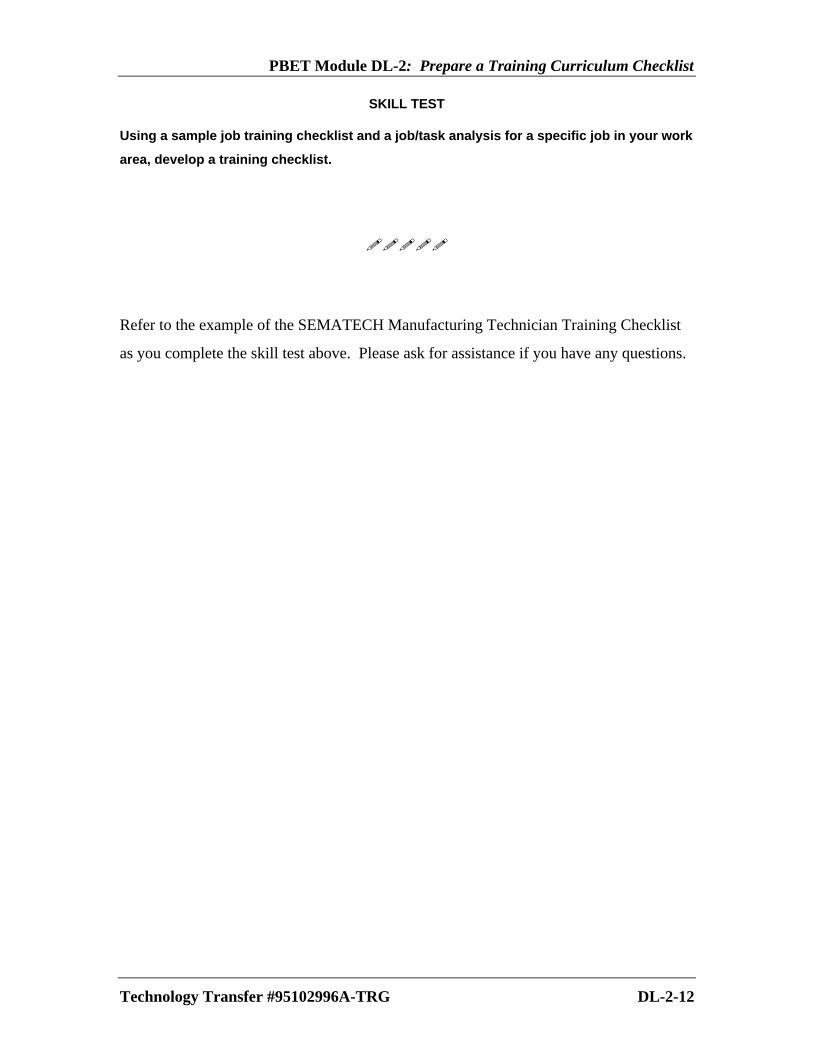
PBET Module DL-2: Prepare a Training Curriculum Checklist
Technology Transfer #95102996A-TRG DL-2-12
SKILL TEST
Using a sample job training checklist and a job/task analysis for a specific job in your work
area, develop a training checklist.
!!!!!
Refer to the example of the SEMATECH Manufacturing Technician Training Checklist
as you complete the skill test above. Please ask for assistance if you have any questions.

Instructor Guide
DL-3 CREATE AN ACTION PLAN FOR PBET IMPLEMENTATION
PBET Course Map
• We’ve covered completing a training curriculum
checklist
• Now we’re going to discuss creating an action plan to
implement PBET
Create an Action Plan for PBET Implementation
• Once you return to your workplace you’ll need to have
a plan or course of action to follow to get PBET
accepted and implemented
• Ask a volunteer to read the objective from the foil
• In this module we will rely on some group discussion
and brainstorming, too
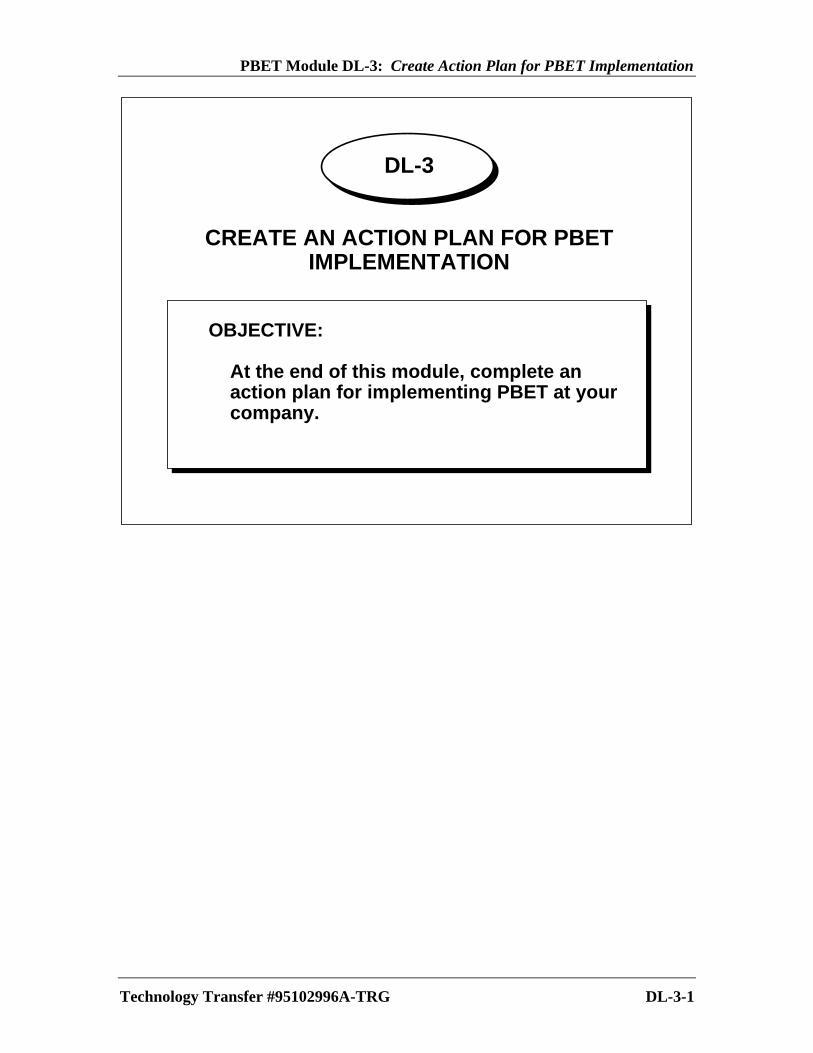
PBET Module DL-3: Create Action Plan for PBET Implementation
Technology Transfer #95102996A-TRG DL-3-1
DL-3
CREATE AN ACTION PLAN FOR PBETIMPLEMENTATION
OBJECTIVE:
At the end of this module, complete anaction plan for implementing PBET at yourcompany.

Instructor Guide
Getting Buy-in at Your Company
• Ask participants to show by raising their hands which
of them already have “buy-in”
• Ask each of the participants who raised their hands
why they have “buy-in” at their companies, and record
their responses on the flipchart
− Have participants record their responses in their
notebooks
• Ask the participants who don’t yet have the “buy-in”
they need, why they think it isn’t there -- what are the
obstacles?
− Flipchart their responses
− Post both lists where the participants can see
them
PBET Module DL-3: Create Action Plan for PBET Implementation
Technology Transfer #95102996A-TRG DL-3-2
The reasons why companies are willing to implement PBET:
!!!!!
Many companies are eager to implement Performance-Based Equipment Training. In the
space above, list the reasons companies are willing to implement PBET. Use the reasons
from the flipchart.

Instructor Guide
Reasons Companies Are Implementing PBET
• Tell participants that now you’re going to open the
class to a group discussion and brainstorming session
to assist those who still need “buy-in.” Have
participants refer to the flipcharts if the
discussions/brainstorming need a starting point
• Create a flipchart page with the title “Possible
Solutions,” and list participants’ ideas that could be
solutions. The following suggestions may be added to
their lists, if appropriate:
− SEMATECH recommendations/endorsement
− Customer expectations
− Benchmarking
− Having management read What Every Manager
Should Know About Training by Robert Mager
PBET Module DL-3: Create Action Plan for PBET Implementation
Technology Transfer #95102996A-TRG DL-3-3
Possible solutions or actions for implementing PBET:
!!!!!
Record solutions or actions that may help you overcome PBET objections or obstacles at
your company.

Instructor Guide
PBET Implementation Action Plan
Time: Approximately 20 minutes
Materials: Participant guide, pen/pencil
Directions: Tell participants to create their own PBET
Implementation Action Plan by filling in the action plan in
their notebooks. They may ask their colleagues or the
course instructor for input or assistance

PBET Module DL-3: Create Action Plan for PBET Implementation
Technology Transfer #95102996A-TRG DL-3-4
PBET IMPLEMENTATION ACTION PLAN
The Action Who Is Responsible When It Will Be Completed

Instructor Guide

Evaluate
Module No. Page No.
EV-1: Describe Evaluation Levels EV-1-1The PBET evaluation phasesFour levels of evaluationLevel 1Level 2Level 3Level 4
Instructor Guide
EV-1 DESCRIBE LEVELS OF EVALUATION
PBET Course Map
• Here’s where we are now on the PBET course map
PBET Phases
• We’ve covered implementing SEMATECH PBET
• Now we’re going to talk about the last phase of PBET,
the Evaluation phase
Evaluate Training
• Ask a volunteer to read the objective from the foil
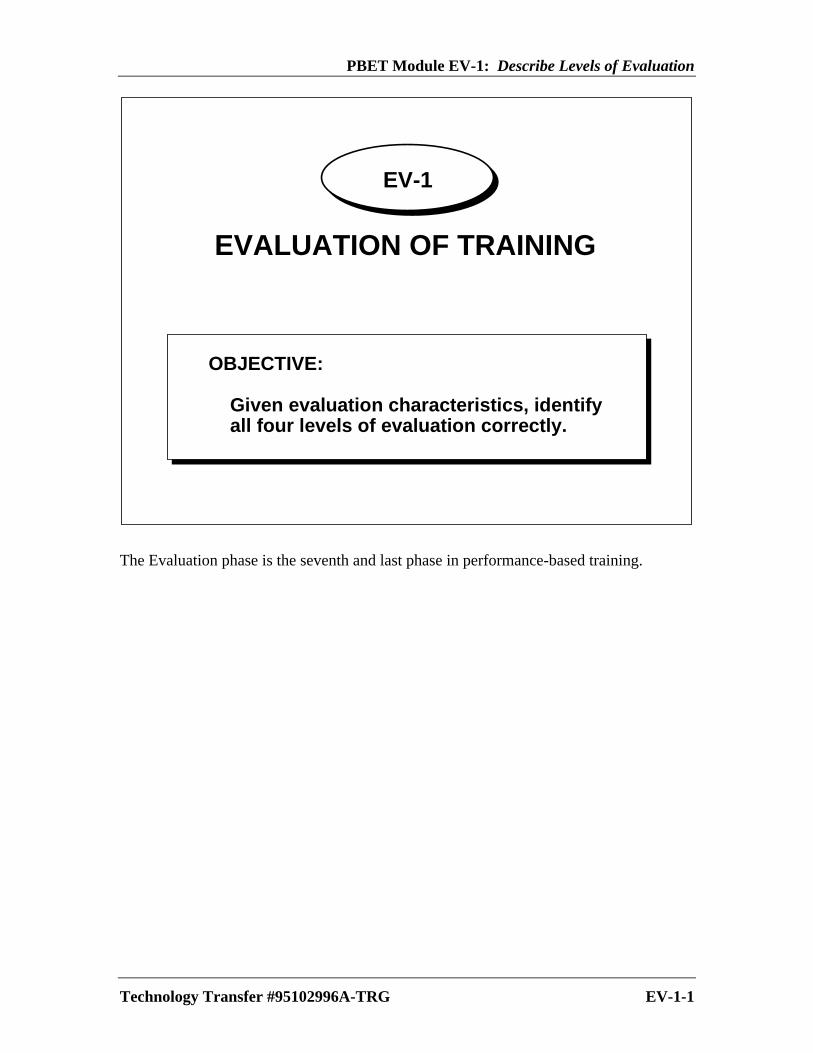
PBET Module EV-1: Describe Levels of Evaluation
Technology Transfer #95102996A-TRG EV-1-1
EV-1
OBJECTIVE:
Given evaluation characteristics, identifyall four levels of evaluation correctly.
EVALUATION OF TRAINING
The Evaluation phase is the seventh and last phase in performance-based training.

Instructor Guide
The Evaluation Phase of PBET
Instructor Note: Ask participants how they currently
evaluate training
Brainstorm and Capture Ideas
• Who or what part of the training program gets
evaluated?
• Why is it important to evaluate training?
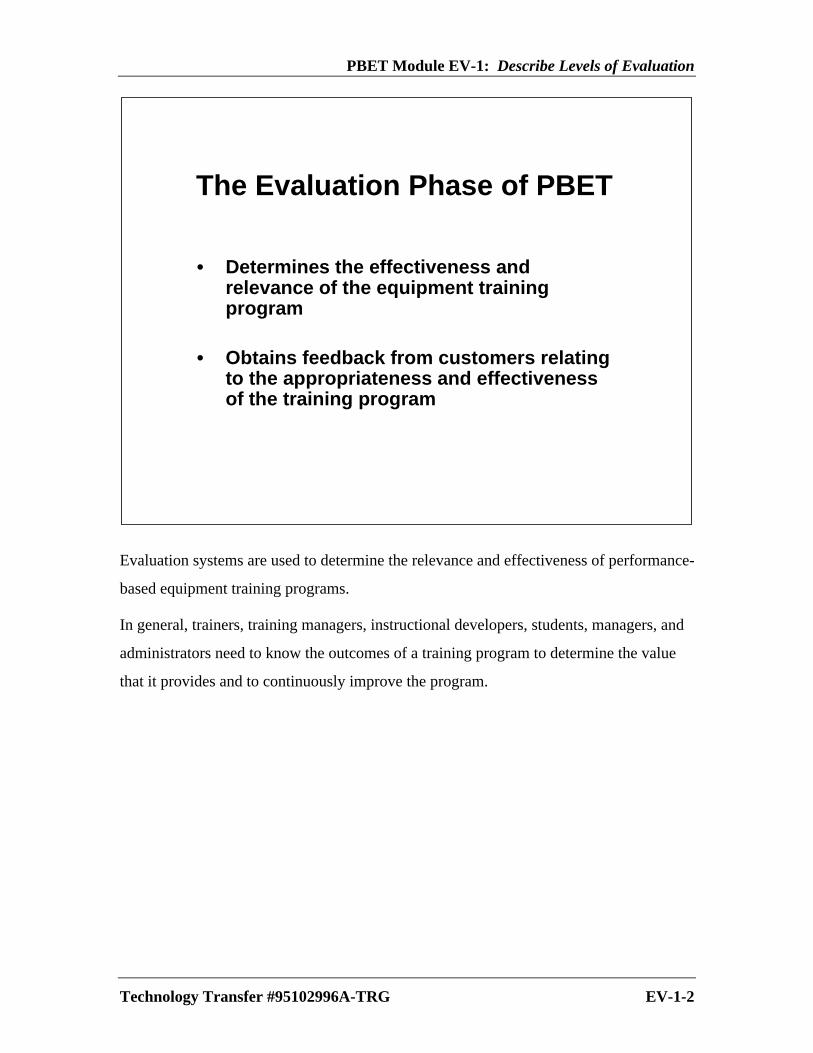
PBET Module EV-1: Describe Levels of Evaluation
Technology Transfer #95102996A-TRG EV-1-2
The Evaluation Phase of PBET
• Determines the effectiveness andrelevance of the equipment trainingprogram
• Obtains feedback from customers relatingto the appropriateness and effectivenessof the training program
Evaluation systems are used to determine the relevance and effectiveness of performance-
based equipment training programs.
In general, trainers, training managers, instructional developers, students, managers, and
administrators need to know the outcomes of a training program to determine the value
that it provides and to continuously improve the program.

Instructor Guide
Donald Kirkpatrick’s Four Levels of Evaluation
• Level 1 -- measures participant’s reactions
− Captures participant’s first reactions to training
− Evaluation sheets check course material,
information, instructor, setting, etc.
− Sometimes referred to as “smile sheets” or course
satisfaction sheets because they gauge participant
reaction
• Level 2 -- measures participant’s learning
− Can be a written test, demonstration, or simulation
that tests participants’ skills/ knowledge against
course objectives
• Level 3 -- measures application of learning
− Conducted at the participants’ work site a few
months after training
− Determines if participants are using their new
skills
− Is accomplished by observation and/or
interviews/assessments from participant,
supervisors, and perhaps customers
• Level 4 - -measures return on investment
− Searches for training impact and value
− Looks for cost benefits in terms of business results
(ROI)

PBET Module EV-1: Describe Levels of Evaluation
Technology Transfer #95102996A-TRG EV-1-3
Donald Kirkpatrick’sFour Levels of Evaluation
Level 1 -- Measures participant’s first reactions
Level 2 -- Measures participant’s learning
Level 3 -- Measures application of learning atthe workplace
Level 4 -- Measures return on investments
We base our PBET evaluation system on Donald Kirkpatrick’s four levels of evaluation.
(Kirkpatrick is a well-respected former professor and training consultant.)
Instructor Guide
A4
Level 1
• Refer to the SEMATECH example (in Appendix E of
your manual). This is a Level 1 evaluation tool. It is a
scannable form that can be easily scored; responses can
be tabulated by spreadsheet software for ease of
reporting course results
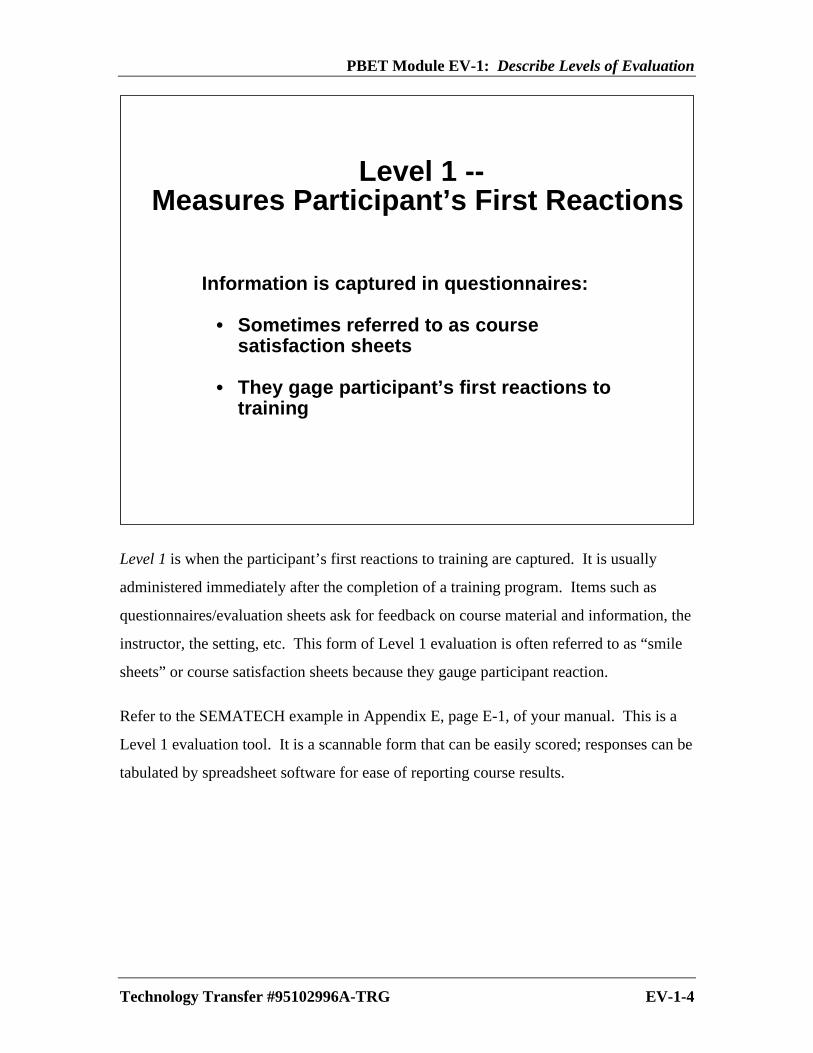
PBET Module EV-1: Describe Levels of Evaluation
Technology Transfer #95102996A-TRG EV-1-4
Level 1 --
Information is captured in questionnaires:
• Sometimes referred to as coursesatisfaction sheets
• They gage participant’s first reactions totraining
Measures Participant’s First Reactions
Level 1 is when the participant’s first reactions to training are captured. It is usually
administered immediately after the completion of a training program. Items such as
questionnaires/evaluation sheets ask for feedback on course material and information, the
instructor, the setting, etc. This form of Level 1 evaluation is often referred to as “smile
sheets” or course satisfaction sheets because they gauge participant reaction.
Refer to the SEMATECH example in Appendix E, page E-1, of your manual. This is a
Level 1 evaluation tool. It is a scannable form that can be easily scored; responses can be
tabulated by spreadsheet software for ease of reporting course results.

Instructor Guide
Level 2
• Level 2 evaluations can be administered for each
lesson of a course as well as include a pretest and
posttest
• How was Level 2 conducted in this course?
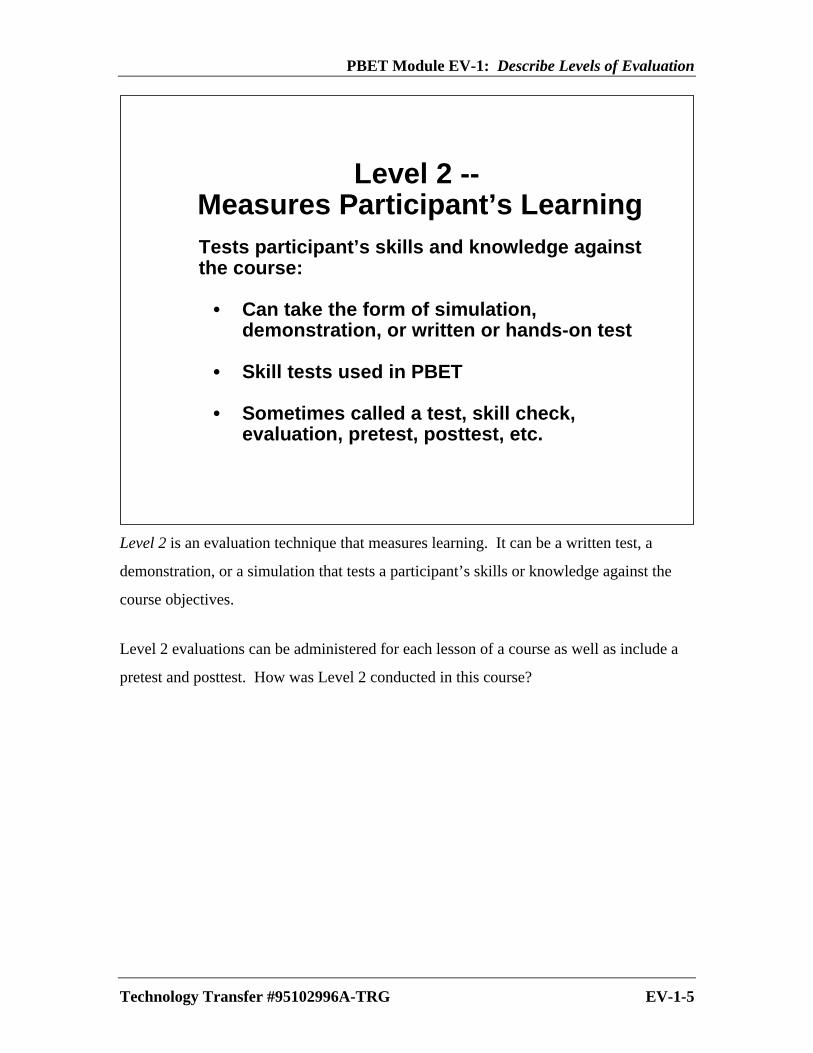
PBET Module EV-1: Describe Levels of Evaluation
Technology Transfer #95102996A-TRG EV-1-5
Level 2 --
Tests participant’s skills and knowledge againstthe course:
• Can take the form of simulation,demonstration, or written or hands-on test
• Skill tests used in PBET
• Sometimes called a test, skill check,evaluation, pretest, posttest, etc.
Measures Participant’s Learning
Level 2 is an evaluation technique that measures learning. It can be a written test, a
demonstration, or a simulation that tests a participant’s skills or knowledge against the
course objectives.
Level 2 evaluations can be administered for each lesson of a course as well as include a
pretest and posttest. How was Level 2 conducted in this course?
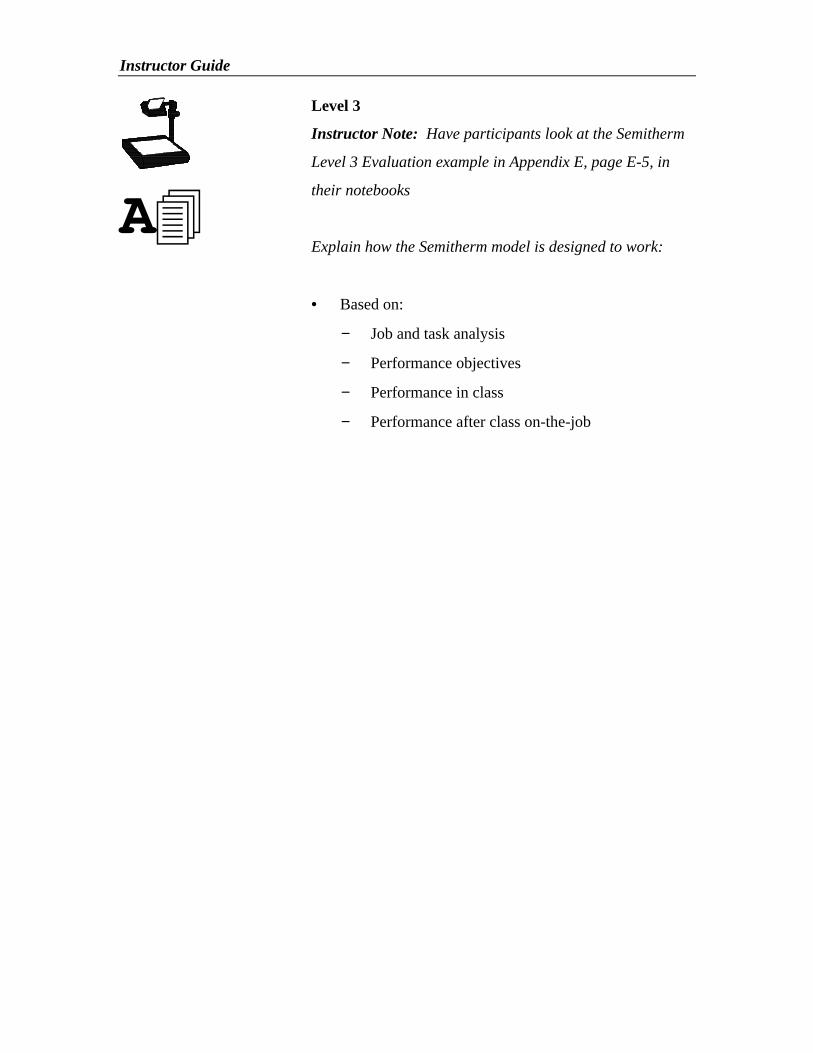
Instructor Guide
A4
Level 3
Instructor Note: Have participants look at the Semitherm
Level 3 Evaluation example in Appendix E, page E-5, in
their notebooks
Explain how the Semitherm model is designed to work:
• Based on:
− Job and task analysis
− Performance objectives
− Performance in class
− Performance after class on-the-job

PBET Module EV-1: Describe Levels of Evaluation
Technology Transfer #95102996A-TRG EV-1-6
Conducted a few months after training atworkplace:
• By interviews, observations, orassessments from participants andsupervisors
• Determine if participants are using theirnew skills
Level 3 --Measures Application of Learning at
the Workplace
A Level 3 evaluation is conducted at the participants’ work location to determine if the
participants are actually using their new skills. Three to four months after the training, a
Level 3 evaluation is accomplished either by observation or through interviews/
assessments from the participant, the supervisors, and perhaps the customers.

Instructor Guide
Level 4
• Explain how the Semitherm model works Appendix E,
(page E-9)
− Codes (A-T) are used to represent performance
objectives (skills) from the course
− The codes are matched with work done on
equipment that requires a specific skill
− The Field Service Engineering (FSE) report has a
place where the code can be written in
− The FSE report indicates time to repair (TTR)
− TTR is tracked over time to see if training helped
reduce it
• SEMATECH currently uses Levels 1, 2, and 3.
Evaluation information is used to improve training
courses
• The SEMATECH Technician Training Council has a
task force investigating ways for Level 3 and 4
evaluations to be conducted

PBET Module EV-1: Describe Levels of Evaluation
Technology Transfer #95102996A-TRG EV-1-7
Level 4 --Measures Return on Investments
Measures the value of the training activitywithin the company
What is the impact to the company in terms of:
• Time saved?
• Improved productivity?
• Improved efficiency?
• $$ saved?
A Level 4 evaluation is the most difficult to obtain because it searches for training impact
and value. It looks for the cost benefits in terms of business results -- the return on the
training investment. In PBET, it requires tracking the cost benefits of having a trained
workforce and relating these benefits to improved equipment utilization and improved
manufacturing efficiency.
Please refer to the Semitherm Level 4 evaluation in your Participant guide:
• Codes (A-T) are used to represent performance objectives (skills) from the course
• The codes are matched with work done on equipment that requires a specific skill
• The FSE report has a place where the code can be written in
• The FSE report indicates time to repair (TTR)
• TTR is tracked over time to see if training helped reduce it
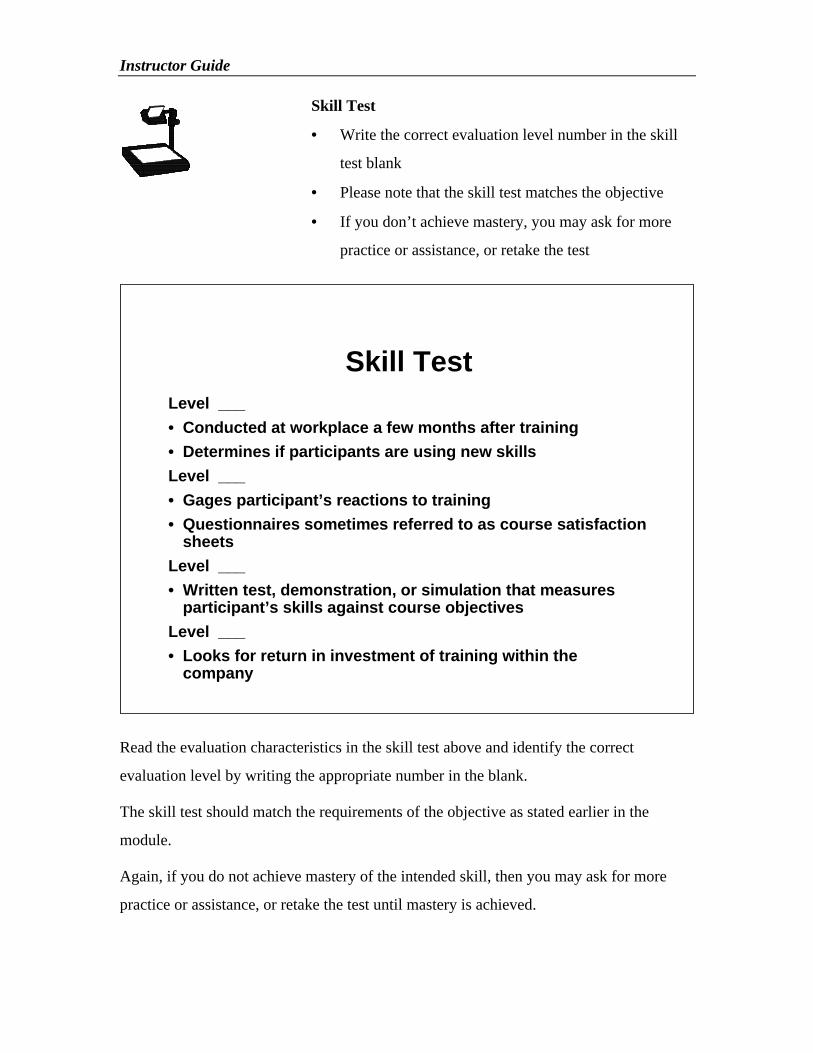
Instructor Guide
Skill Test
• Write the correct evaluation level number in the skill
test blank
• Please note that the skill test matches the objective
• If you don’t achieve mastery, you may ask for more
practice or assistance, or retake the test
Skill TestLevel ___
• Conducted at workplace a few months after training
• Determines if participants are using new skills
Level ___
• Gages participant’s reactions to training
• Questionnaires sometimes referred to as course satisfactionsheets
Level ___
• Written test, demonstration, or simulation that measuresparticipant’s skills against course objectives
Level ___
• Looks for return in investment of training within thecompany
Read the evaluation characteristics in the skill test above and identify the correct
evaluation level by writing the appropriate number in the blank.
The skill test should match the requirements of the objective as stated earlier in the
module.
Again, if you do not achieve mastery of the intended skill, then you may ask for more
practice or assistance, or retake the test until mastery is achieved.

Appendix A
APPENDIX A
Lesson Planning Form Definitions...............................................................................A-1
Lesson Planning Form Sample.....................................................................................A-3
Lesson Planning Form with Lines ...............................................................................A-5
Lesson Planning Form with No Lines .........................................................................A-7
Task Analysis Worksheet .............................................................................................A-9
Training Media Decision Chart .................................................................................A-11
Observation Sheet for PBET......................................................................................A-13
PBET Class Performance Record..............................................................................A-15
PBET Individual Performance Checklist .................................................................A-17
Bibliography ................................................................................................................A-19

Instructor Guide

Appendix A
Technology Transfer #95102996A-TRG A-1
PBET Lesson Planning Form Definitions
Instructor’s Guide Class: Guidelines for Effective Equipment Training
Module Title: Effective Lesson Planning Using Principles of Performance-Based Equipment Training
Target Audience: Who is the targeted audience? Location: SEMATECH Tech. Trng. Workshop
Module Objective:The performance objective or instructional objective is a clearly written statement that is understood by allperformers. The objective is performance based, specific and measurable, and relevant to the requirementsof the course or task to be performed. A well-written objective statement contains three importantrequirements.
1. Performance is the action that results from executing the task that’s described in the objective.2. Condition describes the environment, location, and/or situation where the performance is to take place,
and it tells what materials, supplies, tools, equipment and resources may be used while performing thetask.
3. The standard gives the acceptable level of performance. It may be stated in terms of how accurate theperformance must be, how many times it must be performed, and how much time is allowed.
Prerequisite Skills: The skills that are necessary before the performers may participate in the training.
Skill Test:Any instructional system that utilizes well-stated objectives as a means of informing performers how theyare expected to perform at the end of a course or a unit of instruction should have an accompanying well-matched skill test. The skill test measures the outcomes of the performance. The test must match theobjective in terms of performance, condition, and standard.
Additional Resources:Given the requirements of the performance objective and the skill test, the instructional designer sets out toevaluate and diagnose the relevance and appropriateness of the material for the targeted audience. Thedesigner determines if the material provides an adequate coverage of the subject matter. For example: Arethere adequate examples? Are the skills and concepts adequately covered? Are there assumptions madethat a learner might not understand? Is the language or reading level appropriate? Is it too technical--nottechnical enough? If a performer tried the material what would he or she think? Having examined thematerial, the designer determines what supplementary material is needed.
Training Aids & Media Tools & Materials for Practice
Determine additional aids that will be required; forexample, written procedures, flipchart, foils,photographs, models, etc. If possible, describe title ofeach aid and place them in numerical order as they are tobe presented.
Note: SMEs and other qualified performers may be usedas models or subject information.
List equipment, tools, and suppliesthat are required as part of the practiceand final performance.

Instructor Guide
A-2 Technology Transfer #95102996A-TRG
Relevant Practice Description:In this space, describe what the performers will be doing when they are practicing the intended performancethat is stated in an objective.
The more we repeat an activity, the more chances we have of improving the outcomes of subsequentperformances. However, the practice must be relevant to the stated objective.
A good relevant practice description contains four important ingredients.
1. Performance2. Conditions3. Modeling4. Feedback
Conditions:Describe how and with what the relevant practice is to be performed. In some cases, a similar activity maybe substituted for the real relevant practice.
Type of Modeling:Provide a way in which the performance can be demonstrated to a performer. The instructor or some othercompetent performer can model the performance. Various forms of media may also be used to model theperformance; for example, pictorials, diagrams, sample practice sheets, videotape, and photographs.
Feedback Mechanism:Wherever possible, provide indicators, signs, or cues that performers may use to measure their ownperformance. And if that isn’t possible, provide a means for informing the performers how well they areprogressing. The instructor can provide feedback, but other methods can also work as effectively; forexample, video recording and still photography. Use also checklists, job aids, a list of correct responses,etc.
Summary of Module Content:Describe the contents of the module so that other instructors can understand it enough to be able to teach itand manage it. In the summary include the following suggestions:
1. A description of relevance -- what benefit will the module provide the participant?2. Which teaching aids will be used at what time with which concepts?3. Which skills are to be introduced, modeled, practiced, and tested?4. The order in which specific concepts and skills are to be introduced.5. The conditions in which the module is to be performed.

Appendix A
Technology Transfer #95102996A-TRG A-3
PBET Lesson Planning Form Sample
Astaire Model 1950 Stepper
Instructor’s Guide Class: Stepper Operator Training
Module Title: Module 4: Perform Daily Checks
Target Audiences: Litho operators with >6 mos. Exp Location: Classroom/lab/fab
Objective:Given an Astaire Stepper and a 14-step checksheet for "daily checks," the performer will perform each dailycheck accurately and relate any errors or nonstandard conditions to the instructor. The performer must alsointerpret the nonconforming conditions correctly for the instructor.
Prerequisite Skills: Completion of Modules 1-3
Skill Test:Given an Astaire Stepper and a checksheet listing all elements to be inspected on a daily basis, theperformer will go directly to the designated inspection site, evaluate the conditions that are to be checked,note the conditions on the checksheet, interpret the situation for the instructor, and suggest a correct courseof action if necessary. Place a ä in the Comment section if an item meets the standard, or a ? if an itemdoes not meet the requirement. You have 15 minutes to perform this task.
Additional Resources:Optional: Operator Manual, Chapter 4, pages 1-12.
Teaching Aids & Media Tools & Materials for Practice
FOILS
1. Daily Checks Locator Map2. Electronics Cabinet – 1, 23. Electronics Cabinet – 3, 44. Control Console – 5, 6, 75. Stepper Unit– 8, 96. Wafer Feed Sys. – 10, 117. Merc. Lamp and Laser – 12, 138. Pneumatic Gauges – 149. Daily Checklist
14-step daily checklistClassroomOverhead projector
Astaire Stepper
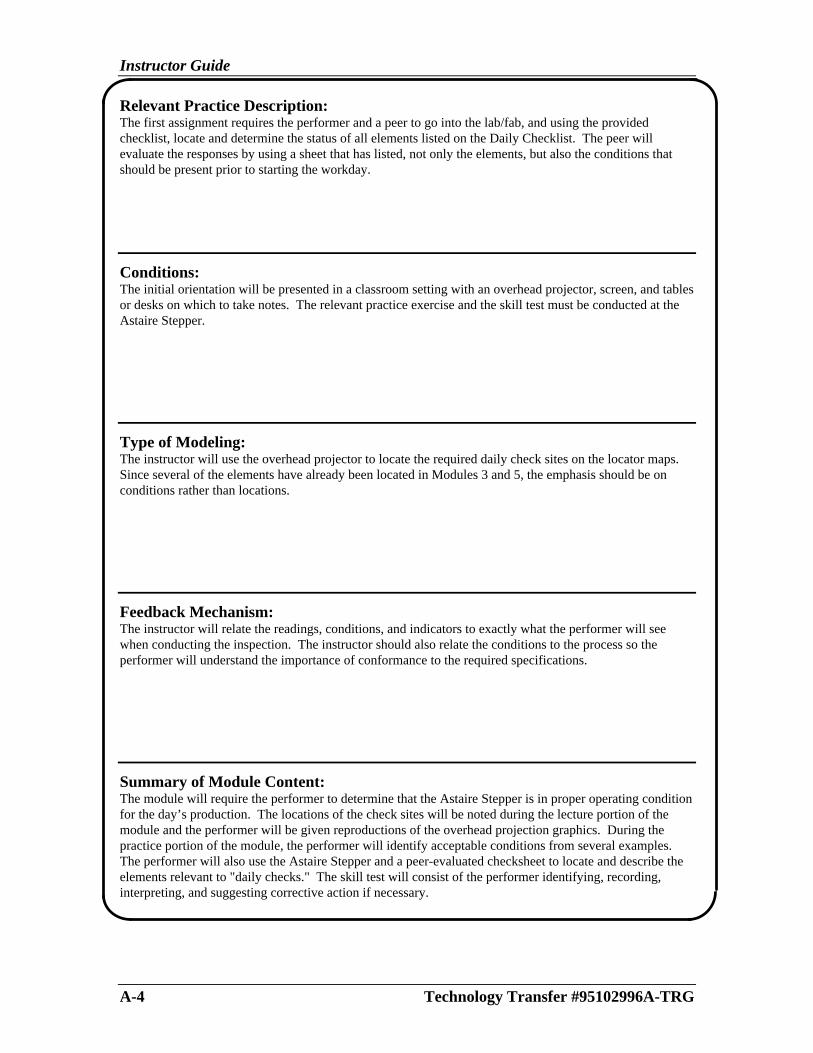
Instructor Guide
A-4 Technology Transfer #95102996A-TRG
Relevant Practice Description:The first assignment requires the performer and a peer to go into the lab/fab, and using the providedchecklist, locate and determine the status of all elements listed on the Daily Checklist. The peer willevaluate the responses by using a sheet that has listed, not only the elements, but also the conditions thatshould be present prior to starting the workday.
Conditions:The initial orientation will be presented in a classroom setting with an overhead projector, screen, and tablesor desks on which to take notes. The relevant practice exercise and the skill test must be conducted at theAstaire Stepper.
Type of Modeling:The instructor will use the overhead projector to locate the required daily check sites on the locator maps.Since several of the elements have already been located in Modules 3 and 5, the emphasis should be onconditions rather than locations.
Feedback Mechanism:The instructor will relate the readings, conditions, and indicators to exactly what the performer will seewhen conducting the inspection. The instructor should also relate the conditions to the process so theperformer will understand the importance of conformance to the required specifications.
Summary of Module Content:The module will require the performer to determine that the Astaire Stepper is in proper operating conditionfor the day’s production. The locations of the check sites will be noted during the lecture portion of themodule and the performer will be given reproductions of the overhead projection graphics. During thepractice portion of the module, the performer will identify acceptable conditions from several examples.The performer will also use the Astaire Stepper and a peer-evaluated checksheet to locate and describe theelements relevant to "daily checks." The skill test will consist of the performer identifying, recording,interpreting, and suggesting corrective action if necessary.

Appendix A
Technology Transfer #95102996A-TRG A-5
PBET Lesson Planning Form
Developer: Class:
Module Title:
Target Audience: Location:
Module Objective:
Prerequisite Skills:
Skill Test:
Additional Resources:
Training Aids & Media Tools & Materials for Practice

Instructor Guide
A-6 Technology Transfer #95102996A-TRG
Relevant Practice Description
• Conditions: ________________________________________________________
______________________________________________________________________ ______________________________________________________________________ ______________________________________________________________________ ______________________________________________________________________ ______________________________________________________________________
• Type of Modeling: __________________________________________________
______________________________________________________________________ ______________________________________________________________________ ______________________________________________________________________ ______________________________________________________________________ ______________________________________________________________________ ______________________________________________________________________
• Feedback Mechanism: _______________________________________________
______________________________________________________________________ ______________________________________________________________________ ______________________________________________________________________ ______________________________________________________________________ ______________________________________________________________________ ______________________________________________________________________
Module Content Description: ____________________________________________
______________________________________________________________________ ______________________________________________________________________ ______________________________________________________________________ ______________________________________________________________________ ______________________________________________________________________ ______________________________________________________________________ ______________________________________________________________________ ______________________________________________________________________ ______________________________________________________________________ ______________________________________________________________________ ______________________________________________________________________ ______________________________________________________________________ ______________________________________________________________________ ______________________________________________________________________ ______________________________________________________________________ ______________________________________________________________________

Appendix A
Technology Transfer #95102996A-TRG A-7
PBET Lesson Planning Form
Developer: Class:
Module Title:
Target Audience: Location:
Module Objective:
Prerequisite Skills:
Skill Test:
Additional Resources:
Training Aids & Media Tools & Materials for Practice
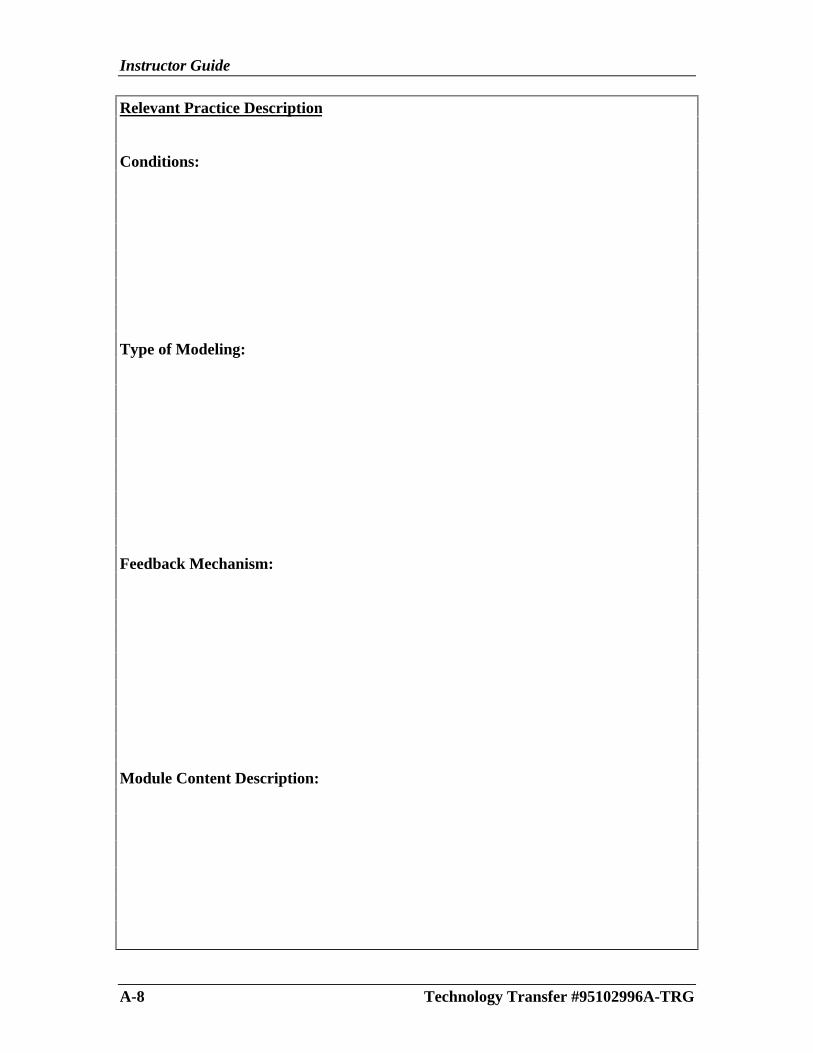
Instructor Guide
A-8 Technology Transfer #95102996A-TRG
Relevant Practice Description
Conditions:
Type of Modeling:
Feedback Mechanism:
Module Content Description:
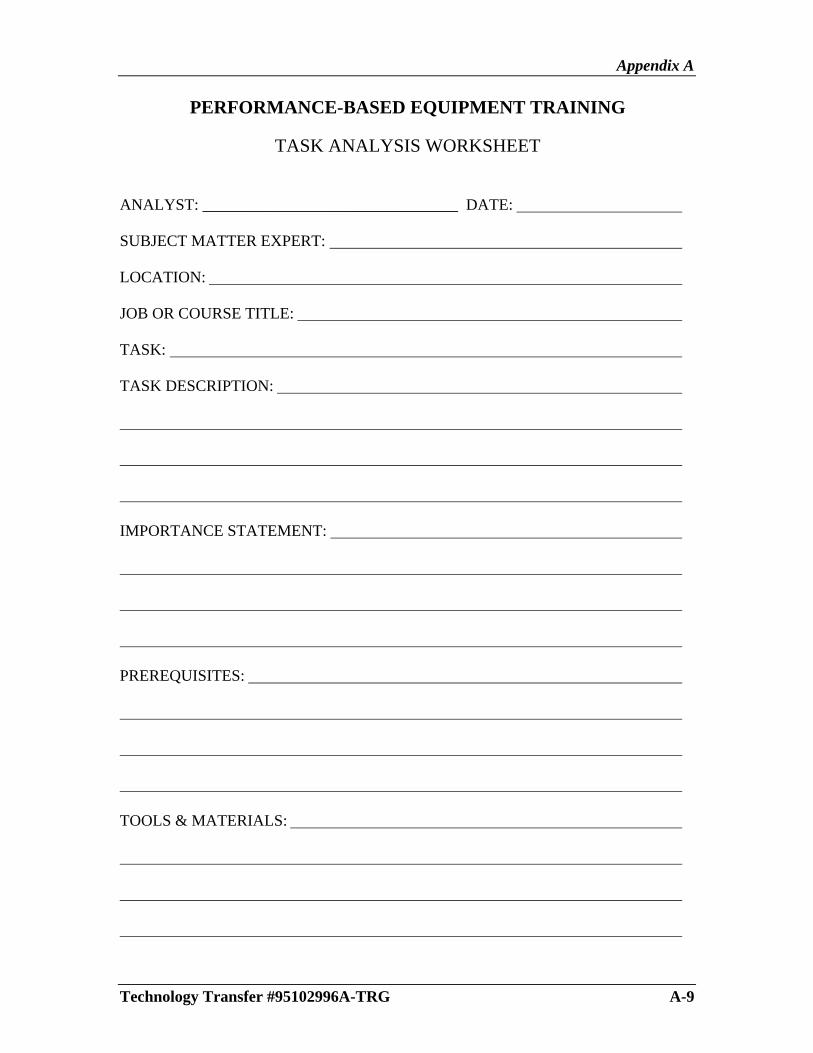
Appendix A
Technology Transfer #95102996A-TRG A-9
PERFORMANCE-BASED EQUIPMENT TRAINING
TASK ANALYSIS WORKSHEET
ANALYST: ________________________________ DATE:
SUBJECT MATTER EXPERT:
LOCATION:
JOB OR COURSE TITLE:
TASK:
TASK DESCRIPTION:
IMPORTANCE STATEMENT:
PREREQUISITES:
TOOLS & MATERIALS:

Instructor Guide
A-10 Technology Transfer #95102996A-TRG
HAZARDS & SAFETY:
HIDDEN KNOWLEDGE:
CRITICAL CONCEPTS:
OTHER RELATED PROCEDURES:
COURSE DESIGN CONSIDERATIONS:

Appendix A
Technology Transfer #95102996A-TRG A-11
TRAINING MEDIA DECISION CHART (DS4)
Media Advantages Disadvantages When To UsePrint • Self-paced
• Easy review/reference• Easy revision• Economical
• Can’t demonstrate motion• Requires audience that likes to read
• Provides factual information• Describes workflow, functions• As an adjunct
Audiographic • Good for poor reading audience• Easy access of equipment• Self-paced• Economical
• Can’t demonstrate motion• Not suitable for revision
• Recognition/discrimination of audiostimuli
• Self-study training
Instructor-Led Workshops • Dynamic presentation - interaction• Can incorporate all media• Provides coaching and feedback• Flexible
• May involve travel costs• Inconsistent presentation• Scheduling
• When audience is at one site• When teaching interpersonal skills
Videotape • Addresses visual, audio, color,motion needs
• Evokes emotion• Consistent presentation• Good for poor reading audience
• Considerable development time andbudget
• Needs hardware• Not suitable for revision
• Demonstrating proper performanceof complex tasks/role modeling
• Promotion• Subjects that have long shelf life• Self-study or instructor-led
Interactive Videodisk • Addresses visual audio, motion• Highly interactive• Self-paced• Consistent presentation• Eliminates/reduces need for
instructor• Easily administered/managed
• Considerable development time andcost
• Needs hardware• Not suitable for revision
• Demonstrating proper performancetasks/role modeling
• Subjects that have a long shelf life -core curriculum
Multimedia • Self-paced• Consistent presentation• Interactive• Easily administered/managed• Full audio• Full high quality video
• Considerable development time andcost
• Needs hardware• Revisions are costly
• Teaching computer-relatedknowledge/skills
• Audience that uses computersregularly
• Subjects that have a long shelf life
Instructor Guide
A-12 Technology Transfer #95102996A-TRG

Appendix A
Technology Transfer #95102996A-TRG A - 13
OBSERVATION SHEET FOR PBET
Assembly Training Pilot
(PL2)
Observe the performer and your group’s pilot assembly training. As you observe, thinkabout what improvements might be necessary, based on the pilot experience, and recordthem on this sheet.
1. Was the training activity important to you and/or your job? _____ If it could have been
improved, tell us how.
2. Was the practice relevant? _____ If it could have been improved, tell us how.
3. Was the modeling adequate? _____ If it was not, tell us how it could have been improved.
4. Was the feedback mechanism appropriate? _____ If it could have been improved, tell how.
5. Were the training materials effective and appropriate? _____ How could the training
materials be improved?

Instructor Guide
A-14 Technology T

Appendix A
Technical Transfer #95102996A-TRG A - 15
Class Performance Record
PBET Modules
Names IN-1 IN-2 IN-3 ID-1 AN-1 AN-2 AN-3 DS-1 DS-2 DS-3 DS-4 DS-5 DS-6 DV-1 PL-1 PL-2 DL-1 DL-2 DL-3 EV-1
1.
2.
3.
4.
5.
6.
7.
8.
9.
10.
11.
12.

Instructor Guide
A-16 Technology Transfer #95102996A-TRG

Appendix A
Technology Transfer #95102996A-TRG A-17
Performance-Based Equipment Training
Individual Performance Checklist
Name: Company:
Objectives Date Participant Instructor
IN-1. Course Orientation _______ _______ _______
IN-2. Identify PBET Characteristics _______ _______ _______
IN-3. List PBET Design Phases _______ _______ _______
ID-1. Perform Needs Analysis _______ _______ _______
AN-1. Perform Task Analysis _______ _______ _______
AN-2. Write Performance Objectives _______ _______ _______
AN-3. Develop a Skills Hierarchy _______ _______ _______
DS-1. Develop Skills Tests _______ _______ _______
DS-2. Describe Relevant Practice _______ _______ _______
DS-3. Analyze Resource Materials _______ _______ _______
DS-4. Select Delivery Method _______ _______ _______
DS-5. Summarize a PBET Lesson _______ _______ _______
DS-6. Complete a Second PBET Lesson Plan _______ _______ _______
DV-1. Develop Instructional Materials _______ _______ _______
PL-1. Describe Trainer Characteristics _______ _______ _______
PL-2. Pilot a PBET Lesson Plan _______ _______ _______
DL-1. Describe Trainer Responsibilities _______ _______ _______
DL-2. Prepare a Training Curriculum Checklist _______ _______ _______
DL-3. Create Action Plan for PBET Implementation _______ _______ _______
EV-1. Describe Evaluation Levels _______ _______ _______
Participant: _________________________ Instructor: _________________________

Instructor Guide
A-18 Technology Transfer #95102996A-TRG

Appendix A
Technology Transfer #95102996A-TRG A-19
BIBLIOGRAPHY
Anderson, Donald H., Selecting and Developing Media for Instruction, Van NostrandReinhold, New York, NY, 1983.
Birnbrauer, Herman, The ASTD Handbook for Technical Skills Training, Volume 2,American Society for Training and Development, Alexandria, VA, 1986.
Bolton, Robert N., People Skills: How to Assert Yourself, Listen to Others, and ResolveConflicts, Simon & Schuster, Inc., New York, NY, 1979.
Bloom, B. S., et al, Handbook of Formative and Summative Evaluation of PerformerLearning, McGraw-Hill, New York, 1973.
Bloom, B. S., et al, Taxonomy of Educational Objectives, Handbook 1: CognitiveDomain, McKay, New York, 1956.
Bower, E. M., and Hollister, W. G. (Eds.), Behavioral Science Frontiers in Education,Wiley, New York, 1967.
Boyd, R. D., Apps, J. W., and Associates, Redefining the Discipline of Adult Education,Jossey-Bass, San Francisco, CA, 1980.
Bruner, J. S. The Process of Education, Harvard University Press, Cambridge, MA,1966.
Bruner, J. S. Toward a Theory of Instruction, Harvard University Press, Cambridge, MA,1966.
Brunner, E. deS. An Overview of Adult Education Research, Adult EducationAssociation, Washington, D. C., 1959.
Cantor, Jeffrey A., "How to Design, Develop, and Use Performance Tests," Training &Development Journal, September, 1988, 72-75.
Crow, L. D., and Crow, A. (Eds.), Readings in Human Learning, McKay, New York,1963.
Davidove, Eric A., "Evaluating the Return on Investment of Training," Performance &Instruction, January, 1993, 1-8.
Dixon, Nancy M., Evaluation: A Tool for Improving HRD Quality, UniversityAssociates, Inc., San Diego, CA, 1990.
Eitington, Julius E., The Winning Trainer: Winning Ways to Involve People in Learning,Gulf Publishing Company, Houston, TX, 1984.

Instructor Guide
A-20 Technology Transfer #95102996A-TRG
Fast, Dorothy, "A New Approach to Quantifying Training Program Effectiveness," inEvaluating Training Programs, ed. Donald L. Kirkpatrick, American Society forTraining and Development, Madison, WI, 1975, p. 47-53.
Gagne, R. M., The Conditions of Learning, Holt, Rinehart, and Winston, New York,1965.
Gilbert, Thomas F., Human Competence, McGraw-Hill Book Company, New York, NY,1978.
Gilly, Jerry W., How to Collect Data, ed. Barbara Darraugh, "Info-Line Series,"American Society for Training and Development, Alexandria, VA, 1990.
Herzberg, Frederick, The Motivation to Work, John Wiley & Sons, New York, 1959.
Herzberg, Frederick, Work and the Nature of Man, The World Publishing Co., Cleveland,OH, 1966.
Hilgard, E. R., and Bower, G. H., Theories of Learning, Appleton-Century-Crofts, NewYork, 1966.
Jackson, J. H., and Keaveny, T. J., Successful Supervision, Prentice-Hall, Inc., EnglewoodCliffs, NJ, 1980.
Kirkpatrick, Donald L., Evaluating Training Programs-The Four Levels, Berret-KohlerPublishers, Inc., San Francisco, CA, 1994.
Knowles, Malcolm S., The Adult Education Movement in the United States, 2nd ed.,Krieger Publishing Co., Huntington, N.Y, 1977.
Knowles, Malcolm S., The Adult Learner-- A Neglected Species, Gulf Publishing Co.,Houston, TX, 1990.
Leathers, Dale G., Nonverbal Communication Systems, Allyn & Bacon, Boston, MA,1976.
Long, Lori, Surveys from Start to Finish, ed. Gerry Spruell, "Info-Line Series," AmericanSociety for Training and Development, Alexandria, VA, 1986.
Mager, Robert F., Analyzing Performance Problems, Second Edition, Lake PublishingCompany, Belmont, CA, 1984.
Mager, Robert F., and Peter Pipe, Performance Analysis Flowchart and PerformanceAnalysis Worksheet, available from Center for Effective Performance, Atlanta, GA.
Mager, Robert F., Developing Attitude Toward Learning, Second Edition, LakePublishing Company, Belmont, CA, 1984.
Appendix A
Technology Transfer #95102996A-TRG A-21
Mager, Robert F., Goal Analysis, Second Edition, Lake Publishing Company, Belmont,CA, 1984.
Mager, Robert F., Instructional Module Development: Preparation, Second Edition, 15-17.
Mager, Robert F., Measuring Instructional Results, Second Edition, Lake PublishingCompany, Belmont, CA, 1984.
Mager, Robert F., Preparing Instructional Objectives, Revised Second Edition, LakePublishing Company, Belmont, CA, 1984.
Mager, Robert F., Troubleshooting the Troubleshooting Course, Lake PublishingCompany, Belmont, CA, 1982.
Mager, Robert F., What Every Manager Should Know About Training, Lake PublishingCompany, Belmont, CA, 1992.
Margolis, Fredric H., and Bell, Chip R., Instructing for Results, University Associates,San Diego, CA, 1986.
Maslow, A. H., Motivation and Personality, Harper and Row, New York, 1970.
McKay, Mathew; Davis, Martha; and Fanning, Patrick, How to Communicate: TheUltimate Guide to Improving Your Personal and Professional Relationships, NewHarbinger Publications, Inc., 1983.
McLagan, Patricia A., Helping Others Learn: Designing Programs for Adults, Addison-Wesley, Reading, MA 1978.
Phillips, Jack J., Handbook of Training Evaluation and Measurement Methods, SecondEdition, Gulf Publishing Company, Houston, TX 1991.
Pipe, Objectives, Tool for Change, Pitman Learning, Inc., Belmont, CA, 1975.
Semiconductor Technician Training Workshop Presentation Materials, February 11-13,1992, Sematech Technology Transfer Document #92020990A-XFR, Sematech, Inc.,1992.
Sharon, Amiel T., "Testing...1, 2, 3," Training & Development Journal, September, 1989,30-33.
Smith, Jack and Merchant, Sharon, "Using Competency Exams for Evaluating Training,"Training & Development Journal, August, 1990, 65-71.
Smith, Martin E., "Measuring Results" in Training and Development Handbook, ThirdEdition, ed. Robert L. Craig, McGraw-Hill Book Company, New York, NY, 1987,pp. 320-342.

Instructor Guide
A-22 Technology Transfer #95102996A-TRG
Special Report, "The Consensus Accounting Model," Training & Development Journal,July, 1990, S-9 – S-14.
Sudman, Seymour, and Bradburn, Norman M., Asking Questions: A Practical Guide toQuestionnaire Design, Jossey-Bass, San Francisco, CA, 1982.
Sullivan, Richard L. and Elenburg, Mary Jo., "Performance Testing," Training &Development Journal, November, 1988, 38-40.
Tenopyr, Mary L., "Testing" in Training and Development Handbook, Third Edition, ed.,Robert L. Craig, McGraw-Hill Book Company, New York, NY, 1987, pp. 286-300.
Verderber, Rudolph F., Communicate!, Third Edition, Wadsworth Publishing Company,Inc., Belmont, CA, 1981.
Zemke, Ron and Kramlinger, Tom, Figuring Things Out: A Trainer’s Guide to Needsand Task Analysis, Addison-Wesley, Reading, MA, 1982.

APPENDIX B
Examples of Supporting Instructional and Resource Materials
Starting DOS.................................................................................................................. B-1
Word Processing............................................................................................................ B-2
Introduction to Photolithography................................................................................ B-3
Diffraction of Light ....................................................................................................... B-4
Introduction to Furnace Processes .............................................................................. B-7

Instructor Guide

Appendix B
Technology Transfer #95102996-A-TRG B-1
Target Audience: Anyone who needs to learn how to use DOS.
Starting DOS (page 4)
The Enter Key
The Enter key is labeled with a bent left arrow (¿) like the return key on a typewriter, it isused to mark the end of a line. In general, DOS doesn't know what you have typed untilyou press Enter, so remember: You end a command by pressing Enter.
The Backspace Key
The Backspace key is labeled with a long left arrow (←). It erases the last character youtyped; use it to correct typing errors.
STARTING THE SYSTEM
If you’re not using a fixed disk, open the latch of drive A (the left-hand drive) and put inthe DOS system diskette. The diskette goes in with the label up and away from themachine, as shown in Figure 2-2. When the diskette is all the way in, close the latch.
Figure 2-2. Inserting the DOS System Diskette

Instructor Guide
B-2 Technology Transfer #95102996-A-TRG
Target Audience: Anyone who needs to learn how to use a wordprocessor.
Word Processing (page 3)
If you’re unlucky, the cursor on your word processor may drive you nuts by rapidlyflashing on and off.)
As you type, the cursor moves along. Each new letter appears on the space where thecursor was, and the cursor then moves to the next space to the right. (The cursor alsoindicates the place where text is going to be deleted or changed.)
Memory and Storage
When text appears on a word processor’s screen, it’s simultaneously stored in thecomputer’s memory (actually, it’s stored in the memory first, and then displayed on thescreen, but both happen virtually simultaneously). The portion of memory you write yourtext in is called RAM (for “random access memory”), read/write memory or R/Wmemory.
Since a computer’s memory goes blank when you turn the computer off, you must storewhat you want to keep on floppy disks (also called diskettes or floppies).
Floppies are one of several kinds of storage media. Storage−implying a certain amountof permanence−is distinguished from memory−which, in computers (unlike elephants), isephemeral.
Floppies are the word processor's equivalent of filing cabinet drawers. Each will holdseveral dozen files. A file is any piece of text that you give a name. It can be thousandsof words long, or just one word long. You can split long files in two, and combine shortfiles into one. You decide what makes up a file, by giving a chunk of text a distinctname.
A floppy looks sort of like a 45-rpm record in its jacket and is made of essentially thesame stuff as recording tape. Floppies are enclosed in square jackets, which are about1/16" thick and usually measure 8", 5 1/4" or 3 1/2" on each side (these are the commonsizes).
Information is written onto floppies, and read off of them, by devices called disk drives.This is done by a read/write head, which is mounted at the end of a short arm that movesback and forth over the disks while they spin around at high speed.
Files can also be stored on a cassette tape, or on something called a hard disk.

Appendix B
Technology Transfer #95102996-A-TRG B-3
Target Audience: Semiconductor manufacturing technicians who have worked in theindustry at least one year. Most of these technicians are high school graduates. Manywill have an AS degree or equivalent education. They should have already met theprerequisite, which is having completed a 2-day class on semiconductor processingoverview.
Introduction to Photolithography (page 4)
Wafer Condition Prior to Lithography
The condition of the wafer upon arrival in the lithography area is very important to know.The surface topography of the wafer has a direct effect on the process specificationsrequired at the resist coating step as well as at the exposure step. The surface conditionmay affect the ability of the resist to adhere to the wafer and to spread uniformly.Whether the wafer surface is shiny or appears dull has a direct bearing on the subsequentsettings of the alignment and exposure systems in the printing equipment.
Wafer Condition After Lithography
Wafers usually flow from lithography into the etch area and occasionally flow into the ionimplant area. The pattern printed on a wafer has certain features that will help facilitatethe etch and implant processes. The lithography process not only ensures that certain linewidth requirements (resolution) be met, but also ensures that each masking layer properlyoverlaps the preceding layer (registration). Another consideration of the resist coating onthe wafer is that the resist be able to withstand the environmental conditions of the etchand ion implant processing equipment.
Process Types
There are two types of photolithography processes. These are referred to as the negativeand positive lithography processes. The type of process used in any specific applicationis dependent on various factors, such as: product type, line width requirements, maskdesign, photoresist type, exposure method (machine type), and other engineeringpreferences.
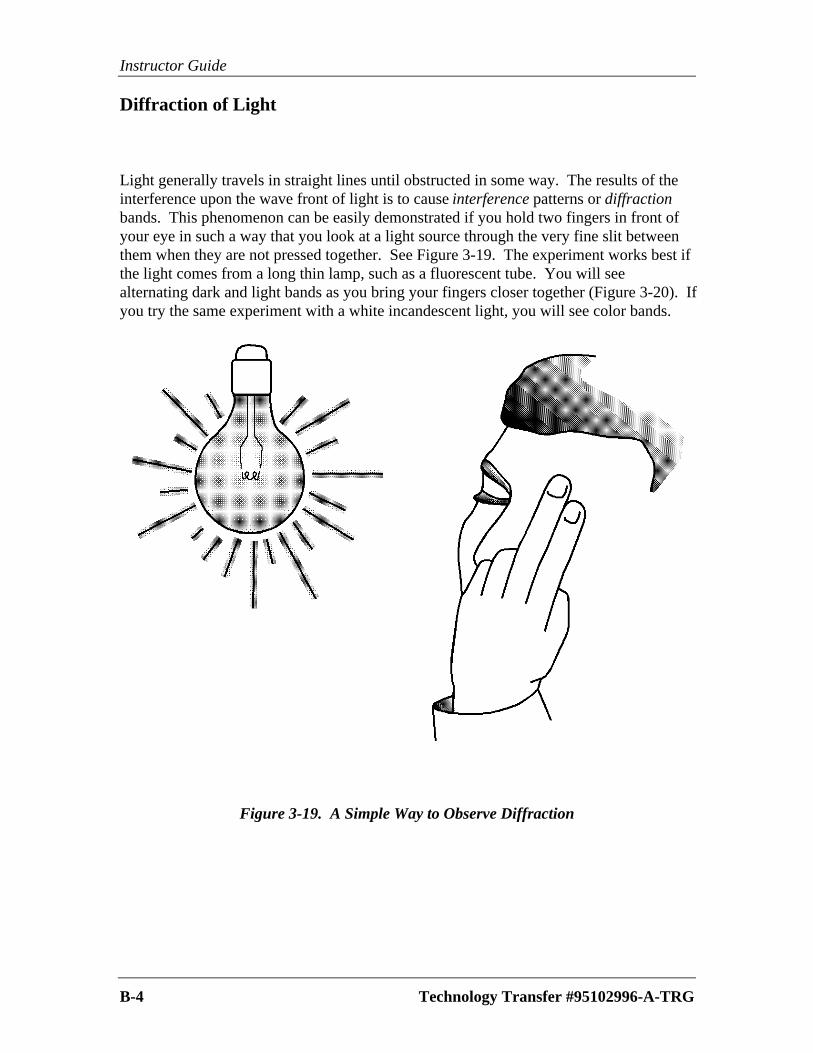
Instructor Guide
B-4 Technology Transfer #95102996-A-TRG
Diffraction of Light
Light generally travels in straight lines until obstructed in some way. The results of theinterference upon the wave front of light is to cause interference patterns or diffractionbands. This phenomenon can be easily demonstrated if you hold two fingers in front ofyour eye in such a way that you look at a light source through the very fine slit betweenthem when they are not pressed together. See Figure 3-19. The experiment works best ifthe light comes from a long thin lamp, such as a fluorescent tube. You will seealternating dark and light bands as you bring your fingers closer together (Figure 3-20). Ifyou try the same experiment with a white incandescent light, you will see color bands.
Figure 3-19. A Simple Way to Observe Diffraction
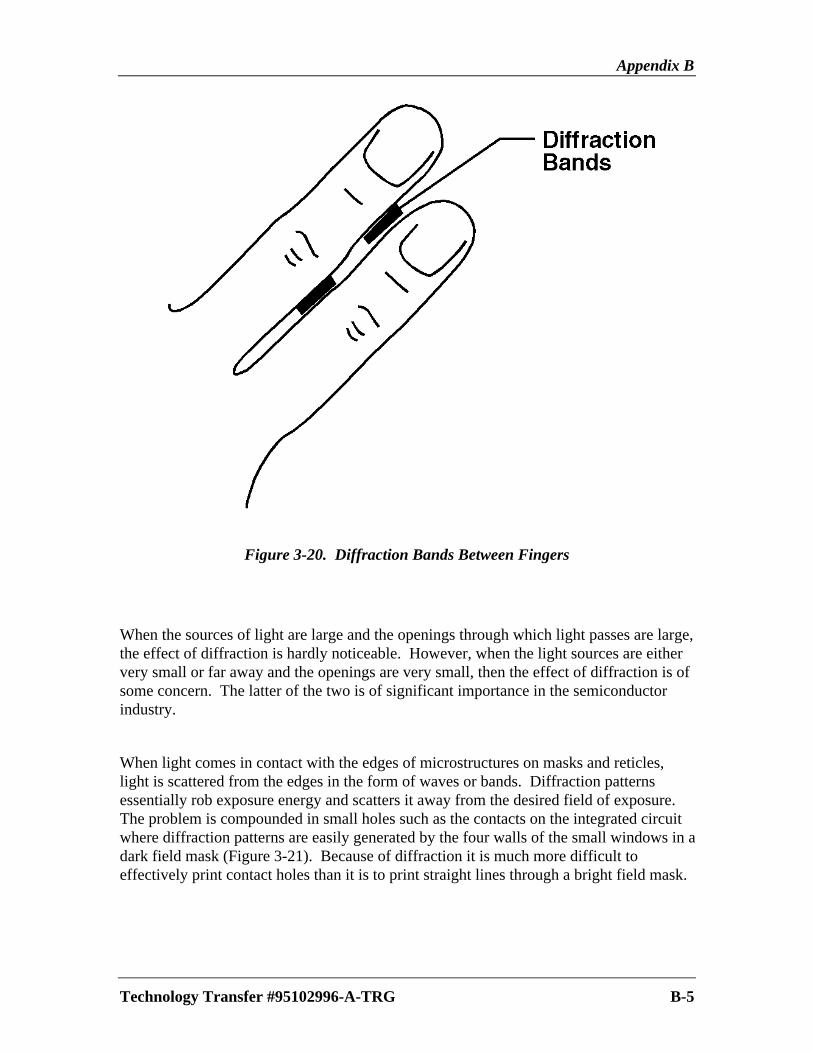
Appendix B
Technology Transfer #95102996-A-TRG B-5
Figure 3-20. Diffraction Bands Between Fingers
When the sources of light are large and the openings through which light passes are large,the effect of diffraction is hardly noticeable. However, when the light sources are eithervery small or far away and the openings are very small, then the effect of diffraction is ofsome concern. The latter of the two is of significant importance in the semiconductorindustry.
When light comes in contact with the edges of microstructures on masks and reticles,light is scattered from the edges in the form of waves or bands. Diffraction patternsessentially rob exposure energy and scatters it away from the desired field of exposure.The problem is compounded in small holes such as the contacts on the integrated circuitwhere diffraction patterns are easily generated by the four walls of the small windows in adark field mask (Figure 3-21). Because of diffraction it is much more difficult toeffectively print contact holes than it is to print straight lines through a bright field mask.

Instructor Guide
B-6 Technology Transfer #95102996-A-TRG

Appendix B
Technology Transfer #95102996-A-TRG B-7
Furnace Processes and Related Issuesin
Semiconductor Manufacturing
Introductionto
Furnace Processes

Instructor Guide
B-8 Technology Transfer #95102996-A-TRG
This manual was developed by the Electronics Training Division of the Texas Engineering ExtensionService (TEEX), the Texas A&M University System, under contact from SEMATECH (RequisitionNo. A 33887)
S-72 PTAB Performance Based Equipment Training ProjectTimothy K. (Tim) Decker, Intel/SEMATECH, Co-Chair
Julian Serda, SEMATECH, Co-Chair
Subject Matter ExpertsMichael J. (Mike) D’Elia, Advanced Micro Devices
Dennis Villar, National SemiconductorDavid M. Wittler , Texas Instruments
Authors (TEEX)Richard Day
Amiya R. Ghatak-RoyKumar Kishore
Venkateswara Rao MadduriJoe Napoli
Graphics (TEEX)Cheryl GoodwinAshok Gowda
Vincent RigginsJohn Schroeder
Project Adviser (TEEX)James P. (Pat) Wallace
AcknowledgmentsSteve Berlin, Watkins-Johnson Dean Pace, Silicon Valley Group, Inc.
Michael Current, Applied Materials Cynthia M. (Cindy) Reiley, SEMATECHRex Collier, TEEX Mason Rittman, TEEX
Ricardo Garcia, SEMATECH Pegasus Rumaine, SEMATECHSteve Hayes, Varian associates, Inc. Chris Sallee, SEMATECH
Walter Huber, MEMC Inc. Reza Sharaf, Quester TechnologyMeg Karakekes, Advanced Micro Devices Doug Swanson, Varian Associates, Inc.
John Karonika, TEEX James L. Taylor, Advanced Micro DevicesRichard Lipscomb, National Semiconductor Philippe Tissot, TEEX
Roger Lorenzo, TEEX Lee Troncalli, SemithermJim Mayer, Matheson Gases & Equipment Keith Whiteside, Texas Instruments
Mary Ann Murphy, Texas Instruments Mark E. Yelverton, Advanced Micro DevicesLinda K. Nichols, Advanced Micro Devices Gil Yetter, SEMATECH
This manual is generic in nature and based on sources and information believed to be reliable, butthe authors disclaim any warranty and liability based on or relating to the contents of this manual.The process recipes and other examples given here are for explanation of concepts only and should
not be used for any actual semiconductor processing.
Copyright 1994 by SEMATECH, Inc.

Appendix B
Technology Transfer #95102996-A-TRG B-9
Module Introduction
This module defines a furnace process and shows where the furnace processes fit into thesequence of wafer fabrication. The difference between a grown film and a deposited filmis explained. The student is then introduced to the other furnace processes of diffusion,annealing, alloying, ashing, and reflow. A glossary follows the text to help those studentswho may not be familiar with the terms used in semiconductor processing. A set ofevaluation questions is provided at the end of the module to be used by the student tocheck his or her understanding of the material presented.
Module Outline
Module Objectives .............................................................................................................. 1Course Focus and Direction ................................................................................................ 2What is a Furnace Process................................................................................................... 3Furnace Processes in Semiconductor Manufacturing.......................................................... 3
Growing and Depositing Films .................................................................................. 5Diffusing..................................................................................................................... 6Annealing ................................................................................................................... 7Alloying...................................................................................................................... 8Ashing ........................................................................................................................ 8Reflow ........................................................................................................................ 9Typical Furnace Processes ....................................................................................... 10
Summary ........................................................................................................................... 10Glossary of Terms ............................................................................................................. 11Evaluation Questions......................................................................................................... 14
List of Figures
Figure 1. Where common furnace processes fit into wafer fabrication.............................. 4Figure 2. A grown silicon dioxide (SiO2) film .................................................................. 5Figure 3. A deposited silicon dioxide (SiO2) film............................................................. 5Figure 4. Diffusion of dopants into a silicon substrate....................................................... 7Figure 5. Thermal annealing ion implant damage.............................................................. 8Figure 6. Using the reflow process to round edges and taper sidewalls............................. 9
List of Tables
Table 1. Course modules.................................................................................................... 3Table 2. Common furnace processes................................................................................ 10

Instructor Guide
B-10 Technology Transfer #95102996-A-TRG

Appendix B
Technology Transfer #95102996-A-TRG B-11
MODULE OBJECTIVES
After completing this module, the student will be able to
1. Explain in one sentence the purpose of a furnaceprocess.
2. Identify at least one characteristic of each of thefollowing processes: anneal, alloy, ashing,diffusion, deposition, gettering, oxidation, andreflow.
3. Describe where the furnace processes occur inthe overall semiconductor manufacturingprocess.
4. List at least six semiconductor processes that usea furnace. For each process give a characteristicof the physical effects of the process on theproduct being manufactured.
Instructor Guide
B-12 Technology Transfer #95102996-A-TRG
COURSE FOCUS
AND DIRECTION This course provides an introductory overview ofhardware and processes related to furnaces insemiconductor manufacturing. Anyone assigned towork in the diffusion furnace area or who has aninterest in the subject may enroll in this course;however, these individuals must have the prerequisiteskills and knowledge as stated in the previouslypublished course description.
A pre-test will be given at the beginning of the courseto assess the audience’s level of understanding offurnace processes and related topics. A post-test will beadministered at the end of the course to determine theamount of improvement students will have gained fromthe course.
A variety of theoretical and practical topics coveringboth equipment and process will be presented. Thiscourse will help manufacturing personnel solve simplefurnace related problems by providing useful andrelevant background information. It will also helpdistinguishing between basic equipment and processrelated problems.
The course is structured as a series of modules, eachcovering a topic related to furnace process orequipment. Table 1 is a list of the modules that makeup this course. The first three modules (1, 2, and 3)present an overview of furnace processes andequipment. The fourth module covers the properties ofgases and gas flow. The fifth module identifiespotential hazards and respective safety procedurespertaining to furnaces. The next five modules (6, 7, 8,9, and 10) each discuss five important sub-systemsrelated to the furnace, namely, temperaturemeasurement/control, mass flow controllers, gasdelivery systems, vacuum systems, and waferhandling/transfer systems. The following six modules(11, 12, 13, 14, 15, and 16) each deal with the differenttypes of furnace processes, namely, anneal, alloy,

Appendix B
Technology Transfer #95102996-A-TRG B-13
oxidation, deposition, diffusion, ashing, reflow, andgettering processes. This is followed by a module (17)on film thickness and particle measurements. The nexttwo modules (18 and 19) discuss preventivemaintenance issues and troubleshootingprocess/equipment problems. The last module (20)presents a brief discussion of future industry trends infurnace processing.
1. Introduction to Furnace Processes2. Equipment and Process Parameters3. Furnace Equipment Overview4. Properties of Gases and Gas Flow5. Hazards and Safety6. Temperature Measurement and Control7. Mass Flow Controllers8. Gas Delivery Systems9. Vacuum Systems10. Wafer Handling and Transfer Systems11. Anneal Processes12. Alloy Processes13. Oxidation Processes14. Deposition Processes15. Diffusion Processes16. Ashing, Reflow, and Gettering Processes17. Film Thickness and Particle Measurements18. Preventive Maintenance Issues19. Troubleshooting Process and Equipment Problems20. Future Trends in Furnace Processes
Table 1. List of course modules
WHAT IS AFURNACE PROCESS? A furnace process is a wafer fabrication process that
makes use of temperatures, significantly above roomtemperature, to aid or enable the desired chemicalreaction relative to the fabrication of semiconductordevices. The furnace chamber may contain gases athigh, low or atmospheric pressure depending on thespecific process.
FURNACE PROCESSESIN SEMICONDUCTORMANUFACTURING Figure 1 shows where furnace processes fit into the
overall sequence of wafer fabrication. Furnace processesoccupy a noble position in wafer fabrication since they
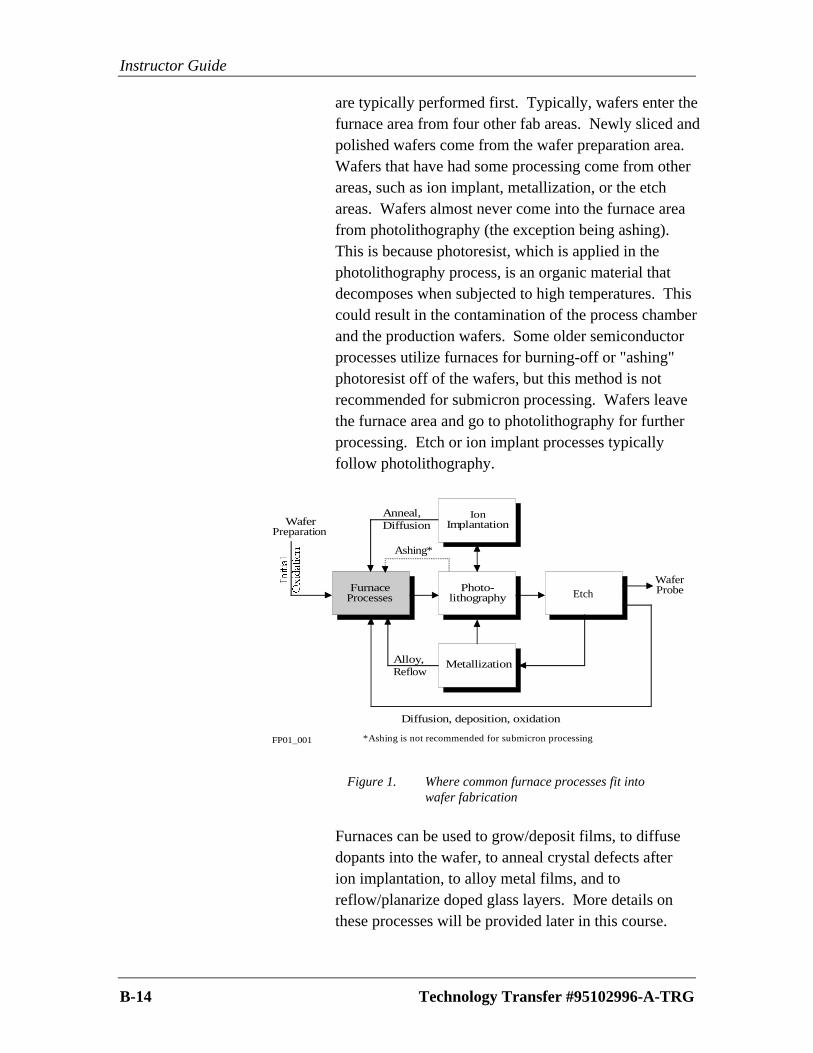
Instructor Guide
B-14 Technology Transfer #95102996-A-TRG
are typically performed first. Typically, wafers enter thefurnace area from four other fab areas. Newly sliced andpolished wafers come from the wafer preparation area.Wafers that have had some processing come from otherareas, such as ion implant, metallization, or the etchareas. Wafers almost never come into the furnace areafrom photolithography (the exception being ashing).This is because photoresist, which is applied in thephotolithography process, is an organic material thatdecomposes when subjected to high temperatures. Thiscould result in the contamination of the process chamberand the production wafers. Some older semiconductorprocesses utilize furnaces for burning-off or "ashing"photoresist off of the wafers, but this method is notrecommended for submicron processing. Wafers leavethe furnace area and go to photolithography for furtherprocessing. Etch or ion implant processes typicallyfollow photolithography.
FP01_001
FurnaceProcesses
Photo-lithography
IonImplantation
Metallization
Etch
WaferPreparation
WaferProbe
Ashing*
Anneal,Diffusion
Alloy,Reflow
Diffusion, deposition, oxidation
*Ashing is not recommended for submicron processing
Figure 1. Where common furnace processes fit intowafer fabrication
Furnaces can be used to grow/deposit films, to diffusedopants into the wafer, to anneal crystal defects afterion implantation, to alloy metal films, and toreflow/planarize doped glass layers. More details onthese processes will be provided later in this course.

Appendix B
Technology Transfer #95102996-A-TRG B-15
Growing and Depositing
Films Films are grown or deposited on the wafer surface toform a layer that has different electrical characteristicsthan the substrate. In general, the growth of a film,such as silicon dioxide, uses and incorporates some ofthe substrate atoms into the film, resulting in theconsumption of part of the substrate, as illustrated inFigure 2.
FP01_003
Si
Grown SiOfilm
2
Crystalline Si
Originalsubstratesurface
Interface
Grown SiO2
+++++
Figure 2. A grown silicon dioxide (SiO2) film
A deposited film, on the other hand, lies on the surface
of the substrate and does not incorporate any of the
substrate atoms into the film, as illustrated in Figure 3.
All of the materials needed for the film are provided by
the process gas mixture.
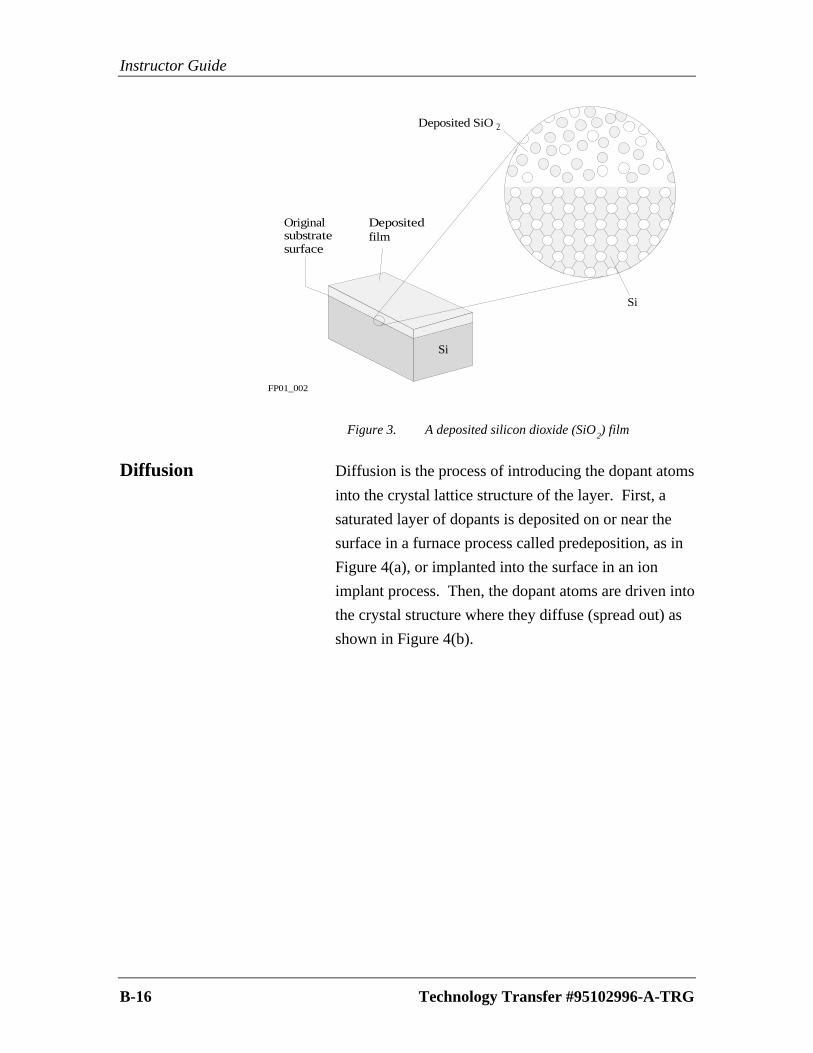
Instructor Guide
B-16 Technology Transfer #95102996-A-TRG
FP01_002
Si
Deposited film
Originalsubstratesurface
Si
Deposited SiO 2
Figure 3. A deposited silicon dioxide (SiO2) film
Diffusion Diffusion is the process of introducing the dopant atoms
into the crystal lattice structure of the layer. First, a
saturated layer of dopants is deposited on or near the
surface in a furnace process called predeposition, as in
Figure 4(a), or implanted into the surface in an ion
implant process. Then, the dopant atoms are driven into
the crystal structure where they diffuse (spread out) as
shown in Figure 4(b).

Appendix B
Technology Transfer #95102996-A-TRG B-17
Silicon substrate
Saturated layer of dopants
Silicon substrate
(a) Predeposition
(b) Drive-in
Dopants after drive-in
FP01_005
Mask
Figure 4. Diffusion of dopants into a silicon substrate
Annealing Thermal annealing of wafers in a furnace is used to heal
the small crystal fractures, especially after an ion
implant process as illustrated in Figure 5. During
annealing, the silicon atoms move back into their lattice
positions and the covalent bonds between the atoms that
were broken during the implant process are re-
established. Further, the dopant ions are aligned into
the lattice structure. The dopant atoms become
activated when the bonds are established.

Instructor Guide
B-18 Technology Transfer #95102996-A-TRG
FP01_006
(a) Before implant
(b) After implant
(c) After anneal SiDopant
Figure 5. Thermal annealing of ion implant damage
Alloying Wafers are heated in a furnace after the metallization
process, which causes the metal to combine with the
silicon in the contact areas, forming an alloy. Alloying
(sometimes called sintering) improves the adherence of
the metal to the silicon surface and improves the
electrical characteristics of the contact.
Ashing Ashing is a process used to strip photoresist from a
wafer, by the application of heat. When this is done in
a furnace, the wafers are raised to a high temperature
(about 700°C) in the presence of oxygen (O2).
Currently, however, photoresist is ashed with oxygen
(O2) in a plasma reactor usually without adding external
heat. High temperature ashing in a furnace is not
recommended for submicron processes.
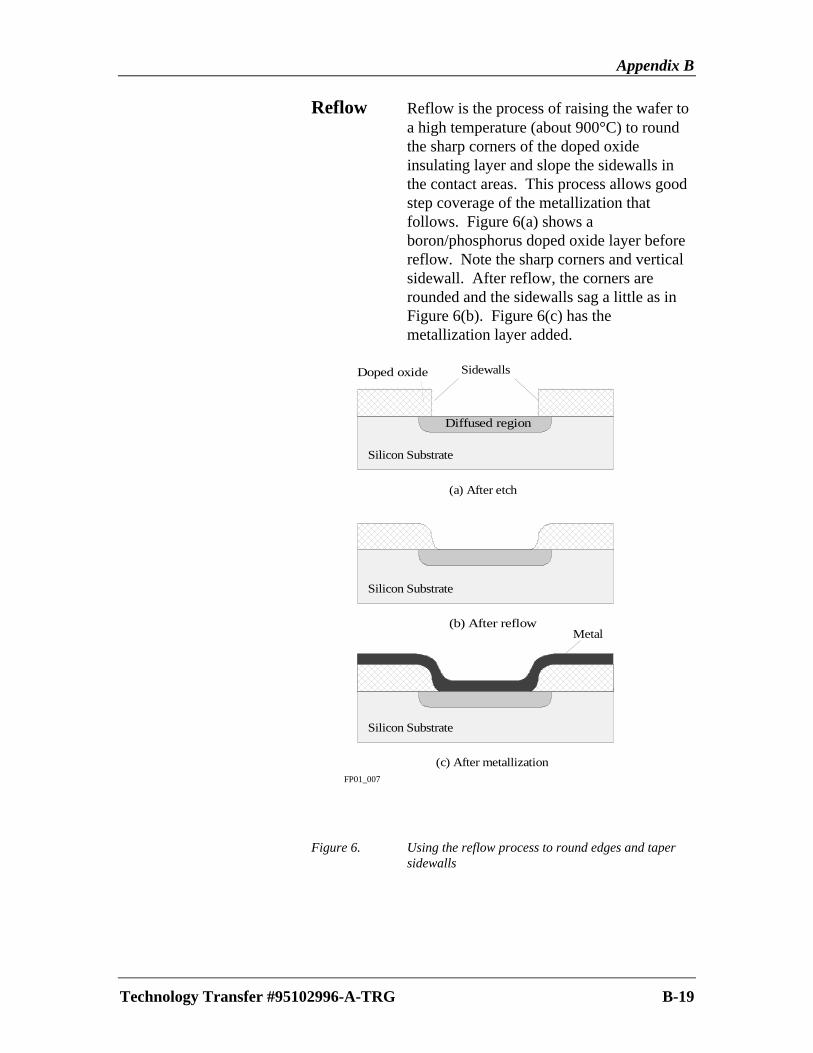
Appendix B
Technology Transfer #95102996-A-TRG B-19
Reflow Reflow is the process of raising the wafer toa high temperature (about 900°C) to roundthe sharp corners of the doped oxideinsulating layer and slope the sidewalls inthe contact areas. This process allows goodstep coverage of the metallization thatfollows. Figure 6(a) shows aboron/phosphorus doped oxide layer beforereflow. Note the sharp corners and verticalsidewall. After reflow, the corners arerounded and the sidewalls sag a little as inFigure 6(b). Figure 6(c) has themetallization layer added.
(a) After etch
(b) After reflow
Silicon Substrate
(c) After metallization
Silicon Substrate
Sidewalls
Silicon Substrate
FP01_007
Metal
Doped oxide
Diffused region
Figure 6. Using the reflow process to round edges and tapersidewalls
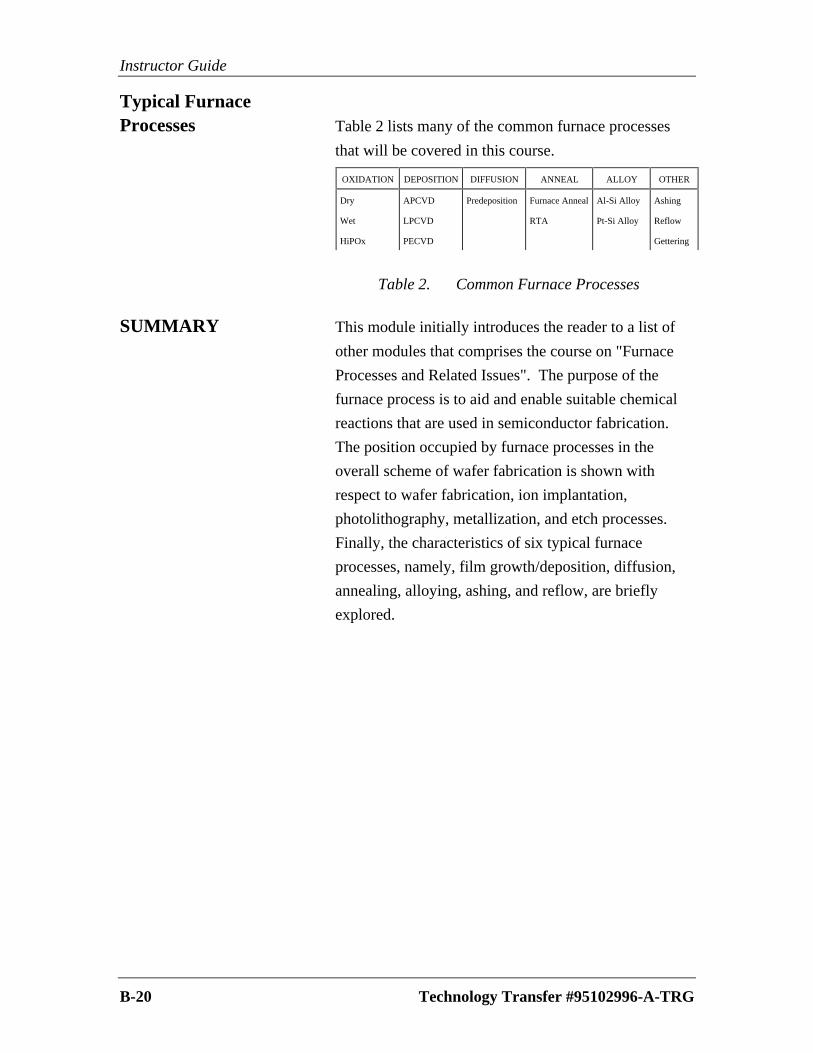
Instructor Guide
B-20 Technology Transfer #95102996-A-TRG
Typical FurnaceProcesses Table 2 lists many of the common furnace processes
that will be covered in this course.
OXIDATION DEPOSITION DIFFUSION ANNEAL ALLOY OTHER
Dry
Wet
HiPOx
APCVD
LPCVD
PECVD
Predeposition Furnace Anneal
RTA
Al-Si Alloy
Pt-Si Alloy
Ashing
Reflow
Gettering
Table 2. Common Furnace Processes
SUMMARY This module initially introduces the reader to a list of
other modules that comprises the course on "Furnace
Processes and Related Issues". The purpose of the
furnace process is to aid and enable suitable chemical
reactions that are used in semiconductor fabrication.
The position occupied by furnace processes in the
overall scheme of wafer fabrication is shown with
respect to wafer fabrication, ion implantation,
photolithography, metallization, and etch processes.
Finally, the characteristics of six typical furnace
processes, namely, film growth/deposition, diffusion,
annealing, alloying, ashing, and reflow, are briefly
explored.

Appendix B
Technology Transfer #95102996-A-TRG B-21
GLOSSARY OF TERMS
Al-Si alloying An alloying process in which the deposited Al metal orAl-Si alloy layer is alloyed to the underlying siliconsubstrate. Al-Si alloying is used to fabricate ohmiccontacts.
alloy A thermal process in which a metal layer is heat treatedwith silicon in order to improve contact and electricalcharacteristics between the two. The two mostimportant alloying processes are Al-Si and Pt-Si
anneal A thermal process used to heal the small crystalfractures caused primarily by the ion implant process.During annealing, the silicon and dopant atoms moveinto the crystal lattice positions.
APCVD Abbreviation for atmospheric pressure chemical vapordeposition. The APCVD process is a chemical vapordeposition (CVD) technique which is performed at ornear atmospheric pressure (760 Torr).
ashing A process in which photoresist is stripped off the wafersurface by the application of heat and in the presence ofoxygen (O2). Modern techniques of ashing use anoxygen plasma reactor to remove the resist layer.
covalent bond A chemical bond between atoms in which electrons areshared.
diffusion A thermal process in which dopant atoms at or near thewafer surface are redistributed deeper into the bulk ofthe wafer. For diffusion to occur, both heat and aconcentration gradient are required.
dopant A chemical element, from the third or fifth group of theperiodic table, which is incorporated in trace amounts ina semiconductor crystal, to favorably alter its electricalcharacteristics. Examples of common dopants used insilicon are boron (B), phosphorus (P), arsenic (As), andantimony (Sb).
Instructor Guide
B-22 Technology Transfer #95102996-A-TRG
doped oxide Silicon dioxide (SiO2) containing a few percent ofsilicon dopants (B, P). Doped oxide has a lowersoftening (reflow) temperature as compared to undopedoxide.
drive-in Drive-in is the second stage of the dopant diffusionprocess in which the saturated dopant on the wafersurface is driven into the wafer to obtain the requiredjunction depth. (The first stage is predeposition.
gettering Gettering is the process of removal of crystallinedefects and metal contaminants from the active regionof the substrate.
HiPOx Abbreviation for high pressure oxidation. HiPOx is theprocess of oxidation of the wafer by the application of ahigh pressure (10-20 atms).
LPCVD Abbreviation for low pressure chemical vapordeposition. The LPCVD process is a chemical vapordeposition (CVD) technique which is performed at apressure below atmospheric pressure (0.1-1.0 Torr).
metallization A process usually performed by evaporating orsputtering a thin film of metal or alloy on the surface ofa wafer.
organic compound A chemical compound of carbon (C), hydrogen (H), andone or more other elements, such as oxygen (O) ornitrogen (N).
PECVD Abbreviation for plasma enhances chemical vapordeposition. The PECVD process is a chemical vapordeposition (CVD) technique which used a plasma to aidin the deposition process.
photolithography A micropatterning process in which a pattern istransferred from a photomask onto the wafer using atechnique similar to photography.

Appendix B
Technology Transfer #95102996-A-TRG B-23
planarization A process that smooths the contours of the wafer
surface by improving surface topography.
plasma A fourth state of matter composed of charged and
uncharged particles which is used in semiconductor
processing as a means to energize and drive chemical
reactions, such as ashing.
predeposition Predeposition is the first stage of the dopant diffusion
process in which the surface of the wafer is saturated
with the dopant. (The second stage is drive-in).
Pt-Si alloying An alloying process in which the deposited Pt metal
layer is alloyed to the underlying silicon substrate. Pt-
Si alloying is used to fabricate Schottky-barrier
contacts.
reflow A high temperature process that rounds the corners of
the doped oxide insulating layer and slopes the
sidewalls. This process allows good step coverage of
the metallization that follows.
RTA Abbreviation for rapid thermal anneal. RTA process is
an annealing technique which has a short process time
(order of seconds).
substrate A wafer that is the basis for subsequent processing
operations in the fabrication of semiconductor devices
or circuits.
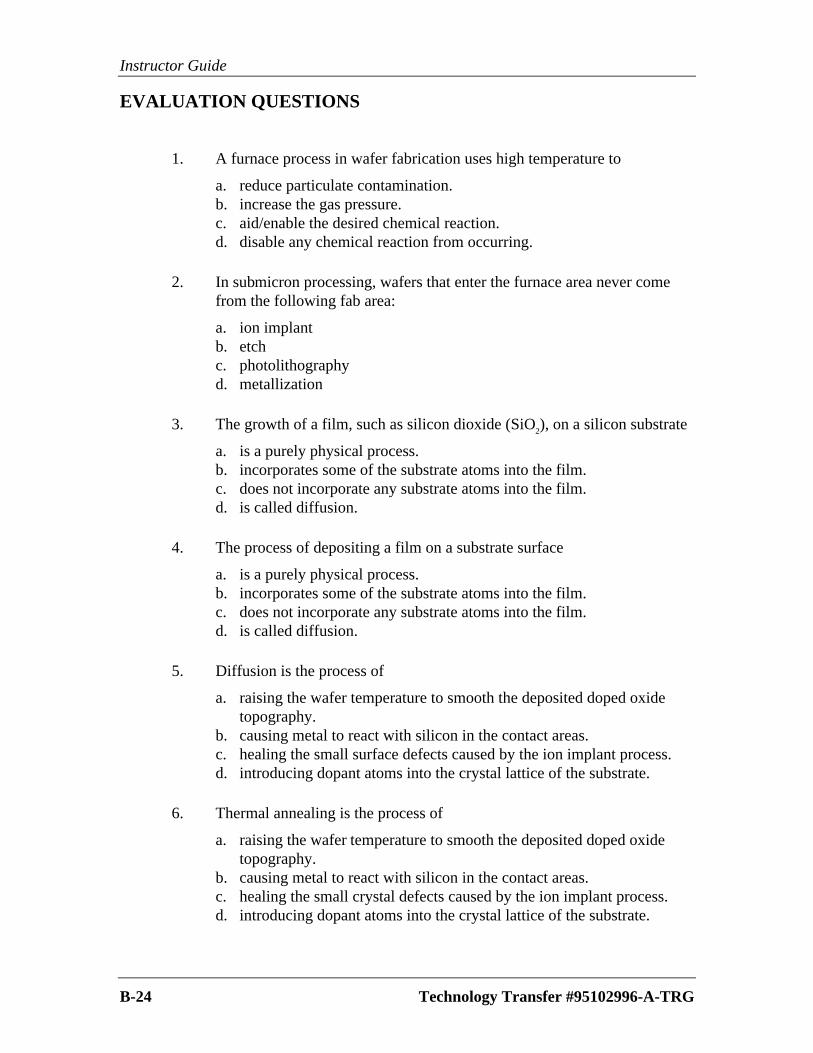
Instructor Guide
B-24 Technology Transfer #95102996-A-TRG
EVALUATION QUESTIONS
1. A furnace process in wafer fabrication uses high temperature to
a. reduce particulate contamination.b. increase the gas pressure.c. aid/enable the desired chemical reaction.d. disable any chemical reaction from occurring.
2. In submicron processing, wafers that enter the furnace area never comefrom the following fab area:
a. ion implantb. etchc. photolithographyd. metallization
3. The growth of a film, such as silicon dioxide (SiO2), on a silicon substrate
a. is a purely physical process.b. incorporates some of the substrate atoms into the film.c. does not incorporate any substrate atoms into the film.d. is called diffusion.
4. The process of depositing a film on a substrate surface
a. is a purely physical process.b. incorporates some of the substrate atoms into the film.c. does not incorporate any substrate atoms into the film.d. is called diffusion.
5. Diffusion is the process of
a. raising the wafer temperature to smooth the deposited doped oxidetopography.
b. causing metal to react with silicon in the contact areas.c. healing the small surface defects caused by the ion implant process.d. introducing dopant atoms into the crystal lattice of the substrate.
6. Thermal annealing is the process of
a. raising the wafer temperature to smooth the deposited doped oxidetopography.
b. causing metal to react with silicon in the contact areas.c. healing the small crystal defects caused by the ion implant process.d. introducing dopant atoms into the crystal lattice of the substrate.
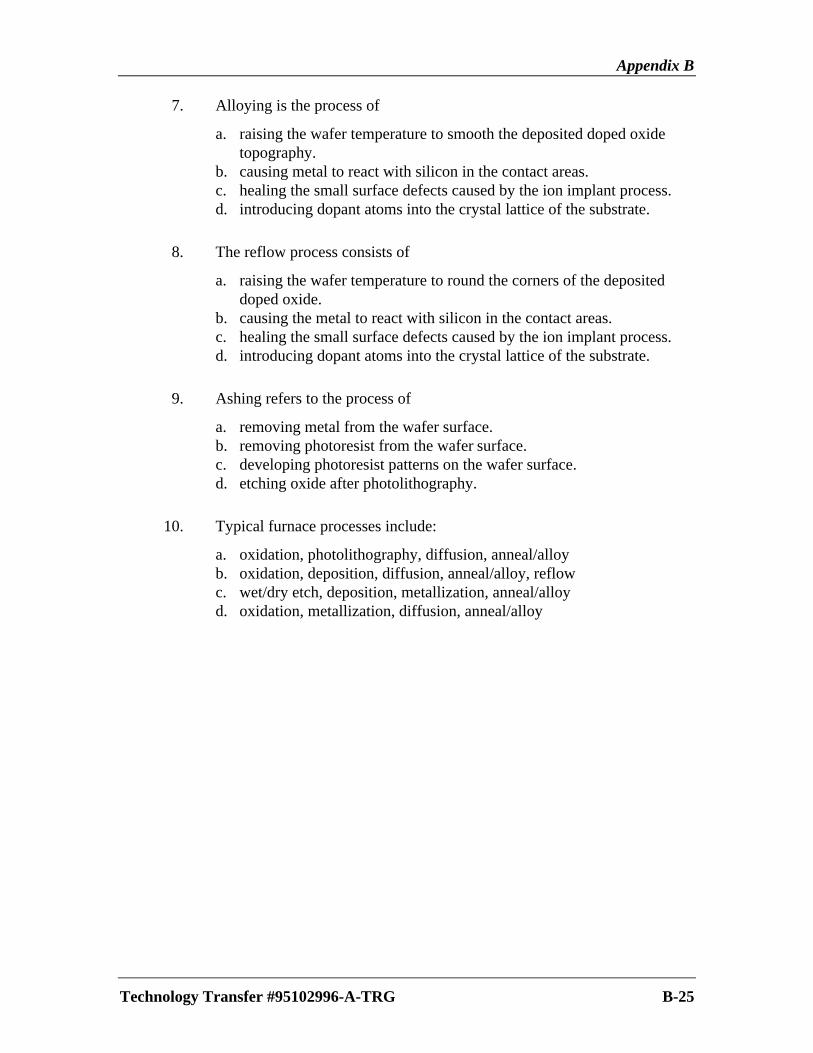
Appendix B
Technology Transfer #95102996-A-TRG B-25
7. Alloying is the process of
a. raising the wafer temperature to smooth the deposited doped oxidetopography.
b. causing metal to react with silicon in the contact areas.c. healing the small surface defects caused by the ion implant process.d. introducing dopant atoms into the crystal lattice of the substrate.
8. The reflow process consists of
a. raising the wafer temperature to round the corners of the depositeddoped oxide.
b. causing the metal to react with silicon in the contact areas.c. healing the small surface defects caused by the ion implant process.d. introducing dopant atoms into the crystal lattice of the substrate.
9. Ashing refers to the process of
a. removing metal from the wafer surface.b. removing photoresist from the wafer surface.c. developing photoresist patterns on the wafer surface.d. etching oxide after photolithography.
10. Typical furnace processes include:
a. oxidation, photolithography, diffusion, anneal/alloyb. oxidation, deposition, diffusion, anneal/alloy, reflowc. wet/dry etch, deposition, metallization, anneal/alloyd. oxidation, metallization, diffusion, anneal/alloy

Instructor Guide
B-26 Technology Transfer #95102996-A-TRG
APPENDIX C
SEMATECH MT Certification Process......................................................................C-1
Guidelines for Writing Certification Tests .................................................................C-5
Examples of Test Styles.................................................................................................C-8
Guidelines for Developing Training and Certification Checklists .........................C-13
Example of MT Training Checklist...........................................................................C-17

Instructor Guide
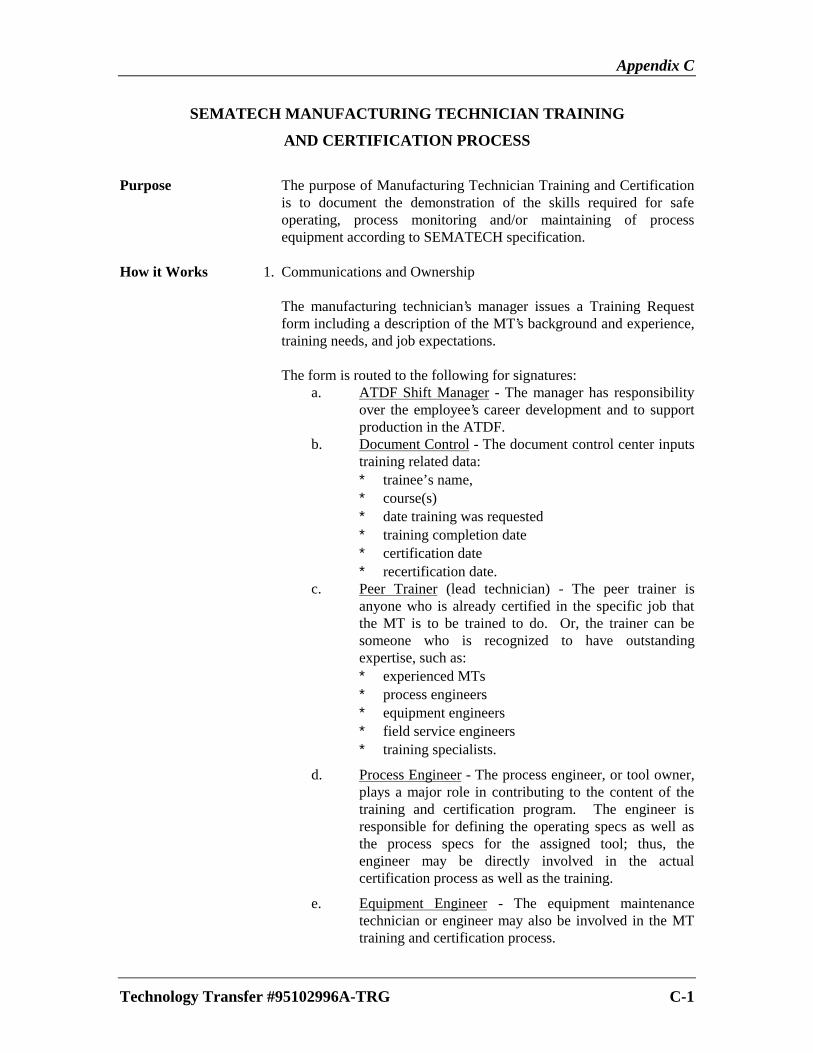
Appendix C
Technology Transfer #95102996A-TRG C-1
SEMATECH MANUFACTURING TECHNICIAN TRAINING
AND CERTIFICATION PROCESS
Purpose The purpose of Manufacturing Technician Training and Certificationis to document the demonstration of the skills required for safeoperating, process monitoring and/or maintaining of processequipment according to SEMATECH specification.
How it Works 1. Communications and Ownership
The manufacturing technician’s manager issues a Training Requestform including a description of the MT’s background and experience,training needs, and job expectations.
The form is routed to the following for signatures:a. ATDF Shift Manager - The manager has responsibility
over the employee’s career development and to supportproduction in the ATDF.
b. Document Control - The document control center inputstraining related data:∗ trainee’s name,∗ course(s)∗ date training was requested∗ training completion date∗ certification date∗ recertification date.
c. Peer Trainer (lead technician) - The peer trainer isanyone who is already certified in the specific job thatthe MT is to be trained to do. Or, the trainer can besomeone who is recognized to have outstandingexpertise, such as:∗ experienced MTs∗ process engineers∗ equipment engineers∗ field service engineers∗ training specialists.
d. Process Engineer - The process engineer, or tool owner,plays a major role in contributing to the content of thetraining and certification program. The engineer isresponsible for defining the operating specs as well asthe process specs for the assigned tool; thus, theengineer may be directly involved in the actualcertification process as well as the training.
e. Equipment Engineer - The equipment maintenancetechnician or engineer may also be involved in the MTtraining and certification process.

Instructor Guide
C-2 Technology Transfer #95102996A-TRG
f. MT Trainee - The MT trainee signs the training requestto show his/her commitment to the training program.The trainee will receive a training and certificationchecklist. This serves as the individual’s preliminarycareer development roadmap.
2. Prepare an Individualized Roadmap
After the training request has been received and signed by all affectedparties, the peer trainer prepares the standard SEMATECH MT Trainingand Certification Checklist for the assigned work area. The peer trainerreviews the training goals and objectives with all affected parties. Anindividualized roadmap is determined and the peer trainer is givenpermission to start the training process.
Major Events There are several steps to the certification process.
Step 1 Kickoff Meeting. The manager meets with the trainee and peer trainerand explains why the training is important and what will be expectedfrom the MT on the job after the training is completed. Any additionalexpectations will also be covered at this time, such as length of time tocomplete training, number of hours dedicated to training, etc.
Step 2 Roadmap Explanation. The trainer will begin by explaining the trainee’straining and certification roadmap. The trainer will explain what will bedone, how long it will take, and how performance will be evaluated.
Step 3 Four-Step Training Process. While following the individualizedroadmap to guide the training process, the trainer will apply four basicsteps in the training process.
a. Trainer tells the trainee what the trainee is expected todo.
b. Trainer demonstrates the required skill and answers thetrainee’s questions.
c. Trainee practices the skill while the trainer coaches thetrainee. Trainee practices until the desired level ofcompetency is achieved.
d. Trainee explains, demonstrates, and answers the trainer’squestions.
Step 4 Record Keeping. When both the trainer and the trainee agree a skill hasbeen mastered, the trainer initials and dates the training checklist. Theprocess in steps 3 and 4 is repeated until the MT performs all skillsrelated to a task or job with acceptable competence.

Appendix C
Technology Transfer #95102996A-TRG C-3
Step 5 Certification Test. During the certification test the MT must completethe task according to specification with no assistance or errors. Inaddition to the performance portion of the certification test, a written testwill also be administered for each level of certification. Only afterachieving a perfect score on both the performance tests and the writtentests will a MT be certified.
Successful Completion. If the engineer or person responsible for thecertifying is satisfied with the performance, the engineer will sign thecertificate and inform the trainer and the MT’s manager that the MT iscertified and ready to be assigned to the job the MT has been trained toperform.
Remedial Action. If the MT did not perform according to thespecification or made errors, the engineer will notify the manager andtrainer that the MT will need additional supervised practice or training.
Step 6 Recognition. After receiving the certification documentation from thetrainer and the person accountable for the certification, the Level 3manager will sign the certificate and present it to the MT.
Step 7 Recertification. The same procedure applies for MTs requiringrecertification.

Instructor Guide
C-4 Technology Transfer #95102996A-TRG
Appendix C
Technology Transfer #95102996A-TRG C-5
GUIDELINES FOR WRITING CERTIFICATION TESTS
Introduction These guidelines describe what a trainer will need to do to develop writtentests for a manufacturing technician certification program.
Basic Rules Follow these basic rules when preparing written tests for certifyingmanufacturing technicians:
1. Early Warning. Prior to the start of the training program, the trainershould explain to the MT the objectives of the course and the test thatwill be used to evaluate his performance. A MT should know inadvance the topics to be covered on the test. This information will helpsteer the MT’s learning.
2. Test Styles. Select a test style that fits the target audiences’ learningpreferences. The method of testing should be easy to administer,manage, and maintain as well as easy for the MT to understand how toperform the test.
3. Open Book. In most cases, MTs should be allowed to use the sameresources they would have available when performing the tasks and jobthey have been trained to do. This includes specifications, manuals,checklists, etc.
4. Objective-Driven. Tests should match the objectives of the training andcertification program. A test should not be subjective and open toscrutiny. If the training program has a strong foundation of soundperformance objectives, and if the test is based on the objectives, thenthere is a stronger probability that the MT’s performance will bemeasured in an objective manner.
5. Specifications. Ultimately, it is the SEMATECH operatingspecifications that determine the specific content of the certificationtests. Objectives are derived from the specifications. The performanceobjectives provide the means for measuring a MT’s ability to performaccording to the specification.
6. Test the Test. Tests are only as good as the people who design them.Written tests have to be carefully designed to prevent ambiguity,inferences, and misinterpretations. The author of the test must remainopen-minded and flexible. The test should be administered severaltimes. After each test session, MTs should be allowed to critique thetest to determine if unfair, irrelevant, or confusing questions need to berevised.
Instructor Guide
C-6 Technology Transfer #95102996A-TRG
7. Update the Test. Ensure that the test is kept up to date as specificationsare updated. The continuous improvement concept also applies todesigning effective tests.
8. Pretest or Sample Test. A prerequisite test, or "pretest," may be helpfulin assessing entry level skills for new or prospective MTs. This testusually includes a sampling of questions from the actual certificationtest.
RequiredResources Training and Certification Checklists containing Performance Objectives
Specifications for the Designated Work Area and for Related Process Tool(s)
Relevant Resource Materials considered Necessary for the Performance of aTask
Test Styles Tests can be written in various styles. The test style should fit the specificapplication for which a test is designed to serve. In general, the testdeveloper should use the simplest method that will provide a fair means ofevaluating a MT’s skills.
Matching Tests• Match words
- Match words to statements- Match names and/or statements to objects- Combination of all of the above
• Multiple-Choice- A statement followed by two or more choices- Two or more choices within a statement
• Fill in the blank- Word statements with missing words- Tables with missing information
• Complete the statement
• True or False tests
• Tests requiring a written response
Appendix C
Technology Transfer #95102996A-TRG C-7
Locate &DescribeItems Verbal Style. Have the list of parts, components, systems, or objects
available on paper or computer and verbally test the MT at the actualworkstation.
Written Style. Matching test - match names, objects, and descriptions. Thesame skill can be accurately tested by using photographs, drawings, or videoof the equipment when the actual machine is not available.
Explain Stepsin a Process Verbal Style. Given an actual SEMATECH specification, the MT can be
asked direct questions regarding the process at the actual work location.
Written Style. Practically any test style can be used to test for anunderstanding of a process flow. Even flash cards containing worddescriptions of the process or actual photographs can be used as a means oftesting for the correct order of all steps in the process.
RecallParametersin a Process Verbal Style. Having available an actual SEMATECH specification, the MT
can be asked direct questions regarding the process at the actual worklocation.
Written Style. Any test style can be used to test for recall of specificinformation contained within a specification.

Instructor Guide
C-8 Technology Transfer #95102996A-TRG
EXAMPLES OF TEST STYLES
MatchingTest Matching Words to Statements
A. Wafer D. NotchB. Die E. FlatC. Scribe lines F. Test die
1.__ A single isolated product device on a wafer.
2.__ These run vertically and horizontally on a wafer to isolateindividual dice.
3.__ Special devices on the wafer that help engineers tell the results ofthe process.
4.__ A small alignment hole on the edge of a wafer.
5.__ A straight alignment indentation on a wafer’s edge.
6.__ A flat circular slice of silicon on which many semiconductor ICsare built.
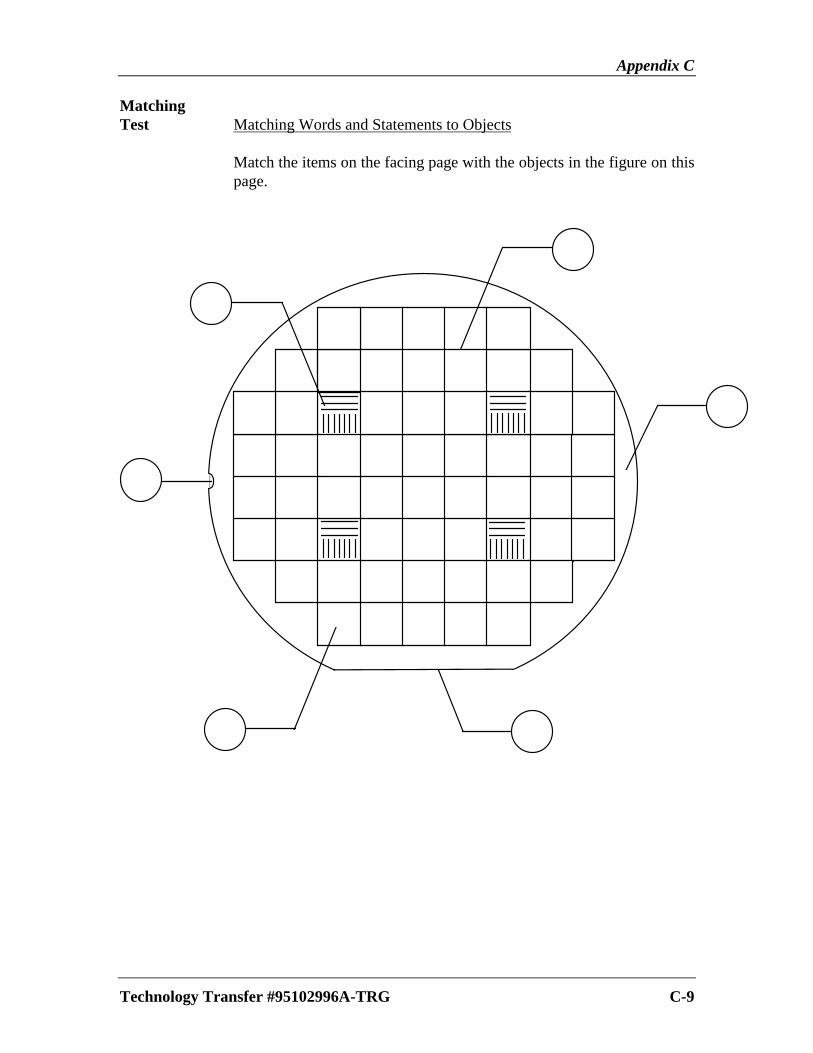
Appendix C
Technology Transfer #95102996A-TRG C-9
MatchingTest Matching Words and Statements to Objects
Match the items on the facing page with the objects in the figure on thispage.

Instructor Guide
C-10 Technology Transfer #95102996A-TRG
MultipleChoice 1. Proper airflow in critical areas serves two functions -
A. cooling and heating.B. cooling and contamination control.C. barometric pressure and contamination control.D. humidity and contamination control.
2. Humidity interferes with the ability of:A. the vacuum in wafer handling systems.B. resist to adhere to the wafer surface.C. MTs to perform their jobs.D. lens focus system.E. all of the above.F. none of the above.
3. Select the statement that best describes the term "through-the-lens."
A. A point of view outside the plane of the projectionlens.
B. Light rays that pass through the same plane as theprojection lens.
C. Same as enhanced global alignment.D. TTL refers to the type of alignment used when dark
field lighting is used.
4. Given a list of tools, which are used to measure criticaldimensions? (Circle all that apply.)
A. Optical microscopeB. Confocal microscopeC. Scanning slit microscopeD. Scanning electron microscopeE. Interference microscopeF. Ellipsometer
5. In microlithography, the (NA, resolution, depth of focus) is definedas the smallest isolated feature which is repeatedly printed by aphotolithography process.

Appendix C
Technology Transfer #95102996A-TRG C-11
Fill inthe Blank Word Statements with Missing Words
1. In microlithography, the _ _ _ _ _ _ _ _ _ _ is defined as thesmallest isolated feature that is repeatedly printed by a _ _ _ _ _ _ __ _ _ _ _ _ _ _ _ process.
Tables with Missing Information
Use this table to test your troubleshooting skills. Place an "X" in theappropriate place to a specific "Defect ID" to some "Possible Causesdue to Process Variations." The first one has been done for you as anexample.
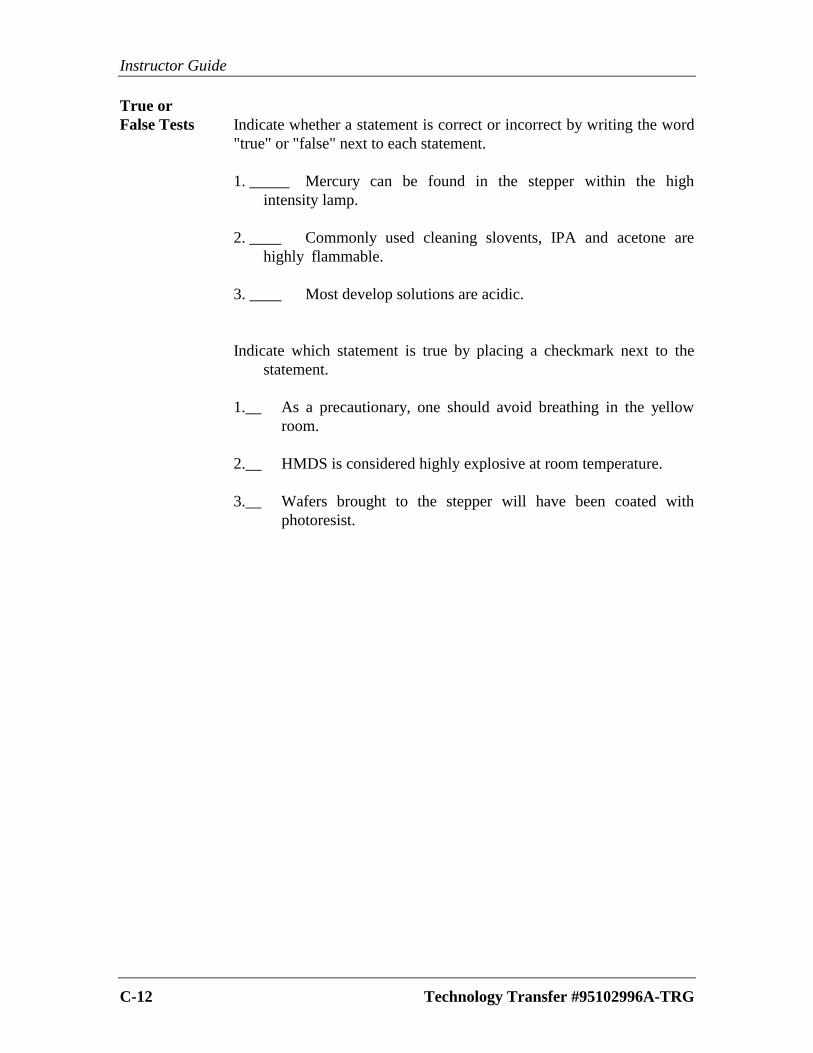
Instructor Guide
C-12 Technology Transfer #95102996A-TRG
True orFalse Tests Indicate whether a statement is correct or incorrect by writing the word
"true" or "false" next to each statement.
1. _____ Mercury can be found in the stepper within the highintensity lamp.
2. ____ Commonly used cleaning slovents, IPA and acetone arehighly flammable.
3. ____ Most develop solutions are acidic.
Indicate which statement is true by placing a checkmark next to thestatement.
1.__ As a precautionary, one should avoid breathing in the yellowroom.
2.__ HMDS is considered highly explosive at room temperature.
3.__ Wafers brought to the stepper will have been coated withphotoresist.
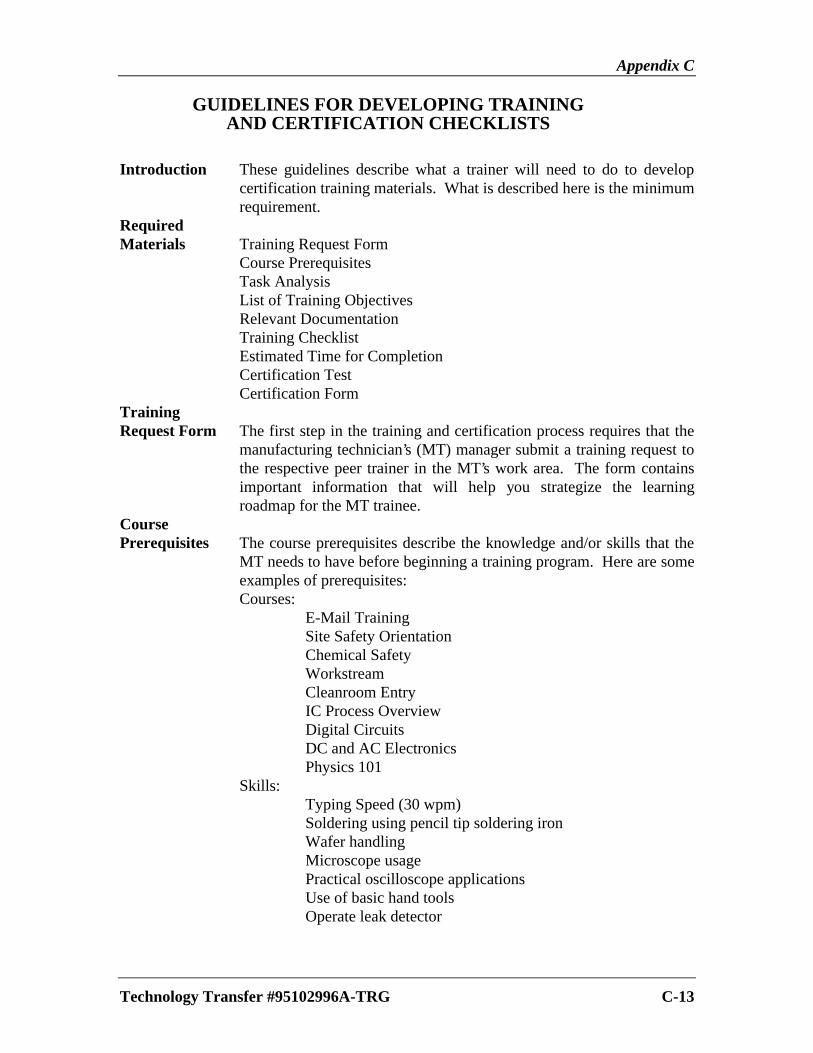
Appendix C
Technology Transfer #95102996A-TRG C-13
GUIDELINES FOR DEVELOPING TRAININGAND CERTIFICATION CHECKLISTS
Introduction These guidelines describe what a trainer will need to do to developcertification training materials. What is described here is the minimumrequirement.
RequiredMaterials Training Request Form
Course PrerequisitesTask AnalysisList of Training ObjectivesRelevant DocumentationTraining ChecklistEstimated Time for CompletionCertification TestCertification Form
TrainingRequest Form The first step in the training and certification process requires that the
manufacturing technician’s (MT) manager submit a training request tothe respective peer trainer in the MT’s work area. The form containsimportant information that will help you strategize the learningroadmap for the MT trainee.
CoursePrerequisites The course prerequisites describe the knowledge and/or skills that the
MT needs to have before beginning a training program. Here are someexamples of prerequisites:Courses:
E-Mail TrainingSite Safety OrientationChemical SafetyWorkstreamCleanroom EntryIC Process OverviewDigital CircuitsDC and AC ElectronicsPhysics 101
Skills:Typing Speed (30 wpm)Soldering using pencil tip soldering iron
Wafer handlingMicroscope usagePractical oscilloscope applicationsUse of basic hand toolsOperate leak detector
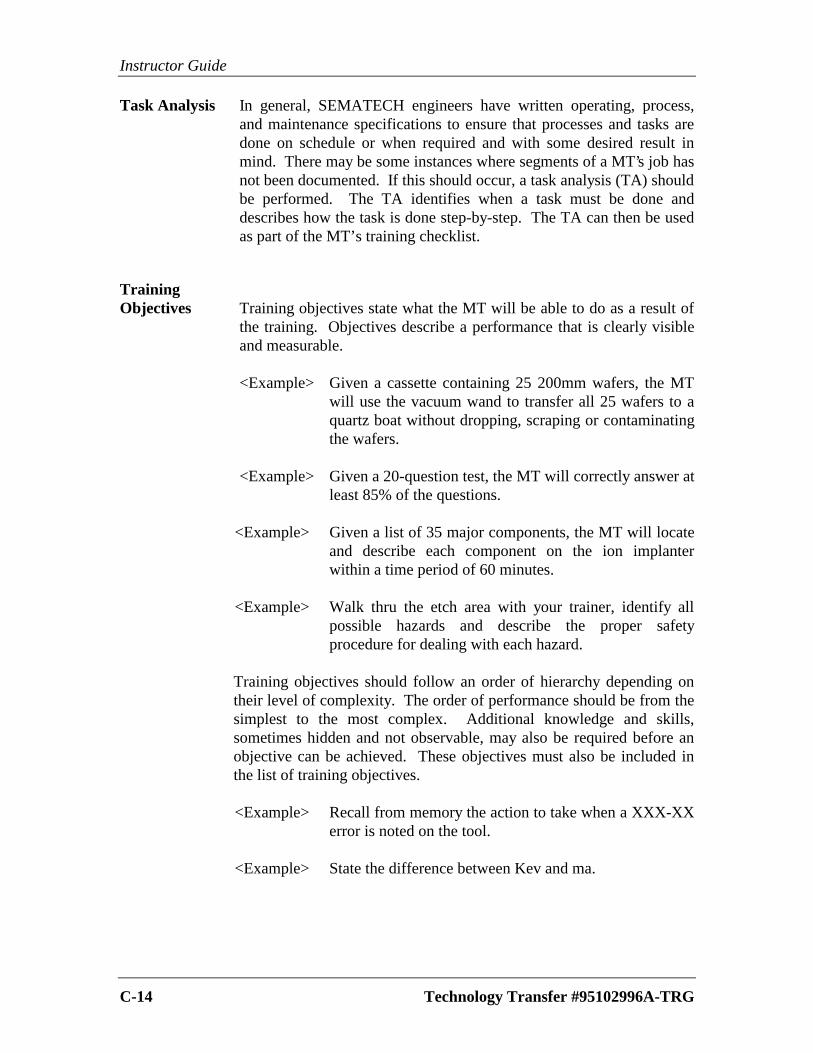
Instructor Guide
C-14 Technology Transfer #95102996A-TRG
Task Analysis In general, SEMATECH engineers have written operating, process,and maintenance specifications to ensure that processes and tasks aredone on schedule or when required and with some desired result inmind. There may be some instances where segments of a MT’s job hasnot been documented. If this should occur, a task analysis (TA) shouldbe performed. The TA identifies when a task must be done anddescribes how the task is done step-by-step. The TA can then be usedas part of the MT’s training checklist.
TrainingObjectives Training objectives state what the MT will be able to do as a result of
the training. Objectives describe a performance that is clearly visibleand measurable.
<Example> Given a cassette containing 25 200mm wafers, the MTwill use the vacuum wand to transfer all 25 wafers to aquartz boat without dropping, scraping or contaminatingthe wafers.
<Example> Given a 20-question test, the MT will correctly answer atleast 85% of the questions.
<Example> Given a list of 35 major components, the MT will locateand describe each component on the ion implanterwithin a time period of 60 minutes.
<Example> Walk thru the etch area with your trainer, identify allpossible hazards and describe the proper safetyprocedure for dealing with each hazard.
Training objectives should follow an order of hierarchy depending ontheir level of complexity. The order of performance should be from thesimplest to the most complex. Additional knowledge and skills,sometimes hidden and not observable, may also be required before anobjective can be achieved. These objectives must also be included inthe list of training objectives.
<Example> Recall from memory the action to take when a XXX-XXerror is noted on the tool.
<Example> State the difference between Kev and ma.

Appendix C
Technology Transfer #95102996A-TRG C-15
<Example> Explain the difference between Charles’s Law andBoyle’s Law.
<Example> List at least 3 items that are needed for ionizing a gas ina plasma etch reactor.
RelevantDocumentation Ensure that all necessary reference documentation including videos
and other applicable resources will be available when you need themfor the training process. Here are some items to consider:
Safety ModuleStandard Operating Procedures (SOPs)SpecificationsSupplier Manuals and SchematicsTheory of OperationText BooksOther Suggested Resources
On the training checklist indicate the pages or sections of thedocument that the MT should read to support the performance of aspecific objective on the training checklist.
TrainingChecklist The training checklist is a form that the trainer and MT use to track
their progress. It lists all the objectives that the MT will achieve or beable to do so as a result of the training course. Next to each task aretwo underlined spaces. When the trainer and the MT agree that theactivity has been mastered, they initial and date the appropriateobjective. When all the objectives have been initialed, a certificationtest can be scheduled.
Estimated Timefor Completion The time estimate includes the number of hours of on-the-job training
as well as the number of additional hours needed for readingassignments or for doing homework. The time estimate should alsostate the approximate duration of the course. For example, a trainingcourse may include several four-hour sessions that will be completedover a two-month period.
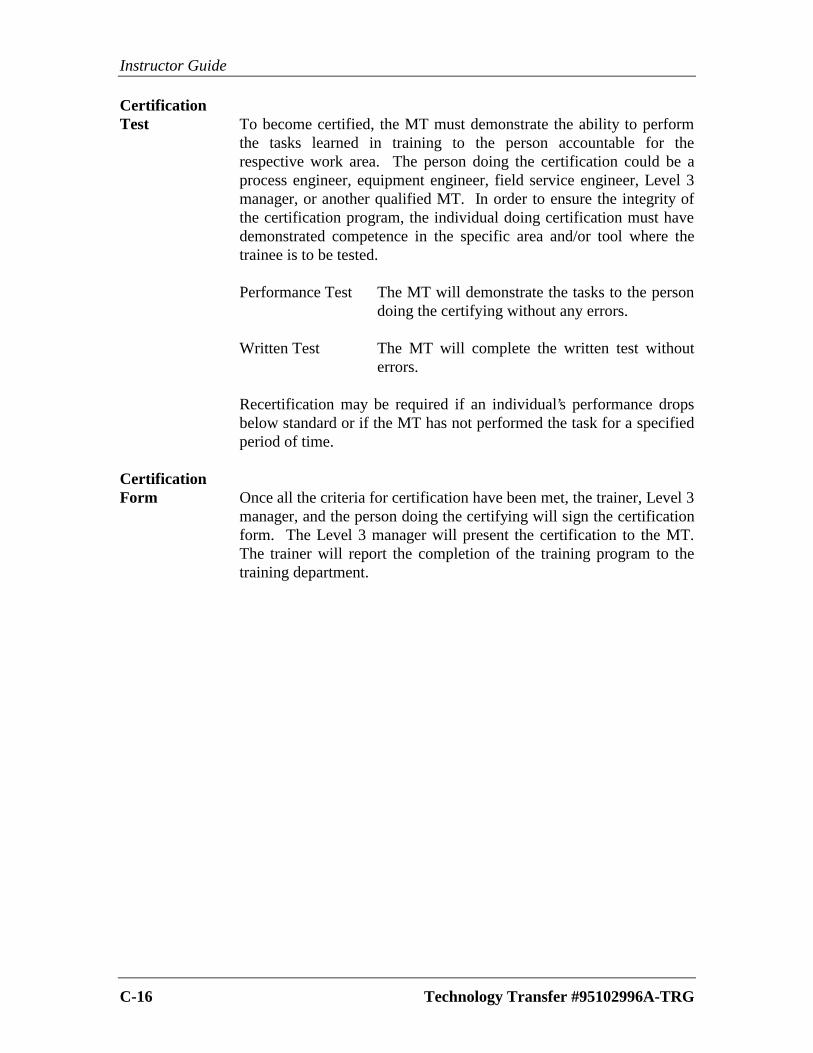
Instructor Guide
C-16 Technology Transfer #95102996A-TRG
CertificationTest To become certified, the MT must demonstrate the ability to perform
the tasks learned in training to the person accountable for therespective work area. The person doing the certification could be aprocess engineer, equipment engineer, field service engineer, Level 3manager, or another qualified MT. In order to ensure the integrity ofthe certification program, the individual doing certification must havedemonstrated competence in the specific area and/or tool where thetrainee is to be tested.
Performance Test The MT will demonstrate the tasks to the persondoing the certifying without any errors.
Written Test The MT will complete the written test withouterrors.
Recertification may be required if an individual’s performance dropsbelow standard or if the MT has not performed the task for a specifiedperiod of time.
CertificationForm Once all the criteria for certification have been met, the trainer, Level 3
manager, and the person doing the certifying will sign the certificationform. The Level 3 manager will present the certification to the MT.The trainer will report the completion of the training program to thetraining department.

Appendix C
Technology Transfer #95102996A-TRG C-17
MANUFACTURING TECHNICIAN TRAINING CHECKLIST
As trainee completes each class or procedure, trainee and trainer (or instructor) should initial and date each section.
l. CORE COURSES
WEEK ONE – ORIENTATIONTo include: PC/Windows
E-MailHAZCOMSite Safety OrientationChemical SafetyCleanroom Entry Certification 28
TIME TRAINEE TRAINER DATE
2. WorkStream Training
3. Semiconductor Processing Overview 8
4. Electrical Safety 6
5. Lockout/Tagout 1
6. RS1/Quickstart 7
7. Intro to Statistical Methods 7.5
8. Passive Data Collection 7.5
TIME TRAINEE TRAINER DATEll. NON-TOOL ATDF TRAINING
1. Tour of bay including familiarization of all equipment in thebay.
2. Safety Itemsa. Demonstrate proper evacuation routesb. Demonstrate the correct use of personal protective
equipmentc. Identify the different types of alarmsd. Identify the emergency phone numberse. Identify the hazards in the bayf. Demonstrate how to contact security and the reasons for
contacting them
3. Key Contactsa. Demonstrate how to use the paging systemb. Demonstrate how to contact managementc. Demonstrate how and why to contact fab stores
4. Housekeepinga. Demonstrate the proper housekeeping policies in the
ATDF
5. Wafer Handlinga. Demonstrate the correct way to handle wafers and the
use of the transfer toolb. Demonstrate the correct way to use the notch finderc. Demonstrate the correct way to use the wafer sleuth tool
6. Equipment Ownersa. Identify the equipment owners for your area
7. Timesheetsa. Demonstrate how to correctly fill out a timesheet and
where to send it
8. Special Codesa. Identify the special codes and nonmenclatures used in
the ATDF
9. Hazardous Wastesa. Identify and/or demonstrate the proper procedure for the
removal/exit of hazardous wastes
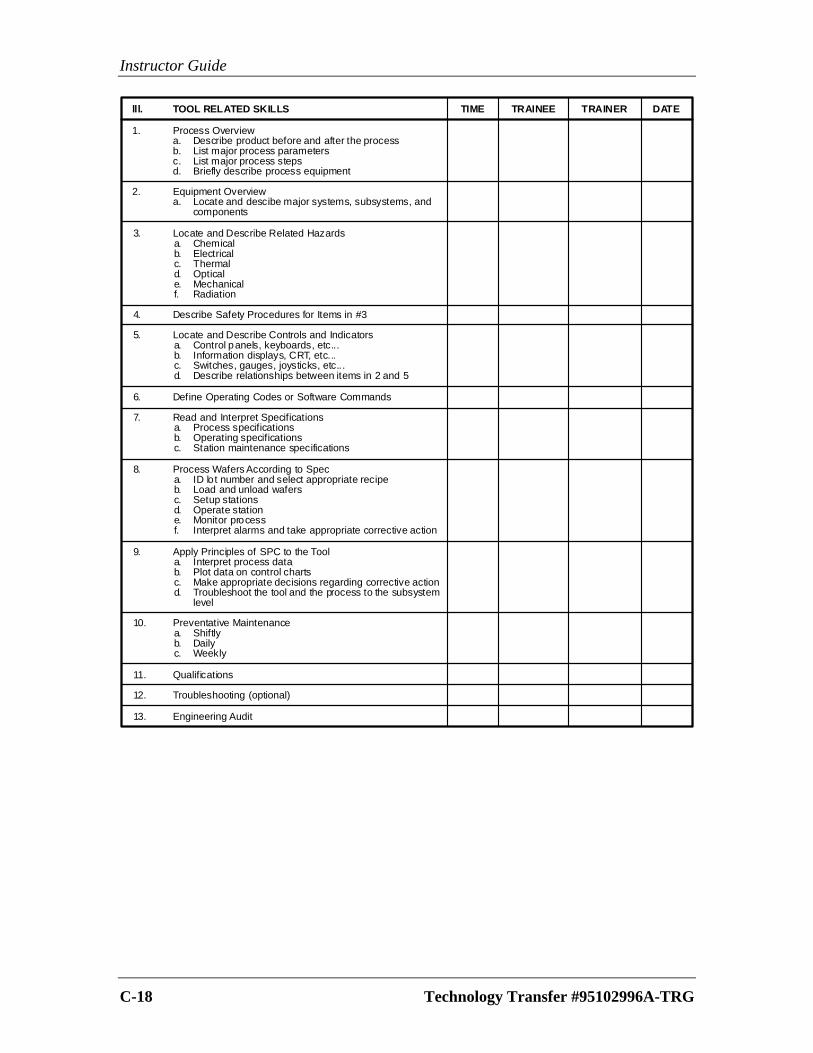
Instructor Guide
C-18 Technology Transfer #95102996A-TRG
TIME TRAINEE TRAINER DATElll. TOOL RELATED SKILLS
1. Process Overviewa. Describe product before and after the processb. List major process parametersc. List major process stepsd. Briefly describe process equipment
2. Equipment Overviewa. Locate and descibe major systems, subsystems, and
components
3. Locate and Describe Related Hazardsa. Chemicalb. Electricalc. Thermald. Opticale. Mechanicalf. Radiation
4. Describe Safety Procedures for Items in #3
5. Locate and Describe Controls and Indicatorsa. Control panels, keyboards, etc...b. Information displays, CRT, etc...c. Switches, gauges, joysticks, etc...d. Describe relationships between items in 2 and 5
7. Read and Interpret Specificationsa. Process specificationsb. Operating specificationsc. Station maintenance specifications
8. Process Wafers According to Speca. ID lot number and select appropriate recipeb. Load and unload wafersc. Setup stationsd. Operate statione. Monitor processf. Interpret alarms and take appropriate corrective action
9. Apply Principles of SPC to the Toola. Interpret process datab. Plot data on control chartsc. Make appropriate decisions regarding corrective actiond. Troubleshoot the tool and the process to the subsystem
level
6. Define Operating Codes or Software Commands
10. Preventative Maintenancea. Shiftlyb. Dailyc. Weekly
11. Qualifications
12. Troubleshooting (optional)
13. Engineering Audit
APPENDIX D
Examples of Completed Lesson Plans Courtesy of Semitherm
1. Course Introduction................................................................................................D-1
2. Equipment Overview ..............................................................................................D-5
3. Process Characteristics ...........................................................................................D-9
4. Safety ......................................................................................................................D-11
5. Computer Screen Interpretation .........................................................................D-15
6. Alarm Screen Interpretation................................................................................D-17
7. External Controls and Indicators ........................................................................D-19
8. Semitherm VTP-1500 Operations Course Map .................................................D-21

Instructor Guide

Appendix D
Technology Transfer #95102996A-TRG D-1
Instructor Guide: #01 Class: Semitherm VTP-1500 Operations
Module Title: VTP-1500 Vertical Furnace Course Introduction
Target Audience: Operators, Technicians,Engineers -- anyone responsible for operating theVTP-1500
Location: Classroom
Prerequisite Skills: Basic computer skills, basic electronics, mechanical skills
Module Objective: Upon completion of this module, the participant will be able to
• List expectations regarding the course
• Follow the course format and schedule
• Understand the purpose of the performance objectives
• Understand the course completion criteria
• Complete the course pretest
• Tour the facilities and learn evacuation procedures for the site of the class
Skill Pretest: The pretest will be administered during this module. Two functions are served bythis test: (1) The pretest is designed to measure each participant’s competency level regarding thecontents of the course. (2) The instructor can tailor the pace and contents of the course based onthe results of the pretest. There is no passing grade requirement for this test.
Additional Resources: The instructor will require an assistant. This person can take theparticipants on a tour of the facilities while the instructor grades the pretest.
Training Aids & Media Tools & Materials for Practice
1. Overhead projector and screen 2. Transparency of the facility layout 3. Pointer and transparency markers 4. Flipchart and markers to take notes 5. Name tents and markers 6. Class roster 7. Registration forms 8 Transparency of course outline or map 9. Transparency of Individual Progress Chart10. Transparency of Class Progress Chart
None required
Relevant Practice Description: Not applicable
Conditions: Not applicable
Type of Modeling: Not applicable
Feedback Mechanism: Not applicable

Instructor Guide
D-2 Technology Transfer #95102996A-TRG
Module Content Description: The purpose of this module is to welcome theparticipants to the class and to allow them and the instructor time to get acquainted beforestarting the class. Participants should fill out the registration form if they have notalready done so. Participants are asked to write their names on the name tents using themarkers provided. Then everyone is allowed to introduce themselves. During theintroductions, the instructor can check the attendance for the day.
The instructor will explain the location and procedures for: accessing the break areas,cafeteria, restrooms, telephones, health services, etc. Safety is of a major concern, sohazards are pointed out and safety procedures are explained including emergencyprocedures and the evacuation routes.
Class schedules are announced, including meeting times, breaks, lunch, and specifictimes when equipment will be available for demonstrations, practice, and testingsessions.
The instructor will explain the course format including the purpose of the course and theindividual module objectives. Participants will learn that the course is based onperformance objectives that are derived from careful front-end analysis. Skill tests areadministered in each module to determine each participant’s understanding of conceptsand level of skill competency. The tests are graded individually and appropriate feedbackis provided by the instructor or the course materials to ensure participants know how wellthey are doing at all times.
Participants are informed that the course is a performance-based equipment training(PBET) course, and as such, it allows for plenty of relevant practice to support theconcepts and performance of skills demonstrated by the instructor. Wherever possible,participants will receive as much "hands-on" practice on the VTP-1500 Vertical FurnaceSystem as is possible.
The course outline or course map is explained. If a course map is available, the instructorcan point out the logical sequencing of individual units of instruction (modules). Theinstructor can explain the specific order of modules for the specific class based on currentneeds.
Satisfactory completion of the VTP-1500 Operations course by each participant requiressatisfactory performance of each skill test attempted. The pretest and posttest must betaken by each participant; however, the results are not used to rank the participantsagainst each other. Instead, the results of the posttest are compared to the pretest todetermine the extent of individual improvement in learning the VTP-1500. Eachparticipant will have an "Individual Performance Chart" where the participant can recordperformance on the pretest, posttest, and individual learning modules. Both the instructorand the participant are required to sign the IPC as an indication of agreement between thetwo that all or specific instructional modules have been completed. The instructor willhave a "Class Performance Chart" to track the completion of modules as they arecompleted by each participant.
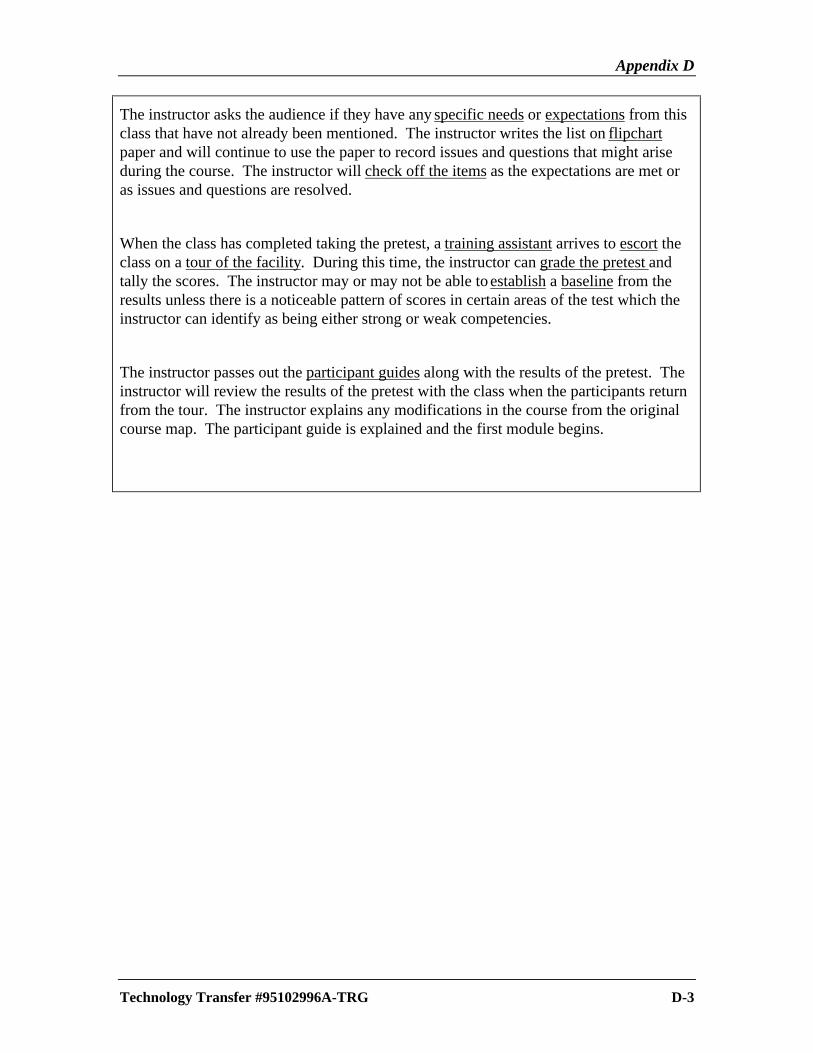
Appendix D
Technology Transfer #95102996A-TRG D-3
The instructor asks the audience if they have any specific needs or expectations from thisclass that have not already been mentioned. The instructor writes the list on flipchartpaper and will continue to use the paper to record issues and questions that might ariseduring the course. The instructor will check off the items as the expectations are met oras issues and questions are resolved.
When the class has completed taking the pretest, a training assistant arrives to escort theclass on a tour of the facility. During this time, the instructor can grade the pretest andtally the scores. The instructor may or may not be able to establish a baseline from theresults unless there is a noticeable pattern of scores in certain areas of the test which theinstructor can identify as being either strong or weak competencies.
The instructor passes out the participant guides along with the results of the pretest. Theinstructor will review the results of the pretest with the class when the participants returnfrom the tour. The instructor explains any modifications in the course from the originalcourse map. The participant guide is explained and the first module begins.

Instructor Guide
D-4 Technology Transfer #95102996A-TRG

Appendix D
Technology Transfer #95102996A-TRG D-5
Instructor Guide: #02 Class: Semitherm VTP-1500 Operations
Module Title: VTP-1500 Vertical Furnace Overview
Target Audience: Operators, Technicians,Engineers -- anyone responsible for operatingthe VTP-1500
Location: Classroom and/or at the VTP-1500
Prerequisite Skills: Basic computer skills, basic electronics, mechanical skills
Module Objectives:1. Given a functional block diagram and pictorial drawings, the student will be able to locate anddescribe the function of the nine specific major subsystems in the VTP-1500 Vertical Furnacewith at least 90% accuracy.
2. Using an operational VTP-1500 Vertical Furnace and a checklist, the student will be able tolocate and describe the components of each of the following major subsystems to items on thechecklist with 90% accuracy: (a) process chamber/heater element system, (b) temperature controlsystem, (c) gas delivery system, (d) exhaust/pressure control system, (e) computer controlsystem, (f) water flow control system, (g) interlock system, (h) wafer transfer system, and (i)power distribution system.
3. Using available documentation the student will be able to identify wafer transfer movementdesignations and wafer station designations of the VTP-1500 Vertical Furnace with 90%accuracy.
Skill Test: (1) The instructor will provide a checklist of nine major subsystems of the VTP-1500 Vertical Furnace. At the VTP-1500 the student will locate each item on the checklist anddescribe to the instructor the purpose of each subsystem. Acceptable performance on this test is90% or better. (2) On the reverse side of the checklist will be a pictorial diagram of the wafertransfer station. The student will be asked to name the major components of the wafer transfersystem and to identify the wafer transfer movement designations -- direct load, load, unload,preload, and post load
Additional Resources: None
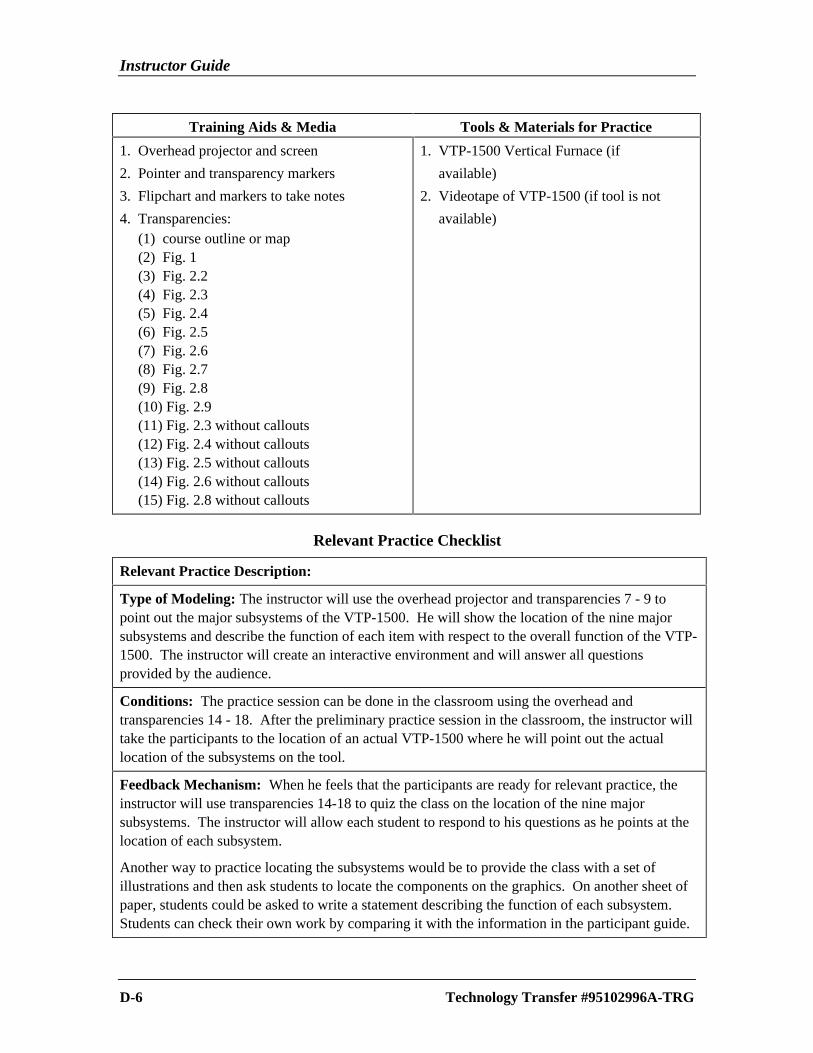
Instructor Guide
D-6 Technology Transfer #95102996A-TRG
Training Aids & Media Tools & Materials for Practice
1. Overhead projector and screen
2. Pointer and transparency markers
3. Flipchart and markers to take notes
4. Transparencies: (1) course outline or map (2) Fig. 1 (3) Fig. 2.2 (4) Fig. 2.3 (5) Fig. 2.4 (6) Fig. 2.5 (7) Fig. 2.6 (8) Fig. 2.7 (9) Fig. 2.8 (10) Fig. 2.9 (11) Fig. 2.3 without callouts (12) Fig. 2.4 without callouts (13) Fig. 2.5 without callouts (14) Fig. 2.6 without callouts (15) Fig. 2.8 without callouts
1. VTP-1500 Vertical Furnace (if
available)
2. Videotape of VTP-1500 (if tool is not
available)
Relevant Practice Checklist
Relevant Practice Description:
Type of Modeling: The instructor will use the overhead projector and transparencies 7 - 9 topoint out the major subsystems of the VTP-1500. He will show the location of the nine majorsubsystems and describe the function of each item with respect to the overall function of the VTP-1500. The instructor will create an interactive environment and will answer all questionsprovided by the audience.
Conditions: The practice session can be done in the classroom using the overhead andtransparencies 14 - 18. After the preliminary practice session in the classroom, the instructor willtake the participants to the location of an actual VTP-1500 where he will point out the actuallocation of the subsystems on the tool.
Feedback Mechanism: When he feels that the participants are ready for relevant practice, theinstructor will use transparencies 14-18 to quiz the class on the location of the nine majorsubsystems. The instructor will allow each student to respond to his questions as he points at thelocation of each subsystem.
Another way to practice locating the subsystems would be to provide the class with a set ofillustrations and then ask students to locate the components on the graphics. On another sheet ofpaper, students could be asked to write a statement describing the function of each subsystem.Students can check their own work by comparing it with the information in the participant guide.

Appendix D
Technology Transfer #95102996A-TRG D-7
Module Content Description: This module introduces participants to the location and functionof nine major subsystems of the VTP-1500 Vertical Furnace. Participants will be expected toknow the location of these items directly on the tool; however, plenty of classroom practice willbe provided before participants are tested directly on the tool. It is also a requirement forparticipants to be able to describe the basic function of each of the nine major subsystems.
In addition, participants will learn the names of the major components of the wafer transfersystem and be able to identify the wafer transfer movement designations -- direct load, load,unload, preload, and post load

Instructor Guide
D-8 Technology Transfer #95102996A-TRG

Appendix D
Technology Transfer #95102996A-TRG D-9
Instructor Guide: #03 Class: Semitherm VTP-1500 Operations
Module Title: Process Characteristics
Target Audience: Operators, Technicians,Engineers -- anyone responsible for operatingthe VTP-1500
Location: Classroom
Prerequisite Skills: Completion of the following courses: Module 2 of the VTP-1500Operations course, completion of the SEMATECH Furnace Processes course or equivalent, andbasic college chemistry.
Module Objective: Given a list of processes available on the VTP-1500 Vertical Furnace and alist of specific process characteristics, the student will be able to match the characteristics to theprocess with at least 90% accuracy.
Skill Test: Participants will be given a list of processes which are available on the VTP-1500and a list of hardware and process characteristics. Participants are required to match eachprocess to its relevant hardware and process characteristics.
Additional Resources: None
Training Aids & Media Tools & Materials for Practice
1. Overhead projector and screen
2. Pointer and transparency markers
3. Flipchart and markers to take notes
4. Transparencies:
(1) course outline or map
(2) block diagram 3.1
(3) atmospheric system vs. LPCVD
(4) polysilicon deposition bullets
(5) silicon nitride deposition bullets
(6) dry ox process bullets
(7) pyrogenic process bullets
(8) H2 anneal process bullets
(9) POCl3 dep. proc. bullets
(10) HTO process bullets
(11) TEOS process bullets
(12) block diagram 3.2
(13) Fig. 3.3 Process Characteristics table
None required
Instructor Guide
D-10 Technology Transfer #95102996A-TRG
Relevant Practice ChecklistRelevant Practice Description:
Conditions: The relevant practice for this module will take place entirely in the classroom.
Type of Modeling: The instructor will use the transparencies provided for this module todescribe the versatility of the VTP-1500 in handling a variety of furnace processes. When theinstructor has completed presenting the process and hardware characteristics of eachconfiguration, the instructor will verbally quiz the audience to give them practice in associatingprocess characteristics to hardware requirements. The flipchart can be used for this activity.
Feedback Mechanism: The instructor will provide appropriate feedback during the practicesession. The instructor can also refer students to their participant guides or reference thetransparencies as needed. These materials can also serve as feedback mechanisms.
Module Content Description: This module introduces participants to the various processconfigurations that can be performed in the Semitherm VTP-1500 Vertical Furnace. At thispoint it is very important that participants have previously completed the prerequisite courseslisted on the front cover of this instructor guide. Or, participants should have equivalent workexperience.
In summary, it is assumed that participants will already have the necessary chemistry and generalfurnace process background to be able to understand the applications of the VTP-1500. For arefresher of the process concepts mentioned in this module, consult the SEMATECH FurnaceProcesses participant guide.
Block diagram 3.1 is used to list and categorize the different process configurations of the VTP-1500. Each process is summarized briefly by using the bullet transparencies listed on the frontpage of this instructor guide. The instructor will describe the equipment requirements for eachprocess and explain the function of the process configuration.
The purpose of the module is to ensure that the participants in the course are able to discriminatebetween one process and another in terms of hardware requirements and process characteristics.
Appendix D
Technology Transfer #95102996A-TRG D-11
Instructor Guide: #04 Class: Semitherm VTP-1500 Operations
Module Title: Safety
Target Audience: Operators, Technicians,Engineers -- anyone responsible for operatingthe VTP-1500
Location: Classroom and/or at the VTP-1500
Prerequisite Skills: Completion of the following courses: Modules 2 & 3 of the VTP-1500Operations course, completion of the SEMATECH Furnace Processes course or equivalent, andbasic college chemistry.
Module Objective:
(1) From memory, the student will be able to identify the four classifications of safety hazardsassociated with working on or around the VTP-1500 Vertical Furnace with 100% accuracy.
(2) Given a list of the nine major functional subsystems described in Module 2, the student willbe able to identify which of the four classifications of hazards are associated with each of thesubsystems and cite at least one example of each with 100% accuracy.
(3) Given a safety violation scenario by the instructor, the student will be able to describe whatconsequences may/will occur due to the safety violation.
(4) Using a functional VTP-1500 Vertical Furnace, the student will be able to locate and operateall EPO and EMO switches and give an example of a scenario in which the switches might beused.
(5) From memory, the student will be able to list the possible consequences of activating theEPO button with at least 90% accuracy.
Skill Test: The skill test for this module will be performed directly at the VTP-1500 VerticalFurnace. The participant will have a checklist of hazards that can be found in the VTP-1500.The participant must be able to locate each item on the VTP-1500, indicate the type of hazard(thermal, electrical, mechanical or chemical), and explain the safety procedure for working in thearea of the potential hazard.
Additional Resources: MSDS information for typical chemicals that are used in the processesand maintenance of semiconductor furnaces.

Instructor Guide
D-12 Technology Transfer #95102996A-TRG
Training Aids & Media Tools & Materials for Practice
1. Overhead projector and screen
2. Pointer and transparency markers
3. Flipchart and markers to take notes
4. Transparencies:
(1) course outline or map (2) list of four hazard categories (3) illustrations or picture of VTP-1500 (4) list of thermal hazards (5) list of electrical hazards types (6) list of mechanical hazards (7) table of chemical hazards, Fig. 4.1 (8) subystem hazard chart, Fig. 4.2 (9) process chamber hazards (10) gas delivery system hazards (11) water flow system hazards (12) exhaust pressure control hazards (13) wafer transfer system hazards (14) temp. control system hazards (15) computer, interlock, and power distribution system hazards
1. VTP-1500 Vertical Furnace or
videotape
of the VTP-1500
2. Safety glasses
3. Gloves (3 types)
Relevant Practice Checklist
Relevant Practice Description:
Conditions: The relevant practice for this module will take place in the classroom and at thelocation of the VTP-1500 Vertical Furnace.
Type of Modeling: The instructor will use the transparencies provided for this module toexplain the types of possible hazards that can be found in the VTP-1500 Vertical Furnacedepending on process characteristics and hardware configuration. When the instructor hascompleted pointing out the hazards and explaining safety procedures, the instructor will verballyquiz the audience to give them practice in associating the types of hazards with hardware andprocess requirements. The overhead transparencies and the flipchart can be used for this type ofactivity.
Feedback Mechanism: The instructor will provide appropriate feedback during the practicesession. The instructor can also refer students to their participant guides or reference thetransparencies as needed. These materials can also serve as feedback mechanisms.

Appendix D
Technology Transfer #95102996A-TRG D-13
Module Content Description: This module introduces participants to the various potentialhazards that can be found in the Semitherm VTP-1500 Vertical Furnace. It is very important thatparticipants complete the prerequisite courses or lessons listed on the front cover of thisinstructor guide before attempting this module. Or, participants should have equivalent workexperience.
The instructor will use transparency #2 to introduce the four types of potential hazards that canbe found in the VTP-1500. Transparency #3 is used throughout this lesson to help locate theareas in the VTP-1500 where the hazards may exist. The remaining transparencies are used tosummarize the types of hazards.
The types of hazards may vary depending on the type of process and equipment configurationthat has been designed into the specific furnace system. For example, a pyrogenic torch wouldonly be found on wet oxidation systems and a bubbler can be found in a POCl3 depositionsystem.
Prior to the skill test students will have ample time in the classroom and at the VTP-1500 to askpertinent questions related to hardware, processes, hazards and safety procedures.

Instructor Guide
D-14 Technology Transfer #95102996A-TRG

Appendix D
Technology Transfer #95102996A-TRG D-15
Instructor Guide: #05 Class: Semitherm VTP-1500 Operations
Module Title: Computer Screen Interpretation
Target Audience: Operators, Technicians,Engineers -- anyone responsible for operatingthe VTP-1500
Location: Classroom, and/or at the VTP-1500
Prerequisite Skills: Completion of the following courses: Modules 2 - 4 of the VTP-1500Operations course and the SEMATECH Furnace Processes course or equivalent. Basiccomputer keyboarding skills is required and proficiency in the use of DOS and Windows userinterfaces is helpful.
Module Objective:
(1) Using a diagram of the Main screen, the RUN screen, the wafer handling screen, and theMAINT screen, the student will be able to locate and describe the different fields, icons, boxes,and drawings with an accuracy of 90%.
(2) Given an Intouch TM Software Main Screen, the student will be able to describe theresultant machine/software action of touching the different fields, icons, boxes, and drawingswith at least 90% accuracy.
Skill Test:
Additional Resources:
Training Aids & Media
1. Overhead projector (2ea) and screen (2ea)
or one InTouch remote video display and
one overhead projector
2. Pointer and transparency markers
3. Flipchart and markers to take notes
4. Transparencies: (1) Main screen (2) bullets for Main screen (3) Main screen soft key definitions (4) bullets for Main screen soft keys (pages) (5) Run screen (6) bullets for Run screen (7) Recipe Edit screen (#1) (8) bullets for Recipe Edit screen (9) clear/cut/copy/paste functions (10) Deviation Parameters screen (#2) (11) bullets for Deviation Parameters screen (12) Temp and PID Parameters screen (#3) (13) bullets for Temp/PID Parameters screen
Transparencies (continued) (14) Load Pattern Edit screen (15) bullets for Load Pattern Edit screen (16) Wafer Handling screen (17) bullets for Wafer Handling screen (18) Furnace Charts screen (19) bullets for Furnace Charts screen (20) Datalog screen (21) bullets for Datalog screen (22) Change Pens screen (23) bullets for Change Pens screen (24) Change Scales screen (25) Maint screen (26) bullets for Maint screen (27) Digital Inputs screen (29) Digital Outputs screen (30) Alarm Screen (31) bullets for Alarm screen

Instructor Guide
D-16 Technology Transfer #95102996A-TRG
Tools & Materials for Practice
1. VTP-1500 Vertical Furnace or videotape of the VTP-1500
2. InTouch remote monitor (if available)
3. Safety glasses
4. Gloves (3 types)
Relevant Practice Checklist
Relevant Practice Description:
Conditions: The relevant practice for this module will take place in the classroom using theInTouch remote computer system, or at the location of the VTP-1500 Vertical Furnace.
Type of Modeling: The instructor will access the InTouch software screens via the remotesystem. Or, if the remote is not available, the instructor may use an overhead projector and thelisted transparencies to describe the screens. A second overhead projector can be used to displaythe bullets summarizing individual screen functions. The instructor will explain screens andrelated soft keys.
Feedback Mechanism: The instructor can call up specific screens on the remote system or usethe available screen transparencies to verbally quiz the audience on their knowledge of thescreens. The instructor will provide the immediate feedback to inform participants how wellthey are doing.
Module Content Description: This module describes the functions of 15 screens of theSemitherm VTP-1500 operator interface software. The module also describes the various softkeys associated with these screens. Operators will be able to interpret the informationrepresented by these specific screens.
The instructor can use two methods to present the information from this module; (1) the best wayis to have available the InTouch remote software computer station. The overhead projector canbe used to display the bullets summarizing each of the related screens. (2) If the InTouch remotestation is not available, use screen transparencies on one overhead projector and use a secondprojector to display related bullets for the screen.

Appendix D
Technology Transfer #95102996A-TRG D-17
Instructor Guide: #06 Class: Semitherm VTP-1500 Operations
Module Title: Alarm Screen Interpretation
Target Audience: Operators, Technicians,Engineers -- anyone responsible for operatingthe VTP-1500
Location: Classroom, and/or at the VTP-1500
Prerequisite Skills: Completion of the following courses: Modules 2 - 5 of the VTP-1500Operations course and the SEMATECH Furnace Processes course or equivalent. Basiccomputer keyboarding skills is required and proficiency in the use of DOS and Windows userinterfaces is helpful.
Module Objective:
(1) Given a VTP-1500 Vertical Furnace in a random alarm state, the student will be able to usethe alarm screen display and a list of alarm definitions provided by the instructor to describe theeffect the alarm will have on the operation of the tool. The student’s responses must be within90% accuracy.
(2) Given an active alarm scenario, the student will be able to describe the correctprocedure/action to take at an operations level in order to prevent damage to the tool or productor injury to personnel.
Skill Test: The instructor will induce a random alarm scenario on the VTP-1500. The studentmust be able to call up the Alarm Screen and interpret the alarm type and locate the alarmdefinition in the alarm message list. The student must be able to describe the correctprocedure/action to take at an operations level in order to prevent damage to the tool or productor injury to personnel.
Additional Resources: None required
Training Aids & Media Tools & Materials for Practice
1. Overhead projector (2ea) and screen (2ea) or one InTouch remote video display and one overhead projector2. Pointer and transparency markers3. Flipchart and markers to take notes4. Transparencies: (1) Course map or course outline (2) Alarm screen (3) Alarm soft key definitions (4) Table of Alarm warnings (sample) (5) Practice alarm scenario exercises
1. VTP-1500 Vertical Furnace or videotape of the VTP-15002. InTouch remote monitor (if available)

Instructor Guide
D-18 Technology Transfer #95102996A-TRG
Relevant Practice ChecklistRelevant Practice Description:
Conditions: The relevant practice for this module can be accomplished by three possiblemethods: (1) by using the InTouch software (SIC) at the location of the VTP-1500 VerticalFurnace, (2) by using the InTouch remote computer system in the classroom, or (3) by simplycreating alarm condition scenarios on paper, transparencies, or by other means.
Feedback Mechanism: The instructor can call up specific screens on the remote system or usethe available screen transparencies to verbally quiz the audience on their knowledge of the alarmscreens and relevant remedial action. The instructor will provide the immediate feedback toinform participants how well they are doing.
Module Content Description: This module describes the functions of the alarm screen of theSemitherm VTP-1500 operator interface software. Operators will be able to interpret theinformation represented by these specific alarm screens.
The instructor can use one or a combination of three methods to present the information fromthis module; (1) the best way is to have available the InTouch remote software computer station.The overhead projector can be used to display the transparency tables summarizing the alarmmessages, (2) if the InTouch remote station is not available, use screen transparencies on oneoverhead projector and use a second projector to display related bullets for the screen, and (3) ifthe VTP-1500 is available, use the furnace computer interface (SIC).
Appendix D
Technology Transfer #95102996A-TRG D-19
Instructor Guide: #07 Class: Semitherm VTP-1500 Operations
Module Title: External Controls and Indicators
Target Audience: Operators, Technicians,Engineers -- anyone responsible for operatingthe VTP-1500
Location: Classroom, and/or at the VTP-1500
Prerequisite Skills: Completion of the following courses: Modules 2 - 6 of the VTP-1500Operations course and the SEMATECH Furnace Processes course or equivalent. Basiccomputer keyboarding skills is required and proficiency in the use of DOS and Windows userinterfaces is helpful.
Module Objective:
(1) Using system drawings, photos, and a list of external controls and indicators, the student willbe able to locate and explain the purpose of all external controls and indicators on the VTP-1500Vertical Furnace to at least 90% accuracy.
(2) Using an operational VTP-1500 Vertical Furnace, the student will be able to locate allexternal controls and indicators and describe to the instructor their purpose and/or operation withat least 90% accuracy.
Skill Test: The instructor will provide the student with a checklist of controls and indicators tobe located. The student will point at each control and indicator according to the list provided.The student must then explain the purpose of each respective control and indicator. The studentmust respond with a minimum of 90% accuracy.
Additional Resources: None required
Training Aids & Media
1. Overhead projector (2ea) and screen (2ea) or one InTouch remote video display and one overhead projector2. Pointer and transparency markers3. Flipchart and markers to take notes4. Transparencies: (1) Course map or course outline (2) Fig. 7.1 location of controls & indicators (3) Fig. 7.2 watchdog/temp. control drawer (4) Fig. 7.3 power distribution drawer panel (5) Fig. 7.4 SIC drawer front panel
Transparencies (continued) (6) Fig. 7.5 SFC drawer front panel (7) Fig. 7.6 EPO button (8) Fig. 7.7 robot EMO, Enable, Front door enable/disable switch (9) Fig. 7.8 Ampstack front panel (10) Fig. 7.9 PatliteTM signal tower (11) Fig. 7.10 CAL 9000 temp controller (12) Fig. 7.11 lift speed control needle valves

Instructor Guide
D-20 Technology Transfer #95102996A-TRG
Training Aids & Media
1. VTP-1500 Vertical Furnace or videotape of the VTP-1500
2. InTouch remote monitor (if available)
Relevant Practice Checklist
Relevant Practice Description:
Conditions: The practice session can be accomplished very easily in the classroom withtransparencies that can be displayed via the overhead projector.
Modeling Methods: The instructor will use overhead transparencies in the classroom to pointour the location and purpose of specific controls and indicators on the VTP-1500. Theparticipants will have a list of the controls and indicators they will be responsible for locatingand describing.
Feedback Mechanism: The instructor can provide the feedback indicating correct or incorrectresponses on the part of the participants or they can refer to their student guides for theappropriate responses.
Module Content Description: The instructor can use overhead transparencies to show thelocation of the controls and indicators that the participants are responsible for locating anddescribing. The modeling and practice can be done in the classroom, but the skill test should beperformed on the actual VTP-1500.

Appendix D
Technology Transfer #95102996A-TRG D-21
Introduction to VTP-1500
Operator Training Course
Describe Process Characteristics
Describe Equipment and Functions &
Interpret Functional Block Diagram
Follow Safety Procedures
Interpret Alarm Screen and Act
Accordingly
Interpret Controls & indicators
Access Maint. Mode
Interpret Load Patterns
Interpret Process Recipes
Edit Load Patterns from Touch Screen
Edit Process Recipes from Touch Screen
Access Windows
Copy Files from Disk
Select Recipe
Operate System in Auto
Mode
Select Load Pattern
Access Wafer Handling Screen
Operate System in Semi-Auto
Mode
Access "Run" Screen
Follow "Man" Operation Safety
Procedures
Interpret Interlocks
Operate System lin
Manual Mode
Perform Filler Wafer Change
Procedures
Perform Process Chamber
Leak-back CheckRun Process
Access Data Logging Screen
Execute Data Logging Function
Perform error Recovery
Interpret Main Computer Screen
SEMITHERM VTP-1500VERTICAL FURNACE
OPERATIONS COURSE
SAMPLE LESSON PLANSCOURTESY OF SEMITHERM

Instructor Guide
D-22 Technology Transfer #95102996A-TRG

APPENDIX E
Examples of Evaluation Systems
Level 1 Evaluation Form .............................................................................................. E-1
Level 3 Evaluation System............................................................................................ E-5
Level 4 Evaluation System............................................................................................ E-9

Instructor Guide

Appendix E
Technology Transfer #95102996A-TRG E-1

Instructor Guide
E-2 Technology Transfer #95102996A-TRG

Appendix E
Technology Transfer #95102996A-TRG E-3
Level 1

Instructor Guide
E-4 Technology Transfer #95102996A-TRG
Appendix E
Technology Transfer #95102996A-TRG E-5
Level 3
Evaluation Flow
1. Write performance-based objectives for the whole course.
2. Determine the metrics that the performance-based objectives should influence.
3. Integrate the performance-based objectives into a matrix to show the relationshipsbetween the objectives and the metrics.
4. Get customer agreement regarding the metrics and the training’s relationship toinfluence the metrics.
5. Develop the course to support the objectives.
6. Utilize Level 3 check sheet for customer indication of level of importance, i.e., H, M,L.
7. Perform Level 2 evaluation to check students’ mastery of skills as stated in thecourse objectives.
8. Utilize Level 3 check sheet for follow-up evaluation of supervisor’s and students’perception of whether student is applying learned skills on the job after 3-4 months.
9. For skills being applied, cross-reference to original level of importance rating.
10. For skills being applied, cross-reference the matrix to see which of the metricsshould have been affected.
11. Gather the data on the metrics and look for delta on pre-training data vs. post-training data.
12. Report the findings.
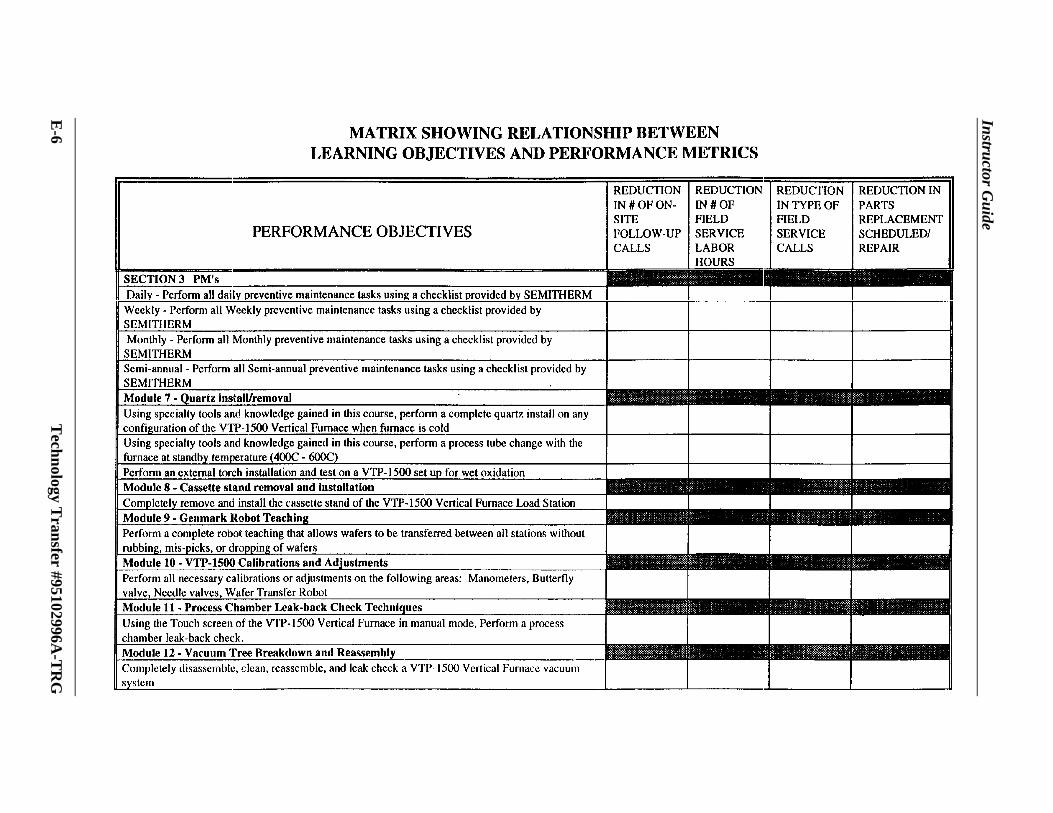
Instructor Guide
E-6
Technology T
ransfer #95102996A-T
RG

Appendix E
Technology T
ransfer #95102996A-T
RG
E-7

Instructor Guide
E-8
Technology T
ransfer #95102996A-T
RG

Appendix E
Technology Transfer #95102996A-TRG E-9
LEVEL 4 EVALUATION STRATEGY
A. What will be measured:Reduction in installation timeReduction in number of on-site follow-up callsReduction in number of emergency requestsReduction in Field Service labor hoursReduction in type of Field Service callsReduction in damaged warranteed part replacement
B. Sources of Data:Field Service reports (and Database?)
199_ - 199_ Reduction in installation time199_ - 199_ Reduction in number of on-site follow-up calls199_ - 199_ Reduction in number of emergency requests199_ - 199_ Reduction in Field Service labor hours199_ - 199_ Reduction in type of Field Service calls199_ - 199_ Reduction in damaged warranteed part replacement
C. Accounting system to be used:Excel spreadsheet
D. How data will be analyzed:Reduction in installation time will be measured in hoursReduction in number of on-site follow-up callsReduction in number of emergency requestsReduction in Field Service labor hoursReduction in type of Field Service callsReduction in damaged warranteed part replacement
E. When and how results will be reported and to whom:A formal written report will be generated and an information briefing will be heldto communicate results of the study to:
R. ThompsonS. ThompsonT. Manley
F. Collect and reduce the data:Cost of Training system (actual or projected)Benefits accruing from Training (actual or projected)
G. Analyze the data:Compare costs and benefitsDevelop conclusions and recommendations
H. Report findings:Prepare a formal written reportPresent an information briefing

Instructor Guide
E-10 Technology Transfer #95102996A-TRG
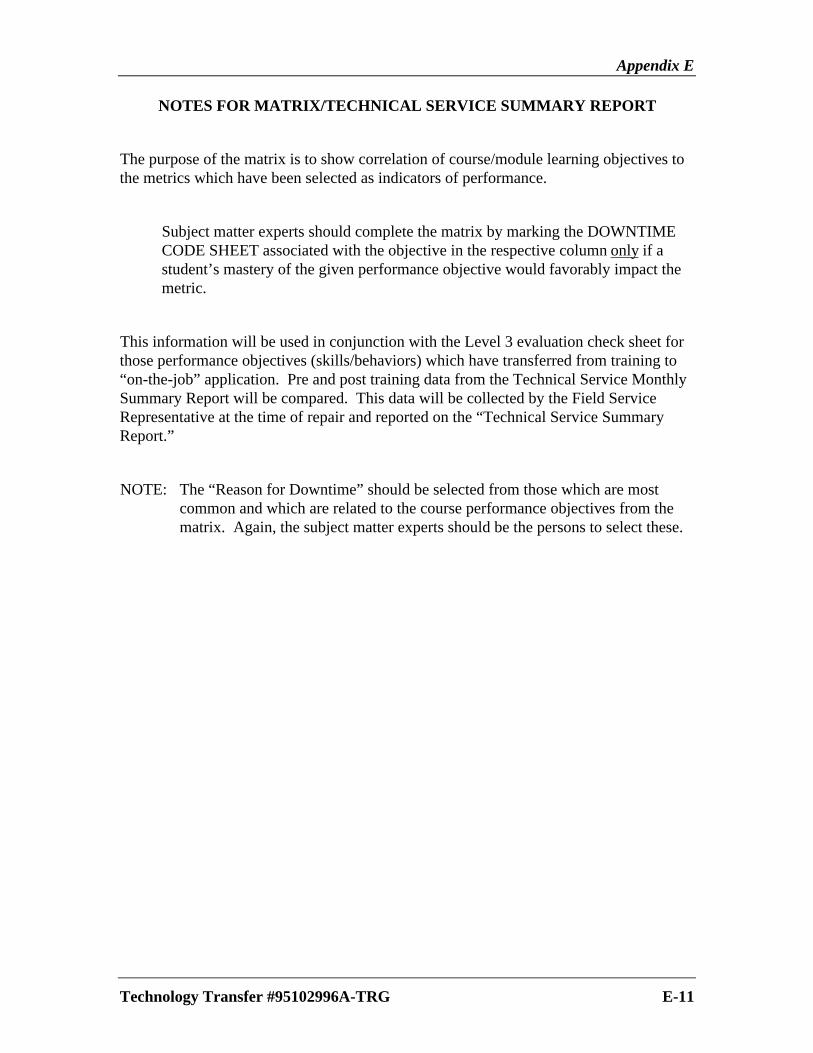
Appendix E
Technology Transfer #95102996A-TRG E-11
NOTES FOR MATRIX/TECHNICAL SERVICE SUMMARY REPORT
The purpose of the matrix is to show correlation of course/module learning objectives tothe metrics which have been selected as indicators of performance.
Subject matter experts should complete the matrix by marking the DOWNTIMECODE SHEET associated with the objective in the respective column only if astudent’s mastery of the given performance objective would favorably impact themetric.
This information will be used in conjunction with the Level 3 evaluation check sheet forthose performance objectives (skills/behaviors) which have transferred from training to“on-the-job” application. Pre and post training data from the Technical Service MonthlySummary Report will be compared. This data will be collected by the Field ServiceRepresentative at the time of repair and reported on the “Technical Service SummaryReport.”
NOTE: The “Reason for Downtime” should be selected from those which are mostcommon and which are related to the course performance objectives from thematrix. Again, the subject matter experts should be the persons to select these.

Instructor Guide
E-12 Technology Transfer #95102996A-TRG
DOWNTIME CODE SHEET
REASON FOR DOWNTIME CODE
SYSTEM WILL NOT PUMP DOWN TO SETPOINT A
PROCESS GAS WILL NOT FLOW / INCORRECT FLOW B
ROBOT WILL NOT LOAD WAFERS C
ROBOT WILL NOT PREALIGN WAFERS D
SYSTEM WILL NOT CONTROL PROCESS PRESSURE E
QUARTZ REMOVAL & REPLACEMENT F
PYRO TORCH REMOVAL & REPLACEMENT G
ELEMENT WILL NOT RAISE & LOWER H
JAR WILL NOT RAISE & LOWER I
FURNACE WILL NOT MAINTAIN TEMPERATURE SETPOINT J
ELEMENT WILL NOT ENABLE K
PROCESS GAS VALVE WILL NOT OPEN L
CASSETTE NOT IN POSITION M
COOLING WATER FAILURE N
BASEPLATE TEMPERATURE CONTROL FAILURE O
THERMOCOUPLE FAILURE P
WEEKLY PM Q
MONTHLY PM R
SEMIANNUAL PM S
OTHER T

Appendix E
Technology T
ransfer #95102996A-T
RG
E-13
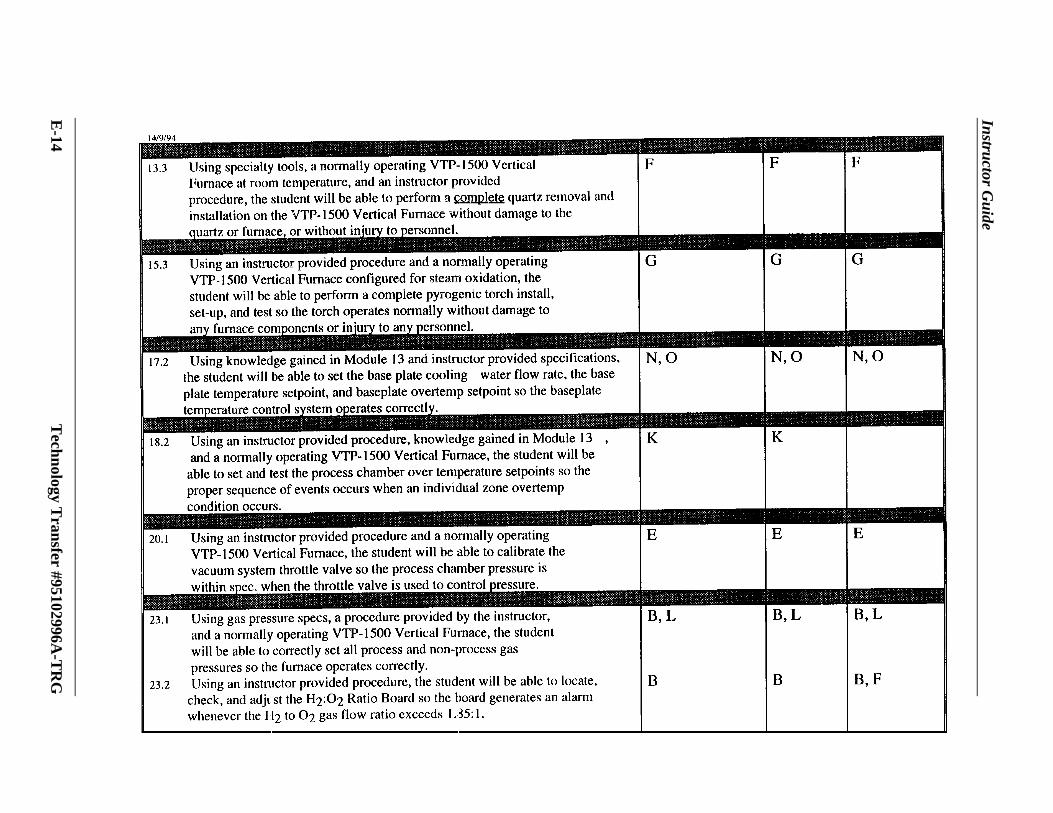
Instructor Guide
E-14
Technology T
ransfer #95102996A-T
RG

Appendix E
Technology T
ransfer #95102996A-T
RG
E-15

Instructor Guide
E-16
Technology T
ransfer #95102996A-T
RG

APPENDIX F
SEMATECH’s Transferable Courses ......................................................................... F-1
Tech Transfer Document Request Form..................................................................... F-8
Technician Training Council ..................................................................................... F-11
PBET Course Map ...................................................................................................... F-12

Instructor Guide

Appendix F
Technology Transfer #95102996A-TRG F-1
SEMATECH Learning Resource Guide
Chapter 5:
Transfer of SEMATECH
Courses
Technology Transfer #92061162D-TRG

Instructor Guide
F-2 Technology Transfer #95102996A-TRG
Introduction to Course Transfers
Purpose The SEMATECH technology transfer process makes technologyand knowledge available to SEMATECH and SEMI/SEMATECHmember companies. Materials for many courses developed oracquired by SEMATECH are available through this process.Course materials are provided for internal review or for internalinstruction to employees, suppliers, and customers.
SEMATECH and SEMI/SEMATECH members may realizesubstantial savings in course development costs when they are ableto apply the materials as designed.
Non-Transferable SEMATECH contracts with a number of training providers toCourses develop responses to training needs. Many of the courses
described in this document are owned by external providers and arenot available through Technology Transfer.
The descriptions of those courses include a notation that the courseis contracted with a training provider. Chapter 7 contains acomprehensive listing of training suppliers currently providingservices to support the SEMATECH curriculum.
Ordering To request SEMATECH technology transfer documents, use theDocuments form on page 5-6.
Appendix F
Technology Transfer #95102996A-TRG F-3
Intent to Course Transfers
Introduction The technology transfer document for a given course contains thematerials necessary to support the intended purpose of the transfer.The intent may be to support instruction of the course, or it may beto provide materials for benchmarking or course development.
Course When the materials transfer includes the participant guide,Instruction instructor guide, and visual aids, the purpose of the transfer is to
support instruction of the course.
Support materials or equipment such as videos, catapults, orcalculators are not included in the transfer package. Informationabout the equipment and materials required, along with a sourcefor purchasing, is included in the instructor guide provided with thecourse materials.
Course When the transfer document includes only the participant guide,Benchmarking the material may be useful in benchmarking or in courseDevelopment development.
In these cases, SEMATECH does not intend to transferinstructional capability.
Conditions of To protect SEMATECH and the copyright/license agreements withTransfer our training suppliers, some restrictions may apply to the use of the
materials. The restrictions will be clearly outlined in theintroductory letter that accompanies the technology transferdocument.
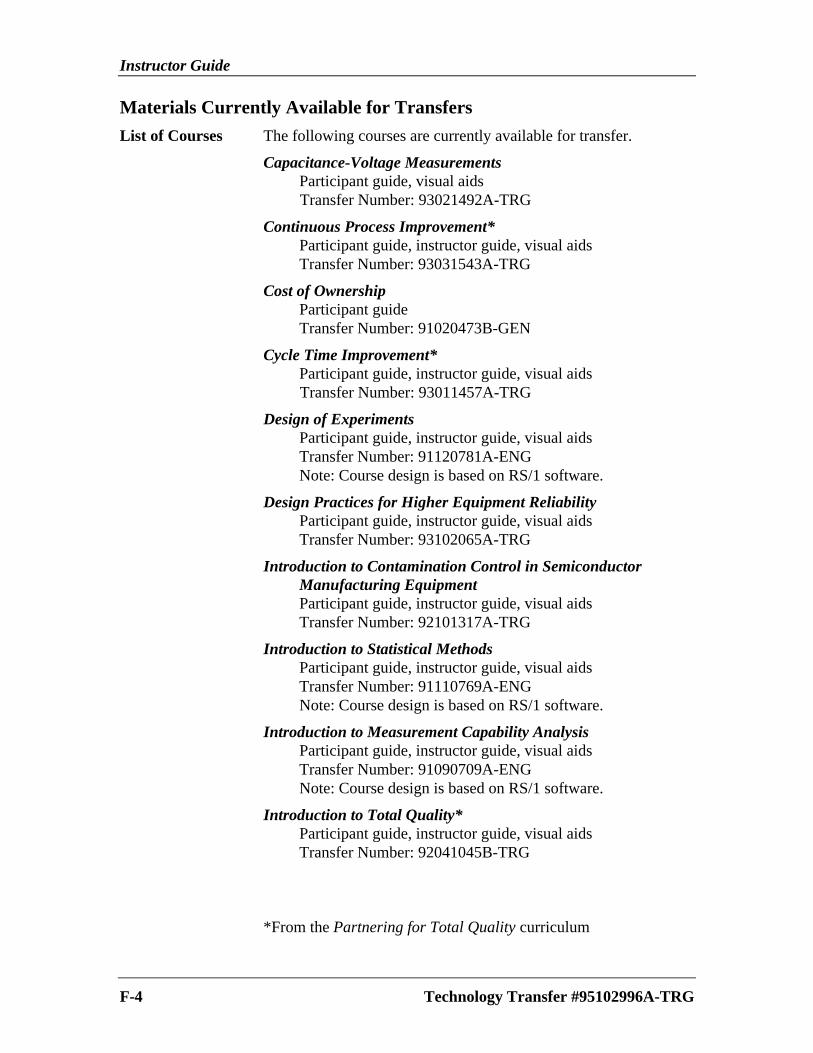
Instructor Guide
F-4 Technology Transfer #95102996A-TRG
Materials Currently Available for Transfers
List of Courses The following courses are currently available for transfer.
Capacitance-Voltage MeasurementsParticipant guide, visual aidsTransfer Number: 93021492A-TRG
Continuous Process Improvement*Participant guide, instructor guide, visual aidsTransfer Number: 93031543A-TRG
Cost of OwnershipParticipant guideTransfer Number: 91020473B-GEN
Cycle Time Improvement*Participant guide, instructor guide, visual aidsTransfer Number: 93011457A-TRG
Design of ExperimentsParticipant guide, instructor guide, visual aidsTransfer Number: 91120781A-ENGNote: Course design is based on RS/1 software.
Design Practices for Higher Equipment ReliabilityParticipant guide, instructor guide, visual aidsTransfer Number: 93102065A-TRG
Introduction to Contamination Control in SemiconductorManufacturing EquipmentParticipant guide, instructor guide, visual aidsTransfer Number: 92101317A-TRG
Introduction to Statistical MethodsParticipant guide, instructor guide, visual aidsTransfer Number: 91110769A-ENGNote: Course design is based on RS/1 software.
Introduction to Measurement Capability AnalysisParticipant guide, instructor guide, visual aidsTransfer Number: 91090709A-ENGNote: Course design is based on RS/1 software.
Introduction to Total Quality*Participant guide, instructor guide, visual aidsTransfer Number: 92041045B-TRG
*From the Partnering for Total Quality curriculum
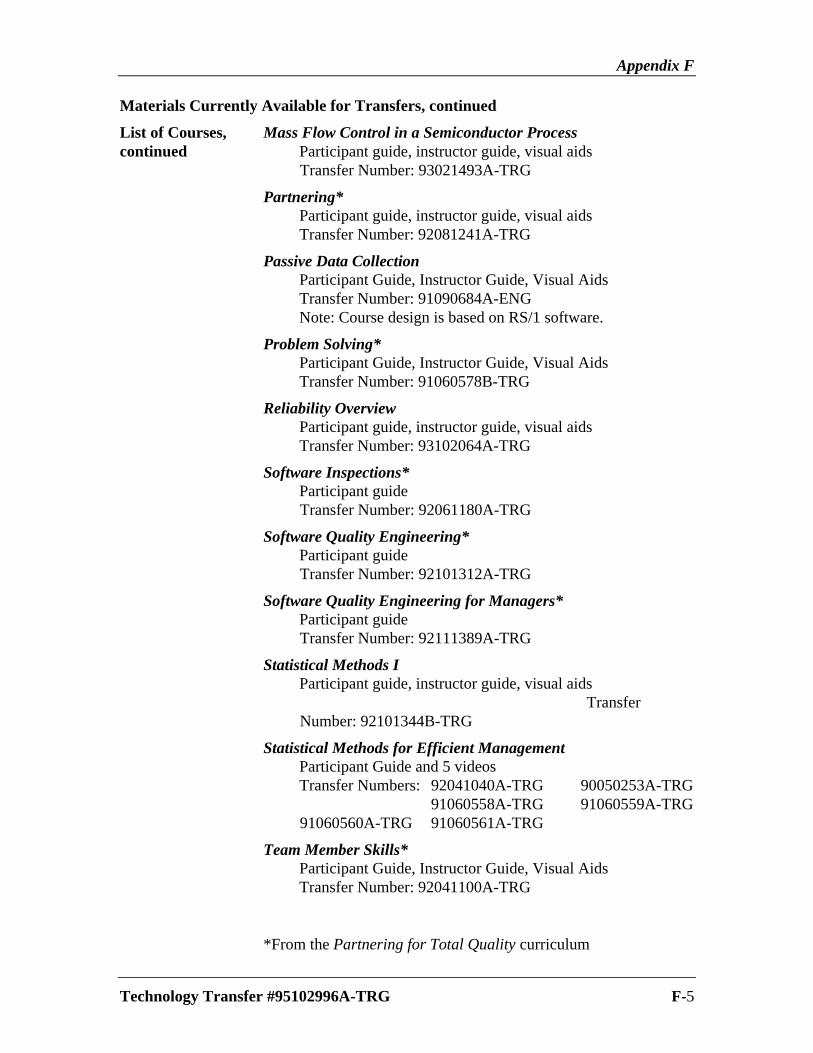
Appendix F
Technology Transfer #95102996A-TRG F-5
Materials Currently Available for Transfers, continued
List of Courses, Mass Flow Control in a Semiconductor Processcontinued Participant guide, instructor guide, visual aids
Transfer Number: 93021493A-TRG
Partnering*Participant guide, instructor guide, visual aidsTransfer Number: 92081241A-TRG
Passive Data CollectionParticipant Guide, Instructor Guide, Visual AidsTransfer Number: 91090684A-ENGNote: Course design is based on RS/1 software.
Problem Solving*Participant Guide, Instructor Guide, Visual AidsTransfer Number: 91060578B-TRG
Reliability OverviewParticipant guide, instructor guide, visual aidsTransfer Number: 93102064A-TRG
Software Inspections*Participant guideTransfer Number: 92061180A-TRG
Software Quality Engineering*Participant guideTransfer Number: 92101312A-TRG
Software Quality Engineering for Managers*Participant guideTransfer Number: 92111389A-TRG
Statistical Methods IParticipant guide, instructor guide, visual aids
TransferNumber: 92101344B-TRG
Statistical Methods for Efficient ManagementParticipant Guide and 5 videosTransfer Numbers: 92041040A-TRG 90050253A-TRG
91060558A-TRG 91060559A-TRG91060560A-TRG 91060561A-TRG
Team Member Skills*Participant Guide, Instructor Guide, Visual AidsTransfer Number: 92041100A-TRG
*From the Partnering for Total Quality curriculum

Instructor Guide
F-6 Technology Transfer #95102996A-TRG
Transfers Planned for 1995
List of Courses The following courses will become available for transfer in 1995.
Capacity Utilization Bottleneck Efficiency System (CUBES)Participant guide
Failure Mode and Effect Analysis (FMEA)Participant guideTransfer Number: 93102063A-TRGInstructor guide and visual aidsTransfer Number: 94122657A-TRG
Failure Reporting, Analysis, and Corrective Action System (FRACAS)Participant guideTransfer Number: 94022236A-TRGInstructor guide and visual aidsTransfer Number: 94122656A-TRG
Furnace Processes in Semiconductor ManufacturingParticipant guide, instructor guide, visual aids
Performance-Based Equipment Training
Performance-Based Equipment Training (PBET) Participant Guide, Technology Transfer#95102995A-GENPerformance-Based Equipment Training (PBET) Transparency Masters, TechnologyTransfer #95103004A-TRGPerformance-Based Equipment Training (PBET) Templates, Technology Transfer#95103011A-TRGPerformance-Based Equipment Training (PBET) Task Analysis, Technology Transfer#95052836A-TRG
Tactical Software ReliabilityParticipant guideTransfer Number: 94092525A-TRG
Tactical Software ReliabilityInstructor guide and visual aidsTransfer Number: 94122658A-TRG
*From the Partnering for Total Quality curriculum

Appendix F
Technology Transfer #95102996A-TRG F-7
Technology Transfer Distribution Requisition
Date: ____________________
Send to:
Company _________________________ Phone _______________
Name_______________________________ FAX ______________
Mailing Address ______________________ M/S ______________
_____________________________________________________
City __________________________ State _____ Zip _________
Title Technology Transfer # # ofcopies
Please mail or FAX the completed form to:
Customer Service RepresentativeSEMATECH
2706 Montopolis DriveAustin, TX 78741
Phone 512/356-SEMAFAX 512/356-3081
Internet Address: [email protected]

Instructor Guide
F-8 Technology Transfer #95102996A-TRG

Appendix F
Technology Transfer #95102996A-TRG F-9
Technology Transfer Distribution Requisition
Date: ____________________
Send to:
Company _________________________ Phone _______________
Name_______________________________ FAX ______________
Mailing Address ______________________ M/S ______________
_____________________________________________________
City __________________________ State _____ Zip _________
Title Technology Transfer # # ofcopies
Please mail or FAX the completed form to:
Customer Service RepresentativeSEMATECH
2706 Montopolis DriveAustin, TX 78741
Phone 512/356-SEMAFAX 512/356-3081
Internet Address: [email protected]

Instructor Guide
F-10 Technology Transfer #95102996A-TRG

Appendix F
Technology Transfer #95102996A-TRG F-1
SEMATECHSEMATECHSEMI/SEMATECHSEMI/SEMATECH
SEMATECHTraining Projects
||||
|||
• Performance-BasedEquipment Training
• Furnace ProcessesCourse Development
• Electronic Document
Technician TrainingPlanning Committee
Technician TrainingWorkshop
1992-93 Task Forces
• Reference Manual
• Training Course Outline
• Training Evaluation
Doc. #93031567A-XFR
• Mass Flow Controller Doc. #93021493A-TRG
1993-94, 1994-95 Task Forces
• Benchmarking Training Programs
• Semiconductor Technician Curriculum
• Levels 3 & 4 Training Evaluation
• Standards for Electronic Documentation
• Define Technician Certification Process
Proceedings Doc. #94062402A-WS
Presentations Doc. #94062403A-XFR
Reports Doc. #94062404A-XFR
92
93
94

Instructor Guide
F-2 Technology Transfer #95102996A-TRG
IN--3. List PBET Design Phases
DL-2. Prepare a TrainingCurriculum Checklist
PBETCourse MapIN-2. Identify PBET Characteristics
IN-1. Course Orientation
ID-1. Describe Needs Analysis
AN-1. Perform Task Analysis
AN-2. Write Performance Objectives
AN-3. Develop a Skills HierarchyDS-1. Develop Skills Tests
DS-4. Select Delivery Method
DS-3. Analyze Materials
DS-2. Describe Relevant Practice
EV-1. Describe Evaluation Levels
PL1. Describe Trainer Characteristics
PL. Pilot a PBET Lesson Plan
DL-1. Describe Trainer Responsibilities
DL-3. Create Action Plan forPBET Implementation
DV-1. Develop Instructional Materials
DS-6. Complete a Second PBET Lesson Plan
DS-5. Summarize a PBET Lesson

Customer ServiceSEMATECH Technology Transfer
2706 Montopolis DriveAustin, TX 78741
http://www.sematech.orgfax: (512) 356-3081
e-mail: [email protected]