peoplesoft implementation project
TRANSCRIPT

10/17/2017 1 of 24
PeopleSoft Implementation Project
Business Process Documentation
eProcurement Requester
Requisition Entry, Manage Requisitions, Copy
Requisitions, Cancel a Requisition, and New Year
Instructions
PeopleSoft Version: 9.1 Financials/Supply Chain
Author: Aaron Dise and Denise McDonald

10/17/2017 2 of 24
TABLE OF CONTENTS
Revision Control................................................................................................................ 3 1. .............................................................................................................................
Log into SFS to Create Requisition .................................................................... 4 2. .............................................................................................................................
Create a Requisition ........................................................................................... 4
Steps for the System ........................................................................................................ 13 3. .............................................................................................................................
Manage Requisitions (View Status, Lifespan, and Perform Actions on the
Requisitions) ..................................................................................................... 13 4. .............................................................................................................................
Copy Requisition (Used to create a NEW requisition and can be used to
resubmit a DENIED requisition) ...................................................................... 16 5. .............................................................................................................................
Cancel a Requisition ......................................................................................... 20 6. .............................................................................................................................
New Year Requisitions Instructions (May 1 – June 30) .................................... 23

10/17/2017 3 of 24
Revision Control
VERSION DATE NAME COMMENTS
1.0 12/5/2016 Aaron Dise UAT
1.1 2/7/2017 Denise McDonald Updated Per Training Feedback
1.2 10/10/2017 Denise McDonald Updated Per Training Feedback
10/17/2017 4 of 24
Steps for the System
Log into SFS to Create Requisition
eProcurement Requisitions are created in SFS. Most people use SFS to enter and/or
approve Expense reports. This is the same system. If you are not a current SFS user, go
to the below link to access SFS.
https://portal.sfs.wisconsin.edu
If you have trouble logging in, please reach out to your Business Unit Admin or contact
Security using the below link.
https://www.wisconsin.edu/sfs/security/
Create a Requisition
You can create a requisition using the below steps or you can use the copy function for
faster entry. Using the copy function allows you to take an existing requisition, copy to a
completely new requisition identified by a new requisition ID, and modify it as needed.
The end result is the same however, the primary advantage with copying is the chart
fields from the previous requisition will automatically be populated on the new
requisition.
IF YOU WOULD LIKE TO CREATE A REQUISITION USING THE COPY
FUNCTION, GO TO COPY REQUISITION SECTION OF THESE PROCEDURES,
OTHERWISE PLEASE PROCEED WITH STEP 1.
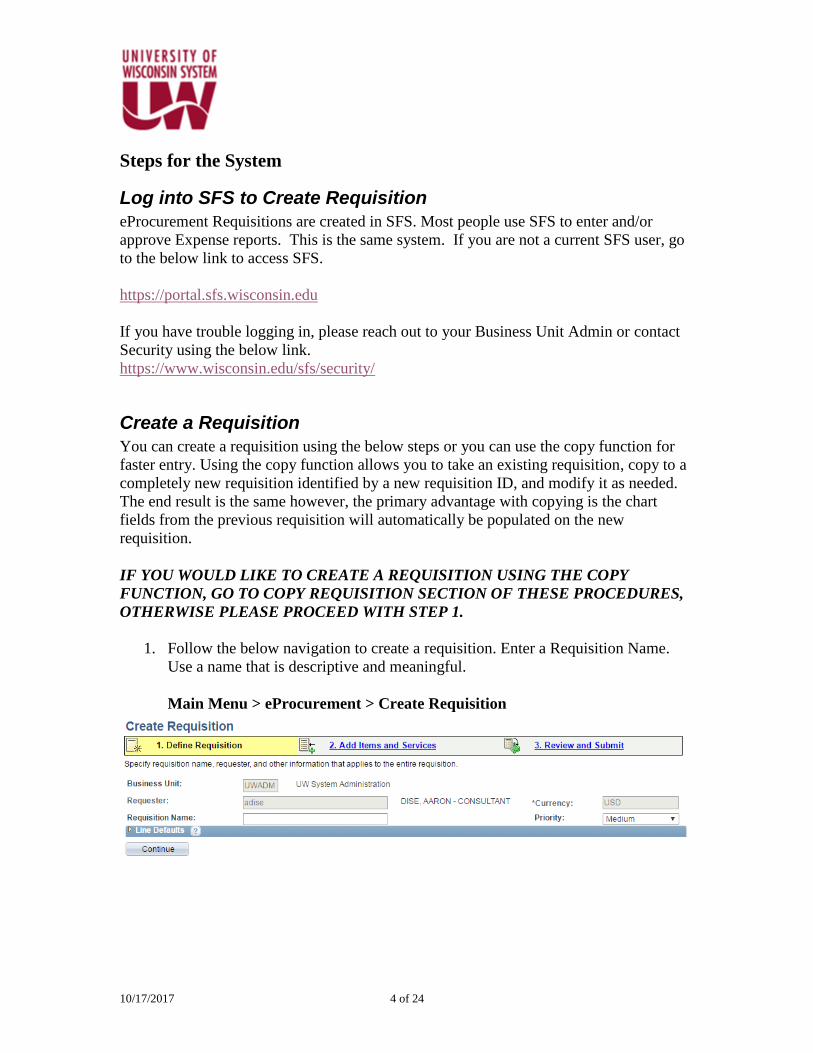
1. Follow the below navigation to create a requisition. Enter a Requisition Name.
Use a name that is descriptive and meaningful.
Main Menu > eProcurement > Create Requisition
10/17/2017 5 of 24
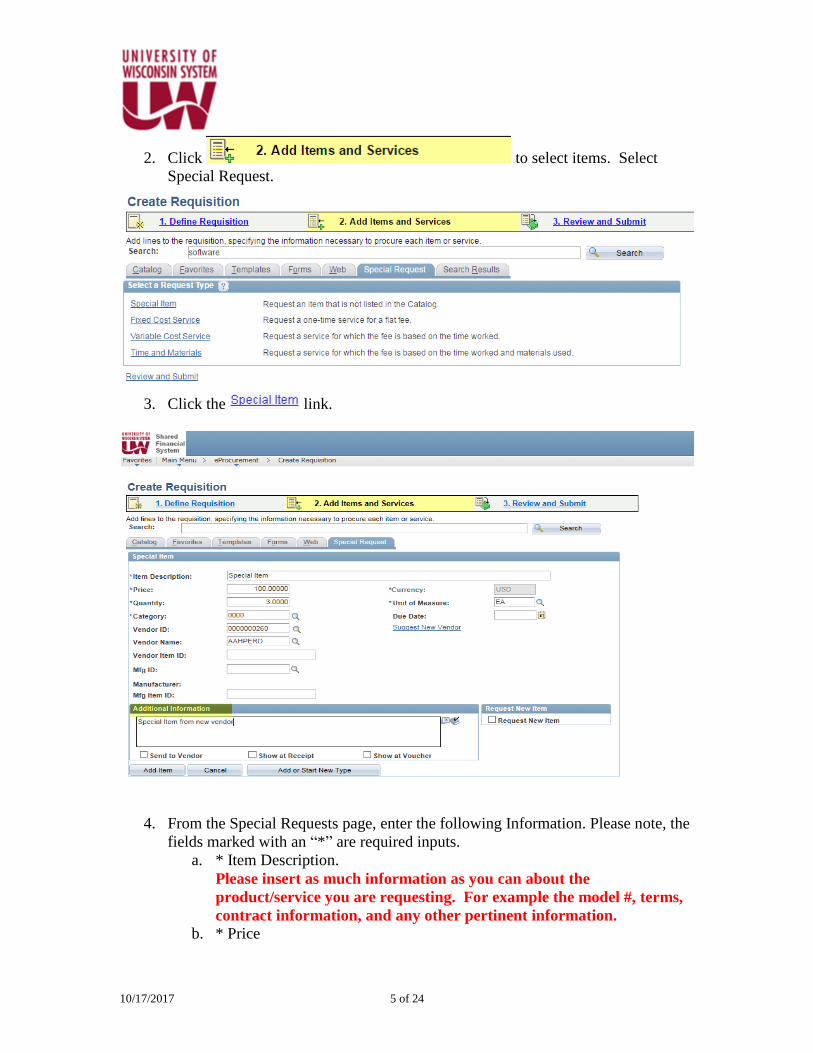
2. Click to select items. Select
Special Request.
3. Click the link.
4. From the Special Requests page, enter the following Information. Please note, the
fields marked with an “*” are required inputs.
a. * Item Description.
Please insert as much information as you can about the
product/service you are requesting. For example the model #, terms,
contract information, and any other pertinent information.
b. * Price
10/17/2017 6 of 24
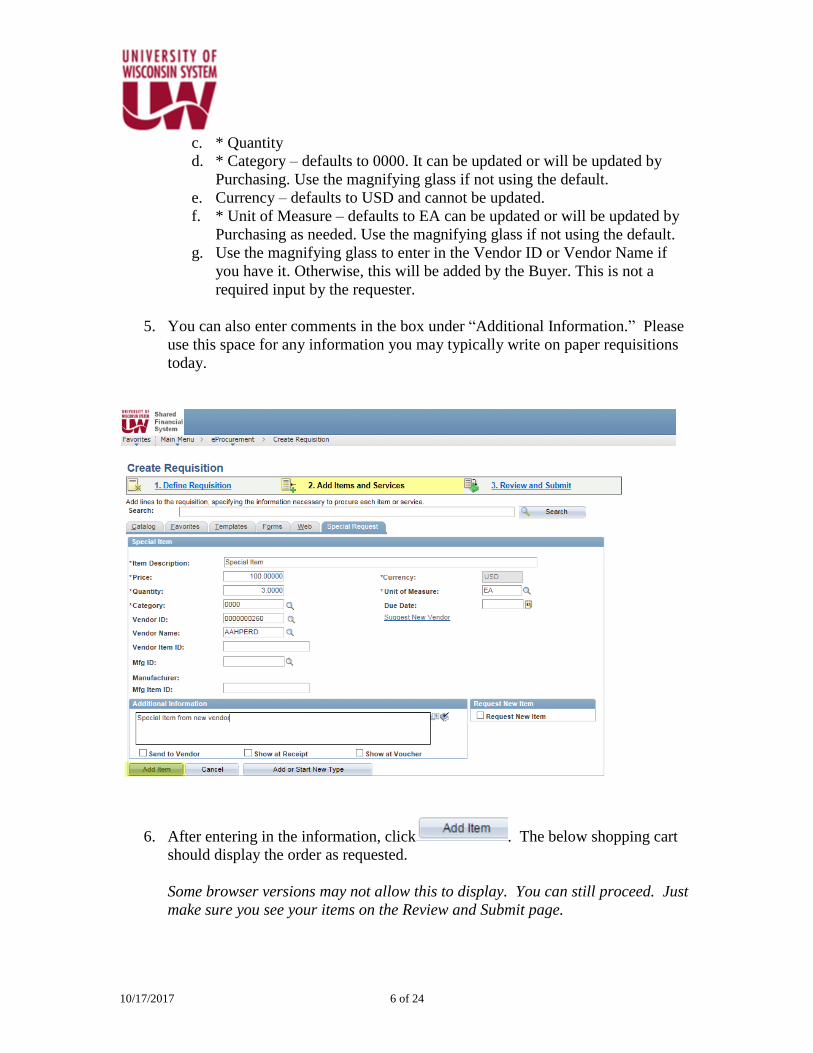
c. * Quantity
d. * Category – defaults to 0000. It can be updated or will be updated by
Purchasing. Use the magnifying glass if not using the default.
e. Currency – defaults to USD and cannot be updated.
f. * Unit of Measure – defaults to EA can be updated or will be updated by
Purchasing as needed. Use the magnifying glass if not using the default.
g. Use the magnifying glass to enter in the Vendor ID or Vendor Name if
you have it. Otherwise, this will be added by the Buyer. This is not a
required input by the requester.
5. You can also enter comments in the box under “Additional Information.” Please
use this space for any information you may typically write on paper requisitions
today.
6. After entering in the information, click . The below shopping cart
should display the order as requested.
Some browser versions may not allow this to display. You can still proceed. Just
make sure you see your items on the Review and Submit page.
10/17/2017 7 of 24
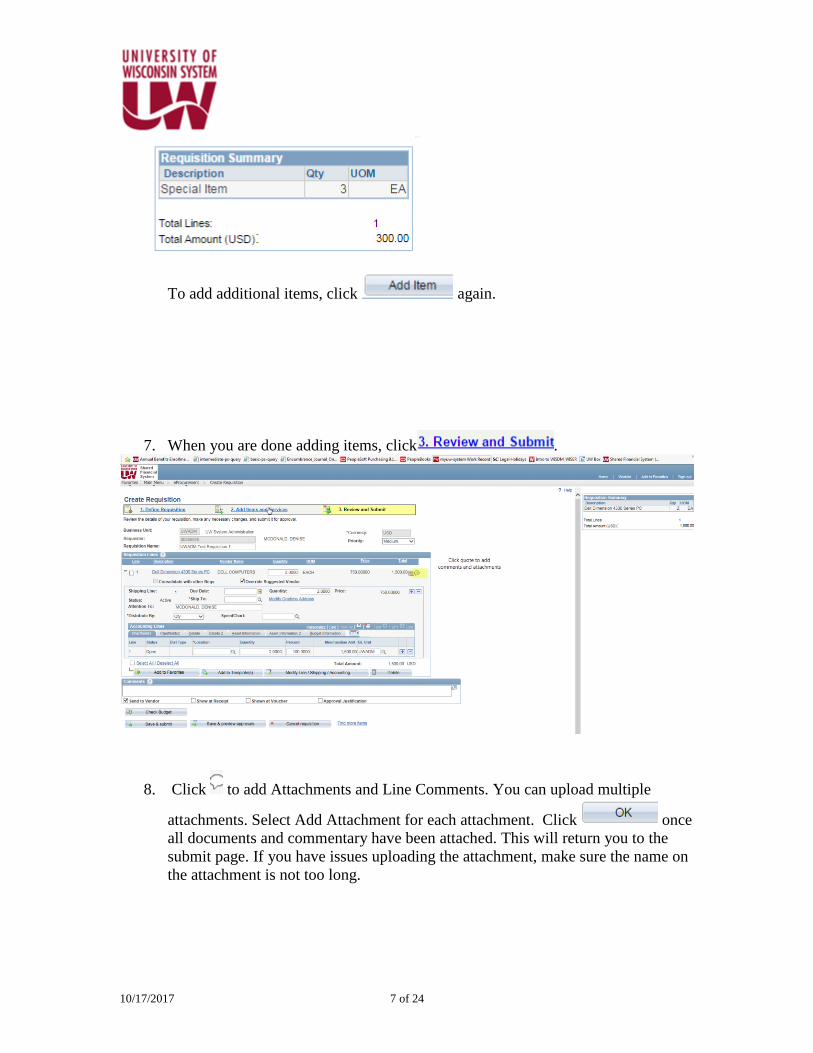
To add additional items, click again.
7. When you are done adding items, click .
8. Click to add Attachments and Line Comments. You can upload multiple
attachments. Select Add Attachment for each attachment. Click once
all documents and commentary have been attached. This will return you to the
submit page. If you have issues uploading the attachment, make sure the name on
the attachment is not too long.

10/17/2017 8 of 24
9. Select to add the appropriate Ship To, Location, and chartfield combo
information.
10. If this is your first time entering a requisition, go to step 11. If this is not your first
time and you have already personalized your view, go to step 13. THIS STEP IS
OPTIONAL.
11. Click the carrot to expand and display the below.

10/17/2017 9 of 24

10/17/2017 10 of 24
12. Select Personalize as highlighted above to add all chartfields on one page. Adjust
the fields as shown below. Click OK.
13. Enter the following chartfields. The magnifying glass allows you to select from a
list of available variables.
Ship To
Location
Account
Fund
Dept
Program

10/17/2017 11 of 24
14. Under the Accounting Lines Section, select the second tab “Chartfields2.” The
below will display. Enter a valid chartfield combination. If you need assistance
finding a valid chartfield combination go to the link in step 16. If you enter in a
Project number you have to enter in Business Unit in the PC Business Unit field.
It will just be your SetID, i.e. UWADM or UWSYS.
10/17/2017 12 of 24
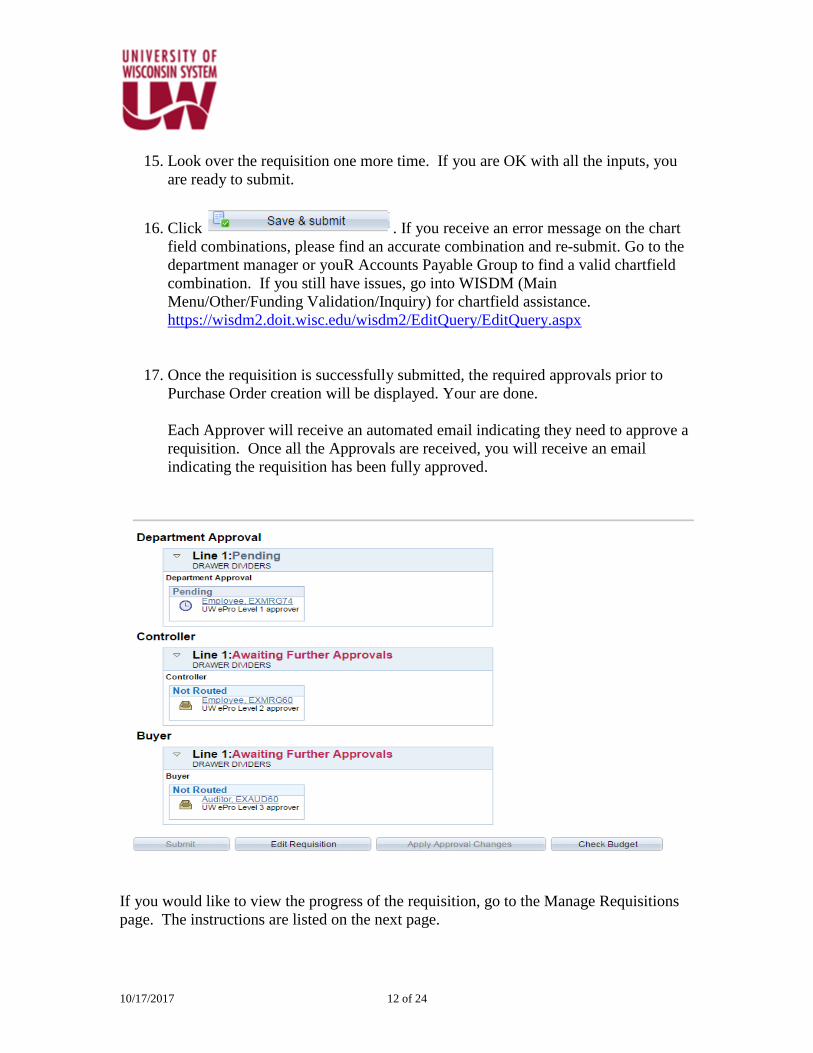
15. Look over the requisition one more time. If you are OK with all the inputs, you
are ready to submit.
16. Click . If you receive an error message on the chart
field combinations, please find an accurate combination and re-submit. Go to the
department manager or youR Accounts Payable Group to find a valid chartfield
combination. If you still have issues, go into WISDM (Main
Menu/Other/Funding Validation/Inquiry) for chartfield assistance.
https://wisdm2.doit.wisc.edu/wisdm2/EditQuery/EditQuery.aspx
17. Once the requisition is successfully submitted, the required approvals prior to
Purchase Order creation will be displayed. Your are done.
Each Approver will receive an automated email indicating they need to approve a
requisition. Once all the Approvals are received, you will receive an email
indicating the requisition has been fully approved.
If you would like to view the progress of the requisition, go to the Manage Requisitions
page. The instructions are listed on the next page.

10/17/2017 13 of 24
Steps for the System
Manage Requisitions (View Status, Lifespan, and Perform Actions on the Requisitions)
The below navigation will allow you to view the status and the lifespan of the requisition.
You can also perform actions on the requisition(s).
Main Menu > eProcurement > Manage Requisitions
View Status of Requisition
1. Enter in criteria to select the requisition(s) you want to review. You can search by:
Business Unit Requisition Name
Requisition ID Requests Status (i.e. Approved, Completed, etc.)
Date From Date To
Requester (Employee ID) PO ID
2. Once you click Search, the requisitions will appear. The Status column provides the
status of the requisition.

10/17/2017 14 of 24
Type of Status
Pending – Waiting on Approvals
Approved – Requisition has been approved, but purchase order has not been created
Open – Saved, but not submitted
PO Created – Purchase Order has been created
PO Dispatched – Purchase Order has been dispatched
View Lifespan of the Requisition
3. Click to view the Lifespan of the requisition. You can click on any highlighted icon
to get more details on the stage. For example you can see the Approvals by clicking
the Approval icon. You can click on Purchase Orders to get more details on the
Purchase Order. Once the purchase order is paid, you can click on the Invoice or
Payment icon to get payment and invoice details.
Once the requisition moves through entire “Lifespan” the link(s) all icons will be
available for review.
Perform Actions on a requisition
4. The following actions are available.
a. Copy Requisition
b. Edit Requisition
c. View Approvals
d. View Printable Version
e. Cancel Requisition

10/17/2017 15 of 24
5. Select the Action and Click “Go” to trigger the action.
Copy Requisition
Allows you to take an existing requisition and copy it for the creation of a new
requisition. If a requisition is DENIED you cannot make updates to the requisition
and re-submit it. You have to create another requisition. The copy function gives
you an easy way to do this. You can copy the denied requisition, make the
appropriate corrections/updates and re-submit.
Edit Requisition
Allows you to edit an existing requisition. Once you edit it, the approval process starts
all over.
View Approvals – Displays the approvers on the requisition
View Printable Version

10/17/2017 16 of 24
System Steps
Copy Requisition (Used to create a NEW requisition and can be used to resubmit a DENIED requisition)
The copy function is an efficient way to create new requisitions when some or all of the
required fields are the same as existing requisitions. This is also an efficient way to
handle denied requisitions.
1. Follow the below navigation to get to the Manage Requisition Screen
Main Menu > eProcurement > Manage Requisitions
2. Search for the requisition to copy using one or more of the below criteria.
Business Unit Requisition Name
Requisition ID Requests Status (i.e. Approved, Completed, etc.)
Date From Date To
Requester (Employee ID) PO ID
3. Find the requisition to copy, select “Copy Requisition”, and hit “Go.”
10/17/2017 17 of 24
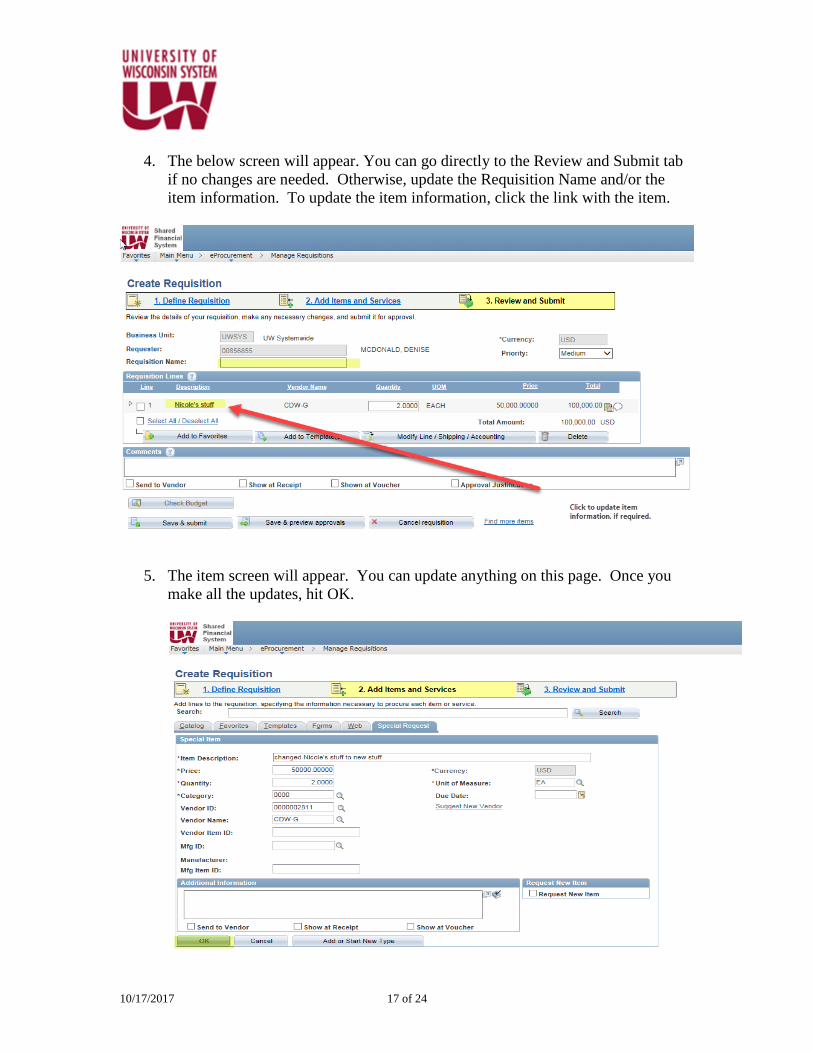
4. The below screen will appear. You can go directly to the Review and Submit tab
if no changes are needed. Otherwise, update the Requisition Name and/or the
item information. To update the item information, click the link with the item.
5. The item screen will appear. You can update anything on this page. Once you
make all the updates, hit OK.

10/17/2017 18 of 24
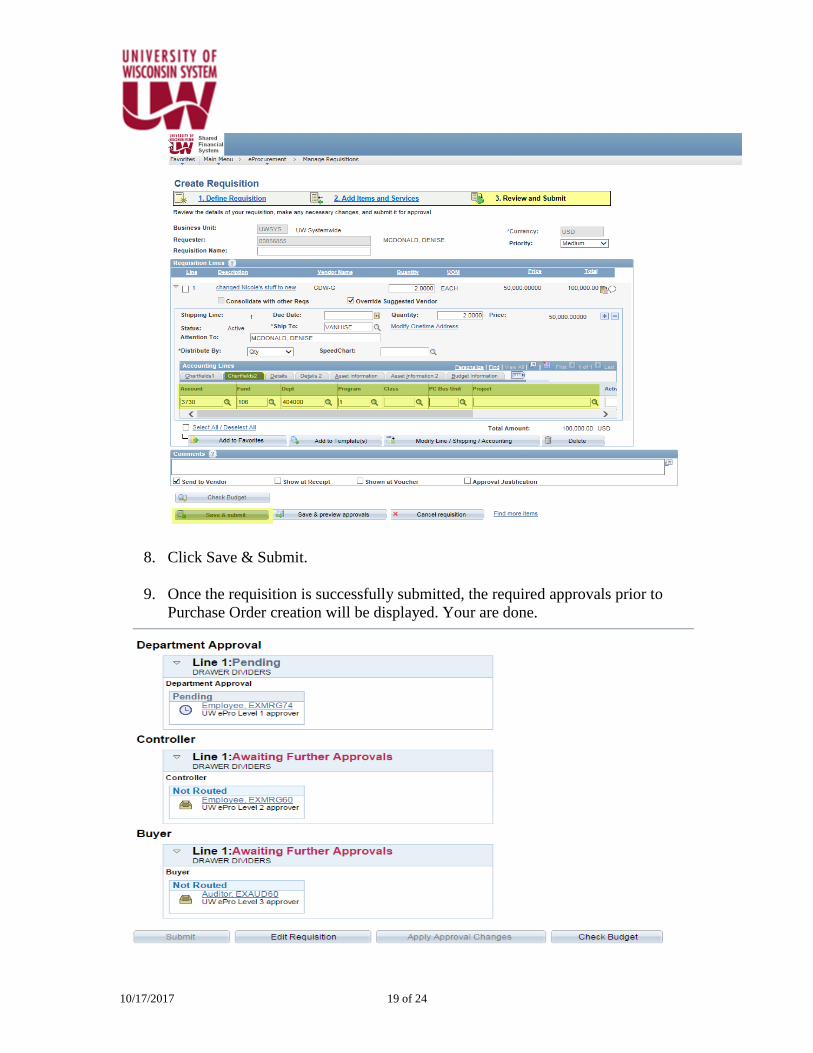
6. Select the carrot to expand the requisition.
7. You can go directly to the Review and Submit tab if no changes are needed.
Otherwise, modify any of the below highlighted fields, add attachments, or do
anything that is needed.
10/17/2017 19 of 24
8. Click Save & Submit.
9. Once the requisition is successfully submitted, the required approvals prior to
Purchase Order creation will be displayed. Your are done.

10/17/2017 20 of 24
Cancel a Requisition
You may need to cancel a requisition you created. If you need to cancel the requisition go
to the below Navigation.
Main Menu > eProcurement > Manage Requisitions
You will get the below screen. Request Status should be blank. If it is not, use the drop
down to select the blank space.
Enter in as many filters as you desire. The more fields populated the quicker your search.
My recommendation is to have at least the Business Unit populated before you search. It
would also be ideal to have the Requisition ID number you want to cancel.
10/17/2017 21 of 24
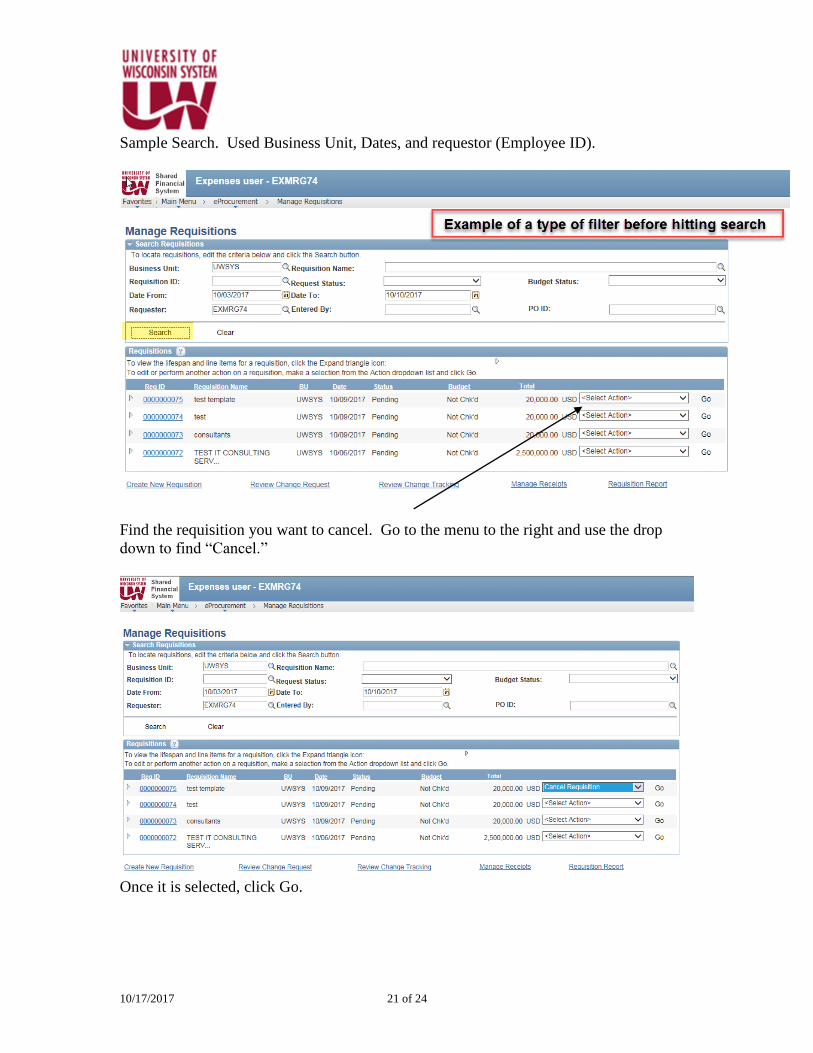
Sample Search. Used Business Unit, Dates, and requestor (Employee ID).
Find the requisition you want to cancel. Go to the menu to the right and use the drop
down to find “Cancel.”
Once it is selected, click Go.

10/17/2017 22 of 24

10/17/2017 23 of 24
New Year Requisitions Instructions (May 1 – June 30)
May 1st through June 30th, requisitions for the New Fiscal can be entered into the System.
These requisitions must be flagged as NEW YEAR requisitions. The below steps give
instructions on identifying the requisitions as a NEW YEAR. The screen shots assume
FY18 is the NEW YEAR.
1. Follow the path below to create a requisition.
Main Menu > eProcurement > Create Requisition
2. Add FY18 to the beginning of the Requisition Name Field.
3. Add item(s) as normal.
4. After clicking Add Item, click the Review and Submit tab.
5. Click the carrot to Expand

10/17/2017 24 of 24
6. Update as Normal, but Insert “FY18” in comments section. If you have other
comments, just insert after FY18.
7. Save and Submit as normal. Approvers and Buyers will now know the requisition
is for a New Year PO.