pendo power router - user manual - logo included manual.pdf · pendo power router - user manual...
TRANSCRIPT
Contents 1.Overview
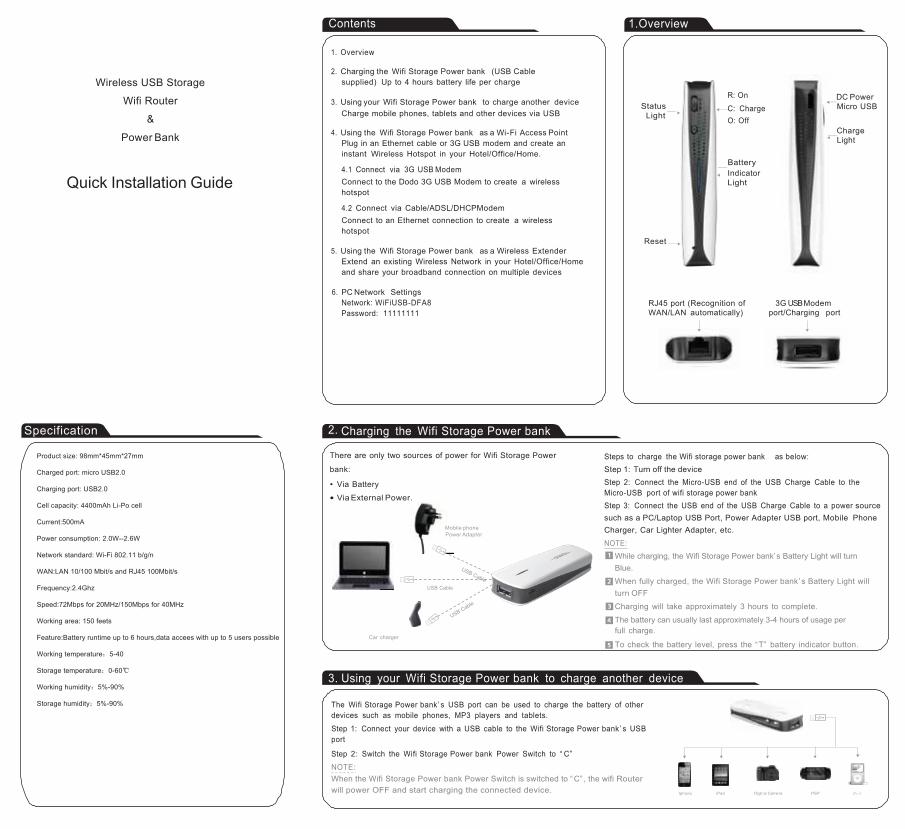
1. Overview
Wireless USB Storage
Wifi Router
&
Power Bank
2. Charging the Wifi Storage Power bank (USB Cable
supplied) Up to 4 hours battery life per charge
3. Using your Wifi Storage Power bank to charge another device Charge mobile phones, tablets and other devices via USB
4. Using the Wifi Storage Power bank as a Wi-Fi Access Point
Plug in an Ethernet cable or 3G USB modem and create an instant Wireless Hotspot in your Hotel/Office/Home.
4.1 Connect via 3G USB Modem Connect to the Dodo 3G USB Modem to create a wireless hotspot
4.2 Connect via Cable/ADSL/DHCP Modem Connect to an Ethernet connection to create a wireless hotspot
5. Using the Wifi Storage Power bank as a Wireless Extender
Extend an existing Wireless Network in your Hotel/Office/Home and share your broadband connection on multiple devices
Status
Light
Reset
R: On
C: Charge O: Off
Battery
Indicator Light
DC Power
Micro USB
Charge Light
6. PC Network Settings
Network: WiFiUSB-DFA8 Password: 11111111
RJ45 port (Recognition of WAN/LAN automatically)
3G USB Modem port/Charging port
Quick Installation Guide
Specification 2. Charging the Wifi Storage Power bank
Product size: 98mm*45mm*27mm
Charged port: micro USB2.0
Charging port: USB2.0
Cell capacity: 4400mAh Li-Po cell
Current:500mA
Power consumption: 2.0W--2.6W
Network standard: Wi-Fi 802.11 b/g/n
WAN:LAN 10/100 Mbit/s and RJ45 100Mbit/s
Frequency:2.4Ghz
Speed:72Mbps for 20MHz/150Mbps for 40MHz
Working area: 150 feets
Feature:Battery runtime up to 6 hours,data accees with up to 5 users possible
Working temperature:5-40
Storage temperature:0-60℃
Working humidity:5%-90%
Storage humidity:5%-90%
There are only two sources of power for Wifi Storage Power
bank:
• Via Battery
• Via External Power.
Moblie phone Power Adapter
USB Cable
Car charger
Steps to charge the Wifi storage power bank as below: Step 1: Turn off the device Step 2: Connect the Micro-USB end of the USB Charge Cable to the Micro-USB port of wifi storage power bank Step 3: Connect the USB end of the USB Charge Cable to a power source such as a PC/Laptop USB Port, Power Adapter USB port, Mobile Phone Charger, Car Lighter Adapter, etc. NOTE:
While charging, the Wifi Storage Power bank’s Battery Light will turn Blue. When fully charged, the Wifi Storage Power bank’s Battery Light will turn OFF Charging will take approximately 3 hours to complete.
The battery can usually last approximately 3-4 hours of usage per full charge.
To check the battery level, press the “T” battery indicator button.
3. Using your Wifi Storage Power bank to charge another device
The Wifi Storage Power bank’ s USB port can be used to charge the battery of other devices such as mobile phones, MP3 players and tablets.
Step 1: Connect your device with a USB cable to the Wifi Storage Power bank’ s USB
port
Step 2: Switch the Wifi Storage Power bank Power Switch to “ C” NOTE: When the Wifi Storage Power bank Power Switch is switched to “C” , the wifi Router will power OFF and start charging the connected device. Iphone iPad Digit al Camera PSP iPod

4. Using the Wifi Storage Power bank as a Wi-Fi Access Port
4.1 Connect via 3G USB Modem Before you begin, please make sure you have these items:
1. Wifi Storage Power bank 2. 3G USB Modem
3. SIM Card (activated and with a data plan)
Hardware Installation Steps: Step 1: Insert the 3G SIM Card into 3G USB Modem Step 2: Connect the 3G USB Modem to the Wifi Storage Power bank’ s USB port
Step 3: Switch the Wifi Storage Power bank Power Switch to “ R” Step 4: Open your PC/phone/tablet Wireless Network settings and connect to the network Wi-Fi SSID: WiFiUSB-DFA8
4.2 Connect via Cable/ADSL/DHCP Modem Before you begin, please make sure you have these items: 1. Wifi Storage Power bank 2. Switch, Router, ADSL Modem or Ethernet Port with Internet access ready (eg: existing office LAN, hotel LAN, etc which has a ready Internet connection)
3. RJ45 Cable
Hardware Installation Steps: Step 1: Connect the Ethernet Port, Switch, Router or ADSL Modem LAN port to one-end of the RJ45 cable Step 2: Connect the other end of the RJ45 cable to the Wifi Storage Power bank’ s WAN/LAN port
Step 3: Switch the Wifi Storage Power bank Power Switch to “ R” Step 4: Open your PC/phone/tablet Wireless Network settings and connect to the network Wi-Fi SSID: WiFiUSB-DFA8
Step 5: Enter the password as “ 11111111” Step 5: Enter the password as “ 11111111” Step 6: Connect and surf the Internet
iPhone
iPad
Step 6: Connect and surf the Internet
NOTE: If you cannot surf, please do the following operations:
Open a browser and enter http://10.10.10.254 at the address bar
Select ‘ WiFi’ Enter the password as “ 11111111”
Select: Internet > WAN Network
Select “ DHCP” as the ‘ WAN Connection Type’ Select ‘ Apply’
Computer
Tablets/iP ad
Smartphones
Computer
5. Using Wifi Storage Power bank as wireless network storage 6
Before you begin, please make sure you have these items:
1. Wifi Storage Power bank
2. Wi-Fi network
3. USB storage device (such as USB disk, USB hub with card, external HDD and other storage device with USB plug)
Hardware Installation Steps: Step 1: Connect your external USB device to Wifi Storage Power bank
Step 2: Scan QR code with your smart phone or tablet PC to install app from Android market or Apple store automatically. The
APP’ s name is UISDisk
Step 3: Switch the Wifi Storage Power bank Power Switch to “ R”
Step 4: Open your PC/phone/tablet Wireless Network settings and connect to the network Wi-Fi SSID: WiFiUSB-DFA8 Step 5: Enter the password as “ 11111111” and connect it
Step 6: Play the APP of UISDisk and see all files in your mobile device and WIFIUSB. You’ d play, copy, paste such
files between them as easy as you do at PC
NOTE: If your device are using other OS beside Andriod or iOS. You ’d use our web storage as the below
Open a browser and enter http://10.10.10.254 at the address bar. Enter into web and select the icon you’ d like to play
Smartphones
Computer
Tablets/iP ad