pencil documentation - read the docsstencil developer documentation introduction to pencil stencils...
TRANSCRIPT

Pencil DocumentationRelease 2.0.21
Pencil Contributors
May 23, 2017

Contents
1 Stencil Developer Documentation 31.1 Introduction to Pencil Stencils . . . . . . . . . . . . . . . . . . . . . . . . . . . . . . . . . . . . . . 31.2 Preparing the Development Environment . . . . . . . . . . . . . . . . . . . . . . . . . . . . . . . . 41.3 Tutorial . . . . . . . . . . . . . . . . . . . . . . . . . . . . . . . . . . . . . . . . . . . . . . . . . . 61.4 Reference Guide . . . . . . . . . . . . . . . . . . . . . . . . . . . . . . . . . . . . . . . . . . . . . 32
2 Developer Documentation 692.1 Code Overview . . . . . . . . . . . . . . . . . . . . . . . . . . . . . . . . . . . . . . . . . . . . . . 692.2 Code Style . . . . . . . . . . . . . . . . . . . . . . . . . . . . . . . . . . . . . . . . . . . . . . . . 702.3 Debugging . . . . . . . . . . . . . . . . . . . . . . . . . . . . . . . . . . . . . . . . . . . . . . . . 702.4 Writing Documentation . . . . . . . . . . . . . . . . . . . . . . . . . . . . . . . . . . . . . . . . . 702.5 The Build System . . . . . . . . . . . . . . . . . . . . . . . . . . . . . . . . . . . . . . . . . . . . 71
3 Developer API Documentation 733.1 Controller . . . . . . . . . . . . . . . . . . . . . . . . . . . . . . . . . . . . . . . . . . . . . . . . . 733.2 Pencil . . . . . . . . . . . . . . . . . . . . . . . . . . . . . . . . . . . . . . . . . . . . . . . . . . . 733.3 CollectionManager . . . . . . . . . . . . . . . . . . . . . . . . . . . . . . . . . . . . . . . . . . . . 74
4 Maintainer Documentation 754.1 Creating a New Release . . . . . . . . . . . . . . . . . . . . . . . . . . . . . . . . . . . . . . . . . 75
5 Indices and tables 77
i

ii

Pencil Documentation, Release 2.0.21
This documentation is just for stencil developers & Pencil developers at the moment.
There is a github issue for adding user documentation.
Contents 1

Pencil Documentation, Release 2.0.21
2 Contents
CHAPTER 1
Stencil Developer Documentation
Introduction to Pencil Stencils
Overview
Pencil controls shapes in its document by mean of stencils. Each stencil (Rectangle, for example) is indeed a templateto generate shapes. Each template defines:
• The look: what the generated shape looks like, defined by means of SVG elements.
For example: the Rectangle stencil defines a shape formed by a single SVG <rect> element.
• The properties: which properties the shape has plus optional extra constraints on them.
For example: the Rectangle stencil has a box property of type Dimension, a strokeStyle prop-erty of type StrokeStyle and a fillColor property of type Color.
• The behaviors: how the shape’s look is changed according to changes made to its properties.
For example: the Rectangle <rect> element has its fill and fill-opacity change to the fillColorproperty of the shape.
• The actions: which actions that external objects and users can ask the shape to do.
For example: the Rectangle stencil defines a Remove border action to allow users to set thestrokeStyle width property to 0px and hence makes the <rect> element’s border disappear.
Stencils are organized into collections. Each collection contains a set of related stencils and can be installed into oruninstalled from Pencil using the collection manager.
The Process of Creating Shapes from Stencils
After being installed into Pencil, a stencil can be used to create shapes by dragging it into the drawing pane of a page.When a stencil is dropped into a page, the following actions will be taken by Pencil to create a shape for that stencil:
3

Pencil Documentation, Release 2.0.21
1. Creating a shape as an SVG element containing all SVG elements defined in the content section of the stencildefinition.
2. Putting the newly-created shape into the page content.
3. Setting initial values for all properties in the shape to the default values as defined in the stencil.
4. Applying all behaviors defined in the stencil to make the shape’s look change according to these initial propertyvalues.
Manipulating Shapes in the Drawing Page
After being successfully inserted into a page, a shape begins its life in that page. During its life, a shape may haveits properties changed by the user. Depending on the type, a property value can be changed in a specific way that iseasiest for the user.
Note: Pencil reserves the use of some special property names for pre-defined purposes. Please refer the SpecialProperty Names document for detailed information on how these property names can be used in your stencil.
An example of this is that the box property of type Dimension should always be used to determined the dimension ofthe outermost box surrounding the shape.
Preparing the Development Environment
This document gives you a quick overview of how the development environment can be set up for developers to startcreating stencils.
Creating the skeleton structure
To start a new stencil collection, you need to have a dedicated directory in your local file-system to store all filesrelated to that collection. A minimal collection requires only the Definition.xml file while a more complex collectionrequires extra files/directories to store icons.
A typical collection structure should be created as shown in the following diagram:
[dir] CollectionName||__[dir] icons #optional| || |__shape1.png||__Definition.xml
The Definition.xml file should contain the following skeleton code:
<Shapes xmlns="http://www.evolus.vn/Namespace/Pencil"xmlns:p="http://www.evolus.vn/Namespace/Pencil"xmlns:svg="http://www.w3.org/2000/svg"xmlns:xlink="http://www.w3.org/1999/xlink"
id="your_collection_id"displayName="Display name of your collection"description="Further description of this collection"
4 Chapter 1. Stencil Developer Documentation
Pencil Documentation, Release 2.0.21
author="Names of the authors"url="Optional URL to the collection's web page">
<!-- Your shapes go here -->
</Shapes>
Development tools
Developing Pencil stencil collections requires no special tools. All that’s needed is a text editor and, for distribution,a compatible archiving tool that can create ZIP files.
Although special tools are not required, the following set of software programs may be useful in the stencil creationprocess.
• Text editor: Just about any modern text editor is sufficent for creating stencils. Features such as XML syntaxhighlighting and completion are useful when editing stencil collections. For GNU/Linux users, gedit is recom-mended. It should be installed by default in many Gnome-based distributions. For Windows users, Notepad ++is an awesome selection. For Mac users, the open-source Textmate is strongly recommended.
• SVG editor: Inkscape provides powerful tools for creating standards-compliant SVGs. You will need it for allSVG-related work when creating your stencils.
• Bitmap editor: You may need a bitmap editor for creating stencil icons or editing bitmaps used in the stencilcode. GIMP is highly recommended for all your needs, including all everyday bitmap editing activities, not justfor developing stencils.
Installing into Pencil as a developer collection
Pencil provides a convenient way to load and reload a stencil collection that is under development as if it is installedlike the others for testing purpose.
To load your collection, go to Tools » Developer Tools » Load Developer Stencil Directory... and select the directorythat contains your Definition.xml file. To reload your stencil collection after making changes, simply hit the “F5” key.
Debugging in stencil development
There may be cases where you encounter issues in your stencil JavaScript code that you would like to debug. There isno supported way to set up a interactive debugging session for your stencil code like what you may have with an IDE.The only way to debug your code is to add debugging trace messages. Since stencil JavaScript code is executed in asand-boxed environment, use of alert or file writing is not possible.
For the purpose of debugging, Pencil provides a utility function named stencilDebug for logging a message to theconsole:
stencilDebug("Value of x: " + x);
This statement will log the message to the Error Console that can be enabled by launching Pencil via:
xulrunner -app "path_to_pencil_application.ini" -jconsole
1.2. Preparing the Development Environment 5

Pencil Documentation, Release 2.0.21
Packaging for distribution
When you’re happy with your collection and would like to distribute it to other users, you’ll need to create a packageby compressing all files in the stencil directory into a single ZIP package. Make sure that the Definition.xml fileis located at the root level of ZIP file.
Tutorial
Your First Shape
Let’s begin with a collection contains a simple shape that provides a Hello World text item. This shape containsProperty definitions, Element definitions (in the p:Content section) and Behaviors(which make the content changeaccording to Property values).
<?xml version="1.0" encoding="UTF-8"?><Shapes xmlns="http://www.evolus.vn/Namespace/Pencil"
xmlns:p="http://www.evolus.vn/Namespace/Pencil"xmlns:svg="http://www.w3.org/2000/svg"id="collection" displayName="My Collection"description="My First Collection" author="author">
<Shape id="helloworld" displayName="Hello World"icon="Icons/plain-text.png">
<Properties><PropertyGroup name="Text">
<Property name="label" displayName="Label"type="PlainText">Hello World</Property>
<Property name="textColor" displayName="Color"type="Color">#000000ff</Property>
<Property name="textFont"displayName="Font"type="Font">Arial|normal|normal|13px</Property>
</PropertyGroup></Properties>
<Behaviors><For ref="text">
<TextContent>$label</TextContent><Fill>$textColor</Fill><Font>$textFont</Font><BoxFit>
<Arg>new Bound(0, 0, 100, 12)</Arg><Arg>new Alignment(0, 1)</Arg>
</BoxFit></For>
</Behaviors>
<p:Content xmlns:p="http://www.evolus.vn/Namespace/Pencil"xmlns="http://www.w3.org/2000/svg"><text id="text" />
</p:Content></Shape>
</Shapes>
6 Chapter 1. Stencil Developer Documentation

Pencil Documentation, Release 2.0.21
Each child node in <For></For> is a behavior that defines how content should be changed according to the proper-ties. More details about can be found in the Behavior Reference.
The $label variable used in the TextContent behavior demonstrates how properties can be referenced in the inputarguments for behaviors.
Collection Properties
Shapes in a collection tend to have common styles such as the same font, color and stroke style. For the convenience ofStencil authors, Pencil supports grouping styles common to several shapes into collection properties. These collectionproperties can be used as the default value for a specific stencil’s properties. Then, if the collection style is changed,the default property values for shapes will be changed accordingly.
Have a look at this example. Collection properties are defined and then used in shape properties.
<Shapes><!-- We define Collection Properties here --><Properties>
<PropertyGroup name="Text"><Property name="defaultTextFont" type="Font" displayName="Default Font">
Arial|normal|normal|13px</Property><Property name="defaultTextColor" type="Color" displayName="Default Text
→˓Color">#000000ff
</Property></PropertyGroup>
</Properties><Shape id="helloworld" displayName="Hello World" icon="Icons/plain-text.png">
<Properties><PropertyGroup name="Text">
<Property name="label" displayName="Label" type="PlainText">Hello World
</Property><!-- And use them in actual Property elements here --><Property name="textColor" displayName="Color" type="Color">
<E>$$defaultTextColor</E></Property><Property name="textFont" displayName="Font" type="Font">
<E>$$defaultTextFont</E></Property>
</PropertyGroup></Properties>
<Behaviors><!-- ... -->
</Behaviors>
<p:Content xmlns:p="http://www.evolus.vn/Namespace/Pencil"xmlns="http://www.w3.org/2000/svg">
<text id="text" /></p:Content>
</Shape></Shapes>
Text content inside the <Property> tag of a stencil is the literal presentation of the initial value for that property.In this example you will notice that the content inside that tag is nested in a <E></E> instead. This is the notation
1.3. Tutorial 7

Pencil Documentation, Release 2.0.21
to indicate that the initial value should be obtained by evaluating the expression inside the <E> tag. To reference aspecific collection property inside this expression, the $$ syntax is used.
Drawing Path - The D Behavior
Pencil shapes are usually created using paths that are based on the SVG Path Specification. Pencil supports drawingshapes using the D behavior. This behavior generates the d attribute for the <path> SVG element as defined in theSVG Path Data Specification. The value used in D is an array in which each item is a drawing command.
The shape in this tutorial is a triangle drawn from 3 points that are defined by properties of type Handle.
<Shape id="triangle" displayName="Triangle" icon="Icons/triangle.png"><Properties>
<PropertyGroup><Property name="a" displayName="Point" type="Handle">
0,0</Property><Property name="b" displayName="Point" type="Handle">
90,0</Property><Property name="c" displayName="Point" type="Handle">
45,60</Property>
</PropertyGroup><PropertyGroup name="Border">
<Property name="strokeColor" displayName="Line Color" type="Color">#1B3280ff
</Property><Property name="strokeStyle" displayName="Line Style" type="StrokeStyle">
2|</Property>
</PropertyGroup></Properties><Behaviors>
<For ref="path"><StrokeColor>$strokeColor</StrokeColor><StrokeStyle>$strokeStyle</StrokeStyle><D>[M($a.x, $a.y), L($b.x, $b.y), L($c.x, $c.y), z]</D>
</For></Behaviors><p:Content xmlns:p="http://www.evolus.vn/Namespace/Pencil"
xmlns="http://www.w3.org/2000/svg"><path id="path" fill="none" style="stroke-linejoin: round;" />
</p:Content></Shape>
In the above example, Handle properties provide points that can be moved on the drawing canvas. Their values arechanged after the move and the behavior code will then be executed to regenerate the path’s D value.
You can notice that various SVG Path commands are used in this example(M, L & z). Pencil supports the followingSVG Path commands: M, L, l, C, c, S, s, Q, q, T, A, a and z.
In many other situations, paths may not rely solely on the position of handles. A triangle can also be drawn using abounding box specified by a Dimension Property, as shown in the following example:
<Shape id="triangle" displayName="Triangle" icon="Icons/triangle .png"><Properties>
<PropertyGroup>
8 Chapter 1. Stencil Developer Documentation

Pencil Documentation, Release 2.0.21
<Property name="box" type="Dimension">200,80</Property><Property name="strokeColor" displayName="Line Color" type="Color">
#1B3280ff</Property><Property name="strokeStyle" displayName="Line Style" type="StrokeStyle">
2|</Property>
</PropertyGroup></Properties><Behaviors>
<For ref="path"><StrokeColor>$strokeColor</StrokeColor><StrokeStyle>$strokeStyle</StrokeStyle><D>[M(0, 0), L($box.w, 0), L($box.w/2, $box.h), z]</D>
</For></Behaviors><p:Content xmlns:p="http://www.evolus.vn/Namespace/Pencil"
xmlns="http://www.w3.org/2000/svg"><path id="path" fill="none" style="stroke-linejoin: round;" />
</p:Content></Shape>
It is very convenient to create shapes with specific points based on handles or the bounding box. The D behavior isused heavily in the built-in Flowchart stencil collection.
Add Transparent Background
The two examples above generate unfilled triangles so it is very difficult for users to drag and move the objects on thedrawing canvas. The suggested way to avoid this is to create a transparent path as the background below the trianglewith a thicker stroke.
<Shape><!-- .... --><Behaviors>
<For ref="bgpath"><D>[M($a.x, $a.y), L($b.x, $b.y), L($c.x, $c.y), z]</D>
</For><For ref="path">
<!-- ... --></For>
</Behaviors><p:Content>
<path id="bgpath" fill="none" style="stroke: rgba(0, 0, 0, 0); stroke-width:→˓10px;"/>
<path id="path" fill="none" style="stroke-linejoin: round;" /></p:Content>
</Shape>
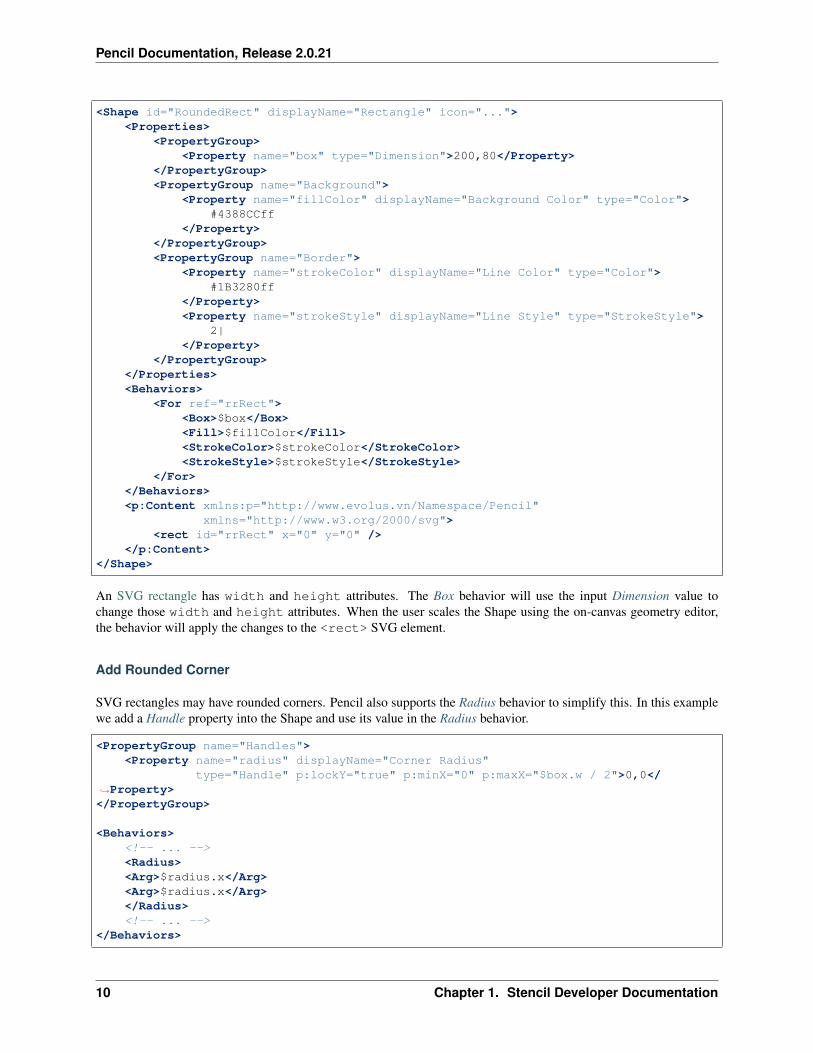
Drawing Resizeable Shapes - The box Property
In most cases, shapes are expected to be scalable. Pencil uses the Dimension property type to set shape size throughthe Box behavior. A Dimension property named box can be modified by the on-screen geometry editor. Changes tothe size of box will be applied to the shape’s size.
The following example is a resizeable rectangle based on a $box property.
1.3. Tutorial 9
Pencil Documentation, Release 2.0.21
<Shape id="RoundedRect" displayName="Rectangle" icon="..."><Properties>
<PropertyGroup><Property name="box" type="Dimension">200,80</Property>
</PropertyGroup><PropertyGroup name="Background">
<Property name="fillColor" displayName="Background Color" type="Color">#4388CCff
</Property></PropertyGroup><PropertyGroup name="Border">
<Property name="strokeColor" displayName="Line Color" type="Color">#1B3280ff
</Property><Property name="strokeStyle" displayName="Line Style" type="StrokeStyle">
2|</Property>
</PropertyGroup></Properties><Behaviors>
<For ref="rrRect"><Box>$box</Box><Fill>$fillColor</Fill><StrokeColor>$strokeColor</StrokeColor><StrokeStyle>$strokeStyle</StrokeStyle>
</For></Behaviors><p:Content xmlns:p="http://www.evolus.vn/Namespace/Pencil"
xmlns="http://www.w3.org/2000/svg"><rect id="rrRect" x="0" y="0" />
</p:Content></Shape>
An SVG rectangle has width and height attributes. The Box behavior will use the input Dimension value tochange those width and height attributes. When the user scales the Shape using the on-canvas geometry editor,the behavior will apply the changes to the <rect> SVG element.
Add Rounded Corner
SVG rectangles may have rounded corners. Pencil also supports the Radius behavior to simplify this. In this examplewe add a Handle property into the Shape and use its value in the Radius behavior.
<PropertyGroup name="Handles"><Property name="radius" displayName="Corner Radius"
type="Handle" p:lockY="true" p:minX="0" p:maxX="$box.w / 2">0,0</→˓Property></PropertyGroup>
<Behaviors><!-- ... --><Radius><Arg>$radius.x</Arg><Arg>$radius.x</Arg></Radius><!-- ... -->
</Behaviors>
10 Chapter 1. Stencil Developer Documentation
Pencil Documentation, Release 2.0.21
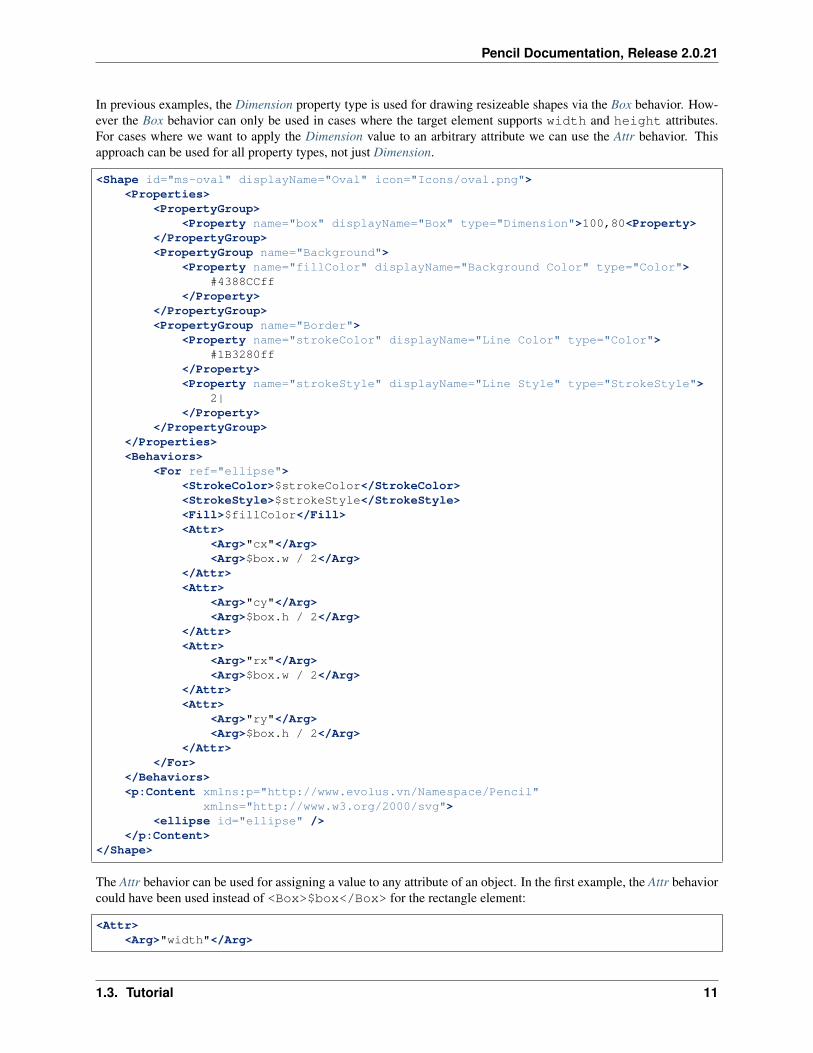
In previous examples, the Dimension property type is used for drawing resizeable shapes via the Box behavior. How-ever the Box behavior can only be used in cases where the target element supports width and height attributes.For cases where we want to apply the Dimension value to an arbitrary attribute we can use the Attr behavior. Thisapproach can be used for all property types, not just Dimension.
<Shape id="ms-oval" displayName="Oval" icon="Icons/oval.png"><Properties>
<PropertyGroup><Property name="box" displayName="Box" type="Dimension">100,80<Property>
</PropertyGroup><PropertyGroup name="Background">
<Property name="fillColor" displayName="Background Color" type="Color">#4388CCff
</Property></PropertyGroup><PropertyGroup name="Border">
<Property name="strokeColor" displayName="Line Color" type="Color">#1B3280ff
</Property><Property name="strokeStyle" displayName="Line Style" type="StrokeStyle">
2|</Property>
</PropertyGroup></Properties><Behaviors>
<For ref="ellipse"><StrokeColor>$strokeColor</StrokeColor><StrokeStyle>$strokeStyle</StrokeStyle><Fill>$fillColor</Fill><Attr>
<Arg>"cx"</Arg><Arg>$box.w / 2</Arg>
</Attr><Attr>
<Arg>"cy"</Arg><Arg>$box.h / 2</Arg>
</Attr><Attr>
<Arg>"rx"</Arg><Arg>$box.w / 2</Arg>
</Attr><Attr>
<Arg>"ry"</Arg><Arg>$box.h / 2</Arg>
</Attr></For>
</Behaviors><p:Content xmlns:p="http://www.evolus.vn/Namespace/Pencil"
xmlns="http://www.w3.org/2000/svg"><ellipse id="ellipse" />
</p:Content></Shape>
The Attr behavior can be used for assigning a value to any attribute of an object. In the first example, the Attr behaviorcould have been used instead of <Box>$box</Box> for the rectangle element:
<Attr><Arg>"width"</Arg>
1.3. Tutorial 11

Pencil Documentation, Release 2.0.21
<Arg>$box.w</Arg></Attr><Attr>
<Arg>"height"</Arg><Arg>$box.h</Arg>
</Attr>
Drawing Images
A Pencil shape may contain bitmap images. This tutorial will show how to embed an image in a stencil.
Suppose that we have a bitmap image of a hand and we would like to create a stencil of the hand image with an editablename text label.
The first thing you have to do is convert the image into BASE64 format which is supported by Pencil for embeddingbinary data. There are many ways of converting an image into BASE64; the method shown below is for developers onGNU/Linux systems:
$ base64 --wrap=0 hand.png
After performing the conversion, you can copy the output and use it in the XML code, as shown below:
<Shape id="image" displayName="Image" icon="Icons/image.png"><Properties>
<PropertyGroup><Property name="box" type="Dimension" p:lockRatio="true">
36,45</Property>
</PropertyGroup><PropertyGroup name="Text">
<Property name="name" displayName="Name" type="PlainText">Hello World
</Property><Property name="textColor" displayName="Color" type="Color">
#000000ff</Property><Property name="textFont" displayName="Font" type="Font">
Arial|normal|normal|13px</Property>
</PropertyGroup></Properties><Behaviors>
<For ref="image"><Box>$box</Box>
</For><For ref="name">
<TextContent>$name</TextContent><Fill>$textColor</Fill><Font>$textFont</Font><BoxFit>
<Arg>new Bound(0, $box.h + 13, $box.w, 13)</Arg><Arg>new Alignment(1, 1)</Arg>
</BoxFit>
12 Chapter 1. Stencil Developer Documentation
Pencil Documentation, Release 2.0.21
</For></Behaviors><p:Content xmlns:p="http://www.evolus.vn/Namespace/Pencil"
xmlns="http://www.w3.org/2000/svg" xmlns:xlink="http://www.w3.org/1999/→˓xlink">
<image id="image" x="0" y="0" xlink:href="data:image/png;base64,iVBORw0KGgo...→˓ (BASE64 content of the image)" />
<text id="name" /></p:Content>
</Shape>
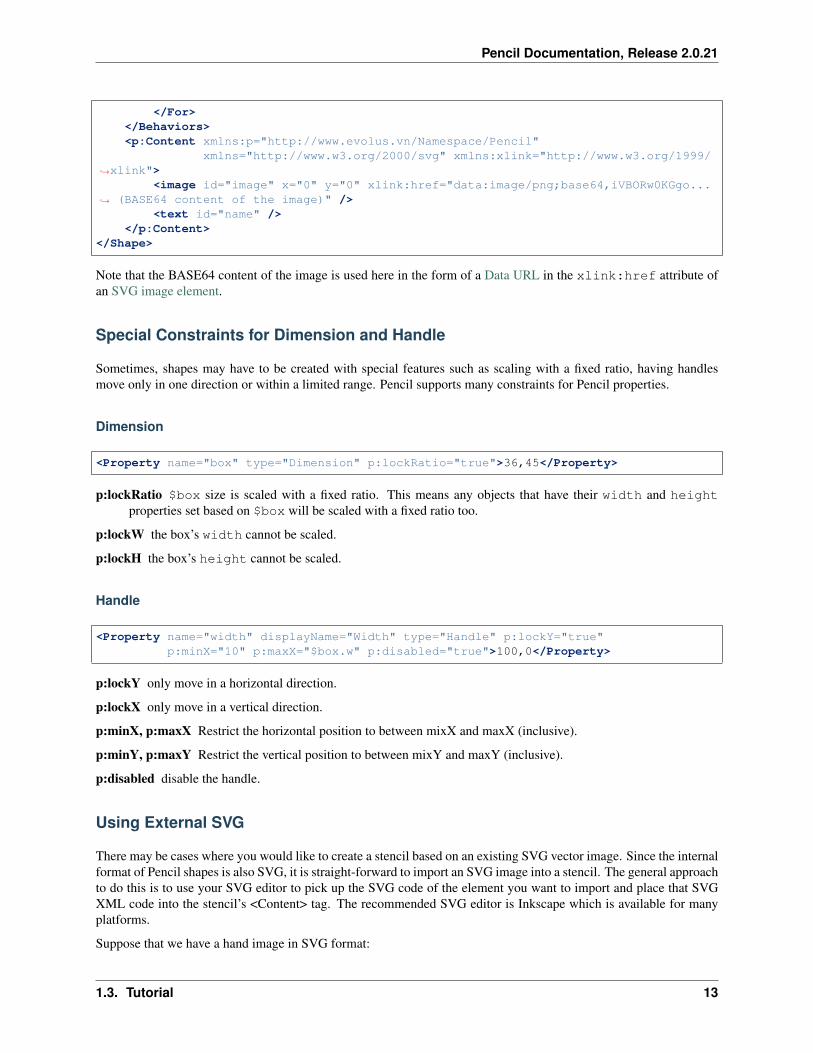
Note that the BASE64 content of the image is used here in the form of a Data URL in the xlink:href attribute ofan SVG image element.
Special Constraints for Dimension and Handle
Sometimes, shapes may have to be created with special features such as scaling with a fixed ratio, having handlesmove only in one direction or within a limited range. Pencil supports many constraints for Pencil properties.
Dimension
<Property name="box" type="Dimension" p:lockRatio="true">36,45</Property>
p:lockRatio $box size is scaled with a fixed ratio. This means any objects that have their width and heightproperties set based on $box will be scaled with a fixed ratio too.
p:lockW the box’s width cannot be scaled.
p:lockH the box’s height cannot be scaled.
Handle
<Property name="width" displayName="Width" type="Handle" p:lockY="true"p:minX="10" p:maxX="$box.w" p:disabled="true">100,0</Property>
p:lockY only move in a horizontal direction.
p:lockX only move in a vertical direction.
p:minX, p:maxX Restrict the horizontal position to between mixX and maxX (inclusive).
p:minY, p:maxY Restrict the vertical position to between mixY and maxY (inclusive).
p:disabled disable the handle.
Using External SVG
There may be cases where you would like to create a stencil based on an existing SVG vector image. Since the internalformat of Pencil shapes is also SVG, it is straight-forward to import an SVG image into a stencil. The general approachto do this is to use your SVG editor to pick up the SVG code of the element you want to import and place that SVGXML code into the stencil’s <Content> tag. The recommended SVG editor is Inkscape which is available for manyplatforms.
Suppose that we have a hand image in SVG format:
1.3. Tutorial 13

Pencil Documentation, Release 2.0.21
And its SVG XML code is the following:
<?xml version="1.0" encoding="UTF-8" standalone="no"?><svg xmlns:dc="http://purl.org/dc/elements/1.1/" xmlns:cc="http://creativecommons.org/→˓ns#"
xmlns:rdf="http://www.w3.org/1999/02/22-rdf-syntax-ns#" xmlns:svg="http://www.w3.→˓org/2000/svg"
xmlns="http://www.w3.org/2000/svg" xmlns:sodipodi="http://sodipodi.sourceforge.→˓net/DTD/sodipodi-0.dtd"
xmlns:inkscape="http://www.inkscape.org/namespaces/inkscape" inkscape:version="0.→˓48.1"
width="64" height="64" id="svg2" version="1.1"><path d="m 32.3,53.9 c -7.8,0 -15.3,0 -15.3,-21 0,-19 3.5,-15.3 5.1,-13.8 v -3.3
→˓c 0.2,-2.4 6,-2.2 6,-0.3 v -3 c 0,-3.2 6.7,-2.9 6.7,-0.8 v 4.1 c 0.2,-2.3 5.4,-3.2→˓5.6,1.3 0,7 -0.1,14.6 -0.2,16.8 2.7,3 5.7,-11.6 10.9,-9 2.4,2.5 -6.7,19.7 -7.7,21.5→˓-1,1.7 -5.2,7.5 -11.1,7.5 z"
id="path8" inkscape:connector-curvature="0"style="fill:#ffffff;stroke:#000000;stroke-width:1;stroke-miterlimit:4;
→˓stroke-dasharray:none" /><path sodipodi:nodetypes="cccccccccc" style="fill:none;stroke:#000000"
→˓inkscape:connector-curvature="0"id="path10" d="M 22.025873,18.820772 22.948882,32.71885 M 28.060203,14.
→˓888365 29,31 M 34.808683,14.331201 35,32 m 3,5 c 0,0 -5,1 -7,11 M 20,35 c 4,-5 12,-→˓4 17,-3" /></svg>
The primary part of the SVG is the set of two <path> elements. This XML fragment should be copied into the stencilcode as in the following code:
<Shape id="hand" displayName="Hand" icon="Icons/hand.png"><Properties>
<PropertyGroup><Property name="box" type="Dimension" p:lockRatio="true">
72,90</Property>
<Property name="fillColor" type="Color" displayName="Background Color">#f3f8c5ff
</Property></PropertyGroup><PropertyGroup name="Border">
<Property name="strokeColor" displayName="Line Color" type="Color"><E>$$strokeColor</E>
</Property><Property name="strokeStyle" displayName="Line Style" type="StrokeStyle">
<E>$$strokeStyle</E></Property>
</PropertyGroup>
<PropertyGroup name="Text"><Property name="name" displayName="Name" type="PlainText">
Hello World</Property><Property name="textColor" displayName="Color" type="Color">
#000000ff
14 Chapter 1. Stencil Developer Documentation

Pencil Documentation, Release 2.0.21
</Property><Property name="textFont" displayName="Font" type="Font">
Arial,sans-serif|normal|normal|13px</Property>
</PropertyGroup></Properties><Behaviors>
<For ref="group"><Transform>[scale($box.w/36, $box.h/45)]</Transform><StrokeColor>$strokeColor</StrokeColor><StrokeStyle>
new StrokeStyle($strokeStyle.w / (Math.max($box.w / 36, $box.h / 45)),→˓ $strokeStyle.array);
</StrokeStyle><Fill>Color.fromString("#00000000")</Fill>
</For>
<For ref="hand"><Fill>$fillColor</Fill>
</For>
<For ref="name"><TextContent>$name</TextContent><Fill>$textColor</Fill><Font>$textFont</Font><BoxFit>
<Arg>new Bound(0, $box.h + 13, $box.w, 13)</Arg><Arg>new Alignment(1, 1)</Arg>
</BoxFit></For>
</Behaviors><p:Content xmlns="http://www.w3.org/2000/svg">
<g id="group"><path id="hand" d="m 32.3,53.9 c -7.8,0 -15.3,0 -15.3,-21 0,-19 3.5,-15.3
→˓5.1,-13.8 v -3.3 c 0.2,-2.4 6,-2.2 6,-0.3 v -3 c 0,-3.2 6.7,-2.9 6.7,-0.8 v 4.1 c 0.→˓2,-2.3 5.4,-3.2 5.6,1.3 0,7 -0.1,14.6 -0.2,16.8 2.7,3 5.7,-11.6 10.9,-9 2.4,2.5 -6.→˓7,19.7 -7.7,21.5 -1,1.7 -5.2,7.5 -11.1,7.5 z"
<path d="M 22.025873,18.820772 22.948882,32.71885 M 28.060203,14.888365→˓29,31 M 34.808683,14.331201 35,32 m 3,5 c 0,0 -5,1 -7,11 M 20,35 c 4,-5 12,-4 17,-3→˓" />
</g>
<text id="name" /></p:Content>
</Shape>
The stencil will contain only the SVG content copied from the original hand image. This hand can be scaled with afixed ratio and a fixed stroke-width now.
Maintaining a Fixed Stroke Width
Please note that without any special handling, when an SVG element is scaled with Transform behavior, the strokewidth will be also scaled accordingly. If we would like to have the hand scaled while the stroke width is unchanged,the way to do it is as in the above example: recalculating the width using the scale ratio:
<StrokeStyle>new StrokeStyle($strokeStyle.w / (Math.max($box.w / 36, $box.h / 45)),
→˓$strokeStyle.array);
1.3. Tutorial 15

Pencil Documentation, Release 2.0.21
</StrokeStyle>
Grouping SVG elements
Many of the SVG attributes are inherited by children nodes from their parent node. In this example, the two <path>elements are grouped in a <g> parent node so that common behaviors can be applied to just this parent node. Bygrouping, all the Fill, StrokeStyle, StrokeColor and Transform behaviors will be applied to both the paths.
In case one or more children need to have special treatments, you can always assign them an id and declare separatebehaviors for it:
<For ref="hand"><Fill>$fillColor</Fill>
</For>
Drawing Sketchy Lines
Users may want to work with sketchy shapes to create draft notes. So Pencil supports drawing sketchy lines in additionto providing a stencil collection that contains many basic sketchy shapes.
This example shows how to create a simple sketchy shape from sketchy lines:
<Shape id="sketchyShape" displayName="Sketchy Shape" icon="Icons/sketchyShape.png"><Properties>
...</Properties><Behaviors>
<For ref="text"><TextContent>
new PlainText(Math.round($box.w) +" x "+Math.round($box.h))</TextContent><Font>$textFont</Font><Color>$textColor</Color><BoxFit>
16 Chapter 1. Stencil Developer Documentation

Pencil Documentation, Release 2.0.21
<Arg>Bound.fromBox($box)</Arg><Arg>$textAlign</Arg>
</BoxFit></For><For ref="line1">
<D>[
sk(0, 0, $box.w, 0),skTo($box.w, $box.h),skTo(0, $box.h),skTo(0, 0),z,sk(3, 3, $box.w - 3, $box.h - 3),sk(3, $box.h - 3, $box.w - 3, 3),
]</D><Fill>$fillColor</Fill><StrokeColor>$strokeColor</StrokeColor><StrokeStyle>$strokeStyle</StrokeStyle>
</For><For ref="mask">
<Fill>$fillColor</Fill><D>
var length = $box.w - 5;var height = $textFont.getPixelHeight();[
M($box.w/2 - length / 2, $box.h/2 - height / 2),L($box.w/2 + length / 2, $box.h/2 - height / 2),L($box.w/2 + length / 2, $box.h/2 + height / 2),L($box.w/2 - length / 2, $box.h/2 + height / 2),z
]</D>
</For></Behaviors><p:Content xmlns:p="http://www.evolus.vn/Namespace/Pencil"
xmlns="http://www.w3.org/2000/svg"><path id="line1" style="stroke-linejoin: round;" /><path id="mask" style="fill:white;stroke:none" /><text id="text" />
</p:Content></Shape>
In fact, drawing sketchy lines is the same as drawing normal lines. Simply use sk(x, y), skTo(x, y) insteadof M(x, y), L(x, y) to create sketchy shapes.
Actions
There are cases where you may want to provide users with a way to quickly change a shape’s properties in a particularway. For example, changing the width and height of a rectangle to the same value, changing the border color of a shapeto a color with the same hue as the background but darker, etc. The traditional way is for users to do the calculationthemselves and change each of the properties to the desired value.
Pencil introduces the Action tag, in which stencil developers can define a routine that performs calculations andmakes changes to a shape’s properties.
The following example show how an Action is defined to let users quickly change the rectangle to a square:
1.3. Tutorial 17

Pencil Documentation, Release 2.0.21
<Shape id="RoundedRect" displayName="Rectangle" icon="..."><Properties>
...</Properties><Behaviors>
...</Behaviors><Actions>
<Action id="makeSquares" displayName="Make Squared"><Impl>
var box = this.getProperty("box");box.w = Math.max(box.w, box.h);box.h = box.w;this.setProperty("box", box);
</Impl></Action>
</Actions><p:Content xmlns:p="http://www.evolus.vn/Namespace/Pencil"
xmlns="http://www.w3.org/2000/svg"><rect id="rrRect" x="0" y="0" />
</p:Content></Shape>
In the <Action>, the shape’s properties are modified and will be applied immediately to objects that refer to theseproperties. The above code is simple: box.h is forced to equal box.w resulting in the rectangle becoming a square.
Note: In the context of action execution, the keyword this is bound to the shape itself so that you can retrieve andset the property values via it.
Object Snapping
Pencil users will know that Pencil provides snapping between objects. Object snapping is very useful for aligningobjects so that drawing operations can be done quickly. There are 6 default snappings in Pencil:
Fig. 1.1: Top-to-Top
Sometimes the snapping needs to be customized for specific purposes. This tutorial will show how to create newcustom snappings. These definitions are put into an <Action></Action> which must have the exact id ofgetSnappingGuide.
<Shape id="RoundedRect" displayName="Rectangle" icon="Icons/rectangle.png"><Properties>
...
18 Chapter 1. Stencil Developer Documentation

Pencil Documentation, Release 2.0.21
Fig. 1.2: Bottom-to-Bottom
Fig. 1.3: Center-to-Center (horizontal)
Fig. 1.4: Left-to-Left
1.3. Tutorial 19

Pencil Documentation, Release 2.0.21
Fig. 1.5: Right-to-Right
Fig. 1.6: Middle-to-Middle (vertical)
20 Chapter 1. Stencil Developer Documentation

Pencil Documentation, Release 2.0.21
</Properties><Behaviors>
...</Behaviors><Actions>
<Action id="getSnappingGuide"><Impl>
var b = this.getBounding();return [
new SnappingData("FrameTop", b.y + b.height/2, "TabBottom", false,→˓ this.id),
new SnappingData("Top", b.y + b.height, "Top", false, this.id),new SnappingData("Bottom", b.y, "Bottom", false, this.id),new SnappingData("Left", b.x + b.width, "Left", true, this.id),new SnappingData("Right", b.x, "Right", true, this.id)
];</Impl>
</Action></Actions><p:Content xmlns:p="http://www.evolus.vn/Namespace/Pencil"
xmlns="http://www.w3.org/2000/svg"><rect id="rrRect" x="0" y="0" />
</p:Content></Shape>
The getSnappingGuide action is expected to return an array of snapping hints. Each snapping hint is composedof an object of type SnappingData:
new SnappingData(snappingName, position, toSnappingName, isHorizontalSnapping, this.→˓id)
Where:
• snappingName: is the name of this snapping hint.
• position: is the position in this shape when the snapping hint is defined (vertical or horizontal).
• toSnappingName: is the Snapping name of other hints that can be snapped to this hint.
• isHorizontalSnapping: if true, the snapping will be in the Horizontal direction.
Built-in snapping data: by default, even if you don’t provide snapping definitions, Pencil has the following snappingdata defined for all objects:
new SnappingData("Top", b.y, "Top", false, this.id),new SnappingData("Bottom", b.y + b.height, "Bottom", false, this.id),new SnappingData("HCenter", b.y + b.height / 2, "HCenter", false, this.id),new SnappingData("Left", b.x, "Left", true, this.id),new SnappingData("Right", b.x + b.width, "Right", true, this.id),new SnappingData("VCenter", b.x + b.width / 2, "VCenter", true, this.id),
where b is the object bounds, b.y is the object’s top position, b.x is the object’s left position, b.height is theobject bound height, b.width is the object bound width.
In the above example for the Rectangle shape, four default snappings are modified and a new snapping is created.
1.3. Tutorial 21

Pencil Documentation, Release 2.0.21
In the above example, A‘s Top snapping was modified by new SnappingData("Top", b.y + b.height,"Top", false, this.id),. So other objects that have Top snapping will snap to A‘s new Top. The logic forBottom, Left, Right snappings are the same.
Also in this example, a custom, new snapping hint is introduced. This is good for special stencils where we would liketo have very specific snappings defined:
new SnappingData("FrameTop", b.y + b.height/2, "TabBottom", false, this.id)
Suppose that we have another stencil named B with the following custom snapping defined:
new SnappingData("TabBottom", b.y, "FrameTop", false, this.id)
So, A has a new snapping, FrameTop, which allows other snappings of type TabBottom to be snapped to. Since Bhas a snapping hint called TabBottom defined, it will be possible for B to snap to A at the expected position.
If other shapes want to snap to A at FrameTop, they just need to define a snapping with the name TabBottom likeB does.
As noted above, all objects in Pencil have a Top snapping hint defined by default as its top position, so to have allobjects be able to snap to our A‘s special FrameTop snapping point, just modify the SnappingData definition to thefollowing:
new SnappingData("FrameTop", b.y + b.height/2, "Top", false, this.id)
Dynamic DOM Content
In some special cases, a shape’s content is composed of a dynamic element structure. Pencil provides the DomContentbehavior so that the DOM content of an element can be changed dynamically. The value provided to this behavior is
22 Chapter 1. Stencil Developer Documentation
Pencil Documentation, Release 2.0.21
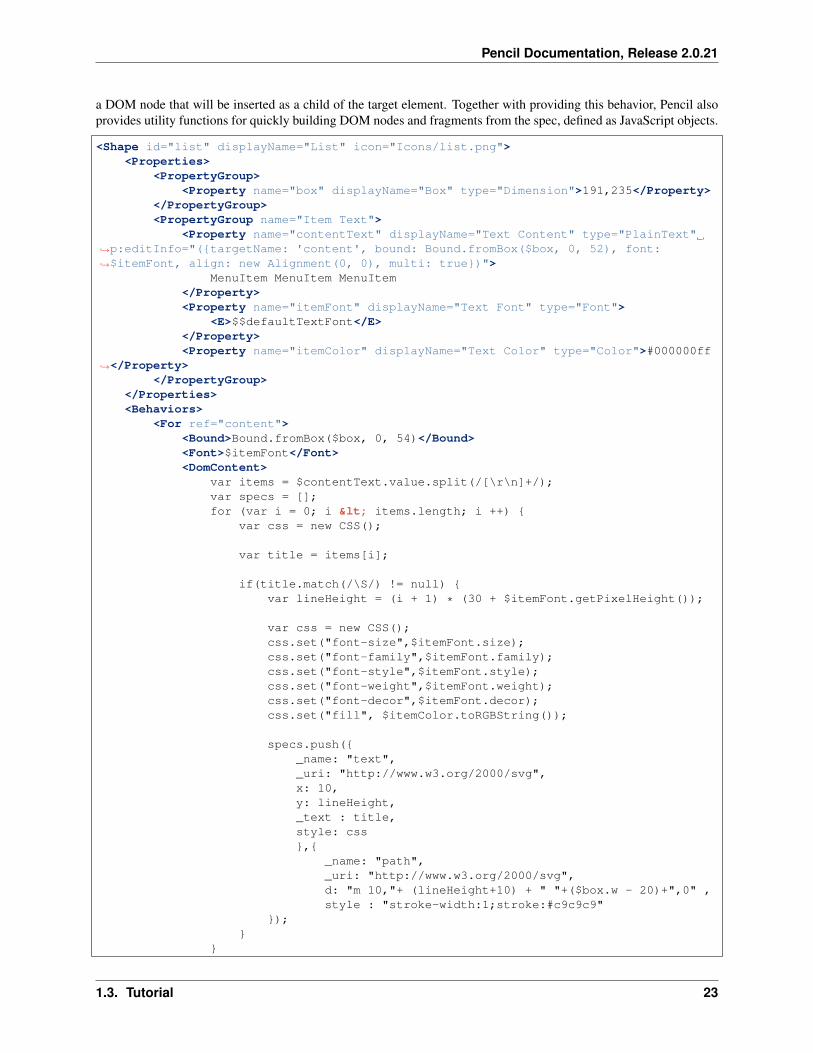
a DOM node that will be inserted as a child of the target element. Together with providing this behavior, Pencil alsoprovides utility functions for quickly building DOM nodes and fragments from the spec, defined as JavaScript objects.
<Shape id="list" displayName="List" icon="Icons/list.png"><Properties>
<PropertyGroup><Property name="box" displayName="Box" type="Dimension">191,235</Property>
</PropertyGroup><PropertyGroup name="Item Text">
<Property name="contentText" displayName="Text Content" type="PlainText"→˓p:editInfo="({targetName: 'content', bound: Bound.fromBox($box, 0, 52), font:→˓$itemFont, align: new Alignment(0, 0), multi: true})">
MenuItem MenuItem MenuItem</Property><Property name="itemFont" displayName="Text Font" type="Font">
<E>$$defaultTextFont</E></Property><Property name="itemColor" displayName="Text Color" type="Color">#000000ff
→˓</Property></PropertyGroup>
</Properties><Behaviors>
<For ref="content"><Bound>Bound.fromBox($box, 0, 54)</Bound><Font>$itemFont</Font><DomContent>
var items = $contentText.value.split(/[\r\n]+/);var specs = [];for (var i = 0; i < items.length; i ++) {
var css = new CSS();
var title = items[i];
if(title.match(/\S/) != null) {var lineHeight = (i + 1) * (30 + $itemFont.getPixelHeight());
var css = new CSS();css.set("font-size",$itemFont.size);css.set("font-family",$itemFont.family);css.set("font-style",$itemFont.style);css.set("font-weight",$itemFont.weight);css.set("font-decor",$itemFont.decor);css.set("fill", $itemColor.toRGBString());
specs.push({_name: "text",_uri: "http://www.w3.org/2000/svg",x: 10,y: lineHeight,_text : title,style: css},{
_name: "path",_uri: "http://www.w3.org/2000/svg",d: "m 10,"+ (lineHeight+10) + " "+($box.w - 20)+",0" ,style : "stroke-width:1;stroke:#c9c9c9"
});}
}
1.3. Tutorial 23

Pencil Documentation, Release 2.0.21
Dom.newDOMFragment(specs);</DomContent>
</For></Behaviors><p:Content xmlns:p="http://www.evolus.vn/Namespace/Pencil"
xmlns="http://www.w3.org/2000/svg"><g id="content" />
</p:Content></Shape>
In this example, the text content entered by the user is supposed to be split across multiple lines. The code inside thebehavior splits the text content and creates a text element for each line, containing that line and a path element asthe footer of the text.
The utility method Dom.newDOMFragment(specs); is used here to create DOM fragments from the objectspecs.
External JavaScript
A shape may contain long and complex JavaScript code for calculating behavior values. Moreover, other shapes maycontain exactly the same code. This means it takes time to review and modify shapes. For convenience, such codeshould be brought out of shapes and put into <Script></Script> tags that at the collection level.
<Shapes>...<Script></Script> <!-- Shared code goes here -->...<Shape></Shape><Shape></Shape>
</Shapes
Example:
<Script>collection.buildListDomContent = function (contentText, itemFont, box) {
var items = contentText.value.split(/[\r\n]+/);var specs = [];for (var i = 0; i > items.length; i ++) {
var css = new CSS();var title = items[i];
if (title.match(/\S/) != null) {var lineHeight = (i + 1) * (30 + itemFont.getPixelHeight());
var css = new CSS();css.set("font-size",itemFont.size);css.set("font-family",itemFont.family);css.set("font-style",itemFont.style);css.set("font-weight",itemFont.weight);css.set("font-decor",itemFont.decor);css.set("fill", itemColor.toRGBString());
specs.push({_name: "text",_uri: "http://www.w3.org/2000/svg",x: 10,y: lineHeight,
24 Chapter 1. Stencil Developer Documentation

Pencil Documentation, Release 2.0.21
_text : title,style: css
},{_name: "path",_uri: "http://www.w3.org/2000/svg",d: "m 10,"+ (lineHeight+10) + " "+(box.w - 20)+",0" ,style : "stroke-width:1;stroke:#c9c9c9"
});}
}var frag = Dom.newDOMFragment(specs);
return frag;};
</Script>...<Shape id="list" displayName="List" icon="Icons/list.png">
<Properties><PropertyGroup>
<Property name="box" displayName="Box" type="Dimension">191,235</Property></PropertyGroup><PropertyGroup name="Item Text">
...</PropertyGroup>
</Properties><Behaviors>
<For ref="content"><Bound>Bound.fromBox($box, 0, 54)</Bound><Font>$itemFont</Font><DomContent>collection.buildListDomContent($contentText, $itemFont, $box)
→˓</DomContent></For>
</Behaviors><p:Content xmlns:p="http://www.evolus.vn/Namespace/Pencil" xmlns="http://www.w3.
→˓org/2000/svg"><g id="content" />
</p:Content></Shape>
As you may notice, in the context of JavaScript execution within a stencil behavior, the collection object is boundto the current collection that owns the stencil. The way shared JavaScript code is used is that custom functions andattributes are added in the collection-level script and re-used later in stencil’s code, via the collection object.
Nine-Patch
Nine Patch is an image format that adds extra information into a normal image file to define which parts of the imageshould be stretched when the image is scaled. The technique used by this format is also implemented in the core ofthe Android OS.
More information about this format can be found at: http://developer.android.com/guide/topics/graphics/2d-graphics.html#nine-patch
It is very simple and flexible to make a stencil based on an existing bitmap image by defining the areas that shouldstretch using the Nine-patch format. Starting from version 2.0, Pencil also provides built-in behaviors and tools tosupport this technique for developers to use when creating their collections. There are already many collections usingthis technique in the Pencil repository such as the iOS UI Stencils.
1.3. Tutorial 25

Pencil Documentation, Release 2.0.21
Creating a simple stencil using Nine-patch
Suppose we have the rounded rectangle image shown below and we want to create a shape based on this image thatcan be scaled to any size while maintaining the corner radius.
1. Defining Nine-patch
The first step is to create a Nine-patch from this image by adding 4 black lines to its border to define the scaling andpadding areas:
In this nine-patch, the top and left lines are used to divide the rectangle into nine pieces while the bottom and rightlines are used to define the bounds.
Note: The thickness of these lines must be 1 pixel. For the purpose of illustration, lines are enlarged in this tutorial.
2. Generating JS code
The next step is to use Pencil-provided tools to load this nine-patch image and generate JavaScript code containing thenine-patch data in a structure that is compatible with Pencil’s built-in implementation of nine-patch images.
Go to Tools » Developer Tools » N-Path Script Generator... to launch the tool and load theimage created above. Code generated by this tool should be copied and used in the stencil. After parsing you can seethat the images are sliced into 9 pieces:
These pieces are sliced based on the lines on the top and left side of the images:
• The 1, 3, 7, 9 piece will be the same when scaling box.
• The width of 2, 5, 8 piece will be scale based on the ratio between old width and new width.
26 Chapter 1. Stencil Developer Documentation

Pencil Documentation, Release 2.0.21
• The height of 4, 5, 6 piece will be scale based on the ratio between old height and new height.
3. Use the generated code in your stencil
The easiest way to use the generated code is to define a set of nine-patches at the collection level by using the<Script> tag. The generated code in the above step is used as the value of the “sample” property in the followingexample.
<Script comments="N Patches">collection.nPatches = {
sample: {"w": 35,"h": 35,"p1": {
"x": 15,"y": 16
},"p2": {
"x": 20,"y": 22
},"patches": [
[{
"url": "data:image/png;base64,→˓iVBORw0KGgoAAAANSUhEUgAAABEAAAARCAYAAAA7bUf6AAAAr0lEQVQ4jaXTMQ6DMAwF0L+ycQPOwMbJOEA5CHuWKEYZEQsqdpE69ATdUJeuHemAxAIkgVjK+J8sOwbOlhlzNPcbiC2MPEEyhQXrLoUeKhC/→˓QTJvnrOUSqClBPF3N+xFbJuhebycYSdCfQHDnyBgF6G+APEvGNggts1OdbBBlEqCZ3CIaCkvAStSd6l3jV5ED9VlYEWOfmIwYsY8CiCZsRxTLEJs45HlnGM7kSkW+QMkMjoMrMdPRgAAAABJRU5ErkJggg==→˓",
"w": 17,"h": 17,"scaleX": false,"scaleY": false
},{
"url": "data:image/png;base64,→˓iVBORw0KGgoAAAANSUhEUgAAAAEAAAARCAYAAAAcw8YSAAAAFUlEQVQImWNg2HjyJwPDppP/→˓qUgAAOGdKhRyz8aoAAAAAElFTkSuQmCC",
"w": 1,"h": 17,"scaleX": true,"scaleY": false
},{
"url": "data:image/png;base64,→˓iVBORw0KGgoAAAANSUhEUgAAABEAAAARCAYAAAA7bUf6AAAApUlEQVQ4ja3TsQ3CQAwF0N/→˓SsQEz0DFZBkgGoU9zOp+uRDQosUFKwQTpIpq0lKZIAKHQXHyW3D75WzZAMsBLB+KI0JTwtz2Si0SXzT1cW+F43hqQDzbCSYG63hiQucP1jnja2RAShecH6HKwIVO8538oCZknWkRLRd47+ln2GoRE4aSwI8Tj945WI6JwbWVHiPsMiOj0a1YkNKUdIY4Z4kiXYRIZXuZVOgx3G7yrAAAAAElFTkSuQmCC→˓",
"w": 17,"h": 17,"scaleX": false,"scaleY": false
}],[
{"url": "data:image/png;base64,
→˓iVBORw0KGgoAAAANSUhEUgAAABEAAAABCAYAAAA4u0VhAAAAE0lEQVQImWNg2HjyJ8Omk/→˓8pwQCRHioUjQN2IAAAAABJRU5ErkJggg==",
1.3. Tutorial 27

Pencil Documentation, Release 2.0.21
"w": 17,"h": 1,"scaleX": false,"scaleY": true
},{
"url": "data:image/png;base64,→˓iVBORw0KGgoAAAANSUhEUgAAAAEAAAABCAYAAAAfFcSJAAAADUlEQVQImWNg2HTyPwAErAJ72rrK9QAAAABJRU5ErkJggg==→˓",
"w": 1,"h": 1,"scaleX": true,"scaleY": true
},{
"url": "data:image/png;base64,→˓iVBORw0KGgoAAAANSUhEUgAAABEAAAABCAYAAAA4u0VhAAAAEklEQVQImWNg2HTyP0V448mfAJLeKhTUgefAAAAAAElFTkSuQmCC→˓",
"w": 17,"h": 1,"scaleX": false,"scaleY": true
}],[
{"url": "data:image/png;base64,
→˓iVBORw0KGgoAAAANSUhEUgAAABEAAAARCAYAAAA7bUf6AAAAnUlEQVQ4ja3UMQ6CQBCF4b+l4wacgc6TeQA9CP02ZIdsSWgMzkpi4QnsiI0tpRarJQIZXzLtl92dmQWJIxJfpsLHqx0RDXak6Q9/→˓uM5Q2hEA0bsdqc9HO1J1OaJPGwJQx70dcS6judxsCEBoC7w+bAiAnHaITjbkC2050WxCW6x+o59xLktdW2j/→˓qlRdngZyZrI3xw9lWloNn29kfAN5zToMs/CBPQAAAABJRU5ErkJggg==",
"w": 17,"h": 17,"scaleX": false,"scaleY": false
},{
"url": "data:image/png;base64,→˓iVBORw0KGgoAAAANSUhEUgAAAAEAAAARCAYAAAAcw8YSAAAAFElEQVQImWNg2HTyPwM1iY0nfwIA480qFPtI62wAAAAASUVORK5CYII=→˓",
"w": 1,"h": 17,"scaleX": true,"scaleY": false
},{
"url": "data:image/png;base64,→˓iVBORw0KGgoAAAANSUhEUgAAABEAAAARCAYAAAA7bUf6AAAAn0lEQVQ4ja3TPQqDQBAF4Nemyw1yhnSezAPoQextlp1lS0kTdEbBwhPYSRrblEkRMIiB7Do+2PZj5w8geSnfBDVipdcjxF6PuDo7oJzuqkR4BAAdYppcifCM4nbWIUZSLNk1kXZAWZ72I5Yf8NUFq8T14Qm6J9gk5gc/→˓gVDEtcO2hGCEZxhJ100MRniEafLvHvwLyQQrPYg9XJ19biEubzv/OgxaZ8VBAAAAAElFTkSuQmCC",
"w": 17,"h": 17,"scaleX": false,"scaleY": false
}]
],"lastScaleX": 1,"lastScaleY": 1
}
28 Chapter 1. Stencil Developer Documentation

Pencil Documentation, Release 2.0.21
}</Script>
Then in the code for the stencil that uses this nine-patch, you can use Pencil’s built-in functions to simplify the code.
<Shape id="sample" displayName="NPathSampe" icon="Icons/sample.png"><Properties>
<PropertyGroup><Property name="box" type="Dimension">320,44</Property>
</PropertyGroup>
<PropertyGroup name="Text"><Property name="text" displayName="Text" type="PlainText">Content</
→˓Property><Property name="textFont" displayName="Default Font" type="Font">
→˓Helvetica|bold|normal|20px</Property></PropertyGroup>
</Properties><Behaviors>
<For ref="bg"><NPatchDomContent>
<Arg>collection.nPatches.sample</Arg><Arg>$box</Arg>
</NPatchDomContent></For><For ref="text">
<TextContent>$text</TextContent><Font>$textFont</Font><Fill>Color.fromString('#ffffffff')</Fill><BoxFit>
<Arg>getNPatchBound(collection.nPatches.sample, $box)</Arg><Arg>new Alignment(1, 1)</Arg>
</BoxFit></For>
</Behaviors><p:Content xmlns="http://www.w3.org/2000/svg">
<g id="bg"></g><text id="text" />
</p:Content></Shape>
The NPatchDomContent behavior uses the provided nine-patch and dimension to perform scaling calculations and fillthe bg element with images generated from the nine-patch.
The getNPatchBound() utility function is used here to obtain the bounds defined by the bottom and right markersin the nine-patch to place the text in the correct position.
1.3. Tutorial 29

Pencil Documentation, Release 2.0.21
4. More complex nine-patch
Despite the name of the technique, nine-patch images can be defined so that they are sliced into an unlimited numberof pieces. Suppose that we have the following bitmap and we would like to have it scale in a way that in the verticaldirection, only the blue and red parts are scaled while the cyan areas remain unscaled. In the horizontal direction thewhole length of the image should be scaled.
To do this, we can add the scaling markers to the image as shown in the following nine-patch:
If we do not add right and bottom lines, getNPatchBound will return the bound that contains the whole image.
Using Shortcuts
A stencil may contain many properties. When a shape is dragged onto the canvas, each property is assigned its defaultvalue. It is often useful to be able to provide several variations of a shape, each with different default property values.Pencil supports this through shortcuts, which allow a stencil to be linked to by any number of shortcuts stencils, witheach shortcut specifying its own default property values.
<Shape id="label" displayName="Label" icon="Icons/plain-text.png"><Properties>
<PropertyGroup name="Text"><Property name="label" displayName="Label" type="PlainText">Hello World</
→˓Property><Property name="textColor" displayName="Color" type="Color">#808080ff</
→˓Property><Property name="shadowColor" displayName="Shadow Color" type="Color">
→˓#008000ff</Property><Property name="textFont" displayName="Font" type="Font">Arial,sans-
→˓serif|normal|normal|13px</Property><Property name="shadow" displayName="Width Shadow" type="Bool">false</
→˓Property></PropertyGroup>
</Properties><Behaviors>
<For ref="text"><TextContent>$label</TextContent><Fill>$textColor</Fill><Font>$textFont</Font>
30 Chapter 1. Stencil Developer Documentation

Pencil Documentation, Release 2.0.21
<BoxFit><Arg>new Bound(0, 0, 100, 12)</Arg><Arg>new Alignment(0, 1)</Arg>
</BoxFit></For><For ref="shadow">
<Visibility>$shadow</Visibility><TextContent>$label</TextContent><Fill>$shadowColor</Fill><Font>$textFont</Font><BoxFit>
<Arg>new Bound(1, 1, 100, 12)</Arg><Arg>new Alignment(0, 1)</Arg>
</BoxFit></For>
</Behaviors><p:Content xmlns:p="http://www.evolus.vn/Namespace/Pencil" xmlns="http://www.w3.
→˓org/2000/svg"><text id="shadow" /><text id="text" />
</p:Content></Shape>
<Shortcut displayName="Label with shadow" icon="Icons/label-shadow.png" to="label"><PropertyValue name="shadow">true</PropertyValue>
</Shortcut>
Here, a shortcut is created to the label stencil, with the shortcut overriding the default value of the label’s shadowproperty. All properties can be changed using this method. The to attribute should be equal to the target shape’s id.
A shortcut may refer to a stencil from another collection. In this situation, the to property needs to be in the form ofcollectionid:shapeId.
<Shortcut displayName="name" icon="" to="collectionId:shapeId"><!-- ... -->
</Shortcut>
Note: Due to limitations in Pencil, the referenced collection needs to be loaded first otherwise the shortcut will notwork.
Tips and Tricks
Visibility and Transform
Visibility and Transform are two universal behaviors in Pencil that can be applied to any type of object:
<Visibility>...</Visibility><Transform>...</Transform>
Forced dependencies
Upon changes being made to a specific property, all elements that have at least one behavior referring to that propertywill be invalidated and the behavior code will be executed. In some special cases, you may want a specific behavior to
1.3. Tutorial 31

Pencil Documentation, Release 2.0.21
be executed when a specific property changes even when that property is not explicitly referenced. In this case, add acomment with the format //depends $propertyName to the behavior concerned.
<For ref="text"><TextContent>new PlainText("Hello World")</TextContent><Fill>Color.fromString("#000000ff")</Fill><Font>new Font()</Font><BoxFit>
<Arg>new Bound(0, 0, 100, 12) //depends $textColor</Arg><Arg>new Alignment(0, 1)</Arg>
</BoxFit></For>
Reference Guide
Stencil Collection Structure and File Format
Stencil Collection Structure
A stencil collection is usually distributed as a single ZIP archive containing all related files for that collection.
This collection ZIP archive has one main XML file named (exactly) Definition.xml and other optional files orsub-directories containing supporting files for the main XML (primarily icon files).
The Definition.xml file name is case-sensitive and is the only required file for a collection. All other files can beomitted when not needed.
Format of the Definition.xml file
Each Definition.xml file defines a collection of stencils by providing collection information and all stencil defi-nitions. This is just a standard XML file that can be created by virtually any text editor you have on your system.
General Structure
The Definition.xml file has the following structure:
<Shapes xmlns="http://www.evolus.vn/Namespace/Pencil"xmlns:p="http://www.evolus.vn/Namespace/Pencil"xmlns:svg="http://www.w3.org/2000/svg"xmlns:xlink="http://www.w3.org/1999/xlink"
id="your_collection_id"displayName="Display name of your collection"description="More description about this collection"author="Names of the authors"url="Optional URL to its web page">
<Properties><!-- Collection properties -->
</Properties><Script>
<!-- Shared script code for your collection --></Script>
32 Chapter 1. Stencil Developer Documentation

Pencil Documentation, Release 2.0.21
<!-- Shape and shortcut definitions --><Shape>...</Shape><Shortcut>...</Shortcut>
</Shapes>
The following list summarizes the format:
• The out-most tag is <Shapes> with the namespace URI set to http://www.evolus.vn/Namespace/Pencil.
• Information about the collection is specified by the <Shapes> node’s attributes: id, displayName,description, author and url.
• A collection may have properties that can referenced as initial values for shape properties. These propertiesshould be defined in the <Properties> section of the collection.
• A collection may also have shared JavaScript code that can be re-used across its shapes. Such code can bedefined in the <Script> tag.
• Each shape in the collection is defined in a separate <Shape> tag placed right under the root <Shapes> tag.Please refer the next section for details on definition structure for a shape.
• Beside shapes, a collection may also contain shortcuts which are references to another shape with differentdefault values for its properties. Shortcuts are defined in <Shortcut> tags.
The <Shape> tag
Each shape in a collection is defined in a <Shape> tag with the following structure:
<Shape id="shape_id" displayName="Shape display name" icon="url_to_shape_icon"><Properties>
<PropertyGroup name="Property group name"><Property name="..."
displayName="..."type="...">{Default value}</Property>
<Property>...</Property><Property>...</Property>
</PropertyGroup><PropertyGroup>...</PropertyGroup>
</Properties><Behaviors>
<For ref="target_element_id"><!-- Single argument behavior, for example 'Font' --><Behavior_Name>JS expression for input value<Behavior_Name>
<!-- Multi argument behavior, for example 'BoxFit' --><Other_Behavior_Name>
<Arg>JS expression for argument 1</Arg><Arg>JS expression for argument 2</Arg>...
</Other_Behavior_Name></For>
</Behaviors><p:Content xmlns:p="http://www.evolus.vn/Namespace/Pencil" xmlns="http://www.w3.
→˓org/2000/svg"><!-- SVG content of the stencil
1.4. Reference Guide 33

Pencil Documentation, Release 2.0.21
Each element can be identified by the 'id' attributewhich is referenced by the 'ref' attributes in the Behaviorsections defined above -->
</p:Content></Shape>
The collection’s <Properties> tag
The collection’s <Properties> tag is used as the place to define properties at the collection level. This is therecommended way for stencil author to define changeable default values for shape properties. Properties defined inthis section can be referenced in the stencil’s code using the $$ syntax and can be changed by users by right-clickingon the collection in the collection pane.
The structure of this section is similar to the <Properties> section at the <Shape> level:
<Shapes>...<Properties>
<PropertyGroup name="Text"><Property displayName="Default Text Font"
name="defaultTextFont"type="Font">Helvetica|normal|normal|12px</Property>
<Property displayName="Default Text Color"name="defaultTextColor"type="Color">#000000ff</Property>
</PropertyGroup></Properties>...
</Shapes>
The collection’s <Script> tag
The collection’s <Script> tag is used to define shared JavaScript code within a collection. JavaScript code in thissection will be executed when the collection is loaded into Pencil. In the execution context of these scripts, a specialobject named collection is available and is virtually bound to the collection itself. This object is also availablein the execution of behavior and action code of each stencil so developers can use it as a shared object for storingfunction definitions and constants that need to be used across stencils.
<Shapes>...<Script commnent="Shared collection objects">
//sample constant definitioncollection.DEFAULT_PADDING = 5;
//sample shared functioncollection.gradToDeg = function (grad) {
return grad * 180 / Math.PI;};
</Script>...
</Shapes>
34 Chapter 1. Stencil Developer Documentation

Pencil Documentation, Release 2.0.21
The collection’s <Shortcut> tag
The <Shortcut> tag creates an alias to an existing stencil and provides different initial values to that stencil’sproperties. The structure of this tag is described below:
<Shapes>...<Shortcut displayName="Display name"
icon="..."to="[collection_id:]stencil_id"><PropertyValue name="property_name">new default value</PropertyValue><PropertyValue>...</PropertyValue><PropertyValue>...</PropertyValue>
</Shortcut>...
</Shapes>
Pencil Data Types
Pencil supports various data types for shape properties. Some of them are equivalent to data types in popular program-ming languages while the others are for convenience.
This document lists all supported data types in Pencil, with both JavaScript syntax and XML syntax for use in stencilcoding. Most of the supported data types have at least one way end-users can modify the value from the GUI.
Alignment
Data structure for storing two-dimension alignment.
class Alignment(h, v)
Arguments
• h (number) – horizotal alignment. 0: left, 1: center, 2: right
• v (number) – vertical alignment. 0: top, 1: middle, 2: bottom
static Alignment.fromString(s)
Arguments
• s (string) – string representation
Returns Alignment built from string representation
Alignment.toString()
Returns String representation of the Alignment
XML syntax
<Property name="test" displayName="Test" type="Alignment">h,v</Property>
1.4. Reference Guide 35

Pencil Documentation, Release 2.0.21
Editor support
Property page:
Properties of type Alignment can be edited in the shape property page.
Bool
Data type for storing boolean values.
class Bool(value)
Arguments
• value (boolean) – true or false
static Bool.fromString(s)
Arguments
• s (string) – String representation
Returns Bool built from String representation
Bool.toString()
Returns String representation of this Bool
Bool.negative()
Returns negated Bool object
XML syntax
<Property name="sample" displayName="Sample" type="Bool">value</Property>
Editor support
Context menu:
Properties of type Bool can be edited in the context menu of the shape using a checkbox item.
36 Chapter 1. Stencil Developer Documentation

Pencil Documentation, Release 2.0.21
Dimension
Data structure for storing object size, a pair of width and height values
class Dimension(width, height)
Arguments
• width (number) –
• height (number) –
static Dimension.fromString(s)
Arguments
• s (string) –
Returns Build a Dimension object from its string presentation.
Dimension.toString()
Returns String representation of the object
Dimension.narrowed(paddingX[, paddingY ])Arguments
• paddingX (number) –
• paddingY (number) –
Returns Return a new Dimension object with is created by narrowing the callee by the providedpaddings. If paddingY is omitted, paddingX will be used for both directions.
XML syntax
<Property name="box" displayName="Box" type="Dimension"p:lockRatio="true">width,height</Property>
Note:
p:lockRatio Meta constraint used in XML syntax to hint that the ratio of this object should be maintained when itswidth or height is changed.
1.4. Reference Guide 37

Pencil Documentation, Release 2.0.21
Editor support
On-canvas editor:
A Dimension property with the special name of box can be edited using the on-canvas geometry editor.
Toolbar editor:
And also via the geometry toolbar located on the top of the Pencil application window.
Bound
Data structure for storing a bounding box which is a composite of a location and a size.
class Bound(left, top, width, height)
Arguments
• left (number) –
• top (number) –
• width (number) –
• height (number) –
static Bound.fromBox(box, paddingX, paddingY)
Arguments
• box –
• paddingX (number) –
• paddingY (number) –
Returns a new Bound object from a Dimension() object narrowed down on each sides usingthe provided paddings
38 Chapter 1. Stencil Developer Documentation

Pencil Documentation, Release 2.0.21
var b = Bound.fromBox(box, x, y);//equals to:var b = new Bound(x, y, box.w - 2 * x, box.h - 2 * y)
static Bound.fromString(s)
Arguments
• s (string) –
Returns A Bound object built from its string presentation
Bound.toString()
Returns string presentation of a Bound object
Bound.narrowed(paddingX, paddingY)
Arguments
• paddingX (number) –
• paddingY (number) –
Returns a new Bound object by using the callee and narrowing down each sides by the providedpaddings
Color
Data structure for storing object color with alpha blending
class Color()Default opaque black color
static Color.fromString(String)
Arguments
• s (string) – color representation
Returns a color object from string presentation in CSS numerical color syntax.
Color.fromString("#ffffffff"); // solid whiteColor.fromString("#ffffff"); // also solid whiteColor.fromString("rgb(255, 0, 0)"); // solid red
// semi-transparent blue:Color.fromString("rgba(0, 0, 255, 0.5)");
Color.fromString("transparent"); //transparent
//semi-transparent black:Color.fromString("#00000033");
Color.toString()
Returns the extended hexa string presentation of the color: #RRGGBBAA
Color.toRGBString()
Returns the CSS color in the format of rgb(red, green, blue)
Color.toRGBAString()
1.4. Reference Guide 39

Pencil Documentation, Release 2.0.21
Returns the CSS color in the format of rgba(red, green, blue, alpha)
Color.shaded(percent)
Arguments
• percent (number) –
Returns a darker version of a color using the provided percent.
Color.hollowed(percent)
Arguments
• percent (number) –
Returns a more transparent version of a color by the provided percent.
Color.inverse()
Returns negative version of a color
Color.transparent()
Returns a fully transparent version of a color
XML syntax
<Property name="color" displayName="My Color" type="Color">#000000ff</Property>
Editor support
Property page:
Properties of type Color can be edited in the property dialog with a color chooser that supports both simple andadvanced mode.
40 Chapter 1. Stencil Developer Documentation
Pencil Documentation, Release 2.0.21
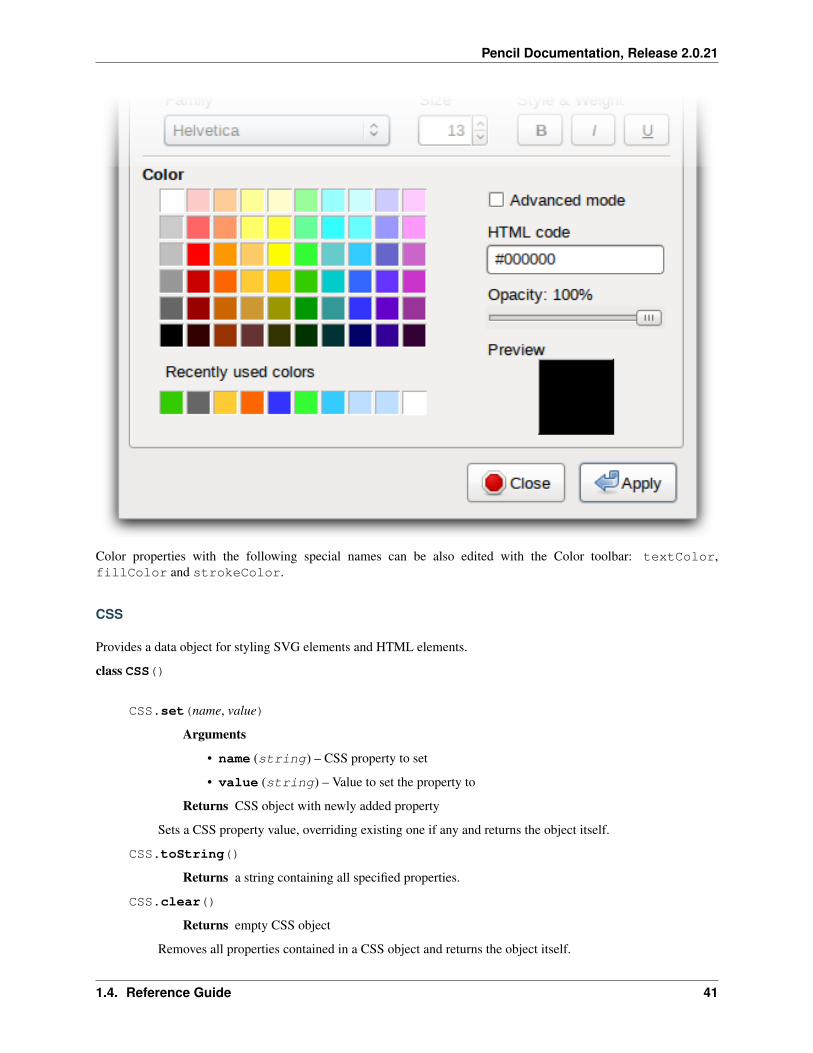
Color properties with the following special names can be also edited with the Color toolbar: textColor,fillColor and strokeColor.
CSS
Provides a data object for styling SVG elements and HTML elements.
class CSS()
CSS.set(name, value)
Arguments
• name (string) – CSS property to set
• value (string) – Value to set the property to
Returns CSS object with newly added property
Sets a CSS property value, overriding existing one if any and returns the object itself.
CSS.toString()
Returns a string containing all specified properties.
CSS.clear()
Returns empty CSS object
Removes all properties contained in a CSS object and returns the object itself.
1.4. Reference Guide 41

Pencil Documentation, Release 2.0.21
CSS.unset(name)
Arguments
• name (string) – Removes a specific property from a CSS object if any
Returns the object itself.
CSS.get(name)
Returns the properties value.
CSS.contains(name)
Returns Check whether a CSS object contains the property.
CSS.setIfNot(name, value)Sets a property to valuee if the property has not already been set, returns the object itself
static CSS.fromString(literal)Parses the CSS string and creates a CSS object containing all parsed property/value pairs.
CSS.importRaw(literal)Parses the CSS string and add all parsed property/value pairs to the object overriding any existing proper-ties.
Enum
Data structure to store an option with the possibility to specify available options via XML metadata.
XML syntax
<Property name="type" displayName="Type" type="Enum"p:enumValues="['one|One', 'two|Two']">two</Property>
• value: Member field storing the selected value’s id.
• p:enumValues: An array literal containing all possible options. Each option is in the syntax of id|DisplayName.
Editor support
Context menu:
Properties of type Enum can be edited in the context menu of the shape.
42 Chapter 1. Stencil Developer Documentation

Pencil Documentation, Release 2.0.21
Font
Data structure for manipulating font information.
class Font()
static Font.fromString(s)
Arguments
• s (string) –
Returns a Font object created from its string presentation.
Font.getPixelHeight()
Returns the font height in pixels.
Font.toString()
Returns a string representing the font object.
Font.toCSSFontString()
Returns the string presentation of the font object in CSS syntax.
Font.getFamilies()
Returns the families field of the font.
XML syntax
<Property name="textFont" displayName="Text Font"type="Font">{families}|{weight}|{style}|{size}[|{decor}]</Property>
Editor support
Property page:
Properties of type Font can be edited in the property dialogue.
A Font property with the special name textFont is editable with the Font style toolbar.
1.4. Reference Guide 43

Pencil Documentation, Release 2.0.21
Handle
Provides a special data object representing a 2D coordinate that can be modified on the drawing canvas by useroperations.
<Property name="a" displayName="Start Point" type="Handle">x,y</Property>
• x: Distance to the left border of the shape
• y: Distance to the top border of the shape
• p:lockX: The x value should not be changed, horizontal movement is disabled. Default value: false
• p:lockY: The y value should not be changed, vertical movement is disabled. Default value: false
• p:minX: Minimum value of x. Movement of the handle should not pass this lower limit.
• p:maxX: Maximum value of x. Movement of the handle should not pass this upper limit.
• p:minY: Minimum value of t. Movement of the handle should not pass this lower limit.
• p:maxY: Maximum value of y. Movement of the handle should 0not pass this upper limit.
• p:noScale: Disable auto-scaling of Handle value when the object box property is changed. Default value:false
Editor support
On-canvas editor:
Each property of type Handle is shown as a yellow bullet when the shape is focused. The property can be edited bymoving the bullet.
ImageData
Data structure that stores a binary bitmap image.
class ImageData(w, h, dataUrl)
Arguments
• w (number) – The image width
• h (number) – The image height
• dataUrl (string) – The base64 data URL of the image
44 Chapter 1. Stencil Developer Documentation

Pencil Documentation, Release 2.0.21
var image = new ImageData(10, 15, "data:image/png;base64,iVBORw0KQmCC...");
static ImageData.fromString(s)
Returns an ImageData object from its string presentation.
ImageData.toString()
Returns the string presentation of the object.
XML syntax
<Property name="image" displayName="Image"type="ImageData"><![CDATA[w,h,url]]></Property>
PlainText
Data object that represents a piece of plain text.
class PlainText(s)
Arguments
• s (string) – The text string
static PlainText.fromString(s)
Arguments
• s (string) –
Returns A PlainText object created from the given string
PlainText.toString()
Returns PlainText object as a String
PlainText.toUpper()
Returns Uppercase version of this PlainText
XML syntax
<Property name="text" displayName="Text"type="PlainText"><![CDATA[Pugnabant totidemque vos nam]]></Property>
Editor support
On-canvas editor:
1.4. Reference Guide 45

Pencil Documentation, Release 2.0.21
PlainText properties can be edited right on the canvas using a simple text input.
RichText
Data structure for storing rich-text content in HTML format.
class RichText(String s)
Arguments
• s (string) – Rich text string
static RichText.fromString(String s)
Arguments
• s (string) – Rich text String
Returns a RichText object from the provided JS string
RichText.toString()
Returns The String representation of this object
XML syntax
<Property name="text" displayName="Text"type="RichText"><![CDATA[A <b>rich</b> text string]]></Property>
Editor support
On-canvas editor:
46 Chapter 1. Stencil Developer Documentation

Pencil Documentation, Release 2.0.21
RichText properties can be edited right on the canvas using a rich-text input.
StrokeStyle
Data structure for storing stroke styling information.
class StrokeStyle(width, dasharray)
Arguments
• width (number) –
• dasharray (array) – The dasharray value is specified as a JavaScript array containinglengths of dashes and spaces. More information can be found in the SVG Specification forStroke dash array.
// construct a 'dash-space-dot-space' stroke at 1px widthvar stroke = new StrokeStyle("1,[4,2,1,2]");
static StrokeStyle.fromString(s)
Arguments
• s (string) –
Returns a StrokeStyle object from its string presentation.
StrokeStyle.toString()
Returns String representation of this object
StrokeStyle.condensed(ratio)
Arguments
• ratio (number) –
Returns a new version of the callee created by condensing the width by the provided ratio.
1.4. Reference Guide 47

Pencil Documentation, Release 2.0.21
XML syntax
<Property name="stroke" type="StrokeStyle"displayName="Border Style">w|dasharray</Property>
When the dasharray is omitted, the stroke is considered solid.
<Property name="stroke" type="StrokeStyle"displayName="Border Style">1|[4,2,1,2]</Property>
Editor support
Property page editor:
StrokeStyle properties can be edited in the property page of the shape.
ShadowStyle
Data structure that stores shadow style information.
class ShadowStyle(dx, dy, size)
Arguments
• dx (number) –
• dy (number) –
• size (number) –
static ShadowStyle.fromString(s)
Arguments
• s (string) –
Returns a ShadowStyle object from its string presentation
var style = ShadowStyle.fromString("3|3|10");
ShadowStyle.toString()
Returns The string representation of this object
48 Chapter 1. Stencil Developer Documentation

Pencil Documentation, Release 2.0.21
ShadowStyle.toCSSString()
Returns the string representation in CSS syntax.
XML syntax
<Property name="shadow" type="ShadowStyle"displayName="Box Shadow">dx|dy|size</Property>
Editor support
Property page editor:
ShadowStyle properties can be edited in the property page of the shape.
Behavior Reference
To help Stencil developers define how the content in shapes should be changed to be reflect a shape’s properties, Pencilprovides the Behavior concept. With behaviors, attributes or content of the target object can be changed based on theBehavior’s input values. The target object can be an SVG object or an HTML object in the <Content> section ofthe shape.
This section lists all supported behaviors in Pencil, each with XML syntax and examples.
Behaviors applied to an object within the shape are defined as below::
<For ref="target_object_id"><Behavior_1>....</Behavior_1><Behavior_2>....</Behavior_2>.......<Behavior_n>....</Behavior_n>
</For>
For the ease of understanding the examples used in this document, let’s assume that we have a box property of typeDimension() defined for the shape:
<Property name="box" type="Dimension">150,150</Property>
CustomStyle
This behavior is used to assign a value to a specific CSS attribute of the target object. Value and name are specified inthe input arguments of the behavior.
1.4. Reference Guide 49

Pencil Documentation, Release 2.0.21
Target object
Any object.
XML Syntax
<CustomStyle><Arg>propertyName</Arg><Arg>value</Arg>
</CustomStyle>
Input value
• propertyName: name of CSS property.
• value: value to assign to propertyName.
Result
The the CSS property propertyName of the target object is assigned the provided value.
Example
<CustomStyle><Arg>"width"</Arg><Arg>$box.w + "px"</Arg>
</CustomStyle>
Attr
This behavior is used to assign a value to a specific XML attribute of the target object. Value and name (and optionalnamespace URI) are specified in the input arguments of the behavior.
Target object
Any object.
XML Syntax
<Attr><Arg>attributeName</Arg><Arg>value</Arg><Arg>namespace</Arg>
</Attr>
50 Chapter 1. Stencil Developer Documentation

Pencil Documentation, Release 2.0.21
Input value
• attributeName: name of attribute.
• value: value to assign to propertyName.
• namespace: namespace URI that this attribute is in. If the attribute has no namespace, the namespace argumentcan be omitted.
Result
The attributeName attribute of the target object is assigned the provided value.
Example
<Attr><Arg>"width"</Arg><Arg>$box.w</Arg>
</Attr><Attr>
<Arg>"xlink:href"</Arg><Arg>value</Arg><Arg>PencilNamespaces.xlink</Arg>
</Attr>
If the namespace was defined in a parent node, the namespace argument could be omitted.
<Attr><Arg>"xlink:href"</Arg><Arg>value</Arg>
</Attr>
Box
This behavior is used to assign values to the width and height attributes of the target object.
Target object
Any object that supports width and height attributes.
XML syntax
<Box>dimensionValue</Box>
Input value
• dimensionValue: an expression that returns a value of type Dimension().
1.4. Reference Guide 51

Pencil Documentation, Release 2.0.21
Result
The width and height attributes of the target object are set to the values represented by the dimensionValue object.
Example
<Box>$box</Box>
Or directly
<Box>new Dimension(50,50)</Box>
Bound
This behavior is used to assign values to the width and height attributes and set the position of the target object.
Target object
Any object that supports width and height attributes.
XML syntax
<Bound>bound</Bound>
Input value
• bound: an object of type Bound()
Example
52 Chapter 1. Stencil Developer Documentation

Pencil Documentation, Release 2.0.21
<Bound>new Bound(x, y, width, height)</Bound>
<Bound>Bound.fromBox(Box, paddingX, paddingY)</Bound>
<Bound>Bound.fromBox(new Dimension(width, height), paddingX, paddingY)</Bound>
Radius
This behavior sets the rx and ry attributes of the target SVG objects that support corner radius (including Rectangleand Ellipse).
Target object
A rectangle or ellipse SVG element.
XML syntax
<Radius><Arg>rx</Arg><Arg>ry</Arg>
</Radius>
1.4. Reference Guide 53

Pencil Documentation, Release 2.0.21
Input value
• rx: number - horizontal radius
• ry: number - vertical radius
Result
The target object’s (Rectangle, Ellipse) rx and ry attributes are set to the given values.
Example
<Radius><Arg>5</Arg><Arg>5</Arg>
</Radius>
Fill
This behavior sets the fill and fill-opacity attributes of the target SVG objects that can be filled with color.
Target object
Any SVG object that can be filled with color.
XML syntax
<Fill>color</Fill>
Input value
• color: The color to fill the target with - an object of type Color().
Result
The target object’s color and opacity are set.
Example
<Fill>Color.fromString("#ffffffff")</Fill>
Or:
<Property name="color" displayName="fColor" type="Color">#000000ff</Property>....<Fill>$color</Fill>
54 Chapter 1. Stencil Developer Documentation

Pencil Documentation, Release 2.0.21
Color
This behavior sets the color and opacity attributes of the target HTML object.
Target object
Any HTML object.
XML syntax
<Color>color</Color>
Input value
• color: The desired text color for the target - an object of type Color().
Result
The target object’s color and opacity CSS properties are set.
Example
<Color>Color.fromString("#ffffffff")</Color>
Or:
<Property name="color" displayName="fColor" type="Color">#000000ff</Property>....<Color>$color</Color>
StrokeColor
This behavior sets the stroke and stroke-opacity attributes of the SVG target objects that have stroke.
Target object
Any Object that can be given a stroke.
XML syntax
<StrokeColor>color</StrokeColor>
1.4. Reference Guide 55
Pencil Documentation, Release 2.0.21
Input value
• color: Color of the stroke - an object of type Color().
Result
The target object’s stroke color and stroke opacity are set.
Example
<StrokeColor>Color.fromString("#ffffffff")</StrokeColor>
Or:
<Property name="color" displayName="fColor" type="Color">#000000ff</Property>...<StrokeColor>$color</StrokeColor>
StrokeStyle
This behavior is used to set the stroke-width and stroke-dasharray attributes of the target object.
Target object
Any Object that has a stroke.
XML syntax
<StrokeStyle>strokeStyle</StrokeStyle>
Input value
• strokeStyle: an object of type StrokeStyle().
Result
The stroke of the target object is assigned the given value.
Example
<StrokeStyle>StrokeStyle.fromString("1|[1,3]")</StrokeStyle>
Or:
56 Chapter 1. Stencil Developer Documentation

Pencil Documentation, Release 2.0.21
<Property name="strokeStyle"type="StrokeStyle"displayName="Border Style">1|[2,1,2,4]</Property>
...<StrokeStyle>$strokeStyle</StrokeStyle>
Visibility
This behavior is used to assign value to the visibility and display attributes of the target object.
Target object
Any object.
XML Syntax
<Visibility>value</Visibility>
Input value
• value: Whether the object should be visible/displayed. Either Pencil’s Bool() data object or a JavaScriptboolean value.
Result
visibility and display attributes of the target object are changed according to the input value.
Example
<Visibility>Bool.fromString("true")</Visibility>
Or:
<Property name="value" displayName="Value" type="Bool">true</Property>...<Visibility>$value</Visibility>
BoxFit
This behavior is used to set text bounds and alignment.
Target object
An SVG text object.
1.4. Reference Guide 57

Pencil Documentation, Release 2.0.21
XML syntax
<BoxFit><Arg>bound</Arg><Arg>alignment</Arg>
</BoxFit>
Input value
• bound: an object of type Bound().
• alignment: an object of type Alignment().
Result
The text content of the element is changed to fit the provided bound and given the provided alignment.
Example
<BoxFit><Arg>Bound.fromBox($box)</Arg><Arg>new Alignment(1,1)</Arg>
</BoxFit><Property name="textAlign"
displayName="Text Alignment" type="Alignment">1,1</Property>...<BoxFit>
<Arg>Bound.fromBox($box)</Arg><Arg>$textAlign</Arg>
</BoxFit>
Font
This behavior is used to set the target object’s text font. With this behavior, a set of font-related attributes are changed.
Target object
An SVG Text object or any HTML object.
XML Syntax
<Font>font</Font>
Input value
• font: an object of type Font().
58 Chapter 1. Stencil Developer Documentation

Pencil Documentation, Release 2.0.21
Result
font-family, font-size, font-weight, font-style and text-decoration attributes of the objectare assigned values derived from the given Font object.
Note that the text-decoration attribute is only supported for HTML objects. It is impossible to settext-decoration on SVG Text objects.
Example
<Font>Font.fromString("Helvetica|normal|normal|14px")</Font><Property name="font" type="Font" displayName="Default Font">→˓Helvetica|normal|normal|14px</Property>...<Font>$font</Font>
D
This behavior is used to set the d attribute of an SVG path object. The provided array of drawing functions is convertedto SVG drawing operations.
Target object
A path object.
XML Syntax
<D>[...]</D>
Input value
• [...]: an array of drawing instruction functions. Pencil supports drawing functions that are equivalent to popularSVG path data instructions:
– M(x,y): set point.
– L(x,y): draw a line from a point to x,y.
Example: <D>[M(0, 0), L(10,10)]</D>
– C(x1, y1, x2, y2, x, y): the same as C in SVG.
– c(x1, y1, x2, y2, x, y): the same as c in SVG.
– S(x2, y2, x, y): the same as S in SVG.
– s(x2, y2, x, y): the same as s in SVG.
– Q(x1, y1, x, y): the same as Q in SVG.
– q(x1, y1, x, y): the same as q in SVG.
– z: the same as z in SVG.
1.4. Reference Guide 59

Pencil Documentation, Release 2.0.21
And two Pencil-specific instructions for drawing sketchy lines:
– sk(x1, y1, x2, y2): move to x1, y1 and draw a sketchy line to x2, y2
– skTo(x, y): draw a sketchy line from the current position to x, y
Result
Each function in the input array is converted to its corresponding SVG drawing operation. Pencil-specific instructionsare also converted to standard SVG drawing operations but using a special algorithm to make the lines sketchy. Theresulting value is assigned to the d attribute of the path object.
Example
<D>[M(0, 0), L($box.w, 0), L($box.w, $box.h), L(0, $box.h), z]</D>
Transform
This behavior is used to control the transform attribute of SVG target objects. The provided array of transformationfunctions is converted to SVG transformation functions.
Target object
Any SVG object.
XML Syntax
<Transform>[...]</Transform>
Input value
[...]: an array of instruction functions. The functions are similar to the SVG transformation functions:
• rotate(x)
• translate(x, y)
• scale(x, y)
• skewX(a)
• skewY(a)
Result
The transform attribute of the SVG target object is assigned a value based on the input functions.
60 Chapter 1. Stencil Developer Documentation

Pencil Documentation, Release 2.0.21
Example
<Transform>[scale($box.w.120, $box.h/100), transform(50, 70)]</Transform>
Scale
This behavior is used to assigned to the scale function in the transform attribute of an SVG object. This behavioris equivalent to the Transform behavior with just one scale().
Target object
Any SVG object.
XML Syntax
<Scale>width_ratio, height_ratio</Scale>
Input value
• width_ratio: number - the horizontal scale ratio
• height_ratio: number - the vertical scale ratio
Result
The SVG object will be given a transform attribute containing a scale function with the given ratios. Note thatusing this behavior will empty the current value of the transform attribute.
Example
<Scale><Arg>$box.w/120</Arg><Arg>$box.h/100</Arg>
</Scale>
TextContent
This behavior is used to control the content of the target text object.
Note: this behavior does not support text wrapping for PlainText() content in SVG elements. To have thePlainText() content wrapped inside an SVG text element with a specific aligmnent, please use the PlainTextCon-tent behavior.
Target object
An SVG text object or any HTML object.
1.4. Reference Guide 61

Pencil Documentation, Release 2.0.21
XML Syntax
<TextContent>text</TextContent>
Input value
• text: a PlainText() or RichText() value.
Result
The target object’s text content is changed.
Example
<TextContent>new PlainText("text here...")</TextContent><Property name="content"
displayName="HTML Content" type="RichText">text here...</Property>....<TextContent>$label</TextContent>
PlainTextContent
This behavior is used to control the wrapped text inside an SVG text element. This is the recommended way toimplement wrapped plain-text content instead of using HTML wrapping. This behavior produces compliant SVGoutput and the resultant drawing can be used in other SVG editors like Inkscape.
Target object
An SVG text element.
XML Syntax
<!--[CDATA[<PlainTextContent-->
<arg>plainTextValue</arg><arg>bound</arg><arg>alignment</arg>
Input value
• text: an object of type PlainText().
• bound: an object of type Bound().
• alignment: an object of type Alignment().
62 Chapter 1. Stencil Developer Documentation

Pencil Documentation, Release 2.0.21
Result
Content of the target object will be filled with <tspan> elements to create wrapped text content. The transformattribute of this element may be used in for controlling the bounding.
Example
<Property name="content"displayName="Text Content"type="PlainText">text here...
...<plaintextcontent>
<arg>$content</arg><arg>Bound.fromBox($box, 10)</arg><arg>new Alignment(1, 1)</arg>
</plaintextcontent>
DomContent
This behavior populates the target object with a child DOM node.
Target object
Any object.
XML Syntax
<DomContent>domContent</DomContent>
Input value
• domContent: a DOM element or a DOM fragment to add as a child of the target object.
Please refer the associated tutorial on Dynamic DOM Content for more information.
Image
This behavior is used to control the xlink:href, width and height attributes of an SVG <image> element.
XML Syntax
<Image>imageData</Image>
Input value
• imageData: an object of type ImageData()
1.4. Reference Guide 63

Pencil Documentation, Release 2.0.21
Result
xlink:href, width and height attributes of the target <image> element are changed to be in sync with theprovided imageData input value.
Example
<Property name="icon"displayName="Icon"type="ImageData"><![CDATA[10,15,data:image/png;base64,iVBOR...]]></Property>
...
<Image>$icon</Image>
EllipseFit
This behavior is used control an ellipse element so that it fits into the provided bound.
Target object
An SVG ellipse object.
XML Syntax
<EllipseFit>box</EllipseFit>
Input value
• box: an object of type Dimension().
Result
The cx, cy, rx, ry attribute values are changed.
Example
<EllipseFit>$box</EllipseFit>
Width
This behavior is used to assign the width attribute of the target object.
64 Chapter 1. Stencil Developer Documentation
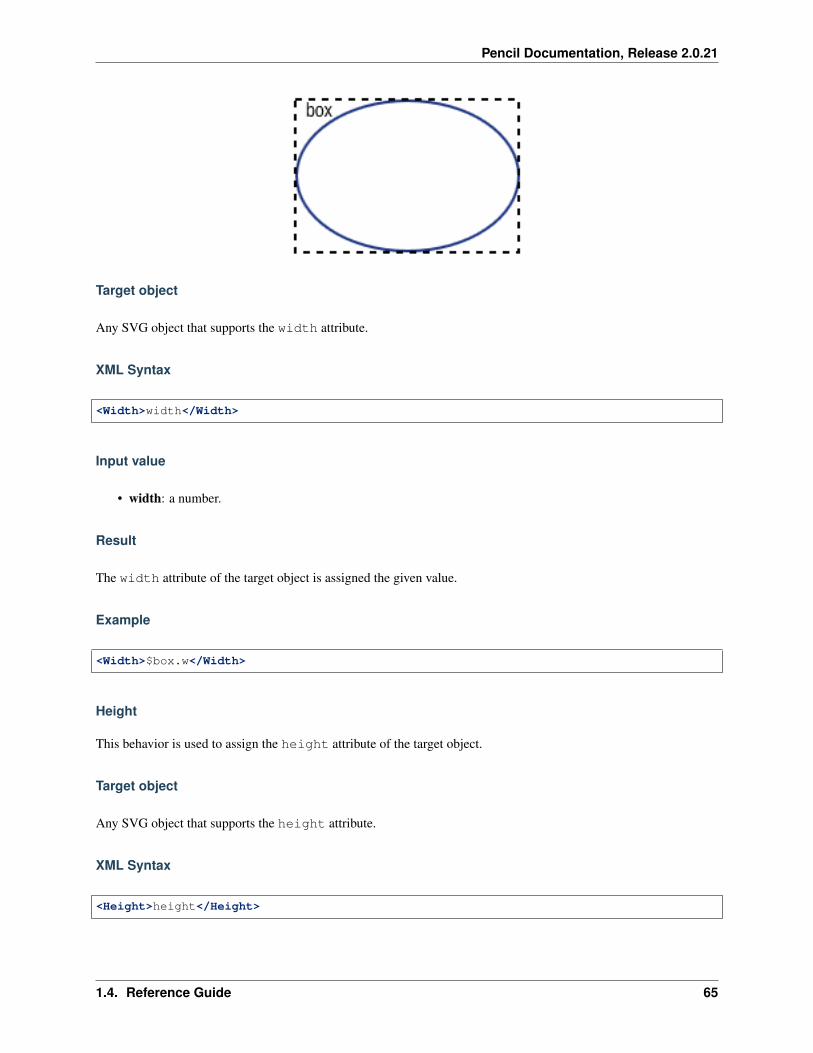
Pencil Documentation, Release 2.0.21
Target object
Any SVG object that supports the width attribute.
XML Syntax
<Width>width</Width>
Input value
• width: a number.
Result
The width attribute of the target object is assigned the given value.
Example
<Width>$box.w</Width>
Height
This behavior is used to assign the height attribute of the target object.
Target object
Any SVG object that supports the height attribute.
XML Syntax
<Height>height</Height>
1.4. Reference Guide 65

Pencil Documentation, Release 2.0.21
Input value
• height: a number.
Result
The height attribute of the target object is assigned the given value.
Example
<Height>$box.h</Height>
NPatchDomContent
This behavior is used to fill the target <g> SVG element with <image> elements provided in the Nine-Patch withcorrect scaling for the provided dimensions.
Target object
An SVG <g> element.
XML Syntax
<NPatchDomContent><arg>ninePatch</arg><arg>dimension</arg>
</NPatchDomContent>
Input value
• ninePatch: a Nine-Patch data structure.
• dimension: an object of type Dimension().
Result
The Nine-Patch data structure is used together with the dimension object to calculate scaling for patches. <image>elements for the patches are generated and added as children of the target <g> element.
Example
For more information on how to use this behavior, please refer the associated tutorial on Using Nine-Patch.
66 Chapter 1. Stencil Developer Documentation

Pencil Documentation, Release 2.0.21
InnerText
This behavior is used to fill the content of the target object with a DOM text node.
Target object
Any object.
XML Syntax
<InnerText>value</InnerText>
Input value
• value: a string.
Result
A new DOM text node is generated with the provided value and added as a child of the target object.
Example
<InnerText>"put content here..."</InnerText>
Special Property Names
There is no actual limitation on the way shape properties can be named. Stencil developers can choose the namesthat best describe the purpose of each property. There is however a list of special names that Pencil provides specialsupport for. The following list summarizes those special names together with how they are handled in Pencil.
Prop-ertyName
Type Pencil Supports
box Di-men-sion
Shapes with this special property are supposed to be resizeable. Pencil will support resizingthe shape by showing scaling handles when it is focused on the drawing canvas. Movingthose handles will change the box property value. The way the shape is scaled upon changesof this property is defined by the stencil developer via the behavior definition.
textFont Font Value of this property can be changed using the Font toolbartext-Color
Color Value of this property can be changed using the Text color toolbar button
fillColor Color Value of this property can be changed using the Background color toolbar buttonstroke-Color
Color Value of this property can be changed using the Line color toolbar button
strokeStyle StrokeStyleValue of this property can be changed using the Line style toolbar
1.4. Reference Guide 67
Pencil Documentation, Release 2.0.21
68 Chapter 1. Stencil Developer Documentation
CHAPTER 2
Developer Documentation
This section contains useful information for people interested in contributing code to Pencil.
If you’ll be testing & debugging using Firefox, you will probably want to start off by setting up an extension develop-ment environment.
Code Overview
The application code lives under app/content/pencil/.
Many of the files directly under app/content/pencil/ are pairs of UI definitions and their JavaScript files (e.g.exportWizard.xul and exportWizard.js)
mainWindow.xul & common/pencil.js are good places to start reading the code - they are responsible forinitializing the application.
mainWindow.xul is responsible for specifying the application’s base UI, including keybindings, menus, toolbars,panes, and for including the application’s JavaScript-Files. mainWindow.js contains mostly helper functionsused in the .xul file, along with post-boot code like parsing command-line arguments & building the RecentDocuments menu.
common/pencil.js initializes a global Pencil object & sets up event listeners on boot-up. The Pencil objectcontains attributes linked to the application’s Controller, Rasterizer, etc.
common/controller.js is responsible for managing the Document & it’s Pages. The Controller ob-ject contains methods for creating new Documents/Pages, saving/loading Documents & moving/removing/duplicatingPages.
common/utils.js is a huge grab bag of randomness, from DOM & SVG manipulation to font sorting to creatingtemp files to grabbing images from the clipboard to getting a file’s extension from it’s path.
bindings/ contains components like the color picker & font editor. stencils/ contains the default StencilCollections bundled with Pencil.
You should also reference the Developer API Documentation.
69

Pencil Documentation, Release 2.0.21
Code Style
Some things to keep in mind:
• Wrap lines longer than ~80 characters
• Indent using 4 spaces, never use tabs
• Always use the strict equality operators === and !==.
• Run jshint on the changed files(this might generate a lot of errors on some files).
Debugging
If you set the DEBUG environmental variable when building Pencil, the build.sh script will enable debuggingfeatures like printing calls to dump() to the console or debug() to the javascript console:
export DEBUG=truecd build./build.sh linux# If you've got XULRunner:xulrunner Outputs/Linux/application.ini -console -jsconsole -purgecaches# If you only have Firefox installed:firefox --app Outputs/Linux/application.ini -console -jsconsole -purgecaches
Setting DEBUG will cause also Pencil to start a remote debugging server on port 6000. This lets you use Firefox’sDOM Inspector to debug Pencil - but only when you run Pencil using xulrunner. You can connect Firefox to thedebugging server by going to Firefox -> Tools -> Web Developer -> Connect.... You may needto enable Remote Debugging under Firefox’s Web Developer Tools Settings(Ctrl-Shift-I then click thegear icon in the upper-right).
Writing Documentation
This documentation is built using Sphinx, which adds some extra flavor on top of reStructuredText. If you’re unfamiliarwith these tools a good starting point is the reStructuredText Primer, Sphinx Markup & JavaScript Domain pages inSphinx’s documentation.
The API documentation is generated by the Sphinx plugin autoanysrc. This parses all the comments in javascriptfiles from the /app/ directory. If a comment follows the form /*""" docs here */, autoanysrc will add thecomment to the Developer API Documentation page. For example:
/*"""Module/Section Name===================
A description about the current file
*/function SomeClass(arg) {
/*""".. class:: SomeClass(arg)
A text description of the class
:param string arg: The argument you must pass in when initializing
70 Chapter 2. Developer Documentation

Pencil Documentation, Release 2.0.21
.. attribute:: arg
The argument passed to the constructor
*/this.arg = arg;
}SomeClass.prototype.someFunction = function() {
/*""".. function:: someFunction(void) {
:returns: something
*/return this.arg;}
}
Note that the dots for the function annotation should be indented by one space, so they line up with the * of the/*. This will create the proper nesting in the final documentation.
The Build System
The build.sh script is responsible for building everything. Each build is usually in two steps: copying & modifyingfiles common to all builds then customizing those files for the specific build(by removing files, embedding xulrunner,creating the expected directory structure, etc.).
The build script uses the properties.sh file to hold variables such as the current version & the mini-mum/maximum firefox/xulrunner versions. The script uses replacer.sh to replace all instances of @VARIABLE@with the value of VARIABLE in the file passed to it.
If you add a variable to properties.sh you must modify the replacer.sh script to replace the variable. Ifyou add a variable to a file, you must make sure that file is processed by replacer.sh at some point(usually in theprep() function).
replacer.sh uses the sed-debug-script to remove all the text between //DEBUG_BEGIN and //DEBUG_END. This can be used to enable code only when building for development. If you add //DEBUG_BEGIN and//DEBUG_END to a file, make sure build.sh passes the file to replacer.sh``(again, this usuallyhappens in the ``prep() function).
You can pass the clean argument to build.sh to remove all the outputs. You can use maintainer-clean toremove any XULRunner downloads as well.
2.5. The Build System 71

Pencil Documentation, Release 2.0.21
72 Chapter 2. Developer Documentation

CHAPTER 3
Developer API Documentation
This section contains documentation on Pencil’s internal API for Pencil’s developers.
Controller
The Controller() is responsible for managing the Document & its Pages. It is usually accesed via the globalPencil object.
class Controller(win)
Arguments
• win – The window the controller should manipulate.
Controller.mainViewThe Element containing the application’s main display window.
The Controller object contains methods for creating new Documents/Pages, saving/loading Docu-ments & moving/removing/duplicating Pages.
Pencil
Initializes a global Pencil namespace & sets up event listeners on boot.
class Pencil()
The Pencil namespace contains attributes linked to the application’s Controller, Rasterizer, etc. aswell as various helper functions.
Pencil.controllerA Controller() initialized from the XUL window.
Pencil.getDocumentExporterById(id)
Arguments
73

Pencil Documentation, Release 2.0.21
• id – The id of a DocumentExporter.
Returns The requested DocumentExporter or null if a matching DocumentExporter cannot befound.
Pencil.setPainterCommandChecked(id)
Arguments
• v – boolean; currently only as false; determines state of the format painter function.
Returns undefined
Side Effect: If passed value v is false, it deactivates the format painter tool (used for copying formats ofstencils on canvas) Side Effect: If passed value v is false, it removes the painter class from all canvas(“pages” in the GUI) if passed value v is false.
Called on click on stencils on canvas or if the toolbarFormatPainterCommand button is clicked.
Pencil.setupCommands()Activates & deactivates commands via the Pencil._enableCommand() function along with the idsof the <command> XUL Elements from mainWindow.xul.
Called e.g. if an element is selected in order to provide applicable commands.
Whether a command is activated or deactivated depends on the state of the application(if a document hasbeen created, if there is an active canvas element, etc.) and the active element (e.g. a selected stencil)
Pencil._enableCommand(name, condition)
Arguments
• name (string) – An id of a <command> XUL Element.
• condition (boolean) – Determines whether the command is activated or deactivated.A value of true activates the command.
CollectionManager
class CollectionManager()A namespace responsible for loading and unloading Stencil Collections.
74 Chapter 3. Developer API Documentation

CHAPTER 4
Maintainer Documentation
This section contains some information that’s useful for Pencil maintainers.
Creating a New Release
There’s a release.sh script that lives in the build/ directory. This script automates:
1. Creating a release branch
2. Updating the version number
3. Sectioning off the changelog
4. Updating distribution-specific files
5. Creating a release commit & tag
6. Pushing the branch to origin
7. Creating a release on Github
8. Uploading the built packages to the Github release
You will need git, curl, sed and jshon. Then you can just pass the new version number to the script:
cd build./release.sh 2.4.42
Once the script is complete, you will have to manually merge the release branch into the master and developbranches, then delete the release branch:
git checkout mastergit merge release-v2.4.42git push origingit checkout developgit merge release-v2.4.42git push origin
75

Pencil Documentation, Release 2.0.21
git push origin :release-v2.4.42git branch -d release-v2.4.42
76 Chapter 4. Maintainer Documentation

CHAPTER 5
Indices and tables
• genindex
• modindex
• search
77

Pencil Documentation, Release 2.0.21
78 Chapter 5. Indices and tables

Index
AAlignment() (class), 35Alignment.toString() (Alignment method), 35
BBool() (class), 36Bool.negative() (Bool method), 36Bool.toString() (Bool method), 36Bound() (class), 38Bound.narrowed() (Bound method), 39Bound.toString() (Bound method), 39
CCollectionManager() (class), 74Color() (class), 39Color.hollowed() (Color method), 40Color.inverse() (Color method), 40Color.shaded() (Color method), 40Color.toRGBAString() (Color method), 39Color.toRGBString() (Color method), 39Color.toString() (Color method), 39Color.transparent() (Color method), 40Controller() (class), 73Controller.mainView (Controller attribute), 73CSS() (class), 41CSS.clear() (CSS method), 41CSS.contains() (CSS method), 42CSS.get() (CSS method), 42CSS.importRaw() (CSS method), 42CSS.set() (CSS method), 41CSS.setIfNot() (CSS method), 42CSS.toString() (CSS method), 41CSS.unset() (CSS method), 41
DDimension() (class), 37Dimension.narrowed() (Dimension method), 37Dimension.toString() (Dimension method), 37
FFont() (class), 43Font.getFamilies() (Font method), 43Font.getPixelHeight() (Font method), 43Font.toCSSFontString() (Font method), 43Font.toString() (Font method), 43
IImageData() (class), 44ImageData.toString() (ImageData method), 45
PPencil() (class), 73Pencil._enableCommand() (Pencil method), 74Pencil.controller (Pencil attribute), 73Pencil.getDocumentExporterById() (Pencil method), 73Pencil.setPainterCommandChecked() (Pencil method),
74Pencil.setupCommands() (Pencil method), 74PlainText() (class), 45PlainText.toString() (PlainText method), 45PlainText.toUpper() (PlainText method), 45
RRichText() (class), 46RichText.toString() (RichText method), 46
SShadowStyle() (class), 48ShadowStyle.toCSSString() (ShadowStyle method), 48ShadowStyle.toString() (ShadowStyle method), 48static Alignment.fromString() (static Alignment method),
35static Bool.fromString() (static Bool method), 36static Bound.fromBox() (static Bound method), 38static Bound.fromString() (static Bound method), 39static Color.fromString() (static Color method), 39static CSS.fromString() (static CSS method), 42
79

Pencil Documentation, Release 2.0.21
static Dimension.fromString() (static Dimension method),37
static Font.fromString() (static Font method), 43static ImageData.fromString() (static ImageData method),
45static PlainText.fromString() (static PlainText method),
45static RichText.fromString() (static RichText method), 46static ShadowStyle.fromString() (static ShadowStyle
method), 48static StrokeStyle.fromString() (static StrokeStyle
method), 47StrokeStyle() (class), 47StrokeStyle.condensed() (StrokeStyle method), 47StrokeStyle.toString() (StrokeStyle method), 47
80 Index