pedestrian safety lesson plans - colorado department of
TRANSCRIPT

Colorado Department of Transportation
Pedestrian Safety Lesson Plans:Kindergarten through 3rd grade

Photo credits:Sprinkle Consulting, Inc.Joshua Lawton/Consortium Productionshttp://www.worldchanging.com phott by Jay Willijaasper

Colorado Department of Transportation
1
Colorado Department of Transportation
1
INTRODUCTIONAs recently as 1969 about half the school aged children in the United States walked or bicycled to school. Today fewer than 15% of school children walk or bike to school and as much as 20-30% of morning traffi c is generated by parents driving their children to school. Children are less active today and the majority of children living within a 1/2 mile of schools are driven in private vehicles. Obesity rates are on the rise and the cost of obesity and other health related challenges have signifi cant impacts on the rising cost of health care in the Unites States, not to mention the lifestyles of our children.1 In response to these challenges, in an effort to encourage healthy living, the Colorado Department of Transportation has developed a series of pedestrian and bicycle safety lesson plans in support of the Colorado Safe Routes to School program.These lesson plans, which help educators teach children about safe walking and bicycling, introduce a variety of skills that can help children stay safe while they walk by teaching them skills that will help them safely cross the street. Statistics show that child pedestrians are disproportionately represented in injury crashes and that the typical factors in those crashes that can be mitigated by education and practice.
Fifty to sixty percent of pedestrian injuries to children aged 5 to 9 are “mid-block dart-out” crash types. Pedestrians under age 10 are over represented in crashes where contributing factors are “ran into street,” “ran from between parked vehicles,” and “playing in street.” (Federal Highway Administration, 1996).
HOW TO USE THESE LESSON PLANSThese lessons are based on Matlin’s theory of bottom-up or stimulous-driven processing. The lessons break the process of crossing the street down into the individual components of the task. The key to success with this program is to have the children actively engage in each task a number of times. This repetition will help students develop the habit and build on a conceptual understanding of what it means to cross safely.2
This curriculum is a combination of indoor and outdoor lessons that can be used together or separately, depending on time and space available. Each lesson builds on the concepts and skills of the previous one, and the review of the concepts and key messages is encouraged. The outdoor lessons are the practical application of the skills learned in the indoor lessons.
RELATIONSHIP TO COLORADO ACADEMIC STANDARDSThese lessons are age appropriate, and therefore span kindergarten through second grade. The Kindergarten lessons satisfy the following academic standard for the Kindergarten grade level the Health and Physical Education content area:
Standard 2. Explain safe behavior as a pedestrian and with motor vehicles
1 What is Safe Routes to School: Background and Statistics; Safe Routes to School National Partnership 2 Child Pedestrian Safety Education: Applying Learning and Developmental Theories to Develop Safe Street-Crossing Behaviors, p.12; NHTSA (2009)
Colorado Department of Transportation Safe Routes to SchoolPedestrian Safety Lesson PlansKindergarten through 2nd Grade

Colorado Department of Transportation
2
Colorado Department of Transportation
2
Evidence Outcomes: a. Explain safe behavior when getting on and off while riding on school buses e. Demonstrate safe pedestrian behaviors
While all of these lessons will satisfy this standard, some of the concepts may be too advanced for the Kindergarten age group and therefore not appropriate for this group. Lessons may be adapted to satisfy other standards.
MATERIALS
Many of the lessons included in this section use Florida’s Safe Routes to School elementary Traffi c DVD or the WALK smart/BIKE smart DVD to introduce the concepts. The Safe Routes to School DVD is a compendium of pedestrian traffi c safety video clips. It is available by emailing [email protected] .edu. The WALKsmart/BIKEsmart DVD is available by emailing [email protected] or by calling (541) 349-4845.
Where the DVDs are needed, they will be listed in the Materials section. Notes will also be included in each section about how to adapt the lesson if the video is not available. Worksheets and other supplementary materials will be included following each lesson.
ACKNOWLEDGEMENTSThere are a number of pedestrian and bicycle safety programs in use across the country. Research for this project included the review of a variety of these programs. The lessons included in this series are modelled after the Florida’s Safe Routes to School Elementary Traffi c Safety Education Program. Additional program references include the following:
Safe Routes for Kids, the Bicycle Transportation AllianceWALKSMART/BIKESMART VERMONT!Iowa Kids on the MoveSafe Kids Worldwide
Thanks also to Jenna Berman of Bike Colorado and Landon Hilliard, Boulder Valley School District and numerous teachers and reviewers who graciously gave their time to this project.
FUNDED BYThis project was funded by the Colorado Department of Transportation and a Safe Routes to School Grant.

Colorado Department of Transportation
3
Colorado Department of Transportation
3
LESSON LISTPedestrian and School Bus Safety
Lesson Title Page Indoor/Outdoor1 What is traffi c? Introduction 4 Indoor2 What does it mean to be visible? 5 Indoor3 Being visible 6 Indoor4 Stopping at the edge; stopping and searching 8 Indoor5 Crossing the street 11 Indoor6 Visual barriers; model street crossing 13 Indoor7 Visual barriers; model street crossing 15 Outdoor8 Crossing intersections 16 Indoor/Outdoor9 Parking lot safety 20 Outdoor10 School bus safety 21 Indoor/outdoor12 Helmet fi tting 27 Indoor/Outdoor13 Review/evaluation and certifi cates 27 Indoor

Colorado Department of Transportation
4
GRADE(S): KINDERGARTEN, 1ST, 2ND
OBJECTIVE: To understand traffi c and street dangers; to understand the importance of asking an adult to help cross the street. The majority of crashes and fatalities among this age group are caused by “dart outs.” By helping students begin to understand the basic concepts of sharing spaces with vehicles, “dart outs” and other dangerous behaviour can be minimized.
KEY MESSAGES: Understand all things that make up traffi c and share the same road.
VOCABULARY: traffi c, ‘dart-out’, pedestrian, dangerous, hazard
ACTIVITY: Defi ne and discuss traffi c.Ask strudents if they walk and some reasons why.Ask the class what might be dangerous about the street as a pedestrian.Have a discussion about what to do if toys, pets, other children or parents are in the street. Ask students where to walk (sidewalk, side of street, facing traffi c).
After reviewing traffi c and the inherent dangers, ask students why they should ask an adult to help and never enter the street unsupervised (even to greet an adult in the street).
Assessmnent: Student answers should refl ect an understanding of traffi c and street dangers.
Ask students to tell stories about their experiences with the street. You will be surprised what they know already and can share with the class!
Review key messages
LESSON TIME: 10 Minutes
MATERIALS: None
TAKE HOME: None
LESSON 1: What is traffi c? Introduction

Colorado Department of Transportation
5
GRADE(S): KINDERGARTEN, 1ST, 2ND
OBJECTIVE: To understand the need to be visible to drivers. Children don’t typically understand that bad weather and low-light conditions make it harder for motorists to see pedestrians.
KEY MESSAGES: Drivers don’t always see pedestrians, particularly children; bad weather can make this even more challenging for drivers.
VOCABULARY: traffi c, pedestrian, visible, low-light
ACTIVITY: Begin by asking students to help explain what ‘pedestrian’ means.Answer: Someone who is walking on foot.
Ask children to think of times when they have been a pedestrian in the last week.Answer: Walking to school, crossing the street to go to a neighbors house, walking to a nearby park, crossing a parking lot to get to the store, etc.
Tell students “Walking, playing and running can be fun, healthy and safe activities if you remember some important safety tips while near roadways and cars.”
Ask children to think about and respond with true or false to this statement: if you can see a car, then the driver can see you.Answer: False. Call on a few children who correctly responded false to explain their reasoning.
Tell students “Many times drivers do not see pedestrians. In fact pedestrians are especially diffi cult to see at night, dawn, dusk and in bad weather. It’s important to be VISIBLE!”
ACTIVITY: Distribute strips of wax paper and have the children hold them up over their eyes. Have the children pretend that the wax paper is fog or rain, and explain that neither drivers nor pedestrians can see as well in bad weather. Ask children to note: Which things are most easily seen through the wax paper? Examples: light from the window, bright/light colors, etc.
OPTIONAL ACTIVITY: Have several children wearing dark and light clothing stand on opposite sides of the classroom. Ask the children to look at the students through the wax paper and identify which they see more easily.
Review key messages.
LESSON 2: What does it mean to be visible?
LESSON TIME: 15 minutes
MATERIALS: 1) Wax paper torn off in 4-inch strips (one per student)
TAKE HOME: None

Colorado Department of Transportation
6
GRADE(S): KINDERGARTEN, 1ST, 2ND
OBJECTIVE: To understand how pedestrians can be most visible to drivers in low-light conditions
KEY MESSAGES: Bright colors and retro-refl ective materials make pedestrians more visible to drivers
VOCABULARY: traffi c, pedestrian, visible, retro-refl ective, dawn, dusk
ACTIVITY:Ask for three volunteers: one in white or bright colored clothing, and two in dark-colored clothing. The rest of the children should be ready to write down the three safety rules for visibility as they are discovered. Perform these experiments to help children decide three guidelines for being most visible to drivers.
1. Have two children walk across the front of the group, one child in light-colored clothing and one with dark. Ask “Which one is most visible?”
Summarize the exercise with the following rule:RULE 1: Wear white or bright-colored clothing, footwear and accessories when walking during the day.
2. Now turn off or dim the lights and have the two children in dark-colored clothing walk across the front of the room, but give one a fl ashlight to carry and shine around the room as he/she walks. Which student is most visible?
Summarize the exercise with the following rule:RULE 2: Carry a fl ashlight when walking at night, dawn, dusk or in bad weather.
3. Now, have the same two children in dark-colored clothing walk across the front of the room. One student should wear or carry clothing with retro-refl ective material as he/she walks. This time, various children in the audience should be given the chance to hold the fl ashlight at eye level at they shine it around the front of the room, simulating moving car headlights. (it is important that the fl ashlight is shone from eye level to that they light will be refl ected back to the eye.) Which student is most visible?
Summarize the exercise with the following rule: RULE 3: Wear clothing, footwear and accessories with retro-refl ective material when walking at night, dawn, dusk or in bad weather.
ACTIVITY: Have children look at their shoes, backpacks and clothing to determine if they are wearing any retro-refl ective materials. Have students identify/model their gear.
LESSON 3: Being visible
LESSON TIME: 20 minutes
MATERIALS: 1) Sample of retro-refl ective material: (back-pack, police/fi re fi ghters uniforms, athletic shoes, sample tape from 3M, fl ashlight
TAKE HOME: None

Colorado Department of Transportation
7
ACTIVITY: Have students fold a piece of paper in half. On one side, have students draw a pedestrian who might be diffi cult to see (wearing dark clothing, etc.). On the other side, have children draw a pedestrian who is properly dressed and equipped for walking at dusk (wearing light colors or clothing, shoes and accessories with retro refl ective material, and carrying a fl ashlight.
Assessment: Have students share with the class about their pedestrians.
Review key messages.
LESSON 3: Being visible

Colorado Department of Transportation
8
LESSON 4: Stopping at the edge; stopping and searching
GRADE(S): KINDERGARTEN, 1ST, 2ND
OBJECTIVE: To teach children skills necessary to be safe pedestrians by teaching the basics of crossing the street with the emphasis on stopping at the edge of the street before they cross (school bus safety rules will be addressed in Lesson 10). This lesson begins by using mock street simulations to teach basic pedestrian skills, and then progressively applies these skills in various traffi c situations.
By the end of the lessons, it may be appropriate to have 2nd grade children perform these skills in a real street situations. Younger students can continue to build skills in an indoor or mock-crossing environment.
It is important to note that children at this age may not be ready to cross streets on their own. Regardless of skills, they should be encouraged to cross the street only with the help of an adult.
KEY MESSAGES: Stop at the edge before crossing the street.
VOCABULARY: traffi c, edge, searching
ACTIVITY 1: STOP AND SEARCH; STOPPING AT THE EDGE
This is a great activity to begin teaching children to STOP before crossing or entering the street and to look left-right-left and behind. More importantly, it introduces them to one of the basic components of traffi c safety: stopping at an edge and searching. Children must be taught to stop and think before they venture out in traffi c - this means stopping at an edge and looking and identifying traffi c, not just shaking their head left-right-left.
DISCUSSION TOPICS & QUESTIONS FOR THE VIDEOS:1. Traffi c Identifi cation:
a. What are the children looking for? Answer: Traffi c
b. What two things did the children do before they became a part of traffi c? Answer: Stopped at the edge, looked left-right-left
c. Why do you think the children should look left fi rst and then left once again before crossing the street? Answer: To check for cars
d. Why should they keep looking? Answer: Because cars may approach
LESSON TIME:1 class period
MATERIALS: 1) FloridaTraffi c Safety Education DVD
2)Walk Smart Interactive DVD
3)Willie the Whistle video (download at www.nhtsa.gov/peopple/injury/willie/video/html) 4) Computer/ DVD player/ Projector and screen or white wall
5) Open space where children can move around
6) Masking tape (to mark “edges” on the fl oor)
7) Audio player and fun music to fi t audio player format
TAKE HOME: None

Colorado Department of Transportation
9
2. The Best Places to Cross:a.Where are the best places to cross a street?
Answers: the cross walk, traffi c light, and where the crossing guard, policeman, or safety patrol is guiding you.
b.Where are places you shouldn’t cross?Answer: A busy street, where there aren’t the things listed above.
ACTIVITY 1:1. Show video and discuss issues(Kindergarten) Traffi c Safety Education Video download:“Stop and Look with Willy Whistle” 7 minutes
(1st & 2nd Grade) Walk Smart Interactive CD™: “Where to Walk” 3:00 minutes, “How to Read Traffi c Signs” 3:00 minutes
(1st & 2nd Grade) Traffi c Safety Education DVD™: “Stopping at the Edge” 1:30 minutes
If no video is available, ask students about their crossing experiences, and review the questions with them.
ACTIVITY 2:SET UP: Lay down strips of masking tape to identify the ‘edge’ of the sidewalk. Desks or chairs can substitute for parked cars to help explain that the “edge” may not be at the edge of the sidewalk.
1. Demonstrate proper stop and search (left-right-left-behind) technique. With your back to the class, point and look left, say “left”, then point and look right and say “right”, then point and look left again and say “left”, then say “clear and keep looking” as you cross the tape. To assure that students are actually looking and not just shaking their heads left-right-left, ask them to identify things they see when they look in that direction. You may hang mock signs or other easily identifi able items. Always verbalize your actions, and look and identify the signs on the wall, calling out what you see each time.
2. Have the children practice this stop and search pattern in the same manner at one of the “edges.”
3. Start the music, and ask the children to move around the room in the manner you ask until the music stops. For example, have them spin, elephant walk, crab walk, hop, walk backwards, etc.
4. When the music stops, children stop movement and stand at the edge
LESSON 4: Stopping at the edge; stopping and searching

Colorado Department of Transportation
10
of a strip of tape. Talk the class through the stop and search pattern. They should point to where they are looking and verbalize their actions. Repeat the activity several times.
5. Once the students have learned the technique of stopping and searching, teach them the importance of fi nding the proper edge. Explain that parked cars along curbs create new edges at which they must stop.
5. Ask the students the following questions:a. What is an edge?
Answer: a curb, road side, parked car, row of hedges, etc.
b. Why do you fi rst look left, then right, then left again, before crossing the street?
Answer: The closest lane of traffi c is the left; you need to look for traffi c coming in both directions. Then, look left once again before you start crossing because a car that you didn’t see before might be coming now.
c. Why do you keep on looking as you cross the street? Answer: Traffi c is always moving and cars and trucks may come up quickly.
d. Why is it important to stop? Answer: It is important to remember to stop fi rst and look for traffi c when you are chasing your toy/ball into the street because cars may be coming from either direction.
e. What do you do when you see a car? Answer: Stop, wait for car to pass, and search left-right-left again!
f. What do you do when there are parked cars or a row of hedges blocking your view?
Answer: The cars or hedges are the edge. Look left-right-left at this edge and cross when it is safe!
6. Repeat until the class masters the skills of stopping at their edge and looking for traffi c.
Assessment: As a class or in small groups, have students cross the street and call out the steps.
Review key messages.
LESSON 4: Stopping at the edge; stopping and searching

Colorado Department of Transportation
11
GRADE(S): KINDERGARTEN, 1ST, 2ND
OBJECTIVE: To understand the need for crossing any street with care and caution. To become familiar with the important steps in crossing a street, such as stopping at the curb and fi nding the edge, looking left, right, and left again before crossing, and continuing to scan for traffi c while crossing.
BACKGROUND: Using a mock crosswalk is good way to introduce children to the complexities of crossing the street.
KEY MESSAGES: Crossing the street involves a number of important steps such as stopping at the curb and fi nding the edge, looking left, right, and left again before crossing, and continuing to scan for traffi c while crossing.
SUGGESTED LOCATION FOR LESSON: This lesson should be taught in a gym or other indoor space. Kindergarten age students tend to have trouble with distractions outdoors. Once students learn basics of crossing the lesson can be performed outside on a playground or fi eld. Depending on school location, familiarizing students with a midblock crosswalk location may be appropriate.
PREPARATION: Practice crosswalk should be set up ahead of class. “Draw” a crosswalk using masking tape, fl oor tape, or sidewalk chalk. Mark the ends of the “curb” with traffi c cones to make it easier for students to know where to line up.
VOCABULARY: pedestrian; edge; crosswalk; scan; diagonal; straight; safe; dangerous; left; right; traffi c
ACTIVITY 1: Complete Cyrus Safety Maze worksheet
ACTIVITY 2: Crossing safely Assemble students to have a discussion about traffi c. Use the following discussion topics to engage students:
a. Do any of you walk places?
b. What kind of things do we need to be careful of when walking? Answer: Cars, trucks, bicycles, trains
c. Should kindergarteners walk places by themselves? Answer: No, you should always walk with an adult
LESSON 5: Crossing the street
LESSON TIME:1 class period
MATERIALS: 1) Masking Tape or fl oor tape
2) Small cones (optional)
3)Sidewalk chalk (if working out-doors)
TAKE HOME: Cyrus’ Safety Maze worksheet and Traffi c Signals Coloring page

Colorado Department of Transportation
12
d. Can any of you tell me what a crosswalk is?
e. Is it safe to think that cars will always stop for us in crosswalks? Answer: No, we need to look and wait for them to stop)
f. What are some things that grownups do in their cars instead of paying attention?
g. If a crosswalk signal says I should walk do I still need to look left-right-left again? Answer: Yes!
ACTIVITY 2: Crossing the street! Assemble students at sample midblock crosswalk. Defi ne the edge and where students should be standing to prepare for crossing. Students should stand near the edge but not in the street.
• Have students “check their feet” for untied shoelaces. Discuss dangers of tripping and falling in the street.
• Instruct students to look left-right-left, discuss what they are looking for. Ask students what they see (if outside, if inside ask what they might expect to see) when they look left-right-left. Correct students who are simply turning their heads or looking at the ceiling or fl oor.
• Discuss what to do if a car is coming. Students should learn to wait for cars to pass and look left-right-left again to ensure the street is clear.
• Students should practice crossing as a group. Instruct students to continue to scan the street for cars as they cross. Ask students why they shouldn’t walk too slowly or run across an intersection. (re: may trip and fall, might not make it across)
• Ask students if their neighborhoods have crosswalks. If not, ask then what would be done differently when crossing the street.
Practice this until students can perform the crossing on their own. If time allows or in another class period take students outside to practice crossing either on the playground or if possible in a parking lot which has a crosswalk painted on it. The street crossing will be more diffi cult with the distractions of traffi c, other students playing etc. Encouraging students to concentrate on crossing despite distractions is important.
LESSON 5: Crossing the street


Colorado Department of Transportation
13
LESSON 6: Visual barriers & Model Street crossing (indoor)
LESSON TIME:30 minutes
MATERIALS:Activity 1 1)Traffi c Safety Education DVD™Video:
“Visual Barriers” (1:30 minutes)
“Visual Barriers/Parking Lot”(1 minute)
“Unseen Humans”(1:30 minutes)
2) TV/ DVD player/projector/screen
TAKE HOME: NONE
GRADE(S): KINDERGARTEN, 1ST, 2ND
OBJECTIVE: To teach children to recognize visual barriers and how these barriers can block the motorists view of pedestrians and bicyclists. Can be combined with Lesson 7.
BACKGROUND INFORMATION: Children seldom realize that just because they can see a car coming toward them, the driver doesn’t always see them. Visual barriers can be serious threats to a pedestrian, cyclist or motorist because barriers obstruct the view. Identifying visual barriers in their own neighborhoods will help students remember to stay clear of them or be especially careful to make themselves visible to a car driver. They can also do this by what they wear. Discuss wearing bright visible colors, retro-refl ective tape on heels, backpacks and jackets if they are walking at dawn, dusk or especially in the dark.
This lesson uses the Traffi c Safety Education DVD. If the video is not available, draw a street including parked cars and ask students the questions.
ACTIVITY: Show the video and discuss visual barriers. Explain that sometimes we have to look around an object to see what is on the other side. In traffi c, this could be a car, truck, bush, light pole, and so on.
Use the videos to guide the discussion.
Video: Traffi c Safety Education DVD Lesson 33a: “Visual Barriers”™1:30 minutes3b: “Visual Barriers/Parking Lot”™1 minute3c: “Unseen Humans”™1:30 minutes
DISCUSSION TOPICS & QUESTIONS
1. Video 3a: “Visual Barriers”a. What is a visual barrier?
Answer: Something that blocks your view of the street.b. Why wasn’t the fi rst edge a good place to cross the street? Answer: Because parked cars blocker her view of the street and blocked cars from being able to see her.c. What is Loretta looking for? Answer: Oncoming traffi cd. Where did she stand to look? Answert At the edge of the sidewalk.e. What is a second edge? Answer: at the edge of the parked cars.

Colorado Department of Transportation
14
f. What blocked her view? Answer: The parked carsg. What did she do before she became a part of traffi c? Answer: She looked left-right-left
2. Video 3b: “Visual Barriers/Parking Lot”a. What did you see the children do? Answer: They stopped at the edge of the parked cars.b. What are they looking for? Answer: Moving vehiclesc. How did they deal with parked cars? Answer: They moved to the edge of the parked cars and looked for traffi cd. How did they deal with traffi c? Answer: They waited until it was safe to crosse. Did you see any visual barriers? Answer: Yes, the parked carsf. Why didn’t Kim and her sister cross the street after looking for cars? Answer: Because a car was comingg. Why is it important to treat a parking lot the same as a street? Answer: Because cars drive in parking lots like they drive in streets and may not see you.
3. Video 3c: “Unseen Humans”a. What visual barriers did you see? Answer: Bushes, trash cans, etc.b. Could a vehicle driver see the humans? Answer: Noc.What visual barriers do you have in your neighborhood? Answer: Buches, trees, parked cars, trash cans, etc.d. What would you do if you were hidden by a visual barrier? Answer: Move out from behind the barrier to the edge where cars can see you and you can see cars
LESSON 7: Visual barriers & Model Street crossing (outdoor)

Colorado Department of Transportation
15
OBJECTIVE: Children will learn to recognize different street crossings, visual barriers, and determine whether a crossing is safe.
BACKGROUND INFORMATION: Practicing stop and search techniques at model intersections or on barricaded streets teaches children how to make safe decisions when they come to a street crossing. It is important to demonstrate several models because children may live in the inner-city, a suburb, or in a rural environment, making their pedestrian experiences unique. Make sure the children understand it is not a race; they are not supposed to run across the street. This is also a time to discuss and recognize visual barriers, and what to do when a visual barrier is present.
ACTIVITY: Model Street Crossing & Visual Barriers (Outdoor)Outdoors in a real (sidewalk and crossing) or simulated setting.
Note: Review crossing street skills from Lesson 4, 5 and 6.
ACTIVITY:1. Construct several model streets on the playground or use a barricaded street near the school.Place a cone on each station to mark a starting point. Make each street unique with bushes or surface differences. Divide the class into several small groups with partners and a group leader. Have them practice crossing the “model” street and identifying when it’s safe to cross. Have each group demonstrate. Group leaders should guide children in making decisions on crossing the street. (1 leader for 5-8 children).
2. Put a model crossing near the edge of a building or light pole; put one beside a parked car so children must look around the car before crossing; put one beside a tall bush or garbage can near a driveway.
3. Discuss the barriers and what made it safe or unsafe to cross.
Note: When they do left-right-left make sure they identify what they see when they look.
LESSON7: Visual barriers & Model Street crossing (outdoor)
LESSON TIME:20 Minutes
MATERIALS:1) Visual barriers, real or cardboard (boxes, large garbage bin or bags fi lled with air, bushes, fence, and car)
2) Chalk, ropes, or fi eld markers
3) 6 traffi c cones
4) A group leader for every 8 children
TAKE HOME: None

Colorado Department of Transportation
16
LESSON 8: Crossing intersections
LESSON TIME: 50 minutes
MATERIALS:Activity 1: 1) Traffi c Signals Coloring Page
Activity 2: 1) TV & DVD player or computer & projector
2) Traffi c Safety Education DVD“What is an Intersection?” (1:00 minutes)“How to Cross an Intersection” (1:30 minutes)
3) Walk Smart Interactive CD“Watching for Cars” 3:00 minutes
4) Field markers or rope
5) Music player to match format
6)Tape with fun music
TAKE HOME: Traffi c Signals Coloring page
GRADE(S): 1ST, 2ND
OBJECTIVE: For children to understand why it is important to look behind them or over their shoulder for on-coming traffi c before crossing at an intersection and to understand the complexity of the intersection. This lesson is made up of 4 activities.
BACKGROUND INFORMATION: Children often have diffi culty understanding complicated traffi c situations; therefore, it is especially important for children to be taught the similarities and differences between crossing a street and crossing at an intersection. All possible intersection scenarios should be explored with children. The messages conveyed by traffi c signs and signals must also be taught to children. Traffi c signs, signals and rules were made up by adults for adults; children often interpret these things differently. For children to learn how to cross an intersection safely, they must also understand the traffi c signs, signals, and rules of the road that regulate intersections.
ACTIVITY 1: Have children color the Traffi c Signals Coloring page.
ACTIVITY 2:1. Arrange fi eld markers or rope to simulate street corners.
2. Show videos and discuss issues. Defi ne and discuss intersections. Explain to the class that cars may drive up from behind at an intersection so we need to search there too.
3. Explain to the class that the fi eld markers or rope are edges (like curbs) that make up an intersection. It is also where they need to stop.
4. Demonstrate the stop and search pattern for intersections with your back toward the class:
a) Stop at the edge.b) Look left, right, left, and search behind and forward.c) Cross when clear.d) Keep looking while crossing.
Like Lesson 1, have the children say everything aloud.
5. Assign or have the children choose partners.
6. Have the children practice intersection crossing to music just as they did in Lesson 2: Activity 1

Colorado Department of Transportation
17
LESSON 8: Crossing intersections
ACTIVITY TIME: 15 minutes
MATERIALS:Activity 3:1) 8 giant numbered cards
2) 8 traffi c cones
3) 2 stop signs
4) Life size mock intersection using ropes or a line marker large fi eld space or black top
5) 4 sets of cards numbered 1-8
6) 2 assistant group leadersBarriers (cardboard or real) like train cars, cars etc.
OBJECTIVE: For children to practice looking behind them or over their shoulder for oncoming traffi c before crossing at an intersection.
BACKGROUND INFORMATION: Children live and play in their neighborhoods where traffi c is a reality. Another reality is that children are not born with the knowledge and ability to negotiate traffi c; they must be taught the rules of the road and the proper procedures to be safe pedestrians. Using real and secured intersections or creating realistic intersection situations for children to practice will help them when they are faced with real traffi c situations.
A child’s fi eld of vision is narrower than an adult’s. Children see things much later than adults. They believe that because they can see a car, the car driver can see them. Practicing crossing techniques using a “real” street with visual barriers can help children understand the importance of obeying pedestrian safety rules. Parents, volunteers, and teacher aides can help secure the area and serve as group leaders. A small intersection on school grounds would work well for this option.
ACTIVITY 3:1. Use a real but secured intersection or layout a mock intersection on a fi eld or black top area. Try to create one that is realistic, identifying sidewalks, curbs, center lane, and crosswalks. Set out giant numbered cards in a clockwise direction and cones around the perimeter of the intersection to identify 8 destination points. See intersection diagram on page 18.
2. Assemble children and group leaders near the model intersection and ask these questions:
a. Where do you stand to look before crossing at an intersection? Answer: At the edgeb. What are you looking for? Answer: Traffi c from both directionsc. What do you do before you become a part of traffi c? Answer: Look left-right-left and behind if at an intersectiond. Why do you look back? Answer: Because cars might be coming form behind youe. Why do you need to pay close attention to parked cars even though they are not moving? What visual barriers do you see here? Answer: Cars may not be able to see you behind parked carsf. Name some “barriers” that would prevent you from having a clear view of the street. Answer: Cars, bushes, trash cans, wallsg.Where is the new edge you need to search from? Answer: At the edge of the obstruction

Colorado Department of Transportation
18
LESSON 8: Crossing intersections
3. Demonstrate the proper crossing technique.
4. Assign each group and leader to a work station. The children will coach each other through the process of crossing the street with a visual barrier.
5. Once all the children can complete this skill well, introduce a ball to be retrieved. The adult group leader rolls the ball into the street. A child enters the street after stopping at the edge and searching properly for on-coming traffi c. If you are not comfortable conducting this lesson on real streets, use mock streets.
6. Let children move to new stations to practice with different scenarios.

Colorado Department of Transportation
19
LESSON 8: Crossing intersections (outdoor)
OBJECTIVE: To teach children how to apply all the skills they have learned throughout the pedestrian safety unit in a real traffi c situation. Practicing pedestrian safety skills in the environment to which the skills apply is an important part of the learning process. Requires a real intersection
ACTIVITY 4:1. This is the culminating lesson for pedestrian safety lessons. Children will have the opportunity to practice crossing at a real intersection. Secure a low traffi c intersection on or around campus. Set up the giant numbered cards around the intersection as they are set up for the Model Intersection in Activity 2. Adult volunteers should stand beside the giant numbers to give guidance and provide security.
2. This activity is conducted the same way as the Model Intersection activity, only now the children are working in a real intersection and possibly negotiating with real cars and traffi c signals. You may wish to secure additional adult supervision, but avoid police assistance and blocking the road to traffi c because the goal of this lesson is to provide students with the same real life experiences that they will face when crossing real intersections.
ACTIVITYTIME: 30 minutes
MATERIALS:
1) 4 adult group leaders
2) 8 giant numbered cards (1-8)
3) Low traffi c intersection
4)8 traffi c cones

Colorado Department of Transportation
20
LESSON9: Parking lot safety (outdoor)
LESSON TIME: 30 minutes
MATERIALS: 1) Masking Tape or fl oor tape
2)Small cones (optional)
3) Sidewalk chalk (if working out-doors)
TAKE HOME: None
GRADE(S):1ST, 2ND
OBJECTIVE: Small children should understand that they cannot be seen easily in parking lots and should not walk through a parking lot without taking an adult’s hand.
Key messages: Children may not be easily seen in parking lots
VOCABULARY: parking lot, visible
Suggested Location for Lesson: School parking lot or teachers’ parking lot
Preparation: Obtain permission from school administration to take children into the parking lot of the school. Have a teacher aide or parent volunteer to assist if possible in order to maintain control of the group. Put cones in parking lot to cordon off the section you will be in with the students.
ACTIVITY: Trip to the Parking Lot! Take students (and volunteers if available) out to the designated part of the lot. Discuss what cars to when they are getting ready to move and how cars back up (look at lights, talk about sounds that cars make, etc).
Have one adult and one student stand on one side of a car while the class is on the other side. Discuss who you can see the easiest and why a grown up might not see a kindergartener out when driving in a parking lot.
Assessment: Ask students how they can stay safe in parking lots.
Review key messages.

Colorado Department of Transportation
21
LESSON 10: School bus safety (indoor/outdoor)
LESSON TIME: 60 minutes
Videos: • Traffi c Safety Education DVD (optional)1. [2nd grade] Safe School Bus Behavior 15:00 minutes (Indoor)
2. School Bus Danger Zones Street Crossing 15:00 minutes (Outdoor)
MATERIALS: Activity 1 (indoor):
1) Chairs, arranged to resemble rows of seats on a bus
2) Flash cards
TAKE HOME: None
GRADE(S): KINDERGARTEN, 1ST, 2ND GRADE REVIEW
OBJECTIVE: Children will learn the importance of safe and responsible behavior while riding the school bus. There are 2 activities in this lesson. Activity 2 modeled after Classroom Activities in School Bus and Pedestrian Safety Education, Bulletin No. 93138.
BACKGROUND: Bus drivers have the tremendous responsibility of safely transporting children to and from school, on fi eld trips, and to various events on a daily basis. Drivers must remain alert and attentive to the rules of the road, the traffi c conditions around them and to the students on the bus. Quiet, responsible behavior on the bus is an important component of any school bus program.
Video: Traffi c Safety Education DVD “Be Cool, Follow the Rules” 15:25 min
ACTIVITY 1:1. When a school bus is not available, arrange pairs of chairs in a straight line that to resemble the inside of a school bus, allowing space for the aisle.
2. Divide the class into two groups, one group to role play and the other to describe what the students should do. These groups will switch roles throughout the activity.
3. Ask the fi rst group to role play. Assign a bus driver and several students to be on the bus. Assign several students to be waiting for the bus and one to be walking to the bus stop.
4. Tell the students that the bus is picking them up for school.
5. Ask the students who are watching the group to tell the students what to do to get on the bus safely.
Question: The student walking to the bus sees the bus coming. What should he/she do?Answer: Continue to walk to the bus
Question: Is it ok to run?Answer: No
Question: What is the right way to go to the bus stop?Answer: To walk(Have the student who is walking join the other students to get on the bus.

Colorado Department of Transportation
22
Question: Where should the students stand to wait for the bus? (Ask the students waiting for the bus to stand in the right place.)Answer: 3 large steps away from the curb
Question: Ask the students on the bus how they should act. Should they be rowdy? Ask them to act like they do when they ride the bus.
Have the waiting students ‘board’ the bus.Question: How do you board the bus?Answer: One at a time, single fi le, holding on to the handrail.
Question: Why is it important to be quiet and careful getting on the bus?Answer: Because pushing or shoving can cause someone to fall or be pushed into the pathway of a bus or a car.
Question (to all students): How do you get off the bus?Answers: Quietly, no climbing over other students to get out, let others ahead of you exit fi rst, do not switch seats while others are loading or unloading, exit the bus promptly, have your belongings ready, respect personal space, do not tap other students on the back of the head when exiting. Discuss other possible scenarios with students.
Question: Ask the students where they should put their bags.Answer: Under the seat in front of them
Queston: Ask students why they need to keep the aisle clear.Answer: To avoid tripping someone and to ensure a quick evacuation in an emergency situation.
Ask students who are on the bus, to disembark. How many steps away from the bus should they go?Answer: 3
Tell the students who got off the bus that they need to cross the street. Question: What should they do?Answer: Walk 5 step in front of the bus on the sidewalk and make eye contact with the bus driver. Wait for the signal from the bus driver to cross.
Have the students who got off the bus walk to the right spot to cross. Ask the student playing the bus driver to signal to the students to cross. Ask the students to cross the street.
Ask the students watching if crossing students did it right.
Repeat various roles with students from the class to review the concepts.
LESSON 10: School bus safety (indoor)

Colorado Department of Transportation
23
ACTIVITY 2: Read the following statements to the students. Have them give a thumbs up when the children are behaving and a thumbs down when they are misbehaving.
The bus door is closed, and the bus is leaving for school. In the back, two boys start throwing paper at each other. THUMBS DOWN
A girl sitting behind the bus driver turns around and yells loudly to her friend in the back of the bus. THUMBS DOWN
Two boys sirring next to each other are talking loudly. The bus comes to a stop,and the boys quit talking for a moment so the driver can listen for other cars. THUMBS UP
A girl with a saxaphone for her band lesson places the saxophone case under the seat before the bus begins to move. THUMBS UP
The bus stops at a railway crossing. Three friends in the back of the bus keep yelling and laughing loudly. THUMBS DOWN
A boy sees his best friend poking his penciil into the seat, so he starts doing the same thing. THUMBS DOWN
Another boy sees the two boys poking their pencils into the bus seat and asks them to stop. THUMBS UP
A boy cleaning out his book bag thows paper onto the fl oor of the bus.THUMBS DOWN
A girl see her best friend sitting a few rows in front of her. While the bus is moving, the girl gets up from her seat to go sit next to her friend. THUMBS DOWN
A boy gets off the bus and immediately runs across the street to meet his friend. THUMBS DOWN
A girl gets off the bus, stands on the curb and waits for the driver’s signal to cross the road. THUMBS UP
ASSESSMENT: Ask students to describe the steps to get on the school bus.
Review key messages.
MATERIALS: Activity 2(indoor): None
LESSON 10: School bus safety (indoor)

Colorado Department of Transportation
24
ACTIVITY 2: School Bus Danger Zones Street Crossing (Outdoor)
OBJECTIVE: To teach children the four danger zones around a school bus, the importance of staying in the bus driver’s line of vision, and how to cross in front of a school bus.
Video: Traffi c Safety Education DVDLesson 5: School Bus Safety- “Visual Barriers/ School Bus” 1:30 minutes
BACKGROUND:A school bus acts as a visual barrier for the bus driver, students and vehicles stopped in front of, or behind, a school bus. When children enter or exit a school bus, it is important for them to stop at the edge, move 5 big steps (10 feet) in front of the bus for the bus driver to have constant view of them, stop at the new edge in front of the bus, look left-right-left, wait for all traffi c to stop and continue to look while crossing. Observing all these rules is important when a school bus is involved. Children killed in school bus related crashes most often are the result of either an overtaking and passing vehicle or the bus driver’s inability to see the child. Teaching children safe school bus loading, unloading, and street crossing practices can save a child’s life.
Discussion Topics & Questions:a. How far do you move away from the bus when you get off? Answer: 3 big stepsb. Why is it important to walk fi ve (5) big steps (10 feet) away from the front of the bus before crossing? Answer: To be able to be seen by the bus driverc. What second edge do Sam and his sister stop at before crossing the street? Answer: The busd. The 10 foot rule - How far do you move away from the bus before becoming a part of traffi c? Answer: 10 feete.Discuss the importance of stopping at the edge of bus.
ACTIVITY:1. Show the video and discuss the questions.
2. If available, the bus should be parked on a street on the school grounds so the children can practice getting on the bus, dismounting the bus and crossing the street.
LESSON 10: School bus safety (outdoor)
LESSON TIME: 30 minutes
Video: Traffi c Safety Education DVDSchool Bus Safety- “Visual Barriers/ School Bus” (1:30 minutes)
Activity 2 (outdoor): 1) School bus and driver, when possible
2) 8 cones or bean bags or chalk
3) Poster board with bus drawing and danger zones highlighted
4) When a school bus is not possible: Chairs
5) Large cardboard box
TAKE HOME: None
Colorado Department of Transportation
25
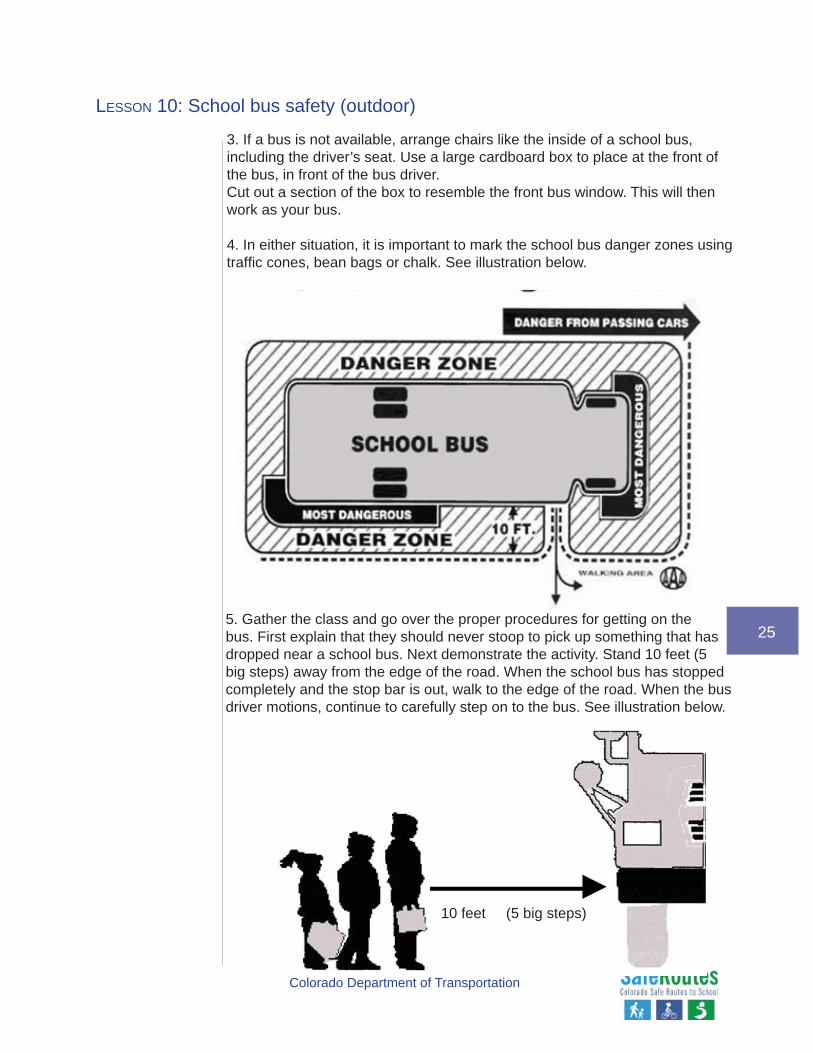
5. Gather the class and go over the proper procedures for getting on the bus. First explain that they should never stoop to pick up something that has dropped near a school bus. Next demonstrate the activity. Stand 10 feet (5 big steps) away from the edge of the road. When the school bus has stopped completely and the stop bar is out, walk to the edge of the road. When the bus driver motions, continue to carefully step on to the bus. See illustration below.
10 feet (5 big steps)
LESSON 10: School bus safety (outdoor)
3. If a bus is not available, arrange chairs like the inside of a school bus, including the driver’s seat. Use a large cardboard box to place at the front of the bus, in front of the bus driver.Cut out a section of the box to resemble the front bus window. This will then work as your bus.
4. In either situation, it is important to mark the school bus danger zones using traffi c cones, bean bags or chalk. See illustration below.

Colorado Department of Transportation
26
LESSON 10: School bus safety (outdoor)
Children practice the procedure in pairs until everyone is on the bus. Then everyone gets off the bus and stands 3 big steps (5 feet) away from the bus door while the teacher discusses the proper procedures for bus dismounting and crossing the street.
7. Demonstrate the proper dismounting and crossing procedure. Get straight off the bus, take 3 big steps (5 feet) away from the bus, then take 5 big steps (10 feet) to the front of the bus and stop. Search left-right-left to make sure traffi c has stopped behind the bus. When it is clear and the bus driver signals it is OK to cross, move to the edge of the curb, continue searching, then walk to the edge of the bus and stop and search for traffi c. When the road is clear or traffi c is completely stopped, cross the street while continuing to search for traffi c. See illustration below.
New edge
3 big steps = 5 feet
5 big steps = 10 feet

Colorado Department of Transportation
27
LESSON11: Helmets fi tting (optional)
LESSON TIME: 30 minutes
MATERIALS: 1) Size small helmets
TAKE HOME: Helmet Fit Guide
GRADE(S): KINDERGARTEN, 1ST, 2ND (REVIEW)
OBJECTIVES: Learn the proper way to wear a helmet. Bicycle helmets have been proven to prevent a large percentage of traumatic brain injuries when worn correctly.
VOCABULARY: traffi c, intersection, helmet
KEY MESSAGES: Always wear a properly fi tting helmet when riding your bicycle.
Your students may be riding bicycles, kick scooters, or tricycles. Knowing how to properly wear a helmet is important to keep them safe for a variety of activities. This exercise will show them the steps to take to fi t their helmets corredtly.
Activity: Helmet Fit Using the helmet fi t guide on the following pages instruct students to try on helmets. Check each student for proper fi t.
Reduced cost helmets are available at www.prorider.com/cns. Additional resources may be available. Contact the Safe Routes to School Coordinator at [email protected]

Colorado Department of Transportation
28
LESSON 12: Review/evaulation and certifi cates
GRADE(S): KINDERGARTEN, 1ST, 2ND
ACTIVITIES: 1. Evaluation 10:00 minutes (Indoor)(For 1st and 2nd Grade)
2. Student and Parent Safety Pledge 20:00 minutes (Indoor)
ACTIVITY DESCRIPTION:For kindergarten and fi rst grade this works well as a teacher review given orally. For second graders, hand out the Evaluation Forms. This can also be done as a group question and answer session. An awards ceremony can be a great way to celebrate student achievement. It is important that the children know how important the information they learned will be for the rest of their life! Great job, everyone!
*Evaluation Form Answers: 1.Yes 2.Yes 3.No 4.No 5.Yes 6.No 7.No 8.Yes
Name _____________________________ Grade _________
1. What should you always to before crossing the street? Answer: Stop and search “left-right-left” before crossing the street
2. Why is it important to keep looking and listening for cars as you cross the street?Answer: Because they might approach while you are crossing
3. Is it safe to cross the street between two parked cars? If not, why?Answer: Yes, but move out to the new “edge” and look left-right-leftAnswer: Because on-coming cars might not see you
4. Is the edge of the sidewalk always the best place to stop and search for cars before crossing the street?Answer: YES but… When might it not be?Answer: where there are visual barriers blocking your view
5. Can car drivers see you better if you are wearing bright colored clothes?Answer: Yes
6. If a crossing signal starts fl ashing “don’t walk” when you are in the middle of crossing the street, should you go back to where you started?Answer: NO but…What should you do?Answer: Continue crossing the street with care
LESSON TIME: 30 minutes
MATERIALS:None
TAKE HOME:Student and Parent Safety Pledge

Colorado Department of Transportation
29
7. Is it easy for car drivers to see children on small bikes?Answer: NOWhy not?Answer: Because bicycles are smaller than cars and drivers might not see them
8. Should you stop at the edge of the school bus to search for cars before crossing the street?YES!
LESSON 12: Review/evaulation and certifi cates

Colorado Department of Transportation
30
Pedestrian/School Bus Safety Evaluation
Name _____________________________ Grade _________
1. What should you always to before crossing the street?
2. Why is it important to keep looking and listening for cars as you cross the street?
3. Is it safe to cross the street between two parked cars? If not, why?
4. Is the edge of the sidewalk always the best place to stop and search for cars before crossing the street?
5. Can car drivers see you better if you are wearing bright colored clothes?
6. If a crossing signal starts fl ashing “don’t walk” when you are in the middle of crossing the street, should you go back to where you started?
7. Is it easy for car drivers to see children on small bikes?
8. Should you stop at the edge of the school bus to search for cars before crossing the street?

Colorado Department of Transportation
31
STUDENT AND PARENT SAFETY PLEDGE
I promise to always:
1. Stop, look left, right, and left again and wait for traffi c to pass before I cross the street.
2. Listen to the bus driver and all his or her safety rules.
3. Stay 5 giant steps away from the street when I’m waiting for a bus.
4. Wear a bike helmet every time I ride my bike.
5. Wear light, bright colors and refl ective markers so I can be seen walking and riding in the dark.
6. Be predictable when I am a part of traffi c.
7. Always follow traffi c safety rules and encourage my friends to also.
X_________________________________Student Signature
X_________________________________Parent Signature
31
LESSON 12: Review/evaulation and certifi cates