table of contentssite-media.net/gseven/g7_rangefindermanual.pdf5 precautions avoid staring directly...
TRANSCRIPT

2
Table of ContentsForeword 4Precautions 5Section 1 - Introducing the G7 BR2 6Unpacking the G7 BR2 7Understanding How the G7 BR2 Works 7 Ballistic Compensation 7 LCD Display 8 Laser Range Sensor 8 TruTargeting 8 Altimeter 8 Temperature Sensor 8 Inclination Sensor 9 Digital Processor 9 Eyepiece 9 In-scope LCD 9
Section 2 - Quick Start 10Section 3 - Basic Operations 11Battery 11 Low Battery Warning 11Buttons 12 Powering OFF the G7 BR2 13Display Indicators 14Measurement Modes 15Target Selection Menu 16Error Codes 17Eyepiece 18Focus Adjustment Ring 18Firmware Revision Number 19Measuring Point 19Neck Strap 20Restore Default Settings 21
Section 4 - System Setup Menu 20Ballistic Profile Menu 23Backlight Menu 24Cross Hair Display Menu 25Section 5 ndash Taking a Range Only Measurement 26Measurement Results Menu in the Range Only Mode 27
Section 6 ndash Setting up a Ballistic Profile 28
3
Section 7 ndash Taking a Ballistic Profile Measurement 31Drop Units = BDC 31 Measurement Results Menu in the BDC Mode 32Drop Units = MOA 33Drop Units = Inches 34Wind Correction Menu 35
Section 8 ndash Edit Mode 36Lower Display 36Upper Display 37 Editing a Ballistic Profile Description 38
Section 9 - Care amp Maintenance 40Section 10 - Specifications 41Section 11 - Troubleshooting 43Section 12 ndash Warranty 43
G7 BR2 Ownerrsquos ManualFirst Edition
Part Number 0144859Copyright Notice Information in this document is subject to change without notice and does not represent a commitment on the part of Gunwerks LLC No part of this manual may be repro-duced in any form or by any means electronic or mechanical including photocopying recording or information storage and retrieval systems for any purpose other than the purchaserrsquos personal use without the express written consent of Gunwerks LLC Copyright (c) [2011] Gunwerks LLC All Rights Reserved Unauthorized duplication in whole or in part is strictly prohibitedFirst Edition September 2011
PatentsThis product is covered by pending patent applications andor the following issued US Patents 6445444 5612779 6057910 6226077 7349073 8001714
TrademarksTruPulse is a registered trademark of Laser Technology Inc Gore-Tex is a registered trademark of W L Gore and Associates All other trademarks are the property of their respective ownersGunwerks Contact Information PO Box 22 Burlington WY 82411Phone 3077623240Fax 8663300790Email customerservicegunwerkscom
4
Foreword
Dear Customer
Gseven is a Gunwerks brand whose sole purpose is to change the long range shooting game To create and build products for the first shot
Your new ballistic rangefinder offers features and functionality that have never been offered in a hunting rangefinder before In addition to exceptional ranging capability the G7 BR2 offers real time ballistic calculations based on your specific Ballistic Coefficient (BC) and Muzzle Velocity (MV) Measurements for air pressure temperature and inclina-tion are collected and then utilized in our sophisticated calculations to generate a precise ballistic solution out to 1400 yards
The correction can be applied with MOA output and a standard elevation turret or with a ballistic turret and the Shoot To Range output setting The G7 BR2 also offers the correct wind hold compensation using our patented windage technology to complete the most precise ballistic solu-tion available in the industry
We wish you success and perfection in your shooting To take advan-tage of the ballistic capabilities make sure you review this manual in its entirety
Aaron DavidsonPresident Gunwerks LLC
5
PrecautionsAvoid staring directly at the laser beam for prolonged periods
The G7 BR2 is designed to meet FDA eye safety requirements and is classified as eye-safe to Class 1 limits which means that virtually no hazard is associated with directly viewing the laser output under normal conditions As with any laser device however reasonable pre-cautions should be taken in its operation It is recommended that you avoid staring into the transmit aperture while firing the laser The use of optical instruments with this product may increase eye hazard
Never attempt to view the sun through the scopeLooking at sun through the scope may permanently damage your eyes
Never point the unit directly at the sunExposing the lens system to direct sunlight even for a brief period may permanently damage the internal components
Avoid direct sun exposure on the eyepieceExposing the eyepiece to direct sunlight can damage the internal dis-play
Do not expose the instrument to extreme temperaturesG7 BR2 components are rated for an operating temperature range of 32deg to 122deg F and a storage temperature range of -4deg to 158deg F
6
Section 1 - Introducing the G7 BR2Congratulations on the purchase of your G7 BR2 the first rangefinder to feature a real time ballistic calculation that accepts your specific bullet Ballistic Coefficient (BC) and Muzzle Velocity (MV) as inputs to build a custom ballistic profile and then calculate a real time ballistic solution based on measured environmental and sighting conditions
bull Range Only Mode for shooters that need range only information Presented as horizontal distance and includes basic range with updown hill angle to target cor-rection Ranges to 1400 yardsbull Ballistic calculations are powered by the advanced G7 ballistic engine The precise algorithms are configured to allow ultra fast real time calculations as Shoot To Range or MOA Compensationbull Shoot To range compensates the line of sight range for variations in air density and inclination angle The output is specific to the programmed BC and MV Shoot To range is configured to work with BDC turretsbull Minute of Angle (MOA) Correction calculates and outputs the ballistic correction in MOA units Most rifle scope turrets are calibrated in MOA unitsbull MOA wind correction values are calculated and easily accessed to display the cor-rection for different wind valuesbull Onboard sensors measure incline angle barometric pressure and temperature These sensors provide the data to the G7 ballistic engine to calculate the Shoot To Range or MOA Correctionbull Programmable for up to five different cartridge combos Specific inputs include Ballistic Coefficient Muzzle Velocity and Sight Height Altitude and Temperature are also provided when programming for a BDC turretbull Very simple intuitive display offers selectable reticles and four intensity settings for varying light conditions The Backlit LCD display is visible in bright light and low light conditionsbull The rugged housing is weatherproof and features a Gore-Texreg membrane The tripod mounting stud is frac14-20 on the bottom of the housingbull The eyepiece features an adjustable focus with a click adjustable twist-up eye cup
7
Unpacking the G7 BR2When you unpack your new G7 BR2 check to make sure that you received ev-erything that you ordered and that it all arrived undamagedbull G7 BR2bull Eyepiece coverbull Userrsquos Manual on CDbull Carrying casebull Neck strap
Understanding How the G7 BR2 WorksMeasurements of all sensors are recorded every time the button is pressed and released In addition to the rangefinding circuitry the G7 BR2 Ballistic Range-finder samples air pressure temperature and inclination angleBallistic CompensationThe G7 BR2 Rangefinder combines best in class ranging capability with an ad-vanced ballistic computer to measure the range to target and calculate a complete ballistic solution The G7 BR2 was designed to be very simple to use offering a one-button press to both measure and calculate your ballistic solution Once the unit has been programmed and the Main Display is shown press and hold the Fire button until a range measurement in displayed When configured in BDC mode the Line Of Sight distance will be displayed for approximately two seconds and then the compensated range is displayed A small C to the left of the distance indicator will distinguish a compensated distance from a line of sight distance Use the compensated distance in conjunction with a Ballistic Turret If you have configured the device to calculate and display your ballistic solution in Minutes of Angle (MOA) the MOA correction is displayed with MOA indicated in the top right section of the Upper Display
The calculated wind correction is easily accessed and displayed in 5 or 10 mph increments After ranging and receiving a ballistic solution pressing either the or button will display the calculated wind hold in MOA for the ballistic solution While in the Wind Correction Menu pressing either of the selection buttons increments the wind value up or down from 5 to 50 mph and displays the corresponding wind correction To apply this correction just dial or hold the correct value in the rifle scope
8
LCD DisplayA liquid crystal display (LCD) is mounted within the optical system and when activated displays a reticle for targeting yards and the display indica-tors Inherent in the manufacturing process are small black spots that appear in the optical system These are a natural characteristic of the LCD and can-not be fully eliminated in the manufacturing process These small black spots do not affect the distancing performance of the unit
Laser Range SensorThe laser range sensor emits invisible eye safe infrared energy pulses The G7 BR2 determines distance by measuring the time it takes for each pulse to travel from the rangefinder to the target and back The laser indicator ( ) is displayed whenever the laser is being transmitted The laser may be active for a maximum of 5 seconds Once the target is acquired or the laser has timed out you can release the button
TruTargetingThe G7 BR2 automatically provides the best accuracy and acquisition dis-tance to a given target Maximum measurement distance varies with target quality and environmental conditions For Range Only measurements the maximum measurement distance is approximately 2000 yards For range measurements with ballistic calculations the maximum measurement dis-tance is approximately 1400 yards
When selecting a target you should consider the followingbull Color The brighter the color the longer the rangebull Finish Shiny finishes provide longer range than dull finishesbull Angle Shooting perpendicular to a target provides better range than shooting to a target at a sharp anglebull Lighting Conditions Overcast skies will increase the unitrsquos maximum range and sunny skies will decrease the unitrsquos maximum range
Altimeter Your Ballistic Rangefinder is instrumented with a barometric pressure sensor that is mounted inside the housing A Gore-Texreg membrane allows accurate sampling of barometric pressure while maintaining a weatherproof seal This device measures relative pressure uncorrected to sea level this is station pressure A simple calculation converts the station pressure reading to an equivalent altitude for standard conditions Both the station pressure reading and equivalent altitude are available under the Measured Values Menu
9
Temperature SensorThe temperature sensor is located at the front of the unit under the rubber armor The front of the temperature sensor is exposed to ambient conditions but the device housing temperature can affect the accuracy of the reading There will be a slight response time delay as the unit reaches ambient tem-perature
Inclination SensorThe inclination sensor is located inside the housing of the G7 BR2 rangefind-er When the rangefinder is aimed at an object and the range is obtained by depressing the Fire button the inclination angle to the target is determinedDigital ProcessorThe G7 BR2 includes LTIrsquos proprietary ASIC chip (Application-Specific In-tegrated Circuit) The ASIC chip combined with high-speed CPU processing allows the G7 BR2 to deliver accurate and fast measurementsEyepieceThe eyepiece is located at the back of the G7 BR2 and includes a 7X magnification scope
In-scope LCDbull The In-scope LCD displays menu items option indicators error codes and measure-ment results Figure 2 shows the in scope LCD with all display segments lit Each time the instrument is powered ON all display segments are lit for just a couple of secondsbull If it appears that not all display indicators are working properly please contact Gun-werks Customer Service for assistancebull The G7 BR2 has multiple options for the display of the cross hair (page 24) Figure 3 shows the factory default cross hair In this example the BR2 is ready to take a Range Only measurement
10
Section 2 - Quick Start
1 Install the battery (page 9) 2 Press to power ON the G7 BR23 Select a target such as a tree or a building For this example the target should be ap- proximately 100 yards4 Look through the eyepiece (see Figure 4) and use the crosshair to aim to the target The in-scope LCD should look similar to Figure 5A 5 Press-and-hold The LASER status indicator is displayed while the laser is active (Figure 5B) The laser will remain active for a maximum of 5 seconds while acquiring data about the target
o If the target is not acquired release and repeat this step
6 Release once the distance is displayed (Figure 5C) In this example the ldquohrdquo that proceeds the 100 yards indicates horizontal distance and Range Only Mode The measurement will be dis-played for 8 seconds or until you press a button
o Press or to scroll through the Mea-sured Value Menu and see the results acquired for each function
o Hor Dist = horizontal distance yards)o Aprx Alt = approximate altitude (feet)o inHg = barometric pressure o Temp = temperature (degF)o Incline = inclination (degrees)o LOS Dist = line of sight distance (yards)
o Repeat steps 3-6 above to take another measurement
11
Section 3 - Basic Operations
BatteryThe G7 BR2 Rangefinder is powered by a 3 Volt Lithium battery commonly referred to as CR123A or also referred to as CR123
1 Remove the Battery Compartment Cover by lifting up the Hinged Tab and turning coun-ter clockwise
2 Insert the battery negative end (-) first3 Re-insert the Battery Compartment Cover
and use the Hinged Tab to turn clockwise4 Press down on the Hinged Tab to secure
Low Battery WarningThe G7 BR2 monitors the incoming battery voltage Figure 7 shows the location of the battery status in-dicator It is located on the right side of the LCD just above the yards indicatorbull When the voltage drops below 26V the battery
status indicator is displayedo You should replace the battery as soon as pos-
sibleo Although the unit operates at this level it is
recommended that you install a new bat-tery before the setup or update of a ballistics profile Data may be lost if the system shuts down before this process is complete
bull When the voltage drops below 24V system opera-tion is locked and then shuts down
o You must replace the battery to return to normal system operation
If the system shuts down during the process of setting up or updating a ballistic profile entered data will be lost and will have to be re-entered
12
ButtonsThe G7 BR2 has a 4-button keypad located on the top panel of the instrument The buttons provide easy access to the instrument functions programming and operating commandsThis manual refers to the buttons while the laser is oriented as shown in Figure 8
System Set upMenu
(and sub menus)
System Set upMenu
(and sub menus)
MeasurementMode
MeasurementMode
Sleep Mode
Sleep Mode
Edit Mode
Edit Mode
Selects the displayed menu option
Initiates measurement
Wakes up instrument
When a Ballistic Profile Description is displayed Starts the Edit Mode
When editing a character or number advances to the next character or number
Exits Set up Menu and returns to MeasurementMode For sub menus returns to previous menu
Short Press Increments to the next target type(page 16)
Press and hold for 3 seconds Displays the System Setup Menu (page 22)
Measured Values Menu or Wind CompensationMenu Toggles to the other menu
Wakes up instrument
Exits the Profile Edit Mode
While viewing measurement results returns to the Measurement Screen You must press the button a second time to initiate a newmeasurement
13
System Set upMenu
(and sub menus)
System Set upMenu
(and sub menus)
MeasurementMode
MeasurementMode
Edit Mode
Edit Mode
Sleep Mode
Sleep Mode
Scrolls to the previous menu option
Scrolls to next menu option
Enters the Wind Compensation Menu aftercalculating a ballistic solution
Measured Values Menu or Wind Compensation Menu scrolls to the next option
Measured Values Menu or Wind Compensation Menu scrolls to the previous option
Enters the Wind Compensation Menu aftercalculating a ballistiv solution
Scrolls to the next character or numberThe auto-accelerating editor scrolls faster thelonger the button is pressed
Scrolls to the previous character or number The auto-accelerating editor scrolls faster thelonger the button is pressed
Wakes up instrument
Wakes up instrument
Powering OFF the G7 BR2To conserve battery power if no button presses are detected after a specified length of time the G7 BR2 will enter Sleep Mode and then turn itself OFF
Sleep Mode 8 seconds Shut Down 45 seconds
Note These times are after the last button press or major instrument operation such as storing ballistic profile data
14
Display IndicatorsFigure 9 shows the LCD in-scope display The G7 BR2rsquos internal software is organized into options Each option represents a specific measurement or setup function and has a cor-responding display indicator Refer to Figure 9 and the table below for information about each indicator
Upper Display
Battery Voltage
MeasurementUnits
Lower Display
na
Laser
Displays menu items and messages
Low battery warning (page 11)
Y YardsM Meters (not active in the G7 BR2)F Feet or Fahrenheit
Displays messages and measurement results
Although part of the display not active in the G7 BR2
The instrumentrsquos laser is firing
15
Measuerment Modes
Range OnlyMeasurement
Measurementwith Ballistic
Profile
The crosshair and yard indicator are displayed and - appears in the LowerDisplay See page 26 for information about taking a range only measurement
Data measurements and calculated valuesare displayed in the Measured ValuesMenu
The G7 BR2 allows you to store 5different cartridge combinations The ballistic profile indicator appears in the farright of the Upper Display In this example P1 represents Profile 1 See page 28 for information about setting up a ballistic profile See page 31 for information about taking a measurement with a ballistic profile
16
Target Selection MenuThe G7 BR2 allows you to select or eliminate targets and to take the most accurate measurements possible in various field conditions When the mea-surement screen (Range Only or Ballistic Profile) is displayed press the button to increment through the Target Selection Menu
Standard
Continuous
Nearest
Farthest
Standard single shot strongest target mode
The ldquocrdquo display indicator appears in the left edge of the Upper Display The unit logs found in the area of the crosshair while the button is pressed The results are up-dated in the lower display as each target is acquired
Allows for easy acquisition of small targets without inadvertently getting background targets that have stronger signal strengthThe ldquoNrdquo display indicator appears in the left edge of the Upper Display The unit logs all targets found in the area of the crosshair while the button is held down Brackets surround the cross hair briefly to indicate multiple targets acquired Of the targets acquired the distance to the nearest target appears in the lower display
Allows objects such as brush or tree branch-es to be ignored so that only background targets are acquiredThe ldquoFrdquo display indicator appears in the left edge of the Upper Display The unit logs all targets found in the area of the crosshair while the button is held down Brackets surround the cross hair briefly to indicate multiple targets acquired Of the targets acquired the distance to the farthest target appears in the lower display
17
Error CodesError conditions can occur in a measurement or in the system hardware To make sure that you never get an erroneous measurement the G7 BR2 monitors both system hard-ware and measurements The temperature and pressure sensors will display null values if an error is encountered or values are out of rangeError codes appear in the main display and are in the form of ldquoE xxrdquo where ldquoxxrdquo is an error code number Figure 10 shows an example error code E 32 The ldquoClearrdquo message that appears in the Upper Display is prompting you to press the button to restore default settings
Error Codes ExplanationE 31 Checksum error for factory-fixed parameterE 32 Checksum error for user stored data Restore default settings to clear this error (see above)E 33 Unit failed self test during power ON sequenceE 34 Unit failed the built-in PLL testE 35 Processor failed to show current measurement complete within the timeout limitE 36 Tilt sensor reading is outside maximum workable rangeE 37 Calibration error Contact Gunwerks Customer E 38 Service for assistanceE 39
bull If you encounter an error code allow the unit to completely power OFF Then press the button to power ON the unit and repeat the intended measurement or actionbull If the error persists contact Gunwerks Customer Service for assistance
18
EyepieceThe adjustable eyepiece is designed for comfort and to block extraneous light To extend the eyepiece turn the eyepiece counter-clockwise while pulling up To return the eyepiece to its original position turn the eyepiece clockwise and push down To match your personal preference the eyepiece may be located in any position from fully up to fully down If wearing eyeglasses or sunglasses you will find that the fully down position brings the eyepiece lens closer to your eye and gives you a full field of view
Eyepiece CoverThe eyepiece cover protects the internal components from sunlight exposure The eyepiece cover should be in place whenever the G7 BR2 is not in use To attach the eyepiece coverFeed the thin cord under the metal bar and flare the loop open Pull the eyepiece cover through the loop and cinch tight
Focus Adjustment RingThe focus adjustment ring (see Figure 11) allows you to focus the LCD in-scope display relative to the target for your eye During assembly opti-mum focus is set to infinity To adjust the LCD focus turn the focus adjustment ring to suit your personal preference Power ON or wake up the G7 BR2 and then aim at a distant object Adjust the Focus Adjustment Ring until the crosshair is at its optimum focus or sharpness For future reference note the position of the scale on the Focus Adjustment Ring
19
Firmware Revision NumberThe firmware revision number provides manufacturing information about your G7 BR2 To display the firmware revision number
1 Start with the G7 BR2 powered OFF press the button2 Look through the eyepiece and press to display the firmware revision number The display should look similar to Figure 12 3 Press the button or button to clear this display
Figure 12 uses firmware revision 210 for the purpose of an example Your G7 BR2 may include a different firmware revision number
Measuring PointThe measuring point of the BR2 is located at the center point of the instrument the frac14-20 thread
20
Neck Strap1 Find the two Attachment Points located on the rear panel of the BR22 Insert the end of one of the connector straps into one side of the eyelet
opening and feed it through to the other side3 Feed the strap up from the bottom of the buckle then over the center of
the buckle and back down through the other side4 Pull the strap to take up any slack and tighten the strap to simply have a
loop that is fed through the eyelet5 Repeat steps 2-4 to attach the other connector strap to the other side of
the G7 BR26 Attach one end of the neckstrap into the side release buckle of one of
the connector straps7 Attach the other end of the neckstrap to the side release buckle of the
other connector strap
bull Make sure the strap is straight when attaching it to the G7 BR2 This will help you avoid uncomfortable twists in the strap that will rub your neck
bull Before use check to make sure the neckstrap is secure Failure to do so may result in the BR2 hitting the ground or other object
bull The neckstrap may also be attached to the carrying case
21
Restore Default SettingsIt is possible to restore the G7 BR2rsquos default settings Restoring the default settings affects the system setup options The table below lists the parameters and the associated default setting
ParameterMeasurement Mode
Target TypeBack LightCross Hair
Profile DescriptionsDrop Units
Drag StandardBallistic Coefficient
Muzzle VelocitySight Height
Turret TemperatureTurret Altitude
Zero Range 1000
00
G1
MOAProfile 1 Profile 5
Level 2Standard
Range Only
6015
Default Value
To restore the default settings the unit must be powered OFF
1 Press the button2 Press the button The firmware revision number will be displayed3 Press the button ^ Clear will appear in the Upper Display4 Press the button if you want to restore the default settings
Press the button if you want to cancel the operation
22
Section 4 - System Setup MenuFigure 15 shows an overview of the System Setup Menu which can be accessed from the Measurement Mode Each option is described separately in the following sections
1 From the Measurement Mode press and hold the button for 3 seconds ldquoProfilerdquo will appear in the Upper Display and ldquoSELEctrdquo will appear in the Lower Display
2 Press or to display the previous or next option bull Press the button to return to the Measurement Mode3 Press to select an option bull Press the button to return to the Measurement Mode
23
Ballistic Profile MenuThe G7 BR2 allows you to define five custom ballistic profiles The Ballistic Profile Menu allows you to select Range Only measurements or to select review or edit a ballistic profile
1 From the Measurement Mode press and hold the button for 3 seconds ldquoProfilerdquo will appear in the Upper Display and ldquoSELEctrdquo will appear in the Lower Display
2 Press to display the current pro-file selection
3 Press or to display the previ-ous or next option
4 Press to select a Profile bull Press or to review the settings
associated with the profilebull See page 27 for information about
editing a ballistic profilebull When finished press the button to
return to the Profile Selection Menu You must press button again to return to the System Setup Menu Pressing the again will return to the Measurement Mode
Each time the G7 BR2 is powered ON it will return to the same profile selec-tion that was last used
24
Backlight MenuThe G7 BR2 has a backlit LCD display with an adjustable intensity to match viewing and ambient light conditions The Back Light Menu has 4 levels of intensity or brightness
1 From the Measurement Mode press and hold the button for 3 seconds ldquoProfilerdquo will appear in the Upper Display and ldquoSELEctrdquo will appear in the Lower Display
2 Press or to display the Backlight Menu as shown in the figure below
3 Press to display the current Backlight setting4 Press or to increase or decrease the value Backlight setting5 When finished press the button to save the Backlight set-
ting and return to the System Setup Menu You must press the button again to return to the Measurement Mode
Each time the G7 BR2 is powered ON it will returnto the same backlight level that was last used
25
Cross Hair Display MenuTo fit your application the G7 BR2 offers three options for displaying the cross hair
1 From the Measurement Mode press and hold the button for 3 seconds ldquoProfilerdquo will appear in the Upper Display and ldquoSELEctrdquo will appear in the Lower Display
2 Press or to display the Cross Hair Display Menu 3 Press to display the current cross hair selection4 Press or to display another cross hair option5 When finished press the button to save the Cross Hair selection
and return to the System Setup Menu You must press the but-ton again to return to the Measurement Mode
Each time the G7 BR2 is powered ON it will return to the same cross hair display that was last used
26
Section 5 ndash Taking a Range Only MeasurementDuring Range Only Mode ballistic calculations are not applied and the unit can acquire most targets up to 2000 yards Measurement results are presented as horizontal distance and include basic range with updown hill angle to target correction Range only is the default measurement mode When you power ON the G7 BR2 the last used measurement profile will be active For information about applying a ballistic profile to measurements see Section 7 (page 31)
The basic steps for taking a Range Only measurement1 Look through the eyepiece and use the cross hair to
aim to the target 2 Press and hold the button The Laser status
indicator is displayed while the laser is ac-tive The laser remains active for a maximum of 5 seconds while acquiring data about the targetbull If the target is not acquired in the 5-second
period release the button and repeat this step
3 Once the measurement is displayed release the button The measurement will remain displayed until you press any button or until the unit goes into Sleep Mode
bull The lsquohrsquo character in the Lower Display indicates that the horizontal distance result is displayed
4 Press either the button or button to view the Measured Values Menu See example on next page
bull To take another measurement press the button exit the Measured Values Menu and return to the Measurement Mode Press the button a second time to fire the laser
bull Until the laser is fired you may press either the button or button to return to the Measured Values Menu
27
Measurement Results Menu in the Range Only ModeExample Measured Values Menu (Range Only Measurement)
Horizontal Distance
Apporximate Altitude
Barometric Pressure
Temperature
Inclination
Line of Sight Distance
28
Section 6 ndash Setting up a Ballistic ProfileThe BR2 allows you to define and store five ballistic profiles
1 In the Profile Select Menu select the ballistic profile that you want to review or edit (page 23)
2 Press or to display the previous or next option 3 Press the button to select an item that you want to change
bull Edit the value - or -bull Press or to display the previous or next optionbull Press the button to save the selection and return to the
Profile Select Menubull Press button again to calculate and store the ballistic
profile Pls Wait is displayed during this process which will take approximately 14 seconds
o You will have to press the button one more time to return to the Measurement Mode
Descriptionbull Press the button to enter a descriptive label
or name for the ballistic profile cartridge caliber or load description Maximum of 8 characters
bull See page 36 for information about the Edit Mode
Drop Unitsbull Bullet Drop Compensator (BDC) Corrects the
LOS Range to your Ballistic Profile and field conditions for a ldquoShoot Tordquo Range The Shoot To Range is for use with a calibrated Ballistic turret Just dial or hold the appropriate calibra-tion
bull Minutes of Angle (MOA) Standard units of angular correction for field adjustable height and windage turrets Returns the MOA correc-tion for the ballistic solution to hold or dial on a standard MOA reticle or turret Just dial or hold the appropriate calibration
bull Inches Correction for sight in only turrets User estimates dimension at target
29
Drag Standard bull G1 The industry standardbull G7 Most modern long range bullets fit this model bull Use the G1 model unless you have an accurate Bal-
listic Coefficient based on the G7 standard bull G1 and G7 are not interchangeable
Ballistic Coefficient (BC) bull All bullet manufacturers list a BC for their bullets
This number describes the bulletrsquos efficiency in overcoming air resistance A higher number is better Usually the number is less than one (for example Berger 7mm 168 VLD G1 is 0617) Be sure to use the Ballistic Coefficient appropriate to the selected Drag Standard (G1 or G7)
bull If you are using a Ballistic turret use the BC from that profile
bull See page 35 for information about the Edit Mode
Muzzle Velocity (MV) bull The MV is the speed the bullet leaves the barrel
(unit is feet per second) and automatically corrects for a measured chronograph distance of 15 feet
bull If you are unable to measure your MV go to wwwgsevencom and use the trajectory validation feature to calculate your actual MV based on shooting re-sults If you are using a Ballistic Turret use the MV from that profile
bull See page 35 for information about the Edit Mode
Sight Height bull The distance from the center line of the barrel to the
centerline of the scope (unit is inches) It is easy to measure Add half the diameter of the scope to half the diameter of the action to the distance between the scope and action Or place a ruler on the side of your rifle and estimate
bull See page 35 for information about the Edit Mode
30
Turret Temperature bull The temperature the Ballistic turret was config-
ured forbull Unit is degrees Fahrenheitbull See page 36 for information about the Edit Mode
Turret Altitude bull The Altitude the Ballistic turret was configured
for bull Unit is feetbull See page 36 for information about the Edit Mode
The Zero Range bull The range at which your calibration for drop
compensation is referenced Usually consider-ing the point blank range of your cartridge 200 yards is a common and useful zero range Your MOA elevation adjustment Ballistic Turret or Ballistic Reticle should reflect and reference your zero range For example with your rifle sighted in at 200 yards to hit right on the bulls eye your ballistic turret or MOA turret should be adjusted to reflect 2 (for 200 yards) or 0 respectively
bull See page 36 for information about the Edit Mode
Notesbull Be certain to double check all entries The program does not check val-
ues so invalid entries do not generate an error messagebull Highly accurate scope and ballistics data are supplied when you purchase
a complete rifle system from Gunwerks bull Use the Ballistics Calculator at wwwgsevencom to determine your bal-
listics databull If you are tuning and developing your own loads and rifle setup the
better you can resolve your BC MV etc the better the performance you will get from your laser
bull If BC and MV values are set to 0 the unit will auto clear the user-entered profile name and usually reset to the factory default (example Profile 1)
31
Section 7 ndash Taking a Ballistic Profile MeasurementSetup the ballistics profile to match the cartridge combination (page 23) The basic steps for taking a Ballistic measurement are the same as taking a Range Only mea-surement (page 26) For range measurements with ballistic calculations the maxi-mum measurement distance is approximately 1400 yards Measurement results vary depending upon the Drop Units selection associated with the ballistic profile
After completing a measurement the calculated wind correc-tion is easily accessed After ranging and receiving a ballistic solution pressing either the or will display the calcu-lated wind hold in MOA for the ballistic solution
Drop Units = BDC1 Look through the eyepiece and use the cross hair to aim to
the target In this example P1 indicates that Ballistic Profile 1 is active and will be applied to the measurement
2 Press and hold the button The Laser status indicator is displayed while the laser is active The laser re-
mains active for a maximum of 5 seconds while acquiring data about the target
bull If the target is not acquired in the 5-second period release the button and repeat this step
3 Once the measurement is displayed release the but-ton The Line of Sight distance will be displayed for just a few seconds and then the display will be updated lsquocrsquo will appear in the Lower Display to indicate the compensated distance or Shoot To Distance
4 Press the or button to display the Wind Correction Menu (page 35) To apply this correction just dial or hold the correct value in the rifle scope
bull Press the button to toggle between the Mea-sured Values Menu and the Wind Correction Menu
bull Press the button to the Measured Values Menu If the or button are pressed before the next measurement the last Wind Correction Value and Measured Value will appear
32
Measurement Results Menu in the BDC ModeExample Measured Values Menu (Ballistic Profile Measurement)
BDC DistanceShoot To Distance
Approximate Altitude
Barometric Pressure
Temperature
Inclination
Line of Sight Distance
33
Measurement Results Menu in the BDC ModeExample Measured Values Menu (Ballistic Profile Measurement)
Drop Units = MOAIn this example the figures to the right show Profile 1with Drop Units of MOA The process of taking the measure-ment is the same as BDC Mode
The first value displayed represents the Line of Sight Distance In this example 224 yards The next value displayed is the MOA correction value for bullet drop 17 MOA in this example
The Measured Value Menu includesbull MOA Dropbull Approximate Altitudebull Barometric Pressurebull Temperaturebull Inclinationbull Line of Sight Distance
Press the or button to display the Wind Correction Menu (page 35) To apply this correction just dial or hold the correct value in the rifle scope
bull Press the button to toggle between the Measured Values Menu and the Wind Correction Menu
bull Press the button to the Measured Values Menu If the or button are pressed before the next measurement the last Wind Correction Value and Measured Value will appear
34
Drop Units = InchesIn this example the figures to the right show Profile 1with Drop Units of Inches The process of taking the measurement is the same as BDC or MOA mode
The first value displayed represents the Line of Sight Distance In this example 223 yards The next value displayed is the Inches correction value 4 inches in this example
The Measured Value Menu includesbull IN Dropbull Approximate Altitudebull Barometric Pressurebull Temperaturebull Inclinationbull Line of Sight Distance
Press the or button to display the Wind Correction Menu (page 35) To apply this correction just hold off the correct value in the rifle scope
bull Press the button to toggle between bull the Measured Values Menu and the Wind
Correction Menubull Press the button to the Measured Values
Menu If the or button are pressed before the next measurement the last Wind Correction Value and Measured Value will appear
35
Wind Correction MenuEntering the Wind Correction Menu is accomplished by pressing the or buttons after a measurement sequence has been accomplished in BDC MOA or Inches Mode While in the Wind Correction Menu pressing either or increments the wind value up or down from 5 to 50 miles per hour and displays the corresponding wind correction Select the wind correction that best approxi-mates the right angle component to your shot direction
To apply this correction just dial or hold the correct value in the rifle scope
bull If Drop Units = BDC or MOA the correction value is in MOAbull If Drop Units = Inches the correction values in inchesbull Press the button to toggle between the Measured Values Menu
and the Wind Correction Menu
36
Section 8 ndash Edit ModeThe G7 BR2 has an editor that can be used to manually enter values for the various instrument setup values The instrument does not check or validate entered values so it is recommended that you verify values before exiting the Ballistic Profile Menu
Editable options include Profile Description Ballistic Coefficient Muzzle Velocity Sight Height Turret Temperature Turret Altitude Zero Range
Restoring factory defaults will clear the stored values The table on page 39 may be used to record profile data
Lower DisplayWhen all of indicators are lit the Lower Display looks like Figure 26
Numeric Values Figure 27
To edit a numeric value1 Press the button One of the digits will be flashing2 Press or to increase or decrease the value of the digit until desired
value is displayed3 Press the button to edit the next digit4 Repeat steps 2 and 3 until correct value is displayed5 Press the button to exit the Edit Mode
37
Upper DisplayOf the editable options listed on the previous page only the Profile Description is edited using the Upper Display When all of indicators are lit the Upper Display looks like the figure to the right The Profile Description is limited to 8 characters
You may select from ASCII characters that include upper case letters (A-Z) lower case letters (a-z) numbers (0-9) and special characters
ldquo $
amp lsquo ( )
+ -
lt = gt
[ ] ^
_ ` |
~ blank space
38
Editing a Ballistic Profile Description1 Display the System Setup Menu Pro-
file Select will be displayed2 Press the button to display the
Ballistic Profile Menu3 Press or to scroll to the profile
you wish to edit In this example we will edit Profile 1
4 Press the button to select the profile you wish to edit The factory de-fault Profile 1 will appear in the Upper Display and dESc in the Lower Display
5 Press the button to start the Edit Mode The left most character of the Upper Display will be flashing
6 Press or to increase or decrease the value of the flashing characterbull The auto-accelerating editor scrolls
faster the longer the button is pressed
bull If you need to make a correction press the button repeatedly to return to the character that you want to correct
7 Press the button to scroll to the next character in the description Maximum = 8 characters
8 Press the button to exit the Edit Mode The message Pls Wait appears in the Upper Display while the instrument calculates intermediate tables for the selected profilebull More than 1 profile may be setup
before exiting the Edit Mode 9 Do not press any buttons until the ldquoPls
Waitrdquo message is cleared and the Mea-surement Screen is displayed showing the updated profile number P1 in this example
39
Description
1 2 3 4 5
Profile Number
DropUnits
Drag Standard
BallisticCoefficient
MuzzleVelocity
SightHeight
TurretTemperature
TurretAltitude
ZeroRange
40
Section 9 - Care amp MaintenanceThe battery is the only user-replaceable part in the G7 BR2 Do not remove any screws To do so will effect or void the G7Gunwerks Limited WarrantyTemperature Range
Operating temperature range 32deg to 122deg F Storage temperature range -4deg to 158deg F
Protecting from Moisture and DustThe G7 BR2 is sealed to provide protection from normally expected field conditions It is protected from dust and rain but will not withstand submersion
If water leakage is suspected1 Power OFF the G7 BR22 Remove the battery3 Air dry the G7 BR2 at room temperature with the battery compartment open
Protecting from ShockThe G7 BR2 is a precision instrument and should be handled with care It will with-stand a reasonable drop shock If the unit suffers from a severe drop shock power on the unit and attempt a measurement Please contact G7 Customer Service if you need assistance
TransportingWhen transporting the G7 BR2 the unit should be secured in the provided carrying case The provided neck strap can be used when carrying the G7 BR2 in the field The eyepiece cover should be in place whenever the G7 BR2 is not in use
CleaningClean the G7 BR2 after each use before returning it to its carrying case Check all of the following items
bull Excess moisture Towel off excess moisture and air dry the instrument at room temperature with the battery removed and the battery compartment open
bull Exterior dirt Wipe exterior surfaces clean to prevent grit buildup in the car-rying case Isopropanol may be used to remove dirt and fingerprints from the exterior
bull Transmit and Receive Lenses Use the provided lens cloth to wipe the lenses Failure to keep the lenses clean may damage them
StoringIf you wonrsquot be using the G7 BR2 again soon remove the battery before storing the instrument
41
Section 10 - SpecificationsAll specifications are subject to change without notice Please refer to Gunwerks website for current specifications If you are not able to locate the information on the website or if you do not have internet access please contact Gunwerks via phone or fax Refer to the inside front cover for Gunwerks contact information
Measurement Systembull Measurement Range 0 - 2500 yards
Functional Range 2000 yards Reflective Range 2500 yards
bull Maximum Compensated Range 1400 yardsbull Accuracy
Range plusmn1 yard Tilt plusmn1 degree Temperature plusmn2deg F Pressure plusmn05 InHg
bull Measuring System 905 nm infrared pulse laserbull Display System Black mask dot matrix LCD with in-scope projectionbull Target System In-scope projection of aiming reticle
Ballistics Calculation Limitsbull Maximum Tilt Angle for Computed Ballistics plusmn90 Degbull Maximum Temperature for Computed Ballistics 122deg Fbull Minimum Temperature for Computed Ballistics 32deg Fbull Maximum Pressure for Computed Ballistics 36 InHgbull Minimum Pressure for Computed Ballistics 4 InHg
Optical Systembull Field of View 340 feet at 1000 yardsbull Type Monocular thru-the-lens view coincident with laser output beambull Magnification 7X
42
Miscellaneousbull Operating Temperature 32deg to 122deg Fbull Storage Temperature -4deg to 158deg Fbull Power Source CR 123bull Battery Life Intensive use and brightness 4-5 hours Average use 8-10 hoursbull Dimensions 52 L x 45 W x 21 H in (132 L x 114 W x 53 H cm)bull Weight (with battery) 090 lbs (040 kg)bull Structure Glass filled polycarbonate compositebull Targeting Modes Standard Near Far Continuousbull Environmental Waterproof dustproof IP55
Laserbull Class FDA Class 1 (CFR 21)bull Wavelength 905 nm
43
Section 11 - TroubleshootingProblem Remedy
The unit does not power ON or the LCD does not illuminate
Press the buttonCheck the display and if necessary replace the battery
Make sure the unit is powered ONMake sure that nothing is obstructing the trans-mit lens or the receive lensMake sure the unit is held steady while pressing the buttonMake sure that you press-and hold as long as the laser is active (5 second maximum)
To conserve battery power if no button presses are detected after a specified length of time the G7 BR2 will enter Sleep Mode and then power itself OFF
bull Sleep Mode 8 secondsbull Shut down 45 secondsbull Note These times are after the last button
press or major instrument operation
Review Ballistic Profile inputsIf problem persists contact Gunwerks for as-sistance See inside front cover for Gunwerks contact informationContact Gunwerks for service See inside front cover for Gunwerks contact information
The target cannot be acquired
The G7 BR2 does not have an OFF button
Incorrect measurements
E37 (or similar value)appears in the Main Display
Section 12 ndash Warranty
The G7 BR2 is covered by the one-year G7Gunwerks Limited Warranty
G7 offers a bulletproof product warranty All of the G7 products are built to very rugged performance standards and checked and rechecked before they are shipped
If a G7 product should fail during normal use please contact G7 Customer Service Feel free to call or write with any questions you may have about our products
To register your G7 BR2 please visit the G7 web site httpwwwgsevencomcustomer-servicewarranty
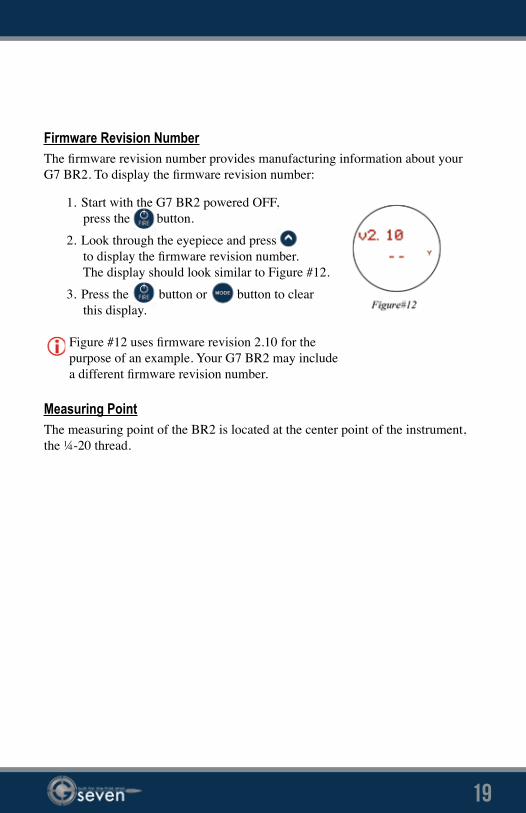
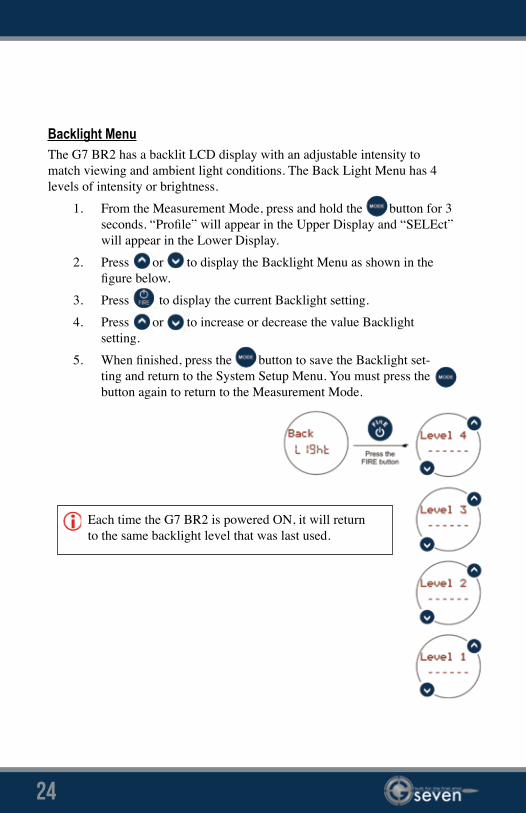
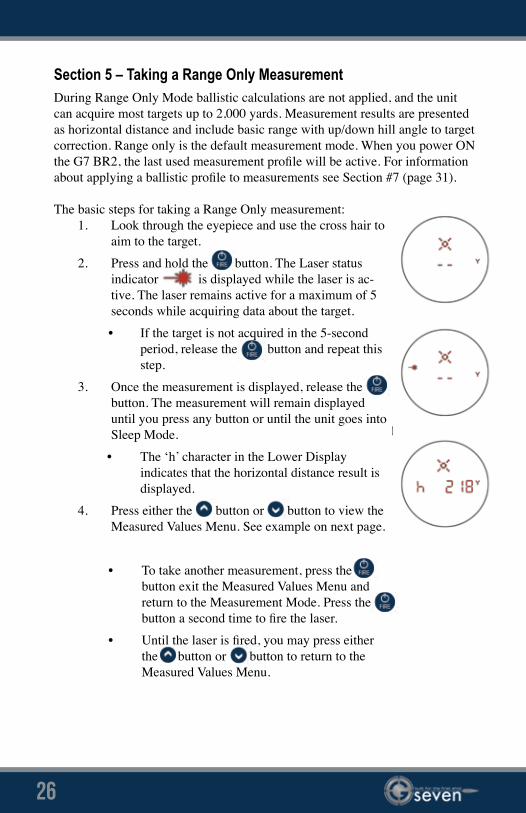
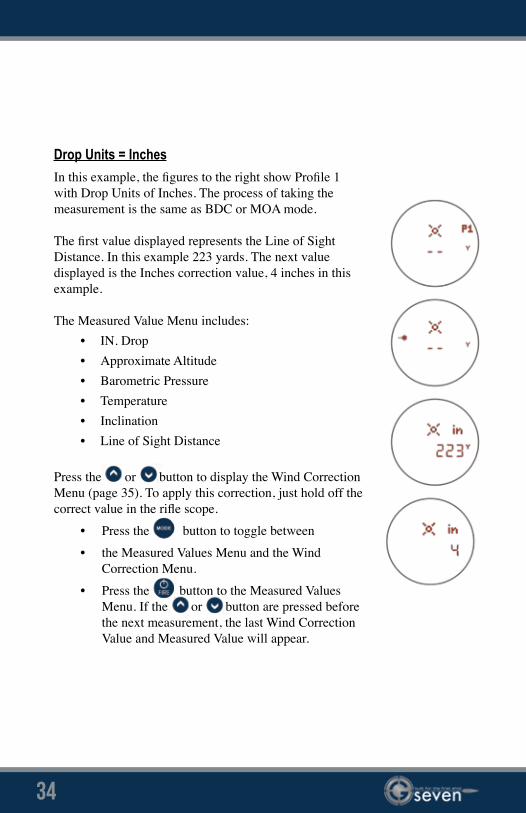
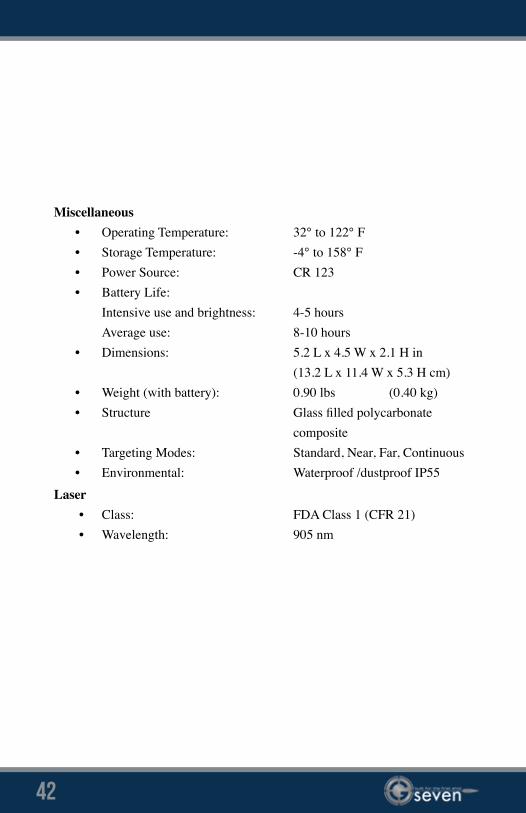
