acs hp series battery charger - alpha...
TRANSCRIPT

ACS HP Series Battery ChargerQuick Start Guide
Effective: December 2011

PowerAlpha Technologies ®

Preliminary3
AIP900-0012-B0-001 Rev. A (01/2012)
Photographs contained in this manual are for illustrative purposes only. These photographs may not match your installation.
Operator is cautioned to review the drawings and illustrations contained in this manual before proceeding. If there are questions regarding the safe operation of this powering system, please contact Alpha Technologies or your nearest Alpha representative.
Alpha shall not be held liable for any damage or injury involving its enclosures, power supplies, generators, batteries or other hardware if used or operated in any manner or subject to any condition not consistent with its intended purpose or is installed or operated in an unapproved manner or improperly maintained.
NOTE:
NOTE:
NOTE:
Contacting Alpha Industrial Power: www.alpha.comFor service information, (7 AM to 5 PM, Eastern Time):
Tel: 1-800-996-6104
Fax: 1-678-584-9259
ACS HP Series Battery Charger Quick Start Guide
Effective Date: December, 2011© 2011- Alpha Industrial Power
1075 Satellite Blvd, Suite 400, Suwanee, GA 30024Tel: 1-800-996-6104 Fax: 1-678-584-9259

4
AIP900-0012-B0-001 Rev. A (01/2012)
ContentsSAFETY NOTES ................................................................................................................... 5
IMPORTANT SAFETY INSTRUCTIONS ............................................................................... 5
GENERAL SAFETY PRECAUTIONS.................................................................................... 6
1.0 Introduction ................................................................................................................. 8What This Manual Covers .......................................................................................... 8Who Should Read This Manual .................................................................................. 8How to Use This Manual ............................................................................................. 81.1 Product Overview............................................................................................. 81.2 Theory of Operation ........................................................................................ 91.3 System Components.......................................................................................111.4 Specifications ................................................................................................. 12
2.0 System Installation.................................................................................................... 132.1 Installation Notes ........................................................................................... 132.2 Recommended Installation Layout................................................................. 142.3 Electrical Connection and Wiring ................................................................... 152.4 InstallingtheRectifierModules ...................................................................... 16
3.0 Operation .................................................................................................................. 173.1 Placing the System into Service .................................................................... 17
3.1.1 Initial Turn-Up ...................................................................................... 173.2 RectifierOperationalStatus ........................................................................... 183.3 CXC Controller Operational Status ................................................................ 19
3.3.1 Startup and Reset Procedure ............................................................. 193.3.2 Normal Operation ............................................................................... 203.3.3 Menu Navigation and Sample Programming ...................................... 20
FiguresFig.1-1,SimplifiedBlockDiagram ......................................................................................10Fig.1-2,ConfiguredChargerSystem ..................................................................................11Fig. 2-1, Cabinet Footprint with Dimensions........................................................................14Fig.2-2,RectifierModule ....................................................................................................16Fig.3-1,RectifierLEDs .......................................................................................................18Fig. 3-2, Cordex Controller Front Panel...............................................................................19Fig. 3-3, Normal Operating Mode “Home Page”..................................................................20Fig. 3-4, Navigation Screen .................................................................................................20
Con
tent
s &
Fig
ures

Preliminary5
AIP900-0012-B0-001 Rev. A (01/2012)
TheuseofATTENTIONindicatesspecificregulatory/coderequirementsthatmayaffecttheplacementofequipment and /or installation procedures.
ATTENTION:
The use of CAUTION indicates safety information intended to PREVENT DAMAGE to material or equipment.
WARNING presents safety information to PREVENT INJURY OR DEATH to the technician or user.
ANOTEprovidesadditionalinformationtohelpcompleteaspecifictaskorprocedure.NOTE:
Safe
ty N
otat
ion
WARNING!
CAUTION!
SAFETY NOTATIONReview the drawings and illustrations contained in this manual before proceeding. If there are any questions regarding the safe installation or operation of this product, contact Alpha Industrial Power, Tel: 1-800-996-6104 Fax: 1-678-584-9259 or the nearest Alpha representative. Save this document for future reference.To reduce the risk of injury or death, and to ensure the continued safe operation of this product, the following symbols have been placed throughout this manual. Where these symbols appear, use extra care and attention.

6
AIP900-0012-B0-001 Rev. A (01/2012)
Gen
eral
Saf
ety
GENERAL SAFETY PRECAUTIONS:Thisunitanditsassociatedhardwaremustbeservicedonlybyqualified,authorizedpersonnel.Unitmustremainlockedatalltimes,exceptwhenauthorizedservicepersonnelarepresent.Remove all conductive jewelry or personal equipment prior to servicing equipment, parts, connectors, wiring, or batteries. Read and follow all installation, equipment grounding, usage, and service instructions included in this manual. Use proper lifting techniques whenever handling enclosure, equipment, parts, or batteries. Batteries contain dangerous voltages, currents and corrosive material. Batteryinstallation,maintenance,serviceandreplacementmustbeperformedbyauthorizedpersonnelonly.Never use un-insulated tools or other conductive materials when installing, maintaining, servicing or replacing batteries.Use special caution when connecting or adjusting battery cabling. An improperly connected battery cable or an unconnectedbatterycablecanresultinarcing,afire,orpossibleexplosion.Abatterythatshowssignsofcracking,leakingorswellingmustbereplacedimmediatelybyauthorizedpersonnelusing a battery of identical type and rating.Avoid any contact with gelled or liquid emissions from a valve-regulated lead-acid (VRLA) battery. Emissions contain dilute sulfuric acid which is harmful to the skin and eyes. Emissions are electrolytic, which are electrically conductive andarecorrosive.FollowtheChemicalHazardsnotesifcontactoccurs.Do not smoke or introduce sparks in the vicinity of a battery. Under certain overcharging conditions, lead-acid batteries can vent a mixture of hydrogen gas that is explosive. Proper venting of the enclosure is required. Follow the battery manufacturer’s approved transportation and storage instructions. Neverchargeafrozenbattery.Neverenergizeaphysicallydamagedcharger.Prior to installation, verify that the AC input voltage to the unit and its equipment match with respect to voltage and frequency. Prior to installation, verify that the output voltage from the unit or its equipment match the voltage requirements of the connected equipment (load). Prior to installation, verify that the unit’s utility service panel is equipped with a properly rated circuit breaker for use with the equipment inside. Refer to manufacturer’s recommendations. Review and upgrade utility service panel circuit breaker requirements whenever the equipment within the enclosure is changed. Prior to installation, contact local utilities, local building maintenance departments, and cable/piping locator services to ensure that installation does not interfere with existing utility or building cables/piping. Before performing any maintenance on this, make sure that the battery and the AC Power are disconnected. Note that both AC and DC current are present in this unit even with indicators and breakers set to the “OFF” position. Do not exceed the output rating of equipment. Verify load requirements prior and during connection process. Prior to handling the batteries, touch a grounded metal object to dissipate any static charge that may have developed in your body. The charger contains electrostatically-sensitive equipment. Use proper electrostatic discharge (ESD) procedures to prevent any severe damage to the electronic components.

Preliminary7
AIP900-0012-B0-001 Rev. A (01/2012)
Utility Power Connection Notes Connectingtotheutilityshouldbeperformedonlybyqualifiedservicepersonnelandincompliancewithlocalelectrical codes. Connection to utility power must be approved by the local utility before installing the system.
Equipment Grounding Connection Notes In order to provide a ready, reliable source of backup power it is necessary to connect the system to an effective grounding and Earthing system that not only provides for the safety of the service personnel responsible for its operation and maintenance, but also facilitates the proper operation and protection of the equipment within the network. Such a grounding system provides protection with respect to operator safety, system communication, and equipment protection.
Low impedance grounding is mandatory for personnel safety, critical for the proper operation of the system and must be in place and connected to the system before the supply cables are connected.
SAFETY GROUNDThe safety ground is a two-part system, comprised of the utility service and the ACS HP Series Battery Charging system.
1. Utility serviceAs a minimum requirement for the protection of equipment, the local utility service must provide a low-impedance path for fault current return to Earth. This must meet or exceed the requirements of the US National Electrical Code or the Canadian Electrical Code. The connection between the system and the utility must also meet or exceed the requirements of the US National Electrical Code or the Canadian Electrical Code.
2. The grounding systemThe grounding system consists of a low-impedance connection between the enclosure and an Earth Ground (located at least 6’ away from the Utility Earth connection).This impedance between the system and Earth must not exceed 0.1 Ohms.Lightning Strike GroundLightning strikes, grid switching, or other aberrations on the power line and/or communications cable have the potential to cause high-energy transients which can damage the powering or communications systems. Without a low-impedance path to ground, the current, when traveling through wires of varying impedance, produce damaging high voltage. The most viable method available to protect the system from damage is to divert these unwanted high-energy transients along a low-impedance path to ground. A low-impedance path to ground prevents these currents from reaching high voltage levels and posing a threat to equipment. The single-point grounding system provides a low-impedance path to ground, and the key to its success is the proper bonding of the ground rods, so the components of the grounding system appear as a single point of uniform impedance. We recommend the use of a surge arresting device electrically bonded to the ACS HP Charger Ground System.
Pow
er C
onne
ctio
n
WARNING!

8
AIP900-0012-B0-001 Rev. A (01/2012)
What This Manual CoversThisuser’smanualcontainsimportanttechnicalinstructionstobefollowedbyqualifiedpersonnel for the installation, start-up, and maintenance of this unit. It is recommended that this manual be read closely to ensure and reliable operation of this equipment.
Who Should Read This ManualThe Product Safety Information chapter and the Operation chapter are intended for anyone who will be operating the ACS HP Series Battery Charger. The Installation and Maintenance chapters areintendedforqualifiedinstallers,trainedelectriciansortechnicianswhoarefullyeducatedonthehazardsofinstallingelectricalequipmentsuchasuninterruptiblepowersuppliesandtheirassociated batteries and accessories.
How to Use This ManualBefore you begin installing or operating the system, please ensure that you are familiar with all the warnings and cautions described in this manual (see Product Safety Information). Once you are aware of all the safety issues, then you can start to plan the installation per Section 2.0, Installation. After you have completed the installation, you can start learning how to operate the system to meet the needs of your application.
1.1 Product OverviewThe ACS HP Series Battery Charger is a modular, switched mode AC-DC conversion design, consistingofoneormoreCordexrectifiermodulescoupledwithaCordexCXCmicroprocessorcontroller.Thischargingsystempossessesaunitypowerfactorwithefficiencygreaterthan93%, a negligible THD input level, and clean output power, providing reliable, quality DC power for many years. The4RUshelfoftheunitaccommodatesuptofive,hotswappableCordex4.4kWrectifiers,which allows for N+1 or N+N redundancy capability, as well as expansion capability up to 175Aoutputcapacity.Thehotswappabledesignoftherectifiersallowsthemtobeinsertedorremoved from the shelf without requiring the power to be cut to or from the system or the load. Configuration,monitoring,andcontrolofthechargingsystemisprovidedbytheCordexCXCcontroller, either locally via the CXC touch screen display or remotely via an ethernet or RS-232 connection and an internet browser (DNP3 Level 2 communication is also available as an optional feature). Battery management, data logging, and temperature compensation are just some of the standard features supplied by the CXC controller. Other standard features of the ACS HP series battery charger include high interrupting current input and output circuit breakers, AC and DC surge protection, common Form C alarm relay contacts, and high voltage shutdown. For full component technical and operational details of the ACS HP series battery charger, please refer to the following manual sections pertaining to the Cordex 125-4.4kW modular switchedmoderectifiers,theCordexCXCcontroller,andtheCordexCXCcontrollersoftware.
1.0
Intr
oduc
tion
Preliminary9
AIP900-0012-B0-001 Rev. A (01/2012)
1.2 Theory of operation Please refer to the power circuit block diagram on the following page for a theory of operation of theACSHPswitchedmodeAC-DCconversionsystem.The187-312VAC,50/60Hzinputisfedthroughacircuitbreakerintoafullwaverectifier,whichinturnprovidesa120Hz(340Vpeak)pulsetraintoaninputfiltercircuit.Theinputfilterprovidesanominal290VDC"rawsupply",withapproximately30VP-P120Hzripple,tothetransistorswitchingcircuit.Thetransistorswitchingcircuit“chops”therawsupplyintoa525VP-P,100kHz(nominal)rectangularwaveformwitha nominal 66% duty cycle. This high frequency switching waveform is then fed into a ferrite powertransformer,inwhichthewaveformis“steppeddown”andisolated.Arectifiercircuitthenconverts the power transformer output to a DC pulse train with a nominal 160 V peak. Next, a two-stageoutputfilteraveragesandsmoothesthispulsetraindownward,providingthenominal125VDCoutputwithlownoise.Avoltageerroramplifiercircuitsensestheoutputvoltageandcompares it with the voltage reference to provide a voltage error signal. Similarly, a current error amplifier,usingashuntresistorandscalingamplifier,sensestheoutputcurrentandcomparesit with the desired maximum output current, in order to provide a current error signal. These signals are then fed into the pulse width modulator (PWM) via ORing circuitry so that either voltageorcurrentregulationisachieved.ThePWMcontrolsthe"ON"timeoftheswitchingtransistors,varyingtheoutputascommandedbytheerroramplifiers.ThePWMalsosensestheswitching transistor current on an instantaneous basis to provide cycle-by-cycle protection of the switchingtransistors.Anauxiliarysupply,poweredviaasmall50/60Hztransformer,andaDC/DC converter power the control circuit and front panel circuitry. The PWM receives the ON/OFF command and clock signal from the front panel circuit and control circuitry.
1.0
Intr
oduc
tion

10
AIP900-0012-B0-001 Rev. A (01/2012)
1.0
Intr
oduc
tion
Fig.1-1,SimplifiedBlockDiagram
1.2 Theory of operation, continued

Preliminary11
AIP900-0012-B0-001 Rev. A (01/2012)
1.3 System ComponentsThe ACS HP Series Battery Charger is comprised of a number of individual subsystems designed to worktogethertoprovidehighlyreliable,filteredpowerinsupportoftheload.Atypicalsystemwill contain the following:
1
2
3
4
5
7
1. Blank equipment panel.
2. Cordex4.4kWrectifiersLoadedontopre-installedshelf.Theshelfcontainsuptofivehot-swappable4400WRectifiermodules.TheRectifiersareusedasthe charging component of a hybrid “UPS” system.
3. Cordex Controller CXCR: Controls the entire AC and DC power system. Provides web-based and localdisplayinterfacetosetconfigurablefeaturesofInvertersandRectifiermodules,batterychargingvoltages, and system-wide alarms.AC Output Distribution Panel: DIN rail circuit breakers can be installed to feed individual AC load circuits.
4. Main breaker panel: Serves as main disconnect for the Inverter AC input.
5. Auxiliary/Distribution breaker panel
6. Blank equipment panel.
7. Perforated ventilation panel.
6
Fig.1-2,ConfiguredChargerSystem1.
0 In
trod
uctio
n

12
AIP900-0012-B0-001 Rev. A (01/2012)
SpecificationsElectricalInput:
Voltage:Nominal: 208 to 250VacOperating: 187 to 312VacExtended: 187 to 90Vac (derated)
Phase: 1 or 3Frequency: 45 to 70HzCurrent: 23A/module-nom. (130A Max@ 175ADC output)Power: 4400W continuous/modulePower Factor: >0.99 (50 to 100% load)THD: <5%Efficiency: >93%
Output:Voltage: 90 to 160VdcCurrent: 35A/module-nom. (200A Max @ 110VDC)Load Regulation: Static <±0.5%Line Regulation: Static <±0.1%Transient Response: <±5% for 40 to 90% load step, 30ms recovery timeRipple: ±30mVrms Battery Eliminator
MechanicalDimensions:
Standard XLmm: 1049 H x 622 W x 597 D 1806 H x 700 W x 622 Din: 41.25 H x 24.5 W x 23.5 D 71.1 H x 27.55 W x 24.5 D
Weight: 100 kg (220 lbs) for 105A system 115 kg (253 lbs) for 105A systemCabinet: NEMA 1 (black finish) NEMA 1 (black finish)EnvironmentalTemperature
Standard: -40˚ to 50°C (-40˚ to 122°F)Extended: -40˚ to 75°C (-40˚ to 167°F)Storage: -40˚ to 85°C (-40˚ to 185°F)
Humidity: 0 to 95% RH non-condensing
Elevation: -500 to 2,800m (-1,640 to 9,186ft); to 4,000m (13,124ft) derated to 40˚C (104˚F)
Audible Noise: <55dBa @ 1m (3ft)Ventilation: Forced Air/ConvectionMTBF: >350,000 hours
Standard FeaturesFull graphic touch screen LCD with virtual alphanumeric and numeric keyboardsModbus ProtocolAccess GUI user interface via Internet browser through Ethernet port or RS-232 craft port on CXC ControllerHigh interrupting current input and output breakers (10kA IC)Reverse polarity protectionAC and DC surge suppressionCurrent limit protectionSoft start protectionCommon Form C alarm relay contactsHigh voltage shutdownAC failure alarmHigh/Low voltage alarmCharger failure alarmPositive/Negative ground fault alarmDC output failure alarm
Standard Features (continued)Control Functions
Automatic, scheduled, or manual float charging (adjustable)Automatic, scheduled, or manual equalize charging (adjustable)High/Low voltage alarm setting (adjustable)Charge current limit (adjustable)Automatic or manual battery testingBattery capacity and runtime predictionTemperature compensation
Daily Statistics: Minimum, maximum and average on input channels, with date and time stampBattery current, rectifier current, and AC mains volt-age for prior 90 days
Event Log: On all events such as alarms, power on, any change of state of the digital inputs, or other miscellaneous events
Battery Log: Battery health history on last 20 discharges, time of discharge, and battery capacity
Options
Low voltage disconnect
DC Output Panel
Up to 10 x 2 Pole, 5-60A breakers (10kA IC) with alarm monitoring
DNP3 Level 2
Standards, CertificationsSafety:
EN 60950
UL 60950-1 (pending)
CSAC22.2 No. 60950-1-03
CE EN 60950, CB Scheme
Telcordia (Bellcore) GR-1089-CORE
EMC:
EN 55022 (CISPR 22)
EN 61000-3-2 EN 61000-3-3
EN 61000-4-2 EN 61000-4-3
EN 61000-4-4 EN 61000-4-5
EN 61000-4-6 EN 61000-4-11
ETS 300 019-1-1 ETS 300 019-1-2
ETS 300 753 IEC60950
ICES-003 Class B FCC Part 15 Class B
FCC Part 68
1.4 Specifications
1.0
Intr
oduc
tion

Preliminary13
AIP900-0012-B0-001 Rev. A (01/2012)
2.1 Installation Notes• The ACS HP Series Battery Charger is designed to be installed in a controlled environment,
sheltered from rain, excessive dust and other contaminants.• The system arrives pre-wired, and the installer is responsible for connecting the utility input
to the system, the battery strings, and the system to the load.• All wiring must be in accordance with applicable electrical codes.• Access to connection points is provided from the front of the system rack.• The required gauge of the AC input, DC+/DC- input and AC output cabling is determined by
the current rating, Circuit Breaker rating, typical ambient temperatures and must meet the applicable local electrical codes. Typically the AC input and standard AC out put is 6 wires (L1, L2, and L3, N, N, G) up to 350 kcmil THHW or RW90 type cable that will connect to the UPSwithtradesizeupto3.5conduit.
Tools required:
Various tools are required for product installation. This list serves as a guide:
Slotheadscrewdrivers(bladesizes1/4”,1/8”,1/16”)
Philipsheadscrewdriver,#2(tipsize3/16”)
Digital voltmeter equipped with test leads
Adjustable 125/220Vdc load (optional)
Cutters and wire strippers
Crimping tool (optional for large gauge wire)
Socket and ratchet set
2.0
Inst
alla
tion
14
AIP900-0012-B0-001 Rev. A (01/2012)
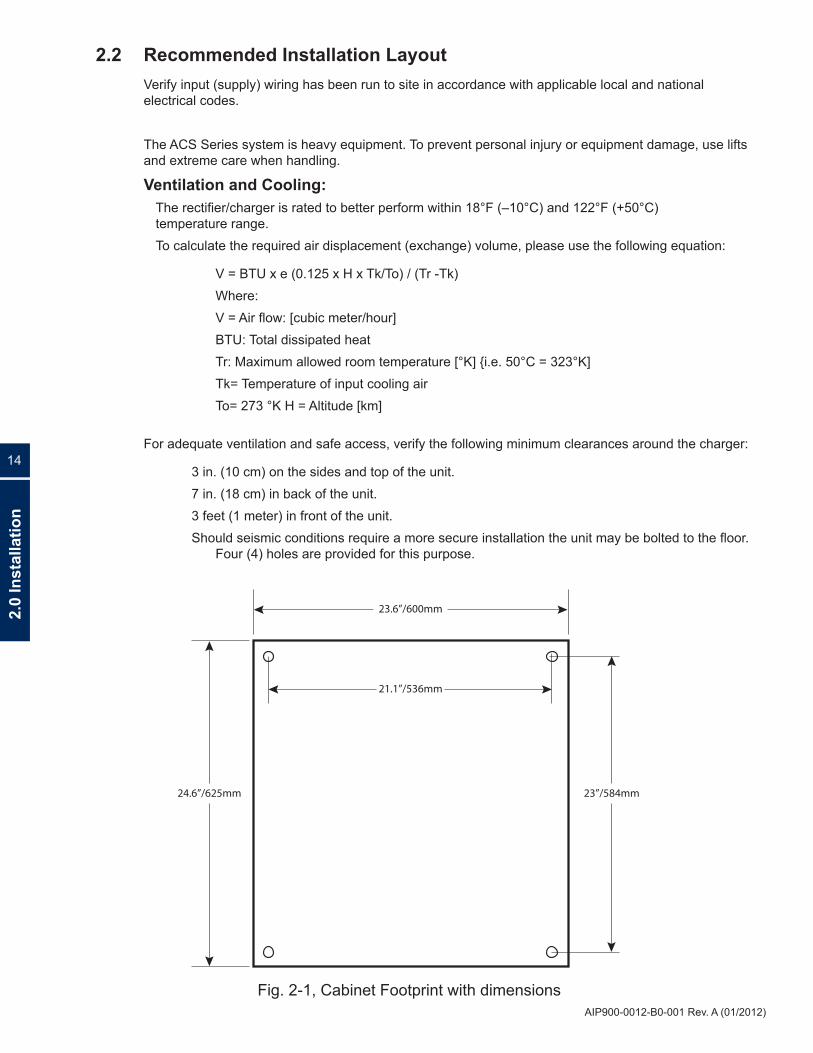
2.2 Recommended Installation LayoutVerify input (supply) wiring has been run to site in accordance with applicable local and national electrical codes. The ACS Series system is heavy equipment. To prevent personal injury or equipment damage, use lifts and extreme care when handling.
Ventilation and Cooling: Therectifier/chargerisratedtobetterperformwithin18°F(–10°C)and122°F(+50°C) temperature range. To calculate the required air displacement (exchange) volume, please use the following equation:
V = BTU x e (0.125 x H x Tk/To) / (Tr -Tk) Where: V=Airflow:[cubicmeter/hour] BTU: Total dissipated heat Tr:Maximumallowedroomtemperature[°K]{i.e.50°C=323°K] Tk= Temperature of input cooling air To=273°KH=Altitude[km]
For adequate ventilation and safe access, verify the following minimum clearances around the charger:
3 in. (10 cm) on the sides and top of the unit. 7 in. (18 cm) in back of the unit. 3 feet (1 meter) in front of the unit. Shouldseismicconditionsrequireamoresecureinstallationtheunitmaybeboltedtothefloor.
Four (4) holes are provided for this purpose.
23.6”/600mm
21.1”/536mm
24.6”/625mm 23”/584mm
Fig. 2-1, Cabinet Footprint with dimensions
2.0
Inst
alla
tion

Preliminary15
AIP900-0012-B0-001 Rev. A (01/2012)
2.3 Electrical Connection and WiringAlways refer to the ACS system electrical schematic diagram for proper installation. Before connecting the ACS Series Battery Charger insure that:
The battery is disconnected (if applicable)
The circuit breakers are “OFF”
The relays, fuses and circuit boards are installed
The unit is wired in accordance with the instructions (refer to the wiring connections and electrical diagram)
Wiresizeisveryimportant.Thenameplateprovidestheessentialinformationregardingtheinputandoutput voltages and currents. Refer to your Local or National Electrical Code for WIRE GAUGE and GROUNDING instructions.
CAUTION!
WARNING!
Wireamperecapacitymustbesizedtothemaximalcorrespondentcurrent.Correctvoltageandpolarity are of critical importance. Check all connections for tightness and polarity. Connect battery (if applicable) to the output terminals observing its polarity.
2.0
Inst
alla
tion

16
AIP900-0012-B0-001 Rev. A (01/2012)
2.4 Installing the Rectifier Modules Before installation, verify all upstream and downstream circuit breakers are in the OFF (open) position.
TheRectifiershelvesarefactory-installedandpre-wired.Intheeventashelfrequiresremoval or replacement, contact Alpha Industrial Power service at 1-800-996-6104.
NOTE:
Rectifier Module Installation Procedure:
1. Loadthefirstmoduleintheleftmostpositionontheshelf.Populatetheshelffromleft to right. Do not force the module into place; all modules are keyed to ensure the correct module (voltage/polarity) type is used.
2. Insertbyplacingtherectifiermoduleontheshelfbottomandslidingthemoduleintotherearconnector(insidetheshelf).Pressfirmlyintoplacetofullyengagetherearconnector in the shelf receptacle.
3. Turn the front panel thumbscrew to secure the module in place.
4. Reverse the above steps to remove a module.
5. Repeatforeachsucceedingmoduleintheconfiguration.
Fig.2-2,RectifierModule
2.0
Inst
alla
tion

Preliminary17
AIP900-0012-B0-001 Rev. A (01/2012)
3.1 Placing the System into Service
Thisproceduremustbeperformedbyaqualifiedservicetechnician.
To meet North American safety standards, do not change the output voltage and frequency settings.
3.1.1 Initial Start-Up Before applying input power, verify the following:
1. AC input and DC output voltages match the voltages as listed on the ACS unit’s nameplate.
2. Load operating voltage complies with the DC output voltage of the ACS charger.
3. Correct polarity of Utility and battery connections.
4. Unit is correctly grounded to building grounding system.
5. RectifierModulesareinstalledandoperational.
5. Unit connected to load.
6. All input circuit breakers open.
7. All output circuit breakers open.
Apply input power in the following sequence:
1. Apply power to the equipment from the source panel .
2. Turn on AC breaker (turn to ”ON” position) .
The system soft starts by increasing the output current and the voltage. Wait for several seconds until the system output voltage and status is indicated on the LCD screen. If calibration of the unit is necessary, refer to the Cordex Controller and Controller Software manuals for more information.
3. Turn the DC breaker (if supplied) to the ”ON” position.
4. Verifynorectifieralarmconditionsarepresent.
5. Close breakers to load.
3.0
Ope
ratio
n
Perform each step and verify no alarm conditions exist upon completion of the step. If an alarm condition exists, determine the cause of the alarm and correct before proceeding to the next step.
NOTE:
WARNING!
CAUTION!

18
AIP900-0012-B0-001 Rev. A (01/2012)
For detailed installation, operation and fault diagnosis information, refer to the Cordex 125-4.4kWModularSwitchedModeRectifiertechnicalmanual(p/n010-589-B2).
NOTE:
3.2 Rectifier Operational Status
The front panel LEDs provide: RectifierStatusSummary Rectifiersoftwareupgradein-progressindication Locate Module Pattern
Rectifierstatussummarywillshowtherectifieralarmstatus,communicationfailstatusandrectifieron/offstatus.
AC ONThetopLED(green)isonwhenACiswithinvalidrange.TheLEDwillflash(~2Hz)whenACisoutsidethe normal range - AC voltage is invalid if the AC Mains Low or AC Mains High alarm is active. The LED turns off when AC has failed.
DC ONThemiddleLED(green)isonwhentherectifierisdeliveringpowertotheload.TheLEDwillflashwhencommunicationislost.TheLEDturnsoffwhentherectifierisoff;e.g.,whencommandedviatheCXC
AlarmThebottomLED(red)willflashintheeventofanactiveModuleFailalarm;ifthemoduleisunabletosource power as a result of any of the following conditions:Output fuse blown AC Mains Input Fail Module Fail (ramp test fail) High voltage (OVP) shutdown Thermal shutdown Local shutdown UPF fail No output power Fan 1 and 2 fail
TheLEDwillflash(~2Hz)whenaminoralarmisdetected;ifthemodule’soutputcapabilityhasbeenreduced or a minor component failure has been detected during the following conditions:
VACmeterfail ACfoldback Remoteequalize Fan (1 or 2) fail Low output voltage High output voltage Current limit (programmable option) Power limit (programmable option) High temperature foldback Temperature sense fail Soft start operation Communications lost
The LED remains off in the absence of an alarm. If the unit output is not connected to a battery or parallel rectifier,theLEDwillextinguishifnopowerispresent.
1
2
3
2
3
1
Fig.3-1,RectifierLEDs
3.0
Ope
ratio
n

Preliminary19
AIP900-0012-B0-001 Rev. A (01/2012)
3.3.1 Startup and Reset Procedure
WhentheCXCispowered-uporreset,itwillfirstperforma15-secondself-testbeforedisplayingtheCordexlogoandvariousidentificationmessages.Thethreefront-panelLED’swillilluminatetemporarily,butwillextinguishafterthesystemhasfinisheditsself-test.Next,theGUIwilldisplaythe power system’s parameters during Normal operating mode.
3.3 CXC Controller Operational StatusThe Charging system is shipped with the Cordex CXC Controller pre-installed. Detailed information regarding installation, operation and fault diagnosis can be found in the Cordex Controller technical manual (018-570-B2).
Fig. 3-2, Cordex Controller Front panel
3.0
Ope
ratio
n
20
AIP900-0012-B0-001 Rev. A (01/2012)
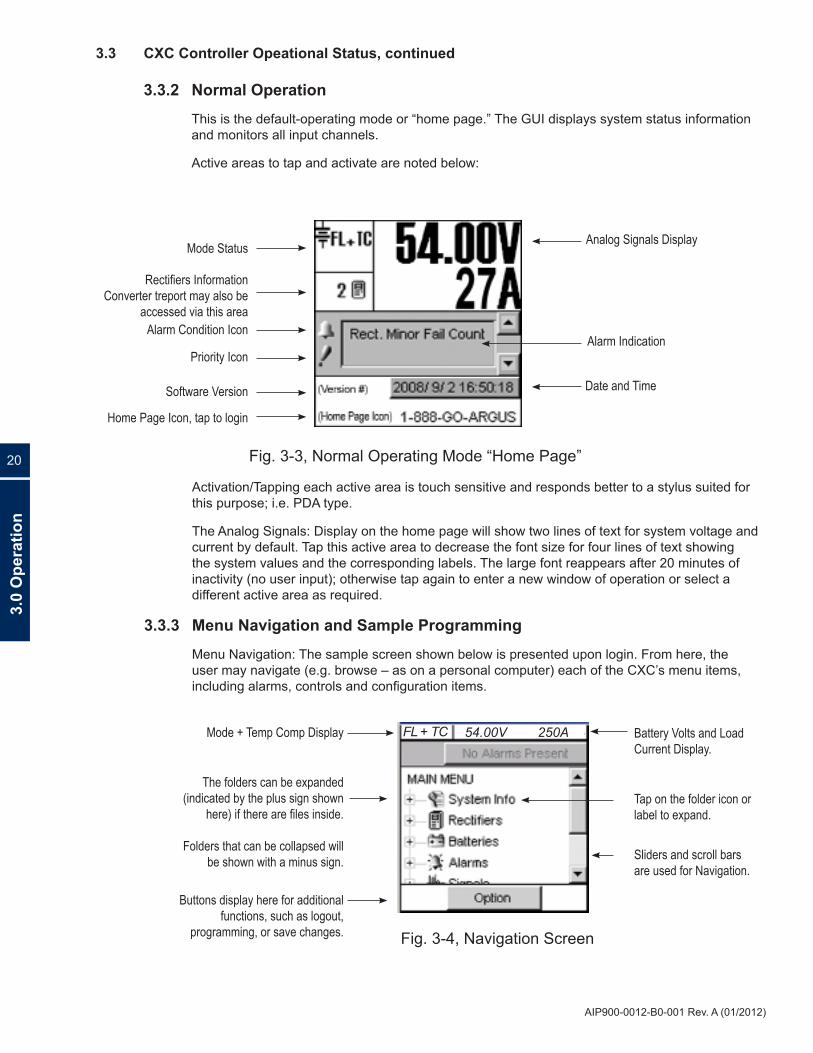
Activation/Tapping each active area is touch sensitive and responds better to a stylus suited for this purpose; i.e. PDA type.
The Analog Signals: Display on the home page will show two lines of text for system voltage and currentbydefault.Tapthisactiveareatodecreasethefontsizeforfourlinesoftextshowingthe system values and the corresponding labels. The large font reappears after 20 minutes of inactivity (no user input); otherwise tap again to enter a new window of operation or select a different active area as required.
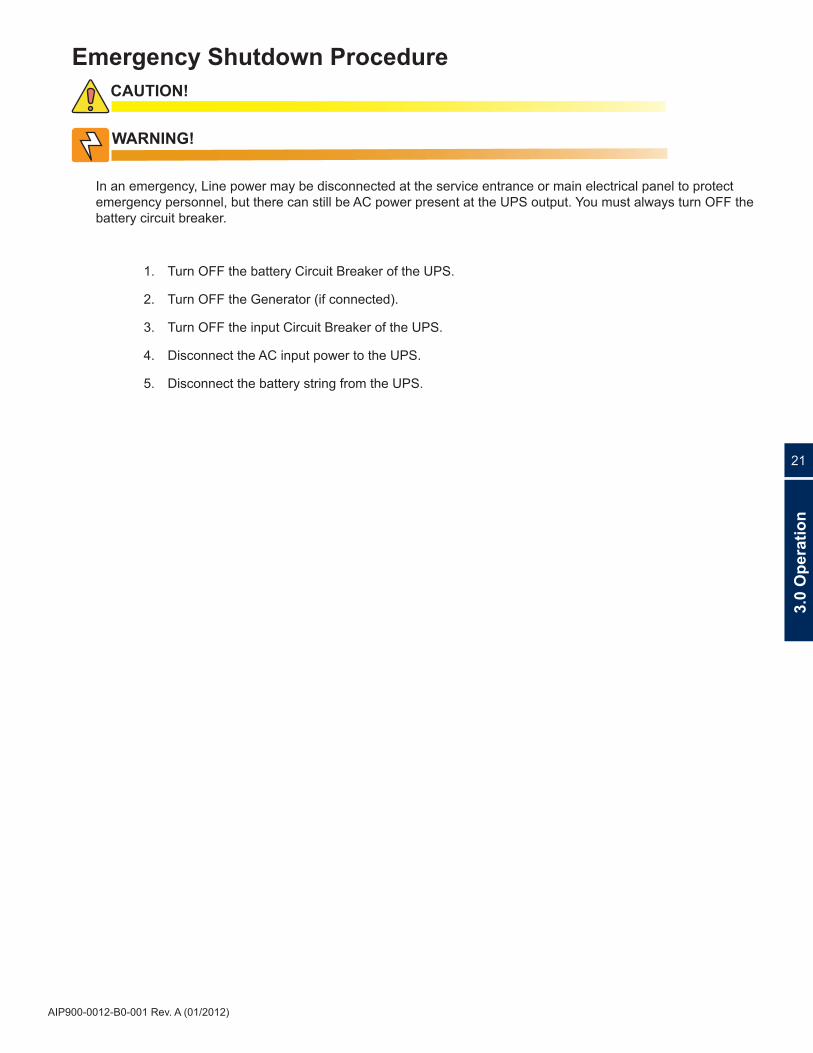
3.3.3 Menu Navigation and Sample Programming
Menu Navigation: The sample screen shown below is presented upon login. From here, the usermaynavigate(e.g.browse–asonapersonalcomputer)eachoftheCXC’smenuitems,includingalarms,controlsandconfigurationitems.
Fig. 3-3, Normal Operating Mode “Home Page”
Analog Signals Display
Rectifiers InformationConverter treport may also be
accessed via this area
Mode Status
Alarm Condition Icon
Priority Icon
Software Version
Home Page Icon, tap to login
Alarm Indication
Date and Time
3.3 CXC Controller Opeational Status, continued
3.3.2 Normal Operation
This is the default-operating mode or “home page.” The GUI displays system status information and monitors all input channels.
Active areas to tap and activate are noted below:
Fig. 3-4, Navigation Screen
Battery Volts and Load Current Display.
The folders can be expanded (indicated by the plus sign shown
here) if there are files inside.
Folders that can be collapsed will be shown with a minus sign.
Mode + Temp Comp Display
Buttons display here for additional functions, such as logout,
programming, or save changes.
Tap on the folder icon or label to expand.
Sliders and scroll bars are used for Navigation.
FL + TC 54.00V 250A
3.0
Ope
ratio
n
Preliminary21
AIP900-0012-B0-001 Rev. A (01/2012)
Emergency Shutdown ProcedureCAUTION!
WARNING!
In an emergency, Line power may be disconnected at the service entrance or main electrical panel to protect emergency personnel, but there can still be AC power present at the UPS output. You must always turn OFF the battery circuit breaker.
1. Turn OFF the battery Circuit Breaker of the UPS.
2. Turn OFF the Generator (if connected).
3. Turn OFF the input Circuit Breaker of the UPS.
4. Disconnect the AC input power to the UPS.
5. Disconnect the battery string from the UPS.
3.0
Ope
ratio
n

this page intentionally blank

this page intentionally blank

Visit us at www.alpha.com
Alpha Technologies Inc.3767 Alpha WayBellingham, WA 98226 United StatesTel: +1 360 647 2360Fax: +1 360 671 4936
Alpha Technologies Ltd.7700 Riverfront GateBurnaby, BC V5J 5M4 CanadaTel: +1 604 436 5900Fax: +1 604 436 1233Toll Free: +1 800 667 8743
Alpha Industrial Power Inc.1075 Satellite Blvd NW, Suite 400Suwanee, GA 30024 United StatesTel: +1 678 475 3995Fax: +1 678 584 9259
Alpha Energy1628 W Williams DrivePhoenix, AZ 85027 United StatesTel: +1 623 251 3000Fax: +1 623 249 7833
Alpha Technologies GmbHHansastrasse 8D-91126Schwabach, GermanyTel: +49 9122 79889 0Fax: +49 9122 79889 21
Technologies Argus First de MexicoAnatole France Num. 17 Colonia Polanco11560, México D.F. Tel: +52 55 5280 6990
Alpha Technologies Europe Ltd.Twyford House ThorleyBishop’s StortfordHertfordshire, CM22 7PA UnitedKingdomTel: +44 1279 501110Fax: +44 1279 659870
Alphatec Ltd.339 St. Andrews St. Suite 101 Andrea ChambersP.O. Box 564683307 Limassol, CyprusTel: +357 25 375 675Fax: +357 25 359 595
Alpha TEK oooKhokhlovskiyPereulok16Stroenie1,Office403Moscow, 109028 RussiaTel: +7 495 916 1854Fax: +7 495 916 1349
Alpha TechnologiesSuite 1903, 19/F., Tower 133 Canton Road, Tsim Sha TsuiChinaHongKongCity,KowloonHongKongPhone: +852 2736 8663Fax: +852 2199 7988
Alpha Innovations BrasilAvenida Ibirapuera, 2120–Cj76Moema - 04028-001SantosSP,BrazilTel: +55 11 2476 0150Fax: +55 11 2476 0150
Alphatec BalticS.KonarskioStreet49-201Vilnius, LT-03123 LithuaniaTel: +370 5 210 5291Fax: +370 5 210 5292
Due to continuing product development, Alpha Technologiesreservestherighttochangespecificationswithoutnotice. © 2011 Alpha Technologies. All Rights Reserved. Alpha® is a registered trademark of Alpha Technologies.