payment gateway api - bitpay · pdf filepayment gateway api ... a merchant can elect to...
TRANSCRIPT

Payment Gateway API
v1.2
BitPay, Inc.
https://bitpay.com
©20112016 BITPAY, Inc. All Rights Reserved. 1

Table of Contents Special Note Introduction Activate API Access (api version 1) Bitcoin Payment Protocol
Native Refund Address Support Secure, Signed Payment Requests User Friendly QR Codes (BIP 73) Direct Payment Communication BitPay Implementation
BIP 72 (old style) compatible URI BIP 73 (new style) compatible URI
Invoice States Base States Exception States Invoice State Diagram Invoice Payment Scenarios
Partial Payment Received Overpayment Received
Create an Invoice Required POST fields Optional Payment Notification (IPN) fields Optional Order Handling fields Optional Buyer Information to display BitPay Server Response
Get Invoice Status Receive Invoice Status Updates Get Bitcoin Best Bid (BBB) Rates
BitPay Server Response Get the Transaction Ledger
Required GET parameters Example Ledger GET Request BitPay Server Response Example JSON Response to Retrieving a Transaction Ledger
Instant Payment Notification (IPN) Integration Hints
Embedded Invoice (iframe) Post to Parent Window Constructing a Custom Invoice
Invoice Status Updates Generating a Custom QR Code Image
Sample Client Library Testing
Merchant Account Setup Testing Considerations
Troubleshooting Revision History
©20112016 BITPAY, Inc. All Rights Reserved. 2

Special Note This document covers BitPay API version 1, which is now deprecated by API version 2. BitPay API version 2 now handles cryptographically secure channels on top of the TLS/SSL channels that are normally provided. Version 1 of the api will remain permanently active, but to use new api enhancements, please use version 2 of the api. Please see https://bitpay.com/api/ for documentation on API v2.
Introduction The Bitcoin Payment Gateway API is designed for merchants that need full control over their customers’ shopping and checkout experience. An eCommerce site can make use of this API to transmit invoice information to BitPay.com from their backend server, and receive server notifications when the customer has completed payment and the invoice total has been credited to the merchant account. A merchant can elect to receive notifications immediately upon receipt of a payment, or when the payment has been completed and credited to the merchant account. The following interactions with the BitPay.com service available via this API:
Create an invoice Fetch an invoice status Receive invoice status updates Fetch Bitcoin Best Bid exchange rates Retrieve your merchant account ledger
Activate API Access (api version 1) The BitPay.com JSON API is accessible at https://bitpay.com/api. Please refer to the “Special Note” above. The merchant must obtain an API key from the bitpay website by logging into their merchant account and clicking on “Payment Tools”,”Legacy API Keys”. A merchant can create multiple keys for use with different ecommerce stores or API functions. Once an API key has been created, BitPay will use this API key to authenticate your API connections. The merchant’s API key must remain private and should never be visible on any clientfacing code. Should it ever be compromised, the merchant can generate a new key in their BitPay account. When connecting to BitPay, use HTTP Basic Authentication with the username as your API key and leave the password blank (the following page describes the HTTP Basic authentication protocol in detail: http://www.ietf.org/rfc/rfc2617.txt). You should also only communicate with the server if you can validate the bitpay.com SSL certificate with a certificate authority. Most HTTPS client libraries make this as simple as setting a switch. Taking both of these steps will ensure that you are always communicating with the Bitpay server and that your API key will never be exposed. Please see the section, Instant Payment Notifications for more details regarding security for incoming requests from BitPay.
©20112016 BITPAY, Inc. All Rights Reserved. 3

Bitcoin Payment Protocol The BitPay server fully supports the Bitcoin Payment Protocol. See the specifications for this implementation:
Payment Protocol (BIP70) https://en.bitcoin.it/wiki/BIP_0070 Payment Protocol MIME Types (BIP71) https://en.bitcoin.it/wiki/BIP_0071 URI Extensions for Payment Protocol (BIP72) https://en.bitcoin.it/wiki/BIP_0072 Use “Accept” header for response type negotiation with Payment Request URLs (BIP73)
https://en.bitcoin.it/wiki/BIP_0073 The Bitcoin Payment Protocol (as specified in BIPs 70 73) eliminates a lot of human error in making a bitcoin payment. A user can just click on a payment link, or scan a QR code, and the wallet software offers two simple choices to the user, pay or don’t pay. The user no longer has to copy the address and amount into their wallet.
Native Refund Address Support With the Payment Protocol, the wallet supplies a refund address along with the payment. This eliminates another potential source of error in refund situations. This approach to refunds works on the block chain, with any wallet software, and does not require the buyers to have a BitPay account.
Secure, Signed Payment Requests The payment protocol supports optional SSL signatures (technically X.509 signatures) on payment requests. This offers certainty to users that they are sending their payment to the intended recipient (all BitPay payment requests are signed). When using a wallet that supports the payment protocol (currently Bitcoin Core and the Android Bitcoin Wallet), you will immediately notice that your wallet tells you that BitPay is requesting a payment.
User Friendly QR Codes (BIP 73) BitPay also supports BIP73, which considerably improves the usability of QR codes for Bitcoin payments. BIP73 reduces the information required to be embedded in a payment request QR code, reducing their density. Less dense QR codes are easier to use in low light situations or from longer distances. These lower density QR codes are also normal HTTP URLs, offering an opportunity to provide additional information and instructions to users of devices that don’t already have a wallet installed. BitPay displays both the older, backward compatible QR code as well as the newer payment protocol QR code. You can toggle between these two QR codes by clicking or tapping on the QR code in our current invoice.
Direct Payment Communication Perhaps the most exciting thing about the payment protocol is that it eliminates the need to use the mesh network for communicating a payment from sender to recipient. The Bitcoin mesh network currently serves two purposes: communicating payments from sender to recipient and communicating payments from originator to miners. By communicating payments directly from sender to recipient, the mesh network can be used exclusively for communicating payments from originator to miners. The network is then free to propagate or ignore transactions without adversely affecting the communications between sender and recipient. This allows for the emergence of a true market in transaction fees. And by
©20112016 BITPAY, Inc. All Rights Reserved. 4

reducing the load on the mesh network to just those transactions which are profitable for miners, it improves Bitcoin’s scalability.
BitPay Implementation The BitPay server supports both BIP72 and BIP73 compatible URIs.
BIP 72 (old style) compatible URI The BIP 72 URI scheme begins with the “bitcoin:” protocol and is followed by the bitcoin address to which the payment is sent, the amount to send, and a parameter (‘r’) that encodes the complete BIP 73 payment URI. Wallets that scan this protocol and which are not BIP 73 enabled will simply ignore the extra ‘r’ parameter. This results in the wallet receiving only the bitcoin address and the payment amount.
bitcoin:19aDWT1BroEdoJHJfmFz5P43mDCs5EFmqz?amount=0.0016&r=https%3A%2F%2Fbitpay.com%2Fi%2FBK3rjpRjXcA1wxthbCTs1M
BIP 73 (new style) compatible URI The BIP 73 URI scheme is arbitrary and defined by the server implementation. When a wallet scans a BIP 73 URI it won’t immediately be able to use the URI information to send a payment to the network. The wallet must first send a request using the scanned URI with additional information in the header of the HTTP request (see the Bitcoin Payment Protocol specifications, BIP 70 to 73). The wallet will expect the response to be usable to send a payment to the Bitcoin network. The BitPay payment URI for the Bitcoin Payment Protocol is simply the URI of the BitPay invoice.
https://bitpay.com/i/BK3rjpRjXcA1wxthbCTs1M
©20112016 BITPAY, Inc. All Rights Reserved. 5

Invoice States A BitPay invoice can be in one of a number of states. Payments sent to the bitcoin address associated with an invoice will only be credited to the invoice when its base state is “new”. There are two sets of invoice states that may be consulted; base states and exception states. Base states provide a simple and straightforward understanding of the overall status of an invoice. Exception states provide additional details about the status of the invoice if a payment exception has occurred. Exception states are used for detecting payment exceptions and subsequent execution of automated rules to perform certain customer support operations. For example, using exception states it is possible to detect an under paid invoice, apply decision logic, and either refund the payment or accept the under payment (thereby updating the invoice to match the amount paid) all without customer support desk intervention.
Base States
State Description
“new” An invoice starts in this state. When in this state and only in this state, payments to the associated bitcoin address are credited to the invoice. If an invoice has received a partial payment, it will still reflect a status of new to the merchant (from a merchant system perspective, an invoice is either paid or not paid, partial payments and over payments are handled by bitpay.com by either refunding the customer or applying the funds to a new invoice.
“paid” As soon as payment is received it is evaluated against the invoice requested amount. If the amount paid is equal to or greater than the amount expected then the invoice is marked as being paid. To detect whether the invoice has been overpaid consult the invoice exception status (exceptionStatus).
“confirmed” The transaction speed preference of an invoice determines when an invoice is confirmed. For the high speed setting, it will be confirmed as soon as full payment is received on the bitcoin network (note, the invoice will go from a status of new to confirmed, bypassing the paid status). For the medium speed setting, the invoice is confirmed after the payment transaction(s) have been confirmed by 1 block on the bitcoin network. For the low speed setting, 6 blocks on the bitcoin network are required. Invoices are considered complete after 6 blocks on the bitcoin network, therefore an invoice will go from a paid status directly to a complete status if the transaction speed is set to low.
“complete” When an invoice is complete, it means that BitPay.com has credited the merchant’s account for the invoice. 6 confirmation blocks on the bitcoin network are required for an invoice to be complete.
“expired” An expired invoice is one where payment was not received and the 15 minute payment window has elapsed.
“invalid” An invoice is considered invalid when it was paid, but payment was not confirmed within 1 hour after receipt. It is possible that some transactions on the bitcoin network can take longer than 1 hour to be included in a block. In such circumstances, once payment is confirmed, BitPay will make arrangements with
©20112016 BITPAY, Inc. All Rights Reserved. 6

the merchant regarding the funds (which can either be credited to the merchant account on another invoice, or returned to the buyer).
Exception States
“paidPartial” If the amount paid is less than the amount expected then the invoice is marked as being partially paid.
“paidOver” If the amount paid is greater than the amount expected then the invoice is marked as being overpaid.
©20112016 BITPAY, Inc. All Rights Reserved. 7
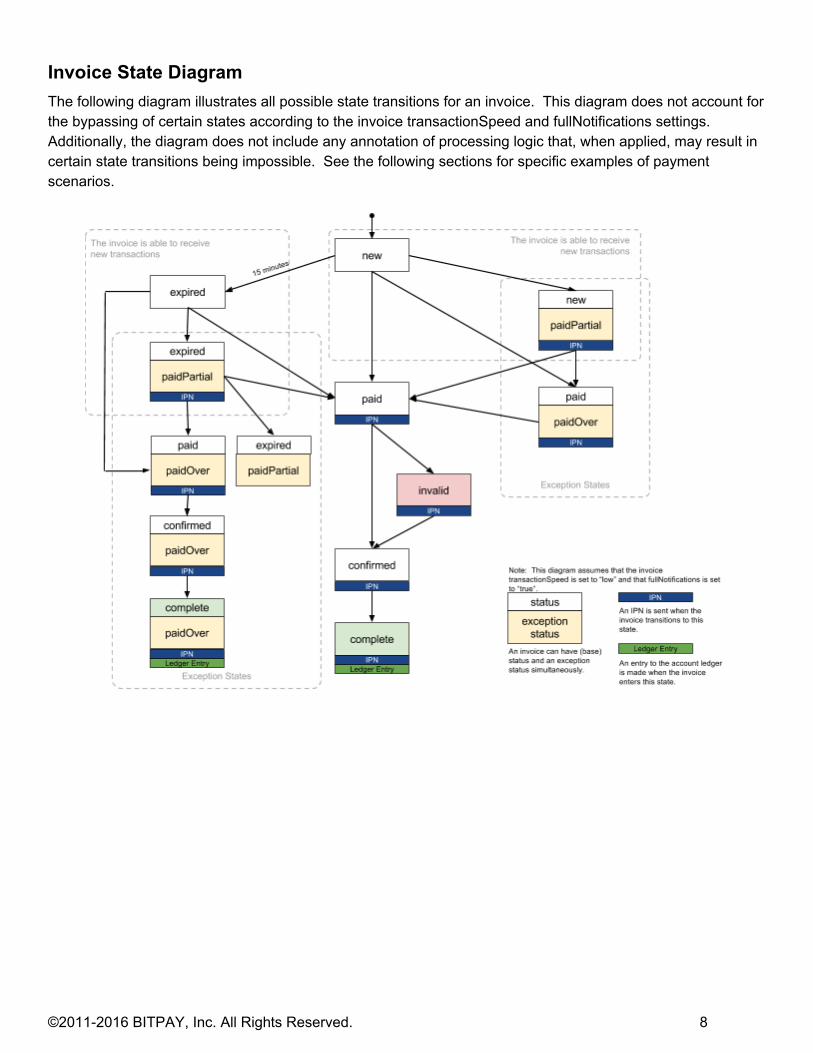
Invoice State Diagram The following diagram illustrates all possible state transitions for an invoice. This diagram does not account for the bypassing of certain states according to the invoice transactionSpeed and fullNotifications settings. Additionally, the diagram does not include any annotation of processing logic that, when applied, may result in certain state transitions being impossible. See the following sections for specific examples of payment scenarios.
©20112016 BITPAY, Inc. All Rights Reserved. 8

Invoice Payment Scenarios The BitPay server will always report proper exception states regardless of the invoice transactionSpeed and fullNotification settings. If a payment exception occurs then an IPN will be sent as early as possible. For example, if an invoice with transactionSpeed set to “low” and fullNotifications set to “false” has a payment exception then an IPN will be sent immediately following the detection of the exception. In this case the invoice “status” will be set to “paid” and the “exceptionStatus” will indicate the exception. Conversely, if no payment exception had occurred then no IPN would have been sent when the invoice status was “paid” (since fullNotifications set to “false” results in bypassing the invoice state “paid”).
Note: The scenario diagrams and examples in this section are written assuming that the invoice transactionSpeed is set to “low” and that fullNotifications is set to “true” (i.e., the full set of invoice states is represented).
Partial Payment Received When the amount of bitcoin paid is less than the amount expected by the invoice the BitPay server will send an IPN for the invoice with the following invoice status:
Invoice Attribute Description Value
“status” Base status “new”
“exceptionStatus” Exception status “paidPartial”
The handling of an IPN for a “paidPartial” invoice requires your implementation to determine whether the received payment should be accepted as full payment or refunded back to the customer. Additionally, your implementation should consider that the partial payment may be followed by one or more subsequent payments that, when added together, fully satisfy the invoice amount. A “paidPartial” invoice will never be written to your account ledger. If your implementation accepts the partial payment (via this API) then BitPay will adjust the invoice amount to be equal to the partially paid amount. For example, if the invoice was originally created to collect a $100 payment and the payment received was $99, then accepting the $99 payment will result in the invoice being updated to expect $99. This process results in a fully paid invoice and a follow up IPN is sent with the invoice status set to “paid”. If the invoice remains “valid” then it will progress to the “complete” state and a ledger entry for the adjusted amount is made. Occasionally, BitPay may be unable to mark a partially paid invoice as fully paid due to the duration of time a transaction has been outstanding, shifts in exchange rates, or a combination of these. In this scenario BitPay can refund a customer's payment. However, a request to BitPay to accept a partial payment will never result in the partial payment being refunded. Your implementation must issue a request to refund the partial payment amount. If your implementation chooses to refund the payment (via this API) then BitPay will return the received payment to the customer’s refund address per your instructions. Refunding a partially paid invoice will not result in a ledger entry since the ledger was not previously updated with a matching full payment.
©20112016 BITPAY, Inc. All Rights Reserved. 9

Your implementation may choose to wait for the invoice to be fully paid. In this scenario it is important that you use the invoice “expirationTime” to schedule continued processing of the invoice. If the “expirationTime” has passed then BitPay will no longer automatically accept any payments sent to the invoice your implementation should either accept or refund the payment. If a new IPN (for the subject invoice) is received by your implementation prior to the invoice “expirationTime” then you should immediately cancel the invoice processing event tied to the “expirationTime” and handle the IPN normally.
©20112016 BITPAY, Inc. All Rights Reserved. 10

Overpayment Received When the amount of bitcoin paid is greater than the amount expected by the invoice the BitPay server will send an IPN for the invoice with the following invoice status:
Invoice Attribute Description Value
“status” Base status Dependent on transaction speed of the invoice.
Transaction Speed
Value
“low” “paid”
“medium” “paid”
“high” “confirmed”
“exceptionStatus” Exception status “paidOver”
The handling of an IPN for a “paidOver” invoice requires your implementation to determine whether the received overpayment amount should be accepted as a credit to your account or refunded back to the customer. If your implementation accepts the overpayment amount (via this API) then BitPay will credit the overpayment amount to your ledger. For example, if the invoice was originally created to collect a $100 payment and the payment received was $101, then accepting the $1 overpayment amount will result in a $1 credit to your ledger. In this case, the invoice is not adjusted; the invoice will simply reflect that a $100 payment (the full amount) was received. This process results in a fully paid invoice. The next IPN sent will have invoice status set to “confirmed”. If the invoice remains “valid” then it will progress to the “complete” state and a ledger entry for the full invoice amount is made. If your implementation chooses to refund the overpayment amount (via this API) then BitPay will return the received overpayment amount to the customer’s refund address per your instructions. Refunding an overpaid amount will not result in a ledger entry since the ledger was not previously updated with the overpaid amount.
©20112016 BITPAY, Inc. All Rights Reserved. 11

©20112016 BITPAY, Inc. All Rights Reserved. 12

Create an Invoice An invoice is created by sending an http POST message to https://bitpay.com/api/invoice with the details of the invoice passed in the body of the request. The body of the message must be JSON encoded and the contenttype should be set to “application/json”. On successful creation, the invoice details will be provided in a JSON encoded response. If there is an error, you will receive a JSON encoded error response. All error responses will have an “error” field that is an object with two fields called “type” and “message”. A merchant is restricted to creating no more than 100 invoices per hour (there are also per second and per minute limits). The fields in the request are described below:
Required POST fields
Name Description
“price” This is the amount that is required to be collected from the buyer. Note, if this is specified in a currency other than BTC, the price will be converted into BTC at market exchange rates to determine the amount collected from the buyer.
"currency” This is the currency code set for the price setting. The pricing currencies currently supported are USD, EUR, BTC, and all of the codes listed on this page: https://bitpay.com/bitcoinexchangerates
Optional Payment Notification (IPN) fields
Name Description
“posData” A passthrough variable provided by the merchant and designed to be used by the merchant to correlate the invoice with an order or other object in their system. Maximum string length is 100 characters. This passthrough variable can be a JSONencoded string, for example posData: ‘ “ref” : 711454, “affiliate” : “spring112” ‘
“notificationURL” A URL to send status update messages to your server (this must be an https URL, unencrypted http URLs or any other type of URL is not supported). Bitpay.com will send a POST request with a JSON encoding of the invoice to this URL when the invoice status changes.
“transactionSpeed” default value: set in your https://bitpay.com/ordersettings, the default value set in your merchant dashboard is “medium”.
“high”: An invoice is considered to be "confirmed" immediately upon receipt of payment.
“medium”: An invoice is considered to be "confirmed" after 1 block
©20112016 BITPAY, Inc. All Rights Reserved. 13

confirmation (~10 minutes).
“low”: An invoice is considered to be "confirmed" after 6 block confirmations (~1 hour).
NOTE: Orders are posted to your Account Summary after 6 block confirmations regardless of this setting.
“fullNotifications” default value: false
true: Notifications will be sent on every status change.
false: Notifications are only sent when an invoice is confirmed (according to the “transactionSpeed” setting).
“notificationEmail” Bitpay will send an email to this email address when the invoice status changes.
Optional Order Handling fields
Name Description
“redirectURL” This is the URL for a return link that is displayed on the receipt, to return the shopper back to your website after a successful purchase. This could be a page specific to the order, or to their account.
Optional Buyer Information to display
Name Description
“orderID” Used to display your public order number to the buyer on the BitPay invoice. In the merchant Account Summary page, this value is used to identify the ledger entry. Maximum string length is 100 characters.
“itemDesc” Used to display an item description to the buyer. Maximum string length is 100 characters.
“itemCode” Used to display an item SKU code or part number to the buyer. Maximum string length is 100 characters.
“physical” default value: false
true: Indicates a physical item will be shipped (or picked up)
false: Indicates that nothing is to be shipped for this order
“buyerName” “buyerAddress1” “buyerAddress2” “buyerCity”
These fields are used for display purposes only and will be shown on the invoice if provided. Maximum string length of each field is 100 characters.
©20112016 BITPAY, Inc. All Rights Reserved. 14

“buyerState” “buyerZip” “buyerCountry” “buyerEmail” “buyerPhone”
BitPay Server Response The response to a create invoice request, the response to a get invoice request, and the content of a status update notification are all identical JSON representations of the invoice object. The fields are described below:
Name Description
“id” The unique id of the invoice assigned by bitpay.com
“url” An https URL where the invoice can be viewed.
“posData” The passthrough variable provided by the merchant on the original invoice creation.
“status” The current invoice base status. The possible states are described earlier in this document.
“new” “paid” (amount paid is equal or greater than requested invoice amount) “confirmed” “complete” “expired” “invalid”
“exceptionStatus” The current invoice extended status. The possible states are described earlier in this document.
“false” (the invoice is not in an exception state) “paidPartial” (amount paid is less than the requested invoice amount) “paidOver” (amount paid is greater than the requested invoice amount) “paidLate”
“btcPaid” The amount of bitcoins paid to the invoice.
“rate” The numeric exchange rate (based on invoice currency) associated with the invoice at the time of the original purchase.
“price” The price set by the merchant (in terms of the provided currency).
“currency” The 3 letter currency code in which the invoice was priced.
“btcPrice” The amount of bitcoins being requested for payment of this invoice (same as the price if the merchant set the price in BTC).
“invoiceTime” The time the invoice was created in milliseconds since midnight January 1,
©20112016 BITPAY, Inc. All Rights Reserved. 15

1970. Time format is “20140101T19:01:01.123Z”.
“expirationTime” The time at which the invoice expires and no further payment will be accepted (in milliseconds since midnight January 1, 1970). Currently, all invoices are valid for 15 minutes. Time format is “20140101T19:01:01.123Z”.
“currentTime” The current time on the BitPay.com system (by subtracting the current time from the expiration time, the amount of time remaining for payment can be determined). Time format is “20140101T19:01:01.123Z”.
©20112016 BITPAY, Inc. All Rights Reserved. 16

Get Invoice Status To get the current state of an invoice, an http GET request can be sent to https://bitpay.com/api/invoice/<id>, where the <id> is the invoice id provided when the invoice was created. The format of the response is exactly the same as that which is returned when creating an invoice.
Receive Invoice Status Updates Invoice status updates can be sent either via email, https or both. The “notificationEmail” and “notificationURL” settings control the destination for the notification. Note, email notification is a human readable format and not intended for use as a system interface. For https notification, BitPay.com sends a POST request to the given URL with a JSON encoding of the invoice that is identical to the format returned from a create invoice or get invoice request. If “fullNotifications” are set to true, then an update will be sent for every change in status. If “fullNotifications” are false, then an update is only sent when an invoice is confirmed (according to the “transactionSpeed” setting).
©20112016 BITPAY, Inc. All Rights Reserved. 17

Get Bitcoin Best Bid (BBB) Rates BitPay consolidates market depth from multiple exchanges to provide buyers with a Bitcoin Best Bid (BBB) exchange rate. BitPay currently calculates BBB based on Bitcoin/US Dollar rates because of the maximum liquidity. For a complete list of available currencies see https://bitpay.com/bitcoinexchangerates. To calculate the exchange rate for US Dollars, we pull the market depth from exchanges with adequate liquidity and withdrawal capability in USA and the Eurozone. The exchange order books are merged into a Consolidated Level II table. The BBB is calculated by simulating an autorouting market sell order, across all exchanges, with zero commission fees. Buyers will always get a better value by spending their bitcoins at a BitPay merchant than by selling them on an exchange. The BBB is available via JSON API at https://bitpay.com/api/rates. Rates are updated every 1 minute.
BitPay Server Response The response to a request for BBB is a list of identical JSON representations of the rate object. The fields are described below:
Name Description
“name” The full display name of the currency.
“code” The three letter code for the currency, in all caps.
“rate” The numeric exchange rate of this currency provided by the BitPay server.
©20112016 BITPAY, Inc. All Rights Reserved. 18

Get the Transaction Ledger The bitcoin tranaction ledger is retreived by sending an http GET message to https://bitpay.com/api/ledger with the details of the ledger query passed in the request URL. On successful retrieval, the invoice details will be provided in a JSON encoded response. If there is an error, you will receive an empty JSON array in the response; [] . The parameters in the transaction ledger request are described below:
Required GET parameters
Name Description
“c” This is the three letter currency code set for the ledger. The payout currencies currently supported are:
BTC Bitcoin AUD Australian Dollar CAD Canadian Dollar EUR Eurozone Euro GBP Pound Sterling MXN Mexican Peso NZD New Zealand Dollar USD US Dollar ZAR South African Rand
"startDate” The start date for the ledger query. Ledger entries are retrieved from this date (inclusive) forward. The format for this parameter is “yyyymmdd”; example “20140101”.
“endDate” The end date for the ledger query. Ledger entries are retrieved up to and including this date. The format for this parameter is “yyyymmdd”; example “20140131”.
Example Ledger GET Request
https://bitpay.com/api/ledger?c=BTC&startDate=20140101&endDate=20140131
©20112016 BITPAY, Inc. All Rights Reserved. 19

BitPay Server Response The response to a request for a transaction ledger is a list of identical JSON representations of the transaction object (most commonly invoice details). The fields are described below:
Name Description
“code” The transaction code in the BitPay ledger. The code is associated with a transaction type, “txType”.
1000 = “sale” 1001 = “fee” 1002 = "payout" 1003 = "ACH/other" 1004 = "charity fee refund" 1005 = "deposit" 1006 = "exchange" 1007 = "exchange fee" 1008 = "plan charge" 1009 = "plan change credit" 1010 = "plan underuse credit" 1011 = "plan charge transfer" 1012 = “bitpay donations”
“amount” The amount of the credit or debit from the account. The amount is expressed in the currency unit specified in the request (see GET parameter “c”). The amount is a positive number for a ledger credit. The amount is a negative number for ledger debit.
“timestamp” The date and time the ledger entry was made. Time format is “20140101T19:01:01.123Z”.
“description” The item description specified when the invoice was created. See invoice field “itemDesc”.
“orderId” The merchant order identifier specified when the invoice was created. See invoice field “orderID”. If the invoice did not specify an “orderID” then this field will not be present in the result set.
“txType” Identifies the type of transaction for the ledger entry. One of the following:
“sale” “fee” "payout" "ACH/other" "charity fee refund" "deposit" "exchange" "exchange fee" "plan charge" "plan change credit" "plan underuse credit"
©20112016 BITPAY, Inc. All Rights Reserved. 20

"plan charge transfer"
“exRates” This is a JSON block containing the exchange rate used in the transaction.
currency code the three letter currency code specifying the units of the associated exchange rate.
exchange rate the exchange rate price expressed in the associated currency code.
Example: "USD":915.0704604254529
“buyerFields” This is a JSON block containing the buyer details for the transaction. These values were provided when the invoice was created. All values are strings. Maximum string length is 100 characters. If no buyer information was specified when the invoice was created then this field will be present but the JSON block will be empty; e.g. . If only several of the buyer information fields were specified when the invoice was created then those that were not specified will not be present in the result set.
“buyerName” “buyerAddress1” “buyerAddress2” “buyerCity” “buyerState” “buyerZip” “buyerEmail” “buyerPhone”
“invoiceId” The unique id of the invoice assigned by bitpay.com
“sourceType” An identifier that specifies the type of source used to initiate the ledger entry. One of the following:
<blank> “invoice” “bitcoinTx”
©20112016 BITPAY, Inc. All Rights Reserved. 21

Example JSON Response to Retrieving a Transaction Ledger
[ "code":1000, "amount":0.0195, "timestamp":"20131202T16:16:29.612Z", "description":"2", "txType":"sale", "exRates":"USD":1025, "buyerFields": "buyerName":"BitPay Customer", "buyerAddress1":"3423 Piedmont Rd NE", "buyerAddress2":"Suite 516", "buyerCity":"Atlanta", "buyerState":"GA", "buyerZip":"30305", "buyerEmail":"[email protected]", "buyerPhone":"18554BITPAY", "invoiceId":"C8a5bQeRTPDineVSDCw6KJ", "sourceType":"invoice", "code":1001, "amount":0.0002, "timestamp":"20131202T16:16:29.612Z", "txType":"fee", "exRates":"USD":1025, "buyerFields": "buyerName":"BitPay Customer", "buyerAddress1":"3423 Piedmont Rd NE", "buyerAddress2":"Suite 516","buyerCity":"Atlanta", "buyerState":"GA", "buyerZip":"30305", "buyerEmail":"[email protected]", "buyerPhone":"18554BITPAY", "invoiceId":"C8a5bQeRTPDineVSDCw6KJ", "sourceType":"invoice", "code":1000, "amount":0.1093, "timestamp":"20140106T19:01:09.522Z", "description":"Bill 1", "txType":"sale", "exRates":"USD":915.0704604254529, "buyerFields":, "invoiceId":"JHfkEPc212HThzB25ngz31", "sourceType":"invoice", "code":1001, "amount":0.0011, "timestamp":"20140106T19:01:09.522Z",
©20112016 BITPAY, Inc. All Rights Reserved. 22

"txType":"fee", "exRates":"USD":915.0704604254529, "buyerFields":, "invoiceId":"JHfkEPc212HThzB25ngz31", "sourceType":"invoice" ]
©20112016 BITPAY, Inc. All Rights Reserved. 23

Instant Payment Notification (IPN) An IPN (Instant Payment Notifications) is an HTTP POST message sent from the BitPay server to the merchants eCommerce server. The primary purpose of an IPN is to reconcile a BitPay payment transaction with the customer order status on the merchants eCommerce server. The BitPay server send IPNs for each invoice according to the setting within the invoice. The BitPay invoice payload has an IPN parameter called "fullNotifications" with the following description:
default value: false true: Notifications will be sent on every status change. false: Notifications are only sent when an invoice is confirmed (according to the invoice “transactionSpeed” setting).
If "fullNotifications" is set “true” then the BitPay server will POST the complete invoice (all fields) to the invoice's notificationURL whenever the status of the invoice changes. If "fullNotifications" is set “false” then the BitPay server will only send the IPN when the invoice reaches the "confirmed" state. The BitPay server attempts to send IPNs multiple times until the send is either successful or the BitPay server gives up. As of this writing the BitPay server attempts retries on the following schedule.
0:00 1 minute delay 1:00 4 minute delay 5:00 9 minute delay 14:00 16 minute delay 30:00 25 minute delay 55:00 failed
The BitPay server consider a status code 200 response to be a successful send. The BitPay server does not follow redirects. The invoice status that is sent with the IPN is the status at the time of IPN delivery (not the status at the time IPN was first attempted). IPNs need to be handled idiomatically (as they can be resent) and you should not assume you will receive an IPN for every invoice status (i.e., if you receive an invoice status of "complete" then you can assume that the invoice has been "paid" and can do whatever you would have done if you received a "paid" status). We would advise you to open a nonstandard port and specify that port within the notificationURL instead of whitelisting BitPay IP addresses as they are subject to change without notice. Since we are not yet signing these notifications they should not be trusted outright. We recommend verifying these notifications against our API when they are received to make sure the data presented is authentic. For example when an invoice paid notification comes in, you should make a request to our API to check the status of that invoice to make sure it was actually paid. This provides additional security in verifying paid orders.
©20112016 BITPAY, Inc. All Rights Reserved. 24

In the event that IPNs are not being received or processed as expected, please check the following:
Verify that your callback handler at the "notificationURL" is properly receiving POSTs. You can verify this by POSTing your own messages to the server from a tool like Chrome Postman.
Verify that the POST data received is properly parsed and that the logic toward updating order status on your server is as expected.
Verify that your server is not blocking POSTs from servers it may not recognize.
©20112016 BITPAY, Inc. All Rights Reserved. 25

Integration Hints
Embedded Invoice (iframe) Post to Parent Window When an invoice is presented in an iframe you have an option to receive invoice status updates in the parent window. This option is useful for updating the parent window presentation or redirecting the parent window to another URL after the invoice has been paid. When the invoice iframe receives a status update from the BitPay server the new status is posted from the invoice iframe to the parent window via the Window.postMessage method and passing the following event data:
status: string where ‘status’ can be any of the Invoice States according to the descriptions provided.
Your implementation should take into consideration the browser support for this method. See http://caniuse.com/#feat=xdocmessaging for a list of browsers supporting Window.postMessage. Following is an HTML code example illustrating a simple interaction between an invoice iframe and its parent document.
<html> <head> <title>Parent</title> </head> <body> <p>Invoice status: <span id="s1"></span> <iframe src=”https://bitpay.com/invoice?id=UbAd3j1E7ivCe5i9t88obd” style="width: 800px; height: 800px;"></iframe> <script language="javascript"> window.addEventListener("message", function(event) document.getElementById("s1").innerHTML=event.data.status; , false); </script> </body> </html>
©20112016 BITPAY, Inc. All Rights Reserved. 26

Constructing a Custom Invoice There are instances when it is not possible to directly display the presentation of a BitPay server generated HTML invoice (either the full page or the iframe). This occurs when the system requesting an invoice is interacting with the customer via a device that does not directly present or render HTML content. Example use cases include:
Proprietary gaming platform Custom embedded display device (gas pump, kiosk device)
Constructing an invoice typically requires that the implementation generate it’s own QR (Quick Response) code, enabling custom interaction with a Bitcoin wallet, and/or making the bitcoin address visible to receive payment. Additional concerns include:
Time limit the client must ensure that presentation of the invoice does not exceed the maximum time allowed by BitPay to present payment. Currently the time limit is 15 minutes.
Prices the invoice should display both the bitcoin price as well as the local currency price. It is not recommended to display the bitcoin/local currency exchange rate as this could be confusing to the buyer.
Bitcoin address in some settings it may be convenient to display (or otherwise present) the bitcoin address for copy and paste. This is useful if the buyer must transfer the bitcoin address to their bitcoin wallet manually.
Other information details about the product or service being purchased, an order identifier, the merchant name, address, etc.
Invoice Status Updates Use of the BitPay server provided invoice URL for presentation of the invoice includes the benefit of the client presented invoice receiving socket messages from the BitPay server when invoice status changes. For example, subsequent to paying an invoice the BitPay server will update the status of the invoice and send that status via a direct socket connection between the BitPay server and the invoice presenting web browser client. When presenting a custom invoice this socket connection is not possible. The only means for updating the presentation of the invoice (e.g., to show ‘paid’ status) is to receive the invoice IPN at your server and then to update your invoice presentation (e.g., using AJAX) at the client.
Generating a Custom QR Code Image
Important: This method uses the Bitcoin Payment Protocol to obtain the backwards compatible “bitcoin:” URI string. Introspection of the content of this URI string is strongly discouraged. Any use of the content of the URI string (e.g., the bitcoin address) for sending a payment transaction will result in a non standard implementation as provided by the signed payment request specified via the Bitcoin Payment Protocol.
The QR code is a digitally encoded image that contains the Bitcoin payment URI. The BitPay server supports both the old style (BIP 72) Bitcoin protocol (for backwards compatibility) as well as the new style (BIP 73) Bitcoin Payment Protocol.
©20112016 BITPAY, Inc. All Rights Reserved. 27

When choosing to generate your own QR code image you must make a choice between the two style of URI you wish to encode in the image. For maximum compatibility with wallets you should choose to encode the BIP 72 compatible URI. This URI scheme can be scanned successfully by all existing Bitcoin wallets. As more wallets provide support for the Bitcoin Payment Protocol you may choose to switch from using the BIP 72 compatible URI to the BIP 73 compatible URI. The density of a BIP 72 QR code is higher than that of a BIP 73 QR code and may result in increased scanning errors. The BIP 73 URI to encode into a custom QR code image is simply the BitPay invoice URL; the ‘uri’ field obtained from the invoice payload after creating or GETting the invoice (api version 2 only). If you choose to encode the BIP 72 URI scheme in a custom QR code image then you will need to obtain the “bitcoin:” protocol URI string from the BitPay server using a feature outlined in BIP 73. Perform the following steps to retrieve the “bitcoin:” protocol string.
1. Create the BitPay invoice using this API specification. 2. Obtain the ‘url’ field of the invoice response payload. 3. Construct a GET request to the BitPay server setting the following HTTP header. Be sure not to Accept
“application/bitcoinpaymentrequest”. Send the GET to the the ‘uri’ obtained from the invoice payload.
GET /i/K5mgZzji3BRsis87cqFjAy HTTP/1.1 Host: bitpay.com Accept: text/urilist
4. Read the “bitcoin:” URI string from the server response. 5. Encode the “bitcoin:” URI string using your QR image encoding library.
©20112016 BITPAY, Inc. All Rights Reserved. 28

Sample Client Library For convenience, a sample client library is provided to demonstrate how to interact with the BitPay.com JSON API. You can use this client library as is on your server, you can customize it, or you can use it as a guide for developing a client library in another language. The sample client library is written in JavaScript and is designed to run using Nodejs. Nodejs can be downloaded from http://nodejs.org. The examples have been tested on version 0.8.9, but should work on later versions as well. The sample client library can be obtained from https://github.com/bitpay/nodejsclient/archive/master.zip. The zip file contains 3 utilities: createInvoice, getInvoice, invoiceListener. These files are executable and invoke the node runtime using typical Unix shebang notation. They can also be started by passing them as the first argument to the “node” runtime. The files themselves are JavaScript source code. To use the utilities, modify the config.js file and copy and paste an API key from your merchant account into the apiKey setting. This will associate your API calls with your merchant account. You will need to create your own unique SSL key and certificate in order to receive payment notifications from BitPay’s servers. You can test payment notifications using http only, but it is strongly advisable to use SSL. To create an invoice, run the createInvoice utility and pass in an invoice description on stdin. A sample invoice description is provided in the file sampleInvoice.json. To create an invoice using this sample, run the following command:
$ ./createInvoice <sampleInvoice.json The newly created invoice will be output on a single line in JSON format. To get an invoice, run the getInvoice utility and pass the invoice id as the sole argument as follows:
$ ./getInvoice <invoiceid> Just as before, the invoice will be output on a single line in JSON format. To receive notifications of invoice status updates, use the invoiceListener utility. It takes a single parameter on the command line to specify the port number (or it can be specified in config.js) and listens for incoming notifications from BitPay.com. If you create an invoice with a notificationURL to your server and port, notifications of status changes on that invoice will be delivered to this utility. When a notification is received, the utility will print the JSON encoded invoice on stdout (one line per notification). With these utilities, it is easy to craft a solution that can create a BitPay.com invoice and receive payment notifications.
©20112016 BITPAY, Inc. All Rights Reserved. 29

Testing Testing transaction processing is easily accomplished using the BitPay production server.
Merchant Account Setup In order to test you must have an established BitPay merchant account. It is perfectly safe to test using a single production merchant account, however, this may not be suitable for some organizations due to security and ledger accounting visibility concerns. If you require a test environment to be completely isolated from your production environment then you should request a second BitPay merchant account. Complete the following steps to setup your merchant account for testing:
1. Set your payout to 100% BTC see https://bitpay.com/accounting 2. Set your bitcoin address to be the same address from which you send bitcoin while paying invoices 3. Generate an API key for your account see https://bitpay.com/apikeys
Setting up your merchant account this way allows the bitcoins you send for payment to be circulated back to you the following day when merchant payouts are run.
Testing Considerations Testing may involve not only the integration of the BitPay service and the payment of invoices but also how you handle common payment exceptions. See the BitPay Customer Support Guide for more information about payment exceptions. You should consider testing the following kinds of transactions:
A fully paid invoice, paid on time (within 15mins) A fully paid invoice, paid late (after 1 hour, after 24 hours) An under paid invoice (pay an amount less than the invoice requires) An overpaid invoice (pay an amount more than the invoice requires) An invoice with and without wallet fees
Try to force an invalid transaction using a low value invoice with no wallet fees Invalid transactions are invoices that have been paid but which have zero confirmations within
one hour of being received by the BitPay server
©20112016 BITPAY, Inc. All Rights Reserved. 30

Troubleshooting Community help and support can be found on the BitPay support forums at https://help.bitpay.com.
Symptom Possible Cause Solution
Customer order status is not updated after payment.
The immediate payment notification (IPN) URL is specified incorrectly. The BitPay API supports sending IPN POSTs to only secure socket layer (SSL) URLs. Additionally, the IPN URL must have a valid SSL certificate.
1. Verify that your callback handler at
the "notificationURL" is properly receiving POSTs. You can verify this by POSTing your own messages to the server from a tool like Chrome Postman.
2. Verify that the POST data received is properly parsed and that the logic toward updating order status on the merchants eCommerce server is as expected.
3. Verify that the merchants eCommerce server is not blocking POSTs from servers it may not recognize.
©20112016 BITPAY, Inc. All Rights Reserved. 31

Revision History 0.1 September 2011 Original Release
0.2 December 2011 Updated SSL info
0.3 September 2012 Changed Authentication from SSL fingerprint to API token method
0.3.1 December 2013 Added Business Integration Scenarios
0.3.2 January 2014 Added explanation of transaction speed and fulfillment Added BBB API section Added Troubleshooting section Added Testing section Added new implementation scenario
0.4 January 2014 Added Transaction Ledger API section Moved Business Integration Scenarios to the new Quick Start Guide
0.5 March 2014 Added Bitcoin Payment Protocol Added Instant Payment Notification (IPN) Added Constructing a Custom Invoice
0.6 March 2014 Added support for extended invoice states
1.2 Sept 2016 Removed references to ipAddressList.txt Added BitPayapproved strategy to handle ipn security Removed the link to the old documentation that references using SSL certificates for authentication. All of our plugins are updated to use at least v1 of our api Added the special note about the use of version 2 of the api Fixed api field names that were changed over time. Verified the nodejs examples still work
©20112016 BITPAY, Inc. All Rights Reserved. 32