paying for your tier 4 online application – for applications made … · 2019-08-06 · paying...
TRANSCRIPT

Paying for your Tier 4 online application – for applications made in the UK
Introduction 2
1. Paying your Immigration Health Surcharge (IHS) 2 2. Paying the Visa Application Fee 3. Booking your appointment 4. Uploading your documents online 5. Downloading your application and document checklist 6. Documents you need to take to your appointment
5 6 8 9 9

2
Introduction In order to finalise and submit your Tier 4 application, you need to complete the following steps by accessing your Tier 4 visa application via your UKVI email link. N.B. We recommend that you only do this after the International Student Support Service have checked your draft application and documents for you and confirmed that they are complete and correct. 1. Paying your Immigration Health Surcharge (IHS)
All students making tier 4 visa applications in the UK are required to pay the “immigration health surcharge” in addition to the visa application fee. The fee is calculated according to the length of visa you are applying for. The current fee is £300 per year, plus £150 per part year (up to 6 months).
The charges are per person included within the application. Students with dependants should multiply the charge by the number of people included within the application.
For full information about the immigration health surcharge, please check: www.gov.uk/healthcare-immigration-application/overview To pay your IHS charge, please refer to the screenshots below after accessing your Tier 4 online application via your email link.
Click on “Go to IHS website” to be redirected to pay your Immigration Health Surcharge.
Click on “Go to IHS website”

3
You will be directed to the following confirmation summary page. In response to the question, “Staying in the Isle of Man, Jersey or Guernsey”, click on “Add where you are planning to stay”.
“Are you applying from within the UK?” Answer Yes. “Are you applying to stay in the Isle of Man, Jersey or Guernsey?” Answer No. You will also be asked if your course is at NQF7. Answer “Yes” if you are studying a Master’s degree or Postgraduate Diploma. Answer “No” for all other courses.
Click on “Continue”
Click on “Save and Continue”
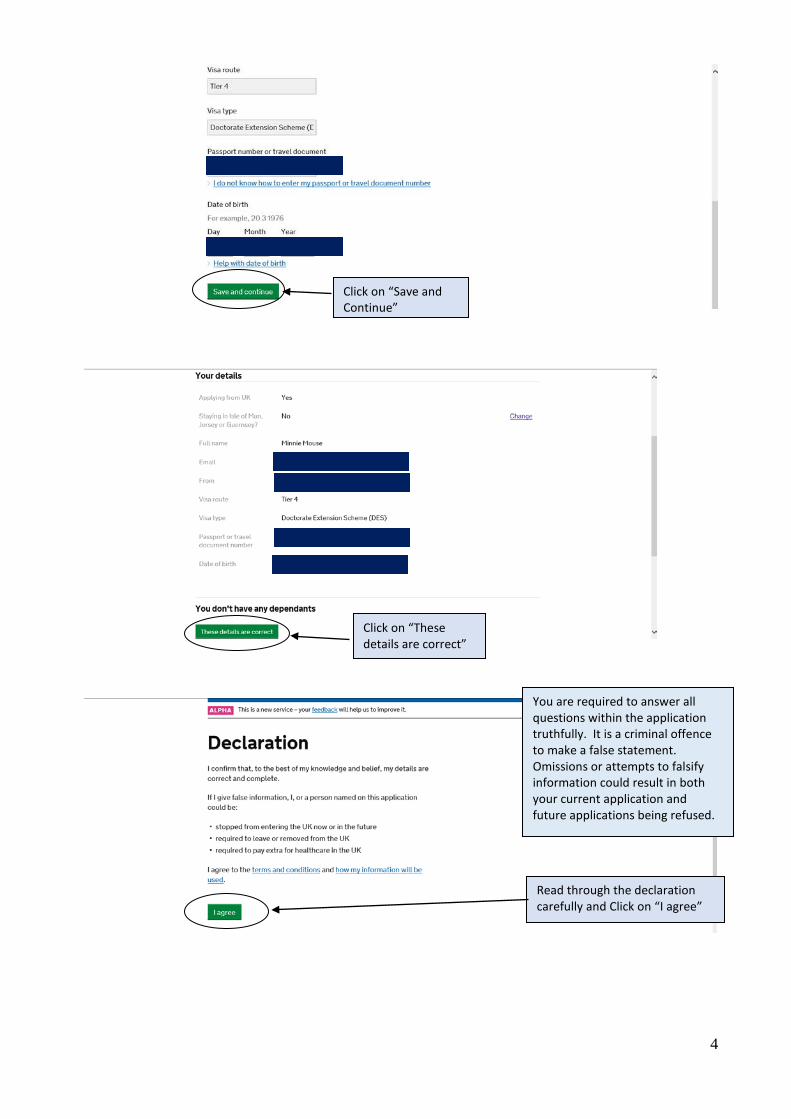
4
Click on “Save and Continue”
Click on “These details are correct”
Read through the declaration carefully and Click on “I agree”
You are required to answer all questions within the application truthfully. It is a criminal offence to make a false statement. Omissions or attempts to falsify information could result in both your current application and future applications being refused.

5
You will be connected to the World Pay website to make your card payment. It is important to ensure you have your credit / debit card available before proceeding to the payment page. You also need to make sure you are aware of your credit / debit card’s daily limit on transactions and ensure you have sufficient funds in your account. Some students may not be able to make the IHS payment and visa application fee on the same day. 2. Paying the Visa Application Fee Current application fees (from December 2018) are as follows and include the £19.20 biometric enrolment fee:
• £494.20 for standard service applications (decision within 8 weeks after attending biometric
appointment) • £994.20 for the priority service (decision within 5 working days after attending biometric appointment) • £1294.20 for the Super Priority service (decision on the next working day after attending biometrics
appointment).
If you are including dependants in your application, the price shown will be for all the applicants included in the application. Choose your payment option and your chosen method of payment and click on Continue to Worldpay to pay your application fee. 3. Book your appointment
After paying your application fee, you will next be asked to book an appointment at a UKVCAS (UK Visa and Citizenship Application Services) Centre, to provide your biometric details. You need to do this by the date which is shown on your online application (see screenshot for example below).
“Pay now” to be forwarded to the payment page to pay your IHS surcharge.

6
After selecting the option, “book appointment”, you will be directed to the UK Visa and Citizenship Application Services website (see below). Under “Arrange an appointment at a service point”, click on “Book an Appointment”.
You will be sent a 6-digit system access code to your e-mail in order to set up an account and choose a password. Make sure you check your junk folder. Once you have set up your account and chosen a password, you can log in and complete the appointment booking.
You will be asked to choose a service point location where you wish to enrol your biometric. The options provided are as follows:
- Core service which offers some free of charge and out of hours appointments - Enhanced service offering a package of additional services, e.g. translations - Premium lounges offering a personalised customer experience.
Enter your UK address postcode in the box to find the nearest UKVCAS centres to you.

7
You will be presented with a list of local centres (see screenshot above) closest to you. Select the service point that you require. The closest service point in Nottingham is Nottingham Central Library (there is an additional £60 minimum appointment booking fee if you choose to attend your appointment in Nottingham – this price is doubled if you choose a next day appointment). The nearest Core Service Point to Nottingham is located in Birmingham (this offers some free of charge appointments as well as payable appointments depending on the appointment timings).
After you have selected your service point, you will be provided with a list of possible dates and times for appointments at your chosen centre (see screenshot below). Click to highlight the date and time that you want to attend your appointment (the booking fee will be shown at the bottom of the screen once you have highlighted your choice) and then click on “Reserve appointment”.
Booking appointment fee shown here after you have highlighted your chosen appointment date.

8
You will be directed to a summary screen to review your booking details. Check your information clearly (click on “Add another service” if you wish to add any additional services to your appointment, e.g. translations, interpretation, document checking, document scanning). Please note that these additional services are optional and the document checking service is only for checking the quality of the scans, not to advise you on whether or not your documents meet the requirements for your application. If you need advice on your documents and want to check if they meet the UKVI requirements, please submit them to the International Student Support Service at NTU.
Once you have confirmed all of the necessary details, enter “Place your Order”. Your appointment confirmation will be sent to you by email. You will need to print off this confirmation (this includes a QR code which will be scanned on your arrival at the application centre) and take this with you along with your supporting documents to your appointment.
4. Upload your documents online

9
You will need to upload your supporting documents before you attend your appointment. It is possible to get your documents scanned at the visa application centre but you will have to pay an extra fee of £45 for this. You can upload your documents online by clicking on the “Upload your documents link” at the bottom of your booking confirmation. (See screenshot on previous page). You will be directed to the following page to scan your documents and will be presented with a list of supporting documents which you need to scan and attach. The screenshot below explains how to do this:
5.Download your application and document checklist
You are advised to print (and keep) a copy of the draft application form as a record of the answers you have provided. At this stage, you also need to print a copy of the document checklist (with the QR code) for you to take with you to your appointment.
6.Documents you need to take to your appointment
Some documents are mandatory – your visa application cannot be processed without them. If you are unsure about which documents you need to prepare, please contact the International Student Support Service. For further guidance on these documents, please refer to: www.ntu.ac.uk/student_services/international_students/applying_for_a_tier_4uk/index.html Your documents can be originals or copies; however, your passport and visa documents must be originals. Document To be provided by… Appointment confirmation checklist with QR code
All students
Current passport All students Biometric Residence Permit (BRP)
All students in possession of a BRP
Police Registration All students with the requirement to register with the Police
Step 1: Click on Choose file to select your scanned saved document from your PC.
Step 1: Click on Choose file to select your scanned saved document from your PC.
Step 1: Click on Choose file to select your scanned saved document from your PC.
Step 2: Click on “upload” to upload your document to your application. If your document, e.g. your bank statement, is more than one page long and saved in separate files, repeat procedure, clicking on “Choose file” and then “Upload file”.
Step 3: Confirmation that your files have successfully uploaded

10
Certificate * Personal bank statements
Students who have the funds required for their maintenance saved in their personal bank accounts.
* Parent’s bank statements, birth certificate and letter from parents
Students who are using their parent’s bank statements as evidence they meet the maintenance requirement
* Official sponsorship letter
Students who have an official financial sponsor, e.g. their Government
* Documents used to obtain offer
All students, unless assessed on progress to date (see your CAS). Students who have completed the PEAP course need to submit their PEAP report and any previous qualifications which were listed on their CAS (along with official English translations if these are not printed in English)
*ATAS certificate Students who are studying specific postgraduate research courses * Professional translations
Students who are submitting documents which are not in English must provide a professional translation.
NB students with dependants will need additional documentation and should refer to the International Student Support Service dependants guidance on our webpages: http://www4.ntu.ac.uk/student_services/international_students/applying_for_a_tier_4uk/dependants/index.html Differentiation arrangements. Different documentary requirements apply for certain nationalities. For more information about these arrangements and who is affected, check the gov.uk website: https://www.gov.uk/guidance/immigration-rules/immigration-rules-appendix-h-tier-4-documentary-requirements Students whose nationality is on the differentiation arrangements list will be asked on the application, “Do you wish to apply under the differentiation arrangements?” If this applies to you, we strongly recommend that you answer “Yes” to this question. Those students should prepare the documents in the table above, marked by an asterisk (*). However, these documents do not need to be uploaded for scanning to the UKVI unless they are specifically requested. Last updated 01/08/2019