pathogen- and matrix-independent metagenomics workflow
TRANSCRIPT

Pathogen- and Matrix-independent Metagenomics Workflow
Harmonized Step-by-step Protocols 19 Sept 2018, v 02
This document contains the following SOPs:
Disintegration of liquid and solid samples using the Covaris cryoPREP CP02 Impactor
Disintegration of solid or liquid samples in liquid nitrogen using the Mikro-Dismembrator S
Extraction of total RNA from liquid or disintegrated solid samples using TRIZOL and RNeasy Mini Kit spin columns with on-column DNase digestion
Isolation of viral RNA for whole genome sequencing from liquid or disintegrated samples using the QIAamp Viral RNA Mini Kit
Isolation of DNA from liquid or disintegrated samples using the QIAamp DNA Mini Kit
Nucleic acid quantification using NanoDrop ND1000 Spectrophotometer
RNA Quantification using Quant-iT RiboGreen RNA Assay Kit
Quality check of extracted RNA using Agilent RNA 6000 Pico Kit
Concentrating RNA for cDNA synthesis using Agencourt RNAClean XP Beads
cDNA synthesis for the generation of double stranded cDNA from purified RNA
Fragmentation of dsDNA by hydrodynamic shearing using the Covaris M220 Focused-ultrasonicator
Purification and concentration of fragmented DNA using Agencourt AMPure XP beads
Automated library preparation with the SPRIworks Fragment Library System II for sequencing with Illumina MiSeq
Library preparation including end-repair and adapter ligation for sequencing with Ion Torrent PGM
Purification and concentration of the end-repaired and adapter-ligated Ion Torrent Library using Agencourt AMPure XP beads
Size selection of end-repaired and adapter-ligated library using Agencourt AMPure XP beads
Quality check of Library using Agilent High Sensitivity DNA Kit
SOP_010105_Disintegration_cryoPREP_FLI.docx Page 1 of 4
FLI
SOP_010105_Disintegration_Cryoprep_FLI
Disintegration
(Covaris cryoPREP CP02)
Standard Operating Procedure
Disintegration of liquid and solid samples using the Covaris
cryoPREP CP02 Impactor
29th Aug 2018
Prepared by: Claudia Wylezich, Katja Goller
Contact: [email protected]
Institution: Friedrich-Loeffler-Institut (FLI), Germany
SOP-Version: 5
Attachments: none
SOP_010105_Disintegration_cryoPREP_FLI.docx Page 2 of 4
Introduction
The cryoPREP CP02 impactor (Covaris) allows a rapid and efficient sample disintegration
of samples deeply frozen in liquid nitrogen in order to avoid RNA degradation during the
disintegration process. The system delivers repeatable high impact mechanical force in
order to cryofracture sample material for improved lysis with extraction buffers. This protocol
describes the disruption using the automated system combined with Covaris Tissue Tubes.
The pulverized sample is resuspended in lysis buffer AL (Qiagen) and should either be used
directly in downstream applications e.g. nucleic acid extraction (SOP_020104_NaE_RNA_
Trizol_FLI, SOP_020203_NaE_RNA_ViralRNAKit_FLI, SOP_020304_NaE_DNA_DNAMini
Kit_FLI) or can be stored at 4°C over night.
Sample Material
Solid and liquid sample material.
Equipment and Reagents
Successful RNA extraction demands an RNase-free environment, therefore only RNase-
free tubes, aerosol-free pipette tips, and only DEPC-treated (Nuclease-free) water must be
used. Gloves have to be worn throughout the procedure and changed regularly in order to
avoid RNase contamination.
In general only use reagents that do not exceed the expiration date. When working with
chemicals, always wear a suitable lab coat, disposable gloves, and protective goggles. For
more information, consult the appropriate material safety data sheets (MSDSs), available
from the manufacturer.
Equipment
- Covaris cryoPREP CP02 Impactor
- Tissue Tubes TT1 extra thick (520007), plug (520006) and special handle (all Covaris)
- Liquid nitrogen
- Container suitable for safe transport of liquid nitrogen (e.g. Plastic Dewar vessel,
neoLab; cat. no. 1-0042 [4 l])
- Ice pans suitable for liquid nitrogen (e.g. Magic Touch Ice pans; Thomas Scientific,
cat no. 1224J40)
- Laminar flow hood
- Chemical fume hood
- Thermal block for 1.5 ml reaction tubes
- Dissection instruments (e.g. forceps, scissors, petri dishes)
- Plastic lab ware (2 ml tubes, pipettes and pipette filter tips)
- Disposable gloves
- Cotton gloves
- Personal protective clothing (protective goggles)
Reagents
- Lysis buffer AL (Qiagen; cat. no. 19075)
- Disinfectant for dissection instruments (e.g. gigasept FF, Schülke, cat. no. 125502)
SOP_010105_Disintegration_cryoPREP_FLI.docx Page 3 of 4
General remarks
ONLY use the Covaris cryoPREP-System after having been instructed by trained
personnel
Before handling liquid nitrogen, read the appropriate material safety data sheet and
operating instructions!
Literature
- Covaris Protocol Tissue dry Pulverization using the cryoPREP™ CP02 (Part number:
010303, Revision: A, 22 June 2015)
- Wylezich C, Papa A, Beer M, Höper D (2018) A versatile sample processing workflow
for metagenomic pathogen detection. Scientific Reports DOI:10.1038/s41598-018-
31496-1

SOP_010105_Disintegration_cryoPREP_FLI.docx Page 4 of 4
Before getting started
- Preheat 2 – 3 ml buffer AL for each sample in a thermal block at 56°C.
- Pull on cotton gloves (to protect your hands from freezing) and two pairs of
disposable gloves
- Fill liquid nitrogen in the ice pan and put the pan in a laminar flow for the
subsequent sample processing
Procedure
1. - Prepare approx. 20 mg solid or 200 µl liquid sample
2. - Place the sample to the centre of the Tissue Tube through the top opening using
forceps or tweezers
3. - After the sample is loaded, seal the Tissue Tube using a plug but do not screw
tightly
4. - While holding the tube using the special handle, freeze the sample by immersing
the flexible pouch into liquid nitrogen; avoid dipping the plug or transfer tube
5. - Verify that the pouch is not swelled (a sign of trapped air) and that the sample
remains centred in the pouch
6. - Open the cryoPREP lid and insert the frozen Tissue Tube using the handle
7. - Close the cover, select impact level 6, and press green “ACTIVATE” button
8. - Remove Tissue Tube from the cryoPREP instrument using the l handle
9. - Repeat steps 4 – 8 once
10. - Unscrew the plug and resuspend the sample in 1 - 2 ml preheated lysis buffer AL
11. - Transfer the sample solution into two fresh 2 ml reaction tubes
For subsequent nucleic acid isolation, continue with SOP_020104_NaE_RNA_Trizol_FLI,
SOP_020203_NaE_RNA_ViralRNAKit_FLI, or SOP_020304_NaE_DNA_DNAMiniKit_FLI
SOP_010203_Disintegration_Mikrodismembrator_FLI.docx Page 1 of 4
FLI
SOP_010203_Disintegration_Mikrodismembrator_FLI
Sample disintegration
(Mikro-Dismembrator S)
Standard Operating Procedure
Disintegration of solid or liquid samples in liquid nitrogen using the
Mikro-Dismembrator S
12th Sept 2017
Prepared by: Katja Goller
Contact: [email protected]
Institution: Friedrich-Loeffler-Institut (FLI), Germany
SOP-Version: 3
Attachments: none
SOP_010203_Disintegration_Mikrodismembrator_FLI.docx Page 2 of 4
Introduction
The procedure described here is used for the disintegration of sample material. For the
disintegration the “Mikro-Dismembrator S” (Sartorius) is used. Mikro-Dismembrator is a
laboratory grinding mill which can be used for efficient and reproducible fine grinding and
disintegration of samples for the isolation of DNA and RNA. The disintegration is
performed in liquid nitrogen within PTFE shaking flasks and chrome steel or tungsten
carbide grinding balls enabling a continuously cooling chain of the samples and thus
prevents degradation of the RNA. The Mikro-Dismembrator is operated with a selected
shaking frequency for a defined time. The pulverized sample is resuspended in lysis buffer
AL (Qiagen) and should be used directly in downstream applications e.g. nucleic acid
isolation (e.g. SOP_020104_NaE_RNA_Trizol_FLI, SOP_020203_NaE_RNA_ViralRNAKit
_FLI, SOP_020304_NaE_DNA_DNAMiniKit_FLI) or can be stored at 4°C over night.
Sample Material
Solid sample material (tissue) or liquid samples.
Equipment and Reagents
Successful RNA extraction demands an RNase-free environment, therefore only RNase-
free tubes, aerosol-free pipette tips, and only DEPC-treated (Nuclease-free) water must be
used. Gloves have to be worn throughout the procedure and changed regularly in order to
avoid RNase contamination.
In general only use reagents that do not exceed the expiration date. When working with
chemicals, always wear a suitable lab coat, disposable gloves, and protective goggles. For
more information, consult the appropriate material safety data sheets (MSDSs), available
from the manufacturer.
Equipment
- Mikro-Dismembrator S (Sartorius, cat. no. 8531609)
- Holder for shaking flasks (Sartorius, cat. no 38240343)
- Grinding balls
- Tungsten carbide (Sartorius, cat. no 8547203 [5 mm], cat. no. 8547408 [7 mm], or
cat. no. 8547300 [10 mm])
- Chrome steel (Sartorius, cat. no. 8546703 [5 mm], cat. no. 8546916 [9 mm], or cat.
no. 8546800 [10 mm])
- PTFE Shaking flasks (Sartorius, cat. no. 8531838 [3 ml], cat. no. 8531846 [5 ml], or
cat. no. 8531854 [7 ml])
- Ice pans suitable for liquid nitrogen (e.g. Magic Touch Ice pans; Thomas Scientific,
cat. no. 1224J40)
- Laminar flow hood
- Chemical fume hood
- Liquid nitrogen
- Container suitable for safe transport of liquid nitrogen (e.g. Plastic Dewar vessel,
neoLab cat. no. 1-0042)
- Thermal block
- Sterilised dissection instruments (e.g. forceps, scissors, petri dishes)
- RNase-free plastic lab ware (2 ml tubes, pipettes and pipette filter tips)
SOP_010203_Disintegration_Mikrodismembrator_FLI.docx Page 3 of 4
- Disposable gloves
- Cotton gloves
- Personal protective clothing (protective goggles)
Reagents
- Lysis buffer AL (Qiagen; cat. no. 19075)
- Disinfectant (e.g. gigasept FF, Schülke, cat. no. 125502)
- Ethanol (denatured)
General remarks
ONLY use the Mikro-Dismembrator S after having been instructed by trained personnel! Before handling liquid nitrogen, read the appropriate material safety data sheet and
operating instructions!
Literature
- Operating Manual Mikro-Dismembrator S (Satorius, publication no.: SB-1001-
e05021)

SOP_010203_Disintegration_Mikrodismembrator_FLI.docx Page 4 of 4
Before getting started
- Sort shaking flasks (wear disposable gloves!) and grinding balls according to their
size.
- Grinding ball:
o 5 ml shaking flask: one 5 mm grinding ball
o 7 ml shaking flask: one 7 mm or 10 mm grinding ball
- Instrument settings: frequency 2000 rpm, duration 2 min
- Preheat 2 – 3 ml buffer AL for each sample in a thermal block at 56°C
- Pull on cotton gloves (to protect your hands from freezing) and two pairs of
disposable gloves
- Fill liquid nitrogen in the ice pan and put the pan in a laminar flow for the
subsequent sample processing
Procedure
1. - Take the flask cap, the beaker and the grinding ball with a forceps, put them into
the liquid nitrogen (opening upwards) and let them cool down until no bubbles rise
up anymore
2. - Prepare approx. 20 mg tissue or 200 µl liquid sample
3. - Carefully remove the beaker of the liquid nitrogen (make sure that the beaker is
filled with liquid nitrogen)
4. - Place the tissue sample or pipette the liquid sample into the beaker
5. - Add the grinding ball and add further liquid nitrogen in case the beaker is not
completely filled anymore
6. - Quickly close the beaker with the flask cap
7. - Place the closed shaking flask into the holder and disintegrate at 2000 rpm for
2 min
8. - Take the flask out of the holder and open it in a laminar flow
9. - Add 1 ml lysis buffer AL pre-heated to 56 °C, mix thoroughly by pipetting
10. - Pipette the pulverized sample into a 2-ml tube and repeat the previous step until
the disintegrated sample is completely removed from the beaker
11. - Cleaning o Clean and disinfect the shaking flasks and grinding balls in gigasept
FF (diluted) o Subsequently clean it with sterile water o Rinse with 99.9% Ethanol (denatured) and let dry under UV light
For subsequent nucleic acid isolation, continue with SOP_020104_NaE_RNA_Trizol_FLI,
SOP_020203_NaE_RNA_ViralRNAKit_FLI, or SOP_020304_NaE_DNA_DNAMiniKit_FLI

SOP_020105_NaE_RNA_Trizol_FLI.docx Page 1 of 5
FLI
SOP_020105_NaE_RNA_Trizol_FLI
RNA extraction
(Trizol and RNeasy Mini Kit)
Standard Operating Procedure
Extraction of total RNA from liquid or disintegrated solid samples
using TRIZOL and RNeasy Mini Kit spin columns with on-column
DNase digestion
29th Aug 2018
Prepared by: Claudia Wylezich, Katja Goller
Contact: [email protected]
Institution: Friedrich-Loeffler-Institut (FLI), Germany
SOP-Version: 5
Attachments: none

SOP_020105_NaE_RNA_Trizol_FLI.docx Page 2 of 5
Introduction
The here described method allows extraction of total RNA from liquid or disintegrated
samples. This protocol combines a phenol/guanidine-isothiocyanate-based lysis with silica-
membrane-based spin column RNA purification. RNA can be purified from either lysed liquid
or disintegrated and lysed solid samples; in both cases, Trizol LS Reagent is used. Also for
liquid samples, a disintegration is recommended if they are to be used for pathogen
detection. For on-column isolation of the RNA, the QIAamp RNeasy Mini Kit columns are
used. Additionally, to avoid co-purification of DNA, DNA is digested on-column with the
RNase-Free DNase Set. The RNA is eluted in RNase-free buffer or water.
Sample Material
Liquid samples (e.g., serum/plasma, cell culture supernatant, EDTA-blood diluted 1:2 in
PBS, supernatant from swabs, liquor) or samples disintegrated and lysed (tissue and stool
homogenates) according to SOP_010104_Disintegration_Cryoprep_FLI or
SOP_010203_Disintegration_Mikrodismembrator_FLI.
Equipment and Reagents
Successful RNA extraction demands an RNase-free environment, therefore only RNase-
free tubes, aerosol-free pipette tips, and only DEPC-treated (nuclease-free) water must be
used. Gloves have to be worn throughout the procedure and changed regularly in order to
avoid RNase contamination.
In general only use reagents that do not exceed the expiration date. When working with
chemicals, always wear a suitable lab coat, disposable gloves, and protective goggles. For
more information, consult the appropriate material safety data sheets (MSDSs), available
from the manufacturer.
Equipment
- Refrigerated centrifuge (for 1.5 ml and 2 ml tubes)
- Vortexer
- Chemical fume hood
- Pipettes
- Disposable gloves
- 1.5 ml and/or 2 ml tubes
- Sterile, RNase-free pipet tips (with aerosol barriers to prevent cross contamination)
Reagents
- Trizol LS Reagent (Life Technologies; cat. no. 10296-028)
- RNeasy Mini Kit (Qiagen, cat. no. 74106)
- RNase-Free DNase Set 50 (Qiagen cat. no. 79254)
- Ethanol (96 – 100%, undenatured)
- Ethanol (75%, undenatured, diluted in DEPC-treated water)
- Chloroform
- RNase-free water (DEPC-treated)
SOP_020105_NaE_RNA_Trizol_FLI.docx Page 3 of 5
General remarks
Trizol contains high amounts of chaotropic salts and phenol!
WARNING Toxic in contact with skin and if swallowed. Causes burns. After contact with
skin, wash immediately with plenty of detergent and water. If you feel unwell, seek medical
advice (show label where possible). Phenol (108-95-2) and other components (NJTSRN
80100437-5000p).
CAUTION When working with Trizol use gloves and eye protection (shield, safety goggles).
Avoid contact with skin or clothing. Use in a chemical fume hood. Avoid breathing vapor.
Preparation of reagents supplied with the kits.
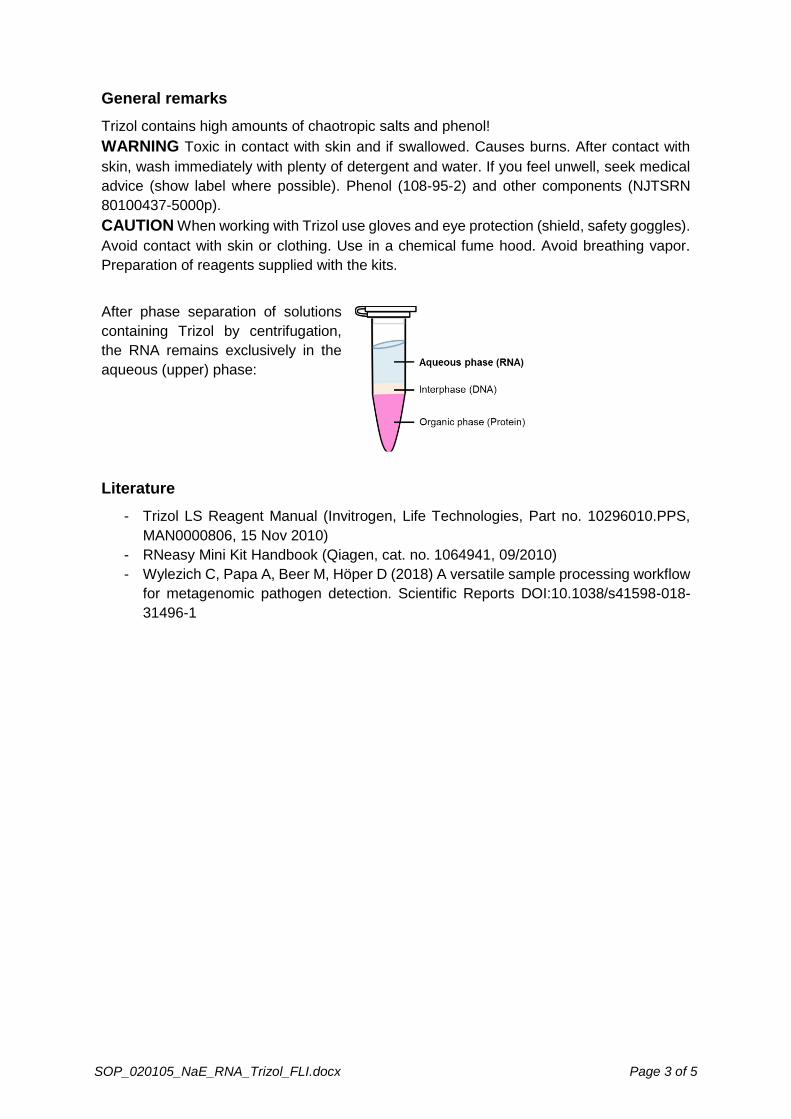
After phase separation of solutions
containing Trizol by centrifugation,
the RNA remains exclusively in the
aqueous (upper) phase:
Literature
- Trizol LS Reagent Manual (Invitrogen, Life Technologies, Part no. 10296010.PPS,
MAN0000806, 15 Nov 2010)
- RNeasy Mini Kit Handbook (Qiagen, cat. no. 1064941, 09/2010)
- Wylezich C, Papa A, Beer M, Höper D (2018) A versatile sample processing workflow
for metagenomic pathogen detection. Scientific Reports DOI:10.1038/s41598-018-
31496-1
SOP_020105_NaE_RNA_Trizol_FLI.docx Page 4 of 5
Before getting started
- Pre-cool the refrigerated centrifuge at 4°C
- Equilibrate samples to room temperature (RT)
- If intending to perform an on-column DNase digest, prepare 80 µl DNaseI working
solution per sample (on ice!):
o Add 10 μl DNase I stock solution (see above) to 70 μl Buffer RDD
o Mix by gently inverting the tube and centrifuge briefly
o Do not vortex as DNase I is sensitive to physical denaturation
- Prepare buffer RPE from the QIAamp RNeasy Mini Kit:
o Before first use, add the appropriate amount of ethanol (96 – 100%) to
the buffer concentrate as indicated on the bottle
o Stable for 1 year when stored closed at RT
o Shake before use
Procedure
This protocol is suitable for the purification of RNA from 250 μl sample volume. Larger
starting volumes can be processed by increasing the initial sample volume proportionally to
the volumes of Trizol and chloroform and loading the complete volume successively onto
the column (step 5).
1. - Pipet 750 μl Trizol LS Reagent into a 2 ml tube
2. - Add 250 μl sample
- Thoroughly shake manually for 15 s
- Briefly centrifuge for 5 s at 8,000 rpm
- Incubate 5 min at RT
3. - Add 200 μl chloroform
- Thoroughly shake manually for 15 s
- Incubate 10 min at RT
- Centrifuge 10 min at 13,000 rpm at 4°C
4. - Transfer the upper aqueous phase into a new sterile 2 ml tube
- Add 600 µl ethanol (75%)
- Mix by pulse-vortexing
- Briefly centrifuge for 5 s at 8,000 rpm
5. - Apply 600 µl of the sample from step 4 to the column
- Centrifuge at 10,000 rpm for 20 s
- Discard the collection tube and place the column into a clean 2 ml collection tube
6. - Apply residual sample from step 4 to the column
- Centrifuge at 10,000 rpm for 20 s
- Discard the collection tube and place the column into a clean 2 ml collection tube
7. - Add an equal volume (600 µl) buffer RW1 to the column
- Centrifuge at 10,000 rpm for 20 s
- Discard the collection tube and place the column into a clean 2 ml collection tube
8. - Apply 80 µl DNase working solution to the centre of the membrane
- Incubate for 15 min at RT
- Add 500 µl buffer RW1 to the column
- Centrifuge at 10,000 rpm for 20 s
- Discard the collection tube and place the column into a clean 2 ml collection tube
SOP_020105_NaE_RNA_Trizol_FLI.docx Page 5 of 5
9. - Add 500 µl buffer RPE
- Centrifuge at 10,000 rpm for 20 s
- Discard the collection tube and place the column into a clean 2 ml collection tube
10. - Add 500 µl buffer RPE
- Centrifuge 1 min at 13,000 rpm
- Discard the collection tube and place the column into a clean 2 ml collection tube
- Centrifuge 2 min at 13,000 rpm (to let the column dry)
- Discard the collection tube and place the column into a clean 1.5 ml tube
11. - Add 50 µl RNase-free water to the centre of the membrane
- Incubate 1 min at RT
- Centrifuge 1 min at 10,000 rpm
12. - Repeat step 11 twice, elute into the same tube
RNA is stable for up to one year when stored at -70°C.
When the RNA will be used for NGS it is recommended to subsequently continue with
quantification of RNA (SOP_030102_NAQuant_ND1000_FLI and SOP_030202_RNA
Quant_RiGreen_FLI) and ds cDNA synthesis (SOP_060104_cDNA-synthesis_FLI).
SOP_020203_NaE_RNA_ViralRNAKit_FLI.docx Page 1 of 6
FLI
SOP_020203_NaE_RNA_ViralRNAKit_FLI
RNA extraction
(QIAamp Viral RNA Mini Kit)
Standard Operating Procedure
Isolation of viral RNA for whole genome sequencing from liquid or
disintegrated samples using the QIAamp Viral RNA Mini Kit
8th Sept 2017
Prepared by: Katja Goller
Contact: [email protected]
Institution: Friedrich-Loeffler-Institut (FLI), Germany
SOP-Version: 3
Attachments: none
SOP_020203_NaE_RNA_ViralRNAKit_FLI.docx Page 2 of 6
Introduction
QIAamp Viral RNA Mini Kits enable the purification of viral RNA from liquid cell-poor
samples. To obtain high-quality RNA it is recommended to use fresh samples. In case of
frozen samples they should not be thawed more than once. Repeated freeze–thawing of
samples will lead to reduced viral titres and degradation of the RNA. In principle, the
sample is first lysed under highly denaturing conditions to inactivate RNases and to ensure
isolation of intact viral RNA. Buffering conditions are then adjusted to provide optimum
binding of the RNA to a silicagel-based membrane, and the sample is loaded onto the
QIAamp Mini spin column. The RNA binds to the membrane, and contaminants are
washed away. Viral RNA is not separated from DNA so that both will be purified in parallel.
To avoid co-purification of DNA, DNA can be digested on-column with the RNase-Free
DNase Set. The RNA is eluted in RNase-free buffer or water and can be stored for up to
for up to one year at –70°C.
Sample Material
Liquid samples (serum/plasma, cell culture supernatant, EDTA-blood diluted 1:2 in PBS,
supernatant from swabs, liquor) or samples disintegrated and lysed (tissue and stool
homogenates) according to SOP_010104_Disintegration_Cryoprep_FLI or SOP_010203_
Disintegration_Mikrodismembrator_FLI.
Equipment and Reagents
Successful RNA extraction demands an RNase-free environment, therefore only RNase-
free tubes, aerosol-free pipette tips, and only DEPC-treated water must be used. Gloves
have to be worn throughout the procedure and changed regularly in order to avoid RNase
contamination.
In general only use reagents that do not exceed the expiration date. When working with
chemicals, always wear a suitable lab coat, disposable gloves, and protective goggles. For
more information, consult the appropriate material safety data sheets (MSDSs), available
from the manufacturer.
Equipment
- Microcentrifuge (for 1.5 ml and 2 ml tubes)
- For use of the vacuum protocol vacuum manifold (e.g. EveryPrep Universal Vacuum
Manifold, ThermoFisher Scientific cat. no. K2111-01)
- Vortexer
- Laminar flow hood
- Pipettes
- Disposable gloves
- 1.5 ml and/or 2 ml tubes
- 2 ml collection tubes (Qiagen, cat. no. 19201)
- Sterile, RNase-free pipet tips (with aerosol barriers to prevent cross contamination)
Reagents
- QIAamp Viral RNA Mini Kit (Qiagen, cat. no. 52904 or 52906)
- RNase-Free DNase Set (Qiagen, cat. no. 79254)
- Ethanol (96 – 100%, undenatured)
- RNase-free water (DEPC-treated)
SOP_020203_NaE_RNA_ViralRNAKit_FLI.docx Page 3 of 6
General remarks
Carrier-RNA included in the Viral RNA Mini Kit consists of poly-A sequences (100 bp – 10
kbp in length). Therefore, for whole genome shotgun sequencing or metagenomics no
carrier-RNA is used to avoid compromising the DNA library for sequencing!
Literature
- QIAamp Viral RNA Mini Kit Handbook (1090245, 12/2014)
- RNeasy Mini Kit Handbook (on-column DNase Digestion)
SOP_020203_NaE_RNA_ViralRNAKit_FLI.docx Page 4 of 6
Preparation of reagents supplied with the QIAamp Viral RNA Mini kit
Buffer AW1
- Before first use, add the appropriate amount of ethanol (96 – 100%) as indicated on
the bottle to the buffer concentrate
- Stable for 1 year when stored closed at room temperature (RT)
Buffer AW2
- Before first use, add the appropriate amount of ethanol (96 – 100%) as indicated on
the bottle to the buffer concentrate
- Stable for 1 year when stored closed at RT
Before getting started
- Equilibrate samples to room temperature (RT)
- Check that buffers AW1 and AW2 are prepared as described above
- Shake all buffers for mixing
- If intending to perform an on-column DNase digest, prepare DNaseI working
solution (on ice!):
o Add 10 μl DNase I stock solution (see above) to 70 μl Buffer RDD
o Mix by gently inverting the tube and centrifuge briefly
o Do not vortex as DNase I is sensitive to physical denaturation
- Prepare buffer RPE from the QIAamp RNeasy Mini Kit:
o Before first use, add the appropriate amount of ethanol (96 – 100%) to
the buffer concentrate as indicated on the bottle
o Stable for 1 year when stored closed at RT
Procedure
This protocol is for the purification of viral RNA from 140 μl liquid sample. Larger starting
volumes, up to 560 μl (in multiples of 140 μl) can be processed by increasing the initial
volumes proportionally and loading onto the QIAamp Mini spin column.
The spin protocol is suitable for all situations. When handling several samples in parallel or
for larger sample volumes, the vacuum protocol is recommended (below).
All centrifugation steps are carried out at RT
A. Spin Protocol
1. - Pipet 560 μl of Buffer AVL per 140 µl sample into a suitable tube (note the final
volume is 9-fold the sample volume)
2. - Add sample
- Mix by pulse-vortexing for 15 s
- Incubate at room temperature for 10 min and briefly centrifuge
3. - Add 560 μl ethanol (96 – 100%) per 140 µl sample
- Mix by pulse-vortexing for 15 s and briefly centrifuge
4. - Apply 630 μl of the sample solution to the QIAamp Mini column (in a 2 ml collection
tube) without wetting the rim
- Centrifuge at 8000 rpm for 1 min
- Discard the collection tube and place the column into a clean 2 ml collection tube
5. - Repeat step 4 until the complete sample has been applied to a single column
6. - Add 650 µl Buffer AW1 to the column
- Centrifuge at 8000 rpm for 1 min
SOP_020203_NaE_RNA_ViralRNAKit_FLI.docx Page 5 of 6
- Discard the collection tube and place the column into a clean 2 ml collection tube
7. - Add 80 µl DNase working solution to the column
- Incubate for 15 min at RT
- Add 650 µl Buffer AW1
- Centrifuge at 8000 rpm for 1 min
- Discard the collection tube and place the column into a clean 2 ml collection tube
8. - Add 650 µl Buffer AW2 to the column
- Centrifuge at full speed 14,000 rpm for 3 min
- Discard the collection tube and place the column into a clean 2 ml collection tube
- Centrifuge at full speed 14,000 rpm for 1 min
9. - Place the column in a clean 1.5 ml tube
- Add 50 μl of Buffer AVE
- Incubate at room temperature for 1 min
- Centrifuge at 8000 rpm for 1 min
10. - For higher RNA recovery and recovery of long RNAs, repeat step 11 twice and
elute into the same tube
B. Vacuum protocol
1. - Pipet 560 μl of Buffer AVL per 140 µl sample into a suitable tube (note the final
volume is 9-fold the sample volume)
2. - Add sample
- Mix by pulse-vortexing for 15 s
- Incubate at room temperature for 10 min and briefly centrifuge
3. - Add 560 μl ethanol (96 – 100%) per 140 µl sample
- Mix by pulse-vortexing for 15 s and briefly centrifuge
4. - Mount one spin column per sample onto the vacuum manifold, attach the manifold
to the vacuum pump
5. - Apply 630 μl of the sample solution to the QIAamp Mini column without wetting the
rim.
- Apply vacuum to the manifold until all samples have completely been drawn
through the column. After all lysates have been drawn through the QIAamp Mini
column, close the main vacuum valve and open the screw cap valve to vent the
manifold. Close the screw cap valve after the vacuum is released from the
manifold.
6. - Repeat step 5 until the complete sample has been applied to a single column
7. - Add 750 µl Buffer AW1 to the column
- By applying vacuum as described in step 5, draw the complete buffer AW1 through
the columns
8. - Add 80 µl DNase working solution to the column
- Incubate for 15 min at RT
9. - Add 750 µl Buffer AW1 to the column
- By applying vacuum as described in step 5, draw the complete buffer AW1 through
the columns
10. - Add 750 µl Buffer AW2 to the column

SOP_020203_NaE_RNA_ViralRNAKit_FLI.docx Page 6 of 6
- By applying vacuum as described in step 5, draw the complete buffer AW2 through
the columns
11. - Place each column in a clean 2 ml collection tube
- Centrifuge at full speed 14,000 rpm for 1 min to dry the membrane
- Discard the collection tube
12. - Place each column in a clean 1.5 ml tube
- Add 50 μl of Buffer AVE
- Incubate at room temperature for 1 min
- Centrifuge at 8000 rpm for 1 min
13. - For higher RNA recovery and recovery of long RNAs, repeat step 12 twice and
elute into the same tube
RNA is stable for up to one year when stored at -70°C.
When the RNA will be used for NGS it is recommended to subsequently continue with
quantification of RNA (SOP_030102_NAQuant_ND1000_FLI and SOP_030202_RNA
Quant_RiGreen_FLI) and ds cDNA synthesis (SOP_060104_cDNA-synthesis_FLI).
SOP_020305_NaE_DNA_DNAMiniKit_FLI.docx Page 1 of 3
FLI
SOP_020305_NaE_DNA_DNAMiniKit_FLI
DNA extraction
(QIAamp DNA Mini Kit)
Standard Operating Procedure
Isolation of DNA from liquid or disintegrated samples using the
QIAamp DNA Mini Kit
14th Jun 2018
Prepared by: Katja Goller, Claudia Wylezich
Contact: [email protected]
Institution: Friedrich-Loeffler-Institut (FLI), Germany
SOP-Version: 5
Attachments: none
SOP_020305_NaE_DNA_DNAMiniKit_FLI.docx Page 2 of 3
Introduction
The QIAamp DNA Mini Kit enables the purification of total DNA using proteinase K. In
principle the purification procedure comprises four steps and is carried out using QIAamp
Mini spin columns in a standard microcentrifuge. In a first step, the sample is lysed.
Afterwards, the sample is loaded to the spin column on which the DNA is adsorbed onto
the silica membrane. The bound DNA is washed in two centrifugation steps to remove any
residual contaminants. Finally, the DNA is eluted in Buffer AE or Nuclease-free water
ready for direct downstream applications. Alternatively, it can be stored at -20°C for later
use. The purified DNA is up to 50 kb in size, with predominating fragments of approx.
20-30 kb. When the DNA will be used for NGS, it is recommended to directly proceed to
the next step.
Sample Material
Liquid samples (e. g., whole blood, plasma, serum, buffy coat, other body fluids, bone
marrow, lymphocytes, cultured cells) or samples disintegrated and lysed (tissue and stool
homogenates) according to SOP_010104_Disintegration_Cryoprep_FLI or SOP_010203_
Disintegration_Mikrodismembrator_FLI.
Equipment and Reagents
Successful DNA extraction demands a nuclease-free environment, therefore only
Nuclease-free tubes, aerosol-free pipette tips, and only nuclease-free water must be used.
Gloves have to be worn throughout the procedure and changed regularly in order to avoid
nuclease contamination.
In general only use reagents that do not exceed the expiration date. When working with
chemicals, always wear a suitable lab coat, disposable gloves, and protective goggles. For
more information, consult the appropriate material safety data sheets (MSDSs), available
from the manufacturer.
Equipment
- Microcentrifuge (for 1.5 ml and 2 ml tubes)
- Vortexer
- Laminar flow hood
- Pipettes
- Disposable gloves
- 1.5 ml and/or 2 ml tubes
- 2 ml collection tubes (Qiagen, cat. no. 19201)
- Sterile, DNase-free pipet tips (with aerosol barriers to prevent cross contamination)
- Thermal mixer, heating block or water bath
Reagents
- QIAamp DNA Mini Kit (Qiagen cat. no. 51304 or 51306)
- Ethanol (96 – 100%, undenatured)
- RNase-free water (DEPC-treated)
Literature
- QIAamp DNA Mini Kit Handbook (1090246, 02/2015)

SOP_020305_NaE_DNA_DNAMiniKit_FLI.docx Page 3 of 3
Preparation of reagents supplied with the QIAamp DNA Mini kit
Buffer AW1 and AW2
Before first use, add the appropriate amount of ethanol (96 – 100%) as indicated on
the bottle to the buffer concentrate
Buffer AL
Do not add proteinase K directly to buffer AL
All Buffers are stable for 1 year when stored closed at room temperature (RT).
Before getting started
- Equilibrate samples to RT
- Check that buffers AW1 and AW2 are prepared as described above
- Heat thermal mixer to 56°C
Procedure
This protocol is for the purification of DNA from 200 μl liquid sample or tissue
homogenates. All centrifugation steps are carried out at RT
1. - Pipet 20 µl Proteinase K in a 1.5 ml tube
2. - Add 200 µl of the sample and 200 µl buffer AL
- Mix by pulse-vortexing for 15 s
- Incubate at 56°C for 10 min and briefly centrifuge
3. - Add 200 μl ethanol (96 – 100%)
- Mix by pulse-vortexing for 15 s and briefly centrifuge
4. - Apply 700 μl of the sample solution to the QIAamp Mini spin column (in a 2 ml
collection tube) without wetting the rim
- Centrifuge at 8,000 rpm for 1 min
- Discard the collection tube and place the column into a clean 2 ml collection tube
5. - Add 700 µl Buffer AW1 to the column
- Centrifuge at 8,000 rpm for 1 min
- Discard the collection tube and place the column into a clean 2 ml collection tube
6. - Add 700 µl Buffer AW2 to the column
- Centrifuge at 14,000 rpm for 1 min
- Discard the collection tube and place the column into a clean 2 ml collection tube
7. - Repeat step 6 once
8. - Centrifuge at full speed 14,000 rpm for 3 min
- Place the column in a clean 1.5 ml reaction tube
9. - Add 50 μl of Nuclease-free water directly on the membrane
- Incubate at RT for 2 min
- Centrifuge at 8,000 rpm for 1 min
10. - For higher DNA recovery, repeat step 8 and elute into the same tube
Double-stranded DNA is stable for up to one year when stored at -20°C. When the DNA
will be used for NGS, it is recommended to subsequently continue with quantification of
DNA (SOP_030102_NAQuant_ND1000_FLI).
SOP_030102_NAQuant_ND1000_FLI.docx Page 1 of 4
FLI
SOP_030102_NAQuant_ND1000_FLI
Nucleic acid quantification
(NanoDrop)
Standard Operating Procedure
Nucleic acid quantification using NanoDrop ND1000
Spectrophotometer
8th Sept 2017
Prepared by: Claudia Wylezich
Contact: [email protected]
Institution: Friedrich-Loeffler-Institut (FLI), Germany
SOP-Version: 2
Attachments: none
SOP_030102_NAQuant_ND1000_FLI.docx Page 2 of 4
Introduction
The NanoDrop 1000 Spectrophotometer (Thermo Scientific) measures concentration and
purity of nucleic acids in minute volumes (1-2 µl) with high accuracy and reproducibility.
Due to the wide concentration range that can precisely be measured (lower limit 2 ng/µl,
upper limits dsDNA 3700 ng/µl, RNA 3000 ng/µl, ssDNA 2400 ng/µl) prior dilution of the
samples is not necessary. The spectrophotometer utilizes a patented sample retention
technology that employs surface tension alone to hold the sample in place without the
need for cumbersome cuvettes allowing for clean-up in seconds.
The sample is pipetted onto the end of a fiber optic cable (the receiving fiber). A second
fiber optic cable (the source fiber) is then brought into contact with the liquid sample
causing the liquid to bridge the gap between the fiber optic ends. The gap is controlled to
both 1 mm and 0.2 mm paths. A pulsed xenon flash lamp provides the light source and a
spectrometer utilizing a linear CCD array is used to analyze the light after passing through
the sample. The instrument is controlled by PC based software, and the data is logged in
an archive file on the PC.
Sample Material
RNA extracted according to protocols SOP_020104_NaE_RNA_Trizol_FLI, or
SOP_020203_NaE_RNA_ViralRNAKit_FLI, DNA extracted according to protocol
(SOP_020304_NaE_DNA_DNAMiniKit_FLI).
Equipment and Reagents
Successful RNA extraction demands an RNase-free environment, therefore only RNase-
free tubes, aerosol-free pipette tips, and only DEPC-treated water must be used. Gloves
have to be worn throughout the procedure and changed regularly in order to avoid RNase
contamination.
In general only use reagents that do not exceed the expiration date. When working with
chemicals, always wear a suitable lab coat, disposable gloves, and protective goggles. For
more information, consult the appropriate material safety data sheets (MSDSs), available
from the manufacturer.
Equipment
- NanoDrop 1000 Spectrophotometer connected with a computer running the
NanoDrop control software
- 2.5 µl or 10 µl Pipette
- Sterile, RNase-free pipet tips (with aerosol barriers for preventing cross-
contamination)
- Soft laboratory wipes for cleaning
- Disposable gloves
Reagents
- Sample solvent
- Nuclease-free water (DEPC-treated)

SOP_030102_NAQuant_ND1000_FLI.docx Page 3 of 4
General remarks
ONLY use the NanoDrop ND1000 after having been instructed by trained personnel!
Literature
- NanoDrop 1000 Spectrophotometer V3.7 User’s Manual (Thermo Scientific)
SOP_030102_NAQuant_ND1000_FLI.docx Page 4 of 4
Before getting started
No remarks
Procedure
1. Switch on the computer and start software ‘ND’
2. While the computer and software are starting up, clean the sample pedestals of
the ND1000 using nuclease-free water and laboratory wipes
3. After software start-up, click the button “Nucleic Acid”, apply 2 µl of nuclease free
water to the lower sample pedestal when requested, close the upper pedestal, and
initialise the instrument
4. After initialisation, choose the sample type right-hand pull-down menu
5. Open the sampling arm and pipette 2 µl of a blank sample (the buffer, solvent, or
carrier liquid used with your samples) direct onto the lower measurement pedestal
6. Close the sampling arm and initiate a measurement using the Blank button
7. Open the sampling arm, wipe the lower and upper pedestals using a soft
laboratory wipe
8. Enter the sample name into the sample ID field (make sure not to press <ENTER>
in this field)
9. Pipette 2 µl of the sample directly onto the lower pedestal, close the sampling arm,
and initiate a measurement using the Measure button
10. Immediately after the measurement is complete, open the sampling arm and wipe
the sample from both the upper and lower pedestals to prevent sample carryover
11. Repeat steps 8 – 10 for all samples
12. After the last sample measurement, perform a measurement of your solvent
according to steps 7 – 9 to make sure the instrument is clean; enter “blank” or
“solvent” as sample ID
SOP_030202_RNAQuant_RiGreen_FLI.docx Page 1 of 5
FLI
SOP_030202_RNAQuant_RiGreen_FLI
RNA quantification
(RiboGreen)
Standard Operating Procedure
RNA Quantification using Quant-iT RiboGreen RNA Assay Kit
8th Sept 2017
Prepared by: Claudia Wylezich, Dirk Höper
Contact: [email protected]
Institution: Friedrich-Loeffler-Institut (FLI), Germany
SOP-Version: 2
Attachments: none
SOP_030202_RNAQuant_RiGreen_FLI.docx Page 2 of 5
Introduction
Quant-iT RiboGreen RNA reagent is an ultrasensitive fluorescent nucleic acid stain for
quantifying RNA in solution and enables quantification of as little as 1 ng/ml RNA using a
fluorescence microplate reader. The RiboGreen reagent is non-fluorescent when free in
solution; upon binding to nucleic acids (single- or double stranded), the fluorescence of the
RiboGreen reagent increases more than 1000-fold. The nucleic acid-bound RiboGreen
reagent has an excitation maximum of approximately 500 nm and an emission maximum
of approximately 525 nm. The fluorescence is directly proportional to the amount of nucleic
acids over a range of approx. 10 pg/µl – 400 pg/µl. This linearity is maintained in the
presence of several compounds commonly found to contaminate nucleic acid preparations,
including nucleotides, salts, urea, ethanol, chloroform, detergents, proteins, and agarose.
Since RiboGreen reagent also binds to DNA, pre-treatment of mixed RNA/DNA samples
with DNase has to be used to generate an RNA-selective assay.
Sample Material
RNA extracted according to protocols SOP_020104_NaE_RNA_Trizol_FLI, or
SOP_020203_NaE_RNA_ViralRNAKit_FLI.
Equipment and Reagents
Successful RNA extraction demands an RNase-free environment, therefore only RNase-
free tubes, aerosol-free pipette tips, and only DEPC-treated (nuclease-free) water must be
used. Gloves have to be worn throughout the procedure and changed regularly in order to
avoid RNase contamination.
In general only use reagents that do not exceed the expiration date. When working with
chemicals, always wear a suitable lab coat, disposable gloves, and protective goggles. For
more information, consult the appropriate material safety data sheets (MSDSs), available
from the manufacturer.
Equipment
- Multimode Microplate Reader (e.g., Tecan Infinite F200 incl. fluorescence optical kit
- Blue, 490/515-580 nm)
- 2 PCR workstations (one master mix box, one template box)
- Mini centrifuge
- Black 96-well microplates (e.g. Greiner, cat. no. 655900)
- Pipettes
- Sterile, RNase-free pipet tips (with aerosol barriers to prevent cross contamination)
- Sterile, disposable polypropylene plasticware for reagent preparation
- RNase-free water (DEPC-treated)
- Disposable gloves
Reagents and consumables
- Quant-iT RiboGreen RNA Reagent (Component A) (Invitrogen; cat. no. R11491,
R11490)
- 20X TE Buffer, RNase-free (Component B) (Invitrogen; cat. no. R11490)
- Ribosomal RNA standard, 16S and 23S rRNA from E. coli (Component C)
(Invitrogen; cat. no. R11490)
SOP_030202_RNAQuant_RiGreen_FLI.docx Page 3 of 5
General remarks
Caution: No data are available addressing the mutagenicity or toxicity of Quant-iT
RiboGreen RNA reagent. Because this reagent binds to nucleic acids, treat the reagent
as a potential mutagen and handle with appropriate care.
Handle the DMSO stock solution with particular caution (double gloves) as DMSO is
known to facilitate the entry of organic molecules into tissues.
Literature
- Quant-iT™ RiboGreen® RNA Reagent and Kit User Manual (no. MP 11490, 10
June 2008) (https://tools.thermofisher.com/content/sfs/manuals/mp11490.pdf)

SOP_030202_RNAQuant_RiGreen_FLI.docx Page 4 of 5
Before getting started
- Allow the Quant-iT RiboGreen RNA Reagent (Component A) to warm to room
temperature before opening the vial (keep dark).
Procedure
Mastermix box
1. Prepare the 1X TE working solution
o Calculate 1800 µl 1X TE for the standards
o Calculate 200 µl 1X TE per sample
o Dilute 100 µl of 20X TE (Component B) in 1900 µl nuclease-free water. To
reduce the pipetting error, use the same pipette for all steps, if possible
2. Prepare RiboGreen working solution
o Dilute RiboGreen reagent (Component A) in 1X TE; add 1µl RiboGreen to
999 µl 1X TE
Template box
3. Prepare the quantification standard
o Prepare 260 µl RNA standard working solution 0,5 ng/µl (dilute
Component C 1:200 in 1X TE)
o Serially dilute RNA standard 1:2 in 1X TE (e.g. add 105 µl RNA standard to
105 µl 1X TE) up to a final dilution of 1:64
4. Dilute samples with RNA concentrations >20 ng/µl (NanoDrop measurement) in
1X TE to fit in the linear measurement range of the assay (approx. 10 pg/µl –
400 pg/µl)
5. Pipet each standard concentration in duplicates of 50 µl into the microtiter plate
according to the scheme below (table 1); pipet 50 µl of the undiluted standard into
an additional well
6. Pipet duplicates of each sample into the microtiter plate and add 1X TE to a final
volume of 50 µl
7. Add 50 µl RiboGreen working solution to every standard and sample, mix and
incubate for 3 min at RT, protected from light
Measurement
8. Measure the fluorescence with the microplate reader; for the Tecan Infinite F200
use the parameters specified in table 2, below. For other microplate readers use
equivalent parameters
9. Save the results to an Excel-File
Calculation
10. Check the raw fluorescence data for plausibility
11. Calculate mean values per well from the multiple measurements
12. Check that the duplicate measurements do not deviate more than 5%
13. Calculate the linear regression from the standards, check that R2 ≥ 0.985
14. Using the linear regression formula, calculate the amount of RNA in the samples;
mind the sample dilutions!

SOP_030202_RNAQuant_RiGreen_FLI.docx Page 5 of 5
Table 1 Pipetting scheme
Standard 1:1
50Aµl 1 25 ng
Standard 1:1
50Aµl 2 25 ng
RiboRef Standard
1:1A3 50 μl
25 ng
A4
A5
A6
A7
A8
A9
A10
A11
A12
Standard 1:2
50Bµl 1 12,5 ng
Standard 1:2
50Bµl 2 12,5 ng
B3
B4
B5
B6
B7
B8
B9
B10
B11
B12
Standard 1:4
50Cµl 1 6,25 ng
Standard 1:4
50Cµl 2 6,25 ng
C3
C4
C5
C6
C7
C8
C9
C10
C11
C12
Standard 1:8
50Dµl 1 3,125 ng
Standard 1:8
50Dµl 2 3,125 ng
D3
D4
D5
D6
D7
D8
D9
D10
D11
D12
Standard 1:16
50Eµl 1 1,5625 ng
Standard 1:16
50Eµl 2 1,5625 ng
E3
E4
E5
E6
E7
E8
E9
E10
E11
E12
Standard 1:32
50Fµl 1 0,78125 ng
Standard 1:32
50Fµl 2 0,78125 ng
F3
F4
F5
F6
F7
F8
F9
F10
F11
F12
Standard 1:64
50Gµl 1 0,390625 ng
Standard 1:64
50Gµl 2 0,390625 ng
G3
G4
G5
G6
G7
G8
G9
G10
G11
G12
Standard 1X TE
50Hµl 1 0 ng
Standard 1X TE
50Hµl 2 0 ng
H3
H4
H5
H6
H7
H8
H9
H10
H11
H12
Table 2 Measurement parameters for Tecan Infinite 200
Parameter Value
Plate Greiner 96 Flat Bottom Black Polystyrol [GRE96fb_chimney.pdfx]
Shake Orbital, 3 mm Amplitude, 20 s
Temperature 25 °C ± 0,5 °C
Mode Fluorescence, top measurement
Measurements per well Circle (filled), 5 x 5, frame 350 µm
Excitation wavelength 485 nm
Emissions wavelength 535 nm
Excitation bandwidth 20 nm
Emission bandwidth 25 nm
Amplification automatic determination from well A3 (RiboRef)
Number flashes 25
Integration time 20 µs
Delay 0 µs
Idle time 0 ms
SOP_040102_RNAQual-check_RNAPico-chip_FLI.docx Page 1 of 5
FLI
SOP_040102_RNAQual-check_RNAPico-chip_FLI
Quality check of RNA
(RNA Pico Chip)
Standard Operating Procedure
Quality check of extracted RNA using Agilent RNA 6000 Pico Kit
8th Sept 2017
Prepared by: Claudia Wylezich, Dirk Höper
Contact: [email protected]
Institution: Friedrich-Loeffler-Institut (FLI), Germany
SOP-Version: 2
Attachments: none
SOP_040102_RNAQual-check_RNAPico-chip_FLI.docx Page 2 of 5
Introduction
High quality input RNA is essential for successful preparation of cDNA shotgun sequencing
libraries. The Agilent RNA 6000 Pico assay is suitable to analyze total RNA or mRNA
using only 1 µl of sample containing 200 – 5000 pg/µl RNA with a size between 25 and
6000 bases. For samples with a higher concentration of RNA, the samples may be diluted
or the Agilent RNA 6000 Nano Kit for samples with RNA concentrations ranging from 25
ng/µl to 500 ng/µl may be used. The dye labelled nucleic acids are separated
electrophoretically based on their size in a microfluidic system. Internal standards ensure
assay accuracy and reproducibility. From the generated electropherogram, the software
calculates an RNA Integrity Number (RIN) that can help in assessing RNA quality.
Quality checked RNA can be accurately quantified according to SOP_030202_RNAQuant_
RiGreen_FLI or be directly used for cDNA synthesis (SOP_060104_cDNA-synthesis_FLI).
Sample Material
RNA extracted according to protocols SOP_020104_NaE_RNA_Trizol_FLI, or
SOP_020203_NaE_RNA_ViralRNAKit_FLI.
Equipment and Reagents
Successful RNA extraction demands an RNase-free environment, therefore only RNase-
free tubes, aerosol-free pipette tips, and only DEPC-treated (nuclease-free) water must be
used. Gloves have to be worn throughout the procedure and changed regularly in order to
avoid RNase contamination.
In general, only use reagents that do not exceed the expiration date. When working with
chemicals, always wear a suitable lab coat, disposable gloves, and protective goggles. For
more information, consult the appropriate material safety data sheets (MSDSs), available
from the manufacturer.
Equipment
- Agilent 2100 Bioanalyzer
- Chip Priming Station (Agilent, cat. no. 5065-4401, supplied with Bioanalyzer)
- IKA Vortexer Model MS3 with chip adapter (supplied with Bioanalyzer)
- Vortexer, Microcentrifuge
- Pipettes
Reagents and consumables
- Agilent RNA 6000 Pico Kit (Agilent, cat. no. 5067-1513)
- Nuclease-free water (DEPC-treated)
- 0.5, 1.5 ml tubes (sterile, Nuclease-free, low bind)
- Disposable gloves
- Sterile, Nuclease-free pipet tips (with aerosol barriers to prevent cross
contamination)
General remarks
- The RNA concentration should be between 200-5000 pg/µl for total RNA; if
necessary, dilute samples with Nuclease-free water
SOP_040102_RNAQual-check_RNAPico-chip_FLI.docx Page 3 of 5
Literature
- Agilent RNA 6000 Pico Kit Quick Start Guide (Part no. G2938-90049, 08/2013)
SOP_040102_RNAQual-check_RNAPico-chip_FLI.docx Page 4 of 5
Before getting started
- Prepare the RNA ladder:
o Briefly centrifuge the ladder and pipette tube content in an RNase-free tube
o Incubate for 2 min at 70°C for heat denaturing; immediately cool on ice
o Add 90 µl RNase-free water, mix well and spin down
o Prepare 2 µl-aliquots in 0.5 µl RNase-free tubes
o Store aliquots at -70°C and thaw on ice if needed
- Prepare the RNA gel matrix:
o Pipette 550 µl of RNA gel matrix into a spin filter
o Centrifuge at 1500 × g for 10 min
o Prepare aliquots á 65 µl into 0.5 µl RNase- free tubes
o Store at 4°C and use the filtered gel within 4 weeks
- Equilibrate the RNA dye concentrate to room temperature 30 min before use
(protect from light)
- Dilute RNA samples to ≤ 5 ng/µl if concentration is higher and denature the samples
2 min at 70°C, store on ice until use
- Set up the chip priming station:
o Screw on the syringe to the lid of the chip priming station
o Adjust the syringe clip to the top position
o Ensure that the base plate is inserted in position C
Procedure
1. Vortex the RNA dye concentrate for 10 sec, spin down, add 1 µl of dye into an
aliquot of filtered gel
2. Vortex well and centrifuge at 13000 × g for 10 min; use this mix within one day
3. Put a new RNA chip on the chip priming station
4. Pipette 9 µl of gel-dye mix in the well marked G
5. Ensure that the plunger is positioned at 1 ml, close the chip priming station and
press the plunger until it is held by the clip
6. After exactly 30 sec release the clip
7. After further 5 sec slowly pull back the plunger to the 1 ml position
8. Open the chip priming station; pipette 9 µl of gel-dye mix in wells marked G
9. Pipette 9 µl of RNA conditioning solution into the well marked CS
10. Pipette 5 µl of RNA marker in all sample wells (1-11) and the well marked “ladder”
11. Pipette 1 µl of heat denatured ladder aliquot in the well marked “ladder”
12. Load all sample wells: pipette 1 µl of sample in each used sample well (1-11);
pipette 1 µl of RNA marker in each sample well not used for a sample
13. Vortex the chip with the IKA Vortexer MS3 for 1 min at 2400 rpm (as indicated)
14. Within 5 min, run the chip in the Agilent 2100 Bioanalyzer with the assay
“Eukaryote Total RNA Series II.xsy” for RNA
15. After running the chip, apply a cleaning chip filled with 350 µl of fresh Nuclease-
free water for about 30 sec to clean electrodes; let the electrodes air dry with the
lid open

SOP_040102_RNAQual-check_RNAPico-chip_FLI.docx Page 5 of 5

SOP_050104_Concentrating-RNA_FLI.docx Page 1 of 4
FLI
SOP_050104_Concentrating-RNA_FLI
Concentrating RNA
(magnetic beads)
Standard Operating Procedure
Concentrating RNA for cDNA synthesis using Agencourt
RNAClean XP Beads
29th Aug 2018
Prepared by: Claudia Wylezich
Contact: [email protected]
Institution: Friedrich-Loeffler-Institut (FLI), Germany
SOP-Version: 4
Attachments: none
SOP_050104_Concentrating-RNA_FLI.docx Page 2 of 4
Introduction
For cDNA synthesis, up to 500 ng high quality RNA in a maximum volume of 17 µl is
needed. Low concentrated RNA solutions need to be concentrated with the Agencourt
RNAClean XP Beads. This system utilizes solid-phase paramagnetic bead technology for
purification and concentration of RNA. Excess oligonucleotides, nucleotides, salts, and
enzymes are removed using a simple washing procedure. Total RNA bound to magnetic
beads will be separated from contaminants and washed with ethanol. Afterwards, the
bound RNA will be eluted in an appropriate amount of RNase-free water. Concentrated
RNA can directly be used for cDNA synthesis (SOP_060104_cDNA-synthesis_FLI).
Sample Material
RNA extracted according to protocols SOP_020104_NaE_RNA_Trizol_FLI, or
SOP_020203_NaE_RNA_ViralRNAKit_FLI.
Equipment and Reagents
Successful working with RNA demands an RNase-free environment, therefore only
RNase-free tubes, aerosol-free pipette tips, and only DEPC-treated water must be used.
Gloves have to be worn throughout the procedure and changed regularly in order to avoid
RNase contamination.
In general, only use reagents that do not exceed the expiration date. When working with
chemicals, always wear a suitable lab coat, disposable gloves, and protective goggles. For
more information, consult the appropriate material safety data sheets (MSDSs), available
from the manufacturer.
Equipment
- PCR workstations (template box)
- Magnetic particle concentrator (MPC; e.g. Life Technologies cat. no. 12321D)
- Shaker for 1.5 ml tubes
- Vortexer
- Pipettes
Reagents and consumables
- Agencourt RNAClean XP beads (Beckman Coulter, cat. no. A63987)
- Un-denatured ethanol (80% (v/v), RNase-free
- RNase-free water (DEPC-treated)
- 1.5 ml tubes (sterile, RNase-free, low-bind)
- Disposable gloves
- Sterile, RNase-free pipet tips (with aerosol barriers to prevent cross contamination)
General remarks
- Make sure the Agencourt RNAClean XP beads are at room temperature and are
thoroughly mixed. The reagent (magnetic particle solution) should appear
homogenous and consistent in colour.
- Do not freeze.

SOP_050104_Concentrating-RNA_FLI.docx Page 3 of 4
Literature
- Agencourt RNAClean XP manual (Beckman Coulter, Protocol 001298v001) - Wylezich C, Papa A, Beer M, Höper D (2018) A versatile sample processing
workflow for metagenomic pathogen detection. Scientific Report DOI:10.1038/s41598-018-31496-1

SOP_050104_Concentrating-RNA_FLI.docx Page 4 of 4
Before getting started
Resuspend an aliquot of the magnetic particle solution via shaking or vortexing.
Procedure
Template box
1. Add 1.8 volumes of Agencourt RNAClean XP Beads to an RNA sample in a low-
bind tube and mix the RNA-bead-solution thoroughly by pipette mixing (15x)
2. Incubate 7 min at room temperature (RT) on a shaker (550 rpm)
3. Place the reaction tube onto the MPC for 5 min to separate the beads from
supernatant (until the beads have concentrated on the tube wall)
4. Slowly aspirate the cleared solution from the reaction tube without disturbing the
beads and discard the solution; keep the reaction tube in the MPC while aspirating
the solution
5. Depending on pellet size, dispense 500 – 1000 µl 80% ethanol to reaction tube
and incubate 30 s at RT
6. Slowly aspirate the ethanol from the reaction tube and discard while keeping the
tube on the MPC
7. Repeat step 5-6 once while the reaction tube keeps in the MPC
8. Air-dry the pellet for 10 min with the cap open (keeping on MPC); do not over-dry!
9. Take reaction tube from MPC, elute RNA with 20 μl RNase-free water by careful
pipette mixing and incubate for 2 min
10. Place the reaction tube onto the MPC, incubate for 2 min and pipet 17 µl of the
concentrated RNA solution into a clean reaction tube
Continue directly with the cDNA synthesis (SOP_060104_cDNA-synthesis_FLI).
SOP_060105_cDNA-synthesis_FLI.docx Page 1 of 5
FLI
SOP_060105_cDNA-synthesis_FLI
cDNA synthesis
Standard Operating Procedure
cDNA synthesis
for the generation of double stranded cDNA from purified RNA
29th Aug 2018
Prepared by: Claudia Wylezich, Katja Goller
Contact: [email protected]
Institution: Friedrich-Loeffler-Institut (FLI), Germany
SOP-Version: 5
Attachments: none
SOP_060105_cDNA-synthesis_FLI.docx Page 2 of 5
Introduction
The here described one-tube procedure is dealing with the synthesis of double stranded
(ds) cDNA from purified total RNA using the cDNA Synthesis System from Roche. The ds
cDNA is required for the subsequent construction of non-directional cDNA libraries for
next-generation sequencing. If necessary, prior to cDNA synthesis the purified RNA has to
be concentrated with Agencourt RNAClean XP Beads. This purified and eventually
concentrated RNA is then used in the ds cDNA synthesis. Firstly, a first-strand synthesis
reaction has to be performed and in order to generate ds cDNA, a subsequent second
strand synthesis is done. The first and second strand syntheses are performed in the same
tube, which speeds up the synthesis procedure and maximizes recovery of cDNA. The last
step in the cDNA synthesis is to ensure that the termini of the cDNA are blunt. cDNA can
either be used for a subsequent DNA fragmentation step
(SOP_070104_DNA_Frag_Covaris_FLI) or stored at -20°C.
Sample Material
Five-hundred ng high quality RNA in a maximum volume of 17 µl. In case the
concentration is less, RNA needs to be concentrated with the Agencourt RNAClean XP
Beads (SOP_050103_Concentrating-RNA_FLI).
Equipment and Reagents
Successful cDNA synthesis demands an RNase-free environment, therefore only RNase-
free tubes, aerosol-free pipette tips, and only DEPC-treated water must be used. Gloves
have to be worn throughout the procedure and changed regularly in order to avoid RNase
contamination.
In general only use reagents that do not exceed the expiration date. When working with
chemicals, always wear a suitable lab coat, disposable gloves, and protective goggles. For
more information, consult the appropriate material safety data sheets (MSDSs), available
from the manufacturer.
Equipment
- 2 PCR workstations (one master mix box, one template box)
- Microcentrifuge
- Thermal Cycler
- NanoDrop Spectrophotometer for nucleic acid quantification
- Magnetic particle concentrator (MPC; e.g. DynaMag™-2, Life Technologies)
- Vortexer
- Pipettes
Reagents and consumables
- cDNA-Synthesis System (Roche, cat. no. 11 117 831 001)
- Hexanucleotide Mix (Roche, cat. no. 11277081001)
- RNase-free water (DEPC-treated)
- 0.2 M EDTA pH 8.0
- 0.2 ml, 1.5 ml and 2.0 ml tubes (sterile, RNase-free)
- Disposable gloves
- Sterile, RNase-free pipet tips (with aerosol barriers to prevent cross contamination)
SOP_060105_cDNA-synthesis_FLI.docx Page 3 of 5
General remarks
To avoid contaminations:
- Tubes containing purified template RNA/DNA must exclusively be opened and
handled in a template PCR workstation.
- Buffers and reagents for preparing master mixes must exclusively be opened and
handled in a clean master mix box.
- Change gloves after handling template RNA/DNA before working in the master
mix box.
- Buffers and reagents once opened in the template box must never be used and
opened in the master mix box.
Literature
- Roche cDNA-Synthesis System (cat. no. 11 117 831 001) Manual
- Wylezich C, Papa A, Beer M, Höper D (2018) A versatile sample processing
workflow for metagenomic pathogen detection. Scientific Reports
DOI:10.1038/s41598-018-31496-1
SOP_060105_cDNA-synthesis_FLI.docx Page 4 of 5
Before getting started
- Preheat thermal cycler to 95°C.
Procedure
A. First strand synthesis
Master mix box
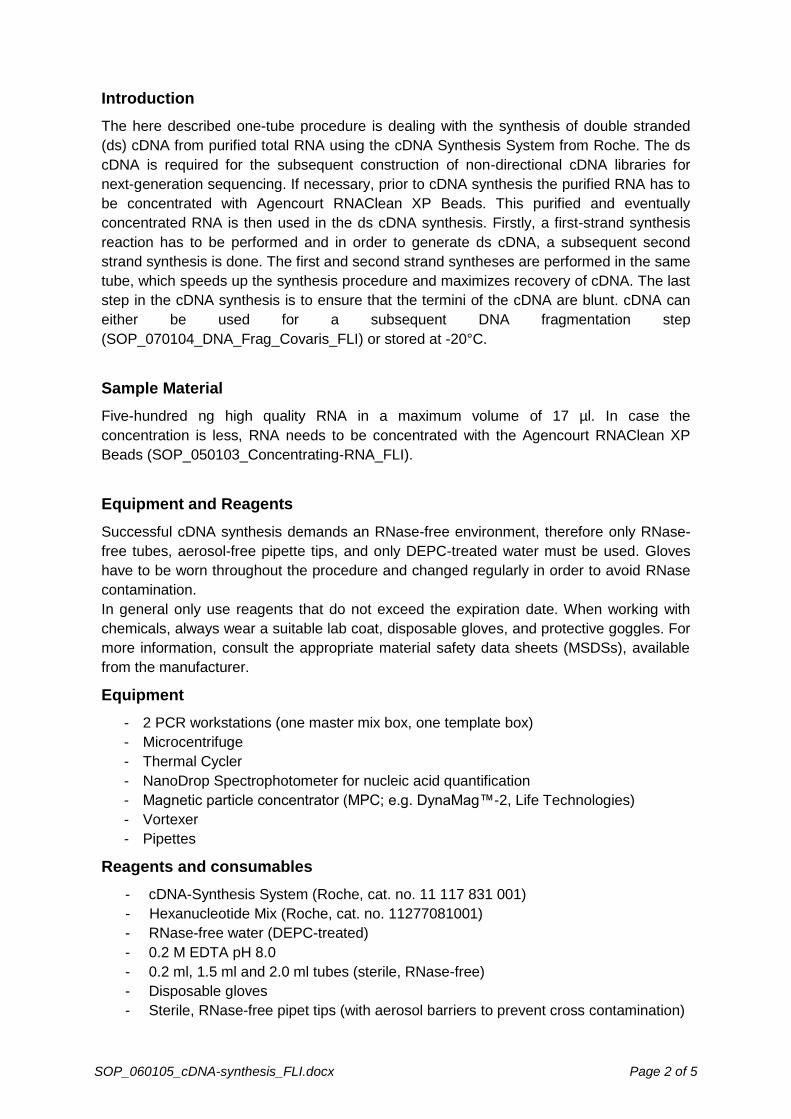
1. Prepare master mix for the first strand synthesis:
Components 1 x x
Vial 1 (5× RT-buffer AMV) 8.0 µl µl
Vial 3 (DTT, 0.1 M) 4.0 µl µl
Vial 7 (dNTPs, 10 mM) 4.0 µl µl
Vial 4 (Protector RNase Inhibitor, 25 U/μl) 1.0 µl µl
Vial 2 (AMV RT, 25 U/μl) 2.0 µl µl
Total volume 19.0 µl
µl
2. Pipette 4 µl of the Hexanucleotide Mix in a 0.2 ml PCR-Tube.
Template box
3. Add a maximum of 500 ng template RNA in a total volume of 17 µl to the
Hexanucleotide Mix
4. Briefly vortex and centrifuge
5. Incubate 2 min at 95°C and subsequently cool down the reaction for 2 min on ice
6. Add 19 µl of the first-strand master mix
7. Incubate 10 min at 25°C, 60 min at 42°C with hot-lid on (110°C)
8. Briefly before the incubation is finished start preparing the master mix for the
second-strand synthesis (see below)
9. After the incubation is finished, keep on ice
10. Before proceeding to the master mix box, change gloves
B. Second strand synthesis
Master mix box
11. Prepare master mix for the second strand synthesis:
Components 1 x x
Vial 9 (5× 2nd strand synthesis buffer) 30.0 µl µl
Vial 12 (Water, PCR Grade) 72.0 µl µl
Vial 7 (dNTPs, 10 mM) 1.5 µl µl
Vial 10 (2nd strand enzyme) 6.5 µl µl
Total volume 110.0 µl µl
Template box
12. Add 110 µl second strand synthesis master mix to the first-strand reaction, briefly
mix and centrifuge
SOP_060105_cDNA-synthesis_FLI.docx Page 5 of 5
13. Incubate 2 h at 16°C (hot-lid off)
14. Add 20 μl of vial 11 (T4 DNA Polymerase), carefully mix and centrifuge briefly
15. Incubate 5 min at 16°C
16. Stop reaction by adding 17 µl 0.2 M EDTA, pH 8.0
Store cDNA at -20°C or continue directly with the DNA fragmentation
(SOP_070104_DNA_Frag_Covaris_FLI).
SOP_070104_DNA_Frag_Covaris_FLI.docx Page 1 of 4
FLI
SOP_070104_DNA_Frag_Covaris_FLI
DNA fragmentation
(Covaris M220 Focused-
ultrasonicator)
Standard Operating Procedure
Fragmentation of dsDNA by hydrodynamic shearing using the
Covaris M220 Focused-ultrasonicator
28th Aug 2017
Prepared by: Katja Goller
Contact: [email protected]
Institution: Friedrich-Loeffler-Institut (FLI), Germany
SOP-Version: 4
Attachments: none
SOP_070104_DNA_Frag_Covaris_FLI.docx Page 2 of 4
Introduction
The fragmentation of DNA is a critical sample preparation step required by all second-
generation sequencing platforms. The quality and diversity of the final sample library
depends on this fragmentation step. A random process to generate unbiased libraries is
required that must also be robust to ensure consistent and reproducible performance
without operator induced variation. The M220 Focused-ultrasonicator uses the Adaptive
Focused Acoustic (AFA) process to apply hydrodynamic shearing forces to the DNA to
randomly fragment it. It is conducted under isothermal conditions ensuring both unbiased
fragmentation and high recovery of double-stranded DNA. The M220 generates DNA
fragments adjustable from 150 to 5000 bp. Depending on the sequencing platform,
different DNA shearing protocols are used to obtain the optimal fragment length.
Sample Material
The complete volume of the cDNA synthesised according to SOP_060104_cDNA-
synthesis_FLI or 500 ng DNA isolated according to SOP_020304_NaE_DNA_DNAMini
Kit_FLI and quantified following the procedure of SOP_030102_NAQuant_ND1000_FLI.
Equipment and Reagents
In general only use reagents that do not exceed the expiration date. When working with
chemicals, always wear a suitable lab coat, disposable gloves, and protective goggles. For
more information, consult the appropriate material safety data sheets (MSDSs), available
from the manufacturer.
Equipment
- Covaris M220 Focused-ultrasonicator with M220 microTUBE holder (cat. no.
500301)
- Fragmentation tubes (microTUBE AFA Fiber Screw Cap 6 x 16 mm, 130 µl; Covaris,
cat. no. 520096)
- Wash bottle (supplied with starter Kit)
Reagents
- AFA-grade water (Covaris, cat. no. 520101) or highly purified water, at least ASTM
Type III or ISO grade 3
- Nuclease-free water (DEPC-treated)
General remarks
- ONLY use the M220 after having been instructed by trained personnel
- NEVER run a method without AFA-grade water in the acoustic assembly; this could
damage the transducer
- DO NOT leave water in the water bath for an extended time. Empty the water bath
and wipe it dry after use with a lint-free cloth
- Do not employ isopropyl alcohol, ammonia-based or abrasive cleaners on the
acoustic assembly
- Store the tube holder in a dry place
DNA shearing protocols: Use the following pre-installed DNA shearing protocol:

SOP_070104_DNA_Frag_Covaris_FLI.docx Page 3 of 4
DNA_0500_bp_130_ul_Snap_Cap_microTUBE
Literature
- User manual M220 (Covaris, publication no. P/N 010157, 10/2014)
- Wylezich C, Papa A, Beer M, Höper D (2018) A versatile sample processing
workflow for metagenomic pathogen detection. Scientific Reports
DOI:10.1038/s41598-018-31496-1
SOP_070104_DNA_Frag_Covaris_FLI.docx Page 4 of 4
Before getting started
- Switch on the M220 Focused-ultrasonicator and the computer
- Start software ‘SonoLab’
- Carefully place the microTube holder in the Acoustic Assembly
- Fill the Acoustic Assembly with approx. 15 ml AFA-grade water
Procedure
1. Pipette 130 µl sample in the microTUBE (if the sample volume is less than 130 µl
fill up to 130 µl with water)
2. Place the microTUBE in the microTube holder and fix it with the sample weight
3. Start protocol via the start button, repeat fragmentation once by pressing the
repeat button
4. Pipette sample into a clean 1.5 ml tube
5. If the sample volume is greater than 130 µl, repeat steps 1-4 using the same
microTube
Use the fragmented DNA for library preparation (SOP_090102_Library-prep_automated_
IlluminaMiSeq_FLI or SOP_080102_Purification_fragmented-cDNA_FLI followed by
SOP_090202_Library-prep_IonTorrent_FLI).
SOP_080103_Purification_fragmented-DNA_FLI.docx Page 1 of 4
FLI
SOP_080103_Purification_fragmented-DNA_FLI
Purification and concentration of
fragmented DNA (magnetic beads)
Standard Operating Procedure
Purification and concentration of fragmented DNA using
Agencourt AMPure XP beads
29th Aug 2018
Prepared by: Claudia Wylezich
Contact: [email protected]
Institution: Friedrich-Loeffler-Institut (FLI), Germany
SOP-Version: 3
Attachments: none

SOP_080103_Purification_fragmented-DNA_FLI.docx Page 2 of 4
Introduction
For manual library preparation for the Ion Torrent PGM according to LOP_Library-
prep_IonTorrent_FLI_v1, a maximum volume of 20.5 µl DNA sample is needed. The cDNA
fragmented according to LOP_DNA_Frag_Covaris_FLI_v3 usually has a volume of 260 µl
and therefore needs to be concentrated with the Agencourt AMPure XP beads. This
system utilizes solid-phase paramagnetic bead technology for purification of DNA. Excess
short nucleotides, salts, and enzymes are removed using a simple washing procedure.
DNA bound to magnetic beads will be separated from contaminants and washed with
ethanol. Afterwards, the bound DNA will be eluted in an appropriate amount of Nuclease-
free water. Concentrated and purified cDNA can directly be used for library preparation
(SOP_090202_Library-prep_IonTorrent_FLI).
Sample Material
DNA fragmented according to SOP_070104_DNA_Frag_Covaris_FLI.
Equipment and Reagents
Successful working with DNA demands a Nuclease-free environment, therefore only
Nuclease-free tubes, aerosol-free pipette tips, and only DEPC-treated water must be used.
Gloves have to be worn throughout the procedure and changed regularly in order to avoid
Nuclease contamination.
In general only use reagents that do not exceed the expiration date. When working with
chemicals, always wear a suitable lab coat, disposable gloves, and protective goggles. For
more information, consult the appropriate material safety data sheets (MSDSs), available
from the manufacturer.
Equipment
- PCR workstation (template box)
- Magnetic particle concentrator (MPC; e.g. Life Technologies cat. no. 12321D)
- Shaker for 1.5 ml tubes
- Vortexer
- Pipettes
Reagents and consumables
- Agencourt AMPure XP beads (Beckman Coulter, cat. no. A63881)
- Un-denatured ethanol (80% (v/v)), Nuclease-free
- Nuclease-free water (DEPC-treated)
- 1.5 ml tubes (sterile, Nuclease-free, low-bind)
- Disposable gloves
- Sterile, Nuclease-free pipet tips (with aerosol barriers to prevent cross
contamination)
General remarks
- Aliquot the AMPure XP beads in order to prevent repeated warming and cooling as
this will degrade the buffer and render the beads non-functional.
- When opening a new lot of AMPure XP beads, perform a bead calibration before
first use (SOP_000102_AMPureBead-calibration_FLI).

SOP_080103_Purification_fragmented-DNA_FLI.docx Page 3 of 4
- Make sure the Agencourt AMPure XP beads are at room temperature and are
thoroughly mixed. The reagent (magnetic particle solution) should appear
homogenous and consistent in colour.
- Do not freeze.
Literature
- DeAngelis MM, Wang DG, Hawkins TL. 1995. Solid-phase reversible immobilization for the isolation of PCR products. Nucleic Acids Res 23:4742-4743.
- AGENCOURT AMPURE XP PCR PURIFICATION (Beckman Coulter, protocol no. 000387v001)
- Wylezich C, Papa A, Beer M, Höper D (2018) A versatile sample processing workflow for metagenomic pathogen detection. Scientific Reports DOI:10.1038/s41598-018-31496-1

SOP_080103_Purification_fragmented-DNA_FLI.docx Page 4 of 4
Before getting started
Allow an aliquot of the magnetic particle solution to come to room temperature before
use. Resuspend via vortexing until it appears homogenous and consistent in colour.
Procedure
Template box
1. Add 1.8 volumes of Agencourt AMPure XP beads to each cDNA sample in a low-
bind tube and mix the DNA-bead-solution thoroughly by pipette mixing (15x)
2. Incubate 7 min at room temperature (RT) on a shaker (550 rpm)
3. Place the reaction tube onto the MPC for 5 min to separate the beads from
supernatant (until the beads have concentrated on the tube wall)
4. Slowly aspirate the cleared solution from the reaction tube without disturbing the
beads and discard the solution; keep the reaction tube in the MPC while aspirating
the solution
5. Dispense 1 ml 80% ethanol to reaction tube and incubate 30 s at RT
6. Slowly aspirate the ethanol from the reaction tube and discard
7. Repeat step 5-6 while the reaction tube keeps on MPC
8. Air-dry the pellet for 10 min with the cap open (keeping on MPC); do not over-dry!
9. Take reaction tube from MPC, elute DNA with 25 μl Nuclease-free water by careful
pipette mixing and incubate for 2 min
10. Place the reaction tube onto the MPC, incubate for 2 min, and pipet 22 µl of the
concentrated DNA solution into a clean reaction tube
Continue directly with the library preparation (SOP_090202_Library-prep_IonTorrent_FLI).

SOP_090102_Library-prep_automated_IlluminaMiSeq_FLI.docx Page 1 of 5
FLI
SOP_090102_Library-prep_automated_IlluminaMiSe
q_FLI
Automated library preparation for
Illumina MiSeq
Standard Operating Procedure
Automated library preparation with the SPRIworks Fragment
Library System II for sequencing with Illumina MiSeq
29th Aug 2018
Prepared by: Claudia Wylezich
Contact: [email protected]
Institution: Friedrich-Loeffler-Institut (FLI), Germany
SOP-Version: 2
Attachments: none

SOP_090102_Library-prep_automated_IlluminaMiSeq_FLI.docx Page 2 of 5
Introduction
The here described procedure is dealing with the automatic preparation of libraries that are
for use on Illumina MiSeq instruments. The SPRIworks Fragment Library System II is an
automated system which can process up to 10 samples in parallel in less than 4 hours and
is working absolutely contamination-free. Reagents required to prepare a single library are
provided pre-dispensed in disposable cartridges. As input, fragmented DNA is loaded onto
the SPRI-TE instrument which performs the subsequent steps in the library construction
process. The SPRIworks Fragment Library System II employs enzymatic reactions (end-
repair and ligation of barcode adapters containing a unique identifying sequence), SPRI-
based reaction purifications to automatically generate fragment libraries. Except the
adapters, all reagents required to construct a single library are contained within the reagent
cartridge. End-repaired and adapter-ligated DNA fragments can directly be used for size
selection (SOP_100102_SizeSelection_Library_FLI) or stored at -20°C.
Sample Material
DNA fragmented according to SOP_070104_DNA_Frag_Covaris_FLI.
Equipment and Reagents
Only Nuclease-free tubes, aerosol-free pipette tips, and only DEPC-treated water must be
used. Gloves have to be worn throughout the procedure and changed regularly in order to
avoid Nuclease contamination.
In general, only use reagents that do not exceed the expiration date. When working with
chemicals, always wear a suitable lab coat, disposable gloves, and protective goggles. For
more information, consult the appropriate material safety data sheets (MSDSs), available
from the manufacturer.
Equipment
- SPRI-TE Nucleic Acid Extractor (Beckman Coulter)
- SPRIworks Method Card for Instrument Library II (REF A85410)
- 2 workstations (one master mix box, one template box)
- Rotator
- Microcentrifuge
- Vortexer
- Pipettes
Reagents
- Cartridges, tubes and tips: provided with SPRIworks System II for Roche GS FLX
DNA Sequencer (Beckman Coulter, cat. no A84806)
- Barcode Adapters (25 µM, e.g. Bioo Scientific NEXTFlex 96 DNA Adapters, cat. no.
514106)
- Nuclease-free water (DEPC-treated)
- Disposable gloves
- Sterile, Nuclease-free pipet tips (with aerosol barriers to prevent cross
contamination)
General remarks
SOP_090102_Library-prep_automated_IlluminaMiSeq_FLI.docx Page 3 of 5
- Blunt end adapters are not compatible with SPRIworks Fragment Library System II
- Do not change the method card while instrument is powered on
To avoid contaminations:
- Tubes containing fragmented and concentrated DNA or cDNA synthesis products
must exclusively be opened and handled in a template PCR workstation.
- Buffers and reagents for preparing master mixes must exclusively be opened and
handled in a clean master mix box.
- Change gloves after handling template cDNA before working in the master mix
box.
- Buffers and reagents once opened in the template box must never be used and
opened in the master mix box.
- Do not use the same barcode as in the sequencing run before.
Literature
- SPRIworks Fragment Library System II (Beckman Coulter, Part Number A87326B,
2015)
- Wylezich C, Papa A, Beer M, Höper D (2018) A versatile sample processing
workflow for metagenomic pathogen detection. Scientific Reports
DOI:10.1038/s41598-018-31496-1
SOP_090102_Library-prep_automated_IlluminaMiSeq_FLI.docx Page 4 of 5
Before getting started
- Thaw one cartridge per library at room temperature on a rotator until all contents
are completely thawed (30 – 60 min)
- Shake the cartridges thoroughly until all beads are dissolved
- Make sure the liquid drop is at the bottom of the tube/cartridge without air bubbles
Procedure
Master mix box
1. Prepare 3 labelled screw cap tubes provided with the kit for each library: sample
tube, adapter tube, library tube
2. Take off all caps of the tubes; keep the caps of the library tubes
3. Pipet 2,5 µl of one of the different barcode adapters to the adapter tube and dilute
with 2,5 µl Nuclease-free water; open only one barcode adapter tube at a time and
change gloves between pipetting the different adapters to avoid cross-
contamination
Template box
4. Transfer 500 ng fragmented DNA in a maximum of 400 μl to the sample tube, fill
up to 400 μl with Nuclease-free water
SPRI-TE Nucleic Acid Extractor
5. Set up the instrument
o Turn off the instrument
o Press the EJECT button, remove any method card if necessary and carefully
insert the SPRIworks method card for Fragment Library System II (REF
A85410)
o Close the instrument door
o Turn the power on
6. Open the door only when the screen displays the TOP MENU
7. When cartridges have completely thawed, ensure that all solutions including
magnetic beads are at the bottom of the wells by gently tapping on the bench top
8. Remove tip/tube rack and reagent rack (in this order) from the instrument
9. Insert one cartridge per library into the grooved channel of the reagent rack by
grasping the labelled lip and sliding it to the back of the channel
10. Arrange the tubes and tips provided with the kit as displayed in the Table below
Position in the tip tube rack Consumables
1 Sheath with Piercing Tip
2 Sheath with 1 ml Tip
3 Sheath with 200 µl Tip
4 Uncapped 2 ml Adapter Tube with Adapters
5 Uncapped 2 ml Library Tube
11. Load reagent rack and tip/tube rack (in this order) into the instrument; the back
edge of the tip/tube rack overlaps the reagent rack when loaded correctly

SOP_090102_Library-prep_automated_IlluminaMiSeq_FLI.docx Page 5 of 5
12. Load the uncapped sample tube containing the fragmented DNA into the circular
hole in position 13 of the reagent rack
13. Start the run
o Close the instrument door
o Select the green START button
o Specify 1 = no size selection and select ENTER to confirm
o After a heat block test, the run begins automatically
14. The run is finished when the instrument displays “Run Complete”
o Open the door
o Retrieve and cap the library tubes
o Discard used sheaths, tips and cartridges
15. To clean the instrument, select UV-Clean from the TOP MENU
Store the libraries at 4°C for up to 6 hours or -20°C for long time storage or continue
directly with size selection (SOP_100102_SizeSelection_Library_FLI).
SOP_090202_Library-prep_IonTorrent_FLI.docx Page 1 of 5
FLI
SOP_090202_Library-prep_IonTorrent_FLI
Library preparation for
IonTorrent PGM
Standard Operating Procedure
Library preparation including end-repair and adapter ligation for
sequencing with Ion Torrent PGM
29th Aug 2018
Prepared by: Claudia Wylezich
Contact: [email protected]
Institution: Friedrich-Loeffler-Institut (FLI), Germany
SOP-Version: 2
Attachments: none
SOP_090202_Library-prep_IonTorrent_FLI.docx Page 2 of 5
Introduction
The here described one-tube procedure is dealing with the preparation of shotgun
sequencing libraries for use on Life Technologies instruments (e.g. Ion Torrent PGM). This
procedure uses fragmented DNA as input. After fragmentation, the ends of the DNA
fragments have to be repaired. Then, platform specific adaptors, either barcoded or non-
barcoded, have to be ligated to both ends of the DNA fragments. The resulting libraries
can directly be used for purification and subsequent size selection (SOP_090302_
Purification_IonTorrent-Library_FLI, SOP_100102_SizeSelection_Library_FLI) or stored at
-20°C. Libraries prepared according to this SOP are also suitable for sequencing using the
Ion Torrent S5/S5XL instruments using Ion 520 or Ion 530 chips but not with Ion 540 chips.
Sample Material
Double-stranded DNA fragmented according to SOP_070104_DNA_Frag_Covaris_FLI
and concentrated and purified according to SOP_080102_Purification_fragmented-
DNA_FLI.
Equipment and Reagents
Only Nuclease-free tubes, aerosol-free pipette tips, and only DEPC-treated water must be
used. Gloves have to be worn throughout the procedure and changed regularly in order to
avoid Nuclease contamination.
In general only use reagents that do not exceed the expiration date. When working with
chemicals, always wear a suitable lab coat, disposable gloves, and protective goggles. For
more information, consult the appropriate material safety data sheets (MSDSs), available
from the manufacturer.
Equipment
- 2 PCR workstations (one master mix box, one template box)
- Microcentrifuge
- Thermal Cycler
- Magnetic particle concentrator (MPC; e.g. DynaMag™-2, Life Technologies)
- Vortexer
- Pipettes
Reagents and Consumables
- GeneRead DNA Library L Core Kit (Qiagen, cat. no. 180432)
- Barcode Adapters (e.g. Life Technologies, Ion Xpress Barcode Adapters 1-16, cat.
no. 4471250)
- Nuclease-free water (DEPC-treated)
- 0.2 ml tubes (sterile, Nuclease-free)
- Disposable gloves
- Sterile, Nuclease-free pipet tips (with aerosol barriers to prevent cross
contamination)
General remarks
To avoid contaminations:
- Tubes containing fragmented and concentrated DNA must exclusively be opened

SOP_090202_Library-prep_IonTorrent_FLI.docx Page 3 of 5
and handled in a template PCR workstation.
- Buffers and reagents for preparing master mixes must exclusively be opened and
handled in a clean master mix box.
- Change gloves after handling template DNA before working in the master mix
box.
- Buffers and reagents once opened in the template box must never be used and
opened in the master mix box.
- Do not use the same barcode as in the sequencing run before.
Literature
- QIAGEN GeneRead™ Library Prep (L) Handbook (cat. no. 1090330, 12/2014)
- Wylezich C, Papa A, Beer M, Höper D (2018) A versatile sample processing
workflow for metagenomic pathogen detection. Scientific Reports
DOI:10.1038/s41598-018-31496-1
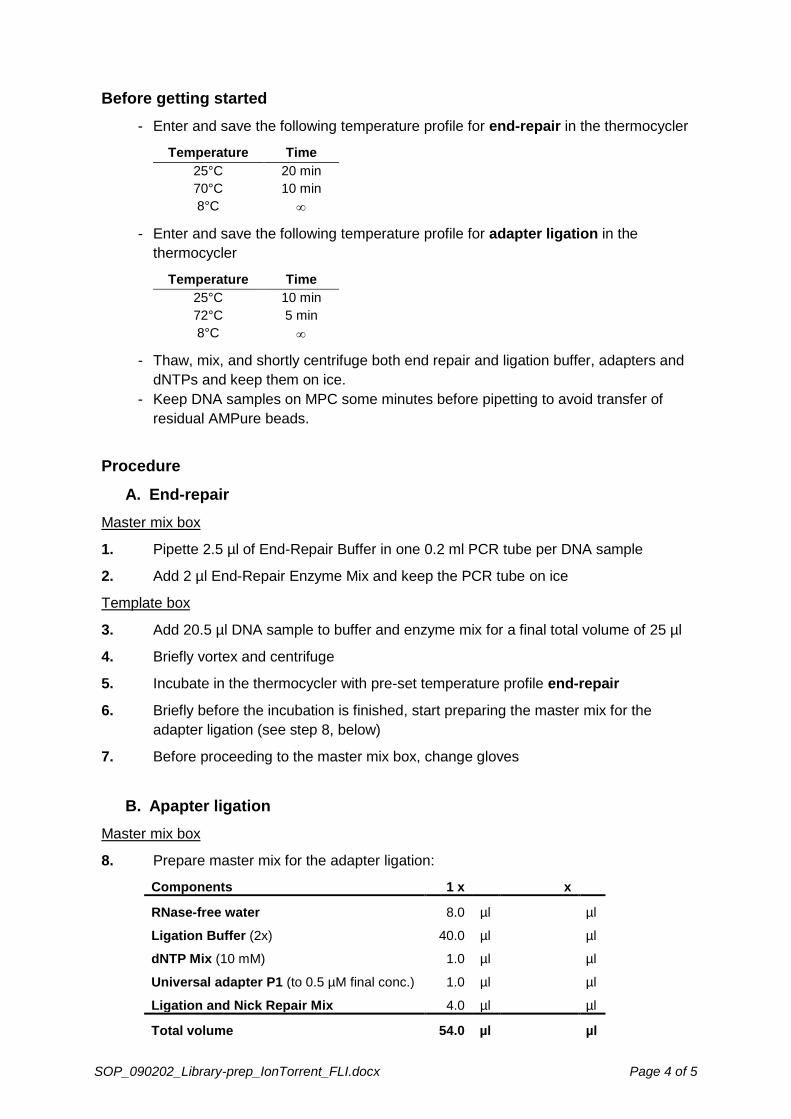
SOP_090202_Library-prep_IonTorrent_FLI.docx Page 4 of 5
Before getting started
- Enter and save the following temperature profile for end-repair in the thermocycler
Temperature Time
25°C 20 min
70°C 10 min
8°C
- Enter and save the following temperature profile for adapter ligation in the
thermocycler
Temperature Time
25°C 10 min
72°C 5 min
8°C
- Thaw, mix, and shortly centrifuge both end repair and ligation buffer, adapters and
dNTPs and keep them on ice.
- Keep DNA samples on MPC some minutes before pipetting to avoid transfer of
residual AMPure beads.
Procedure
A. End-repair
Master mix box
1. Pipette 2.5 µl of End-Repair Buffer in one 0.2 ml PCR tube per DNA sample
2. Add 2 µl End-Repair Enzyme Mix and keep the PCR tube on ice
Template box
3. Add 20.5 µl DNA sample to buffer and enzyme mix for a final total volume of 25 µl
4. Briefly vortex and centrifuge
5. Incubate in the thermocycler with pre-set temperature profile end-repair
6. Briefly before the incubation is finished, start preparing the master mix for the
adapter ligation (see step 8, below)
7. Before proceeding to the master mix box, change gloves
B. Apapter ligation
Master mix box
8. Prepare master mix for the adapter ligation:
Components 1 x x
RNase-free water 8.0 µl
µl
Ligation Buffer (2x) 40.0 µl
µl
dNTP Mix (10 mM) 1.0 µl
µl
Universal adapter P1 (to 0.5 µM final conc.) 1.0 µl
µl
Ligation and Nick Repair Mix 4.0 µl
µl
Total volume 54.0 µl
µl
SOP_090202_Library-prep_IonTorrent_FLI.docx Page 5 of 5
9. Briefly vortex and centrifuge
10. Pipette 54 µl of master mix in one 0.2 ml PCR tube per DNA sample
11. Add 1 µl of the chosen barcode adapter to each master mix aliquot; open only one
barcode adapter tube at a time and change gloves between pipetting the different
adapters to avoid cross-contamination
Template box
12. Add 25 µl end-repaired DNA (from part A End-repair, above), briefly mix and
centrifuge
13. Incubate in the thermocycler with pre-set temperature profile adapter ligation
Continue directly with purification of the library (SOP_090302_Purification_IonTorrent-
Library_FLI).

SOP_090303_Purification_IonTorrent-Library_FLI.docx Page 1 of 4
FLI
SOP_090303_Purification_IonTorrent-Library_FLI
Purification of library
(magnetic beads)
Standard Operating Procedure
Purification and concentration of the end-repaired and adapter-
ligated Ion Torrent Library using Agencourt AMPure XP beads
29th Aug 2018
Prepared by: Claudia Wylezich
Contact: [email protected]
Institution: Friedrich-Loeffler-Institut (FLI), Germany
SOP-Version: 3
Attachments: none

SOP_090303_Purification_IonTorrent-Library_FLI.docx Page 2 of 4
Introduction
The end-repaired and adapter-ligated library has to be purified to remove excess of
polyethylene glycol (PEG), salts, and enzymes. Otherwise, the high concentration of PEG
in the ligation mix will interfere with proper size selection (see SOP_100102_
SizeSelection_Library_FLI). To this end, Agencourt AMPure XP beads are used. This
system utilizes solid-phase paramagnetic bead technology for purification and
concentration of DNA. DNA bound to magnetic beads will be separated from contaminants
and washed with ethanol. Afterwards, the bound DNA will be eluted in an appropriate
amount of Nuclease-free water. Concentrated and purified cDNA can directly be used for
size selection (SOP_100102_SizeSelection_Library_FLI).
Sample Material
End-repaired and adapter-ligated libraries prepared according to SOP_090202_Library-
prep_IonTorrent_FLI.
Equipment and Reagents
Successful working with DNA demands a Nuclease-free environment, therefore only
Nuclease-free tubes, aerosol-free pipette tips, and only DEPC-treated water must be used.
Gloves have to be worn throughout the procedure and changed regularly in order to avoid
Nuclease contamination.
In general, only use reagents that do not exceed the expiration date. When working with
chemicals, always wear a suitable lab coat, disposable gloves, and protective goggles. For
more information, consult the appropriate material safety data sheets (MSDSs), available
from the manufacturer.
Equipment
- PCR workstations (template box)
- Magnetic particle concentrator (MPC; e.g. Life Technologies cat. no. 12321D)
- Shaker for 1.5 ml tubes
- Vortexer
- Pipettes
Reagents and consumables
- Agencourt AMPure XP beads (Beckman Coulter, cat. no. A63881)
- Un-denatured ethanol (80% (v/v), RNase-free
- Nuclease-free water (DEPC-treated)
- 1.5 ml tubes (sterile, Nuclease-free, low-bind)
- Disposable gloves
- Sterile, Nuclease-free pipet tips (with aerosol barriers to prevent cross
contamination)
General remarks
- Aliquot the AMPure XP beads in order to prevent repeated warming and cooling as
this will degrade the buffer and render the beads non-functional.
- When opening a new lot of AMPure XP beads, perform a bead calibration before
first use (LOP_AMPureBead-calibration_FLI_v1).

SOP_090303_Purification_IonTorrent-Library_FLI.docx Page 3 of 4
- Make sure the Agencourt AMPure XP beads are at room temperature and are
thoroughly mixed. The reagent (magnetic particle solution) should appear
homogenous and consistent in colour.
- Do not freeze.
Literature
- DeAngelis MM, Wang DG, Hawkins TL. 1995. Solid-phase reversible immobilization for the isolation of PCR products. Nucleic Acids Res 23:4742-4743.
- AGENCOURT® AMPURE® XP PCR PURIFICATION (Beckman Coulter, protocol no.
000387v001)
- Wylezich C, Papa A, Beer M, Höper D (2018) A versatile sample processing
workflow for metagenomic pathogen detection. Scientific Reports
DOI:10.1038/s41598-018-31496-1
SOP_090303_Purification_IonTorrent-Library_FLI.docx Page 4 of 4
Before getting started
Allow an aliquot of the magnetic particle solution to come to room temperature before
use. Resuspend via vortexing until it appears homogenous and consistent in colour.
Procedure
Template box
1. Pipette 144 µl (1.8 volumes) of Agencourt AMPure XP beads to 80 µl of end-
repaired and adapter-ligated DNA library in a low-bind tube and mix the DNA-
bead-solution thoroughly by pipette mixing (15x)
2. Incubate 7 min at room temperature (RT) on a shaker (550 rpm)
3. Place the reaction tube onto the MPC for 5 min to separate the beads from
supernatant (until the beads have concentrated on the tube wall)
4. Leaving the tube in the MPC, slowly aspirate the supernatant from the tube without
disturbing the beads and discard the solution
5. Dispense 500 µl 80% ethanol to reaction tube and incubate 30 s at RT
6. Leaving the tube in the MPC, slowly aspirate the ethanol from the tube without
disturbing the beads and discard the solution
7. Repeat step 5-6 twice while the reaction tube keeps in the MPC
8. Air-dry the pellet for 10 min with the cap open (keeping on MPC); do not over-dry!
9. Take reaction tube from MPC, elute DNA with 27 μl Nuclease-free water by careful
pipette mixing and incubate for 2 min
10. Place the reaction tube onto the MPC, incubate for 2 min and pipet about 25 µl of
the concentrated DNA solution into a clean low-bind tube
11. Repeat step 9-10 to increase the yield of library (final volume 50 µl)
Continue directly with size selection (SOP_100102_SizeSelection_Library_FLI).
SOP_100103_SizeSelection_Library_FLI.docx Page 1 of 4
FLI
SOP_100103_SizeSelection_Library_FLI
Size selection of Library
(magnetic beads)
Standard Operating Procedure
Size selection of end-repaired and adapter-ligated library using
Agencourt AMPure XP beads
29th Aug 2018
Prepared by: Claudia Wylezich
Contact: [email protected]
Institution: Friedrich-Loeffler-Institut (FLI), Germany
SOP-Version: 3
Attachments: none

SOP_100103_SizeSelection_Library_FLI.docx Page 2 of 4
Introduction
After DNA fragmentation, the obtained fragments are of different sizes. For optimal
sequencing results, the fragment size should be within the specified range of the used
sequencing platform and sequencing protocols. For current PGM or MiSeq sequencing
protocols, a peak size of 550 bp with a size range of 300 – 1000 bp is recommended.
Fragments out of this range can be removed using Agencourt AMPure XP beads applying
solid-phase paramagnetic bead technology. Due to the high concentration of polyethylene
glycol (PEG) and NaCl, DNA binds reversibly to the bead surface. By adjusting the PEG
concentration, the size of fragments binding to the beads can be controlled. Unbound DNA
will be separated from DNA fragments of the desired size and be discarded by washing
with ethanol. After the washing steps, the bound DNA is eluted in an appropriate amount of
Nuclease-free water. Size-selected libraries have to be quality checked and quantified
(SOP_110102_LibQual-check_HS-chip_FLI, SOP_120102_LibQuant_Kapa_FLI).
Sample Material
End-repaired and adapter-ligated libraries prepared according to SOP_090202_Library-
prep_IonTorrent_FLI and purified according to SOP_090302_Purification_IonTorrent-
Library_FLI or prepared according to SOP_090102_Library-prep_automated_Illumina
MiSeq_FLI.
Equipment and Reagents
Successful working with DNA demands a Nuclease-free environment, therefore only
Nuclease-free tubes, aerosol-free pipette tips, and only DEPC-treated water must be used.
Gloves have to be worn throughout the procedure and changed regularly in order to avoid
Nuclease contamination.
In general, only use reagents that do not exceed the expiration date. When working with
chemicals, always wear a suitable lab coat, disposable gloves, and protective goggles. For
more information, consult the appropriate material safety data sheets (MSDSs), available
from the manufacturer.
Equipment
- PCR workstations (template box)
- Magnetic particle concentrator (MPC; e.g. Life Technologies cat. no. 12321D)
- Shaker for 1.5 ml tubes
- Vortexer
- Pipettes
Reagents and Consumables
- Agencourt AMPure XP beads (Beckman Coulter, cat. no. A63881)
- Un-denatured ethanol 80% (v/v), RNase-free
- Nuclease-free water (DEPC-treated)
- Buffer EB (QIAGEN, cat. no. 19086)
- 1.5 ml tubes (sterile, Nuclease-free, low-bind)
- Disposable gloves
- Sterile, Nuclease-free pipet tips (with aerosol barriers to prevent cross
contamination)

SOP_100103_SizeSelection_Library_FLI.docx Page 3 of 4
General remarks
- Aliquot the AMPure XP beads in order to prevent repeated warming and cooling as
this will degrade the buffer and render the beads non-functional.
- When opening a new lot of AMPure XP beads, perform a bead calibration before
first use (SOP_000102_AMPureBead-calibration_FLI).
- Make sure the Agencourt AMPure XP beads are at room temperature and are
thoroughly mixed. The reagent (magnetic particle solution) should appear
homogenous and consistent in colour.
- Do not freeze.
Literature
- DeAngelis MM, Wang DG, Hawkins TL. 1995. Solid-phase reversible immobilization
for the isolation of PCR products. Nucleic Acids Res 23:4742-4743.
- AGENCOURT® AMPURE® XP PCR PURIFICATION (Beckman Coulter, protocol no.
000387v001)
- GS FLX Titanium General Library Preparation Method Manual (USM-00048.B, April
2009)
- GS FLX System Short Fragment Removal Procedure (Technical Bulletin TCB No.
2011-002, February 2011)
- TruSeq® DNA PCR-Free Library Prep - Reference Guide (Part # 15036187 Rev. D,
June 2015)
- Wylezich C, Papa A, Beer M, Höper D (2018) A versatile sample processing
workflow for metagenomic pathogen detection. Scientific Reports
DOI:10.1038/s41598-018-31496-1

SOP_100103_SizeSelection_Library_FLI.docx Page 4 of 4
Before getting started
- Allow an aliquot of the magnetic particle solution to come to room temperature
before use. Resuspend via vortexing until it appears homogenous and
consistent in colour.
- For the upper size selection, dilute Agencourt AMPure XP beads per the table:
1 x x
AMPure XP beads 104.0 µl µl
Water (PCR grade) 80.0 µl µl
Sum 184.0 µl µl
Procedure
Template box
1. Fill the generated library up to 100 µl with Nuclease-free water (low-bind tube)
2. Add 160 µl diluted Agencourt AMPure XP beads (see Table above) per DNA
library to remove large fragments and mix the DNA-bead-solution thoroughly by
pipette mixing (15x)
3. Incubate 7 min at room temperature (RT) on a shaker (550 rpm)
4. Place the reaction tube onto the MPC for 5 min to separate the beads from
supernatant (until the beads have concentrated on the tube wall)
5. Slowly aspirate the cleared solution from the reaction tube without disturbing the
beads; pipette into a clean 1.5 ml low-bind tube in two steps á 125 µl
6. Add 30 µl undiluted Agencourt AMPure XP beads per 250 µl supernatant from
step 5 to remove small fragments and mix the DNA-bead-solution thoroughly by
pipette mixing (15x)
7. Incubate 7 min at room temperature (RT) on a shaker (550 rpm)
8. Place the reaction tube onto the MPC for 5 min to separate the beads from
supernatant (until the beads have concentrated on the tube wall)
9. Leaving the tube in the MPC, slowly aspirate the supernatant in two steps á 138 µl
from the tube without disturbing the beads and discard the solution
10. Leaving the tube in the MPC, dispense 200 µl 80% ethanol to reaction tube and
incubate 30 s at RT
11. Slowly aspirate the ethanol from the reaction tube and discard
12. Repeat step 10-11 while the reaction tube keeps on MPC
13. Air-dry the pellet for 3-5 min with the cap open (keeping on MPC); do not over-dry!
14. Take reaction tube from MPC, elute DNA with 17.5 μl Buffer EB by careful pipette
mixing and incubate for 2 min
15. Place the reaction tube onto the MPC, incubate for 2 min and pipet 15 µl of the
DNA solution into a clean safe-lock tube
16. Repeat step 14-15 to increase the yield of library
Store the completed library at 4°C or continue directly with quality check (SOP_110102_
LibQual-check_HS-chip_FLI)
SOP_110102_LibQual-check_HS-chip_FLI.docx Page 1 of 3
FLI
SOP_110102_LibQual-check_HS-chip_FLI
Quality check of library
(HS Chip)
Standard Operating Procedure
Quality check of Library using Agilent High Sensitivity DNA Kit
11th Sept 2017
Prepared by: Claudia Wylezich
Contact: [email protected]
Institution: Friedrich-Loeffler-Institut (FLI), Germany
SOP-Version: 2
Attachments: none

SOP_110102_LibQual-check_HS-chip_FLI.docx Page 2 of 3
Introduction
High quality sequencing libraries are essential for successful sequencing. Therefore, the
size distribution, especially the absence of too short or too long fragments and of primer
dimers, must be ensured. The High Sensitivity DNA assay is suitable for this analysis. The
dye labelled nucleic acids are separated electrophoretically based on their size in a
microfluidic system. Internal standards ensure assay accuracy and reproducibility. Quality
checked libraries can be accurately quantified according to SOP_120102_LibQuant_
Kapa_FLI.
Sample Material
Sequencing library generated and size selected according to SOP_100102_SizeSelection_
Library_FLI.
Equipment and Reagents
Successful working with DNA demands a Nuclease-free environment, therefore only
Nuclease-free tubes, aerosol-free pipette tips, and only DEPC-treated water must be used.
Gloves have to be worn throughout the procedure and changed regularly in order to avoid
Nuclease contamination.
In general, only use reagents that do not exceed the expiration date. When working with
chemicals, always wear a suitable lab coat, disposable gloves, and protective goggles. For
more information, consult the appropriate material safety data sheets (MSDSs) for DMSO,
available from the manufacturer.
Equipment
- Agilent 2100 Bioanalyzer
- Chip Priming Station (Agilent, cat. no. 5065-4401, supplied with Bioanalyzer)
- IKA Vortexer Model MS3 with chip adapter (supplied with Bioanalyzer)
- Vortexer, Microcentrifuge
- Pipettes
Reagents and consumables
- High Sensitivity DNA Kit (Agilent, cat. no. 5067-4626)
- Nuclease-free water (DEPC-treated)
- 1.5 ml tubes (sterile, Nuclease-free, low bind)
- Disposable gloves
- Sterile, Nuclease-free pipet tips (with aerosol barriers to prevent cross
contamination)
General remarks
- While not in use, keep all reagents at 4°C and protect from light
- The DNA sample should be between 5 – 500 pg/µl for accurate determination
Literature
- Agilent High Sensitivity DNA Kit Quick Start Guide (Part no. G2938-90320, 05/2009)
SOP_110102_LibQual-check_HS-chip_FLI.docx Page 3 of 3
Before getting started
- Prepare the gel-dye mix:
o Equilibrate the HS DNA dye concentrate and one vial of the HS DNA gel
matrix to room temperature (at least 30 min; protect from light!)
o Add 15 µl HS DNA dye concentrate to the HS DNA gel matrix vial
o Vortex, briefly centrifuge, and transfer solution to a spin filter
o Centrifuge at 2240 × g for 10 min
- Equilibrate reagents and gel-dye mixes to room temperature 30 min before
use; protect from light!
- Dilute DNA samples to 5 – 500 pg/µl if necessary
- Set up the chip priming station:
o Screw on the syringe to the lid of the chip priming station
o Adjust the syringe clip to the lowest position
o Ensure that the base plate is inserted in position C
Procedure
1. Put a new HS chip on the chip priming station
2. Pipette 9 µl of gel-dye mix in the well marked G
3. Ensure that the plunger is positioned at 1 ml, close the chip priming station and
press the plunger until it is held by the clip
4. After exactly 60 sec release the clip
5. After further 5 sec slowly pull back the plunger to the 1 ml position
6. Open the chip priming station; pipette 9 µl of gel-dye mix in wells marked G
7. Pipette 5 µl of marker in all sample wells (1-11) and the well marked “ladder”
8. Pipette 1 µl of HS DNA ladder in the well marked “ladder”
9. Load all sample wells: pipette 1 µl of sample in each used sample well (1-11);
pipette 1 µl of marker in each sample well not used for a sample
10. Vortex the chip with the IKA Vortexer MS3 for 1 min at 2400 rpm (as indicated)
11. Within 5 min, run the chip in the Agilent 2100 Bioanalyzer using the assay “High
Sensitivity DNA.xsy” for dsDNA
12. After running the chip, apply a cleaning chip filled with 350 µl of fresh Nuclease-
free water for about 30 sec to clean electrodes; let the electrodes air dry with the
lid open
In case the size distribution is out of the suitable range, repeat the size selection procedure
according to SOP_100102_SizeSelection_Library_FLI. Otherwise, continue directly with
quantification of the library (SOP_120102_LibQuant_Kapa_FLI).