paragraph formatting - weebly
TRANSCRIPT

Lesson Skill Matrix
Skill Exam Objective Objective
Number
Setting Line Spacing in Text
and Between Paragraphs
Set line and paragraph spacing and indentation. 2.2.3
Creating and Formatting a
Bulleted List
Create a numbered or bulleted list. 3.3.1
Creating and Formatting a
Numbered List
Change bullet characters or number formats for a list level.
Define a custom bullet character or number format.
Increase or decrease list levels.
Restart or continue list numbering.
Set starting number value.
3.3.2
3.3.3
3.3.4
3.3.5
3.3.6
Software Orientation
The Indents and Spacing Tab in the Paragraph Dialog Box
The Paragraph dialog box contains Word’s commands for changing paragraph alignment,
indentation, and spacing. The Indents and Spacing tab of the Paragraph dialog box is shown in
Figure 4-1. Use this figure as a reference throughout this lesson as well as the rest of this book.
Paragraph Formatting
Lesson 4 Page 1

Figure 4-1
Indents and Spacing tab of the Paragraph dialog box
Formatting Paragraphs
Paragraph formatting is an essential part of creating effective, professional-looking
documents in Word. When a document is formatted properly and the text is attractively
spaced and positioned, the reader can focus on the content. Word’s paragraph
formatting feature enables you to set values for paragraph alignment, indentation, and
spacing between paragraphs. Word’s formatting features also enable you to remove
paragraph formatting altogether.
Setting Indents
You can use indents to set paragraphs off from other text in your documents. Word
documents can include first-line indents, hanging indents, and negative indents. The
commands for indenting paragraphs are available in the Paragraph command group on
the Home tab, as well as in the Paragraph command group of the Layout tab. Both
command groups have dialog box launchers that give you access to additional
commands. In this exercise, you learn to set indents using the dialog box and the ruler.
An indent is a blank space inserted between text and the left or right margin. A first-line
indent inserts blank space between the left margin and the first line of the paragraph
(one-half inch is the default setting for this indent). A hanging indent, common in legal
Lesson 4 Page 2

(one-half inch is the default setting for this indent). A hanging indent, common in legal
documents and bibliography pages, begins the first full line of text in a paragraph at the
left margin; all the remaining lines in the paragraph are then indented from the left
margin. A negative indent extends paragraph text into the left margin. You can indent
paragraphs from the left margin, the right margin, or both, and you can set the sizes of
indents using Word’s paragraph-formatting tools. You can also drag the markers on the
ruler to set indents. Table 4-1 shows the various indent markers as they appear on the
ruler.
Table 4-1
Types of indents on the Ruler
Step by step Set First-Line Indents
On the Recent screen, click Open Other Documents. The Open screen appears.1.
Connect your flash drive to one of the USB ports on your computer.2.
Click This PC.3.
Click the Browse button. Use the vertical scroll bar to scroll down and locate the
data files for this lesson on your flash drive. Double-click the lesson folder to open
it.
4.
Locate and open the file named Books Beyond.5.
Click the View tab. Then, in the Show group, select the Ruler checkbox.6.
Select the four paragraphs under Acknowledgement.7.
On the Home tab, in the Paragraph group, click the dialog box launcher located in
the bottom right corner of the group. Verify that the Indents and Spacing tab is the
active tab.
8.
In the Indentation section of this tab, change the Special selection by clicking the
drop- down arrow and selecting First line. The By box lists 0.5 inches by default, as
shown in Figure 4-2.
9.
GET READY. Before you begin these steps, be sure to launch Microsoft Word.
Lesson 4 Page 3
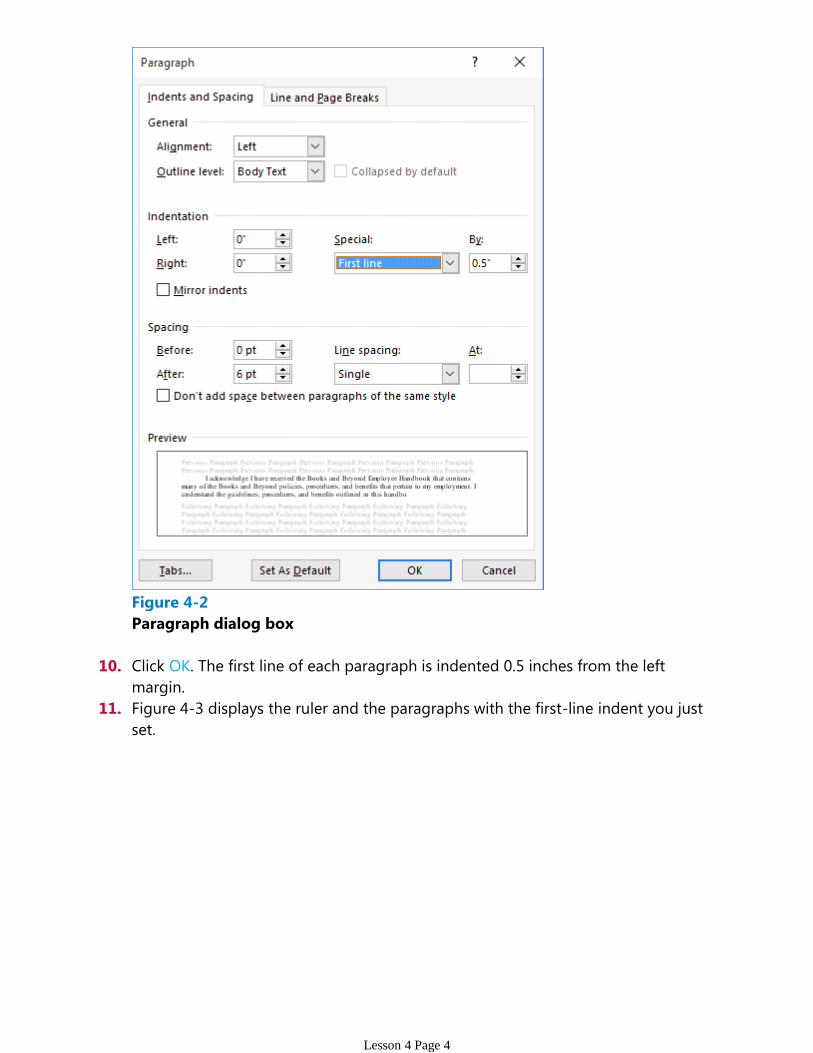
Figure 4-2
Paragraph dialog box
Click OK. The first line of each paragraph is indented 0.5 inches from the left
margin.
10.
Figure 4-3 displays the ruler and the paragraphs with the first-line indent you just
set.
11.
Lesson 4 Page 4
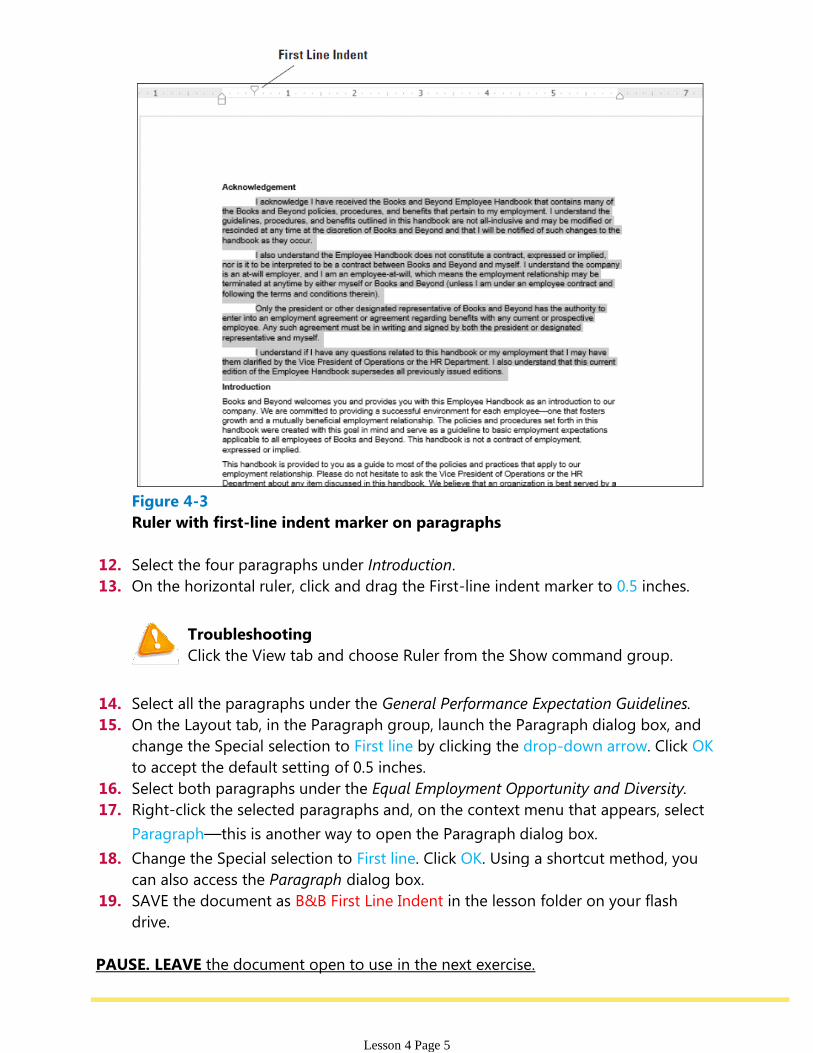
Figure 4-3
Ruler with first-line indent marker on paragraphs
Select the four paragraphs under Introduction.12.
On the horizontal ruler, click and drag the First-line indent marker to 0.5 inches.13.
Troubleshooting
Click the View tab and choose Ruler from the Show command group.
Select all the paragraphs under the General Performance Expectation Guidelines.14.
On the Layout tab, in the Paragraph group, launch the Paragraph dialog box, and
change the Special selection to First line by clicking the drop-down arrow. Click OK
to accept the default setting of 0.5 inches.
15.
Select both paragraphs under the Equal Employment Opportunity and Diversity.16.
Right-click the selected paragraphs and, on the context menu that appears, select
Paragraph—this is another way to open the Paragraph dialog box.
17.
Change the Special selection to First line. Click OK. Using a shortcut method, you
can also access the Paragraph dialog box.
18.
SAVE the document as B&B First Line Indent in the lesson folder on your flash
drive.
19.
PAUSE. LEAVE the document open to use in the next exercise.
Step by step Set Hanging Indents
Lesson 4 Page 5

Step by step Set Hanging Indents
Select the first two paragraphs under the heading Acknowledgement.1.
On the Home tab, launch the Paragraph dialog box and change the Special
selection from First Line to Hanging. Click OK. The first line of both paragraphs
begins at the left margin whereas the remaining paragraphs are indented 0.5
inches from the left margin.
2.
Under the same heading, select the last two paragraphs. On the horizontal ruler,
click and drag the first-line indent marker so that it aligns with the left margin. You
need to reposition the first-line indent marker so that it doesn't move when you
begin dragging the hanging indent marker. Your markers on the ruler should
match Figure 4-4.
3.
Figure 4-4
Markers on ruler aligned
Click and drag the hanging indent marker to 0.5 inches. You have now repositioned
the marker using the ruler, and both paragraphs have hanging indents. Your
document should look similar to the one shown in Figure 4-5.
4.
GET READY. USE the document that is open from the previous exercise.
Lesson 4 Page 6

Figure 4-5
Sample document with
hanging indent
SAVE the document as B&B Hanging Indent in the lesson folder on your flash drive.5.
PAUSE. LEAVE the document open to use in the next exercise.
Step by step Set Left and Right Indents
Select the four paragraphs under Introduction. 1.
Open the Paragraph dialog box from the Home tab. 2.
Under the Special group, select (none). Click OK. Notice the paragraphs are left
aligned.
3.
Select the first two paragraphs under Introduction.4.
Right-click and click Paragraph to open the dialog box. In the Indentation group,
change the left and right indents to 1 inch by clicking the up arrow. Click OK.
5.
Select the last two paragraphs under the same heading.6.
On the Layout tab, in the Paragraph group, click the up arrow next to Indent Left to
indent the left side of the paragraph to 1 inch on the ruler.
7.
Click the up arrow next to Indent Right to indent the right side of the paragraph to
1 inch on the ruler. Notice that paragraphs are one inch from the left and right
margins (see Figure 4-6).
8.
GET READY. USE the document that is open from the previous exercise.
Lesson 4 Page 7

Figure 4-6
Sample document displaying
left and right indents
SAVE the document as B&B Left&Right Indent in the lesson folder on your flash
drive.
9.
PAUSE. LEAVE the document open to use in the next exercise.
Step by step Set Negative Indents
Under the Equal Employment Opportunity and Diversity heading, select both
paragraphs.
1.
Launch the Paragraph dialog box from the Home tab. Under the Special group,
select (none). Click OK.
2.
Select the first paragraph under the heading.3.
In the Layout tab, in the Paragraph group, click the down arrow next to Indent Left
to indent the left side of the paragraph to -0.5 inch on the ruler as shown in Figure
4-7.
4.
GET READY. USE the document that is open from the previous exercise.
Lesson 4 Page 8

Figure 4-7
Sample document
with negative left indent
Position your insertion point anywhere in the last paragraph, and then launch the
Paragraph dialog box from the Layout tab.
5.
Under the Indentation group, click the down arrow next to Right to indent the right
side of the paragraph to -0.5 inch. Click OK (see Figure 4-8). When repositioning
the indentations, you can select or place the insertion point anywhere in the
paragraph. For multiple paragraphs, select them and change the indents.
6.
Figure 4-8
Sample document with
negative right indent
SAVE the document as B&B Negative Indent in the lesson folder on your flash
drive, and then CLOSE the file.
7.
PAUSE. LEAVE Word open for the next exercise.
Take Note
Changing paragraph indents can be completed by using the Ruler or launching the
Paragraph dialog box found on the Home or Layout tab.
Lesson 4 Page 9
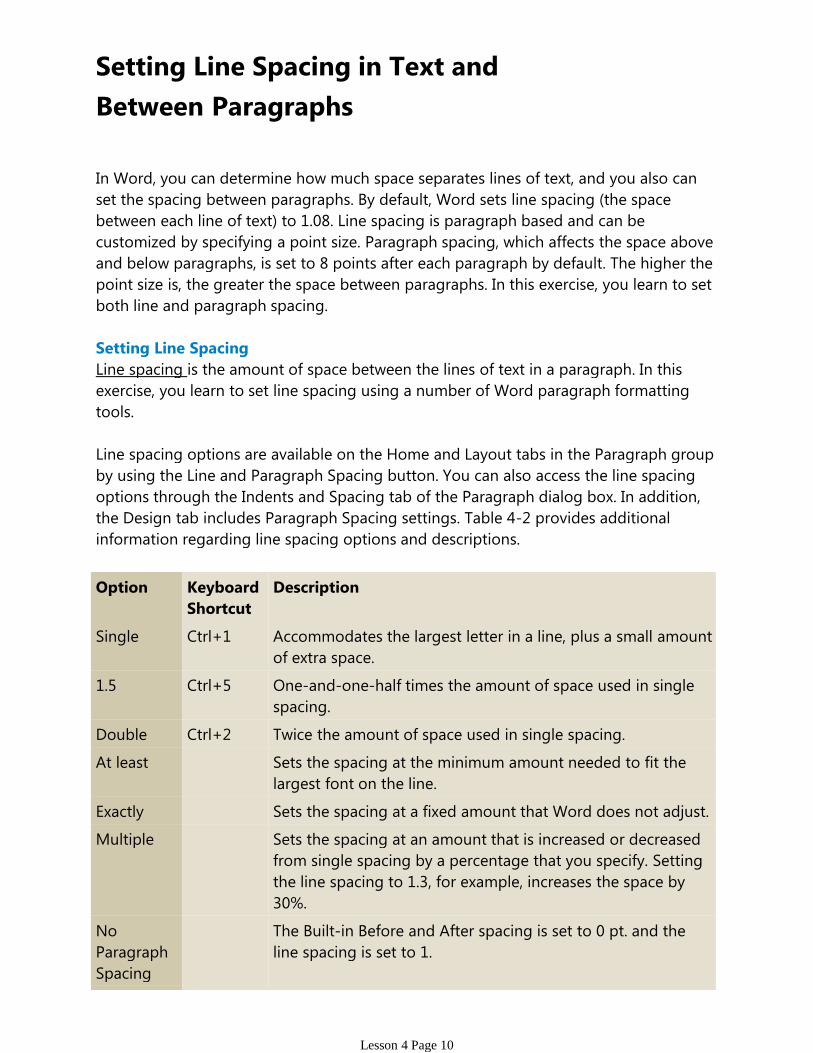
In Word, you can determine how much space separates lines of text, and you also can
set the spacing between paragraphs. By default, Word sets line spacing (the space
between each line of text) to 1.08. Line spacing is paragraph based and can be
customized by specifying a point size. Paragraph spacing, which affects the space above
and below paragraphs, is set to 8 points after each paragraph by default. The higher the
point size is, the greater the space between paragraphs. In this exercise, you learn to set
both line and paragraph spacing.
Setting Line Spacing
Line spacing is the amount of space between the lines of text in a paragraph. In this
exercise, you learn to set line spacing using a number of Word paragraph formatting
tools.
Line spacing options are available on the Home and Layout tabs in the Paragraph group
by using the Line and Paragraph Spacing button. You can also access the line spacing
options through the Indents and Spacing tab of the Paragraph dialog box. In addition,
the Design tab includes Paragraph Spacing settings. Table 4-2 provides additional
information regarding line spacing options and descriptions.
Option Keyboard
Shortcut
Description
Single Ctrl+1 Accommodates the largest letter in a line, plus a small amount
of extra space.
1.5 Ctrl+5 One-and-one-half times the amount of space used in single
spacing.
Double Ctrl+2 Twice the amount of space used in single spacing.
At least Sets the spacing at the minimum amount needed to fit the
largest font on the line.
Exactly Sets the spacing at a fixed amount that Word does not adjust.
Multiple Sets the spacing at an amount that is increased or decreased
from single spacing by a percentage that you specify. Setting
the line spacing to 1.3, for example, increases the space by
30%.
No
Paragraph
Spacing
The Built-in Before and After spacing is set to 0 pt. and the
line spacing is set to 1.
Compact The Built-in Before spacing is set to 0 pt., After is set to 4 pt.,
Setting Line Spacing in Text and
Between Paragraphs
Lesson 4 Page 10

Compact The Built-in Before spacing is set to 0 pt., After is set to 4 pt.,
and the line space is set to 1.
Tight The Built-in Before spacing is set to 0 pt., After to 6 pt., and
line spacing 1.15.
Open The Built-in Before spacing is set to 0 pt., After to 10 pt., and
line spacing 1.15.
Relaxed The Built-in Before spacing is set to 0 pt., After to 6 pt., and
line spacing to 1.5.
Double The Built-in Before spacing is set to 0 pt., After 8 pt., and line
spacing 2.
Table 4-2
Line spacing options
Step by step Set Line Spacing in a Paragraph
Place the insertion point in the first paragraph under the Acknowledgement
heading.
1.
On the Home tab, in the Paragraph group, click the Line and Paragraph Spacing
button to display the Line Spacing menu and options to add and remove spacing
before and after paragraphs (see Figure 4-9).
2.
Figure 4-9
Line Spacing menu
Select 2.0 to double-space the text.3.
Place the insertion point in the second paragraph.4.
In the Paragraph group, launch the dialog box.5.
In the Spacing group, change the Line spacing by clicking the drop-down arrow
and selecting Double. Click OK. The paragraph is now double-spaced.
6.
Place the insertion point in the third paragraph.7.
Press Ctrl+2 to double-space the paragraph.8.
Click the Design tab and, in the Document Formatting group, click the Paragraph 9.
GET READY. OPEN the Books Beyond document from the lesson folder.
Lesson 4 Page 11

Click the Design tab and, in the Document Formatting group, click the Paragraph
Spacing button to display the menu as shown in Figure 4-10.
9.
Figure 4-10
Paragraph Spacing menu
Select Double. Notice that the remaining document is double-spaced. This feature
in Word 2016 changes spacing for the entire document to include new paragraphs.
10.
Take Note
When using the Document Formatting group to apply paragraph spacing, you do
not have to select the paragraphs to use one of the built-in formatting commands.
SAVE the document as B&B Double Spacing in the lesson folder on your flash
drive.
11.
PAUSE. LEAVE the document open to use in the next exercise.
Step by step Modify Line Spacing in a Paragraph
Select the four paragraphs under Acknowledgement.1.
Return to the Line and Paragraph Spacing drop-down menu in the Paragraph
group on the Home tab. To set more precise spacing measurements, click Line
Spacing Options to display the Indents and Spacing tab of the Paragraph dialog
box.
2.
In the Spacing section, click the drop-down arrow and select Exactly in the Line
spacing list. In the At list, click the up arrow until it reads 22 pt.
3.
GET READY. USE the document that is open from the previous exercise.
Lesson 4 Page 12

spacing list. In the At list, click the up arrow until it reads 22 pt.
Click OK. The line spacing is increased.4.
SAVE the document as B&B Exact Spacing in the lesson folder on your flash drive,
and then CLOSE the file.
5.
PAUSE. LEAVE Word open for the next exercise.
Setting Paragraph Spacing
Paragraphs are usually separated by a blank line in Word documents. When you press
the Enter key at the end of a paragraph, Word adds the designated space above or
below the paragraph. By default, the spacing after a paragraph is set to 8 points and the
spacing before paragraphs is set to zero, but you can change these settings for a single
paragraph or for an entire document. In this exercise, you learn to set paragraph
spacing.
To increase or decrease paragraph spacing, use the Before and After spin boxes in the
Indents and Spacing tab of the Paragraph dialog box. You can also change the
paragraph spacing in the Paragraph group on the Home tab by opening the Line and
Paragraph Spacing menu and selecting Add Space Before Paragraph or Remove Space
After Paragraph.
Step by step Set Spacing around a Paragraph
Select the entire document.1.
On the Home tab, in the Paragraph group, click the arrow in the lower-right corner
of the group to display the Paragraph dialog box. The Indents and Spacing tab is
the active tab.
2.
In the Spacing section, click the up arrow next to Before until it reads 24 pt.3.
Click the up arrow next to After until it reads 24 pt. Review the preview area and
notice the increase of spacing in the document.
4.
Click OK. Notice the spacing between the paragraphs.5.
With the entire document still selected, click the drop-down arrow next to the Line
and Paragraph Spacing button in the Paragraph group to display the Line Spacing
menu.
6.
Click Remove Space Before Paragraph.7.
Repeat step 6, and then click Remove Space After Paragraph. The spacing before
and after have been removed from the document.
8.
Place the insertion point in the heading, Acknowledgement.9.
Click the Layout tab, and then in the Paragraph group, click the up arrow and
increase the Spacing After to 12 pt.
10.
Use the Format Painter and repeat step 10 for each heading, Introduction, General
Performance Expectation Guidelines, and Equal Employment Opportunity and
Diversity.
11.
Use multi-selection to select the paragraphs under each heading and change the
Spacing After to 6 pt.
12.
GET READY. OPEN the Books Beyond document from the lesson folder.
Lesson 4 Page 13

Spacing After to 6 pt.
SAVE the document as B&B Spacing Before&After in the lesson folder on your
flash drive, and then CLOSE the file.
13.
PAUSE. LEAVE Word open for the next exercise.
Lesson 4 Page 14
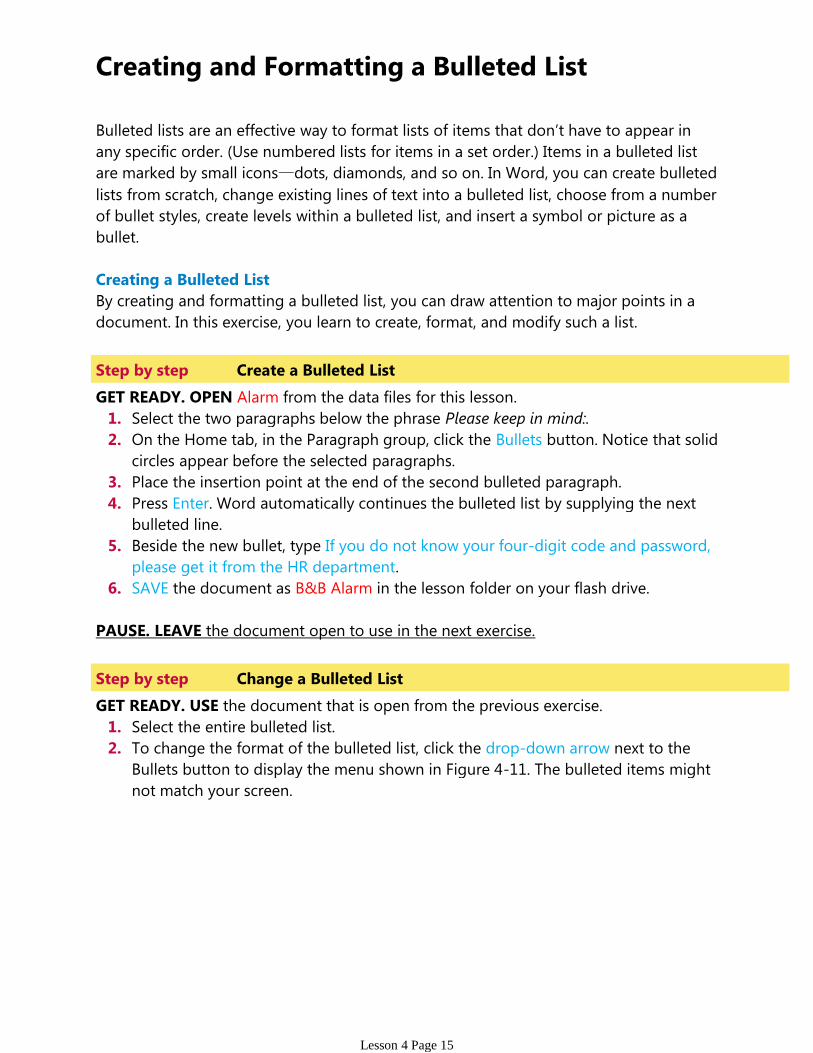
Bulleted lists are an effective way to format lists of items that don’t have to appear in
any specific order. (Use numbered lists for items in a set order.) Items in a bulleted list
are marked by small icons—dots, diamonds, and so on. In Word, you can create bulleted
lists from scratch, change existing lines of text into a bulleted list, choose from a number
of bullet styles, create levels within a bulleted list, and insert a symbol or picture as a
bullet.
Creating a Bulleted List
By creating and formatting a bulleted list, you can draw attention to major points in a
document. In this exercise, you learn to create, format, and modify such a list.
Step by step Create a Bulleted List
Select the two paragraphs below the phrase Please keep in mind:.1.
On the Home tab, in the Paragraph group, click the Bullets button. Notice that solid
circles appear before the selected paragraphs.
2.
Place the insertion point at the end of the second bulleted paragraph.3.
Press Enter. Word automatically continues the bulleted list by supplying the next
bulleted line.
4.
Beside the new bullet, type If you do not know your four-digit code and password,
please get it from the HR department.
5.
SAVE the document as B&B Alarm in the lesson folder on your flash drive.6.
GET READY. OPEN Alarm from the data files for this lesson.
PAUSE. LEAVE the document open to use in the next exercise.
Step by step Change a Bulleted List
Select the entire bulleted list.1.
To change the format of the bulleted list, click the drop-down arrow next to the
Bullets button to display the menu shown in Figure 4-11. The bulleted items might
not match your screen.
2.
GET READY. USE the document that is open from the previous exercise.
Creating and Formatting a Bulleted List
Lesson 4 Page 15

Figure 4-11
Bullet formatting options
Take Note
To change a bulleted list to a numbered list (or vice versa), select the list and then
click either the Bullets button or the Numbering button. To remove one of the
bullets from the Library, open the Bullets drop-down menu; then in the Bullet
Library, select the bullet and right-click to remove it.
Click the hollow circle in the Bullet Library.3.
SAVE the document as B&B Alarm with Hollow Bullets in the lesson folder on your
flash drive.
4.
PAUSE. LEAVE the document open to use in the next exercise.
Step by step Change a Bullet List Level
Adding an unordered list such as bullets appears with no rank over the others. Changing
the bullet list level can change the appearance of the bullet and indentation.
Place the insertion point in the second bulleted item.1.
Click the drop-down arrow next to the Bullets button, point to Change List Level,
and then note the levels that appear (see Figure 4-12). When you point to the list
level, a ScreenTip appears displaying the level.
2.
GET READY. USE the document that is open from the previous exercise.
Lesson 4 Page 16
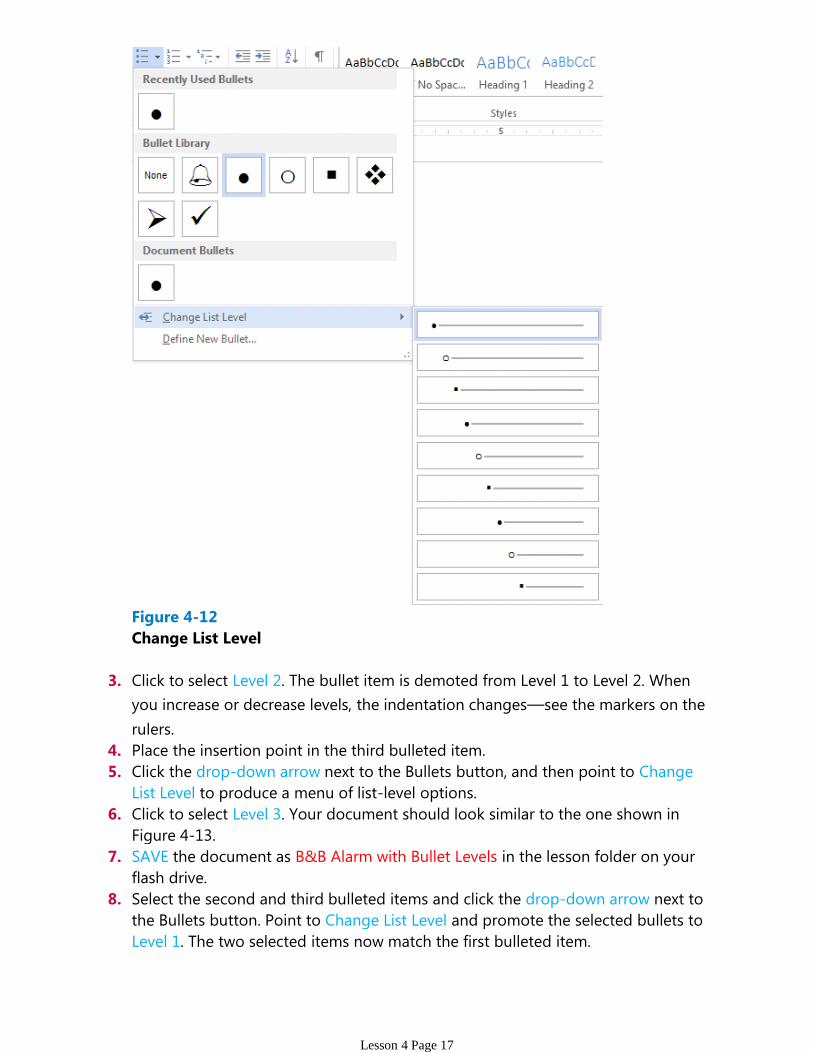
Figure 4-12
Change List Level
Click to select Level 2. The bullet item is demoted from Level 1 to Level 2. When
you increase or decrease levels, the indentation changes—see the markers on the
rulers.
3.
Place the insertion point in the third bulleted item.4.
Click the drop-down arrow next to the Bullets button, and then point to Change
List Level to produce a menu of list-level options.
5.
Click to select Level 3. Your document should look similar to the one shown in
Figure 4-13.
6.
SAVE the document as B&B Alarm with Bullet Levels in the lesson folder on your
flash drive.
7.
Select the second and third bulleted items and click the drop-down arrow next to
the Bullets button. Point to Change List Level and promote the selected bullets to
Level 1. The two selected items now match the first bulleted item.
8.
Lesson 4 Page 17

Figure 4-13
Sample document
with bullet levels
Click Undo to return the bulleted items to second and third level.9.
SAVE the document with the same filename in the lesson folder on your flash drive.10.
PAUSE. LEAVE the document open to use in the next exercise.
Step by step Insert Special Character Symbols
The Define New Bullet dialog box provides options to change the alignment and add
new bullet characters, such as symbols or pictures. When you click on either option, a
new dialog box appears.
Select the second and third bulleted items and promote them to the first level, and
then select all three bulleted items.
1.
Click the drop-down arrow next to the Bullets button, and then click Define New
Bullet.
2.
Click the Symbol button in the Define New Bullet dialog box. The Symbol dialog
box opens, as shown in Figure 4-14.
3.
GET READY. USE the document that is open from the previous exercise.
Lesson 4 Page 18

Figure 4-14
Symbol dialog box
Change the Font by clicking the drop-down arrow. Scroll down and select
Wingdings.
4.
Select the bell in the first row, sixth column. Click OK to close the Symbol dialog
box.
5.
Click OK to close the Define New Bullet dialog box.6.
SAVE the document as B&B Alarm Update in the lesson folder on your flash drive.7.
PAUSE. LEAVE the document open to use in the next exercise.
Step by step Insert a Picture Bullet
The three bulleted items are still selected. Click the drop-down arrow next to the
Bullets button, and then click Define New Bullet.
1.
Click the Picture button in the Define New Bullet dialog box. The Insert Pictures
location box opens, as shown in Figure 4-15. Microsoft has provided a new insert
picture location screen where you have the option to locate a picture from your
computer or network, Bing Image Search, or your OneDrive space.
2.
GET READY. USE the document that is open from the previous exercise.
Lesson 4 Page 19
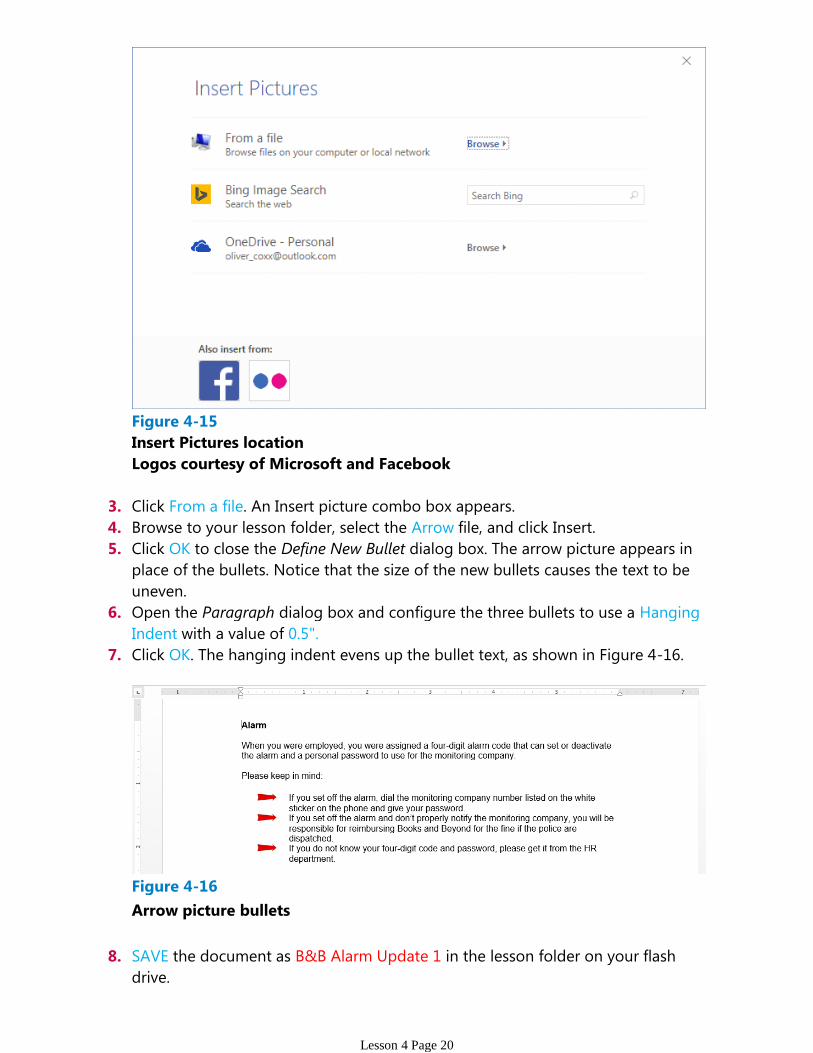
Figure 4-15
Insert Pictures location
Logos courtesy of Microsoft and Facebook
Click From a file. An Insert picture combo box appears. 3.
Browse to your lesson folder, select the Arrow file, and click Insert. 4.
Click OK to close the Define New Bullet dialog box. The arrow picture appears in
place of the bullets. Notice that the size of the new bullets causes the text to be
uneven.
5.
Open the Paragraph dialog box and configure the three bullets to use a Hanging
Indent with a value of 0.5".
6.
Click OK. The hanging indent evens up the bullet text, as shown in Figure 4-16.7.
Figure 4-16
Arrow picture bullets
SAVE the document as B&B Alarm Update 1 in the lesson folder on your flash
drive.
8.
Lesson 4 Page 20
PAUSE. LEAVE the document open to use in the next exercise.
Step by step Change the Alignment in a Bullet List
In the previous exercises, you learned to create bullets using the Bullet Library, to create
a bullet using symbols, and to insert pictures as bullets. You also changed the levels of
the bullets by promoting or demoting the list levels. In this exercise, you learn to adjust
the alignment to any type of bullet.
In the bulleted list, notice the distance between the image and text. Adding a
custom bullet allows you to change the alignment.
1.
Select the three bullets items.2.
Click the drop-down arrow next to the Bullets button, and then click Define New
Bullet.
3.
Under the Alignment group, click the drop-down arrow and select Right. Notice
the space between the image and text in the Preview area.
4.
Click OK.5.
SAVE the document as B&B Alarm Update 2 in the lesson folder on your flash
drive.
6.
GET READY. USE the document that is open from the previous exercise.
PAUSE. LEAVE the document open to use in the next exercise.
Lesson 4 Page 21

You can quickly add numbers to existing lines of text to create a list, or Word can
automatically create a numbered list as you type.
Creating a Numbered List
In this exercise, you learn how to create and format a numbered list in Word.
Step by step Create a Numbered List
Select the four paragraphs under the Set Alarm heading.A1.
On the Home tab, in the Paragraph group, click the drop-down arrow next to the
Numbering button to display the Numbering Library shown in Figure 4-17.
2.
Figure 4-17
Numbering formatting options appear in the Numbering Library
Select the option, 1., 2., 3. The paragraphs now appear as an ordered list.3.
Place the insertion point at the end of item number four and press Enter. Notice
that Word automatically numbers the next line sequentially.
4.
In the new numbered line, type Leave the premises immediately.5.
GET READY. USE the document that is open from the previous exercise.
Creating and Formatting a Numbered List
Lesson 4 Page 22

In the new numbered line, type Leave the premises immediately.5.
Select the four paragraphs under the Deactivate Alarm heading.6.
On the Home tab, in the Paragraph group, click the drop-down arrow next to the
Numbering button.
7.
Select the option, a., b., c., The four paragraphs are numbered and aligned left.8.
SAVE the document as B&B Numbered Alarm List in the lesson folder on your flash
drive.
9.
PAUSE. LEAVE the document open to use in the next exercise.
Step by step Modify a Numbered List
Select the numbered list under the Set Alarm heading.1.
To change the format of the numbered list, click the drop-down arrow next to the
Numbering button, and then click Define New Number Format. The Define New
Number Format dialog box appears.
2.
Click the Number style drop-down arrow and select uppercase roman numerals
(see Figure 4-18). The format for the selected text changed to uppercase roman
numerals.
3.
In the Alignment drop-down list, set the value to Right.4.
Click the Font button and select Arial Black, size 12 pt. Review the preview area to
see how the numbering will appear. Click OK to close the Font dialog box.
5.
Click OK to close the Define New Number Format dialog box.6.
Take Note
To change the formatting of list numbers, click any number to select the entire list.
If you select the text as well, the formatting of both the text and the numbering
change.
GET READY. USE the document that is open from the previous exercise.
Lesson 4 Page 23
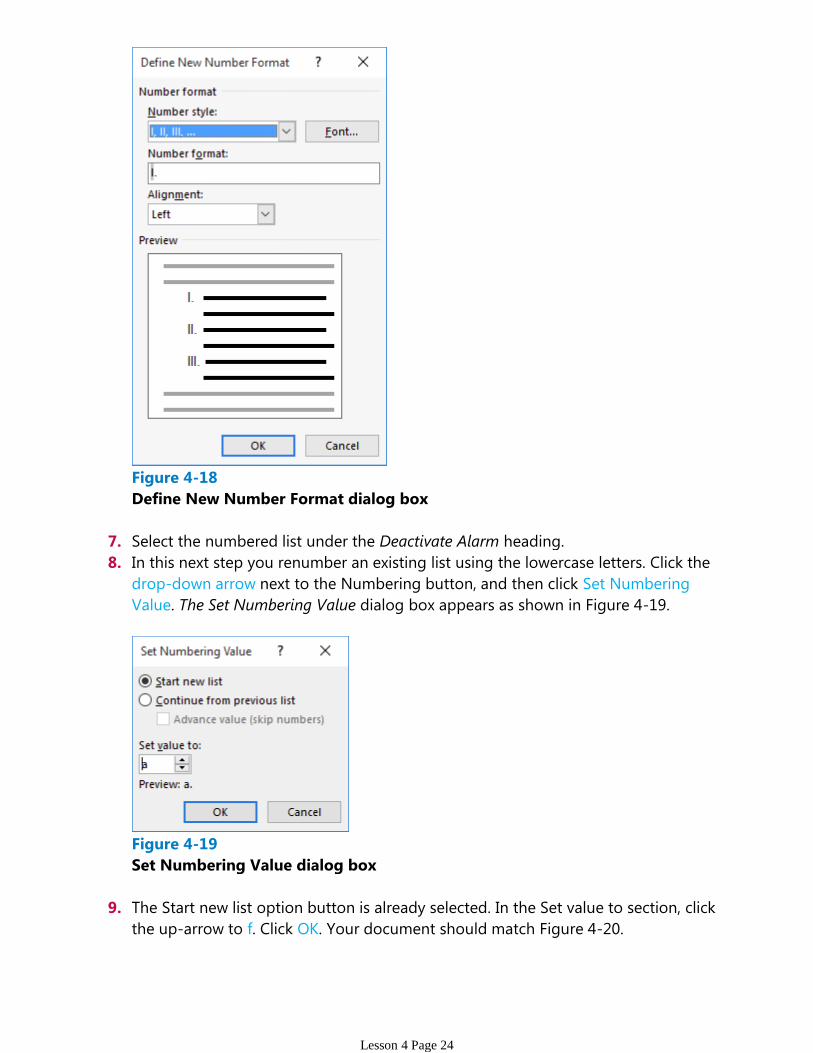
Figure 4-18
Define New Number Format dialog box
Select the numbered list under the Deactivate Alarm heading.7.
In this next step you renumber an existing list using the lowercase letters. Click the
drop-down arrow next to the Numbering button, and then click Set Numbering
Value. The Set Numbering Value dialog box appears as shown in Figure 4-19.
8.
Figure 4-19
Set Numbering Value dialog box
The Start new list option button is already selected. In the Set value to section, click
the up-arrow to f. Click OK. Your document should match Figure 4-20.
9.
Lesson 4 Page 24

Figure 4-20
Sample document with different modified numbering list
SAVE the document as B&B Numbered Alarm List 1 in the lesson folder on your
flash drive.
10.
PAUSE. CLOSE the document.
Setting and Modifying Tabs
Tabs are used to align text or numbers in your document. You can use the ruler to set
tabs or, for a more exact setting, use the Tabs dialog box. As you apply custom tabs to
selected text, Word applies the tabs to the paragraphs. When you press the Enter key,
the tab settings are carried forward into the next paragraph.
Take Note
To view tabs as Word sets them, display nonprinting characters, as discussed in Lesson
1.
Setting Tabs on the Ruler
By default, Word sets left-aligned tab stops every half-inch on the ruler. To set a tab at a
different position on the ruler, you can click the tab selector at the left end of the ruler
and a ScreenTip will appear showing the type of tabs at the tab selector. Tabs are part of
paragraph formatting—the selected text is affected by the setting or modification of a
tab. In this exercise, you learn to set tabs on Word's ruler.
Table 4-3 lists the types of tabs available in Word and their descriptions. To view tabs on
the ruler, place your insertion point in the paragraph.
After tabs are set, press the Tab key; the insertion point moves to the next set position.
To move a tab stop to a different position on the ruler, click and drag the tab left or
right to a new position.
Lesson 4 Page 25

right to a new position.
Table 4-3
Tab stops on the ruler
Step by step Set Tabs On a Ruler
On the Home tab in the Paragraph group, click the Show/Hide (¶) button to show
nonprinting characters.
1.
Place the insertion point on the blank line below the Meals & Incidentals
Breakdown heading.
2.
Click the tab selector at the left of the ruler until the Center tab appears. The
horizontal ruler is shown in Figure 4-21, displaying the different types of tabs.
3.
Figure 4-21
The horizontal ruler with tab sets
Troubleshooting
If the horizontal ruler is not visible, click the View tab, and then add a
check mark by Ruler.
Click the ruler at the 2.5-inch mark to set a Center tab. The Center tab appears as
an inverted T.
4.
Click the ruler at the 4-inch mark to set a Center tab. The ruler shows two tab
settings.
5.
Press Tab and type Chicago.6.
Press Tab and type New York.7.
Select the list of words starting with Breakfast and ending with Totals. When setting
tabs, tabs are part of the paragraph formatting—the selected text will be affected
by the tab settings after the Tab key is pressed.
8.
Click the tab selector until the Right tab appears—displays as an reverse L.
GET READY. OPEN Per Diem from the data files for this lesson.
Lesson 4 Page 26

Click the tab selector until the Right tab appears—displays as an reverse L.9.
Click the ruler at the 1-inch mark to set a Right tab.10.
Deselect the list, and place the insertion point in front of each word in the list, and
then press Tab to align it at the Right tab. When setting a Right tab, press the Tab
key with existing text or press the Tab key, and then type the new text. The text
characters are aligned at the right and move to the left.
11.
SAVE the document as Per Diem First Draft in the lesson folder on your flash drive.12.
PAUSE. LEAVE the document open to use in the next exercise.
Using the Tabs Dialog Box
The Tabs dialog box is useful for setting tabs at precise locations on the ruler, clearing
all tabs, and setting tab leaders. Tab leaders are symbols such as dotted, dashed, or
solid lines that fill the space before a tab. In this exercise, you practice setting tabs and
leaders using the Tabs dialog box.
Step by step Use the Tabs Dialog Box
Select the list of words starting with Breakfast and continuing to the end of the
document.
1.
On the Home tab, in the Paragraph group, click the dialog box launcher to launch
the Paragraph dialog box.
2.
Click the Tabs button on the bottom left of the Paragraph dialog box to display the
Tabs dialog box. In the Tabs dialog box, you should see the 1" Right tab setting
that you set in the previous exercise.
3.
In the Tab stop position box, type 2.6. In the Alignment section, select Decimal. In
the Leader section, select 2, and then click Set. After specifying values for individual
tabs, you must click Set to position the tab.
4.
In the Tab stop position box, type 4.1. In the Alignment section, select Decimal. In
the Leader section, select 2, and then click Set. Setting a leader provides a guide to
the next tab setting. Refer to Figure 4-22 and compare with your screen.
5.
GET READY. USE the document that is open from the previous exercise.
Lesson 4 Page 27

Figure 4-22
Tabs dialog box
Click OK to close the Tabs dialog box. Notice that nothing happens yet.6.
Place the insertion point after the word Breakfast and press Tab.7.
Type $10.98 and press Tab.8.
Type $12.50. Repeat this process for each line, typing the numbers shown in Figure
4-23. Notice how the decimals align properly.
9.
Figure 4-23
Tabs and tab leaders
Formatting
SAVE the document as Per Diem Second Draft in the lesson folder on your flash
drive.
10.
PAUSE. LEAVE the document open to use in the next exercise.
Moving Tabs
Lesson 4 Page 28

Moving Tabs
You can reposition tabs using your mouse pointer by dragging them to new positions
on the ruler or by opening the Tabs dialog box.
Step by step Move Tabs
Select the block of text beginning with Breakfast… and ending with …$63.49.
Include the non-printing character (¶) in your selection.
1.
Position the mouse pointer at 4.1" on the ruler until you see the Decimal Tab
ScreenTip.
2.
Click and drag the tab on the ruler to 5”. Notice the Decimal Tab setting for the
five lines is positioned at 5" on the ruler.
3.
With the text still selected, position the mouse pointer at 2.6" on the ruler until you
see the Decimal Tab ScreenTip.
4.
Click and drag the tab on the ruler to 3". Release the left mouse button. Notice the
Decimal Tab setting for the five lines is positioned at 3" on the ruler.
5.
Select Chicago. Drag the center tab setting and position it at 3" on the ruler.
Double-click the center tab on the ruler to open the Tabs dialog box—check the
positioning of the tab. Chicago should align above the amounts.
6.
Select New York. Drag the center tab setting and position it at 5" on the ruler.
Double-click the center tab on the ruler to open the Tabs dialog box—check the
positioning of the tab. New York should align above the amounts.
7.
SAVE the document as Per Diem Final in the lesson folder on your flash drive.8.
GET READY. USE the document that is open from the previous exercise.
STOP. CLOSE Word
Lesson 4 Page 29
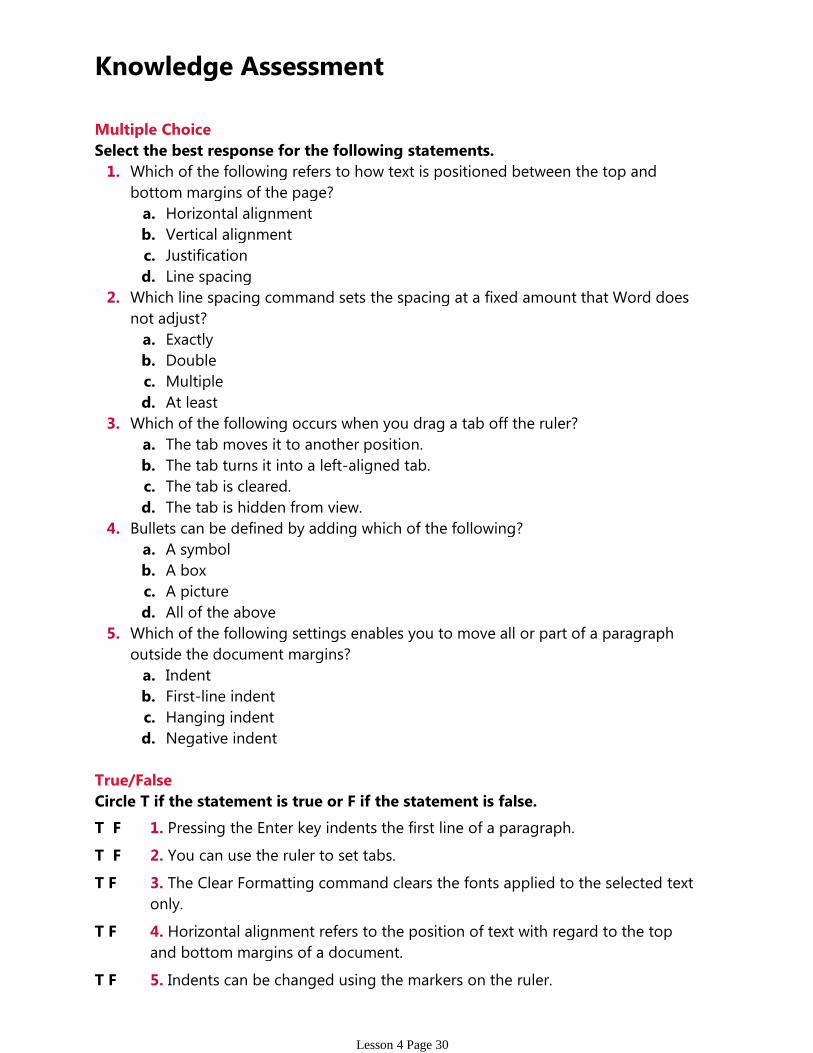
Multiple Choice
Horizontal alignmenta.
Vertical alignmentb.
Justificationc.
Line spacingd.
Which of the following refers to how text is positioned between the top and
bottom margins of the page?
1.
Exactlya.
Doubleb.
Multiplec.
At leastd.
Which line spacing command sets the spacing at a fixed amount that Word does
not adjust?
2.
The tab moves it to another position.a.
The tab turns it into a left-aligned tab.b.
The tab is cleared.c.
The tab is hidden from view.d.
Which of the following occurs when you drag a tab off the ruler?3.
A symbola.
A boxb.
A picturec.
All of the aboved.
Bullets can be defined by adding which of the following?4.
Indenta.
First-line indentb.
Hanging indentc.
Negative indentd.
Which of the following settings enables you to move all or part of a paragraph
outside the document margins?
5.
Select the best response for the following statements.
True/False
Circle T if the statement is true or F if the statement is false.
T F 1. Pressing the Enter key indents the first line of a paragraph.
T F 2. You can use the ruler to set tabs.
T F 3. The Clear Formatting command clears the fonts applied to the selected text
only.
T F 4. Horizontal alignment refers to the position of text with regard to the top
and bottom margins of a document.
T F 5. Indents can be changed using the markers on the ruler.
Knowledge Assessment
Lesson 4 Page 30

Project 4-1: Formatting an Expense Report
You are employed in the financial department at Blue Yonder Airlines and have been
asked to create a document to show expenses for fiscal years 2009–2012.
OPEN a blank document.1.
SAVE the document as 4-1 Expense Report in the lesson folder on your flash drive.2.
Type BLUE YONDER AIRLINES, and press Enter.3.
Type Expense Report, and press Enter.4.
Set a center tab using the ruler at the 2", 3", 4", and 5" marks. Then at the left
margin, press the Tab key.
5.
Type the following text: at the 2", type 2009, and press Tab; at the 3", type 2010,
and press Tab; at the 4", type 2011, and press Tab; and at 5", type 2012, and press
Enter.
6.
Remove the center tab settings by dragging them off the ruler.7.
Select the paragraph mark, and then change the tab selector to Decimal. Set
decimal tabs at the 2", 3", 4", and 5" marks.
8.
Type the following text and values (and then press Tab or Enter, as instructed):9.
Center the title, BLUE YONDER AIRLINES. Change the font size for the title to 26 pt.,
bold, and apply the font color Blue-Gray, Text 2, Darker 50%.
10.
Center the subtitle, Expense Report. Change the font size for the subtitle to 18 pt.,
bold, and apply the font color Black, Text 1.
11.
Select the year headings from 2009 to 2012 and set the bold and underline
attributes.
12.
Use multi-selection to select Corporate Contracts, Sky Diving, Charter Flights, and
Flight School, and set the bold attribute.
13.
Select the Page Setup dialog box launcher from the Layout tab, and then click the
Layout tab. In the Page group, change the vertical alignment to Center. Click OK to
close the Page Setup dialog box.
14.
SAVE the document with the same filename in the lesson folder and CLOSE the file.15.
GET READY. LAUNCH Word if it is not already running.
LEAVE Word open for the next project.
Project 4-2: Formatting Paragraphs
In your job at Books and Beyond, you continue to work on documents that will be part
of the employee handbook.
GET READY. LAUNCH Word if it is not already running.
Projects
Lesson 4 Page 31

OPEN Guidelines from the data files for this lesson.1.
SAVE the document as 4-2 Handbook Guidelines in the lesson folder on your flash
drive.
2.
In the third paragraph, select the two lines that begin Verbal discussion . . . and
Written warning . . . .
3.
On the Home tab, in the Paragraph group, click the drop-down arrow next to the
Bullets button and select the solid circle.
4.
Place the insertion point after the second item in the bulleted list and press Enter.5.
Type Termination as the third bulleted item.6.
Select the five double-spaced paragraphs beginning with abuse, misuse . . . and
ending with falsification, misinterpretation . . . .
7.
Click the drop-down arrow next to the Bullets button and click Define New Bullet.8.
Click the Symbol button, and then click the drop-down arrow in the Font box and
select Wingdings.
9.
Scroll to the top of the Wingdings menu and select the solid diamond (character
code 116).
10.
Click OK to close the Symbol dialog box, and then click OK to close the Define New
Bullet dialog box.
11.
Select the remaining paragraphs beginning with insubordination, willful
disregard . . . and ending with engaging in conduct . . . .
12.
Click the drop-down arrow next to the Bullets button and click Define New Bullet.13.
Click the Picture button.14.
Click From a file and select the Arrow picture file.15.
Change the Alignment setting to Right and click OK. 16.
Select the first, second, third, and last paragraph in the document. Avoid selecting
the bulleted lists.
17.
On the Home tab, in the Paragraph group, click the Justify button.18.
With the paragraphs still selected, apply the first-line indent by launching the
Paragraph dialog box.
19.
Under Special, click the drop-down arrow and select First Line.20.
Click OK to close the Paragraph dialog box.21.
SAVE the document with the same filename in the lesson folder and CLOSE the file.22.
GET READY. LAUNCH Word if it is not already running.
CLOSE Word.
Lesson 4 Page 32