paperless on-boarding on ribily
TRANSCRIPT

www.ribily.com
Paperless On-Boarding App
www.ribily.com
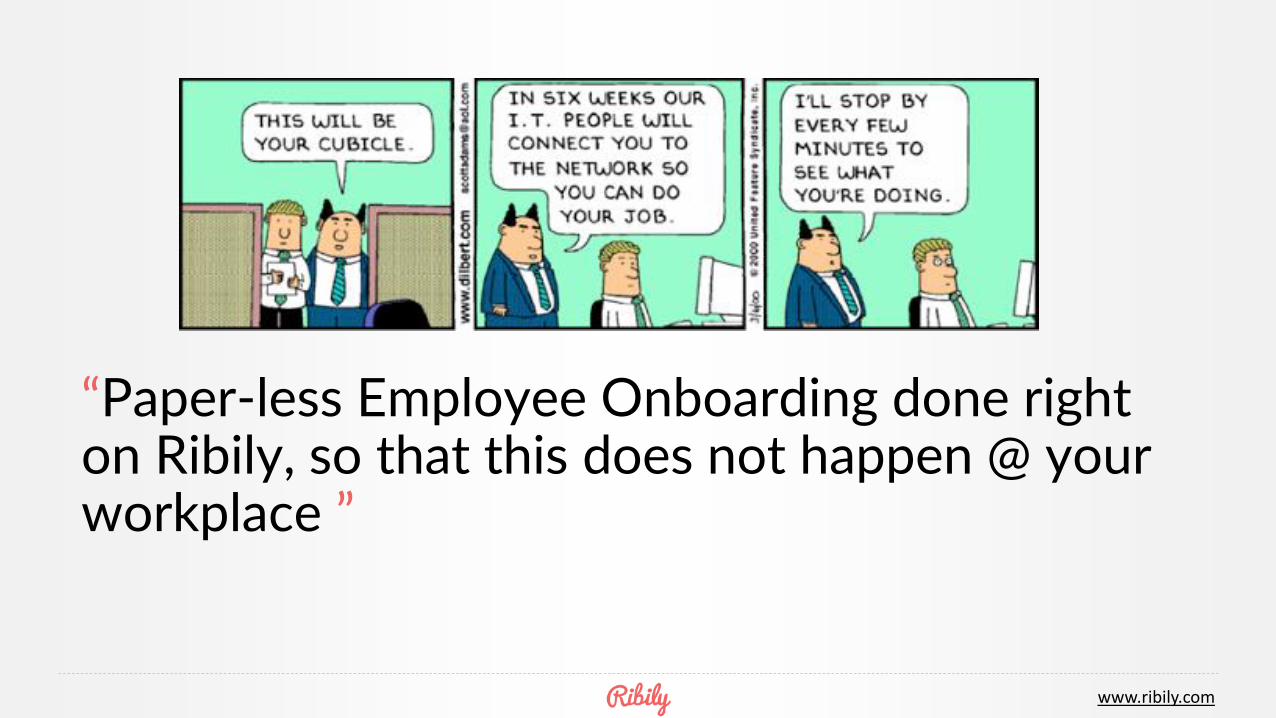
“Paper-less Employee Onboarding done right on Ribily, so that this does not happen @ your workplace ”
www.ribily.com
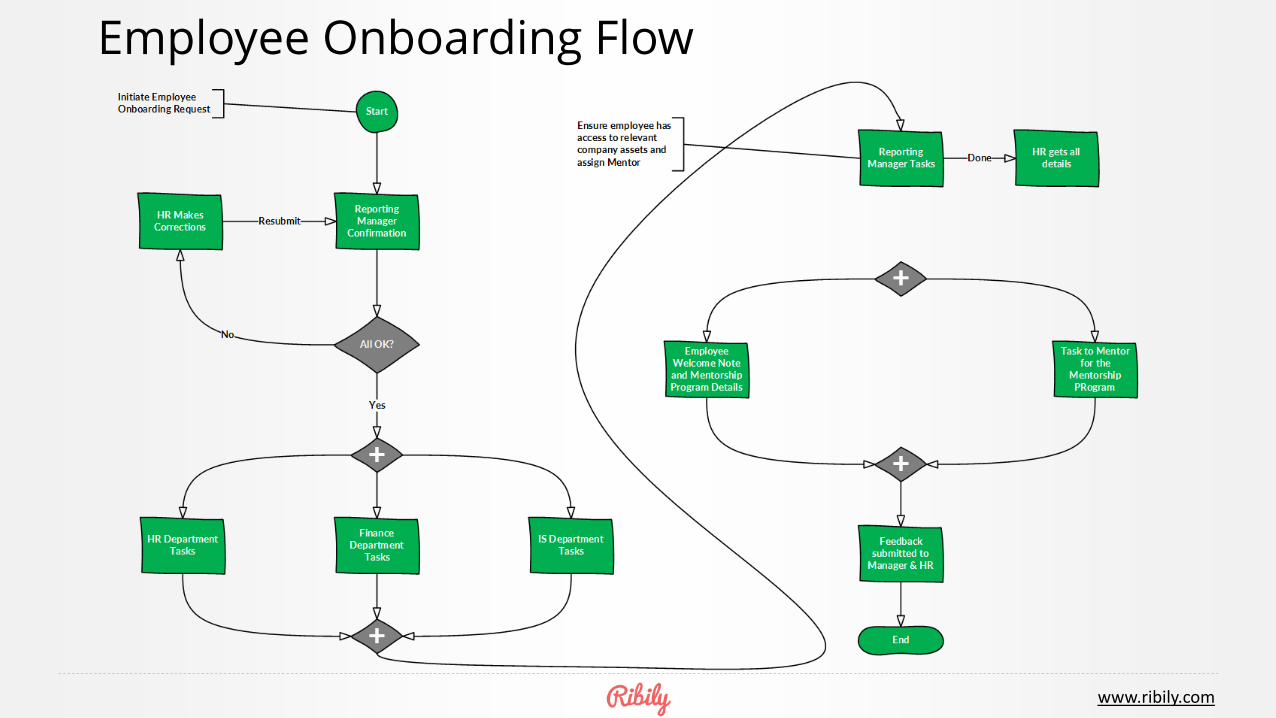
Employee Onboarding Flow

www.ribily.com
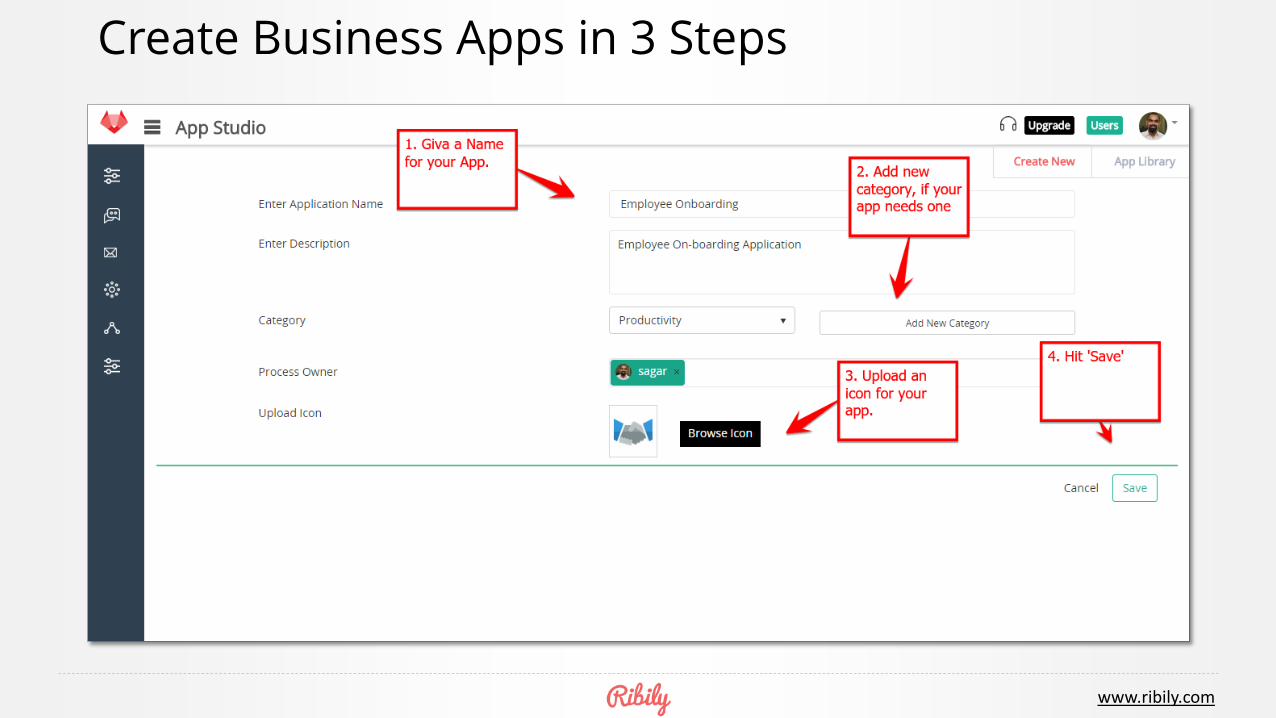
Creating ‘Employee On-Boarding’ App on Ribily
www.ribily.com
Create Business Apps in 3 Steps
www.ribily.com
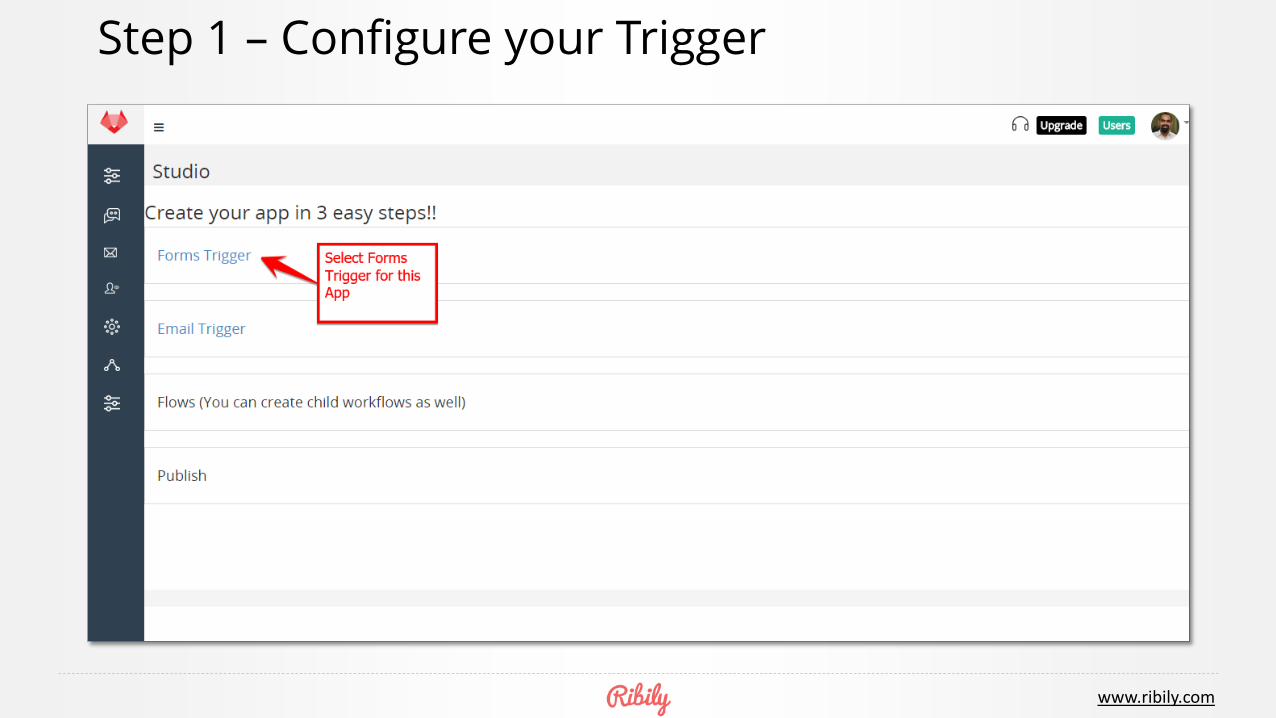
Step 1 – Configure your Trigger

www.ribily.com
Start building your ‘form’ – Add a ‘Control’
www.ribily.com
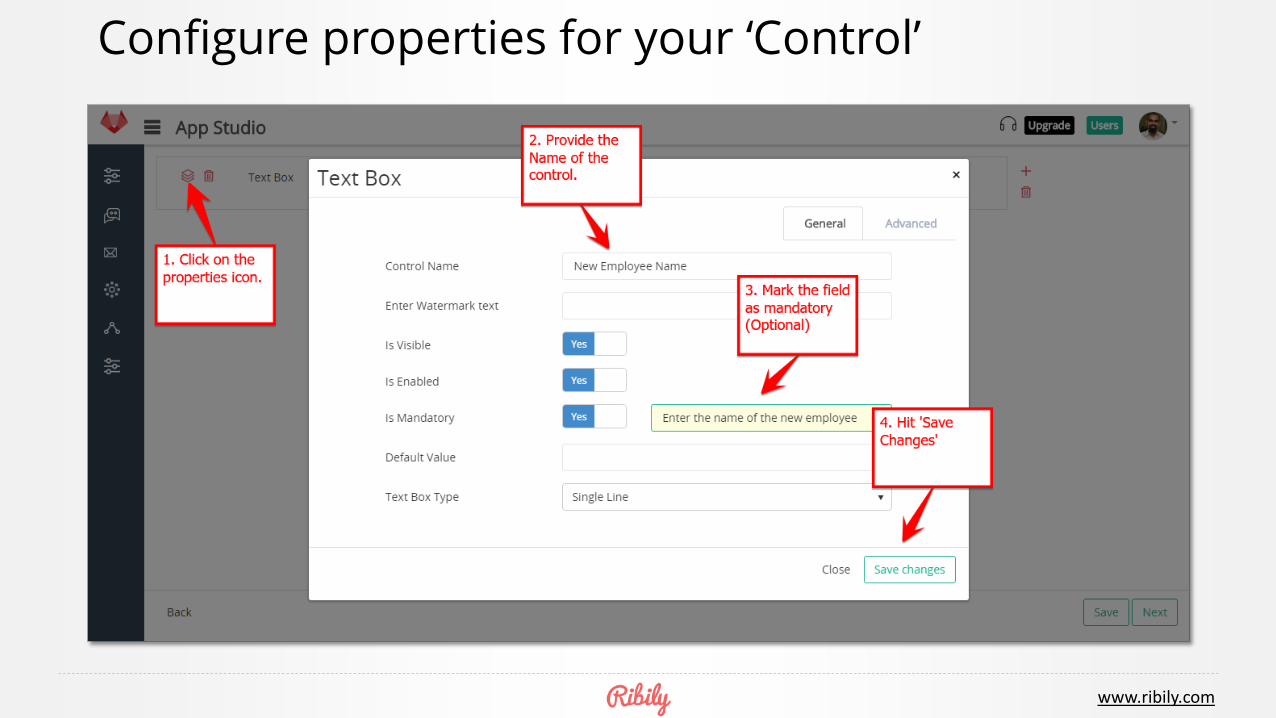
Configure properties for your ‘Control’
www.ribily.com
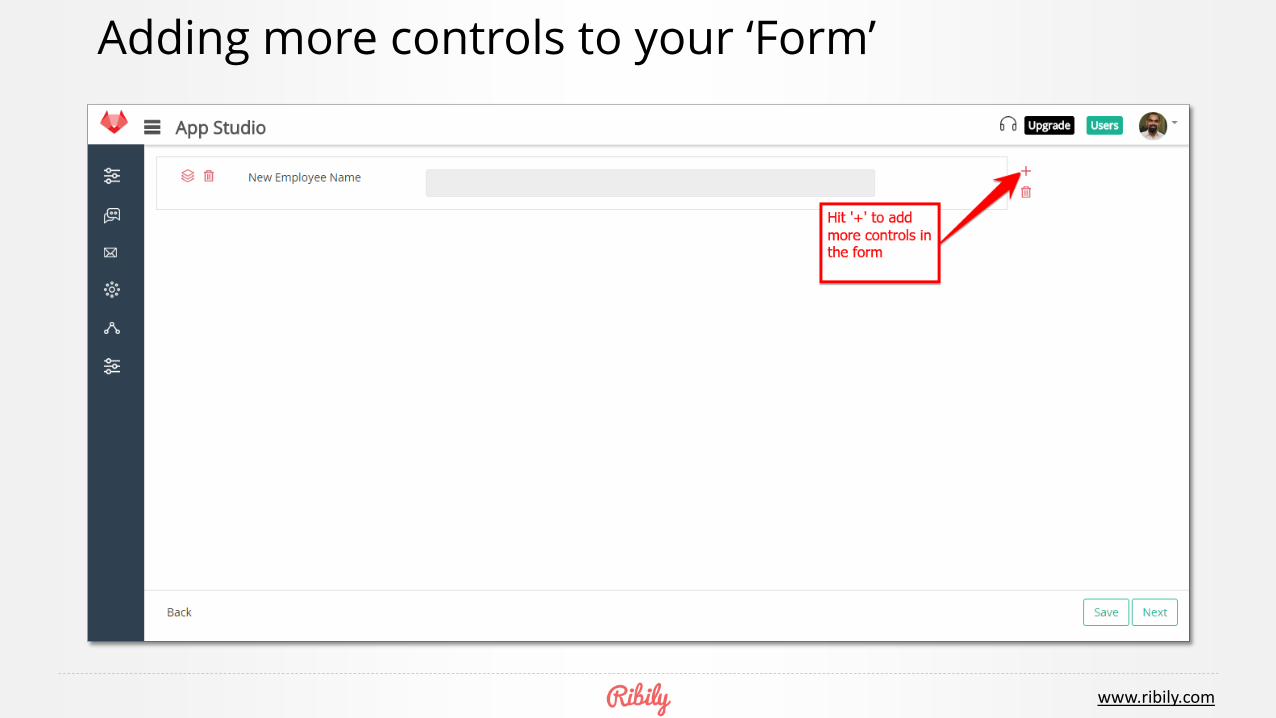
Adding more controls to your ‘Form’

www.ribily.com
Configure your form within minutes
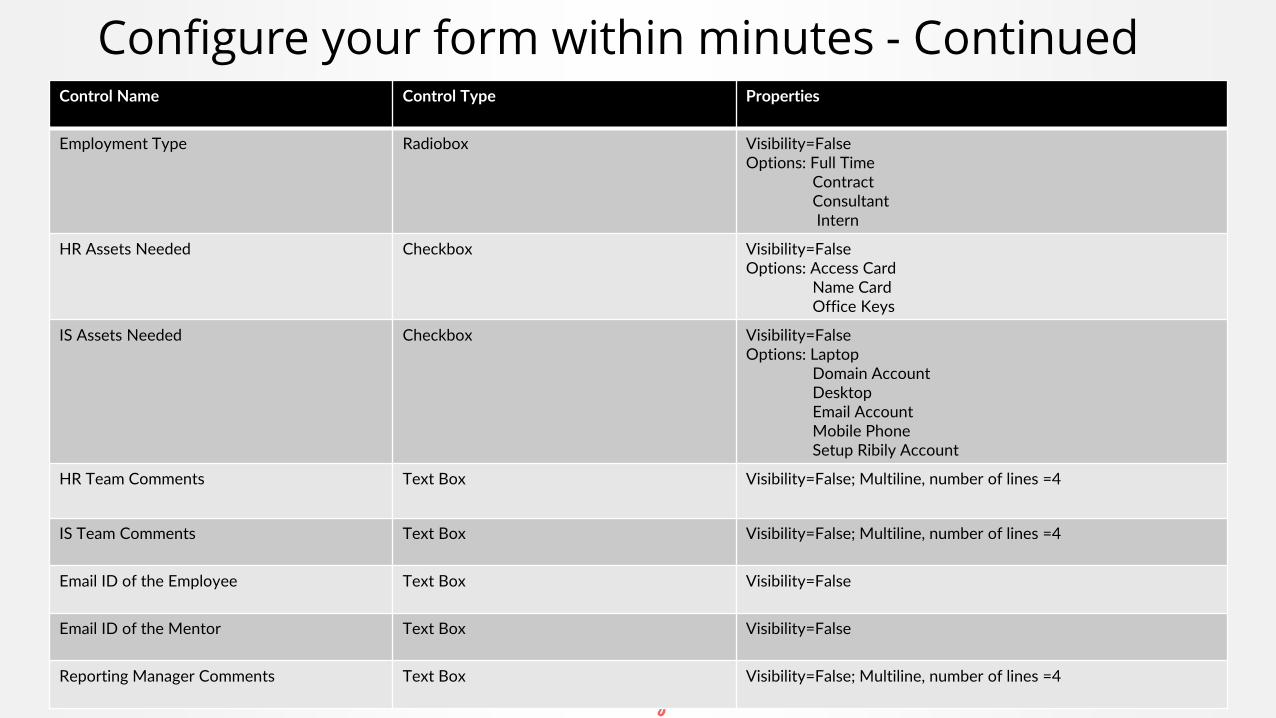
• Add these controls to the form after adding ‘New Employee’s Name’.
Control Name Control Type Properties
Joining Date Date Mandatory
Employee Contact Number Text Box Mandatory
HR Comments Text Box Visibility=True; Multiline, number of lines =4
Reporting Managers Email ID Text Box Mandatory
Label Label Text: Please Mark the kind of assets the new employee would requireVisibility=False
Employee Designation Dropdown Visibility=FalseOptions: Executive
Sr ExecutiveLeadManagerVP
www.ribily.com
Configure your form within minutes - ContinuedControl Name Control Type Properties
Employment Type Radiobox Visibility=FalseOptions: Full Time
ContractConsultantIntern
HR Assets Needed Checkbox Visibility=FalseOptions: Access Card
Name CardOffice Keys
IS Assets Needed Checkbox Visibility=FalseOptions: Laptop
Domain AccountDesktopEmail AccountMobile PhoneSetup Ribily Account
HR Team Comments Text Box Visibility=False; Multiline, number of lines =4
IS Team Comments Text Box Visibility=False; Multiline, number of lines =4
Email ID of the Employee Text Box Visibility=False
Email ID of the Mentor Text Box Visibility=False
Reporting Manager Comments Text Box Visibility=False; Multiline, number of lines =4
www.ribily.com
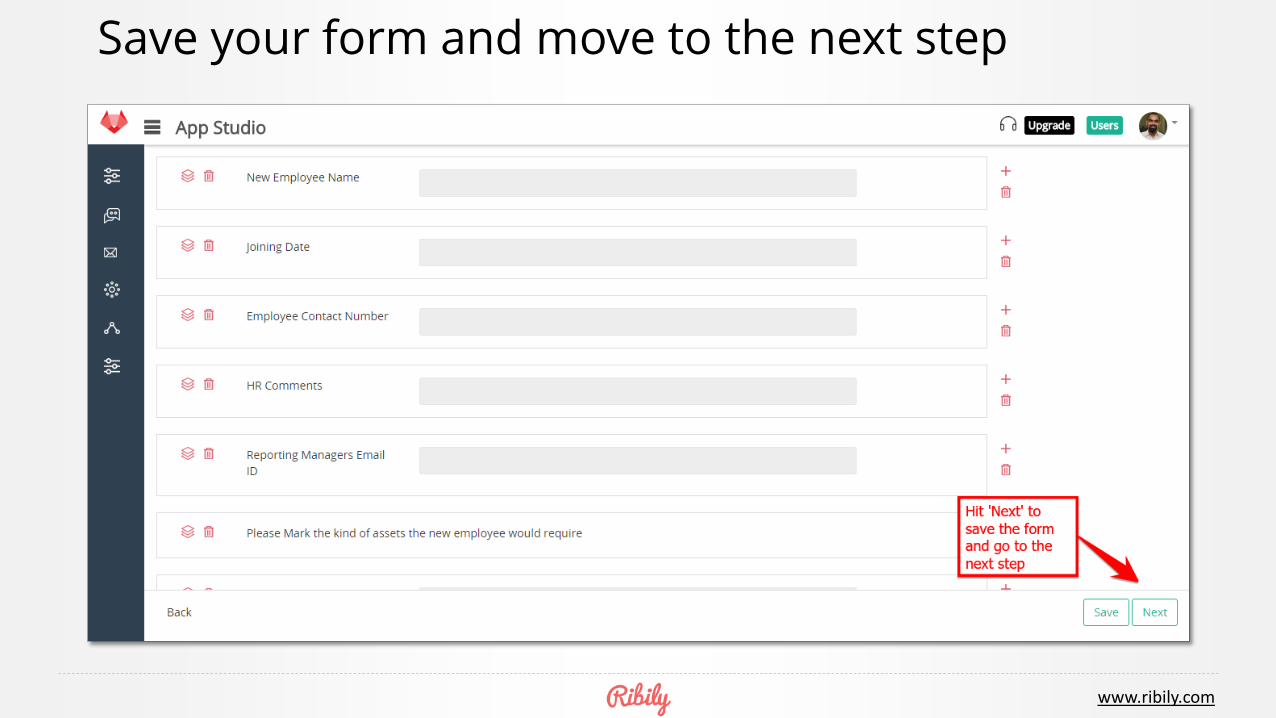
Save your form and move to the next step

www.ribily.com
Step 2 – Configure your ‘Flow’
www.ribily.com
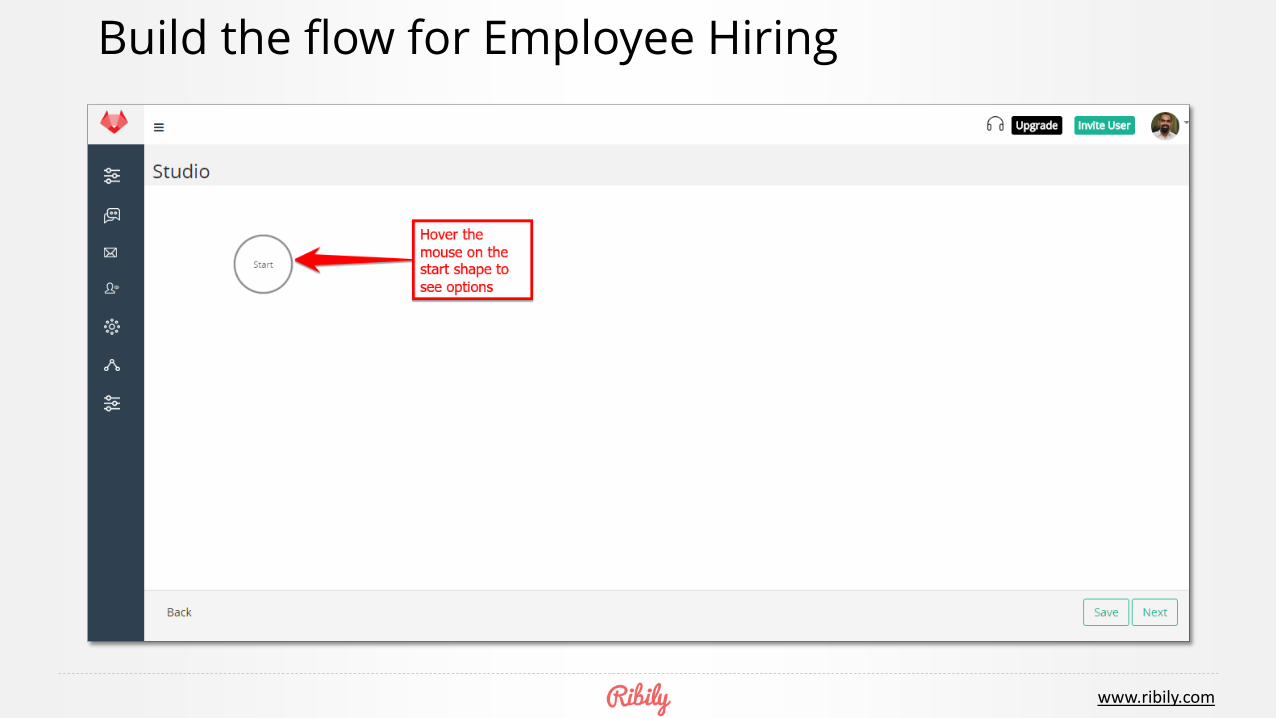
Build the flow for Employee Hiring
www.ribily.com
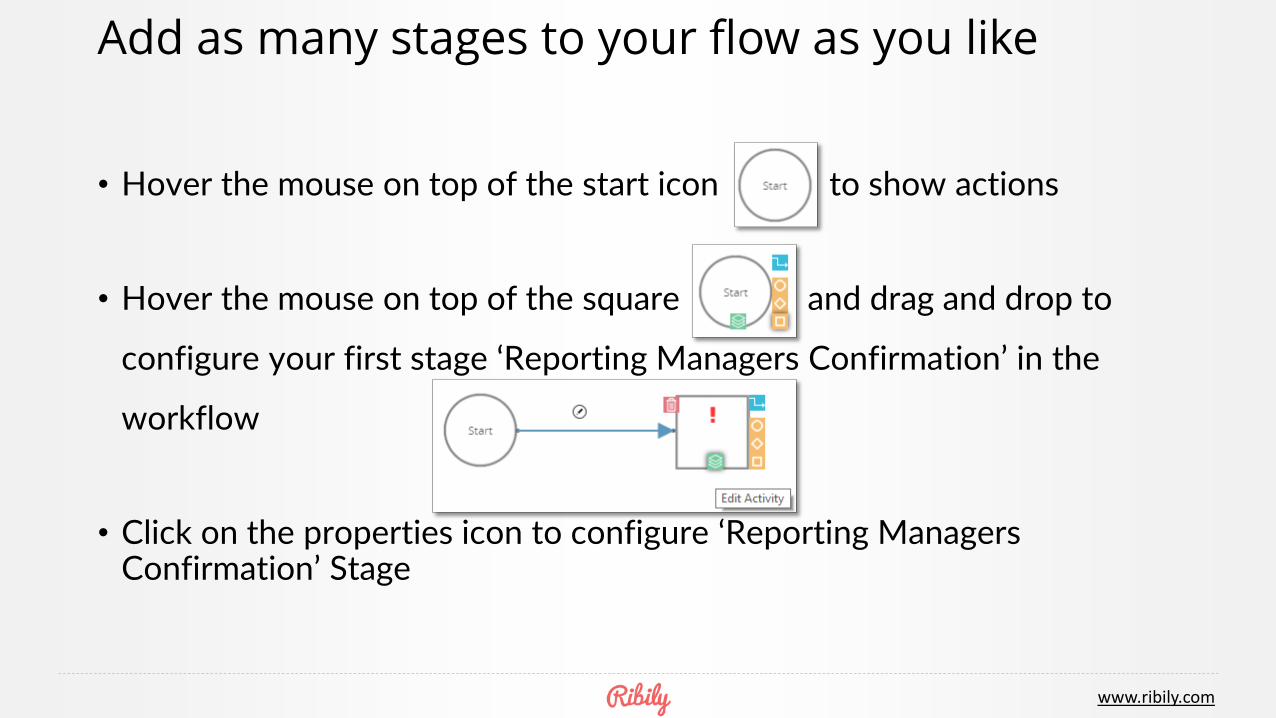
Add as many stages to your flow as you like
• Hover the mouse on top of the start icon to show actions
• Hover the mouse on top of the square and drag and drop to
configure your first stage ‘Reporting Managers Confirmation’ in the
workflow
• Click on the properties icon to configure ‘Reporting Managers Confirmation’ Stage
www.ribily.com
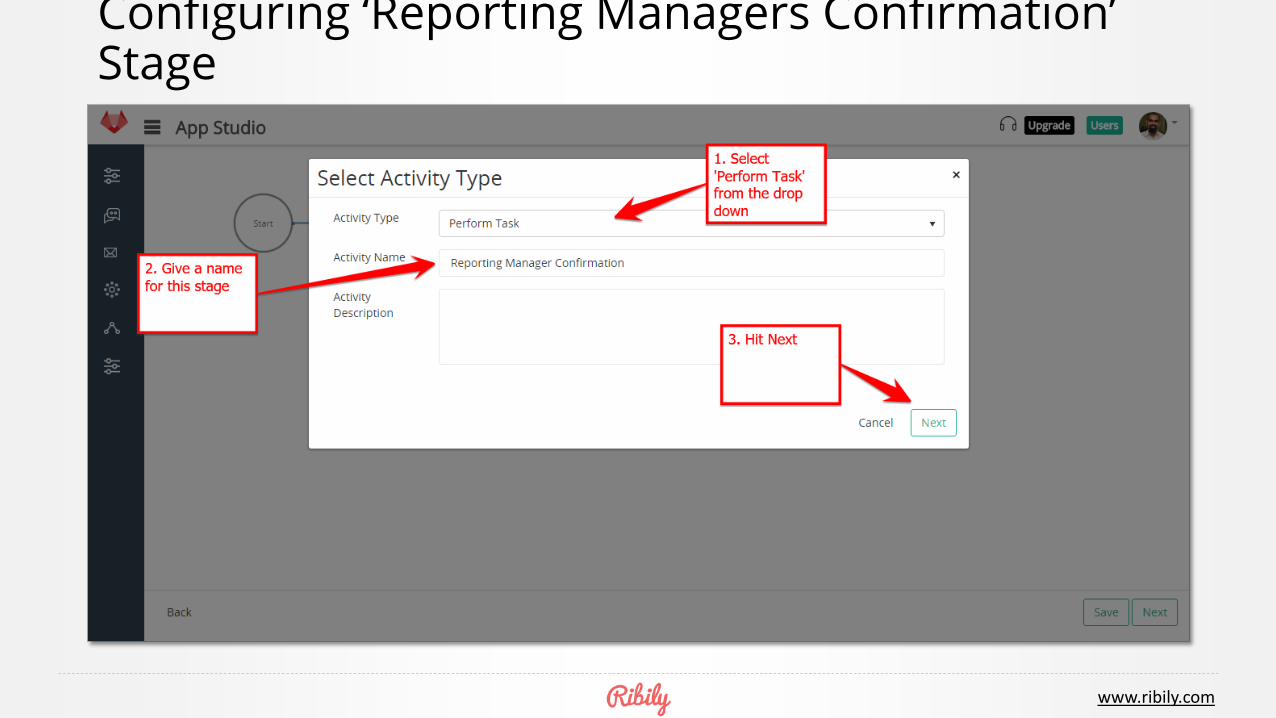
Configuring ‘Reporting Managers Confirmation’ Stage
www.ribily.com
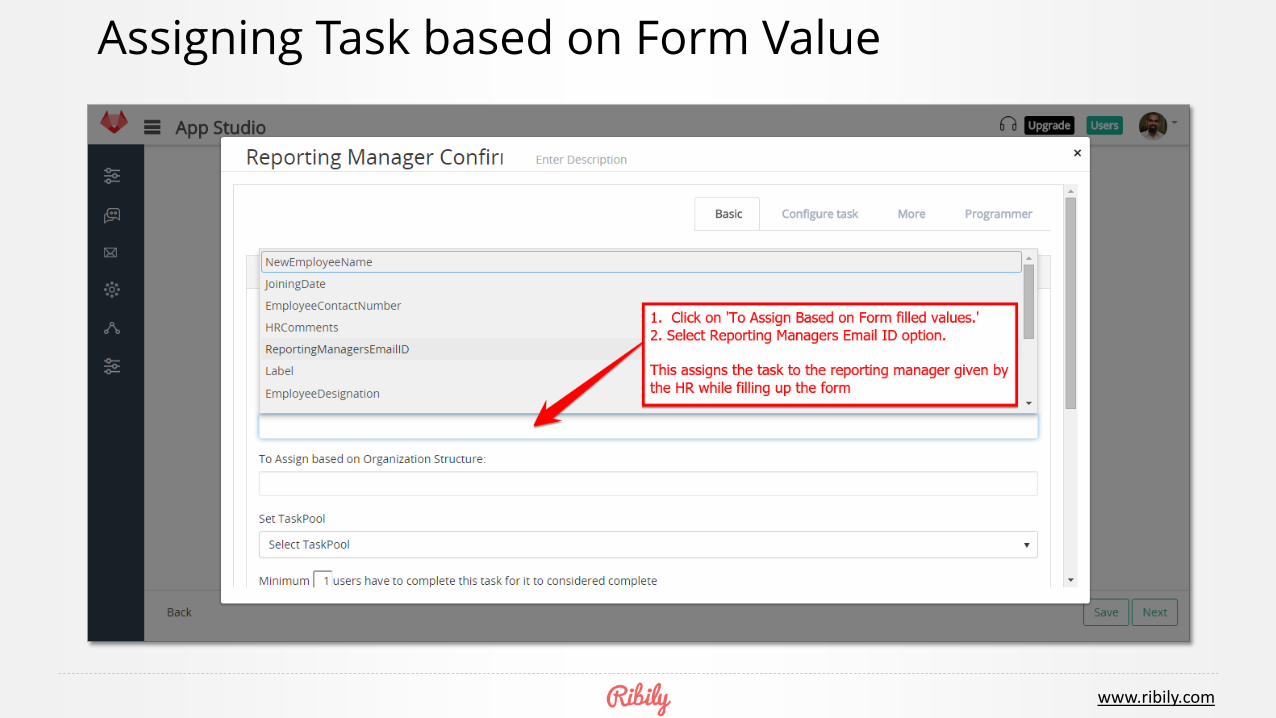
Assigning Task based on Form Value

www.ribily.com
Configuring Actions for the Stage

www.ribily.com
Configuring Control Visibility
• Ensure that the following settings are made for the ‘Reporting Managers Confirmation’ Stage.
• All Fields Visible except• HR Team Comments
• IS Team Comments
• Reporting Manager Comments
• All Fields Disables except• Employee Designation
• Employee Type
• HR Assets Needed
• IS Assets Needed

www.ribily.com
Configuring personalized email for the user

www.ribily.com
Set up Stage Transitions
• Add another square shape. This one will be to assign Task to the HR Team to set up assets for the new employee.
• Click on the icon on the connecting line and select ‘Submit’
www.ribily.com
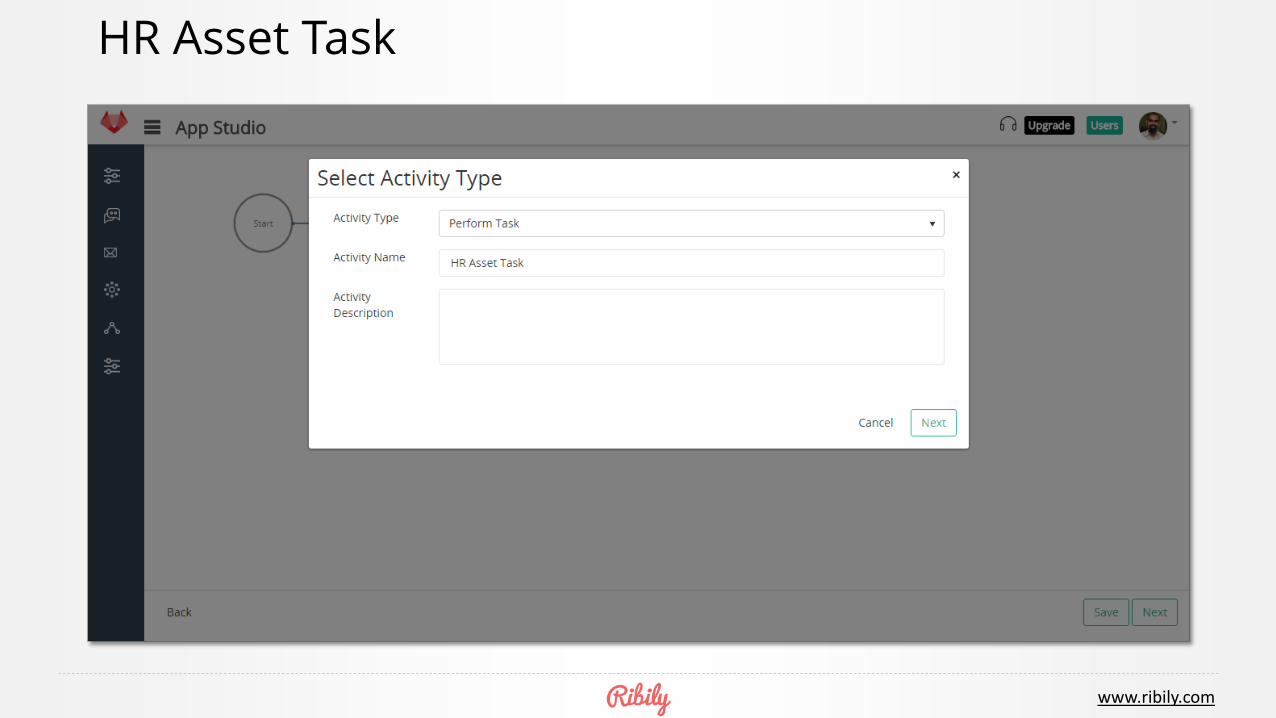
HR Asset Task
www.ribily.com
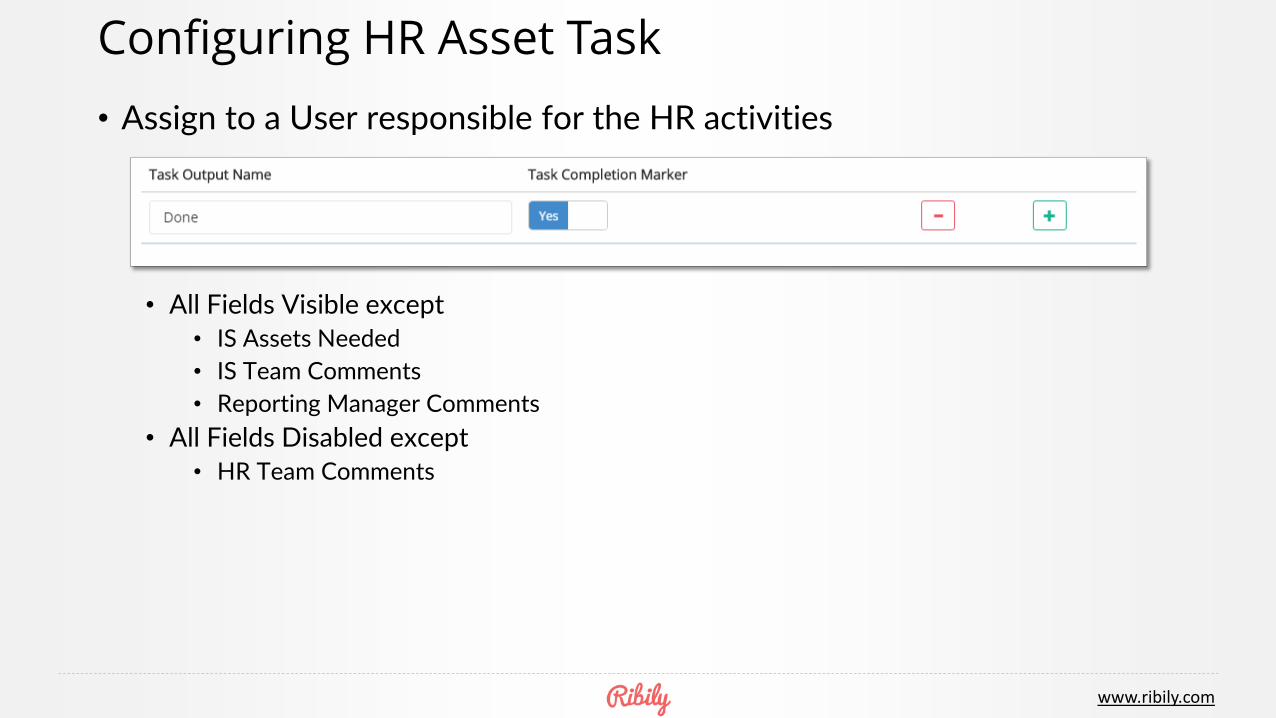
Configuring HR Asset Task
• Assign to a User responsible for the HR activities
• All Fields Visible except• IS Assets Needed
• IS Team Comments
• Reporting Manager Comments
• All Fields Disabled except• HR Team Comments
www.ribily.com
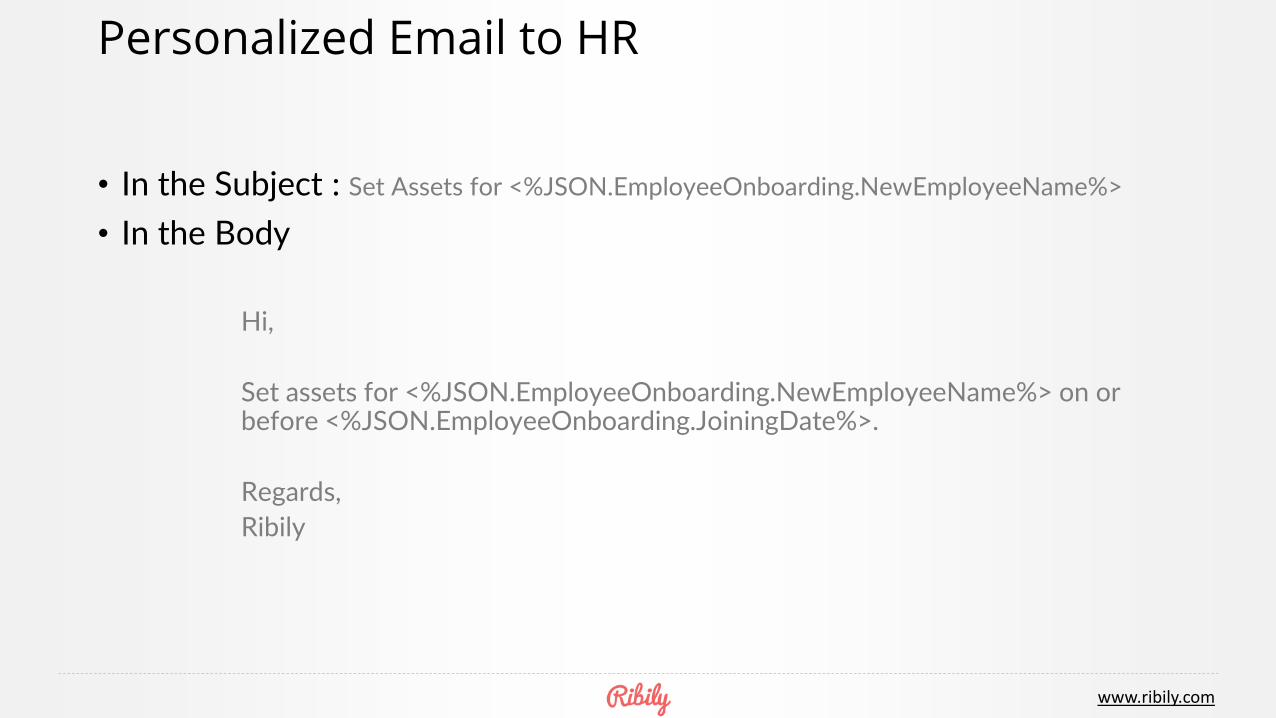
Personalized Email to HR
• In the Subject : Set Assets for <%JSON.EmployeeOnboarding.NewEmployeeName%>
• In the Body
Hi,
Set assets for <%JSON.EmployeeOnboarding.NewEmployeeName%> on or before <%JSON.EmployeeOnboarding.JoiningDate%>.
Regards,
Ribily

www.ribily.com
Set up IS Task in Parallel
• Set up the IS Asset Task in parallel to the HR Asset Task

www.ribily.com
Configuring IS Asset Task
• Assign to a User responsible for the IS activities
• All Fields Visible except• HR Assets Needed
• HR Team Comments
• Reporting Manager Comments
• All Fields Disabled except• IS Team Comments

www.ribily.com
Personalized Email to IS Executive
• In the Subject : Set Assets for <%JSON.EmployeeOnboarding.NewEmployeeName%>
• In the Body
Hi,
Set assets for <%JSON.EmployeeOnboarding.NewEmployeeName%> on or before <%JSON.EmployeeOnboarding.JoiningDate%>.
Regards,
Ribily
www.ribily.com
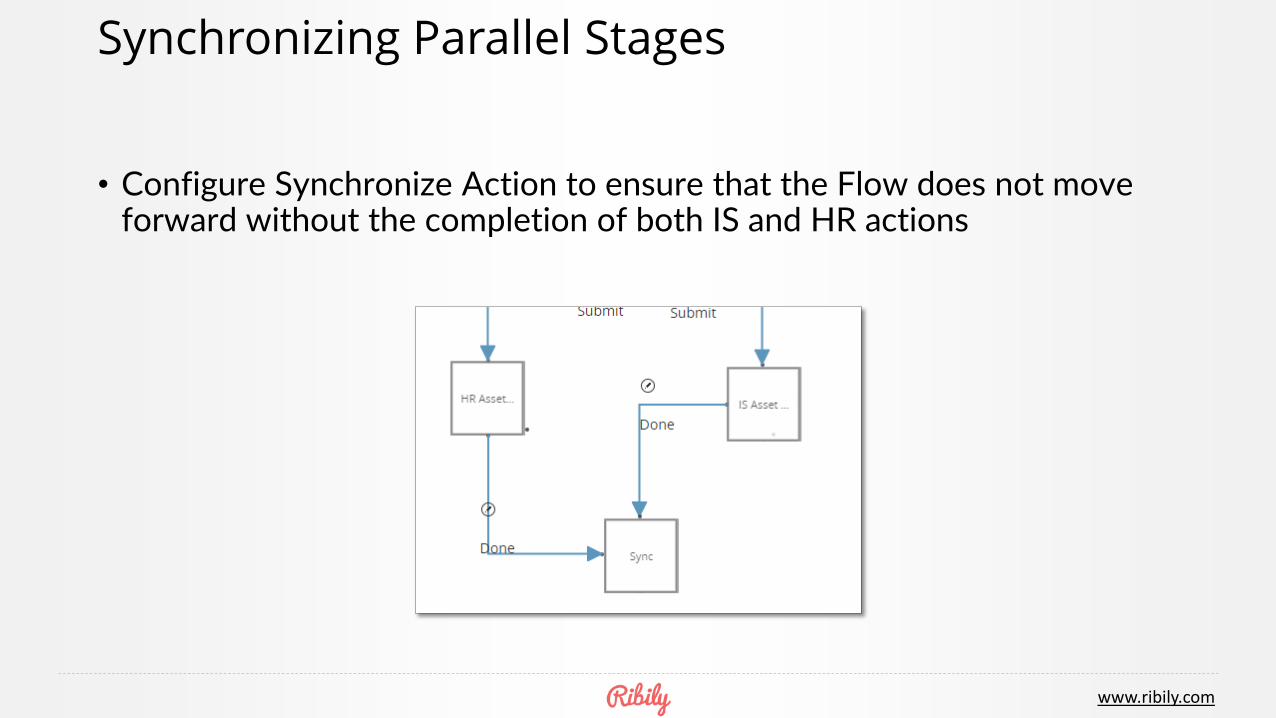
Synchronizing Parallel Stages
• Configure Synchronize Action to ensure that the Flow does not move forward without the completion of both IS and HR actions
www.ribily.com
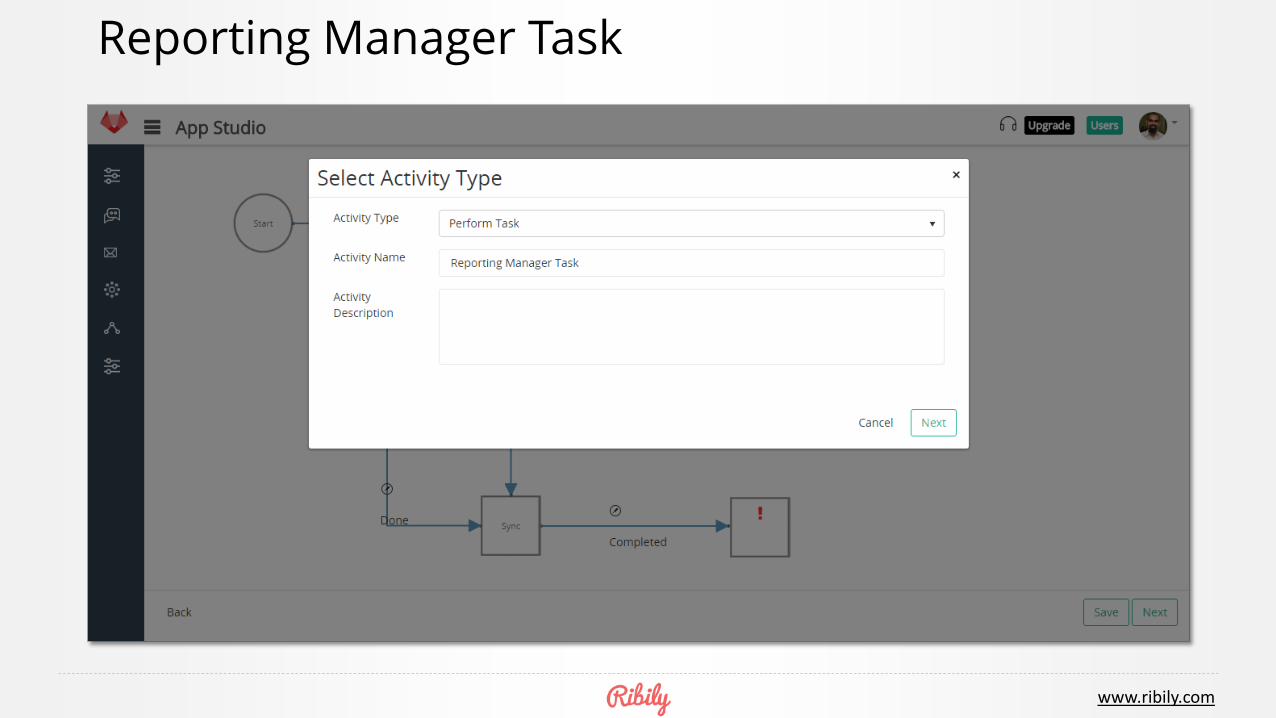
Reporting Manager Task

www.ribily.com
Configuring Reporting Manager Task
• Assign to a Reporting Manager based on Email ID as shown earlier
• All Fields Visible except
• All Fields Disabled except• Reporting Manager Comments
• Email ID of the Mentor
www.ribily.com
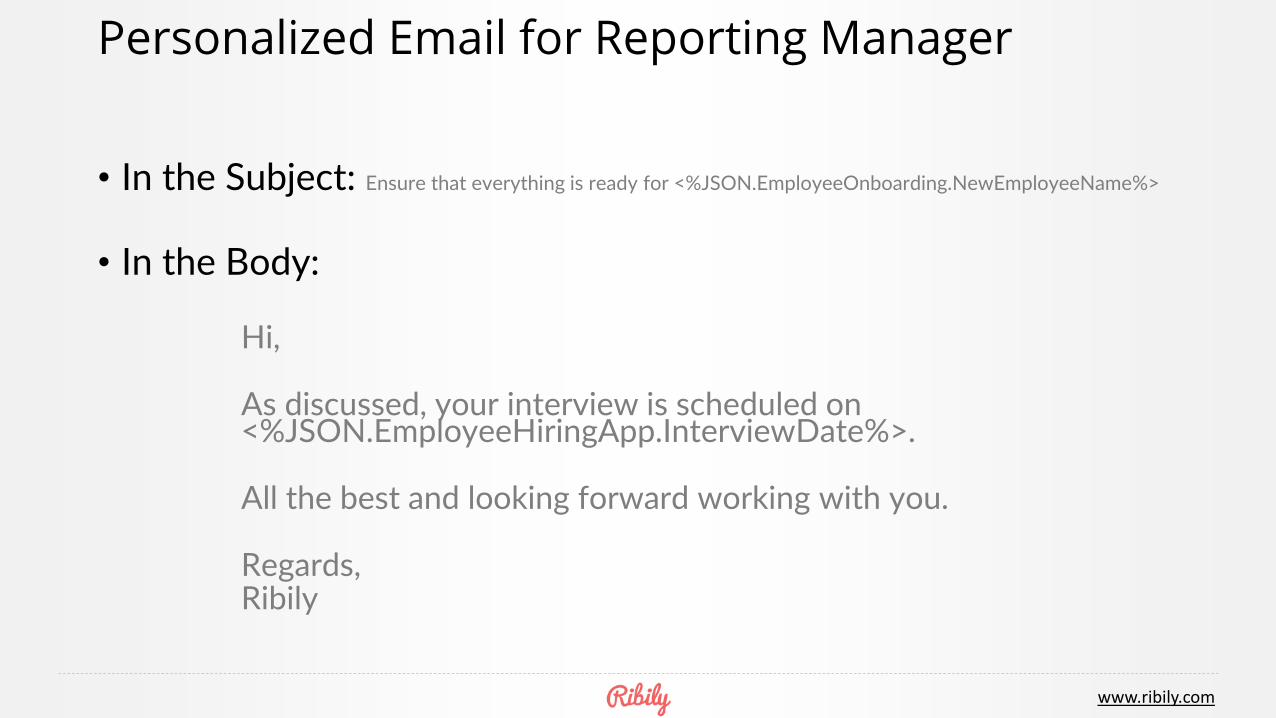
Personalized Email for Reporting Manager
• In the Subject: Ensure that everything is ready for <%JSON.EmployeeOnboarding.NewEmployeeName%>
• In the Body:
Hi,
As discussed, your interview is scheduled on <%JSON.EmployeeHiringApp.InterviewDate%>.
All the best and looking forward working with you.
Regards,Ribily

www.ribily.com
Set up IS Task in Parallel
• Set up the Employee Welcome Task in parallel to the Task to the Mentor to set up the Mentor Mentee Task
www.ribily.com
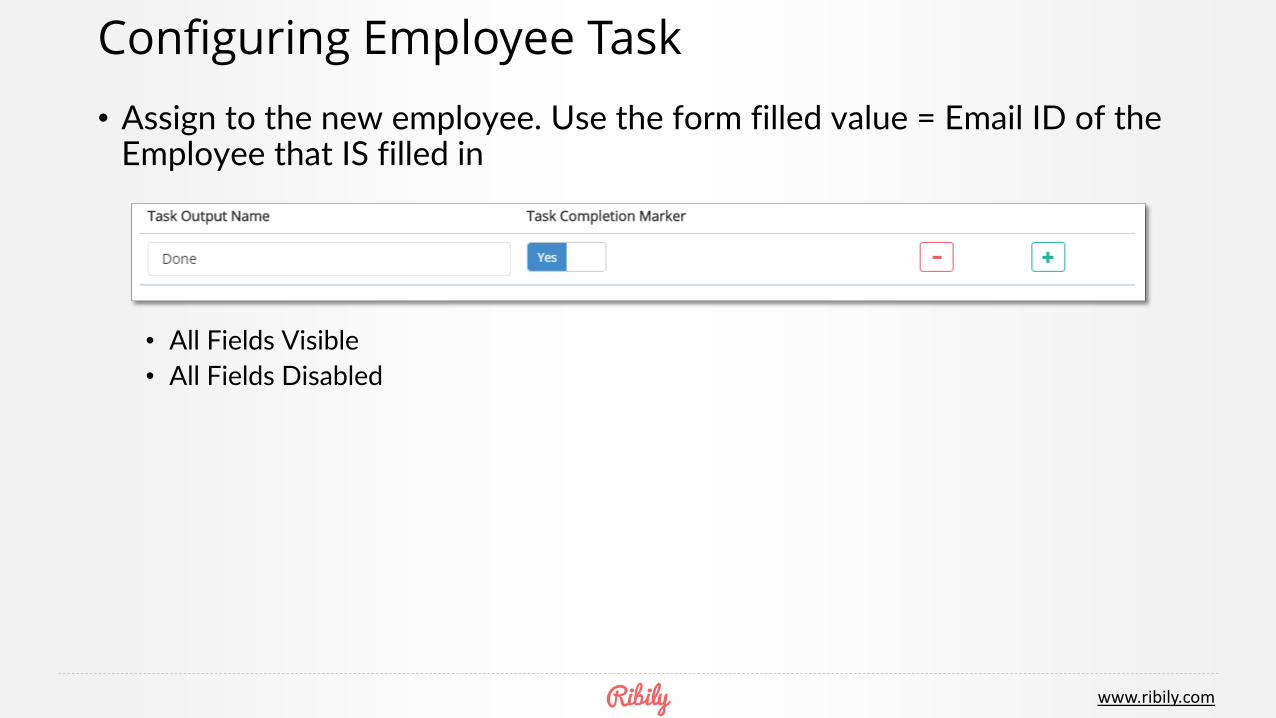
Configuring Employee Task
• Assign to the new employee. Use the form filled value = Email ID of the Employee that IS filled in
• All Fields Visible
• All Fields Disabled

www.ribily.com
Onboarding Email to the new Employee
• In the Subject : Welcome Aboard <%JSON.EmployeeOnboarding.NewEmployeeName%>
• In the Body
Hi <%JSON.EmployeeOnboarding.NewEmployeeName%>,
Welcome Aboard!
Hope you enjoy working here. Your reporting manager has assigned you a mentor for the first month. You can reach him on <%JSON.EmployeeOnboarding.MentorEmailID%>. Please click on Done on the form once the mentorship program is done.Regards,Ribily

www.ribily.com
Configuring Mentor Task
• Assign to the Mentor. Use the form filled value = Email ID of the Mentor that Reporting Manager filled in
• All Fields Visible
• All Fields Disabled
www.ribily.com
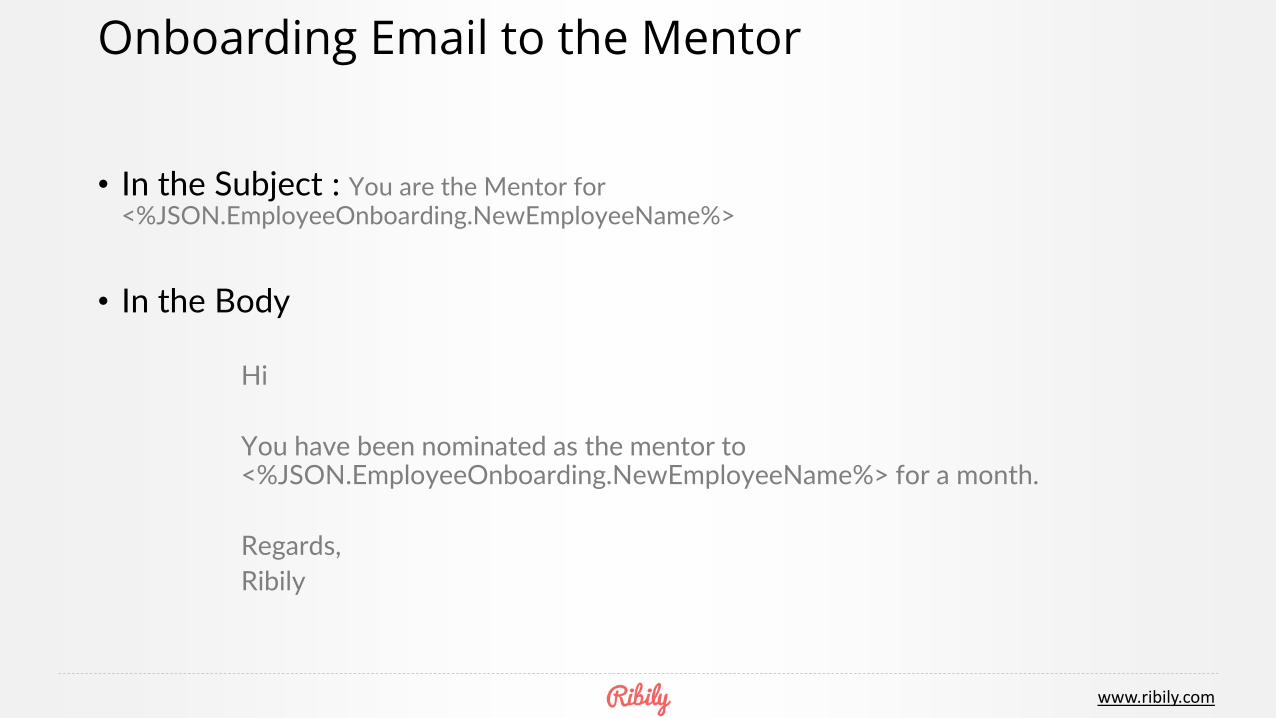
Onboarding Email to the Mentor
• In the Subject : You are the Mentor for <%JSON.EmployeeOnboarding.NewEmployeeName%>
• In the Body
Hi
You have been nominated as the mentor to <%JSON.EmployeeOnboarding.NewEmployeeName%> for a month.
Regards,
Ribily
www.ribily.com
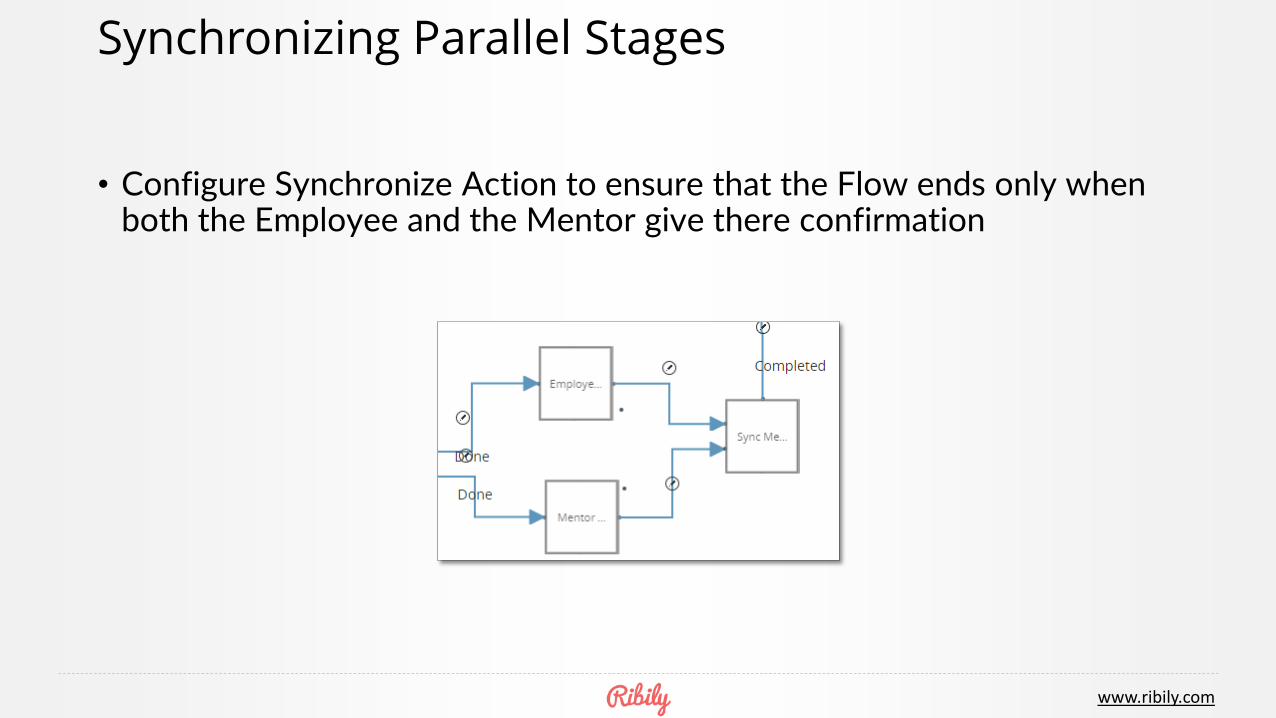
Synchronizing Parallel Stages
• Configure Synchronize Action to ensure that the Flow ends only when both the Employee and the Mentor give there confirmation
www.ribily.com
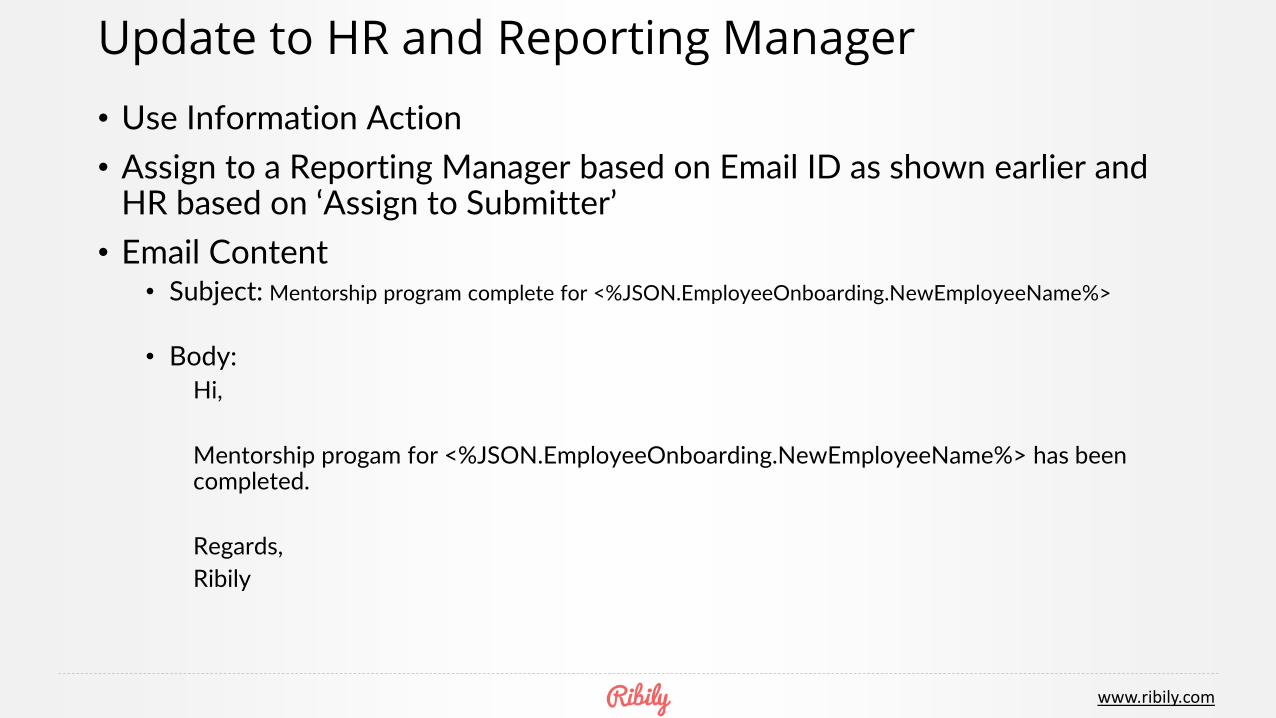
Update to HR and Reporting Manager
• Use Information Action
• Assign to a Reporting Manager based on Email ID as shown earlier and HR based on ‘Assign to Submitter’
• Email Content• Subject: Mentorship program complete for <%JSON.EmployeeOnboarding.NewEmployeeName%>
• Body:Hi,
Mentorship progam for <%JSON.EmployeeOnboarding.NewEmployeeName%> has been completed.
Regards,
Ribily
www.ribily.com
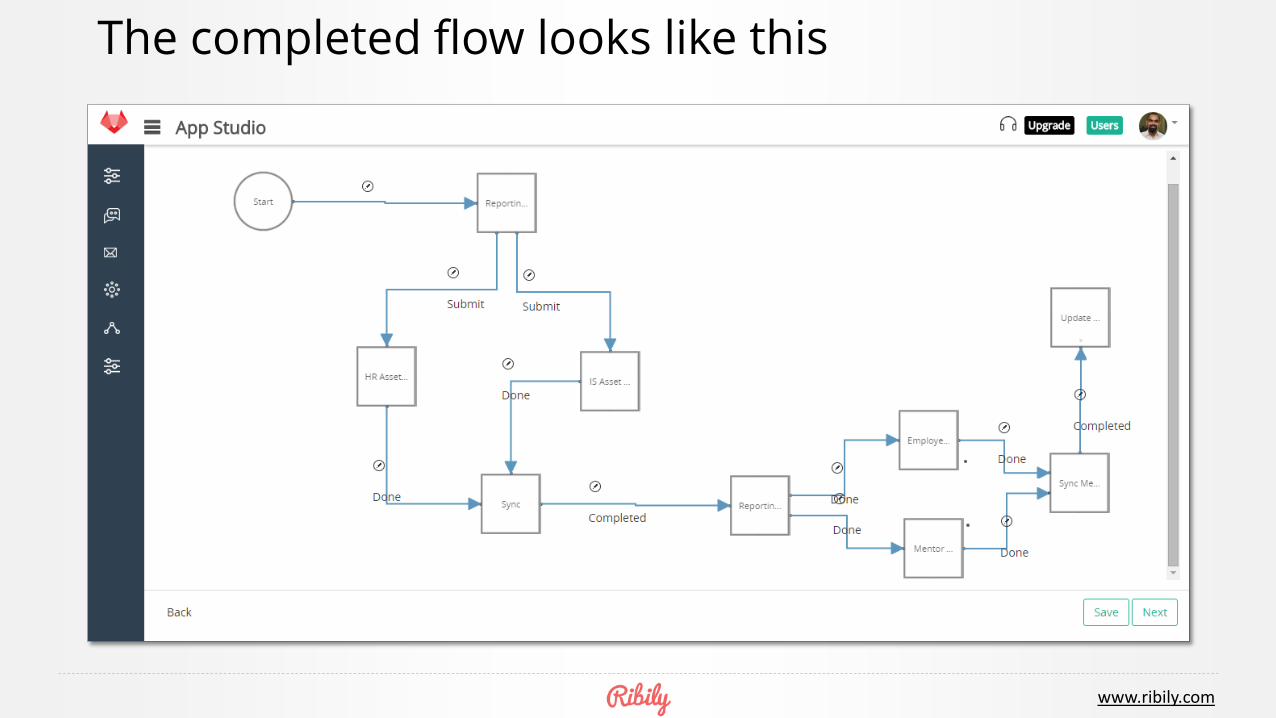
The completed flow looks like this
www.ribily.com
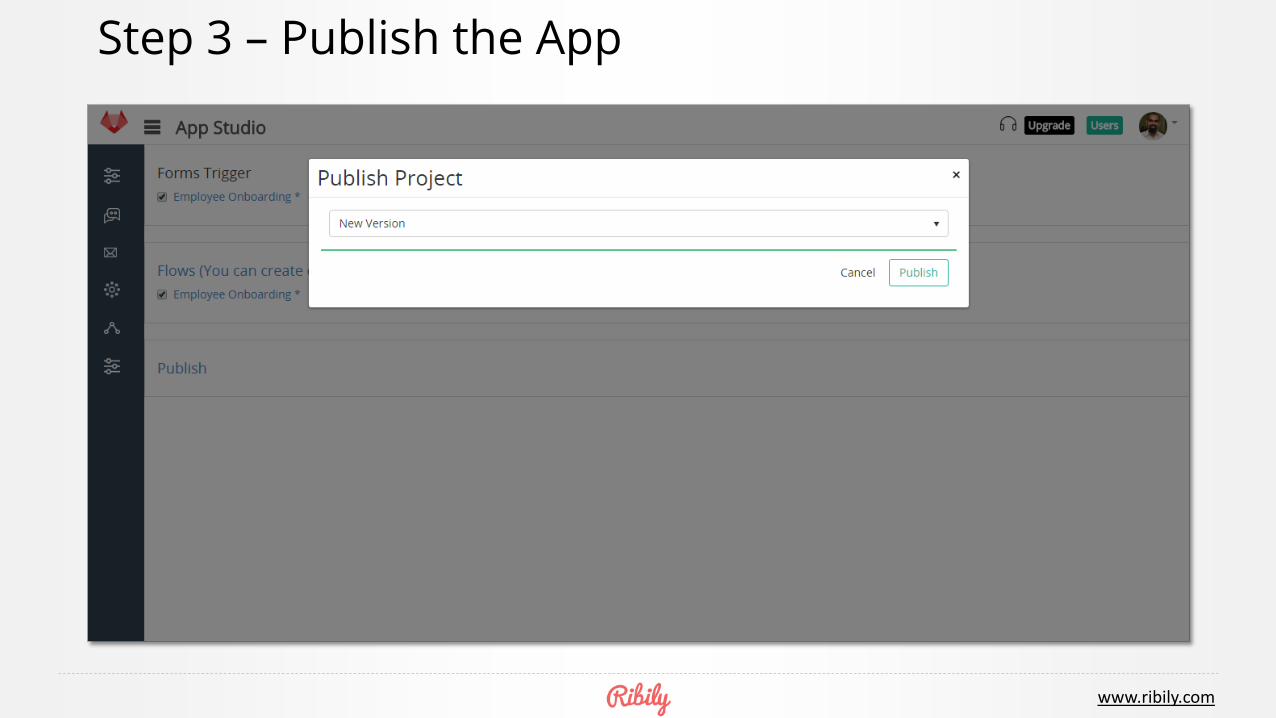
Step 3 – Publish the App
www.ribily.com
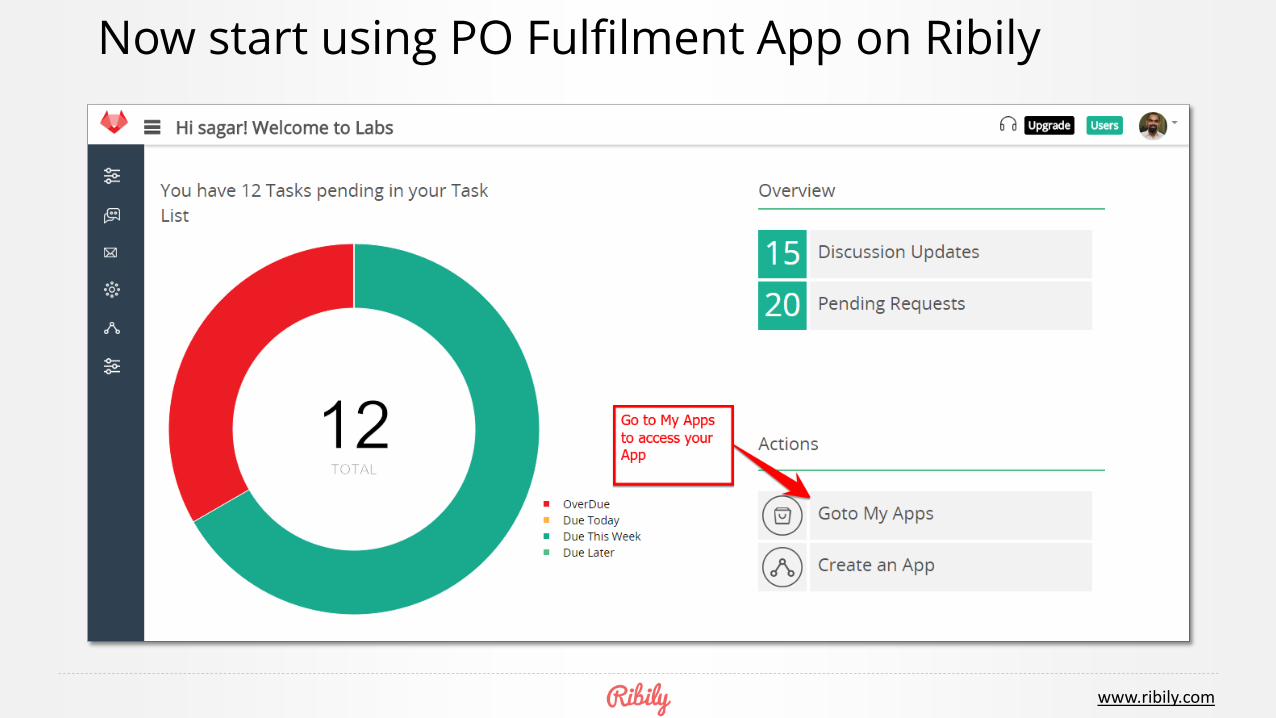
Now start using PO Fulfilment App on Ribily

www.ribily.com
www.ribily.com