panel/bypass operating instructions - tr200
TRANSCRIPT

Rev. 2008-12-09130R0479 MG14A102
*MG14A102*
Panel/BypassOperating Instructions
December 2008
TR200
BAS-SVX22A-EN
BAS-SVX22A-EN
Trane has a policy of continous product and product data improvement and reserves the right tochange design and specifications without notice.
www.trane.com
For more information, contact your local Traneoffice or e-mail us at [email protected]
Literature Order Number BAS-SVX22A-EN
Date December 2008
Supersedes

Table of Contents
Introduction 4
Purpose of the manual 4
Overview 5
Typical bypass operation 5
Bypass Circuits 6
Bypass Options 7
Bypass Platform Configurations 8
Switch Mode Power Supply (SMPS) 8
Disconnects 9
Main disconnect 9
Drive disconnect (optional) 9
Bypass selector switch 9
Option Panel Configurations 10
Option Panel Voltage and Frame Ratings 11
Pre-Installation 12
Receiving Inspection 12
Pre-installation Check 12
Installation Site Check 13
Harsh Environments 14
Airborne Liquids 14
Airborne Solids 14
Corrosive Chemicals 14
Installation 15
Tools Required 15
Branch Cuitcut Protection 15
Drive Fuses 15
Internal Option Panel Fuses 16
Mechanical Installation 16
TR200 Option Panel Operating Instructions 1

Lifting 16
Hoist or Overhead Lift 16
Forklift 16
Shipping Weights 17
Cooling 18
Electrical Installation 20
Component Identification 21
Wire and Cable Access 23
Wire Size 24
Wire Type Rating 24
Terminal Tightening Torques 24
Input Line Connection 24
Motor Wiring 26
Grounding (Earthing) 27
Control Wiring 27
Serial Communication Bus Connection 28
Start Up 29
Pre-start Procedure 29
Inspection Prior to Start Up 30
Start Up Procedure 31
Electromechanical Bypass (EMB) Operation 34
EMB(0) and EMB1 39
EMB Auto bypass 42
EMB Common Run/Stop 43
EMB Run Permissive 43
EMB Overload 44
EMB Safety Interlock 45
EMB Fire Mode 46
EMB Fault Reporting 46
2 TR200 Option Panel Operating Instructions
EMB Switches 47
Electronically Controlled Bypass (ECB) Operation 48
Overview 48
Drive Control Terminals 49
ECB Control Card 51
ECB Drive or Bypass Selection 54
ECB Programming 55
ECB Hand/OFF/Auto 56
ECB Mode of Operation 57
Bypass Status Word Bit Examples 59
ECB Auto Bypass 59
ECB Run Permissive 61
ECB Overload 61
ECB Safety Interlock 63
ECB Common Run/Stop 63
ECB Advanced Fire Mode 64
ECB Fault Reporting 64
Non-bypass Component Functions 65
Power Fusing 65
Reactors 65
Disconnects 65
Motor Options 66
Contactor Motor Select 67
Start Up Troublehooting 68
Option Panel Alarm and Warnings 68
TR200 Option Panel Operating Instructions 3

IntroductionPurpose of the manualThis manual is intended to provide detailed information for the installation and operation of the option panel
used in conjunction with a Trane variable frequency drive (VFD or drive). To enable efficient handling of the
equipment, requirements are provided for installation of mechanical, electrical, and control wiring, proper
grounding, and environmental considerations. Pre-start and start up procedures are detailed. Also included is
a detailed overview of the option panel bypass function. In addition, identification of other optional components
and their operation and start up troubleshooting instructions are included. For the electronically controlled by-
pass, additional programming and operation information is provided.
Warnings, Cautions and NoticesNote that warnings, cautions and notices appear at appropriate intervals throughout this manual. Warnings are
provide to alert installing contractors to potential hazards that could result in personal injury or death. Cautions
are designed to alert personnel to hazardous situations that could result in personal injury, while notices indicate
a situation that could result in equipment or property-damage-only accidents.
Your personal safety and the proper operation of this machine depend upon the strict observance of these
precautions.
Warnings, Cautions and Notices appear at appropriate sections throughout this literature. Read these carefully.
WARNINGIndicates a potentially hazardous situation which, if not avoided, could result in death or serious injury.
CAUTIONIndicates a potentially hazardous situation which, if not avoided, could result in minor or moderate injury. It could alsobe used to alert against unsafe practices.
NOTICEIndicates a situation that could result in equipment or property-damage only accidents.
Note
Indicates something important to be noted by the reader.
✮ Indicates default setting
4 TR200 Option Panel Operating Instructions

OverviewA variable frequency drive regulates the speed and operation of an electric motor(s). The drive is programmable
and offers many features and savings compared to operating a motor from unregulated line voltage. The option
panel is a protective enclosure in which the drive and various optional components are assembled and mounted.
One of the most common functions of the option panel is to allow switching between VFD control and running
in bypass. In bypass, the motor is operated directly from line input power.
Two types of bypass options are available: the electromechanical bypass (EMB) and electronically controlled
bypass (ECB). The EMB is operated by selector switches on the front of the panel. The EMB controls a motor(s)
by switching between drive control, operation in bypass, or off. In addition, a test setting is available which
disengages the motor from the drive but keeps the drive operational while the motor runs in bypass. The
switching function activates contactors that open or close to provide power to the motor through the drive or
bypass circuitry, as required.
The ECB also uses contactors to provide power to the motor through the drive or bypass circuitry. However, the
ECB contains a local processor which interacts with the drive’s control logic for programmable options, remote
inputs, and status reporting. The VFD’s logic circuitry is backed up by an independent panel-mounted power
supply so that, even if the drive loses power, control and communication functions are maintained. Program-
ming and display are provided by the VFD’s keypad. An important feature of the ECB is the ability to accept
commands from a building automation system (BAS) and to report operational status in return.
See more detailed descriptions of the EMB in Sections 5 and ECB in Section 6 of this manual.
Typical bypass operationWith contactors M1 and M2 closed and contactor M3 open (see the following figure (Basic 3-contactor bypassfunctions)), the motor is running in drive control. Opening contactor M2 removes power to the motor but allows
the drive to remain under power. This is the test mode and only available in the three-contactor configuration
shown. With contactors M1 and M2 open and contactor M3 closed, the motor is running in bypass from the line
input. For a two-contactor configuration, M1 is absent. In this case, contactors M2 and M3 control the options
for running in drive or bypass mode. The drive disconnect and fuses shown in the figure are controlled by an
ON/OFF disconnect on the bypass panel.
Introduction
TR200 Option Panel Operating Instructions 5
Bypass Circuits
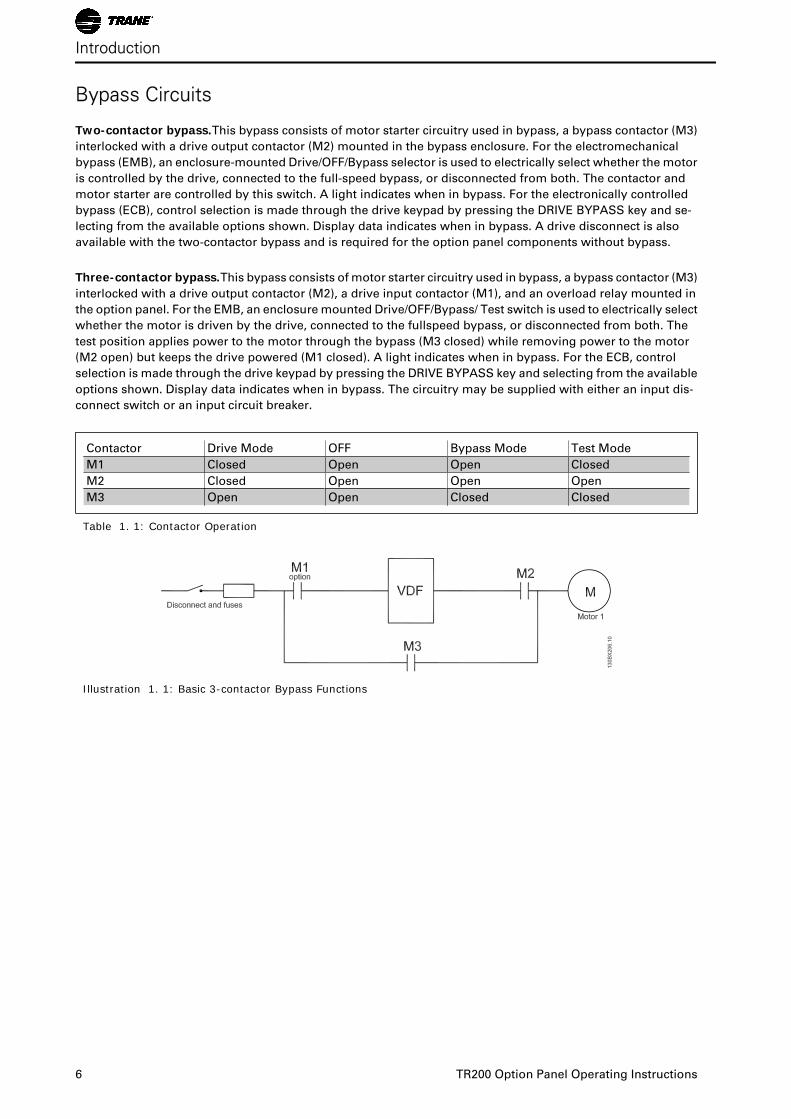
Two-contactor bypass.This bypass consists of motor starter circuitry used in bypass, a bypass contactor (M3)
interlocked with a drive output contactor (M2) mounted in the bypass enclosure. For the electromechanical
bypass (EMB), an enclosure-mounted Drive/OFF/Bypass selector is used to electrically select whether the motor
is controlled by the drive, connected to the full-speed bypass, or disconnected from both. The contactor and
motor starter are controlled by this switch. A light indicates when in bypass. For the electronically controlled
bypass (ECB), control selection is made through the drive keypad by pressing the DRIVE BYPASS key and se-
lecting from the available options shown. Display data indicates when in bypass. A drive disconnect is also
available with the two-contactor bypass and is required for the option panel components without bypass.
Three-contactor bypass.This bypass consists of motor starter circuitry used in bypass, a bypass contactor (M3)
interlocked with a drive output contactor (M2), a drive input contactor (M1), and an overload relay mounted in
the option panel. For the EMB, an enclosure mounted Drive/OFF/Bypass/ Test switch is used to electrically select
whether the motor is driven by the drive, connected to the fullspeed bypass, or disconnected from both. The
test position applies power to the motor through the bypass (M3 closed) while removing power to the motor
(M2 open) but keeps the drive powered (M1 closed). A light indicates when in bypass. For the ECB, control
selection is made through the drive keypad by pressing the DRIVE BYPASS key and selecting from the available
options shown. Display data indicates when in bypass. The circuitry may be supplied with either an input dis-
connect switch or an input circuit breaker.
Contactor Drive Mode OFF Bypass Mode Test Mode
M1 Closed Open Open Closed
M2 Closed Open Open Open
M3 Open Open Closed Closed
Table 1. 1: Contactor Operation
Illustration 1. 1: Basic 3-contactor Bypass Functions
Introduction
6 TR200 Option Panel Operating Instructions

Bypass Options
Common run/stop with bypass.Allows a common remote signal through the VFD input terminals to initiate
operation in either drive control or bypass. A relay closure starts the motor(s) in drive or bypass, depending
upon the position of the bypass selector switch.
Automatic bypassAutomatically transfers the motor(s) from drive to bypass without operator intervention
when a fault condition trips the drive, after a programmable time-out period. The VFD’s internal fault circuitry
controls this action. The time delay permits all automatically resettable faults to clear prior to transfer to bypass.
Run permissive or safety circuit signals override the auto bypass function and may prevent or delay running in
bypass.
Run permissive in bypass.With run permissive active, the drive sends a run request and waits for a remote
response to before notifying the motor to start. The response indicates the system is safe to operate.
Basic fire mode in bypass.This option switches the panel to bypass whenever a remote fire mode command
is given to the VFD through the input terminals. In either drive or bypass, fire mode is intended to ignore common
safety and overload inputs in emergency situations. The motor will continue to run in bypass until fire mode is
removed or the drive or option panel fail. External safety signals and motor overload are ignored when in fire
mode.
Advanced fire mode in bypass.The advanced fire mode allows for a variety of programmable responses to an
external fire mode command signal. Bypass options are programmed through the drive’s fire mode parameters.
See fire mode section of the drive manual and support materials for available options.
Overload protection.This thermally activated device provides mechanical overload protection for the motor(s)
while in bypass operation. It measures motor current and is set to the full load amps (FLA) of the motor. A 1.2
x FLA service factor is built-in and maintained, meaning that should the motor current increase above that value,
the overload will calculate the level of increase to activate timing for the trip function. The higher the current
draw, the quicker the trip response. It provides Class 20 motor protection.
Introduction
TR200 Option Panel Operating Instructions 7

Bypass Platform Configurations
The EMB is available in three platforms: EMB(0), EMB1, and EMB2. The features available as options with each
platform are listed in the following table. The ECB, also listed below, has all option features available. See
Chapter 5 for additional details on the EMB and Chapter 6 for the ECB.
Control Feature EMB(0) EMB1 EMB2 ECB
Safety Interlock X X X X
Common Start/Stop X X X
Automatic Bypass X X
Run Permissive in Bypass X X
Basic Fire Mode X X
Advanced Fire Mode X
Serial Communication X
Table 1. 2: Bypass Configurations
Illustration 1. 2: Bypass Curcuit with Options
Switch Mode Power Supply (SMPS)
The VFD’s logic circuitry is backed up by an independent panel-mounted switch mode power supply so that,
even if the drive loses power, the control and communication functions are maintained. The SMPS converts
three-phase AC input power to 24 VDC control power. Since the SMPS draws power from all three phases, it
offers immunity protection from most phase-loss and brown-out conditions. The SMPS is internally protected
from short circuit on its output and three board-mounted fuses provide additional protection. The SMPS is not
designed for external use and may take up to 5 seconds to initialize at power-up.
Introduction
8 TR200 Option Panel Operating Instructions

Disconnects
Main disconnectThe main disconnect removes line input power to the drive and bypass. A main disconnect is available in four
options.
• Fused disconnect. Two-position (ON/OFF) rotary switch, padlock compatible, with three fuses, one on
each phase, built into the switch. For safety, the switch must be in the OFF position before the option
panel door can be opened
• Disconnect with fuses. Twoposition (ON/OFF) rotary switch, padlock compatible, with a fuse block
mounted separately from the disconnect. Three fuses, one on each phase, are located on the fuse
block. For safety, the switch must be in the OFF position before the option panel door can be opened.
• Disconnect without fuses. For user-supplied fuses option.
• Main circuit breaker. A thermal/ magnetic current interrupt device using an ON/TRIP/OFF/RESET switch.
When in the ON position, a trip fault removes power from the drive/bypass circuit and the switch
moves to the TRIP setting. It must be moved to the RESET position momentarily after the fault has
been cleared to reset the circuit breaker.
Drive disconnect (optional)Twoposition (ON/OFF) rotary switch disconnects main AC line input power to the drive only.
Bypass selector switchThe bypass selector switch is used for either the 2- contactor or 3-contactor bypass for EMB units.
2
130B
X20
8.10
3
1
Illustration 1. 3: Disconnects
1. Bypass selector switch
2. Main disconnect
3. Drive disconnect
Introduction
TR200 Option Panel Operating Instructions 9

Option Panel ConfigurationsThe TR 200 Drive Series has three tiers of option panel enclosure types. These designations are universal for
both the EMB and ECB panels as well as drive options without bypass. See the below figure for descriptions
and available options.
Tier 1 Tier 2 Tier 3
Drive plus either
or both of the
following:
1. Fuses
2. Disconnect
Drive with bypass or up to two of the
following:
1. Contactor motor selection
2. dV/dt filter or input AC line reactor (NEMA
1 only)
3. Dual motor control
Drive with bypass plus up to two of the
following:
1. Contactor motor selection
2. dV/dt filter or input AC line reactor (NEMA
1 only)
3. Dual motor control
Table 1. 3: Tier Definitions and Features
Introduction
10 TR200 Option Panel Operating Instructions

Option Panel Voltage and Frame RatingsThe following table defines the voltage and hp ratings of the frames sizes for the option panel. See the me-
chanical drawing shipped with the unit for dimensions.
Frames A2 - A5Volts VAC hp
208-230 1.5-5
460-480 1.5-10
575-600 1.5-10
Table 1. 4: Panel Voltage and Frame Ratings
Frame B1Volts VAC hp
208-230 7.5-15
460-480 15-25
575-600 15-25
Frame B2Volts VAC hp
208-230 20
460-480 30-40
575-600 30-40
Frame C1Volts VAC hp
208-230 25-30
460-480 50-75
575-600 50-75
Frame C2Volts VAC hp
208-230 40-60
460-480 100-125
575-600 100-125
Frame D1Volts VAC hp
460-480 150-200
575-600 150-200
Frame D2Volts VAC hp
460-480 250-350
575-600 250-400
Introduction
TR200 Option Panel Operating Instructions 11

Pre-InstallationReceiving InspectionInspect the packaging and equipment closely when received. Any indication of careless handling by the carrier
should be noted on the delivery receipt, especially if the equipment will not be immediately uncrated. Obtain
the delivery person’s signed agreement to any noted damages for any future insurance claims. Ensure that the
model number and power match the order and intended use for the drive.
IMPORTANT LOST OR DAMAGED GOODS INSPECT THIS SHIPMENT IMMEDIATELY UPON ARRIVAL If goods
are received short or in damaged condition, insist on a notation of the loss or damage across the face of the
freight bill. Otherwise no claim can be enforced against the transportation company. If concealed loss or damage
is discovered, notify your carrier at once and request an inspection. This is absolutely necessary. Unless you do
this the carrier will not entertain any claim for loss or damage. The agent will make an inspection and can grant
a concealed damage notation. If you give the transportation company a clear receipt for equipment that has
been damaged or lost in transit, you do so at your own risk and expense. Trane IS WILLING TO ASSIST YOU
TO COLLECT CLAIMS FOR LOSS OR DAMAGE, BUT WILLINGNESS ON OUR PART DOES NOT MAKE US RE-
SPONSIBLE FOR COLLECTION OF CLAIMS OR REPLACEMENT OF MATERIAL. THE ACTUAL FILING AND
PROCESSING OF THE CLAIM IS YOUR RESPONSIBILITY.
Illustration 2. 1: Sample Panel Label
1. Panel input rating
2. Panel output rating
3. Serial number
Pre-installation Check1.Compare option panel model number to what was ordered.
2. Ensure each of following are rated for same voltage:
• Drive
• Option panel
• Power line
• Motor
12 TR200 Option Panel Operating Instructions
3. Ensure that panel output rating is equal to or greater than motor total full load current for full motor per-
formance.
• For multiple motor applications, add the full load current ratings of all motors.
• Motor power size and option panel must match for proper overload protection.
• If panel rating is less than motor, full motor output cannot be achieved.
4. Check motor wiring:
• Any disconnect between drive and motor should be interlocked to drive safety interlock circuit to avoid
unwanted drive trips.
• Do not connect power factor correction capacitors between drive and motor.
• Two speed motors must be wired permanently for full speed.
• Y-start, Δ-run motors must be wired permanently for run.
Installation Site Check
• Because the option panel relies on the ambient air for cooling, it is important to observe the limitations
on ambient air temperature. Derating concerns start above 104°F (40°C) and 3300 feet (1000 m) ele-
vation above sea level.
• It is important with multiple panels to check wall strength. Make sure that the proper mounting screws
or bolts are used.
• Ensure that the wall or floor area for installation will support the weight of the unit.
• If construction work continues after the equipment is mounted, it is important to keep the interior free
from concrete dust and similar dirt. If the unit does not have power applied to it, supply a protective
covering. It is important to ensure that the components stay as clean as possible. It may be necessary
to clean the interior once construction is completed.
• Keep drawings and manuals accessible for detailed installation and operation instructions. It is impor-
tant that the manuals be available for equipment operator.
Pre-Installation
TR200 Option Panel Operating Instructions 13
Harsh Environments
NOTICEThe mechanical and electrical components within the option panel can be adversely affected by the environment. Theeffects of contaminants in the air, either solid, liquid, or gas, are difficult to quantify and control.
Airborne LiquidsLiquids in the air can condense in components. Water carried in the air is easily measured as relative humidity,
but other vapors are often more difficult to measure or control. Steam, oil and salt water vapor may cause
corrosion of components. In such environments, use NEMA 12 enclosures to limit the exchange of outside air
into the option enclosure. Extremely harsh environments may require a higher level of protection.
Airborne SolidsParticles in the air may cause mechanical, electrical or thermal failure in components. A NEMA 1 enclosure
provides a reasonable degree of protection against falling particles, but it will not prevent the fan from pulling
dirty air into the enclosure. A typical indicator of excessive levels of airborne particles is dust around the fan. In
dusty environments, use NEMA 12 enclosures.
Corrosive ChemicalsIn environments with high temperatures and humidity, corrosive gases such as sulfur, nitrogen and chlorine
compounds cause corrosion to occur in components. Indications of corrosion are blackened copper or rust on
steel or oxidized aluminum. In such environments, it is recommended that the equipment be mounted in a
cabinet with fresh air ventilation and that corrosive compounds be kept away. A non-ventilated cabinet fitted
with an air conditioner as a heat exchanger may be used. Conformal coated circuit boards may be specified to
reduce the corrosive effects of a harsh environment.
Pre-Installation
14 TR200 Option Panel Operating Instructions
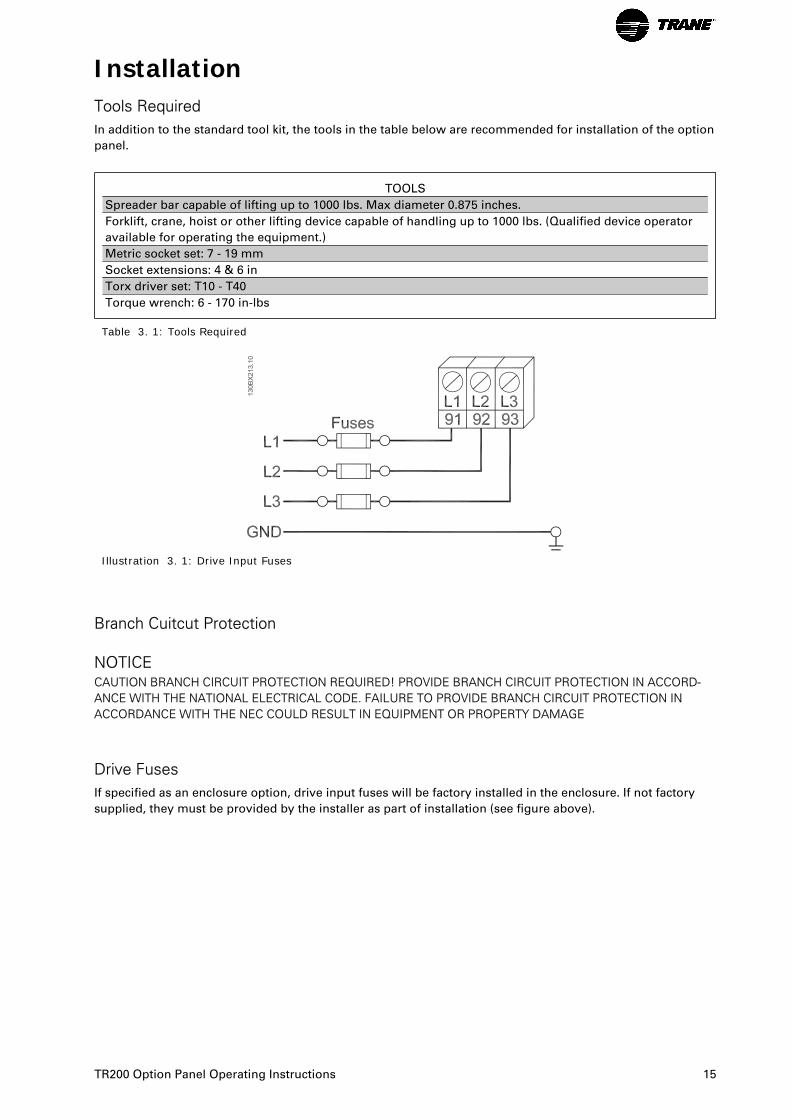
InstallationTools RequiredIn addition to the standard tool kit, the tools in the table below are recommended for installation of the option
panel.
TOOLS
Spreader bar capable of lifting up to 1000 lbs. Max diameter 0.875 inches.
Forklift, crane, hoist or other lifting device capable of handling up to 1000 lbs. (Qualified device operator
available for operating the equipment.)
Metric socket set: 7 - 19 mm
Socket extensions: 4 & 6 in
Torx driver set: T10 - T40
Torque wrench: 6 - 170 in-lbs
Table 3. 1: Tools Required
Illustration 3. 1: Drive Input Fuses
Branch Cuitcut Protection
NOTICECAUTION BRANCH CIRCUIT PROTECTION REQUIRED! PROVIDE BRANCH CIRCUIT PROTECTION IN ACCORD-ANCE WITH THE NATIONAL ELECTRICAL CODE. FAILURE TO PROVIDE BRANCH CIRCUIT PROTECTION INACCORDANCE WITH THE NEC COULD RESULT IN EQUIPMENT OR PROPERTY DAMAGE
Drive FusesIf specified as an enclosure option, drive input fuses will be factory installed in the enclosure. If not factory
supplied, they must be provided by the installer as part of installation (see figure above).
TR200 Option Panel Operating Instructions 15

Internal Option Panel FusesWhen applicable, use the specified fuse or an equivalent replacement only for internal option panel fuses. Fuse
options include the drive disconnect and contactor fuses. See the nameplate label (table below) on the inside
cover of the unit for option panel fuse ratings.
Fuse Manufacturer Part Number/Size
F12 Ferraz-Shawmut 500V FA 5 A
F13 Ferraz-Shawmut 500V FA 10 A
F15 Bussmann LPJ-25SP
F16 Bussmann LPJ-25SP
F900,F901,F902 Ferraz-Shawmut 500V FA 4 A
F00 ... 600 VAC, 120 A, Class CC
Table 3. 2: Sample Fuse Rating Label
Mechanical Installation
Lifting
WARNINGCheck the weight of unit to determine the safety of the lifting method. Ensure that the lifting device is suitable for thetask. If necessary, plan for a hoist, crane or forklift with appropriate rating to move the units.
Follow recommendations below. failure to do so could result in death or serious injury.
Hoist or Overhead Lift
• Use solid steel spreader bar for lifting. Slide spreader bar through two (2) lifting rings on drive. Lifting
rings are 19 mm (0.75 in) in diameter (see previous table).
• Connect spreader bar to a hoist or other lifting device.
• Lift unit slightly using lifting rings with weight distributed evenly.
• Remove skid and other supports from under drive.
• For floor mounting applications, a floor mounting kit is available from Trane specifically designed to
anchor drive to floor.
Forklift
• Only a competent lift operator with additional support personnel should attempt moving unit.
• Carefully position forklift and ensure stability prior to lift.
Installation
16 TR200 Option Panel Operating Instructions
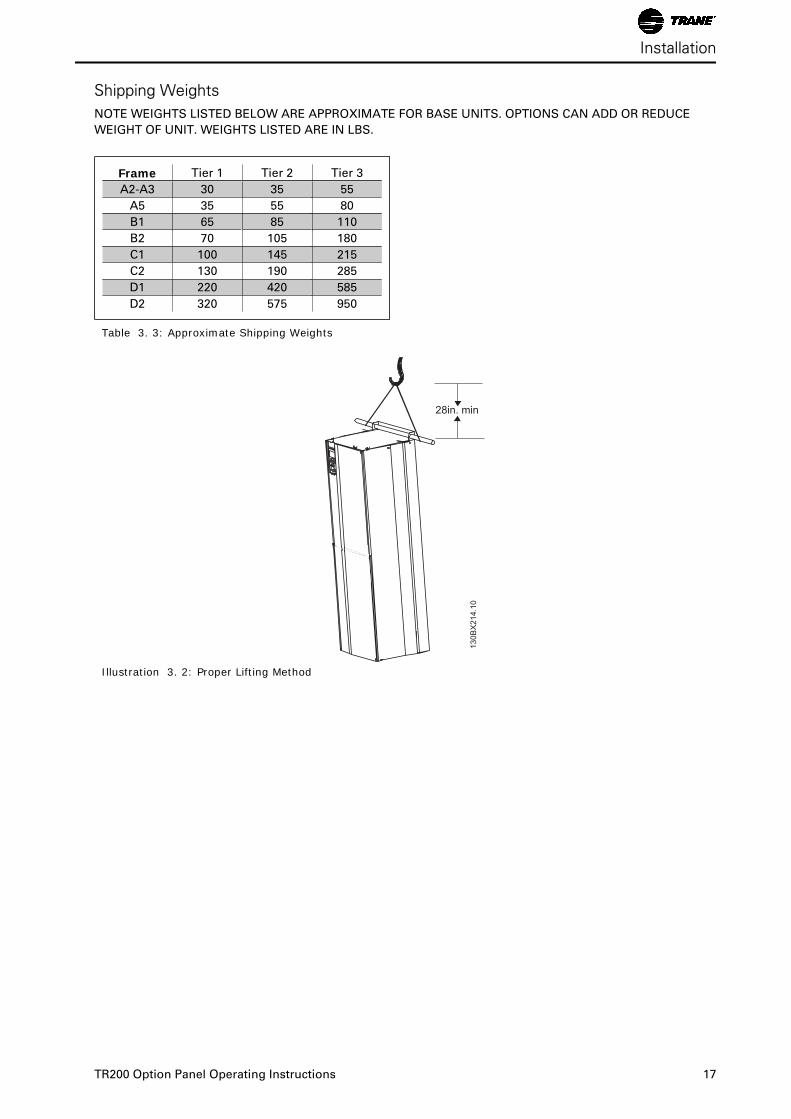
Shipping WeightsNOTE WEIGHTS LISTED BELOW ARE APPROXIMATE FOR BASE UNITS. OPTIONS CAN ADD OR REDUCE
WEIGHT OF UNIT. WEIGHTS LISTED ARE IN LBS.
Frame Tier 1 Tier 2 Tier 3
A2-A3 30 35 55
A5 35 55 80
B1 65 85 110
B2 70 105 180
C1 100 145 215
C2 130 190 285
D1 220 420 585
D2 320 575 950
Table 3. 3: Approximate Shipping Weights
28in. min
130B
X21
4.10
Illustration 3. 2: Proper Lifting Method
Installation
TR200 Option Panel Operating Instructions 17

Cooling
• Mount the drive and panel vertically.
• Option panels rely on the ambient air for cooling, it is important to observe the limitations on ambient
air temperature. See the following table for temperature rating data. Derating concerns start above
3300 feet elevation above sea level.
• Most option panels with drives may be mounted side-by-side without additional side clearance. A2 and
A3 units require 1.5 in. clearance between units (see the next figure).
• Top and bottom clearance is required for cooling (see figure Cooling Airflow). Generally, 100 to 250 mm
(4 to 10 inches) minimum clearance is required, depending upon the hp (kW) of the unit. See the
mechanical drawing shipped with the unit for specific requirements.
• No additional back plate is required for drives with the option panel.
• Units may be mounted flush to the wall or free standing. A free-standing mounting kit is available from
Trane.
• See table below for temperature ratings.
Temperature Ratings
Frame Size NEMA 1 NEMA 12
A2-A3 45° C NA
A5 NA 40° C
B1-C1 45° C 40° C
C2, D1-D2 40° C 40° C
Table 3. 4: Temperature Ratings
Illustration 3. 3: Side Cooling Clearance, A-2 and A-3 Frames
Installation
18 TR200 Option Panel Operating Instructions

4.0 in min.
CEILING
FLOOR
AIRFLOW
4.0 in min.AIRFLOW
130B
X21
6.10
Illustration 3. 4: Cooling Airflow
Installation
TR200 Option Panel Operating Instructions 19

Electrical Installation
WARNINGEQUIPMENT HAZARD! ROTATING SHAFTS AND ELECTRICAL EQUIPMENT CAN BE HAZARDOUS. IT IS STRONGLYRECOMMENDED THAT ALL ELECTRICAL WORK CONFORM TO ALL NATIONAL AND LOCAL REGULATIONS. IN-STALLATION, START-UP AND MAINTENANCE SHOULD BE PERFORMED ONLY BY QUALIFIED PERSONNEL.FAILURE TO FOLLOW LOCAL REGULATIONS COULD RESULT IN DEATH OR SERIOUS INJURY.
• Motor control equipment and electronic controls are connected to hazardous line voltages. Extreme care
should be taken to protect against electrical hazard.
• Correct protective grounding of the equipment must be established. Ground currents are higher than 3
mA.
• A dedicated ground wire is required.
• Wear safety glasses whenever working on electric control or rotating equipment.
NOTE MAKE ALL POWER CONNECTIONS WITH MINIMUM 75O C RATED COPPER WIRING FOR INSTALLA-
TIONS IN NORTH AMERICA
WARNINGINDUCED VOLTAGE! RUN OUTPUT MOTOR CABLES FROM MULTIPLE DRIVES SEPARATELY. INDUCED VOLTAGEFROM OUTPUT MOTOR CABLES RUN TOGETHER CAN CHARGE EQUIPMENT CAPACITORS EVEN WITH THEEQUIPMENT TURNED OFF AND LOCKED OUT. FAILURE TO RUN OUTPUT MOTOR CABLES SEPARATELY COULDRESULT IN DEATH OR SERIOUS INJURY.
NOTE RUN INPUT POWER, MOTOR WIRING AND CONTROL WIRING IN THREE SEPARATE METALLIC CON-
DUITS OR RACEWAYS FOR HIGH FREQUENCY NOISE ISOLATION. FAILURE TO ISOLATE POWER, MOTOR AND
CONTROL WIRING COULD RESULT IN LESS THAN OPTIMUM DRIVE AND ASSOCIATED EQUIPMENT PER-
FORMANCE.
• Because the wiring from the option enclosure to the motor carries high frequency electrical pulses, it is
important that no other wires are run in this conduit. If the incoming power wiring is run in the same
conduit as the motor wiring, these pulses can couple electrical noise back onto the building power
grid.
At least three separate conduits must be connected to the panel option (the next figure).
• Power into the option enclosure (and ground back to the distribution panel)
• Power from the option enclosure to the motor (and earth ground)
• Control wiring
Control wiring should always be isolated from the high voltage power wiring.
Avoid getting metal chips into electronics.
Follow the connection procedures as illustrated in the drawing provided with the unit.
Installation
20 TR200 Option Panel Operating Instructions

Illustration 3. 5: Power Connections
Electrical Installation
Component IdentificationMechanical layout drawings are provided inside the cover of each unit with an option panel. These illustrations
are intended to provide the installer or equipment user with component identification and location for that
specific unit. The below figure represents a typical layout drawing. The following table provides definitions for
drawing reference designators. (Not all reference designators are shown.)
VDF M1
VDF
24V
M3GDGDM2F16
1 130B
X21
8.10
Illustration 3. 6: Sample Mechanical Layout Diagram
Installation
TR200 Option Panel Operating Instructions 21

ID Definition Function24V Option panel 24 Vdc SMPS Supply 24 Vdc control power to option panel for internal use only
CB1 Main Circuit breaker Provide isolation between option panel and current protection for
incoming mains
DS1 Main or line disconnect Provide isolation between option panel and mains
DS2 Drive disconnect Provide isolation between VFD and line voltage
DF15 Main fused disconnect Provide isolation between option panel and mains
DV1 VFD output motor filter Output filter to provide filtering for PWM drive output wave form
F12 T1 secondary fuse Current protection for internal 120 Vac control circuit
F13 T1 primary fuse Current protection for line side of 120 Vac internal control trans-
former
F15 Line or main fuse Provide current protection to option panel
F16 Drive fuse Provide current protection to drive
GD Ground terminal Customer connection for power grounds to mains and motor
LR1 VFD input line reactor Input reactor to provide additional input impeadance to drive
M1 VFD input contactor Provide isolation between VFD and line voltage
M2 VFD output contactor Provide isolation between VFD and motor
M3 Bypass contactor Provide line voltage to motor
M4 Motor 1 contactor Used to select motor 1 operation
Table 3. 5: Reference Designator Definitions
ID Definition FunctionM5 Motor 2 contractor Used to select motor 2 operation
MT1 Motor 1 connection terminal Provides termination point for motor leads in option panel
OL1 Overload for motor 1 Provide overload protection to motor when running in bypass
OL2 Overload for motor 2 Provide overload protection to motor when running in bypass
PL2 Bypass indicator light Provides indication when motor is in bypass mode
S1 Bypass selector switch Operator interface for bypass mode selection on electromechani-
cal bypass
S103 Auto bypass selection switch 4 position switch used to setup auto bypass on EMB2 control op-
tion
S2 CMS selector switch Operator interface for contactor motor selection
T1 120 Vac control transformer Provide internal 120 Vac supply
T3 120 Vac control transformer Provide customer 120 Vac supply
TB1 Terminal Block 1 Customer bypass control connections for ECB-CMS and EMB0
control option
VFD Variable frequency drive Provide variable frequency and voltage to AC motor
X55 Customer terminal block Customer control connection terminal block on EMB1 and EMB2
control option
X56 Customer terminal block Customer control connection terminal block on EMB1 and EMB2
control option
X58 Customer terminal block Customer control connection terminal block on EMB2 control op-
tion
Installation
22 TR200 Option Panel Operating Instructions

Wire and Cable Access
• Determine the wiring path through the option panel enclosure. See the mechanical layout drawing lo-
cated on the inside cover of the unit for locations to connect power and motor wiring.
• Removable access covers are provided for cable connections (see figure Conduit Entry Diagrams). Remove
access covers prior to drilling holes to prevent metal shavings from damaging internal electronic
components.
• For some units, access holes are provided for input power, motor leads, and control wiring.
• Run input power, motor wiring, and control wiring in three separate conduits for isolation.
NOTICERUN INPUT POWER, MOTOR WIRING AND CONTROL WIRING IN THREE SEPARATE METALLIC CONDUITS ORRACEWAYS FOR HIGH FREQUENCY NOISE ISOLATION. FAILURE TO ISOLATE POWER, MOTOR AND CONTROLWIRING COULD RESULT IN LESS THAN OPTIMUM DRIVE AND ASSOCIATED EQUIPMENT PERFORMANCE.
• The drive always resides in the left-hand panel when multiple panels are present.
• Power connections are typically on the rightside panel, or far right for tier 3 panel configurations.
• NEMA 12 enclosures available for additional environmental protection.
• Control wiring should be isolated from power components inside the unit as much as possible.
• See the mechanical layout drawing on the inside of the unit’s panel and the connection diagram supplied
with the unit for connection details.
1
2
3
130B
X22
0.10
1 2
130B
X22
1.10
1 2
130B
X22
2.10
3 2
130B
X22
3.10
1
Tier 1 (bottom view) Tier 2 (bottom
view) NEMA 1
Tier 2 (bottom
view) NEMA 12
Tier 3 (bottom view) NEMA
1
1. Control Wiring
2. Input Power
3. Motor Power
1. Drive
2. Bypass
1. Drive
2. Bypass
1. Drive
2. Bypass
3. Additional options
Installation
TR200 Option Panel Operating Instructions 23

Wire Size
WARNINGElectrocution and Fire Hazards with Improperly Installed and Grounded Field Wiring!Improperly installed and grounded field wiring poses FIRE & ELECTROCUTION hazards. To avoid these hazards, youMUST follow requirements for field wiring installation and grounding as described in the National Electrical Codes (NEC)and your local/state electrical codes. All field wiring MUST be performed by qualified personnel.Failure to follow these requirements could result in death or serious injury.
NOTICEMAKE ALL POWER CONNECTIONS WITH MINIMUM 75°C / 167 °F RATED COPPER WIRING FOR INSTALLATIONSIN NORTH AMERICA.
• Size wiring to the input current of the drive. Recommended wire sizes are provided on the connection
drawing inside the cover of the unit.
• Local codes must be complied with for cable sizes.
Wire Type Rating
• Use wiring corresponding to the wiring rating specifications provided.
• The wire rating specifications are located on the tightening torque and wire rating label inside the cover
of the option panel (see figure Conduit Entry Diagrams).
Terminal Tightening Torques
• Tighten all connections to the torque specifications provided.
• The torque tightening specifications are located on the tightening torque and wire rating label inside the
cover of the option panel (see figure below.)
Field Conn. Tightening Torque lb-in (N-m) Temperature & Type Rating
L1, L2, L3 / GND 25 (2.8) / 25 (2.8) Use 75 °C Copper Cond.
1T1, 1T2, 1T3 / GND 25 (2.8) / 25 (2.8) Use 75 °C Copper Cond.
2T1, 2T2, 2T3 / GND 25 (2.8) / 25 (2.8) Use 75 °C Copper Cond.
TB1 7 (0.8) Use 60 °C Copper Cond.
Table 3. 6: Sample Tightening Torque and Wire Rating Label
Input Line ConnectionNOTE
RUN INPUT POWER, MOTOR WIRING AND CONTROL WIRING IN THREE SEPARATE METALLIC CONDUITS OR
RACEWAYS FOR HIGH FREQUENCY NOISE ISOLATION. FAILURE TO ISOLATE POWER, MOTOR AND CONTROL
WIRING COULD RESULT IN LESS THAN OPTIMUM DRIVE AND ASSOCIATED EQUIPMENT PERFORMANCE.
• Connect 3-phase AC input power wire to terminals L1, L2, and L3. See the connection drawing inside
the cover of the unit.
• Depending on the configuration of the equipment, input power may be connected to a circuit breaker
or input disconnect.
• Torque terminals in accordance with the information provided on the connection diagram inside the
cover of the unit.
Installation
24 TR200 Option Panel Operating Instructions

• Use with Isolated Input Source. Many utility power systems are referenced to earth ground. Although
not as common, the input power may be an isolated source. All drives may be used with an isolated
input source as well as with ground reference power lines.
Installation
TR200 Option Panel Operating Instructions 25

Motor Wiring
WARNINGWARNING Electrocution and Fire Hazards with Improperly Installed and GroundedField Wiring! Improperly installed and grounded field wiring poses FIRE & ELECTROCUTION hazards. To avoid thesehazards, you MUST follow requirements for field wiring installation and grounding as described in the National ElectricalCodes (NEC) and your local/state electrical codes. All field wiring MUST be performed by qualified personnel. Failureto follow these requirements could result in death or serious injury.
WARNINGINDUCED VOLTAGE! RUN OUTPUT MOTOR CABLES FROM MULTIPLE DRIVES SEPARATELY. INDUCED VOLTAGEFROM OUTPUT MOTOR CABLES RUN TOGETHER CAN CHARGE EQUIPMENT CAPACITORS EVEN WITH THEEQUIPMENT TURNED OFF AND LOCKED OUT. FAILURE TO RUN OUTPUT MOTOR CABLES SEPARATELY COULDRESULT IN DEATH OR SERIOUS INJURY.
NOTE
RUN INPUT POWER, MOTOR WIRING AND CONTROL WIRING IN THREE SEPARATE METALLIC CONDUITS OR
RACEWAYS FOR HIGH FREQUENCY NOISE ISOLATION. FAILURE TO ISOLATE POWER, MOTOR AND CONTROL
WIRING COULD RESULT IN LESS THAN OPTIMUM DRIVE AND ASSOCIATED EQUIPMENT PERFORMANCE.
• Connect the 3-phase motor wiring to bypass terminals T1 (U), T2 (V), and T3 (W). See the connection
drawing inside the cover of the unit.
• Depending on the configuration of the equipment, motor wiring may be connected to an electrical or
mechanical overload, a contactor, or terminal block.
• Torque terminals in accordance with the information provided on the connection diagram inside the
cover of the unit.
• Motor wiring should never exceed the following maximum distances: 300m (1000 ft) for unshielded
150m (500 ft) for shielded
• Motor wiring should always be as short as practical.
Installation
26 TR200 Option Panel Operating Instructions

Grounding (Earthing)
WARNINGWARNING Electrocution and Fire Hazards with Improperly Installed and Grounded Field Wiring! Improperly installedand grounded field wiring poses FIRE & ELECTROCUTION hazards. To avoid these hazards, you MUST follow require-ments for field wiring installation and grounding as described in the National Electrical Codes (NEC) and your local/stateelectrical codes. All field wiring MUST be performed by qualified personnel. Failure to follow these requirements couldresult in death or serious injury.
IMPORTANT
• Follow all local and national codes for proper electrical equipment grounding (earthing).
• Correct protective grounding of the equipment must be established. Ground currents are higher than 3
mA.
• A dedicated ground wire is required.
• Connect the ground wire directly to a reliable earth ground. Grounding studs are provided on the back
plate of the option panel for grounding.
• Do not use conduit connected to the option panel as a replacement for a ground wire.
• Do not ground one panel to another in a “daisy chain” fashion. Each panel must have a dedicated ground
connection.
• A high strand count ground wire is preferred for dissipating high frequency electrical noise.
• Keep the ground wire connections as short as possible.
Control Wiring
WARNINGElectrocution and Fire Hazards with Improperly Installed and GroundedField Wiring!Improperly installed and grounded field wiring poses FIRE & ELECTROCUTION hazards. To avoid these hazards, youMUST follow requirements for field wiring installation and grounding as described in the National Electrical Codes (NEC)and your local/state electrical codes. All field wiring MUST be performed by qualified personnel. Failure to follow theserequirements could result in death or serious injury.
Detailed instructions for terminal functions, control wiring installation, and operation is shown in Section 5
Electromechanical Bypass (EMB) Operation and Section 6 Electronically Controlled Bypass (ECB) Operation.
NOTE
RUN INPUT POWER, MOTOR WIRING AND CONTROL WIRING IN THREE SEPARATE METALLIC CONDUITS
ORRACEWAYS FOR HIGH FREQUENCY NOISE ISOLATION. FAILURE TO ISOLATE POWER, MOTOR AND CON-
TROL WIRING COULD RESULT IN LESS THAN OPTIMUM DRIVE AND ASSOCIATED EQUIPMENT PERFORM-
ANCE.
• It is recommended that control wiring is rated for 600 V for 480 V and 600 V drives and 300 V for 200-240
V drives.
• Isolate control wiring from high power components in the drive.
• See label inside of panel cover for details.
Installation
TR200 Option Panel Operating Instructions 27

130B
X22
4.10
2
3
4
1
Illustration 3. 7: Control Terminals Location
1. EIA-485 terminal
2. Jumper wire
3. Control terminals
4. Grounded restraining clips
Serial Communication Bus ConnectionThe ECB reports serial communication data to host systems through the drive. Connection to the serial com-
munication network is made either through the EIA-485 terminals on the drive (see figure above) or, for other
protocols, terminals located on the communication option card. For option card connection, see the option card
instructions provided with the unit.
• For ECB serial communication protocols using the EIA-485 terminals, make connections in the following
manner.
IT IS RECOMMENDED TO USE BRAIDED-SHIELDED, TWISTED-PAIR CABLES TO REDUCE NOISE BETWEEN
CONDUCTORS.
1. Connect signal wires to terminal (+) 68 and terminal (-) 69 on control terminals of drive. (See the drive
support materials for wire size and tightening torque.)
2. Terminate shield to grounded restraining clip provided by stripping wire insulation at point of contact.
3. If shielded cabling is used, do not connect end of shield to terminal 61.
Programming
Serial communication point maps, parameter settings, and other details for bypass option functionality are
included in the serial communication materials supplied with the unit.
Installation
28 TR200 Option Panel Operating Instructions

Start UpPre-start Procedure
1. Input power to unit must be OFF and locked out per OSHA requirements. Do not rely on panel disconnect
switches.
NOTICE
HIGH VOLTAGE! IF INPUT AND OUTPUT CONNECTIONS HAVE BEEN CONNECTED IMPROPERLY, THERE IS PO-TENTIAL FOR HIGH VOLTAGE ON THESE TERMINALS. IF POWER LEADS FOR MULTIPLE MOTORS ARE IMPROP-ERLY RUN IN SAME CONDUIT, THERE IS POTENTIAL FOR LEAKAGE CURRENT TO CHARGE CAPACITORS WITHINOPTION PANEL, EVEN WHEN DISCONNECTED FROM LINE INPUT. FOR INITIAL START UP, MAKE NO ASSUMP-TIONS ABOUT POWER COMPONENTS. FOLLOW PRE-START PROCEDURES DESCRIBED BELOW. FAILURE TOFOLLOW PRE-START PROCEDURES DESCRIBED BELOW COULD RESULT IN DEATH, SERIOUS INJURY OR DAM-AGE TO EQUIPMENT.
1. Use AC voltmeter to verify there is no voltage on input terminals L1, L2, and L3, phase-to-phase and phase-
to-ground, and output terminals T1, T2, and T3, phase-tophase and phase-to-ground.
2. Use ohmmeter to confirm continuity of motor by measuring T1-T2, T2-T3, and T3-T1.
3. Use ohmmeter to confirm open on input by measuring L1-L2, L2-L3, and L3-L1. Note that if an isolation
transformer is between the power source and panel, continuity will be present. In this case, visually confirm
that motor and power leads are not reversed.
4. Inspect the panel for loose connections on terminals.
5. Check for proper ground: option panel to main building distribution ground, and option panel to motor
ground. See label inside panel cover for proper wire size.
6. Confirm control connections terminated per connection diagrams supplied with the equipment.
7. Check for external devices between drive option panel output and motor. It is recommended that no devices
be installed between motor and drive.
8. Record motor nameplate data; hp, voltage, full load amps (FLA), and RPM. It will be needed to match motor
and drive later on.
9. Confirm that incoming power voltage matches drive label voltage and motor nameplate voltage.
10. For multiple winding motors, motor must be wired on run winding, not start winding.
NOTICECAUTION EQUIPMENT DAMAGE! IF MOTOR FLA (FULL LOAD AMPERAGE) IS GREATER THAN UNIT MAXIMUMAMPS, DRIVE AND OPTION PANEL MUST BE REPLACED WITH ONE OF APPROPRIATE RATING. DO NOT ATTEMPTTO RUN UNIT. FAILURE TO MATCH FLA TO UNIT MAXIMUM AMP RATING MAY RESULT IN EQUIPMENT DAMAGE.
1. Confirm motor FLA is equal to or less than maximum option panel output current. Some motors have higher
then normal NEMA currents.
2. Check that overload relay(s) is set for FLA of connected motor. Service factor is built into overload relay.
3. For drive start up procedures, see drive instruction manual.
TR200 Option Panel Operating Instructions 29

Inspection Prior to Start UpBefore applying power to the unit, inspect the entire installation as detailed in table below.
Inspect For Description
Auxiliary equip-
ment
Look for auxiliary equipment, switches, disconnects, or input fuses/circuit breakers that
may reside on input power side of drive or output side to motor. Examine their opera-
tional readiness and ensure they are ready in all respects for operation at full speed.
Check function and installation of pressure sensors or encoders (etc.) used for feedback
to drive. Remove power factor correction caps on motor(s), if present.
Cable routing Ensure that input power, motor wiring and control wiring are in three separate metallic
conduits for high frequency noise isolation. Failure to isolate power, motor and control
wiring could result in less than optimum drive and associated equipment performance.
Control wiring Check for broken or damaged wires and connections. Check the voltage source of the
signals, if necessary. The use of shielded cable or twisted pair is recommended. Ensure
the shield is terminated correctly.
EMC considera-
tions
Check for proper installation with regard to electromagnetic capability.
Environmental
conditions
See option panel label for the maximum ambient operating temperature. Humidity levels
must be less than 95% non-condensing.
Fan clearance Some units have a cooling fan located below the drive and require sufficient clearance
for fan removal. See the installation drawing supplied with the unit for clearance re-
quirements.
Fusing and circuit
breakers
Check that all fuses are inserted firmly and in operational condition and that all circuit
breakers are in the open position.
Grounding The option panel requires a dedicated ground wire from its chassis to the building
ground. It is highly recommended that the motor be grounded to the panel chassis. The
use of conduit or mounting of the panel to a metal surface is not considered a suitable
ground. Check for good ground connections that are tight and free of oxidation.
Input and output
power wiring
Check for loose connections. Check for proper fusing or circuit breakers.
Panel interior Option panel interior must be free of dirt, metal chips, moisture, and corrosion. Check
for harmful airborne contaminates such as sulfur based compounds.
Proper clearance Option panels require top and bottom clearance adequate to ensure proper air flow for
cooling in accordance with the unit size.
Switches Ensure that all switch and disconnect settings are in the proper position.
Vibration Look for any unusual amount of vibration the equipment may be subjected to. The panel
should be mounted solidly or the use of shock mounts employed.
Table 4. 1: Inspection Prior to Start Up
Start Up
30 TR200 Option Panel Operating Instructions

Start Up ProcedureIn the following procedures, changing the equipment between drive mode and bypass mode is required. Chang-
ing modes is different for the ECB and EMB. The ECB uses pushbuttons on the drive keypad while the EMB uses
switches on the front of the panel. Be familiar with the operation of these devices prior to start up.
WARNINGEQUIPMENT HAZARD! OPTION PANELS CONTAIN DANGEROUS VOLTAGES WHEN CONNECTED TO LINE VOLT-AGE. INSTALLATION, START-UP AND MAINTENANCE SHOULD BE PERFORMED ONLY BY QUALIFIED PERSON-NEL. FAILURE TO PERFORM INSTALLATION, START-UP AND MAINTENANCE BY QUALIFIED PERSONNEL ONLYCOULD RESULT IN DEATH OR SERIOUS INJURY.
1. Perform pre-start up procedure.
2. Ensure that all operator devices are in OFF position. Main and drive disconnect switches on front of elec-
tromechanical bypass panel must be in OFF position. Panel door(s) closed.
3. Keep main disconnect switch in OFF position and apply voltage to option panel. DO NOT operate drive or
bypass at this time.
4. Confirm input line voltage is balanced within 3%. If not, correct input voltage imbalance before proceeding.
Repeat procedure after voltage correction, if applicable.
NOTICEMOTOR START! ENSURE THAT MOTOR, SYSTEM, AND ANY ATTACHED EQUIPMENT IS READY FOR START. FAIL-URE TO ENSURE MOTOR, SYSTEM, AND ANY ATTACHED EQUIPMENT IS READY FOR START COULD RESULT INPERSONAL INJURY OR EQUIPMENT DAMAGE.
5. To apply power, turn main disconnect (and drive disconnect, when applicable) to ON position. If a bypass
is connected, place bypass in drive mode.
6. Enter drive programming data per instructions in drive instruction manual.
In steps 7 through 11, for a bypass with a contactor motor selection (CMS) option, put the motor selector switch
in motor 1 position. Repeat the procedure for motor 2 with the switch position in motor 2. For dual motor
applications, check both motors at same time.
Start Up
TR200 Option Panel Operating Instructions 31

7. Check motor rotation direction in drive control as follows.
a. Put panel in drive mode.
b. Hand start drive at minimum speed (see drive instruction manual for details).
c. Confirm directional rotation.
d. If incorrect, stop drive, remove power, and lock out.
e. Reverse connection of any 2 of 3 motor leads at terminal. Do not change incoming power leads.
f. Remove lockout and apply power.
g. Confirm directional rotation.
8. Check motor rotation direction in bypass as follows.
a. Momentarily bump motor in bypass.
b. Confirm directional rotation.
c. If incorrect, stop drive, remove power, and lock out.
d. Reverse connection of any 2 of 3 input power leads at terminal. Do not change motor leads
f. Confirm directional rotation.
NOTICEFULL SPEED OPERATION! ENSURE THAT THE MOTOR, SYSTEM, AND ANY ATTACHED EQUIPMENT IS READYFOR FULL SPEED OPERATION. USER ASSUMES ALL RESPONSIBILITY FOR ASSURING SYSTEM IS ABLE TO SAFE-LY RUN AT FULL SPEED. FAILURE TO ENSURE THAT THE MOTOR, SYSTEM, AND ANY ATTACHED EQUIPMENTIS READY FOR FULL SPEED OPERATION COULD RESULT IN EQUIPMENT DAMAGE.
Start Up
32 TR200 Option Panel Operating Instructions

9. Check full load amps in drive mode on motor terminals.
a. Put unit into drive mode.
b. Check full load amps on motor terminals T1, T2, and T3. Verify motor amps are within drive and motor rated
current and are balanced within 3%. If incorrect, see Troubleshooting Section in this manual for isolation pro-
cedures.
c. Check full load amps on input terminals L1, L2, and L3. Verify that current is within FLA of drive and balanced
within 3%. If incorrect, see Troubleshooting Section in this manual for isolation procedures.
10. Check full load amps in bypass mode on motor terminals.
a. Put unit into bypass mode.
b. Check full load amps on terminals T1, T2, and T3. Verify motor amps are within motor FLA rated current and
balanced within 3%. If incorrect, see Troubleshooting Section in this manual for isolation procedures.
For steps 12-14, see sections 5 and 6 in this manual for details.
11. Check operation of any optional functions to confirm they work, as applicable. Options may include run
permissive, fire mode, common start/stop, or others.
12. Exercise safety circuit and verify that unit stops running.
13. Exercise start/stop circuit and verify that unit starts and stops with system in auto mode of operation.
Start Up
TR200 Option Panel Operating Instructions 33

Electromechanical Bypass (EMB) Operation
Illustration 5. 1: Customer-side EMB2 Control Card Terminal Connctions
34 TR200 Option Panel Operating Instructions

Conn. Term. Input/Output Type Function
X55
1 Input Normally open, dry relay
contact
Closed when motor can
start to run2 Input
3 Input Normally open, dry relay
contact
Closed for remote start
with common start/stop4 Input
5 Input Normally open, dry relay
contact
Safety input, open to stop
6 Input
7 Input Normally open, dry relay
contact
Closed to enable Fire
Mode8 Input
9 Output Normally open, dry relay
contact
Closed indicates Fire
Mode activated10 Output
11 Output Normally open, dry relay
contact
Closed indicates Motor 1
selected12 Output
Conn. Term. Input/Output Type Function
X56
1 Output Normally open, dry relay
contact
Closed indicates Motor 2
selected2 Output
3 Output Normally open, dry relay
contact
Closed when panel is in
Drive Mode4 Output
5 Output Normally open, dry relay
contact
Closed when panel is in
Bypass Mode6 Output
7 Output Normally open, dry relay
contact
Open when drive is in
Fault Condition
8 Output Common form C relay
contact
Common for fault relay
9 Output Normally closed form C
relay contact
Closed when drive is in
Fault Condition
10 Input Normally open, dry relay
contact
CMS Motor 2, close to se-
lect
11 Input Normally open, dry relay
contact
CMS common
12 Input Normally open, dry relay
contact
CMS Motor 1, close to se-
lect
Conn. Term. Input/Output Type Function
X581 Output Normally open, dry relay
contact
Closed indicates run re-
quested2 Output
Table 5. 1: EMB2 Control Card Terminal Functions
Electromechanical Bypass (EMB) Operation
TR200 Option Panel Operating Instructions 35

The first of the following tables lists EMB2 default parameter settings for bypass operation. If the drive is rein-
itialized, be sure that these settings are maintained or reset for proper bypass operation.
The second of the following tables lists common functions for controlling a motor(s) with a bypass and the
typical terminal connections used. Commands enable drive functions. Status reports describe conditions but
do not enable a function.
130B
X22
6.101
2
3
4Illustration 5. 2: EMB2 Control Card
1. Switch S103 Autobypass Timer
2. Terminal X56
3. Terminal X55
4. Terminal X58
Electromechanical Bypass (EMB) Operation
36 TR200 Option Panel Operating Instructions
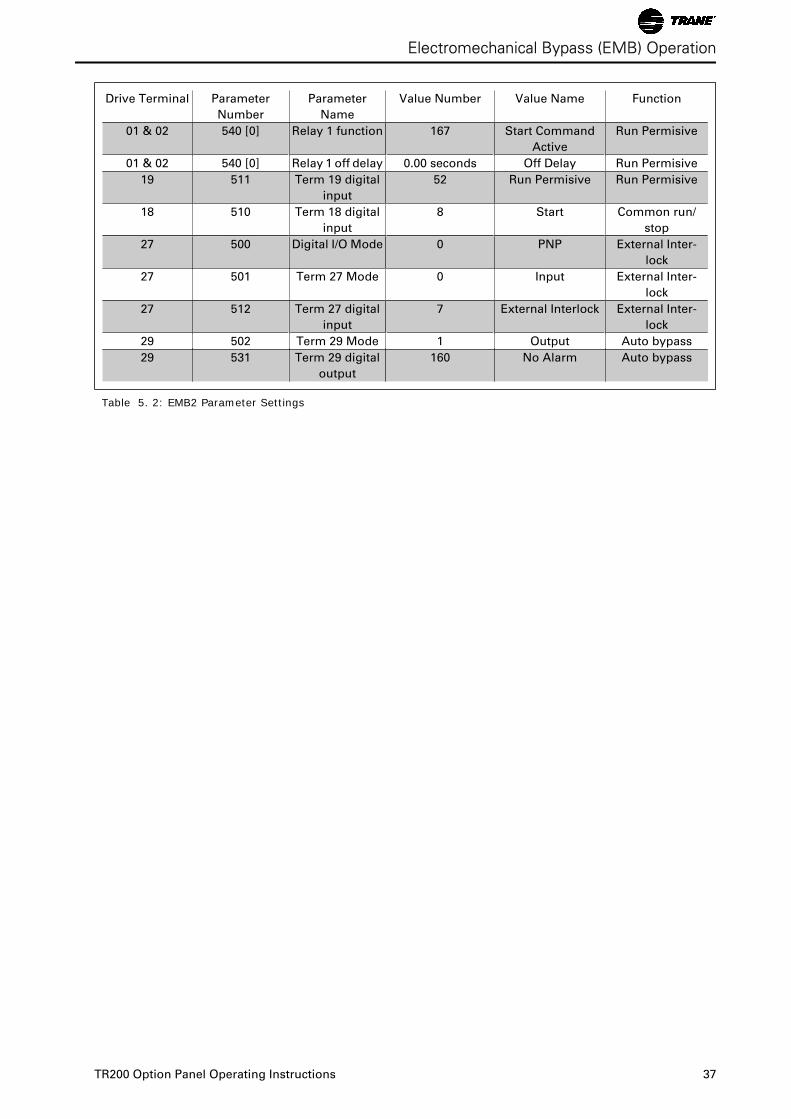
Drive Terminal Parameter
Number
Parameter
Name
Value Number Value Name Function
01 & 02 540 [0] Relay 1 function 167 Start Command
Active
Run Permisive
01 & 02 540 [0] Relay 1 off delay 0.00 seconds Off Delay Run Permisive
19 511 Term 19 digital
input
52 Run Permisive Run Permisive
18 510 Term 18 digital
input
8 Start Common run/
stop
27 500 Digital I/O Mode 0 PNP External Inter-
lock
27 501 Term 27 Mode 0 Input External Inter-
lock
27 512 Term 27 digital
input
7 External Interlock External Inter-
lock
29 502 Term 29 Mode 1 Output Auto bypass
29 531 Term 29 digital
output
160 No Alarm Auto bypass
Table 5. 2: EMB2 Parameter Settings
Electromechanical Bypass (EMB) Operation
TR200 Option Panel Operating Instructions 37

Name Function Drive Terminals EMB2 X56 EMB2 X55 EMB2 X58
Remote Drive
Start (with com-
mon start/stop)
Input
Command
3, 4
Remote Drive
Start (without
common start/
stop)
Input
Command
13, 18
Motor Running
on Drive
Output
Status
04, 05, 06
Run request (for
run permissive)
Output
Command
1, 2
Run Enable (for
run permissive)
Input
Command
1, 2
Safety Stop Input
Command
5, 6
Drive Fault Output
Status
7, 8, 9
Fire Mode Input
Command
7, 8
Remote Motor 1
Select
Input
Command
11, 12
Remote Motor 2
Select
Input
Command
10, 11
Motor 1 Selected Output
Status
11, 12
Motor 2 Selected Output
Status
1, 2
Drive Mode Output
Status
3, 4
Bypass Mode Output
Status
5, 6
Fire Mode Output
Status
9, 10
Table 5. 3: Typical HVAC Control Connections
Electromechanical Bypass (EMB) Operation
38 TR200 Option Panel Operating Instructions

EMB(0) and EMB1The electromechanical bypass is available in two additional types, the EMB(0) and EMB1. Each has reduced
functionality from the EMB2. The figures and tables below list for features and functions available in either type.
The following three tables list terminal functions for EMB(0) and EMB1, respectively, and EMB1 default param-
eter settings for bypass operation. If the drive is reinitialized, be sure that these settings are maintained or reset
for proper bypass operation.
See the mechanical layout diagram inside the cover of the unit for connector locations within the unit.
130B
X22
8.10
1
Illustration 5. 3: EMB(0) Control Connector
1. Terminal TB1
130B
X22
7.10
1
2
Illustration 5. 4: EMB1 Control Card
1. Terminal X55
2. Terminal X56
Electromechanical Bypass (EMB) Operation
TR200 Option Panel Operating Instructions 39
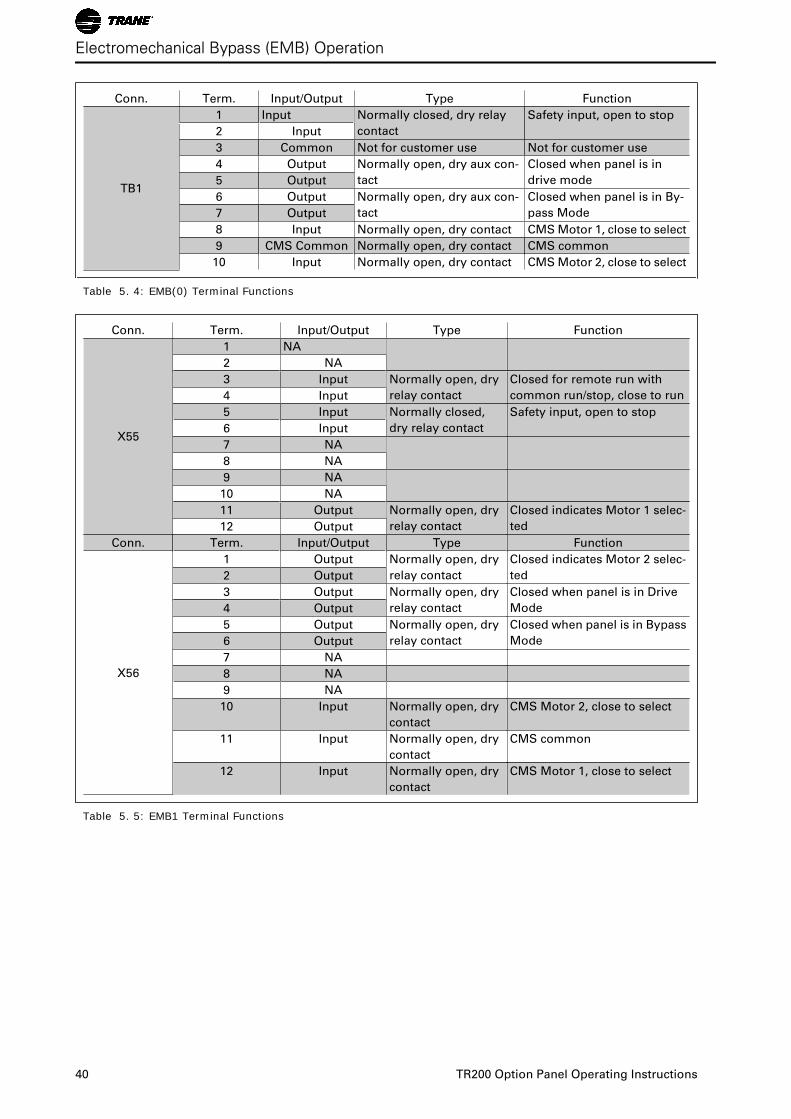
Conn. Term. Input/Output Type Function
TB1
1 Input Normally closed, dry relay
contact
Safety input, open to stop
2 Input
3 Common Not for customer use Not for customer use
4 Output Normally open, dry aux con-
tact
Closed when panel is in
drive mode5 Output
6 Output Normally open, dry aux con-
tact
Closed when panel is in By-
pass Mode7 Output
8 Input Normally open, dry contact CMS Motor 1, close to select
9 CMS Common Normally open, dry contact CMS common
10 Input Normally open, dry contact CMS Motor 2, close to select
Table 5. 4: EMB(0) Terminal Functions
Conn. Term. Input/Output Type Function
X55
1 NA
2 NA
3 Input Normally open, dry
relay contact
Closed for remote run with
common run/stop, close to run4 Input
5 Input Normally closed,
dry relay contact
Safety input, open to stop
6 Input
7 NA
8 NA
9 NA
10 NA
11 Output Normally open, dry
relay contact
Closed indicates Motor 1 selec-
ted12 Output
Conn. Term. Input/Output Type Function
X56
1 Output Normally open, dry
relay contact
Closed indicates Motor 2 selec-
ted2 Output
3 Output Normally open, dry
relay contact
Closed when panel is in Drive
Mode4 Output
5 Output Normally open, dry
relay contact
Closed when panel is in Bypass
Mode6 Output
7 NA
8 NA
9 NA
10 Input Normally open, dry
contact
CMS Motor 2, close to select
11 Input Normally open, dry
contact
CMS common
12 Input Normally open, dry
contact
CMS Motor 1, close to select
Table 5. 5: EMB1 Terminal Functions
Electromechanical Bypass (EMB) Operation
40 TR200 Option Panel Operating Instructions

Drive terminal Parameter num-
ber
Parameter name Value number Value name Function
18 510 Term 18 digital in-
put
8 Start Common run/stop
27 500 Digital I/O Mode 0 PNP External Interlock
27 501 Term 27 Mode 0 Input External Interlock
27 512 Term 27 digital in-
put
7 External Inter-
lock
External Interlock
Table 5. 6: EMB1 Parameter Settings
Electromechanical Bypass (EMB) Operation
TR200 Option Panel Operating Instructions 41

EMB Auto bypassGeneral Information
Auto bypass allows a fault condition in the drive to activate running the motor in bypass without operator
intervention. Activation of the function is through setting DIP switches (S103) located on the EMB2 bypass con-
trol card (see Figure EMB2 Control Card) earlier this chapter. A fault condition enables a delay timer prior to
tripping the drive into bypass. The fault trip and running in bypass are reported as output from the bypass control
card. The auto bypass function is built-in.
Prior to Enabling Auto Bypass
• Complete the start-up procedure to verify motor rotation direction in bypass is correct and that the
system is ready in all respects for continuous full speed operation in bypass.
WARNINGHIGH VOLTAGE! REMOVE POWER TO BYPASS PANEL BEFORE SETTING AUTO BYPASS DIP SWITCH SETTINGS.BYPASS CAN CONTAIN HIGH VOLTAGE. FAILURE TO REMOVE POWER TO BYPASS PANEL BEFORE SETTING DIPSWITCHES COULD RESULT IN DEATH OR SERIOUS INJURY.
Operation
• With the bypass selector switch in drive and auto bypass enabled, a fault signal from the drive will
activate the auto bypass timer.
• If the fault clears before the time delay is complete, the motor remains operating in drive mode. This
allows temporary faults, such as a momentary under or over voltage, to clear without transferring
the system to bypass.
• If the timer completes its cycle before the fault clears, the panel trips into bypass mode and the motor
runs at constant full speed from line input voltage.
• In bypass, the motor will stop if safety or motor overload conditions are exceeded.
• Once auto bypass is activated, the only way to reset the unit back to drive is by operator intervention.
Ensure that the fault has been cleared, then rotate the bypass switch to the OFF position momentarily
before setting it back to the drive position. This resets the drive and fault timer.
Auto Bypass Function Setup
Enable auto bypass by closing one or more DIP switches on switch S103 located on the bypass control card.
(Times are approximate.)
• All OFF = no auto bypass operation
• 1-3 ON = 15 second delay (minimum)
• Switch 1 only ON = 30 sec. delay
• Switch 2 only ON = 60 sec. delay
• Switch 3 only ON = 300 sec. delay (maximum)
• Switch 4 = Always OFF
Electromechanical Bypass (EMB) Operation
42 TR200 Option Panel Operating Instructions

EMB Common Run/StopGeneral Information
The common run/stop function provides remote run and stop control of the motor(s) in bypass. Without common
run/stop, the motor would automatically run at full speed whenever the bypass is activated. The remote signal
provides drive control as well as bypass control, making this one input common to both. Common run/stop is
enabled by factory default. When used with the run permissive function, common run/stop permits run request
operation in bypass.
Prior to Enabling Common Run/Stop
• Complete the start-up procedure to verify motor rotation direction in bypass is correct and that the
system is ready in all respects for continuous full speed operation in bypass.
Operation
• A user supplied remote start command wired to connector X55, terminals 3 and 4 initiates remote bypass
operation. With common run/ stop, bypass mode cannot be activated by hand on the drive keypad
or by serial communication.
Common Run/Stop Setup
• Wire input terminals 3 and 4 on connector X55 per the system application.
To Disable Common Run/Stop
• Common run/stop is enabled by factory default when ordered.
• To disable the feature, jumper terminals 3 and 4 on connector X55. This allows the bypass to start when
the bypass switch is placed in the bypass position.
• Remove red wire from terminal 18 of the drive control terminal and insulate the end of the wire to prevent
shorting. This is required or the drive will always have a run command.
• If applicable, connect remote run/stop input to terminals 12 and 18 in the drive.
EMB Run PermissiveGeneral Information
Run permissive allows a remote signal to notify the drive to start, indicating the system is safe to operate. Run
permissive works in drive or bypass mode. Run permissive is disabled by factory default when ordered by a
jumper wire on connector X58 between terminals 1 and 2.
Prior to Enabling Run Permissive
• Complete the start-up procedure to verify motor rotation direction in bypass is correct and that the
system is ready in all respects for continuous full speed operation in bypass.
• Verify that the drive is programmed for the run permissive function. See the drive support materials for
programming the run permissive function.
Operation
• A start command can be from local hand start on the drive keypad or a remote auto start signal through
digital input connector X55, terminals 3 and 4, or the serial communications input.
• In response to a start command, an output request is sent from X58 terminals 1 and 2 to the external
equipment (to activate a valve or damper, for example).
• When a return run signal on X55 terminals 1 and 2 is received, the motor is started in either drive or
bypass mode, depending upon the bypass switch position.
Electromechanical Bypass (EMB) Operation
TR200 Option Panel Operating Instructions 43

Run Permissive Function Setup
• Remove factory-installed jumper wire on connector X55, terminals 1 and 2.
• Wire the output run request to connector X58, terminals 1 and 2.
• Wire the input run permission to connector X55, terminals 1 and 2 per the system application.
Disable Run Permissive
• Run permissive is enabled by factory default when ordered.
• To disable the run permissive function, jumper between terminals 1 and 2 on connector X55.
EMB OverloadGeneral Information
The overload device provides overcurrent protection for the motor when running in bypass. The thermally ac-
tivated overload monitors motor current and trips to remove power to the motor if a sustained overcurrent
condition exists. A Class 20 overload is standard with a variable setting for motor current. Test and reset buttons
are also provided. In drive mode, the drive provides current sensing and trip protection. Fuses provide quick
action for high over current conditions.
Prior to Enabling Overload
• Verify that the overload current dial setting matches the motor FLA rating on the motor nameplate.
• If the motor FLA is greater or less than range of the current dial, reconfirm that the motor hp and voltage
are within the option panel (and drive) rating. If less than the FLA rating, replace the overload with
the correct size. If greater than the FLA rating, replace the panel with one of a proper rating.
NOTICEMOTOR DAMAGE! REPEATED ATTEMPTS TO RESET OVERLOAD CAN CAUSE MOTOR DAMAGE. CORRECTOVERLOAD CONDITION AND LET OVERLOAD AND MOTOR RETURN TO NORMAL OPERATING TEMPERATUREBEFORE RESETTING. SEE MOTOR MANUFACTURER’S RECOMMENDATIONS FOR TIME BETWEEN START AT-TEMPTS. FAILURE TO CORRECT OVERLOAD CONDITION AND LET MOTOR RETURN TO NORMAL OPERATINGTEMPERATURE COULD CAUSE MOTOR DAMAGE.
Operation
Overloads are rated by class. The class is defined by the NEC to determine the maximum time to trip. A Class
20 overload, for example, has a typical trip delay of 20 seconds or less at 600% current and normal operating
temperature. This allows for high motor inrush current for 20 seconds while the motor is ramping up to syn-
chronous speed. The trip time, however, is based on the percentage of overload. The higher the overload, the
shorter the trip time. It is important that the overload class not exceed the motor class rating or motor damage
could occur. For dual motor operation, an overload is provided for each motor. For contact motor select, one
overload is provided and monitors either motor when selected.
Electromechanical Bypass (EMB) Operation
44 TR200 Option Panel Operating Instructions

Overload Function Setup
• Set the overload current dial to the FLA of the motor. DO NOT add the service factor of the motor into
the setting. A service factor of 120% for Class 20 is designed into the overload.
• Pressing the test pushbutton verifies the operation of the overload. The overload should trip when
pressed. Use the reset pushbutton to reset the overload after test.
• Reset is used to reset the overload after it trips. If the overload is still hot, wait until the motor reaches
normal operating temperature before resetting. The overload offers a manual (hand) or auto reset
selection. It is highly recommended to operate in the manual factory setting to prevent the risk of
damage to the motor.
T1 T2 T3
97NO 98NO 95NC 96NC
1020 30
RESETTEST
MANUAL
AUTO
TRIP
5
130B
X22
9.10
Illustration 5. 5: Sample Overload Device
EMB Safety InterlockGeneral Information
The safety interlock feature prevents the drive or bypass from operating. For operation in drive or bypass, the
safety interlock input contact must be closed. Only a fire mode command to run in bypass overrides this func-
tion.Safety inputs include, but are not limited to, high and low pressure limit switches, fire alarm, smoke alarm,
high and low temperature switches, and vibration sensors.
Operation
When an external safety input closes, the option panel is in operational mode. When open, power is interrupted
to all contactors and relays and the bypass ignores all run commands except for fire mode operation, when
enabled. When power is interrupted in drive mode, the drive display indicates an external fault, meaning the
problem is external to the drive. In some instances, a fault can be caused by a failure within the option panel,
which will still be reported as an external fault from the drive. A factory installed jumper allows the unit to operate
when no safety input is connected. This jumper must be removed when connecting in a safety interlock circuit.
Safety Interlock Function Setup
• For EMB1 and EMB2, remove factory-installed jumper between terminals 5 and 6 on connector X55.
• Wire safety input to terminals 5 and 6 on connector X55.
• For EMB(0), wire safety input to connector TB1, terminals 1 and 2.
Electromechanical Bypass (EMB) Operation
TR200 Option Panel Operating Instructions 45

EMB Fire ModeGeneral Information
The fire mode function is built-in. Fire mode runs the motor at full speed in bypass and is intended to ignore
common safety, overload, and bypass switch inputs in emergency situations. The motor will continue to run in
bypass until fire mode is removed or the unit fails.
Prior to Enabling Fire Mode
• Complete the start-up procedure to verify motor rotation direction in bypass is correct and that the
system is ready in all respects for continuous full speed operation in bypass.
Operation
• Activation of fire mode is accomplished by closing connector X55, input terminals 7 and 8.
• When activated, a relay overrides the safety circuit, motor overload, and bypass switch (SW1) position.
• Fire mode is deactivated only when removed or fuses blow.
• Fire mode status can be reported through connector X55, terminals 9 and 10, a normally open dry contact
that closes when fire mode is active.
Fire Mode Function Setup
• Wire fire mode input to connector X55, terminals 7 and 8.
• Wire fire mode status output to connector X55, terminals 9 and 10.
EMB Fault ReportingGeneral Information
A fault indication is provided if the drive experiences a fault or bypass input power is lost. The EMB2 bypass
control card monitors the drive fault output for status reporting. The fault contacts are fail-safe, meaning that if
power is removed a fault condition is automatically reported. Fault status is not monitored in bypass operation.
Operation
For the EMB2, fault reporting is monitored through a Form-C relay (RL2) on the bypass control board. The relay
reports a fault on connector X56 terminals 7, 8, and 9. In normal operation, the relay is powered and terminal 7
is closed with terminal 9 open. In a fault condition, power to the relay is lost and the relay positions automatically
reverse, signaling the fault condition. Terminal 8 is the common to both. For the EMB(0) or EMB1, drive terminals
1 (common), 2 and 3 report faults with 2 open and 3 closed in the fault condition.
Fault Reporting Function Setup
• For EMB2, fault reporting status is connected to connector X56, output terminals 7, 8, and 9.
• For EMB(0) or EMB1, fault reporting status is connected to drive output terminals 1, 2, and 3.
Electromechanical Bypass (EMB) Operation
46 TR200 Option Panel Operating Instructions

EMB SwitchesBypass selector switch.The bypass selector switch is used for either the 2- contactor or 3-contactor bypass.
• 2-contactor bypass.A panelmounted Drive/OFF/Bypass selector switch is used to electrically select
whether the motor is driven by the drive (M2 contactor), connected to the full-speed bypass (M3
contactor), or disconnected from both. See figure below.
• 3-contactor bypass.A panelmounted Drive/OFF/Bypass/Test selector switch is used to electrically select
whether the motor is controlled by the drive (M1 and M2 contactors), connected to the full-speed
bypass (M3 contactor), or disconnected from both. The test position allows for operation in bypass
while still providing power to the drive (M1 and M3). See figure below.
Illustration 5. 6: Basic 3-contactor Bypass Functions
Electromechanical Bypass (EMB) Operation
TR200 Option Panel Operating Instructions 47
Electronically Controlled Bypass (ECB) Operation
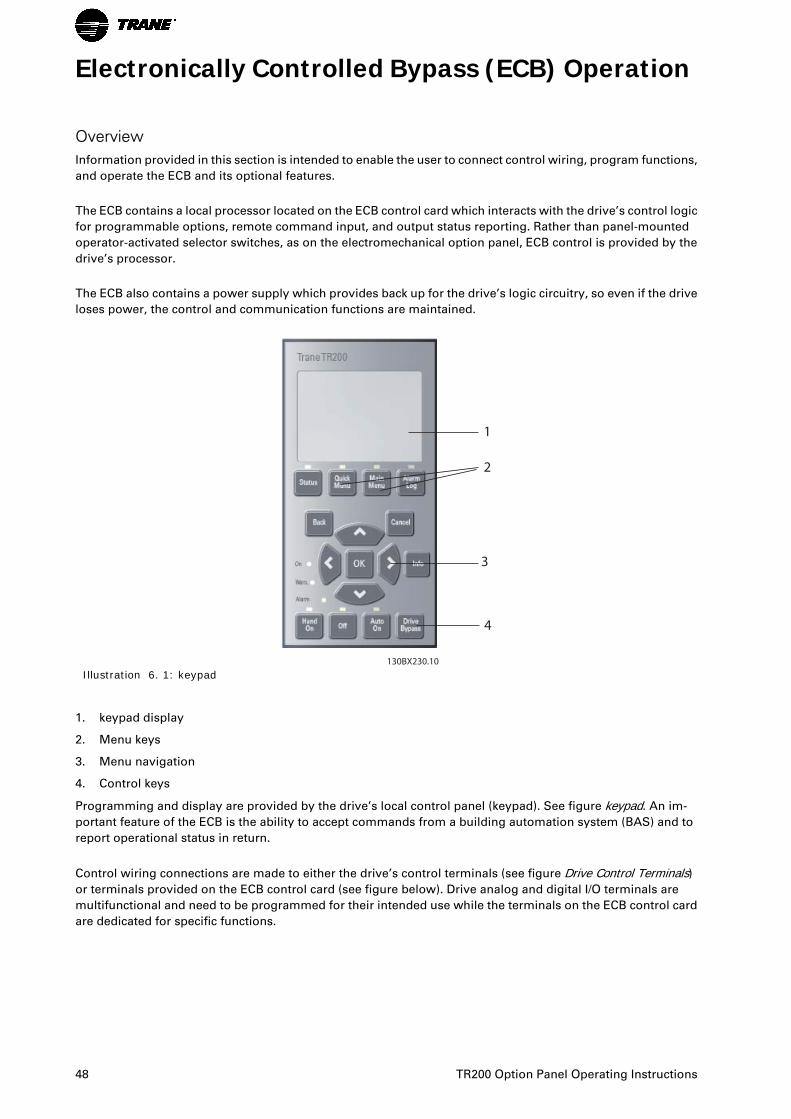
OverviewInformation provided in this section is intended to enable the user to connect control wiring, program functions,
and operate the ECB and its optional features.
The ECB contains a local processor located on the ECB control card which interacts with the drive’s control logic
for programmable options, remote command input, and output status reporting. Rather than panel-mounted
operator-activated selector switches, as on the electromechanical option panel, ECB control is provided by the
drive’s processor.
The ECB also contains a power supply which provides back up for the drive’s logic circuitry, so even if the drive
loses power, the control and communication functions are maintained.
Illustration 6. 1: keypad
1. keypad display
2. Menu keys
3. Menu navigation
4. Control keys
Programming and display are provided by the drive’s local control panel (keypad). See figure keypad. An im-
portant feature of the ECB is the ability to accept commands from a building automation system (BAS) and to
report operational status in return.
Control wiring connections are made to either the drive’s control terminals (see figure Drive Control Terminals)
or terminals provided on the ECB control card (see figure below). Drive analog and digital I/O terminals are
multifunctional and need to be programmed for their intended use while the terminals on the ECB control card
are dedicated for specific functions.
48 TR200 Option Panel Operating Instructions

Programming options for drive terminals are seen by pressing the MAIN MENU key or QUICK MENU key on the
keypad keypad. Parameter menus appear in the keypad display. The arrow keys are used for navigating through
the parameter lists. Terminal functions are programmed in the 5-00 parameter group. (See table below for
factory default parameter settings for drives with an ECB.) Bypass functions are programmed in the 31-00 pa-
rameter group (see later this chapter). See the drive’s supporting materials for detailed programming instruc-
tions.
Parameter Parameter name Setting title Setting Function
5-01 Term 27 Mode Input 0 Customer Interlock
5-02 Term 29 Mode Output 1 Auto bypass
5-10 Term 18 digital in-
put
Start 8 Common run/stop
5-11 Term 19 digital in-
put
Run Permissive 52 Run Permissive
5-12 Term 27 digital in-
put
External Interlock 7 Customer Interlock
5-31 Term 29 digital out-
put
No Alarm 160 Auto bypass
5-40(0) Relay 1 function Start Command
Active
167 Run Permissive
5-40(0) Relay 1 off delay Off Delay 0.00 S Run Permissive
Table 6. 1: Parameter Group 5-** Factory Default Settings
Drive Control TerminalsDefinitions of the drive terminals are summarized in the next table. The figure below shows the removable drive
connectors and terminals.
• Connector 1 provides four digital inputs, two selectable digital inputs or outputs, 24 VDC terminal supply
voltage, and a common for optional customer supplied 24 VDC voltage.
• Serial communications use EIA-485 connector 2 with terminal 68 (+) and 69 (-).
• Connector 3 provides two analog inputs, one analog output, 10 VDC supply voltage, and commons for
the inputs and output.
• A USB port, connector 4, is also available for use with the MCT-10 programming software available on
the Trane website.
• Also provided are two Form C relay outputs that are in various locations depending upon the drive
configuration and size.
See the drive support materials for detailed instructions.
Electronically Controlled Bypass (ECB) Oper-ation
TR200 Option Panel Operating Instructions 49
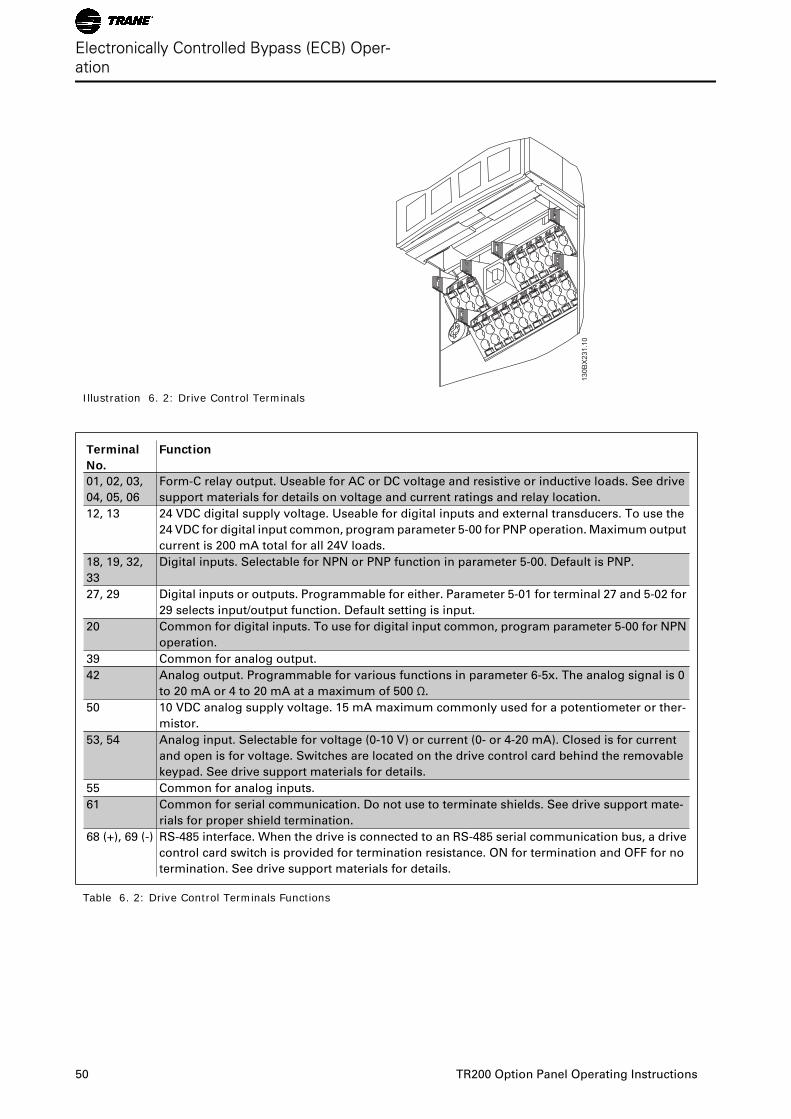
130B
X23
1.10
Illustration 6. 2: Drive Control Terminals
TerminalNo.
Function
01, 02, 03,
04, 05, 06
Form-C relay output. Useable for AC or DC voltage and resistive or inductive loads. See drive
support materials for details on voltage and current ratings and relay location.
12, 13 24 VDC digital supply voltage. Useable for digital inputs and external transducers. To use the
24 VDC for digital input common, program parameter 5-00 for PNP operation. Maximum output
current is 200 mA total for all 24V loads.
18, 19, 32,
33
Digital inputs. Selectable for NPN or PNP function in parameter 5-00. Default is PNP.
27, 29 Digital inputs or outputs. Programmable for either. Parameter 5-01 for terminal 27 and 5-02 for
29 selects input/output function. Default setting is input.
20 Common for digital inputs. To use for digital input common, program parameter 5-00 for NPN
operation.
39 Common for analog output.
42 Analog output. Programmable for various functions in parameter 6-5x. The analog signal is 0
to 20 mA or 4 to 20 mA at a maximum of 500 Ω.
50 10 VDC analog supply voltage. 15 mA maximum commonly used for a potentiometer or ther-
mistor.
53, 54 Analog input. Selectable for voltage (0-10 V) or current (0- or 4-20 mA). Closed is for current
and open is for voltage. Switches are located on the drive control card behind the removable
keypad. See drive support materials for details.
55 Common for analog inputs.
61 Common for serial communication. Do not use to terminate shields. See drive support mate-
rials for proper shield termination.
68 (+), 69 (-) RS-485 interface. When the drive is connected to an RS-485 serial communication bus, a drive
control card switch is provided for termination resistance. ON for termination and OFF for no
termination. See drive support materials for details.
Table 6. 2: Drive Control Terminals Functions
Electronically Controlled Bypass (ECB) Oper-ation
50 TR200 Option Panel Operating Instructions
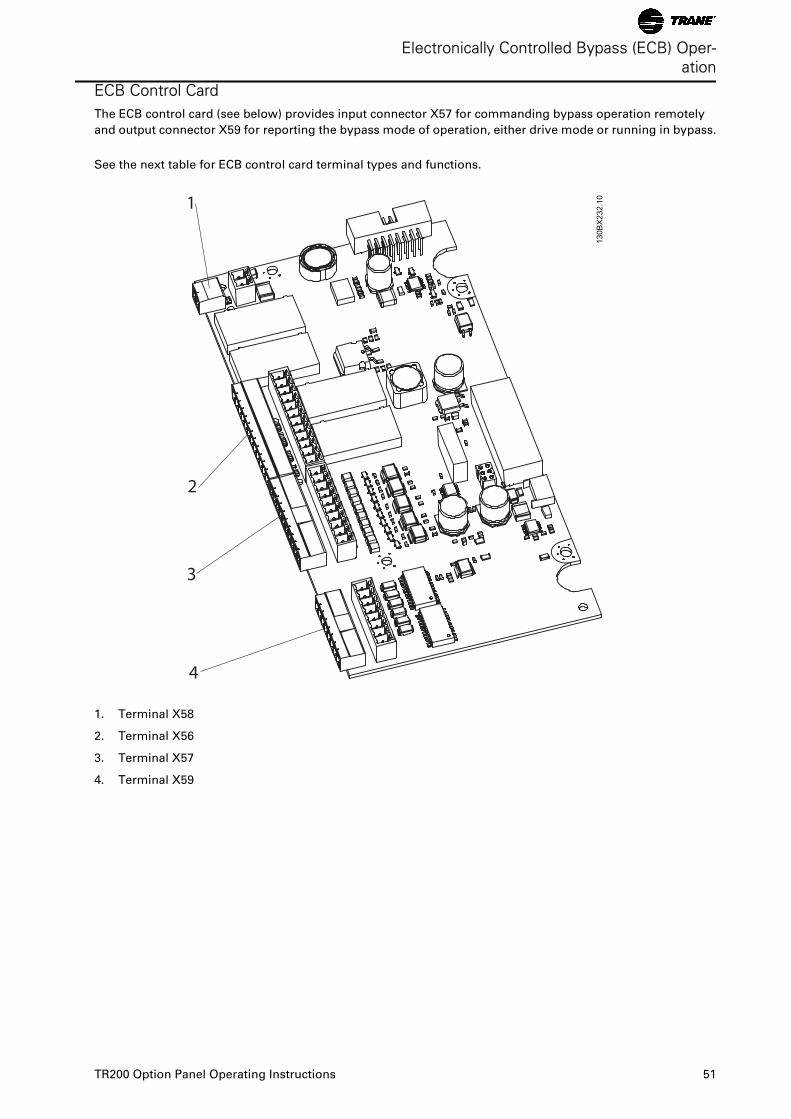
ECB Control CardThe ECB control card (see below) provides input connector X57 for commanding bypass operation remotely
and output connector X59 for reporting the bypass mode of operation, either drive mode or running in bypass.
See the next table for ECB control card terminal types and functions.
1
130B
X23
2.10
2
3
4
1. Terminal X58
2. Terminal X56
3. Terminal X57
4. Terminal X59
Electronically Controlled Bypass (ECB) Oper-ation
TR200 Option Panel Operating Instructions 51
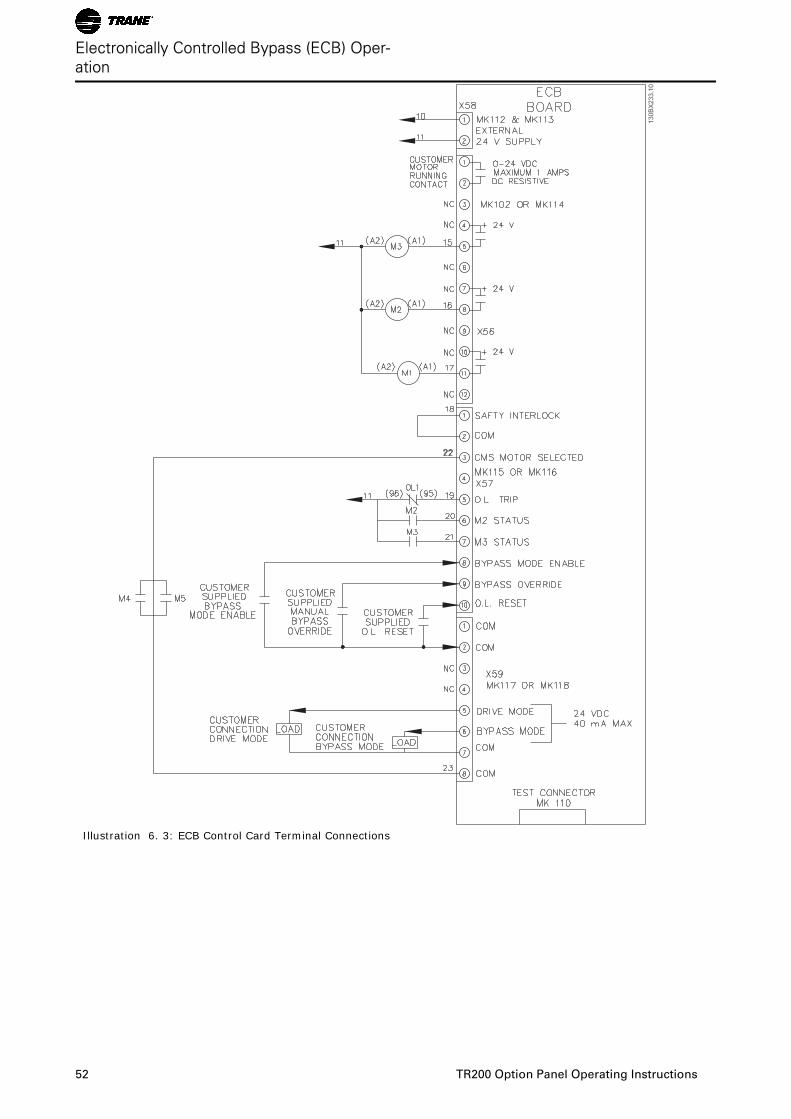
Illustration 6. 3: ECB Control Card Terminal Connections
Electronically Controlled Bypass (ECB) Oper-ation
52 TR200 Option Panel Operating Instructions

Input Conn. Term. Function Type
X57
1 Digital input for safety stop User supplied dry contact
2 Common User supplied dry contact
3 Factory use only
4 No function
5 Factory use only
6 Factory use only
7 Factory use only
8 Digital input for remote bypass enable User supplied dry contact
9 Digital input overrides system to Bypass
Mode ignoring all other inputs and com-
mands, except for safety stop on terminal 1.
User supplied dry contact
10 Digital input for remote overload reset User supplied dry contact
Output Conn. Term. Function
X59
1 Common for binary I/O
2 Common for binary I/O
3 No function
4 No function
5 Digital output indicates panel is in Drive
Mode.
24 VDC digital output
6 Digital output indicates panel is in Bypass
Mode
24 VDC digital output
7 Common for binary I/O
8 Common for binary I/O
Relay Output Term. Function
X56
1 N.O. contact for running in bypass or drive Relay output for user
2 N.O. contact for running in bypass or drive Relay output for user
3-12 Factory use only
Table 6. 3: ECB Card Terminals
Electronically Controlled Bypass (ECB) Oper-ation
TR200 Option Panel Operating Instructions 53

ECB Drive or Bypass SelectionUse the drive keypad and display to switch between the motor running in drive mode or bypass when operating
in local control. The display in operating mode is shown below.
1. Press DRIVE BYPASS key. Display
changes to show bypass and drive
mode options (shown in Step 2).
1 = Display
2 = Info key
3 = Drive/Bypass Option Key
2. When running in drive mode, press
OK key on keypad to activate bypass
mode or press CANCEL to remain in
drive mode. In bypass, motor will run at
full speed.13
0BX
235.
10
3. When running in drive mode, press
OK key on keypad to activate drive
mode or press CANCEL to remain in by-
pass mode.
130B
X23
7.10
4. Press STATUS key to return to drive
status display.
130B
X23
6.10
NOTE PRESSING THE INFO KEY AT ANY TIME DISPLAYS TIPS AND GUIDELINES FOR PERFORMING THE
FUNCTION CURRENTLY ACTIVATED.
130B
X23
8.10
Electronically Controlled Bypass (ECB) Oper-ation
54 TR200 Option Panel Operating Instructions

ECB ProgrammingUse the drive keypad and display for programming ECB functional options. All programming options appear in
numbered parameters. Parameters are arranged in groups by related functions. Programming is performed by
accessing the parameters through a menu and selecting from displayed options or entering numerical values.
See the drives’ supporting materials for detailed programming instructions.
Access parameters to program bypass functions in accordance with the following instructions.
1. Press MAIN MENU key on drive keypad to ac-
cess parameter groups. (Note that memory func-
tion of menu returns to last used function. Use
BACK key to return to main menu index when
necessary.)
130B
X23
9.10
2. Press UP or DOWN arrows on drive keypad to
scroll through parameter groups. Dotted outline
surrounds selected group. Bypass options are
found in the 31- 00 Bypass parameter group.
130B
X24
0.10
3. Press OK key to enter selected parameter
group.
4. Use UP or DOWN arrows to scroll through pa-
rameter list.
5. Press OK again to enter programming mode
which allows changing parameter options or da-
ta. Option is inverse highlighted.
130B
X24
1.10
6. Use UP or DOWN arrows to scroll through pro-
grammable options.
7. Press OK key again to activate selection or CAN-
CEL key to cancel.
8. For entering numeric values, use RIGHT or LEFT
arrows to select numeric digit, then use UP or
DOWN arrows to scroll through digit numbers
0-9. Selected digit is inverse highlighted.
130B
X24
2.10
9. Press OK key to activate selection or CANCEL
key to cancel.
10. Press STATUS key to return to operational
display data or BACK key to return to parameter
menu options.
Electronically Controlled Bypass (ECB) Oper-ation
TR200 Option Panel Operating Instructions 55

ECB Hand/OFF/AutoGeneral Information
The HAND ON, OFF RESET, and AUTO ON keys on the drive keypad control both the drive and bypass (see
figure keypad earlier this chapter). The DRIVE BYPASS key allows the user to locally select drive or bypass mode
of operation. It does not necessarily start or stop the motor.
Prior to Enabling Hand/Off/Auto
• Complete the start-up procedure to verify motor rotation direction in bypass is correct and that the
system is ready in all respects for continuous full speed operation in bypass.
Programming Key Functions
For the OFF RESET and DRIVE BYPASS keys, the table below lists the parameters that select functions for the
control keys. A password protection can also be assigned in these parameters.
Operation
• HAND ON allows the user to start the motor locally from the keypad. Press the HAND ON to start the
motor locally either in drive or bypass mode.
• OFF RESET allows the user to stop the motor locally from the keypad. Press the OFF RESET to stop the
motor locally, either in drive or bypass mode.
• AUTO ON allows the motor to be started remotely from digital input or serial communications. Press
AUTO ON to activate remote motor start and stop from a digital input or serial communications in
drive or bypass mode.
• Press the DRIVE BYPASS key to initiate the display to toggle between drive or bypass mode of operation.
Press the OK key to accept the change or CANCEL key to cancel the action.
Parameter number Key Function
00-44 Off / Reset This disables or enables the [Off / Reset] key on
keypad. (0) disabled, (1) enabled, (2) password Default
value is (1) enabled.
00-45 Drive / bypass This disables or enables the [Drive Bypass] key on
keypad. (0) disabled, (1) enabled, (2) password Default
value is (1) enabled.
Table 6. 4: keypad Control Keys Programming
Electronically Controlled Bypass (ECB) Oper-ation
56 TR200 Option Panel Operating Instructions

ECB Mode of OperationGeneral Information
The ECB has four modes of operation: drive, bypass, auto bypass, and test. The mode is selected through the
drive keypad and display. Bypass mode select can be accessed directly by pressing the DRIVE/BYPASS key on
the keypad.
Prior to Enabling Mode of Operation
• Complete the start-up procedure and verify motor rotation direction in bypass is correct and that the
system is ready in all respects for continuous full speed operation in bypass.
• Press the OFF/RESET key on the drive keypad to prevent operation of the motor.
Operation
Drive mode.The motor is connected to and controlled by the drive. Contactors M1 (optional) and M2 are closed
while contactor M3 is open. (Contactor M1 for test mode is only present in the 3-contactor configuration.) The
motor will not run until a run command is present.
Bypass mode.The motor operates at full speed across the line when a run command is present. Contactor M3
is closed and M1 (optional) and M2 are open.
Test mode.Test mode puts the panel into bypass mode and will automatically run in bypass. Contactor M1 is
closed supplying power to the drive for test purposes while M2 is open. Contactor M3 controls the operation of
the motor in bypass, closed to run the motor, open to remove power. The control keys on the drive keypad will
not control the bypass until test mode is removed.
Auto bypass mode.When in drive mode, auto bypass is a timed interval that allows a fault condition in the drive
to activate running the motor in bypass without operator intervention.
Electronically Controlled Bypass (ECB) Oper-ation
TR200 Option Panel Operating Instructions 57

Mode of Operation Select
• Mode of operation is programmed through the 31-00 parameter group. See table below.
Parameter Number Selection Function
31-00 Bypass Mode Selects source of motor power.
(0) Drive (drive mode) (1) Bypass
(bypass mode)
31-01 Bypass Start Time Delay Sets a delay time for starting in by-
pass that allows for external ac-
tions to take place prior to line
starting the motor.
0-60 Seconds (default value is 5
seconds)
31-02 Bypass Trip Time Delay Setting a value other than 0 sec-
onds enables auto bypass. Bypass
trip delay sets the delay time before
switching to bypass mode when
the drive has a fault.
0-300 seconds (default is 0 seconds
= OFF)
31-03 Test Mode Activation Setting to enabled puts bypass in
test mode. See manual for warn-
ings and cautions.
(0) disabled (default value) (1) ena-
bled
31-10 Bypass Status Word Read only display which shows the
bypass status in hex. See next table
for details.
0, 216-1 (default value is 0)
31-11 Bypass Running Hours Read only display which shows by-
pass running hours.
Table 6. 5: Bypass Parameter Functions
Bit Description0 Test ModeThe Test Mode bit will be true when the ECB is in Test Mode.
1 Drive ModeThe Drive Mode bit will be true when the ECB is in Drive Mode.
2 Automatic Bypass ModeThe Automatic Bypass Mode bit will be true when the ECB is in Au-
tomatic Bypass Mode.
3 Bypass ModeThe Bypass Mode bit will be true when the ECB is in Bypass Mode.
4 ReservedThis bit is reserved for future use.
5 Motor Running from Bypass/DriveThe Motor Running from Bypass/Drive Bit will be true when
the motor is running from either the drive or the bypass.
6 Overload TripThe Overload Trip Bit will be true when the ECB detects an overload trip.
7 M2 Contactor FaultThe Contactor Fault Bit will be true when an M2 Contactor Fault is detected.
8 M3 Contactor FaultThe Contactor Fault Bit will be true when an M3 Contactor Fault is detected.
9 External InterlockThe External Interlock Bit will be true when an External Interlock fault is
detected.
10 Manual Bypass OverrideThe Manual Bypass Override Bit will be true when the Manual Bypass
Override input is true.
Table 6. 6: Parameter 31-10 Bypass Status Word Bit Definitions
Electronically Controlled Bypass (ECB) Oper-ation
58 TR200 Option Panel Operating Instructions

Bypass Status Word Bit Examples
1. Motor running and bypass in drive mode. Status word 22 hexadecimal converts to 00000100010 binary.
Bit 10 9 8 7 6 5 4 3 2 1 0
Binary 0 0 0 0 0 1 0 0 0 1 0
1. External interlock fault (open) and bypass in bypass mode. Status word 208 hexadecimal converts to
01000001000 binary.
Bit 10 9 8 7 6 5 4 3 2 1 0
Binary 0 1 0 0 0 0 0 1 0 0 0
ECB Auto BypassGeneral Information
Auto bypass allows a fault condition in the drive to activate running the motor in bypass without operator
intervention. Activation of the function is through setting timer start parameters in the drive programming. Fault
trip and running in bypass are reported through the drive display, digital outputs, and serial communications.
In addition, the independently powered ECB card is available to report bypass status when the drive is inoperable
(control card operative) through its serial communications or digital outputs.
Prior to Enabling Auto Bypass
• Complete the start-up procedure to verify motor rotation direction in bypass is correct and that the
system is ready in all respects for continuous full speed operation in bypass.
Operation
• With the auto bypass function enabled, a fault signal from the drive activates the auto bypass timer.
• If the fault clears before the time delay is complete, the motor remains operating in drive mode. This
allows temporary faults, such as a momentary under or over voltage, to clear without transferring
the system to bypass.
• If the timer completes its cycle before the fault clears, the panel trips into bypass mode and the motor
runs at constant full speed from line input voltage.
• In bypass, the motor will stop:
- if the drive receives a remote stop command
- local stop (OFF key) on the drive keypad is pressed
- a remote start command is removed
- a safety is open
- motor overload is tripped
• Once auto bypass is activated, the only way to reset the unit back to drive mode is by operator inter-
vention. Ensure that the fault has been cleared, then press the BYPASS key on the drive keypad and
select drive mode.
Electronically Controlled Bypass (ECB) Oper-ation
TR200 Option Panel Operating Instructions 59
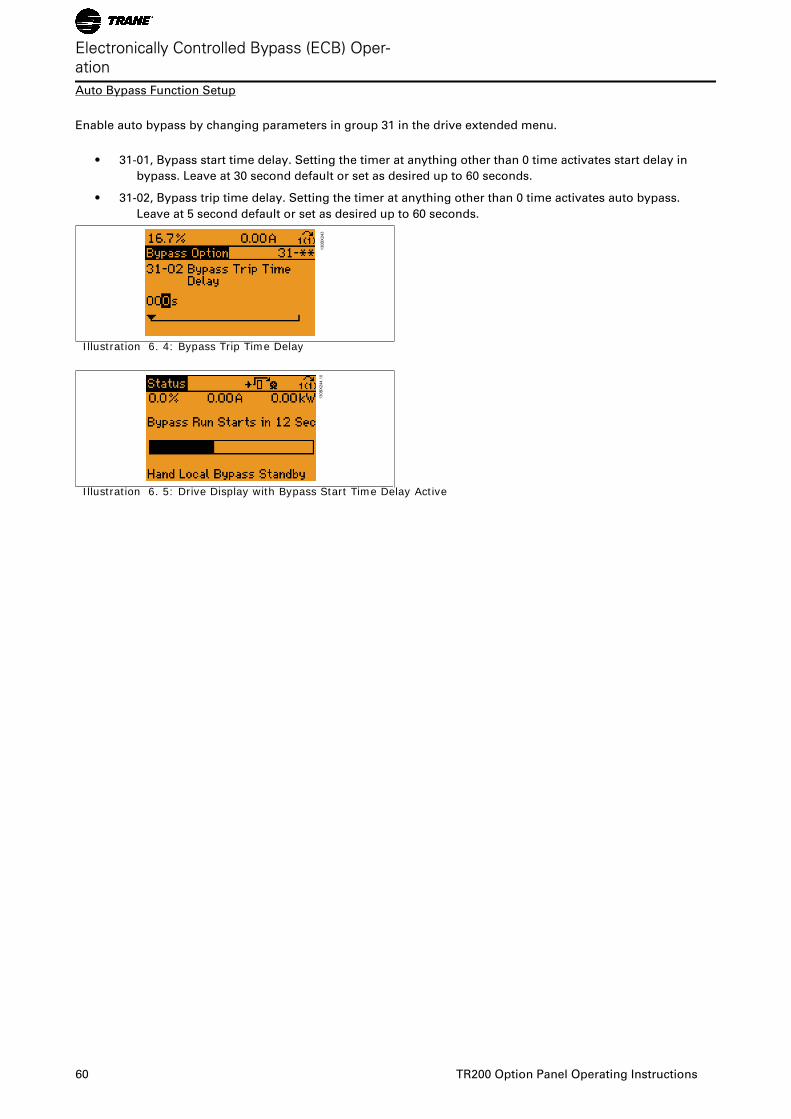
Auto Bypass Function Setup
Enable auto bypass by changing parameters in group 31 in the drive extended menu.
• 31-01, Bypass start time delay. Setting the timer at anything other than 0 time activates start delay in
bypass. Leave at 30 second default or set as desired up to 60 seconds.
• 31-02, Bypass trip time delay. Setting the timer at anything other than 0 time activates auto bypass.
Leave at 5 second default or set as desired up to 60 seconds.
130B
X24
3
Illustration 6. 4: Bypass Trip Time Delay
130B
X24
4.10
Illustration 6. 5: Drive Display with Bypass Start Time Delay Active
Electronically Controlled Bypass (ECB) Oper-ation
60 TR200 Option Panel Operating Instructions

ECB Run PermissiveGeneral Information
With run permissive active, the drive sends a run request and waits for a remote response to before notifying
the motor to start. The response indicates the system is safe to operate. Run permissive operates from the
keypad hand/off/auto select in drive or bypass mode. Run permissive is enabled by programming in the drive
parameters.
Prior to Enabling Run Permissive
• Complete the start-up procedure to verify motor rotation direction in bypass is correct and that the
system is ready in all respects for continuous full speed operation in bypass.
• Verify that the drive is programmed for the run permissive function. See the drive support materials for
programming the run permissive function.
Operation
• A start command can be initiated from local hand start, serial communications, or a remote auto start
signal through digital drive input terminals.
• In response to the start command, an output request is sent from the programmable drive relay to the
external equipment (to activate a valve or damper, for example).
• When a return run signal on the digital input is received, the motor is started in either drive or bypass,
depending upon which mode is active.
Run Permissive Function Setup
• See the drive manual or support materials for programming and wiring to the drive control terminals.
• Wire the output run request to the drive output terminals selected, and program the terminals for run
request.
• Wire the input run command to the drive input terminals selected, and program the terminals for run
permissive.
Disable Run Permissive
• Disable run permissive through the drive parameters and terminal programming.
ECB OverloadGeneral Information
An overload device provides overcurrent protection for the motor when running in bypass. The thermally acti-
vated overload monitors motor current and trips to remove power to the motor if a sustained overcurrent
condition exists. A Class 20 overload is standard with a variable setting for motor current. Test and reset buttons
are also provided. In drive mode, the drive provides current sensing and trip protection. Fuses provide quick
action for high over current conditions.
Prior to Enabling Overload
• Verify that the overload current dial setting matches the motor FLA rating on the motor nameplate.
• If the motor FLA is greater or less than range of the current dial, reconfirm that the motor hp and voltage
are within the option panel (and drive) rating. If less than the FLA rating, replace the overload with
the correct size. If greater than the FLA rating, replace the panel with one of a proper rating.
Electronically Controlled Bypass (ECB) Oper-ation
TR200 Option Panel Operating Instructions 61

NOTICEMOTOR DAMAGE! REPEATED ATTEMPTS TO RESET OVERLOAD CAN CAUSE MOTOR DAMAGE. CORRECTOVERLOAD CONDITION AND LET OVERLOAD AND MOTOR RETURN TO NORMAL OPERATING TEMPERATUREBEFORE RESETTING. SEE MOTOR MANUFACTURER’S RECOMMENDATIONS FOR TIME BETWEEN START AT-TEMPTS. FAILURE TO CORRECT OVERLOAD CONDITION AND LET MOTOR RETURN TO NORMAL OPERATINGTEMPERATURE COULD CAUSE MOTOR DAMAGE.
Operation
Overloads and motors are both rated by class. The class is defined by the NEC to determine the maximum time
to trip. A Class 20 overload, for example, has a typical trip delay of 20 seconds or less at 600% current and normal
operating temperature. This allows for high motor inrush current for 20 seconds while the motor is ramping up
to synchronous speed. The trip time, however, is based on the percentage of overload. The higher the overload,
the shorter the time.
T1 T2 T3
97NO 98NO 95NC 96NC
1020 30
RESETTEST
MANUAL
AUTO
TRIP
5
130B
X22
9.10
Illustration 6. 6: Sample Overload Device
Overload Function Setup
• Set the overload current dial to the FLA of the motor. DO NOT add the service factor of the motor into
the setting. A service factor of 1.2 x FLA is designed into the overload.
• Pressing the test pushbutton verifies the operation of the overload. The overload should trip when
pressed. Use the reset pushbutton to reset the overload after test.
• Reset is used to reset the overload after it trips. If the overload is still hot, wait until the motor reaches
normal operating temperature before resetting. The overload offers a manual (hand) or auto reset
selection. It is highly recommended to operate in the manual factory setting to prevent the risk of
damage to the motor.
Electronically Controlled Bypass (ECB) Oper-ation
62 TR200 Option Panel Operating Instructions

ECB Safety InterlockGeneral Information
The safety interlock feature prevents the drive or bypass from operating. Only a fire mode command to run
overrides this function. For operation in drive or bypass mode, the safety external interlock input contact must
be closed. External inputs include, but are not limited to, high and low pressure limit switches, fire alarm, smoke
alarm, high and low temperature switches, and vibration sensors.
Operation
When an external safety input closes on ECB terminals 1 and 2 on connector X57, the option panel is in opera-
tional mode. When open, power to the motor is disabled. The bypass ignores all run commands except for fire
mode operation, when applicable. The drive display indicates alarm 221, bypass interlock, meaning the problem
is external to the drive. A factory installed jumper between X57 terminals 1 and 2 allows the unit to operate
when no safety input is connected. This jumper must be removed when connecting in a safety interlock circuit.
Safety Interlock Function Setup
• Remove factory-installed jumper between ECB connector X57 terminals 1 and 2 on drive control termi-
nals.
• Wire safety input to connector X57 terminals 1 and 2.
• For technicians familiar with connecting to drive terminals 12 and 27 for safety interlock, be aware that
ECB bypass operation will NOT stop with the external fault report. Use terminals 1 and 2 on connector
X57, as indicated, for bypass control.
ECB Common Run/StopGeneral Information
The common run/stop function provides remote run and stop control of the motor(s) while in either drive or
bypass. Without common run/stop, the motor would automatically run at full speed whenever the bypass is
activated. The remote signal provides drive control as well as bypass control, making this one input common
to both. Common run/stop is enabled by factory default. When used with the run permissive function, common
run/stop permits run request operation in bypass.
Operation
A user supplied remote run command wired to drive terminals 13 and 18 initiates remote drive or bypass op-
eration. Common run/stop can also be activated by hand on the drive keypad or through serial communication.
Operation in either drive or bypass is determined by drive or bypass mode selection, not the run/stop command.
Prior to Enabling Common Run/Stop
• Complete the start-up procedure to verify motor rotation direction in bypass is correct and that the
system is ready in all respects for continuous full speed operation in bypass.
Common Run/Stop Setup
• Wire a remote run/stop to drive input terminals 13 and 18 (default run input). Ensure that parameter 18
is programmed for run (default setting).
Electronically Controlled Bypass (ECB) Oper-ation
TR200 Option Panel Operating Instructions 63

ECB Advanced Fire ModeGeneral Information
Drive operation in advanced fire mode is programmable. In the event the drive does not function, the motor is
operated in bypass at full speed. Fire mode is intended to ignore common safety and overload inputs in emer-
gency situations. The fire mode function is built-in. See the drive support materials for programmable options.
Prior to Enabling Fire Mode
• Complete the start-up procedure to verify motor rotation direction in bypass is correct and that the
system is ready in all respects for continuous full speed operation in bypass.
• Verify that the drive is programmed for the fire mode function. See the drive support materials for pro-
gramming the fire mode function.
Operation
• Activation of fire mode is accomplished by programming the drive for fire mode.
• When activated, the ECB ignores safety circuits and motor overload.
• Fire mode is deactivated only when removed or fuses blow.
• Fire mode status can be reported through serial communications or drive output.
Fire Mode Function Setup
• Program drive for fire mode.
• If required, program a drive output for fire mode status.
• See the drive support materials for programming the fire mode function.
ECB Fault ReportingGeneral Information
The ECB monitors bypass contactors M2 and M3 and reports failures to the drive for display and external re-
porting. The drive also monitors the ECB card for bypass communication errors.
Operation
ECB detected faults are reported by the drive in three ways: warnings and alarms are displayed on the keypad
display, through serial communication, or through output relays. The drive provides a form-C fault relay on
terminals 01, 02, and 03. The fault contacts are fail-safe, meaning that if power is removed the contacts close
and a fault condition is reported.
The drive monitors the ECB card communication and detects when communication stops. An ECB card failure
or communication error could cause this. Contact Traneusing the phone number on the back of this manual for
technical support if this happens.
Fault Reporting Function Setup
• Automatic function. No set up required.
Electronically Controlled Bypass (ECB) Oper-ation
64 TR200 Option Panel Operating Instructions

Non-bypass Component FunctionsPower FusingFor all option panel power fuses, use the specified fuse or an equivalent replacement only. See the fuse ratings
label on the inside cover of the unit for option panel fuse ratings.
Main fusing.Main fuses are located ahead of the drive and bypass. Main fuses are designed to protect the
circuitry within the bypass panel but is not adequate to protect the drive. Main fuses are dual-element, time-
delay types and mount inside the bypass enclosure.
Drive fusing.Drive fuses are located ahead of the drive and are a fast-acting type. Drive fuses are standard in
two-contactor and three-contactor bypasses. A fuse/disconnect enclosure may be used if no options other than
a fuse block and disconnect switch are required.
100,000 amp SCCR.The option panel is at least 5,000 amps short-circuit current rating (SCCR). An additional
100,000 amp SCCR is available as an option. See the panel label for SCCR rating.
ReactorsInput line reactor.This is a 3-phase reactor, mounted on the input to the option panel This lowpass reactor
adds 3% impedance on the line input. The impedance filters noise from the line input to the drive along with
the return drive noise on the line. It is not in operation when running across the line.
Output dV/dt filter.This is a 3-phase reactorcapacitor- resistor combination. Mounted in series with the output
of the drive, it functions to reduce the magnitude of voltage spikes related to PWM wave forms generated by
the drive. It allows the use of longer motor leads and reduces insulation stress on motors without interphase
insulation. It is not connected to the motor when running across the line.
DisconnectsMain disconnect.The main disconnect removes line input power to the drive and option panel. A main discon-
nect is available in four options.
• Fused disconnectTwo-position (ON/OFF) rotary switch, padlock compatible, with three fuses, one on
each phase, built into the switch. For safety, the switch must be in the OFF position before the option
panel door can be opened or fuses removed.
• Disconnect with fuses.Twoposition (ON/OFF) rotary switch, padlock compatible, with a fuse block
mounted separately from the disconnect. Three fuses, one on each phase, are located on the fuse
block. For safety, the switch must be in the OFF position before the option panel door can be opened.
• Main circuit breaker.A thermal/ magnetic current interrupt device using an ON/TRIP/OFF/RESET switch.
When in the ON position, a high current fault removes power from the drive/option panel circuit and
the switch moves to the TRIP setting. It must be moved to the RESET position momentarily after the
fault has been cleared to reset the circuit breaker.
• Disconnect without fuses.For user-supplied fuses option.
Drive disconnect.Two-position (ON/ OFF) rotary switch disconnects main AC line input power to the drive only.
TR200 Option Panel Operating Instructions 65

Motor OptionsThe drive with bypass has three motor combination options available for drive control or for running in bypass:
single motor, dual motor, or contact motor select.
Single Motor Option
General Information
The single motor option is when a drive is running one motor or the motor is operating in bypass mode. The
drive and motor are normally the same hp. The FLA of the motor must be less than or equal to the maximum
output current of the drive.
Prior to Enabling Single Motor Operation
• Complete the start-up procedure to verify motor rotation direction is correct and that the system is ready
in all respects for continuous full speed operation in bypass.
Function
There are no special functions related to single motor option.
Dual Motor Option
General Information
The dual motor option is available for one drive running two motors at the same time or both motors running
in bypass. The motors may be of the same or different hp, but combined FLA of the motors must be equal to or
less than the maximum output current of the drive. (Note that the combined hp of the two motors is not appro-
priate for sizing the drive; use FLA.) Both motors respond to drive commands or run at full output speed in
bypass. Separate overloads are required since the drive does not monitor individual motor current but the total
current draw.
Prior to Enabling Dual Motor Operation
• Complete the start-up procedure to verify each motor rotation direction is correct and that the system
is ready in all respects for continuous full speed operation in bypass.
• When using dual motors, see the drive support materials for any special requirements for running dual
motors.
Function
For dual motor operation, a separate overload relay is connected to each motor overload. If either overload trips,
both motors stop.
Contactor Motor Select Option
General Information
The contactor motor select option is available for one drive alternating operation between two motors.
See Contactor Motor Select in this manual for details on this option.
Non-bypass Component Functions
66 TR200 Option Panel Operating Instructions

Contactor Motor SelectGeneral Information
Contactor motor select (CMS) is an option available for one drive alternating operation between two motors.
Contactors M4, M5, and switch SW2 are added in the option panel for this function. The motors must be of equal
hp and current rating and match the drive rating (as in single motor operation). Motor selection is made through
a panelmounted selector switch (SW2), remotely through control wiring input, serial communications, or the
drive’s smart-logic controller. Status reporting is available to indicate which motor is in operation.
Prior to Enabling Contactor Motor Select
• Complete the start-up procedure to verify the motor rotation direction is correct for both motors and
that the system is ready in all respects for continuous operation.
Operation
• The panel mounted contactor motor select switch (SW2) has three positions: Motor 1/Auto/Motor 2. It
is operated by hand for manual operation. The motor 1 position selects motor 1, and the motor 2
position selects motor 2.
• When SW2 is in the auto position, either motor can be selected remotely. (Do not close both contacts
at once.)
• The drive’s smart-logic controller can alternate motors when SW2 is in auto position. See the drive
support materials for details.
• Serial communications commands can alternate motors when SW2 is in auto position. See the drive
support materials for details.
Motor Select Status
• The EMB option panel reports the motor selected in either local or remote operation.
Contactor Motor Select Function Setup
For EMB(0) or ECB, see the connection drawing supplied with the unit. For EMB1 or EMB2, make connections
as follows.
• For remote control, connect control wiring to connector X56 terminals 11 and 12 for motor 1 operation
and to terminals 11 and 10 for motor 2.
• For status reporting, wire to connector X55 terminals 11 and 12 for motor 1 select, and connector X56
terminals 1 and 2 for motor 2 select.
Contactor Motor Select Switch
This optional switch is provided for contact motor select available with the EMB option when two equally rated
motors are operated by one drive. The panel mounted Motor 1/ Auto/Motor 2 selector switch provides local
control of motor 1 or 2 along with an auto setting that allows for remote motor selection.
Non-bypass Component Functions
TR200 Option Panel Operating Instructions 67

Start Up TroublehootingOption Panel Alarm and Warnings
Code
Number
Title Definition
220 Overload Trip Motor overload has tripped. Indicates excess motor load. Check motor and
driven load. To reset press the OFF/Reset key. Then, to restart the system,
press the Auto ON or Hand ON key.
221 Bypass Interlock Bypass interlock has opened and caused the motor to stop. Correct the prob-
lem. Depending on the setting of parameter 14-20, the system will either
automatically reset this alarm or require the OFF/Reset key to be pressed.
222 M2 Open Failed ECB: The contactor that connects the drive to the motor failed to open. The
motor can not be operated.
223 M2 Close Failed ECB: The contactor that connects the drive to the motor failed to close. The
motor can not be operated.
224 M3 Open Failed ECB: The contactor that connects the motor to the power line has failed to
open.
226 M3 Close Failed ECB: The contactor that connects the motor to the power line has failed to
close. The motor can not be operated.
227 Bypass Com Error Communication between the main control card and the bypass option has
been lost. Motor control lost. It will be possible to run the motor using Manual
Bypass Override. See the Option Panel's Instruction Manual for more details.
228 APU Low Voltage The Option Panel Power Supply has failed, or there is a power problem.
229 Motor Disconn. Terminal 3 on connector X57 of the ECB control card shows an open. This
generally means that neither motor has been selected in contactor motor se-
lect. Select a motor.
Table 8. 1: Option Panel Alarms and Warnings
DisplayText Definition
Bypass Run Starts in: Indicates the number of seconds until the motor will be started in
bypass. This time delay can be adjusted using parameter 31-01.
Bypass Activates in: Indicates the number of seconds left until the system automatically
activates Bypass Mode. Time delay can be adjusted using parame-
ter 31-02.
Table 8. 2: Option Panel Status Display
68 TR200 Option Panel Operating Instructions
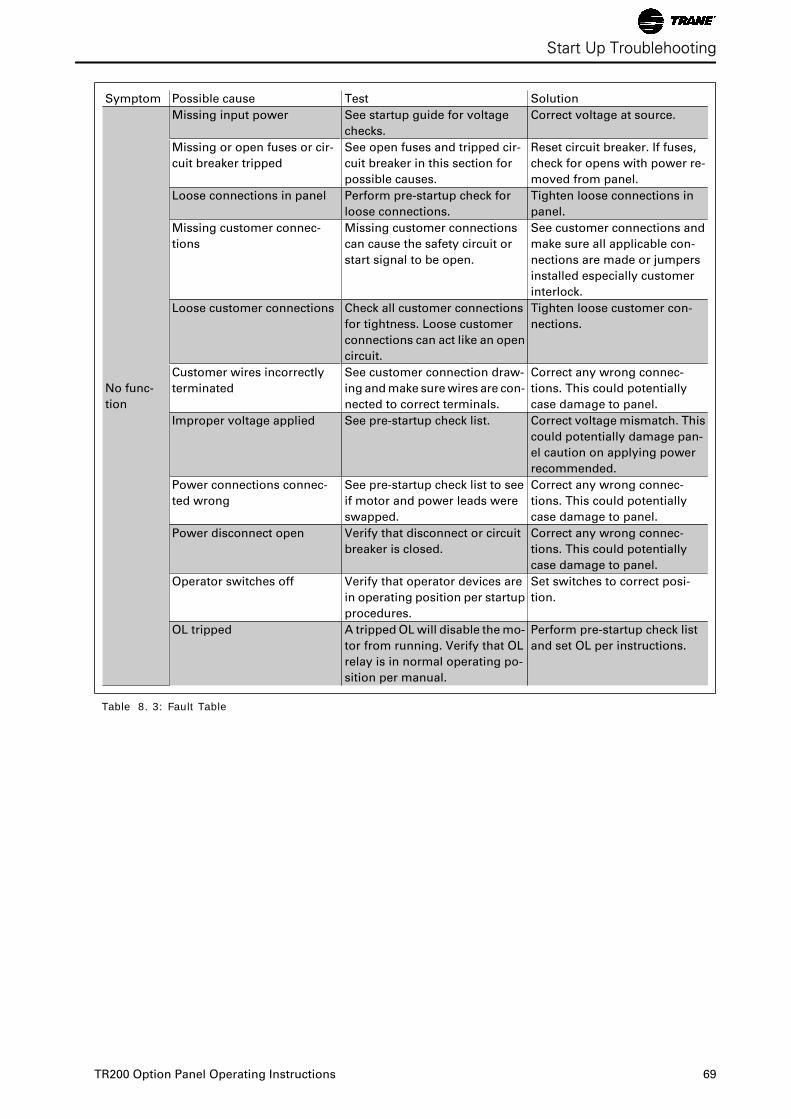
Symptom Possible cause Test Solution
No func-
tion
Missing input power See startup guide for voltage
checks.
Correct voltage at source.
Missing or open fuses or cir-
cuit breaker tripped
See open fuses and tripped cir-
cuit breaker in this section for
possible causes.
Reset circuit breaker. If fuses,
check for opens with power re-
moved from panel.
Loose connections in panel Perform pre-startup check for
loose connections.
Tighten loose connections in
panel.
Missing customer connec-
tions
Missing customer connections
can cause the safety circuit or
start signal to be open.
See customer connections and
make sure all applicable con-
nections are made or jumpers
installed especially customer
interlock.
Loose customer connections Check all customer connections
for tightness. Loose customer
connections can act like an open
circuit.
Tighten loose customer con-
nections.
Customer wires incorrectly
terminated
See customer connection draw-
ing and make sure wires are con-
nected to correct terminals.
Correct any wrong connec-
tions. This could potentially
case damage to panel.
Improper voltage applied See pre-startup check list. Correct voltage mismatch. This
could potentially damage pan-
el caution on applying power
recommended.
Power connections connec-
ted wrong
See pre-startup check list to see
if motor and power leads were
swapped.
Correct any wrong connec-
tions. This could potentially
case damage to panel.
Power disconnect open Verify that disconnect or circuit
breaker is closed.
Correct any wrong connec-
tions. This could potentially
case damage to panel.
Operator switches off Verify that operator devices are
in operating position per startup
procedures.
Set switches to correct posi-
tion.
OL tripped A tripped OL will disable the mo-
tor from running. Verify that OL
relay is in normal operating po-
sition per manual.
Perform pre-startup check list
and set OL per instructions.
Table 8. 3: Fault Table
Start Up Troublehooting
TR200 Option Panel Operating Instructions 69

Symptom Possible cause Test Solution
Open power
fuses or circuit
breaker trip
Improper voltage applied See pre-startup check list and
correct if wrong.
Correct voltage mismatch.
This could potentially dam-
age panel caution on apply-
ing power recommended.
Power connections connec-
ted wrong
Motor and line voltage swap-
ped. Make sure the line in and
motor out are on the correct
terminals. See pre-startup
check list.
Correct any wrong connec-
tions. This could potentially
case damage to panel.
Power ground fault Check motor and panel power
wires to ground.
Eliminate any ground faults
detected.
Phase to phase short Motor or panel has a short
phase to phase. Check motor
and panel phase to phase for
shorts.
Eliminate any shorts detec-
ted.
Motor overload Motor is overloaded for the
application.
Perform startup and verify
motor current is within spec-
ifications. If motor current is
exceeding nameplate FLA re-
duce the load on the motor.
Drive overload Drive is overloaded for the ap-
plication.
Perform startup and verify
drive current is within speci-
fications. If not reduce the
load on the motor.
Loose connections Perform pre-startup check for
loose connections.
Tighten loose connections.
Table 8. 4: Fault Table
Start Up Troublehooting
70 TR200 Option Panel Operating Instructions

Sy
mp
tom
Po
ssib
le c
au
se
Te
st
So
luti
on
Re
pe
ate
d f
use
or
cir
cu
it b
reake
r
Ap
pli
ca
tio
n p
rob
lem
Pe
rfo
rm s
tart
up
pro
ce
du
res. C
he
ck p
an
el o
utp
ut
mo
tor
cu
rre
nt
at
full s
pe
ed
an
d c
he
ck f
or
ex
ce
s-
siv
e o
ve
r cu
rre
nt.
If c
urr
en
t is
to
hig
h r
ed
uce lo
ad
on
mo
tor.
Pan
el p
rob
lem
Pe
rfo
rm s
tart
up
pro
ce
du
res. C
he
ck p
an
el in
pu
t
cu
rre
nt
at
full s
pee
d a
nd
ve
rify
it
is w
ith
in a
cce
pt-
ab
le r
an
ge
.
If c
urr
en
t is
to
hig
h r
ed
uce lo
ad
on
mo
tor.
Po
we
r p
rob
lem
Mo
nit
or
inco
min
g p
ow
er
for
su
rge
s a
nd
sa
gs a
nd
ov
era
ll q
ua
lity
.
Co
rre
ct
an
y p
rob
lem
s f
ou
nd
.
Mo
tor
pro
ble
mT
est
mo
tor
for
co
rre
ct
fun
cti
on
.R
ep
air
or
rep
lace
mo
tor
if a
pro
ble
m is f
ou
nd
.
Op
en
co
ntr
ol
fuse
Imp
rop
er
vo
lta
ge
ap
plied
See
pre
-sta
rtu
p c
heck lis
t.C
orr
ect
vo
lta
ge
mis
ma
tch
. T
his
co
uld
po
ten
tially
da
ma
ge p
an
el ca
uti
on
on
ap
ply
ing
po
wer
reco
m-
me
nd
ed
.
Cu
sto
me
r w
ire
s in
co
rrectl
y t
erm
inate
dS
ee
cu
sto
me
r co
nn
ecti
on
dra
win
g a
nd
ma
ke
su
re
wir
es a
re c
on
ne
cte
d t
o c
orr
ect
term
ina
ls.
Co
rre
ct
an
y w
ron
g c
on
ne
cti
on
s. T
his
co
uld
po
-
ten
tia
lly
ca
se d
am
ag
e t
o p
an
el.
Co
ntr
ol g
rou
nd
fa
ult
Ch
eck a
ll c
on
tro
l w
ire
s f
or
a s
ho
rt t
o g
rou
nd
.C
orr
ect
an
y g
rou
nd
fau
lts f
ou
nd
. T
his
co
uld
po
-
ten
tia
lly
ca
se d
am
ag
e t
o p
an
el.
Co
ntr
ol sh
ort
Ch
eck c
on
tro
l w
ires f
or
a s
ho
rt in
su
pp
ly v
olt
ag
e.
Co
rre
ct
an
y s
ho
rts. T
his
co
uld
po
ten
tia
lly
ca
se
da
ma
ge t
o p
an
el.
Op
en
SM
PS
fu
se
Imp
rop
er
vo
lta
ge
ap
plied
See
pre
-sta
rtu
p c
heck lis
t.C
orr
ect
vo
lta
ge
mis
ma
tch
. T
his
co
uld
po
ten
tially
da
ma
ge p
an
el ca
uti
on
on
ap
ply
ing
po
wer
reco
m-
me
nd
ed
.
Cu
sto
me
r w
ire
s in
co
rre
ctl
y t
erm
inate
dS
ee
cu
sto
me
r co
nn
ecti
on
dra
win
g a
nd
ma
ke
su
re
wir
es a
re c
on
ne
cte
d t
o c
orr
ect
term
ina
ls.
Co
rre
ct
an
y w
ron
g c
on
ne
cti
on
s. T
his
co
uld
po
-
ten
tia
lly
ca
se d
am
ag
e t
o p
an
el.
Co
ntr
ol g
rou
nd
fa
ult
Ch
eck a
ll c
on
tro
l w
ire
s f
or
a s
ho
rt t
o g
rou
nd
.C
orr
ect
an
y g
rou
nd
fau
lts f
ou
nd
. T
his
co
uld
po
-
ten
tia
lly
ca
se d
am
ag
e t
o p
an
el.
Co
ntr
ol sh
ort
Ch
eck c
on
tro
l w
ires f
or
a s
ho
rt in
su
pp
ly v
olt
ag
e.
Co
rre
ct
an
y s
ho
rts. T
his
co
uld
po
ten
tia
lly
ca
se
da
ma
ge t
o p
an
el.
Mo
tor
rota
tio
n
inco
rre
ct
Ro
tati
on
in
co
rre
ct
in b
yp
ass, d
riv
e o
r b
oth
Mo
tor
rota
tio
n is b
ackw
ard
s in
dri
ve m
od
e, b
y-
pa
ss m
od
e, o
r b
oth
.
Pe
rfo
rm m
oto
r ro
tati
on
pro
ce
du
re in
sta
rtu
p s
ec-
tio
n o
f m
an
ual.
Start Up Troublehooting
TR200 Option Panel Operating Instructions 71
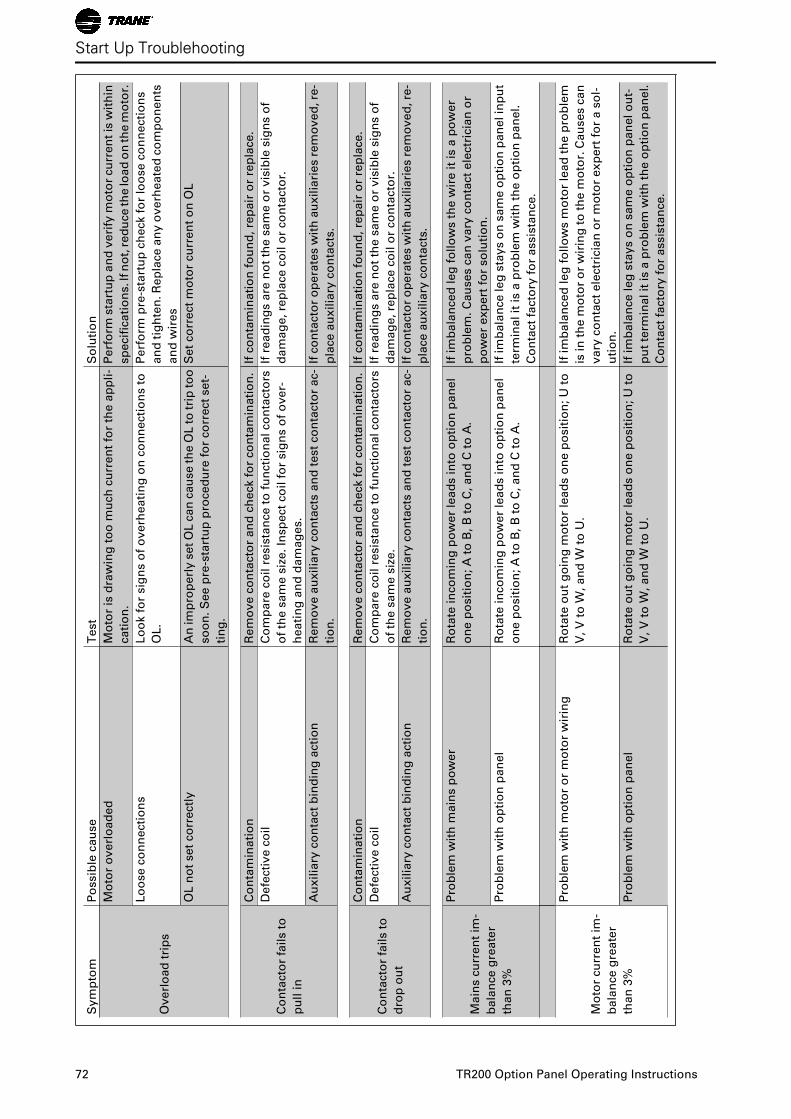
Sy
mp
tom
Po
ssib
le c
au
se
Test
So
luti
on
Ove
rlo
ad
tri
ps
Mo
tor
ov
erl
oa
ded
Mo
tor
is d
raw
ing
to
o m
uch
cu
rre
nt
for
the
ap
pli-
ca
tio
n.
Pe
rfo
rm s
tart
up
an
d v
eri
fy m
oto
r cu
rre
nt
is w
ith
in
sp
ecif
ica
tio
ns. I
f n
ot,
re
du
ce
th
e lo
ad
on
th
e m
oto
r.
Lo
ose c
on
ne
cti
on
sL
oo
k f
or
sig
ns o
f o
ve
rhe
ati
ng
on
co
nn
ecti
on
s t
o
OL
.
Pe
rfo
rm p
re-s
tart
up
ch
eck f
or
loo
se
co
nn
ecti
on
s
an
d t
igh
ten
. R
ep
lace a
ny
ove
rhe
ate
d c
om
po
nen
ts
an
d w
ire
s
OL
no
t se
t co
rre
ctl
yA
n im
pro
perl
y s
et
OL c
an
cau
se
th
e O
L t
o t
rip
to
o
so
on
. S
ee p
re-s
tart
up
pro
ce
du
re f
or
co
rrect
se
t-
tin
g.
Set
co
rre
ct
mo
tor
cu
rre
nt
on
OL
Co
nta
cto
r fa
ils t
o
pu
ll i
n
Co
nta
min
ati
on
Re
mo
ve c
on
tacto
r a
nd
ch
eck f
or
co
nta
min
ati
on
.If
co
nta
min
ati
on
fo
un
d, re
pair
or
rep
lace
.
Defe
cti
ve c
oil
Co
mp
are
co
il r
esis
tan
ce t
o f
un
cti
on
al co
nta
cto
rs
of
the
sa
me
siz
e.
Insp
ect
co
il f
or
sig
ns o
f o
ve
r-
hea
tin
g a
nd
da
mag
es.
If r
ead
ing
s a
re n
ot
the s
am
e o
r vis
ible
sig
ns o
f
da
ma
ge, re
pla
ce
co
il o
r co
nta
cto
r.
Au
xilia
ry c
on
tact
bin
din
g a
cti
on
Re
mo
ve a
uxil
iary
co
nta
cts
an
d t
est
co
nta
cto
r a
c-
tio
n.
If c
on
tacto
r o
pe
rate
s w
ith
au
xilia
rie
s r
em
ov
ed
, re
-
pla
ce
au
xilia
ry c
on
tacts
.
Co
nta
cto
r fa
ils t
o
dro
p o
ut
Co
nta
min
ati
on
Re
mo
ve c
on
tacto
r a
nd
ch
eck f
or
co
nta
min
ati
on
.If
co
nta
min
ati
on
fo
un
d, re
pair
or
rep
lace
.
Defe
cti
ve c
oil
Co
mp
are
co
il r
esis
tan
ce t
o f
un
cti
on
al co
nta
cto
rs
of
the
sa
me
siz
e.
If r
ead
ing
s a
re n
ot
the s
am
e o
r vis
ible
sig
ns o
f
da
ma
ge, re
pla
ce
co
il o
r co
nta
cto
r.
Au
xilia
ry c
on
tact
bin
din
g a
cti
on
Re
mo
ve a
uxil
iary
co
nta
cts
an
d t
est
co
nta
cto
r a
c-
tio
n.
If c
on
tacto
r o
pe
rate
s w
ith
au
xilia
rie
s r
em
ov
ed
, re
-
pla
ce
au
xilia
ry c
on
tacts
.
Ma
ins c
urr
en
t im
-
bala
nce
gre
ate
r
tha
n 3
%
Pro
ble
m w
ith
ma
ins p
ow
er
Ro
tate
in
co
min
g p
ow
er
lea
ds i
nto
op
tio
n p
an
el
on
e p
osit
ion
; A
to
B,
B t
o C
, a
nd
C t
o A
.
If im
ba
lan
ce
d l
eg
fo
llo
ws t
he
wir
e it
is a
po
we
r
pro
ble
m. C
au
se
s c
an
va
ry c
on
tact
ele
ctr
icia
n o
r
po
we
r e
xp
ert
fo
r so
luti
on
.
Pro
ble
m w
ith
op
tio
n p
an
el
Ro
tate
in
co
min
g p
ow
er
lea
ds i
nto
op
tio
n p
an
el
on
e p
osit
ion
; A
to
B,
B t
o C
, a
nd
C t
o A
.
If im
bala
nce
le
g s
tay
s o
n s
am
e o
pti
on
pan
el in
pu
t
term
inal it
is a
pro
ble
m w
ith
th
e o
pti
on
pa
nel.
Co
nta
ct
facto
ry f
or
assis
tan
ce
.
Mo
tor
cu
rre
nt
im-
bala
nce
gre
ate
r
tha
n 3
%
Pro
ble
m w
ith
mo
tor
or
mo
tor
wir
ing
Ro
tate
ou
t g
oin
g m
oto
r le
ad
s o
ne
po
sit
ion
; U
to
V, V
to
W, a
nd
W t
o U
.
If im
ba
lan
ced
le
g f
ollo
ws m
oto
r le
ad
th
e p
rob
lem
is in
th
e m
oto
r o
r w
irin
g t
o t
he
mo
tor.
Ca
use
s c
an
va
ry c
on
tact
ele
ctr
icia
n o
r m
oto
r ex
pert
fo
r a
so
l-
uti
on
.
Pro
ble
m w
ith
op
tio
n p
an
el
Ro
tate
ou
t g
oin
g m
oto
r le
ad
s o
ne
po
sit
ion
; U
to
V, V
to
W, a
nd
W t
o U
.
If im
bala
nce
le
g s
tays o
n s
am
e o
pti
on
pan
el o
ut-
pu
t te
rmin
al it
is a
pro
ble
m w
ith
th
e o
pti
on
pa
ne
l.
Co
nta
ct
facto
ry f
or
assis
tan
ce
.
Start Up Troublehooting
72 TR200 Option Panel Operating Instructions

Rev. 2008-12-09130R0479 MG14A102
*MG14A102*
Panel/BypassOperating Instructions
December 2008
TR200
BAS-SVX22A-EN
BAS-SVX22A-EN
Trane has a policy of continous product and product data improvement and reserves the right tochange design and specifications without notice.
www.trane.com
For more information, contact your local Traneoffice or e-mail us at [email protected]
Literature Order Number BAS-SVX22A-EN
Date December 2008
Supersedes