painting miniatures - darklight · pdf file · 2006-05-03paints - many types of...
TRANSCRIPT

IntroductionWhether used for Dungeons and Dragons, Warhammer, orany other game, well painted miniatures can dramaticallyenhance the experience. The information contained withinthis booklet is designed for those wishing to create show-pieces: it is not for those who want to paint entire armies.The goal in painting a miniature figure is to make it as real-istic as possible.
Materials NeededAs in any hobby, there are a variety of different materials
and tools which can be used. Some are absolute necessi-ties, while others can help with the process.
Xacto Knife - This is a must. A metal barrel with dis-posable blades, this tool is used to trim excess mater-ial from the figure as well as some additional sculptingwhen and where required. Children under the age of12 should use this tool only with adult supervision.
Model File - For filing the figure to remove mouldinglines or flash.
Paintbrush - The better the paintbrush, the better.Avoid cheap paintbrushes as they will not hold a pointand many will shed bristles. Buy brushes in four sizes:2/3, 00, 000, and 0000. The 000 brush will be yourmain brush and the others will be used to specific situ-ations. The larger brush (2/3) is used to apply thewashes to the model. This brush can be older and/orcheaper since it is not required for small detail work.
When pointing the brush, wet your fingers and gentlyroll the brush into a point. NEVER put a brush in yourmouth. This often results in a mild (and sometimesnot so mild) form of poisoning called “painter’s colic”.
Paints - Many types of paint will work, but the best touse are either designed specifically for metal or plasticfigures, or model paints. I personally prefer Humbrolmodel paints as they have a wide selection of coloursand are very high in quality. Regardless of the type ofpaint chosen, they should always be matte, nevergloss (except for liquids).
Paint Thinner - Buy thinner to match your paints. Ifpossible, buy thinner at the same store as you pur-chased your paints. In general, however, purchase tur-pentine for oil-based paints. Not paint thinner, turpen-tine (they’re not the same thing). Thinner can be usedto clean brushes, but for washes, a quality turpentineis best.
Spray Primer - The model must be primed before it ispainted, particularly metal figures. Purchase primerdesigned specifically for figures as these will be thinenough to prevent filling in the detail as well as adher-ing properly to the surface.
Spray Fixative - This is used once the figure is com-pleted to preserve and protect the paint job. Find a fix-ative which creates the desired finish, preferably amatte one. I find that the best fixes are those for oilpaintings.
Epoxy Glue - Many figures come in pieces and somemust be attached to their bases. The best glue to useis epoxy which is a two part glue which is mixedtogether in equal quantities to activate. The glue willbond metal to metal and metal to plastic.
Cutting Mat - Although you won't be doing a lot of cut-ting, this will protect the surface when you do and canalso be used to protect the surface from paints or thin-ners.
Metal Jar Lids - These are sometimes needed for mix-ing paint or for creating washes. They should be metalonly without cardboard or plastic inserts. DO NOT USEPLASTICS. Most of the paints and thinners you will wantto use will eat the plastic.
Eyedropper - Used to add paint and/or thinner in creat-ing washes.
Contour Putty - Used for filling in holes.
Toilet Paper - Quantities of toilet paper are indispensi-ble for cleaning the brushes between colours, cleaningthe eye dropper and jar lid, and cleaning up spills.
copyright - Robin Day, 2001 1
ModelFile
XactoKnife
JarLid
CuttingMat
Paints
SprayPrimer
FixativePaintbrushes EpoxyGlue
Painting Miniatures
Q-tips - Used to remove excess paint or glue from themodel if over-applied.
Fine Grit Sandpaper - For smoothing the model inareas where the file cannot reach or when a smootherfinish is required.
Magnifying Lamp - This type of lamp mounts on a tableor desk and contains a large magnifying glass. Theseare available in a wide variety of sizes, qualities andprices. For anyone wanting to paint a lot of figureswithout going blind, this is a must.
Preparing the FigureBefore priming, the figure must be cleaned and trimmed ofall “flash” and other moulding imperfections. Examine themodel carefully to determine which portions are flash andwhich are details. Use a knife to trim away any excessmetal or plastic, being careful not to remove too muchmaterial. Use a file to smooth any moulding marks or lines.Small pieces of very fine sandpaper can be used when thefile is too coarse or will not fit into small spaces.
C a u t i o n : As some figures contain lead and other poiso-nous chemicals do not sand or file metal figures near foodor drink or over surfaces where such is to be prepared orconsumed.
Do not assemble the figure or attach it to it’s base (if sepa-rate) until all of the pieces are painted. Try to avoid paintingthe areas which are to be glued. The glue adheres betterto the primed surface.
While the model is being smoothed, think about whichcolours will be used to paint the figure. Choose colours forthe flesh tones, fabrics, weaponry, etc. Planning will help toanticipate any problems with particular areas or textures.
After the model is smoothed, it should be washed beforebeing primed. To wash the model, use a soft toothbrush(ensure that the toothbrush is soft: hard or medium maybend the figure) with a small amount of dish-washingd e t e rgent. Use very little pressure when cleaning themodel to avoid bending any small pieces or marring thesurface. Rinse the figure thoroughly and dry using toiletpaper.
Priming the FigureBefore priming the figure, decide on a colour for the under-coat. The three most common colours for undercoating orpriming are white, black and grey. Each of these is general-ly used for a different purpose:
White: Undercoating with white will make the coloursmore vivid and intense. Use white when undercoatingheroes, ghosts, or other luminous characters/beings.
Black: Undercoating with black will darken and desatu-rate the colours. Use this on zombies, dark minions,orcs, goblins and other darker creatures. This can also
be helpful if you find it difficult to paint right to theedges as it can hide small imperfections.
Grey: Undercoating with grey provides a neutralground on which to paint the colours. This will interferewith the actual colours the least and is generally usedto preserve the look of the colours themselves. I pre-fer to use grey primer for this reason.
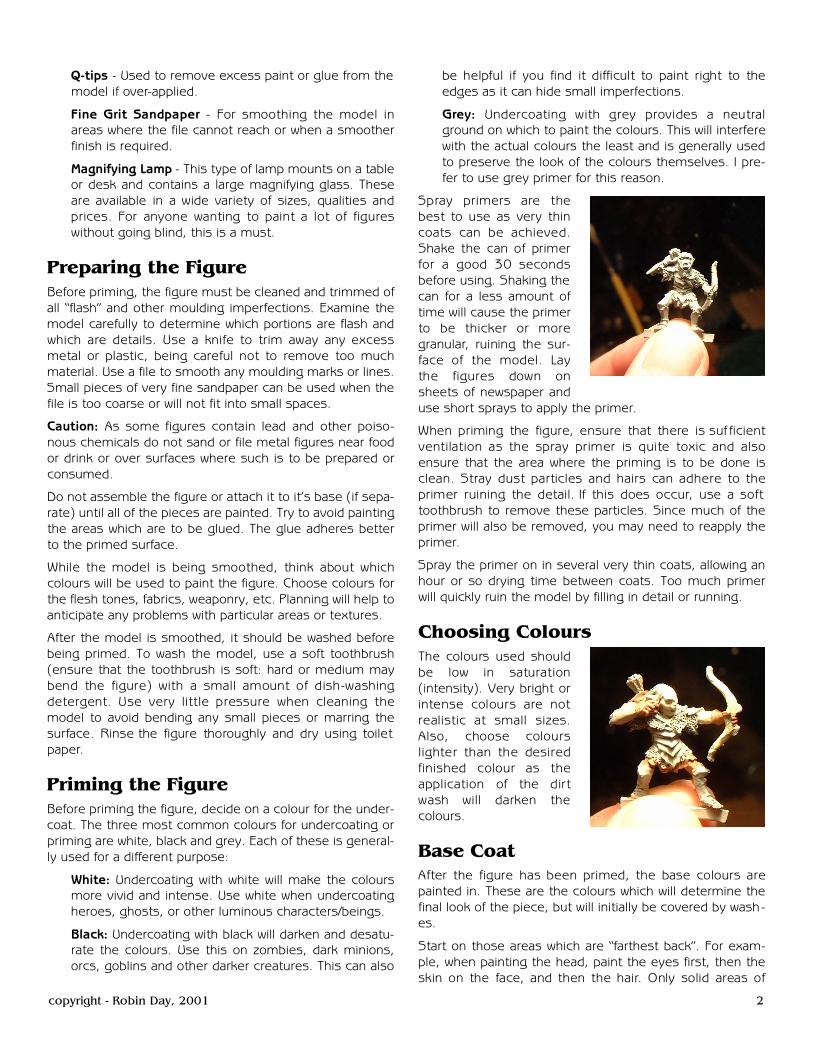
Spray primers are thebest to use as very thincoats can be achieved.Shake the can of primerfor a good 30 secondsbefore using. Shaking thecan for a less amount oftime will cause the primerto be thicker or moreg r a n u l a r, ruining the sur-face of the model. Laythe figures down onsheets of newspaper anduse short sprays to apply the primer.
When priming the figure, ensure that there is suff i c i e n tventilation as the spray primer is quite toxic and alsoensure that the area where the priming is to be done isclean. Stray dust particles and hairs can adhere to theprimer ruining the detail. If this does occur, use a softtoothbrush to remove these particles. Since much of theprimer will also be removed, you may need to reapply theprimer.
Spray the primer on in several very thin coats, allowing anhour or so drying time between coats. Too much primerwill quickly ruin the model by filling in detail or running.
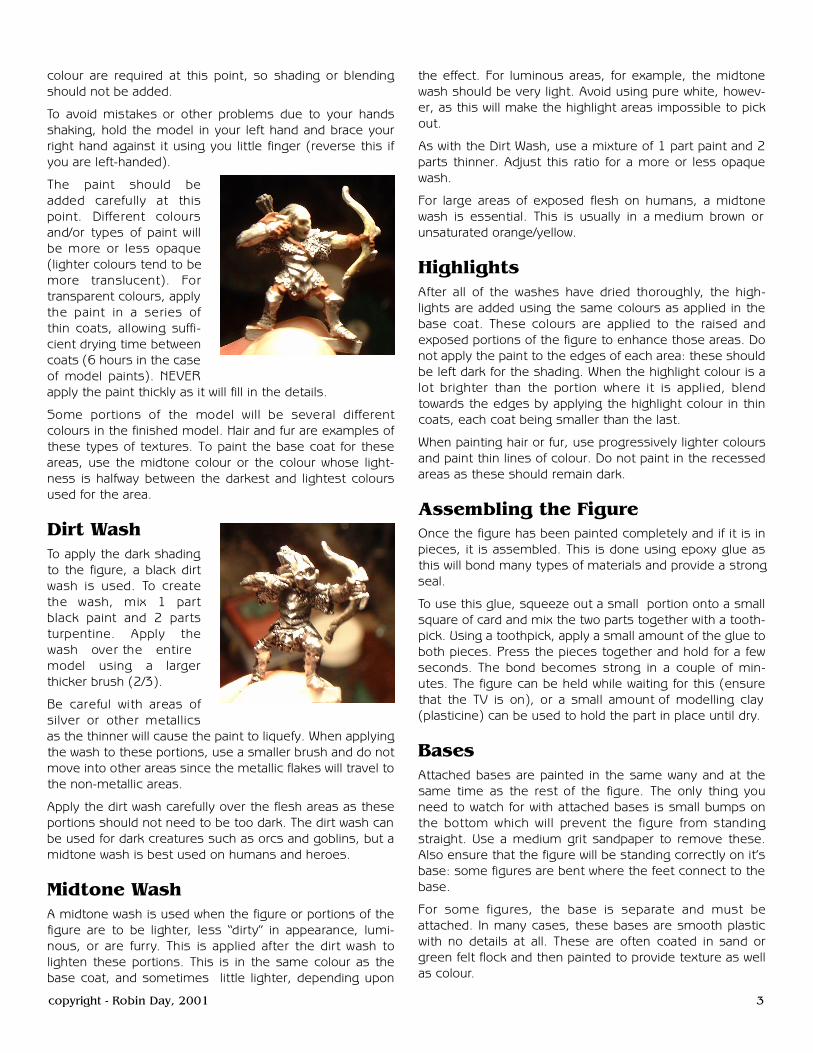
Choosing ColoursThe colours used shouldbe low in saturation(intensity). Very bright orintense colours are notrealistic at small sizes.Also, choose colourslighter than the desiredfinished colour as theapplication of the dirtwash will darken thecolours.
Base CoatAfter the figure has been primed, the base colours arepainted in. These are the colours which will determine thefinal look of the piece, but will initially be covered by wash-es.
Start on those areas which are “farthest back”. For exam-ple, when painting the head, paint the eyes first, then theskin on the face, and then the hair. Only solid areas of
copyright - Robin Day, 2001 2
colour are required at this point, so shading or blendingshould not be added.
To avoid mistakes or other problems due to your handsshaking, hold the model in your left hand and brace yourright hand against it using you little finger (reverse this ifyou are left-handed).
The paint should beadded carefully at thispoint. Different coloursand/or types of paint willbe more or less opaque(lighter colours tend to bemore translucent). Fortransparent colours, applythe paint in a series ofthin coats, allowing suff i-cient drying time betweencoats (6 hours in the caseof model paints). NEVERapply the paint thickly as it will fill in the details.
Some portions of the model will be several diff e r e n tcolours in the finished model. Hair and fur are examples ofthese types of textures. To paint the base coat for theseareas, use the midtone colour or the colour whose light-ness is halfway between the darkest and lightest coloursused for the area.
Dirt WashTo apply the dark shadingto the figure, a black dirtwash is used. To createthe wash, mix 1 partblack paint and 2 partsturpentine. Apply thewash over the entiremodel using a larg e rthicker brush (2/3).
Be careful with areas ofsilver or other metallicsas the thinner will cause the paint to liquefy. When applyingthe wash to these portions, use a smaller brush and do notmove into other areas since the metallic flakes will travel tothe non-metallic areas.
Apply the dirt wash carefully over the flesh areas as theseportions should not need to be too dark. The dirt wash canbe used for dark creatures such as orcs and goblins, but amidtone wash is best used on humans and heroes.
Midtone WashA midtone wash is used when the figure or portions of thefigure are to be lighter, less “dirty” in appearance, lumi-nous, or are furry. This is applied after the dirt wash tolighten these portions. This is in the same colour as thebase coat, and sometimes little lighter, depending upon
the effect. For luminous areas, for example, the midtonewash should be very light. Avoid using pure white, howev-er, as this will make the highlight areas impossible to pickout.
As with the Dirt Wash, use a mixture of 1 part paint and 2parts thinner. Adjust this ratio for a more or less opaquewash.
For large areas of exposed flesh on humans, a midtonewash is essential. This is usually in a medium brown orunsaturated orange/yellow.
HighlightsAfter all of the washes have dried thoroughly, the high-lights are added using the same colours as applied in thebase coat. These colours are applied to the raised andexposed portions of the figure to enhance those areas. Donot apply the paint to the edges of each area: these shouldbe left dark for the shading. When the highlight colour is alot brighter than the portion where it is applied, blendtowards the edges by applying the highlight colour in thincoats, each coat being smaller than the last.
When painting hair or fur, use progressively lighter coloursand paint thin lines of colour. Do not paint in the recessedareas as these should remain dark.
Assembling the FigureOnce the figure has been painted completely and if it is inpieces, it is assembled. This is done using epoxy glue asthis will bond many types of materials and provide a strongseal.
To use this glue, squeeze out a small portion onto a smallsquare of card and mix the two parts together with a tooth-pick. Using a toothpick, apply a small amount of the glue toboth pieces. Press the pieces together and hold for a fewseconds. The bond becomes strong in a couple of min-utes. The figure can be held while waiting for this (ensurethat the TV is on), or a small amount of modelling clay(plasticine) can be used to hold the part in place until dry.
BasesAttached bases are painted in the same wany and at thesame time as the rest of the figure. The only thing youneed to watch for with attached bases is small bumps onthe bottom which will prevent the figure from standingstraight. Use a medium grit sandpaper to remove these.Also ensure that the figure will be standing correctly on it’sbase: some figures are bent where the feet connect to thebase.
For some figures, the base is separate and must beattached. In many cases, these bases are smooth plasticwith no details at all. These are often coated in sand orgreen felt flock and then painted to provide texture as wellas colour.
copyright - Robin Day, 2001 3

To attach the figure and paint the base, use epoxy glue andglue the figure to it’s base. Use something to prop up thefigure to ensure that it is straight until it is dry. After theepoxy is thoroughly dry, use contour putty to fill in anyremaining holes. Wait for the putty to dry and smooth thesurface using sandpaper.
Coat the top of the base with a thin layer of epoxy, beingvery careful not to get any glue on the sides of the base.Sprinkle either or both of fine grain sand or green felt flock-ing onto the glue.
Once the glue has dried, paint the top of the base. Whensand has been used, paint the base a medium grey orbeige and add small, scattered patches of dark green. Inthe middle of the green patches, add small amounts of amedium green (not too bright) for highlights.
When green flock has been used, add some areas of a yel-low ochre (dark, unsaturated yellow) to show variations inthe vegetation. Adding some grey or brown areas for dirtcan also add realism.
The base can also be decorated with pieces from other fig-ures. Skulls, swords, limbs, etc. can be cut from other fig-ures and glued in place on the base. Remember to paintthese pieces before gluing them to the base, however.
Varnish/FixativesAfter the entire figure has been painted and assembled,the fixative is applied. The best “fix” to use is spray fixativeas this is easy to apply in very thin coats.
Place the figure on newspaper or a dropcloth and apply athin coat of fixative to one side. Allow this coat to dry, turnthe figure around and spray the other side. Once this coatis dry, turn the figure 90° and spray again. Rotate figure180° and spray once more. Additional coats can be appliedusing this process.
Caution: Do not overspray the fixative as it will run. Alsoavoid too thick a coat as it may yellow over time.
Other TechniquesDry Brushing - This is a common technique for painting fig-ures, particularly when painting a large number of figures.This is used primarily for adding highlights once the darkwash is complete. and is done by dipping an old brush intothe paint and blotting it on a rag, toilet paper or papertowel until most of the paint has been removed. The raisedareas are then brushed. Since most of the paint has beenremoved, this will apply small amounts of paint to createthe highlights.
I generally do not use drybrushing as I prefer to build upthe colours using shading techniques for a more realisticeffect and this technique tends to destroy brushes.
Additional Tips• Don’t rush, take your time. Good figures are always theresult of patience and painstaking work.
• Experiment with cheaper figures before tackling a $40scene or a $100 dragon.
• Be very careful with the finished figures. Although the fix-ative will take a certain amount of abuse, it will chip even-tually, especially on metal figures.
• Plan out the colours and their order before beginningwork on the model.
• Read about other techniques to learn more. For a start,here is a list of URLs for websites which contain info aboutpainting and building miniatures:
http://www.faqs.org/faqs/games/miniatures/painting-faq/
Excellent resource for materials, equipment, tech-niques, etc. for both metal and plastic figures.
http://www.paintingclinic.com/clinic/clinic.htm
Wide variety of techniques, discussions of materials,tips for painting flesh, drybrushing, etc.
http://ravensbranch.tripod.com/howto.html
A ong discussion of the types of paints and materialsto purchase as well as some discussion on technique:particularly for sci-fi miniatures.
Final NotePainting miniatures is a hobby and not an exact science.Experiment with many different techniques to determinewhich ones work best for you.
To quote Richard Bach, “All of this could be wrong”.
copyright - Robin Day, 2001 4